Okay, Ronin’s Grips started making Yugo M70 grips sometime around 2004 and rapidly added models – the challenge was that I hand polished each and every one of them. It took a ton of time, handwork and was putting my carpal tunnel through the roof. Jeff Miller of HillBilly Firearms told me to abrasive blast the grips for a better grip and a heck of a lot less handwork. I was sold – I had to change something. Jeff also gave me a few tips – get a foot control to protect the seals vs. being in the cabinet with all of the grit, put transparency film on the window of the unit to make it last longer and he told me to get a “thumper” to make the grit settle.
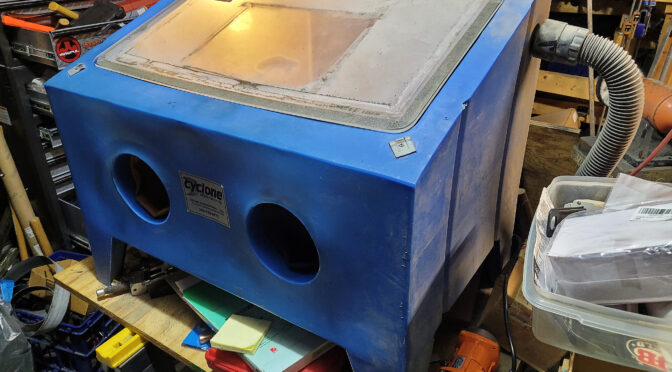
Well, way back in the day margins were super thin so I bought a large bench top abrasive blast cabinet from Cyclone Manufacturing in Dowagiac, MI – they are about an hour from my shop and I could pick it up along with the foot control, I got a box of transparency film either from Amazon or a local office supply store, but I had no idea what a “thumper” was or how important it is to productivity.
Fast forward to about a month ago. Abrasive blasting used to take me a while – blast, hit the cabinet or manually move the material around in the hopper, blast some more, whack the cabinet or move the material around … it gets old. It took me years to realize that this really sucks but blasting was so much better than polishing that I didn’t think much about it.
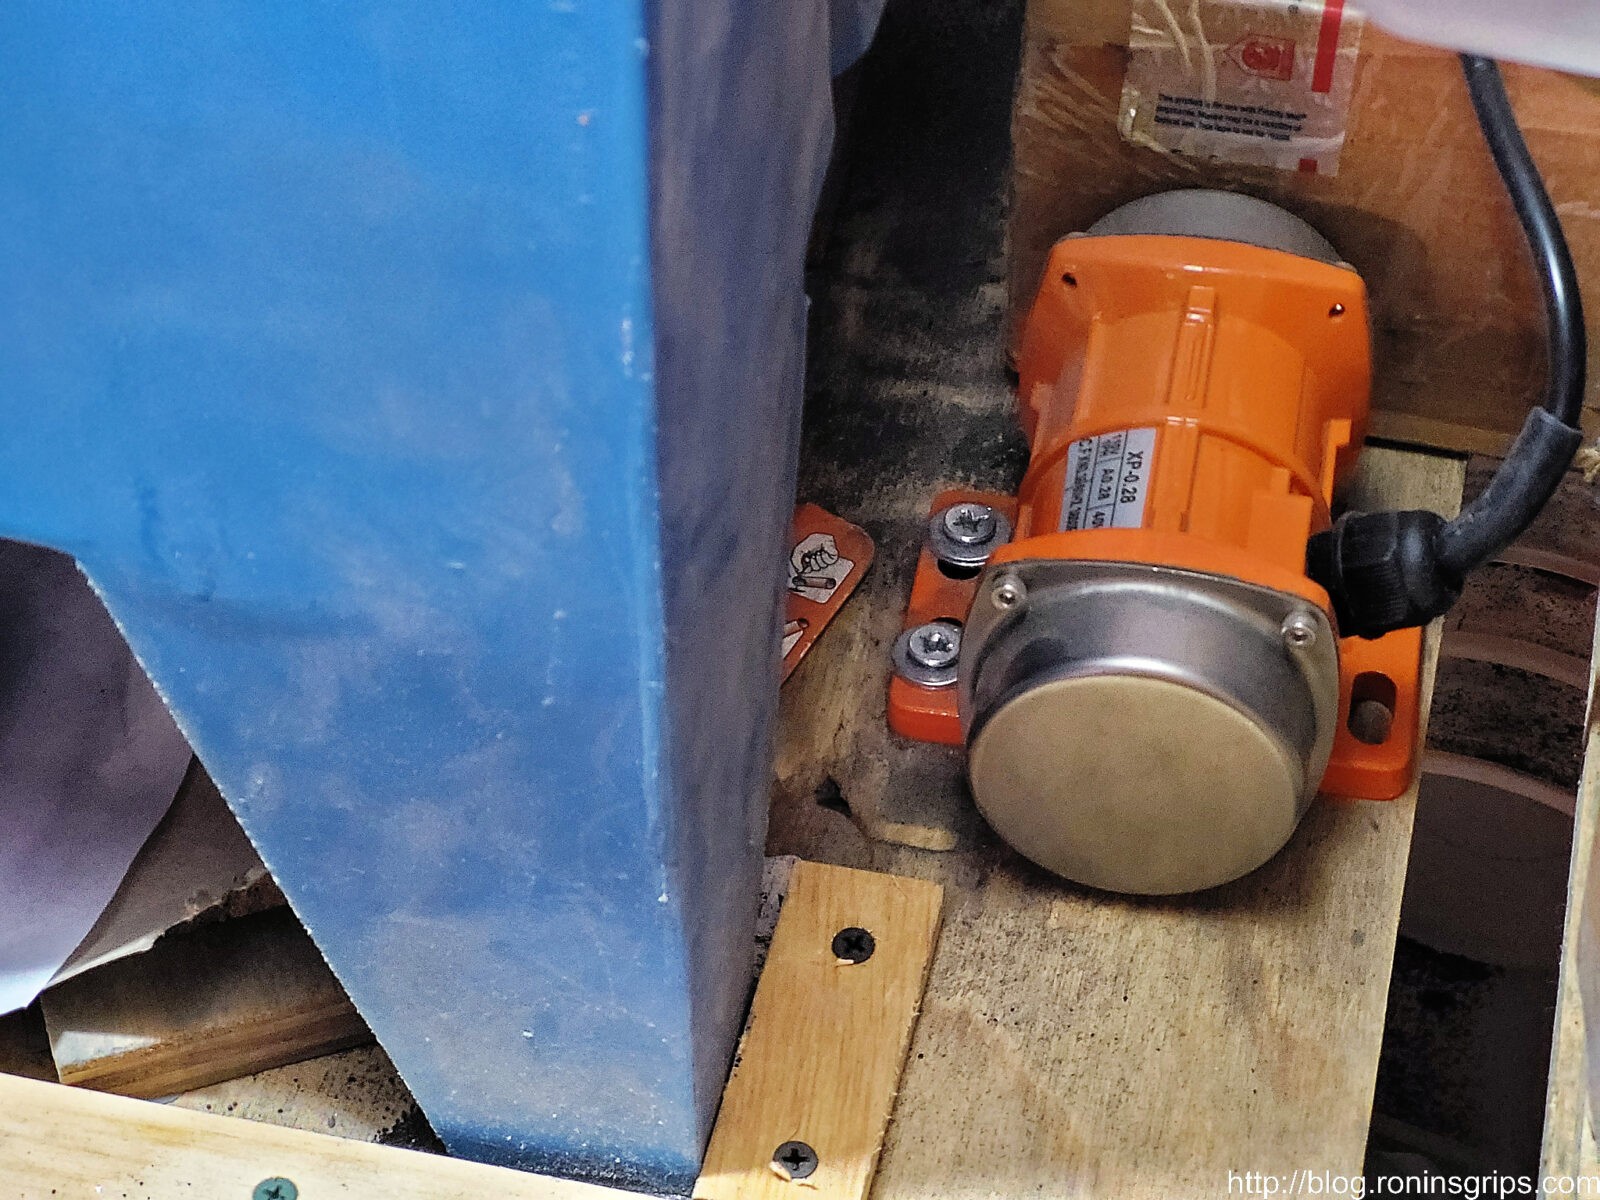
So, a “thumper” is basically and industrial vibrator (insert joke here) that uses an electric motor in a housing with off center weights on the shaft that then vibrate like crazy when the motor runs. I guess you could call it the power of Amazon but one day I was scrolling through Amazon and a suggested item came up – a concrete vibrator – and it looked like a small motor in a housing. I had 25 Galil grips I was going to blast and all of a sudden I remembered Jeff’s advice.
Okay, the power of a vibrator with a blast cabinet is that the vibrations cause the grit to shake down to the lowest point constantly. You can blast and blast and blast. The unit was $118 with free delivery and I figured I would give it a try.
It shipped from the importer, not Amazon, and showed up a few days later – it was pretty quick as I recall. The unit was very well made other than my needing to tape up a plastic junction box on the power cord that was a little cracked and I needed to attach a 120 volt plug – it was one phase and they said about 40 watts so nothing special. The machine label says – 110V, 1 phase, 40 watts, 3600 RPM – the little thing totally kicks butt and was only $49.
Here’s a close up of the label – note it says 40 watts. There are bigger units but I don’t think you need them for an abrasive blaster.
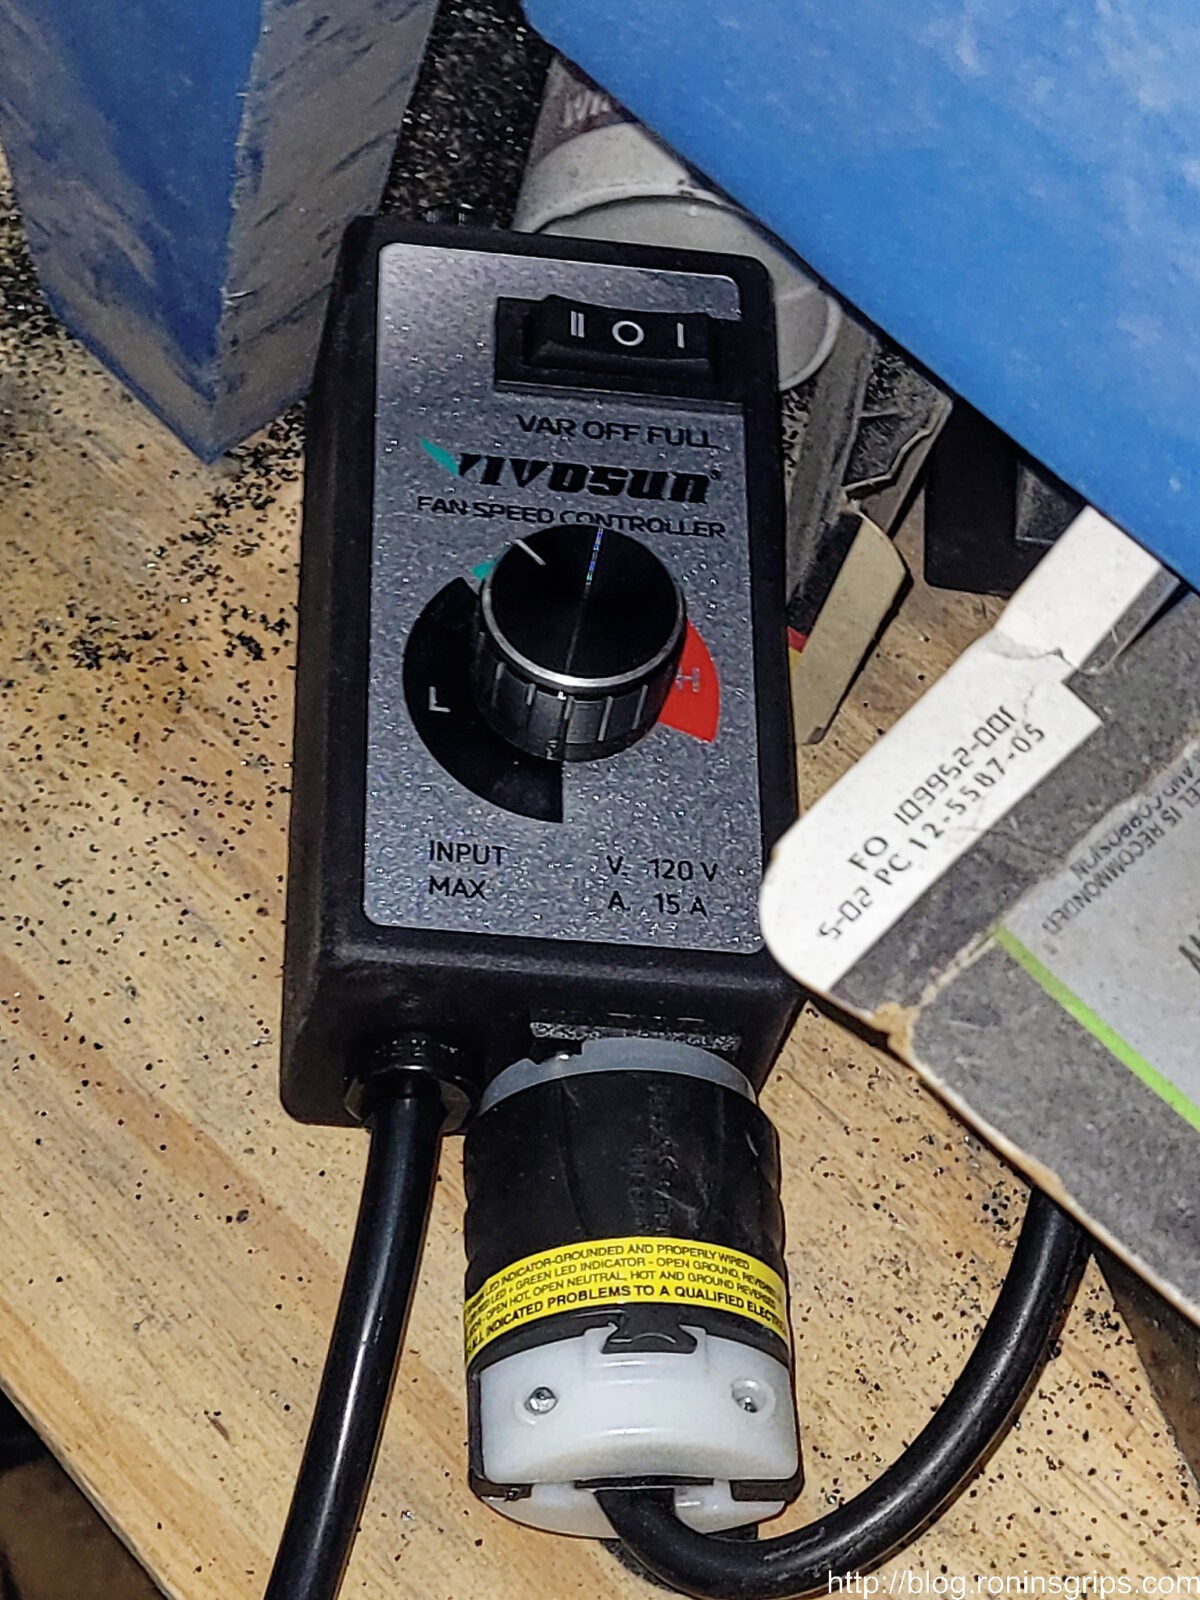
I didn’t put it on the blaster right away because I wasn’t really sure how violent it would be and I am glad I didn’t – it vibrates like you would not believe – there is nothing subtle about it – and I immediately realized two things – 1) I was going to mount it on the free standing tool bench and not the plastic blast cabinet walls or it would eventually shake loose and 2) I needed a variable speed control to tone it down some.
Try #1
Okay, so sometimes you just have to poke fun at yourself – or at least I do. I marked the bolt holes on the 3/4″ plywood bench top and mounted the vibrator. I then plugged the power cord from the vibrator into the speed controller, the controller into a surge strip and turned it on at full speed.
I wish I had a before photo or a video of what happened next but I don’t. Every single thing on that table started vibrating right off of it. Yeah, all the grit went to the bottom on the blast table but the blast table was headed to the edge of the bench too. Whoa! I hit the off switch.
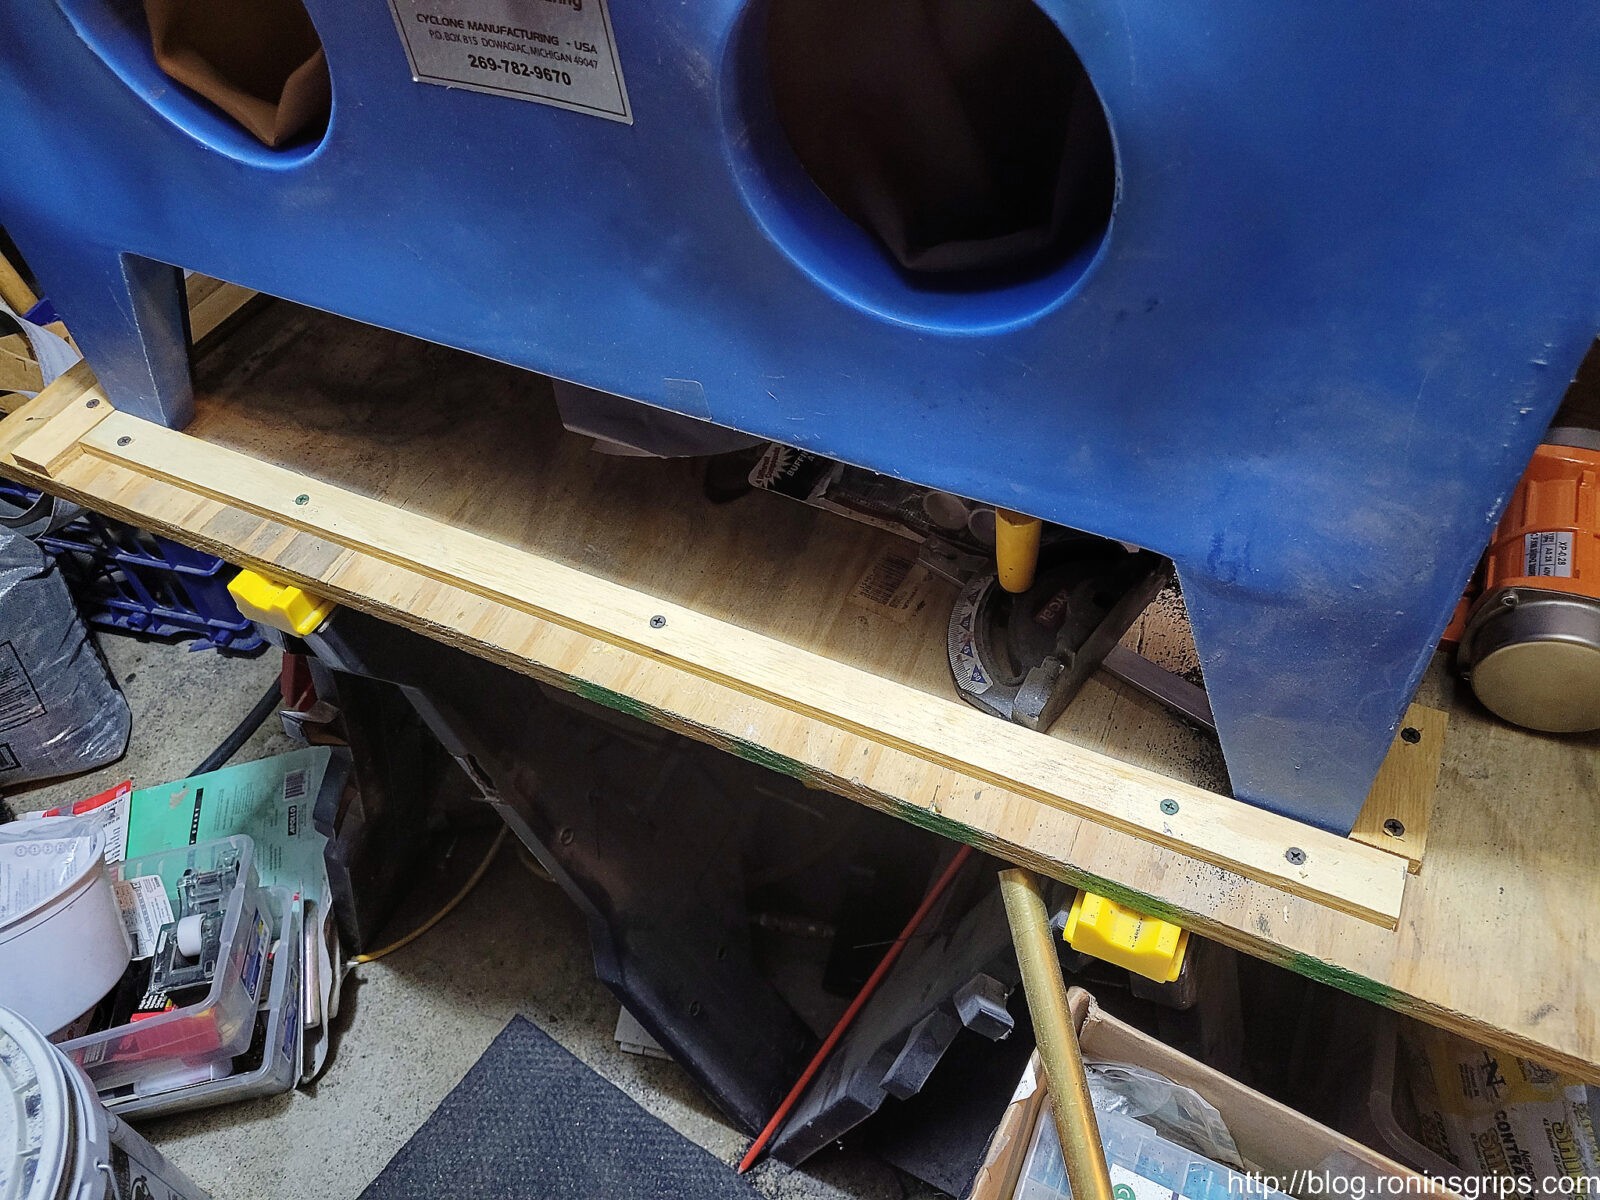
Try #2
I simply took some strips of plywood and added a cradle around the legs to limit travel. That worked. Time to try blasting some stuff.
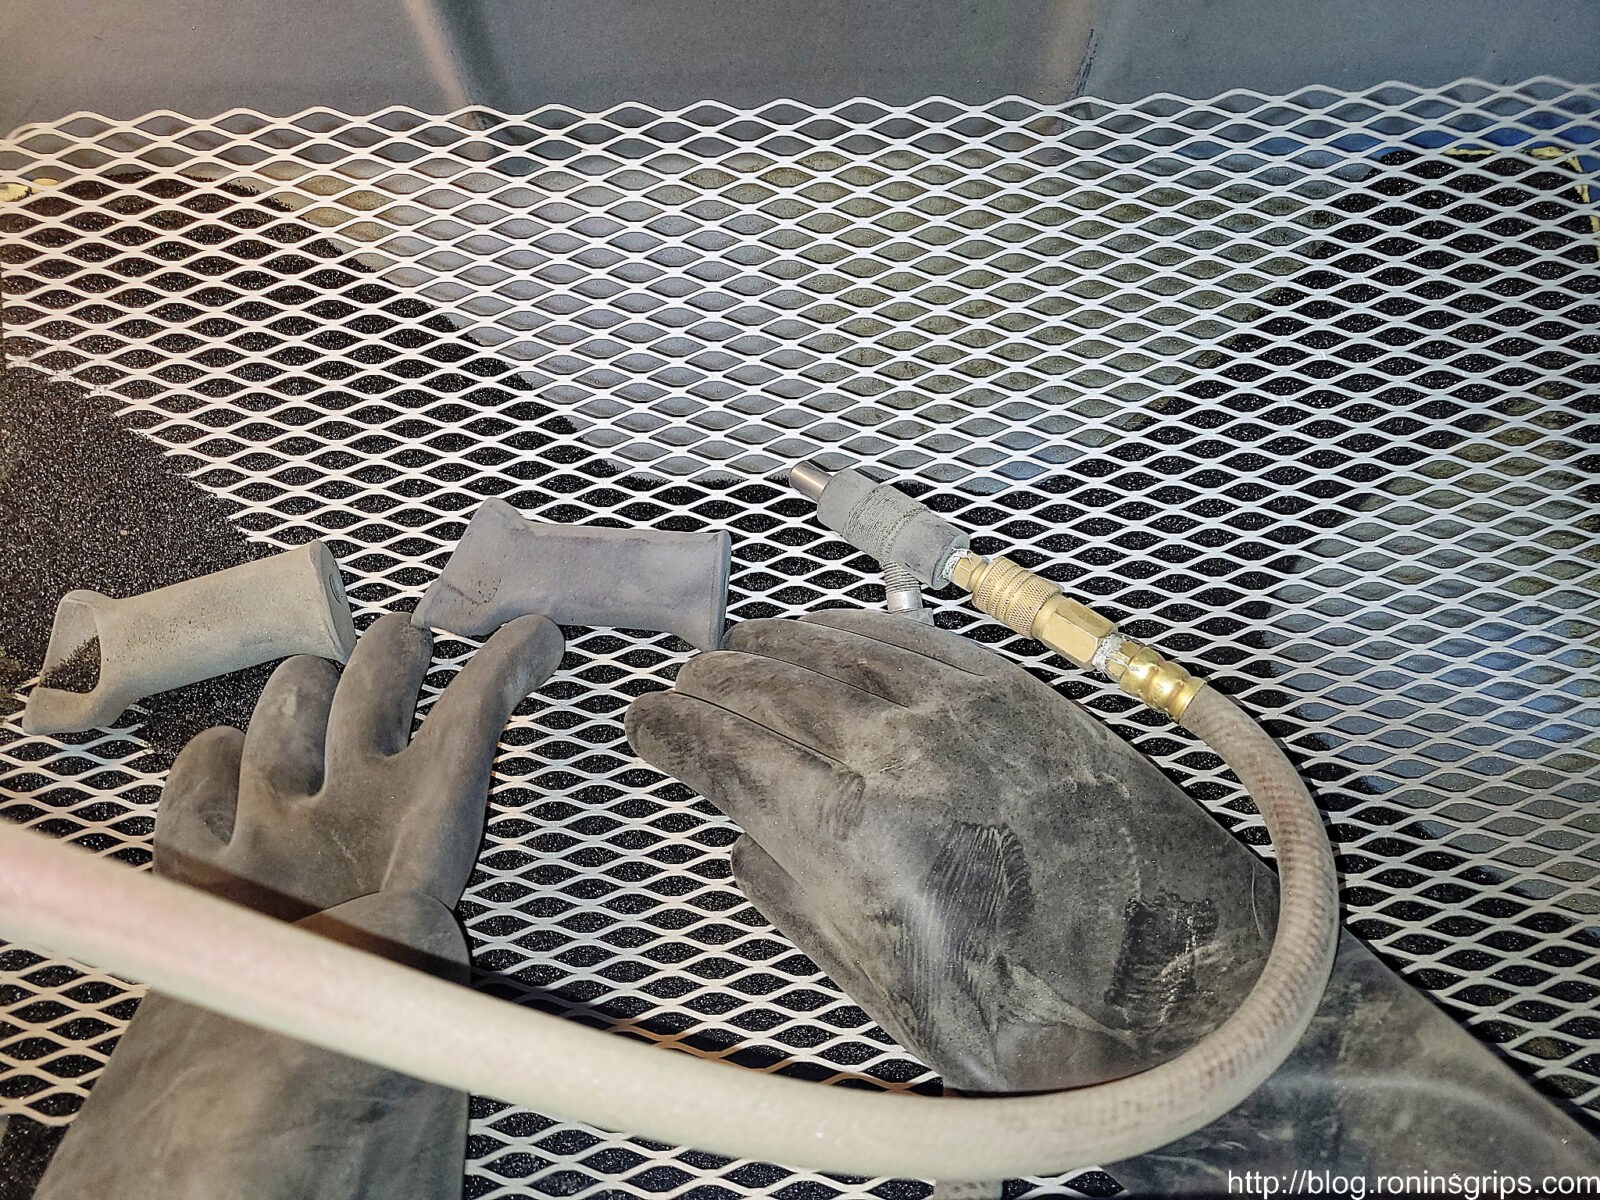
Here’s the vibrator.
Here’s the speed controller.
Another view of the strips to limit travel. Everything on the floor had been on the workbench before I turned the vibrator on the first time 🙂 By the way, the 3/4″ plywood top is screws into the stands it is on.
Actually Blasting
Folks, it is night and day different – stunningly different. Because I don’t have to stop and whack the side of the baster or reach in and move grit around, I’d bet I’m getting work done 2-3 times faster. A bench top blaster doesn’t have a very deep bottom so without a thumper, I spent a lot of time moving grit over to the pick ,up.
Another fun lesson learned. Over the years, I’ve developed the habit of putting my chin on the plexiglass as I focused on doing the work. Don’t do that. I put my chin down on the vibrating plexiglass and it felt like someone was playing the tambourine with my teeth 🙂
Those are two IMI Galil grips getting blasted. What an amazing difference.
In Conclusion
This is one time I can honestly tell you that I have one regret – I should have done this years and years ago. Wow. It was worth it! I’ve used vibrator and speed controller both extensively for a little over a month and it’s a great combo. I don’t use the slowest speed but I am closer to the low end on the dial than I am the fastest speed.
Note, I got lucky with my first purchase. I really wasn’t sure what size to buy but the 40 watt unit has worked great. I can’t imagine anyone needing a bigger unit for a blast cabinet. These generic industrial vibrators have all kinds of uses including for the movement of powders, grains, rock, etc. so they sell bigger and more powerful ones as well.
I’d highly recommend this to anyone who has a ton of blasting to do and is getting tired of having to stop and manually move grit around.
Note, I have to buy all of my parts – nothing here was paid for by sponsors, etc. I do make a small amount if you click on an ad and buy something but that is it. You’re getting my real opinion on stuff.
Starting in 2021, I started to offer 10mm magazines for the Rock Island Armory A2 HC pistols – “A2” being a marketing opportunity to refer to the next generation 1911A1 pistol prototyping the US Army did starting in 2004 that experimented with different sights, extractors, mainsprings, etc. The “HC” stands for high capacity and reflects the RIA pistols are using a staggered magazine design to hold far more rounds than a single stack could.
At any rate, I had a number of customers ask me to produce mags for the 9mm RIA A2 HC pistols – the 51679 Tac Ultra and the 56645 Pro Ultra Match HC. Our 10mm mags had proven to be very successful and after enough requests, I decided to enter the 9mm magazine market.
One thing I learned with making AK grips is that you really need to have the weapon to make a part for it. This allows you to check fitment, reinforce potentially weak areas, etc. So, when I started with the 10mm mags, I bought a 52009 Rock Ultra HC and later a 56862 Tac Ultra Match HC. Why? Because you also find that a given firearm may differ enough that if you build and test only with it, you may not be making something others can use.
There’s an engineering problem called “stacked tolerance”. Every part has a specification that says, for example “9.0mm” and then there is a tolerance specified – for example “+/- .01”. That means the part produced can range from 8.99 to 9.01 in size. Make an assembly and all of those tolerances may combine, or “stack” in such a way that if you build a part to work for that particular unit then another assembly that happens to stack in the other direction may not be able to use that part. Testing on multiple pistols helps with a testing – at least a bit because you are reducing the odds of one pistol having a problem or working and others not.
So, by having both the 52009 and 56862 10mm pistols, I could test magazines to make sure they fed right, dropped free, etc. With the 9mm pistols, I had limited funds and just started with the 51679 – the Tac Ultra. That decision bit me hard.
The Initial Magazine Prototyping Didn’t Make Sense
When I prototype, I buy a bunch of original magazines and then start looking for what is close enough to modify and start tinkering with the feed lips, feed angles, the spring and the follower. To keep track of things, I applied numbered stickers to every magazine and kept track of the dimensions plus performance.
What I also learned with the 10mm mags is that the best dummy rounds are the machined aluminum A-Zoom Snap-Caps. Dummy rounds that are made from a case and a bullet will see the bullet pushed back into the case and/or get deformed after some fairly low number of cycles. The machined aluminum A-Zoom Snap-Caps are dimensionally accurate and can cycle hundreds of times before needing to be replaced. By the way, don’t do this type of work with live rounds – it’s an accident waiting to happen.
Back to the 9mm world, I was working on the mags and things just didn’t make sense. A magazine would work and then it wouldn’t. One set of dimensions would work and then they wouldn’t. Something just wasn’t adding up. The pistol would fail to eject randomly, I’d then have the old round and the new round in the slide at the same time and of course it jammed.
It had to be the mags right? I blew through a bunch of mags and time before it dawned on me that the pistol itself must have issues. I hadn’t questioned it before because the pistol was brand new out of the box. Sure, I had cleaned and lubed it first before cycling hundreds of snap caps through it. The problem was that I assumed it was good to go and the initial testing seemed to show a reliable pistol … but I only tested a few mags worth of snap caps – maybe 34-52 cycles max.
Testing The First Pistol
I loaded a magazine up, racked the slide and loaded a snap cap. I then pulled the slide back slowly and the extractor lost control of the extracted round as I pulled the slide to the rear. That wasn’t supposed to happen. If I went slow, it would either fail to extract completely or lose control of the round.
I’m not a 1911 gunsmithing guru but I had to learn some stuff really fast. I knew if I sent the pistol back to Rock Island/Armscor, it would be at least a month before I would get it back. So I read posts and watched videos that explained the pistol had an extractor problem and how to correct it. I bought a few different brands of 9mm extractors, the Brownells extractor tool, the Jack Weigand extractor gauge and tensioning tool.
Boy, I could not get that thing to work even after trying a few different brand extractors and a Wilson. At this point I was pretty ticked off. My last best guess was that the extractor looked like it was clocked slightly. When I inserted the Weigand 9mm gauge, I could feel initial tension as I inserted it and then it would drop off rapidly as I inserted the gauge the rest of the way (it centers over the firing pin hole). Rather than do a new firing pin stop plate, I decided to stop chasing best guesses mainly because I was blowing time I did not have to spend. The pistol was under warranty so feeling both stupid and defeated, I finally got an RMA to send the pistol back.
No, I’m Not Incredibly Patient
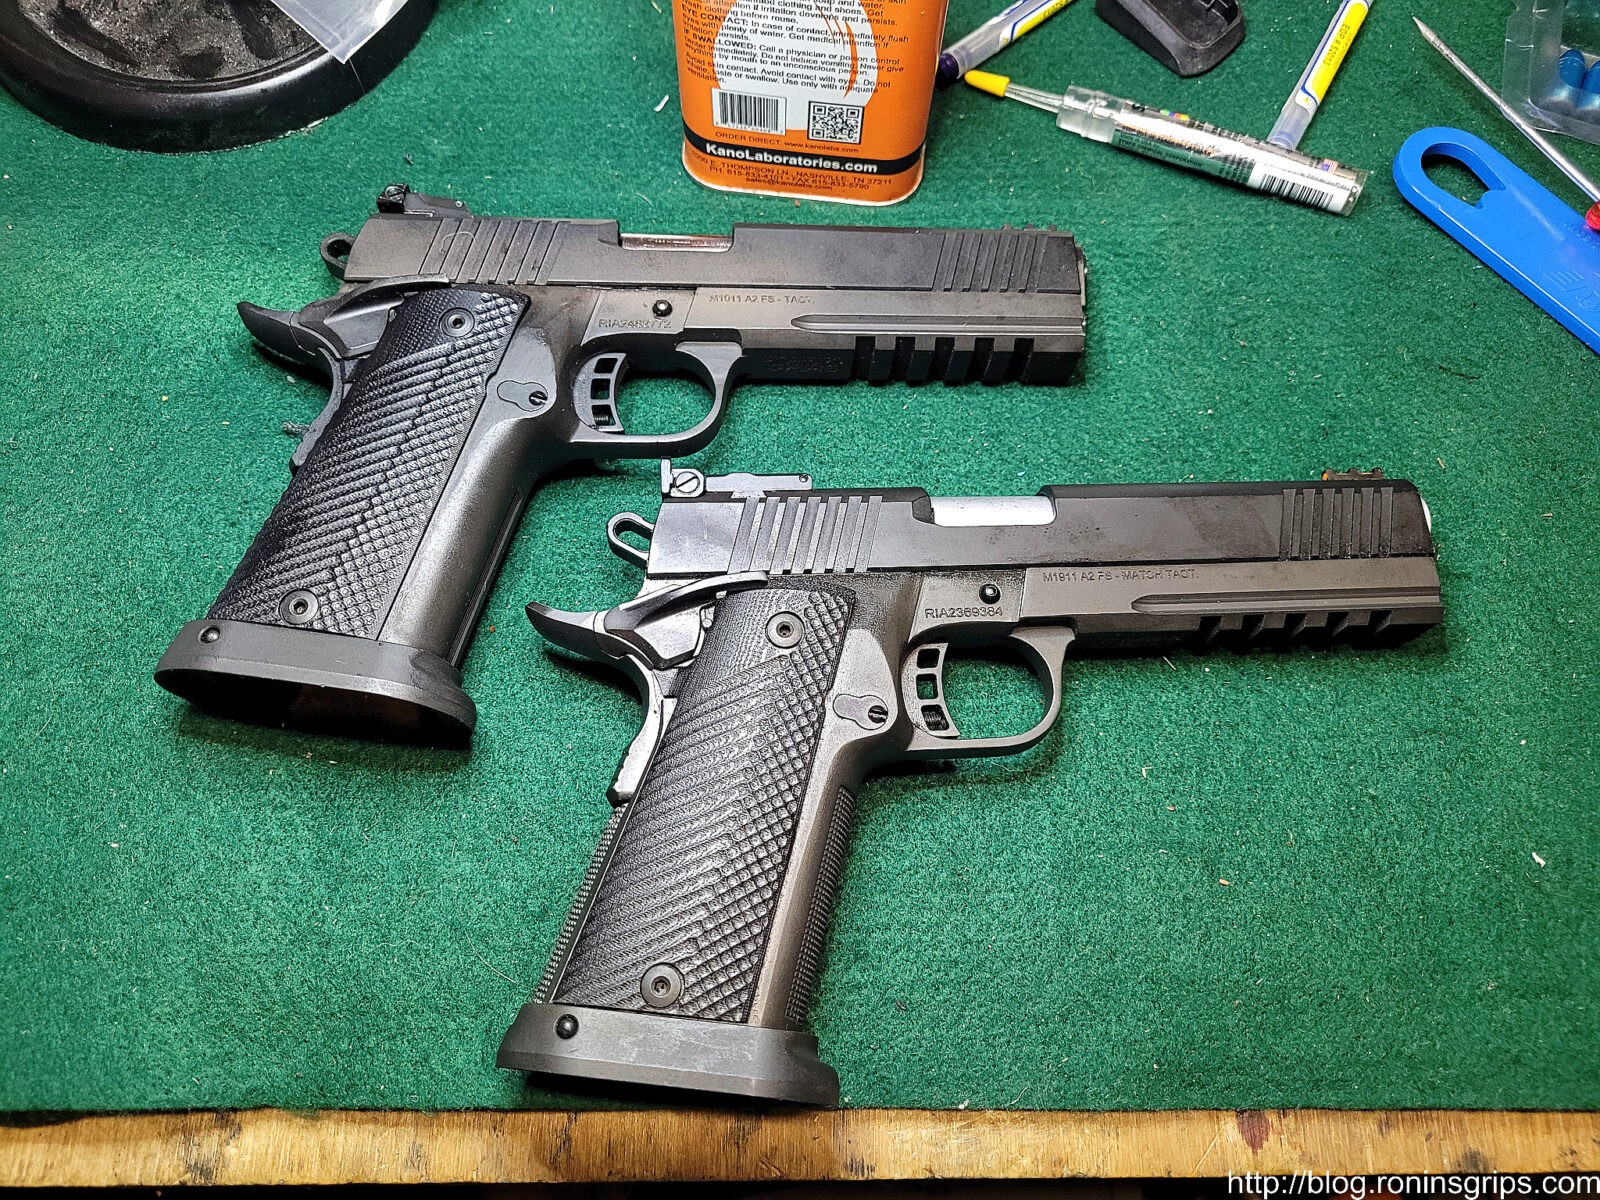
In the meantime, I bought a 56645 Pro Ultra Match HC and it has worked great – no problems at all. I was able to work out the details on the mags. Now, I am not patient so I actually ordered a second 51679 Tac Ultra that I looked at, cycled a few rounds through but really didn’t use a great deal – my primary go-to test platform was the 56862 … until I decided to take some photos about the RIA 9mm A2 HC pistols and looked at the 51679’s extractor.
The second 51679 is at the top and the 56862 Tac Ultra Match is at the bottom. The Match pistol has nice checkering on the front of the grip, the top of the exposed barrel is a grey matte finish and has a target rear sight.
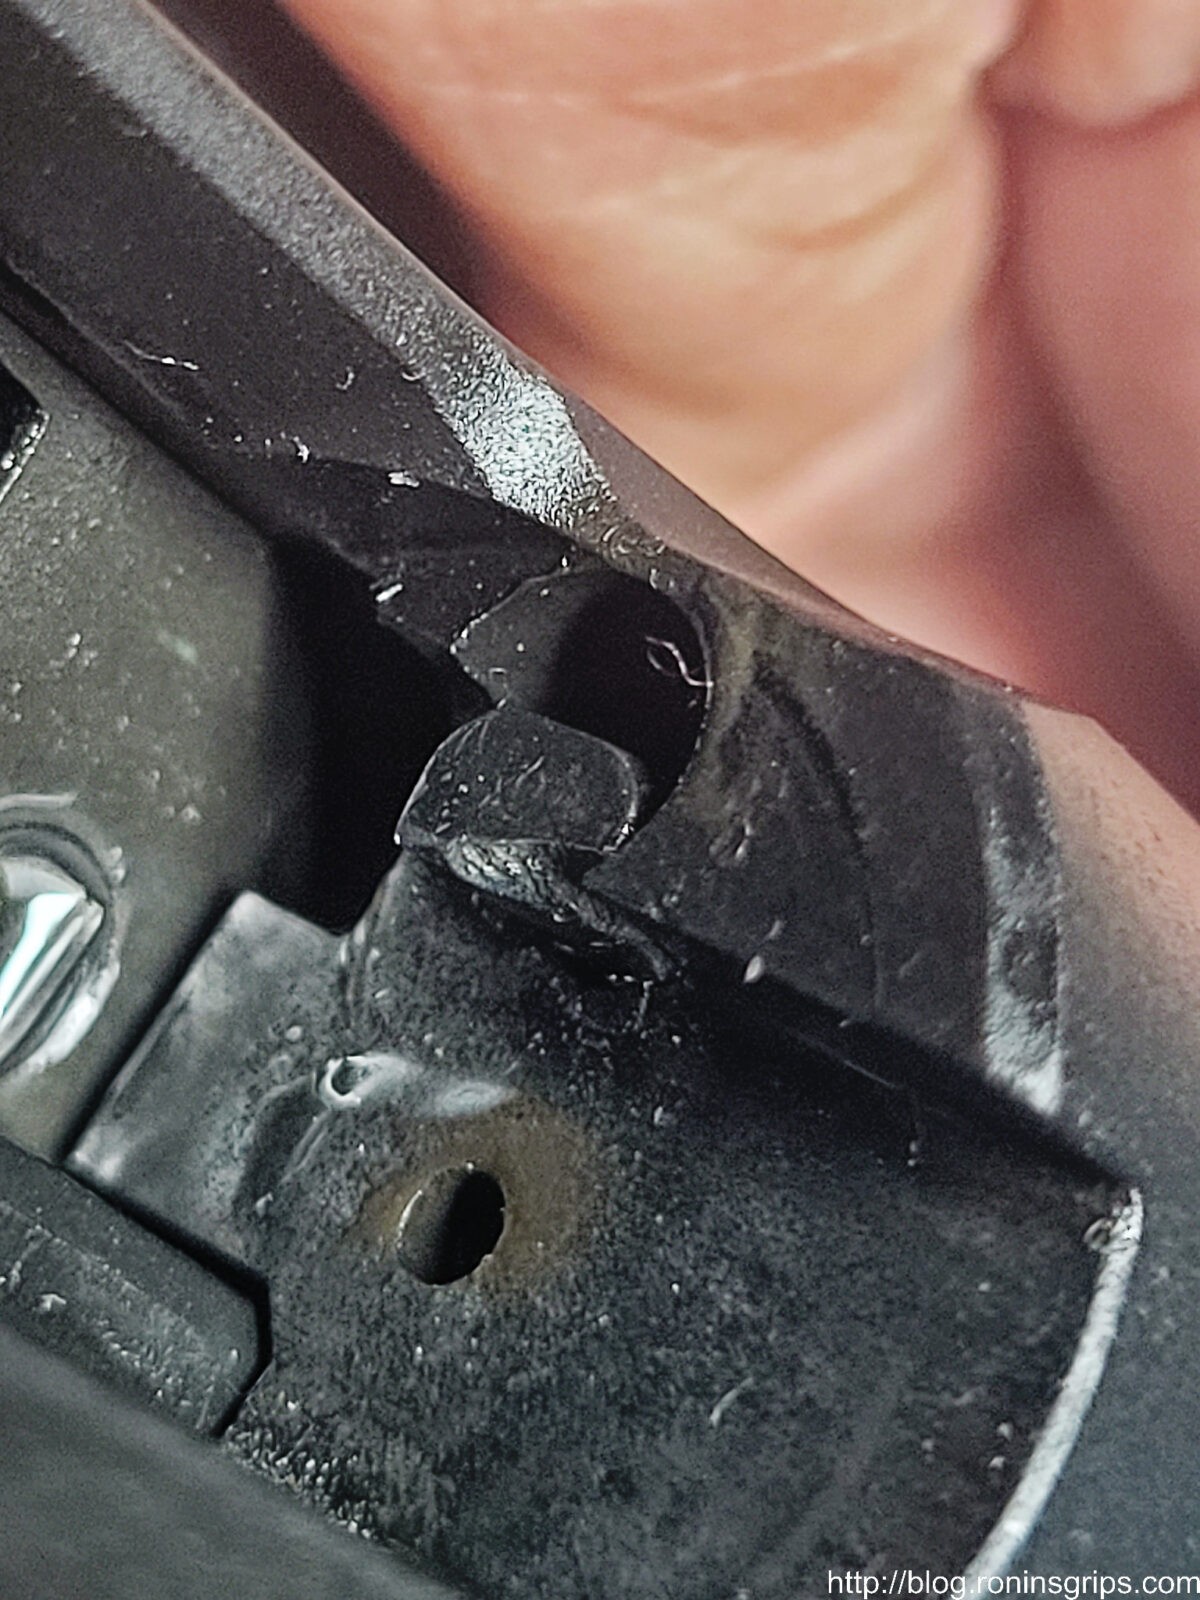
“You’ve got to be kidding me” – I thought to myself. Inserting a choice F bomb of course. The extractor in the brand new 51679 that probably has less than 100 hand cycled Zoom snap caps through it was almost completely broken off other than a little tiny nub on one end. WTF?!?!
I was happily taking photos for a blog post when I saw the silver grain of the busted extractor. Yeah, I was swearing up a storm. Really?
Okay, two 51679s bought from different vendors off Gunbroker about a month apart both having extraction problems …. wow. I’ll be honest – I’m disappointed. RIA 1911s are econobox models but they usually work – so, no, I’m not remotely happy not to mention jumping through hoops waiting for ever for their customer service to respond. I did learn a bunch though and will share with you what I did and what you can do if you want to.
Metal Injection Molding For Extractors Isn’t The Best Choice
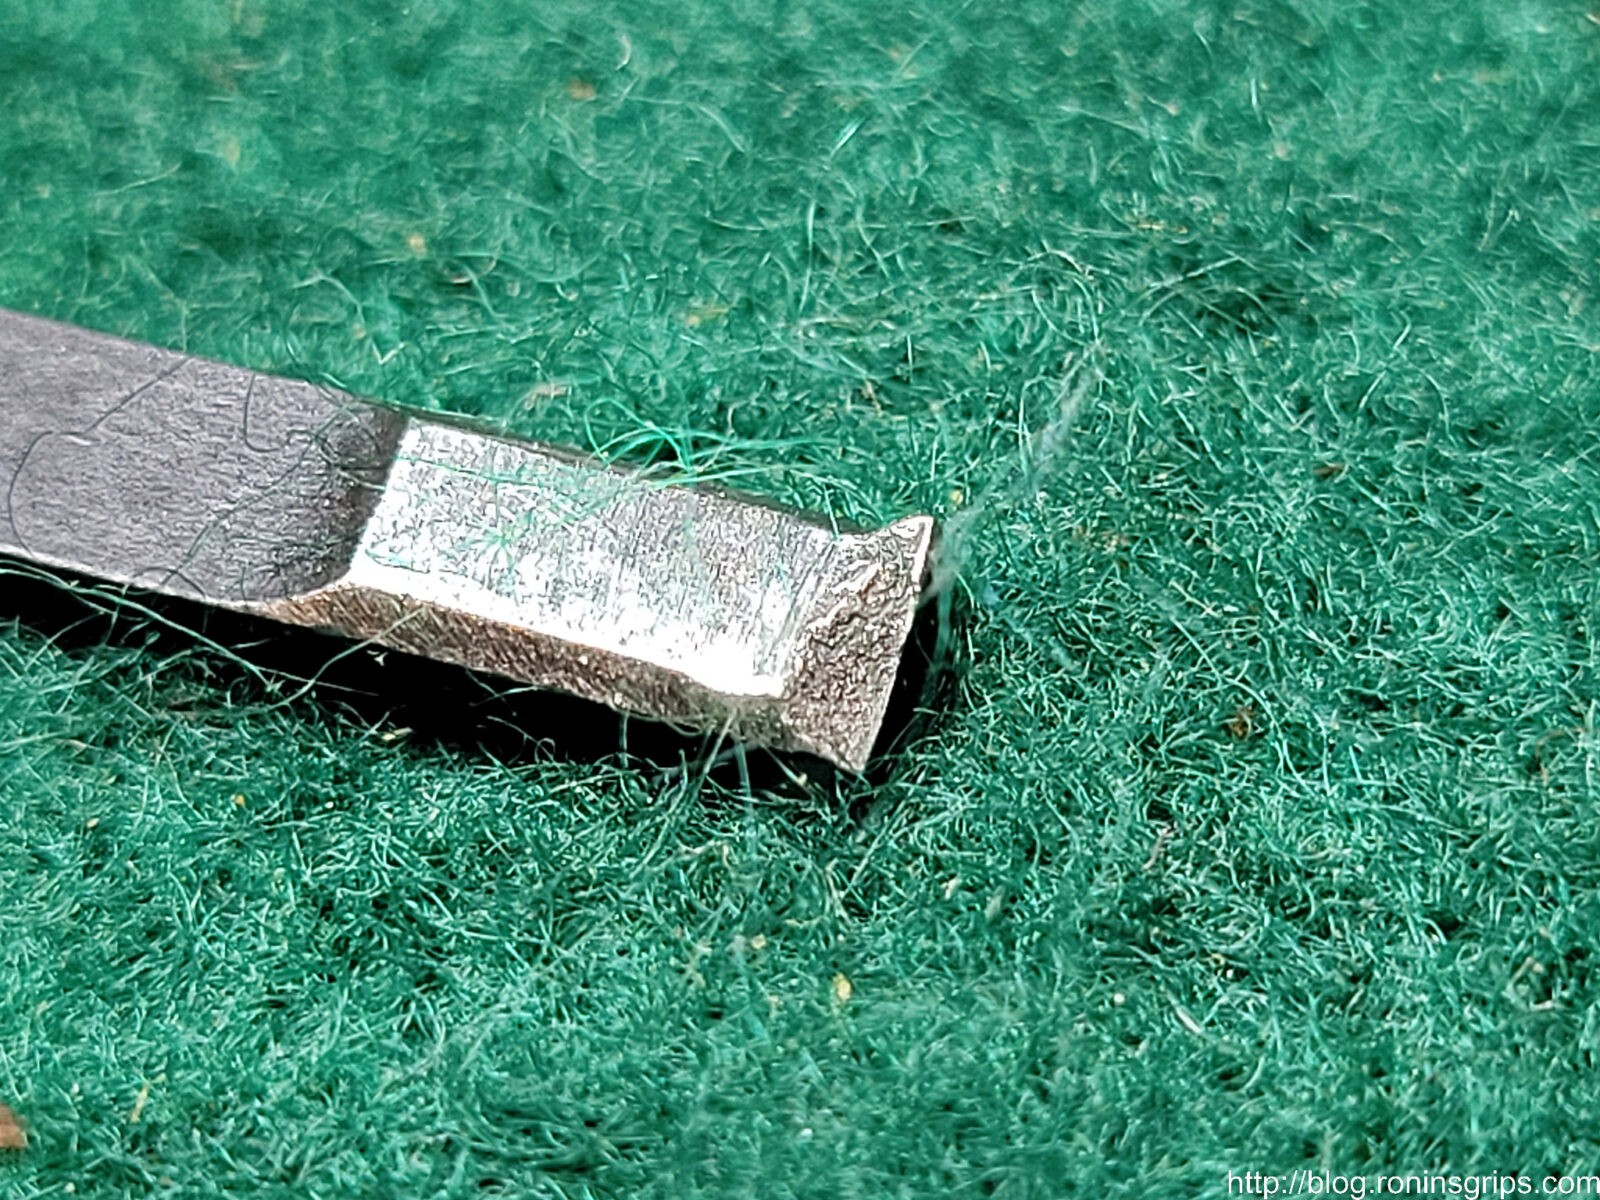
The problem is that to keep costs down, Armscor, who owns the Rock Island brand, make the ejector using Metal Injection Molding (MIM). If you search on the web, you will see a ton of guys arguing against the use of MIM in high stress parts. As I just learned with extractors, it’s not the strongest manufacturing approach – making them from forged high-quality steel is a far better idea.
I removed the extractor from the pistol and zoomed in as best I could to get you this photo. You can see the grainy structure that is a signature of metal injection molding. That nub at the top right edge in the photo was just enough to yank the case out of the chamber … sometimes.
Okay, if you get a new RIA 9mm pistol, check the extractor out of the box. Clean and lube it, go to the range and keep your eye on the extractor. If it breaks you have two options – send it back to Rock Island/Armscor for a RMA repair or do it yourself. Heck, you could even just replace the extractor yourself before you have a problem if you want to.
I Decided To Replace the Extractor Myself
I learned a ton on that first pistol plus I had all of the tools and spare Wilson Combat extractors. I just needed to trust in my abilities a bit more and try it again. If there’s one thing I know about myself, it’s that I am persistent and don’t give up easy. With this in mind, I dove back in again with far better results.
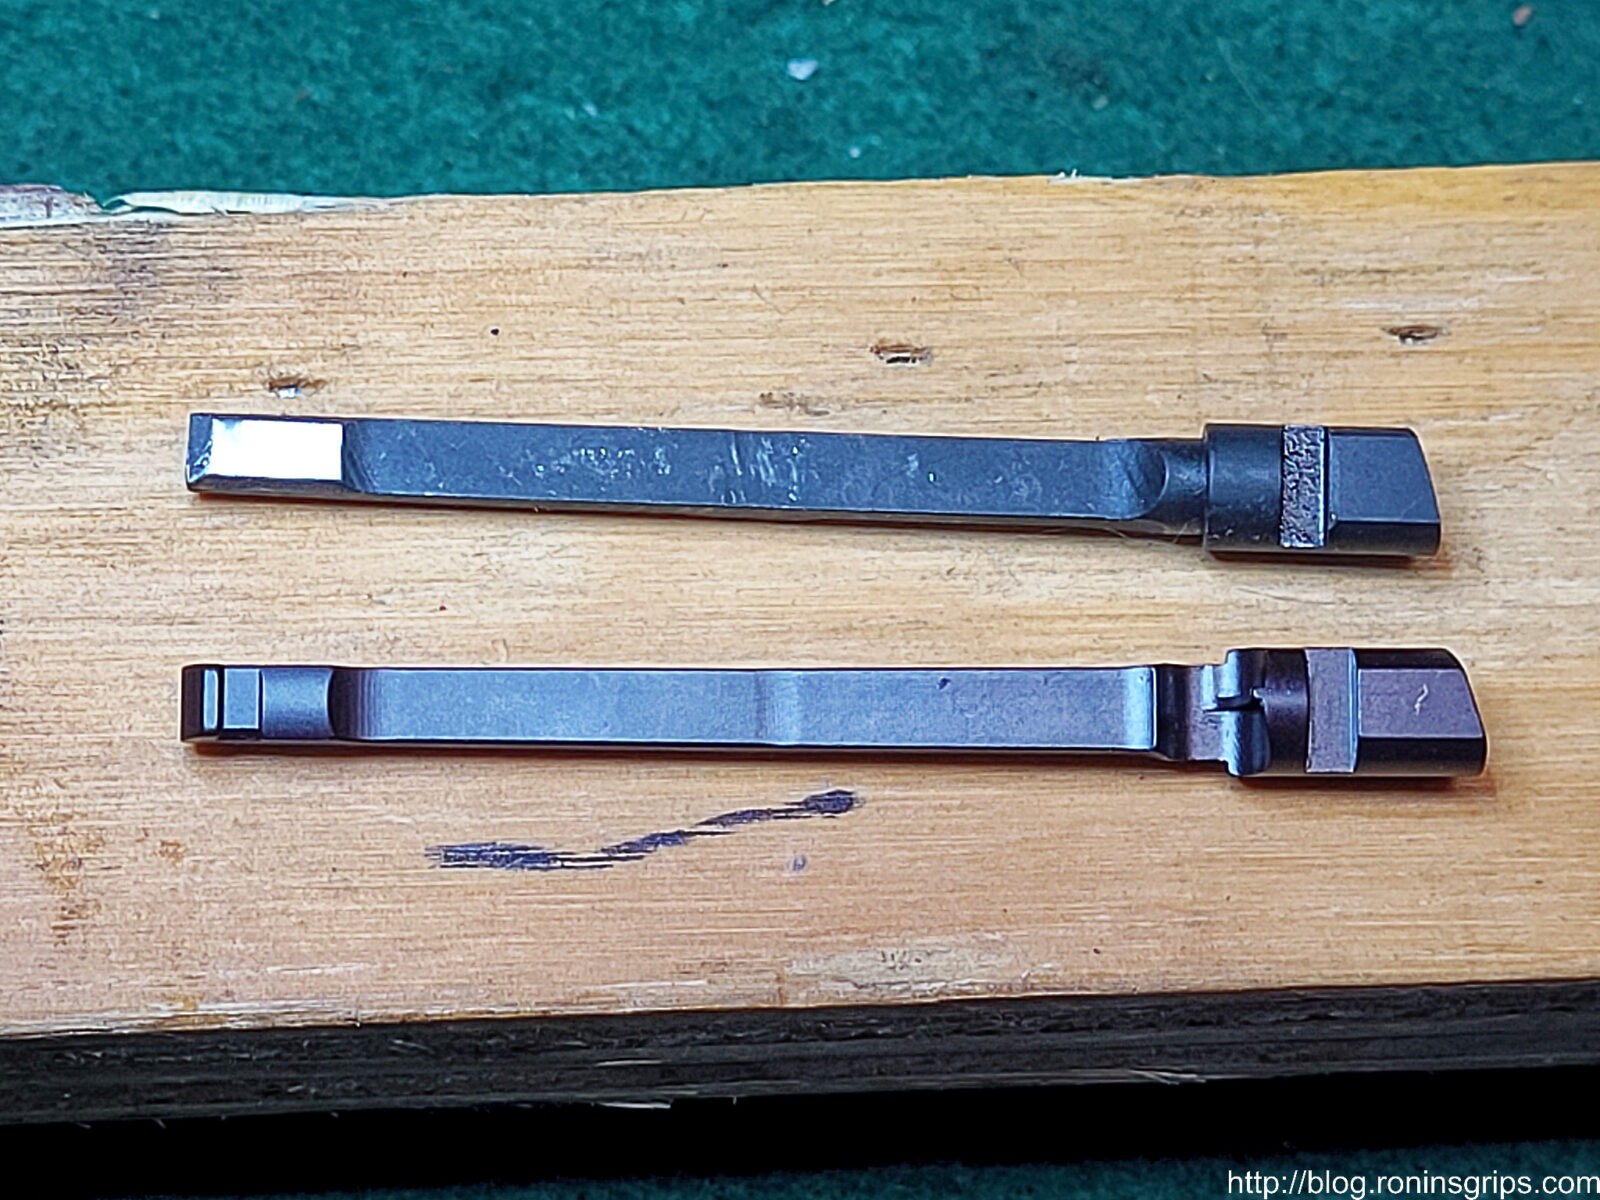
The top is the failed Rock Island 9mm ejector and it is a series 70 design. The lower extractor is a state of the art forged 9mm extractor from Wilson Combat. It is a series 80 design but will work just fine in a series 70 pistol.
Fully Machined from S7 shockproof tool steel with a tensile strength of 275,000 PSI
Optimized hook design for maximum strength and case rim contact
Hook location tolerances held to +/- .001″
Radiused corners for extended life and smooth feeding
Enhanced design holds tension longer over factory part many times over
Heat treated to optimum hardness and cryogenically treated
Guaranteed for life against breakage or we will replace at no cost to you
Note: I went with a series 80 extractor because they were in stock even though the RIA pistols are based on a series 70 design. You can use a series 80 extractor in a series 70 pistol but not vice versa. You can get them from Brownells, Wilson directly and other places.
Recommended Tools
You don’t need specialized tools but if you can afford them, I would highly recommend the following:
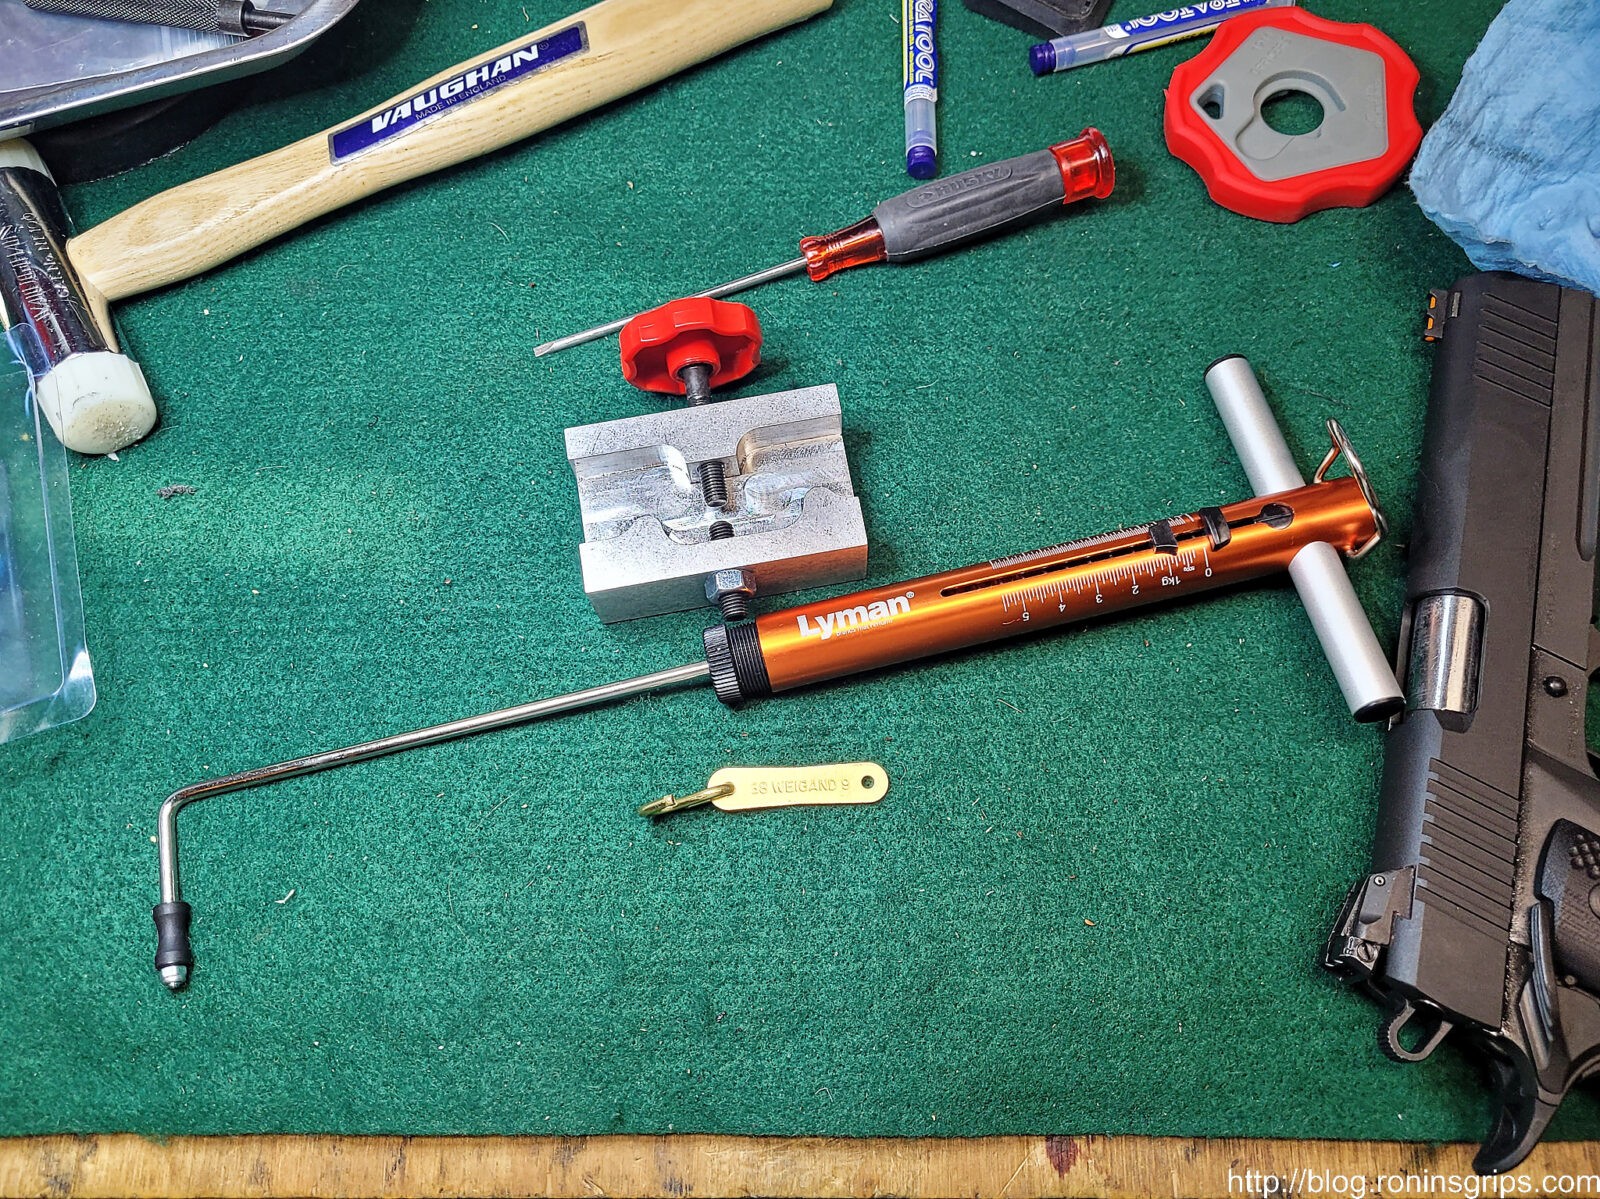
Weigand’s extractor tension gauge set – let’s you precisely dial in extractor tension. Note, I did add a brass s-hook so I can grab it with a trigger pull gauge more easily.
Lyman – Mechanical Trigger Pull Gauge – even though I have some digital trigger pull gauges, I lacked a mechanical unit and there are times where it is handy to see an analog scale changing vs. flashing numbers you can’t read so I bought it regardless. Yes, if you have a trigger pull gauge already, you can use it.
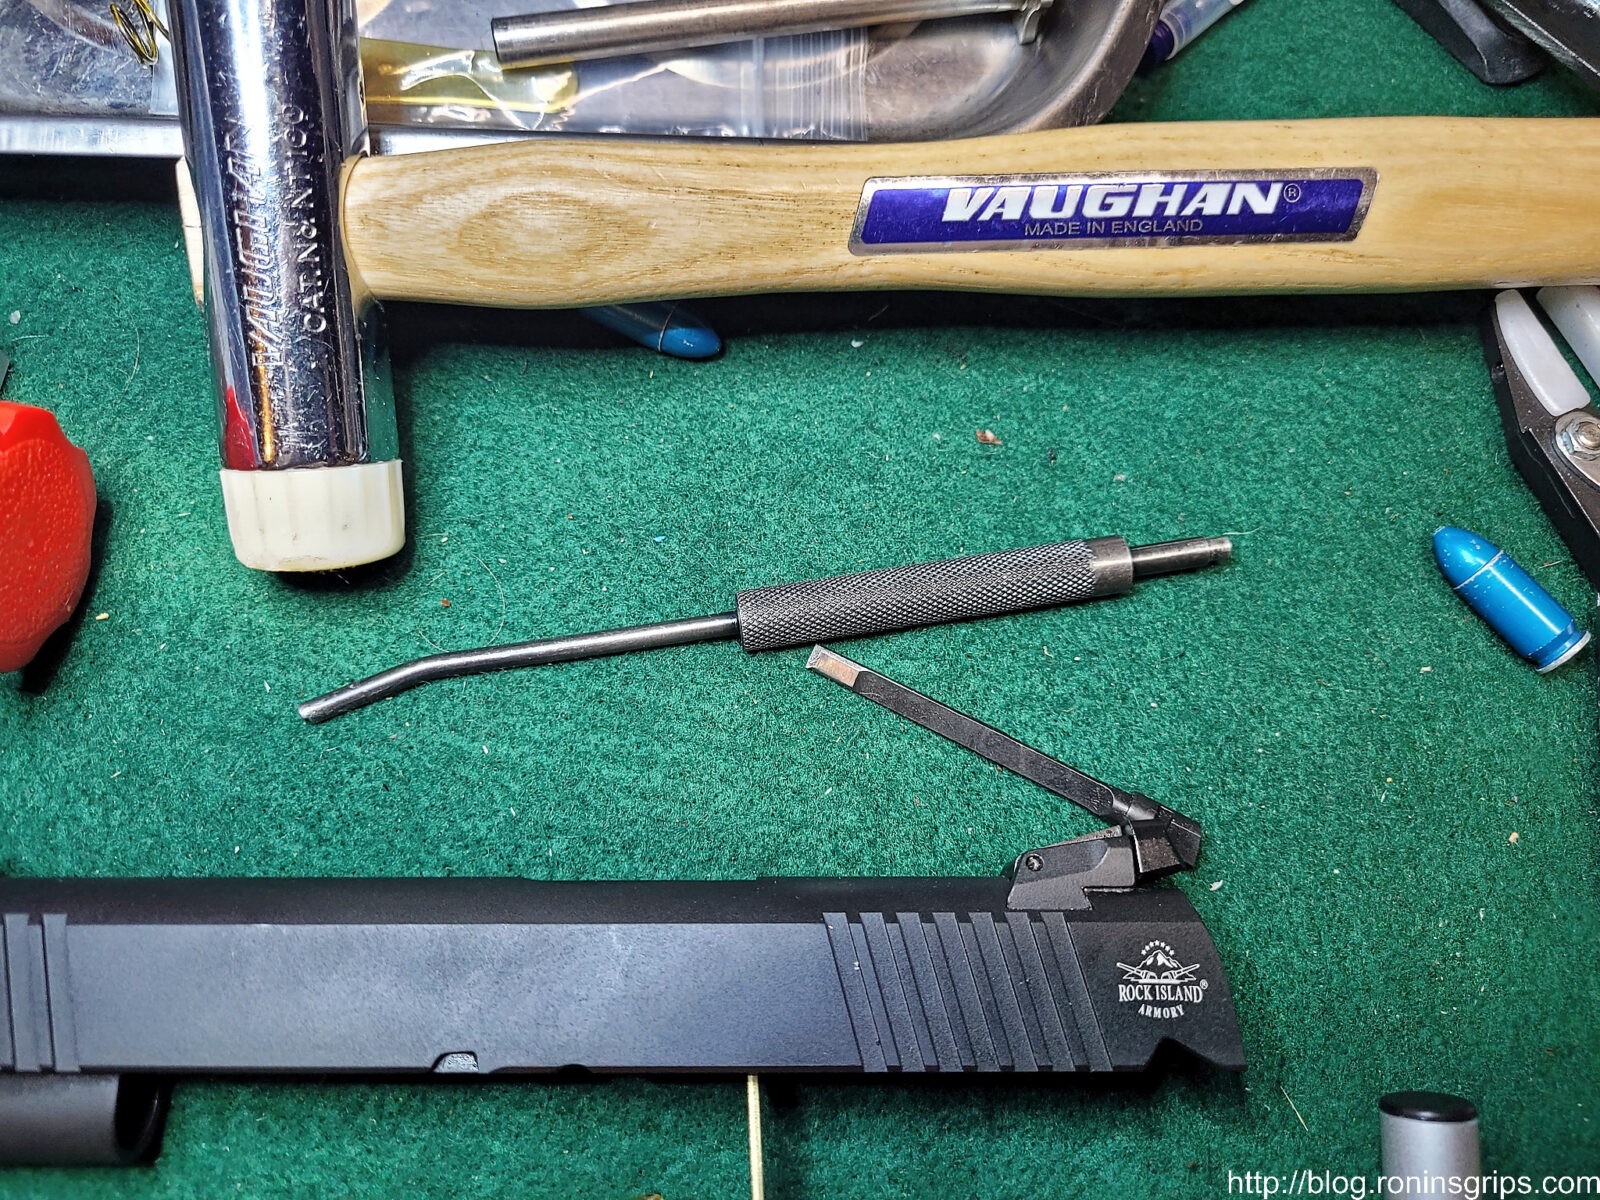
The long angled tool is the 1911 Extractor Tool from Brownells and totally worth it in my opinion. The long angled end lets you reach into the slide and push extractor back and then down into the hole for removal. The other end is perfect sized for pushing down the firing pin to aid with the removal and installation of the firing pin stop. Note the blue A-Zoom snap cap – that is the color of their volume packs of rounds. Exact same material and tolerances – just a different color.
The silver block with the red handle is Weigand’s tool for adjusting extractor tension. The big orange thing is the Lyman mechanical trigger pull gauge. The brass plate is the gauge with a brass S-hook that I added. The gauge is sold as a set and each end is for a different caliber. The hole you see is actually for lining up on the firing pin hole – I just added the S-hook on the .38 end because I don’t have any plans to shoot .38 Super. Note, the small blade screw driver makes it real easy to nudge the firing pin up or down so the firing pin stop plate can be pushed into position.
Make sure your pistol is unloaded – that the chamber is empty and a loaded magazine is not inserted. In short, work safe. Also, do not use live ammo for testing – use snap caps.
Let me give you an overview and then a couple of videos to watch:
Remove the slide
Remove the firing pin stop plate by pushing down with the straight short end of the extractor tool and then slide the plate off. Be CAREFUL that the firing pin and/or spring don’t come flying out as you remove the plate.
Push the extractor backwards by pushing the head of extractor backwards down the hole out the rear of the slide
Insert the new extractor and line it up so the stop plate can be re-inserted. It needs to line up with the top and bottom of the stop plate groove and it needs to be straight up and down parallel to the sides. You don’t need to install the firing pin and spring until you are done.
Insert the Weigand gauge and pull it out using the trigger pull gauge to find out how many ounces it takes.
Use the Weigand tensioning tool to increase or decrease the tension. I dialed mine in to 28 ounces (1.75 pounds).
You can try testing feeding and extracting dummy rounds to see how it performs. The extractor should maintain control until the extracted dummy round hits the ejector.
Once it is dialed in, you can then re-install the firing pin return spring, lube the firing pin and reinstall it also.
There’s a trick to the plate – wiggle it in and push down the firing pin enough to get the plate to sit on the “shelf” at the rear. You can then maintain pressure on the plate and use the other hand to use the extractor tool to push the firing pin down far enough and hold it there while you push the plate back into place.
More Details
Wilson has a video on how to change to their extractor and a bit about setting the tension:
The following is a video of Jack Weigand explaining how to use his extractor gauges and tensioning tool:
Adjusting The Extractor Landing Pad
The most detailed post and guidance in general about extractors that I read is here – and if you read down, you will get to sections/replies about 9mm extractors. One thing you will notice discussed is reprofiling the “fitting pad” to better fit the radius of the extractor hole. I stoned and polished the fitting pad to be more rounded but that was it. I put more emphasis on getting a weight in the 25-28oz range and did do that after may 3-4 tries.
Pulling the gauge out the final time was about 1-3/4 pounds which is 28 oz. In testing the pistol, extraction was just fine.
Was The Match Pistol Higher End?
I wondered if maybe more care was put into the match pistol. There are some nice perks in terms of features but the trigger feels about the same between the two pistols. I’ll write up something more detailed down the road – for now let me just say they pistols are not night and day different in terms of how they feel with cycling the slide or pulling the trigger.
In terms of pricing, there’s not a huge difference on Gunbroker. The first 51679 was bought on 3/5/22 for $819.99, the Match pistol was $899.00 on 3/25/22 and the second 51679 was bought on 4/3/22 for $899.00 also. In writing this, it’s surprising that the Match wasn’t $100-200 more on the street but it wasn’t. If you look at the manufacturer’s suggested retail price (MSRP) – Armscor did set the 51679 at $899 and the Match 56645 at $1099. In other words, Armscor was hoping the Match would command a premium.
You can find the 51679 pistols right now with a bit of hunting. The 56645 match pistol is challenging to find as it seems to be a bit more rare now but it is out there too. I’d tell you to get the 56645 Pro Ultra Match HC if you can find it. As you can imagine, I’m not too thrilled with my 51679 experience right now and there is little to no price difference *if* you can find one.
Conclusion
I’m not sure what to tell you about what happened – I only have data from two 51679 pistols and one 56645 pistol. It could just be really bad luck – neither of my current 10mm pistols have given me any trouble and the 56645 Pro Ultra Match has been fine so far as well although I have only cycled maybe 500-600 snap caps through it so far.
The first 51679 had something going on that I can’t explain and am waiting on Armscor to fix it under warranty. It certainly was not a broken extractor. For the second one to have a snapped extractor claw with so very few rounds – I guess that highlights the limitation of MIM and that forged extractors are better – there’s a reason why Wilson’s Bullet Proof extractors have such a good reputation.
6/22/22 Update: RIA did a warranty repair after about 4-5 weeks. All they told me was that they confirmed the extraction problem, fixed it and the pistol was fully operational now. So, I still don’t know exactly what happened but at least Armscor/RIA stood behind it and made things right.
We’ll see what Armscor comes back with regarding the first pistol and I’ll report it here. I guess the big thing I want folks to know is that changing an extractor is not an arcane black magic endeavor. There are tons and tons of videos and posts that you can read. At some point you just need to wade in, give it a go and learn.
My other lesson learned is that don’t replace a busted Armscor extractor (MIM) with the same thing. Upgrade. I decided to go with Wilson Combat due to all the good reviews I read and would recommend that.
I still have a lot to learn about 1911s and don’t claim to know much. I’m really focused just on the mags but I hope this helps out anyone who reads it.
A Stunningly Good 1911 Reference Book Recommendation
6/29/23 Update: The match 9mm MIM extractor is still doing just fine and I have no idea how many thousands of times it has been cycled. The Wilson is doing great on the other pistol also.
12/17/22 Update: I’m somewhat surprised – the original MIM extractor in the Match 9mm is still doing just fine thousands of rounds later. So is the Wilson but I am not surprised about the Wilson holding up.
Note, I have to buy all of my parts – nothing here was paid for by sponsors, etc. I do make a small amount if you click on an ad and buy something but that is it. You’re getting my real opinion on stuff.
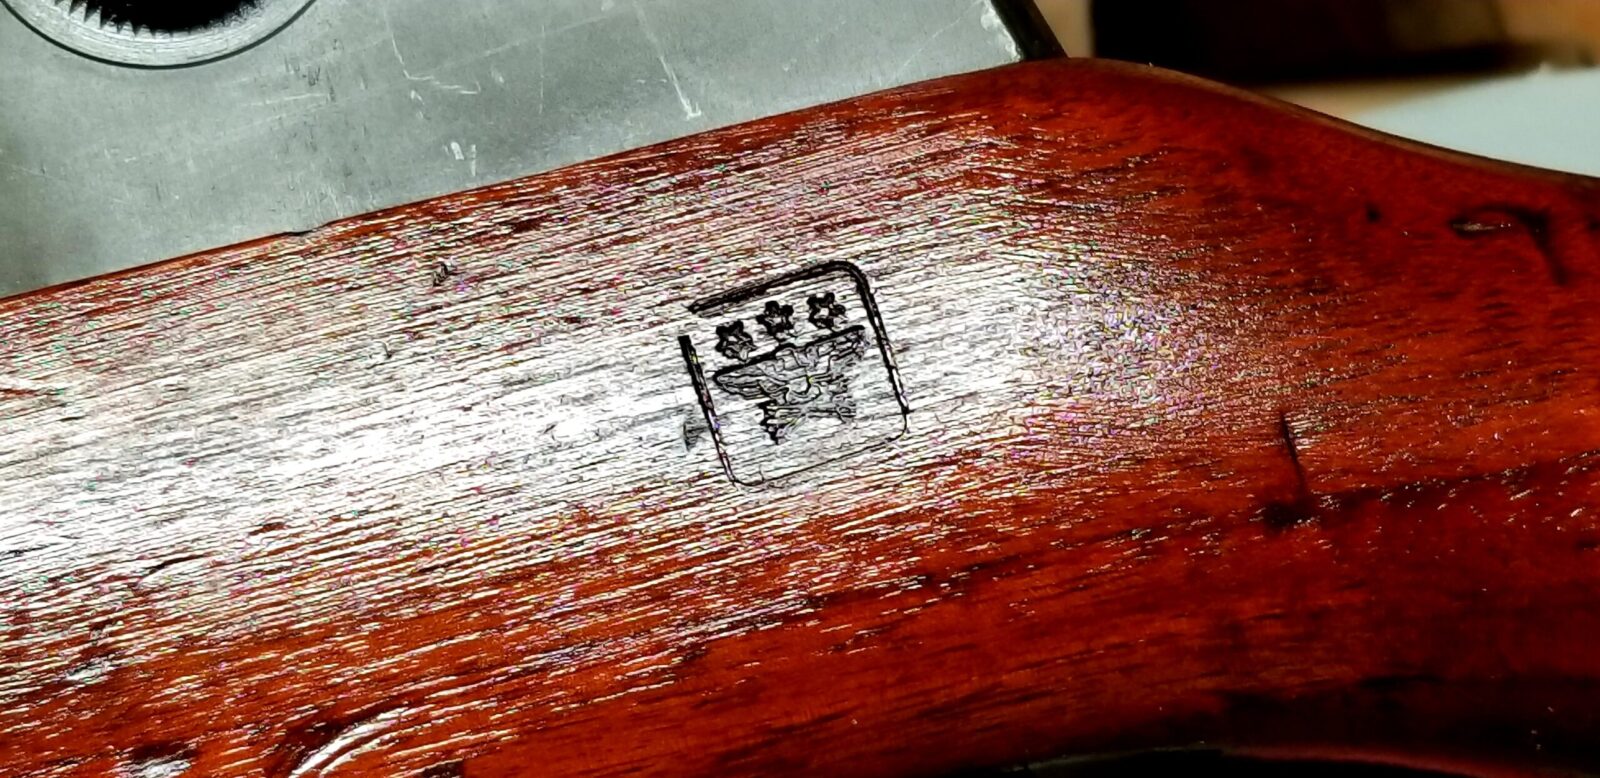
Some of you who know me as “ronin” back on the AKFiles way back when may recall that I bought my dad a M1 Garand, his bucket list rifle, back in 2011 after he was diagnosed with cancer. Just in case something ever happened to the AKFiles post, I had saved the text and photos and put them into a blog post on my site [click here].
My dad passed away in 2014 and I couldn’t even look at the rifle – it just hurt too much. I talked to one of my best friends, Scott, about it because he’d lost his dad too and he told me to just tuck it away and look at it some day in the future. He knew the rifle meant a lot to me and I took his advice.
So fast forward to the present time. I finally decided it was time to look at the Garand and make sure it wasn’t rusting. I recalled oiling it before putting it away the last time but that was six years previous. At any rate, I opened the CMP case up and everything looked good.
I then rolled back the Limbsaver pad off the butt of the stock – I’d put it there so the rifle wouldn’t kick my dad too hard – and the wood had visibly dried out under the Limbsaver. I really don’t know why – it must have been something to do with the polymer in the Limbsaver slip-on pad and the linseed oil on the stock.
I saw the dry wood and literally thought “Oh no”. Then I got a grip, realized it was just dry and tracked down what type of linseed oil to get.
It was a shock and really started me. My dad was the one who taught me how to shoot and clean firearms. That I might have let him down and hurt his rifle did not sit well at all.
The Limbsaver pad worked great with my dad. I guess I shouldn’t have left it installed for six years. By the way, I am not blaming the recoil pad – Limbsaver pads are my favorites to help tame recoil.
It turns out that the original buttstocks were finished with linseed oil and the dark reddish color they take on over time is from the linseed oil oxidizing. This was real linseed oil that is sometimes called raw or pure linseed oil and not boiled linseed oil that will have chemicals added to it to speed up the drying time.
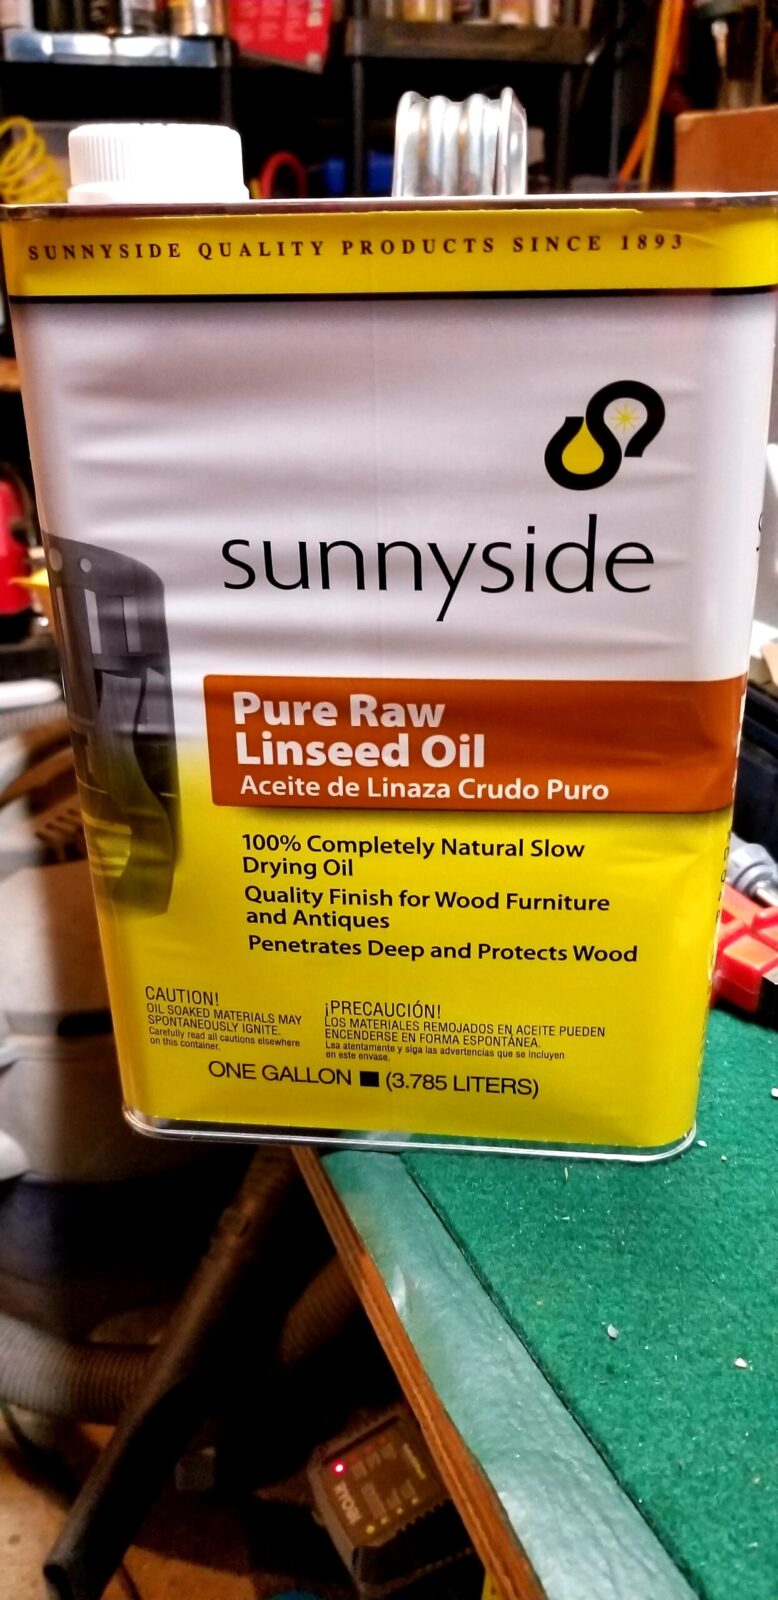
I did some digging and found SunnySide Raw Linseed oil on Amazon.com in both pint and gallon containers. If you are touching up wood, a pint is plenty. I bought a gallon to have for other uses and I may have it a long time given my current rate of usage.
All of the local hardware stores had boiled linseed oil and I was able to find this on Amazon.
With raw linseed oil, be very sure to lightly applied it to the wood and let it soak in and dry before applying the next. I did two very light coats over several days. Never put it on thick or it will get gummy and may never dry.
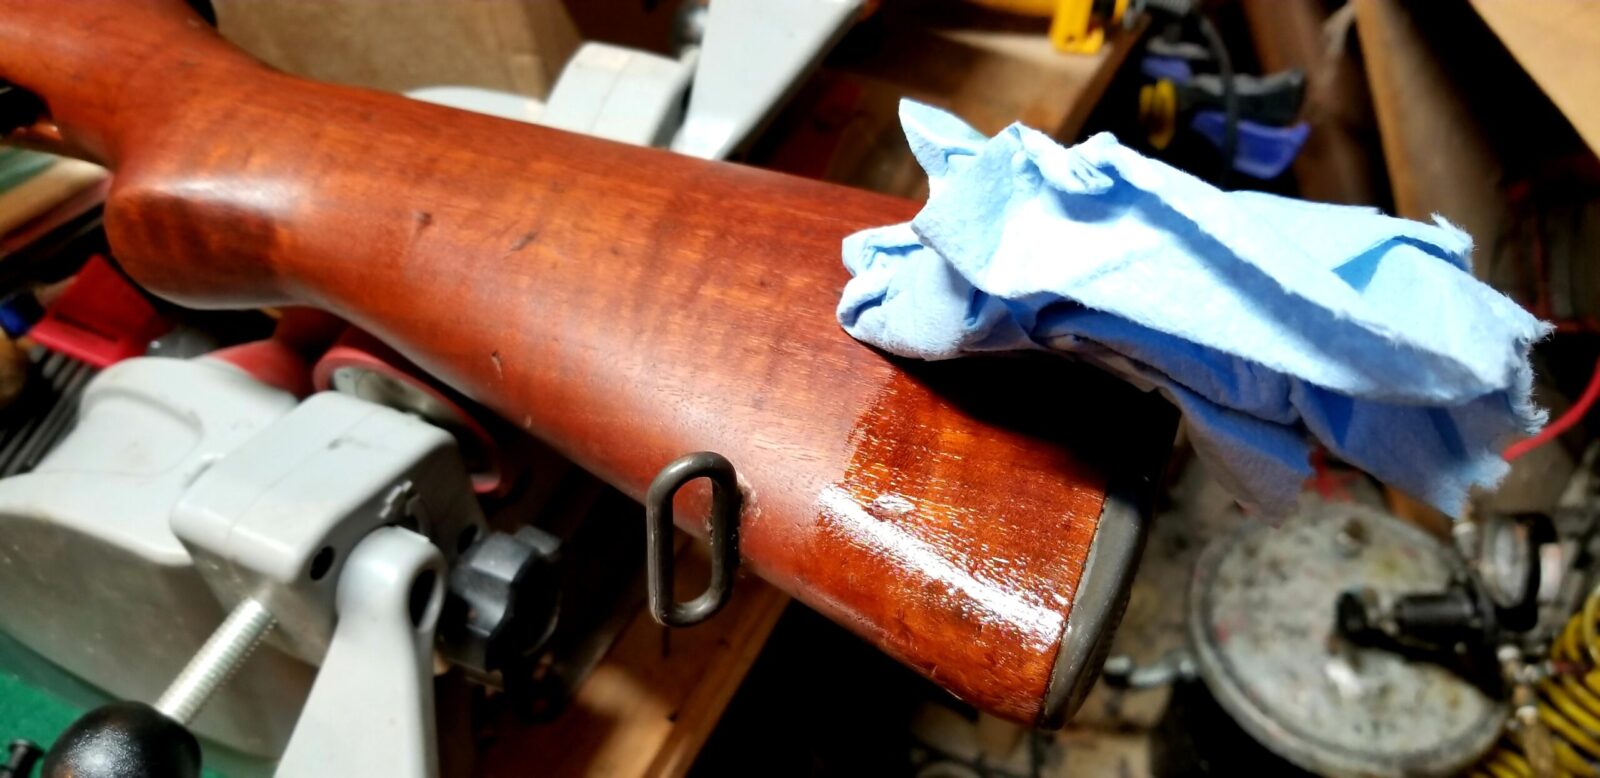
As I was applying the first coat I could already tell it was going to look amazing.
I was still appling the linseed oil at this point but notiice the dry area is gone. Even after the linseed oil cured it was gone.
Also, there is a real important fire hazard you need to know. When linseed oil dries it gets hot and can spontaneously combust. You do not want to crumple up towels that have linseed oil on them and toss them in your trash – they just might ignite.
I take my old towels and burn them in my burn barrel. Some guys who can’t do that will lay the towels out flat on bricks or concrete that can’t burn and let them dry before throwing them out. When laid flat they do not get hot enough to catch fire and are safe once dry.
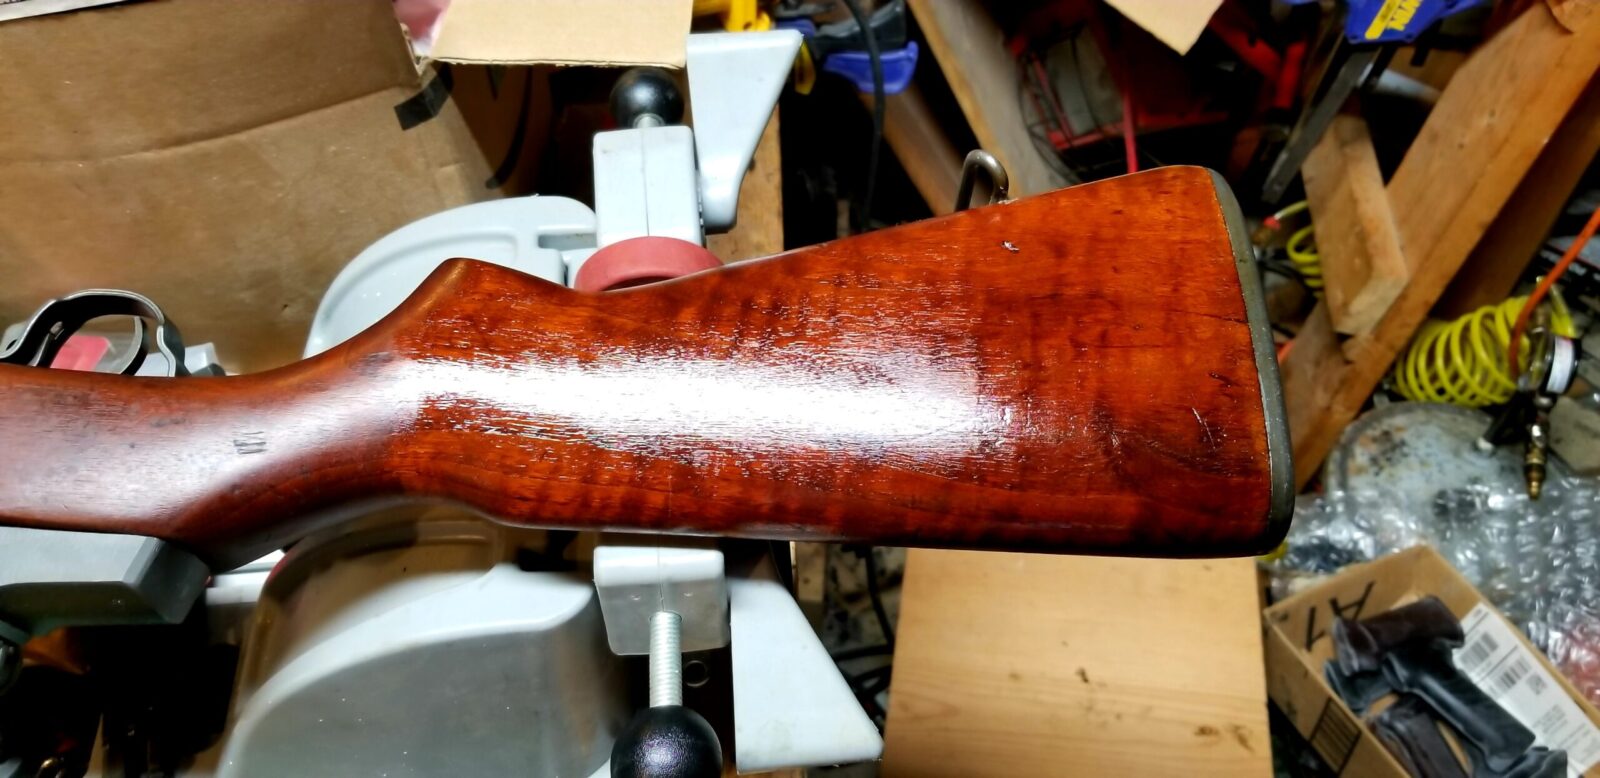
Ignore the mess and look at the wood.
Here’s a close up of a cartouche after two coats.
Let me reinforce an earlier comment – this stuff dries slow. Apply it thin, let it dry all the way before you install the next coat. I would definitely recommend making sure it is fully dried before putting the rifle back into a case or the padding in the case may stick to the finish. I guess a hard lesson learned for me from years ago is that when it comes to finishes, you need to do your homework about how to apply each type and be patient. When I was younger I was very impatient and ran into different problems many times. With my dad’s Garand, I knew to be very patient.
Summary
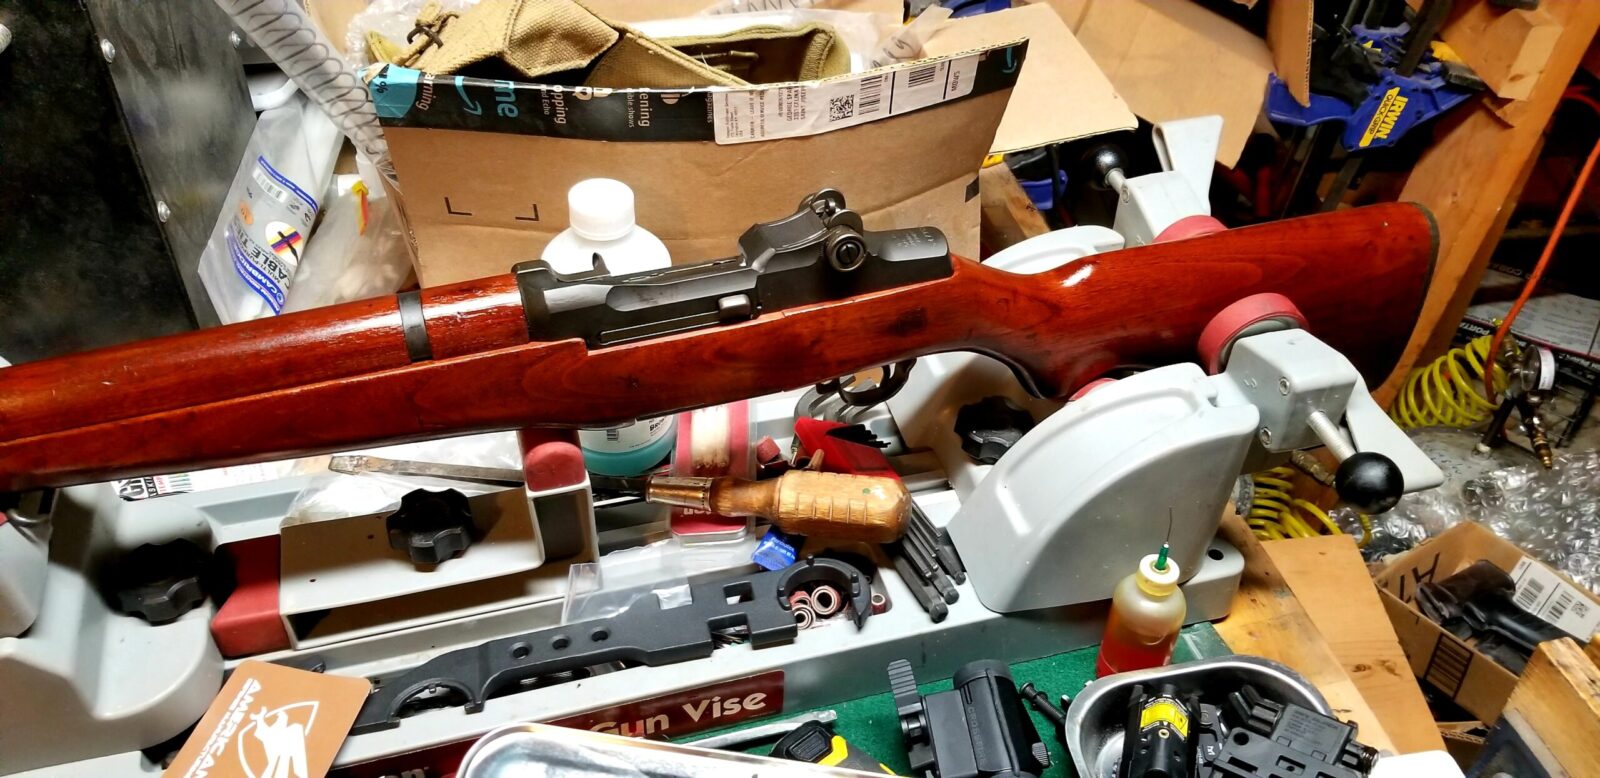
If you have a Garand with a dry stock, try appling one or more light coats of raw linseed oil and let it dry all the way. The results were amazing. So, I checked the Garand over all the way, oiled it again, left the slip on recoil pad off the stock and put it back in storage. Maybe I will take it to the range this summer and remember my dad.
I hope this helps you out.
Note, I have to buy all of my parts – nothing here was paid for by sponsors, etc. I do make a small amount if you click on an ad and buy something but that is it. You’re getting my real opinion on stuff.
So, let’s review how to remove a riveted AK trigger guard assembly. For those of you building from virgin kits or complete demilled (“demilitarized”) kits, you don’t need to do this but for many folks they do. In my case, I needed to remove the trigger guard from a beat to heck donor rifle that someone had butchered.
You have three options to remove the trigger guard rivets:
Drill them out by center punching each rivet or using a rivet drill jig and remove them.
Mill the heads off, drill a hole and punch out the remainer of the bodies.
Grind the heads off, drill a hole and punch out the remainder
All of the above methods work. It really comes down to what you are most comfortable with. As for myself, I use option three. The reason I just don’t drill them out is that rivet head shapes can vary considerably. The AK-Builder drilling jig is fantastic but it can’t guarantee you are centered on every rivet.
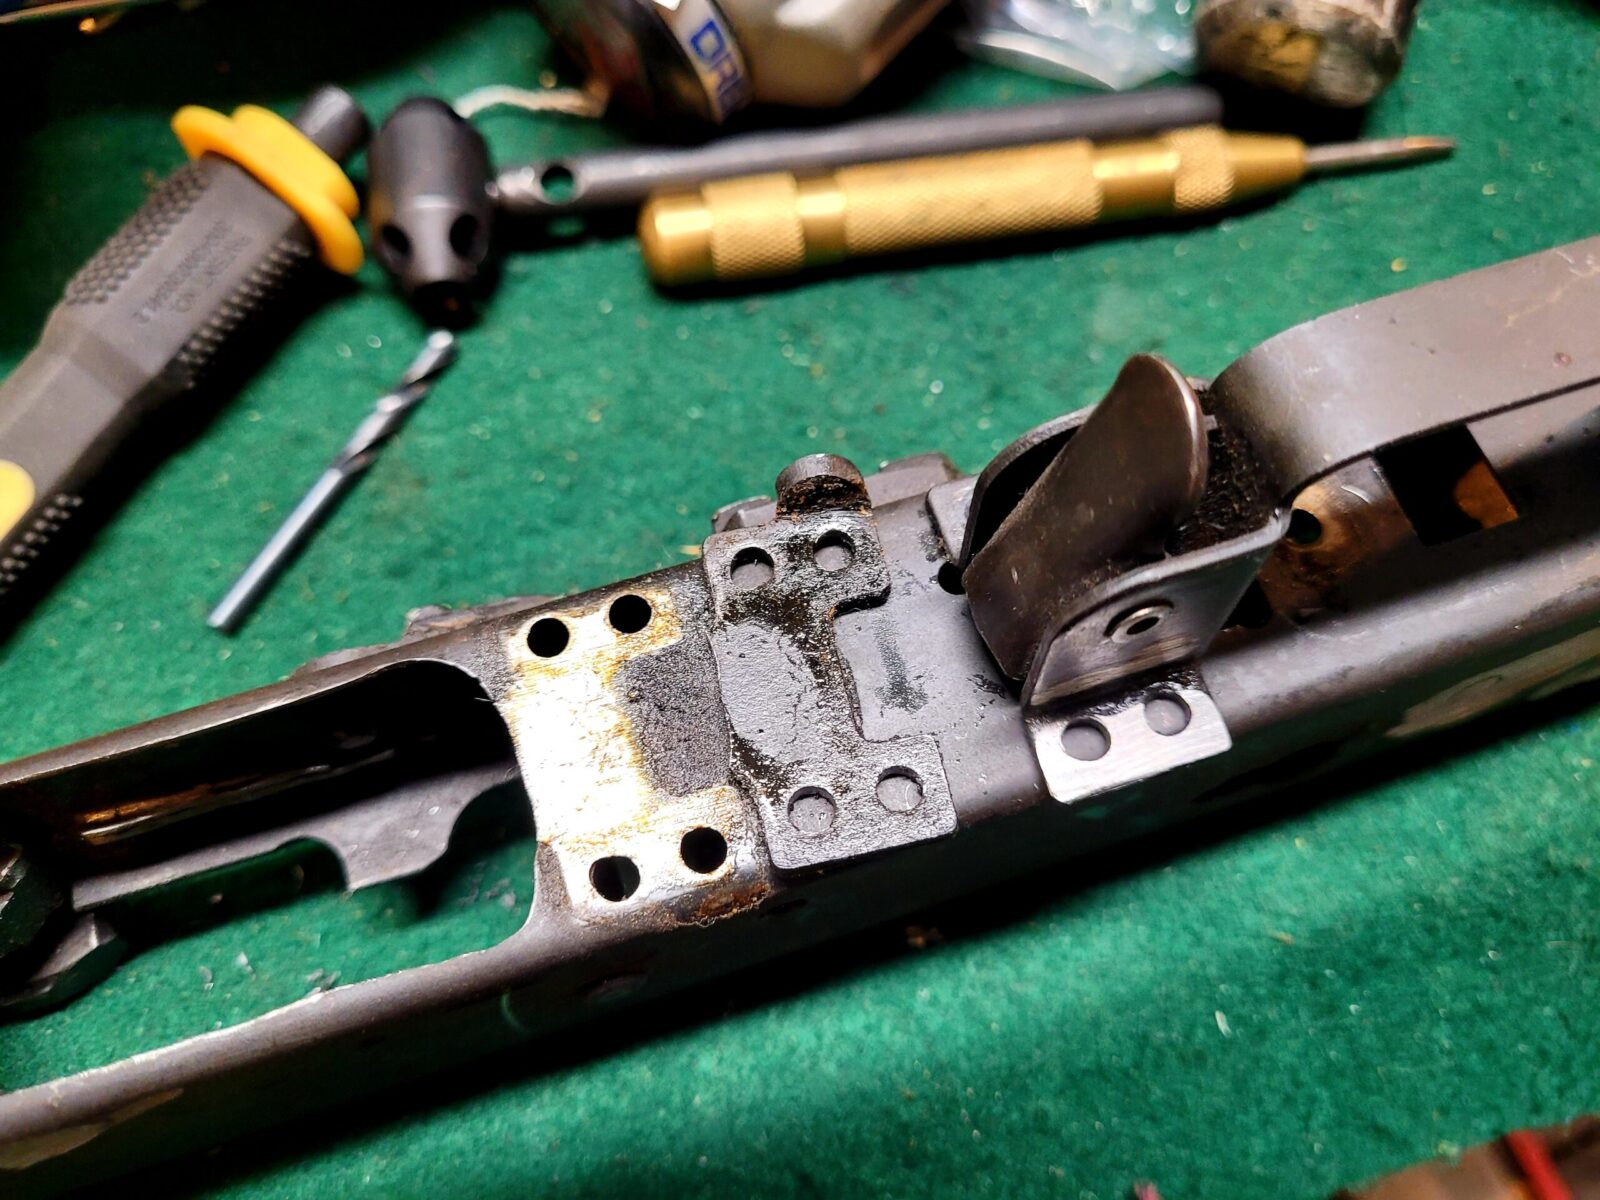
With this in mind, I simply take a 4″ grinder and take off the rivet heads flush to the surface of the trigger guard itself. This lets me see the outline of the rivet bodies so I can then drill and 1/8″ hole and I’ll explain why after a couple of photos.
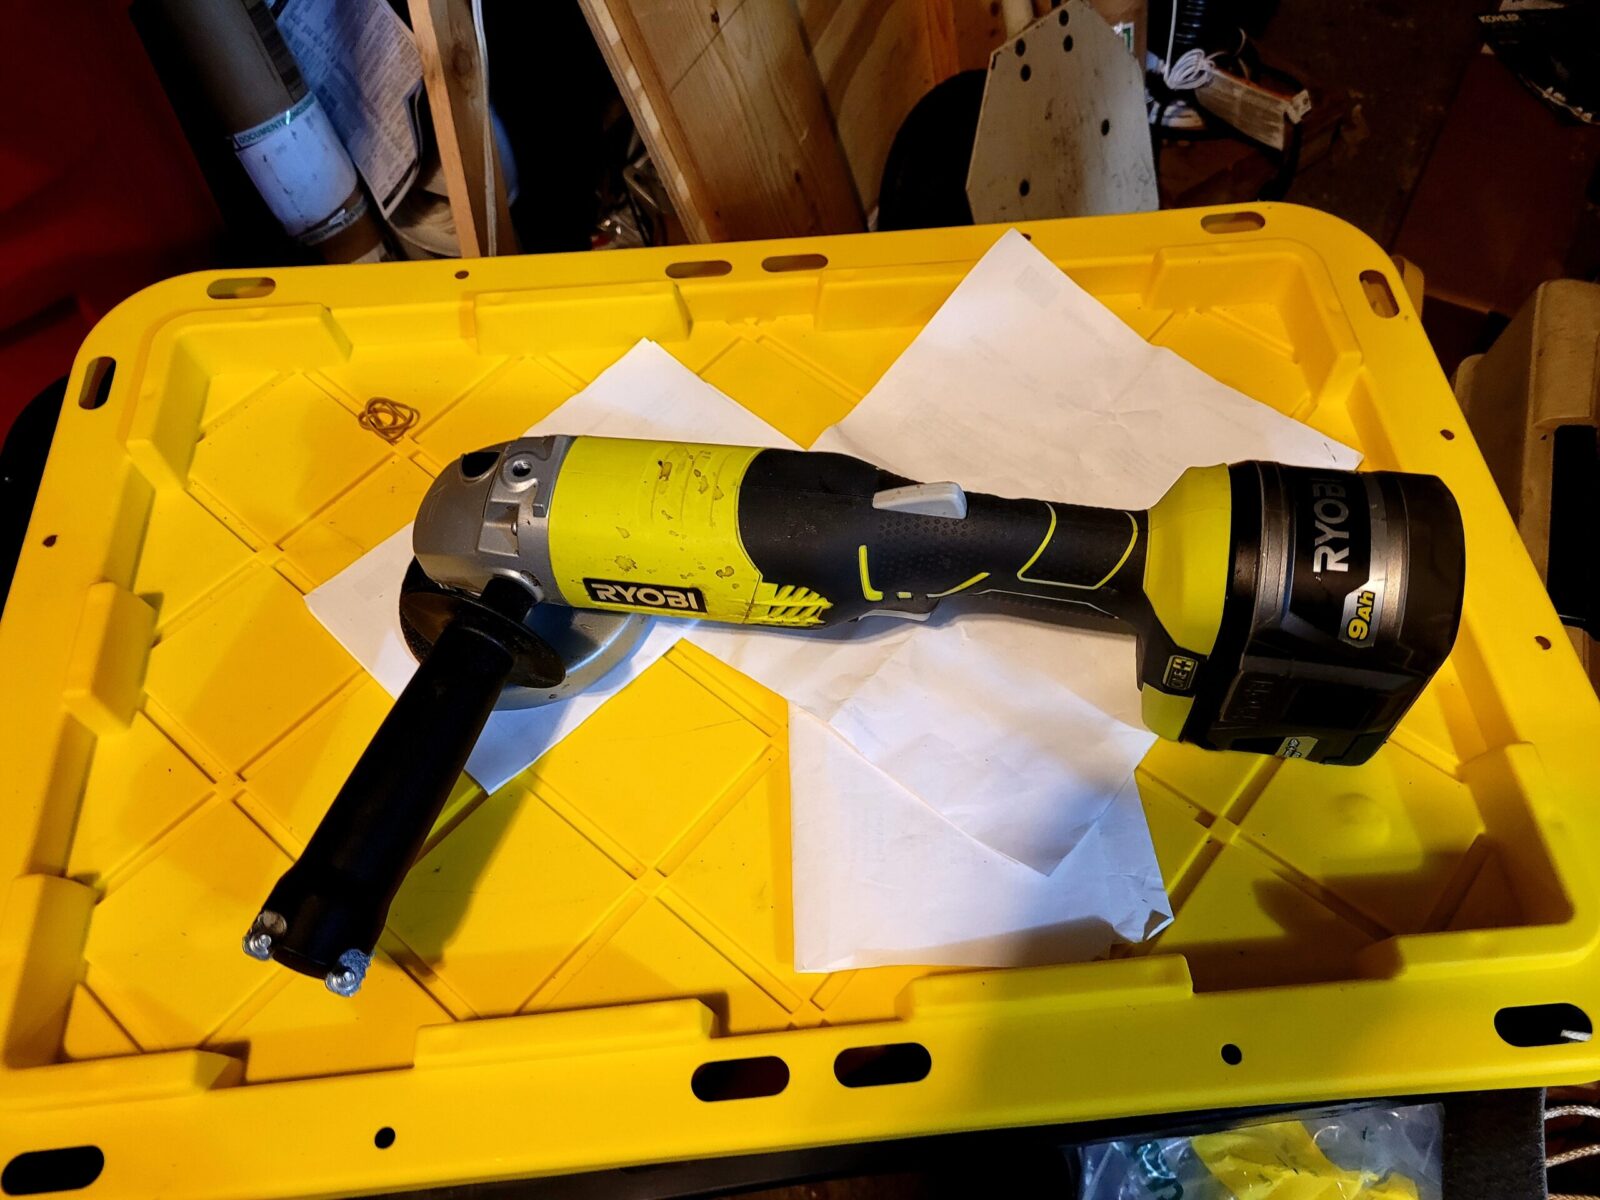
This is my 4.5″ Ryobi 18 volt grinder. To be honest, the tool pleasantly surprised me. I really wondered how much torque and battery life it would have. Over the last six months I have ground down quite a few bolts and metal parts with this tool. Before I had it, I had a 4″ Makita corded grinder that I still have — it’s just that cordless is so convenient. The Ryobi made short work of the five rivets that hold on the trigger guard.
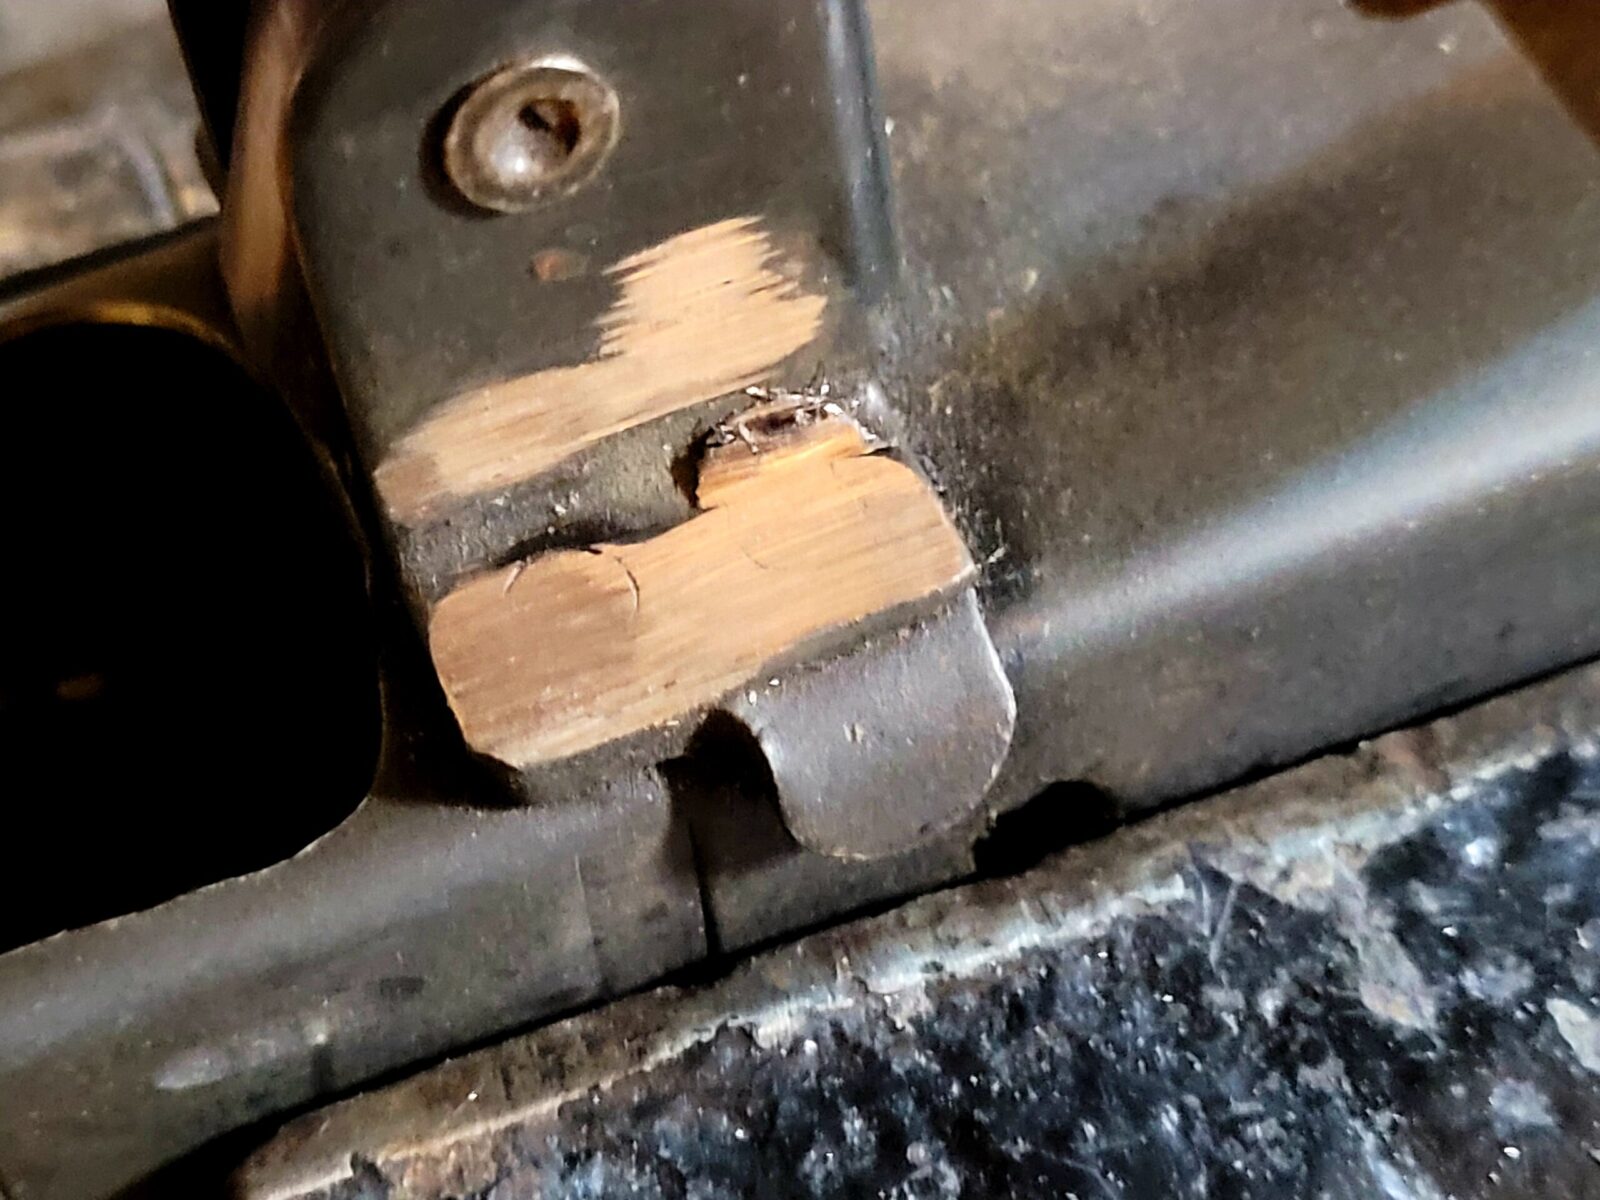
Definitely practice with your angle grinder until you are able to control it. What you want to do is to remove the rivet head with out doing major damage to the trigger guard. Can you see the outline of the rivet bodies? That is what we want to get all of the way around.
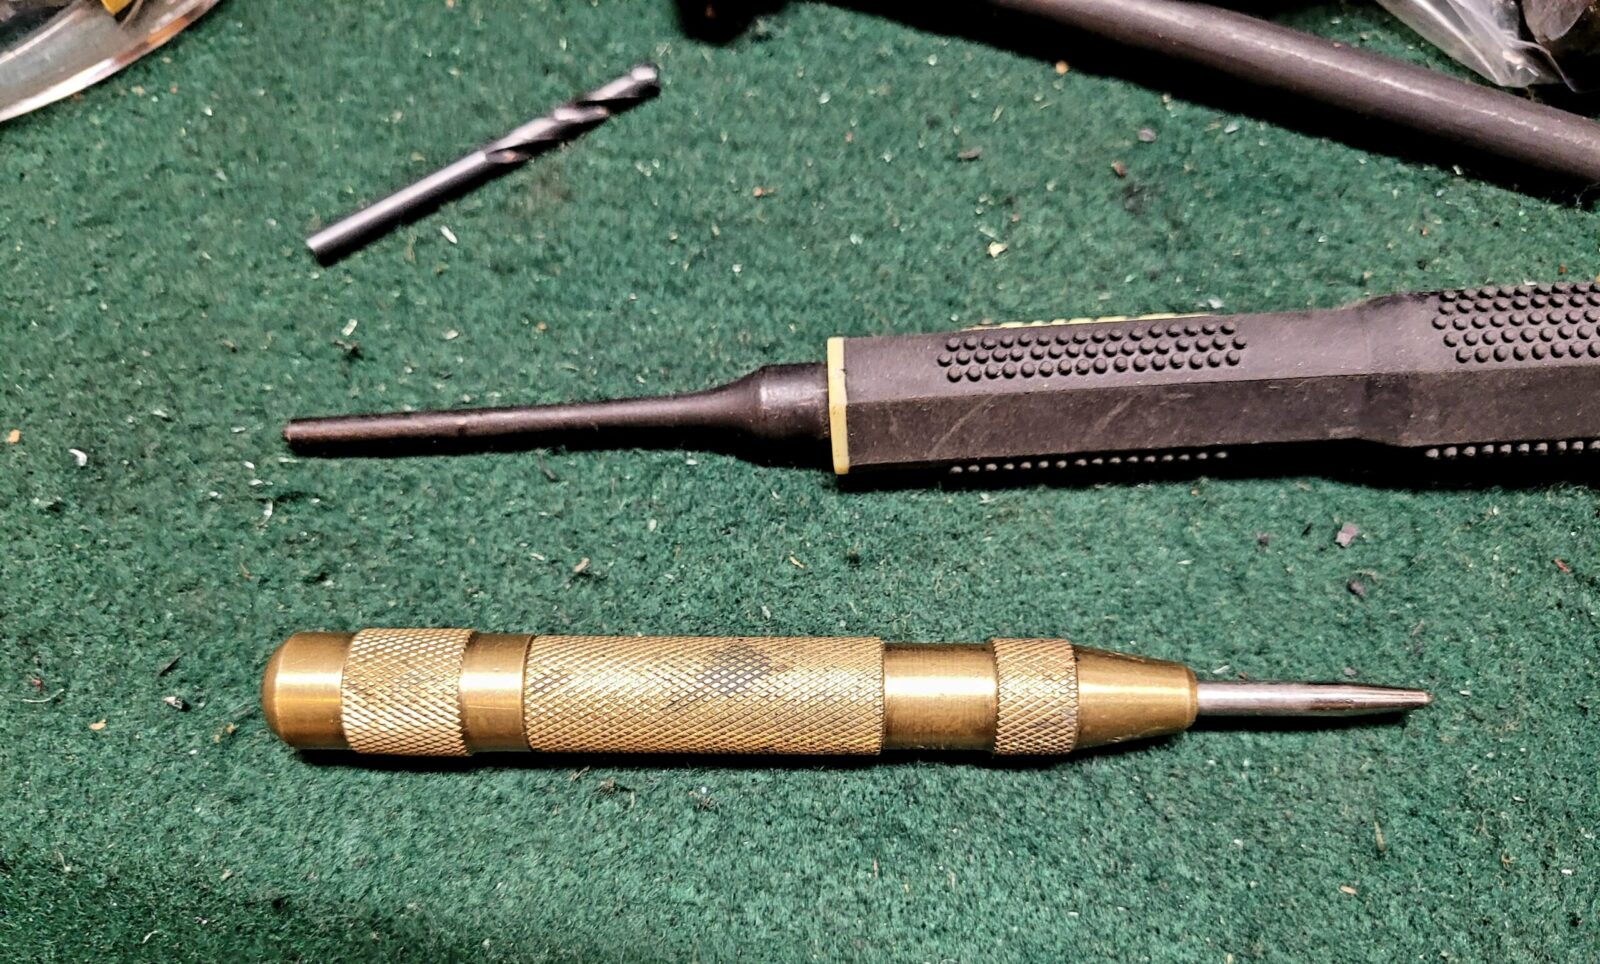
The next steps you will do are to center punch each rivet, drill an 1/8″ hole through the rivet and then use a roll pin punch to knock the rivet out. This was a bit of an epiphany for me one day – I was trying to keep the punch on the rivet and I thought to myself – “Man, what if I drill a hole and use the right sized roll pin punch? The little ball on the end of the roll pin punch ought to keep it centered.” I tried it and it worked great. No more punches slipping around.
At the bottom is an automatic center punch. I love these things. You push down on the handle until the action cycles inside and the hardened tip makes a dimple in the surface without a hammer. Above it is my roll pin punch. Tons of companies make these and you can barely see the little ball at the end that will center the punch on the drill hole. Above it is an 1/8″ drill bit. I’d recommend you go with good cobalt bits when demilling. They last longer and will go through just about anything. Note, if you buy a cheap cobalt drill bit it can be worse than plain high speed steel from a quality manufacturer. Go with a brand name – Norseman is my favorite but you can go with stuff from big box stores too like Bosch, Dewalt, etc. If you are getting a set off Amazon, be sure to check reviews.
Here’s the finished result – a nicely separated receiver, selector stop plate and trigger guard. Be careful not to lose that stop plate – you will need to and the trigger guard for your next build.
One perk of only using an 1/8″ drill bit is that you have some margin for not being exactly centered on the rivet. 1/8″ is 3.127mm and a 5/32″ drill bit comes in at 3.969mm so real close to the actual 4mm holes drilled in the parts and if you are off a tad then you wind up with an “egged” or misshapen holes. Of course you can use other size drill bits – just figure out what you like.
Even though rivets are relatively soft steel, I still recommend you use cutting fluid. I keep some Tap Magic in a little squeeze bottle with a needle tip and it makes it super easy to add it when working.
Summary
Removing the trigger guard is all about getting rid of the five rivets that hold it in place. Whether you drill, sand, mill, grind or otherwise cut off the tops, then drill out the remainder – using a roll pin punch really makes it easy to punch them out the rest of the way.
Note, I have to buy all of my parts – nothing here was paid for by sponsors, etc. I do make a small amount if you click on an ad and buy something but that is it. You’re getting my real opinion on stuff.
I have wanted to build an IMI Galil from a kit for years and just never got around to it. One thing that kept me from jumping in was that I had never really dug into the design deeply by taking one apart and looking at everything.
In 2006, like a lot of guys, I read the late Steve Matthews great article in Firearm News about building your own AK rifle or pistol. For whatever reason, the AK building bug bit me hard and I wound up with a number of barreled Romy-G kits along with flats, rivets and tools from AK-Builder.
I read everything I could and guys kept telling me you “just gotta dig in, do it and learn”. Well sir, I did. I trashed my first flat or two – I think I messed up the bend on one and the other I ruined the top rails as I didn’t cut them right. Yes, back in those days we had to put Dykem Blue on the top rails and scribe a line to cut to using a layout jig AK-Builder eventually came out with. I messed up a lot and I learned a lot.
A fair amount of the mistakes were caused because I had never really studied AKs prior to trying to build my first one. Over the years I have learned a ton more but one lesson sure has stuck with me – it’s way easier to build something if you have first had experience with the design including disassembly.
Fast Forward To December 2020
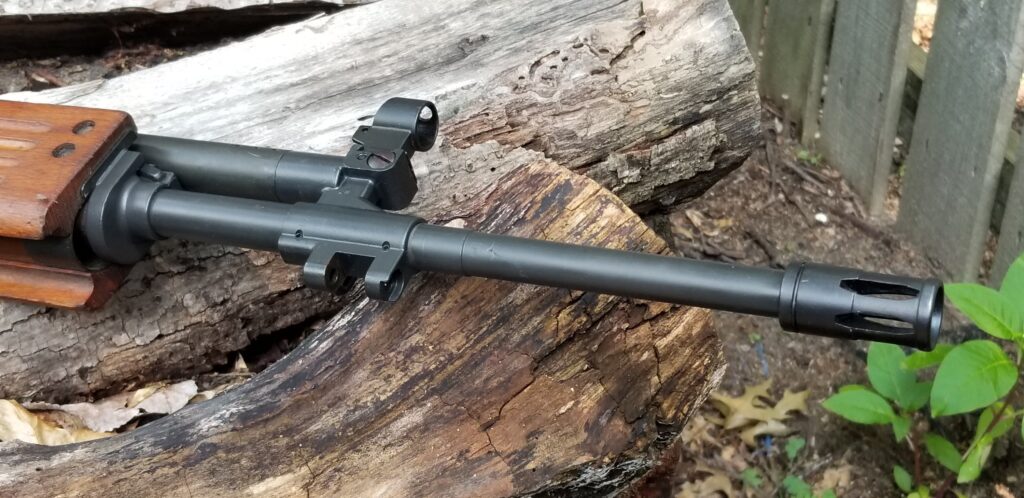
Everyone was in a panic buying everything firearm oriented in sight and I was trying to figure out whether to make the slightly sideways leap from AK designs that I knew to a Galil that was based on the Finnish RK.62 and had a screw in barrel (not pressed and had to be headspaced, the extractor cut and barrel populated later), some wierd looking thumb selector (no idea what that linkage was going to look like) plus I was sure I would run into other little unque surprises.
So I took a rather odd gamble. Other than custom shops, like the amazing Jeff Miller at Hillbilly Arms, there are two shops cranking out IMI Galil clones using original Galil ARM and AR kits married to new US barrels and receivers. ATI and their Galeio and James River Armory (JRA) and their Gallant, which uses Galil ARM kits. Note, they are using new receivers and appear to have corrected issues they had with their earlier 2019-ish models.
The JRA seemed to get good reviews and was affordable around $1,000. Now, a receiver will run you $400-500 once you include S&H plus your FFL’s transfer fee. A barrel will run you $99-199 depending on what you get and then you will spend another $300-400 for a kit. All of a sudden, looking at that JRA rifle as a parts kit became really attractive plus they use an 18″ 1:9 twist that can stabilize up to 62 grain M855 “green tip” bullets – actually it can go up to 72 in theory but I wanted to be able to shoot M855. The original Galil’s had 1:12 twists that could stabilize the older M193 55 grain rounds but not M855 – when you see targets where guys fired M855 rounds through a 1:12 Galil barrel, the bullets often “keyhole” or hit sideways. So, the 1:9 twist rate really appealed to me.
I wish I could say it went smooth but FedEx’s Ground Service (the old RPS group they bought years ago) threw a big monkey wrench in things. Classic shipped promptly but FedEx Ground’s South Bend office has been having huge problems due to lack of staff. It took maybe 2-3 weeks from when they got it until they actually delivered it to my FFL.
Scott Igert, the owner of Michigan Gun Exchange is a good friend of mine and I use him for all of my FFL needs plus he has the best gun store in Southwest Michigan in my honest opinion. At any rate, Scott sent me a photo of an AK and told me my Galil was in. Leave it to Scott to pull a prank and I knew full well he knew what a Galil looked like so he didn’t get me as good this time … unlike other times 🙂 That’s what friends are for.
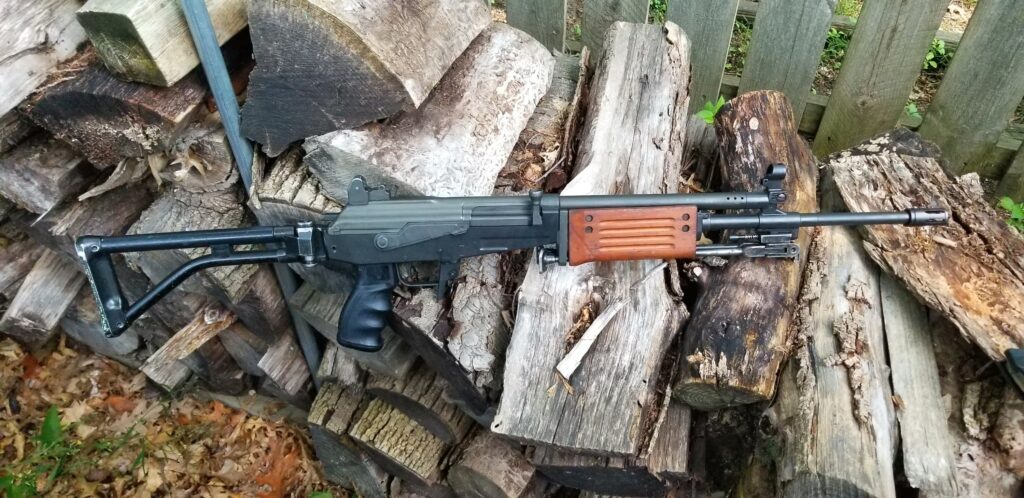
At any rate, I went and snagged the Gallant, took it home and promptly took it apart. I didn’t really care about the warranty because short of some huge problem with the receiver or a bent barrel, it wasn’t going back.
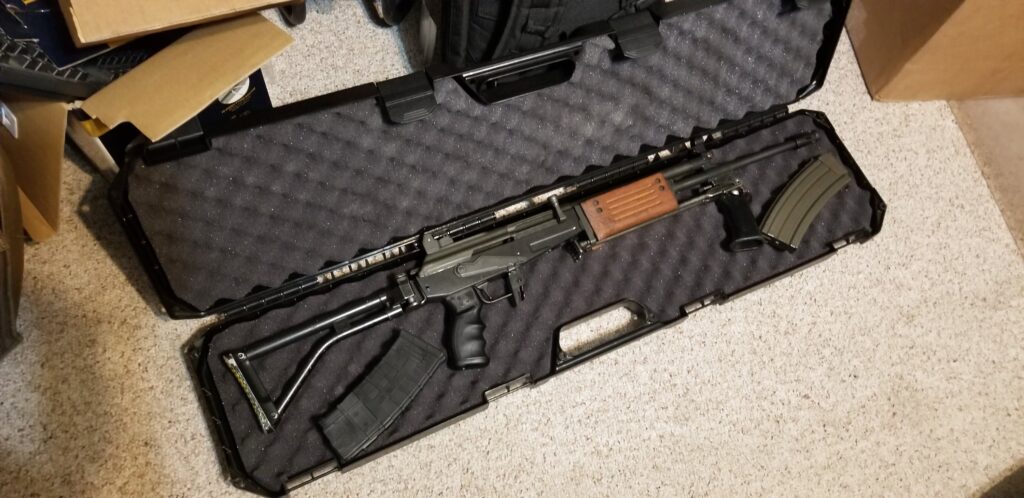
The Gallant ships in a hard case to protect the rifle. I snapped this photo literally when I got home and opened the case to take a serious look at the rifle.
So let me itemize my observations
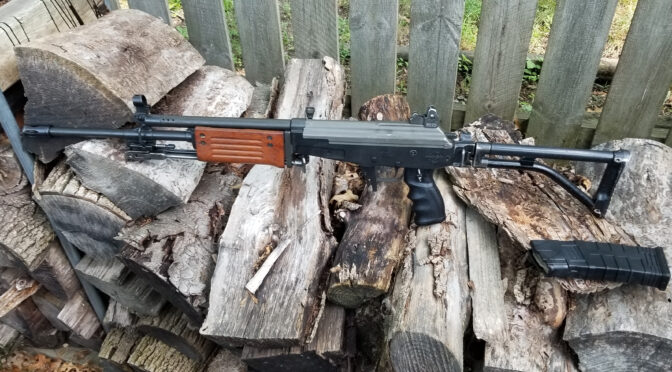
They tell you right up front it is supposed to look battle worn. The skeptic in me thinks it was a way to cut costs but another side of me likes the look – the receiver and barrel are black, parts with the original finish have the grey/green parkerized finish on them and the wood has a look that only a ton of grease oil and God knows what can achieve. I actually found myself liking it.
I’ve not done the battle worn look before and like it. I originally thought I would refinish the rifle but am now leaning towards leaving it the way it is including the wood handguard. For me, that blocking handguard is one of the iconic “signs” that tells you that you’re looking at a Galil ARM.
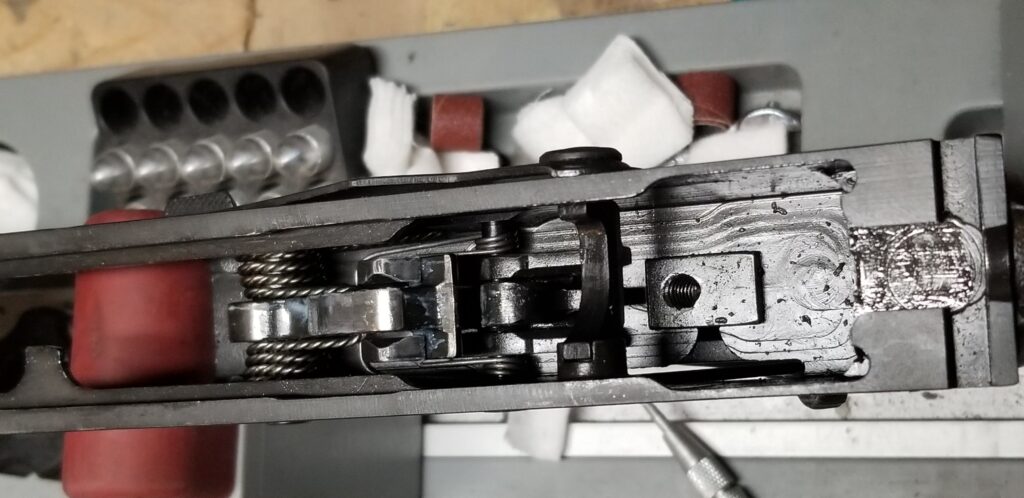
For 922r compliance, they have a US 1:9 barrel, a US receiver, a US Galil-Ultra looking grip made my Phoenix Technologies here in the US and a US Tapco magazine. Now that last one gets a bit of a groan – the Tapco magazines are plastic, they work, but there are a ton of nice steel surplus 35 round mags out there that would make the rifle no longer 922r compliant if inserted. As best as I can tell, they used an original Galil fire control group with it’s forged trigger hooks and two part spring setup – one spring for the trigger and one for the hammer – if it is aftermarket, it is not marked.
Note, I emailed JRA and asked them about the compliance parts. So far, they have not responded. Classic says on their web page that surplus mags fit (and they do by the way) but there is no mention of compliance.
Now, there are a two primary mindsets out there when it comes to 922r compliance: Some worry about it because they want to be legal. Some don’t care for whatever reason and that is their decsion. As for myself, I ensure that anything I build or modify is 922r compliant. So, I wanted to use steel surplus Israeli mags so I decided to swap out the original IMI hammer, trigger and disconnect with a new ALG enhanced fire control group (FCG). Yes, an AK FCG will work in an IMI Galil. If Classic tells me they actually sourced a US made IMI-style FCG, I will update this. I’m writing this post after already making the change to the ALG.
Heresa quick snapshot of the FCG that came with the JRA. Note that there hammer and trigger springs are independent. Also note that the person assembling the rifle took the time to polish the hammer face so the bolt carrier would cycle smoother. On the negative side, those are metal chips in the receiver from machining — I cleaned everything out. I’ll post more details as I do posts for each change I made.
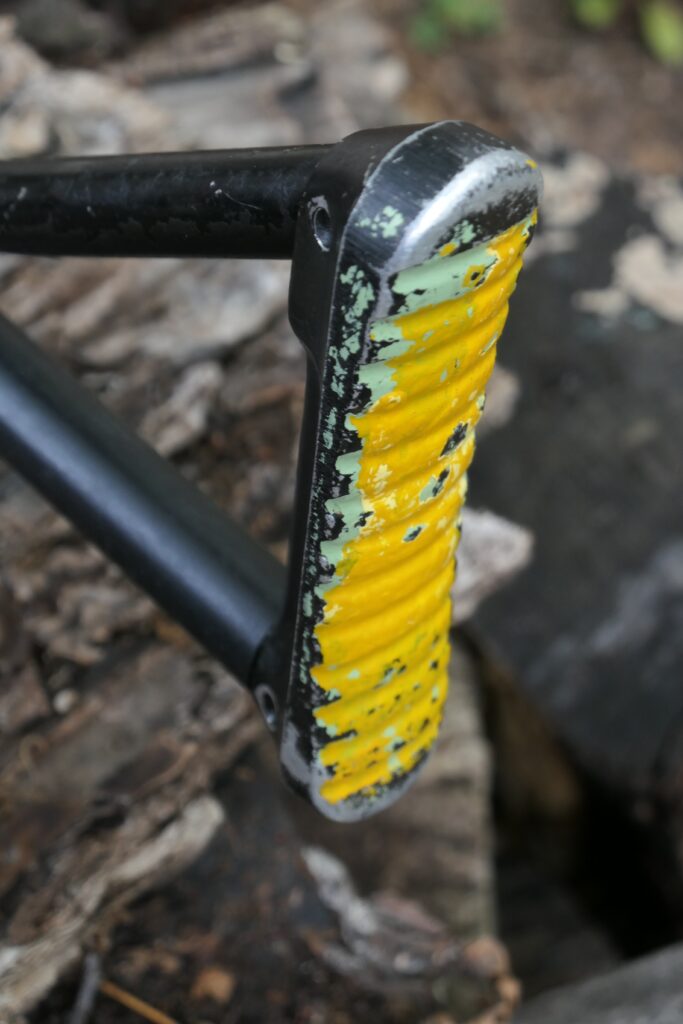
The buttstock made me groan. It had a giant splash of yellow paint on the very butt of the stock for some reason. The color was hideous, the horizontal tube had a few small nicks, and the finish was a bit more beat up than I preferred so decided I would swap it out for one in better shape from a SAR kit I had.
I am sure there is some meaning behind these colors but … yuck.
The rifle did come with an ARM bipod but it had a bunch of rust in the mechanism. It worked but definitely need cleaning and refinishing.
The Classic Firearms listing is straight up and honest – they bought a bunch of the detachable ARM bipods in the surplus market that were in good shape but not great. Mine had most of the finish gone from the legs and some rusting in the mechanism but it was fully operational. It would be an easy refinishing job some day when I have time. The ARM already weighs quite a bit empty so having a bipod installed was not on my high priority list *but* I did want a bipod to be complete.
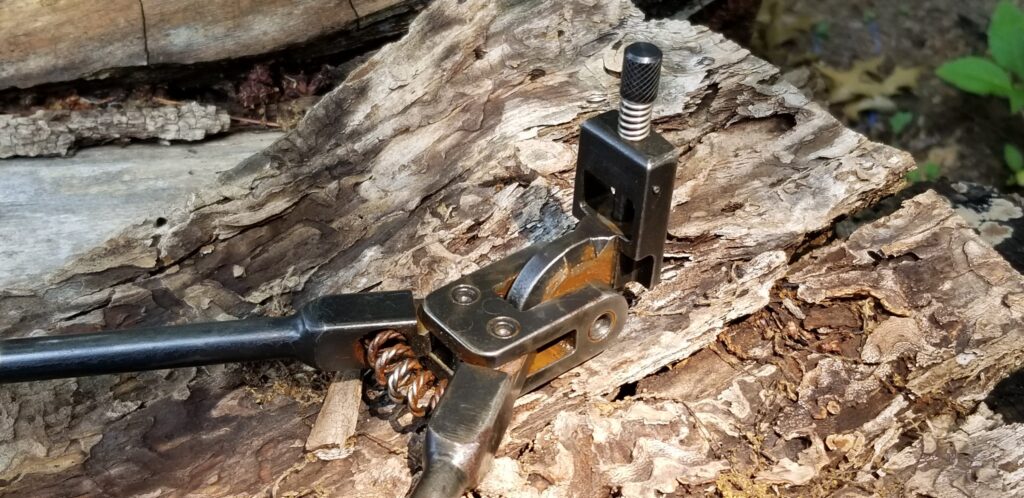
The handguard was way, way to loose. This was pointed out in the ad so I expected some – but not what I felt. I don’t like it when they shake and rattle so that needed to be tightened up. The wood was in good shape though and I really liked the coloring.
Note how the rear forged retainer is canted with the top forward. There are two coil tensioning springs – one on each side – of the bottom. Because the handguard was so loose, they were causing the retainer to cant. Definitely fixable.
The barrel looked good – it was not bent and the components were installed right — other than the notch for the handguard not being close enough as mentioned previously. The bore was also nice and shiney with nice sharp rifling.
The barrel looked good inside and out. I was happy that they picked a 1:9 twist rate as I tend to shoot M855 62 grain ammo the most.
The top cover is still driving me nuts when it comes to installation. It is a delicate balancing act to get the recoil spring assembly to stay in the receiver groove and go into the dust cover vs. going out of the groove and falling into the receiver. I have some Galil receiver stubs and I want to see if the receiver that JRA used is too short or if the IMI suffered from the same headache. I haven’t decided yet if I just want to live with it or cut the tab down about 1/8th-3/16th of an inch shorter, cut new grooves in it and the refinish the whole rod assembly.
Getting the recoil rod to stay in the right place and pop out of the dust cover during assembly is more of adventure than I care for. Honestly, that tab/button does not need to stick out that far sheesh.
Happily the rifle was properly headspaced and it fed rounds nicely. For a kit built rifle, it cycled and the FCG operated smoothly – surprisingly smoothly. Okay, it looked like I had a solid foundation to build on. So far, so good.
At this point, I knew I was going to keep it so it was time to start making changes. I put the rifle back together and started thinking about what I was going to do. I’ll detail what I did in subsequent posts.
Note, I have to buy all of my parts – nothing here was paid for by sponsors, etc. I do make a small amount if you click on an ad and buy something but that is it. You’re getting my real opinion on stuff.
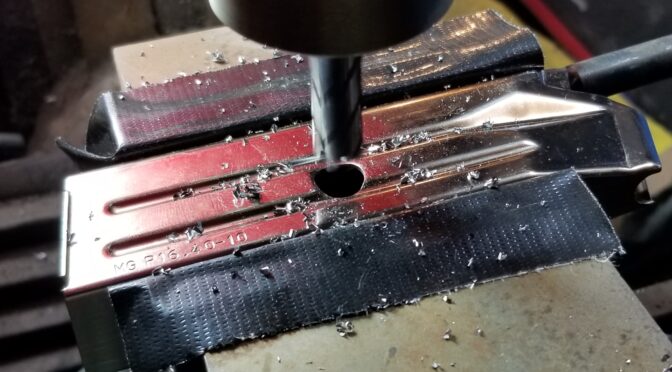
Hi folks, I’ve been doing plunge cuts on Mec-Gar magazine tubes to remove an indent they have to limit rounds. Mec-Gar magzines are high quality and the tubes are hardened high carbon steel. I dulled two uncoated carbide bits that I had bought from either MSC or McMaster before I decided I better try something else.
A quick safety note: For readers unfamiliar with machining, this is an end mill meant to be used in a millling machine in this case. Carbide is interesting in that it is very wear resistant but it is also very brittle. Because of this, the workpiece you are cutting must be very rigidly held in place or the vibrations will tear up the mill and potentially send pieces of carbide flying at you. So, #1 – wear safety glasses. #2 – only do this type of work with a mill. #3 – to be explicit, I would not recommend doing this in a drill press. End of safety brief .
I suspected part of my problem was the heat being generated and adding cutting fluid made for a messy clean up that took longer than I wanted. This made me start researching coated carbide end mills and they get pricey fast.
I decided to check out Amazon because it was a Friday night and I really needed to get some center cutting end mills in ASAP to keep producing magazines.
I ran across a listing a listing for “Speed Tiger ISE Carbide Square End Mills” and started reading. It has an Aluminum Titanium Boron Nitride (AlTiBn) coating that they claimed improved wear resistance and provided better heat resistance as well. Given the number of good reviews they had,I ordered in three to give them a try.
Well, guess what? I am still using my first end mill after 60+ plunge cuts into approximately 18 gauge hardened hgh carbon sheet metal with no lubricant. Make all the jokes you want about dry cutting but it is saving me a bunch of clean up time.
I plan to keep using the first bit and still have two in reserve. Given the very deceent price to performance ratio,I thought I would pass along the report. The following has links to a number of Speed Tiger’s products:
I hope this helps you out.
Note, I have to buy all of my parts – nothing here was paid for by sponsors, etc. I do make a small amount if you click on an ad and buy something but that is it. You’re getting my real opinion on stuff.
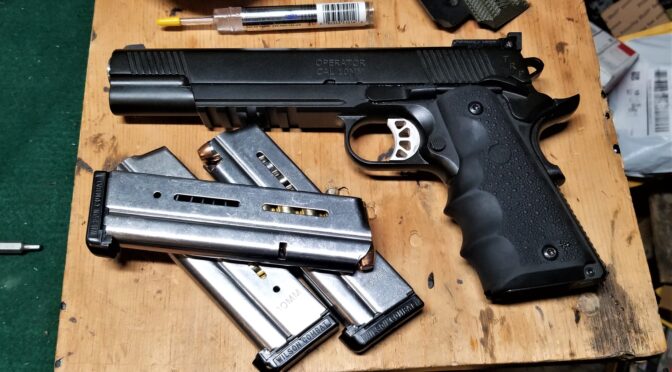
H folks – I’ve had a few questions come in about my Springfield Armory TRP Operator 10mm 6″ pistol. I answered the emails but figured a blog post might help others out so I am going to list the question and my answer to each.
Was it reliable out of the box?
The short answer is “no” and for the price you’d expect better reliability out of the box. This is my third 6″ 10mm 1911 style pistol – I had a Rock Island Big Rock (their Tac Ultra (arguably a 2011-style given the double stack magazine) and a Dan Wesson Bruin. Only the Bruin was flawless in terms of operation out of the box. I wish I hadn’t sold it actually.
I am to the point in life where I trust nothing out of the box and have found that ammo, lubrication, magazines, and design factors all can impact reliability. The TRP Operator had issues until I sent it back to Springfield Armory for repair – the slide was randomly locking open so they replaced that and I also noticed the magazine release button was far stiffer. I’d heard that they go over the pistols carefully when they go back for repair and I guess they do. I lubricated it carefully, took it to the range and only then did it run without any surprises. It does run very well now.
At any rate, I learned from my friend Scott Igert what I needed to do to improve chambering for the Big Rock and wrote a blog post about it. I did the same to the TRP and it did solve the chambering problem. I did a blog post on that too.
It does beg the question why did I need to do this in the first place – the TRP wasn’t reliable with any model of mag I had or any type of ammo including FMJ. What it tells me is that they really didn’t put a lot of care into assembly. It also reinforces that you should never trust a pistol out of the box for something critical – hunting or defense – ever.
Note, I am to the point where I also immediately replace the mags of 1911s which leads us to the next point.
What magazines do you run?
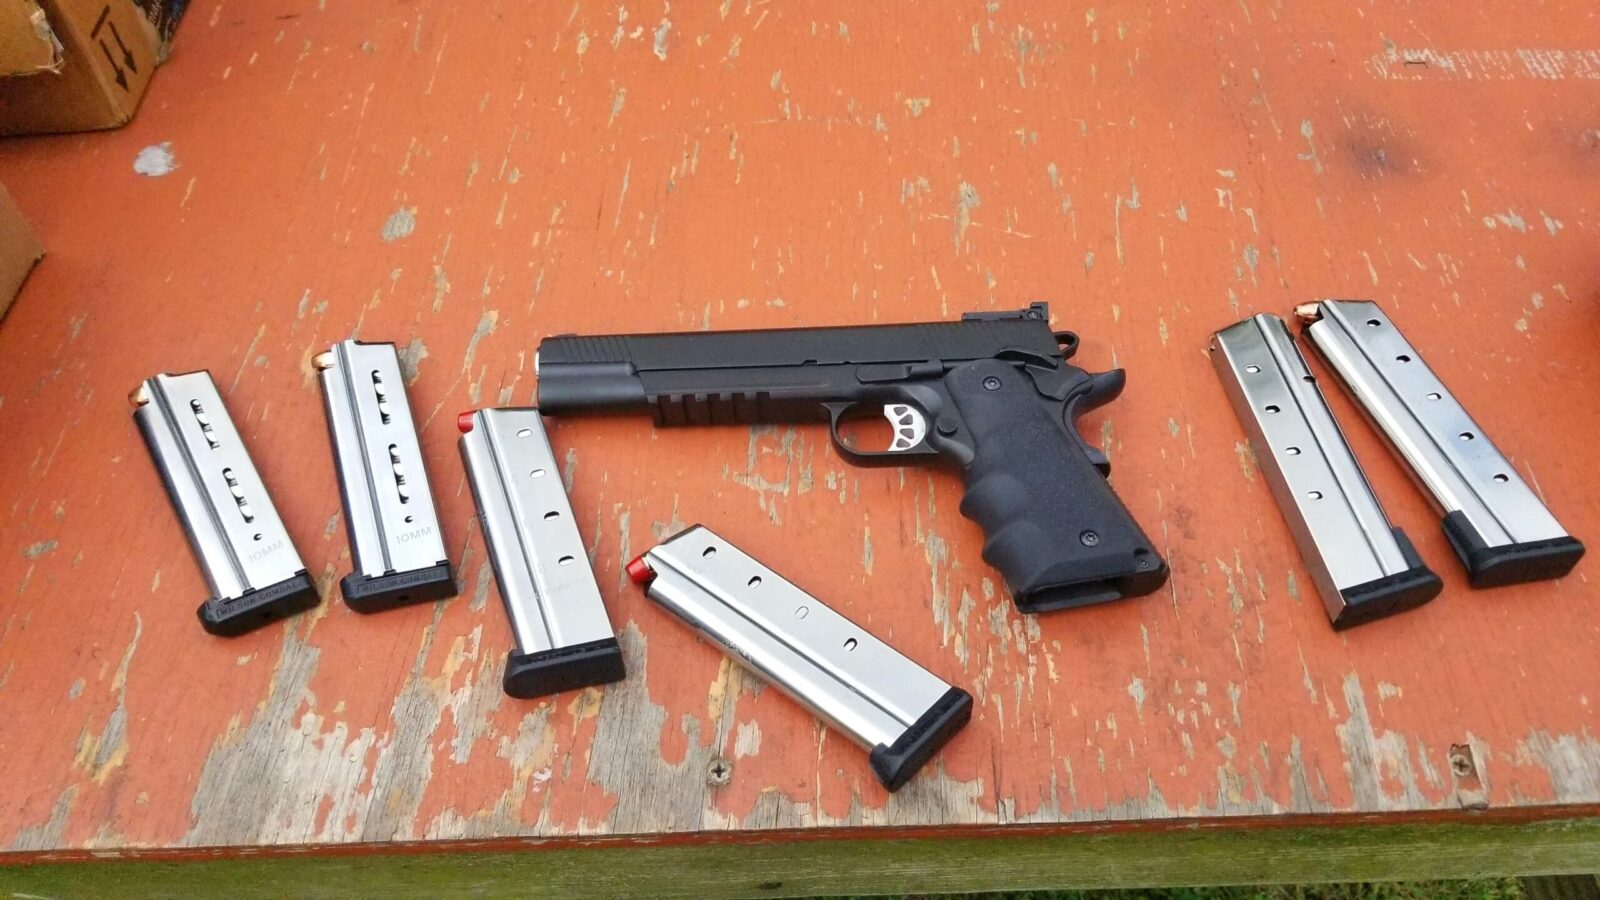
I’ve had so many feed problems caused by 1911 magazines over the years that I always replace the mags that come with the pistol with Wilsons or Tripp Research Cobras. I did not have magazine related problems with the 8 round magazines.
Guys ask this quite a bit. My go-to ammo maker for 10mm is Underwood. They have a number of offerings and a great reputation. So, I have a number of HP and hard cast rounds from them and they all work just fine. For range ammo, I use 180gr S&B FMJ and it all works fine,
I simply can’t afford to buy a ton of brands and types of ammo to test – the above is just my experience.
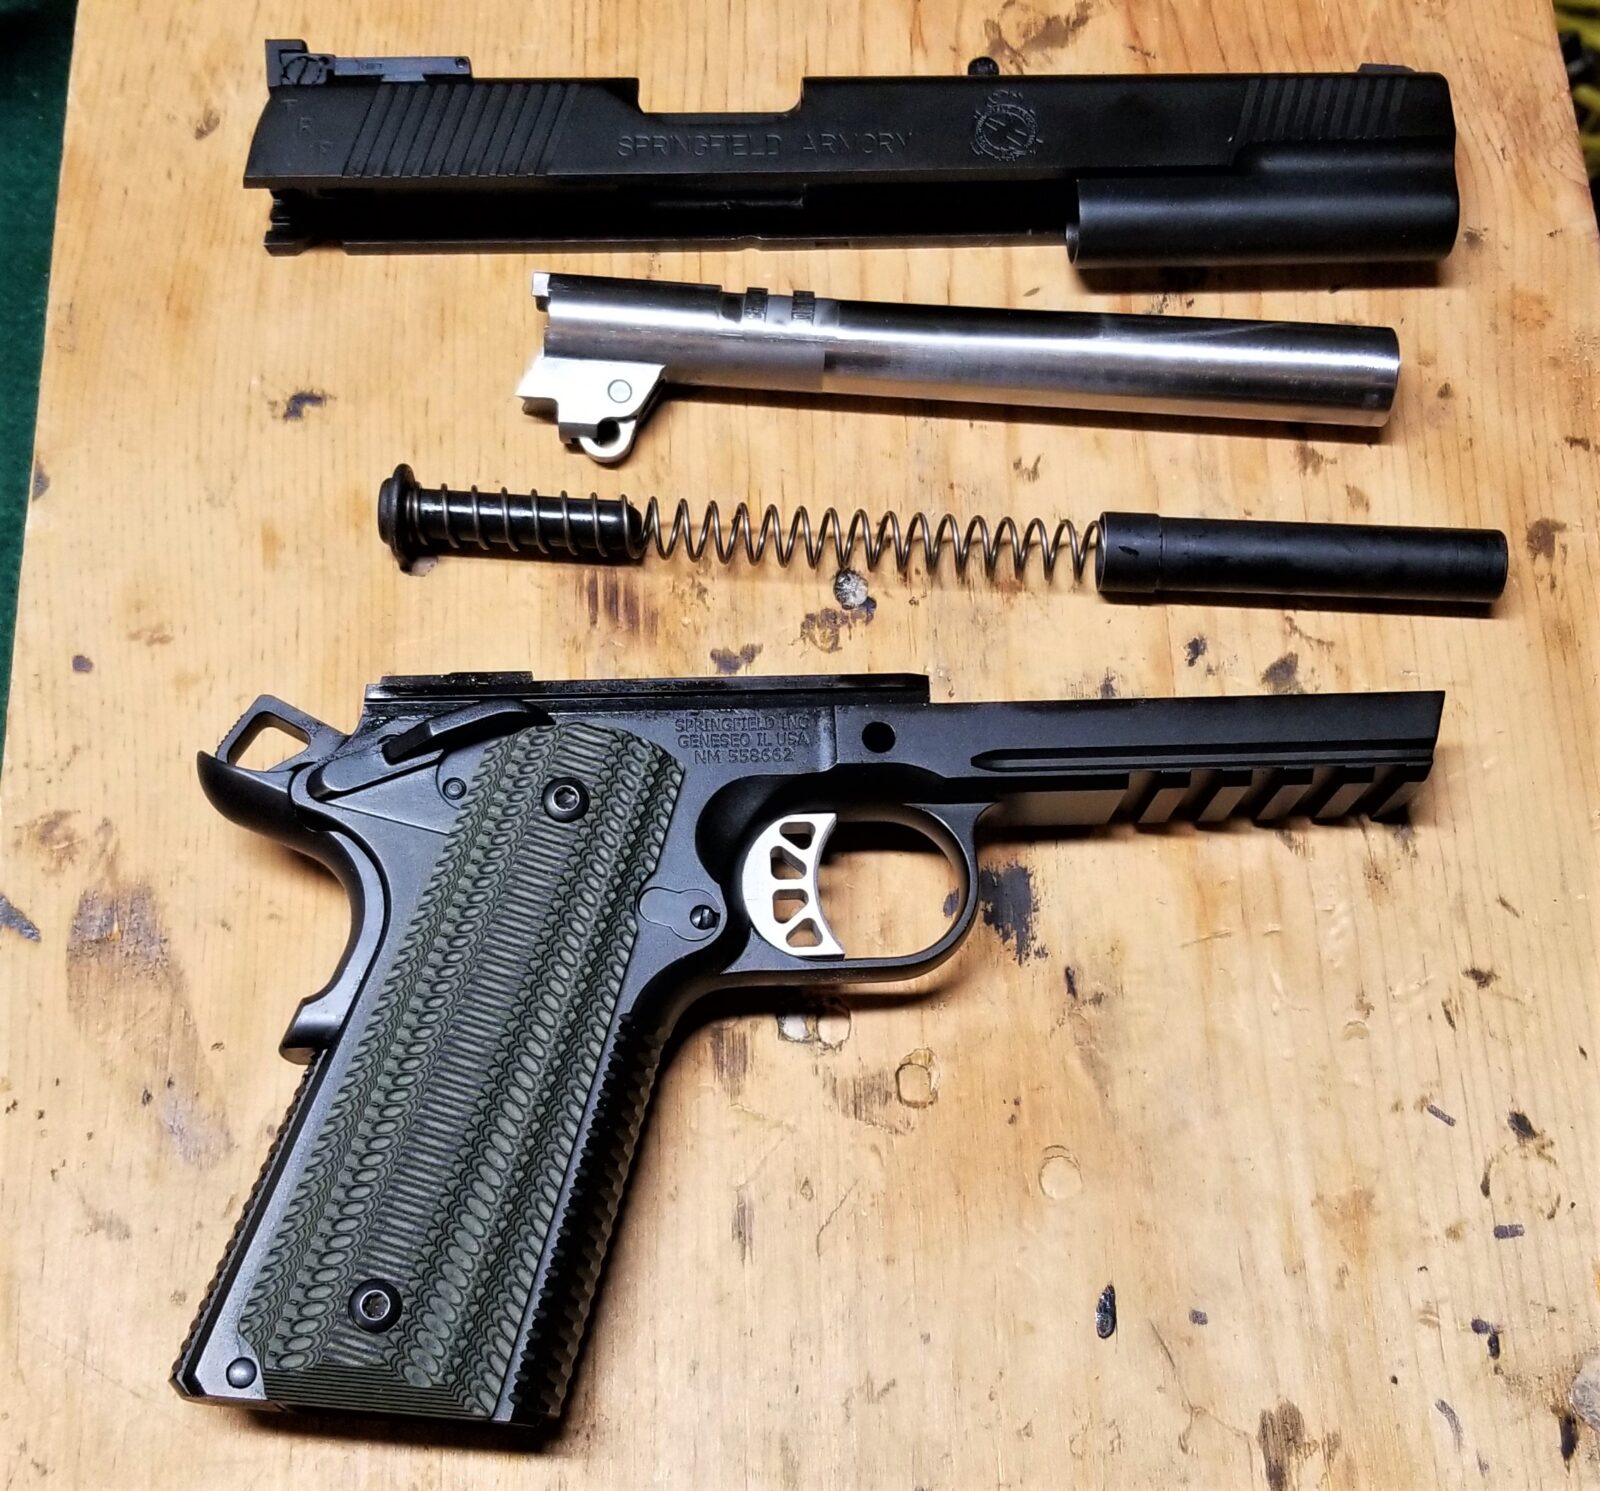
Does it use a barrel bushing like a traditional 1911?
In short, no it does not. A match bull barrel is fitted to the slide.
There is no barrel bushing like a traditional 1911 uses. The bull barrel fits directly into the slide. The three piece operating rod and free spring make re-assembly a challenge at first but you get used to it after a while.
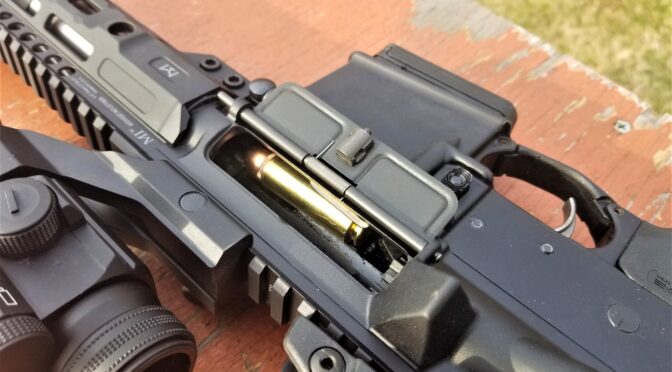
Does it use a captured recoil spring?
No, it uses a unique setup of a rod, spring and end cap (see the above photo) that fit together but are not held together in any way. I’ve not seen this setup before and while it makes re-assembly a different experience, it does work and I am used to it now. I would gladly have replaced it with a captured model but I was unable to find anyone who makes one for the 6″ TRP.
Is the 6″ model worth it vs the 5″ model?
I’m to the point that a 6″ pistol really is for hunting and I’d prefer shorter for easier carrying. The weight and balance of a 6″ 1911-style pistol, including the TRP, really soaks up the recoil of the 10mm and makes it easy to shoot – even heavy loads. I really like the 10mm cartridge and think I will get either a 4.25″ or 5″ 1911 model in the future. I may just get a Rock Island and plan on tuning it up out of the box – they are good base pistols in my honest opinion.
I do have a custom shoulder holster from Tucker Custom Gunleather that is a work of art but your’s truly who stands 5′ 8″ is maybe 2-3″ too short to pull it off comfortably. I’d go with a 5″ or even a commander next time if I wanted it for EDC. I have a Blackhawk Spec Ops chest holster that works great for the TRP for field use.
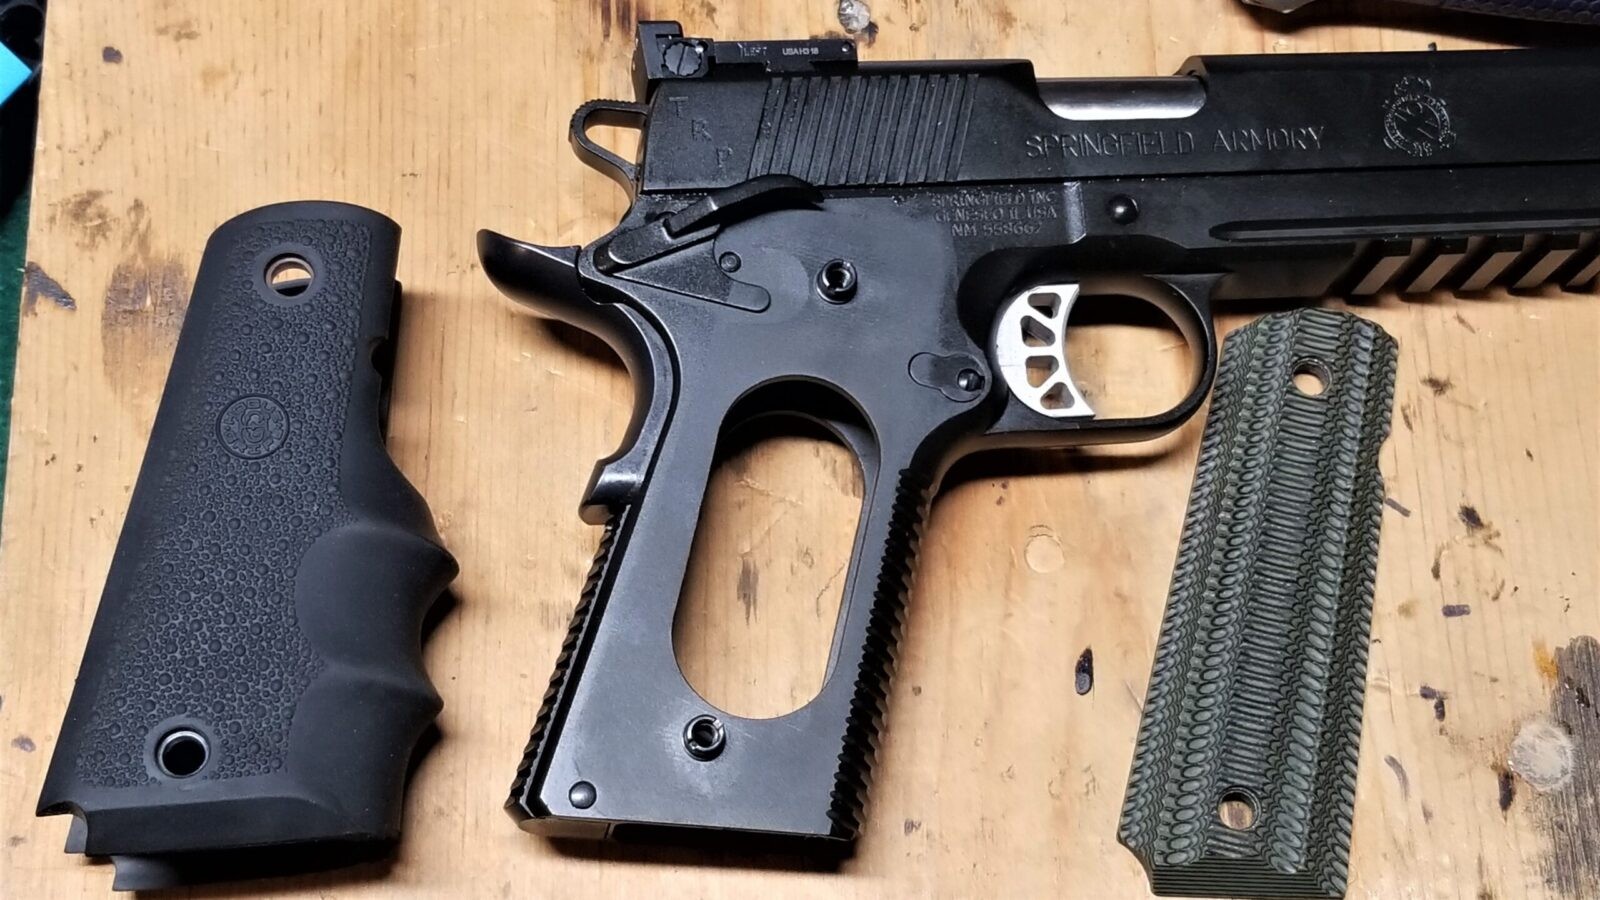
Why did you replace the grips?
The short answer is that I have carpal tunnel and rubber grips are way easier on my hands.
I find Hogue wrap around grips really help my hands.
Do you like your TRP Operator and would you recommend it?
This is a weird question for me to answer. The reliability sucked out of the box and really disappointed me – especially given the cost. It runs great now though and I think I am to the point that I trust it. I only have maybe 100 rounds through it since it came back from Springfield Armory to fix the random slide locking open issue and want to get 100-200 more through it before I decide for sure.
After I did my tuning and SA did the slide lock repair, the pistol ran great. It also needed lubrication when it came back from repair but during the last range trip it worked great with all the magazines I bought and types of ammo including FMJ and HPs.
I will say that Springfield Armory’s customer service was good but the repair turnaround was slow due to all of the pandemic buying – I sent it in for repair in late June or early July and got it back in about six weeks. No telling how long it would be now if someone needed to send in their pistol. I always have a “can I trust this now” thing going on in my head when a pistol comes back from repair.
So I am thinking as I write this. I guess I would say the TRP Operator is a decent pistol but it does not wow me – especially for the cost and what I needed to do. If you buy one, I would absolutely recommend you test the hell out of it before relying on it. That’s a recommendation I would make regardless of weapon to be fair. In conclusion, I do think it is reliable now and may very well keep it – we’ll see how it performs over time.
Note, I have to buy all of my parts – nothing here was paid for by sponsors, etc. I do make a small amount if you click on an ad and buy something but that is it. You’re getting my real opinion on stuff.
Okay, so the last range trip went a lot better. The new Lancer L5AWM mags with Tromix followers worked great. The reliability on the pistol was coming along but not where I wanted it and the rifle was disappointing still but I knew what was going on.
7.5″ Beowulf Buffer Spring
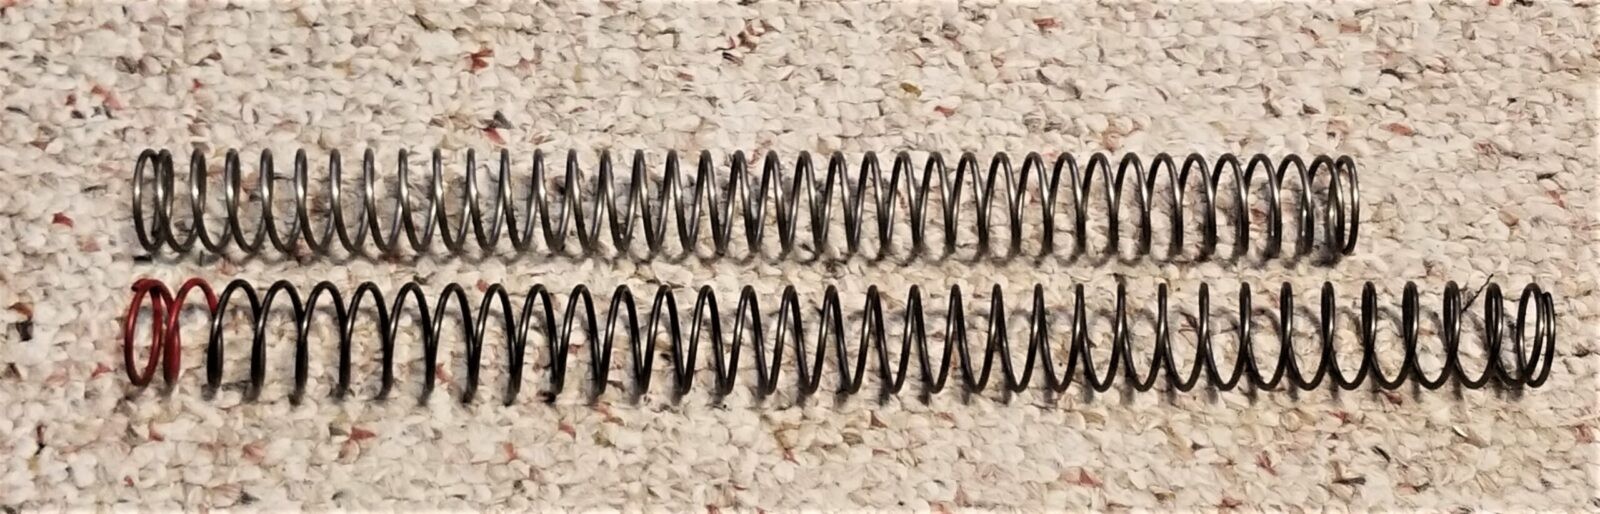
My 7.5″ Beowulf pistol is running pretty well but I wanted to increase the forward force of the bolt carrier to strip the next round and chamber it. I was already running an H2 buffer but an other wise normal carbine spring. I upped my game to a Sprinco Red Extra Power Carbine buffer spring that they say is made with the “thumper” cartridges such as the .458 SOCOM, .450 Bushmaster, .50 Beowulf. I bought mine from Primary Arms.
The Mil-Spec Carbine Buffer Spring is on top. The Extra Power spring is on the bottom with one end painted red. That’s handy for knowing what spring is in the weapon at a glance.
I cleaned the pistol, lubed everything and installed the extra power spring and the H2 buffer that was in there. It definitely slammed home harder when I released the bolt.
When we go to the range next, I’ll be taking a standard carbine spring, an enhanced Sprinco spring and the carbine already has the extra power spring already installed. I’m also taking standard, H2 and H3 buffers with me.
Changed the Spring and the Buffer on my Full Size Beowulf Rifle
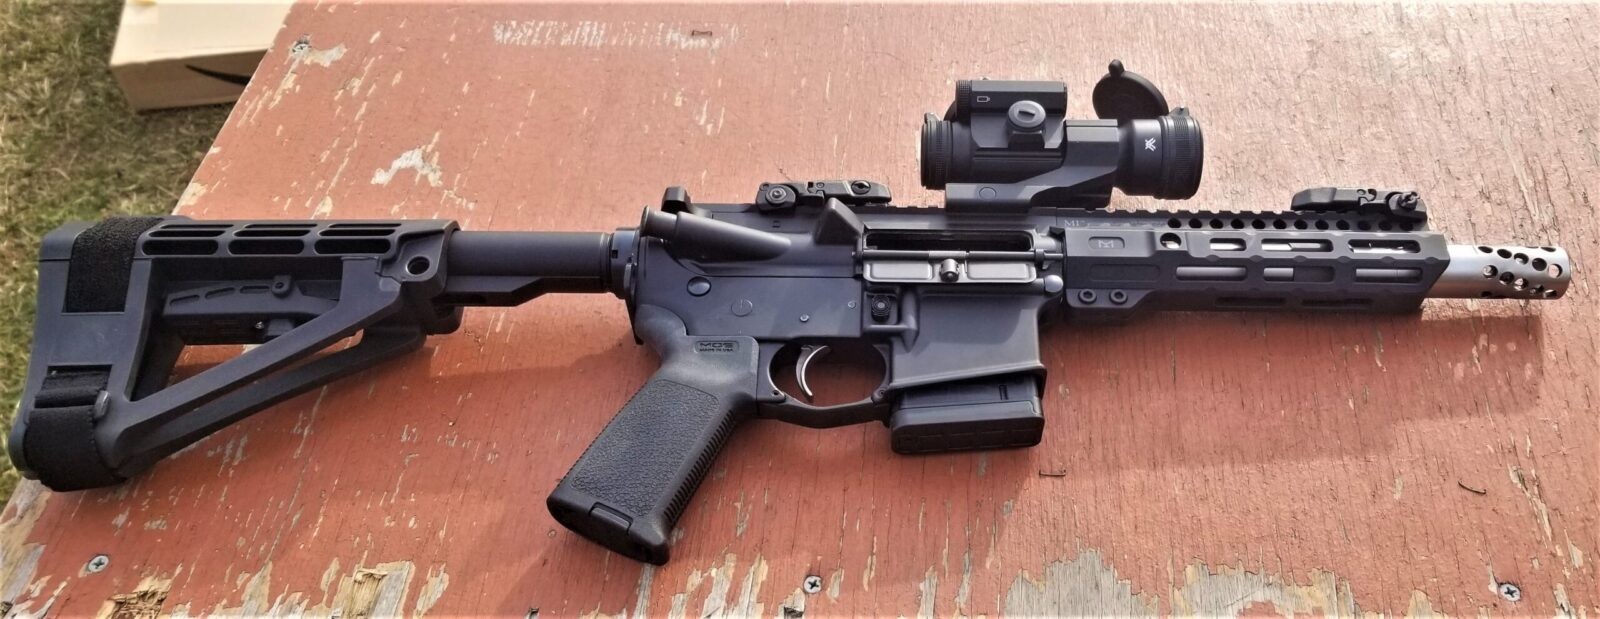
This rifle was built using an Alexander Arms DIY upper.
When we were shooting this, it had a hard time stripping the next round and chambering it. It dawned on me that they hydraulic buffer that I originally used wasn’t driving the bolt carrier forward hard enough. You see, a Hydraulic buffer has a piston inside that has a controlled leak down rate and, for whatever reason, it was dampening the stripping of the next round properly.
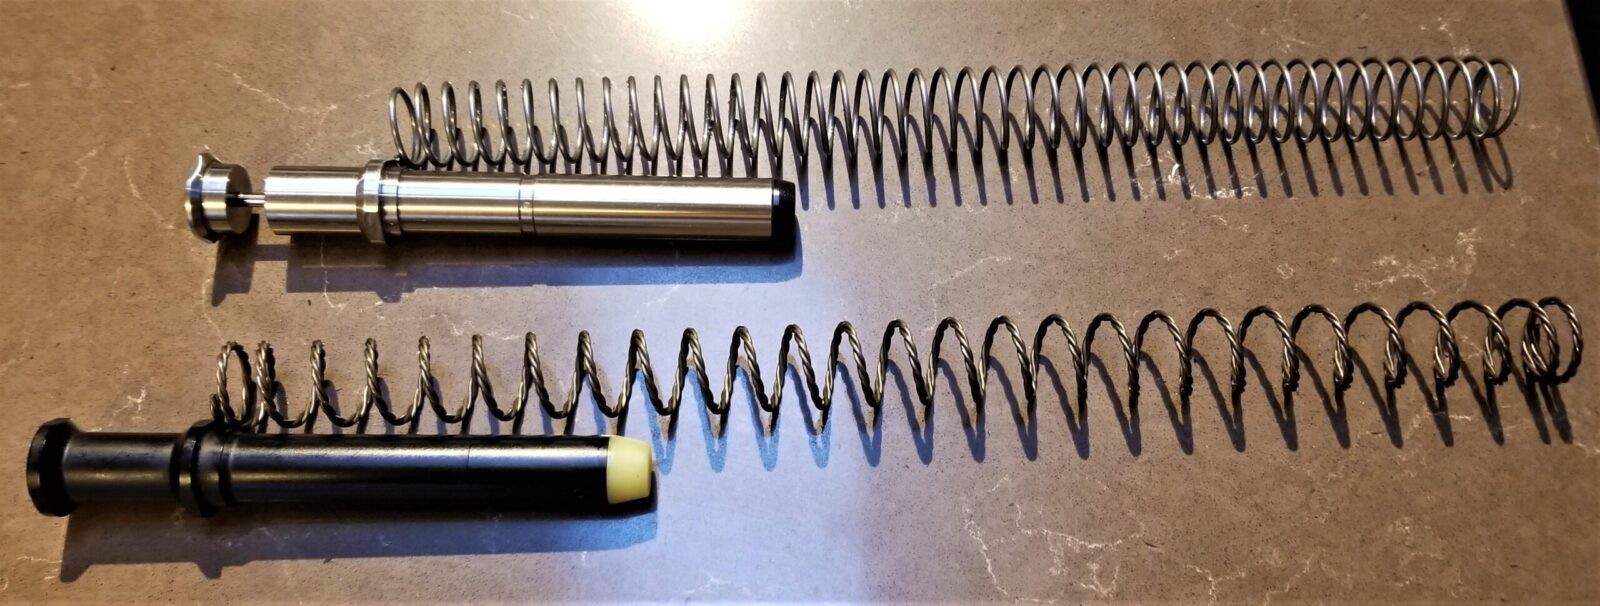
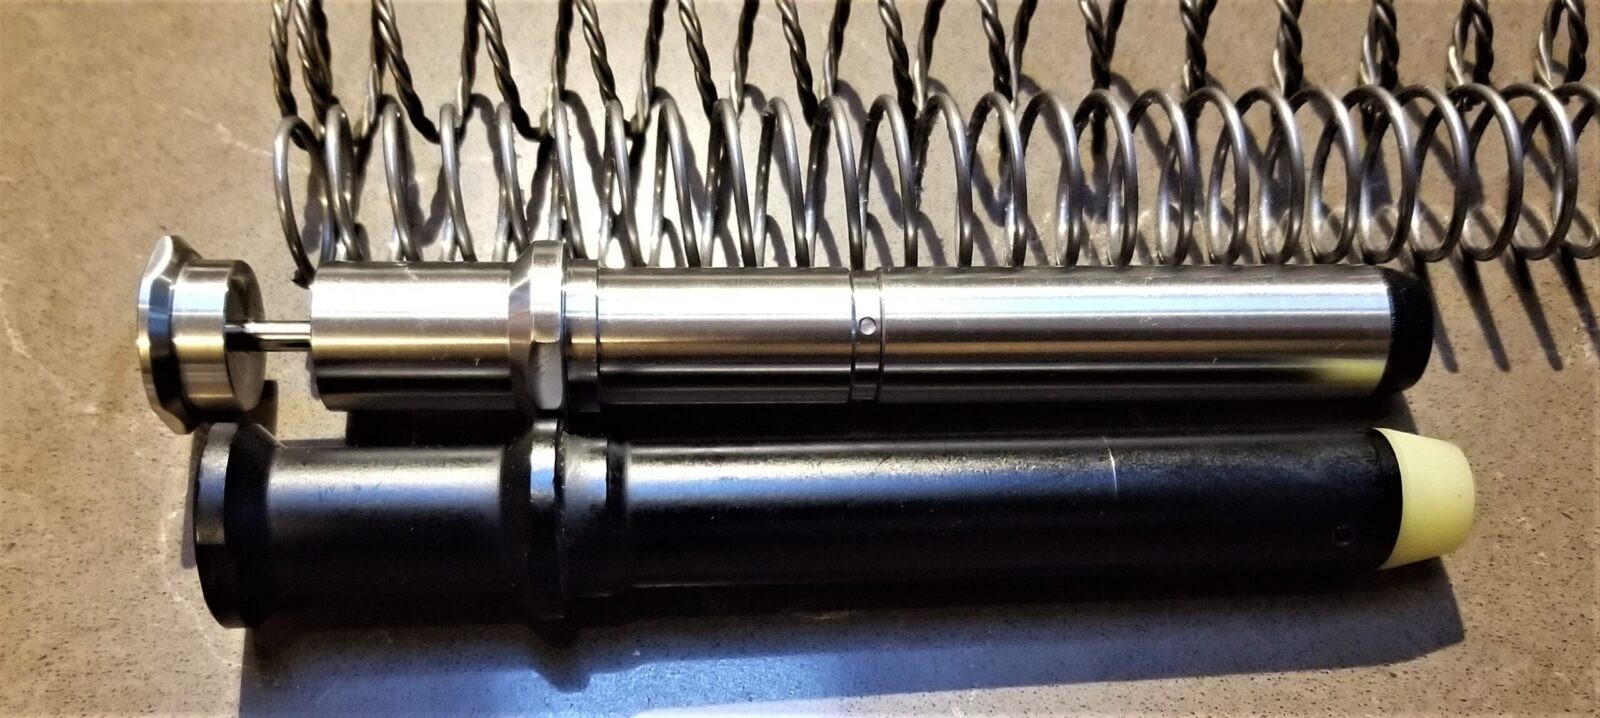
Top: KynSHOT hydraulic buffer and Mil-Spec rifle-length buffer spring. Bottom: Expo Arms 5.4oz buffer and Geiselle Super 42 Rifle-length buffer spring
The Kynshot buffer is very nicely made but I don’t think it’s the best choice for this application. I will save it for future projects.
When I cleaned the rifle prior to installing the new spring and buffer, the one surprising thing I found was that it was fairly dry. Why? I have no idea and this would have impacted functionality at the range also as I assumed I’d lubed it already before putting it away. Yet another example of my memory not being what it used to be.
Given that surprise, I went through and applied Super Lube oil and grease before installing the new Geiselle spring and Expo buffer. Afterwards, the action slammed home very easily.
I will take the hydraulic buffer with me back to the range for testing but am somewhat skeptical of it right now. The rifle is set for the next range visit at this point. Another Mil-Spec spring and buffer will be in the bag as well.
Conclusion
We have a ton of snow right now and I’ll have to wait to test my hypotheses. I expect that with the above changes, the two Beowulfs will run very well now.
I hope this helps you out!
Note, I have to buy all of my parts – nothing here was paid for by sponsors, etc. I do make a small amount if you click on an ad and buy something but that is it. You’re getting my real opinion on stuff.