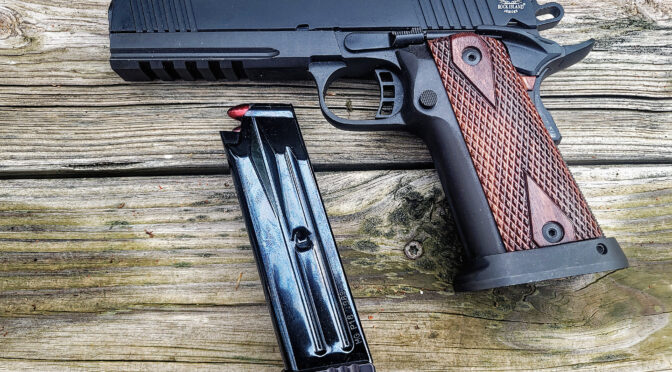
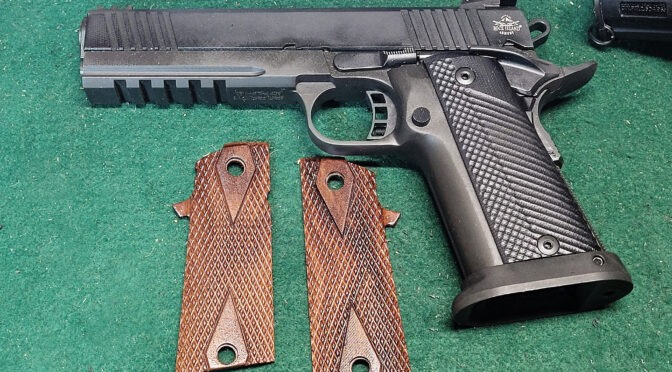
I sent out an email newsletter the other day with a photo of my RIA 51679 Tac Ultra in 9mm with wood grips. I also mentioned they are the only wood grips I have ever liked and was being honest. What surprised me was the number of people who emailed me asking if I had more photos and I do.
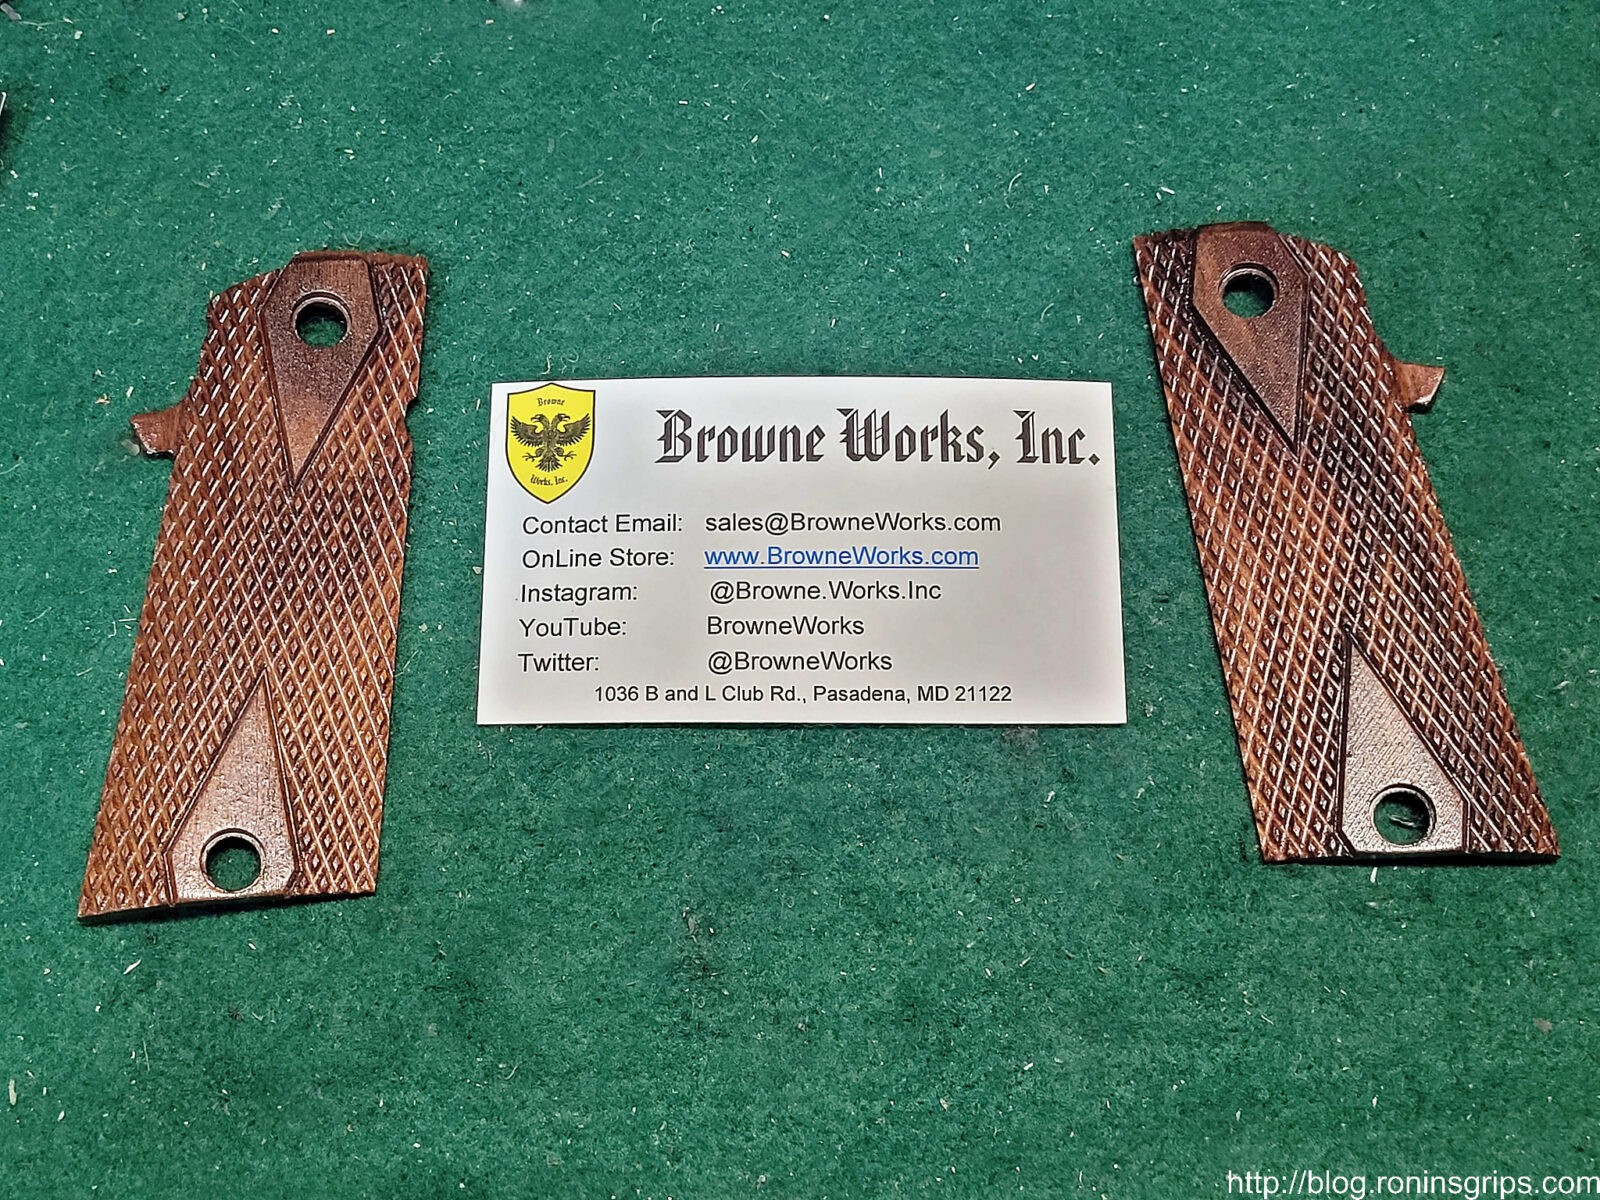
Mark Browne is the owner of Browne Works, Inc., located in Pasadena, MD, southeast of Baltimore. He has a wide variety of offerings for the Ultra and Tac Ultra both FS and MS models. He also has them for the A2 HC (like I needed) plus the BBR. The pricing is very reasonable also and he has a variety of materials you can choose from – click here for his website. If you want more info, I did a blog post about them a while back so click here for that to open in a new tab.
Note, I have to buy all of my parts – nothing here was paid for by sponsors, etc. I do make a small amount if you click on an ad and buy something but that is it. You’re getting my real opinion on stuff.
One of the things I enjoy about the firearm industry is meeting neat people. Dan Barnett contacted me a few weeks back. He is a certified “polymer” pistol armorer and had recently got into 1911s. As part of the journey, he purchased a used Rock Island Armory 51679 Tac Ultra FS HC 9mm and was trying to sort out why it was failing to eject way more than he cared for and he would have an empty case and a round trying to be fed in the slide at the same time. He and I hit it off because we both like the soft shooting Rocks.
Dan’s 51679 Tac Ultra
Because of my past experiences with RIA Tac Ultra 9mm extractors failing, I asked him how his looked and he told me that it looked nice and sharp – no broken parts. I send him my blog post on extractors and recommended he switch his to a Wilson Combat if he ever runs into a problem or wants to make the upgrade anyways.
There was a possibility the extractor tension was too light but I figured we’d assume it was okay for the moment. Note, if you open a slide slowly and watch the cartridge or casing being extracted, the extractor should maintain control all the way to the ejector. If it doesn’t and the extractor looks ok then it is most likely the tension and there are specialty gauges out there for testing and setting them.
With the extractor tentatively ruled out, what I told him was that not many people understand how critical the magazine feed lips are to proper feeding and ejection of a 1911 and that his Tac Ultra was just that – an oversize 1911.
What can happen is that the front feed lip gap can be set too wide allowing the front of the cartridge to tilt up in the air too far. Then, as the newly extracted case comes backwards, the riding too high bullet pushes the spent case up just enough to miss the ejector. Honestly, there is a really delicate brilliant dance going on inside a 1911 and all it takes is something to be off just enough and things go wrong.
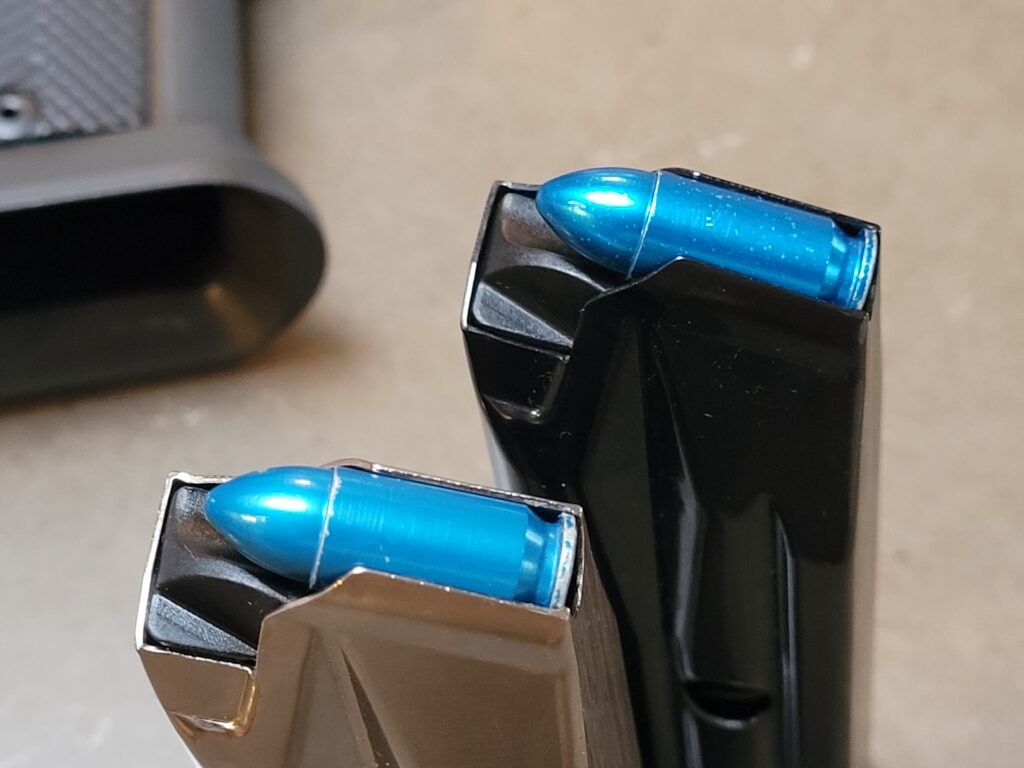
Dan took his calipers to the four mags he had and the front of the feed lips that can be adjusted were all over 0.320″ and I recommend starting somewhere between 0.308 to 0.312″. There isn’t a magic number due to all of the variables one can encounter. Too wide and it can cause a failure to eject or stove piping. You can even have rounds falling out of the mag. Too narrow and you have the cartridge moving straight ahead, smashing nose first into the feedramp and stopping / jamming right then and there.
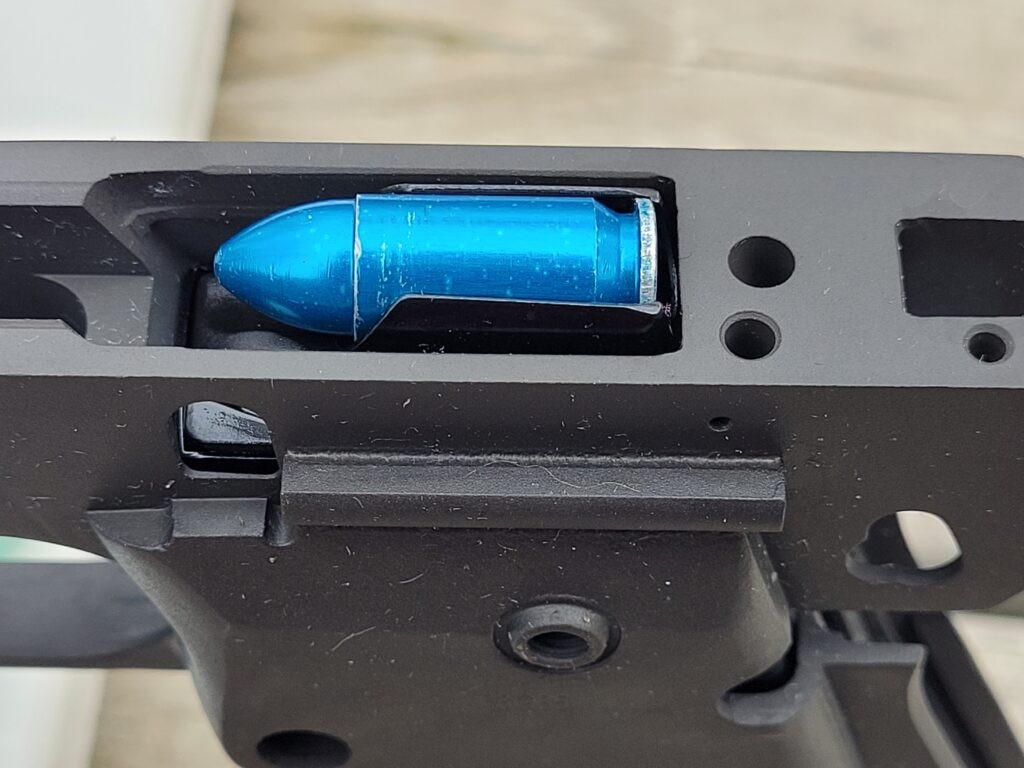
You can see the ejector is just above the rear rim of the dummy round and the round is angled up slightly. If that nose is up too much, it will nudge the extracting case high enough to miss or intermittently miss the extractor.
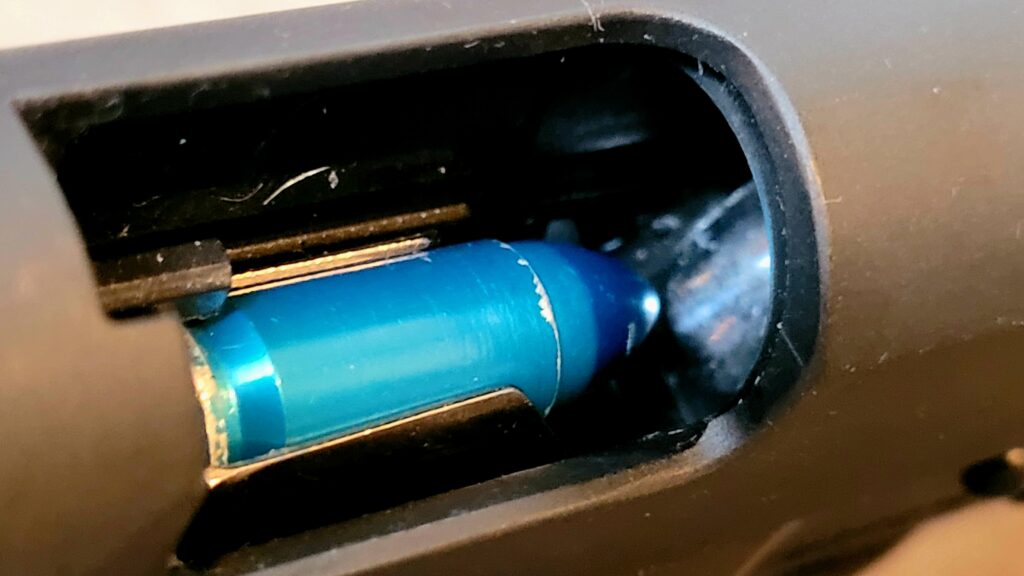
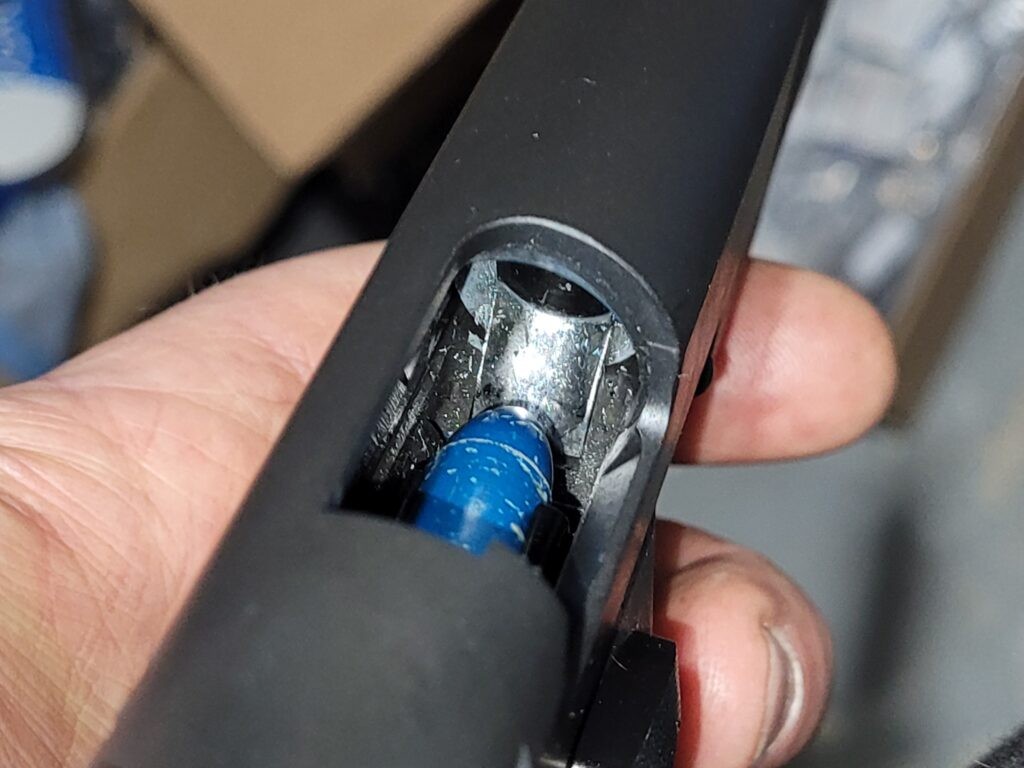
This is looking down at the face of the slide – what I want you to see is that there is nothing there to limit the round from working its way towards the top of the slide. The extractor has a firm grip on the rim of the case but that’s it.
Dan asked what he should do, I told him to disassemble the magazine and then carefully hold the magazine budy (the “tube”) on a table or better yet a piece of wood that lets the bottom lips dangle but supports the magazine all the upwards. Then lightly tap on each front side of the magazine to close the gap. Light tap left, light tap right, and measure. Repeat until it gets to the right gap – either via measurement or testing the mag with some dummy rounds.
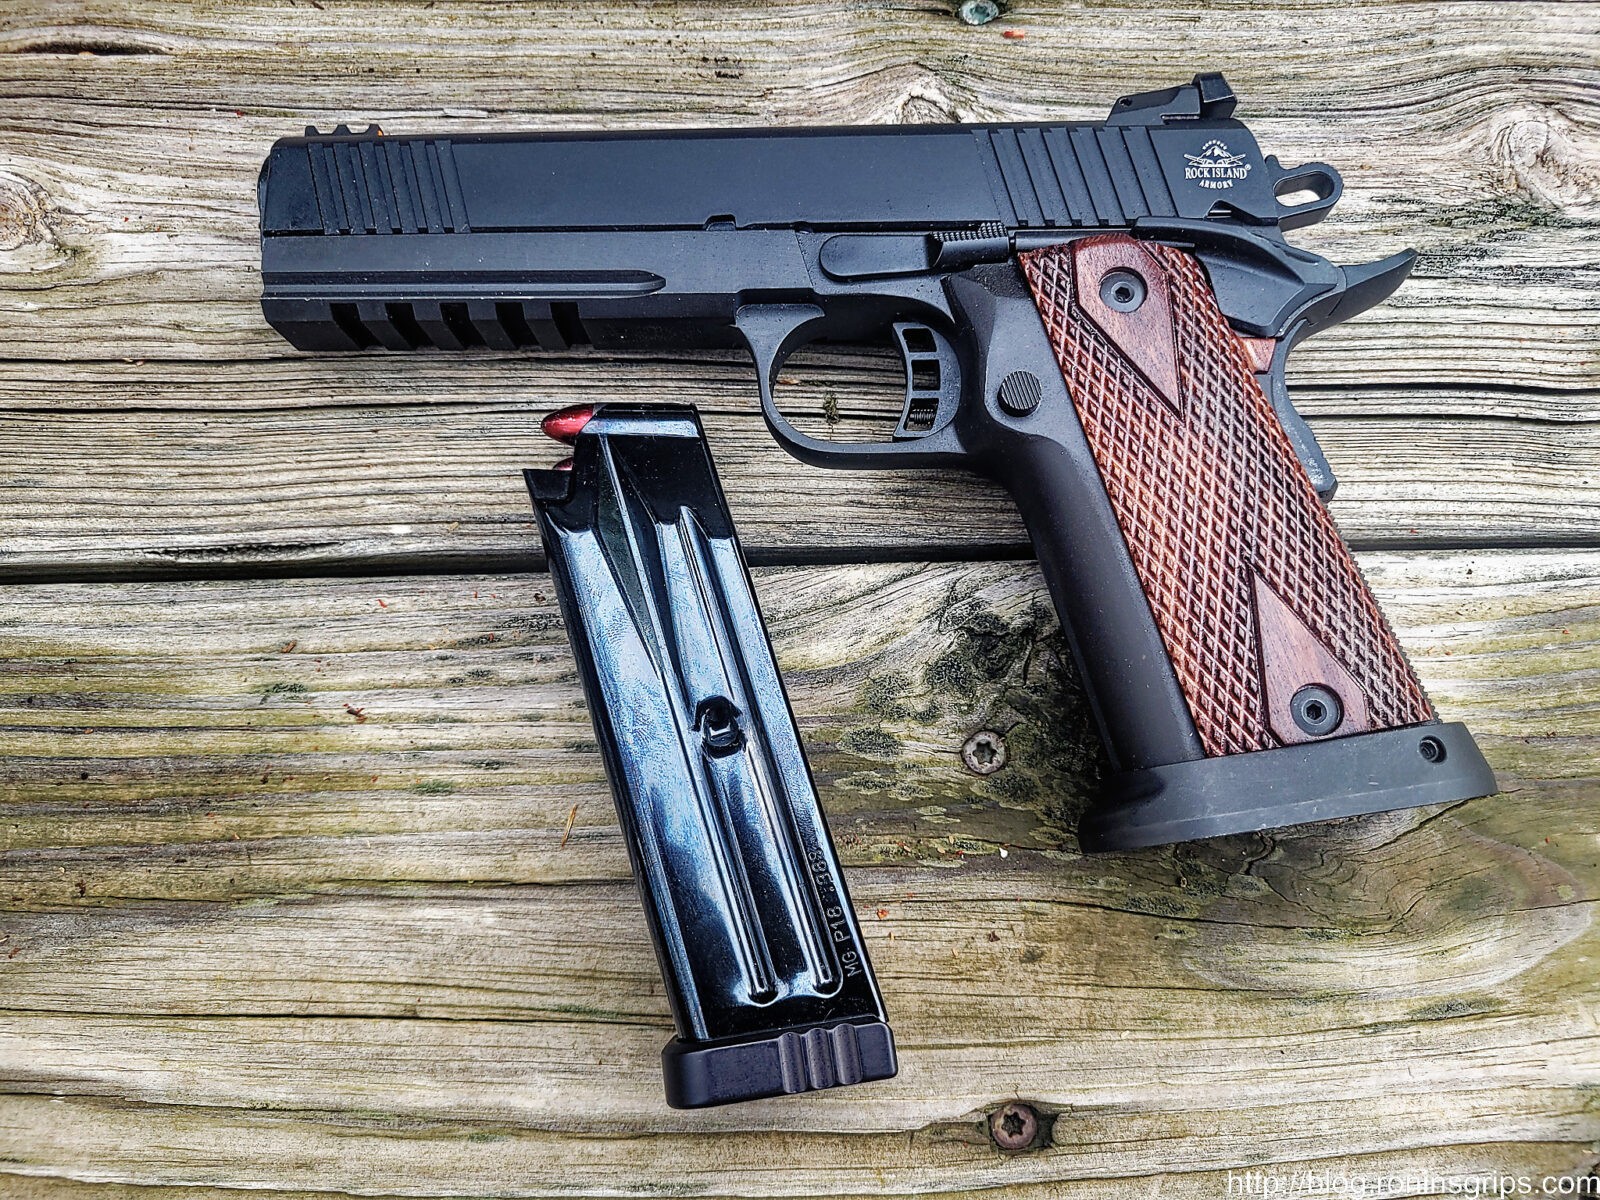
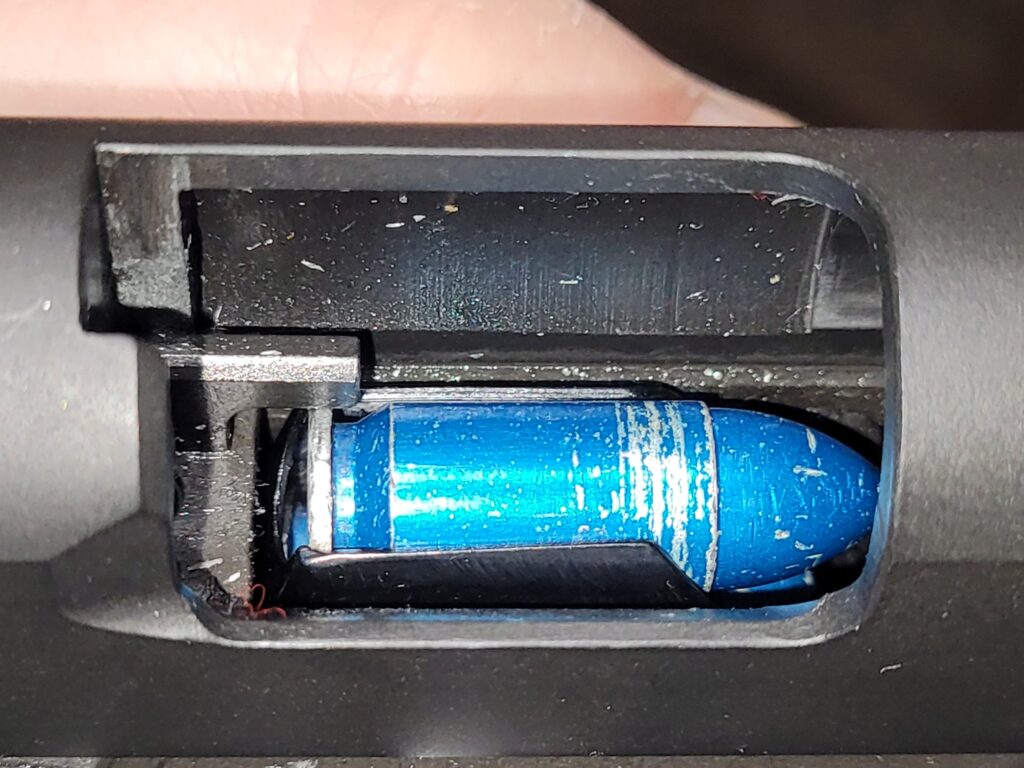
This is a Steelworx machined stainless steel 9mm dummy round and what I prefer to use these days for testing. I no longer use the blue A-Zoom snap caps as they are not dimensionally identical to a true 115 9mm FMJ round. To adjust the lips, disassemble the mag and then tap on the front of the feed lips only – in the case you can see they are tapered in and are closest to the red. You do not need to hit on the other parts. By tapping on the front the steel lip will gracefully bend in the direction you are tapping it.
Dan adjusted his gap to be around around 0.3095 by looking at where the bullet would hit the ramp/enter the chamber and testing . Your gap could be different from his.
By the way, the back of the magazine is fixed due to the folded metal ears that form the back of the lips. You can’t adjust them much at all or they will buckle or break. I leave them alone.
This tapping doesn’t take a ton of effort so use a light hammer and light taps – this is not a “mongo smash” moment because if you crush the neck of the mag, it’s game over unless you have a mandrel to open it back up. These days I use a light body hammer to do the work.
If you go too far and need to open the lips, use malleable chain pliers also known as chandelier or lamp chain pliers to open the lips back up. External snap ring pliers can also work but are not my first choice. The chain pliers distribute the pressure along a larger area of the lips vs. the relative point pressure of the snap ring pliers’ pins.
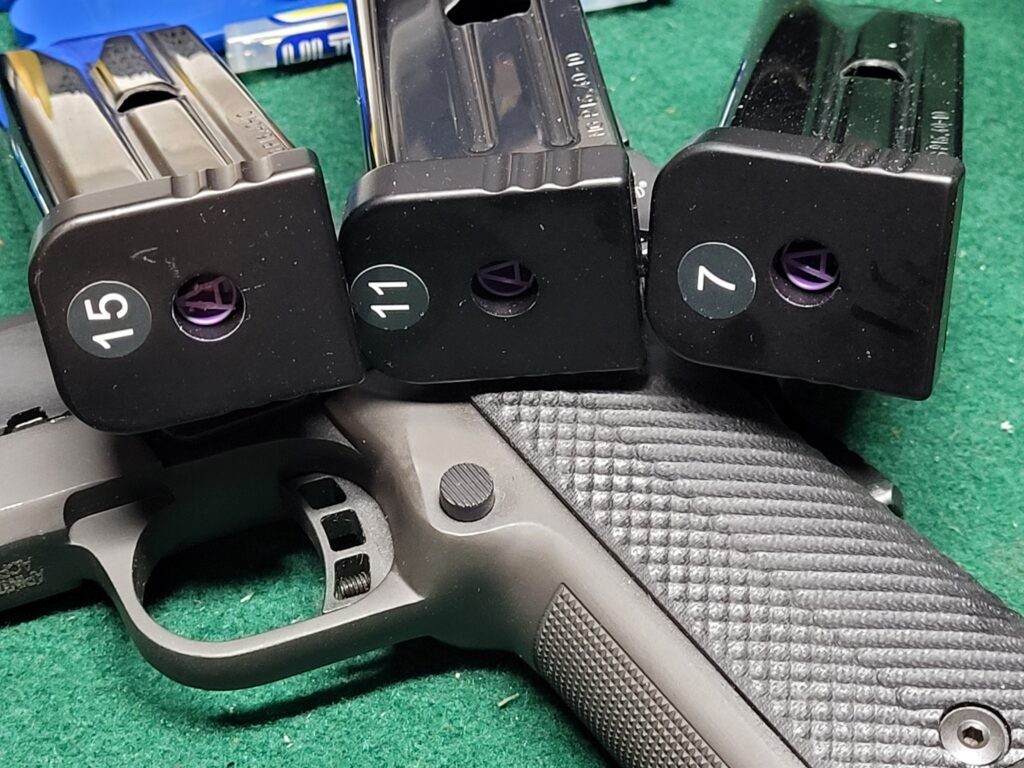
Feed lip gaps will change with use – this is not a one time exercise and why it is a good idea to number your mags. This way you can write down the setting for each magazine or know that when you get back front the range which magazine you need to take a look at.
How did the adjustments work out for Dan? He finished a 1,000 round tactical range session with zero malfunctions. I told him to have fun because there is always something to adjust or tinker with on a 1911 and I mean that in a good way.
In the first post, I told you about Stoner CNC for grips made from G10 composite, in the second I told you about a great option for wood – Browne Works and in this third post, we’ll cover a firm with a unique name and good grips.
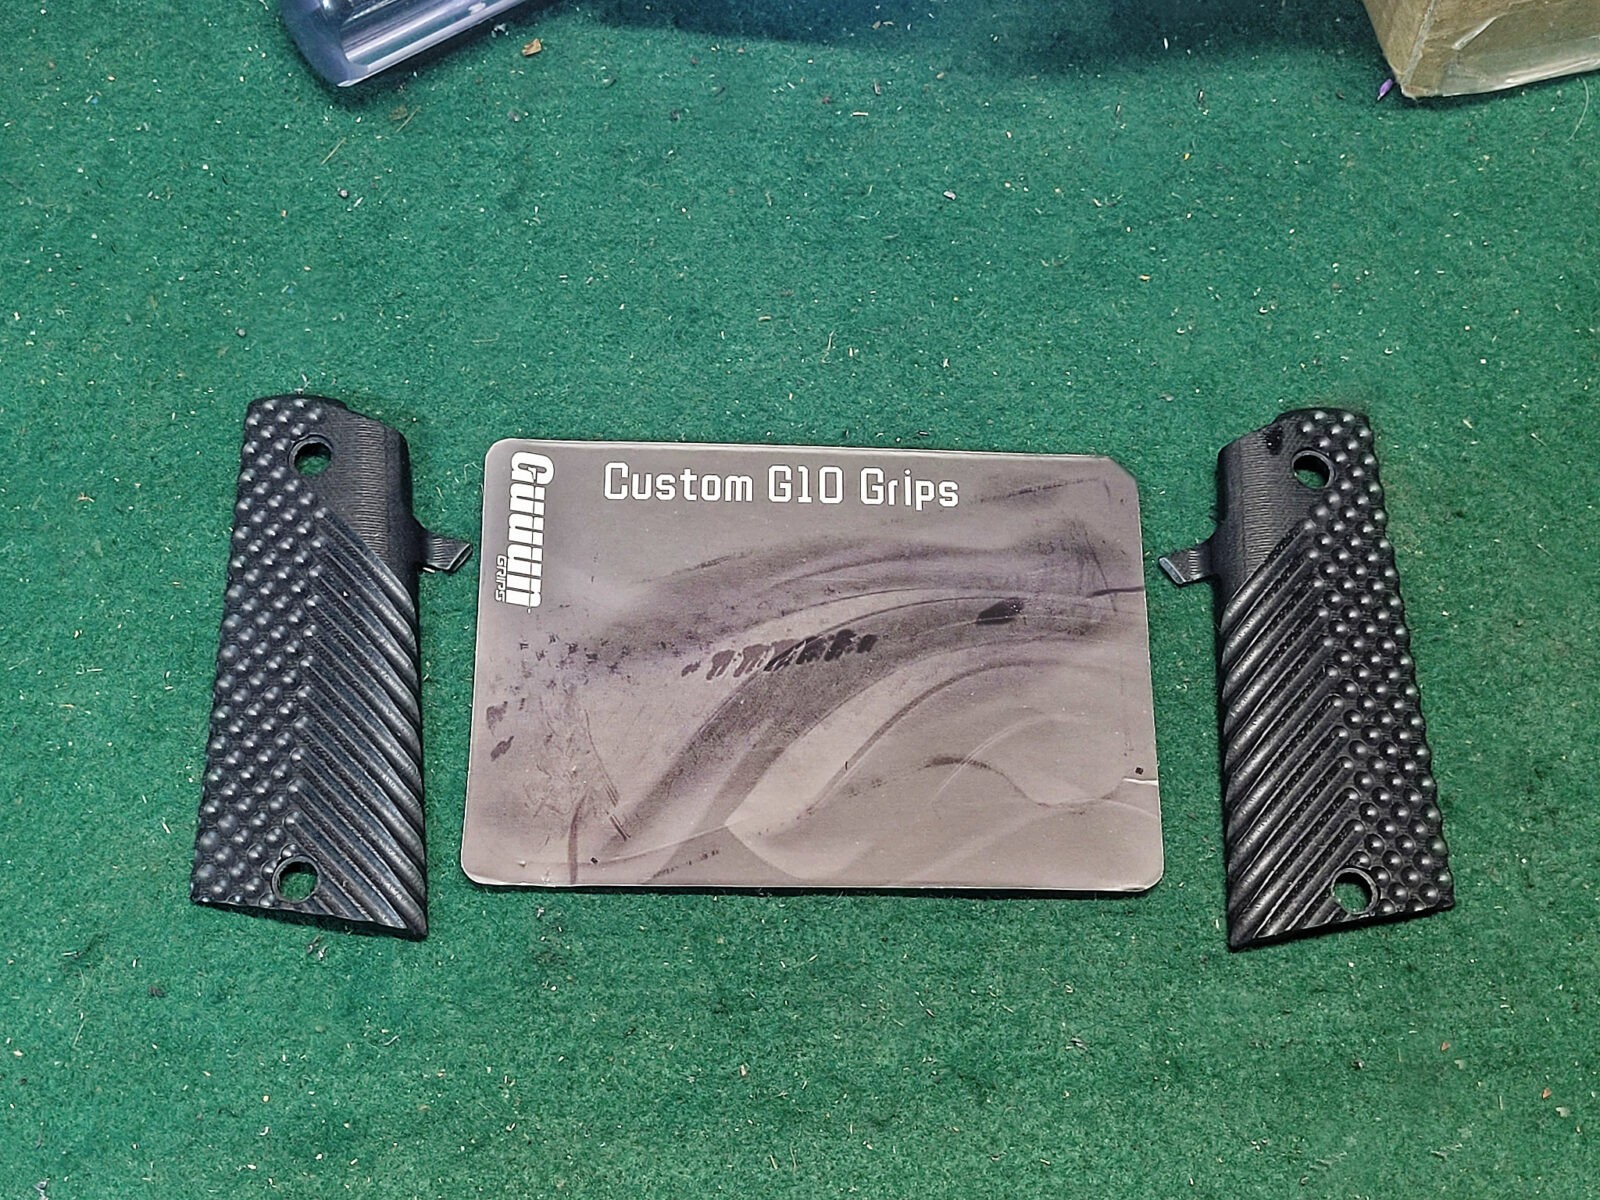
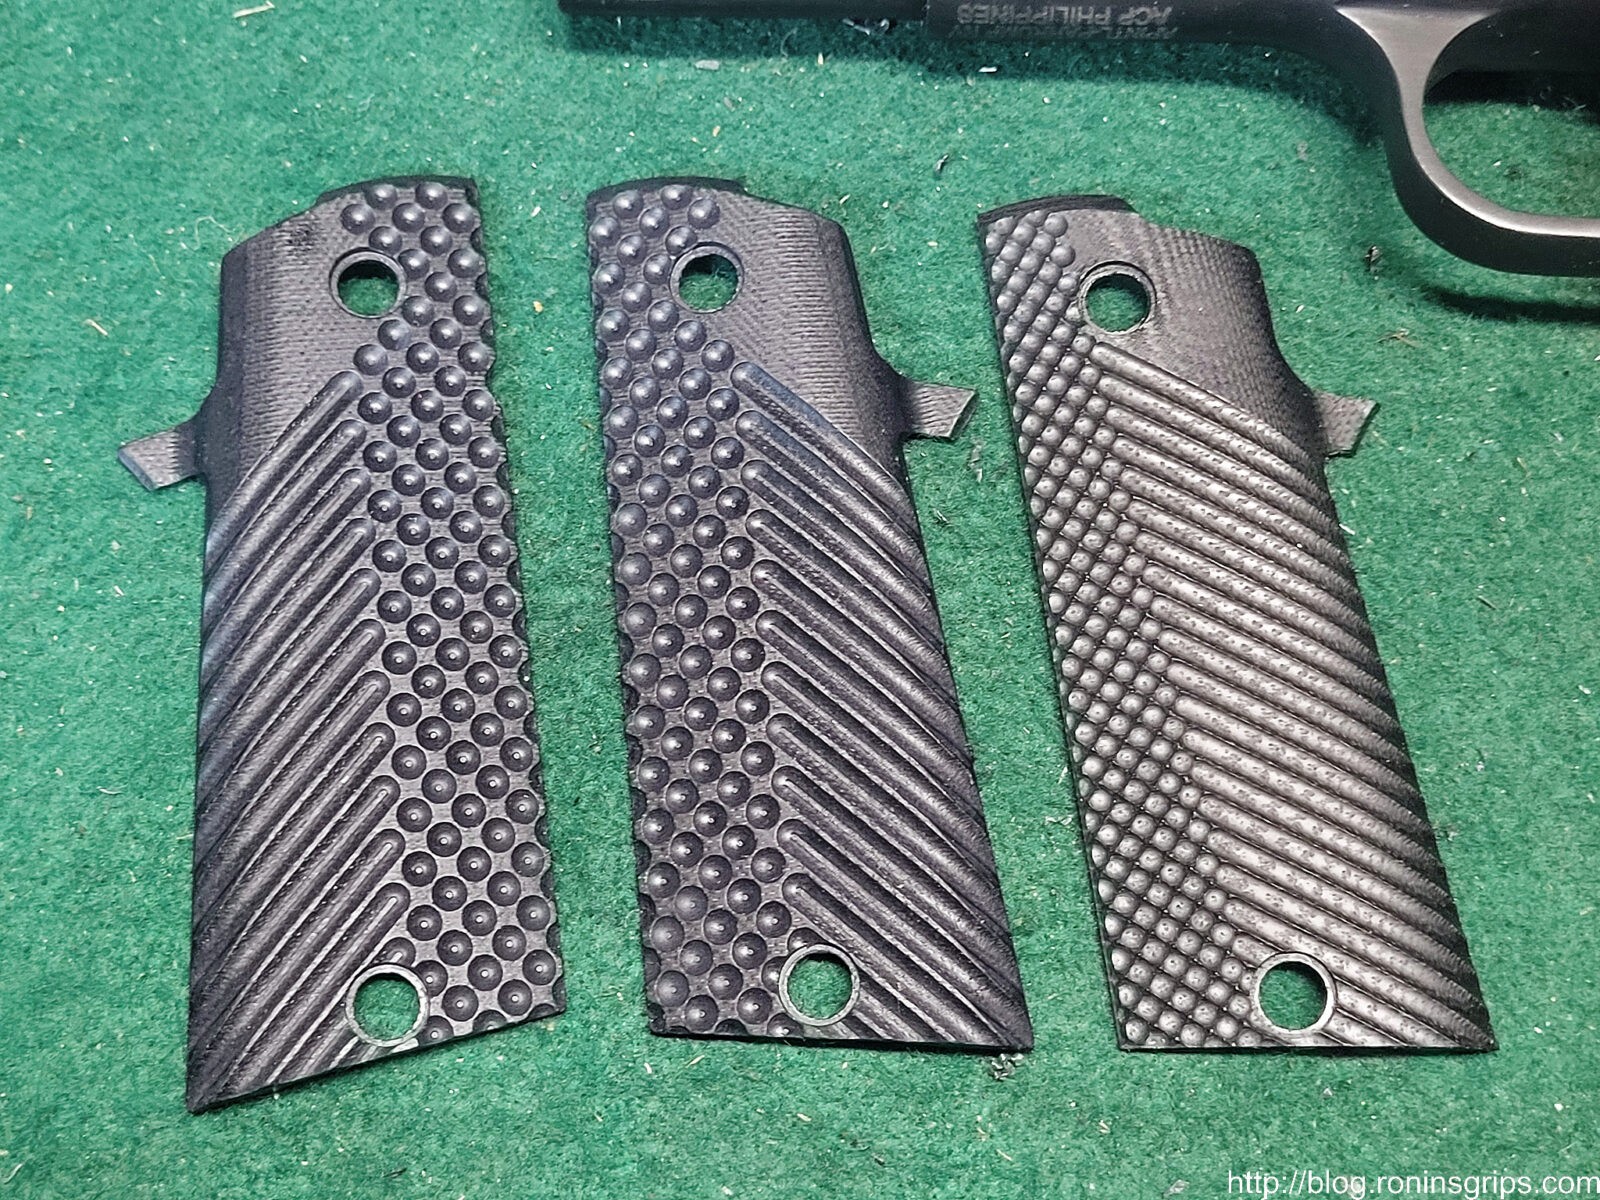
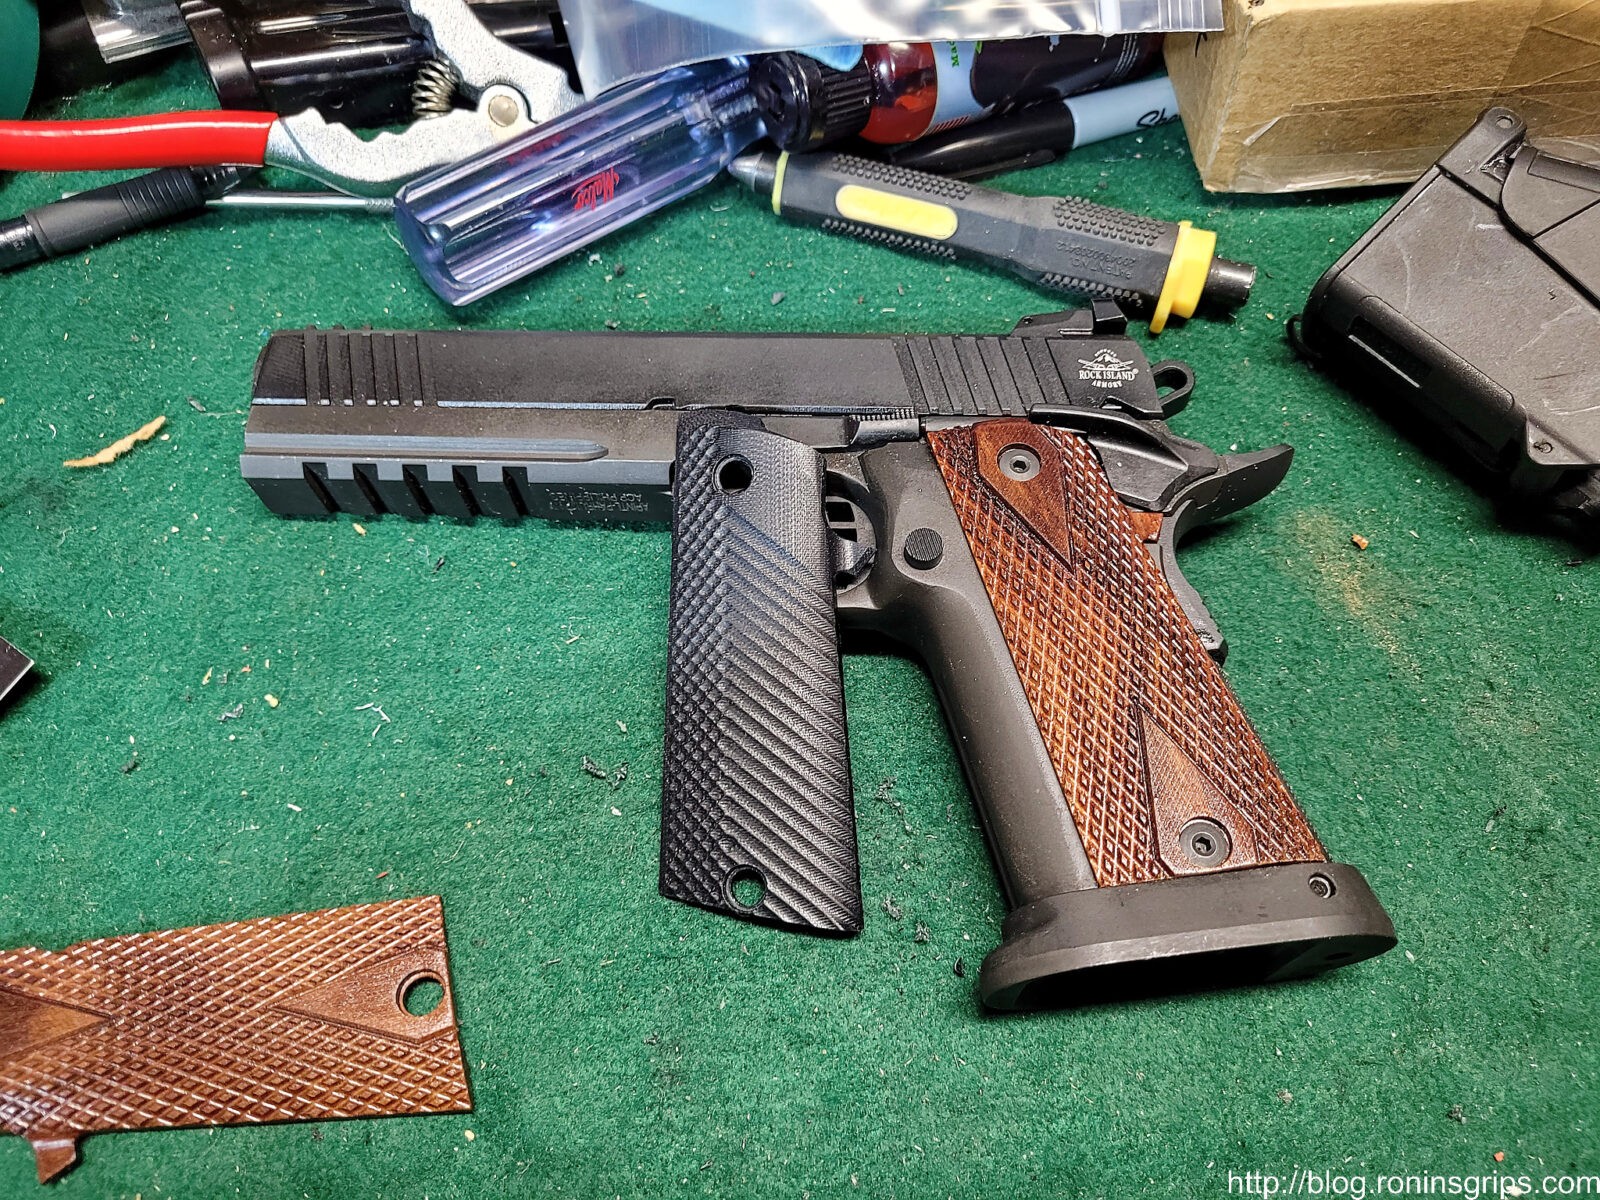
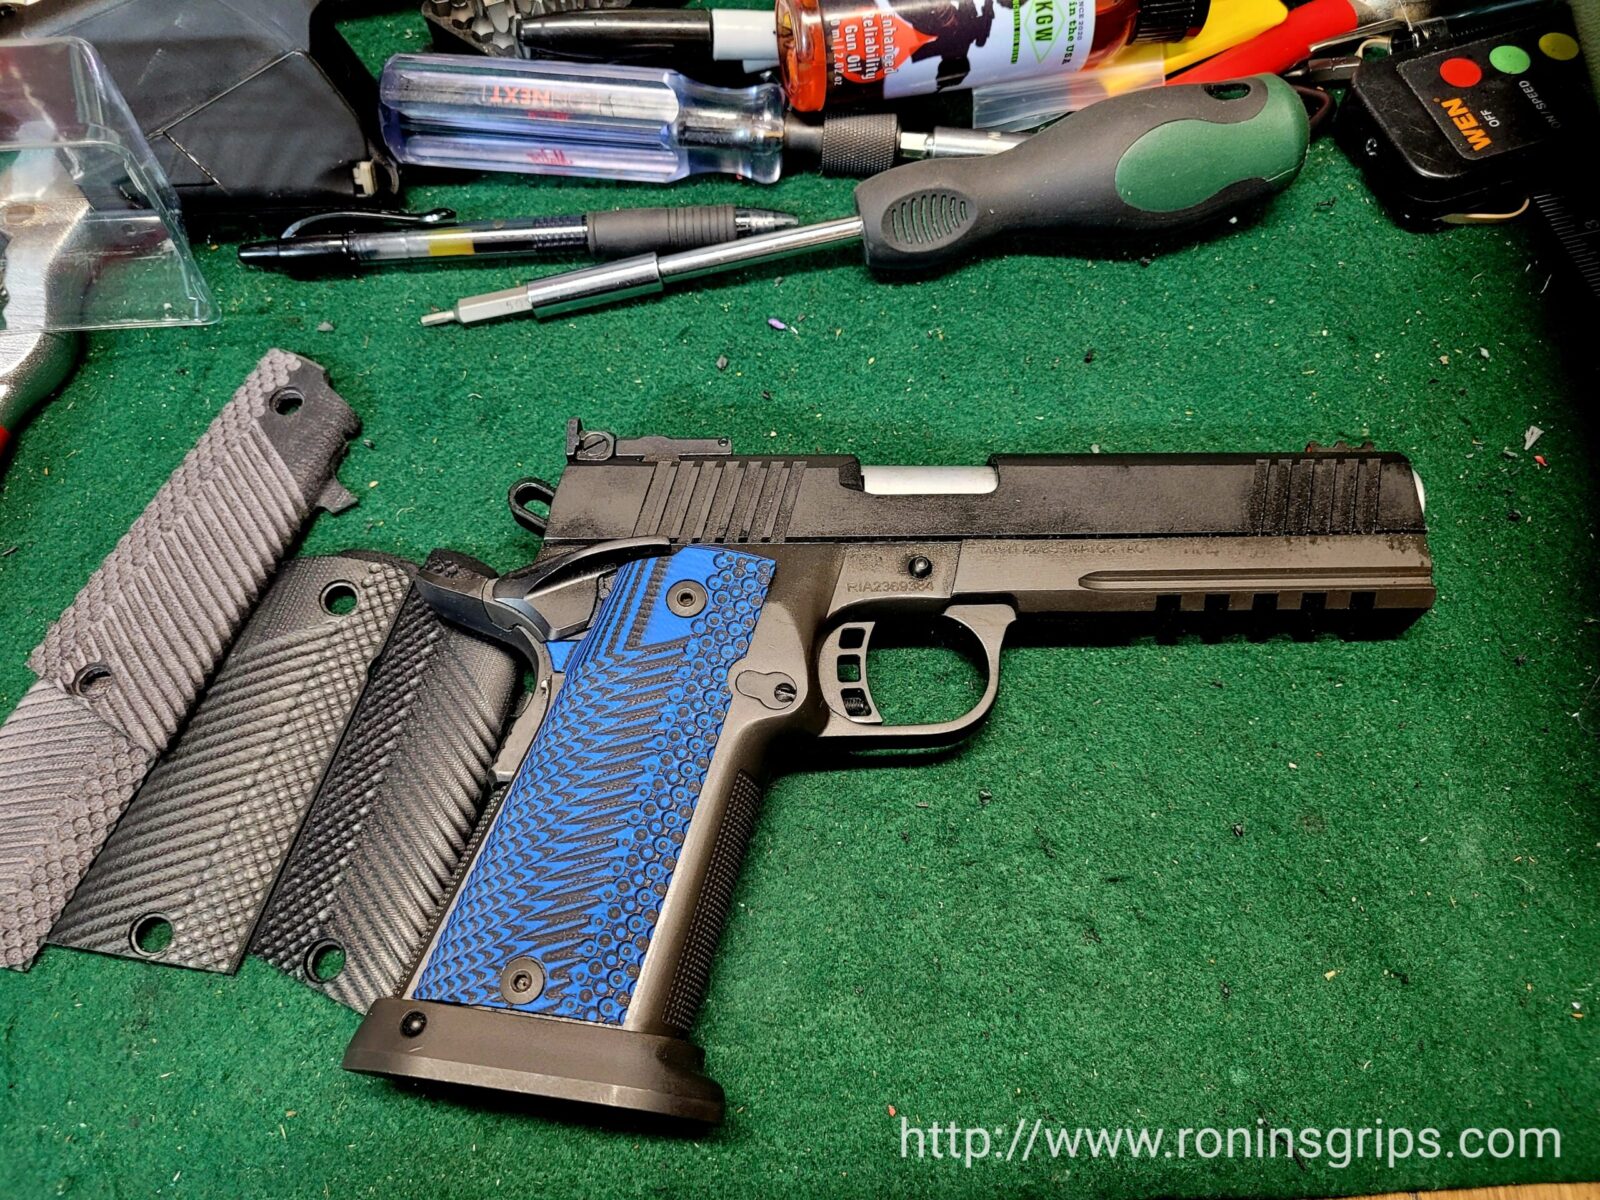
The firm is called Guun Grips and they make custom G10 grips for bunch of pistol models and different styles of grips. You can find their offerings on their own website as well as tons of listings on eBay and Amazon. It’s my understanding that the grips are made in China and then sold in the US via Aurora, Colorado. So much is made in China these days that I’m not very surprised – it is interesting to note that when you search on them there are lots of satisfied 1911 and CZ.75 owners running their grip plates.
The grip plates are machined from G10 composite and available in either black or grey.
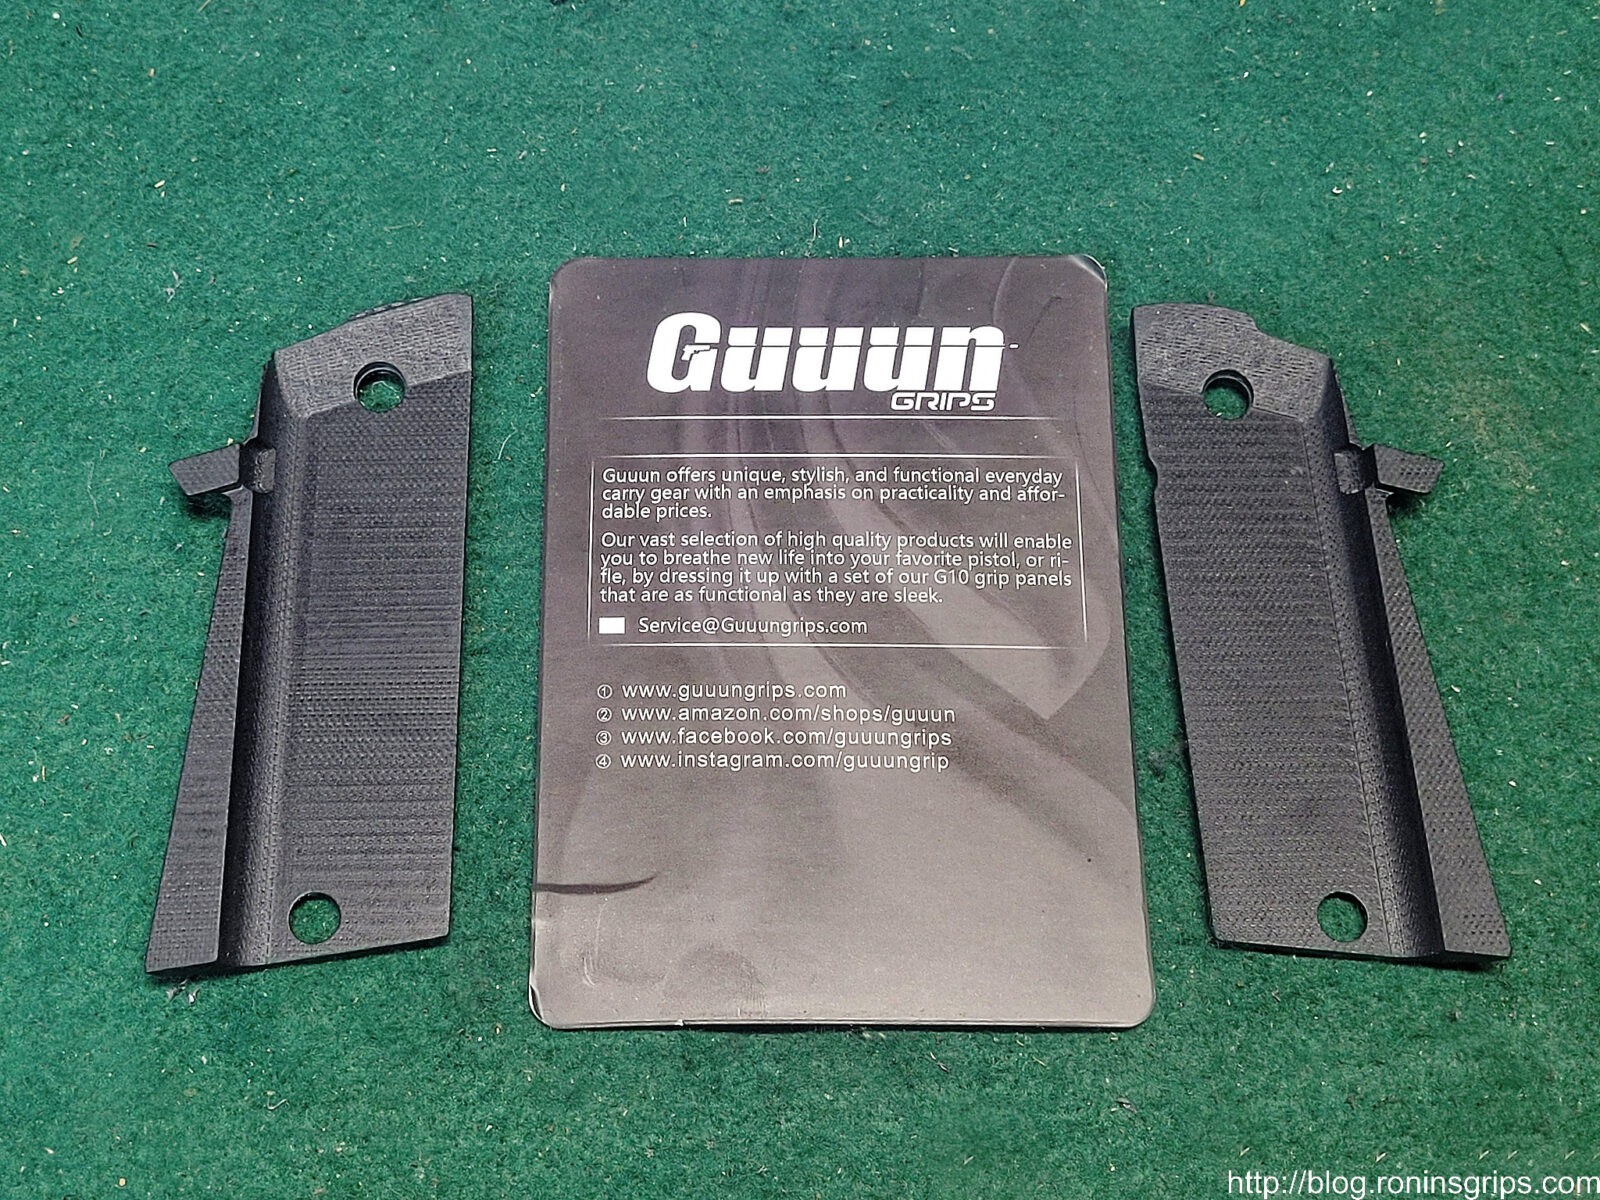
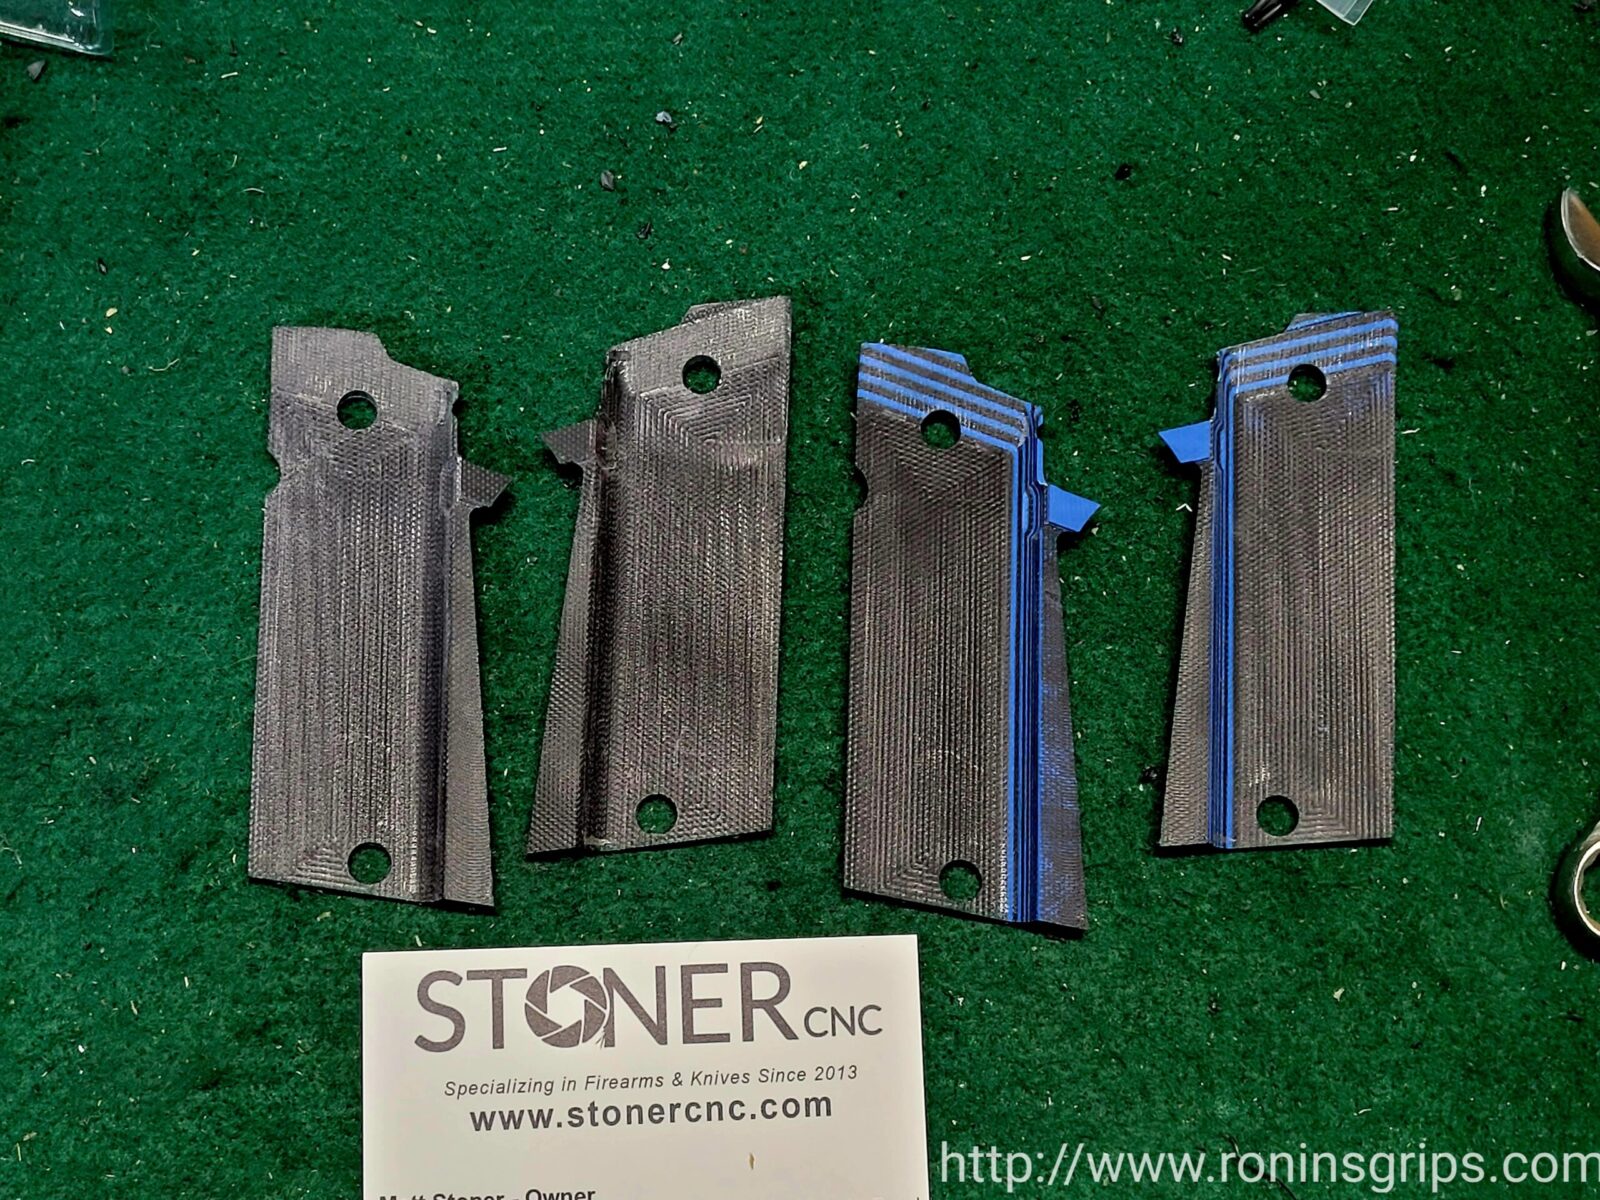
The back of the plates show good attention to detail. All edges are well formed and smooth.
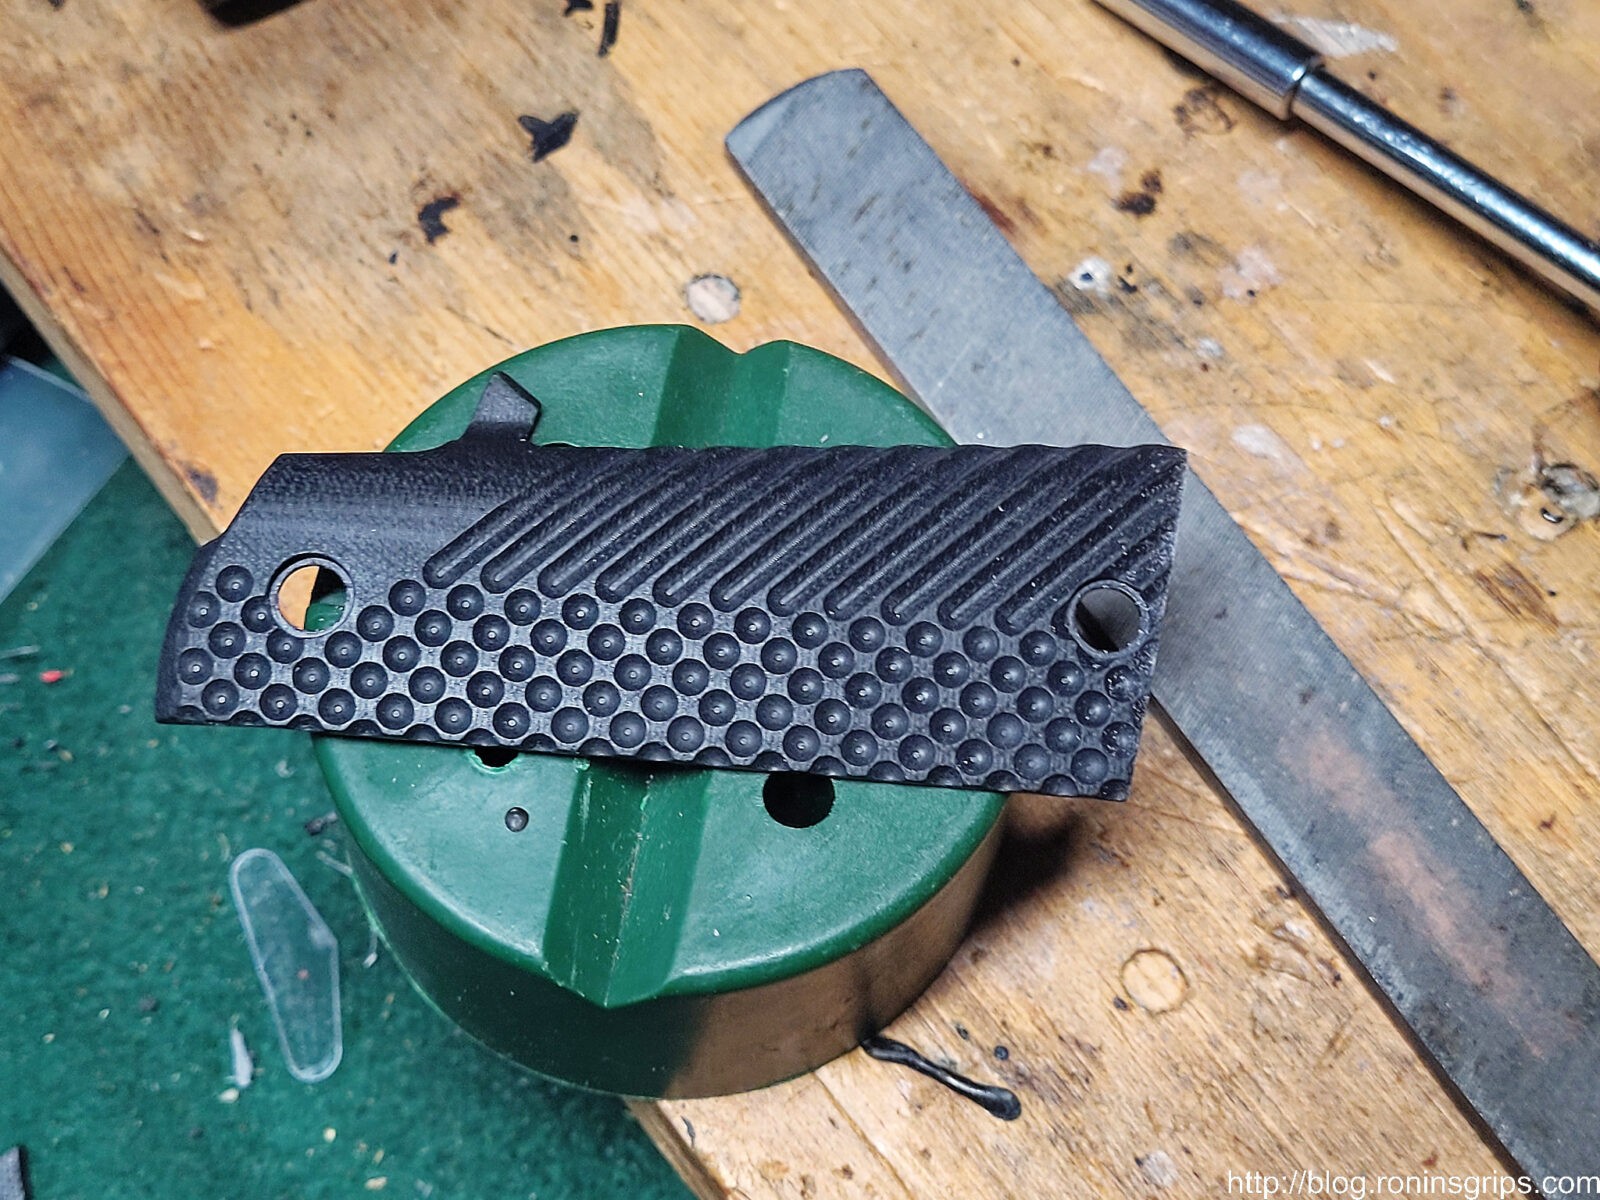
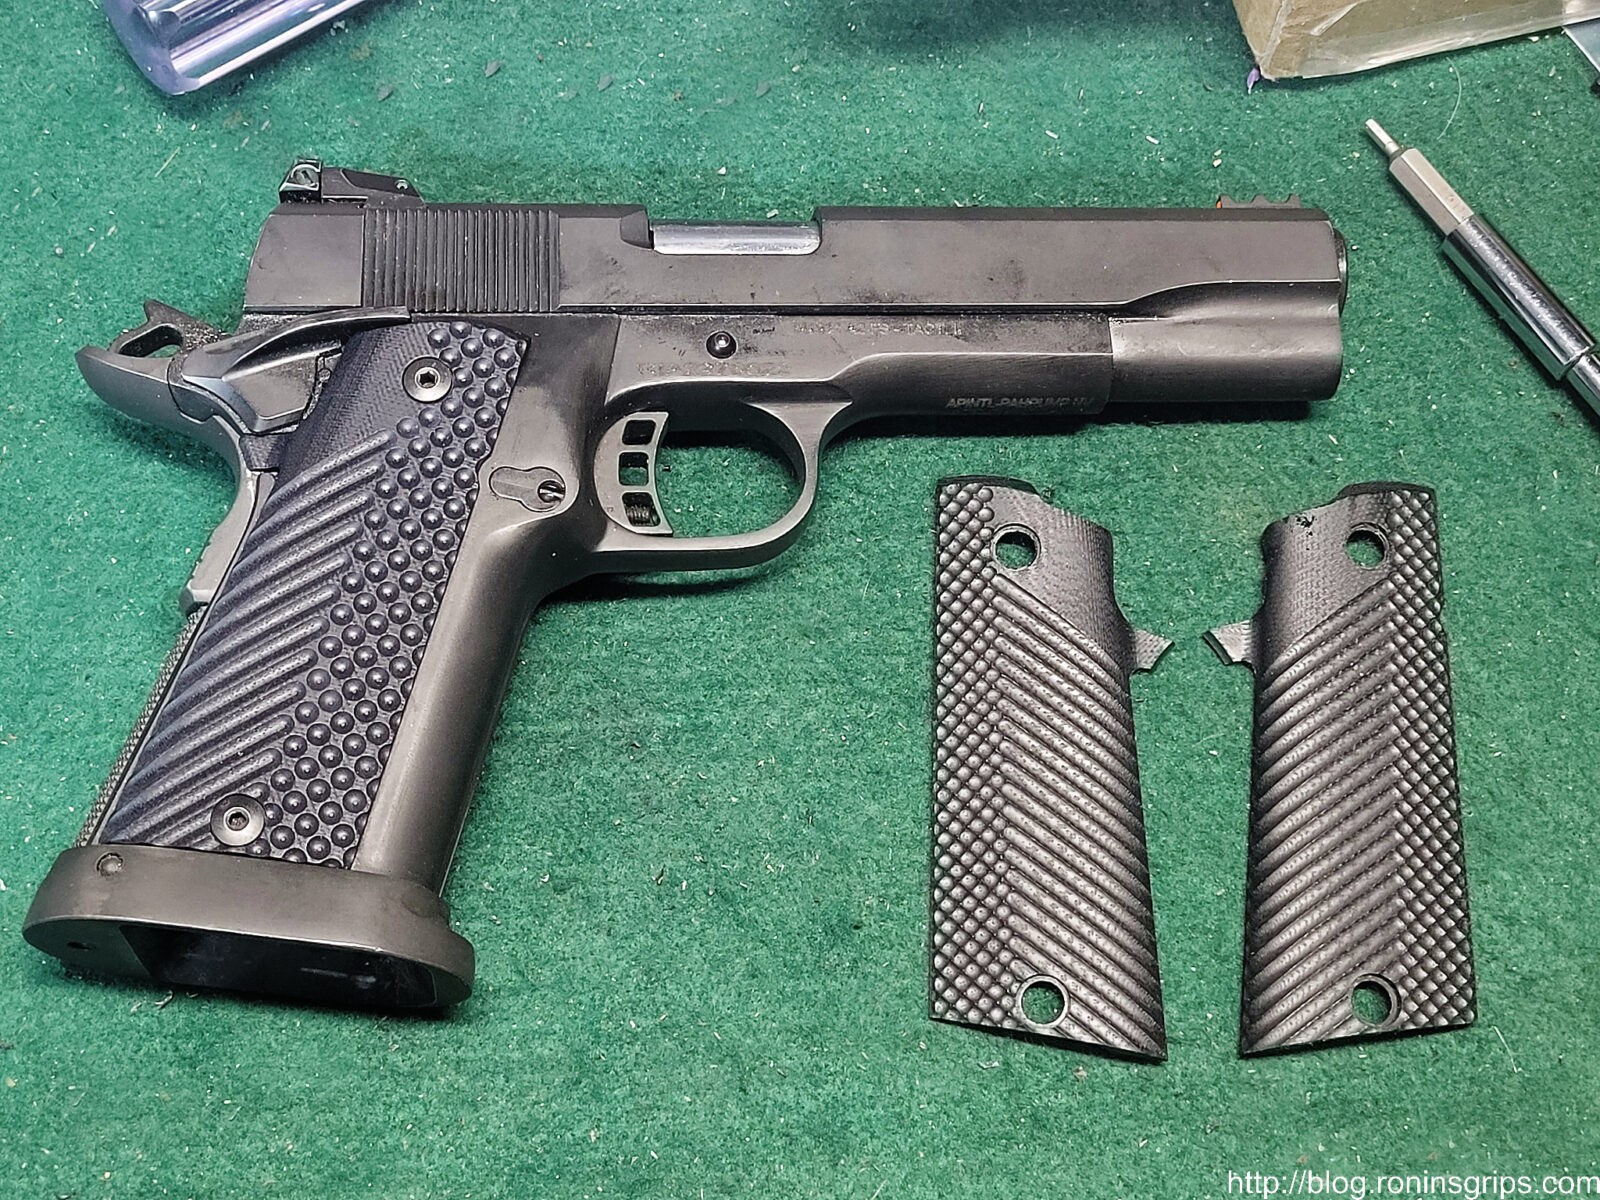
Installation was very straight forward – unscrew the pair of grip screws and put on the new panel. I did need to do some light filing on the right side to get the G10 panels to sit flat and the holes to line up accordingly. Oddly enough, the left side went right on.
The plate does not want to sit flat or line up with the holes in the frame. These are indications that fitting is needed. It doesn’t take much filing to get them to fit.
The G10 files easily – use a dust mask as you really shouldn’t be breathing composite dust. Go slow and take your time – file, test fit and repeat until the plates sit flush.
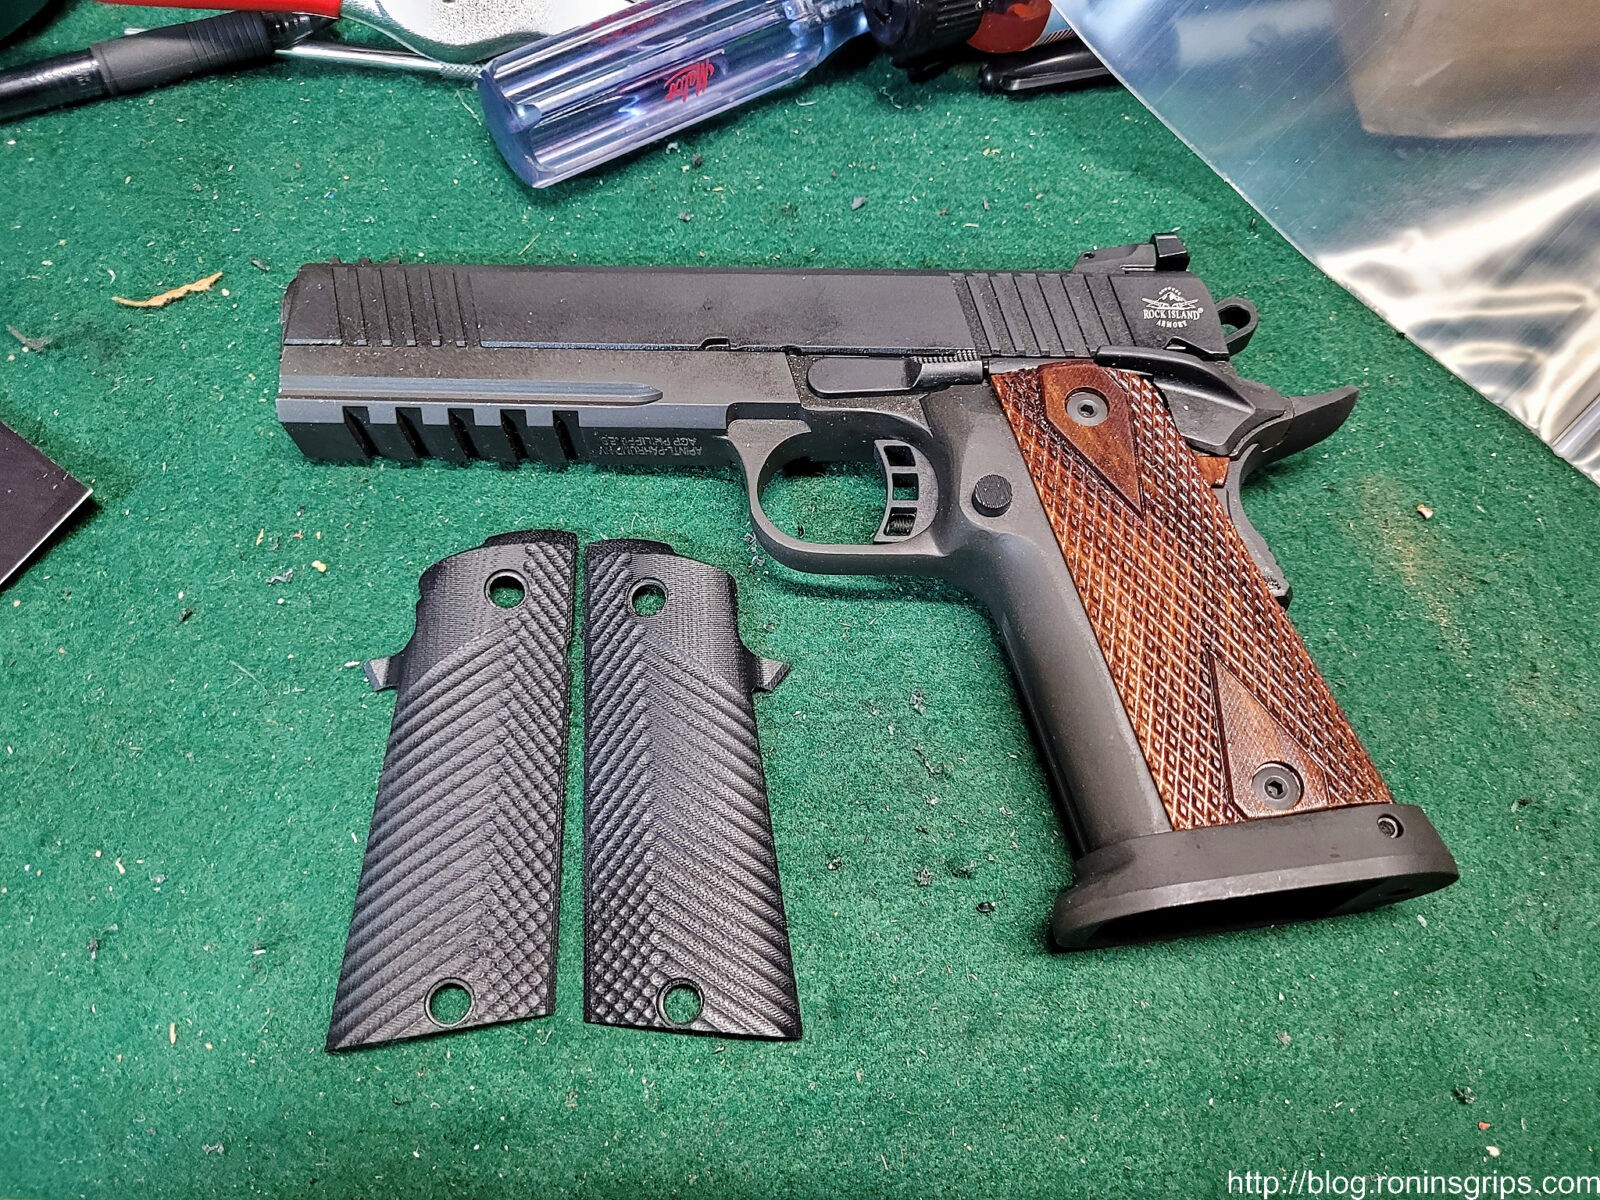
The left two plates are the Guuun models and the right is the original RIA. You can see the slight differences in the number of divots and grooves as well as the depth of them. The Guuun grips actually feel quite good.
Once the plate is seated nicely flat on the frame the grip screws are reinstalled.
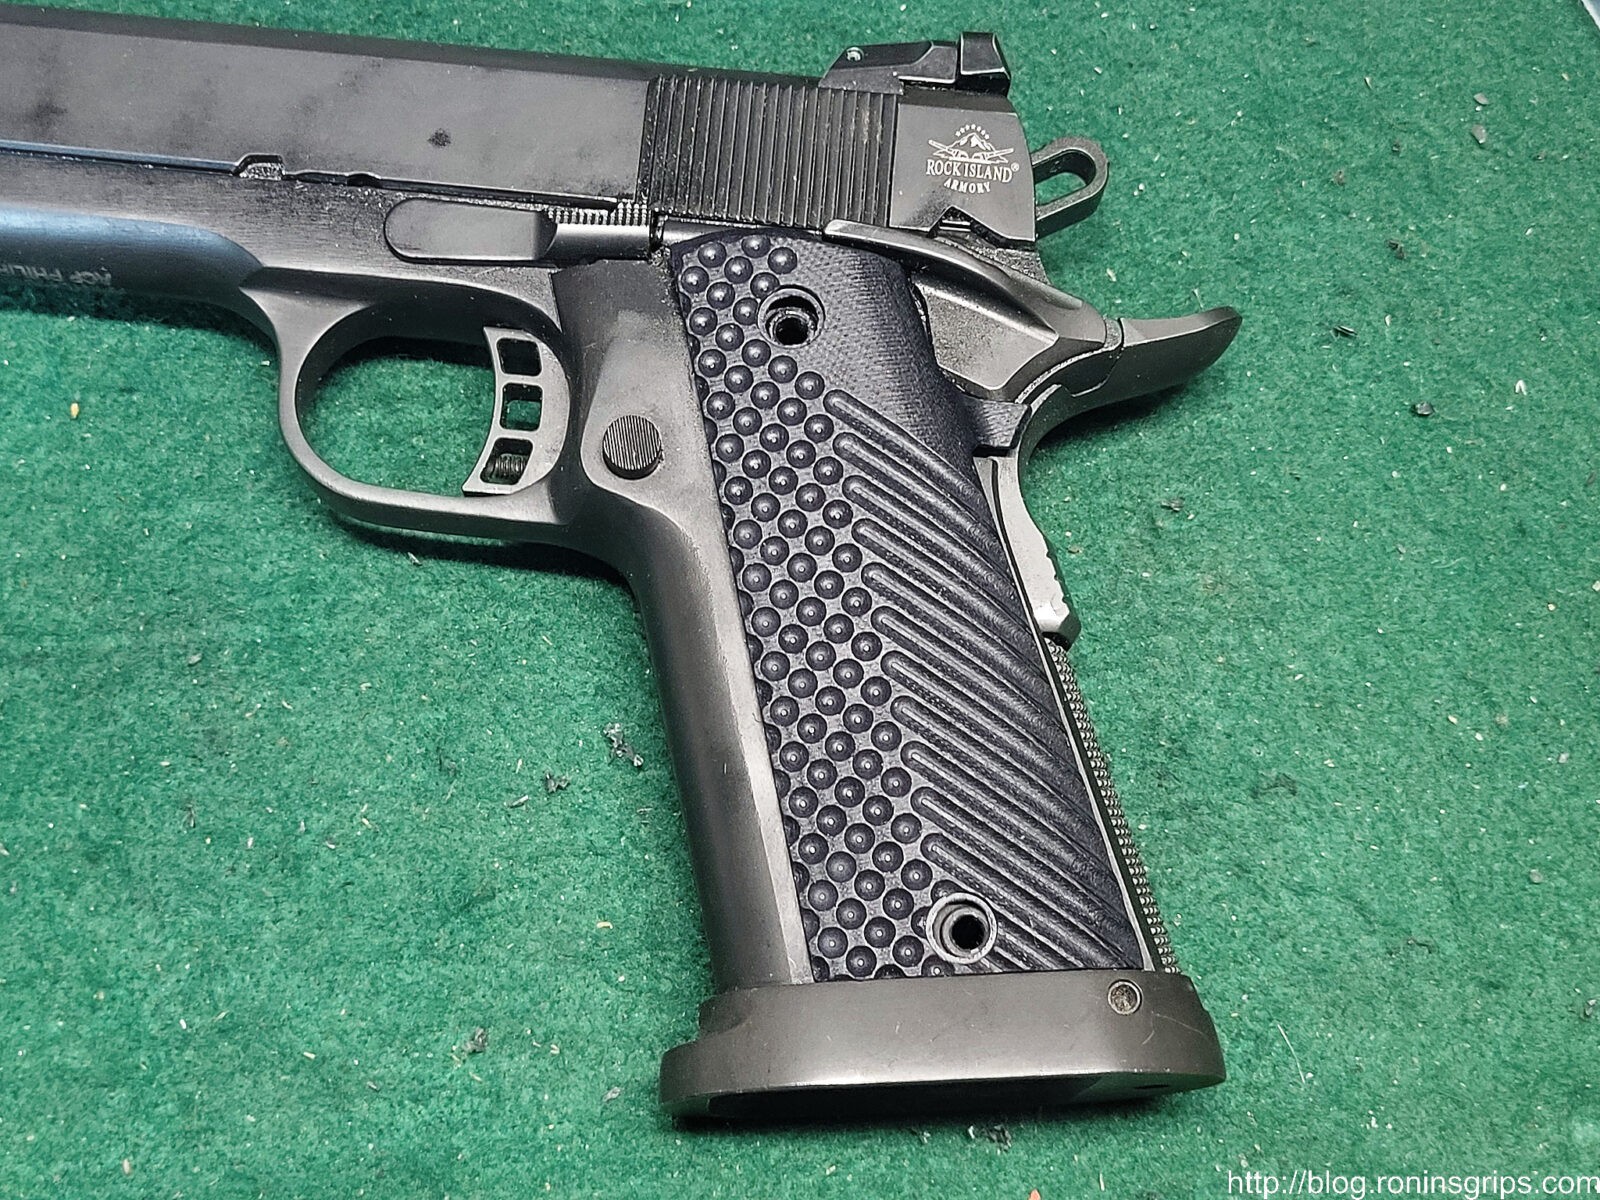
You know, I like the feel better than the original RIA plates. “Feel” is a subjective thing – but I do like the way the plate feels in my hand.
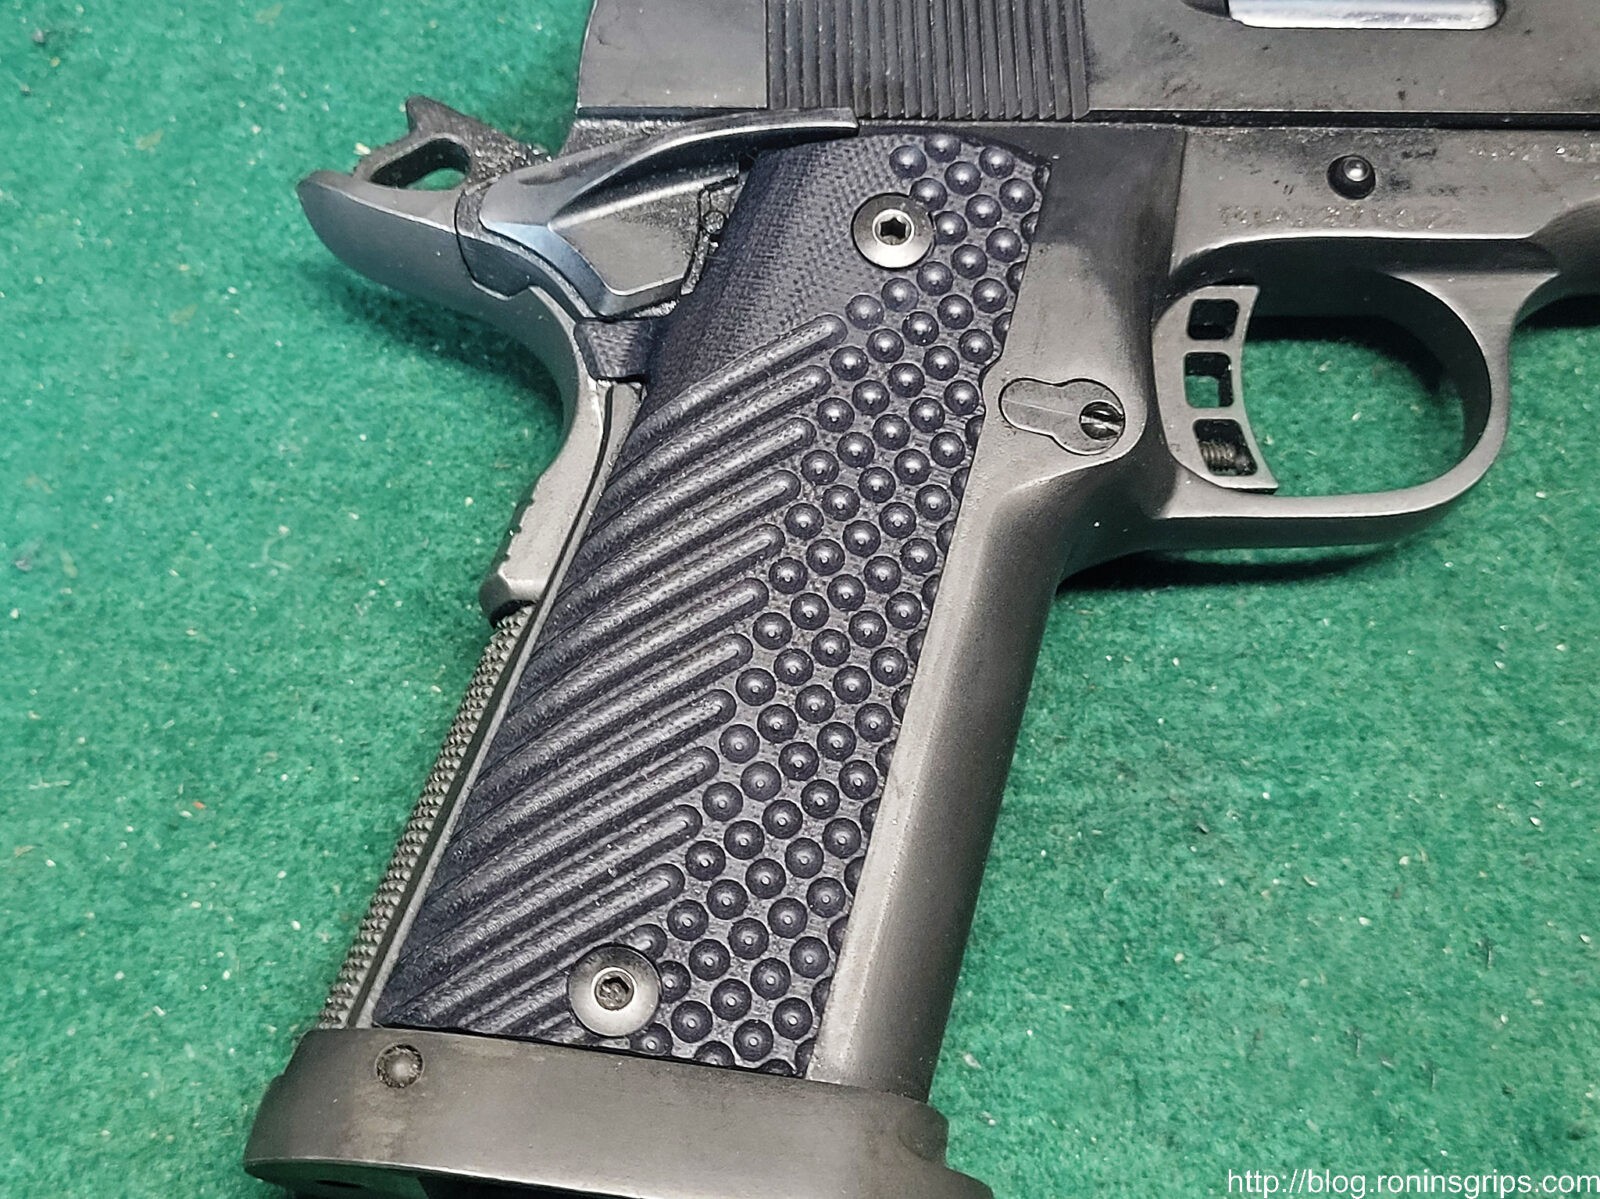
A closer view
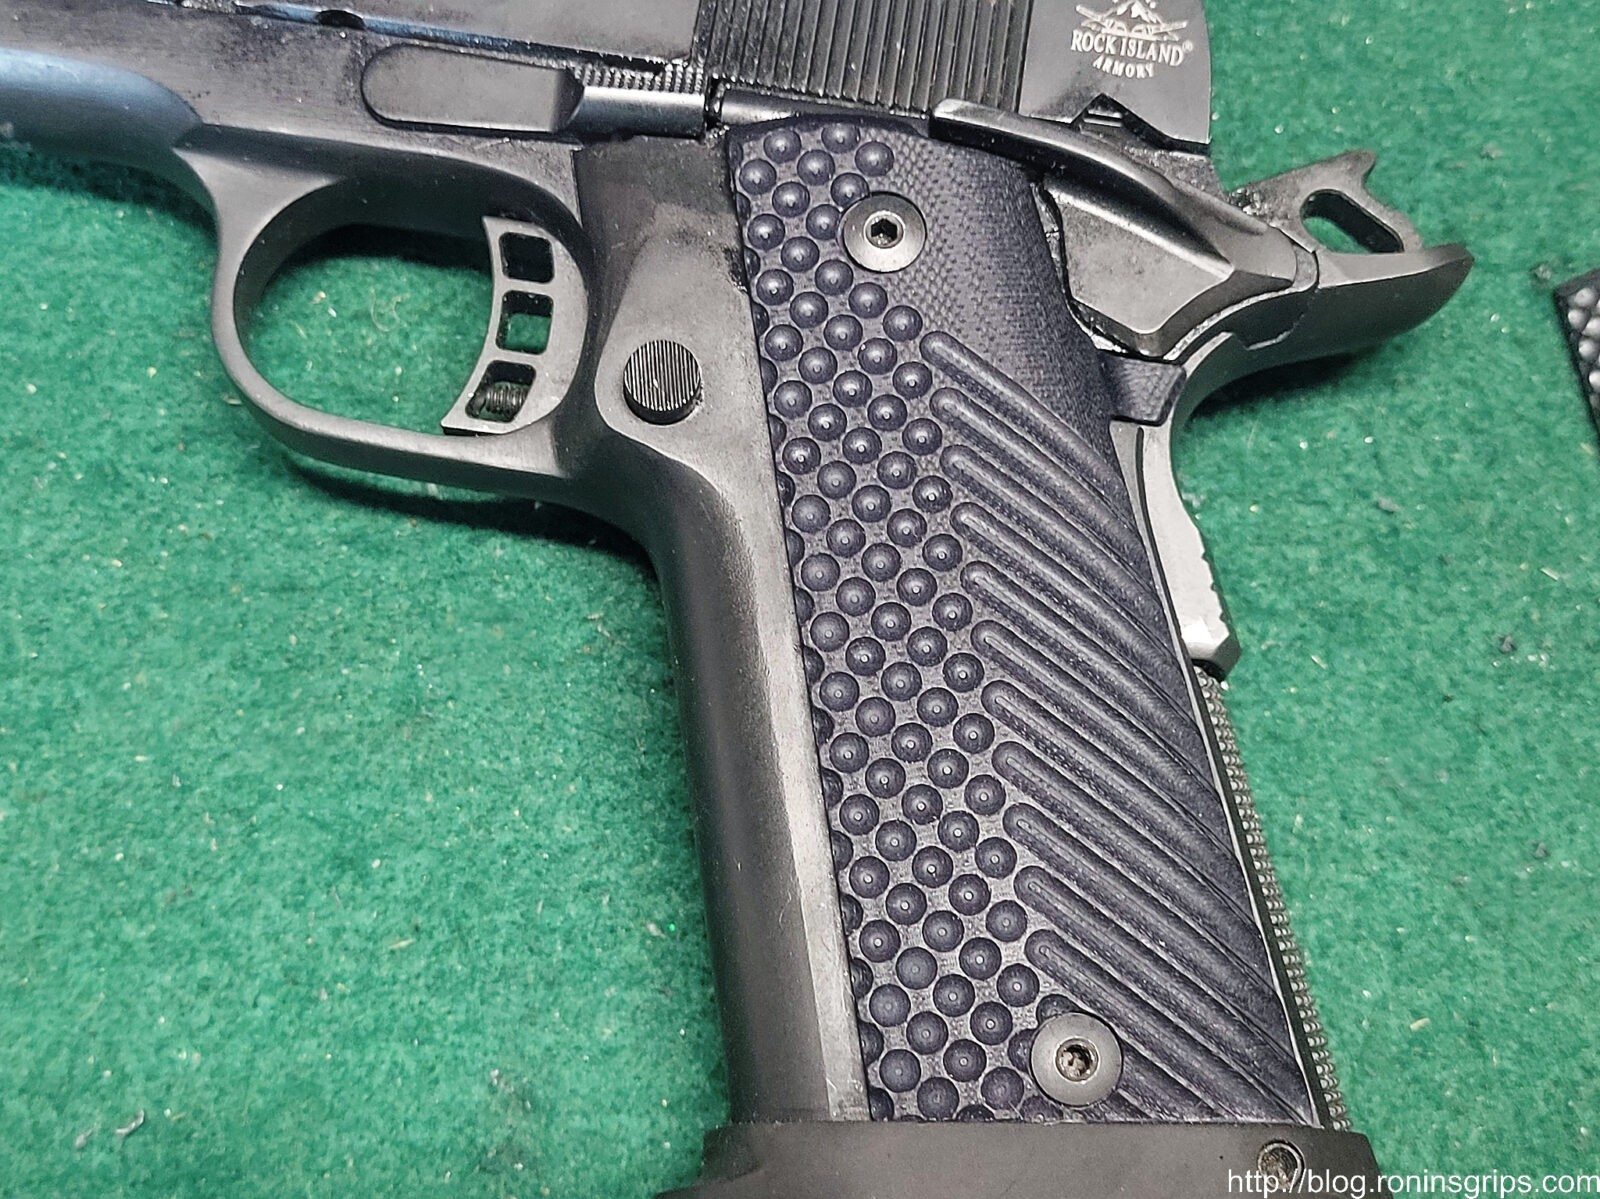
And of the other side.
Summary
The Guuun grip plates are nicely made. To be honest, I didn’t expect them to be made very well but they are – the material, machining and finishing are all very good.
So, here’s another option for you whether you want to stick with black and have a different feel or opt for their grey color.
Note, I have to buy all of my parts – nothing here was paid for by sponsors, etc. I do make a small amount if you click on an ad and buy something but that is it. You’re getting my real opinion on stuff.
Mark Browne is the owner of Browne Works, Inc., located in Pasadena, MD, southeast of Baltimore. He is a true custom grip maker and sands and finishes them by hand with a very wide offering for pistol models including the 1911, Beretta 92, Hudson G9, Llama, SIg Sauer and, of course, the Rock Island single and double stack pistols.
For Rock Island pistols he has a wide variety of offerings for the Ultra and Tac Ultra both FS and MS models. He also has them for the A2 HC (like I needed) plus the BBR. The pricing is very reasonable also and he has a variety of materials you can choose from – click here for his website.
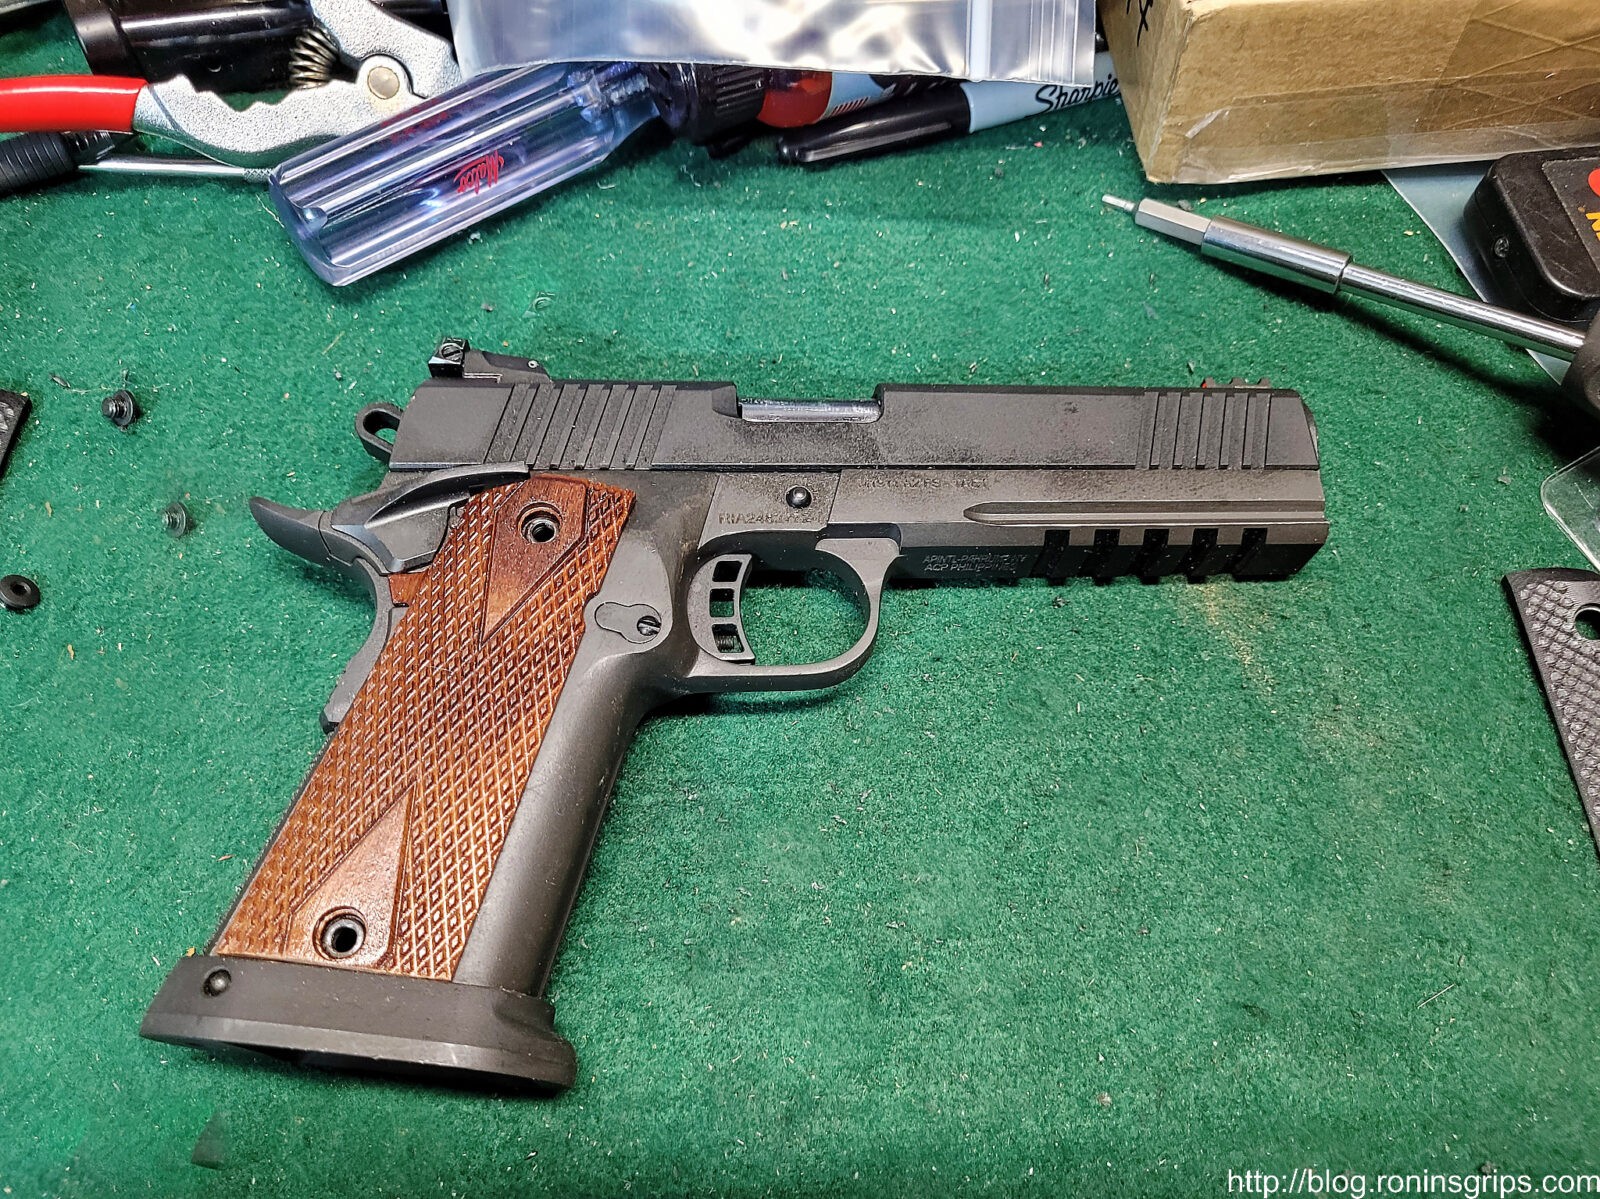
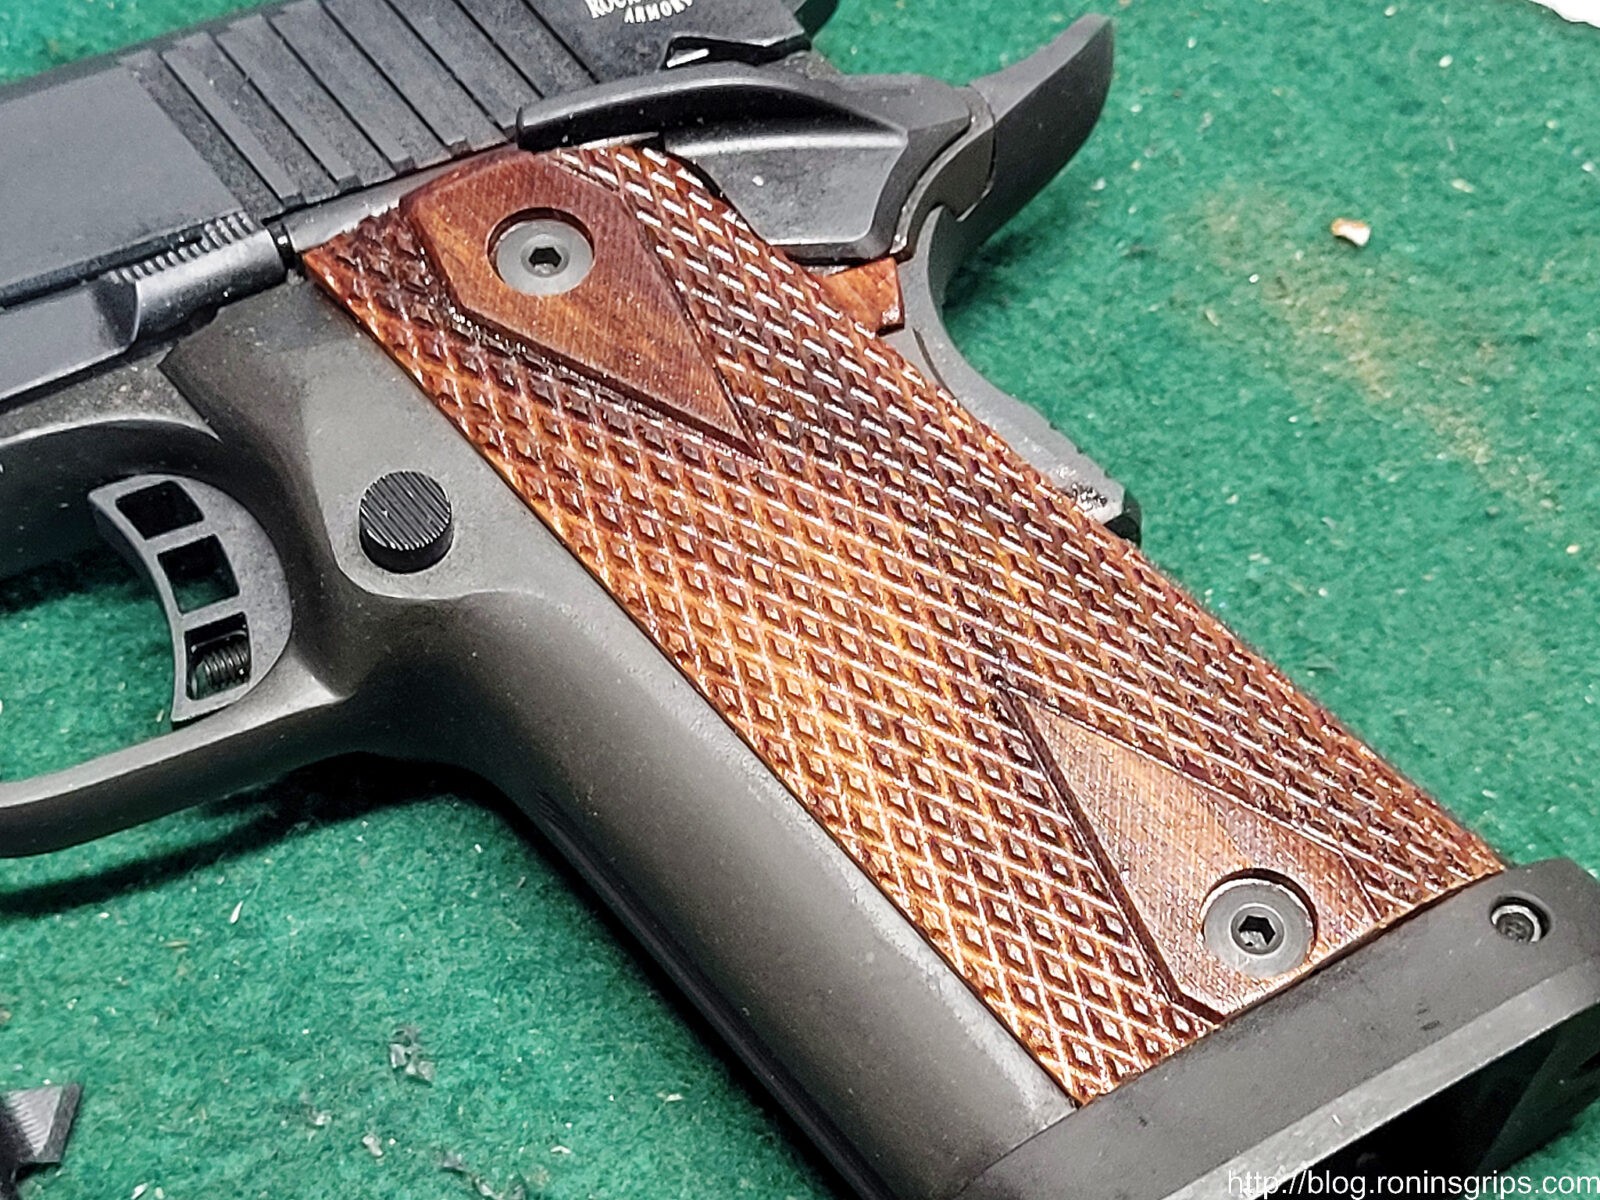
The wood is Brazilian Rosewood. Mark added hardener and did a double diamond pattern on it. There is a satin finish sealant on them as well. I think they look amazing – the photos don’t do them justice.
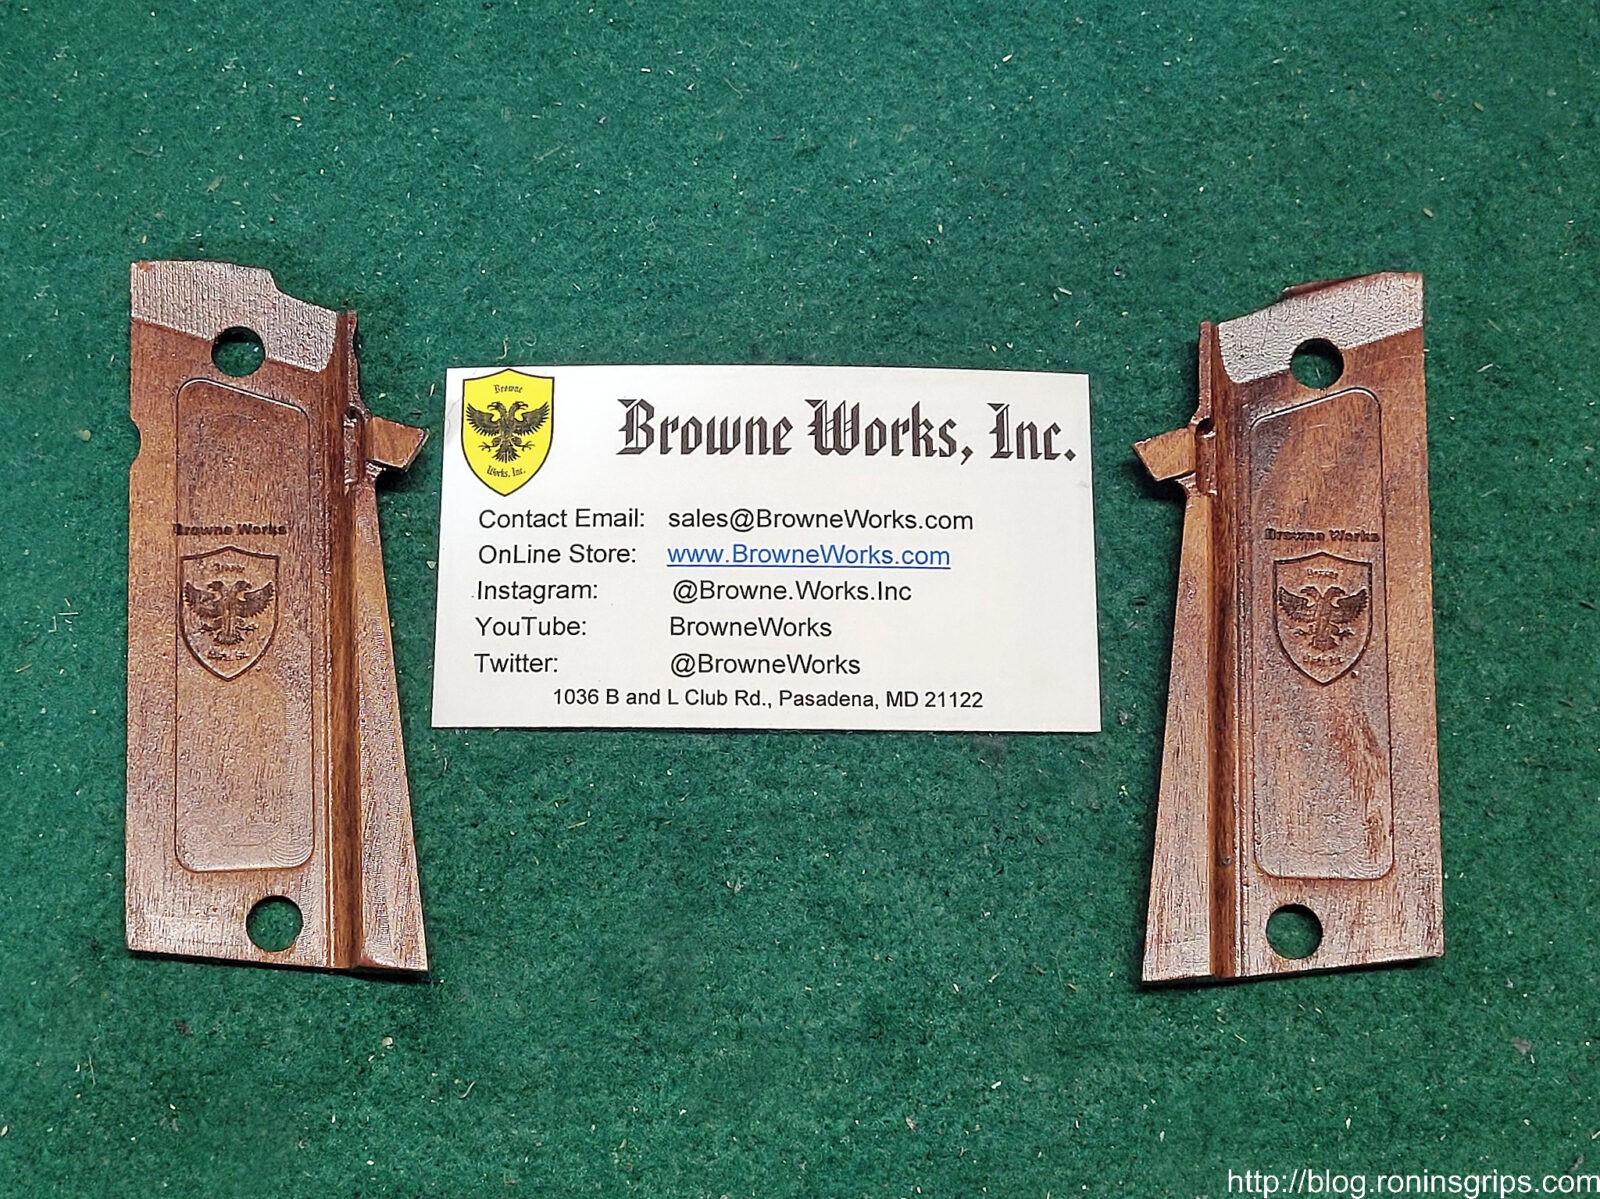
Mark can do laser engraving if you want. He does engrave his logo on the back of each panel plus it shows you the attention to detail in terms of the finishing he does.
Installation was very straight forward – unscrew the pair of grip screws and put on the new panel. I did need to do some light filing to get the wood panels to sit flat and the holes to line up accordingly.
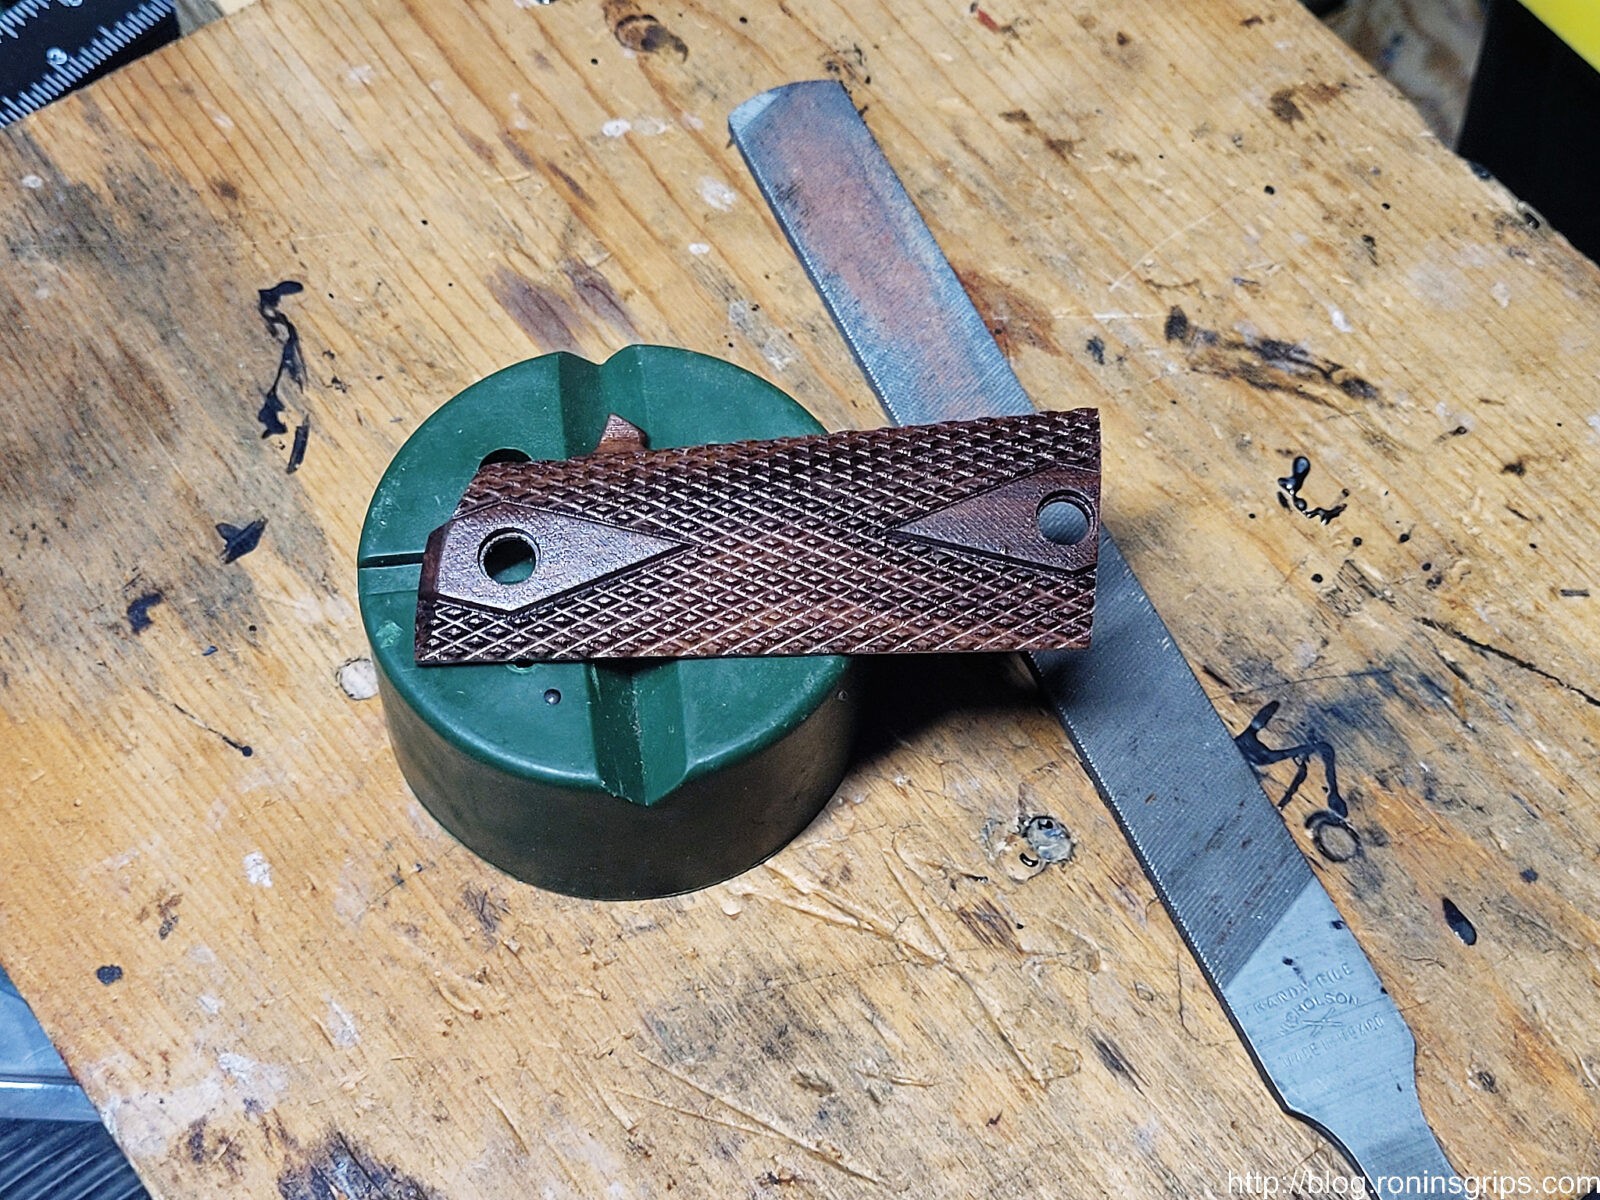
I did need to remove some off the bottom. I used a smooth file and would take a tad off in a straight line along the bottom and test repeatedly until the panel fit nice and snug.
Now I need to insert something here that Mark did that really helped me out. The photos in this post are actually of my second set. On the rear of the grip is a tab that covers a slot. I don’t know what happened but it cracked on my original right side plate. I contacted Mark and he told me he would make a new one and add hardener and use the cool double diamond pattern and he didn’t charge me! He had no idea who I was or that I planned a blog post – I never said anything. He took care of me and that speaks a lot about him and his customer service right there.
The grips look great!
And the other plate is fitted – the screws were next on the to-do list.
These grips are really nice. I never thought I would go with wood but I am leaving these plates on my pistol.
Both in terms of looks and how they feel, these
Summary
I’m not always a wood fan but to be perfectly honest, I like these – a lot. The checkering really gives you a nice grip without biting into your hand. They are staying on the pistol!
When it comes to Browne Works for RIA A2 HC pistols – I definitely recommend them based on my experience.
Note, I have to buy all of my parts – nothing here was paid for by sponsors, etc. I do make a small amount if you click on an ad and buy something but that is it. You’re getting my real opinion on stuff.
Because we sell customized magazines for the Rock Island A2 HC pistols – their staggered magazine pistols based on the Para design that hold 14-17 rounds depending on caliber – I am often asked if I make grip panels – the slabs that go on each side of the magazine housing. The short answer is no – I don’t make them. The next question is usually – do you know anyone who does and again, I’d answer no.
Well, if I get asked something enough eventually my curiosity perks up so I started digging. There are a couple of key things you need to know:
The Rock Island A2 HC pistols have very wide magazine wells so they use relative thin proprietary grip plates that are not compatible with regular 1911 pistols.
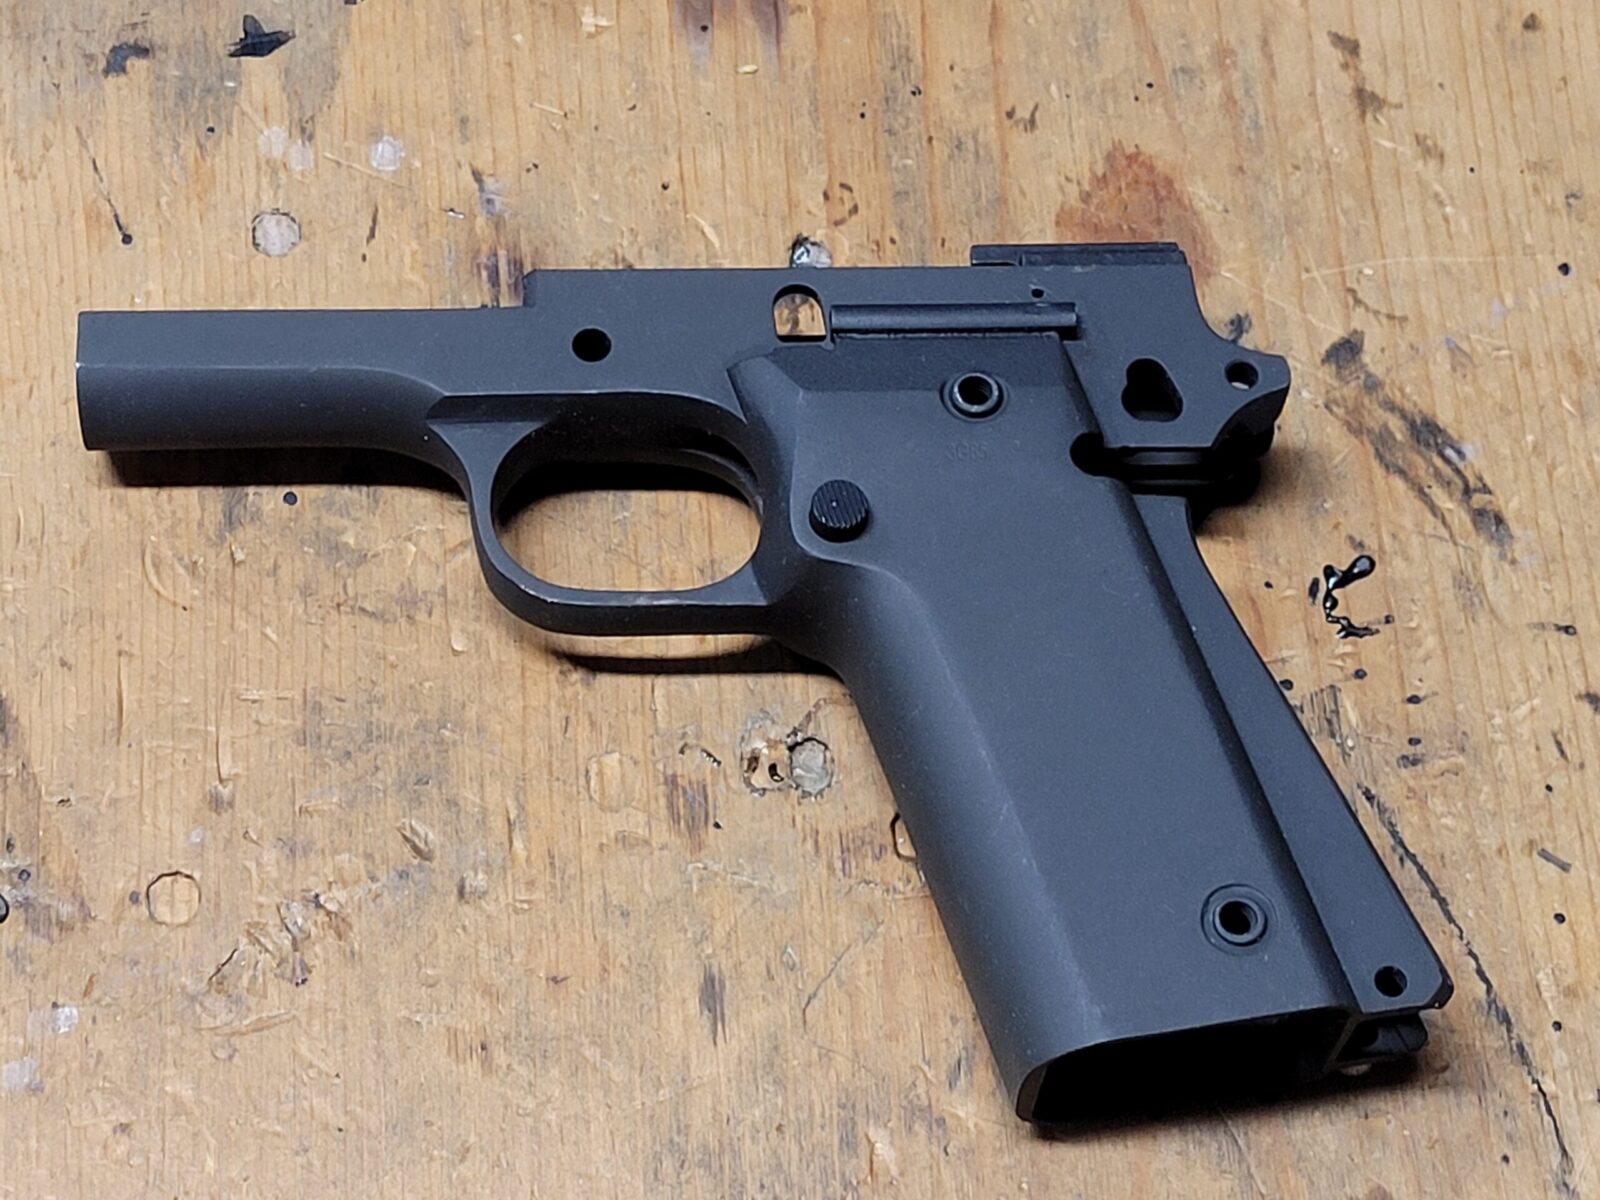
The bushings that are normally replaceable in a 1911 part of the A2 HC frame and can not be easily relaced. I don’t know for sure but I think they did this to keep the thickness down
They use unique screws – the screws are #10-32. Overall length is 0.205″ and the threaded shaft is about 0.145″. Advanced Tactical (the online retail business unit of Armscor) sells replacement screws and sometimes they pop up elsewhere. The key point is that they are not standard 1911 grip panel screws.
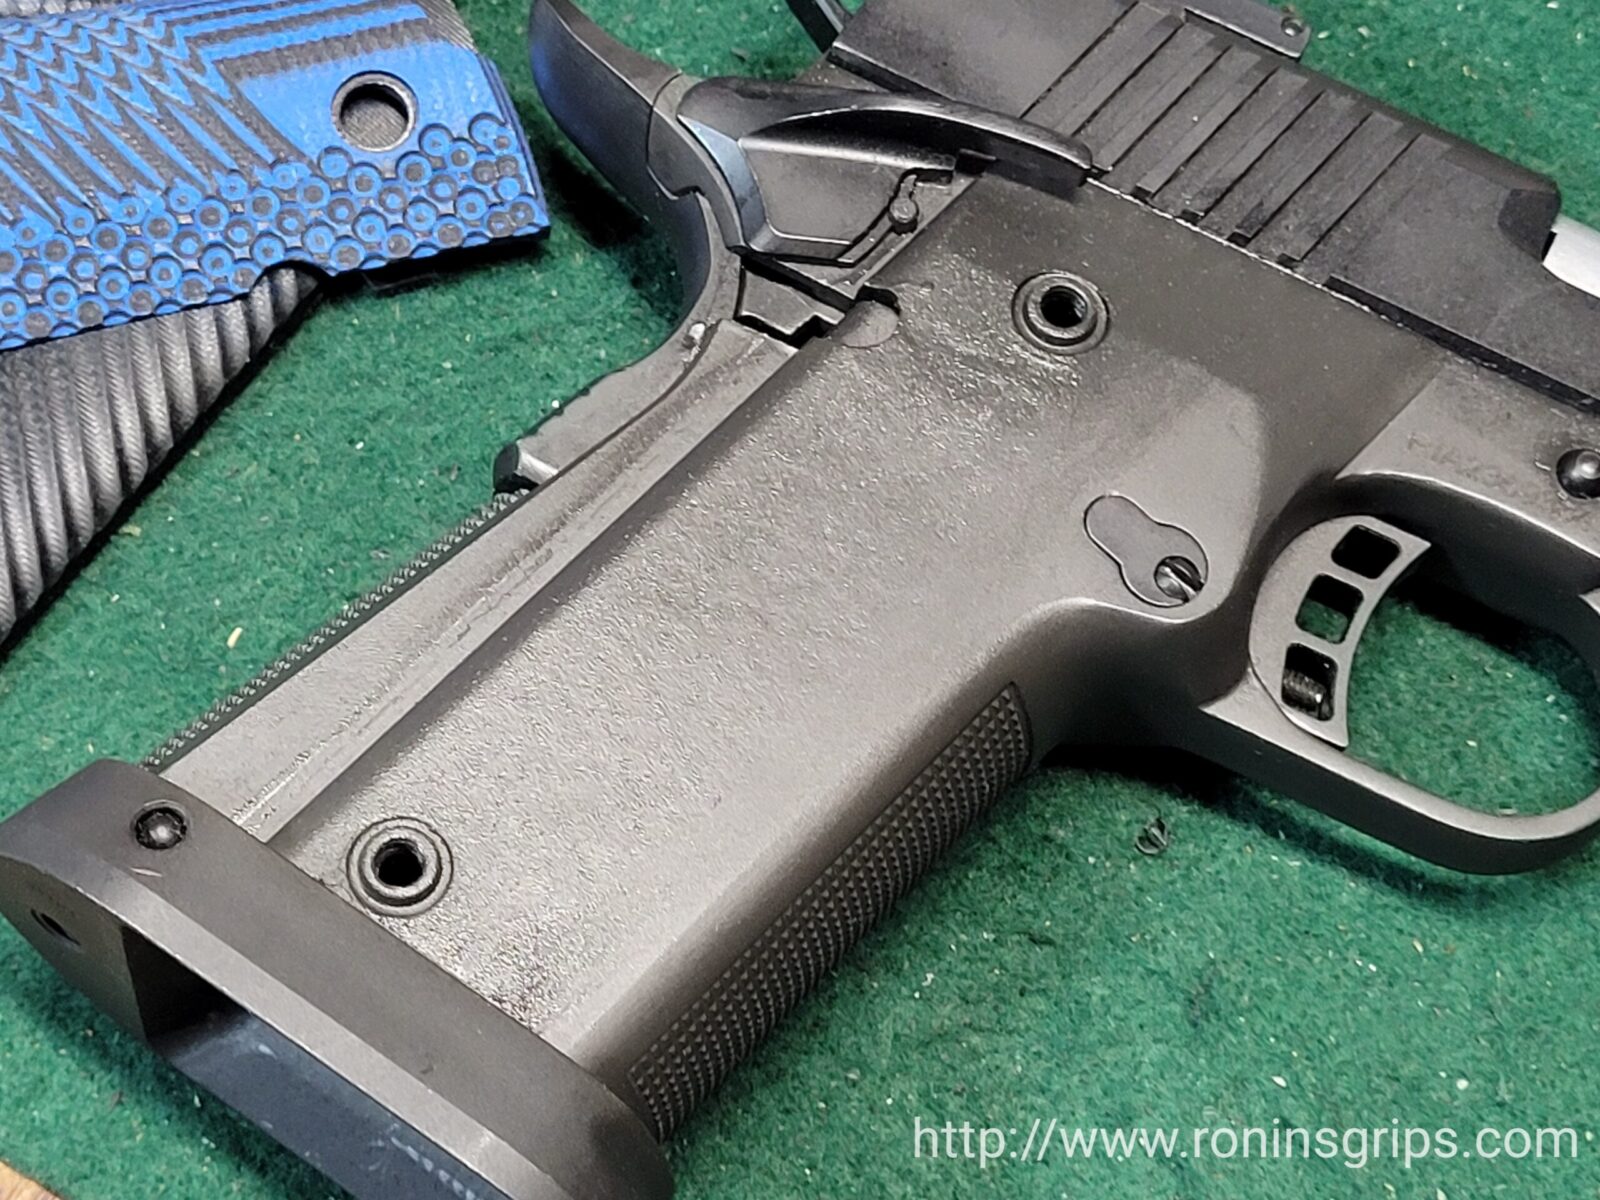
Here’s a good view if the integral bushings that are part of the frame. Probably to keep the overall thickness down, costs as well I bet, separate bushings were not used.
So who sells grip panels? Option 1: Stoner CNC
I found three vendors and ordered in panels for testing. I’m doing this first post on the first box I opened – no super secret selection crtieria. This first set came from Stoner CNC.
Matt Stoner is the owner of Stoner CNC located in Archbold, Ohio, and makes grip panels from G10 composite for just a ton of pistols – 1911, Kimber, Ruger, Springfield Armory, Beretta, RIA and more. I ran into one small snag – I couldn’t find any recent reviews, his Facebook page was last updated in 2019 and nobody answered emails from his website while I was searching. I kept digging and what I found out is that he also sells on eBay and on Amazon so I went ahead and ordered two sets of panels from eBay [Click here for the listing] and they arrived six days later — by the way, he also did reply to the email just before they arrived I think. My guess is that he’s like a lot of small businesses (including mine) – stretched thin trying to keep all the balls in the air – manufacturing, emails, Facebook, etc.
As of my writing this, he doesn’t have them listed on eBay or Amazon but does have the panels that you need on his website. He only offers one series of plates that he calls “Slash & Burn” under the 1911 doublestack listing on the main page. From there you can pick the color and specify what model frame the panels will go on. The RIA Short is for pistols with the factory mag well flare (the big bell bottom on the A2 HC pistols) installed and the Long model is if you have removed / don’t have the flare.
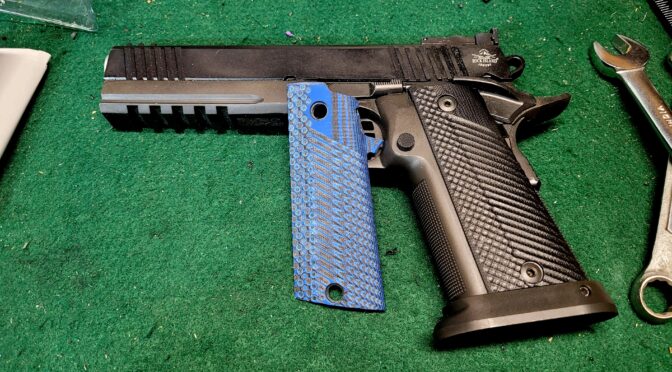
These are the “Slash & Burn” grips for double stack 1911s and they are for the RIA Short (Magwell) meaning the factory mag well flare is installed. He does offer a long cut if you do not have the magwell flare installed.
The machining of the G10 is nicely done. It seemed plenty strong from what I could tell.
Installation is very straight forward – unscrew the pair of screws and put on the new panel. I did not need to sand anything to fit. You’ll notice the holes are a little on the large side so you can move the panels a hair if you need to. If you must trim them to fit, look very carefully at the bottom at it may be hitting the flare and just need a bit of material removed. Again , mine went right on.
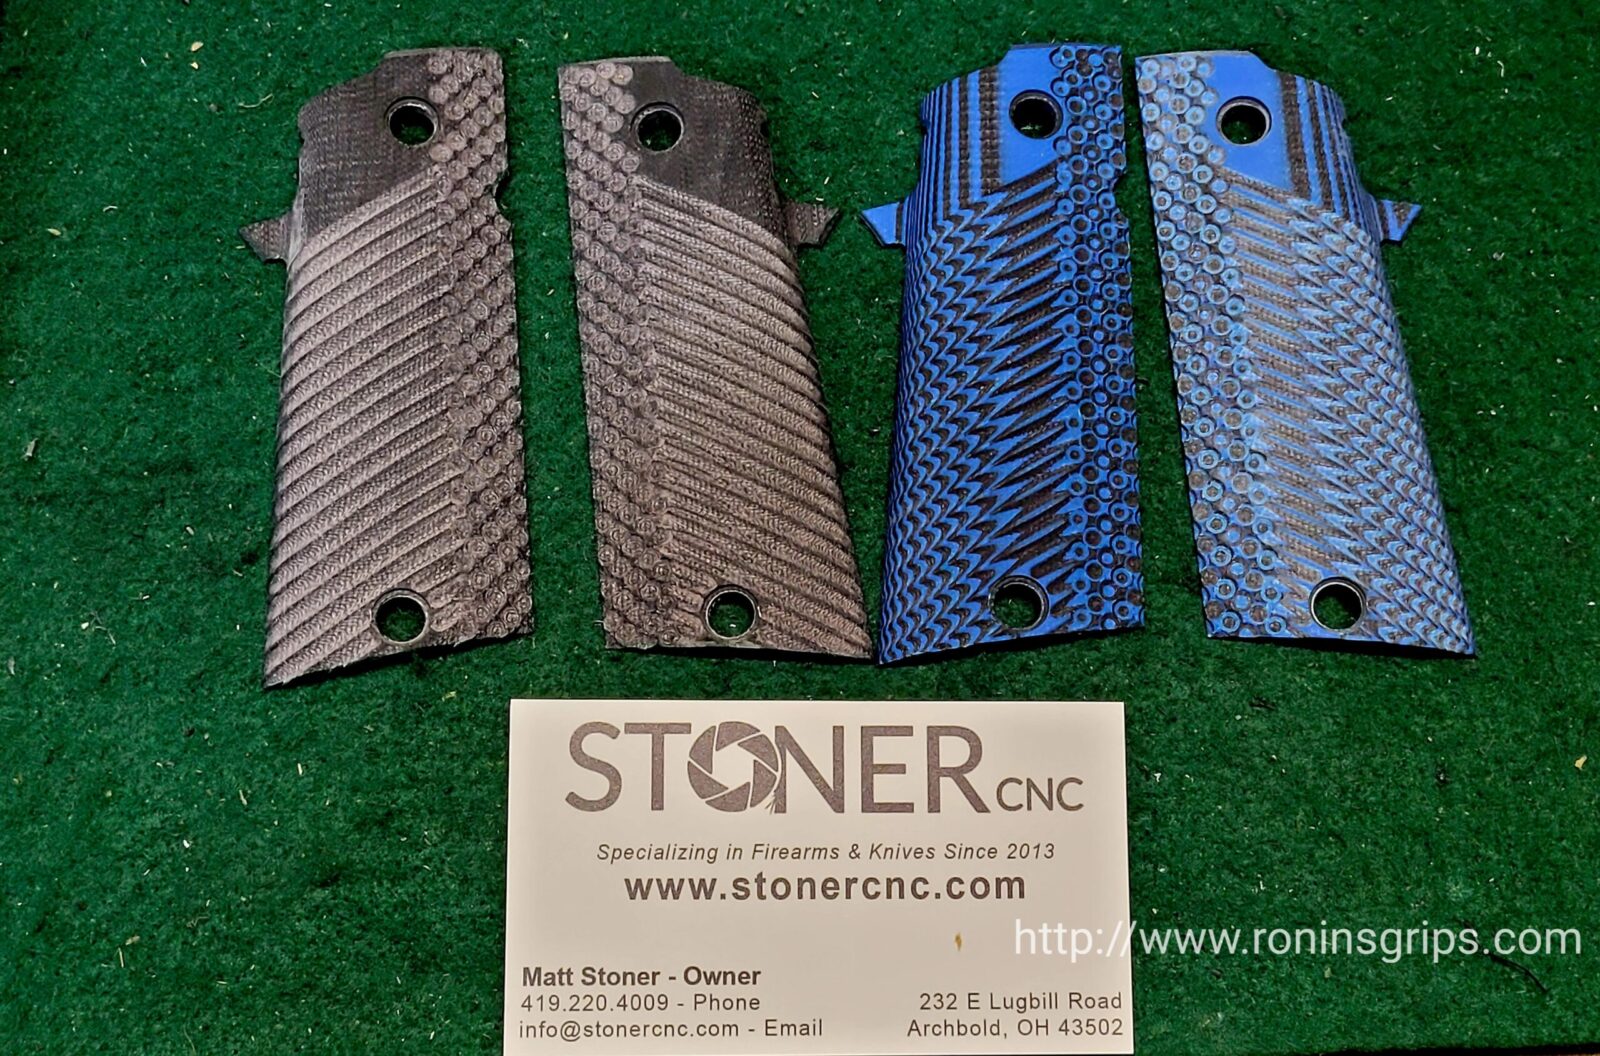
The far right plates are the Stoner Slash & Burn in Black. The middle plates are the originals from RIA and, of course, you can see the blue ones on the pistol.
Summary
They are well made, affordable and give you different color options. There is a little bit more of a positive feeling meaning I can feel the ridges and get more of a grip whereas the original RIA plates seem a tad smoother.
Bottom line, if you want something other than black then Stoner has you covered. If I had it to do over, I would have gotten another color for the second set other than black.
Would I recommend them – yes and I hope this helps you out.
Note, I have to buy all of my parts – nothing here was paid for by sponsors, etc. I do make a small amount if you click on an ad and buy something but that is it. You’re getting my real opinion on stuff.
Rock Island Armory (RIA) is a brand name that is owned by Armscor Global Defense located in Marakina, Philippines. Armscor obtained a license from the Philippine government in 1952 to begin making firearms. In 1980 it became Arms Corporation of the Philippines (ArmsCor) and in the mid-80s they bought the US brand “Rock Island Armory” and began exporting firearms to the US. They have invested in quality improvement and automation to create their wide variety of firearms offered today. They also have opened plants in the US – one in Stevensville, MT, and the other in Pahrumo, NV.
In March 2022, a Philippine TV crew visited the Armscor factory in Marakina and produced this nice video that focuses mainly on their 1911 production area:
The reason I wanted to share this with you is that RIA pistols do have a long history and Armscor is not some fly by night company. This is my opinion – I would describe RIA 1911 pistols as being designed, built and sold to shooters who want an acceptable 1911 without spending a fortune. They are not claiming to turn out semi-custom pistols – instead, good enough pistols at an affordable price point.
In marketing, when you are trying to hit a certain price point to attract the buyers you are after, you have to figure out the features, the materials, and process combination to get you there. Now reliability and accuracy are features also so this needs to be factored in – the pistols need to be good enough but not necessarily over the top – even though we wish they were.
Ok, but are the 9mm HC 17 round pistols “good”?
So let’s go back to the question – are they good? For the price, yes. You can’t compare them to far higher end pistols such as Stacatto or Bul – it’s simply not fair. It would be like comparing a daily-driver economy model Ford or GM car to a BMW. Yes, they are all cars but the engineering and attention to detail during manufacturing in the BMW are going to be very different. They are for different markets comprised on people with different disposable income levels and tastes – and have different price points.
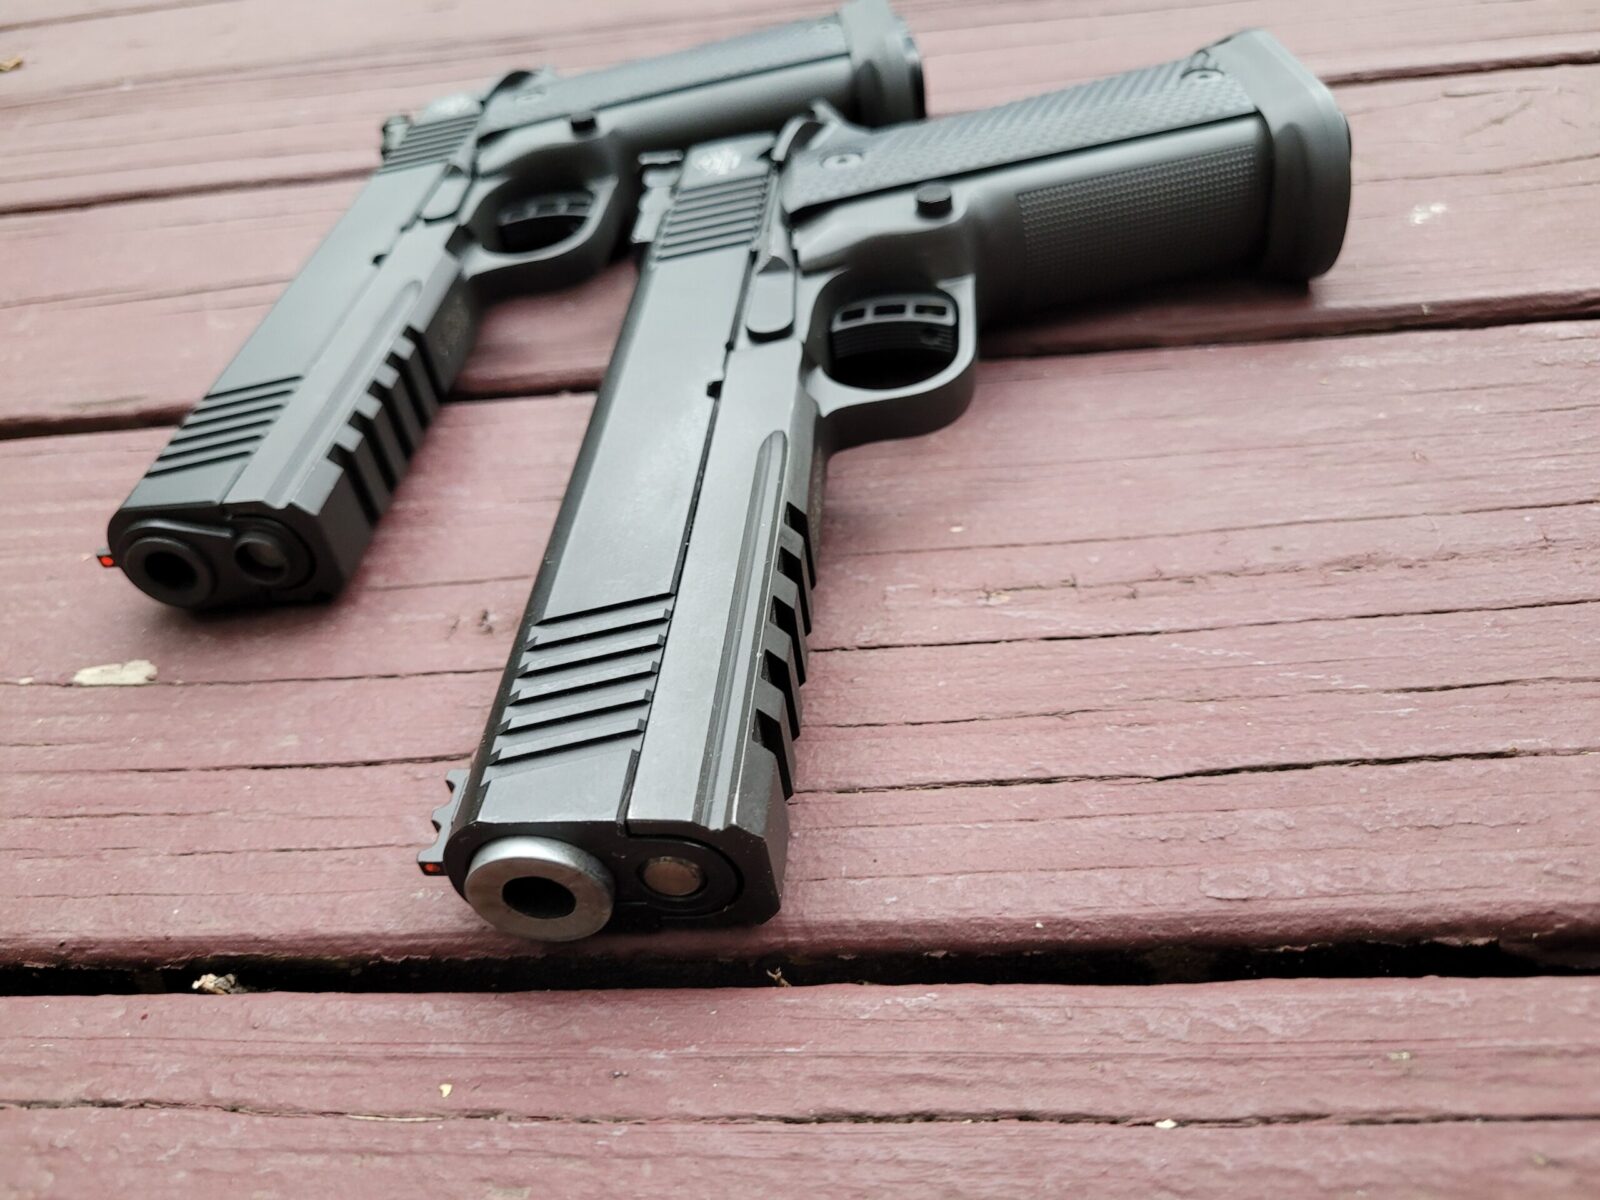
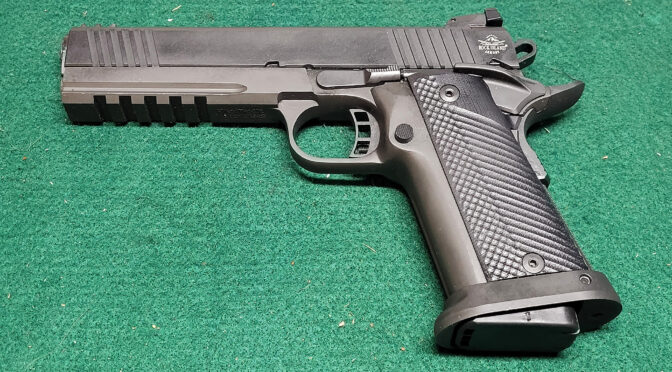
The two pistols I am discussing to be clear are the 9mm RIA A2 HC pistols – the 51679 Tac Ultra FS HC and the 56645 Pro Ultra Match HC – by the way, FS means “Full Size” and HC means “high capacity” because they hold 17 rounds in staggered magazines.
The frames and slides are made from 4140 alloy steel via CNC and they do have QA steps. The barrel seems to be pretty decent but then the price point issue begins to creap in.
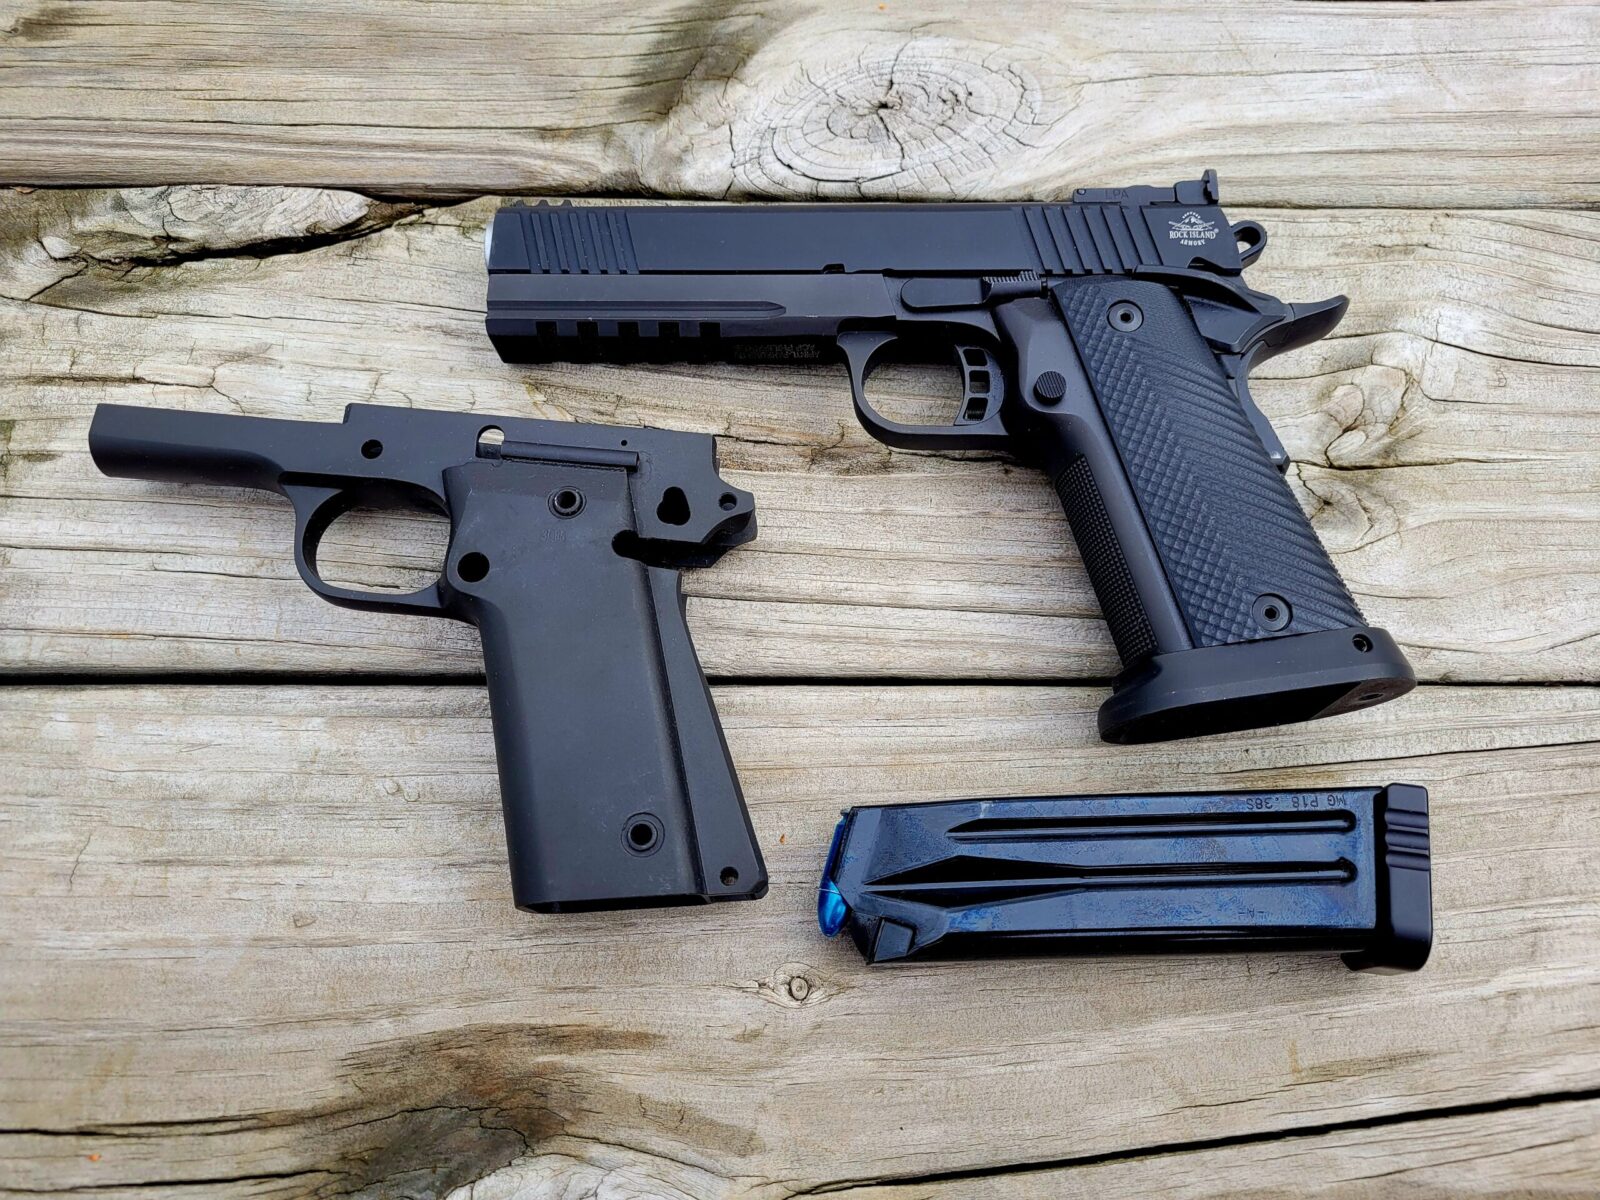
I bought four of the A2 HC 80% frames back when I was doing R&D on magazines for the 10mm/..40 S&W calibers (they use the same magazine design) and also the 9mm magazines. What not everyone knows is that these pistols also share a common frame. I installed the RIA magazine catch and ejector but they milled all of the holes and applied, as you can see, a very decent parkerized finish.
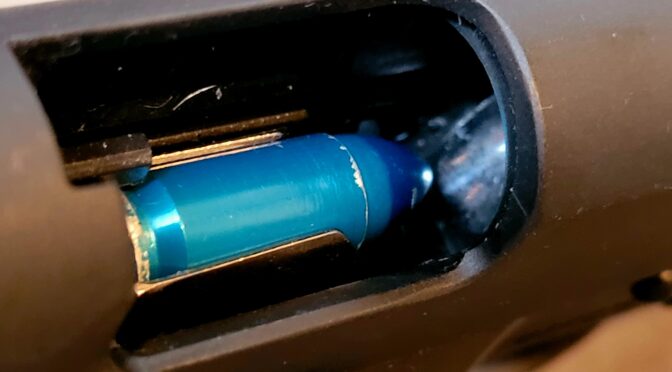
Here are two 80% frames with the top one holding a 10mm magazine and dummy red A-Zoom round. The bottom one has a 9mm magazine. The blue round is an A-zoom snap cap and I don’t use or recommend them any longer as the bullet is shaped very differently than a 115gr or 124gr FMJ round so you may think feeding will work when it doesn’t. I sure found that out the hard way.ĵ
For example, to keep costs down, Armscor uses metal injection molded (MIM) parts. I know through first hand experience, the extractors are MIM and they will not have the longevity of a forged part made from tool steel such as one from Wilson Combat *but* the extractors can be replaced if you ever have a problem so it’s not like you suddenly have a boat anchor and that’s one of the beauties of 1911-style pistols – there is a huge aftermarket parts industry and tons of websites/forums out there to help you sort out what is going on not to mention 1911 gunsmiths and that Armscor has good warranty service – I’ve had to avail on it twice – one on a 6″ 10mm Big Rock and also on a 9mm Tac Ultra that had failure to extract issues … and on that one, there was something seriously wrong because just replacing the extractor didn’t work. [Click here for a post I wrote about my extractor journeys with RIA 9mms].
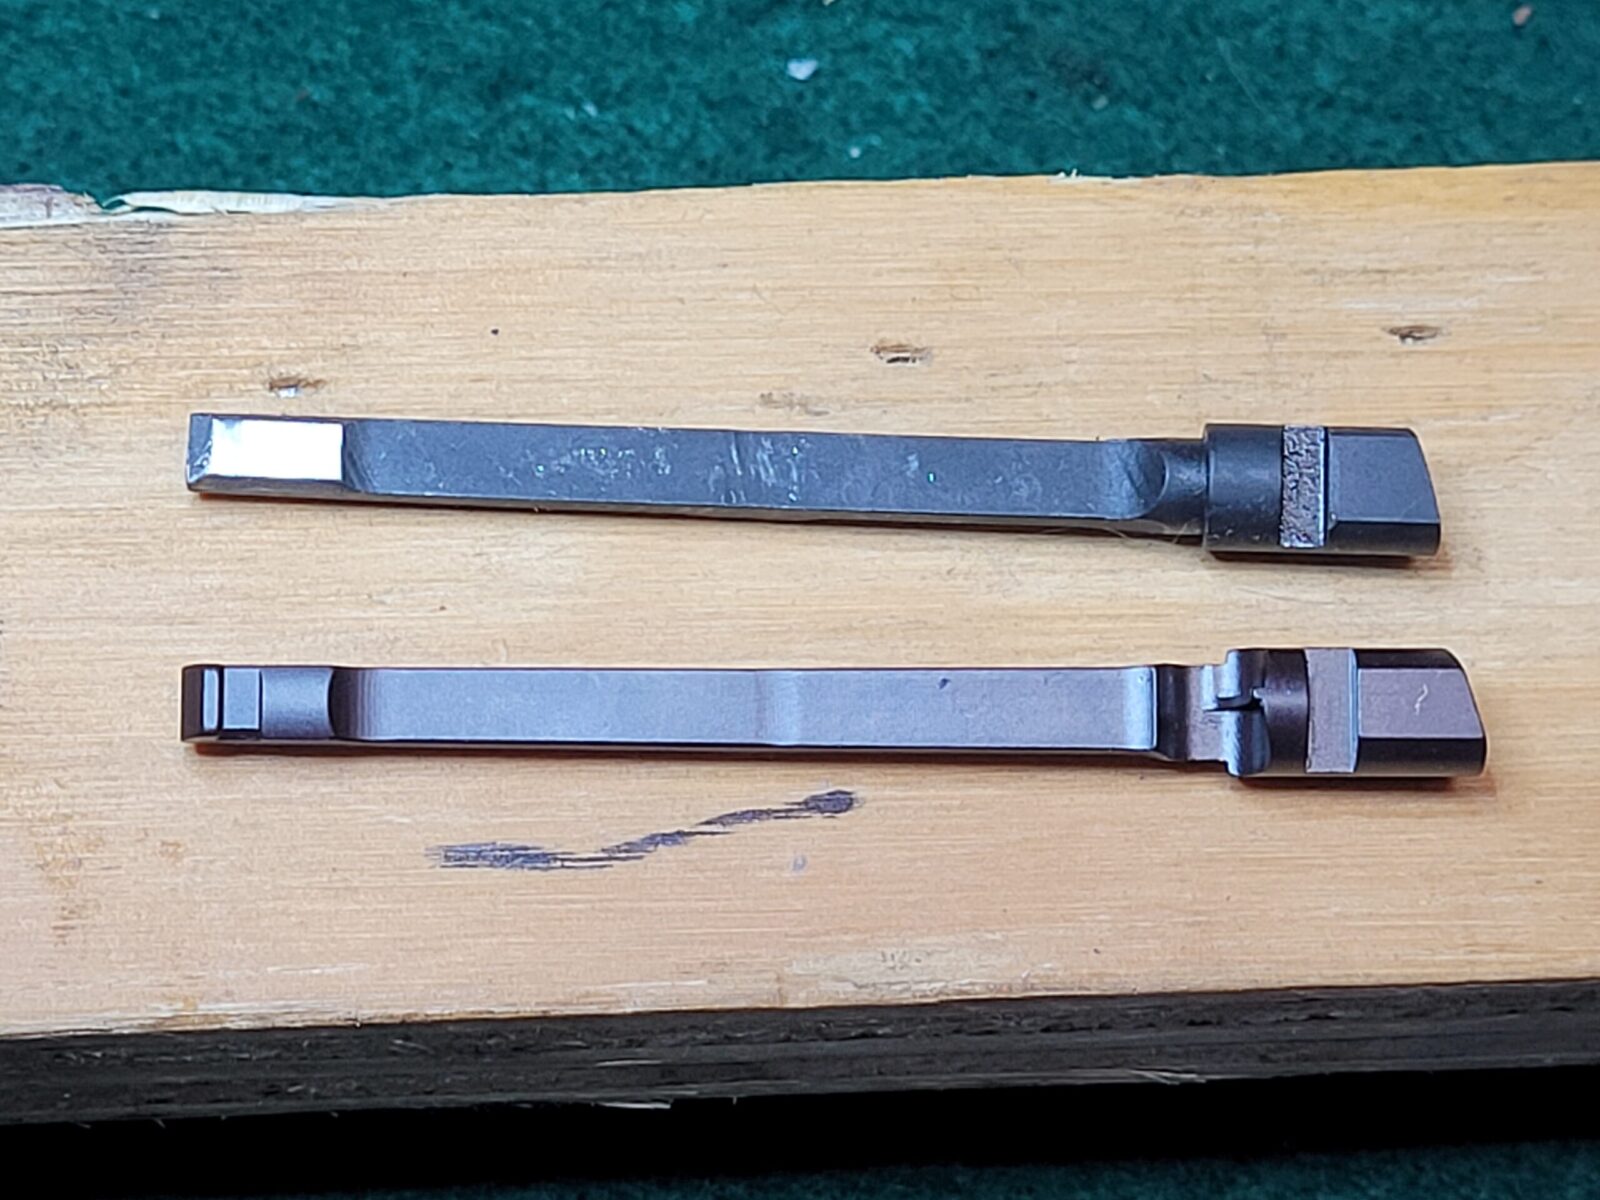
The top is the original Armscor extractor and the claw snapped off. The bottom is a forged tool steel Wilscon Combat. If you run into an issue, read the post I wrote and upgrade to a Wilson.
They also use a parkerized finish and its applied very nicely. There is a but coming – but parkerizing leaves a rough finish and means they need to wear in more compared to other brands that use a different finish and/or have careful polishing and tuning while parts are assembled.
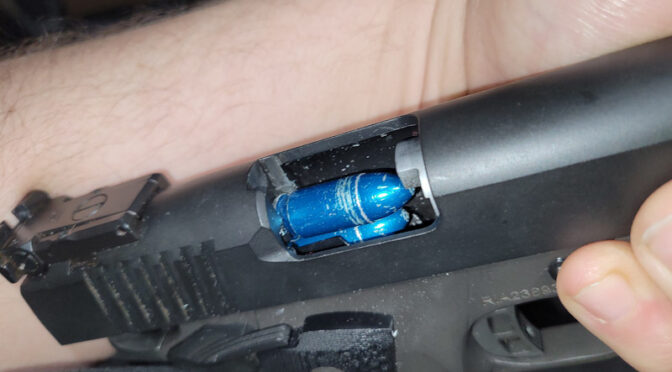
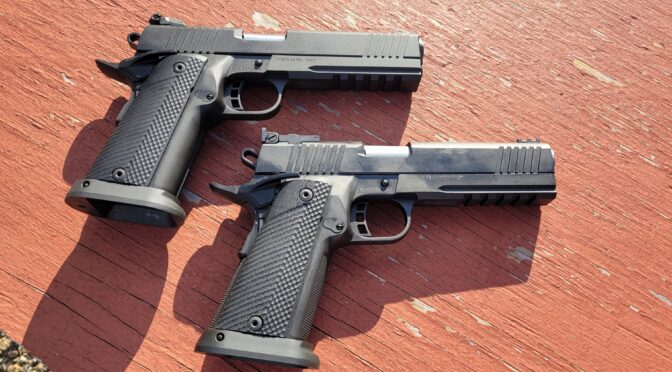
Every parkerized RIA pistol that I have seen has a very nice consistent finish on it. The left pistol is the TAC and you can tell due to the bushing, normal barrel and no checkering on the grip. The right pistol is the Match. It has a bull barrel, full length guide rod and checkering on the front of the grip. The rear sights differ but you can’t see them in this photo.
That’s an 80% frame with no modifications right next to it’s finished cousin – a 51679 Tac Ultra. Under the pistol is one of our tuned Mec-Gar P18 magazines with a Dawon +200 base plate. Click here for our 9mm RIA magazine offerings.
Conclusion
This is my way of saying they are good enough. You are buying an entry level pistol that has been on the market for many years and word would get around quickly if they were utter junk. Does the gun need wear in? Yes. Might there be issues? Yes. Do they have warranty support? Yes and they do stand behind and repair their pistols.
Would I recommend these RIA Tac Ultra FS and Pro Match Ultra HC pistols to someone looking for an entry level 17 round 9mm 1911 style pistol? You may find it odd but yes I would and I’d explain the above.
I hope this helps you out.
1/6/2023 Update: I’ve had zero problems since writing this post. Both pistols have cycled thousands of times during magazine testing (meaning rounds are cycled by hand but not actually fired) and the slides are smooth as glass. I took both to the range recently and they functioned just fine with both 115 and 124gr bulk FMJ – I think the 115gr was CCI and the 124gr was S&B if I recall right.
Note, I have to buy all of my parts – nothing here was paid for by sponsors, etc. I do make a small amount if you click on an ad and buy something but that is it. You’re getting my real opinion on stuff.
This post reflects a journey I’ve been on regarding making and selling magazines for the 9mm Rock Island Armory (RIA) FS A2 pistols. These pistols are based on Para Ordnance designs that use a staggered magazine that can accomodate 15+ rounds in a fattened 1911 grip. Think of them as 1911 pistols on steroids with a fat grip the holds more rounds they hold more rounds so sometimes RIA calls them “HC” for high capacity.
These are my two 9mm test platforms. The top pistol is the 56645 Pro Ultra Match HC (you can see the checkering on the front strap of the grip) and the bottom is 51679 Tac Ultra FS HC.
For over a year now, I’ve been making magazines for the FS A2 pistols chambered in 10mm and .40 S&W. The interesting thing is that 9mm, .38 Super, .40 S&W and 10mm all use the same frame. You’d think making the 9mm mags would be an easy jump – I did at least — maybe it was just me.
The 10mm round is bigger than 9mm – it is fatter and longer. You don’t think about that a lot until you are trying to get the ejecting case to hit the ejector – the 10mm round is a hell of a lot easier to make hit the ejector than the 9mm. Also, the relatively short 9mm round has a long way to travel before it goes into the chamber. I found myself having to kick out some assumptions I had for magazines in order to get the 9mm round to reliably work.
In general, I now understand why the 1911 community is so fast to cast suspicion on the magazines when feed and ejection problems are happening. John Browning was an absolute genius and the 1911 design shows it but it does need all of the parts to be working together correctly to deliver a reliabile pistol.
Oh yeah, the magazines can make or break reliability. Let me share with you some observations I’ve made so far about the magazine after making a few hundred of the 9mm models either modifying P18 magazines (.38/9mm) or P16 mags (10/.40).
What about feed lip length?
The feed lips are the part of the magazine that hold the top round down and at the right angle. If they are too short, the round tends to be presented at too high of an angle and if they are too long, the front gap may not be adjustable enough to support the feed angle needed.
The blue rounds are A-Zoom Snap Caps. I use them during magazine prototyping and testing rather than live ammo The magazine lips are long pieces of rounded sheet metal that are going up the sides of the cartridge and are both positioning and retaining the round. Note the plastic “shelf” of the follower that is on the left bottom edge of each magazine that is level with the metal body. When the last round is fed from the magazine, the follower rises and that shelf is what engages the slide lock lever to put upwards pressure on it. When the slides travels rearword with the extraction and ejection of the last round, the slide lock level pushes up and locks the slide open ready for the next magazine to be fired.
The original 1911 was designed for .45 ACP but we are feeding a little short round from the back of the magazine towards the chamber a mile away. How can we maintain control? The short answer is have longer feed lips on the magazine. These longer lips are what get the relatively small 9mm round from the back of the magazine all the way into the chamber.
“We’ve got a long way to go and a short time to get there” were the famous words in “East Bound and Down” by Jerry Reed in the movie classic Smokey and the Bandit. The feed lips need to control the feeding of the cartridge all the way from the back of the magazine to the point the bullet engages the feed ramp and then starts to go into chamber. A 9mm Luger cartrdge is 1.169″ long. In comparison, 10mm Auto is 1.260″ overall. and .45 ACP is 1.275″. You might thing those differences are small but they definitely impact the design and operation of the pistol – they need to be planned for if you want reliability.
The reason I listed this section is that the length of the feed lips can vary depending on the model of pistol so if you are trying to use a magazine from another type of pistol you may find you need to trim the feed lips back. I didn’t have to change the P16 or P18 mags for the 9mm but I did need to modify the P16 Para mags to feed reliability in RIA 10mm and .40 S&W pistols.
What happens if the front feed lip gap is too wide? You tend to get a Failure to Eject (FTE) or the Slide locks open prematurely
The feed lip gap at the front of the magazine controls where the cartridge is going vertically – the angle towards the chamber. Increase the gap and the front of cartridge rises and decrease it and the angle goes down. But wait, there’s more.
If the front of the round pushes up too much, it will cause the extracting case to slide up the breech face and out of position thus missing the ejector bar you can see just above the rear of the cartidge. The tell tale is that you have the new round and the old case in the back of the slide at the same time.
Now here’s the first gotcha: The feed lip gap still controls the rise of the bullet in the front but if it goes too far, the bullet is going to interfere with extraction, pushing the extracted case upwards on the breach face of the slide and out of position to correctly engage the ejector and all of a sudden you have the old case in the slide, a new round trying to feed and you have a jam. If you go for a front feed lips gap of .305-.308″ you will be fine. Depending on your pistol once you get somewhere around .320″, you are going to cause the ejection problem I just mentioned
There’s an interesting design issue with all 1911 breech faces – they are flat. The extractor pushes the case to the right in this photo. The ejector bar is exiting its cut out from the breech face in the lower right but there is nothing to truly limit upwards travel.
I’ve spent a lot of time chasing this dimension because you tend to get better feeding the more the bullet is oriented towards the chamber but with the 9mm you have to be mindful of the impacts on the the ejecting cartridge.
By the way, in addition to interfering with ejection, a feed lip gap that is too wide can allow the follower to travel too far upwards and prematurely lock the slide open with one cartridge remaining in the magazine.
I should point out that the most likely cause of a failure to eject (FTE) is a faulty magazine. The second most likely is a worn or failing extractor. It probably is not the ejector bar.
What happens if the front feed lip gap is too narrow? You tend to get a failure to feed (FTF)
If you move the feed lips to close together, the new round that needs to be fed into the chamber comes in at too flat of an angle and smashes straight into the feed ramp. On one hand the 9mm bullet is rounded abruptly but the feed ramp is quite abrupt. I tend to find that somewhere under .302″ this happens but I haven’t done a lot of testing on this dimension because I have been more focused on wanting the cartridge angled up vs. down.
The round travels up the feed ramp but it needs have enough of an upward angle to ride the ramp up. If it is too shallow it will slam the bullet into the ramp and stop. Note that RIA did polish the ramp – that was an unexpected nice touch. In general, I’d recommend polishing the ramp smooth to aid in feeding. Also, look at the shape of the snap cap – it mimics a classic full metal jacket 115gr bullet. The curvature of the bullet will aid in feeding. Different bullet shapes can affect feeding in some pistols and you may need to tweak certain mags for certain rounds – it’s next to impossible to guess so test your pistol with certain combinations of cartrdiges and magazines to ensure they are reliable. You may find your pistol likes some and hates others. I’d probably just move to another cartridge if it were me and my pistol had issues with a given round.
Yeah, the lips have a memory
So the magazines are made of high carbon steel that is heat treated. The feed lip gap falls within a certain tolerance. If it changed either wider or narrower, the lips are going to move back towards their original positing anywhere from .002-.004″ so plan accordingly.
This is where experience matters with the mags you are working with. Once you have your dimensions figured out, you may find you need to bend further than the nominal dimension so when the sheet metal starts to relax it will stop in the range you want.
You may also find that the metal does most of its movement in some number of minutes after you do the initial tune and need to do it one more time. Some guys will wait overnight to do the final tuning. I wait at least 30 minutes.
What about left and right bends to the feed lips?
The more you bend the feed lips in one direction too much, the round will point that way and either glance the chamber wall or actually slam into the chamber and stop depending on how off you are. Try and get the cartridge to point into the center of the chamber in terms of left to right.
This is an 80% RIA frame that I used during prototyping. I’m not enough of a machinist to actually complete it but it really helps you see what is going on. If the right feed lip is bent too much to the right then the round will go in that directton – same for the left lip. You want to point the round into the center of chamber.
What about the follower?
It’s really interesting how important the follower is. On one hand it is pushing the rounds up againt the feed lips properly and on the other, there is a small “shelf” on the front left edge that pushes the slide stop lever up and locks the slide open on empty (unless you are using competition followers such as the Arredondos that purposefully do not lock the slide open).
The walls at the top of the 9mm mag really need to taper inward to properly channel the staggered round into the single exit position at the top. The follower’s sides need to be appropriately tapered and rounded as well less they drag on the walls. The original Mec-Gar followers have significant drag that you can feel when loading the mgazine so revising them made the most sense.
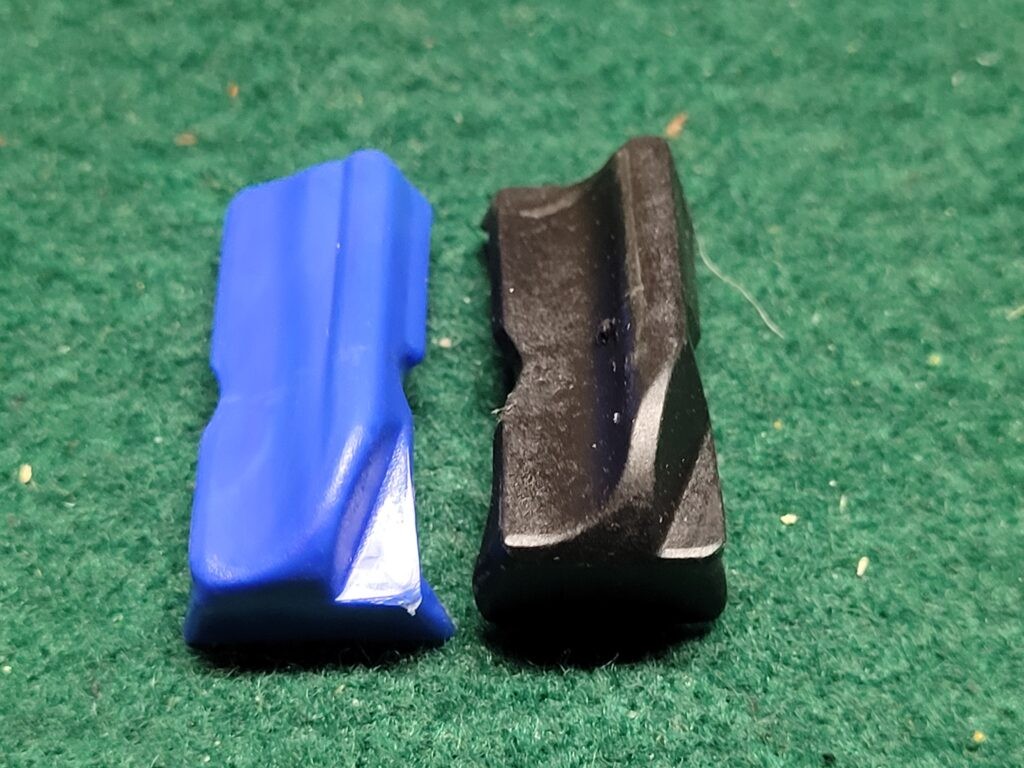
The Arredondo follower is on the left. It is more angled and rounded on the right side in this photo than the Mec-Gar on the right. The Arredondo was desined for competition is when you look at the bottom right edge of each you will see the Arredondo slopes down fast so it will not raise the slide stop lever. The Mec-Gar has a more elevated edge that will lock the slide open. Our modified Mec-Gar followers improve reliability by having more rounded edges but still can lock the slide open.
By the way, to make life more colorful, when you install the follower the spring tension will spread the feed lips wider by about 0.002-0.004″.
How about the spring?
The Mec-Gar springs are okay. How much spring is enough or to little really depends on how well it can keep constant upwards pressure on the follower to move the rounds up fast enough and keep them in position. With the drag on the follower reduced, the spring can do its job.
There is an exception though – if you add a magazine extension or base plate that adds capacity, the spring really ought to be longer so get a Wolff or Arredondo spring that can supply the pressure over a longer distance.
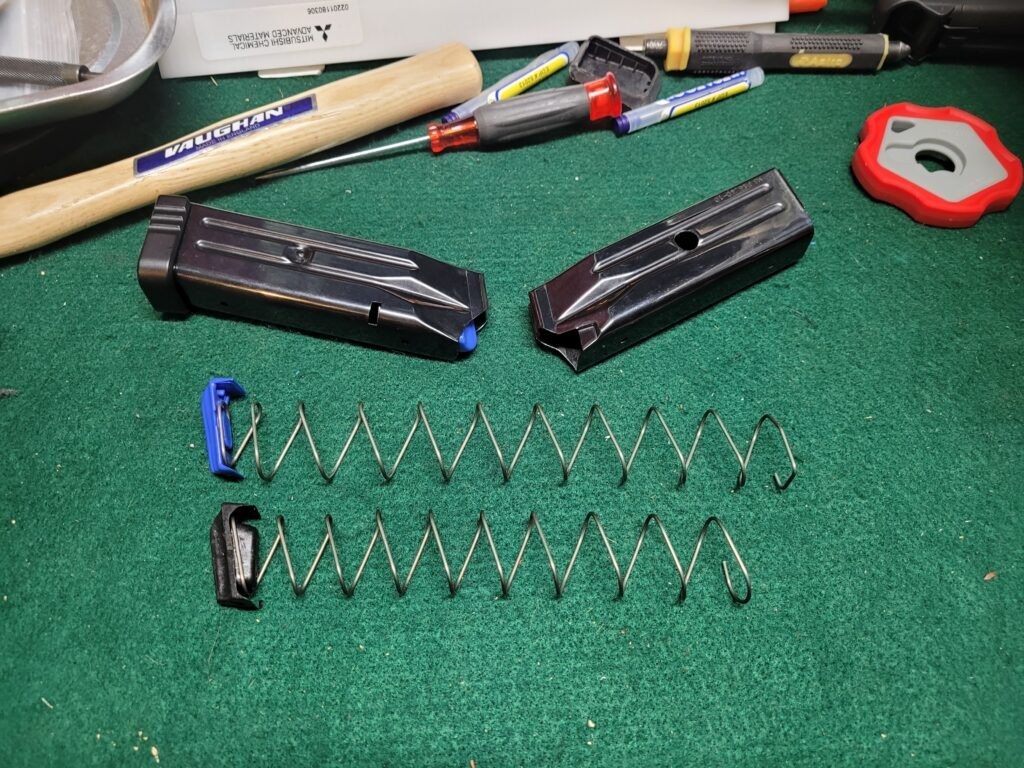
The top assembly has the a easy to identify blue Arredondo follower and longer spring. The spring is made by Wolff but is bent to properly hold the Arredondo follower. The black follower and shorter spring are the original Mec-Gar units.
Yes, springs can and do wear our so if you feel the follower is being pushed up sufficiently or is sluggish *and* the walls do not appear bent then you probably need a new spring.
What about lubricant?
Mec-Gar mags come with some lubricant all over the insides of the mags, follower, spring, floor plate and base plate. On one hand it protects against corrosion but on the other it can attract dirt.
I would recommend that you use a good dry lubricant film. I used to use Dupont’s Teflon dry lubricant film spray but they discontinued it over environmental and health concerns about Teflon. The company is now producing a dry film using a ceramic technology that I really like and find it does a remarkable job at lubricating magazines.
If you are in a marine environment and you need the corrosion protection the use the oil of your choice – you need to worry about rust, I get it. For me, the Dupont Dry Film Lube aerosol spray does a great job. The new followers and the inside of the magazine tubes coated with this enables remarkably smooth movement of the follower.
Number your magazines
A tip you really ought to consider is to number your magazines so you can keep track of them. I like stickers because you can readily remove them if you put a baseplate on a different magazine tube but there are plenty of guys who use a permanent marker or etcher to uniquely identify each magazine.
The benefit of doing this is that when you are at the range if you find that some magazine is having problems, you can write down or take a photo of the number and know what you need to work on. Face it, if you have a bunch of mags and they all look pretty similar it can be hard to keep track of them otherwise.
By numbering the magazines, I can track dimensions and performance over time.
We do sell the stickers if you are interested – click here.
I’m still learning
I don’t claim to know everything – let me right up front about that. I now know what people mean whey they say “The more I learn, the less I know”. In other words, as I learn more I am increasingly aware that there is a ton of stuff I don’t know.
Hopefully this gives you some insight about why one magazine will work great but then another one doesn’t. The above are things to consider.
My reason for writing this is to give you some idea of what we’ve learned and are building into each 9mm magazine that you buy from us – we aren’t just relabeling mags and selling them at a heck of a mark up.
What are are doing is ensuring the dimesions, doing the necessary modifications and testing teach magazine in one of our 9mm RIA pistols to ensure you get a reliable mag. If you have problems with a magazine from us, we will definitely make it right.
We do have a new post about how to load our v2 9mm magazines to get reliable feeding. Click here for it.
Note, I have to buy all of my parts – nothing here was paid for by sponsors, etc. I do make a small amount if you click on an ad and buy something but that is it. You’re getting my real opinion on stuff.
Starting in 2021, I started to offer 10mm magazines for the Rock Island Armory A2 HC pistols – “A2” being a marketing opportunity to refer to the next generation 1911A1 pistol prototyping the US Army did starting in 2004 that experimented with different sights, extractors, mainsprings, etc. The “HC” stands for high capacity and reflects the RIA pistols are using a staggered magazine design to hold far more rounds than a single stack could.
At any rate, I had a number of customers ask me to produce mags for the 9mm RIA A2 HC pistols – the 51679 Tac Ultra and the 56645 Pro Ultra Match HC. Our 10mm mags had proven to be very successful and after enough requests, I decided to enter the 9mm magazine market.
One thing I learned with making AK grips is that you really need to have the weapon to make a part for it. This allows you to check fitment, reinforce potentially weak areas, etc. So, when I started with the 10mm mags, I bought a 52009 Rock Ultra HC and later a 56862 Tac Ultra Match HC. Why? Because you also find that a given firearm may differ enough that if you build and test only with it, you may not be making something others can use.
There’s an engineering problem called “stacked tolerance”. Every part has a specification that says, for example “9.0mm” and then there is a tolerance specified – for example “+/- .01”. That means the part produced can range from 8.99 to 9.01 in size. Make an assembly and all of those tolerances may combine, or “stack” in such a way that if you build a part to work for that particular unit then another assembly that happens to stack in the other direction may not be able to use that part. Testing on multiple pistols helps with a testing – at least a bit because you are reducing the odds of one pistol having a problem or working and others not.
So, by having both the 52009 and 56862 10mm pistols, I could test magazines to make sure they fed right, dropped free, etc. With the 9mm pistols, I had limited funds and just started with the 51679 – the Tac Ultra. That decision bit me hard.
The Initial Magazine Prototyping Didn’t Make Sense
When I prototype, I buy a bunch of original magazines and then start looking for what is close enough to modify and start tinkering with the feed lips, feed angles, the spring and the follower. To keep track of things, I applied numbered stickers to every magazine and kept track of the dimensions plus performance.
What I also learned with the 10mm mags is that the best dummy rounds are the machined aluminum A-Zoom Snap-Caps. Dummy rounds that are made from a case and a bullet will see the bullet pushed back into the case and/or get deformed after some fairly low number of cycles. The machined aluminum A-Zoom Snap-Caps are dimensionally accurate and can cycle hundreds of times before needing to be replaced. By the way, don’t do this type of work with live rounds – it’s an accident waiting to happen.
Back to the 9mm world, I was working on the mags and things just didn’t make sense. A magazine would work and then it wouldn’t. One set of dimensions would work and then they wouldn’t. Something just wasn’t adding up. The pistol would fail to eject randomly, I’d then have the old round and the new round in the slide at the same time and of course it jammed.
It had to be the mags right? I blew through a bunch of mags and time before it dawned on me that the pistol itself must have issues. I hadn’t questioned it before because the pistol was brand new out of the box. Sure, I had cleaned and lubed it first before cycling hundreds of snap caps through it. The problem was that I assumed it was good to go and the initial testing seemed to show a reliable pistol … but I only tested a few mags worth of snap caps – maybe 34-52 cycles max.
Testing The First Pistol
I loaded a magazine up, racked the slide and loaded a snap cap. I then pulled the slide back slowly and the extractor lost control of the extracted round as I pulled the slide to the rear. That wasn’t supposed to happen. If I went slow, it would either fail to extract completely or lose control of the round.
I’m not a 1911 gunsmithing guru but I had to learn some stuff really fast. I knew if I sent the pistol back to Rock Island/Armscor, it would be at least a month before I would get it back. So I read posts and watched videos that explained the pistol had an extractor problem and how to correct it. I bought a few different brands of 9mm extractors, the Brownells extractor tool, the Jack Weigand extractor gauge and tensioning tool.
Boy, I could not get that thing to work even after trying a few different brand extractors and a Wilson. At this point I was pretty ticked off. My last best guess was that the extractor looked like it was clocked slightly. When I inserted the Weigand 9mm gauge, I could feel initial tension as I inserted it and then it would drop off rapidly as I inserted the gauge the rest of the way (it centers over the firing pin hole). Rather than do a new firing pin stop plate, I decided to stop chasing best guesses mainly because I was blowing time I did not have to spend. The pistol was under warranty so feeling both stupid and defeated, I finally got an RMA to send the pistol back.
No, I’m Not Incredibly Patient
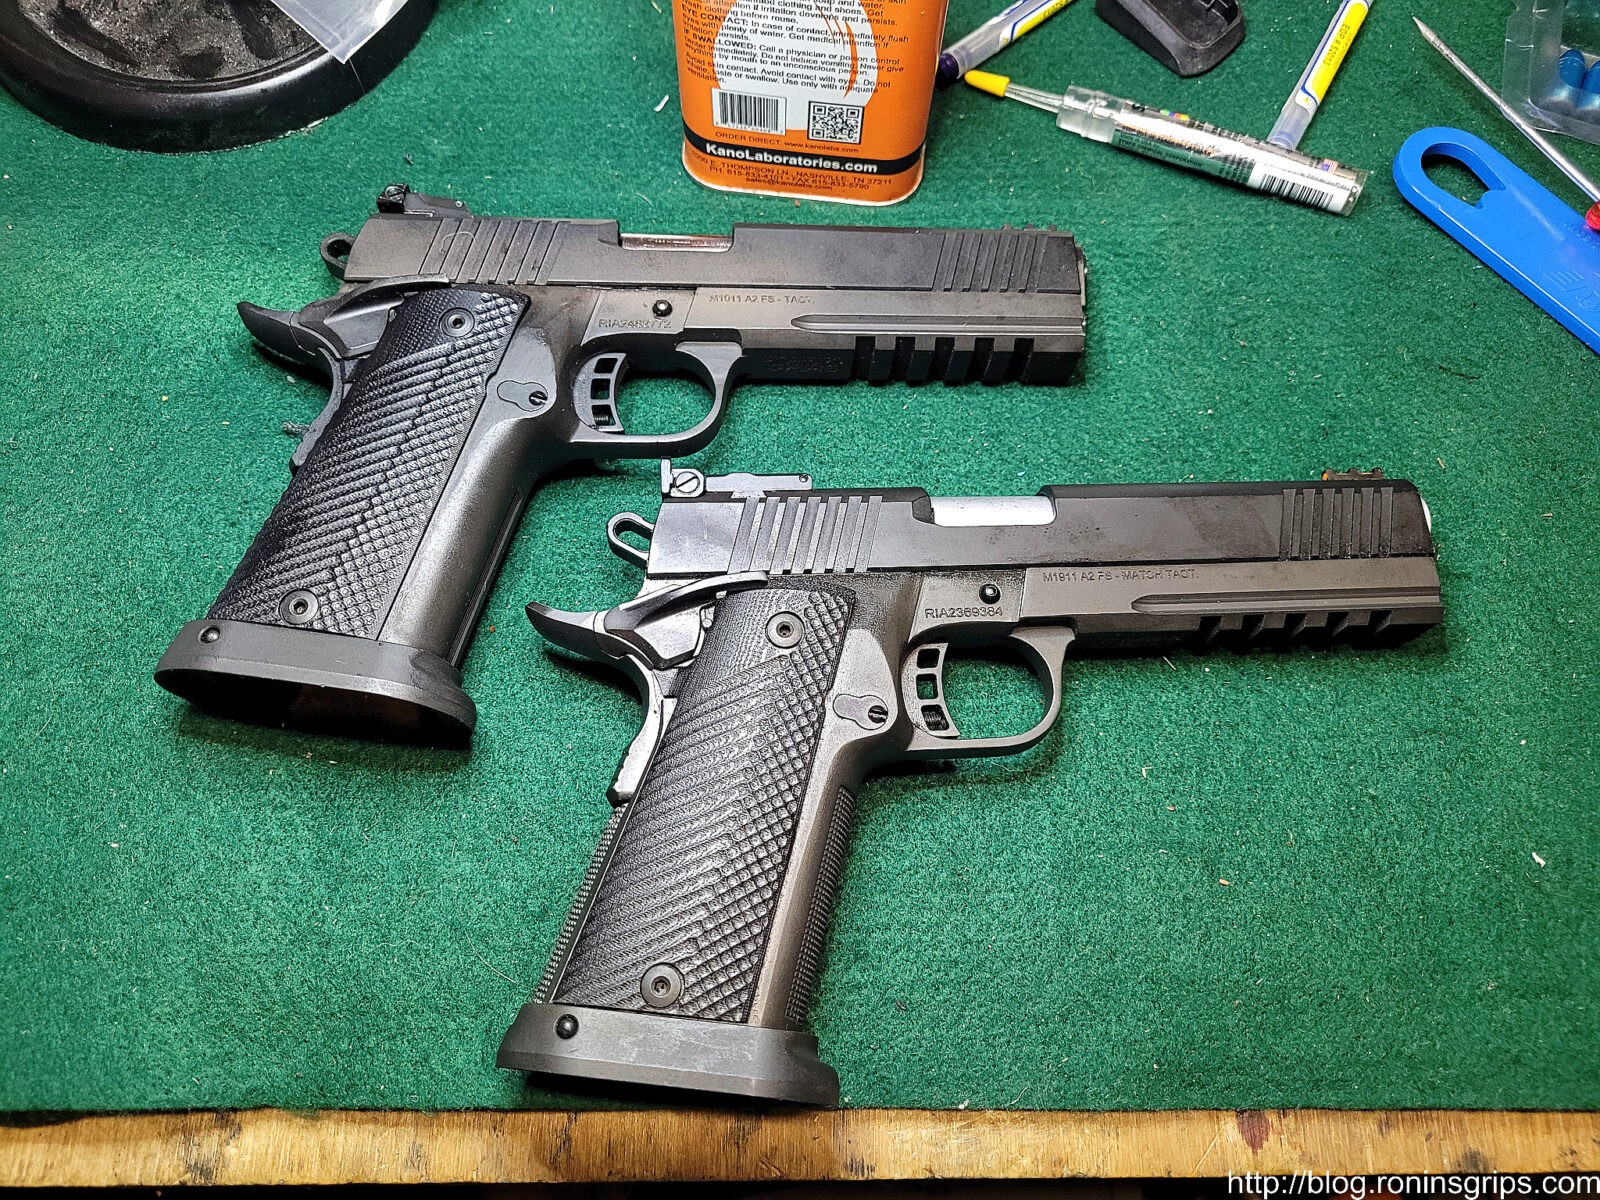
In the meantime, I bought a 56645 Pro Ultra Match HC and it has worked great – no problems at all. I was able to work out the details on the mags. Now, I am not patient so I actually ordered a second 51679 Tac Ultra that I looked at, cycled a few rounds through but really didn’t use a great deal – my primary go-to test platform was the 56862 … until I decided to take some photos about the RIA 9mm A2 HC pistols and looked at the 51679’s extractor.
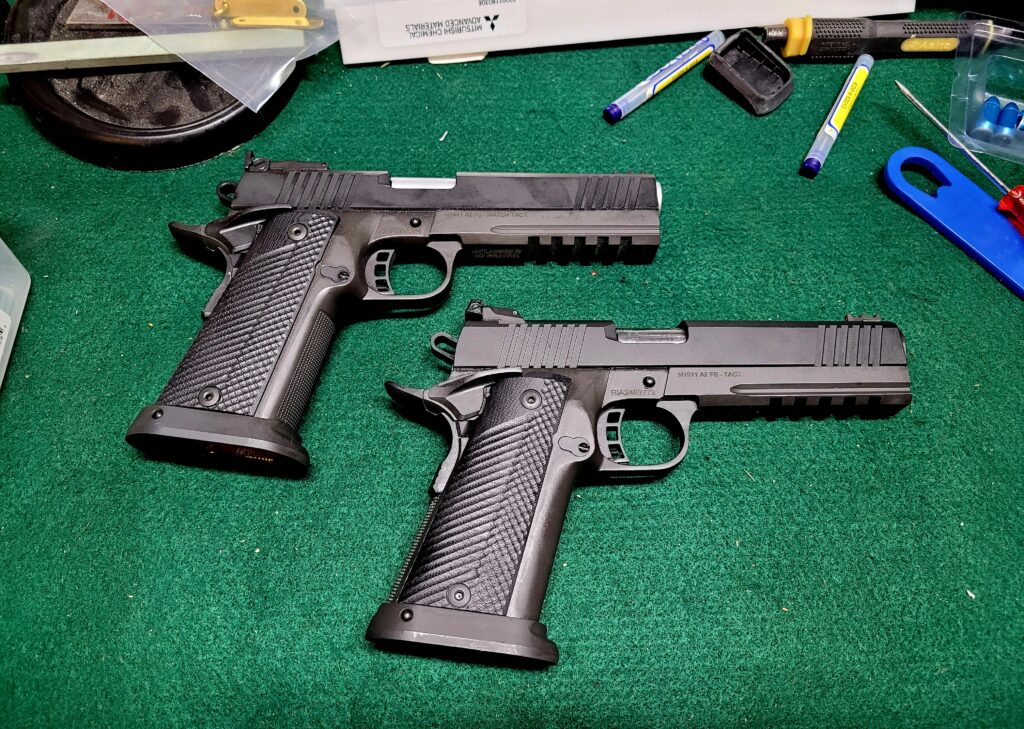
The second 51679 is at the top and the 56862 Tac Ultra Match is at the bottom. The Match pistol has nice checkering on the front of the grip, the top of the exposed barrel is a grey matte finish and has a target rear sight.
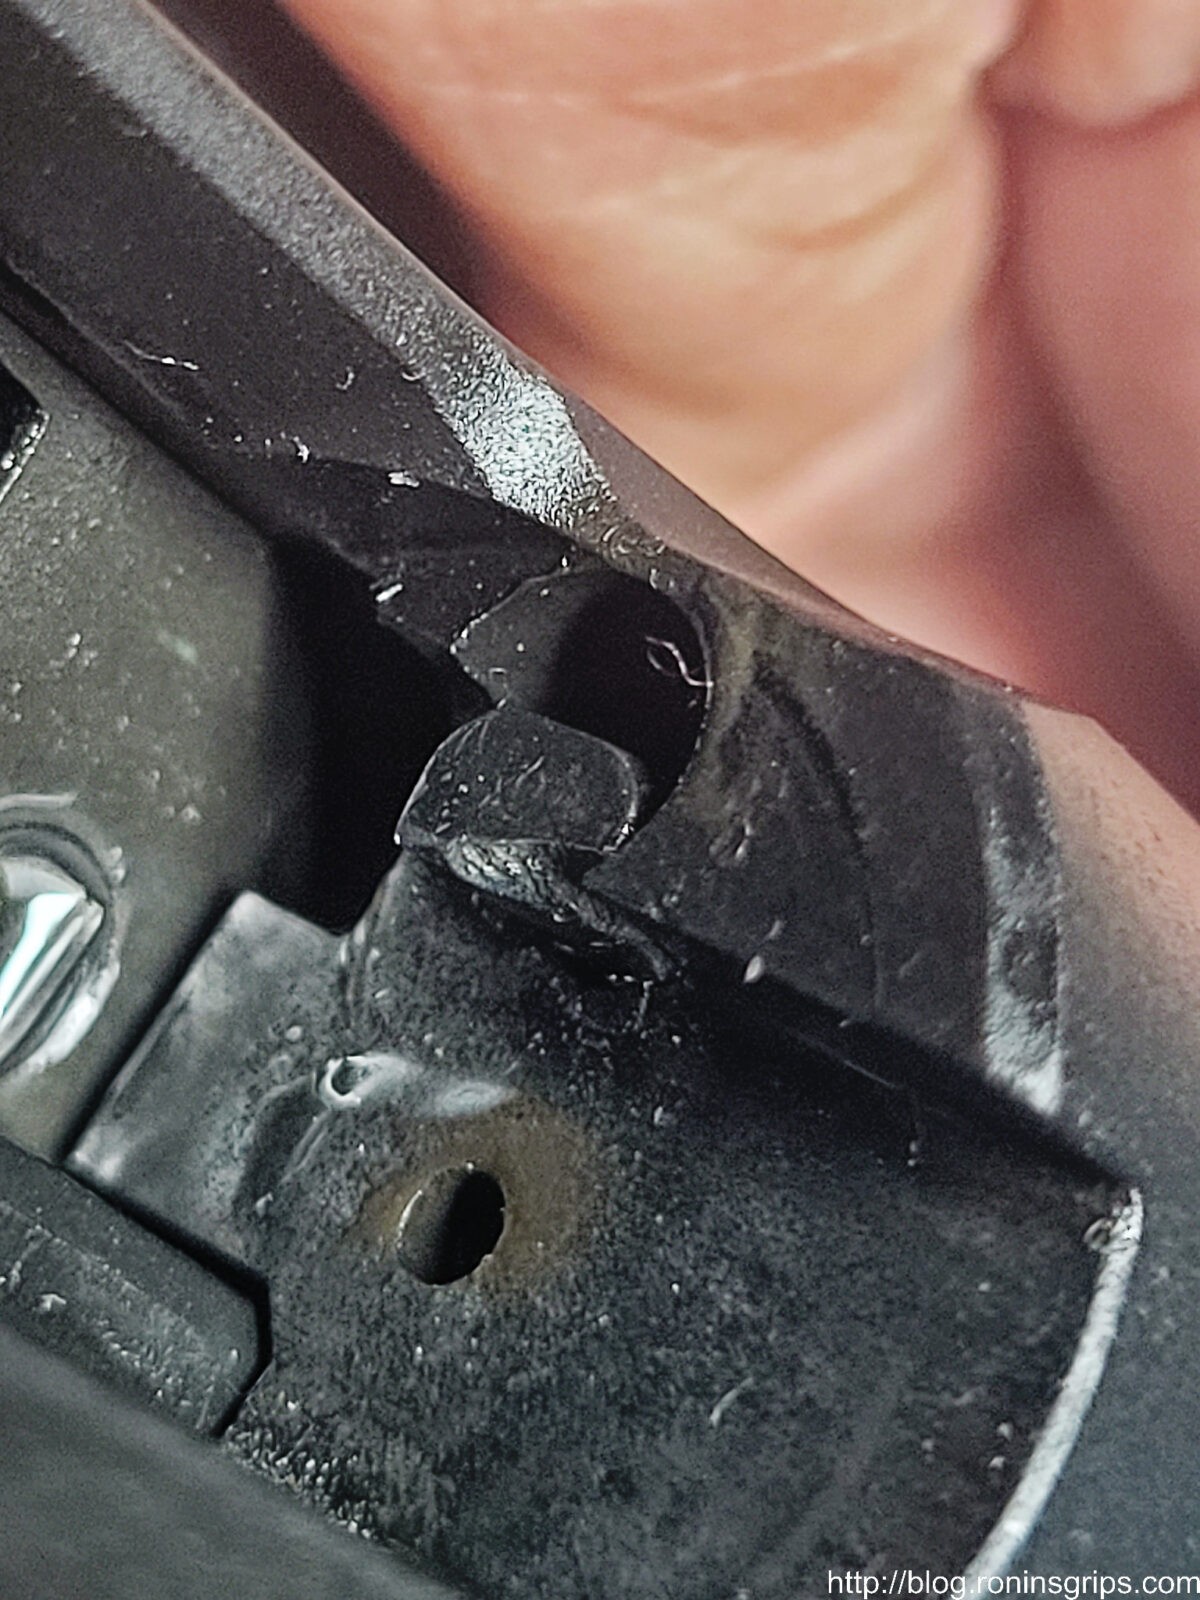
“You’ve got to be kidding me” – I thought to myself. Inserting a choice F bomb of course. The extractor in the brand new 51679 that probably has less than 100 hand cycled Zoom snap caps through it was almost completely broken off other than a little tiny nub on one end. WTF?!?!
I was happily taking photos for a blog post when I saw the silver grain of the busted extractor. Yeah, I was swearing up a storm. Really?
Okay, two 51679s bought from different vendors off Gunbroker about a month apart both having extraction problems …. wow. I’ll be honest – I’m disappointed. RIA 1911s are econobox models but they usually work – so, no, I’m not remotely happy not to mention jumping through hoops waiting for ever for their customer service to respond. I did learn a bunch though and will share with you what I did and what you can do if you want to.
Metal Injection Molding For Extractors Isn’t The Best Choice
The problem is that to keep costs down, Armscor, who owns the Rock Island brand, make the ejector using Metal Injection Molding (MIM). If you search on the web, you will see a ton of guys arguing against the use of MIM in high stress parts. As I just learned with extractors, it’s not the strongest manufacturing approach – making them from forged high-quality steel is a far better idea.
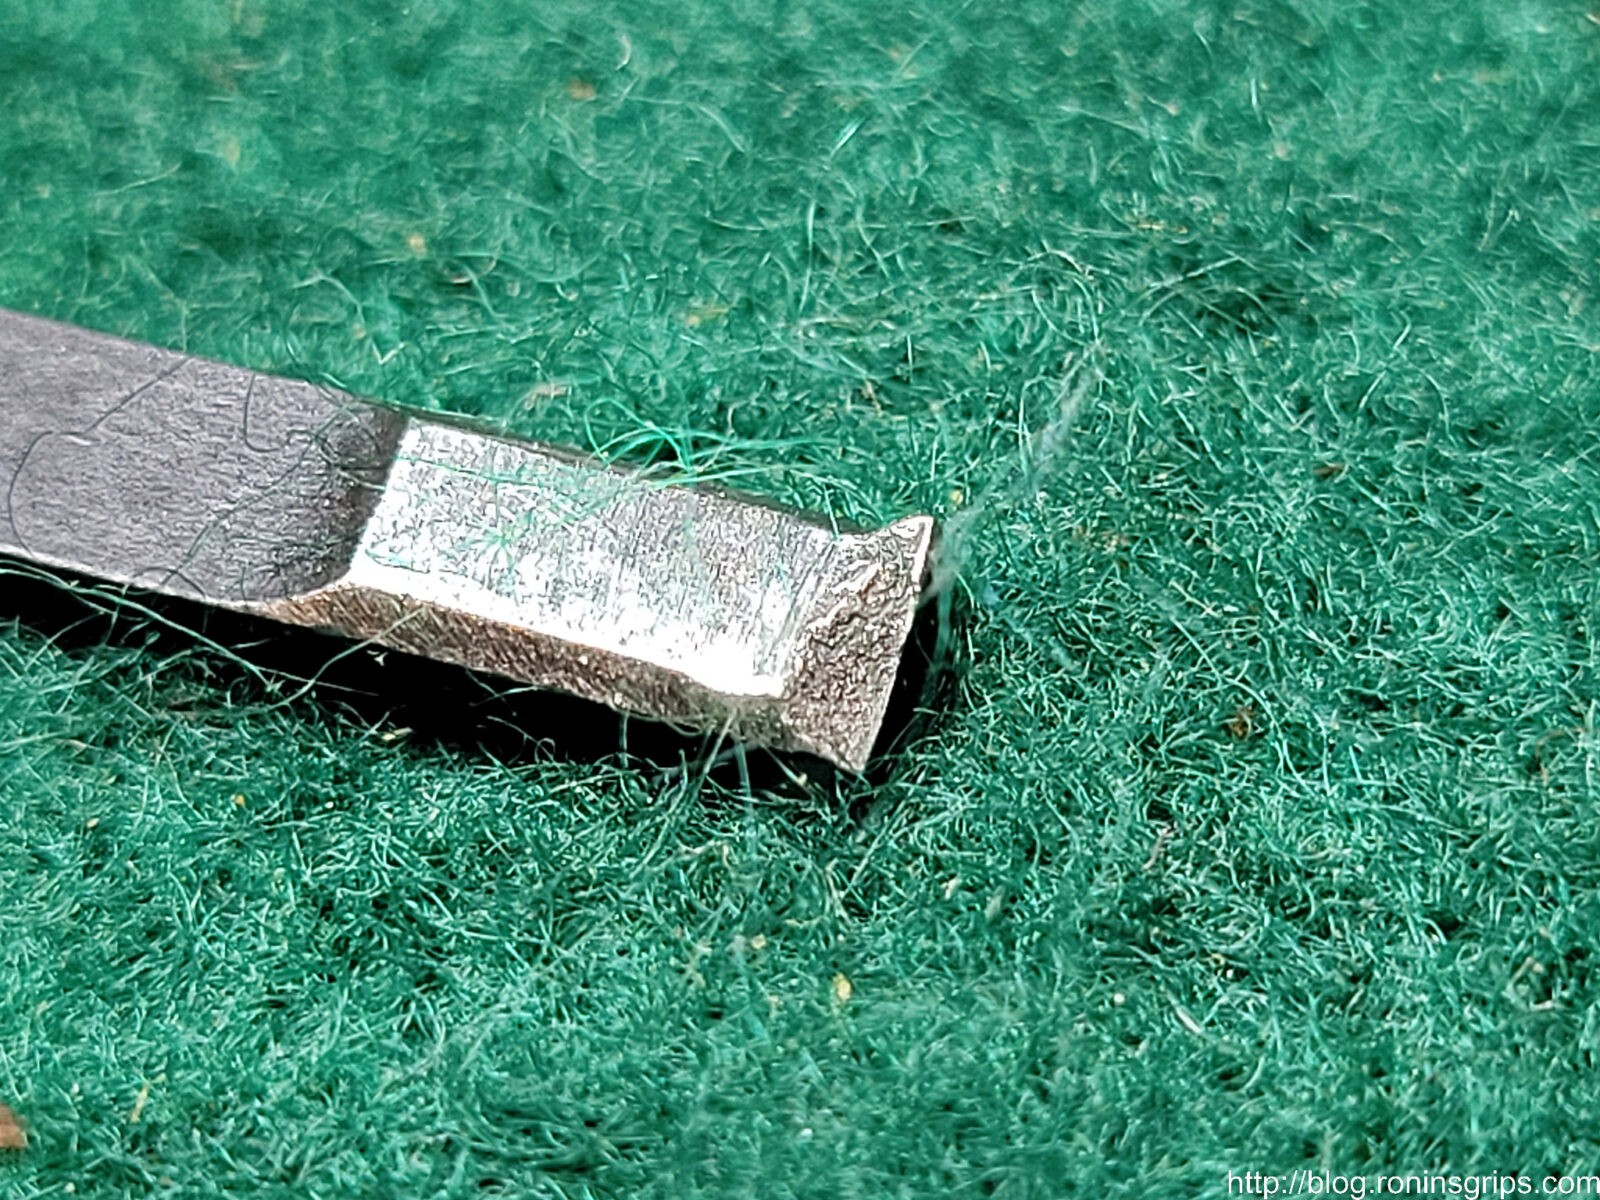
I removed the extractor from the pistol and zoomed in as best I could to get you this photo. You can see the grainy structure that is a signature of metal injection molding. That nub at the top right edge in the photo was just enough to yank the case out of the chamber … sometimes.
Okay, if you get a new RIA 9mm pistol, check the extractor out of the box. Clean and lube it, go to the range and keep your eye on the extractor. If it breaks you have two options – send it back to Rock Island/Armscor for a RMA repair or do it yourself. Heck, you could even just replace the extractor yourself before you have a problem if you want to.
I Decided To Replace the Extractor Myself
I learned a ton on that first pistol plus I had all of the tools and spare Wilson Combat extractors. I just needed to trust in my abilities a bit more and try it again. If there’s one thing I know about myself, it’s that I am persistent and don’t give up easy. With this in mind, I dove back in again with far better results.
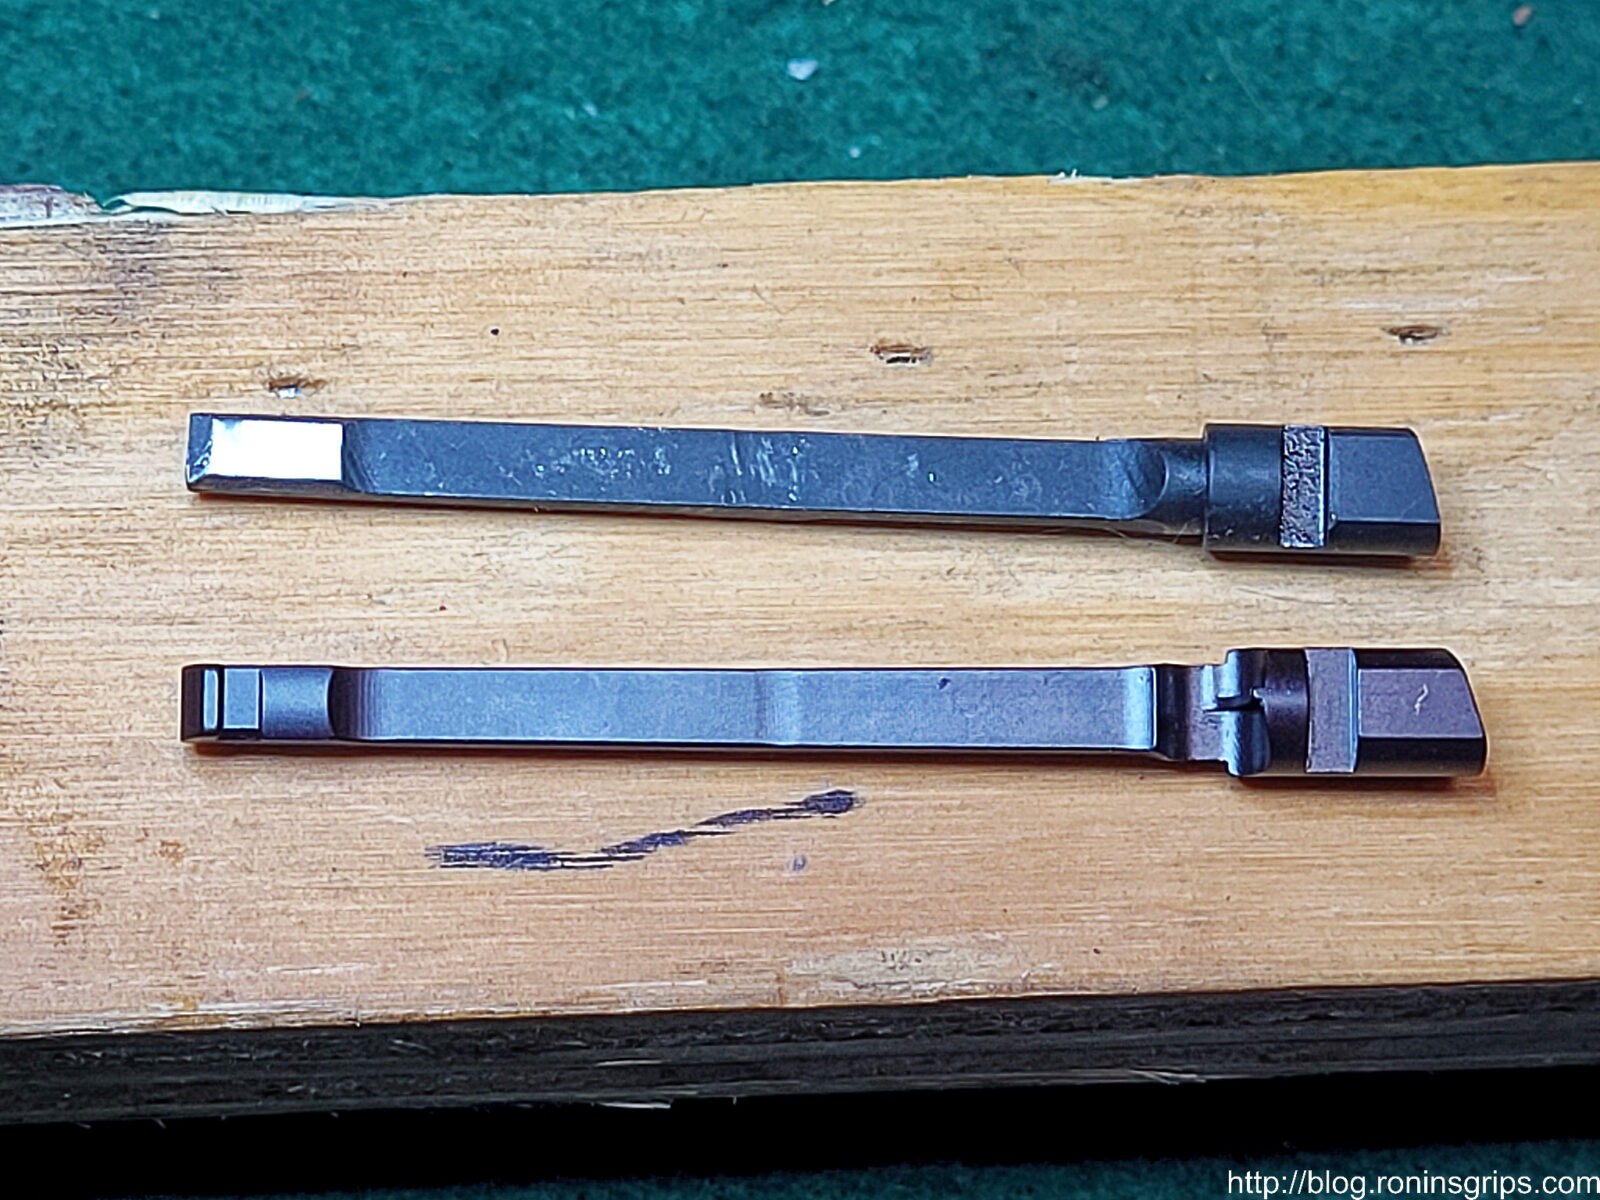
The top is the failed Rock Island 9mm ejector and it is a series 70 design. The lower extractor is a state of the art forged 9mm extractor from Wilson Combat. It is a series 80 design but will work just fine in a series 70 pistol.
Fully Machined from S7 shockproof tool steel with a tensile strength of 275,000 PSI
Optimized hook design for maximum strength and case rim contact
Hook location tolerances held to +/- .001″
Radiused corners for extended life and smooth feeding
Enhanced design holds tension longer over factory part many times over
Heat treated to optimum hardness and cryogenically treated
Guaranteed for life against breakage or we will replace at no cost to you
Note: I went with a series 80 extractor because they were in stock even though the RIA pistols are based on a series 70 design. You can use a series 80 extractor in a series 70 pistol but not vice versa. You can get them from Brownells, Wilson directly and other places.
Recommended Tools
You don’t need specialized tools but if you can afford them, I would highly recommend the following:
Weigand’s extractor tension gauge set – let’s you precisely dial in extractor tension. Note, I did add a brass s-hook so I can grab it with a trigger pull gauge more easily.
Lyman – Mechanical Trigger Pull Gauge – even though I have some digital trigger pull gauges, I lacked a mechanical unit and there are times where it is handy to see an analog scale changing vs. flashing numbers you can’t read so I bought it regardless. Yes, if you have a trigger pull gauge already, you can use it.
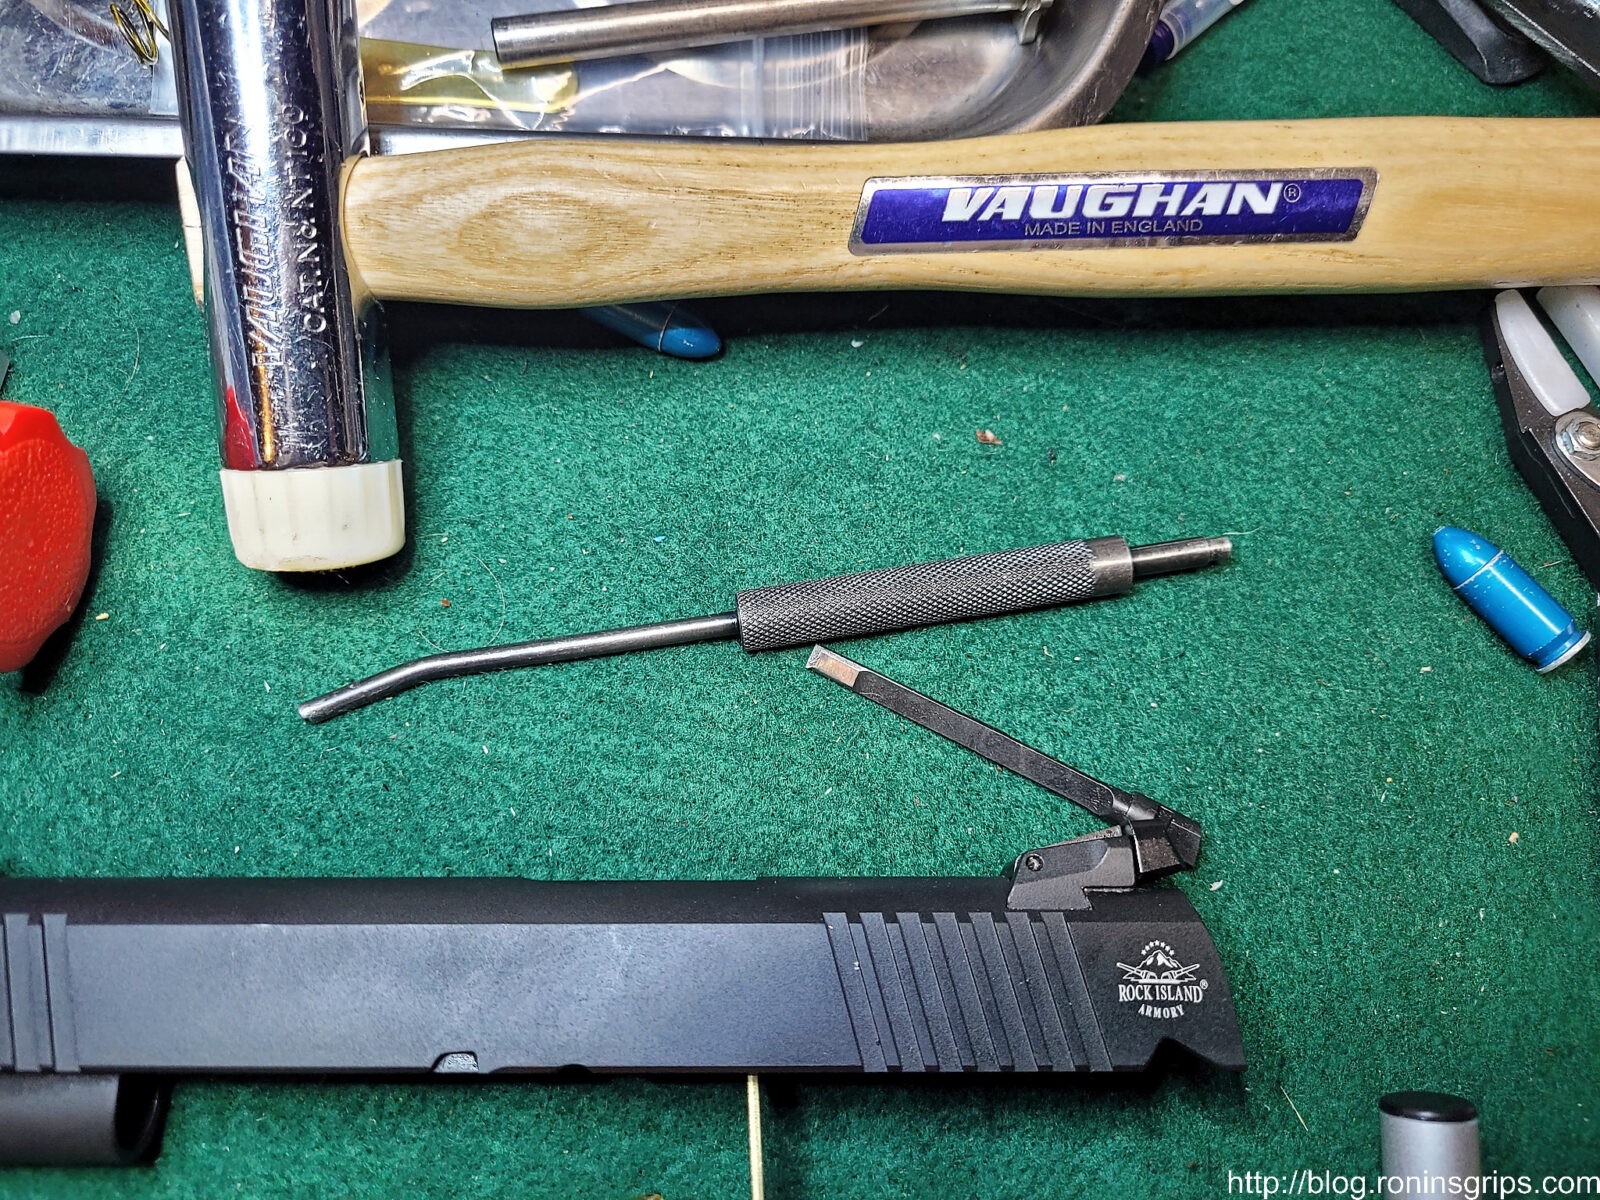
The long angled tool is the 1911 Extractor Tool from Brownells and totally worth it in my opinion. The long angled end lets you reach into the slide and push extractor back and then down into the hole for removal. The other end is perfect sized for pushing down the firing pin to aid with the removal and installation of the firing pin stop. Note the blue A-Zoom snap cap – that is the color of their volume packs of rounds. Exact same material and tolerances – just a different color.
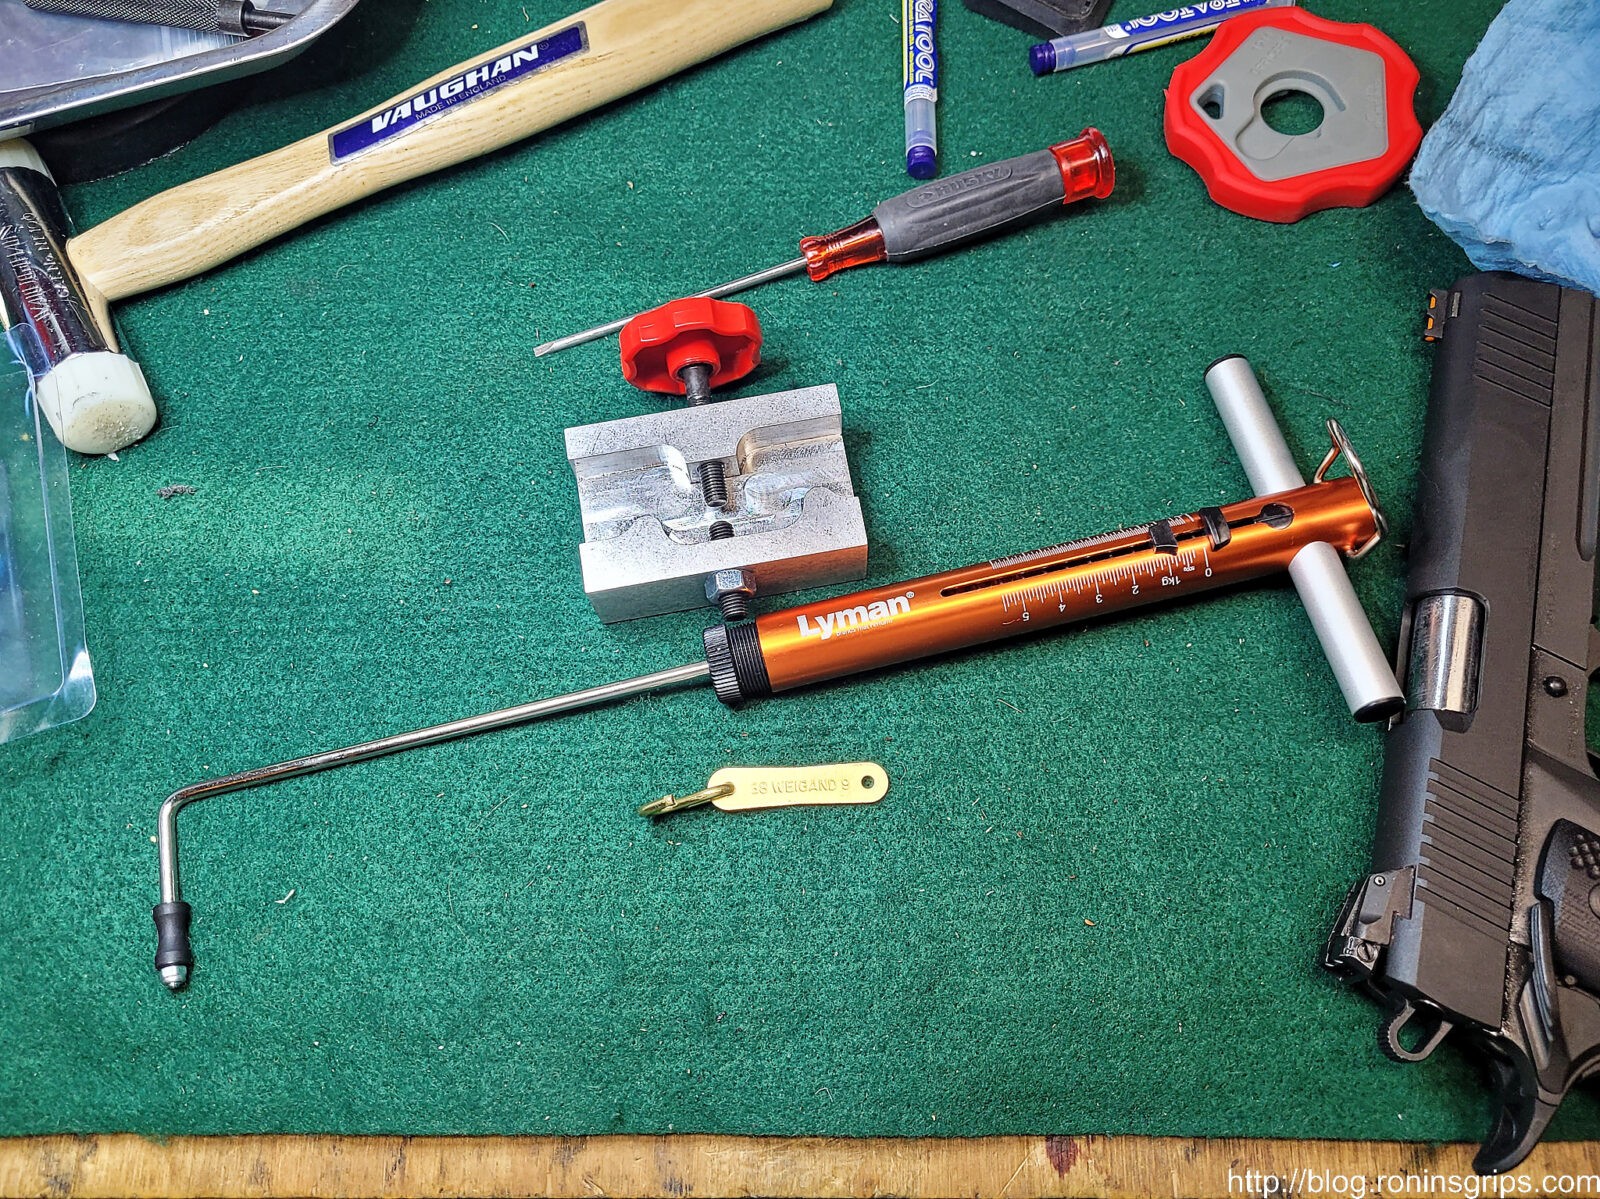
The silver block with the red handle is Weigand’s tool for adjusting extractor tension. The big orange thing is the Lyman mechanical trigger pull gauge. The brass plate is the gauge with a brass S-hook that I added. The gauge is sold as a set and each end is for a different caliber. The hole you see is actually for lining up on the firing pin hole – I just added the S-hook on the .38 end because I don’t have any plans to shoot .38 Super. Note, the small blade screw driver makes it real easy to nudge the firing pin up or down so the firing pin stop plate can be pushed into position.
Make sure your pistol is unloaded – that the chamber is empty and a loaded magazine is not inserted. In short, work safe. Also, do not use live ammo for testing – use snap caps.
Let me give you an overview and then a couple of videos to watch:
Remove the slide
Remove the firing pin stop plate by pushing down with the straight short end of the extractor tool and then slide the plate off. Be CAREFUL that the firing pin and/or spring don’t come flying out as you remove the plate.
Push the extractor backwards by pushing the head of extractor backwards down the hole out the rear of the slide
Insert the new extractor and line it up so the stop plate can be re-inserted. It needs to line up with the top and bottom of the stop plate groove and it needs to be straight up and down parallel to the sides. You don’t need to install the firing pin and spring until you are done.
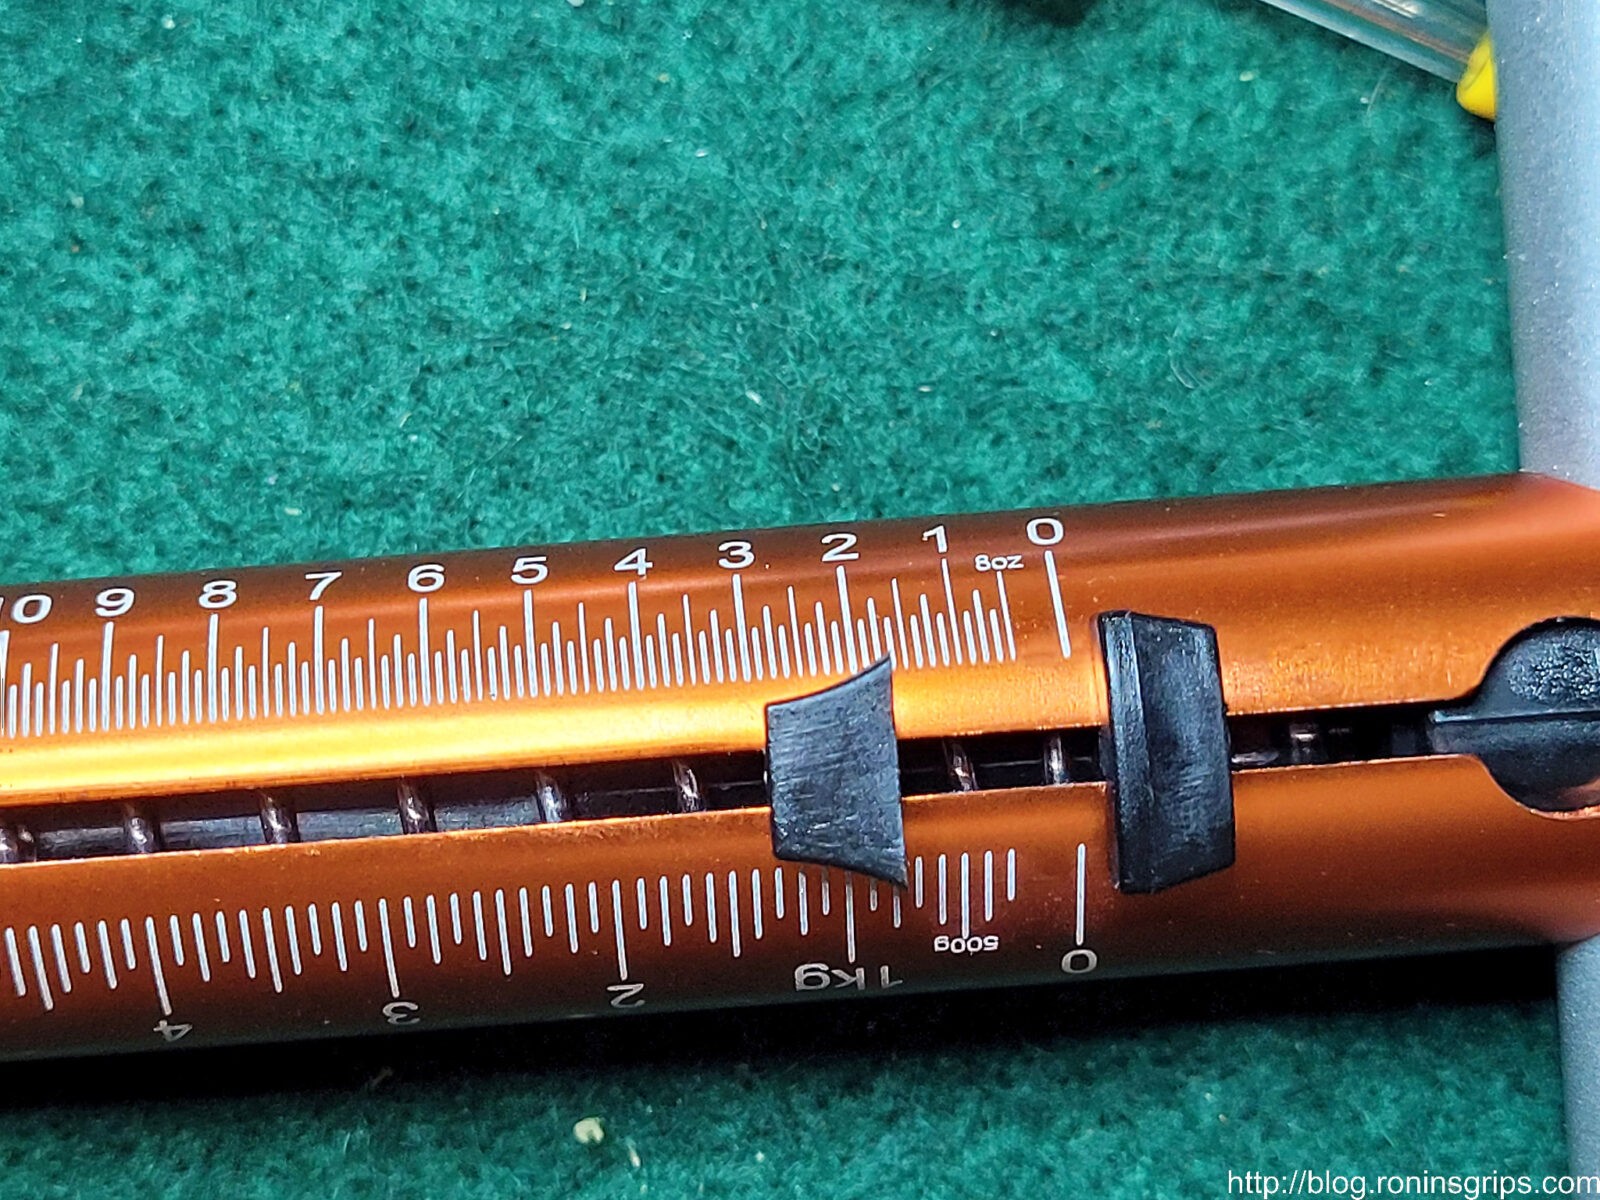
Insert the Weigand gauge and pull it out using the trigger pull gauge to find out how many ounces it takes.
Use the Weigand tensioning tool to increase or decrease the tension. I dialed mine in to 28 ounces (1.75 pounds).
You can try testing feeding and extracting dummy rounds to see how it performs. The extractor should maintain control until the extracted dummy round hits the ejector.
Once it is dialed in, you can then re-install the firing pin return spring, lube the firing pin and reinstall it also.
There’s a trick to the plate – wiggle it in and push down the firing pin enough to get the plate to sit on the “shelf” at the rear. You can then maintain pressure on the plate and use the other hand to use the extractor tool to push the firing pin down far enough and hold it there while you push the plate back into place.
More Details
Wilson has a video on how to change to their extractor and a bit about setting the tension:
The following is a video of Jack Weigand explaining how to use his extractor gauges and tensioning tool:
Adjusting The Extractor Landing Pad
The most detailed post and guidance in general about extractors that I read is here – and if you read down, you will get to sections/replies about 9mm extractors. One thing you will notice discussed is reprofiling the “fitting pad” to better fit the radius of the extractor hole. I stoned and polished the fitting pad to be more rounded but that was it. I put more emphasis on getting a weight in the 25-28oz range and did do that after may 3-4 tries.
Pulling the gauge out the final time was about 1-3/4 pounds which is 28 oz. In testing the pistol, extraction was just fine.
Was The Match Pistol Higher End?
I wondered if maybe more care was put into the match pistol. There are some nice perks in terms of features but the trigger feels about the same between the two pistols. I’ll write up something more detailed down the road – for now let me just say they pistols are not night and day different in terms of how they feel with cycling the slide or pulling the trigger.
In terms of pricing, there’s not a huge difference on Gunbroker. The first 51679 was bought on 3/5/22 for $819.99, the Match pistol was $899.00 on 3/25/22 and the second 51679 was bought on 4/3/22 for $899.00 also. In writing this, it’s surprising that the Match wasn’t $100-200 more on the street but it wasn’t. If you look at the manufacturer’s suggested retail price (MSRP) – Armscor did set the 51679 at $899 and the Match 56645 at $1099. In other words, Armscor was hoping the Match would command a premium.
You can find the 51679 pistols right now with a bit of hunting. The 56645 match pistol is challenging to find as it seems to be a bit more rare now but it is out there too. I’d tell you to get the 56645 Pro Ultra Match HC if you can find it. As you can imagine, I’m not too thrilled with my 51679 experience right now and there is little to no price difference *if* you can find one.
Conclusion
I’m not sure what to tell you about what happened – I only have data from two 51679 pistols and one 56645 pistol. It could just be really bad luck – neither of my current 10mm pistols have given me any trouble and the 56645 Pro Ultra Match has been fine so far as well although I have only cycled maybe 500-600 snap caps through it so far.
The first 51679 had something going on that I can’t explain and am waiting on Armscor to fix it under warranty. It certainly was not a broken extractor. For the second one to have a snapped extractor claw with so very few rounds – I guess that highlights the limitation of MIM and that forged extractors are better – there’s a reason why Wilson’s Bullet Proof extractors have such a good reputation.
6/22/22 Update: RIA did a warranty repair after about 4-5 weeks. All they told me was that they confirmed the extraction problem, fixed it and the pistol was fully operational now. So, I still don’t know exactly what happened but at least Armscor/RIA stood behind it and made things right.
We’ll see what Armscor comes back with regarding the first pistol and I’ll report it here. I guess the big thing I want folks to know is that changing an extractor is not an arcane black magic endeavor. There are tons and tons of videos and posts that you can read. At some point you just need to wade in, give it a go and learn.
My other lesson learned is that don’t replace a busted Armscor extractor (MIM) with the same thing. Upgrade. I decided to go with Wilson Combat due to all the good reviews I read and would recommend that.
I still have a lot to learn about 1911s and don’t claim to know much. I’m really focused just on the mags but I hope this helps out anyone who reads it.
A Stunningly Good 1911 Reference Book Recommendation
6/29/23 Update: The match 9mm MIM extractor is still doing just fine and I have no idea how many thousands of times it has been cycled. The Wilson is doing great on the other pistol also.
12/17/22 Update: I’m somewhat surprised – the original MIM extractor in the Match 9mm is still doing just fine thousands of rounds later. So is the Wilson but I am not surprised about the Wilson holding up.
Note, I have to buy all of my parts – nothing here was paid for by sponsors, etc. I do make a small amount if you click on an ad and buy something but that is it. You’re getting my real opinion on stuff.