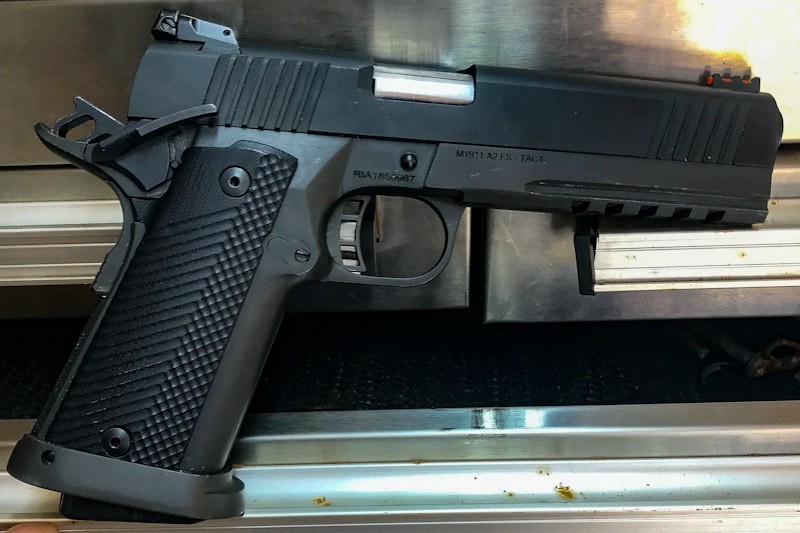
One of the things I enjoy about the firearm industry is meeting neat people. Dan Barnett contacted me a few weeks back. He is a certified “polymer” pistol armorer and had recently got into 1911s. As part of the journey, he purchased a used Rock Island Armory 51679 Tac Ultra FS HC 9mm and was trying to sort out why it was failing to eject way more than he cared for and he would have an empty case and a round trying to be fed in the slide at the same time. He and I hit it off because we both like the soft shooting Rocks.
Dan’s 51679 Tac Ultra
Because of my past experiences with RIA Tac Ultra 9mm extractors failing, I asked him how his looked and he told me that it looked nice and sharp – no broken parts. I send him my blog post on extractors and recommended he switch his to a Wilson Combat if he ever runs into a problem or wants to make the upgrade anyways.
There was a possibility the extractor tension was too light but I figured we’d assume it was okay for the moment. Note, if you open a slide slowly and watch the cartridge or casing being extracted, the extractor should maintain control all the way to the ejector. If it doesn’t and the extractor looks ok then it is most likely the tension and there are specialty gauges out there for testing and setting them.
With the extractor tentatively ruled out, what I told him was that not many people understand how critical the magazine feed lips are to proper feeding and ejection of a 1911 and that his Tac Ultra was just that – an oversize 1911.
What can happen is that the front feed lip gap can be set too wide allowing the front of the cartridge to tilt up in the air too far. Then, as the newly extracted case comes backwards, the riding too high bullet pushes the spent case up just enough to miss the ejector. Honestly, there is a really delicate brilliant dance going on inside a 1911 and all it takes is something to be off just enough and things go wrong.
Dan took his calipers to the four mags he had and the front of the feed lips that can be adjusted were all over 0.320″ and I recommend starting somewhere between 0.308 to 0.312″. There isn’t a magic number due to all of the variables one can encounter. Too wide and it can cause a failure to eject or stove piping. You can even have rounds falling out of the mag. Too narrow and you have the cartridge moving straight ahead, smashing nose first into the feedramp and stopping / jamming right then and there.
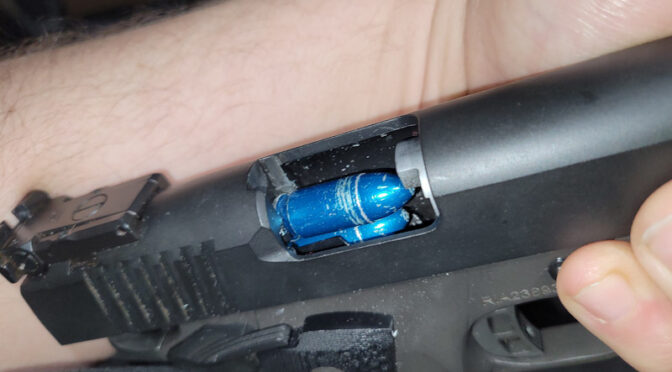
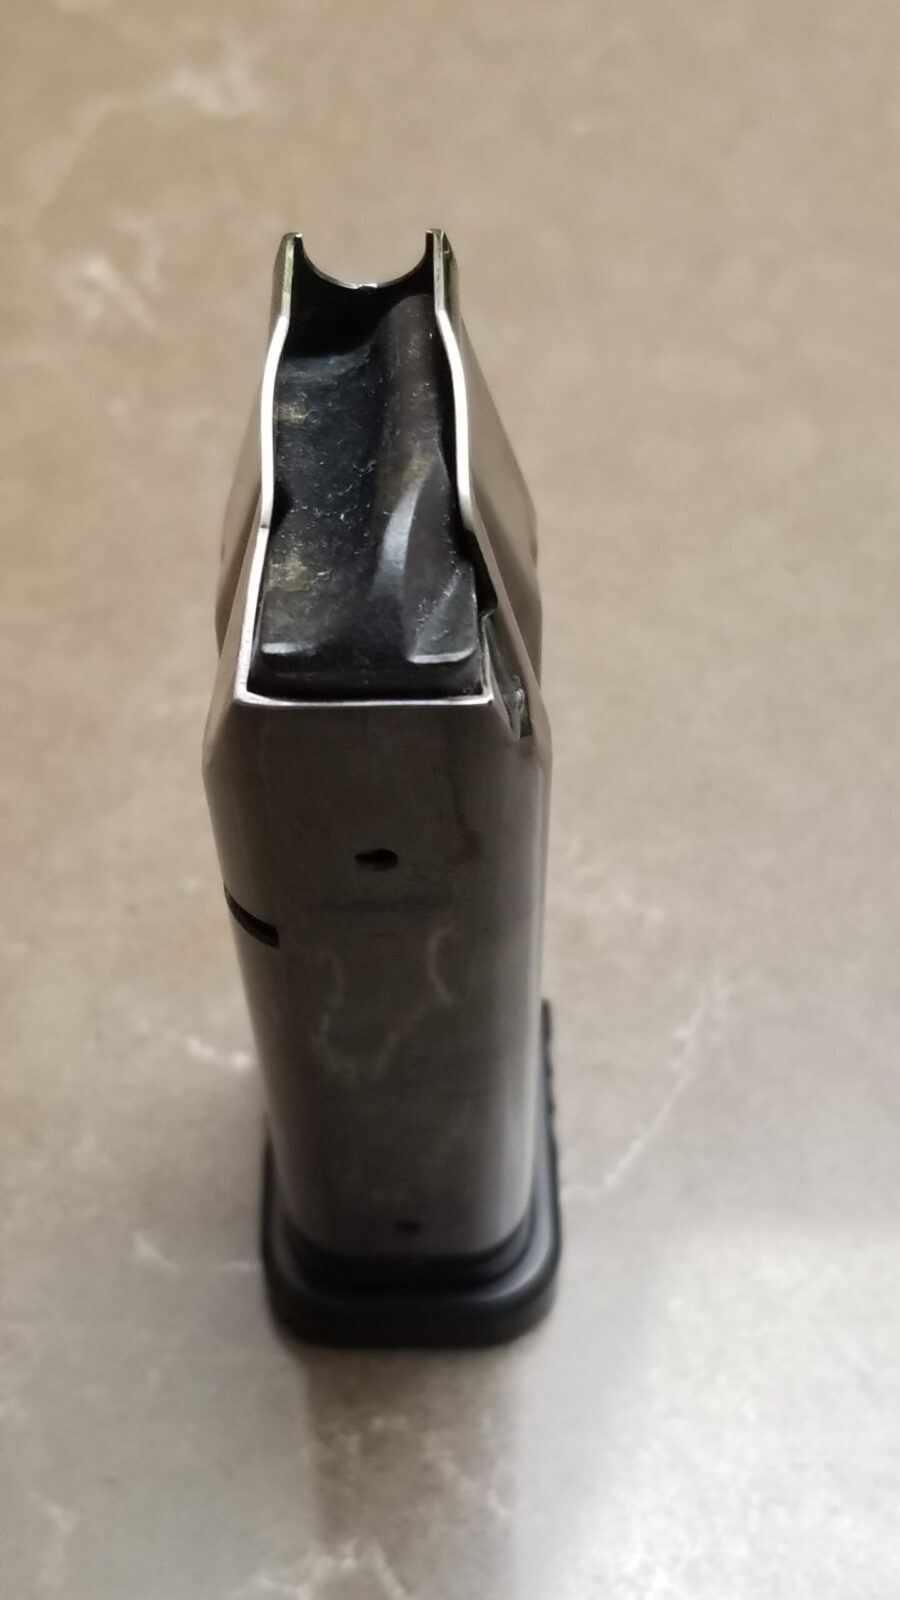
You can see the ejector is just above the rear rim of the dummy round and the round is angled up slightly. If that nose is up too much, it will nudge the extracting case high enough to miss or intermittently miss the extractor.
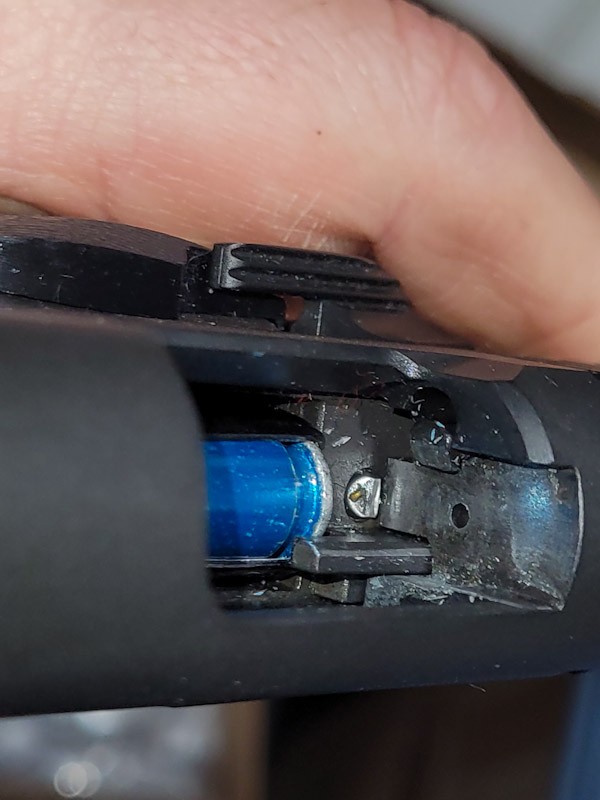
This is looking down at the face of the slide – what I want you to see is that there is nothing there to limit the round from working its way towards the top of the slide. The extractor has a firm grip on the rim of the case but that’s it.
Dan asked what he should do, I told him to disassemble the magazine and then carefully hold the magazine budy (the “tube”) on a table or better yet a piece of wood that lets the bottom lips dangle but supports the magazine all the upwards. Then lightly tap on each front side of the magazine to close the gap. Light tap left, light tap right, and measure. Repeat until it gets to the right gap – either via measurement or testing the mag with some dummy rounds.
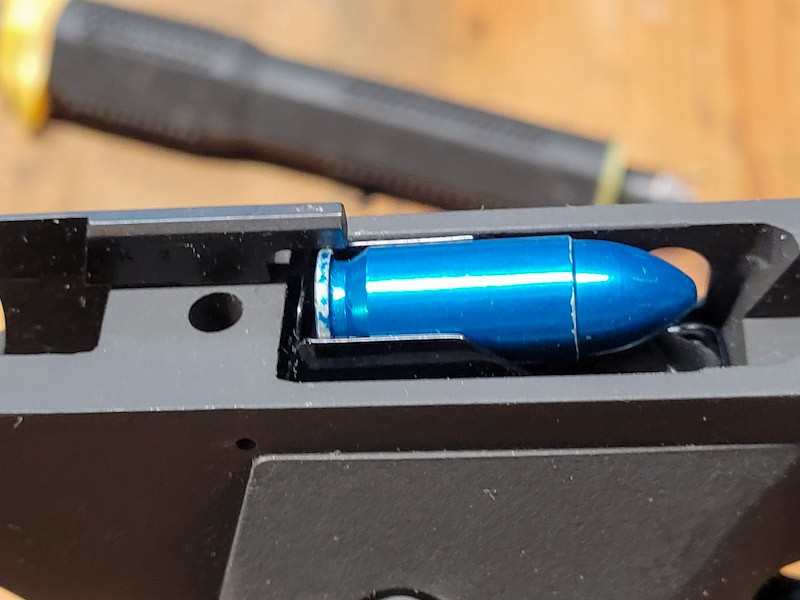
This is a Steelworx machined stainless steel 9mm dummy round and what I prefer to use these days for testing. I no longer use the blue A-Zoom snap caps as they are not dimensionally identical to a true 115 9mm FMJ round. To adjust the lips, disassemble the mag and then tap on the front of the feed lips only – in the case you can see they are tapered in and are closest to the red. You do not need to hit on the other parts. By tapping on the front the steel lip will gracefully bend in the direction you are tapping it.
Dan adjusted his gap to be around around 0.3095 by looking at where the bullet would hit the ramp/enter the chamber and testing . Your gap could be different from his.
By the way, the back of the magazine is fixed due to the folded metal ears that form the back of the lips. You can’t adjust them much at all or they will buckle or break. I leave them alone.
This tapping doesn’t take a ton of effort so use a light hammer and light taps – this is not a “mongo smash” moment because if you crush the neck of the mag, it’s game over unless you have a mandrel to open it back up. These days I use a light body hammer to do the work.
If you go too far and need to open the lips, use malleable chain pliers also known as chandelier or lamp chain pliers to open the lips back up. External snap ring pliers can also work but are not my first choice. The chain pliers distribute the pressure along a larger area of the lips vs. the relative point pressure of the snap ring pliers’ pins.
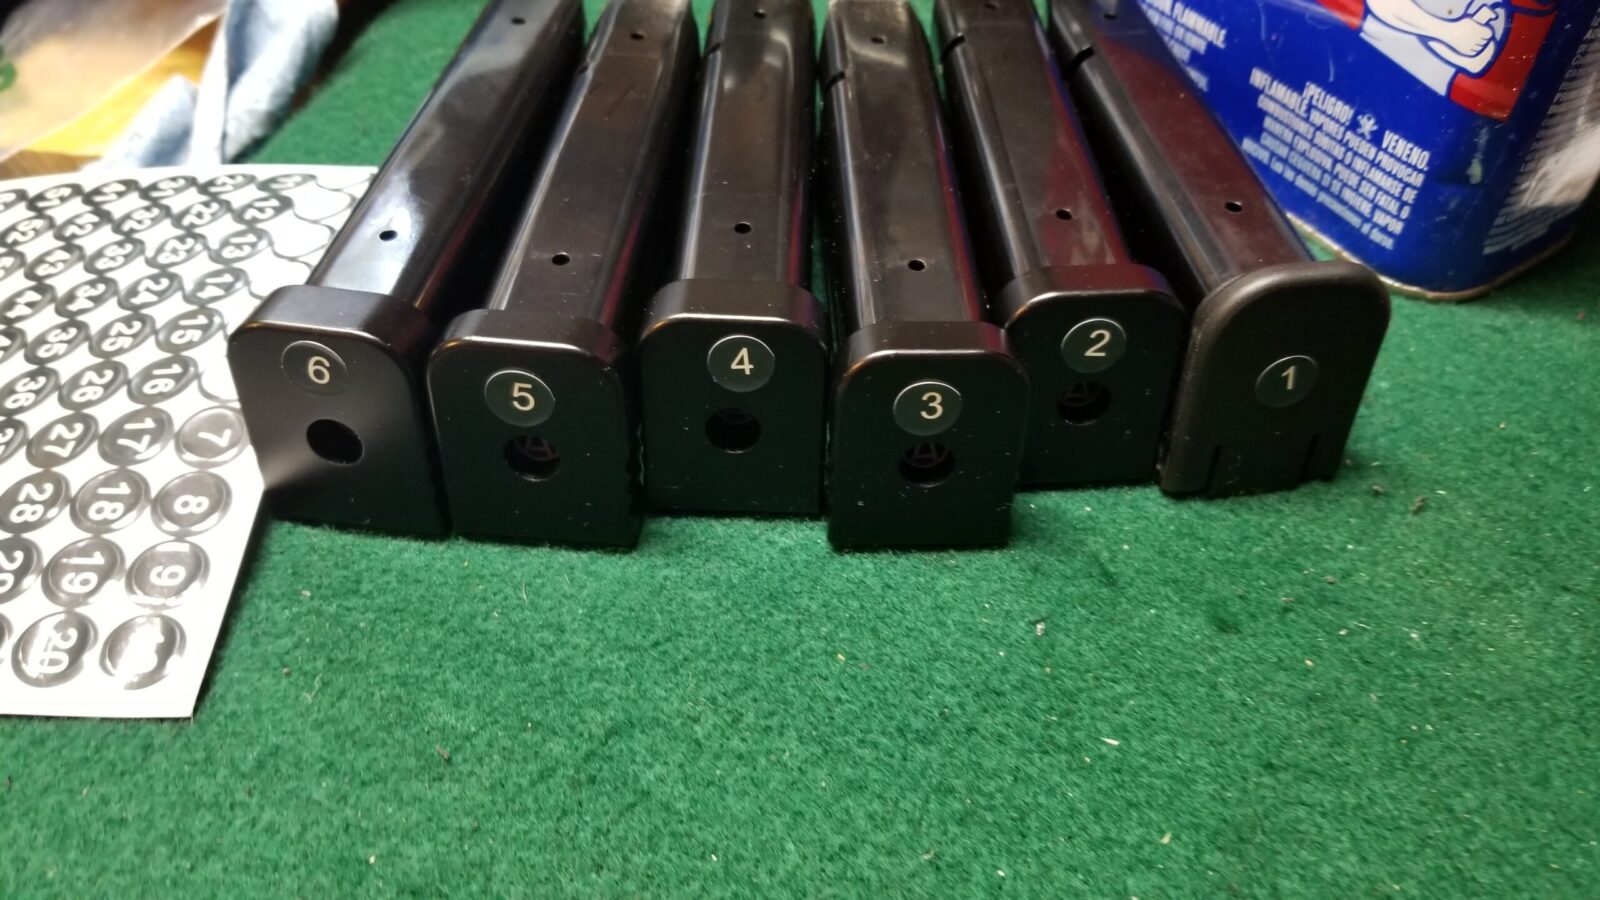
Feed lip gaps will change with use – this is not a one time exercise and why it is a good idea to number your mags. This way you can write down the setting for each magazine or know that when you get back front the range which magazine you need to take a look at.
How did the adjustments work out for Dan? He finished a 1,000 round tactical range session with zero malfunctions. I told him to have fun because there is always something to adjust or tinker with on a 1911 and I mean that in a good way.
I started digging and found out that the Mec-Gar MGP164010B is the exact same magazine except Mec-Gar used a hydraulic press to form dimples in the tube to stop the follower at 10 rounds for folks with Para 16 pistols in areas that had a 10-round limit.
I brought in a bunch of the 10 round mags and converted them for use in the RIA pistols. Then, the supply of the MGP164015B mags dried up and I decided to figure out how to convert the MGP164010B magazines for use in 16 round RIA .40 and 10mm pistols.
To make a long story short, you drill out the dimples, remove the burrs from the inside of the tube and then sand it down. That’s why the mags have 3/8″ windows drilled in them. The fact the magazine bodies were tempered steel definitely made life interesting when it came to the drilling and deburring operations.
Here’s a Mec-Gar 20 round magazine that is about to get the dimple drilled out. I made the jig to securely hold the magazines during the drilling operations.
Folks, I have gone through a ton of dummy rounds prototyping and now testing the magazines. I also use a MagLula to help me load every magazine and with 15 rounds. I am testing that the load and feed smoothly. If they do not then that would tell me something needs more work in the tube.
Note, I have to buy all of my parts – nothing here was paid for by sponsors, etc. I do make a small amount if you click on an ad and buy something but that is it. You’re getting my real opinion on stuff.
It was brought to my attention that there are owners of high capacity (HC) Rock Island Armory (RIA) Full Size A2 pistols who are in a jam because where they live limits their magazine capacity to 10 rounds (California, Connecticut, Washington DC, Hawaii, Maryland, Massachusetts and New York state to name a few. The problem is that nobody is making 10 round magazines for these “high cap” RIA pistols — until now.
The following are the 15-round 10mm and .40 high cap RIA pistol models that I am aware of:
51994 TAC Ultra MS 10mm
51914 TAC Ultra FS 10mm
56862 TAC Ultra Threaded 10mm
52000 PRO Match Ultra 6″ HC 10mm
52009 Rock Ultra FS HC 10mm
51738 Pro Match Ultra H – 40S&W
3/24/2024 Update: This is an obsolete post and product. We now make 10 and 15 round magazines by blocking and pinning closed our third generation magazines. These new mags have excellent springs and an anti-friction coating. Please click here for the product listings.
How did we make a 10-round magazines?
Okay, good question. The RIA pistols are related to Para Ordnance pistols (Paras) so magazines for those pistols can be adapted. Mec-Gar is a large players in the magazine market and it just so happens they make a number of magazines for the Paras including ones with 10-round limits – the MGP164010B – “B” meaning blued and MGP164010N – “N” meaning nickel plated.
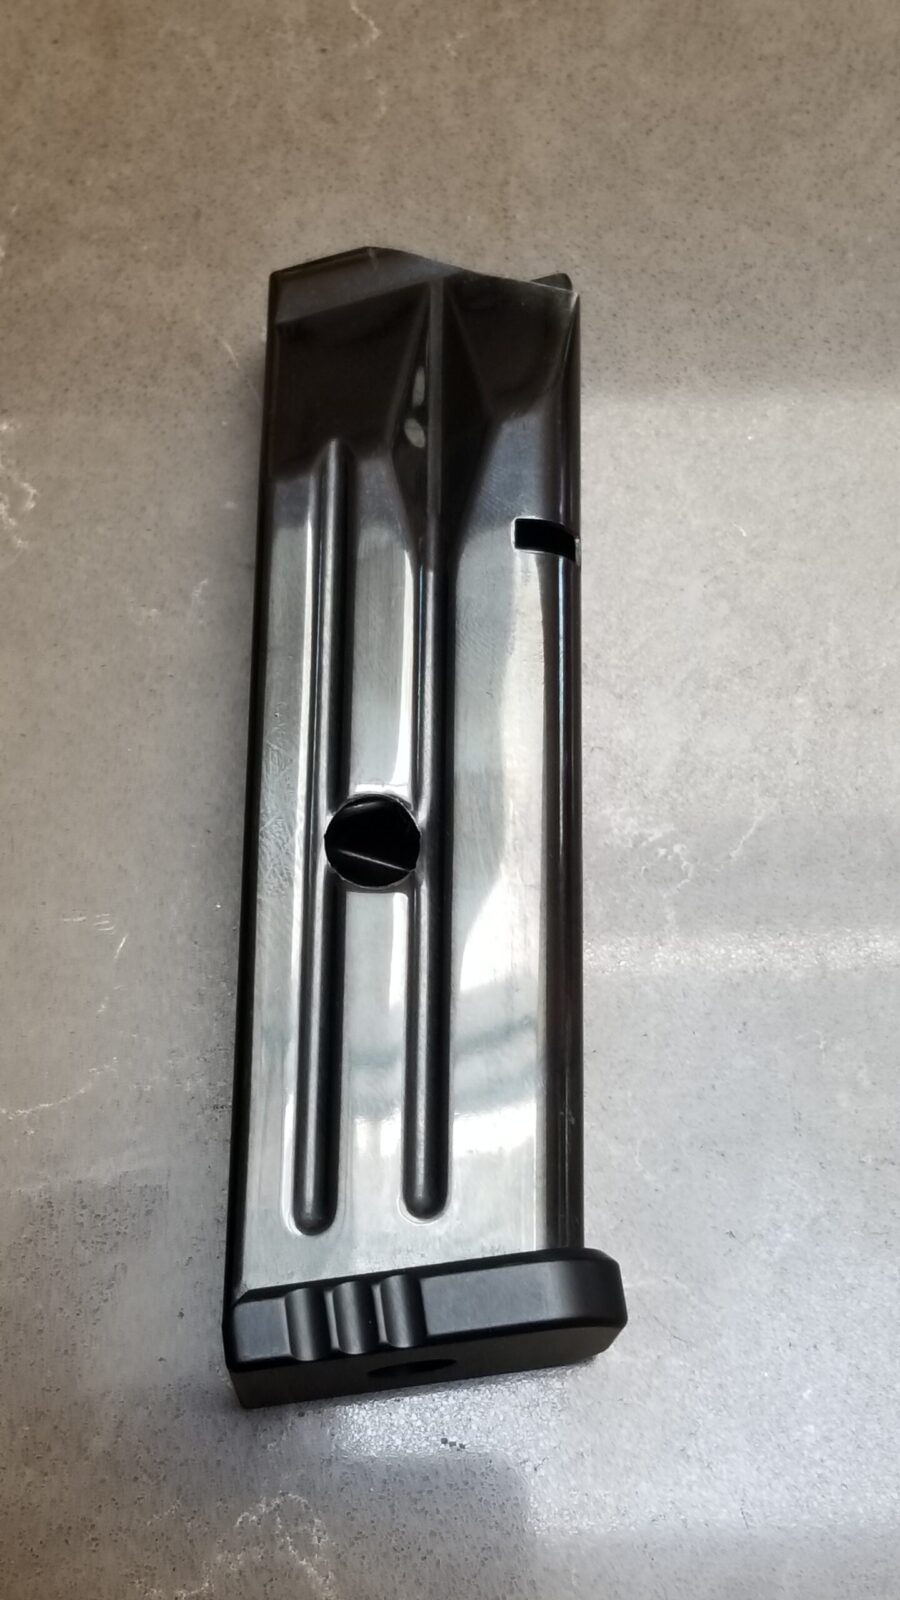
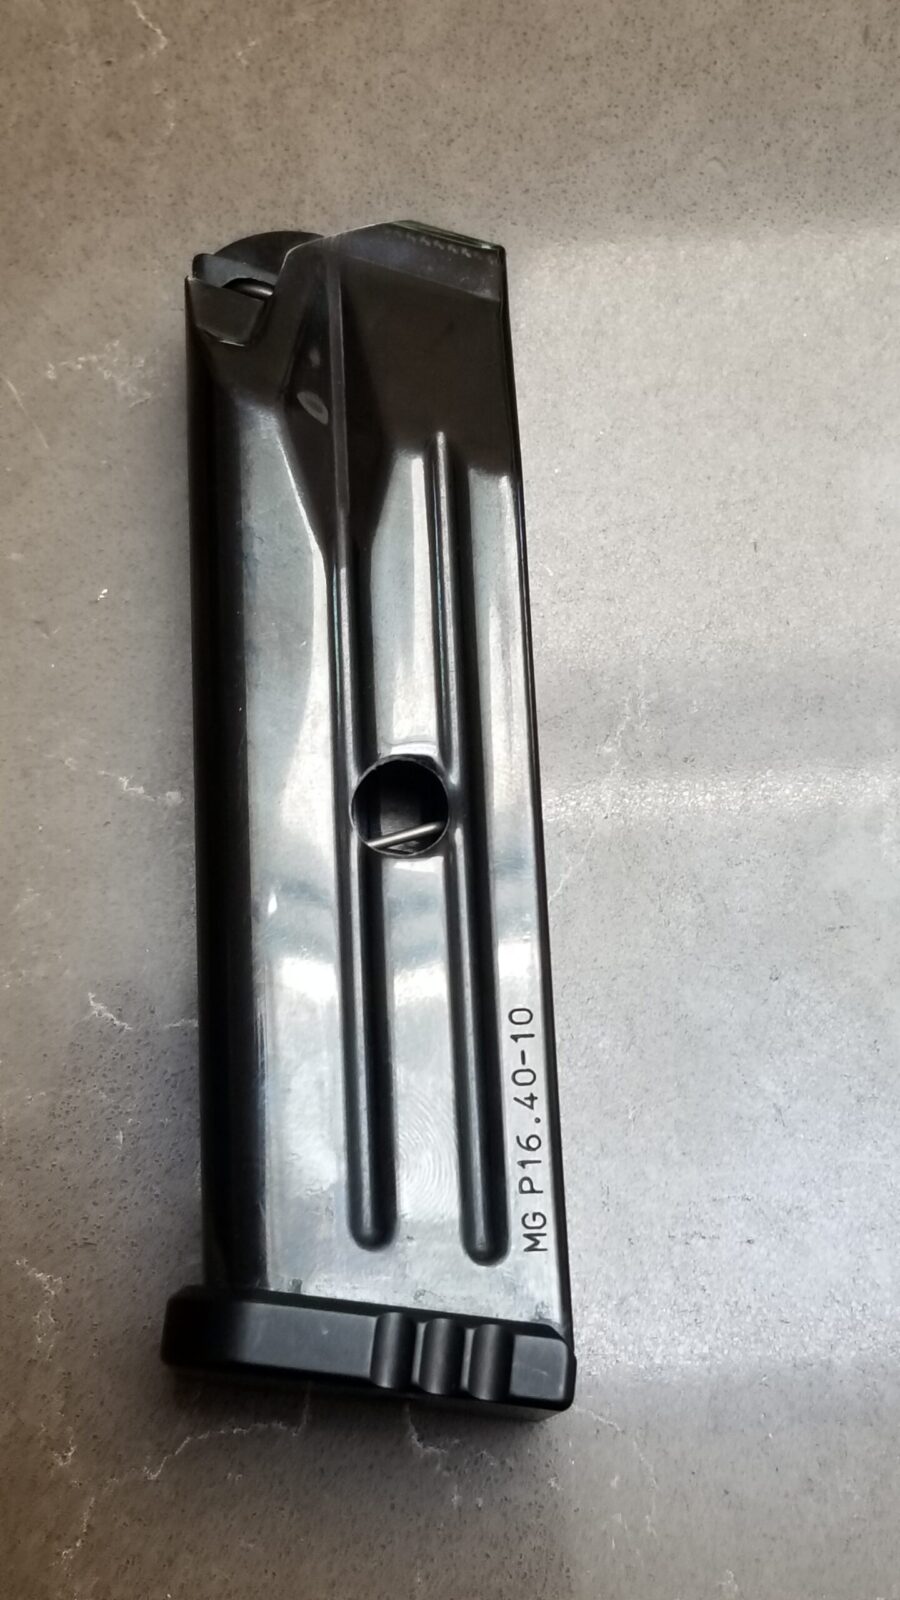
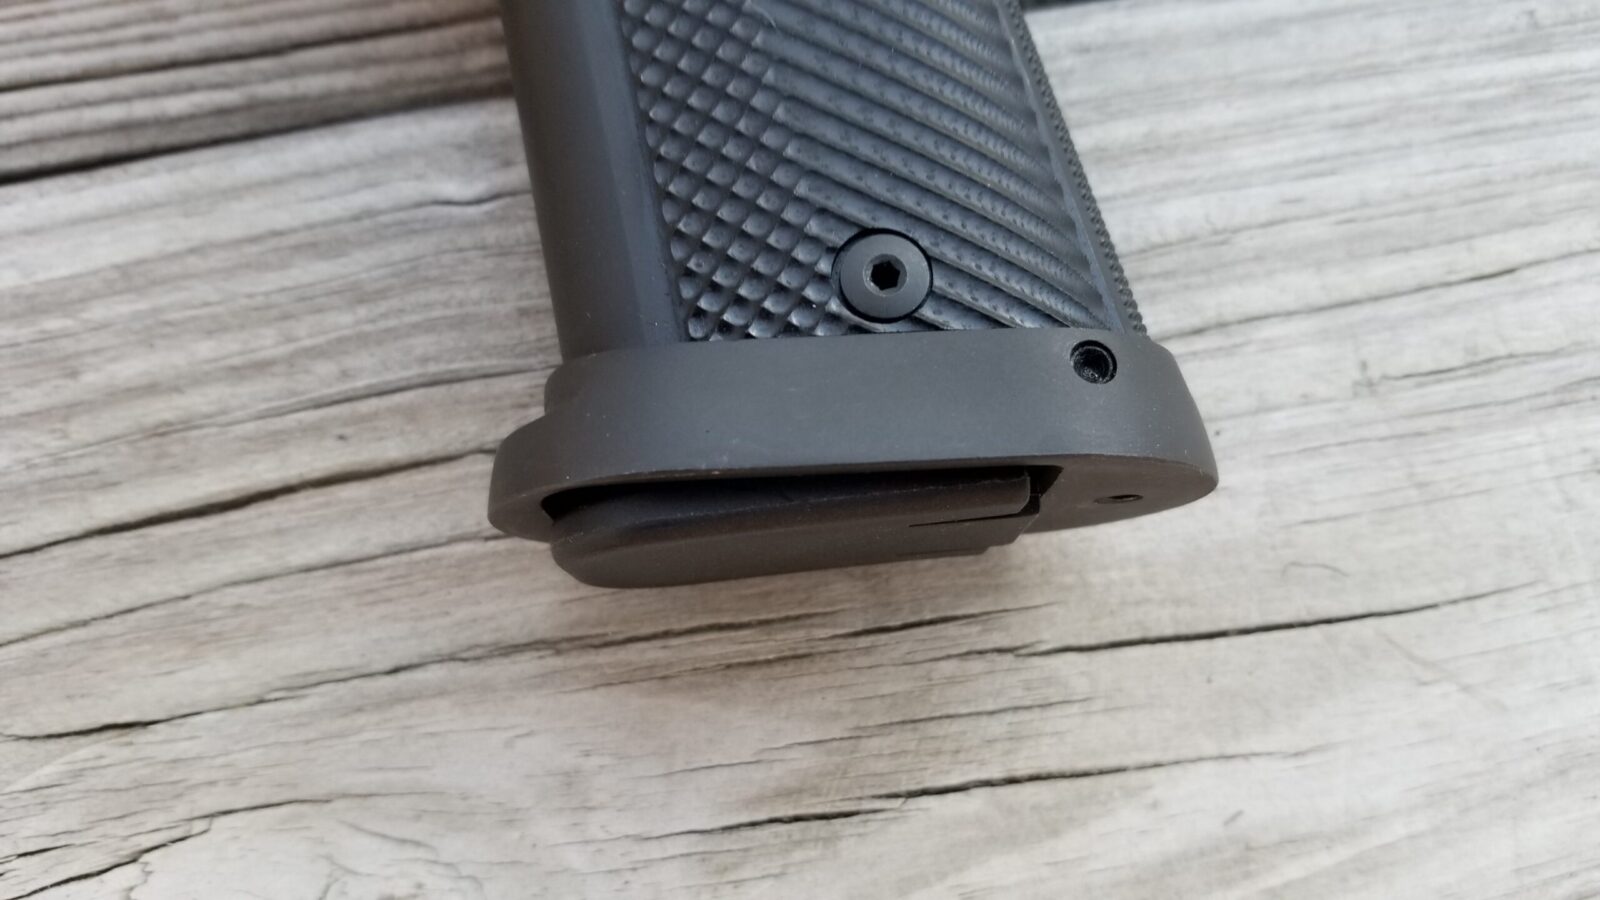
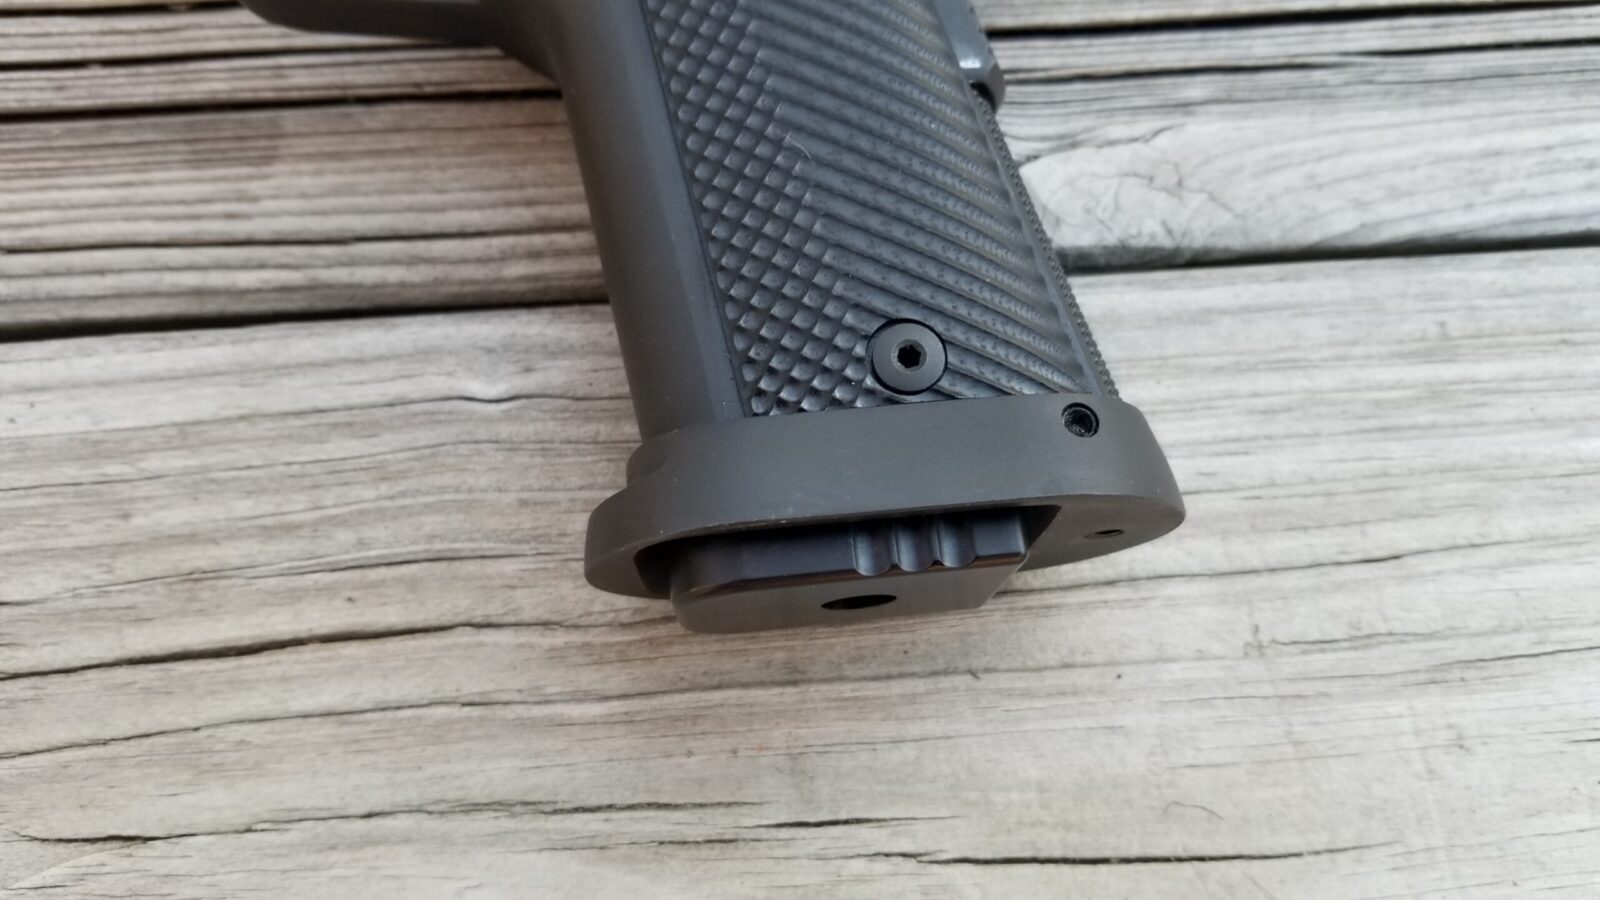
This is the Mec-Gar MGP164010B magazine – the feed lips need to be trimmed and opened up and the baseplate needs to be replaced as the long front tab will not fit in the big mag well funnels that RIA puts on their pistols plus they really need to be longer to allow you to effectively smack that mag into position in a rush. Last comment – that dimple is pressed in with a die and limits the follower from going down to far such that only 10 rounds can be limited.
The above magazines are essentially Mec-Gar’s 15-round Para P16 MGP164015B magazine but with the dimples pressed into each size of the magazine limited the capacity to 10 rounds. So everything I learned about converting the Para 16 mags over for RIA HC use applied here not to mention the jigs I had worked out to do the work.
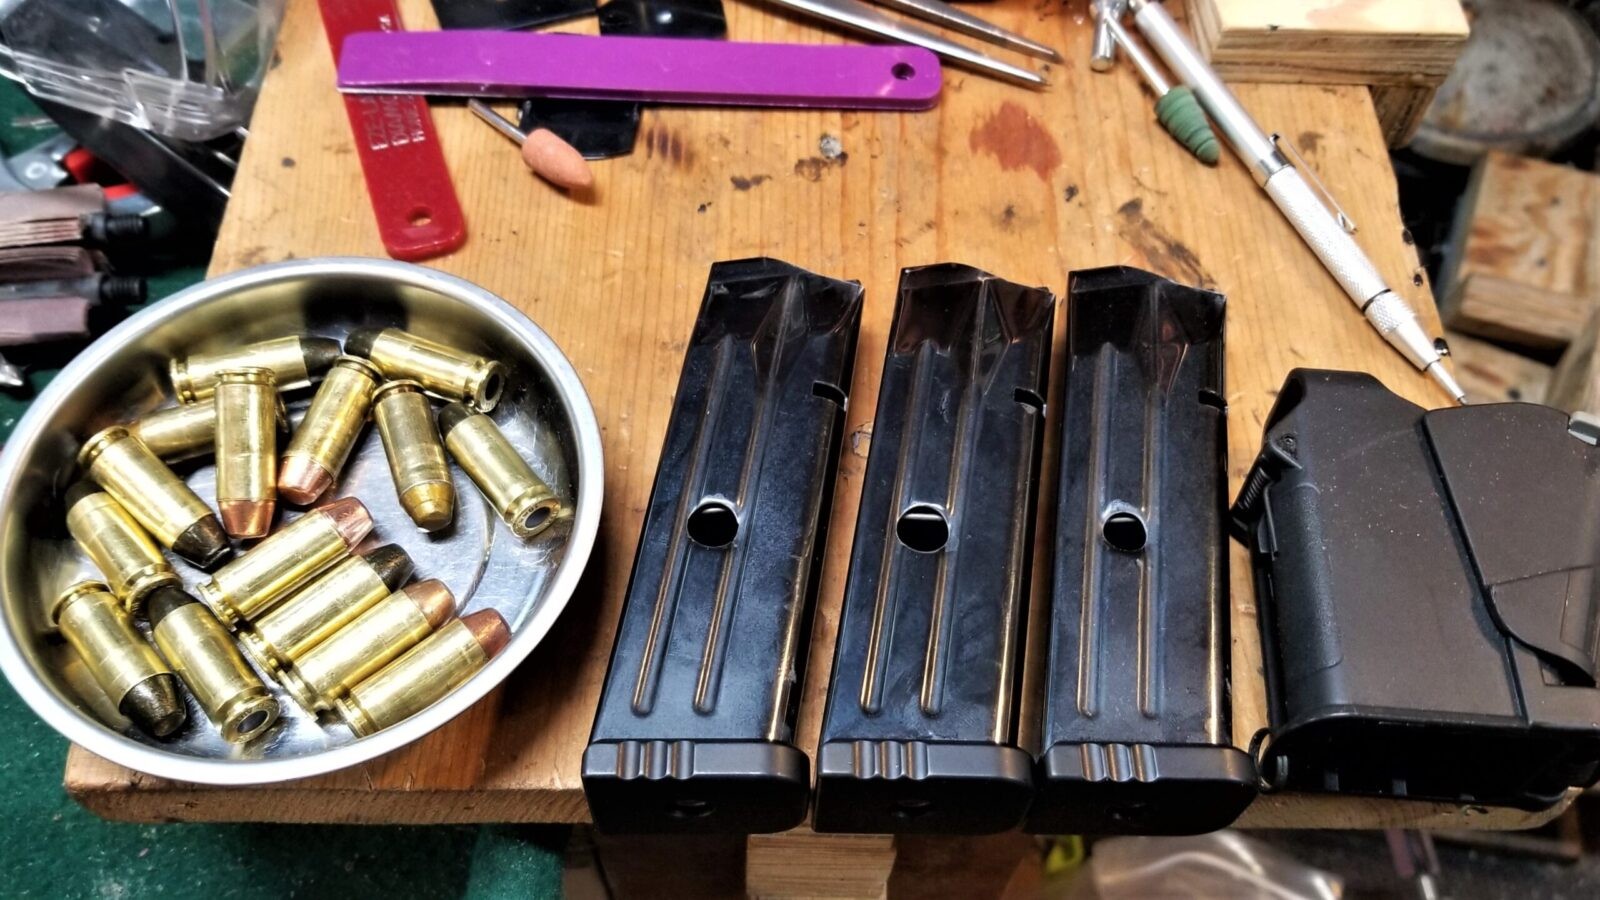
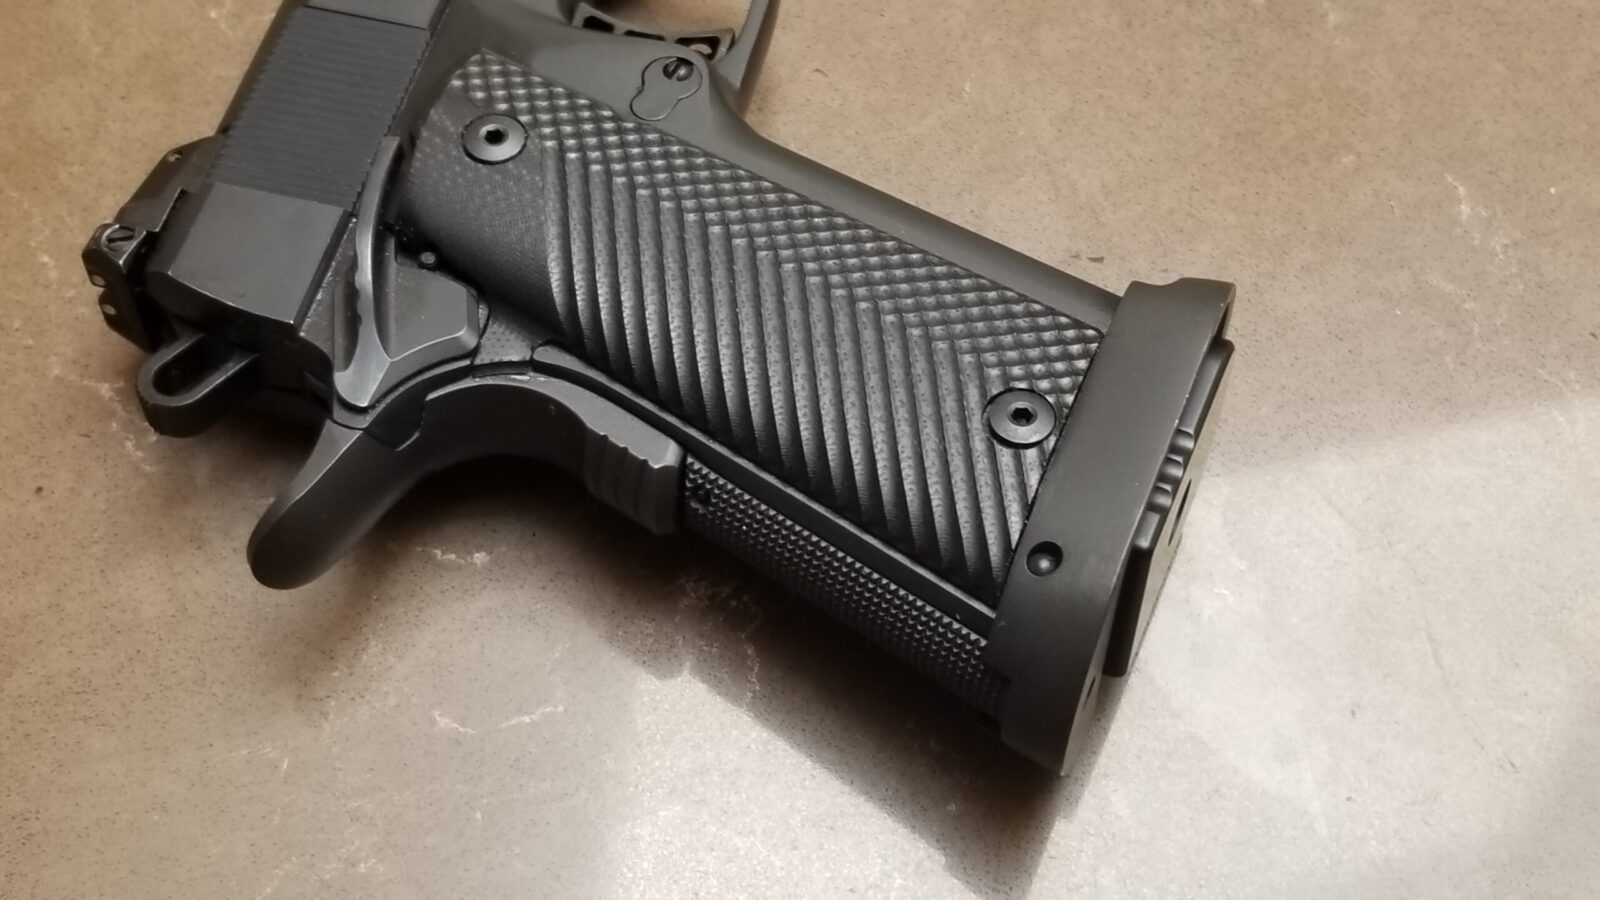
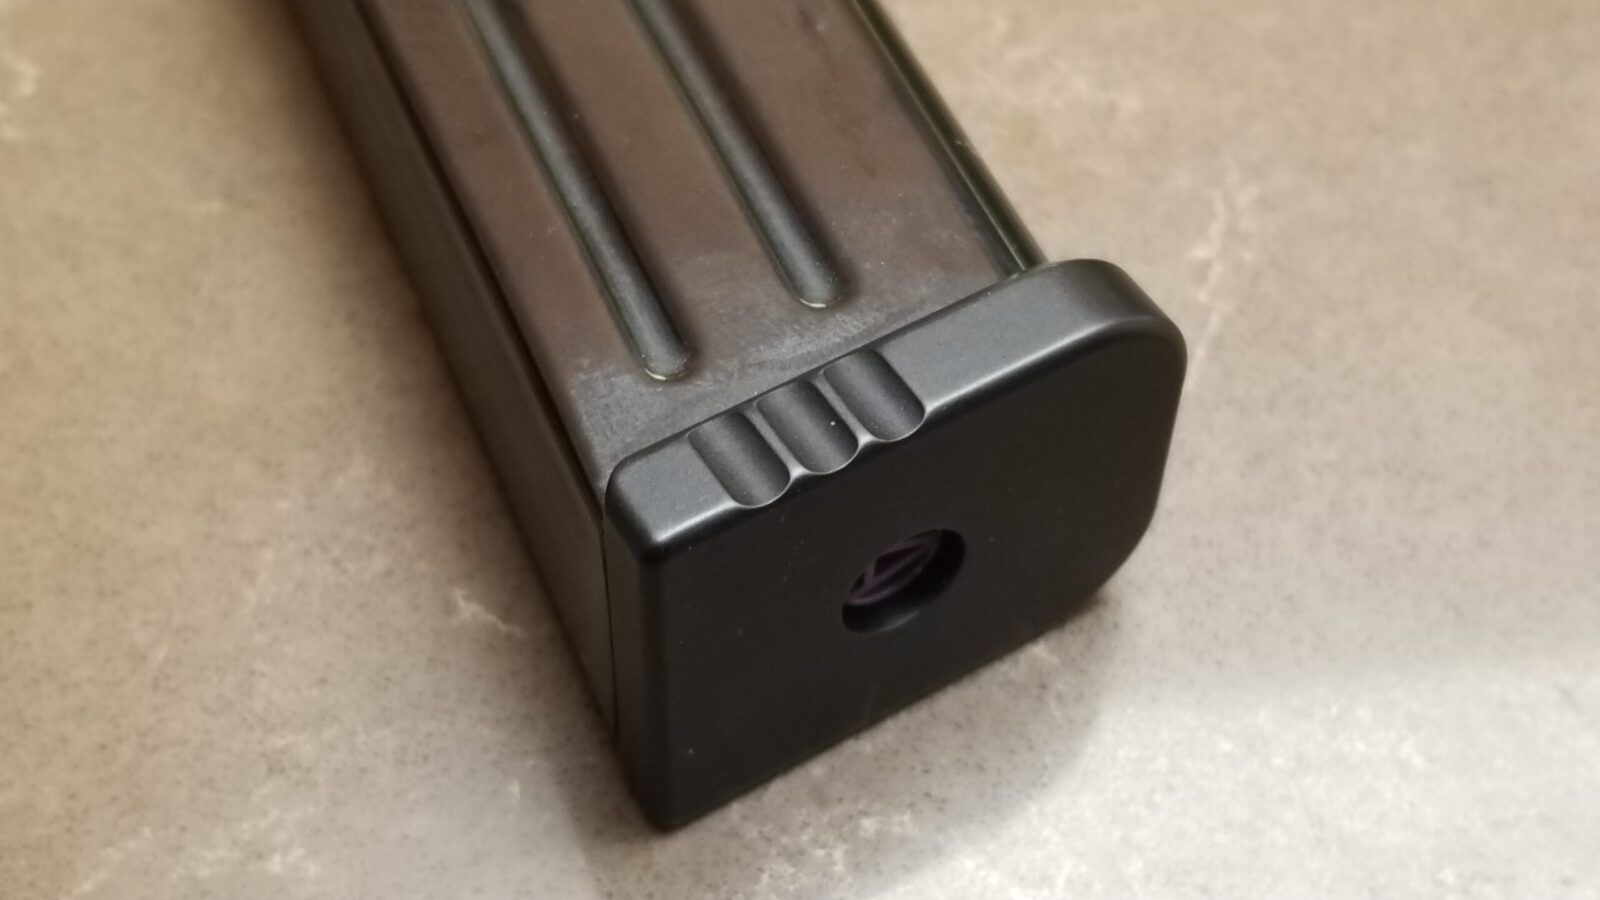
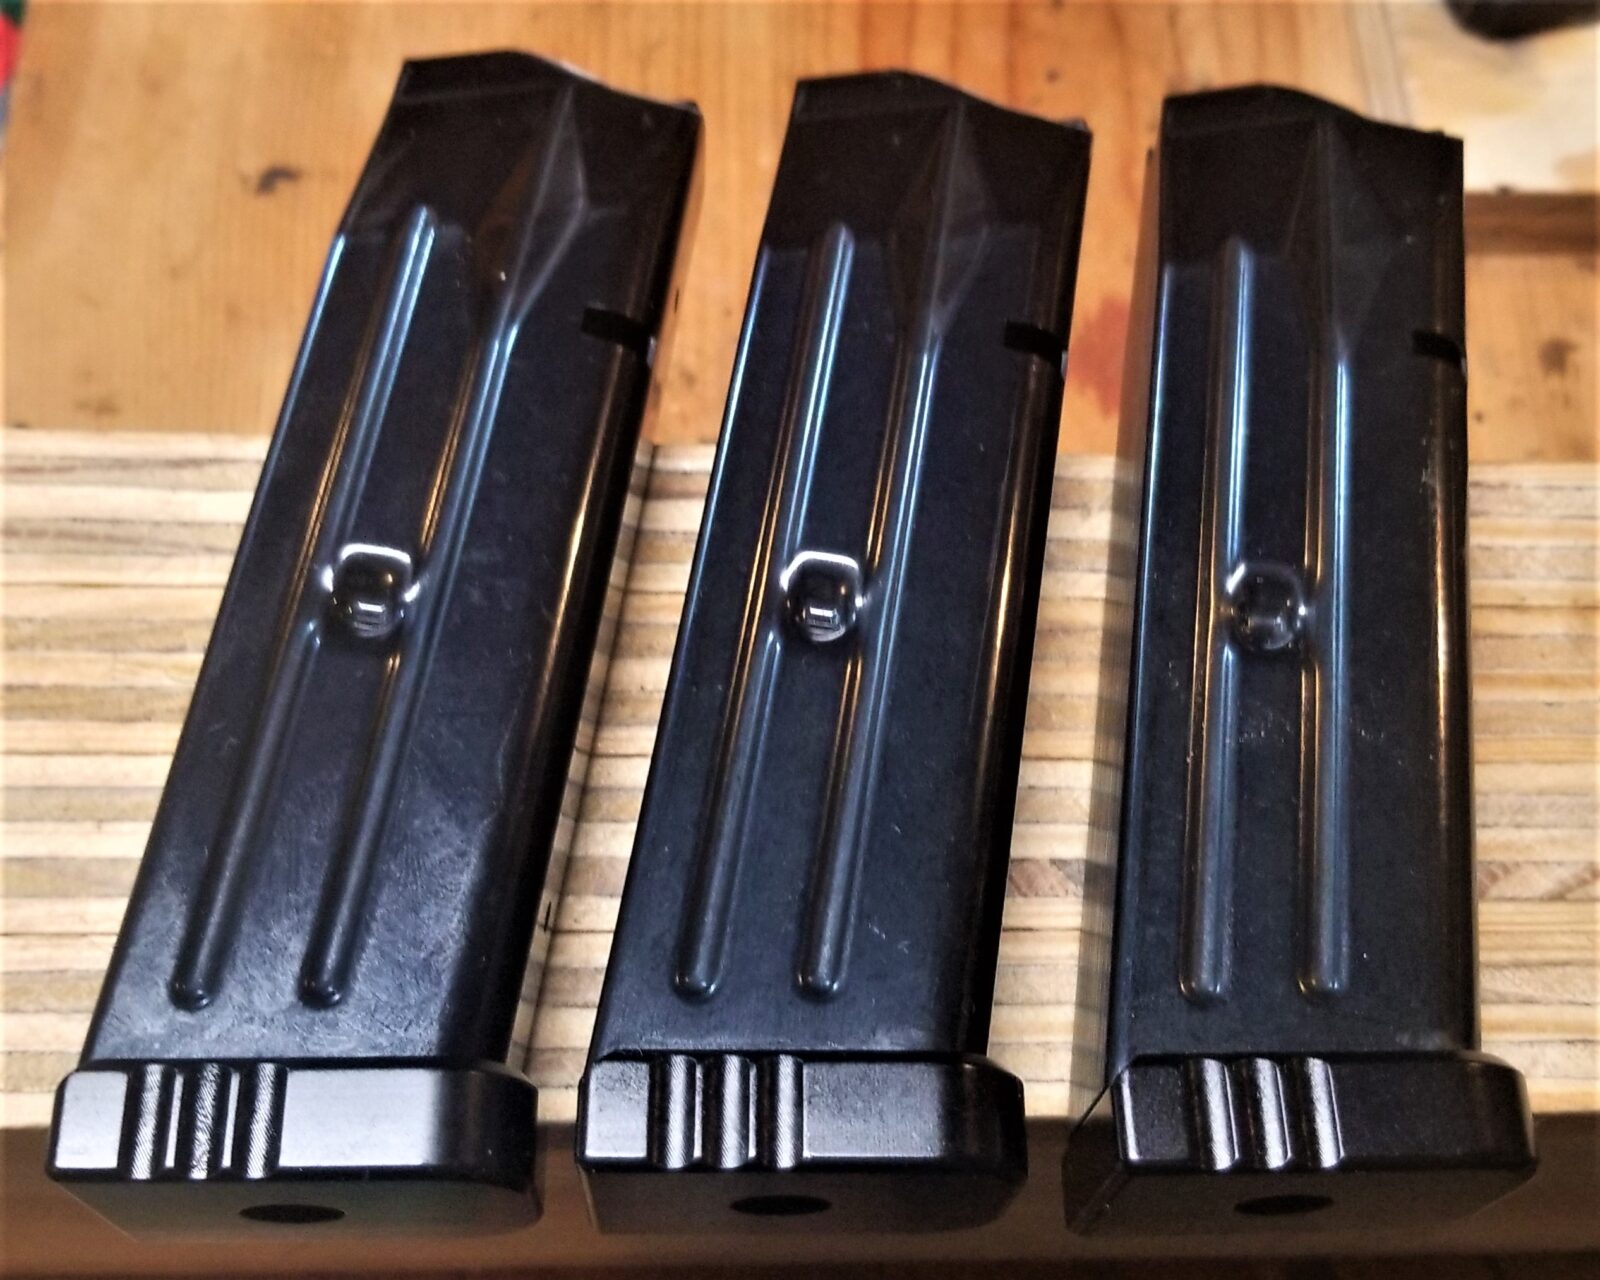
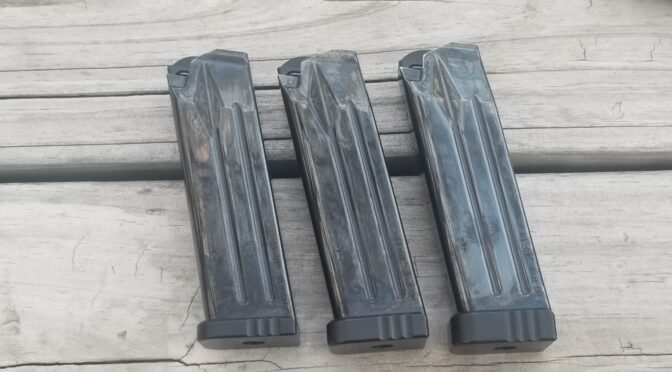
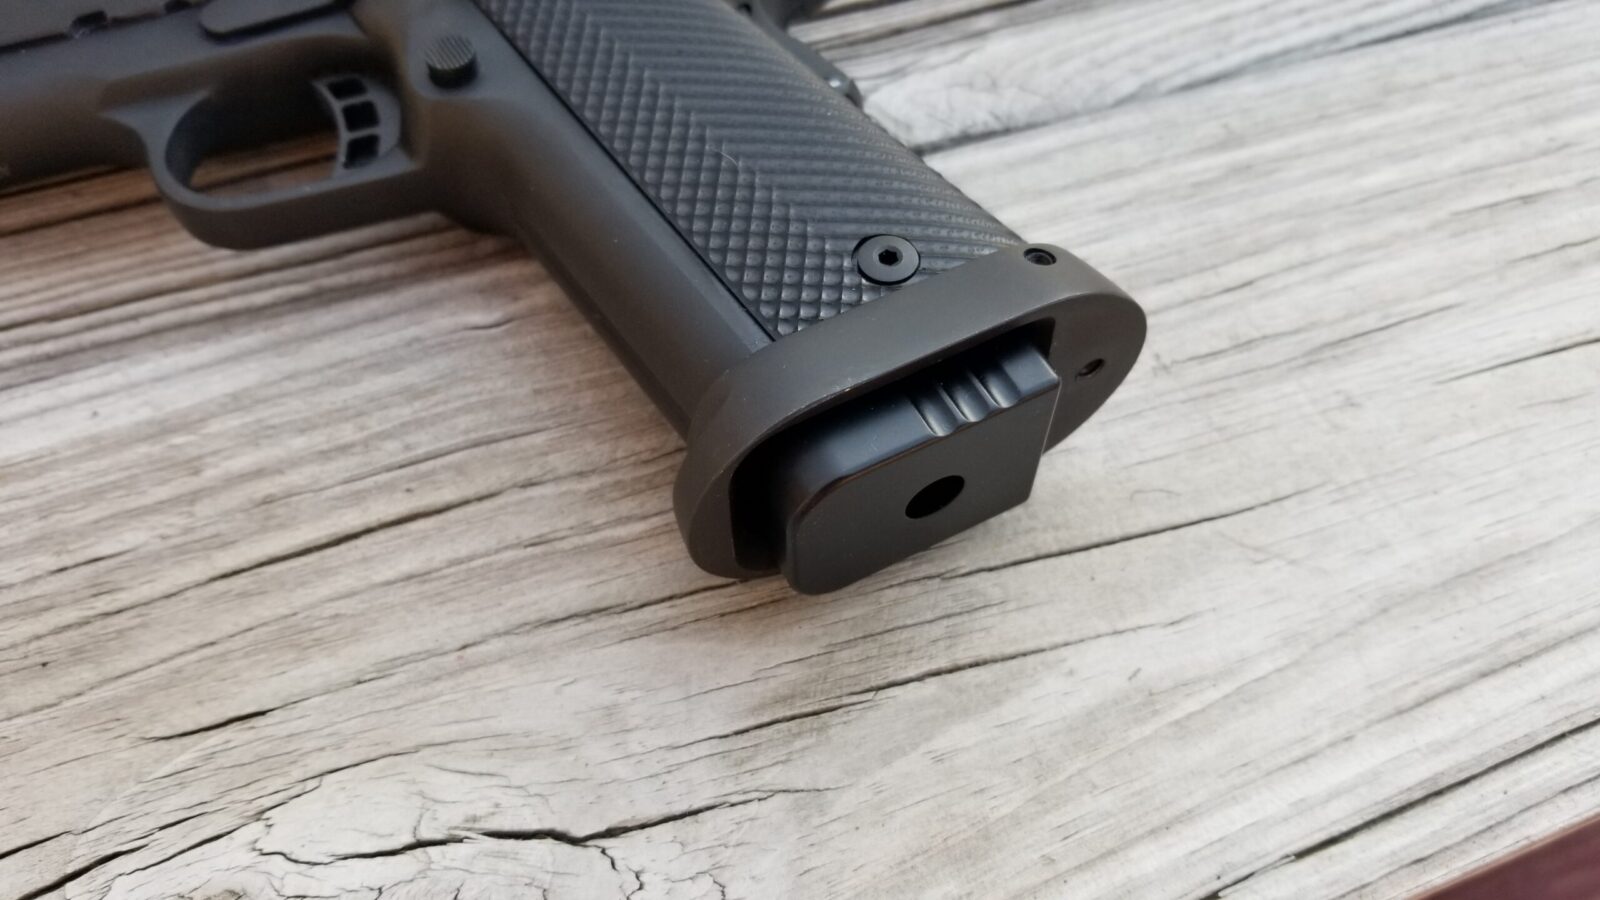
These are three examples of the converted 10-round magazines ready for RIA HC pistol use. The thicker Dawson Precision +200 base plates protrude just a bit from the big RIA funnel and allow for positive seating of the mags (that’s a fancy way to say “slap them in so they seat fully”).
This is a better view of the modified feed lips. The magazines retain their original followers that lock the slides open.
The +200 base plate extends just a bit below the funnel.
Because of pistol and magazine variations, you may find that you need to adjust the feed lips just a bit for your pistol. This sounds daunting but it is actually quite easy. Click here for the blog post on that.
I have an initial batch of magazines ready for sale and have more if the Para mags coming in. I don’t know how secure the supply will be of the Mec-Gar 10 round magazines but I will try to keep them in stock.
3/24/2024 Update: This is an obsolete post and product. We now make 10 and 15 round magazines by blocking and pinning closed our third generation magazines. These new mags have excellent springs and an anti-friction coating. Please click here for the product listings.
I hope this helps you out.
Note, I have to buy all of my parts – nothing here was paid for by sponsors, etc. I do make a small amount if you click on an ad and buy something but that is it. You’re getting my real opinion on stuff.
Hi folks, I am just trying to get the word out there that we actually have OEMP164015B compatible magazines that the 10mm and 40mm high cap 2011-style RIA pistols use in stock.
The base magazine I used to create these mags are the very well made Mec-Gar magazines for the Para P-16 (mag model MGP164015B). In addition to being close in terms of the required tube design, the Mec-Gar mags are quality and feature:
heat treated tubes
high tensile music wire springs
the follower is made from high impact nylon and locks the slide open
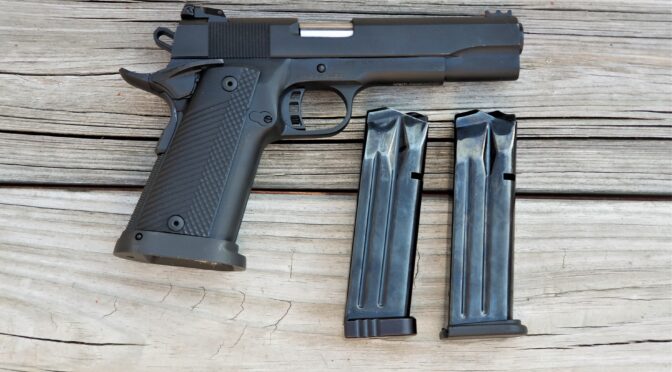
These mags were all converted by me and then hand fit and tuned to my RIA 52009 high cap 10mm pistol. For most shooters they should be good to go. If there is a feed problem then a minor adjustment of the feed lips (perhaps opening them a tad so the round sits higher) should be all that is required.
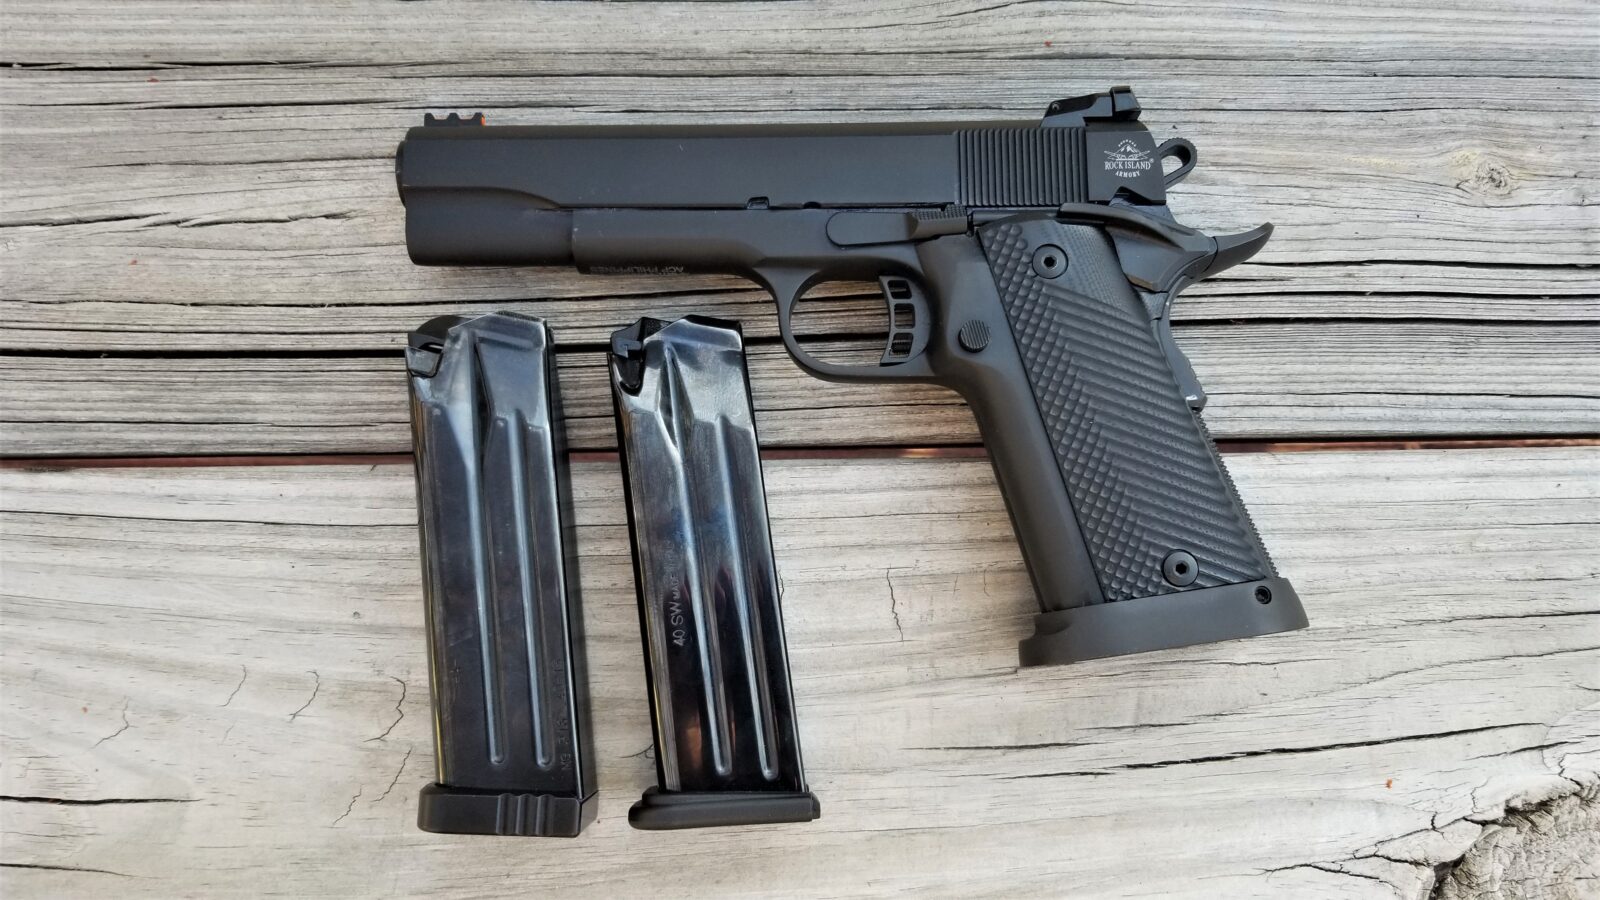
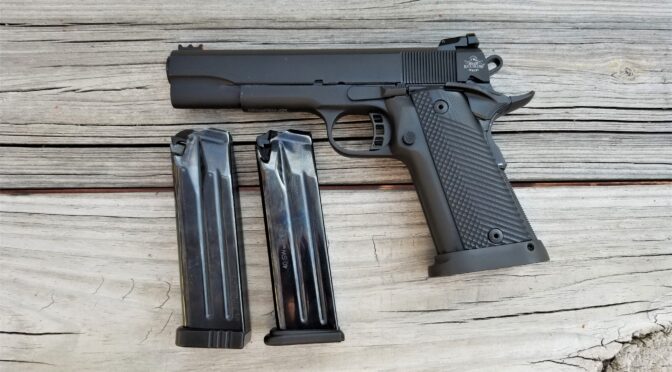
This is my personal 52009 10mm pistol. The magazine on the left is one of mine and has a +100 Dawson baseplate on it. The mag on the right is an original OEMP164015B that is made by ACT-Mag for RIA.
To accommodate the flared mag well that RIA put on these pistols, I used a variety of lengths of Dawson Precision base plates. The +100 Dawson model pretty much is flush with the bottom of the flared mag well, the +200 sits just a bit lower and the +300 is lower still. The number refers to the length (0.100, 0.200 and 0.300 inches).
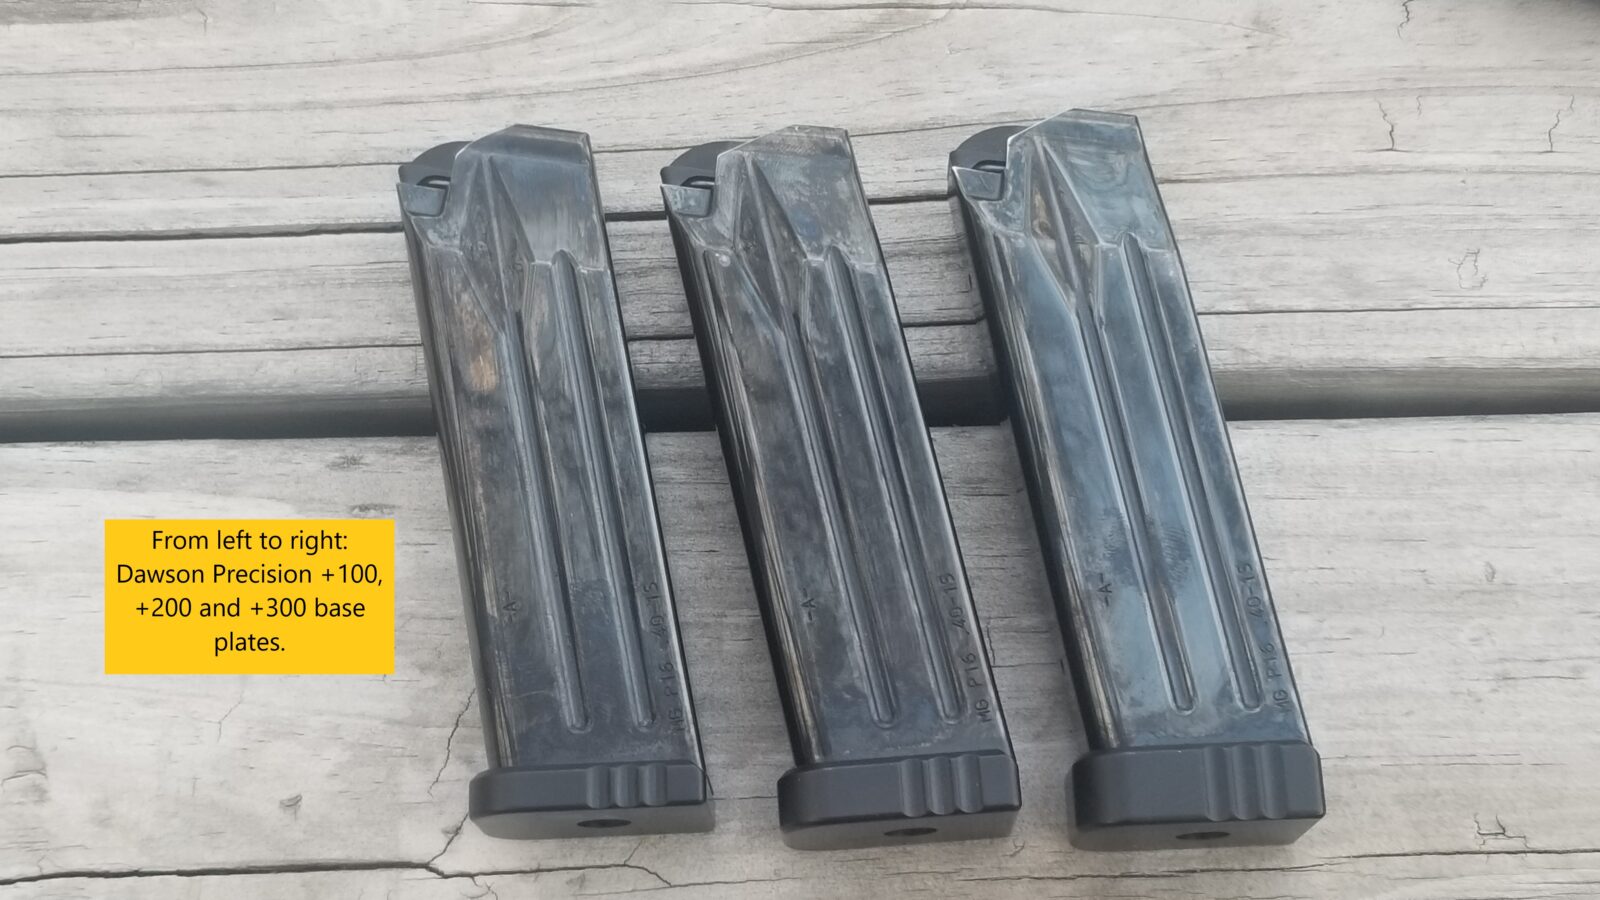
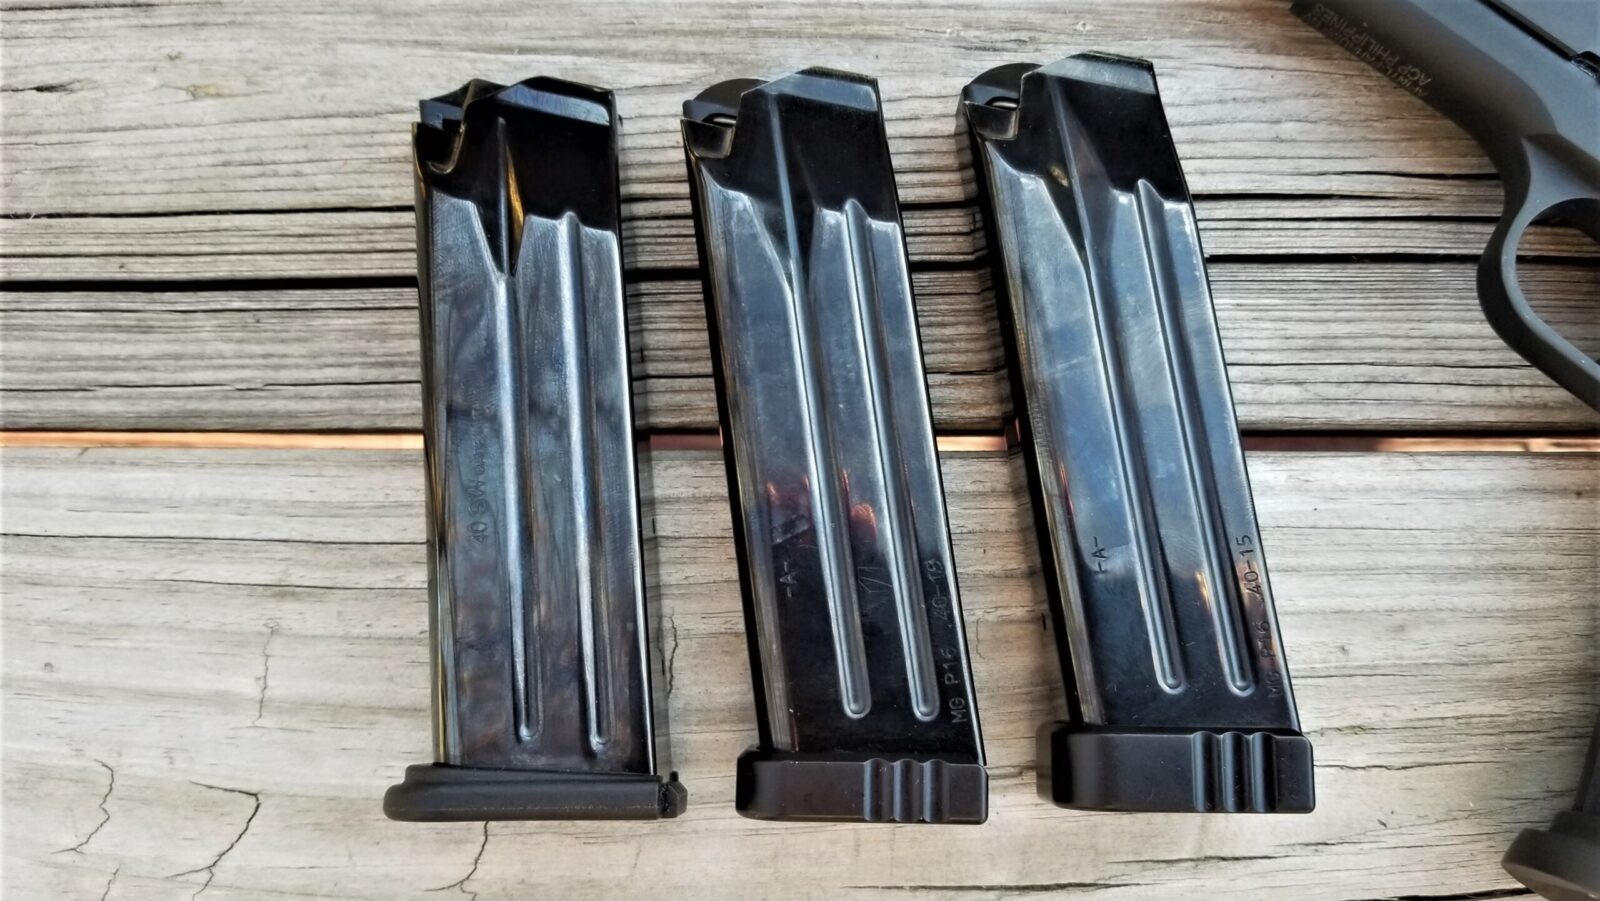
Here’s a picture of three converted mags. As the text says in the photo, from left to right the Dawson Precision base plates are the +100, +200 and +300 models.
Our prices start at $69.99 and go down (not up) the more you buy. I just saw some of these magazines listed for the first on GunBroker this morning and they start at $80 and go up!
In the first post, I outlined the problem that high cap Rock Island Armory 10mm magazines (OEMP164015B) are next to impossible to find right and and shared some of the research I did. I also let the cat out of the bag that I figured out a way to successfully convert Mec-Gar Para P16 magazines (MGP164015B) for use in the RIA pistols.
Safety Comment – Use Dummy Cartridges / Snap Caps
I said this in the first post and it is so important that I want to reinforce the message – I knew I was going to need to do a ton of cycling of rounds. Using live ammo is risky because you have the very real risk of a negligent discharge. To avoid this, order yourself in a bunch of dummy cartridges. There are sellers on eBay that will sell you 10+ at time. Order yourself in 10-20 rounds. You are going to smash the crap out of them due to the heavy recoil spring a 10mm uses. I trashed at least 10-15 of them. Most were due to the bullet being smashed back into the case, one dented the case pretty bad and one deformed the case right at the mouth.
I can’t even guess how many cycles I did – especially starting out. I’m going to hazard a guess and say I averaged about three cycles per dummy before something failed on the dummy as I worked out the kinks and I would load three rounds per magazine to do the testing.
I can’t stress it enough – get dummies to tune your magazines.
Comparing the RIA and Para Mags
Per the first post, Armscor’s RIA mags are actually made my ACT-Mag. Since my pistol did not come with a mag, the seller was able to get Armscor to send me a OEM mag so I had a baseline to compare to. I definitely made sure it function tested properly before doing anything else. Never assume something works until you test it – I can’t stress that enough.
To let you see the differences, here are photos with comments in teh captions of the two mags:.
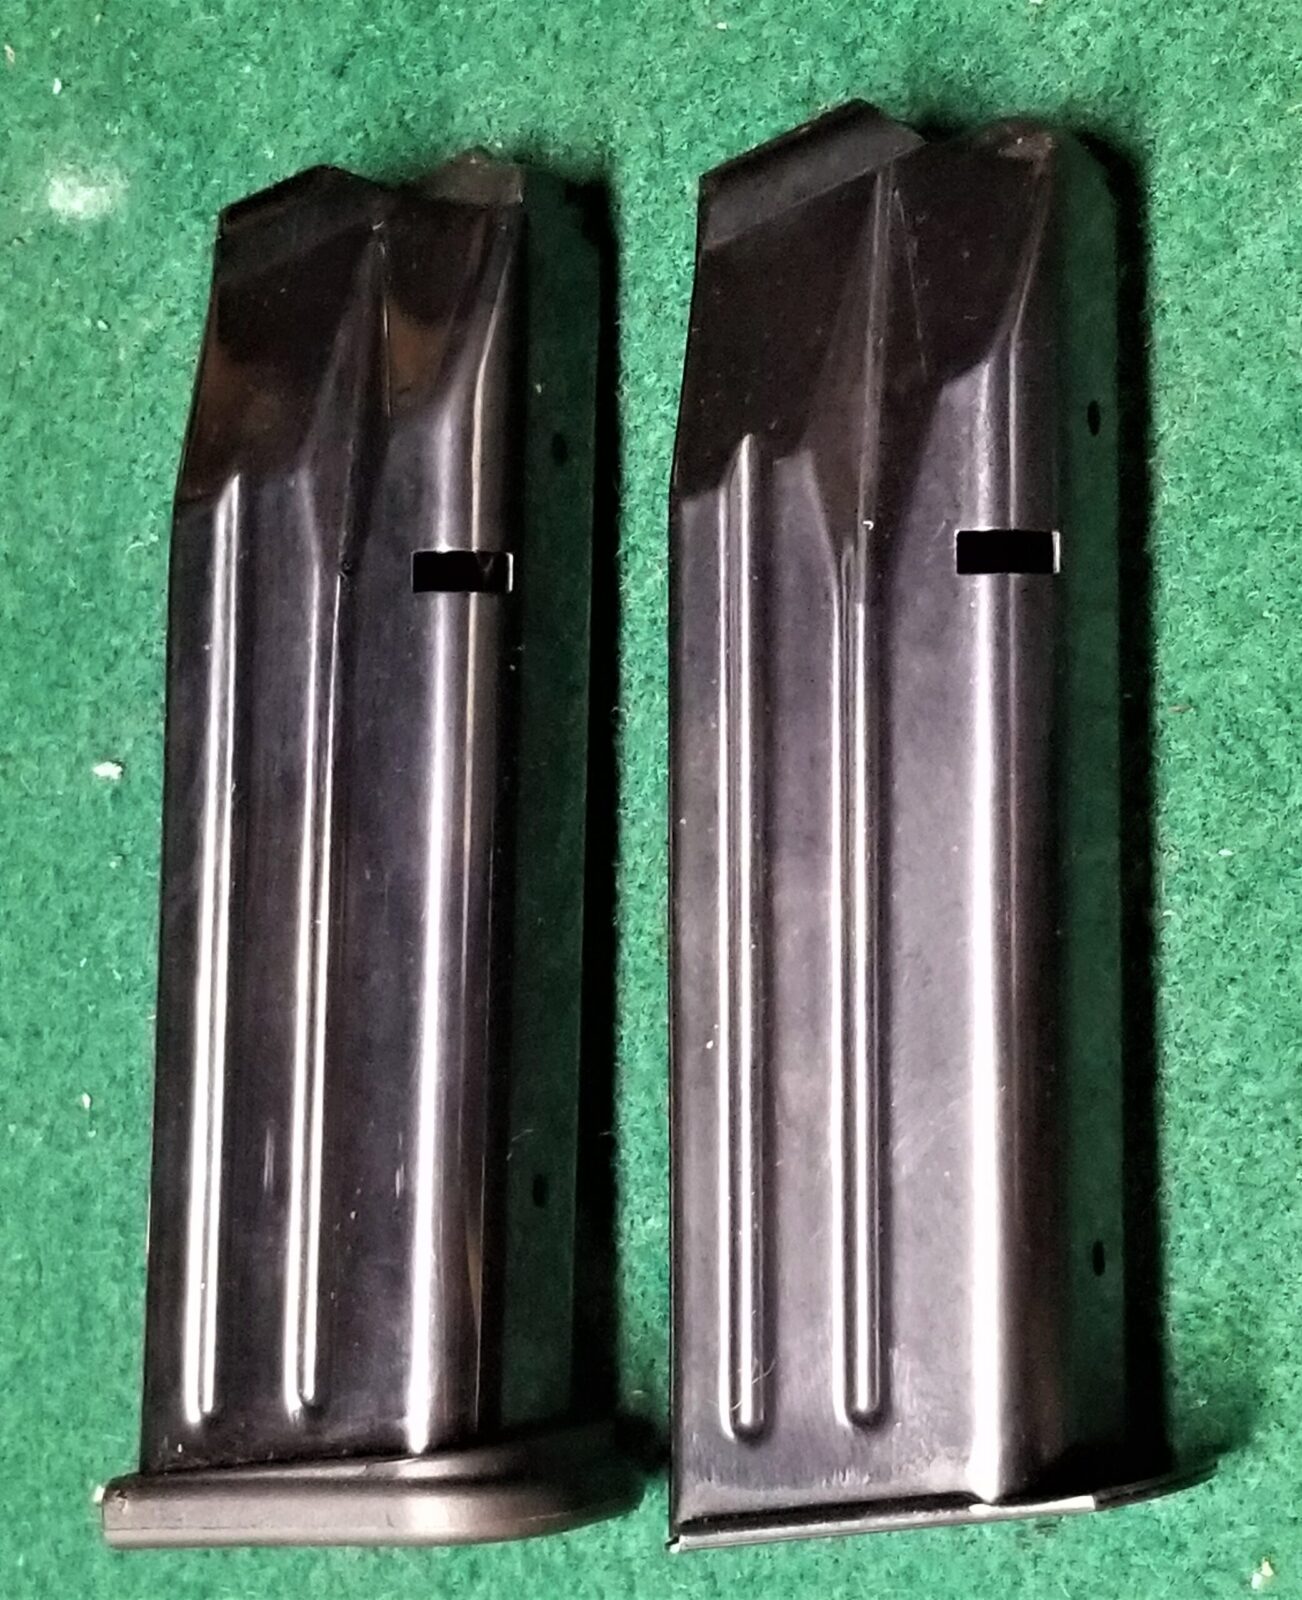
The RIA model has a plastic baseplate and the the Para model (right) has a steel base plate. Look at the top – the feed lips are much longer on the Para. The magazine locking slot is the same.
RIA on the left – see how the baseplate is stepped. This clears the big mag well funnel on the RIA pistols. The longer flat metal base plate runs right into the funnel and prevents the mag from seating. The RIA model has “40 SW Made in Italy” – the 10mm uses the same mag. Now the Para mag has more marking. On the left edge of the mag in the photo you can see “-A-” and on the right lower-edge in says “MG P16 .40-15”. The followers are a tad different and again the different length feed lips are apparent.
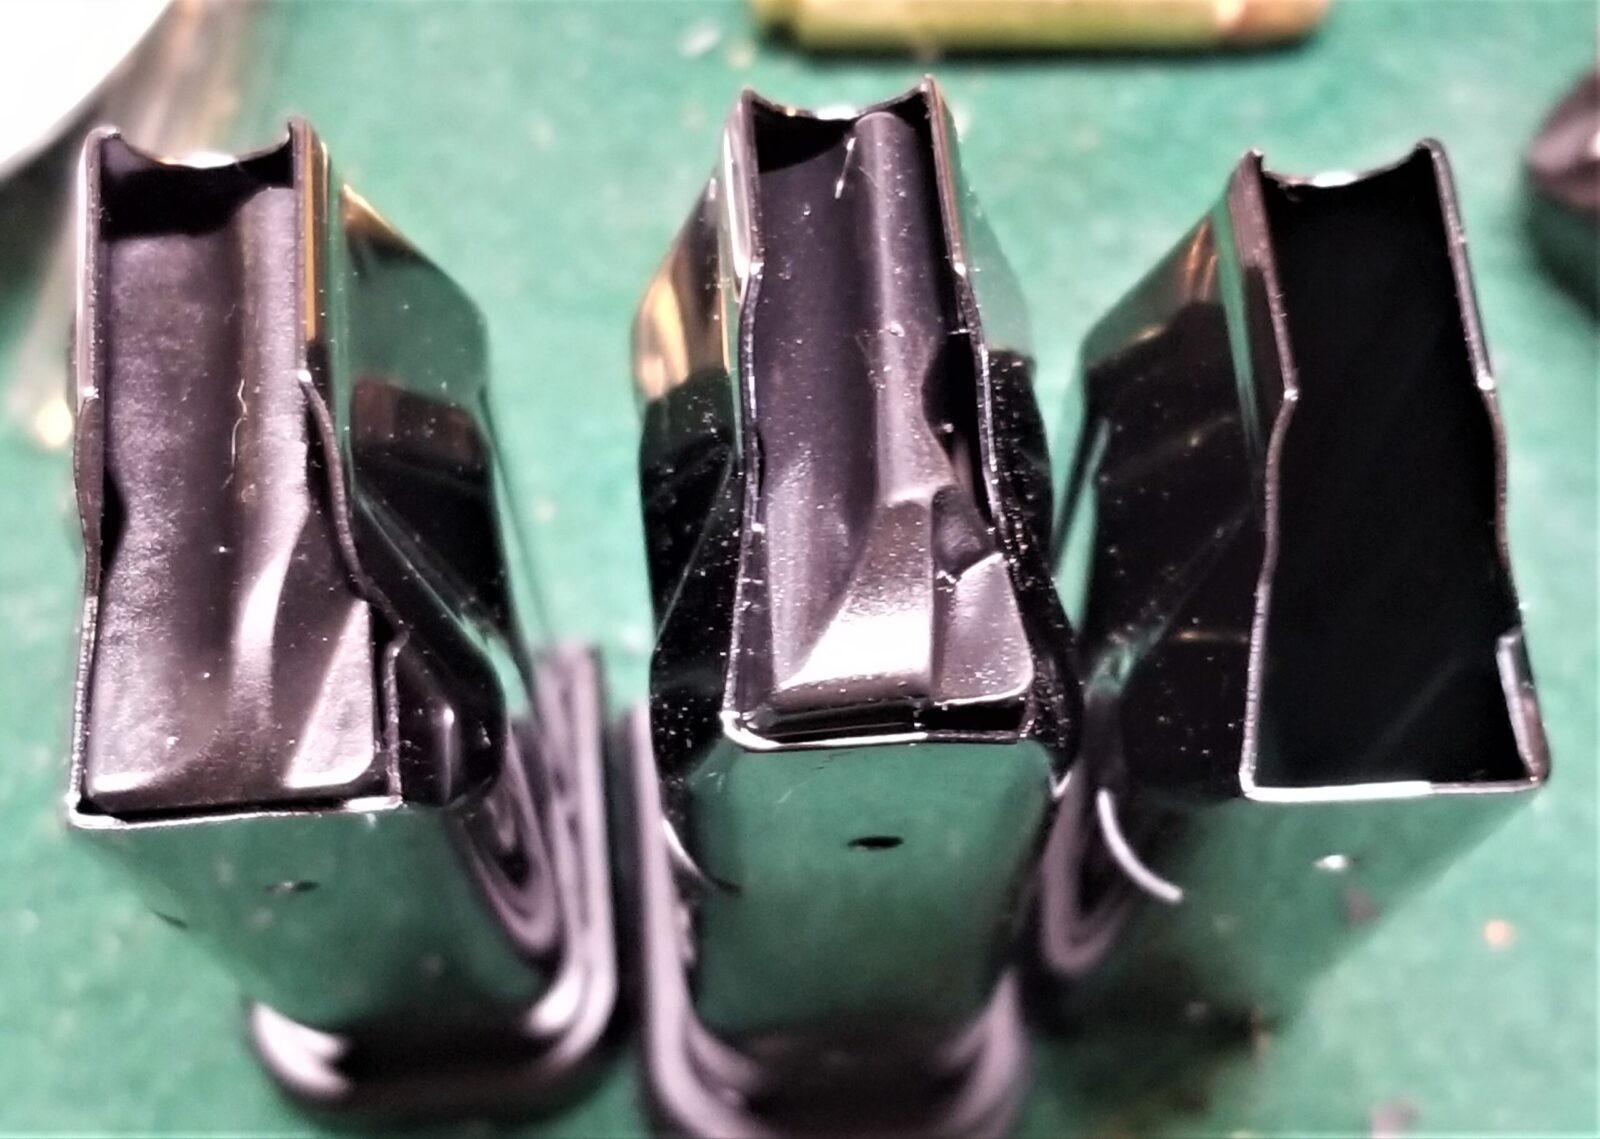
From left to right: Para, RIA, empty Para tube. The RIA follower is slightly different. I found that they work okay but I wasn’t sure at first.
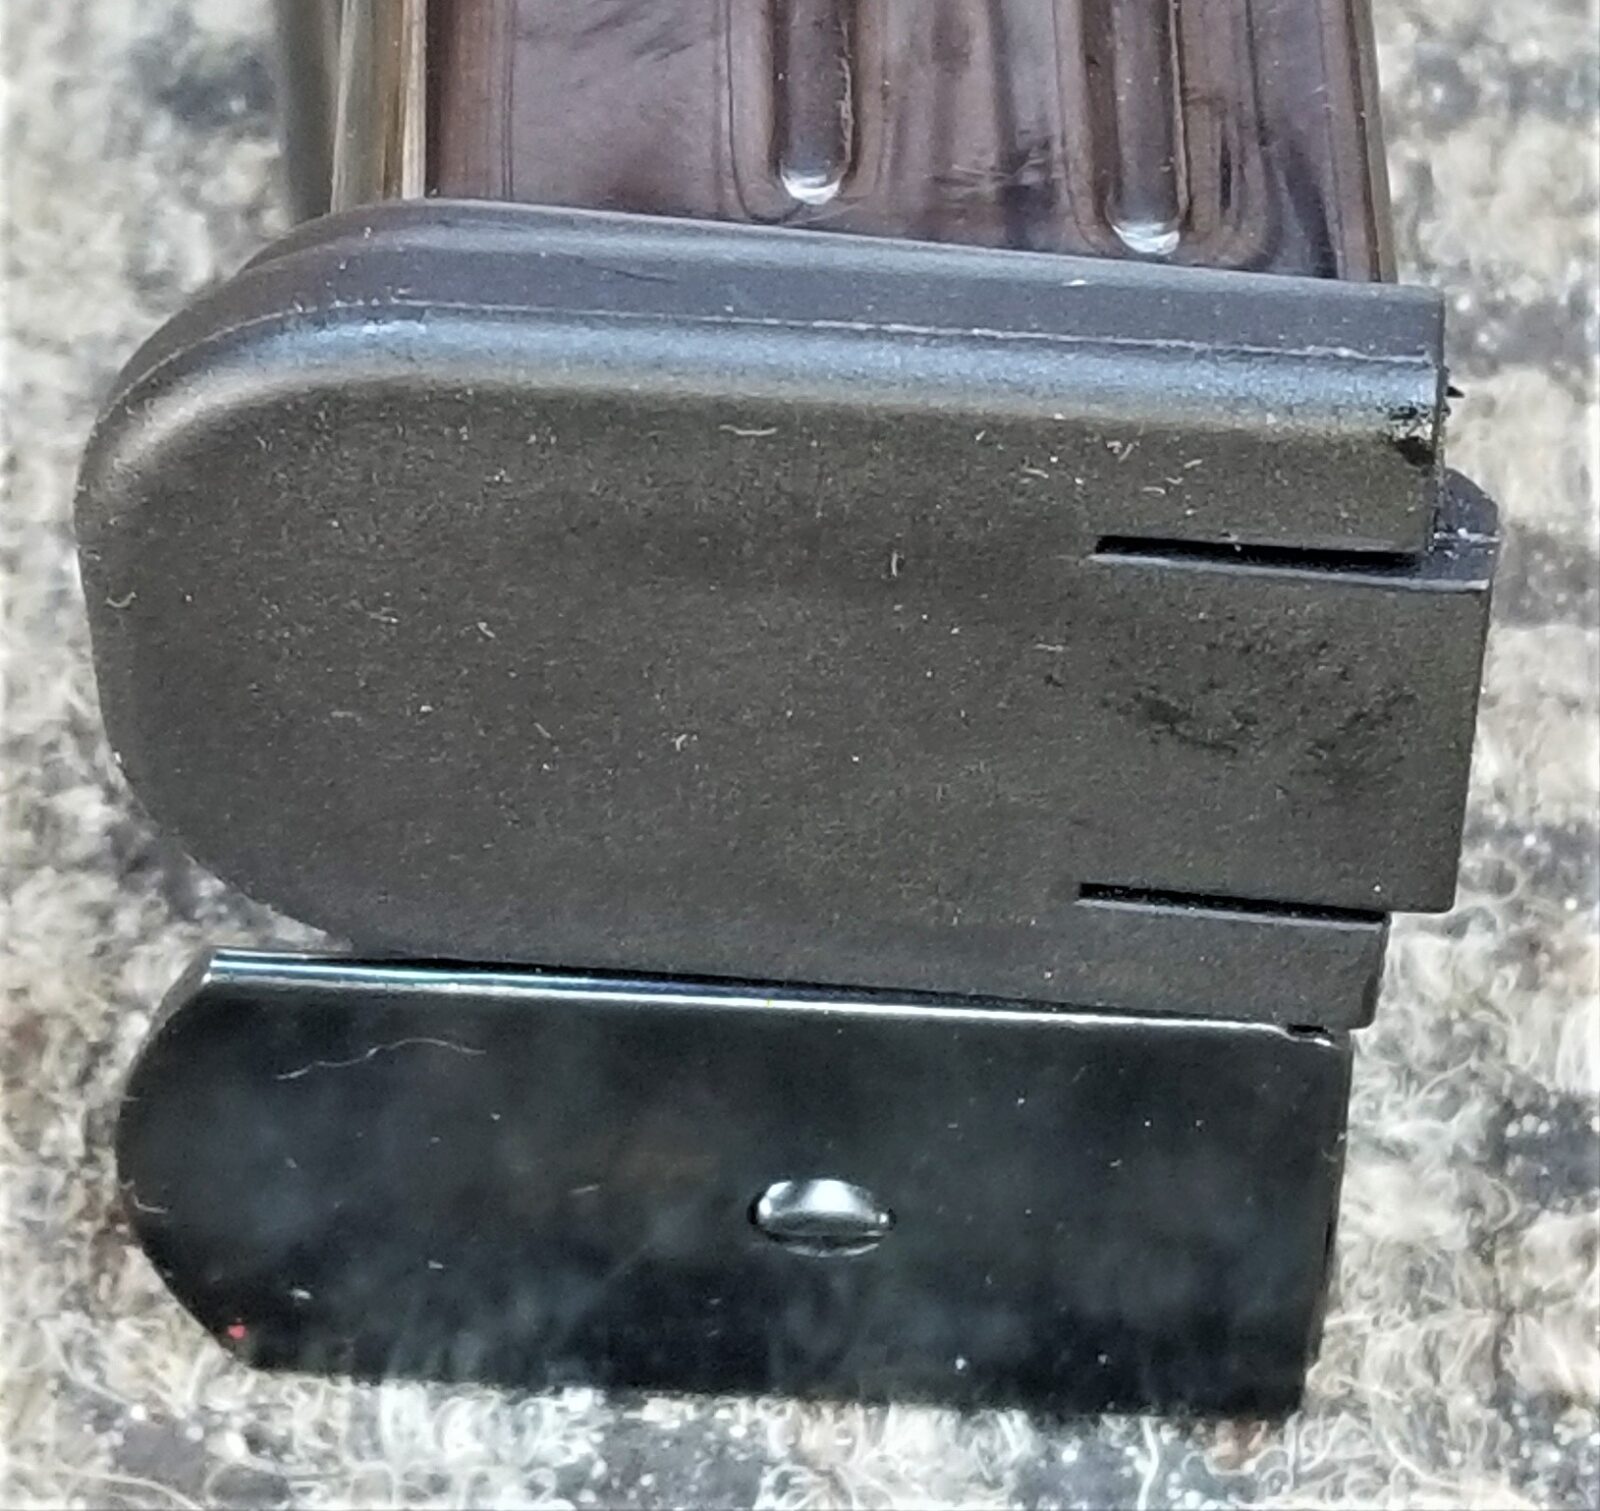
Top is the RIA base plate and the bottom is the Para. The Para’s metal plate is too long but can easily have the front ground down to fit the mag well. The tapered top of the RIA base plate can clear the funnel. The Para’s plate is more like an immediate shelf or duck’s bill that hits the front of the funnel. The other three sides of the Para base plate are fine.
What Needed To Change?
There were two things that needed to change for sure and one maybe:
The feed lips on the Para were too long thus preventing the round from pivoting up to align with the chamber. Fortunately the Para lips need to be trimmed. It would be far harder, if not impossible, to lengthen the lips if they were too short.
The base plate needed to either be trimmed or replaced to fit in the mag well funnel
This was the “maybe”: The followers were slightly different and I didn’t know if the original Para follower would work or not. I figured that I would address the first two points and then decide the next steps. Let’s start with the easy one – what to do with the base plate.
Changing The Base Plate
You have two options here and either one works – it’s up to you. When you remove the Para base plate you will notice that the tube of the magazine’s body rests in a cup. You can remove that front tab off just shy of the depression. I left about a 1/4″ in front. This serves to stop the plate and located it properly on the plate. Seriously – just file, sand, or otherwise cut the extra material off. I used my big 2×72 Esteem grinder to remove the extra material and round the edges.
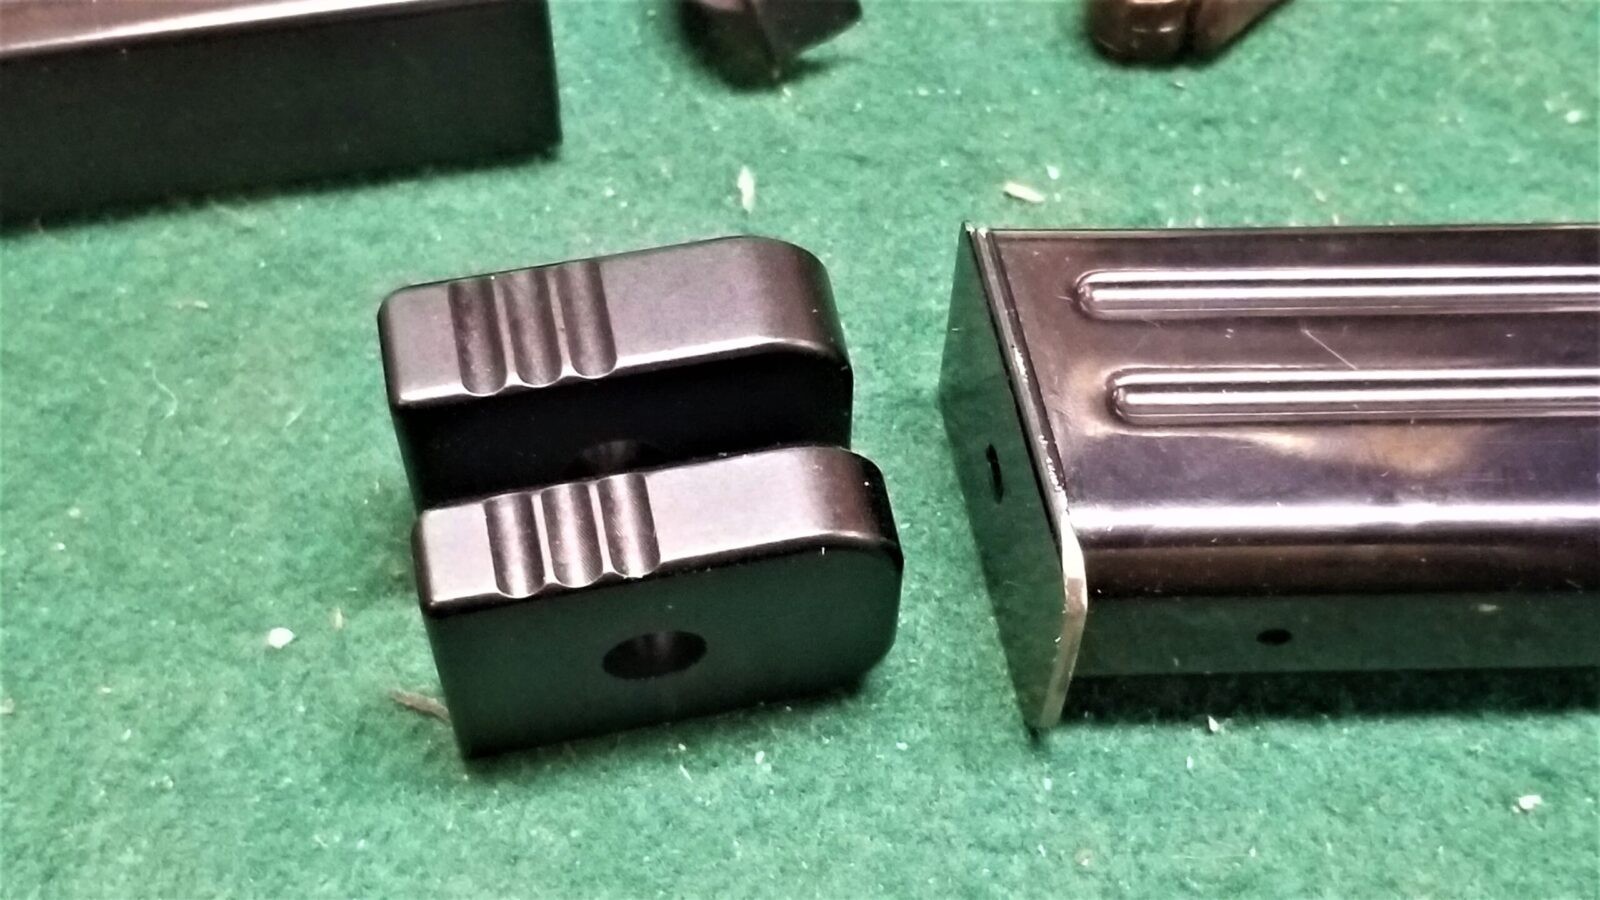
On the left is a modified base plate and on the right is an original. I reprofiled the plate on my grinder but you could use any tool you are comfortable with. Just remove material until the magazine seats fully. The above modified plate has about a 1/4″ or a tad more of material on it. You just need to leave enough for the plate to be positioned appropriately on the magazine. Yes, the mags do drop free.
The pro of the above is that it is fast, easy and cheap to do. The con is that the bottom of the magazine sits further into the mag well than I would like. You could easily add .100-.200 of material on the bottom using somethign like Kydex or G10 and some quality epoxy or a stiff rubber with an adhesive tape. In all cases be sure to drill or punh the hole out so you can remove the plate in the future – I had that mistake many year ago and learned a lesson – it is way easier to make the hole before you install it and need to remove the baseplate!
Your second option is to buy an aftermarket base plate. I bought some plates from Dawson Precision that I really like. Their +100 plates sit flush with the mag well, the +200 extends just below/outside of the mag well and the +300 sits further yet. All three work and it comes down to preference.
Here are two Dawson extended base plates on the left. The top left is their +300 model and below it is the +200. My modified plate is in the magazine. The Dawson plates are CNC machined and fit perfectly. I like both.
Changing The Feed Lips
This step is slightly more involved than the baseplate. In this step we need to shorten the longer Para feed lips. Again, I was really happy they just needed to be shortened. I was expecting to need to change the angle but shortening them isn’t as bad as you may think.
This is where having an original RIA mag to compare to the Para mag was invaluable. I needed to remove the same amount of material from the front of both feed lips. After watching the pistol load the mag and feed dummy rounds as closely as I could, I decided to use my grinder to remove material in a straight line from the front top edge to where I wanted the new front of the feed lips to be.
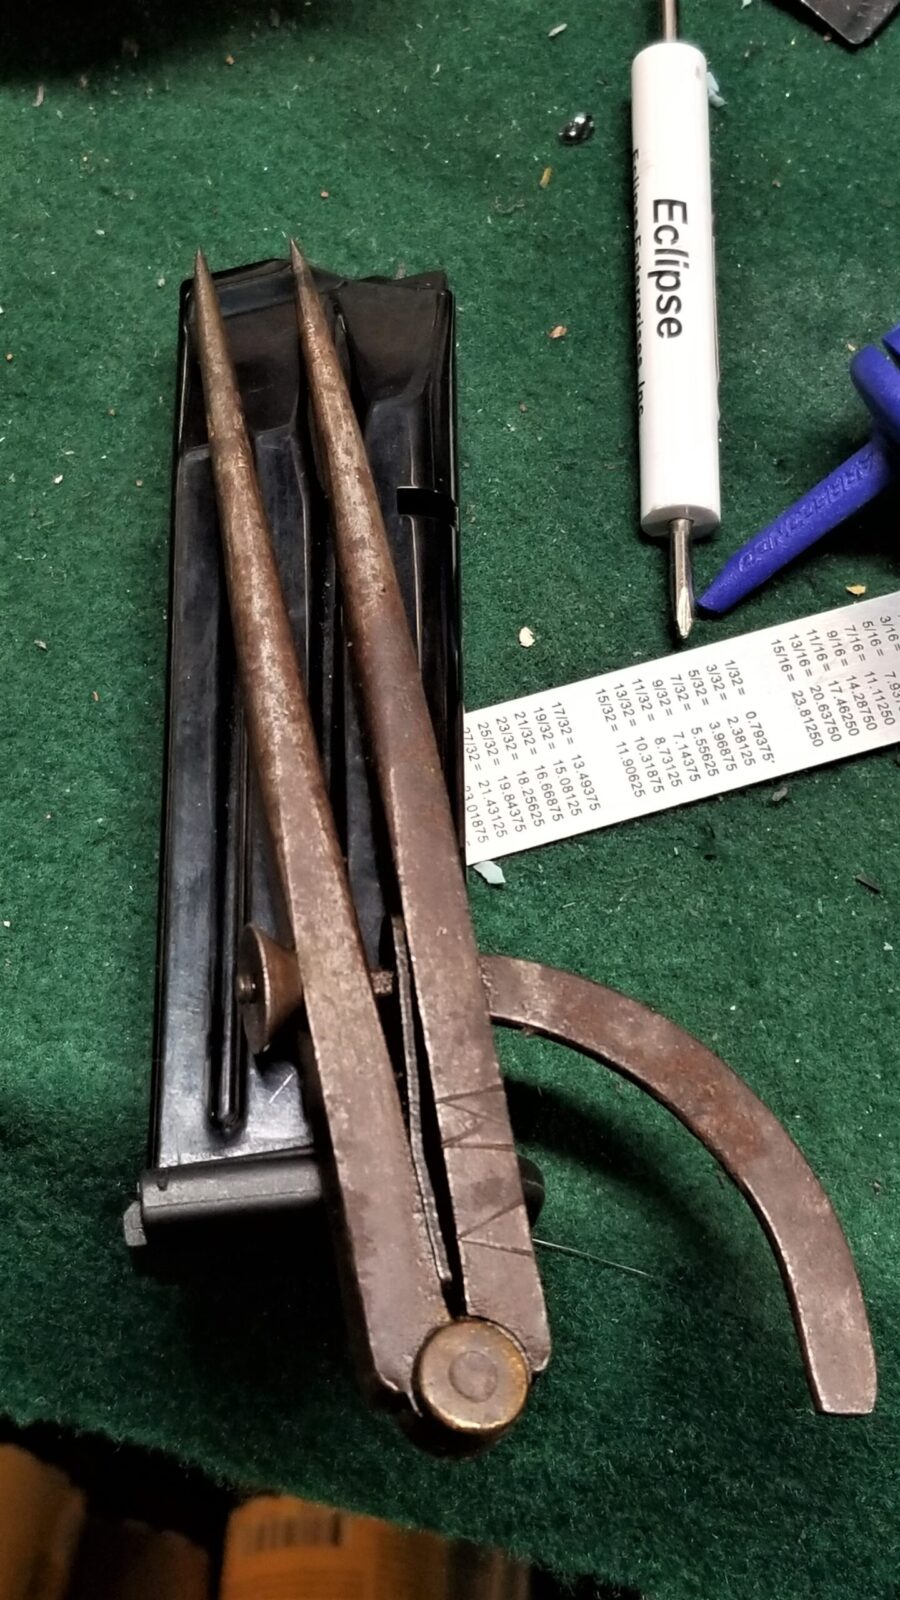
Rather than measure and transcribe, I used a steel divider (compass) that was my grandfather’s. I like doing stuff like that when the occasion suits. A divider wants to spring open and a small thumbscrew allows you to adjust the gap between the two points. In the case of the feed lips, I could use it to duplicate the length of the feed lips to each new magazine I needed to cut down using the back of the feed lips as the reference point.
Adjust the divider so the points are at both ends of the RIA magazine’s feed lips. This makes it extremely easy to scribe the mark for where the feed lips will be trimmed to on the Para mags. Yeah, these dividers are old. They belonged to my grandfather, then my dad and now me. Using tools reminds me of projects with my dad and the importance of family.
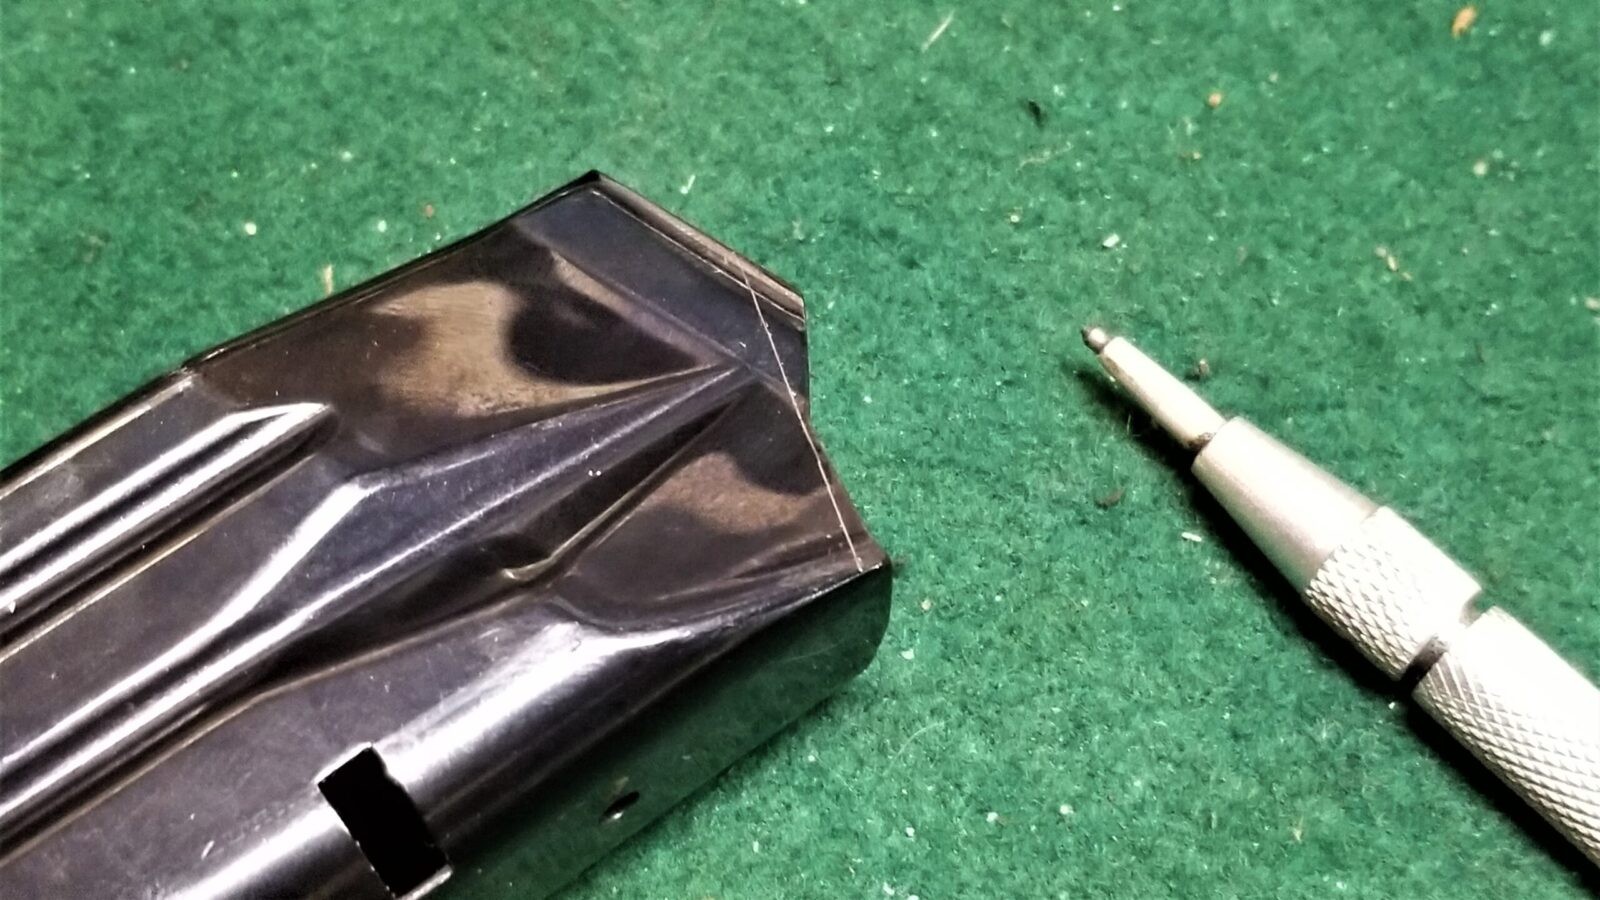
I would then use a scribe with a carbide tip to etch the distance and a small steel rule served as a straight edge from which I scribed a line at an angle from the front top edge of the magazine tube back to the length I just scribed.
Two things – first you can see the line I will grind down to marked on the magazine body. Second, the scribe has a carbide tip that cuts right through the finish and makes a real easy line to see. The first scribe I tried had a hardened steel tip and it didn’t make a very clear line. The carbide tipped one bit right in and easily scored the finish. Get a carbide tipped scribe if you can. I tried varying the angle it didn’t seem to make a big difference. I tried to more closely follow the original edge of the magazine with latter magazines.
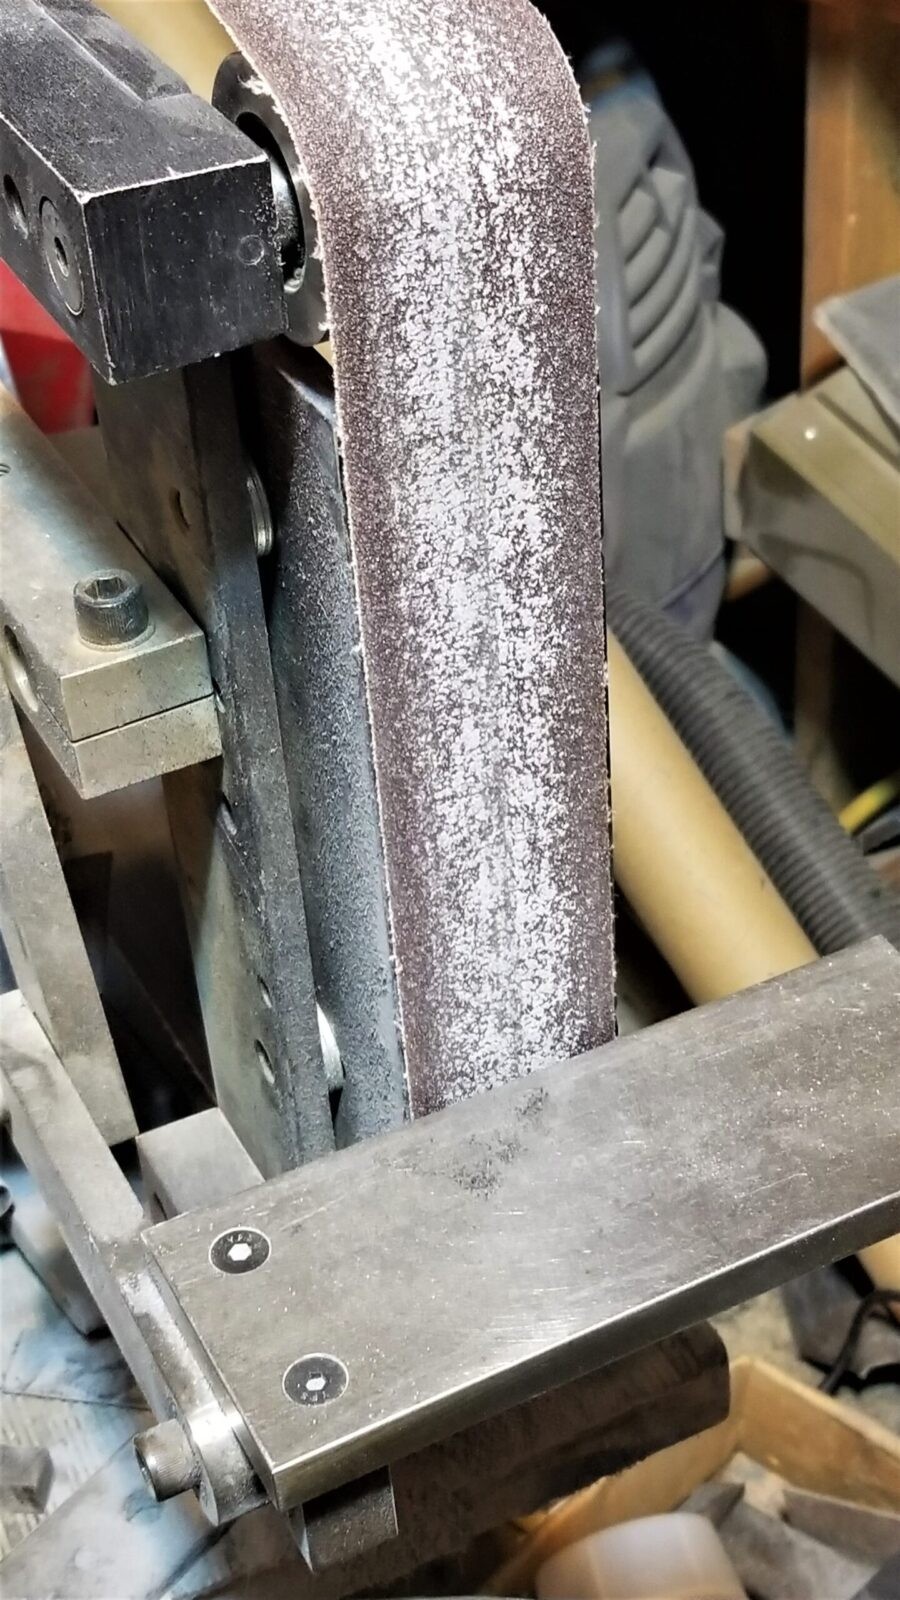
Everything above that line needed to be removed. Again, I used my big 2×72 belt sander, or “grinder” as knife makers call them. I squared my work table to the belt, used a 80 grit belt and removed the offending steel by carefully pushing my scribed line towards the belt in a parallel manner. In English, I sanded off the metal above the scribed line 😉 Any kind of sander would make short work of this but it will be way easier if it has a flat table that will enable to you feed the magazine towards the sanding belt or sanding disc in a controlled manner. I would not do it free hand – same goes with a file but I’ve also seen guys wield a pile of files to do work I only thought could be done by a mill so to each their own. By the way, take care not to overheat the lips when sanding.
This is my 2×72 Esteem grinder (belt sander) and it’s simply wicked. I bought it after my dad passed away and it whipped the extra material of the mags with speed and ease. Because the work platform is trued to the belt’s backing plate, I found I could trim the mags in one pass by putting the flat edge on the platform and feeding the magazine into the belt to remove material. I think it’s an 80-ish grit belt and it left a burred edge that definitely needed cleaning up. Note, these big grinders run cool due to the long belt and a variable speed drive that let’s me dial down the speed so I don’t burn the metal. You don’t want to hurt the heat treat so an easy gauge for novices is to not let your work piece get hotter than you can touch. You can let it air cool or have a dunk tank – just be sure to spray it with WD40 later to displace the water.
Slow down removing material as you get close to the line. Double check all of your measures and scribed lines. It is way easier to take more metal off than to remove too much.
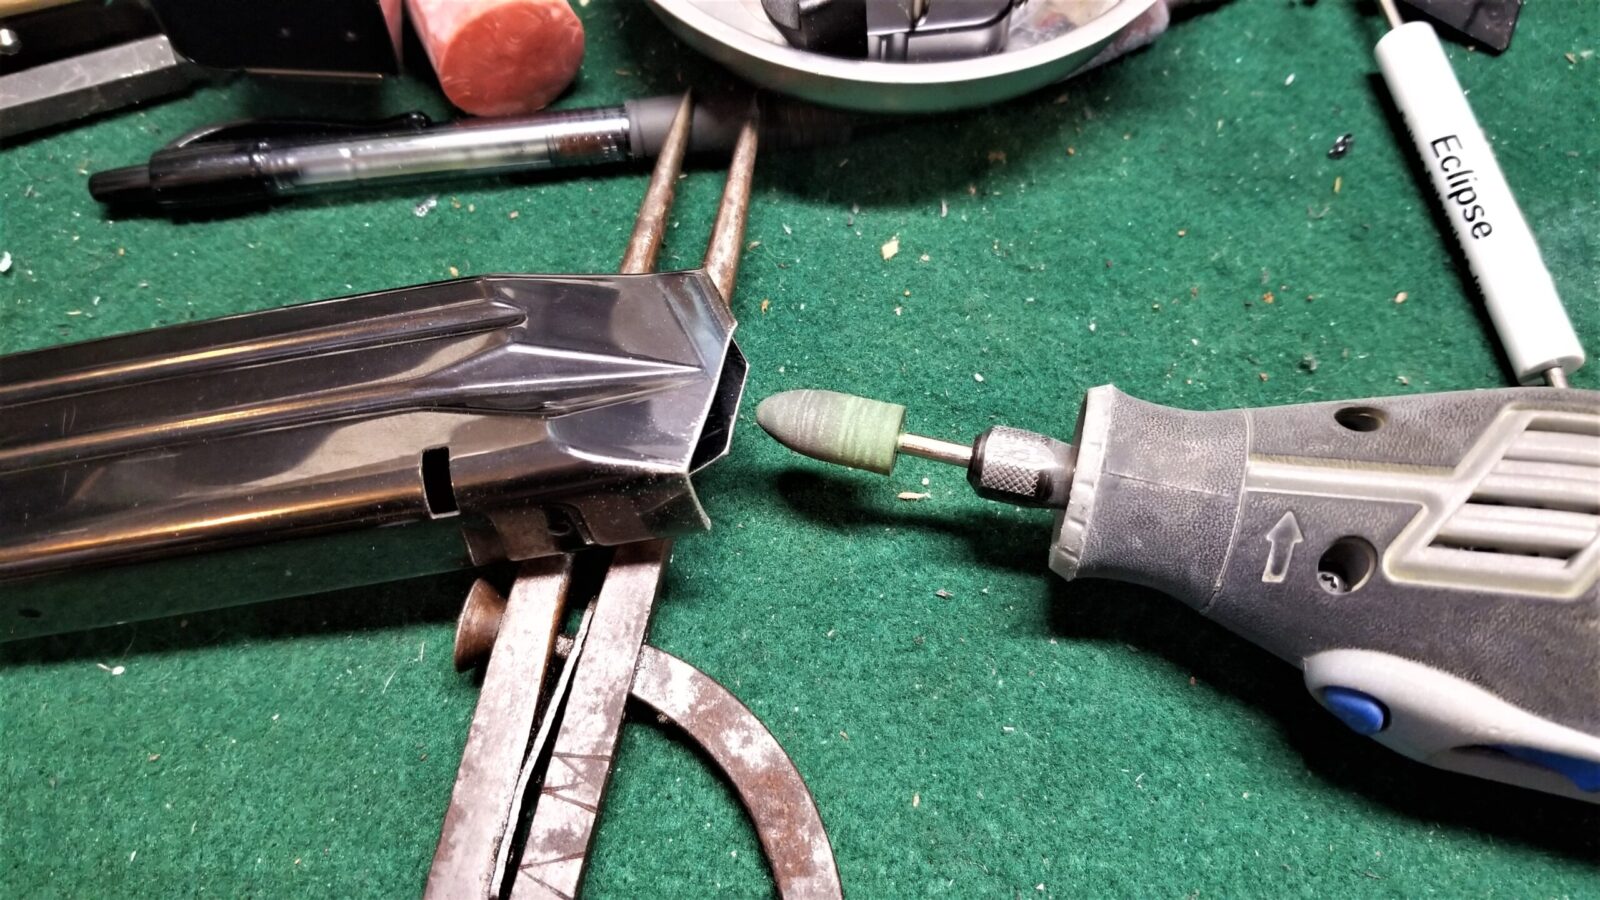
With the coarse cut made, you need to go in and remove all of the burrs and round the sharp steel edges over. I used a specialty flap sander known as a “sanding mop” at 180 grit and then a rubber polishing cone in my Dremel.
I used a type of flap sander known as a sanding mop to do the initial deburring but you could use small files, stones, or whatever you are comfortable with. Here, I am using a rubber polishing bit to clean things up and ensure there are rounded edges on all of the newly trimmed steel.
Last, blow out the tub, wipe it out and clean the body too. You don’t want abrasive materials jamming up the magazine or the pistol. After that, reassemble the magazine and check the action of the follower and that everything seems ok.
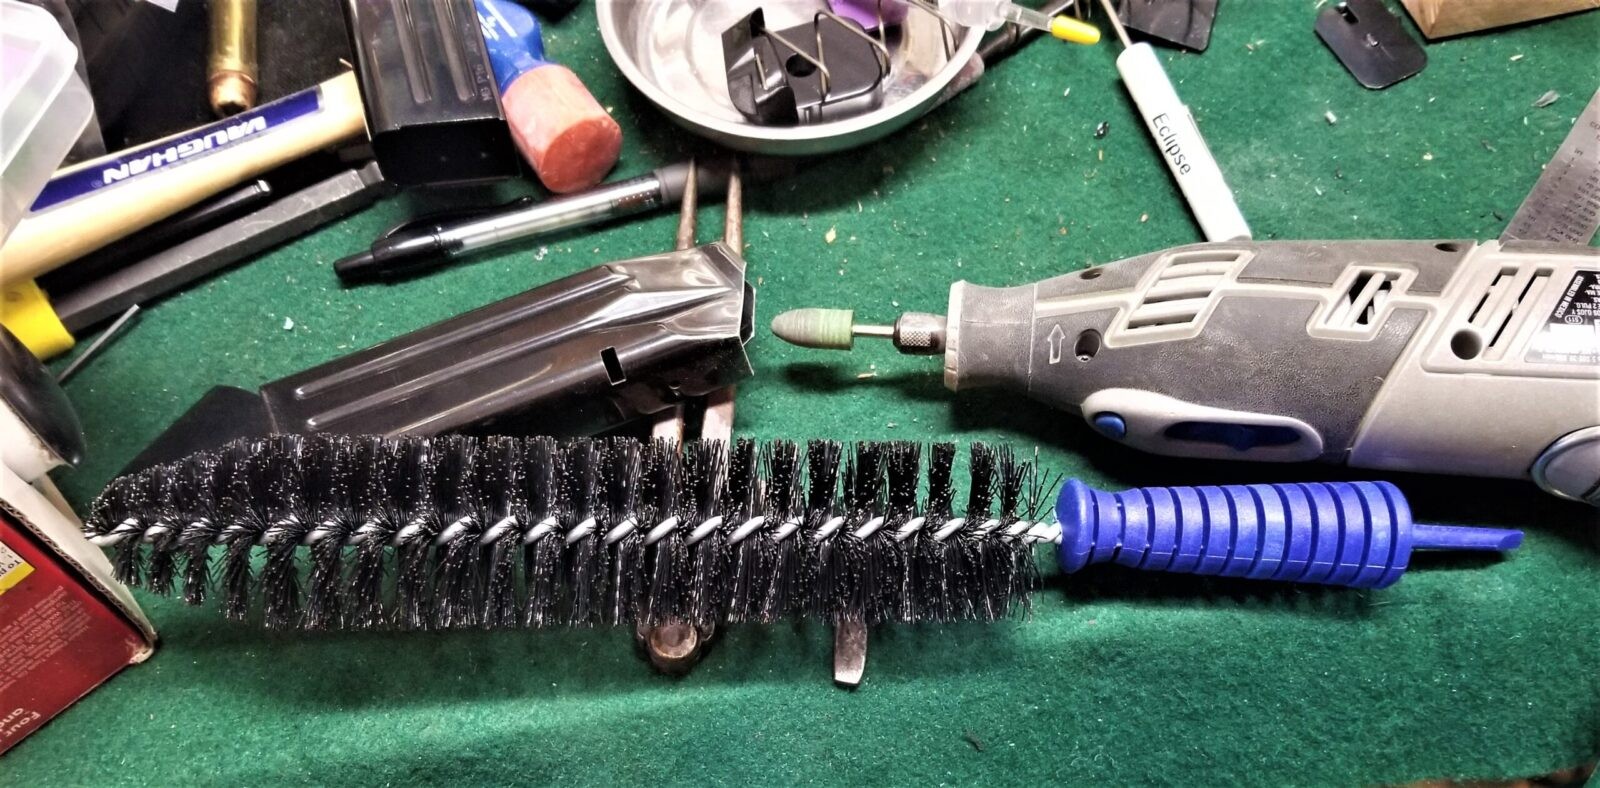
After blowing out the tubes. I used a purpose built Arredondo HiCap Mag Brush to ensure the insides of the tubes were clean.
Las step was to function test the magazine with at least three dummy rounds. Four would be even better because you will test feed from both directions as the follower pushes the rounds up from the bottom of the magazine.
Feed Lip Measures
I measured the first few magazines I converted and they were fine so I stopped checking every mag unless I ran into a problem during function testing.
Feed Lip
RIA Mag
MGP164015B
Modified
Length
0.482″
0.599″
0.436-.438″
Front Gap
0.356″
0.354″
0.362-0.364″
Back Gap
0.340″
0.364″
0.336-0.370″
Measures are approximates. I had one RIA mag and measured two MGP164015B mags and averaged the measures. The length was a challenge as I had to make a judgement call as to where the actual front part of the lip was at given the angle. The length was measured from the back forward. I measured three modified mags after fine tuning. Each mag was tuned until it reliably fed.
Fine Tuning
Trimming the lips gets you in the ballpark but more work needs to be done. Every magazine was deburred and had all top surfaces deburred and polished. The inside of the magazine was treated with Dupont Teflon. The feed lips were adjusted until four rounds fed reliably into my RIA 52009 10mm pistol. The final round was tested four times.
To tune the feed lips, use snap ring pliers or chandelier chain pliers to open the feed lips ever so slightly and test. In general, it does not take much. Your goal is to get the bullet pointed towards the chamber as much as possible. Go slow and test – it really does not take much to spread the lips and change the angle.
This fine tuning gets you in the ballpark – you then need to actually go to the range and shoot them to see if any final tuning is needed and then brings us up to the last topic – you need to number your mags so you can keep track of what mags are having problems so you can work on them.
Note: I purposefully fit the mags to use the supplied Mec-Gar followers that can lock the slide open. There are aftermarket Arredondo followers that are really nice and are angled to point the round more at the chamber. The downside is that they don’t lock the slide open – while a person in competition doesn’t need that, I do like to know when I fired the last round.
A lot of feeding problems are actually caused by the magazine – notably the feed angle and that is controlled by the feed lips and the follower. The feed lips can get bent when they are dropped, sat on, or whatever. The follower is plastic and will wear over time – not fast, but it will wear.
You need to put a unique number on each magazine so you can track the ones that are having problems and need some tweaking. I’ve seen guys use engravers, paint pins and stickers. What you use is up to you. I’m currently using waterproof stickers on my mags.
I am using waterproof stickers to track my mags. You could use an engraver or paint pen. I find that permanent markers rub off way to easy. The paint pens are a bit better. The method that holds up best is an engraver if you are good enough at it.
Conclusion
I now have my original RIA magazines and a nice back up selection of mags for hunting, going to the range, bear protection, etc. How did they turn out? So far, so good at the bench. I expect most will do really well at the range as well and I am waiting for a chance to go.
Left is the original RIA mag, in the middle is a converted mag with a Dawson +200 base plate and the mag on the right is also a converted unit but with a +300 base plate.
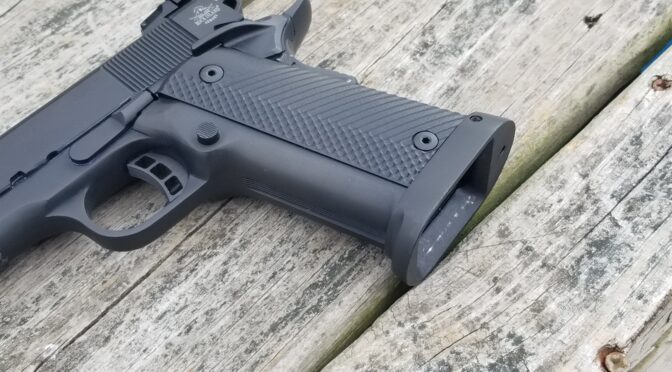
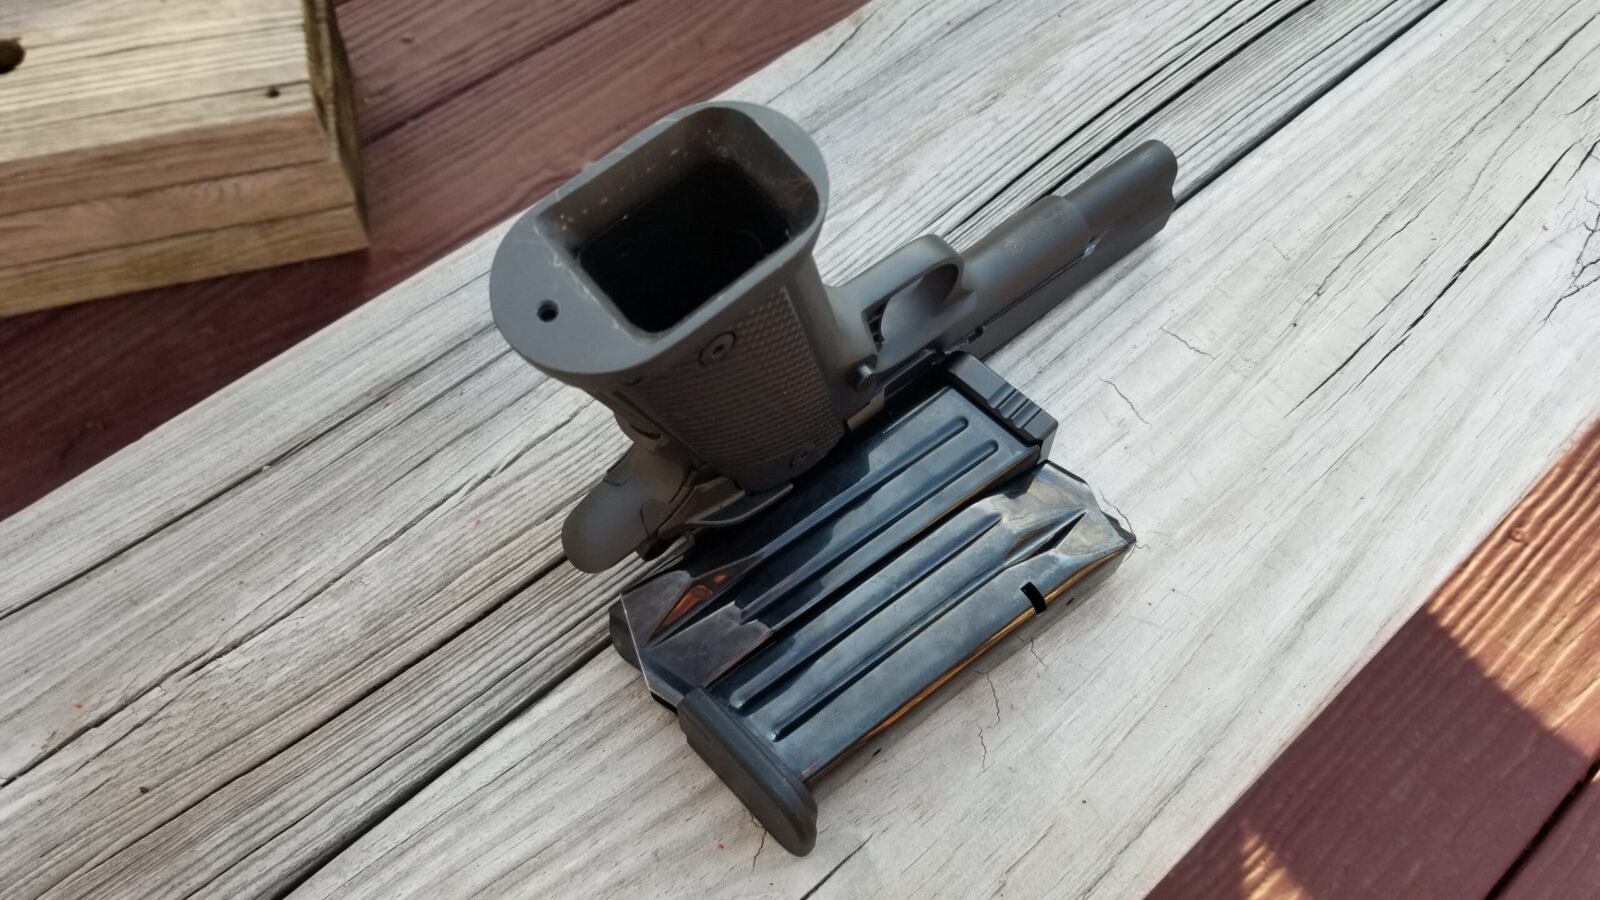
This is the mag well on the high cap pistols. It’s big and I really like it but it really does mean that you need to have a longer baseplate and just a piece of metal like the Para P16 originally had. You can make your own by adding something to the Para plate or buy an extended plate such as the ones from Dawson Precision that I use.
Pistol with the original RIA mag fully inserted. It is almost flush with the bottom of the mag well.
This is the +200 Dawson base plate. It stick out far enough that I can firmly seat / smack / beat the mag into place if I need to. Not much to grab onto though but all of the mags easily drop free – at least during bench testing they do.
The .300 base plat stick out a tad further. Dawson’s number is the length in tenths of an inch – 0.100, 0.200 and 0.300. I ordered some 0.100 plates but they haven’t arrived yet. They will likely be very close to the polymer plate that RIA has on their mags.
I figure there must be guys like me who have one of the RIA high cap .40 or 10mm pistols who want spare mags and hope this will help them out.
6/29/2021 Update: Folks, I have converted a ton of mags now so if you order, I want you to know I have the process working smoothly. My biggest problem right now is finding mags – everyone and their brother is sold out of mags – it’s crazy.
4/1/2021 Update: Added dimensions for the modified mags and info on fine tuning.
3/22/2021 Update: I took them to the range and they worked great with both Ammo Inc 180gr TMC ammo and a variety of Underwood HPs.
Note, I have to buy all of my parts – nothing here was paid for by sponsors, etc. I do make a small amount if you click on an ad and buy something but that is it. You’re getting my real opinion on stuff.
Ok, so I wanted to get back into the high capacity 10mm 1911 game. Generically, these are often referred to as 2011 pistols. The first maker I know who used that label was STI back when they offered both 1911 single-stack and 2011 pistols. At some point, the Philippine firearms company Armscor entered the fray with higher capacity Rock Island Armor (RIA) models based on the Para design. Notice how I say “based on” because not everything interchanges. So with a bit of history, let’s skip forward to my 52009 pistol. It’s a nice solidly made pistol and you can usually say that for their pistols. However, I ran into a snag – there are no spare magazines anywhere in the US. I kid you not.
Folks, I seriously scoured the WWW for the magazine the high-cap RIA 10mms use — the FS A2 part # OEMP164015B. Nobody has them – not even the Armscor parts website or Gunbroker.
Back when I had my 52000 Rock Ultra, you could get aftermarket ACT magazines that worked great and I bought a bunch. Unfortunately, when I sold my Rock Ultra, I sold the magazines. So, in trying to find mags for my new pistol, I literally visited probably 25-50 vendor web pages that were all out of stock. Argh!
Time to Research
I had the 52009 pistol inbound from Reed Sports – great group by the way, the threat of new gun control regulations and wanting more than one mag all were pushing me to find an alternative source of magazines. I read tons of forum posts, had to sort through a lot of useless data and came away with some important nuggets:
The RIA pistols are based on the Para design so if you own one of the following 10mm models, read on:
51994 TAC Ultra MS 10mm
51914 TAC Ultra FS 10mm
56862 TAC Ultra Threaded 10mm
52000 PRO Match Ultra 6″ HC 10mm
52009 Rock Ultra FS HC 10mm
All RIA high capacity 10mm (and .40 S&W) pistols use the same magazines – the 1911 – FS – A2 series, part number OEMP164015B.
ACT-Mag makes the OEMP164015B magazines for RIA.
Mec-Gar, another magazine manufacturer, sells aftermarket Para P16 Magazines that are for both the .40 & 10mm – MGP164015B
It seems like there were some older P16 magazines from Mec-Gar that had some problems and guys posting in blogs mentioned to look for the newer ones that are made in Italy.
The Para P16 Mec-Gar magazine MGP164015B is not the same as the RIA OEMP164015B made by ACT-Mag — but boy is that numbering similar. It made me wonder about the design relationship – what changed?
There were some very vague comments of guys modifying the P16 magazine to work in their RIA pistol.
My conclusion after a ton of reading: I was betting the P16 design was close to what I needed and hopefully I could make it work with some tinkering. It was time to order in some of the Mec-Gar P16 magazines and see just what the differences were.
The good news – there were a number of website with Mec-Gar MGP164015B Para P16 magazines in stock. I went ahead and ordered in some from Numrich Arms to do my experimenting.
Keep reading – it takes modification to get the mags to work. The P16 mags will not work in a RIA high cap without some changes. You can read to the bottom of this post or jump to the post with the modifications by clicking here.
Small Delays
The pandemic, winter weather and gun regulation fears have all created a bizarre environment to operate in these days. For me and Ronin’s Grips, we’ve been crazy busy for a number of months and that is why you haven’t seen me post much – I haven’t had the time to tinker or write!
In terms of this project, Winter weather in Memphis screwed up all FedEx over night shipments for almost two weeks. Then when the pistol arrived, there was no magazine in the case. I found Armscor to be completely unresponsive for whatever reason whereas Reed Sports got a hold of their new Armscor rep and were able to get me one magazine. Kudos to Reed Sports – they are a big seller on Gunbroker in addition to their own stores – I would do business with them again and certainly recommend them as well.
Numrich was fast to ship – I had their mags even before the pistol arrived. I did try one out of the box and it absolutely would not feed. The bullet wasn’t remotely pointing at the chamber if would smash into the feed ramp or shoot up at a 45 degree angle and get seriously stuck. I couldn’t do anything until the RIA OEMP164015B magazine arrived.
Do You Really Care About The Finish?
If you are striking out on the blued version of the magazine – MGP164015B – and don’t care about the finish, you do have another option – there is a nickel version that is identical other than the finish and its part number is MGP164015N. Note how all that changes is the last character of the part number from “B” for blue to “N” for nickel.
I don’t know about you but if I needed a spare mag and my choices were no mag or shiny nickel, I’d rather have a spare mag! You could either just live with it or refinish it. Seriously, I’d opt for anything other than just having one mag.
One other option is to get a 10 round version of the magazine. What Mec-Gar did for those was to use a press to press in dimples that prevent the follower from going down all the way. You can drill out those dimples and the magazines will then hold their full capacity.
Safety Comment
I knew I was going to need to do a ton of cycling of rounds. Using live ammo is risky because you have the very real risk of a negligent discharge. To avoid this, order yourself in a bunch of dummy cartridges. There are sellers on eBay that will sell you 10+ at time. Order yourself in 10-20 rounds. You are going to smash the crap out of them due to the heavy recoil spring a 10mm uses. I trashed at least 10-15 of them. Most were due to the bullet being smashed back into the case, one dented the case pretty bad and one deformed the case right at the mouth.
I can’t even guess how many cycles I did – especially starting out. I’m going to hazard a guess and say I averaged about three cycles per dummy before something failed on the dummy as I worked out the kinks and I would load three rounds per magazine to do the testing.
I can’t stress it enough – get dummies to tune your magazines. If you can find them, get the 10mm A-Zoom Snap Caps – they last way longer. The dummies get their bullets smashed back into the case sooner or later.
Next Post – Making the Modifications
In the next post, I’ll go through the details and what you need to do to modify the Para P16 mags to work – yeah, I let that surprise out. They do work but you need to alter them. Click here for the next post.
By the way, if you go to buy the Mec-Gar Para 16 mags, make sure the vendor has them in stock or you are comfortable with how long they say you will need to wait.
Note, I have to buy all of my parts – nothing here was paid for by sponsors, etc. I do make a small amount if you click on an ad and buy something but that is it. You’re getting my real opinion on stuff.