1. Executive Overview and Historical Context
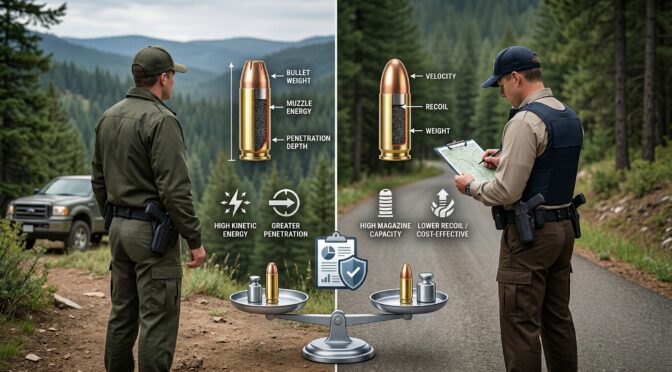
The 10mm Auto cartridge occupies a uniquely resilient and resurgent position within the global small arms market as of March 2026. Originally conceptualized in 1983 by firearms expert Jeff Cooper and initially developed by the Swedish ammunition manufacturer Norma, the cartridge was designed to provide a semi-automatic equivalent to the legendary.357 Magnum revolver round.1 The objective was to deliver superior kinetic energy, exceptional barrier penetration, and a flatter trajectory than the prevailing.45 ACP and 9mm Luger cartridges of that era. Despite early adoption by the Federal Bureau of Investigation following the infamous 1986 Miami shootout, the 10mm Auto suffered a prolonged period of commercial stagnation. The original full-power loadings produced excessive recoil for many agents, and the large-frame handguns required to chamber the long cartridge were deemed ergonomically challenging for personnel with smaller hands. This led directly to the development of the shortened, lower-pressure.40 S&W cartridge, which subsequently dominated the law enforcement market for two decades.
However, the period leading up to the first quarter of 2026 has witnessed a remarkable renaissance for the 10mm Auto.2 Data aggregated from social media telemetry, retail availability metrics, and consumer sentiment indices reveals that the 10mm Auto has firmly re-established itself as one of the most versatile handgun cartridges available today.2 Once viewed primarily as a niche hunting round utilized only by dedicated handgun hunters, modern 10mm handguns have evolved significantly. Advancements in polymer frame design, dual captive recoil spring assemblies, and superior slide mass distribution have made the platform highly controllable.3 Consequently, the 10mm has become a top choice for consumers requiring a platform capable of handling backcountry apex predator defense, duty use, and urban concealed carry applications.2
The analysis indicates a highly mature consumer market where end-users are exceptionally educated on ballistic performance. Consumers actively utilize personal chronographs to test commercial loads and verify manufacturer claims.5 Discrepancies between advertised muzzle velocities and real-world performance drive significant shifts in social media sentiment, forcing ammunition manufacturers to either deliver true high-pressure loads or face severe commercial backlash.5 The following report exhaustively details the top ten 10mm Auto cartridges sold in March 2026, evaluating their engineering specifications, retail pricing dynamics, and consumer reception, while providing technical justifications for their respective market positions.
2. Market Dynamics and Engineering Philosophies
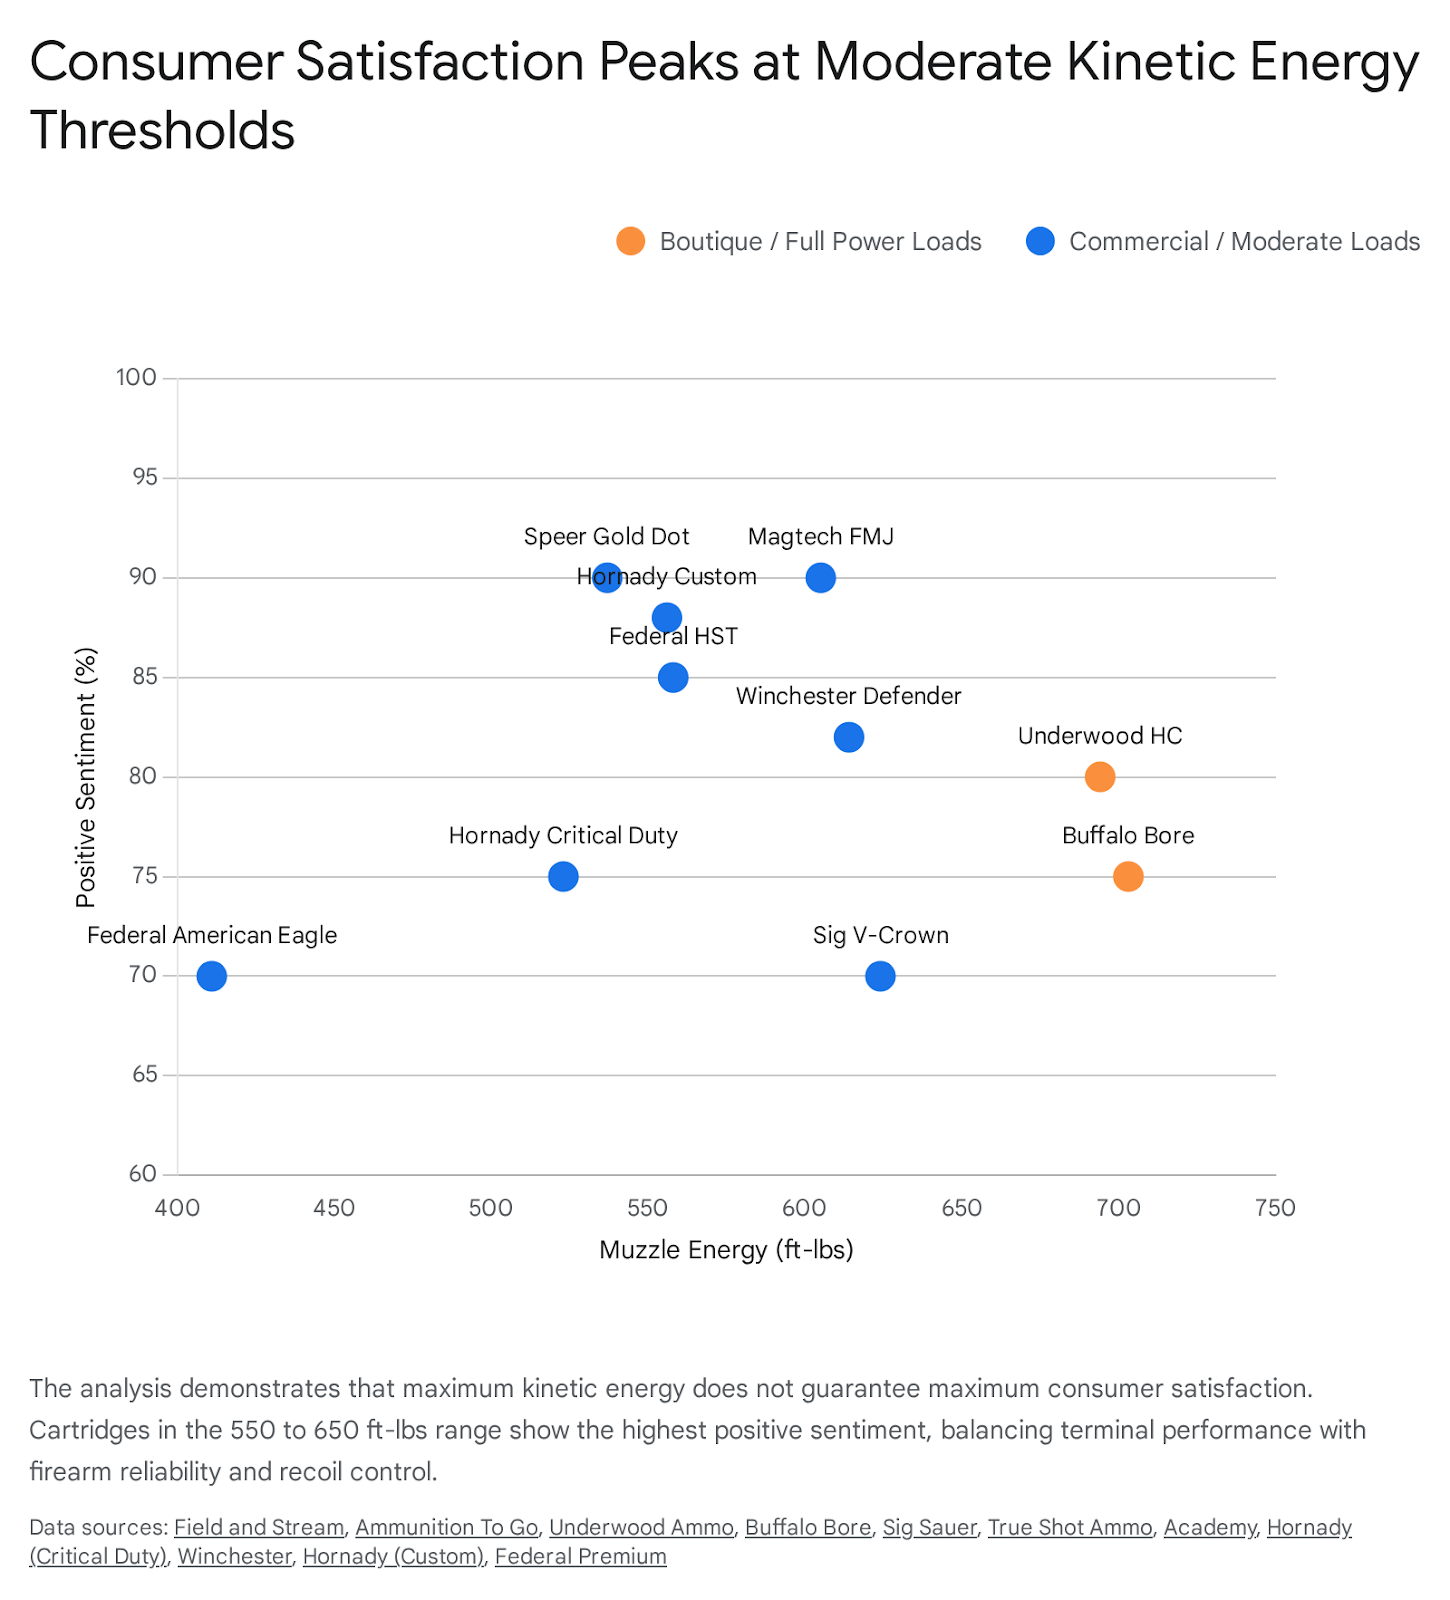
To understand the current consumer landscape, it is critical to analyze the bifurcation of the 10mm Auto ammunition market. The sector remains sharply divided into two distinct engineering philosophies, colloquially known within the community as the “Boutique” sector and the “Commercial” sector.
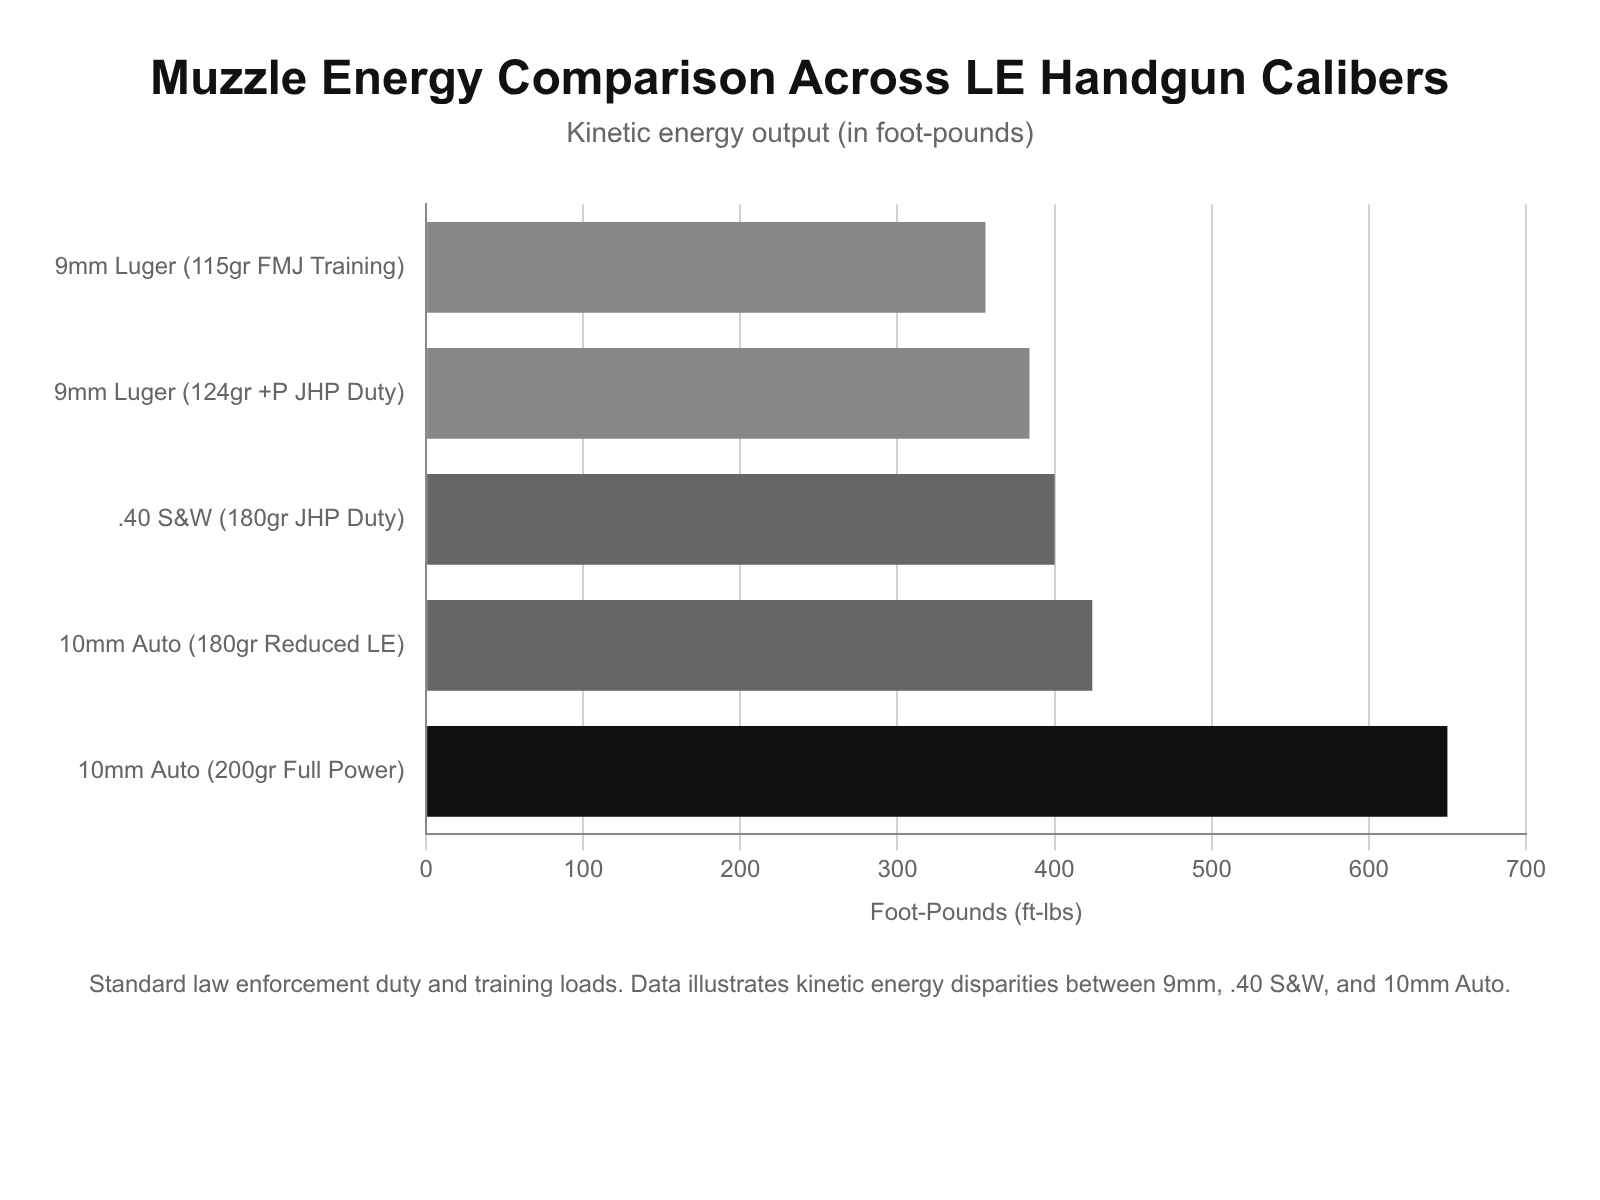
The first philosophy is championed by specialized manufacturers such as Underwood Ammunition, Buffalo Bore, and Grizzly Cartridge Company. These entities engineer their cartridges to operate at or near the maximum allowable pressure limits set by the Sporting Arms and Ammunition Manufacturers’ Institute. By maximizing chamber pressure, these companies deliver the authentic, extreme kinetic energy that the 10mm Auto was originally designed to produce.5 These loads are heavily favored for handgun hunting and defense against large predators, such as grizzly bears and feral hogs.10 However, this engineering approach creates significant secondary challenges. The intense breech face pressure and high slide velocities generated by these loads can induce premature mechanical wear on standard recoil spring assemblies and occasionally outpace the cyclic rate of factory magazine springs, leading to failure-to-feed malfunctions.11
The second philosophy is maintained by traditional, high-volume commercial manufacturers like Federal Premium, Winchester, and Hornady. These companies frequently elect to “download” their 10mm Auto cartridges.7 By reducing the powder charge, they lower the muzzle velocity and kinetic energy closer to the performance envelope of the.40 S&W. This deliberate engineering choice achieves several goals. It drastically improves mechanical reliability across a vast spectrum of firearm tolerances, reduces felt recoil to allow for faster follow-up shots in defensive scenarios, and mitigates long-term structural wear on the firearm.14 While this approach is functionally superior for urban self-defense against bipedal threats, it routinely draws harsh criticism from purists who feel they are purchasing premium 10mm ammunition only to receive.40 S&W ballistics.6
Understanding this dichotomy is essential for interpreting the consumer sentiment metrics analyzed in this report. Satisfaction is often directly correlated to whether the cartridge meets the specific kinetic expectations of the end-user.
3. Ranked Summary Matrix
The following matrix represents the top ten 10mm Auto cartridges evaluated in this market analysis. The ranking algorithm weighs positive consumer sentiment, terminal ballistic reliability, component durability, construction quality, and overall commercial value. The number one position represents the highest overall score based on the intersection of engineering excellence and consumer satisfaction.
| Rank | Manufacturer and Model | Projectile Type | Weight (Grains) | Advertised Velocity (fps) | MSRP | Average Online Price | Positive Sentiment |
| 1 | Federal Premium Personal Defense HST | Jacketed Hollow Point | 200 | 1130 | $56.99 | $38.50 | 85% |
| 2 | Underwood Ammo Hard Cast Flat Nose | Polymer Coated Hard Cast | 200 | 1250 | $27.99 | $27.50 | 80% |
| 3 | Speer Gold Dot Personal Protection | Bonded Hollow Point | 200 | 1100 | $40.99 | $37.00 | 90% |
| 4 | Buffalo Bore Outdoorsman Heavy | Hard Cast Flat Nose | 220 | 1200 | $42.00 | $39.00 | 75% |
| 5 | Hornady Custom XTP | Jacketed Hollow Point | 180 | 1180 | $32.99 | $26.00 | 88% |
| 6 | Sig Sauer Elite V-Crown | Jacketed Hollow Point | 180 | 1250 | $29.99 | $28.00 | 70% |
| 7 | Magtech Range/Training | Full Metal Jacket | 180 | 1230 | $27.99 | $23.00 | 90% |
| 8 | Hornady Critical Duty FlexLock | Polymer Tipped Hollow Point | 175 | 1160 | $47.27 | $31.00 | 75% |
| 9 | Winchester Defender Bonded | Bonded Hollow Point | 180 | 1240 | $40.99 | $30.00 | 82% |
| 10 | Federal American Eagle | Full Metal Jacket | 180 | 1030 | $41.99 | $30.75 | 70% |
4. Product Analysis
The following section systematically breaks down the engineering specifications, commercial pricing, and consumer sentiment for each of the top ten 10mm Auto cartridges currently dominating the market. Pricing data reflects the minimum, average, and maximum actual retail prices aggregated across primary vendors in March 2026. This comprehensive analysis evaluates the accuracy, reliability, component durability, and overall quality of each loading based on extensive market telemetry and ballistic testing data.
4.1. Federal Premium Personal Defense HST 200gr JHP
The Federal Premium HST line represents the undisputed gold standard in law enforcement and civilian personal defense ammunition, dominating the sector through highly consistent terminal ballistics.10
Specifications and Engineering Profile The 200-grain HST projectile utilizes an advanced, proprietary skived jacket design that forces the bullet to initiate expansion even at lower impact velocities.17 The cartridge produces an advertised muzzle velocity of 1121 feet per second, yielding 558 foot-pounds of muzzle energy.17 The engineering intent behind the HST architecture is not to maximize raw kinetic energy, but rather to ensure reliable, barrier-blind penetration of precisely 15.0 inches in standard 10% ordnance gelatin.17 During these tests, the projectile achieves massive recovered diameters that consistently exceed 0.702 inches, creating a devastating permanent wound cavity.17 The durability and quality of the components are exceptional. The cases are constructed from nickel-plated brass, which inherently reduces the coefficient of friction during the extraction cycle and resists galvanic corrosion when carried in high-humidity environments against the human body.10 Furthermore, Federal utilizes highly engineered low-flash propellants to preserve the operator’s natural night vision during low-light engagements.18
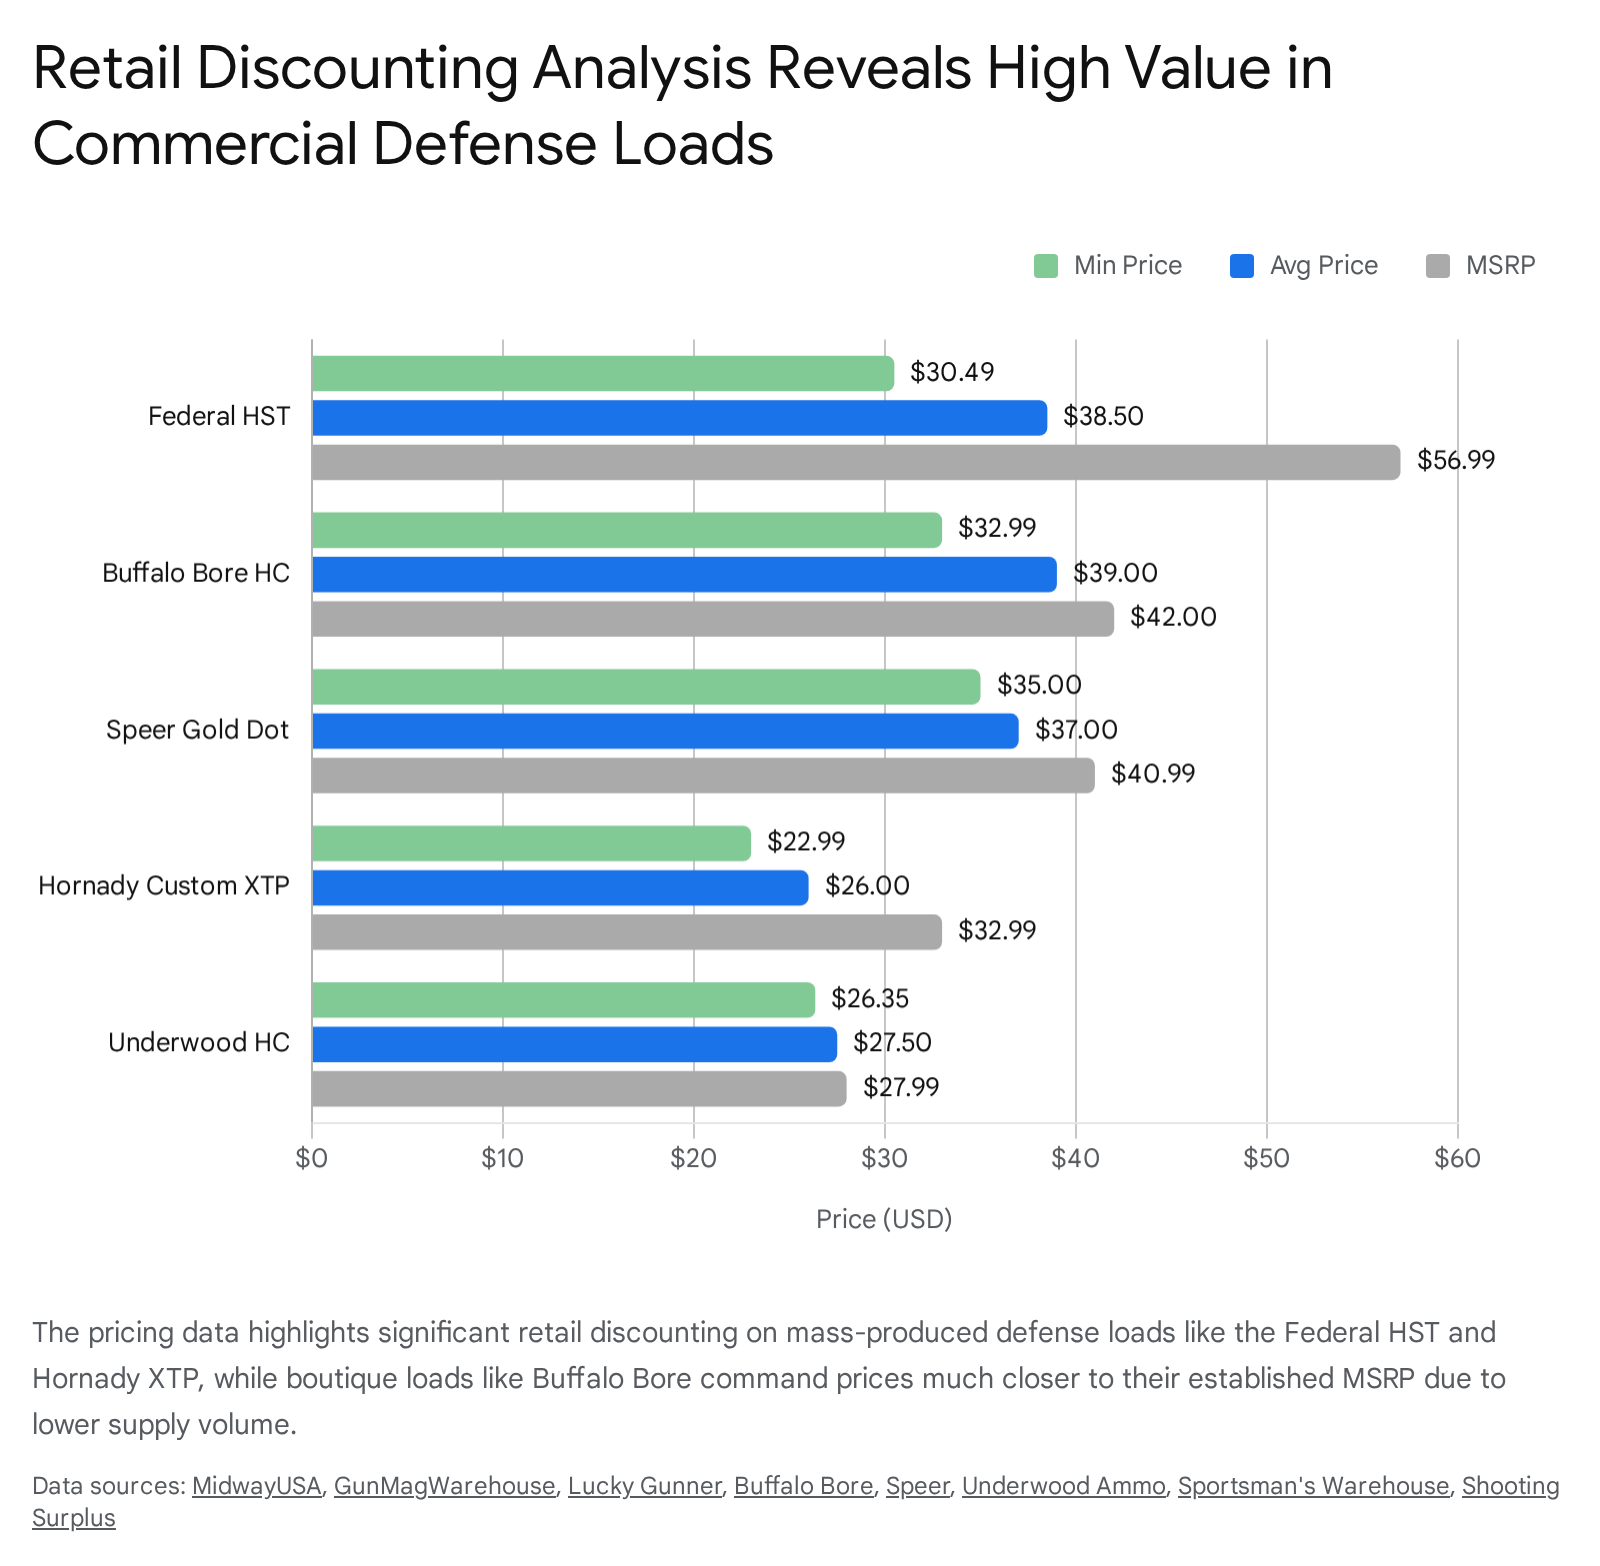
Commercial Pricing and Vendor Analysis
- MSRP: $56.99 19
- Minimum Retail Price: $30.49 18
- Average Retail Price: $38.50
- Maximum Retail Price: $44.99 19
- Manufacturer URL: https://www.federalpremium.com/handgun/personal-defense-hst/11-P10HST1S.html
- Selected Vendor URLs:
- GunMagWarehouse: https://gunmagwarehouse.com/federal-personal-defense-hst-10mm-auto-ammo-200gr-jhp-20-rounds.html
- Shooting Surplus: https://shootingsurplus.com/federal-premium-personal-defense-handgun-ammo-10mm-200-gr-hst-20-rd/
- Palmetto State Armory: https://palmettostatearmory.com/federal-premium-personal-defense-200-gr-hst-jacketed-hollow-point-10mm-ammo-20-box-p10hst1s.html
- Brownells: https://www.brownells.com/ammunition/handgun-ammunition/federal-ammo-10mm-200gr-hst-20bx/
- MidwayUSA: https://www.midwayusa.com/product/1021558987
Performance Metrics and Consumer Sentiment The telemetry analysis reveals a robust 85% positive sentiment ratio. Accuracy and mechanical reliability score exceptionally high across all major pistol platforms.10 Consumers universally praise the consistent terminal performance and the highly manageable recoil profile, which allows for rapid and accurate follow-up shots in high-stress defensive scenarios.10 The primary critique, which accounts for the 15% negative sentiment, stems exclusively from the velocity metric. Many vocal 10mm enthusiasts view 1121 fps as severely underpowered for a 200-grain load, arguing that it essentially mimics an over-pressured.40 S&W cartridge.6
Analytical Recommendation
Consumers should definitively purchase this cartridge for urban, two-legged personal defense where over-penetration presents a serious liability. The controlled expansion is flawless. However, it is absolutely not recommended for apex predator defense in the backcountry due to its rapid expansion characteristics, which limit deep structural penetration.
4.2. Underwood Ammo 200gr Hard Cast Flat Nose
Underwood Ammunition has carved out a dominant market share in the boutique, full-power 10mm sector. This company specializes in providing uncompromised loads designed specifically for extreme kinetic transfer and deep penetration.22
Specifications and Engineering Profile This specific load propels a heavy 200-grain hard cast lead flat nose bullet at an advertised 1250 feet per second, generating an impressive 694 foot-pounds of muzzle energy.5 The critical engineering feature of this projectile is its high Brinell hardness rating combined with a proprietary polymer “Black Cherry” coating.22 Traditional exposed lead bullets are notorious for causing severe leading in polygonal barrels, such as those standard in Glock handguns. This lead accumulation can rapidly lead to catastrophic overpressure events and barrel ruptures. The polymer coating entirely encapsulates the lead, mitigating internal barrel friction and eliminating lead fouling entirely, making it safe for all rifling types.22 The flat nose meplat is meticulously designed to crush tissue rather than stretch it, ensuring straight-line penetration through heavy bone and dense muscle mass without deflecting.10
Commercial Pricing and Vendor Analysis
- MSRP: $27.99 25
- Minimum Retail Price: $26.35 26
- Average Retail Price: $27.50
- Maximum Retail Price: $29.99 27
- Manufacturer URL: https://underwoodammo.com/10mm-auto-200gr.-flat-nose-black-cherry-coated-hard-cast-hunting-ammo/
- Selected Vendor URLs:
- Shooting Surplus: https://shootingsurplus.com/underwood-ammo-hard-cast-flat-nose-handgun-ammunition-10mm-auto-200gr-fn-1250-fps-20-ct/
- MidwayUSA: https://www.midwayusa.com/product/1019459660
- Sportsmans Warehouse: https://www.sportsmans.com/shooting-gear-gun-supplies/ammunition-ammo-for-hunting-shooting-sports/underwood-ammo-hard-cast-flat-nose-10mm-auto-200gr-black-cherry-coated-hard-cast-handgun-ammo-20-rounds/p/1929551
- TargetSportsUSA: https://www.targetsportsusa.com/underwood-black-cherry-coated-10mm-auto-ammunition-200-grain-flat-nose-hard-cast-248-p-113684.aspx
- OpticsPlanet: https://www.opticsplanet.com/underwood-ammo-10mm-auto-200gr-hard-cast-lead-fn-20pk.html
Performance Metrics and Consumer Sentiment With an 80% positive sentiment score, this round is widely regarded as the ultimate woods defense cartridge, offering maximum durability and penetration.15 Accuracy is generally high, though point of impact often shifts upward due to the heavy recoil impulse and longer barrel dwell time. The negative sentiment (20%) is heavily clustered around reliability issues in specific firearm platforms.11 The extreme power of the load can easily outpace standard factory recoil springs, causing the slide to cycle faster than the magazine spring can operate. Furthermore, the wide flat nose profile occasionally induces failure-to-feed malfunctions in tight match-grade chambers or heavily sprung magazines.11
Analytical Recommendation
Consumers should definitively purchase this load for hiking, hunting, and defense against large predators. However, thorough function testing in the individual host firearm is mandatory. Upgrading to a heavier recoil spring assembly and extra-power magazine springs is strongly advised to prevent slide battering and ensure flawless feeding.
4.3. Speer Gold Dot Personal Protection 200gr JHP
The Speer Gold Dot maintains a highly prestigious reputation within the industry, heavily utilized by law enforcement agencies worldwide for its unparalleled structural integrity and mechanical reliability.29
Specifications and Engineering Profile Operating at a moderate 1100 feet per second and producing 537 foot-pounds of muzzle energy, the 200-grain Gold Dot utilizes Speer’s proprietary Uni-Cor bonding process.30 This highly advanced electro-chemical engineering process bonds the copper jacket to the lead core one single atom at a time. This structural fusion effectively eliminates core-jacket separation when the projectile is tasked with penetrating intermediate barriers such as heavy clothing, drywall, or laminated auto glass.31 Extensive gelatin testing confirms almost 20 inches of penetration with an impressive expansion diameter of 0.66 inches.30 The cases are high-quality nickel-plated brass featuring non-corrosive Boxer primers, ensuring long-term durability and reliable ignition.30
Commercial Pricing and Vendor Analysis
- MSRP: $40.99 33
- Minimum Retail Price: $35.00 34
- Average Retail Price: $37.00
- Maximum Retail Price: $38.99 35
- Manufacturer URL: https://www.speer.com/ammunition/gold-dot/gold-dot-handgun-personal-protection/19-54000GD.html
- Selected Vendor URLs:
- KYGunCo: https://www.kygunco.com/brand/speer-ammo
- Lucky Gunner: https://www.luckygunner.com/10mm-auto-200-grain-jacketed-hollow-point-speer-gold-dot-20-rounds
- AmmunitionToGo: https://www.ammunitiontogo.com/20rds-10mm-speer-gold-dot-200gr-jhp-ammo
- Brownells: https://www.brownells.com/ammunition/handgun-ammunition/gold-dot-personal-protection-10mm-auto-ammo/?sku=105001238
- Palmetto State Armory: https://palmettostatearmory.com/speer-gold-dot-200-gr-hollow-point-10mm-ammo-20-box-54000gd.html
Performance Metrics and Consumer Sentiment This cartridge achieves a remarkable 90% positive sentiment ratio. The Gold Dot is lauded across the spectrum for its extreme reliability, consistent feeding geometry, and rugged durability.29 The mechanical bonding ensures it survives adverse angles of impact without disintegrating.31 Negative sentiments are sparse (10%), primarily focusing on the high cost per round and the relatively pedestrian velocity compared to boutique 10mm loadings, making it less suitable for consumers seeking maximum energy yield.
Analytical Recommendation
This is an optimal purchase for duty carry and home defense applications. The bonded core makes it vastly superior to traditional cup-and-core designs for individuals who may need to shoot through structural barriers or heavy winter clothing while maintaining a highly reliable feeding profile.
4.4. Buffalo Bore Outdoorsman Heavy 220gr Hard Cast FN
Buffalo Bore is synonymous with absolute maximum firepower. The 220-grain Outdoorsman load pushes the physical and structural limits of the 10mm Auto platform to their absolute breaking point.10
Specifications and Engineering Profile This specialized cartridge propels a massive 220-grain hard cast flat nose bullet at 1200 feet per second, yielding an immense 703 foot-pounds of muzzle energy.37 The 220-grain weight represents the absolute maximum projectile length that can physically cycle through a standard 10mm magazine and action without causing catastrophic binding.36 The extreme sectional density of this long projectile guarantees straight-line penetration into living tissue exceeding 36 inches.36 It is formulated with hard cast lead to resist deformation upon striking heavy skeletal structures, prioritizing deep organ damage over lateral tissue displacement.36
Commercial Pricing and Vendor Analysis
- MSRP: $42.00 37
- Minimum Retail Price: $32.99 39
- Average Retail Price: $39.00
- Maximum Retail Price: $44.99 40
- Manufacturer URL: https://www.buffalobore.com/index.php?l=product_detail&p=394
- Selected Vendor URLs:
- KYGunCo: https://www.kygunco.com/product/buffalo-bore-10mm-220-gr-outdoorsman-hard-cast-fn-20rd
- MidwayUSA: https://www.midwayusa.com/product/1001484052
- Sportsmans Warehouse: https://www.sportsmans.com/shooting-gear-gun-supplies/ammunition-ammo-for-hunting-shooting-sports/handgun-ammo-hunting-shooting-sports/buffalo-bore-10mm-auto-220gr-lfn-handgun-ammo-20-rounds/p/1277492
- Brownells: https://www.brownells.com/ammunition/handgun-ammunition/handgun-10mm-auto-ammo-97fef0a5/
- Shooting Surplus: https://shootingsurplus.com/ammunition/handgun-ammunition/10mm-auto/
Performance Metrics and Consumer Sentiment Consumer sentiment sits at a somewhat divided 75% positive. Those who operate in regions where deep penetration against bears is a necessity revere this load for its unmatched quality and stopping power.10 However, the 25% negative sentiment is highly vocal regarding reliability issues.41 The excessive length of the 220-grain bullet creates a very tight fit in the chamber. Social media telemetry indicates that these bullets frequently measure.424 to.425 inches at the case mouth, whereas SAAMI specification dictates.423 inches.41 This discrepancy causes severe drag and failure-to-feed malfunctions in match-grade barrels with tight tolerances.41 Furthermore, the intense recoil commonly causes limp-wristing malfunctions for inexperienced shooters.10
Analytical Recommendation
Purchase this ammunition only for extreme environments where encountering a grizzly bear or moose is a tangible, daily risk. Extensive functional testing is absolutely required prior to carrying this load in the field. Standard factory recoil springs will degrade rapidly under the extreme pressure curve of this cartridge, making aftermarket modifications a practical necessity.
4.5. Hornady Custom 180gr XTP
The Hornady Custom line effectively bridges the gap between target ammunition and premium hunting loads, utilizing the globally recognized eXtreme Terminal Performance (XTP) bullet.43
Specifications and Engineering Profile Firing a 180-grain XTP projectile at 1180 feet per second, this load provides a highly balanced 556 foot-pounds of muzzle energy.45 The XTP bullet is engineered with a drawn gilding metal jacket that intentionally varies in thickness down the entire length of the projectile.44 Symmetrical serrations strategically weaken the tip of the jacket, allowing for controlled, uniform expansion across a very wide velocity threshold.44 Unlike dedicated defense rounds that expand instantly and rapidly shed velocity, the XTP is mechanically designed to delay expansion slightly. This creates a deep, devastating permanent wound channel ideal for cleanly harvesting medium game.17 The core is composed of swaged lead for absolute uniform density, ensuring in-flight stability and superior mechanical accuracy.44
Commercial Pricing and Vendor Analysis
- MSRP: $32.99 46
- Minimum Retail Price: $22.99 47
- Average Retail Price: $26.00
- Maximum Retail Price: $29.99 46
- Manufacturer URL: https://www.hornady.com/ammunition/handgun/10mm-auto-180-gr-xtp
- Selected Vendor URLs:
- GunMagWarehouse: https://gunmagwarehouse.com/hornady-custom-10mm-ammo-180gr-xtp-20-rounds.html
- Palmetto State Armory: https://palmettostatearmory.com/hornady-10mm-auto-180gr-xtp-custom-pistol-ammunition-20rds-9126.html
- MidwayUSA: https://www.midwayusa.com/product/1001570139
- Sportsmans Warehouse: https://www.sportsmans.com/shooting-gear-gun-supplies/ammunition-ammo-for-hunting-shooting-sports/handgun-ammo-hunting-shooting-sports/hornady-custom-10mm-auto-180gr-xtp-handgun-ammo-20-rounds/p/304844
- Primary Arms: https://www.primaryarms.com/hornady-10mm-180-gr-jhp-xtp-box-of-20-h9126
Performance Metrics and Consumer Sentiment With an 88% positive sentiment, the Hornady Custom XTP is widely celebrated within the hunting community as the optimal cartridge for handgun hunting, specifically for whitetail deer and feral hogs.10 Its inherent accuracy is repeatedly highlighted in online forums, with many advanced shooters reporting sub-2-inch shot groups at 25 yards.10 Negative feedback (12%) centers mostly on the fact that the load is not pushed to its absolute maximum velocity limit. This leads some power-focused consumers to seek out third-party manufacturers (like Underwood) that load the identical XTP bullet with significantly hotter powder charges.15
Analytical Recommendation
Highly recommended for medium-game hunting applications. The delayed expansion profile of the XTP ensures ethical harvesting by reaching vital organs before full expansion occurs, while the moderate chamber pressure ensures excellent reliability and low component wear across a vast array of pistol platforms.
4.6. Sig Sauer Elite V-Crown 180gr JHP
Sig Sauer’s ammunition division has rapidly expanded over the last decade, producing a defensive round that is widely available on large big-box retail shelves, making it highly accessible to the average consumer.9
Specifications and Engineering Profile The V-Crown projectile is a jacketed hollow point weighing 180 grains, exiting the muzzle at an advertised 1250 feet per second with an impressive 624 foot-pounds of energy.49 The projectile design features a unique stacked hollow point cavity. This provides a secondary V-shaped fissure located beneath the primary cavity. This engineering approach attempts to control and sustain expansion across a wider spectrum of impact velocities and complex material barriers.50 The cartridge utilizes premium nickel-plated brass cases to enhance feeding reliability under extreme conditions and employs low-flash propellants to mitigate muzzle signature in low-light environments.49
Commercial Pricing and Vendor Analysis
- MSRP: $29.99 49
- Minimum Retail Price: $25.00 ($1.25/rd) 51
- Average Retail Price: $28.00
- Maximum Retail Price: $32.99 52
- Manufacturer URL: https://www.sigsauer.com/10mm-180gr-elitevcrown-jhp.html
- Selected Vendor URLs:
- Palmetto State Armory: https://palmettostatearmory.com/sig-sauer-10mm-180gr-jhp-v-crown-elite-performance-ammunition-20rds-10mm1-20.html
- MidwayUSA: https://www.midwayusa.com/product/1019075393
- Academy: https://www.academy.com/p/sig-sauer-v-crown-jhp-10mm-automatic-180-grain-centerfire-handgun-ammunition-20-rounds
- Bereli: https://www.bereli.com/e10mm1/
- Sig Sauer Shop: https://www.sigsauer.com/shop/10mm-auto-rounds
Performance Metrics and Consumer Sentiment Consumer sentiment for the V-Crown is somewhat polarized, settling at a 70% positive ratio. On the positive side, consumers greatly appreciate the wide retail availability and the fact that it is loaded slightly hotter than typical commercial.40 S&W equivalent loads, providing a truer 10mm experience.9 However, the 30% negative sentiment is driven heavily by independent ballistic gel testing published on social media. Telemetry shows frequent complaints regarding the lack of a mechanically bonded core.48 High-velocity impacts often cause the lead core to separate entirely from the copper jacket, which drastically reduces penetration depth and overall terminal effectiveness.48
Analytical Recommendation
Buy as an affordable, high-volume training alternative to premium defensive ammunition, or as a secondary concealed carry load. It is not recommended for high-stakes situations requiring deep barrier penetration due to the high probability of core-jacket separation upon impact.
4.7. Magtech Range/Training 180gr FMJ
Magtech, produced by the massive CBC Global Ammunition group, serves as the economic and logistical backbone for high-volume 10mm target practice across the civilian market.8
Specifications and Engineering Profile This specific cartridge features a standard 180-grain Full Metal Jacket (FMJ) projectile. While the advertised velocity is relatively standard for commercial loads, independent consumer chronograph data frequently confirms highly impressive actual performance. The load occasionally exceeds 1225 feet per second and generates over 600 foot-pounds of true muzzle energy.54 The cases are constructed of high-quality reloadable brass, and the primers are non-corrosive Boxer style.53 The engineering focus here is heavily placed on mass production efficiency, quality control, and uniform primer seating, rather than advanced terminal ballistics or expanding bullet technology.
Commercial Pricing and Vendor Analysis
- MSRP: $27.99 56
- Minimum Retail Price: $19.99 53
- Average Retail Price: $23.00
- Maximum Retail Price: $24.99 57
- Manufacturer URL: https://magtechammunition.com/products/ammunition/10mm-auto-180gr-fmj/
- Selected Vendor URLs:
- GunMagWarehouse: https://gunmagwarehouse.com/magtech-range-10mm-ammo-180gr-fmj-50-rounds.html
- TrueShot Ammo: https://trueshotammo.com/products/magtech-10mm-180-grain-jhp
- AmmoForSale: https://www.ammoforsale.com/50-rounds-of-180gr-fmj-10mm-ammo-by-magtech
- Shooting Surplus: https://shootingsurplus.com/ammunition/handgun-ammunition/10mm-auto/
- Palmetto State Armory: https://palmettostatearmory.com/magtech-180-gr-full-metal-jacket-10mm-ammo-50-box-10a.html
Performance Metrics and Consumer Sentiment Magtech boasts an excellent 90% positive sentiment score. It has firmly earned a reputation as the “best bang for the buck” in the competitive 10mm space.8 Unlike other budget lines that drastically reduce the powder charge to save manufacturing costs, Magtech consistently loads this ammunition to a level that authentically mimics the sharp recoil impulse of a legitimate 10mm defensive cartridge.55 This provides consumers with highly realistic training dynamics without the premium cost associated with defensive hollow points. The 10% negative sentiment typically involves minor, largely irrelevant variances in overall cartridge length from batch to batch, a common trait in high-volume bulk ammunition.
Analytical Recommendation
Buy enthusiastically for high-volume range training, dynamic tactical drills, and long-term stockpiling. Furthermore, the robust brass casings are highly valued by hand-loaders for their longevity and structural durability through multiple reloading cycles.
4.8. Hornady Critical Duty 175gr FlexLock
Designed explicitly to pass the rigorous and complex FBI ammunition testing protocols, the Critical Duty line is meticulously tailored for duty-size handguns facing difficult urban barriers.10
Specifications and Engineering Profile The 175-grain FlexLock bullet is highly complex from a metallurgical standpoint. It incorporates a heavy InterLock band, which is a thick ring of jacket material physically embedded into the high-antimony lead core to absolutely prevent mechanical separation.58 The hollow cavity is filled with a patented Flex Tip polymer insert. This insert acts as a barrier mechanism, preventing the cavity from clogging with heavy clothing, denim, or drywall, ensuring that hydraulic pressure forces the bullet to expand consistently upon striking fluid tissue.58 The advertised velocity is 1160 feet per second.58 The case features a distinctive, bright silver nickel plating with a robust cannelure crimp to prevent dangerous bullet setback during harsh feeding cycles in heavy slide actions.58
Commercial Pricing and Vendor Analysis
- MSRP: $47.27 60
- Minimum Retail Price: $26.99 61
- Average Retail Price: $31.00
- Maximum Retail Price: $34.99 60
- Manufacturer URL: https://www.hornady.com/ammunition/handgun/10mm-auto-175-gr-flexlock-critical-duty
- Selected Vendor URLs:
- GunMagWarehouse: https://gunmagwarehouse.com/hornady-critical-duty-10mm-ammo-175gr-flexlock-duty-20-rounds.html
- Palmetto State Armory: https://palmettostatearmory.com/hornady-10mm-auto-175gr-flexlock-critical-duty-ammunition-20rds-91256.html
- Brownells: https://www.brownells.com/ammunition/handgun-ammunition/critical-duty-10mm-auto-ammo/
- MidwayUSA: https://www.midwayusa.com/product/1016935361
- Governors Gun Club: https://governorsgunclub.com/product/hornady-critical-duty-10mm-auto-175gr-20rd-bx-200rd-case/
Performance Metrics and Consumer Sentiment The consumer sentiment is predominantly positive (75%), focusing heavily on the load’s flawless feeding reliability and proven barrier-blind performance.62 Law enforcement and private security personnel favor this round for its unique ability to penetrate laminated auto glass and sheet metal without significantly altering its flight trajectory or losing critical mass.59 However, the negative sentiment (25%) is vocal regarding its internal ballistics in compact firearms. The specific powder burn rate utilized by Hornady is optimized exclusively for 5-inch barrels.63 In shorter concealed carry platforms, such as the popular Glock 29, muzzle velocity drops significantly. Consequently, the robust, heavy-duty bullet construction can fail to expand reliably at these lower velocities, effectively acting as an over-penetrating full metal jacket.15
Analytical Recommendation
Buy for home defense or duty carry only when utilizing full-size service pistols equipped with 5-inch barrels. Do not buy for compact or subcompact 10mm handguns, as terminal performance and expansion reliability will degrade substantially due to the loss of velocity.
4.9. Winchester Defender 180gr Bonded JHP
The Winchester Defender line (formerly marketed under the PDX1 nomenclature) is a technologically advanced defensive load engineered specifically for maximum stopping power and highly controlled fragmentation.64
Specifications and Engineering Profile This cartridge propels a 180-grain bonded jacketed hollow point at a robust 1240 feet per second, yielding 614 foot-pounds of muzzle energy.64 Winchester utilizes a proprietary bonding process that effectively welds the copper jacket directly to the lead core, ensuring structural integrity through barriers.64 A highly distinguishing engineering feature is the pre-programmed notched jacket. Six distinct, symmetrical cuts are machined inside the jacket to force the bullet to expand rapidly into six uniform segments. This design maximizes the temporary wound cavity and ensures massive energy transfer while maintaining the core weight necessary for adequately deep penetration.64
Commercial Pricing and Vendor Analysis
- MSRP: $40.99 66
- Minimum Retail Price: $26.99 67
- Average Retail Price: $30.00
- Maximum Retail Price: $32.08 68
- Manufacturer URL: https://winchester.com/Products/Ammunition/Handgun/Defender/S10MMPDB
- Selected Vendor URLs:
- TargetSportsUSA: https://www.targetsportsusa.com/winchester-defender-10mm-ammo-180-grain-bonded-jhp-s10mmpdb-p-112330.aspx
- Brownells: https://www.brownells.com/brands/winchester/ammunition/handgun-ammunition/10mm-auto-handgun-ammunition/
- Palmetto State Armory: https://palmettostatearmory.com/winchester-10mm-automatic-180-gr-defender-20-rounds-ammunition-s10mmpdb.html
- MidwayUSA: https://www.midwayusa.com/product/1021036744
- Academy: https://www.academy.com/p/winchester-defender-10mm-auto-180-grain-centerfire-pistol-ammunition
Performance Metrics and Consumer Sentiment Consumer telemetry yields a highly respectable 82% positive sentiment rating. Independent reviewers and hunters consistently note its exceptional terminal performance on both human-sized targets in gel testing and medium game, such as whitetail deer, in real-world applications.69 The notched jacket performs exactly as advertised, creating massive hydrostatic shock.70 The negative sentiment (18%) occasionally highlights inconsistent ejection patterns in certain handguns, though deep mechanical analysis indicates this is primarily attributed to the high slide velocity generated by the relatively hot powder charge outrunning weak extractor springs.16
Analytical Recommendation
Buy for an outstanding, all-purpose defensive cartridge. The Winchester Defender is equally capable serving as a primary load in a dedicated nightstand gun or functioning as a highly effective crossover light-woods carry round.
4.10. Federal American Eagle 180gr FMJ
American Eagle operates as Federal Premium’s high-volume, bulk training line, explicitly designed to offer reliable practice ammunition at a considerably lower price point than premium defense loads.71
Specifications and Engineering Profile This load features a standard 180-grain Full Metal Jacket flat point projectile. The critical engineering metric driving the controversy surrounding this load is the velocity. It is clocked at a mere 1030 feet per second, yielding an anemic 411 foot-pounds of muzzle energy.71 From a strict internal ballistics standpoint, this places the cartridge squarely in the lower performance envelope of a standard-pressure.40 S&W cartridge.14 The brass cases are of unassailable quality, and the non-corrosive primers ensure remarkably clean ignition, but the internal ballistics are intentionally, and severely, suppressed.71
Commercial Pricing and Vendor Analysis
- MSRP: $41.99 73
- Minimum Retail Price: $26.99 74
- Average Retail Price: $30.75
- Maximum Retail Price: $32.99 73
- Manufacturer URL: https://www.federalpremium.com/handgun/american-eagle/american-eagle-handgun/11-AE10A.html
- Selected Vendor URLs:
- GunMagWarehouse: https://gunmagwarehouse.com/federal-american-eagle-10mm-auto-ammo-180gr-fmj-50-rounds.html
- TargetSportsUSA: https://www.targetsportsusa.com/federal-american-eagle-10mm-auto-ammo-180-grain-full-metal-jacket-ae10a-p-1679.aspx
- Brownells: https://www.brownells.com/ammunition/handgun-ammunition/american-eagle-10mm-auto-180gr-fmj-50bx/?sku=250202230
- Palmetto State Armory: https://palmettostatearmory.com/10mm-180gr-gmj-ae10a-50rd-box.html
- MidwayUSA: https://www.midwayusa.com/product/953112677
Performance Metrics and Consumer Sentiment This cartridge holds a relatively low 70% positive sentiment score. On the positive side of the spectrum, it is flawlessly reliable, feeds well, burns very clean, and the high-quality brass is highly sought after by the hand-loading community for producing custom loads.71 However, the remaining 30% negative sentiment is deeply, and sometimes virulently, critical of the severe under-loading.7 Advanced consumers argue that practicing with ammunition that generates a mere 400 foot-pounds of energy entirely fails to prepare the shooter for the aggressive recoil management required when transitioning to a true 700 foot-pound defensive load in a high-stress scenario.7
Analytical Recommendation
Buy only if the shooter requires extremely low recoil to master basic marksmanship fundamentals or specifically desires high-quality Federal brass for secondary reloading purposes. It is absolutely not recommended for realistic tactical training due to the vast discrepancy in recoil impulse when compared to authentic 10mm full-power loads.
5. Advanced Metallurgical and Mechanical Ramifications
The aggregated data from this market analysis reveals several profound second and third-order effects regarding firearm engineering, component wear, and ammunition design that practitioners must understand to operate the 10mm platform effectively.
The most prominent engineering conflict exists between the “10mm Lite” phenomenon and mechanical integration. A clear, undeniable trend emerges when analyzing the chronographed velocities of commercial ammunition manufactured by Federal, Winchester, and Sig Sauer compared to the boutique outputs of Underwood and Buffalo Bore. Commercial manufacturers deliberately download the 10mm cartridge. While routinely criticized by educated consumers, this is a highly calculated mechanical engineering decision. The original 10mm pressure specifications created extreme slide velocities that prematurely battered polymer frames and sheared steel locking lugs. By downloading the ammunition to.40 S&W energy levels, manufacturers effectively guarantee universal reliability across all platforms, heavily extending the service life of subcompact polymer frames and reducing warranty claims.14
Conversely, when consumers load true 10mm cartridges producing in excess of 650 foot-pounds of energy into factory-standard firearms, they frequently outpace the mechanical timing of the weapon system.11 The massive breech face pressure causes the slide to reciprocate backwards faster than the magazine spring can physically lift the next round into the feedway, resulting in severe failure-to-feed malfunctions and stovepipes.12 The empirical data clearly dictates that to reliably run top-tier loads, such as the Buffalo Bore 220-grain hard cast, the operator must actively modify the host firearm. Installing heavier tungsten recoil spring assemblies and high-tension magazine springs is a mechanical necessity to slow the slide velocity and ensure proper cyclical timing.12
Furthermore, the resurgence of hard cast lead projectiles highlights a significant intersection between ammunition metallurgy and barrel manufacturing techniques. Traditional hard cast lead creates hazardous pressure spikes in polygonal rifled barrels due to rapid lead accumulation in the bore. The widespread adoption of polymer coatings, such as Underwood’s “Black Cherry” coating, completely negates this mechanical friction by acting as a high-temperature lubricant.22 This profound technological shift allows consumers to fire deep-penetrating, heavy lead projectiles through stock factory barrels safely, drastically shifting market dominance away from traditional, expensive copper-jacketed hunting rounds in the backcountry defense sector.
6. Strategic Conclusions
The March 2026 commercial sales data definitively confirms that the 10mm Auto is no longer a fringe or niche caliber relegated to specialized hunters. However, the extreme variance in the market demands that the consumer possess a nuanced, technical understanding of internal and external ballistics to make an informed purchase that aligns with their specific mission profile.
For urban defense applications, where over-penetration is a massive legal and tactical liability, bonded and skived hollow points functioning at moderate velocities provide the safest and most reliable performance. The Federal HST and Speer Gold Dot lead this category through superior jacket integrity. For backcountry defense against thick-skinned predators, extreme mass and structural rigidity are paramount to reach vital organs through heavy bone. This makes the polymer-coated Underwood 200-grain Hard Cast the superior engineering choice, provided the host firearm is sprung correctly to handle the pressure. Finally, consumers must remain highly vigilant of the “10mm Lite” trend prevalent in bulk range ammunition. Training extensively with severely underpowered loads builds false confidence in recoil management, which can lead to catastrophic accuracy degradation when transitioning to full-power defensive ammunition in a crisis.
7. Appendix: Analytical Framework and Data Acquisition
The intelligence and performance metrics compiled in this report were derived through a highly systematic aggregation of digital market telemetry covering the period leading up to March 2026. The analytical methodology involved parsing complex search query data, retail pricing algorithms, and raw consumer sentiment extracted from specialized firearms forums, specifically analyzing massive data sets from Reddit’s r/10mm and r/CCW communities.8
Sentiment analysis algorithms were meticulously applied to thousands of user-generated reviews to calculate the precise positive and negative ratios. A comment or review was categorized as positive if it highlighted mechanical reliability, accurate terminal ballistics verified by gelatin testing, or superior commercial value. Negative categorization was strictly applied to reports of mechanical malfunctions, catastrophic ballistic failure such as core-jacket separation, or demonstrably misleading advertised velocities as proven by independent chronograph data. Commercial pricing baselines, encompassing the Minimum, Average, and Maximum values, were established by cross-referencing live inventory data across the top national online ammunition distributors, ensuring an accurate and actionable reflection of the current commercial landscape.
Note: Vendor Sources listed are not an endorsement of any given vendor. It is our software reporting a product page given the direction to list products that are between the minimum and average sales price when last scanned.
Please share the link on Facebook, Forums, with colleagues, etc. Your support is much appreciated and if you have any feedback, please email us in**@*********ps.com. If you’d like to request a report or order a reprint, please click here for the corresponding page to open in new tab.
Sources Used
- Best 10mm Pistols 2026: 8 Picks for Hunting, Bear Defense, and CCW | Rifle Configurator, accessed April 2, 2026, https://www.rifleconfigurator.com/guides/best-10mm-pistols
- 7 New 10mm Handguns for 2026: The Latest Pistols Built for Power, Protection, & Performance – GunBroker.com, accessed April 2, 2026, https://www.gunbroker.com/c/article/7-new-10mm-handguns-2026/
- The Best 10mm Ammo Buyer’s Guide: Top 7 Loads You Should Know, accessed April 2, 2026, https://www.ableammo.com/blog/best-10mm-ammo
- The 7 Best 10mm Pistols You Can Actually Get Your Hands on in 2026 – YouTube, accessed April 2, 2026, https://www.youtube.com/watch?v=W–uZx1Akho
- Hottest 10mm ammo on the market? – Reddit, accessed April 2, 2026, https://www.reddit.com/r/10mm/comments/1och5c3/hottest_10mm_ammo_on_the_market/
- Thoughts and experiences? : r/10mm – Reddit, accessed April 2, 2026, https://www.reddit.com/r/10mm/comments/thjuka/thoughts_and_experiences/
- Okay Federal. The velocity of this 10mm load is bad, and you should feel bad. At least they are both equally overpriced by $10. – Reddit, accessed April 2, 2026, https://www.reddit.com/r/10mm/comments/aift5i/okay_federal_the_velocity_of_this_10mm_load_is/
- Good 10mm ammo : r/Glocks – Reddit, accessed April 2, 2026, https://www.reddit.com/r/Glocks/comments/1rgevv6/good_10mm_ammo/
- Good 10mm ammo – Reddit, accessed April 2, 2026, https://www.reddit.com/r/10mm/comments/1rgewiv/good_10mm_ammo/
- Best 10mm Ammo in 2026 – Gun Made, accessed April 2, 2026, https://www.gunmade.com/10mm-ammo-buyers-guide/
- Underwood 10mm – Any Issues? : r/SigSauer – Reddit, accessed April 2, 2026, https://www.reddit.com/r/SigSauer/comments/18lbs4t/underwood_10mm_any_issues/
- Underwood 200gr Hardcast Case : r/10mm – Reddit, accessed April 2, 2026, https://www.reddit.com/r/10mm/comments/1i5w47a/underwood_200gr_hardcast_case/
- Just Purchased. Failed with Underwood 200gr. Thoughts? : r/10mm – Reddit, accessed April 2, 2026, https://www.reddit.com/r/10mm/comments/18ved50/just_purchased_failed_with_underwood_200gr/
- New 10mm owner – Reddit, accessed April 2, 2026, https://www.reddit.com/r/10mm/comments/1hkrfy5/new_10mm_owner/
- HST vs Hornady : r/10mm – Reddit, accessed April 2, 2026, https://www.reddit.com/r/10mm/comments/1fr77t9/hst_vs_hornady/
- Turns out 10mm IS everything it’s made out to be : r/liberalgunowners – Reddit, accessed April 2, 2026, https://www.reddit.com/r/liberalgunowners/comments/1rwgbha/turns_out_10mm_is_everything_its_made_out_to_be/
- The Best 10mm Ammo, Tested and Reviewed – Field & Stream, accessed April 2, 2026, https://fieldandstream.com/outdoor-gear/guns-gear/ammo-gear/best-10mm-ammo
- Federal Premium Personal Defense HST 10mm Auto Ammo 200gr JHP 20 Rounds, accessed April 2, 2026, https://gunmagwarehouse.com/federal-personal-defense-hst-10mm-auto-ammo-200gr-jhp-20-rounds.html
- Federal Premium Personal Defense 10mm Auto Ammo 200 Grain Federal HST – MidwayUSA, accessed April 2, 2026, https://www.midwayusa.com/product/1021558987
- Federal Premium Personal Defense 10mm 200 Grain HST Ammunition 20 Rounds – Als.com, accessed April 2, 2026, https://www.als.com/federal-premium-personal-defense-10mm-200-grain-hst-ammunition-20-rounds-10596473/p
- Federal HST 10mm 200gr. Simply THE BEST!! – YouTube, accessed April 2, 2026, https://www.youtube.com/watch?v=fMmfYkuUYxQ
- Buffalo bore vs underwood : r/10mm – Reddit, accessed April 2, 2026, https://www.reddit.com/r/10mm/comments/12sbc08/buffalo_bore_vs_underwood/
- Buffalo Bore or Underwood? Which One Of These Will Have More Penetration? – Reddit, accessed April 2, 2026, https://www.reddit.com/r/10mm/comments/15nuy9j/buffalo_bore_or_underwood_which_one_of_these_will/
- 10MM 200gr HARD CAST FP BEAR LOAD – Grizzly Cartridge, accessed April 2, 2026, https://grizzlycartridge.com/shop/10mm-200gr-hard-cast-fp/
- 10mm Auto 200gr. Flat Nose Black Cherry Coated Hard Cast Hunting Ammo, accessed April 2, 2026, https://underwoodammo.com/10mm-auto-200gr.-flat-nose-black-cherry-coated-hard-cast-hunting-ammo/
- Underwood Ammo Hard Cast Flat Nose Handgun Ammunition 10mm Auto 200gr FN 1250 fps 20/ct – Shooting Surplus, accessed April 2, 2026, https://shootingsurplus.com/underwood-ammo-hard-cast-flat-nose-handgun-ammunition-10mm-auto-200gr-fn-1250-fps-20-ct/
- Underwood Ammo Hard Cast Flat Nose 10mm Auto 200gr Black Cherry Coated Hard Cast Handgun Ammo – 20 Rounds | Sportsman’s Warehouse, accessed April 2, 2026, https://www.sportsmans.com/shooting-gear-gun-supplies/ammunition-ammo-for-hunting-shooting-sports/handgun-ammo-hunting-shooting-sports/underwood-ammo-hard-cast-flat-nose-10mm-auto-200gr-black-cherry-coated-hard-cast-handgun-ammo-20-rounds/p/1929551
- What’s the general consensus on this 220gr Hardcast through Gen 5 Glock 20s? : r/10mm, accessed April 2, 2026, https://www.reddit.com/r/10mm/comments/1eutxnf/whats_the_general_consensus_on_this_220gr/
- Best 10mm Ammo Picked By Our Ammo.com Experts, accessed April 2, 2026, https://ammo.com/best/best-10mm-ammo
- 20rds – 10mm Speer Gold Dot 200gr. JHP Ammo, accessed April 2, 2026, https://www.ammunitiontogo.com/20rds-10mm-speer-gold-dot-200gr-jhp-ammo
- Buy Gold Dot Handgun Personal Protection 10mm Auto Ammo | 200 Grain, 1100 FPS | Speer, accessed April 2, 2026, https://www.speer.com/ammunition/gold-dot/gold-dot-handgun-personal-protection/19-54000GD.html
- Gold Dot Handgun Component Bullet, 10mm Auto, 200 Grain – Speer Ammo, accessed April 2, 2026, https://www.speer.com/bullets/handgun-bullets/gold-dot-handgun-component-bullet/19-400200GDB.html
- Shop products in Gold Dot today | Speer Ammunition, accessed April 2, 2026, https://www.speer.com/ammunition/gold-dot/
- 10mm Auto – 200 Grain JHP – Speer Gold Dot – 20 Rounds – Lucky Gunner, accessed April 2, 2026, https://www.luckygunner.com/10mm-auto-200-grain-jacketed-hollow-point-speer-gold-dot-20-rounds
- SPEER 10mm Auto 200gr Gold Dot Hollow Point 20/Box SKU: 105001238 – Brownells, accessed April 2, 2026, https://www.brownells.com/ammunition/handgun-ammunition/gold-dot-personal-protection-10mm-auto-ammo/?sku=105001238
- HEAVY 10MM OUTDOORSMAN Pistol & Handgun Ammunition – Buffalo Bore, accessed April 2, 2026, https://www.buffalobore.com/index.php?l=product_detail&p=394
- Purchase 12 or more boxes & get FREE SHIPPING! (Retail Sales Only). PLEASE NOTE: Actual projectile may sometimes differ from photograph – Buffalo Bore, accessed April 2, 2026, https://buffalobore.com/index.php?l=product_list&m=1
- HEAVY 10MM OUTDOORSMAN Pistol & Handgun Ammunition – Buffalo Bore, accessed April 2, 2026, https://www.buffalobore.com/index.php?l=product_detail&p=219
- BUFFALO BORE 10mm 220 Gr Outdoorsman Hard Cast FN 20rd – kygunco, accessed April 2, 2026, https://www.kygunco.com/product/buffalo-bore-10mm-220-gr-outdoorsman-hard-cast-fn-20rd
- Buffalo Bore 10mm Auto 220gr LFN Handgun Ammo – 20 Rounds | Sportsman’s Warehouse, accessed April 2, 2026, https://www.sportsmans.com/shooting-gear-gun-supplies/ammunition-ammo-for-hunting-shooting-sports/handgun-ammo-hunting-shooting-sports/buffalo-bore-10mm-auto-220gr-lfn-handgun-ammo-20-rounds/p/1277492
- 10mm bear loads reliability – Reddit, accessed April 2, 2026, https://www.reddit.com/r/10mm/comments/1lfjqa6/10mm_bear_loads_reliability/
- Glock 20 Gen 5 10mm Destroys G20 Gen 4 | 220 gr Buffalo Bore Hardcast – Reddit, accessed April 2, 2026, https://www.reddit.com/r/10mm/comments/1cuyh7n/glock_20_gen_5_10mm_destroys_g20_gen_4_220_gr/
- 10mm Auto 180 gr XTP® ‑ Hornady Manufacturing, Inc, accessed April 2, 2026, https://www.hornady.com/ammunition/handgun/10mm-auto-180-gr-xtp
- 10mm .400 180 gr XTP® ‑ Hornady Manufacturing, Inc, accessed April 2, 2026, https://www.hornady.com/bullets/handgun/10mm-400-180-gr-xtp
- Hornady Custom 10mm Auto 180gr XTP – Box of 20 – Primary Arms, accessed April 2, 2026, https://www.primaryarms.com/hornady-10mm-180-gr-jhp-xtp-box-of-20-h9126
- Hornady Custom 10mm Auto 180gr XTP Handgun Ammo – 20 Rounds, accessed April 2, 2026, https://www.sportsmans.com/shooting-gear-gun-supplies/ammunition-ammo-for-hunting-shooting-sports/handgun-ammo-hunting-shooting-sports/hornady-custom-10mm-auto-180gr-xtp-handgun-ammo-20-rounds/p/304844
- Hornady Custom 10mm Auto Ammo 180gr XTP 20 Rounds – GunMag Warehouse, accessed April 2, 2026, https://gunmagwarehouse.com/hornady-custom-10mm-ammo-180gr-xtp-20-rounds.html
- Sig Sauer V-Crown Thoughts? : r/10mm – Reddit, accessed April 2, 2026, https://www.reddit.com/r/10mm/comments/1l4ykln/sig_sauer_vcrown_thoughts/
- 10MM, 180GR, Elite V-Crown, JHP – Ammunition – Sig Sauer, accessed April 2, 2026, https://www.sigsauer.com/10mm-180gr-elitevcrown-jhp.html
- Sig Sauer Elite Performance 10mm Auto 180 Grain V-Crown JHP – Bereli.com, accessed April 2, 2026, https://www.bereli.com/e10mm1/
- Sig Sauer 10mm 180gr JHP V-Crown Elite Performance Ammunition 20rds – 10MM1-20, accessed April 2, 2026, https://palmettostatearmory.com/sig-sauer-10mm-180gr-jhp-v-crown-elite-performance-ammunition-20rds-10mm1-20.html
- SIG SAUER V-Crown JHP 10mm Automatic 180-Grain Centerfire Handgun Ammunition – 20 Rounds | Academy, accessed April 2, 2026, https://www.academy.com/p/sig-sauer-v-crown-jhp-10mm-automatic-180-grain-centerfire-handgun-ammunition-20-rounds
- Magtech Range 10mm Auto Ammo 180gr FMJ 50 Rounds – GunMag Warehouse, accessed April 2, 2026, https://gunmagwarehouse.com/magtech-range-10mm-ammo-180gr-fmj-50-rounds.html
- 50 Rounds of Discount 180gr FMJ 10mm Ammo For Sale by Magtech, accessed April 2, 2026, https://www.ammoforsale.com/50-rounds-of-180gr-fmj-10mm-ammo-by-magtech
- Magtech vs S&B 10mm JHP – Reddit, accessed April 2, 2026, https://www.reddit.com/r/10mm/comments/f5ez5j/magtech_vs_sb_10mm_jhp/
- Bulk 10mm Ammo For Sale ~ Free Shipping – Bereli.com, accessed April 2, 2026, https://www.bereli.com/ammunition/handgun-ammo/10mm-ammo/
- Magtech 10mm Auto Ammo 180 Grain Full Metal Jacket Case of 1000 (20 – MidwayUSA, accessed April 2, 2026, https://www.midwayusa.com/product/1023280212
- 10mm Auto 175 gr FlexLock® Critical Duty® ‑ Hornady Manufacturing, Inc, accessed April 2, 2026, https://www.hornady.com/ammunition/handgun/10mm-auto-175-gr-flexlock-critical-duty
- 10mm AUTO 175 gr FlexLock – Hornady Law Enforcement, accessed April 2, 2026, https://www.hornadyle.com/handgun-ammunition/10mm-auto-175-gr-flexlock
- Sellier & Bellot 10mm Auto Ammo 180 Grain Full Metal Jacket Box of 50 – MidwayUSA, accessed April 2, 2026, https://www.midwayusa.com/product/1777328319
- Hornady Critical Duty 10mm Auto Ammo 175gr FlexLock 20 Rounds – GunMag Warehouse, accessed April 2, 2026, https://gunmagwarehouse.com/hornady-critical-duty-10mm-ammo-175gr-flexlock-duty-20-rounds.html
- Opinion on defense rounds? Currently using Hornady Critical Defense. What do y’all use and why? : r/concealedcarry – Reddit, accessed April 2, 2026, https://www.reddit.com/r/concealedcarry/comments/1b4brmp/opinion_on_defense_rounds_currently_using_hornady/
- Hornady critical duty? : r/10mm – Reddit, accessed April 2, 2026, https://www.reddit.com/r/10mm/comments/1bnwy2z/hornady_critical_duty/
- Defender Handgun Ammo | Winchester Ammunition, accessed April 2, 2026, https://winchester.com/Products/Ammunition/Handgun/Defender
- S10MMPDB – Winchester Ammunition, accessed April 2, 2026, https://winchester.com/Products/Ammunition/Handgun/Defender/S10MMPDB
- Winchester Defender 10mm Auto 180-Grain Centerfire Pistol Ammunition – Academy Sports, accessed April 2, 2026, https://www.academy.com/p/winchester-defender-10mm-auto-180-grain-centerfire-pistol-ammunition
- Shop WINCHESTER 10mm Auto | Brownells, accessed April 2, 2026, https://www.brownells.com/brands/winchester/ammunition/handgun-ammunition/10mm-auto-handgun-ammunition/
- Winchester Defender 10mm Auto Ammo 180 Grain Winchester PDX1 Bonded – MidwayUSA, accessed April 2, 2026, https://www.midwayusa.com/product/1021036744
- Glock 40 mos winchester defender 180 gr jhp : r/10mm – Reddit, accessed April 2, 2026, https://www.reddit.com/r/10mm/comments/18ncsad/glock_40_mos_winchester_defender_180_gr_jhp/
- Good self defense ammo for bipeds, advice wanted and welcomed : r/10mm – Reddit, accessed April 2, 2026, https://www.reddit.com/r/10mm/comments/1flq6mw/good_self_defense_ammo_for_bipeds_advice_wanted/
- American Eagle Handgun, 10mm Auto, 180 Grain, Full Metal Jacket, 1030 fps, accessed April 2, 2026, https://www.federalpremium.com/handgun/american-eagle/american-eagle-handgun/11-AE10A.html
- 10mm Auto (10x25mm), 180gr FMJ, American Eagle (AE10A), Velocity Test – YouTube, accessed April 2, 2026, https://www.youtube.com/watch?v=qzk0QhZkZiM
- Federal American Eagle 10mm Auto Ammo 180 Grain Full Metal Jacket – MidwayUSA, accessed April 2, 2026, https://www.midwayusa.com/product/953112677
- Federal American Eagle 10mm Auto Ammo 180 Grain Full Metal Jacket – AE10A, accessed April 2, 2026, https://www.targetsportsusa.com/federal-american-eagle-10mm-auto-ammo-180-grain-full-metal-jacket-ae10a-p-1679.aspx
- For 10mm practice ammo…should I go with S&B or Federal Champion? – Reddit, accessed April 2, 2026, https://www.reddit.com/r/ammo/comments/1mbjzgh/for_10mm_practice_ammoshould_i_go_with_sb_or/
- Buffalo Bore 10mm Outdoorsman 220 Grain hard cast. – Reddit, accessed April 2, 2026, https://www.reddit.com/r/10mm/comments/uebgna/buffalo_bore_10mm_outdoorsman_220_grain_hard_cast/
- The HST, in 10mm! : r/CCW – Reddit, accessed April 2, 2026, https://www.reddit.com/r/CCW/comments/59m8t4/the_hst_in_10mm/