Starting in 2021, I started to offer 10mm magazines for the Rock Island Armory A2 HC pistols – “A2” being a marketing opportunity to refer to the next generation 1911A1 pistol prototyping the US Army did starting in 2004 that experimented with different sights, extractors, mainsprings, etc. The “HC” stands for high capacity and reflects the RIA pistols are using a staggered magazine design to hold far more rounds than a single stack could.
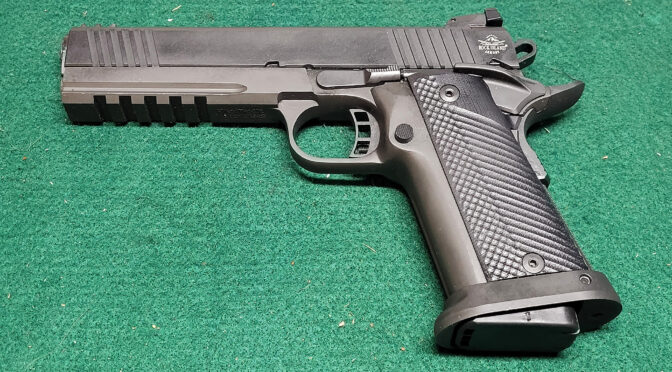
At any rate, I had a number of customers ask me to produce mags for the 9mm RIA A2 HC pistols – the 51679 Tac Ultra and the 56645 Pro Ultra Match HC. Our 10mm mags had proven to be very successful and after enough requests, I decided to enter the 9mm magazine market.
One thing I learned with making AK grips is that you really need to have the weapon to make a part for it. This allows you to check fitment, reinforce potentially weak areas, etc. So, when I started with the 10mm mags, I bought a 52009 Rock Ultra HC and later a 56862 Tac Ultra Match HC. Why? Because you also find that a given firearm may differ enough that if you build and test only with it, you may not be making something others can use.
There’s an engineering problem called “stacked tolerance”. Every part has a specification that says, for example “9.0mm” and then there is a tolerance specified – for example “+/- .01”. That means the part produced can range from 8.99 to 9.01 in size. Make an assembly and all of those tolerances may combine, or “stack” in such a way that if you build a part to work for that particular unit then another assembly that happens to stack in the other direction may not be able to use that part. Testing on multiple pistols helps with a testing – at least a bit because you are reducing the odds of one pistol having a problem or working and others not.
So, by having both the 52009 and 56862 10mm pistols, I could test magazines to make sure they fed right, dropped free, etc. With the 9mm pistols, I had limited funds and just started with the 51679 – the Tac Ultra. That decision bit me hard.
The Initial Magazine Prototyping Didn’t Make Sense
When I prototype, I buy a bunch of original magazines and then start looking for what is close enough to modify and start tinkering with the feed lips, feed angles, the spring and the follower. To keep track of things, I applied numbered stickers to every magazine and kept track of the dimensions plus performance.
What I also learned with the 10mm mags is that the best dummy rounds are the machined aluminum A-Zoom Snap-Caps. Dummy rounds that are made from a case and a bullet will see the bullet pushed back into the case and/or get deformed after some fairly low number of cycles. The machined aluminum A-Zoom Snap-Caps are dimensionally accurate and can cycle hundreds of times before needing to be replaced. By the way, don’t do this type of work with live rounds – it’s an accident waiting to happen.
Back to the 9mm world, I was working on the mags and things just didn’t make sense. A magazine would work and then it wouldn’t. One set of dimensions would work and then they wouldn’t. Something just wasn’t adding up. The pistol would fail to eject randomly, I’d then have the old round and the new round in the slide at the same time and of course it jammed.
It had to be the mags right? I blew through a bunch of mags and time before it dawned on me that the pistol itself must have issues. I hadn’t questioned it before because the pistol was brand new out of the box. Sure, I had cleaned and lubed it first before cycling hundreds of snap caps through it. The problem was that I assumed it was good to go and the initial testing seemed to show a reliable pistol … but I only tested a few mags worth of snap caps – maybe 34-52 cycles max.
Testing The First Pistol
I loaded a magazine up, racked the slide and loaded a snap cap. I then pulled the slide back slowly and the extractor lost control of the extracted round as I pulled the slide to the rear. That wasn’t supposed to happen. If I went slow, it would either fail to extract completely or lose control of the round.
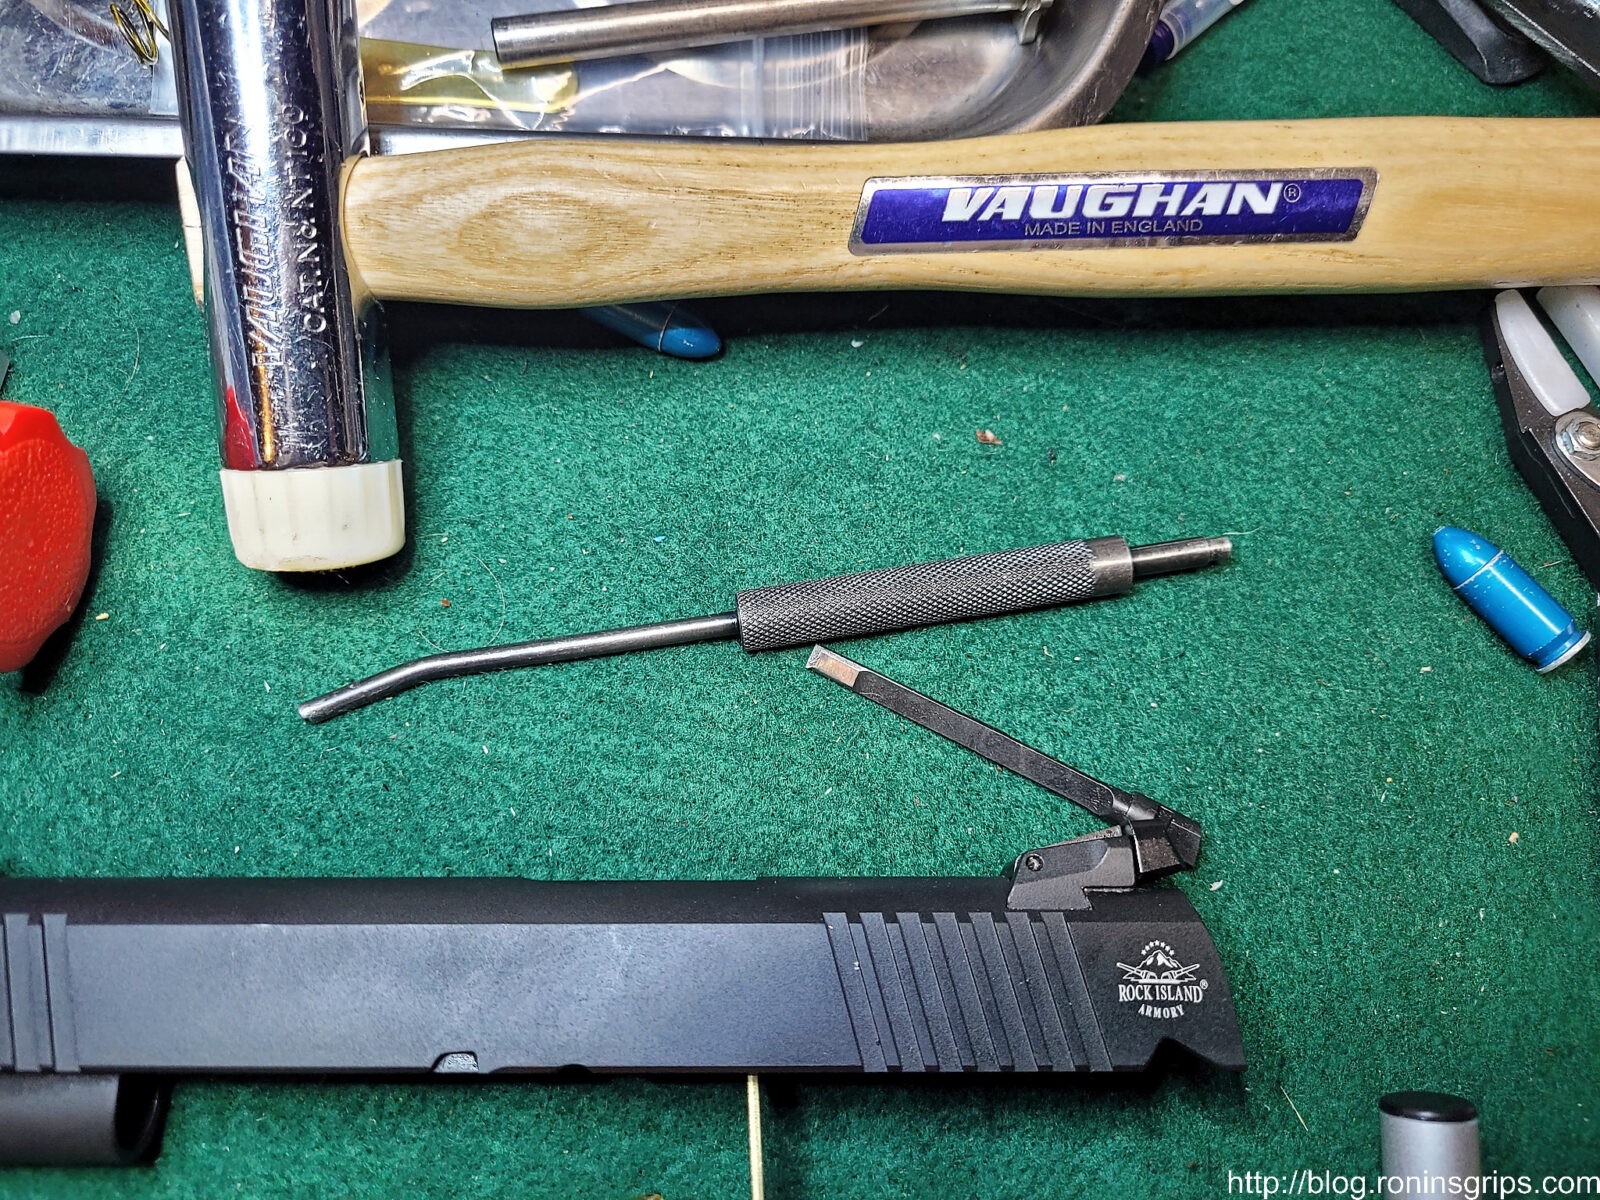
I’m not a 1911 gunsmithing guru but I had to learn some stuff really fast. I knew if I sent the pistol back to Rock Island/Armscor, it would be at least a month before I would get it back. So I read posts and watched videos that explained the pistol had an extractor problem and how to correct it. I bought a few different brands of 9mm extractors, the Brownells extractor tool, the Jack Weigand extractor gauge and tensioning tool.
Boy, I could not get that thing to work even after trying a few different brand extractors and a Wilson. At this point I was pretty ticked off. My last best guess was that the extractor looked like it was clocked slightly. When I inserted the Weigand 9mm gauge, I could feel initial tension as I inserted it and then it would drop off rapidly as I inserted the gauge the rest of the way (it centers over the firing pin hole). Rather than do a new firing pin stop plate, I decided to stop chasing best guesses mainly because I was blowing time I did not have to spend. The pistol was under warranty so feeling both stupid and defeated, I finally got an RMA to send the pistol back.
No, I’m Not Incredibly Patient
In the meantime, I bought a 56645 Pro Ultra Match HC and it has worked great – no problems at all. I was able to work out the details on the mags. Now, I am not patient so I actually ordered a second 51679 Tac Ultra that I looked at, cycled a few rounds through but really didn’t use a great deal – my primary go-to test platform was the 56862 … until I decided to take some photos about the RIA 9mm A2 HC pistols and looked at the 51679’s extractor.
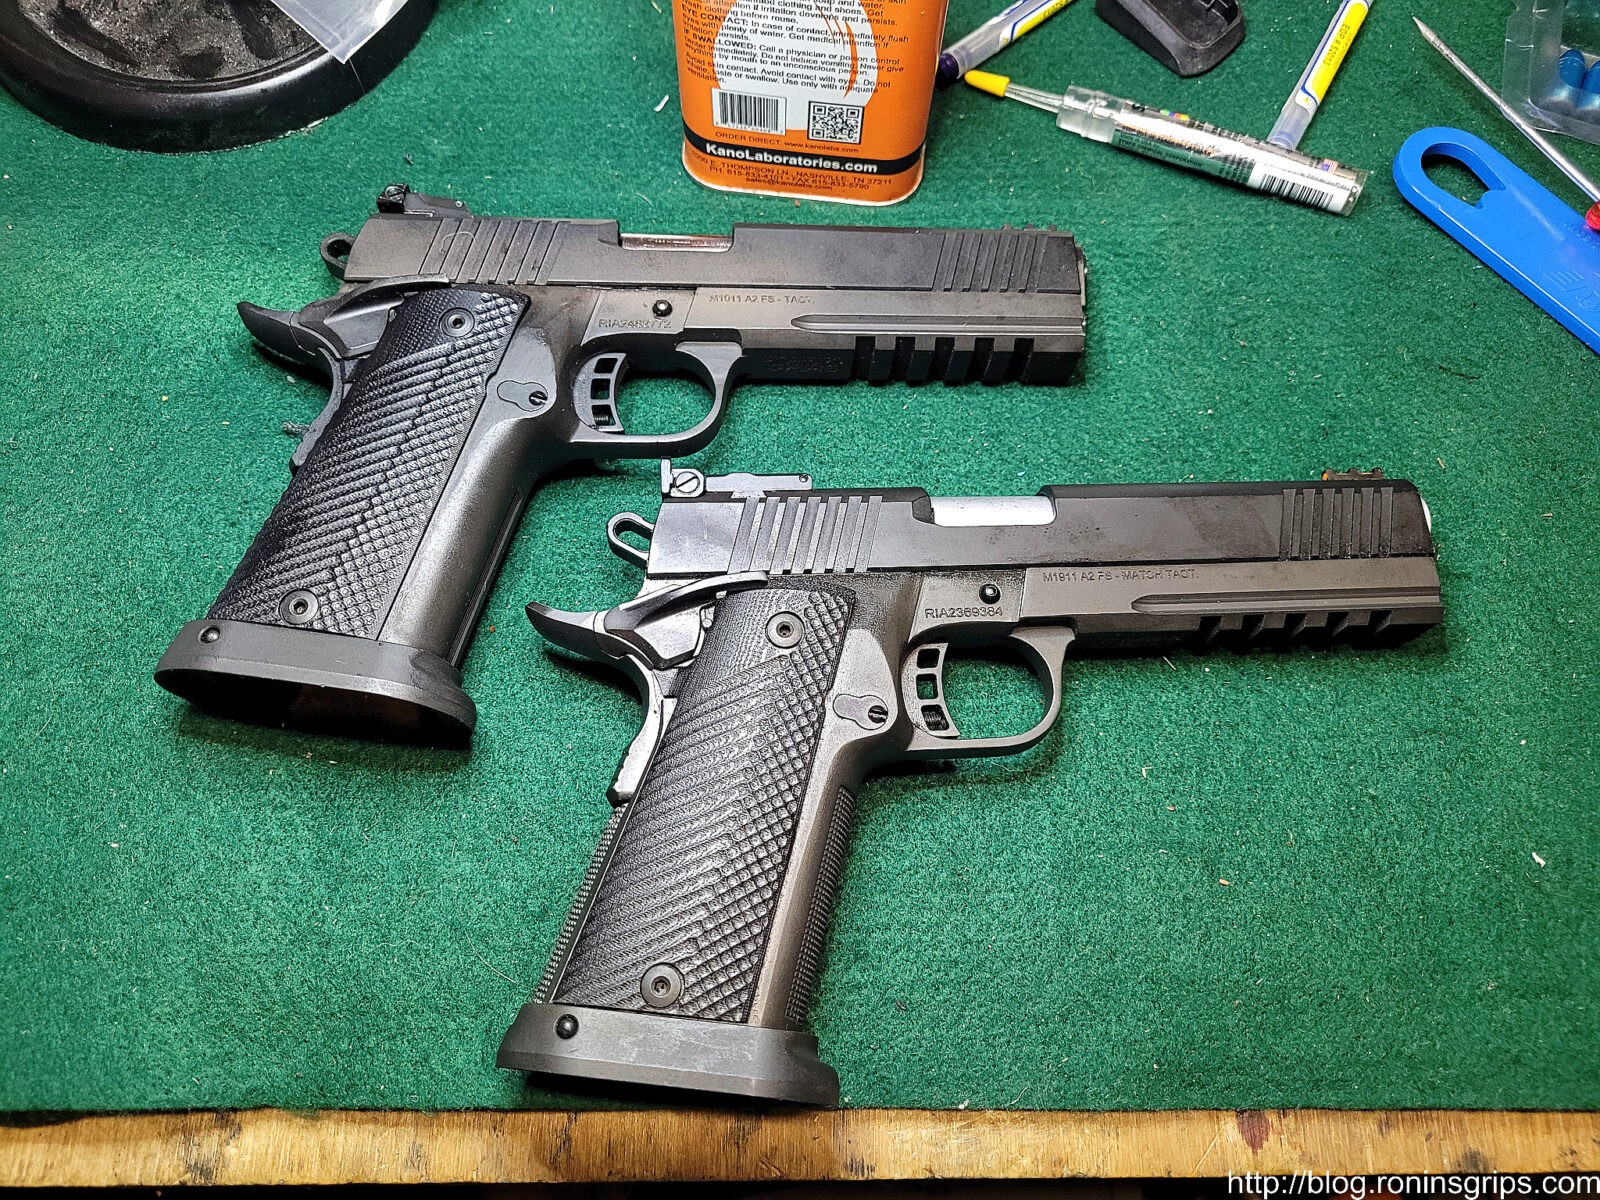
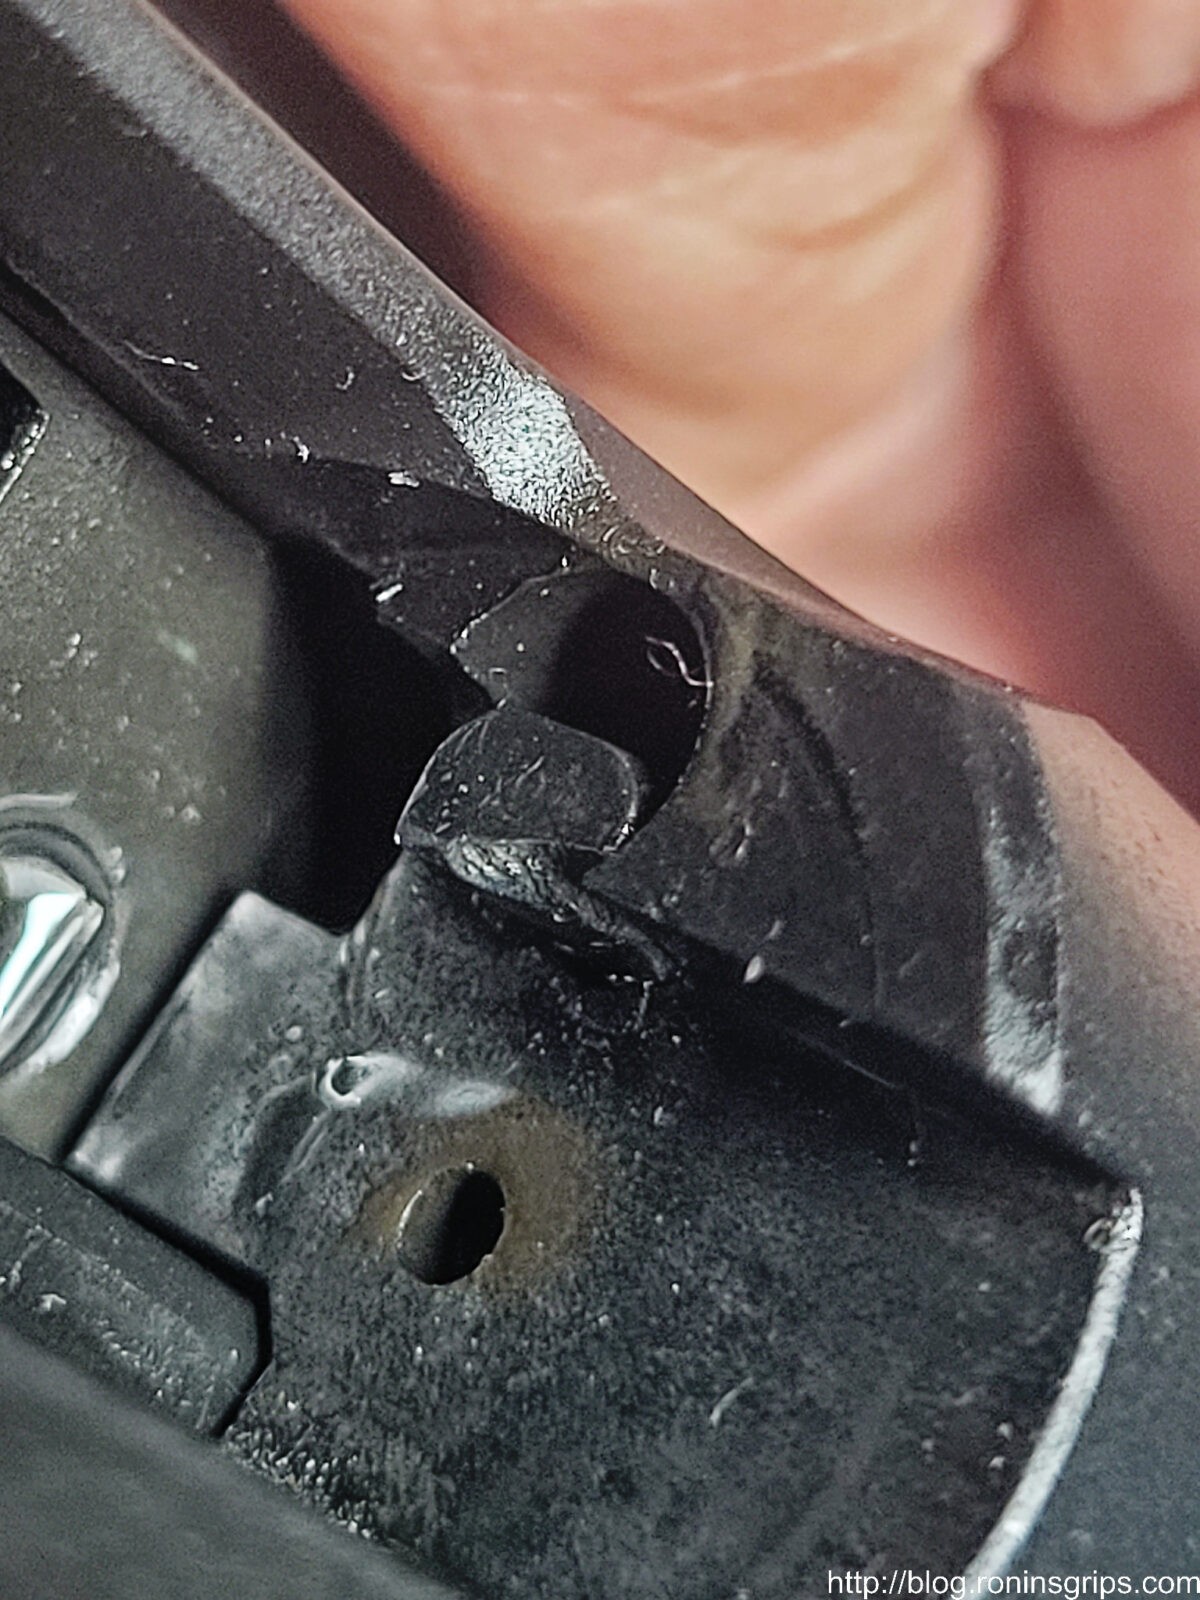
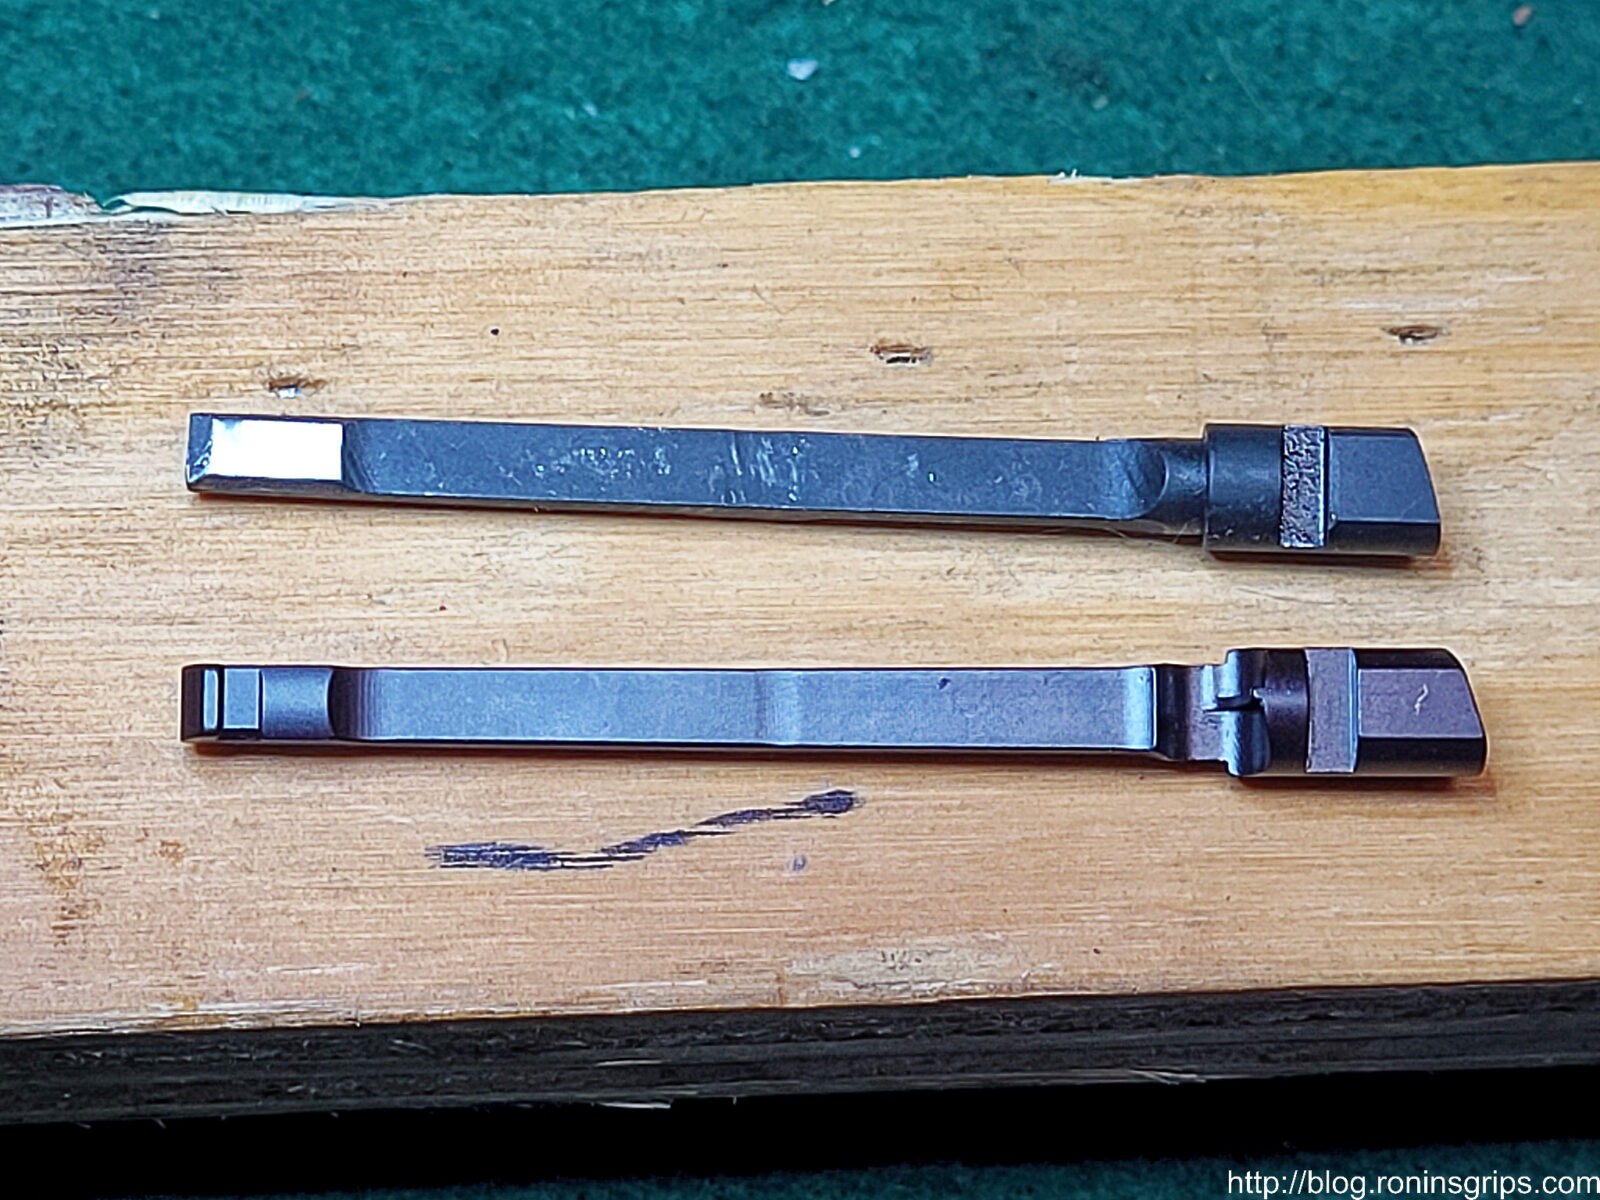
“You’ve got to be kidding me” – I thought to myself. Inserting a choice F bomb of course. The extractor in the brand new 51679 that probably has less than 100 hand cycled Zoom snap caps through it was almost completely broken off other than a little tiny nub on one end. WTF?!?!
Okay, two 51679s bought from different vendors off Gunbroker about a month apart both having extraction problems …. wow. I’ll be honest – I’m disappointed. RIA 1911s are econobox models but they usually work – so, no, I’m not remotely happy not to mention jumping through hoops waiting for ever for their customer service to respond. I did learn a bunch though and will share with you what I did and what you can do if you want to.
Metal Injection Molding For Extractors Isn’t The Best Choice
The problem is that to keep costs down, Armscor, who owns the Rock Island brand, make the ejector using Metal Injection Molding (MIM). If you search on the web, you will see a ton of guys arguing against the use of MIM in high stress parts. As I just learned with extractors, it’s not the strongest manufacturing approach – making them from forged high-quality steel is a far better idea.
Okay, if you get a new RIA 9mm pistol, check the extractor out of the box. Clean and lube it, go to the range and keep your eye on the extractor. If it breaks you have two options – send it back to Rock Island/Armscor for a RMA repair or do it yourself. Heck, you could even just replace the extractor yourself before you have a problem if you want to.
I Decided To Replace the Extractor Myself
I learned a ton on that first pistol plus I had all of the tools and spare Wilson Combat extractors. I just needed to trust in my abilities a bit more and try it again. If there’s one thing I know about myself, it’s that I am persistent and don’t give up easy. With this in mind, I dove back in again with far better results.
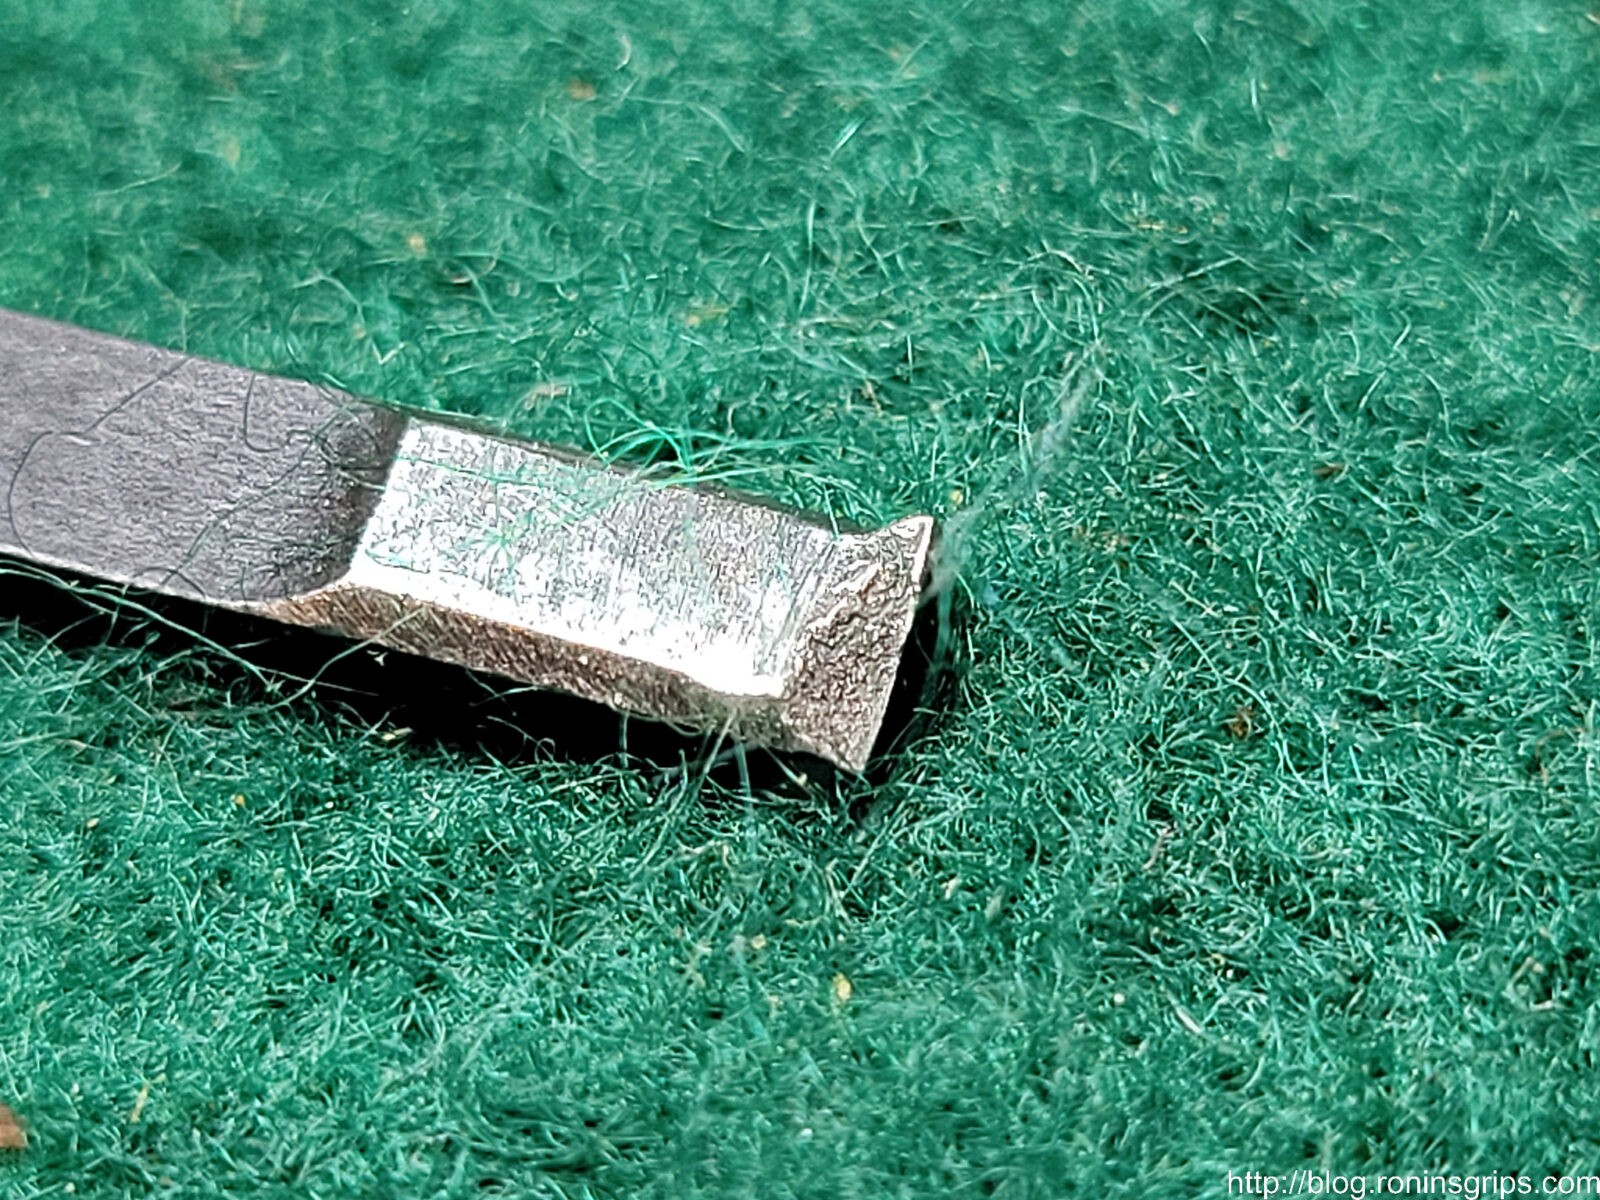
First, let me explain why I went with a Wilson “Bullet Proof” .38/9mm extractor. They have an excellent reputation a number of guys posted about throwing away their RIA ejector and installing a Wilson. Instead of being MIM, here’s what Wilson says about their extractors:
- Fully Machined from S7 shockproof tool steel with a tensile strength of 275,000 PSI
- Optimized hook design for maximum strength and case rim contact
- Hook location tolerances held to +/- .001″
- Radiused corners for extended life and smooth feeding
- Enhanced design holds tension longer over factory part many times over
- Heat treated to optimum hardness and cryogenically treated
- Guaranteed for life against breakage or we will replace at no cost to you
Note: I went with a series 80 extractor because they were in stock even though the RIA pistols are based on a series 70 design. You can use a series 80 extractor in a series 70 pistol but not vice versa. You can get them from Brownells, Wilson directly and other places.
Recommended Tools
You don’t need specialized tools but if you can afford them, I would highly recommend the following:
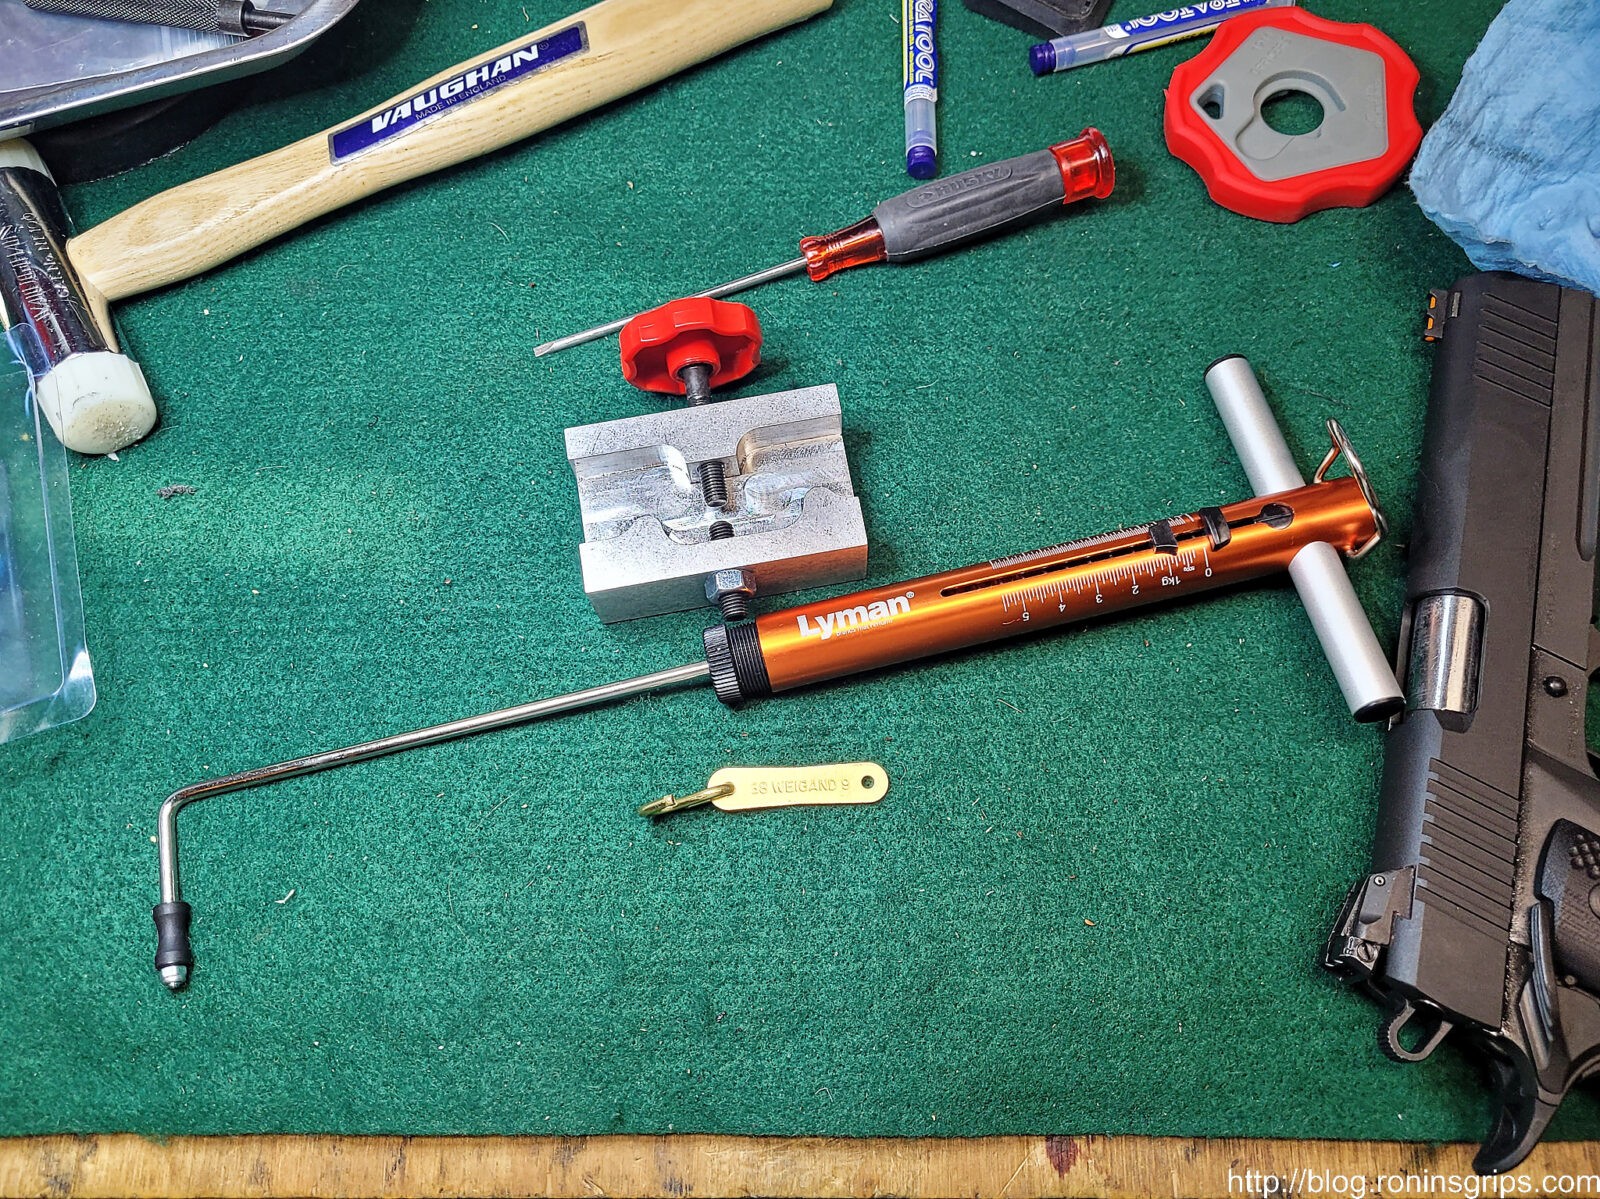
- Weigand’s extractor tension gauge set – let’s you precisely dial in extractor tension. Note, I did add a brass s-hook so I can grab it with a trigger pull gauge more easily.
- Weigand’s 1911 extractor tensioning tool – let’s you precisely control the bending of your extractor
- Brownells’ 1911 extractor removal tool – folks, this is so handy – get it.
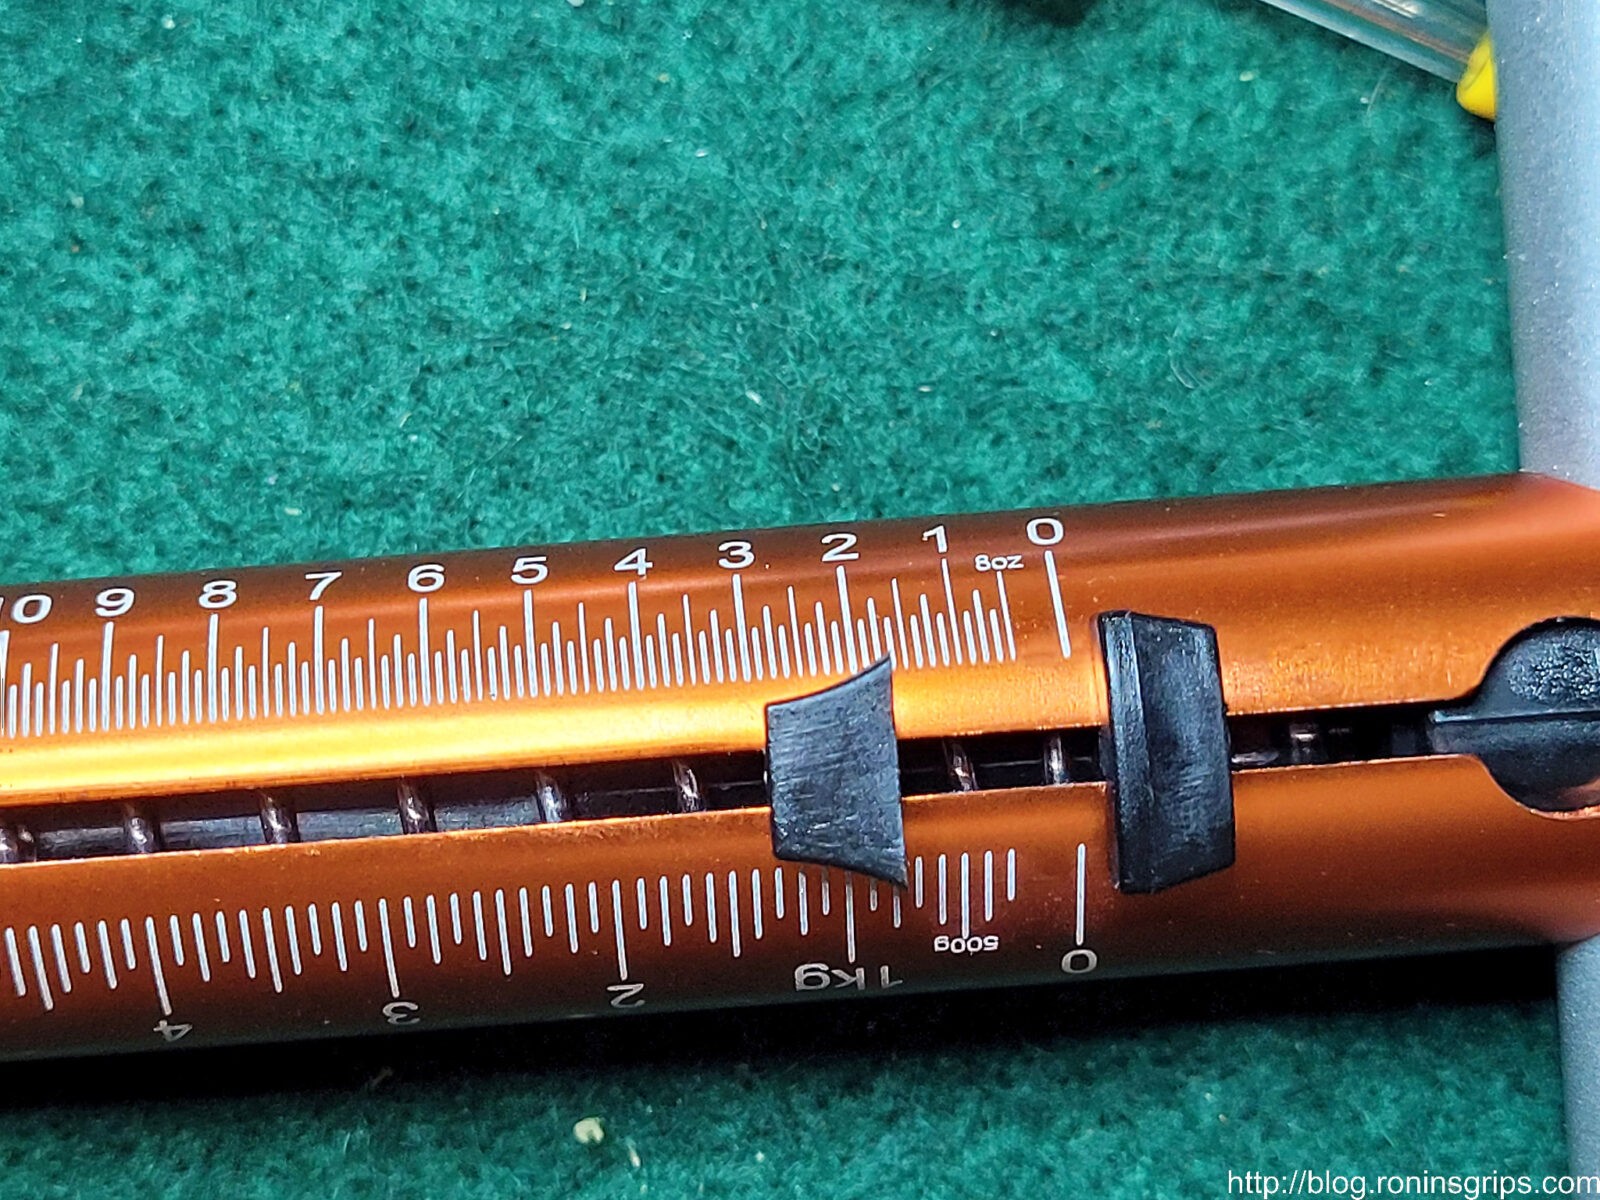
- Lyman – Mechanical Trigger Pull Gauge – even though I have some digital trigger pull gauges, I lacked a mechanical unit and there are times where it is handy to see an analog scale changing vs. flashing numbers you can’t read so I bought it regardless. Yes, if you have a trigger pull gauge already, you can use it.
Polish the Extractor
From what I read and saw, the Wilson extractor is practically ready out of the box other than setting the tension. Some guys recommended polishing the surfaces where the cartridge will come in contact and I did that with one of the small rubberized abrasive polishing bits in my Dremel.
How to Install
| Make sure your pistol is unloaded – that the chamber is empty and a loaded magazine is not inserted. In short, work safe. Also, do not use live ammo for testing – use snap caps. |
Let me give you an overview and then a couple of videos to watch:
- Remove the slide
- Remove the firing pin stop plate by pushing down with the straight short end of the extractor tool and then slide the plate off. Be CAREFUL that the firing pin and/or spring don’t come flying out as you remove the plate.
- Push the extractor backwards by pushing the head of extractor backwards down the hole out the rear of the slide
- Insert the new extractor and line it up so the stop plate can be re-inserted. It needs to line up with the top and bottom of the stop plate groove and it needs to be straight up and down parallel to the sides. You don’t need to install the firing pin and spring until you are done.
- Insert the Weigand gauge and pull it out using the trigger pull gauge to find out how many ounces it takes.
- Use the Weigand tensioning tool to increase or decrease the tension. I dialed mine in to 28 ounces (1.75 pounds).
- You can try testing feeding and extracting dummy rounds to see how it performs. The extractor should maintain control until the extracted dummy round hits the ejector.
- Once it is dialed in, you can then re-install the firing pin return spring, lube the firing pin and reinstall it also.
- There’s a trick to the plate – wiggle it in and push down the firing pin enough to get the plate to sit on the “shelf” at the rear. You can then maintain pressure on the plate and use the other hand to use the extractor tool to push the firing pin down far enough and hold it there while you push the plate back into place.
More Details
Wilson has a video on how to change to their extractor and a bit about setting the tension:
Now, I also read the Brownell’s blog post about extractors plus a more detailed Wilson Combat instructional PDF file.
The following is a video of Jack Weigand explaining how to use his extractor gauges and tensioning tool:
Adjusting The Extractor Landing Pad
The most detailed post and guidance in general about extractors that I read is here – and if you read down, you will get to sections/replies about 9mm extractors. One thing you will notice discussed is reprofiling the “fitting pad” to better fit the radius of the extractor hole. I stoned and polished the fitting pad to be more rounded but that was it. I put more emphasis on getting a weight in the 25-28oz range and did do that after may 3-4 tries.
Was The Match Pistol Higher End?
I wondered if maybe more care was put into the match pistol. There are some nice perks in terms of features but the trigger feels about the same between the two pistols. I’ll write up something more detailed down the road – for now let me just say they pistols are not night and day different in terms of how they feel with cycling the slide or pulling the trigger.
In terms of pricing, there’s not a huge difference on Gunbroker. The first 51679 was bought on 3/5/22 for $819.99, the Match pistol was $899.00 on 3/25/22 and the second 51679 was bought on 4/3/22 for $899.00 also. In writing this, it’s surprising that the Match wasn’t $100-200 more on the street but it wasn’t. If you look at the manufacturer’s suggested retail price (MSRP) – Armscor did set the 51679 at $899 and the Match 56645 at $1099. In other words, Armscor was hoping the Match would command a premium.
You can find the 51679 pistols right now with a bit of hunting. The 56645 match pistol is challenging to find as it seems to be a bit more rare now but it is out there too. I’d tell you to get the 56645 Pro Ultra Match HC if you can find it. As you can imagine, I’m not too thrilled with my 51679 experience right now and there is little to no price difference *if* you can find one.
Conclusion
I’m not sure what to tell you about what happened – I only have data from two 51679 pistols and one 56645 pistol. It could just be really bad luck – neither of my current 10mm pistols have given me any trouble and the 56645 Pro Ultra Match has been fine so far as well although I have only cycled maybe 500-600 snap caps through it so far.
The first 51679 had something going on that I can’t explain and am waiting on Armscor to fix it under warranty. It certainly was not a broken extractor. For the second one to have a snapped extractor claw with so very few rounds – I guess that highlights the limitation of MIM and that forged extractors are better – there’s a reason why Wilson’s Bullet Proof extractors have such a good reputation.
| 6/22/22 Update: RIA did a warranty repair after about 4-5 weeks. All they told me was that they confirmed the extraction problem, fixed it and the pistol was fully operational now. So, I still don’t know exactly what happened but at least Armscor/RIA stood behind it and made things right. |
We’ll see what Armscor comes back with regarding the first pistol and I’ll report it here. I guess the big thing I want folks to know is that changing an extractor is not an arcane black magic endeavor. There are tons and tons of videos and posts that you can read. At some point you just need to wade in, give it a go and learn.
My other lesson learned is that don’t replace a busted Armscor extractor (MIM) with the same thing. Upgrade. I decided to go with Wilson Combat due to all the good reviews I read and would recommend that.
I still have a lot to learn about 1911s and don’t claim to know much. I’m really focused just on the mags but I hope this helps out anyone who reads it.
A Stunningly Good 1911 Reference Book Recommendation
By the way, If you want a really good book with tons of dimensions, drawings and photos, then get Jerry Kuhnhausen’s “The Colt .45 Automatic – A Shop Manual”. What I bought off Amazon is the “New Expanded 10th Edition” published in 2015. It gave me a better understanding about the extractor and the firing pin stop.
I hope this post helps you out!
6/29/23 Update: The match 9mm MIM extractor is still doing just fine and I have no idea how many thousands of times it has been cycled. The Wilson is doing great on the other pistol also.
12/17/22 Update: I’m somewhat surprised – the original MIM extractor in the Match 9mm is still doing just fine thousands of rounds later. So is the Wilson but I am not surprised about the Wilson holding up.
Note, I have to buy all of my parts – nothing here was paid for by sponsors, etc. I do make a small amount if you click on an ad and buy something but that is it. You’re getting my real opinion on stuff.
Please share the link on Facebook, Forums, with colleagues, etc. Your support is much appreciated and if you have any feedback, please email us in**@*********ps.com. If you’d like to request a report or order a reprint, please click here for the corresponding page to open in new tab.