Tag Archives: tools

Using a Vevor Air Bag Jack To Lift Vehicles To Work On Them

Hi folks – back in 2020, I wrote about buying a Mophorn 3 ton pneumatic/air- pillow jack to work on our vehicles. Actually, I bought it in 2019 and it’s still going strong. This past Fall, I decided to get a second air bag jack but decided to get one with a higher lift capacity to better jack up my 2021 Ram 2500.

To give some background, I wanted an air-pillow/air-bag lift for speed and to save my shoulders that could no longer handle pumping a hydraulic jack arm over and over to lift a vehicle. I have an air-over-hydraulic bottle jack but it is tall and slow. The air bag jacks use compressed air to inflate a rubber cylinder that then lifts the vehicle – like what you see in air-ride or air-lift suspensions on trucks. They are called by a variety of names as you can see in this post: pneumatic jacks, air bag jacks, air pllow jacks, pillow lift jacks. Air-over-hydraulic is a different creature – air is used to actuate the hydraulic pump vs. you hand pumping to move the hydraulic pump up.

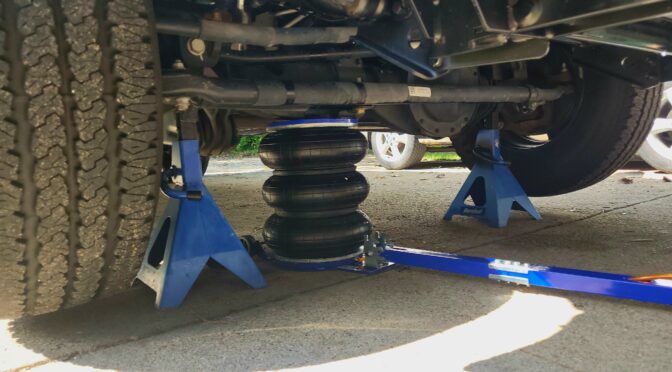
Always Use Jack Stands

Once the vehicle is in the air, I always put jack stands all the way around to support it. This is always a good idea regardless of jack type you use and the air bag jacks are no different.

Vevor 11,023 Pound Jack

I did some of my usual digging on Amazon and tool sights and decided to get a Vevor 11,000 pound air jack. I bought it in September 2022 and started using it right away because it’s really speeds things up to be able to lift both ends of a vehicle without repositioning the jacks.

There was one thing in their product page on Amazon that confused me until I realized it was a metric term. They say it can lift 11,023 pounds / 5 tons. Well, being used to American measures, 5 tons if 10,000 pounds soI wondered if this was some kind of hype. The issue is that they mean 5 metric tons. A metric ton is 1,000 KG or 2,204.6 so 5 metric tons is 11,023 pounds.

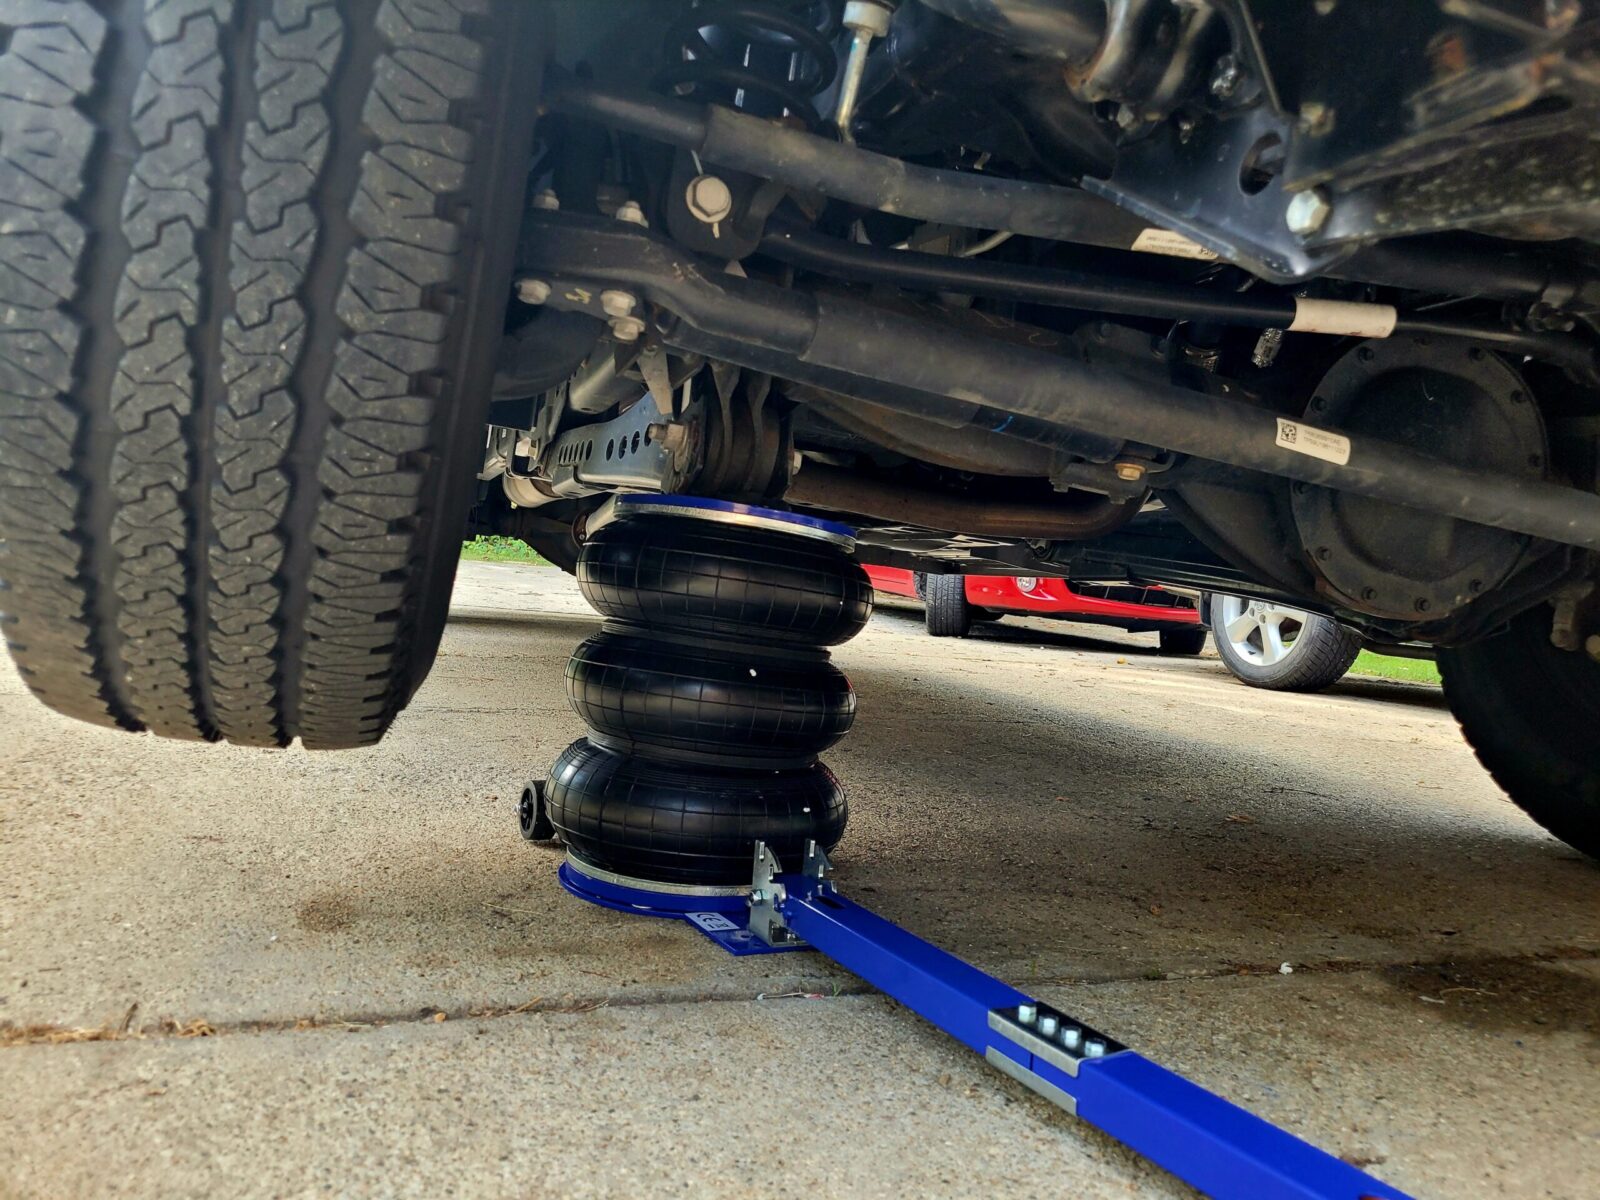
Their stated operating air pressure range is 5-10 kg/cm^2. That comes out to 71.1 to 142.2 PSI. The airline for my driveway tools is at 100 PSI – most of my tools are 90 PSI. My guess is that given their operating range, the jack can’t lift its rated maximum capacity. I can tell you that it has no problem lifting the front or rear of either my 6.7L Hemi 2021 Ram 2500 or full size 2016 Ford Transit F150 van and that’s really what I wanted. The photo at the top of the blog is the Vevor with my Ram 2500 up in the air.

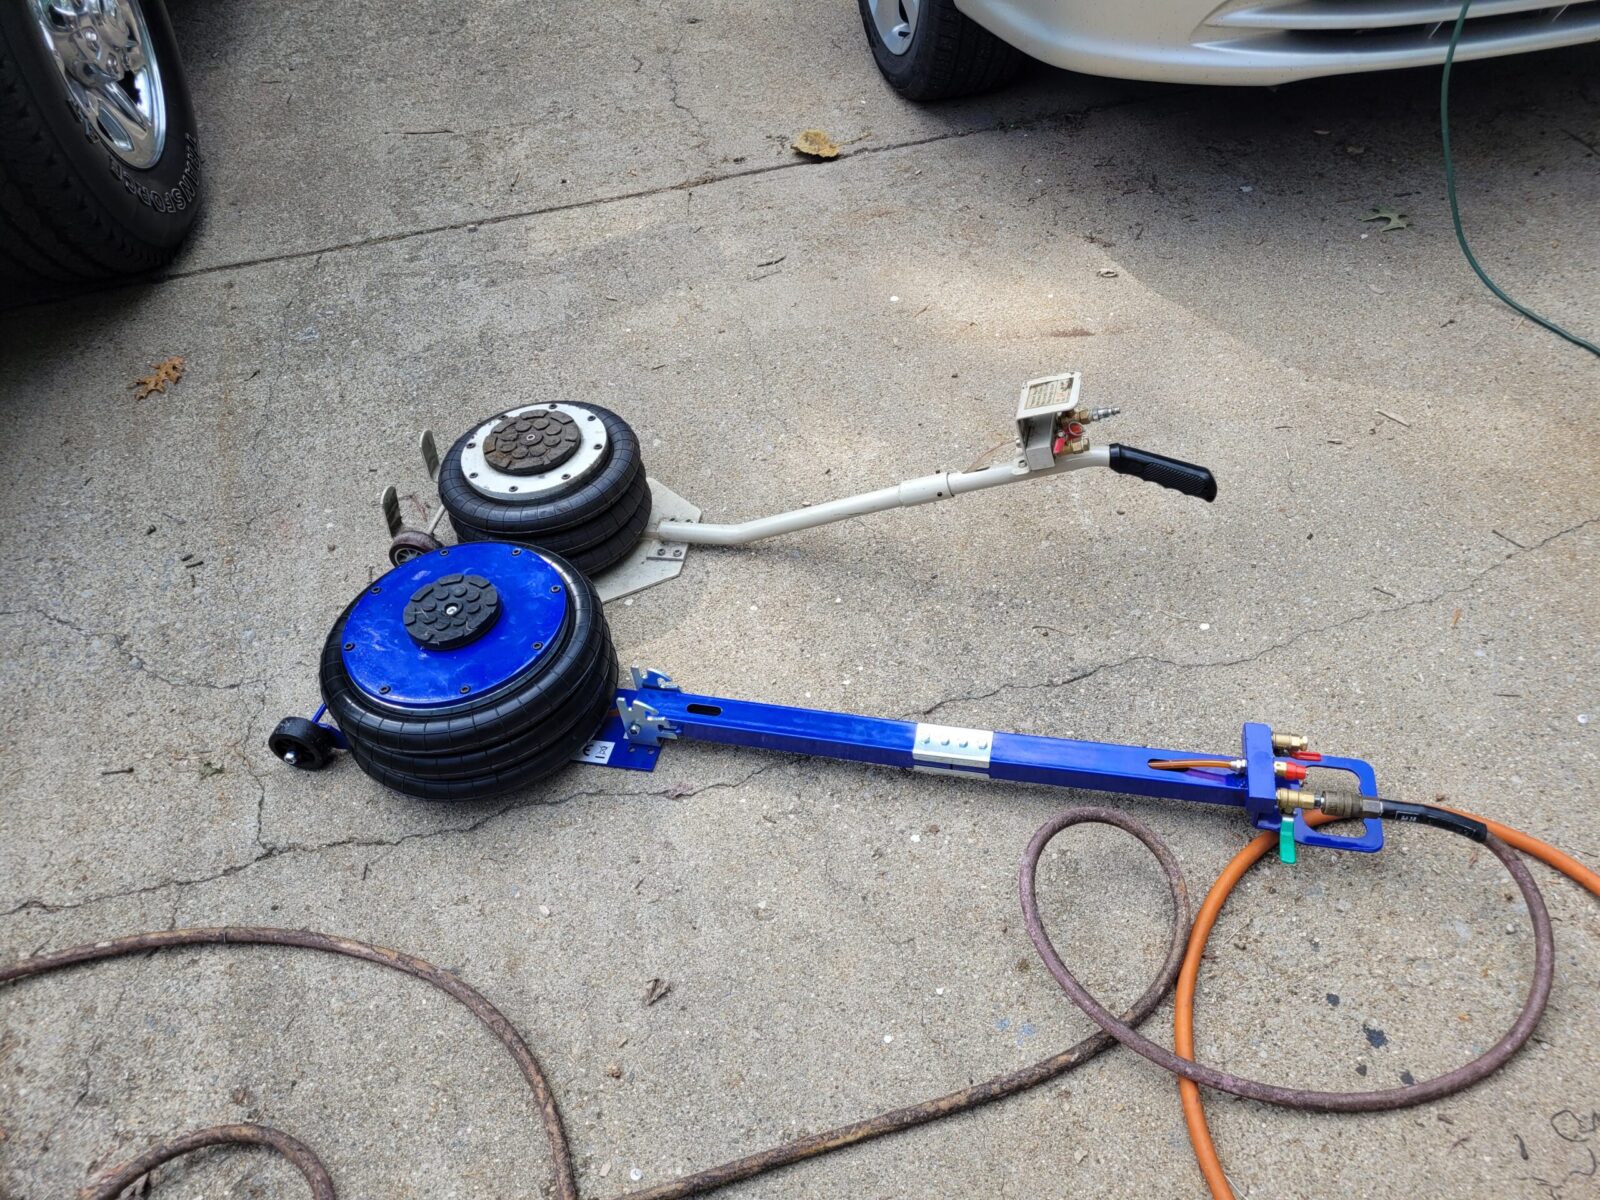
The lifting height is about 15.75″ and the minimum height is 5.3″. The minimum matters a lot when you are trying to get it under some vehicles. One trick I have found is to stand on the air bag to get the air out and then close the exhaust valve to make it thin enough to slide under some cars.

The Mophorn is slightly taller and you can see the Vevor has a larger diameter air bag.

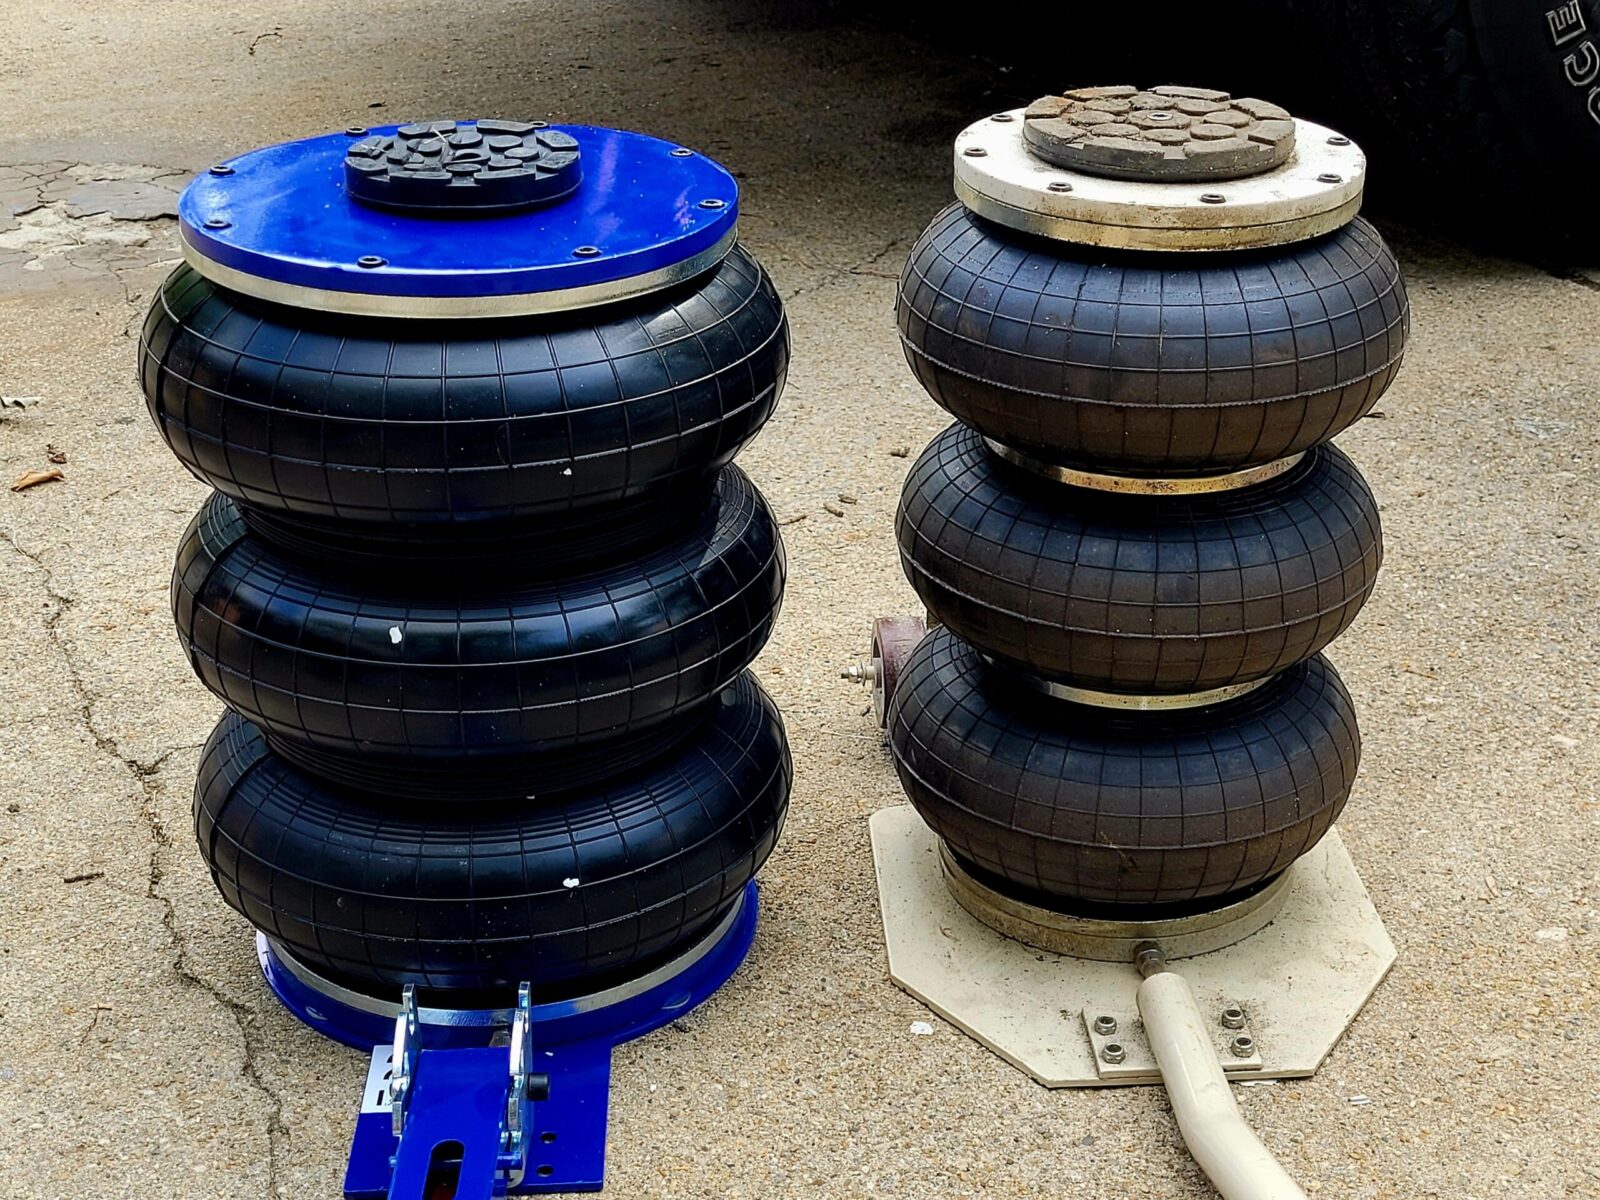
One of the nice perks is that the handle has three positions so you can slide it in flat under a vehicle or at an angle if so you choose. My Mophorn jack’s handle is in a fixed position so that limits how far it can slide under some vehicles but it’s also more sturdy since it can’t move.

You can see the difference between the fixed Mophorn handle vs the 3-position Vevor.

With the Mophorn jack, the screws securing the botton of the bag to the plate started to come loose and the unit was leaking air. With the Vevor, they are in solid and really did not want to back off – I was going to add medium Loc-Tite but since they were in so firmly, I decided to leave them alone. They may even have a thread locker applied already – I’m not sure. I think out of all of the screws there were only one or two I could torque down further.

The Vevor has no problem lifting my Ram 2500 with 100 PSI of air.

Summary

All in all, the Vevor air bag lift seems like a solid unit. I’ve not had any problems at all. I sometimes wish the handle wouldn’t move so easily but its ability to fold flat to the ground makes up for that.

I’d recommend the Vevor11,000 pound unit off Amazon [click here to go there]. The Mophorn is always an option also – I’m still happy with that as well.

Last comment – Vevor has a ton of models with different configurations and lifting capacities – click here to open the Amazon listings in a new tab.

2/10/24 Update: Still using both – no problems. I don’t see the Mophorn unit any longer but this CXRCY 6600 pound lift unit looks identical. Chinese brand names come and go but this may be the same factory.


If you find this post useful, please share the link on Facebook, with your friends, etc. Your support is much appreciated and if you have any feedback, please email me at in**@ro*********.com. Please note that for links to other websites, I may be paid via an affiliate program such as Avantlink, Impact, Amazon and eBay.


Add A “Thumper” To A Blast Cabinet And More Than Double Your Productivity!

Okay, Ronin’s Grips started making Yugo M70 grips sometime around 2004 and rapidly added models – the challenge was that I hand polished each and every one of them. It took a ton of time, handwork and was putting my carpal tunnel through the roof. Jeff Miller of HillBilly Firearms told me to abrasive blast the grips for a better grip and a heck of a lot less handwork. I was sold – I had to change something. Jeff also gave me a few tips – get a foot control to protect the seals vs. being in the cabinet with all of the grit, put transparency film on the window of the unit to make it last longer and he told me to get a “thumper” to make the grit settle.

Well, way back in the day margins were super thin so I bought a large bench top abrasive blast cabinet from Cyclone Manufacturing in Dowagiac, MI – they are about an hour from my shop and I could pick it up along with the foot control, I got a box of transparency film either from Amazon or a local office supply store, but I had no idea what a “thumper” was or how important it is to productivity.

Fast forward to about a month ago. Abrasive blasting used to take me a while – blast, hit the cabinet or manually move the material around in the hopper, blast some more, whack the cabinet or move the material around … it gets old. It took me years to realize that this really sucks but blasting was so much better than polishing that I didn’t think much about it.

So, a “thumper” is basically and industrial vibrator (insert joke here) that uses an electric motor in a housing with off center weights on the shaft that then vibrate like crazy when the motor runs. I guess you could call it the power of Amazon but one day I was scrolling through Amazon and a suggested item came up – a concrete vibrator – and it looked like a small motor in a housing. I had 25 Galil grips I was going to blast and all of a sudden I remembered Jeff’s advice.

Okay, the power of a vibrator with a blast cabinet is that the vibrations cause the grit to shake down to the lowest point constantly. You can blast and blast and blast. The unit was $118 with free delivery and I figured I would give it a try.

It shipped from the importer, not Amazon, and showed up a few days later – it was pretty quick as I recall. The unit was very well made other than my needing to tape up a plastic junction box on the power cord that was a little cracked and I needed to attach a 120 volt plug – it was one phase and they said about 40 watts so nothing special. The machine label says – 110V, 1 phase, 40 watts, 3600 RPM – the little thing totally kicks butt and was only $49.

Here’s a close up of the label – note it says 40 watts. There are bigger units but I don’t think you need them for an abrasive blaster.

I didn’t put it on the blaster right away because I wasn’t really sure how violent it would be and I am glad I didn’t – it vibrates like you would not believe – there is nothing subtle about it – and I immediately realized two things – 1) I was going to mount it on the free standing tool bench and not the plastic blast cabinet walls or it would eventually shake loose and 2) I needed a variable speed control to tone it down some.

Try #1

Okay, so sometimes you just have to poke fun at yourself – or at least I do. I marked the bolt holes on the 3/4″ plywood bench top and mounted the vibrator. I then plugged the power cord from the vibrator into the speed controller, the controller into a surge strip and turned it on at full speed.

I wish I had a before photo or a video of what happened next but I don’t. Every single thing on that table started vibrating right off of it. Yeah, all the grit went to the bottom on the blast table but the blast table was headed to the edge of the bench too. Whoa! I hit the off switch.

Try #2

I simply took some strips of plywood and added a cradle around the legs to limit travel. That worked. Time to try blasting some stuff.

Here’s the vibrator.
Here’s the speed controller.
Another view of the strips to limit travel. Everything on the floor had been on the workbench before I turned the vibrator on the first time 🙂 By the way, the 3/4″ plywood top is screws into the stands it is on.

Actually Blasting

Folks, it is night and day different – stunningly different. Because I don’t have to stop and whack the side of the baster or reach in and move grit around, I’d bet I’m getting work done 2-3 times faster. A bench top blaster doesn’t have a very deep bottom so without a thumper, I spent a lot of time moving grit over to the pick ,up.

Another fun lesson learned. Over the years, I’ve developed the habit of putting my chin on the plexiglass as I focused on doing the work. Don’t do that. I put my chin down on the vibrating plexiglass and it felt like someone was playing the tambourine with my teeth 🙂

Those are two IMI Galil grips getting blasted. What an amazing difference.

In Conclusion

This is one time I can honestly tell you that I have one regret – I should have done this years and years ago. Wow. It was worth it! I’ve used vibrator and speed controller both extensively for a little over a month and it’s a great combo. I don’t use the slowest speed but I am closer to the low end on the dial than I am the fastest speed.

Note, I got lucky with my first purchase. I really wasn’t sure what size to buy but the 40 watt unit has worked great. I can’t imagine anyone needing a bigger unit for a blast cabinet. These generic industrial vibrators have all kinds of uses including for the movement of powders, grains, rock, etc. so they sell bigger and more powerful ones as well.

I’d highly recommend this to anyone who has a ton of blasting to do and is getting tired of having to stop and manually move grit around.


Note, I have to buy all of my parts – nothing here was paid for by sponsors, etc. I do make a small amount if you click on an ad and buy something but that is it. You’re getting my real opinion on stuff.

If you find this post useful, please share the link on Facebook, with your friends, etc. Your support is much appreciated and if you have any feedback, please email me at in**@ro*********.com. Please note that for links to other websites, I may be paid via an affiliate program such as Avantlink, Impact, Amazon and eBay.


Use Dupont Ceramic Dry Film Lubricant In Your Steel and Aluminum Pistol, Rifle and Shotgun Magazines To Smooth Their Operation

Firearms box magazines all work the same – a spring is pushing against a follower that is then pushing the ammunition on the direction needed. The follower is often pushing against at least one wall of the box magazine and dragging. This can be especially bad with steel and aluminum magazines making loading the magazines more tedious and even cause problems with feeding. It begs the question – how can I lubricate the inside of the magazine?

The knee jerk reaction is to put oil in the magazine to lubricate things. I’d recommend against this course of action because the oil will trap dirt and eventually can start causing sticking and jamming.

I’d recommend that you use a dry film lubricant aerosol instead. These sprays on and then the liquid evaporates off and what is left in place are thousands of particles that are slippery. I do not recommend any of the dry films that include a wax – like chain lubes. The wax may trap dirt as well over time.

Don’t spray anything in, or on, a plastic magazine without first checking with the manufacturer. Some plastic magazines are self-lubricating and don’t need any additional lubrication. Also, when spraying any solvent (which is basically what the dry film particles are floating in) on plastic, you risk the plastic getting gummy due to a chemical reaction – this depends on what plastic they useed. My recommendation is really for steel and aluminum magazines.

A Quick Side Note About Teflon

Up until a few years ago, I used to like Teflon, which is what Dupont, the owners of the trademark call it. Teflon was discovered by Chemours, which was a spin off from Dupont, in 1938. If you see someone selling “PTFE” – that is the generic name for Teflon. By saying their product contains “PTFE” then they don’t have to pay royalties to Dupont or risk having Dupont sue them.

So, Teflon and PTFE were selling great and then people started worrying about the safety of people eating Teflon, Teflon in the environment and so on. I’m not hear to weigh in on this but whether it was concerns over marketing, lawsuits or just the pandemic, the Dupont Teflon Aerosol Spray went on hiatus for the longest time.

In late 2021, it re-appeared but with a different formulation. The new spray uses a ceramic now and not Teflon. I corresponded with Hank Krause the president and CEO of Finish Line Technologies – the group that actually markets the spray. I was concerned about the change in formulation because the Dupont spray had been excellent before. Want a quick way to test this?First, spray some competing dry films on a black plastic surface and see how some of them actually leave very little residue. Also look at how evenly the distribution is. Not all are the same.

I think this photo says a lot. On the left is the original Dupont spray with Teflon. In the middle is Super Lube’s Dry Film and on the right is CRC’s. This is why I swore by the Dupont dry film for years. The CRC was dry film was going to be my fall back once I ran out of the Dupont Teflon.

Nano-Ceramic Boron

At any rate, Hank told me that they have moved away from Teflon to Nano-ceramic boron nitride particles and I told him my concern that I didn’t know whether to change to a new dry film technology I knew nothing about. Hank told me the new formulation used thier same propretary technology for binding the particles to the surface and the following are benefits of the new ceramic technology over Teflon (I will copy and paste his list verbatim):

  • Helps extend life of the lubricant, thus delivering longer relubrication intervals
  • Provides enhanced lubricity
  • Provides better extreme pressure capabilities
  • Increases the high temperature operating range of the lubricant
  • Provides better resistance against chemicals
  • Helps repel water and moisture more effectively

So, based on Hank’s assurances, I ordered in some cans of the spray and started testing them. The residue looked very similar to the Teflon test above – the ceramic dry film residue is also white.

The black strip is the shiny side of a piece of Kydex. I included the cans in the photo. The Dupont sprays put down the thickest coat. Interestingly enough, the CRC left a very fine film. I couldn’t find the SuperLube product – I may have tossed it – I’m not sure.

In terms of lubricity, it does the job just as well and maybe even better than the Teflon. While this may seem subjective, the lubrication seems very good with one solid spray of the ceramic both in the tube of the magazine and on the follower. Any over spray wipes right off with a rag.

With the ceramic spray, feeding rounds by hand into the magazines and unloading all feel very smooth. Bear in mind that this comment is after hundreds of loaind and unloading cycles by your’s truly.

Our new second generation followers for our RIA 9mm magazines are converted from OEM followers with the final step being fine sanding paper. It’s my speculation that the ceramic particles are getting into the tiny grooves of the follower and providing excellent lubrication.

At any rate, I am very happy with the new Dupont Ceramic Dry Film aerosol for use inside firearm magazines and wanted to pass along the word. Going forward, we are using the Dupont product in all of our steel magazines that do not already have an anti-friction coating (AFC).

By the way, I cleaned out a bunch of IMI Galil magazines that I bought and you could tell there was a bunch of friction going on in the mags between the parkerized tubes and followers – the parts hadn’t worn in yet by any means. With the mags disassembled, I sprayed in a heavy coat of the Dupont Ceramic Dry Film in the tubes and sprayed both the followers and springs, let them dry and re-assembled the mags — wow! What an amazing improvement.

Note, the Amazon listing is a bit confusing. I think to try and get traffic they started selling the ceramic forumla from the same listing they had for the Teflon formula. So, you will see a photo of an aerosol can that says “ceramic” but then in the text of the listing you will see mentions of Teflon – it is the ceramic formula that they are selling now.

I hope this helps you out.

We make a variety of magazines for the 10mm, .40 S&W and 9mm Rock Island Armory (RIA) FS A2 pistols. Click here to see them.

Note, I have to buy all of my parts – nothing here was paid for by sponsors, etc. I do make a small amount if you click on an ad and buy something but that is it. You’re getting my real opinion on stuff.

If you find this post useful, please share the link on Facebook, with your friends, etc. Your support is much appreciated and if you have any feedback, please email me at in**@ro*********.com. Please note that for links to other websites, I may be paid via an affiliate program such as Avantlink, Impact, Amazon and eBay.


Super Secret AK Furniture Fitting Tool

Ok, now that I have your attention with that title, I often get asked how to fit the various furniture parts of an AK to a given rifle – the gas tube cover / upper hand guard cover, the lower handguard and the buttstock. Most of the work can be done with a secret tool – a slightly modified single cut file and patience.

For example, this is Palmetto State Armory’s Redwood furniture set on a Romy G kit I built.

Most of the time with new furniture, you need to remove material and a single cut file works great for that. With the pictured PSA Redwood furniture set, I needed to think the half circle ends of the gas tube cover and I also had to fit the lower hand guard just a tad.

This is an 8″ single cut Nicholson Handy File that I bought many years ago and modified. I prefer a single cut file so I can go slow and not remove material too fast. Just remember an old saying – “it’s easier to take more material off than it is to put it back on.”

Now here’s the trick to really make this tool work for fitting furniture – grind one thin side smooth – literally get rid of the file’s teeth. This will allow you to quickly and easy run the file right against a raised edge, such as the lips of the gas tube cover, and remove material that you want while leaving the raised edge untouched.

I find an 8″ file just the right size. 8″ is the measurement from the front edge, or “point” of the file, to the base of the heel – the bottom of the main body before the tang starts. The file shown is an 8″ Nicholson Handy File but any 8″ single cut or a file with single cut on one size and double-cut on another would work.

Any brand of file ought to work. Some come with a “safe” edge meaning no teeth. Just test it first to see if any of the teeth from the perpendicular surfaces protrude enough to cut – if they do then knock them down so the smooth surface can ride on the material you are working on with zero cutting happening from that side.

I used my big belt sander and removed all the teeth from this one edge and ensure it was smooth. I purposefully left the teeth on the other thin edge.

Just be patient – look at where the furniture is binding, remove a small amount and test the fit. In general, you want AK furniture to fit snug vs. rattling around. Patience is the key though – don’t rush things. Just keep inspecting, filing off a bit and testing over and over.

So everything is installed, nothing broke because I rushed and the end result is nice snug fitting furniture.

Summary

A single cut file with one thin edge ground is the secret tool but you need to be patient when using it. I can’t even begin to guess how many lower and upper handguards I have adjusted with this file over the years plus I have learned a bit more patience as well.

I hope this helps you out.

Save on End Mills and Other Cutting Tools – Two Solid Vendors I’m Using

Everyone is trying to save money these days and that includes me. When you start talking about quality carbide end mills and cobalt drills, the costs rack up fast but there are options for you to save money and I’ll make this short and sweet.

To be clear, these folks did not pay me or even know I was going to do this blog post. I’m not getting a dime from them.

Drills and Cutters

I needed to buy a 3/4″ reduced shank cobalt drill bit. These things are usually around $40-50/ea and I was able to get a nicely made Qualtech from Drills and Cutters for $32.91 out the door. I use this bit for drilling out the top of my AK-12 grips and the glass reinforced polymer shreds HSS bits so discount Silver & Deming bits don’t last. Spending the money for a quality bit made from cobalt makes a ton of sense because it will do hundreds of holes before it needs to be sharpened.

So, Drills and Cutters is a web store that you can buy from and they may have the manufacturer ship direct to you. I have found their pricing and shipping speeds very good.

They sell drill bits, taps & dies, cutters & saws, reamers, end mills, carbide burrs, annual cutters and more.

So, if you want to save money, check them out at:

https://drillsandcutters.com/ or call them at 1-800-870-3201


End Mill Discount

The second group I want to share with you is EndMillDiscount.com. Carbide is not cheap and “cheap” carbide tooling does not hold up. I go through a fair number of carbide end mills and carbide spotting/centering drills each year. When you need to drill hardened steel, there are situations where you simply need the hardness to cut. So, I needed to order in more 1/4″ bits and started shopping around. With the word “Discount” in the site’s name I was a little nervous but they had *really* good prices and I couldn’t find any negative reviews so I took the plunge.

I ordered 4 of the HTC 4-flute 1/4″ diameter end mills at $7.15/ea and 2 of the SwiftCarb Spotting/Centering drills at $16.98/ea and shipping was only $10.51. Wow, in just a few days the end mills arrived drop shipped from HTC and then the drills arrived drop shipped from SwiftCarb. I was very impressed.

Do you ever look at a photo and ask yourself “Why?” I don’t know why that big end mill is in the photo at the bottom. The smaller 1/4″ bits are what I ordered from End Mill Discount. They worked great by the way.

End Mill Discount sells end mills, drills, micro tools, cutters, cobalt tools, carbide burrs and more.

I definitely plan on buying from them again. Visit them at:

http://www.endmilldiscount.com or call them at 1-888-305-TOOL


I hope this helps you out.


If you find this post useful, please share the link on Facebook, with your friends, etc. Your support is much appreciated and if you have any feedback, please email me at in**@ro*********.com. Please note that for links to other websites, I may be paid via an affiliate program such as Avantlink, Impact, Amazon and eBay.


Painting the Cleaned Up 18″ Ridgid Pipe Wrench

In the last post I told you about removing the rust from the old Ridgid pipe wrench using a solution of apple cider and Prep-N-Ethc. Now we’ll go over painting it. I considered three options – using a durable bake on weapons paint, a spray on epoxy paint or a basic spray paint. I went with the latter simply to save money. It just so happened that I had cans of Fusion All-In-One Gloss Red Pepper and Satin Black Krylon in stock. All-in-one meaning it contained both the primer and the paint.

As a reminder from the last post, this is what the wrench looked like after I cleaned it up and ran it through the hot apple cider bath.

What is Krylon?

Krylon is an acrylic laquer and not an enamel. In case you are wondering about the unique name, it comes from the founder’s first two letters of his last name – Krester – and that he was so impressed by Dupont’s discovery of nylon that he dropped the “n” and called his paint Krylon. This was a marketing move because he’d developed the basic formula in 1947 and nylon was introduced shortly after.

I like Krylon because it dries fast. I hate waiting for Rustoleum to dry and that pushes me in the direction of Krylon. With that said, Rustoleum’s enamel paint tends to be more durable. If I had it in stock, I would have used Rustoleum and baked it on.

Applying The Krylon

I took the wrench, disassembled it again and sprayed everything down again with brake cleaner to make sure there wasn’t any oil. A side benefit of acid rust removal is that it does acid etching of the surface as well creating little pockets/surface imperfection all over that give an excellent surface for finishes to adhere to.

I like to paint in the sun and use it to heat up the parts. I typically use old boxes to hold the parts to catch the overspray.
This is the handle after the first or second coat.

When spray painting, you need to be patient. You build up to the final color you want by spraying successive coats of paint. Follow the directions for drying time per coat and the maximum time to wait to apply the next coat.

Because I acid etched the surface, I didn’t apply a primer plus Krylon’s Fusion series claims to have some primer in it. I noticed on the can they still recommended primer for a bare metal but I skipped that. I typically waited 15-20 minutes between light coats based on the instructions on the can. Light coats reduces the risk of runs and making a mess.

Be sure to let the paint have plenty of time to set before you turn it over. Either wait until just before the maximum time before next coats or you will need to wait until the first side fully cures. I would rather try and do it together to get the best adhesion that I can. If it fully cures then you either get a less than ideal bond or you have to scuff it. Some folks will hang their parts to avoid some of this.

So, I put the parts in my curing oven for a couple of hours at 175F to help stuff dry fully and let it sit overnight before reassembly. With enamel, a lot of folks say that baking helps. I don’t think it makes a big difference with Krylon but I do know that it pays to let parts have the full time to cure based on the instructions on the can. If they say 24 hours, give it 24 hours. I’ve ruined a ton of paint jobs being in a rush.

Here are the three main parts. In some original ads it looks like they did not paint the jaws. I painted the jaws for expediency and to retard rust. I figure it will wear off with use where it needs to.

So here is the refinished wrench:

From the top – 1. Another old one of my grandpa’s. The rivet holding the thumbscrew and top jaw is really loose. 2. The wrench I just refinished. 3. A Craftsman that was my dad’s. 4. Guess who bought the cheap Harbor Freight wrench when we first got a house 20+ years ago – me 🙂

Conclusion

Well, it was interesting to learn about Ridgid and to bring some color back to the old wrench. I’ve already used this to tighten a pipe since I tool the photo. The paint did come right off the jaw as I knew it would but I’ll definitely be using it more in the future and remembering my dad and grandpa who passed it down.


If you find this post useful, please share the link on Facebook, with your friends, etc. Your support is much appreciated and if you have any feedback, please email me at in**@ro*********.com. Please note that for links to other websites, I may be paid via an affiliate program such as Avantlink, Impact, Amazon and eBay.


Cleaning Up My Grandfather’s 18″ Ridgid Pipe Wrench

Like so many of my stories, this one begins as so “One day I was in my shop and ran across and old rusty tool that was still functional”. Let’s start with a bit of backstory.

My grandfather immigrated from Quebec along with his brother to the Boston area to improve their lot in life. They’d grown up on a farm near Compton, Quebec, and somewhere along the line had picked up the skills necessary to service heavy machinery. He’d tell my dad stories of working on various machines who then relayed some of them to me.

My grandfather had a family, including by dad of course, somewhere near Rockport and eventually bought a farm in Derry, NH, sometime in the late 1930s or early 1940s where he raised dairy cattle, grew hay and what not. Along the way he amassed quite a few tools that then passed on to my dad.

One of these tools was a rusty 18″ pipe wrench that I recall my dad using on a number of occasions and when my dad passed away, I got the tools, including this old wrench.

So, I’m in my shop moving stuff and uncover this big 18″ pipe wrench that I then took a lot closer look at. Interestingly enough, it was made by Ridgid.

Ridgid and the 18″ Pipe Wrench

For years I thought Ridgid was a made-up Home Depot house brand. Actually, it was founded in 1923 in North Ridgeville, Ohio, and moved to Elyria, Ohio, in 1943. What got them started was the invention of the modern pipe wrench. In 1966 it was bought by Emerson Electric and today it sells a lot of different tools including hand tools they make, power tools by Techtronic Industries of Hong Kong and Wet Dry vacs made by Emerson.

This 18″ pipe wrench was rusty but solid. The jaws were still sharp and nothing was cracked or bent.
You’ll notice it does identify the Ridge Tool Company as being in Elyria so that tells us it was made after the move in 1943.
The original patent was 1549164 from August 11, 1925, and was then updated to patent 1552091 dated September 1, 1925. Now the patent tells us a bit more. 1727623 was filed on September 10, 1929. The next pipe wrench patent was 2051755 filed on August 18, 1936. [A big thank you VintageMachinery.0rg having this info online.]

Now if you read the caption of the photo above, the 1727623 patent was in 1929 and 2051755 filed in 1936. That patent was actually split into two and an additional patent 2076830 was filed in 1937. I’m going to go out on a limb and bet that wrench was made somewhere between 1929 and 1937. The compression spring in the wrench is a leaf design and not conical so that does put it prior to 1937 patent.

In reading, guys report the markings as not being very reliable and company records incomplete so the above is really a best guess but it does basically align with when my grandfather would have been buying tools.

So I had a decision to make – leave it alone and let it rust or clean it and apply paint. Well, it’s not like these wrenches are rare collector pieces and this was a tool I would use going forward – seriously, other than being rusty it was good as new.

Removing the Rust

I considered three options – abrasive, electrolytic or acid. The rust was actually pretty light and I opted to go with acid – notably a combination of apple cider and phosphoric acid.

The first step was to spray down the wrench with brake cleaner liberally to get rid of oils. Next, I put a wire brush in my hand drill and removed all of the loose rust and dirt from the wrench body, nut and jaw.

I used brake cleaner to remove the initial oil as well as just before I inserted the wrench into the acid bath.
Getting in a bit closer, note the sole remnant of red paint to the right of the RIDGID logo on the handle of the wrench.

The acid bath was a gallon of grocery store bought apple cider vinegar plus about a quart of Prep-N-Etch phosphoric acid. Apple cider alone would do the job but I was re-using apple cider and I wanted to make sure there was enough acid to do the job.

Now a trick to really get things done is to heat up the apple cider bath and get it warm – you don’t need to boil it. I don’t bother with a thermometer for this – just hot to the touch. The reason why is that heating up a solution speeds up the chemical reaction. If it’s cooler then it just takes longer and if it is boiling off then you are losing liquid needlessly.

This is a full size stainless buffet / chafing pan that I use for acid etching and parkerizing – I clean it after each use of course. Underneath it is my big two-burner Camp Chef Explorer stove that is awesome for heating up tanks with acid or park solution. There are all kinds of different sizes of chafing pans by the way full, half, third, etc. and you can see them first had at restaurant supply stores like Gordon Foods, Sams Club sometimes has them, etc.

Please remember something – do this in a well ventilated area or outdoors or the condensation will cause exposed steel to rust. It’s a very weak acid solution and while the vapors aren’t something you should be breathing, I would be more worried about causing rust if I were you.

Before I put the wrench parts in the warm/hot acid bath, I really hosed them down with brake cleaner one more time while wearing nitrile gloves. The reason for the gloves was mainly to keep oils from my skin from contaminating the otherwise clean surface. Oil will block the acid. The hot bath will remove some oil but it is contaminated at that point and must be discarded.

The bubbles are caused by the chemical reaction between the rust, steel and acid.

I checked it every few minutes and when all the rust was gone, I pulled it out, hosed it down liberally with water and then used WD40 to displace the water and reduce the odds of rusting. This is what WD40 was meant to do – water displacement formula 40.

At this point it was getting dark and I decided to wait until the next day to point the wrench but here’s what it looked like at that point. The next post will be about painting the wrench and the end result.

By the way, I’ve written on using apple cider to remove rust from tools as well as formal manganese parkerizing before this so you can click on one of the links to learn more.


If you find this post useful, please share the link on Facebook, with your friends, etc. Your support is much appreciated and if you have any feedback, please email me at in**@ro*********.com. Please note that for links to other websites, I may be paid via an affiliate program such as Avantlink, Impact, Amazon and eBay.


Restored An Almost 100 Year Old Samson 5263 3.5″ Machinists’ Vise For Regular Use

Growing up, my dad has this big rusty vise on his work bench and we’d use it for all kinds of stuff ranging from holding mower blades and axes during sharpening to bending metal for brackets and so forth. I knew it came from my grandfather’s farm in New Hampshire but not much else., When my parents moved near us, my dad brought the vise with him and installed it on a tool bench in their new garage.

Life can be harsh. I have a lot of good memories about my parents but nothing really prepares you for when they pass away. I was close to my dad and to this day, when I use one of his old tools, it makes me feel good – kind of like he’s still here and happy to see me using something of his – hopefully the right way.

At any rate, when we had to sell their house and clean stuff out, I snagged the big old vise and stuck it on the floor in the corner of my shop and really didn’t think much about it for almost five years. One day I started thinking about installing a second vise in my shop near another area where I do a lot of work that requires both work holding and a vise that can withstand 50-100 ft/lbs of torque. I figured I had two options – I have a 6″ Harbor Freight unit somewhere buried in my shop that I could dig out or I could go find my dad’s and take a closer look at it.

So. I dug out the old vise from under a work bench and blew off a ton of dust and dirt. The first thing that I noticed was that it weighed a ton and the second was that it was remarkably beefy and actually in really good shape other than surface rust. The action moved fairly well albeit a little gritty. Everything felt fairly tight meaning nothing seemed to be bent or broken. Last but not least, other than missing the handle on the locking nut, everything seemed to be there.

Where did Samson vises come from?

I did some searching on the web and found mention that Samson vises were sold by Sears from about 1908 to 1939 based on searching for “Samson Machinists” on ancestry.com. This page is from a 1923 Sears catalog and was copied from Vintagemachinery.org:

There it is down in the lower-left – 99N5263. A 3-1/2″ jaw width with a 5″ opening, weight was 37 pounds and cost a whopping $9.30!! Wow! Now, when my grandpa actually bought it, I have no idea. If my dad knew, he never said or I don’t recall – at this point, I’m really not sure.

By the way, in the catalog ad above, look at the weight of the 5266 5″ vise – 93 pounds! That would be a fun one to find. It must be enormous – I’ll have to keep my eye out for one 🙂

By the way, I couldn’t find a definitive answer about who made the Samson vises for Sears. Some people thought it was Reed but I haven’t confirmed that. If you search on Reed Vises, you will see some similar designs but I did not see an exact match. I emailed both Reed and Yost to see if they can share any insights. If I find out, I’ll update this post.

8/25/2020 Update: I got a very nice email from James about Samson vises based on some research he did: “Samson Vises were the Sears house brand before Craftsman took over in 1927. Samson Vises were made by Rock Island Vise Company for Sears and Roebuck out of Rock Island, Illinois.”

Restoring the old vise for regular use

Other than quite a bit of surface rust, it was really in very shape and I decided to use the old vise. The next thing I had to decide was what to do with the finish – it was rusty my whole life so I thought about just oiling the rust and sealing it. Another part wanted to fix it up. I honestly thought about it for a few days because I couldn’t do anything right away. In the end, I decided to refinish it. From what I could tell the vises were originally black and either partially or fully painted. My vise had zero paint on it anywhere.

Note: I am not doing a 100% overhaul to make it look like when it shipped from Sears. I wanted to clean it up some have it be functional. I just want to be clear in case any purists take issue with my use of the term “restoration”.

So, the first step was to disassemble the vise both to make sure it was indeed salvageable and also to clean everything. The weather wasn’t cooperating so you’ll some photos were taken indoors and some outdoors so bear with me.

Before I took the vise apart, I mocked up where I wanted it on the bench and drilled the holes. I planned to use 3/8″ bolts to secure it and they are in the photo. The bench it is on has a top made of 1-1/2″ of plywood and weighs 5-600 pounds because of the massive steel frame I built for it.
The first thing you do is to remove the sliding jaw. This is usually done by rotating the handle until the screw exits the spindle nut in the body of the vise and the sliding jaw then pulls out. Be aware that the sliding unit can be surprisingly heavy depending on the design of the vise.
The greasy looking thing is the spindle and it was in great shape. There were remnants of old grease protecting it, the screw and the ways where the sliding jaw slid (the clear tracks on the body. There were no signs of cracks – just dirt and rust in non critical areas.
To the right of the main body of the vise is the lock nut. Normally there is a small handle on it but it’s long gone. This is basically threaded onto a bolt that protrudes us from the clamp in the base. It simply unthreads. The shiny 3/8″ grade 1 bolt to the right of it will become the new handle for it.
This is the bottom of the slide. As you can see, the machined surfaces and screw are in great shape.
Somehow I always manage to miss taking a photo. The top part of the vise is secured to the base by a heavily made axle bolt. It’s the beefy chunk of steel sitting between the base and my ball pein hammer. Surprisingly, it came out very easily with a simple adjustable wrench – I just reached in perpendicular and turned the bolt not expecting it to come loose and it did. That was a very pleasant surprise. So you can also see that the bottom surface of the static jaw assembly and the top of the base are in remarkably good shape compared to the exterior.
Here’s an even closer view of the base and the locking pad bolt. You can also see the axle nut off to the back right by the back ear of the vise even better.. I think they greased it well almost a 100 years ago and that saved the inside parts. I suppose it’s possible my grandfather or dad took it apart and lubed it but I can’t ask them now.
The weather cooperated and I took the parts outside to degrease and wire brush them.
I could have punched out pins and removed the spindle nut but I figured the vise was really solid mechanically so I took a shortcut and didn’t tear the static or sliding jaws down further.
Here’s a zoomed in photo of the static jaw’s pad. I think I can barely see a screw down on the right but it would be a heck of a chore to remove them. Honestly, the jaws were in good enough shape for me.
“72C” is marked on the base. It was the only other marking I found in addition to “Samson 5263” on the side of the static jaw’s body.
After cleaning up the static jaw, the model number was clear as day – 5263.
For the really thick rust, I used my Ingersoll-Rand needle scaler to knock it off. The external surfaces on the base of the vise were the worst.
Here’s everything after degreasing with lots of brake cleaner and the paint will be Satin Black Krylon Fusion.
Here they are from another angle.
I applied four coats of paint following the directions on the can. By the way, when a paint tells you to allow two days for it to cure and you expect it to be rubbing a lot – give it the two days. I have messed up so many finishes over the years that I now follow the directions on timing between coats and how long until a full cure.
This will be my new locking nut handle. I had to grind down the nut so it would clear the body of the vise and then I abrasive blasted the surface so the black pain will stick. It was not blasted or painted yet for this photo.
From left to right – Locking nut, locking pad, and then the axle bolt.
I found it funny to set a modern cheap 4.5″ vise next to the big Samson. Look at the difference in slides! My dad always told me to be careful and not bend the slide on the Samson. Being a kid, I did what he said without knowing much. I look at the Samson’s slide now and it would take a hell of a lot of force to bend that slide!
I greased everything with Super Lube grease. I use it a lot now because it doesn’t dry out fast and has fine particles of PTFE in it to help with lubrication. I kid you not, I coated threads, surfaces, everything!
Boy did it turn smoothly on the base!
It looks and feels like new – with some character marks of course. She is around 100 years old!
The purplish tinge is the Super Lube grease. I literally coated all sliding surfaces to try and get stuff coated. I then wiped it down after this photo. Note that it also shows at the back that the vise is not perfectly concentric. It’s still tight but not perfectly centered on the base – my guess is that it never was. We’re talking being off center by about a 1/16th of an inch or less.
Here’s the locking nut with the finished 3/8″ bolt that serves as the new sliding handle. I applied blue LocTite to the nut to secure it. Note that I can turn the vise and use it from either direction on the bench. Right now it is rotated away from the side of the bench where I primarily plan to use it.
From McMaster I ordered 3.5″ copper Wilton jaw pad covers. My 4″ Wilton has original brass covers that are beefier but these copper units will work.
So you put the pads in your vise and then tap down the surfaces including the small ears on the left and right sides. The Samson is asymmetrical so I labeled the front pad so when I remove them I don’t have to fumble around figuring out which pad goes to the front and which to the back.
I also bought some Mission Automotive plastic pads that are held in place by strong magnets. These come in handy for delicate surfaces.

Conclusion

So the vise is back in use. Every time I use it, I feel good about it and hope my dad approves.


If you find this post useful, please share the link on Facebook, with your friends, etc. Your support is much appreciated and if you have any feedback, please email me at in**@ro*********.com. Please note that for links to other websites, I may be paid via an affiliate program such as Avantlink, Impact, Amazon and eBay.