Growing up, my dad has this big rusty vise on his work bench and we’d use it for all kinds of stuff ranging from holding mower blades and axes during sharpening to bending metal for brackets and so forth. I knew it came from my grandfather’s farm in New Hampshire but not much else., When my parents moved near us, my dad brought the vise with him and installed it on a tool bench in their new garage.
Life can be harsh. I have a lot of good memories about my parents but nothing really prepares you for when they pass away. I was close to my dad and to this day, when I use one of his old tools, it makes me feel good – kind of like he’s still here and happy to see me using something of his – hopefully the right way.
At any rate, when we had to sell their house and clean stuff out, I snagged the big old vise and stuck it on the floor in the corner of my shop and really didn’t think much about it for almost five years. One day I started thinking about installing a second vise in my shop near another area where I do a lot of work that requires both work holding and a vise that can withstand 50-100 ft/lbs of torque. I figured I had two options – I have a 6″ Harbor Freight unit somewhere buried in my shop that I could dig out or I could go find my dad’s and take a closer look at it.
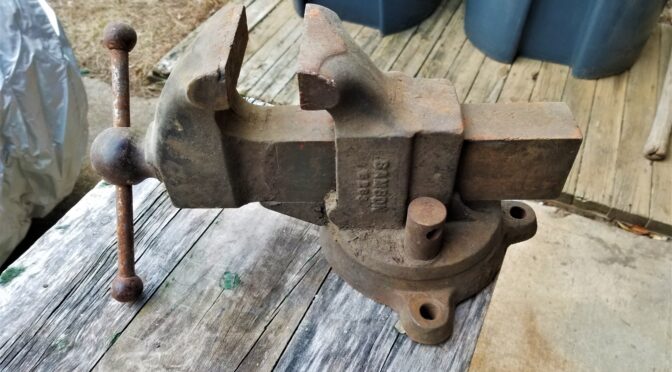
So. I dug out the old vise from under a work bench and blew off a ton of dust and dirt. The first thing that I noticed was that it weighed a ton and the second was that it was remarkably beefy and actually in really good shape other than surface rust. The action moved fairly well albeit a little gritty. Everything felt fairly tight meaning nothing seemed to be bent or broken. Last but not least, other than missing the handle on the locking nut, everything seemed to be there.
Where did Samson vises come from?
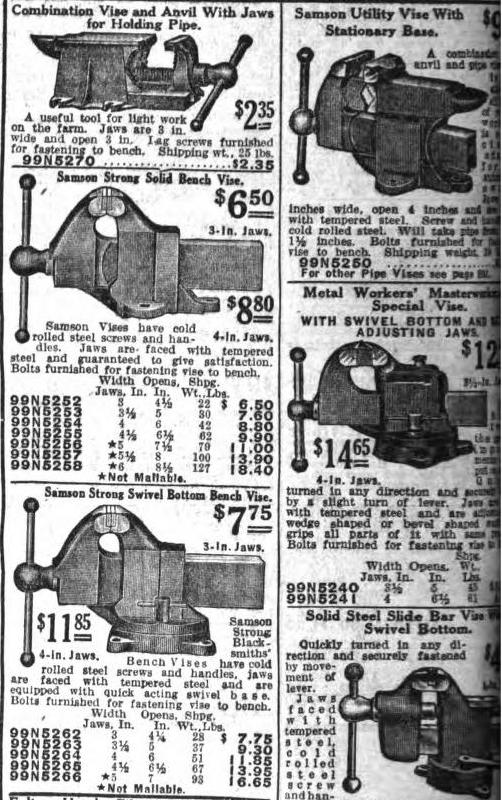
I did some searching on the web and found mention that Samson vises were sold by Sears from about 1908 to 1939 based on searching for “Samson Machinists” on ancestry.com. This page is from a 1923 Sears catalog and was copied from Vintagemachinery.org:
There it is down in the lower-left – 99N5263. A 3-1/2″ jaw width with a 5″ opening, weight was 37 pounds and cost a whopping $9.30!! Wow! Now, when my grandpa actually bought it, I have no idea. If my dad knew, he never said or I don’t recall – at this point, I’m really not sure.
By the way, in the catalog ad above, look at the weight of the 5266 5″ vise – 93 pounds! That would be a fun one to find. It must be enormous – I’ll have to keep my eye out for one 🙂
By the way, I couldn’t find a definitive answer about who made the Samson vises for Sears. Some people thought it was Reed but I haven’t confirmed that. If you search on Reed Vises, you will see some similar designs but I did not see an exact match. I emailed both Reed and Yost to see if they can share any insights. If I find out, I’ll update this post.
8/25/2020 Update: I got a very nice email from James about Samson vises based on some research he did: “Samson Vises were the Sears house brand before Craftsman took over in 1927. Samson Vises were made by Rock Island Vise Company for Sears and Roebuck out of Rock Island, Illinois.”
Restoring the old vise for regular use
Other than quite a bit of surface rust, it was really in very shape and I decided to use the old vise. The next thing I had to decide was what to do with the finish – it was rusty my whole life so I thought about just oiling the rust and sealing it. Another part wanted to fix it up. I honestly thought about it for a few days because I couldn’t do anything right away. In the end, I decided to refinish it. From what I could tell the vises were originally black and either partially or fully painted. My vise had zero paint on it anywhere.
Note: I am not doing a 100% overhaul to make it look like when it shipped from Sears. I wanted to clean it up some have it be functional. I just want to be clear in case any purists take issue with my use of the term “restoration”.
So, the first step was to disassemble the vise both to make sure it was indeed salvageable and also to clean everything. The weather wasn’t cooperating so you’ll some photos were taken indoors and some outdoors so bear with me.
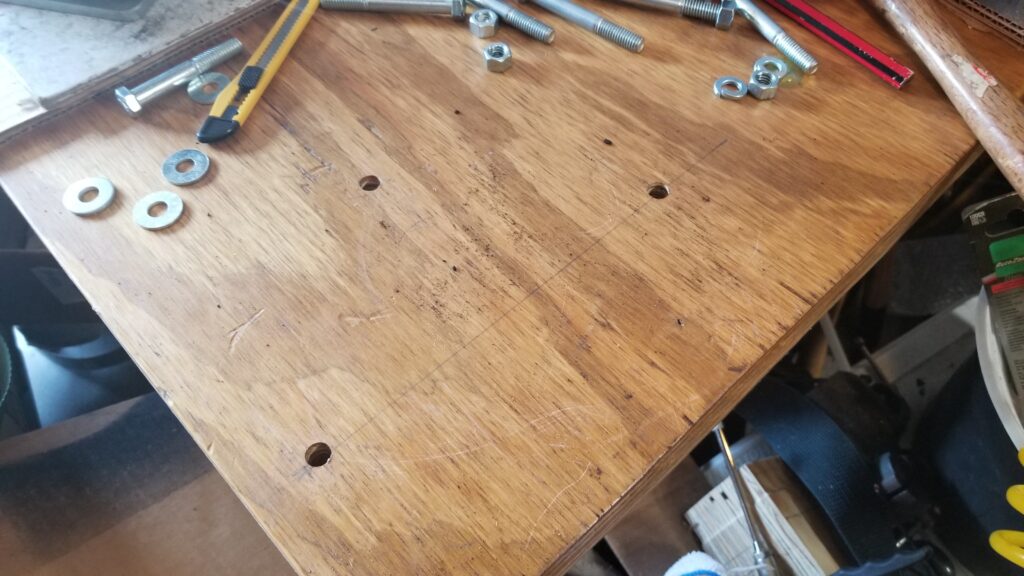
Before I took the vise apart, I mocked up where I wanted it on the bench and drilled the holes. I planned to use 3/8″ bolts to secure it and they are in the photo. The bench it is on has a top made of 1-1/2″ of plywood and weighs 5-600 pounds because of the massive steel frame I built for it.
The first thing you do is to remove the sliding jaw. This is usually done by rotating the handle until the screw exits the spindle nut in the body of the vise and the sliding jaw then pulls out. Be aware that the sliding unit can be surprisingly heavy depending on the design of the vise.
The greasy looking thing is the spindle and it was in great shape. There were remnants of old grease protecting it, the screw and the ways where the sliding jaw slid (the clear tracks on the body. There were no signs of cracks – just dirt and rust in non critical areas.
To the right of the main body of the vise is the lock nut. Normally there is a small handle on it but it’s long gone. This is basically threaded onto a bolt that protrudes us from the clamp in the base. It simply unthreads. The shiny 3/8″ grade 1 bolt to the right of it will become the new handle for it.
This is the bottom of the slide. As you can see, the machined surfaces and screw are in great shape.
Somehow I always manage to miss taking a photo. The top part of the vise is secured to the base by a heavily made axle bolt. It’s the beefy chunk of steel sitting between the base and my ball pein hammer. Surprisingly, it came out very easily with a simple adjustable wrench – I just reached in perpendicular and turned the bolt not expecting it to come loose and it did. That was a very pleasant surprise. So you can also see that the bottom surface of the static jaw assembly and the top of the base are in remarkably good shape compared to the exterior.
Here’s an even closer view of the base and the locking pad bolt. You can also see the axle nut off to the back right by the back ear of the vise even better.. I think they greased it well almost a 100 years ago and that saved the inside parts. I suppose it’s possible my grandfather or dad took it apart and lubed it but I can’t ask them now.
The weather cooperated and I took the parts outside to degrease and wire brush them.
I could have punched out pins and removed the spindle nut but I figured the vise was really solid mechanically so I took a shortcut and didn’t tear the static or sliding jaws down further.
Here’s a zoomed in photo of the static jaw’s pad. I think I can barely see a screw down on the right but it would be a heck of a chore to remove them. Honestly, the jaws were in good enough shape for me.
“72C” is marked on the base. It was the only other marking I found in addition to “Samson 5263” on the side of the static jaw’s body.
After cleaning up the static jaw, the model number was clear as day – 5263.
For the really thick rust, I used my Ingersoll-Rand needle scaler to knock it off. The external surfaces on the base of the vise were the worst.
Here’s everything after degreasing with lots of brake cleaner and the paint will be Satin Black Krylon Fusion.
Here they are from another angle.
I applied four coats of paint following the directions on the can. By the way, when a paint tells you to allow two days for it to cure and you expect it to be rubbing a lot – give it the two days. I have messed up so many finishes over the years that I now follow the directions on timing between coats and how long until a full cure.
This will be my new locking nut handle. I had to grind down the nut so it would clear the body of the vise and then I abrasive blasted the surface so the black pain will stick. It was not blasted or painted yet for this photo.
From left to right – Locking nut, locking pad, and then the axle bolt.
I found it funny to set a modern cheap 4.5″ vise next to the big Samson. Look at the difference in slides! My dad always told me to be careful and not bend the slide on the Samson. Being a kid, I did what he said without knowing much. I look at the Samson’s slide now and it would take a hell of a lot of force to bend that slide!
I greased everything with Super Lube grease. I use it a lot now because it doesn’t dry out fast and has fine particles of PTFE in it to help with lubrication. I kid you not, I coated threads, surfaces, everything!
Boy did it turn smoothly on the base!
It looks and feels like new – with some character marks of course. She is around 100 years old!
The purplish tinge is the Super Lube grease. I literally coated all sliding surfaces to try and get stuff coated. I then wiped it down after this photo. Note that it also shows at the back that the vise is not perfectly concentric. It’s still tight but not perfectly centered on the base – my guess is that it never was. We’re talking being off center by about a 1/16th of an inch or less.
Here’s the locking nut with the finished 3/8″ bolt that serves as the new sliding handle. I applied blue LocTite to the nut to secure it. Note that I can turn the vise and use it from either direction on the bench. Right now it is rotated away from the side of the bench where I primarily plan to use it.
From McMaster I ordered 3.5″ copper Wilton jaw pad covers. My 4″ Wilton has original brass covers that are beefier but these copper units will work.
So you put the pads in your vise and then tap down the surfaces including the small ears on the left and right sides. The Samson is asymmetrical so I labeled the front pad so when I remove them I don’t have to fumble around figuring out which pad goes to the front and which to the back.
I also bought some Mission Automotive plastic pads that are held in place by strong magnets. These come in handy for delicate surfaces.
Conclusion
So the vise is back in use. Every time I use it, I feel good about it and hope my dad approves.