Building an AK takes a fair amount of drilling, fitting and riveting that can intimidate someone thinking about building their first rifle. Lucky for them, the industry has evolved a lot of really cool tools exist to enable faster higher quality results. A good example of evolution is the location and drilling of the the rivet holes in the receiver for the front and rear trunnions.
Back around 2006 or so when I got started, you either measured the location of the trunnion holes and marked them or you could take a post it note, push it on the trunnion to get an outline of the holes and then transfer it to the receiver, again marking where to drill. You learned quick to start with a small drill bit so you could adjust a bit if you were off with either method – I got pretty good with the post it note method actually.
One of the AK-parts and tool vendors that has been around the longest is AK-Builder and he was always bringing new offerings to the market, I slowly added one of all of his tools as funds permitted. I had his rivet jig, flat bending jig, the top rail layout jig (if you remember those) and so forth. At some point he added a really, really cool jig for locating and drilling the holes for the trunnions. I bought it and swear by it to this day.
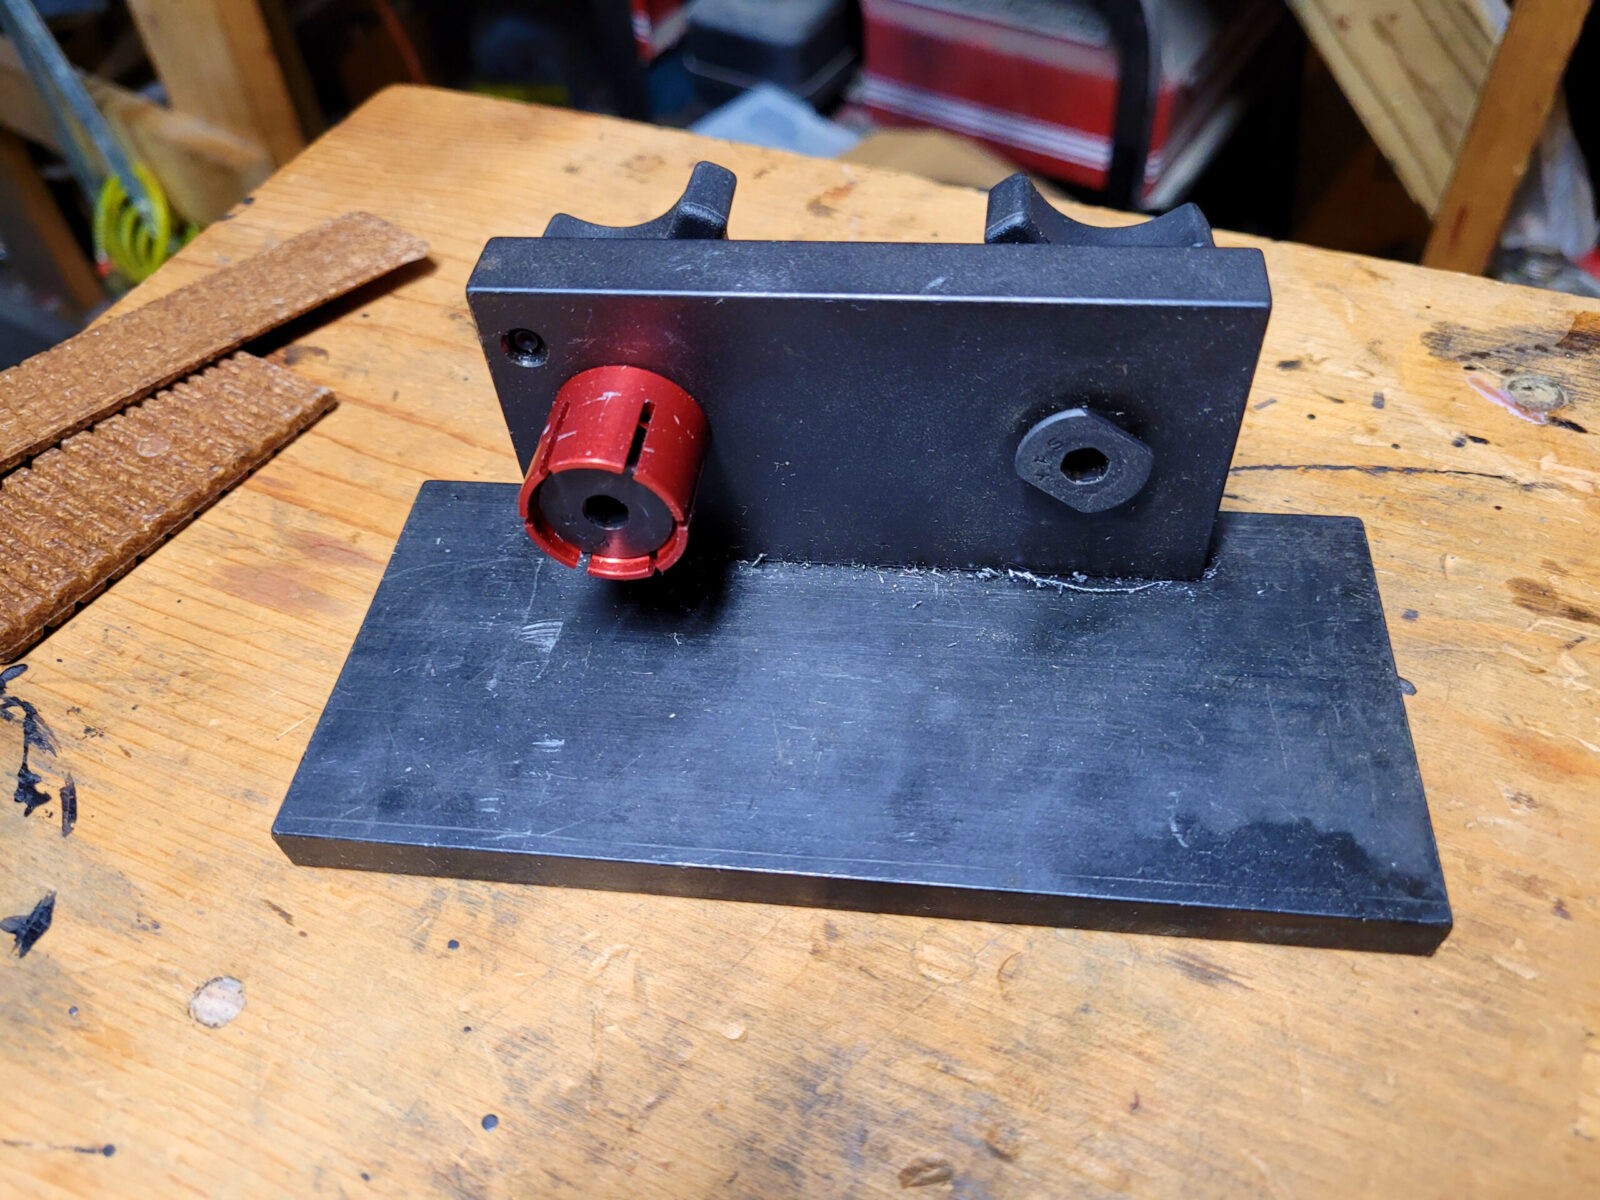
The jig is extremely well made and durable. When you buy it, you have options for the sizes of mandrels to fit different barrel channel holes. The red one you see works on 7.62 AKs and they also have one for 5.45 and the unique MAK90. The rounded rectangle on the right holds the rear trunnion.
Using It For The Front Trunnion Holes
Using this fixture is about as easy as it gets but you must have a drill press. I’d recommend an X-Y table on your drill if you plan to do this much but at least have a drill press.
Securely mount the fixture to your drill press.
Insert the trunnion and tighten the knob so it can’t move.
Move your drill table around to line the drill bit up with the hole in the trunnion.
Slide the receiver over the trunnion.
Lower the drill and it will go in the exact same location as the trunnion hole you lined up on.
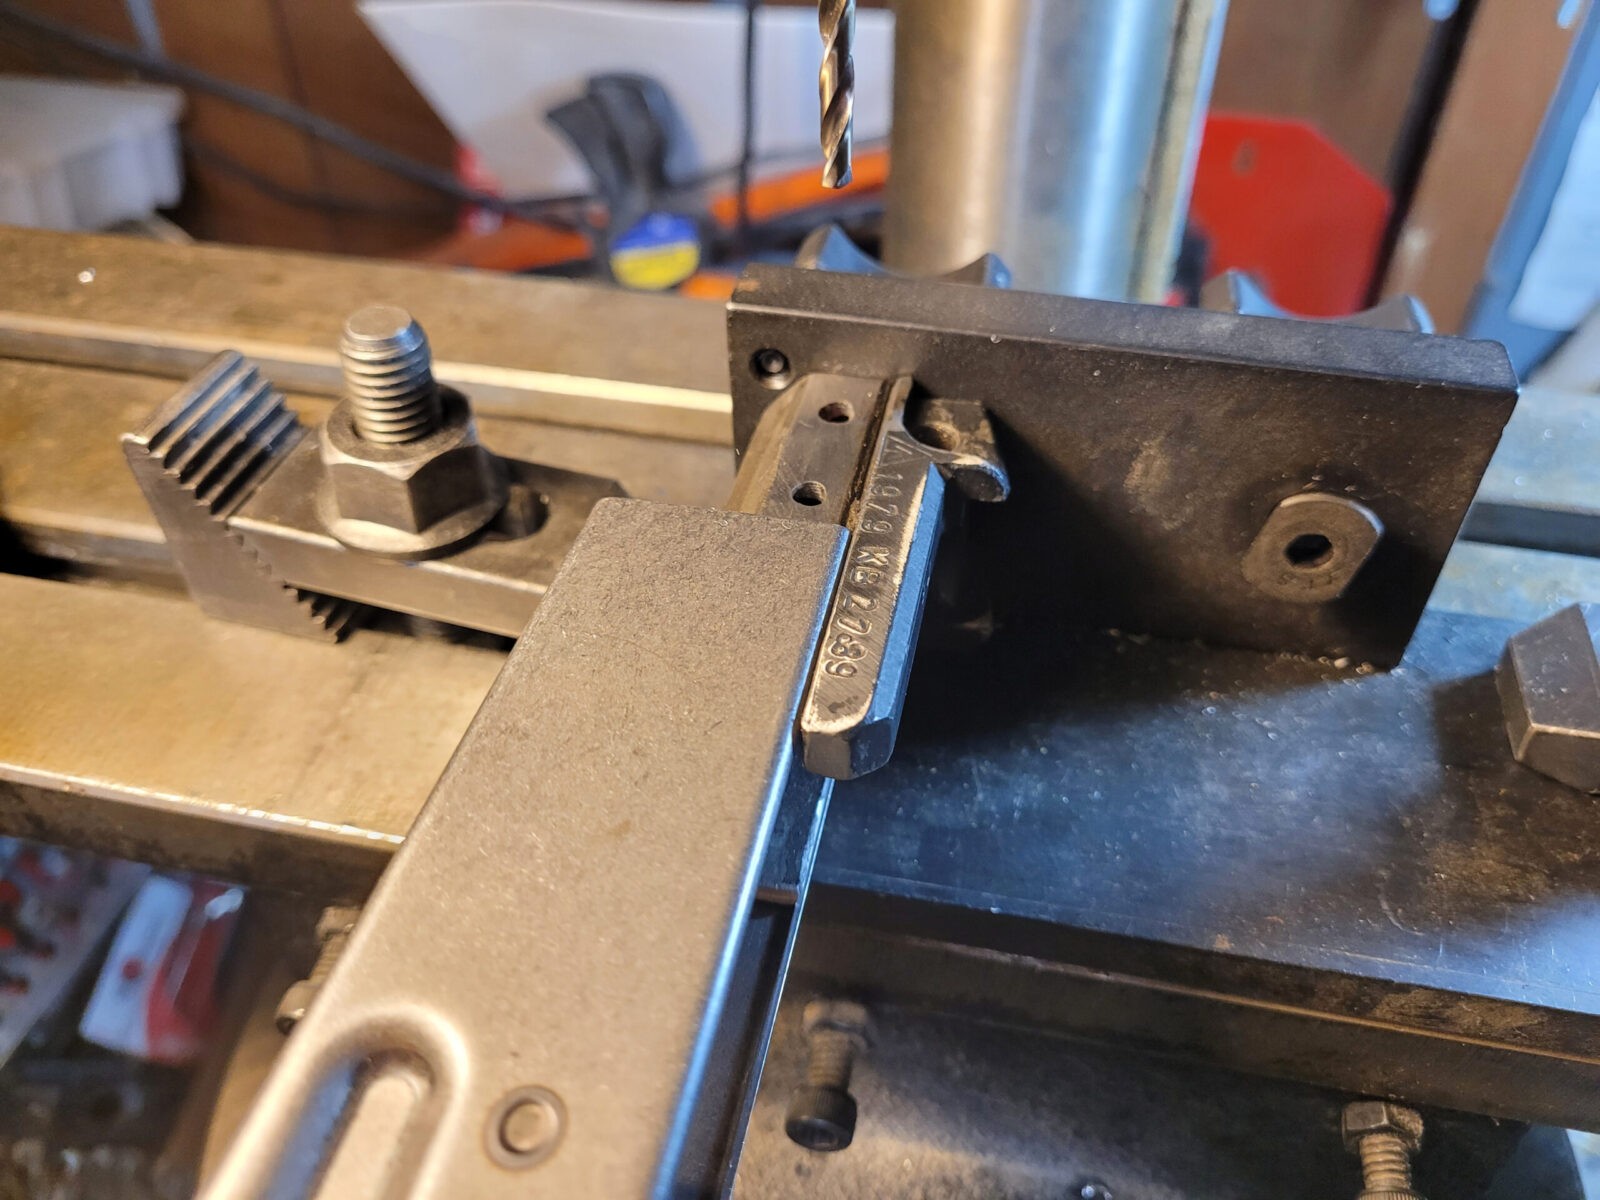
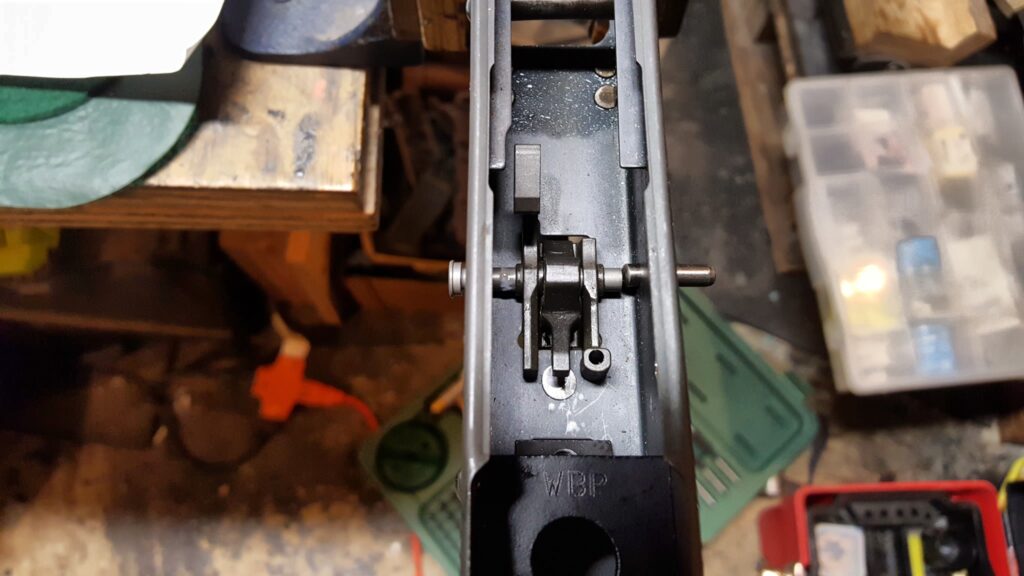
The front trunnion is being held securely by the fixture. I am sliding the receiver forward and when I bring the drill down, it will make the hole in the exact same spot as what was in the trunnion.
This fixture is the best means I have found to quickly and accurately locate and drill the trunnion holes in the receiver. I prefer undrilled receivers because with this jig I can put the holes exactly where I want them. By the way, these are AK-Builder rivets also.
Tips For The Front Trunnion Holes
Confirm the drill bit sizes you need before you start. For most AKMs, the front rivet holes are 4mm so you can use either a 4mm or 5/32″ (3.868mm) bit. Note, that dimension can be different so just confirm is my point. Also, I’d recommend good cobalt bits personally.
Use cutting fluid – I like Tap Magic personally.
You will drill a hole at a time – do not try to go all the way through. Small alignment errors become big problems when you do that. Avoid the grief – do a hole per rivet.
Make sure the table can’t move, that the fixture is secure and that the trunnion is being held firmly. If anything moves, you are hosed.
Line up on the hole, slide the receiver all the way on, pull it back just enough to verify nothing moved one last time.
After I drill the first rivet hole I carefully inspect everything is lined up. I then move to the second rivet hole and repeat the above but before I drill, I insert temporary rivets in the holes to make sure nothing moves. DO NOT SQUISH THEM – I literally am just using their bodies to keep everything lined up. It really helps avoid small movement errors.
If you mess up real bad for some reason, weld the hole shut and start over.
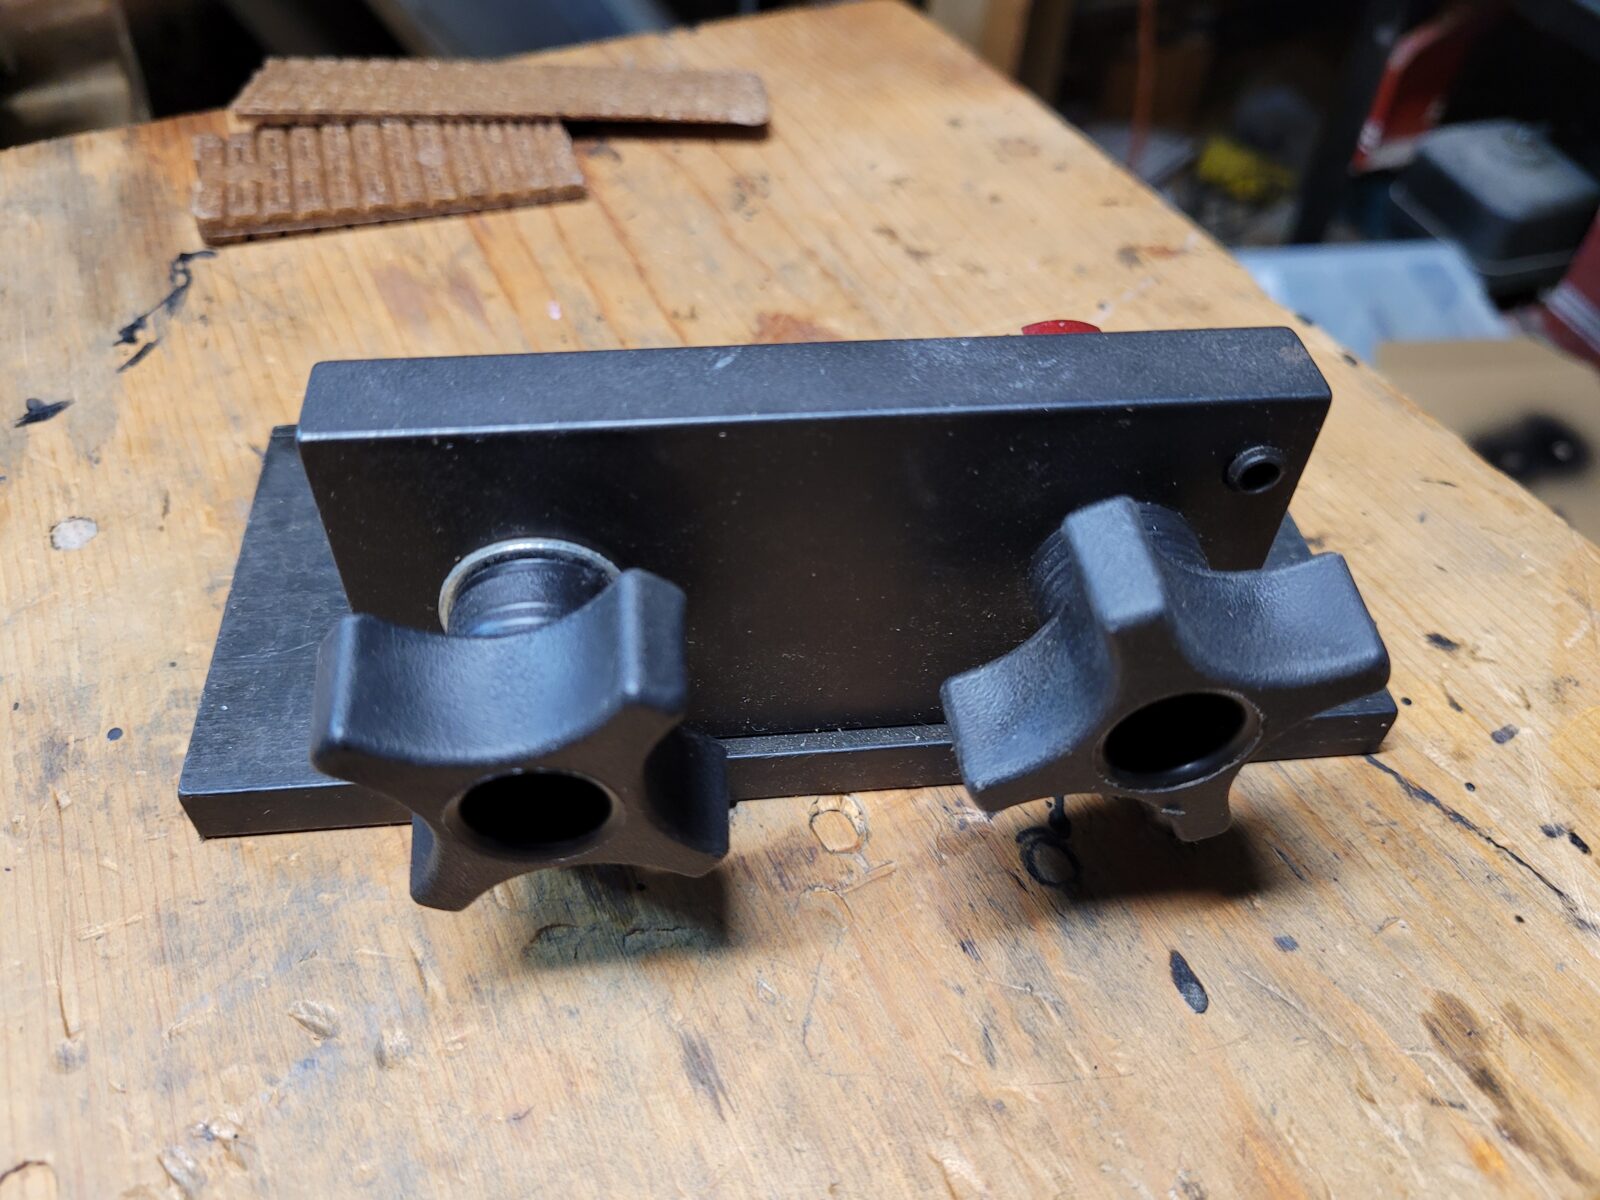
Doing the rear rivet holes uses the other side of the drilling jig. The little rectangular tab goes into the top of the rear trunnion where the recoil spring rod normally sits and you can then crank it down tight to hold it in place while drilling.
Notice the receiver will be parallel to the jig during these operations. Again, make sure everything is secure and you need to make sure the back of the receiver is true to the rear of the trunnion.
The end result will be accurately located holes. Before you set the rivets, this is when you should be thinking about a side rail for optics if you want one. I like the AKM side rail mount from AK-Builder. Those holes you will need to manually locate and drill. Use a caliper and true the top of the rail to the top of the receiver if you do install one.
Tips For the Rear
First, read all the tips I wrote for the front trunnion if you skipped them.
The key to all of this is a solid setup and nothing moving.
Confirm the size drill bit you need. It will probably be 4.5mm which you can do with that size drill or be close with 11/64″ (4.365mm).
DO NOT DRILL STRAIGHT THROUGH. I’d recommend you take your time and do a hole at a time.
Once you get a hole drilled and are ready to do the next, stick a rivet in it to prevent movement.
Summary
The AK-Builder drilling jig is the best tool I know to help you quickly and accurately locate and drill the front and rear trunnion holes in your receiver. I definitely recommend it.
Note, I have to buy all of my parts – nothing here was paid for by sponsors, etc. I do make a small amount if you click on an ad and buy something but that is it. You’re getting my real opinion on stuff.
So, let’s review how to remove a riveted AK trigger guard assembly. For those of you building from virgin kits or complete demilled (“demilitarized”) kits, you don’t need to do this but for many folks they do. In my case, I needed to remove the trigger guard from a beat to heck donor rifle that someone had butchered.
You have three options to remove the trigger guard rivets:
Drill them out by center punching each rivet or using a rivet drill jig and remove them.
Mill the heads off, drill a hole and punch out the remainer of the bodies.
Grind the heads off, drill a hole and punch out the remainder
All of the above methods work. It really comes down to what you are most comfortable with. As for myself, I use option three. The reason I just don’t drill them out is that rivet head shapes can vary considerably. The AK-Builder drilling jig is fantastic but it can’t guarantee you are centered on every rivet.
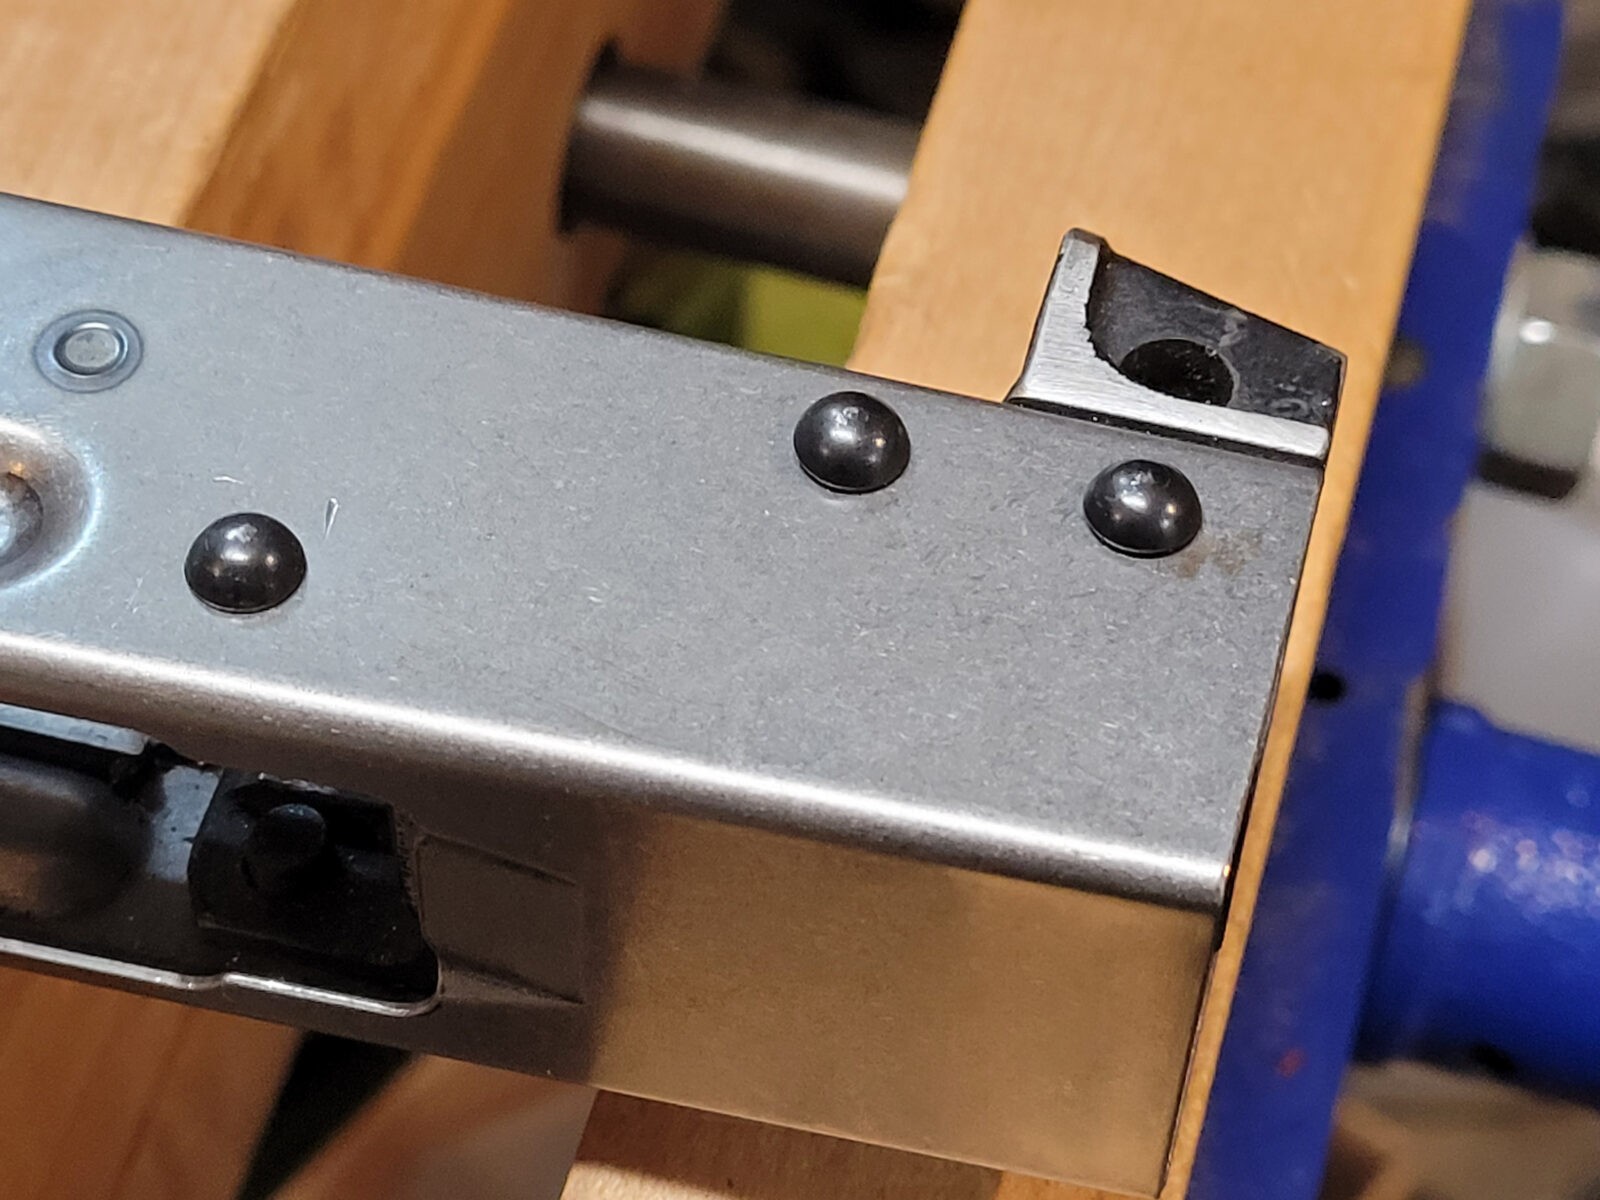
With this in mind, I simply take a 4″ grinder and take off the rivet heads flush to the surface of the trigger guard itself. This lets me see the outline of the rivet bodies so I can then drill and 1/8″ hole and I’ll explain why after a couple of photos.
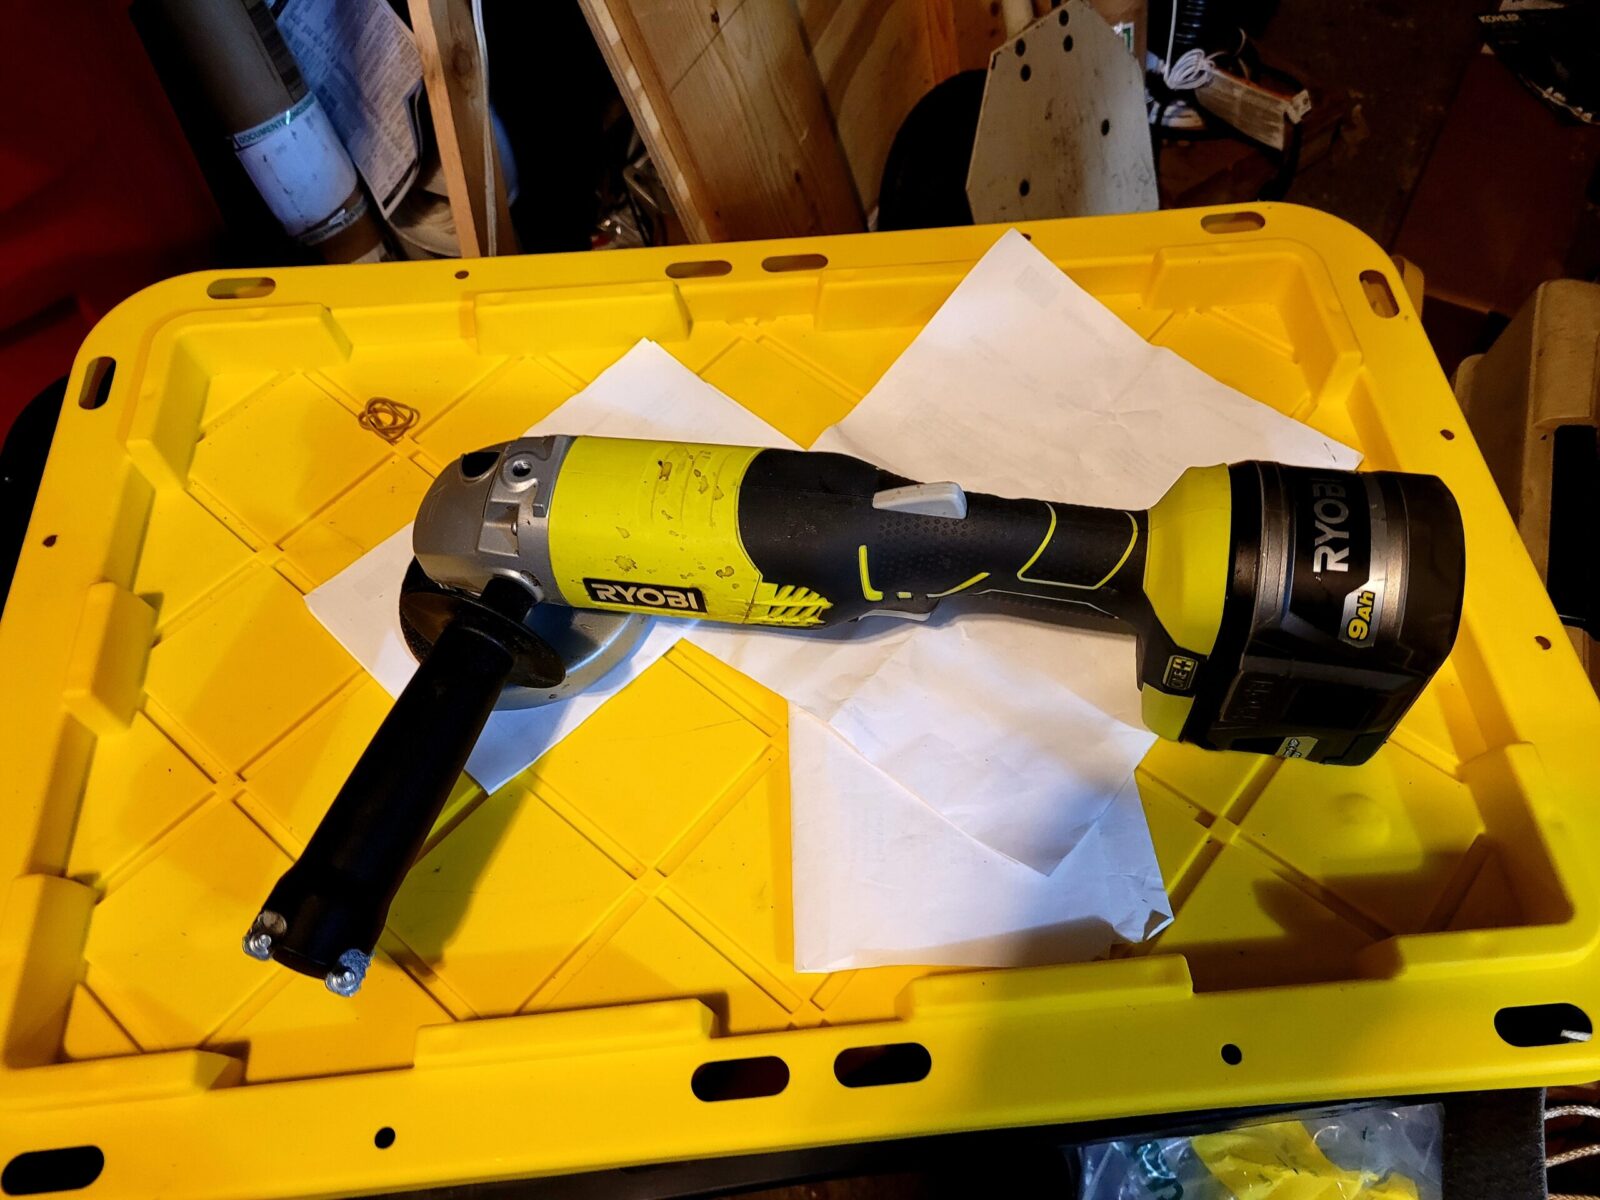
This is my 4.5″ Ryobi 18 volt grinder. To be honest, the tool pleasantly surprised me. I really wondered how much torque and battery life it would have. Over the last six months I have ground down quite a few bolts and metal parts with this tool. Before I had it, I had a 4″ Makita corded grinder that I still have — it’s just that cordless is so convenient. The Ryobi made short work of the five rivets that hold on the trigger guard.
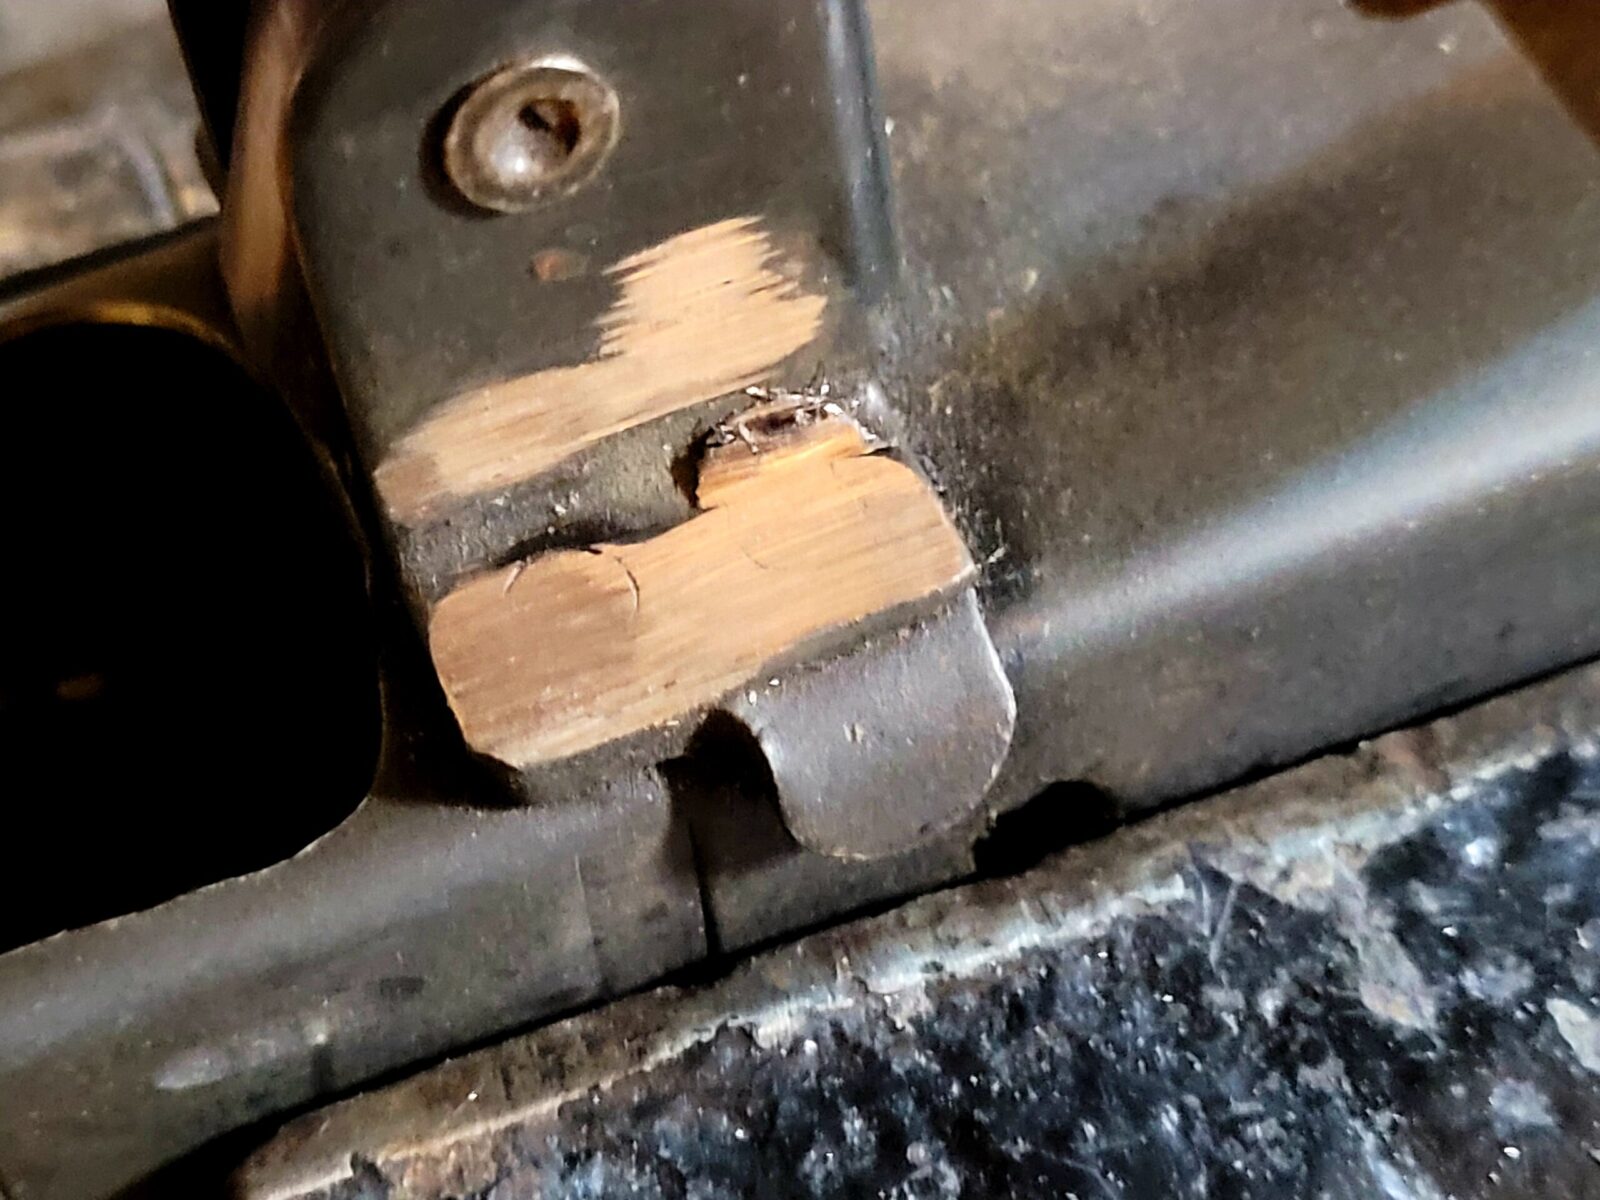
Definitely practice with your angle grinder until you are able to control it. What you want to do is to remove the rivet head with out doing major damage to the trigger guard. Can you see the outline of the rivet bodies? That is what we want to get all of the way around.
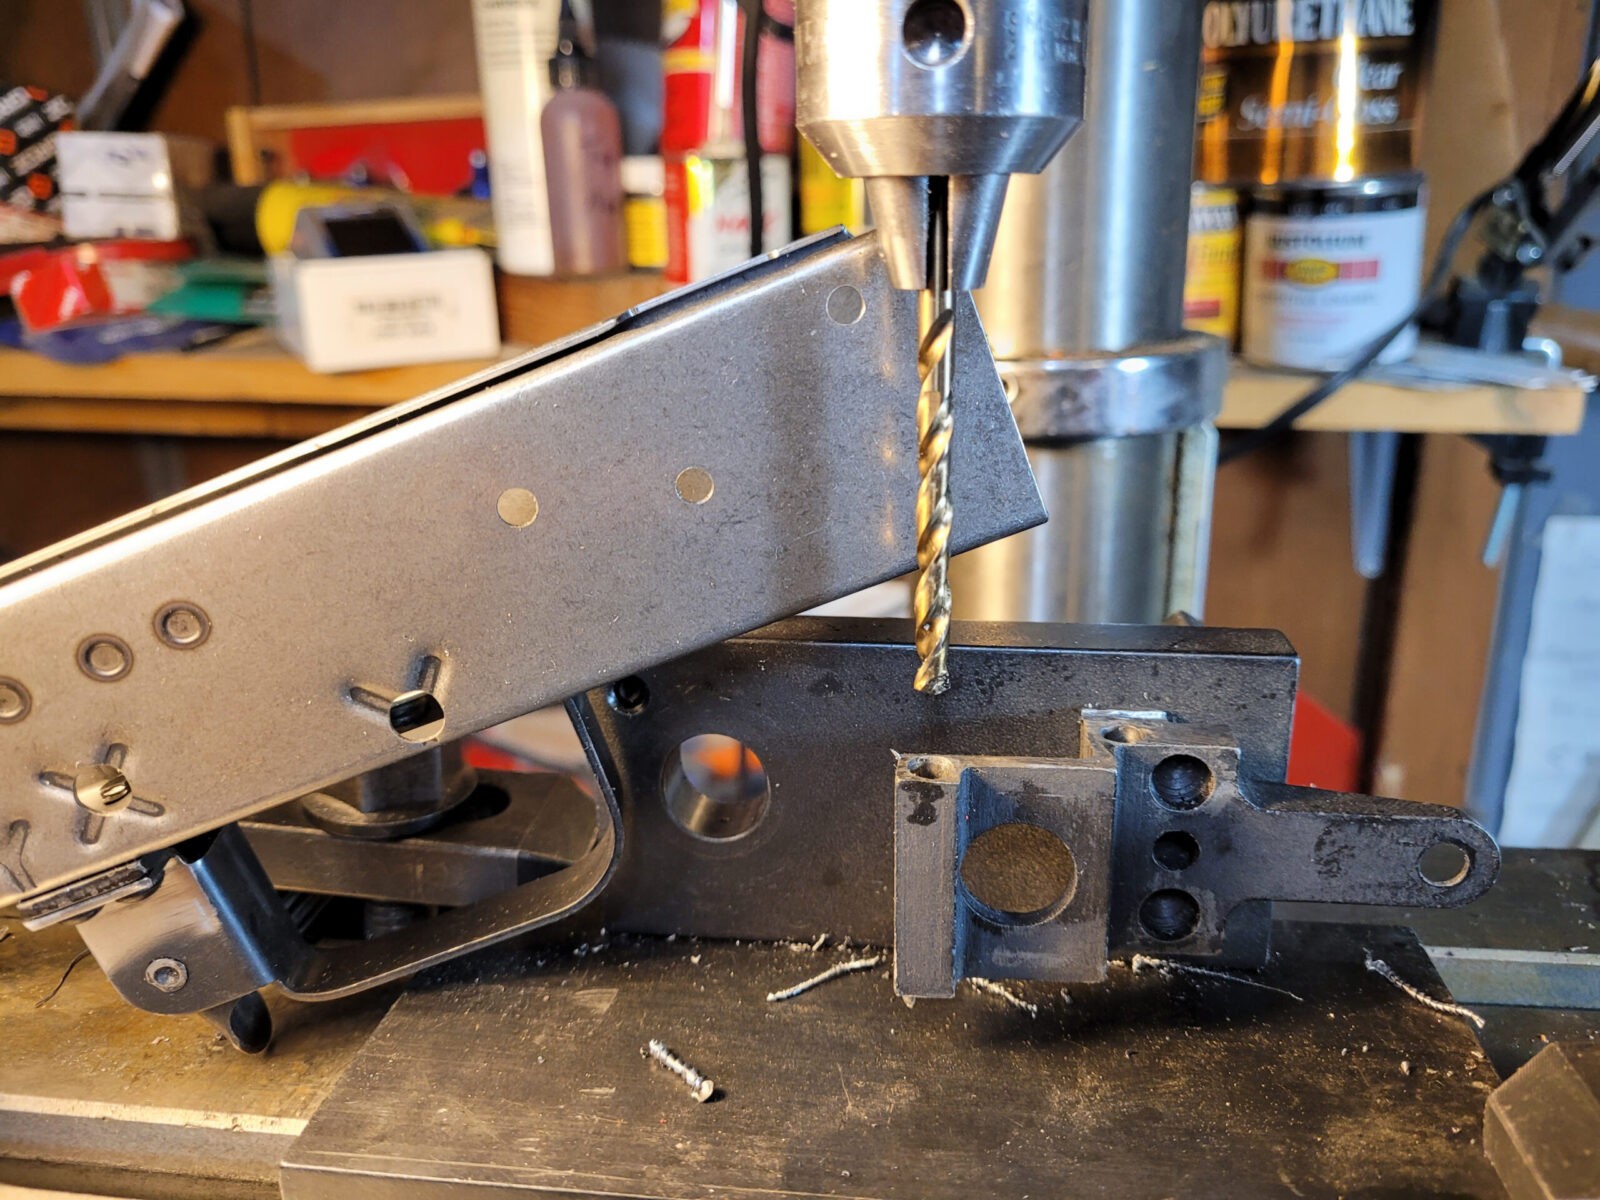
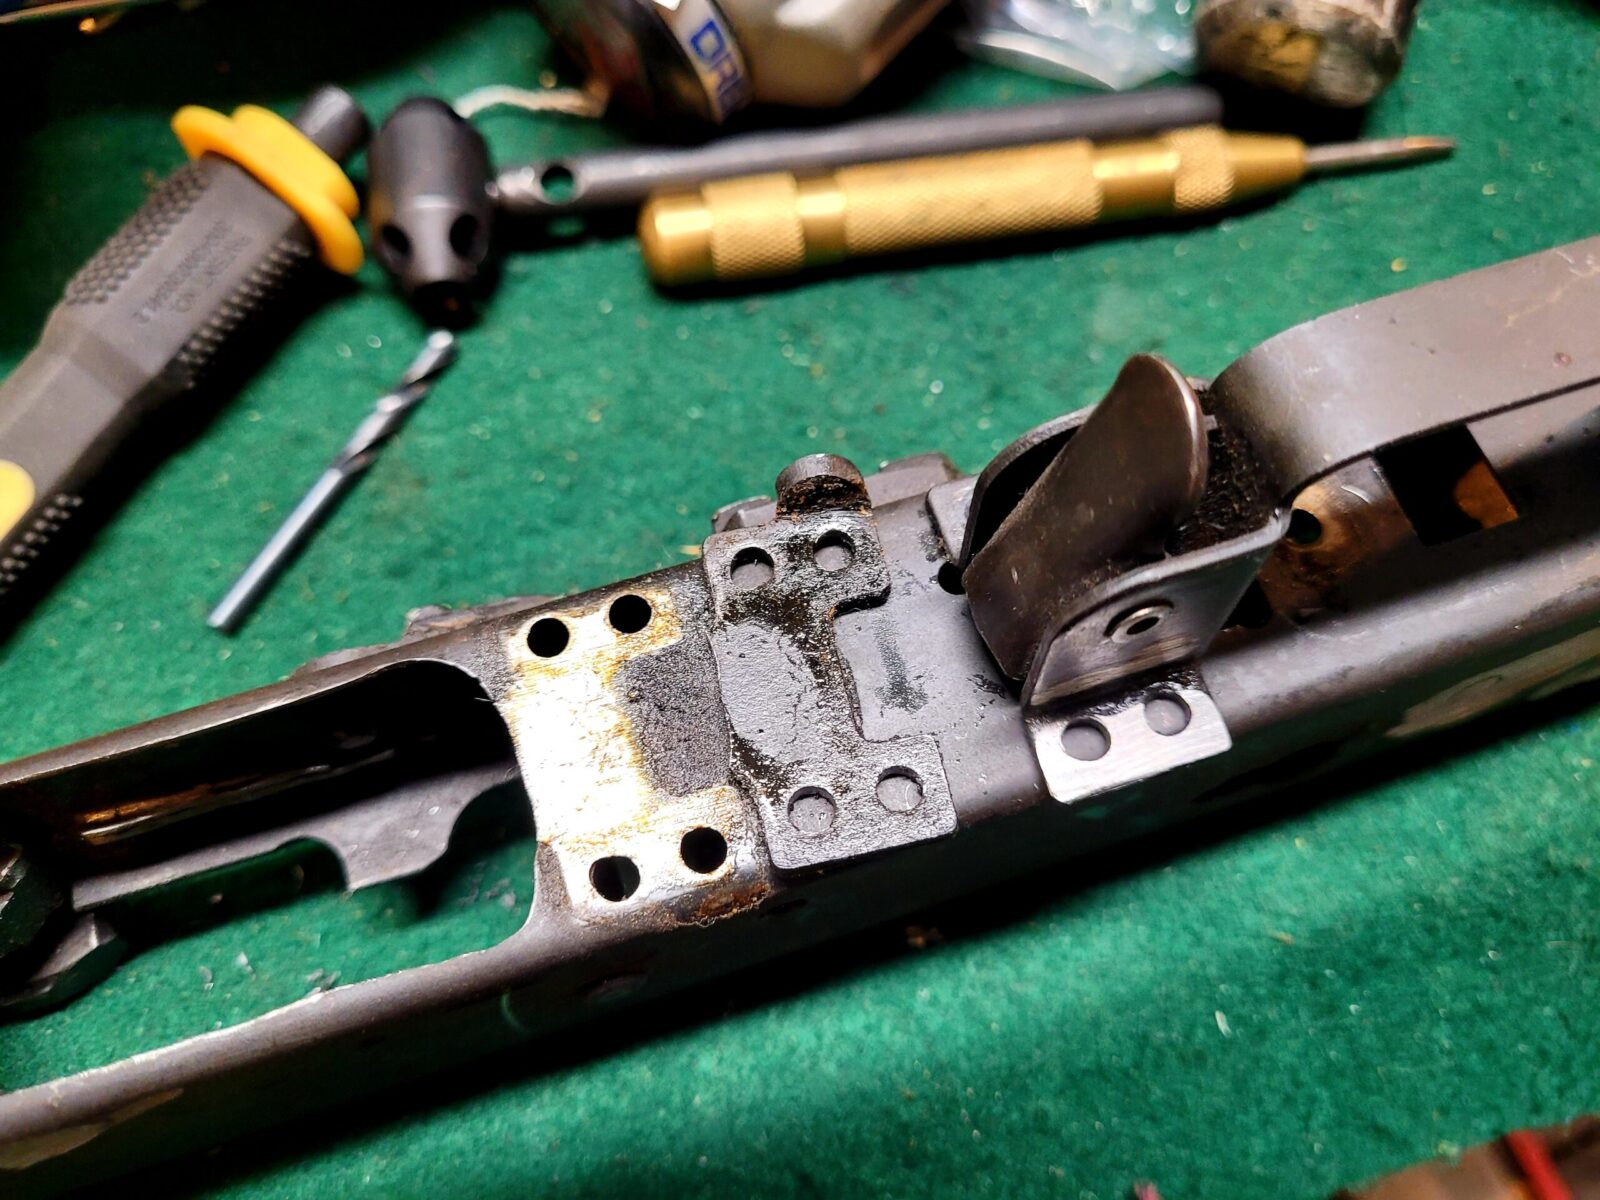
The next steps you will do are to center punch each rivet, drill an 1/8″ hole through the rivet and then use a roll pin punch to knock the rivet out. This was a bit of an epiphany for me one day – I was trying to keep the punch on the rivet and I thought to myself – “Man, what if I drill a hole and use the right sized roll pin punch? The little ball on the end of the roll pin punch ought to keep it centered.” I tried it and it worked great. No more punches slipping around.
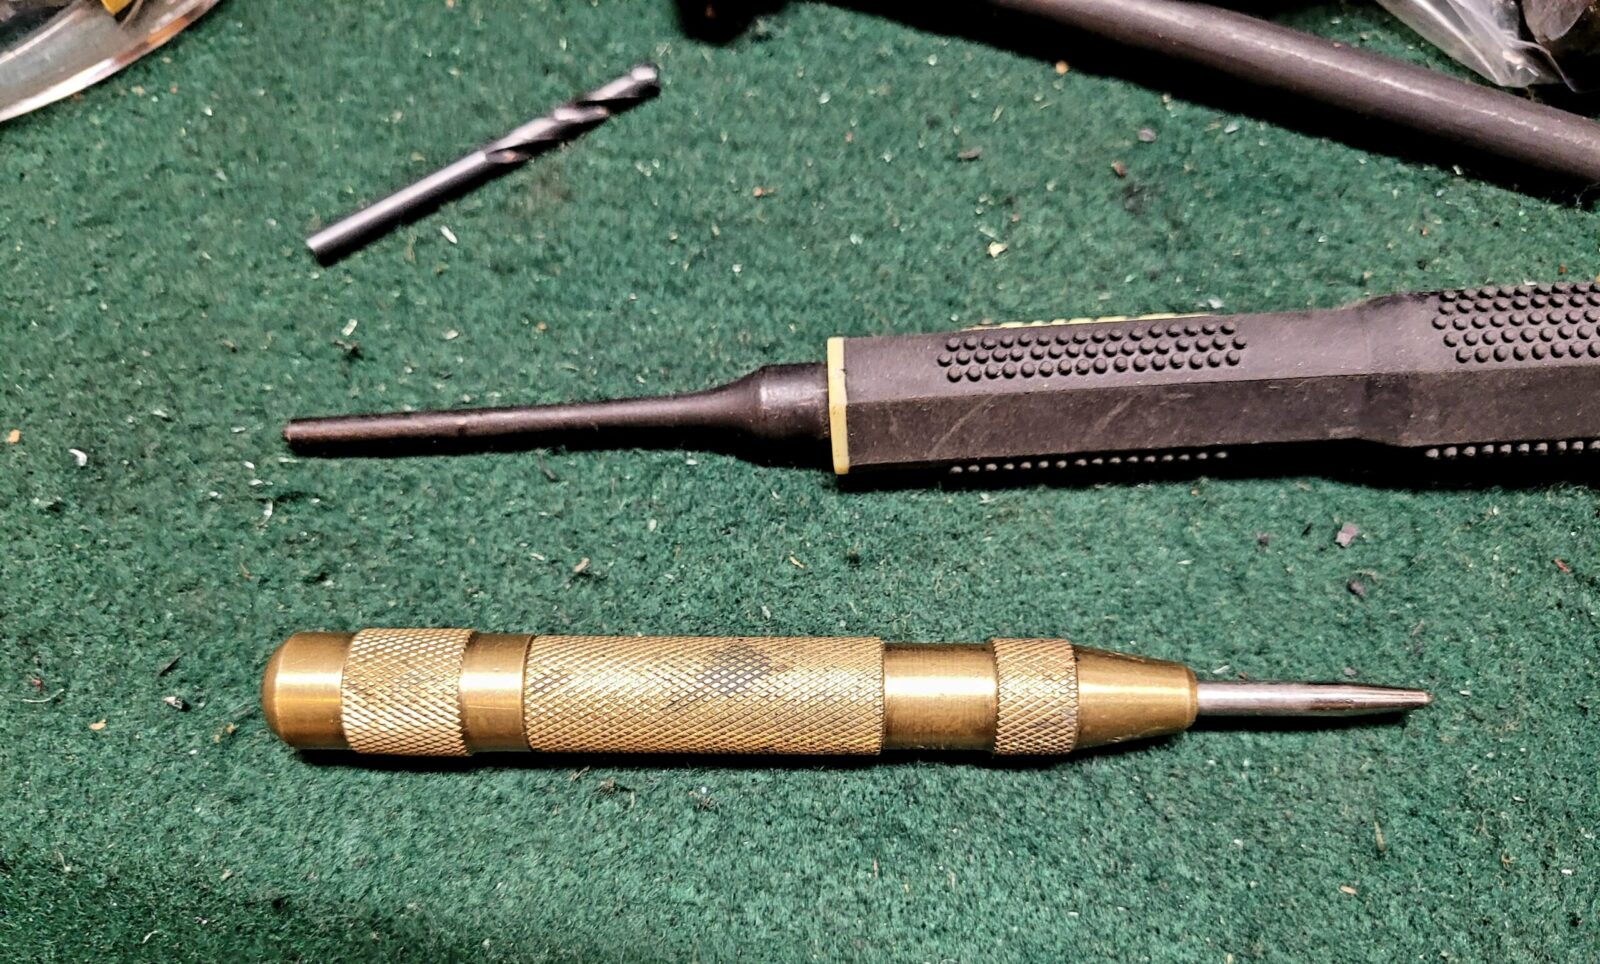
At the bottom is an automatic center punch. I love these things. You push down on the handle until the action cycles inside and the hardened tip makes a dimple in the surface without a hammer. Above it is my roll pin punch. Tons of companies make these and you can barely see the little ball at the end that will center the punch on the drill hole. Above it is an 1/8″ drill bit. I’d recommend you go with good cobalt bits when demilling. They last longer and will go through just about anything. Note, if you buy a cheap cobalt drill bit it can be worse than plain high speed steel from a quality manufacturer. Go with a brand name – Norseman is my favorite but you can go with stuff from big box stores too like Bosch, Dewalt, etc. If you are getting a set off Amazon, be sure to check reviews.
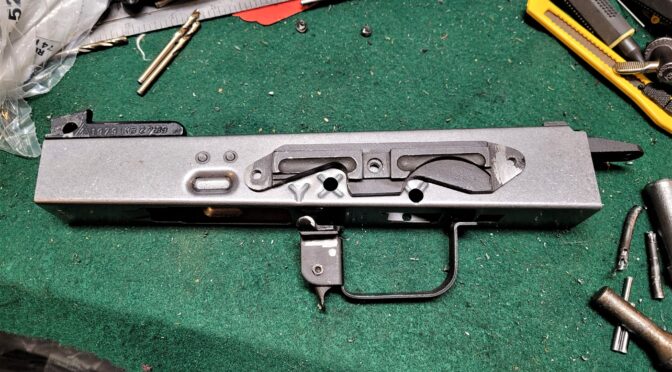
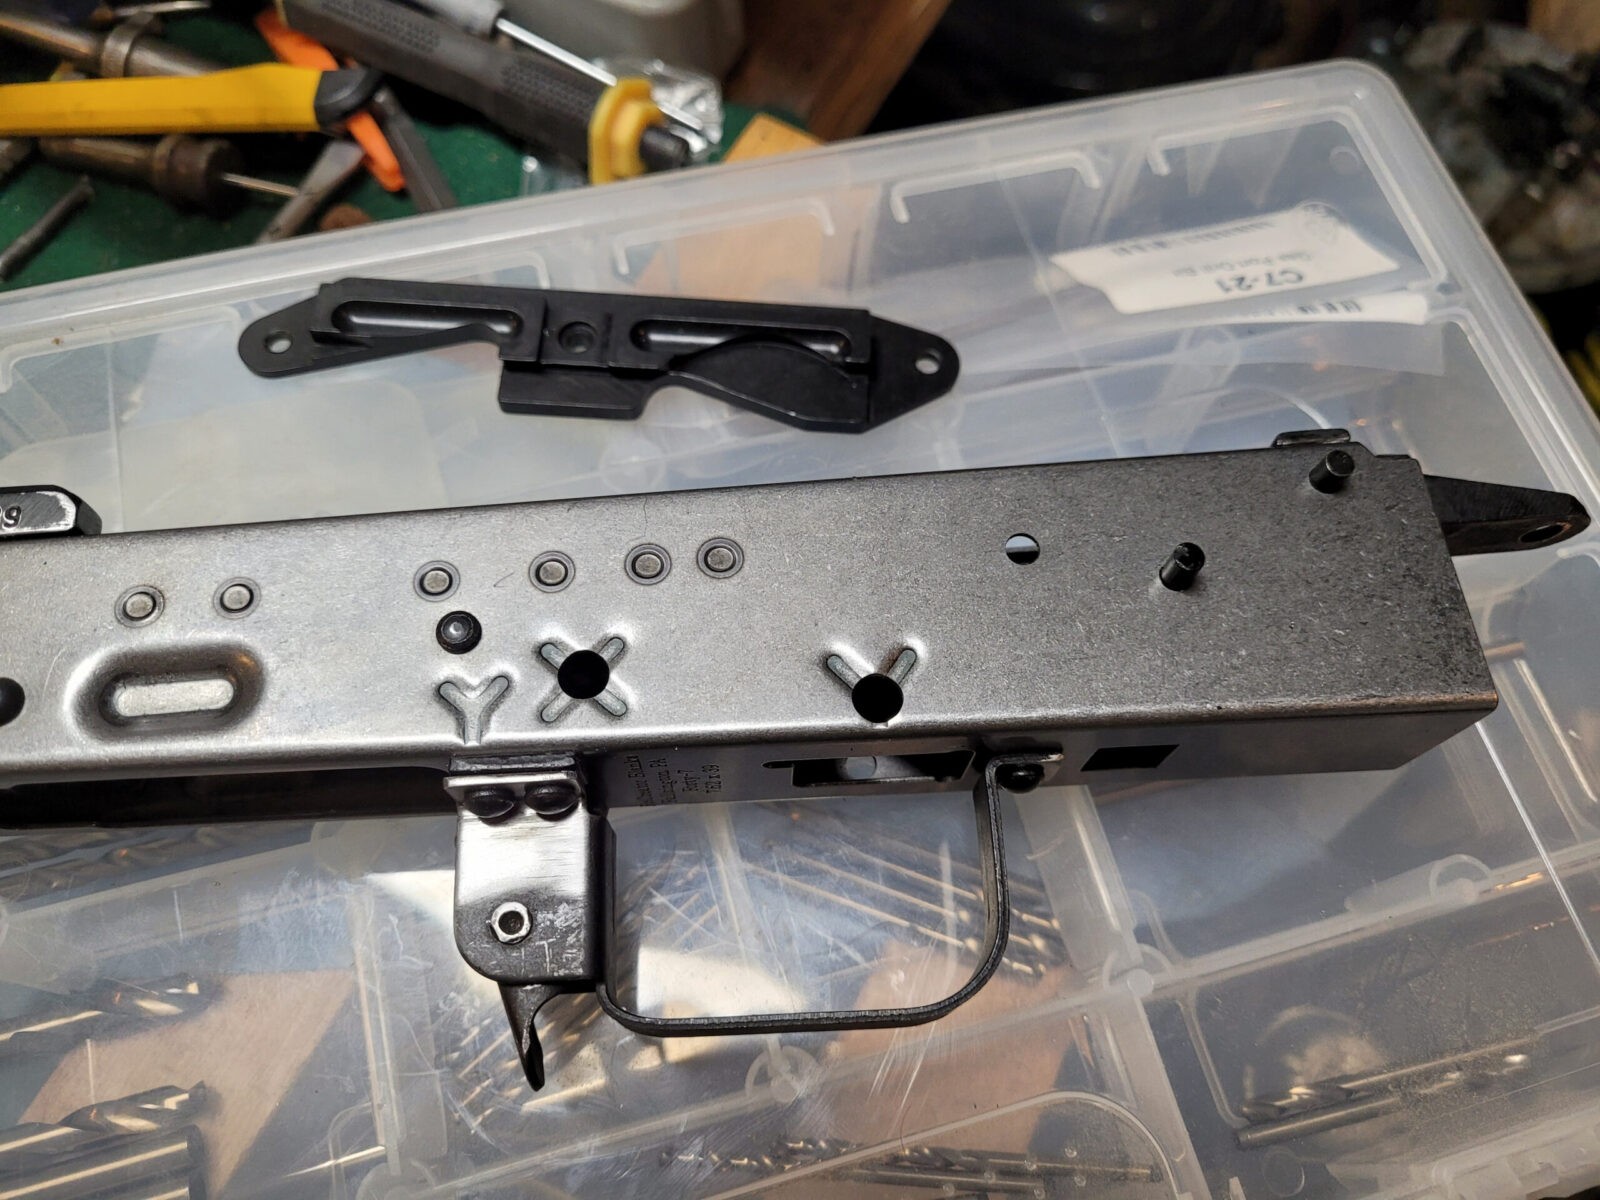
Here’s the finished result – a nicely separated receiver, selector stop plate and trigger guard. Be careful not to lose that stop plate – you will need to and the trigger guard for your next build.
One perk of only using an 1/8″ drill bit is that you have some margin for not being exactly centered on the rivet. 1/8″ is 3.127mm and a 5/32″ drill bit comes in at 3.969mm so real close to the actual 4mm holes drilled in the parts and if you are off a tad then you wind up with an “egged” or misshapen holes. Of course you can use other size drill bits – just figure out what you like.
Even though rivets are relatively soft steel, I still recommend you use cutting fluid. I keep some Tap Magic in a little squeeze bottle with a needle tip and it makes it super easy to add it when working.
Summary
Removing the trigger guard is all about getting rid of the five rivets that hold it in place. Whether you drill, sand, mill, grind or otherwise cut off the tops, then drill out the remainder – using a roll pin punch really makes it easy to punch them out the rest of the way.
Note, I have to buy all of my parts – nothing here was paid for by sponsors, etc. I do make a small amount if you click on an ad and buy something but that is it. You’re getting my real opinion on stuff.
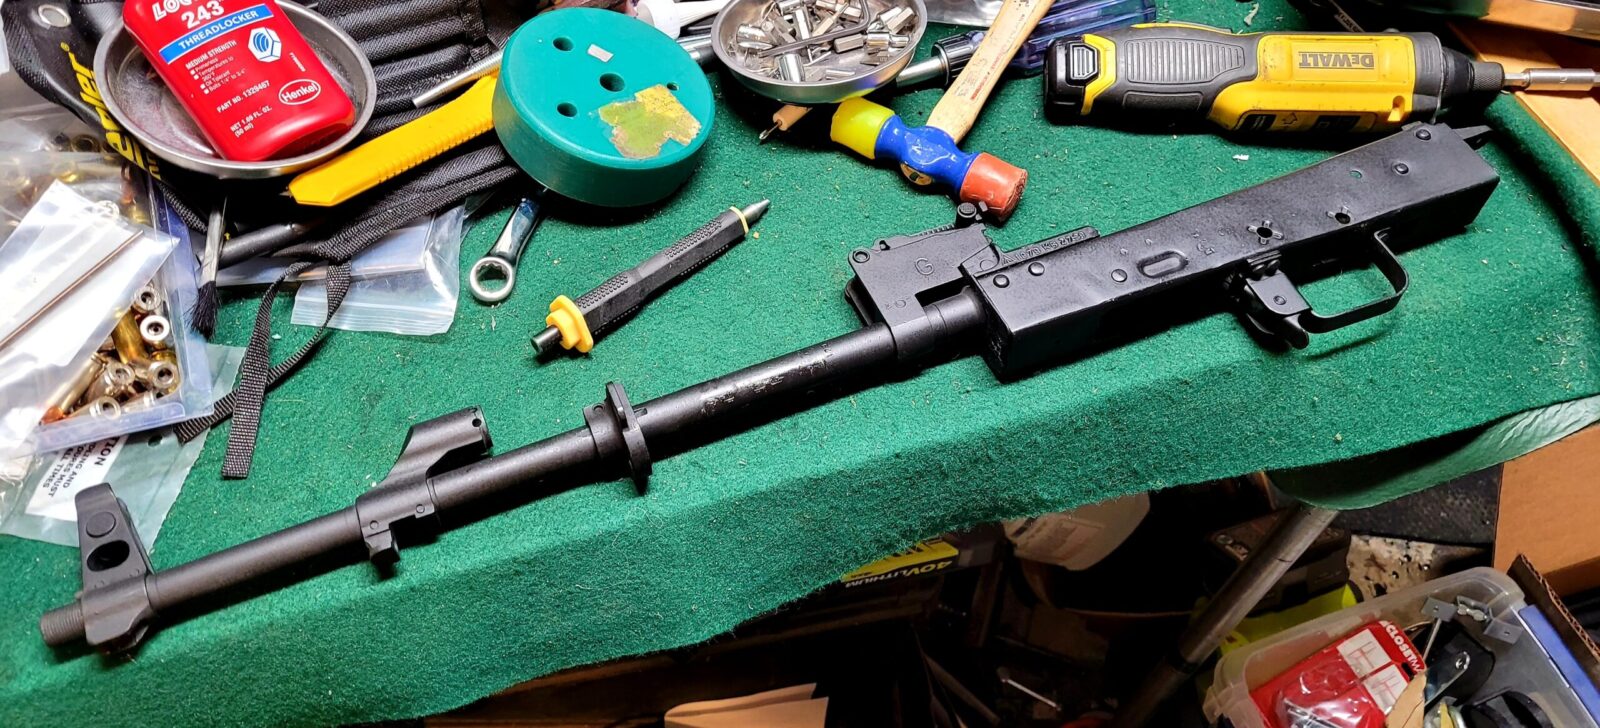
I have a long history with building AK-47 rifles and a number of variants including: Hungarian, Romanians, Russian, and Yugoslavian. The problem I have these days is a total lack of time so I rarely get to indulge in building any more. In fact, this past year, I only got to build one AK and I had a lot of fun doing it. Rather than do a few giant posts, I am going to do a bunch of posts for each step I do.
The first thing I like to do is to remove the barrel and get it out of the way. Back in the golden age of AK Kit building you could get completed barreled AK kits for $89/ea and sometimes even less. Then the ATF decided to re-interpret the law and in July 2005 they told importers they would no longer approve the importation of kits with the original barrels. Now importers did have a lot of orders in the pipeline so the prices slowly went up and the supply dried up.
Today, you are only going to find kits with barrels that someone is selling from their collection usually at an astronomical price (I’ve seen them range from $600-1,200 literally for kits that used to be $99) or one of the vendors has decided to offer a service to assemble headspaced kits such as Arms of America. The other reason you may need to do this is that you have a donor rifle that you are getting parts from, which is what I was doing.
When I started, everything was done with hydraulic presses or the caveman approach of using big hammers that I never cared for. Today, you can remove a hammer super fast 99% of the time with an air hammer and that is my preferred method. I want to give you a few options to consider and some tips along the way.
What did I Just Work On?
I had an old Romanian Garda kit that I had built on an AK-Builder flat many years ago. I actually dug through my photos and it dates back to June 2007 when I built it originally. When I built it, I was tinkering with how to form the rivet heads and while it was a rock solid AK function-wise, the rivet heads always bugged me so I decided to rebuild it.
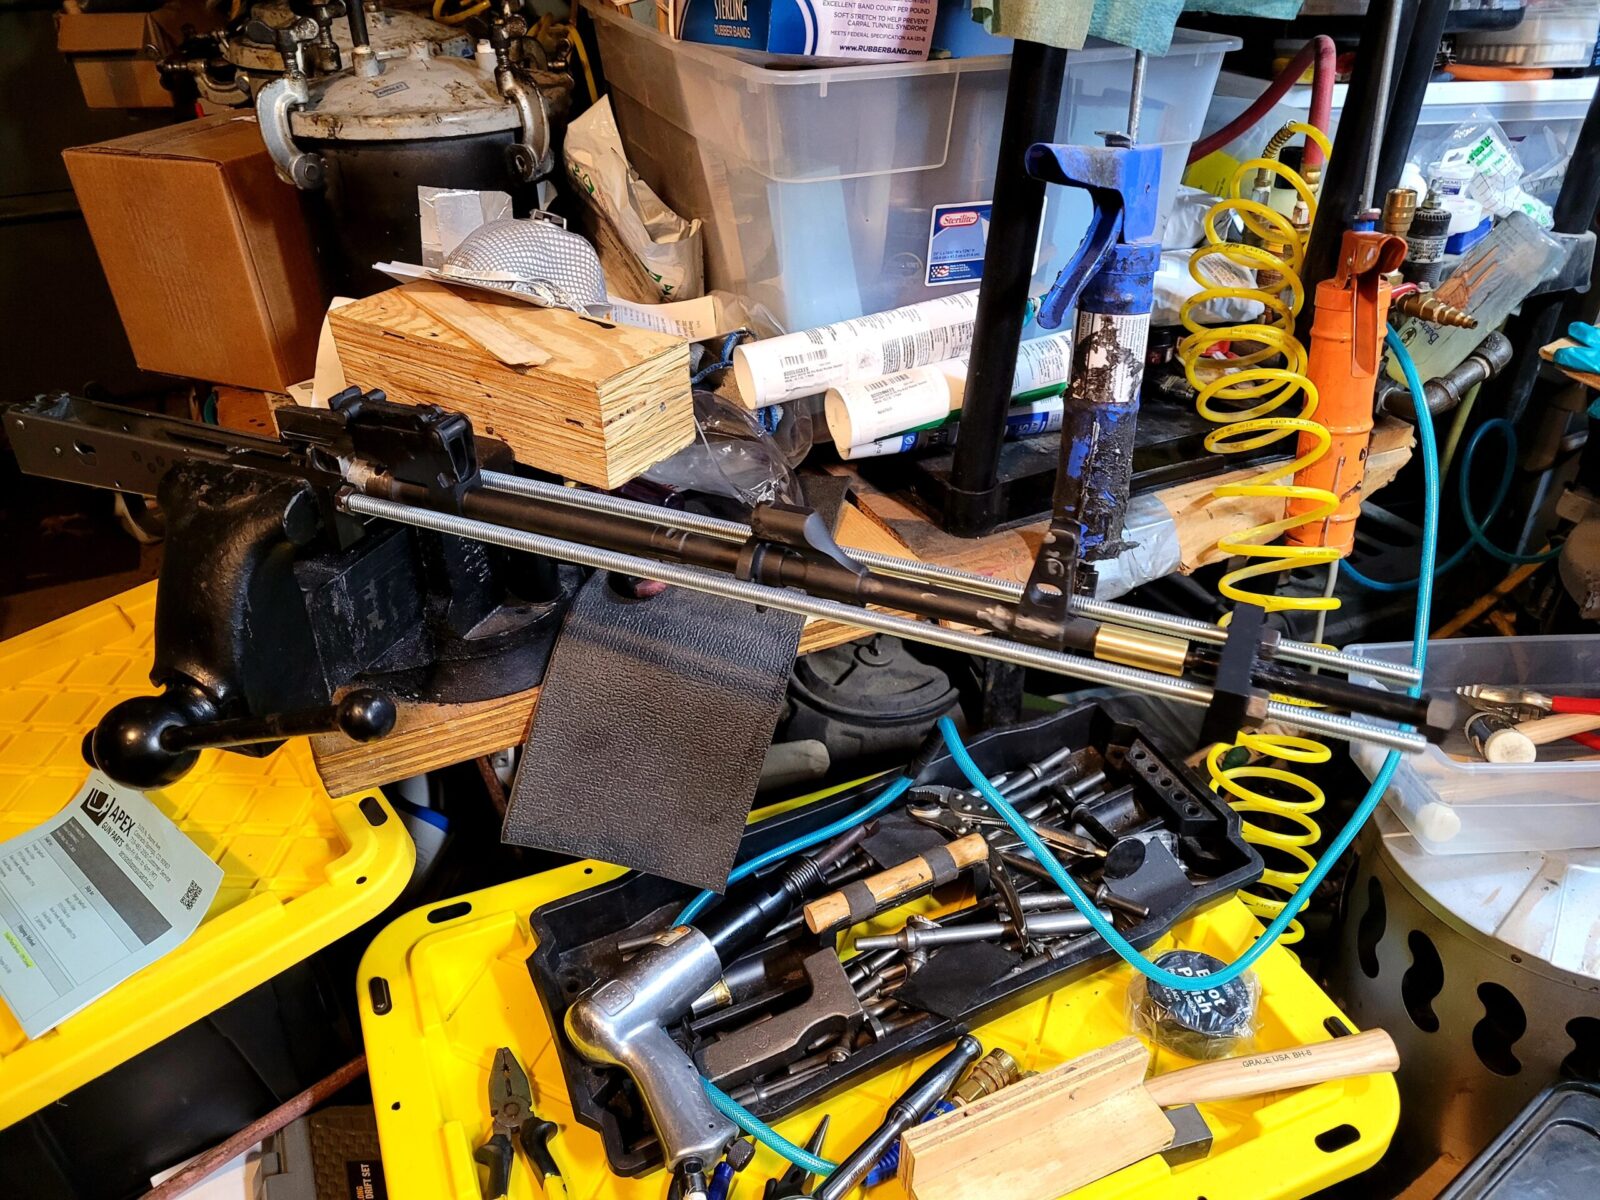
This was my last Romy G (meaning a Romanian Garda rifle) rifle. I’d built it on an AK-Builder flat and had experimented with forming the rivets and the heads always looked awful so it was going to be my source or donor rifle for my new one. Yes, my workbench almost always looks like that.
Options To Remove the Barrel Pin
There are three common ways that I can think of:
Use a press to push out the pin – works great but it takes space and you need a jig to properly support the trunnion so nothing bends under the pressure. It also takes time to set up everything. Huge hint to the new folks who use a press – whack the side of the press that the bottle jack is pushing down – sometimes called the jack bracket – or the side of the frame supporting the bottle jack. The vibration will loosen stubborn pins and lower the risk of something breaking / bending or even shattering under extreme pressure. In short, use the hammer to introduce shock and vibration to the pin while under load – pump the jack handle to increase the load and whack, pump, whack, and so forth. I guess I should do a blog post on this some day but I hope you get the general idea – don’t just increase the pressure alone. Some pins come out super easy and some will fight you the while way out.
Use a big hammer and beat the pin out – I have never had luck with this and only tried it a couple of times before deciding it wasn’t for me. I have a hereditary tremor in my hands and trying to hit a punch with a heavy hammer/small sledge with sufficient force just isn’t in the cards for me. Tons of guys have used the “BFH” (Big F’ing Hammer) method and driven the pin out.
Use an air riveter or air hammer to drive the pin out. Folks, I started using this method some years back and it’s all I use now. It’s fast, easy and you don’t need to worry about things breaking/bending like you do with a press.
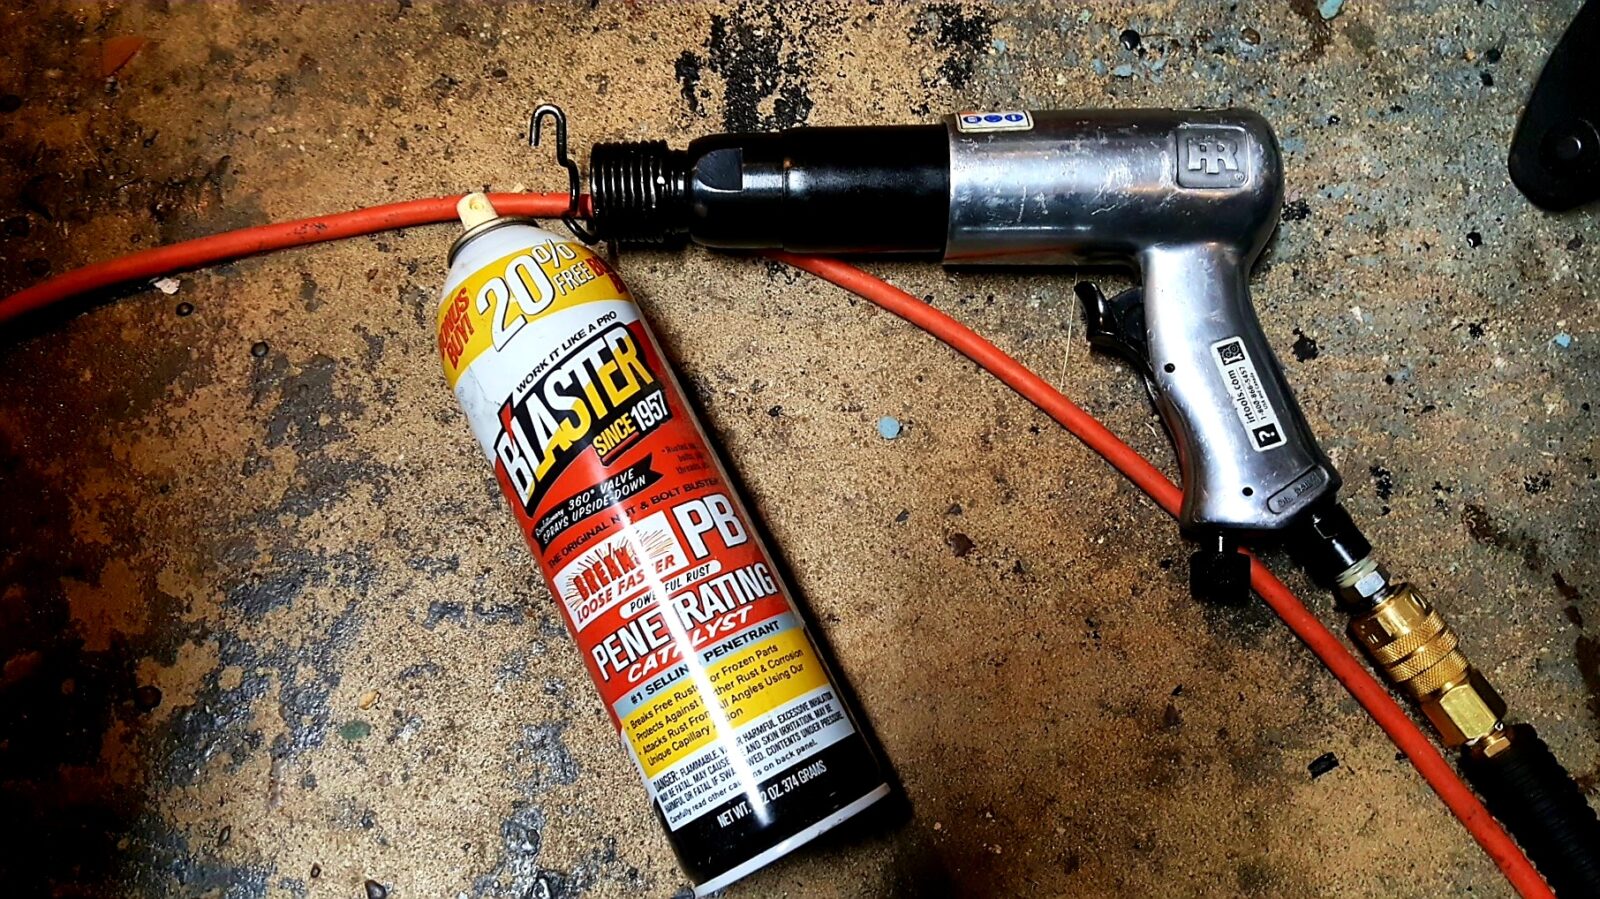
So option 3 is what I do. I use a Ingersoll Rand model 117 air hammer that I bought many years ago. The stroke length is 3.5″ and the hammer is .69″ diameter, or at least the bore for it is this helps the hammer hit hard at 2,000 blows per minute.
This is a photo of my IR 117. The air tool oil I used had gummed up and I used PB Blaster to free things up. That was some years back. I tossed whatever brand oil I was using but that IR is solid.
Note, I bought the 117 many years ago and may actually upgrade to one of the new 119Max air hammers. They have a .75″ bore (8% larger), still a 3.5″ stroke and is moving at 2,530 blows per minute. So it hits harder and it has an anti-vibration design as well. This makes it easier to control and less fatigue on the hands.
Regardless, the point is to get a big air hammer. I’m not sure if one of the super cheap Harbor Freight units will do the job or not. If you look to other brands on Amazon or where ever, look for units they describe as “long” – referring to the length of the hammer bore – or if they use a number, go for 4X or higher. I’ve typically seen that designation to refer to riveters and the 117 is a fine riveter for 1/4″ because of the nice variable trigger it has. The 2x, 3x, 4x, etc. all are referring to the number of times longer the barrel is compared to some original model as I understand it. The size of the rivet gun is based on the size of the rivet that needs to be set so guys may have a number of rivet guns in their tool box if they do a lot of riveting for planes, sheet metal, etc.
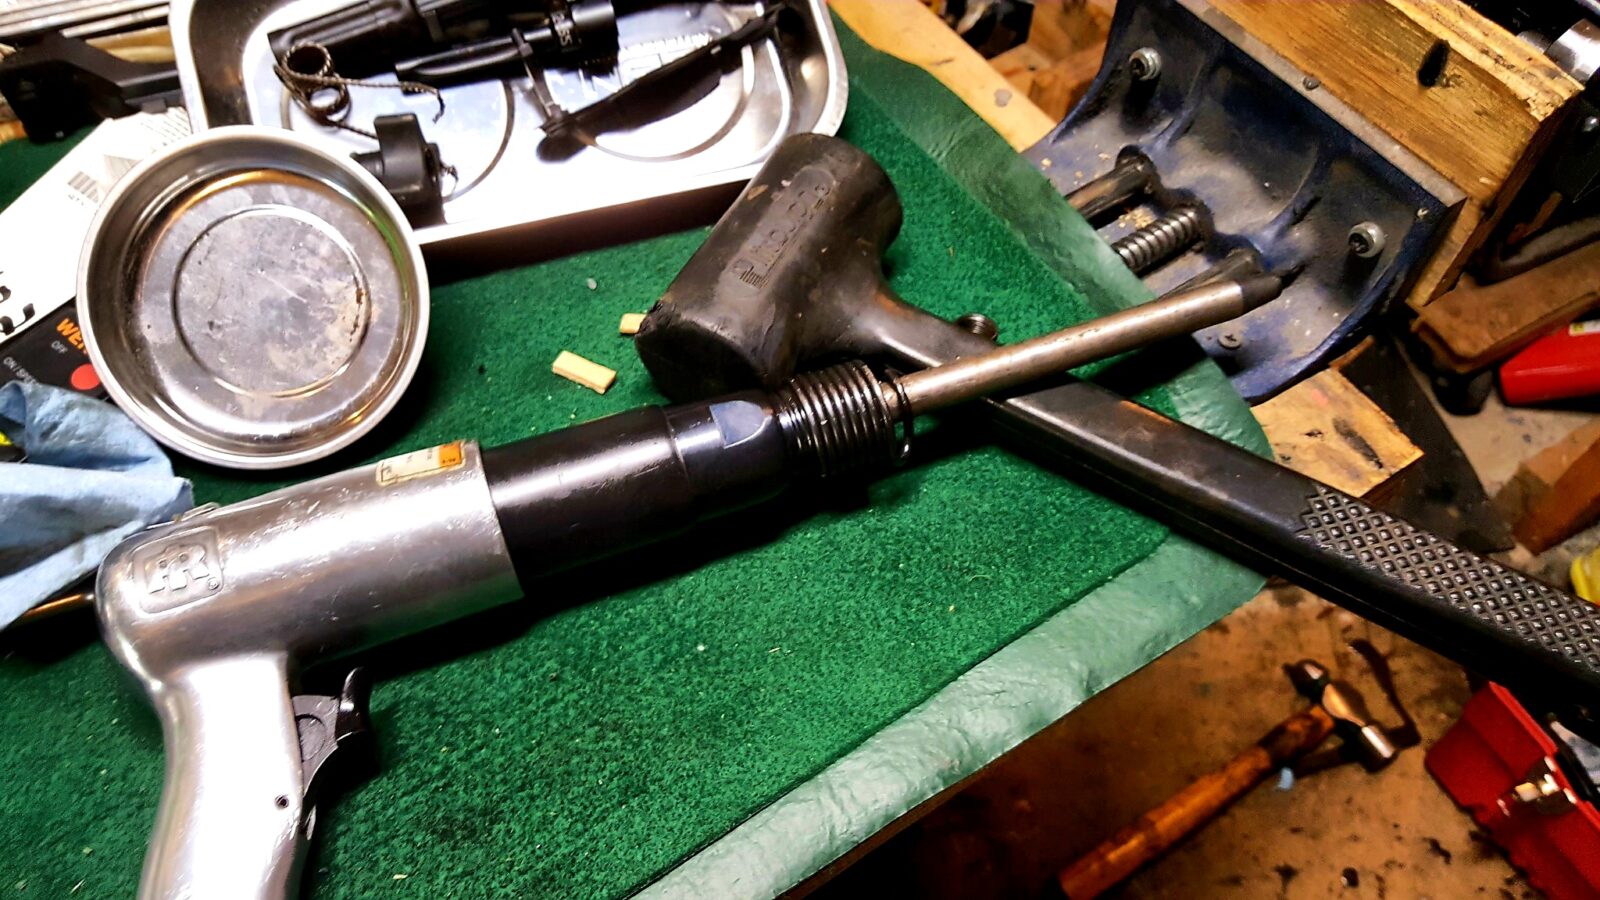
To push the pin out, you can use long air hammer drift pins or even start with the conical chisel and finish up with a hammer and punch.
You can get the barrel pin started with the conical chisel that comes with many air hammer kits and finish it with a big hammer and punch or you can use air hammer drift punches and hammer it all of the way out. Ignore the dead blow hammer – it was just sitting there at the time – I probably was adjusting my drill press table at the time.
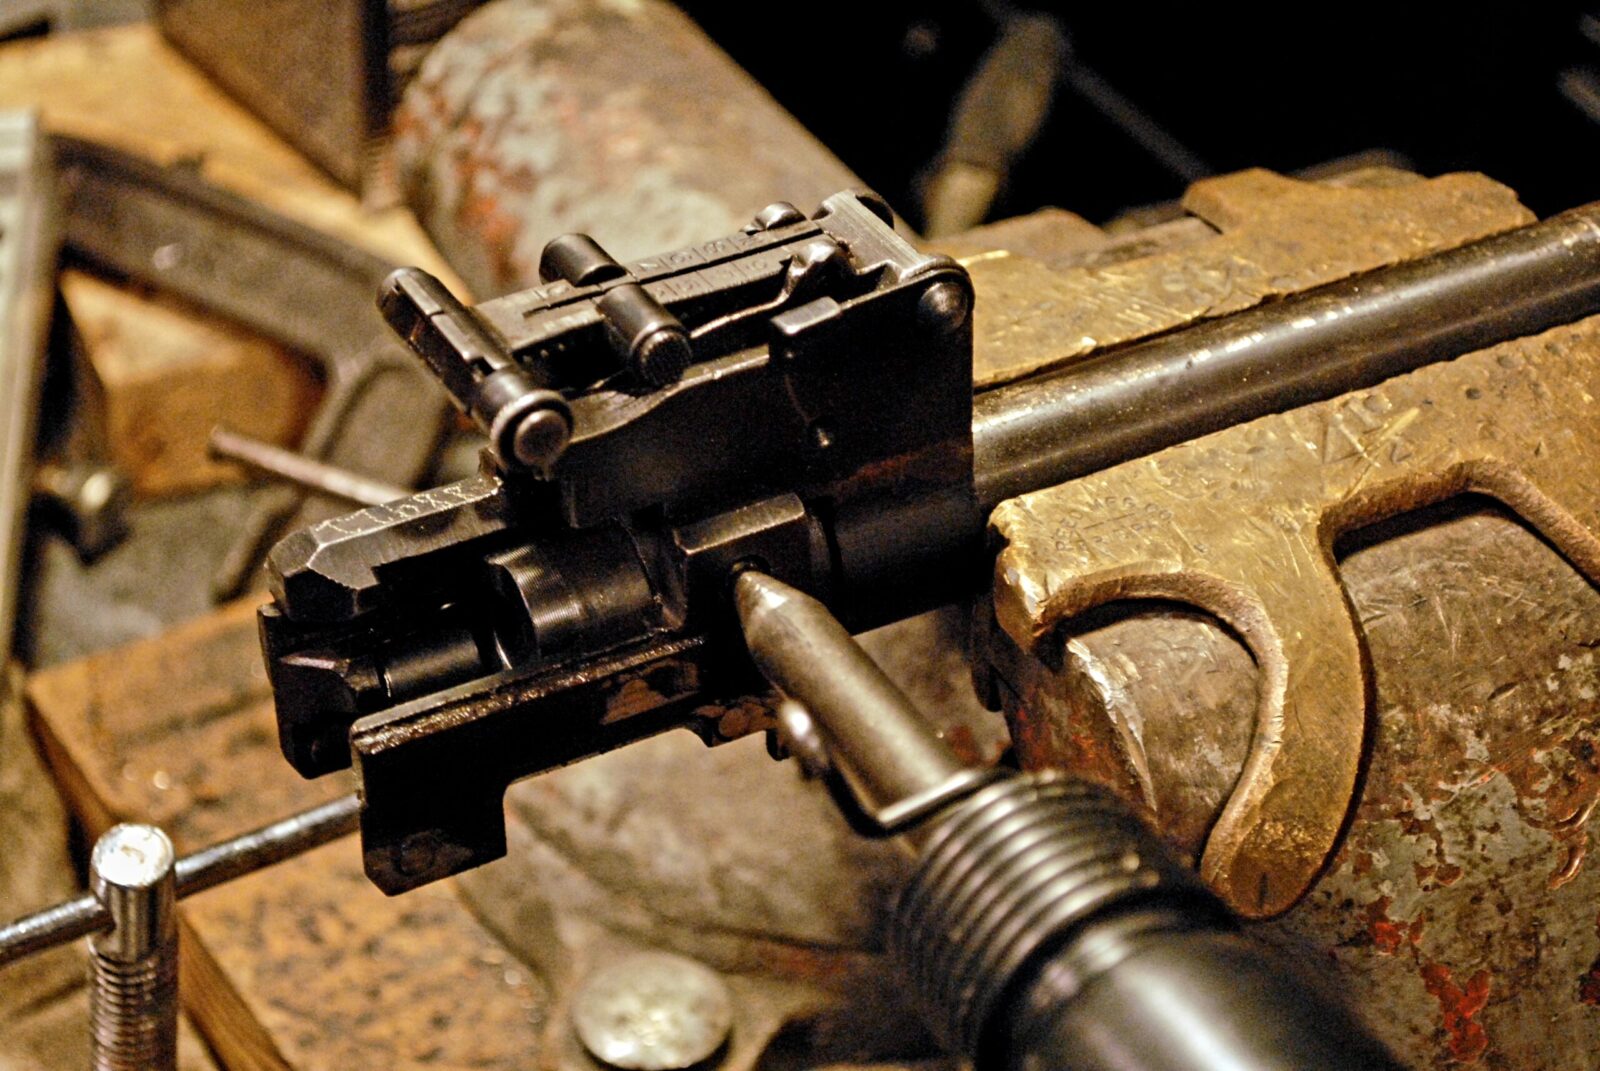
This is an M72B1 trunnion where I used the air hammer to start the pin being pushed out and then finished with a hammer and punch. I now put a long drift pin in the air hammer to push it the rest of the way out vs. using a hammer to finish it.
Note – If the trunnion is not secure then not only will it want to move on you but you will also lose a ton of force due to vibrations/movement that would otherwise be directed at the pin.
Slow down as you drive the pin out or it will fly across the room. I’m speaking with first hand experience on that. You will want to save the pin so you can re-use it.
Once you have the pin out, don’t lose it! I used to use a fishing tackle organizer and now I just use a magnetic tray. It is real easy to lose track of that pin and it’s happened to me.
Options To Remove the Barrel
There are four common ways to remove a barrel – I say “common” because I bet guys have figured out tons of other ways but let’s hit the trop four.
Option 1: Use A Hydraulic Shop Press
This is definitely a proven method. 12-20 ton shop presses were traditionally the go-to tools for a lot of AK work relating to barrels and rivets. For barrel work, guys use jigs from AK-Builder and others plus can make their own. The basic idea is to support the front of the trunnion and press the barrel out. Here’s a link to a post I did some years back for making your own barrel back out tool – I will tell you to make several – a long one if you need to reach through a receiver and a much shorter one if you are just pressing a barrel out of a trunnion or milled receiver stub.
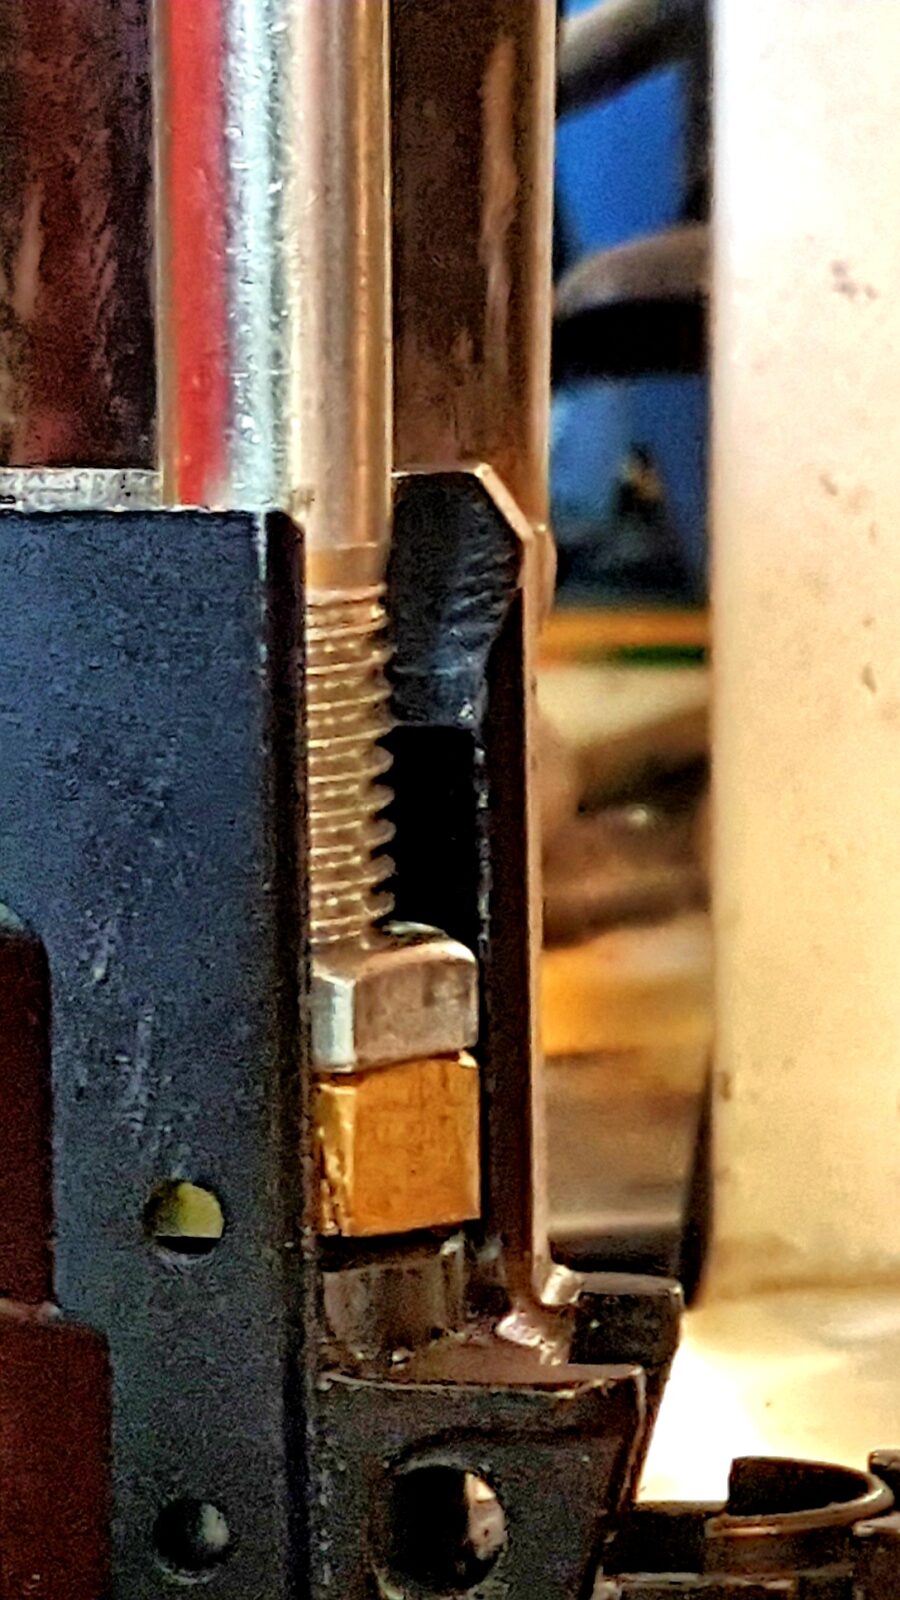
This is 30 ton H-Frame hydraulic press. The super thick press plates are from SWAG OffRoad and they are rock solid. I’ve bent thinner press plates while working on stubborn parts. The SWAG plates simple do not budge. With the barrel pointed downward, I support the front edge of the trunnion and use the small 1/2″ bolt with a brass nut and steel backing nut to press down on the breach end of the barrel. The barrel assembly is from a WBP kit that is still one of my favorite rifles – click here to read that story.
The brass is soft and will not hurt the end of the barrel – don’t use steel for that part. The steel jam nut in the rear is what provides the strength so the brass doesn’t just push right off the threads – it will do that if it’s brass alone. You bring the press down, make sure the little barrel ram is square on the barrel and not something else and the barrel will push right out.
If you want to get a press, the Harbor Freight 12-20 ton models do the job. You can certainly spend more money and you are paying for how true the various parts are to one another and the amount of pressure they can apply. I have a knock off import 30 ton press and it does the job but is nothing to jump up and down about. I do like the large wide H-frame presses that have a nice big work area vs. the small skinny A-frames but it is up to you. Note, a bench top press will really limit your options and probably be disappointing. Also, a 12 ton press is the smallest you should consider. I’d recommend a 20 ton unit if you can afford it. I bought mine just to do AKs but have used it for all kinds of stuff since like pressing in barrels, etc.
To be clear, I have all the tools I need to use my press and it is my fall back method for stubborn barrels but it takes me longer to do the set up than I care for because of how my shop is set up. If you go the press route and it is easy to get to your press, rock on. I can have the pin and barrel out before I even get done setting up my press to do barrel work is all I am saying.
Option 2: Use a BFH
Some guys will just take a big f’ing hammer and a punch to drive the barrel out. I have honestly never tried this approach because of the tremor in my hands but there are a few guys out there who claimed to have used this approach. If you do this, make sure the trunnion is very well supported and can’t move. Get a big heavy hammer (say 1-5 pounds) and use a barrel back out tool like I described above. Be very careful to strike just on the pin or you will beat up your trunnion. I cringe while writing this just so you know. Guys have done it so I feel I need to mention it but I can’t personally recommend it. I think the risk of the punch moving accidentally and then beating the crap out of your trunnion is just way too high to be acceptable.
Option 3: All Thread Method
This method got it’s name from the use of threaded rods that can be used to create a tool to either push out or insert a barrel. Toth Tool makes one this is very nice but I have only used it one time to insert a barrel and it did a great job. They say it will work on pushing out a barrel and I tend to believe them unless you get a kit that has an insanely tight fit. Over the years, I’ve only had a maybe 3-4 barrels out of dozens that I wonder if it could have done the job. With many people building from scratch and not demilling or they are getting headspaced kits that they don’t have to fight as bad with, I think this would be a very strong option. I literally just bought my Toth tool and will give it a try at some point.
This is me using the Toth barrel tool to install a barrel. It’s very well made and I plan to use it a lot more.
Option 4: Use An Air Hammer (My Preference)
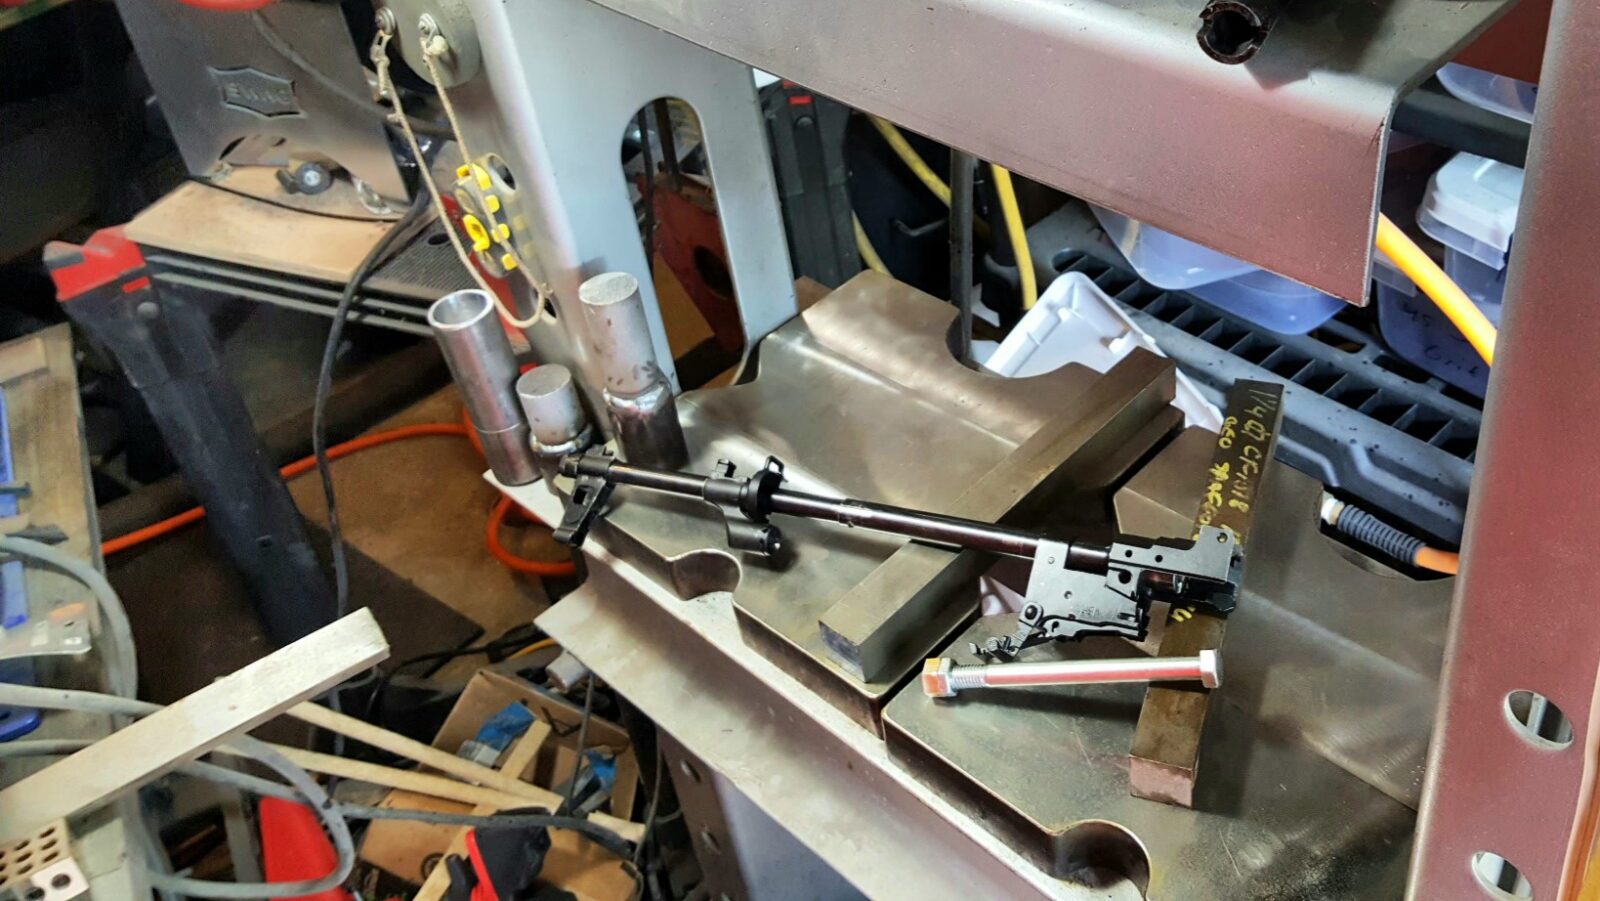
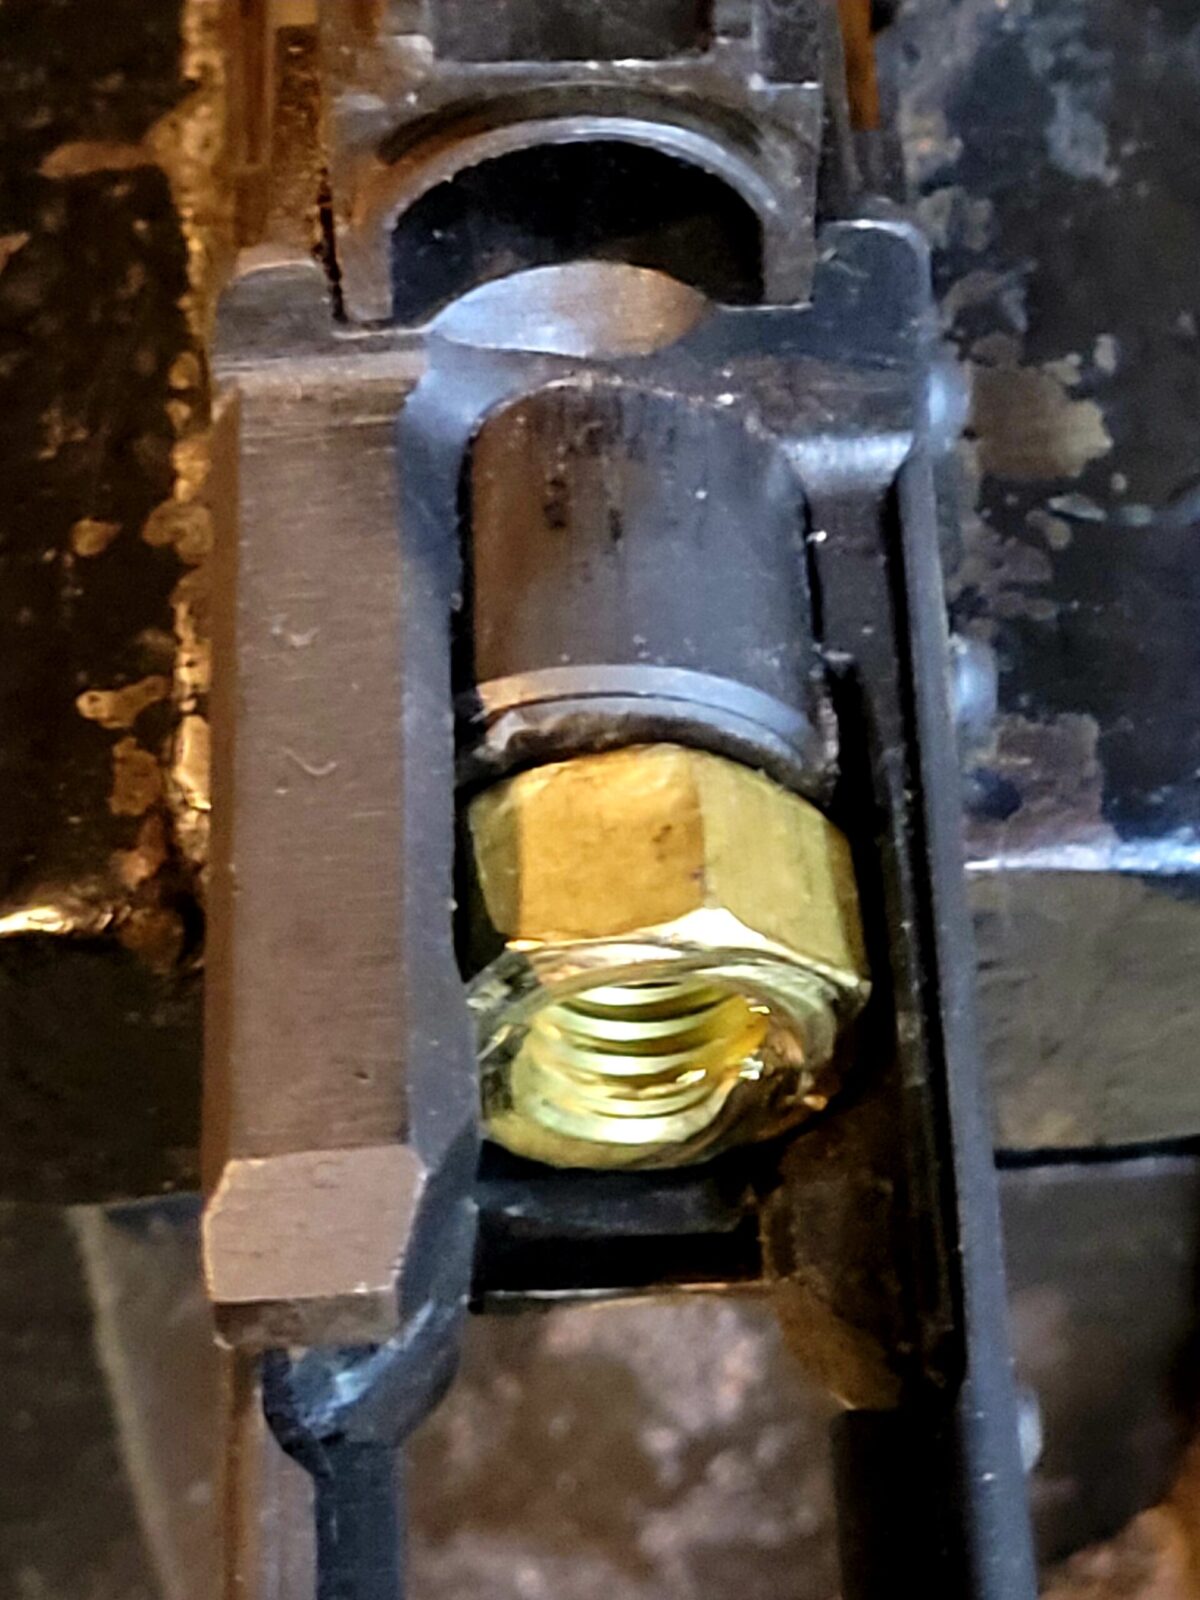
Do you notice a recurring theme? I’m not very patient so I look for quick methods. I used my big IR air hammer and drove the barrel out. I put the assembly in a solid vise, inserted a brass 1/2″ nut in to protect the barrel, an angled rivet set so I could reach in at an angle and hammer the barrel out. All said and done it took a couple of minutes.
I inserted a 1/2″ brass nut to protect the barrel from the angled steel rivet set. You always want to put a soft metal in to serve as a buffer to protect the breach. If you don’t do this, the hardened metal rivet set will beat the snot out of the barrel.
The air hammer works almost all of the time and is my go to method but note that I do have a big press in the event I run into something really stubborn that can’t be air hammered out.
Avoiding Galling
There is an ugly cosmetic issue that can happen when pushing out an extremely tight fitting AK barrel or one where the originating country maybe didn’t have the best metallurgy and that is a problem known as “galling”.
When an AK is assembled at the factory, the barrel is inserted into the trunnion, the hole for the barrel pin is drilled and then the pin is inserted. When the hole is drilled, a potentially sharp surface is created at the top front portion of the hole in the trunnion. If the barrel is pressed very tightly or the metallurgy is off, when pushing the barrel back out, this surface shaves the metal off the barrel creating an unsightly blemish on the shank of the barrel. It’s just cosmetic and does not hurt the functioning of the barrel but it sure is ugly.
The barrel on the left had galling when it was removed. The barrel on the right, by luck, had minimal galling.
There is a trick that can help reduce the chance of galling. You push the barrel pin out as normal and just start to press the barrel out so you expose part of the front top edge of barrel channel inside the trunnion in the pin hole and dress it, meanin slightly dull or bevel it so it does not dig into the part of the barrel shank (the breach end) that will still need to push past that sharp surface.
Here, the barrel has moved ahead slightly. By reaching in with a small circular file to the inside front edge of the barrel channel, the sharp edge of the trunnion can be knocked down and reduce the chances of galling. Note the red shows the location but you need to file in the barrel channel, not the outside of the trunnion.
Small circular files, like chainsaw sharpening files make quick work of this. I have a few circular files and just grab whatever one gives me enough room to maneuver inside the 7mm (0.276″) barrel pin hole.
You can then press a bit more and see if there is galling taking place. If so, push the barrel back out a bit, get rid of the steel that is shearing off and try breaking the edge of the front barrel channel lip a bit more.
Again, this is purely cosmetic and not something that will reduce the safety or reliability of the weapon. Do I always do this? No, just on expensive kits where I don’t want the barrel to look bad.
Some Quick Tips
Let me briefly summarize some lessons I’ve learned over the years:
If there’s any sign of rust around the barrel, trunnion or pin then either soak the assembly in Ed’s Red or spray it down with PB Blaster and let it sit at least overnight. I have a 5 gallon bucket about half full of Ed’s Red and I will literally put the whole trunnion assembly right in the bucket with the barrel sticking out and leave it there.
If you are not familiar with your air hammer, practice with it and get a feel for the trigger and how to control it. Otherwise you might beat some parts up that you did not want to.
If you use a press to push out the barrel pin, remember that tons (literally) of additional pressure is not always the best bet. Press pins can shatter, trunnions can tear and so forth. Whack the press with a metal hammer to introduce vibrations to the part. It can make things way easier.
Keep track of your barrel pin both when it comes out of the hole as well as later.
Make sure everything is properly supported and you have clearances all the way around your part. I bent a barrel once years ago because I didn’t notice it was resting on something that shouldn’t have been there.
If you are going to clamp a barreled receiver in a vise, clamp on the trunnion and not on the far softer sheet metal.
When pressing out the barrel, protect the steel on the chamber end and do not press or beat on it directly. Insert a brass or copper buffer in there to avoid steel to steel contact.
When pressing or hammering out the barrel, make sure your tool is pushing directly on the barrel and hasn’t somehow lodged against the trunnion.
When the barrel comes out of the trunnion have something soft for it to land on or hold on to it so the barrel isn’t damaged during the fall.
Conclusion
You can absolutely get a barrel pin and barrel out of an AK with a press fit barrel in 10-15 minutes with an air hammer. The only catch is if you are stuck with one of those kits with unholy tight interference fit and then you’ll need a press.
Note, I have to buy all of my parts – nothing here was paid for by sponsors, etc. I do make a small amount if you click on an ad and buy something but that is it. You’re getting my real opinion on stuff.
You may be thinking I am kind of late to the game with a post about the 3D printing of firearms but you’d be a bit wrong yourself. This domain is alive and exploding with designs that range from almost entirely 3D printed to sophisticated hybrid designs where some parts are printed and some key parts are leveraged from off the shelf suppliers such as Glock slide assemblies and AR uppers.
Just look at these examples:
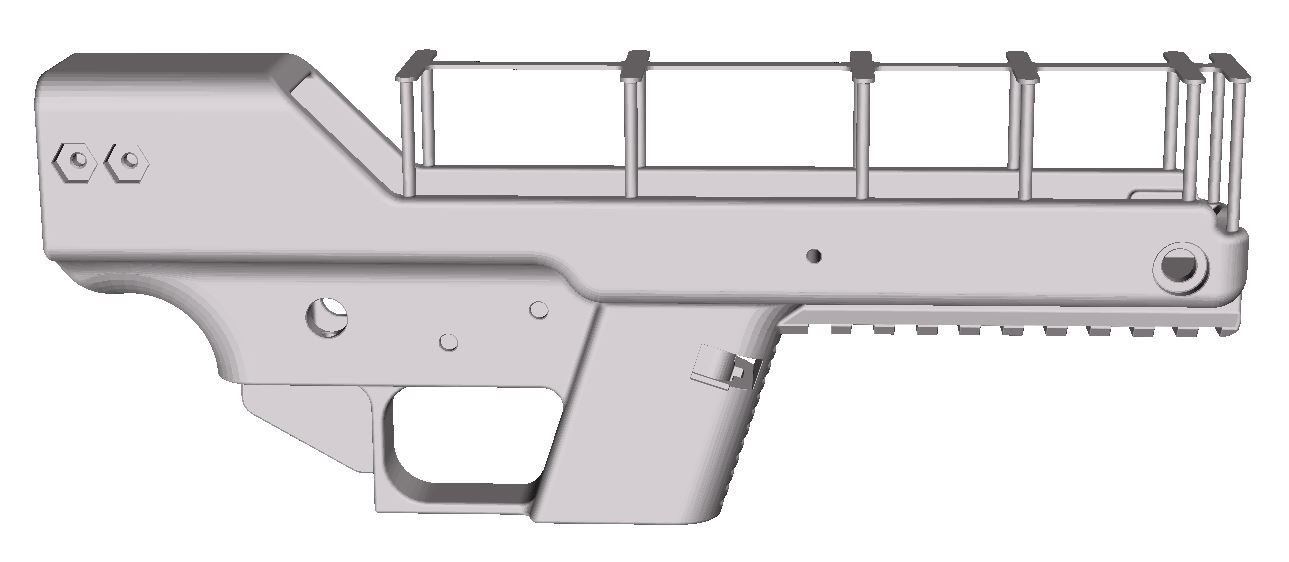
This is a rendering of the FMDA DD17 Glock 17 compatible frame STL file.
This is a rendering of the FMDA DD19 Glock 19 compatible frame v1.2 STL file.
This is a rendering of the Mac Daddy frame STL file.
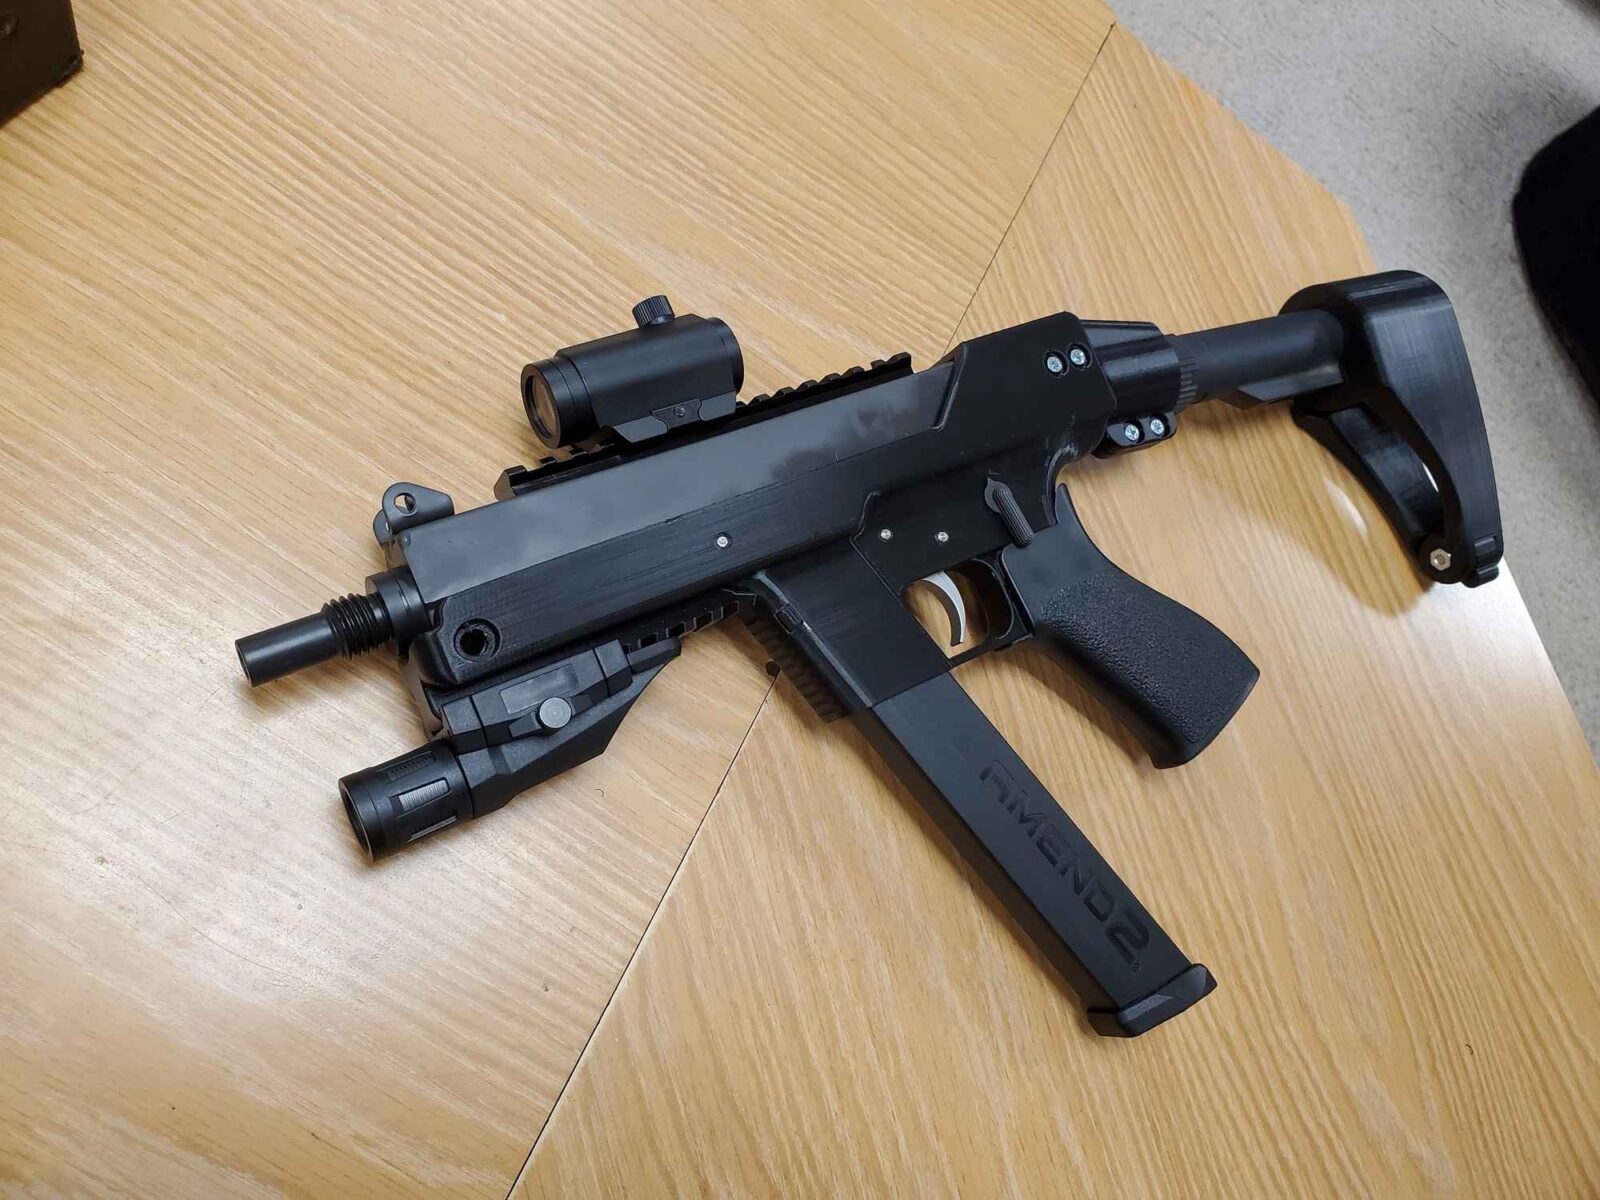
The authors of the Mac Daddy project provide the above photo in their Zip file as an example of the finished weapon. Note, this is not mine – I don’t even own a 3D printer!
There are just tons and tons of designs – AR receivers, AK receivers, vz Scorpion receivers, modern polymer pistol lowers … the list goes on and on.
It’s interesting to look at this vibrant community as a one step removed observer. I am intrigued by the innovation and the designs but I also have zero time to learn 3D printing at this point. Between my day job, Ronin’s Grips, family and the need to sleep at least a few hours every night, there is no free time. My wife also made it clear to me in no uncertain terms that I am not to buy a 3D printer — which really doesn’t phase me because I have no time as I mentioned.
The reason I wanted to take a moment and write this post is so that those of you who are curious can dig into the many how-to guides and access the tons of designs that are accessible at this time. It’s hard to say what way the winds of regulation will blow in the United States or a given state for that matter. In some countries, even the possession of these 3D design files would get you in huge trouble.
With that said, the following links are provided for educational purposes only. Please understand the laws and regulations in your area before you download anything or try to build a weapon. You assume all liability.
In addition to CTRL+Pew mentioned above, there are tons of download links where people are sharing/replicating a huge “Print2a” repository plus have photos and links to individual designs:
Honestly folks, I am not kidding. I find this topic fascinating from an engineering perspective but I have no plans to get into it. Consider this blog post as an introduction and you will need to take it from here.
For all the authors cranking out these amazing designs – rock on! I seriously enjoy seeing them.
Lastly, why did I mention Pandora’s Box in the title? Because I highly doubt the proponents of gun control will ever be able to close the box again.
Again, the above links and information is provided for educational purposes only. Please understand the laws and regulations in your area before you download anything or try to build anything. You assume all liability.
All renderings and the photos of the Mac Daddy are from files that claim to be in the public domain. I do not own them.
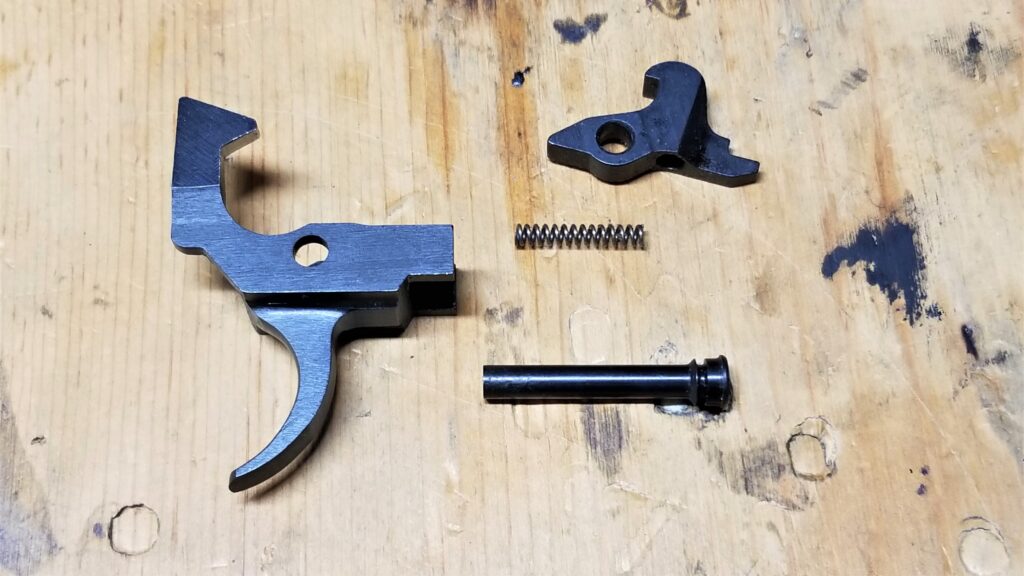
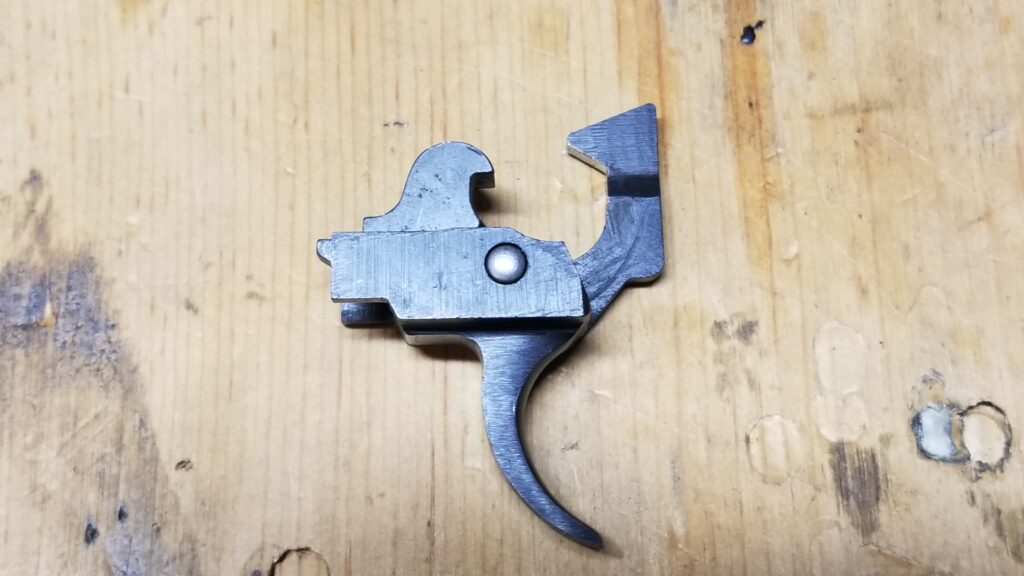
The typical semi-auto AK trigger has four parts – the trigger body, disconnector, disconnector spring and pin. Installing it can be a challenge because you need to properly align the disconnector while sliding the pin through from one side of the receiver to another. For me, with big hands, this task takes more effort than I want.
This is your typical semi-automatic AK trigger group. On the left is the trigger body, top right is the disconnector, under the disconnector is its spring and at the bottom right is the trigger pin. The challenge is getting this all assembled inside of the AK receiver as the pin needs to pass from one side of the receiver, through one side of the trigger, through the disconnector to capture it, out the other side of the trigger and finally out the other side of the receiver. Trying to get it all to align inside of the trigger takes some patience.
The Solution – Use A Slave Pin
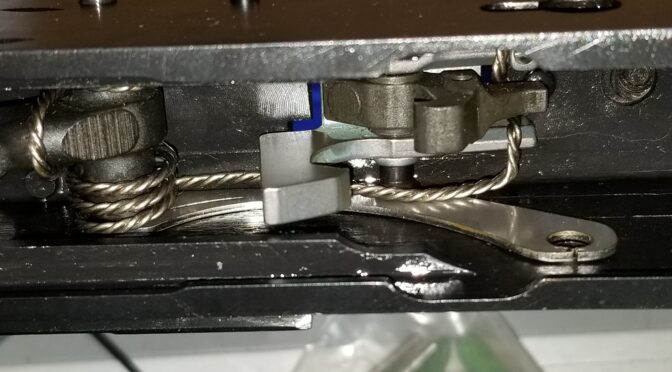
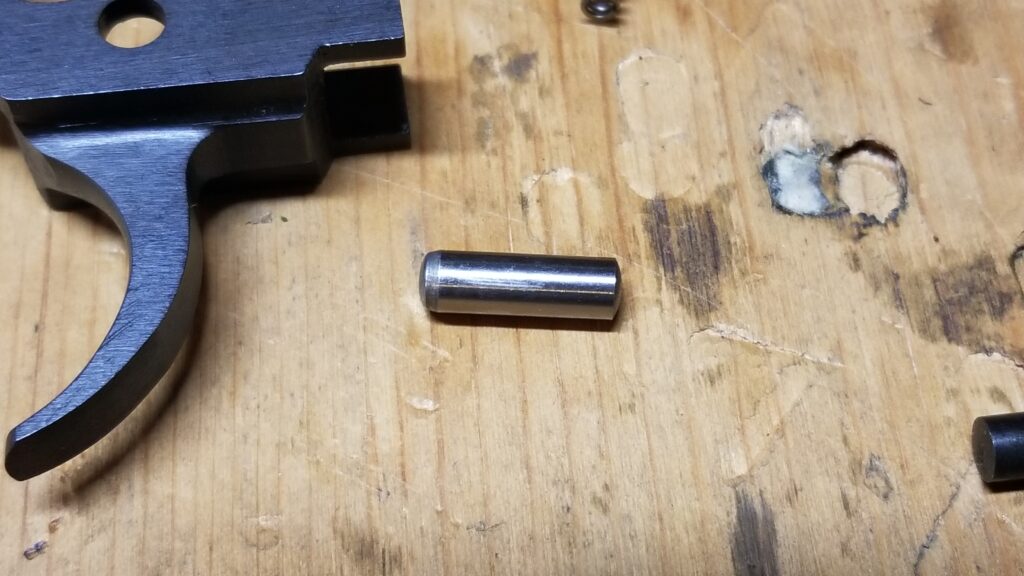
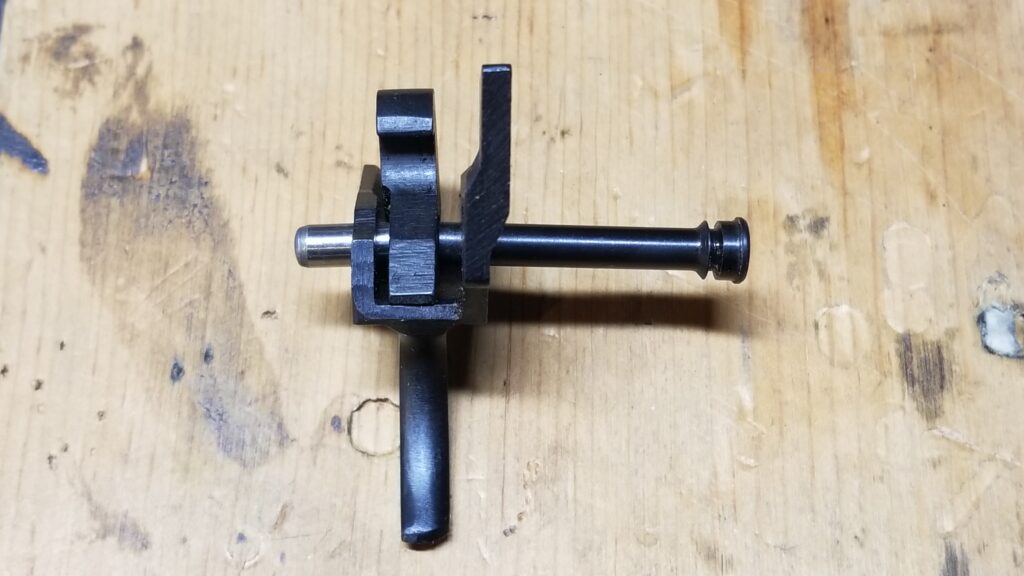
There is an easier approach. We can slide a properly sized dowel pin to serve as a “slave pin” during assembly to secure and properly align the disconnector and trigger outside of the receiver. This simplifies life tremendously. The unit is assembled outside where you can see what is going on, is lowered into the receiver and then the actual trigger pin is pushed through and it displaces the slave pin – the slave just exits the other side of the receiver.
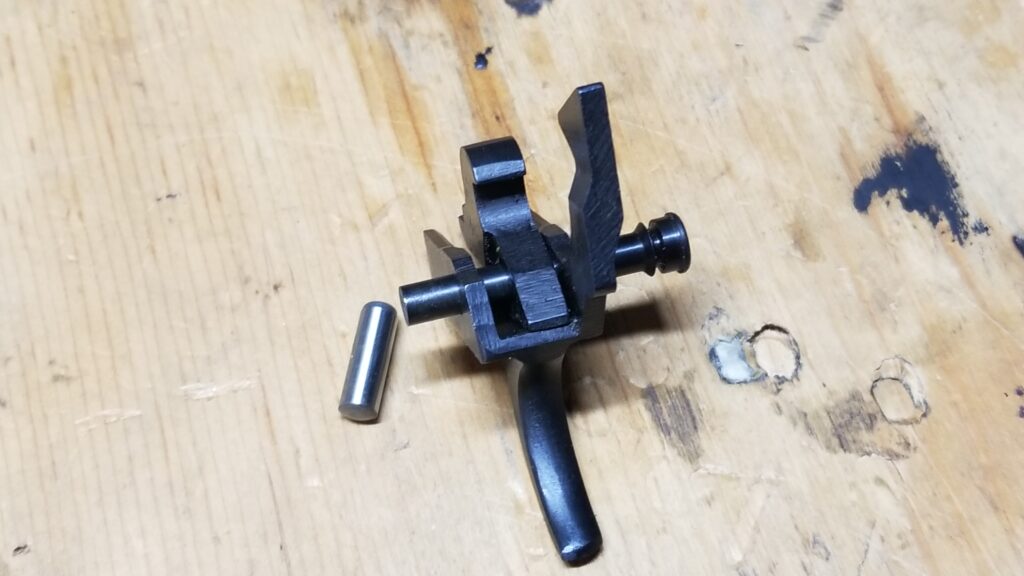
This is the slave pin. Note how one side is beveled more than the other. That is the side that is inserted first. The bevel helps move things around during insertion and then the 5mm body provides the actual alignment for the trigger pin.This is the assembled trigger group with the slave pin holding it all together.Normally this would be in the receiver but I want you to see what is going on. As the trigger pin is inserted, it pushes the slave pin out of the way and it exits via the opposite receiver hole.This photo shows how when the trigger pin is fully inserted, the slave simply drops out.This is an ALG semi-auto trigger and you can see how slave pin is exiting the receiver as the trigger pin is installed. So there’s the end result. A slave pin makes a world of difference. Note, that is one if our fire control group plates retaining the trigger and hammer pins.
Folks, if you are like me and are sick and tired of the assault by liberals on our second amendment freedoms, you are always looking for sources of firearms advice. Youtube used to be a great source for videos on firearms – everything from reviews, to gunsmithing to build-it-yourself (BIY) guidance. Unfortunately, that is no longer the case – Youtube has turned anti-gun also and I resent it.
So, where can you see videos about firearms? One promising source is Gunstreamer – http://www.gunstreamer.com. I’ve watched a few videos there now and find the site easy to navigate and there are definitely some quality videos showing up there. Definitely check them out and consider supporting them – I am.