1. Executive Summary and Market Context
The modern small arms market is currently experiencing a profound structural and mechanical paradigm shift. For over six decades, the traditional AR-15 rifle has dominated both the civilian consumer market and the professional tactical sector. Originally designed by Eugene Stoner in the late 1950s, the AR-15 utilizes a direct impingement gas system that has long been revered for its inherent accuracy, extremely low reciprocating mass, and overall lightweight profile.1 However, as the demands of the modern consumer and the operational requirements of tactical professionals continue to evolve, a growing consensus is driving a transition away from this legacy architecture.1 End-users are increasingly demanding enhanced modularity, superior thermodynamic performance when equipped with sound suppressors, and the structural capability to utilize fully folding stocks for discreet transport and vehicular deployment.1
Because the internal mechanics of the AR-15 physically prohibit the integration of a true folding stock and inherently struggle with the increased backpressure generated by suppressors, alternative gas piston platforms have surged in popularity.1 This exhaustive research report provides a deep technical analysis of three leading 5.56mm gas piston platforms currently driving this market transition. The specific firearms evaluated in this report include the CZ Bren 2 Ms, the IWI X95 Tavor, and the SIG Sauer MCX Spear-LT.4
By rigorously examining the core engineering principles of direct impingement versus short-stroke and long-stroke gas piston operations, this report illustrates how internal fluid dynamics and mechanical linkages directly dictate external structural capabilities.1 Furthermore, the analysis evaluates the critical ergonomic differences and the necessary adjustments to the manual of arms required when an end-user transitions their training from a legacy AR-15 to these modern piston platforms.3 Finally, current market pricing data is tabulated for each specific platform to provide an objective, data-driven overview of the financial investment required to acquire these advanced systems from compliant retail vendors.
2. The Direct Impingement Baseline Architecture
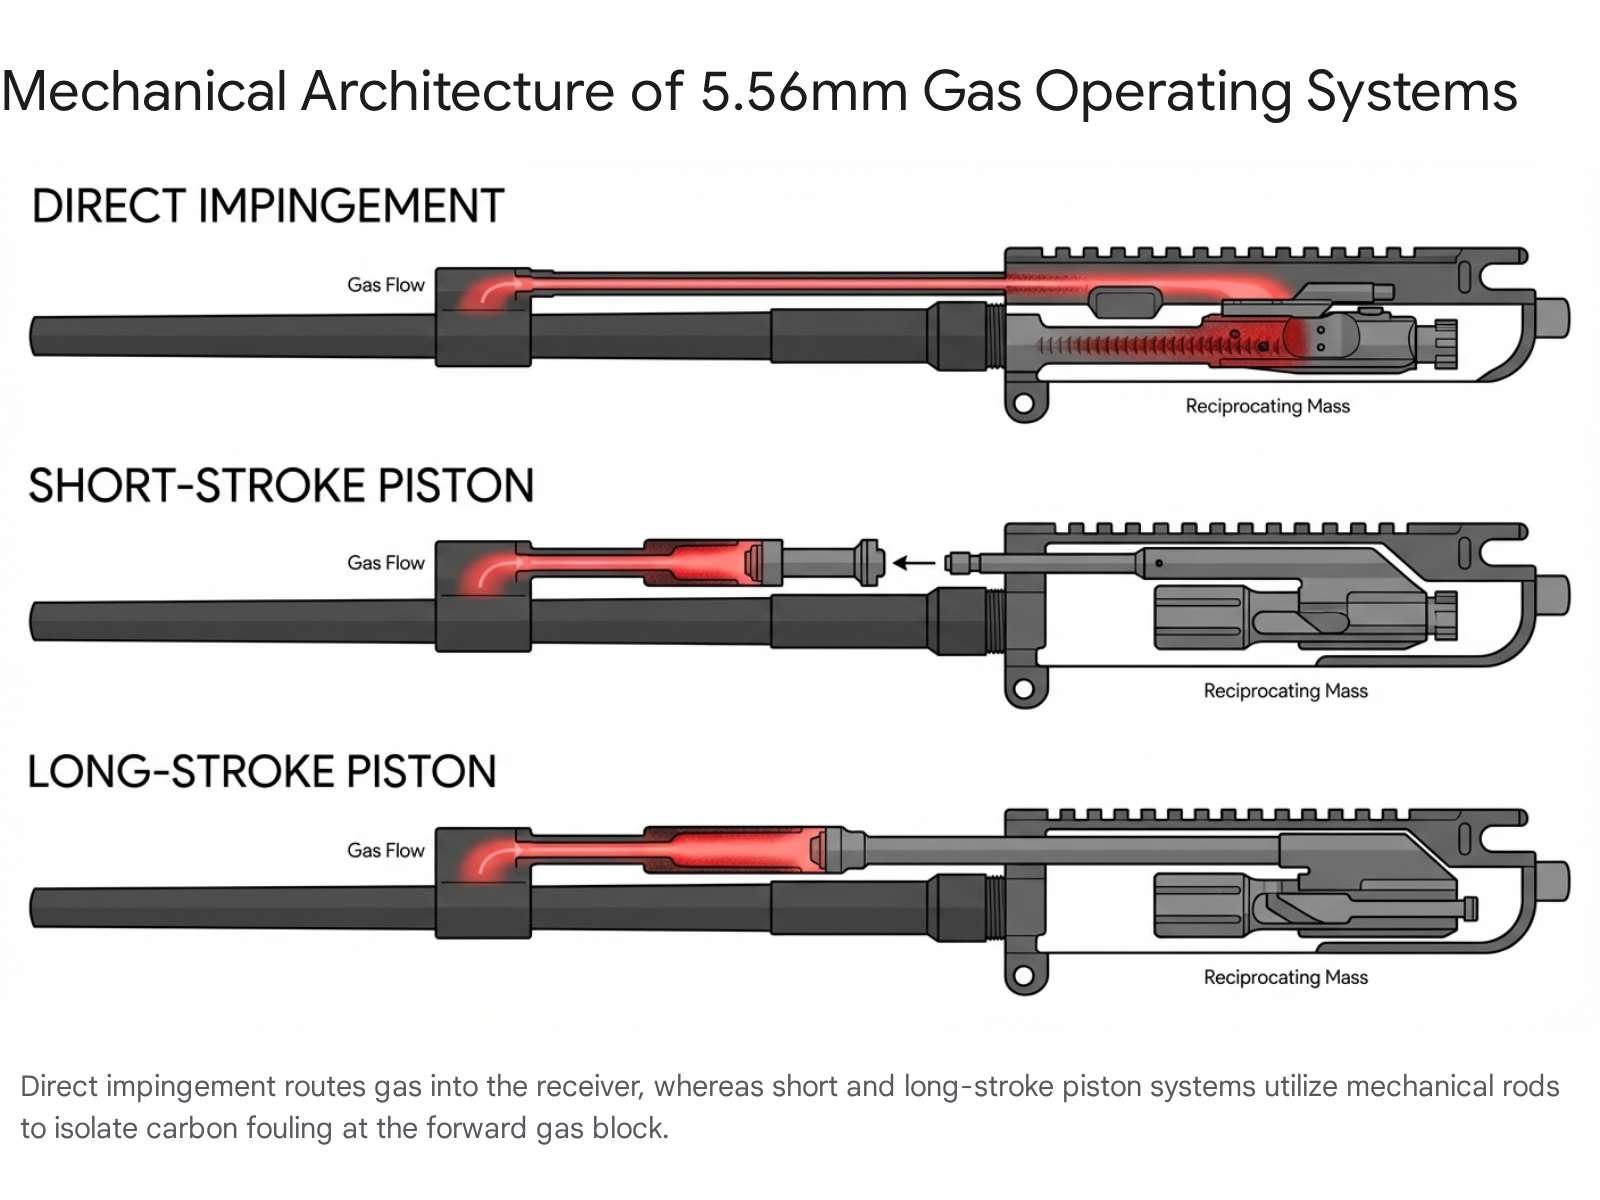
To fully comprehend the structural and operational shift toward modern alternative platforms, it is absolutely essential to first dissect the physical and mechanical baseline established by the legacy AR-15. Both the traditional AR-15 and modern piston-driven alternatives utilize the expanding high-pressure gases generated by the ignition of the powder charge to cycle the action.1 However, these systems route, harness, and vent this thermodynamic kinetic energy in fundamentally different ways, leading to drastically different operational profiles.
The traditional AR-15 operates on a mechanism widely referred to as a direct impingement system, although mechanical engineers often classify it more accurately as an internal piston design. As the bullet is propelled down the barrel by expanding gases, it passes a tiny port drilled precisely into the top of the bore.1 Once the projectile passes this port, a portion of the extremely high-pressure, superheated gas is bled upward from the barrel into a mounted gas block.1 From this forward gas block, the hot gas is forcefully directed backward toward the receiver through a very narrow, hollow stainless steel gas tube.1 This elongated tube extends completely into the upper receiver of the rifle and physically interfaces with the gas key, a component securely bolted to the top of the bolt carrier group.1
Once the gas enters the gas key, it flows directly into a meticulously machined expansion chamber located entirely inside the bolt carrier itself.1 As the gas rapidly expands within this internal chamber, the extreme pressure forces the carrier backward away from the bolt. This initial rearward movement of the carrier interacts with a cam pin, causing the bolt head to rotate and unlock from the barrel extension lugs.1 With the bolt unlocked, the residual pressure and the momentum of the carrier drive the entire assembly violently rearward to complete the extraction, ejection, and feeding cycle.1
The primary mechanical advantage of the direct impingement system is its sheer operational simplicity and its exceptionally low reciprocating mass.1 Because there is no heavy external piston rod or secondary linkage hardware traveling back and forth above the barrel, the rifle is generally much lighter.1 Furthermore, because the hollow gas tube merely hovers above the barrel and does not physically push against the action during the firing cycle, the barrel can be truly free-floated within the handguard.1 Free-floating a barrel completely isolates it from external mechanical pressures, which minimizes the disruption of the barrel harmonics during the exact moment the projectile is traveling down the bore.1 This harmonic isolation yields an extremely high inherent accuracy potential, establishing the direct impingement AR-15 as a standard for precision semi-automatic fire.1
Despite these notable advantages, the direct impingement design possesses inherent thermodynamic and mechanical drawbacks that have spurred the development of alternative platforms. By routing hot, high-pressure gas directly into the central action of the firearm, the direct impingement system inherently introduces massive amounts of unburnt carbon powder, abrasive particulate matter, and extreme heat directly into the bolt carrier group and the upper receiver.1 This rapid accumulation of carbon fouling acts as an abrasive paste when mixed with lubricants, accelerating component wear, drying out essential lubricating oils, and necessitating frequent, rigorous cleaning protocols to maintain basic reliability.1 Furthermore, the superheated gases can rapidly raise the temperature of the bolt carrier group to levels that are dangerous to touch, potentially leading to the premature failure of small parts like gas rings and extractor springs.9
3. Mechanics of Modern Gas Piston Operating Systems
In stark contrast to the direct impingement method, modern platforms like the CZ Bren 2, the IWI X95 Tavor, and the SIG Sauer MCX Spear-LT utilize mechanical piston systems to cycle their actions.4 These designs prioritize internal cleanliness and extreme reliability by keeping the destructive forces of the expanding gases far away from the delicate internal receiver components.2 Gas piston firearms generally fall into two distinct engineering categories known as short-stroke and long-stroke systems.2
3.1 Short-Stroke Gas Piston Dynamics
The short-stroke gas piston system is the most prevalent alternative mechanism found in modern 5.56mm platforms, heavily utilized by both the CZ Bren 2 Ms and the SIG Sauer MCX Spear-LT.4 In this specific architectural layout, the expanding gas is still bled from a port in the barrel into a forward gas block.1 However, instead of traveling completely down a hollow tube into the receiver, the high-pressure gas immediately strikes a solid, captive metal piston located directly inside the gas block itself.1
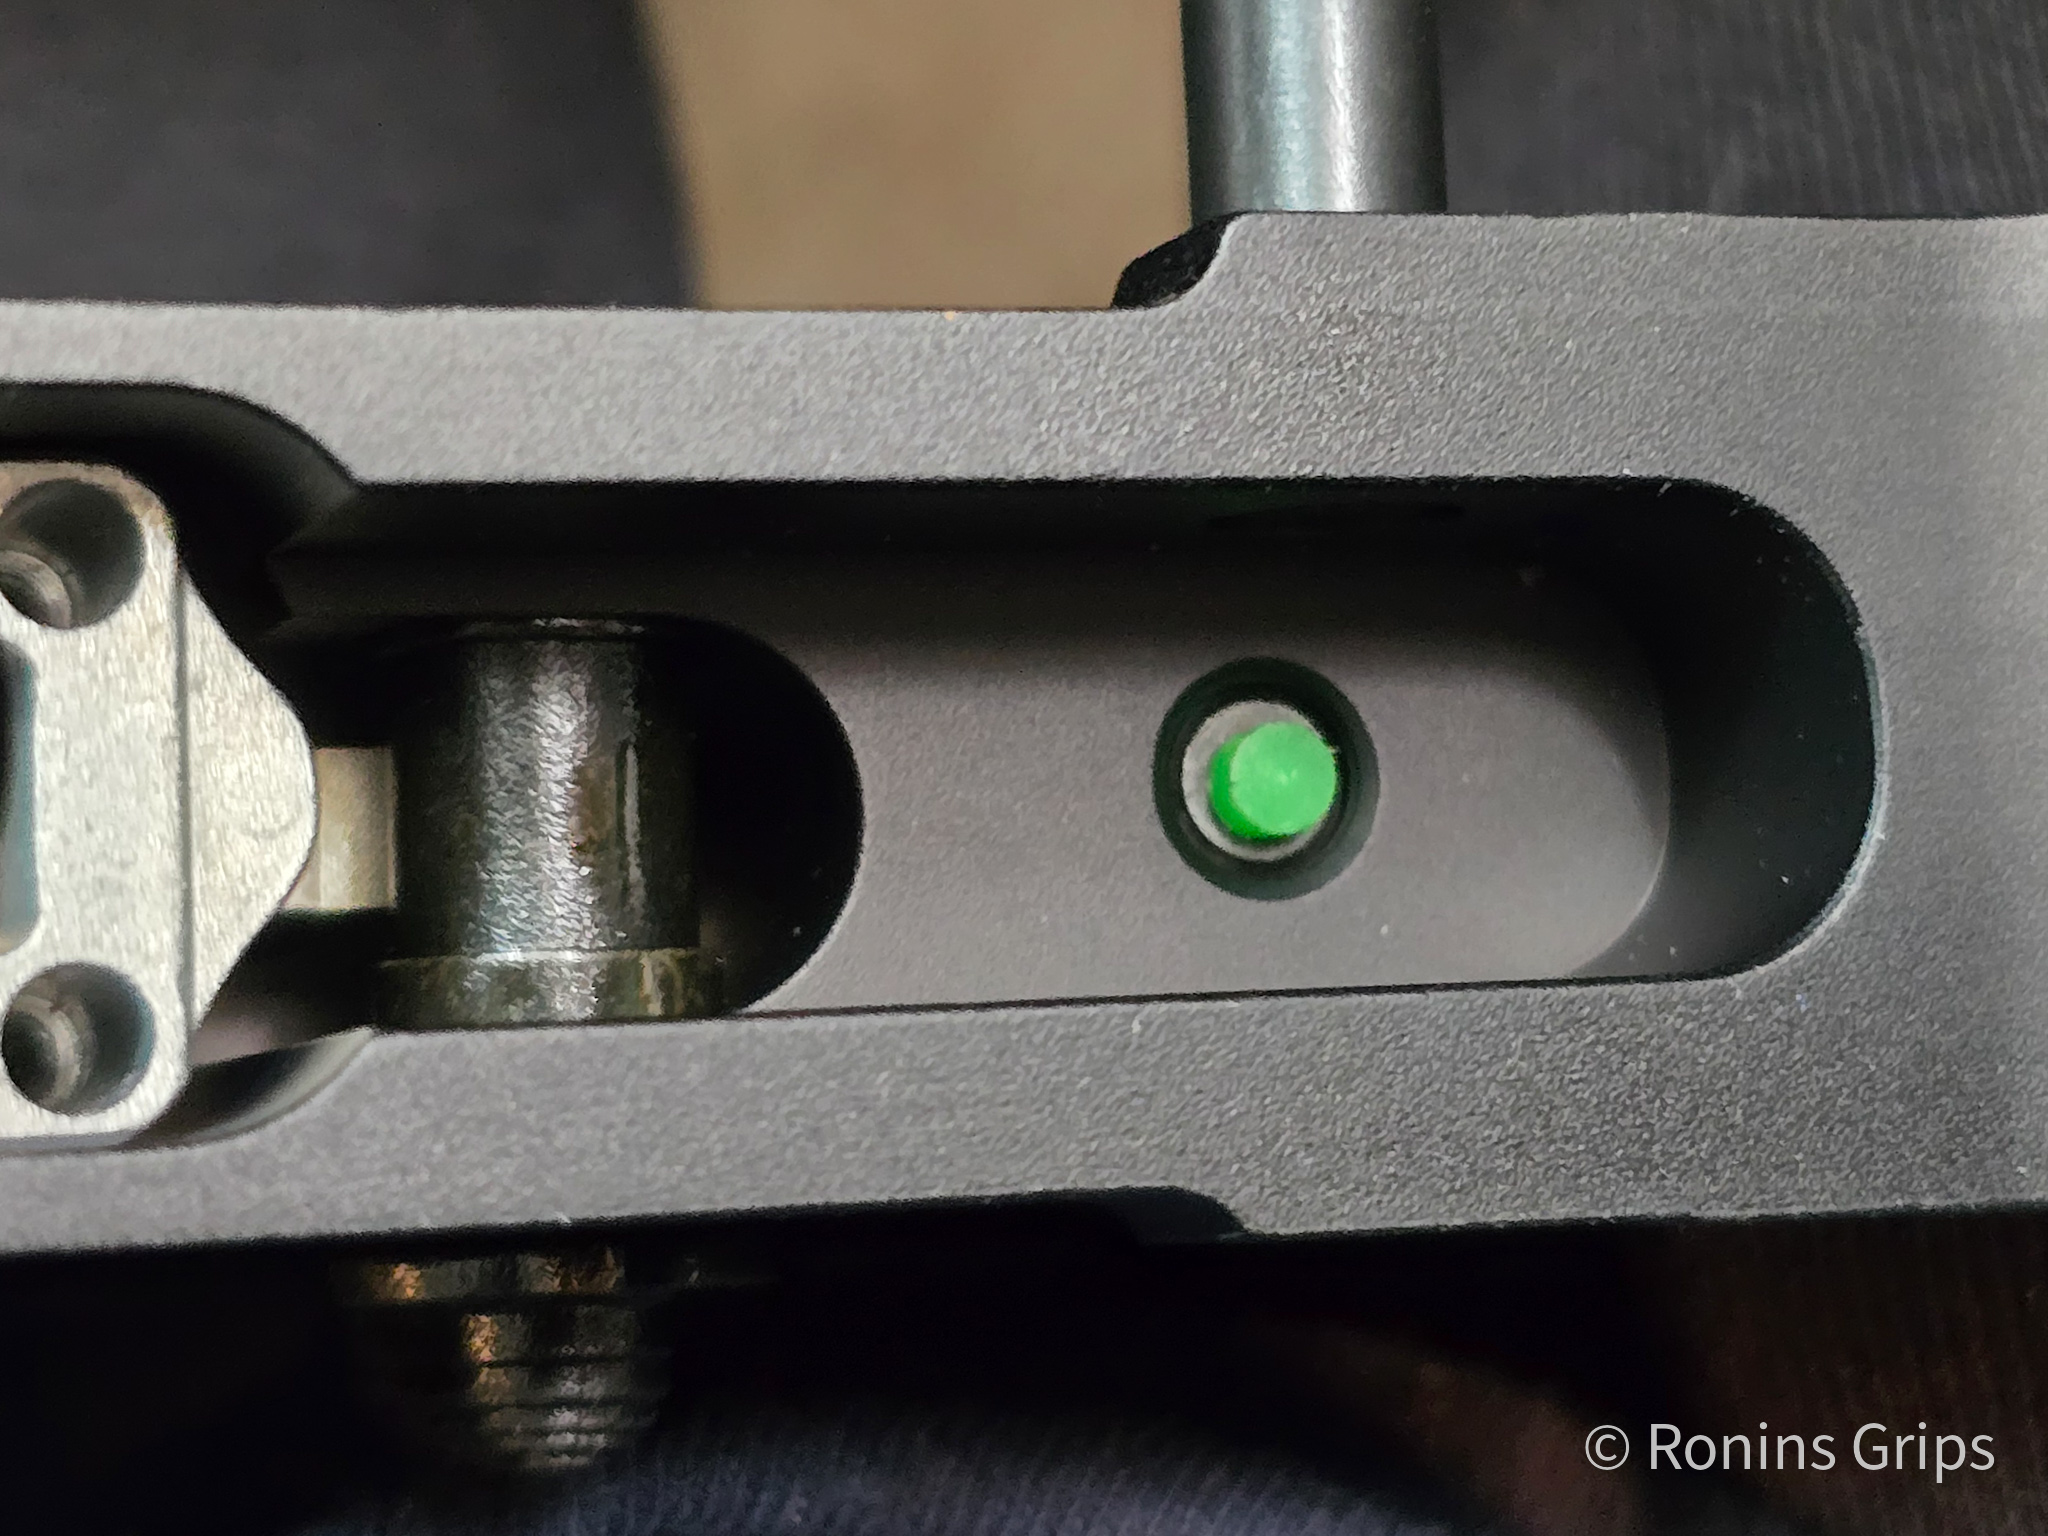
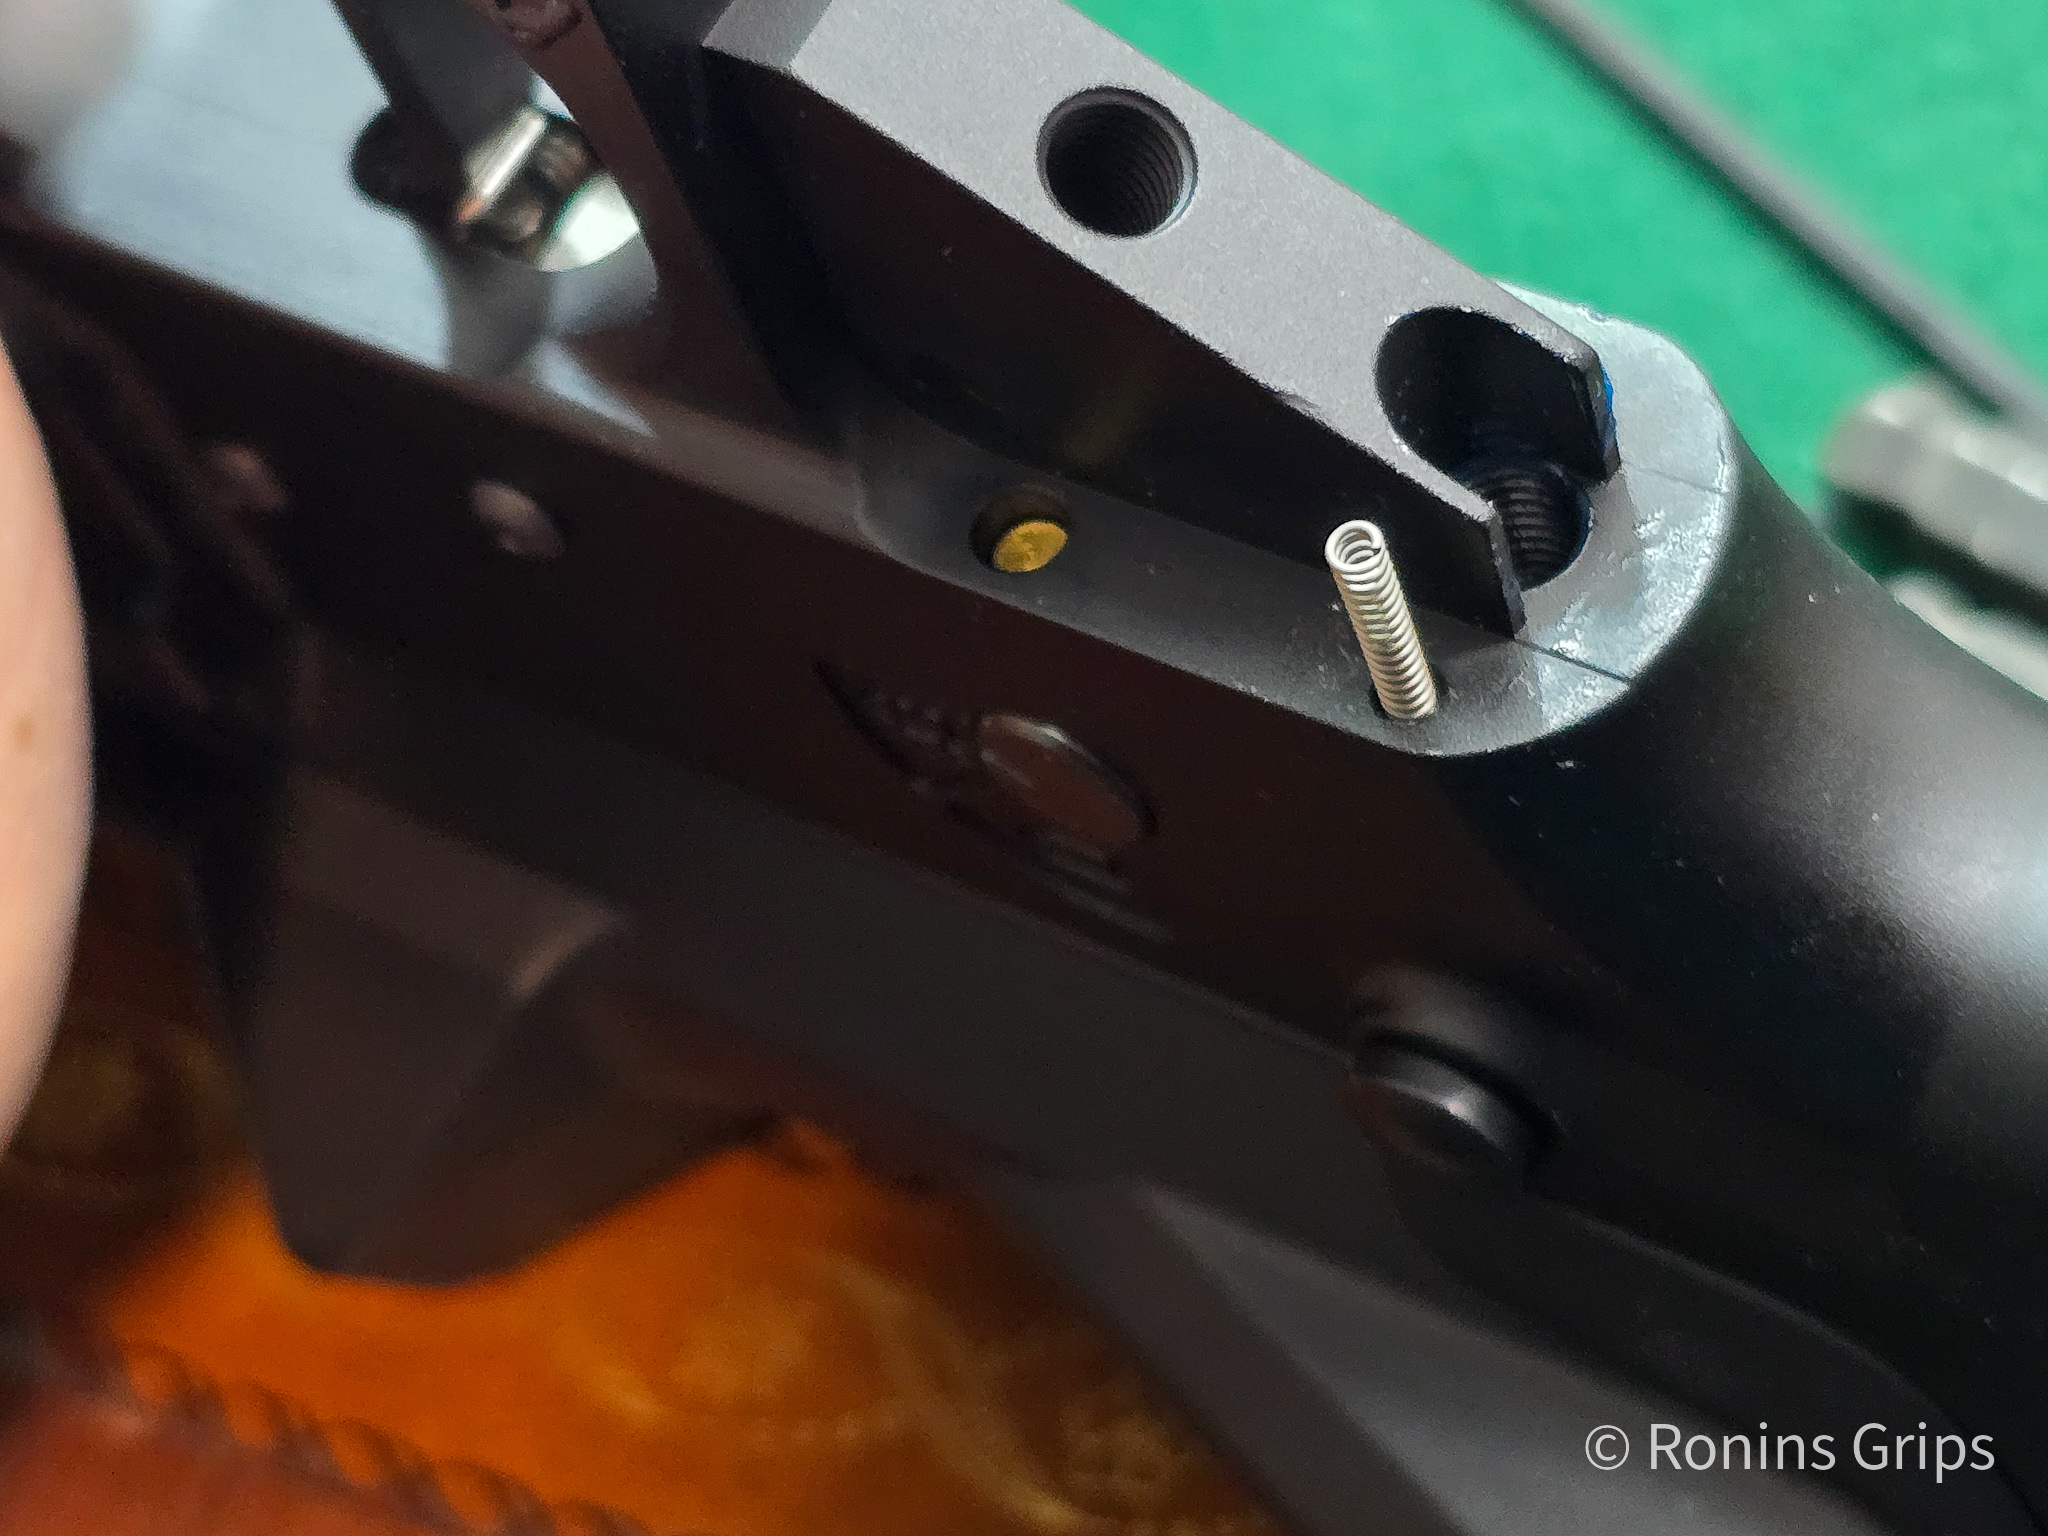
Under immense pressure from the tapped gas, this piston is driven violently rearward for a remarkably short distance, typically just a fraction of an inch.1 As the piston moves, it strikes a solid operating rod extending rearward toward the receiver.1 This rapid, violent movement delivers a sharp, purely mechanical kinetic tap to the top front of the bolt carrier group.1 The kinetic energy is instantly transferred, sending the unlocked bolt carrier flying rearward along its guide rails to complete the standard extraction and feeding cycle.1 The piston itself does not travel with the carrier, it is immediately halted by the gas block structure and returned to its forward resting position by a dedicated, specialized return spring located above the barrel.
The physical separation of the high-pressure gas expansion chamber from the main upper receiver is the defining engineering triumph of the short-stroke piston design.2 The superheated gases and unburnt carbon particulate are aggressively vented into the atmosphere at the gas block, located far forward on the barrel, rather than being dumped into the action.1 Consequently, the bolt carrier group and the interior of the upper receiver remain remarkably clean and cool to the touch even after sustained strings of rapid fire.1 This drastic reduction in internal fouling minimizes the need for heavy lubrication and significantly extends the intervals required between cleaning sessions, ensuring the firearm continues to operate reliably in austere, muddy, or sandy environments.2
3.2 Long-Stroke Gas Piston Dynamics
The IWI X95 Tavor utilizes a highly robust long-stroke gas piston system, a design philosophy that shares its fundamental mechanical lineage with the legendary Kalashnikov series of rifles.5 Similar to the short-stroke mechanism, high-pressure gas is tapped at the barrel port and routed into a gas block where it forcefully strikes the face of a piston.1 However, in a long-stroke configuration, the piston head, the lengthy operating rod, and the entire bolt carrier group are mechanically unified into a single, massive, solid assembly.1
When the expanding gas strikes the piston face, the entire unified assembly travels rearward together for the full length of the cycling stroke.1 Unlike the short-stroke system where the piston delivers a quick tap and stops, the long-stroke piston stays physically engaged with the carrier and rides all the way back into the receiver space before returning forward to chamber the next round.1
This specific engineering design introduces a significantly larger reciprocating mass during the firing cycle, which can theoretically alter the recoil impulse perceived by the shooter and slightly shift the harmonic whip of the barrel, potentially affecting absolute precision.1 However, the long-stroke system is globally renowned for its absolute, brutal reliability under the most adverse conditions imaginable.9 The unified mass carries immense kinetic energy as it cycles, allowing the action to literally power through heavy carbon fouling, environmental mud, or foreign debris with minimal resistance.9 Just like the short-stroke system, the long-stroke design successfully keeps the bulk of the intense heat and the carbon particulate isolated at the forward gas block, ensuring the actual bolt mechanism remains relatively clean.1
4. Structural Engineering Advantages of Piston Architecture
The intricate engineering choices regarding these internal gas systems are not merely academic differences in fluid dynamics or theoretical physics. The internal mechanics explicitly dictate the external physical capabilities of the firearm. The widespread migration away from the AR-15 is heavily influenced by the rigid structural limitations imposed by the direct impingement system, limitations that modern gas piston designs completely bypass.1
4.1 Eradication of the Buffer Tube and Implementation of Folding Stocks
The most visually apparent and tactically significant limitation of the traditional AR-15 is the receiver extension, a component commonly known in the industry as the buffer tube. Because the AR-15 bolt carrier is physically pushed rearward by expanding gas expanding within its own internal chamber, it requires a long, hollow physical space to recoil into in order to extract the spent casing and compress the return spring.3 This mandatory space is provided by a cylindrical aluminum tube that protrudes directly out the back of the lower receiver. The main recoil spring and a weighted buffer completely reside inside this tube.3
Consequently, an AR-15 can utilize a collapsible telescopic stock that slides forward and backward along the outside of the buffer tube, but it can never have a stock that truly folds flush against the side of the receiver while retaining the ability to fire.3 If a user modifies an AR-15 with an aftermarket folding adapter and attempts to fire the weapon while the stock is folded, the bolt carrier has absolutely nowhere to travel, resulting in a catastrophic malfunction and severe potential structural damage to the receiver housing.
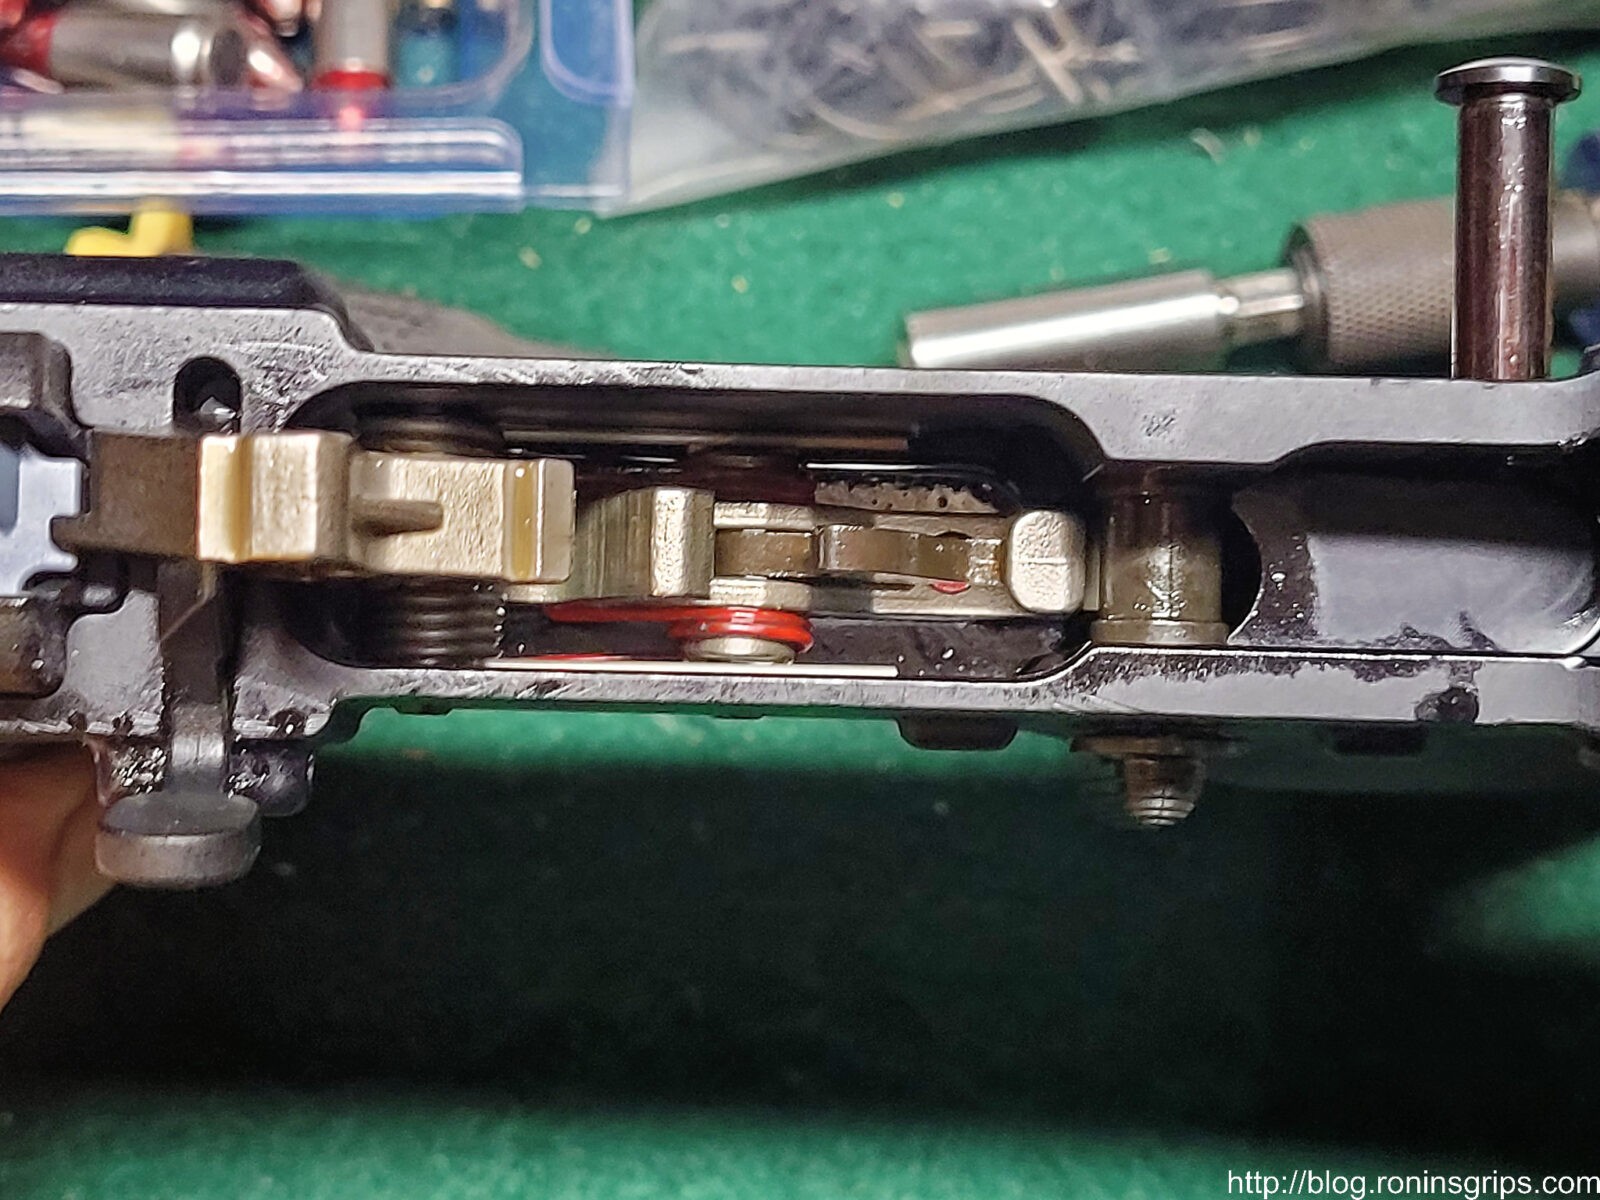
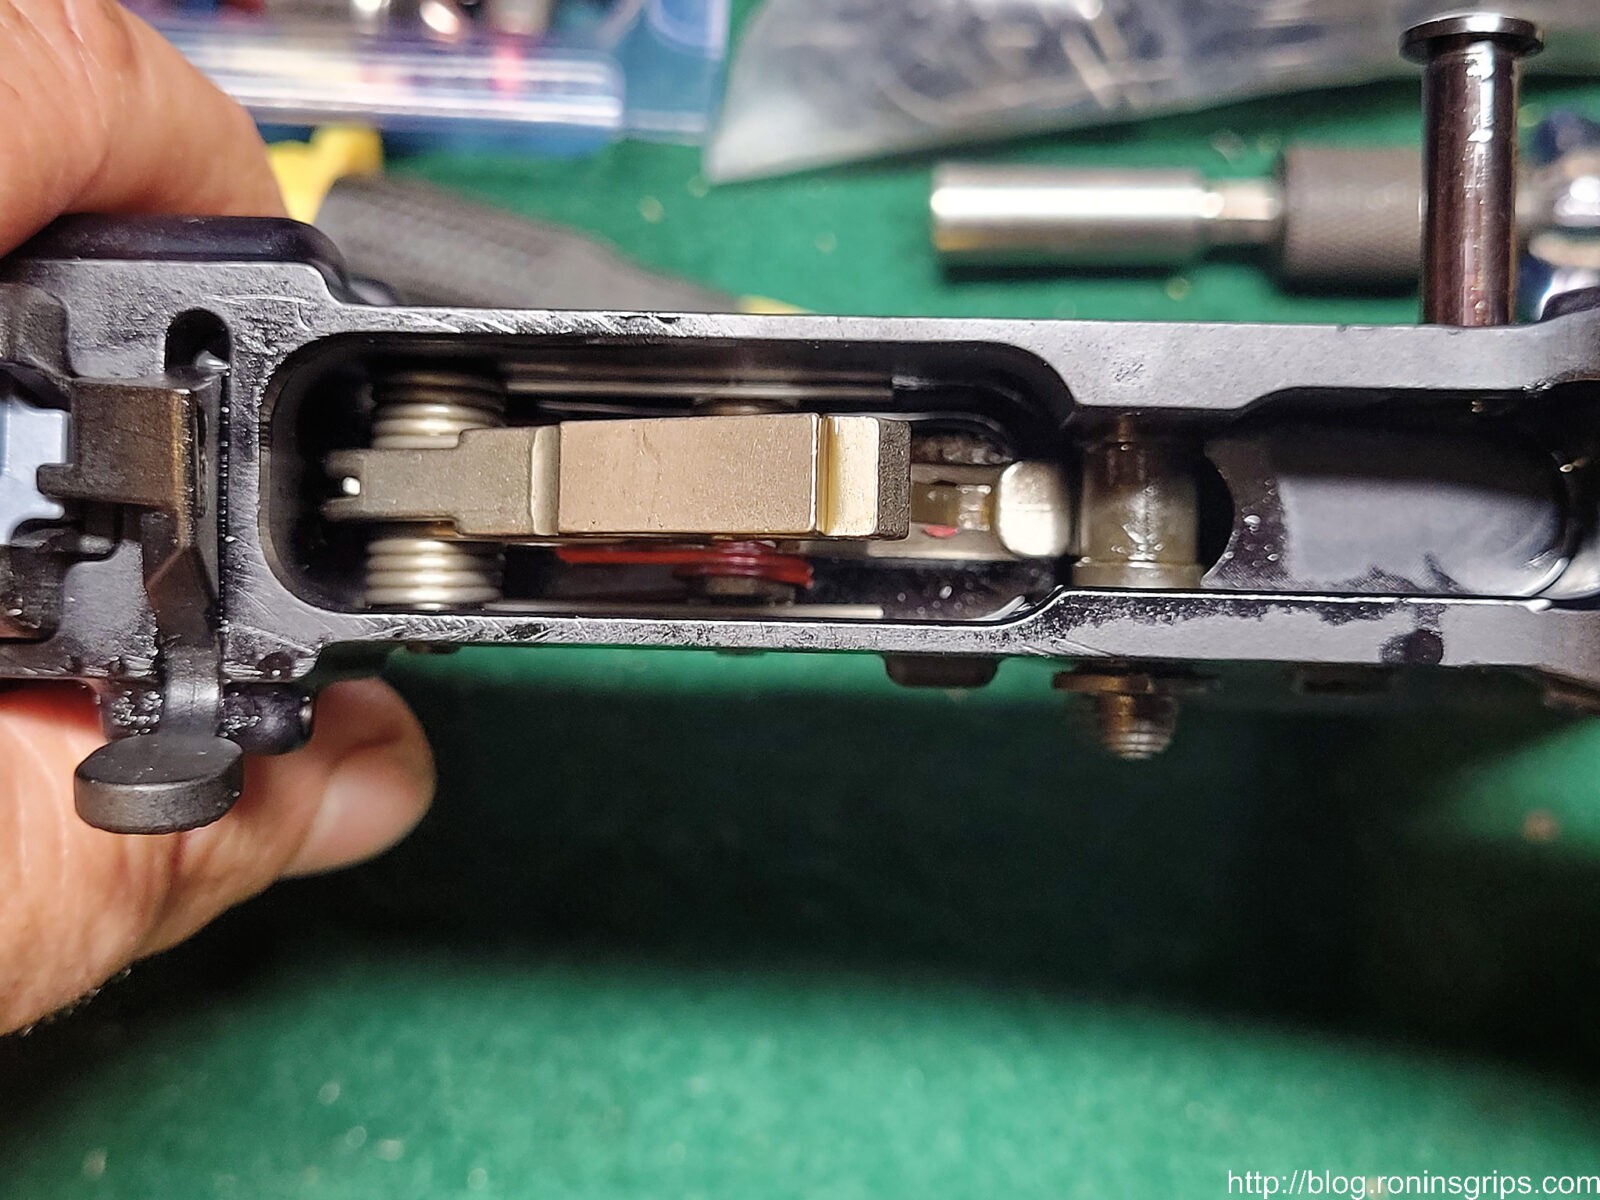
Modern gas piston platforms entirely circumvent this strict geometric limitation. By utilizing alternative mechanical pathways to transfer kinetic energy, engineers have completely redesigned the recoil mechanisms. In advanced platforms like the CZ Bren 2 and the SIG Sauer MCX Spear-LT, the recoil springs are completely contained within the upper receiver itself, located entirely above or immediately around the bolt carrier group.3 Because the bolt carrier no longer needs to recoil outside the physical footprint of the upper receiver, the rear of the firearm effectively ends immediately behind the trigger group.7
This internal engineering triumph allows for the seamless integration of fully side-folding stocks.1 A folding stock drastically reduces the overall length of the firearm, turning a standard 16-inch carbine into an incredibly compact package when folded. This represents a massive logistical and tactical advantage for civilian consumers and professionals who require a firearm that can be discreetly transported in standard bags, securely stored in tight vehicle compartments, or maneuvered easily through extremely confined spaces during rapid deployment.12
4.2 Mitigation of Internal Fouling and Suppressor Optimization
The second major structural advantage of piston-driven platforms is their extreme resistance to internal carbon fouling, a trait which translates directly into heightened reliability under adverse conditions and specifically during suppressed fire.2
Over the last decade, the use of sound suppressors has surged in popularity among civilian shooters and tactical units alike. A suppressor works by physically trapping and delaying the expansion of high-pressure gases at the muzzle of the firearm. This physical obstruction inherently increases the backpressure within the barrel.13 On a standard direct impingement AR-15, this significantly increased backpressure forces a massive volume of highly toxic gas, unburnt powder, and thick carbon particulate back down the gas tube and straight into the upper receiver.2
This rapid accumulation of thick fouling acts as an abrasive paste, accelerating component wear, aggressively drying out lubricating oils, and dramatically increasing the risk of feeding and extraction malfunctions. Furthermore, the excess gas pressure frequently escapes through the small gaps around the rear charging handle, venting highly noxious fumes directly into the shooter’s face and eyes.13
Gas piston platforms excel remarkably when suppressed. Because the primary gas expansion chamber is located externally at the forward gas block, the substantially increased backpressure generated by the suppressor is vented forward into the atmosphere, safely away from the shooter and the delicate central action.1 The bolt carrier group remains shielded from the aggressive influx of carbon.
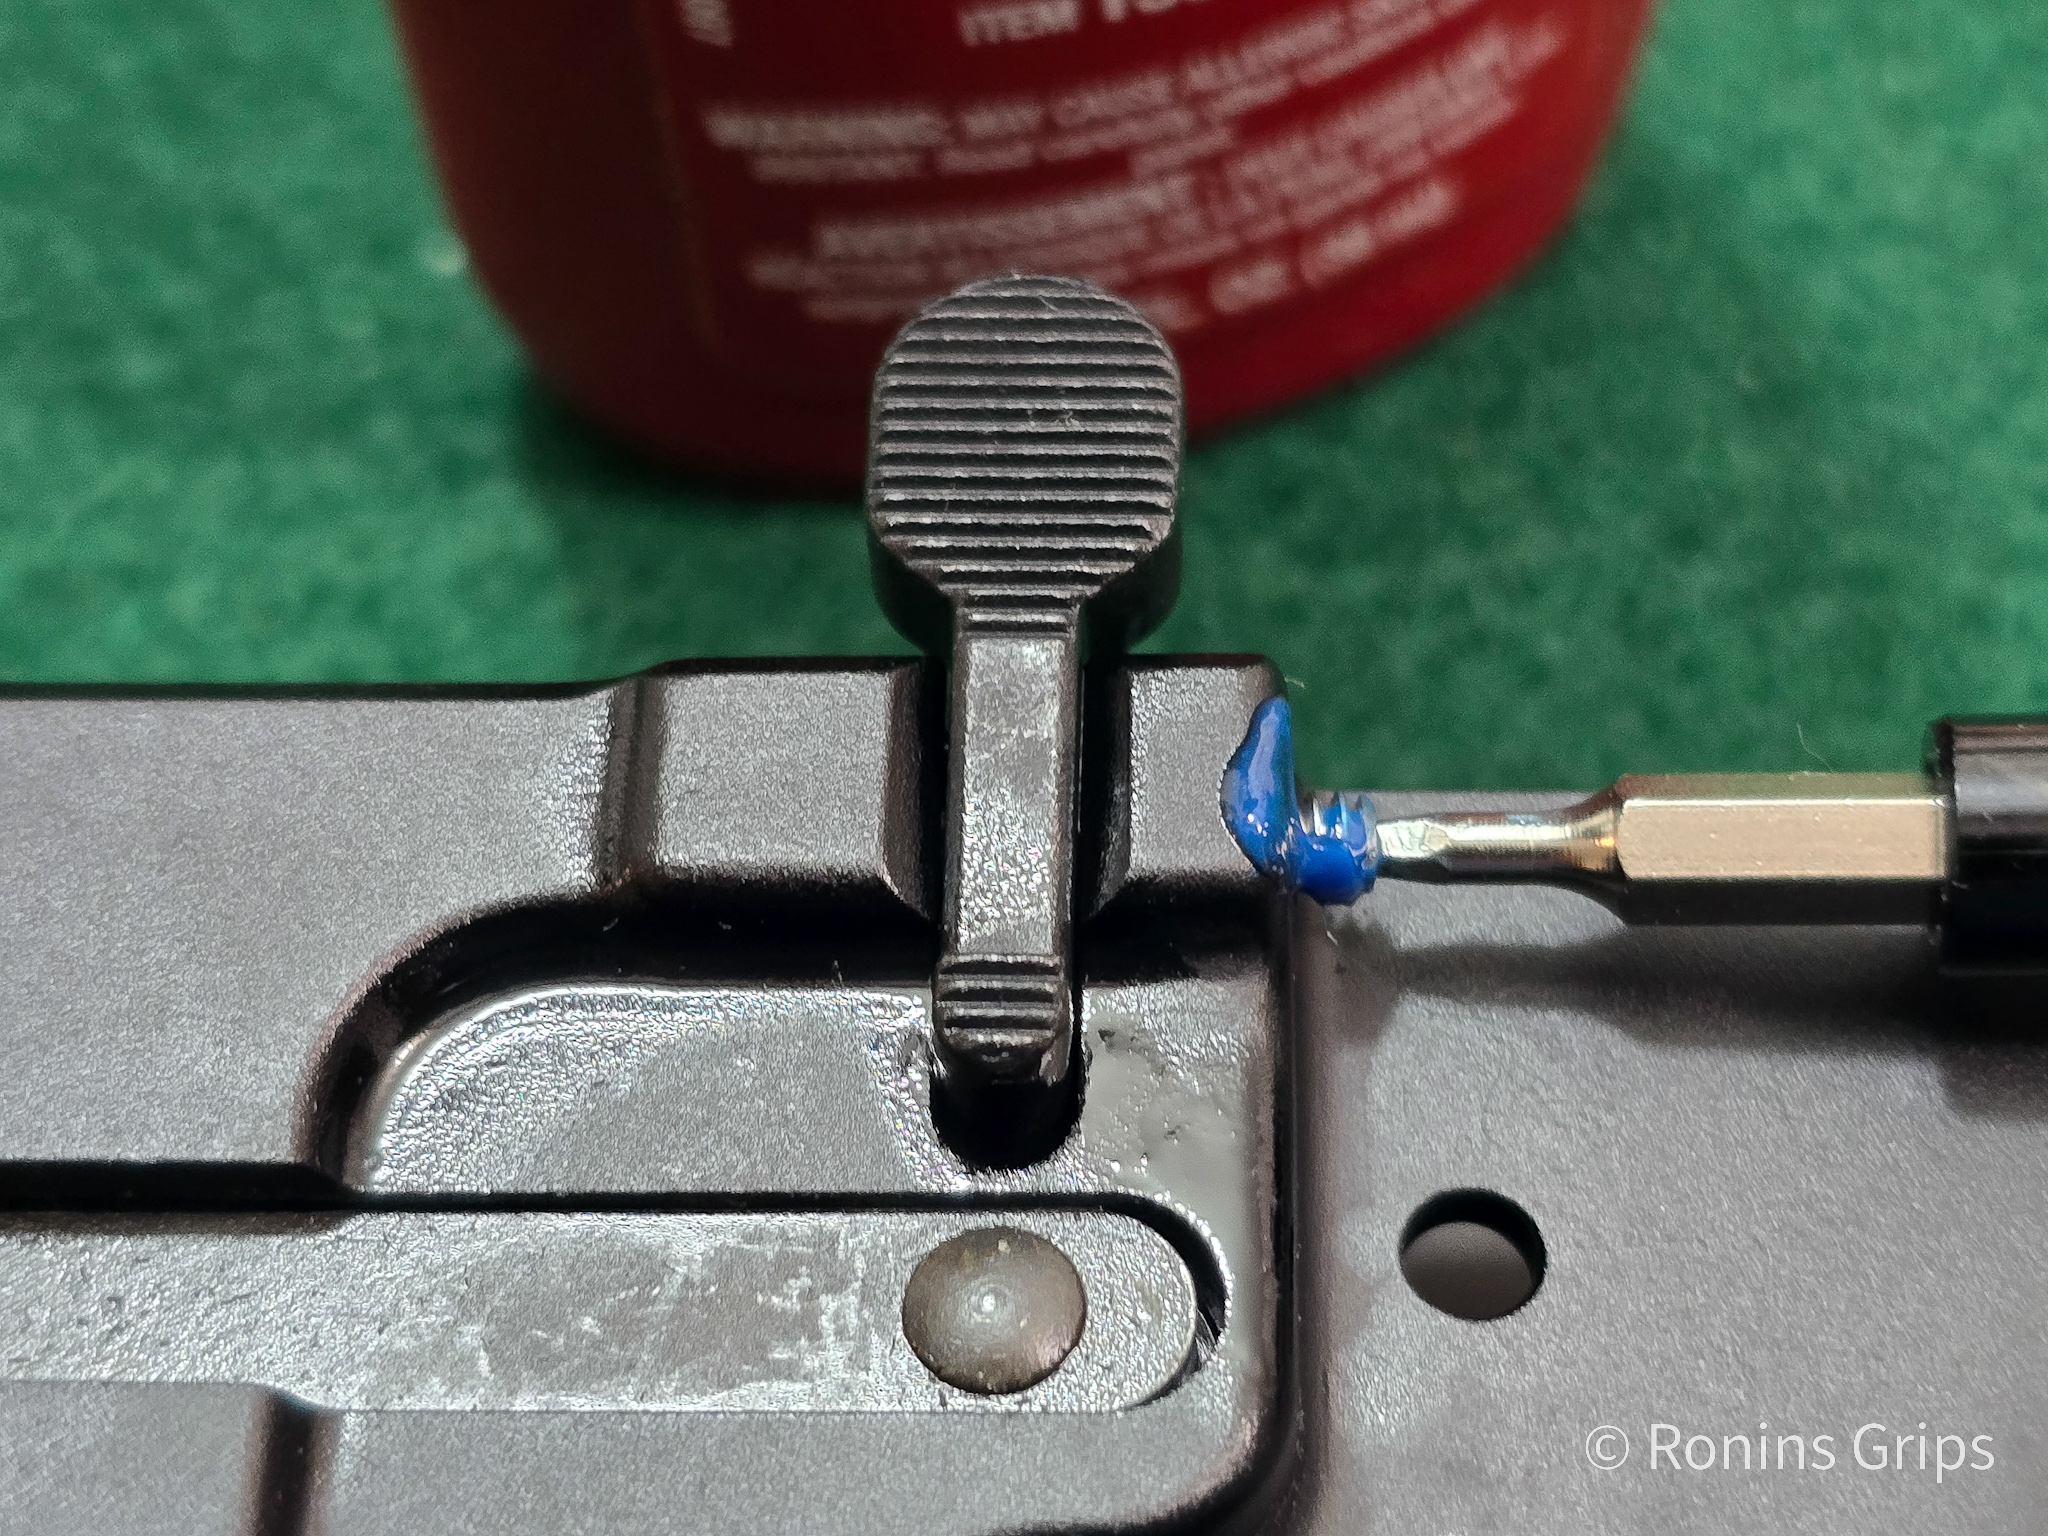
Additionally, modern piston rifles, including both the CZ Bren 2 and the SIG MCX, feature manually adjustable gas blocks.4 By simply rotating a valve located at the front of the gas block, the user can physically restrict the size of the gas port.4 When a suppressor is attached to the muzzle, the user selects the restricted gas setting, which perfectly tunes the kinetic energy transferred to the piston, preventing the action from being over-driven and violently battered by the excess pressure.15 This intelligent gas regulation ensures smooth, reliable extraction and drastically reduces internal parts wear over the lifespan of the firearm.
5. The CZ Bren 2 Ms Technical and Ergonomic Profile
The CZ Bren 2 Ms is a heavily refined evolution of the original Bren 805 carbine, representing a comprehensive clean-sheet design philosophy aimed at producing a highly modular, exceptionally lightweight, and robust combat rifle.7 It has quickly become a highly sought-after platform for users seeking a lightweight piston alternative to the standard AR-15.
5.1 Engineering and Materials
The manufacturer’s official specifications and technical data can be accessed directly at https://www.czfirearms.com/en-us/products/scorpion-bren/cz-bren-2-ms-carbine. The Bren 2 utilizes a refined short-stroke gas piston system paired with a manual, adjustable gas regulator built directly into the forward block.4
A core component of the Bren 2 design is its highly advanced material construction, which was carefully selected to reduce weight.18 To achieve rigorous weight reduction without sacrificing necessary structural integrity, CZ engineers explicitly split the receiver materials.7 The upper receiver, which contains the heavy reciprocating mass and bears the explosive pressure of the operating cycle, is precisely machined from a solid billet of aerospace-grade 7075 T6 aluminum alloy.18 The lower receiver, which houses the trigger control group and the magazine well, is manufactured from a highly durable, carbon fiber-reinforced polymer.7
The barrel of the Bren 2 is a masterpiece of modern metallurgy. Manufactured entirely in-house by CZ, the barrel is cold hammer-forged, a highly demanding manufacturing process utilizing 40 tons of pressure to precisely shape the internal bore around a mandrel.18 Furthermore, the bore of the barrel is heavily hard-chrome lined.4 Chrome lining provides an exceptionally hard, friction-reducing, and corrosion-resistant surface that dramatically increases the barrel’s service life to a guaranteed minimum of 20,000 rounds and practically eliminates the risk of rust in austere, humid environments.4
5.2 Manual of Arms Transition
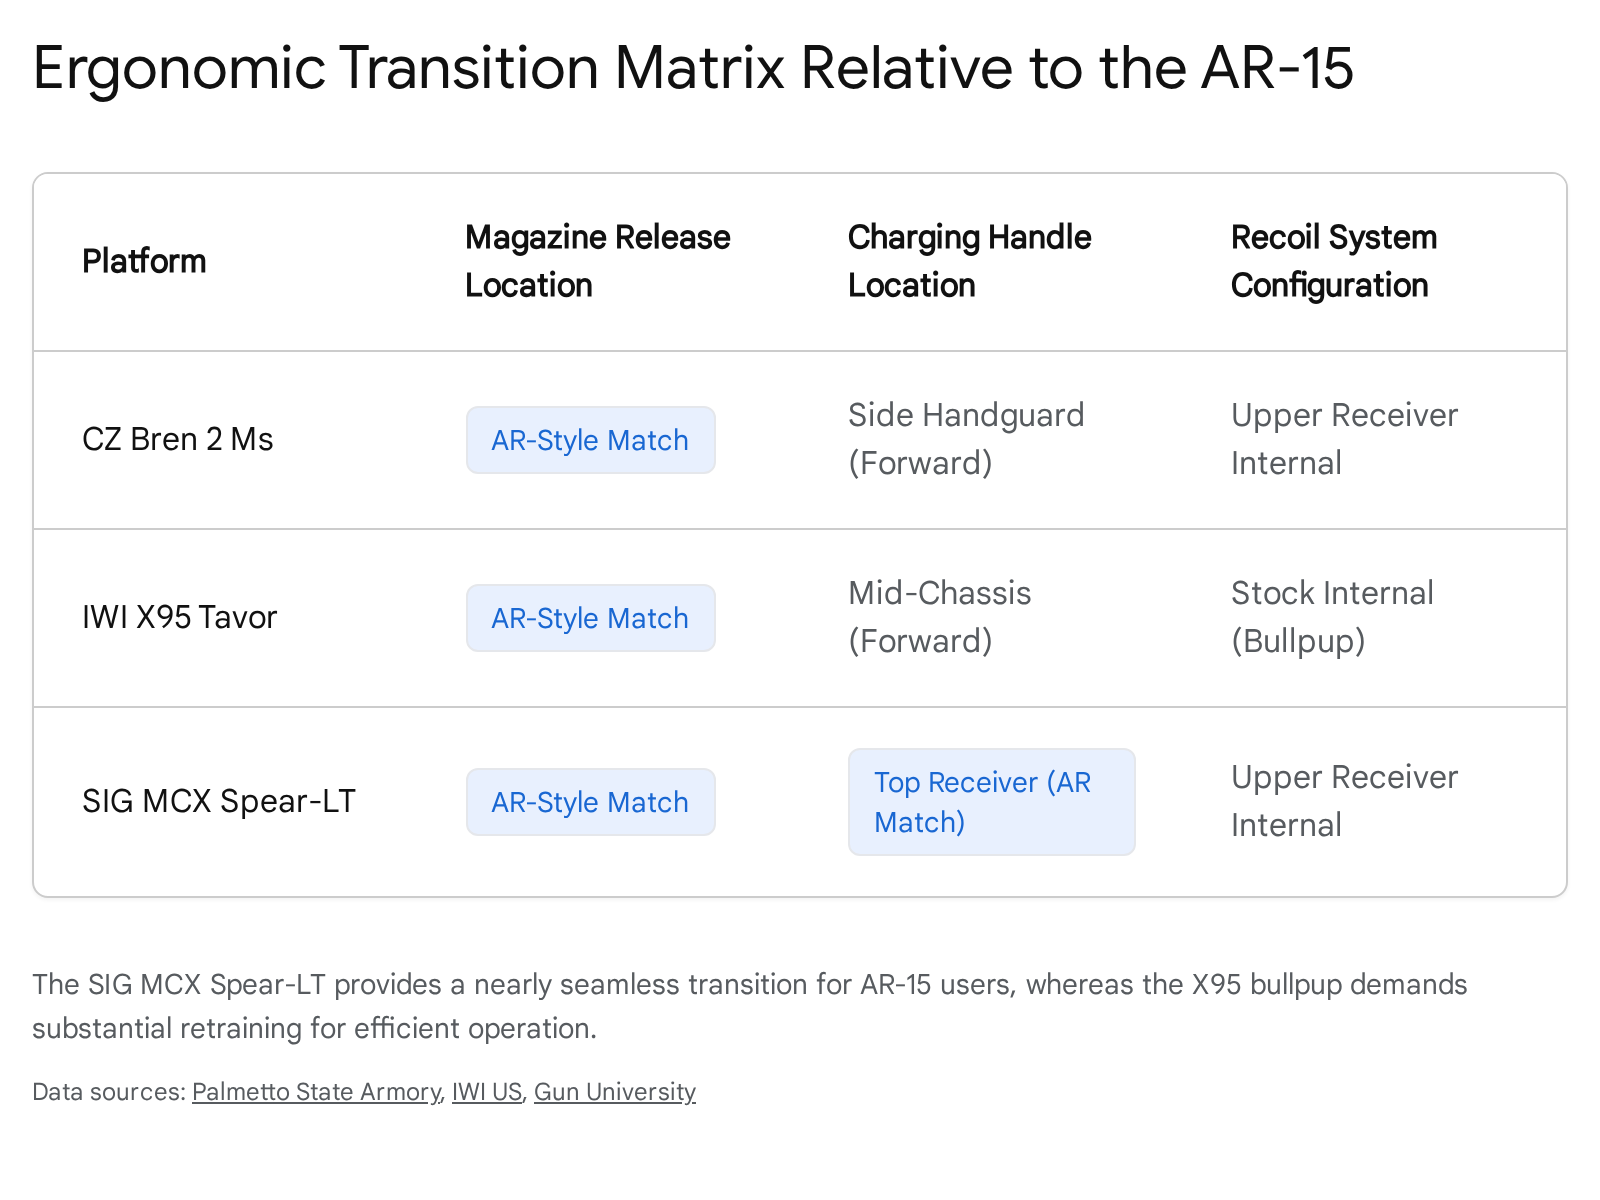
Transitioning from a standard AR-15 to the CZ Bren 2 Ms requires minimal neurological rewiring for the operator, as CZ explicitly designed the lower receiver controls to closely mimic the established AR-15 layout.4
The primary magazine release button and the manual safety selector switch are fully ambidextrous and located in the exact same geometric positions as those found on a traditional AR-15.7 A user accustomed to firmly pressing the magazine release with their right index finger will find the Bren 2 entirely intuitive and natural. Furthermore, the Bren 2 accepts standard AR-15 pattern STANAG magazines for its 5.56 NATO variants, ensuring complete logistical cross-compatibility with the user’s existing ammunition inventory.7
The bolt catch and release system is also heavily inspired by the AR-15, featuring a standard paddle style release on the left side of the receiver, but it is intelligently mirrored on the right side for true ambidexterity.7 CZ engineers also integrated a highly innovative secondary bolt catch mechanism nestled securely inside the front of the trigger guard housing.7 This unique feature allows the user to lock the bolt to the rear or release it entirely using only their trigger finger, without ever breaking their strong firing grip on the weapon.
The most prominent manual of arms divergence from the AR-15 is the location and operation of the charging handle mechanism. The standard AR-15 utilizes a T-shaped charging handle located at the extreme top rear of the upper receiver, requiring the user to break their cheek weld and pull awkwardly from the rear to cycle the weapon.20 The Bren 2 eliminates this rearward design entirely. Instead, it features a forward-mounted, side-charging handle located directly on the handguard rail.4 This charging handle is non-reciprocating, meaning it stays locked securely forward during firing, entirely eliminating the risk of it violently striking the user’s hand or barricade.7 It can be quickly swapped to either the left or right side of the weapon without specialized tools, depending entirely on the operator’s preference.7 Furthermore, the handle acts as a highly functional forward assist, allowing the user to physically push the bolt carrier completely closed if a round fails to chamber properly due to heavy fouling.7
Because the entire recoil spring system is entirely self-contained inside the aluminum upper receiver, the Bren 2 is completely devoid of a buffer tube and is equipped directly from the factory with a side-folding, adjustable length-of-pull shoulder stock, maximizing its transportability.12
5.3 Market Pricing and Product Sourcing
When sourcing the CZ Bren 2 Ms 16.5-inch Carbine chambered in 5.56 NATO, market analytics reveal a consistent pricing structure across reputable online retailers. The absolute minimum observed price points rest around $1,949.99, with the standard average market price hovering near $2,200.00.12
The following table presents exactly five compliant preferred vendors currently offering the precise CZ Bren 2 Ms 16.5″ Carbine (5.56 NATO) within the acceptable price parameters.
| Vendor | Product Description | Listed Price | Direct Product URL |
| Sportsmans Warehouse | CZ USA Bren 2 MS 5.56 NATO 16in Carbine | $1,949.99 | (https://www.sportsmans.com/shooting-gear-gun-supplies/modern-sporting-rifles/cz-usa-bren-2-ms-556mm-nato-16in-black-anodized-semi-automatic-modern-sporting-rifle-301-rounds/p/1787537) |
| Brownells | CZ-USA Bren 2 MS Carbine 5.56 NATO 16.5″ | $2,182.99 | (https://www.brownells.com/guns/rifles/semi-auto-rifles/bren-2-ms-carbine-223-rem5.56×45-semi-auto-rifle/) |
| Primary Arms | CZ USA Bren 2 MS Carbine 5.56 NATO 16.5″ (Awaiting Restock) | $2,193.89 | Primary Arms Link |
| KYGunCo | CZ-USA Bren 2 MS Carbine 5.56 NATO 16.5″ | $2,202.24 | (https://www.kygunco.com/product/cz-usa-08610-bren-2-ms-carbine-black) |
| Palmetto State Armory | CZ-USA Bren 2 MS Carbine 5.56 NATO 16.5″ (Awaiting Restock) | $2,361.99 | (https://palmettostatearmory.com/cz-usa-bren-2-ms-carbine-223-rem-5-56x45mm-16-50-rifle-black-08610.html) |
6. The IWI X95 Tavor Technical and Ergonomic Profile
The Israeli Weapon Industries X95 Tavor represents an entirely different architectural philosophy compared to both the AR-15 and the CZ Bren 2. Engineered specifically to meet the extreme close-quarters combat requirements of the Israeli Defense Forces, the X95 discards the traditional rifle layout entirely in favor of an advanced bullpup configuration.23
6.1 Engineering and Bullpup Architecture
The manufacturer’s official technical specifications and detailed features can be accessed at https://iwi.us/firearms/tavor-x95/5-56-nato-16-5in-barrel/. A bullpup design achieves extreme compactness by physically relocating the entire firing action, including the bolt carrier, the chamber, and the magazine well, to a position completely behind the trigger group, nested deep within the shoulder stock.23
This radical engineering choice yields an incredibly short overall footprint without compromising the terminal ballistics generated by a full-length barrel. For instance, the standard retail X95 is equipped with a full 16.5-inch barrel, maximizing the velocity and fragmentation potential of the 5.56 NATO cartridge, yet the entire rifle measures a mere 26.125 inches in overall length.24 To contextualize this specific dimension, the X95 is shorter than a legally restricted AR-15 equipped with a drastically reduced 10.5-inch barrel and a fully collapsed stock.
Internally, the X95 relies on a highly robust, unified long-stroke gas piston system paired with a closed rotating bolt.5 The barrel is cold hammer-forged from high-grade Chrome Moly Vanadium steel and heavily chrome-lined for maximum durability under sustained automatic fire conditions.24 The exterior receiver housing is manufactured from high-impact reinforced polymer, providing excellent structural resilience against drops and impacts while keeping the overall weapon weight manageable at roughly 7.9 pounds.24
6.2 Manual of Arms Transition
The transition from a standard AR-15 to an IWI X95 represents the steepest learning curve and highest friction of the three platforms discussed.8 The geometric relocation of the critical components severely alters the biomechanics of reloading, malfunction clearance, and basic weapon manipulation.8
On a standard AR-15, the magazine well is located directly in front of the trigger, sitting securely within the operator’s forward peripheral vision. On the X95 bullpup, the magazine well is tucked deeply beneath the shooter’s armpit, near the rear of the stock.23 Executing a rapid reload requires the operator to bring their support hand completely rearward, physically sweeping past the pistol grip to blindly index the fresh magazine into the rearward well.8 While some tactical operators advocate for tucking the stock extremely high over the shoulder to facilitate a clear visual line to the magazine well during a reload, extensive training allows for seamless, rapid blind reloads utilizing ingrained muscle memory.25
IWI recognized the friction associated with transitioning from the globally dominant AR-15 and heavily modernized the X95 layout compared to their legacy Tavor SAR model to ease this training burden.8 Crucially, the ambidextrous magazine release button was physically repositioned to the exact geometric location of an AR-15 magazine release, sitting directly above and forward of the trigger guard.24 Pressing this forward button with the firing index finger drops the empty magazine located at the rear of the rifle via a long internal mechanical linkage system. Furthermore, the X95 features a significantly upgraded fire control pack, providing a crisp 5 to 6 pound trigger pull that closely rivals standard AR-15 triggers, overcoming a common complaint regarding heavy bullpup trigger linkages.8
The charging handle is strategically positioned forward on the chassis, allowing the shooter to forcefully manipulate the bolt without ever dismounting the rifle from the shoulder pocket.24 Furthermore, the entire weapon is fully modular and fully ambidextrous, allowing left-handed shooters to completely swap the ejection port, bolt assembly, and charging handle to the opposite side of the firearm.24 Because the heavy action is located in the rear, the balance of the rifle is severely shifted, creating a rear center of gravity that anchors the weapon firmly into the shoulder, allowing for surprisingly stable one-handed firing if the operator’s support arm is injured or occupied.23
6.3 Market Pricing and Product Sourcing
Market data indicates an incredibly stable pricing structure for the standard 16.5-inch 5.56 NATO IWI X95 Tavor across the entire retail industry. While the manufacturer’s suggested retail price is listed at $1,999.00, the heavily standardized online market price sits firmly at $1,749.99.26
The following table presents exactly five compliant preferred vendors currently offering the exact IWI X95 Tavor 16.5″ (5.56 NATO) at the industry standard price.
| Vendor | Product Description | Listed Price | Direct Product URL |
| Bereli | IWI Tavor X95 5.56 NATO 16.5″ Rifle | $1,749.99 | (https://www.bereli.com/shooting/firearms/rifles/iwi-tavor-x95-16-5-56-nato-rifle/) |
| Midway USA | IWI Tavor X95 5.56 NATO 16.5″ Rifle | $1,749.99 | (https://www.midwayusa.com/product/1020543979) |
| Sportsmans Warehouse | IWI Tavor X95 5.56 NATO 16.5″ Rifle | $1,749.99 | (https://www.sportsmans.com/shooting-gear-gun-supplies/modern-sporting-rifles/iwi-tavor-x95-556mm-nato-165in-fdeblack-semi-automatic-modern-sporting-rifle-301-rounds/p/1647669) |
| KYGunCo | IWI Tavor X95 5.56 NATO 16.5″ Rifle | $1,749.99 | (https://www.kygunco.com/product/iwi-israel-weapon-industries-xg16-tavor-x95-5.56-odg-16.5-301-flattop) |
| Shooting Surplus | IWI Tavor X95 5.56 NATO 16.5″ Rifle | $1,752.53 | (https://shootingsurplus.com/iwi-tavor-x95-bullpup-rifle-flattop-black-5-56nato-16-5-barrel-w-steel-muzzle-brake-10rd-mag/) |
7. The SIG Sauer MCX Spear-LT Technical and Ergonomic Profile
The SIG Sauer MCX Spear-LT represents the absolute latest evolution in the highly successful MCX lineage, a premium platform specifically requested by and developed alongside top-tier global special operations groups.6 It aims to perfectly marry the unrivaled ergonomics and modularity of the AR-15 with the supreme reliability and cleanliness of a modern short-stroke gas piston.
7.1 Engineering and Internal Recoil Mechanisms
The official engineering specifications are hosted by the manufacturer directly at https://www.sigsauer.com/mcx-spear-lt-5-56-16-rifle.html. The MCX Spear-LT utilizes a highly refined short-stroke gas piston operating system coupled with a manually adjustable gas valve located at the block, allowing the operator to easily toggle between standard unsuppressed firing and heavy suppressed operations.3
The true engineering marvel of the MCX platform lies in its complete internalization of the buffer and recoil assembly. SIG Sauer engineers entirely eliminated the need for a rearward receiver extension tube by migrating the entire recoil system directly into the upper receiver housing.3 The MCX utilizes dual captive recoil springs that ride horizontally directly above the bolt carrier group.3 When the gas piston powerfully strikes the carrier, the carrier is driven rearward along internal steel guide rails, completely compressing the dual springs entirely inside the physical footprint of the upper receiver.3
This internal restructuring allows the MCX Spear-LT to be equipped with a low-profile, push-button folding minimalist stock, rendering the full 16-inch 5.56 NATO rifle exceptionally compact for transport or vehicular deployment.3 Furthermore, the platform is wildly modular. The cold hammer-forged steel barrels are explicitly designed to be easily swappable at the user level, allowing the operator to quickly change barrel lengths or even calibers by simply loosening two captive Torx screws located on the receiver.3 The entire aluminum handguard has been severely lightened compared to previous Virtus generations, utilizing new attachment screws to guarantee absolute rigidity for mounting sensitive laser aiming modules that require zero shift mitigation.30
7.2 Manual of Arms Transition
The SIG Sauer MCX Spear-LT was deliberately and painstakingly engineered to eliminate any transition friction for an operator previously trained on the legacy AR-15 system.3 From a strict biomechanical and ergonomic standpoint, the lower receiver of the MCX Spear-LT is functionally and visually identical to a highly upgraded AR-15 lower receiver.3
The manual safety selector, the primary magazine release button, and the bolt catch are located in the exact geometrical positions established by the original AR-15 design.3 Furthermore, SIG Sauer engineered these controls to be completely ambidextrous right out of the box, allowing full manipulation of all critical weapon functions with either the left or right hand.3 Unlike the CZ Bren 2 or the IWI X95 which utilize forward charging mechanisms, the MCX retains the traditional rear-mounted, T-shaped charging handle, which is also fully ambidextrous.6 Therefore, any malfunction clearance drill, charging procedure, or rapid reloading sequence mastered on an AR-15 translates instantly and perfectly to the MCX Spear-LT without a single modification in physical technique or muscle memory.3
Additionally, the MCX Spear-LT retains vast aftermarket compatibility with the broader AR-15 ecosystem. It accepts all standard AR-15 pattern STANAG magazines flawlessly, and crucially, the lower receiver is designed to be fully compatible with standard AR-15 style aftermarket trigger groups.10 However, the factory trigger provided with the Spear-LT is a premium SIG Flatblade Match Trigger, providing an exceptionally crisp two-stage break that requires no immediate upgrading.10
7.3 Market Pricing and Product Sourcing
The SIG Sauer MCX Spear-LT is deliberately positioned as a premium, tier-one tactical platform, and its pricing structure directly reflects its advanced engineering, premium coatings, and extensive military pedigree. The absolute minimum online market price for the 16-inch 5.56 NATO model typically sits at $2,579.99, with the overwhelming average standard market price being $2,599.99 across reputable dealers.32
The following table presents exactly five compliant preferred vendors currently offering the precise SIG Sauer MCX Spear-LT 16″ (5.56 NATO) within the optimal observed price bracket.
| Vendor | Product Description | Listed Price | Direct Product URL |
| KYGunCo | Sig Sauer MCX Spear LT 5.56 NATO 16″ Coyote | $2,579.99 | (https://www.kygunco.com/product/sig-sauer-rmcx-556n-16b-lt-mcx-spear-lt-5.56-nato-16-coyote-30rd) |
| Midway USA | Sig Sauer MCX-SPEAR LT IR 5.56 NATO 16″ | $2,599.99 | (https://www.midwayusa.com/product/1028051791) |
| Sportsmans Warehouse | Sig Sauer MCX-SPEAR LT IR 5.56 NATO 16″ | $2,599.99 | (https://www.sportsmans.com/shooting-gear-gun-supplies/modern-sporting-rifles/sig-sauer-mcx-spear-lt-ir-556mm-nato-16in-gen-ii-nir-cerakote-semi-automatic-modern-sporting-rifle-301-rounds/p/1899471) |
| Brownells | Sig Sauer MCX Spear LT IR 5.56 NATO 16″ | $2,599.99 | (https://www.brownells.com/guns/rifles/semi-auto-rifles/mcx-spear-lt-ir-5.56×45-nato-semi-auto-rifle/) |
| Bereli | Sig Sauer MCX Spear LT 5.56 NATO 16″ (Awaiting Restock) | $2,299.00 | (https://www.bereli.com/sig-sauer-mcx-spear-lt-ar-15-rifle-5-56-16-30rd-black-rmcx-556n-16b-lt-b/) |
8. Conclusions on the Evolution of 5.56mm Weapon Systems
The gradual migration of consumers and tactical professionals away from the direct impingement AR-15 is clearly not a transient trend based on aesthetic preference, but rather a calculated, data-driven evolution driven by rigid modern operational requirements.1 The AR-15 remains an exceptionally light, highly modular, and inherently accurate weapon system, but its fundamental gas routing mechanics impose strict thermodynamic limits on extreme durability, optimal suppressor integration, and its minimal structural footprint.1
The alternative platforms exhaustively analyzed in this report elegantly solve these historical engineering bottlenecks through advanced mechanical piston systems. The CZ Bren 2 Ms proves definitively that high-end aerospace aluminum and carbon fiber polymer can be masterfully combined with a robust short-stroke piston to create a lightweight, fully folding combat rifle that runs impeccably clean under harsh conditions.7 The IWI X95 Tavor demonstrates the absolute terminal ballistic advantages of the compact bullpup configuration, maximizing the velocity of the 5.56 NATO cartridge while providing a massive reduction in physical length via a proven long-stroke piston designed for severe combat environments.23 Finally, the SIG Sauer MCX Spear-LT represents the ultimate engineering bridge between legacy ergonomics and next-generation internal mechanics, offering operators the clean-running, bufferless reliability of a piston system without requiring them to unlearn decades of deeply ingrained AR-15 muscle memory.3
Ultimately, the decision to invest in these highly advanced platforms requires the civilian consumer or agency procurement officer to carefully balance the markedly increased financial entry cost and the reliance on proprietary manufacturer part ecosystems against the substantial tactical advantages provided.1 The integration of fully folding stocks, the heavy reduction in catastrophic carbon fouling, and the seamless optimization with modern sound suppressors ensure that gas piston platforms will continue to aggressively capture market share from the traditional AR-15 in the years to come.
Note: Vendor Sources listed are not an endorsement of any given vendor. It is our software reporting a product page given the direction to list products that are between the minimum and average sales price when last scanned.
Please share the link on Facebook, Forums, with colleagues, etc. Your support is much appreciated and if you have any feedback, please email us in**@*********ps.com. If you’d like to request a report or order a reprint, please click here for the corresponding page to open in new tab.
Sources Used
- Direct Impingement vs Gas Piston AR‑15: Pros and Cons | Mid State Firearms, accessed April 14, 2026, https://midstatefirearms.com/piston-driven-ar15-or-direct-impingement-key-differences/
- Direct Impingement vs Gas Pistons: Differences and Similarities – Sonoran Desert Institute, accessed April 14, 2026, https://sdi.edu/2022/05/17/direct-impingement-vs-gas-pistons-differences-and-similarities/
- Sig Sauer MCX Spear LT Review: Evolution of the AR-15 Style Platform? – Gun University, accessed April 14, 2026, https://gununiversity.com/sig-sauer-mcx-spear-lt-review/
- CZ BREN 2 Ms PISTOL 5.56×45 – CZ Firearms, accessed April 14, 2026, https://www.czfirearms.com/en-us/products/pistols/cz-bren-2-ms-pistol
- IWI Tavor X95 – Wikipedia, accessed April 14, 2026, https://en.wikipedia.org/wiki/IWI_Tavor_X95
- MCX-SPEAR LT IR 5.56 NATO 16″ – SIG Sauer, accessed April 14, 2026, https://www.sigsauer.com/mcx-spear-lt-ir-5-56-nato-16.html
- CZ-USA CZ Bren 2 Ms 5.56 AR Pistol, Blk – 91451 | Palmetto State Armory, accessed April 14, 2026, https://palmettostatearmory.com/cz-usa-cz-bren-2-ms-5-56-ar-pistol-blk-91451.html
- 6 Reasons Why the IWI Tavor is Better than the AR-15 | thefirearmblog.com, accessed April 14, 2026, https://www.thefirearmblog.com/blog/2022/09/27/6-reasons-why-the-iwi-tavor-is-better-than-the-ar-15/
- Direct impingement vs gas piston. Worth worrying about or nah? – Reddit, accessed April 14, 2026, https://www.reddit.com/r/liberalgunowners/comments/1ln1y10/direct_impingement_vs_gas_piston_worth_worrying/
- MCX-SPEAR LT 5.56 16″ RIFLE – SIG Sauer, accessed April 14, 2026, https://www.sigsauer.com/mcx-spear-lt-5-56-16-rifle.html
- Three Excellent AR-15 Alternatives (2022) – Sonoran Desert Institute, accessed April 14, 2026, https://sdi.edu/2022/01/25/three-excellent-ar-15-alternatives-2022/
- CZ USA BREN 2 MS CARBINE 223 REM/5.56X45 SEMI-AUTO RIFLE – Brownells, accessed April 14, 2026, https://www.brownells.com/guns/rifles/semi-auto-rifles/bren-2-ms-carbine-223-rem5.56×45-semi-auto-rifle/
- MCX SPEAR LT or CZ BREN 2 : r/ar15 – Reddit, accessed April 14, 2026, https://www.reddit.com/r/ar15/comments/1c0n4gj/mcx_spear_lt_or_cz_bren_2/
- MCX-SPEAR LT 5.56 11.5″ PISTOL – SIG Sauer, accessed April 14, 2026, https://www.sigsauer.com/mcx-spear-lt-5-56-11-5-pistol.html
- CZ Bren 2 | First Shots – Better Than the Scar? – YouTube, accessed April 14, 2026, https://www.youtube.com/watch?v=iXTWCbrxwR0
- BREN 2 MS 5.56X45 NATO SEMIAUTO HANDGUN Safety Instructions, accessed April 14, 2026, https://www.brownells.cz/WebRoot/MediaDefinition/safety_instructions/250/031/392/250031392_en_GB.pdf
- CZ BREN 2 Ms CARBINE – CZ Firearms, accessed April 14, 2026, https://www.czfirearms.com/en-us/products/scorpion-bren/cz-bren-2-ms-carbine
- BREN 2 Series – CZ Firearms, accessed April 14, 2026, https://www.czfirearms.com/products/semi-automatic/cz-bren-2-series
- CZ Bren 2 MS 223 REM/5.56 NATO 11″ Pistol, Black | Palmetto State Armory, accessed April 14, 2026, https://palmettostatearmory.com/cz-bren-2-ms-223-rem-5-56-nato-11-pistol-black.html
- Thoughts on CZ Bren 2 vs AR-15 pistol? : r/CZFirearms – Reddit, accessed April 14, 2026, https://www.reddit.com/r/CZFirearms/comments/1rzft0o/thoughts_on_cz_bren_2_vs_ar15_pistol/
- CZ Bren 2 MS Carbine For Sale – From $1949.99, Rating, Price – Pew Pew Tactical, accessed April 14, 2026, https://www.pewpewtactical.com/products/cz-bren-2-ms-carbine/
- CZ USA Bren 2 MS 5.56mm NATO 16in Black Anodized Semi Automatic Modern Sporting Rifle – 30+1 Rounds, accessed April 14, 2026, https://www.sportsmans.com/shooting-gear-gun-supplies/modern-sporting-rifles/cz-usa-bren-2-ms-556mm-nato-16in-black-anodized-semi-automatic-modern-sporting-rifle-301-rounds/p/1787537
- Micro TAVOR x95 – IWI, accessed April 14, 2026, https://iwi.net/iwi-x95/
- 5.56 NATO Tavor X95 With 16.5″ Barrel | IWI US, accessed April 14, 2026, https://iwi.us/firearms/tavor-x95/5-56-nato-16-5in-barrel/
- IWI TAVOR X95 VS AR15 – ROUND TWO – “TRANSITIONS” – YouTube, accessed April 14, 2026, https://www.youtube.com/watch?v=emmn71ssKV0
- Tavor X95 Modern Bullpup 5.56, 300Blk & 9mm Rifles | IWI US, accessed April 14, 2026, https://iwi.us/firearms/tavor-x95/
- IWI Tavor X95 5.56mm NATO 16.5in FDE/Black Semi Automatic Modern Sporting Rifle – 30+1 Rounds, accessed April 14, 2026, https://www.sportsmans.com/shooting-gear-gun-supplies/modern-sporting-rifles/iwi-tavor-x95-556mm-nato-165in-fdeblack-semi-automatic-modern-sporting-rifle-301-rounds/p/1647669
- IWI Tavor X95 16″ 5.56 NATO Rifle – Bereli Inc., accessed April 14, 2026, https://www.bereli.com/shooting/firearms/rifles/iwi-tavor-x95-16-5-56-nato-rifle/
- Sig Sauer MCX-SPEAR LT IR 5.56mm NATO 16in Gen II NiR Cerakote Semi Automatic Modern Sporting Rifle – 30+1 Rounds | Sportsman’s Warehouse, accessed April 14, 2026, https://www.sportsmans.com/shooting-gear-gun-supplies/modern-sporting-rifles/sig-sauer-mcx-spear-lt-ir-556mm-nato-16in-gen-ii-nir-cerakote-semi-automatic-modern-sporting-rifle-301-rounds/p/1899471
- SIG Sauer MCX Spear LT AR-15 Rifle 5.56 16″ 30rd, Black – RMCX …, accessed April 14, 2026, https://www.bereli.com/sig-sauer-mcx-spear-lt-ar-15-rifle-5-56-16-30rd-black-rmcx-556n-16b-lt-b/
- Let’s talk.. is the sig mcx spear LT a better platform than a bougie ar15 platform? What makes what better. – Reddit, accessed April 14, 2026, https://www.reddit.com/r/ar15/comments/13zjnep/lets_talk_is_the_sig_mcx_spear_lt_a_better/
- Sig Sauer MCX-SPEAR LT 5.56 NATO 16″ 30rd – Coyote – kygunco, accessed April 14, 2026, https://www.kygunco.com/product/sig-sauer-rmcx-556n-16b-lt-mcx-spear-lt-5.56-nato-16-coyote-30rd
- Sig Sauer MCX-SPEAR LT IR Semi Automatic Rifle 5.56x45mm NATO 16 Black – MidwayUSA, accessed April 14, 2026, https://www.midwayusa.com/product/1028051791