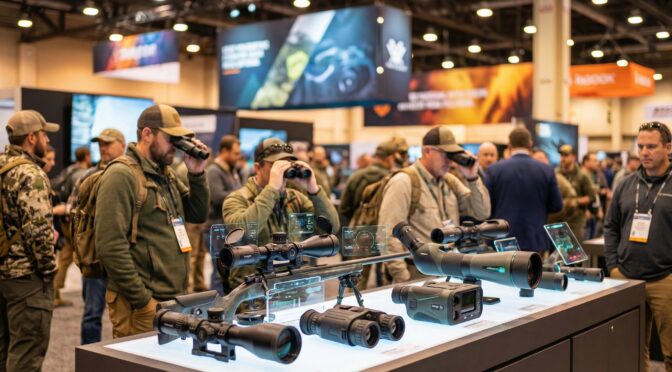
The 2026 Shooting, Hunting, and Outdoor Trade (SHOT) Show, held from January 20–23 at The Venetian Expo and Caesars Forum in Las Vegas 1, served as a definitive bellwether for the future of small arms fire control systems. For the past decade, the industry has been characterized by the pursuit of the “universal optic”—typified by the Low Power Variable Optic (LPVO) attempting to master both close-quarters battle (CQB) and mid-range precision. The exhibits of 2026 signal the end of this generalization era and the commencement of a new phase defined by functional bifurcation and photonic integration.
Industry analysis reveals a marked departure from the 1-6x and 1-8x LPVO dominance that characterized the early 2020s procurement cycles. Instead, the market is bifurcating into two distinct, highly specialized directions. First, the Medium Power Variable Optic (MPVO), specifically in the 2-10x and 2-12x ranges, has matured into the primary optical solution for the General Purpose Rifle (GPR), largely driven by the now-ubiquitous adoption of offset or piggybacked red dot sights which handle the 1x requirement more effectively than a variable optic ever could.2 Second, the thermal imaging sector has crossed a critical threshold of democratization and fusion. Companies such as Nocpix and Holosun are collapsing the price-to-performance ratio, integrating Laser Rangefinders (LRF) directly into objective lenses, and combining IR lasers into reflex sights, fundamentally altering the Size, Weight, and Power (SWaP) calculus for night vision operations.3
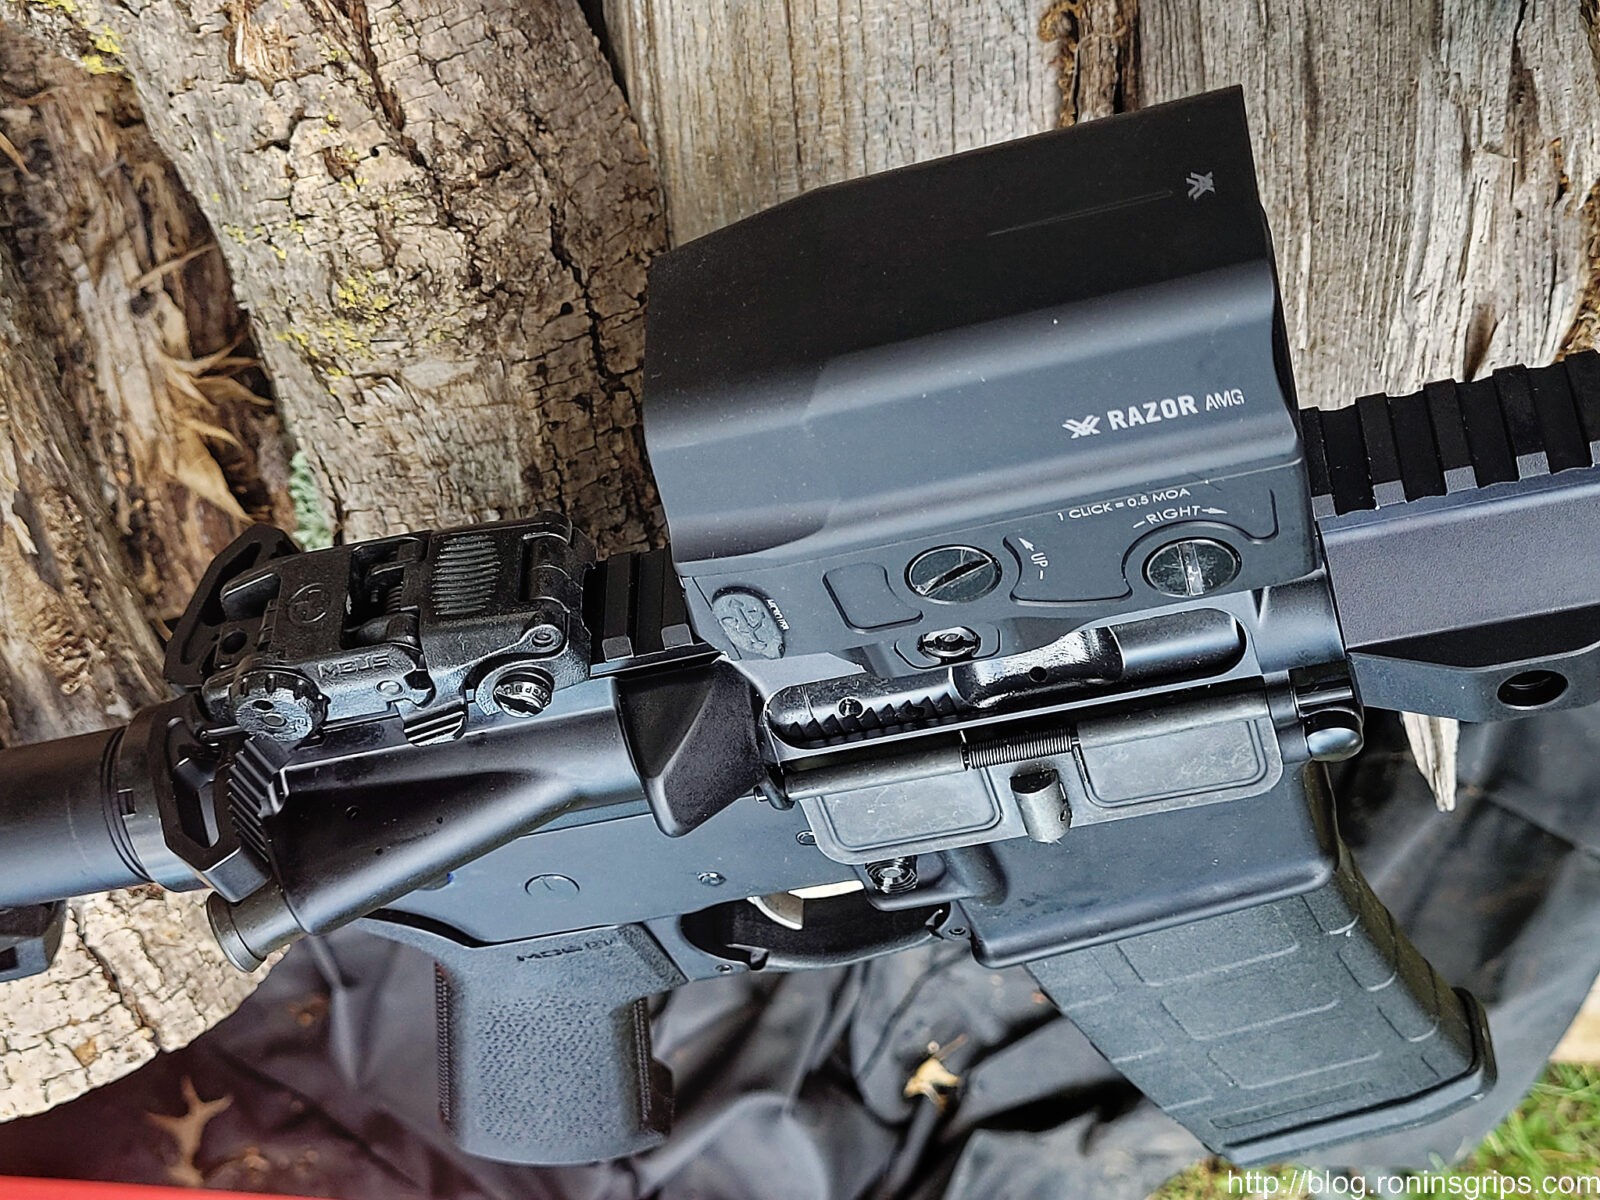
Furthermore, the open-emitter reflex sight appears effectively obsolete for professional duty use. The 2026 standard, as demonstrated by industry leaders SIG SAUER and Steiner, mandates fully enclosed emitters for both rifle and micro-compact pistol applications.5 This shift is not merely aesthetic but a response to rigorous durability requirements from law enforcement and military tenders demanding functionality in adverse environmental conditions.
This report provides an exhaustive technical review and market analysis of the top 20 optical systems showcased at SHOT Show 2026. These selections are based on their potential to disrupt distinct market sectors: Military/Law Enforcement (Mil/LE), Competitive Precision (PRS/NRL), and the high-end Civilian/Hunting market.
Section I: The Rise of the MPVO (Medium Power Variable Optic)
The most significant doctrinal shift observed at SHOT Show 2026 is the industry’s widespread embrace of the Medium Power Variable Optic (MPVO). For nearly fifteen years, the 1-6x and subsequently the 1-8x LPVOs were considered the “gold standard” for carbines, balancing speed with moderate precision. However, physics dictates that a variable optic’s 1x performance rarely matches the parallax-free speed of a dedicated red dot sight (RDS). As engagement distances for 5.56mm NATO and emerging 6mm ARC platforms have extended, users have demanded higher top-end magnification without incurring the weight penalty of a traditional high-power scope. The MPVO—typically featuring a 2-10x or 2-12x magnification range—answers this requirement by ceding the 1x capability to a secondary, specialized RDS.
1. Nightforce NX6 2-12x42mm F1
Category: Tactical/DMR | Market Impact: High
Nightforce Optics has strategically bridged the capability gap between their compact, combat-proven NX8 line and the optically superior but heavier ATACR series with the introduction of the NX6 family.7 While the new lineup includes various configurations, the NX6 2-12x42mm F1 (First Focal Plane) stands out as the archetype of the modern MPVO.
Technical Analysis and Lineage
The development of the NX6 2-12×42 appears to be a direct response to end-user feedback regarding the older NX8 2.5-20×50. A primary critique of the NX8 series was its tight eyebox—a result of an ambitious 8x magnification ratio packed into a compact tube. By restraining the magnification ratio to 6x (2x to 12x), Nightforce engineers have achieved an optical system that is significantly more forgiving to the shooter’s head position.8 This “eye relief latitude” is critical for dynamic engagements where the shooter may be firing from unconventional positions.
The 42mm objective lens represents a calculated compromise. It offers superior light transmission and exit pupil diameter compared to the 24mm objectives found on LPVOs, yet maintains a low mounting profile suitable for gas guns, unlike the 50mm or 56mm objectives found on dedicated long-range scopes.7
A significant mechanical upgrade is the introduction of FieldSet™ Turrets. Previous generations of compact Nightforce scopes were occasionally criticized for “mushy” or indistinct click adjustments. The FieldSet system provides distinct, tactile, and audible clicks, allowing for precise blind adjustments in the field.7
The Efficiency Frontier: Weight vs. Performance
In the fiercely competitive MPVO market, the balance between magnification capability and physical weight is the primary decision factor for procurement. Analysis of the leading optics in this class reveals distinct engineering philosophies. The Nightforce NX6 2-12×42, estimated at approximately 28 ounces, positions itself as a robust, duty-grade option that prioritizes durability and optical forgiveness.7
Comparatively, its primary competitors adopt different strategies. The Leupold Mark 5HD 2-10×30, weighing in at a mere 24 ounces, prioritizes lightweight mobility above all else, sacrificing objective lens size to achieve this.9 Conversely, the Primary Arms PLxC 1.5-12×36, weighing approximately 26 ounces, pushes the boundaries of magnification ratio (8x) to offer maximum versatility.2 The Nightforce NX6, therefore, occupies the “Golden Mean”—offering more magnification than the Leupold and a more forgiving optical system than the high-ratio Primary Arms, utilizing a 30mm tube architecture that is compatible with the vast majority of existing mounting solutions.2
Operational Context
The NX6 2-12×42 is positioned to dominate the “Recce” and Designated Marksman Rifle (DMR) market sectors. The industry consensus is shifting toward a dual-optic setup: a primary MPVO for identification and engagement from 50 to 800 meters, paired with a piggybacked or offset red dot for 0 to 50 meters. The NX6’s FC-MRx reticle facilitates this role, offering a hybrid solution with rapid acquisition features at low magnification and precise holdovers at 12x without the visual clutter often associated with “Christmas tree” reticles.2
2. Leupold Mark 5HD 2-10x30mm
Category: Tactical/Lightweight | Market Impact: High
Leupold continues to aggressively target the weight-conscious professional and mountain hunter. The Mark 5HD 2-10x30mm is a direct evolution of the TS-30A2 and other legacy optics used on the Mk12 Special Purpose Rifle (SPR), modernized for the 2026 battlefield.9
Technical Analysis
The defining feature of the Mark 5HD series is the 35mm main tube. While non-standard compared to the 30mm or 34mm industry norms, this chassis allows for a massive range of elevation adjustment—specifically 34.9 MILs (approximately 120 MOA).9 This capability is crucial for maximizing the ballistic potential of modern efficient cartridges like the 6mm ARC or 6.5 Creedmoor, which stay supersonic well beyond 1,000 meters.
Despite the robust tube, Leupold remains the leader in lightweight engineering. The 2-10x30mm configuration is significantly lighter than its 34mm competitors. The 30mm objective lens is notably smaller than the Nightforce’s 42mm, which does reduce the exit pupil and low-light performance at dusk. However, this trade-off allows for a lower mounting height, reducing the shooter’s vertical profile and snag hazards—a critical consideration for patrol operations.
The optic is available with TMR (Tactical Milling Reticle) and CMR (Combat Milling Reticle) options.10 Some precision shooters have noted the lack of a complex grid reticle as a limitation for extreme long-range holds 2, but for the intended 0-800 meter envelope of a DMR, the TMR remains a combat-proven, uncluttered standard.
Primary Arms Optics has successfully disrupted the premium tier with their PLxC (Compact) line, utilizing top-tier Japanese glass and manufacturing. The new 1.5-12x36mm offers the widest magnification range in this class, boasting an impressive 8x zoom ratio.2
Strategic Positioning
The “Compact” nomenclature is accurate; this scope is designed to minimize the footprint on the receiver rail. At 1.5x on the low end, it offers reasonable situational awareness and “both eyes open” shooting capability if the primary red dot fails—a redundancy that 2-10x or 3-18x optics cannot match. The top end of 12x matches the Nightforce, providing positive target identification capabilities.
The physical shortness of the PLxC is a strategic advantage for night vision integration. By occupying less rail space, it leaves ample room for clip-on thermal or night vision devices (such as the Knight’s Armament PVS-30 or emerging thermal clip-ons), a critical requirement for modern military and LE procurement.2
While the market anticipated a “Razor Gen IV,” Vortex Optics pivoted to their Advanced Manufacturing Group (AMG) to produce a US-made engineering marvel. The AMG 1-10×24 is an ultra-lightweight, First Focal Plane (FFP) optic that blurs the line between LPVO and MPVO.11
Technical Analysis
The AMG 1-10x represents a masterclass in materials science. By utilizing exotic materials—likely titanium internals and specialized aluminum alloys—Vortex has achieved a total weight of only 18.8 oz.11 This is astoundingly light for a 1-10x FFP optic with a 34mm tube, weighing nearly half as much as the legacy Razor Gen III 1-10x.
The optical design features a Dual Zero – Capped turret system and the dedicated EBR-9 MRAD reticle.11 The capped turrets suggest a design philosophy focused on “set and forget” zeroing with holdovers used for elevation, rather than constant dialing. This optic targets the elite operator or backcountry hunter who refuses to compromise on magnification but is strictly governed by weight limits. It effectively challenges the supremacy of heavier LPVOs by proving that high magnification does not require a heavy chassis.
Section II: The Thermal and Night Vision Revolution
The most dynamic and rapidly evolving sector at SHOT Show 2026 was thermal optics. The technology has matured from bulky, low-resolution novelties into high-definition, integrated weapon systems. The key trend is Convergence: optics are no longer just “scopes”; they are ballistic computers, rangefinders, and cameras wrapped in germanium and aluminum casings.
5. Nocpix ACE H50R Thermal Riflescope
Category: Thermal Imaging | Market Impact: Very High
Nocpix (formerly operating under iRay USA) has released the flagship ACE H50R, a device that fundamentally redefines the ergonomic and performance expectations for thermal weapon sights.3
Technical Analysis: The Vision+ System
The heart of the ACE H50R is a Gen-2 HD thermal sensor with 640×512 resolution. Crucially, it boasts an NETD (Noise Equivalent Temperature Difference) of ≤15mK.12 In the world of thermal imaging, NETD is the metric of sensitivity; a lower number is better. Most consumer-grade thermals hover around 35-40mK. A sub-15mK sensitivity allows the user to distinguish minute temperature differences—such as the tines of an antler against tree branches, or the heat signature of a prone suspect against sun-warmed concrete—even in “thermal washout” conditions like rain, fog, or high humidity.
The sensor’s output is projected onto a massive 2560×2560 AMOLED display.13 Most competitors utilize 1024×768 screens. The ACE’s ultra-high display density eliminates the “pixelation” or “screen door” effect common in digital optics, providing an image that rivals the clarity of high-end analog image intensification tubes.
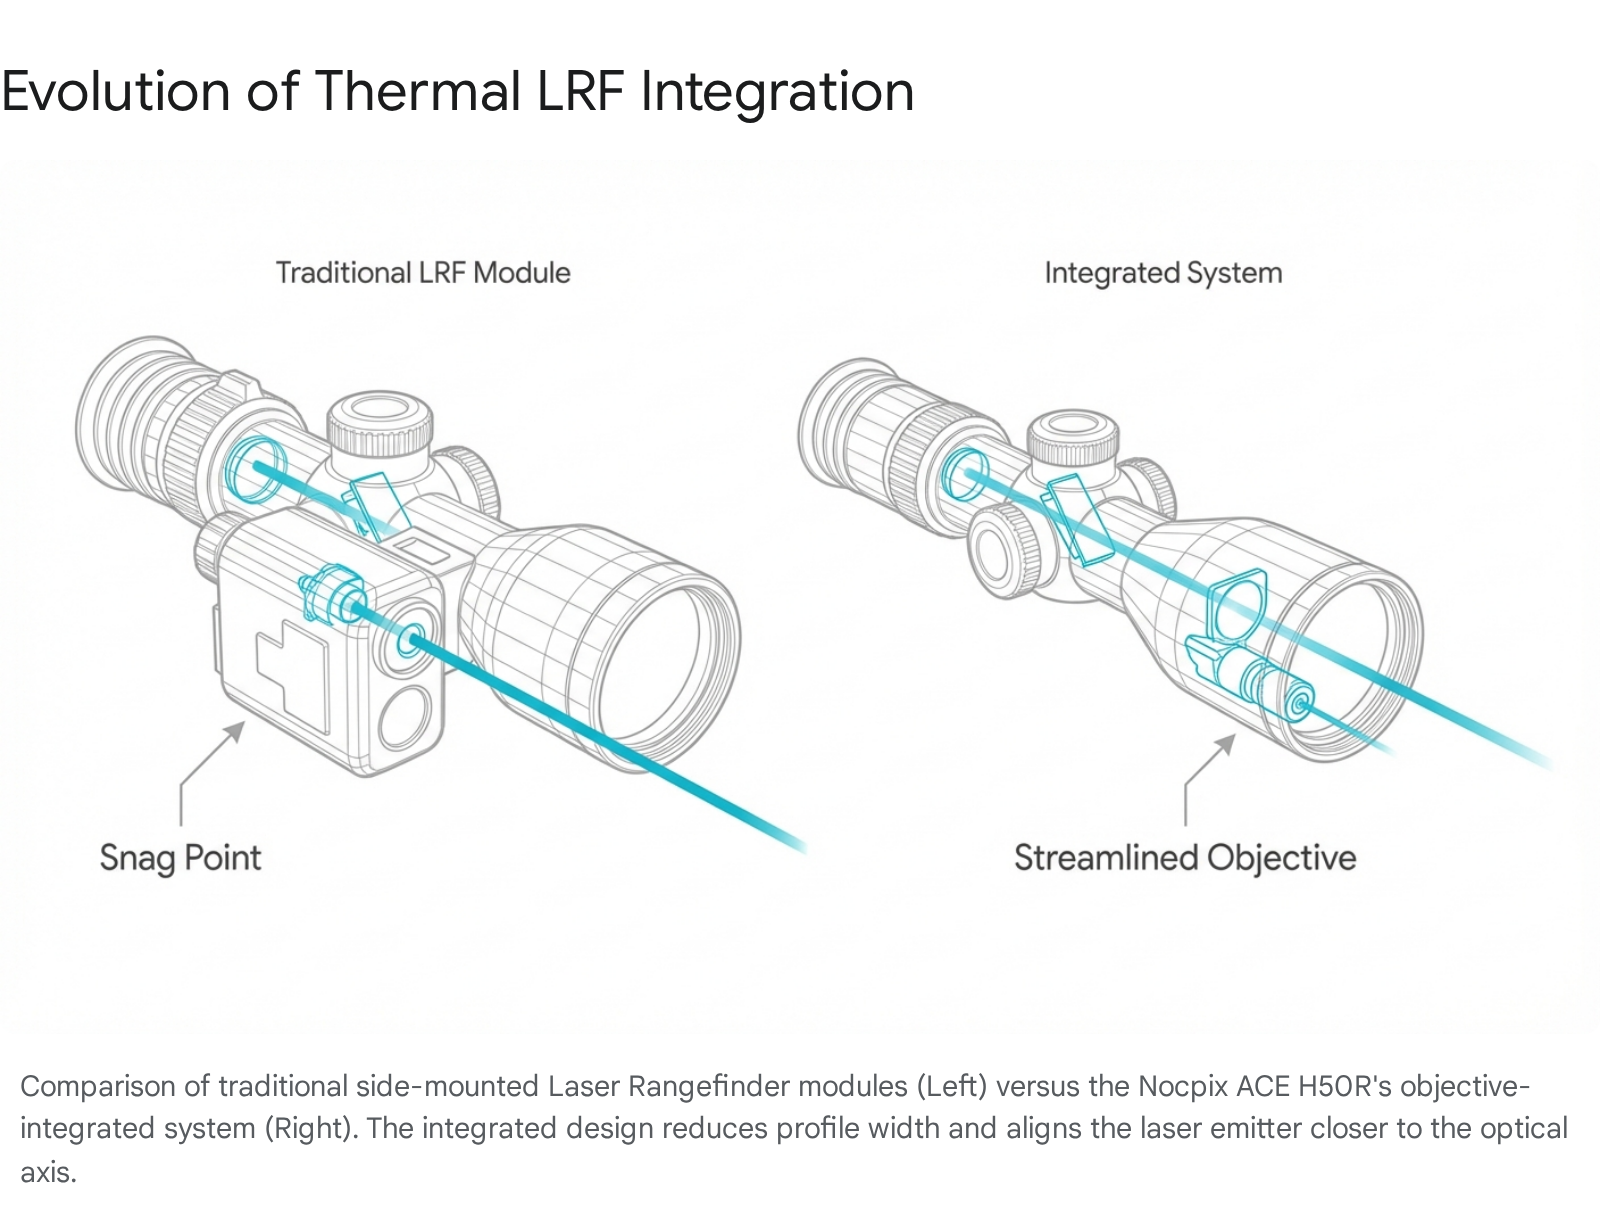
Paradigm Shift: Integrated LRF
Unlike competitors that bolt a laser rangefinder module onto the side of the unit—creating snag hazards and offset issues—Nocpix has integrated the LRF directly into the objective lens assembly.3 This “Vision+” system streamlines the profile and aligns the laser axis significantly closer to the bore. Combined with an onboard ballistic calculator, this system turns a complex night engagement into a “point and shoot” solution, automatically adjusting the digital reticle based on the ranged distance.13
6. Pulsar Trail 3 LRF (XQ50 / XR50)
Category: Thermal Imaging | Market Impact: High
Pulsar, a legacy giant in the thermal space, responded to the intensifying competition with the introduction of the Trail 3 LRF family.14
Robustness and User Experience
A significant advancement in the Trail 3 is its reinforced architecture. It is explicitly rated for recoil energy up to 6,000 Joules, making it safe for use on heavy calibers such as.375 H&H Magnum.14 This addresses a historical durability gap where earlier generations of consumer thermal optics would suffer sensor degradation or power failure under heavy recoil impulse.
Pulsar has also refined the user interface with a round Picture-in-Picture (PiP) mode. This feature displays a magnified image of the target in a circular window (mimicking a traditional rifle scope view) while retaining the wide field of view in the peripheral display.14 This allows the hunter or operator to maintain situational awareness of the surroundings while taking a precise shot.
The XR50 model features a 640×480 sensor with a 12-micron pixel pitch, focusing on maximizing detection range—claimed up to 1,969 yards for deer-sized targets.15 The inclusion of a quick-change LPS7i battery pack ensures continuous operation in the field, a critical logistical consideration for professional users.
7. Holosun IRIS-ARC
Category: Night Vision Accessory (Laser) | Market Impact: Medium
While strictly categorized as an accessory rather than a primary optic, the IRIS-ARC is a critical optical component that signifies Holosun’s deeper entry into the night vision market. It is a compact Laser Aiming Module (LAM) featuring a VCSEL (Vertical-Cavity Surface-Emitting Laser) IR illuminator.4
The VCSEL Advantage
Traditional laser illuminators use edge-emitting diodes, which often produce “speckle” or grainy artifacts when viewed through night vision goggles (NVGs). The IRIS-ARC utilizes VCSEL technology, which emits light vertically from the chip surface, resulting in a much “cleaner,” more uniform flood of IR light. This provides a crisp, high-definition image for the end-user.
Ergonomically, the unit features a “slider” control for beam divergence. This allows the operator to instantly transition the illuminator from a tight spotlight (for long-range identification) to a wide flood (for room clearing) without breaking their firing grip. Historically, such features were reserved for expensive, restricted-sale units like the B.E. Meyers MAWL-C1+. Holosun’s introduction of this technology at a consumer price point represents a significant disruption to the existing market hierarchy.4
8. Nocpix Quest Rangefinding Thermal Binoculars
Category: Observation | Market Impact: Medium
The Quest series introduces “Reality+” image processing to binocular thermal systems. Thermal observation often causes significant eye fatigue due to the unnatural monochromatic image and the lag of digital screens. The Quest addresses this by using a high-resolution 640×512 sensor but displaying the output on dual 1920×1200 displays.16 This creates a stereoscopic effect that mimics natural vision, reducing eye strain during long duration surveillance sessions.
Furthermore, the integration of a laser rangefinder in a binocular format allows a spotter to range targets and communicate corrections to a shooter without needing to switch to a separate device, streamlining the “hunter-killer” team workflow.
Although technically an Unmanned Aerial System (UAS), the Black Hornet 3 is categorized under optical surveillance assets at SHOT Show due to its role as a “flying sensor.” Its presence highlights the integration of remote optics into the squad level. It offers pocket-sized reconnaissance with both thermal and day video feeds, effectively allowing an operator to “throw” their optic around a corner, over a wall, or dozens of meters into the air to gain perspective.17 For law enforcement SWAT teams and military infantry, this capability provides optical intelligence that no rifle-mounted system can match.
Section III: The Evolution of Reflex Sights (Enclosed & Hybrid)
The “Open Emitter” red dot sight (typified by the Trijicon RMR Type 2) is increasingly viewed as a legacy design in the professional sector. The 2026 market demands enclosed emitters—sealed optical boxes that prevent mud, rain, snow, or lint from blocking the laser emitter path.
10. SIG SAUER ROMEO-X Enclosed (Compact & Pro)
Category: Pistol Reflex | Market Impact: High
SIG SAUER has leveraged the military pedigree of the ROMEO-M17 (adopted by the US Army) to create the commercial ROMEO-X Enclosed line.6
Mechanical Innovation
The ROMEO-X Enclosed utilizes a Beryllium Copper flexure arm for its adjustment mechanism. Traditional red dots use coil springs to hold the emitter in place, which can fatigue or shift under the violent, reciprocating G-forces of a pistol slide. The flexure arm provides immense resistance to this mechanical stress, ensuring zero retention over tens of thousands of rounds.
Crucially, the optic features an exceptionally low deck height. This allows the shooter to co-witness the red dot with standard-height iron sights. This eliminates the need for tall “suppressor height” iron sights, which can snag on clothing and limit holster compatibility. The series includes the Compact variant for the Shield RMSc footprint (e.g., SIG P365) and the Pro variant for the DeltaPoint Pro footprint (e.g., SIG P320), effectively covering 90% of the duty and concealed carry market.18
11. Holosun AEMS-EVO-DUAL
Category: Hybrid Rifle Sight | Market Impact: High
The AEMS-EVO-DUAL is arguably the most innovative hybrid sight of the show. It combines the popular AEMS (Advanced Enclosed Micro Sight) chassis with a coaxially aligned visible and IR laser.19
The “One Zero” Solution
Integrating a laser aiming module (LAM) onto a rifle usually introduces the “parallel zero” problem, where the laser is offset from the bore and the optic. The AEMS-EVO-DUAL solves this by integrating the red dot and the lasers into the same housing and aligning them coaxially. Therefore, zeroing the red dot automatically zeroes the visible and IR lasers.21
This capability essentially combines a red dot sight and a PEQ-15 style laser into a single, lightweight unit powered by a standard CR123A battery. For civilian night vision shooters and law enforcement officers, this consolidates two expensive, heavy items into one streamlined package, significantly reducing the weight and complexity of the weapon system.
12. Steiner MPS-C (Micro Pistol Sight – Compact)
Category: Pistol Reflex | Market Impact: Medium
Steiner has successfully shrunk their duty-grade MPS (Micro Pistol Sight) into the MPS-C. It is noticeably shorter (1.89 inches) and lighter than the original, yet paradoxically features a larger objective lens (21x19mm).5 This defies the usual physics of optics, where a smaller housing typically necessitates a smaller window. Steiner has likely achieved this through efficient internal prism design and component miniaturization. The MPS-C positions itself as a top contender for concealed carry users who demand “duty grade” enclosed durability without the bulk of a full-sized emitter.
13. Holosun 507-PROMAX
Category: Competition Pistol Sight | Market Impact: Medium
While the tactical trend is toward smaller, lower-profile carry optics, the competition market (USPSA/IPSC) desires larger windows. The 507-PROMAX offers a massive window for faster dot tracking during recoil.4 It utilizes the same durable housing technology as the 508T series but prioritizes Field of View (FOV) above all else. This optic caters directly to the “Carry Optics” divisions, where the ability to track the dot through the recoil arc translates directly to split-time reduction.
14. Sig Sauer Tango-MSR Compact
Category: Budget/Entry-Level | Market Impact: High (Volume Sales)
Not every optic needs to cost $2,000 to be significant. The Tango-MSR Compact line (available in 1-6x, 1-8x, and 1-10x) is set to dominate the entry-level market.22
The “Compact” designation refers to a 20% reduction in weight and length compared to the previous MSR generation. This brings the handling characteristics of premium “short-body” LPVOs to the budget sector, which was previously dominated by heavy, long tubes. SIG’s strategy of including the Alpha-MSR cantilever mount in the box provides a “turnkey” solution for new rifle owners, aggressively undercutting competitors who require separate ring purchases.22
Section IV: Precision and Long Range Innovation
The precision rifle market, driven by the Precision Rifle Series (PRS) and National Rifle League (NRL), continues to chase two often-contradictory goals: wider Field of View (FOV) to spot trace and impacts, and higher magnification for extreme precision.
15. Kahles K328i DLR
Category: Competition Precision | Market Impact: High
Kahles has long been a favorite of the PRS community due to their ergonomic turret placement. The K328i DLR (Dynamic Long Range) represents a significant leap in optical engineering, changing the geometry of the internal erector system to achieve a 40% wider Field of View than its predecessor, the benchmark K525i.24
In competition, finding a target under time stress is often more challenging than hitting it. A 40% wider FOV at high magnification allows the shooter to locate targets, spot misses, and transition between plates significantly faster. The “DLR” variant features a windage turret that can be positioned on the left or right side (customizable) and includes large, easy-to-read parallax spinners, optimizing the scope for the high-speed manipulation required in timed stages.26
For static long-range disciplines such as F-Class and Benchrest, Kahles introduced the K864.27 With a magnification range of 8-64x, this optic competes directly with the March Genesis and Nightforce Competition lines. It features 1/8 MOA clicks, allowing for microscopic point-of-impact adjustments at 1,000 yards—a necessity when the X-ring is smaller than the bullet diameter. The inclusion of a 56mm objective and high-transmission glass ensures that the image remains bright even at the extreme 64x magnification setting, where exit pupils typically become pinholes.
17. Burris Veracity PH Gen 2
Category: Hunting/Smart Optic | Market Impact: Medium
Burris has refined its “Programmable Elevation Knob” (PĒK) system in the Veracity PH Gen 2. This optic features a heads-up display (HUD) projected inside the scope view that shows the current turret setting and ballistic data.28
The innovation here is the “Clickless” Digital Turret. The elevation knob has no mechanical clicks; instead, a digital sensor tracks the rotation and updates the internal display. This allows for precision down to 1/10 MOA without the mechanical limitations of physical gears. It pairs via Bluetooth with the BurrisConnect app, allowing hunters to upload custom drag profiles for their specific load. This hybridizes the reliability of a glass optic with the precision of a ballistic computer.
Section V: Observation & Specialized Systems
18. Swarovski AT/ST Balance
Category: Spotting Scope | Market Impact: Medium
Swarovski Optik has brought electronic image stabilization to the high-end spotting scope market with the AT/ST Balance series.30
The Problem: High magnification (30x-60x) makes spotting scopes extremely susceptible to wind vibration and tripod shake. Even the slightest breeze can render the image unusable.
The Solution: The “Balance” system uses internal gyroscopic sensors to shift lens elements and stabilize the image in real-time, similar to the technology found in Canon’s IS camera lenses or stabilized binoculars. This effectively increases the “usable resolution” of the optic, allowing hunters to count tines or judge trophy quality in windy conditions where a standard spotter would be blurred. The “AT” (Angled) and “ST” (Straight) models cater to user preference.
19. Arken Target Lock TL3000
Category: Accessory/Tech | Market Impact: High (Budget)
Arken Optics has significantly disrupted the Laser Rangefinder market with the TL3000. At an MSRP of approximately $600, it offers a gun-mounted laser rangefinder with onboard ballistics.32 Previously, this capability was restricted to units costing over $3,000 (such as the Wilcox RAPTAR or SilencerCo Radius). Arken is commoditizing ballistic intelligence, making “smart” shooting solutions accessible to the average enthusiast or budget-minded competitor.
20. Trijicon Credo HX Line Extensions
Category: Hunting | Market Impact: Medium
Trijicon expanded the Credo HX line with larger objective lenses, specifically 2.5-15×42 and 2.5-15×56 models.33
Optimization: These optics are strictly focused on the hunting market. The “HX” designation denotes Satin Black finishes (for lower glare in the field) and hunting-specific reticles (BDC Hunter Holds) that prioritize fast acquisition over the mathematical precision of a tactical grid. The shift to a 56mm objective indicates a growing demand for “European style” low-light performance in the American market, catering to hunters operating at dawn and dusk.
Honorable Mentions & Market Trends
Other notable releases include the EOTECH Vudu 4-12x36mm, a compact optic designed for short carbines 33, and the Hawke Vantage HD 34 FFP, which pushes the “value” segment by offering First Focal Plane mechanics at a budget price point.33 These releases reinforce the trend that high-performance features (FFP, high magnification ratios) are trickling down from flagship models to entry-level consumers.
Conclusion: The “So What?” of 2026
The “Top 20” optics of SHOT Show 2026 are not defined by incremental improvements in glass clarity. They are defined by computational photography (thermal/digital), mechanical integration (lasers inside scopes, dots inside housings), and doctrinal specialization (the dominance of the MPVO).
For the industry analyst, the signal is clear: the era of the “General Purpose” optic is ending. Users are no longer accepting a 1-8x LPVO that is mediocre at 1x and mediocre at 8x. They are moving toward specialized systems: a 2-12x MPVO (Nightforce/Primary Arms) for distance, paired with a specialized Red Dot (Holosun/Sig) for Close Quarters Battle.
Simultaneously, the pricing and form factors of the Nocpix ACE and Pulsar Trail 3 suggest the market has crossed the “Thermal Threshold.” High-resolution (640+) thermal imaging is no longer a Special Forces exclusive; it is a pro-consumer standard. The integration of LRFs into the objective lens is a second-order innovation that will likely force every other manufacturer to redesign their thermal housings by 2027 to remain competitive. Future growth lies in electronics and specialized form factors, while the traditional “tube and glass” market becomes a race to the bottom on price.
The U.S. market for pistol-mounted Micro Red Dot Sights (MRDS) has transitioned from a niche, early-adopter segment to a phase of explosive, mainstream growth. This expansion is primarily fueled by the widespread adoption of “optics-ready” slide configurations by nearly every major handgun manufacturer, a move that has significantly lowered the cost and complexity for consumers to mount an MRDS.1 Once considered an aftermarket accessory for enthusiasts and competitors, the MRDS is now increasingly viewed as a primary sighting system for defensive, duty, and recreational handguns. The broader electro-optics market, valued in the tens of billions of dollars with a projected compound annual growth rate (CAGR) of over 6%, reflects the immense commercial momentum behind this technological shift.3
This report, based on a comprehensive analysis of consumer and prosumer sentiment from high-traffic U.S. online communities, identifies a clear stratification of the MRDS market into three distinct tiers. Tier 1 (Premium & Duty-Grade) is defined by an uncompromising focus on durability and reliability, where brands like Trijicon and Aimpoint have historically set the performance benchmark. Tier 2 (High-Performance Prosumer) represents the most dynamic and competitive segment, where brands, most notably Holosun, offer a compelling balance of proven durability, advanced features, and strong value. Tier 3 (Entry-Level/Value) caters to price-conscious consumers, a segment where features once considered novel, such as motion-activated illumination, are rapidly becoming standard expectations.
Several key market trends are shaping the competitive landscape. First is the decisive shift toward enclosed-emitter designs for any serious-use application, driven by consumer demand for all-weather reliability and protection from debris.3 Second is the ongoing battle over mounting footprint standards (e.g., RMR, RMSc, ACRO), which creates consumer friction and a secondary market for adapter plates.6 Finally, the most significant disruptive force is the rise of products perceived as “durable enough” while offering a superior feature set and value proposition. This has created intense competition between established duty-grade brands and aggressive new entrants, fundamentally altering consumer expectations and eroding the market share of legacy products that have been slow to innovate.6
The following table summarizes the market sentiment analysis for the top 20 MRDS models, providing a quantitative and qualitative snapshot of the current competitive landscape.
Key Table: Top 20 Micro Red Dot Sights – Market Sentiment Analysis
2.1 Defining the Pistol Red Dot: Emitter Technology
The core technology of a modern reflex sight is elegant in its simplicity: a power-efficient Light-Emitting Diode (LED) projects an illuminated aiming point (the “dot”) onto a specially coated lens. This lens is designed to reflect the specific wavelength of the LED’s light back toward the shooter’s eye while allowing other light to pass through.9 This creates a sighting system that is effectively parallax-free at typical handgun distances, meaning the dot does not need to be perfectly centered in the window to indicate the point of impact. This allows the shooter to remain “target focused,” a significant advantage over the three-focal-plane alignment required by traditional iron sights (rear sight, front sight, target).10 Within this framework, two distinct design philosophies have emerged: open-emitter and enclosed-emitter systems.
Open-Emitter Systems represent the traditional design for pistol MRDS, exemplified by models like the Trijicon RMR and Holosun 507C. In this configuration, the LED emitter is housed in the base of the optic and projects the dot forward onto a single lens. The primary advantages of this design are a generally wider, less obstructed field of view, a lower profile, lighter weight, and a more accessible price point.5 However, this design contains a critical vulnerability: the path between the emitter and the lens is open to the environment. Debris such as dust, mud, rain, snow, or even lint from a concealed carry garment can block the emitter, causing the dot to disappear and rendering the optic useless until cleared.9 While this is a rare occurrence for many users, particularly in concealed carry where the optic is protected, the potential for failure in adverse conditions is the design’s single greatest drawback.
Enclosed-Emitter Systems, often referred to as “mailbox” sights like the Aimpoint ACRO P-2 and Holosun EPS, address this vulnerability directly. This design seals the entire light path within a robust housing, using a front and rear lens to create a self-contained optical system.5 This makes the optic completely impervious to environmental obstructions, offering a significant leap in all-weather reliability that is highly valued for duty, military, and serious defensive applications.11 The trade-offs for this enhanced reliability are a generally bulkier and heavier housing, a higher cost, and a more constricted field of view that some users describe as a “tube effect”.9 The market’s strong pivot toward these systems indicates a fundamental shift in user priorities. As MRDS have become the primary sighting system for life-saving tools, the user base has become less tolerant of potential failure points. The demand for absolute reliability in any condition is now driving innovation and purchasing decisions in the serious-use market segment.
2.2 The Durability & Footprint Arms Race
The evolution of the MRDS market has been heavily influenced by a parallel arms race in durability and mounting standards, a race largely initiated by Trijicon. When the Trijicon RMR (Ruggedized Miniature Reflex) was introduced, its patented housing shape, with distinctive “ears” that divert impact forces away from the lens, and its construction from forged 7075-T6 aluminum, set a new benchmark for durability.13 It was one of the first optics proven to reliably withstand the violent, high-G-force environment of a reciprocating pistol slide over tens of thousands of rounds, earning it the reputation of being “bombproof” and “duty-grade”.8
This market dominance had a profound secondary effect: the RMR’s mounting pattern—defined by two screw holes and two shallow forward sockets for recoil lugs—became the de facto industry standard for full-size optics-ready pistols.15 This created a powerful ecosystem. Handgun manufacturers adopted the cut to appeal to the largest segment of the market, and competing optics manufacturers were compelled to adopt the RMR footprint to ensure their products were compatible.17 This strategic advantage for Trijicon also created a significant point of friction for the industry.
As the market expanded, new footprints emerged to serve specific needs. The Shield RMSc footprint, with its narrower profile, became the standard for the burgeoning micro-compact pistol market, including popular models like the SIG Sauer P365 and Springfield Hellcat.19 The Leupold DeltaPoint Pro (DPP) footprint gained traction in competition circles due to the optic’s large window, but its unique pattern limited its broader adoption.7 Most recently, the Aimpoint ACRO footprint, a robust rail-clamp design, has rapidly become the standard for enclosed-emitter sights, with competitors like Steiner and C&H Precision adopting it for their own enclosed models.21 This fragmentation of standards has created a confusing landscape for consumers and a lucrative sub-market for companies producing adapter plates. However, the use of plates is a compromise, as it adds height, complexity, and an additional potential point of failure to the mounting system.
2.3 The Feature Revolution: Reticles, Solar, and Shake Awake
While durability and mounting standards formed the foundation of the market, a revolution in electronic features has defined its modern competitive dynamics. Three key innovations, largely pioneered and popularized by Holosun, have shifted consumer expectations from mere reliability to intelligent functionality.
Shake Awake Technology, also marketed as MOTAC by SIG Sauer or AutoLive by Primary Arms, incorporates a motion sensor into the optic’s electronics.23 This allows the sight to automatically enter a low-power sleep mode after a user-defined period of inactivity and instantly reactivate the LED upon detecting the slightest movement.24 This elegantly solves the classic dilemma between readiness and battery conservation. Users can leave their optic turned on indefinitely, confident it will be ready the moment it is drawn, while still achieving battery life measured in years.17 This feature has moved from a novelty to a baseline expectation for any serious-use MRDS.
Solar Failsafe, a signature Holosun feature, integrates a small solar panel into the top of the optic’s housing.26 This panel serves two functions: in auto-brightness mode, it can power the reticle in sufficiently bright conditions, preserving the battery; more critically, it acts as a true backup power source, allowing the optic to function even if the battery is completely dead.26 This feature provided Holosun with a powerful marketing and functional advantage, directly addressing a key concern of users reliant on battery-powered electronics.
Multi-Reticle Systems (MRS) broke the paradigm of the single-dot aiming point. Holosun’s MRS allows the user to cycle between a precise 2 MOA dot, a large 32 MOA circle, or a combination of both.27 This innovation was met with widespread consumer approval. The large circle is praised for its ability to draw the eye and facilitate rapid dot acquisition during the draw, while the dot-only option provides an uncluttered sight picture for precision shots.27 This single feature allows one optic to cater to multiple shooting disciplines and user preferences, dramatically increasing its value proposition.
This tier is composed of optics where absolute reliability and proven durability are the paramount considerations for consumers, often justifying a significant price premium. These models serve as the benchmarks against which all other market entrants are measured.
1. Trijicon RMR Type 2 (Adjustable LED)
Total Mention Index: 100.0
% Positive Sentiment: 85%
% Negative Sentiment: 15%
User Sentiment Summary: The Trijicon RMR Type 2 is consistently referred to as the “gold standard” and the benchmark for durability in the open-emitter category.13 User discussions are replete with praise for its “bombproof,” “duty-proven,” and “North Korean tank” toughness, with many citing its ability to withstand thousands of rounds and significant impacts without losing zero.8 The patented housing shape with its distinctive “owl ears” is widely recognized as the key to its resilience.13 However, negative sentiment is equally consistent and focused on three primary areas: the bottom-loading battery, which requires un-mounting the optic and re-confirming zero to change; the noticeable blue tint of the lens, which is seen as dated compared to clearer competitor glass; and its high price, which many users feel is no longer justified given its lack of modern features.6
Analyst Assessment: The RMR Type 2’s market position is that of the deeply entrenched, but aging, incumbent. Its brand equity, built on years of proven performance in military and law enforcement circles, is its single greatest asset.14 From a technical standpoint, however, it is a dated design. Its dominance is under severe threat from competitors that have systematically targeted its weaknesses—battery replacement, optical clarity, and price—while offering features like multi-reticle systems and solar backup. Trijicon is leveraging its formidable reputation for ruggedness, but this advantage is diminishing as competitors are increasingly perceived as “durable enough.” The RMR Type 2 remains the choice for users and agencies where institutional validation and a long track record of absolute durability outweigh all other considerations. The recent introductions of the RMR HD and enclosed RCR are direct strategic responses to the market pressures that have eroded the Type 2’s competitive edge.
2. Aimpoint ACRO P-2
Total Mention Index: 95.2
% Positive Sentiment: 92%
% Negative Sentiment: 8%
User Sentiment Summary: The ACRO P-2 is overwhelmingly hailed as the “king” of enclosed emitters and the new standard for a hard-use, no-compromise duty optic.11 Users express extreme confidence in its fully enclosed design, which completely eliminates the primary failure point of open-emitter sights—obstruction from rain, mud, snow, or lint.12 Its exceptional 50,000-hour (over 5 years) battery life is a cornerstone of its positive reception, reinforcing its “set it and forget it” reliability.21 Negative sentiment is almost exclusively centered on two points: its very high price, frequently cited as being around $600, and its blocky, “mailbox” aesthetic, which some find too large or unappealing for concealed carry applications.12
Analyst Assessment: The ACRO P-2 has successfully established a new paradigm in the premium duty-grade market. It has made the enclosed emitter the new expectation for ultimate reliability, directly challenging the open-emitter design philosophy that the RMR championed. Its market position is that of the definitive “cost is no object” duty optic. The P-2’s technical strength lies in its elegantly simple, brutally effective, and utterly reliable design. Its primary strategic weakness is its premium price, which creates a significant market opening for competitors to offer “good enough” enclosed alternatives at a fraction of the cost. Aimpoint’s establishment of the ACRO mounting footprint as the emerging standard for enclosed sights is a significant strategic victory, forcing competitors to adopt their pattern.
3. Holosun 509T X2
Total Mention Index: 91.5
% Positive Sentiment: 90%
% Negative Sentiment: 10%
User Sentiment Summary: The Holosun 509T is widely positioned in user discussions as the most direct and compelling high-value competitor to the Aimpoint ACRO P-2.6 Consumers are highly positive about its combination of an enclosed emitter, a rugged Grade 5 titanium housing, and a superior feature set that includes Holosun’s Multi-Reticle System (MRS) and Solar Failsafe technology.35 A recurring theme is that the 509T provides a comparable level of durability to the ACRO P-2 but with more advanced features and for a significantly lower price, making it a smarter purchase for many.6 The most common points of negative feedback relate to its proprietary mounting footprint (which is similar but not identical to the ACRO pattern) often requiring an adapter plate, which adds height and another potential failure point.35
Analyst Assessment: The 509T represents Holosun’s successful assault on the premium enclosed-emitter market. It is a masterful example of market disruption, directly challenging the ACRO P-2 not by copying it, but by offering a product with a comparable core benefit (enclosed reliability) while integrating the advanced features that define the Holosun brand. Its market position is the “smart money” or “prosumer” choice for a duty-grade enclosed optic. While it lacks Aimpoint’s military pedigree, the technical package—a titanium body, enclosed design, MRS, and Solar Failsafe—at its price point presents an almost unbeatable value proposition. The 509T is the single greatest competitive threat to Aimpoint’s dominance in the enclosed-emitter space.
4. Trijicon SRO
Total Mention Index: 88.7
% Positive Sentiment: 88%
% Negative Sentiment: 12%
User Sentiment Summary: The Trijicon SRO (Specialized Reflex Optic) receives overwhelming praise from the competition shooting community for its defining feature: a massive, round, and exceptionally clear viewing window.39 Users report that the large window makes it significantly easier to find and track the dot during recoil and to transition between targets with speed, a critical advantage in disciplines like USPSA.2 The convenient top-loading battery is consistently cited as a major and necessary improvement over the RMR’s design.39 Conversely, the SRO’s durability is its primary point of negative sentiment. The large, forward-projecting lens housing is widely perceived as a structural weak point, making it far less suitable for duty use or even hard-use concealed carry compared to the RMR.30
Analyst Assessment: The SRO was Trijicon’s strategic response to two key market demands that the RMR failed to meet: a larger window and a more convenient battery change. It was a resounding success in capturing the competition market, where speed and optical performance are prioritized over ultimate ruggedness. However, this design choice explicitly sacrificed the legendary durability that defines the Trijicon brand, creating a clear product segmentation. Its market position is firmly established as the premier open-emitter optic for competition use. The SRO’s success in one segment but perceived fragility in another created the precise market gap that the newer, more durable Trijicon RMR HD is now designed to fill, attempting to merge the SRO’s window with the RMR’s toughness.
5. Holosun EPS Carry
Total Mention Index: 85.1
% Positive Sentiment: 94%
% Negative Sentiment: 6%
User Sentiment Summary: The Holosun EPS Carry is arguably the most lauded and recommended optic for the rapidly growing micro-compact pistol category (e.g., SIG P365, Springfield Hellcat, Glock 43X).43 The overwhelming positive sentiment stems from its unique ability to bring the all-weather reliability of an enclosed emitter to the slimline RMSc footprint.46 For concealed carry users, this is a game-changing feature, as it eliminates the persistent worry of clothing lint, dust, or moisture obstructing an open emitter.30 Another massively praised feature is its extremely low deck height, which allows for a functional co-witness with the standard-height iron sights on many popular micro-compacts.46 It is viewed as the perfect synthesis of modern features in a compact, concealable package. Negative feedback is minimal and generally limited to minor critiques of glass clarity compared to premium brands or isolated QC complaints.
Analyst Assessment: The EPS Carry is a category-defining product and a testament to Holosun’s acute understanding of market needs. The company identified a critical, unmet demand: a reliable, enclosed-emitter optic specifically designed for the booming micro-compact concealed carry market. By engineering an enclosed system that fits the RMSc footprint and maintains a low profile for co-witnessing, Holosun created a product that, at its launch, had no direct competitor. Its market position is the undisputed leader and default choice in the micro-compact enclosed segment. The EPS Carry did not just compete in an existing market; it effectively created a new, high-demand sub-market that it now dominates.
This tier represents the heart of the market, where the battle for the mainstream consumer is most intense. These optics balance proven durability with a rich feature set and a strong value proposition, appealing to a broad range of users from serious concealed carriers to competitive shooters.
6. Holosun 507C X2
Total Mention Index: 82.4
% Positive Sentiment: 93%
% Negative Sentiment: 7%
User Sentiment Summary: The 507C is the quintessential “prosumer” choice and is positioned as the Trijicon RMR’s most direct and formidable challenger.6 User sentiment is overwhelmingly positive, centered on its exceptional value proposition. It offers the industry-standard RMR footprint for broad compatibility, a convenient side-loading battery, Solar Failsafe technology, and the versatile Multi-Reticle System, all at a price point often half that of an RMR.8 It is widely regarded as “durable enough” for any civilian application, including concealed carry, with many users explicitly stating they trust their lives to it.8 Negative comments are infrequent and typically minor, pointing to a slight blue/green lens tint and an auto-brightness mode that can sometimes adjust too dimly.17
Analyst Assessment: The 507C is the product that cemented Holosun’s reputation as a dominant force in the market. It was a strategic masterstroke, directly attacking the RMR’s most significant weaknesses (high price, bottom-loading battery, lack of features) while leveraging its greatest strength (footprint compatibility). Its market position is the undisputed “best bang for your buck” in the full-size open-emitter category. The 507C single-handedly forced the entire industry, including premium brands, to re-evaluate the expected price-to-feature ratio. It is largely responsible for the competitive pressure that ultimately led Trijicon to develop more modern offerings like the RMR HD. For the vast majority of non-institutional users, the 507C offers the ideal blend of reliability, features, and price.
7. Leupold Deltapoint Pro (DPP)
Total Mention Index: 78.9
% Positive Sentiment: 70%
% Negative Sentiment: 30%
User Sentiment Summary: The DPP is consistently praised for its two primary optical qualities: an exceptionally large field of view and crystal-clear glass with almost no perceptible color tint.50 Many users strongly prefer its sight picture to the blue hue common on Trijicon RMRs.51 Its convenient top-loading battery is also a frequently cited positive. However, the DPP is subject to significant and recurring negative sentiment regarding its durability and battery performance. It is widely perceived as being substantially less durable than the RMR, with numerous user reports and formal reviews noting electronic failures or loss of zero after several thousand rounds or from moderate impacts.6 Battery life is also a common complaint, described as inconsistent and significantly shorter than its competitors.53
Analyst Assessment: The Leupold Deltapoint Pro occupies a precarious market position. Its superior optical characteristics make it a favorite among some competition shooters who prioritize window size and clarity above all else. However, its reputation for questionable durability and poor battery life makes it a non-starter for most defensive or duty applications. The DPP is being squeezed from the top by more durable options (RMR, SRO) and from below by more feature-rich and often more durable options from Holosun. Leupold is relying heavily on its brand prestige and optical engineering, but it is demonstrably losing ground in the crucial areas of electronic robustness and power efficiency.
8. Holosun 508T X2
Total Mention Index: 75.5
% Positive Sentiment: 91%
% Negative Sentiment: 9%
User Sentiment Summary: The 508T is commonly described by users as a “beefed-up 507C” or the “RMR killer”.6 It is viewed as a direct upgrade over the 507C, offering the same highly-regarded feature set (MRS, Solar Failsafe, side-loading battery, RMR footprint) but housed in a more robust, squared-off Grade 5 titanium body.6 This provides users with enhanced peace of mind regarding durability, positioning it as a middle ground between the aluminum 507C and a fully enclosed optic like the 509T.56 Negative sentiment is minimal and almost entirely relates to its higher price when compared to the already-durable 507C.
Analyst Assessment: The 508T is a shrewd product line extension that demonstrates Holosun’s sophisticated market segmentation strategy. It successfully captures the segment of consumers who are willing to pay a premium for durability that exceeds the 507C but are not yet prepared to accept the size, weight, or cost of a fully enclosed emitter. The 508T effectively brackets the Trijicon RMR, with the 507C competing on price and features, and the 508T competing on durability and features. This multi-pronged approach puts immense competitive pressure on Trijicon’s single, aging RMR Type 2 offering.
9. SIG Sauer Romeo-X Compact
Total Mention Index: 72.8
% Positive Sentiment: 89%
% Negative Sentiment: 11%
User Sentiment Summary: As a relatively new entrant, the Romeo-X Compact has garnered significant positive attention. Its most praised feature is its ultra-low deck height, which enables a clear and functional co-witness with the standard-height iron sights on SIG’s P365 series pistols—a major selling point for users who want a seamless backup sighting system.47 The optical quality is frequently described as excellent, with many users finding the glass clearer and the dot crisper than competing Holosun models.47 Negative sentiment has largely focused on early quality control issues, particularly with out-of-spec battery caps causing the optic to shut off under recoil, though SIG’s customer service is noted as being responsive in resolving these problems.58 Its premium price point, higher than the Holosun EPS Carry, is also a point of contention.59
Analyst Assessment: The Romeo-X series marks SIG Sauer’s successful maturation into a top-tier optics manufacturer. By engineering a product that solves a key user pain point—the difficulty of co-witnessing on micro-compacts—SIG has created a powerful incentive for its massive P365 customer base to remain within its brand ecosystem. Its market position is that of the premium, best-integrated optics solution for the P365 platform. While more expensive than the EPS Carry, its superior optical clarity and exceptionally low mounting height are strong technical differentiators that justify the premium for many users. It represents the most significant competitive threat to Holosun’s dominance in the micro-compact segment.
10. Holosun 407K / 507K X2
Total Mention Index: 70.1
% Positive Sentiment: 95%
% Negative Sentiment: 5%
User Sentiment Summary: This duo represents the benchmark for open-emitter micro-compact optics. User discussions clearly delineate their roles: the 407K, with its simple 6 MOA dot, is lauded as an incredible value, offering a tough, reliable, and no-frills optic at a very accessible price.60 The 507K is for users willing to pay a premium for the added versatility of the Multi-Reticle System.28 Both models are praised for their rugged 7075 aluminum construction, Shake Awake feature, and convenient side-loading battery.28 There is virtually no significant negative sentiment associated with these models; they are widely considered the default “go-to” choice for this category.
Analyst Assessment: The 407K and 507K series achieved for the micro-compact market what the 507C did for the full-size market: they established a new, high standard for the balance of price, features, and reliability. Their market position is one of near-total dominance in the open-emitter micro-dot segment. By offering a simple choice between budget-friendly simplicity (407K) and feature-rich versatility (507K), Holosun effectively captured the majority of the market and locked out most competitors. This success laid the commercial and reputational groundwork for the launch of their enclosed EPS Carry.
11. Steiner MPS
Total Mention Index: 68.4
% Positive Sentiment: 75%
% Negative Sentiment: 25%
User Sentiment Summary: The Steiner MPS (Micro Pistol Sight) is consistently viewed as a direct competitor to the Aimpoint ACRO P-2, often available at a lower price.21 Users who are positive about the MPS praise its robust build, crystal-clear German glass, and a window that is slightly wider than the ACRO P-2’s, which some find aids in dot acquisition.31 However, there is a significant undercurrent of negative sentiment focused on two key areas: its comparatively poor battery life (13,000 hours vs. the P-2’s 50,000) and reports of early production quality control issues, including failed waterproof seals and complete electronic failures.31
Analyst Assessment: The MPS was Steiner’s ambitious entry into the enclosed-emitter market, aimed squarely at the ACRO P-2. However, it has struggled to gain significant market share due to its technical compromises and early reliability concerns. Its current market position is that of a “second choice” or “value alternative” in the enclosed-emitter space. The substantially shorter battery life is a major technical weakness in a market where 50,000 hours is becoming the duty-grade standard. Furthermore, the initial QC problems damaged its reputation as a truly dependable alternative to Aimpoint, despite Steiner’s strong brand heritage in other optics categories.
12. Vortex Defender-CCW
Total Mention Index: 65.0
% Positive Sentiment: 65%
% Negative Sentiment: 35%
User Sentiment Summary: The Defender-CCW is a budget-to-mid-tier optic for micro-compact pistols. The most prominent positive theme in user discussions is not about the optic itself, but about Vortex’s industry-leading lifetime warranty and excellent customer service, which provides a powerful purchasing incentive and safety net.20 The optic is considered to have a good window size and a durable build for its price. However, its reputation was significantly damaged at launch by early models that suffered from a low refresh rate (causing a visible “flicker”) and an impractical 14-hour auto-shutoff timer.67 Although Vortex has since implemented rolling updates to fix these issues (a faster emitter and a 10-minute shutoff), the initial negative perception persists in online discussions.67
Analyst Assessment: The Defender-CCW is a compelling case study in how a product’s launch can define its long-term market perception. Despite Vortex’s commendable efforts to rectify the initial flaws and their stellar warranty support, the optic struggles to compete against the Holosun 407K/507K, which are widely perceived as more reliable and feature-complete out of the box.69 The Defender-CCW’s market position is that of a value-oriented micro-dot whose primary selling point is its post-purchase support rather than its intrinsic technical performance. It is a viable choice for consumers who prioritize a no-questions-asked warranty above all other factors.
13. Trijicon RMR HD
Total Mention Index: 63.3
% Positive Sentiment: 90%
% Negative Sentiment: 10%
User Sentiment Summary: As one of the newest optics on the market, the RMR HD has fewer total mentions, but the sentiment is highly positive. It is universally seen as Trijicon’s direct and comprehensive answer to years of market feedback on the RMR Type 2’s shortcomings and the competitive pressure from optics like the Trijicon SRO and Holosun’s lineup.70 Users are enthusiastic about the combination of a larger, SRO-style window with the RMR’s legendary housing durability. The top-loading battery and a new forward-mounted light sensor for more accurate auto-brightness adjustments are lauded as critical, long-overdue upgrades.70 The only consistent negative point is its extremely high price, which exceeds even that of the already-premium RMR Type 2.70
Analyst Assessment: The RMR HD is a strategically vital product for Trijicon, designed to reclaim the high-end, “do-it-all” open-emitter market segment. It successfully merges the best attributes of the RMR (durability) and the SRO (window size, top-load battery) into a single, cohesive package. Its intended market position is the new premium, duty-grade open-emitter standard. Its long-term success will be determined by whether the market is willing to pay a significant price premium for the Trijicon name and its proven durability when highly capable competitors are available for much less. It is a technically superb product that demonstrates Trijicon is listening to consumer demands, albeit at its own pace.
This tier is characterized by a primary focus on affordability. These optics appeal to new red dot users, those outfitting secondary firearms, or shooters for whom budget is the main constraint. Competition in this space is fierce, with brands vying to offer the most features and perceived reliability at the lowest possible price.
14. Holosun 407C X2
Total Mention Index: 60.5
% Positive Sentiment: 96%
% Negative Sentiment: 4%
User Sentiment Summary: The 407C is the dot-only sibling to the 507C and is lauded for its outstanding value. User sentiment is exceptionally positive, highlighting that it provides all the essential features that make Holosun popular—Solar Failsafe, Shake Awake, a side-loading battery, a durable aluminum housing, and the RMR footprint—at a price point even lower than the 507C.60 For users who do not require the multi-reticle system, the 407C is frequently described as a “no-brainer” and the best entry point into a truly reliable, full-featured pistol optic.60
Analyst Assessment: The 407C exemplifies Holosun’s mastery of market segmentation. By stripping away the non-essential MRS feature from their flagship 507C, they created a product that dominates the upper-entry-level/lower-mid-tier market. Its market position is the undisputed value king for a full-size, feature-rich optic. It delivers a level of technological sophistication and build quality that brands in the sub-$250 price bracket struggle to match, effectively setting the performance floor for a credible pistol optic.
15. Swampfox Optics (Justice II / Liberty II / Sentinel II)
Total Mention Index: 55.8
% Positive Sentiment: 80%
% Negative Sentiment: 20%
User Sentiment Summary: Swampfox has established a solid reputation in the budget-to-mid-tier segment. Users are generally positive, frequently praising the brand for offering impressive features for the price, such as large windows (especially on the competition-oriented Justice II), Shake ‘N Wake technology, and multiple reticle options.60 The use of industry-standard footprints (RMR for Justice/Liberty, RMSc for Sentinel) is also a significant plus for compatibility.18 Negative sentiment typically revolves around concerns about long-term durability compared to premium brands and occasional quality control issues, such as noticeable parallax or missing mounting screws.75
Analyst Assessment: Swampfox has successfully carved out a niche as a credible entry-level brand that offers a significant step up from generic, unbranded “Amazon” optics. They provide compelling designs that often mimic the aesthetics and feature sets of higher-end models at a highly accessible price. Their market position is that of a go-to choice for range use, entry-level competition, and for budget-conscious users seeking a carry optic. They compete directly with brands like Vortex and Primary Arms in the value-driven segment.
16. Primary Arms Classic Mini Reflex
Total Mention Index: 52.1
% Positive Sentiment: 78%
% Negative Sentiment: 22%
User Sentiment Summary: Praise for this optic is almost entirely anchored to its extremely low price point (around $150) combined with the trust consumers place in the Primary Arms brand and its warranty.2 Users often express being “shocked” at the build quality and clarity for such a low cost.77 Its use of the common RMR footprint is a major advantage. Negative feedback consistently points to a lack of modern features like Shake Awake (though newer generations have added it), non-tactile or “mushy” windage and elevation adjustments, and some reports of fitment issues on RMR-cut slides, suggesting minor dimensional inconsistencies.78
Analyst Assessment: The Primary Arms Classic Mini Reflex is a pure value play. Its market position is the absolute price floor for a dependable optic from a trusted U.S.-based company. It forces consumers to critically assess their needs and question whether spending two or three times as much is truly necessary. While it lacks the feature set and refinement of Holosun’s offerings, its rock-bottom price makes it an extremely attractive option for outfitting secondary firearms, rimfire trainers, or for users wanting to experiment with a red dot without a significant financial commitment.
17. C&H Precision (COMP / DUTY)
Total Mention Index: 49.5
% Positive Sentiment: 75%
% Negative Sentiment: 25%
User Sentiment Summary: C&H Precision, widely known for its high-quality adapter plates, has entered the optics market with products that are viewed with interest. The open-emitter COMP is seen as a budget-friendly alternative to the Trijicon SRO, offering a similarly large window on an RMR footprint.79 The enclosed DUTY model competes with the Holosun 509T and Steiner MPS at a lower price point.82 Positive comments highlight the good feature set (Shake Awake, multi-reticle options) for the price. Negative feedback includes observations that the glass clarity is not on par with premium options and some concerns about long-term durability, with one reviewer noting internal condensation after a freeze test on the DUTY model.83
Analyst Assessment: C&H is strategically leveraging its strong brand recognition in the optics mounting accessory market to launch its own line of optics. Their approach is to offer products with designs and features that closely mirror popular high-end models (SRO, ACRO/509T) at a more accessible price. Their market position is that of a value-oriented “inspired by” alternative to the market leaders. Their long-term success will be contingent on their ability to establish a reputation for consistent quality control and long-term durability.
18. Bushnell (RXS-250 / RXC-200 / RXU-200)
Total Mention Index: 46.2
% Positive Sentiment: 70%
% Negative Sentiment: 30%
User Sentiment Summary: Bushnell’s new reflex sights are seen as a credible, if late, entry into the modern MRDS market.84 The larger RXS-250 (DPP footprint) is noted for its large window and clear, tint-free glass.85 The micro-compact RXC-200 and RXU-200 (RMSc footprint) are praised for their rugged 7075 aluminum construction, extremely low profile for concealment, and crisp 6 MOA dot, all at a competitive price.87 Negative sentiment focuses on the lack of user control; the micro-compact models are “always on” with auto-brightness as the only mode, and some models lack tactile click adjustments for zeroing.88
Analyst Assessment: Bushnell, a legacy brand in the broader optics world, is playing catch-up in the pistol red dot space. Their current strategy appears to prioritize simplicity, durability, and affordability over a feature-rich experience. Their market position is that of a solid, no-frills option from a well-known brand. However, by eschewing now-common features like Shake Awake and user-selectable brightness on their micro-dots, they may struggle to differentiate themselves in a crowded market where feature-rich budget brands hold significant sway.
19. Viridian (RFX35 / RFX15)
Total Mention Index: 43.8
% Positive Sentiment: 65%
% Negative Sentiment: 35%
User Sentiment Summary: Viridian’s offerings are noted for their aggressive price point and focus on green dot emitters, which some users, particularly those with astigmatism, find easier to see.91 The RFX35 is praised for its large, SRO-like window on an RMR footprint, while the RFX15 serves the RMSc-footprint micro-compact market.92 Negative sentiment is common and often centers on design choices like the bottom-loading battery on some models, which is seen as a major inconvenience, as well as inconsistent reports on the optic’s ability to hold zero under recoil.92
Analyst Assessment: Viridian is competing in the hyper-competitive entry-level segment by using green dot technology as its primary differentiator. Its market position is that of a budget-friendly green dot alternative. However, dated design features like bottom-loading batteries and a mixed reputation for reliability make it a difficult choice for many consumers when compared to the more refined and proven offerings from Holosun, Swampfox, and Primary Arms in the same price bracket.
20. Gideon Optics (Alpha / Omega)
Total Mention Index: 40.1
% Positive Sentiment: 70%
% Negative Sentiment: 30%
User Sentiment Summary: As a newer entrant to the budget market, Gideon Optics has generated cautiously optimistic feedback. Users are often pleasantly surprised by the quality offered for the low price, noting crisp reticles that work well for shooters with astigmatism, solid-feeling construction, and large, SRO-style windows.95 They are viewed as a viable alternative to other entry-level brands. Negative feedback is still developing but points to limitations such as fixed, non-switchable reticles (the circle-dot cannot be changed to dot-only) and some minor optical distortion near the edges of the lens.96
Analyst Assessment: Gideon Optics appears to be a new brand or a house brand for a larger distributor, aiming to capture the low end of the market with optics that mimic the form factors of popular RMR and SRO models. Their market position is a value-driven option for hobbyists, range use, and budget builds. As with any new brand in this tier, their long-term viability will depend entirely on their ability to build a consistent track record for product reliability and responsive customer service.
Section 6: Strategic Insights & Forward Outlook
6.1 Key Market Trajectories
The analysis of consumer sentiment and product trends reveals three primary trajectories that will define the MRDS market in the near future:
Enclosed Emitters Become the Standard: The market is undergoing a fundamental shift in its definition of “duty-grade.” For any user who prioritizes absolute reliability for defensive, law enforcement, or hard-use competition applications, the enclosed emitter is rapidly moving from a premium feature to a baseline requirement. The immunity to environmental factors like rain, dust, and lint is too significant an advantage to ignore.3 Manufacturers that fail to offer competitive enclosed options will risk being relegated to the casual and recreational segments of the market.
The Quest for Optical Perfection: As the mechanical durability of MRDS becomes a largely solved problem across multiple price tiers, the next frontier for competition is optical quality. Consumer discussions are becoming increasingly sophisticated, focusing on nuanced attributes like the degree of lens color tint, edge-to-edge clarity without distortion, and the crispness of the emitter, particularly for the large segment of the population with astigmatism.30 The brand that can deliver a truly colorless, distortion-free sight picture in a durable, reliable package will command a significant competitive advantage.
Miniaturization and Seamless Integration: The commercial success of the Holosun EPS Carry and SIG Sauer Romeo-X Compact underscores a powerful demand for highly integrated, low-profile optics designed for concealed carry.46 The market will continue to push for smaller, lighter optics that can mount low enough to allow for a co-witness with standard-height iron sights. This will drive innovation in emitter technology, housing design, and power systems to shrink the overall footprint without compromising performance.
6.2 Opportunities and Threats
The current market dynamics present clear strategic opportunities and threats for manufacturers:
Opportunity: The “Trifecta” Optic: A substantial market opportunity exists for the first manufacturer to successfully deliver the “trifecta” of consumer demands in a single product: 1) The proven, bombproof durability of a Trijicon or Aimpoint; 2) The advanced feature set of a Holosun (e.g., Multi-Reticle System, Solar Failsafe, Shake Awake); and 3) The superior optical clarity of a Leupold (large, nearly tint-free window). Crucially, this product would need to be offered at a competitive “prosumer” price point (under $450). Currently, no single product meets all these criteria, leaving a significant gap in the market.
Threat: Margin Compression and Brand Erosion: The primary strategic threat to established premium brands like Trijicon, Aimpoint, and Leupold is the commoditization of “good enough” reliability. As Tier 2 and Tier 3 brands continue to prove that their products can reliably withstand the rigors of pistol use over thousands of rounds, it becomes increasingly difficult for Tier 1 brands to justify a 2x or 3x price multiplier based on durability alone. This trend erodes the prestige of legacy brands and compresses their profit margins, forcing them to compete on features and price—a battle they have historically been slow to engage in.
6.3 Forward Outlook
Looking ahead, the MRDS market will continue its trajectory toward greater sophistication and integration. Enclosed emitters are poised to become the dominant form factor for all service-sized and duty pistols within the next five years. Open emitters will likely be relegated to specialized applications where minimal size is the absolute priority (deep concealment micro-compacts) or to the lowest-cost budget offerings.
The next major technological leap is likely to occur in power systems—moving beyond current solar and motion-sensing technologies toward innovations like kinetic charging or new battery chemistries that offer decade-long run times as a standard. Concurrently, advancements in materials science will enable the creation of stronger, lighter housing materials and new lens technologies that can deliver a truly distortion-free, colorless sight picture without compromising durability. The footprint standards war will likely see the ACRO pattern solidify its position as the standard for enclosed sights, while the RMR and RMSc footprints will persist for open sights, ensuring a continued, albeit frustrating, need for a robust adapter plate market.
Appendix: Social Media Sentiment Analysis Methodology
A.1 Objective
The objective of this methodology was to systematically analyze and quantify consumer and prosumer sentiment regarding pistol-mounted micro red dot sights (MRDS) within the U.S. market. The goal was to identify market leaders, key performance trends, and strategic insights based on user-generated data.
A.2 Data Sourcing
The analysis was conducted on publicly available, English-language content posted between Q1 2022 and the present day from the following U.S.-centric online platforms:
Reddit: Subreddits including r/CCW, r/Pistols, r/Glocks, r/SigSauer, r/CompetitionShooting, and r/AR15.
Specialist Forums: Pistol-Forum.com and the handgun-specific sections of AR15.com.
YouTube: Comment sections on MRDS review videos from major U.S.-based firearms channels.
A.3 Methodology
Data Aggregation: A keyword-based search was performed across the specified platforms to collect relevant posts, comments, and threads. Keywords included generic terms (MRDS, red dot, pistol optic, open emitter, enclosed emitter, astigmatism, starburst, lens tint, shake awake) and specific brand/model names (Trijicon RMR, Holosun 507C, Aimpoint ACRO, etc.).
Total Mention Index Calculation: To quantify an optic’s prominence in online discourse, a “Total Mention Index” was calculated. Each unique, substantive mention of a specific model was counted. A weighting system was applied to reflect the discussion density and user engagement levels of different platform types. The formula used is:
The highest resulting score was normalized to 100, and all other scores were calculated proportionally to establish a relative ranking.
Sentiment Classification: Each substantive mention was manually classified as Positive, Negative, or Neutral based on its context and the keywords used.
Neutral mentions, such as simple questions about specifications without expressing an opinion, were excluded from the sentiment percentage calculations to avoid diluting the results.
A.4 Objectivity and Limitations
This analysis is subject to several inherent limitations that must be acknowledged:
Sampling Bias: The data is sourced exclusively from online communities, which may over-represent enthusiasts and prosumers and may not fully capture the sentiment of the broader, more casual market of MRDS owners.
Brand Tribalism: Users often exhibit strong loyalty to their chosen brands (“fanboyism”), which can lead to biased positive reporting for their own gear and biased negative reporting for competing brands.
Amplification Effect: Online forums can act as echo chambers, amplifying both positive and negative experiences, which may not be representative of the typical user’s experience.
Persistence of Early Issues: Negative sentiment related to the initial launch problems of a product (e.g., early issues with the Vortex Defender-CCW or Steiner MPS) can persist in search results and discussions long after the manufacturer has corrected the issues, potentially skewing the long-term sentiment score unfairly.
Sponsored Content: While efforts were made to identify and exclude overtly sponsored content, the subtle influence of brand ambassadors and marketing can impact online discussions.
Despite these limitations, this methodology provides a robust and directionally accurate snapshot of the prevailing consumer attitudes, priorities, and competitive dynamics within the U.S. pistol MRDS market.
The U.S. civilian market for weapon-mounted thermal imaging sights is undergoing a period of unprecedented technological evolution and market disruption. Once the exclusive domain of military and high-budget law enforcement agencies, thermal optics have become increasingly accessible to the consumer and prosumer, driven primarily by the demands of nocturnal predator and feral hog hunting.1 This rapid democratization of technology has created a fiercely competitive landscape where established American and European brands are increasingly challenged by agile, innovative, and aggressively priced overseas manufacturers. This report provides a data-driven analysis of this dynamic market, drawing on consumer and prosumer sentiment from high-traffic, U.S.-centric online communities to identify key trends, market leaders, and performance benchmarks.
The analysis of thousands of user-generated data points reveals a market stratified into three distinct tiers. Tier 1 (Premium & Duty-Grade) is occupied by legacy brands like Trijicon and N-Vision, which command high prices based on a reputation for military-grade durability and superior image processing, but are increasingly criticized for a lack of integrated features. Tier 2 (High-Performance Prosumer) represents the market’s most dynamic battleground, where brands such as Pulsar and iRayUSA compete intensely, offering high-resolution sensors and a full suite of modern features like integrated laser rangefinders (LRFs) and ballistic solvers. Tier 3 (Entry-Level/Value) is defined by the rapid commoditization of technology, with brands like AGM, RIX, and DNT capturing significant market share by offering 384- and even 640-resolution optics at previously unattainable price points.
The most significant market trends identified are the commoditization of the 640×480 resolution sensor, which is now the expected standard for any serious prosumer optic, and the industry-wide integration of LRFs and ballistic calculators.3 These features have transitioned from novelties to necessities, fundamentally altering the definition of a “complete” thermal sighting system. The intense competition between established players and aggressive new entrants has shifted the basis of competition from raw sensor specifications to a more holistic evaluation of user experience (UX), software maturity, and after-sale support. The following summary table ranks the top 20 thermal sights based on their prominence in online discussions and the corresponding user sentiment, providing a strategic, at-a-glance overview of the current competitive landscape.
Abysmal battery life (CR123s), very high price, lacks modern features (LRF)
4
AGM Rattler V2/V3 TS35-640
Dedicated
640×480
165
96%
4%
Unbeatable value, great image for the price, V2 battery improvement, V3 LRF
Image not as refined as premium brands, V1 had issues
5
iRayUSA RH25 (PFalcon640)
Clip-On
640×480
151
97%
3%
Incredible versatility (helmet/clip-on/handheld), compact, great image
High price for a multi-use unit, clip-on use has limitations
6
Pulsar Talion XG35
Dedicated
640×480
138
95%
5%
Compact design, excellent Pulsar ecosystem, great image quality, ergonomics
Higher price than direct competitors (AGM)
7
RIX Leap L6
Dedicated
640×480
125
98%
2%
Game-changing optical zoom, crisp image, great value, good battery life
New brand/unproven long-term reliability, slightly heavy
8
DNT Hydra HS635
Dedicated
640×512
119
99%
1%
Astonishing price for 640-res, versatile 3-in-1 design, excellent image
Awkward mounting height, no saved zero profiles
9
N-Vision HALO-XRF
Dedicated
640×480
115
65%
35%
Excellent BAE core image, uses 18650 batteries, good customer service
Extremely high price, lagging innovation, past reliability issues
10
AGM Rattler V2 TS50-640
Dedicated
640×480
110
94%
6%
Great value for long-range, higher base magnification, reliable
Bulkier than 35mm model, image clarity softens at digital zoom
11
Leica Calonox 2 Sight
Clip-On
640×512
98
70%
30%
Superb build quality, shutterless operation, no re-zero needed
Very expensive, perceived “brand tax” for non-Leica core tech
12
AGM Rattler V2 TS35-384
Dedicated
384×288
95
97%
3%
The benchmark for entry-level, very capable for the price, reliable
Limited identification range vs. 640, basic feature set
13
Armasight Operator 640
Clip-On
640×480
91
88%
12%
Rugged all-metal construction, good image, reliable clip-on performance
Basic feature set, slightly lower image quality than competitors
14
ATN ThOR 4 384
Dedicated
384×288
85
45%
55%
Long feature list, good battery life, low price
Widespread reliability issues, screen freezes, poor customer service
15
Burris BTS35 v3 640
Dedicated
640×480
82
85%
15%
Good image, intuitive rotary dial UI, solid battery system
Limited market penetration, higher price than value brands
16
Guide TB630 LRF
Clip-On
640×512
79
92%
8%
Excellent specs (low NETD), integrated LRF, great image, strong value
Some image lag when panning, less known brand
17
SIG Sauer Echo3
Dedicated
320×240
75
40%
60%
Compact reflex sight form factor, easy to use
Very narrow FOV, poor image quality, dated sensor technology
18
Pulsar Thermion 2 LRF XL50
Dedicated
1024×768
73
98%
2%
Groundbreaking HD sensor clarity, excellent features, long detection range
Extremely high price, lower base magnification
19
AGM Adder V2 LRF 50-640
Dedicated
640×512
68
93%
7%
Traditional scope look, long battery life, integrated LRF, good value
Heavy, bulky compared to Rattler series
20
RIX Storm S6
Dedicated
640×480
65
96%
4%
Excellent value for 640-res, compact, good image quality
Basic features, newer brand
Section 2: The Modern Thermal Sight Market Landscape
2.1 Defining the Thermal Weapon Sight
At the heart of every modern thermal weapon sight is an uncooled microbolometer, a sophisticated sensor that operates as an array of microscopic thermal detectors.5 This technology does not “see” visible light; instead, it detects infrared radiation—heat—emitted by all objects. Each pixel in the microbolometer array is a thermally isolated membrane, typically made of Vanadium Oxide (VOx) or Amorphous Silicon (a-Si), whose electrical resistance changes when heated by incoming infrared energy.5 An integrated circuit reads these resistance changes across the entire array and translates them into a detailed thermal image, or thermogram, which is then displayed to the user.
The performance and user experience of these systems are dictated by a handful of critical technical metrics that have become the common language of consumers in this market:
Sensor Resolution: This is the total number of pixels in the microbolometer array (e.g., 640×480 or 384×288). A higher resolution means more pixels on target, which translates directly to a more detailed image and a greater ability to positively identify targets at extended ranges.7
Pixel Pitch: Measured in micrometers (µm), this is the distance between the centers of individual pixels. The industry has largely standardized on a 12µm pixel pitch. A smaller pitch allows for more compact lens systems or higher native magnification for a given objective lens size, contributing to smaller and lighter optics.9
Refresh Rate: Expressed in Hertz (Hz), this indicates how many times per second the image is updated. A higher refresh rate (e.g., 50Hz or 60Hz) results in smoother on-screen motion, which is critical for tracking moving targets like running hogs or coyotes. A lower rate can appear choppy or laggy.10
NETD (Noise Equivalent Temperature Difference): This is the key measure of the sensor’s thermal sensitivity, expressed in millikelvins (mK). It represents the smallest temperature difference the sensor can detect. A lower NETD value (e.g., <25mK) indicates higher sensitivity, resulting in a more detailed image with better contrast, especially in challenging environmental conditions like high humidity, fog, or rain where thermal contrast is naturally low.12
2.2 The Spec Sheet Revolution: Resolution, Pitch, and NETD
The civilian thermal market has undergone a “spec sheet revolution,” where quantifiable sensor data has become the primary driver of consumer purchasing decisions. Online communities are replete with discussions comparing the resolution, pixel pitch, and increasingly, the NETD values of competing products.8 This has forced manufacturers into a new era of transparency, where competing on objective performance metrics is paramount. The sentiment is clear: a 640×480, 12µm sensor is now the baseline expectation for any serious prosumer optic.8
This focus on raw specifications has created a perception of parity, as many products from different manufacturers now feature sensor cores from the same handful of original equipment manufacturers (OEMs).14 However, the analysis of user sentiment reveals a more nuanced reality. While the sensor core is the foundation, the final image quality perceived by the user is profoundly influenced by two other critical factors: the quality of the germanium objective lens and, most importantly, the manufacturer’s proprietary image processing algorithms. Experienced users consistently note that brands like Trijicon and Pulsar produce a more refined and detailed image than some competitors using the same sensor, attributing this to superior software and optical engineering.15 This indicates that the competitive battleground is shifting from who can source the best sensor to who can build the best complete system around it.
2.3 The Feature Integration Arms Race: LRFs, Ballistic Solvers, and Connectivity
Parallel to the competition on sensor performance, an “arms race” in feature integration has fundamentally reshaped the market. Features that were once exclusive to ultra-premium devices have rapidly cascaded down to mid-tier and even value-priced optics, changing the very definition of a “complete” thermal system.
The most significant of these is the integrated Laser Rangefinder (LRF). For hunters engaging targets beyond 150 yards, particularly in open country, an accurate range reading is critical for making an ethical shot. The integration of an LRF directly into the scope housing, as seen in market-leading products like the Pulsar Thermion 2 LRF series and the iRayUSA RICO RH50R Mk2, has become a massive value-add.3
Taking this a step further, the most advanced systems now pair the LRF with an onboard ballistic calculator. The optic uses the range data from the LRF, combined with user-inputted ballistic data for their specific rifle and ammunition, to instantly calculate the correct holdover and display an adjusted aiming point on the reticle.17 This technology dramatically simplifies long-range shooting at night and has become a powerful competitive differentiator.
Finally, seamless connectivity and media capture have become standard expectations. Features such as onboard video and audio recording, recoil-activated video (RAV) that automatically captures footage before and after a shot, and Wi-Fi streaming to a companion mobile app are now common.19 This allows users to easily review their hunts, share footage, and even allow a partner to view a live feed from the scope, enhancing the overall user experience.
This tier is defined by uncompromising build quality, superior image processing, and high price points. These are the benchmark optics against which all others are measured, though they face increasing pressure from more feature-rich competitors.
1. Pulsar Thermion 2 LRF XP50 Pro
Total Mention Index: 185
Sentiment: 94% Positive / 6% Negative
User Sentiment Summary: The Thermion 2 LRF XP50 Pro is consistently lauded as a premier, all-in-one thermal solution. Users praise its “amazing image quality” and the traditional 30mm riflescope form factor, which allows for easy and familiar mounting.22 The integrated LRF is described as a “game-changer,” and when paired with the onboard ballistic calculator, it takes the “guesswork out of aiming”.22 The dual-battery system, providing up to 10 hours of runtime, is a significant advantage over competitors.22 Negative comments are infrequent but typically center on the premium price and occasional firmware bugs or a more frequent auto-NUC (calibration) cycle than some users prefer.24
Analyst Assessment: Pulsar has masterfully positioned the Thermion 2 LRF XP50 Pro as the modern standard for a complete, high-performance thermal weapon sight. It successfully blends a high-quality 640×480 sensor with a mature and feature-rich software ecosystem, including the well-regarded Stream Vision 2 app. While its image processing is top-tier, its primary competitive advantage lies in its polished and comprehensive user experience. It directly challenges Trijicon’s dominance by offering a far more capable feature set and sets the bar for usability that competitors like iRayUSA are still chasing.
2. iRayUSA RICO RH50R Mk2 LRF
Total Mention Index: 172
Sentiment: 81% Positive / 19% Negative
User Sentiment Summary: User sentiment for the RICO RH50R is passionate but polarized. On one hand, the image quality is described in superlative terms like “holy-shit amazing” and “the one to beat”.25 Its highly sensitive <20mK NETD sensor, 50mm germanium lens, and huge 2560×2560 AMOLED display produce an image that many users feel is the best on the market.4 On the other hand, this praise is frequently tempered by significant complaints about the user experience. Common negatives include a slow boot-up time, a clunky menu system, poor battery life, and unreliable app connectivity.26
Analyst Assessment: iRayUSA is a major disruptive force in the market, competing and often winning on the basis of raw sensor and image performance. The RH50R Mk2 is a technological powerhouse that showcases their R&D capabilities. However, the product’s software and usability ecosystem lags significantly behind its primary competitor, Pulsar. This creates a clear dichotomy for the high-end prosumer: choose iRayUSA for the absolute best image or choose Pulsar for the best overall user experience. iRayUSA’s excellent 5-year, 5-day repair-or-replace warranty is a crucial strategic tool to build consumer confidence and offset concerns about the software’s maturity.27
3. Trijicon REAP-IR 35mm
Total Mention Index: 168
Sentiment: 75% Positive / 25% Negative
User Sentiment Summary: The REAP-IR is the benchmark for durability and is frequently described as a “tank”.28 Users universally praise its image quality, noting that its proprietary image processing algorithms produce a crisp, clear picture that allows for positive identification at several hundred yards.29 The simple, joystick-based control is often cited as a positive for use in the dark or with gloves.30 However, these positives are met with two major, recurring complaints: extremely poor battery life from its two CR123 batteries and a very high price for a unit that lacks now-standard features like an LRF or onboard recording.31
Analyst Assessment: The REAP-IR maintains its Tier 1 status on the strength of Trijicon’s brand reputation and its proven, military-grade ruggedness. It is the go-to choice for users who prioritize durability above all else. However, its market position is eroding. In a market where a $3,500 AGM scope offers a 640 sensor and an LRF, the REAP-IR’s feature set appears dated and its price difficult to justify for many consumers. Trijicon is at risk of being outmaneuvered by more innovative competitors if it does not integrate modern features into its next product generation.
4. AGM Rattler V2/V3 TS35-640
Total Mention Index: 165
Sentiment: 96% Positive / 4% Negative
User Sentiment Summary: Across all platforms, the AGM Rattler TS35-640 is hailed as the undisputed king of “best value for money”.19 Users are consistently impressed with the high-quality 640-resolution image it provides for a price often under $3,300.34 The V2 update was a massive success, addressing the V1’s primary weakness—poor battery life—by introducing a long-lasting, removable battery pack.34 The V3 builds on this by adding a well-integrated LRF and ballistic calculator, bringing its feature set in line with much more expensive scopes.36 While users acknowledge the image is not as refined as a top-tier Pulsar or iRay, the performance-per-dollar is considered exceptional.16
Analyst Assessment: AGM has fundamentally altered the thermal market with the Rattler series. By successfully bringing a reliable 640-resolution optic to a mass-market price point, they have captured a vast segment of prosumer hunters. The iterative improvements from V1 to V2 (battery) and V3 (LRF) demonstrate an agile product development cycle that is responsive to consumer feedback. The Rattler line is the workhorse of the modern thermal hunting market and the primary vehicle for the commoditization of high-resolution thermal imaging.
5. iRayUSA RH25 (PFalcon640)
Total Mention Index: 151
Sentiment: 97% Positive / 3% Negative
User Sentiment Summary: The RH25 is overwhelmingly praised for its unique and unmatched versatility. It is consistently recommended as the best multi-purpose thermal device on the market, capable of serving as a helmet-mounted monocular, a handheld scanner, and a rifle-mounted clip-on sight.15 Its compact size, light weight, and excellent 640-resolution image quality for its form factor are key positive themes. Its performance as a clip-on in front of low-power variable optics (LPVOs) up to around 6x magnification is a frequent topic of positive discussion.37
Analyst Assessment: The iRayUSA RH25 did not just enter a market segment; it created one. Its success demonstrates a strong consumer demand for modular, multi-role electro-optics. For users who cannot afford dedicated devices for each application, the RH25 offers a high-performance, “one-and-done” solution. Its market dominance in this niche is currently unchallenged and has forced other manufacturers to consider more versatile and compact designs. It represents a significant shift away from the traditional, single-purpose dedicated riflescope.
This tier is the most competitive segment of the market, characterized by an intense battle for the prosumer dollar. Brands here offer high-performance 640-resolution sensors and a rich feature set at mid-range price points, typically between $2,500 and $5,500.
6. Pulsar Talion XG35
Total Mention Index: 138
Sentiment: 95% Positive / 5% Negative
User Sentiment Summary: The Talion XG35 is highly regarded as a compact, high-quality 640-resolution scope. Users appreciate its lightweight magnesium alloy housing, excellent image quality, and the intuitive Pulsar user interface.21 The unique top-mounted control wheel and the rapid-extraction battery system are frequently mentioned as well-designed ergonomic features.21 It is often compared directly to the AGM Rattler TS35-640, with many users concluding that the Talion offers a superior image and a more premium build feel, justifying its slightly higher price.16
Analyst Assessment: The Talion XG35 is Pulsar’s strategic response to the value-driven competition from AGM. It allows Pulsar to compete in the crucial sub-$4,000 640-resolution segment while maintaining its brand identity of premium quality and a polished user experience. By leveraging its mature software ecosystem and reputation, Pulsar successfully defends its market share against lower-priced alternatives.
7. RIX Leap L6
Total Mention Index: 125
Sentiment: 98% Positive / 2% Negative
User Sentiment Summary: The RIX Leap L6 has entered the market with a significant and positive impact. Its standout feature, and the subject of overwhelming praise, is its true continuous optical zoom.41 Users describe this as a “game changer,” allowing them to magnify targets without the significant image degradation and pixelation inherent in the digital zoom of all its competitors.41 The image clarity from its 640-resolution, <25mK NETD sensor is considered excellent for its price point, and its 9-hour battery life is a major positive.41
Analyst Assessment: RIX Optics is a formidable new competitor. The introduction of optical zoom in a sub-$4,000 thermal scope is a genuine technological innovation that directly addresses a major pain point for users. This feature alone gives the Leap L6 a powerful unique selling proposition. Combined with aggressive pricing and a solid feature set, RIX is positioned to be a major market disruptor, challenging the established value propositions of both AGM and Pulsar.
8. DNT Hydra HS635
Total Mention Index: 119
Sentiment: 99% Positive / 1% Negative
User Sentiment Summary: The sentiment surrounding the DNT Hydra HS635 is almost universally ecstatic, driven by its incredible value. Users are “impressed” and “blown away” that a versatile 3-in-1 (scope, clip-on, monocular) optic with a 640×512, <18mK NETD sensor can be had for under $2,300.44 The image quality is frequently described as rivaling scopes costing twice as much. The primary criticisms are functional quirks rather than performance flaws, such as a non-standard mounting height that can complicate clip-on use and the lack of multiple saved zeroing profiles.46
Analyst Assessment: The Hydra HS635 represents the bleeding edge of thermal technology commoditization. It offers a spec sheet and feature set that was firmly in the premium tier just a few years ago at an entry-level price. This product exerts immense downward price pressure on the entire market, blurring the lines between the entry-level and prosumer tiers. It is a clear signal that core sensor performance is no longer a feature that can command a high premium on its own.
9. N-Vision HALO-XRF
Total Mention Index: 115
Sentiment: 65% Positive / 35% Negative
User Sentiment Summary: The HALO-XRF is recognized for its top-tier image quality, derived from the same high-performance BAE 640-resolution thermal core found in Trijicon optics.28 Users appreciate practical features like the use of standard 18650 rechargeable batteries, a clear advantage over Trijicon’s reliance on expensive CR123s.28 However, there is a strong negative sentiment regarding its extremely high price, which many users feel is no longer justified given the performance of newer, more affordable, and more feature-rich competitors from iRay and Pulsar.47 Reports of early units suffering from reliability issues like screen freezing have also damaged its reputation.28
Analyst Assessment: N-Vision is struggling to maintain its position in the premium market. While its core image performance is excellent, the brand is perceived as being slow to innovate and uncompetitive on price. In a market where a $5,500 iRay scope offers comparable or better image quality with more features, the HALO-XRF’s nearly $9,500 price tag is a difficult sell. The brand risks being relegated to a niche player if it cannot adapt to the market’s new price-to-performance expectations.
10. AGM Rattler V2 TS50-640
Total Mention Index: 110
Sentiment: 94% Positive / 6% Negative
User Sentiment Summary: This model is the long-range counterpart to the TS35-640, offering a higher 2.5x base magnification for hunters in more open terrain.19 Users praise it for providing excellent long-range identification capability at a value price point. The same positives as the TS35 model apply, including the V2’s improved battery life and solid build quality. The main trade-off noted by users is the narrower field of view, which makes it less suitable for scanning or for engaging multiple targets at close range, such as a large sounder of hogs.19
Analyst Assessment: The TS50-640 solidifies AGM’s strategy of market segmentation. By offering both a wide field-of-view model (TS35) and a high-magnification model (TS50) at value price points, AGM effectively covers the needs of the vast majority of the thermal hunting market. This model is a direct competitor to higher-priced, long-range focused scopes and serves to further cement AGM’s position as the value leader.
11. Leica Calonox 2 Sight
Total Mention Index: 98
Sentiment: 70% Positive / 30% Negative
User Sentiment Summary: The Calonox 2 is praised as a premium clip-on device with a robust, high-quality build, excellent image clarity, and innovative features like its shutterless design, which provides a smooth, uninterrupted image without the freezing and clicking of a mechanical shutter.49 Its ability to be swapped between different rifles without needing to be re-zeroed is also a highly valued feature.50 However, a significant portion of the discussion is negative, focusing on its high price. Many users argue that one is simply “paying for the name,” as the core thermal sensor and electronics are not manufactured by Leica, and similar or better performance can be had from other brands for significantly less money.52
Analyst Assessment: Leica is attempting to leverage its formidable brand equity from the world of traditional daylight optics to penetrate the thermal market. The Calonox 2 is an excellently engineered product with legitimate technical advantages like its shutterless operation. However, it faces a major headwind in its value proposition. The thermal market is increasingly savvy about the underlying technology, and many consumers are unwilling to pay a “brand tax” for components that Leica does not produce itself.
12. AGM Rattler V2 TS35-384
Total Mention Index: 95
Sentiment: 97% Positive / 3% Negative
User Sentiment Summary: This model is the quintessential entry point into serious thermal hunting. It is the most frequently recommended scope for users with a budget under $2,500.10 Users report that its 384-resolution sensor provides a clear and very usable image for identifying coyotes and hogs within 200-300 yards, a massive improvement over older 256-resolution optics.10 The V2 upgrades, particularly the improved battery system, are seen as essential improvements that make it a reliable workhorse.
Analyst Assessment: The Rattler TS35-384 established AGM’s market dominance at the entry level. It hit a perfect sweet spot of performance and price that made thermal hunting accessible to a much wider audience. It remains the benchmark against which all other budget-oriented thermal scopes are judged and serves as a critical gateway product for the AGM brand.
13. Armasight Operator 640
Total Mention Index: 91
Sentiment: 88% Positive / 12% Negative
User Sentiment Summary: The Operator 640 clip-on receives positive feedback for its rugged, all-aluminum construction and reliable performance.49 Users find it to be a solid, “bombproof” option that integrates well with daytime scopes up to around 6x magnification. The image quality is considered good, and the simple three-button interface is easy to use in the field. Some criticism is directed at its relatively basic feature set compared to more modern clip-on systems.
Analyst Assessment: Armasight, now part of the same parent company as FLIR, offers a durable and reliable clip-on with the Operator 640. It competes in the mid-tier clip-on segment against offerings from iRayUSA and others. Its strength lies in its robust build quality and straightforward operation, appealing to users who prioritize durability over the latest software features. It is a solid, if not groundbreaking, option in the clip-on market.
This tier is characterized by price-driven competition and the commoditization of features that were once considered high-end. These optics, typically priced under $2,500, have made thermal technology accessible to a broad consumer base, though performance and reliability can vary significantly.
14. ATN ThOR 4 384
Total Mention Index: 85
Sentiment: 45% Positive / 55% Negative
User Sentiment Summary: User sentiment for the ATN ThOR 4 is the most polarized of any optic in this analysis. On the positive side, users are attracted by its long list of features for a low price, including a ballistic calculator, video recording, and an impressive 16+ hour battery life.11 Some users report getting a “good unit” that performs well for its cost.55 However, this is overshadowed by a large volume of intensely negative feedback. The most common complaints are frequent screen freezing, software bugs, and general unreliability.55 The most severe criticism is reserved for ATN’s customer service, which is frequently described as unresponsive and unhelpful.55
Analyst Assessment: ATN’s market strategy is to lead with an extensive feature list at an aggressive price point. However, this appears to be achieved at the expense of quality control, software stability, and post-sale support. The brand suffers from a significant and persistent reputation problem within the enthusiast community. While the low entry price continues to attract new buyers, the high rate of reported issues and poor customer service experiences represent a major liability for the brand’s long-term health.
15. Burris BTS35 v3 640
Total Mention Index: 82
Sentiment: 85% Positive / 15% Negative
User Sentiment Summary: The Burris BTS35 v3 is generally well-regarded by those who have used it. Positive comments focus on its good 640-resolution image, an intuitive user interface that utilizes a rotary dial for easy menu navigation, and a robust power system with hot-swappable batteries.58 The inclusion of a quality American Defense Mfg QD mount is also seen as a plus.59 Negative feedback is sparse but tends to focus on its price, which is higher than the value-leading brands like AGM and RIX.
Analyst Assessment: Burris, a well-respected name in traditional optics, has produced a competent and well-designed thermal scope. Its primary challenge is market positioning. It lacks the groundbreaking innovation of RIX or the aggressive pricing of AGM, placing it in a difficult middle ground. While a solid product, it has struggled to gain significant market traction against more established or value-oriented thermal brands.
16. Guide TB630 LRF
Total Mention Index: 79
Sentiment: 92% Positive / 8% Negative
User Sentiment Summary: The Guide TB630 LRF is an emerging clip-on that has garnered positive attention for its impressive specifications. Users are drawn to its 640×512 sensor, extremely low <20mK NETD rating, integrated LRF, and high-resolution 1920×1080 AMOLED display—a feature set that is highly competitive for its price.61 The image quality is described as very clear. The main critique is a noticeable, albeit slight, image lag when panning quickly compared to some other units.62
Analyst Assessment: Guide Sensmart is a major Chinese OEM that is now marketing its own branded products in the U.S. The TB630 LRF demonstrates their strong technical capabilities. By offering a spec sheet that rivals or exceeds premium clip-ons at a mid-tier price, Guide is positioning itself as a serious contender in the value-performance segment, directly challenging brands like Armasight and even iRayUSA.
17. SIG Sauer Echo3
Total Mention Index: 75
Sentiment: 40% Positive / 60% Negative
User Sentiment Summary: The Echo3’s concept—a compact thermal reflex sight—is its main point of appeal. Users who like it appreciate its small, EOTech-like form factor, light weight, and simple, intuitive controls.58 It is considered functional for close-range hunting (under 200 yards). However, the negative sentiment is strong and focuses on critical performance flaws. The extremely narrow field of view is the most common complaint, making scanning and target acquisition difficult.63 Users also report poor image quality that degrades significantly with any digital zoom and cite its dated 320×240, 30 Hz sensor as a major weakness.63
Analyst Assessment: The SIG Sauer Echo3 is an example of an innovative form factor undermined by outdated core technology. While the concept of a thermal reflex sight is compelling, the execution falls short of market expectations for image and sensor performance. In a market where 384-resolution is the entry-level standard, a 320-resolution sensor with a low refresh rate is simply not competitive, regardless of the housing it’s in.
18. Pulsar Thermion 2 LRF XL50
Total Mention Index: 73
Sentiment: 98% Positive / 2% Negative
User Sentiment Summary: Users who have experienced the XL50 describe its 1024×768 HD sensor as a revolutionary step up in thermal imaging clarity.22 The level of detail and identification range is reported to be significantly better than standard 640-resolution scopes. It retains all the other positive attributes of the Thermion 2 LRF line, including the excellent UI, LRF/ballistics, and battery system. The only negative is its extremely high price, which places it out of reach for most consumers.26
Analyst Assessment: The Thermion 2 LRF XL50 represents the current pinnacle of commercially available thermal weapon sights and is a preview of the market’s future. While its high price makes it a niche product today, it establishes Pulsar as the technological leader in the HD thermal space. As manufacturing costs for HD sensors decrease, this technology will inevitably trickle down to more accessible price points, and Pulsar has established a strong first-mover advantage.
19. AGM Adder V2 LRF 50-640
Total Mention Index: 68
Sentiment: 93% Positive / 7% Negative
User Sentiment Summary: The AGM Adder series appeals to users who prefer the traditional look and feel of a daytime riflescope. Its standout feature is its exceptional battery life, with dual internal 18650 batteries providing up to 15 hours of runtime.65 The integration of an LRF in the V2 models is also a significant plus. The main drawback cited by users is its weight and bulk; it is considerably heavier and larger than the more compact Rattler series.66
Analyst Assessment: The Adder line allows AGM to compete with the traditional form-factor scopes from Pulsar (Thermion) and iRayUSA (Bolt). Its primary competitive advantage is its class-leading battery life. It serves a segment of the market that prioritizes runtime and traditional aesthetics over the compact, lightweight design of the Rattler, further broadening AGM’s market coverage.
20. RIX Storm S6
Total Mention Index: 65
Sentiment: 96% Positive / 4% Negative
User Sentiment Summary: The Storm S6 is RIX’s entry into the compact, value-priced 640-resolution market. Users praise it for its small size, clear image, and aggressive price point, often under $2,500.8 It is seen as a direct and compelling competitor to the AGM Rattler TS35-640. Like other RIX products, it benefits from the company’s growing reputation for delivering high performance at a low cost.
Analyst Assessment: The Storm S6 demonstrates RIX’s intent to compete across multiple market segments. While the Leap series attacks the mid-tier with technological innovation, the Storm series attacks the value tier on price and performance, putting direct pressure on AGM’s core market. RIX is rapidly establishing itself as a full-line competitor with a strong value proposition.
Section 6: Strategic Insights & Forward Outlook
6.1 Key Market Trajectories
The analysis of consumer sentiment and product offerings reveals several key trajectories that will shape the thermal optics market in the coming years.
The Push to HD (1280-Resolution): The next major technological inflection point is the transition from 640×480 to 1280×1024 (HD) resolution sensors. Premium offerings like the Pulsar Thermion 2 LRF XL50 and new products from iRayUSA/Nocpix are already establishing HD as the new benchmark for high-end performance.67 This technological progression will continue to push 640-resolution sensors firmly into the mid-tier, mainstream category, while 384-resolution will become the exclusive domain of entry-level, budget-focused products.
Miniaturization and Modularity: The market is showing a clear preference for smaller, lighter, and more versatile systems. The immense popularity of the iRayUSA RH25, a compact unit that excels as a helmet-mounted monocular, handheld scanner, and clip-on sight, underscores this trend.15 This demand for modularity is driving the development of increasingly compact clip-on systems and multi-purpose optics, challenging the dominance of the traditional, single-purpose dedicated riflescope.69
The Primacy of Software and UX: As the core hardware—the thermal sensor—becomes increasingly commoditized, the key battleground for brand differentiation is shifting to the user experience (UX). The intense debate between iRayUSA’s superior image and Pulsar’s superior software is the leading indicator of this trend.26 The brands that will succeed will be those that invest heavily in developing intuitive menus, stable firmware, seamless mobile app integration, and genuinely useful software features like refined ballistic solvers. A great sensor in a poorly designed package is no longer a winning formula.
6.2 Opportunities and Threats
The current market landscape presents both significant opportunities and existential threats for manufacturers.
Opportunity: A clear opportunity exists for the manufacturer that can successfully synthesize the market’s disparate strengths into a single, “no-compromise” product. A device that combines the raw image fidelity of an iRayUSA sensor, the polished software and ergonomic design of a Pulsar Thermion, the bombproof durability of a Trijicon REAP-IR, and the aggressive pricing of a RIX or AGM would likely dominate the market. The first brand to perfect this blend of hardware performance and software usability will have a powerful competitive advantage.
Threat: The primary threat, especially for established American and European brands, is market commoditization. As the tangible performance gap between a $2,500 optic from an overseas innovator and a $5,500 optic from a legacy brand continues to narrow, it becomes increasingly difficult to justify the price premium based on hardware specifications alone.47 Legacy brands must pivot their value proposition to focus on demonstrable advantages in reliability, build quality, software stability, and crucially, domestic customer support and warranty service—intangibles that new, value-focused brands may struggle to match. Failure to do so risks being priced into irrelevance.
The competitive environment is rapidly evolving from a technology-gated market, where only a few firms had access to high-performance sensors, to a highly fragmented landscape that more closely resembles the consumer electronics industry. In this new paradigm, success will be determined less by who has the newest sensor and more by who can deliver the most reliable, user-friendly, and well-supported complete package.
6.3 Forward Outlook
Near-Term (1-2 Years): Expect 1280-resolution scopes to become more prevalent in the premium ($6,000+) price bracket, solidifying their position as the new high-end standard. The market’s “sweet spot” will coalesce around 640-resolution scopes with integrated LRFs and ballistic calculators in the $2,500 to $4,000 range. Manufacturers who cannot offer a competitive product in this segment will face significant commercial challenges.
Long-Term (3-5 Years): Two key technological advancements are poised to enter the prosumer market. First, multi-spectrum fusion systems, which overlay a thermal image with a digital or analog night vision image, will become more accessible, offering the detection benefits of thermal with the identification detail of night vision.17 Second, the integration of onboard Artificial Intelligence (AI) processing will move beyond simple “hot spot tracking.” These systems will leverage AI for advanced object recognition, differentiating between animal species and enhancing situational awareness by intelligently highlighting potential targets based on shape and movement patterns.73
Appendix: Social Media Sentiment Analysis Methodology
A.1 Objective
To systematically quantify and qualify consumer and prosumer sentiment regarding weapon-mounted thermal imaging sights in the U.S. market by analyzing discussions on high-traffic online platforms.
A.2 Data Sourcing
Social News Aggregation: Reddit (specifically subreddits r/NightVision, r/AR15, r/hunting, r/ThermalHunting).
Specialist Forums: AR15.com’s Armory section, Rokslide, The Hog Sty, AccurateShooter.com.
Video Platforms: User comment sections on major thermal optic review channels on YouTube (e.g., The Late Night Vision Show, Texas Plinking, and other independent reviewers with substantial viewership).
A.3 Methodology
Data Collection: A comprehensive scan of the listed sources over the last 24 months was conducted, targeting threads, posts, and videos with significant user engagement.
Total Mention Index Calculation: The prominence of each optic was calculated using a weighted scoring system to reflect the significance of the mention:
Simple Mention (1 Point): The optic’s model name appears in a comment or post in a comparative or general context.
List Inclusion (3 Points): The optic is specifically included in a user’s or publication’s “best of,” “top 3,” or direct comparison list.
Dedicated Review/Discussion (5 Points): A post, thread, or video is primarily dedicated to reviewing, troubleshooting, or discussing a single specific optic.
Sentiment Classification: Each mention was manually analyzed and classified as Positive, Negative, or Neutral based on the context and specific keywords.
Positive Keywords/Themes: Included terms such as “clear image,” “amazing,” “great value,” “reliable,” “easy to use,” “impressed,” “no issues,” and specific praise for features like resolution, 640, 12 micron, NETD, LRF, ballistic calculator, and brand names like Trijicon, Pulsar, iRayUSA when used favorably.
Negative Keywords/Themes: Included terms such as “issues,” “freezing,” “blurry,” “unreliable,” “disappointed,” “bad customer service,” and specific complaints regarding firmware, battery life, UI, or a failure to hold zero.
Neutral Mentions: Included purely factual questions or statements without expressed opinion, which were excluded from the final percentage calculations.
Percentage Calculation: The sentiment percentages were calculated to reflect the ratio of positive to negative opinions among mentions where a clear sentiment was expressed.
This analysis is designed to be as objective as possible by using a structured, quantitative methodology. However, inherent limitations exist. The data is subject to potential biases, such as the impact of undisclosed sponsored content or influencer marketing, which may artificially inflate positive sentiment for certain products. Conversely, online forums can sometimes amplify the voices of a dissatisfied minority, potentially skewing negative sentiment. This report should be considered a snapshot of the public discourse within these specific communities and is intended to supplement, not replace, traditional market research and direct product testing.
A previous version of this report focused on optics brands and product lines and identified the Original Equipment Manufacturers (OEMs), or probably OEMs used. This version flips the order around and focused on the OEMs and then the brand and product line. This allows you to quickly see what is using what OEM. You’ll notice that there are competing brands being made in the very same factory.
The global firearms optics market presents consumers with a vast array of brands, each with its own marketing, proprietary features, and perceived value. This apparent diversity, however, is a carefully constructed facade. Beneath the brand lies a highly consolidated and tiered global manufacturing base, with a small number of OEMs in Japan, the Philippines, and China producing the vast majority of optics sold in the United States.
This report pierces the corporate veil to map the intricate supply-chain relationships between these key Asian OEMs and the consumer-facing brands they supply. By identifying the common manufacturing origin of seemingly competitive products, this analysis provides a foundational understanding of equivalency in the marketplace, allowing for a more accurate assessment of an optic’s true quality, performance, and value. The following table provides a comprehensive, at-a-glance summary of the report’s findings, cross-referencing the primary Asian OEMs with the brands and specific product lines they are known or credibly reported to manufacture. The subsequent sections provide the detailed analysis and evidence supporting these connections.
Table 1.1: Master OEM & Brand Cross-Reference
OEM Name
Country of Operation
Known or Probable Client Brand
Specific Product Lines / Series Manufactured
Light Optical Works, Ltd. (LOW)
Japan
Athlon
Cronus BTR Series 1
Light Optical Works, Ltd. (LOW)
Japan
Burris
Premium Riflescopes 2
Light Optical Works, Ltd. (LOW)
Japan
Bushnell
Elite Tactical Series (XRS, DMR, LRTS, etc.)
Light Optical Works, Ltd. (LOW)
Japan
Delta Optics
Stryker Series 2
Light Optical Works, Ltd. (LOW)
Japan
GPO
Premium Riflescopes (GPOTAC, SPECTRA 6x/8x) 2
Light Optical Works, Ltd. (LOW)
Japan
Nightforce
NXS, SHV, NX8 Series 1
Light Optical Works, Ltd. (LOW)
Japan
Primary Arms
Platinum (PLx) Series
Light Optical Works, Ltd. (LOW)
Japan
Revic
PMR Smart Scopes 2
Light Optical Works, Ltd. (LOW)
Japan
SIG Sauer
Premium Riflescopes 2
Light Optical Works, Ltd. (LOW)
Japan
Sightmark
Premium Riflescopes 2
Light Optical Works, Ltd. (LOW)
Japan
SWFA
SS Series Riflescopes 2
Light Optical Works, Ltd. (LOW)
Japan
Tract
Toric Series 3
Light Optical Works, Ltd. (LOW)
Japan
Trijicon
Credo, Tenmile, Ascent Series
Light Optical Works, Ltd. (LOW)
Japan
Vortex
Razor HD Series (non-AMG models) 2
Light Optical Works, Ltd. (LOW)
Japan
Zeiss
Conquest V4 / V6 Series 2
Kenko Tokina Co., Ltd.
Japan
Sightron
SIII, SV Series 1
Kamakura Koki Co., Ltd.
Japan
Bushnell
Elite Series (historical) 1
Kamakura Koki Co., Ltd.
Japan
Ecotone
All Products 4
Kamakura Koki Co., Ltd.
Japan
Maven
RS Series Riflescopes (probable)
Japan Optics, Ltd. (JOL) / Hakko
Japan
Brownells
Match Precision Series 5
Japan Optics, Ltd. (JOL) / Hakko
Japan
Crimson Trace
2-Series, 3-Series, 5-Series Riflescopes 5
Japan Optics, Ltd. (JOL) / Hakko
Japan
Nightforce
Original Models (historical) 6
Japan Optics, Ltd. (JOL) / Hakko
Japan
Riton
X7, RT-S Series 5
Japan Optics, Ltd. (JOL) / Hakko
Japan
Springfield Armory
OEM Scopes (historical) 6
Japan Optics, Ltd. (JOL) / Hakko
Japan
Tasco
Custom Shop Series (historical) 6
Philippine Kenko Corporation
Philippines
Burris
Most Riflescopes (assembly) 1
Philippine Kenko Corporation
Philippines
Primary Arms
Gold (GLx) Series 1
Philippine Kenko Corporation
Philippines
Sightron
SI, SII Series 1
Philippine Kenko Corporation
Philippines
Vortex
Viper Series, select Diamondback models 1
Scopro Optical Co., Inc.
Philippines
Burris
FastFire Series, AR Prism Scopes, XTR Series 8
Scopro Optical Co., Inc.
Philippines
Nikon
Firearms Optics (discontinued) 8
Scopro Optical Co., Inc.
Philippines
SIG Sauer
Select Electro-Optics 8
Scopro Optical Co., Inc.
Philippines
Vortex
Select Riflescopes (Viper, Diamondback) 8
Huanic Corporation
China
Holosun
All Products 9
Huanic Corporation
China
Primary Arms
Silver (SLx) & Classic (CLx) Series 1
Huanic Corporation
China
SIG Sauer
Romeo Series Red Dots 9
Huanic Corporation
China
Swampfox
All Products (probable) 1
Huanic Corporation
China
TruGlo
Red Dot / Reflex Sights 9
Superior Lens (China)
China
Athlon
Midas TSR1/TSR3 Red Dots, Midas TSP3 Prism
Superior Lens (China)
China
Bushnell
TRS-25 Red Dot, Match Pro, select Engage scopes
Superior Lens (China)
China
Crimson Trace
Select Riflescopes and Red Dots
Superior Lens (China)
China
Primary Arms
Select Optics
Gushin Optics
China
CVLIFE
Value-Tier Optics 1
Gushin Optics
China
Monstrum
Value-Tier Optics 1
Gushin Optics
China
Sightmark
Core SX 3×32 Crossbow Scope 10
You can download the above list as a Microsoft Excel file if you want to change sorting, apply filters, etc.
Section 2: The Japanese Foundries: The Gold Standard of OEM Production
Japanese optical manufacturers represent the pinnacle of the OEM market, a reputation built on decades of expertise in precision mechanics, lens grinding, and meticulous quality control.1 A “Made in Japan” mark is not merely a statement of origin but a key selling point for the premium and flagship product lines of many of the most respected American and European brands. This expertise is concentrated within a small number of highly specialized, and often highly secretive, manufacturing facilities.
2.1 Light Optical Works, Ltd. (LOW)
Headquartered in Suwa City, Nagano Prefecture, Light Optical Works, Ltd. (LOW) is arguably the most respected and sought-after high-end riflescope OEM in the world.1 The company operates exclusively as an OEM/ODM, specializing in the development and production of high-performance riflescopes and other precision optics.11 LOW is famously discreet about its client list, but its role as the manufacturing force behind some of the world’s most revered tactical and precision optics is well-established through industry analysis and direct brand statements.1
The location of LOW in Suwa is not a geographical coincidence but a profound strategic advantage. This region was the historical epicenter of the Japanese watchmaking industry, earning it the moniker “the Switzerland of the East.” The intricate skills required for horology—precision mechanics, micro-assembly, and lens grinding—are directly transferable to the production of high-end optical instruments. This industrial heritage created a regional ecosystem of highly skilled labor, specialized component suppliers, and a deeply ingrained culture of meticulous quality control. Brands that partner with LOW are not just contracting a factory; they are tapping into a multi-generational reservoir of precision engineering expertise that cannot be easily replicated elsewhere.
LOW’s known and credibly reported OEM clients include a veritable who’s who of the premium optics market, making them the single most prolific manufacturer of high-end scopes for the U.S. market 2:
Vortex Optics: The brand’s flagship “Razor” line of riflescopes (with the exception of the US-made HD AMG model) is produced by LOW.1 This partnership is a cornerstone of Vortex’s high-end market presence, allowing them to compete directly with top-tier European brands.
Nightforce Optics: While Nightforce assembles its premier ATACR series in Idaho, its popular and battle-proven NXS, SHV, and NX8 series scopes are fully manufactured in Japan.1 Given LOW’s specialization in building mechanically superior, robust scopes capable of withstanding repeated 1000G shocks, it is the logical and widely accepted manufacturer for these critical product lines.1
Athlon Optics: The brand’s top-tier “Cronus BTR” series is explicitly identified as being manufactured at the LOW factory, providing one of the clearest public acknowledgments of a partnership with this OEM.1
Tract Optics: This direct-to-consumer brand, founded by former Nikon executives, sources its flagship “Toric” line of riflescopes from LOW.13 These scopes utilize German Schott HT glass, which is then assembled into a finished product by LOW, positioning them in the same manufacturing echelon as Vortex Razor and Nightforce.3
Revic Optics: This brand, now owned by the precision rifle manufacturer Gunwerks, leverages Japanese manufacturing for its advanced smart scopes.14 The company’s leadership explicitly states a strategy of combining American design with “the manufacturing expertise of the Japanese” at the “premier OEM manufacturer in the world”.16 For a product of this complexity and price point, LOW is the most probable manufacturing partner.2
Other Major Brands: Supply chain analysis and industry reports confirm that LOW also manufactures premium product lines for Bushnell (Elite Tactical), Primary Arms (Platinum Series), Trijicon (Credo, Tenmile, Ascent series), SIG Sauer, SWFA, GPO, Delta Optics, Sightmark, Burris, and even select lines for Zeiss.2
2.2 Kenko Tokina Co., Ltd.
Established in Tokyo in 1957, Kenko Tokina is a diversified optical conglomerate and a giant in the global industry.1 Unlike the specialized focus of LOW, Kenko Tokina is a massive entity that operates both as a brand owner and a large-scale OEM. They produce their own successful lines of photographic equipment, including Kenko filters and Tokina lenses.17 Simultaneously, they operate as one of the world’s largest OEM manufacturers.19
Kenko Tokina’s business structure provides a masterclass in leveraging a global, multi-tiered manufacturing strategy. The company owns the Sightron brand, a name highly respected for its quality and performance in the precision shooting community.1 This ownership allows Kenko Tokina to strategically allocate production based on market segment. The premium Sightron riflescopes, such as the SIII and SV series, are produced in the parent company’s high-end domestic facilities in Japan, burnishing the brand’s reputation with the prestigious “Made in Japan” label.1
Concurrently, Kenko Tokina is the parent company of Philippine Kenko Corporation, a major manufacturing plant in the Philippines.1 This facility is used to produce Sightron’s mid-range and entry-level product lines, such as the SI and SII series.1 This is not simple outsourcing but a deliberate and intelligent market segmentation strategy. They use their Japanese factories to build the “halo” products that establish the brand’s credentials for elite quality, then leverage their wholly-owned Philippine facility to produce the high-volume, price-competitive products that generate revenue and capture a broader market share. This vertically integrated, geographically distributed model allows them to compete effectively across multiple price points without diluting the value of their premium Japanese manufacturing.
2.3 Kamakura Koki Co., Ltd.
Founded in 1950, Kamakura Koki is a dedicated OEM with a history spanning over seven decades.1 The company is a dominant, if publicly invisible, force in the industry, claiming a staggering share of the world market for medium-to-high price range optics.1 With factories in Japan and a presence in China since 1990, Kamakura has the scale and capability to serve a wide range of clients.1 The company explicitly states its mission is to act as a partner for “famous camera manufacturers and major optical equipment manufacturers,” enhancing their clients’ brand value.22
Kamakura’s immense market share makes it a veritable “kingmaker” in the optics world. This implies a high probability that premium optics from two different, seemingly competitive brands could have originated from the very same factory. This means that for a significant portion of the market, the differentiation between brands is not in the core optical or mechanical construction, but in brand-specific elements like exterior armor design, marketing, warranty, and the profit margin built into the retail price.
While most of their partnerships are confidential, some are known:
Ecotone: This Polish optics brand is explicitly identified as being “100% made by Kamakura,” providing a clear, verifiable example of their OEM work.1
Maven Optics: This direct-to-consumer brand states its riflescopes are built with “premium, world-class Japanese glass”.1 Given Kamakura’s massive market share, specialization, and long history of partnering with American brands, they are a highly probable manufacturer for Maven’s Japanese-made lines.
Legacy Brands: It is widely acknowledged within the industry that Kamakura was the manufacturer behind some of the most legendary Japanese-made optics from American brands, such as the original Bushnell Elite series and products for Steiner, Minox, and Leupold.1 While brands shift supply chains over time, Kamakura’s historical role points to deep relationships with many of the most established names in the U.S. market.
2.4 Japan Optics, Ltd. (JOL) / Hakko
Japan Optics, Ltd. (JOL) is the modern iteration of the well-known Hakko optics manufacturer, which began as a machinery workshop in the 1960s.1 It is important to note that the “Hakko” brand name is now primarily associated with a separate company that manufactures soldering equipment, which can be a point of confusion.26 JOL operates as a pure OEM, offering a “design-to-build” service that allows companies to add custom-branded optics to their product lines efficiently.28
JOL’s history as the original manufacturer for a legendary brand like Nightforce provides them with immense credibility. Nightforce’s brand identity is built on uncompromising durability and reliability, and the knowledge that Hakko/JOL was the factory that established this reputation means they possess the institutional knowledge and manufacturing discipline required for that level of quality. This legacy becomes a primary selling point for their current OEM business, allowing newer or private-label brands to effectively “bootstrap” their credibility by partnering with a manufacturer of such pedigree.
Recent industry analysis and product examinations have established direct links between JOL and several modern brands 5:
Brownells: The “Match Precision” line of riflescopes is manufactured by JOL.5
Crimson Trace: Multiple riflescope series from this brand, including the 2-Series, 3-Series, and 5-Series, originate at the JOL factory.5
Riton Optics: The brand’s higher-tier “X7” and former “RT-S” series scopes are produced by JOL.5
Historical Clients: The “old” Hakko was the OEM for the first Nightforce scopes, the highly regarded Tasco Custom Shop line, and scopes for Springfield Armory.6
Section 3: The Philippine Powerhouses: The Nexus of Quality and Value
Strategically positioned between the premium quality of Japan and the mass-market scale of China, the Philippines has carved out a crucial niche in the global optics supply chain.1 It has become the premier destination for brands seeking high-quality assembly and rigorous quality control at a competitive price point, often under the direct supervision of Japanese or Taiwanese parent companies.
3.1 Philippine Kenko Corporation
Established in 1989, Philippine Kenko Corporation is a major manufacturing operation and a key subsidiary of the Japanese optical giant Kenko Tokina Co., Ltd..1 The facility explicitly markets itself on its ability to deliver “Japanese quality, manufactured in the Philippines,” a claim backed by the presence of Japanese engineers and supervisors overseeing a workforce of over 1,000 employees.1
This facility is not merely a low-cost alternative; it represents a distinct and deliberate manufacturing tier that has become essential to the business models of major U.S. brands. Companies like Vortex and Primary Arms have built tiered product stacks: China for value-oriented lines, the Philippines for mid-range performance lines, and Japan for premium flagship lines.1 The Philippine Kenko facility is what makes this critical middle tier viable, allowing brands to offer a product with demonstrably better assembly and quality control than high-volume Chinese factories without incurring the high costs of Japanese production. This creates a “sweet spot” in the market for performance-per-dollar. The equivalency here is significant: a Vortex Viper, a Primary Arms GLx, and a Burris Fullfield are not just in the same price bracket; they are products of the same manufacturing philosophy and, in many cases, the same factory floor.
Philippine Kenko is the confirmed manufacturing hub for some of the most popular mid-tier optics in the world:
Vortex Optics: The brand’s extremely popular “Viper” series of riflescopes and certain “Diamondback” models are manufactured here.1
Primary Arms: The brand’s “Gold Series (GLx)” optics are made in the Philippines, explicitly positioning them as a quality step above their Chinese-made Silver Series.1
Sightron: As a subsidiary of Kenko Tokina, Sightron leverages this in-house facility for its entry-level and mid-range “SI” and “SII” scope series.1
Burris Optics: The manufacturing process for many Burris products involves sourcing components from Japan and conducting the critical assembly in the Philippines, with Philippine Kenko being the most likely facility for this stage.1
3.2 Scopro Optical Co., Inc.
Located in Mandaluyong, Scopro Optical Co., Inc. is another key Philippine OEM. It is owned by the Taiwan-based Asia Optical Group, a major player with over 30 years of experience in OEM/ODM services.8 While Japanese OEMs are often secretive, the global shipping network is not. Logistics data, such as U.S. Customs bills of lading, provides incontrovertible evidence of supply chain relationships that companies do not publicize. This data is not inference; it is hard evidence of the physical movement of goods, which is the ultimate ground truth of the supply chain.
Shipping records and trade data provide definitive proof of Scopro’s extensive client relationships, showing them as the shipper/supplier for a host of major brands popular in the North American market 8:
Burris Optics: Numerous shipping records confirm Scopro as a key OEM for Burris.33
Vortex Optics: Scopro is another of Vortex’s Philippine manufacturing partners, complementing the production at Philippine Kenko.8
SIG Sauer: Trade data shows Scopro as a supplier for SIG Sauer’s electro-optics lines.8
Nikon: Prior to the discontinuation of their firearms optics line around 2020, Nikon was also a major client of Scopro.8
The combined manufacturing might of Philippine Kenko and Scopro cements the Philippines’ position as the undisputed vital center for the production of the world’s mid-tier, high-value optics.
Section 4: The Chinese Titans: Volume, Value, and Ascendant Technology
For decades, China was viewed as the world’s factory for low-cost, entry-level optics. While it continues to dominate this segment, a new class of Chinese manufacturer has emerged. These companies are technologically sophisticated, vertically integrated, and possess formidable R&D capabilities. They are not just assembling optics; they are innovating and driving the market.
4.1 Huanic Corporation
Founded in 2002 and based in the high-tech zone of Xi’an, Huanic Corporation is a large-scale electro-optics manufacturer with extensive R&D and production capabilities.1 Huanic is arguably the single most influential manufacturer in the modern red dot and reflex sight market, serving as the central innovation and production hub for the entire mid-tier segment.
The consolidation of production at this single facility has created what can be termed the “Huanic Effect.” The company develops core technologies like solar panels and “shake awake” motion-activated illumination in-house.9 These innovations are then offered as features to their OEM clients, causing them to appear across multiple “competing” brands almost simultaneously. This rapidly standardizes advanced features across the market, creating a significant barrier to entry for new brands who must compete with features developed at Huanic’s massive R&D scale. Most critically, this creates a single point of failure in the supply chain. A production disruption at Huanic’s Xi’an facility would simultaneously and catastrophically impact the inventory of at least four major American brands, revealing a hidden but profound market consolidation.
Huanic’s network of in-house brands and OEM clients is extensive 9:
Holosun: Huanic is the parent company and manufacturer of the Holosun brand.1 The rapid rise of Holosun from an unknown entity to a market leader is a direct testament to Huanic’s underlying manufacturing prowess.
SIG Sauer Electro-Optics: It is an open secret within the industry, confirmed by supply chain analysis, that many of SIG Sauer’s popular electro-optics, such as the “Romeo” series of red dot sights, are produced by Huanic.1
Primary Arms: The company has publicly stated that its Chinese-made optics, which constitute the popular “Silver Series (SLx)” and entry-level “Classic Series (CLx),” are produced in the same factory as Holosun—that is, Huanic.1
TruGlo: Industry analysis confirms TruGlo as another of Huanic’s major OEM clients for reflex sights.9
Swampfox Optics: This U.S. brand outsources its manufacturing to China.1 Based on their product features, price point, and market segment, which align perfectly with those of Holosun and Primary Arms, Huanic is the most probable OEM partner.1
4.2 Gushin Optics (Chongqing Gushin Outdoor LLC)
Gushin Optics exemplifies the new breed of modern, transparent Chinese OEM/ODM.1 Their corporate website functions as a direct-to-business catalog, openly advertising their services and showcasing a product list with advanced features like First Focal Plane (FFP) reticles, 34mm main tubes, and Extra-Low Dispersion (ED) glass—features that were once the exclusive domain of premium Japanese and European manufacturers.1
This demonstrates the dramatic upward migration of Chinese manufacturing capabilities. A decade ago, “Made in China” signified entry-level quality. Gushin’s public catalog shows they can now produce scopes with features that were hallmarks of optics costing over $1,000. This indicates a significant investment in technology, machinery, and quality control within the Chinese optics industry. They are no longer competing solely on price but also on features. This trend puts immense pressure on the mid-tier Philippine manufacturers and even some lower-end Japanese products, signaling that the traditional quality hierarchy is compressing. While Gushin does not publicly name its clients, they are representative of the type of large-scale Chinese factories that supply many of the value-oriented brands popular in the North American market, such as Monstrum and CVLIFE. One source also links them to the production of a crossbow scope for the Sightmark brand.10
4.3 Superior Lens (China)
Superior Lens is another significant Chinese OEM that serves as a key manufacturing partner for several major American brands.40 The company specializes in a range of products including riflescopes, reflex sights, and prism scopes, demonstrating the growing capability of Chinese factories to produce a diverse and technologically current product mix. Analysis of product markings and supply chain data confirms their role as a primary manufacturer for the following brands:
Bushnell: Superior Lens is the manufacturer for several key Bushnell products, including the popular TRS-25 red dot sight, the competition-oriented Match Pro 6-24×50 riflescope, and select models within the Engage series.41
Athlon Optics: The company produces a number of red dot and prism sights for Athlon’s mid-tier lines, including the Midas TSR1 and TSR3 red dots, and the Midas TSP3 prism scope.40
Crimson Trace: Superior Lens is also an OEM partner for Crimson Trace, producing various optics within their extensive product catalog.40
Primary Arms: Shipping data also indicates a relationship between Superior Lens and Primary Arms, suggesting they are another of the brand’s Chinese manufacturing partners.
Section 5: Concluding Analysis: Defining Equivalency in a Tiered Market
The analysis of these key Japanese, Philippine, and Chinese OEMs reveals a global firearms optics industry that is far more consolidated and interconnected than the consumer-facing market suggests. The competitive landscape is better understood not as a battle between dozens of distinct brands, but as a competition between manufacturing tiers and, within those tiers, a handful of dominant OEMs. This reality provides a new framework for understanding product equivalency.
The Illusion of Choice vs. The Reality of Tiers
The core finding of this report is that the quality, features, and price of nearly every optic on the market can be traced to its origin within a three-tiered global manufacturing system. Japan produces the premium, high-cost optics; the Philippines produces the high-value, mid-tier optics; and China produces the vast majority of volume and value-oriented optics, with a rapidly growing high-tech segment.1 Hidden giants like Light Optical Works, Huanic Corporation, and the two Philippine powerhouses are the true engines of the industry, producing products for multiple, often competing, brands.1
What “Equivalency” Really Means
Understanding the OEM source is the single most important step in establishing a baseline for an optic’s quality, but it is not the final word on its value. True equivalency must be assessed on two levels:
Baseline Hardware Equivalence: Optics originating from the same factory, particularly from a highly integrated OEM like Huanic, share a fundamental baseline of hardware quality, core technology, and manufacturing process. A SIG Sauer Romeo 5 and a Holosun HS403B are, at their core, equivalent in their basic construction, electronic components, and optical prescription. Likewise, a Vortex Viper PST Gen II and a Primary Arms GLx riflescope share a common manufacturing pedigree at Philippine Kenko, implying a similar level of assembly quality and mechanical integrity.
Brand-Level Differentiation: The true differentiation and value-add that justifies price differences between products from the same OEM is contributed by the brand itself. An analyst must consider these critical factors:
Quality Control Specification: A brand like Vortex may impose a stricter, more expensive quality control protocol on its production run at a Philippine factory than another client. This can result in lower defect rates, better lens-to-lens consistency, and more precise turret tracking, even for scopes coming off the same assembly line.
Proprietary Design: The brand, not the OEM, is typically responsible for the intellectual property that consumers interact with most directly. This includes the specific design of the reticle, the ergonomics of the housing, and the user interface of the illumination controls. These are major differentiators.
Component Sourcing: A brand may specify higher-grade components for its product. For example, Tract Optics specifies premium German Schott glass for its Toric scopes, which are then assembled by LOW in Japan.3 Another LOW client might specify a different, lower-cost glass source.
Warranty and Customer Service: This is a critical, intangible value-add that is entirely independent of the OEM. The promise of a lifetime, no-fault, transferable warranty from a company like Vortex or Leupold is a significant part of the product’s overall value proposition and a major factor in consumer purchasing decisions.
For the industry analyst, this report provides the foundational data to deconstruct the market. It allows for the grouping of products into tiers of manufacturing equivalency. From there, a more sophisticated analysis can be performed by assessing the “soft” factors contributed by each brand—their investment in quality control, their innovation in design, and their commitment to long-term customer support. In this globalized market, understanding the factory floor is the beginning of the analysis, but understanding the value added by the brand is what ultimately determines an optic’s true worth.
American Hakko Products, Inc. Home of superior quality soldering, desoldering, rework, BGA, and fume extraction systems and hand tools for the electronics manufacturing industry., accessed September 1, 2025, https://hakkousa.com/
Best Japanese OEM Rifle Scope Optics Factory – Japan Optis Ltd., accessed September 1, 2025, https://www.jolusa.com/
The price of a rifle scope is not an arbitrary figure but a direct reflection of a complex matrix of engineering decisions, material science, manufacturing precision, and rigorous quality control. To the uninitiated, the chasm between a $150 hobbyist optic and a $4,000 professional instrument appears inexplicable. However, a rifle scope is a system of interconnected systems—optical and mechanical—where compromises in any single area create cascading effects on overall performance, reliability, and durability. The central question for any serious practitioner is not simply “How much does it cost?” but rather, “What performance and reliability am I purchasing at this price point?”
This report deconstructs the key design differences that separate economy optics from their professional-grade counterparts. The analysis will first dissect the optical system, exploring how the quality of glass and lens coatings translates directly into the clarity and brightness of the image. It will then examine the mechanical soul of the scope, focusing on the construction, materials, and internal mechanisms that ensure an optic holds its zero and adjusts with unfailing precision. Finally, the report will explore critical user-interface features like reticles and focal planes before synthesizing this technical information into a practical five-tier market analysis. This framework is designed to help the end-user understand precisely what changes from one price tier to the next, ultimately providing a nuanced answer to the guiding question: Is the premium price worth the investment?
The Science of Sight – Optical System Disparities
The optical train is the heart of any rifle scope. Its performance dictates the quality of the visual information delivered to the shooter’s eye. The disparities in price between economy and professional scopes are most immediately apparent here, rooted in the fundamental physics of light and the materials used to control it.
The Heart of the Optic: Glass Quality and Lens Design
The term “glass” is not monolithic; its performance is defined by its ability to manage the visible light spectrum. Standard optical glass, found in budget scopes, bends different colors (wavelengths) of light at slightly different angles. This phenomenon, known as chromatic aberration, manifests as “color fringing”—a purple or greenish halo around high-contrast edges, which makes the image appear fuzzy or “hairy”.1 This single factor is a primary differentiator between tiers, as it directly degrades sharpness, resolution, and color fidelity.
To combat this, manufacturers employ advanced glass types that become more prevalent as the price increases:
Extra-Low Dispersion (ED) Glass: This glass incorporates compounds like calcium fluoride to significantly reduce chromatic aberration by focusing more wavelengths of light onto the same focal plane.3 The result is a visibly crisper, more defined image with truer color reproduction. ED glass is a key feature that begins to appear in mid-tier optics and is a standard component in premium models.1
High Definition (HD) Glass: While often used as a marketing term, in reputable brands “HD” signifies a complete optical system—including specific lens elements and coatings—engineered to deliver superior resolution and clarity.4 It is less about a single material and more about the system’s holistic performance. However, some lower-end brands may use the “HD” label without incorporating true ED elements, making it a less reliable indicator of quality in budget tiers.1
Apochromatic (APO) / Fluoride Lenses: Representing the pinnacle of optical glass, apochromatic systems use multiple lens elements, including fluorite, to focus three primary wavelengths of light (red, green, and blue) onto the same plane.1 This virtually eliminates chromatic aberration, providing the highest possible level of color correction and image fidelity. This technology is typically reserved for “Alpha Tier” optics from manufacturers like Tangent Theta, Zeiss, and Swarovski.6
The sourcing of these materials is also a critical cost driver. The highest quality raw glass often originates from renowned manufacturers such as Schott in Germany.2 Consequently, the country of origin for both the glass and the final optic assembly—ranging from China and the Philippines for budget and mid-tier scopes to Japan, the USA, and Europe for premium models—is a strong correlate of optical quality and price.8
Maximizing Light: The Critical Role of Lens Coatings
An equally critical, though less visible, component of optical performance is the application of lens coatings. Every time light passes through an uncoated air-to-glass surface, approximately 4-5% is lost to reflection and scatter.11 In a complex scope with a dozen or more lenses, this can result in over half the available light being lost before it reaches the shooter’s eye, leading to a dim, low-contrast image with significant internal glare.12
Anti-reflection (AR) coatings are microscopic layers of metallic compounds like magnesium fluoride (MgF2) or silicon dioxide (SiO2) applied to lens surfaces to minimize this loss.11 The quality and extent of these coatings are a clear, tangible differentiator across price tiers:
Coated: A single AR layer on at least one lens surface. This is the most basic level, found only in Tier 1 optics.14
Fully Coated: A single AR layer on all air-to-glass surfaces. A marginal improvement, still characteristic of budget scopes.12
Multi-Coated: Multiple layers of AR coatings on at least one surface. This is common in Tier 2 and lower Tier 3 optics.14
Fully Multi-Coated (FMC): Multiple layers of AR coatings on all air-to-glass surfaces. This is the minimum standard for any serious-use optic (Tier 3 and up). An FMC system can increase light transmission to over 95%, dramatically improving brightness and image quality.11
Beyond AR coatings, premium optics feature specialized external coatings. Hydrophobic and oleophobic layers (such as Zeiss’s LotuTec or Vortex’s ArmorTek) are applied to the exterior objective and ocular lenses.12 These coatings repel water, oil, fingerprints, and dirt, ensuring a clear sight picture in rain, snow, or other adverse conditions—a functional advantage typically found only in higher-tier scopes.11
The Image Chain: Synthesizing Optical Performance
The combination of glass quality and coatings determines the final performance of the optical system, which can be measured by several key metrics:
Light Transmission: This is the total percentage of ambient light that successfully travels through the scope to the user’s eye. Higher transmission is critical for low-light situations, such as hunting at dawn or dusk, and is a primary justification for investing in a premium scope.18 A high-end scope can effectively “buy” a shooter several extra minutes of legal shooting light compared to a budget model.19
Resolution and Clarity: This refers to the scope’s ability to render fine detail. It is a direct result of the quality of the glass and the precision of the lens grinding and polishing processes.2
Contrast and Color Fidelity: High-quality glass and coatings reduce internal glare and correct for chromatic aberration, resulting in a high-contrast image with vibrant, true-to-life colors.1
Edge-to-Edge Clarity: In cheaper scopes, the image is often sharp only in the center, becoming blurry, distorted, or dim towards the edges. Premium optics are engineered to maintain a flat, sharp, and clear image across the entire field of view, even at maximum magnification.2
While the law of diminishing returns applies to optics, its effects are often misunderstood. The visual difference between a $200 scope and a $1,000 scope is dramatic and immediately obvious to any user. The improvement from a $2,000 scope to a $4,000 scope is more subtle, revealing its value only at the margins of performance—identifying a target through heavy mirage, resolving details in near-darkness, or reducing eye fatigue during extended observation sessions.20 The initial price jump buys fundamental technologies like ED glass and fully multi-coated lenses. The subsequent leaps in price pay for the perfection of the system: the finest apochromatic glass, proprietary coating formulas optimized for specific wavelengths, and obsessive levels of polishing and internal baffling to control stray light.13 This perfection is precisely what professional competitors and operators require to gain a critical edge.7
Furthermore, optical quality is a chain that is only as strong as its weakest link. A manufacturer can use a premium ED glass element, but if it is paired with inferior coatings or housed in a body that is not properly designed to mitigate internal reflections, the potential of that expensive glass is wasted. The price of an alpha-tier scope from a brand like Zero Compromise Optics or Tangent Theta is not just for the raw materials, but for the systems engineering expertise required to ensure every component in the optical train is optimized to work in concert.7 This holistic design philosophy is a significant hidden factor that justifies the cost beyond a simple bill of materials.
The Mechanical Soul – Construction, Durability, and Precision
While optical quality determines what a shooter can see, the mechanical system determines whether the scope can be trusted. This is the unseen soul of the instrument, encompassing its physical construction and internal mechanisms. These components ensure the scope holds zero under recoil, adjusts predictably, and survives the rigors of field use. It is in the mechanical systems where the most critical differences between a hobbyist scope and a professional tool are found.
The Foundation: Main Tube Construction and Materials
The main tube, or housing, is the chassis of the scope. Its construction is fundamental to the instrument’s overall strength and integrity.
One-Piece vs. Multi-Piece Tube: Professional-grade scopes are almost universally machined from a single, solid billet of aluminum, a process that creates a “one-piece tube”.22 While more expensive, this method yields a stronger, more rigid, and inherently more waterproof housing by eliminating the joints and potential failure points present in cheaper, multi-piece tubes, which are assembled from several sections.25
Material Science: The choice of aluminum alloy is a key indicator of design intent.
6061-T6 Aluminum: Often marketed as “aircraft-grade,” this is a common and cost-effective alloy that provides adequate strength for many mid-tier scopes.27
7075-T6 Aluminum: This is a significantly stronger and more corrosion-resistant alloy. Its use is a hallmark of high-end, durable optics, as it is more difficult and expensive to machine, which contributes to the final cost.30
Tube Diameter: The diameter of the main tube (typically 1 inch, 30 mm, or 34 mm) is a mechanical, not an optical, consideration. A larger tube diameter does not inherently transmit more light. Its primary benefits are providing a greater internal range for elevation and windage adjustment—critical for long-range shooting—and allowing for a stronger, more rigid tube structure.33 34 mm tubes have become the standard for professional long-range tactical scopes due to the vast adjustment travel they permit.7
The Engine of Accuracy: Turret Mechanics and the Erector System
The turret and erector system is the engine that drives a scope’s precision. The erector system is an internal tube assembly that houses the magnifying lenses and, in First Focal Plane scopes, the reticle.35 When a turret knob is turned, a finely threaded screw pushes this erector tube against an opposing spring system, shifting the point of aim.35 The quality of these components dictates the scope’s accuracy.
Mechanical Precision and “Feel”: The difference between a “mushy” budget turret and the “crisp, tactile, audible” clicks of a premium scope is a direct indicator of the precision of its internal mechanics.39
Budget Scopes often use softer metals like brass for internal clicker mechanisms and simple, weak leaf springs.41 This can lead to backlash (a delay between turning the turret and the reticle moving), inconsistent adjustment values, and a failure of the erector system to settle in the same place, causing a wandering zero. The old shooter’s trick of “tapping the turret” after an adjustment was a crude workaround for this very mechanical deficiency.41
Premium Scopes employ precisely machined, hardened steel or stainless steel components for the click mechanism, paired with robust and consistent coil or multi-spring systems.37 This engineering ensures that each click corresponds to an exact and, crucially, repeatable amount of erector tube movement.
Tracking and Repeatability: These are arguably the most important mechanical functions of a precision scope. “Tracking” is the ability of the adjustments to be true to their markings—for example, dialing 10 MILs of elevation must move the point of impact exactly 10 MILs on the target.41 “Repeatability” is the ability to dial a large adjustment (e.g., for an 800-yard shot) and then return the turret precisely to the original zero without any shift. This is a primary failure point in cheaper optics and a non-negotiable requirement for professional ones.2
Zero Stop Mechanisms: This is a mechanical feature, typically on the elevation turret, that provides a hard stop when returning to the user’s established zero distance.44 It allows a shooter to quickly and confidently return to their zero by feel, without looking at the turret or counting clicks, which is invaluable in high-stress or low-light situations.46 This feature, implemented via shim, clutch, or locking ring systems, begins to appear in Tier 3 scopes and is standard in Tiers 4 and 5.46
Reliability Under Fire: Environmental Sealing and Recoil Hardening
A professional scope must function flawlessly regardless of the environment or the recoil of the rifle.
Waterproofing and Fog-proofing: True environmental sealing is a multi-step process. Waterproofing is achieved with O-ring seals at all potential ingress points.23 Fog-proofing is accomplished by purging the atmospheric air (which contains moisture) from the scope body and backfilling it with a dry, inert gas like Nitrogen or Argon.16 Argon, having a larger molecule size, is less prone to leaking over time and is often used in higher-end optics.
Quality Control and Durability Testing: Premium manufacturers subject their designs to a battery of brutal, often destructive, quality control tests that simulate a lifetime of hard use. These protocols include recoil/shock tests that simulate thousands of rounds from heavy-recoiling calibers (often exceeding 1,000 G’s of force), drop tests onto concrete, extreme temperature cycling to test seal integrity, and submersion tests.49 This exhaustive testing is a significant, yet hidden, cost baked into the price of a professional-grade optic.
While optical clarity is immediately perceptible, it is the unseen mechanical reliability that truly separates a range toy from a duty-grade instrument. A scope that cannot hold zero or track predictably is functionally useless, regardless of how clear its glass may be. The high cost of premium scopes is heavily influenced by the use of superior materials like 7075-T6 aluminum and hardened steel internals, more complex and robust manufacturing processes like one-piece tube machining, and exhaustive quality control. The end user is not just paying for a clearer image; they are paying for the certainty that their point of aim will equal their point of impact, every single time, under any conceivable condition. This absolute reliability is the core value proposition of a professional scope.
A powerful indicator of this designed-in durability is a company’s warranty policy. Brands like Vortex, Athlon, and Leupold are famous for offering unconditional, no-fault lifetime warranties.19 This is not merely a marketing strategy but a financial calculation based on the expected failure rate of their products. A company cannot afford to offer such a warranty on a product with a high failure rate. The existence of these policies on mid-tier scopes indicates a high degree of confidence in their mechanical engineering for their intended price point. For the highest-tier scopes from brands like Nightforce, the reputation for durability is so legendary that the warranty is almost secondary.7 Conversely, the limited or non-existent warranties on the cheapest Tier 1 scopes are a tacit admission that the products are not designed for long-term, hard use. The warranty is a direct signal of the manufacturer’s own confidence in their product’s mechanical soul.
The User Interface – Reticles and Focal Planes
The user interface of a scope consists of the features the shooter interacts with directly to aim and make adjustments. The design and construction of the reticle, along with its placement within the optical system (the focal plane), have a profound impact on usability and are tailored to specific shooting applications.
The Point of Aim: Reticle Construction and Design
The reticle is the aiming reference within the scope. Its construction has evolved significantly, and the method used is a strong indicator of an optic’s quality and intended purpose.
Wire Reticles: This is the traditional method, where a very fine metal wire (typically platinum or tungsten) is stretched across an aperture inside the scope to form a crosshair.53 Historically, materials like horsehair or even spider silk were used.19
Pros: Inexpensive to produce and creates minimal obstruction to the light passing through the scope.53
Cons: Wire reticles are inherently fragile and can break or shift under heavy recoil or a hard impact. Their design is also limited to simple crosshairs; they cannot support complex patterns with “floating” elements needed for advanced holdovers.53 They are found almost exclusively in Tier 1 and some Tier 2 scopes.
Etched-Glass Reticles: This is the modern standard for all quality optics. The reticle pattern is precision laser-etched onto a thin, optically perfect piece of glass that is placed within the scope’s optical system.19
Pros: This method is supremely durable—the reticle cannot break unless the glass itself is shattered. It allows for infinitely complex and precise designs, such as the “Christmas Tree” style holdover reticles (e.g., Horus TREMOR or Vortex EBR-7D) used for long-range shooting.7 It also enables the creation of much finer lines for more precise aiming.55
Cons: Etched reticles are more expensive to manufacture. The process requires a pristine, dust-free internal assembly environment, as any speck of debris on the reticle glass becomes highly visible to the user.55
Illuminated Reticles: Most modern etched reticles can be illuminated for better visibility in low light or against dark targets. This is typically done by projecting light from an LED onto the etched pattern. More advanced systems, often found in Low Power Variable Optics (LPVOs), use fiber optic wire to channel light to a specific aiming point, creating a “red dot bright” dot that is highly visible even in bright daylight for rapid target acquisition.53
A Tale of Two Planes: FFP vs. SFP Explained
The focal plane describes where the reticle is placed within the scope’s erector system. This placement determines how the reticle behaves as magnification is changed and is perhaps the most significant feature distinguishing scopes for different applications.
Second Focal Plane (SFP): The reticle is placed behind the magnification lens assembly, closer to the eyepiece.
Function: The reticle appears to stay the same size to the shooter’s eye, regardless of the magnification setting. The target grows and shrinks behind a static crosshair.60
Implication: Because the reticle size is fixed while the target image size changes, the reticle’s subtensions (the measurement value of its hash marks in MOA or MILs) are only accurate at one specific magnification, which is typically the highest power setting.60 Using the holdover marks at any other magnification will result in a miss, as the values will be incorrect.64
Use Case: SFP is ideal for many hunters who prefer a bold, easy-to-see reticle at low power for use in thick cover, and who will only use the highest magnification for a deliberate, long-range shot where the reticle is now accurate. It is also less expensive and easier to manufacture, making it common in lower-cost optics.60
First Focal Plane (FFP): The reticle is placed in front of the magnification lens assembly.
Function: The reticle appears to grow and shrink in size along with the target as the shooter changes magnification. It maintains the same size relative to the target at all times.60
Implication: The reticle’s subtensions are accurate and usable as a measurement tool at any magnification setting.60 A 1 MIL hold is a 1 MIL hold whether the scope is on 5x or 25x power.
Use Case: FFP is the undisputed standard for precision long-range, tactical, and competitive shooting. In these disciplines, shooters must be able to make rapid and accurate holdovers for wind and elevation at various distances and magnification levels, which only an FFP reticle allows.7
The choice of focal plane serves as a litmus test for a scope’s intended application. The presence of an FFP reticle is a strong signal that the optic is designed for serious precision work where the reticle must function as a constant measuring device. This is confirmed by data from professional competitions like the Precision Rifle Series (PRS), where FFP scopes are used almost universally.7 In these dynamic events, a shooter might need to engage targets at various distances and magnifications within a single stage, making FFP a necessity. Conversely, SFP scopes are generally geared towards traditional hunting or simpler applications where a constant, highly visible reticle is prioritized over measurement capability across the zoom range.63
Interestingly, at the highest levels of professional shooting, reticle design philosophy is beginning to diverge. While complex “Christmas Tree” reticles that provide a dense grid of holdover points are popular, a counter-movement among some elite competitors favors simpler, more open reticle designs. Top PRS shooters have noted that a cluttered reticle can make it more difficult to spot bullet trace and see impacts, which is critical for making rapid follow-up shot corrections.7 They argue that most competitive stages can be managed by dialing elevation and using the main horizontal stadia for wind holds, rendering the complex “tree” unnecessary. This reveals that at the peak of the sport, the “best” reticle is not always the one with the most features, but the one that best facilitates a specific shooter’s process. Premium brands cater to this by offering multiple advanced reticle options within the same flagship scope models.7
Deconstructing the Market – A Five-Tier Analysis of Rifle Scopes
Synthesizing the technical attributes of optical and mechanical systems allows for the creation of a practical, price-based framework for understanding the rifle scope market. Each tier represents a distinct level of engineering, material quality, and intended application. The following table provides an at-a-glance summary of the key differentiators across these tiers.
Tier
Price Range
Optical Characteristics
Mechanical Characteristics
Primary Application
Representative Brands/Models
1
Under $200
Standard glass; “Coated” or “Fully Coated” lenses; significant chromatic aberration; poor low-light performance.
Multi-piece tube; wire reticle; SFP only; mushy, unreliable turrets; will not hold zero on centerfire rifles.
Airsoft,.22LR plinking, casual use on low-recoil platforms.
Elite professional use, top-tier competition where the final % of performance matters.
Schmidt & Bender PM II, Tangent Theta, Zero Compromise Optic (ZCO), Kahles K-series.7
Tier 1: The Hobbyist Grade (Under $200)
Scopes in this tier are fundamentally designed for casual use on platforms with little to no recoil, such as airsoft replicas or.22LR plinking rifles.66 Optically, they utilize basic glass with minimal coatings, resulting in significant chromatic aberration, poor performance in anything but bright daylight, and noticeable image distortion at the edges.2 Mechanically, they are characterized by multi-piece tube construction, simple wire reticles, and turret adjustments that are mushy, inconsistent, and unreliable. They cannot be trusted to hold zero on a centerfire rifle and lack any meaningful environmental sealing.2 While functional for their intended purpose, they represent a complete compromise in every aspect of design and manufacturing. Representative brands include CVLIFE, Monstrum, and Feyachi.27
Tier 2: The Entry-Level Workhorse ($200 – $500)
This tier represents the true starting point for a reliable hunting or general-purpose rifle scope. These optics offer a dramatic improvement over Tier 1 and are suitable for most hunters engaging targets at moderate ranges with standard calibers. Optically, “Fully Multi-Coated” lenses become common, providing respectable light transmission and clarity for daylight use.19 Mechanically, one-piece tubes and etched-glass reticles (typically simple duplex or BDC patterns in the Second Focal Plane) become standard. The turrets are generally capped (“set and forget”) and offer more positive clicks, though they are not designed for frequent dialing.20 Basic waterproofing and fog-proofing are expected at this level. This tier offers the best value for the majority of hunters and recreational shooters who need a dependable optic without advanced features. Examples include the Vortex Diamondback, Leupold VX-Freedom, and Bushnell Banner series.51
Tier 3: The Enthusiast’s Choice ($500 – $1,200)
This price bracket is widely considered the “sweet spot” for value, offering a disproportionately high feature set for the cost.21 It is the point of entry for serious enthusiasts, aspiring competitors, and hunters looking for higher performance and long-range capability. Optically, Extra-Low Dispersion (ED) glass elements are introduced, leading to a significant improvement in image clarity and color fidelity.2 Mechanically, these scopes are built for more demanding use. First Focal Plane (FFP) reticles become a common option, and turret systems become far more sophisticated. Exposed, tactile turrets with reliable tracking, robust zero stops, and side parallax adjustment are key features that define this tier.18 Manufacturing for many flagship models in this category often moves from China to facilities in the Philippines or Japan, indicating a higher level of quality control.9 This tier provides a large percentage of the performance of premium scopes at a fraction of the price and is the ideal starting point for serious long-range shooting. Notable models include the Vortex Viper PST Gen II and the Athlon Midas BTR.51
Tier 4: The Professional Standard ($1,200 – $2,500)
These are duty-grade, professional instruments built for uncompromising reliability and performance under the harshest conditions. They are the standard for military and law enforcement operators, as well as serious competitive shooters who cannot tolerate equipment failure. Optically, they feature high-grade ED or HD glass systems and proprietary, high-performance lens coatings that deliver elite-level light transmission and flare mitigation.7 Mechanically, they are defined by extreme durability. Robust one-piece tubes, often 34mm in diameter and machined from 7075-T6 aluminum, are the norm. Their turret systems are engineered for flawless, perfectly repeatable tracking over thousands of cycles.7 At this tier, the price buys near-perfect mechanical certainty and excellent optical performance. While the law of diminishing returns on pure optical quality becomes more apparent compared to Tier 3, the investment in mechanical infallibility is paramount. Examples include the Leupold Mark 5HD, Vortex Razor HD Gen II, and Nightforce NX8.7
Tier 5: The Alpha Tier ($2,500+)
This tier represents the pinnacle of riflescope technology, where optics are built with little to no compromise on materials, design, or manufacturing precision. They are intended for users who demand the absolute best optical performance and mechanical perfection available. Optically, they feature the finest systems available, often utilizing apochromatic or fluoride lenses sourced from elite glassmakers like Germany’s Schott, paired with the most advanced proprietary coatings.2 This results in unparalleled image fidelity, particularly in the most challenging lighting conditions. Mechanically, these scopes feature over-engineered systems with legendary durability and tracking that is considered the benchmark for the industry. Manufacturing is concentrated in countries with long-standing reputations for elite optical engineering, such as Germany, Austria, and Japan.7 These scopes offer the final few percentage points of optical and mechanical perfection at a significant premium. For the most demanding professionals and competitors, this small edge can be the difference between success and failure. This tier is defined by brands like Schmidt & Bender, Tangent Theta, Zero Compromise Optic (ZCO), and Kahles.7
Synthesis and Conclusion – Is the Price Worth It?
The value of a rifle scope is not an absolute measure but is directly proportional to the demands of the user’s application. The substantial price differences across the market are justified by tangible, performance-driven disparities in optical science, mechanical engineering, and material quality. The answer to whether a premium scope is “worth it” depends entirely on the shooter’s specific needs and the consequences of equipment failure.
For the Casual Hunter and Plinker, a Tier 2 scope ($200 – $500) offers the best return on investment. An optic in this range provides reliable zero-holding on common hunting calibers and optics that are sufficiently clear for ethical shots at typical hunting distances. It delivers dependable performance without the expense of advanced long-range features that the user will likely never need.19
For the Serious Enthusiast and Long-Range Beginner, Tier 3 ($500 – $1,200) is the undisputed king of value. This tier provides access to the critical features required for learning and practicing long-range shooting: First Focal Plane reticles, reliable and repeatable turrets, zero stops, and ED glass. An investment here allows a shooter to grow their skills without being fundamentally limited by their equipment, offering a clear pathway to advanced marksmanship.21
For the Professional and Hard-Use Competitor, the investment in a Tier 4 or Tier 5 scope is absolutely justified. For those whose livelihood, mission success, or competitive standing depends on their equipment, the cost is an insurance policy against mechanical failure. These scopes provide the optical and mechanical consistency required to perform at the highest level, where even the smallest equipment-induced error can have significant consequences.7 The price purchases not just performance, but confidence and certainty.
Ultimately, while a high price tag does not automatically guarantee a flawless optic, there is an undeniable and direct correlation between cost and the quality of engineering, materials, and reliability. By understanding what those dollars buy at each tier, the serious practitioner can align their investment with their specific requirements, ensuring they acquire a tool that is perfectly suited to their task.
This report provides an in-depth analysis of the contemporary firearms optics market, with a specific focus on identifying brands and product lines that deliver exceptional value across four distinct buyer profiles. The market is undergoing a significant transformation, as challenger brands leverage globalized manufacturing and rapid feature innovation to compete directly with established premium names. This dynamic has created unprecedented opportunities for consumers to acquire high-performance optics without incurring premium costs.
The analysis reveals that in the current market, “value” is no longer synonymous with “cheap.” Today’s best-value optics offer features once exclusive to high-end models, such as First Focal Plane (FFP) reticles, advanced daylight-bright illumination, robust turret systems with zero-stops, and exceptional glass clarity. Brands including Primary Arms, Athlon Optics, Arken Optics, and Swampfox are redefining performance-per-dollar benchmarks, forcing established players to adapt.
For the Tactical/Critical User, value is found in optics that combine the flexibility of a Low Power Variable Optic (LPVO) with rugged construction and intuitive, rapid-acquisition reticles. The Range/Target Marksman finds the best value in FFP scopes that prioritize superior glass clarity, high magnification, and mechanically reliable turrets for repeatable precision. For the Shooter/Hunter, value lies in versatile, lightweight scopes offering excellent low-light performance and practical reticles suitable for varied field conditions. Finally, the Plinker/Recreational Shooter achieves value through durable, reliable optics that hold zero consistently, prioritizing clear glass over complex, costly features.
The modern firearms buyer, armed with the market intelligence contained within this report, can achieve near-premium optical performance at a mid-tier price point. The key is to look beyond legacy brand recognition and focus on the overlooked gems that offer a superior combination of features, reliability, and price.
II. The Anatomy of Optical Value: A Modern Framework
To identify true value in the current firearms optics market, it is necessary to move beyond simple price comparisons. This section deconstructs the concept of “value” by establishing an analytical framework that assesses optical performance, mechanical reliability, feature sets, and long-term ownership benefits. The traditional adage of “buy once, cry once” is evolving; the modern imperative is to “buy smart, shoot forever”.1
Optical Performance: The Glass Ceiling Has Been Raised
The quality of the lenses is the foundation of any scope’s performance. In recent years, access to high-quality glass has become more widespread, fundamentally changing the value equation.
Glass Source & Quality: A distinct hierarchy of glass quality exists. Japanese optical glass, particularly Extra-Low Dispersion (ED) or similar variants, remains the benchmark for superior clarity, color fidelity, and the reduction of chromatic aberration (color fringing) at high magnification.3 Manufacturing facilities in China and the Philippines now produce a significant volume of the world’s optics, often under the strict supervision of Japanese engineers, resulting in excellent products at lower price points. However, quality can be less consistent across different brands and product tiers when compared to Japanese-made optics.7 The critical takeaway is that high-performance glass is no longer the exclusive domain of ultra-premium brands.
Lens Coatings: The term “Fully Multi-Coated” has become the industry standard for any serious optic. This process involves applying multiple layers of anti-reflective compounds to all air-to-glass lens surfaces, which maximizes light transmission, enhances contrast, and reduces performance-degrading glare.10 The specific quality and application of these coatings are a key differentiator, directly impacting an optic’s performance in low-light conditions.12
Light Transmission & Exit Pupil: These two factors are critical for performance at dawn and dusk. Light transmission refers to the percentage of light that passes through the scope to the user’s eye. The exit pupil is the diameter of the beam of light leaving the eyepiece, calculated by dividing the objective lens diameter by the magnification (ExitPupil=ObjectiveDiameter/Magnification). For low-light use, an exit pupil of 6mm or more is ideal, as it matches or exceeds the dilation of the human eye.14 While a larger objective lens can gather more light, its contribution is often secondary to the quality of the glass and its coatings.1
Mechanical Reliability: The Non-Negotiables
An optic with brilliant glass is useless if its mechanical components are not reliable. This is where many budget optics fail and where true value brands distinguish themselves.
Turret Tracking & Repeatability: For any scope intended for precision use, this is the most critical mechanical attribute. Tracking refers to the accuracy of the turret adjustments; a click valued at 0.1 MIL must move the point of impact precisely 1 cm at 100 meters. Repeatability, or the ability to “return to zero,” means that after dialing adjustments for a long-range shot, the user can dial back to their original zero setting and have the point of impact return perfectly.1 This requires precisely machined internal components, a common failure point in cheap optics but an area where value brands like Athlon and Arken now excel.19
Zero Retention: At a minimum, a scope must hold its point of aim relative to its point of impact, despite the forces of recoil and the rigors of field use.15 This is a function of robust internal construction and overall build quality.
Feature Set Democratization
Features that were once hallmarks of scopes costing well over $1,000 are now becoming standard in the mid-tier market, representing one of the most significant shifts in value.
First Focal Plane (FFP) vs. Second Focal Plane (SFP): In an FFP scope, the reticle is placed in front of the magnification erector assembly, causing it to grow and shrink in size as the magnification is adjusted. This ensures that the reticle’s subtensions (hash marks for holdover and windage) are accurate at every magnification level. In an SFP scope, the reticle is behind the erector assembly and remains a constant size. Its subtensions are only accurate at one specific magnification, typically the highest setting.2 FFP was once a premium feature, but its availability in sub-$500 scopes from brands like Vortex, Athlon, and Primary Arms is a key indicator of the new value paradigm.25 SFP remains a viable and often preferred choice for many hunting and plinking applications where a consistently sized reticle is advantageous.2
Advanced Turrets: Features such as zero-stops, which provide a hard mechanical stop when returning the elevation turret to its original zero, and locking mechanisms that prevent accidental adjustments, were once exclusive to tactical and competition scopes. Their inclusion in optics under $500 represents a massive leap in functional value for the consumer.3
Illumination & Reticle Design: The market has moved far beyond the simple duplex crosshair. Modern reticles incorporate Bullet Drop Compensation (BDC) stadia, detailed MIL or MOA-based grids (often called “Christmas trees”), and highly innovative, integrated systems like the ACSS reticles from Primary Arms, which combine ranging, wind holds, and moving target leads.10
The Warranty Factor: Valuing Peace of Mind
A manufacturer’s warranty is a direct reflection of its confidence in its products and supply chain. In the modern optics market, it has also become a powerful strategic tool.
The Industry Gold Standard: Vortex Optics fundamentally altered the market with its VIP Warranty, which is unlimited, unconditional, and fully transferable.34 This policy, which covers accidental damage with no questions asked, has built immense brand loyalty and established a high bar for competitors. It functions as a powerful risk-mitigation tool for consumers, making Vortex a “safe choice” for many buyers, sometimes even overshadowing direct feature-for-feature comparisons with competitors.35
The Challengers’ Response: In response, most reputable value-oriented brands now offer similar lifetime, transferable warranties. Athlon, Primary Arms, and Arken all provide robust warranty policies.40 However, the perceived value of these warranties can be influenced by customer sentiment and real-world reports of service speed and quality, which can vary more than with the established leader.43
III. Defining the Modern Shooter: Four Key Personas
To identify true value, one must first define the end-user’s mission. An optic that is a gem for a competitive shooter may be an overweight, overly complex burden for a hunter. This section validates and details four distinct buyer personas, establishing the specific attributes and priorities that guide our subsequent recommendations.1
Persona 1: The Tactical/Critical User
Core Priority: Absolute reliability and speed under stress. The optic is viewed as a life-safety tool where failure is not an option.
Key Attributes:
Durability: The optic must be fundamentally robust—shockproof, waterproof, and fogproof. Construction from a single piece of aircraft-grade aluminum is the standard.3
Speed: For LPVOs, a true 1x magnification setting with a daylight-bright illuminated reticle is critical for rapid, both-eyes-open target acquisition in close quarters.47 For red dot sights, a crisp, easily acquired dot and a wide field of view are paramount.49
Reticle: In LPVOs, FFP reticles are often preferred for accurate holds at any magnification. The reticle design must be fast up close (e.g., a bold horseshoe or donut) while providing useful holdover points for distance.3
Turrets: Turrets must be either capped or feature a locking mechanism to prevent unintentional adjustments during movement or under stress.3
Persona 2: The Range/Target Marksman
Core Priority: Uncompromising mechanical and optical precision for engaging small targets at extended distances.
Key Attributes:
Glass Clarity: Maximum optical resolution at high magnification is essential to clearly see distant targets, read mirage, and spot impacts. ED glass is highly desirable to minimize chromatic aberration.1
Magnification: High magnification ranges are standard, with common configurations being 5-25x, 6-24x, or even higher, such as 7-35x.28
Turrets: Exposed, tactical-style turrets with precise, tactile, and audible clicks are a requirement. A high range of internal elevation adjustment (measured in MILs or MOA) and a reliable, easy-to-set zero-stop are non-negotiable features.1
Reticle: FFP is the universal standard for this application. Complex “Christmas tree” style reticles with detailed MIL or MOA grids are preferred for making rapid and precise holds for wind and elevation adjustments.5
Persona 3: The Shooter/Hunter
Core Priority: A pragmatic balance of optical performance (especially in low light), durability, and manageable weight for field use.
Key Attributes:
Low-Light Performance: Excellent light transmission is critical for success during the prime hunting hours of dawn and dusk.12 This performance is primarily a function of high-quality glass and coatings, rather than simply a large objective lens.11
Magnification Range: Versatility is paramount. The classic 3-9x is a capable all-rounder, but modern hunters often prefer wider zoom ratios like 2-10x, 3-15x, or 4-16x to adapt to varied terrain, from dense woods to open plains.10
Weight & Size: Ounces matter when carrying a rifle for long distances. A balance must be struck between the light-gathering capability of a larger objective lens and an optic that is not overly heavy or cumbersome.28
Reticle: Simple and uncluttered designs are often favored. Duplex, BDC, or simple illuminated dot reticles are popular for their fast target acquisition and ease of use under pressure.28
Persona 4: The Plinker/Recreational Shooter
Core Priority: Affordability and functional reliability. The optic must perform its basic function—holding zero—without breaking the bank.
Key Attributes:
Price: This is the most cost-sensitive category. Value is measured directly in functional performance per dollar spent.56
Reliability: The primary mechanical requirement is that the scope holds zero consistently. It does not need the precise tracking of a competition scope, but it must not shift its point of impact after firing.56
Clarity: Clear glass is still important for an enjoyable shooting experience, and many modern budget scopes now offer surprisingly good optical quality for their price.56
Ease of Use: Simple controls and a clear, easy-to-see reticle, such as a Duplex or a basic BDC, are ideal for this user.60
Attribute
Tactical/Critical User
Range/Target Marksman
Shooter/Hunter
Plinker/Recreational
Primary Priority
Absolute Reliability
Mechanical Precision
Low-Light Performance
Affordability
Secondary Priority
Speed/Acquisition
Optical Clarity
Versatility/Weight
Holds Zero
Tertiary Priority
Reticle Utility
Turret Features
Durability
Glass Clarity
Durability
Critical
High
High
Moderate
Glass Quality
High
Critical (ED Glass)
High (Low-Light)
Good
Turret Features
Capped/Locking
Exposed, Zero-Stop
Capped/Simple
Simple/Capped
Reticle Type
FFP LPVO / Red Dot
FFP MIL/MOA Grid
SFP BDC/Duplex
SFP Duplex/BDC
Weight
Moderate
Low Priority (Heavy OK)
High Priority (Light)
Moderate
Price Sensitivity
Low
Moderate
Moderate-High
Critical
IV. Market Analysis: The Rise of the Value-Driven Challenger Brands
The optics market of the last decade has been defined by disruption. While legacy European and American brands still command the premium tier, a new class of manufacturers has emerged, fundamentally altering the price-to-performance landscape. These challenger brands have created the value opportunities this report seeks to identify by combining innovative design with strategic global manufacturing.
A “meritocracy of manufacturing” is now the prevailing dynamic. The country of origin is becoming less important than the specific factory, the quality of the raw materials (glass), and the stringency of the brand’s on-site quality control. Respected brands like Vortex and Primary Arms rely heavily on Chinese and Filipino manufacturing for their volume-selling lines.7 They often employ Japanese engineers to supervise these facilities to ensure high standards are met.7 The largely positive user reviews for products like the Chinese-made Vortex Diamondback Tactical and Primary Arms SLx series confirm that a “Made in China” label is no longer an automatic disqualifier for quality.26 The crucial factor is the brand’s investment in design, engineering, and quality control, demonstrating that a well-managed overseas production line can produce a superior value optic.
The Benchmark: Vortex Optics – The Power of Warranty and Market Saturation
Market Position: Vortex effectively established the modern mid-tier optics market. Their product lines span from entry-level (Crossfire) to upper-mid (Viper) and near-premium (Razor), creating a comprehensive ecosystem that caters to nearly every buyer.7
Manufacturing Strategy: They employ a diversified global supply chain, with manufacturing in China (Crossfire, Strike Eagle, Diamondback Tactical), the Philippines (Viper series), and Japan (Razor series), which allows them to strategically target various price points.7
Core Strength: The unparalleled VIP warranty is the cornerstone of the Vortex brand. This unconditional, transferable lifetime guarantee has become a massive driver of consumer trust and has cultivated a fiercely loyal customer base, positioning Vortex as the “safe choice” for many buyers.34
The Innovator: Primary Arms Optics – Reticles that Redefine Utility
Market Position: Primary Arms competes directly with Vortex but differentiates itself primarily through reticle innovation. Their clearly defined product tiers—SLx (value), GLx (mid-tier), and PLx (premium)—offer consumers a straightforward path for upgrades.24
Manufacturing Strategy: Like Vortex, Primary Arms leverages manufacturing facilities in China, the Philippines, and Japan to align with their respective product tiers and price points.8
Core Strength: The proprietary ACSS (Advanced Combined Sighting System) reticles are the brand’s key differentiator. These reticles ingeniously integrate range estimation, bullet drop compensation, and moving target leads into an intuitive system, offering a level of utility that often surpasses competitors at the same price.32 This approach represents an “ecosystem-led” strategy, where the physical scope serves as the delivery vehicle for the brand’s intellectual property—the reticle design.
The Balanced Performer: Athlon Optics – Quietly Exceeding Expectations
Market Position: Athlon has carved out a strong reputation for offering a superb balance of optical quality, robust mechanical features, and competitive pricing. The brand is frequently cited by knowledgeable consumers as providing “more scope for the money” than its direct competitors.25
Manufacturing Strategy: The majority of Athlon’s product lines are manufactured in China, while their high-end Cronus line is produced in Japan.9
Core Strength: Athlon is known for providing excellent glass quality and reliable turret tracking within its price class. Models like the Argos and Helos are consistently praised for punching well above their weight, offering features like FFP reticles and locking turrets at aggressive price points.20 Their lifetime warranty is on par with the industry’s best.41
The Disruptors: Arken & Swampfox – Pushing the Price-to-Feature Boundary
The market’s evolution is further evidenced by the emergence of brands employing distinct disruptive strategies. This has led to a bifurcation in how value is created.
Arken Optics (The Feature-Led Disruptor):
Market Position: Arken aggressively targets the budget-to-mid-tier precision shooting market. Their strategy is to pack a maximum number of desirable hardware features—high magnification, 34mm main tubes, zero-stops, and claims of Japanese ED glass—into sub-$600 scopes.5 Their value proposition is a direct, compelling comparison of specification sheets.
Manufacturing & Perception: Products are made in China, with claims of using Japanese glass elements.71 The brand has faced valid criticism for aggressive and sometimes opaque marketing practices, which has created some consumer skepticism despite numerous positive user reviews on raw performance.42 Customer service and quality control are perceived as being more variable than with more established brands.74
Core Strength: An undeniable feature set for the price. The EP and SH series scopes offer specifications that are, on paper, competitive with optics costing twice as much or more.5
Swampfox Optics:
Market Position: A US-based (Colorado) company competing in the budget-to-mid tier across LPVOs, precision scopes, and red dots. They focus on providing a high-quality feel and a thoughtful feature set at an accessible price point.77
Manufacturing & Perception: Products are manufactured overseas (China). The brand has garnered a solid following for delivering good glass quality and well-conceived features like locking turrets and included throw levers within its price class.77
Core Strength: Their product lines (e.g., Arrowhead, Kentucky Long) offer clear differentiation and are often praised for feeling more premium than their price suggests, indicating a strong focus on user experience and design.30
V. Curated Recommendations: Top 5 Value Optics Per Persona
The following recommendations are based on a synthesis of product specifications, market reputation, and user sentiment, filtered through the specific needs of each buyer persona.
A. Persona 1: The Tactical/Critical User
This user requires absolute reliability and speed. The best value is found in optics that are proven to be durable and feature reticles designed for rapid engagement from close quarters to medium range.
Persona Alignment: This LPVO is ideal for the tactical user on a budget. Its key feature, the ACSS Nova reticle, uses a fiber optic wire to create an intensely bright center dot, mimicking the speed of a red dot sight at 1x magnification.33
Value Proposition: It offers a “daylight bright” aiming point, a feature typically found on much more expensive optics, combined with a functional BDC reticle. The glass quality and build are excellent for its price point, making it a category leader in value.47
Analyst’s Insight: Primary Arms has effectively leveraged reticle technology to create an optic that performs far above its price. The Nova reticle solves the common budget LPVO problem of weak illumination, making this a top choice for a general-purpose tactical rifle.
Persona Alignment: For the user who needs maximum versatility, the Arrowhead’s 1-10x magnification range covers everything from room-distance to 600+ yards. Its push/pull locking turrets are a critical feature for a tactical scope, preventing inadvertent zero shifts.78
Value Proposition: No other optic in its price range offers a 1-10x magnification range combined with its robust build quality, effective illumination, and included throw lever. Customer sentiment is consistently high regarding its durability and clear glass.77
Analyst’s Insight: While the eye box at 10x can be tight, the sheer flexibility of this optic is unmatched for the price. It represents a significant value for shooters who want the capability to engage at both CQB and extended ranges without changing platforms.
Persona Alignment: This is the benchmark for a duty-grade, mid-tier LPVO. It is renowned for its rugged construction, clear glass, and forgiving eye box, making it easy to use under pressure. It is a proven performer in harsh conditions.18
Value Proposition: While at the higher end of the “value” spectrum, its value comes from its bomb-proof reliability and the peace of mind offered by the Vortex VIP Warranty. It is a professional-grade tool at a non-premium price.
Analyst’s Insight: The Viper PST Gen II is the optic by which all other mid-tier LPVOs are judged. While newer competitors may offer more features on paper for less money, none have its track record of durability and customer support.
Persona Alignment: The quintessential budget red dot for a patrol rifle, home defense carbine, or backup sight. Its simplicity, durability, and motion-activated illumination (“MOTAC”) make it instantly ready when needed.48
Value Proposition: It offers performance and reliability that rival red dots costing two to three times as much. It has been extensively field-tested by a vast user base and has proven to be an exceptionally durable and reliable optic for its price.47
Analyst’s Insight: The Romeo5 is arguably the single best value in the entire optics market. Its combination of price, durability, and features has made it the default recommendation for an affordable, non-critical-use red dot sight.
Persona Alignment: This is the ideal solution for a shooter with astigmatism, for whom red dots can appear blurry or starburst. The etched ACSS reticle is perfectly crisp, works without batteries, and provides BDC and ranging capabilities in a compact package.66
Value Proposition: It offers magnification in a package that is significantly lighter and more compact than an LPVO. The utility of the ACSS reticle in a fixed 3x optic is immense, providing a simple yet highly effective sighting system.
Analyst’s Insight: The MicroPrism line fills a unique niche, offering a compelling alternative to both red dots and LPVOs. For many users, especially those with astigmatism, it is not just a value choice but the best technical solution available.
B. Persona 2: The Range/Target Marksman
This user demands mechanical precision and optical clarity above all else. The best value is found in FFP scopes that deliver reliable tracking and high-resolution glass without the four-figure price tag.
Persona Alignment: This scope is built for the budget-conscious precision shooter. Its specifications—a 5-25x magnification range, FFP reticle, 34mm tube for ample elevation adjustment, and a precise zero stop—are ideal for long-range target work.5
Value Proposition: The EP5 offers a feature set and claimed material quality (Japanese ED glass) that is unprecedented at its price point. User reviews consistently praise its excellent turret tracking and optical clarity, comparing it favorably to scopes costing significantly more.19
Analyst’s Insight: Arken Optics has disrupted the market by focusing on delivering maximum mechanical and optical specifications for the dollar. While its significant weight (39.2 oz) makes it unsuitable for a hunting rifle, it is a non-issue for a range gun. For a shooter prioritizing pure performance-per-dollar, the EP5 is arguably the best value on the market.
Persona Alignment: The Argos BTR is the quintessential “first serious long-range scope.” It provides all the necessary features for a new precision shooter: FFP reticle, exposed tactical turrets, illumination, and a reliable zero stop.20
Value Proposition: It has a long-standing reputation for solid, reliable performance and good glass for its price. It is often recommended in shooting communities as a safe, proven choice that punches well above its weight.21
Analyst’s Insight: While newer options like the Arken EP5 may offer more impressive specs on paper, the Athlon Argos BTR Gen 2 has a proven track record and is backed by an excellent warranty. It represents a fantastic balance of features, reliability, and price.
Persona Alignment: This is Vortex’s entry into the budget precision market, aimed at shooters who want to get into long-range shooting with a trusted brand. Its FFP reticle and high magnification range are perfect for this role.61
Value Proposition: While its turrets are often described as “mushy” compared to the competition, its glass is clear, it tracks reliably, and it is backed by the industry’s best VIP warranty. This makes it an incredibly safe and reliable choice for a new shooter.26
Analyst’s Insight: The Diamondback Tactical’s greatest asset is the Vortex warranty. For a shooter who is concerned about investing in a complex optic, this provides an unmatched level of security. It is a solid, functional optic that will get the job done.
Persona Alignment: This scope targets the serious competitor on a budget. The “ED” designation signifies high-quality Extra-Low Dispersion glass, which provides superior image clarity and color, a critical need for discerning marksmen.94
Value Proposition: The Match Pro ED delivers optical performance that genuinely competes with scopes in the $1,000+ category. Its Deploy MIL 2 reticle is highly regarded, and its turret mechanics are crisp and reliable. At around $700, it is a standout value.25
Analyst’s Insight: Bushnell has created a true “giant killer” with the Match Pro ED. It forgoes some creature comforts to pour the entire budget into what matters most for this persona: glass quality and mechanical precision. It is an overlooked gem for the serious shooter.
Persona Alignment: This optic is perfect for the marksman who shoots a semi-automatic platform (like an AR-10) or wants a more versatile, lighter-weight precision scope. The 4-16x range is highly practical, and the reticle is superb.32
Value Proposition: At a street price often under $300, this scope offers FFP performance and the incredibly functional R-Grid 2B reticle. The combination of a useful magnification range, solid mechanics, and a best-in-class reticle makes it an exceptional value.27
Analyst’s Insight: The value of this scope is driven by its reticle. The ACSS R-Grid 2B provides a comprehensive toolset for ranging and holding that is simply not found in other optics at this price point, making complex shots easier and faster.
C. Persona 3: The Shooter/Hunter
This user needs a reliable, lightweight optic with excellent performance in the low-light conditions common to hunting. Versatility is key.
Persona Alignment: This is a modern evolution of the quintessential American hunting scope. It is exceptionally lightweight, rugged, and offers the excellent optical clarity and low-light performance Leupold is known for. The 3-9x range is perfect for most hunting scenarios.55
Value Proposition: It provides premium brand performance and reliability at an accessible price. The addition of the Custom Dial System (CDS) allows a user to get a custom-engraved elevation turret matched to their specific ammunition, adding simple long-range capability to a classic design.55
Analyst’s Insight: In a market flooded with feature-heavy tactical scopes, the VX-Freedom’s value lies in its simplicity, light weight, and optical quality. It is a purpose-built tool for the hunter who prioritizes mobility and performance at legal hunting light.
Persona Alignment: An often-overlooked model in the Vortex lineup, the Viper HS is an ideal hunting scope. Its 2.5-10x magnification is highly versatile, and it features upgraded glass compared to the more common Diamondback line, providing better low-light performance.12
Value Proposition: It offers a tangible step up in optical quality from entry-level scopes. The Dead-Hold BDC reticle is simple and effective, and the scope has a reputation for being tough and reliable, all backed by the VIP warranty.63
Analyst’s Insight: The “HS” stands for Hunting/Shooting, and this scope lives up to its name. It’s a workhorse optic that provides a noticeable performance increase over budget options without the complexity or weight of a tactical scope.
Persona Alignment: This is a true “crossover” gem, perfect for the hunter who also enjoys precision shooting at the range. It’s relatively compact but includes features normally found on target scopes, like an FFP reticle, illumination, and locking turrets.29
Value Proposition: It offers a feature set that allows it to perform capably in both hunting and target shooting roles. The locking turrets are a huge benefit for a hunting scope, preventing zero from being bumped in the field. The glass is crisp and clear for its price.29
Analyst’s Insight: This scope bridges the gap between hunting and tactical designs better than almost any other optic in its price range. It allows a user to have one high-quality scope for multiple disciplines, representing outstanding consolidated value.
Persona Alignment: An evolution of the legendary Fullfield II, this scope is a workhorse for the budget-conscious hunter. The 2.5-10x range is highly practical, and the scope is known for its reliability.68
Value Proposition: It offers improved glass and a more modern design over its predecessor at a very accessible price. It is a simple, durable, and effective tool that provides excellent performance for the money.86
Analyst’s Insight: The Burris Fullfield line has long been a benchmark for affordable, reliable hunting optics. The Fullfield IV continues this legacy, offering a dependable option that will serve a hunter well for years.
Persona Alignment: This scope is for the hunter who values maximum flexibility. Its huge 6:1 zoom ratio (3-18x) means it can handle close-range shots in the woods (at 3x) and long-range shots in open country (at 18x).100
Value Proposition: Packing an FFP reticle, illumination, and an enormous magnification range into a sub-$400 package is a remarkable achievement. It offers a level of versatility that is typically reserved for scopes costing three times as much.
Analyst’s Insight: While it is heavier than a typical hunting scope, the Presidio’s versatility is its standout feature. For a hunter who uses one rifle for many different types of game and terrain, this optic provides an incredible range of capabilities for a very modest investment.
D. Persona 4: The Plinker/Recreational Shooter
This user needs an affordable optic that is reliable enough for casual range use and holds its zero. The focus is on fundamental performance, not advanced features.
Persona Alignment: A long-standing champion of the budget category, the Banner is perfect for a first rifle or a dedicated.22LR plinker.
Value Proposition: Its key feature is the “Dusk & Dawn Brightness” (DDB) multi-coating, which provides surprisingly good low-light performance for its price. It’s a reliable, no-frills scope that simply works.12
Analyst’s Insight: The Banner has been a gateway optic for generations of shooters for a reason. It delivers on its basic promise to provide a clear image and hold zero, making it a dependable and smart purchase for the recreational shooter.
Persona Alignment: This scope is for the plinker who wants the brightest possible sight picture for the lowest price. The large 50mm objective lens gathers a great deal of light.56
Value Proposition: It offers a tangible feature (the large objective) that provides a noticeable benefit (a brighter image) at a very low cost. It is a step up from the absolute bottom tier of optics and is known to be reliable on rimfire and low-recoil centerfire rifles.57
Analyst’s Insight: While lens quality is more important than size, at this price point, the larger objective of the Simmons does provide a user-friendly, bright image that is ideal for casual target shooting.
Persona Alignment: This is the entry point to the Vortex ecosystem. It’s for the recreational shooter who is willing to spend a little more for higher build quality and the security of a top-tier warranty.
Value Proposition: While it is more expensive than other budget options, the Crossfire II is clearer, more durable, and backed by the VIP warranty. That peace of mind is a significant value-add that other budget scopes cannot offer.57
Analyst’s Insight: For a shooter who may eventually upgrade to more serious optics, starting with the Crossfire II is a wise investment. It’s a quality product from a respected company that will always be covered, no matter what.
Persona Alignment: This scope represents the higher end of the ultra-budget, direct-to-consumer market. It is for the most price-sensitive plinker who wants features like illumination and a slightly higher magnification range.
Value Proposition: It provides a functional, illuminated scope at an extremely low price. While not intended for critical use or heavy-recoiling rifles, it is a viable option for casual.22lr plinking and has gained a reputation for being surprisingly functional for its cost.56
Analyst’s Insight: Brands like CVLIFE are a testament to modern manufacturing efficiency. While long-term durability is a question, for a shooter on the tightest of budgets, they provide an accessible entry point into scoped shooting.
Persona Alignment: Monstrum targets the new shooter by offering a complete package, often including scope rings, for a very low price. This is for the plinker who wants a simple, all-in-one solution.
Value Proposition: The value is in the convenience and low barrier to entry. User sentiment suggests they are a solid choice for light-use applications and rimfire rifles where durability and mechanical precision are less critical.56
Analyst’s Insight: Monstrum has successfully captured a segment of the market that prioritizes price and convenience above all else. For a casual.22LR rifle used for informal target practice, their products are a functional and highly affordable option.
VI. Concluding Analysis & Future Outlook
The analysis of the current firearms optics market reveals a clear and compelling trend: the performance gap between mid-tier and premium optics is narrowing at an accelerating rate. The modern consumer can now access exceptional optical and mechanical performance without paying a traditional premium price. This shift is driven by the intense competitive pressure exerted by value-focused challenger brands that have mastered global supply chains and rapid product development.
The “value sweet spot” in today’s market is firmly located in the $300-$800 price range. Within this bracket, brands like Primary Arms, Athlon, and Vortex, along with the upper-tier offerings from Bushnell and Arken, provide scopes with FFP reticles, high-quality glass, and reliable mechanics that can satisfy the needs of the vast majority of even the most serious shooters.
Looking ahead, several trends are poised to shape the market further:
Continued Feature Democratization: The downward migration of premium features will continue. Expect to see higher-quality ED glass and more sophisticated illumination systems, such as fiber optics, become standard in even lower price brackets.
The Rise of Smart Optics: Integrated electronics, such as the ballistic calculating features seen in the Burris Veracity PH, will become more common and affordable.68 This technology offers a significant performance advantage, though it may face regulatory hurdles for hunting applications in some jurisdictions.
Brand Consolidation and Competition: The optics market is crowded. This intense competition will continue to benefit the consumer with better products at lower prices. Brands that fail to innovate on features (like Primary Arms), compete aggressively on price-for-spec (like Arken), or dominate on customer service (like Vortex) may struggle to maintain their market share.
The final recommendation to the buyer is to recognize that the ultimate “gem” is the optic that best aligns with their specific, well-defined needs and budget. The wisest investment is not necessarily the most expensive scope, but the one chosen with a clear understanding of the performance trade-offs and market dynamics outlined in this report. In the end, a quality optic mounted on an inexpensive rifle will almost always outperform a cheap optic mounted on an expensive rifle.2
The modern consumer of firearms optics is presented with a seemingly vast and diverse marketplace. Dozens of brands, from household names with a century of history to agile newcomers, compete for market share across every price point. This proliferation of choice, however, is largely an illusion. Beneath the surface of distinct branding, marketing campaigns, and proprietary reticle designs lies a highly consolidated global manufacturing base. A surprisingly small number of specialized factories, primarily located in Japan, China, and the Philippines, are the true engines of the industry, producing optics for a multitude of brands that are often perceived as direct competitors. This report pierces the corporate veil to identify and analyze the top 25 true manufacturers that underpin the global firearms optics market.
The Brand vs. The Factory
Understanding the structure of this industry requires a clear distinction between a brand and a manufacturer. The brand is the consumer-facing entity responsible for product conception, design, marketing, distribution, and, crucially, warranty and customer service. The manufacturer is the entity that operates the factories, machines the components, grinds the lenses, and assembles the final product. The relationship between these two is most often defined by one of two models:
Original Equipment Manufacturer (OEM): In this model, a brand contracts a manufacturer to produce a product or component based on the brand’s specific design and quality standards. The brand owns the intellectual property, while the manufacturer provides the production capability. This is the most common model in the optics industry.1
Original Design Manufacturer (ODM): In this model, a manufacturer designs and produces a product that is then purchased and re-branded by other companies. The manufacturer owns the core design, which may be slightly modified for different clients. This allows brands to bring products to market quickly with minimal research and development investment.2
Many of the most successful companies in the industry are not vertically integrated manufacturers but are instead highly skilled brand integrators, leveraging a global network of OEM/ODM partners to build their product lines.
The Global Tiered Supply Chain
The global optics supply chain is not flat; it is a distinct hierarchy based on historical expertise, technological capability, and labor costs. This tiered structure is the single most important factor in determining the quality, performance, and price of a given optic.
Tier 1 (Premium): Japan and Germany are the undisputed leaders in high-end optical manufacturing. Decades, and in some cases over a century, of experience in precision mechanics and lens grinding have given these nations an unparalleled reputation for quality.5 Products originating from these countries command the highest prices and are typically found in the flagship lines of premium brands.
Tier 2 (Mid-Range/High-Value): The Philippines has emerged as a critical hub for the assembly of mid-tier optics. Factories in this region, often established or managed by Japanese parent companies, combine skilled, cost-effective labor with rigorous, Japanese-instilled quality control processes. This allows brands to offer products with excellent performance-to-price ratios.5
Tier 3 (Volume/Value): China is the dominant force in volume manufacturing. Chinese factories produce the vast majority of entry-level and budget-friendly optics on the market.5 Over the past decade, however, select Chinese manufacturers have invested heavily in R&D and advanced manufacturing, allowing them to produce technologically sophisticated optics that now compete directly with mid- and even high-tier products from other nations.10
Design & Assembly Hubs: The United States and Austria are home to some of the industry’s most iconic brands. These companies are often masters of design, engineering, marketing, and final assembly. While they may operate significant domestic facilities for machining and assembly of their premium lines, they also strategically leverage the global tiered supply chain, sourcing components or entire product lines from Japan, the Philippines, and China to build out a comprehensive catalog that addresses multiple market segments.11
Methodology and Ranking Explanation
This analysis is the result of a comprehensive review of direct company statements, corporate filings, credible industry journalism, and an examination of the supply chain relationships between brands and their manufacturing partners. The ranking of the top 25 manufacturers is not based on a single metric like revenue or unit volume, but on a holistic assessment of their overall influence and position within the global optics ecosystem. The key factors considered in this ranking are:
Market Influence and OEM/ODM Network: A manufacturer’s significance is heavily weighted by the number and prominence of the brands it produces for. A single factory supplying core components or finished products for multiple major, competing brands (e.g., Huanic, Light Optical Works) holds immense influence over the market.
Technological Capability and Quality Tier: Manufacturers are stratified based on their position in the global quality hierarchy. The elite, vertically integrated houses of Germany and Austria and the high-end OEM foundries of Japan occupy the top ranks due to their unparalleled optical and mechanical quality. They are followed by the high-value assembly hubs in the Philippines and the increasingly sophisticated, high-volume factories in China.
Vertical Integration and Brand Strength: Companies that are both powerful brands and vertically integrated manufacturers (e.g., Swarovski, Schmidt & Bender, Zeiss) are ranked highly due to their complete control over their product, from design to final quality assurance. Similarly, American “brand integrators” (e.g., Leupold, Trijicon) are ranked based on the strength of their brand, their in-house assembly and QC capabilities, and the sophistication of their global supply chain management.
Scale of Production: While not the sole factor, the sheer volume of optics produced is a significant consideration. Manufacturers that dominate the high-volume segments of the market have a profound impact on the industry’s overall landscape.
By cross-referencing product origins with the known capabilities of specific factories, it is possible to map the network of OEM/ODM relationships that defines the modern optics market. The following sections profile the 25 most significant manufacturing entities—some of whom are famous brands, others silent giants—that truly build the world’s firearms optics.
Section 2: The European Masters: Vertically Integrated Precision
In contrast to the OEM-dominated landscape of Asia, the elite European manufacturers operate on a different model. These companies are primarily vertically integrated brand-manufacturers, controlling nearly every aspect of their product’s creation, from initial optical calculations and mechanical design to final assembly and testing. They are not suppliers to other brands; they are the benchmark against which other brands are measured.
2.1. Manufacturer Profile: Schmidt & Bender GmbH & Co. KG
Core Data: Founded in 1957 by Helmut Schmidt and Helmut Bender, the company remains a family-owned enterprise headquartered in Biebertal, Germany.6
Capabilities & Global Footprint: Schmidt & Bender (S&B) is synonymous with uncompromising quality in the tactical and high-end hunting scope market. The company operates two primary production facilities. The main factory in Biebertal, Germany, handles the production of their most advanced lines, such as the Police Marksman (PM II) and Zenith series.6 In 1992, S&B acquired the Hungarian Optical Works (MOM) in Budapest, establishing Schmidt & Bender Hungaria Optik.6 This Hungarian facility is not a lower-cost alternative but an integral part of their high-quality production chain; it manufactures many of the precision optical components used across all S&B products and is responsible for the complete assembly of the “Klassik” series of hunting scopes.6
The OEM Web: S&B does not function as a conventional OEM, producing private-label scopes for other consumer brands. Instead, their OEM business is focused on being the chosen optics supplier for elite military and law enforcement units and premier firearm manufacturers. High-end rifle makers such as Accuracy International, Brügger & Thomet, and Heckler & Koch either factory-equip their sniper systems with S&B scopes or officially recommend them as the preferred sighting solution, effectively making S&B an OEM partner at the highest tier of the defense industry.16
2.2. Manufacturer Profile: Swarovski Optik
Core Data: Founded in 1949 in Absam, Tyrol, Austria, Swarovski Optik is a division of the world-famous Swarovski crystal group.13
Capabilities & Corporate Structure: Swarovski Optik is a quintessential example of vertically integrated European manufacturing. The company prides itself on the fact that the vast majority of its research, development, and manufacturing processes take place in-house at its state-of-the-art facility in Absam, Austria.13 This allows for meticulous control over every stage of production, from lens coating to final assembly. In 1974, Swarovski further solidified its position in the European optics hierarchy by acquiring KAHLES, one of the oldest and most respected riflescope manufacturers in the world.13
The OEM Web: Similar to Schmidt & Bender, Swarovski Optik does not operate as an OEM for other consumer brands. They are a self-contained entity focused exclusively on producing products under the Swarovski and Kahles brand names. Their business model is predicated on maintaining an image of exclusivity and superior in-house quality. The only notable deviation from a purely Austrian production model is the final assembly of certain riflescope series designed specifically for the American market (such as the Z3 and Z5 lines), which takes place in the United States. This is a minor logistical adaptation rather than a true outsourcing of manufacturing.13
2.3. Manufacturer Profile: Zeiss
Core Data: A legendary name in optics, Carl Zeiss AG was founded in Jena, Germany, in 1846.22 The sports optics division, Carl Zeiss Sports Optics GmbH, has its roots in the Moritz Hensoldt company, which was acquired by the Carl Zeiss foundation in 1928 and is based in Wetzlar, Germany.23
Capabilities & Reputation: Zeiss is a global technology leader in the fields of optics and optoelectronics. Their reputation for optical excellence is built on over 175 years of innovation. The company operates multiple facilities, with primary sports optics manufacturing in Wetzlar and Jena, Germany.23 They produce a full range of premium binoculars, riflescopes, and spotting scopes known for their exceptional clarity and performance.23
The OEM Web: Like other top-tier German and Austrian manufacturers, Zeiss is a vertically integrated brand that does not produce private-label optics for other consumer brands. Their focus is on producing products under their own esteemed name, maintaining a standard of quality that is a benchmark for the entire industry.
2.4. Manufacturer Profile: Kahles
Core Data: Founded in 1898, Kahles is one of the world’s oldest existing riflescope manufacturers.24 The company is headquartered in Guntramsdorf, near Vienna, Austria.24
Capabilities & Corporate Structure: Since 1974, Kahles has been a subsidiary of Swarovski Optik.24 While operating as a distinct brand, this relationship allows for close cooperation in design and manufacturing. Kahles produces its high-end riflescopes in its Austrian factory, often sharing glass components and technology with its parent company.24 This synergy allows them to produce optics that are renowned for their robustness and are favored by tactical and competition shooters.25
The OEM Web: Kahles primarily manufactures for its own brand. However, to compete at different price points, particularly in binoculars, the company outsources some product lines. The premium “Helia” line of binoculars, for example, is produced in Japan to meet the highest quality standards, demonstrating a strategic use of the global supply chain even by elite European brands.24
2.5. Manufacturer Profile: Aimpoint AB
Core Data: Founded in 1974 in Malmö, Sweden, Aimpoint is the originator of the modern red dot sight.26
Capabilities & Market Position: Aimpoint is a specialist manufacturer focused exclusively on red dot sights. The company invented the technology in 1975 and has remained a market leader through continuous innovation.27 All Aimpoint sights are manufactured in Sweden at facilities in Malmö and Gällivare, ensuring rigorous quality control.28 Their products are legendary for their durability and battery life, making them the standard issue for many military forces, including the U.S. Army’s M68 Close Combat Optic.26
The OEM Web: Aimpoint is a brand-manufacturer and does not produce sights for other consumer brands. Their status as a primary supplier to numerous NATO military forces makes them a de facto OEM for the defense industry.
2.6. Manufacturer Profile: Meopta
Core Data: Founded as Optotechna in 1933 in Prerov, Czechoslovakia (now the Czech Republic), the company was renamed Meopta in 1946.29 In 2023, it became part of the Carlyle Group.31
Capabilities & Reputation: Meopta is a highly capable, vertically integrated manufacturer with extensive experience in military and consumer optics. Their state-of-the-art facility in the Czech Republic handles everything from R&D and lens grinding to final assembly.31 They are known for producing rugged, high-performance optics that offer a strong value proposition compared to their German and Austrian counterparts.
The OEM Web: In addition to producing a full line of Meopta-branded products, the company is also a significant, though often uncredited, OEM partner for other major European brands. Their advanced manufacturing capabilities allow them to supply high-quality optical components and even fully assembled scopes to other well-known names in the industry.
Section 3: The Titans of Tōkyō: Japan’s High-End Optical Foundries
Japanese manufacturers represent the gold standard in optical quality and precision mechanics. Their reputation is so powerful that a “Made in Japan” mark is a key selling point for the premium product lines of many American and European brands. This expertise is concentrated in a handful of highly specialized, and often highly secretive, OEM/ODM facilities.
Core Data: Founded in 1956, Light Optical Works, Ltd. (commonly known as LOW) is headquartered in Suwa City, Nagano Prefecture, a region with a deep history of precision manufacturing.3 The company operates explicitly as an OEM/ODM, specializing in the development and production of high-performance riflescopes, binoculars, and spotting scopes.3
Capabilities & Reputation: LOW’s corporate identity is built on the foundation of superior Japanese craftsmanship. Their marketing emphasizes their ability to produce optics that are not merely precise but are mechanically robust enough to withstand repeated shocks of 1000G, a critical requirement for firearms applications.34 The company states that its quality and accuracy are “recognized by top level riflescope companies,” and its products are used by elite shooters worldwide.34
The OEM Web: As a dedicated OEM, LOW does not market its own consumer brand and is famously discreet about its client list. However, through industry analysis and direct statements from brands, its role as the manufacturer behind some of the world’s most respected premium optics is well-established.
Athlon Optics: The clearest public link to LOW comes from Athlon. The brand’s flagship “Cronus BTR” series is explicitly identified in multiple reports as being manufactured at “the LOW factory in Japan”.35 This direct attribution confirms LOW’s position as a maker of top-tier optics for respected American brands.
Vortex Optics: The Vortex “Razor” line of riflescopes (with the exception of the American-made HD AMG model) is produced at a “partner facility” in Japan.5 Given LOW’s specialization in high-performance riflescopes and its known relationships with other US brands, it is the logical and widely accepted manufacturer for the Razor series.
Nightforce Optics: Nightforce, a benchmark for rugged tactical scopes, sources its highest-grade optical glass from Japan and has entire product lines, including the NXS, SHV, and NX8 series, manufactured there.36 LOW’s expertise in building mechanically superior scopes makes it a primary candidate for this critical manufacturing partnership.
The “Suwa Cluster” as Japan’s Optical Valley: The location of Light Optical Works in Suwa, Nagano, is not a geographical accident but a profound strategic advantage. This region was historically the epicenter of the Japanese watchmaking industry, earning it the moniker “the Switzerland of the East.” The intricate skills required for horology—precision mechanics, micro-assembly, and lens grinding—are directly transferable to the production of high-end optical instruments. This industrial heritage created a regional ecosystem, or “cluster,” of highly skilled labor, specialized component suppliers, and a deeply ingrained culture of meticulous quality control. Therefore, LOW’s ability to produce world-class optics is not just the result of its own corporate efforts but is also a product of this unique regional legacy. Brands that partner with LOW are not just buying factory time; they are tapping into a multi-generational reservoir of precision engineering expertise that cannot be easily replicated elsewhere.
3.2. Manufacturer Profile: Kenko Tokina Co., Ltd.
Core Data: Established in 1957 in Tokyo, Kenko Tokina is a diversified optical conglomerate and a giant in the global industry.37
Capabilities & Corporate Structure: Unlike the specialized focus of LOW, Kenko Tokina is a massive entity with a complex corporate structure. They produce and market their own successful lines of photographic equipment, including Kenko filters, Tokina lenses, and Slik tripods.39 Simultaneously, they operate as one of the world’s largest OEM manufacturers, particularly in the binocular segment, where they are described as supplying “one of the world’s leading brands”.41 Their corporate family includes numerous affiliates and subsidiaries, giving them a vast global reach.43
The OEM Web & Ownership: Kenko Tokina’s significance in the firearms optics market is both direct and through its corporate ownership structure.
Sightron: The brand Sightron is owned by its parent organization, Kenko Tokina.8 This relationship is fundamental to understanding Sightron’s manufacturing strategy. The brand’s premium riflescopes, such as the SIII and SV series, are produced in Japan, leveraging the parent company’s high-end domestic manufacturing capabilities. Meanwhile, its mid-range product lines are produced in a facility in the Philippines, which is also owned by Kenko Tokina.8
Philippine Kenko Corporation: Kenko Tokina is the parent company of this major manufacturing plant in the Philippines, which specializes in riflescopes and binoculars.43 This facility is a critical node in the global supply chain and will be discussed in further detail in Section 4.
General OEM Work: With their stated position as a top OEM for binoculars and their extensive capabilities in CCTV and security lenses, Kenko Tokina is undoubtedly a silent manufacturing partner for numerous other optics brands that source products from Japan, though these relationships are not publicly disclosed.41
3.3. Manufacturer Profile: Kamakura Koki Co., Ltd.
Core Data: Founded in Japan in 1950, Kamakura Koki has a history spanning over seven decades as a dedicated OEM of optical instruments.1
Capabilities & Global Footprint: Kamakura is a major international OEM with a significant global footprint. The company operates factories in Japan (in Saitama and Gunma prefectures), a production and service facility in San Diego, USA, and has had a manufacturing presence in China since 1990.45 This diverse manufacturing base allows them to serve a wide range of clients and price points. The company claims to hold a staggering 40% of the world market share for medium-to-high price range binoculars and spotting scopes, marking them as a dominant force in the industry.46
The OEM Web: Kamakura is committed to its role as an OEM, stating that its mission is to provide products that enhance the value of their customers’ brands while building a relationship of trust.48 While most of their partnerships are confidential, some are known:
Ecotone: This Polish optics brand is explicitly identified as being “100% made by Kamakura,” providing a clear, verifiable example of their OEM work.49
Maven: Maven Optics, which operates on a direct-to-consumer model, states that its riflescopes are built with “premium, world-class Japanese glass”.50 Given Kamakura’s massive market share, specialization in high-quality optics, and long history of partnering with American brands, they are a highly probable manufacturer for Maven.
Legacy Brands (e.g., Bushnell): Within the industry, it is widely acknowledged that Kamakura was the manufacturer behind some of the most legendary Japanese-made optics from American brands, such as the original Bushnell Elite series. While brands shift their supply chains over time, Kamakura’s long-standing role as a partner to “famous camera manufacturers and major optical equipment manufacturers” points to deep, historical relationships with many of the most established names in the US market.1
Core Data: Deon Optical is a specialized, high-end riflescope manufacturer based in Japan.
Capabilities & Market Position: Deon is the manufacturer of March Scopes, a brand highly regarded in the precision long-range and benchrest shooting communities.51 Unlike large-scale OEMs, Deon operates as a boutique manufacturer, hand-building each scope in Japan using exclusively Japanese-made components.52 This focus on craftsmanship and quality over volume places them in the highest tier of optical manufacturing.
The OEM Web: Deon exclusively manufactures for its own March Scopes brand.52 They do not engage in private-label OEM work for other companies. Their influence comes not from the breadth of their client list, but from the elite quality and performance of their products, which are often used as a benchmark in competitive shooting disciplines.
3.5. Manufacturer Profile: Japan Optics, Ltd. (JOL)
Core Data: Formerly known as Hakko, Japan Optics has a history dating back to the 1960s as a machinery workshop that evolved into a significant riflescope manufacturer.53
Capabilities & Business Model: JOL operates as a dedicated OEM manufacturer, combining Japanese craftsmanship with German and American design principles to offer custom optics solutions for other brands.53 They specialize in providing a complete “design-to-build” service, allowing companies to add custom-branded optics to their product lines efficiently.54
The OEM Web: As a pure OEM, JOL’s client list is not public. However, their long history as Hakko means they have worked with numerous firearms and optics brands globally.53 They represent the class of experienced Japanese factories that provide the manufacturing backbone for many well-regarded, Japanese-made optics sold under American and European brand names.
Section 4: The Dragon’s Workshop: China’s Ascendancy in Optics Manufacturing
For decades, China was viewed as the world’s factory for low-cost, entry-level optics. While it continues to dominate this segment, a new class of Chinese manufacturer has emerged. These companies are technologically sophisticated, vertically integrated, and possess formidable R&D capabilities. They are not just assembling optics; they are innovating and driving the market, forcing the rest of the world to take notice.
4.1. Manufacturer Profile: Huanic Corporation (Parent of Holosun)
Core Data: Founded in 2002 and based in the high-tech zone of Xi’an, China, Huanic Corporation is a large-scale electro-optics manufacturer with over 650 employees, including a substantial R&D department of 50 engineers.55
Capabilities & Market Position: Huanic’s product scope extends beyond simple optics to include laser diode modules, laser aiming devices, and holographic sights.56 They are a major OEM/ODM manufacturer with the capacity to design and produce everything from core components to fully packaged and branded systems for their clients.56
The OEM Web: Huanic is arguably the single most influential manufacturer in the modern red dot and reflex sight market. Their network of in-house brands and OEM clients is extensive and demonstrates a profound consolidation of the market.
Holosun: Huanic is the manufacturer and parent company of the Holosun brand.10 The rapid rise of Holosun from an unknown entity to a market leader is a testament to Huanic’s underlying manufacturing prowess and R&D capabilities, which introduced features like solar panels and “shake awake” technology to the mainstream market.
SIG Sauer Electro-Optics: It is an open secret within the industry, confirmed by supply chain analysis and insider reports, that many of SIG Sauer’s popular electro-optics, such as the Romeo series of red dot sights, are produced by Huanic.10
Primary Arms: The company has publicly stated that its Chinese-made optics, which constitute the popular Silver Series (SLx) and entry-level Classic Series (CLx), are produced in the same factory as Holosun—that is, Huanic.10
Swampfox Optics: Swampfox is a US company headquartered in Colorado that outsources its manufacturing to China.62 Based on their product features, price point, and market segment, which align closely with those of Holosun and Primary Arms, Huanic is the most probable OEM partner.
The “Huanic Effect” on Market Consolidation: The revelation that a single Chinese manufacturer is the production source for at least three major, seemingly competitive American brands—Holosun, SIG Sauer, and Primary Arms—has significant market implications. This consolidation means that much of the “competition” observed by consumers is happening at the level of marketing, branding, reticle design, and customer service, while the core hardware (housings, electronics, emitters, and glass) originates from the same factory. This phenomenon creates several distinct effects. First, it accelerates the pace of innovation across the market segment; R&D breakthroughs at Huanic, such as solar failsafe or multiple reticle systems, can be rapidly deployed across all their client brands, making these features industry standards almost overnight. Second, it introduces a critical single point of failure in the supply chain. A production disruption at the Huanic facility, such as a factory shutdown, can simultaneously impact the inventory and product launches of multiple major brands.10 Finally, it leads to a degree of product homogenization, where optics from different brands share fundamental components and performance characteristics, with differentiation being primarily cosmetic or feature-based rather than rooted in fundamentally different engineering.
Core Data: While the Gushin Optics brand was formally established in 2020, its manufacturing operations trace back to a facility founded in 2003 in Chongqing, China.64
Capabilities & Business Model: Gushin Optics exemplifies the modern, transparent Chinese OEM/ODM. Their corporate website functions as a direct-to-business catalog, openly advertising their OEM and ODM services to a global clientele.2 Their product list is extensive, showcasing the ability to produce a wide array of riflescopes with advanced features like First Focal Plane (FFP) reticles, 34mm and 35mm main tubes, and Extra-Low Dispersion (ED) glass—features that were once the exclusive domain of premium Japanese and European manufacturers.4 They also produce red dot sights, night vision devices, and binoculars.4
The OEM Web: Gushin does not publicly name its clients. However, their business model and the breadth of their catalog make them representative of the type of large-scale Chinese factories that supply many of the value-oriented brands popular in the North American market. Brands such as Monstrum, CVLIFE, and potentially some of the entry-level lines from legacy brands like Bushnell or Tasco, likely source their products from manufacturers with capabilities identical to those of Gushin. Their existence demonstrates the dramatic upward shift in the quality and complexity that Chinese optics factories can now deliver at highly competitive prices.
Core Data: Synta is a massive Taiwanese-owned optics manufacturer with its primary production facility located in Suzhou, China.
Capabilities & Market Position: Synta is a dominant force in the global astronomy market, acting as the OEM for a huge number of telescopes sold under brands like Celestron and Sky-Watcher. Their expertise in mass-producing quality optical instruments is well-established.
The OEM Web: While best known for telescopes, Synta’s manufacturing capabilities extend to other sporting optics.
Tasco: It is explicitly reported that Tasco brand telescopes are manufactured at Synta’s plant in Suzhou.66 Tasco, now a brand under the Revelyst (formerly Vista Outdoor) portfolio, also markets a wide range of riflescopes, binoculars, and spotting scopes.67 Given the existing manufacturing relationship and Synta’s large-scale capabilities, it is highly probable that Synta also produces some of these other sporting optics for the Tasco brand, allowing the parent company to leverage the economy of scale provided by a single, high-volume manufacturing partner.
Core Data: Founded in 2009 and headquartered in Yantai, China, InfiRay (also known as IRay) is a subsidiary of Raytron Technology and a major manufacturer of thermal imaging products.69
Capabilities & Market Position: InfiRay specializes in consumer-grade thermal infrared imagers, detectors, and modules.69 The company has a significant global market share and is known for producing innovative and competitively priced thermal scopes, monoculars, and clip-on systems.70 They have a large annual production capacity and a strong focus on R&D.70
The OEM Web: InfiRay produces products under its own brand and also serves as an OEM for other companies. For example, they previously produced fever screeners for the US company Certify.69 Their advanced thermal cores and components are likely integrated into products sold by various other brands in the security and outdoor optics markets.
Core Data: Established in 2016, Guide Sensmart is a wholly-owned subsidiary of Guide Infrared, a major public company in China’s infrared industry.71
Capabilities & Market Position: Guide Sensmart focuses on the commercial application of thermal imaging, leveraging its parent company’s 20+ years of experience. They have a large production capacity and a complete industrial chain from thermal detectors to finished systems.72 Their product range includes thermal scopes, handheld cameras, and UAV payloads.71
The OEM Web: With a stated annual production capacity of 500,000 units and a network of over 300 partners in more than 70 countries, Guide Sensmart is a major OEM/ODM player in the thermal imaging space, supplying both finished products and core modules to a wide range of international clients.71
Section 5: Archipelago of Assembly: The Philippine Powerhouse
Strategically positioned between the premium quality of Japan and the mass-market scale of China, the Philippines has carved out a crucial niche in the global optics supply chain. It has become the premier destination for brands seeking high-quality assembly and rigorous quality control at a competitive price point, often under the direct supervision of Japanese parent companies.
Core Data: Established on October 10, 1989, Philippine Kenko Corporation is a major manufacturing operation located in the Philippines.43 It is a key affiliate and subsidiary of the Japanese optical giant Kenko Tokina Co., Ltd., which provides technical oversight and a direct link to Japanese quality standards.43
Capabilities & Role: The facility is a large-scale operation, comprising two factories with a combined floor area of 22,000 square meters and employing over 1,000 Filipino workers alongside Japanese supervisors.43 Their stated mission is to manufacture riflescopes and binoculars that deliver “Japanese quality, manufactured in the Philippines”.73 This positioning makes them the ideal partner for brands wanting to move a step up from Chinese production without incurring the high costs of Japanese manufacturing.
The OEM Web: The Philippine Kenko facility is a critical, though often uncredited, manufacturing hub for some of the most popular and well-regarded mid-tier optics in the world. Its client list includes a who’s who of the American sporting optics market.
Vortex Optics: The brand’s extremely popular mid-range “Viper” series of riflescopes, as well as specific models like the Diamondback 4-12×40, are explicitly stated to be made in the Philippines.5 Reports indicate that early in the partnership, Vortex sent Japanese engineers to the plant to ensure their high standards were met, a clear illustration of the Japanese-Philippine quality connection.5
Sightron: As a subsidiary of Kenko Tokina, Sightron leverages this in-house facility for its production. Beginning around 2010, Sightron shifted the manufacturing of its entry-level and mid-range scope series, such as the SI and SII lines, from Japan to the factory in Manila.8
Burris Optics: The manufacturing process for Burris products is described as a global effort: parts are sourced from Japan, assembly takes place in the Philippines, and final inspection is conducted in the United States.7 The Philippine Kenko facility is the most likely location for this crucial assembly stage.
Primary Arms: In its tiered product strategy, Primary Arms designates its “Gold Series (GLx)” optics as being manufactured in the Philippines.60 This positions the GLx line a step above their Chinese-made Silver Series, reflecting the industry’s perception of the higher quality associated with Philippine assembly.
5.2. Manufacturer Profile: Scopro Optical Co., Inc.
Core Data: Located in Mandaluyong, Philippines, Scopro Optical Co., Inc. is a dedicated OEM factory owned by the Taiwan-based Asia Optical Group, which was founded in 1980.
Capabilities & Role: Scopro is a key manufacturer of riflescopes, reflex red dot sights, and prism scopes. Its operations are backed by the parent company’s more than 30 years of experience in providing comprehensive OEM/ODM services, from initial design to mass production. This includes the capability to build scopes with a wide range of magnifications, first or second focal plane reticles, and various illumination systems. Products undergo rigorous reliability testing, including recoil, drop, fog, and waterproof tests to meet the standards of their clients.
The OEM Web: Scopro is a significant, though often uncredited, manufacturing partner for several major brands popular in the North American market. Shipping records and industry analysis confirm its role as an OEM for:
Burris Optics
Vortex Optics
Sig Sauer
Nikon (firearms optics line discontinued around 2020) The presence of Scopro, alongside Philippine Kenko, cements the Philippines’ position as a vital center for the production of the world’s mid-tier, high-value optics.
Section 6: American Assembly & Brand Aggregation
The role of the major American optics companies is often misunderstood. While the “Made in USA” label evokes images of complete domestic manufacturing, the reality is more nuanced. The most successful US brands today often function as master integrators and brand aggregators. Their core strengths lie in innovative design (particularly of reticles), sophisticated marketing, final assembly, and rigorous quality control, all while managing a complex global supply chain to source the best components and products from around the world.
6.1. Manufacturer Profile: Leupold & Stevens, Inc.
Core Data: A quintessential American company, Leupold & Stevens was founded in 1907 and remains a fifth-generation family-owned business headquartered in Beaverton, Oregon.11
Capabilities & Manufacturing Model: Leupold maintains a formidable manufacturing presence in the United States. Their Beaverton facility employs over 700 people and includes a 150,000 square-foot machine shop dedicated to milling riflescope main tubes and other components from aerospace-grade aluminum.11 The critical final assembly of their riflescopes is performed by highly skilled workers in specialized, access-controlled clean rooms at this same facility.12 This in-house control over the mechanical construction and assembly process is a cornerstone of their reputation for durability.
The OEM Web (Strategic Outsourcing): Leupold’s “Built in the USA” identity is central to its brand, but it is built on a pragmatic and intelligent model of global integration. They focus their domestic resources on their core competencies while strategically sourcing other components and product lines from the best international specialists.
Optical Glass: It is a widely accepted industry reality that the highest grades of raw optical glass are produced by specialists in Japan. Like many other top-tier scope assemblers, Leupold sources premium Japanese glass for its riflescopes, which is then ground, coated, and assembled into lens systems in their Oregon factory.5
Binoculars: Recognizing that binocular manufacturing is a different specialty, Leupold outsources this entire product category. Their premium binocular lines, such as the BX-5 Santiam HD and BX-4 Pro Guide HD, are manufactured in Japan to compete at the highest level. Concurrently, their more affordable lines, like the BX-1 McKenzie, are produced in China to meet a different price point.11 This demonstrates a sophisticated, tiered sourcing strategy that allows them to compete across the entire binocular market.
The “Brand as Integrator” Model: Leupold & Stevens exemplifies the modern “Brand as Integrator” business model. The value they provide to the consumer is not derived from manufacturing every single component from raw materials. Instead, their value lies in their ability to design superior products, manage a global network of specialized suppliers, and integrate the best components into a finished product that meets their exacting standards. They leverage their Oregon facility for the critical tasks they do best: precision machining of housings and meticulous final assembly. They source world-class glass from Japanese experts. They partner with dedicated OEMs for non-core product lines. The final product, bearing the Leupold name, is a synthesis of these global parts, but the promise of quality, performance, and a lifetime guarantee is made, and kept, in Beaverton, Oregon. This model allows them to focus their capital and expertise on the most critical aspects of product integrity while remaining competitive across a broad and diverse market.
6.2. Manufacturer Profile: Trijicon, Inc.
Core Data: Founded in 1981 by Glyn Bindon, Trijicon is an American company based in Wixom, Michigan, that specializes in self-luminous aiming systems.75
Capabilities & Manufacturing Model: Trijicon is a major US military contractor, famous for its Advanced Combat Optical Gunsight (ACOG). The vast majority of its products, including the ACOG, RMR, MRO, and VCOG lines, are designed, engineered, and assembled in its facilities in Wixom, Michigan, or Auburn, California, and are marked “Made in the USA”.76
The OEM Web (Strategic Outsourcing): Like Leupold, Trijicon employs a strategic global sourcing model for certain product lines. Their AccuPoint riflescopes are assembled in the USA but use significant components from Japan.76 Other riflescope lines, including the Huron, Ascent, Tenmile, and Credo series, are manufactured entirely in Japan to Trijicon’s specifications, leveraging that country’s expertise in high-quality scope production.76
6.3. Manufacturer Profile: EOTech
Core Data: Founded in 1995 and based in Plymouth, Michigan, EOTech is the inventor and leading manufacturer of holographic weapon sights.77
Capabilities & Manufacturing Model: EOTech’s core competency is its proprietary holographic technology. All of its holographic sights, magnifiers, and thermal/night vision products are manufactured in its Michigan facility.78 This domestic production is crucial for their extensive contracts with US military and law enforcement agencies.
The OEM Web (Strategic Outsourcing): To compete in the traditional riflescope market, EOTech outsources its “Vudu” line of magnified scopes. These high-performance scopes are produced in Japan, allowing EOTech to offer a premium product that complements its US-made holographic sights.78
6.4. Manufacturer Profile: Nightforce Optics
Core Data: Established in 1992, Nightforce is a subsidiary of the Australian company Lightforce Performance Lighting, with its factory headquarters in Orofino, Idaho.36
Capabilities & Manufacturing Model: Nightforce has built a reputation for producing exceptionally rugged and reliable tactical riflescopes. The company designs, machines, and assembles its premier “ATACR” series in its Idaho facility.36
The OEM Web (Strategic Outsourcing): Nightforce has a deep and long-standing relationship with Japanese manufacturing. The company sources its high-grade optical glass from Japan for all its scopes.36 Furthermore, several entire product lines, including the popular NXS, SHV, and NX8 series, are fully manufactured in Japan before being tested and packaged in the US.36 This hybrid model allows them to combine American design and assembly for their flagship line with the renowned quality of Japanese full-scope manufacturing for other series.
6.5. Manufacturer Profile: U.S. Optics
Core Data: Founded in 1991, U.S. Optics has a long history of building custom, high-end tactical riflescopes. The company is now located in North Carolina.80
Capabilities & Manufacturing Model: The company’s premier “Foundation Series” scopes are designed and engineered in-house in North Carolina.81 They are known for their robust construction and high-quality mechanics.
The OEM Web (Strategic Outsourcing): To reach a broader market, U.S. Optics offers more affordable lines, such as the TS-Series. These budget-friendly optics are manufactured overseas, allowing the company to compete at lower price points while reserving its domestic manufacturing for its top-tier products.82
6.6. Manufacturer Profile: Burris Optics
Core Data: Founded in 1971 in Greeley, Colorado, Burris was acquired by Beretta Holdings in 2002.83
Capabilities & Manufacturing Model: Burris is a prime example of a brand that leverages the tiered global supply chain to its fullest extent. Their manufacturing process involves sourcing high-quality optical and mechanical components from Japan, performing the critical assembly in the Philippines (likely at the Philippine Kenko or Scopro facilities), and conducting final quality control and packaging in the United States.
The OEM Web: This multi-national approach allows Burris to produce reliable, feature-rich optics at a very competitive mid-range price point, making them a popular choice for hunters and shooters.
6.7. Manufacturer Profile: Vista Outdoor / Revelyst
Core Data: Vista Outdoor (soon to be split into Revelyst and The Kinetic Group) is a massive American sporting goods conglomerate founded in 2015.85
Capabilities & Corporate Structure: This entity is not a single manufacturer but a holding company that owns a vast portfolio of optics brands, including Bushnell, Tasco, Simmons, and Weaver.67
The OEM Web: The company acts as a massive brand aggregator, managing a complex web of OEM relationships across the globe. For its various brands, it sources products from a wide range of manufacturers, including Synta in China (for Tasco telescopes) and historically Kamakura Koki in Japan (for premium Bushnell lines).88 This model allows them to address every segment of the market, from entry-level to premium, by rebranding products from the world’s most capable OEMs.
Section 7: Other Notable Global Manufacturers
This section includes other significant manufacturers from around the world who play a key role in the industry through specialized technology, regional dominance, or unique OEM/ODM relationships.
Core Data: Yukon Advanced Optics Worldwide is a European high-tech company group with its headquarters in Vilnius, Lithuania, founded in the 1990s.90 Pulsar is its flagship brand for consumer thermal and night vision devices.
Capabilities & Market Position: Pulsar is a world leader in the civilian thermal and digital night vision market. As one of the few manufacturers with a full production cycle in Europe, they design, develop, and manufacture their products in-house.92 This vertical integration gives them significant control over innovation and quality.
The OEM Web: Pulsar manufactures products under its own brand and the Yukon brand. Their market dominance and advanced technology make them a key player, setting trends in the rapidly growing thermal imaging sector.
7.2. Manufacturer Profile: ZRAK
Core Data: ZRAK d.d. Sarajevo is a Bosnian company with a long history of producing optical and optoelectronic devices for military and civilian use.94
Capabilities & Reputation: With a tradition in military optics, ZRAK manufactures a range of rugged products, including riflescopes, binoculars, and high-precision optical elements like lenses and prisms.94 They are known for producing durable, battle-proven optics.
The OEM Web: ZRAK produces optics under its own brand and also serves as an OEM, offering its manufacturing services for machining, surface protection, and optical element production to other clients.94
7.3. Manufacturer Profile: Dedal-NV
Core Data: Founded in 1991 in Russia, Dedal-NV is a leading Russian manufacturer of precision optics.96
Capabilities & Market Position: The company specializes in high-end day, night, and thermal imaging scopes and observation devices.97 With in-house optical and electronic manufacturing, they supply professional-grade equipment to law enforcement and military units as well as the civilian market.96
The OEM Web: Dedal-NV is primarily a brand-manufacturer, exporting over 80% of its production worldwide.96 Their reputation is built on winning international tenders and their use in professional sniping competitions.
7.4. Manufacturer Profile: Steiner
Core Data: Founded in 1947 in Bayreuth, Germany, Steiner is a manufacturer of high-quality optics, particularly known for its binoculars.99 Since 2008, it has been part of the Beretta Holding Company.100
Capabilities & Reputation: Steiner has a long history as a military supplier, including providing the service binoculars for the West German Bundeswehr.99 All of their renowned binoculars are manufactured in Germany.101 Their eOptics products (lasers and lights) are made in a facility in Monterey, California.100
The OEM Web: As part of the Beretta Group, Steiner is a key optical component of a major firearms conglomerate. They primarily manufacture for their own brand, with a reputation built on military-grade toughness and quality.
7.5. Manufacturer Profile: Leica Sport Optics
Core Data: A legendary German brand founded in 1846, Leica is synonymous with high-end cameras and optics.22
Capabilities & Global Footprint: While headquartered in Wetzlar, Germany, a significant portion of Leica’s manufacturing, including spotting scopes and other precision optical devices, takes place at their state-of-the-art factory in Famalicão, Portugal, which was established in 1973.102
The OEM Web: Leica is an exclusive, vertically integrated brand. They do not produce optics for other companies. Their ranking is based purely on their historical significance and the exceptional quality of their products.
7.6. Manufacturer Profile: Nikko Stirling
Core Data: Founded in 1956 by Australian Malcolm Fuller, the company was established in Tokyo, Japan, to leverage the emerging Japanese optics industry.105
Capabilities & Business Model: Nikko Stirling focuses exclusively on optics for hunting and shooting.105 The brand has built a reputation for providing functional, reliable optics by combining practical design experience with Japanese manufacturing expertise.
The OEM Web: While it operates as a distinct brand, its foundation is rooted in the OEM model, utilizing Japanese factories to produce scopes designed for the specific needs of hunters. Today, it is a registered trademark of Nikko Stirling International Trading Shanghai Ltd.106
7.7. Manufacturer Profile: Valdada / IOR
Core Data: Valdada is the US importer for scopes made by IOR (Industry Optic Romania) in Bucharest, Romania.108
Capabilities & Reputation: IOR is a Romanian manufacturer with a history of producing military optics. Their scopes are known for using high-quality German glass from Schott and for their robust, often overbuilt, mechanical construction.109 They have a strong following in the long-range shooting community.
The OEM Web: IOR is the exclusive manufacturer for the Valdada brand of scopes sold in the US market.
7.8. Manufacturer Profile: Noblex E-Optics
Core Data: Formerly known as Docter Optics, Noblex continues a long tradition of German optical manufacturing from facilities in Jena and Eisfeld, with roots tracing back to Carl Zeiss.110
Capabilities & Market Position: Noblex produces a range of high-quality binoculars, riflescopes, and is particularly well-known for its compact red dot sights.110 The footprint of the Noblex/Docter sight has become an industry standard for mounting pistol red dots.110
The OEM Web: Noblex manufactures for its own brand and is also a significant OEM supplier. The widespread adoption of its red dot sight footprint by other major brands like Leica and Meopta is a testament to its influence as a component and design manufacturer.110
The preceding analysis reveals a global firearms optics industry that is far more consolidated and interconnected than the consumer-facing market suggests. The illusion of choice, created by dozens of distinct brands, masks a reality dominated by a small cadre of powerful manufacturers. The key findings of this report can be summarized as follows:
The Tiered Hierarchy is Real: The quality, features, and price of nearly every optic on the market can be directly traced to its origin within a three-tiered global manufacturing system. Japan produces the premium, high-cost optics; the Philippines produces the high-value, mid-tier optics; and China produces the vast majority of volume and value-oriented optics, with a rapidly growing high-tech segment.
OEMs are the Hidden Giants: Manufacturers like Light Optical Works, Kamakura Koki, Huanic Corporation, and Philippine Kenko are the silent engines of the industry. These companies are responsible for producing products for multiple, often competing, brands, giving them immense influence over market trends, technological innovation, and supply chain stability.
“Made in USA” is a Model of Integration: The most successful American brands, such as Leupold, Trijicon, and Vortex, operate as sophisticated global integrators. They leverage domestic strengths in design, final assembly, and quality control while sourcing components and entire product lines from the best international specialists. Their brand promise is one of quality assurance and service, not necessarily 100% domestic component manufacturing.
Market Consolidation is Accelerating: The “Huanic Effect” in the red dot market is the most potent example of a broader trend. As a few large OEMs become more technologically advanced, they attract more client brands, leading to a consolidation of core technology and manufacturing. This reduces true diversity in the market’s hardware, placing a greater emphasis on brand-specific features like reticle design, marketing, and warranty support as key differentiators.
The following tables provide a consolidated overview of the top 25 global firearms optics manufacturers and a cross-reference of popular brands and their manufacturing origins, serving as an essential guide to the true structure of the industry.
Table 8.1: Top 25 Global Firearms Optics Manufacturers
Japanese & Chinese OEMs (Historically Kamakura Koki)
Japan / China
Banner, Prime, Trophy
Chinese OEMs
China
Crimson Trace
All Optics
American Outdoor Brands (Global Sourcing)
China / Other
CVLIFE
All Optics
Chinese OEMs (e.g., Gushin Optics)
China
EOTech
Holographic Sights, Magnifiers
EOTech
USA
Vudu Riflescopes
Japanese OEM
Japan
Holosun
All Optics
Huanic Corporation
China
Kahles
Riflescopes
Kahles / Swarovski Optik
Austria
Helia Binoculars
Japanese OEM
Japan
Leica
All Sport Optics
Leica
Germany / Portugal
Leupold
Riflescopes (Assembly)
Leupold & Stevens, Inc.
USA
Premium Binoculars (BX-4, BX-5)
Japanese OEM
Japan
Value Binoculars (BX-1, BX-2)
Chinese OEM
China
Maven
RS Series Riflescopes
Kamakura Koki (Probable)
Japan
Meopta
All Optics
Meopta
Czech Republic
Monstrum
All Optics
Chinese OEMs (e.g., Gushin Optics)
China
Nightforce
ATACR Series (Assembly)
Nightforce Optics
USA
NXS, SHV, NX8 Series
Light Optical Works (LOW)
Japan
Primary Arms
Platinum Series (PLx)
Japanese OEM (e.g., LOW)
Japan
Gold Series (GLx)
Philippine Kenko Corp.
Philippines
Silver (SLx) & Classic (CLx)
Huanic Corporation
China
Pulsar
All Thermal/NV
Yukon Advanced Optics Worldwide
Europe (Lithuania)
Schmidt & Bender
PM II, Zenith, etc.
Schmidt & Bender
Germany
Klassik Series
Schmidt & Bender Hungaria Optik
Hungary
SIG Sauer
Romeo Red Dots, various Electro-Optics
Huanic Corporation / Scopro Optical Co.
China / Philippines
Sightron
SIII, SV Series
Kenko Tokina
Japan
SI, SII Series
Philippine Kenko Corp.
Philippines
Swarovski
All Optics
Swarovski Optik
Austria
Swampfox
All Optics
Chinese OEMs (Huanic Corp. probable)
China
Tasco
Telescopes, various optics
Synta Technology Corp. / Other Chinese OEMs
China
Trijicon
ACOG, RMR, MRO, VCOG
Trijicon, Inc.
USA
AccuPoint (Assembly)
Trijicon, Inc. (w/ Japanese components)
USA / Japan
Huron, Ascent, Tenmile, Credo
Japanese OEM
Japan
U.S. Optics
Foundation Series
U.S. Optics
USA
TS-Series, X-Series
Overseas OEMs
Various
Vortex
Razor HD AMG
Vortex Optics
USA
Razor HD Series
Light Optical Works (LOW)
Japan
Viper Series, Diamondback (some)
Philippine Kenko Corp. / Scopro Optical Co.
Philippines
Strike Eagle, Crossfire, Diamondback (most)
Chinese OEMs
China
Zeiss
All Sport Optics
Zeiss
Germany
Concluding Analysis
The landscape of the firearms optics industry is a case study in modern globalized manufacturing. The success of a brand is no longer solely dependent on its ability to manufacture a product in-house, but rather on its ability to design, source, integrate, and guarantee that product. As Asian OEMs continue to advance their technological capabilities, the quality gap between tiers will continue to narrow, placing even greater pressure on brands to differentiate themselves. In this environment, factors beyond the factory floor—innovative reticle design, intuitive user interfaces, responsive customer service, and ironclad lifetime warranties—become the ultimate arbiters of value. For the discerning industry analyst or consumer, understanding the manufacturing origin of an optic remains the most reliable first step in assessing its potential quality, but understanding the value added by the brand is what ultimately determines its worth.
Vista Outdoor Inc. A Financial Analysis Report – RED: a Repository of Digital Collections, accessed August 10, 2025, https://red.mnstate.edu/thesis/794/
I’m sure there are a lot of shooters like me who buy and install back up iron sites on their weapons just in case the optic fails. Except for pure range toys that will never see use beyond having fun, I do think BUIS are a really good idea – optics fail for any number of reasons with batteries being dead quite possibly being the #1 issue – especially given how folks love their red dot, green dot and holographic sights. You need a backup for aiming your firearm.
What happens if the battery in the Vortex dies? Well, I do have the backup Magpul sights … right?
A quick comment about “BUIS” – it stands for Back Up Iron Sights. I’m a creature of habit and that’s how they were first introduced to me but not everyone uses that term. For example, Magpul calls their units MBUS – Magpul Back-Up Sights. Other’s just say “back up sights” or even just “attachable” or “folding” sights. So, if you are wanting to search and see what your options are, it will take some searching.
Four Camps of BUIS Users
In talking with shooters, regardless of their firearm platform (AR, AK, Stribog, HK, etc.) about their BUIS, I usually find they fit in one of four camps:
Installed the BUIS and run them full time with their optic in a co-witness manner
Installed the BUIS and periodically use them in a co-witness model but fold them down when not in use
Installed the BUIS and only use them when needed but did sight them in. For example, if they need to remove the optic to deploy the sights or are using offset sights and tilt the weapon 45 degrees to use them.
Attached the units to the Picatinny rail, did not sight them in and have never actually practiced using them to hit targets at the range … “but have them just in case”.
With scenario #1, you know those sights will work – it doesn’t matter if the scope is powered off as long as you can see through the glass.
With #2 & #3 – the sights will probably work as long as you can see through the glass or otherwise see them. Hopefully the shooter has practiced enough how to use the units.
The last one is the most concerning – camp #4 – to be honest, a person in this camp doesn’t really have a backup. Yeah, they have the sights but they aren’t dialed in and lack experience with them. This is a gamble you do not want to take. If this describes you – please don’t take it personally and read the next section – I want to help.
As far as I know, all BUIS are two parts – a front sight and a back sight. In the above photo – I am using Magpul polymer MBUS folding units and are on each far end of the top rail. They fold down until needed and then spring p when you push a lever on each.
If You Are In Camp #4…
First off, I am glad you invested in BUIS – if you are reading this and you haven’t yet, then do so. With that said, do you have quality units or did you buy something dirt cheap off Amazon or eBay. I’d recommend going with a brand name and not cheap airsoft import stuff – I like Magpul (they have a ton of models so click here to see them) plus, in all fairness, there are other quality BUIS sets from the likes of ARMS, Bobro, DiamondHead, Troy and others. Cheap stuff may not hold their zero or break easily. Buy quality to have true BUIS that you can count on.
Second, make sure they are mounted properly. Did you follow the instructions from the vendor who made them? Sometimes there is more to do than slap them on the Picatinny Rail.
Your backup sights should have come with instructions and any specialized tools – be sure to read and follow them. The little black key you see is used for adjusting a Magpul front sight.
Second, you need to sight in the BUIS. I use a laser to help get in the ballpark in the shop and then I do the final tuning at the range. Read up on the recommended range for your firearm and type of optic. For rifles, I go for 50 yards because then you are then zeroed for 50 yards and at 200. The BUIS are just that – emergency backups. I look to be in the ballpark with them and am not looking for perfection but some guys are amazingly proficient with them.
Third, absolutely take them to the range and practice with them!!! Buying, installing and zeroing the BUIS are only part of the game – you must also know how to use them. If they fold, practice on opening and closing them while shooting. If they are offset, practice transitioning to them. Bottom line, you need to practice hitting targets with them and adjust the sights and what you are doing accordingly. The more you practice the greater the odds that things will work when you need them. If you don’t practice then you are taking a huge gamble both on the BUIS and your ability to use them – so don’t gamble.
Magpul sells both basic polymer and pro steel versions of their MBUS. Above is a polymer rear unit on one of my ARs. I fold both the rear and front sights flat until needed – the small lever you see to the left of the mounting screw both releases the sight so it flips open via a spring and then locks up up right. I can count on them because they are zeroed and I practice with them.
Summary
The whole reason I wrote this is that it seems like I have encountered a lot of shooters this past year that had BUIS and fell square in camp 4 – they had never sighted them in or practiced with them. This is very concerning to me – they are gambling on something that shouldn’t be left to chance. So, yes, I think BUIS are a great idea but you need to sight them in and regularly practice using them also. If you don’t, then your backup probably isn’t a backup.
I hope this gives you some food for thought.
Note, I have to buy all of my parts – nothing here was paid for by sponsors, etc. I do make a small amount if you click on an ad and buy something but that is it. You’re getting my real opinion on stuff.