Tag Archives: M76

What Is The Best Optic For A Yugo M76 Rifle?

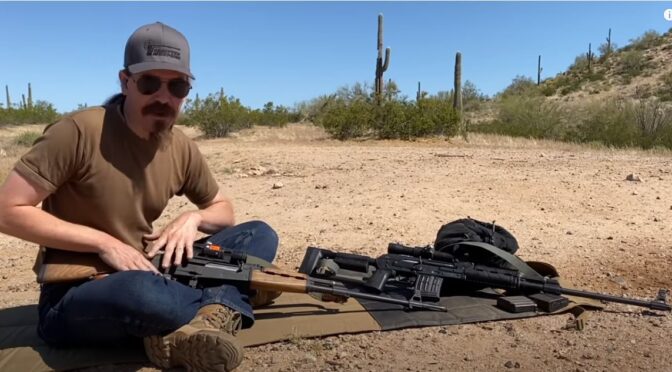
I did a series of posts back in the Fall of 2019 about a custom Yugo M76 that I had Two Rivers Arms build for me that I then added my own optic to [click here for the series]. A fellow recently contacted me about what optic he ought to get for his rifle, I replied and it also occurred to me that more explanation would make for a good blog post.
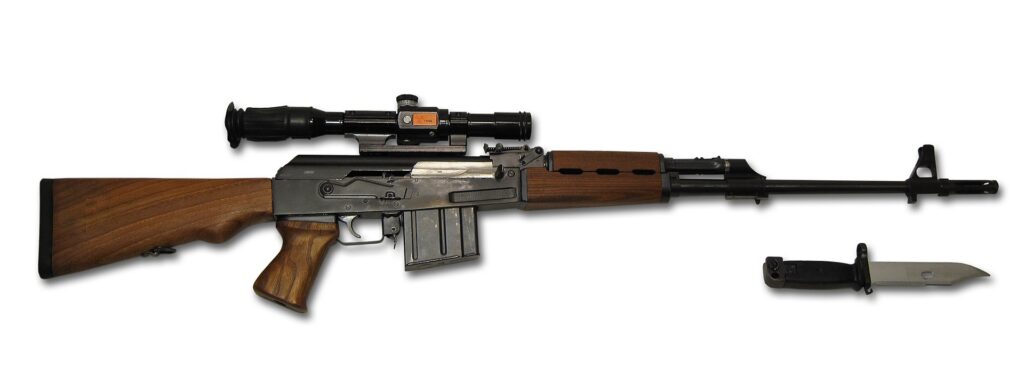
What is a Yugo M76?

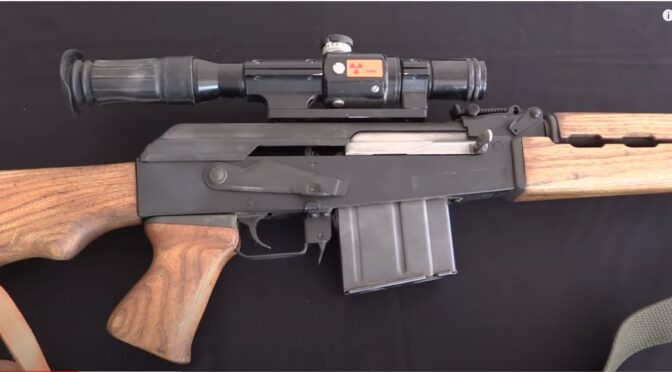
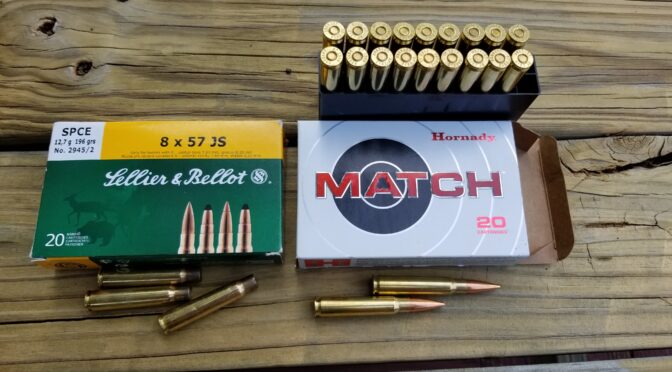
It is a smei-automatic 10-round Designated Marksman’s Rifle (DMR) designed and built by Zastava for the Yugoslav military chambered in 8mm Mauser (7.92x57mm with an IS or JS designator at the end of the size). The 8mm Mauser round is in the same ballpark class as the American .30-06 round to give you a rough equivalent.

Let me revisit the “DMR” designation – because that is what the M76 is. The M76 was designed for a designated marksman in a squad to have much further reach than the rest of the team would have. It was not a surgical weapon and instead stressed reliability and good enough accuracy with an effective range of about 800 meters with 1.5-2 minutes of angle (MOA).

This photo is from Wikipedia and it lets you see the ZRAK optic on the M76. By the way, Wikipedia does have a nice summary write up on the M76.

What does that tell us?

That short intro starts hinting at the type of scope you might want to consider. It’s firing a relatively powerful cartridge but isn’t the most precise rifle on the planet. I can also tell you that while there is recoil, it’s not bad at all.

Choice #1 – Mounting Styles

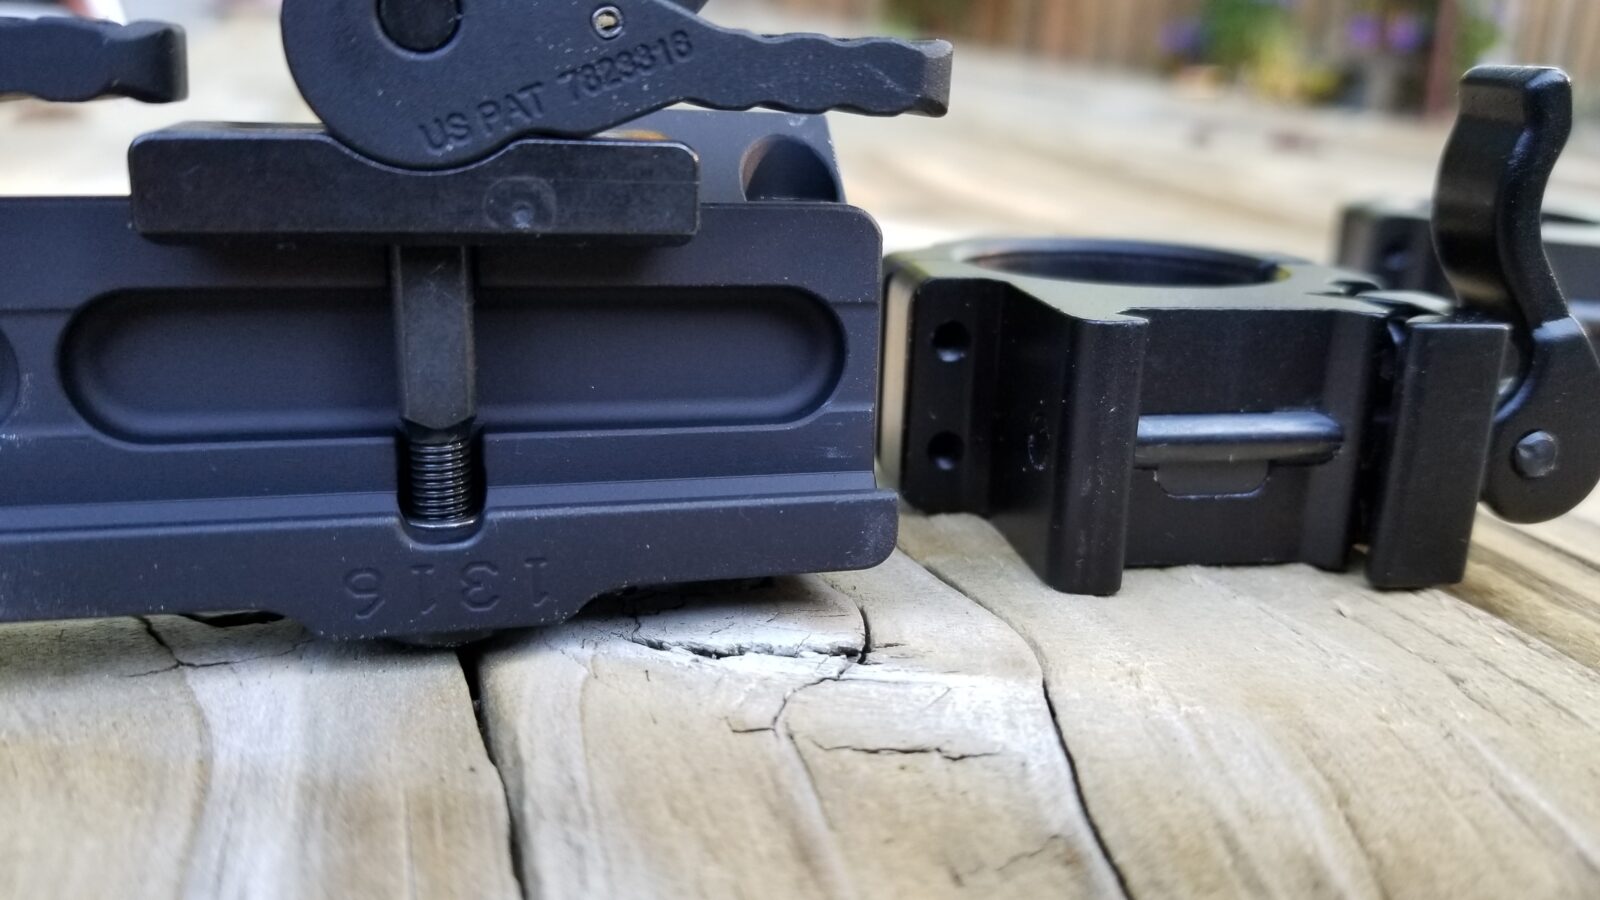
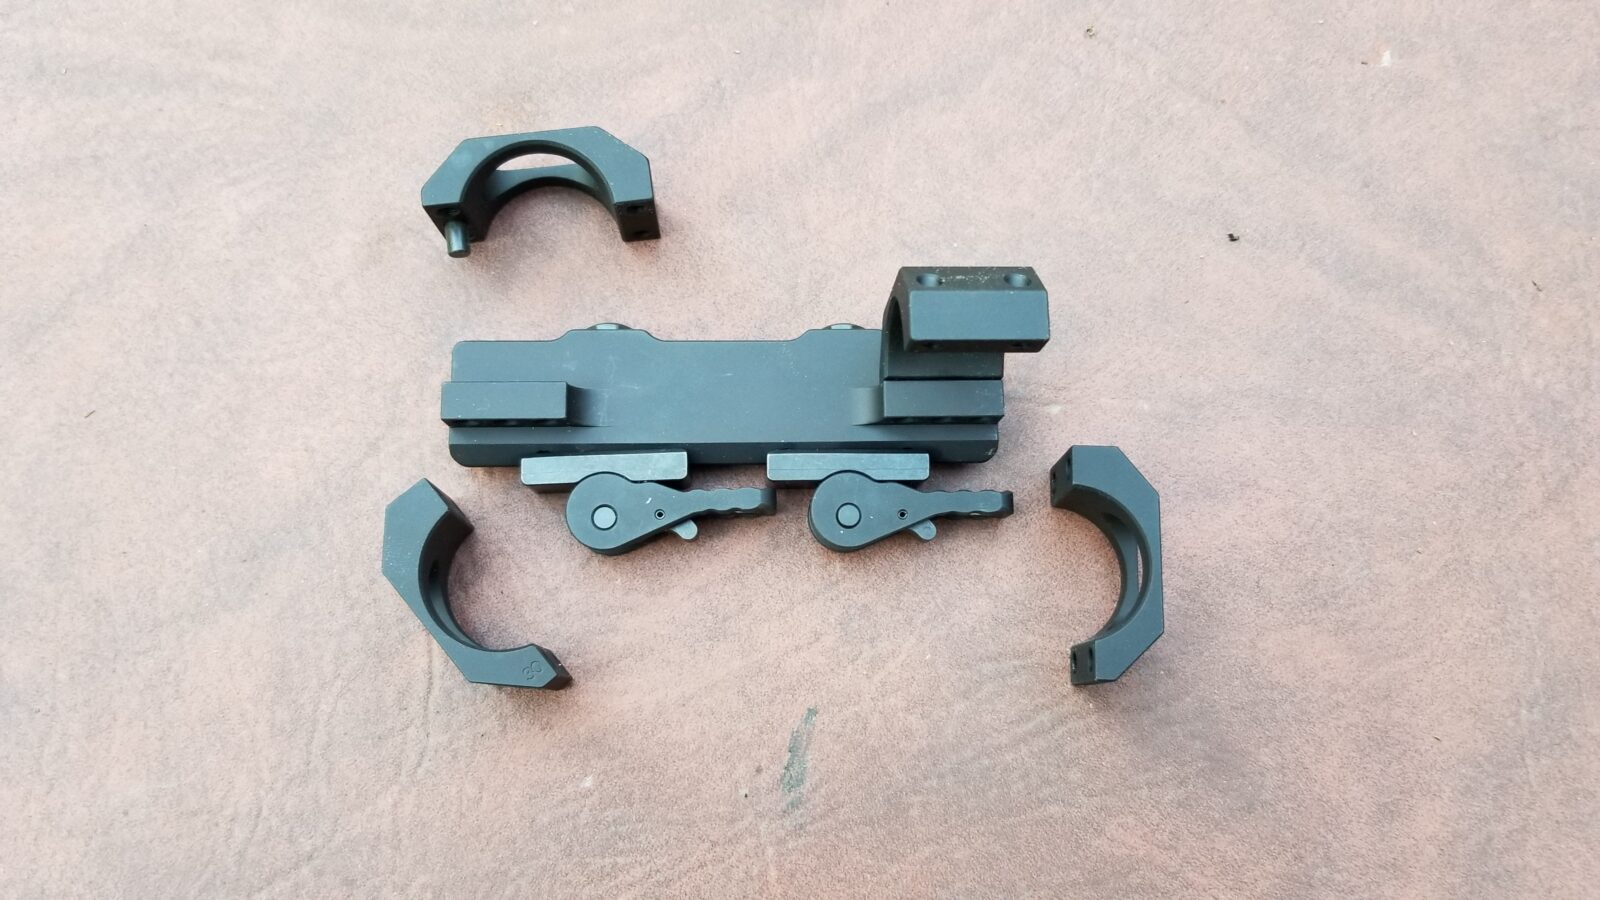
The very first thing to consider is what type of mount you wish to use. The M76 inherits the robust side-mount rail but with some unique dimensions. The rifle was originally paired with an offset 4x ZRAK scope that slid onto that rail and clamped into place. This offset design isn’t for all folks but it definitely works for people familiar with it.

Here you can see the optic side mount rail. It sits securely in a groove in the milled receiver and is riveted in place.

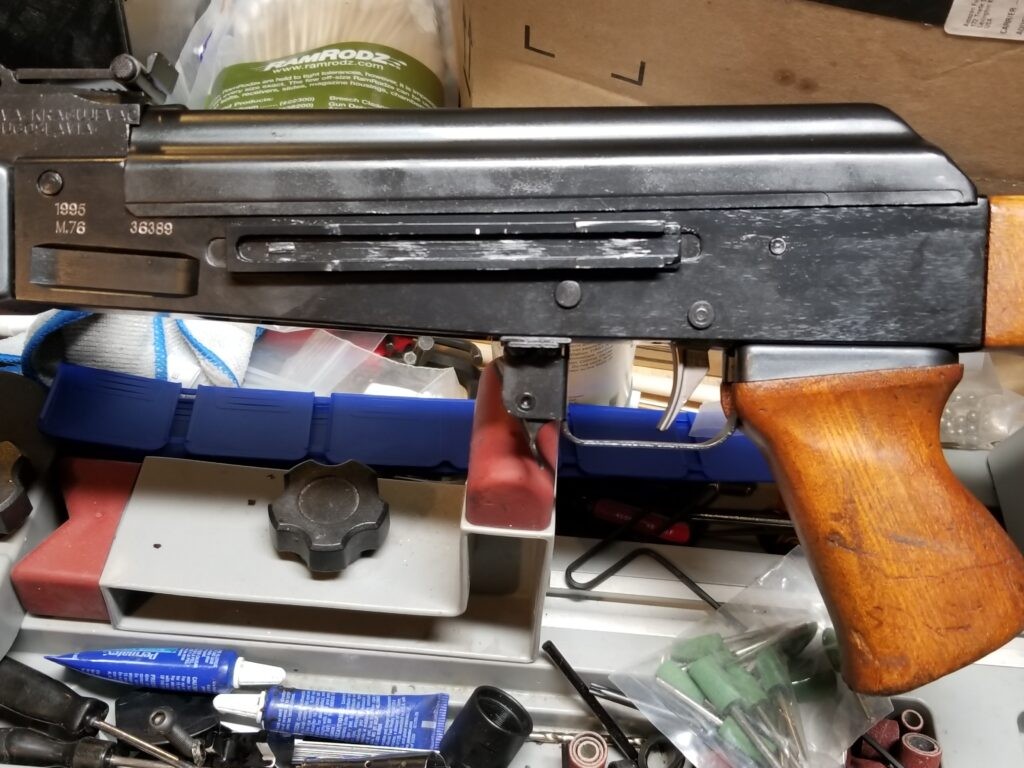
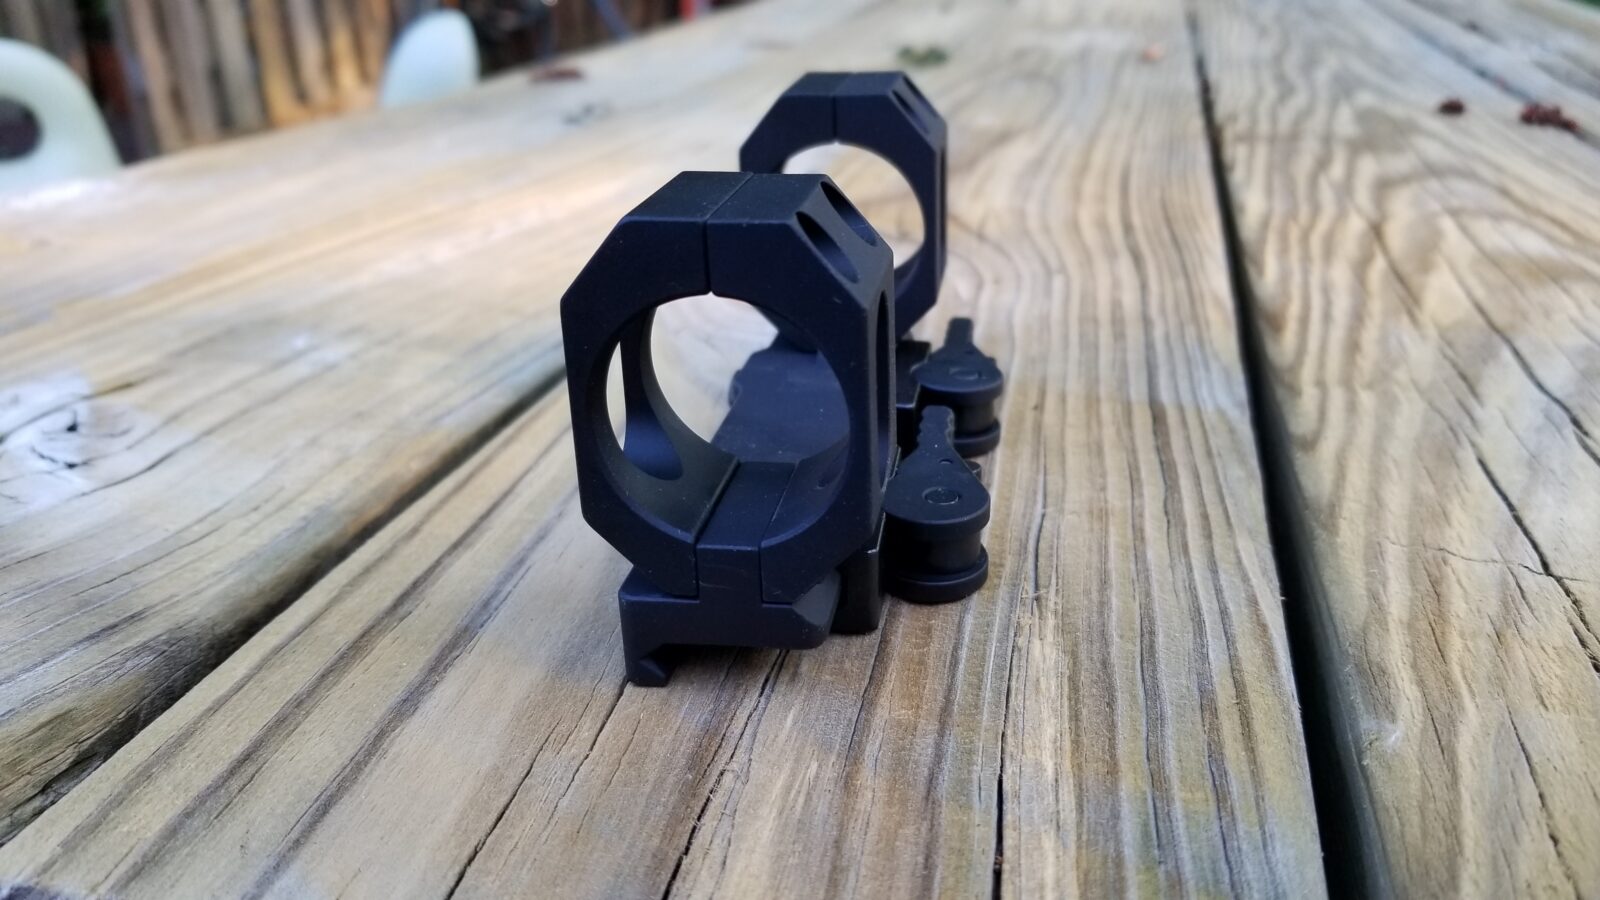
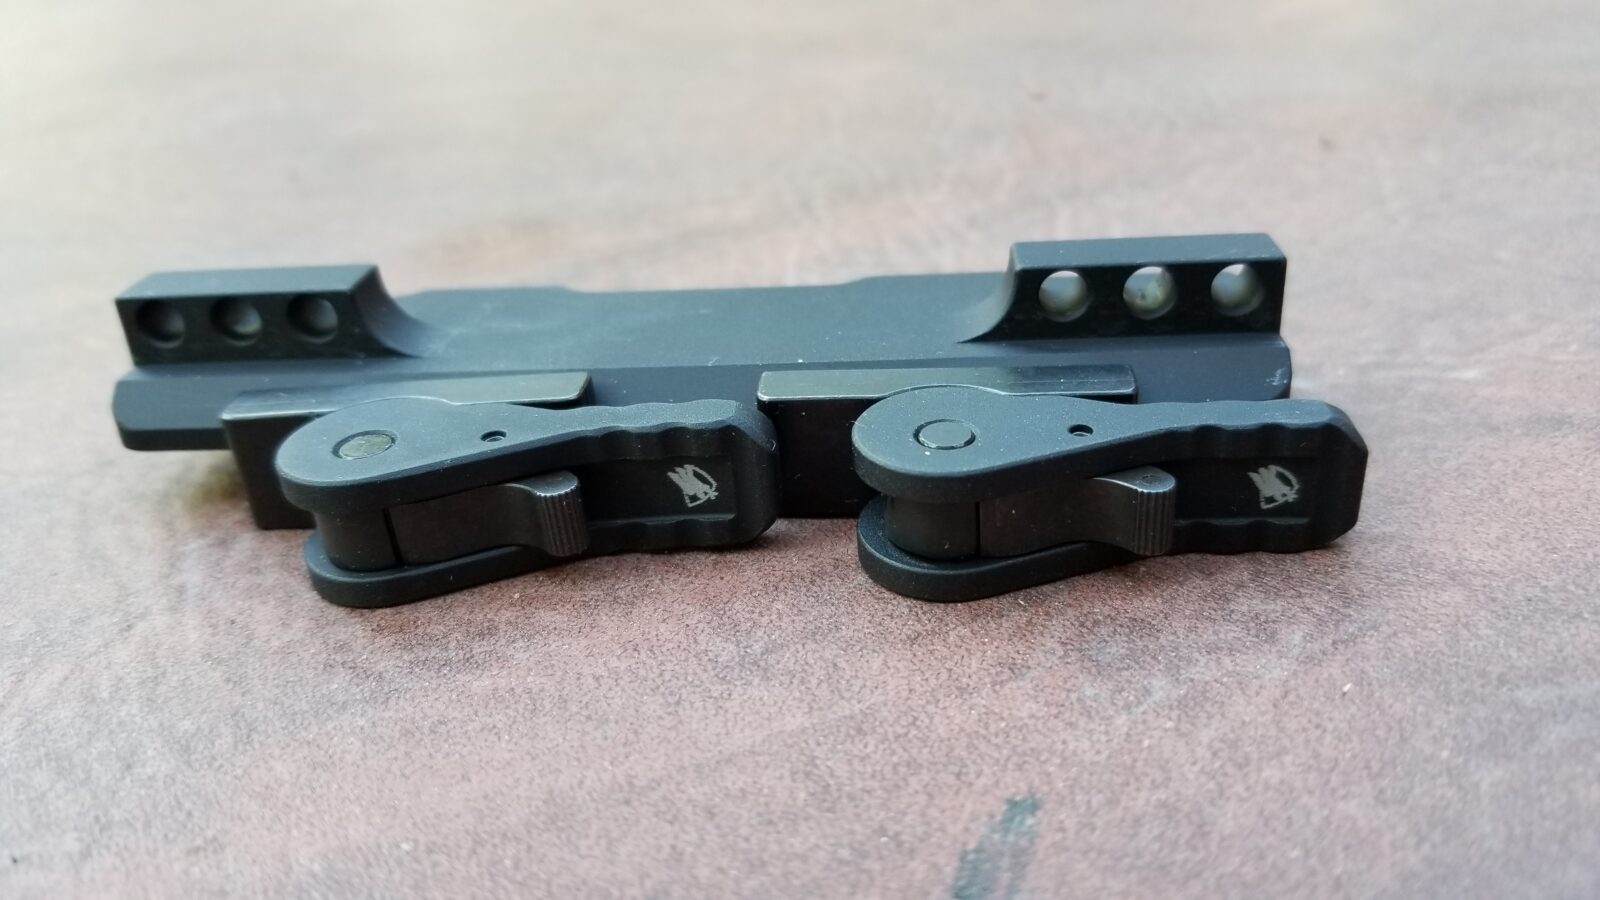
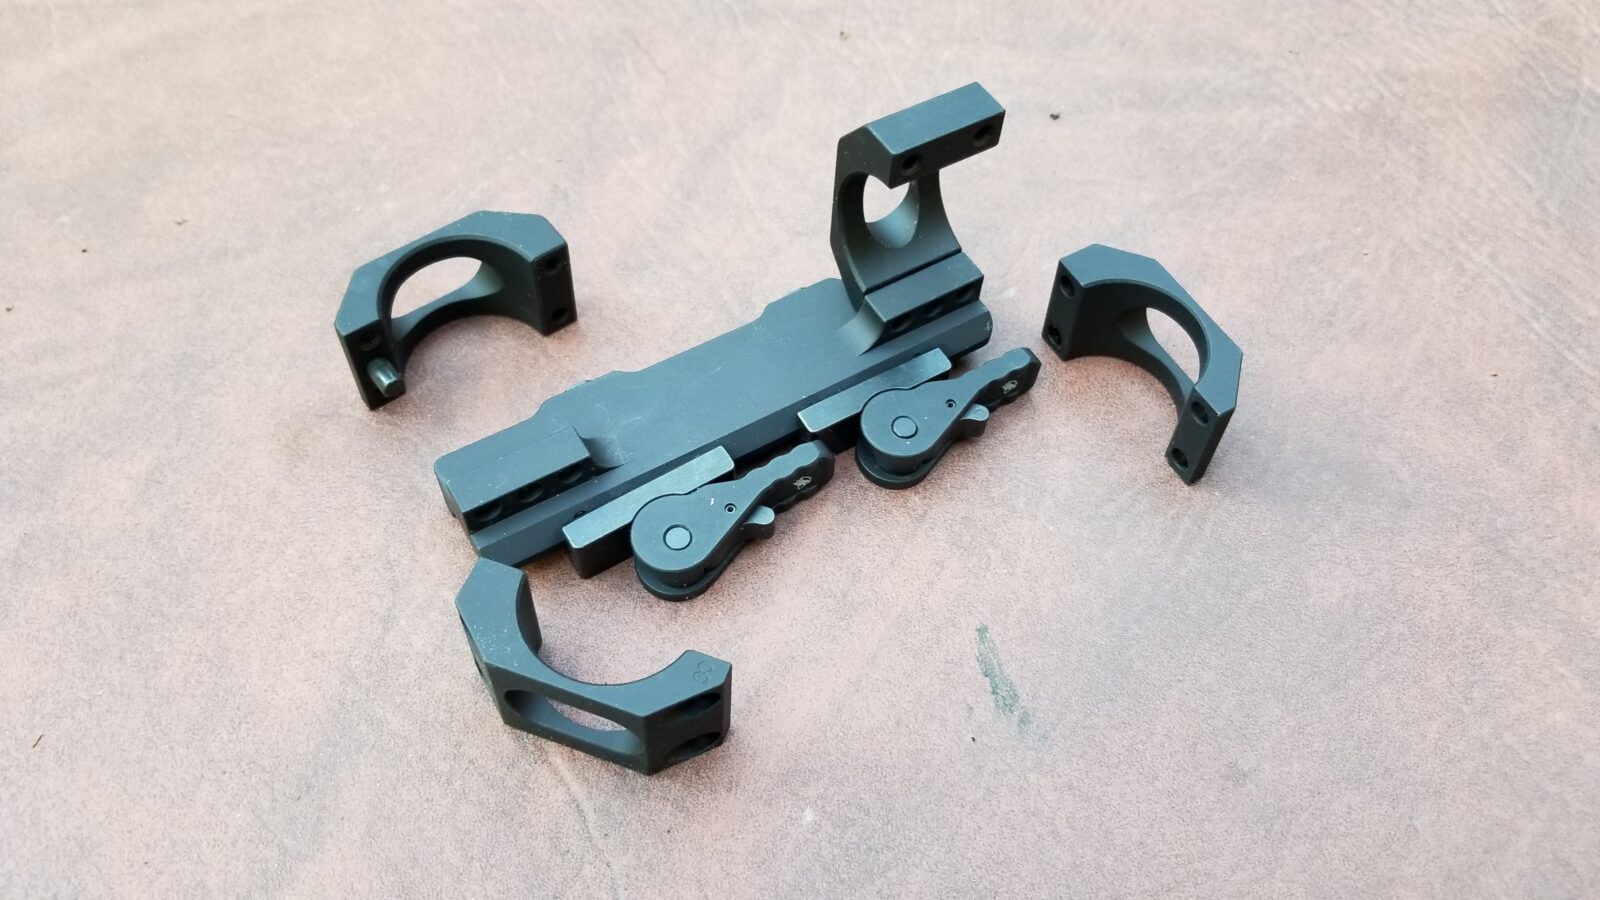
The second route is to get a mount that clamps on the above rail but then centers the optic over the centerline of the bore. Call me an old school American but that is definitely my preference.

You can get mounts this way that directly hold the optic directly with the scope rings being built directly into the mount or you can get mounts that have a Picatinny rail on top that you can then secure whatever optic you want. This is my preference just so you know because it gives me more flexibility down the road.

RS Regulate mounts are the way to go!!

The best side mounts I have found that enable a ton of flexibility and adjustment are the RS Regulate brand mounts designed by Scot Hoskinson. He offers a number of different options so you need to stop by his site and take a look.

This is the RS Regulate AK-303M lower paired with the AKR upper rail.

Note, RS Regulate mounts are being counterfeited in China. I’d recommend only buying direct or from a reputable dealer below:

What optic to use?

On one hand, you could stick with the communist block styling . You can hunt around and buy 4x ZRAK optics still. There are also a lot of different offset mount optics that you can look into that are side mounted for example 8x and variable power. Just confirm the clamp on a particular model has enough adjustment to fasten onto the M76’s rail.

As of my writing this, there aren’t any ZRAK scopes on eBay but Apex Gun Parts does have some in fair to good condition (meaning very worn) and they are a good firm to deal with. Kalinka Optics has a variety of offset mount optics and is also reputable. If you really want an offset scope, I’d recommend Kalinka and go with something new.

With that said, you may be wondering “but what size scope?” The 8mm round definitely has some reach and you have to ask yourself what do you really plan on doing? This “what am I going to use it for” question is known as the “use case”.

When the Yugoslavs designed the M76, they needed a middle of the road simple optic that would allow the shooter to hit something man sized out to 800 meters. Four power magnification fits that bill because it gives you a wide field of view (meaning what you can see left to right and up and down in he scope – the more you see, the wider the field of view). They weren’t looking for precision by any means – just good enough to extend the reach of the shooter.

I’m 53 and while I grew up shooting a lot with iron sights, I can’t see very well at 100 yards and I sure can’t shoot precisely. Now remember, the M76 you have will likely be shooting1-4 MOA (1-4″ at about 100 yards, 2-8″ at 200 yards and so forth). It all depends on the condition of the rifle and the type of ammo you are shooting not to mention your own abilities. Spending a fortune on a giant quality surgical scope, like a 6-24x, is overkill…. unless that is what you really want.

What I would recommend is a variable power and I tend to favor 4-16x because I have the nice bright field of view at 4x and can zoom in if needed. Most of my shooting is within 200 yards so this works just fine for me on my DMR rifles.

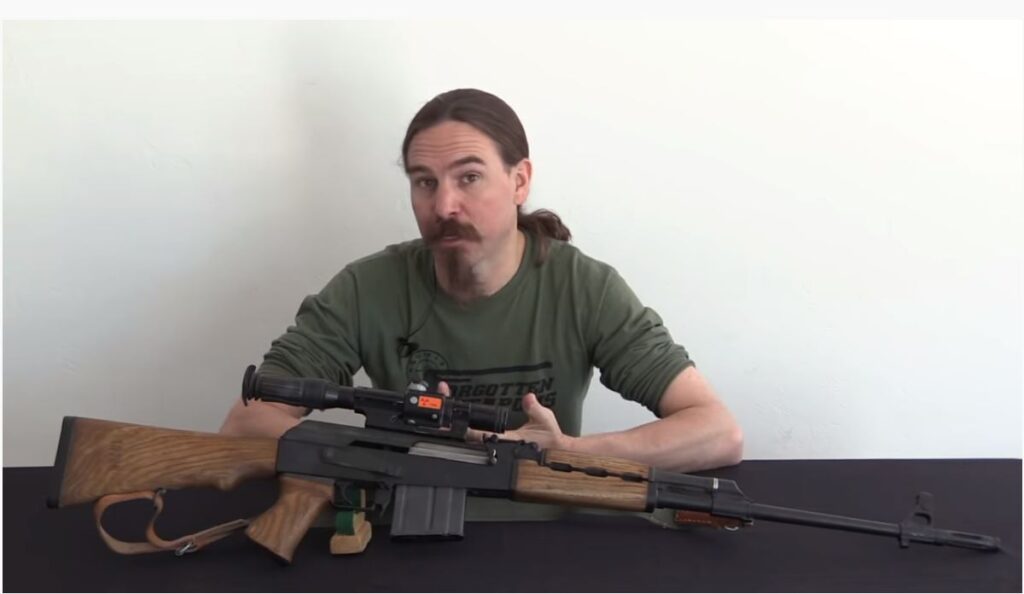
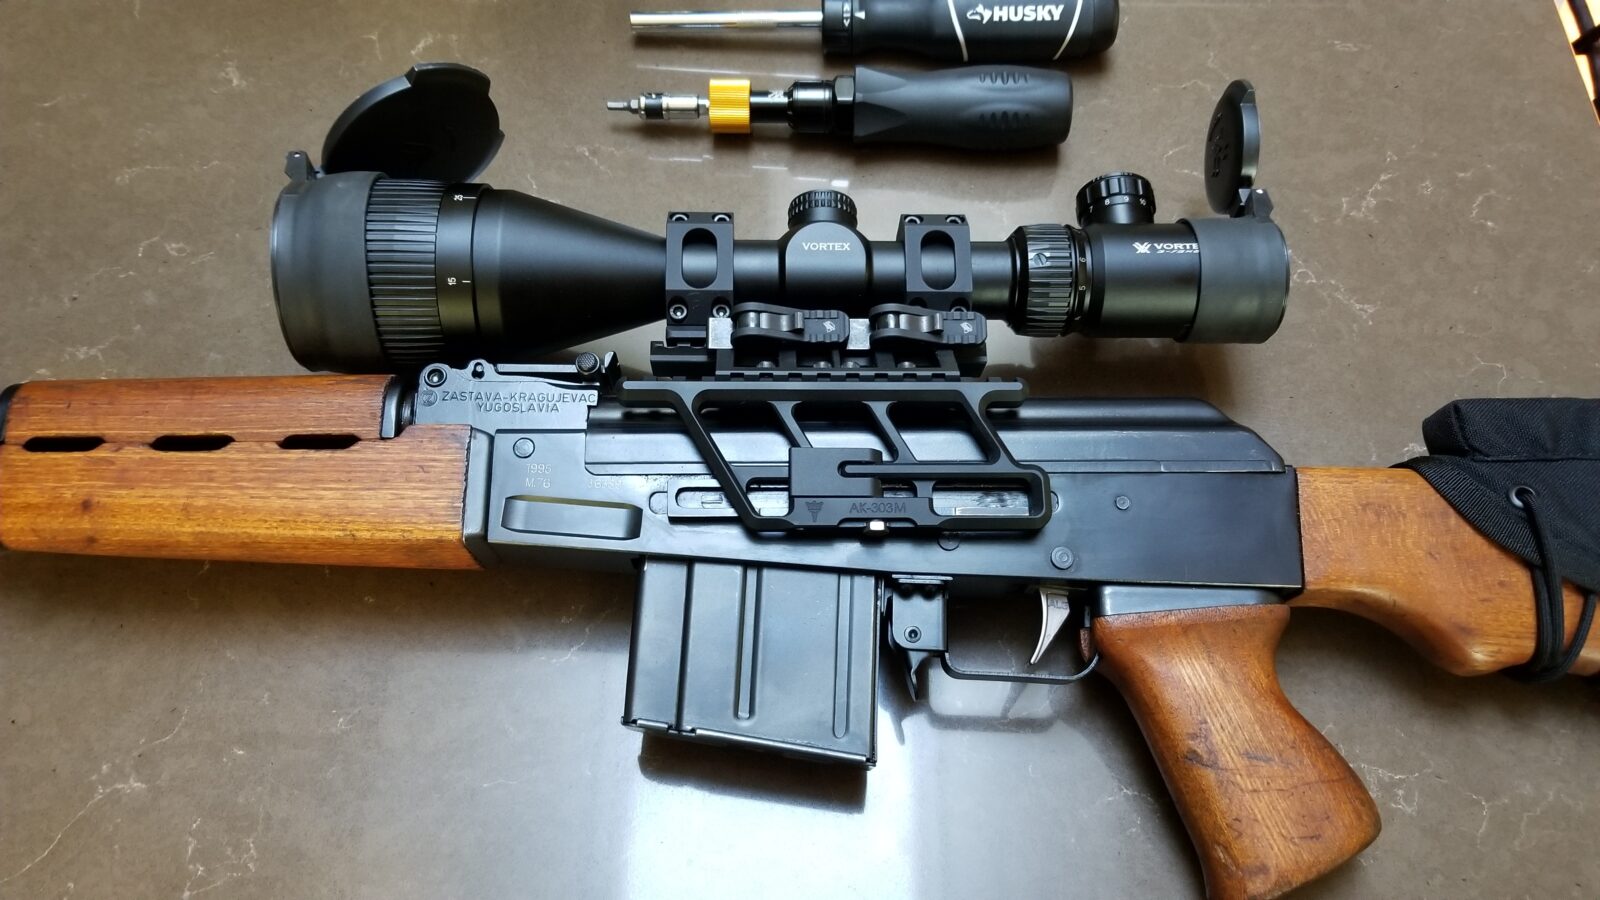
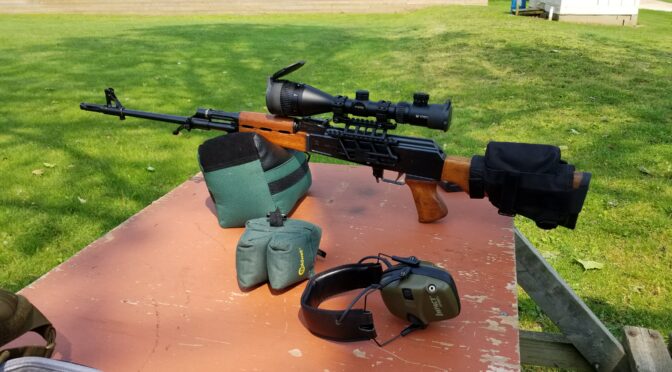
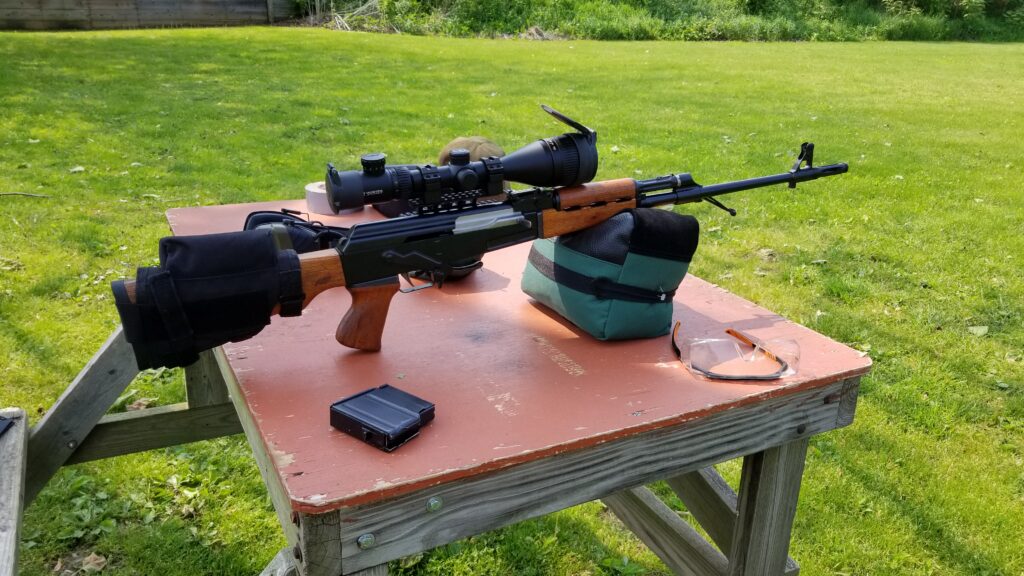
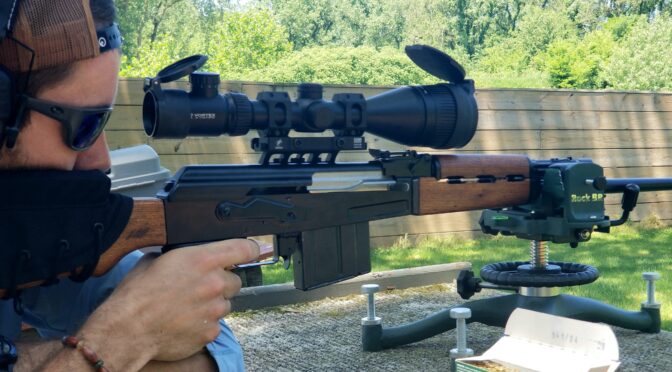
Now you may be wondering “But I saw the photo of that giant scope you are running – what’s up with that?” Good question and let me explain.

That’s a Vortex Crossfire II 3-12×56 scope known as the “hog hunter” and my buddy shooting it during a range visit this summer.

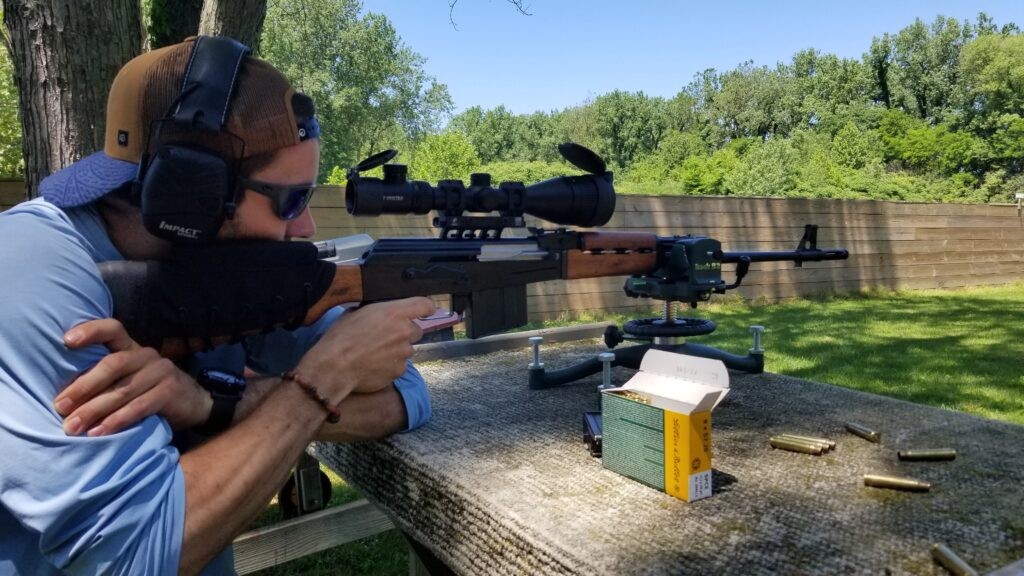
My “use case” when I was planning for the optics was for hog hunting. I wanted a really big objective to suck in light for shooting at dusk and an illuminated recticle. I also happened to already have it left over from another project. It is quite affordable by the way.

So, the Hog Hunter seemed like a great match – 3-12x for fast shooting in close to having a 12x for distance shots. The big 56mm objective does pull in a lot of light. The lit recticle is only bright enough to make a difference at night and isn’t as bright as what you would see on a tactical scope.

Having used it for a while now, I’ll tell you that it delivers on the above with a couple of caveats that may make you stay away from it unless thye don’t bother you:

First, it is a big scope – far bigger than what you may think in terms of dimensions and weight due to the big objective. It’s almost 13.5″ long and 21.1 ounches.

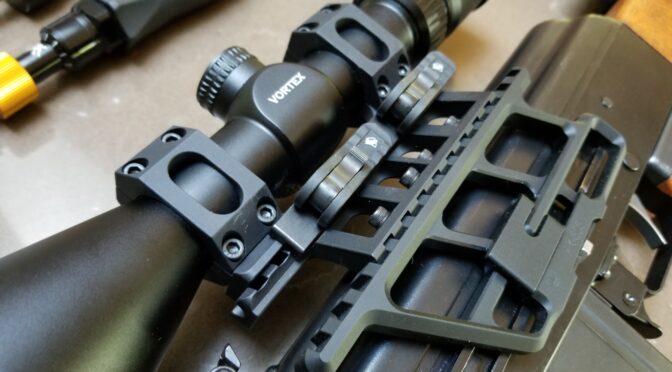
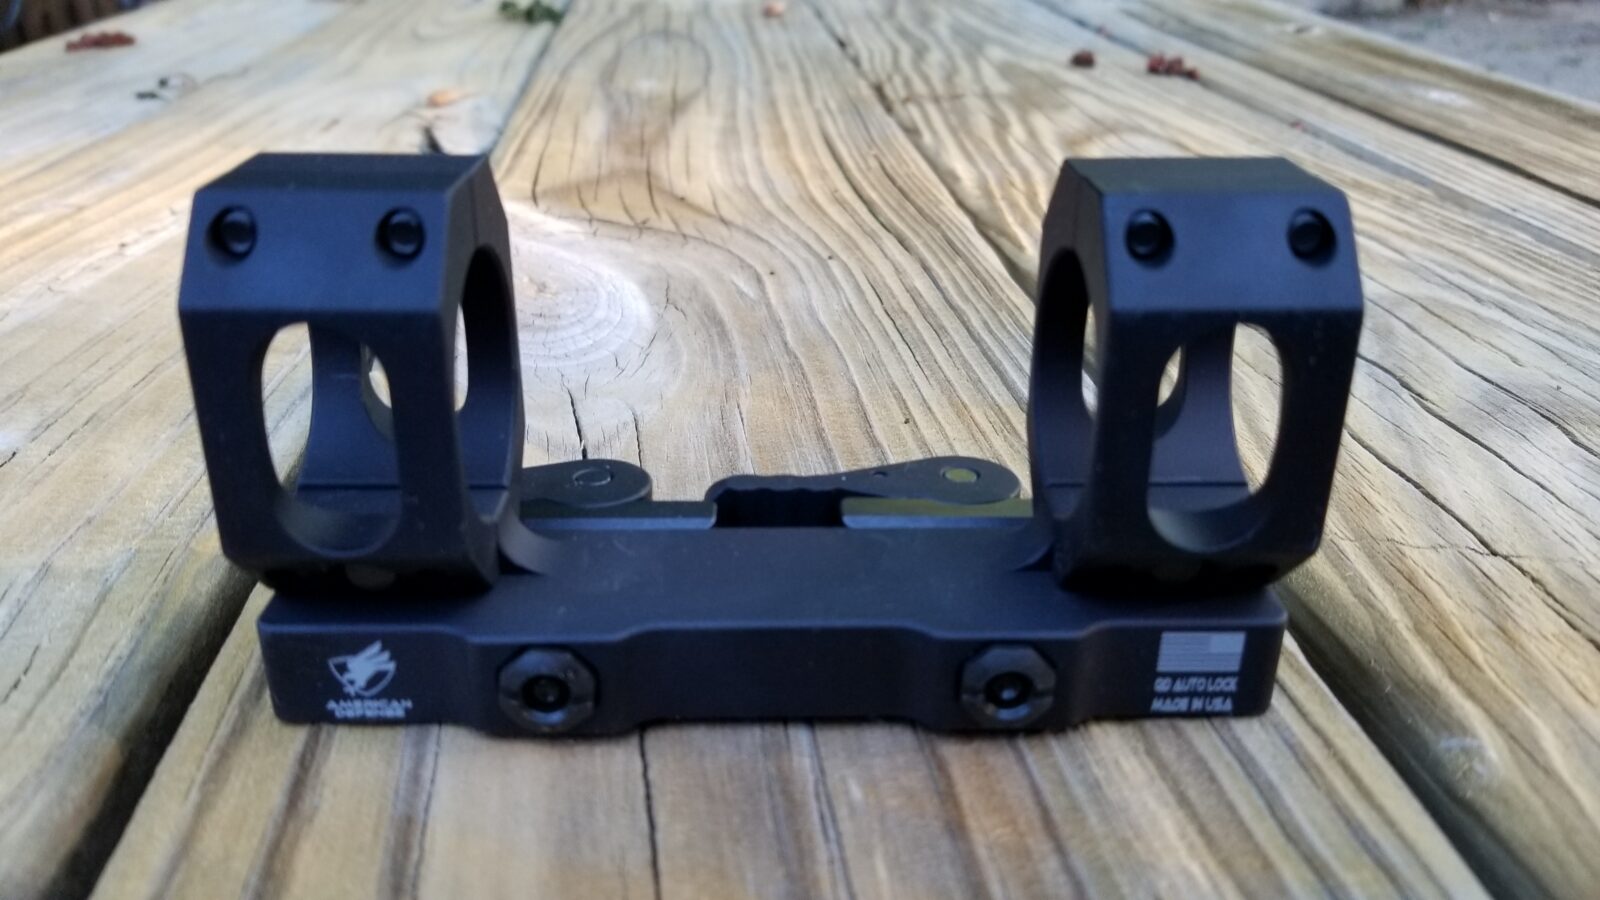
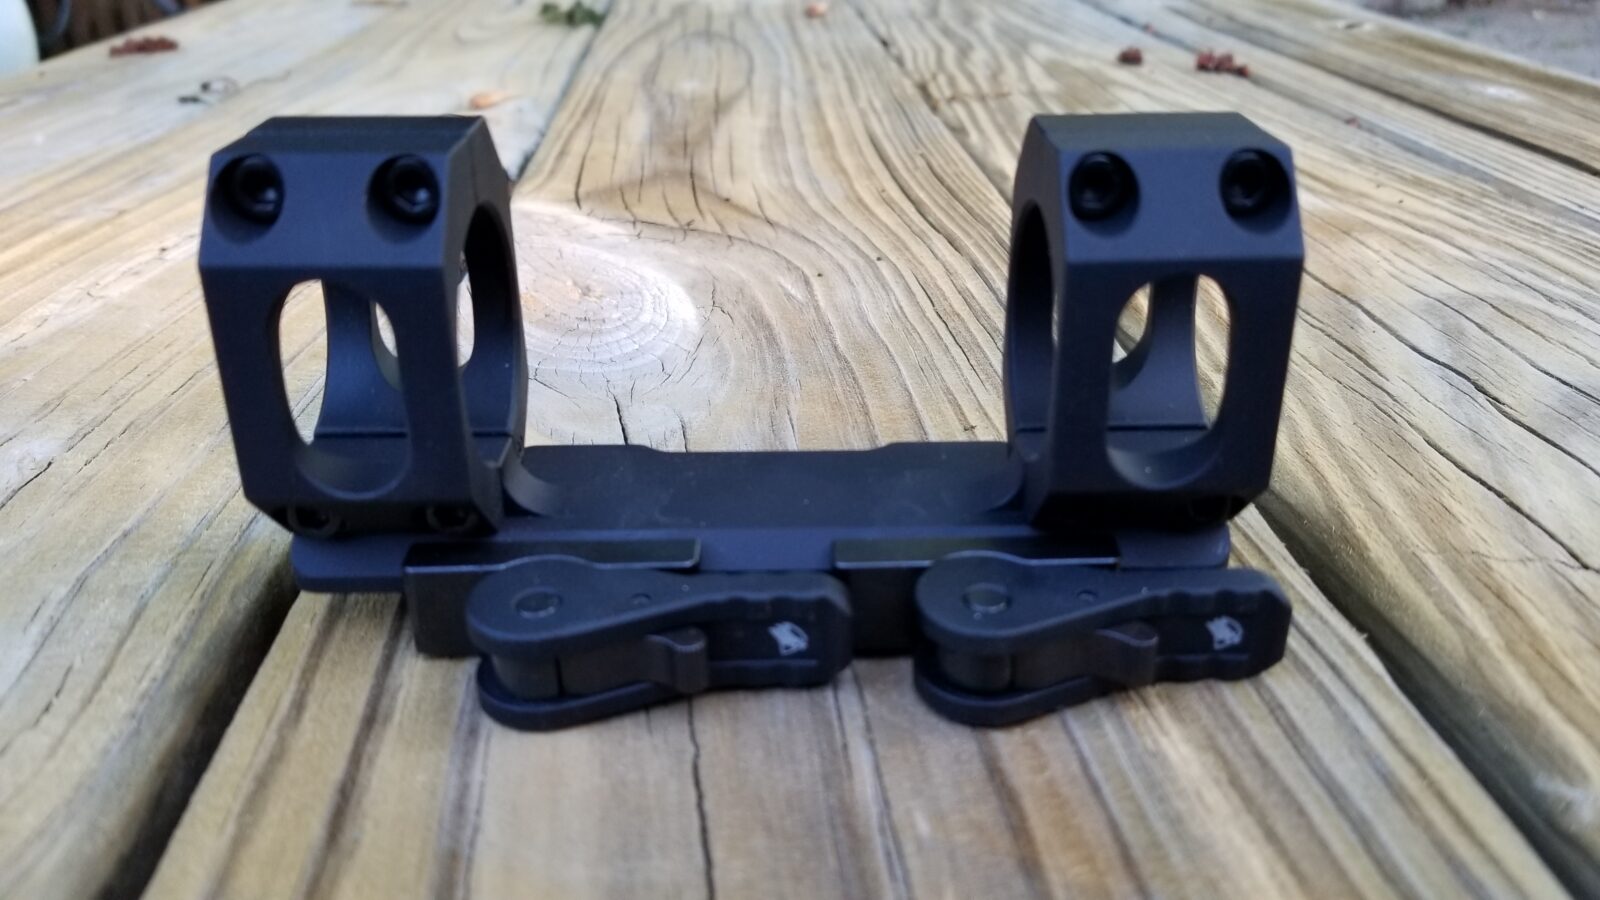
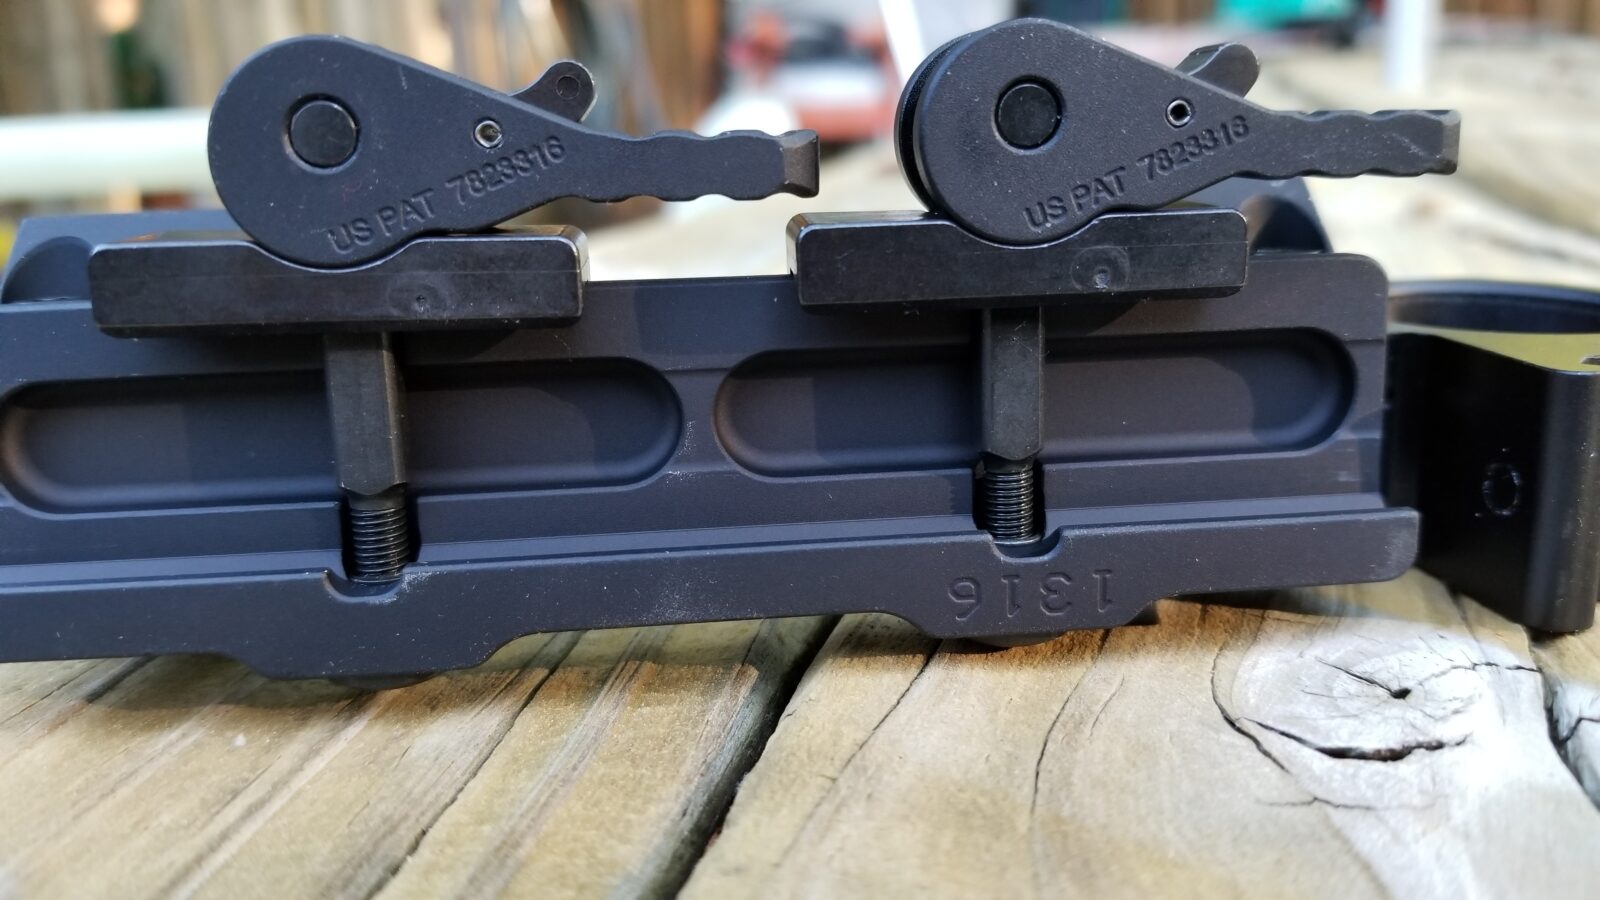
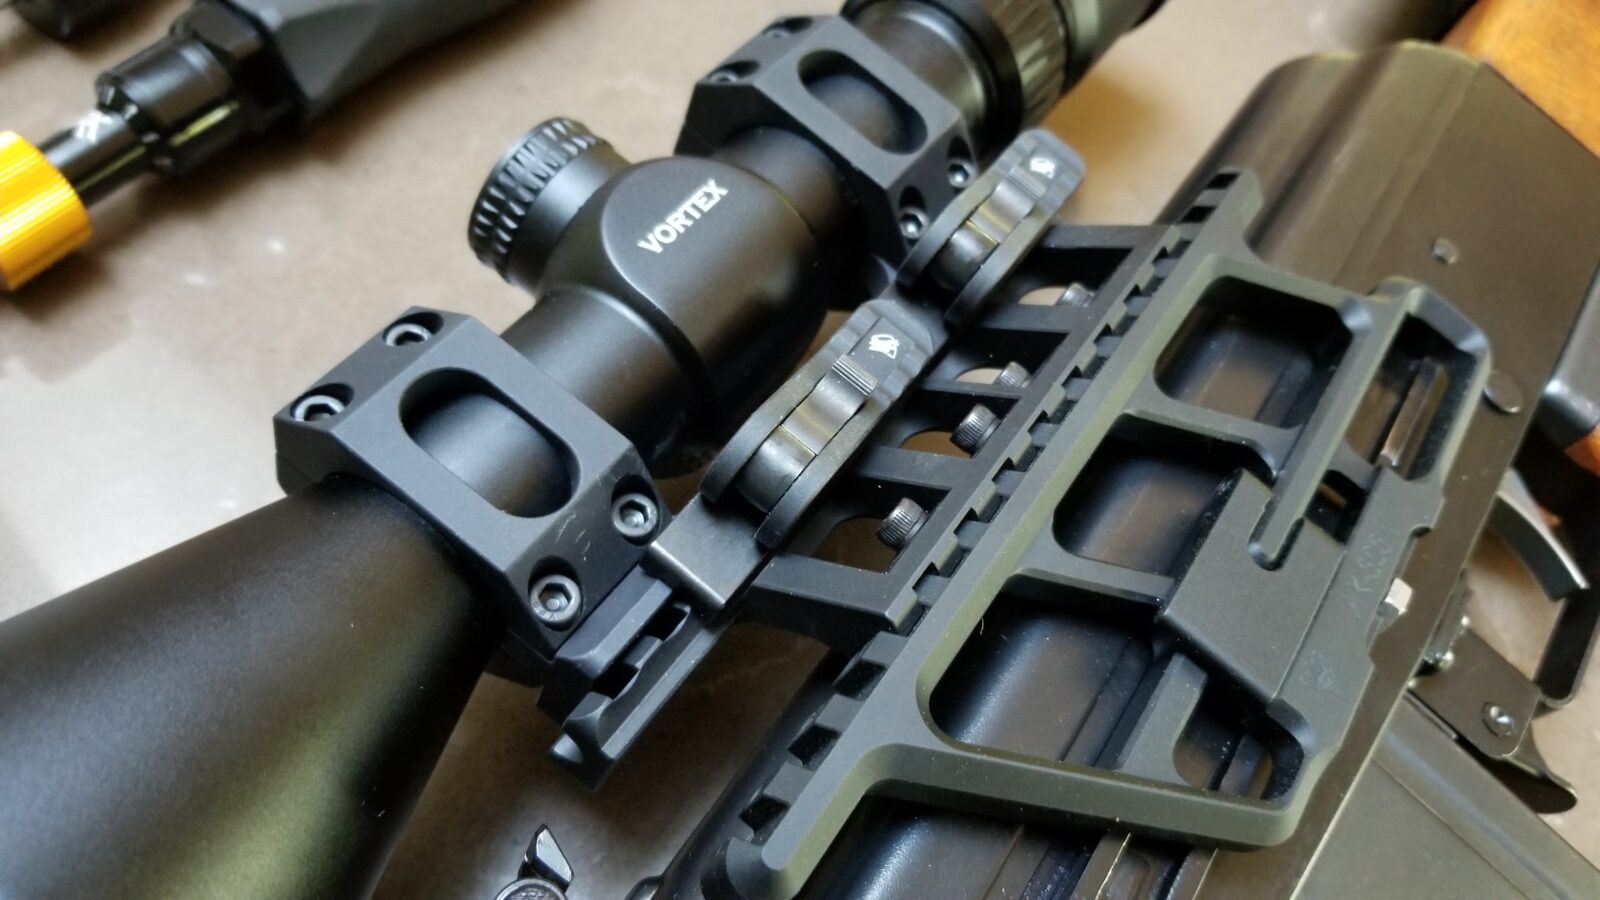
Second. it is a giant objective and you will need to plan for. I had to carefully calculate the rings needed for it to clear the front handguard and I needed them to be quick release because the scope mount could not slide backwards due to the big objective hitting the rear sight block (RSB) of the rifle. I am still using the AD-RECON-SL mount and it is solid!

For a lot of folks, starting with an objective around 40mm tends to give you a nice bright image. I tend to use 44-50mm objectives scopes the most. Think of it this way – the bigger the objective, the more light it can pull in all other things being equal.

So where am I at today and what scope would I recommend?

I still am running the Hog Hunter and like it. If I had it to do over,I would get a 4-16x magnification and a 44-50mm objective. Recticle-wise, I’m fine with just about anything for what I plan to use it for but if I were to specify one, I’d get one with Mil-Rad (Mil-Dot) graduations because that is what I am familiar with.

There are also other variable zoom scopes out there as well such as 2.5-10x, 3-9x, 1-6x, 1-8x, etc. These are all options if you still have good eyes and want an even wider field of view on the low end. I run all of those combinations on rifles where I plan to be relatively close and not so much for long distance. Point being it is up to you – I wanted a higher power scope for shots starting often at 100 yards.

Vortex makes really good optics and I would move with whatever I could afford at the time. What you will notice is that as you move up their product line , the bigger price tag also comes with clearer and brighter optics *but* they all have Vortex’s no nonsense warranty.

Vortex Optics Offerings

I am going to present their various offerings that I would recommend and am able to show the scopes listed at various merchants as well so you can shop around:

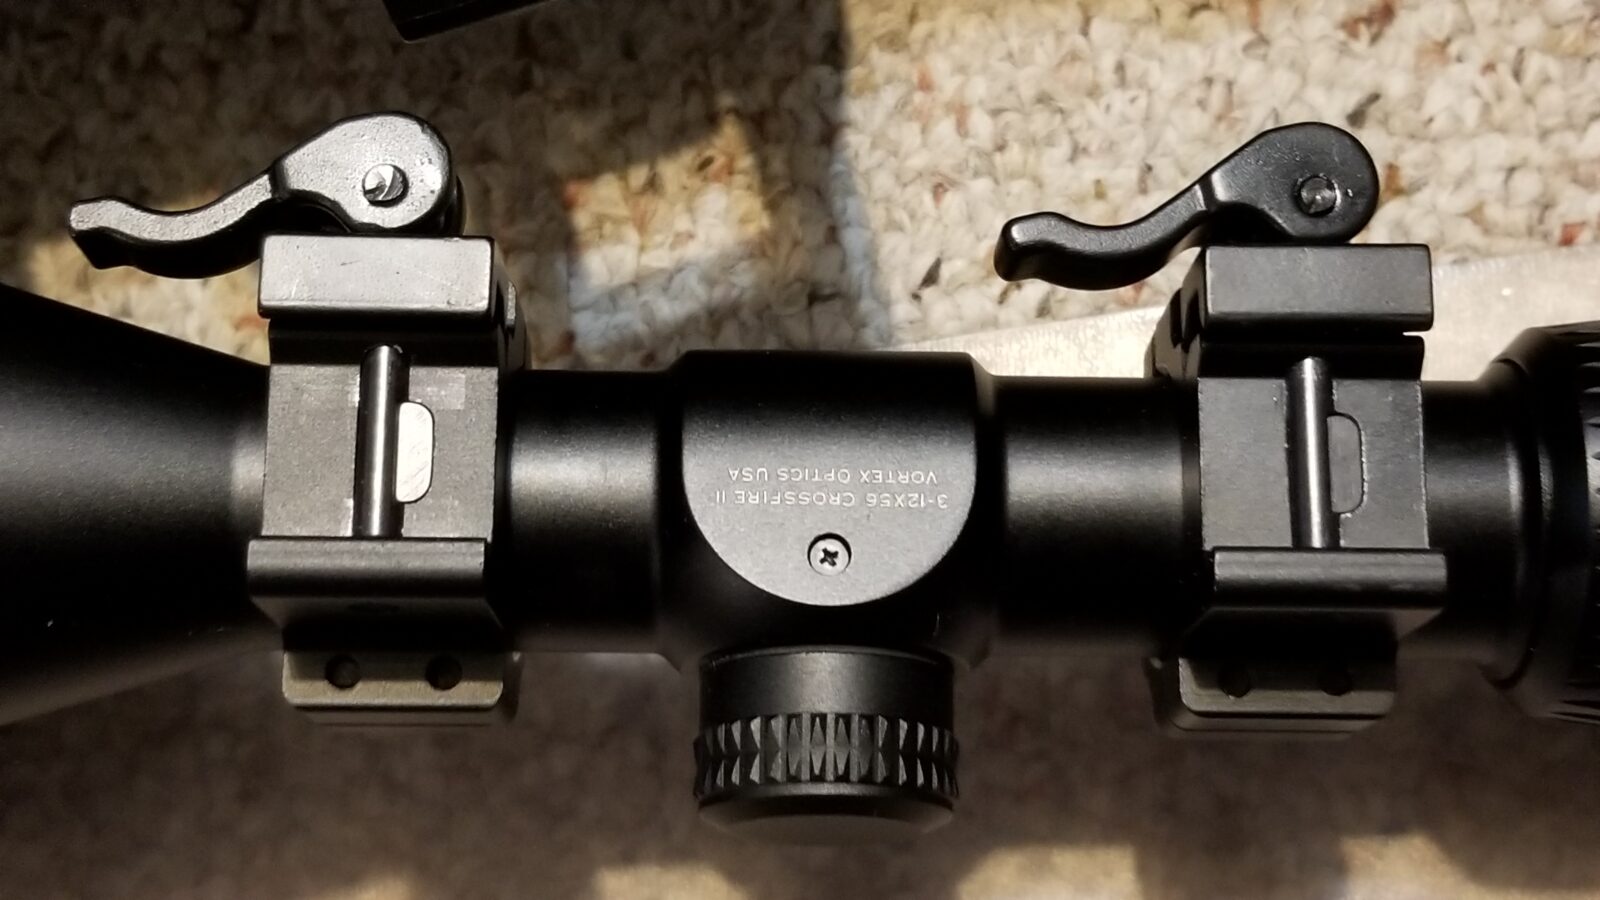
Let’s start with their entry-level Crossfire II scopes:


Next, let’s look at the Diamondback and Diamondback Tactical series scopes:


The following are Strike Eagle scopes and the designs are focusing more on tactical versatility.


Even higher end are the various Viper HS scopes. I have a number of these and find them to be bright, clear and rugged:


My favorite Vortex scopes that I afford is the Viper PST Gen III series. Yeah, budget does have a role and have not been able to afford a Razor but the PSTs excellent. When I can afford a really exceptional optic, I look at the PSTs. A number of vendors still carry Gen II scopes and they work great also. I’ve had several Gen IIs and only one Gen III so far.


In Conclusion

I hope this helps give you some ideas of what optic to put on your M76 rifle. I really like Vortex Optics and am a user – I’m happy with the Hog Hunter but it is big. I think you’d be very happy with just about any of their scopes depending on what you want to do.


Note, I have to buy all of my parts – nothing here was paid for by sponsors, etc. I do make a small amount if you click on an ad and buy something but that is it. You’re getting my real opinion on stuff.

If you find this post useful, please share the link on Facebook, with your friends, etc. Your support is much appreciated and if you have any feedback, please email me at in**@ro*********.com. Please note that for links to other websites, I may be paid via an affiliate program such as Avantlink, Impact, Amazon and eBay.


Video: Ian Takes His Zastava M76 and M91 to the Range – Lucky Guy!

In previous videos, Ian McCollum of Forgotten Weapons has reviewed the Zastava M76 and M91 (here’s the range video for the M91) independently. In this video, he takes them both to the range.

Ian likes the handling and feel of the kit-built M76 but the reliability of the Zastava-built M91 wins him over.

I wish I could afford a M91 but they are just to pricey for me – hovering around the $3,150 mark. So, I’ll just have to watch Ian’s video and wish I had one.

The Video


Kudos to Ian for another two very interesting videos. Be sure to visit his site to learn how you can help sponsor him.

I hope you found this interesting!


Please note that all images were extracted from the video and are the property of their respective owner.

If you find this post useful, please share the link on Facebook, with your friends, etc. Your support is much appreciated and if you have any feedback, please email me at in**@ro*********.com.


Video: Ian Reviews The 8mm Yugo M76 DMR

Ian McCollum, of Forgotten Weapons fame, just did a review of a Yugo M76 designated marksman’s rife (DMR). I like the M76 and own one built for me by Two Rivers Arms so I was listening intently.

Ian’s M76 was built by Century Arms from a kit and he’s happy with it.

Two things I picked up that I didn’t know was that the odd looking muzzle brake’s ribs at the pack are actually threads for a suppressor, Huh… that’s interesting.

Those are interrupted threads at the back of the flash hider for mounting a suppressor.

Second off, I’d heard about the ATF mixup wherein they approved 2,000 M76s to be imported with the full-auto sears installed because the rifle used it as a safety and was never full-auto so it stands to reason it was never a machinegun. Well, the ATF decided later on that these rifles were indeed machineguns because they included the evil full-auto sear and mandated that all rifles had to be collected. What I didn’t realize was that they chopped up the receivers and created all the parts kits that we see today. Ahhhhh,,,, now I know.

At any rate, watch the two videos here – we have Ian’s review and his range visit. The M76s are interesting pieces of history and handle fairly well. [Click here to open a new tab with all of my past M76 related posts listed.]

Ian’s Review Video

Ian Takes The M76 To The Range

Kudos to Ian for another two very interesting videos. Be sure to visit his site to learn how you can help sponsor him.

I hope you found this interesting!


Please note that all images were extracted from the video and are the property of their respective owner.

If you find this post useful, please share the link on Facebook, with your friends, etc. Your support is much appreciated and if you have any feedback, please email me at in**@ro*********.com. Please note that for links to other websites, I may be paid via an affiliate program such as Avantlink, Impact, Amazon and eBay.


Changed my Yugo M76 Scope Mount To An American Defense AD-RECON-SL and It’s Rock Solid!!

When I was adding the big Vortex Hog Hunter scope to my M76 with RS!Regulate side mount optics rail, all I had to prototype with were UTG rings. While the UTG rings aren’t too bad, I have stopped using them with centerfire rifles because they have a rounded screw that passes through the Picatinny rail rail slot. It’s rounded shape and only partially filling the slot risks damaging the rail and the zero shifting because the ring(s) can move.

These are the UTG low profile rings. Note how the screw is round and not rectangular? Also, after 30 rounds of 8mm Mauser firing, the rear flip lever rattled loose.

What is really needed is a quality ring or scope mount that uses a bar that properly fits into the Picatinny Rail slots and locks the optic securely and consistently into position. American Defense mounts are that way and they have an excellent locking lever.

I started using American Defense mounts for my Vortex Crossfire Red Dot optics a little over a year ago and was very satisfied with them and very impressed by their quick release lever design. So, when I needed a new mount for my M76 that was strong enough to hold the big Vortex Hog Hunter scope on my M76 and would clear rear sight block but also be close to the bore, the American Defense AD-RECON-SL immediately came to mind.

American Defense AD-RECON-SL

American Defense started with their QD Auto Lock System – the quick release lever system they developed. – and have branched into a variety of offerings from there including scope, bipod, light, laser and other mounts. In short, they are capitalizing on their really rugged QD levers.

So, the first thing I did was to measure the UTG mount from the top of the rail to the optic center, which I used the top of the lower half ring. That measure came to about 0.975″ and I knew any mount I bought had to be at least that or bigger. The front objective was all but touching the gas tube cover with those UTG low rings.

The AD Recon series has a variety of heights and offsets to select from and they publish specs for you to make an informed decision. In my case, because the RS!Regulate side mount already has front-to-back adjustment, I didn’t feel that I needed any offset but I did want to find as low of a scope mount as I could.

In looking at the specs, the AD-RECON-SL seemed to fit the bill. It had no offset and was their lowest mount with a 1.110″ center for scope with a 30mm tube. it was a tad higher but the slightly higher 0.135″ difference really didn’t worry me so I went ahead an ordered one.

Folks, the AD-RECON-SL did not disappoint. It is really a gorgeous piece of engineering. The fitment is excellent and is finished in a black hard coat. Here are some photos:

Here’s the side of the unit with the adjustment nuts. I love the flag on the side.
Here it is with their patented QD levers. The small lever you see in the middle of the bigger lever is the locking mechanism that keeps the unit secure. The moment you flip those rings you know your dealing with quality.
See how American Defense uses bars to lock the mount into the Picatinny rail? This is the way to go. It makes for a very secure and consistent engagement meaning your optic’s zero will not shift and the rail will not get damaged over time under heavy recoil with a simple round screw.
Yeah… that’s the American Defense unit on the left and the little UTG ring on the right. I would have no hesitation recommending the UTG rings for a rimfire or light recoil applications but not for something where there is significant recoil and a heavy optic combined.
Here’s another angle.

But Why Have QD Rings on a RS!Regulate Mount?

I do need to explain this. I can bet that I will need to take the dust cover off for some reason and don’t want to rely on tools. If I am hunting, I may not have any tools with me and need to clear a jam or something. That means I need a way to remove the scope and rail to get access to the dust cover.

The RS!Regulate’s lower rail does have a quick take down lever that solidly clamps on the M76 rail. That is not the issue and may make you wonder I need another quick release system. The challenge is that the Hog Hunter scope has a giant 56mm front objective for gathering as much light as possible in low-light situations such as dusk. It will hit the M76’s rear sight block if pulled straight back when mounted as low as I want. The solution is to use the AD-RECON-SL optic mount to enable me to lift the scope off the RS!Regulate’s top rail and then I can slide the RS!Regulate assembly off. The combination definitely works.

Installation

Taking the mount apart was easy – remove the four screws on each ring. I was pleasantly surprised that they used a precision pin to guide the rings into position and not just the screws. Again, this makes it stronger and more consistent.

Here’s a close up of the base. The middle hole is for the guide pin and the outer holes are for the screws.
Here you can see the four halves of the rings. The half to the top left with the guide pin. Its counterpart is already installed in the back.
An important design aspect to note is that the halves are not symmerical from top to bottom. The side with the pin is a no-brainer – that goes in the base. The other two halves without pins need to have the thinner section at the bottom for the pieces to mate up correctly. You can see in the top left half that the bottom part with the alignment pin is not as tall as the top. The lower-right is also a good angle for you to see the thinner bottom relative to the top.

There is an installation detail that you may not guess and they detail it in their installation instructions – you install the bottom screws first and tighten them down to the 20-25 in/lbs torque spec first. For folks not used to working with small fasteners, please note that is inch pounds and not foot pounds).

The bottom is torqued down first and then the top. There will be a small gap at the top. This method of bottom then top torquing centers the optic in their design. The only thread locker they will recommend is VC-3 Vibra-tite and the use of anything else will void the warranty. I’ve used a lot of Vibra-tite with Kydex holsters – it’s interesting in that you clean the fastener, apply the VC-3, let it dry and then assemble. It creates a rubbery surface that pretty much negates vibration. It also stays put when you unscrew and reinstall screws. It’s interesting stuff. They include a small packet of it with the mount but I also keep it around for working with Kydex fasteners and other situations where I expect there will be a need to uninstall and reinstall or adjust screws.

Here’s the M76 rifle with the American Defense mount installed. Note I used my Vortex torquing screw driver to do the installation. It’s definitely a precision instrument and what I use for all optics work now. I take care to return it to zero after each use.
Here it is from another angle.
I changed cheek pieces to get a better cheek weld. This unit is nice and stable. I’m so-so about the cheek pad itself and wish it was a bit wider but it is better than the Voodoo cheek pad that was there. I’m still hunting for an even better cheek weld and have some options I want to try that I will report on at a later date after I have a chance to try them. To be clear- it is a solid cheek piece and the right height but personally I do not like the feel of that relatively narrow riser.

In Summary

The combination of the RS!Regulate side mount system and the AD-RECON-SL optic mount is absolutely rock solid as in zero flex at all. even with the big and heavy Vortex Hog Hunter scope. I really think I have the ideal optic solution now for the rifle. The length of pull is better thanks to the installation of a SVL slip-on Limbsaver pad. I still need to find a better cheek piece to get my eye just the way I want it comfortably behind the scope and have some options to try. Last thing to report is that I did do some work on the firing pin but haven’t had time to test the rifle again.


If you find this post useful, please share the link on Facebook, with your friends, etc. Your support is much appreciated and if you have any feedback, please email me at in**@ro*********.com. Please note that for links to other websites, I may be paid via an affiliate program such as Avantlink, Impact, Amazon and eBay.


Part 6: Two Rivers Arms Yugo M76 Rifle – The First Range Trip

I finally got a chance to take the Yugo M76 to the range and my youngest daughter went with me although now that she’s in college she’s gone a lot. I do have fun when she’s home as she loves shooting also and knows her way around a rifle.

Erika is getting the rifle situated. I forgot my good bench rest so we made do with a Caldwell bag rest I brought along just in case. The weather was great.

We set up at 100 yards and I did the initial test firing and sighting in of the rifle. Function-wise, it was great. We did not have a single failure to feed or eject the whole day.

By the way, my daughter is wearing MPOW 035 ear muff hearing protectors and she said they worked great. She wore them when we were shooting the M76, my .338 Lapua and 9mm Glocks. They are excellent not to mention a good deal. I have three sets of them now for her and others. I am still using my Howard Leight by Honeywell electronic ear muffs.7

Both of us were wearing NoCry safety glasses. I use ones that go over my prescription eye glasses and my daughter wears normal ones because she has contacts.

One thing the slowed me up a bit was that the laser bore sight didn’t really help me out much. I have a new one from Wheeler that works great on the actual muzzle end of rifles but it would appear the M76’s brake was not truly perpendicular to the bore. Normally it is pretty slick but at the range, I had to fire a number of rounds to even get them on the backing board first and then finally to the bullseye.

We were shooting S&B 196 grain SPCE ammo. My groups were about 1.5-2″. I’ll get back down to the range one of these days with my better rest so I can test the accuracy. I have some Hornady Vintage Match ammo too that has cool specs but since I didn’t have my bench rest with me, I largely saved it for next time and will explain why I said that in a moment.

Pierced Primers

The only problem we encountered was the firing pin piercing primers. We went through almost 40 rounds and about a third had pierced primers. This is a known issue with M76s and, yes, the rifle is headspaced properly.

At first I thought it might just be the S&B ammo so I tested it with five rounds of Hornady Vintage match also. I think two of the five Hornady rounds were pierced. At any rate, here are some photos of the S&B ammo.

Example pierced primer. It did this both on S&B and Hornady ammo.
At home, I grabbed some random brass and took this photo to show both pierced and cratered primers.

There are a lot of posts about the piercing and cratering of primers with the M76. I’m pretty busy right now but will read all that I can before I do anything.

First, I plan to confirm the pin protrudes between 1.42mm (.056″) minimum and 1.52mm (.060″) maximum.

Second, I want to compare how close the firing pin hole is to the firing pin on my other M76 bolt plus some of my AKs. I don’t think it looks unusually large but it should be investigated.

Third, I have a hypothesis – I think the firing pin needs more of a rounded radius. The current face of the firing pin is relatively flat. There were literally little punched pieces of primer laying on the firing bench that were flat and the primers that intact showed a very flat impact.

Those primer pieces, maybe they should be called chads, show a pretty flat firing pin face.

I’m not going to rush into anything. I do have a second complete bolt assembly that I can look at and scavenge from if need be. If you have suggestions, contact me – in**@ro*********.com.

Bottom line

We had a lot of fun. The rifle performed very well with no feed or ejection problems, no magazine problems and only the pierced primers were minor issue.

I do need to work on the cheek rest more so it stays in place better.

I definitely look forward to shooting this rifle with a better bench rest and also comparing it side by side with my .308 M77. Also, I’ll report back on what I try to correct the firing pin piercing or cratering primers at some point in the future. Until then, have a great day!


If you find this post useful, please share the link on Facebook, with your friends, etc. Your support is much appreciated and if you have any feedback, please email me at in**@ro*********.com. Please note that for links to other websites, I may be paid via an affiliate program such as Avantlink, Impact, Amazon and eBay.


Part 5: Two Rivers Arms Yugo M76 Rifle – How to Find the Correct Commercial Ammunition

I’m new to the Yugo M76 rifle and the world of the 8mm Mauser cartridge. When I searched on 8mm Mauser all kinds nomenclature (how it is named) popped up and I had to do some research to understand what to buy. To try and help others I decided to write a blog post to try and clarify what type of ammunition you need to look at for the M76.

IS, JS, IRS & JRS Cartridge Types

When I heard my M76 was almost done being built by Two River Arms, I started shopping for ammo and quickly got confused – I’m good at that. I really didn’t want to deal with old corrosive ammo so my focus was on current commercial offerings and not hunting down old surplus ammo, etc.

First off, you will notice that much of the 8mm Mauser has an “IS” or “JS” designator after the size such as 8×57 IS. The “I” comes from the German word “Infanterie” which means infantry and was mistaken by some to be a “J” so some groups refer to the round using a “JS” designator instead.

When the round was first officially adopted in 1888, it was for 0.318 bore rifles. The “S” dates back to 1903-1905 when “S Patrone” or S ball cartridge was developed for use in S-bore rifles that was larger at 0.323″.

The nomenclature of the rounds can vary because of this and other factors so you are looking for: 8mm Mauser, 8×57 IS, 8×57 JS, 8×57 and so forth. It will likely say IS or JS somewhere especially if it is European but American producers may just say “8mm Mauser”.

Do NOT buy 8×57 IRS or 8×57 JRS. These refer to a rimmed variant that was developed for use in break barrel sporting rifles – double rifles, drilling rifles and so forth. Once in a while you will see it for sale and it will NOT work in a M76. Just remember – if it ends in RS, your day is going to Really Suck 🙂

CIP and SAMMI Specs

The standards body for small arms ammunition in Europe is the Commission internationale permanente pour l’épreuve des armes à feu portatives (“Permanent International Commission for the Proof of Small Arms”. They refer to the 7.92×57 Mauser formally as 8×57 IS.

The US standards body is the Sporting Arms and Ammunition Manufactuers’ Insitute (SAAMI) and they refer to the round both 8mm Mauser and 8x57mm.

I also noticed one interesting detail – the CIP designated rounds are up to 390.00 MPa or 56,565 PSI. Rifles that use the round must be proof tested to 125% of this.

SAAMI is considerably lower at 241.3 MPa or 35,000 PSI and is done is for liability reasons. Among other things, they are concerned that someone may put a modern cartridge in an older narrower throat “I-Series” barrel.

What am I shooting?

I really like Sellier & Bellot from the Czech Republic and they have a number of rounds for the 8mm Mauser listed as 7.92x57JS. The only load I can seem to find from them in the US is the 196 grain Soft Point Cutting Edge (SPCE) cartridge. It functions great and is accurate in my M76. I’m getting about 1.5-2″ at 100 yards with it.

Here’s my S&B 196gr SPCE ammo. It has worked great so far and I am getting about 1.5-2″ groups at 100 yards shooting 5 round groups. I plan on taking my good bench rest the next time I go to the range and see if I can tighten up the groups.

I also have some of the Hornady Vintage Match but haven’t started using it yet. The specs Hornady publishes sure look good and I look forward to trying it.

Hornday Vintage Match 8x57JS. I just bought this and plan on trying this in the near future.
The unique looking top round is the 196 grain S&B Soft Point Cutting Edge (SPCE) round. This is supposed to be designed for medium game including boar, goats and deer. The bottom round is a Hornady Vintage Match cartridge and the bullet is a 196gr Boat Tail Hollow Point (BTHP) .

Where To Learn More

The following websites provide a lot of insight into the 8mm Mauser round for those of you who want to learn more.

Thank you for reading and I hope this helps you find ammo for your M76.


If you find this post useful, please share the link on Facebook, with your friends, etc. Your support is much appreciated and if you have any feedback, please email me at in**@ro*********.com. Please note that for links to other websites, I may be paid via an affiliate program such as Avantlink, Impact, Amazon and eBay.


Part 4: Two Rivers Arms Yugo M76 Rifle – Fixing The Magazines

The M76 is a pretty wicked designated marksman’s rifle capable of firing 1.5-2 minutes of angle with the hard hitting 8mm Mauser round. It does have a pretty bad weakness however – the magazines can jam so hard you need a tool to get the follower to come up. There’s a solution and that’s what this post is about.

So, What’s The Problem?

Zastava designed the M76 with a bolt hold open (BHO) follower. In other words, the follower has a big lobe that blocks the carrier from going forward and thus locks the action open. Sounds great, right? It would have been if they had closed the gap between the follower and the magazine body and/or made the skirt of the follower longer.

What happens way too frequently is that when the carrier cycles forward, it hits the bolt hold open lobe of the follower causing the follower’s nose to dive down and jam the follower. Literally, the end result most of the time is that it is a bear to open the action and get the magazine to release — I found I needed to fashion a dowel to hit the rear of the follower to free it up. Not good.

Some guys report more headaches than others and I can’t readily tell you why. Maybe Zastava realized the problem and corrected it or maybe there’s enough variation in the gap between the magazine body and follower that it does not always happen. I have about nine M76 magazines and they all nose dived when hit by the bolt carrier practically every time.

The bolt carrier slams the follower down so hard that it can be difficult getting the magazine out of the rifle as well as releasing the follower.
A 3/8″ dowel can be hit with a hammer to pop the follower back into position. Yeah, this sucks.

Cleaning The M76 Magazines

I should point out that I bought about a dozen M76 magazines – some from Apex and some from Ivan Drago on GunBroker. They all had a ton of old cosmoline on them and a lot if was on really thick. I pulled the old paper and junk off the eight you see below and left the rest in storage.

Eight cosmoline laden M76 magazines. Some were almost full of the stuff inside. Some had old newspaper stuck on them as well.
I keep a 5-gallon bucket about half full of Ed’s Red cleaner around that I use to remove cosmoline and what not. Click here for the recipe. I let the crusty magazines sit in there for a couple of days because I had other stuff I was working on and the solution needs time to soften everything up. When I am done, I put the lid back on. It’s great for freeing up rusty parts too.
After the soaking in Ed’s Red to soften and even dissolve some of the crud, I disassembled each magazine and wiped them out. What a mess. No photos of that part but here you can see ones that are done and sitting in a box waiting for next steps.

The Solution to M76 Magazines and Nosediving

Let’s start with two things that didn’t work just so you know. My first try was to simply polish all the edges. That did not work and neither did adding Dupont Teflon dry lube.

My second try was to use sand paper to round everything over underneath the lips of the body and the outside edge of the skirt. That did not work either – even with polishing and Dupont Teflon dry lube.

So, with those two failures, I did some searching on the WWW and found that AKblue posted how he welded a small tab of 20 gauge (0.039″) sheet metal to the back of the follower to close the gap. That did work wonderfully for me and let me walk you through the steps.I went to all the big box stores in the area and nobody had 20 gauge sheet metal. I miss 20 years ago when I could go to a local steel store but they are all gone now.

1. I went to OnlineMetals and bought a 12″x12″ sheet of cold roll mild steel – nothing fancy is needed. 12×12 turned out to be way more than I needed. Shipping is what kills you so I wanted to only buy one time even if some experimenting was needed.

Nothing more exciting than a photo of a 12×12″ piece of 20 gauge sheet metal.

2. I needed to figure out some basic template so I could cut out a bunch of tabs to to then try different shapes with by sanding them down. Now I have a big belt sander – you could use a file or whatever works for you.

That high quality rendering is from an ancient CAD application called pen and paper. The back of the follower was over 0.7055″ wide – I think I just measured the back bent portion and not the sides so take this as a starting point and not an absolute.. Plus wait until you see the fancy ultra precise cutting method (that’s a joke by the way)! In terms of height, I measured about 0.525″ from the lower shelf to the bottom and then added a 0.25″ to have metal to grind down to a shape that worked so the tabs I cut were about 0.71″ wide and about 0.75-.8″ tall.
So much for precision – I used these shears to do the cutting due to the depth of the sheet, I allowed for the thickness of the cutter and clamped a straight edge to guide me from the front to the back. In this photo, the stuff is just sitting there for the photo – I did not have it laid out properly yet. I told you it was high tech, Note, I cut the sheet for the approximate 0.775 dimension.
I scribed the line for the 0.7050 dimension and cut it with my bandsaw. I wasn’t kidding when I said the dimensions were ballparks. I had two criteria I wanted to honor – the tab should not protrude from the top or sides of the follower and I wanted enough material at the bottom to do some experimenting and shaping on.
I then used a Dremel to remove burs. I did not want anything to hang up inside the magazine.
I sanded the back of the follower and sprayed both it and the tab with brake cleaner before welding just to get rid of any contaminants. This is a Harbor Freight 120 volt spot welder and it has the tongs on it for welding in AK rails hence the unique shape of the lower tong if you are familiar with them. If you don’t have a spot welder then I would drill or punch a hole in the tab and shoot a weld with a MIG, etc. I really am not sure if epoxy would hold up with this use case and am recommending true welding for reliability
I didn’t have much room to move the tongs around. I could get two heavy spot welds. This photo shows part of a third attempt but I settled on just two for the rest.
Have you ever wondered about spot welders for casual use but thought they might be too expensive or too complicated? Actually, there are a lot of decent import models that will run on 120 volt household current. The thing you do is to buy one of the tong models, take a few scraps of sheet metal and get to know the sound and color when there is a good weld. First, do it and burn hole on purpose to see but don’t go longer than that or you will melt your copper spot welder tips. Next, back off the time and the amount the tons compress until you find a good weld that doesn’t pull apart easily. That’s it. Click here for a listing of tong spot welders on Amazon – be sure there are over 30 ratings and the higher the average score the better.
First off, the tab is way too long. I am maybe an 1/8-3/16″ at the base of that curve. You’ll also notice that I sanded the back so it would not drag on the magazine body. I polished all the parts using the little rubberized polishing bits in my Dremel.
I did apply a light coat of Super Lube grease to the back to help the parts get to know each other. After things wear in, I bet I will not need it.
You can see the tab. I made sure that the tab was below the lip of the follower. In other words, I did not want it protruding. I went around and polished all edges to make sure nothing would snag.
Here’s another angle – you can just barely see the tab.
Testing of the magazines was done with Realistic Snap Caps. These were great because they are just like the real 8mm Mauser rounds and I could confirm that feeding was okay.

Bottom Line

Welding in the tab did the trick. I think it works for two big reasons – it closed up a rather large gap at the rear that allowed the follower to tilt down to begin with plus by making the skirt of the follower a bit longer, it could not tip as much either. I don’t think the exact shape of the bottom of the tab matters a great deal but you definitely must debur and polish each By adding a bit of Super Lube grease to the back, everything slid very smoothly. I am assuming it will not be needed as parts wear in and time will tell.

Also, I bought way too much 20 gauge sheet metal. You could get by with a far, far smaller sheet. I thought I would have to experiment more and it turned out to be simpler than I thought.

When I went to range feeding was great and not one problem with the follower nosediving when the carrier returned on an empty mag. Problem solved.


If you find this post useful, please share the link on Facebook, with your friends, etc. Your support is much appreciated and if you have any feedback, please email me at in**@ro*********.com. Please note that for links to other websites, I may be paid via an affiliate program such as Avantlink, Impact, Amazon and eBay.


Part 3: Two Rivers Arms Yugo M76 Rifle – The Trigger

When I sent the M76 to Two Rivers Arms to build, I was still using Tapco G2 triggers in my AK builds. Since then, I have moved to ALG Defense’s AK Trigger Ultimate With Lightning Bow (AKT-UL) for anything I’ve built in the last two years. Folks, these are wicked triggers and absolutely hands down my favorite AK triggers.

The top trigger is the ALG AKT-UL. You can see the distinctive shape and the silver colored Nickel Boron finish. The bottom is the Tapco G2 I originally sent to Two Rivers to use. The AKT-UL comes with a new disconnector spring but uses the existing hammer spring. ALG does sell a heavy hammer spring separately if you want it. The extra spring is an auxiliary trigger spring for increasing the pull, which I don’t use. One small pin can be installed and filed down as needed if the safety doesn’t block the trigger sufficiently. I have not needed it so far on any of my rifles. I think the second pin is just a spare.

Not only does the AKT-UL give you three compliance parts as it includes the hammer, trigger and disconnector but the feel is amazing. Now if you know how to tune a G2 trigger, you are used to having a fairly decent AK trigger. The AKT-UL units step it up a notch for sure. ALG does have a shorter and more crisp pull for sure plus they will tell you the trigger has about a 3.5 pound pull which you can tweak a bit by bending the hammer spring.

I got out my Lyman digital trigger gauge and did 20 pulls. The average was 3 pounds 13 ounces and the nice wide trigger shoe makes it feel less.

This is a peek in the M76 receiver as it came from Two Rivers. You can see the Tapco G2 fire control group, orientation of the hammer spring and the pin retaining wire that I am not a huge fan of and replace with a plate. This layout is what you see in most AK rifles unless you get into specialized trigger systems on some of the more modern military designs. For a new person, note the orientation of both the hammer and its spring.

Installation Notes

Safety First Always – Make Sure Your Weapon Is Unloaded! Always assume a weapon is loaded until you confirm it is not. Keep ammo away from your work area and don’t test fit with live ammunition.

Second – read their instructions – they work and you have options. This is not one of those cases where the instructions suck – they are actually quite good. The come with the trigger plus ALG makes them available online – click here to read the instructions for both the Enhanced (EL) and Ultimate (UL) triggers.

I really don’t have any surprises to report. It installed the same as any other AK fire control group and I didn’t need to use any pins and I certainly didn’t want a heavier pull so I didn’t use the auxiliary trigger spring either:

1. Install the hammer with the ears to the rear and spring around the back of the hammer. If it fights you during installation and the little legs that sit on the trigger are facing down, odds are you have the spring installed right. I lubricated all pins with Super Lube Grease before installation. That stuff is my favorite grease now.

Here, the new hammer is installed. Note how the “ears” of the hammer are facing towards the back of the rifle. It’s a common mistake for people new to the AK family of weapons to think that is the part that hits the firing pin but it is not. Also, note how the spring is going around the hammer. You can’t see them but the legs of the hammer spring are facing down. I use needle nose pliers to lift them around out of the way to install the trigger and then set them on the back legs/bars of the trigger.

2. Here’s a tip you will not see in the instructions. A trick I was taught years ago is to use a slave pin that will allow you to assemble the trigger, disconnector and its spring outside of the rifle. This makes it sooooo much easier!! What you do is cut a spare fire control pin or a piece of 5mm stock (0.1969″ or 13/64″ – cheap drill bits work great) down so it fits just inside the trigger pin hole from left to right and slightly taper the ends using a file or sandpaper. Trust me, if you don’t take a few minutes to do this, it is a heck of a juggling act to get the trigger in place with the pin pushed through while keeping the disconnector and its spring in place (don’t forget the little disconnector spring!!).

Here, you can see the slave pin and how it is holding the disconnector nicely in place. I’m not sure why ALG added the window in the disconnector to see the spring but it sure is handy to confirm the spring is there. Perhaps that is why they did it.

3. The trigger is installed by lowering it into position, pushing a fire control pin through the receiver and into the trigger carefully pushing the slave pin out the other side where you can grab it. Note, you will need to wiggle the trigger around some and I just do that with my right hand as I feel the pin through with my left.

4. Next, I used one of our fire control group retaining plates to secure the pins in place instead of the retaining wire. The wire is fine and you can use it if you prefer – I simply don’t care for them. Unlike some plates on the market, our plate is approximately 1.186mm thick and completely fills the groove of the pins to keep them from walking left or right and potentially falling out of the receiver.

Top is our AK fire control group plate. Below it is the type of retaining wire you would see in a M76. AKMs are a bit different due to the differences for automatic fire.

You install the plate by inserting the nose groove into the hammer pin and then rotating the plate down so it secures the trigger pin as well. The rear hole of the plate, the only hole really,is where the selector/safety lever passes through and locks it into position.

This photo shows how the front of the plate engages the hammer pin and the middle groove secures the trigger pin.
Here. everything is installed except for the selector/safety lever so you can see the fire control group and the plate.

That’s it for the trigger. Next up was the need to fix the magazines so they would not nose dive when empty and hit by the bolt carrier. That will be my next post.


If you find this post useful, please share the link on Facebook, with your friends, etc. Your support is much appreciated and if you have any feedback, please email me at in**@ro*********.com. Please note that for links to other websites, I may be paid via an affiliate program such as Avantlink, Impact, Amazon and eBay.