Tag Archives: Vortex

The Vortex UH-1 Sight and V3XM Magnifier Are An Amazing Combination On A Galil Ace Pistol

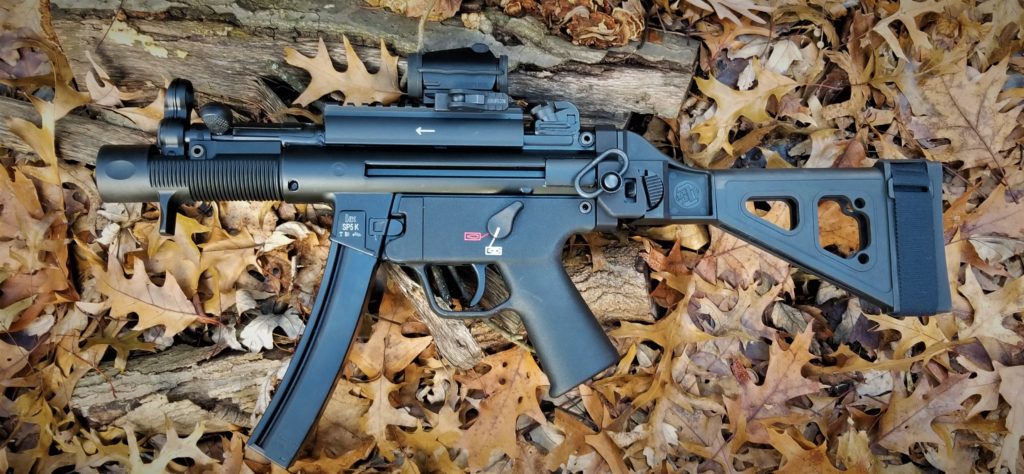
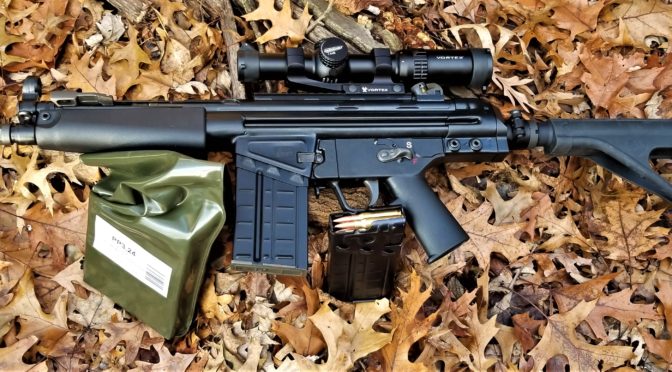
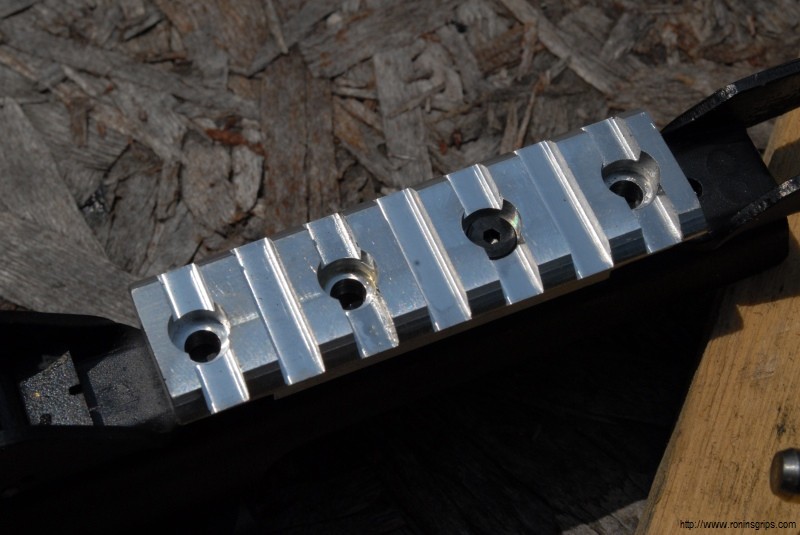
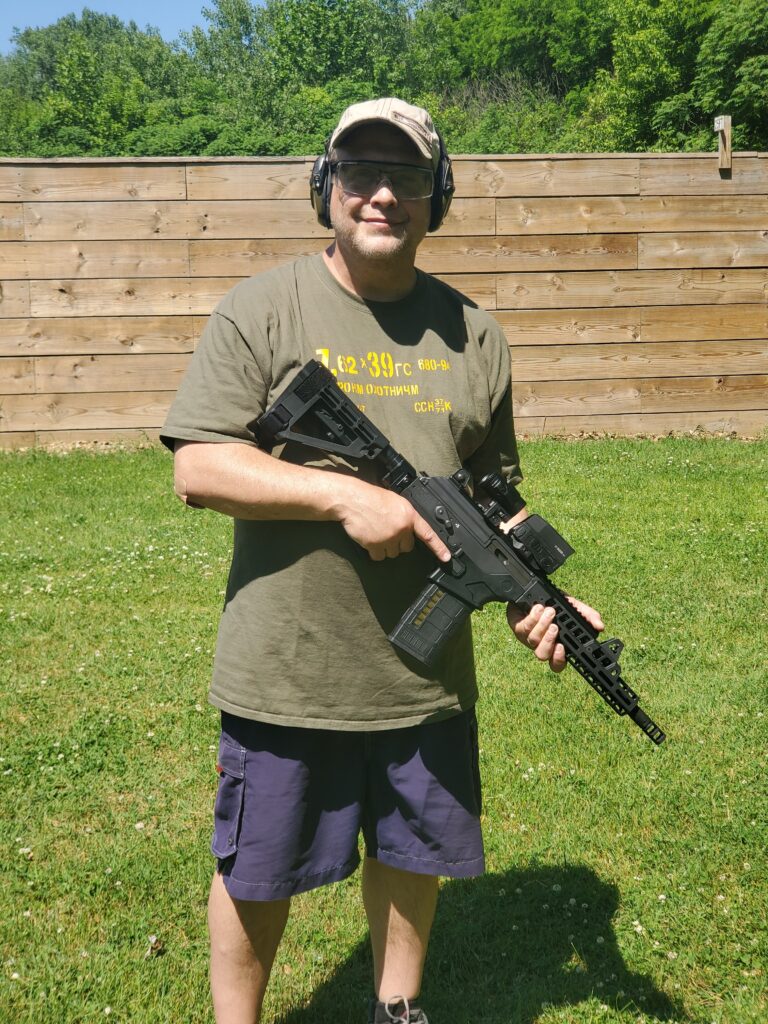
Well, the pandemic threw all my plans right out the window including having time to go to the range. I bought and customized my 7.62×51/.308 Galil Ace Pistol in the Fall of 2019 and just recently was able to take it to the range with my daughter and good friend Niko.

Niko having fun with the Ace and optic combination.

When I was planning the customization of the Ace, I wanted a holographic sight for rapid target acquisition in close, parallax free viewing and also a magnifier to help me out to a hundred yards or so. By the way, tons of guys go further even without a magnifier but this is just me.

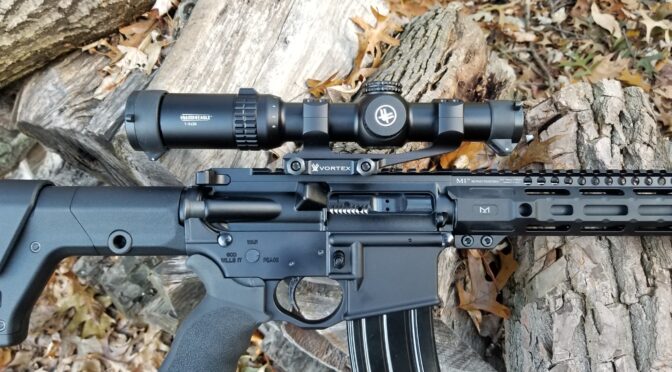
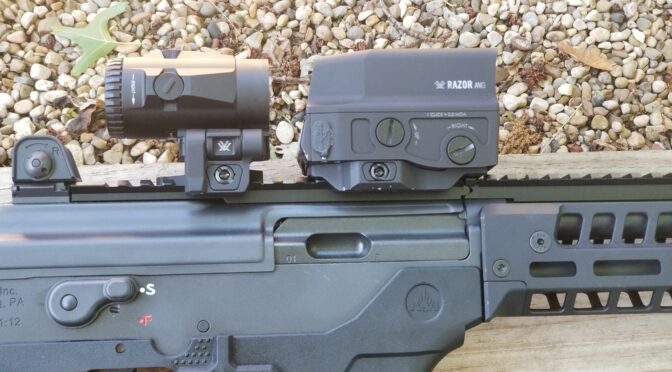
Being a Vortex Optics fan and having read good reviews of their Razor AMG UH-1 optic, I bought one plus the V3XM Micro 3x magnifier. I have to admit that I was nervous. Years back I built an AR-15 and installed both a full size red dot and a full size 3x magnifier and honestly did not like it. The combination used a ton of top rail space due to the size of the two parts and it was heavy. To be honest, I found myself wishing I’d just bought a 1-4x or 1-6x optic at the time.

Why Bother With A Magnifier?

In case you are wondering why I even wanted the 3x magnification, it’s s a simple answer. As I get older,I find myself needing more magnification for any degree of target shooting as I get closer to 100 yards and beyond. Yeah, make fun of me but in talking with a lot of 50+ year old guys, I’m not the only one. I tend to favor 1-6 and 1-8x Vortex Strike Eagles for relatively close in optics – they are light, rugged and allow me to trade off field of view and magnification.

The optics combo fits nicely on the Ace. I like the quality quick release levers they used. The levers clamp very well and have a repeatable zero when removed and re-installed.
Here the magnifier is swung out of the way for 1x viewing through the UH-1. All controls are very easy to use.

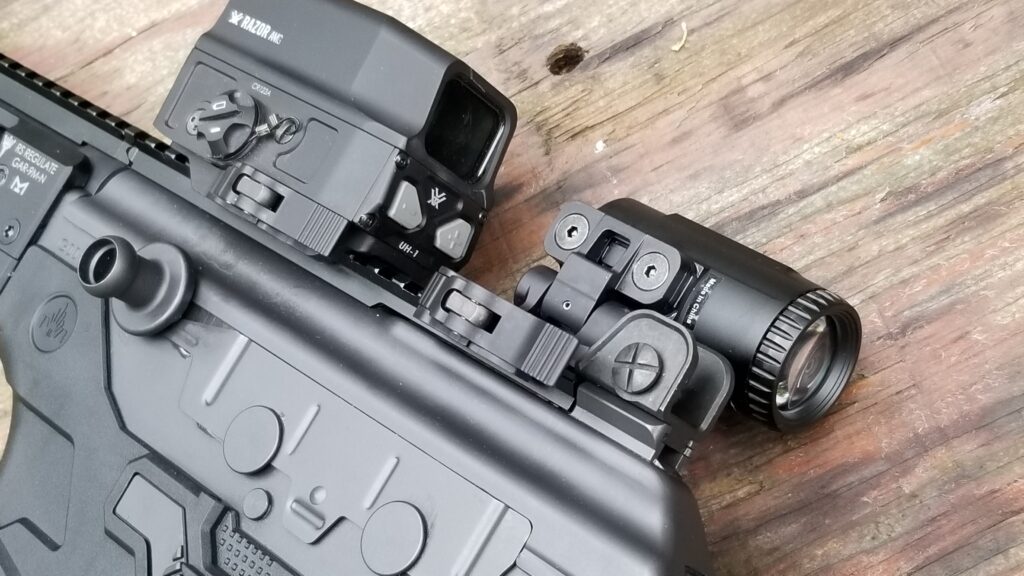
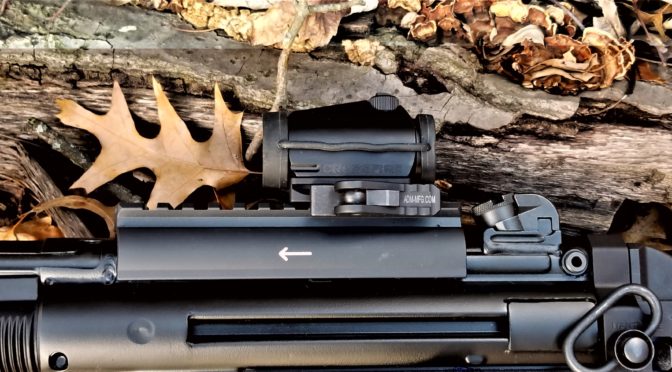
At any rate, back to the UH-1, the UH-1 itself weighs about 11oz and the Micro 3X (V3XM) magnifier adds 9.55oz. So you are looking at about 20-21oz or just over 1.25 pounds for the combination. A 1-6x Strike Eagle weighs 18.5oz and then you need to add at least a basic cantilever mount at 1.3oz, you are totalling 19.8oz.

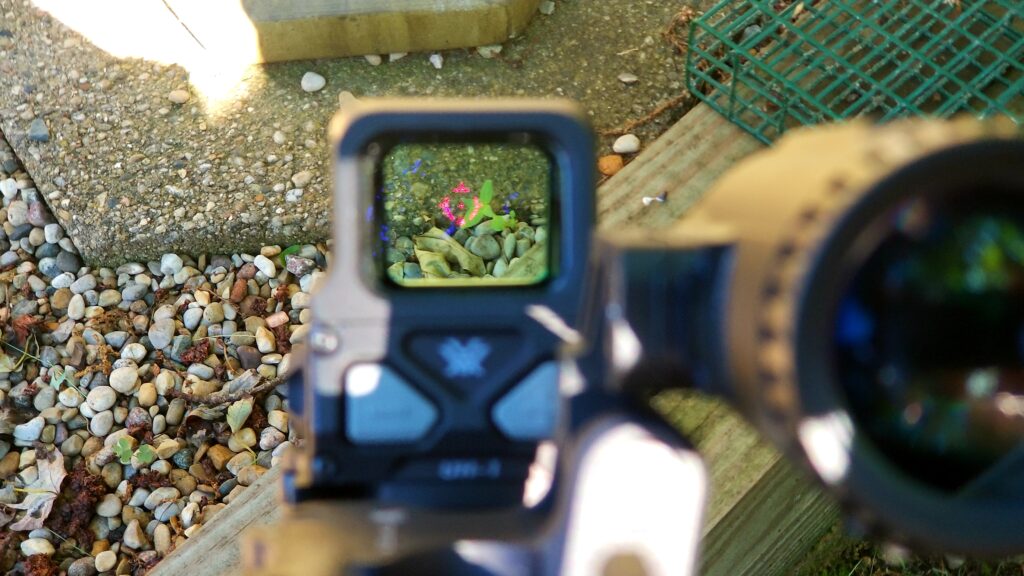
Why am I bringing this up? Some situations really require variable magnification optics and the 1-6x and 1-8x Strikefires are hard to beat. In other cases, you are expecting situations where you will need little to no magnification then the UH-1 wins hands down. Why? Target acquisition is screamingly fast and you don’t have parallax. No parallax means that no matter how you look at the projected recticle (the hologram), the recticle is on the target. With regular scopes, as your eye position changes relative to the recticle, the point of impact changes. This is one reason why a good consistent cheek weld is so important with a traditional optic. Bottom line is that holographic sights seriously rock when it comes to speed of target acquisition.

A 7.62×51 Galil Ace Is Not A Distance Weapon

Another thing to point out is that this weapon is not a target rifle by any stretch of the immagination – it’s for close in work. The 7.62×51 Galil Ace pistol has an 11.8″ barrel and that short length is really going to limit the weapon to less than 200 yards and that is just my opinion because that short length will reduce the velocity of the bullet and there will be more bullet drop at a given distance. The reason is simple – the 7.62×51 and .308 cartridges are still burning powder, generating more pressure and bullet speedwhen the bullet exits the muzzle – all that burning powder makes for an impressive muzzle flash but that’s actually a waste of powder and why it will have less velocity than a weapon with a longer barrel.

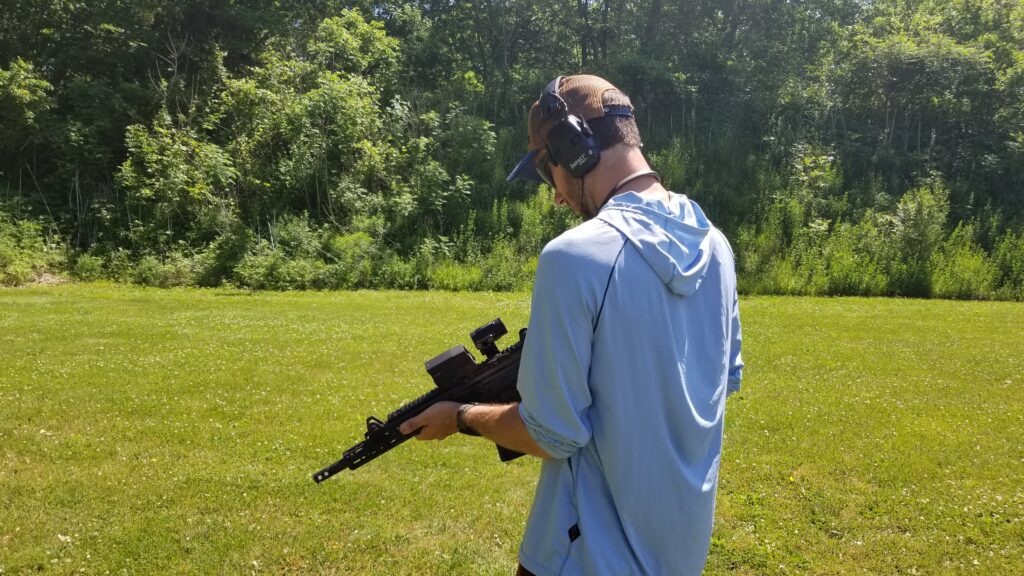
How far do I intend to shoot the Ace? Now that’s the real question and is what drove the selection of the optic. I honestly plan to shoot it under 50 yards the majority of the time. I can flip the magnifier out of the way if I don’t need it.
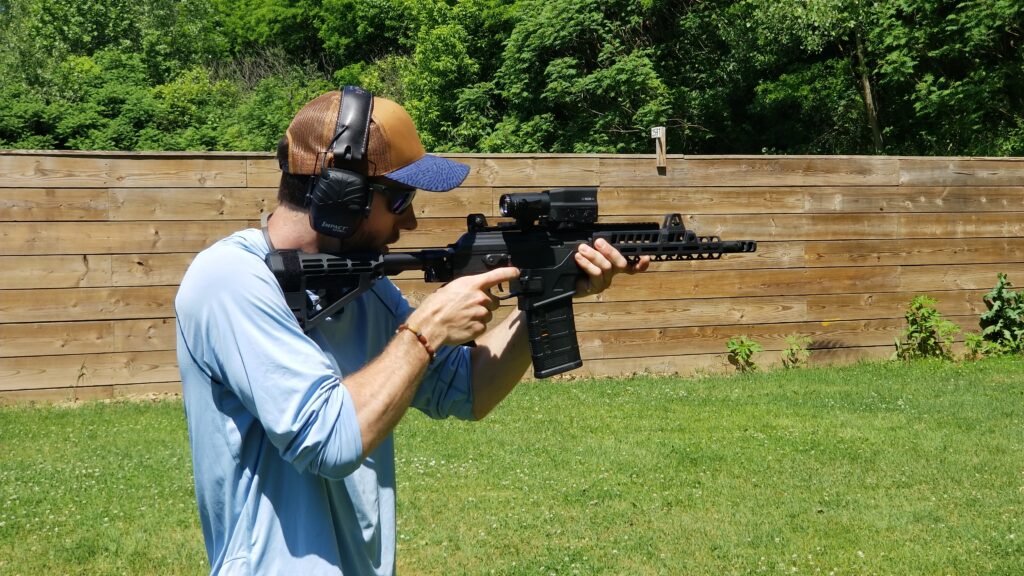
A Bit Of Range Time

How did it work at the range? It was fantastic. The Ace itself ran great with PPU M80 FMJ ammo and the optic pairing was way better than I expected. The recticle was nice and bright even during mid-day son and it was easy to swing the magnifier in and out of position. All three of us liked the Ace and optic combination. After shooting the Ace for the first time, I can definitely see why they have such a excellent reputation.

Even in close the magnifier worked nice. It still has a pretty wide field of view — 38 feet at 100 yards. I went from being cautiously hopeful to really liking the combo.
In this photo, Niko is getting ready to shoot with the magnifier swung out of the way.
I’m still trying to learn the art of getting a decent photo of a recticle. With the UH1 you have 1- brightness levels to select from and I really like it.

In Summary

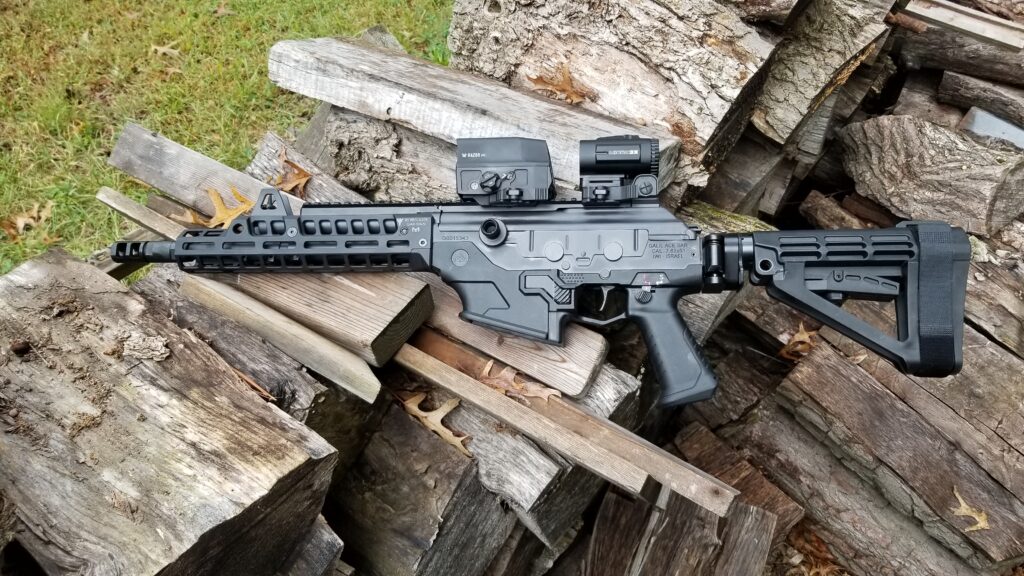
I really like the pairing of the UH-1 optic and the V3XM magnifier on my Galil Ace. The pairing works really, really well and I am already planning on getting one of the new second generation UH-1 optics for a new build I am planning – a 7.25″ 12.7×42 (Beowulf) pistol 🙂


If you find this post useful, please share the link on Facebook, with your friends, etc. Your support is much appreciated and if you have any feedback, please email me at in**@ro*********.com. Please note that for links to other websites, I may be paid via an affiliate program such as Avantlink, Impact, Amazon and eBay.


Vortex Second Generation 1-6 and 1-8×24 Strike Eagles Are On Sale At PSA With Free Mount and Shipping – Coupon Good Thu 5/13/2020

PSA has a deal going on through 5/13 (they extended the deal) on the new second generation Vortex Strike Eagle Scopes. The deal includes the optic, a Vortex 2″ cantilever offset mount (their 14919 CME-202 mount to be specific) and PSA is including free shipping. Use Coupon Code: Strike

What are the differences?

  • Has the new 5.56 calibrated reticle – the AR-BDC3
  • Integral throw lever on the zoom ring
  • Slight design change to the 1-6 body so it looks like the 1-8

Click on the photo to open the PSA page


This is a short post – you might want to snag this deal while you can. I have a first gen 1-6 and really like it. The scope has a great field of view at 1x and helps you zoom in to see things better.

I hope this helps you out.


If you find this post useful, please share the link on Facebook, with your friends, etc. Your support is much appreciated and if you have any feedback, please email me at in**@ro*********.com. Please note that for links to other websites, I may be paid via an affiliate program such as Avantlink, Impact, Amazon and eBay.


By the way, the following are first generation Strike Eagle listings at other vendors so you can compare – I have a first gen 1-6×24 and it has held up great. It’s living on my Beowulf right now so it’s up to you as to whether the new features matter enough:

American Defense Red Dot Optic Mounts Rock!

I really like Vortex Crossfire Red Dots and have been using them extensively for a while now.  They’ve survived 9mm POF-5. 12 gauge shotguns, 5.56 ARs and 7.62×39 AKs with no problem.  The only modification they need is a good quick release mechanism in my opinion.

HK SP5 with a Vortex Crossfire and an American Defense AD-T1-L STD low mount.
Lynx 12 gauge with a Crossfire and also the AD-T1-L STD low base.

The designers at Vortex are pretty shrewd.  They designed the Crossfire to share the same base as the Aimport T-1/H-1.  Because of that smart design consideration, it opens up a ton of options for you.  

My preference these days are quick release mounts made by American Defense right here in the US.   The units are made from 6061 T6 aluminum and finished with a T3 anodized unit.  They are rock solid.  I have had problems in the past with cheap import models and these are rugged and reliable.

They have a low profile unit that I like for AKs and my POF-5 where I don’t care about co-witnessing with the iron sights.  It’s their AD-T1-L STD model.

They also make a taller unit that is an absolute co-witness height for ARs.  

This is one of my Vortex Crossfires.  It has the low-profile American Defense mount on it and the co-witness model is the taller unit on the right.   The small lever you see sticking out from the main lever is the lock to prevent an accidental release.
The bases are held in place by four small screws.  Here’s the “-L” low model next to the co-witness “-10” model.
To change bases is just a matter of removing four screws.  To avoid the screws loosening, use a blue medium Loc-tite or Vibratite.  Do not use a permanent formula.
To adjust the fit, you push with one finger from the lever side and the nut is pushed out of its housing straight across.  Turn it one hex side at a time.  Turn it clockwise to make the clamp tighter or counter-clockwise to loosen it.  (righty-tighty and lefty-loosy

These American Defense mounts work like a charm and the quality is evident.  I can easily remove the red dots when I am working on a weapon or even swap optics if I so choose.  They do have a repetitive zero but I would recommend always putting it in the same rail slot for consistency.

I hope this helps you out.


If you find this post useful, please share the link on Facebook, with your friends, etc. Your support is much appreciated and if you have any feedback, please email me at in**@ro*********.com. Please note that for links to other websites, I may be paid via an affiliate program such as Avantlink, Impact, Amazon and eBay.


Picking an Optic for HK SP5K

In past posts, I have written about buying the SP5K, selecting a brace and the forearm.  Next up is the optic.  It should come as no surprise that my go to brand is Vortex Optics.

I’m a creature of habit.  Vortex products are solid and have a no-nonsense – “if it breaks we will fix it” – warranty.  Vortex does not sponsor me so I have no reason to stick with them other than they deliver.

I knew right way this was going to be a close-in weapon with distances being typically 25 yards or less but maybe stretching out to 50 yards.  It is hard to beat a red dot at those distances for rapid target acquisition.  That narrowed my options down quite a bit.

A second big deal for me is to have a wide field of view but also a relatively small dot size.  This combination rules out a lot of the micro dots that are out there as they are both tiny and have a 4 MOA dot size – that means the red dot will cover 4″ and 100 yards or about 2″ at 50.  The micro dots are okay and I rather like them on pistols but I wanted something a tad finer on this more controllable and accurate weapon.

The Vortex Crossfire Red Dot

All paths lead me to the current Vortex Optics Crossfire red dot. It has a 2 MOA dot size, is only 2.5″ long and only weighs 5.2oz.  It also has a battery life of 7,000 hours at an output setting of 5.  Note the optic has 11 levels so when you have it turned up for bright light settings, you will drain the battery faster – always keep a spare battery in the case.  I’ve had a couple of range sessions get messed up to do dead/dying batteries and no spares.

American Defense AD-T1-L STD Mount

The only shortcoming, if I can even call it that, with the Crossfire is its base.  Vortex did their homework and include both a short base and base that can lower 1/3 co-witness with AR iron sights.  The problem is that they are screwed onto the picatinny rail.  If you need to get the optic off fast, that’s not going to happen as you will need a torx driver.

I do have good news – the Crossfire has the same base geometry as the Aimpoint T-1/H-1 optics.  That’s the key right there – there are a lot of mounting options out there and after some digging, I have been using mounts from American Defense for over a year and they are rock solid.

By the way, make sure you get the right mount – American Defense makes there base for a variety of optics.  I am using the AD-T1-L STD.

Assembling the Optic on the Mount

The good news is that this is really easy.  Undo the four screws on the bottom of the Crossfire to remove the Vortex mount.  Put the American Defense mount underneath it, add a bit of Blue Loc-Tite thread locker and reinstall the screws.

Use the small Torx wrench that Vortex supplies with the Crossfire to remove the four screws so you can the swap the bases.
Here you can see the bottom of the Crossfire and how the American Defense mount will align.
You can see the Blue Loc-Tite and the installed screws.  I like to put the Loc-Tite in the holes and then install the screws.  I wiped the residue away with a paper towel after I took this photo.

The Result

The result turned out really nice.  The optic is just the right height that it is relatively close to the bore and I can get a good consistent cheek weld.


If you find this post useful, please share the link on Facebook, with your friends, etc. Your support is much appreciated and if you have any feedback, please email me at in**@ro*********.com. Please note that for links to other websites, I may be paid via an affiliate program such as Avantlink, Impact, Amazon and eBay.


The Vortex Torque Wrench Optics Mounting Kit is Wicked!!

I’m to the point with rifles that when I want to maintain accuracy, I know I need an accurate torquing driver.  For years I used the Wheeler Firearms Accurizing Torque (FAT) Wrench and it was good enough.  For about $40 I got the base unit that included a few bits and a case.  The FAT wrench had a range from 10-65 in/lbs and good enough accuracy (+/- 2 in/lbs up to 40 pounds and +/- 5% over 40 in/lbs).  My only beef with it was that the mechanical scale that shows you the torque settings was in 5 pound increments.  To get close to 18 in/lbs, for example, required going close to the middle between 15 and 20 in/lbs and calling it even.

I used the FAT wrench pretty much exclusively from October 2014 to May 2018.  It was good enough at the time – way better than going for ballpark feel “farmer tight” settings but in the back of my head though, I wanted better.

By the way, in case you are wondering why a person would get one of these torque wrenches or drivers, it’s because many torque wrenches aren’t calibrated in inch/pounds (they are often foot pounds in the US) and they may not go down as low as 10 inch/pounds (in/lbs).

My interests span many types of firearms from AKs to precision rifles.  With the latter, I own a number of sub-MOA rifles and they demand precision tools if you want repeatability and reliability.  These rifles also have very good Vortex scopes and rings as well.  If you want consistency and the rings to not shoot loose, the value of a torque wrench becomes apparent fast.

I’m a Vortex fan – there’s no two ways about.  Their optics are superb and they have an absolute “we will stand behind it no matter what with no nonsense” warranty.  Once in a while I will see guys troll the brand on Facebook but I honestly question whether they have ever actually even owned one.

Folks, I’ve owned probably 7-8 superb Vortex scopes and a ton of red dots.  I really don’t know how many red dots of various types – probably approaching a dozen.  The glass is good, the scopes are durable and do you know how many times I have used the warranty? — None.  In talking with guys that have, Vortex took care of them.

So, let me get to the point.  Vortex came out with a torque driver called the “Vortex Optics Torque Wrench Mounting Kit” that goes from 10-50 in pounds in calibrated 1 in/lbs increments that you set like a micrometer. You can get a good deal on these on Amazon – click here.

When it arrived, the first thing I noticed was the heft.  This is a solidly built metal tool that screams quality.  It comes with a few bits.  You pull the copper colored locking ring down and turn the handle to get the torque you want.  I did find that you have to push the bits in very firmly.  There is a detent ball that holds the driver bits in and it is surprisingly stout.

A nice touch is that the end of the handle has a 1/4″ socket if you want to use a ratchet wrench for higher torque applications.  For example, Vortex precision rings can go up to 50 in/lbs.  I can do that by hand most of the time but a ratchet makes it much easier.

On the topic of bits, it is a standard 1/4″ drive so you can get a large collection of bits and pair it up with this unit.  For example, I had a Home Depot Husky brand driver with a ton of bits that I picked up on sale at some point and just had sitting on the shelf.  I put it with the Vortex and its few included driver bits.  Additionally, when I am working on a firearm, I typically have my Weaver deluxe toolkit open as well.  It contains a great selection of bits that you tend to find on firearms.

There is one thing I changed though – the Vortex unit comes in a round plastic case that is nice and strong but I don’t have the patience to try and put it all back together for storage.  So, I hopped down to Ace hardware and bought a case to hold the Vortex torque driver, the Husky driver and all the bits plus I have room for more storage.  I also used some of my spare pluckable foam left over from cases to pad the bottom of the case.

In case you are wondering, here are photos of my FAT and Vortex torque drivers side by side:

In this next photo, you can see what I mean about precisely setting the torque on the wrenches.  My Vortex Precision Scope Rings specify a torque of 18 in/lbs.  With the Vortex wrench, you can precisely set it for 18 pounds.  With the FAT, it’s somewhere around 17-19 pounds plus we already know the wrench’s accuracy is limited to +/- 2 in/lbs as well.

On the topic of accuracy, the Vortex driver comes with a certificate of calibration to testing standard DIN-ISO-6789 by a gentleman named Tom on Feb 27, 2018.  You can see my specific wrench nails the accuracy – no more guesswork and no more ballpark torque setting.

In summary, I am very happy with my Vortex wrench and would recommend it to anyone doing precision firearms work, notably optics.  You can pick one up at a very reasonable price from Amazon and you ought to do it.

3/28/24 Update: I use this for any small screw or nut with a torque spec in its range. I use it for rings, handguards, you name it and always reset it to zero afterwards to keep it accurate. Beware of knock-offs that look like it – you’ll get what you pay for.

9/21/23 Update: This is still my go-to tool for scope rings. It’s still working great – just remember to reset it to zero before you put it away.


If you find this post useful, please share the link on Facebook, with your friends, etc. Your support is much appreciated and if you have any feedback, please email me at in**@ro*********.com. Please note that for links to other websites, I may be paid via an affiliate program such as Avantlink, Impact, Amazon and eBay.


Adding a Vortex 1-6×24 Strike Eagle Scope to the PTR PDWR

I really prefer an optic on my firearms at this point.  The PTR PDWR is a relative short range pistol so I figure post of my shots will be within 100 yards.  It could certainly shoot further but, based on what I have read so far, the accuracy goes down hill fast.

While some might consider a red dot, I opted for a true 1-6×24 Vortex Strike Eagle scope that has a 30mm tube.  Now, I have to admit that I have become a bit of a scope snob over the years.  I’ve destroyed cheap scopes, suffered with dark images, short eye relief and what not.  About four to five years ago I happened upon Vortex and they have been my go to brand ever since – not only is the quality there but they back it up with a no-nonsense warranty.

Folks, I’ve owned probably at least a dozen Vortex scopes and red dots.  I still have six that are on firearms that I plan to keep.  I have had zero problems – not one.  Not out of the box and not over time.   I probably will some day – stuff happens.  I’ve talked to other guys who broke their scopes (literally) or had problems and sent them in with Vortex taking care of them no questions asked.  That says a lot.

So, that brings us to the scope.  The Strike Eagle is a decent entry-level AR scope with an illuminated reticle.  I bought this scope about a year ago for a project that didn’t happen and it has been sitting on the shelf.  The good news is that Vortex now also has a 1-8×24 model.

Mounting the Scope

I used to use cheap import cantilever scope mounts but have since stopped due to screws stripping out and easily scratched finishes.  I now use Vortex mounts pretty much exclusively now as well.  I know I sound like a salesman but I really like their stuff.

You’ll notice the quality of the finish and that the parts are beefy.  You can go 18 inch/pounds on the rings and 65 inch/pounds on the rail attachment nuts.  You’ll notice that cheap scope mounts don’t publish torque specs usually because they can’t handle much consistently.

The ring caps are secured by screws that have heads for #8 Torx bits.  They go into steel threaded inserts for added strength – you will not find steel inserts in cheap mounts by the way.  At any rate, lets begin.

Safety First:  Make sure your weapon is unloaded!

As you can see in the above photo, I located the mount on the PDWR’s Picatinny optics rail a few grooves forward of the rear sight.  It was a bit of an arbitrary point.  I know I usually am near the rear plus on my past HK-style weapons I knew I might have to work around the rear sight.

I removed the ring caps using a #8 Torx bit from my Weaver screw driver set and put them in a magnetic parts tray.  I have lost little parts in the past so I am a bit paranoid now.  I use my DeWalt cordless screwdriver to do the removal work as the twisting motion of a screw driver really messes with my carpal tunnel.

Next, I place the scope on the rings and the very first thing I check is the clearance over the rear sight.  In this case you can see the scope clears it.  Years ago with my first rifle, a GSG-522, I scratched a scope by not checking that before I started screwing down the rings.

Next, I install the ring caps back on.  A time saver I do is to use the Dremel to run the screws in but there’s a trick.  Hold the screw driver lightly so it can run the screws in but the screw driver turns in your hand the second it bottoms out.  You don’t want to apply torque – just run the screws in.  I then back them off just a bit so I adjust the scope in the mount.  I also adjust them in or out slightly so I can get any gap between the ring cap and the base equal all the way around.

I then shoulder the rifle and move the scope forward and backward until I get the proper eye relief.  You want to be able to pull the weapon up quickly and see through the whole scope vs. having to move your head around to get a good sight picture.

Also, I true the scope left to right.  If I were doing a precision rifle, I would do it differently but with the PDWR, I eyeballed the reticle relative to the position of the rifle to level the scope and then tightened down the ring caps.  I like to carefully take them down snug all the way around and then set the torque at 18 inch pounds with a Wheeler Fat Wrench – note that Fat Wrench does not have a clear 18 in/lbs setting so I try to get it close.

Once you are set, you also need to torque down the mount’s rail attachment screws to 65 inch pounds.

I was taught to never store a torque wrench under load so once I was done, I then adjusted the Fat Wrench back to zero.

At that point you are done.  While setting up the optic and installing the brace, I noticed some tuning was needed and that will be the next blog post.

Click here for the post about installing the SOB arm brace

Click here for the post about selecting and purchasing the PDWR


If you find this post useful, please share the link on Facebook, with your friends, etc. Your support is much appreciated and if you have any feedback, please email me at in**@ro*********.com. Please note that for links to other websites, I may be paid via an affiliate program such as Avantlink, Impact, Amazon and eBay.


Installing the CNC Warrior Picatinny Rail Scope Mount for the M92 PAP Pistol

Another great accessory for the Yugo M92 or M85 PAP is the slick picatinny rail kit that CNC Warrior sells.  This thing is a breeze to install and is the best means I have seen for adding an optic to the M92. Because the screws are inserted from the rail side, it is superior to other products that require the screws to come in from underneath the dust cover and risk being hit by the bolt carrier.

All you need is the pistol, a drill and some cutting oil to do the installation.

SAFETY STEP – MAKE SURE THE WEAPON IS UNLOADED.  NEVER ASSUME THAT IT IS – VERIFY IT IS UNLOADED BEFORE YOU BEGIN WORK.

1.  This is the top thick hinge of the M85/M92 dust cover.  See the faint circles?  Those are the spot welds and they are very hard!  Do not drill into them!  The new CNC Warrior mount has four holes and you only need to use two of them.  The reason there is four is so you can pick the best two that get you around/away from the spot welds.  Please note that my rail is only silver because it was a brand new design and they hadn’t applied a finish yet.  If you order one, you will get a black rail!

DSC_0241

DSC_0243

2.  Here you can see my fancy high tech tools.  My Ryobi drill, Tap Magic cutting oil to lubricate the drills and the taps.  Note, you will need to buy a tap handle if you do not have one.  Do not take the short cut of trying to start the tap with a regular socket or open end wrench.  You really want the tap to be firmly held so you can tap the threads at a right angle to the surface of the hinge.  Also, see that little black cylinder?  That is a drill guide that you put into the hole you select to guide the drill bit to the right place on the hinge.  Be sure to use the cutting oil!

DSC_0244

DSC_0245

DSC_0246

DSC_0247

DSC_0248

DSC_0249

DSC_0250

DSC_0255

DSC_0257

3.  As an aside, I blasted the mount and then sprayed on flat black Molyresin and baked it.  You’d never know it came to me unfinished.

DSC_0268

DSC_0269

DSC_0275

By the way, pictured above is a cheap Harbor Freight air brush.  I used to buy a bunch of them at a time and then throw them away when they hard problems.  I now use a Paasche H series air brush and am much happier with it.

4.  After you clean up the chips and are ready to do the final screwing of the mount, be sure to apply Blue Loctite so it does not come loose.

DSC_0276

DSC_0278

That’s it!  The mount is solid and it holds my Vortex Sparc red dot just great.  Note our quick takedown pin to make it easy to remove the cover and get the optic out of the way.

DSC_0332

10/27/18 Note:  Vortex discontinued the Sparc red dot.  They sell a great 2 MOA red dot called the Crossfire that I really like.


If you find this post useful, please share the link on Facebook, with your friends, etc. Your support is much appreciated and if you have any feedback, please email me at in**@ro*********.com. Please note that for links to other websites, I may be paid via an affiliate program such as Avantlink, Impact, Amazon and eBay.