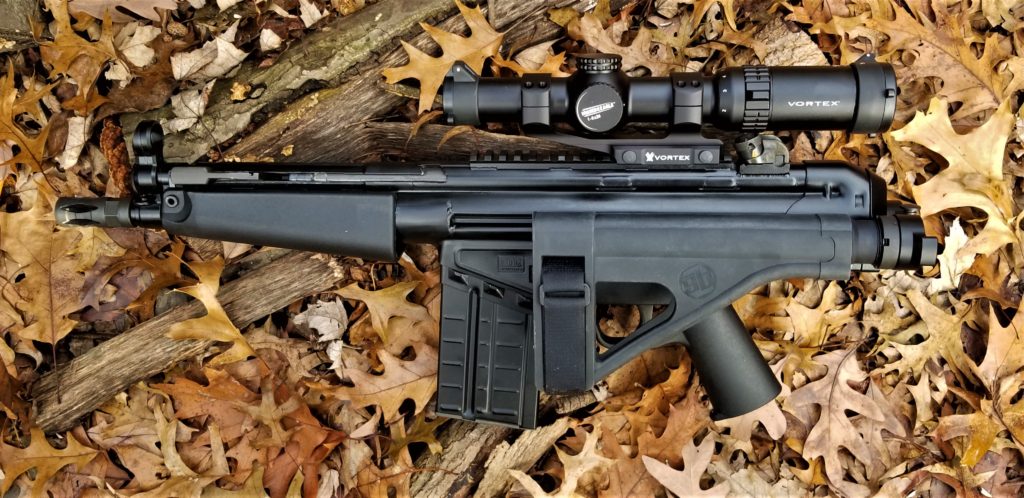
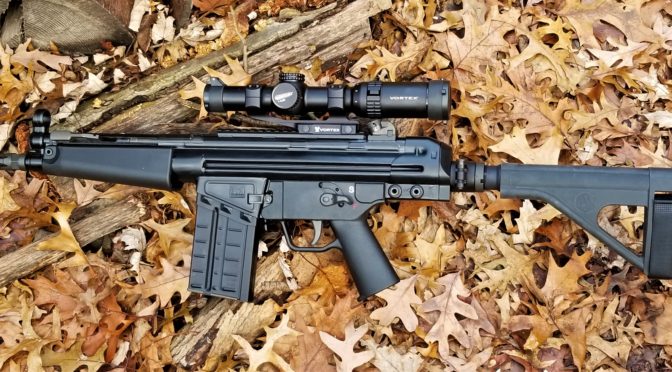
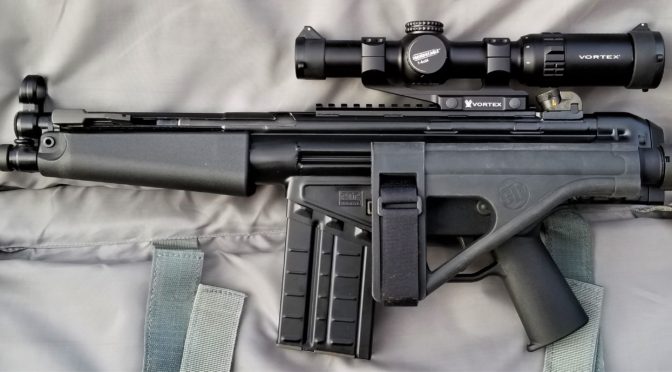
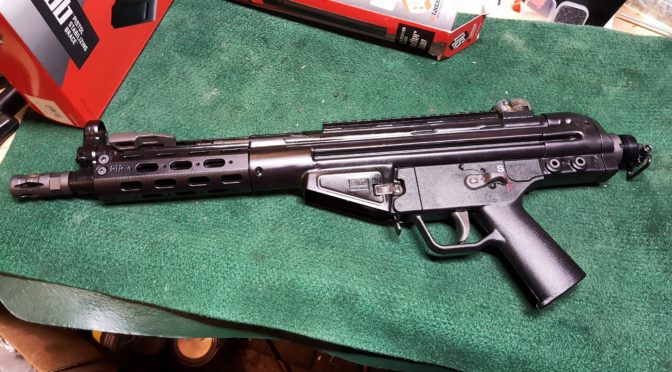
The lighting was right, the leaves were on the ground and it was a great chance to get some new photos of my PTR 105 PDWR pistol. This big pistol is the interesting brain child of PTR. It’s essentially a cut down HK 91.
The PTR 105 configuration has a PTR metal handguard installed. After messing with it some, I decided to install an MP5 handguard as I like the angle on the MP5 handguard more. This also means I should have just bought the PTR 110 that comes with that handguard.
Now, the only problem is that the MP5 handguard is not as rigid as I would like. I’ll experiment some with different handguards in the future.
The PTR 195 and 110 are big pistols at 23.5″ overall, 8.5″ barrels and weigh about 8 pounds. I wanted to install a brace but needed to be mindful of Michigan’s odd 26″ maximum pistol length law. This isn’t legal advice, but my understanding is that the Michigan State Police say that a pistol with a brace is measured from one end to the other in the minimum operable condition. So, by installing a side folder, I could have a brace for when I wanted to use it but also had the minimum operable length at 23″. What you see in the photo is an SB Tactical BTFA folding mechanism, buffer tube and SOB stock. When open, the weapon measures 32.5″.
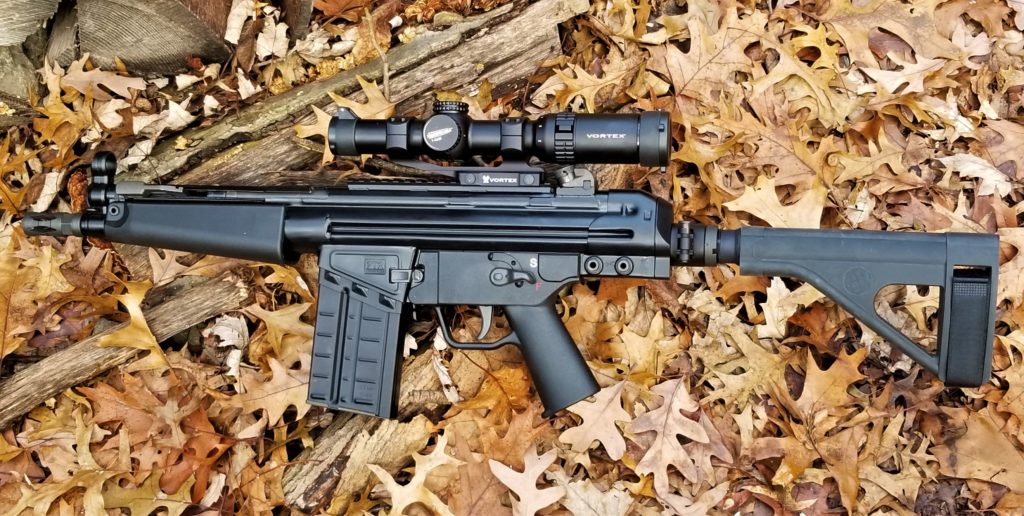
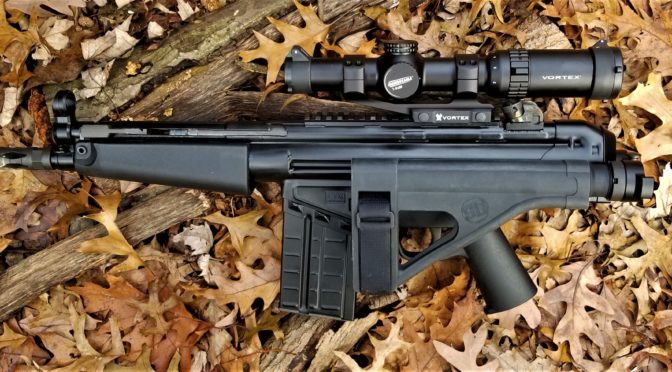
Thanks to the BTFA folding mechanism, I can swing the SOB brace to the left and it locks open. This keeps the brace out of the way of the ejection port. You can configure the BTFA to go either left or right.It definitely has clean lines.The PDWR definitely likes the PPU battle packs of .308 FMJBT 145 grain ammo. It works great and is plenty accurate within 100 yards. I’ll need to try and shoot the PDWR for accuracy some day and see what it can do.
As you can see, the brace is folded open and operating side of the PDWR is nice and clear of any obstructions.
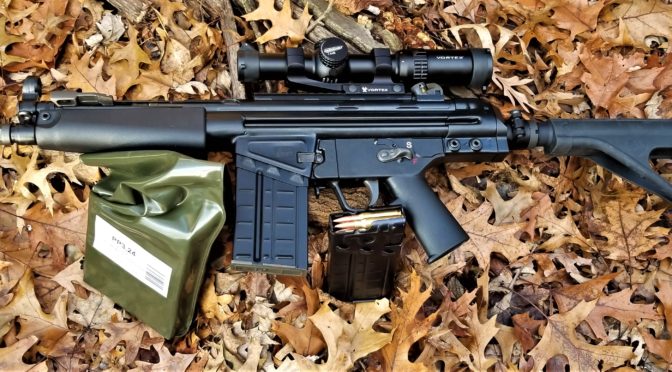
Given the PDWR is chambered in .308 and uses 20 round HK G3 magazines, that is a lot of firepower in a small package. Overkill? Sure. Fun at the range? Absolutely.
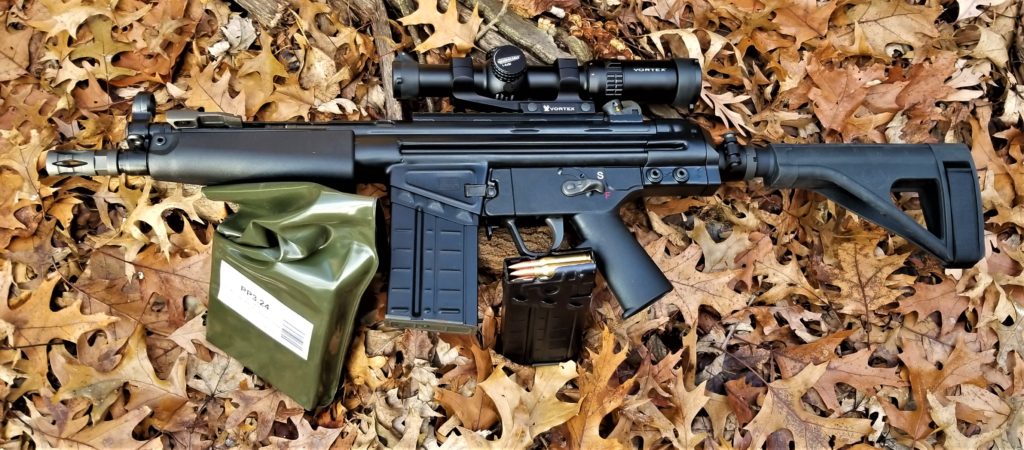
Plain and simple, it ran like a top. We did not have one single problem of any kind. We were running surplus aluminum mags from Robert RTG. The ammo was Prvi Partizan (PPU) .308 M80 145gr FMJ. I’ve had great luck with PPU ammo over the years and have run a variety of their calibers and loads. This .308 ammo comes in a heavy plastic sealed “battle pack” that SGAmmo sells. If you don’t know SG Ammo, they are a great ammo supplier that is a family run business. I buy most of my ammo from them and have nothing but good things to say about them.
We sighted the Vortex 1-6×24 Strike Eagle scope in at at about 25 yards and then just had fun. We weren’t shooting for accuracy but were having fun shooting “zombies” as we called them with the big Splatterburst 18×24 silhouette targets that I really like.
This time out, I was using my new Howard Leight electronic ear muffs. These are cool because they have directional sound amplification for normal sounds – like talking with your friends. When you shoot, they immediately cut the sound off and protect your ears. This is a real nice feature for me as I can’t hear a thing when I wear ear muffs due to my hearing loss and have to take them off to talk to someone. At any rate, these Howard Leights have a great reputation and I must say that I am very happy with them.
One of my brother-in-laws was wearing my new MPOW headphones and thought they did a really good job on cutting down the sound. These are a bargain price at Amazon and work way better than my old cheap Silencios in terms of hearing protection.
Now we did have a funny lesson learned – see how short the barrel is relative to the Caldwell front bag? Yeah, if you get the muzzle brake over that bag and fire, it will rain some kind of brown pebbles (corncob media maybe?) down on you as the muzzle blast shreds the top of the bag 🙂 I have to confess, I am the one who did it and had to use duct tape to seal the top up so we could use it the rest of the day.
The whole point of the range visit was for me any my two brother-in-laws to have fun and function test the PDWR. It performed admirably – neither of them are shooters and, for Jamie, this was his first time shooting anything – I think he did great.
Not one single problem – no feed issues, no ejection issues – it just performed great through about 200 rounds.
At any rate, I did learn a few things:
It upheld the good opinion I have of PTR firearms.
The SOB brace can handle .308 recoil just fine and lines the eye up for the scope great.
As expected, the Vortex scope was great.
The weight of the PDWR absorbs quite a bit of recoil making it a pleasant shooter but there is still recoil that moves you off target with any kind of rapid fire.
The muzzle brake does an okay job but I am going to check into alternatives to cut the recoil down further. The bird cage design is okay but there are definitely better designs out there. The PDWR has a 5/8″-24 TPI threading so there are definitely options.
The PDWR handguard moves forward and backward more than I care for. I am going to experiment on tightening it up or either moving to a DTAC handguard or back to the original PTR handguard. Note – the PDWR uses a MP5-style handguard.
Bottom line, I am very happy with the PDWR and plan to work with it some more on the above plus see how it does as I work my way back to 100 yards. Everything in this sessions was at 25 yards or less and I am curious how it performs as the distance grows. I would recommend the PDWR to anyone looking for a short HK91/G3-type roller lock for short distance use.
The last step in preparation for my first trip to the range was to clean and lubricate the PTR PDWR. One thing I learned with my for PTR was that proper lubrication makes a world of difference and I could tell in working the PDWR that it definitely need lubricating so here’s what I did.
Also, if you need any parts diagrams or more detailed questions, be sure to read the HK G3 Armorer’s Manual.
In general, you know you need to lubricate all moving parts of the firearm such as the trigger and bolt. So let’s start with the trigger.
Lubricating the Trigger Pack:
I employ a very old rule of thumb – If it slides, grease it. If it rotates, oil it. That simple rule has helped me take care of a ton of rifles and pistols over the years and can help you too. [Click here for more on lubricating a firearm in general]
I used a small squeeze bottle filled with Mobil 1 Full Synthetic 5W-30 to reach in and lubricate all places where a part rotated on a pin. I then worked the various parts of the trigger pack to make sure the oil go to where it needed to go.I used Tetra Gun Grease to liberally coat the top of the hammer.
Lubricating the Bolt Assembly:
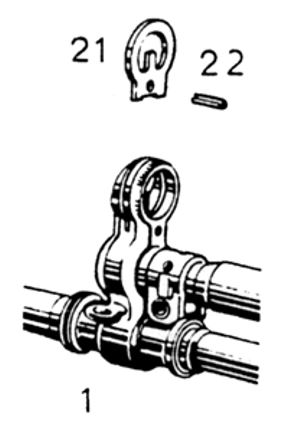
Now the HK bolt assembly is involved and the following is a diagram from the HK G3 Armorer’s Manual:
In short, I oiled all of the internals but did not fully disassemble the bolt. I put the assembly into a non-marring vise, twisted the bolt head off and then reached in with the squeeze bottle to lubricate the rollers, locking piece, firing pin, etc.
After that I applied a thin coat of Tetra Grease to the bolt carrier body and put more on the bottom and sides of the bolt where it would be making contact with the receiver and riding over the hammer.
Cleaned the Barrel:
One thing I always do before heading to the range is to clean the barrel. If you look down in most, you will see varying levels of crud ranging from oil to dust to stuff left over from machining. In the case of the PDWR, the barrel looked pretty good but I still wanted to clean it.
Over the years I have tried all kinds of different approaches to cleaning barrels. The fast and easy one I use now on non-precision firearms that just need a touch up is a bore snake. These things are caliber specific and give you everything you need in an “all in one approach”. I spray CLP on the snake and down the barrel then I drop the weighted cord down the barrel and pull the snake on through. I repeat this until the bore is shiny bright.
Note, there are a ton of brands including cheap generic imports. I’ve used Hoppes and Sage & Braker brands with no problems at all.
At this point the PDWR was ready for the range. The action felt and sounded good.
Okay, when I received the PTR PDWR I did a quick inspection and noticed two small problems that needed fixing. I’m a bit disappointed that PTR quality control did not catch these two items but they are small issues.
First, the front sight blade was bent sideways – to canted, bent. I’m not sure how this happened but thankfully the HK-style hooded sight uses a sheet metal insert for the front post. The following illustration is from the HK G3 Armorer’s Manual:
I figured the easiest thing to try was to simply reach in with pliers with padded jaws and see if I could simply bend it to the right to straighten it. Out came my purple art pliers 🙂 I literally bought these things back in 2013 for some kind of work that required padded jaws. I don’t recall what and as odd as they look, they have held up to light use. My only complaint is that the nylon jaw covers can slide off under very much stress but that was not an issue here at all.
They actually fit perfectly and I was able to bend the sight post straight. Plan B would be to take a pair of needle nose pliers and slide rubber fuel line hose over the jaws. My one concern would be whether the relatively thin jaws could adequately support the post during bending. The art pliers below fit and did the job perfectly.
Fixing a Bur on the Cocking Lever Tube
The second problem I needed to fix was a steel bur on the tip of the cocking handle catch. It bugged me every time my hand hit it and should not have been there. Here it is in the next photo – sharp and pointing out.
In terms of the repair itself, first, I reached in with a Dremel using a small medium grit sanding drum and the tool on slow speed to knock down the sharp irregular edge from the inside. Take your time – remove a little and look. Your goal is always to remove as little material as possible. As the old saying goes, it is easier to take more off than try and put it back on 🙂
In the next photo, you can see the “point” has been sanded down but there is still material on the surface:
Next, I used a 120 grit small flap sander in my bench mounted rotary tool to sand down that lip. I could have used my Dremel but I use the little flap sander attachment so much that I routinely leave it in my bench tool.
Again, the trick is to go slow and take your time. After that, I used compressed air to blow out the tube and receiver and then used carb cleaner spray to “wash out” anything that might have stuck and blew it out one last time. The bur was gone and now it was on to lubricating the weapon.
(Note, that last photo above has the bolt back in when I was testing it later).
I really prefer an optic on my firearms at this point. The PTR PDWR is a relative short range pistol so I figure post of my shots will be within 100 yards. It could certainly shoot further but, based on what I have read so far, the accuracy goes down hill fast.
While some might consider a red dot, I opted for a true 1-6×24 Vortex Strike Eagle scope that has a 30mm tube. Now, I have to admit that I have become a bit of a scope snob over the years. I’ve destroyed cheap scopes, suffered with dark images, short eye relief and what not. About four to five years ago I happened upon Vortex and they have been my go to brand ever since – not only is the quality there but they back it up with a no-nonsense warranty.
Folks, I’ve owned probably at least a dozen Vortex scopes and red dots. I still have six that are on firearms that I plan to keep. I have had zero problems – not one. Not out of the box and not over time. I probably will some day – stuff happens. I’ve talked to other guys who broke their scopes (literally) or had problems and sent them in with Vortex taking care of them no questions asked. That says a lot.
So, that brings us to the scope. The Strike Eagle is a decent entry-level AR scope with an illuminated reticle. I bought this scope about a year ago for a project that didn’t happen and it has been sitting on the shelf. The good news is that Vortex now also has a 1-8×24 model.
Mounting the Scope
I used to use cheap import cantilever scope mounts but have since stopped due to screws stripping out and easily scratched finishes. I now use Vortex mounts pretty much exclusively now as well. I know I sound like a salesman but I really like their stuff.
You’ll notice the quality of the finish and that the parts are beefy. You can go 18 inch/pounds on the rings and 65 inch/pounds on the rail attachment nuts. You’ll notice that cheap scope mounts don’t publish torque specs usually because they can’t handle much consistently.
The ring caps are secured by screws that have heads for #8 Torx bits. They go into steel threaded inserts for added strength – you will not find steel inserts in cheap mounts by the way. At any rate, lets begin.
Safety First: Make sure your weapon is unloaded!
As you can see in the above photo, I located the mount on the PDWR’s Picatinny optics rail a few grooves forward of the rear sight. It was a bit of an arbitrary point. I know I usually am near the rear plus on my past HK-style weapons I knew I might have to work around the rear sight.
I removed the ring caps using a #8 Torx bit from my Weaver screw driver set and put them in a magnetic parts tray. I have lost little parts in the past so I am a bit paranoid now. I use my DeWalt cordless screwdriver to do the removal work as the twisting motion of a screw driver really messes with my carpal tunnel.
Next, I place the scope on the rings and the very first thing I check is the clearance over the rear sight. In this case you can see the scope clears it. Years ago with my first rifle, a GSG-522, I scratched a scope by not checking that before I started screwing down the rings.
Next, I install the ring caps back on. A time saver I do is to use the Dremel to run the screws in but there’s a trick. Hold the screw driver lightly so it can run the screws in but the screw driver turns in your hand the second it bottoms out. You don’t want to apply torque – just run the screws in. I then back them off just a bit so I adjust the scope in the mount. I also adjust them in or out slightly so I can get any gap between the ring cap and the base equal all the way around.
I then shoulder the rifle and move the scope forward and backward until I get the proper eye relief. You want to be able to pull the weapon up quickly and see through the whole scope vs. having to move your head around to get a good sight picture.
Also, I true the scope left to right. If I were doing a precision rifle, I would do it differently but with the PDWR, I eyeballed the reticle relative to the position of the rifle to level the scope and then tightened down the ring caps. I like to carefully take them down snug all the way around and then set the torque at 18 inch pounds with a Wheeler Fat Wrench – note that Fat Wrench does not have a clear 18 in/lbs setting so I try to get it close.
Note, I have to buy all of my parts – nothing here was paid for by sponsors, etc. I do make a small amount if you click on an ad and buy something but that is it. You’re getting my real opinion on stuff.
In the last blog post, I talked about the specifications and ordering the PTR PDWR. Even before it arrived, I knew I wanted to add a brace. My plan was to use PTR railed handguard and I had a “wait and see” attitude towards the brake.
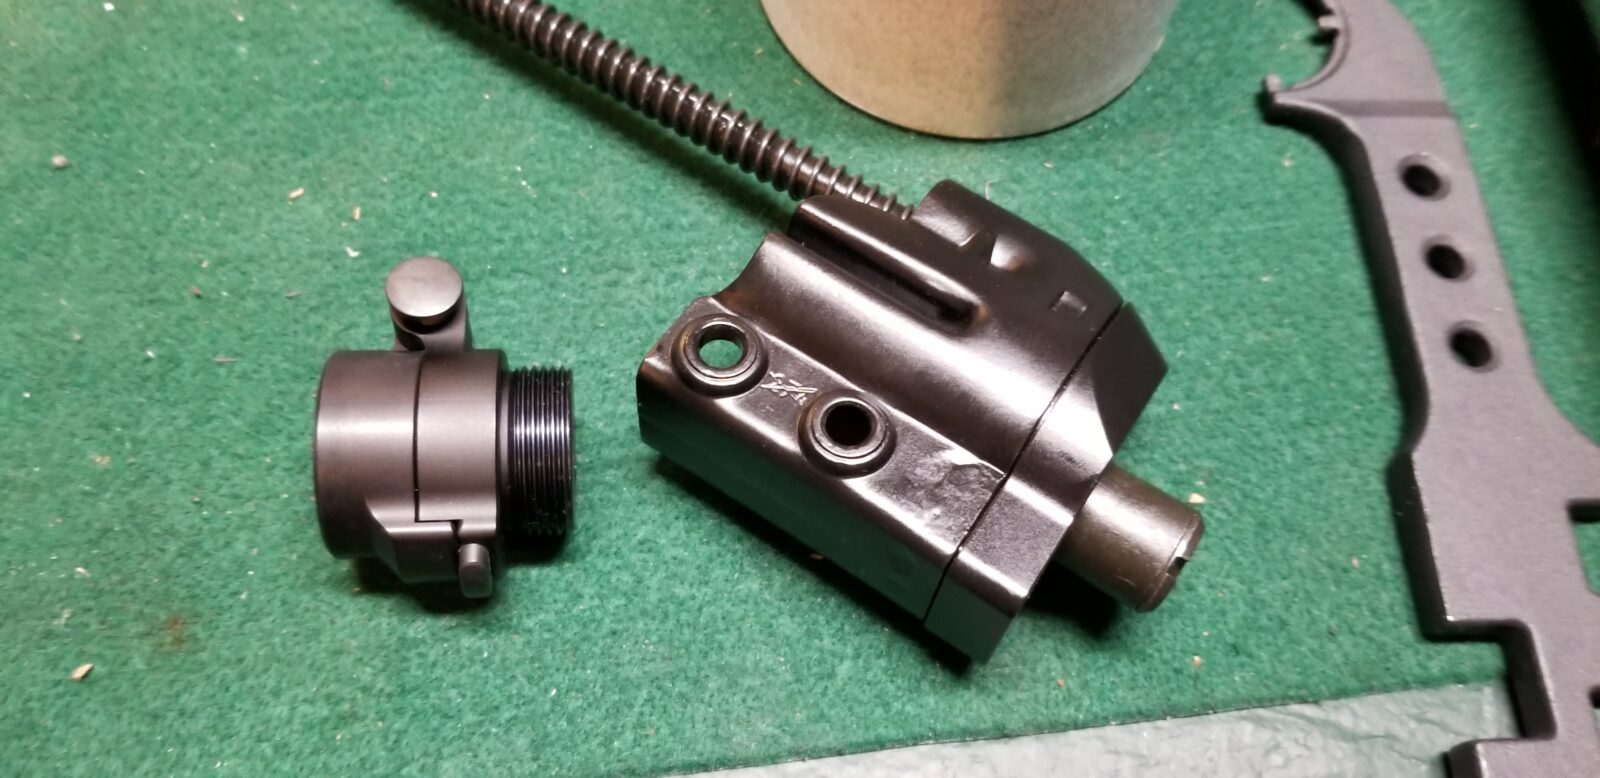
So, the first step was to remove the existing end cap. In HK-type weapons is is held in place by two push pins that are simply pushed back out. You’ll notice that one side is relatively flat:
The other side will be protruding and this is the side that you push on and will remove the pins from the other side:
You then wiggle the end cap and push it off the end of the stamped receiver. It will look like this:
I then secure the end cap assembly in a vise to make working on it easier.
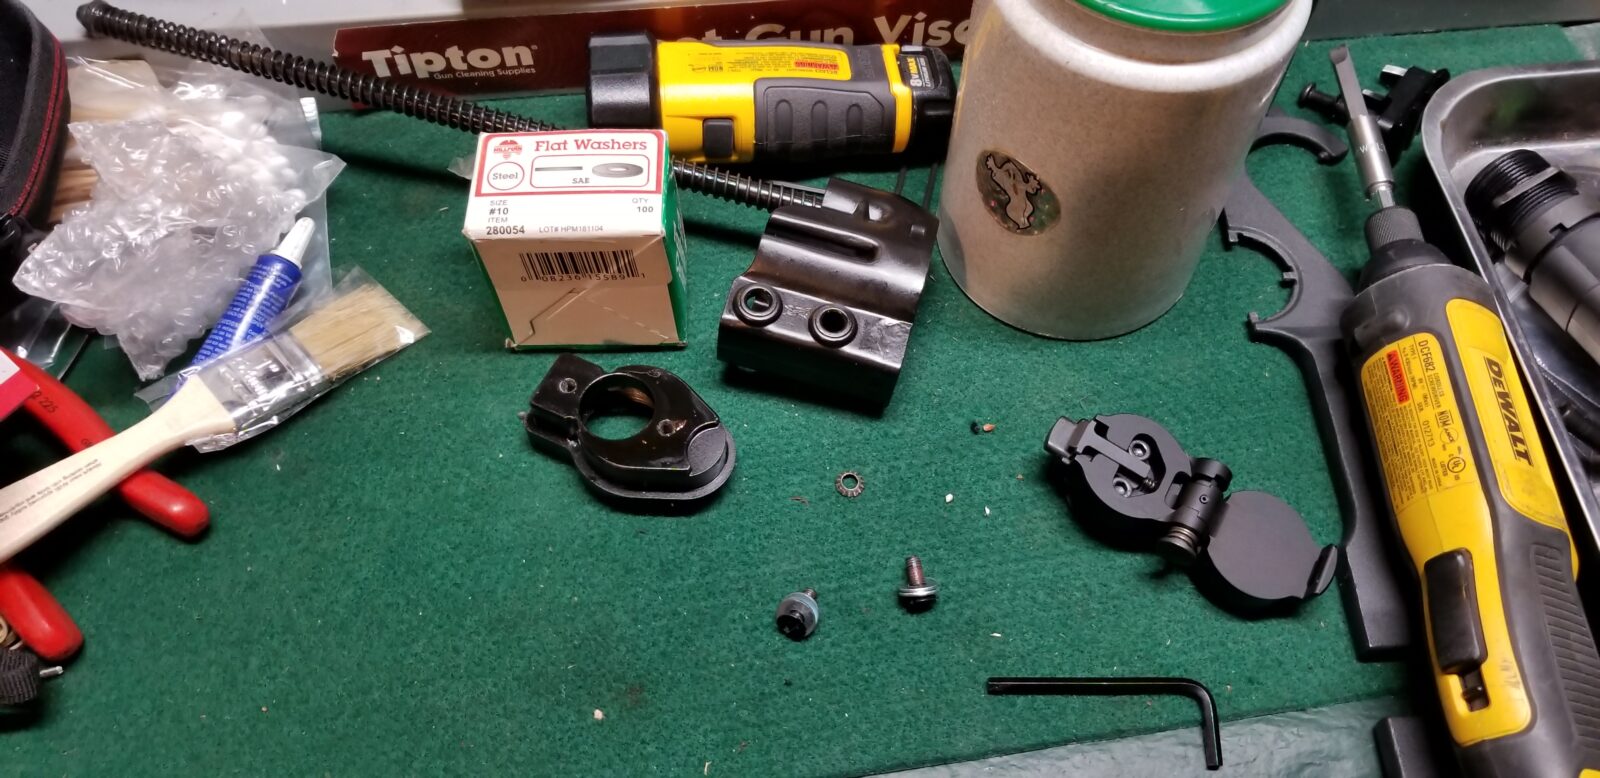
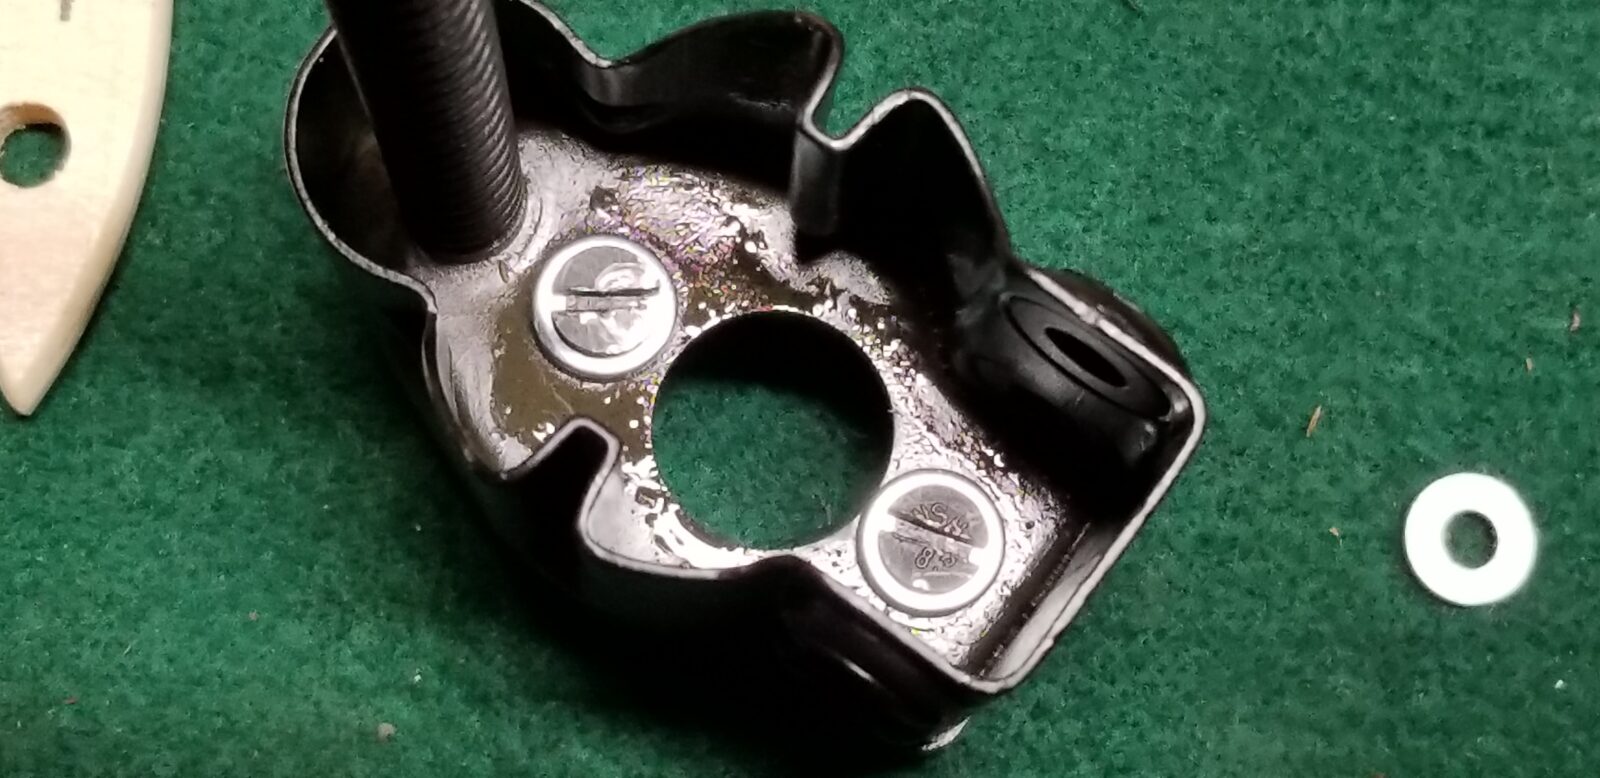
In the next photo you can see how the tube and sling really are like a small stub of an AR/M4 buffer tube complete with an indexed end plate to keep it from rotating and a castle nut. The swivel is separate from the tube and is threaded into place so unscrew and remove it first.
In the next photo, you can see the lighter grey castle nut on the black tube. The light grey surface you can see in the otherwise black cap is the plate you will need to fish out after you back off the castle nut.
To remove the tube itself, you do the exact something you would on an AR. Use a castle nut wrench to loosen the castle nut and then thread it back out of the way. Then pull the end plate out of the receiver so it can rotate and then turn the tube to remove the assembly.
In the next photo you see the castle nut wrench on the tube with the sling. I realized shortly after this was taken that I probably needed to get the sling off before I could back out the tube – that is why I said remove the sling first.
As written above, you will need to pull the end plate out of receiver to be able to turn the tube. With the plate pulled out from the receiver, the tube simple unscrews. If it does not want to unscrew, make sure your plate is out of the way. Also in the next photo, you can see the very secure mount that the sling screw threaded into. That was well thought out.
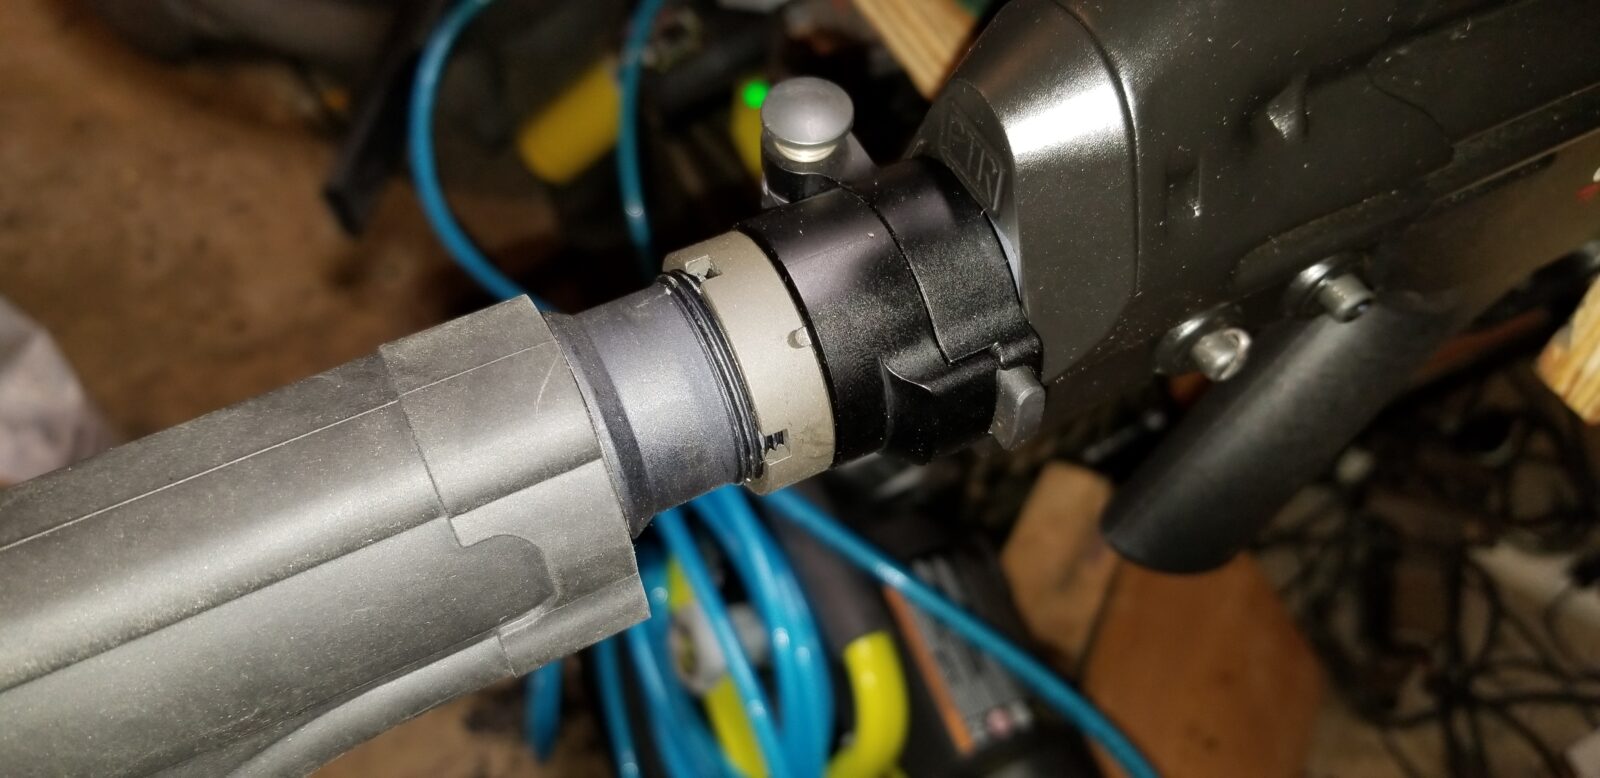
Next, I wanted a folding mechanism to be inline between the receiver cap and the buffer tube. SBTactical makes a very sturdy 6061 aluminum unit known as the “BTFA”. To install it meant the tower that the sling swivel screwed into needed to be removed. It adds about 1.1″ to the length when installed.
The tower is held in place by two screws inside the cap. Mine were beat half to death – the assembler at PTR must have figured nobody would ever notice. He/she was wrong and I was disappointed that they had installed the screws with an undersized blade screw driver and tore up the slots.
Once I removed the tower, I just inserted three #10 washers between each of the screws so the aluminum end cap and the sheet metal assembly would all come back together nice and snug. If I wanted to take the time, which I didn’t have, I should have found some of the correct size button head socket screws and replaced the beat up countersunk originals. So, what I had looked like this and the screws were a bear to get in (Yes, I did use the correct size screw driver to put them back in.)
Putting it Together
The BTFA install is very simply. Use the supplied allen wrench to loosen the disc assembly that is the threaded plug that goes into the receiver. Do not remove them all the way – you just want to loosen it up so you can screw in all the thread and adjust the folder to the direction you want. I wanted the stock to swing to the left to lock out of the way of the ejection port. You then tighten down the allen screws back down.
I installed an SB PDW tube and an SB SOB (love that acronym) brace. Now, to install the tube, I reused the PDWR’s end plate to and a new castle nut that came with the tube.
To install the buffer brace on the tube, I spray silicone on the tube so it can slide on way easier plus it makes it easier to true up the brace if it needs to move a little bit one way or the other.
One comment about the end result, it is a solid folder but the combination of tube and folder is long. I will investigate other options and post the results in the future.
The Handguard
Now, in terms of the handguard, I thought I was going to use the original PTR model you see in the photos above. It’s a little small left-to right in my hands so I actually wound up changing to a US made wide tropical forearm. It’s a tad looser than I would care for and will post updates about that later. I may stick with the existing wide tropical unit or move to a DTAC like I have on my POF-5.
12/17/18 Update: I’ve now tried three or four models of MP5 handguard and they all wiggle. I’m either going back to the PTR unit or a DTAC. The DTAC handguard on my POF-5 has been solid as a rock.
As you know, I really like AK firearms but I also like firearms based on the HK roller lock design. Maybe 3-4 years ago I owned a PTR-KMF4R and it was very accurate and I also learned a lot in terms of maintenance, tuning, etc. Of course, I had to mess with it and add a PRS stock, new trigger, and scope but it really was very accurate. As my interests changed, that rifle was sold to fund other projects but I was impressed.
With the reversal of the ATF position on arm braces, I again found myself looking at heavy big pistols that needed braces. I really like the maneuverability of these weapons. While looking at options for my next project, I ran across the PTR-105, also known as the “PDWR“. This thing’s specs rock and I figured out quickly this was my next project.
8.5″ heavy bull barrel with a 5/8×24 thread and 1/10 twist
23.5″ overall length
8.1 pounds empty
Milled aluminum handguard that uses proprietary removable rails. Note, the PDWR actually uses MP5 handguards so you have a ton of options if you want to try different models.
It has both button and paddle mag releases
The trigger is a lawyer friendly 9-10 pounds
7.5″ welded top rail for optics, which means no additional optic rail is needed as you typically do with non-PTR firearms.
It has a swivel cap on the end that is actually a short tube that is the same diameter and pitch as an M4 buffer tube – which means putting on a buffer tube for a brace would be easy plus not come loose.
To this, I should add that you are basically looking at a cut down semi-automatic HK G3/91. This means you have tons and tons of options for magazines and parts not to mention know how. I buy my HK-related parts from either HKParts.net or RobertRTG.
Also, for those of you unfamiliar with PTR – they have been around for a while now. They are currently made in Aynor, South Carolina with their original tooling and designs coming from an HK G3 licensed factory in Portugal that they bought in 2003. This helped them really get started and they have been refining their products ever since.
So, I did some shopping around and ran into Kelley Enterprises via Gunbroker. They had great reviews there so I also visited their website and met Chuck, the owner.
Chuck is one of those guys who really knows guns, likes his job and likes to talk with folks. I called him once to talk about MP5 clones and had a great experience with that (which is a blog series for another time) and then when I wanted to find out about this PDWR, he gave me a great price.
Folks, how often do you run into somebody who does exactly what he says, follows up and even sends texts with all the tracking info? I have nothing but good things to say about Chuck and have now ordered two roller locks from him (this PDWR and a POF-5). You can either visit his website, email or call him at (305) 923-6560.
Chuck shipped the rifle to my FFL – Scott Igert of Michigan Gun Exchange. Another man of integrity and deep knowledge that I profoundly respect and recommend to anyone who is looking for an FFL in the Southwest Michigan or Northwest Indiana area or is considering buying one of the many unique firearms that passes through his shop in Benton Harbor, MI.
So, I ordered early in the week, Scott had it by Friday and I was there on Sunday to pick it up. The two first things I noticed were the weight and the big magazine for holding the .308 (7.62×51) rounds.
I’ll tell you what I did to the pistol in the next post but I will say this – it ran like a top. Not one single problem after almost 200 rounds but that is a story for another day.