Okay, when I received the PTR PDWR I did a quick inspection and noticed two small problems that needed fixing. I’m a bit disappointed that PTR quality control did not catch these two items but they are small issues.
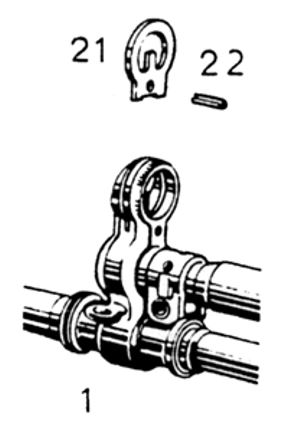
First, the front sight blade was bent sideways – to canted, bent. I’m not sure how this happened but thankfully the HK-style hooded sight uses a sheet metal insert for the front post. The following illustration is from the HK G3 Armorer’s Manual:
I figured the easiest thing to try was to simply reach in with pliers with padded jaws and see if I could simply bend it to the right to straighten it. Out came my purple art pliers 🙂 I literally bought these things back in 2013 for some kind of work that required padded jaws. I don’t recall what and as odd as they look, they have held up to light use. My only complaint is that the nylon jaw covers can slide off under very much stress but that was not an issue here at all.

They actually fit perfectly and I was able to bend the sight post straight. Plan B would be to take a pair of needle nose pliers and slide rubber fuel line hose over the jaws. My one concern would be whether the relatively thin jaws could adequately support the post during bending. The art pliers below fit and did the job perfectly.


Fixing a Bur on the Cocking Lever Tube
The second problem I needed to fix was a steel bur on the tip of the cocking handle catch. It bugged me every time my hand hit it and should not have been there. Here it is in the next photo – sharp and pointing out.

In terms of the repair itself, first, I reached in with a Dremel using a small medium grit sanding drum and the tool on slow speed to knock down the sharp irregular edge from the inside. Take your time – remove a little and look. Your goal is always to remove as little material as possible. As the old saying goes, it is easier to take more off than try and put it back on 🙂

In the next photo, you can see the “point” has been sanded down but there is still material on the surface:

Next, I used a 120 grit small flap sander in my bench mounted rotary tool to sand down that lip. I could have used my Dremel but I use the little flap sander attachment so much that I routinely leave it in my bench tool.


Again, the trick is to go slow and take your time. After that, I used compressed air to blow out the tube and receiver and then used carb cleaner spray to “wash out” anything that might have stuck and blew it out one last time. The bur was gone and now it was on to lubricating the weapon.
(Note, that last photo above has the bolt back in when I was testing it later).
Please share the link on Facebook, Forums, with colleagues, etc. Your support is much appreciated and if you have any feedback, please email us in**@*********ps.com. If you’d like to request a report or order a reprint, please click here for the corresponding page to open in new tab.