Tag Archives: tool

How to level a scope reticle

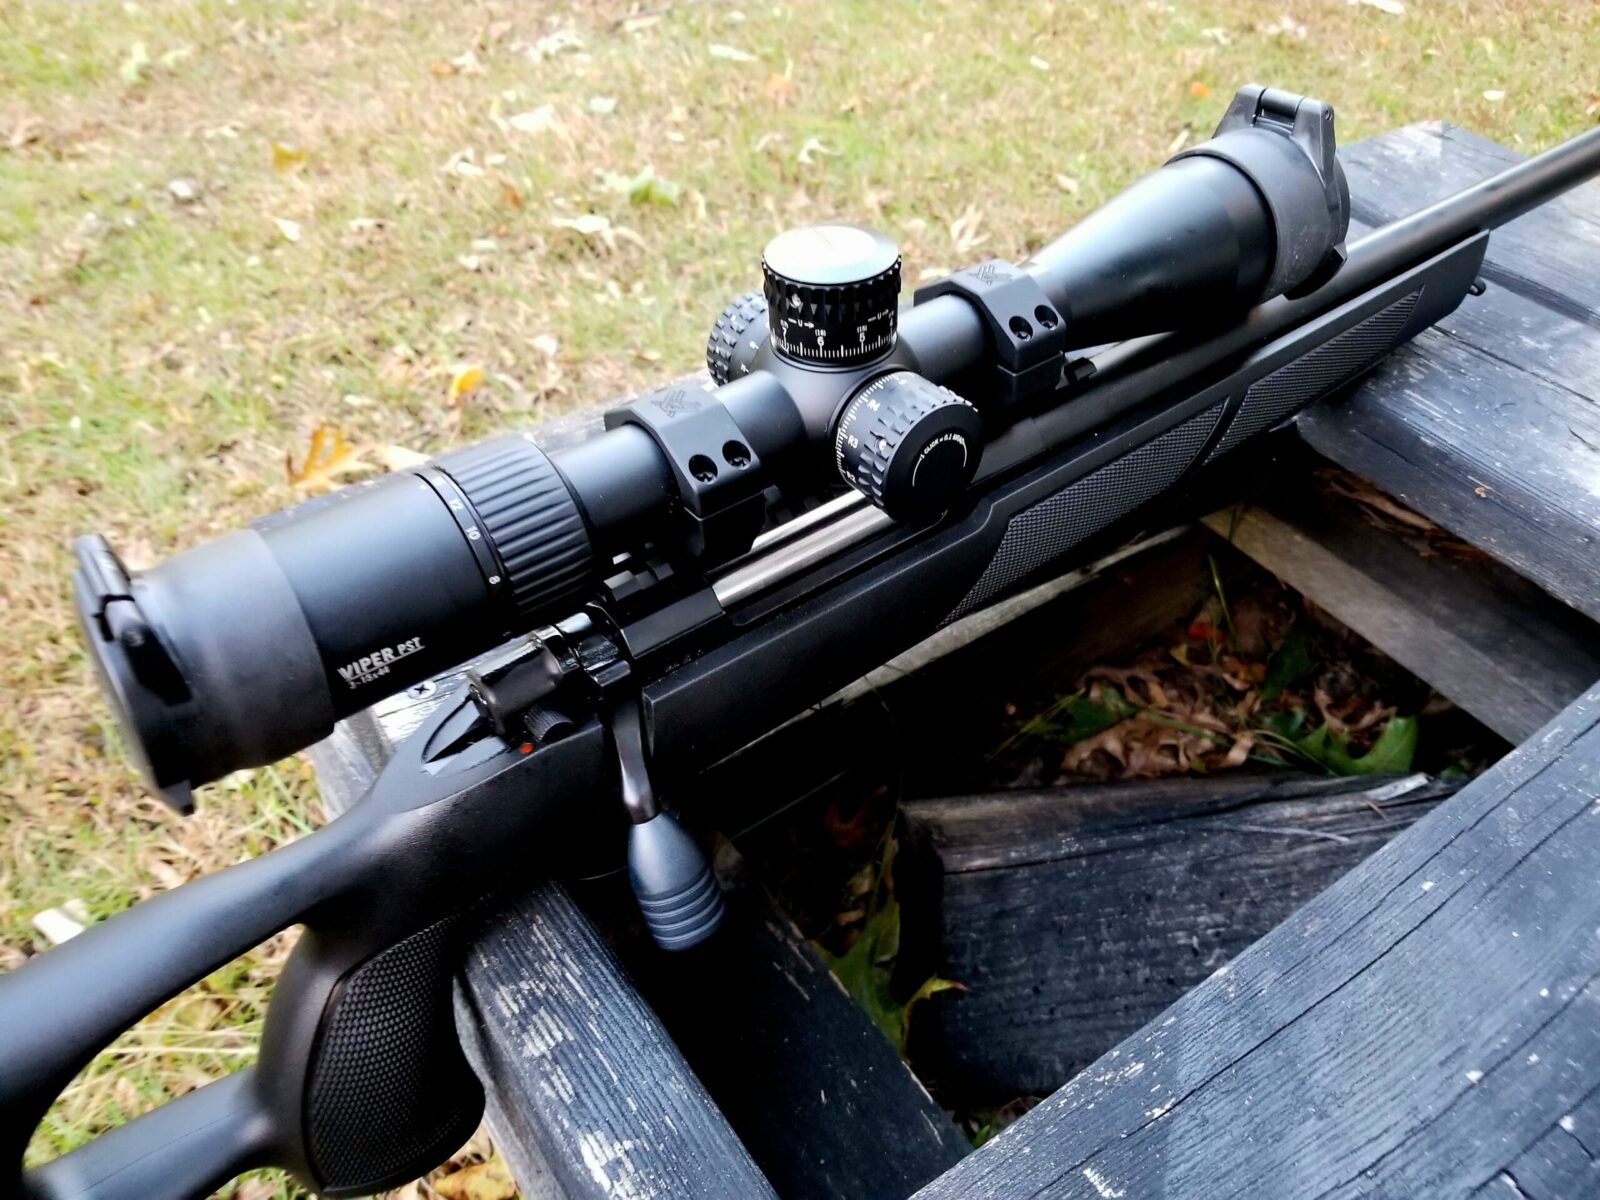
First off, I better explain that a recticle is the formal name for the cross-hairs or series of fine lines that are inside a scope that you use to aim with. There are a ton of different ones out there and one thing you want to do is to get them level with the rifle.

Let’s start with why this matters

The reason for this doesn’t affect the old traditional cross-hair designs but it does the ones that have additional marks to help you better determine the range and the necessary hold based on Mil-Radians (Mils) or Minutes of Angle (MOA).

These are examples of reticles found in a very interesting post about the topic on Wikipedia.

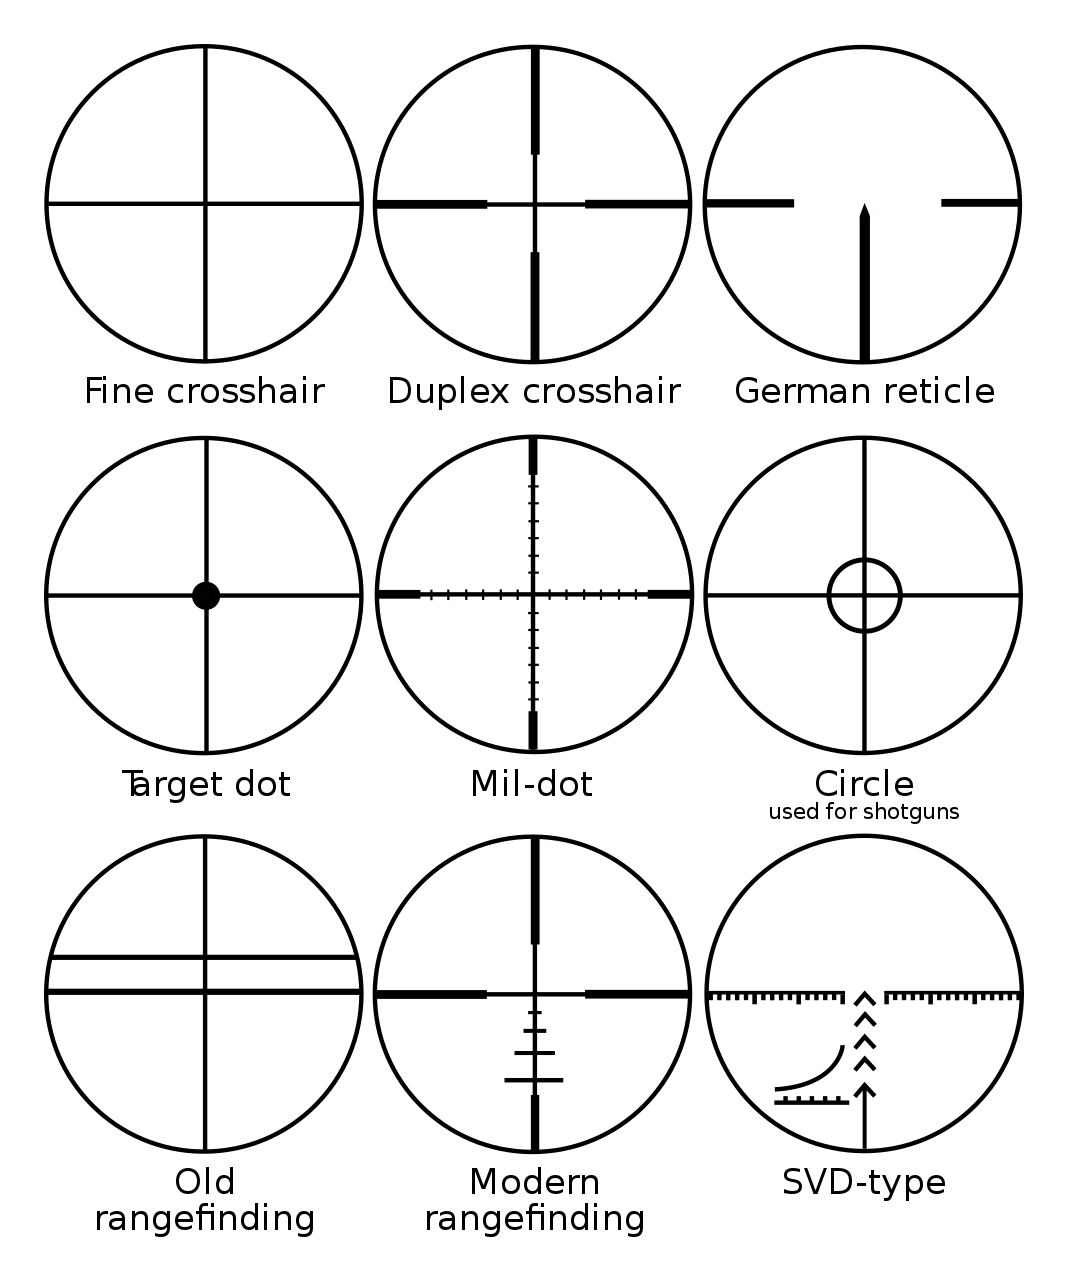
If you search, there are tons and tons of posts about different types of reticles and how to use them. The important point I want to make is that for any of these more modern reticles with additional lines to help you accurately, the horizontal lines must be parallel with the rifle.

How do you level a reticle?

The first way is the old fashioned “eyeball” method. Hold the rifle and make sure the top of the receiver is as level as possible (meaning the rifle is not tilted left or right), look through the scope and adjust it in the rings until it is true to the top of the receiver and then start tightening down the rings while confirming nothing shifts. It’s not the most precise method but it does work, I’ve done a ton of rifles that way, but there is another approach using levels.

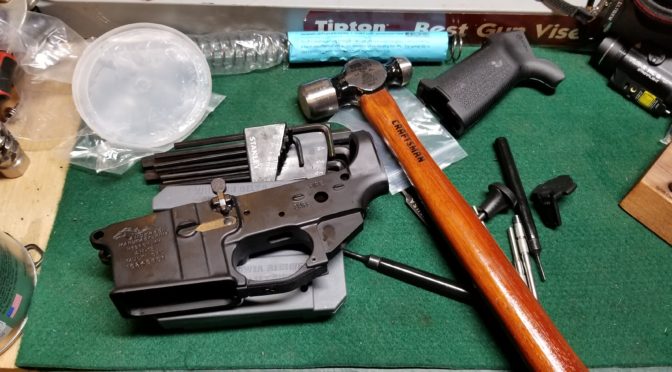
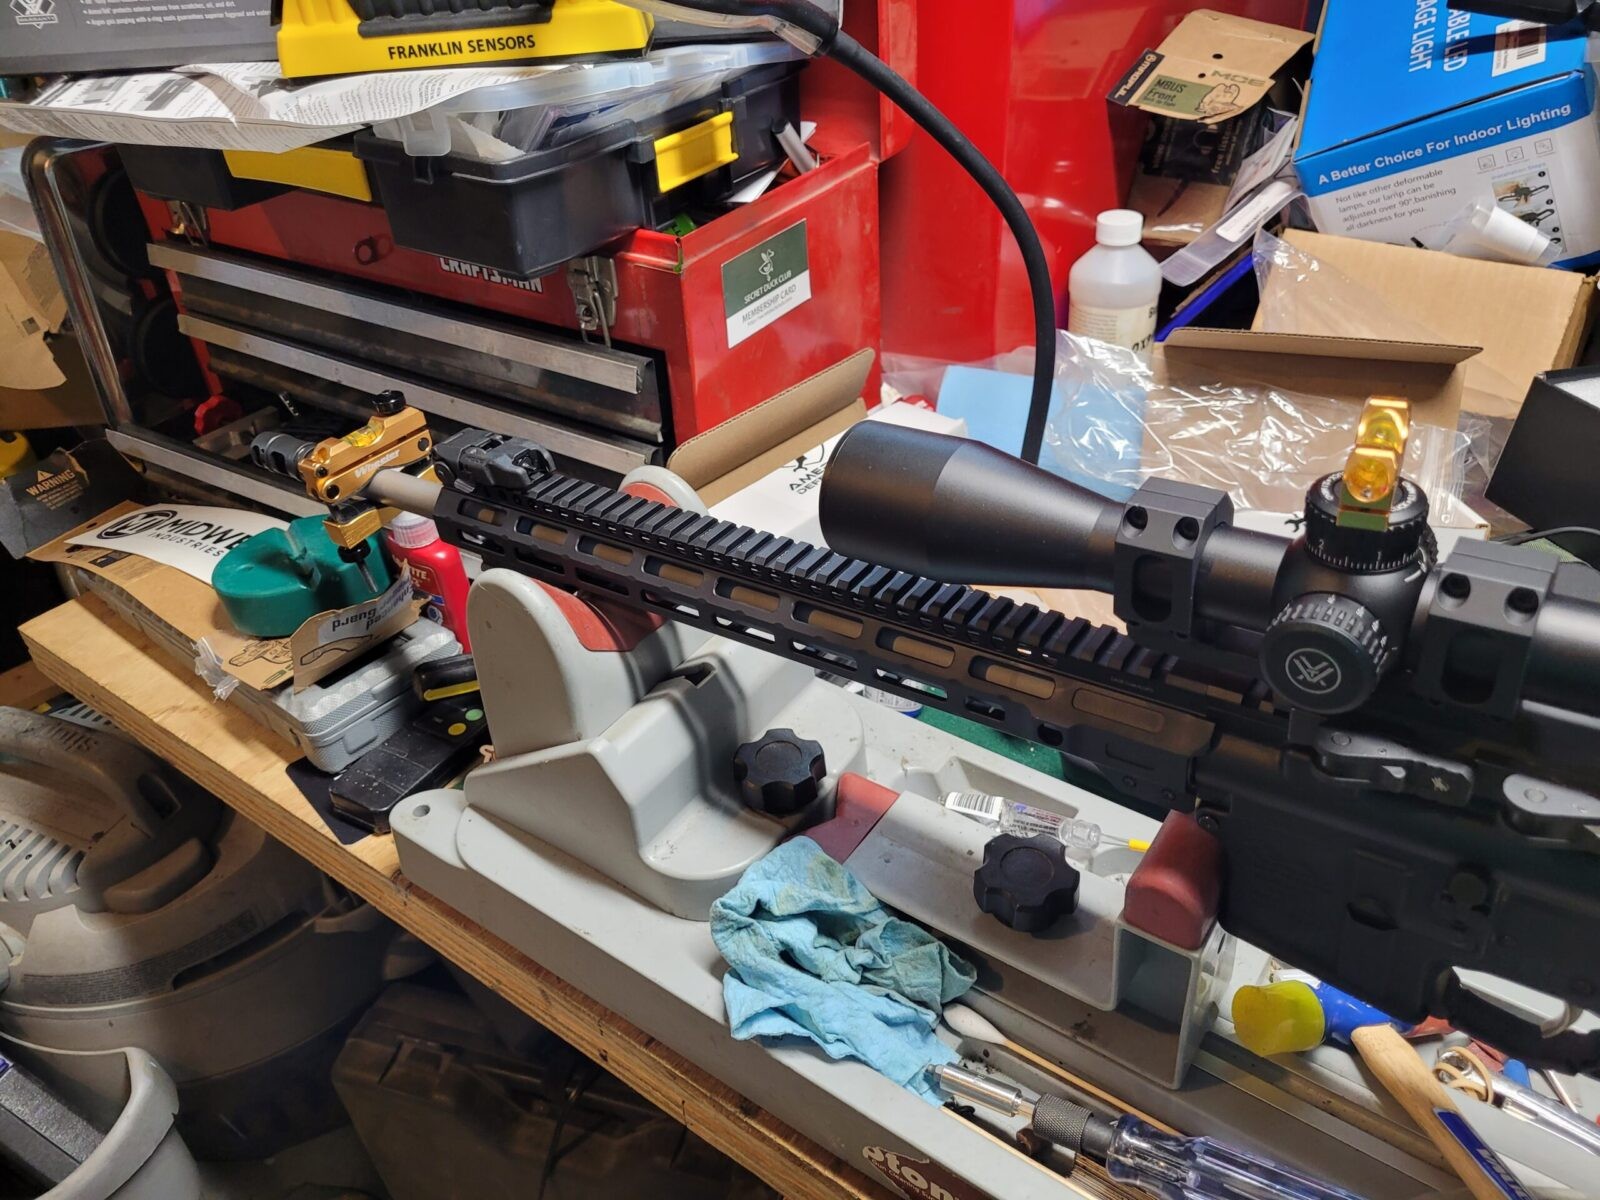
In it’s most form, you put a small level on the top rail or flat spot of your recever, tilt it until it is level and then put the level on the top turret and adjust the scope until it matches. Having something to hold the rifle in place while you work really helps as does having a second level so you can both confirm the receiver and scope are level as you work. You can often find single vial levels at hardware stores or through industrial supply houses. The one negative to this approach is that the levels can slide off if you don’t have things secure. I like to use a Tipton Pro Rifle Vise to hold the rifle in place while working.

Wheeler Engineering does offer a basic level set that works. I don’t use it though because it’s rear receiver piece has a magnet to secure it and that will not work in an AR or other weapon that is made from aluminum and not steel. For this reason, it wasn’t something I could use.

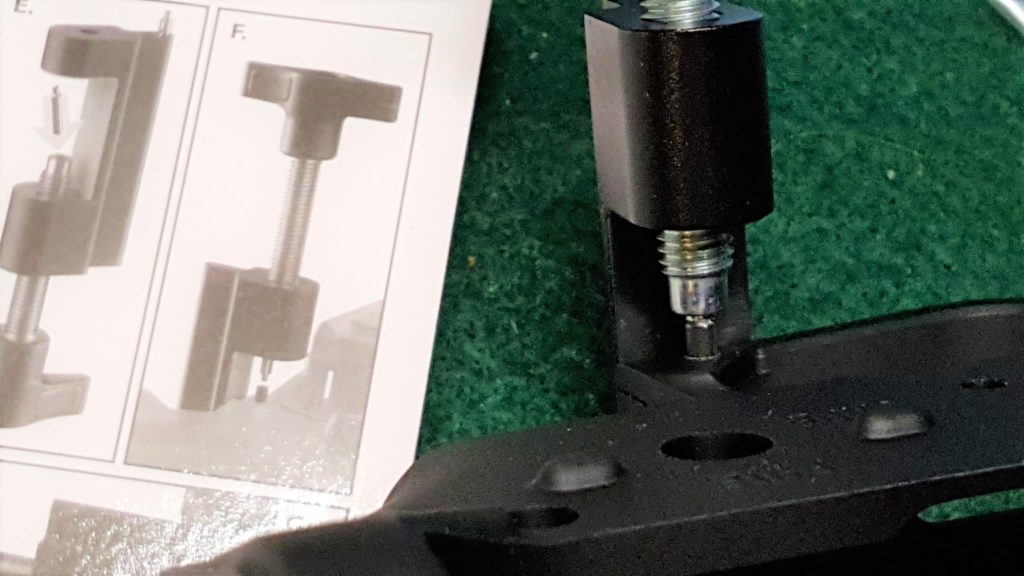
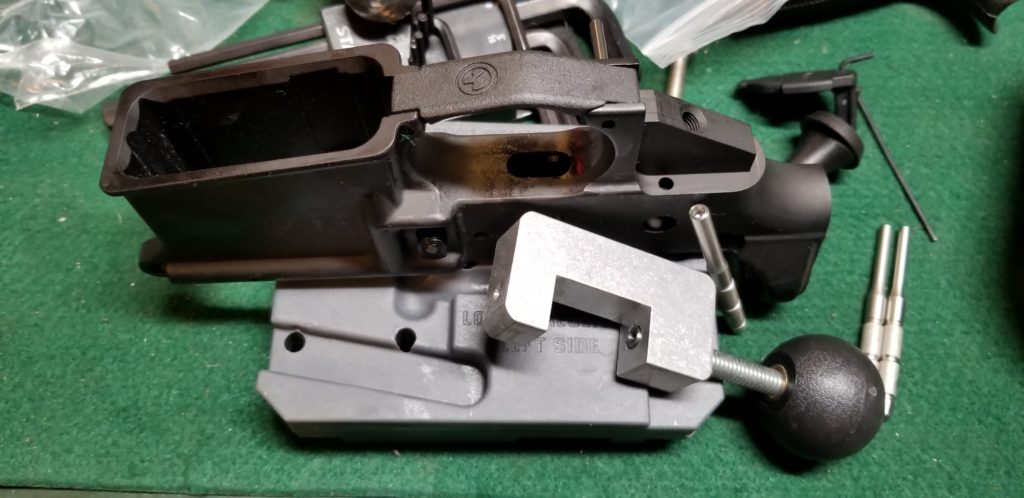
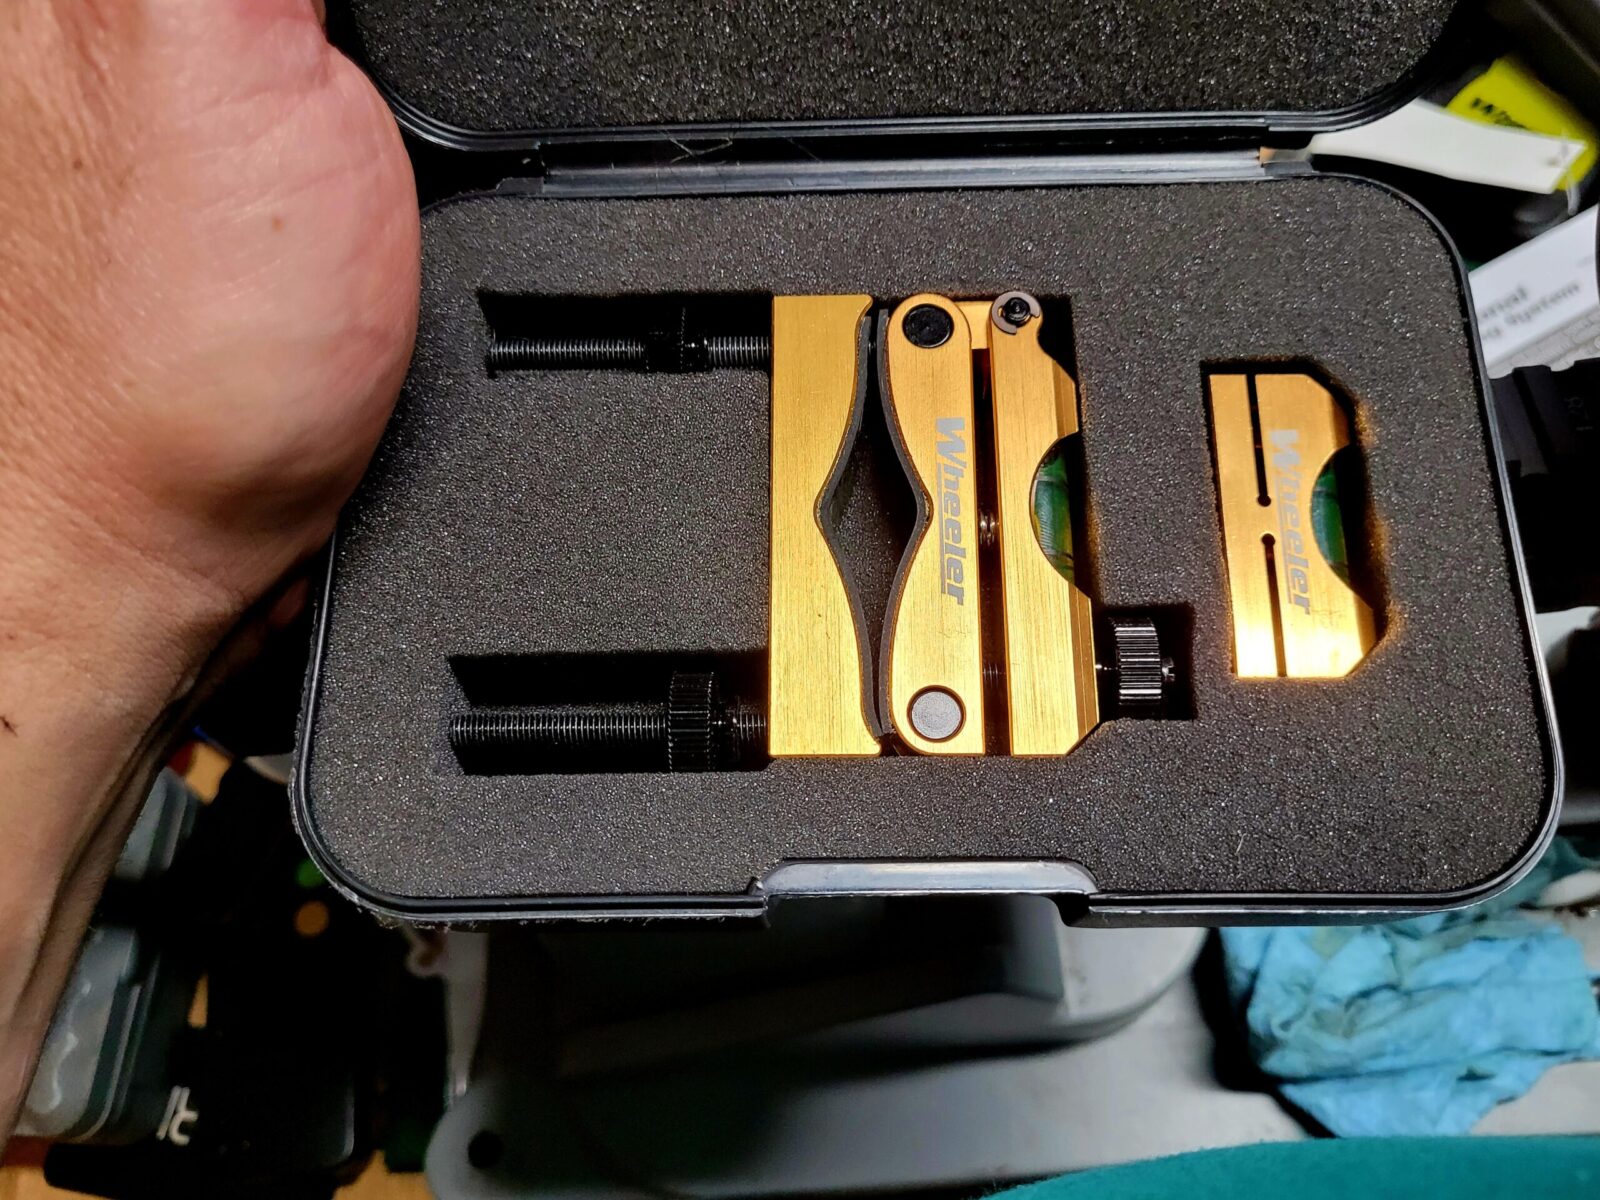
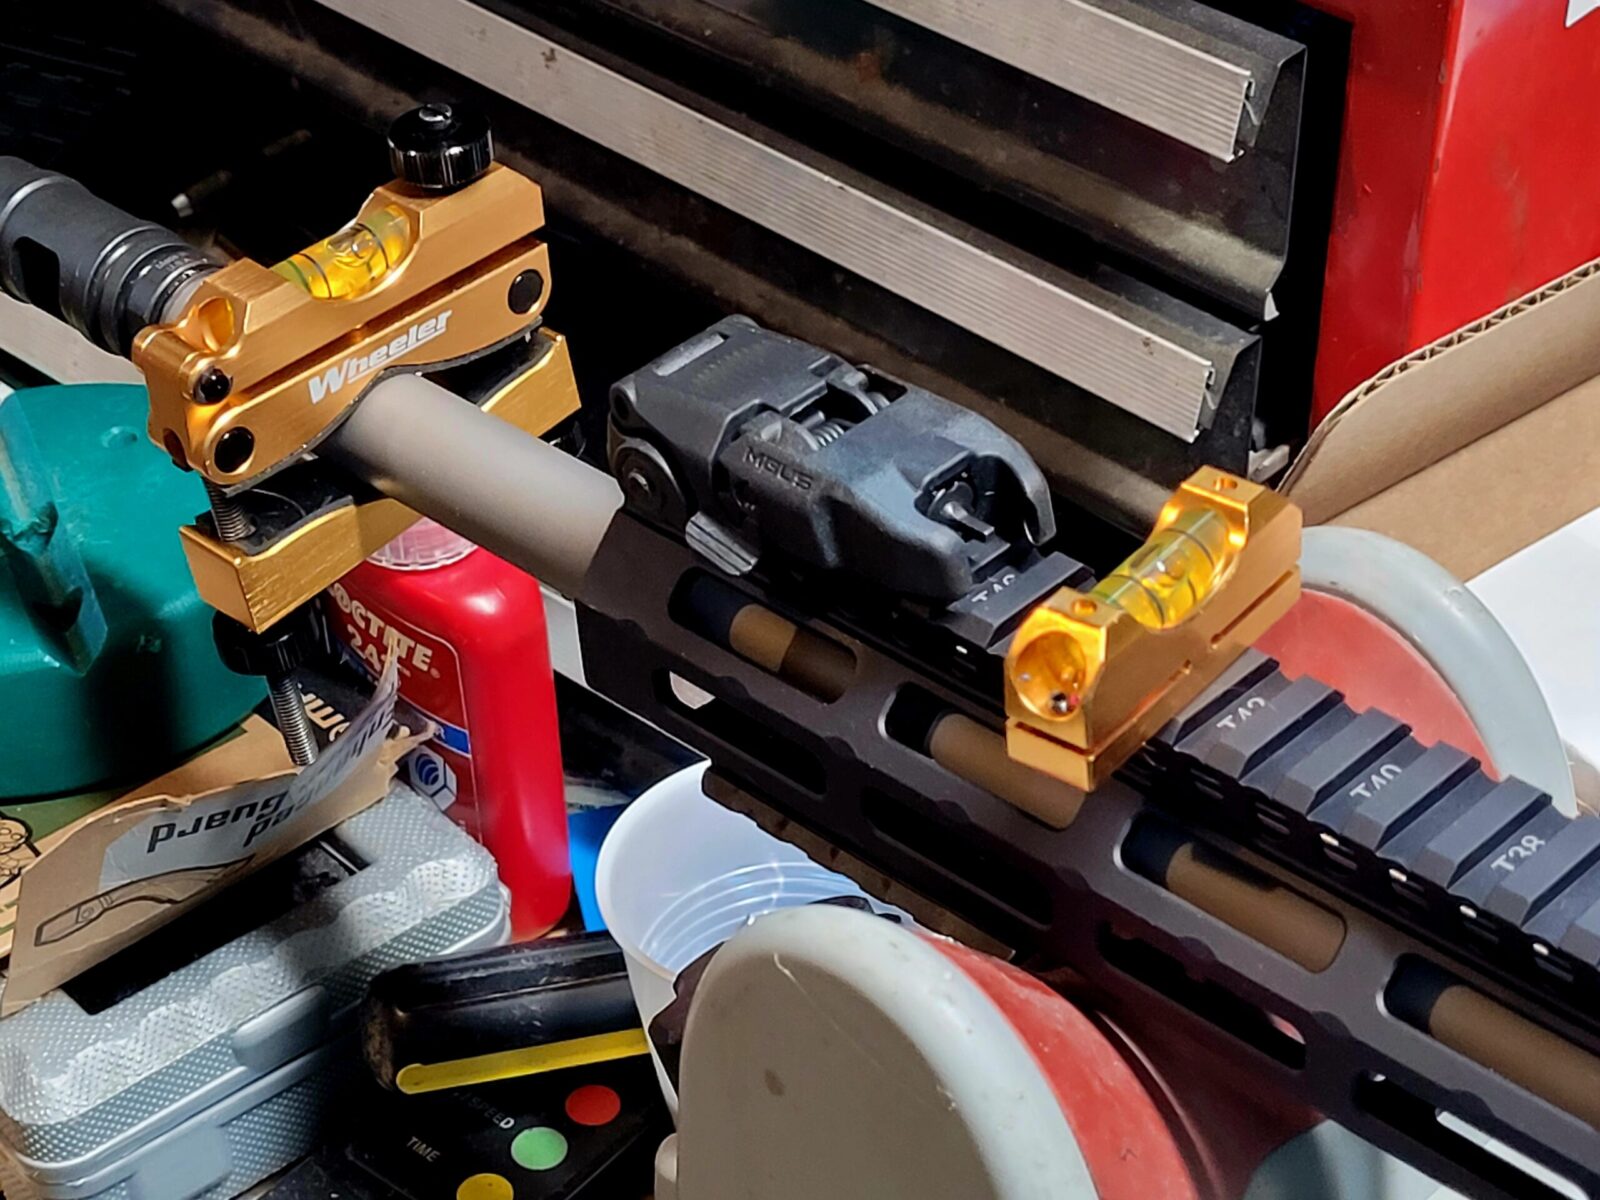
These days, when I have time and I want to try and get the scope as accurately positioned as I can on the first try, I use a Wheeler Engineering Profession Reticle Leveling System. It’s easy and fast.

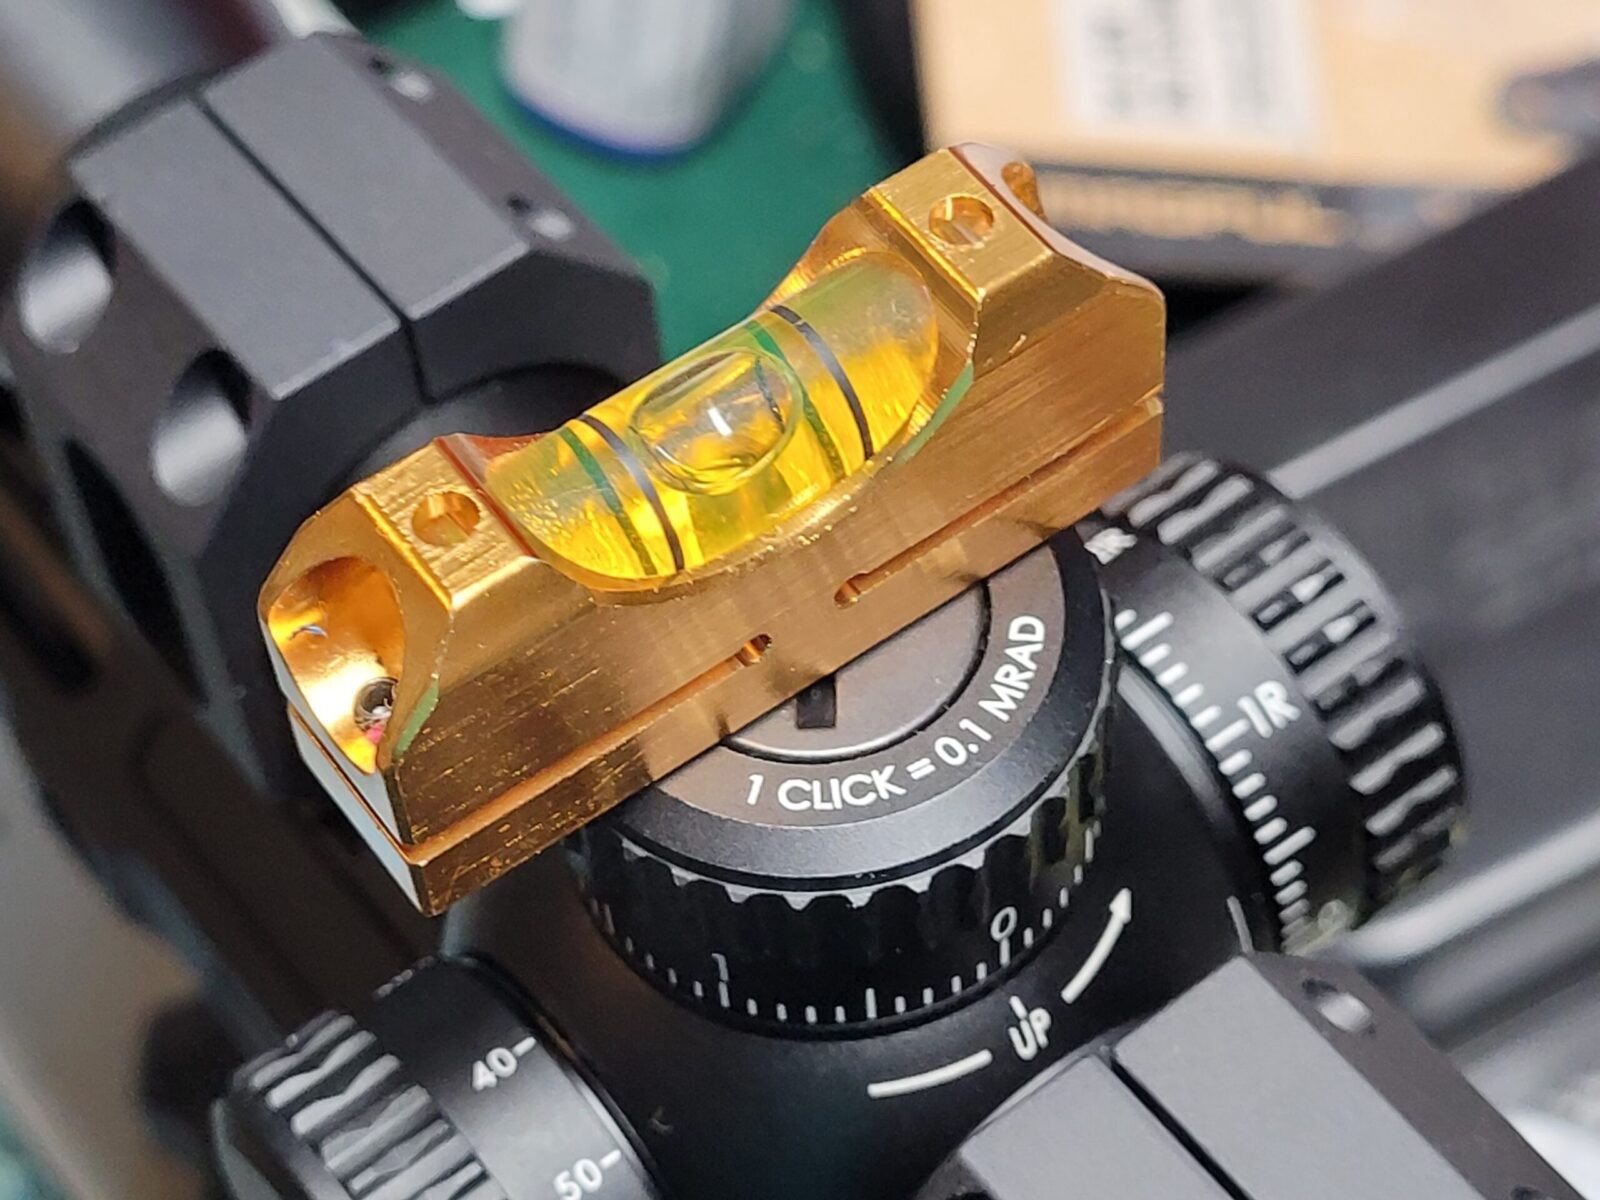
First, you put the level on your receiver/rail and level the receiver. Then you put the clamp on the barrel and level it – I compare both the receiver and the barrel bubble levels before I move the receiver level to the top scope turret. Once the level is on the top turret, I adjust the scope until the bubbles match and it’s done. I’ve used this for a number of years now and am very happy with it.

The professional leveling system has two parts – the barrel clamp and the separate level you use on the receiver and then the scope turret. The two parts are made from aluminum and come in a nice protective case. If it weren’t for the case, mine would look much more beat up. Protecting the parts makes sense for another reason – you don’t want things to get bent, gouged, dented or whatever and then throw off the readings or mar the finish of your weapon.
The first thing you do is to use the small level (shown behind the backuop sight) to true the receiver. Then you adjust the barrel clamp until it is level also. Just visible under the handguard is the front of my Tipton vise.
After the barrel clamp has been levelled, you move the small level to the flat top turret and then rotate the scope however you need to get it flat also. Compare this level to the barrel clamp level to make sure they agree. The more care you take to get the bubbles centered and matching, the better.

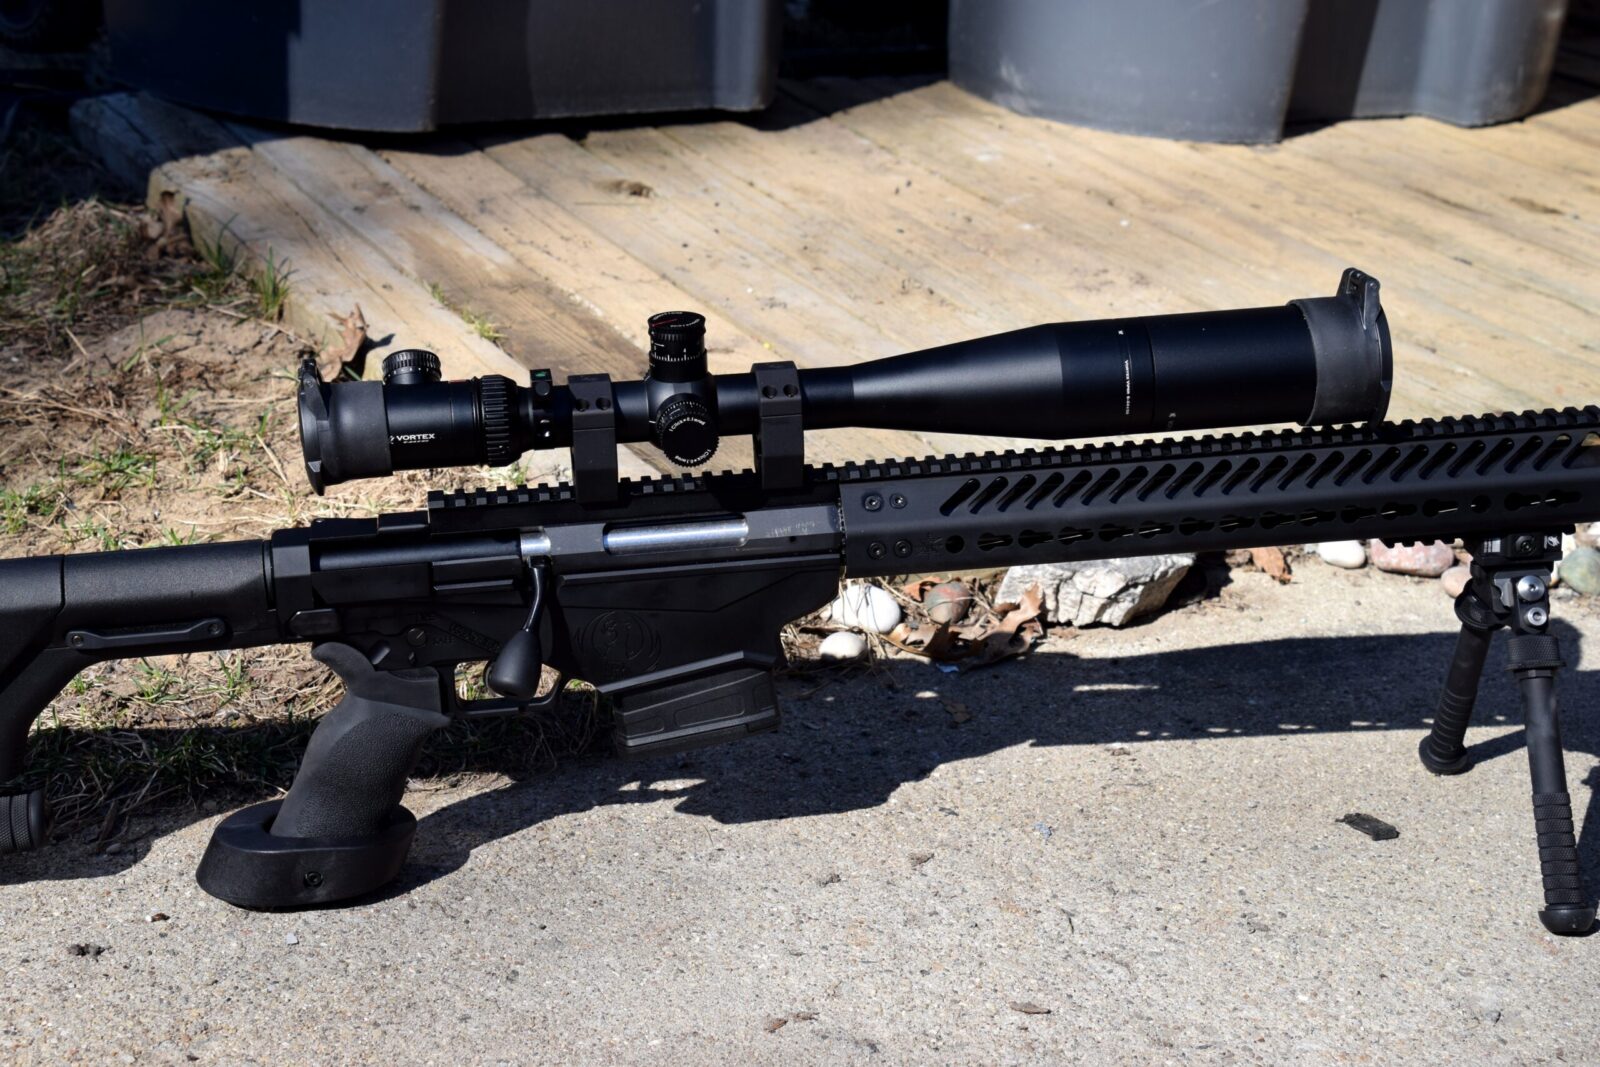
I do use a Vortex torquing screw driver to tighten the scope ring screws and am careful to confirm the scopes levelling does not shift in the process. Vortex scopes say not to torque them past 18 inch/pounds (please note that is inch pounds and not foot pounds just to be very clear – you don’t want to damage your scope but at the same time, you do want it secure).

Again, with any of these methods, it really helps to secure the rifle in a vise where you can adjust and then secure the rifle so the top is horizontally true.

Yeah, this is my real work bench. It was worse than normal as I still had all of the packing from the scope,rings and upper on the bench. The Tipton gun vise has served me very well over the years. By the way, notice the level on the turret – you reall want that perpendicular to the rifle. In this photo it is slightly crooked and no longer perpendicular and risk the scope not bein accurately levelled to the rifle.

Conclusion

The Wheeler Engineering Professional Leveling System has served me well and I have used it on a number of projects over the years. I have no hesitations in recommending it to you as well.

Sabatti Urban Sniper with a Vortex PST scope.
Ruger RPR with Vortex PST optic sporting its sun shade.
IWI .308 Galil with a Vortex PST Gen 2 Scope.

I hope this post helps you out.


Note, I have to buy all of my parts – nothing here was paid for by sponsors, etc. I do make a small amount if you click on an ad and buy something but that is it. You’re getting my real opinion on stuff.

If you find this post useful, please share the link on Facebook, with your friends, etc. Your support is much appreciated and if you have any feedback, please email me at in**@ro*********.com. Please note that for links to other websites, I may be paid via an affiliate program such as Avantlink, Impact, Amazon and eBay.


Looking For A High Quality 5-Gallon Gas Can? Check Out Wavian

I’ll keep this post short and sweet. A couple of my many-year old plastic gas cans are getting brittle and I needed to replace them. Some years back I bought some steel Chinese ones off Amazon that are doing relatively okay other than starting to rust a bit inside – I looked it up and I bought them in 2014 for $54.50 each so that’s not too bad. I wondered what some higher quality options might be so I did some digging and came across Wavian.

Honestly, when I saw their name I assumed it was some cheap import but then started reading more. Wavian cans are made in Latvia and they are a NATO supplier. After getting mine, I can tell you they are the highest quality cans I have seen since my dad’s old surplus cans from WWII or Korea.

A Bit of History

The “Jerry Can” design dates back to 1937 created the Vinzenz Grügenvogel, the chief engineer of Müeller engineering in Schwelm, Germany. An interesting design requirement of the Wehrmacht-Einheitskanister was that a German soldier needed to be able to carry two full cans or four empty ones hence the size and triple top handle design.

There’s a far more complete historical narrative on Wikipedia including what America did if you are interested – click here.

Fast Forward To Today

Folks, these are really nice cans. At any rate, they have some cool features and I just want to highlight the ones I noticed and want to share:

  • They are rated for 20 liters which is actually 5.28 gallons of gas
  • The color you choose, I picked red, is powder coated on and a nice deep color and is gas resistant
  • The welding and assembly is excellent – cheap cans use tack welds that do let go.
  • The steel body is 0.9mm (which is 0.0354″ and puts it a tad thicker than 21 gauge (.034375″ 0.873mm)). Cheaper cans use thinner metal.
  • There is an internal coating to protect the steel – I doubt you will see this in a cheap can – it’s not present in my Chinese cans.
Leave it to the EPA to screw up easy to use gas can spouts. At least Wavian tried to do what they could with the mandate.
The cap closes very securely and the cadmium colored pin you see locks it in place. The pin itself is flared on the far end on purpose so it can’t be accidentally removed all the way and lose – that’s a nice design detail I think.
Brand new Wavian on the left – cheap 8 year old Chinese can is on the right. In all fairness, it’s held up for holding gas but I don’t really transport gas in it. The Wavian is built like a tank.
Here’s a close up of the Chinese can’s filler tube, It’s discolored with age but it works. The con is the it does flip-flop around when you are trying to start pouring. Again, it’s held up being outside all year long so I can’t knock it too hard.

The negative is that they come with a God-awful EPA compliant nozzle. I absolutely hate any nozzle where I have to pull something back and hold it back while trying to hold a can with up to 33.8-37.7 pounds of gasoline in it. Folks, I am 54 and it’s not that easy any longer. At least Wavian tried to do what they could with the mandate. In many cases, if you can push the spout into a filler port on a vehicle, the pressure would keep the spout open but not all gas tank filler ports are shaped that way – for example it will not work on my lawn tractor or generator that both have horizontal gas tank filler ports.

So, I did spend the extra money for a more traditional steel goose neck nozzle that does not have all that EPA stuff on it so I can manage holding and positioning the can with both hands and let the nozzle do it’s thing. By the way, it’s not like Wavian really has a choice – they are mandated to supply a self-closing nozzle but at least they can still sell the aftermarket nozzle.

The EPA-compliant spout is on top. The optional spout that you can buy separately is on the bottom and far easier to use. I will install the longer spout when and where I need it vs. leaving it on the can.

Note, growing up my dad had the old style Jerry cans and kept his nozzles separate from the tanks. I’m going to do the same thing. I’ll grab the nozzle and the gas can I need when it’s time to pour gas.

So, do I like the Wavian can? Absolutely – I just bought a second. If you are looking for just about the best can out there. Get a Wavian. I’ve not seen a modern can even remotely close to this level of quality. I bought both of mine and the fill spout from Amazon:


Note, I have to buy all of my parts – nothing here was paid for by sponsors, etc. I do make a small amount if you click on an ad and buy something but that is it. You’re getting my real opinion on stuff.

If you find this post useful, please share the link on Facebook, with your friends, etc. Your support is much appreciated and if you have any feedback, please email me at in**@ro*********.com. Please note that for links to other websites, I may be paid via an affiliate program such as Avantlink, Impact, Amazon and eBay.


Why The Mophorn Pneumatic Lift Is a Huge Help When Working On Cars and Trucks But Has One Small Issue You Need To Address

Nothing like getting old and realizing that most of your joints hate you. I bring this up because I have two manual pump floor jacks that I have used countless times over the years and the oldest is probably 25 years old – literally. Well, let me put it this way – I had no problem pumping the handle to lift cars and trucks 25 years ago but starting about two years ago, the action really started to cause elbow and shoulder injuries I had to flare up. It got so bad that I had to make a choice either to stop working on vehicles or to find a different approach.

I work on cars and trucks in our driveway so a permanently installed lift was not an option. It had to be something portable. My first thought was to get a low profile air-over-hydraulic jack that is mounted in its own wheeled carrier. They have an incredible lifting capacity (around 22 tons) but they are heavy (around 80 pounds), slow (air over hydraulic is many things but fast is not one of them) and expensive (they start around $200 and just go up from there). What really stopped me was the weight and the cost. I can’t lift or drag as much weight as I used to and the entry-level units were a tad more than I wanted to spend.

So, I kept digging and ran across pneumatic/air jacks. Think of the air suspensions you see under a big rig. Basically one or more air bladders fill with air and lift the top of the jack. They max out in terms of lift height around 18 inches and 3 tons of lift but it depends on the model. Definitely spend some time researching before you buy. I found that I needed to think about:

  • How low I needed the unit to collapse down to fit under our cars to get in position prior to lifting
  • How much weight did I need to lift
  • How high I needed the unit to lift
  • How much did it weigh?
  • What was it going to cost?

I then started reading listings on Amazon plus paying careful attention to review scores. I also talked to a mechanic friend of mine about the safety of the unit and what his thoughts were. He told me to consider two things: 1) always immediately put jack stands in place and 2) don’t lave the unit out in the sun and weather thus harming the rubber. Those suggestions made a lot of sense to me.

On January 8, 2019, I wound up buying a Mophorn Pneumatic Jack, 3 Ton, Triple Air Bag, with a 16″ lift height for about $150 with free shipping. The unit arrived with just little bit of assembly needed. I recall I had to install the handle and the pressure line but that was it.

I get about 15″ of lift at 90 PSI.
Left lever is the exhaust and due to the lever design, you can adjust how slow you want to drain air out. Even if you hit it and have an “oh shit” moment, you typically have a few seconds before the vehicle starts to go down. The middle unit with the pull ring is the safety blow off valve. The far right lever is the air inlet and there is a Milton M-series male plug under the Milton quick connect female fitting. If you want a reliable air system, use Milton fittings – they last.

As you can guess from the sticker above, the lift is made in China and the instruction sheet is pretty terse but it’s really not that hard to figure out. I do want to cover a few specifications with you and convert them from metric to US customary measures – these are from the owner’s manual included in the kit unless otherwise noted:

DescriptionMetricUS
Capacity3,000 kg6,613 lbs
Air Pressure5-10 Kg/cm^271 to 142 PSI
Air pressure from label on handle – presumably the recommended pressure8 kg/cm^2113 PSI
Minimum Height145mm5.71 in
Maximum Height400mm15.75 in
Lifting Time5 seconds5 seconds
Working Temperature-69C to +50C-92F to 122F

What have I lifted with it?

When I say “lift”, I am talking about the front end or the back end – not the whole vehicle.

  • 1994 Toyota Corolla DX
  • 1996 Toyota Land Cruiser
  • 2000 Toyota Camry
  • 2006 Toyota Solara
  • 2008 Toyota Highlander
  • 2016 Ford F150 Transit
  • Others more or less along the lines of a Camry or Highlander

There are a few things I have noticed

First, let me point out that I like this unit and would recommend it but there are a few things I want to point out:

  • The highest my lift will go is 15″ and that may be a function of my only running 90 PSI to the jack
  • I don’t think it actually can lift 3 tons. It bogs down on the front of our old 96 Landcruiser and also our full size F150 Transit. Again, I think it’s my lower air pressure. This summer I might plumb a dedicated 120 PSI line and see what that does. It will depend on time and money.
  • There are stabilizing cones made from steel inside the jack. Maybe 1 in 20 lifts they need a whack to start coming down. I may polish and lube these if I get a chance.
  • The rubber is pretty thick on the bladders. With that said, I do store it indoors away from the sun and the weather. I’m writing this a year later and the bladders show zero signs of wear.

The One Little Thing You Must Do: Blue Loctite Your Screws!!

I have used my jack many times since I bought it. Starting around September I was hearing faint air leak and thought the jack had bent. When I had time I found out that the bottom screws had loosened up and air was simply escaping from between the gasket and the bottom plate. I was surprised and disappointed to note that none of the screws had any thread locker applied to any of them. Many were in varying states of coming lose.

The unit is well made. The air bladders secure to that steel plate you see on them and then that assembly bolt to the dolly.
It’s the screws that attach the bladder to the while disc-shaped plate in the previous photo that came loose. Here are the metal stabilizing cones. I wish I had polished and lubed them when I had it apart and will go back and do that at some point. I did apply air tool oil to the cones after cleaning them of a gritty dust that probably dated back to when they were manufactured.
Before re-assembly I put a thin bead of Permatex Blue RTV gasket seal on the rubber gasket and then applied Blue medium-strength Loctite to each srew and brought them down lightly. I then went criss-cross lightly bringing down each screw to firm and then applied a final torque of 11 NM (about 8 ft-lbs or 97 in-lbs.

I then did the same thing to the top plate as well just to play it safe. No more leaks.

The reassembled bladder assembly then screws back down to the baseplate of the dolly. Note, this photo is actually from when I was taking it apart. The screws were so scuffed up that I just replaced them. Did I mention I use this a lot?

The following is the exact jack on Amazon that I bought and this review is about:

Bottom Line

I would buy this again and recommend it as well – just due the Loctite thing I mentioned. Note there are other Chinese suppliers on Amazon also but they do not get as good of reviews as the Mophorn units so my recommendation is only for that brand.


If you find this post useful, please share the link on Facebook, with your friends, etc. Your support is much appreciated and if you have any feedback, please email me at in**@ro*********.com. Please note that for links to other websites, I may be paid via an affiliate program such as Avantlink, Impact, Amazon and eBay.


How to Safely Change AR Muzzle Devices and Barrel Nuts Using a Magpul BEV Block

If you like working on AR-type rifles and plan to replace a muzzle device or change a barrel nut to install a free-floating handguard or to swap barrels, you are going to need to apply a lot of torque. Torque and aluminum are not friends and this is certainly the case with the upper receiver for AR rifles and pistols.

What not to do?

I actually want to take a minute and tell you two things not to do. First, do not simply clamp your lower in a vise and go cranking on whatever on the upper. Remember that the upper is connected to the lower by two steel pins going through relatively soft aluminim. Not a good combination.

Number two, there are work fixtures that look like a rectangle that allow you to remove the upper from the lower and then pin the upper to this block that is then held by a vise. I’m not fond of this either because then your two aluminum connection points on the receiver take up all the stress and they weren’t designed to do so.

Please do not do either of those or you may regret it. The odds are that you will regret it. I word it this way because you may get by once or twice but these methods are risky so don’t do them.

So what do I recommend?

I use a Magpul Barrel Extension Vise (BEV) block. It’s a very well designed block that engages via the barrel extension with its own steel lugs that are designed for strength but also to not harm the extension.

This is the top of the BEV block. You can see the front engagement lugs, the rear protrusion is for the bolt carrier and I would recommend keeping that O-ring oiled. The hole just under the front lugs is for a cross pin to secure it to the upper.

The BEV block uses a bolt carrier with the bolt removed to further secure it in the upper. You could remove the bolt from the bolt you normally use. I have a bolt carrier body that I keep in my toolbox for just this purpose.

The following photo shows it partially inserted in the upper.

This next photo shows it fully forward with the bolt carrier assembly installed. It does not have a cross pin installed at that point. Even without the pin it can handle the rotation stress. The pin just keeps it all in position and is not load bearing.

At this point you are good to go to change muzzle devices, barrel nuts or whatever else you may need to do without risking damage caused by torque. It’s a solid tool and I highly recommend it.


If you find this post useful, please share the link on Facebook, with your friends, etc. Your support is much appreciated and if you have any feedback, please email me at in**@ro*********.com. Please note that for links to other websites, I may be paid via an affiliate program such as Avantlink, Impact, Amazon and eBay.


Wheeler AR Bolt Catch Punch Set Makes The Job Way Easier

If you are new to building AR lowers, there is one step that is, in my opionion, the most risky in terms of making a mistake and scratching the finish if not even gouging the aluminum.  That’s when you go to install the bolt catch.  You must juggle the receiver, spring, detent, catch, punch and hammer all at the same time while being right against the nicely finished receiver!

The two ears that hold the cross pin of the bolt catch are just above the magazine catch.  In the small hole will sit the spring and the detent pin.

Historically, you had to get ready for battle and would tape your receiver to protect it from slipping punches or glancing blows by a hammer.

I would apply duct tape, Gorilla tape or something thick to protect the finish.  Note, if you are starting out, taping is always a good idea no matter what.

Installing the slide catch is way easier now with the right tools.  I have really come to rely on three punches to get the job done.  The first is a purpose specific punch set from Wheeler this is flat on one side and has a protective rubber coating.

The Wheeler set has two punches.  The starter punch has a hollow end that the pin sits in.  This allows you to focus on the hole and hitting the punch with the hammer.  The other is a roll pin punch that you can use to align the catch at the start and also drive the pin the final distance.
Here the pin is being started.
See, I use the roll pin punch on the left to align the bolt catch and also to capture the detent pin and spring.  Once that punch is in, you can let go!  Whew.  You can then focus on tapping the starter punch on and making sure everything is aligned.

Now plenty of guys can get their build done with the above.  Because of my tremor, I like to drive the pin in the rest of the way by using a really long roll pin punch that safely clears the receiver.  I have a Tekton gunsmith punch set and the 1/8″ roll pin punch works great for me. 

This is the nice Tekton gunsmith punch set that I really like.
This is me with the 1/8″ roll pin punch.

I hope this helps you out.  This is what I do every time now.  It’s also what I use if I need to remove and replace an existing catch.


If you find this post useful, please share the link on Facebook, with your friends, etc. Your support is much appreciated and if you have any feedback, please email me at in**@ro*********.com. Please note that for links to other websites, I may be paid via an affiliate program such as Avantlink, Impact, Amazon and eBay.


Wheeler Tool Makes AR Trigger Guard Installation or Removal a Breeze

I was asked how I install AR trigger guards to minimize scratching up the receiver or even risking snapping an “ear” off.  On one hand, you can use a solid backing block to support the ear and then use a roll pin punch to drive in the pin.  That’s what I used to do but it’s a headache to be honest.  As some of you may know, I have a tremor that makes fine motor stuff a headache so finding methods that are simpler really helps me get work done.

This is a Brownells Billet 7075 aluminum trigger guard (078-101-164) and it has a bulge to accomodate gloves.  The set screw goes in the end with a blind hole.  The roll pin goes through the end that is drilled all the way through.

A few years ago I started using the Wheeler trigger guard tool and it works great.  Click here to see it on Amazon.

This is how I use it:

  1.  Install the end of the triggerguard that uses the set screw.  That’s the end with the blind hole – the roll pin goes in the end where a hole goes all the way through.
  2. I lightly oil the pin to make things easy and tap it with a small hammer just to get it started.
  3. I then use the Wheeler tool with the shorter starter pin.  The starter pin has a nipple that centers it on the roll pin.
  4. Keep the parts aligned and turn the knob to drive the pin in.
  5. Stop when you have inserted the pin – it’s that easy.

Note, Scott Igert of Modern Antique Firearms recommends you put a business card or something between the frame and your receiver to protect it from scratching.

It has two tips – here you can see one installed and one stored in the frame of the tool.  The short one is for installing and the long one is for pushing a roll pin out.
Simply stop once the pin is flush.

Note, I actually have one from another maker also.    I’m holding it in my hand.  It does the same conceptually but is heavier made.  I’ve built probably 4-6 ARs with the Wheeler unit and it seems to be holding up fine.  The other is a Little Crow unit from Brownells for about $39.99 + S&H and its built like a tank but you do pay more for it.

Little Crow Trigger Guard Pin Pusher

I hope this helps you out.  


If you find this post useful, please share the link on Facebook, with your friends, etc. Your support is much appreciated and if you have any feedback, please email me at in**@ro*********.com. Please note that for links to other websites, I may be paid via an affiliate program such as Avantlink, Impact, Amazon and eBay.


The Ingersoll Rand 125 Needle Scaler is a HUGE Time Saver + An Into to Needlers

One of the things you learn in Michigan when you have to work on cars is how to deal with rust. Most cars after 10 years in Michigan look like they were dipped in the ocean and then allowed to rust like crazy. It’s pretty much inevitable. The older the car the worst shape they will be in. This year while working on my 1996 Landcruiser I decided to invest in a needle scaler to go faster and save my hands.

Historically, I would use chisels, screw drivers and wire brushes to remove loose rust from part still on the car. This was time consuming, my carpal tunnel would flare up and my hands would ache.

A friend helping restore an old submarine told me about how he bought a needle scaler to help remove rust faster, I had never seen one at the time and filed it away for future reference. One day in Harbor Freight I finally saw one but I really wasn’t keen on buying one of their tools. I’ve had one too many HF tools die at the wrong time and have slowly moved away from them for most tools.

At any rate, I like Ingersoll Rand air tools and read up on their model 125 needle scaler. It has 4.5 stars out of 5 stars on Amazon with 73 reviews. So I read up more about it.

It generates 4,600 blows per minute using 15 CFM at 90 PSI. It has a rubber seal on its throttle to reduce leaking and you can disassemble the unit to clean or replace needles without tools. To stress that next to the last point – you can buy replacement needle packs for the unit.

So, I took the leap and ordered one from Amazon.com and it showed up in two days courtesty of Amazon Prime. My wife now grills me when Amazon boxes show up 🙂

Out of the Box

It arrived fully assembled both longer (about 12″ without the quick coupler fitting) and also heavier than I expected at about 6.8 pounds, also without the coupler.

The first thing I did was install a quality Milton quick connect male plug. These are case hardened steel and not soft brass like you find at Harbor Freight and the big box discount retailers like Home Depot and Lowes. I swear by Milton now because I haven’t had one fail yet (I’m sure they will eventually) but I have replaced countless Harbor Freight, Home Depot and Lowes air fittings over the years.

I also use quality PTFE/Teflon tape. I’ve also given up on the cheap tape. Ace brand tape is pretty good and lately I’ve been using this AntiSieze Technologies brand heavy duty tape and really prefer it.

Taking it Apart

There apparently is a secret society of air needlers who protect the world from very much information being given about these tools. I kid you not, 90% of the manual is legal disclaimers, safety notices and useless boiler plate. I am seeing this trend over and over with the tool companies.

Since I can’t point you to a page, let me try and explain. At the end of the day, an air needler is an impact tool. Inside the body is a 1″ piston that is driving an “anvil” up against the base of the needles 4,600 times per minute. It’s pretty much what you would expect to see if you pulled apart an air hammer except the body is a straight line vs. a pistol-like configuration.

Why is it long? My guess is that it helps the unit get into tight spaces by reaching further.

Now, the needles are really 1/8″ diameter hardened steel rods. These “needles” are really good at getting under rust flakes and popping them up and off the steel surface. It’s a loud tool but it does its job amazingly well.

So you rotate the black color and it will pull straight off the machine and you can see the three groups. The main tool is on the right, the color is on the top left and the needle assembly with two needles removed for you to see are in the lower right of the next photo:

The needles are held in position by a disc with holes to position each needle and a heavy spring shoves the needles back against the anvil to enable the hammering effect.

Here’s a better photo of the disc with some of the needles pushed out for you to see:

This photo shows how the needles and disc would line up with the piston if head when the collar is in place:

All in all, it is a pretty straight forward tool. You will want to take it apart to clean periodically – at least I do. I take and hose the needles and collar down with brake cleaner and then apply a light oil to the needles.

Also, be sure to keep the air tool lubricated. I do not run inline oilers due to my plastic work and need for clean dry air. Instead, I add 4-6 drops of air tool oil (not regular engine oil) in through the quick connect coupler.

I did think it was interesting that IR listed the exact ML of oil to pour in before running the tool. I just counted off 20 drops of air tool oil before I ran it for the first time and called it even — it’s ran just fine by the way.

The Results

I am really pleased. I used the model 125 a ton on my old Land Cruiser this summer that had flaking rust all over the place including the running boards that were in tough shape. One was salvageable and the other I had to make a replacement. Other parts of the truck were just covered in rust. This needle scaler allowed me to do the work much faster and more thoroughly than ever before.

I ran it at 90 PSI through about a hundred foot of 3/8 inch air line with 1/4″ quick connect fittings. I had no trouble whatsoever blasting through anything that could be removed.

It will definitely dent the hell out of thin sheet metal but I was not worried about that. I just wanted to get rid of the rust scale. I also found that I could use it to hammer on places that I was worried about and if it punched through I knew I had an area I needed to work on. For example some of the fenders while they still had paint had rusted really badly from the inside and we’re paper thin.

What I found interesting was that after a ton of work, none of the needles showed wear when I was done with the truck.

I definitely recommend this Ingersoll Rand model 125 needle scaler. I think it did a superb job and will definitely be using it on future projects.


If you find this post useful, please share the link on Facebook, with your friends, etc. Your support is much appreciated and if you have any feedback, please email me at in**@ro*********.com. Please note that for links to other websites, I may be paid via an affiliate program such as Avantlink, Impact, Amazon and eBay.


Very Compact Astro 1828 ONYX 3/8″ Nano Impact Wrench Is Great For Tight Quarters

This past winter I had the fun of changing the starter motor twice in 15 degree weather in my Landcruiser.  It was a bear getting to the starter bolts with my full size Ingersoll Rand 1/2 Thunder Gun.  It’s an awesome impact wrench and I had trashed a few cheap Harbor Freight ones before taking the advice of my friends and buying it.  To make a long story short, with a long extension and a universal joint, I was able to get the two bolts out.

While working on the truck, it struck me that I really needed a compact impact wrench to get into tight spaces.  I did some digging and found the Astro 1828 Onyx for 3/8″ impact sockets.  I figured I wanted small and probably would not need 1/2″ most of the time.

These next photos show how much more compact the Onyx is compared to the big Thunder Gun:

The little Onyx gets great reviews – currently 4.6 out of 5 stars on Amazon with 148 reviews.  I bought it and a Hot Max 28083 Swivel adapter at the same time.   It arrived in a nice little cardboard box from Amazon and I promptly put good Teflon tape on the swivel’s fittings, installed it and then a Milton M-style plug.

So far, both are holding up great in my home garage use (I’m not a pro mechanic – more like a shade tree one with ADD and sleep deprivation).

What I find interesting is that it is a torquy little beast.  They claim 450 ft/lbs.  I have not bothered checking using a calibrated torque wrench but I can tell you it’s done a great job so far.  For big stuff / tight stuff, I still go to the Thundergun with its 625 ft/lbs of torque.  The Onyx is more of a special purpose tool for me.  By the way, if you notice it is shiny above, I had just used it to remove the drain plug off a 2002 Camry’s transmission.  They are about 18mm and use a 10mm Allen bit to come off.  My 10mm Allen bit is for a 3/8″ drive so I just stuck it on the Onyx and it whipped it right off.  Reinstalling, I set torque at 1 out of 3 and then checked it with a 3/8″ drive ratchet wrench after — it was in there solid.

In short, I am happy with the little Nano and Hot Max swivel combination.  I definitely still use my Thunder Gun for wheel lugs and big fasteners but the Nano is now my go to for tight spaces.

October 2018 Update:  I had a problem with the hog ring clip at the end of the nose.  It bent and would no longer hold sockets properly.  It took a while for the maker to get me the clips but they did take care of me and gave me a few spare.  Click here for the whole story.


If you find this post useful, please share the link on Facebook, with your friends, etc. Your support is much appreciated and if you have any feedback, please email me at in**@ro*********.com. Please note that for links to other websites, I may be paid via an affiliate program such as Avantlink, Impact, Amazon and eBay.