Hi folks. I like building AR rifles and sometimes I just want a kit with all of the parts. Sometimes I will then swap stuff out and the original parts go in a bin but they are nice to have as spares and sometimes I will build the kit with the included parts – it just depends on my mood and budget to be perfectly honest. For years now, my main source for kits has been Palmetto State Armory (PSA) headquartered in Columbia, SC.
I almost always get my stuff off their website but they do have some very cool retail stores scattered around South Carolina. I had an opportunity to go to one a couple years back and it was very cool. Unfortunately, I lacked funds at the time and just picked up a couple of items. A person could put a serious dent in their credit card by going in one of their stores … or their website for that matter 🙂
People used to complain that they were slow to ship and to respond. First off, I always knew they were trying to keep costs low – they always shipped and they did respond – just not right away. For over a year now, I have noticed they are far faster at shipping – sometimes even the same day – and they are also faster at responding. So, if you hear bad stuff about this, I wouldn’t worry about it.
I’ve also heard people question their quality. Folks, if you want a tier one rifle, go buy a tier one rifle or the parts from them. Palmetto gives you a decent combination of quality and price. For folks planning on hunting and target shooting with their friends, I have no reservation to recommend them. If you are shooting in competition or planning to use this rifle in some kind if law enforcement situation or somewhere that requires high reliability, I think you probably need to look at the higher end ARs that are designed to handle tens of thousands of rounds. Look, I’m just being candid – the PSA AR rifles and pistols are solid but they have a different intended audience. There are reasons besides “coolness” where certain buyers must move to suppliers like Daniel Defense, BCM, Knights, LMT, H&K, LWRC, etc.
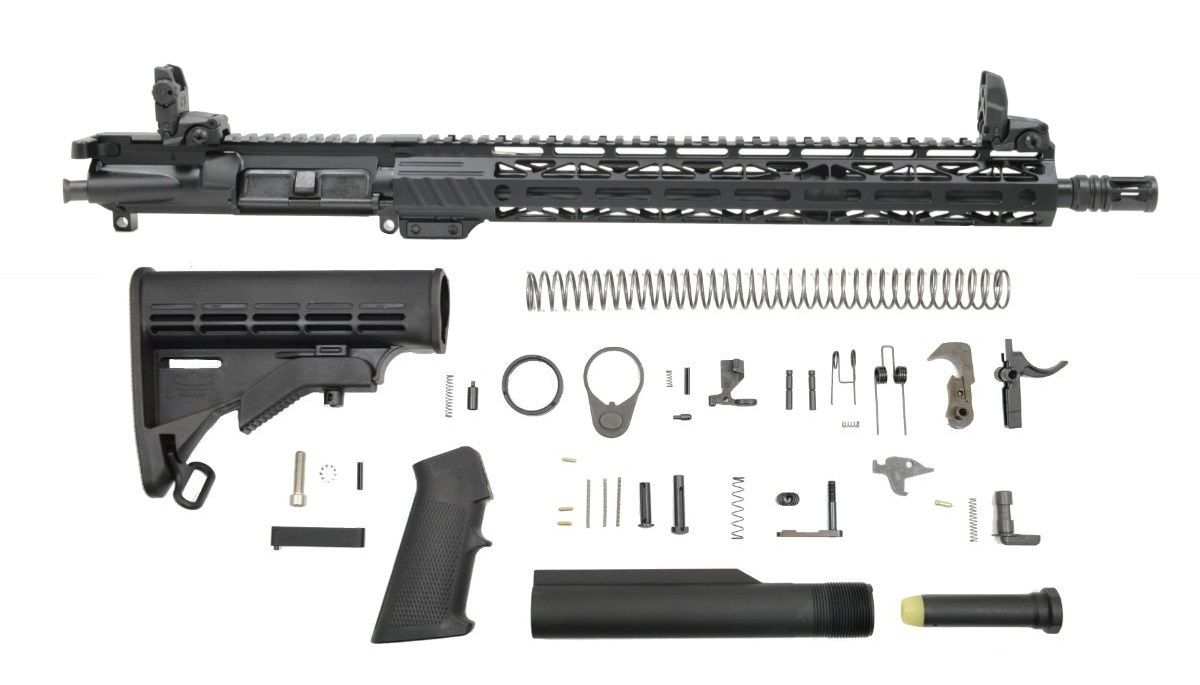
At any rate, back in April of this year (2021), I asked what their top four complete kits were (meaning everything except the lower receiver) and they had a list! If you like building AR kits like I do, I thought you might find this interesting in terms of what is included:
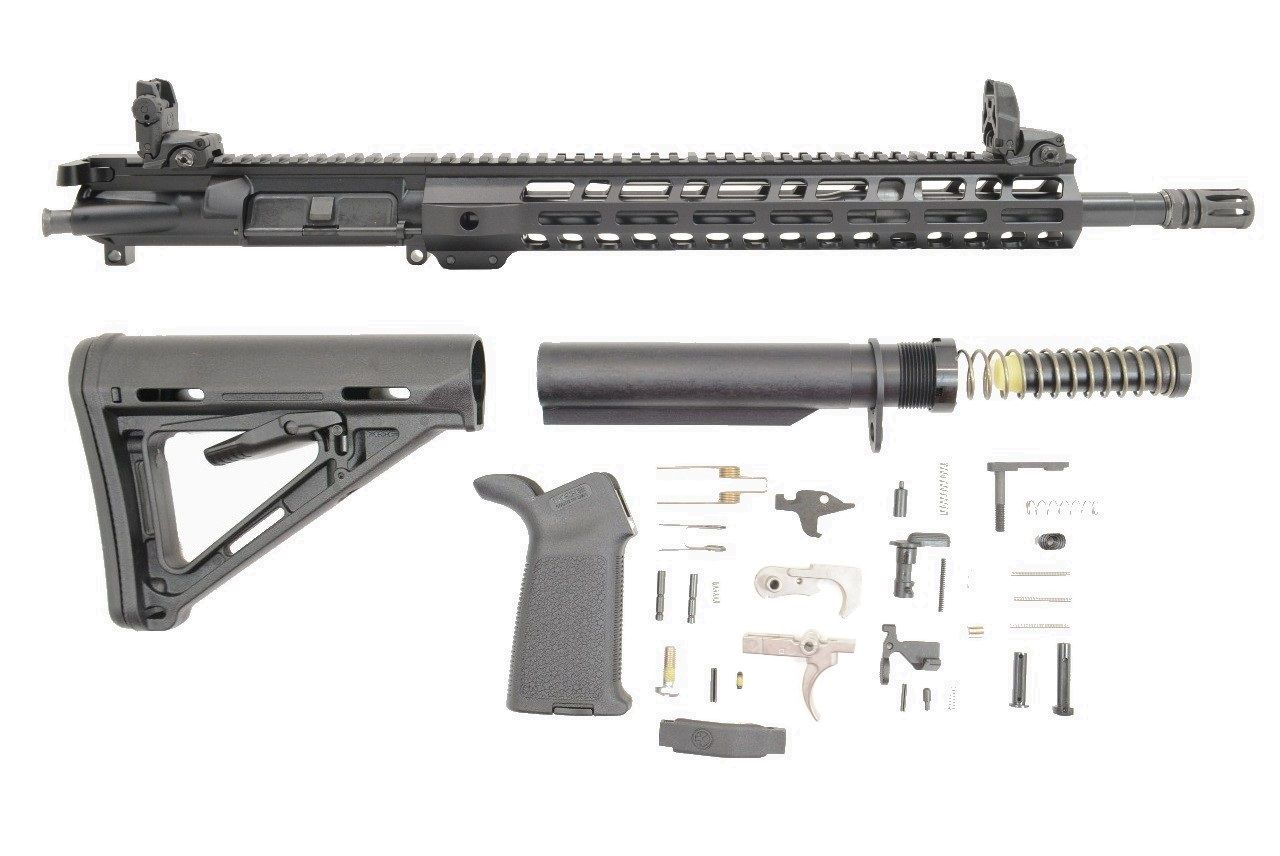
Noteworthy here is the entry level Magpul MOE buttstock and grip plus Magpul MBUS flip up sights. They are also including a PSA EPT fire control group – this means that the trigger and hammer have nickel boron finish causing them to move easier because friction is reduced.
It has one of the PSA 13.5″ long handguards set for M-Lok attachments. Everything else is typically found in any of their AR kits with a collapsible stock. They make and restock these kits all the time.
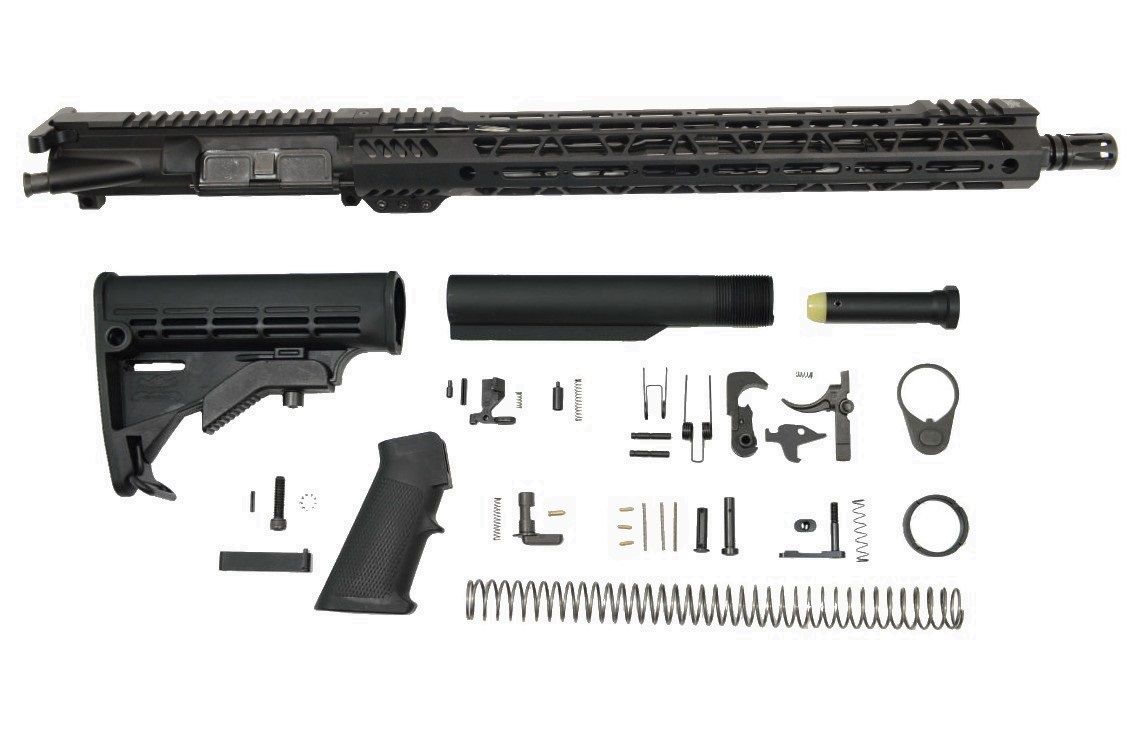
Despite a cool looking 15″ handguard, this is a basic AR and you can replace the grip and buttstock later if you want. It’s selling so well that PSA is out of stock right now but you can be notified when it is back in stock. They tend to make and restock these kits all the time.
The price isn’t listed right now since they are out of stock but I would expect it to be slightly less than the first kit – unless they are charging a premium for that handguard.
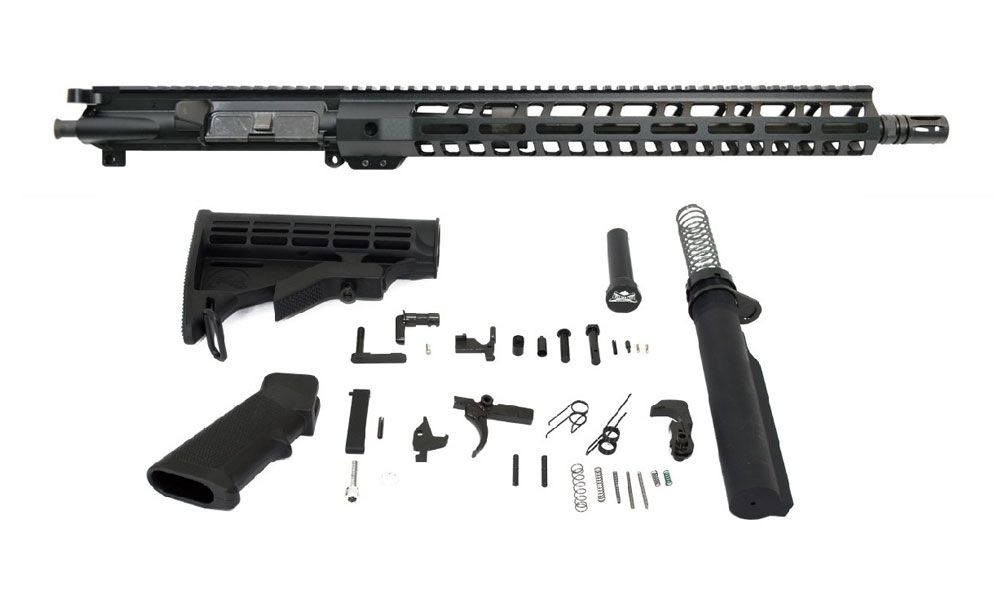
Definitely a basic 15″ railed rifle kit. Everything looks entry level but you can always customize it down the road if you want.
Again, no price as they are out of stock. I’d expect it to be cheaper than the two kits above. You can sign up to be notified when they do get it in stock if you want. They tend to make and restock these kits all the time.
This one has the Magpul BUS sights, an interesting looking handguard … and that’s about it. Everything else is what you tend to see in any of their basic AR rifle kits with collapsing stocks.
The price as of today s $649.99
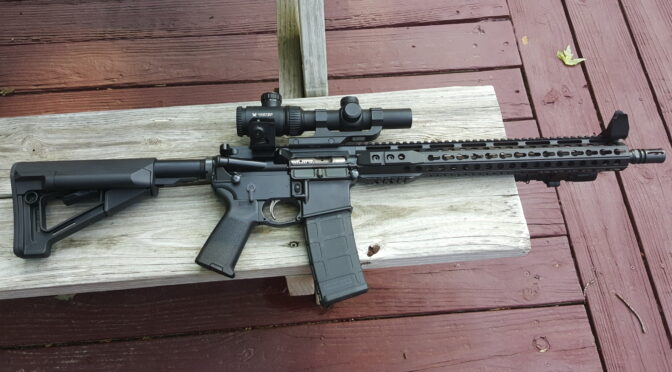
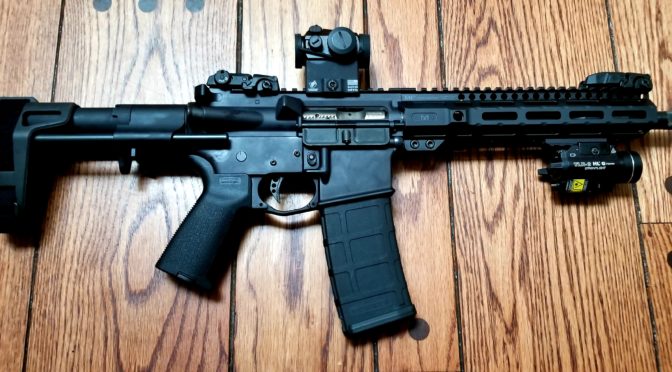
What rifle is in the top photo?
It started out as a PSA 16″ kit. It had an Anderson lower, WMD bolt, and a Magpul ACS-L stock – I like those because they lock in place and don’t rattle. It had a BMC Mod 3 charging handle, Vortex 1-6x scope on a Vortex 2″ offset mount, YHM extended push pins and a PSA ambidextrous selector lever. The fire control group is one of the PSA EPT sets – I do like them for basic triggers. I like Geissele SSA-E triggers the most though. I honestly don’t recall who made the offset sights.
Conclusion
If you’re looking to build a decent entry-level rifle from a kit with all of the parts you need other than the lower receiver, the above should work great for you. At a minimum, they will all give you a foundation to start with.
Note, I have to buy all of my parts – nothing here was paid for by sponsors, etc. I do make a small amount if you click on an ad and buy something but that is it. You’re getting my real opinion on stuff.
A fellow emailed me the other day asking what I use to remove and install sights on my pistols. For those of you wondering what a “sight pusher” is, it is a device that is used to push sights around on a handgun and can be used to install, adjust or remove the sights.
Of course, one size does not fit all so you tend to see pushers that are pistol specific, ones that are designed to with modular shoes, and ones that really shouldn’t have been made in the first place. Yeah, unfortunately I am not joking on that last part. Investigate any pusher before you buy it. Some are sloppy and if the shift or slip, they can put one hell of a scratch in your otherwise nice pistol.
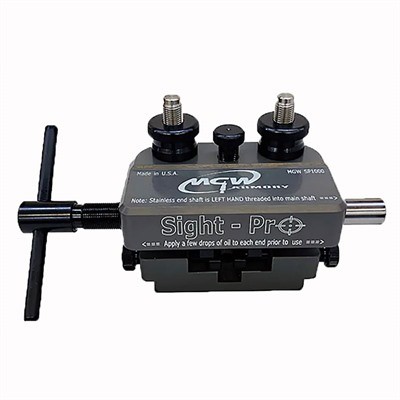
Option #1: For pros who need to support many different pistols, MGW makes the best modular pusher
My good friend, Scott Igert, owns Michigan Gun Exchange and has been changing sights for his customers for many years. Because he has to deal with a variety of pistols and the job must be done right, he swears by his MGW (Maryland Gun Works) Sight-Pro pusher. It’s modular and comes with a 30 degree block for Glock and HK sights. In addition, there are a number of different pusher blocks available for use on other pistols.
Here’s a video from MGW in case you’d like to learn more:
Note, MGW also has a number of pistol model specific tools that work on just the one type of weapon. I’ll include them at the end of the post – they are good and just too many to list.
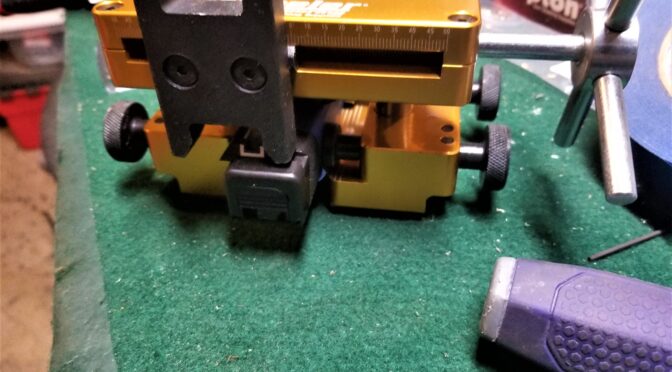
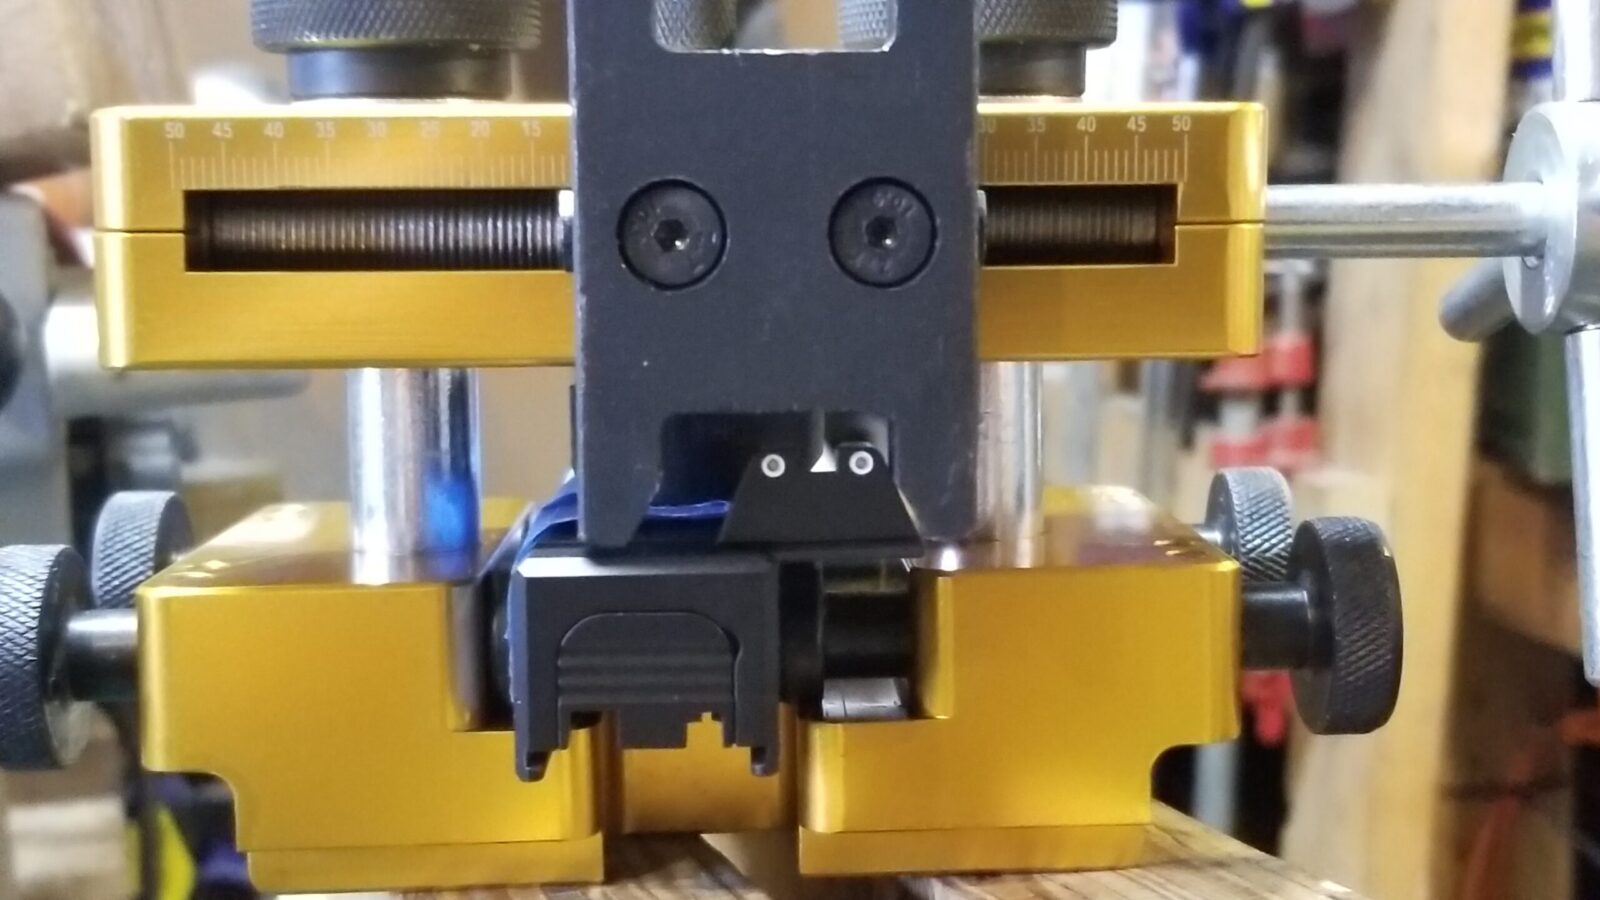
Option #2: Personally, I use the Wheeler Armorer’s Handgun Sight Tool
I work mainly with Glocks and 1911s and the Wheeler unit has worked just fine for my needs. It costs around $138 and so it’s economical. It’s very well made and hasn’t let me down after maybe a dozen uses in two years – again, I’m not using a pusher practically every day like Scott is.
One important thing to consider is that it does not have the flexibility of the MGW – Wheeler advertises it for use with 1911s, Glocks and M&Ps but I have read of a ton of other pistols being involved so do some searching before you buy. Unlike the MGW’s shoes, With the Wheeler, you can flip a plate in the back and the pusher surface that goes against the sight is either straight or angled depending on what you need.
By removing those two allen screws, you can flip the pusher around to either be the side with angled or straight pushing surfaces.
Here I am installing a suppressor height Trijicon sight on a Glock 34 slide.
The following photos let you see the Wheeler pusher from different angles – click on one to see them full size.
Here’s a video from Wheeler that will show you more about their tool:
You’ll notice that I am recommending two pushers for different audiences. For pros wanting to do this for a living, get the MGW Pro-Sight because of the need to support a variety of pistols. For people like me who have an occasional sight to do with a supported pistol, go with the Wheeler.
I hope this helps you out.
3/12/24 Update: The Wheeler is still working just fine. I have no hesitation recommending it.
Note, I have to buy all of my parts – nothing here was paid for by sponsors, etc. I do make a small amount if you click on an ad and buy something but that is it. You’re getting my real opinion on stuff.
I recently was looking for a free floating handguard for a 10.5″ AR pistol build and happened upon the new Midwest Industries (MI) Combat rail series. The name made me think mall ninja but the design is interesting and they did a good job manufacturing the assembly.
The 9.25″ M-LOK Combat rail looked good and three things caught my eye – the barrel nut was knurled, they had an innovative means of timing the handguard to the receiver, and it looked good. Yeah, looks do matter to me.
This is the 9.25″ MI Combat rail as it arrived. I have that small tub of barrel nut grease ready.
So,I availed on Holiday sales and ordered one from Optics Planet. The handguard arrives with everything inside. In other words, you need to unscrew the lower two clamping screws to then remove the barrel nut.
The first hint this is different from a lot of handguard that simply clamp is that insert in the middle – that’s the indexing key.Here is the knurled barrel nut, the indexing key and the two screws.
Now you may be wondering why I care about the design of the barrel nut. There are two reasons – first, the knurling creates a more anti-slip surface than a smooth surface would. Second, and perhaps more importantly, the groove that the key rides in allows the rail to align any way you need it to with the receiver without having to deal with shims and it inhibits the rail from sliding forward. Combine thee knurling, key and very generous tabs that position the rail on the receiver and this rail is very well retained. In other words, it isn’t going anywhere unlike many rails that shoot loose and all of a sudden you are holding the rail separate from the weapon because it slid off the barrel nut. That’s not going to happen with the Combat rail.
Installation Video From MI
MI took the time to assemble a short video for you to understand what is required to install the rail. It’s very straight forward.
My Installation Tips
To be honest, I read the paper instructions that came with the rail and realized it would really help to see what was needed so I watched the above video. I really do recommend you take just under 10 minutes to learn from them first hand. That’s tip #1 🙂
Tip #2 – I’d recommend you use a Magpul Barrel ExtensionVise Block – a “BEV Block”. You need to apply quite a bit of torque to remove the existing nut and 40 foot pounds to install the Combat barrel nut. Click here for a post that provides more details.
Note, the Giessele Reaction Rod works too but just costs more.
Tip #3 – When you remove the muzzle device and/or existing barrel nut, I’d recommend you use open end wrenches and NOT an adjustable wrench. Countless millions of nuts and muzzle devices have been marred or destroyed by adjustable wrench jaws giving too much and rounding corners.
I have a big SAW combination set that I use for tasks like this. For example, to remove the PSA barrel nut that was previously installed, I used this big 1-1/8″ wrench and it took quite a bit of torque to break it free. Again, use a BEV Block or Giessele Reaction Rod to safely handle the torque.
Tip #3 – do degrease the parts. You never know what was used during manufacturing or by a previous installer. For example, my PSA barrel nut was lubricated by some white colored grease. I have no idea what is was and used denatured alcohol to remove it from the receiver plus cleaned the new barrel nut.
Tip #4 – Do use Mil-Spec barrel nut grease. It is designed for the appplication and prevents the nut from sticking/corroding onto the upper receiver.
Tip #5 – Do use a torque wrench to install the handguard. I used to do “farmer tight” where you bring something up firm and call it even. The problem with that is either you apply too little torque and the nut loosens up or too much and you strip the threads. MI supplies the appropriate fitting for a 1/2″ torque wrench. The spec calls for 40 foot pounds so do it.
Tip #6 – for the same reason as the torque wrench, use a torque screw driver to install the gas tube (if it uses them and torque will be 25 inch pounds or there abouts) and the handguard’s Allen screws require 55 inch pounds.
I use a Vortex torquing screw driver for optics. It only goes up to 50 inch pounds so I installed the handguard screws to 50 and not 55. There are other screwdrivers that go higher but that is what I had handy.
The Wheeler FAT torquing screw driver can go up to 65 inch pounds. I have one and it works – I just don’t keep it on my bench now that I have the Vortex.
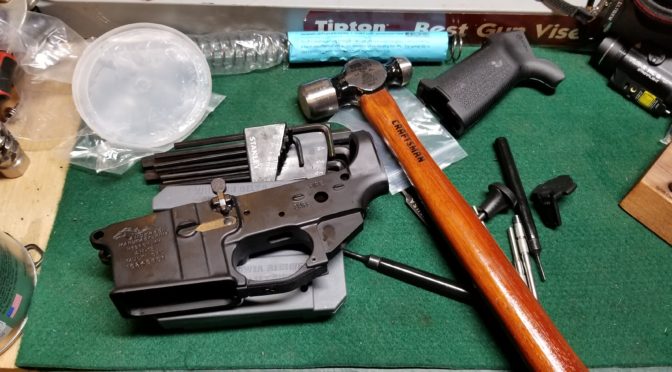
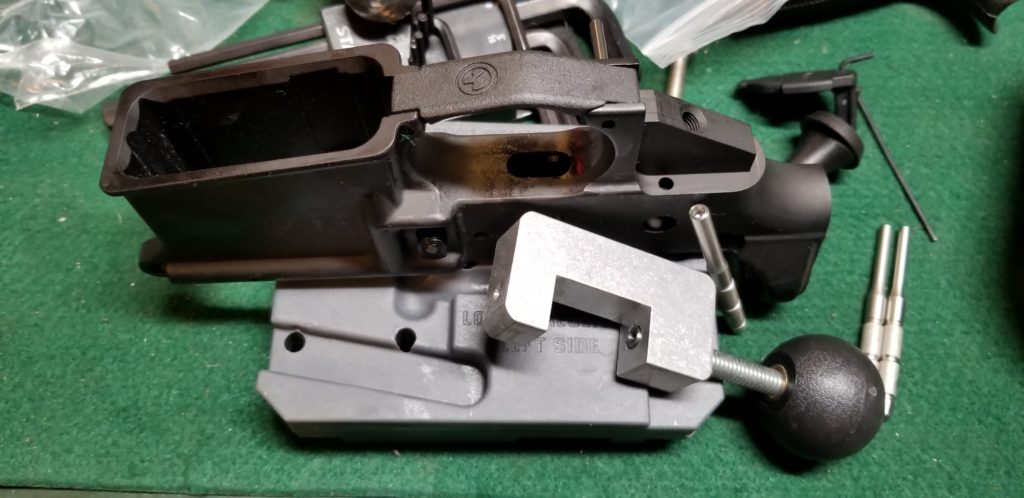
If you are new to building AR lowers, there is one step that is, in my opionion, the most risky in terms of making a mistake and scratching the finish if not even gouging the aluminum. That’s when you go to install the bolt catch. You must juggle the receiver, spring, detent, catch, punch and hammer all at the same time while being right against the nicely finished receiver!
The two ears that hold the cross pin of the bolt catch are just above the magazine catch. In the small hole will sit the spring and the detent pin.
Historically, you had to get ready for battle and would tape your receiver to protect it from slipping punches or glancing blows by a hammer.
I would apply duct tape, Gorilla tape or something thick to protect the finish. Note, if you are starting out, taping is always a good idea no matter what.
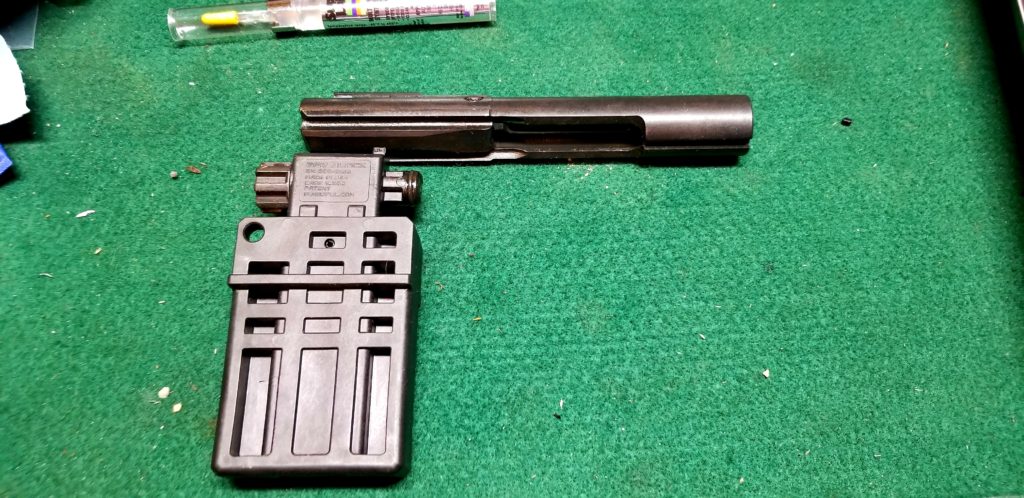
Installing the slide catch is way easier now with the right tools. I have really come to rely on three punches to get the job done. The first is a purpose specific punch set from Wheeler this is flat on one side and has a protective rubber coating.
The Wheeler set has two punches. The starter punch has a hollow end that the pin sits in. This allows you to focus on the hole and hitting the punch with the hammer. The other is a roll pin punch that you can use to align the catch at the start and also drive the pin the final distance.Here the pin is being started.See, I use the roll pin punch on the left to align the bolt catch and also to capture the detent pin and spring. Once that punch is in, you can let go! Whew. You can then focus on tapping the starter punch on and making sure everything is aligned.
Now plenty of guys can get their build done with the above. Because of my tremor, I like to drive the pin in the rest of the way by using a really long roll pin punch that safely clears the receiver. I have a Tekton gunsmith punch set and the 1/8″ roll pin punch works great for me.
This is the nice Tekton gunsmith punch set that I really like. This is me with the 1/8″ roll pin punch.
I hope this helps you out. This is what I do every time now. It’s also what I use if I need to remove and replace an existing catch.
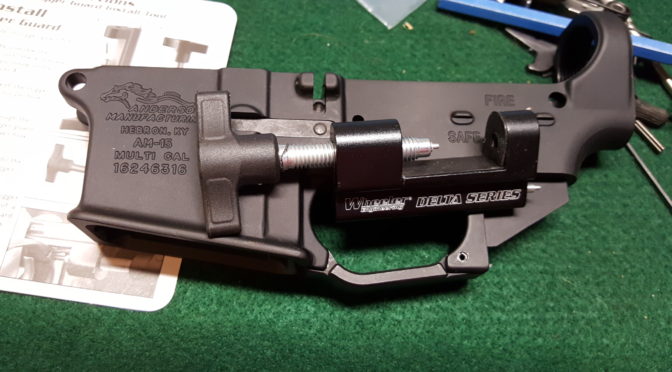
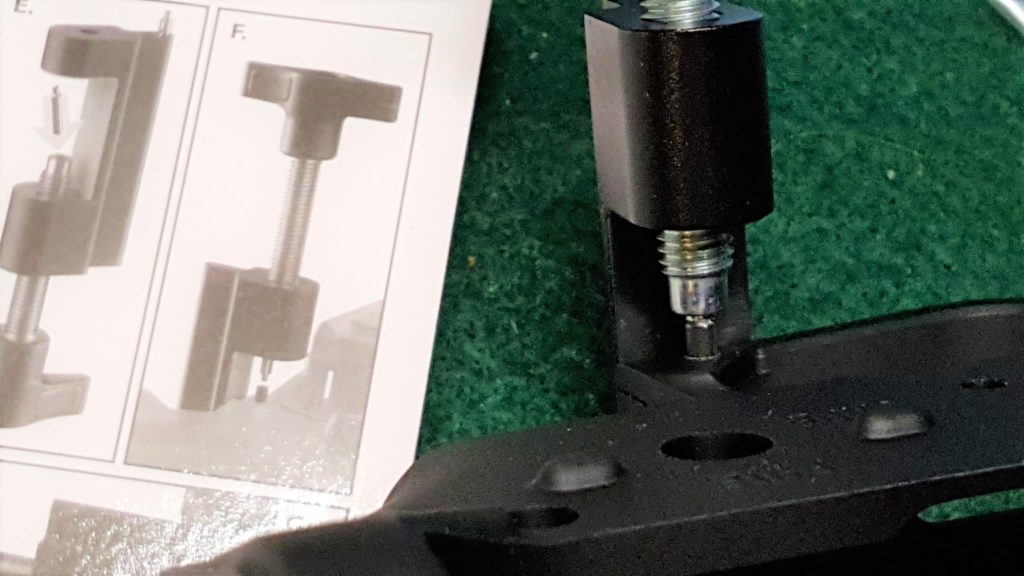
I was asked how I install AR trigger guards to minimize scratching up the receiver or even risking snapping an “ear” off. On one hand, you can use a solid backing block to support the ear and then use a roll pin punch to drive in the pin. That’s what I used to do but it’s a headache to be honest. As some of you may know, I have a tremor that makes fine motor stuff a headache so finding methods that are simpler really helps me get work done.
This is a Brownells Billet 7075 aluminum trigger guard (078-101-164) and it has a bulge to accomodate gloves. The set screw goes in the end with a blind hole. The roll pin goes through the end that is drilled all the way through.
Install the end of the triggerguard that uses the set screw. That’s the end with the blind hole – the roll pin goes in the end where a hole goes all the way through.
I lightly oil the pin to make things easy and tap it with a small hammer just to get it started.
I then use the Wheeler tool with the shorter starter pin. The starter pin has a nipple that centers it on the roll pin.
Keep the parts aligned and turn the knob to drive the pin in.
Stop when you have inserted the pin – it’s that easy.
Note, Scott Igert of Modern Antique Firearms recommends you put a business card or something between the frame and your receiver to protect it from scratching.
It has two tips – here you can see one installed and one stored in the frame of the tool. The short one is for installing and the long one is for pushing a roll pin out.Simply stop once the pin is flush.
Note, I actually have one from another maker also. I’m holding it in my hand. It does the same conceptually but is heavier made. I’ve built probably 4-6 ARs with the Wheeler unit and it seems to be holding up fine. The other is a Little Crow unit from Brownells for about $39.99 + S&H and its built like a tank but you do pay more for it.
Folks, I work a lot with epoxy and reply on it as a structural adhesive to both fill gaps and bond parts together. I’ve done everything from fixing car parts, wood furniture, tools, rifle bedding, scope mount bedding, custom knife handles and much more with epoxy. It is incredibly versatile but you need to do some planning to really get what you want out of it predictably.
In case you didn’t know it, “epoxy” is a general term for a wide range of cured polyepoxide resins glues with different physical characteristics such as how long they cure, strength, temperature resistance and so forth (click here if you want to learn more about the chemistry). There are a ton of options out there as quality manufacturers experiment with different resin and hardener formulations. In short, not all epoxies are the same and for people concerned with the quality of what they are building, they need to think things through. For quite some time I’ve wanted to write down a series of tips for folks to get strong reliable results so here they are:
Buy a quality brand epoxy to begin with
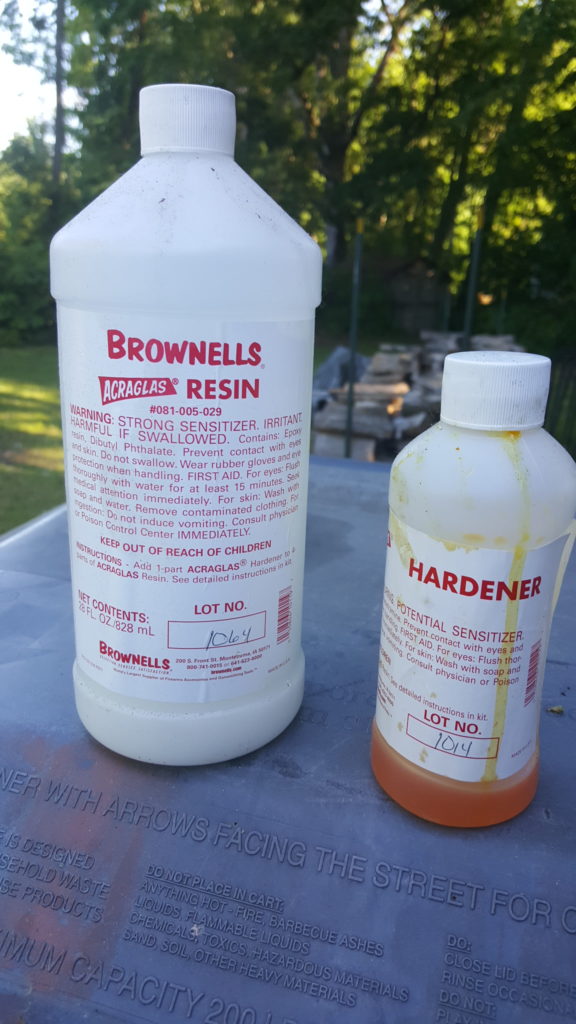
What I have found over the years is that not all epoxies are created equal so spend the money and buy quality epoxy. There can be a huge difference in how well the epoxy will last over time and/or how strong it really is. Do not buy the bargain basement junk. In general, if the maker lists all the physical properties then it is a well thought out and executed formula. I have three epoxies that I use the most in order are Brownell’s AcraGlas liquid (not the gel), Locite E-120HP, JB KwikWeld and ITW Devcon Plastic Steel. Once in a while if I need a fast cure epoxy, I will get a retail blister pack of some five minute epoxy and I’ll explain more in a moment.
Strongly consider what your application is
Epoxy comes in many formulations. They can vary the chemistry of the resin, the hardener and the filler to behave differently. Consider the following example characteristics:
Liquid, Gel/Paste or Putty/Bar — The liquid can seep into pores and fibers plus it can be spread but it can run into places you do not want. Gels and pastes tend to stay put better but do not seep in as well. The really thick puttys and bars are great for filling space or creating an impromptu clamp or to seal a hole but they definite don’t sink in much.
Temperature – you need to think both about the temperature when you are mixing and applying the epoxy as some will not set up at all if too cold. You also need to think about the heat when in operation because many epoxies soften and lose their bond the hotter they get. For example, you may apply epoxy to an exhaust manifold but it will blow off when it gets hot.
Pot life – this is how long you can still apply it before it starts to thicken. Some folks will refer to this as working time. You need to mix the two parts together, apply the epoxy, position and clamp the work before you run out of time. Keep this in mind.
Cure time – this is how long until the epoxy reaches full strength
Color – you can get epoxies in different colors
Ratio / mixing – some are by volume or by weight. The easy consumer stuff is usually 1:1 by volume but when you get into the more sophisticated epoxies the volumes vary or a digital scale is needed
Heat resistance – some epoxies resist heat better than others before they soften and “let go”
Shock resistance – some formulations hold up better than others before they start the break apart and “sugar”. Sugaring refers to the powdery look epoxy gets as it breaks apart. Brownell’s AcraGlas, Loctite E-120HP, JB KwikWeld and ITW Devcon Plastic Steel have all held up very well for me under shocks. My go-to epoxy for most work is Acra-Glas liquid because it holds up so very well.
Others – there are other factors that may matter to you but the important thing is to think through your application
Go with as long of a curing time as you can for maximum strength
What many people do not know is that the faster an epoxy cures, the weaker it is. Conversely, the longer the formulation takes to cure, the stronger it is. All things being equal, a 24 hour curing epoxy will be stronger than 90-second, 5-minute, 30-minute and so forth epoxies. Now there is a time and a place where speed is needed and also situations where strength is paramount. When I make khukuri hands and other things where strength is critical, I always use a 24 hour epoxy.
Use the Proper Ratios
Be sure to carefully follow the mixing ratios. For volume ratio work, I use 10cc or larger syringes without the needles on them to meter liquid resin and hardener. For example, I like AcraGlas and it is 4 parts resin to 1 part hardener. I keep two syringes separated that I re-use over and over. With the syringe in the holding cup labeled “resin”, I use it to draw 4 cubic centimeters (CCs) of resin out and squirt it into a mixing cup. With the hardener syringe, I meter out 1 CC of hardener into the cup. Now you can vary that. If you need a smaller about, meter out 2 CC of resin and 1/2CC of hardener. The syringes really help. If you are doing larger volumes then either use bigger syringes or disposable cups that have measurements printed on the side. Also note how I pour from the bulk container into the smaller intermediary containers that are easy to work with plus I avoid contamination, dropping a big bottle, etc.
The Loctite E-120HP comes in a specialized dispenser tube that uses a gun and tip to do all the mixing. It’s cool as can be for volume work where additional coloring or fillers are not needed.
For the Devcon Plastic Steel, I use my digital scale.
Here’s one thing not to do: Some guys have heard that if they add more hardener it will cure faster. This may be true but the resulting cured epoxy will be weaker. Do not deviate from the manufacturer’s recommendations if you want the physical properties they report.
Mix thoroughly
Folks, I can’t stress this enough. Mix the heck out of the two parts and combine them thoroughly. If you are doing larger volumes, consider doing what is known as a double pour. Pour the two parts into a first container, mix them thoroughly and then pour the combination into the middle of a second container and mix. What a double pour does is avoid having unmixed materials that have stuck to the walls of the container come out when you are applying the epoxy. Keep your pot life / working time in mind.
Most of the time I am using a generic 5oz plastic cup and plastic knife to do the mixing. I buy them by the hundreds for Ronin’s Grips and they are cheap regardless. Do not use styrofoam.
Prepare the surface
Whatever you want to bond epoxy to had better be clean and free of oils, greases, waxes, release agents and so forth. Second, the more abraded the surface the better. If you abrasive blast a surface not only can you double the surface area being bonded together but the irregular surface creates many opportunities for the epoxy to get “under” material to create a better grip. If you can’t blast then at least sand the surface with 80-100 grit sand paper.
So here are two rules to bear in mind when it comes to the surface:
Clean, clean, clean and wear gloves to not contaminate the surface with oil from your skin
Shiny is bad. A polished smooth surface will not give you anywhere near the bonding strength that a blasted or abraded surface will. I blast everything that I can – metals, micarta, plastic and even wood. It makes a world of difference – seriously.
The following is a bakelite handle from an electric griddle of my parents’. The unit works great and has sentimental value so I cleaned it, blasted it, cut a quick cross hatch pattern to give even more grip and then cleaned it again. It set up like a rock and we used it all Memorial Day morning to cook hundreds and hundreds of pancakes with no problem.\
Heating Epoxy
Heat can help you two ways. First, by warming epoxy it tends to flow better. If you need to to soak into wood or other surfaces, consider using a heat gun to blow/chase the epoxy into the wood. Do not burn the epoxy – just warm it up. Second, in general, warming epoxy up tends to make it cure faster. Now there are limits and you need to either experiment or talk to the vendor before doing anything too radical. I will often use a halogen light or other heat source to warm the surface up to 80-100F. In chemistry, there is a formula known as the Arrhenius Equation that notes that for each additional 10 degrees Celsius added, a reaction rate doubles (click here for more info on the equation). My experience is that you want the heat to penetrate and warm all of the epoxy and not just the surface and you also do not want to burn the epoxy. In general, I do not exceed 100F but that is just me. I found something that works good enough and have just stayed there.
Also pay attention to the minimum temperature requirements for curing. Some epoxies will not do anything at all at freezing. Some take forever to cure at 50F. It just depends. When in doubt, use a lamp or something to gently heat the part.
Coloring Epoxy
What many folks do not know is that you can actually color epoxy. I have found two approaches that work. First, use powdered tempera paint. You can stir in a bit of black powder to get black epoxy. Now I did this starting out and have since moved to using epoxy dyes so I am added less powder to the mix because I want to save the volume for glass fillers which we will talk about next.
Fillers
You can modify the physical strength of epoxy by adding a substrate or fillers. For example, fiberglass is matted glass fiber that bonded together with epoxy made for that purpose. Folks working with carbon fibers are using epoxy for bonding that together. I add 1/32″ milled glass fibers to my epoxies to get more strength. If I want more of a paste, I add more glass fiber and if I want it to be more of a liquid, I use less. The exact volume of glass fiber depends on what you are trying to do. Some vendors will give you recommendations and others will not.
Clamping / Work holding
In general, you want to apply the epoxy and then clamp everything together really well and then let it sit. You may choose to use traditional clamps, vacuum, etc. Bear in mind two things:
1. Be careful that you secure the material and that it can’t shift while curing. I can’t tell you how many times I have checked stuff and found out it moved and had to change my approach. Figure this out before you apply the glue in case you need to make something, change your approach, etc. Check it regularly to make sure it hasn’t shifted regardless. Every time I think something can’t move – it does.
2. The epoxy will run out of what you are working on. Decide how you are going to deal with it. Wax paper can protect your tools and table. You can scrape the epoxy off after it has partially cured. You can wipe things down with acetone when partially cured. Just think it through otherwise you are going to glue stuff together really well that you do not want bonded – trust me. It is a real headache so plan for seepage/dripping and how you will deal with it.
Patience
This is something I have gotten better at over the years – wait the recommended amount of time. If they say 24 hours then wait 24 hours. If you have questions about using the part sooner then ask the manufacturer. For example, you might be able to assemble something after 10 hours but not actually put it under strain for 24 hours. Factor in the temperature. The colder it is then the longer it will take. Remember what I said about the heat from lamps above.
Safety
Yeah, I had to add this. Follow all guidance from the vendors. The resins aren’t too bad but some of the hardeners are nasty. Wear rubber gloves, use eye protection, work in a well ventilated area and wear a real good dust mask when sanding. I use N99 masks now for everything.
I hope you found this general epoxy guidance helpful!