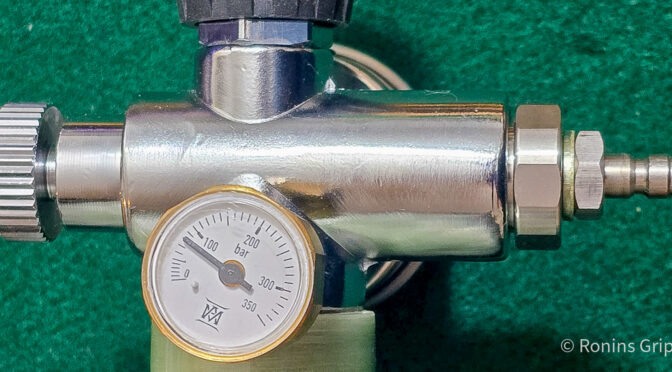
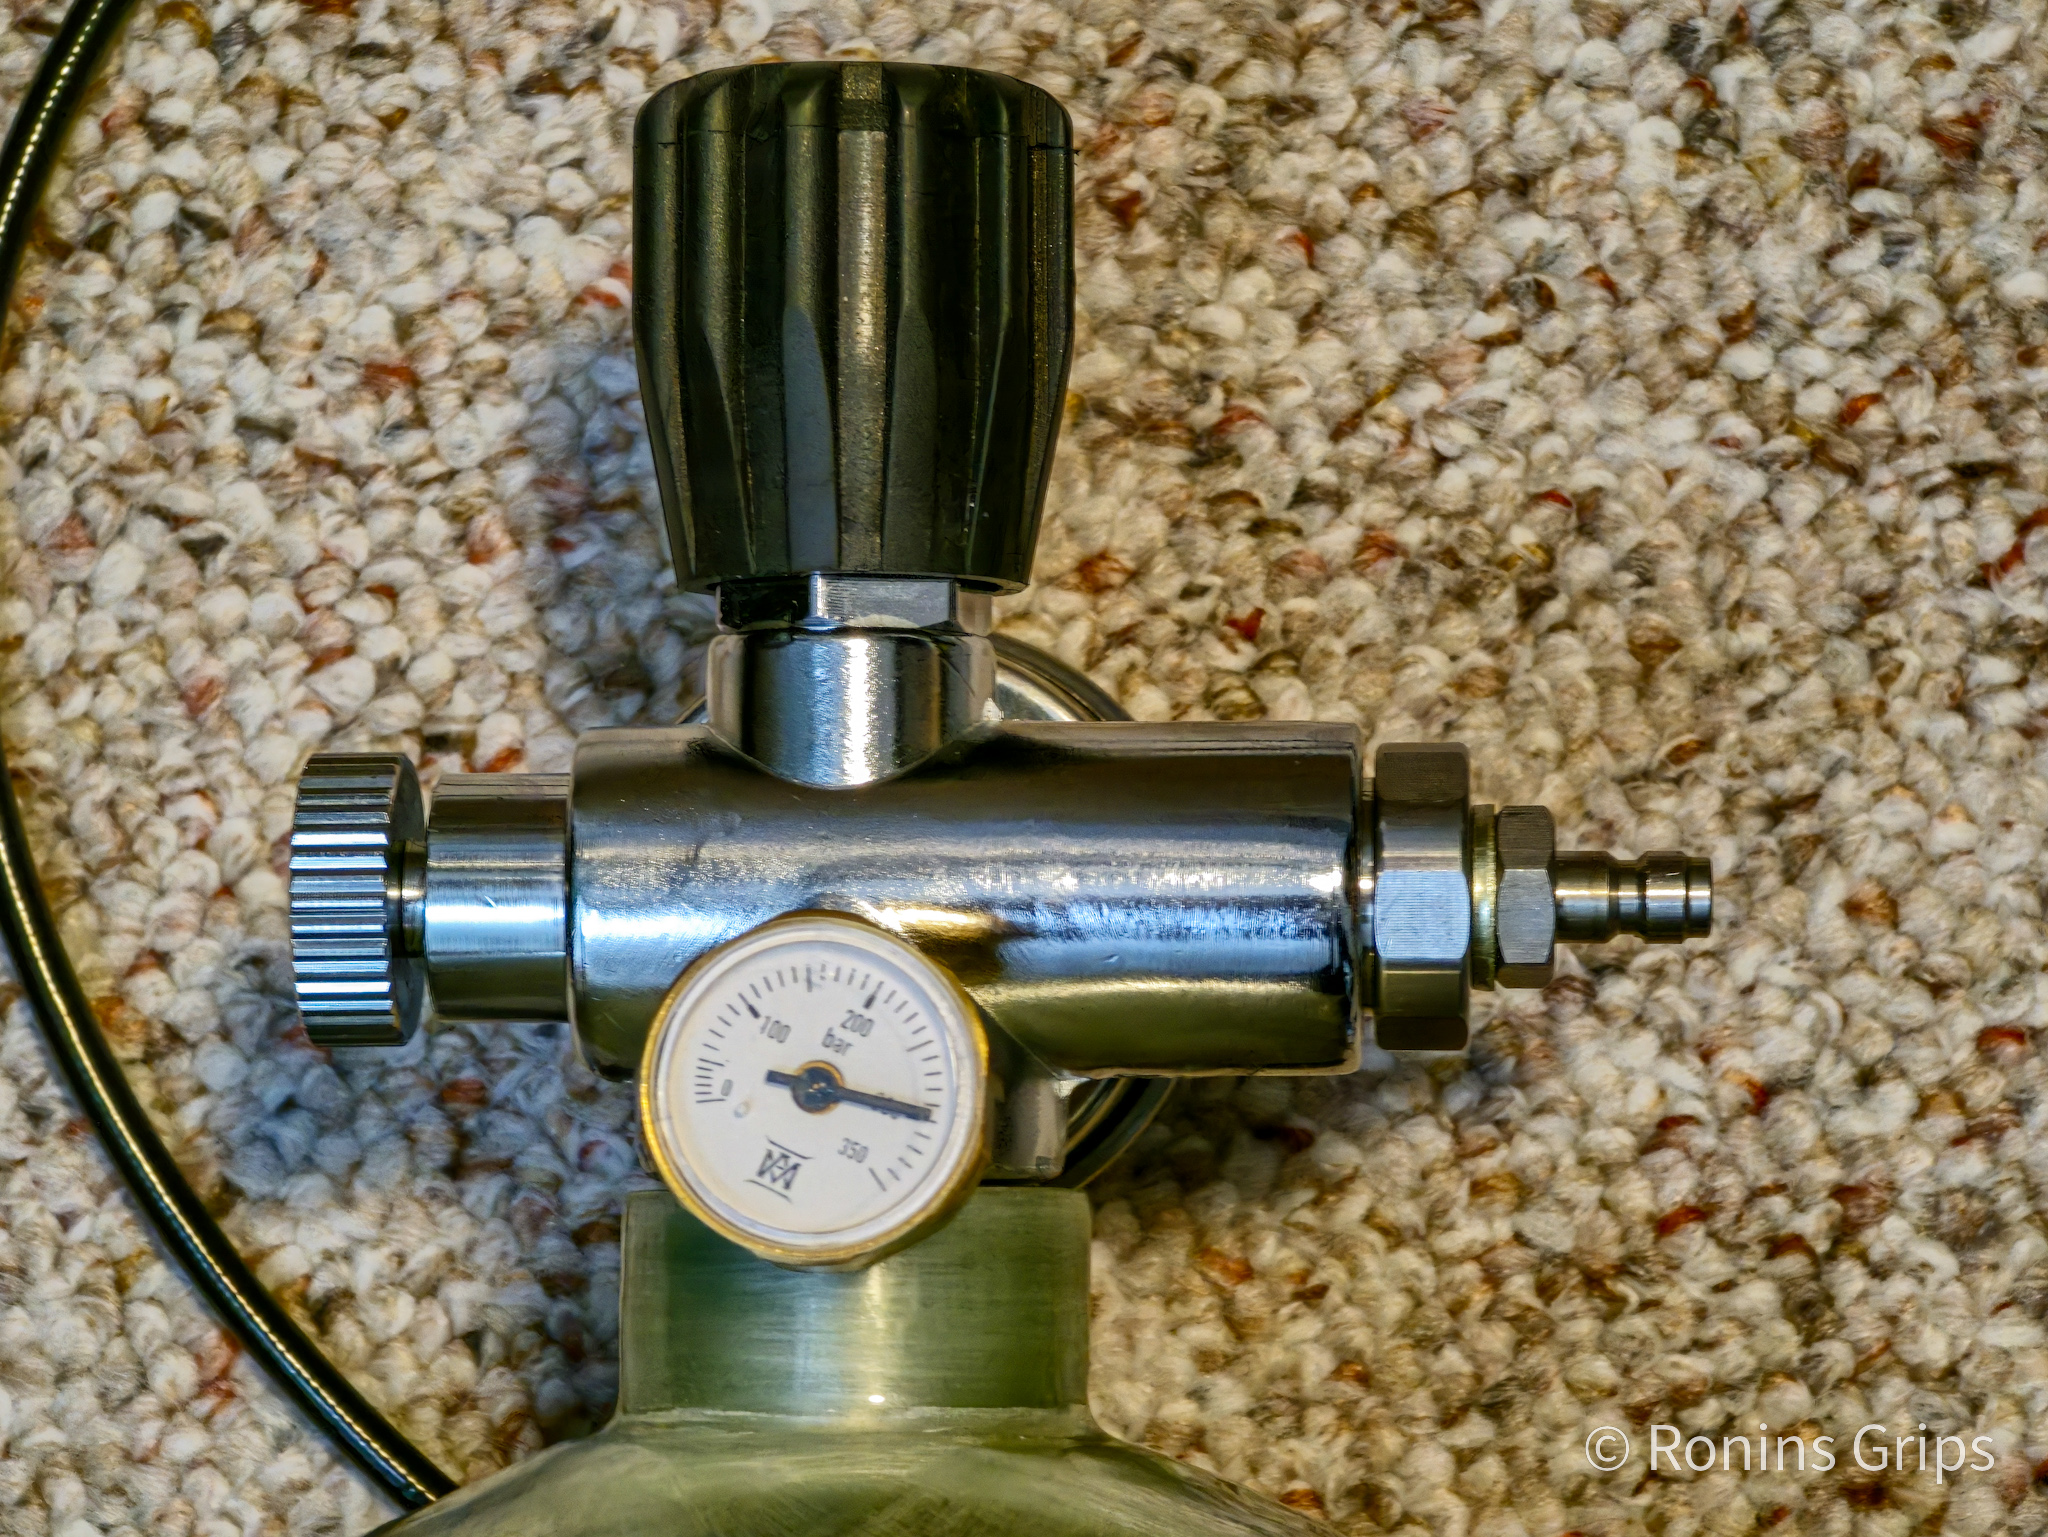
My 6.8L 300 bar/4,351 PSI Air Marksman tank had a slow leak. How slow? It would lose a few hundred PSI per month so real small and slow. I used the CRC Aerosol Leak detector to track it down. The seal between the 7/8ths inch valve stem and the tank/bottle is accomplished via an O-Ring and it needed to be replaced.
This how-to works in general but the o-ring size will change if your valve neck has a different diameter. Not all brands and tank volumes use the same diameter valve stem.
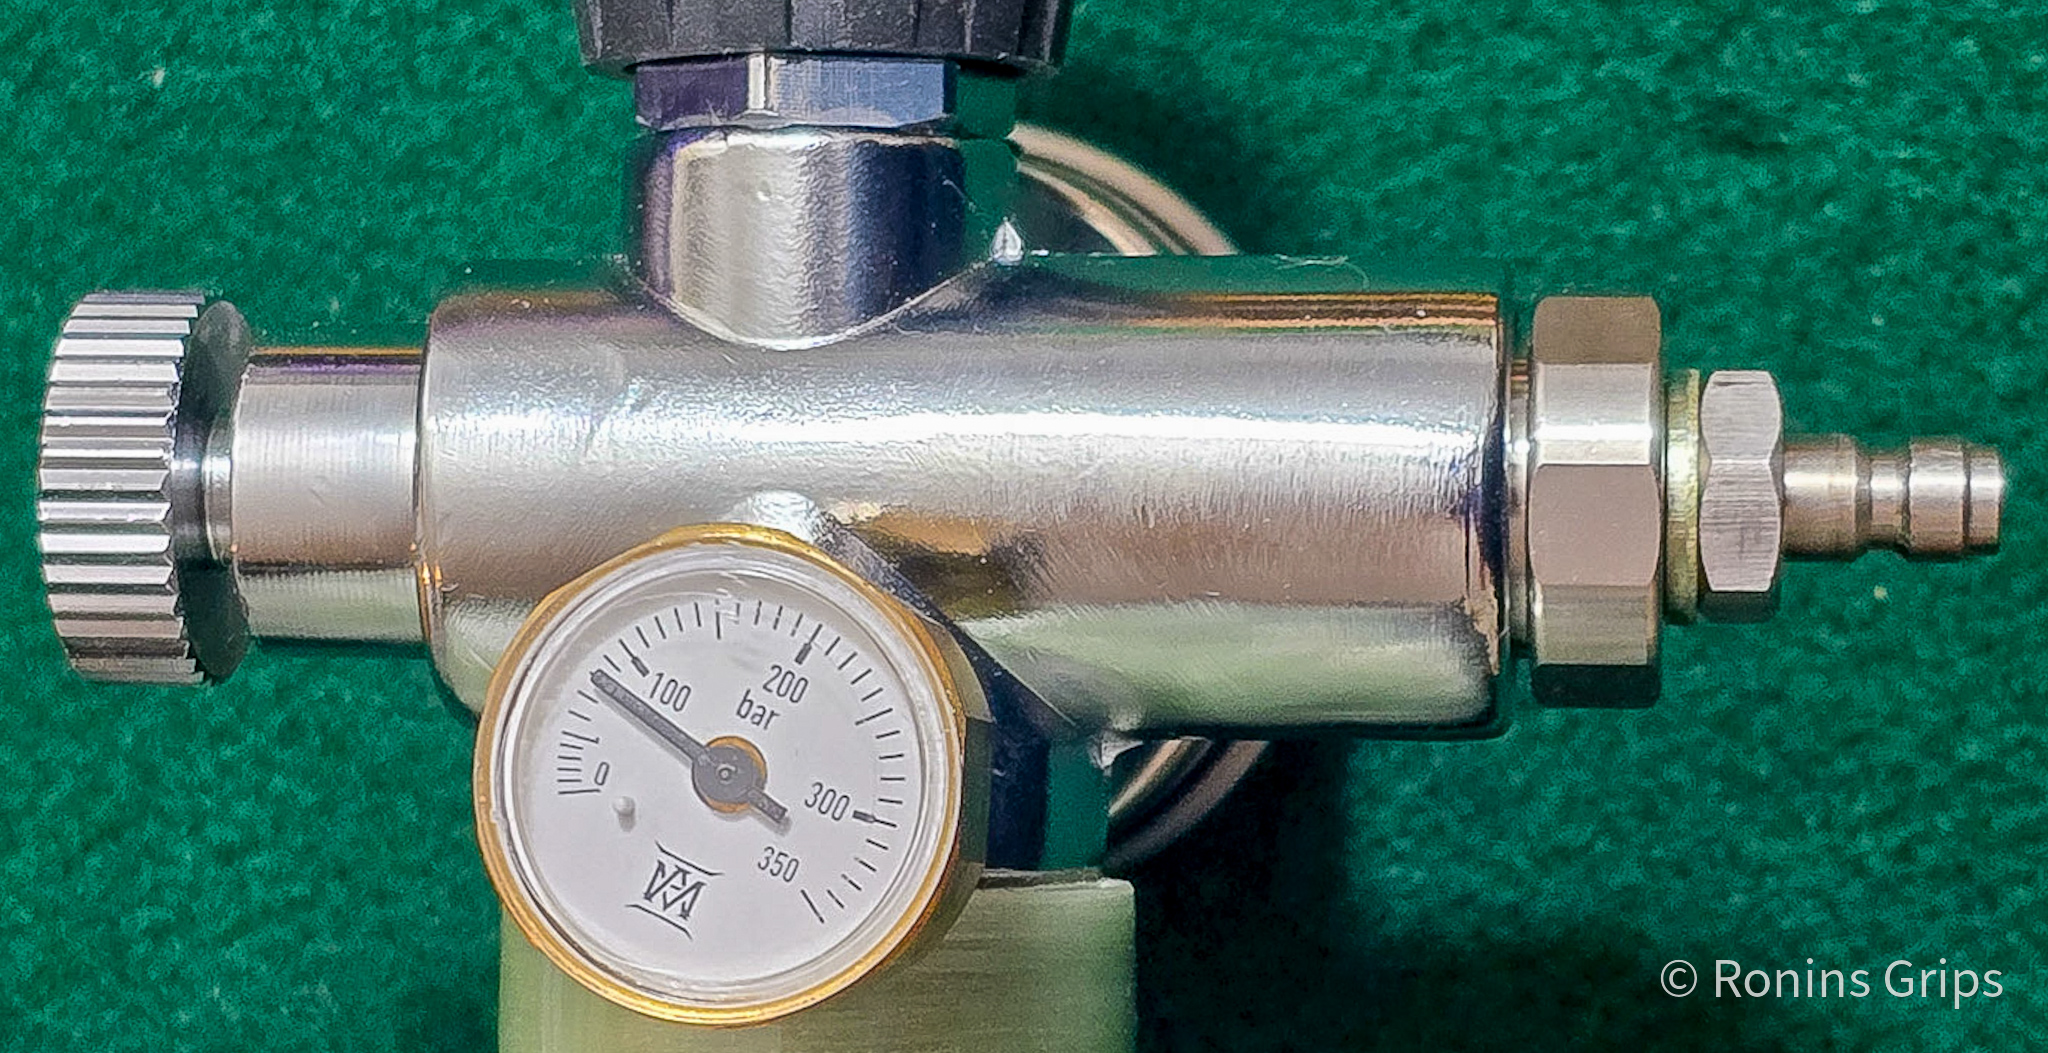
Removing the valve from the tank
The first step is absolutely the most important – open the valve and make sure the tank is competely empty. Before you go any further, open the valve and leave it open. This is your safety check that it is empty. I can’t stress this enough – make sure it is empty!!
The valve and tank are 7/8ths inch right hand thread. That means you turn left (counter clockwise) to loosen it and right (clockwise) to tighten the valve on the tank.
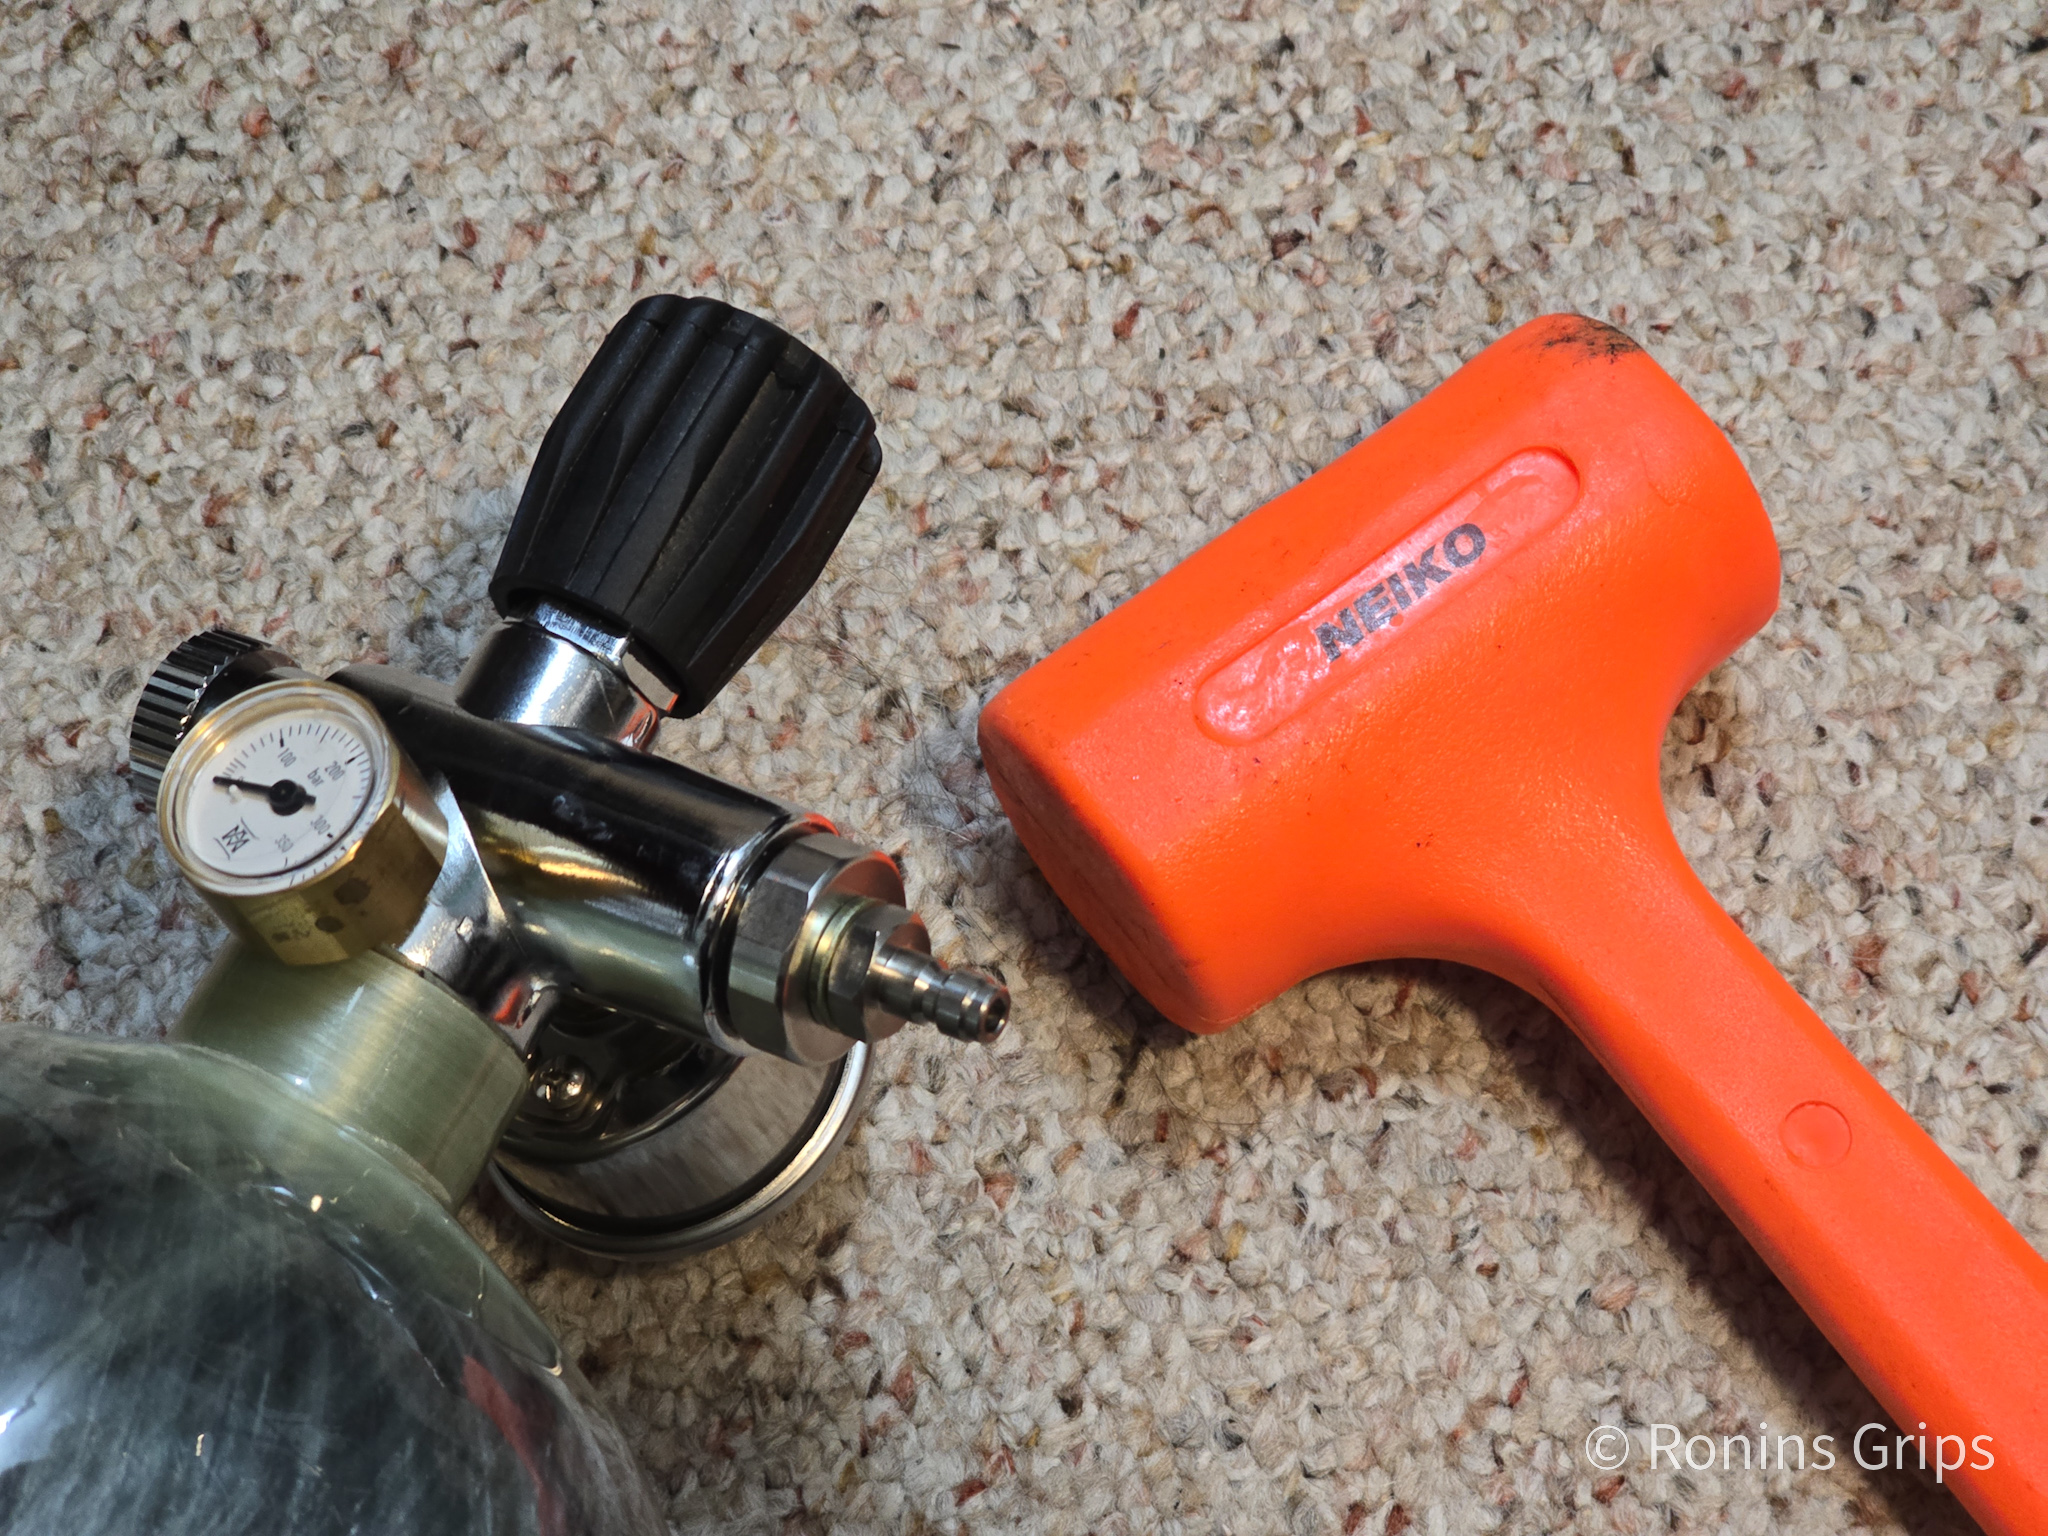
To remove the valve, you can first see if it will unscrew by hand but usually they are a bit “stuck”. I use a non-marring dead blow hammer to hit the valve and smack it loose. Hit a part of the valve body that sticks out like a lever arm and not knobs or gauges.
On the valve body, I smacked the right side of the valve body and not the fill nipple. I also did not want to hit the gauge.
It should not take very much force to get it to come loose. It’s the “whack” that knocks it loose more than just pure brute force. Think of it this was – the sudden jolt on the valve body knocks it loose while inertia is relatively holding the tank body in place. It’s actually way easier than trying to hold the body and apply a wrench or strap to the valve body.
If it isn’t budging, make sure all air is out of the tank before you try more force.
I used a 2 pound Neiko dead blow hammer. A dead blow hammer is filled with steel shot for weight.They do an excellent job of transferring the force of the hit without scratching or denting the target surface.
The Neiko dead blow hammer knocked it lose very easily. I then unscrewed it the rest of the way by hand.
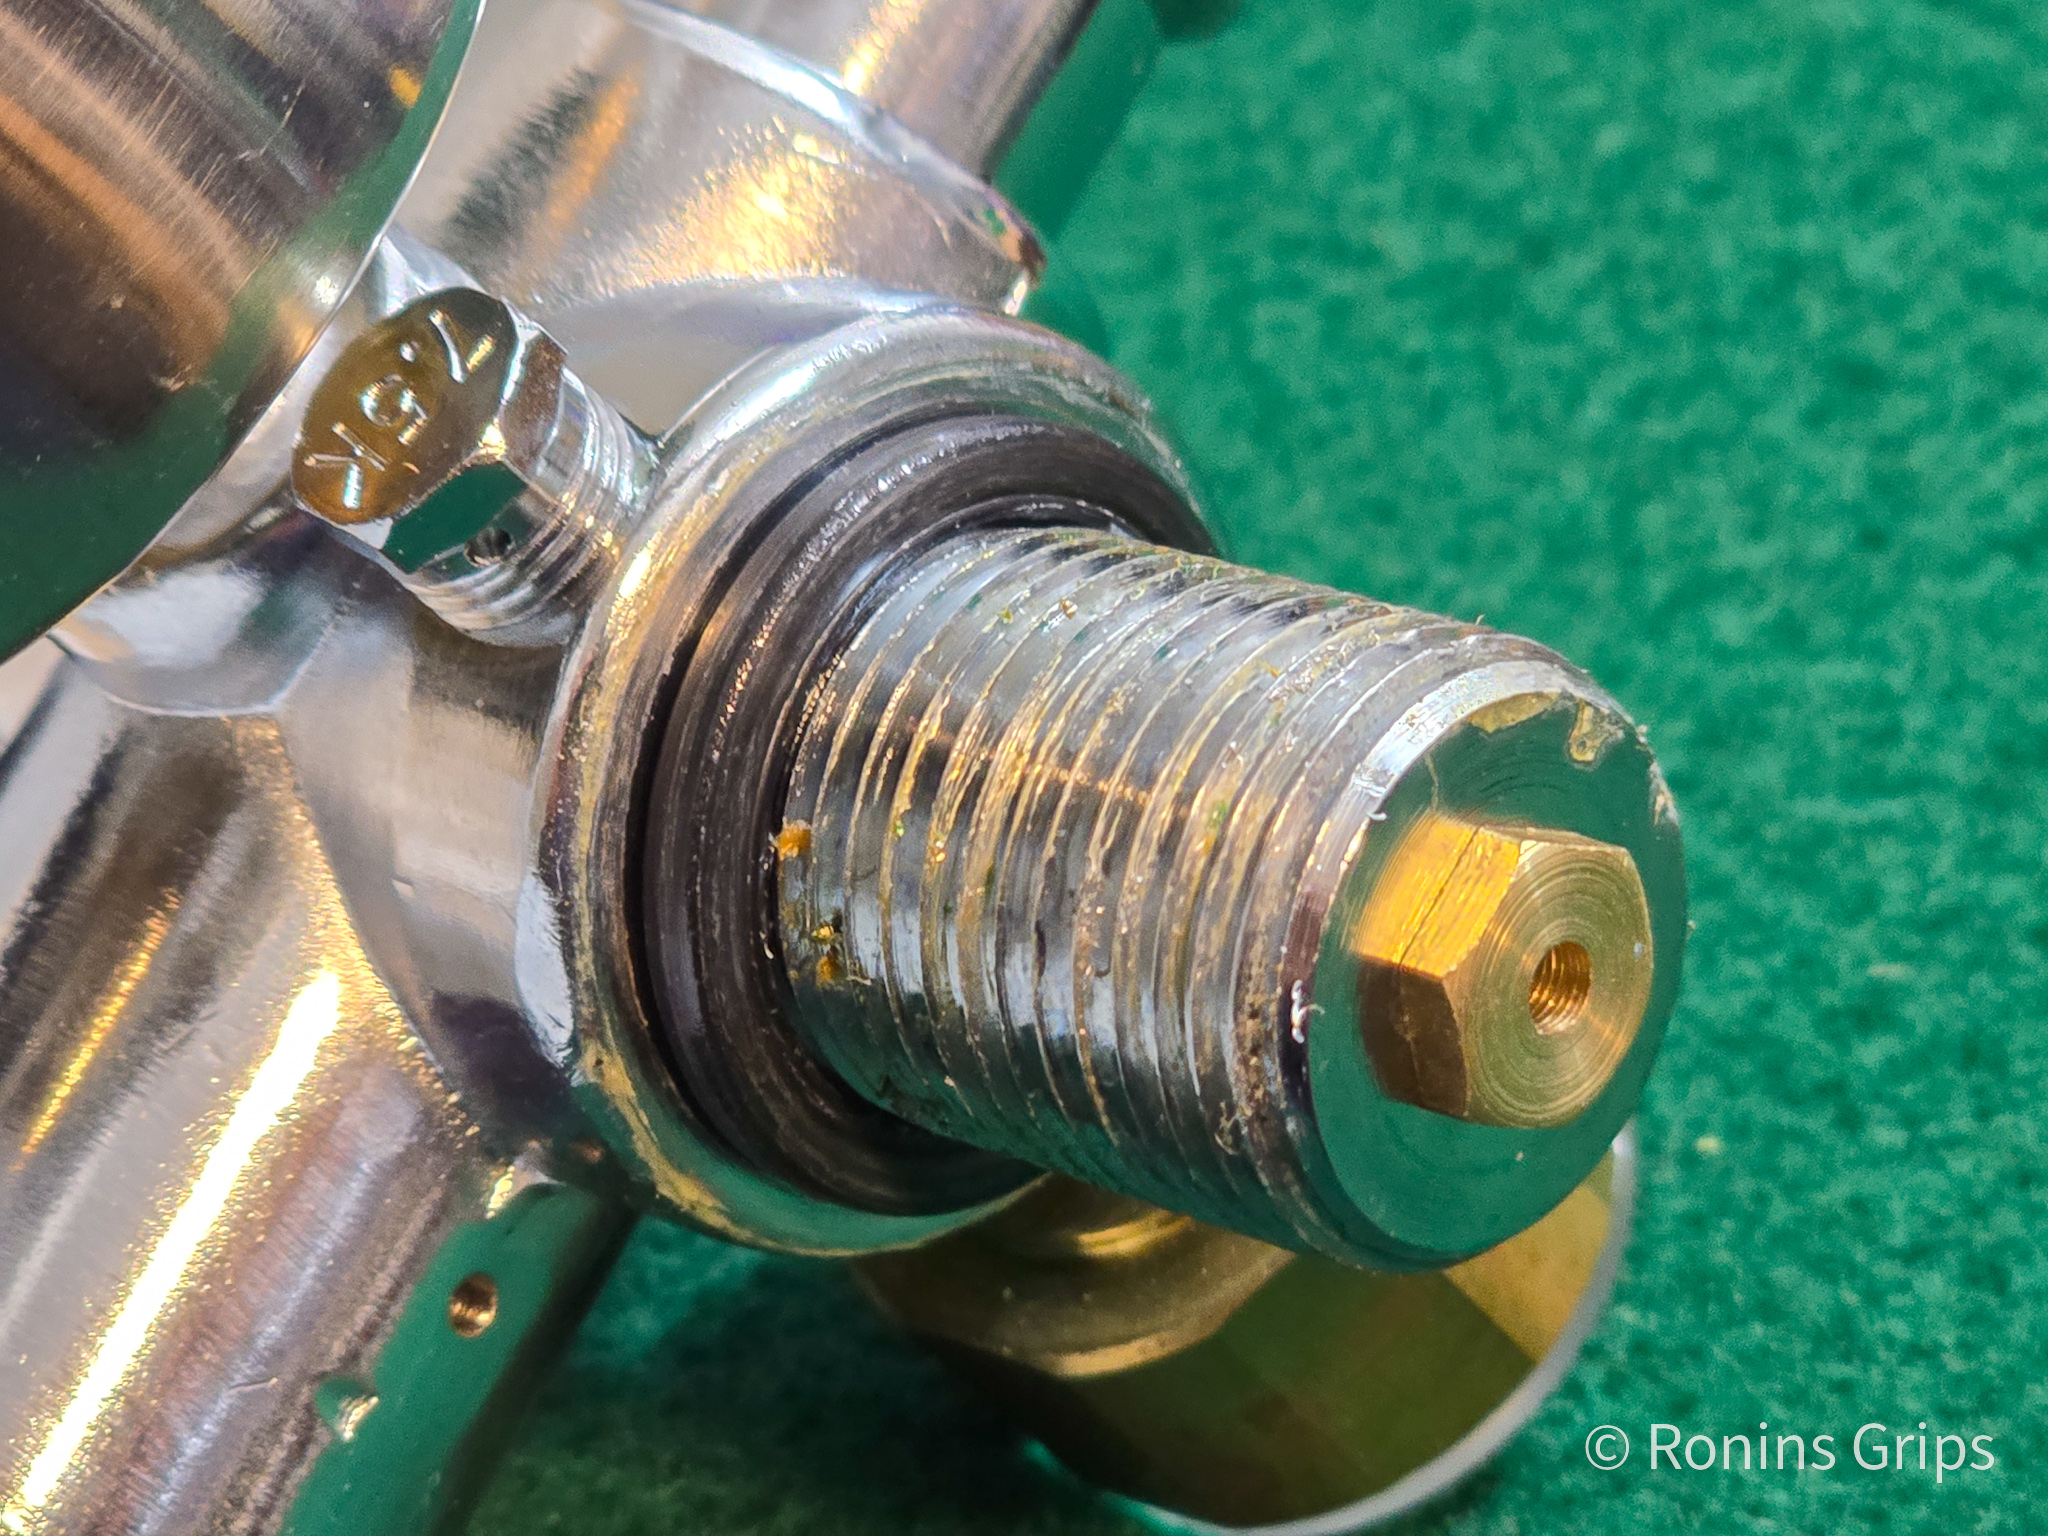
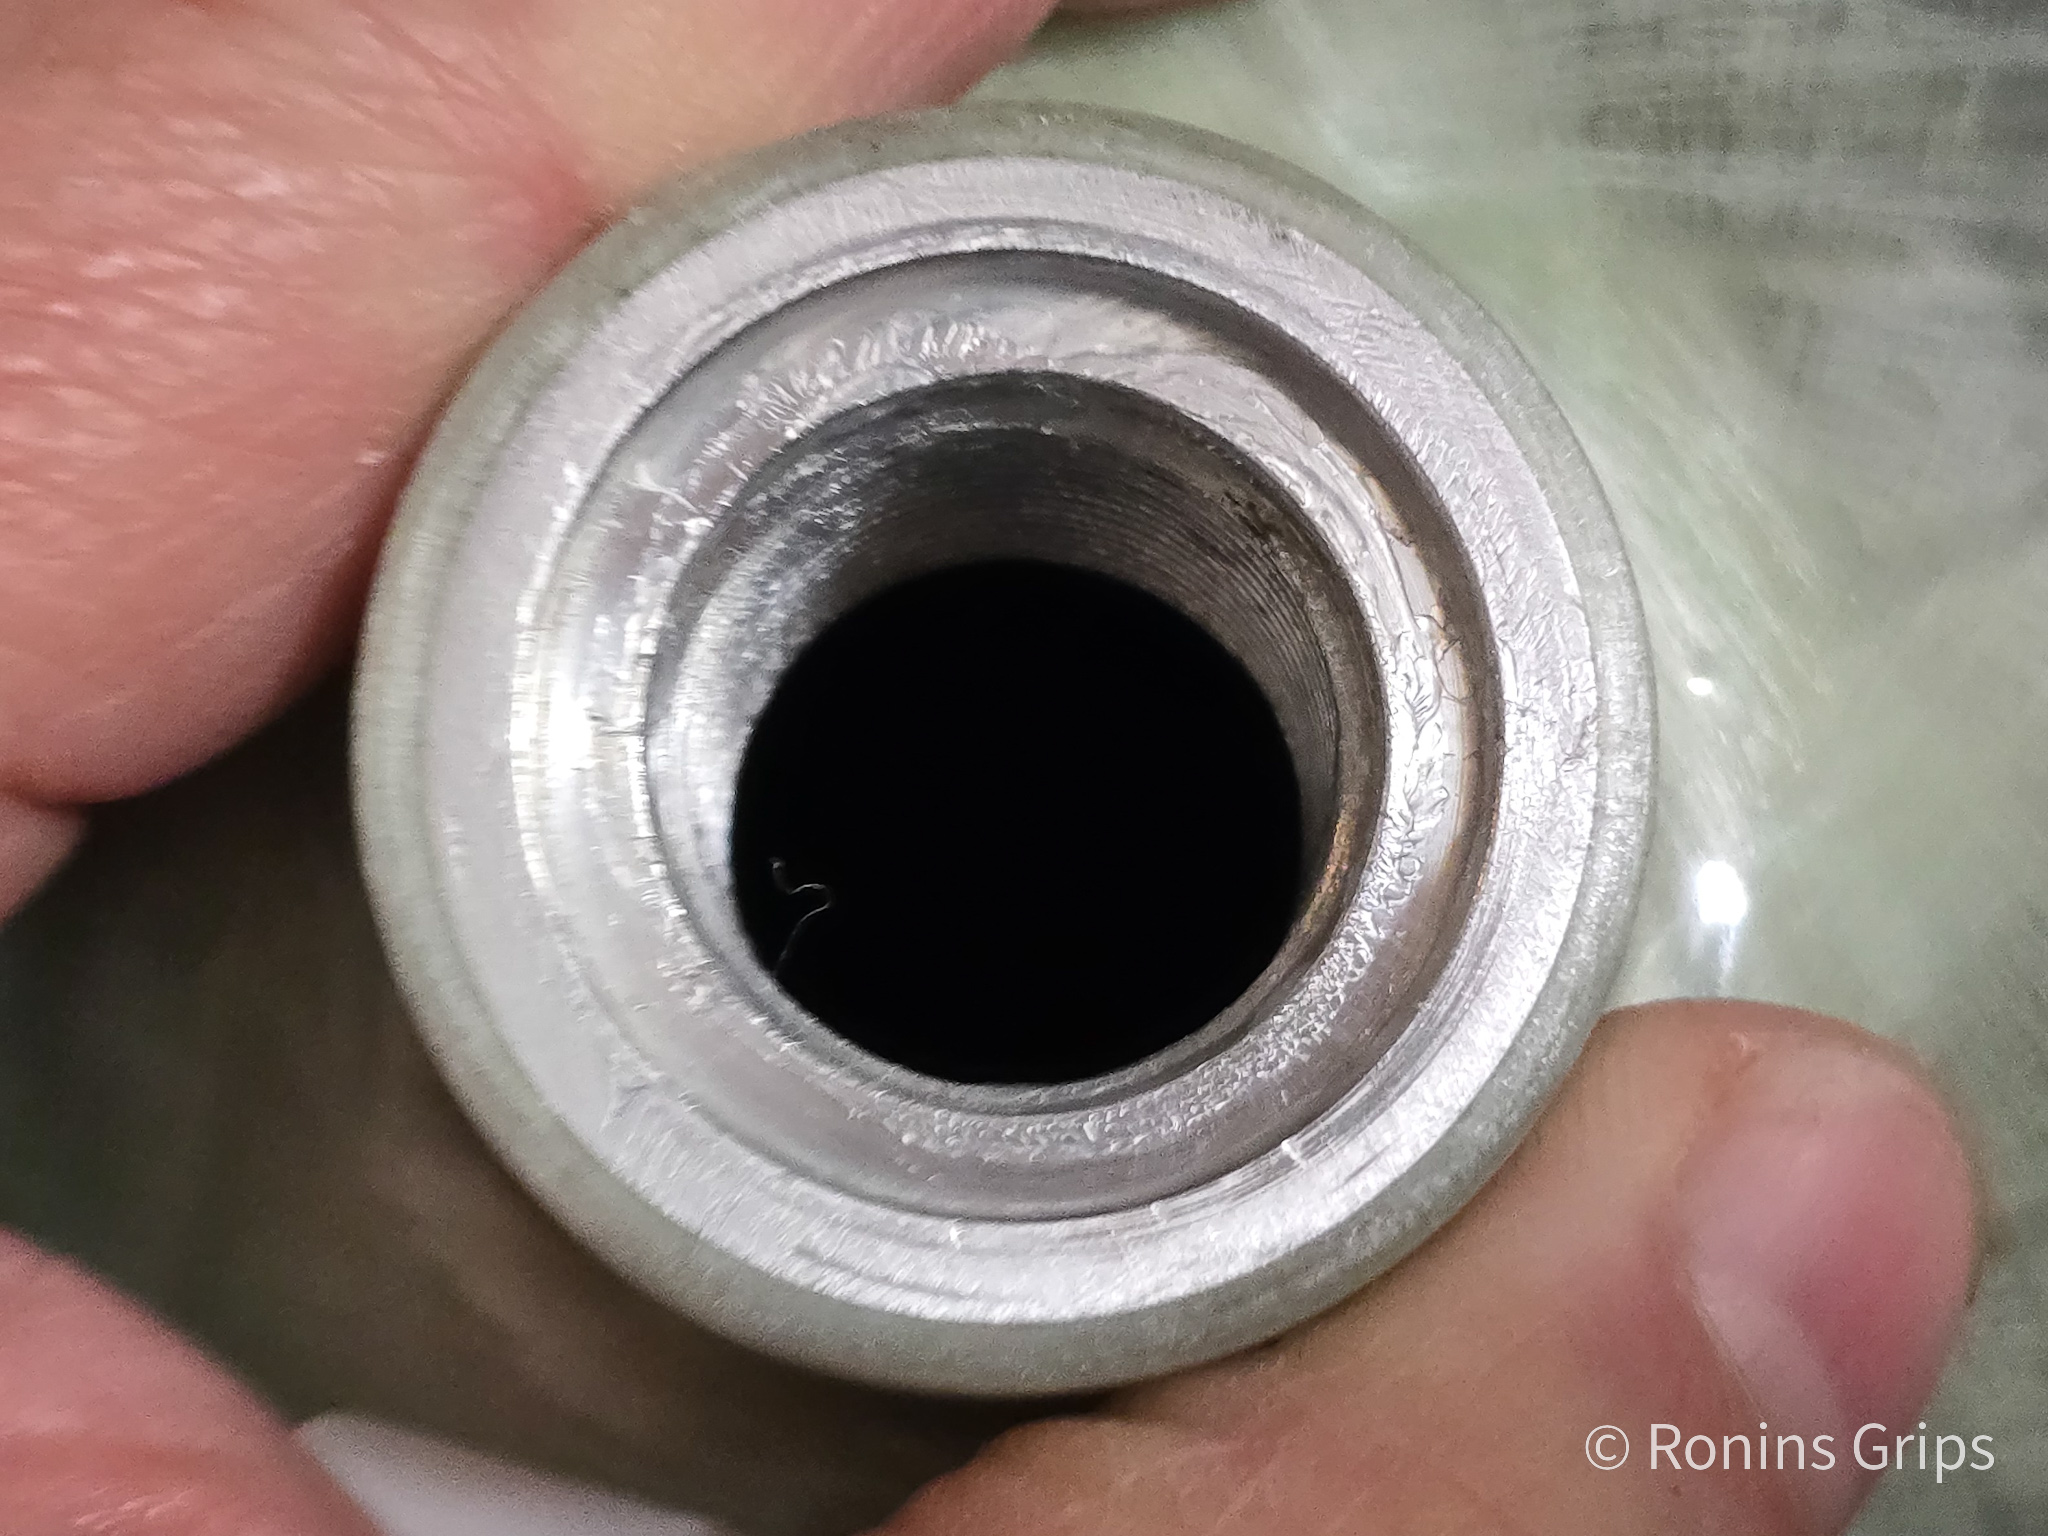
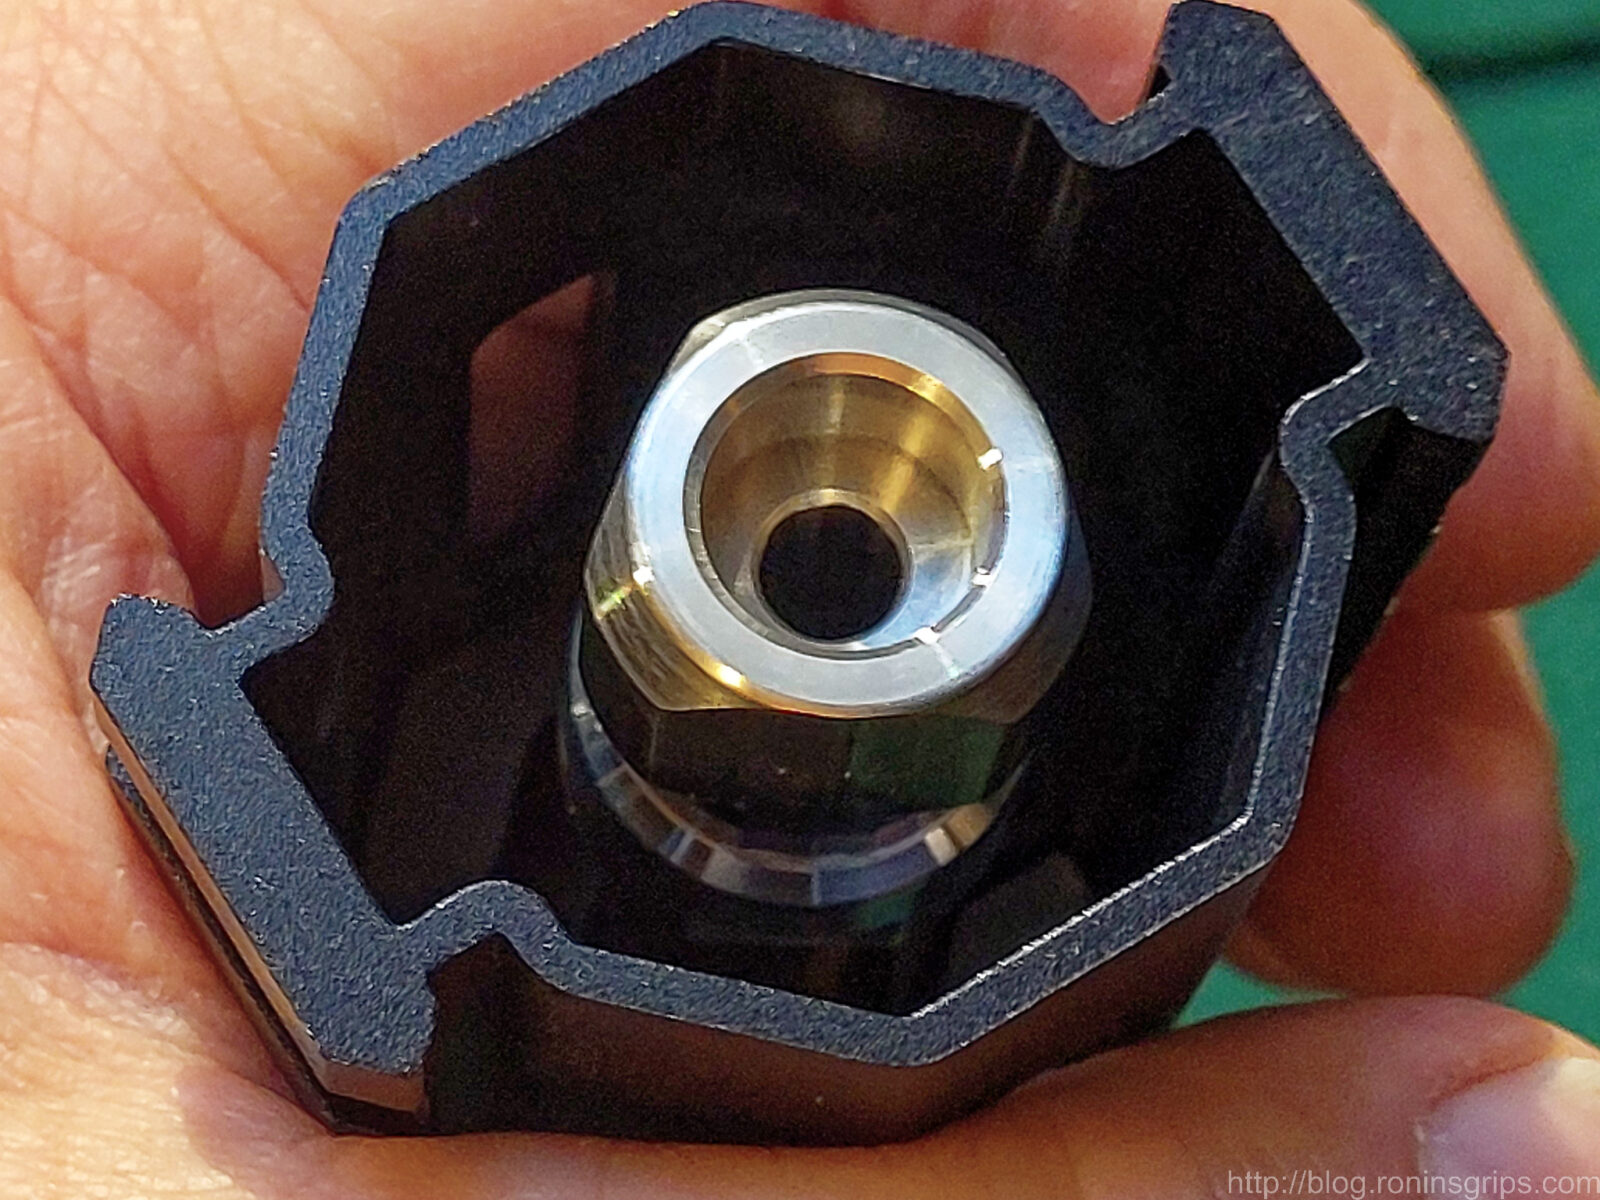
Here’s the valve stem itself. Note the unknown brown flakes right under the o-ring. I was disappointed by the dirt and debris on the valves tem and the top of the tank.
What size was the o-ring?
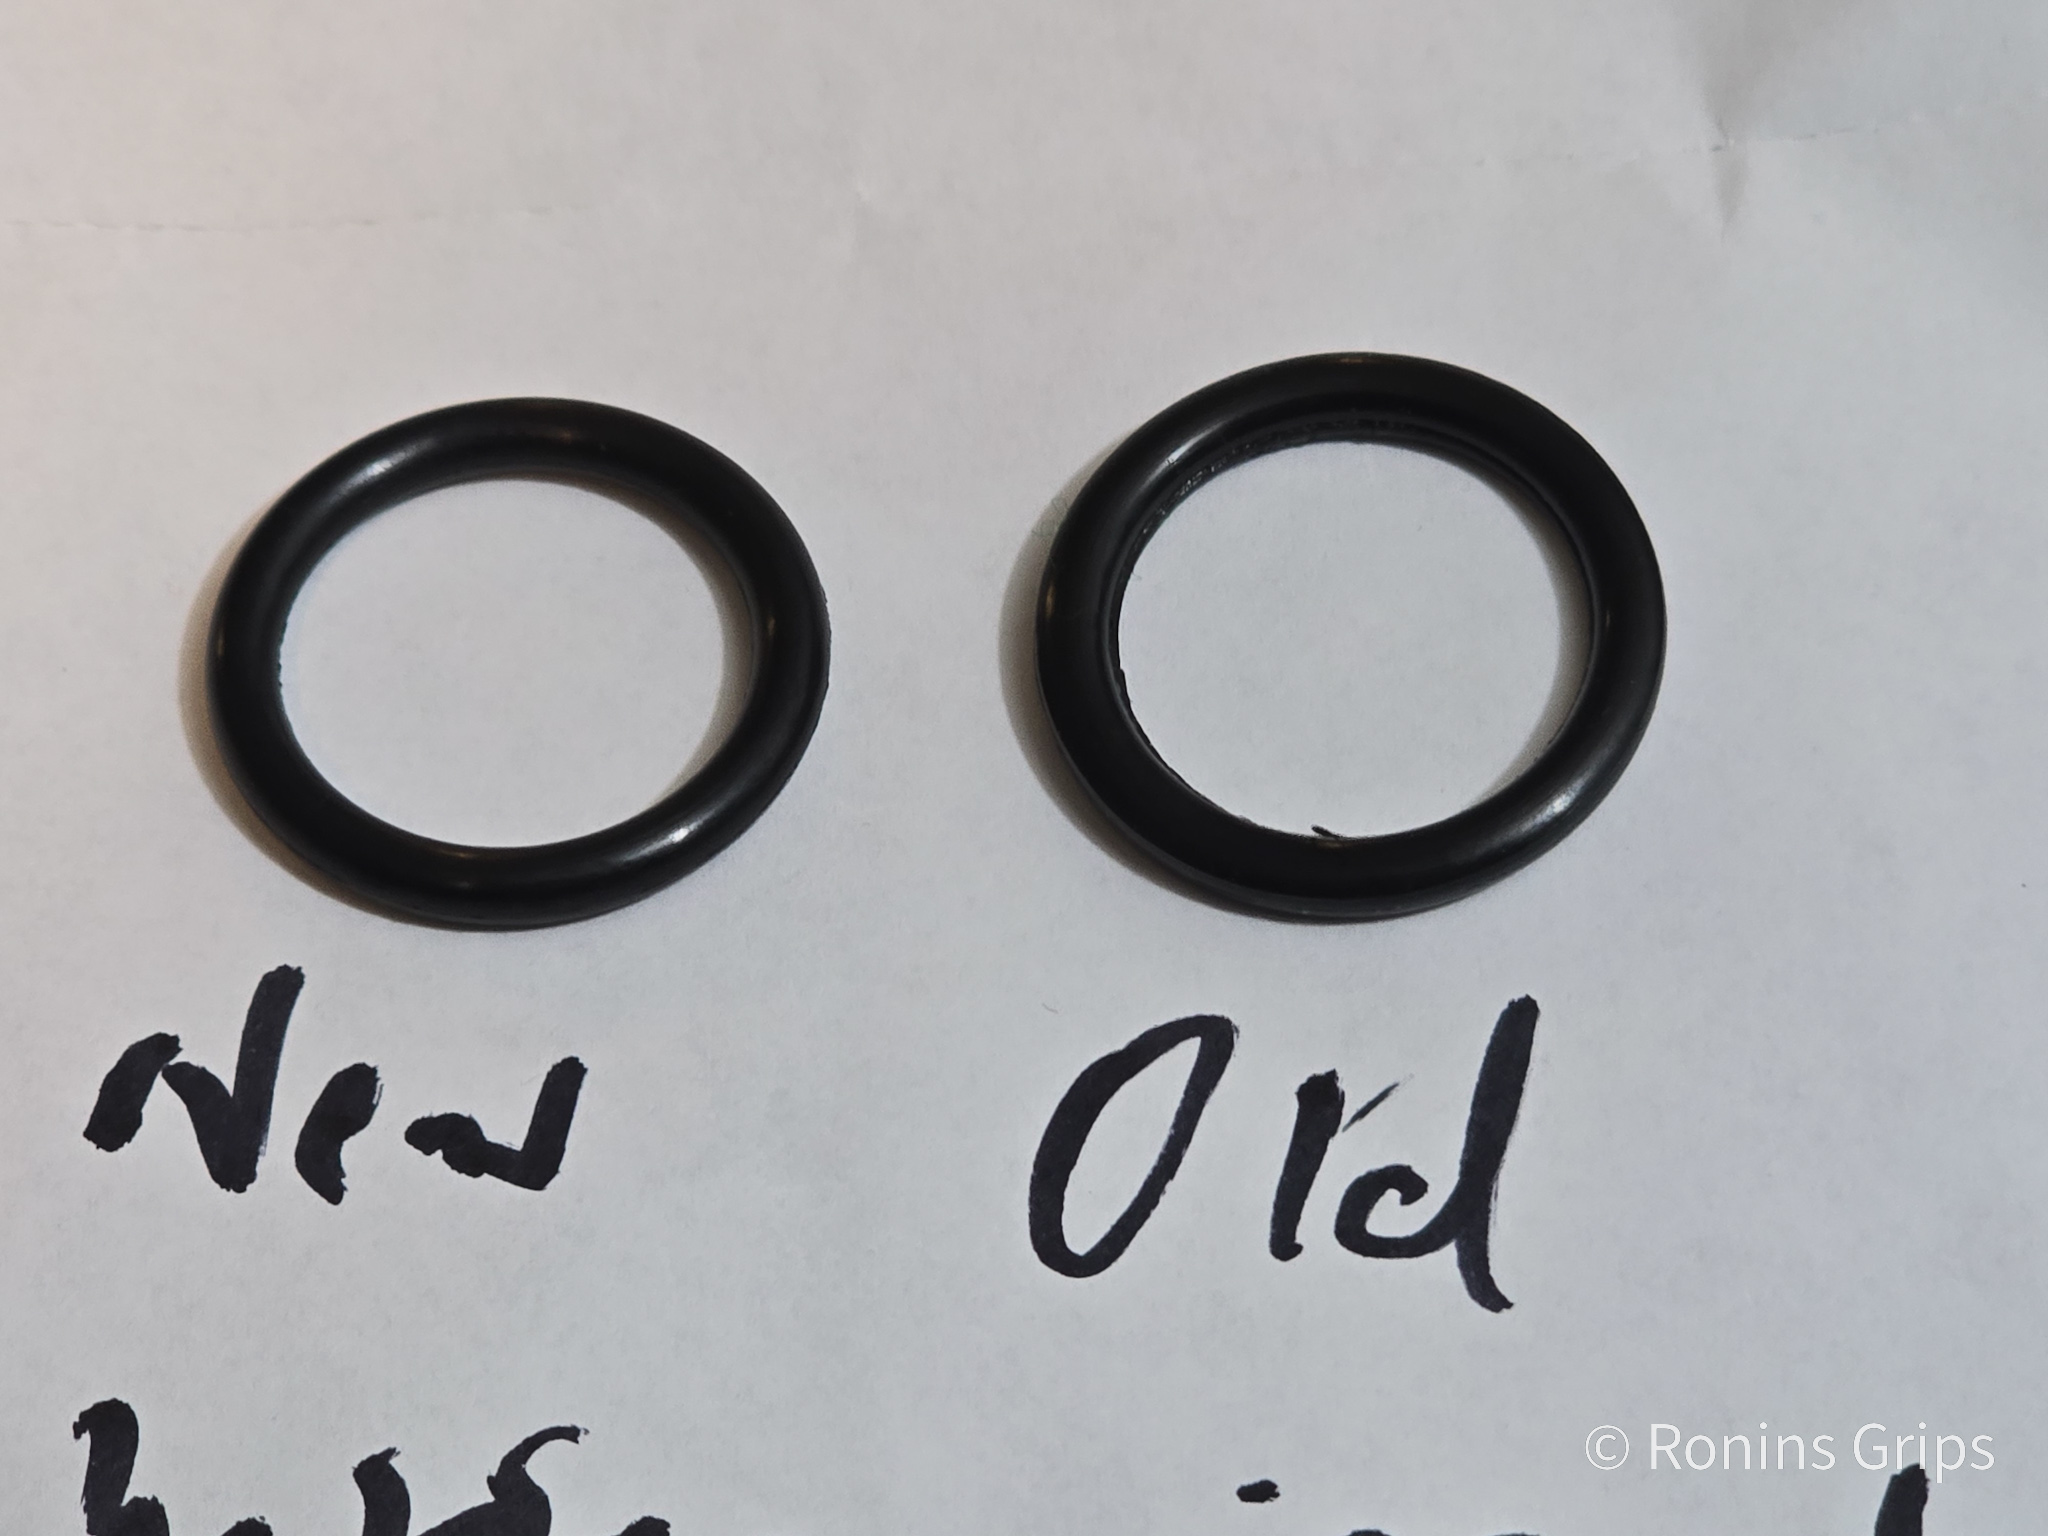
Searching on the WWW said to use a size 212 o-ring on a 7/8ths inch valve stem. What you’ll notice in the next photos is that the 212 size o-ring is an approximation of the original. Odds are the Chinese manufacturer of the Air Marksman tank used a different specification but the SAE 212 o-ring will work.
You can see the sizes are slightly different in terms of the thickness and OD. I do want to point out the manufacturing defects with the original o-ring. See the rubber filament pointing into the inner area of the o-ring? There were multiple filaments at different places on the o-ring.
When I removed the o-ring I noticed the o-ring had a number of filaments left over from manufacturing. In theory these remnants from manufacturing an cause imperfect seals.
This is an example of the several filaments on the o-ring.
It took some digging to find out the size and specification I needed:
Material: Buna-N — need a resistance to chemicals
Inside Diameter (ID): 7/8″Nominal and 0.859″ Actual – the 7/8ths inch (ID) matches with the valve stem’s outer diamter (OD)
Outside Diameter: 1-1/8″ Nominal and 1.149″ Actual – this needs to fit in the pocket the o-ring sits in and the tank has pletty of room for this.
Thickness: 1/8″ Nominal and 0.139″ Actual — this is diameter of the o-ring’s rubber.
Hardness: 90A — it needs to be firm enough that the high-pressure air doesn’t litterally push it out of position. 90A is hard enough to stay put.
O-Ring Number Designator: 212 — these numbers are defined by Aerospace Standard AS568B, Aerospace Size Standard for O-rings and is published by the Society of Automotive Engineers (SAE). This is an American standard and other countries and the ISO have other specifications.
We dos sell the above o-ring on our site if you are interested – click here.
Reassembly
I wish I had taken a before and after photo of the pocket where the oring sits. It was filthy and I wiped it down with a paper towel before I took this next photo.
This photo was after I cleaned it up. I had already applied a very light film of silicone o-ring grease also.
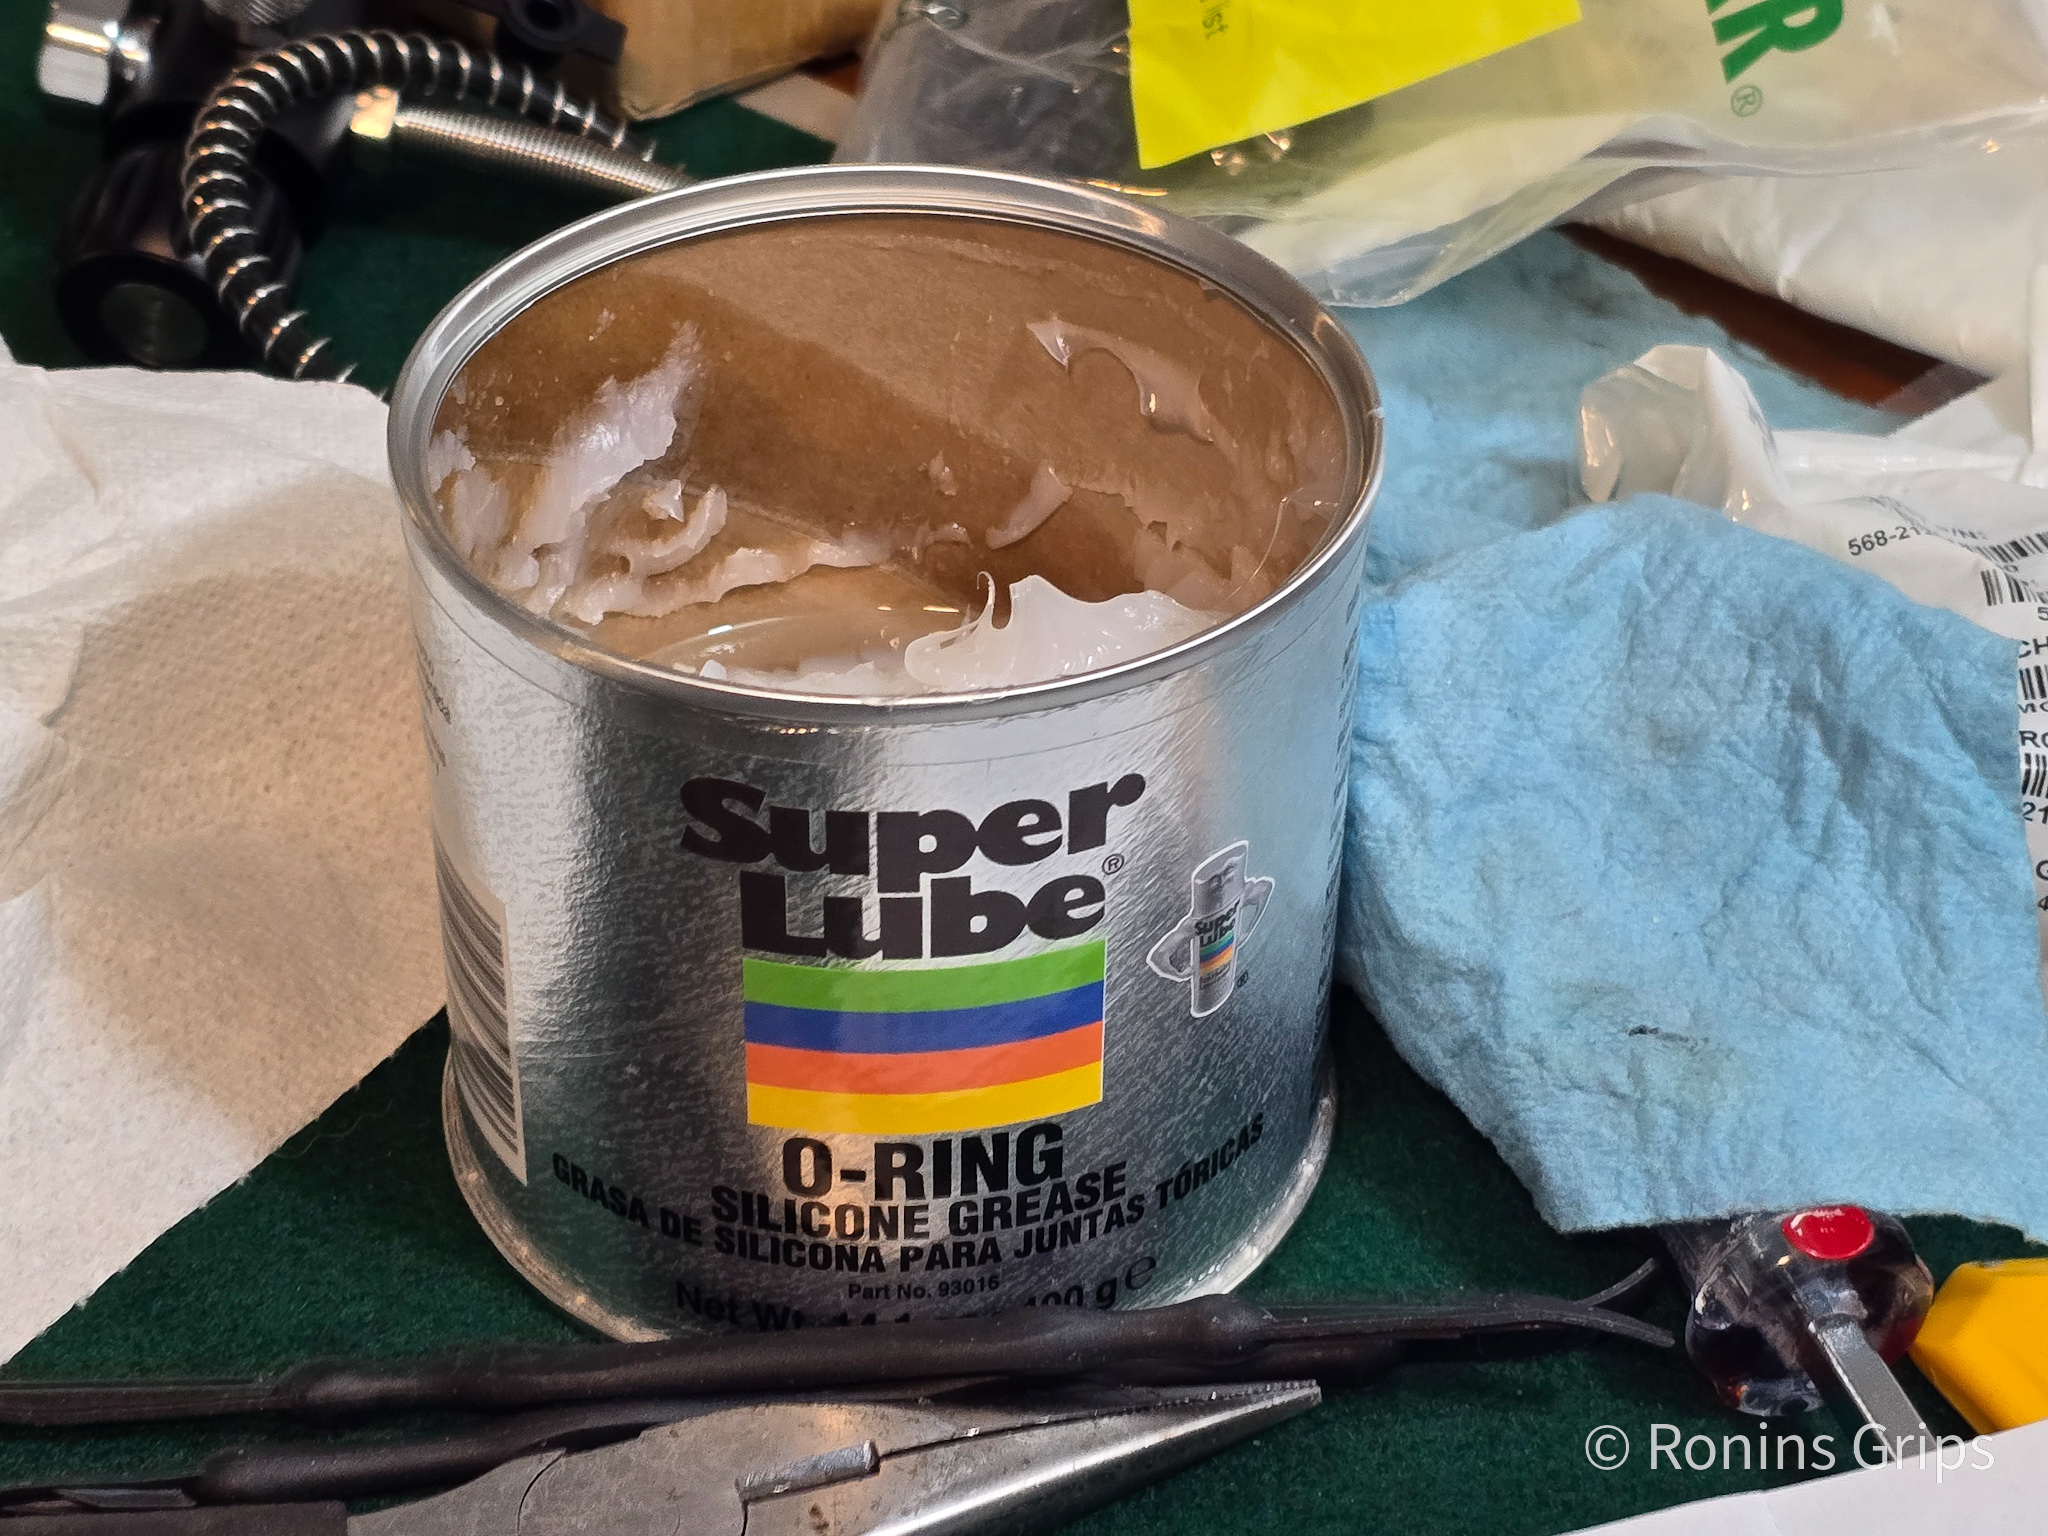
Speaking of o-ring grease, absolutely use a quality silicone based grease and I would recommend one formulated for o-rings. I use Super Lube’s o-ring grease and it works great. The grease lubricates the o-ring so the parts slide around it during reassembly and it doesn’t tear. A film on the threads helps prevent seizing and corrosion.
Note: NEVER use petroleum grease or the high pressure air can cause it to ignite like in a diesel engine.
I use Super Lube brand o-ring grease. I tub like this will last a very long time. Just keep it clean and the lid on when not in use.
I carefully threaded the valve stem back into the tank and it turned very easily. I brought it down snug by hand and added a about an eigth to a quarter turn with the dead blow hammer. If it feels like it is firm then stop – you don’t need excessive force.
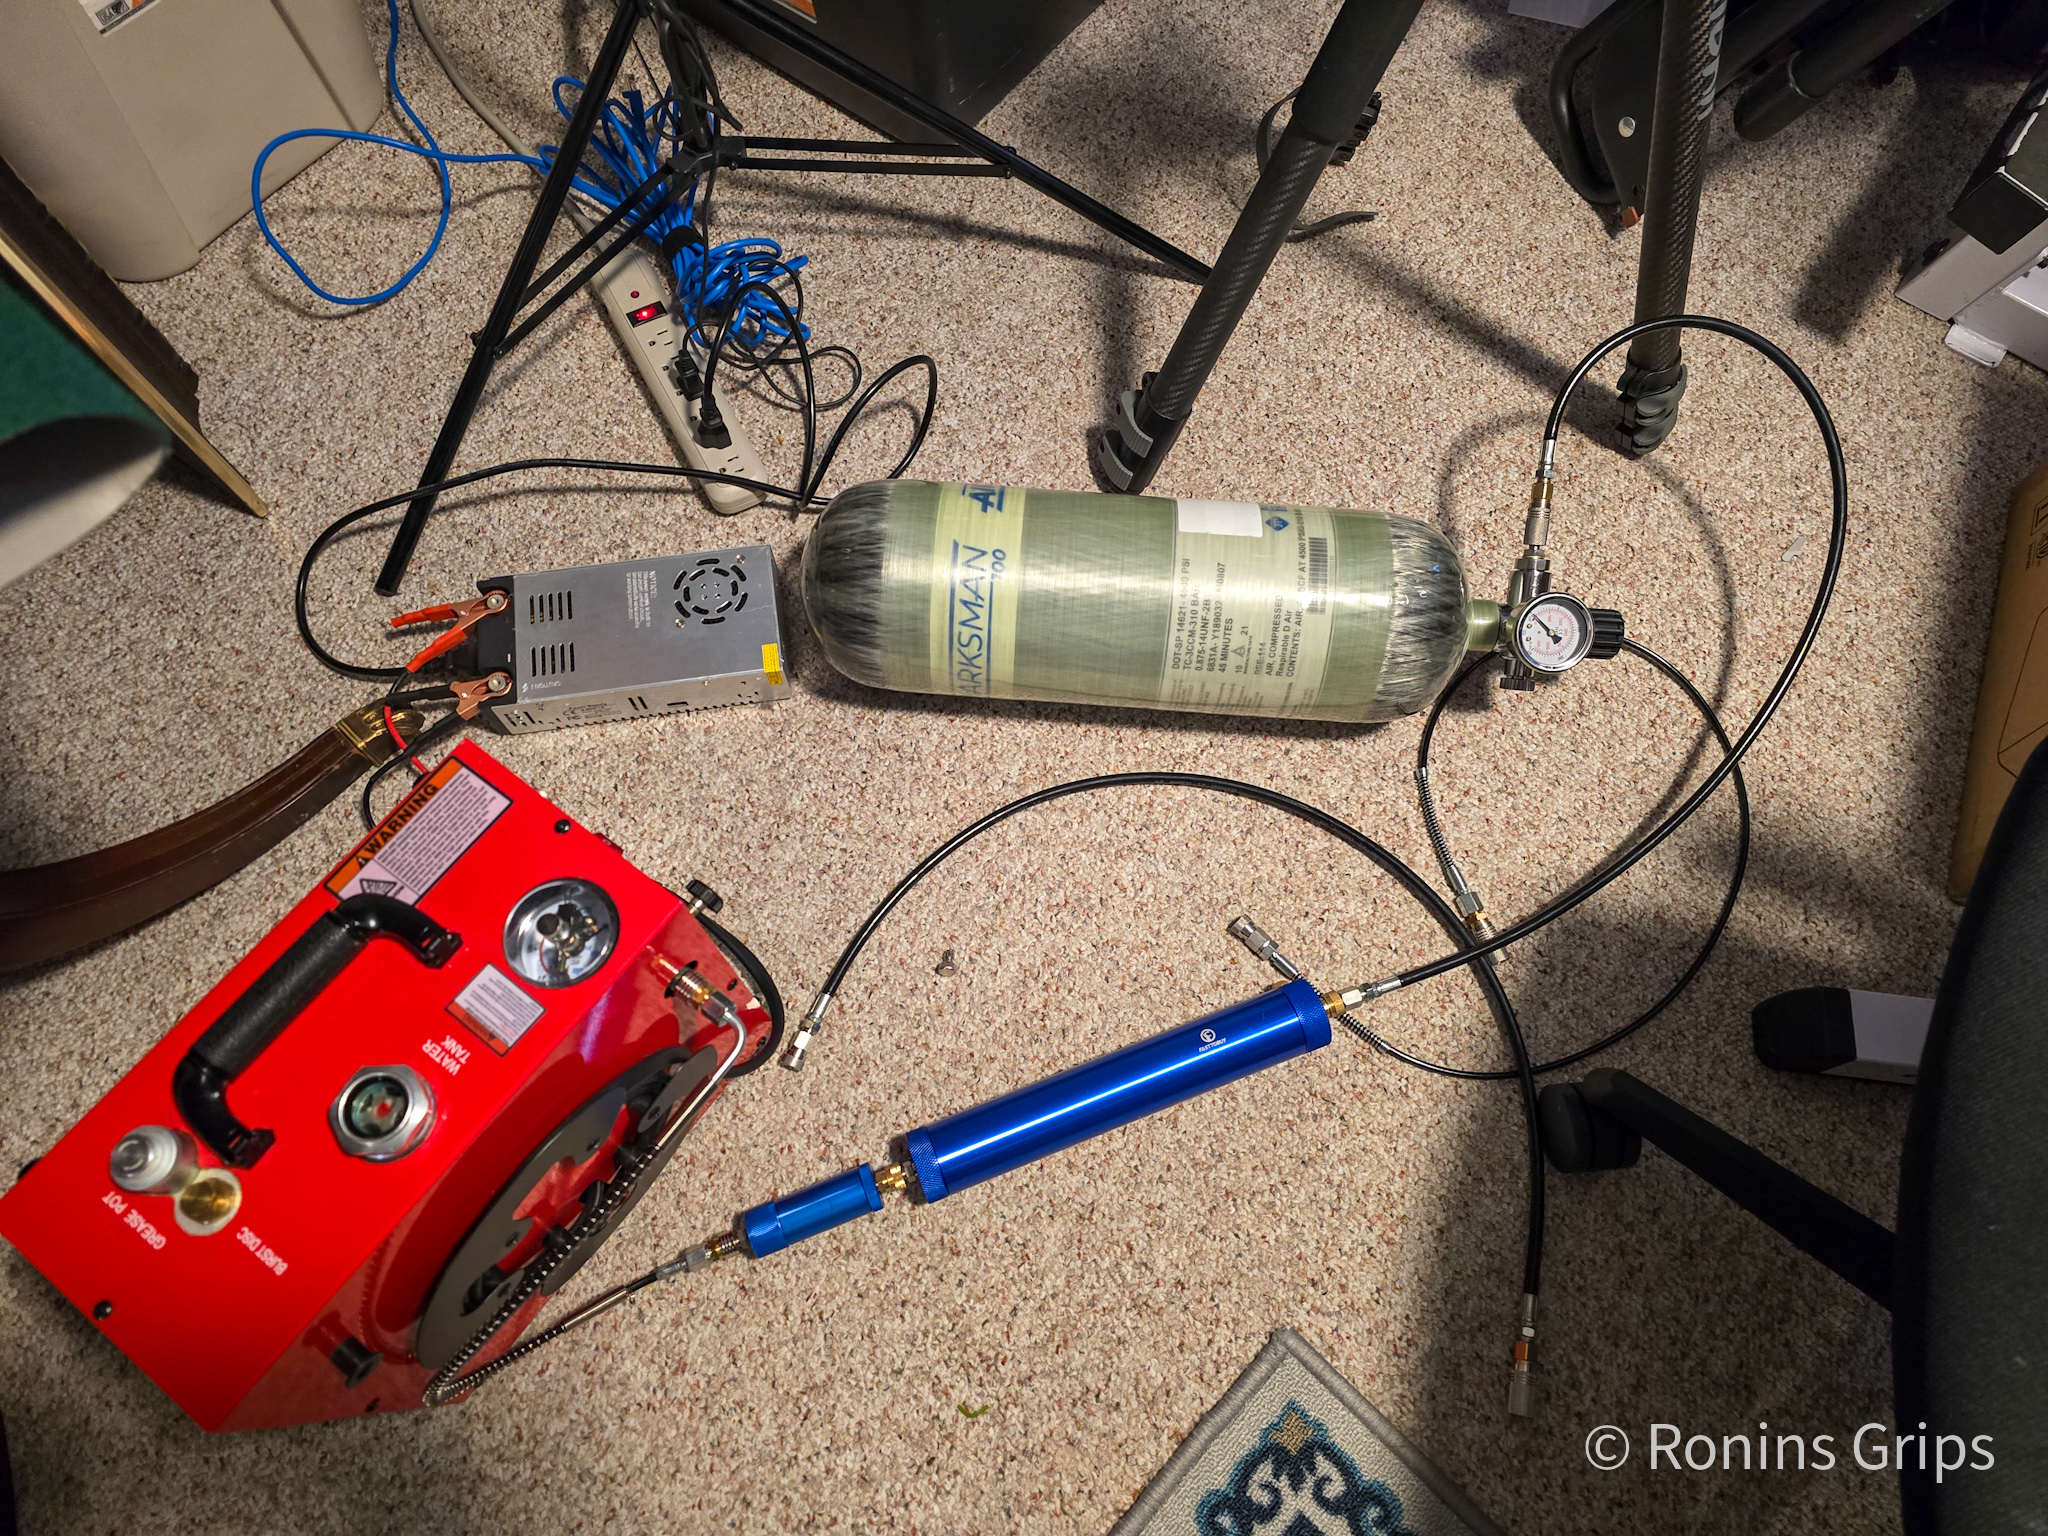
In theory, it is ready to fill but we want to test that. I like to add a 100 bar, stop and watch the pressure gauge for an hour. Why? Well, it takes a long time with a home compressor like my GX CS4 unit to fill a 6.8 liter tank. I’d rather fill it part way and watch vs. wasting extra time on the pump just to find out the leak was still there.
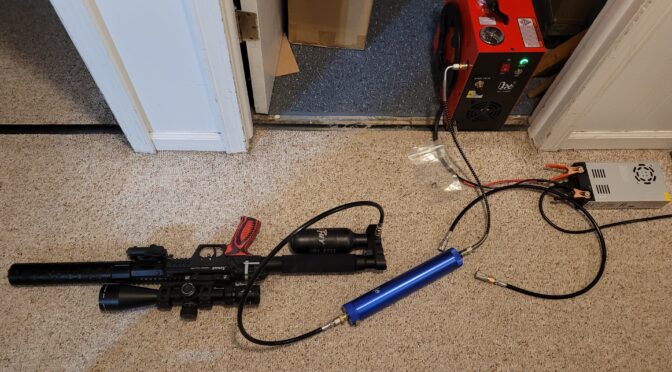
Here’s my GX CS4 compressor doing it’s thing. I use the small inline filter as a first stage to get rid of moisure and the big blue filter for final cleaning. I initially use a dead-head plug to make sure everything is sealed properly before I start filling the tank. It is so easy to have a leak at a quick connect that I make sure stuff is sealed first, then I connect the final hose head while making sure there is no movement of the other components.
So, I filled to 100, watched and everything was okay. I then went to 200 and watched. Finally I went to 300 and watched. None of my gauges agree with each other so I get at or close to 300 bar on the highest-reading gauge and call it done. To explain that, I have gauges on my pump, on the fill port side of the valve and one on the tank side. Whichever hits 300 first I stop at just to be safe. Yes, the tank should be able to handle way past its working rated pressure of 300 bar / 4,351 PSI but I don’t see any point in pushing it and finding out from a safety perspective.
I watched the gauge for two days with no movement. I literally take a photo to compare over time.
The link appears to be gone but I can’t tell you for sure if it was the o-ring with its filaments causing imperfect seals or the dirty condition of the pocket where the o-ring sits on the tank – or maybe even a combination – but it’s not leaking.
Summary
My Air Marksman tank was leaking around the valve stem through some combination of defective o-ring and debrise/dirt during assembly. I cleaned all the surfaces, applied a light film of o-ring grease on the surfaces including on the new o-ring and re-installed the valve on the tank. Problem solved.
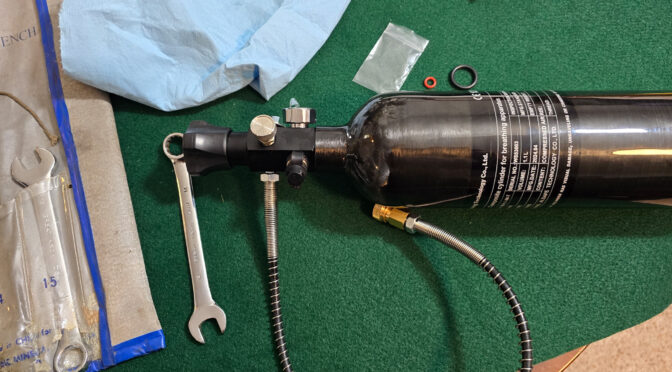
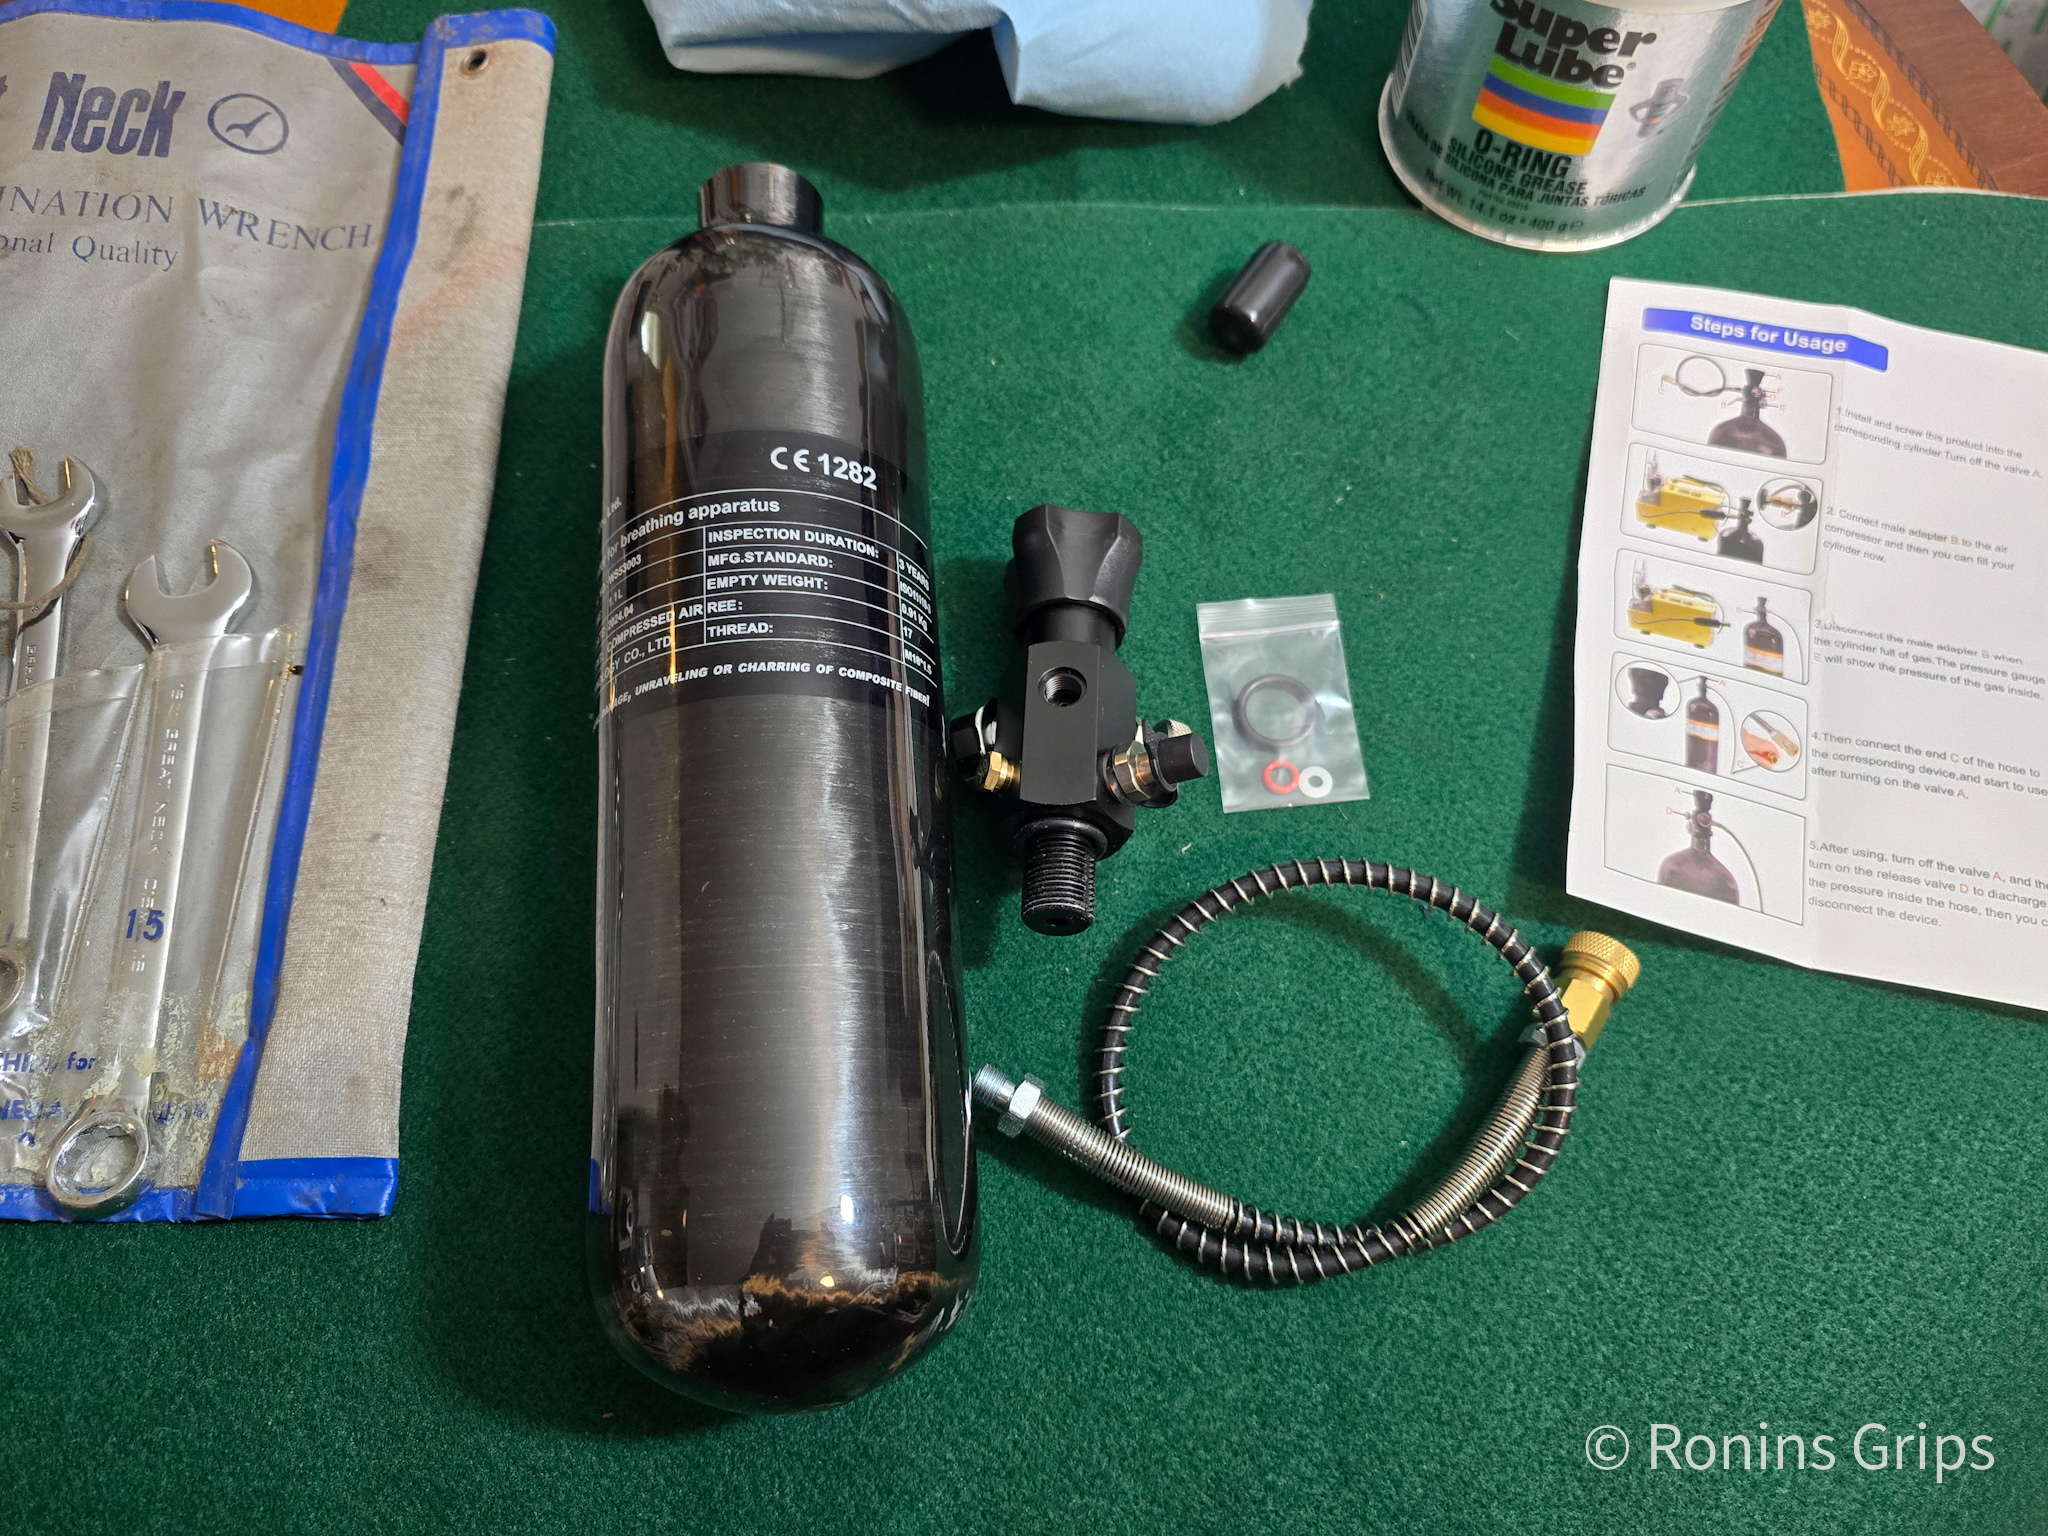
In June 2024, I realized I needed another small tank to top off airguns. I’d sold my Omega to a friend because I had a big bottle and the problem was I had a big bottle (a 6.8L Air Marksman Tank) … It takes a lot more work to whip that out just to top something off. So, I did some digging and decided to buy a small 1.1L/67 Cu In carbon fiber Tuxing air tank off Amazon.
The Tuxing air tank is gorgeous. It has a dark rich glossy carbon fiber look to it. To be honest, it looks far better than I thought it would. My Air Marksman tank is butt ugly in comparison.
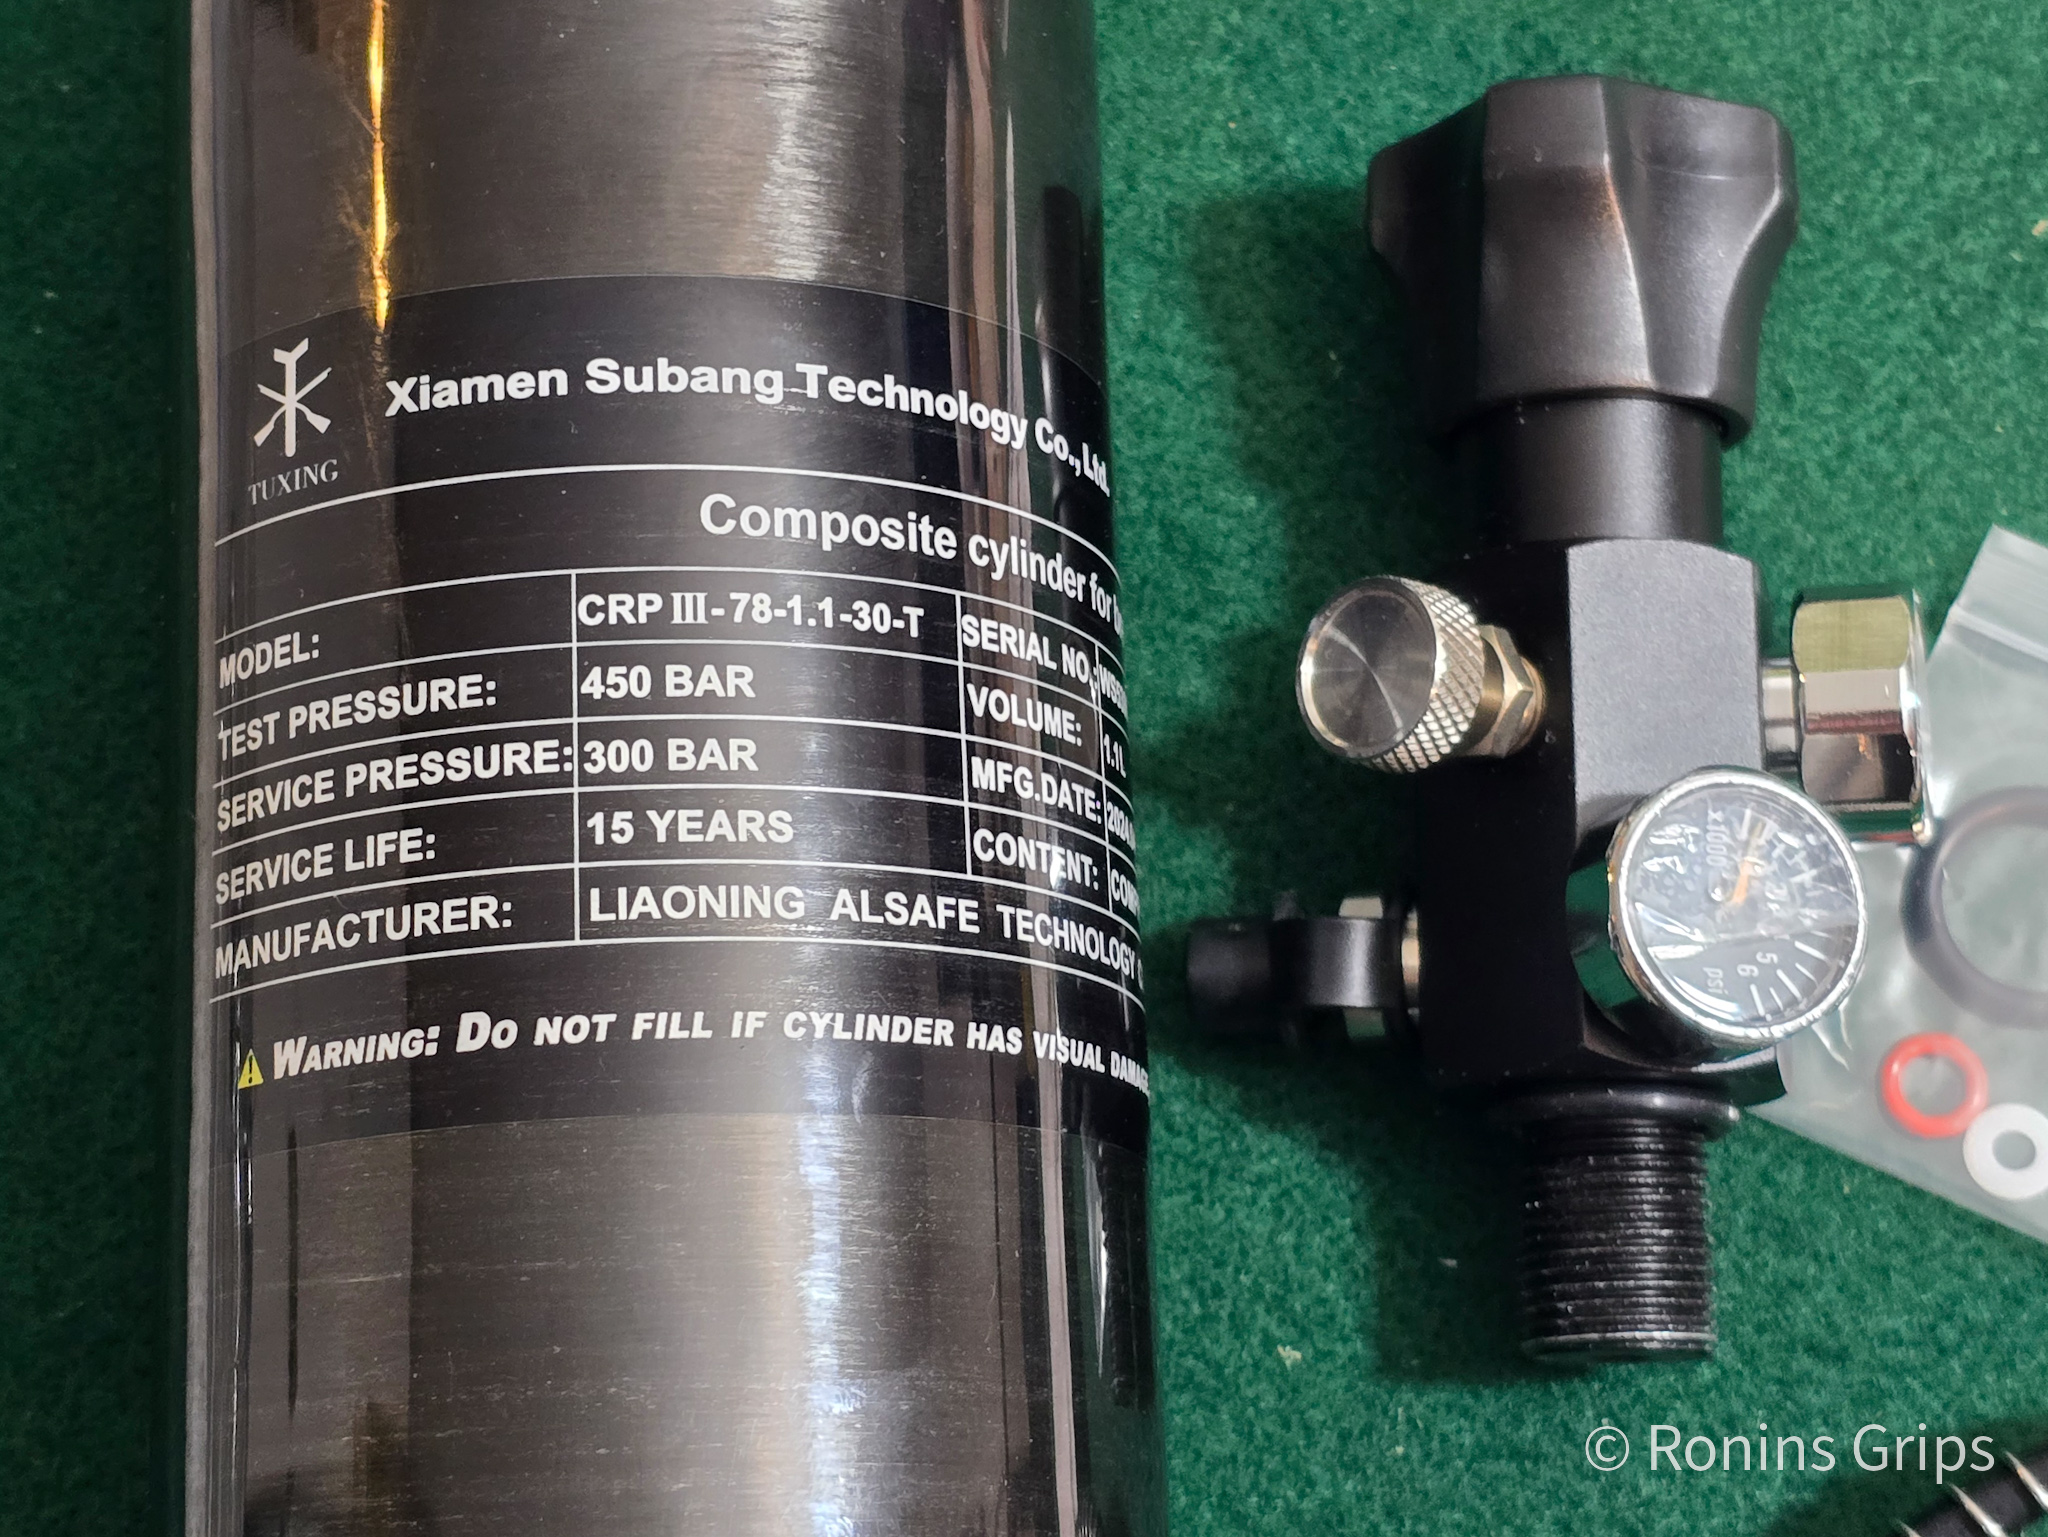
Tuxing is a brand made by the Chinese company Xiamen Subang Technology Co. Ltd., that makes a lot of different products for the High Pressure Air (HPA) and Precharged Pneumatic (PCP) airgun market.
I was a little leery of 4500 PSI in a tank that wasn’t US Department of Transportation (DOT) certified but did some digging and they are “CE” certified for use in the European Union (EU) and also “EN” certified as a storage tank for the EU.
From a safety perspective, the EU certification coupled with good reviews, made me feel safe enough to proceed. Note, since the Tuxing tanks are not DOT certified, I knew I would not be able to get them refilled commercially but since I fill my own tanks I wasn”t worried about it.
I do pay attention to service life though and replace tanks before 10 years pass. Technically, I am supposed to have tanks tested evey 3 years but haven’t been as diligent about that with my PCP tanks as I was with my old SCUBA tanks when I was a diver back in the ancient era of the 1980s and 90s.
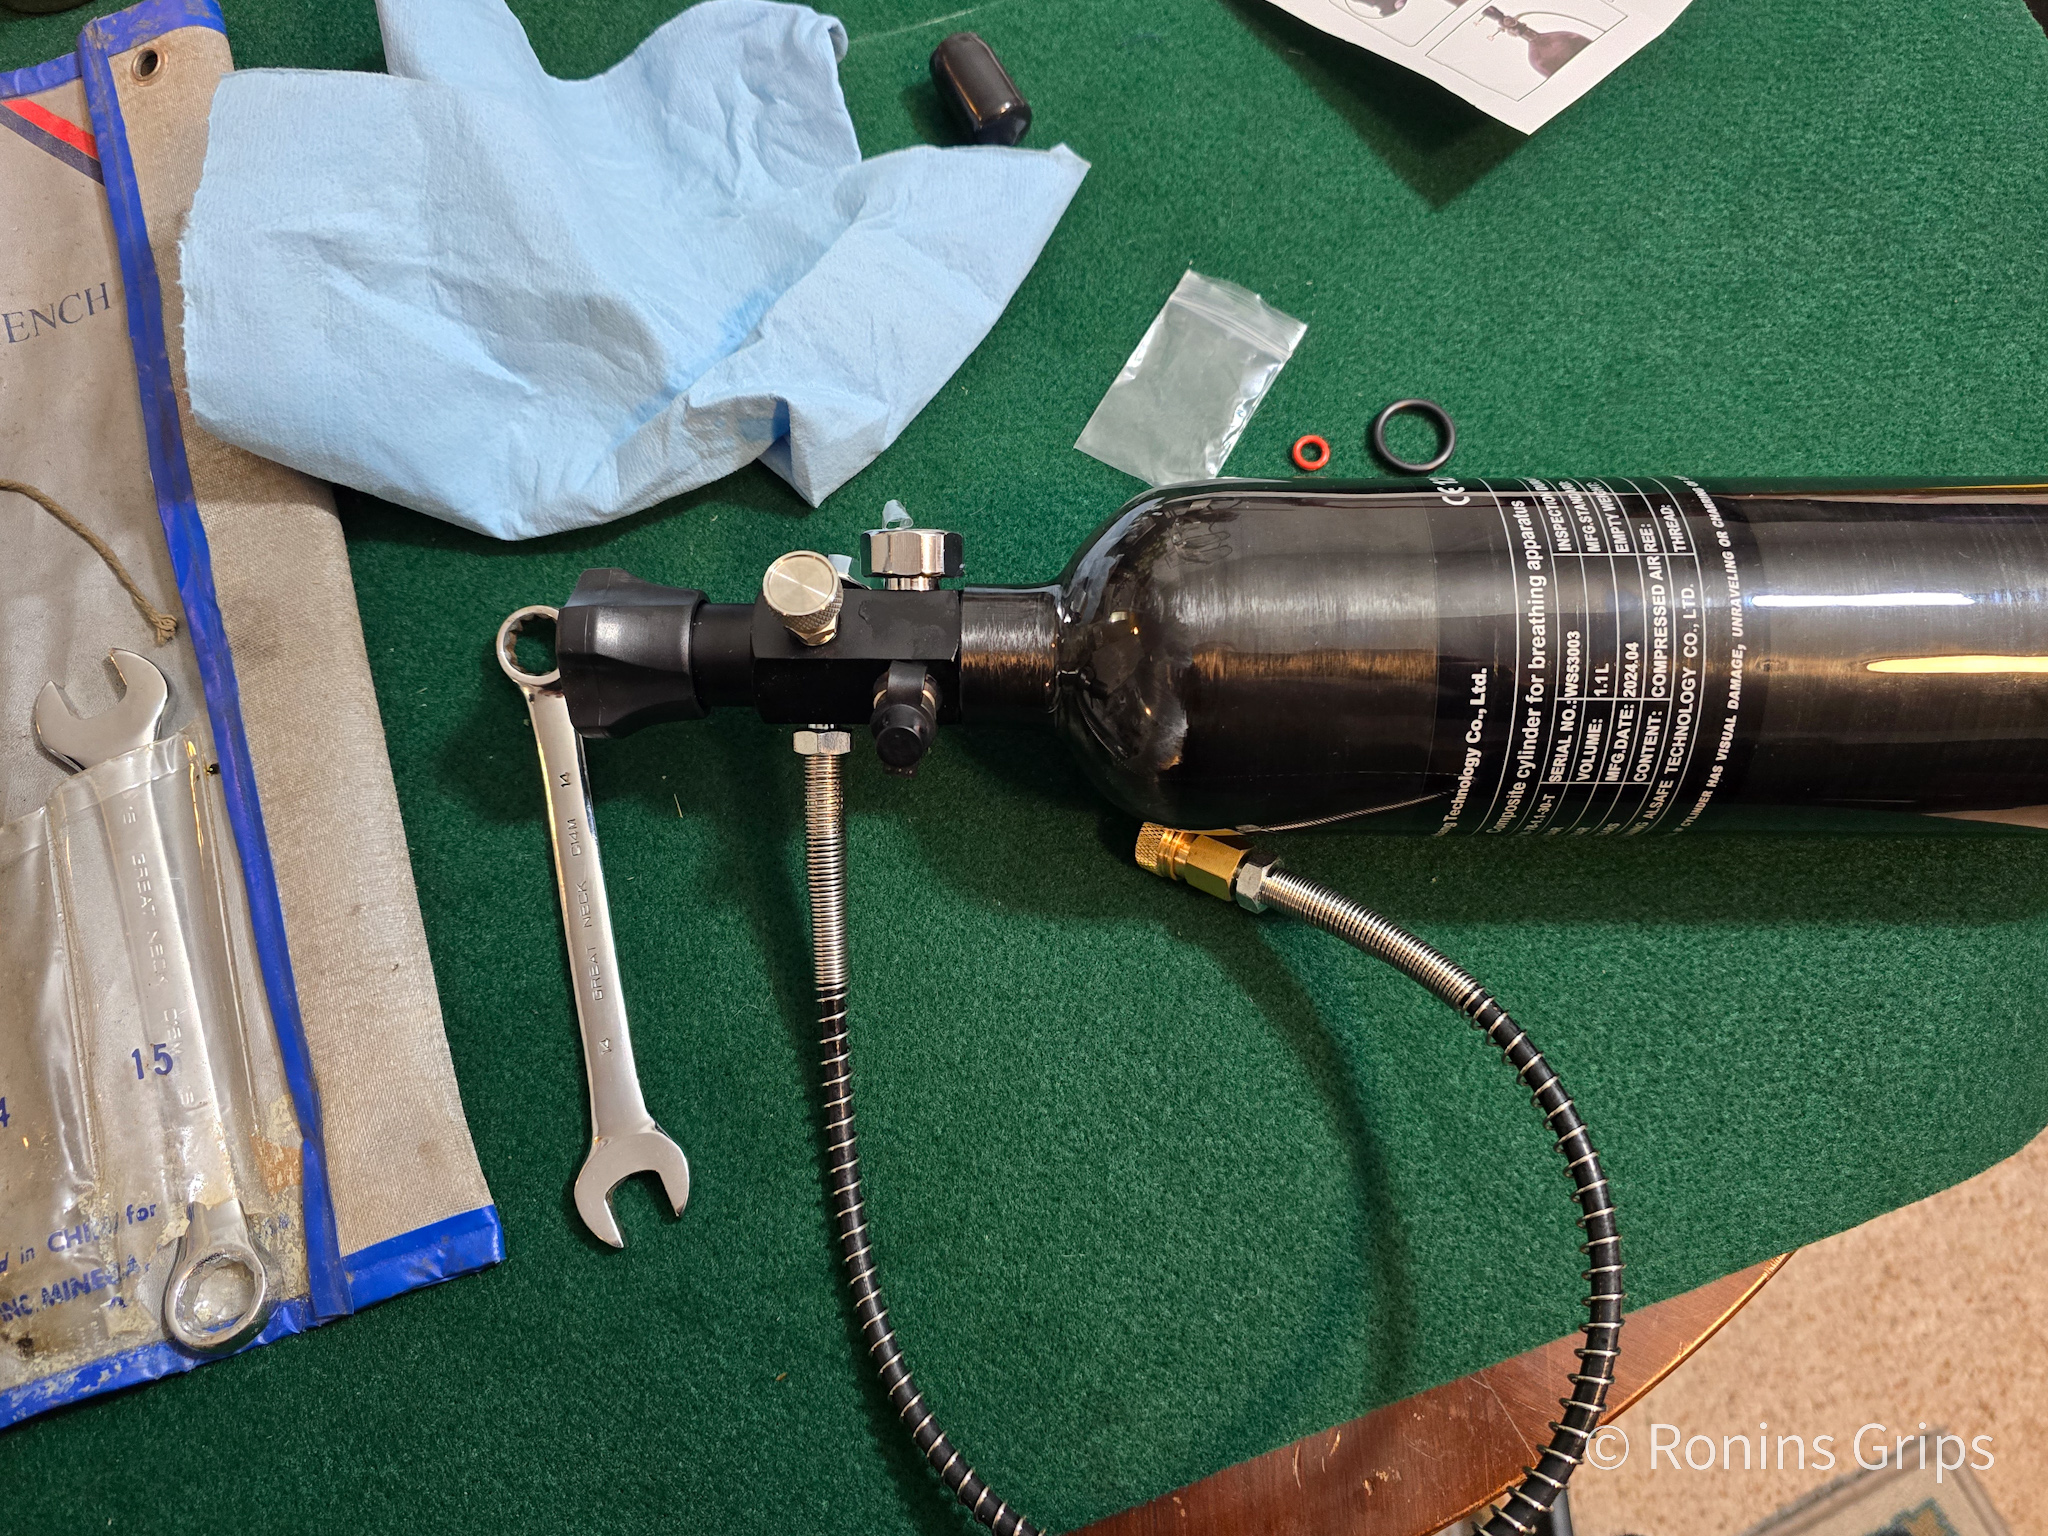
Here is a close up of the Tuxing bottle and the Owfeel regulator.
Assembly of the Owfeel Valve and Tuxing Air Tank
To assembly, lightly coat threads and O-rings with silicone o-ring grease (never use a petroleum product). I use SuperLube’s O-Ring Silicone Grease. The valve is threaded down hand tight onto the tank. The whip for the fill hose can be threaded in and snugged with a wrench.
What I do is to put about 100-200 pounds of air in a tank. The exact amount depends on the lines on the pressure valve. I fill to that point and let it sit to see if the pressure holds.
Never run your fingers/hands over high pressure air lines directly touching them feeling for leaks. At high pressures, you risk injecting air into your blood and having an embolism. Instead, use your gauge and watch the pressure. If there is a leak, read more down below about testing. If the leak is in the wall of the tank or the valve body, it is defective and must be replaced.
Start incrementally increasing the air pressure 500 PSI at a time. At each stopping point, make note of where the indicator is on the gauge, wait 10-15 minutes and see if the pressure leaks down. Fill, wait and watch. Over and over until you reach the maximum pressure.
When you hit the maximum pressure, let it sit and check it at 30 minutes, 60 minutes and then at two hours. It should be holding pressure.
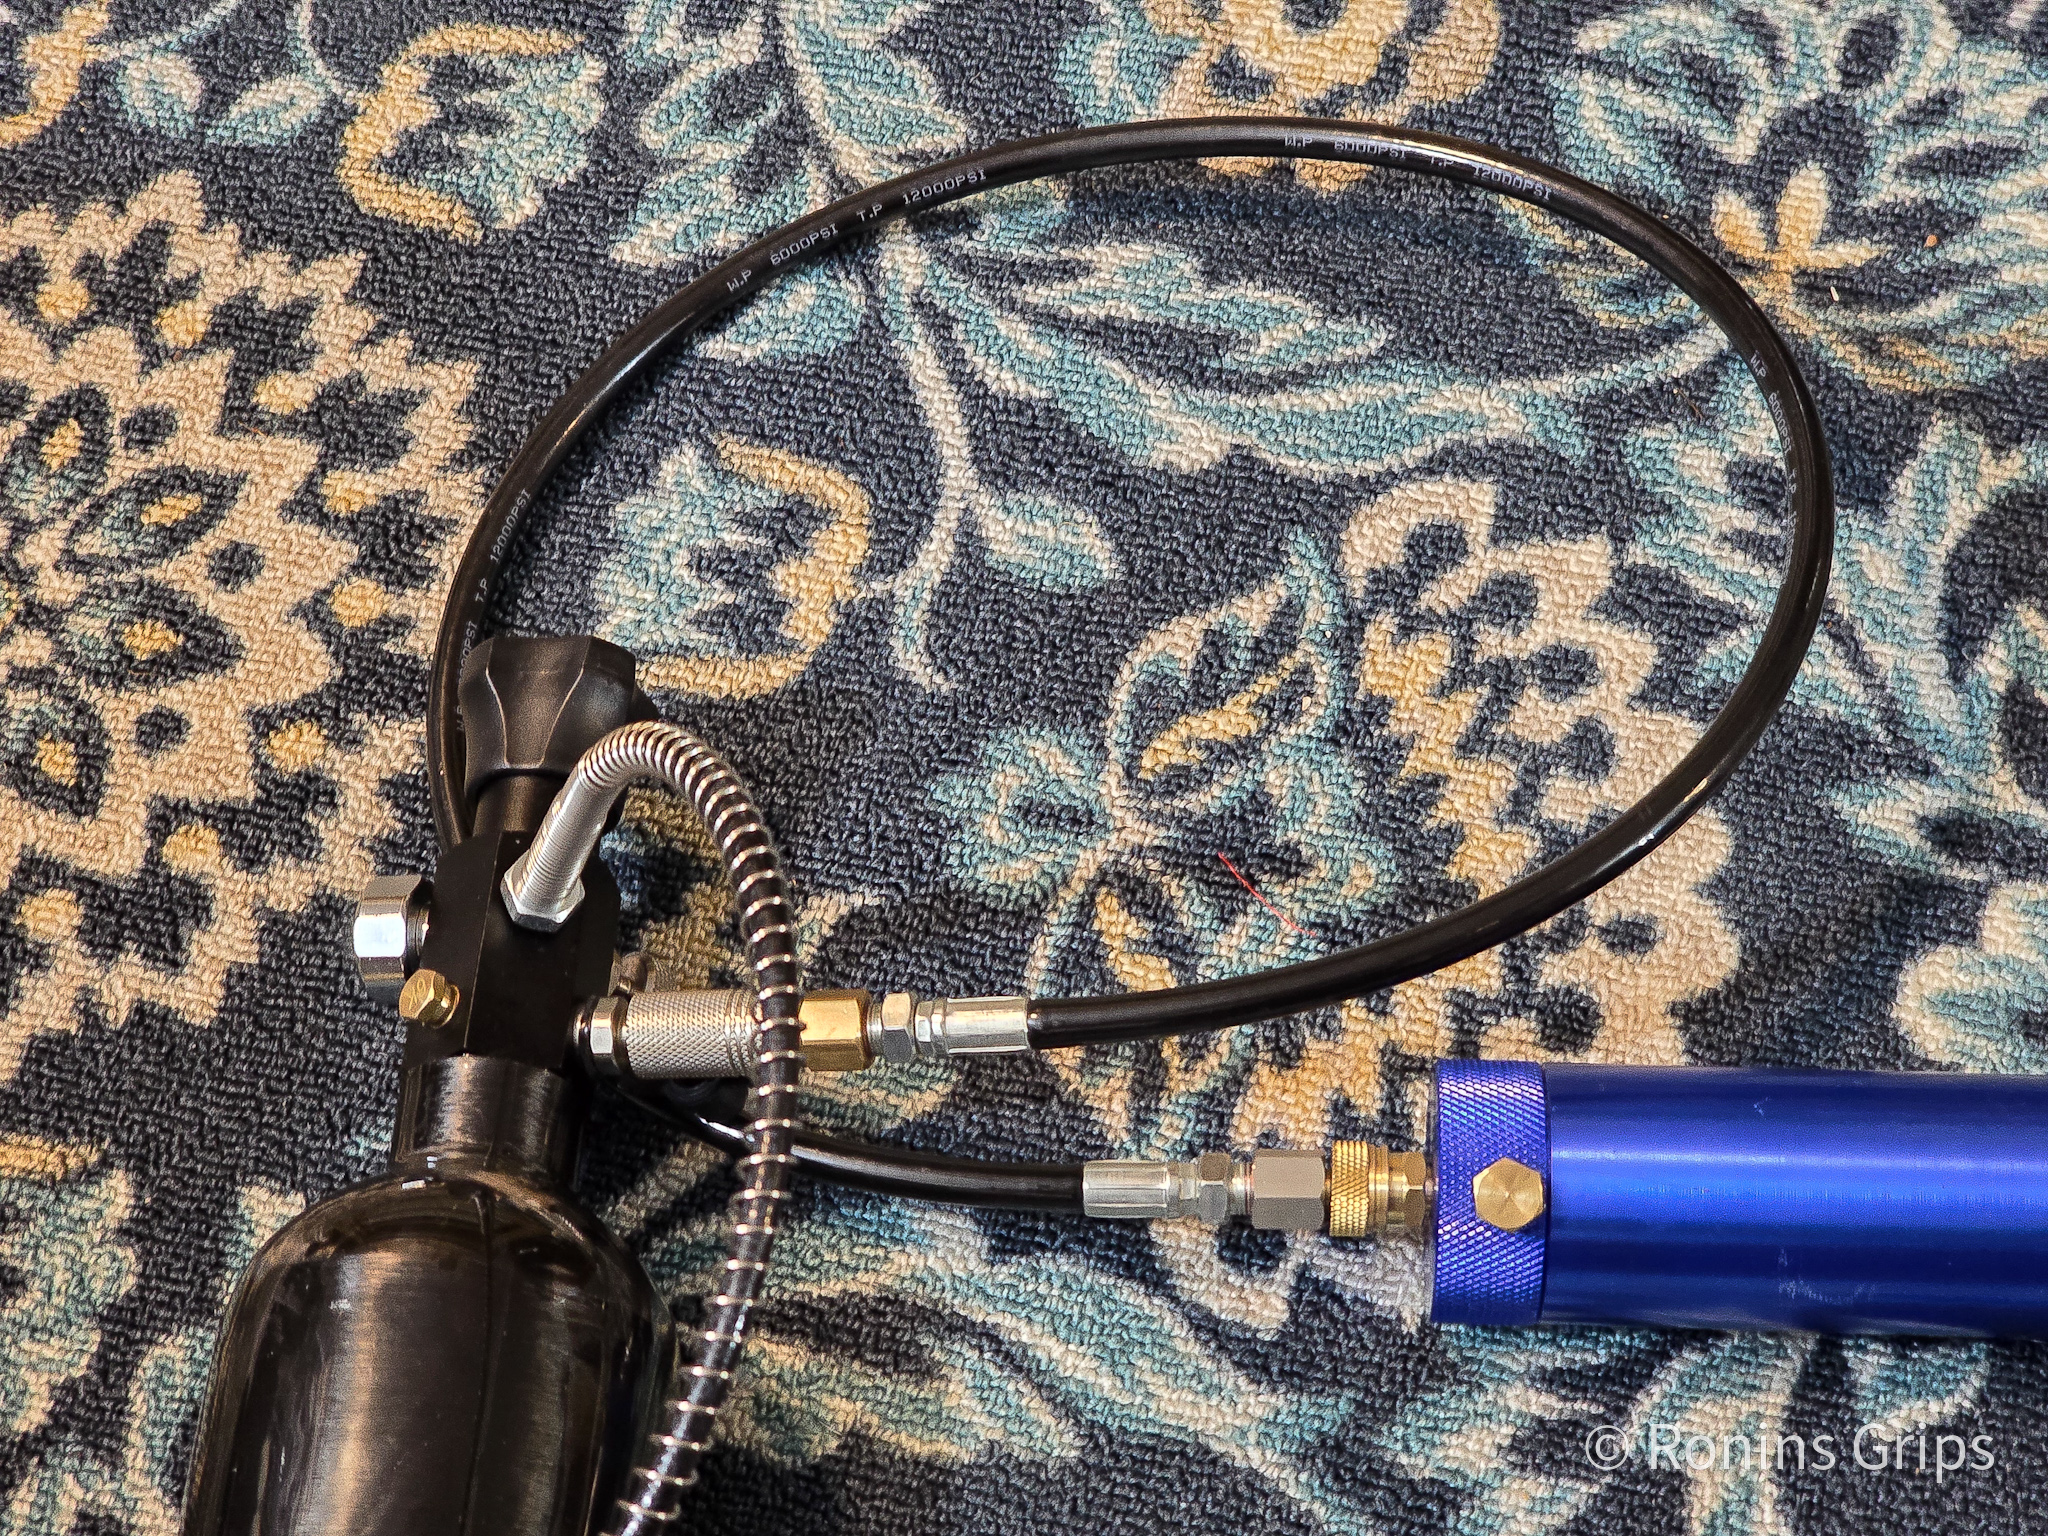
I filled my tank with my GX CS4 compressor and the pressure held. No problems at all. Just remember, the number one source of air leaks are the quick connects. Simply moving them to evenly distribute the load on the seal may fix the leak or you may need to replace the fitting. Any fitting that has problems I replace with an Air Venturi brand fitting. Why Air Venturi? Because they are who I picked years ago after doing some reading and I have never had a problem.
If you have a leak
If you detect a leak, spritz soapy water at the quick connects first – they are the most common leak. If leaking, try repositioning. If it is still leaking, drain the air and replace the fitting.
If still leaking, next check the o-rings where the hose goes into the valve and where the valve goes into the tank. If either leaks, let out the air, is one loose? Do you just need to snug it up? If the connections are solid, then the o-ring may be bad and need to be replaced, try that.
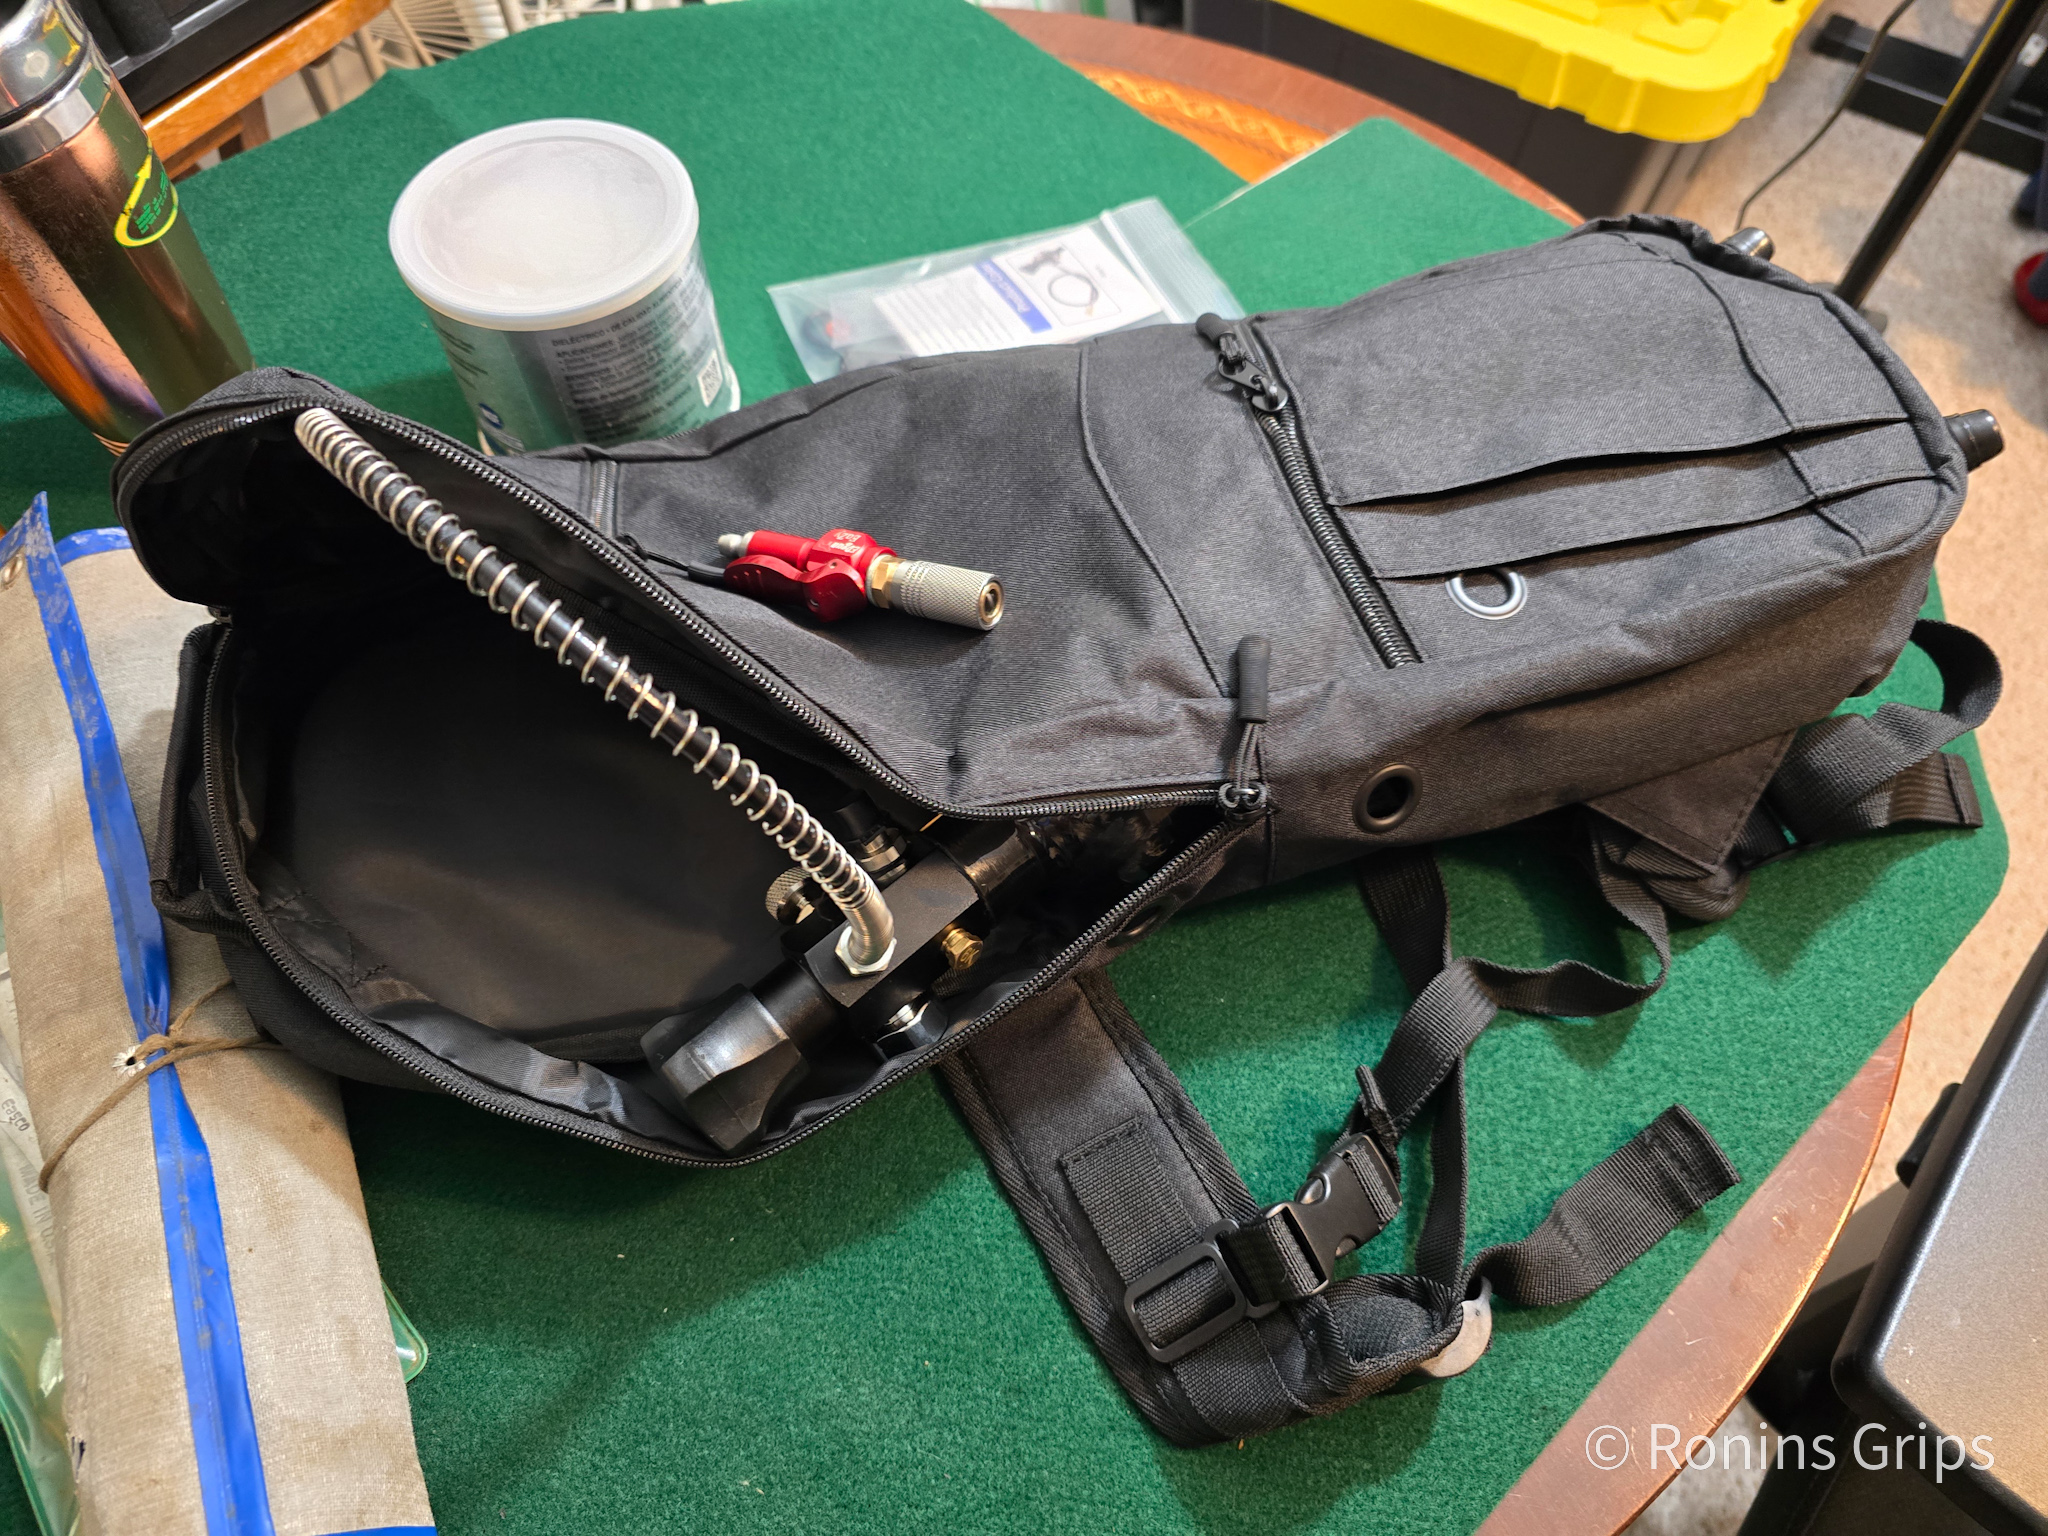
The Tuxing air tank and Owfeel valve make a good affordable compact combination. The unit is small, light and easily fit in the iGuerburn Size D oxygen tank bag I use to both store and move it around in.
Note, I have to buy all of my parts – nothing here was paid for by sponsors, etc. I do make a small amount if you click on an ad and buy something but that is it. You’re getting my real opinion on stuff.
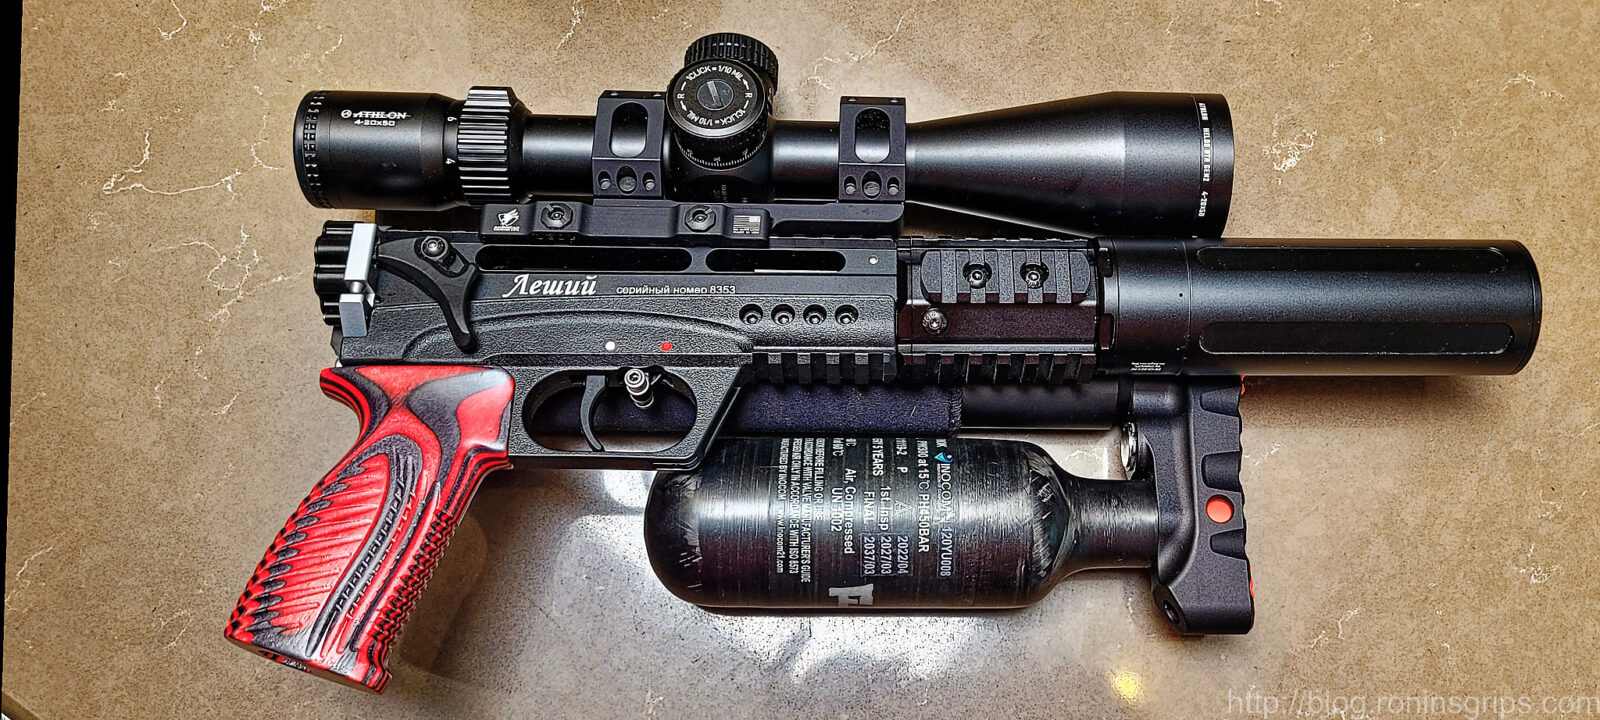
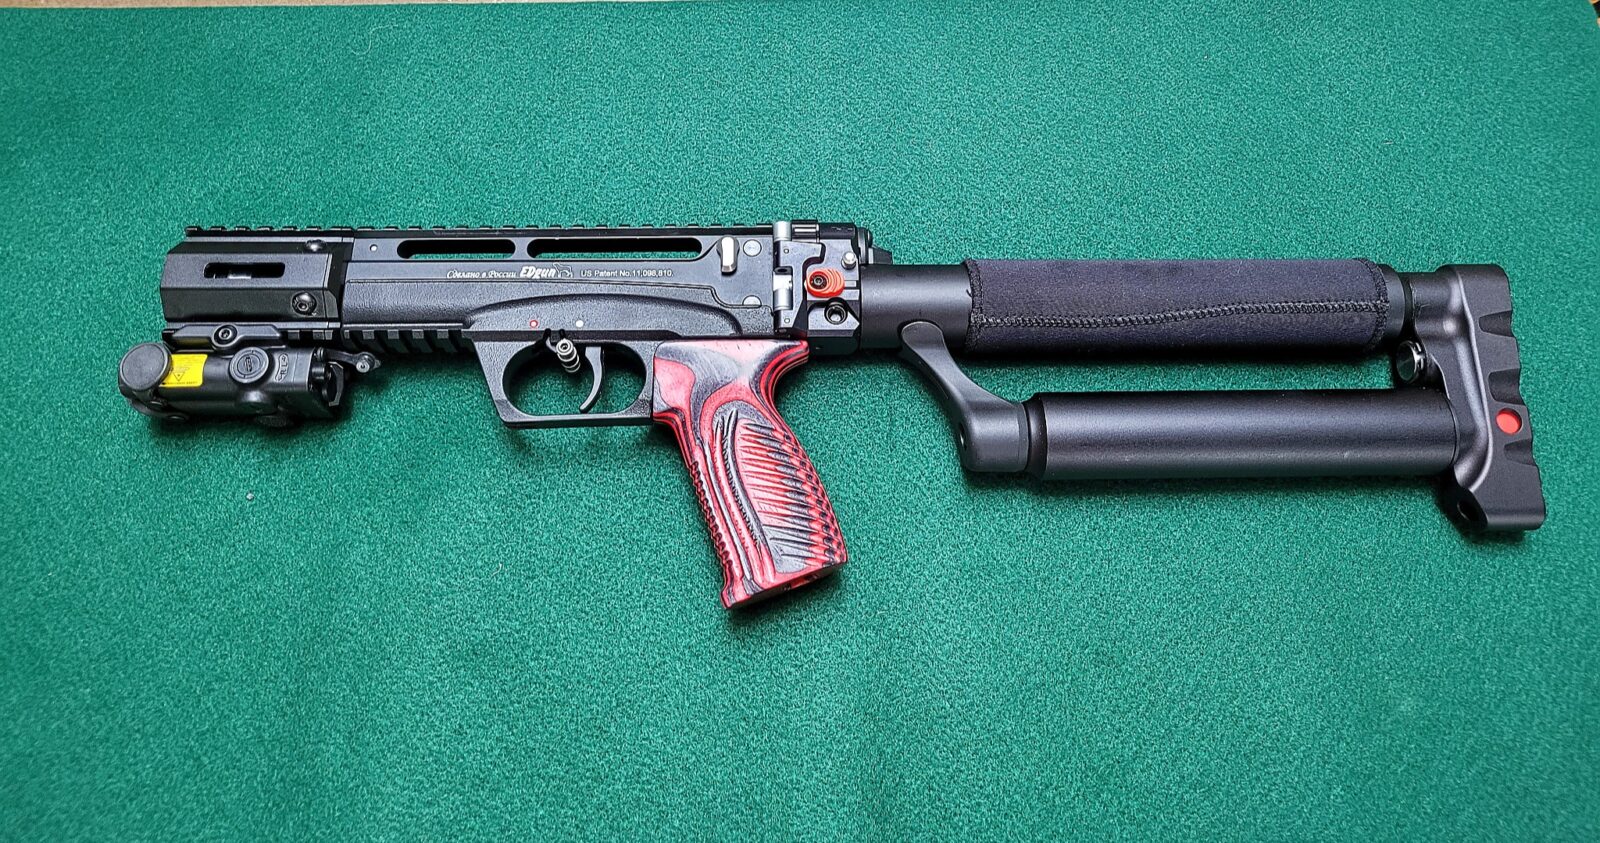
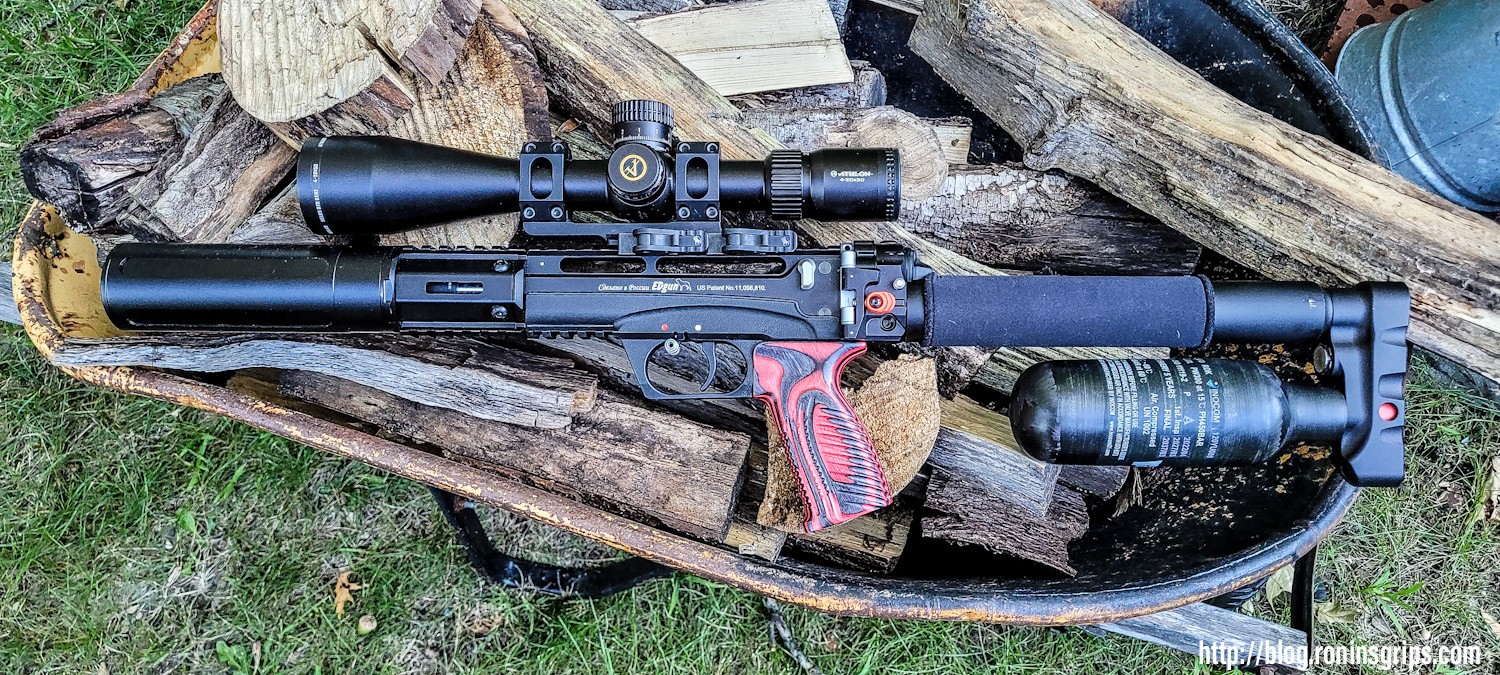
This is my last post about my Edgun Leshiy 2 in this series. I’ve now had it for just over six months (I bought it in February and it’s now September) and have some thoughts to share on it and the various accessories I stuck on it – some stayed on and some are now gone.
Engineering and Assembly of the Leshiy 2 Short Wolverine (REPR)
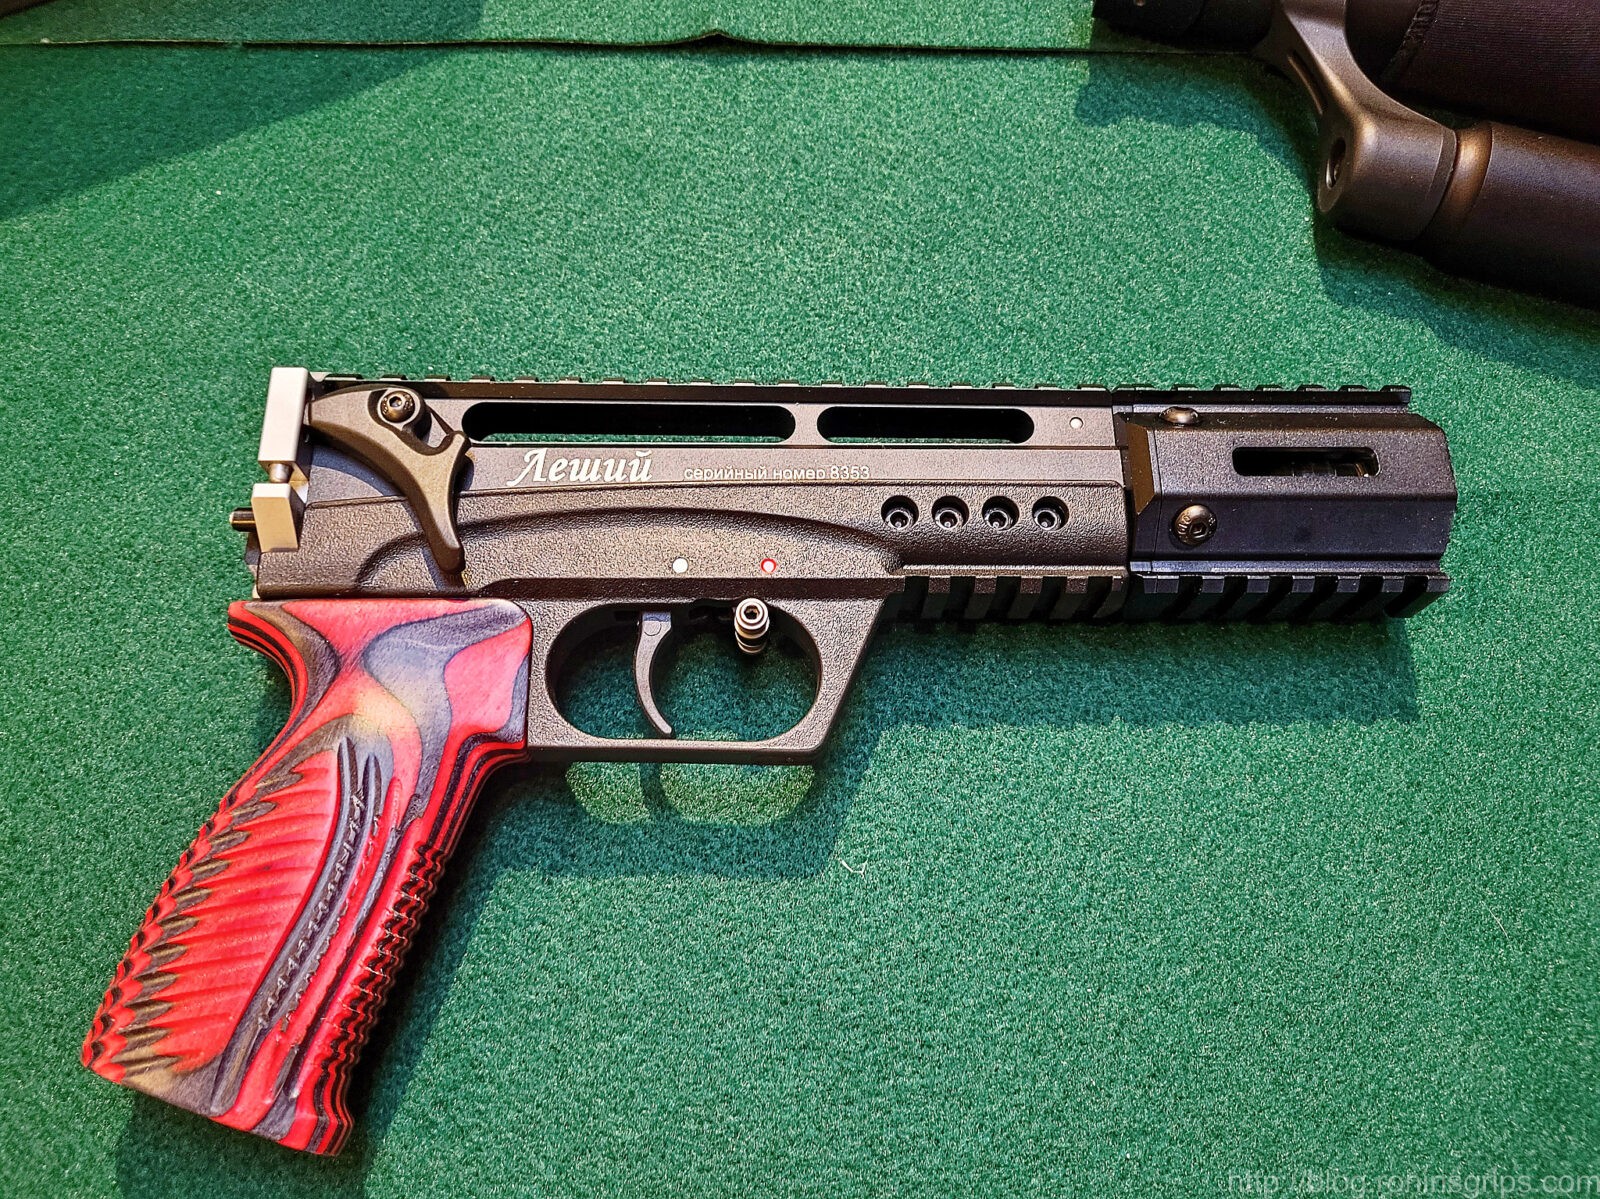
Let’s start with the core airgun itself. The design, machining and fitment of the base Leshiy 2 are superb. I’ve put hundreds of pellets through it and not one jam and it is definitely as accurate as I need in my 30-60 foot typical pest control zone. I don’t recall trying for anything further away as of yet.
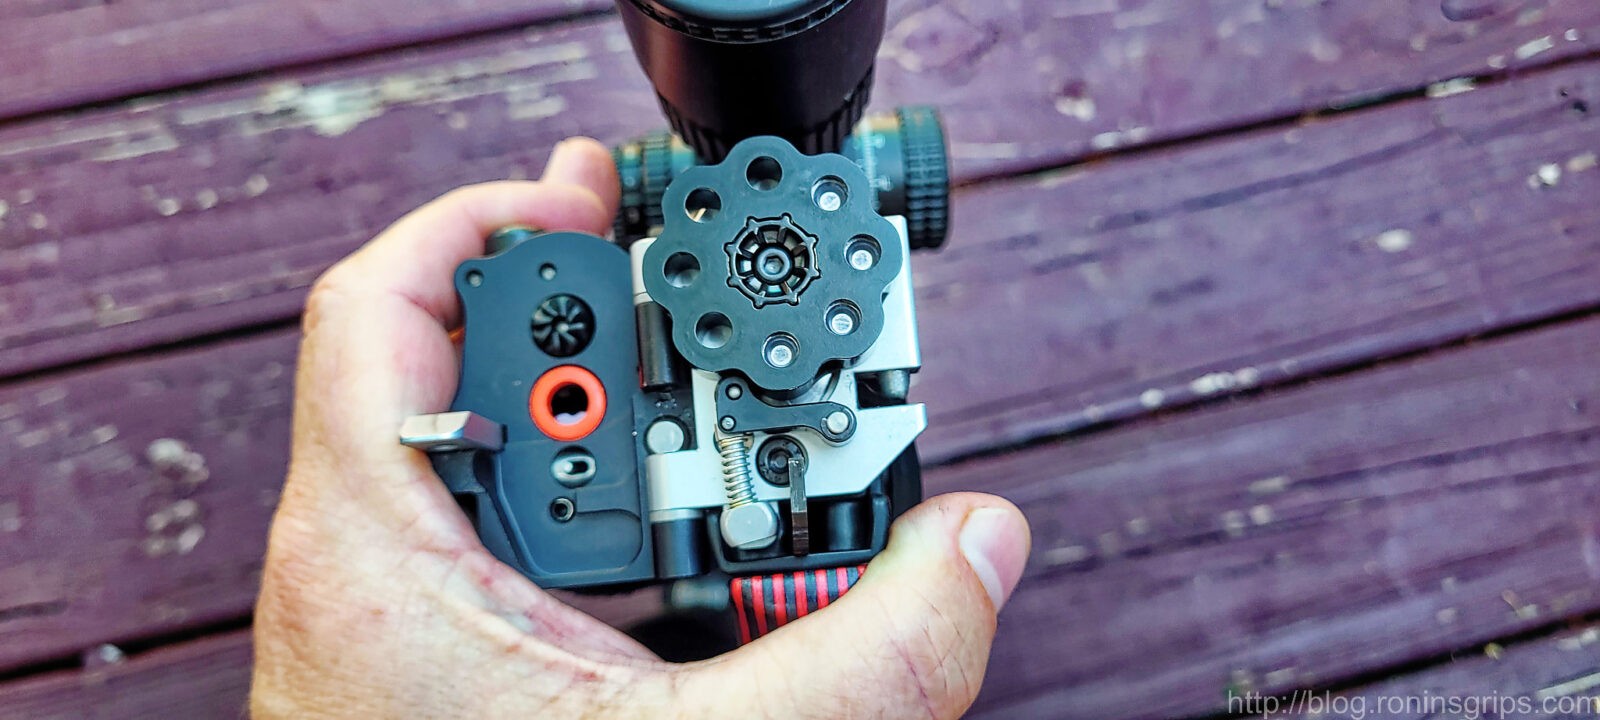
The trigger is set and not adjustable but it is a very good trigger so no real complaints there.
The internal regulator is adjustable but you have to disassemble the rear buttstock to get to it. I wish it was externally adjustable so I could more readily fiddle with it. With that said, Edgun West set it to 130 bar and it works exceptionally well. It hits hard and is accurate.
I really like the trigger safety. The first airgun I had with a safety located where the trigger finger can easily get to it was a Hatsan Gladius. GIven the location of the safety on the Leshiy 2, I find it very fast and easy to turn the safety on or off or to check the status without needing to see it.
I really like the position of the safety. It’s the silver toggle switch right in front of the trigger and you can instantly turn it on, off or check the status all by touch.
At first, I viewed the folding rear stock as a space saving feature only. It’s actually a superb safety as well. If the stock is open, then there is no air supply to “fire” a pellet. As soon as I start heading to the house, I open the stock to reduce the odds of an accident.
One tip that I will stick here, the magazines come out really easy if you wiggle them ever so slightly clockwise and counter-clockwise. If you try to pull them straight out they can be really stubborn. Feeding is amazingly reliable so I wouldn’t want anything changed – this is just a tip to share with you.
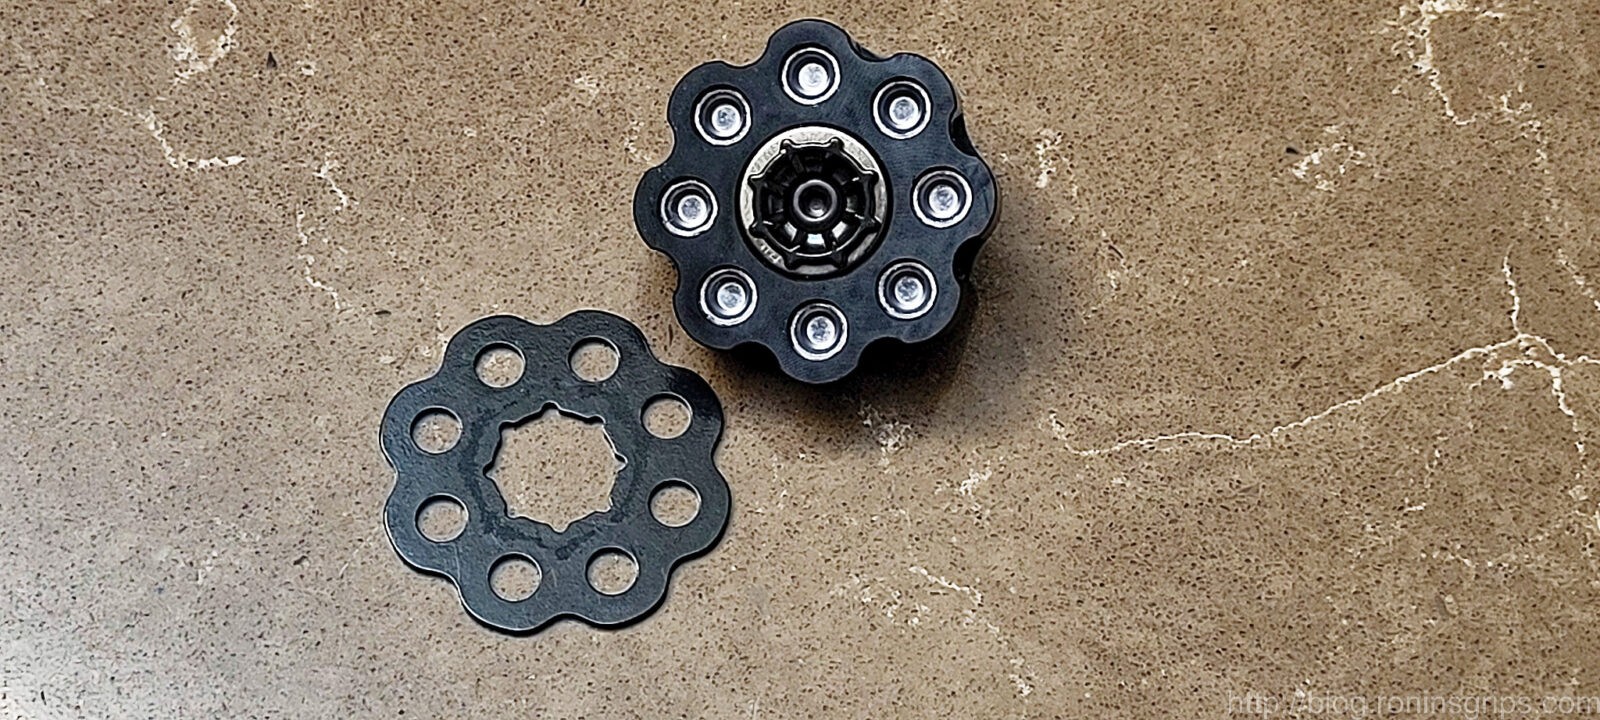
You can see the rotary magazine. The .22 model holds eight pellets. You can see how many you have left right away – there are four in the magazine. Also, with the stock open, there is no air supply so the Leshiy 2 can’t fire.
The pellets are inserted from the rear and the black ring is magnetic. You put that on top of the rear of the magazine and it holds the pellets in place. So, no deformation of the pellet in the mag and they are securely held in place. It’s also easy to load or unload by removing the ring – I virtually never unload – I’m always loading them.
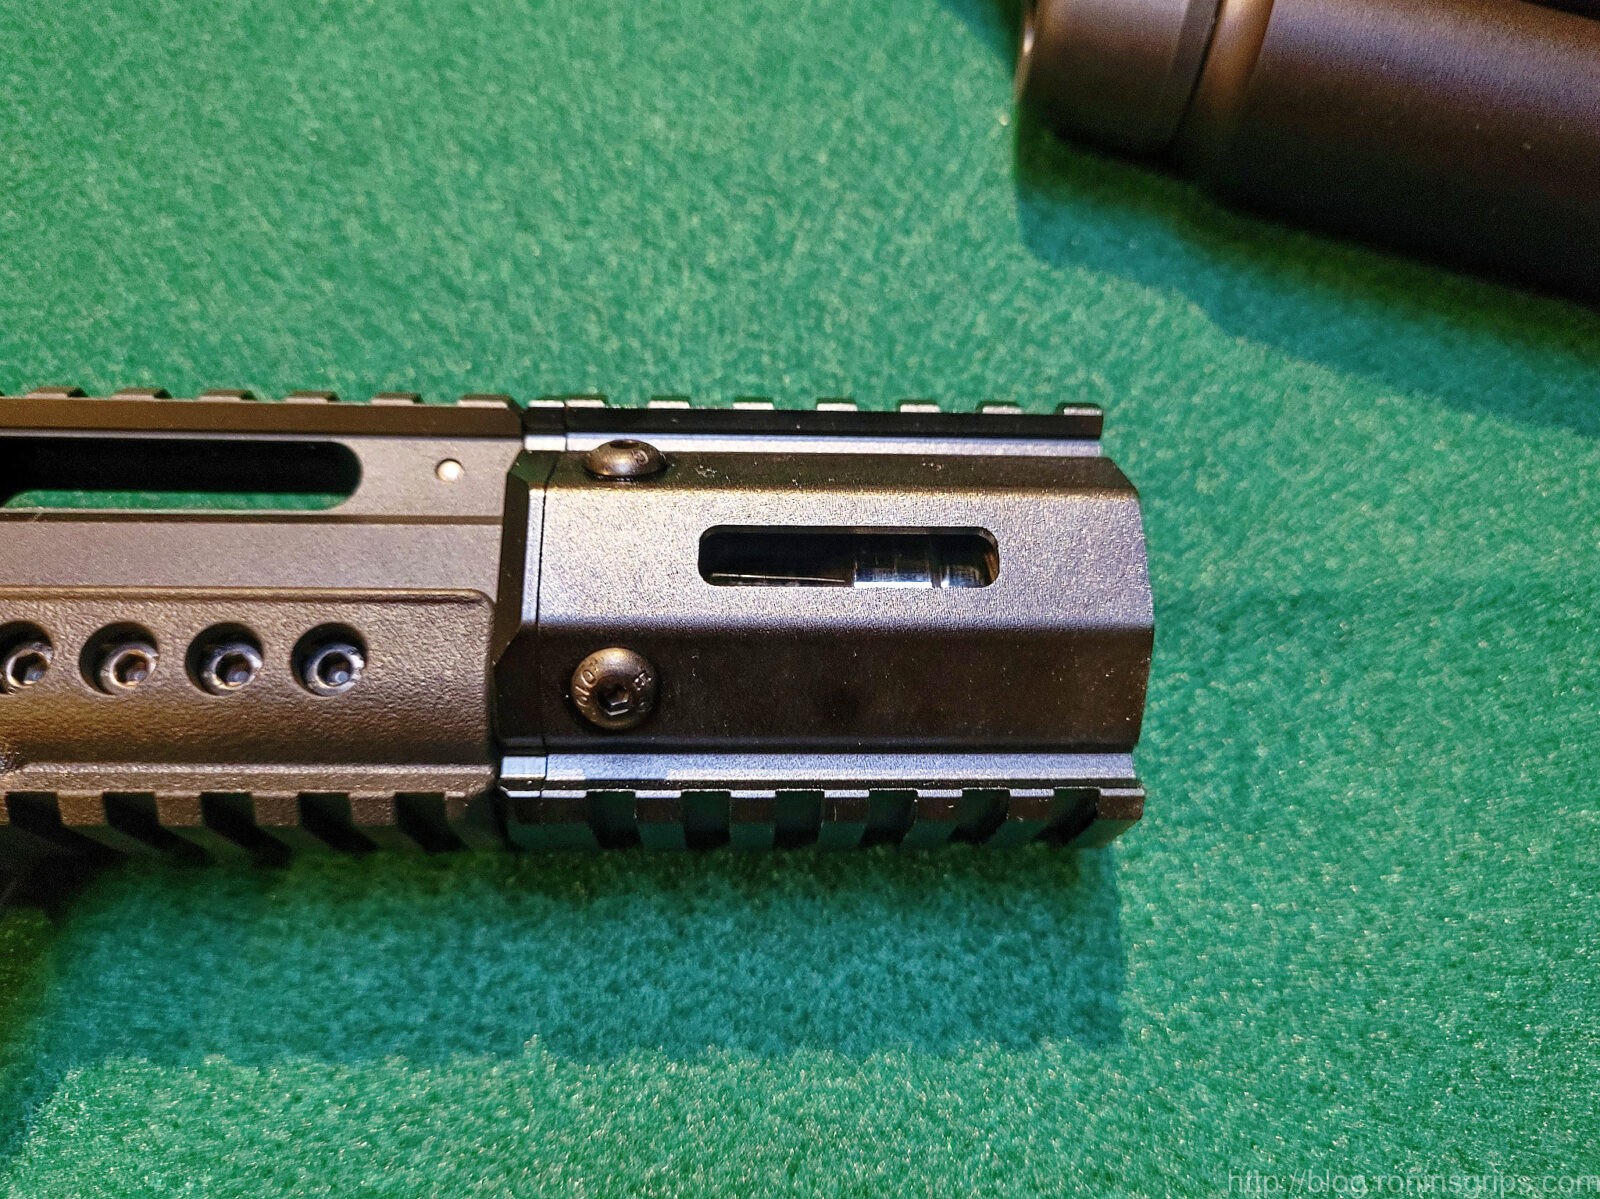
Comment on the Mini 2-3/4″ Picatinny Handguard
First off, this is M-Lok-ish. The slots are per M-Lok spec but you need shorter srews or you will dig into your suppressor or adapter underneath. I initially used a quality Magpul aluminum picatinny rail section and the screw dug into my Behemoth moderator and I gouged it when I went to remove the can. I wondered why the moderator wouldn’t turn and rather than stop and think I went “Mongo turn moderator” on it. Sure, it came off but I gouged the aluminum and it was bright and shiney, I used some Birchwell-Casey Aluminum Black to cover up my mistake. So, either buy their rail section or use your section but realize you will need to shorten the screws. I bought one of their sections.
This small handrail segment covers the barrel and elegantly fills the gap between the end of the Leshiy 2’s frame and where the Behemoth starts. The shiny silver you see through the slot is the trilug adapter for the Behemoth. Because the moderator is right there and the gap between the M-Lok slot and the adapter is too short, regular M-Lok screws will dig into the behemoth if it is installed so either buy their rail section or grind down your screws as needed. Also, you can’t tell it from this photo but the bottom rail was out of spec. The top wail was ok so I removed the button head hex screws and inverted the handguard to have the in-spec segment on the bottom.
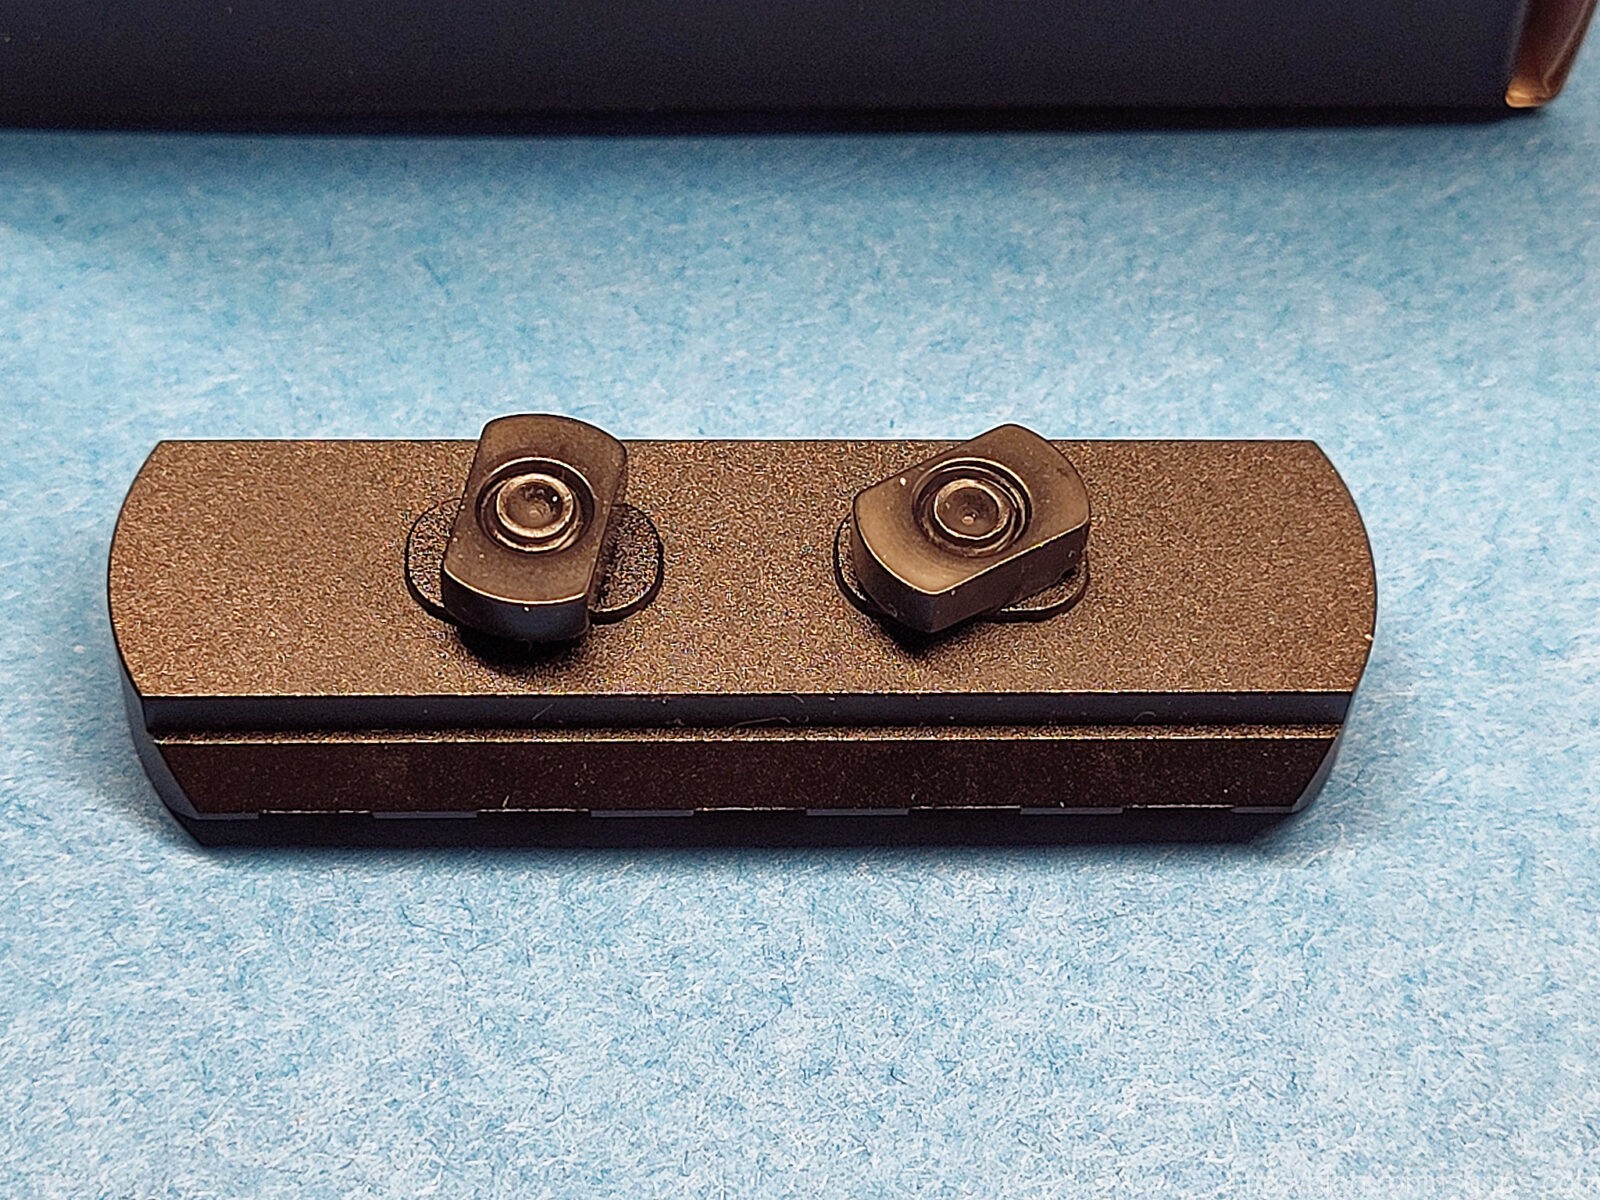
This is an Edgun brand picatinny rail section. Note the really short screws.
Second, the bottom fixed rail machined in the handguard was not done according to the Picatinny spec probably in error. I could get a Holosun laser designator to mount on any rail execept for the bottom one. My solution was to remove the handguard and rotate it 180 degrees so the top rail that worked fine was in the position I needed and the out of spec section that was originally at the bottom was on the top where I didn’t need it. I mentioned what I had to do to Edgun West and they didn’t offer to replace it so oh well. Not sure why they didn’t offer unless it was a known problem. I had a workaround and that was good enough for me but I am passing it along in case you run into the issue – the handguard can be easily removed and inverted – it’s symmertical.
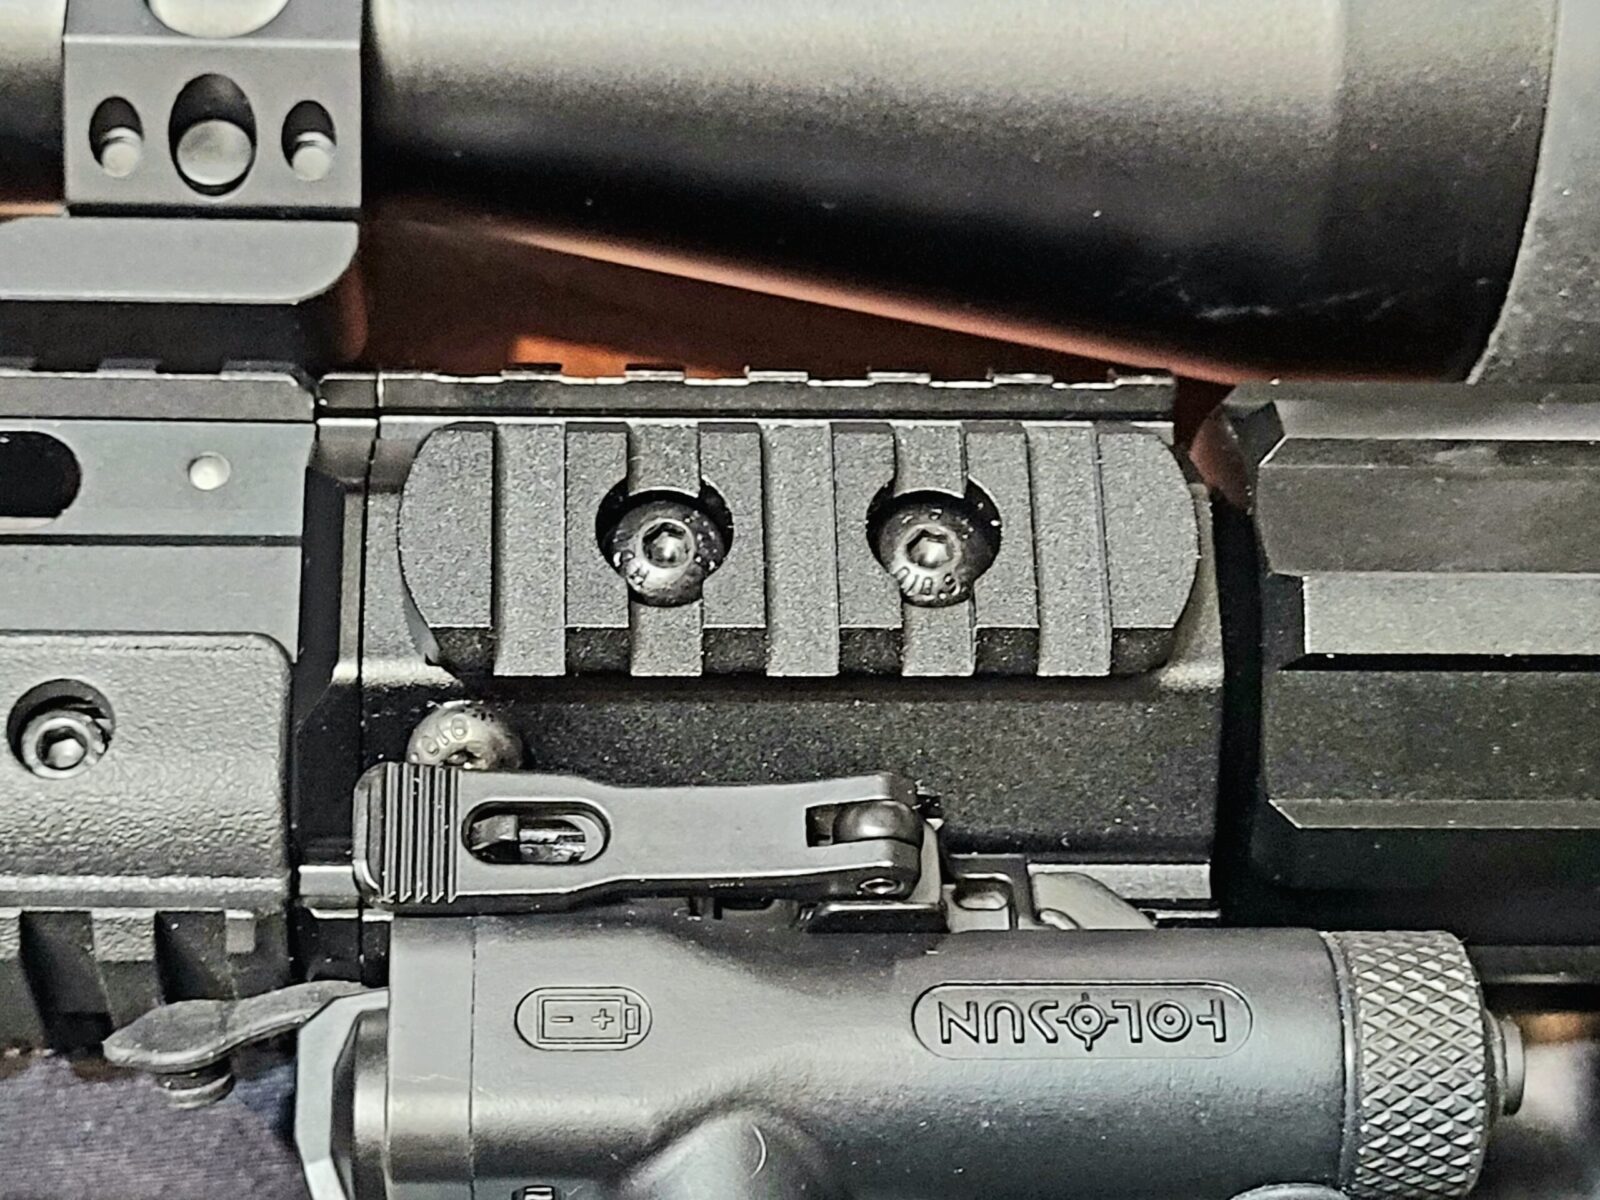
After I flipped the handguard I could mount the Holosun designator on the bottom an d the pressure switch went on the side rail section that is still open. We’ll come back to the Holosun a bit later.
Replaced the Behemoth With a DonnyFL Ronin
The Behemoth with extra sections installed (I think I had 4-5 modules installed towards the end) was really long and didn’t quiet the Leshiy 2 down enough for its size. Some of the noise is likely the air powered semi-auto action bleeding off air and not a moderator design issue. In watching videos of the reflex system Behemoth’s those things are amazingly quiet and I may experiment with one of those in the future but they are expensive and not something I need to do right away.
In search of a quick, I-have-no-more-money-for-this-project fix, I realized I had a spare DonnyFL Ronin moderator that I could use. The DonnyFL was threaded 1/2-28 so I had to get an adapter to convert from the Leshiy’s 14Mx1.0 thread to that. The Ronin was just as quiet and a heck of a lot shorter.
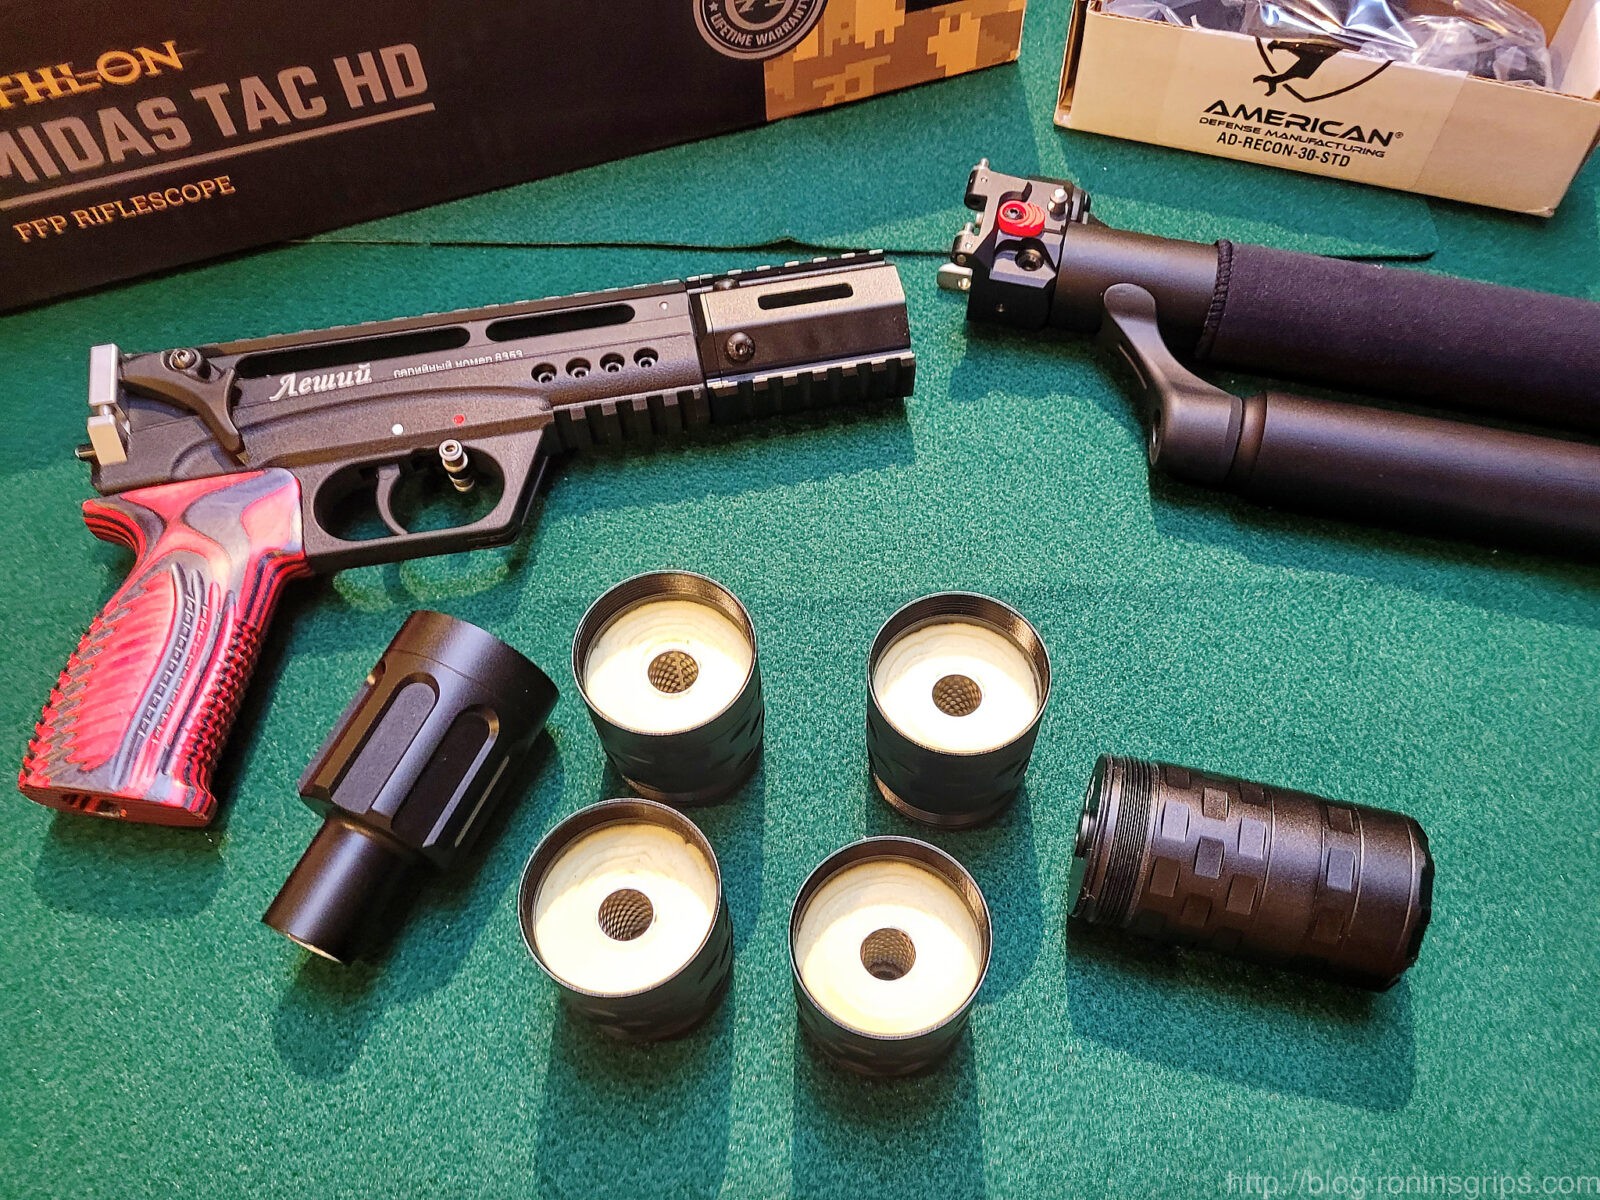
Here’s the Behemoth and I think I added one more section after this was taken. Note, that was the Midas Tac scope that was subsequently returned when it failed during early testing of the Leshiy
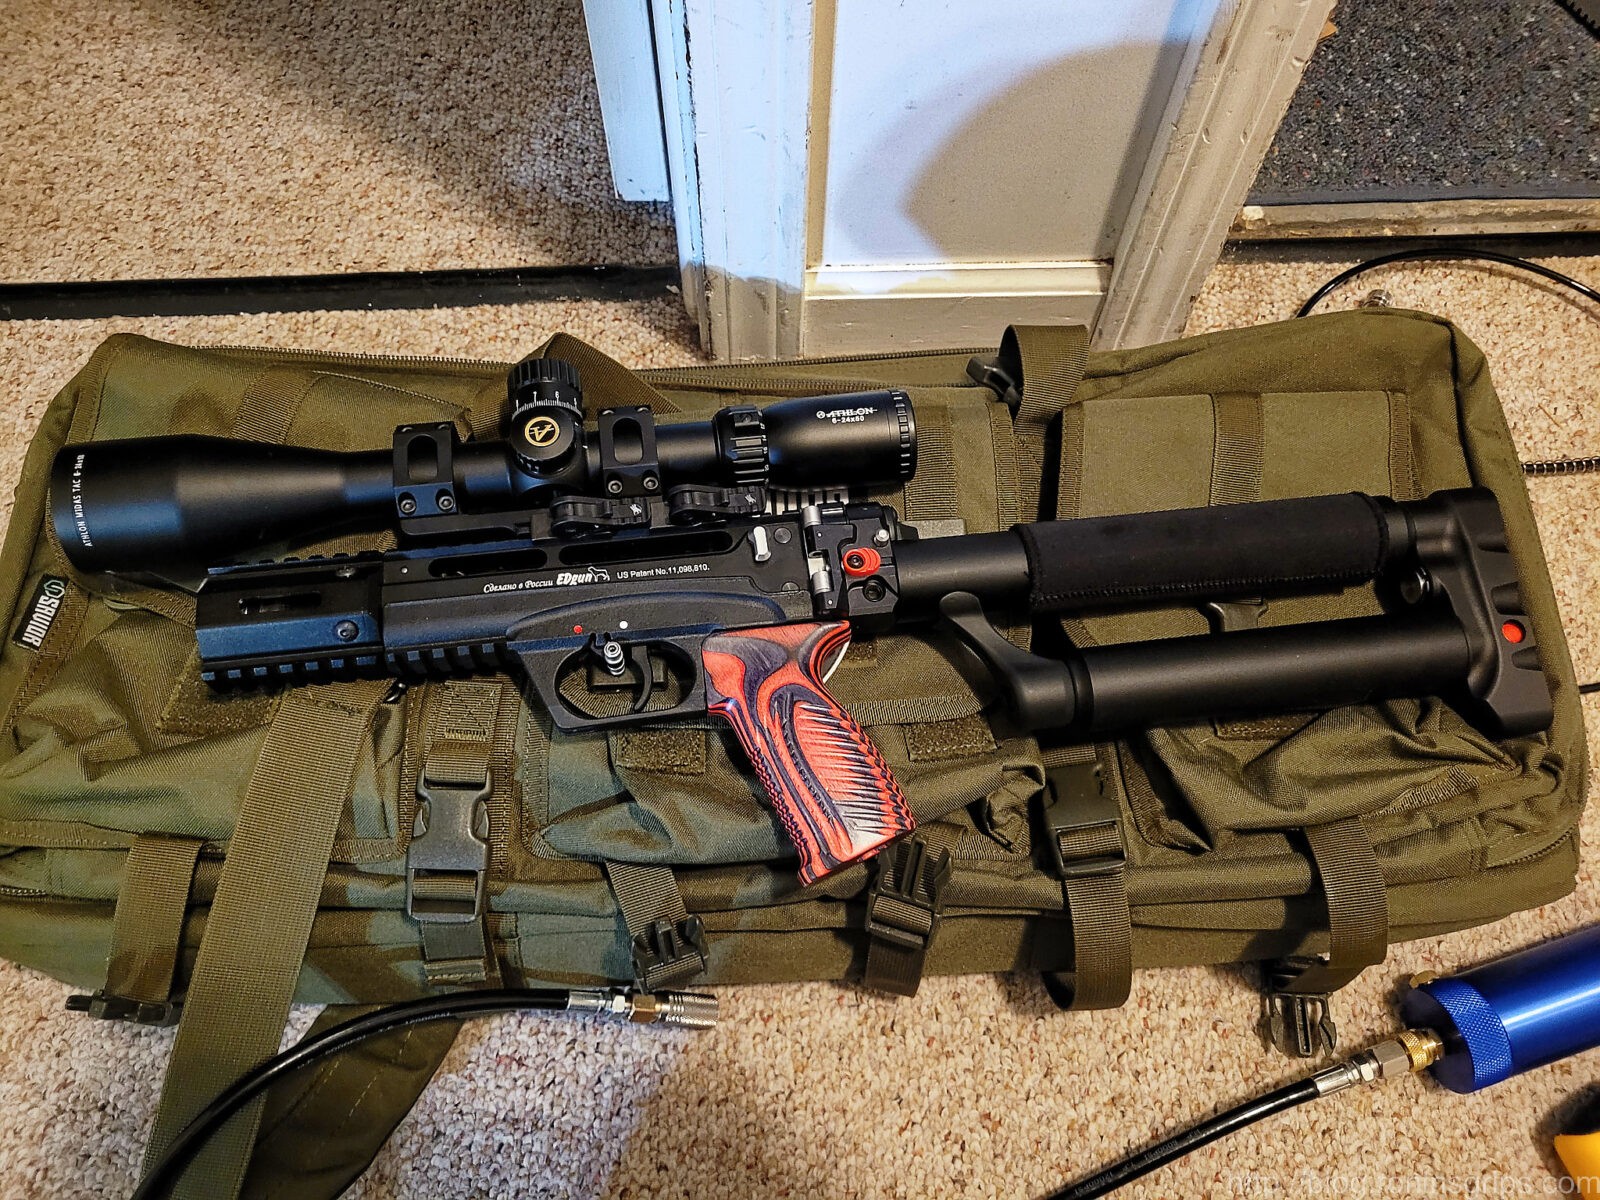
With the Ronin, the Leshiy 2 is 17-1/2″ folded and only 29″ overall. The body of the Ronin is 6-1/4″ and you can’t see the thread adapter. By luck it fit really nice relative to the handguard.
There was a second benefit to the move to the Ronin moderator – it stays put. The trilug system the Behemoth uses does not secure the moderator in a very firm “it’s not going to move easily” manner. The trilug system was meant for easy and fast installation and removal of the moderator.
My use case is different – I store the Leshiy 2 folded in a Savior gun case with the moderator attached and pull it out to use as needed for rapid pest control use. I found out the Behemoth could come loose from repeated insertion and removal from the case. I don’t want to take the time to install the moderator every time.
For me and my use, the use of a standard threaded mounting method worked out better. When I need the Leshiy 2 for pest control, I can grab it out of the case and not worry whether the Behemoth is coming loose or not.
If you need an airgun with a rapid takedown moderator, I don’t think you’ll find a competitor to the Behemoth. If you want compact, you might want to do some experimenting. If you need it to be as quiet as possible, do some digging before you buy. I watched a video of a .30 Leshiy 2 with the reflex version of the Behemoth and it was amazingly quiet.
Last comment – when I need the shot to be really quiet, I use my .25 FX Impact Compact Mk II with a Behemoth moderator. That combination is amazing.
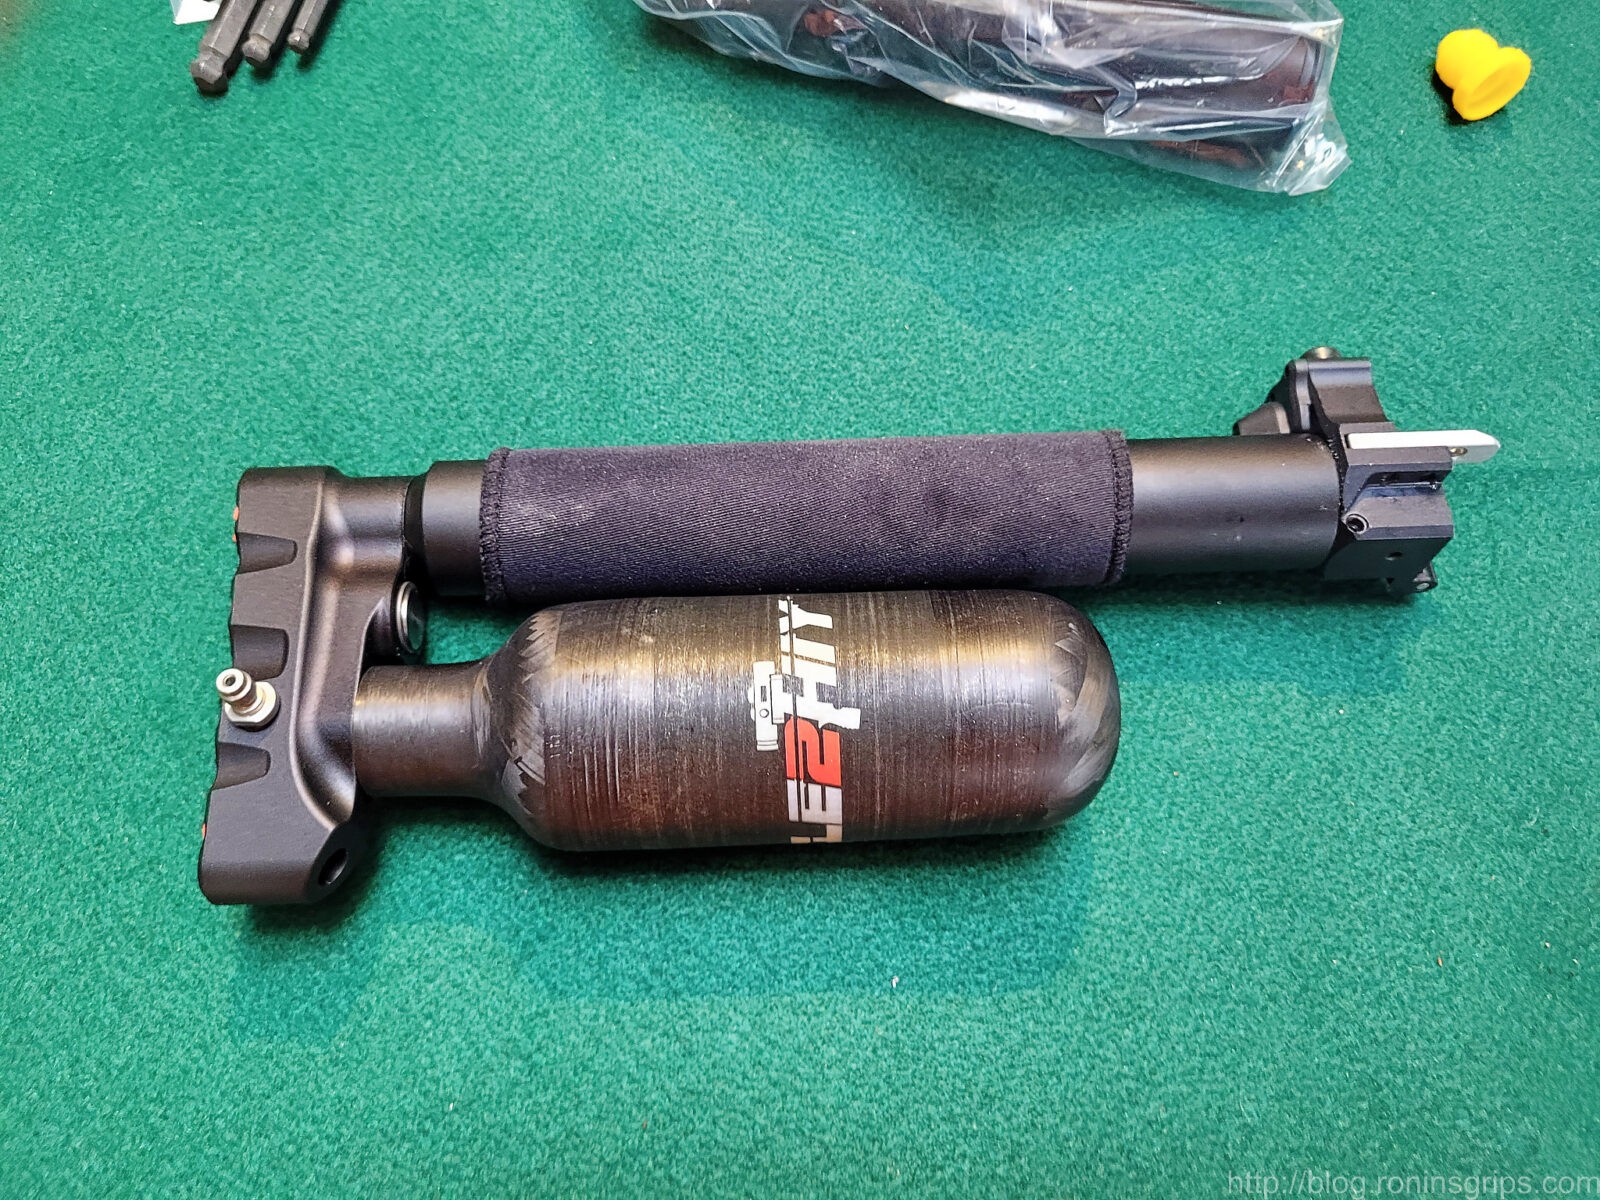
The 300cc @ 300 bar carbon fiber air cylinder was worth it
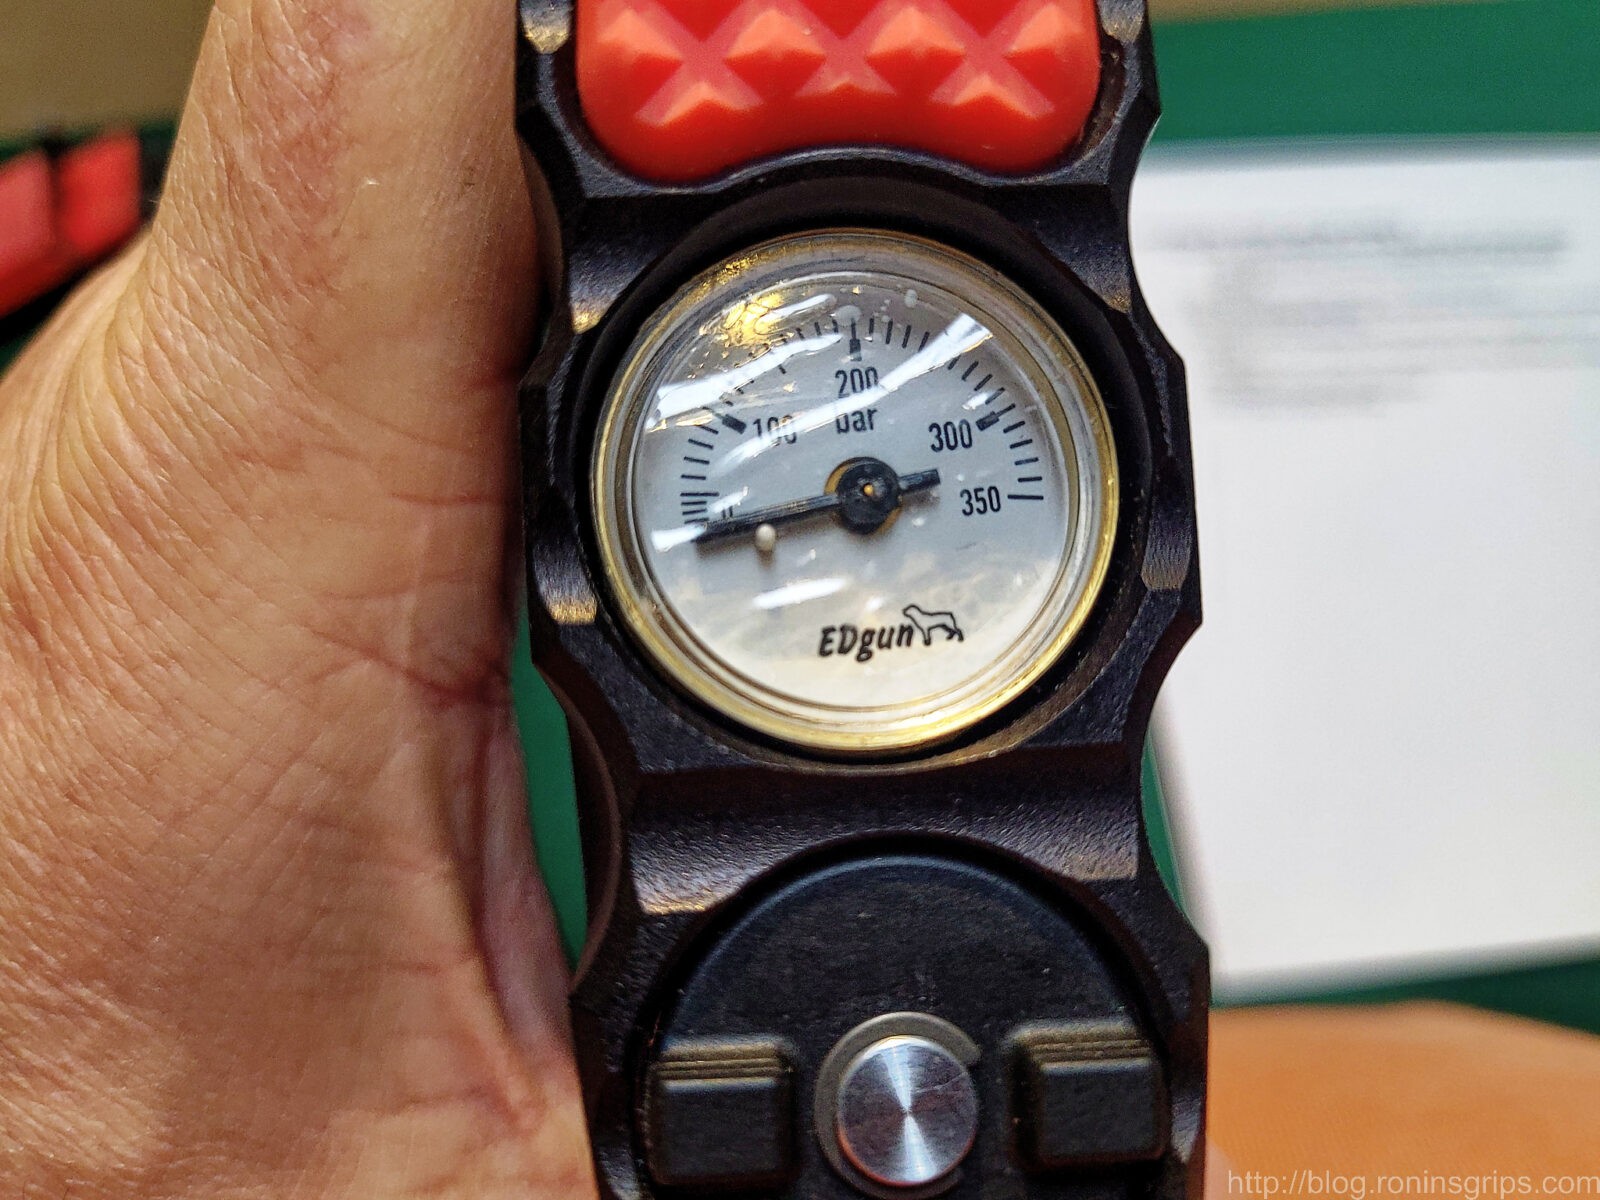
I am very happy with the bigger carbon fiber bottle on the rifle. It still balances and handles nicely – but it has 123% more air than the original resevoir. I fill it direct from the GX CS4 compressor so I can top it off at 300 bar.
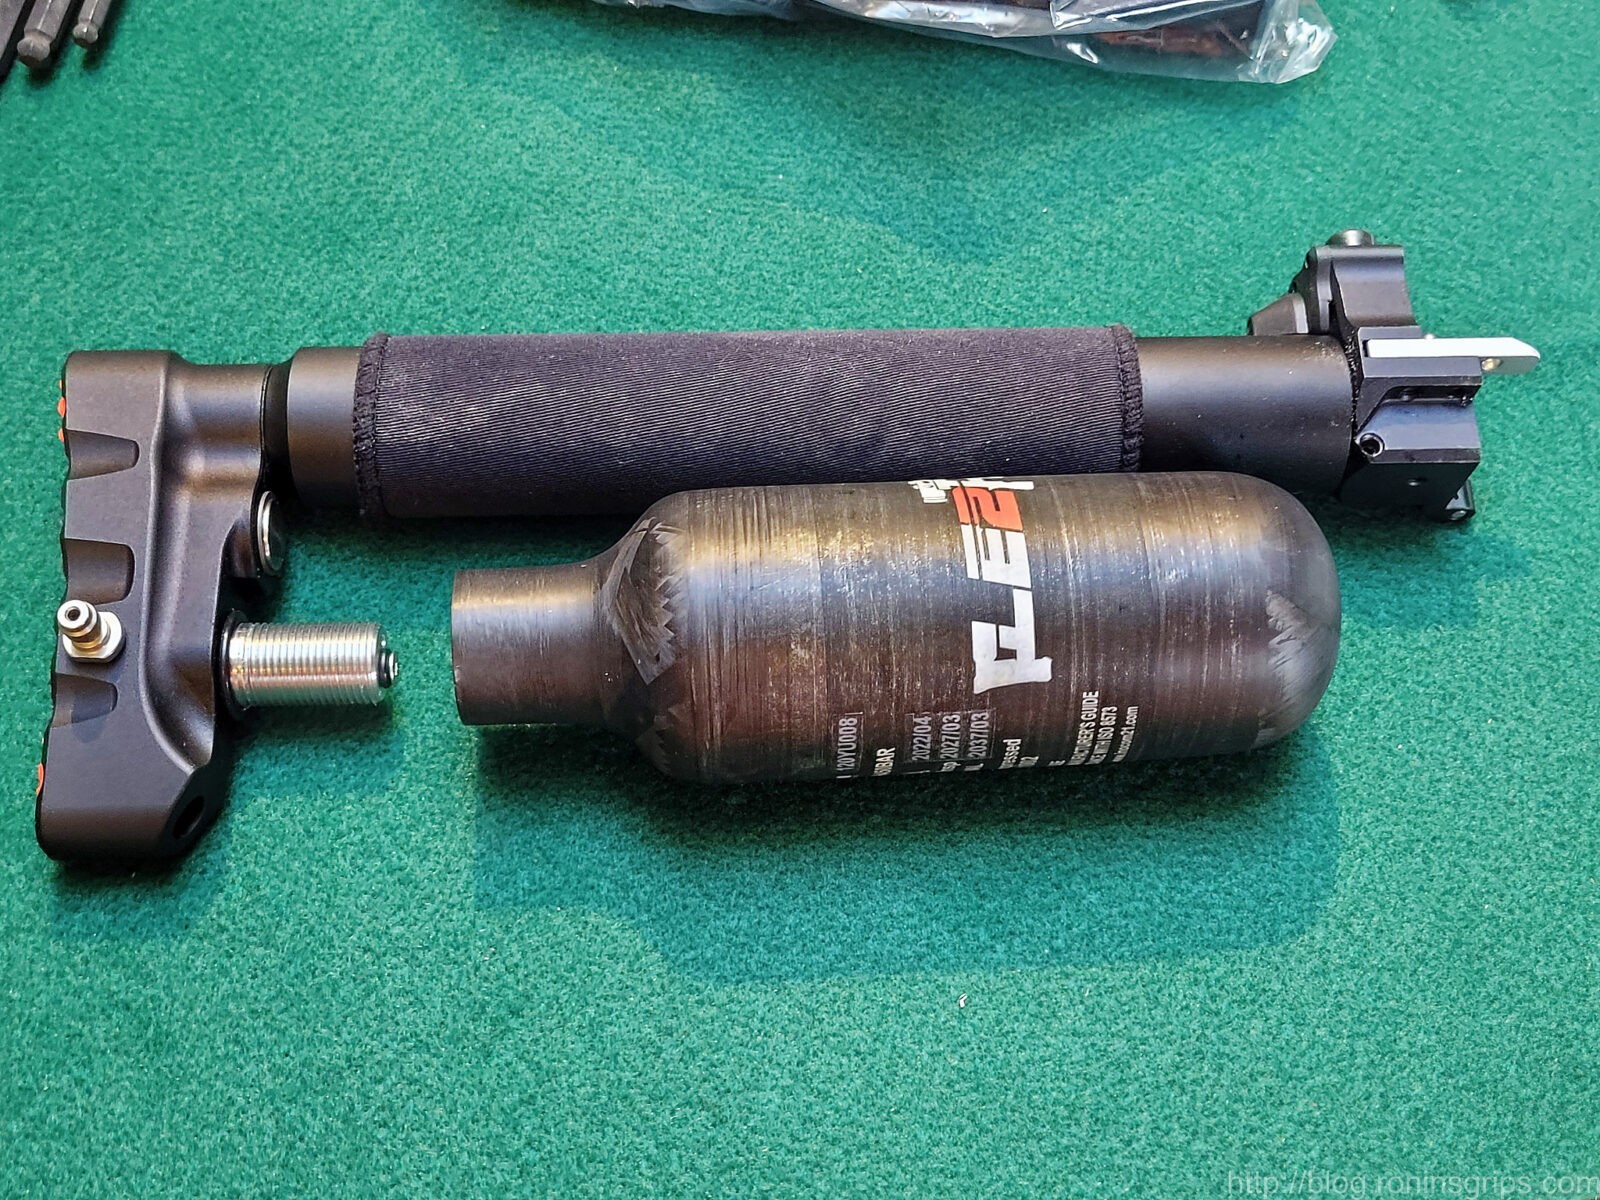
The original reservoir is at the top and the new larger carbon fiber bottle as at the bottom.
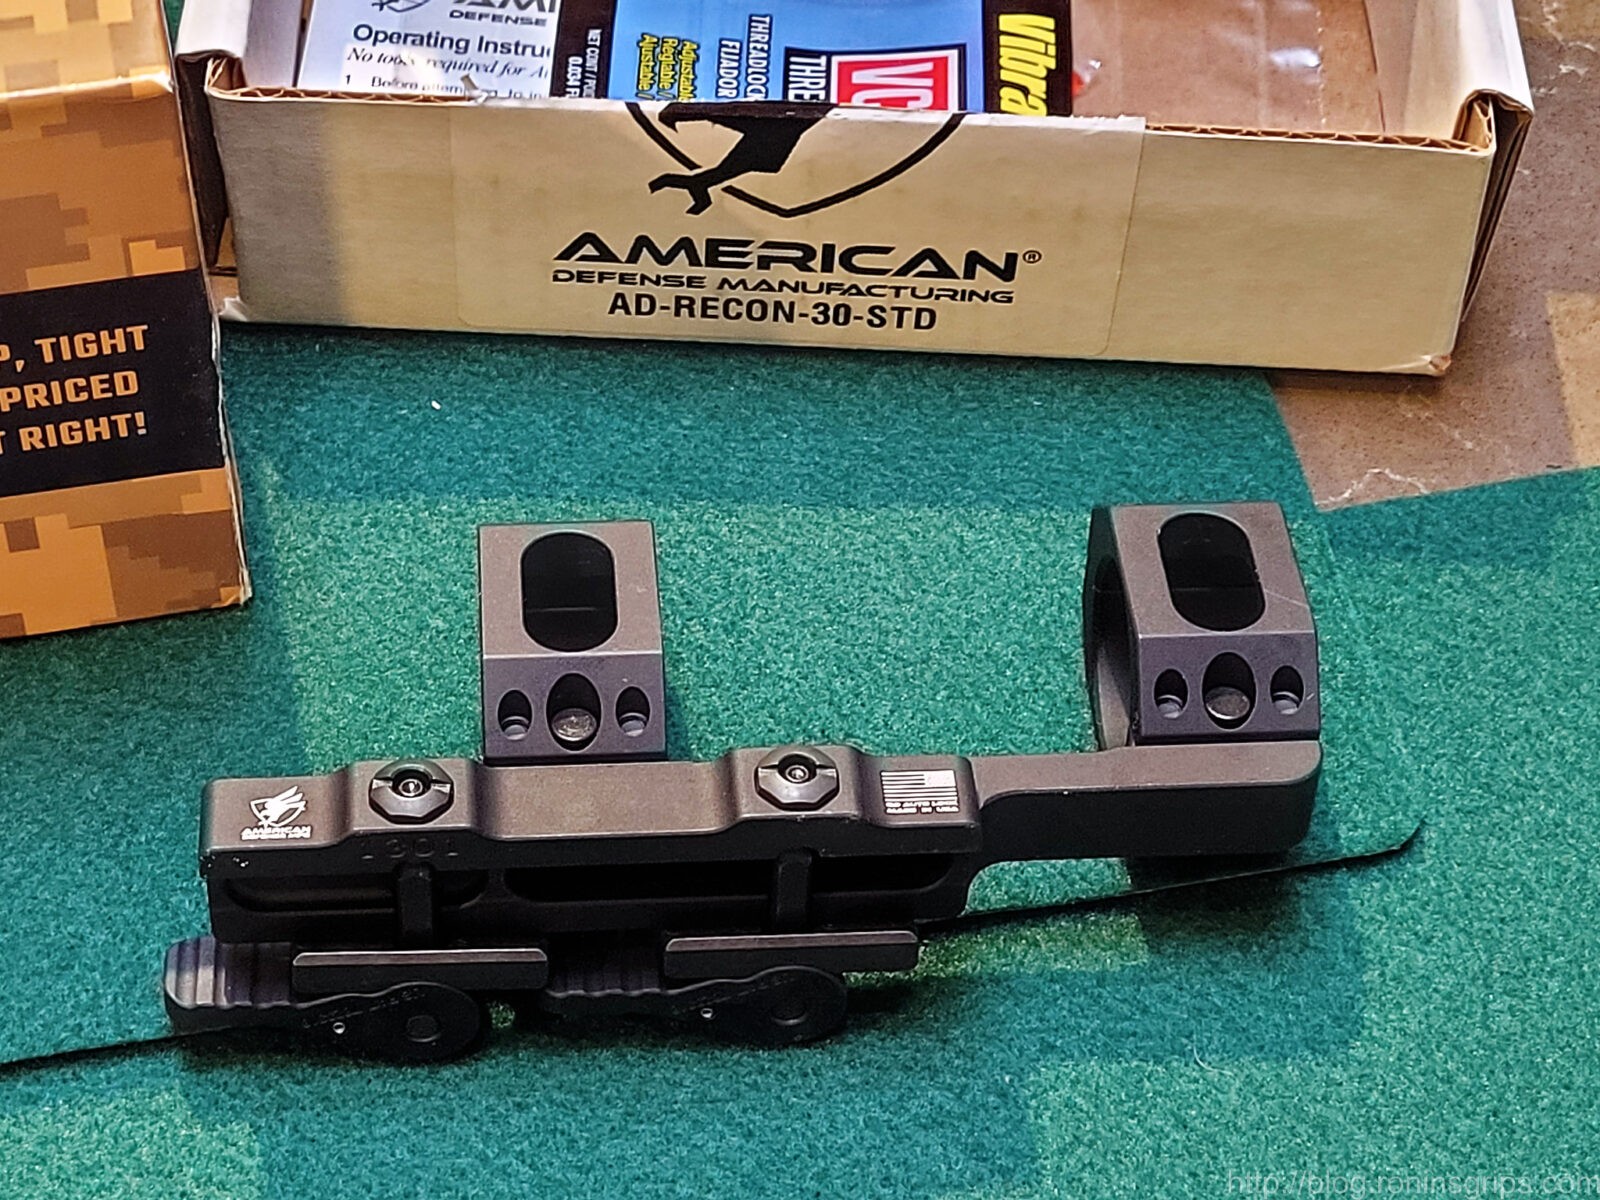
American Defense AD-Recon-30-Std mount worked great as usual
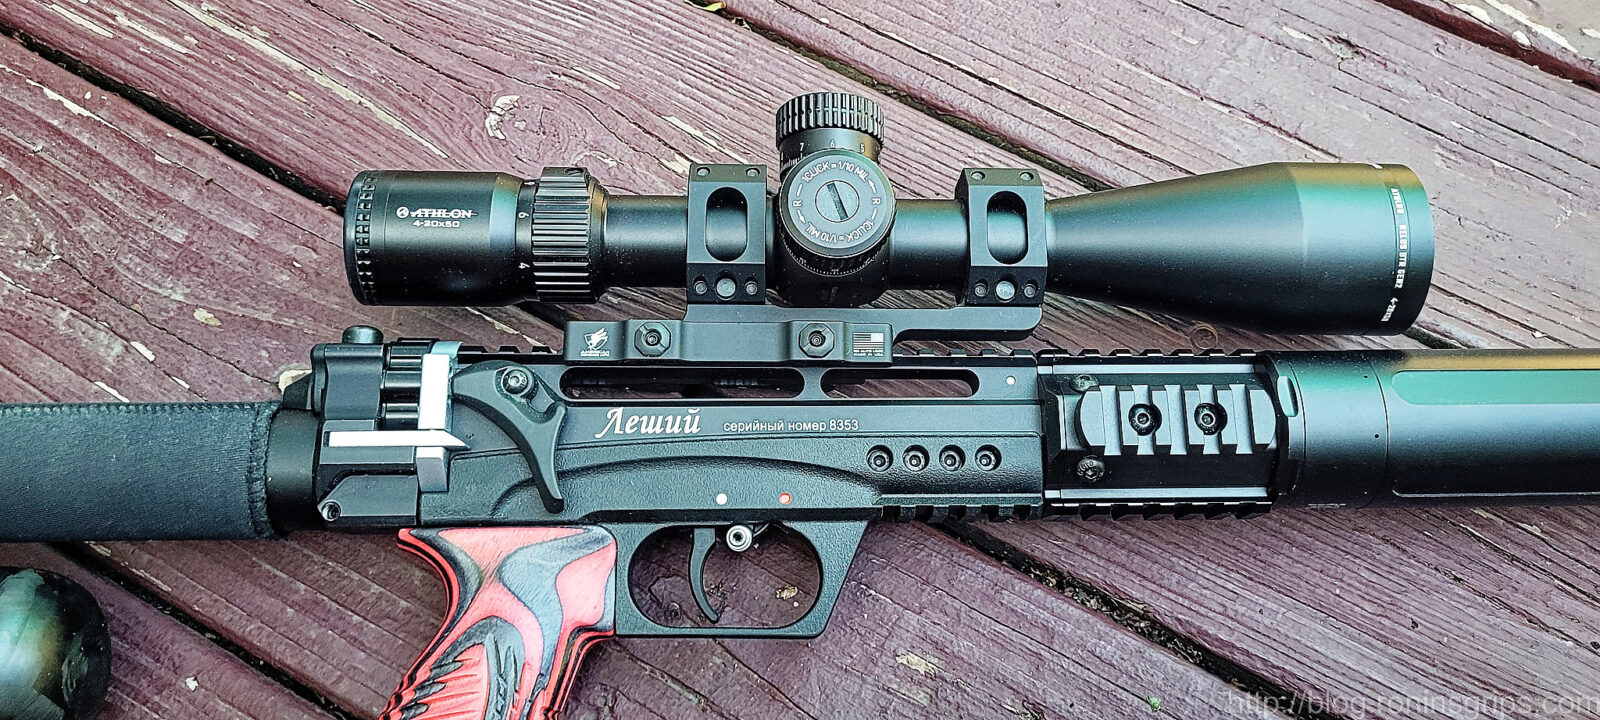
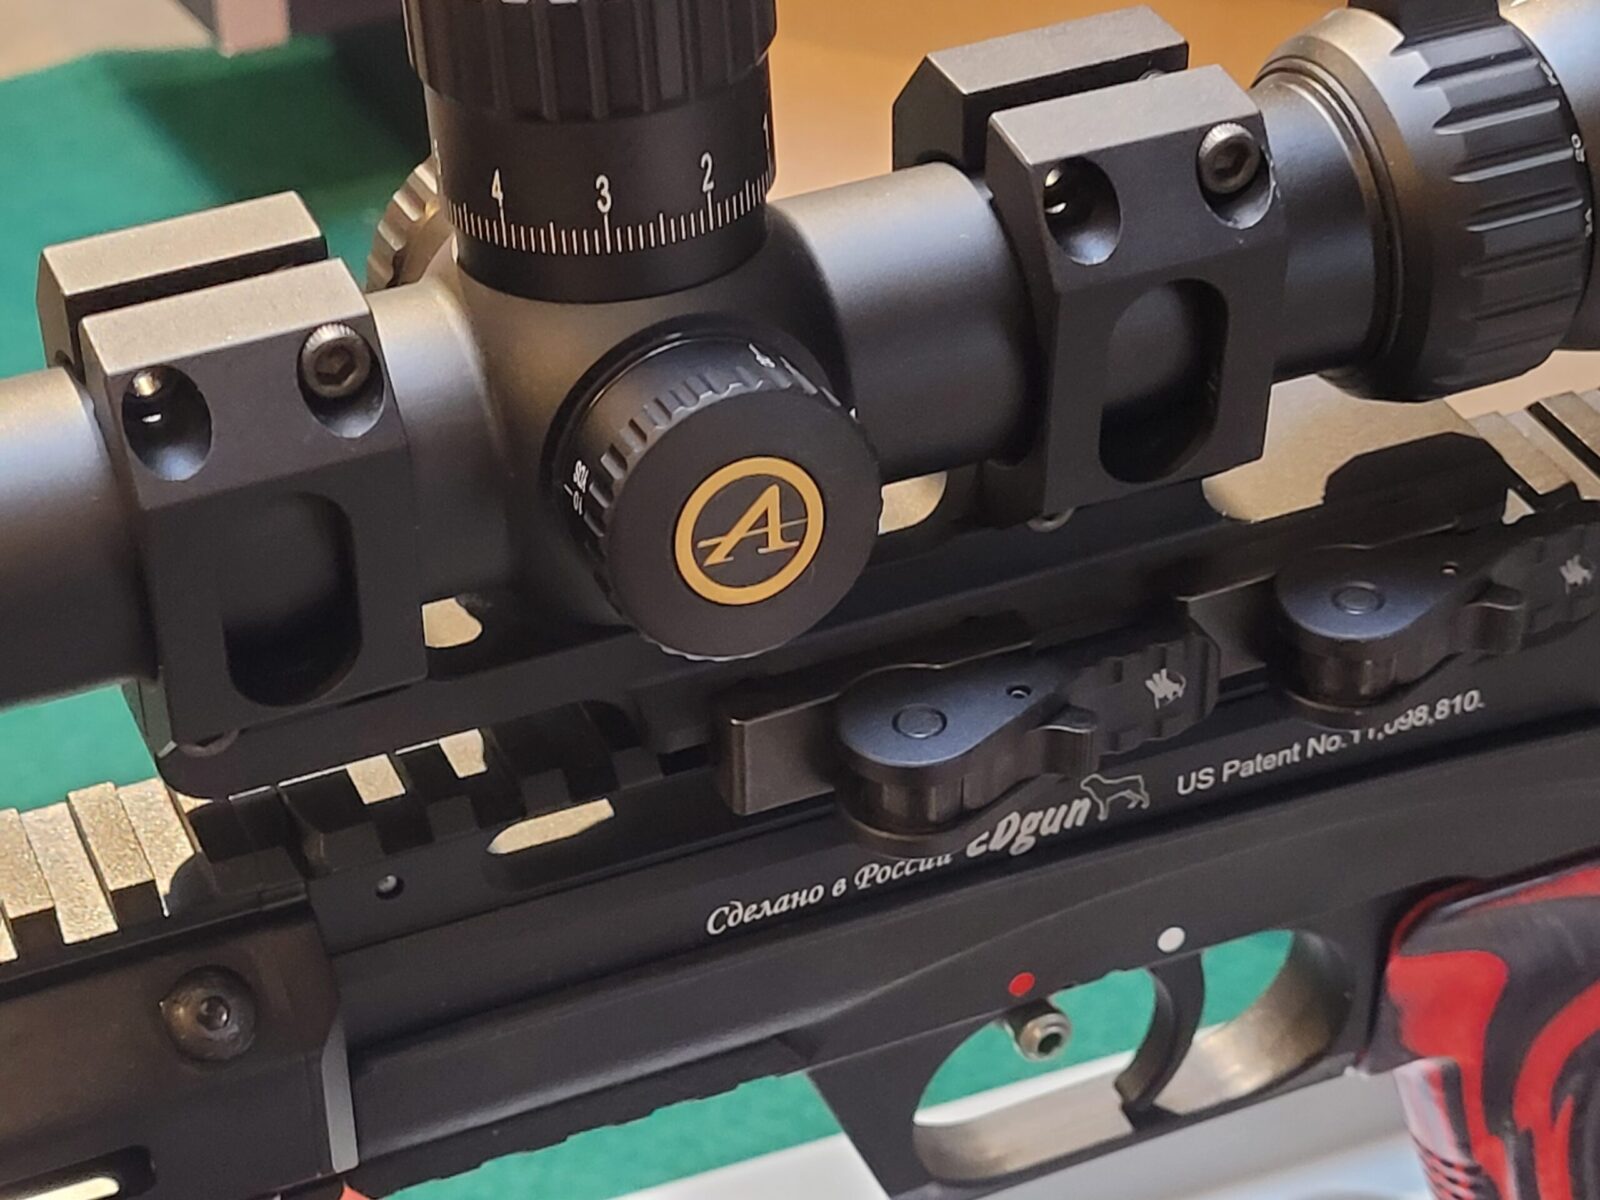
As usual the American Defense mount has been superb. It returns to zero when you remove and then attach the mount to the Leshiy 2 plus it holds the scope securely – two thumbs up. Definitely my favorite quick detach single piece scope mount.
Athlon Helos BTR Gen 2 4-20×50 Scope has been great
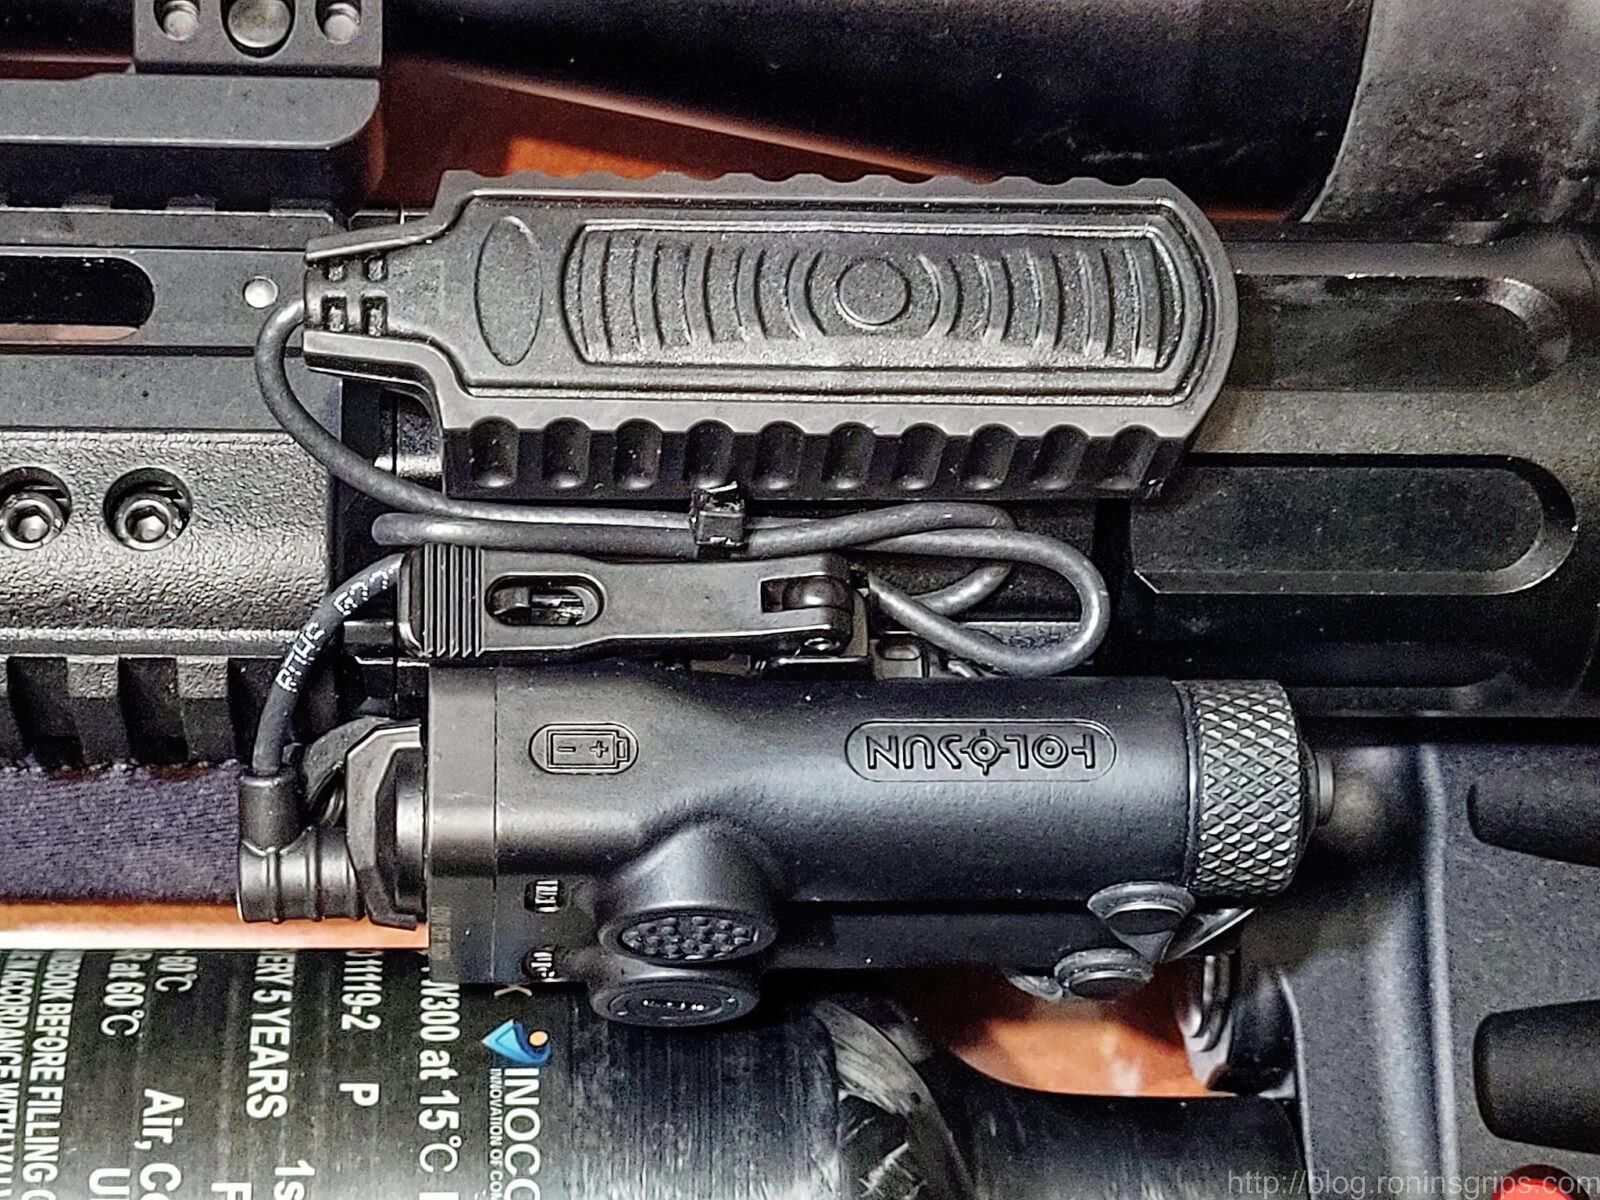
I’ve seen so many gun magazine photos with laser designators that I figuredit was time to try one. I did some research and ordered in a Holosun LE117G green laser designator. The LE is the better made law enforcement model.
So, I mounted it on the bottom with the pressure pad switch on the right side rail where the finger tips of my supporting hand could actuate it and sighted it in at 12 yards.
It looks great right? Oh wow – look he has a laser designator on a high-end air gun… well, I tried to find a use for it other than tricking out the gun for photos and I couldn’t – not really. I am so used to scopes at this point for precision work that I am bringing the rifle up and lining up the reticle. If I turn on the laser, it sits at a different height and shows a different point of impact than the scope as I move away from the point of impact I zeroed them both in at – 12 yards.
It looked slick but didn’t help me with precision shots plus it was adding weight and taking off space so off it came.
The LE117G is now sitting on shelf for potential use in the future. I’m not saying it’s bad – I’m just saying it didn’t fit my planned use for the Leishey 2.
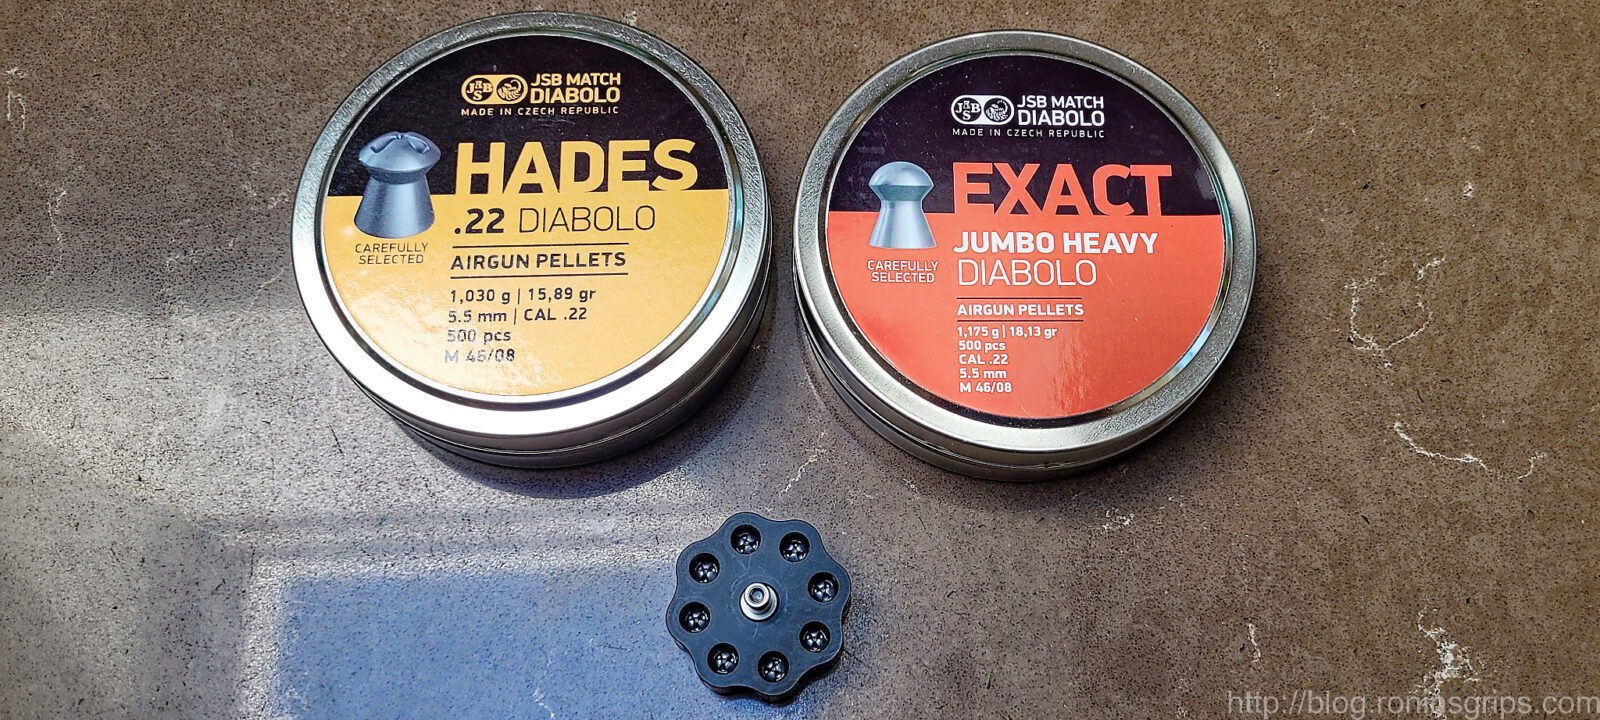
Switched from JSB dome to hollow point pellets
I was talking to another Leshiy 2 owner and he recommended that I try the JSB 15.89gr Hades hollow point pellet. He was having great success with it at close ranges – I think he said he was using them up to 25 yards – but the Diabolo domed pellets were better at a distance.
Well, I ordered in a couple of tins and sighted the Leshiy 2 in using that ammo at 12 yards. It’s definitely accurate enough for me at my close range pests and it does appear to do the job faster. There is a different impact sound when a Hades pellet hits a squirrel though I can’t quite figure out how to describe it.
JSB is my favorite pellet company. Normally I swear by the 18.13gr Exact Jumbo Heavy Diabolos but the Hades have impressed me so far. The Leshiy 2 has no problem feeding them and accuracy has been just fine.
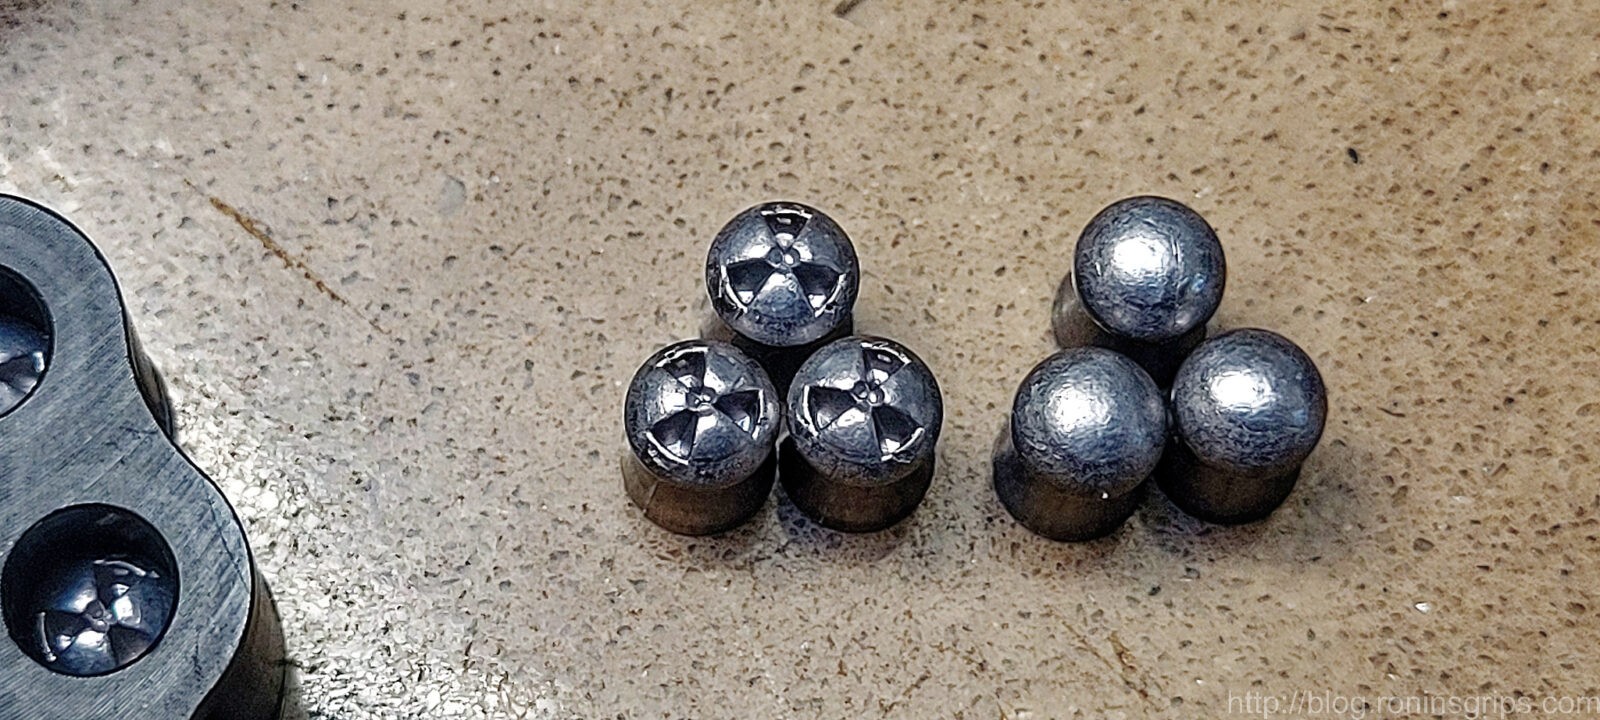
Here’s a close up of the Hades (left) vs. Exacts (right). The Hades pellets have an interesting head design – slightly domed but with the reliefs in the top to aid with mushrooming.
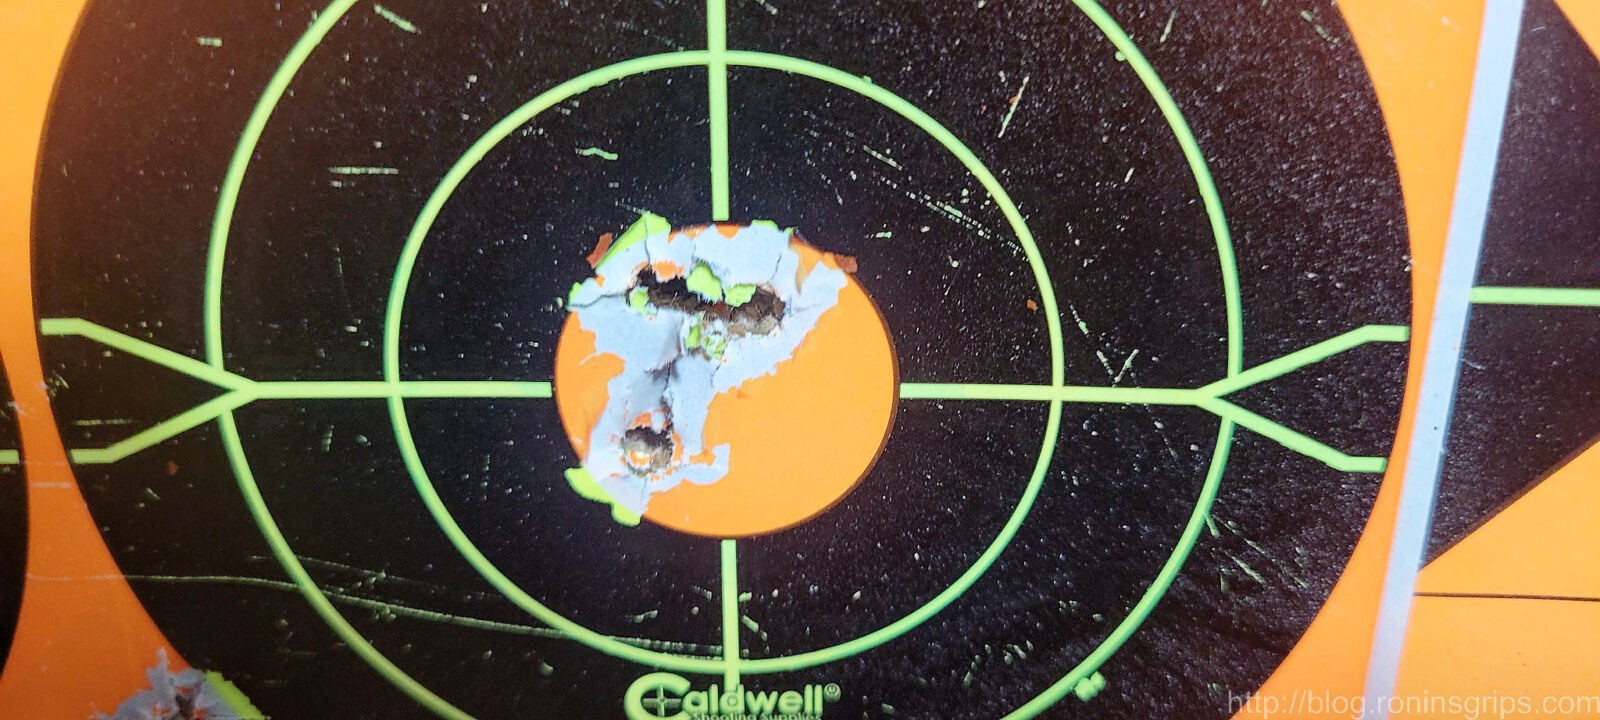
Eight rounds (one magazine) of Hades pellets at 12 yards easily fit in a one inch diameter circle. I was using a Bog carbon fiber Death Grip tripod to hold the Leshey so there was a bit of movement due to my tremor.
Last Batch of Photos
Here are some more photos of the Leshiy 2 as currently configured:
Summary
I use this airgun a few tmes every week – literally. It’s gone through hundreds of pellets and a lot air. Along the way, it has dispatched quite a few squirrels.
If you are looking for a semi-auto airgun that is very well engineered and made plus modular and can change as your needs change – I don’t think you are going to find anything equal too or better than a Leshiy 2.
Note, I have to buy all of my parts – nothing here was paid for by sponsors, etc. I do make a small amount if you click on an ad and buy something but that is it. You’re getting my real opinion on stuff.
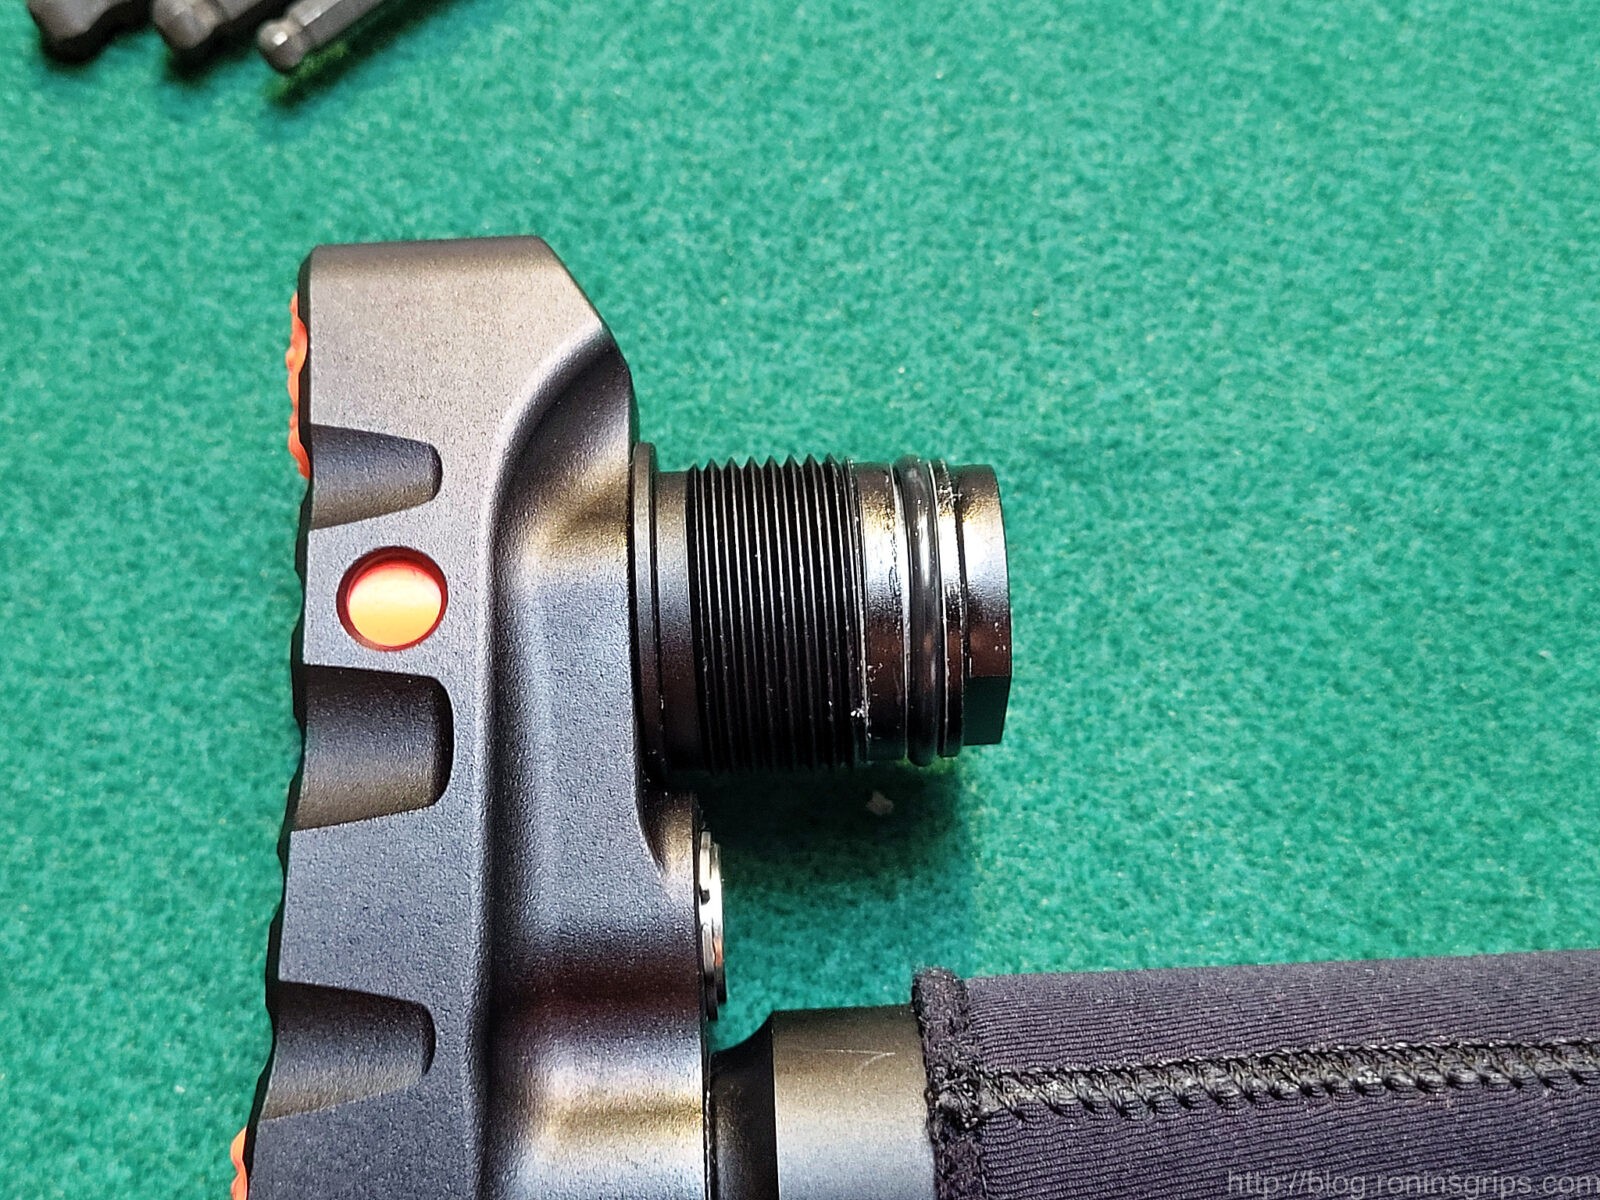
When I bought my EdGun Leshiy 2, I was trying to keep the costs down so I decided to start with the standard air reservoir. In talking with Brian at Edgun West, filling it to 250 bar would yield about 28 shots before the pressure would dip below the regulator’s 130 PSI setting (the regulator is adjustable but Edgun West set it for me at 130 psi to optimize my use of the 18.13 JSB Diabolo Exact pellets). Well, in testing the Leshiy 2 before I gave up on the Athlon Midas scope, that thing could fire .22 pellets fast – it also used air fast as a result.
The Leishy 2’s stock air reservoir is a slick aluminum tube that forms the lower portion of the butt stock assembly and holds 180cc of air at an impressive 300 bar (4,351 PSI) working pressure. Because my GX CS4 compressor can actually go to 400 bar, I was topping the Leshiy 2 off directly at 300 bar. Even so, I went through the air fast. In an earlier post I mentioned I made it about nine days before I decided to order the 300 cc @ 300 bar carbon fber bottle upgrade. That meant about a 40% increase in air volume.
The air reservoir is the lower tube on the buttstock. It holds 180cc of air at 300 bar. There’s also a Holosun green laser designator added under the barrel but that’s another story for another day.
Installing the Bottle
The Edgun West team assured me changing the barrel was very easy and something I could do. I’m going to tell you the same thing – it is very easty and something you can do.
Make sure the Leshiy 2 is cleared. One of the cool things about it is that when you fold open or remove the buttstock, the weapon is safe – there is no air supply but you must get to that point first. Make sure the weapon is safe while you handle it up to the point of opening the stock – remember – it is a semi-auto. Also, don’t forget you are working with high-pressure air – be sure to degass the weapon and don’t force things apart – odds are something doesn’t want to move or turn because it is pressurized. I’ll show you how to de-gas the gun below.
Let me step you through the process of changing the air cylinder. First and foremost – read the instructions they include with the tank. If their instructions differ from mine – follow their’s or contact them and confirm.
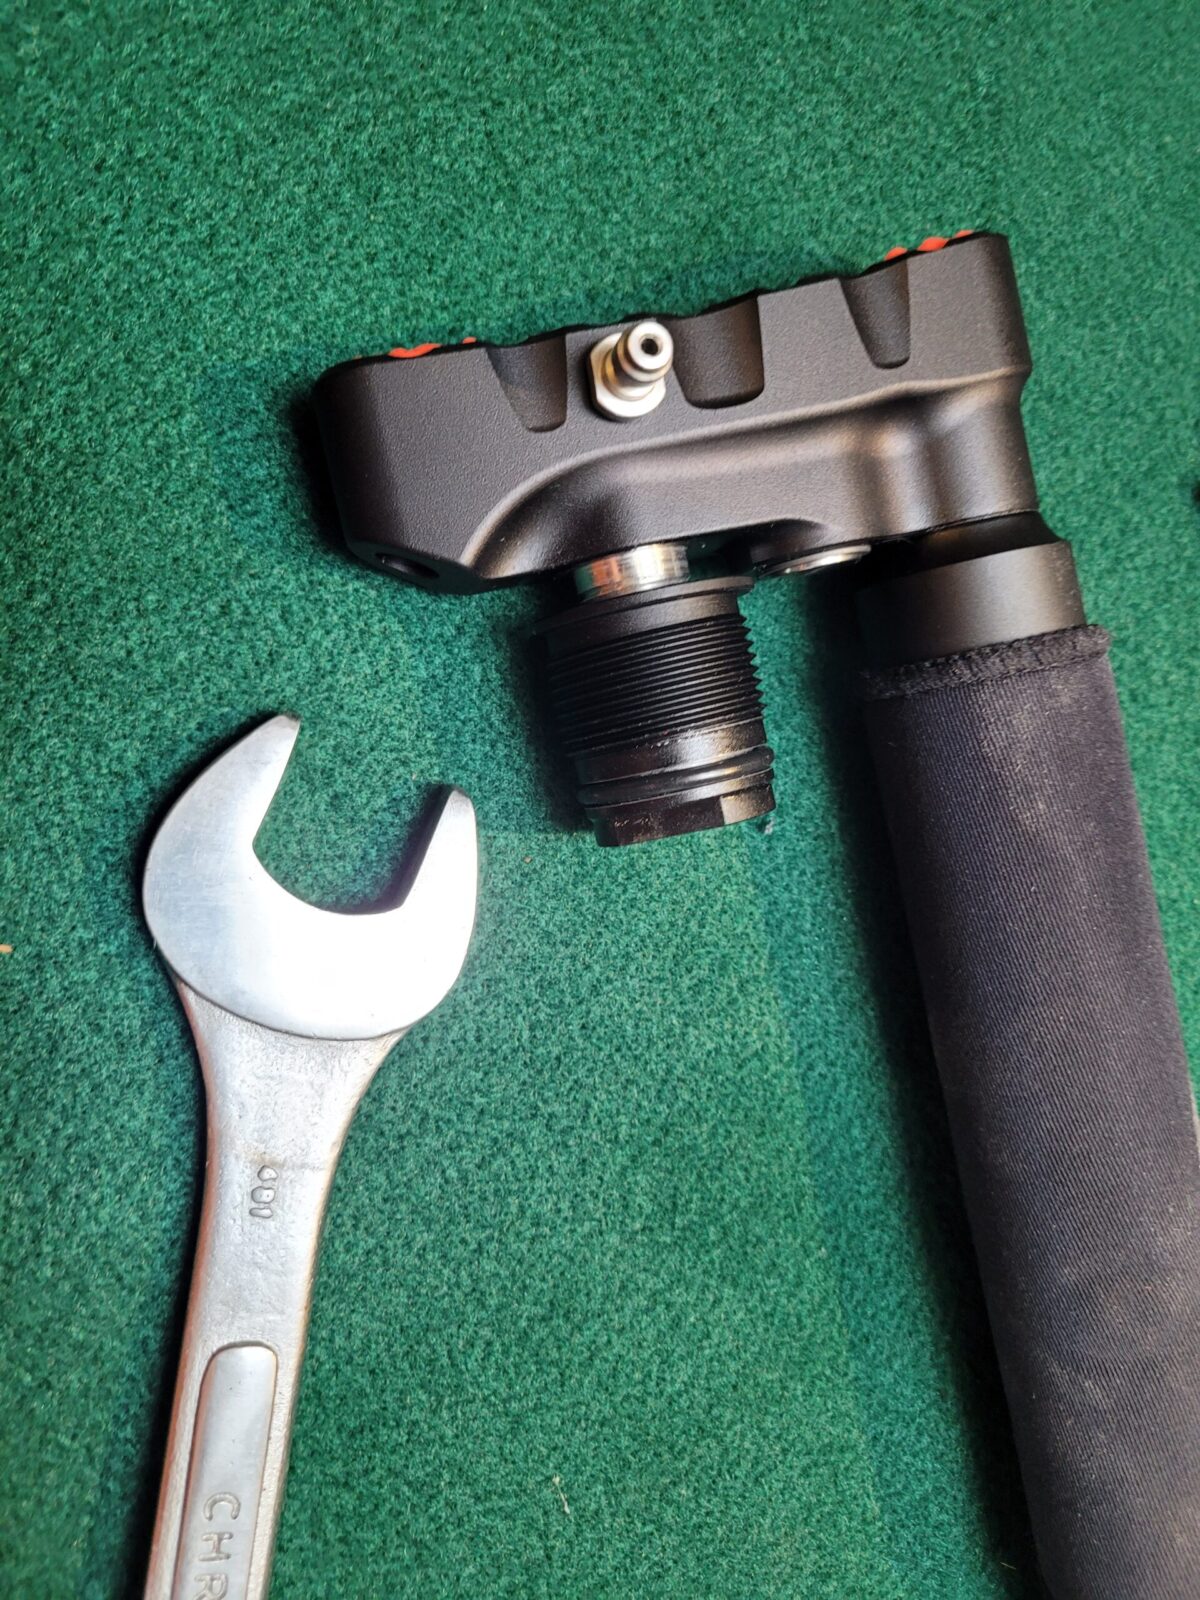
I don’t have photos of it but lift your rear buttstock assembly off the hinges so you can easily work on the air cylinder.
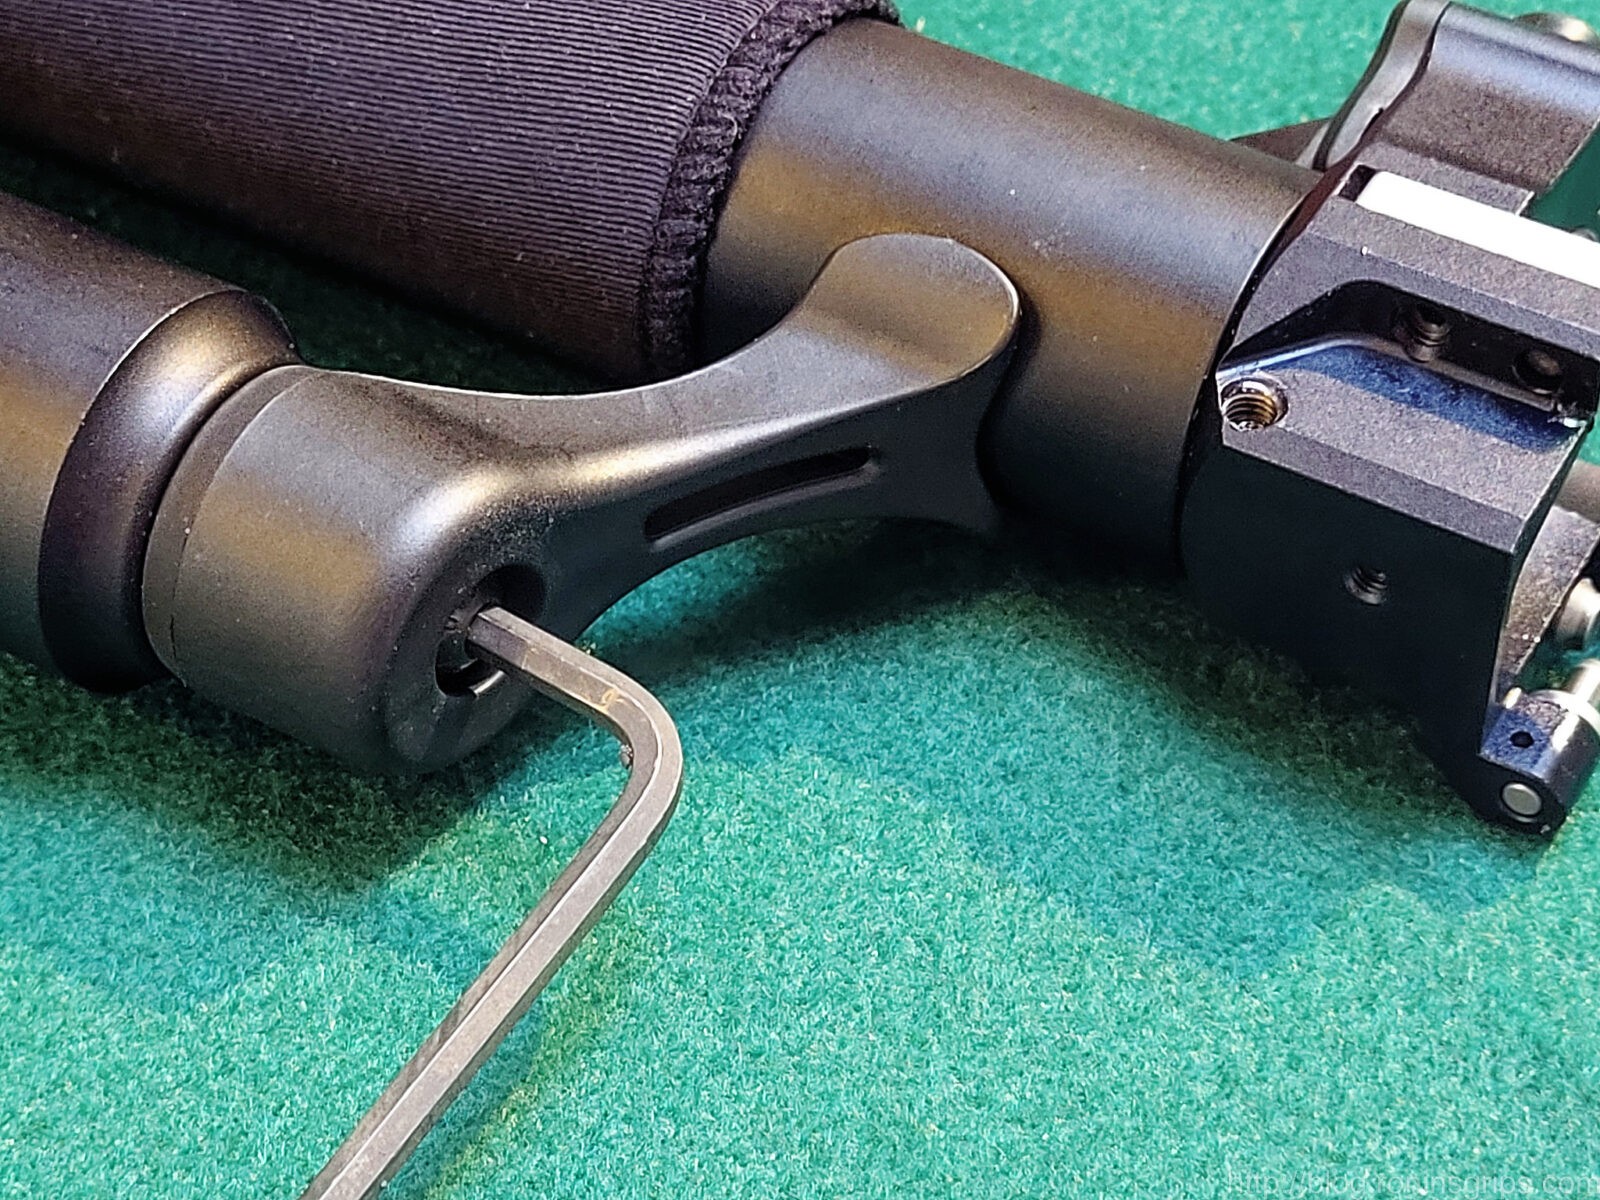
Use a 4mm hex wrench to slightly open the bleed screw. When the air stops coming out, check the gauge. I had to open the screw a tad more a couple of times until the gauge read completely empty. Tighten it again when you are done.
Folks, make sure the gauge is at zero before you proceed. As mentioned, I had to loosen up the screw a tad bit more once or twice until it fully went to zero. There is a detent ball under the screw so I didn’t want to back the screw out too far and lose it. Patience and caution are a good combination when working around high-pressure air.
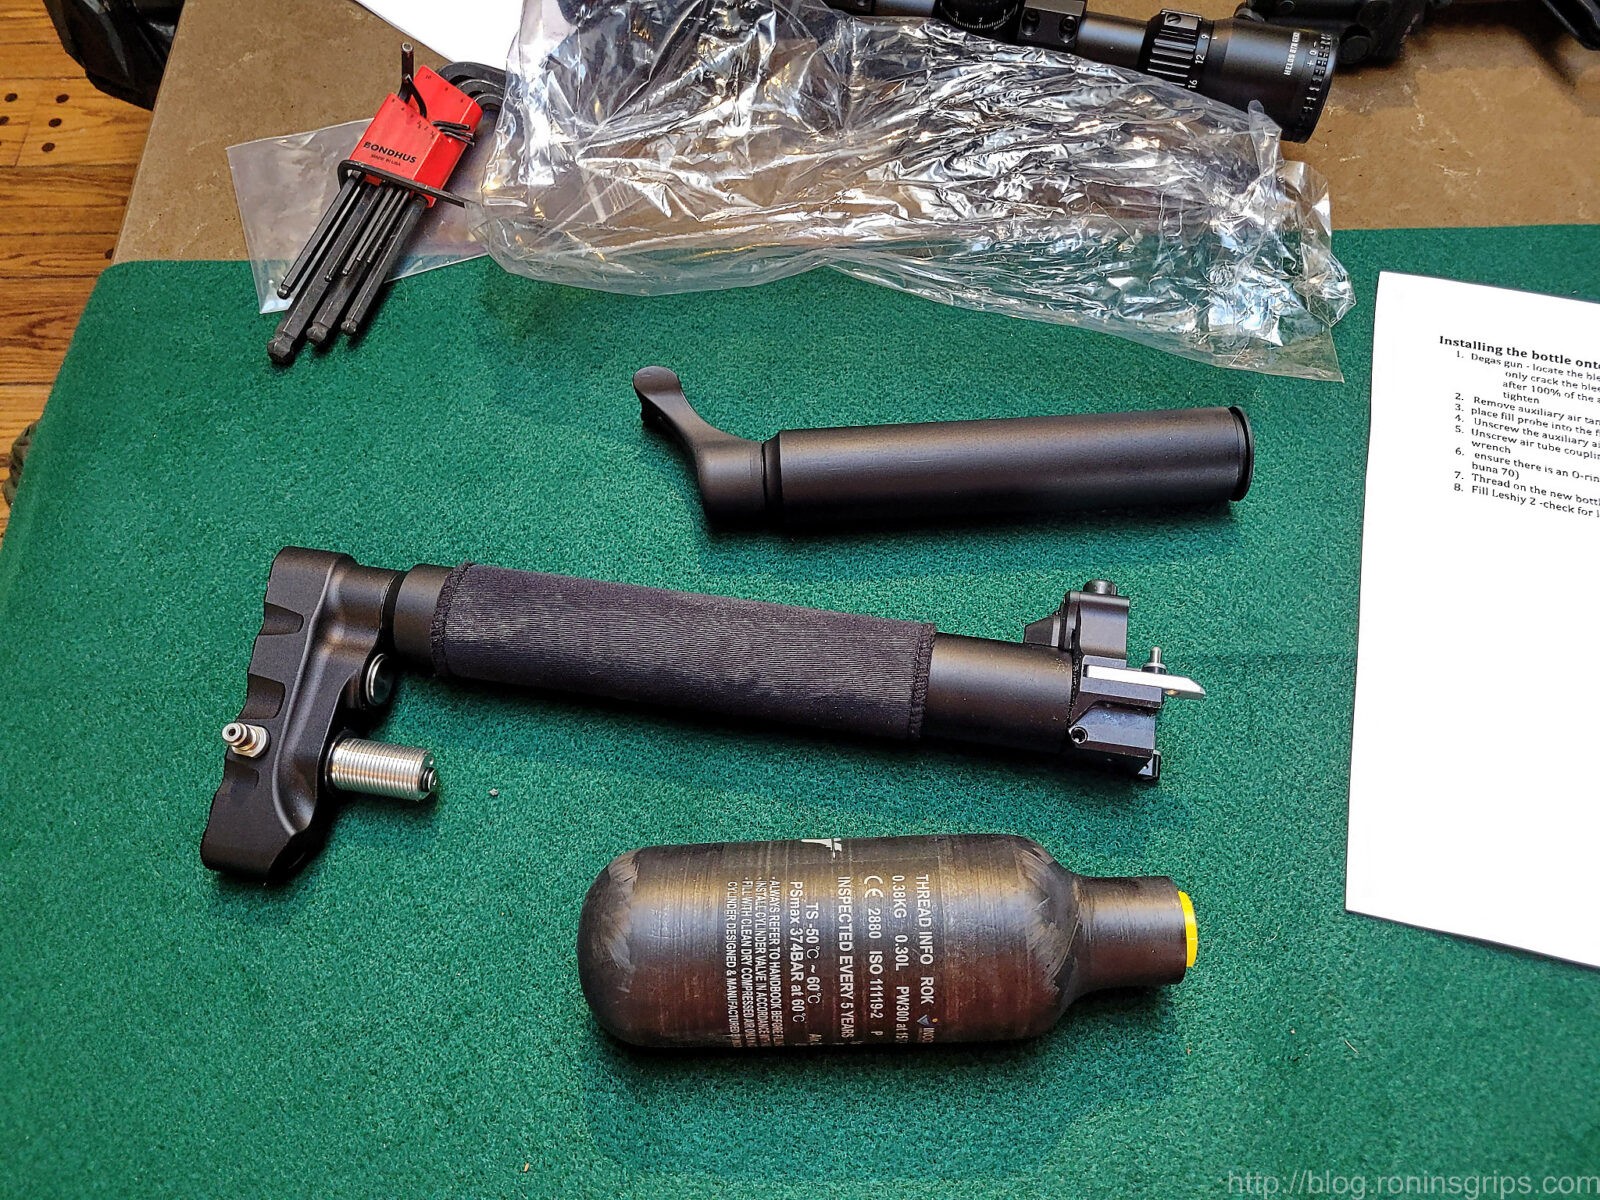
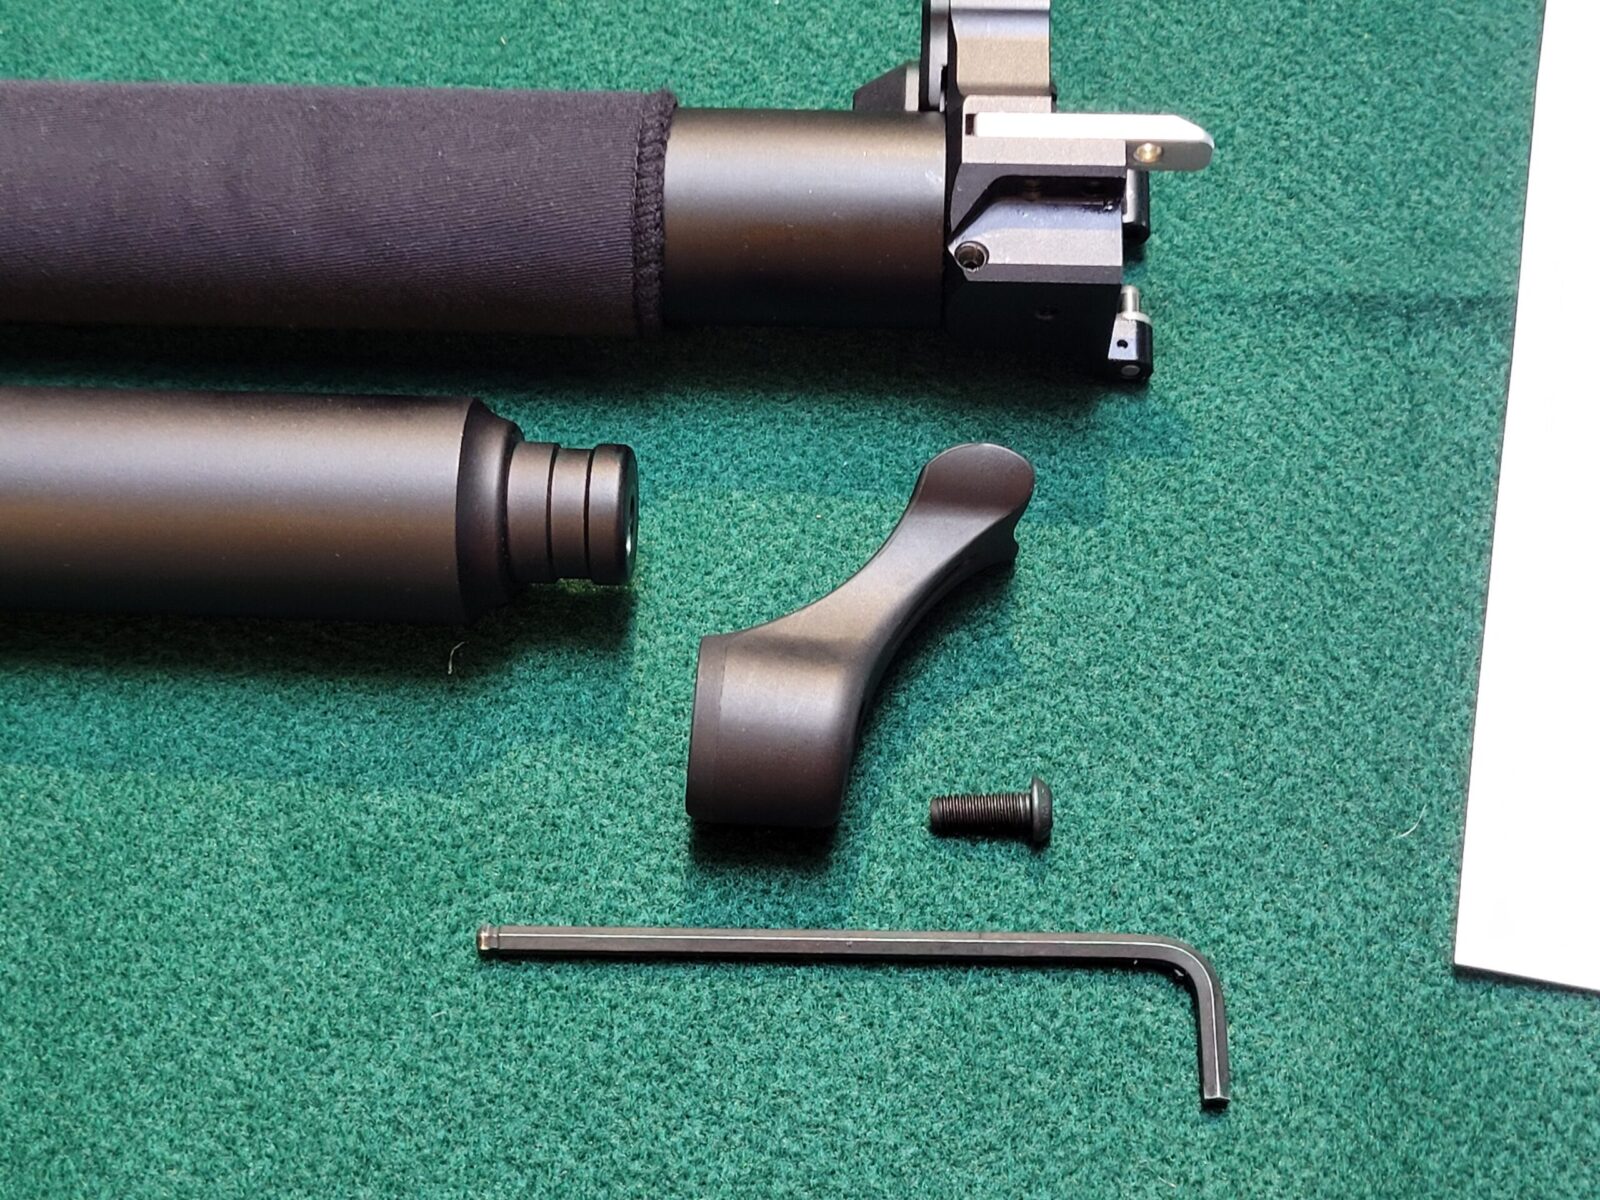
Next, remove the brace. This entails removing the screw shown above and pulling the brace off the end of the original air reservoir. It actually is not attached to the tube above it.
I’d recommend putting the spare parts in zip lock bags and labeling them in case you need them in the future.
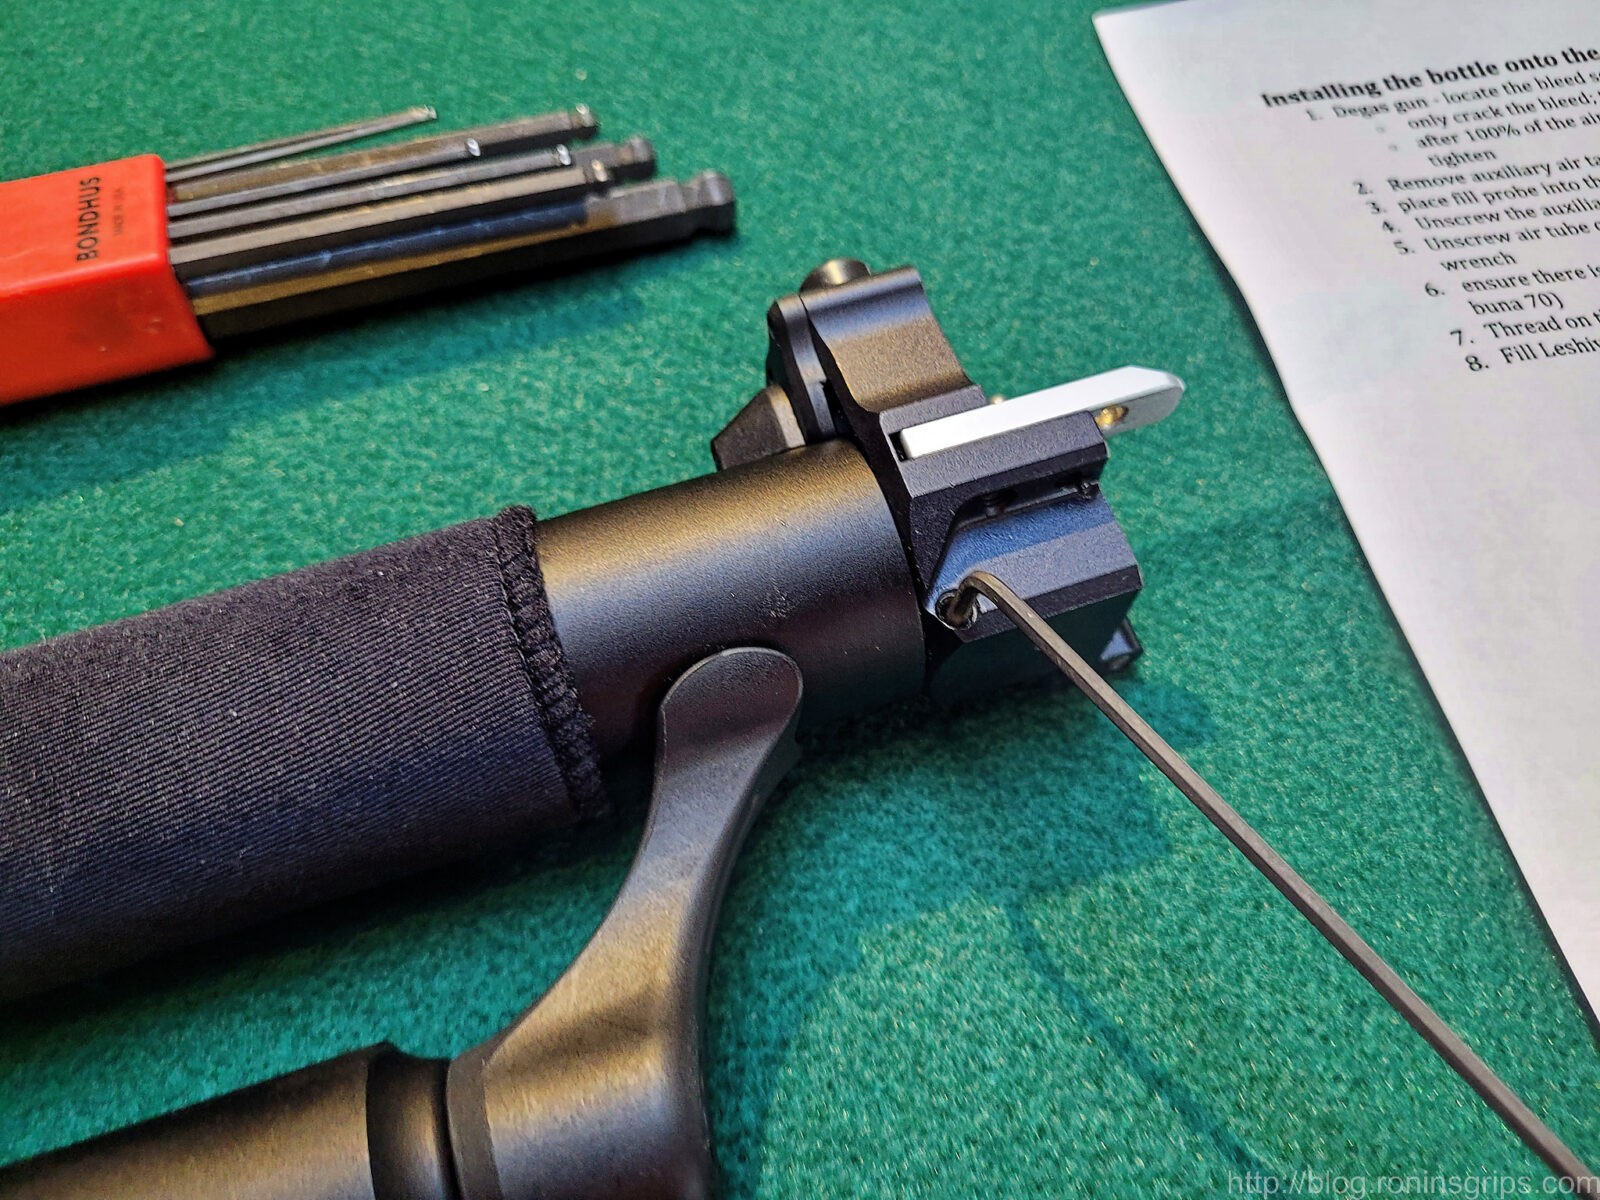
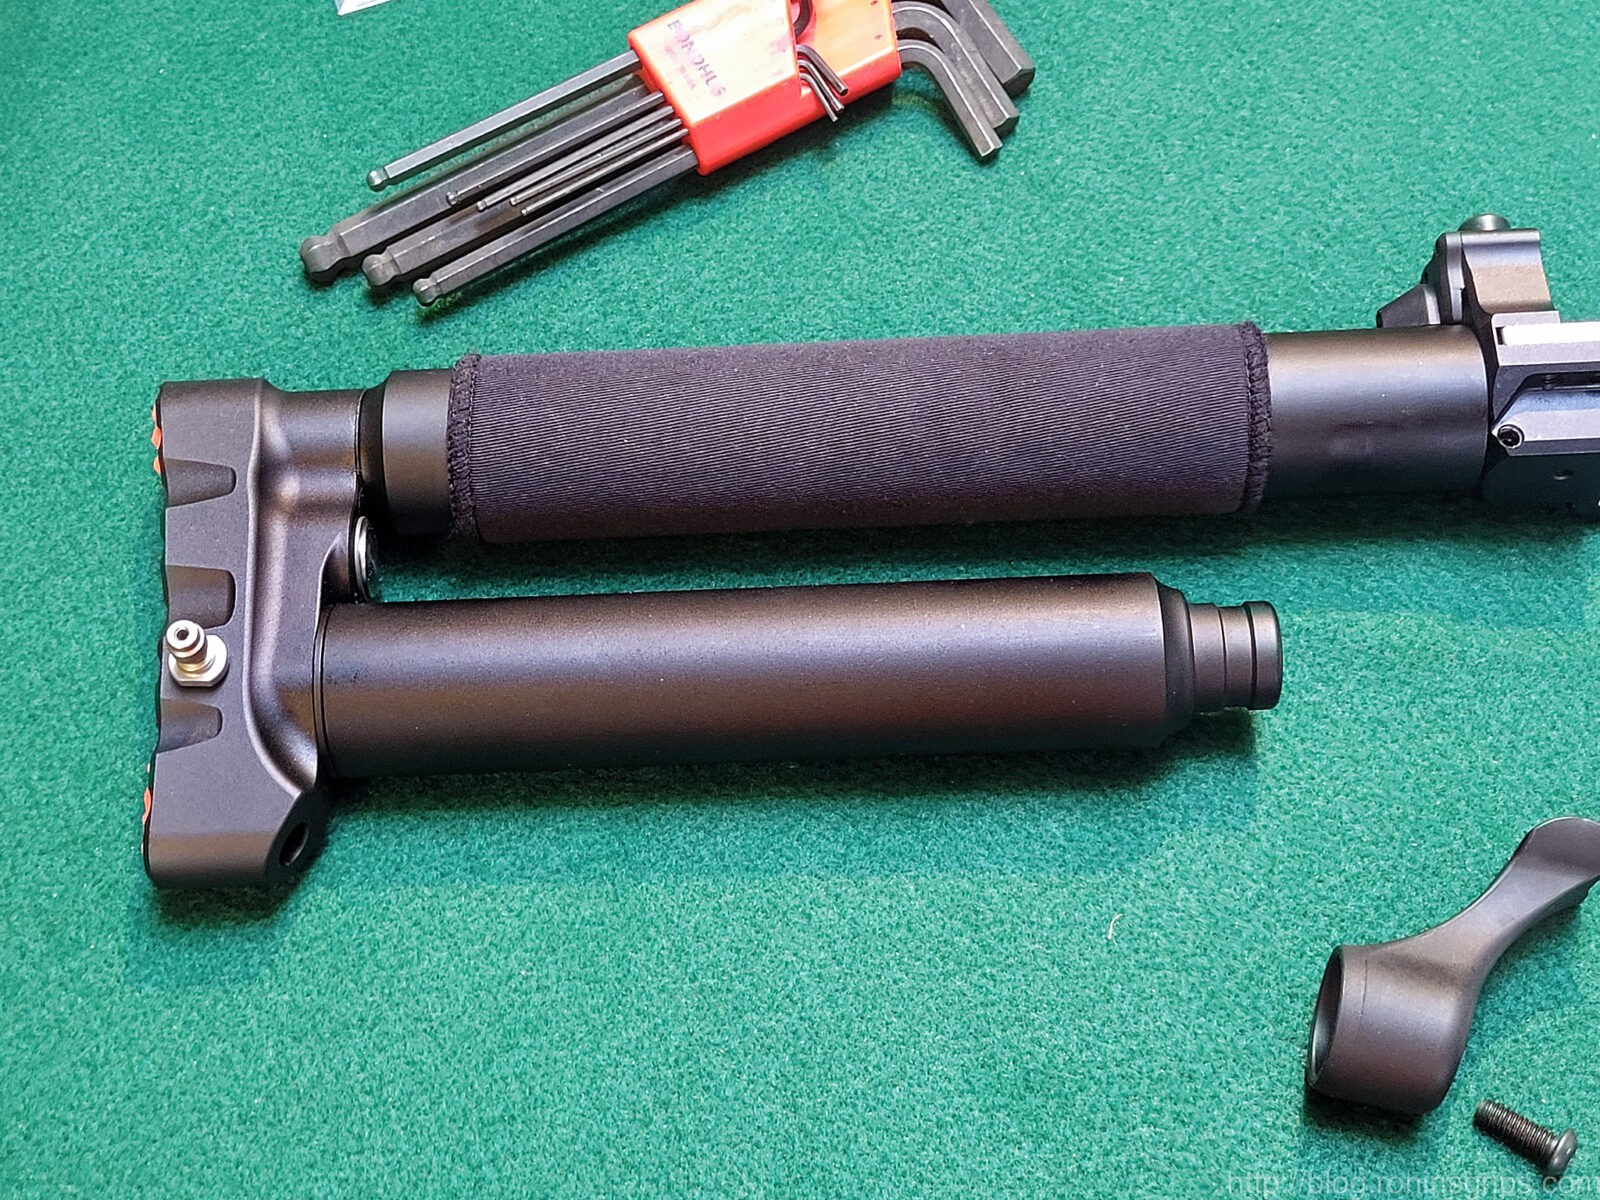
Next is to insert the fill probe into its respective hole. This will prevent internal parts from turning when we remove the existing cylinder and install the new one. Do not forget this step – you need to make sure these internal parts are supported and stay properly aligned.
The existing air reservor came off by hand easily. If it doesn’t you first should confirm the cylinder is not pressurized.
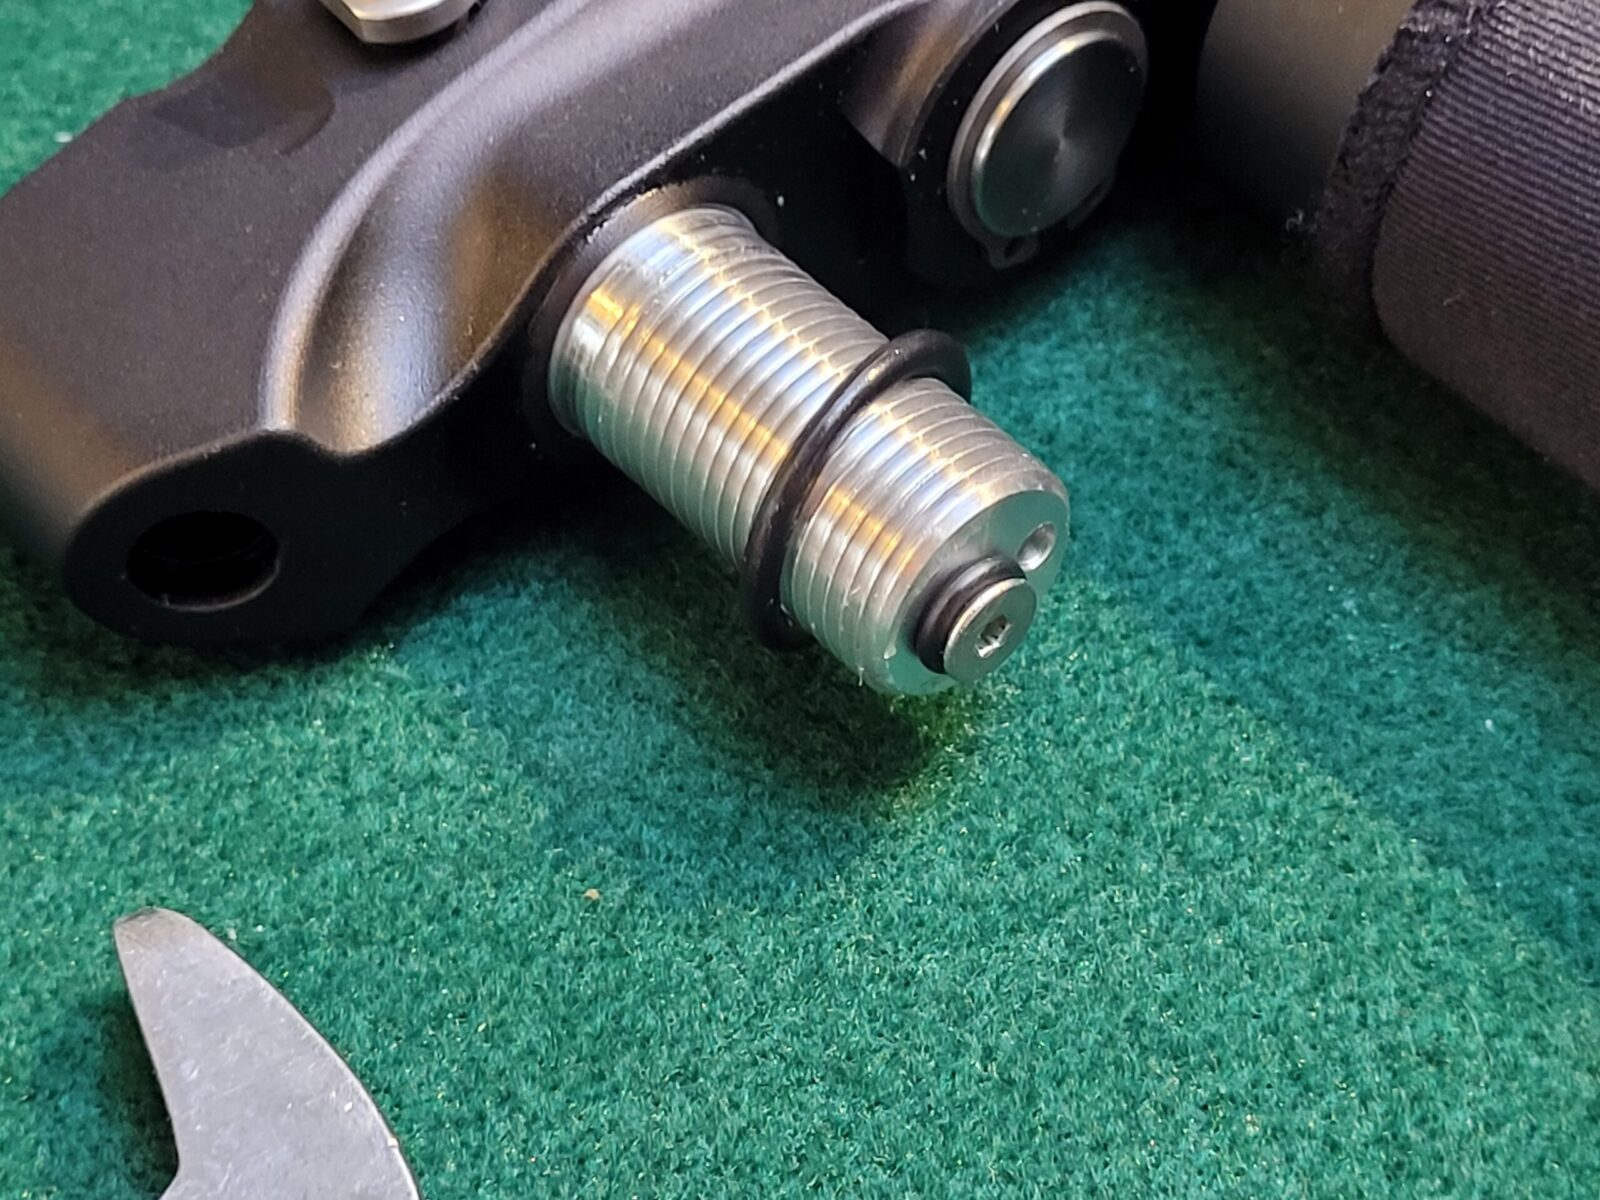
Ensure the fill probe is still installed. Use a 24mm wrench on the flat spots of the “fill tube coupling” to remove it.
Once the coupler is removed, you will see the threaded post the new carbon fiber bottle will screw on to. Make sure the O-ring that was under the coupler is still there. If you lose it or damage it, it is a M18x2.5 buna 70 o-ring. Buna is the type of rubber and 70 is the hardness – just FYI.
Thread the bottle on square – you want the threads to mate properly and not be cross-threaded. You are just going to hand tighten it. Note the fill probe is still there to keep things from turning and the o-ring is on the base of the thread.
That’s it. Everything is done by hand. The o-rings are sealing the mating surfaces so you don’t want, or need, to crush them.
Filling and Testing
I am very cautious and don’t make apologies for it. First, I put 100 bar of air pressure into the tank and watched the gauge for 30 minutes. Actually, I walked away, did other things and came back. The pressure didn’t change and the bottle looked okay – no cracks or bulges. I then added another 100 bar and did the same – it held and no visible defeects showing. I then went up to 300 bar and waited – again, it held and no visible problems.
Why do I do step up the pressure? I would rather know if there is a problem with the tank or o-rings before there is a ton if air pressure. You don’t need to be scared of the pressure but you should respect it. Never forget that.
I Installed the Athlon Helos BTR Gen 2 Scope
As I mentioned in the last post, the Athlon Midas Tac scope died and I ordered an Athlon Helos BTR Gen 2 4-20×50 scope. It arrived and I installed it.
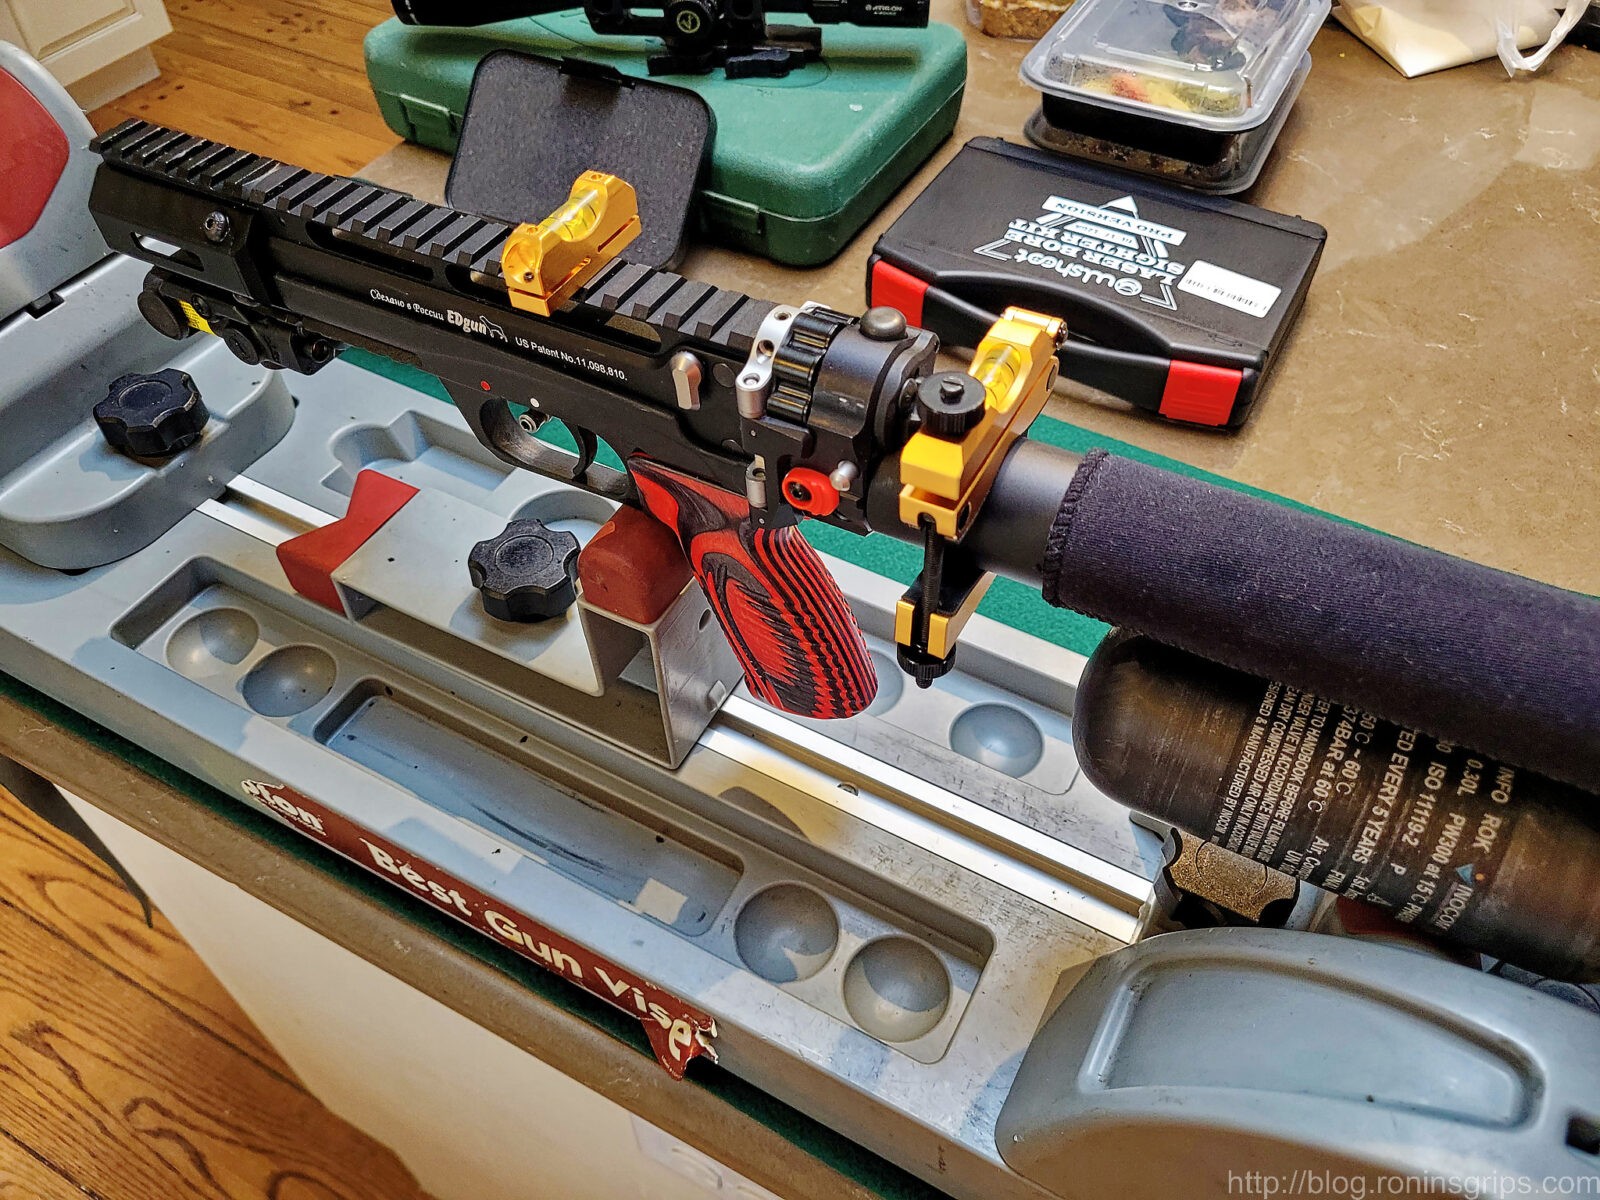
It was cold outside so I comandeered our kitchen island to install the scope. My wife was asleep so I got away with it. I’m used a Weaver reticle leveling system to level the rifle and then the scope.
I used the same American Defense AD-Recon-30-Std mount to hold the scope and more sighted it in.
Testing
I sighted the Leshiy 2 in using my JSB Diabolo Exact Jumbo Heavy 18.13gr pellets. This time around, it was awesome. I sighted in the scope at 12 yards and put pellet after pellet into dime sized groups comprised of 8 pellets per magazine. Wow!!
Photos
Okay, after sighting it in I needed to take some photos to show off the Leshiy 2 and here they are. If you click on one, the slide show mode will open and you can use the controls to move around.
Summary
The Leshiy 2 is really cool. I’ll do one more posts with observations affter six months and how the gun is configured at this time. I have no reservations recommending it, that’s for sure.
Note, I have to buy all of my parts – nothing here was paid for by sponsors, etc. I do make a small amount if you click on an ad and buy something but that is it. You’re getting my real opinion on stuff.
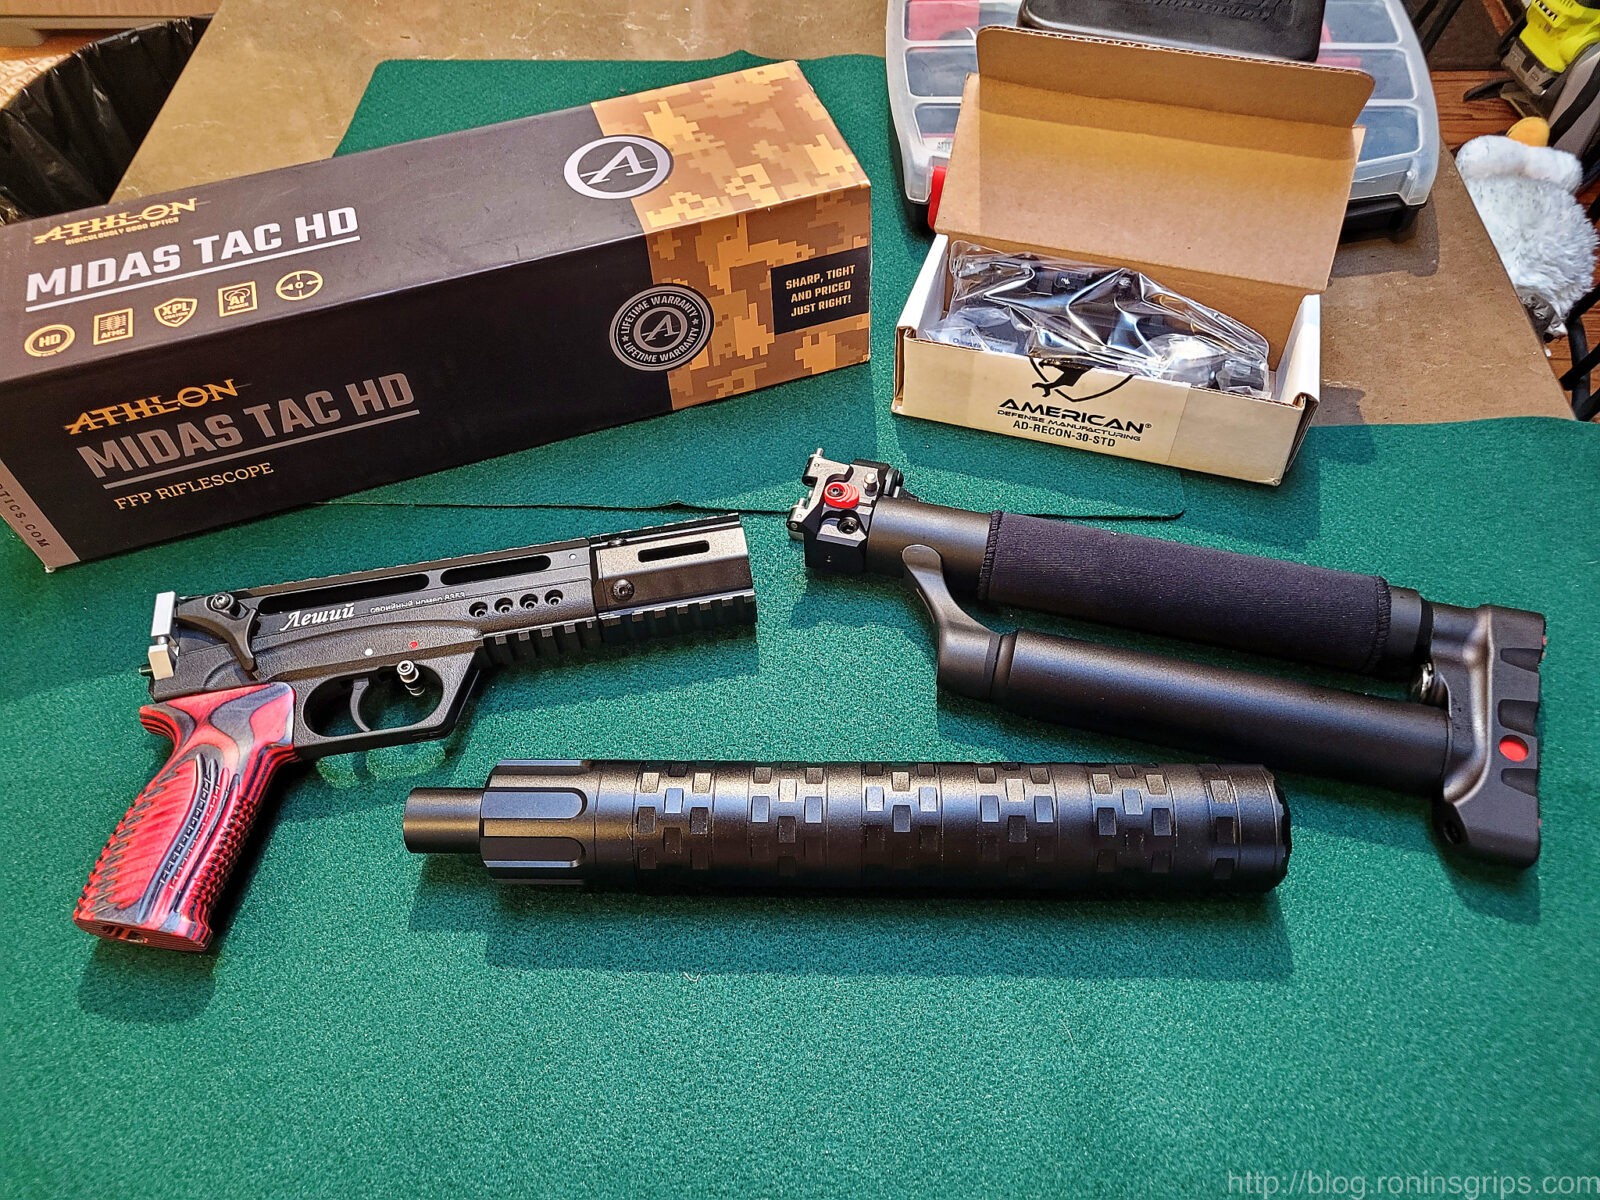
As mentioned in the last post, I had my various parts and it was time to start assembling them. In this post I’ll cover the Behemoth moderator and mounting the Athlon Midas Tac scope.
The Wolverine Short has a 250mm Walthar Lothar barrel. The four screws you see toward the front of the receiver are what holds it in place. Changing the barrel is just a matter of loosening those screws.
The Behemoth Moderator
Legal Disclaimer – I am not a lawyer and this is not legal advice. Airguns aren’t covered in the Gun Control Act (GCA) so they aren’t regulated and the moderators that go on them aren’t. The minute you try and put an airgun or paintball moderator on a firearm, the ATF will consider it a supressor, subject to the GCA and you will be in a lot of trouble for an NFA violation. So, whatever you do, don’t do anything or have anything that will let you mount an airgun moderator on a firearm.
In talking with firearm people, the first thing they do when they see a moderator on an airgun is ask if it is a suppressor. Yes and No. Yes, they are designed to reduce the decibels and pitch of the high-velocity air to muffle the sound like a suppressor but they are specifically design for airguns.
You open up a moderator and you will see materials that can’t handle the heat and pressure of a firearm on purpose. For example, a Behemoth moderator uses felt inside – you don’t see exotic metals. They also use a different thread pattern to mount intentionally. A .22 firearm will likely be threaded 1/2-28 and an airgun is 1/2-20. In the case of a Leshiy 2, the thread is M14x1.25.
In short, at this time, we can run moderators on airguns and I am glad we can because I don’t want loud noises to scare the pests or any people who might wonder what the relatively loud “crack” sound is when I shoot. Note, if you aren’t familiar with precharged pneumatic (PCP) rifles, they can really bark. In general, the larger the caliber the louder they are.
Tucked in the handguard is the trilug adapter for mounting the Behemoth.
I run a Behemoth Trilug with extra baffles on the FX Impact Compact Mk II in .25 caliber and it has stunning noise reduction. I bought one for my Hatsan Jet II and was surprised that it didn’t reduce the noise as much so I went with a Huggett Standard Snipe and really like it. So, that’s how I wound up with a spare Behemoth sitting around.
I bought some spare baffles, which you can do as the Behemoth is modular, and started with four to see how it did for sound reduction.
Adding bagFFes is just a matter of unscrewing the Behemoth in the middle, putting a light bit of silicone grease on the new section’s o-ring and screwing it together. The cream color you see in the moderator sections is felt – this was designed for airguns.
If you are thinking that looks really long – it was really long. I was hoping to have it as quiet as possible so I sacrificed my hope for it to be really short. Given a choice. I’d opt for longer but quieter.
Mounting the Scope
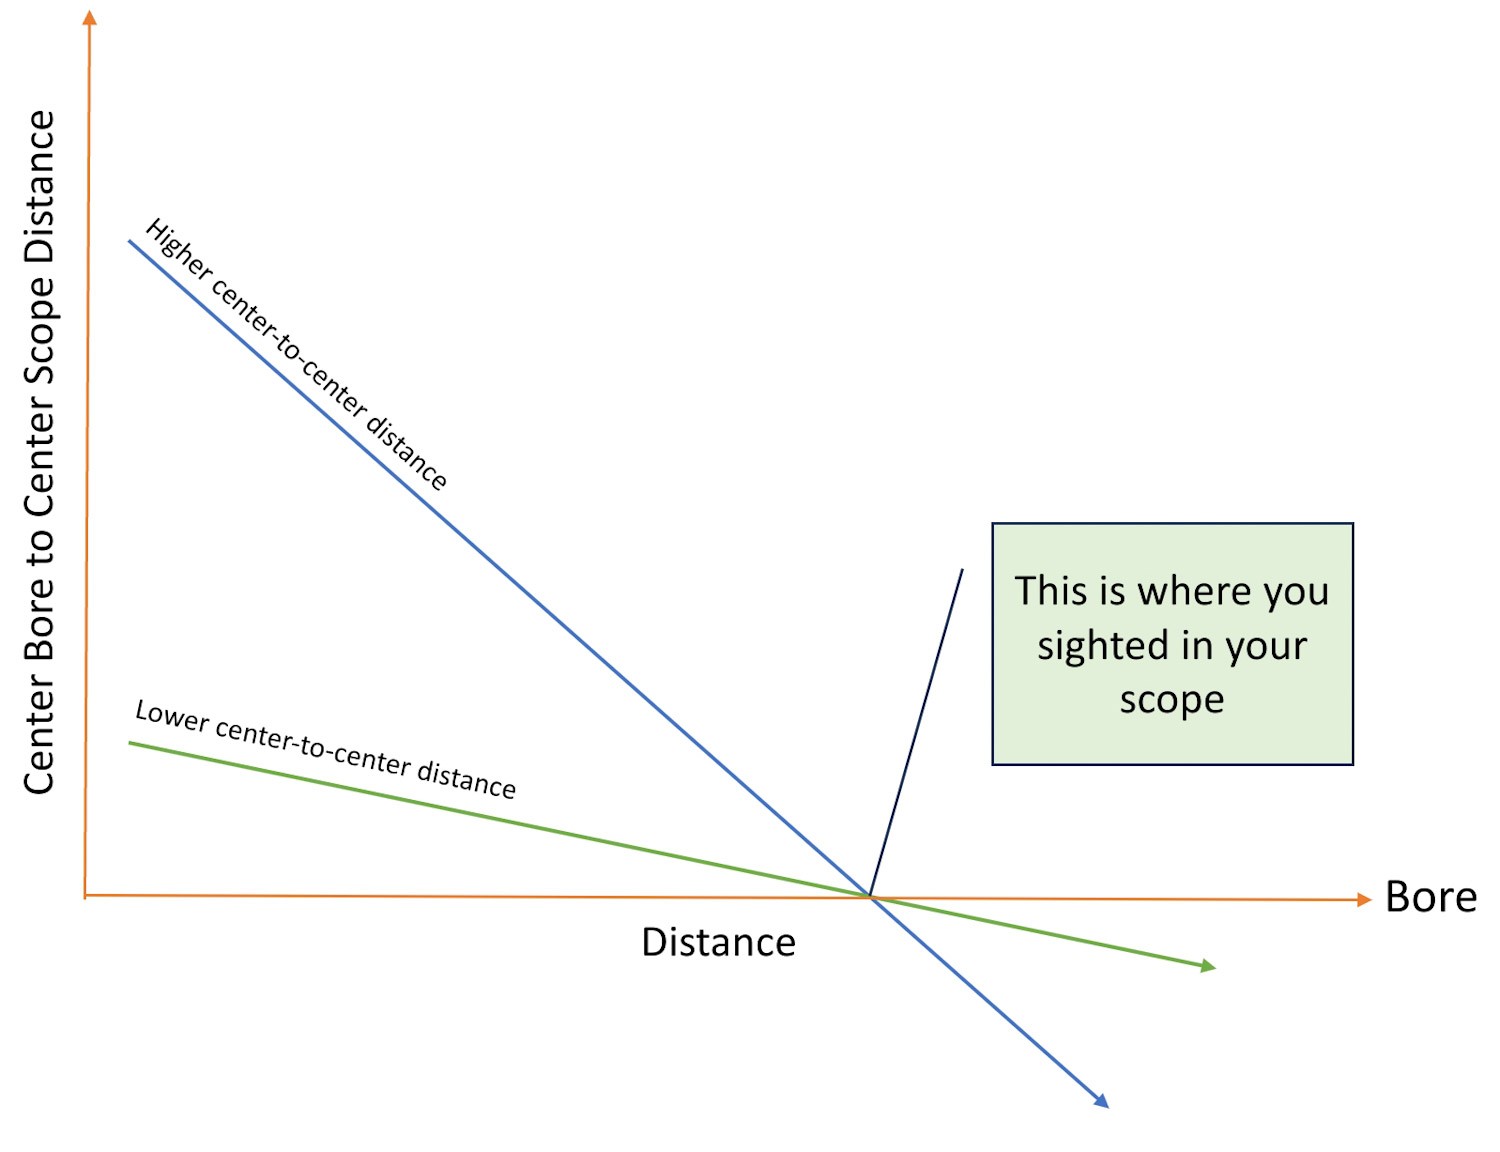
When I buy rings or a scope mount, I buy the lowest option I can. I don’t like to have large distance from the center of the barrel’s bore to the center of the scope as that increases parallax and the amount of the point of impact will shift if the target moves closer or further away from the distance the scope was sighted in at.
This is to illustrate the difference between mounting a scope higher vs. lower. So the top blue line is a scope that is mounted further away than the lower scope symbolized with the green line. Look where the lines cross to the right this is where both scopes are sighted in at. Now look to the left and to the right and the gap between the bottom orange line – the change in point of impact is more dramatic for the scope that is mounted higher. Yeah, I’ll never get awards for my drawings but what I want you to take away from this slide is that lower is better when mounting a scope unless you have a reason you need to go with higher mounts such as clearing a rifle’s action, you want to see through the rings or shooting extremely long distances just to name a few.
With that said, I bought my American defense mount with a flat rifle top in mind and the objective lens housing clearing the top of the Leshiy 2. Now, with the Leshiy 2, I figured my mount as though the top were flat, such as with an AR. The way you determine the height of rings you need for a flat top is to get the diameter of the widest part of your scope – often times that is the objective at the front. Let’s say it measures 2.25″. We take half of that and we get 1.125″. Now rings measure from the center of the scope because most rings and mounts crade half of the optic in the lower portion. We need a ring or a mount just greater than 1.1″. Now if you plan to put a lens cap or something else that adds to the diameter, you need to increase accordingly. If you have a rifle where the barrel tapers down away from the receiver, you factor that in also.
The American Defense AD-Recon-30-Std mount raises the scope 1.472 inches – plenty for the scope with a diameter of 2.25″ that has a half-size of 1.125″. American Defense mounts are my preferred mounts hand down. Quality machining and finishing. The things are just rock solid.
Next, I loosely insert the scope in the mount so I can do some testing in terms of front-to-back positioning to get an eye relief that I like. The eye relief of a scope is how far your pupil is from the glass to get the correct sight picture. I like the scope to be placed so that when I shoulder the rifle, the optic is at the ideal location naturally and I don’t have to move my head forward and backward.
I loosely install the scope in the mount and then experiment shouldering the rifle to determine the placement of the mount and where the scope sits in the rings. The rings are snug enough to hold the scope but still let me move it.
I then put the rifle in my Tipton gun vise, leveled the rifle by placing a level on the picatinny rail of the Leshiy 2. I adjusted it until it was true. I then put a second level on the top scope cap and leveled the scope. The goal was to keep the Leshiy 2 level, the scope level and then confirm by looking through the scope that the reticle appeared true with the rifle – it did.
Lastly, I use a laser boresight to initially zero the scope. Since my desired zero was 12 yards, I used the laser boresight to adjust the elevation and windage of the scope accordingly. I do like laser boresights – in general they at least get you on the paper. Please note, there are and incredible number of variables thaat can and will affect where your pellets actually yet. A boresiht just gets you in the ballpark. You will still need to actually shoot the rifle and do the final dialing in of the scope.
Laser boresights can save you time and headaches by helping you initially dial in the reticle. The boresight projects a laser straight-ish ahead – just how straight it is depends on a number of factors but it tends to be in the ballpark. You project the laser and an object the desired distance away and adjust your elevation (up and down) and windage (left and right) scope knobs accordingly.
First Testing
Filling the Leshiy 2 with my GX CS4 compressor. The Edgun fill probe goes in a port near the end of the buttstock. The red circle you see at the rear is a cover that that is integral with the stock that rotates out of the way. The Leshiy 2 is sitting on a Savior case.
Okay, I used my GX CS4 compressor [click here to see all the posts I did about the compressor] to fill the Leshiy 2 and was super excited. I loaded it up with my favorite JSB Diabolo Exact Heavy 18.13 grain pellets, set up the range, started shooting and dialing in the scope … and the Athlon Midas scope broke within the first 10-15 shots – I was pissed. I was adjusting elevation and windage and all of a sudden a pellet went way off from the cross hairs, then so did another and so forth. No matter what I did, the reticle wouldn’t dial in. I guess the reticle had somehow become disconnected from the adjustment screws inside the scope. Argh!!
I’d only had the scope a short time. I ordered it on February 17th and returned it on February 27th. That same day I bought an Athlon Helos BTR Gen 2 4-20×50. I seriously thought about dropping the Athlon experiment but read good things about the Helos BTR and went that route with “Once more into the breach dear friends” echoing in my head.
The Midas experience wasn’t good but guess what? I really like the Helos. It’s clear and has held zero with countless magnification changes over the months.
Changing topics, the one thing that kind of surprised me was that there was more noise than I expected. The Behemoth on my .25 FX Impact Compact was stunningly quiet. It dawned on me that I was hearing the air venting as the Leshiy 2 cycled the action. It was something that I would need to test more.
Summary
The Leshiy 2 was coming together nicely. To be clear, I never contacted Athlon about the dead Midas. I wanted it dealt with fast so I just did a return through Amazon and bought the Helos BTR Gen 2 scope.
The Behemoth Trilug did not perform the way I expected at all and I had four expansion modules in it total. The sound reduction is ok – just not as much as I had hoped for especially given how long it was. I did change to a DonnyFL Ronin eventually but for a different reason that I will tell you in another post.
In the next post, I’ll tell you about upgrading the onboard air reservoir to a carbon fiber tank.
Note, I have to buy all of my parts – nothing here was paid for by sponsors, etc. I do make a small amount if you click on an ad and buy something but that is it. You’re getting my real opinion on stuff.
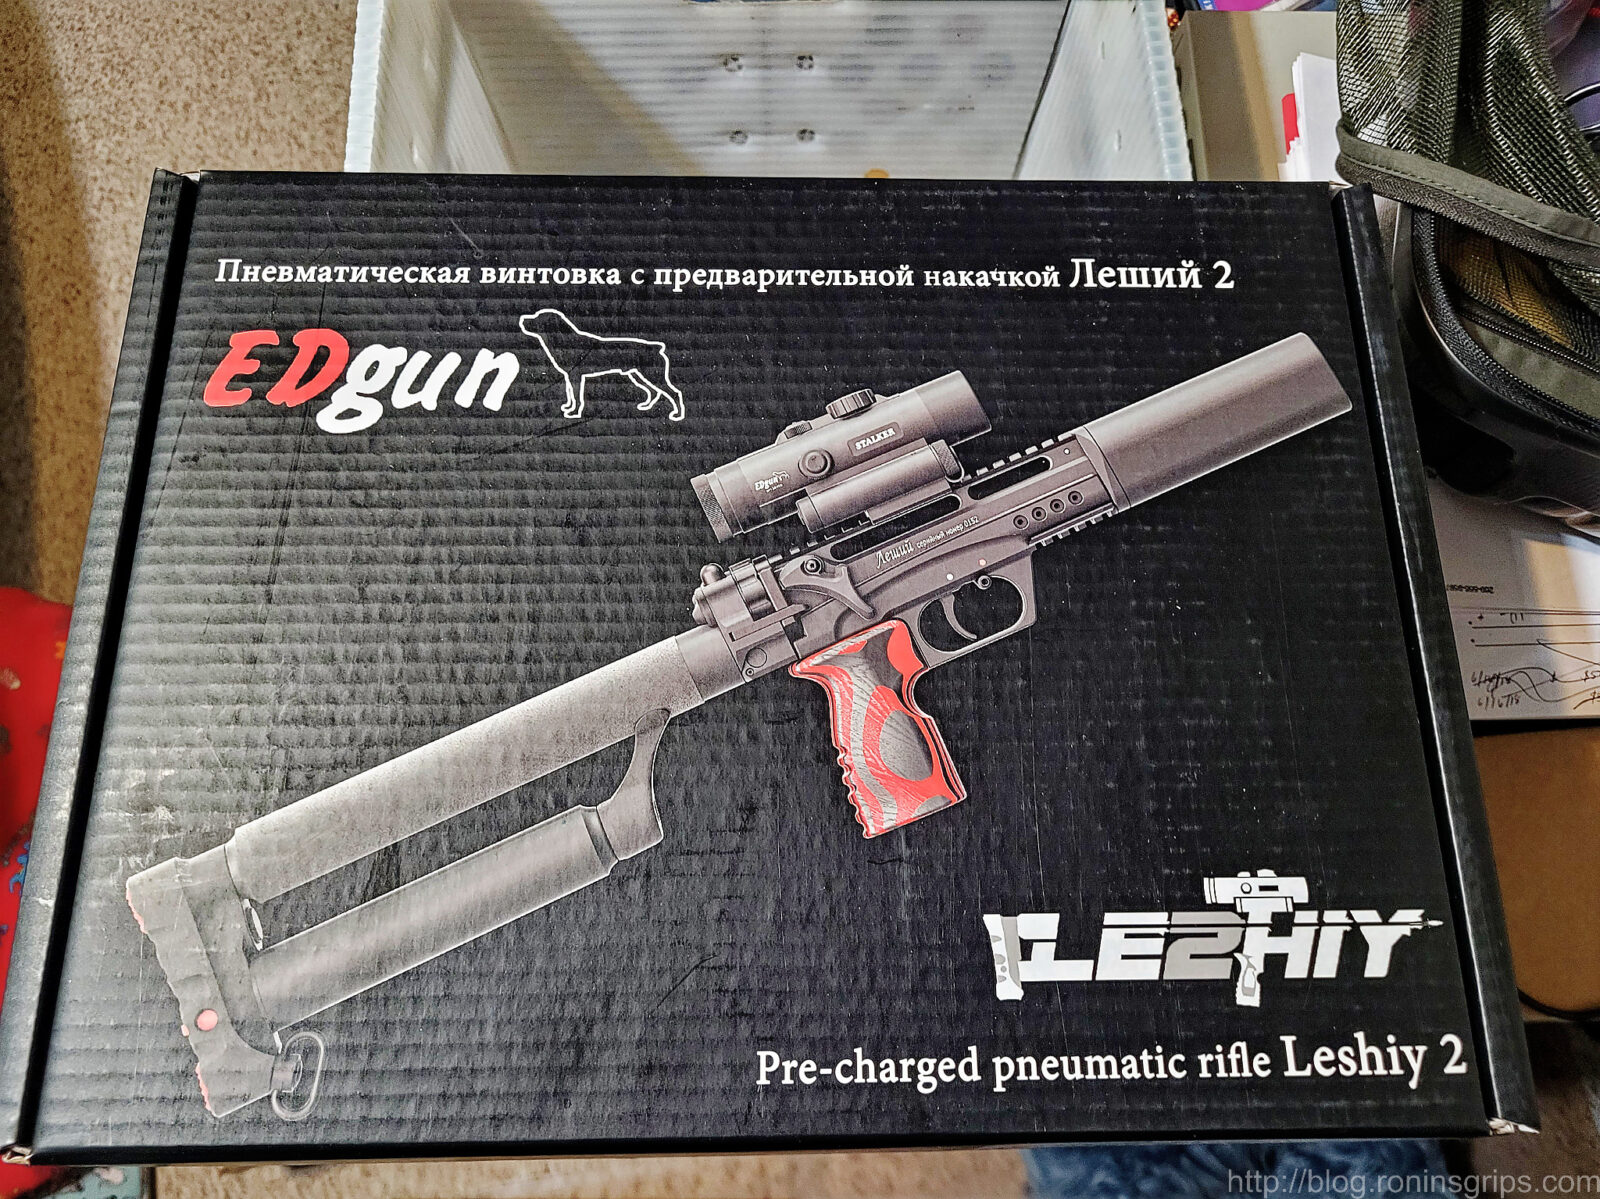
Folks, in February 2023, I bought an EdGun Leshiy 2 Short Wolverine (REPR) from EdGun West. For those of you not familiar with it, the Leshiy 2 is a semi-automatic precharged pneumatic (PCP) airgun. I can sum up my feelings about it having used it for six months now in one word – “wow!” Now bear in mind, I had to buy this so you are going to get an honest review here.
I bought it for pest control with fast follow up shots in mind. When I went from single-shot pellet guns to bult-action with a magazine, that was an amazing improvement. Semi-auto thought, that’s a whole new game – your eye doesn’t even have to leave the scope and the follow-up shot is just a matter of pulling the trigger.
The Leshiy 2 is pricey but it has some amazing engineering in it and is built very nicely. Is it worth it – I’m going to say “Yes” at this point butt we need to view it as a tool and as such it excels at certain use cases but not others. So, what I want to do is to share my experiences for the last six months.
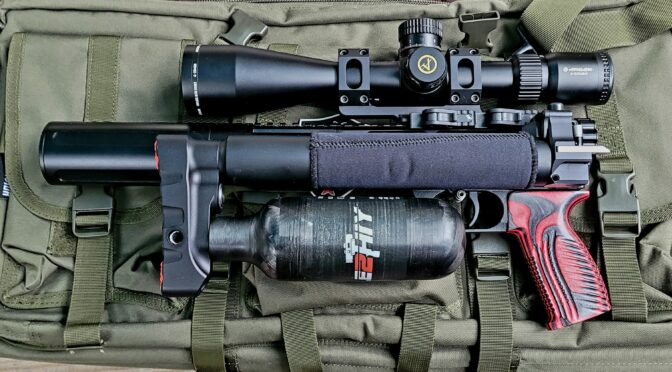
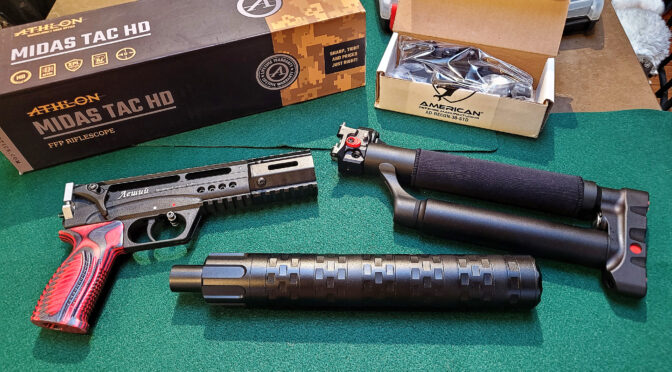
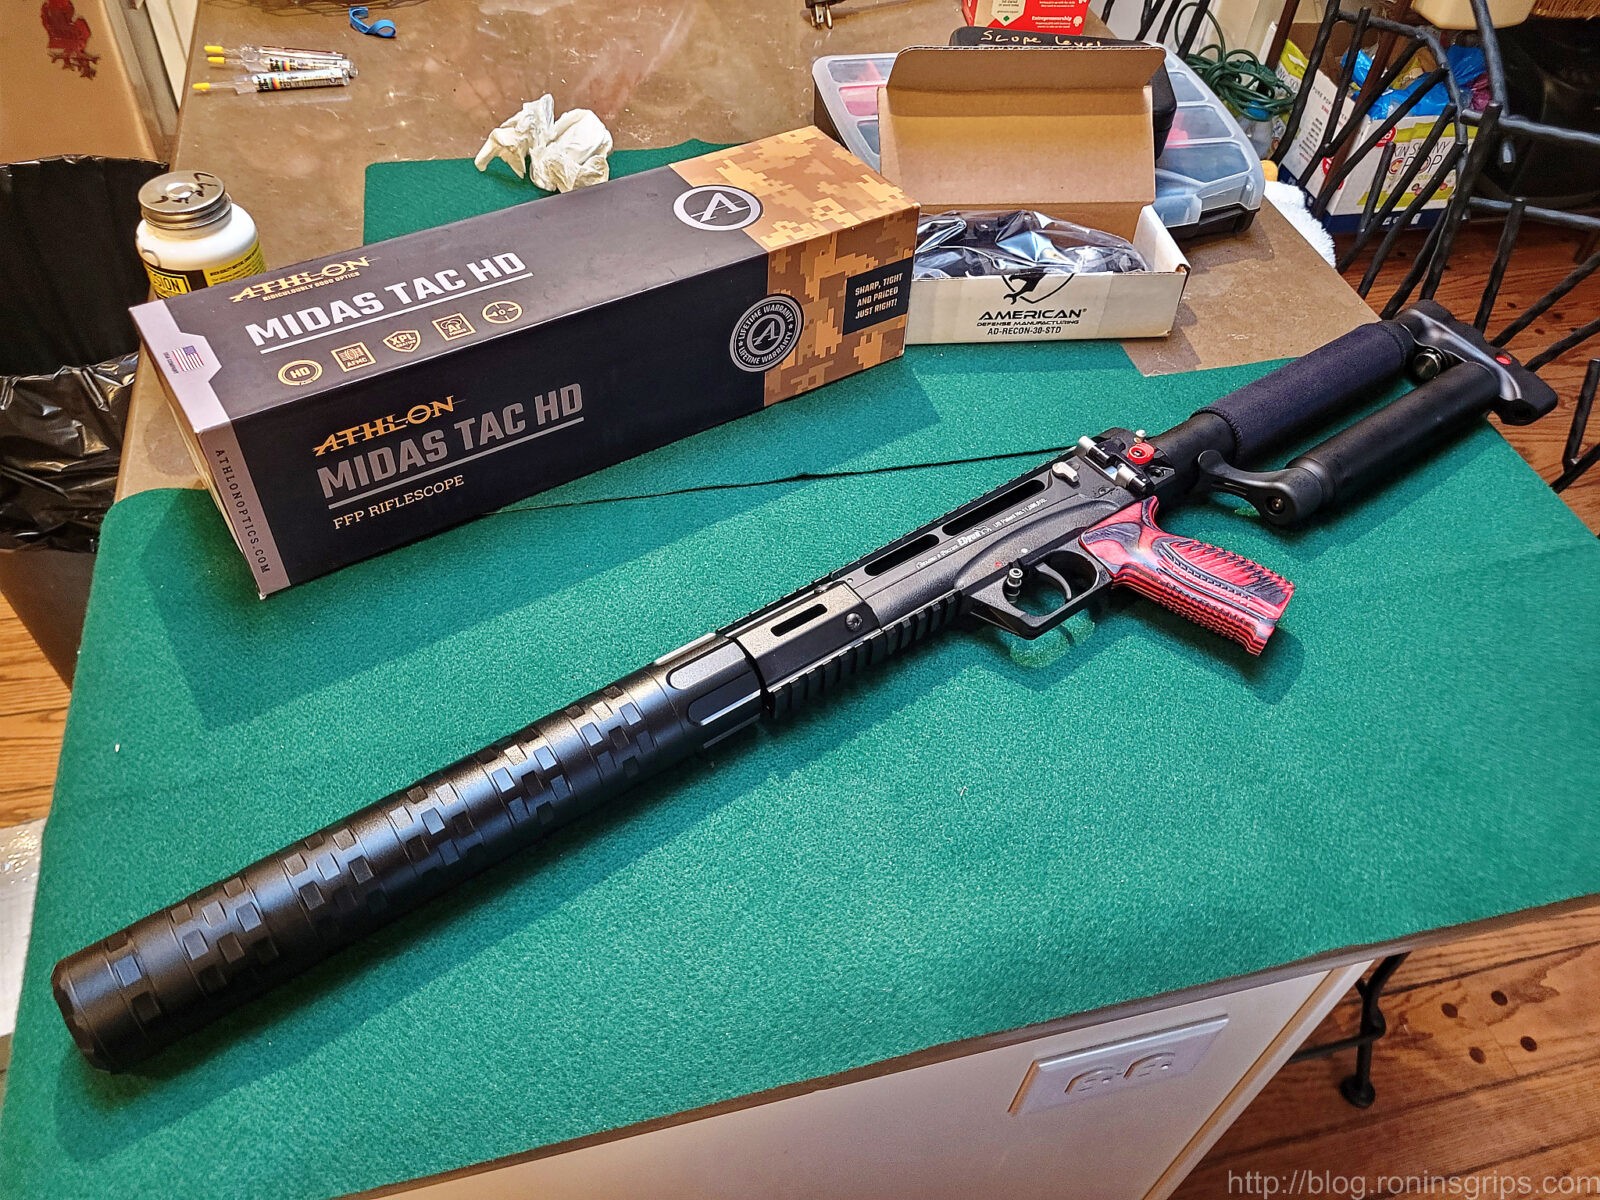
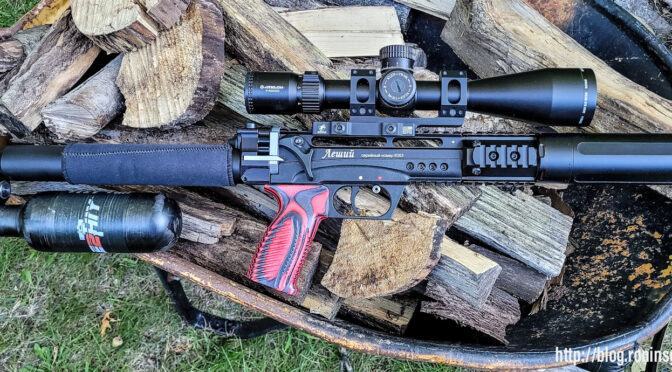
What you are looking at is an Edgun Leshiy 2 Wolverine Short with a REPR valvle. That means it has a 250mm (9.3 inch) barrel, an upgraded Edgun Carbon Fiber air tank, DonnyFL Ronin airgun moderator, ADM scope mount and an Athlon Helos BTR Gen2 4-20×50 Mil-Dot scope. How I arrived at this current configuration has a story that I will share over the next few posts.
Some Background On The Leshiy 2
The airgun company “Edgun” was founded by Eduard Gafarov in Russia in 2005. His designs are unconventional and very interesting to say the least. I’ll let you Google some of his other airguns – I want to focus this article on the Leshiy 2.
The word “Leshiy” refers to a male forest spirit from pagan Russian mythology. Literally “He from the forest”. Wikipedia has more if you want to open tab to read more.
This is actually the second generation of the Leshiy. The first, which is still availble as the Leshiy Classic, is a single shot model. I first heard about the Leshiy 2 in 2021 when I was searching for a new pest control airgun and bought a FX Impact Mk. II Compact. At the time, I went with the FX because it was more affordable and I was a little bit leery of the relatively new Leshiy 2 design.
What Was My Use Case?
No tool, no firearm, no knife, no airgun does everything. You must think about your intended use – what engineers call the “use case”. You want to thing this through to aid you in your selection. If you don’t you risk buying something that doesn’t meet your needs.
For me and pest control, I needed the airgun to be:
Quiet – this was for residential pest control and I needed the sound signature to be as low as possible so the muzzle needed to be threaded and the bore reputed to be true to the threads and vice versa. Barrels that do not have their bores centered in their barrels will risk shooting their moderator resulting in poor accuracy and damage.
Compact – small enough to not attract attention and be maneuverable
Accurate within 100 feet almost always – it’s very rare that I shoot further and the bulk are between 30-60 feet. I needed dime sized groups or less within 25 feet.
Regulated – I’ve owned airguns both with and without regulators. If you want accuracy and consistency, then you really need a regulator that keeps the pressure relatively constant until the pressure in the onboard tank dips below the relator’s set limit.
Semi-Auto – I wanted a fast follow up shot but didn’t want to worry about batteries. I just didn’t see the point of full-auto unless playing around and this was for work.
Magazine Fed – I wanted an airgun where the magazines could be replaced when empty. Not all airgun designs support this.
Reliable – I needed an airgun I could count on that wouldn’t be jamming constantly.
Air Capacity – I am busy so filling up an onboard tank or reservoir isn’t in the top 500 task list of things I need to do so I wanted it to go at least 30-40 rounds before I needed to refill it.
Stopping Power – the targeted pests were mainly tree squirrels and ground squirrels. Anything bigger and I will get out my .25 FX Impact. This was a big deal for me. I didn’t want the constant over penetration I encountered with my .25 but I was also fearful that .177 might not hit hard enough so I went back to .22 caliber for this one.
For me the first three are critical and I call them my QCA criteria – Quiet, Compact and Accurate. Unless I have have a use case that requires a 100 yard airgun, I will view QCA as mandatory table stakes. If an airgun doesn’t have those three then they are not in the running.
In reading and watching reviews, it appeared that the Leshiy 2 more than met my needs. Given the Leshiy 2’s modularity, I could change it as my needs change. If I decided I wanted a different length of barrel or caliber, I could change the set up.
I Decided To Buy One
At the time, there weren’t many vendors carrying the Leshiy 2 and I had a bunch of questions so I talked to Brian Meckler at Edgun West. He talked me through the options.
One thing though – I already had one of the Behemoth moderators so they had basically assembled one of their Leshiy 2 Short Wolverine models with the REPR valve but without the Behemoth. I made it almost 9 whole days until I decided I needed the larger carbon fiber air cylinder and a spare parts kit called “The Drivetrain”.
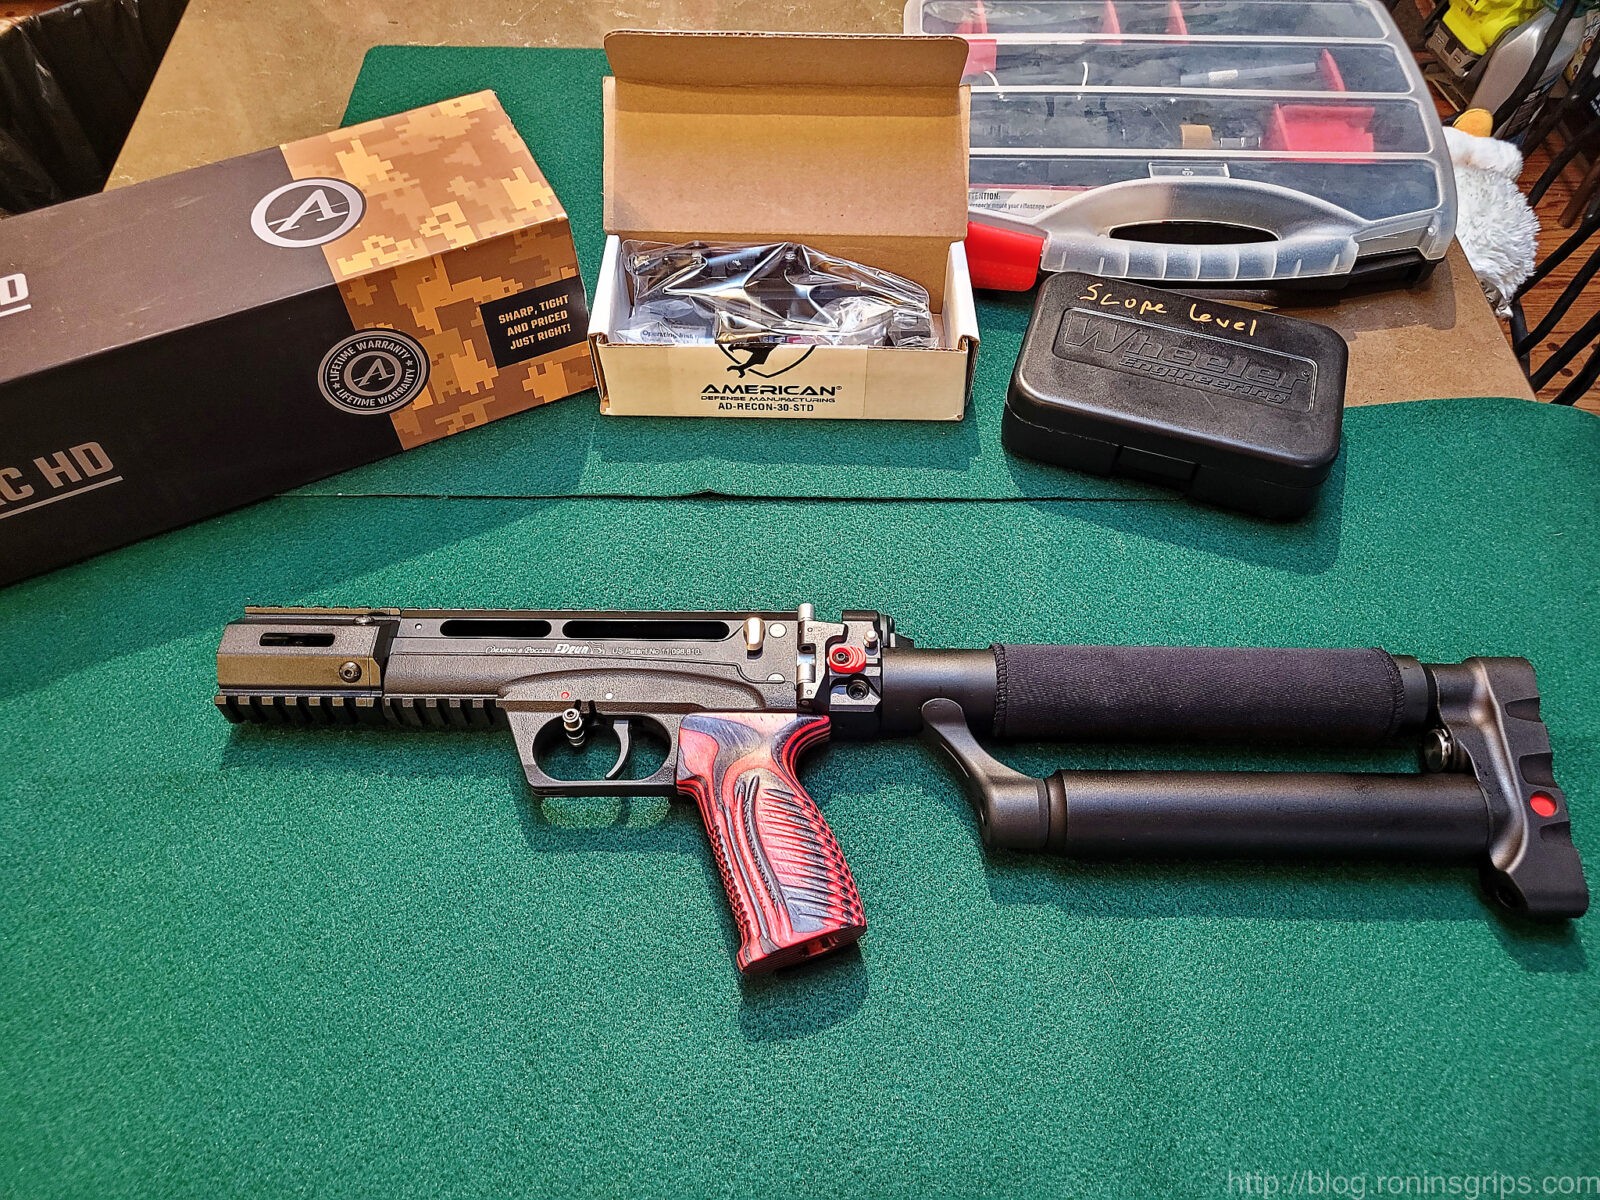
It comes in a surprising small compact box.
I’d also ordered in an American Defense AD-Recon-30-STD scope mount. Folks, I pretty much swear by American Defense now. Their mounts are solid as a rock, repeatable zero and the quick release levers are superb. Take an AD mount and put it side by side with a cheap one – you’ll see what I mean real quick.
As time has past, the best way I can describe it is that airgun scopes are kind of odd ducks. Guys using them are way, way closer to their targets than a firearm shooter, need an adjustable objective that goes down to 10 yard/10 meters, and has quite a bit of elevation adjustment. I also like having an illuminated reticle for shooting pests in low light. Lastly, we want a lot of magnification with clear glass to shoot at relatively small targets.
For an optic, I went out on a limb and tried a new brand – Athlon. I spent some time reading on the airgun forums and their Midas Tac HD 6-24×50 scope seemed to have the features that I wanted at a price I could afford – I bought it for $650 off Amazon.
Here are the partsa – front row – the Leshiy 2 receiver group, the Behemoth moderator under it and the rear stock and air reservoir assembly to the right. At the top, we have the Athlon Modas scope on the left and the American Defense rings on the right.
So, the big day arrived and I had all of the parts – the next post will get into assembly. Everything was going well up to this point and the next post will get into assembly.
I do want to share something a bit out of sequence with the story – the Midas Tac was dead on arrival butI didn’t find this out until testing. I’m mentioning this early because I don’t want somebody rushing out and buying a Midas after just reading the above. In digging deeper on the Athlon line, I read comparisons of the Midas vs the Helos BTR Gen 2. Thanks to Amazon customer service, I returned the Midas Tac and changed to an Athlon Helos BTR Gen 2 4-20×50 that I am happy with and am still running just over six months later.
Summary
Without a doubt, the Edgun Leshiy 2 is a novel airgun and one I like – I’ll tell you that right up front. I did learn a few things along the journey that I will share over the course of a few blog posts and the next one will be about assembling carbine.
Note, I have to buy all of my parts – nothing here was paid for by sponsors, etc. I do make a small amount if you click on an ad and buy something but that is it. You’re getting my real opinion on stuff.
If you are into precharged pneumatic (PCP) airguns and have bought a compressor – you need to also make sure you have a good inline filter. The reason is pretty simple, any compressor sucks in everything that is in the air including dust and moisture. You may not have stopped and though about it, but there are also impurities the are bonded to the water as well – sulfurs, acids, minerals, etc. You really need to filter the air before you pump it into your airgun or air cylinder.
If you are wondering why this is critical it is because your airguns use precise maching and a ton of O-rings. You don’t want contaminants to be introduced that cause premature wear or corrision of the aluminum surfaces. The cleaner your air supply is, all things being equal, the more reliable your airgun will be and the less maintenance required. Please note I am not saying this will make your o-rings and what not last forever – all airguns will require maintenance at some point and the most common need is to go though and replace the seals. Clean air will help them last longer than dirty air is all I am saying.
“But isn’t the oil & water separator in my air compressor enough?” is often asked and the answer is a resounding “No, it is not”. High pressure air is hot and as it expands and cools, condensation forms and this continues after the separator. Yes, the separator is better than nothing but it is not sufficient. What you need is a long filter made up of multiple elements.
Buying a Filter
First off, and I can’t stress this enough, you need a filter with a working pressure equal to or greater than your compressor. A high-pressure air (HPA) compressor has working pressures between 4-5,000 PSI these days so your filter must as well and they are specialized – these are not shop air compressors working at 150-250 PSI. One of those would explode.
Second, you need a long filter. When you go to Amazon or other sites you will notice there are short stubby filters that are 1.5-2.0″ long. I sometimes use them from the tank to the gun but I would not recommend them as the filter immediately after the compressor. They are better than nothing but they are too short and usually just have mesh or foam filter elements inside – no dessicant or carbon.
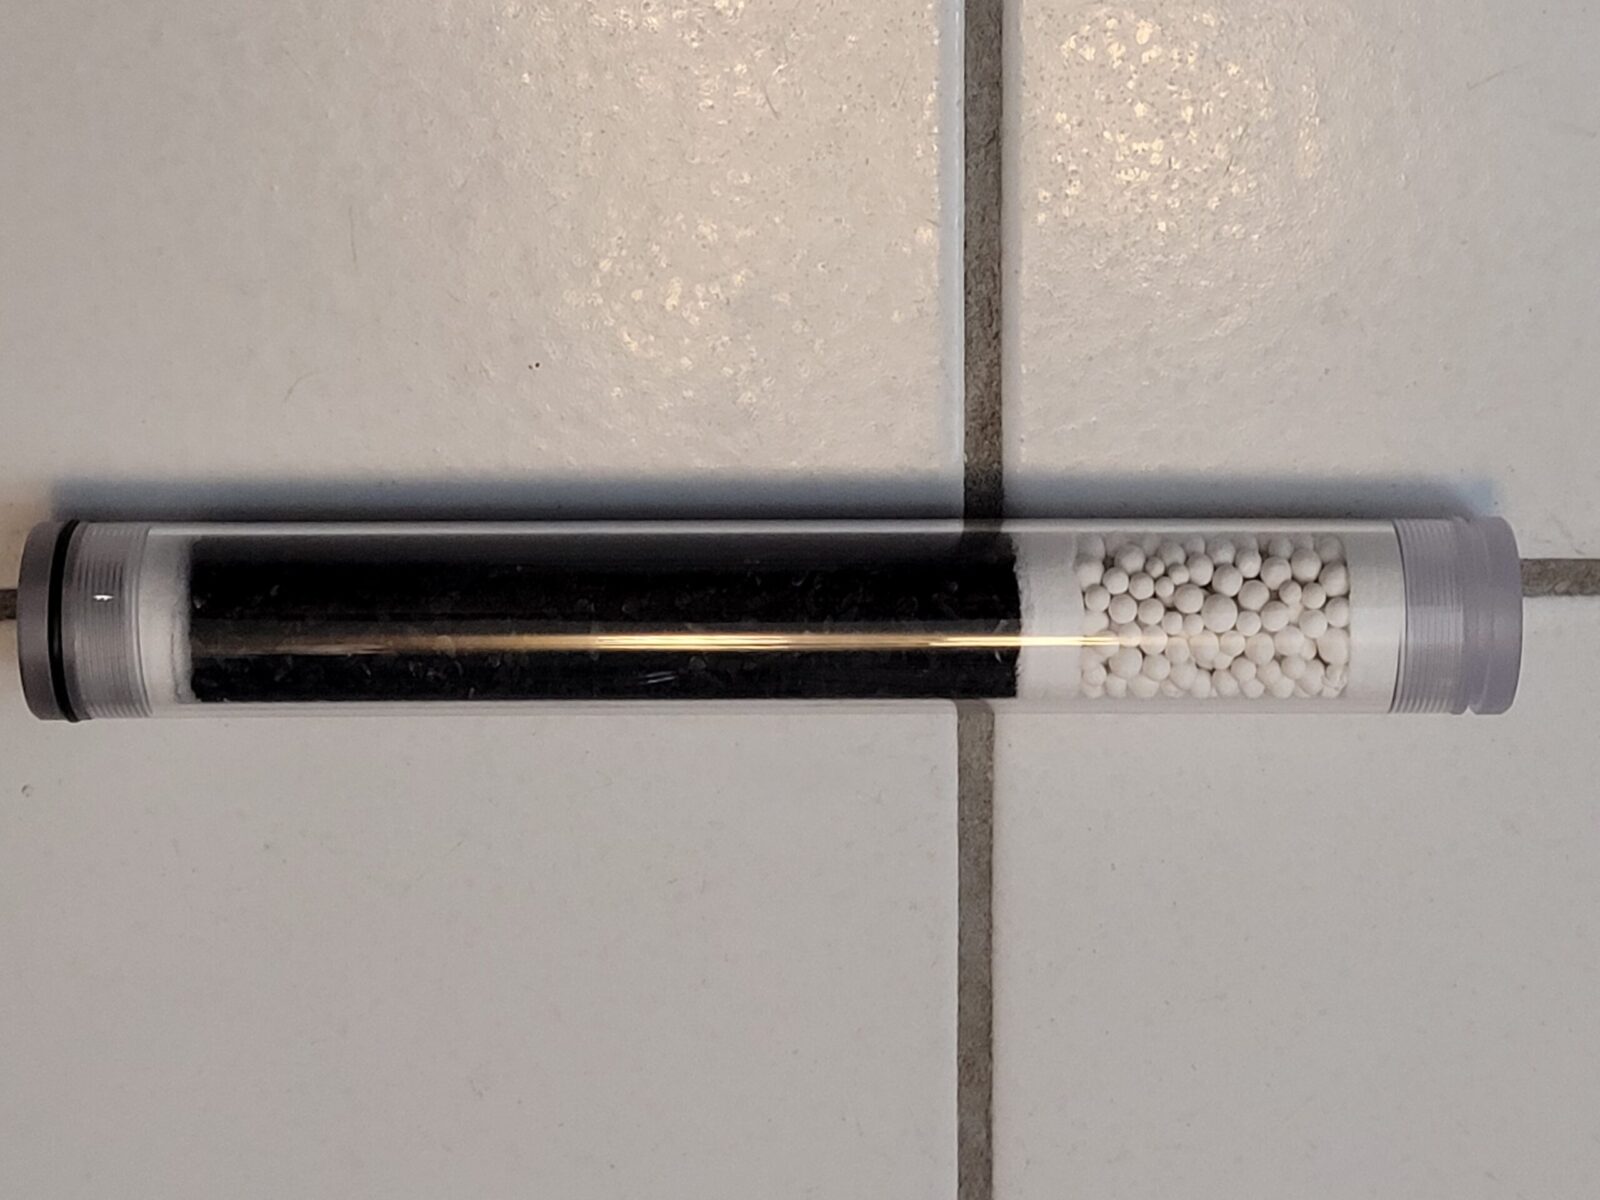
The ones I would recommend are 11.8″ (300mm) long and outside diameter of 1.9″ (50mm) at least. These filters tend to use replaceable cartridges that contain a mesh for particulants, a dessicant for drying the air and a carbon section for neutralizing chemicals that remain.
Air enters at the dessicant end (the white section) and moves towards the black carbon and out the end. There are mesh wafers at the ends and between the dessicant and carbon to trap particulants. The end caps of the filter unscrew and this cartridge can be pushed out and replaced with a new one as it becomes more and more discolored. If airflow stops or you notice fill times taking longer and longer, a plugged filter cartridge is your most likely culprit.This is my GX CS4 compressor and I am using the factory airline and its 8mm quick connect female fitting to connect to the filter’s male plug. The filter I am currently using and really like is sold on Amazon by “FASTTOBUY”. It’s very well made and you can buy additional filter cartridges. The brass colored nut you see on the surface of the left side’s end cap is the burst disc. A burst disc is designed to break first and let air leak vs. allowing the filter to exceed its safe operating pressure. From the filter, there is a Manloney brand air hose with an 8mm plug on one end and an extended length female fitting on the other.
If you read the captions, I really like my 300mmx50mm FASTTOBUY filter. It’s long enough for a fair amount of drying and cleaning to happen but also ins’t completely unwieldy either as I need to move my compressor around. I have toyed with running two filters in series as a first stage and a second stage and may try that some day but for now, I just run the one.
Summary
I can supply clean dry air to my PCP airguns at home with this set up. The FASTOBUY unit works and the fittings they used have worked with what I have so far. They also provide some spare parts including another filter cartridge.
Do you have to go with the one I am recommending? No, of course not. Just look for a long one that gets good reviews and you can get spare filter cartridges for.
What I am telliing you very directly is NOT to fill your airguns right off the air hose direct from the compressor. You need a filter to get rid of water and other contaminants before you fill your airgun or air cylinder.
Note, I have to buy all of my parts – nothing here was paid for by sponsors, etc. I do make a small amount if you click on an ad and buy something but that is it. You’re getting my real opinion on stuff.
FastToBuy 30Mpa Oil Water Filter – Not a GX product but I recommend this filter and you need one between the compressor and your tank or PCP airgun. You will need an extra hose from it to your tank or airgun plus the proper fittings.
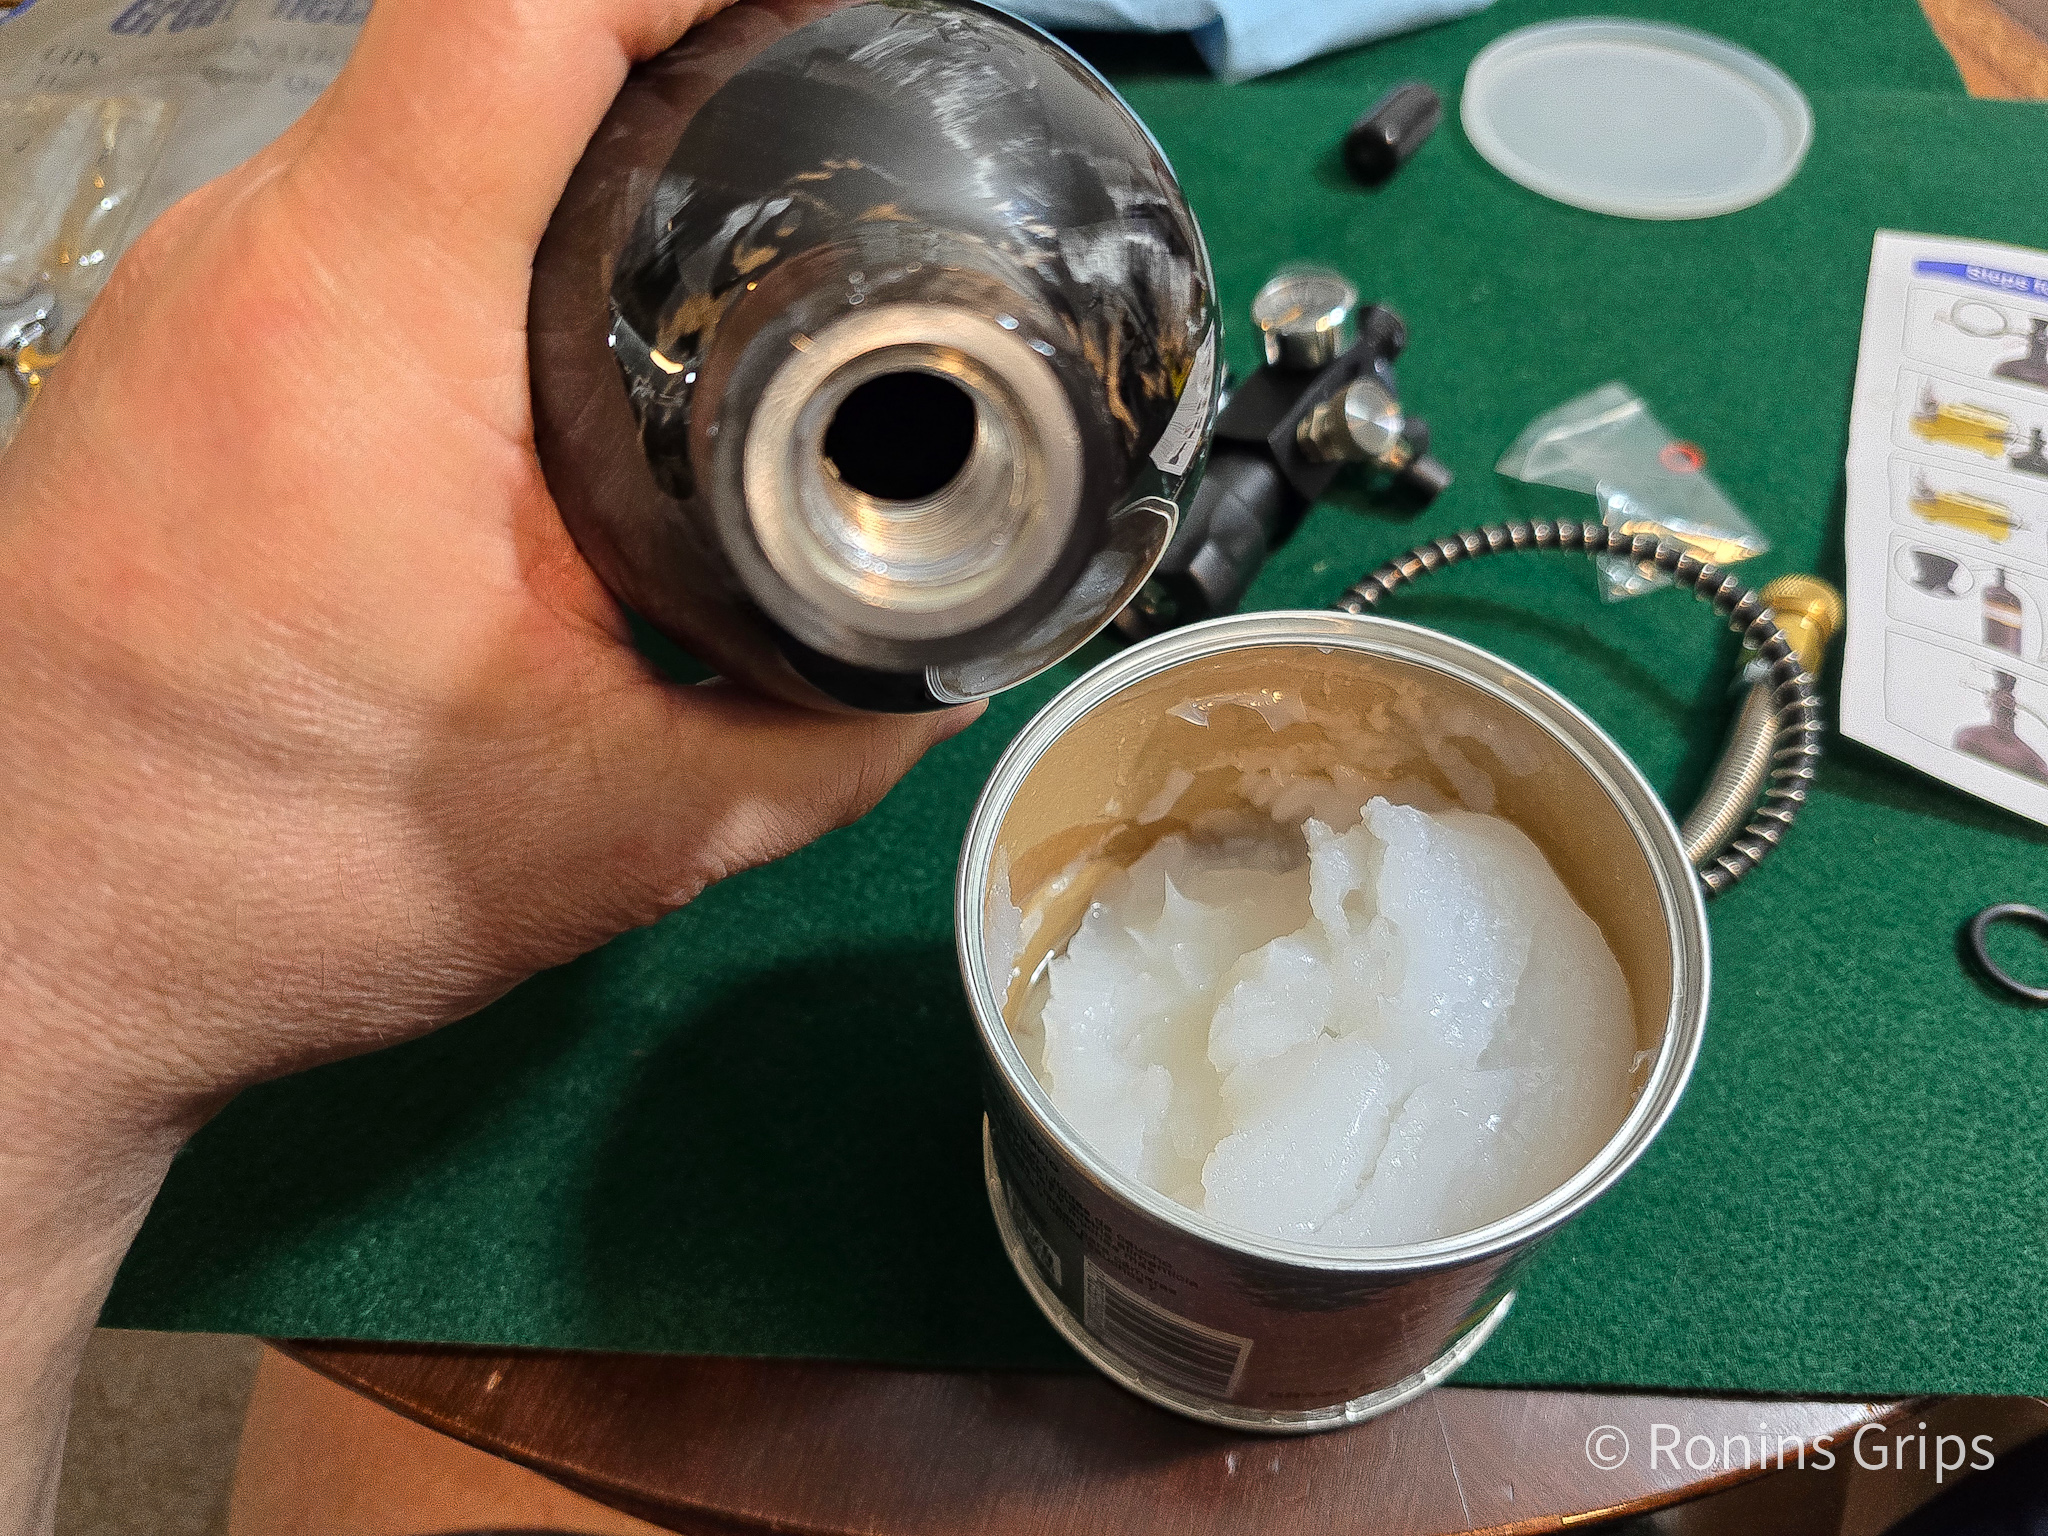
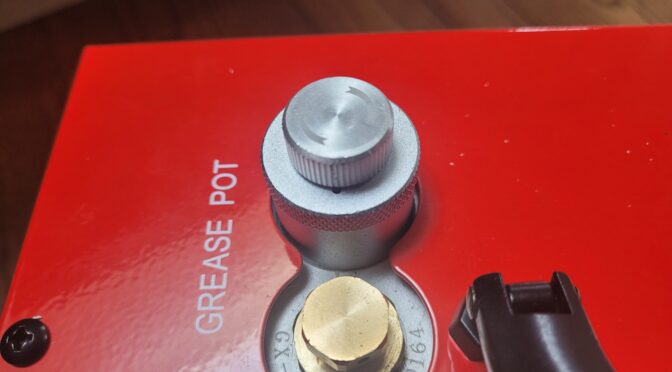
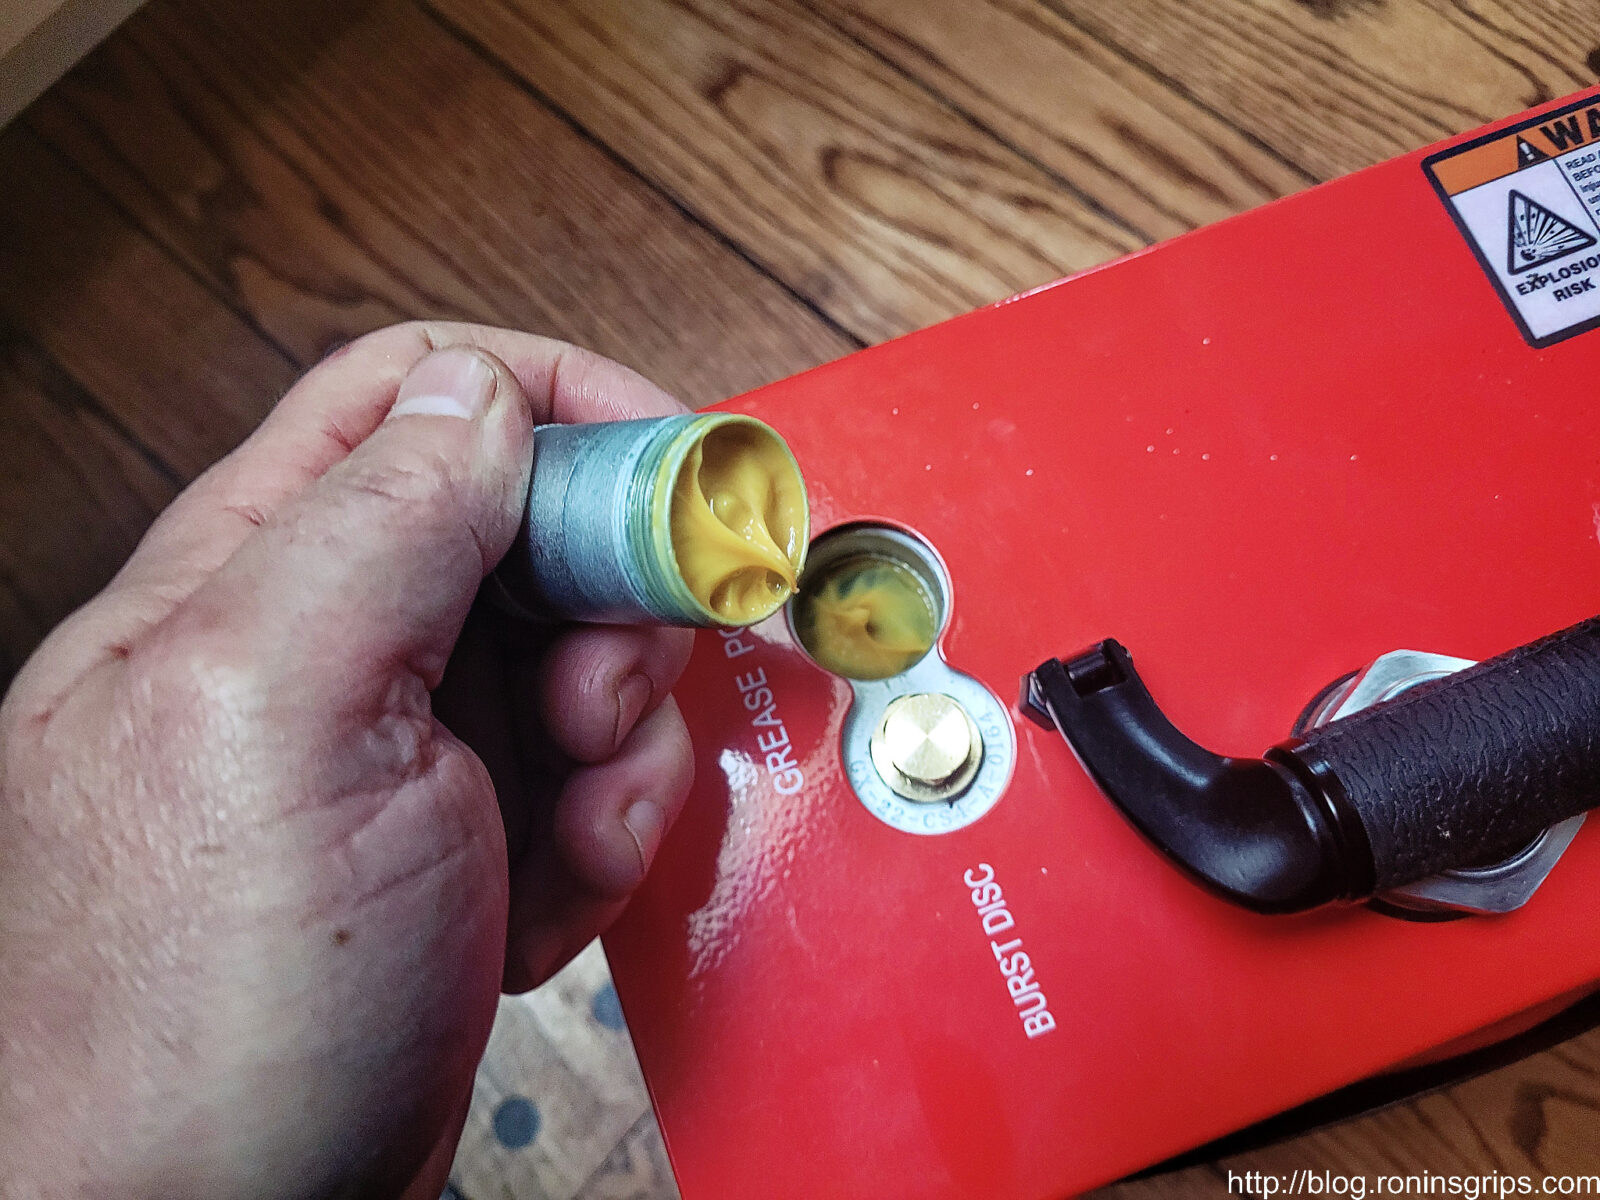
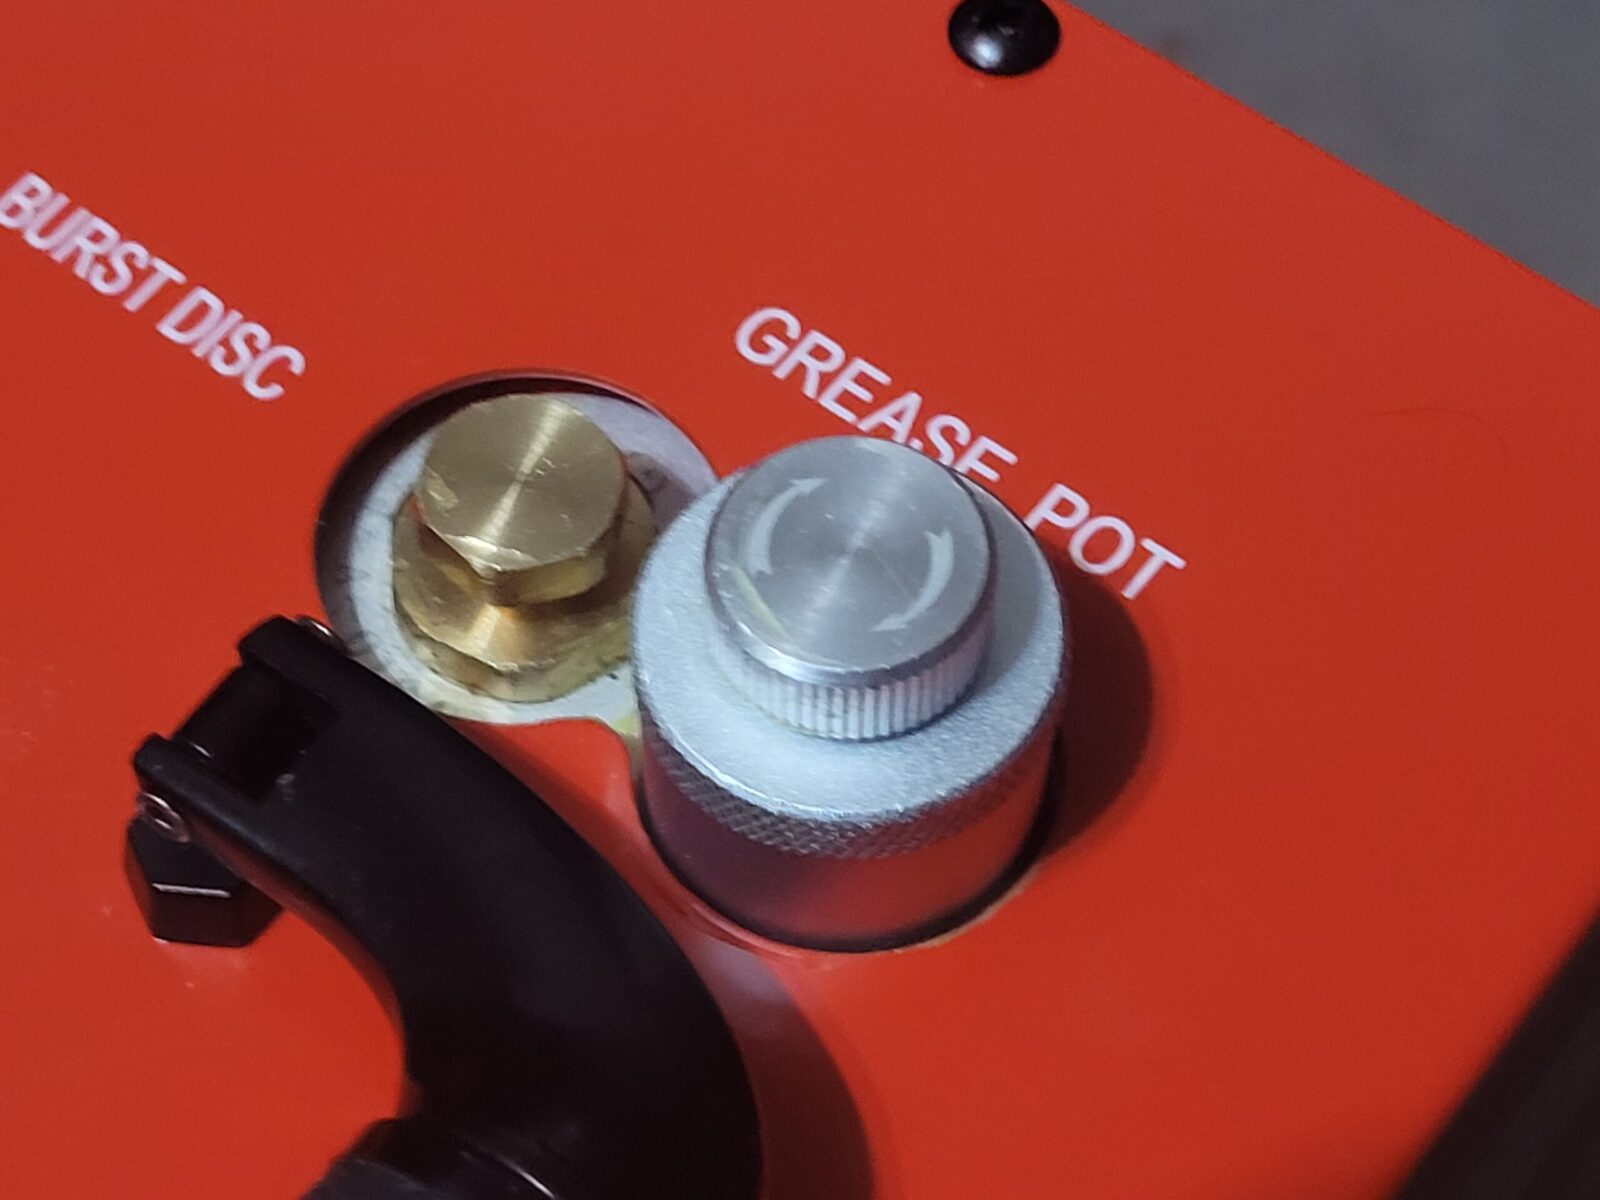
The GX CS4 is a very cool compressor and one of the two ways it gets the long run time is through staying properly greased. (The other is through the use of fluid coolant that I covered in a blog post about setting up and testing the unit). After 4-6 hours of compressing air with your GX CS4, you are supposed to given the top grease pot knob one full turn. How does that work and how does one refill it?
Adding Grease Every 4-6 Hours
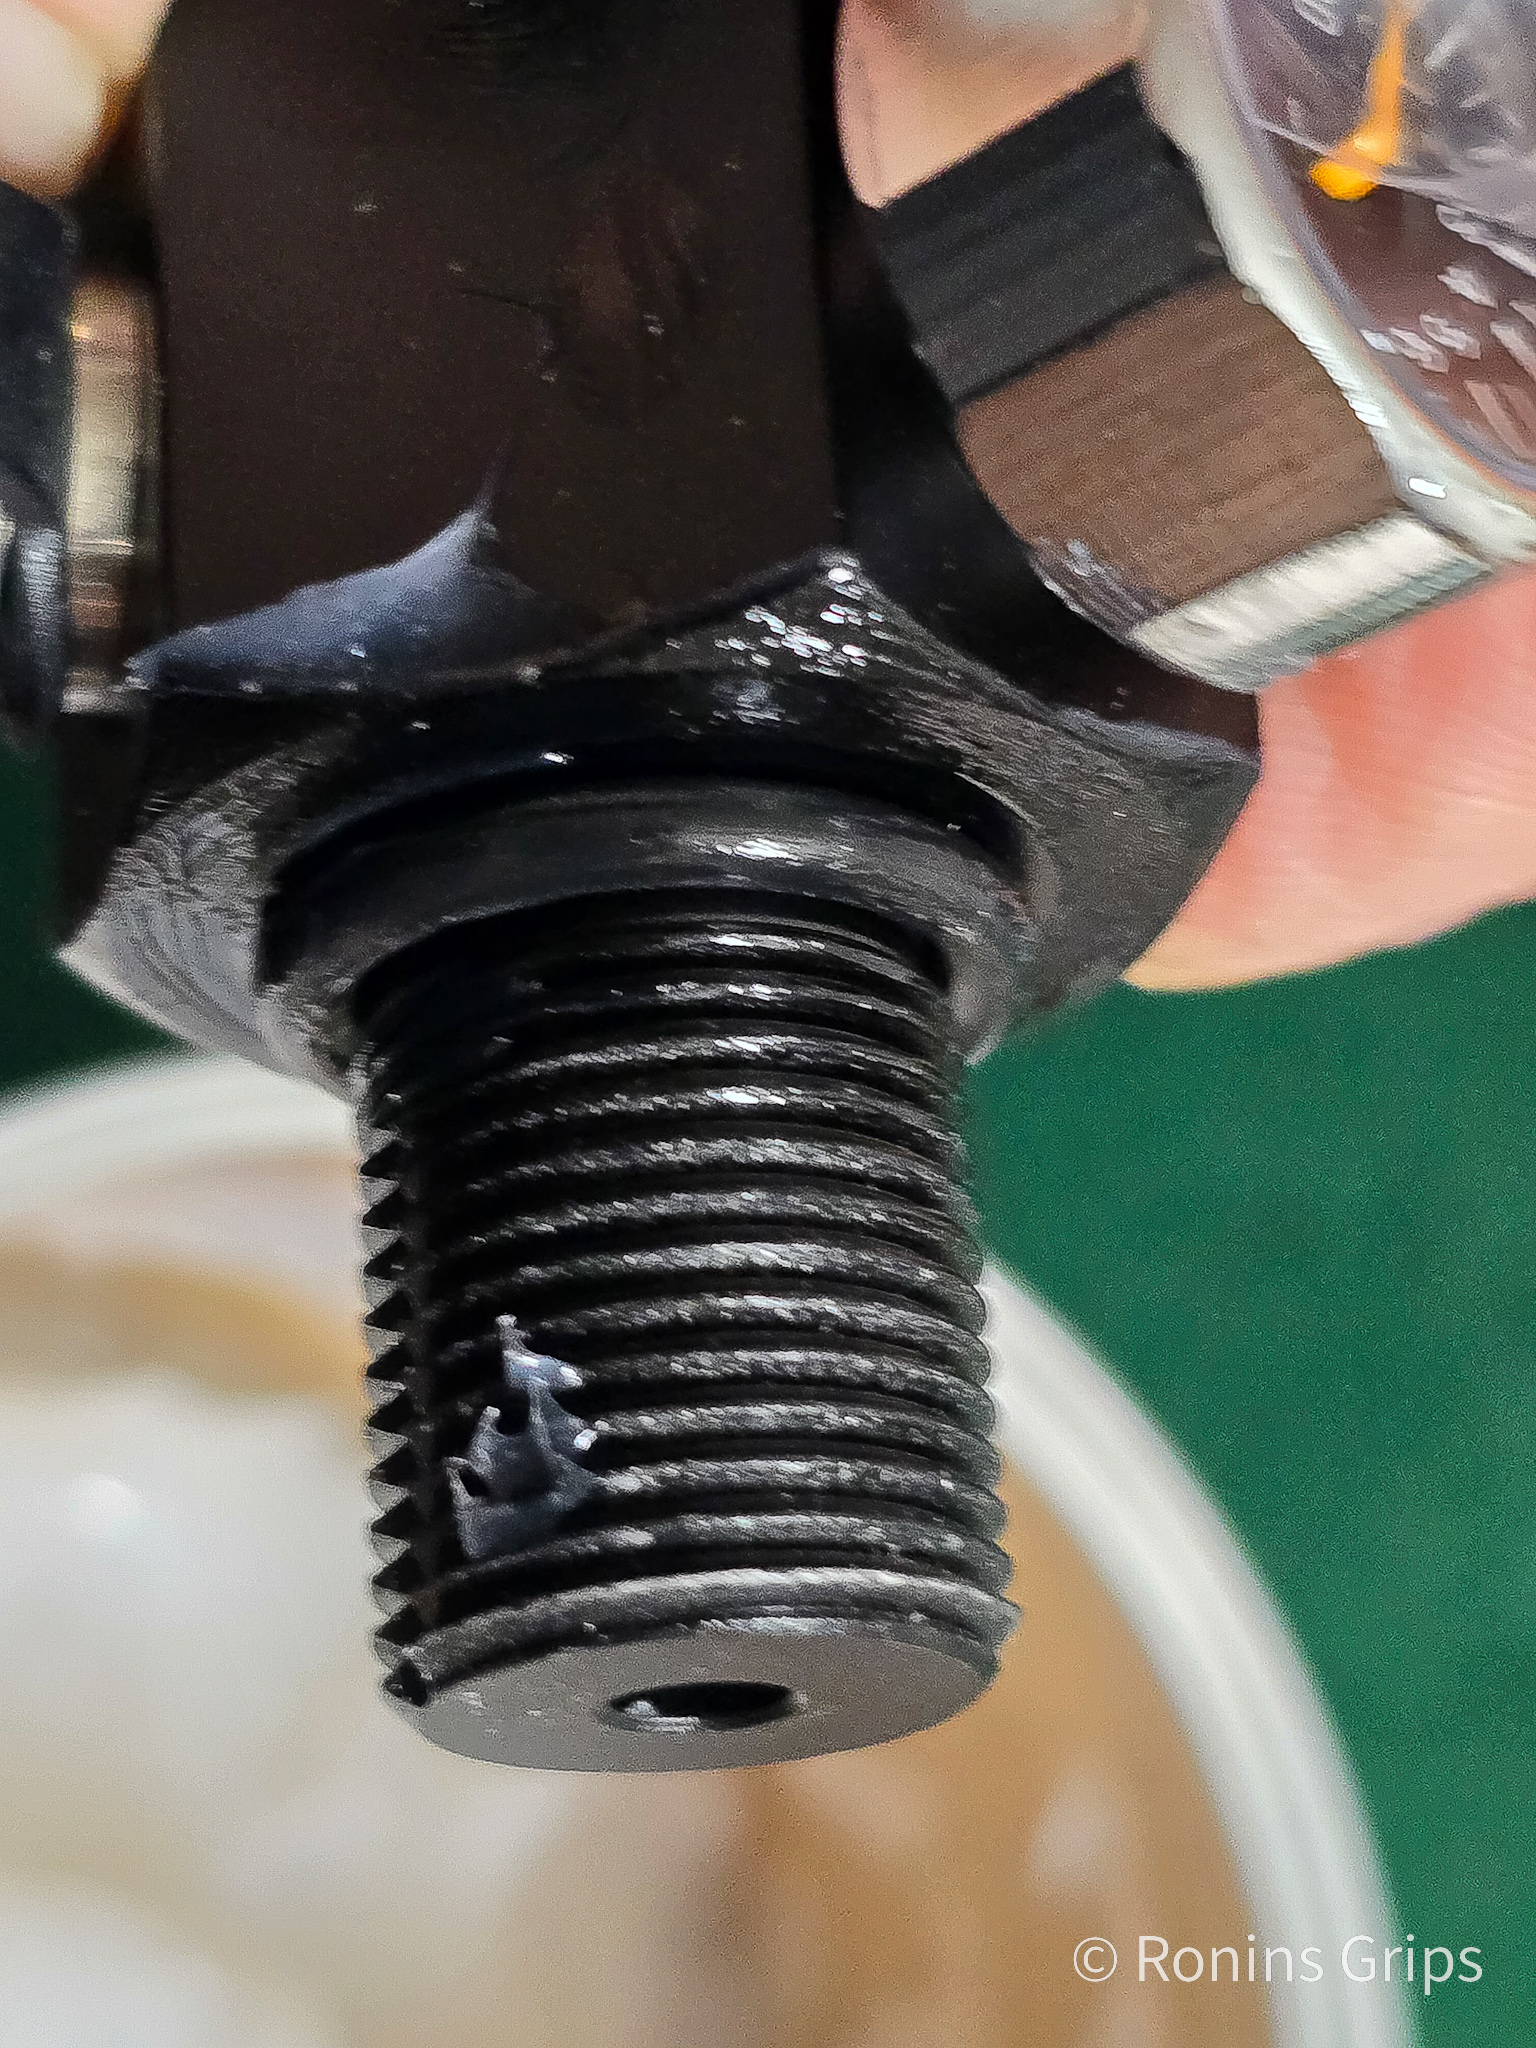
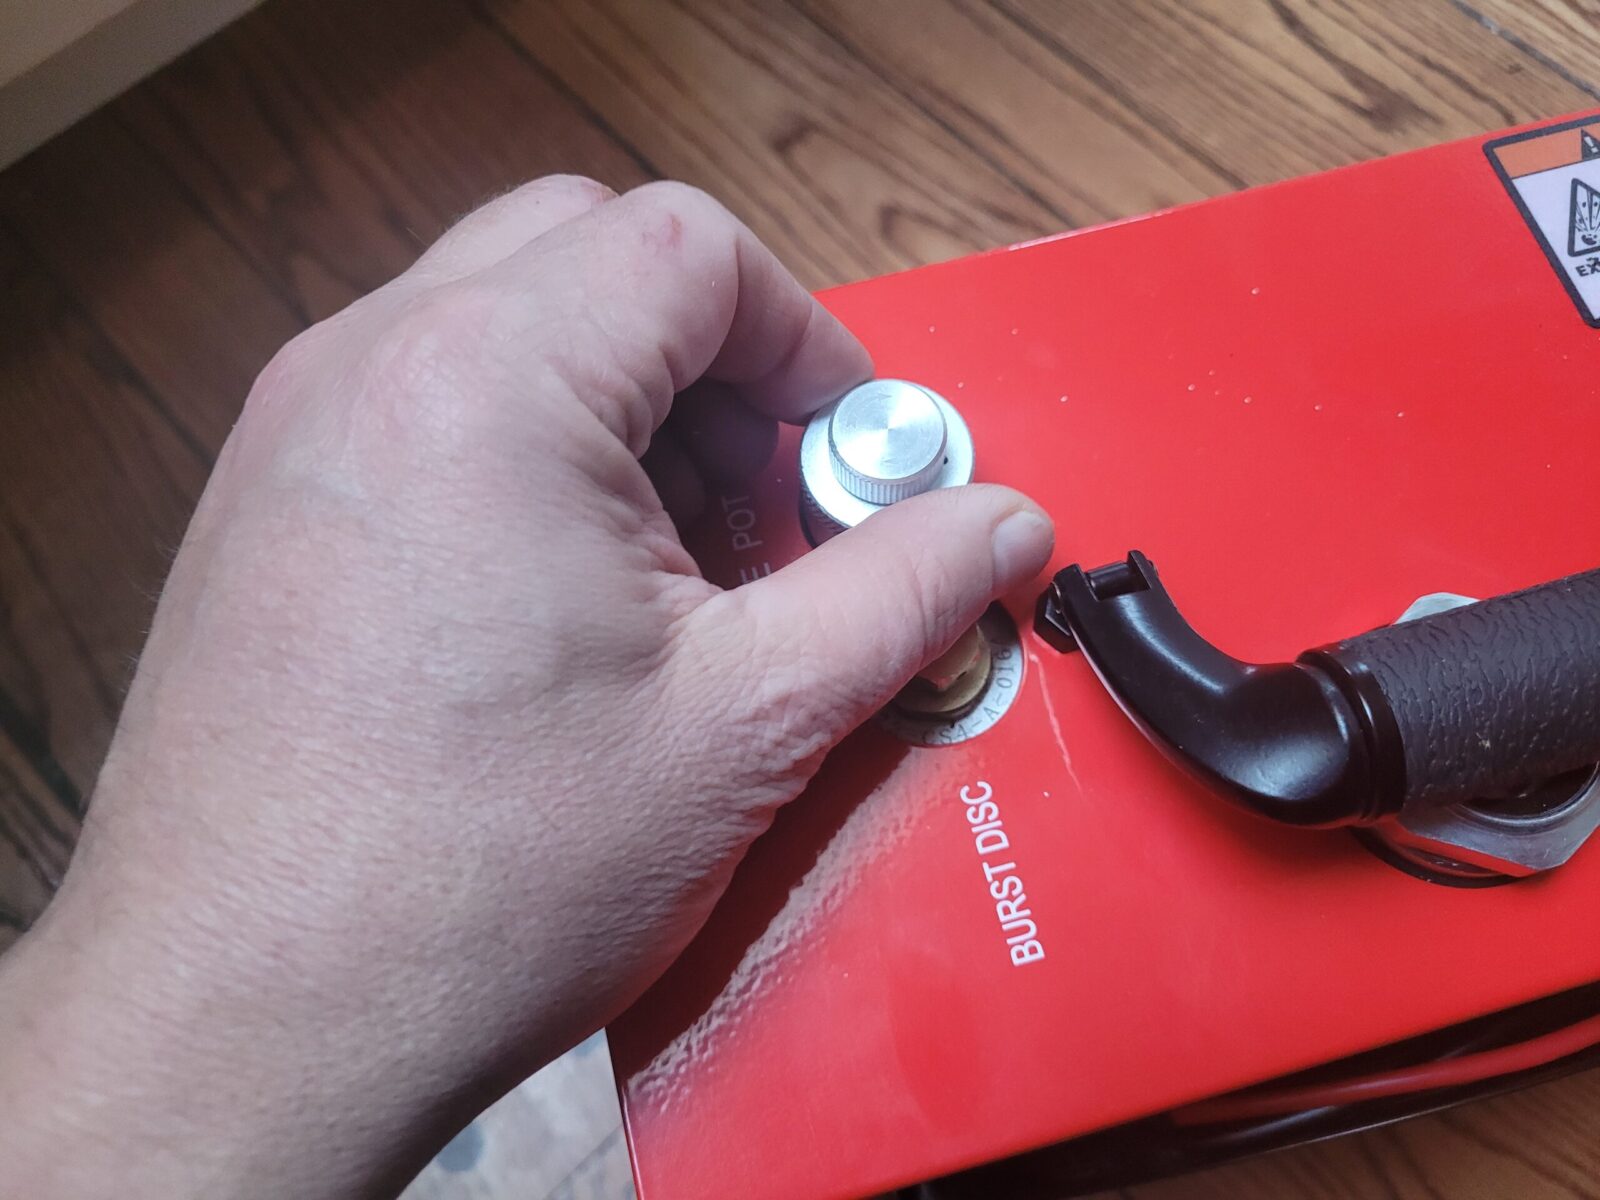
It’s simple, turn the top knob one full turn to introduce grease. You may be wondering why I even bothered adding a blog post. The reason is that when I turned the knob there was so much resistance that I thought the pot was empty – it wasn’t. What I want you to see is why there is resistance:
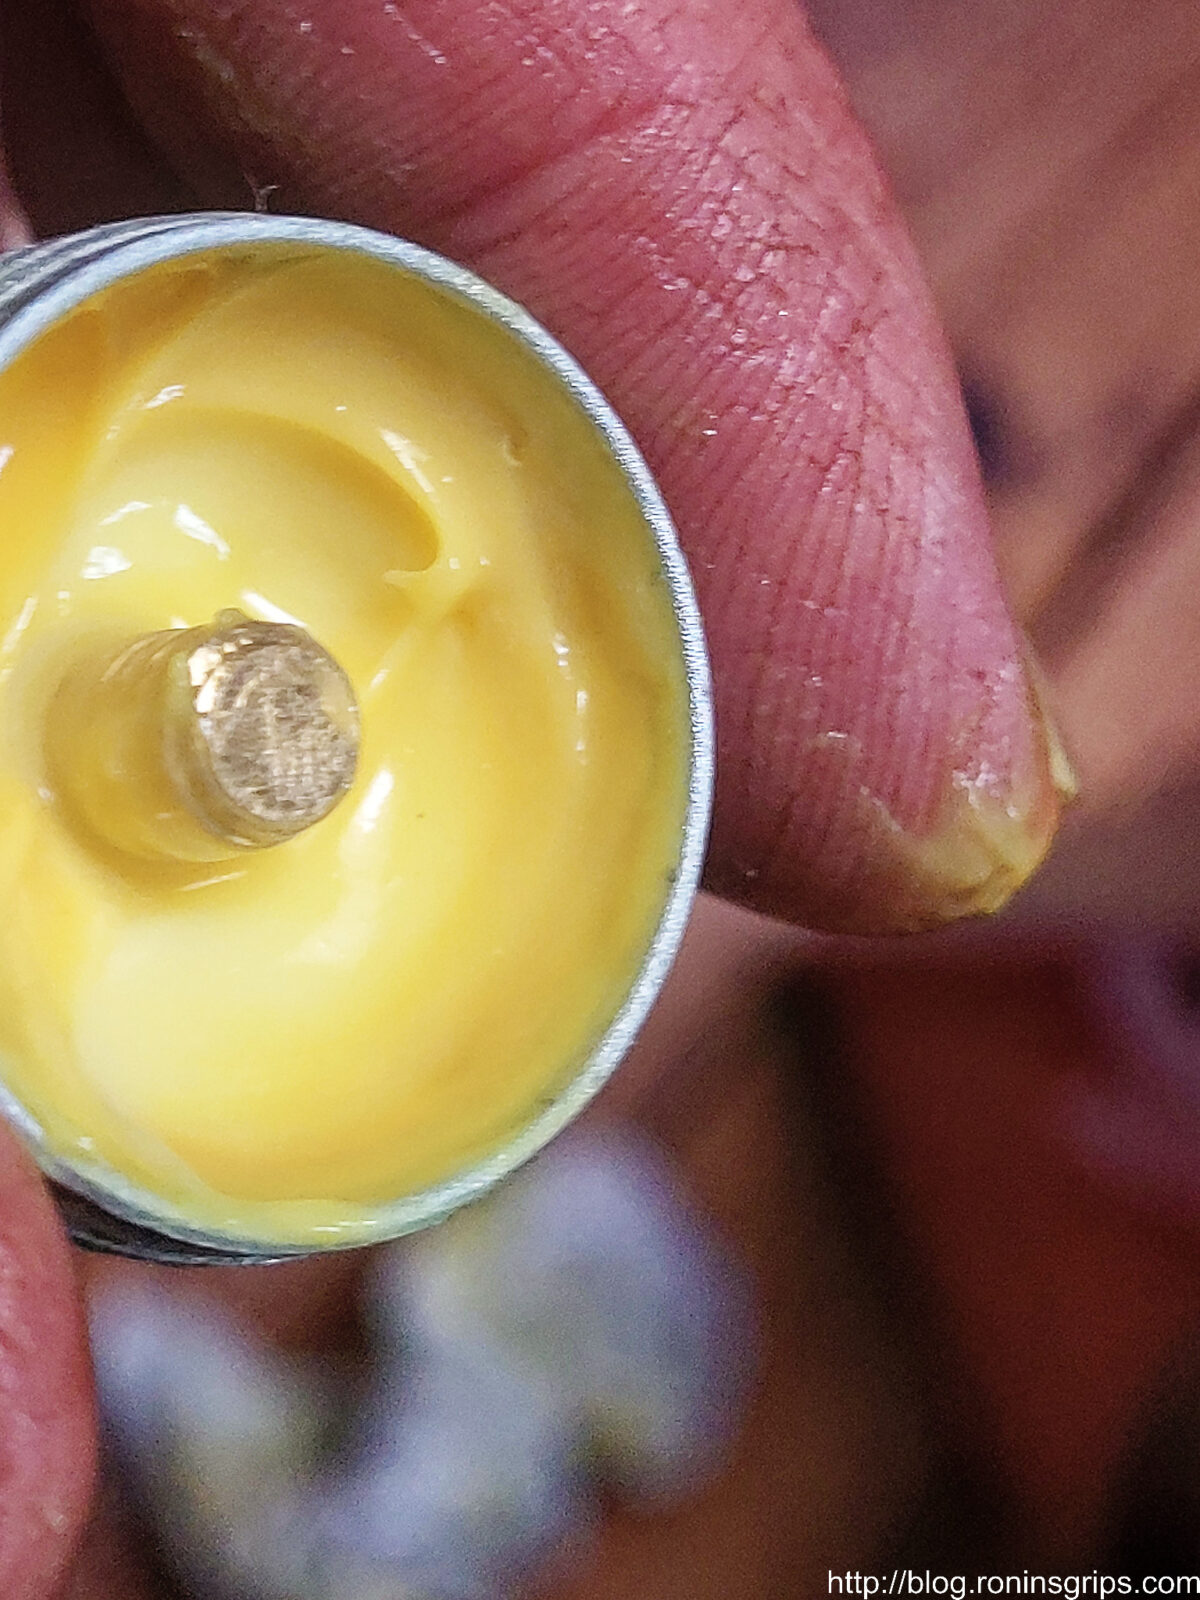
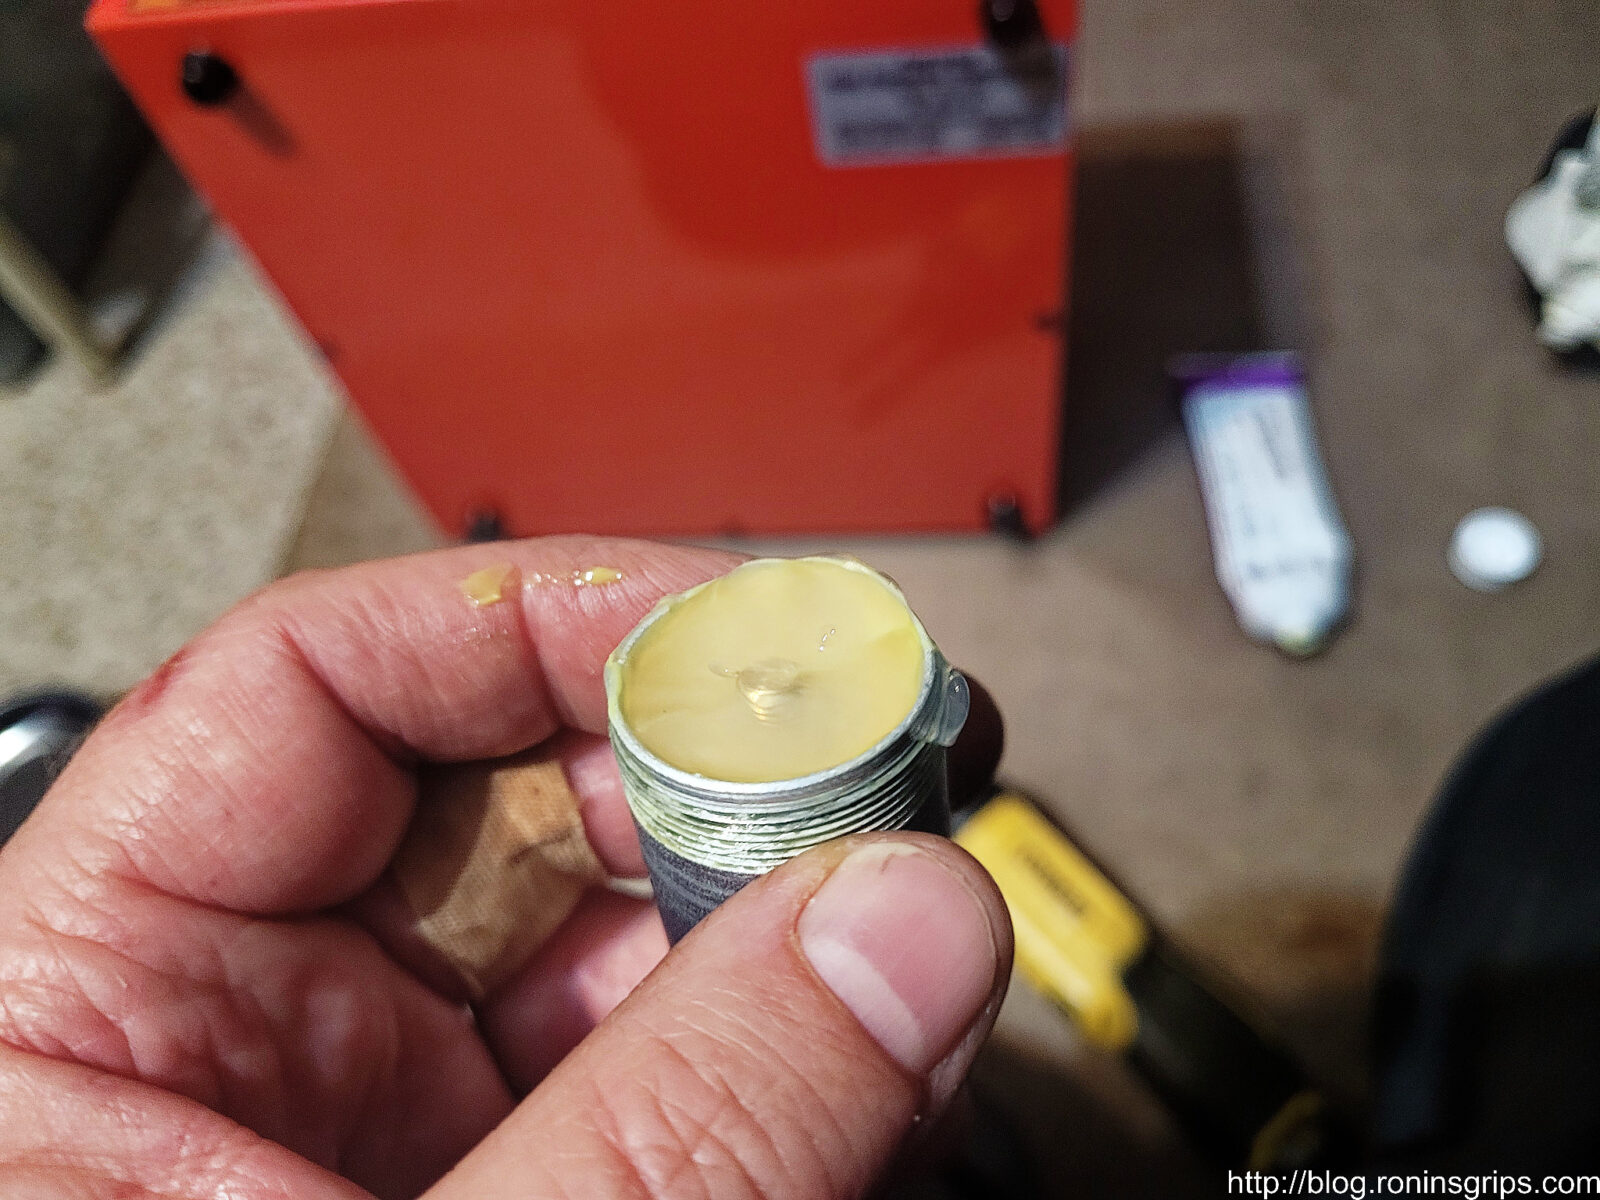
To add grease, you turn the top knob with the arrows one full turn clockwise. The problem was that mine stopped right around 3/4ths of the way around. I thought maybe it had been shipped without the grease pot being filled.To remove the grease pot simply turn the lower portion of the pot counter-clockwise and it will unscrew. It then lifts out.Well, it was definitely full. I can honestly say I have never seen a grease with this color and texture. Note the black thing down in the very bottom of the pot.It’s a simple mechanism. You turn the pot counter-clockwise to cause the plunger to move to the top so you can fill it. Or, you turn it clockwise, the plunger comes down and it pushes grease in … or at least it should.There was a black disc down in the pot / the chamber the pot threads into depending on how you want to describe it.I fished the black disc out using a finger, wiped it off and there was a very small hole in the middle. The black disc is a flow limiter! Now I understand why there was resistance! What this tells us is that you can only turn the screw so much and the limiter will cause resistance. So, turn the top screw until it stops and run the compressor. You can turn the screw on the pot the rest of the way as the grease goes into the mechanism but do not introduce more than one full turn worth of grease.
Refilling the Pot
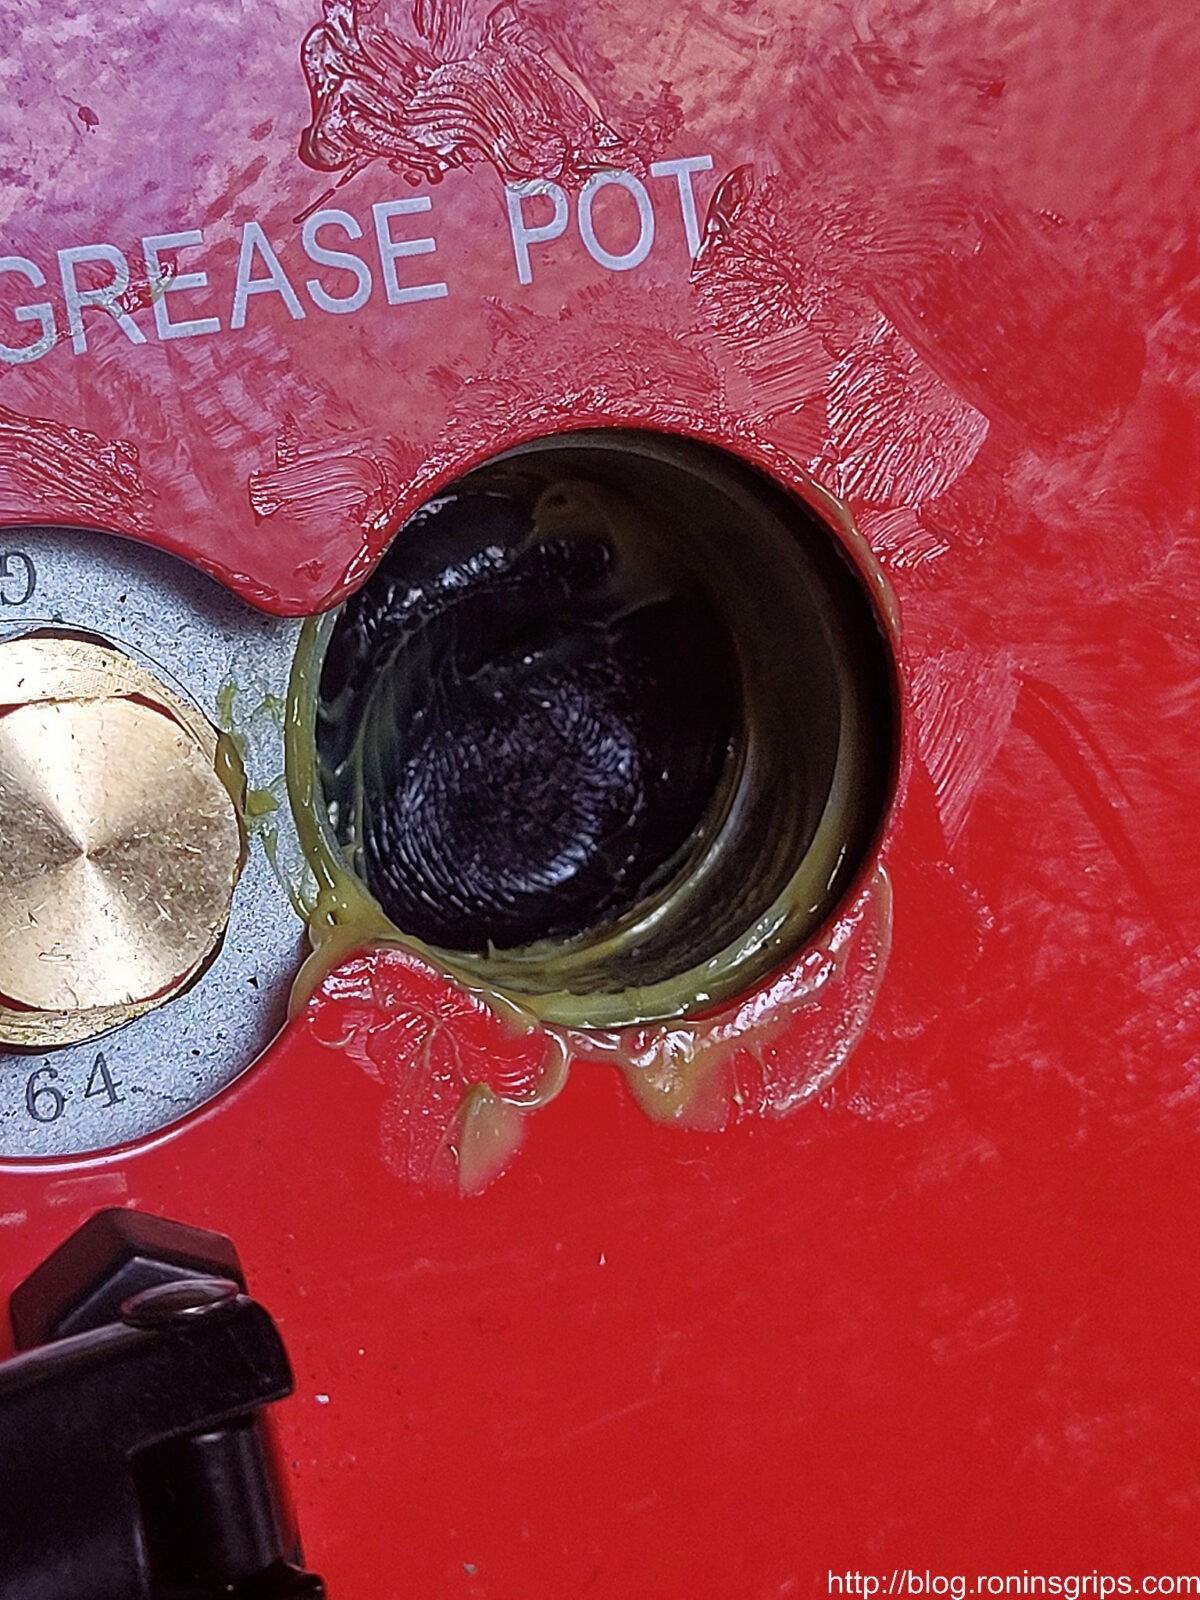
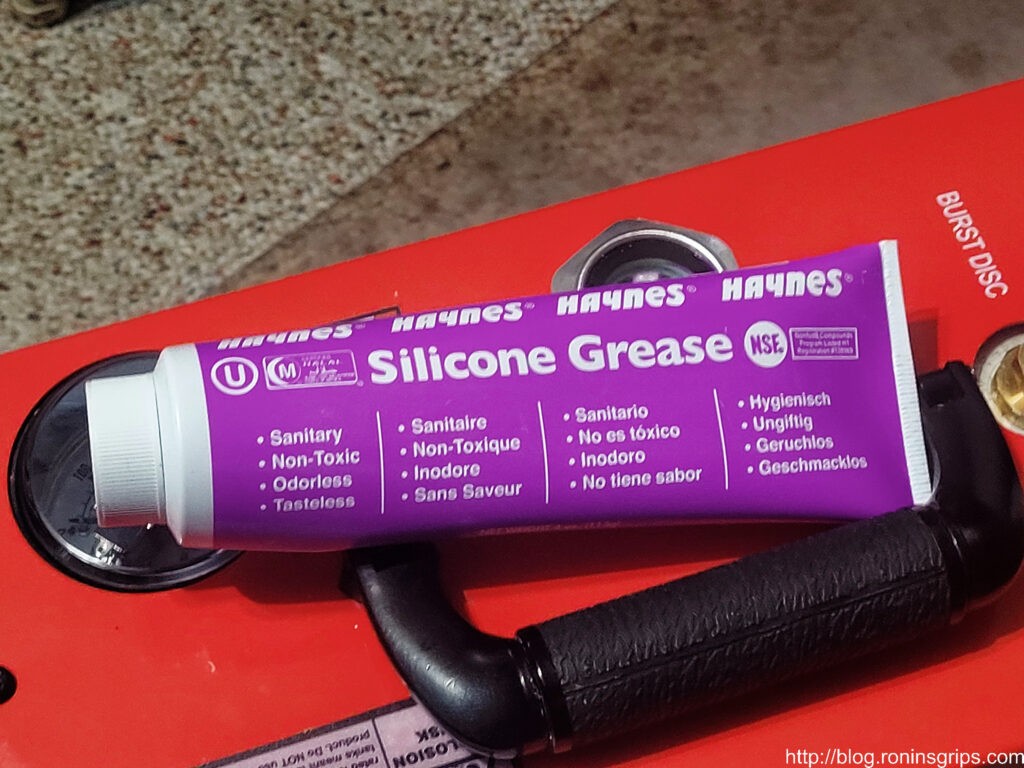
Well, I had really made a mess playing around with the grease pot and lost most of the grease in the process. I asked the Amazon seller, Ankul, what I should use and he told me to go with a general food grade grease. I asked if silicone would work because that seemed to be the composition of most, if not all, food grade greases on Amazon and he said “yes”. Based on that, I ordered a tube of the below Haynes Silicone Grease off Amazon due to it’s good reviews. The important part for you to bear in mind is to go with food grade and I assume this is to protect the seals or something.
This Haynes grease has very good reviews on Amazon so I went with it.I turned the knob counter clockwise and screwed the plunger all the way to the top of the pot and then topped off the pot with the silicone grease and screwed the pot back into the compressor.Once it was installed, I gave the top knob a turn, ran the pump for a minute and then turned it the rest of the way.
Summary
In hindsight, it is very straight forward but I didn’t expect the flow limiter to stop the knob from turning and I didn’t know what grease to use to refill the pot so it seemed like good info to share.
I hope this helps you out.
Note, I have to buy all of my parts – nothing here was paid for by sponsors, etc. I do make a small amount if you click on an ad and buy something but that is it. You’re getting my real opinion on stuff.