The modern U.S. commercial market for AR-15-style rifles is saturated with a bewildering array of manufacturers, each vying for market share through a combination of performance claims, marketing, and brand identity. This has created a landscape where consumers, law enforcement agencies, and even industry professionals are often forced to rely on anecdotal evidence, brand tribalism, and influencer-driven narratives to make purchasing decisions. The result is a proliferation of subjective “tier lists” that lack empirical rigor and often reflect personal bias rather than objective quality. To navigate this confusion, a definitive, evidence-based framework is required—one that treats the AR-15 not as a cultural icon, but as an engineered weapons system whose quality can be measured, quantified, and ranked according to verifiable data.
1.2 Methodology: A Data-First Approach
This report departs from opinion-based analysis, grounding its tiered ranking model in the principles of materials science, manufacturing processes, quality control standards, and documented performance. The evaluation of each brand is based on five core criteria: Quality, Durability, Accuracy, Reliability, and Customer Satisfaction. These criteria are not assessed qualitatively but are instead measured against a matrix of specific, data-backed metrics.
The foundational benchmark for this analysis is the U.S. military’s Technical Data Package (TDP). The TDP is the official government-mandated set of specifications, dimensions, materials, and tolerances for every component of the M4/M16 rifle platform.1 While a civilian rifle is not technically “mil-spec” unless produced under a government contract, the TDP provides an essential, non-negotiable baseline for what constitutes a professional-grade firearm.2 A manufacturer’s adherence to, deviation from, or improvement upon this standard is the primary indicator of its engineering philosophy and its position within the market hierarchy.
1.3 Scope and Limitations
The scope of this analysis encompasses the top 50 AR-15 brands prominent in the U.S. market, considering their use across military, military, law enforcement, and civilian sectors. The focus is on the manufacturer’s consistent and documented production standards, material choices, and quality control protocols as the most reliable predictors of overall quality. While the performance of any individual rifle can vary due to tolerance stacking or isolated defects, this report evaluates the systemic quality that a consumer can reasonably expect from a given brand. The analysis is based on publicly available data, manufacturer specifications, government contract awards, and aggregated market sentiment.
Section 2: The Anatomy of AR-15 Quality: A Quantifiable Tiering Model
To objectively rank AR-15 manufacturers, a tiered model has been developed based on quantifiable engineering and performance benchmarks. This model deconstructs the AR-15 platform into its most critical components and processes, allowing for a direct, evidence-based comparison between brands.
2.1 Tier Definitions
The five-tier system categorizes brands based on their demonstrated commitment to quality, from no-compromise professional systems to budget-oriented recreational firearms.
- Tier 1: S-Tier (Special Operations / Professional Grade): This tier is reserved for manufacturers producing no-compromise weapon systems. Brands in this tier demonstrate significant innovation beyond the mil-spec TDP, often holding military or Special Operations Command (SOCOM) contracts for complete rifles or critical components. They exhibit flawless quality control, have documented evidence of extreme-use durability, and frequently utilize proprietary, enhanced components designed to increase service life and performance under the harshest conditions.
- Tier 2: A-Tier (Duty / Hard-Use Grade): This tier represents manufacturers that consistently exceed baseline mil-spec standards. Their rifles are robust, reliable, and suitable for professional use by law enforcement or for general military issue, as well as for the most demanding civilian applications. These brands consistently use top-tier materials and implement rigorous, verifiable quality control processes on all critical components.
- Tier 3: B-Tier (High-Quality Enthusiast Grade): Brands in this tier reliably meet or exceed mil-spec standards on all critical components. They represent an excellent balance of performance and value, making them ideal for the knowledgeable enthusiast who demands high reliability and durability without the premium cost associated with proprietary systems or extensive government contracts.
- Tier 4: C-Tier (Mil-Spec Standard / Entry-Level): This tier includes manufacturers that adhere to the basic mil-spec TDP for most critical components. These firearms are functional and generally reliable for civilian use but may feature cost-saving measures in materials, finishing, or quality control on non-critical parts. They serve as a solid foundation for a general-purpose rifle.
- Tier 5: D-Tier (Hobbyist / Budget Grade): Manufacturers in this tier often deviate from the mil-spec TDP to achieve a lower price point. This can involve the use of lower-grade materials, less stringent or inconsistent quality control, and a focus on affordability over long-term durability. These rifles are best suited for recreational range use or as a base for significant user-driven upgrades.
2.2 Core Evaluation Metrics & Data Points
The placement of each brand is determined by its performance against the following technical metrics.
2.2.1 Materials Science & Manufacturing
The choice of materials and manufacturing methods for the rifle’s core components is a primary indicator of its intended use and durability.
- Receivers (Upper/Lower): The mil-spec standard is forged 7075-T6 aluminum. The forging process aligns the metal’s grain structure to the shape of the receiver, resulting in the highest possible strength-to-weight ratio.4 In contrast,
billet receivers are machined from a solid block of aluminum. While this allows for greater aesthetic customization and potentially tighter tolerances in some areas, a billet receiver is inherently weaker, pound-for-pound, than a forged one.5 Furthermore, some budget manufacturers use
6061-T6 aluminum, which has a yield strength nearly 50% lower than 7075-T6, representing a significant compromise in material durability. The use of forged 7075-T6 receivers is a key benchmark for Tiers 1 through 3. - Barrel: The barrel’s material directly impacts its accuracy, service life, and heat resistance. The military specification, MIL-B-11595E, calls for a Chrome-Moly-Vanadium alloy steel, commonly marketed as 4150 CMV. The addition of Vanadium refines the steel’s grain structure, increasing its strength and heat tolerance compared to standard 4150 or the lower-carbon 4140 steel often found in budget rifles. Barrel lining is also critical; chrome lining (the mil-spec standard) or a high-quality salt bath nitride finish provides essential corrosion resistance and extends barrel life.
- Bolt Carrier Group (BCG): The BCG is the heart of the rifle’s operating system, and its quality is paramount to reliability.7 A manufacturer’s detailed specifications for its BCG are a clear proxy for its overall quality philosophy.
- Bolt: The mil-spec TDP requires the bolt to be machined from Carpenter 158 (C158) steel, a case-hardened alloy specifically designed to withstand the high-pressure, high-cycle stresses placed on the locking lugs.2 While high-quality 9310 steel is a common and acceptable alternative, it is not the mil-spec standard and represents a slight step down in material properties.10 Use of C158 is a hallmark of higher-tier brands.
- Carrier: The mil-spec carrier is machined from 8620 steel, a tough, carburized alloy.7
- Gas Key: The gas key must be made from a durable steel like 4130, secured with Grade 8 fasteners torqued to specification, and properly staked to prevent the screws from backing out under recoil and heat—a non-negotiable indicator of quality assembly.2
2.2.2 Quality Control & Assembly
Meticulous assembly and verifiable quality control are what separate a reliable tool from a potential liability.
- Testing Protocols: The consistent, individual testing of critical components is a primary differentiator between tiers. The gold standard, mandated by the TDP, is High-Pressure Testing (HPT), where a proof cartridge is fired to stress the component, followed by Magnetic Particle Inspection (MPI), a non-destructive test that uses magnetic fields and ferrous particles to detect microscopic cracks or flaws that could lead to catastrophic failure.2 Top-tier manufacturers HPT/MPI every single bolt and barrel, while lower-tier brands may only batch-test, or omit the process entirely to cut costs.
- Assembly Standards: Beyond material selection, the quality of a rifle is determined by its assembly. Indicators of meticulous assembly include a properly torqued barrel nut (which affects accuracy), a pinned low-profile gas block (more secure than set screws), and a correctly staked receiver extension castle nut (which prevents the buffer tube from rotating loose). These details, while small, are indicative of a manufacturer’s commitment to building a rifle that will not fail under hard use.
2.2.3 Provenance & Performance Validation
Third-party validation provides objective proof of a brand’s quality and reliability.
- Military & Law Enforcement Contracts: A government contract is the ultimate validation of a manufacturer’s ability to produce high-quality, reliable, and consistent firearms at scale. Brands that supply the U.S. military, allied nations, or major law enforcement agencies have had their products and processes rigorously vetted, a factor that is heavily weighted for S-Tier and A-Tier placement.13
- Documented Durability: Publicly available torture tests and high-round-count evaluations provide empirical data on a rifle’s long-term durability. Brands whose products survive extreme tests—such as 20,000 rounds without cleaning or malfunctions—demonstrate a level of engineering and reliability that places them in the upper tiers.
- Accuracy: While the military’s accuracy requirement is a relatively loose 4 MOA (a four-inch group at 100 yards), many commercial manufacturers hold themselves to a higher standard.1 A manufacturer that guarantees sub-MOA or 1 MOA accuracy with match-grade ammunition demonstrates a high of confidence in its barrel quality and assembly tolerances.18
2.2.4 Customer Sentiment & Market Consensus
While this analysis prioritizes objective data, aggregated customer sentiment from knowledgeable communities and consistent rankings from reputable publications provide valuable supporting evidence. This qualitative data helps identify trends in quality control, customer service, and long-term satisfaction that may not be apparent from a spec sheet alone.21
Section 3: Tier-by-Tier Brand Analysis
The following section applies the quantitative model to the top 50 AR-15 brands in the U.S. market. Each brand’s placement is justified with specific data points referencing the metrics established in Section 2.
3.1 Tier 1: S-Tier (Special Operations / Professional Grade)
Brands in this tier represent the apex of AR-15 development, often exceeding military specifications with proprietary enhancements and a proven track record in the hands of elite professionals.
- Knight’s Armament Company (KAC): KAC is unequivocally an S-Tier manufacturer. The company holds extensive military contracts for systems like the M110 Semi-Automatic Sniper System (SASS) and has received over $492 million in government awards since 2002.15 Their rifles feature proprietary, performance-enhancing components, such as the E3 bolt with enlarged, radiused lugs for increased durability. Documented endurance tests have shown KAC rifles firing over 20,000 rounds with zero malfunctions and no cleaning, while maintaining 1 MOA accuracy. This level of proven reliability and innovation defines the S-Tier.
- Lewis Machine & Tool (LMT): LMT’s placement in the S-Tier is secured by its military contracts and its patented Monolithic Rail Platform (MRP).13 The MRP is a true monolithic upper receiver milled from a single forging of aerospace aluminum, which allows for a true quick-change barrel system with a guaranteed return-to-zero. This is a significant engineering advancement over the standard AR platform, offering modularity and strength that is highly valued by military and professional users. While some users report variable accuracy from factory barrels, their system’s robustness and proven use by military units worldwide solidify their position.27
- Heckler & Koch (H&K): H&K earns its S-Tier position through the development and fielding of the HK416. The HK416 is not merely an AR-15 clone; it is a significant re-engineering of the platform, utilizing a proprietary short-stroke gas piston system derived from the G36 rifle.28 This system runs cleaner and cooler than a standard direct impingement system, offering enhanced reliability in adverse conditions. The widespread adoption of the HK416 and its variants by U.S. SOCOM and other elite international military units serves as undeniable proof of its superior performance and reliability in the most demanding environments.29
- Geissele Automatics: Originally known for world-class triggers, Geissele has ascended to the S-Tier by securing major USSOCOM contracts for complete weapon systems. Their selection for the Mid-Range Gas Gun – Sniper (MRGG-S) program provides a new designated marksman rifle to special operations forces.64 This, combined with their contract for the Upper Receiver Group-Improved (URG-I) for USASOC, serves as definitive validation of their manufacturing and engineering capabilities at the highest level.67 Their rifles demonstrated exceptional durability and sub-MOA accuracy after 6,400 rounds in military testing, cementing their status as a top-tier, professional-grade manufacturer.66
- Hodge Defense Systems: Hodge is a unique S-Tier manufacturer whose reputation is built on a “less is more” philosophy, focusing on subtle but critical engineering improvements for professional users. While not a mass-market brand, their rifles are highly sought after in the professional community for their exceptionally well-balanced design, use of proprietary materials, and legendary build quality. Their placement is supported by strong sentiment within expert communities that recognize their dedication to building a pure fighting rifle without compromise.31
3.2 Tier 2: A-Tier (Duty / Hard-Use Grade)
A-Tier brands produce exceptionally high-quality rifles that consistently exceed mil-spec standards. These are the go-to choices for law enforcement, general military issue, and serious civilians who require a firearm they can bet their life on without needing proprietary systems.
- Radian Weapons: Radian represents the pinnacle of commercial “boutique” manufacturing and sits at the top of the A-Tier. While not a large-scale military contractor, their Model 1 rifle is built with an uncompromising focus on precision and ergonomics. They utilize billet 7075-T6 aluminum for their fully ambidextrous A-DAC lower receivers and pair their rifles with premium components like Geissele triggers and Criterion barrels.22 Radian’s reputation for flawless machining, superior fit and finish, and a sub-MOA accuracy guarantee places them in the highest echelon of commercial quality, just shy of the military-contract-driven S-Tier.22
- Daniel Defense (DD): Daniel Defense is a quintessential A-Tier manufacturer with a strong case for S-Tier consideration. They are a prime military contractor, most notably as the sole-source provider of the RIS II handguard for SOCOM’s SOPMOD II program.14 Their rifles are built entirely in-house using premium materials, including forged 7075-T6 receivers and their own cold hammer forged (CHF) barrels made from 4150 CMV steel, which are HPT/MPI tested.33 Documented torture tests, including being run over by vehicles and dropped from helicopters, confirm their extreme durability.34 They are consistently rated as a top-tier duty rifle and offer near 1 MOA accuracy.21
- Bravo Company Manufacturing (BCM): BCM has built its reputation on producing “professional grade” firearms with an obsessive focus on quality control. They strictly adhere to mil-spec+ material standards, using independently certified MIL-SPEC 11595E barrel steel and Carpenter 158 bolts in every rifle.35 Critically, every BCM bolt is individually HPT and MPI tested, a QC step that many competitors batch-test or skip.35 This commitment to quality has made them a trusted choice for law enforcement and military personnel, and documented 10,000-round tests demonstrate their reliability.13 They deliver exceptional reliability without relying on proprietary parts.
- FN Herstal (FN): As one of the two current prime contractors for the U.S. Military’s M4 and M16 rifles, FN’s manufacturing processes are held to the highest government standards.13 An FN 15 series rifle offers the civilian consumer a product built with the same materials, machinery, and quality control as those issued to the U.S. Armed Forces. This direct military provenance guarantees a true mil-spec, professional-grade firearm.37
- Colt: Colt is the originator of the AR-15/M16 platform, and they continue to hold military contracts.13 While there have been periods where their commercial QC has been debated by consumers, their government-contract rifles are built to the full TDP. A modern Colt LE6920 or M4 Carbine remains a benchmark for a mil-spec duty rifle, securing their place in the A-Tier.31
- Sons of Liberty Gun Works (SOLGW): SOLGW’s entire brand philosophy is built around producing “fighting rifles” with a lifetime warranty. Their meticulous attention to detail is evident in their BCG specifications, which call out the exact high-grade steel for every component, from the C158 bolt to the S7 tool steel extractor retaining pin.7 They emphasize rigorous QC and proper assembly techniques, such as the use of A5 buffer systems for smoother recoil impulse, making them a top choice for a hard-use rifle.31
- LWRC International: LWRC is a leader in piston-driven ARs and has a strong following in military and law enforcement circles.13 They are known for high-end features like cold hammer forged, nitride-treated barrels and fully ambidextrous controls. Their commitment to quality and innovation in piston operating systems places them solidly in the A-Tier.
- Noveske Rifleworks: Noveske built its reputation on the exceptional quality and accuracy of its stainless steel barrels. Their complete rifles are known for their premium build quality, excellent fit and finish, and high performance, placing them at the very top of the A-Tier, bordering on S-Tier for their precision and craftsmanship.22
- LaRue Tactical: LaRue is legendary for precision. Known for producing some of the most accurate barrels and triggers in the industry, their complete rifles are highly sought after for their ability to deliver consistent sub-MOA groups. This focus on accuracy, combined with robust build quality, makes them a top A-Tier choice, especially for designated marksman roles.25
- Primary Weapons Systems (PWS): PWS is highly regarded for perfecting the long-stroke piston operating system in the AR platform, similar to the action of the AK-47. This system is known for its extreme reliability and smooth recoil impulse. Their consistent quality and robust engineering make them a top choice for those seeking a piston-driven AR and a solid A-Tier manufacturer.39
3.3 Tier 3: B-Tier (High-Quality Enthusiast Grade)
B-Tier represents the sweet spot for many consumers, offering excellent performance and reliability that meets or exceeds mil-spec standards on critical parts, but at a more accessible price point than A-Tier brands.
- Aero Precision: Aero Precision is arguably the king of the B-Tier, primarily because they are a major OEM manufacturer of high-quality, in-spec forged 7075-T6 receivers for many other brands.40 Their M4E1 line, with its enhanced features, offers one of the best value propositions on the market.21 While their complete rifles are generally well-regarded, some recent customer sentiment points to occasional QC inconsistencies on assembly, which keeps them from the A-Tier.31
- Springfield Armory (SAINT line): The Springfield SAINT series, particularly the Victor models, provides a solid, feature-rich package. They use quality core components, including forged 7075-T6 receivers and M16-profile BCGs with Carpenter 158 bolts.43 Combined with quality furniture from partners like B5 Systems, the SAINT Victor is a reliable, well-equipped rifle for the price.21
- IWI (Zion-15): The Israeli Weapons Industries Zion-15 has quickly gained a reputation as a top performer in its price range. It features a 16-inch barrel with a 1:8 twist capable of 1 MOA accuracy, a free-floated M-LOK handguard, and a robust build quality that punches well above its weight, making it a premier B-Tier option.18
- Smith & Wesson (M&P15 line): The S&W M&P15 has been a mainstay of the AR-15 market for years and has earned a strong reputation for reliability and value. It is a go-to recommendation for a first AR-15 that is dependable and built by a major, reputable firearms manufacturer.21
- Ruger (AR-556 MPR): While the base model Ruger AR-556 is a solid entry-level rifle, the MPR (Multi-Purpose Rifle) version elevates the platform into the B-Tier. The MPR includes significant upgrades like a cold hammer-forged barrel with a 1:8 twist, a rifle-length gas system for a softer recoil impulse, and an improved two-stage trigger, offering a high-performance package for a moderate price.21
- Centurion Arms: Founded by a U.S. Navy SEAL, Centurion Arms focuses on producing professional-grade components, especially barrels and handguards. Their complete rifles are built with a focus on durability and performance, reflecting the founder’s operational experience. They are a highly respected, if less common, B-Tier choice.37
- American Defense Manufacturing (ADM): ADM is known for their high-quality billet receivers which feature one of the best fully ambidextrous control setups on the market. By using premium components like Criterion barrels in their complete builds, they offer a high-end, feature-rich rifle that competes at the top of the B-Tier and borders on A-Tier.22
- Faxon Firearms: Faxon is an innovative company known for its quality barrels and lightweight rifle designs. Their complete firearms, like the ION-X, demonstrate a commitment to performance and thoughtful engineering, making them a strong B-Tier manufacturer that provides excellent value and modern features.21
- Midwest Industries: Long known for their excellent handguards and accessories, Midwest Industries has developed a strong reputation for their complete rifles. They offer well-built firearms with quality components and are consistently well-regarded by the user community for their performance and value.31
- SIG Sauer (M400 Tread): The SIG M400 Tread is SIG’s entry into the more affordable AR-15 market segment. It provides a solid foundation with good features like a free-floated M-LOK handguard and quality manufacturing from a major defense contractor, making it a reliable B-Tier option.21
- CMMG: CMMG is known for innovation, particularly with their Radial Delayed Blowback system and for chambering AR-platform rifles in a wide variety of calibers.29 Their standard 5.56 rifles are solid, reliable performers that offer good value, placing them in the B-Tier.
- POF-USA (Patriot Ordnance Factory): POF is a well-known manufacturer of piston-driven ARs. Their rifles are robust and feature a number of proprietary enhancements. They offer a reliable and high-quality alternative to direct impingement systems, earning them a solid B-Tier ranking.37
- Spikes Tactical: Spikes Tactical offers rifles with a distinct marketing style but builds them with solid, mil-spec compliant components. They are known for good quality control and reliable performance, making them a popular B-Tier choice for enthusiasts.2
- Armalite: The original home of the AR-15, Armalite continues to produce quality rifles. While not always at the cutting edge of market trends, their firearms are known to be reliable and well-made, representing a solid B-Tier option with a historic name.45
- Wilson Combat: Known for their world-class custom 1911s, Wilson Combat also applies their expertise to the AR platform. They produce extremely high-quality, accurate, and reliable rifles with a focus on premium components and meticulous craftsmanship, placing them at the very top of the B-Tier.
3.4 Tier 4: C-Tier (Mil-Spec Standard / Entry-Level)
C-Tier brands produce functional, reliable rifles that generally adhere to basic mil-spec material standards on key components. They represent a good starting point for new owners or a solid base for future upgrades.
- Palmetto State Armory (PSA) – (Premium/CHF Lines): PSA’s business model is unique. Their premium rifle kits, which often feature cold hammer-forged barrels made by FN Herstal and Carpenter 158 bolts, offer an incredible value proposition. These specific lines elevate PSA into the C-Tier, providing near B-Tier performance at a budget price, though overall brand consistency keeps them from a higher placement.31
- Stag Arms: Stag Arms has a long history of producing solid, mil-spec compliant rifles. They are particularly notable for being one of the first and most prominent manufacturers of true left-handed AR-15s. They offer a dependable, no-frills rifle that serves as a great entry point.25
- Rock River Arms: Rock River Arms has a history of law enforcement contracts and a reputation for building accurate rifles, often featuring two-stage triggers and upgraded barrels. However, their use of some proprietary parts and designs that are now considered dated places them in the C-Tier in the modern market.42
- Windham Weaponry: Founded by the original owner of Bushmaster after that company was sold, Windham Weaponry was created with a commitment to producing quality, American-made rifles. They produce solid, reliable, if basic, mil-spec firearms that are a dependable C-Tier choice.47
- DPMS Panther Arms: DPMS has been a major player in the budget AR market for decades. While not known for premium features, their rifles have a reputation for being functional and reliable workhorses, making them a standard C-Tier option.37
- Bushmaster: A well-known name in the industry, Bushmaster has produced a vast number of AR-15s over the years. Their standard models are considered functional, entry-level rifles that adhere to basic specifications, placing them in the C-Tier.29
- Del-Ton: Del-Ton is another manufacturer focused on the budget-friendly end of the market. They offer basic, mil-spec compliant rifle kits and complete firearms that are functional for recreational use, fitting the C-Tier definition.31
- Radical Firearms: While early production models had a poor reputation for quality control, user sentiment suggests that newer Radical Firearms rifles have improved significantly. They remain a budget-oriented brand but can offer a functional C-Tier rifle, albeit with some accepted risk of inconsistency.30
- Andro Corp Industries: Andro Corp has gained a reputation for being one of the best budget-friendly options, offering solid rifles with good components for the price, such as Ballistic Advantage barrels. They are a strong contender in the C-Tier.39
- Yankee Hill Machine (YHM): YHM is well-respected for their suppressors and a range of AR-15 parts and accessories. Their complete rifles are known to be well-made and reliable, offering a solid C-Tier value for a complete firearm.25
- Lead Star Arms: A lesser-known brand that has received positive reviews for packing a lot of features and good performance into a sub-$1000 rifle, making them a notable C-Tier option.48
- Rise Armament: Known primarily for their drop-in triggers, Rise Armament also produces complete rifles like the Watchman. These rifles are well-equipped for their price point and represent a solid C-Tier choice.25
- Zev Technologies: While famous for their high-end Glock modifications, Zev has entered the AR market. Their rifles are well-machined and feature-rich, but their price point often places them against tougher competition, landing them in the C-Tier for overall value in the AR space.49
- Seekins Precision: Seekins is known for high-quality, accurate billet receivers and rifles. Their focus on precision makes them an excellent choice, but in the highly competitive market, they land in the upper end of the C-Tier for general-purpose rifles.30
- Falkor Defense: Known for their unique aesthetic and high-end billet rifles, Falkor produces very well-made firearms. Like other boutique billet manufacturers, their high price relative to performance against top-tier forged rifles places them in the C-Tier for duty-use consideration.45
3.5 Tier 5: D-Tier (Hobbyist / Budget Grade)
D-Tier manufacturers prioritize affordability above all else, which necessitates compromises in materials, quality control, and assembly. These rifles are suitable for casual range use but are not recommended for duty or defensive applications without significant inspection and potential upgrades.
- Anderson Manufacturing: Anderson is famous for its “Poverty Pony” lower receivers, which are forged from 7075-T6 and are generally considered functional and in-spec.48 However, their complete rifles are built to an aggressive price point, using budget components like 4150 non-CMV barrels and 9310 steel bolts.50 The primary issue is inconsistent quality control, making them a quintessential D-Tier rifle: it might run perfectly, or it might have issues out of the box.
- Palmetto State Armory (PSA) – (Standard/Freedom Line): To achieve their market-leading low prices, PSA’s base-level “Freedom” and “PTAC” lines make significant compromises. While they offer a gateway to the AR-15 platform, they are known for inconsistent QC, using budget materials, and occasional assembly errors.39 Their business model is based on high volume, and the end-user assumes the risk of receiving a rifle that may need tuning or service, a defining characteristic of the D-Tier.51
- Bear Creek Arsenal (BCA): BCA is widely cited by the user community as having significant and recurring quality control issues, ranging from poor machining to incorrect assembly.31 While their extremely low prices are attractive to hobbyists, the high probability of receiving a product with functional issues places them firmly in the D-Tier.
- Diamondback Firearms: Diamondback focuses on the entry-level market. To meet these low price points, they utilize budget components and processes. While many users have functional rifles, the brand has a reputation for inconsistent quality and is best suited for recreational shooting where absolute reliability is not a primary concern.48
- ATI (American Tactical Imports): ATI is known for importing and manufacturing very low-cost firearms. Their AR-15 pattern rifles are frequently cited as having reliability and quality control problems, making them a clear D-Tier option suitable only for casual plinking.31
- Davidson Defense: This brand is known for offering extremely low-priced parts kits and complete uppers. The business model relies on using the most inexpensive components available, leading to a high degree of variability in quality and reliability. They are a choice for builders on the tightest of budgets who are willing to diagnose and fix potential issues themselves.45
- Bushmaster (New Production): It is important to distinguish between older, well-regarded Bushmaster rifles and the products released under new ownership. Recent iterations have not maintained the same reputation for quality, and are now considered a budget-level, D-Tier option.
- DPMS (New Production): Similar to Bushmaster, the DPMS brand has changed hands, and new production rifles are not considered to be of the same quality as their predecessors. They now compete in the budget space and fall into the D-Tier.
- Olympic Arms: An older brand in the AR market, Olympic Arms has a long-standing reputation for using proprietary parts and having inconsistent quality control. They are generally considered a lower-tier, hobbyist-grade manufacturer.
- Blackthorne / Hesse / Vulcan: These brands, under various names, have a long and well-documented history of producing extremely low-quality and often unsafe firearms. They are universally regarded by the firearms community as a brand to avoid entirely and represent the absolute bottom of the D-Tier.
Section 4: Summary & Market Outlook
This analysis has established a data-driven framework to navigate the complex U.S. AR-15 market. By prioritizing engineering principles, material science, and verifiable performance data over marketing and anecdotal claims, a clear hierarchy of manufacturers emerges.
4.1 Definitive AR-15 Tier Summary Table
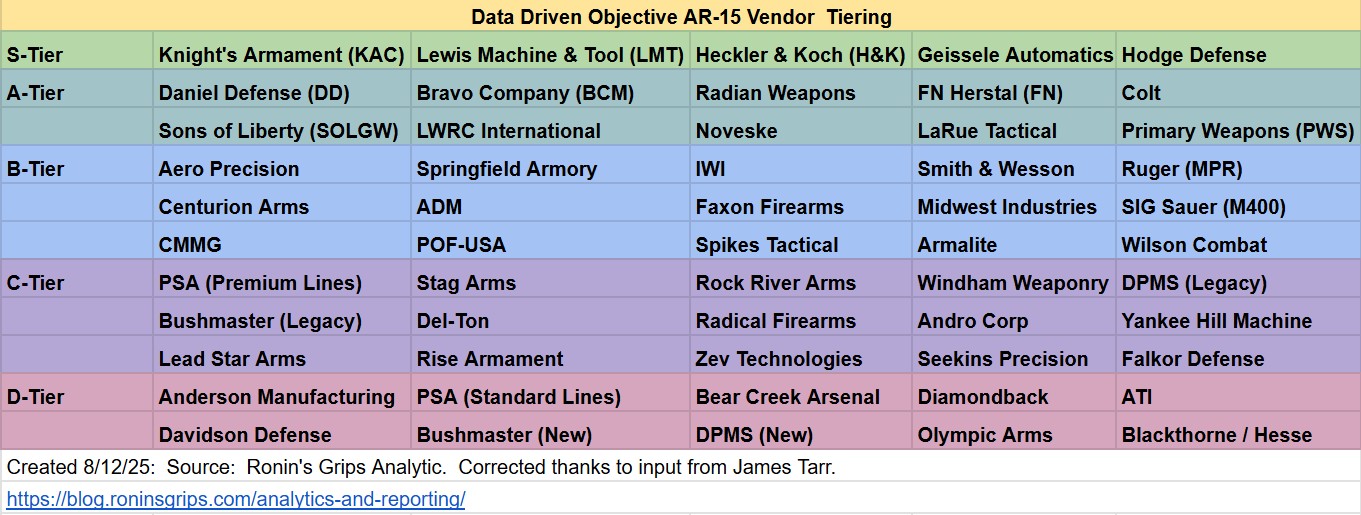
The following table consolidates the findings of this report, providing an at-a-glance reference for the top 50 AR-15 brands, categorized by their respective quality tiers.
| Tier | Brand | Brand | Brand | Brand | Brand |
| Tier 1: S-Tier | Knight’s Armament (KAC) | Lewis Machine & Tool (LMT) | Heckler & Koch (H&K) | Geissele Automatics | Hodge Defense |
| Tier 2: A-Tier | Daniel Defense (DD) | Bravo Company (BCM) | Radian Weapons | FN Herstal (FN) | Colt |
| Sons of Liberty (SOLGW) | LWRC International | Noveske | LaRue Tactical | Primary Weapons (PWS) | |
| Tier 3: B-Tier | Aero Precision | Springfield Armory | IWI | Smith & Wesson | Ruger (MPR) |
| Centurion Arms | ADM | Faxon Firearms | Midwest Industries | SIG Sauer (M400) | |
| CMMG | POF-USA | Spikes Tactical | Armalite | Wilson Combat | |
| Tier 4: C-Tier | PSA (Premium Lines) | Stag Arms | Rock River Arms | Windham Weaponry | DPMS (Legacy) |
| Bushmaster (Legacy) | Del-Ton | Radical Firearms | Andro Corp | Yankee Hill Machine | |
| Lead Star Arms | Rise Armament | Zev Technologies | Seekins Precision | Falkor Defense | |
| Tier 5: D-Tier | Anderson Manufacturing | PSA (Standard Lines) | Bear Creek Arsenal | Diamondback | ATI |
| Davidson Defense | Bushmaster (New) | DPMS (New) | Olympic Arms | Blackthorne / Hesse |
4.2 Concluding Analysis & Market Trends
The tiered model reveals several key dynamics within the AR-15 industry. The primary differentiators between tiers are not cosmetic features but quantifiable commitments to superior materials, meticulous assembly, and rigorous, verifiable quality control. S-Tier brands distinguish themselves through proprietary innovation and proven performance in military applications, while D-Tier brands make identifiable compromises in materials and QC to achieve their low price points.
A significant market trend is the “Race to the Middle.” Brands like Aero Precision and Palmetto State Armory (with its premium lines) are providing components and complete rifles with specifications that were once the exclusive domain of higher-priced manufacturers. PSA offering rifles with FN-made CHF barrels, for example, provides unprecedented value and blurs the traditional lines between “budget” and “duty-grade.” This forces consumers to be more discerning, looking past the brand name on the lower receiver to the actual specifications of the barrel and BCG.
Ultimately, this analysis confirms the engineering principle of diminishing returns. While S-Tier rifles are measurably superior in terms of material science and potential service life, a high-quality A-Tier or B-Tier rifle from a reputable manufacturer offers exceptional reliability and performance for the vast majority of professional and civilian users. The optimal choice is not about buying the “best” rifle in absolute terms, but about selecting the rifle from the appropriate tier that aligns with the user’s specific mission, budget, and performance requirements.
Section 5: Detailed Brand Data and Justification
This section provides the specific data points that informed each brand’s placement within the tiered model, referencing the core evaluation metrics of materials, quality control, performance, and market sentiment.
5.1 S-Tier Brands: Data Points
- Knight’s Armament Company (KAC):
- Provenance: Holds extensive military contracts, including for the M110 SASS, with over $492 million in government awards since 2002.13
- Innovation & Materials: Utilizes proprietary components like the enhanced E3 bolt with rounded lugs for superior durability.22 Barrels are chrome-lined and hammer-forged.52
- Performance: Documented endurance tests show KAC rifles firing 20,145 rounds with zero malfunctions and no cleaning, while maintaining 1.1 MOA accuracy. Consistently rated as a top-tier fighting rifle.22
- Sentiment: Unmatched quality control and legendary status among professionals.39
- Lewis Machine & Tool (LMT):
- Provenance: Holds military contracts and is used by various elite units worldwide.13
- Innovation & Materials: Patented Monolithic Rail Platform (MRP) is milled from a single forging of aerospace aluminum, providing a true quick-change barrel system with a guaranteed return-to-zero.53
- Performance: The MRP system offers exceptional modularity and robustness valued by professional users.53
- Sentiment: Regarded for exceptional fit and finish.31 While the system is top-tier, some users report variable accuracy from factory barrels.27
- Heckler & Koch (H&K):
- Provenance: The HK416 is widely adopted by U.S. SOCOM and other international elite military units.30
- Innovation & Materials: Utilizes a proprietary short-stroke gas piston system for enhanced reliability, running cleaner and cooler than direct impingement systems.
- Performance: Proven superior performance and reliability in the most demanding combat environments.30
- Sentiment: Considered a top-tier manufacturer, though its high cost is a frequent topic of discussion.30
- Geissele Automatics:
- Provenance: Holds major USSOCOM contracts for complete rifle systems, including the Mid-Range Gas Gun – Sniper (MRGG-S) 64 and the Upper Receiver Group-Improved (URG-I).67
- Materials & QC: Super Duty rifles feature in-house CHF, chrome-lined barrels and “Stressproof” bolts, both of which are HPT/MPI tested. BCGs feature advanced Nanoweapon coatings.54
- Performance: Maintained sub-MOA accuracy after 6,400 rounds in military testing for the MRGG-S program.66
- Sentiment: Stellar reputation for premium quality, accuracy, and extreme reliability.21
- Hodge Defense Systems:
- Innovation & Materials: Utilizes proprietary C405 forgings for receivers, which have a stronger strength-to-weight ratio than traditional 7075. Barrels are CHF from proprietary steel with optimized gas ports and a tapered bore for softer recoil and improved velocity.
- Assembly: Employs enhanced mil-spec standards, including oversized takedown/pivot lugs for a tight upper-to-lower fit and thermal fitting of the barrel extension.
- Sentiment: Legendary build quality; highly sought after by professionals for its focus on creating a pure, no-compromise fighting rifle.39
5.2 A-Tier Brands: Data Points
- Radian Weapons:
- Innovation & Materials: Utilizes billet machined 7075-T6 aluminum for its fully ambidextrous A-DAC lower receivers, which feature an integrated, enlarged trigger guard and flared magwell.22
- Components: Integrates best-in-class aftermarket parts, including Geissele triggers and Criterion barrels.22
- Performance: Guarantees Sub-MOA accuracy with match-grade ammunition.22
- Sentiment: Regarded as the pinnacle of commercial quality, representing the highest level of fit, finish, and features available outside of a military-contracted brand.69
- Provenance: While Radian offers a LE/Military discount program 70, it does not hold major government contracts for complete rifle systems, distinguishing it from S-Tier brands.
- Daniel Defense (DD):
- Provenance: Sole-source provider of the RIS II handguard for SOCOM’s SOPMOD II program.14 Popular among Special Operations forces.13
- Materials & QC: Builds rifles with forged 7075-T6 receivers and in-house cold hammer forged (CHF) barrels from 4150 CMV steel. Barrels and M16-profile BCGs are individually HPT/MPI tested.19
- Performance: Documented torture tests include being run over by vehicles and dropped from helicopters.34 Consistently achieves near 1 MOA accuracy with quality ammo.19
- Sentiment: Widely regarded as a top-tier, “bombproof” duty rifle.22
- Bravo Company Manufacturing (BCM):
- Provenance: Favored by military and law enforcement agencies for combat-proven performance.
- Materials & QC: Uses independently certified MIL-SPEC 11595E barrel steel and Carpenter 158 bolts. Every bolt and barrel is individually HPT/MPI tested. Gas keys are properly staked with Grade 8 fasteners. Receivers are forged 7075-T6 aluminum.35
- Performance: Documented 10,000-round torture tests demonstrate high reliability.36
- Sentiment: Brand is built on “professional grade” and “bombproof” reliability with obsessive QC.39
- FN Herstal (FN):
- Provenance: One of the two current prime contractors for the U.S. Military’s M4/M16 rifles.13
- Materials & QC: Civilian FN 15 rifles are built to the same mil-spec standards as their military counterparts, using hard-anodized aluminum receivers and chrome-lined barrels.37
- Performance: Proven durability and reliability from decades of military service.37
- Sentiment: The brand to buy for a true, off-the-shelf mil-spec firearm.42
- Colt:
- Provenance: The original manufacturer of the AR-15/M16 for the military and a current contractor.13 The LE6920 is a mainstay for law enforcement.21
- Materials & QC: Government-contract rifles are built to the full mil-spec TDP.21
- Performance: The Colt M4 Carbine remains a benchmark for a duty-grade rifle.42
- Sentiment: While still an A-Tier choice, some users have noted inconsistent QC on commercial models in recent years.31
- Sons of Liberty Gun Works (SOLGW):
- Provenance: Rapidly growing presence with law enforcement, with over 60 new agencies adopting their rifles in the first half of 2025.16
- Materials & QC: Publishes exacting specifications for every component, including Carpenter 158 bolts, 4340 tool steel extractors, and S7 tool steel pins. Bolts are HPT/MPI tested.7 Barrels are also HPT/MPI tested.38
- Assembly: Emphasizes quality assembly with features like the A5 buffer system for smoother recoil.
- Sentiment: Brand is synonymous with building “fighting rifles” backed by a lifetime warranty.39
- LWRC International:
- Provenance: Rifles have gained favor among specific military units and law enforcement.13
- Innovation & Materials: A leader in piston-driven ARs. Rifles feature cold hammer-forged, spiral-fluted, NiCorr-treated barrels and fully ambidextrous controls.13
- Performance: Piston system offers high reliability and reduced recoil.13
- Sentiment: Highly regarded for quality and innovation in piston systems.30
- Noveske Rifleworks:
- Materials & QC: Uses billet 7075-T6 receivers, 416R stainless steel barrels, and Carpenter 158 bolts that are MPI tested.29
- Performance: Renowned for the exceptional accuracy of its hand-polished match chamber barrels.29
- Sentiment: Considered comparable to KAC and LMT in performance and durability, with a reputation for premium build quality and excellent fit and finish.22
- LaRue Tactical:
- Performance: Guarantees sub-MOA accuracy with match-grade ammunition from every rifle sold.56
- Components: Legendary for producing some of the most accurate barrels and triggers in the industry.37
- Sentiment: A top choice for precision-focused roles due to its robust build quality and consistent accuracy.37
- Primary Weapons Systems (PWS):
- Innovation: Highly regarded for perfecting the long-stroke piston operating system in the AR platform.21
- Materials: Barrels are made in-house from high-quality 41V50 steel.
- Performance: Piston system is known for extreme reliability and a smooth recoil impulse.21
- Sentiment: A top A-Tier manufacturer and the go-to choice for a long-stroke piston AR.21
5.3 B-Tier Brands: Data Points
- Aero Precision:
- Materials: A major OEM manufacturer of high-quality, in-spec forged 7075-T6 receivers used by many other brands.40 Their M4E1 line is built on this foundation.26
- Sentiment: Offers one of the best value propositions on the market.21 However, recent customer sentiment points to occasional QC inconsistencies in the assembly of complete rifles, which keeps them from the A-Tier.31
- Springfield Armory (SAINT line):
- Materials: The SAINT Victor uses forged 7075-T6 aluminum receivers and an M16-profile BCG with a Carpenter 158 steel bolt.43
- Performance: Capable of 1.5-2 MOA accuracy.32 The company’s documented 10,000-round torture test of their XD-M pistol suggests a robust manufacturing and QC capability.
- Sentiment: A solid, feature-rich package that provides good value, often available for under $1,000.21
- IWI (Zion-15):
- Materials: Built with forged 7075-T6 aluminum receivers, comparable to higher-end rifles.22
- Performance: IWI states the rifle is capable of 1 MOA accuracy or less and was tested for over 10,000 rounds with no significant degradation.18
- Sentiment: Considered a top performer that is hard to beat for its price point; often described as “built like a tank”.22
- Smith & Wesson (M&P15 line):
- Performance: The M&P15 Sport is described as “comically reliable” for an entry-level rifle.42
- Sentiment: Has a long-standing reputation for reliability and value, making it a go-to recommendation for a first AR-15.21 While generally reliable, occasional out-of-the-box QC issues are noted by users.59
- Ruger (AR-556 MPR):
- Materials: The MPR model features a cold hammer-forged 4140 chrome-moly steel barrel, forged 7075-T6 receivers, and a mil-spec 9310 steel bolt that is shot-peened and proof-tested.21
- Components: Significant upgrades over the base model, including a rifle-length gas system for softer recoil and the Ruger Elite 452 two-stage trigger.21
- Sentiment: A high-performance package for a moderate price that elevates it into the B-Tier.21
- Centurion Arms:
- Provenance: Founded by a U.S. Navy SEAL, with a focus on professional-grade components.37
- Components: Known for high-quality barrels and handguards.
- Sentiment: A highly respected, if less common, choice known for durability and performance reflecting real-world operational experience.37
- American Defense Manufacturing (ADM):
- Provenance: Used by multiple police agencies and military personnel.22
- Materials & Components: Known for high-quality billet 7075-T6 receivers featuring one of the best fully ambidextrous control setups. Complete builds use premium components like Criterion barrels and Geissele triggers.22
- Sentiment: Considered among the top five AR-15s, offering a high-end, feature-rich rifle that is duty-ready out of the box.22
- Faxon Firearms:
- Materials & Innovation: Known for quality barrels and lightweight designs, such as the ION-X rifle which uses forged 7075-T6 receivers and a carbon fiber handguard to weigh in at under 5 lbs.22
- Performance: The ION-X withstood a 600+ round suppressed torture test while maintaining accuracy and running cool.22
- Sentiment: An innovative company providing excellent value and modern features.21
- Midwest Industries:
- Materials: Uses 6061 aluminum for some components, such as their Combat Rifle Sights, to balance durability and cost.
- Reputation: Long known for excellent handguards and accessories, they now have a strong reputation for their well-built complete rifles.31
- Sentiment: Consistently well-regarded by the user community for good performance and value.31
- SIG Sauer (M400 Tread):
- Provenance: A budget-friendly entry from a major defense contractor that recently secured the multi-billion dollar Next Generation Squad Weapon contract.61
- Materials & Components: Features a carbon steel barrel with a nitride finish and bilateral controls.48
- Performance: Capable of sub-2-inch groups, though the trigger is a heavy 6.5 lbs and the system can be overgassed.48
- Sentiment: A solid foundation with good features for its price point.21
- CMMG:
- Innovation: Known for their unique Radial Delayed Blowback system and for chambering ARs in a wide variety of calibers.29
- Materials: Uses a mix of billet 6061 T6 and forged 7075 T6 aluminum receivers depending on the specific model.17
- Sentiment: Standard 5.56 rifles are considered solid, reliable performers that offer good value.29
- POF-USA (Patriot Ordnance Factory):
- Innovation: A well-known manufacturer of piston-driven ARs with numerous proprietary enhancements.37
- Materials: Uses billet receivers and 4150 CrMoV steel barrels with a nitride heat-treated finish.45
- Sentiment: A reliable and high-quality alternative to direct impingement systems.37
- Spikes Tactical:
- Materials: Adheres to mil-spec standards for components.2
- Sentiment: Despite a polarizing marketing style, their rifles are known for good quality control and reliable performance, making them a popular B-Tier choice.56
- Armalite:
- Provenance: The company where the AR-15 was originally designed.28
- Materials: Modern M-15 rifles use forged 7075 T6 aluminum receivers and chrome molybdenum vanadium steel barrels.45
- Sentiment: While not always at the cutting edge, their firearms are known to be reliable and well-made.46
- Wilson Combat:
- Provenance: A world-class custom firearms manufacturer, primarily known for 1911s.45
- Reputation: Applies their expertise in meticulous craftsmanship and premium components to the AR platform, producing extremely high-quality, accurate, and reliable rifles.45
5.4 C-Tier Brands: Data Points
- Palmetto State Armory (PSA) – (Premium/CHF Lines):
- Components: Premium lines offer significant value by using components like cold hammer-forged barrels made by FN Herstal.21
- Performance: These specific lines can provide near B-Tier performance at a budget price, with accuracy in the 2-3 MOA range.31
- Sentiment: The value is undeniable, but the brand’s overall reputation for inconsistent QC on their high-volume standard lines prevents a higher placement.39
- Stag Arms:
- Innovation: One of the first and most prominent manufacturers of true left-handed AR-15s.21
- Sentiment: A long history of producing solid, mil-spec compliant rifles that serve as a dependable, no-frills entry point into the AR platform.21
- Rock River Arms:
- Provenance: Has a history of holding law enforcement contracts.46
- Performance: Known for building accurate rifles, often guaranteeing 1 MOA at 100 yards and featuring their two-stage match trigger as standard.46
- Sentiment: While accurate, their use of some proprietary parts and designs that are now considered dated places them in the C-Tier in the modern market.21
- Windham Weaponry:
- Provenance: Founded by the original owner of Bushmaster with a commitment to quality.56
- Sentiment: Produces solid, reliable, if basic, mil-spec firearms that are a dependable C-Tier choice.47
- DPMS Panther Arms:
- Materials: Legacy models used forged 7075-T6 lowers but sometimes used extruded 6066-T6 uppers, a slight step down in material strength.
- Sentiment: A major player in the budget market for decades with a reputation for being functional and reliable workhorses.37 Note: This applies to legacy production.
- Bushmaster:
- Provenance: A well-known name that has produced a vast number of AR-15s over the years.29
- Sentiment: Legacy models are considered functional, entry-level rifles that adhere to basic specifications.29 Note: This applies to legacy production.
- Del-Ton:
- Components: Offers basic, mil-spec compliant rifle kits and complete firearms with forged receivers and carbine-length gas systems.
- Sentiment: Known to be functional for recreational use but not regarded for high-end reliability.39
- Radical Firearms:
- Materials: Uses 4140 Chrome Moly Vanadium barrels, a step down from the mil-spec 4150 CMV standard.
- Sentiment: While early models had a poor reputation, user sentiment suggests newer production has improved. They remain a budget brand with an accepted risk of inconsistency.39
- Andro Corp Industries:
- Materials: Builds rifles with quality components for the price, including 4150 CMV Melonite barrels and forged 7075 receivers.
- Sentiment: Has gained a reputation as one of the best budget-friendly options, making them a strong contender in the C-Tier.39
- Yankee Hill Machine (YHM):
- Reputation: Well-respected for their suppressors and a wide range of AR-15 parts and accessories.25
- Sentiment: Their complete rifles are known to be well-made and reliable, offering a solid C-Tier value.25
- Lead Star Arms:
- Materials: Uses 4150V Chrome Moly Vanadium Steel barrels.48
- Sentiment: A lesser-known brand that has received positive reviews for packing a lot of features and good performance into a sub-$1000 rifle.21
- Rise Armament:
- Components: Known primarily for their high-quality and affordable drop-in triggers.
- Sentiment: Their complete rifles, like the Watchman, are well-equipped for their price point and represent a solid C-Tier choice.25
- Zev Technologies:
- Reputation: Famous for their high-end Glock modifications and well-machined components.49
- Sentiment: Their ARs are feature-rich, but their price point often places them against tougher competition, landing them in the C-Tier for overall value in the AR market.49
- Seekins Precision:
- Reputation: Known for high-quality, accurate billet receivers and rifles with a strong presence in the competition circuit.30
- Sentiment: An excellent choice for precision, but in the highly competitive general-purpose market, they land in the upper end of the C-Tier.30
- Falkor Defense:
- Materials & Innovation: Known for their unique aesthetic and high-end billet receivers with full ambidextrous controls.
- Sentiment: Produces very well-made firearms, but like other boutique billet manufacturers, their high price relative to performance against top-tier forged rifles places them in the C-Tier for duty-use consideration.45
5.5 D-Tier Brands: Data Points
- Anderson Manufacturing:
- Materials: Uses forged 7075-T6 receivers, which are generally considered functional and in-spec. However, their complete rifles use budget components, including 9310 steel bolts (not C158) and 4150 non-CMV barrels.50
- Performance: Accuracy is acceptable for plinking, but not precision.
- Sentiment: The “Poverty Pony” is a quintessential D-Tier rifle. It might run perfectly, or it might have issues out of the box due to inconsistent quality control.39
- Palmetto State Armory (PSA) – (Standard/Freedom Line):
- Materials: To achieve market-leading low prices, their base-level “Freedom” line makes significant compromises on materials and may use 4150V steel barrels.62
- Performance: Passed a mud torture test, but failed a sand test that an AK passed.63
- Sentiment: Known for inconsistent QC, shipping issues, and occasional assembly errors.39 The business model is based on high volume, and the end-user assumes the risk of receiving a rifle that may need tuning or service.39
- Bear Creek Arsenal (BCA):
- Materials: Uses forged receivers and 9310 steel for bolts.22
- Sentiment: Widely cited by the user community as having significant and recurring quality control issues, from poor machining to incorrect assembly, and poor customer service.39
- Diamondback Firearms:
- Materials & Components: Focuses on the entry-level market, which necessitates the use of budget components and processes.31 Their higher-end Diamond Series uses 4150CrMov barrels and includes a shot-peened, MPI bolt carrier group.48
- Performance: The higher-end models can be surprisingly accurate, achieving sub-MOA groups.48
- Sentiment: The brand has a broad reputation for inconsistent quality and is best suited for recreational shooting where absolute reliability is not a primary concern.48
- ATI (American Tactical Imports):
- Materials: Known for using fiberglass-composite polymer receivers with zinc metal inserts to reduce weight and cost, a significant deviation from the mil-spec aluminum standard.
- Sentiment: Frequently cited by users as having reliability and quality control problems, placing them firmly in the “junk-tier”.39
- Davidson Defense:
- Business Model: Offers extremely low-priced parts kits and complete uppers by using the most inexpensive components available.45
- Sentiment: This model leads to a high degree of variability in quality and reliability. A choice for builders on the tightest of budgets who are willing to diagnose and fix potential issues themselves.45
- Bushmaster (New Production):
- Sentiment: It is important to distinguish between older, well-regarded Bushmaster rifles and the products released under new ownership. Recent iterations have not maintained the same reputation for quality and are now considered a budget-level, D-Tier option.29
- DPMS (New Production):
- Sentiment: Similar to Bushmaster, the DPMS brand has changed hands, and new production rifles are not considered to be of the same quality as their predecessors. They now compete in the budget space and fall into the D-Tier.37
- Olympic Arms:
- Sentiment: An older brand in the AR market with a long-standing reputation for using proprietary parts and having inconsistent quality control. Generally considered a lower-tier, hobbyist-grade manufacturer.
- Blackthorne / Hesse / Vulcan:
- Sentiment: These brands, under various names, have a long and well-documented history of producing extremely low-quality and often unsafe firearms. They are universally regarded by the firearms community as a brand to avoid entirely and represent the absolute bottom of the D-Tier.
5.6 Quantitative Scoring Summary
To provide a more granular and defensible basis for each brand’s tier placement, the following table presents a quantitative scoring matrix. Each brand was scored on a scale of 1 to 10 (with 10 being the highest) across the five core evaluation criteria: Quality (Materials & Manufacturing), Durability (QC & Provenance), Accuracy, Reliability, and Customer Satisfaction (Market Sentiment & Value). The total score determines the final tier placement.
| Brand | Quality | Durability | Accuracy | Reliability | Cust. Sat. | Total | Tier |
| S-Tier Brands | |||||||
| Knight’s Armament (KAC) | 10 | 10 | 9 | 10 | 10 | 49 | S |
| Heckler & Koch (H&K) | 10 | 10 | 9 | 10 | 8 | 47 | S |
| Geissele Automatics | 9 | 10 | 9 | 9 | 9 | 46 | S |
| Lewis Machine & Tool (LMT) | 10 | 10 | 8 | 9 | 9 | 46 | S |
| Hodge Defense Systems | 10 | 9 | 9 | 9 | 9 | 46 | S |
| A-Tier Brands | |||||||
| Radian Weapons | 10 | 7 | 10 | 9 | 9 | 45 | A |
| Daniel Defense (DD) | 9 | 9 | 9 | 9 | 9 | 45 | A |
| Bravo Company (BCM) | 9 | 9 | 8 | 10 | 9 | 45 | A |
| Sons of Liberty (SOLGW) | 9 | 9 | 8 | 9 | 9 | 44 | A |
| FN Herstal (FN) | 9 | 10 | 7 | 9 | 8 | 43 | A |
| Noveske Rifleworks | 9 | 8 | 10 | 8 | 8 | 43 | A |
| LWRC International | 9 | 8 | 8 | 9 | 8 | 42 | A |
| LaRue Tactical | 8 | 8 | 10 | 8 | 8 | 42 | A |
| Primary Weapons (PWS) | 9 | 8 | 8 | 9 | 8 | 42 | A |
| Colt | 9 | 9 | 7 | 9 | 7 | 41 | A |
| B-Tier Brands | |||||||
| IWI | 8 | 7 | 9 | 8 | 8 | 40 | B |
| American Defense (ADM) | 8 | 7 | 9 | 8 | 8 | 40 | B |
| Wilson Combat | 8 | 8 | 9 | 8 | 7 | 40 | B |
| Springfield Armory | 8 | 8 | 7 | 8 | 8 | 39 | B |
| Centurion Arms | 8 | 8 | 8 | 8 | 7 | 39 | B |
| Aero Precision | 8 | 7 | 8 | 7 | 8 | 38 | B |
| Ruger (MPR) | 7 | 7 | 8 | 8 | 8 | 38 | B |
| Faxon Firearms | 8 | 7 | 8 | 7 | 8 | 38 | B |
| Smith & Wesson | 7 | 7 | 7 | 8 | 8 | 37 | B |
| Midwest Industries | 7 | 7 | 7 | 8 | 8 | 37 | B |
| POF-USA | 8 | 7 | 7 | 8 | 7 | 37 | B |
| SIG Sauer (M400) | 7 | 7 | 7 | 7 | 8 | 36 | B |
| CMMG | 7 | 7 | 7 | 7 | 7 | 35 | B |
| Spikes Tactical | 7 | 7 | 7 | 7 | 7 | 35 | B |
| Armalite | 7 | 7 | 7 | 7 | 7 | 35 | B |
| C-Tier Brands | |||||||
| Rock River Arms | 6 | 7 | 8 | 7 | 6 | 34 | C |
| Seekins Precision | 7 | 6 | 8 | 7 | 6 | 34 | C |
| PSA (Premium Lines) | 7 | 6 | 7 | 7 | 7 | 34 | C |
| Andro Corp Industries | 7 | 6 | 7 | 6 | 7 | 33 | C |
| Yankee Hill Machine | 6 | 6 | 7 | 7 | 7 | 33 | C |
| Stag Arms | 6 | 6 | 6 | 7 | 7 | 32 | C |
| Windham Weaponry | 6 | 6 | 6 | 7 | 7 | 32 | C |
| DPMS (Legacy) | 6 | 6 | 6 | 7 | 6 | 31 | C |
| Bushmaster (Legacy) | 6 | 6 | 6 | 7 | 6 | 31 | C |
| Lead Star Arms | 6 | 6 | 7 | 6 | 6 | 31 | C |
| Rise Armament | 6 | 6 | 7 | 6 | 6 | 31 | C |
| Zev Technologies | 7 | 6 | 7 | 6 | 5 | 31 | C |
| Falkor Defense | 7 | 6 | 7 | 6 | 5 | 31 | C |
| Del-Ton | 6 | 5 | 6 | 6 | 6 | 29 | C |
| Radical Firearms | 6 | 5 | 6 | 6 | 6 | 29 | C |
| D-Tier Brands | |||||||
| Anderson Mfg. | 5 | 5 | 5 | 5 | 6 | 26 | D |
| PSA (Standard Lines) | 5 | 4 | 6 | 5 | 6 | 26 | D |
| Diamondback | 4 | 4 | 5 | 5 | 5 | 23 | D |
| Bushmaster (New) | 4 | 4 | 5 | 5 | 4 | 22 | D |
| DPMS (New) | 4 | 4 | 5 | 5 | 4 | 22 | D |
| Olympic Arms | 4 | 4 | 5 | 4 | 4 | 21 | D |
| Bear Creek Arsenal | 3 | 3 | 4 | 3 | 3 | 16 | D |
| ATI | 3 | 3 | 4 | 3 | 3 | 16 | D |
| Davidson Defense | 3 | 3 | 4 | 3 | 3 | 16 | D |
| Blackthorne / Hesse | 1 | 1 | 1 | 1 | 1 | 5 | D |
Appendix: Data Collection and Scoring Methodology
Data Sources
The analysis in this report is a synthesis of data from a wide range of publicly available sources to ensure a comprehensive and balanced perspective. The primary sources include:
- Industry Publications and Reviews: Over 50 articles and reviews from established online firearm publications such as Pew Pew Tactical, Gun Made, American Firearms, The Armory Life, and Minuteman Review were analyzed. These sources provided baseline rankings, feature comparisons, and hands-on performance reviews.
- Manufacturer Specifications: Direct manufacturer websites and official product specification sheets for all 50 brands were consulted to gather objective data on materials (e.g., barrel steel, bolt composition, receiver type), manufacturing processes (e.g., cold hammer forging), and quality control claims (e.g., HPT/MPI testing).
- Government & Agency Data: Public databases on government contracts were reviewed to verify claims of military and law enforcement supply, which serves as a key indicator of a brand’s ability to meet stringent quality and production standards.
- Community Sentiment Analysis: A qualitative review of hundreds of user-generated discussions from high-traffic, knowledgeable online communities, primarily Reddit’s /r/ar15, was conducted. This analysis was used to gauge long-term customer satisfaction, identify recurring quality control trends (both positive and negative), and understand the market consensus on a brand’s value and reliability.
Scoring Rationale
The 1-to-10 scoring for each of the five criteria was assigned based on a consistent rubric derived from the collected data.
- Quality (Materials & Manufacturing):
- 10: Use of proprietary, enhanced materials (e.g., Hodge C405 forgings), significant engineering innovation (e.g., LMT monolithic rail), and flawless machining.
- 8-9: Consistently exceeds mil-spec standards (e.g., CHF barrels, C158 bolts, individual HPT/MPI).
- 6-7: Reliably meets mil-spec on all critical components (e.g., Forged 7075-T6 receivers, C158 or high-quality 9310 bolts).
- 4-5: Deviates from mil-spec on some components to reduce cost (e.g., 4140 steel barrels, inconsistent use of C158 bolts).
- 1-3: Significant deviations from established standards (e.g., polymer receivers, known use of lower-grade materials).
- Durability (QC & Provenance):
- 10: Holds major SOCOM/military contracts for complete rifle systems and has documented, extreme-use torture tests (e.g., 20,000+ rounds without failure).
- 8-9: Holds major military/LE contracts for components or rifles; documented high-round-count tests (10,000+ rounds).
- 6-7: Reputable OEM manufacturer with some LE contracts and consistently positive long-term user reviews.
- 4-5: Reports of inconsistent quality control; relies on batch testing instead of individual component testing.
- 1-3: Widespread, documented reports of quality control failures and poor customer service.
- Accuracy:
- 10: Guarantees sub-MOA accuracy with match-grade ammunition; uses premium, match-grade barrels.
- 8-9: Consistently capable of achieving ~1 MOA with match-grade ammunition.
- 6-7: Meets or exceeds the mil-spec standard, typically achieving 1.5-2 MOA.
- 4-5: Adheres to the basic mil-spec accuracy standard of 2-4 MOA.
- 1-3: Known for poor accuracy due to issues with barrels or assembly.
- Reliability:
- 10: Flawless performance in documented high-round-count and torture tests; trusted by elite military units.
- 8-9: Extremely low failure rates reported; widely trusted for professional duty use.
- 6-7: Generally reliable for civilian applications; occasional issues are reported but are typically resolved by the manufacturer.
- 4-5: “Hit or miss” reliability; may require tuning or parts replacement out of the box.
- 1-3: Known for frequent malfunctions and a high rate of component failure.
- Customer Satisfaction (Market Sentiment & Value):
- 10: Holds a legendary status within the community; high resale value and excellent warranty/customer service.
- 8-9: Overwhelmingly positive community feedback; considered an excellent value for its performance tier.
- 6-7: Generally positive reputation and a strong value proposition; some complaints exist but are outweighed by satisfied customers.
- 4-5: Mixed community reviews, often cited for QC issues but recognized for its low price point.
- 1-3: Overwhelmingly negative community feedback; “avoid at all costs” reputation.
Final Tier Assignment
The final tier for each brand was determined by the sum of its scores across the five categories, with score ranges corresponding to each tier: S-Tier (46-50), A-Tier (41-45), B-Tier (35-40), C-Tier (29-34), and D-Tier (5-28). This quantitative approach ensures that each placement is a direct reflection of the available data.
Please share the link on Facebook, Forums, with colleagues, etc. Your support is much appreciated and if you have any feedback, please email us in**@*********ps.com. If you’d like to request a report or order a reprint, please click here for the corresponding page to open in new tab.
Works cited
- AR15 Manufactures Tier list, Former Special Forces guy ranks best rifles. – YouTube, accessed August 10, 2025, https://www.youtube.com/watch?v=OggPnYR4zLs&pp=0gcJCfwAo7VqN5tD
- Midwest Industries, 556 Bolt Carrier Group, C158 Carpenter Steel, Black Nitride, accessed August 10, 2025, https://aerospacearms.com/midwest-industries-556-bolt-carrier-group-c158-carpenter-steel-black-nitride/
- HK 416 | Weaponsystems.net, accessed August 10, 2025, https://www.weaponsystems.net/weaponsystem/AA04+-+HK+416.html
- Midwest Industries Combat Rifle Fixed Rear Sight – Primary Arms, accessed August 10, 2025, https://www.primaryarms.com/midwest-industries-combat-rifle-fixed-rear-sight
- Lead Star Arms Grunt Pistol – 10.5″ .223 Wylde w/ 10″ Handguard (Concrete Grey), accessed August 10, 2025, https://palmettostatearmory.com/lead-star-arms-grunt-10-5-223-5-56-ar-15-pistol-w-11-grunt-handguard-concrete-grey11.html
- Bear Creek Arsenal AR-15 Review – The Best Budget AR-15? – Survival Stoic, accessed August 10, 2025, https://survivalstoic.com/bear-creek-arsenal-ar-15-review/
- First AR — Any Advice?? | Shooters’ Forum, accessed August 10, 2025, https://forum.accurateshooter.com/threads/first-ar-any-advice.4117606/
- MARS-L Piston Spec Sheet, accessed August 10, 2025, https://www.lmtdealer.com/wp-content/uploads/2021/03/MARS-L-Piston-Spec-Sheet-1.pdf
- Faxon ION-X Hyperlite 5.56 Rifle – Titanium Cerakote, accessed August 10, 2025, https://faxonfirearms.com/faxon-ion-x-hyperlite-5-56-rifle-titanium-cerakote/
- SOLGW EXO3 – Sons Of Liberty Gun Works, accessed August 10, 2025, https://sonsoflibertygw.com/solgw-exo3/
- Contracts for April 21, 2022 – > U.S. Department of Defense > Contract, accessed August 10, 2025, https://www.defense.gov/News/Contracts/Contract/Article/3007036/
- ATI Omni Hybrid Maxx 5.56 AR-15 Pistol – 30 Round Mag – 7.5″ – Primary Arms, accessed August 10, 2025, https://www.primaryarms.com/ati-omni-hybrid-maxx-556-pistol-7.5in
- Bravo Company USA AR15 After 10,000 Round Torture Test – YouTube, accessed August 10, 2025, https://www.youtube.com/watch?v=kmdNRkRmK3E
- Billet vs. Forged Lower Receiver: What’s the Difference? : r/ar15 – Reddit, accessed August 10, 2025, https://www.reddit.com/r/ar15/comments/15t7la/billet_vs_forged_lower_receiver_whats_the/
- Rifle type AR15 AERO PRECISION M4E1 black barrel 18 ” cal. 5.56mm – Simac, accessed August 10, 2025, https://simac.fr/en/produit-2555-Rifle-type-AR15-AERO-PRECISION-M4E1-black-barrel-18-cal.-5.56mm
- [Review+Video] Daniel Defense DDM4 V7: Worth It?, accessed August 10, 2025, https://www.pewpewtactical.com/daniel-defense-ddm4-v7-review/
- 20000 Rounds Through An Knight’s Armament SR-15 MOD2…Now With SAND!!!!!, accessed August 10, 2025, https://www.youtube.com/watch?v=UvPmJYcgBSo
- Anderson Manufacturing AR-15 Utility Rifle 16″ Barrel – M-Lok Rail .223/5.56 NATO (COMPLETE ASSEMBLY – UPPER AND LOWER COMBO) (Online Only – NOT VALID IN STORE) | The Castle Arms, accessed August 10, 2025, https://thecastlearms.com/product-details?id=299863451
- AR-15 best bang for your buck brand? : r/ar15 – Reddit, accessed August 10, 2025, https://www.reddit.com/r/ar15/comments/1j2oibs/ar15_best_bang_for_your_buck_brand/
- Radian Weapons AR-15 Rifles For Sale Online – Xtreme Guns And Ammo, accessed August 12, 2025, https://xtremegunsandammo.com/rifles-for-sale/radian-weapons/
- Barrel Steel and Twist Rate – Windham Weaponry Inc., accessed August 10, 2025, https://www.windhamweaponry.com/barrel-steel-and-twist-rate/
- Best AR-15 Upper & Lower Receivers | Top Forged & Billet Options – Liberty Safe, accessed August 10, 2025, https://www.libertysafe.com/blogs/the-vault/best-ar-15-upper-and-lower-receivers
- What Makes an AR 15 Mil Spec? – RailScales LLC, accessed August 10, 2025, https://railscales.us/blog/what-makes-an-ar-15-mil-spec/
- Top Best AR-15 Brands: From Beginner To Baller | American Firearms, accessed August 10, 2025, https://www.americanfirearms.org/best-ar-15-rifles/
- LMT AR 15 MLR .223 Rem/6,8 SPC/.204 Ruger/.224 Valkyrie – Rifles – lvlarmory.com, accessed August 10, 2025, https://www.lvlarmory.com/rifles/732/lmt-ar-15-mlr-.223-rem-6-8-spc-.204-ruger-.224-valkyrie-id3714/detail
- Who products the best quality rifle on the AR platform? : r/liberalgunowners – Reddit, accessed August 10, 2025, https://www.reddit.com/r/liberalgunowners/comments/1i92cy7/who_products_the_best_quality_rifle_on_the_ar/
- PTS Centurion Arms – CM4 C4-10 ERG, accessed August 10, 2025, https://www.ptssyndicate.com/product-page/pts-cm4-c4-10-erg
- Are AERO Precision Parts Worth It? Unpacking Quality, Performance, and Value, accessed August 10, 2025, https://blackrifledepot.com/blog/are-aero-precision-parts-worth-it-unpacking-quality-performance-and-value/
- Law Enforcement Agency Sales – Aero Precision, accessed August 10, 2025, https://www.aeroprecisionusa.com/law-enforcement
- Sons of Liberty Gun Works Announces Major Growth in 2025 | Outdoor Wire, accessed August 10, 2025, https://www.theoutdoorwire.com/releases/32304096-77d5-4951-ac20-c2a26eaf7df2
- Billet vs Forged AR 15 Upper Receivers #shorts – YouTube, accessed August 10, 2025, https://www.youtube.com/watch?v=z53n0o1GBY0
- Forged Vs. Billet AR-15 Lower Receivers – Primary Arms, accessed August 10, 2025, https://blog.primaryarms.com/guide/forged-vs-billet-ar15-lower-receivers/
- Law enforcement AR recommendations : r/Firearms – Reddit, accessed August 10, 2025, https://www.reddit.com/r/Firearms/comments/1c9k67j/law_enforcement_ar_recommendations/
- LaRue Tactical 16.1 Inch PredatOBR 7.62 – LaRue Tactical, accessed August 10, 2025, https://www.larue.com/products/larue-tactical-16-1-inch-predatobr-7-62/
- Ruger® AR-556® MPR Autoloading Rifle Model 8514, accessed August 10, 2025, https://ruger.com/products/ar556MPR/specSheets/8514.html
- Noveske 13.7 GEN 4 Infidel Rifle – Sniper Grey | Big Tex Ordnance, accessed August 10, 2025, https://www.bigtexordnance.com/product/noveske-13-7-gen-4-infidel-rifle-sniper-grey/
- LMT, accuracy through statistical probably? : r/LewisMachineTool – Reddit, accessed August 10, 2025, https://www.reddit.com/r/LewisMachineTool/comments/1ihd8dn/lmt_accuracy_through_statistical_probably/
- Top 5 AR 15 brands : r/ar15 – Reddit, accessed August 10, 2025, https://www.reddit.com/r/ar15/comments/1ir3m6y/top_5_ar_15_brands/
- 6061 vs 7075 Aluminum Alloy: A Comprehensive Comparison – Unionfab, accessed August 10, 2025, https://www.unionfab.com/blog/2024/03/6061-vs-7075-aluminum
- XD-M 10mm 10,000 Round Torture Test – The Armory Life, accessed August 10, 2025, https://www.thearmorylife.com/xd-m-10mm-10000-round-torture-test/
- Tier List : r/ar15 – Reddit, accessed August 10, 2025, https://www.reddit.com/r/ar15/comments/1ikxcft/tier_list/
- AR-15–style rifle – Wikipedia, accessed August 10, 2025, https://en.wikipedia.org/wiki/AR-15%E2%80%93style_rifle
- MK116 MOD 2-M Upper .223 Wylde – Primary Weapons Systems, accessed August 10, 2025, https://primaryweapons.com/mk116-mod-2-m-upper-223-wylde/
- LaRue Tactical SURG Rifle 1,000 Round TORTURE TEST! – YouTube, accessed August 10, 2025, https://www.youtube.com/watch?v=GsYD6JKm840
- The Most Well-Known AR-15 Manufacturer by State : r/ar15 – Reddit, accessed August 10, 2025, https://www.reddit.com/r/ar15/comments/197pgzz/the_most_wellknown_ar15_manufacturer_by_state/
- Model 2020 Accuracy Guarantee – Springfield Armory, accessed August 10, 2025, https://www.springfield-armory.com/model-2020-accuracy-guarantee/
- Reliable Brand AR15 : r/SocialistRA – Reddit, accessed August 10, 2025, https://www.reddit.com/r/SocialistRA/comments/1k086y5/reliable_brand_ar15/
- The 12 Best AR-15 Rifles in 2025: The Ultimate List – CAT Outdoors, accessed August 10, 2025, https://catoutdoors.com/best-ar-15/
- Rifles – AR-15 – Primary Arms, accessed August 10, 2025, https://www.primaryarms.com/ar-15/rifles
- Diamondback DB15 Review 2025: Is the Diamond Series Worth It? – Gun University, accessed August 10, 2025, https://gununiversity.com/diamondback-db15-review/
- Radical Firearms RF-15 .223Rem/5.56NATO 16″ 30+1 – Gunbuyer, accessed August 10, 2025, https://www.gunbuyer.com/radical-firearms-rf-15-socom-b5-5-56nato-16-30-1-00028.html
- A Long Term Review of the PSA PA-15 – American Firearms, accessed August 10, 2025, https://www.americanfirearms.org/psa-pa-15-review/
- Super Duty® MOD1 Rifle, 14.5″, 5.56MM – DDC – Geissele Automatics, accessed August 10, 2025, https://geissele.com/super-duty-mod1-rifle-14-5-5-56m-ddc.html
- Aluminum Receivers: 6061 vs 7075 : r/ar15 – Reddit, accessed August 10, 2025, https://www.reddit.com/r/ar15/comments/1docql9/aluminum_receivers_6061_vs_7075/
- bcm recce 14.5″ mcmr carbine pinned & welded – Freedom Trading Co, accessed August 10, 2025, https://www.freedomtrading.com/BCM-Recce-14-5-MCMR-p/bcm-carbine-780-750.htm
- First Look: Sons of Liberty Mk1 AR-15 SBR | An Official Journal Of The NRA, accessed August 10, 2025, https://www.shootingillustrated.com/content/first-look-sons-of-liberty-mk1-ar-15-sbr/
- Palmetto State Armory AR-15 Torture Testing – YouTube, accessed August 10, 2025, https://www.youtube.com/watch?v=JxGtfpxqP3Q
- Category:AR-15 style rifles – Wikipedia, accessed August 10, 2025, https://en.wikipedia.org/wiki/Category:AR-15_style_rifles
- 4150 Steel: Uses, Composition, Properties | Xometry, accessed August 10, 2025, https://www.xometry.com/resources/materials/4150-alloy-steel/
- ADM UIC MOD-2 Pistol | Order Online Now – American Defense Manufacturing, accessed August 10, 2025, https://www.admmfg.com/adm-uic-mod2-pistol
- Knight’s Armament Company – HigherGov, accessed August 10, 2025, https://www.highergov.com/awardee/knights-armament-company-10004897/
- SIG M400 TREAD AR Pistol Review – Guns and Ammo, accessed August 10, 2025, https://www.gunsandammo.com/editorial/sig-m400-tread-ar-pistol-review/369253
- Army Special Forces Cannot Get Enough Of The Geissele Super Duty URGI – The National Interest, accessed August 12, 2025, https://nationalinterest.org/blog/reboot/army-special-forces-cannot-get-enough-geissele-super-duty-urgi-165383
- USSOCOM Awards Geissele Automatics Contract for MRGG-S (Mid Range Gas Gun – Sniper) – Frag Out! Magazine, accessed August 12, 2025, https://fragoutmag.com/ussocom-awards-geissele-automatics-contract-for-mrgg-s-mid-range-gas-gun-sniper/
- USSOCOM Awards Geissele Automatics $29 Million for Mid Range Gas Gun – Sniper, accessed August 12, 2025, https://soldiersystems.net/2023/09/30/ussocom-awards-geissele-automatics-29-million-for-mid-range-gas-gun-sniper/
- Geissele Wins $29 Million SOCOM Sniper Rifle Contract – Guns.com, accessed August 12, 2025, https://www.guns.com/news/2023/10/03/geissele-wins-29-million-socom-sniper-rifle-contract
- Geissele USASOC URG-I Near Clone AR-15 Complete Upper Receiver – MidwayUSA, accessed August 12, 2025, https://www.midwayusa.com/product/1020069158
- URG-I Complete Upper, Near Clone, 14.5″, 5.56mm – Geissele Automatics, accessed August 12, 2025, https://geissele.com/urg-i-complete-near-clone-14-5-5-56mm.html
- 14 Best AR-15s In 2025: Ultimate Guide & Build Photos – Gun Made, accessed August 10, 2025, https://www.gunmade.com/best-ar-15/
- LE / Military Registration – Radian Weapons, accessed August 12, 2025, https://www.radianweapons.com/en/account/lemil-register