Tag Archives: Yugo

Two Rivers Arms Built Yugo M72B1

Once in a while I get to have fun.  For years I have worked with Two Rivers Arms making their grips so I knew they did a good job.  Well over a year ago, I bought two Apex M72B1 kits to have as prototypes but never had time to build them.  I must admit I have fun building rifles but the time just isn’t there any more.  So, given our new M72 handguards were almost ready, I called up Tim at Two Rivers and asked if they could build an M72B1 that looked like it came straight from the factory and that is exactly what they did.  Here are the amazing results of their efforts:

Yugo M72B1 rifle lying on a pile of firewood

Two Rivers Arms Yugo M72B1 rifle with wooden furniture on a pile of logs.

Two Rivers Arms built Yugo M72B1 rifle lying on a pile of firewood

Two Rivers Arms Yugo M72B1 rifle with wooden stock on pile of wood logs

Two Rivers Arms Yugo M72B1 rifle on a pile of logs

Black AK-47 style rifle with wooden stock on wood logs

Close-up of Two Rivers Arms built Yugo M72B1 wooden stock

Close-up of the front sight and gas block on a Two Rivers Arms Yugo M72B1 rifle.

Note, the following is our Yugo M70/M72 grip:

Close up of Two Rivers Arms Built Yugo M72B1 rifle grip and trigger

Two Rivers Arms Built Yugo M72B1 rifle on a log

Close-up of a Two Rivers Arms Yugo M72B1 rifle's wooden handguard and receiver.

Two Rivers Arms built Yugo M72B1 rifle on logs

Let me give you a quick run down of the parts you see above and a few you don’t:

  • Yugo M72B1 kit from Apex with a new Green Mountain barrel
  • Nodak Spud NDS-9 receiver
  • New virgin stock set from R-Guns
  • One of our Yugo M70 pistol grips
  • Tapco G2 FCG
  • RSA FCG retainer plate (I hate the shepherd hooks)
  • Real Yugo BHO Magazine

Two Rivers did the assembly, engraving, bluing and hooked me up with the right muzzle nut and cleaning rod.  This rifle looks simply amazing.  If you ever are looking for a builder, give them a shout … now if I can just afford one of their Tabuk DMRs some day 🙂  Tim, Shawn & Ed – thank you!!

Two Rivers Arms is at:  http://tworiversarms.com/ 

Our pistol grip is online at:  http://shop.roninsgrips.com/Yugoslavian-M70-M72-M85-M92-Grip-Yugo-M70-M72-M92.htm


Please share the link on Facebook, Forums, with colleagues, etc. Your support is much appreciated and if you have any feedback, please email us in**@*********ps.com. If you’d like to request a report or order a reprint, please click here for the corresponding page to open in new tab.


Comparison Photos of Yugo M70 vs M72 Lower Handguards

Folks ask me if the Yugo M70 and M72 use the same handguards – in short, they do not.  The upper gas tube cover is the same across all models of Yugos I have seen but the lower handguard on the M72 is very short and rectangular.  This is especially true when it is next to the long sleek tapered M70 handguard that is also used on the M76 and M77 rifles.  By the way, please ignore the green clay and mess – I was making molds when I took these photos:

Yugo M70 vs M72 lower handguards comparison: wooden parts

Yugo M70 and M72 lower handguards on a workbench

The other unique factor is the ferrule.  Yugo ferrules are very hard to find in the US.  With other countries’ ferrules you may find them for sale by a vendor who did a bulk purchase, but that is never the case with the Yugo M70 ferrule.  We actually found a college student with a talent for making dies and an interest in Yugos who makes replica ferrules for the M70, M76, M77, M85 and M92 handguards.  Now here is the rub – the M72 uses a bigger unique ferrule and you will not find them unless someone sells a handguard with the ferrule installed or has pried one off a handguard for some reason.

These photos show the smaller M70 ferrule by the larger M72:

Close-up of Yugo M70 lower handguard top piece with damage

Yugo M70 vs M72 lower handguards side by side


Please share the link on Facebook, Forums, with colleagues, etc. Your support is much appreciated and if you have any feedback, please email us in**@*********ps.com. If you’d like to request a report or order a reprint, please click here for the corresponding page to open in new tab.


Check out Len’s Yugo M85 With Our Quick Takedown Pin!

Len’s Yugo M85 is looking pretty sweet!

Len's Yugo M85 rifle with takedown pin, placed on a white towel Len's Yugo M85 AK pistol with quick takedown pin, modified with red dot sight

Here’s what he has to say about his weapon:

Tungsten gray is the cerkote, Sight is a see all {from tandemkross}, key mod rail ,covers, and flash hider {Midwest Industries}, Sling adapter {RFT}, Inforce light, THE Pin Ronin’s grips, dust cover rail Storm Werkz. AR mag adapter  PAP 85, 5.56 Will let you know how it shoots and how the sight works {at least I can see it}

If you are interested, we have a “how to” blog post outlining how to install it

If you would like to buy one, they are available via our online store


Please share the link on Facebook, Forums, with colleagues, etc. Your support is much appreciated and if you have any feedback, please email us in**@*********ps.com. If you’d like to request a report or order a reprint, please click here for the corresponding page to open in new tab.


Joseph’s Sweet M77 With Our Bulgy Grip

Joseph’s Zastava M77 looks sweet!  I really like how it turned out!!

Joseph's M77 rifle with bulgy grip and extended magazine
Joseph's M77 rifle with a Bulgy grip and suppressor


Please share the link on Facebook, Forums, with colleagues, etc. Your support is much appreciated and if you have any feedback, please email us in**@*********ps.com. If you’d like to request a report or order a reprint, please click here for the corresponding page to open in new tab.


Jeff’s Yugo M70 Underfolder with our Bulged Handguard Set

This is Jeff’s Yugo M70 underfolder with our bulged Yugo M70 handguard set:

Yugo M70 underfolder rifle with bulged handguard set

The handguard is based on a Zastava design that you will see on some of their import models.  Our design has a reinforced bottom and uses an extra thick gas tube cover based on a wood M70 handguard set.  The gas tube cover needs the Yugo gas tube retaining clip for a snug fit.


Please share the link on Facebook, Forums, with colleagues, etc. Your support is much appreciated and if you have any feedback, please email us in**@*********ps.com. If you’d like to request a report or order a reprint, please click here for the corresponding page to open in new tab.


What is a Ferrule on Yugo and AK Rifles?

A ferrule is a metal end cap found on some wood grips and handguards to protect the end grain of the wood from being hammered and splitting open.  They were used on different country’s weapons and are usually not interchangeable between countries.  For example, Bulgarian and Yugo ferrules are different.

Near and dear to me are the metal ferrules on Yugoslav / Zastava wood lower handguards.  The following photo shows a M92 lower and the black metal cap is the ferrule.  This ferrule does not fit everything Yugo – just the M70, M85/92, and M77.  The M72 and M76 are unique sizes.

Ronin's M92 handguard wood with damaged mounting bracket

You have three options when you need a ferrule:  1) Find a used one and this is real hard – try posting in the Marketplace of http://www.akfiles.com and see if they have one.  2) Buy a replica ferrule from us or 3) Simply pry the old ferrule off, put it on the new handguard and the squeeze the tabs shut again with a pair of pliers.

Close-up of a tool removing wood from a M92 handguard for Ronin's Grips installation.
Black plastic clip for Ronin's Grips M92 handguard installation

Note if you are putting it on one of our plastic handguards either just set it on it with the ears closed or glue it in place.  Absolutely do not try to squeeze the ears shut — the little metal divots will not dig into our plastic and you risk snapping the handguard tabs.  Again, either slide it on or glue it in place with something like rubber glue or Goop that you can later remove if you want.  Epoxy works too but it is pretty permanent.

For example, I just slid the ferrule on the M70 bulged handguard in the next photo.

LiteXpress X-Tactical 101 flashlight with rotary selector and green LED indicator

We manufacture ferrules that fit the Yugo/Zastava M70, M77, M85 and M92 lower handguards. Note, they are specific to those models and will not fit other nationalities or models.

Click here to visit our store with the ferrules for sale.


Please share the link on Facebook, Forums, with colleagues, etc. Your support is much appreciated and if you have any feedback, please email us in**@*********ps.com. If you’d like to request a report or order a reprint, please click here for the corresponding page to open in new tab.


How to Install a Yugo M85 or M92 Dust Cover Quick Takedown Pin from Ronin’s Grips

Years ago, I bought a barreled M92 kit from AK-Builder.com and assembled it.  I then installed a Stormwerkz rail and a Primary Arms M4-style red dot and the dust cover being attached to the rear sight block really got annoying fast.  After some careful examination, I figured out a quick release pin with a ball bearing detent to hold it in place would really make things easier.  It worked great and I have been selling the pins like crazy for almost two years.  I made a mistake though – I didn’t take step by step photos about how to do the installation and people keep asking for a how-to guide.  Thus, I recently bought a Yugo M92 PAP pistol imported by Century Arms from my good friend Scott Igert, who owns Modern Antique Firearms in Benton Harbor, MI, so that I could do some step by step how-to instructions with a lot of photos for folks.

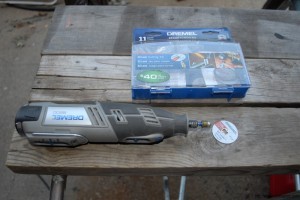
The work will be done with a Dremel tool with a cut off wheel, a few small punches, hammer and a rubber gunsmith block.

SAFETY STEP – MAKE SURE THE WEAPON IS UNLOADED.  NEVER ASSUME THAT IT IS – VERIFY IT IS UNLOADED BEFORE YOU BEGIN WORK.

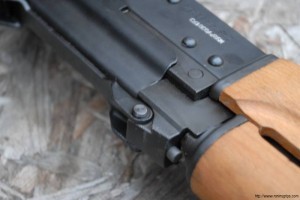
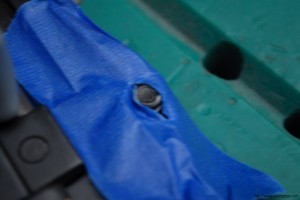
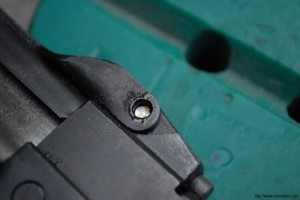
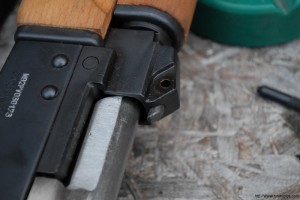
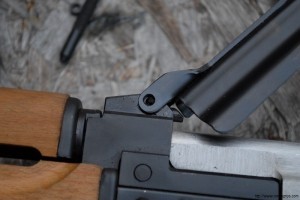
1.  Look at the hinge pin/rivet.  On the side opposite the charging handle, you will see a big rivet head.  On the right side, you will see an odd looking head it is actually the rivet just slightly peened over into a concave washer.  It is that side that we will grind the peened over portion off with our Dremel.  By the way, it is really a pin but it has one end peened over like a rivet.  A rivet would swell into the hole and lock everything up – a pin does not.

Ronin's Grips polymer samples showing heat resistance at different temperatures. Ronin's Grips polymer samples showing heat resistance at different temperatures.

2.  If you don’t use a Dremel tool, take a few minutes and do some practice cutting with a cut off wheel.  It has a tendency to scoot around and you need to get a feel for it so you can control it.  Please, please, please – do not take your Dremel out of the box and try to do this for the very first time.  I like the cordless Dremel as I can work anywhere and lately I have become very fond of the EZ Lock bits.  Of course you can use whatever tool you are comfortable with but this step by step explanation should make the work required more clear (I hope).

Ronin's polymer handle being cut with a plastic knife on foil Ronin's Grips polymer samples showing heat resistance at different temperatures.

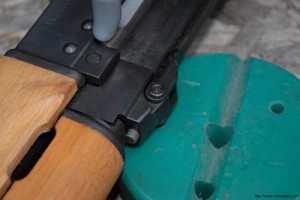
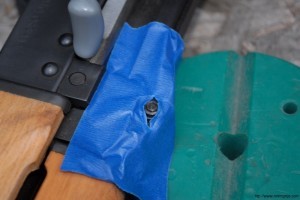
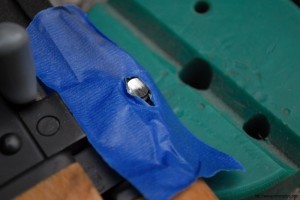
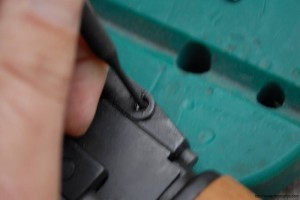
3.  If you are still learning, put a couple of pieces of tape with a slit over the pin’s head that is peened into the washer.  With some tape in place, if your hand slips you will be less likely to mar your finish.  Folks, the secret tip is to do very light cuts.  Let the weight of the tool or even less do the work.  Do NOT push down hard or you will snap the bit.  I also rest my hands on any surface that I can to have more control.  You’ll notice I have a rubber gunsmith block to support the pistol – you could use a piece of pine, a hockey puck, or another non-marring surface.  You want the weapon to be stable when you work on it and you will need to lightly tape the hinge pin/rivet free once the head is ground off.  I used pieces of wood for years and years before bought the block – the key is to have the support and use something that will not scratch up your finish.

Ronin's Grips polymer samples showing heat resistance at different temperatures.  Ronin's Grips polymer samples showing heat resistance at different temperatures. Ronin's Grips polymer samples showing heat resistance at different temperatures. Ronin's Grips polymer samples showing heat resistance at different temperatures.

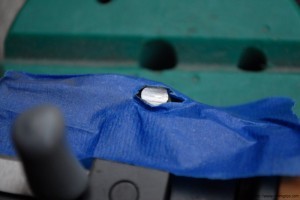
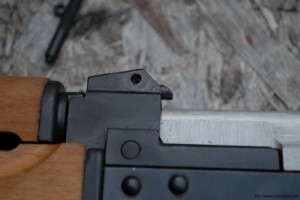
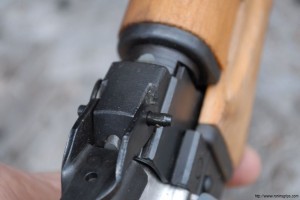
4.  You are just removing enough metal get get rid of a small lip on the rivet.  The next two photos show you the slightly concave look I put in the rivet and you can barely see the shaft.  I then used a small pin punch and a tap from a small hammer to get the pin moving.  It will take very little force to get it to move.  If it doesn’t readily move, then you may need to grind it a bit more.  The only thing holding that rivet shaft in place is the peened edge – it is not swollen in the hole.

Ronin's Grips polymer samples showing heat resistance at different temperatures. Ronin's Grips polymer samples showing heat resistance at different temperatures. Installing Yugo M85 M92 dust cover pin with tool

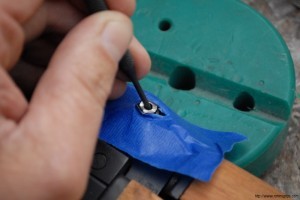
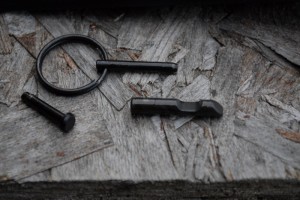
5.  This is a photo of the removed rivet and the hinge rivet/pin starting to slide backwards.  I then used a small punch pin to push it out.  The fourth photo shows the original pin and washer so you can see the end result.

Yugo M85/M92 dust cover quick takedown pin on green plastic Yugo M85/M92 dust cover pin installation: close-up of the quick takedown pin. Hand holding screwdriver to install Yugo M85 dust cover takedown pin Yugo M85/M92 dust cover pin and washer from Ronin's Grips

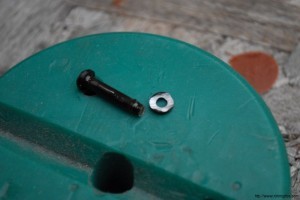
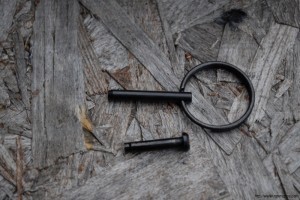
6.  At this point, the dust cover hole is clear but do not try to push the new pin in.  The cover cams shut and it will be needlessly difficult to push the pin in.  For comparison, our pin is shown next to the original.  The pin with a groove in it is something you do not want to lose!  The angled portion is face up towards the dust cover and the round end goes towards the gas tube.  When the dust cover closes, the pin slides forward and holds the gas tube is locked in place.  It’s very simple and does the job just fine.  This locking pin is held in the rear block by the dust cover pin so every time you remove the pin, it can come out.  Just keep track of it each time you clean your M85 / M92 as you will need it.

Yugo M85/M92 dust cover quick takedown pin installation Yugo M85/M92 dust cover quick takedown pin and ring from Ronin's Grips Yugo M85/M92 dust cover quick takedown pin set with ring Yugo M85/M92 dust cover pin installation: close-up of takedown pin.

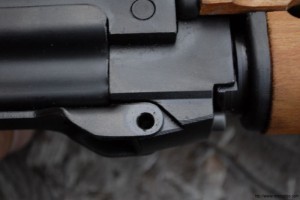
7.  Now, to install our quick takedown pin, install the dust cover, lift it up and align the holes.  At this point, there is no pressure and our pin will slide easily into the hole.  When the dust cover is closed, the resulting pressures lock everything in place.  That is why it works so well with hinge mounted picatinny rails.  My favorite these days is the hinge mounted frail from CNC Warrior by way and we’ll right up an installation guide for that as well.

Yugo M85/M92 dust cover quick takedown pin installed Yugo M85/M92 dust cover quick takedown pin installation detail Yugo M85/M92 dust cover quick takedown pin installation detail Yugo M85/M92 dust cover quick takedown pin installation.

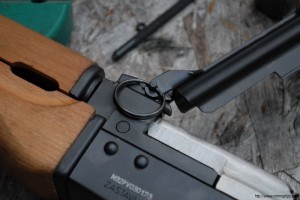
So that’s it!  Again, the key is to use light pressure when grinding the peened over portion of the original hinge pin/rivet away. Then, install the new pin with the dust cover open so it can readily slide in.

If you are interested in buying a pin, please click on this link to go to our online store.


Please share the link on Facebook, Forums, with colleagues, etc. Your support is much appreciated and if you have any feedback, please email us in**@*********ps.com. If you’d like to request a report or order a reprint, please click here for the corresponding page to open in new tab.


CNC Warrior Brake and Replacement Detent Pin for the Zastava M92 PAP

To be imported, the M92 has a muzzle nut, or muzzle cap, installed over the threads with a single big weld.  It’s obvious where the weld is and guess what?  It can be easily removed and if you look close that will also then clear the detent spring hole as well.

Dark polymer material melting on foil, demonstrating heat resistance. Dark polymer material melting on foil, demonstrating heat resistance.

There are a few brake options out there for the M92.  Bear in mind that like many Yugo rifles, the designers made the size and thread of the M92’s muzzle unique.  It is left-hand 26mm wide with a 1.5mm pitch thread – definitely an oddball.   At any rate, CNC Warrior makes a four piece Bulgarian style brake that really cuts down on muzzle flash that I have been drooling over for a while plus they make a number of other brakes, adapters and fake cans that can fit that thread.

The following are more detailed photos for you.  By pulling the small locking wire down, the end cap can be unscrewed and the brake disassembled into its four parts – the body, cap, cone and spring.

Dark polymer material melting on foil, demonstrating heat resistance.

Dark polymer material melting on foil, demonstrating heat resistance.

Dark polymer material melting on foil, demonstrating heat resistance.

Dark polymer material melting on foil, demonstrating heat resistance.

Dark polymer material melting on foil, demonstrating heat resistance.

Dark polymer material melting on foil, demonstrating heat resistance.

Ronin's polymer handle being cut with a plastic knife on foil

They also sell a detent pin kit so you can have the original method to retain the brake as well and it can be installed in literally less than five minutes because the PAP comes with all the holes drilled:

Ronin's polymer handle being cut with a plastic knife on foil

Click here for our post that shows how to install them.


Please share the link on Facebook, Forums, with colleagues, etc. Your support is much appreciated and if you have any feedback, please email us in**@*********ps.com. If you’d like to request a report or order a reprint, please click here for the corresponding page to open in new tab.