The M92 PAP pistol is brought in neutered with a muzzle cap and no detent spring. With some careful Dremel work, some cold blue solution and a bit of patience, it is really easy to restore the pistol back to it’s original threaded muzzle state
SAFETY STEP – MAKE SURE THE WEAPON IS UNLOADED. NEVER ASSUME THAT IT IS – VERIFY IT IS UNLOADED BEFORE YOU BEGIN WORK.
1. Look at the muzzle of the PAP
M92 and you will see a big spot weld that is holding the muzzle cover on. Thankfully it is both small and superficial so it can be cut through.


2. Now the first step is to secure the pistol so it can’t move around. I used a wood jawed woodworking vice but you can use whatever you have handy. If you use a regular vise, be sure to put something over the jaws to protect your M92 from getting all scratched up.

3. I use my Dremel tool all the time. These days I am using one of their cordless jobs with two Lithium batteries and I like the EZ Lock bits that make replacing cutting wheels and other tasks a breeze. Be sure to practice with your Dremel before doing this. Please don’t go buy a Dremel and try and do this fresh out of the box. The secret is to make light cuts and not rush. Let the weight of the tool do the work and carefully guide it and keep it in position.


4. Now, I came in from the front and at a slight angle to protect the front sight & gas block combo. The cap will twist off clock-wise as it is reverse threaded. Cut a bit and test, cut a bit and test over and over. If you have a strap wrench or a pipe wrench, that can help with the removal. Again, remember that this is reverse threaded just like other AKs. It will loosen by turning clockwise.


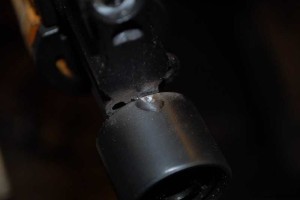
5. Hidden under that large ugly cap is the big 26 x 1.5mm LH (reverse threaded) muzzle just waiting to have your favorite brake or fake can installed but it would be real cool to get the detent pin working again – wouldn’t it?


5. Use a small sanding drum and smooth the block where the weld was and then use the cold bluing solution you like to color the steel while it is fresh and oil free. I like Brownell’s Oxpho Blue and apply it with a Q-Tip per their instructions.


6. CNC Warrior sells a very small kit with the detent pin, spring and cross pin. The PAP has all the holes there already. You literally slide in the pin and spring, turn it the right way and then drive in the cross pin, which is a small roll pin.


7. I really like the Bulgarian 4 piece Krink brakes and CNC Warrior has great version they have made for the M92. I pretty much knew I had to go with this brake! It does a great job reducing muzzle flash and is real high quality. Now that the detent pin was installed, I just threaded it on until it was where I wanted it and the detent pin engaged fully.


So that’s all it took! I hope this helps you with your project.
Stay tuned for more blog posts about the M92.
Please share the link on Facebook, Forums, with colleagues, etc. Your support is much appreciated and if you have any feedback, please email us in**@*********ps.com. If you’d like to request a report or order a reprint, please click here for the corresponding page to open in new tab.