The contemporary firearms industry is currently witnessing a paradigm shift within the high-performance semi-automatic pistol segment, characterized by the aggressive modernization of the double-stack M1911 architecture. This category, dominated for decades by bespoke, high-maintenance competition firearms, is now being redefined by two industrial giants: SIG Sauer and Staccato. The core of this rivalry rests between the SIG Sauer P211-GTO and the Staccato P series, including the recently unveiled HD (High Definition) line. From an engineering perspective, these platforms represent fundamentally different approaches to the same objective: providing a high-capacity, hammer-fired 9mm pistol with superior ergonomics and a “glass-break” trigger pull. The following analysis explores the metallurgical, mechanical, and logistical nuances of these platforms to determine the superior engineering solution for professional and competitive applications.
Metallurgical Foundations and Component Integrity
The structural longevity and operational reliability of a high-performance pistol are primarily dictated by the materials selected and the manufacturing processes employed. The Staccato P and the SIG P211-GTO diverge significantly in their metallurgical philosophies, with implications for both long-term durability and the frequency of required maintenance.
Billet Steel vs. Stainless Construction
The Staccato P architecture is built upon 4140 certified American billet steel for both the frame and the slide.1 Billet machining is the gold standard for component integrity in the firearms industry. By carving the slide and frame from solid blocks of chromium-molybdenum alloy steel, Staccato ensures a uniform grain structure that is free from the microscopic voids or inclusions often present in cast or forged alternatives. The 4140 alloy provides a high strength-to-weight ratio and exceptional fatigue resistance, which is critical for a platform designed to endure the high-cyclic stresses of duty use and high-volume training.1
In contrast, the SIG Sauer P211-GTO utilizes a stainless steel frame and slide.5 While stainless steel offers inherent corrosion resistance—a clear advantage in humid or maritime environments—it presents unique engineering challenges, particularly regarding galling and heat dissipation. User reports indicate that the P211-GTO tends to run significantly hotter than its contemporaries during rapid-fire strings, likely due to the thermal conductivity properties of the stainless steel and the concentration of heat around the compensator.8 Furthermore, the P211-GTO utilizes an alloy grip module, which increases the total unloaded weight of the weapon to approximately 45.9 ounces.5 This mass serves as a passive recoil dampener but sacrifices the slight ergonomic “give” found in the polymer grip modules of the traditional Staccato P models.1
Component Specifications and Dimensions
| Feature | Staccato P (Steel Frame) | SIG Sauer P211-GTO |
| Caliber | 9×19 mm 2 | 9×19 mm 10 |
| Slide Material | 4140 Billet Steel 1 | Stainless Steel 5 |
| Frame Material | 4140 Billet Steel 3 | Stainless Steel 7 |
| Grip Module | Polymer (Tactical Texture) 1 | Aluminum Alloy (G10 Panels) 5 |
| Barrel Length | 4.4″ Bull Barrel 2 | 4.4″ Bull Barrel + MACH3D Comp 5 |
| Overall Length | 8.0″ – 8.1″ 2 | 8.5″ 5 |
| Weight (Unloaded) | 33 oz 2 | 45.9 oz 5 |
| MSRP | $2,499 1 | $2,399 6 |
The physical footprint of the P211-GTO is notably larger than the Staccato P, primarily due to the integrated MACH3D compensator, which extends the overall length to 8.5 inches.5 This extra length, combined with the nearly 13-ounce weight difference, positions the SIG as a dedicated competition or open-carry firearm, whereas the Staccato P maintains a more balanced profile suitable for duty, home defense, and even concealed carry for larger-framed individuals.3
Fire Control Systems and Trigger Mechanics
The fire control group is the heart of the 1911/2011 platform. The engineering of the trigger pull—specifically the take-up, break, and reset—is what differentiates these high-end pistols from standard striker-fired duty weapons.
The Series 80 and Active Firing Pin Block Debate
For decades, the “Series 70” design was the standard for high-end 2011s because it lacked a firing pin block, resulting in a cleaner, lighter trigger pull.14 However, recent industry scrutiny regarding drop safety—highlighted by high-profile testing—has pushed both SIG Sauer and Staccato toward “Series 80” or “Active Firing Pin Block” systems.16
The SIG Sauer P211-GTO utilizes a Series 80 firing pin safety, which mechanically prevents the firing pin from moving forward unless the trigger is fully depressed.13 While this ensures the weapon is drop-safe, it introduces a physical plunger that the trigger bow must move during the trigger press.14 SIG has engineered this system to be relatively unobtrusive, with a factory pull weight between 3.5 and 4 pounds.7 However, technical teardowns have revealed that the P211-GTO uses a proprietary Series 80 plunger and firing pin retained by a roll-pin rather than a traditional firing pin stop-plate.20 This design choice has been criticized by some armorers as “fiddly” and prone to pin “walking” under heavy recoil.20
The Staccato HD line (P4 and P4.5) similarly incorporates an active firing pin block.4 Staccato engineers have focused on maintaining the iconic 2011 trigger feel by refining the interface between the trigger bow and the safety block. The result is a consistent 4.0 to 4.5-pound pull that meets duty requirements while remaining significantly more refined than most striker-fired competitors.4 A key ergonomic shift in the HD line is the removal of the grip safety, which is replaced by a higher, more aggressive beavertail.23 This simplifies the fire control system and ensures that shooters with smaller hands or unconventional grips do not suffer from failure-to-fire malfunctions due to incomplete grip safety activation.23
Trigger Bow Geometry and Aftermarket Interoperability
From a customization perspective, the Staccato P remains the superior platform due to its adherence to 2011 component standards. The trigger bow in a Staccato can be easily swapped for aftermarket units from manufacturers like Red Dirt or Atlas to fine-tune the reach and shoe shape.8
The SIG P211-GTO, however, employs a proprietary trigger bow that is approximately 2.0 mm narrower than a standard 2011 bow.27 This narrower geometry is a requirement for the frame to accommodate the SIG P320 magazine, which is wider than the traditional 2011 tube.27 Consequently, standard 2011 triggers are physically incompatible with the P211-GTO.27 For the end-user, this means that the SIG platform is currently limited to factory trigger components or a very small selection of proprietary aftermarket options.21
Kinematics of the Recoil System and Muzzle Control
The defining performance characteristic of these pistols is their ability to mitigate muzzle rise, allowing for rapid, accurate follow-up shots. The P211-GTO and the Staccato variants utilize radically different mechanical solutions to achieve this.
MACH3D Additive Manufacturing Technology
The SIG P211-GTO features the MACH3D compensator, a muzzle device produced through advanced 3D printing (additive manufacturing) of Inconel or a similar high-temperature superalloy.6 This manufacturing technique allows for complex internal gas-routing geometry that cannot be achieved through traditional machining.7 The MACH3D directs gas not only upward through a traditional port but also laterally and downward through specialized funnels to create a significant downward force.28
Unlike traditional compensators that thread onto the barrel, the MACH3D utilizes a proprietary mounting system involving a taper pin and a spring-loaded locking detent.6 This “non-threaded” design simplifies removal for deep cleaning but introduces small, proprietary parts—such as the compensator retention spring and wedge pin—that are potential failure points and easy to lose during maintenance.9
The Sight Block Advantage
The Staccato HD P4.5 utilizes a “sight block” barrel architecture.4 In this configuration, the front sight is mounted on a stationary block at the end of the 4.5-inch barrel.4 As the slide cycles rearward, the front sight remains stationary, allowing the shooter’s eye to maintain a constant focal point.4 This non-reciprocating mass at the muzzle provides two key benefits:
- Passive Muzzle Control: The weight of the sight block acts as a static counterweight to muzzle rise.4
- Increased Cycle Speed: Because the slide is shorter than the barrel (effectively the 4.0″ slide from the P4), it has less reciprocating mass, leading to a faster cycle time and a flatter recoil impulse.4
For those seeking the ultimate in recoil reduction, the Staccato XC remains the industry benchmark with its “island compensator,” which combines a compensated barrel with the sight block concept, though at a price point roughly $1,900 higher than the SIG.3
Recoil Spring and Guide Rod Engineering
| Model | Recoil System Type | Spring Configuration | Maintenance Notes |
| Staccato P | Dawson Precision Tool-less 3 | Full-length guide rod 1 | No tools required for field strip 1 |
| Staccato HD | Fully Captive Flat Wire 4 | 4.0″ buffered assembly 4 | Simplified parts count 4 |
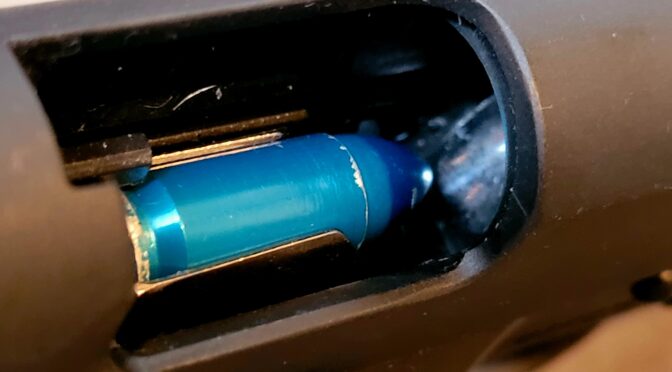
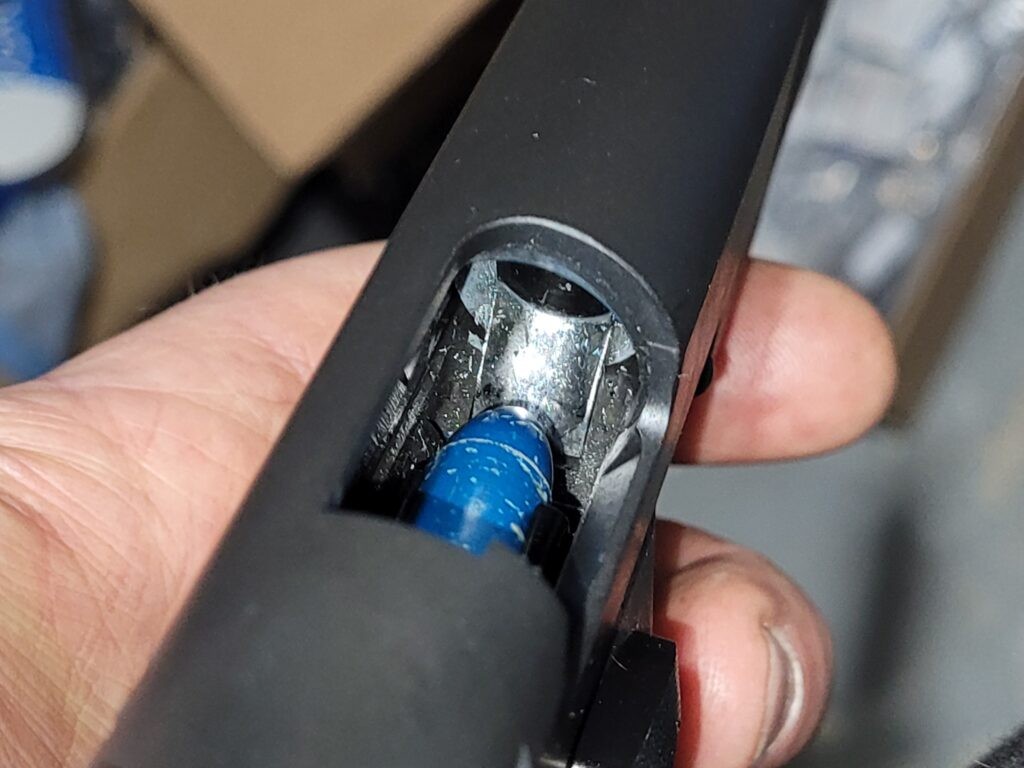
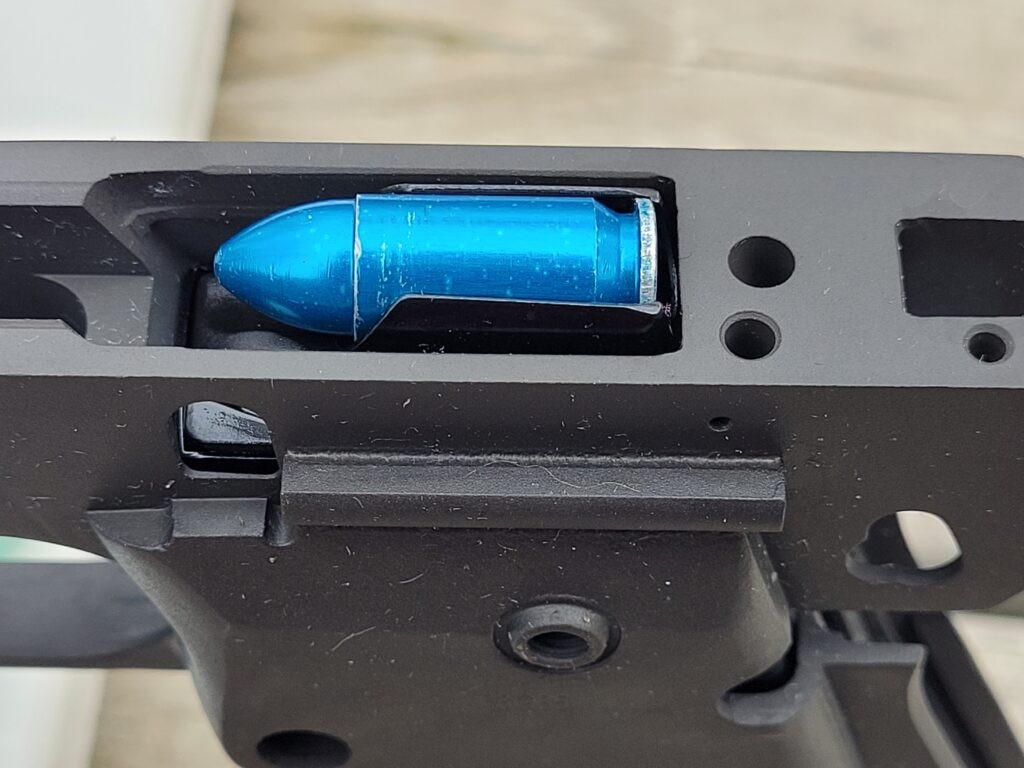
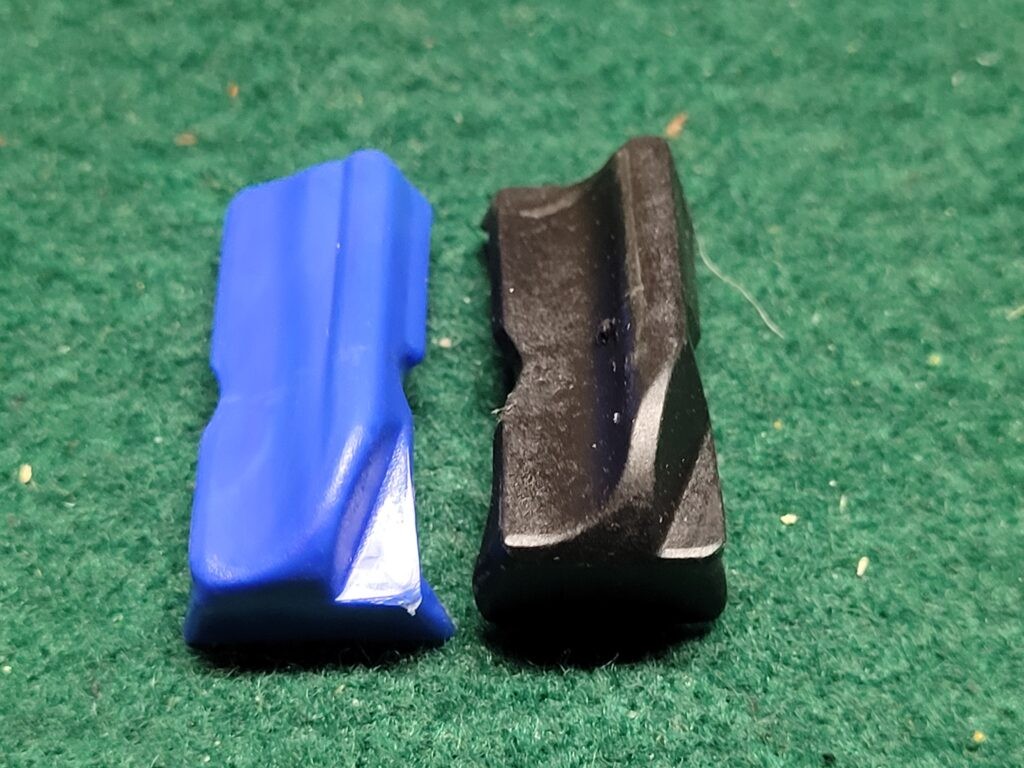
| SIG P211-GTO | Traditional Reverse Plug 28 | Dual springs (8lb & 10lb) 28 | Plastic recoil plug reported to shear 20 |
A critical engineering difference is the recoil plug (also known as the reverse plug). The Staccato P utilizes a machined steel plug that is highly durable.1 The SIG P211-GTO, however, uses a plastic or MIM recoil plug that has been identified as a significant failure point.20 Reports indicate that this plug can shear off its retaining shoulder, causing the spring and plug to shoot through the front of the slide and rendering the pistol inoperable.20 This is an unacceptable failure mode for a duty or professional competition firearm, and many analysts recommend replacing the factory SIG plug with an aircraft aluminum aftermarket version immediately upon purchase.29
Feed System Architecture and Logistical Interoperability
Perhaps the most significant innovation in both the SIG and the Staccato HD lines is the move away from proprietary 2011 magazines. For decades, the “Achilles’ heel” of the double-stack 1911 was its magazine—a modified.45 ACP design that was often finicky when fed 9mm rounds.14
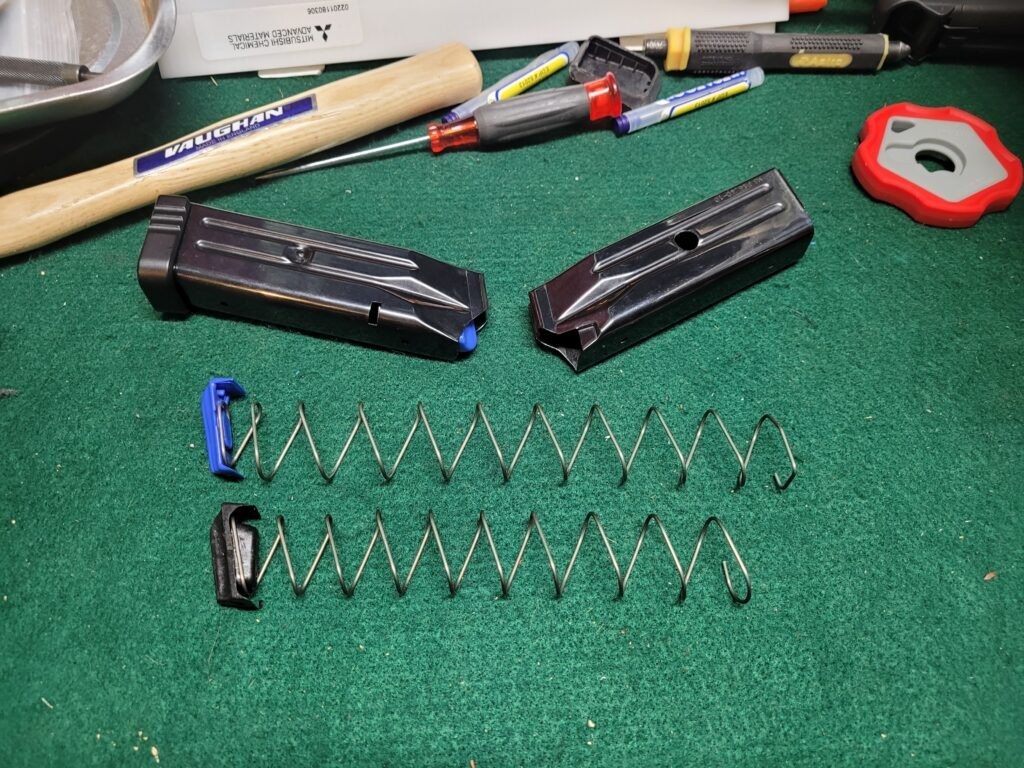
SIG Sauer P320 Magazine Integration
The P211-GTO is designed to feed from standard SIG Sauer P320 steel magazines.14 This offers several advantages:
- Cost and Availability: P320 magazines are inexpensive and widely available, benefiting from the massive U.S. military contract for the M17/M18 pistols.6
- Proven Reliability: The P320 magazine is a modern design with optimized feed lip geometry for 9mm, eliminating the need for the “tuning” often required for traditional 2011 tubes.7
- Ergonomic Preservation: Crucially, SIG managed to use the P320 magazine while maintaining the original 1911 grip angle, which many shooters find provides a more natural point of aim.7
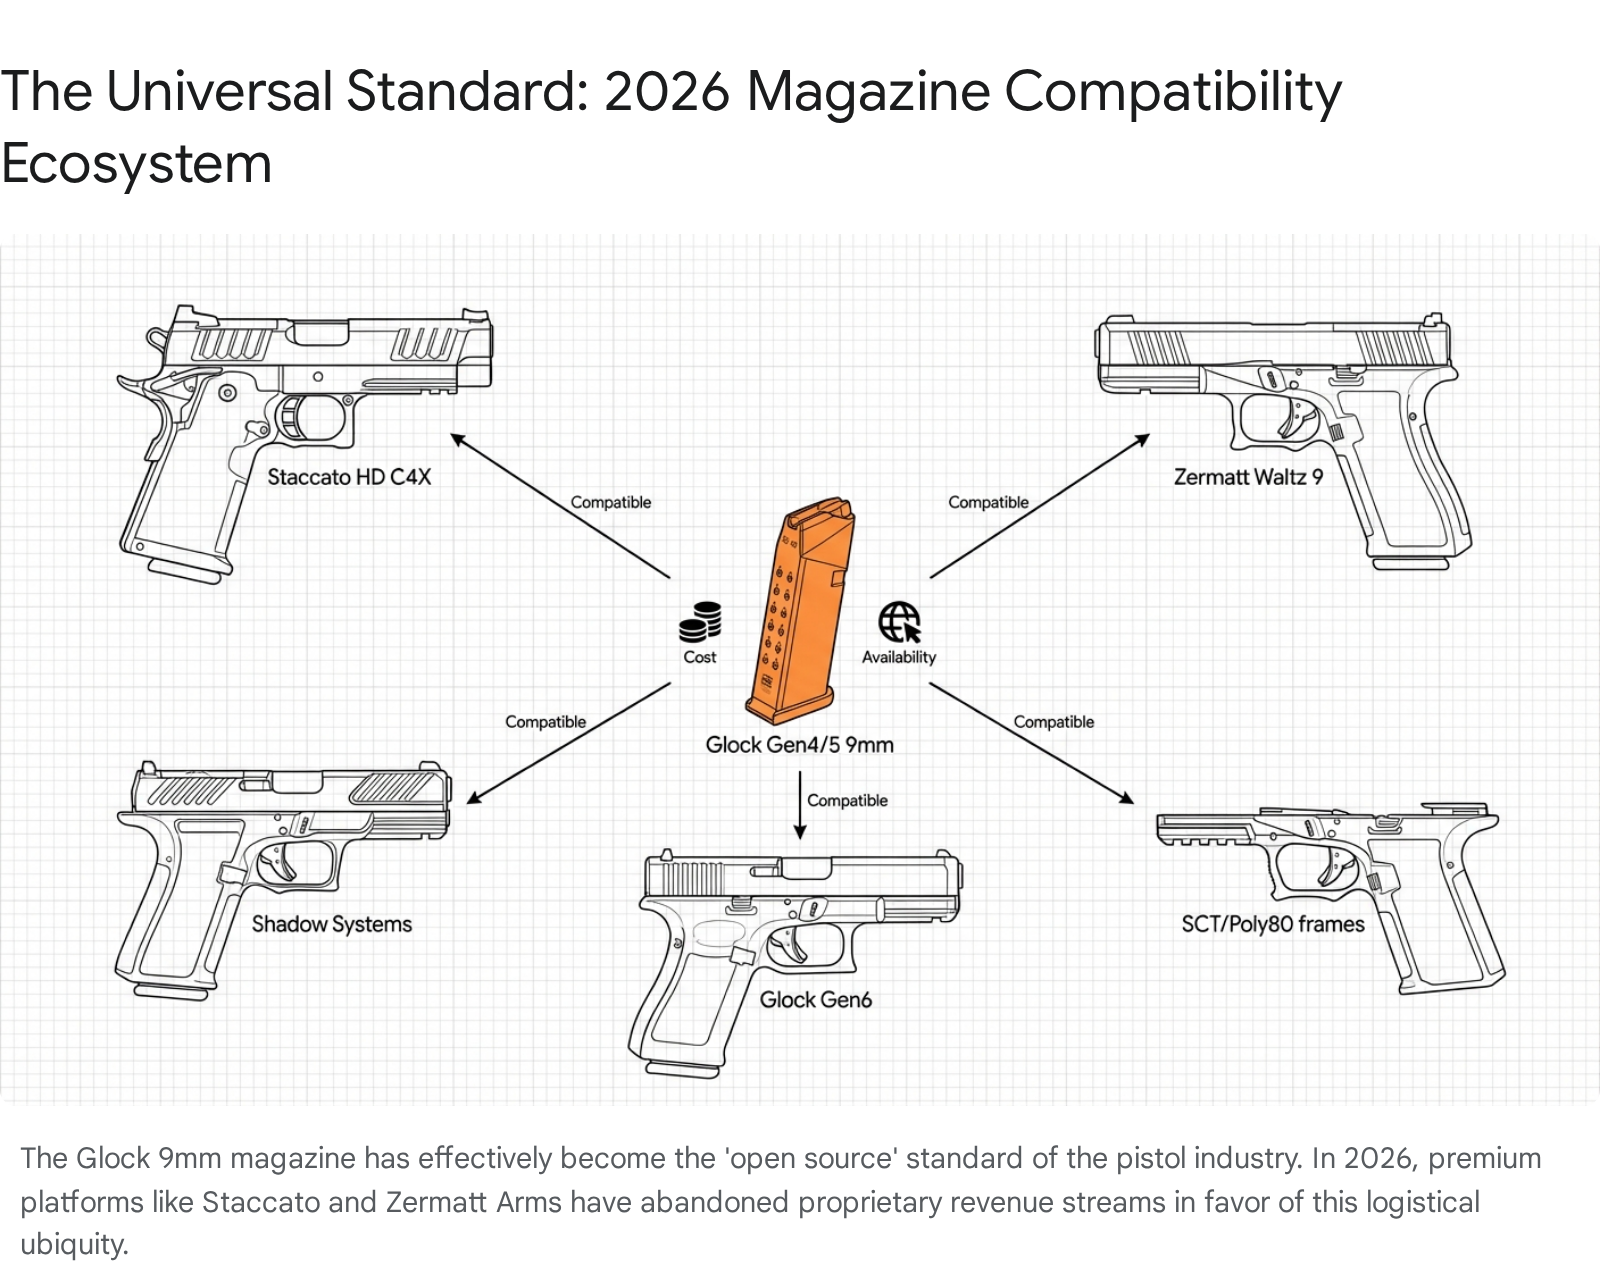
Staccato’s Glock Magazine Strategy
In a parallel move, Staccato’s HD line (P4 and P4.5) has transitioned to Glock-pattern magazines.4 The P-series HD pistols ship with 18-round Mec-Gar Glock-pattern magazines, which are heat-treated and finished in a low-friction coating.4 This change is revolutionary for law enforcement agencies, as it allows officers to carry a high-end 2011 while utilizing the same magazines as their existing Glock duty weapons.23 The Staccato HD grip has been re-contoured to accommodate these magazines, resulting in a slimmer profile that many shooters with smaller hands find superior to the traditional 2011 grip.23
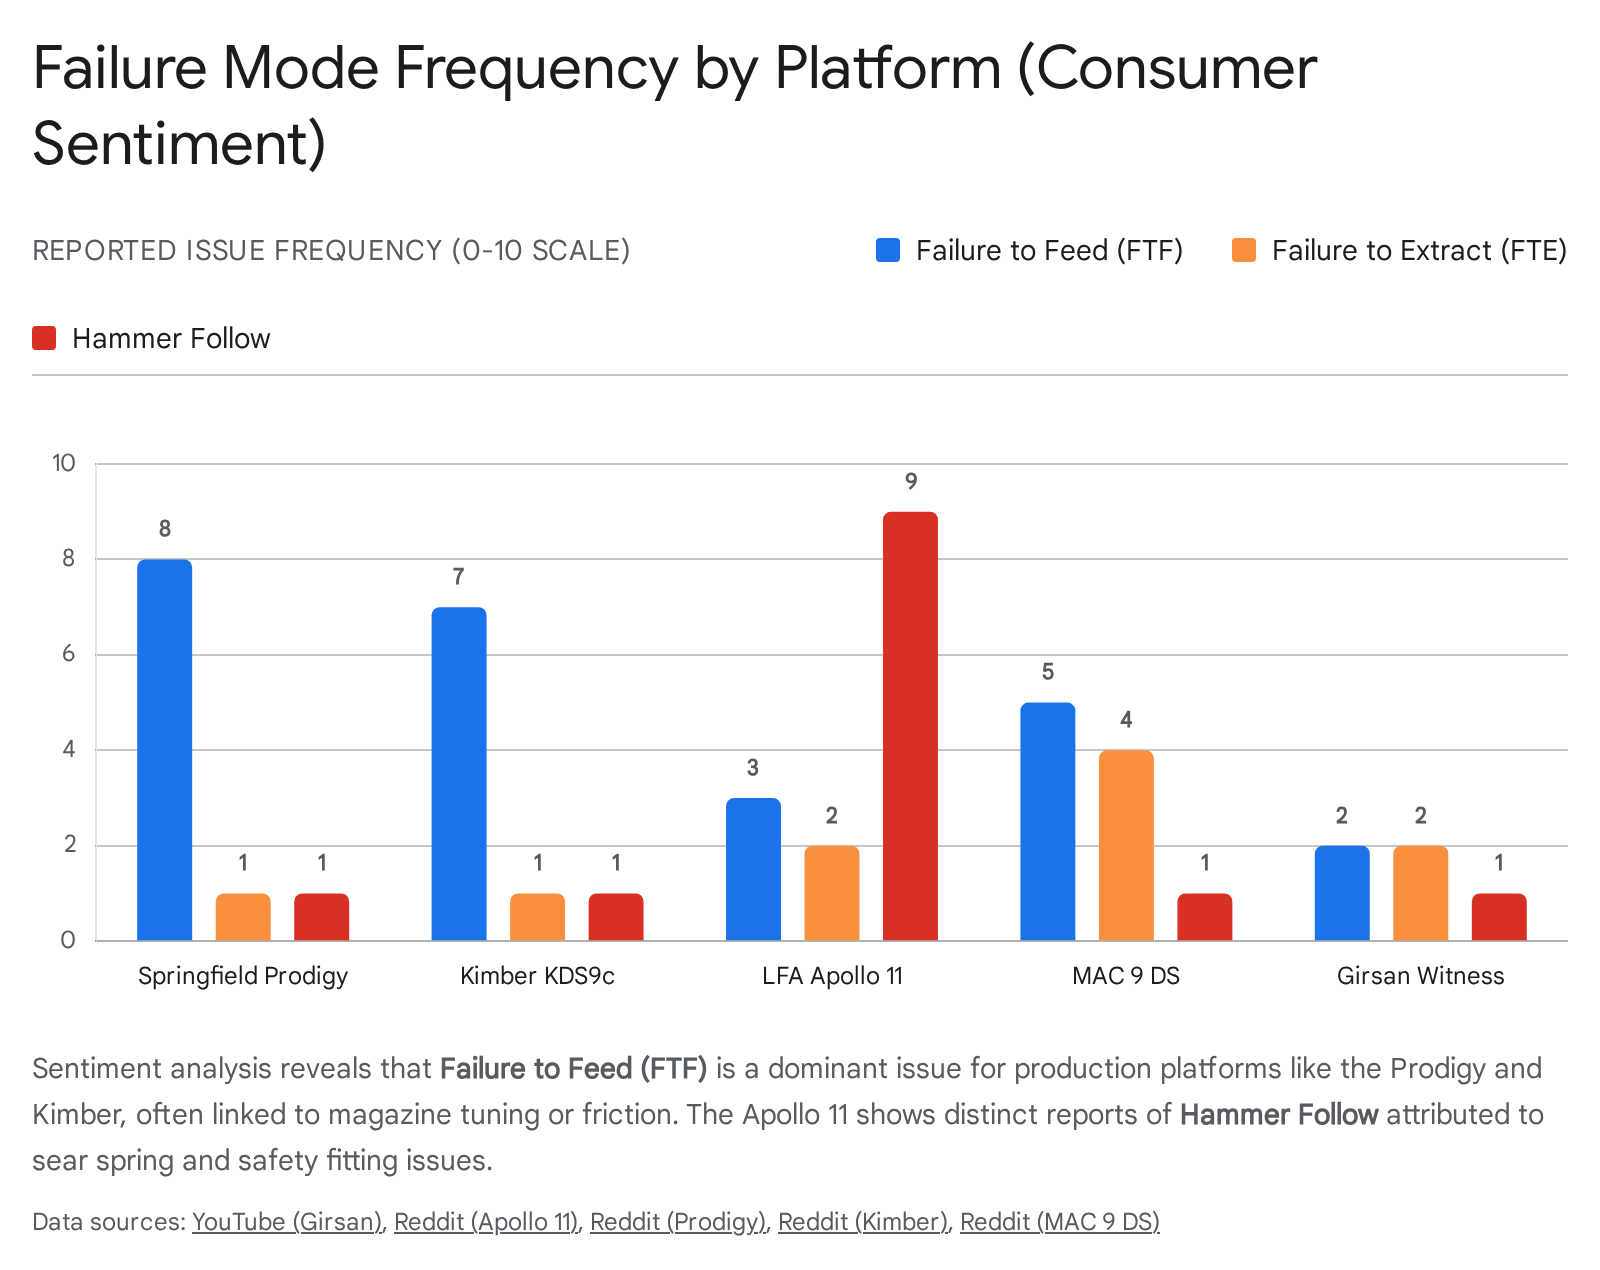
Failure Mode and Effects Analysis (FMEA)
A comprehensive engineering evaluation must address the documented failures of each platform to assess risk and service life.
SIG P211-GTO Documented Flaws
Research indicates that the P211-GTO, while a high-performer on paper, is currently suffering from “first-generation” reliability issues and cost-cutting measures.
- Recoil Plug Fractures: As previously noted, the shearing of the MIM/plastic recoil plug is the most catastrophic failure mode documented.20 This failure immediately renders the gun a “paperweight” and cannot be fixed in the field without spare parts that were, for a time, not available for individual purchase.34
- Barrel Fitting Discrepancies: Users have reported “sloppy” barrel fitting at the hood area, with the ability to rotate the barrel by hand when the slide is closed.20 While this does not always prevent the gun from shooting 1-inch groups at 25 yards, it suggests a lack of the hand-fitting typically associated with $2,400 hammer-fired pistols.20
- Ejection Erraticism: Erratic ejection patterns, with brass often being thrown straight up or back at the shooter, suggest that the extractor tension and ejector geometry may not be optimized for the variable pressures generated by the MACH3D compensator.20
Staccato HD Potential Issues
The Staccato P has a robust track record with over 1,600 law enforcement agencies.2 However, the newer HD line has seen some reports of recoil spring failure.
- Spring Fatigue: At least one report indicates recoil springs snapping at relatively low round counts (600 to 1,100 rounds).38 This may be due to the increased cyclic speed of the HD slide or a batch of substandard springs.38
- Aggressive Grip Texture: The stippled polymer grip is optimized for control with gloves or wet hands but can be abrasive for daily IWB (Inside the Waistband) carry against bare skin.23
Strategic Maintenance Paradigms
Maintaining a high-performance double-stack 1911 requires more attention than a standard polymer striker-fired pistol. Both platforms require frequent lubrication, often referred to as “running the gun wet”.1
Field Stripping and Cleaning
The Staccato P is designed for the “discrete professional,” featuring a tool-less guide rod that allows for field stripping anywhere without pins or clips.1 This is a major engineering advantage for duty use.
The SIG P211-GTO requires a more involved process. While basic field stripping is straightforward, the compensator detent system and the proprietary slide stop assembly are best handled with a punch.21 Furthermore, the carbon buildup within the MACH3D compensator requires specific chemical intervention.9 Industry best practices for cleaning the MACH3D include using penetrating oils like Kroil or specialized carbon removers such as Breakthrough Suppressor Cleaner.39
| Do not use “The Dip” formula of hyrogen peroxide and vinegar sometimes mentioned for cleaning the compensator as it creates a toxic solution. For more information on that, click here. |
Recommended Service Intervals
| Component | Staccato P / HD | SIG P211-GTO |
| Lubrication | Every 500-1,000 rds 42 | Every 300-500 rds (runs hot) 9 |
| Recoil Spring | 5,000 rds 44 | 3,000 – 5,000 rds (dependent on load) 29 |
| Firing Pin Spring | 5,000 rds 44 | 5,000 rds 21 |
| Deep Clean (Comp) | N/A | Every 1,000 rds or Annually 39 |
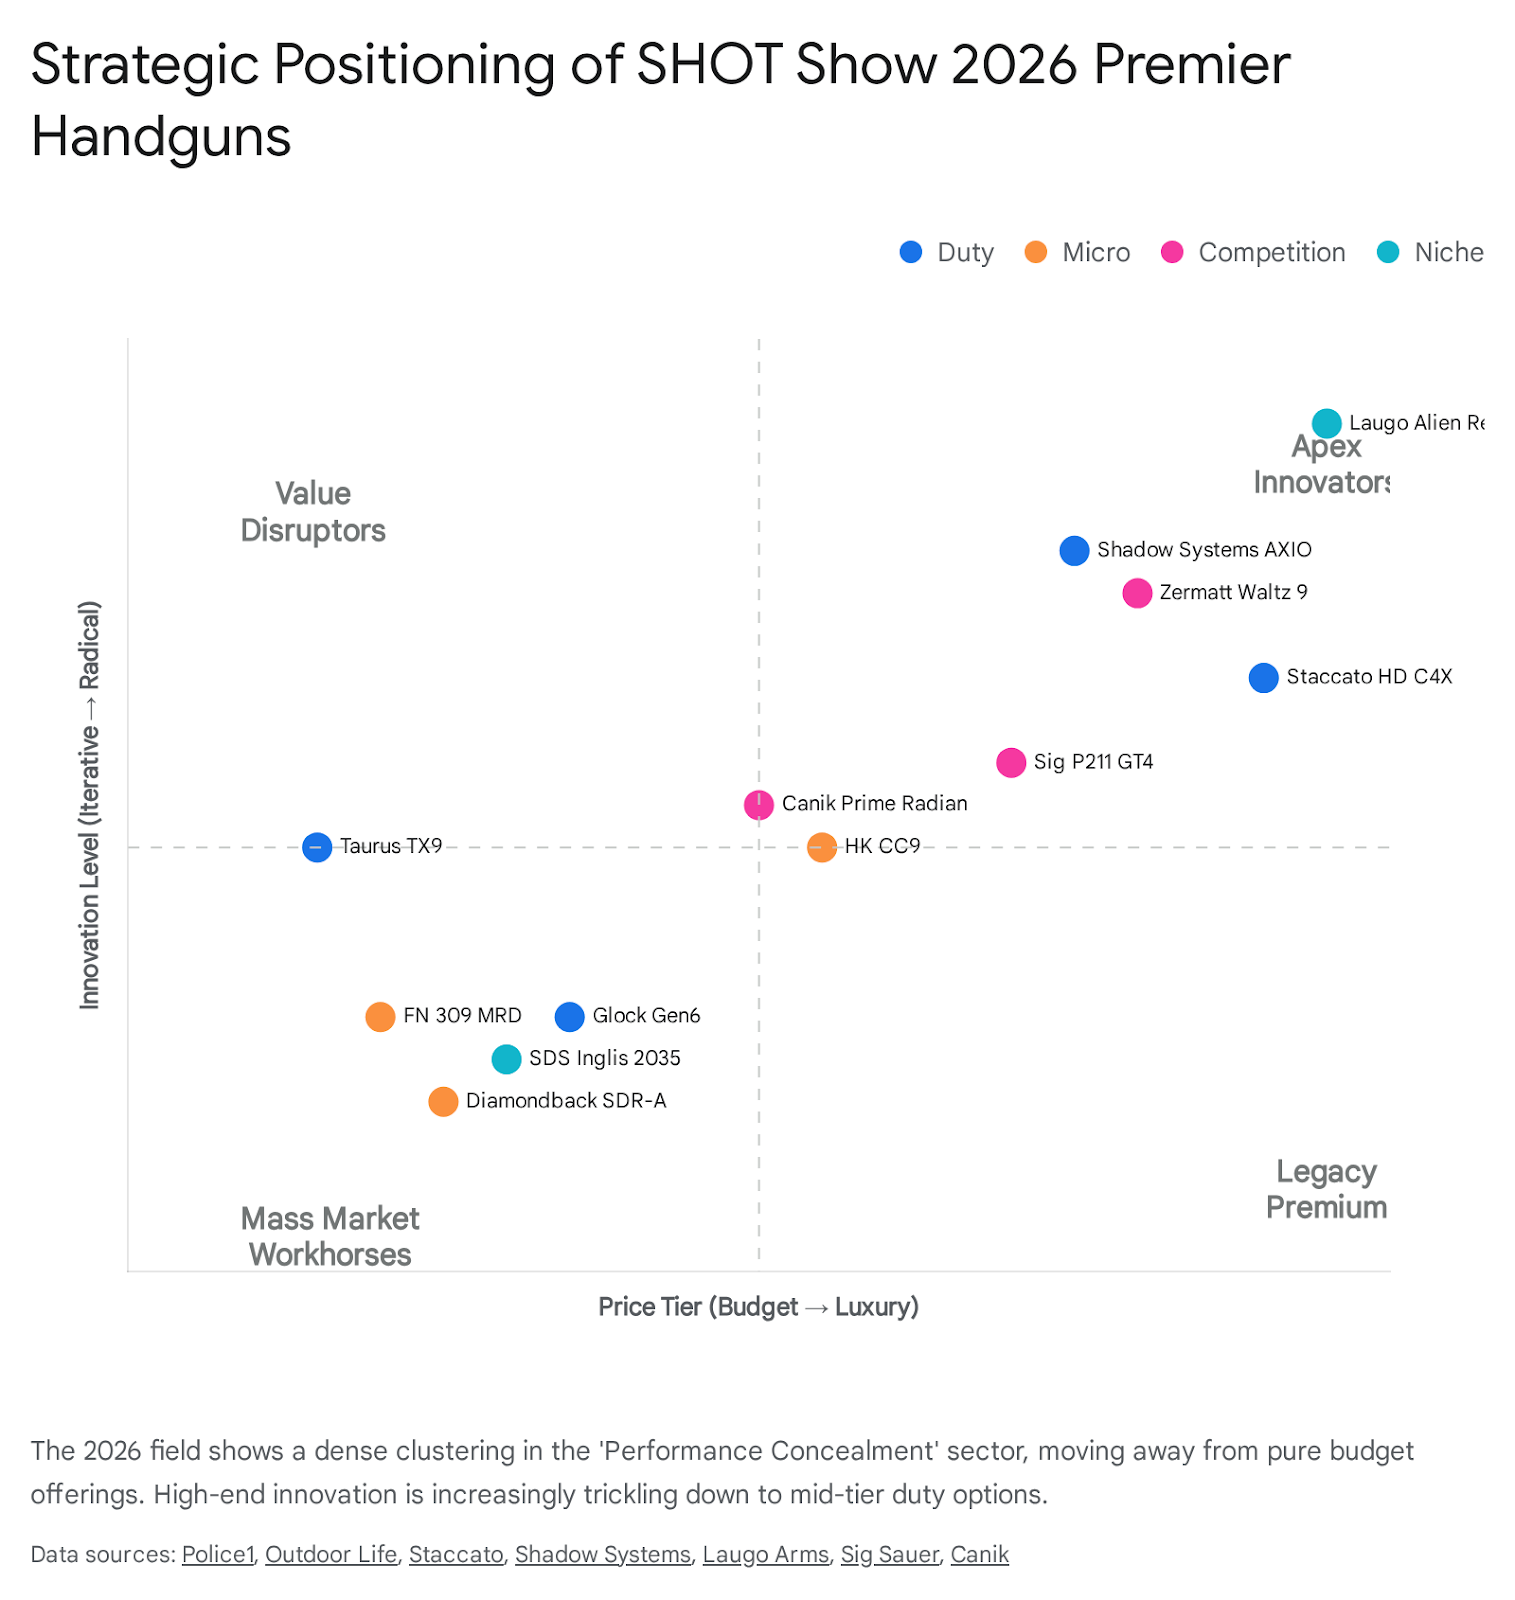
Economic Valuation and Market Positioning
As of late 2025 and early 2026, the market positioning of these two pistols has become clear. The SIG P211-GTO is positioned as a “disruptor”—providing the features of a $4,000 competition gun (the Staccato XC) at a $2,400 price point.17 It is the ideal choice for a shooter who wants maximum technological innovation and flat-shooting performance on a budget.17
The Staccato P and HD lines are positioned as the “gold standard” for reliability and duty-readiness.2 While they may lack the high-tech 3D-printed compensators of the SIG, their use of billet steel, hand-fitted components, and universal Glock magazine compatibility (for the HD) makes them the more mature and reliable engineering choice for life-safety applications.1
Future Outlook: The 2026 Ecosystem
The small arms industry is not static, and both manufacturers have announced significant updates for 2026.
SIG Sauer P211 Expansion
SIG is moving to address the “over-specialization” of the GTO model by releasing the GT4 and GT5 variants.46
- P211-GT4: A carry-optimized model with a 4.2-inch bull barrel, no compensator, and a compact grip module to minimize printing.16
- P211-GT5: A dedicated duty model with a 5.0-inch bull barrel and a full-length dust cover for maximum sight radius and balance.16 These models will likely eliminate the reliability concerns associated with the MACH3D compensator while maintaining the P320 magazine logistical advantage.16
Staccato HD C4X
Staccato’s major 2026 release is the HD C4X.22 This is a 4-inch carry pistol that integrates a compensator into a single-piece barrel, similar to the XC but scaled for concealment.22 With an MSRP of $3,499, it is targeted at elite metropolitan surveillance and tactical units who require a compensated pistol that can live comfortably in an IWB holster.22
Engineering Conclusion and Purchase Recommendation
The decision between the Staccato P/HD and the SIG Sauer P211-GTO is fundamentally a choice between proven reliability and disruptive performance.
Quantitative Comparison Summary
| Metric | Staccato P/HD | SIG P211-GTO | Winner (Engineering) |
| Material Quality | 4140 Billet Steel | Stainless Steel / MIM | Staccato |
| Recoil Mitigation | Sight Block (HD 4.5) | MACH3D Compensator | SIG (for flat shooting) |
| Magazine System | Glock (HD) / 2011 (P) | SIG P320 | Tie (Duty context) |
| Trigger Refinement | Hand-fitted, crisp | Factory mass-produced | Staccato |
| Safety Integration | No grip safety (HD) | Traditional grip safety | Staccato (Ergonomics) |
| Value (MSRP) | $2,499 – $3,899 | $2,399 | SIG |
The “Better” Pistol: Staccato HD P4.5
When evaluated as a tool for a “discrete professional” or an “industry analyst,” the Staccato HD P4.5 is the superior engineering solution. Its use of the sight block barrel provides a stable aiming platform and significant recoil reduction without the maintenance complexity, heat issues, and potential failure modes associated with the SIG’s 3D-printed compensator and MIM recoil plug.4 Furthermore, the compatibility with Glock magazines is a logistical game-changer that offsets the higher initial purchase price.23
The SIG Sauer P211-GTO Recommendation
The SIG Sauer P211-GTO is an exceptional choice for the USPSA or 3-Gun competitor who is already invested in the SIG P320 ecosystem.16 It provides a performance profile that rivals $4,000 custom race guns at a much more accessible price point.18 However, the buyer must be prepared to perform some immediate engineering “hardening”—specifically replacing the recoil plug with a high-quality aftermarket aluminum version and maintaining a rigorous lubrication and cleaning schedule for the MACH3D compensator.9
In summary, for a user demanding a weapon for duty, home defense, or tactical training, buy the Staccato P or HD P4.5. For the user seeking a high-tech competition advantage and cost-effective logistics, the SIG P211-GTO is a bold, high-performance alternative that represents the first step in a new era of mass-produced double-stack 1911s.
Please share the link on Facebook, Forums, with colleagues, etc. Your support is much appreciated and if you have any feedback, please email us in**@*********ps.com. If you’d like to request a report or order a reprint, please click here for the corresponding page to open in new tab.
Sources Used
- The Staccato P: Tested and Reviewed – Outdoor Life, accessed February 8, 2026, https://www.outdoorlife.com/guns/staccato-p-review/
- Staccato P Dawson Precision® Optic | 9x19mm, accessed February 8, 2026, https://dawsonprecision.com/staccato-p-dawson-precision-optic-9x19mm/
- Staccato P, accessed February 8, 2026, https://staccato2011.com/products/staccato-p
- Staccato HD P 4.5, accessed February 8, 2026, https://staccato2011.com/products/staccato-hd-p4-5
- SIG SAUER P211-GTO – American Handgunner, accessed February 8, 2026, https://americanhandgunner.com/news/sig-sauer-p211-gto/
- SIG SAUER P211-GTO: The Next Generation 1911 Pistol [VIDEO] – GunBroker.com, accessed February 8, 2026, https://www.gunbroker.com/c/article/sig-sauer-p211-gto-introduction/
- P211-GTO – Sig Sauer, accessed February 8, 2026, https://www.sigsauer.com/p211-gto.html
- Staccato P vs Kimber 2K11 vs SIG P211 : r/2011 – Reddit, accessed February 8, 2026, https://www.reddit.com/r/2011/comments/1o6m1lb/staccato_p_vs_kimber_2k11_vs_sig_p211/
- cleaning compensator : r/P211_GTO – Reddit, accessed February 8, 2026, https://www.reddit.com/r/P211_GTO/comments/1odcp1n/cleaning_compensator/
- SIG SAUER P211 GTO SAO Full-Size Pistol | Cabela’s, accessed February 8, 2026, https://www.cabelas.com/p/sig-sauer-p211-gto-sao-full-size-pistol
- SIG SAUER P211 GTO SAO Full-Size Pistol | Bass Pro Shops, accessed February 8, 2026, https://www.basspro.com/p/sig-sauer-p211-gto-sao-full-size-pistol
- Pistol P211-GTO RXSL Sig Sauer® / caliber 9×19 | Rigad.com, accessed February 8, 2026, https://www.rigad.com/pistol-p211-gto-rxsl-sig-sauer-caliber-9×19
- Sig Sauer P211-GTO with MACH3D Compensator 9mm Luger 4.4in Nitron Pistol – 10+1 Rounds | Sportsman’s Warehouse, accessed February 8, 2026, https://www.sportsmans.com/shooting-gear-gun-supplies/handguns/sig-sauer-p211-gto-with-mach3d-compensator-9mm-luger-44in-nitron-pistol-101-rounds/p/1945899
- SIG SAUER P211: Serious Retro-Future P211-GTO [REVIEW] – Recoil Magazine, accessed February 8, 2026, https://www.recoilweb.com/sig-sauer-p211-gto-review-190149.html
- Sig Sauer P211-GTO 9MM: Full-Size 1911 Performance Redefined | DLD VIP, accessed February 8, 2026, https://dld-vip.com/guides/gsc_guidesig-sauer-p211-gto-9mm/
- P211 Pistols | Pistols | Firearms – Sig Sauer, accessed February 8, 2026, https://www.sigsauer.com/firearms/pistols/p211-pistols.html
- Sig P211 or Staccato XC : r/SigSauer – Reddit, accessed February 8, 2026, https://www.reddit.com/r/SigSauer/comments/1lv1v92/sig_p211_or_staccato_xc/
- Sig p211 v. Staccato XC : r/2011 – Reddit, accessed February 8, 2026, https://www.reddit.com/r/2011/comments/1lws975/sig_p211_v_staccato_xc/
- SIG Sauer Unveils P211-GTO Double-Stack 1911 | An NRA Shooting Sports Journal, accessed February 8, 2026, https://www.ssusa.org/content/sig-sauer-unveils-p211-gto-double-stack-1911/
- Sig P211 GTO, The good, the bad, and the ugly… – 1911-style Pistols – Brian Enos’s Forums, accessed February 8, 2026, https://forums.brianenos.com/topic/317129-sig-p211-gto-the-good-the-bad-and-the-ugly%E2%80%A6/
- My P211 So far… : r/SigSauer – Reddit, accessed February 8, 2026, https://www.reddit.com/r/SigSauer/comments/1mqebgc/my_p211_so_far/
- Introducing The Staccato HD Family, accessed February 8, 2026, https://staccato2011.com/hd
- Staccato HD P4: Everything You Need to Know [Review] – Blog.GritrSports.com, accessed February 8, 2026, https://blog.gritrsports.com/staccato-hd-p4-review/
- Staccato HD P4, accessed February 8, 2026, https://staccato2011.com/products/staccato-hd-p4
- Discover the Staccato HD Family: Advanced 2011 Pistols for Elite Performance, accessed February 8, 2026, https://staccato2011.com/blog/the-staccato-hd-family
- The New Staccato HD: Where Performance Meets Glock Magazines | The Mag Shack, accessed February 8, 2026, https://themagshack.com/the-new-staccato-hd/
- Sig P211 GTO Trigger bow dimensions and compatibility. : r/2011_Builders – Reddit, accessed February 8, 2026, https://www.reddit.com/r/2011_Builders/comments/1qrx7h6/sig_p211_gto_trigger_bow_dimensions_and/
- TFB Review: SIG P211 – 5,000 Rounds Later | thefirearmblog.com, accessed February 8, 2026, https://www.thefirearmblog.com/blog/tfb-review-sig-p211-5-000-rounds-later-44823619
- Sig P211-GTO | 4.4″ Full Size | 9mm – Dawson Precision, Inc., accessed February 8, 2026, https://dawsonprecision.com/sig-p211-gto-4-4-full-size-9mm/
- P211 MACH3D COMPENSATOR PARTS KIT – Sig Sauer, accessed February 8, 2026, https://www.sigsauer.com/p211-mach3d-compensator-parts-kit.html
- The Staccato HD: Yes, It Takes Glock Mags – Inside Safariland, accessed February 8, 2026, https://inside.safariland.com/blog/the-staccato-hd-yes-it-takes-glock-mags/
- Sig Sauer P211 GTO vs Staccato XC Comparison! – YouTube, accessed February 8, 2026, https://www.youtube.com/watch?v=dVSP1oIuJeY
- P211 issues : r/SigSauer – Reddit, accessed February 8, 2026, https://www.reddit.com/r/SigSauer/comments/1nqktw3/p211_issues/
- SIG P211 GTO CATASTROPHIC FAILURE : r/handguns – Reddit, accessed February 8, 2026, https://www.reddit.com/r/handguns/comments/1p1bguf/sig_p211_gto_catastrophic_failure/
- New For 2025: SIG Sauer P211-GTO | An Official Journal Of The NRA – American Rifleman, accessed February 8, 2026, https://www.americanrifleman.org/content/new-for-2025-sig-sauer-p211-gto/
- Staccato XC vs Sig P211 GTO. The ultimate COMP-etition! – YouTube, accessed February 8, 2026, https://www.youtube.com/watch?v=62gyrAZxDsM
- The Staccato HD Series: A New Standard in 2011 Pistol Innovation, accessed February 8, 2026, https://www.tacticaltargetsystems.com/post/unveiling-the-staccato-hd-series-a-new-standard-in-2011-pistol-innovation
- Recoil Spring tension?? (Staccato 4.5 HD) : r/2011 – Reddit, accessed February 8, 2026, https://www.reddit.com/r/2011/comments/1ozxq1e/recoil_spring_tension_staccato_45_hd/
- Cleaning compensator – Open Pistols – Brian Enos’s Forums… Maku mozo!, accessed February 8, 2026, https://forums.brianenos.com/topic/246232-cleaning-compensator/
- Cleaning Recommendations – Vantage Point Armory, accessed February 8, 2026, https://vparmory.com/pages/cleaning-recommendations
- cleaning comp on p211 GTO : r/2011 – Reddit, accessed February 8, 2026, https://www.reddit.com/r/2011/comments/1om9h4z/cleaning_comp_on_p211_gto/
- Cleaning & Maintenance Schedule : r/Staccato – Reddit, accessed February 8, 2026, https://www.reddit.com/r/Staccato/comments/1i4gp7x/cleaning_maintenance_schedule/
- Staccato Cleaning and Lubrication Tips for Firearms, accessed February 8, 2026, https://staccato2011.com/blog/cleaning-and-lubrication
- CS preventative replacement schedule : r/Staccato_STI – Reddit, accessed February 8, 2026, https://www.reddit.com/r/Staccato_STI/comments/1fv0c5u/cs_preventative_replacement_schedule/
- Still worth getting the p211 GTO for the price AND the Snide remarks about it being an Sig…? : r/SigSauer – Reddit, accessed February 8, 2026, https://www.reddit.com/r/SigSauer/comments/1np494w/still_worth_getting_the_p211_gto_for_the_price/
- SIG Sauer Will Release the P211 GT4 & GT5 Non-Comped Pistols – Blog.GritrSports.com, accessed February 8, 2026, https://blog.gritrsports.com/new-sig-sauer-p211-gt4-gt5-non-comped-pistols/
- SIG P211-GT4: A New Direction for the P211 Line — SHOT Show 2026 – GunsAmerica, accessed February 8, 2026, https://gunsamerica.com/digest/sig-p211-gt4-a-new-direction-for-the-p211-line-shot-show-2026/
- SHOT Show 2026: Staccato HD C4X | An NRA Shooting Sports Journal, accessed February 8, 2026, https://www.ssusa.org/content/shot-show-2026-staccato-hd-c4x/
- SHOT SHOW 2026: Staccato Introduces HD C4X Compact Pistol and Launches Staccato Training Group – Frag Out! Magazine, accessed February 8, 2026, https://fragoutmag.com/shot-show-2026-staccato-introduces-hd-c4x-compact-pistol-and-launches-staccato-training-group/
- [SHOT 2026] The New Staccato HD C4X Compensated Pistol | thefirearmblog.com, accessed February 8, 2026, https://www.thefirearmblog.com/blog/shot-2026-the-new-staccato-hd-c4x-compensated-pistol-44826010