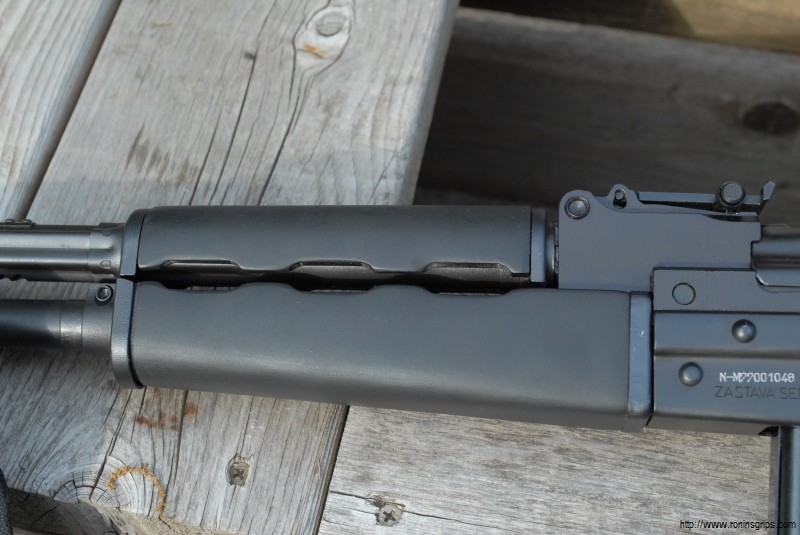
One of the parts I knew I wanted was the folding arm brace from CNC Warrior. This essentially gives you additional support to either fire the pistol with one hand or to even shoulder the weapon comfortably if so desired.
Now the ATF has reviewed and approved the arm brace as not being a shoulder stock. Each arm brace that CNC Warrior ships includes a copy of the ATF letter that says it is not a stock and that attaching it will not make a pistol a SBR.
This stock is a joint design effort between Chris Bonesteel, of Bonesteel Arms and CNC Warrior and is very nicely made. It has a very strong hinge mechanism and is a breeze to install.
When I took the assembly out of the box I immediately noticed how well made it was. I recalled a talk I had several years back with Chris where he worried about some folders being weak and this design reflects that both he and Denny at CNC Warrior wanted to make a strong one. The attention to detail and fitment are very apparent. Hands down, this is my favorite set up that I have seen for the M92.
The following are photos of the brace for people who like to see details:
The following photos shows how nice brace marries up to the back of the receiver plus the quick release sling hole but it has not been attached yet.
It comes with the mounting screw you will need and easy to follow instructions:
I highly recommend you buy their installation kit. It comes with the drill bit and mounting jig to make this a breeze:
In a later blog post, I’ll show you just how easy the installation was. I kid you not, if you have a hand drill and their installation kit, you can do this!!
Note, I have to buy all of my parts – nothing here was paid for by sponsors, etc. I do make a small amount if you click on an ad and buy something but that is it. You’re getting my real opinion on stuff.
AK rifles use press-fit barrels wherein the barrel is pressed into either the forged trunnion (if it is a sheet metal receiver) or the receiver and then held in place by the 7mm barrel pin. As part of this, the barrel must be headspaced to the bolt to help ensure the cartridge is properly seated. A challenge that commonly happens is that a builder inserts the barrel using whatever method ranging from a big hammer to a hydraulic press but when they try to use their headspace gauges, they find they have gone too far. Alternatively, folks trying to insert a barrel back in that was already headspaced notice that they overshot the barrel pin groove when looking through the holes across the groove in the barrel. Regardless of how the mistake is identified, the question becomes “what do I do now?”
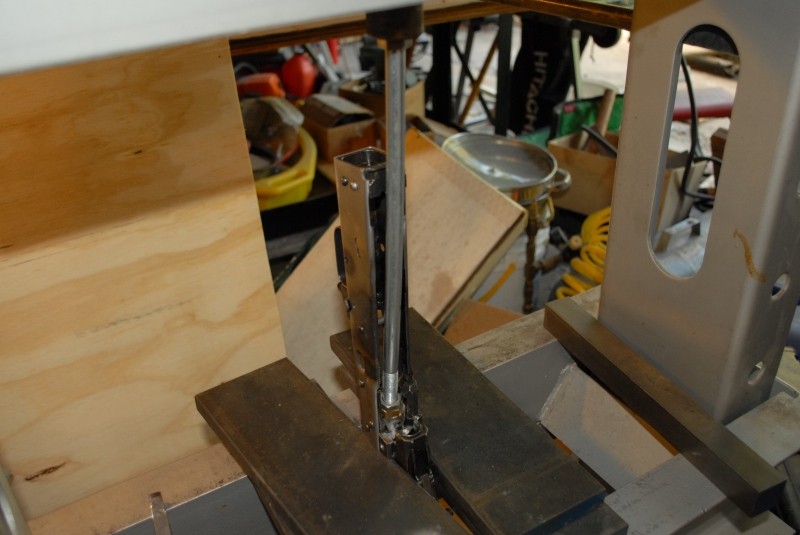
There is a relatively quick and easy solution – use a long shaft to drive the barrel back out. These tools are generically called “barrel back out tools” and you can make one many ways. They can all be summarized as having a long shaft to reach through the receiver to the chamber end of the barrel and then either a copper or brass fitting to protect the chamber from being damaged by the rod. I have seen everything from guys using socket extensions, to pieces of round steel, to custom purpose built tools.
One time, I pressed in a Yugo M72 barrel too far and had to press it back out so I came up with a quick and easy tool that I kept in my tool box and even sold for a while until I stopped because the profit margin just wasn’t sufficient. With that said though, it’s worth sharing with folks just in case they wind up in a jam.
Here is what you need:
One 1/2″ grade one or two bolt that is about 12″ long (or however long you want to make it)
One 1/2″ grade one or two steel nut
One 1/2″ brass nut
For my first tool, that I still have, I just went to my local Ace Hardware store and bought the parts.
Basically, the long bolt allows you to reach into the receiver to the chamber end of the barrel to apply pressure. I used a really long bolt because a Yugo’s rear trunnion is solid and you have to go down at a long shallow angle to press the barrel back out. With AKMs or other AKs with open rear trunnions, you can simply go straight from the back to the front. Note that you need to clear the ejector without damaging it. I purposefully used a low grade bolt as I did not want it brittle from hardening.
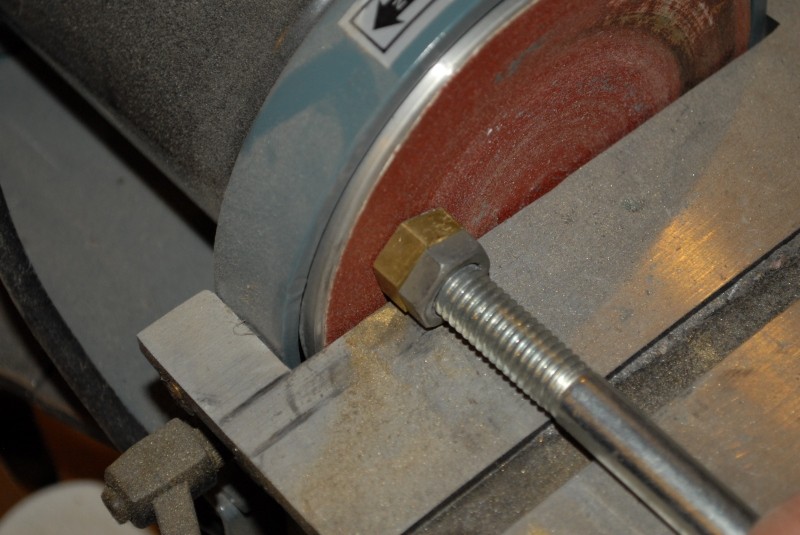
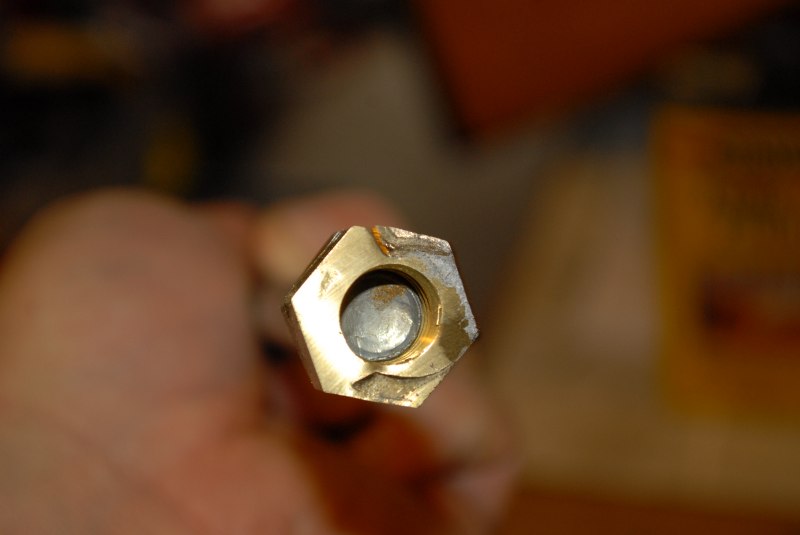
The steel nut needs to be ground down enough so that the combination of it and the brass nut can fit in the area where the bolt normally locks up. You want as much brass as possible to be in front of it and the brass nut should protrude from the bolt. You don’t need a great deal of the brass nut threaded on the bolt as the steel nut is backing it up to provide much needed support. I would grind and test repeatedly until the timing was such that the two nuts matched up just right when I tightened them down.
Use the bolt to hold each nut and sand them down. The steel nut is there to reinforce the brass nut.I don’t have exact dimentions so you can experiment. The steel nut is about half it’s original thickness and the brass is about two thirds. You need enough steel for strength, enough brass to be able to deform yet the assembly must fit in the pocket area inside the trunnion just before the chamber.
Note, I used to grind the brass nut to match the extractor notch in the barrel but have stopped doing so as the brass simply deformed anyways. The following photo shows how the brass simply bends and conforms to the extractor notch plus you can see that the brass nut extends well forward of the steel bolt.
I just let pressure form the end of the brass nut however it needs to. I just grind the brass nut flat. Very important note – the brass nut must extend past the end of the bolt by about 1/4-3/8″ thick. The longer the better. You do not want the steel bolt to contact the chamber even when compressed – just the brass. I talked to guys who used to put two real copper pennies on the end of the barrel to press it out so I used that as my minimum thickness.
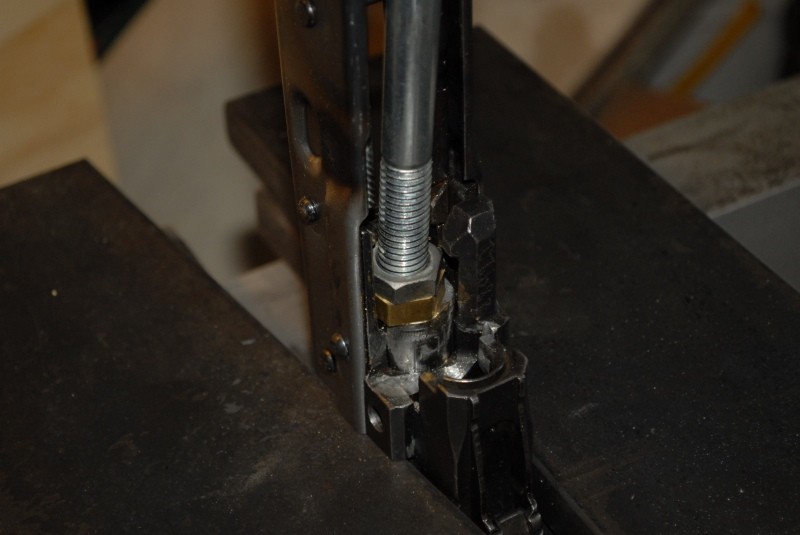
In the next photo, you can see the shallow angle I used to press the Yugo barrel back out. Again, you would not need the same if you could go straight through the receiver:
I actually have a few of these pushers made and ready to use. I have a long 12″ one to be able to reach down at an angle in Yugos (their rear trunnion is solid) plus a much shorter one – maybe about 6″ that I have when I am just working with a barrel in a trunnion.This is actually under load. Only the brass nut is touching the end of the barrel.
Historically I did all my barrel work with my 20 ton press but now I mainly use air tools except for really stubborn parts. When I originally did this post in 2014, I used my press.
With the M72, I was able to very simply move the barrel back out a bit, turn things around and then press the barrel in until the proper headspace was achieved. The tool worked so well that I have it in my tool box still and have used it a few more times plus I did make a dozen or so and sold them to guys who had good luck as well.
As a caution, make sure the trunnion is well supported – you can see I have it resting on the press plates in the photo above. Make sure everything is set up, stable and that you are clearing everything else before you apply pressure with the press.
If you apply pressure and nothing happens, stop and carefully inspect what is going on – the tool may be sitting on something other than the barrel. More force may damage parts and you do not want that.
Lastly, be safe – take your time and play it smart. A press can develop massive pressure. Wear safety glasses and do not dream of having your hands anywhere in, on or around the parts being pressed. All things considered, backing a barrel out should take very little force but you do not want an accident to happen. If you are tired and frustrated, stop and wait until the next day or when you have relaxed and calmed down. Most of my personal accidents have happened when I was in a rush, tired or angry – don’t be me 🙂
In closing, I hope this helps you in your building efforts!
Note, I have to buy all of my parts – nothing here was paid for by sponsors, etc. I do make a small amount if you click on an ad and buy something but that is it. You’re getting my real opinion on stuff.
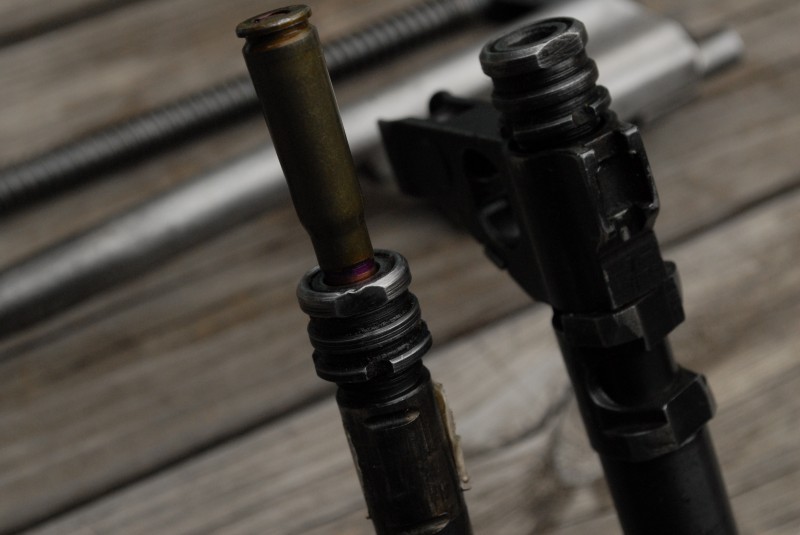
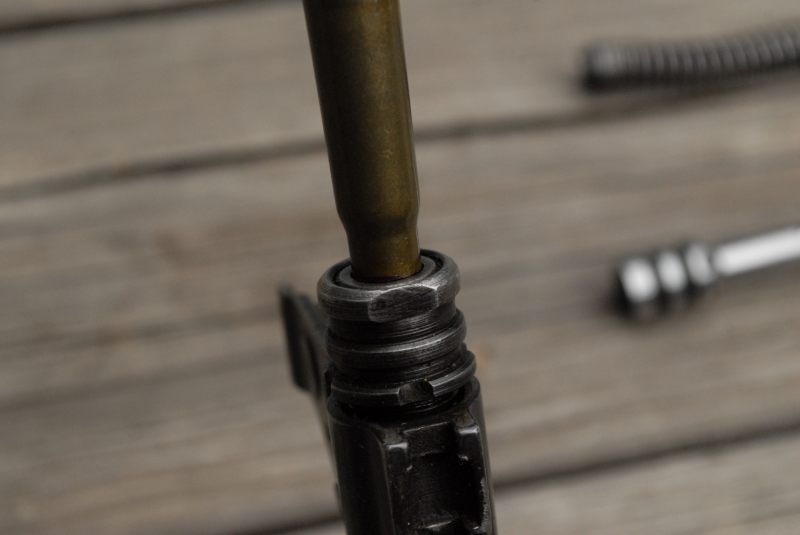
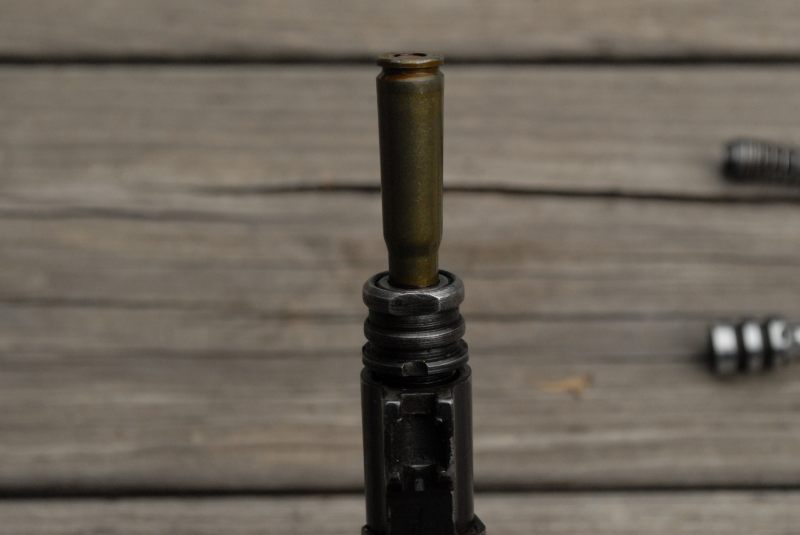
One of the challenges with older AKs is to figure out what kind of shape the barrel is in. Yugos especially are famous for shot out bores. The slang term is “dark bore” meaning the barrel is so corroded that it is no longer shiny and usually they are pretty shot out but not always – it pays to do some testing.
One quick way to check is known as the “bullet drop test”. Basically, you put the bullet end of a cartridge into the muzzle and if the cartridge stops on the bullet then there is still some life left. If it drops in such that the case is hitting, the barrel is pretty well worn out. It’s not a perfect test but it is quick and easy.
Pass on a Yugo M72 barrel
Fail on a Yugo 72 barrel – notice how the bullet can’t be seen at all. The rim of the case is sitting in the bore. This isn’t too bad – I have seen some that drop in all the way into the shoulder of the case!
With that said, I have known tons of builders who went ahead and built battlefield pickup style rifles or just “fun guns” where they could more or less hit a man sized target at 100 yards. Personally, if I am going to all the effort to do a build, I’d rather have an accurate rifle vs. one with a worn out bore.
Now, there are new “endoscopes” that are 5.5mm and can let you look into the bore of rifles. I reviewed a $17 GiraffeCam that connected to my Android phone and was pretty amazed and what I could see especially given its low cost. Click here for the full review.
One of the things that used to drive me nuts with AK builds was driving out barrel pins and then I got a tip from Gunplumber – a variable trigger air hammer or air riveter makes it way easier. Many cheap import air hammers have an air valve behind the trigger that is either on or off and not much in between. Some guys call the variable valve triggers “tickle triggers” – why? I have no idea. At any rate, every air riveter, which looks like an air hammer, that I have seen has a tickle trigger to allow the user more control when setting rivets.
I use the pointed conical air chisel to start the rivet and that is the hard part. Once you get it moving, then use a big hammer and the largest punch you can fit in the hole to drive the rivet the rest of the way out. Note, I only do this when demilling. I use a barrel pin jig to install barrel pins because you have so much more control.
The following photo is of an ATS brand Pro Series 3X riveter. The bigger the number, the more poweful the riveter. I also have a big 4X equivalent Ingersol Rand that I use on large rivets or work needing a powerful tool. The 3X has a nice combination of power and weight and it almost always works on barrel pins and certainly on small trigger guard AK rivets.
You can find rivet guns from many suppliers – even Harbor Freight. I’d recommend you get a 3X for most work and a 4X if you want even more options.
The following is the riveter shown above:
When the conical chisel gets beat up, I grind the tip down and when it is really fried, I just pull out another. I would recommend going with a good brand name. For example, Ingersoll Rand, Chicago Pneumatic, etc.
The big 4x equivalent air hammer I use is the IR 117K standard duty model and it hits hard:
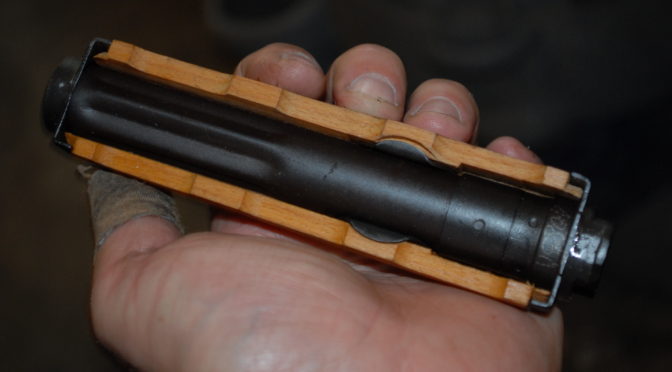
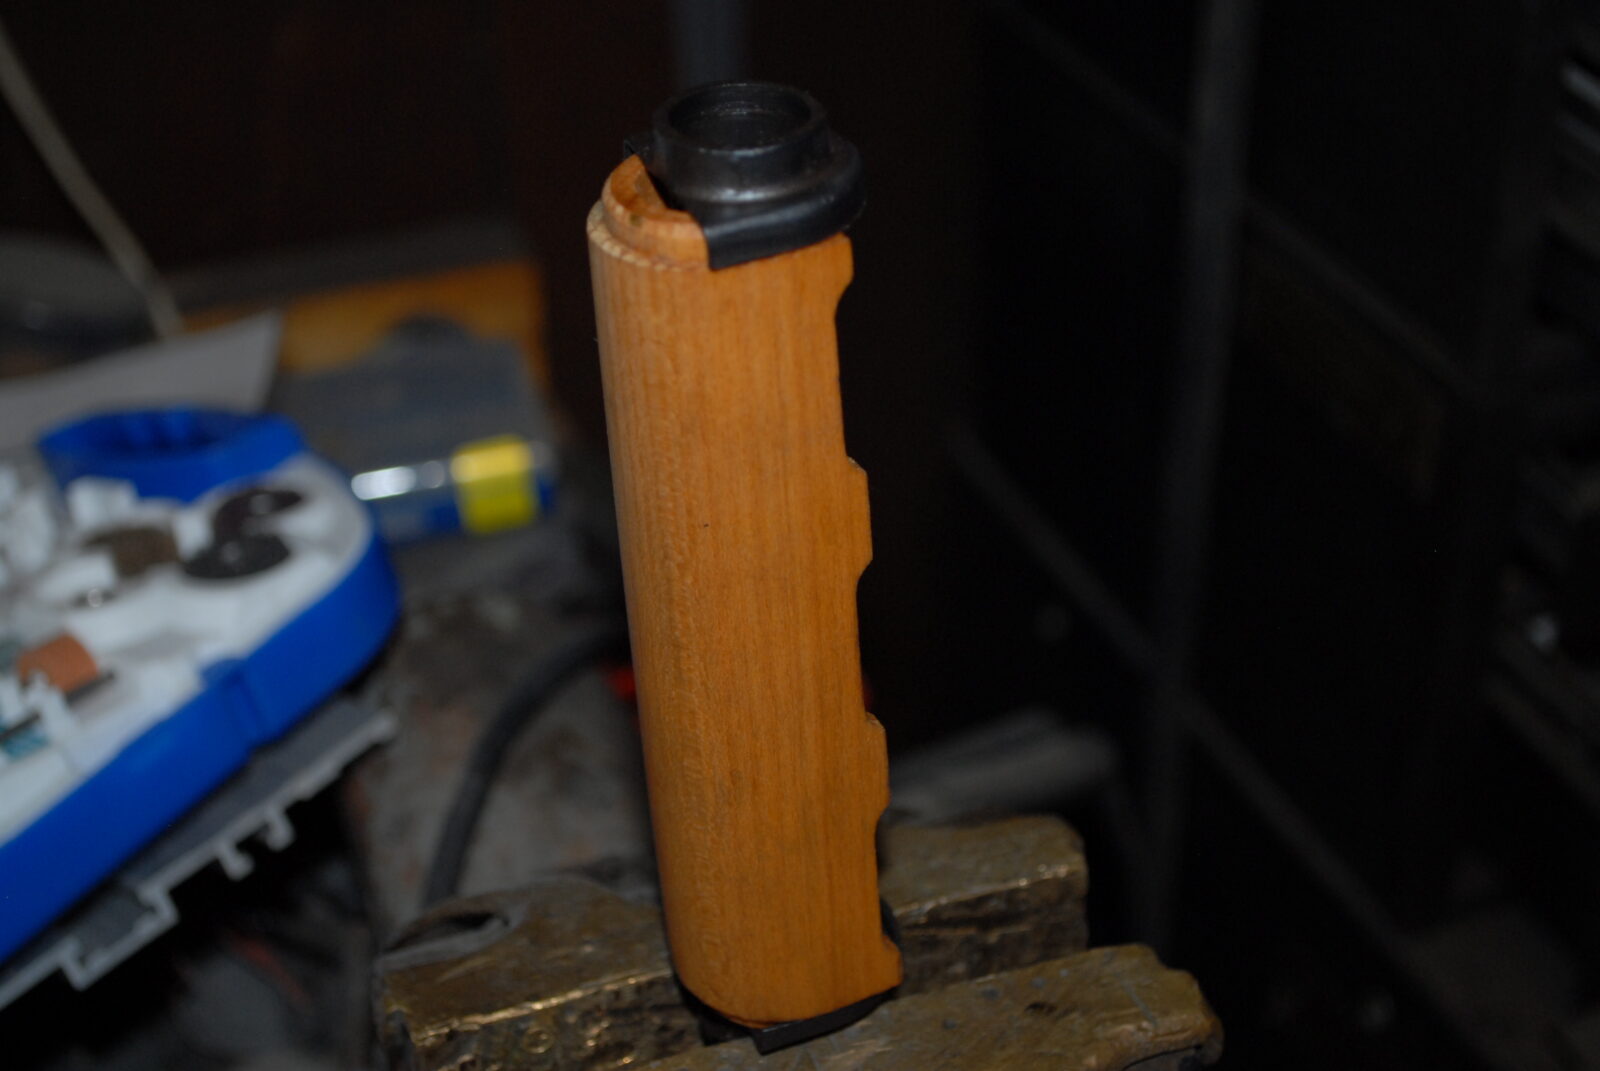
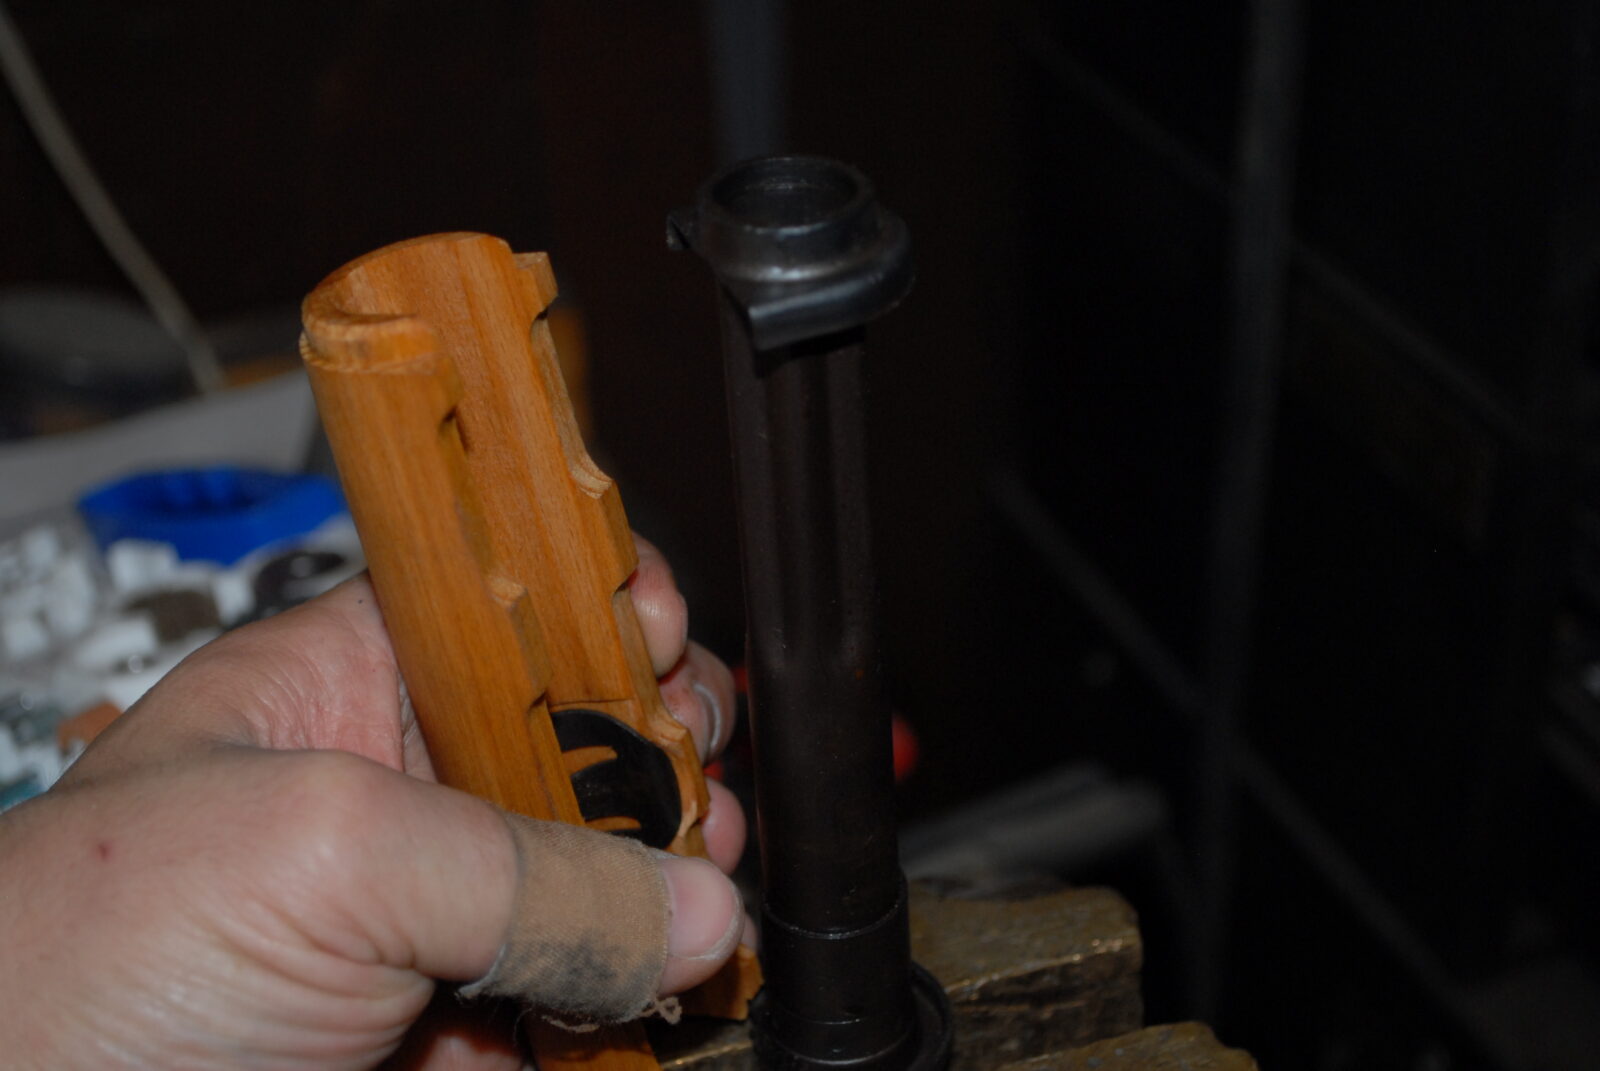
It’s cool having a blog because I can elaborate on questions that people have asked me. A recurring one is how to remove the upper handguard cover, also known as the “gas tube” cover on AK rifles. Every military AK I have seen uses two half circle metal retainers to hold the half moon shaped gas tube cover. Sometimes they cover comes off super easy and other times you need mechanical assistance. Here is the basic process – hold the gas tube with one hand, grab the cover with the other, turn the cover 180 degrees so it is facing the opposite way and then pull it out of the retainers.
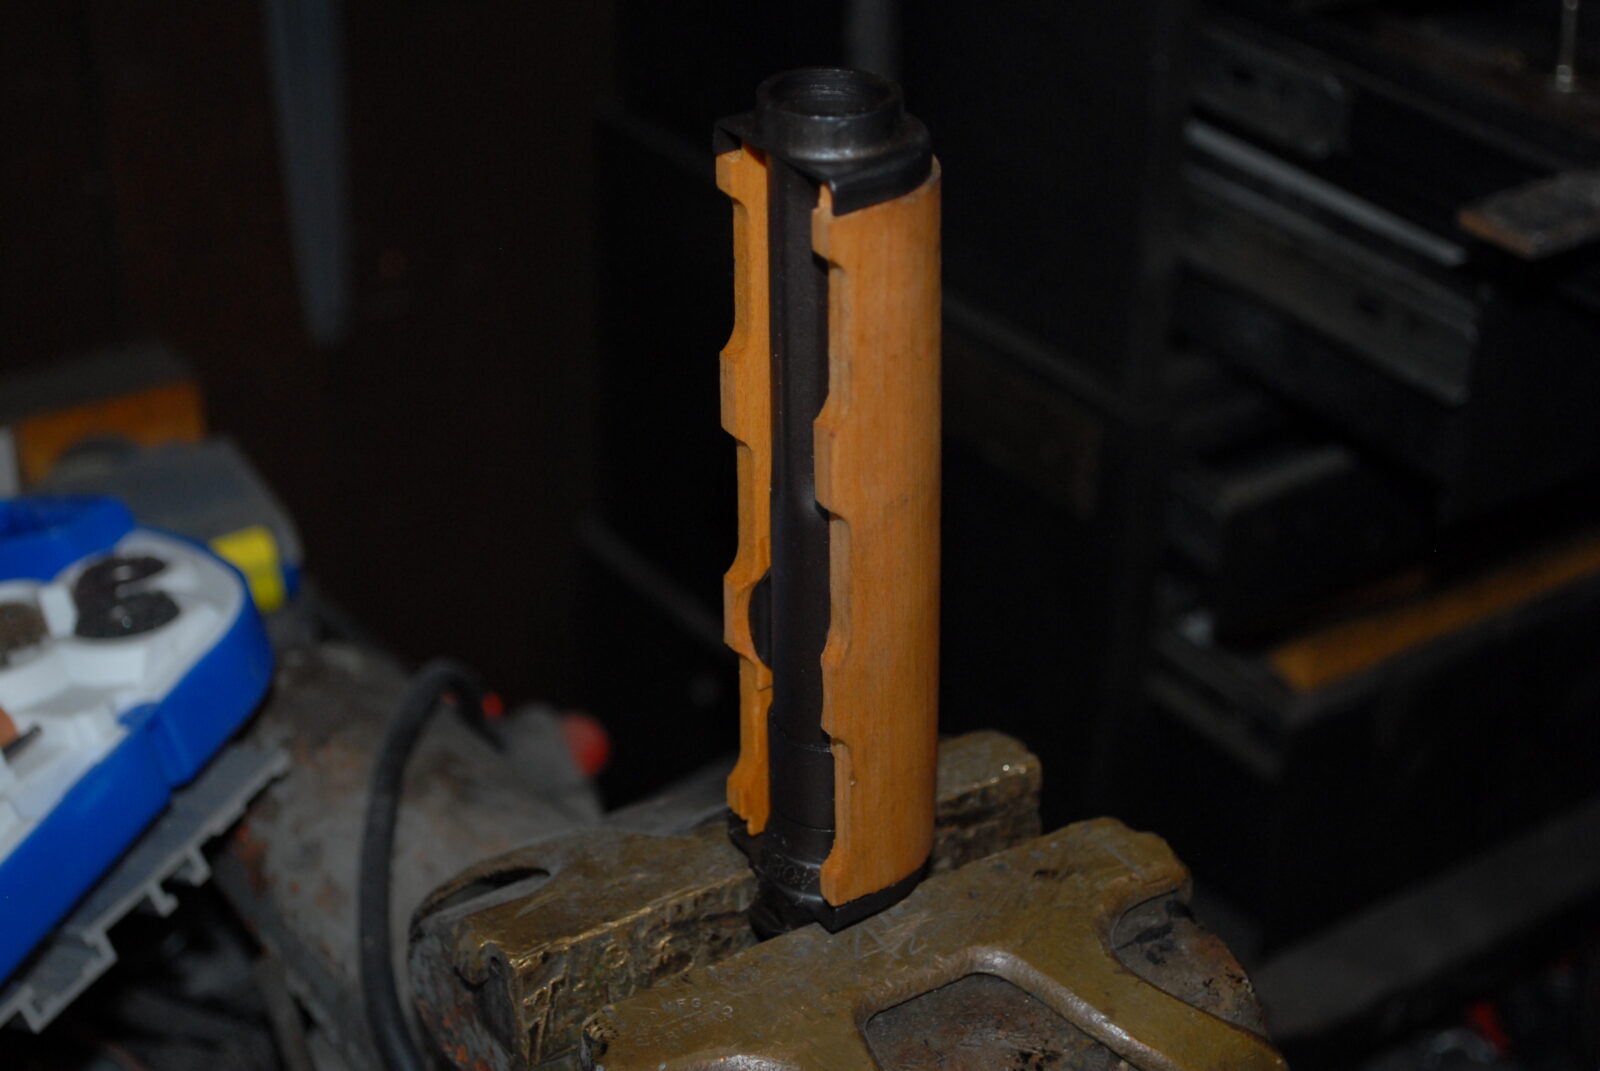
Now, sometimes the wood or plastic has really stuck/doesn’t want to budge. Do the following:
Place the forged end of the gas tube in a vise with either soft jaws to pieces of leather to protect the forging. Absolutely do not put the circular end into the vise or you will crush it.
Close the jaws just enough to hold the assembly in place.
Either firmly by hand or with a strap wrench, rotate the cover 180 degrees so it is face the opposite direction. Note – you can turn it either way as these are just semi-circles and you may find it turns easier to the left or to the right.
If you are applying force and are getting nervous that it still will not turn, you have some issue with one surface sticking to the other. You have two approaches you can try: 1) use a heat gun and warm up the metal retainers from their ends. Sometimes the varnish, BLO, urethane or partially melted plastic is sticking and heat can soften it after which it turns much easier. 2) Just brute force it and if it snaps then replace it. I have never had to resort to this.
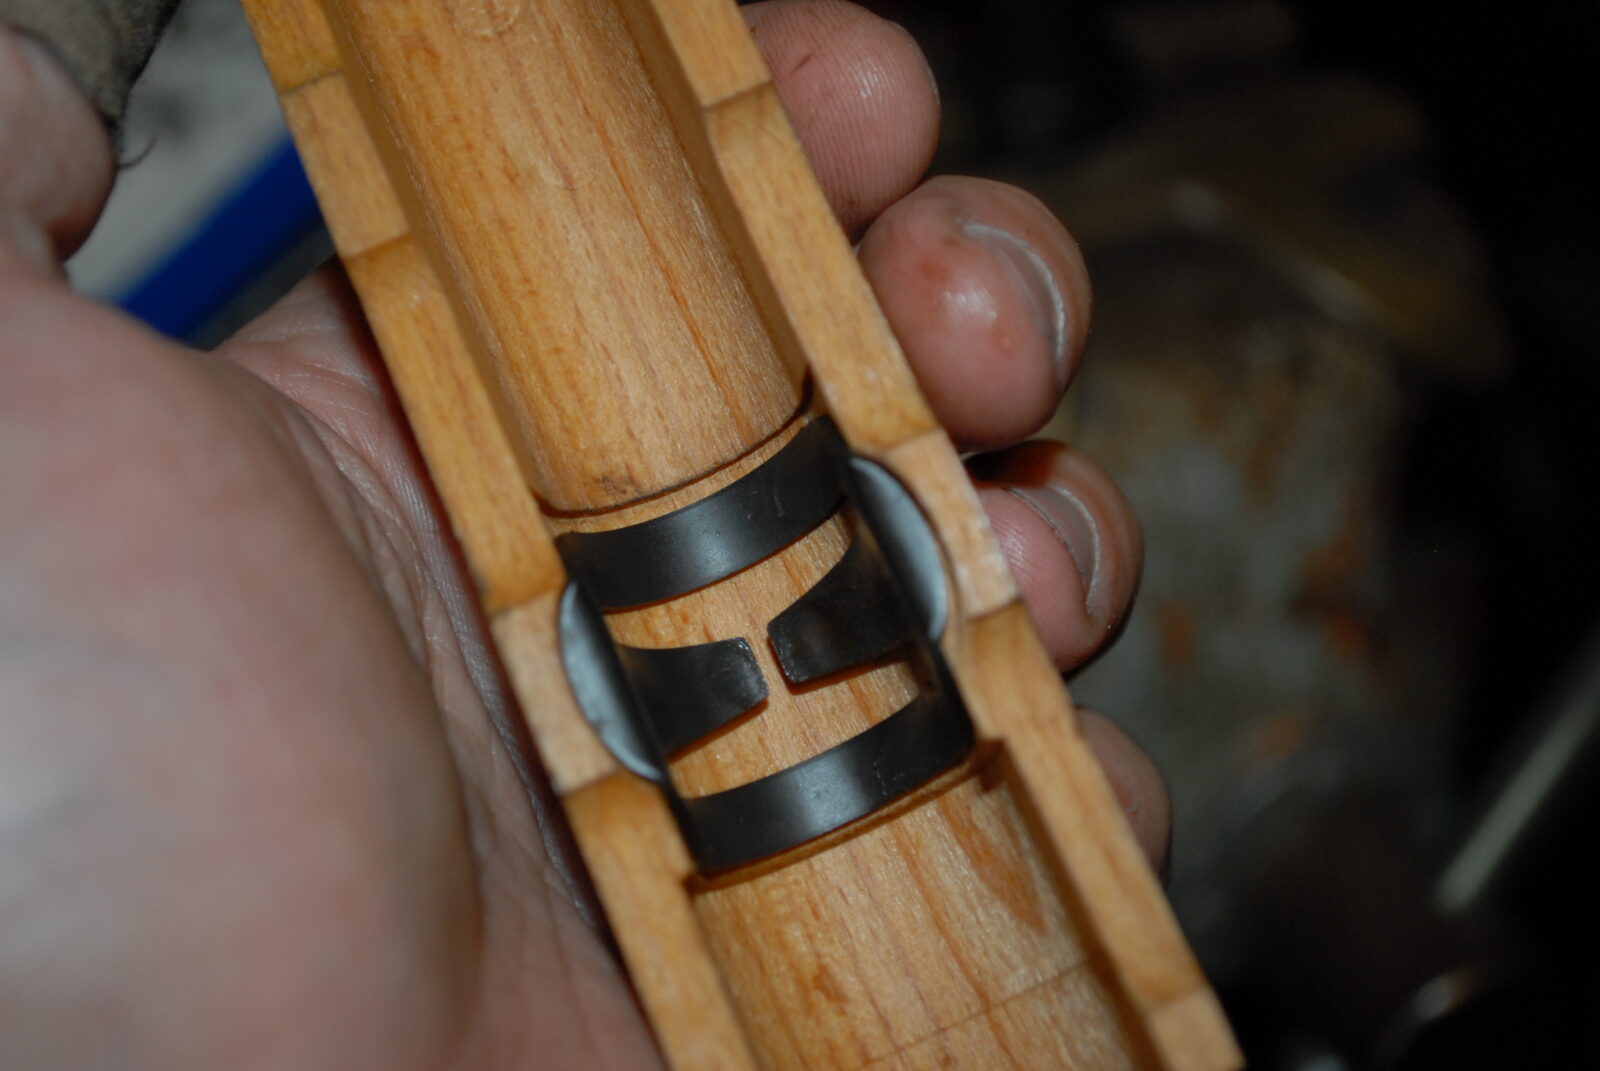
The new cover goes on the reverse. If you are using a wood cover, or our polymer cover, don’t forget to install the retaining clip first to limit cover movement. Some plastic gas tube covers do not use this but our gas tube covers do just to be clear.
Here are some videos that others have recorded to help further just in case:
The method I just outlined is very similar to what this fellow does:
Here are two more for additional perspectives:
Note, I have to buy all of my parts – nothing here was paid for by sponsors, etc. I do make a small amount if you click on an ad and buy something but that is it. You’re getting my real opinion on stuff.
A lot of guys, myself included, have run into retaining wires for the trigger and hammer pins in an AK and had a heck of a time removing or installing them depending on the design. I can’t tell you how many I have had challenges with over the years for one reason or another. I decimated the stock Zastava wire in my M77 the other day but I can explain that one – I now rather despise the wires and just pull them out with pliers with no plan of reusing them. Thus, I bent the heck out of the wire just yanking it out.
There is a solution to the retaining wire problem – or at least, my problem with retaining wires. About two years ago, I stopped using wires altogether and moved to the use of “plates” which are pieces of spring steel or sheet metal that simply go nose first onto the hammer, you then rotate the plate down and it engages the trigger pin and then finally the hole portion winds up aligned with the safety/selector lever hole. What this does is the plate locks up the two pins and then the selector lever locks the plate in place. They are incredibly simple to install and remove if you are doing work with the fire control group.
In terms of plates, there are basically two styles you will find. One originated with RSA and I have used these for a few years now. I only have had one problem – during installation one part of the hammer pin portion snapped right off. I called RSA and they promptly replace the plate. Kudos to them for good customer service.
A relatively newer style is from Tapco but I haven’t used it yet myself though I do have one on order for my Vepr 12 to try out. It does the same thing but has a small tab. I have big fingers and am wondering if this will make installation and removal any easier and let me point out that the RSA is a breeze to install and remove.
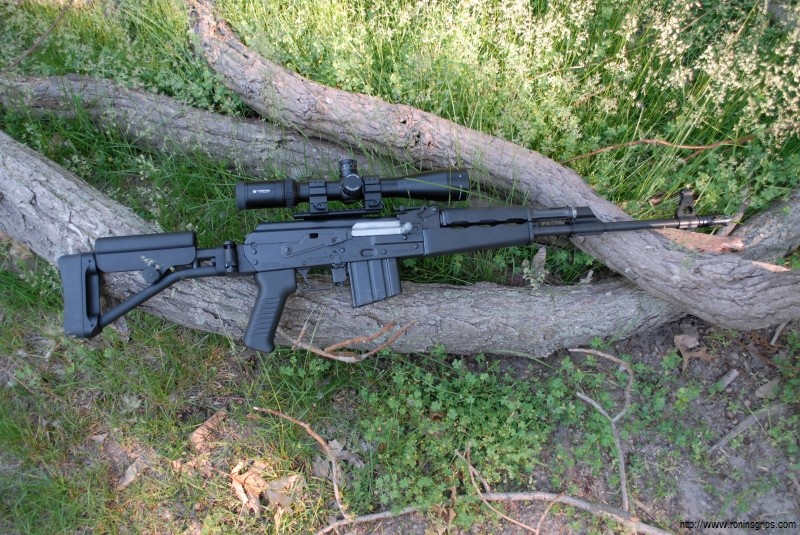
I installed the RS Regulate AK-310 base and AKR top rail in preparation for the new beautiful Vortex HS-T 4-16x44mm scope the folks at Vortex helped me select.
The RS Regulate system is genuinely impressive. By installing the bottom rail, you then have options about the front to back location of the AKR rail as well as left to right. If you wanted to, you could install a shim if you needed even more vertical adjustment on one end or the other to compensate for a poorly placed side mount on the rifle.
The only hangup installing the AR-310 base was a poorly formed rivet with a protruding portion of the head that the base was hanging up on. I ground that portion flush and then used Brownells’ Oxpho blue to touch it up. When steel is freshly ground, I apply the Oxpho cold bluing liquid with a Q-tip and the steel instantly turns black. I let it sit for about 30 seconds and then wipe it off and apply oil.
The AK-310 base slides on like any other ComBlock side mount but it has a very nice cam lever and an adjustable bolt on the bottom to get the cam lever nice and secure. Once I got rid of the protruding rivet, it slid right on and then I adjusted to bolt until it was nice and snug when I flipped the lever.
The AKR looks like a reverse picatinny rail on the bottom and interlocks with the rail top of the AK-310. I had to move the AKR all the way to the front to compensate for the M77’s rear mounted rail. The AKR is held to the AK-310 by 4 screws in grooves. The beauty of this is that you can really dial in the centering of the scope. I was able to get the AKR exactly centered over the M77. Now, once you have it located, they give you two staking pins to drill and install to permanently locate AKR. I have held off doing that I may need to move it around some but went ahead and applied blue Loc-tite on the screws.
With the rail centered and ready to go, I turned my attention to the HS-T scope from Vortex. This is one heck of a nice scope. I opted for the MilDot reticle and a 44mm objective to ensure I cleared the rear sight leaf. In hindsight, I could have gone with a 50mm objective as there was plenty of clearance. I own a Vortex Sparc II red dot and liked it. This is my first actual Vortex rifle scope and I am very impressed.
I used 30mm medium rings to mount the Vortex. They are extremely beefy tactical rings from UTG. You may laugh but I have had very good luck with their rings. The only shortcoming this time is that they were so long (from front to back) that I ate up some precious real estate for sliding the scope forward. It all worked out in the end but for awhile I wasn’t sure if I could get the eye relief right but I did.
There was some give and take as I moved the scope rings and the AKR around. The photo above shows the AKR sitting in the last groove. I wound up actually having it overhang by one by the time it was all set.
So, the scope lines up beautifully with the 1″ cheek riser on my Ace skeleton stock. I have heard that the Vortex scopes have good optics but that is an understatement – you have to look through one to realize how good it is – very bright and clear. Couple that with arguably one of the best no questions asked warranties in the industry and now you know why I bought it. I did a ton of research before doing so as well.
Only one more thing to do now … find the time to take this hammer shooting with multiple brands and loads of good ammo to stretch its legs.
In the very near future, I will swap out the medium rings for a low offset AR mount so I can get the scope closer to the center of the bore plus move the scope just a bit more forward and that will be a post for another day.
One final comment, Ace Riflestocks emailed me the other day and their modular Zastava adapter is back in stock. If you are looking for one, I would recommend checking them out as well as Desert Fox.
I purchased a base Zastava M77 rifle from Bud’s Guns and had the rifle sent to my good friend and FFL, Scott Igert over at http://www.migunexchange.com. To be imported, the rifle was pretty neutered with a thumbhole stock and a tacked on muzzle nut. We then went to work – the result has our M70 traditional handguard set (the same handguard style is used on the M70 series, M76 and M77 rifles), one of our Bulgy ARM-9 custom grips (my favorite grip hands down right now), Tapco G2 FCG, US Phantom brake, a Desert Fox PK1025 adapter, and an Ace skeleton stock with a 1″ pad.
The original muzzle nut was tack welded on. I removed it with a Dremel and touched up with Oxypho Blue from Brownells.
The original gas tube cover did not use a handguard retainer spring/clip. My gas tube covers really need them to stabilize so I dug around in my parts bin and used one.
The Phantom brake is one I had handy and rather than bother with the detent pin, I used a crush washer.
The fixed stock was secured via a long wood screw that went though the integral Yugo grip nut. I was impressed that they did this without harming the 6mm threads in the nut. I just used one of our full length screws and away I went.
Our next post will show the RS Regulate mount and Vortex scope we bought for the rifle.