Here’s a quick tip for you when you need to turn a wrench outside except it is really cold but you still need to feel what you are doing or can’t wear bulky insulated work gloves.
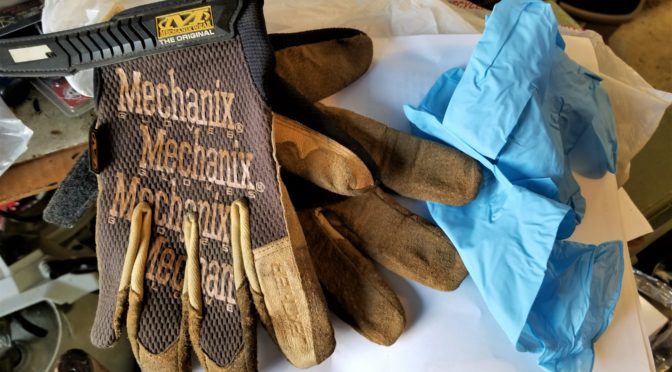
What you need to do is real simple – put on nitrile gloves first. This layer next to your skin insulates and protects you from both the wind and your hands getting wet. This is a big deal when there is snow. The second layer is your regular thin mechanics gloves. I have several brands of work gloves but Mechanix is probably the brand I use most followed by Ace.
I meant to write about this last year but forgot. Yesterday I had to work on my plow and it was +9F. The above worked great. Of course there is a limit and I don’t want anybody getting frostbite so use your common sense and play it is safe it is super cold.
At 9 degrees Farenheit, holding steel tools and moving metal parts around is a recipe for frostbite. It was this kind of work last year that led me to experimenting with putting Nitrile gloves under my thin Mechanics gloves.
I buy boxes of 5 mil Nitrile gloves whenever they go on sale at Harbor Freight. I think the sale prices tend to be around $5.99 and there are 100 in each box. I use a ton of them with my plastics work but also when working on cars. Any brand ought to work but I think the Harbor Freight gloves are a great deal when on sale.
I settled on 5 mil thick gloves because thinner ones fall apart very easily and thicker ones start to be bulky and mess with your sense of touch. I tried both 7 and 9 mil gloves before going back to 5.
I like 5 mil. It’s neither too thin nor too thick in my opinion. Note, they are meant to be disposable so you may or may not get more than one use from them.
The outer gloves are just basic Mechanix brand gloves.
I literally snapped this photo on my way out to work on the plow in 9 degree snowy weather.
I hope this little trick helps you out! I set up some Amazon product links for you below this post in case you would like to buy gloves.
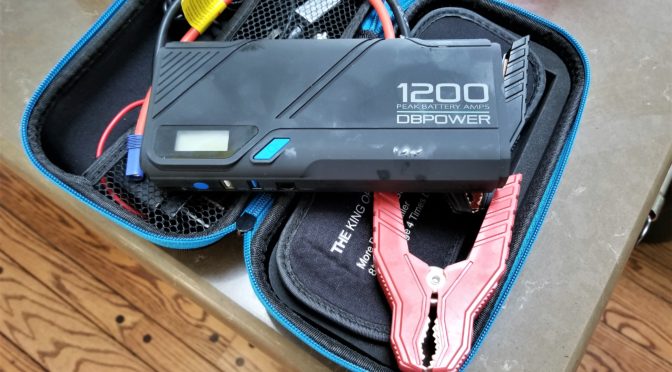
In August 2016 I bought a DBPower 400A DJS10 Peak jump starter amd found it handy. At the end of August 2018, I bought two of the bigger 1200A portable jump starters. I was busy and the units sat until some time in November when I tried to charge them. One was dead on arrival and would not charge no matter what method I tried (USB or their supplied charger). I contacted the seller and they were cool about immediately shipping a replacement. I charged it no problem and put both in our cars as a “just in case” measure.4
So, fast forward to February 1, 2019. Michigan was in the grips of an arctic freeze with ambient temperatures ranging from -8 to -12F and windchills under -20F. It was this way for two days. On the first, I went to start my wife’s Camry for the first time in several weeks and the starter could barely turn a few times before the solenoid clicked. The battery read 11.17 volts.
I thought myself lucky that I had the foresight to buy the batteries as I would not have to move my truck around to jump start it or run an extension cord out to use one of my Noco Genius chargers. The DBPower unit had been in the car and it was about +9F at the time. The whole point of these things is to store them in the car, right? It was fully charged when I put it in there.
Guess what? The DBPower read “Lo” voltage on the LED display when I turned it on and tried to charge the battery. It didn’t help the cart start at all. I was pissed. These things were $72.99/each. I felt like I had wasted a ton of money on junk. That is not a good feeling.
So, I decided to run an extension cord from my shop and hooked up my big Noco Genius G2600 charger to the battery and set it to the 30 amp quick charge setting that runs for five minutes.
This time around, the story ends a lot better – the car started right up. My wife used her car to run errands and I let it charge all last night with the normal charging cycle on the Noco.
4/16/19 Now, DBPower did make things right and replace both units and told me I have to charge the units every two months to have reliable power. If you open a unit up, you will find out they have Lithium Polymer (LiPo) power cells. These can hold a big charge and discharge quickly but they lose the charge as they sit – typically in about two months.
12/6/19 update- still working just fine as long as I keep them charged.
12/21/19 – pulled one out of our van. It’s been there since probably Labor day and the battery is at zero. I’m charging it now. What I am finding with these things is the you need to top them off every 2-3 months. The Noco charger holds a charge far longer than the DBPower unit. I charged the Noco early on the summer and it’s between 50 and 75% right now according to its status LEDs.
7/14/20 – Have now thrown away two units because they don’t buy a charge. Seriously, do not buy a DB Power unit and buy a Noco jumpstarter instead. My Noco holds a charge and has had zero problems.
11/5/20 – Throwing out my last two DBPower units that no longer hold charges. The Noco is still doing just fine and I plan on buying a second one.
Have you ever noticed that things go bad at the worst time? In my case it was during heavy snow. I was plowing wet snow out of the way and had a few hours to beat when the temperatures would drop and turn the melting snow into a block of ice.
My plow truck is a 1996 Toyota Landcruiser that has a rear mounted plow made by a long gone firm named “Super Plow”. It works pretty good when snow stays under 18″ so I plow a few times during a storm to keep it knocked down.
I was plowing, put the truck in park and got out to see what I needed to touch up. I got back in and it would not shift out of Park. I could tell that the shift lock button was not going in as far as it should. First, I tried turning the steering wheel left and right – no luck. The lock would not release. I then put the truck’s transfer case in Neutral and rocked it some – nothing. I dropped the blade to make sure there weren’t any stresses – nothing. Well, that meant the selector solenoid wasn’t moving out of the way. Argh!! Of course I was stuck right in the middle of the driveway.
I called my buddy John Freehling up who is a real mechanic and will forget more about cars than I will ever learn. He told me that there ought to be an emergency release somewhere near the lever and to do a quick search on the Internet to find out just where, which I did.
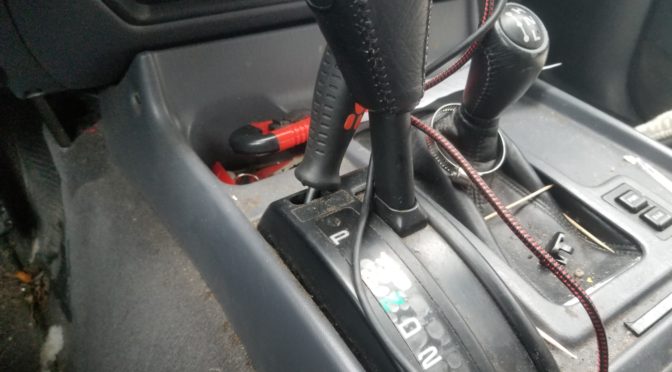
You get access to the emergency release by using a blade screw driver, knife or something, to pry the little rectangular lid that is located to the upper left of the shift console. You then can insert a screw driver to gently push down and release the shift lever. Bingo! Problem solved. I then got the truck back to my garage and went in and read on the computer instead of my little phone screen.
The access plate is at the upper edge of the console. You can see the small plate sitting in the boot of the transfer case lever. You need to reach in and press the release each time you want to take the lever out of park.
The Work Around
Now, it is literally subzero weather right now and I’ll work on permanently solving the weather this weekend when it warms up. Until then, I found a great solution on the web – cut a carpenter’s pencil off so it sticks up slightly – just the body – you don’t need it to be pointed. I put my pencil in and gave myself about an inch protruding and cut it off in my bandsaw.
Getting out of park takes two hands – I push down on the stubby pencil with my left hand, push in the lock button like normal and pull the lever down with my right. Again, you just need it to move the shift lever out of park – not all the time. It works just fine. I was able to finish plowing my hose and my mother-in-law’s no problem.
What might the problem be?
Troubleshooting and fixing this one ought to be pretty straight forward when it is warmer. Here’s what I am going to try in order:
Push down on the brake pedal. If the lights turn on, then the brake pedal switch is good. If they don’t then the problem is most likely the brake pedal switch. I read an interesting post where the guy said unscrewing and removing the brake pedal assembly makes it very straight forward.
If the brake lights come on, make sure they all come on. If not, one blown bulb could potentially cause the problem.
Related to #2 – Check brake light fuse and replace if blown.
If the light all come on, check for power at the solenoid because odds are the solenoid failed.
So, we’ll see what the final fix is but I hope this helps anyone stuck and unable to get the shift lever lock switch to depress and let them shift out of park.
2/3/19 Update: It blew the fuse — As you see, the truck’s plow is on the rear. I smashed the trailer light hookup assembly pretty good and it must have shorted somewhere. This summer I’ll use a hole saw and cut the rear bumper to install a trailer electrical assembly that is better protected vs. under the bumper. So, the truck’s brake lights and shifter are working again.
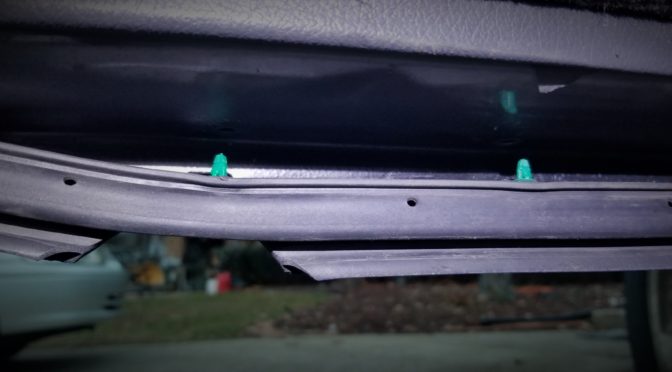
I did some bodywork on my 1996 Landcruiser (an 80-series Landcruiser) this past summer and had to replace the weatherstripping clips on the bottom of the driver side door. I did some digging and found that these clips are the correct size (5mm with a 15mm head) and they worked great for me. The one guy complains that these are green so he only scored it three stars. My originals were a pinkish color so green didn’t matter to me at all plus once installed, you can’t see them.
I popped the remaining originals out with a removal tool. If you don’t have one, they make a world of difference in the removal of clips. In a truck this old, I try to replace old plastic clips when I can as often find them to be brittle and either break during removal or re-insertion.
Here is a clip removal tool. The green clips under it are the brand new replacement units.
The tool you see in the above photo came with the following replacement Toyota Trim Clips package that has helped me out a number of times such as securing drooping engine bay plastic shields on a 2002 Toyota Camry.
Here were the remaining original clips. Note the lovely pink-ish color thus I really didn’t mind what colors the originals were as long as they worked.
Here is the end result – I worked the clips into each hole in the weather stripping and then simply pushed them into the body holes. I think I installed a total of five to six clips. The drooping problem was solved.
The heads securely fit in the holes in the weather stripping and into the body. No more drooping weatherstripping!
In Summary
These clips worked great. I just did this post to try and save anyone trying to find clips specifically for an 80 series Landcruiser.
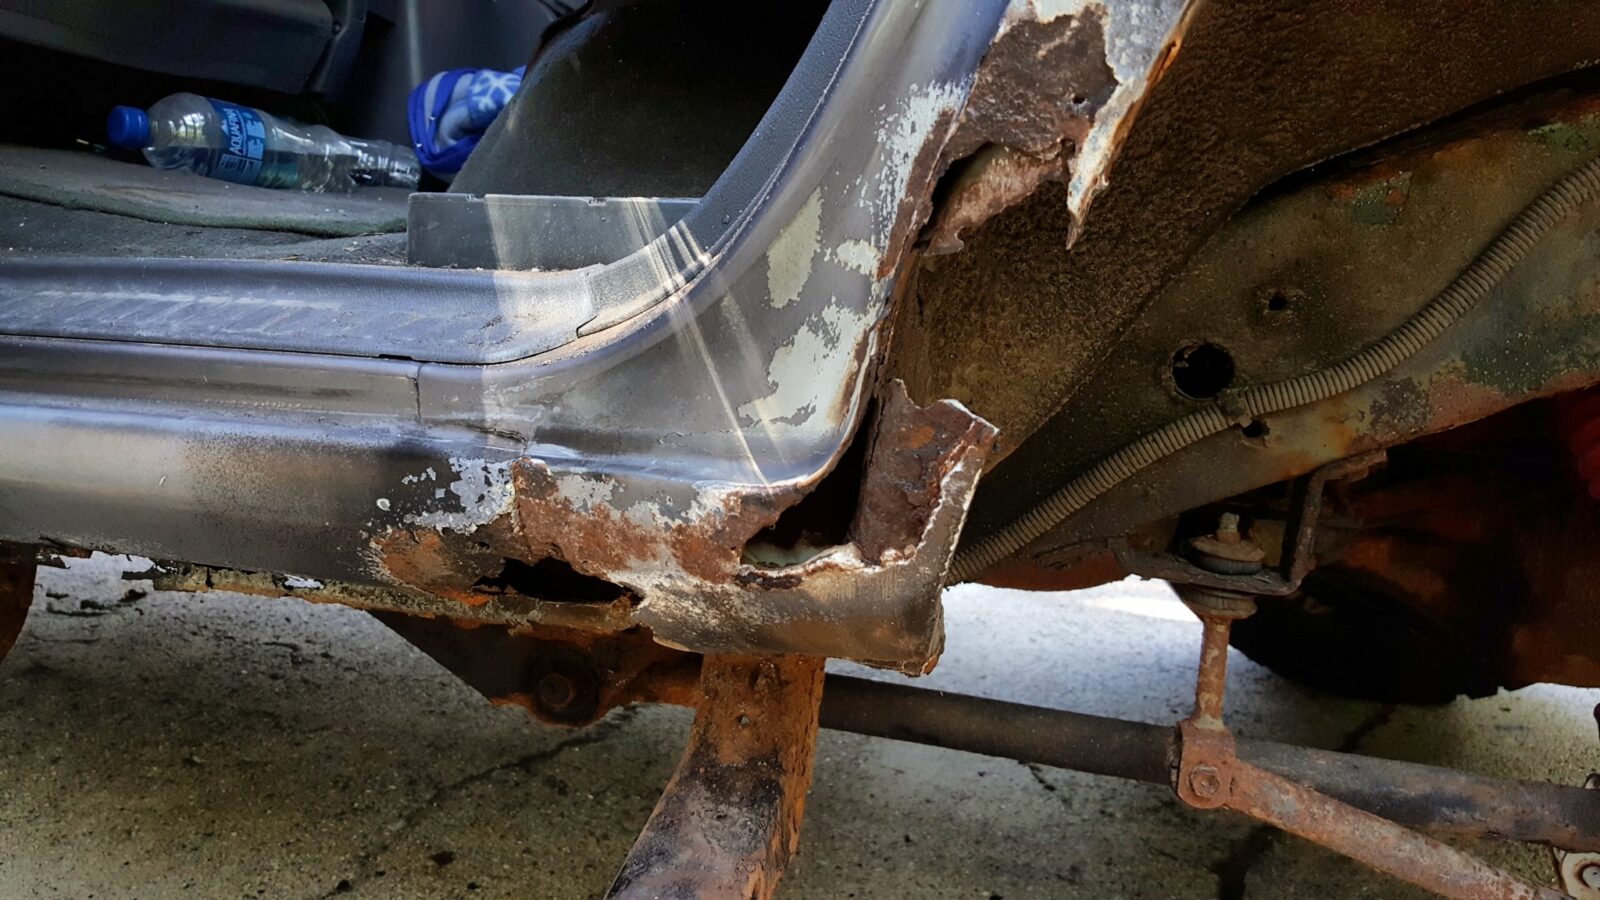
One of the things you learn in Michigan when you have to work on cars is how to deal with rust. Most cars after 10 years in Michigan look like they were dipped in the ocean and then allowed to rust like crazy. It’s pretty much inevitable. The older the car the worst shape they will be in. This year while working on my 1996 Landcruiser I decided to invest in a needle scaler to go faster and save my hands.
Historically, I would use chisels, screw drivers and wire brushes to remove loose rust from part still on the car. This was time consuming, my carpal tunnel would flare up and my hands would ache.
A friend helping restore an old submarine told me about how he bought a needle scaler to help remove rust faster, I had never seen one at the time and filed it away for future reference. One day in Harbor Freight I finally saw one but I really wasn’t keen on buying one of their tools. I’ve had one too many HF tools die at the wrong time and have slowly moved away from them for most tools.
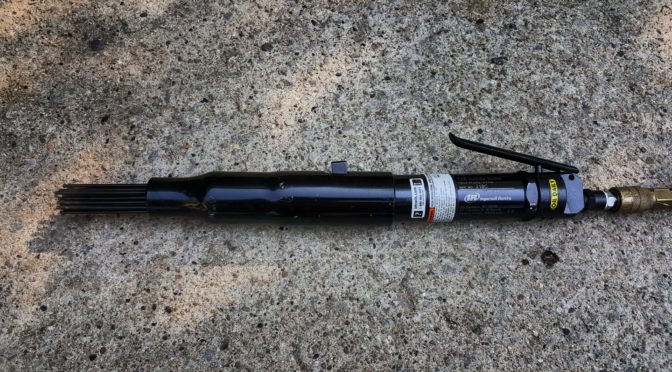
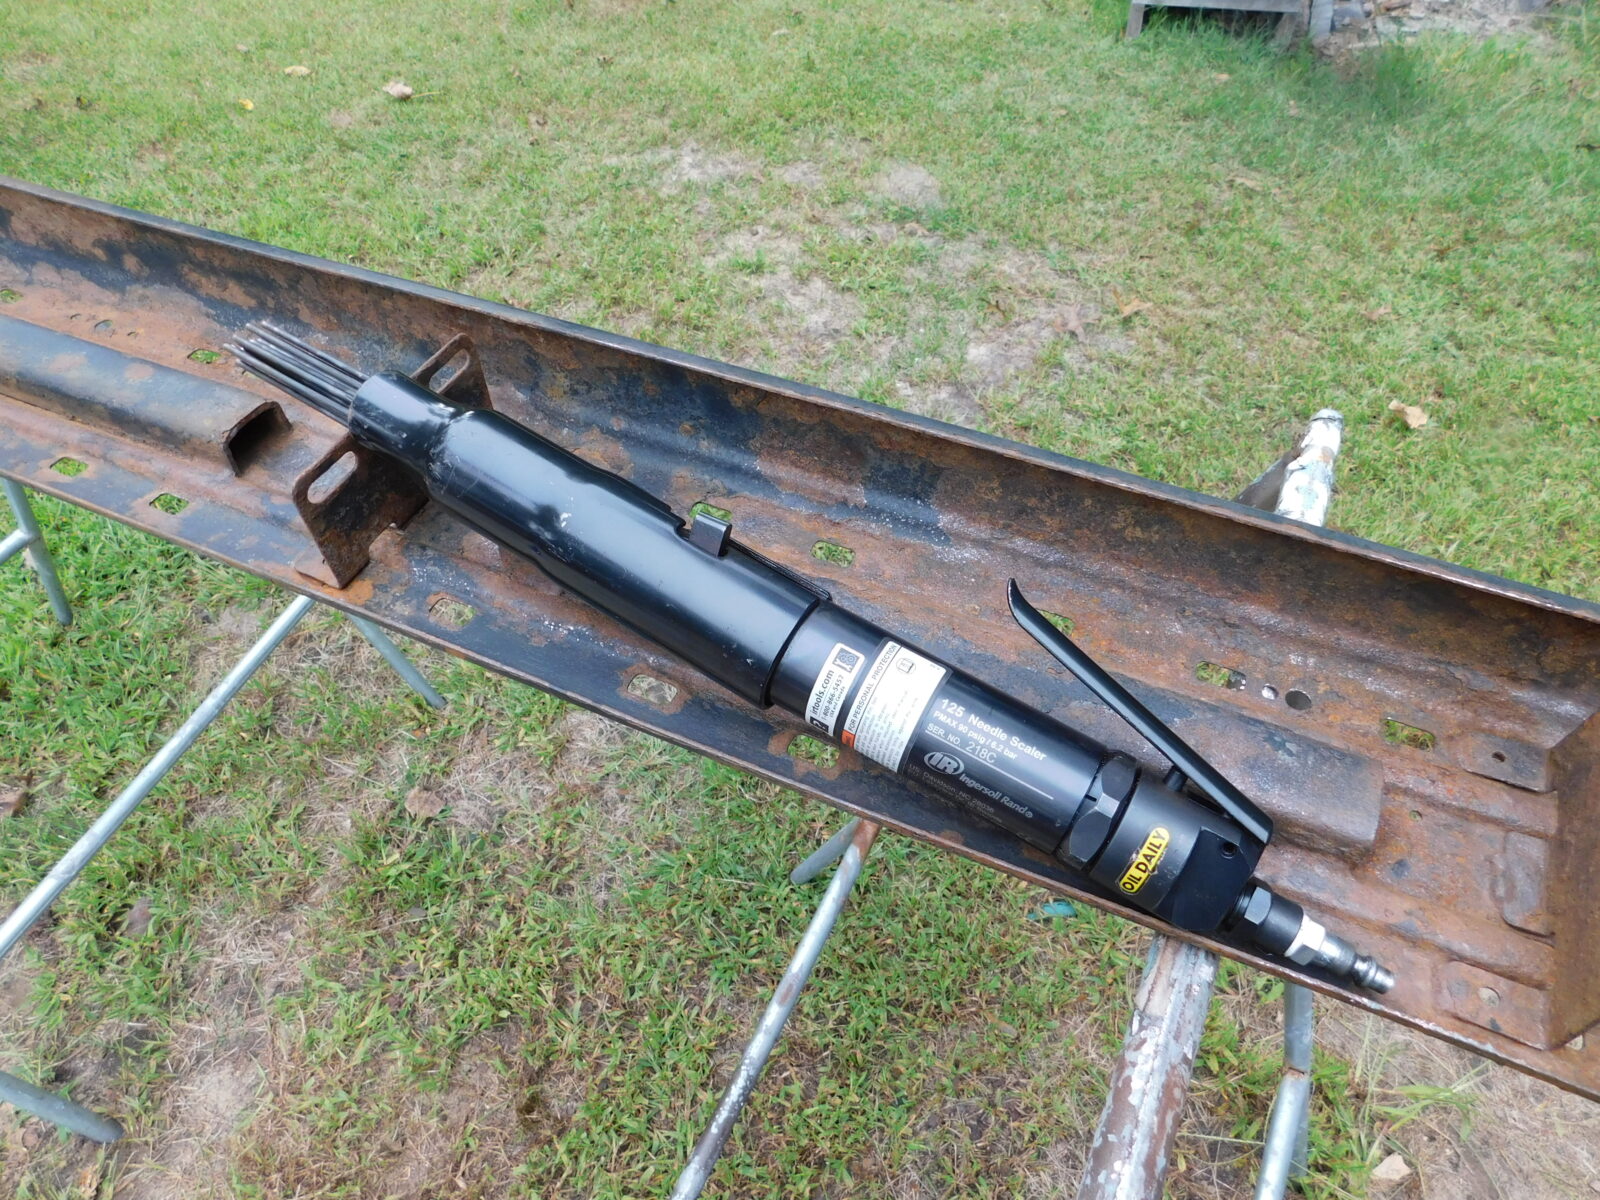
At any rate, I like Ingersoll Rand air tools and read up on their model 125 needle scaler. It has 4.5 stars out of 5 stars on Amazon with 73 reviews. So I read up more about it.
It generates 4,600 blows per minute using 15 CFM at 90 PSI. It has a rubber seal on its throttle to reduce leaking and you can disassemble the unit to clean or replace needles without tools. To stress that next to the last point – you can buy replacement needle packs for the unit.
So, I took the leap and ordered one from Amazon.com and it showed up in two days courtesty of Amazon Prime. My wife now grills me when Amazon boxes show up 🙂
Out of the Box
It arrived fully assembled both longer (about 12″ without the quick coupler fitting) and also heavier than I expected at about 6.8 pounds, also without the coupler.
The first thing I did was install a quality Milton quick connect male plug. These are case hardened steel and not soft brass like you find at Harbor Freight and the big box discount retailers like Home Depot and Lowes. I swear by Milton now because I haven’t had one fail yet (I’m sure they will eventually) but I have replaced countless Harbor Freight, Home Depot and Lowes air fittings over the years.
I also use quality PTFE/Teflon tape. I’ve also given up on the cheap tape. Ace brand tape is pretty good and lately I’ve been using this AntiSieze Technologies brand heavy duty tape and really prefer it.
Taking it Apart
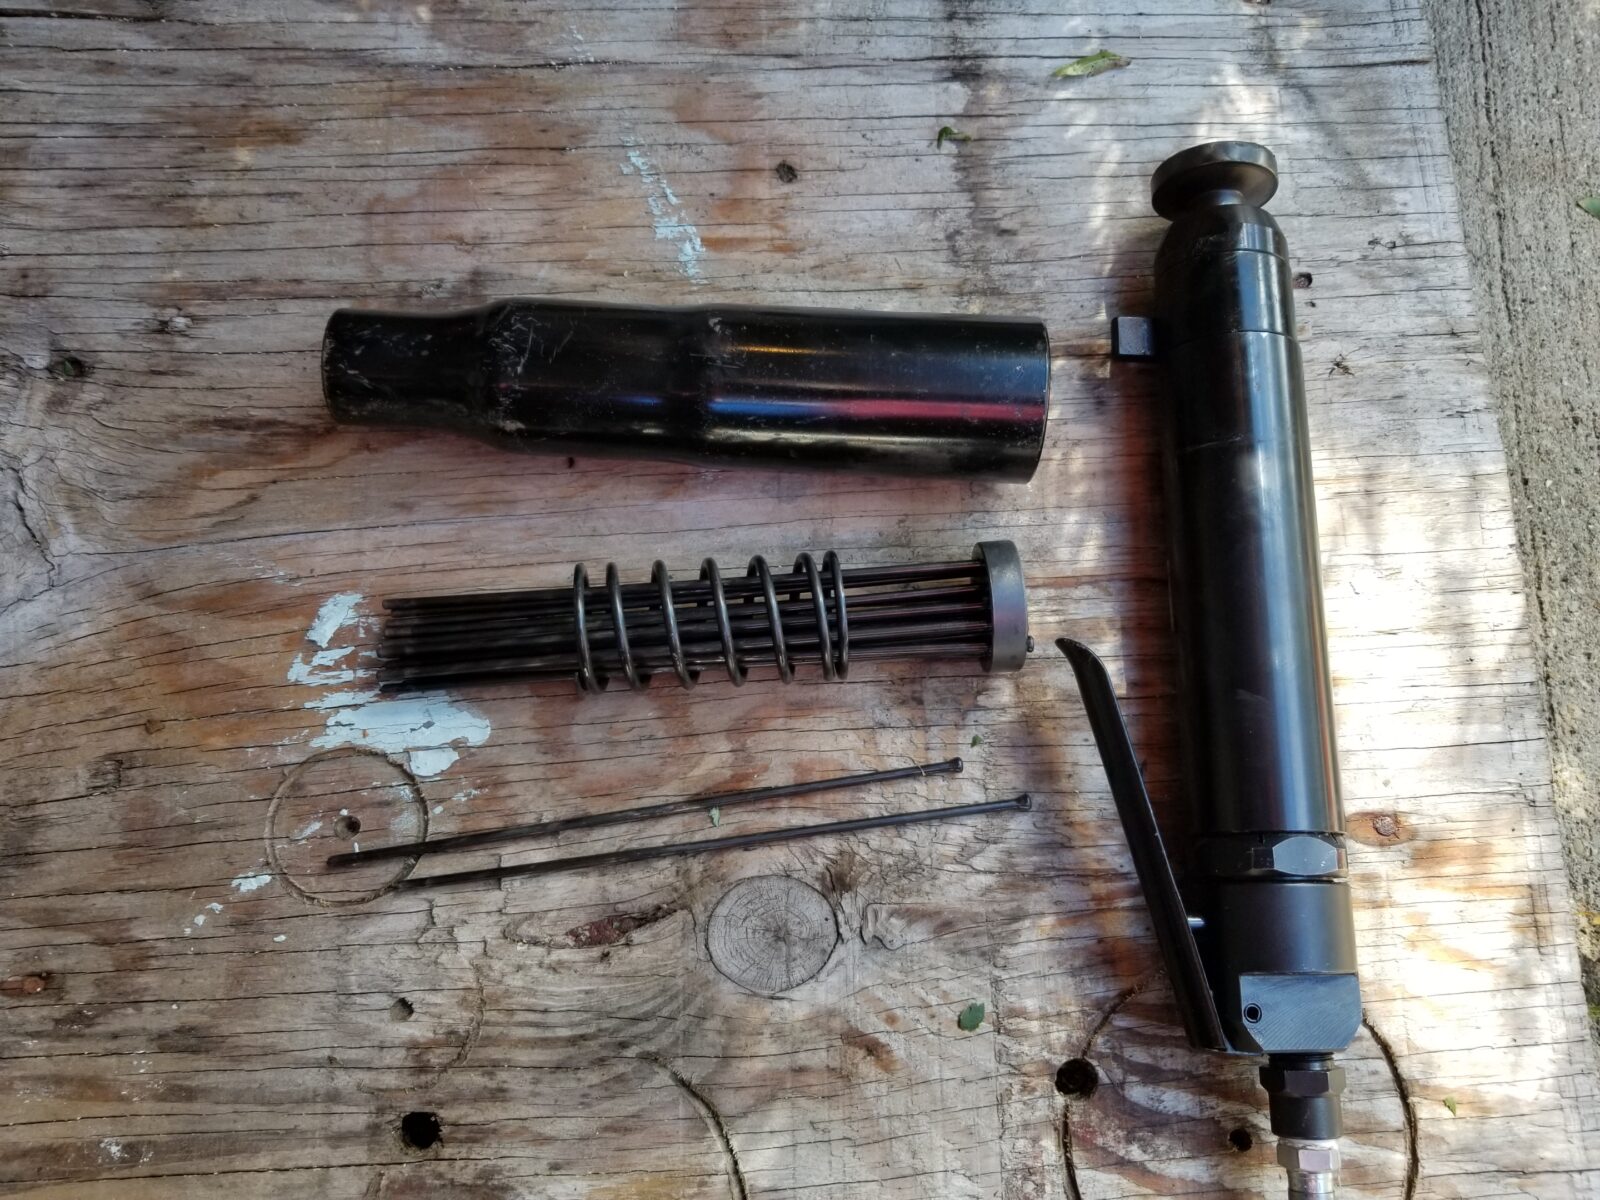
There apparently is a secret society of air needlers who protect the world from very much information being given about these tools. I kid you not, 90% of the manual is legal disclaimers, safety notices and useless boiler plate. I am seeing this trend over and over with the tool companies.
Since I can’t point you to a page, let me try and explain. At the end of the day, an air needler is an impact tool. Inside the body is a 1″ piston that is driving an “anvil” up against the base of the needles 4,600 times per minute. It’s pretty much what you would expect to see if you pulled apart an air hammer except the body is a straight line vs. a pistol-like configuration.
Why is it long? My guess is that it helps the unit get into tight spaces by reaching further.
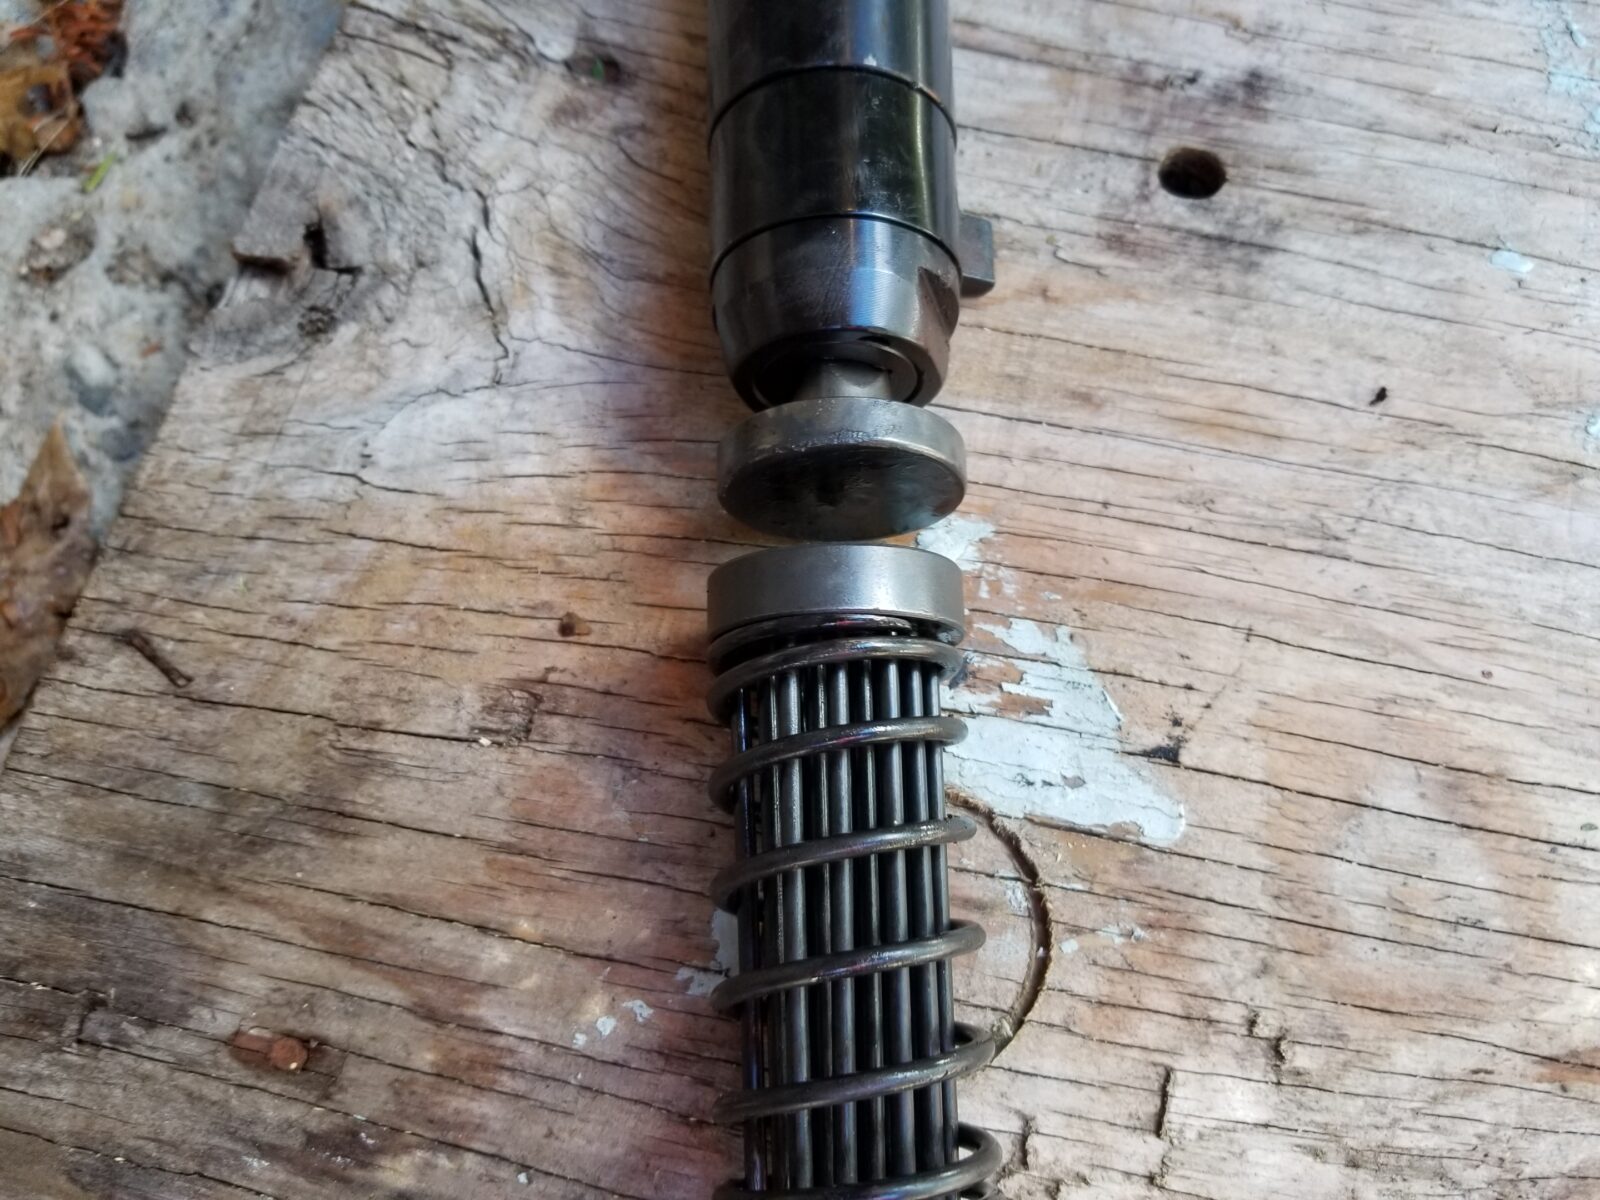
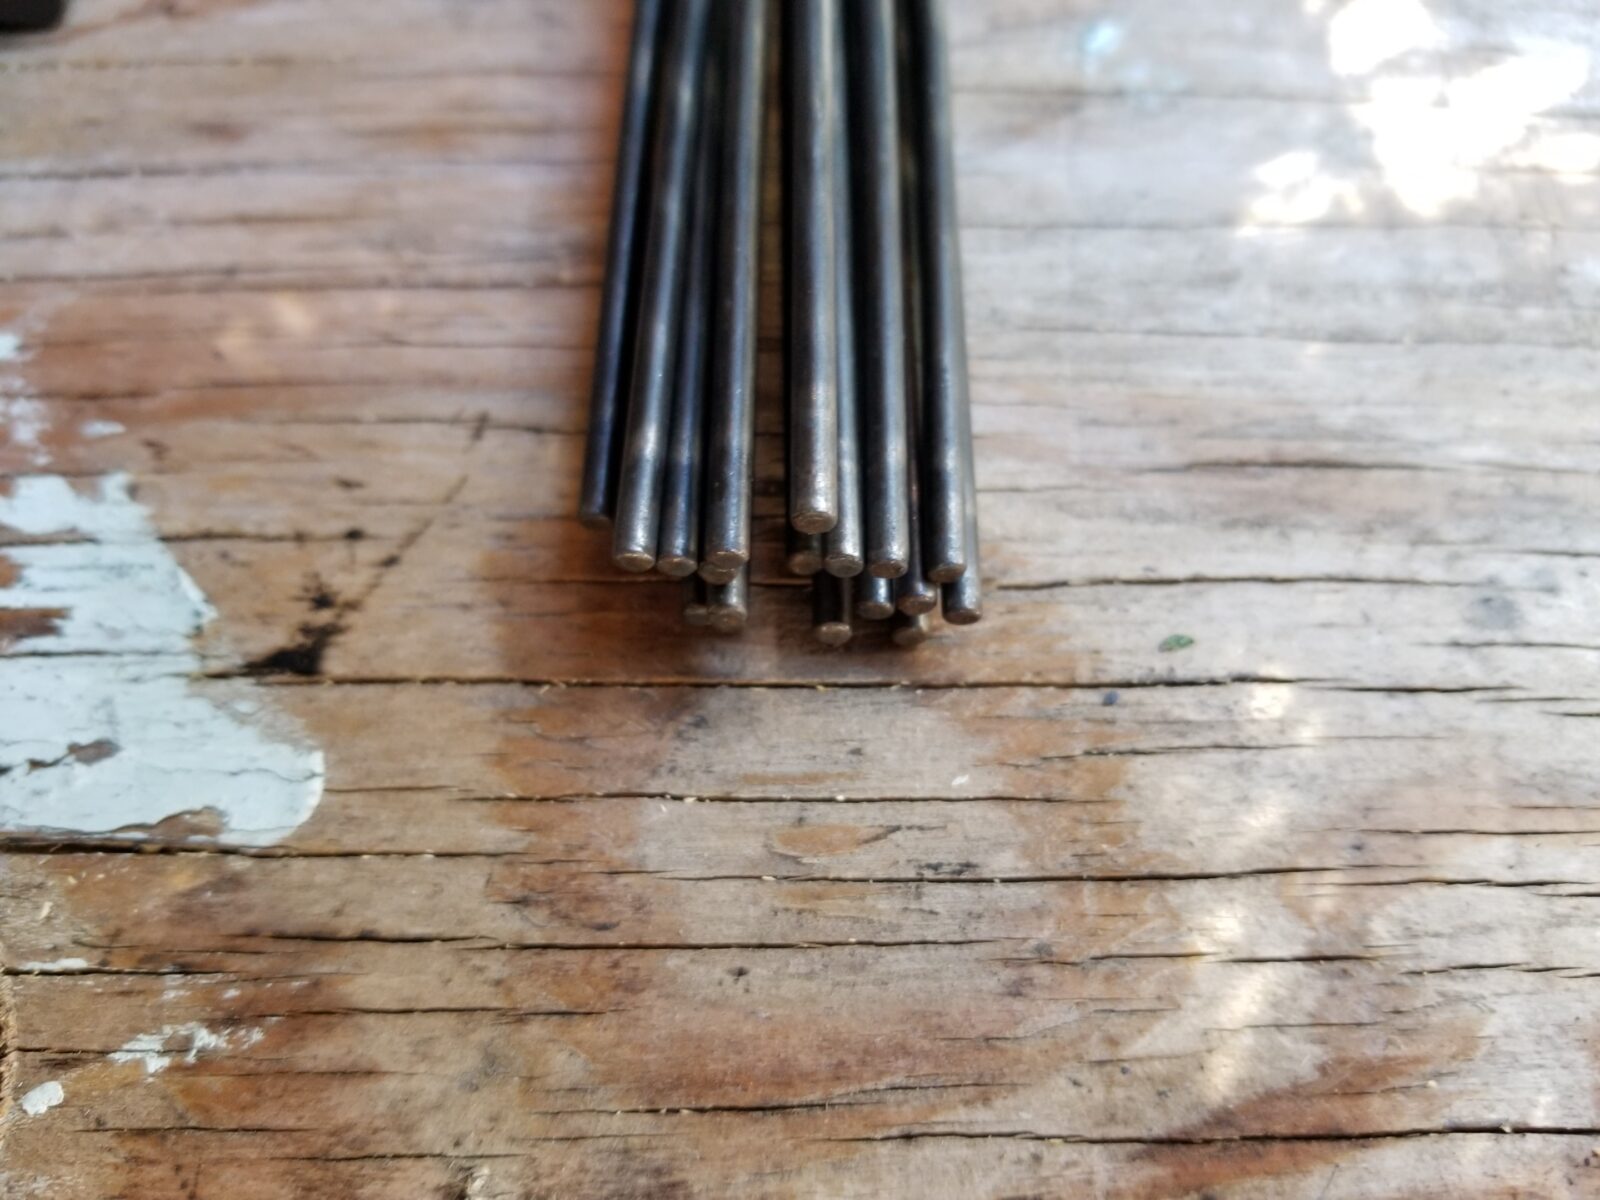
Now, the needles are really 1/8″ diameter hardened steel rods. These “needles” are really good at getting under rust flakes and popping them up and off the steel surface. It’s a loud tool but it does its job amazingly well.
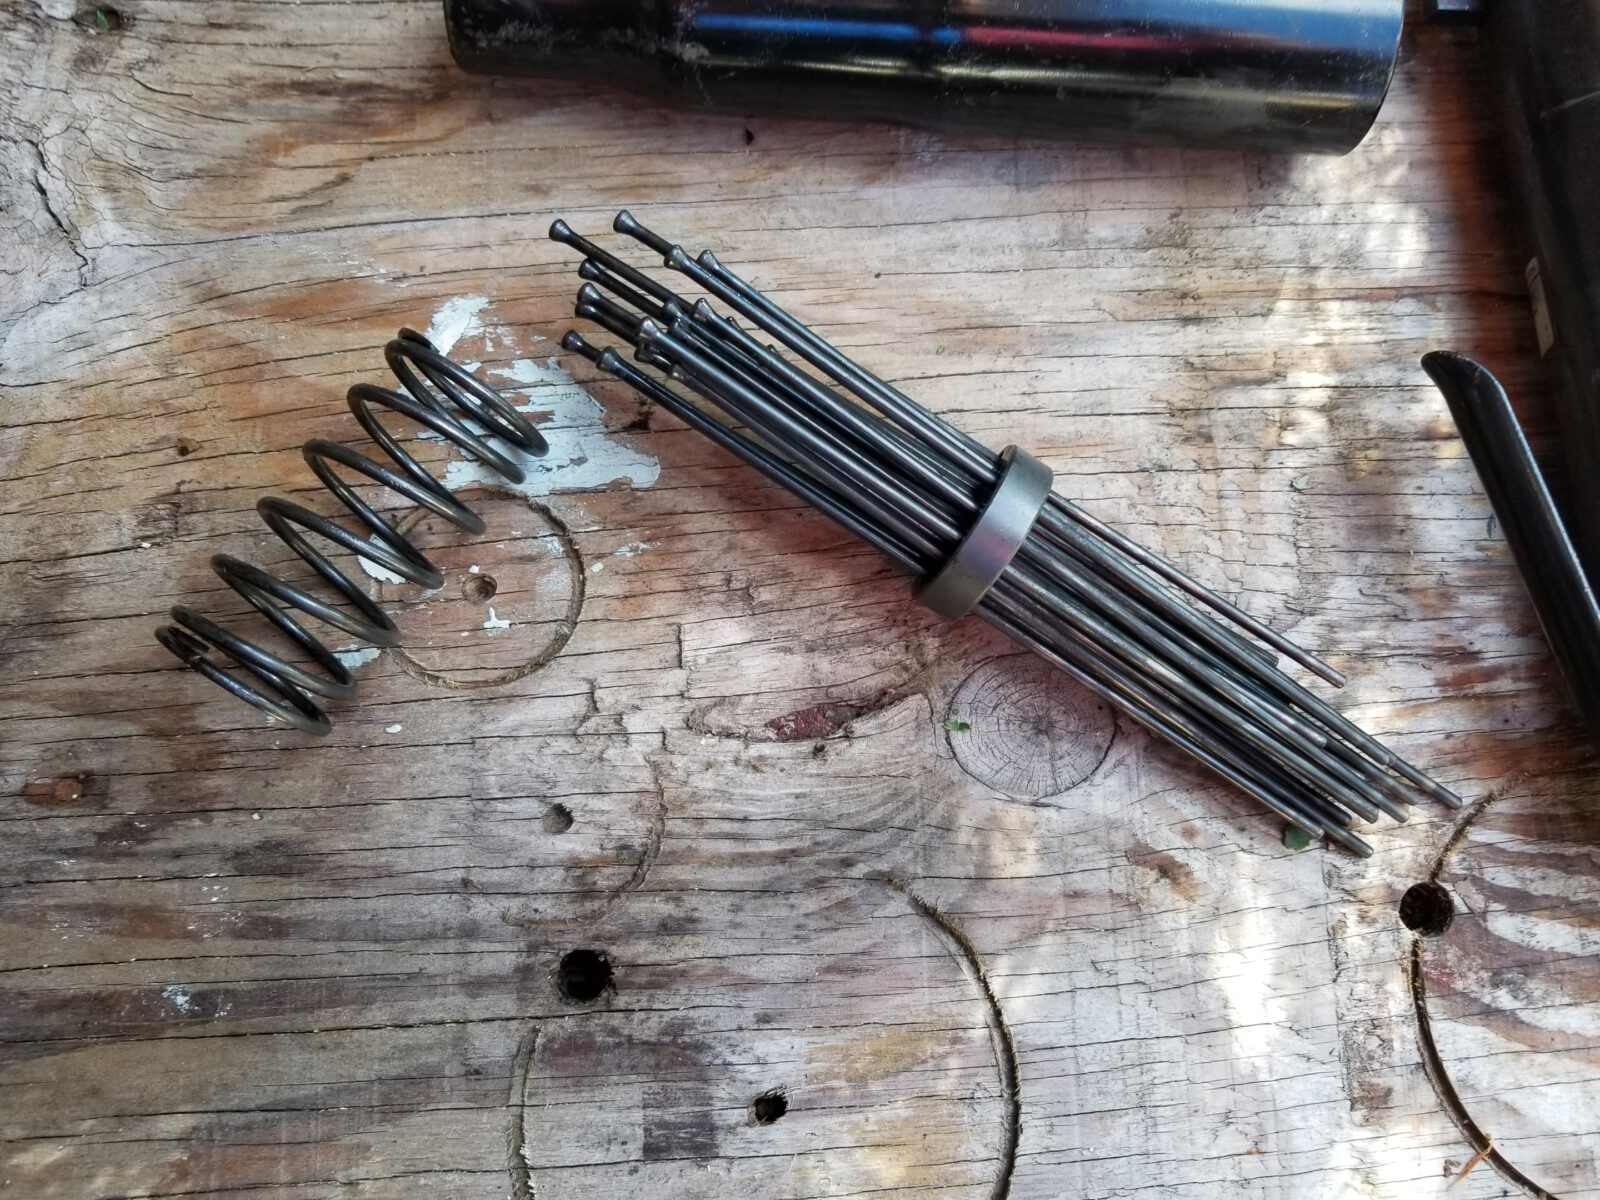
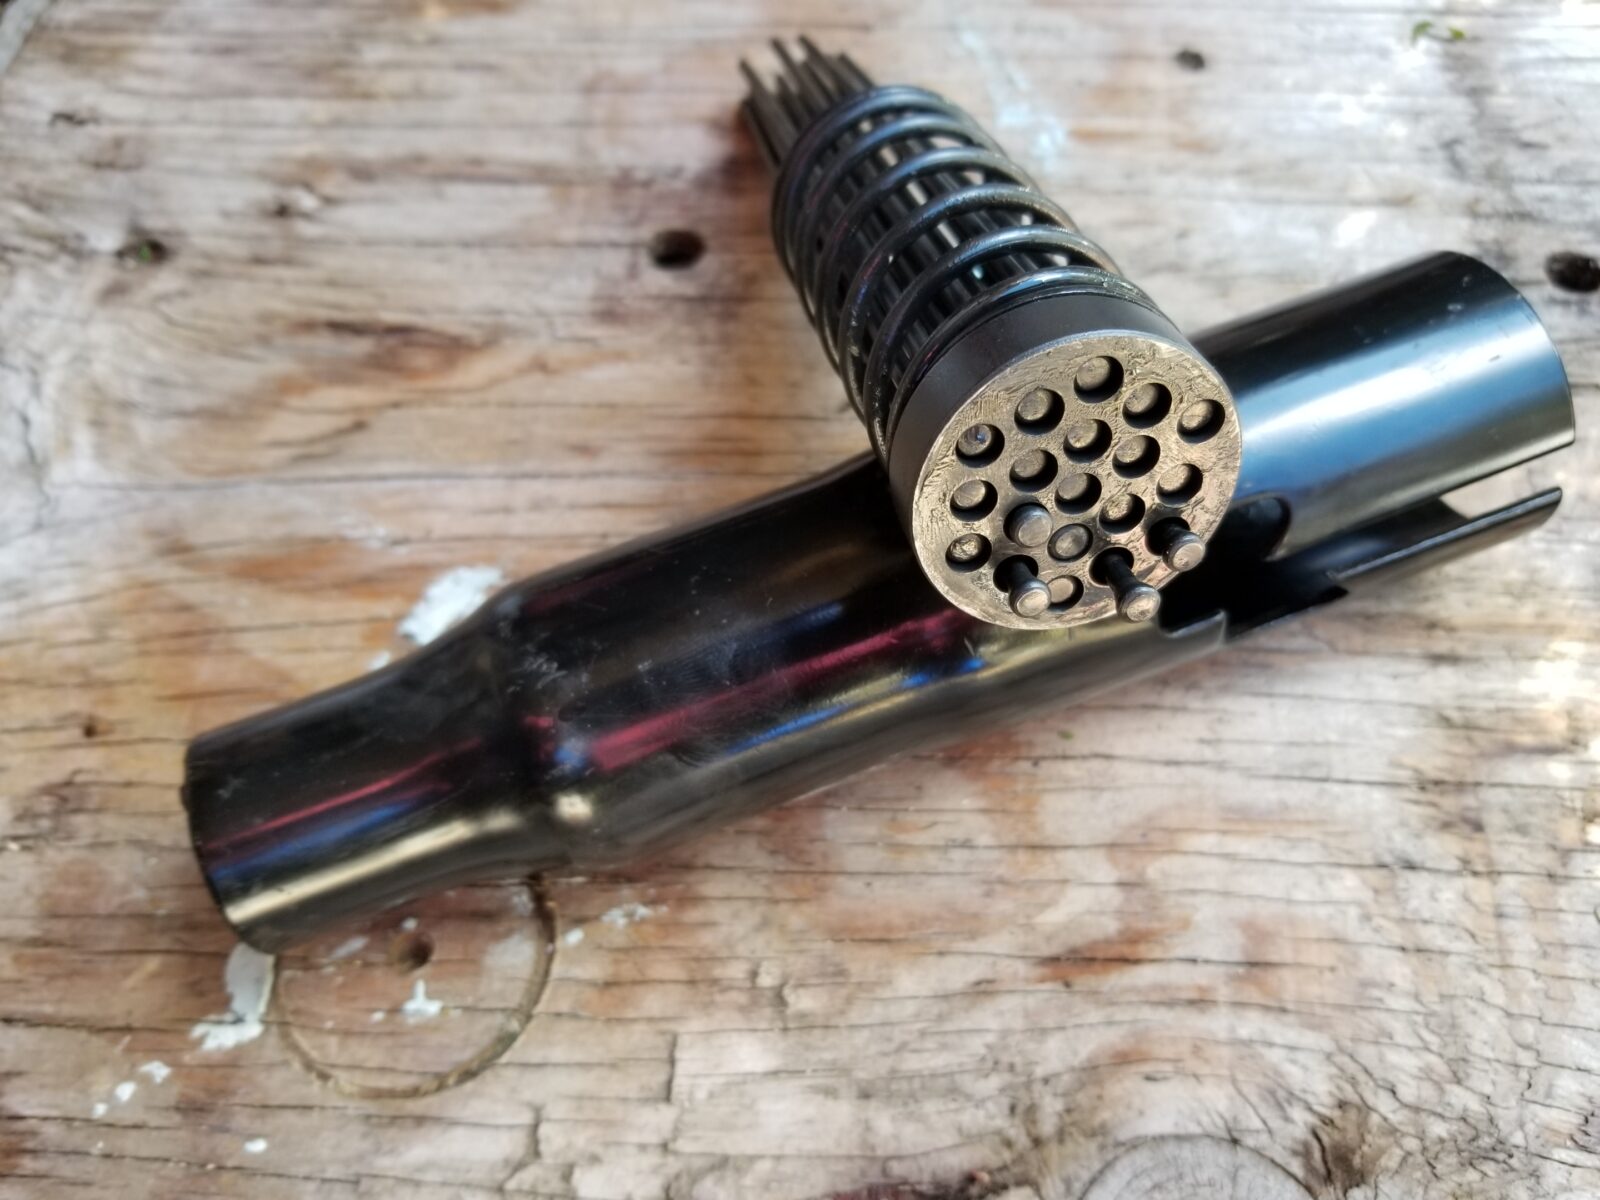
So you rotate the black color and it will pull straight off the machine and you can see the three groups. The main tool is on the right, the color is on the top left and the needle assembly with two needles removed for you to see are in the lower right of the next photo:
The needles are held in position by a disc with holes to position each needle and a heavy spring shoves the needles back against the anvil to enable the hammering effect.
Here’s a better photo of the disc with some of the needles pushed out for you to see:
This photo shows how the needles and disc would line up with the piston if head when the collar is in place:
All in all, it is a pretty straight forward tool. You will want to take it apart to clean periodically – at least I do. I take and hose the needles and collar down with brake cleaner and then apply a light oil to the needles.
Also, be sure to keep the air tool lubricated. I do not run inline oilers due to my plastic work and need for clean dry air. Instead, I add 4-6 drops of air tool oil (not regular engine oil) in through the quick connect coupler.
I did think it was interesting that IR listed the exact ML of oil to pour in before running the tool. I just counted off 20 drops of air tool oil before I ran it for the first time and called it even — it’s ran just fine by the way.
The Results
I am really pleased. I used the model 125 a ton on my old Land Cruiser this summer that had flaking rust all over the place including the running boards that were in tough shape. One was salvageable and the other I had to make a replacement. Other parts of the truck were just covered in rust. This needle scaler allowed me to do the work much faster and more thoroughly than ever before.
I ran it at 90 PSI through about a hundred foot of 3/8 inch air line with 1/4″ quick connect fittings. I had no trouble whatsoever blasting through anything that could be removed.
It will definitely dent the hell out of thin sheet metal but I was not worried about that. I just wanted to get rid of the rust scale. I also found that I could use it to hammer on places that I was worried about and if it punched through I knew I had an area I needed to work on. For example some of the fenders while they still had paint had rusted really badly from the inside and we’re paper thin.
What I found interesting was that after a ton of work, none of the needles showed wear when I was done with the truck.
I definitely recommend this Ingersoll Rand model 125 needle scaler. I think it did a superb job and will definitely be using it on future projects.
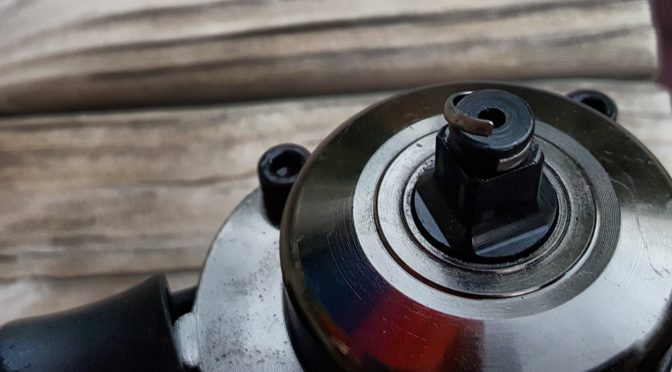
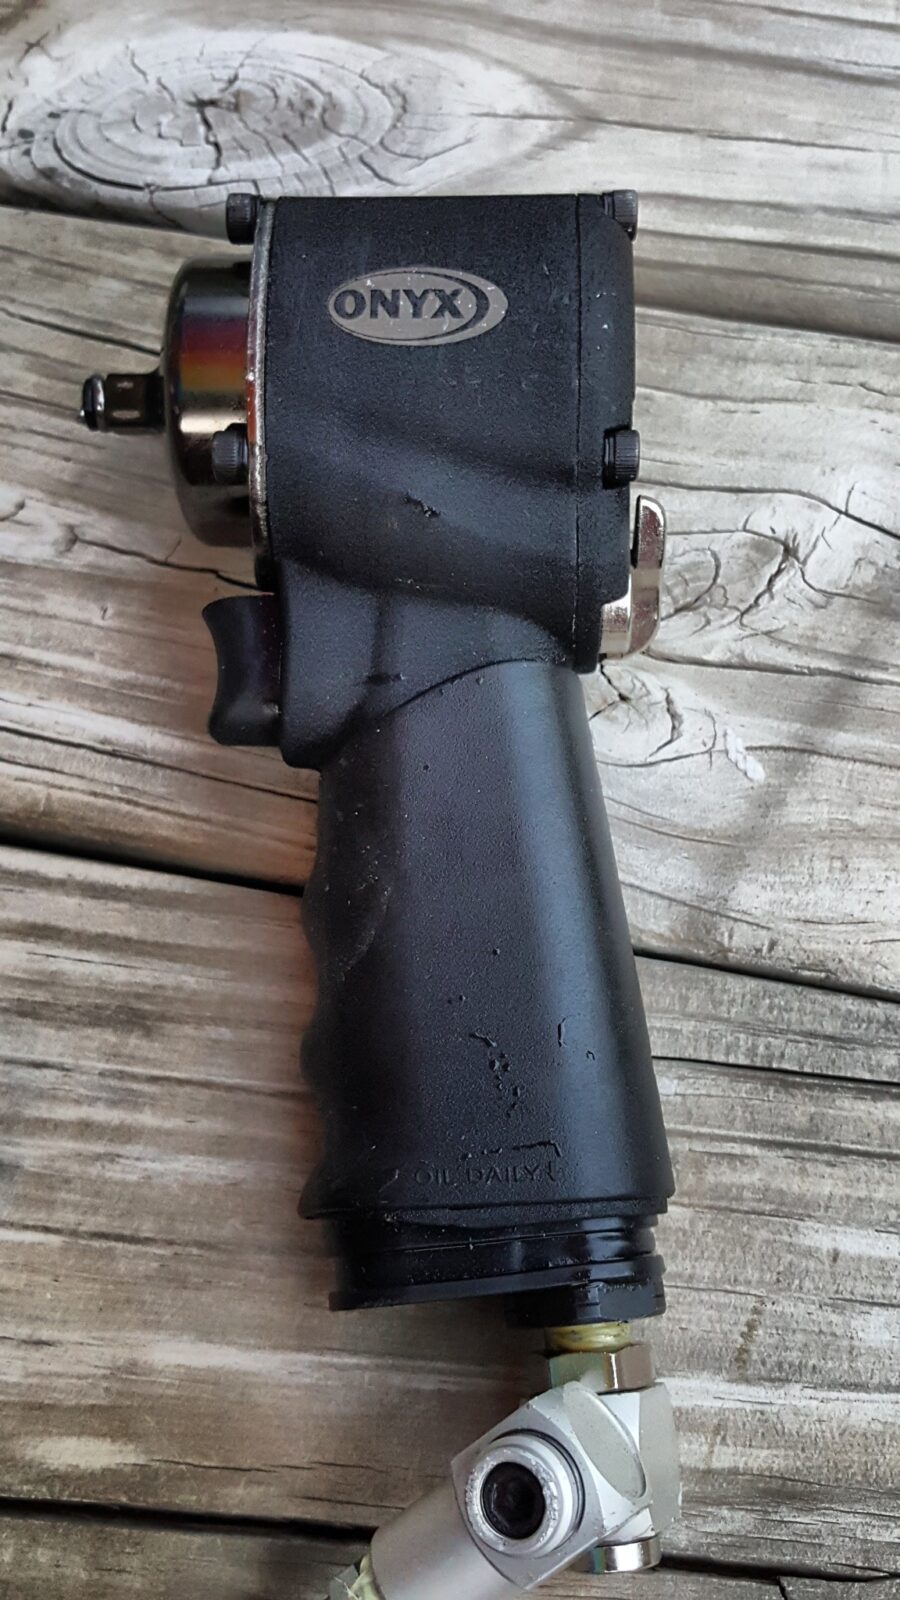
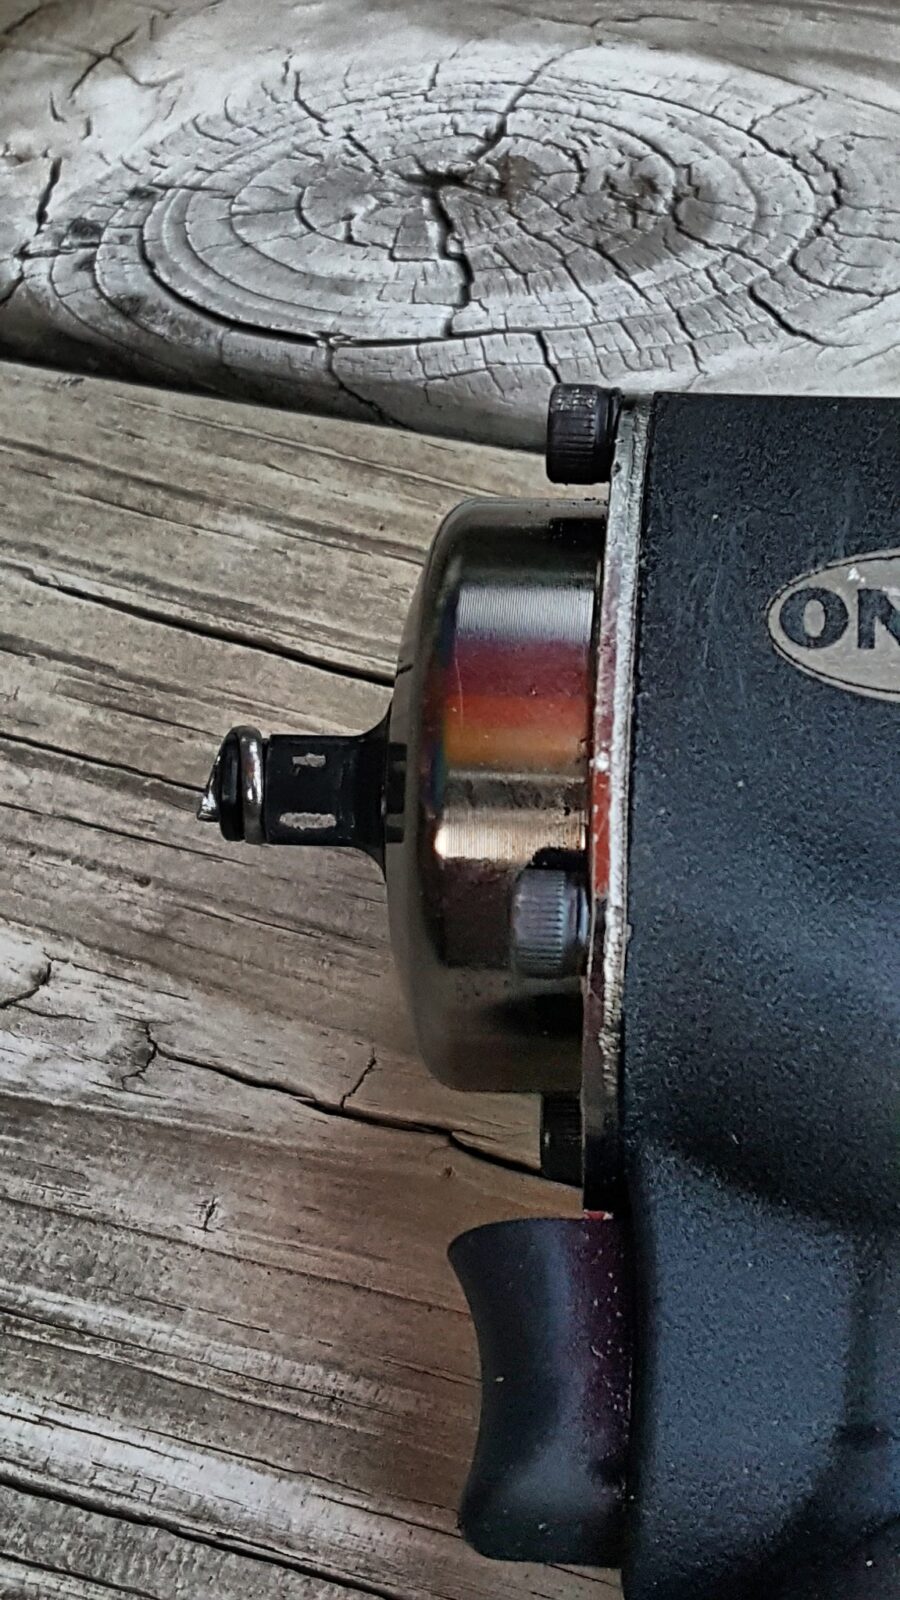
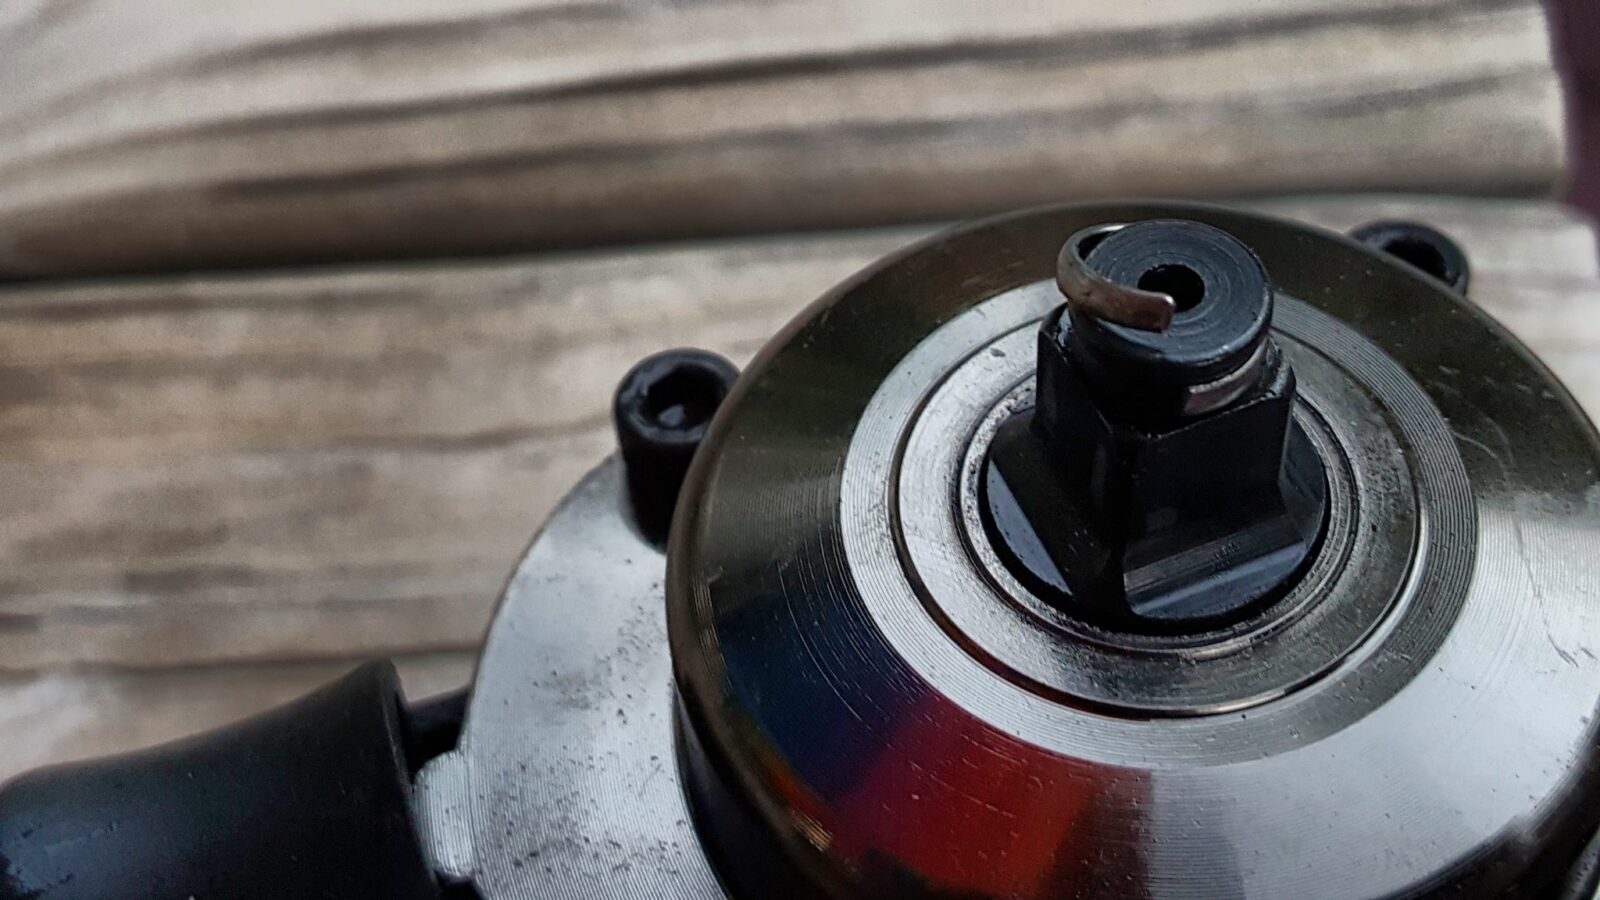
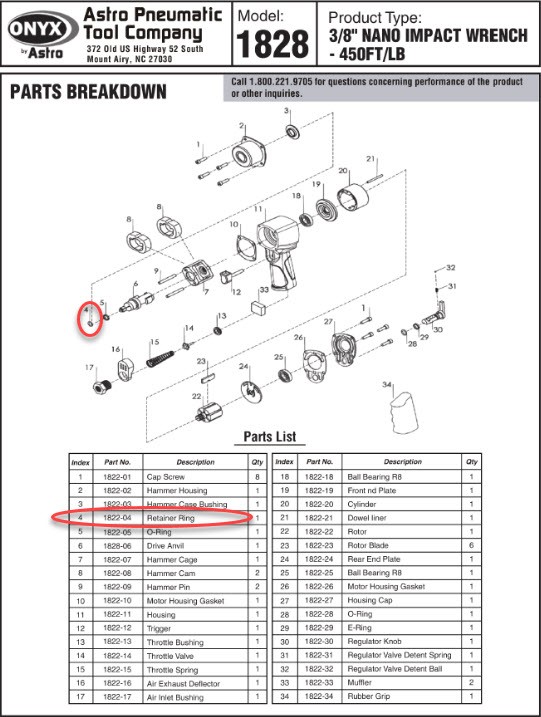
Well, after only moderate use my Onyx 1828 3/8″ Nano Impact Wrench has a problem. On the nose is a small retaining ring, that holds sockets in place. It came out of its groove and bent. At first I couldn’t figure out why it was so hard to put sockets on or take them off the wrench. The last one I had to hammer off and then saw what the problem was:
The retaining ring that holds the sockets on the nose had bent! It was so bad that I didn’t even try to see if I could get a socket on as you can see in the above photos.
First, I checked Amazon to see if I could return it but could not – no worries – I bought it back on January 25, 2018 — about eight and a half months ago. So, I Googled Astra Pneumatics, found their warranty page and they said to call (800-221-9705) with the model number of the unit (The 3/8″ Onyx I have is model # 1828) and the part that I needed from their breakdown sheet located on the main product page – so I got that too:
I circled it in red above for reference – it’s part number 1822-04 and called the 800 number. The phone was promptly answered and the lady I spoke to was very professional. They knew there was a problem with a previous generation of the wrench sold earlier by Amazon that they had since fixed. She said she’d be very happy to send me a new ring for free. “Cool – I don’t have to send it in” so I gave her my info.
Here we are two weeks later and still no ring. I called again and this time wrote down the name of the customer service agent and she gave me a reference number, which the last agent did not. I told her I was bummed because I needed the wrench and the sockets just fell off when I was trying to do odd position work – which was true. The sockets were just falling off on work with any downward angle.
So, I talked to her on September 11th and we’ll see how things go. I’m hoping the ring comes this time or I will call back and escalate matters. I really like the wrench – it’s light, powerful and can get in tight spaces but that all doesn’t matter if it can’t retain its sockets.
So, I wanted to pass this along in case you are having a similar issue and you want to know who to contact and what to request. I’ll update this post once I have the ring and the unit back in operation … or, worst case, I have to call a third time and escalate but I think things will get resolved this time as the customer service agent made sure (literally) that I wrote down both her name and the reference number.
We’ll see.
This started on 9/11/2018.
Update 9/20: They sent the wrong size retaining ring!!! The replacement unit must be for the 1/2″ model. It’s 8:07pm and they closed at 3:30 Pacific so I left a general voicemail as Marcy’s voicemail box in customer service is not accepting messages. I’m now getting irked.
9/21 – Called and talked to Marcy who confirmed they sent the wrong size ring. I told her this was causing problems for and I’d really appreciate it if they would send the ring some way other than first class mail. She mumbled something to the effect that she couldn’t do anything about it or it was out of her control.
9/26 – Still dead in the water and am ticked off.
As an update, some time in October 2018 this got resolved. I called and asked to talk to a supervisor. It turns out the rings were back ordered but she had a stash to help out people who had waited a long time. She sent me two and I was back in business. If you are going to buy one, first find out if they have changed the socket retaining ring/clip design. I think someone at that firm told me they had but confirm this. If it weren’t for this problem, I’d be very happy. The wrench itself works fine otherwise.
2/21/20 Update: I use this wrench occasionally when I am in a tough spot. I don’t use it more because I don’t trust the hog ring to last. I really can’t recommend this tool given the challenges I’ve had and knowing that hog ring is a problem.
Folks who know me also know that I am always tinkering with something – cars, trucks, tractors, firearms, you name it. A few years ago a guy showed me how he could change fluids in his car using a vacuum siphon and I was intrigued but let it slide.
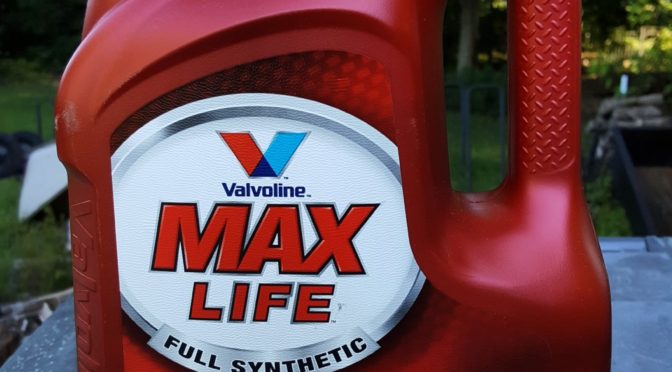
I recently went through all our old Toyotas and changed the transmission fluid to Valvoline Max Life and it dawned on me that it would be real nice to have a way to more precisely get the fluid right where I wanted it in the transmissions because I had slightly overfilled one car. Then I remembered the vacuum siphon and hopped on Amazon.
At any rate, thanks to Amazon prime, I ordered it and the unit arrived two days later. I must say that I was impressed. The plastics are all well done and it worked like a charm.
In this next photo you can see the little adapter and hose extension that comes with the unit. They say three in the ad and the first hose is attached to the cap with a strain relief. The hose is about .39/.31 (OD/ID) and 39.3″ long. The other two hoses are basically extensions via a soft rubber connector. I am using the medium extension that is .26/.21 OD/ID) and also 39.3″ long. That diameter has worked fine for Toyota T-IV ATF, Valvoline Max Life ATF and also 10W30 engine oil. When I say it can suck, that is a compliment in this case 🙂
The next photo shows the pump handle and also the venturi vacuum generator. I have that air line on my dryer system and is running 90PSI off a 60 gallon IR two stage compressor. It really didn’t use too much air. No vacuum generator will win awards for air use but you don’t need to run it for very long – just while you are pumping the fluid out and that will probably be about 2-3 minutes for most engines and transmissions.
The first time I used it, I did so with an air line (it can use compressed air to create a venturi vacuum) . It actually pumped way faster than I realized and I had over a quart out of the car before I realized it. You can definitely reduce the air flow to reduce the vacuum – it was just faster than I thought it would be, which is good news.
I was so impressed that I used the extractor to remove all the ATF from a 94 Corolla in very short order. I let it pump until nothing else came out — no problem.
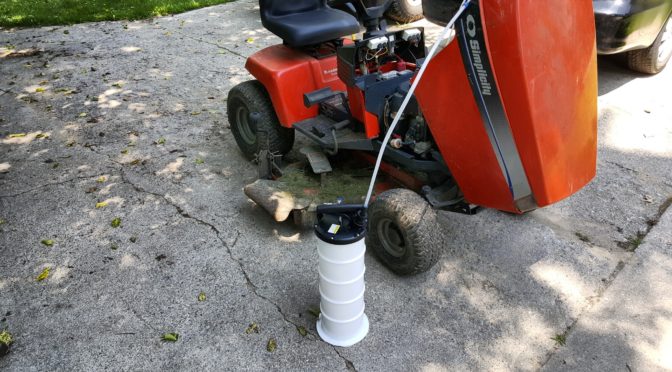
I recently needed to change the oil in my tractor – again, used the siphon and it drained it very quickly. This is noteworthy as I used the hand pump to create the vacuum and it really was effortless. This was also when it dawned on me I better take some photos 🙂 You can see it pulling out the 10W30 no problem at all.
In this next photo, you can see the unit with the hose cap off – it just twists off – and this is the pour spout to empty the unit also.
I’m still on my first set of hoses but they do have a variety of replacement hoses on Amazon in case you want just one hose or a set.
In summary, it’s a great unit. I’ve not had any problems at all and recommend it. Here’s the link one more time:
7/18/2023 Update: Still working just fine – it’s a lot dirtier from use but is still doing the job. A fellow did ask me if they have other sizes and the answer is “Yes”. Click here for the EWK store on Amazon.
6/28/2022 Update: Still working great. I’ve used this on cars, trucks, tractors and even to suck the hydraulic fluid completely out of my snow plow’s hydraulic fluid reservoir.
We are a Toyota family and most of our cars were bought either used or very used from private parties. At any rate, a few years ago I bought a 2002 Toyota Camry XLE with a 4-Cylinder engine. The other day my older daughter said it was making a funny noise in reverse so I checked the dipstick. Wow. Not only was it low but the ATF looked awful. For comparison, the below photo with the brownish ATF on the white paper towel is on the left and brand new ATF is on the right. Wow!! (Yeah, I wrote wow twice because I was stunned.
So I told my daughter to ride with her sister in our old 92 Corolla and that I needed to work on their car. First thing I did was to look at the fluid a couple of times – it was brownish but not black, no metal flakes and no bad smell.
In reading the manual, Toyota wrote that the transmission fluid should be good for the life of the car … right. I guess it depends on how you view that, or at least how they view it. I’m sure I checked the fluid when we got the car and it wasn’t this color but I’m not in a habit of checking it regularly unless I see drips or a puddle under a car or truck.
This car had almost 195,000 miles on it and we put about 50,000 of those miles on it. I figured a change was past due. So, before I did anything, I decided to do some reading first.
Picking Valvoline Max Life ATF
I knew there were a ton of different automatic transmission fluids (ATF) out there and that getting the right one was key. The transmission was designed to use Toyota ATF T-IV and there are different brands that claim to meet the spec. The problem is that the wrong one can cause headaches. One particular formulation kept coming up as I read about what others used – Valvoline Max Life ATF:
Note in the next photo you can see that Valvoline says this can replace Toyota T-IV as well – it’s not just guys on the Internet. By the way, if you feel uncomfortable with what I am saying, definitely do your own research and you’ll see tons of favorable posts about using this fluid.
Okay, so I bought two gallons of the above. The automatic transmission in the car uses about 4.1 quarts. I used a 10mm allen bit in my Onyx 3/8″ impact wrench and drained everything I could from the pan. I then put the plug back in and added two quarts of fresh Max Life and let it run for about 30 seconds and shifted through the gears (I was up on 6 ton jack stands with rubber wheel chocks and the parking brake on).
I then removed the plug again and drained the fluid. I then removed the return line, started the car for maybe 30 seconds if that – I turned it off when nothing else was coming out. I then buttoned it all back up.
In theory the transmission was empty. I’ve had issues in the past where I assumed that was the case but it was not so I didn’t want to assume anything. I added two quarts and moved it to a perfectly flat spot on my driveway. I could just barely see a hint of ATF on the tip. I added a bit more to get it short of the cold empty mark.
I don’t trust the cold measure on the dipstick. With an automatic transmission it must be up to its operating temperature to get a good reading in the hot zone (the bottom mark is for cold is a ballpark – get it hot and then test as you absolutely do not want to overfill an automatic transmission). As it gets hot the fluid expands hence my wanting to know at temperature where I was at.
How to Check the Automatic Transmission Fluid Level
Now, to check the ATF level, Toyota does not tell you in the operator’s manual and I frown on that. With the car flat, let it idle (or drive it 10 miles if you have fluid in it – I had an unknown level so I didn’t want to get on the road) and let the engine and transmission come up to operating temperature (158-176F). Then, with your foot on the brake, shift the gear selector from park through all the gears, stopping at each one and then back up. With the car idling and the transmission in park, check the dipstick.
To make sure the engine and tranny were hot enough, I used my BAFX plug in OBD II probe that connects to the Torque app on my Android phone via Bluetooth.
I kept adding smaller and smaller amounts of ATF and moved the selector lever per the above before I would test the level again. I got it close to full in the hot range and then stopped. As mentioned, I did not want to go past full. By the way, when you are reading a dipstick with during filling, you must wipe it off each time to get a good reading and you may find that you get a better view of the fluid level on one side or the other of the dipstick.
In case you are wondering, I did not do the transmission filter. It would have taken a ton of time and I figured I would start with the fluid and see what happened.
The end result – it shifts beautifully. I could not be happier — even my wife thinks it shifts smoother and feels better. To wrap this up, I wrote this post in case one of you has questions about what transmission fluid is a good substitute for Toyota Type T-IV, and also how to properly check the automatic transmission fluid level.
6/1/2019 Update – Still no problems. Our 1992 Corolla sprung a leak in the transmission fluid cooling line so I had to both install some fuel like to patch the corroded line plus I had to refill the transmission fluid. That was about 2-300 miles ago and that is working fine too. Bottom line, I do think this fluid performs just fine in place of Toyota Type T-IV fluid.
9/10/2018 Update – The Camry XLE has been on a number of 200-400 mile highway road trips at highway speeds and shows no signs of shifting problems. The family agrees the car shifts smoother. I have now replaced the ATF in our 2004 Solara SLE and 1994 Corolla with Max Life ATF also and all are running well. The Solara has close to a 1,000 miles on it now. I’m very pleased with Max Life and will continue using it in my Toyotas. By the way, I now use an EWK Fluid Evacuator for getting the ATF exactly where I want it. Here’s the post about that tool.
2/23/2020 Update – No problems at all with any of the vehicles we’ve used Max Life ATF in. This includes a 2008 Toyota Highlander.