Tired of tripping your circuit breaker when your air compressor refills? You can easily fix that!

I tell you what it is really hard to get by without a compressor but it can also be but it can also be a real headache if the circuit breaker regularly, or even unpredictably, trips when the compressor tries to top off the tank.  There a couple of really easy modifications we can do to the compressor but before that, let’s step through a couple of things first just in case there is another issue at hand:

Safety Stuff

I actually spent more time trying to think about the what-ifs than actually writing the two options to make your compressor start softer but I do want you to approach this safely.  I am assuming you are handy with a basic understanding of electrical wiring and compressed air to do this work.

First, you should be using a properly sized circuit or at least one that is very close.  If your compressor needs far more than what your circuit is sized for, say 30 amps and you only have a 15 amp circuit, then the fix I am going to tell you may not help.  It  does often help when you have a circuit that is very close to the required amps but when there is a heavy draw, it exceeds the circuits capacity so the breaker trips.  My experience is that consumer air compressors list a low draw number like 15 amps and can draw more than that under peak load.  So, for example, if you have a 15 amp circuit and a compressor that says it needs 15 amps – you may be having some challenges that this modification might help with.

In terms of properly sizing a circuit, engineers and others can give you rules of thumb such as doubling the circuit capacity to allow for spikes in demand or to allow 6 amps per 1 HP for 1 phase or 1.25 amps per HP for 3 phase.  Doing this means running new wire and installing new breakers.  DO NOT JUST PUT IN A BIGGER BREAKER!  The breaker is protecting the wiring from over heating and catching fire.  Each thickness, or gauge, of wire has a limit to the number of amps it can carry.  Never put a higher capacity breaker on a smaller cable – you are asking for trouble in the worst way.

Second, plug the compressor directly into the wall.  An extension cord will likely introduce too much resistance and cause the breaker to trip so do not use an extension cord (assuming your compressor is not an air nailer or air brush model – they draw so little that they can use extension cords).

Third, I have only encountered this a few times over the years but breakers can wear out over time.  If you investigate and it seems that you should have enough capacity and can’t figure out why your breaker is tripping, then try installing a new breaker and see if that helps.  Again, install the right size and don’t put the wiring at risk of fire.  If in doubt, bring in an electrician to straighten things out.

Fourth, if you look at your outlets and/or wiring and they look burned, there is any trace of soot or a burned smell stop and get an electrician to inspect the line.  It may sound funny but I have seen lines fail over the years for a ton of unexpected reasons.

Now, on to making a compressor softer starting

IMPORTANT SAFETY ANNOUNCEMENT – BE SURE YOUR SYSTEM IS FULLY DRAINED AND THE COMPRESSOR IS UNPLUGGED (ENSURING THERE IS NO WAY IT CAN TURN ON) BEFORE YOU DO ANY WORK.  The pressures involved can hurt you and we do not want that.

Make sure the unit is unplugged also just to be safe.

So, with those things said, let’s say you need to make your compressor work better with the circuit you have for whatever reason, let’s talk about what some folks call a “soft start” modification.  It’s called this because it makes it easier for the pump and compressor to start and come up to speed before a heavy load is introduced.

The way a compressor works is that a motor has to turn the pump and send air through a filler tube into the main tank. Between that little tube and the tank is a check valve that screws in right at the top of the tank that keeps air from rushing backwards. Now when the compressor fills the tank each time, the switch controller opens a bleed off valve to empty the air in the filler tube to make it easier for the compressor to start next time.  The problem is that the volume of air in that tube is relatively small and when your compressor starts, it can only turn a few times before the tube is full and then the motor must work much harder and thus draw more amps to overcome the check valve to put air in the tank. Depending on the amps required, this can then trip the breaker.

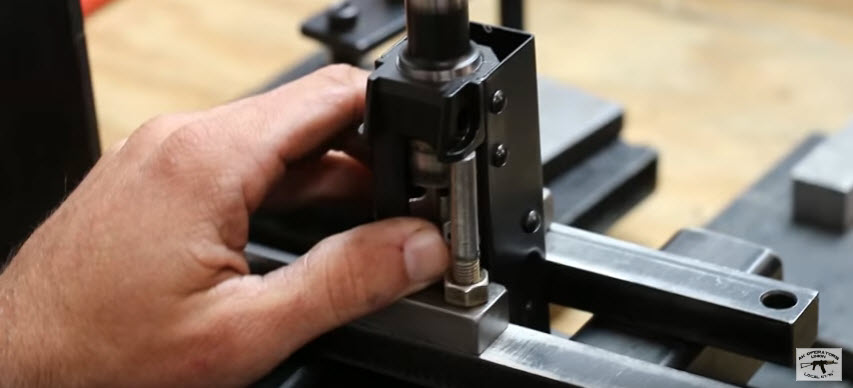
Look at this next photo. See how short and small that left tube is?  The pump can only turn a few times before that left tube is pressurized – it never has a chance to build up speed and momentum in the flywheel. As a result when the pressure of the tank is reached it puts a lot of strain on the motor.

Note, the second smaller tube, which is often a flexible plastic, provides pressure to the cut off switch that automatically turns the motor off when the tank reaches a specified pressure.  We are interested in the larger tube that runs from the head (top) of the compressor pump down to the top of the tank.  It is usually much larger than the pressure switch tube.

The fix is simple – increase the air capacity between the pump and the tank!  You want the motor to be able to start and the heavy flywheel build up momentum before it encounters the pressure behind the check valve.

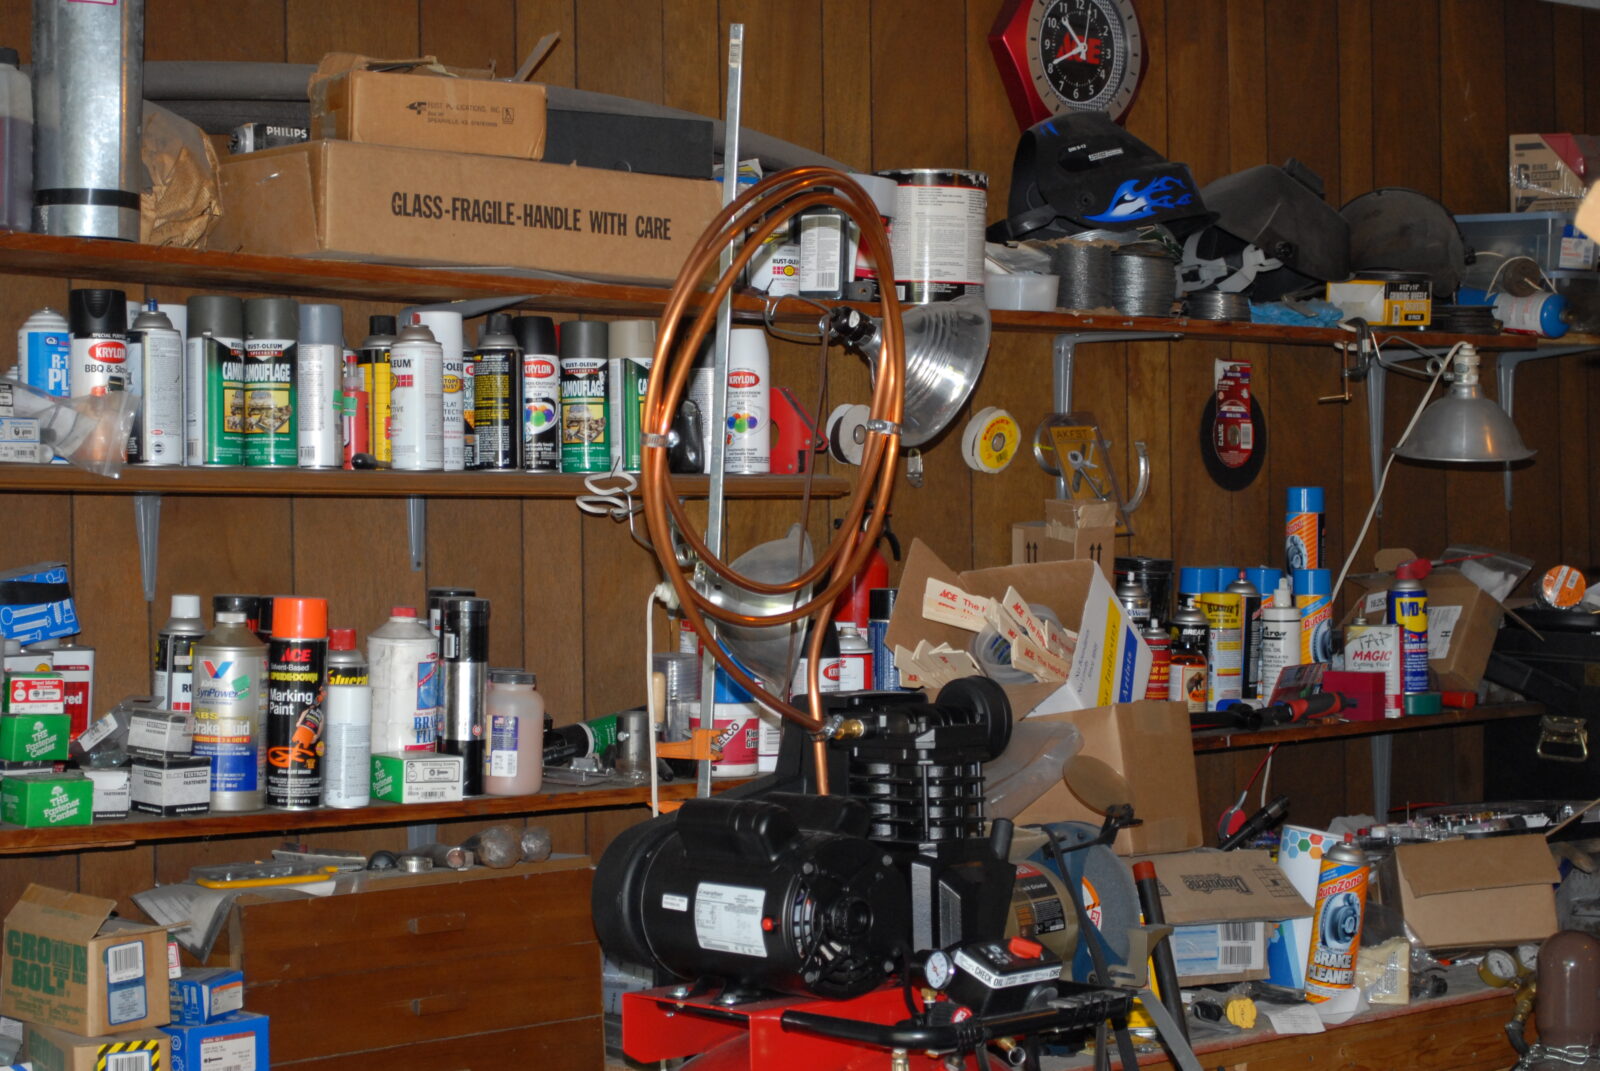
Option one:  Simply make a longer tube so there is more potential volume to fill

There are two options to make this softer starting. One is to just add a long length of copper tubing in between the compressor and the tank. You roll it into a coil and it kind of looks like a moonshine still and it does the job. The con is that it looks really funky. I did this with one of my early compressors and the photo below shows about 8 to 10 foot of tubing installed. I would replace whatever the original tubing was with the same size so you would do the same. You need to replace the compression fittings also and you can do the job in about 30 minutes.  Note that I used hose clamps to keep the coils from rattling.  Ugly as heck but it worked until I finally wore out the pump.  I checked the date on my photos and I ran this setup from 2010 to 2014 – it does hold up.

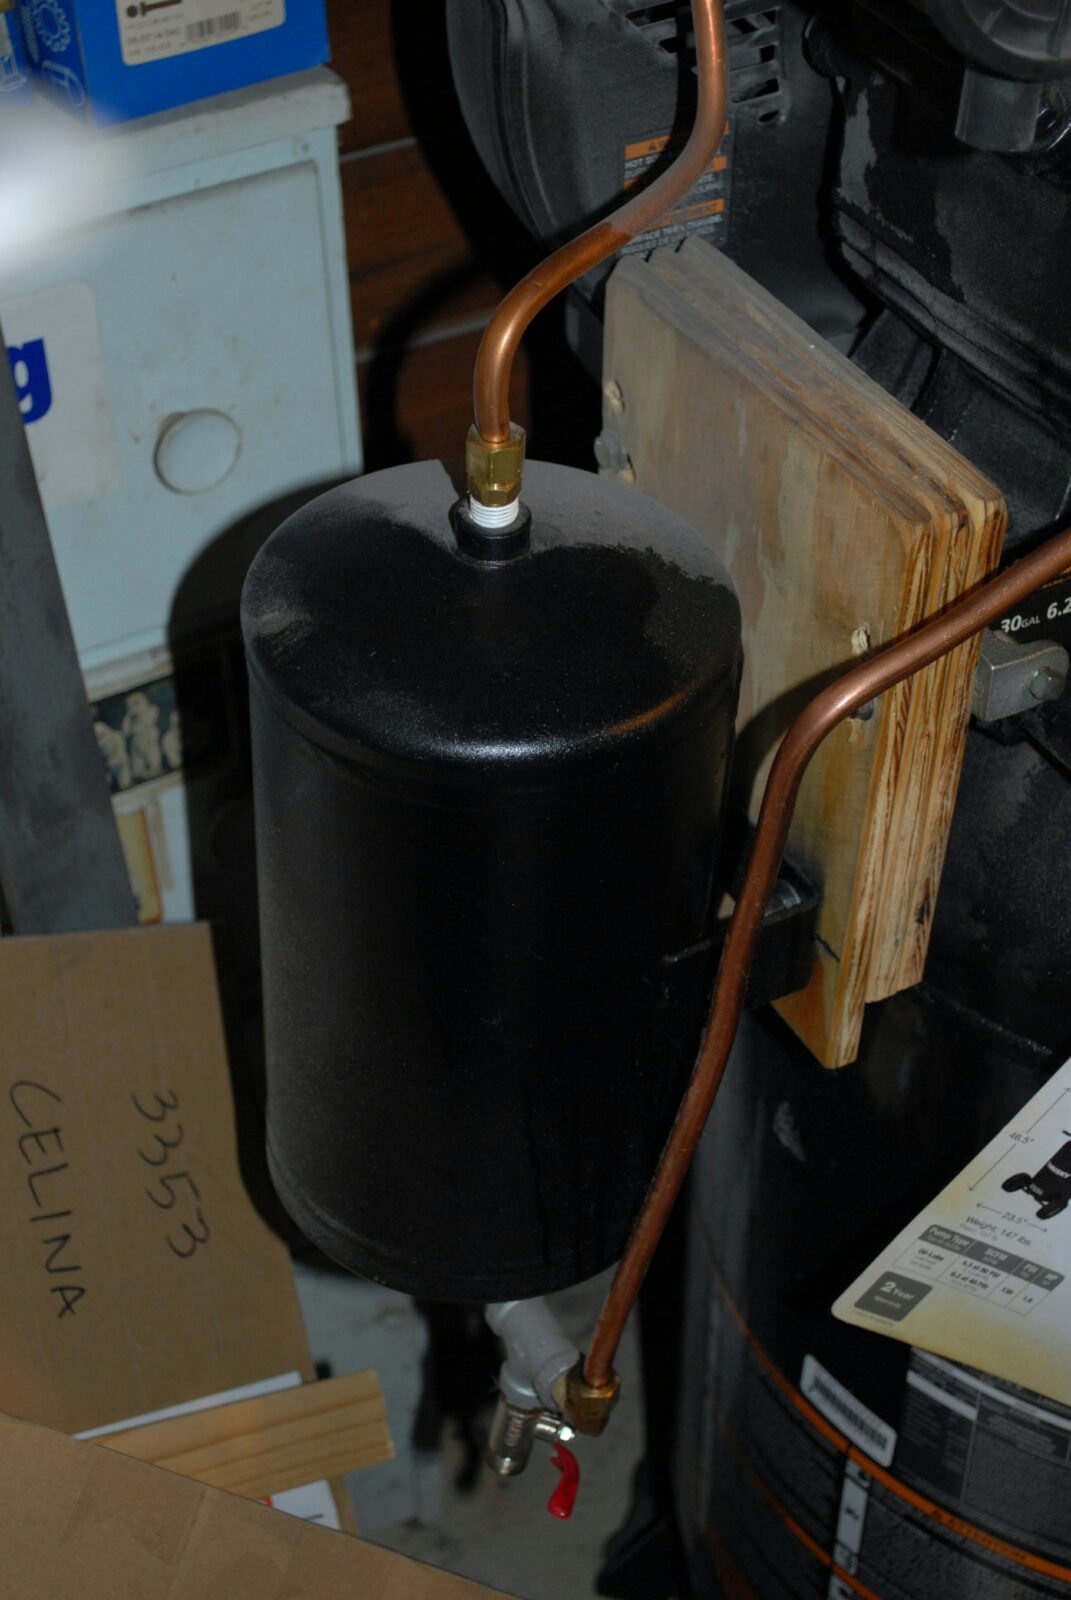
Option two:  Add a reservoir to really increase the volume

The second approach is a little bit more elaborate and involves putting a 1/2 to 1 gallon small air tank between the compressor and the tank. This allows the pump and motor to come up to speed before they must overcome the check valve. This works great. The only slightly annoying thing you will notice is that once the pressure is reached and the compressor cuts off, the pressure relief valve opens and the air runs out longer because there is more air in the line.

A couple of quick design considerations:

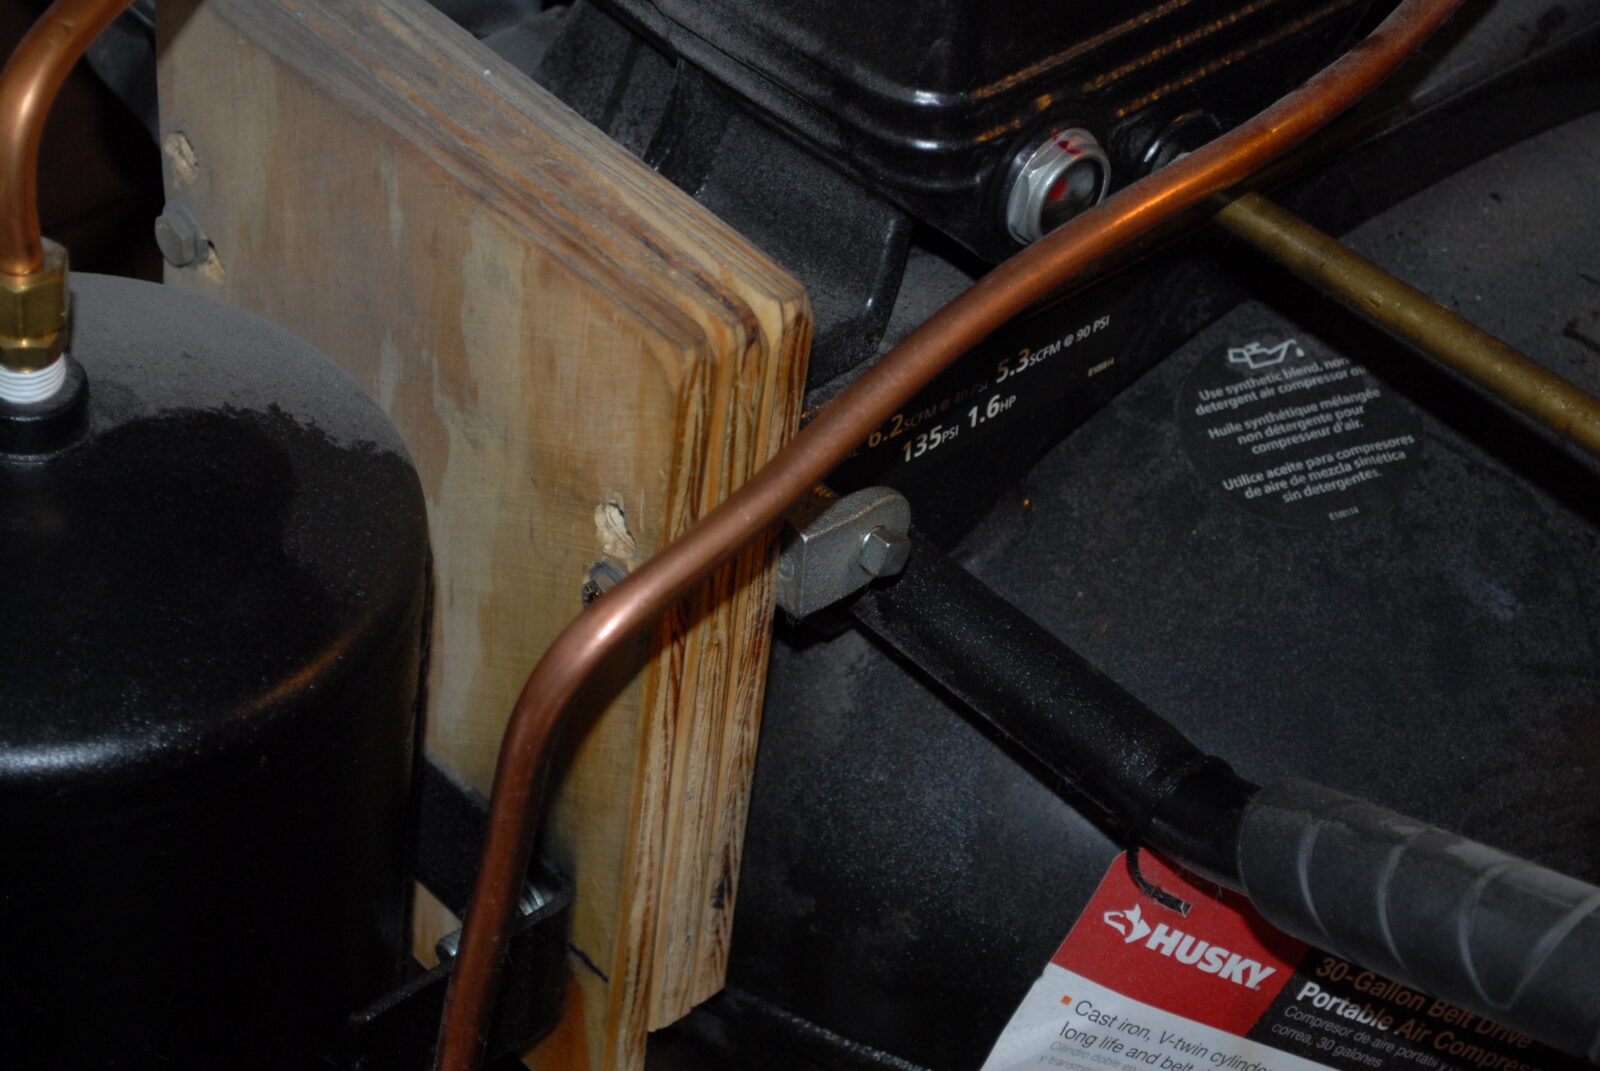
  1.  I carefully bent the aluminum using a tubing bender and tried to avoid abrupt turns.
  2. The small tank you see is a Firestone 9125 1 gallon 150 PSI tank.  The compressor filled the main tank to 135 PSI so the tank needed at least that rating to be safe.  Be sure your tank is at least rated as high as your compressor.
  3. Factor in the length of tank and if you will have enough room.  The one pictured is 12″ long.
  4. The tubing should be at least the same diameter as the original and the tank’s fittings should be adequately sized.  This is a fairly small compressor in the photo.
  5. I secured the tank to plywood and the plywood to the original compressor using the screw hanger fittings you find with conduit.  I wanted it to be relatively portable and I also wanted the wood to take up some of the vibration.
  6. I installed a T-fitting at the bottom of the tank to drain off moisture and never really found any.  I would recommend you still add it even if it just gives you an ability to bleed off air if something happens.
  7. Use quality Teflon/PTFE tape on all of your fittings to prevent leaks
  8. An optional recommendation I would urge you to do is to either use brake-line wrenches or at least quality fixed wrenches to avoid rounding over the fittings.  It is easy for an adjustable wrench to slip and round over the edge of a fitting.  You need to tighten things firmly so they do not leak or come loose.

I got by with the above for a number of years until I could afford to both get a bigger compressor and pay an electrician to run a 240 volt service into my shop.  I don’t need it now but these two approaches got me by for almost six years before I bought my current Ingersoll Rand.


Please share the link on Facebook, Forums, with colleagues, etc. Your support is much appreciated and if you have any feedback, please email us in**@*********ps.com. If you’d like to request a report or order a reprint, please click here for the corresponding page to open in new tab.


Rat Tail Tang Micarta Handle Making Process for Nepalese Khukuris

I am a huge fan of Nepalese khkuris including ones from Himalayan Imports and GK&Co (Deepak Sunar).  I do like customizing them also and have made handles many ways for both the full-tang and rat tail tang blades.  What I am going to show below is a rat tail tang and you’ll notice the curve the tang has.  This is the traditional tang and is very strong.  Westerners have a mistaken belief that full-tang is better.

The Nepalese bladesmiths, known as “kamis”, have evolved their design over centuries based on real world experience.  Their rat tail tang is very strong, allows for the traditional handle to be changed relatively easily and since the handle can flex somewhat on the tang, some of the shock is absorbed there vs. by the wielder’s hand.  When the British arrived they mandated a full tang on their Army models based on their experience and beliefs.  In short, when you are looking at khukuris, do not discount rat tails as weak because they are not.

The first step I do is to blast my slabs of Micarta to prepare them for maximum adhesion.  I am a zealot on cleaning too before gluing.  Do not attempt to glue the shiny micarta to the blade or it will knock right off with the first shock. Basically we are going to make a handle by sandwiching a piece in the middle that has the tang outline cut out between two outer slabs.  These are black canvas micarta slabs that have already been blasted – that is why they are dull.

The thickness of the middle slab needs to be the same thickness as the thickest part of the tang to keep things simple.

Next, I lay the middle slab under the tang and trace its outline.

I was doing two blades at once.  See the one above sitting in the cut out notch and the one below I have just traced the outline with a Sharpie marker.  Please note I have not taped the edge of the khukuri’s blade yet.  I would recommend you do that at some point to protect yourself.

This is slightly out of sequence but see the two round drill holes at the end of the tang?  I did them before sawing to make turning around at the end easier.  The numbers marked on the micarta correspond with which of the two blades I was working with.

I would then use a jig saw or band saw to cut the section out where the handle went.  Note, I more often use a band saw these days and you can do whatever works for you.

[Update 7/19/18:  Don’t buy the above Skilsaw.  It’s not strong enough and I wound up giving it to a friend.  Either get a Dewalt scroll saw or use a band saw]

See how the tang fits in?  It does not need to be perfect as this will all be filled with structural epoxy.

I do not have a photo, but I would abrasive blast the tang until it was clean shiny steel.  I would wear nitrile rubber gloves and hose everything (tang and slabs) down with brake cleaner to make sure no oils from my skin contaminated the work pieces.  Note, I often drive a 1/8″ brass cross-pin in through the thick part of the tang to lock everything in place just in case and also use a piece of thick wall 3/8″ brass tube at the rear to make a lanyard hole.  I did not do these things on this particular model and they are features to consider.  For people new to this, I would recommend the brass cross pin.  I always do this now even though I have never had a handle fail but I evolved this method and learned over the course of a number of years.

Next, take the outer slabs and round the outside edges over.  What you want to do is to create the taper you want before you glue the handle on.  It is hard to sand up front on the handle once it is glued together.  I would take the three pieces, clamp them together and then work on the belt sander until I got the shape I wanted on the front leading edge.  This is all we want to shape at this point.  I always preferred to do the majority of my shaping once the handle was epoxied onto the blade.

For gluing the handle, I will only recommend Brownell’s AcraGlas liquid.  It is a very strong, durable, and shock resistant epoxy.  Absolutely do not use a cheap epoxy as it will likely break down and crumble (“sugar”) over time with repeated heavy blows.  Always bear in mind that the big khukuris are choppers and heavy.  What you do needs to hold up under extreme use compared to many knife handles that see very light relative use.  To be safe, I would recommend you always abrasive blast the steel and the micarta before applying the epoxy – don’t try and just get by with sanding or otherwise scuffing the surface.  By blasting you are almost doubling the surface area for the epoxy to adhere to and the irregular surface creates countless shapes where the epoxy can get under “ridges” in the micarta and the steel to really securely hold the parts together.

Follow the AcraGlas mixing instructions to the letter.  I add in a bit of milled 1/32″ glass fiber to increase the strength in the filled areas.  The ratio for AcraGlas liquid is 1 part hardener to four parts resin and I’d add about 1 part of the glass fiber.  It is a bit of a balancing act because you do not want to make the resulting epoxy too thick.  You need it to run in, fill voids and seep into the micarta as much as possible.  [To get the most out of your epoxy, please click here to read a post I did a while back detailing my lessons learned over the years.]

Next, cut a piece of wax paper to wrap the handle.  You want to apply a ton of epoxy, clamp the heck out of it and let it sit and cure for 24 hours.  When you remove the wax paper, if there are any imperfections you need to fix by adding more glue, first blast the surface, clean it and then glue it.  Do not just put epoxy on top of epoxy without preparing the surface first.

Next, if you haven’t done so yet, tape your blade’s cutting edge to make sure you don’t get sliced when sanding the handle.  When working with a belt sander it can grab hold of the work and surprise you – you don’t want a sharp edge to be flying around!!

I do a lot of my handle work on a Rigid oscillating belt edge sander from Home Depot with 40-80 grit sand paper.  Hook your shop vac up to suck up the dust and be sure to wear both a good dust mask (such as a N99 rated mask/respirator) and eye protection.  The dust goes everywhere so be sure to have the vacuum hooked up and stop periodically to clean up and also to inspect your work.

In terms of shaping the handle, I will relay a piece of funny sounding advice – remove all the material that isn’t part of the handle.  Really useful, right?  When the fellow told me this years ago his point was that making a handle is applied art.  You are sculpting a handle by removing material and working towards a shape you have thought out.  I would remove a bit and test the feel, remove a bit and test the feel over and over.

I have experimented with many shapes over the years and it is really up to you.  I would stick with coarse sanding to keep the handle from being slippery and did both one handed and hand-and-a-half models.  In all cases, I wanted to user to have control while chopping / hacking with the blade.  One real strong recommendation:  ALWAYS build a finger stop or hand stop into your design.  You do not want a hand to slide forward onto the blade.  I always built the stop into the handle but you could certainly make your own metal cross guard or do something else — just be sure to protect the user’s hands.

The below blade is acid etched with a combination of apple cider vinegar and phosphoric acid and then everything, including the handle, had boiled linseed oil (BLO) applied to it. [Click here for my post about acid etching blades.]

This is a handle from a big HI WWII model blade.  Note the lanyard hole at the end.  I would drill the hole both for a friction fit and I would cut the tube longer than needed, blast it, clean it and then apply epoxy liberally before inserting it into the blade.  I would then sand it down to size as part of the final shaping of the handle.

This is black paper micarta that comes out a beautiful obsidian black.  It is on a long, elegant 24″-ish Sirupati.  Notice the oversized pommel to serve as a hand stop and the finger groove up front for indexing and grip.  This is a hand-and-half design meaning a person could grab hold with their second hand if they really wanted to.

The cool thing with the handles is that you have a ton of materials and options to consider to make a very unique functional piece.  I hope this blog post gives you some ideas.


Please share the link on Facebook, Forums, with colleagues, etc. Your support is much appreciated and if you have any feedback, please email us in**@*********ps.com. If you’d like to request a report or order a reprint, please click here for the corresponding page to open in new tab.


How to restore cloudy headlights using toothpaste – This really works!

When car companies moved to plastic headlight lenses they opened the door to them oxidizing over and majorly reducing the transmitted light.  I’m surprised they haven’t been sued yet actually.  I really do not like the fact that light is reduced and people are driving with less and less visibility at night – that seems wrong to me.  However, if they don’t correct this problem we can at least fix it with annual polishing of the lenses.

For badly deteriorated lenses, I use Meguiar’s Heavy Duty Headlight restoration kit. It comes with sandpaper and polish to really let you get through the yellow oxidized plastic.  I have sworn by that kit for several years now and you can do a number of vehicles with each package.  It was also a pretty good price considering you could avoid having to buy new lenses for at least 3-4 cars.

I just learned a trick from my son who was home for a visit.  He uses toothpaste to fix lightly oxidized headlights.  Yes, plan old Crest toothpaste.  Now this isn’t some odd chemical fix that disappears in a few hours.  Toothpaste has a very mild abrasive in it for cleaning your teeth.  Apparently it does an awesome job on car headlight lenses also.  The following is my wife’s Camry that has gone about a year since I last polished it:


Basically he would pour water on the headlight, get the toothbrush wet, added the toothpaste to the old tooth brush and then vigorously rubbed all over the lens.   He’d then pour water, wipe it off, look at the results and repeated it about three times per light until he got it just the way he wanted it.  I’m impressed.

He really didn’t use much toothpaste either.  This is real cheap and effective on light oxidation.  I’m doing this for now on and saving the Meguiar’s HD kit for lenses that are badly damaged.


Please share the link on Facebook, Forums, with colleagues, etc. Your support is much appreciated and if you have any feedback, please email us in**@*********ps.com. If you’d like to request a report or order a reprint, please click here for the corresponding page to open in new tab.


Update on my Hatsan Gladius After a Month – Still very happy!

Well, I’ve had the Gladius for almost a month and the thing rocks.  I have dispatched about a two dozen squirrels strictly for pest control.  It definitely does the job and I only have it on power setting three.  I actually have to consider over penetration even on setting three the pellets go right through the squirrels.

For pests, I am still quite happy with the JSB Jumbo Heavy Diabolo 18.13gr pellets.  I have the rifle on power setting three and am getting about 1/2″ groups at 30 feet.  What I have found is that my first round is a flier if I go to 200 bar.  Instead, I stay between 150-180 bar and it is pretty consistent.  I have a Huma regulator in one of the two air cylinders but am still shooting with the one that came with the rifle until I get some time to use the chronograph and site in the scope with the new changes.

The Hawke scope is holding up just fine.  I did spend the money to get some Butler flip up lens caps.  Size 48 (2.5″) for the objective and 15 (1.558″ for the eyepiece).  They are working fairly well though I do wish the objective fit a bit tighter.

So far, so good.

One year later review – click here.  I am still very happy with the combo!!

6/29/2020 Update: Still very happy! We now have replacement fill-probe O-rings and caps to keep your fill probe clean. Click here to learn more.


Please share the link on Facebook, Forums, with colleagues, etc. Your support is much appreciated and if you have any feedback, please email us in**@*********ps.com. If you’d like to request a report or order a reprint, please click here for the corresponding page to open in new tab.


How to get what you want from epoxy – for me it is long life, shock resistance and strength

Folks, I work a lot with epoxy and reply on it as a structural adhesive to both fill gaps and bond parts together.  I’ve done everything from fixing car parts, wood furniture, tools, rifle bedding, scope mount bedding, custom knife handles and much more with epoxy.  It is incredibly versatile but you need to do some planning to really get what you want out of it predictably.

In case you didn’t know it, “epoxy” is a general term for a wide range of cured polyepoxide resins glues with different physical characteristics such as how long they cure, strength, temperature resistance and so forth (click here if you want to learn more about the chemistry).   There are a ton of options out there as quality manufacturers experiment with different resin and hardener formulations.  In short, not all epoxies are the same and for people concerned with the quality of what they are building, they need to think things through.  For quite some time I’ve wanted to write down a series of tips for folks to get strong reliable results so here they are:

Buy a quality brand epoxy to begin with

What I have found over the years is that not all epoxies are created equal so spend the money and buy quality epoxy.  There can be a huge difference in how well the epoxy will last over time and/or how strong it really is.  Do not buy the bargain basement junk.  In general, if the maker lists all the physical properties then it is a well thought out and executed formula.  I have three epoxies that I use the most in order are Brownell’s AcraGlas liquid (not the gel), Locite E-120HP, JB KwikWeld and ITW Devcon Plastic Steel.  Once in a while if I need a fast cure epoxy, I will get a retail blister pack of some five minute epoxy and I’ll explain more in a moment.

Strongly consider what your application is

Epoxy comes in many formulations.  They can vary the chemistry of the resin, the hardener and the filler to behave differently.  Consider the following example characteristics:

  • Liquid, Gel/Paste or Putty/Bar — The liquid can seep into pores and fibers plus it can be spread but it can run into places you do not want.  Gels and pastes tend to stay put better but do not seep in as well.  The really thick puttys and bars are great for filling space or creating an impromptu clamp or to seal a hole but they definite don’t sink in much.
  • Temperature – you need to think both about the temperature when you are mixing and applying the epoxy as some will not set up at all if too cold.  You also need to think about the heat when in operation because many epoxies soften and lose their bond the hotter they get.   For example, you may apply epoxy to an exhaust manifold but it will blow off when it gets hot.
  • Pot life – this is how long you can still apply it before it starts to thicken.  Some folks will refer to this as working time.  You need to mix the two parts together, apply the epoxy, position and clamp the work before you run out of time.  Keep this in mind.
  • Cure time – this is how long until the epoxy reaches full strength
  • Color – you can get epoxies in different colors
  • Ratio / mixing – some are by volume or by weight.  The easy consumer stuff is usually 1:1 by volume but when you get into the more sophisticated epoxies the volumes vary or a digital scale is needed
  • Heat resistance – some epoxies resist heat better than others before they soften and “let go”
  • Shock resistance – some formulations hold up better than others before they start the break apart and “sugar”.  Sugaring refers to the powdery look epoxy gets as it breaks apart.  Brownell’s AcraGlas, Loctite E-120HP, JB KwikWeld and ITW Devcon Plastic Steel have all held up very well for me under shocks.  My go-to epoxy for most work is Acra-Glas liquid because it holds up so very well.
  • Others – there are other factors that may matter to you but the important thing is to think through your application

Go with as long of a curing time as you can for maximum strength

What many people do not know is that the faster an epoxy cures, the weaker it is.  Conversely, the longer the formulation takes to cure, the stronger it is.  All things being equal, a 24 hour curing epoxy will be stronger than 90-second, 5-minute, 30-minute and so forth epoxies.  Now there is a time and a place where speed is needed and also situations where strength is paramount.  When I make khukuri hands and other things where strength is critical, I always use a 24 hour epoxy.

Use the Proper Ratios

Be sure to carefully follow the mixing ratios.  For volume ratio work, I use 10cc or larger syringes without the needles on them to meter liquid resin and hardener.  For example, I like AcraGlas and it is 4 parts resin to 1 part hardener.  I keep two syringes separated that I re-use over and over.  With the syringe in the holding cup labeled “resin”, I use it to draw 4 cubic centimeters (CCs) of resin out and squirt it into a mixing cup.  With the hardener syringe, I meter out 1 CC of hardener into the cup.  Now you can vary that.  If you need a smaller about, meter out 2 CC of resin and 1/2CC of hardener.  The syringes really help.  If you are doing larger volumes then either use bigger syringes or disposable cups that have measurements printed on the side.  Also note how I pour from the bulk container into the smaller intermediary containers that are easy to work with plus I avoid contamination, dropping a big bottle, etc.

The Loctite E-120HP comes in a specialized dispenser tube that uses a gun and tip to do all the mixing.  It’s cool as can be for volume work where additional coloring or fillers are not needed.

For the Devcon Plastic Steel, I use my digital scale.

Here’s one thing not to do:  Some guys have heard that if they add more hardener it will cure faster.  This may be true but the resulting cured epoxy will be weaker.  Do not deviate from the manufacturer’s recommendations if you want the physical properties they report.

Mix thoroughly

Folks, I can’t stress this enough.   Mix the heck out of the two parts and combine them thoroughly.  If you are doing larger volumes, consider doing what is known as a double pour.  Pour the two parts into a first container, mix them thoroughly and then pour the combination into the middle of a second container and mix.  What a double pour does is avoid having unmixed materials that have stuck to the walls of the container come out when you are applying the epoxy.  Keep your pot life / working time in mind.

Most of the time I am using a generic 5oz plastic cup and plastic knife to do the mixing.  I buy them by the hundreds for Ronin’s Grips and they are cheap regardless.  Do not use styrofoam.

Prepare the surface

Whatever you want to bond epoxy to had better be clean and free of oils, greases, waxes, release agents and so forth.  Second, the more abraded the surface the better.  If you abrasive blast a surface not only can you double the surface area being bonded together but the irregular surface creates many opportunities for the epoxy to get “under” material to create a better grip.  If you can’t blast then at least sand the surface with 80-100 grit sand paper.

So here are two rules to bear in mind when it comes to the surface:

  1. Clean, clean, clean and wear gloves to not contaminate the surface with oil from your skin
  2. Shiny is bad.  A polished smooth surface will not give you anywhere near the bonding strength that a blasted or abraded surface will.  I blast everything that I can – metals, micarta, plastic and even wood.  It makes a world of difference – seriously.

The following is a bakelite handle from an electric griddle of my parents’.  The unit works great and has sentimental value so I cleaned it, blasted it, cut a quick cross hatch pattern to give even more grip and then cleaned it again.  It set up like a rock and we used it all Memorial Day morning to cook hundreds and hundreds of pancakes with no problem.\

Heating Epoxy

Heat can help you two ways.  First, by warming epoxy it tends to flow better.  If you need to to soak into wood or other surfaces, consider using a heat gun to blow/chase the epoxy into the wood.  Do not burn the epoxy – just warm it up.  Second, in general, warming epoxy up tends to make it cure faster.  Now there are limits and you need to either experiment or talk to the vendor before doing anything too radical.  I will often use a halogen light or other heat source to warm the surface up to 80-100F.  In chemistry, there is a formula known as the Arrhenius Equation that notes that for each additional 10 degrees Celsius added, a reaction rate doubles (click here for more info on the equation).  My experience is that you want the heat to penetrate and warm all of the epoxy and not just the surface and you also do not want to burn the epoxy.  In general, I do not exceed 100F but that is just me.  I found something that works good enough and have just stayed there.

Also pay attention to the minimum temperature requirements for curing.  Some epoxies will not do anything at all at freezing.  Some take forever to cure at 50F.  It just depends.  When in doubt, use a lamp or something to gently heat the part.

Coloring Epoxy

What many folks do not know is that you can actually color epoxy.  I have found two approaches that work.  First, use powdered tempera paint.  You can stir in a bit of black powder to get black epoxy.  Now I did this starting out and have since moved to using epoxy dyes so I am added less powder to the mix because I want to save the volume for glass fillers which we will talk about next.

Fillers

You can modify the physical strength of epoxy by adding a substrate or fillers.  For example, fiberglass is matted glass fiber that bonded together with epoxy made for that purpose.  Folks working with carbon fibers are using epoxy for bonding that together.  I add 1/32″ milled glass fibers to my epoxies to get more strength.  If I want more of a paste, I add more glass fiber and if I want it to be more of a liquid, I use less.  The exact volume of glass fiber depends on what you are trying to do.  Some vendors will give you recommendations and others will not.

Clamping / Work holding

In general, you want to apply the epoxy and then clamp everything together really well and then let it sit.   You may choose to use traditional clamps, vacuum, etc.  Bear in mind two things:

1.  Be careful that you secure the material and that it can’t shift while curing.  I can’t tell you how many times I have checked stuff and found out it moved and had to change my approach.  Figure this out before you apply the glue in case you need to make something, change your approach, etc.  Check it regularly to make sure it hasn’t shifted regardless.  Every time I think something can’t move – it does.

2.  The epoxy will run out of what you are working on.  Decide how you are going to deal with it.  Wax paper can protect your tools and table.  You can scrape the epoxy off after it has partially cured.  You can wipe things down with acetone when partially cured.  Just think it through otherwise you are going to glue stuff together really well that you do not want bonded – trust me.  It is a real headache so plan for seepage/dripping and how you will deal with it.

Patience

This is something I have gotten better at over the years – wait the recommended amount of time.  If they say 24 hours then wait 24 hours.  If you have questions about using the part sooner then ask the manufacturer.  For example, you might be able to assemble something after 10 hours but not actually put it under strain for 24 hours.  Factor in the temperature.  The colder it is then the longer it will take.  Remember what I said about the heat from lamps above.

Safety

Yeah, I had to add this.  Follow all guidance from the vendors.  The resins aren’t too bad but some of the hardeners are nasty.  Wear rubber gloves, use eye protection, work in a well ventilated area and wear a real good dust mask when sanding.  I use N99 masks now for everything.

I hope you found this general epoxy guidance helpful!


Please share the link on Facebook, Forums, with colleagues, etc. Your support is much appreciated and if you have any feedback, please email us in**@*********ps.com. If you’d like to request a report or order a reprint, please click here for the corresponding page to open in new tab.


Video: Building an AK-47 (AKM) with Definitive Arms by AK Operators Union, Local 47-74


Back in 2015, Rob Ski went to Definitive Arms to build an AK.  In this video, they really get into the details of building an AK and anyone regardless of experience level is bound to learn something.  You can watch in this 36:13 video as Rob builds his AK under the expert tutelage of the guys at Definitive Arms.

There are some great tips in here for riveting, getting the barrel blocks on square, etc.  Definitely worth your time.  After watching all these build videos, I really wish I had the time to build another.


Please share the link on Facebook, Forums, with colleagues, etc. Your support is much appreciated and if you have any feedback, please email us in**@*********ps.com. If you’d like to request a report or order a reprint, please click here for the corresponding page to open in new tab.


Video: How to build an AK47 from scratch part 6 (the last part) by usmcdoc14

This is his last video in the six part series.  He recaps what he did and shares with you some of his tips for sandblasting such as putting foam earplugs in the chamber.

Here are the links to each segment – when you click on them they will open in a new tab:


Please share the link on Facebook, Forums, with colleagues, etc. Your support is much appreciated and if you have any feedback, please email us in**@*********ps.com. If you’d like to request a report or order a reprint, please click here for the corresponding page to open in new tab.


Video: How to build an AK47 from scratch part 5 by usmcdoc14

This is the 5th video in his six part series.  If you are building from a flat, then you need to pay careful attention to this.  He shows how to file the ejector tip down plus also shows how to do the spot heat treating in this video with a MAPP torch.  I spot heat threat the fire control group (FCG) pin holes but I heat treat the entire lower rails outside of the receiver before I spot weld them in.  His method works just fine so pay attention.  If you are building from a finished receiver then the odds are it has already been heat treated – if you have any doubt, ask the vendor that made it.

By the way, if you need a MAPP torch, go to Home Depot or Lowes (I prefer HD) and buy a Bernzomatic MAPP torch.  Personally, I use a MECO Midget Oxy Acetylene (OA) torch that works great for sheet metal.  Do some comparison shopping though.  It may be real expensive online if they ship the gas too.

Note, the Bernzomatic MAPP torch is definitely more portable so there are times I use it but if I need a lot of heat fast, I get out one of my OA rigs.

Here are the links to each segment – when you click on them they will open in a new tab:


Please share the link on Facebook, Forums, with colleagues, etc. Your support is much appreciated and if you have any feedback, please email us in**@*********ps.com. If you’d like to request a report or order a reprint, please click here for the corresponding page to open in new tab.


When Strength and Quality Matter Most