Remembering My Dad – Carroll Spafford & The M1 Garand Story

Well folks, yesterday was my dad’s birthday and he would have been 91 years old.  I owe him a lot and often think of him.   The pain of losing him is less but I miss him.  He started me shooting when I was so little that he had to hold the .22 rifles and BB Guns and help me aim.  He taught me the basics of shooting rifles and shotguns along with a very heavy dose of how to keep them clean and oiled plus firearms safety.

At any rate, I want to share a special story with you – how a great bunch of guys on AKFiles cared in amazing way and helped me get a Garand for my dad.  It’s a very, very special memory for me so I am combining two posts I did back in 2011 telling the guys there how things went with the purchase and the first trip to the range.  I’ve wanted to do this for a long time just in case something ever happened to the original posts.  So, here they are in memory of my dad.

This first part of the story is from a post I did on AKfiles on February 15, 2011, telling guys how things went — I can’t believe it’s been over six years:

Well gentlemen,

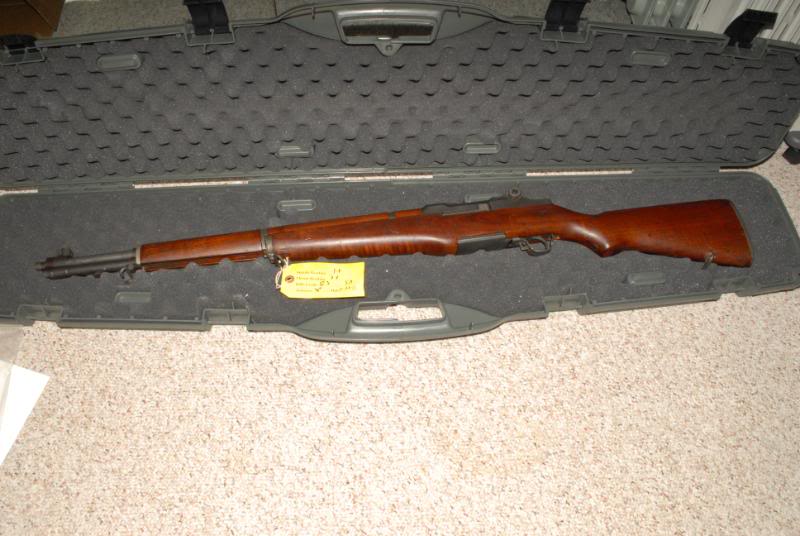
The Garand arrived today via FedEx from CMP and was in fantastic shape. The finish is great, fittment seems solid, action is smooth and the wood is in pretty good shape. I’d say the CMP outdid themselves. You know what, they shipped it FedEx Priority Overnight because they knew why I had ordered this rifle from the very start. I am so very impressed by the staff I talked to there.

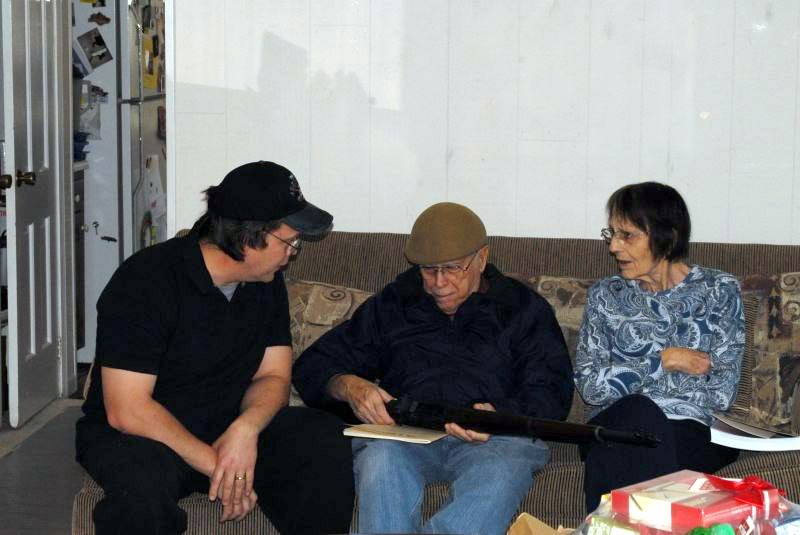
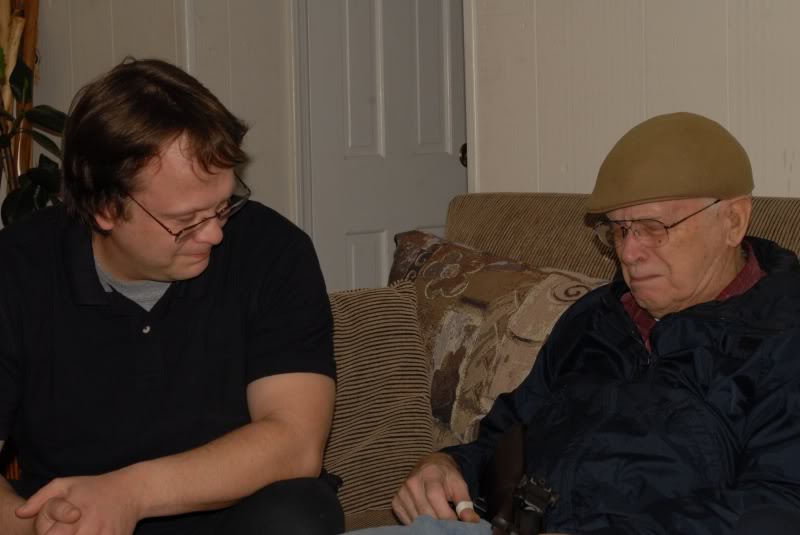
So, after looking the rifle over around 9:30am this morning, I called my parents to come over for lunch. My dad had no idea what was going on. I had them sit down on the couch and gave my dad a 1960s Garand tech manual I told I had found and let him read it while my wife and I finished getting things ready.

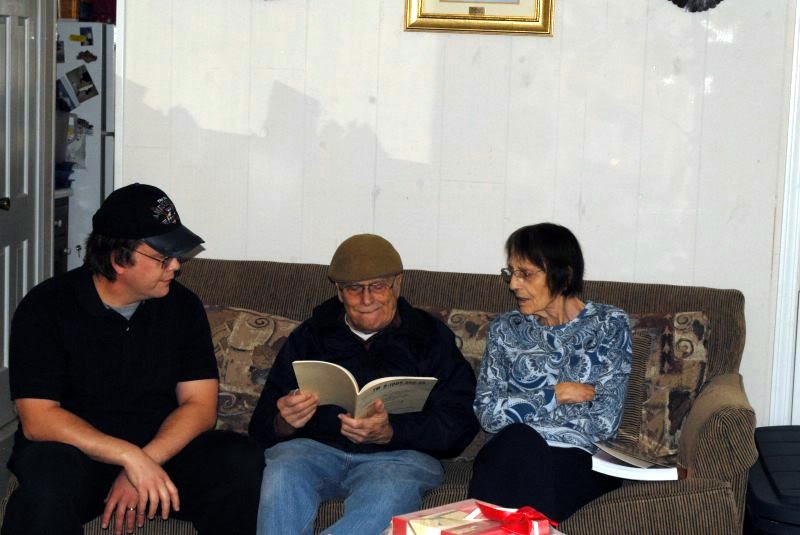
So he’s looking at the manual and my mom and wife are in the room and I ask him – “Isn’t that the rifle you had in the Army but could never afford?” My dad said “Yes” and was thumbing the pages of the manual while I went downstairs. He really had no idea.

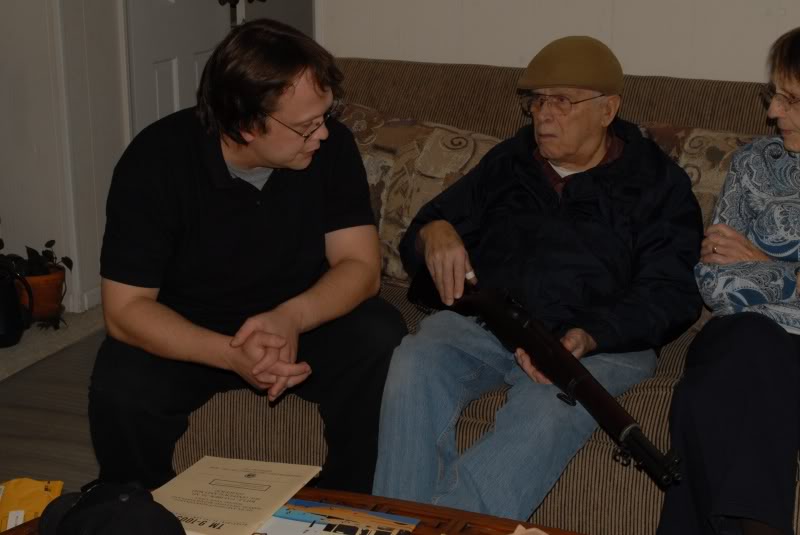
So I went downstairs, got the rifle in its CMP case and came up to them without my dad seeing what was in the case and he really didn’t pay it any mind. So I told him “I think its about time you have one” and at first it didn’t really hit him what I said. He even took the rifle from me without really saying anything.

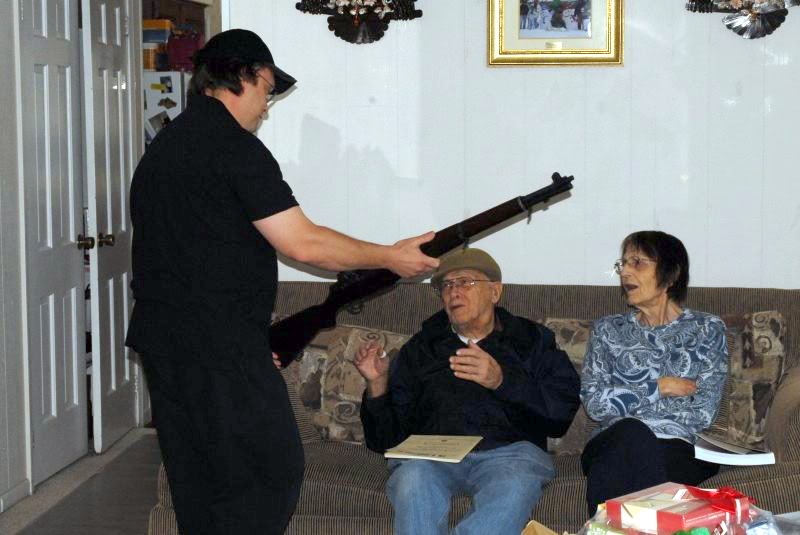
I told him “Dad, this is your rifle and we are going to enjoy it together this summer.” At that point, I think it registered and he asked “It’s mine?” and I told him it was and that it was a real Springfield Armory M1 and not a reproduction. The government Springfield Armory has always been special to him because he grew up in Massachusetts and New Hampshire and I guess because it was close to home.

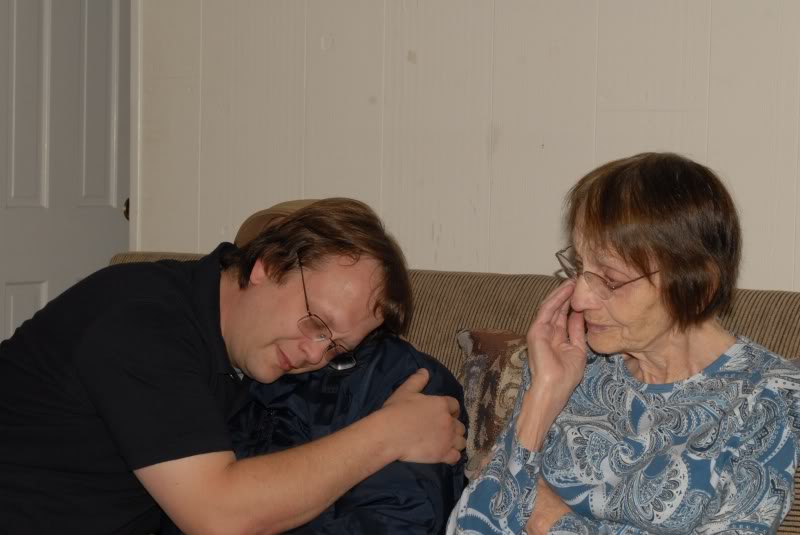
He was looking it over and while he did that I told him about all of you and what you did to help. The prayers, the well wishes, guys wanting to send money, the stories of their fathers, what the CMP did to help and at that point, the only time in my life I have ever seen it, my father started to cry. He told me he never thought he would hold one again.

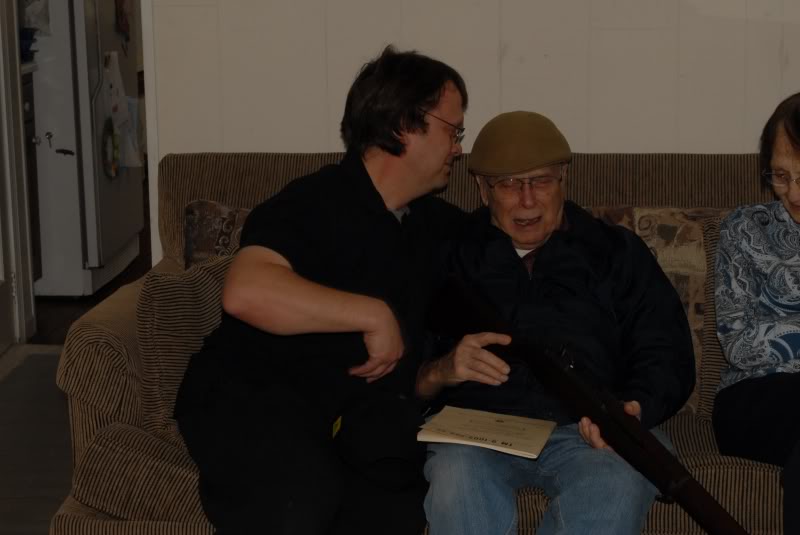
After a few minutes, we got ourselves together and he started really looking the rifle over. He pushed down the follower assembly, or whatever you call it, in the magazine well and carefully pushed the bolt closed saying he didn’t want to get “Garand thumb” and he explained what that meant to us and then the stories began.

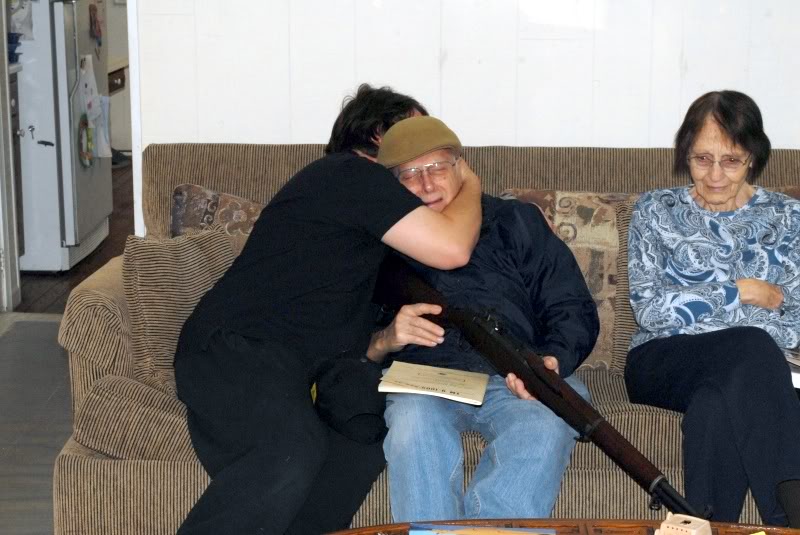
Towards the end, he looked at the rifle again and tears started one last time.

Guys, thank you so much for all you have done. He was so excited – so happy. It was amazing and I am not a good enough writer to tell you how he looked other than to say he was profoundly touched by all that you guys did to help, what the CMP did and so on.

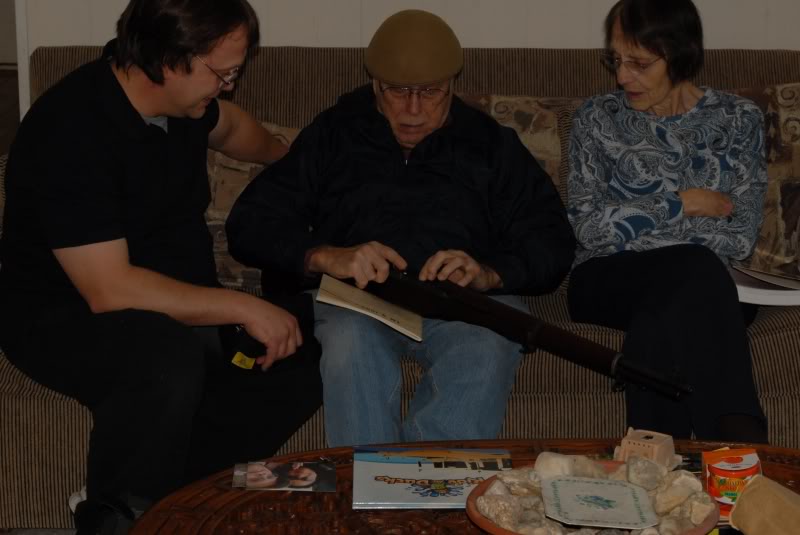
I have a lot to learn about M1 Garands, that’s for sure and I look forward to learning about this one with my dad.

Tomorrow we go to find the results of his bone marrow tests and I told him that no matter what he and I have the Spring and Summer to look forward to so we can take his new Garand out and test it.

Never take your loved ones for granted and do whatever it takes to be able to spend some time with them. Life is precious and time is short.

Thank you my dear, dear friends. You are all amazing.

The second part of the story is from July 27, 2011 when my dad I finally were able to take the Garand to the range:

It’s funny how fast time flies by. As you know, I bought an M1 Garand for my dad and gave it to him. Getting to the range with him was always on the “to do” list but never quite made it to the top due to job conflicts, health, kid stuff, and so on. Before I knew it, time flew by. You don’t realize how fast time slips by until you look back.

On June 27th, my father in law fell over a small 18″ tall dog fence, cracked a neck vertabra hitting a couch and compressed his spinal cord. He will not recover from the injury and subsequent complications caused by kidney and heart disease. It was such a freak accident because he was only 75 and full of energy. Now, he is sedated and kept alive by machines in ICU but still able to think and move his eyes. Calls and well wishes from you guys really, really helped. Bubbazan, Elkaholic, Ding … you guys are great. I can not thank you enough.

I told my wife that it really showed me that we can’t take loved ones for granted or leave loose ends undone. I told her I absolutely had to take my dad to the range with the new Garand. We are home this week catching up on bills and work while my wife’s family takes turns watching my father in law. Thus, I got an opportunity and seized it. Sometimes, and this was one of them, you need to make things happen and that’s what I did.

It’s been real dry and hot here which, for my dad, is perfect because there are fewer mosquitos – when they bite him he swells up huge because his compromised immune system goes nuts. Monday night I had a crash course in M1 Garand disassembly, cleaning and lubrication. Youtube videos and some web pages people had sent me helped tremendously. The CMP armorer knew about the situation with my dad and other than cosmoline in the stock, the rifle was immaculate. The trigger group was gun metal grey and lightly oiled inside. If I didn’t know better, I would have sworn I was looking at a new rifle based on the quality of the parts, lack of wear and cleanliness.

I used Mobile synthetic grease to lubricate the rifle. It really made the rifle nice and slick. I was very concerned about recoil hurting my dad so I installed a medium Limbsaver Slip-On Pad just to be safe. It fit great and really cushioned the butt. So, I packed it up and made sure I had the ammo, targets, hearing protection, and so on for the range.

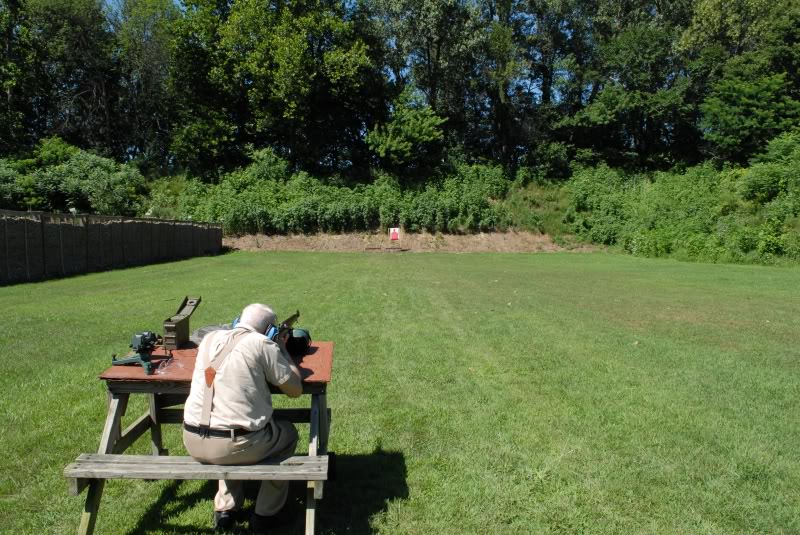
On Tuesday, my dad arrived and we loaded his van up and headed to the sportsman’s club for an afternoon of shooting. When we got there we had the range to ourselves as it was 3pm. It was sunny, hot and no mosquito in sight – things were looking great.

We set up on the range. My dad was definitely excited – he’s always been a big one to understate things but I could tell. Bear in mind an 85 year old man doesn’t move too fast and he was clipping right along. We set up on the 50 yard line to do our testing.


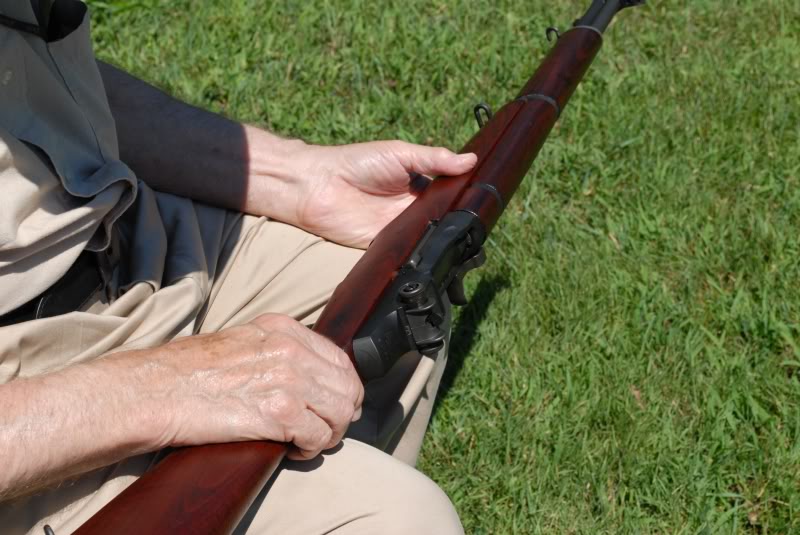
Now I had cleaned and inspected the rifle as best I could. Even so, we installed it in a stand and fired a test round with 25′ of string. Of course, my dad had the honor of pulling the cord and doing the first test firing.

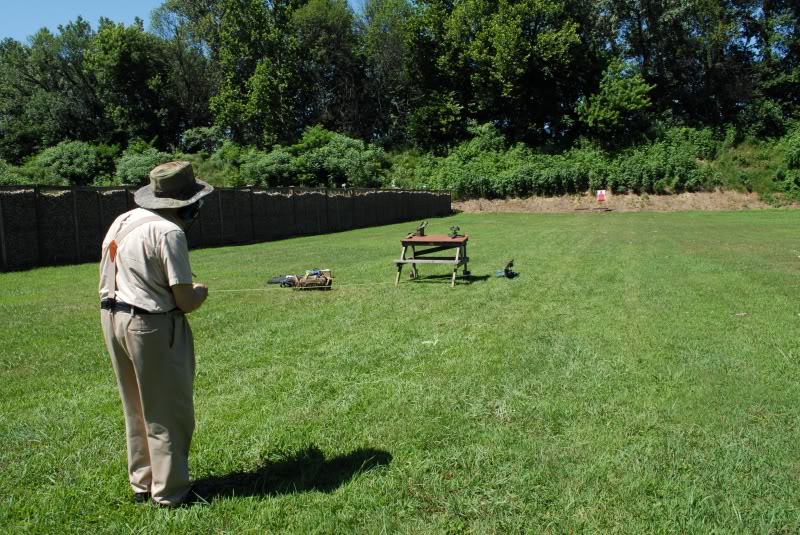
The rifle functioned flawlessly on Greek M2 ball ammo. No bulges, primer looked great – the cartridge looked just fine. We inspected the rifle and everything looked great. My dad had this huge grin on his face.

Of course, the next thing to do was to fire for effect! The old man got down on the bench and lined up. He did it so smoothly that you just knew he and Garands knew each other. I was running around taking photos.

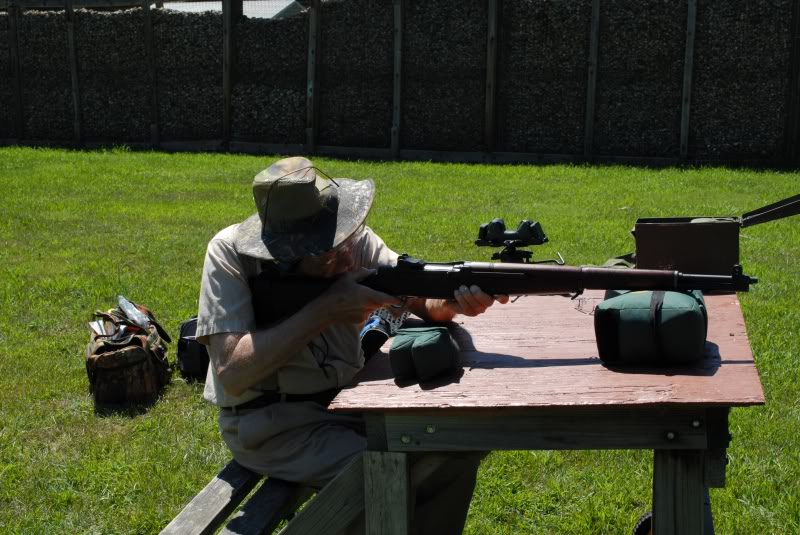
He squeezed off his first shot from an M1 Garand since the last time he fired one in Korea in 1945 – literally 65 years ago. Now bear in mind this was round #2 from the rifle – no changes to the sights plus my dad hasn’t been shooting for almost a year.

That definitely excited both of us so he got down to business


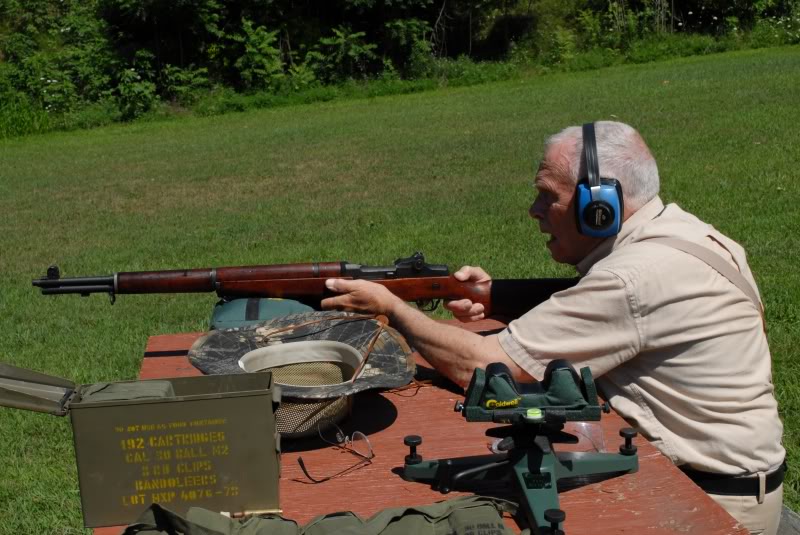
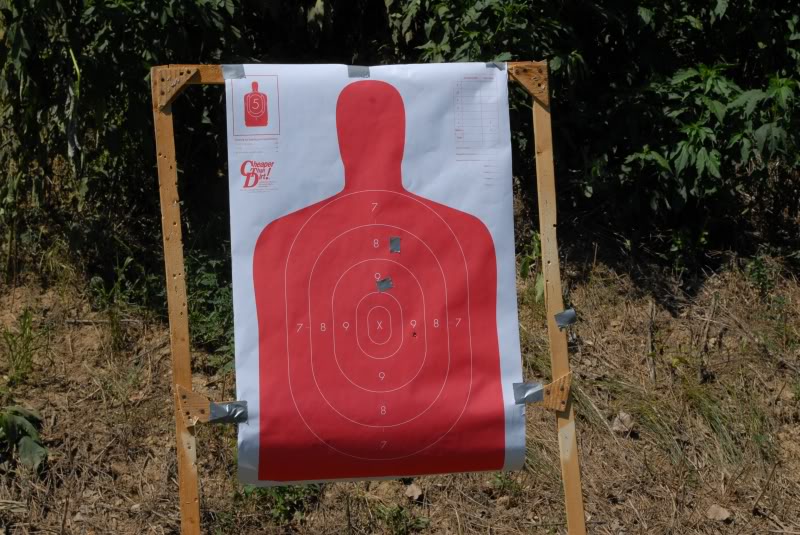
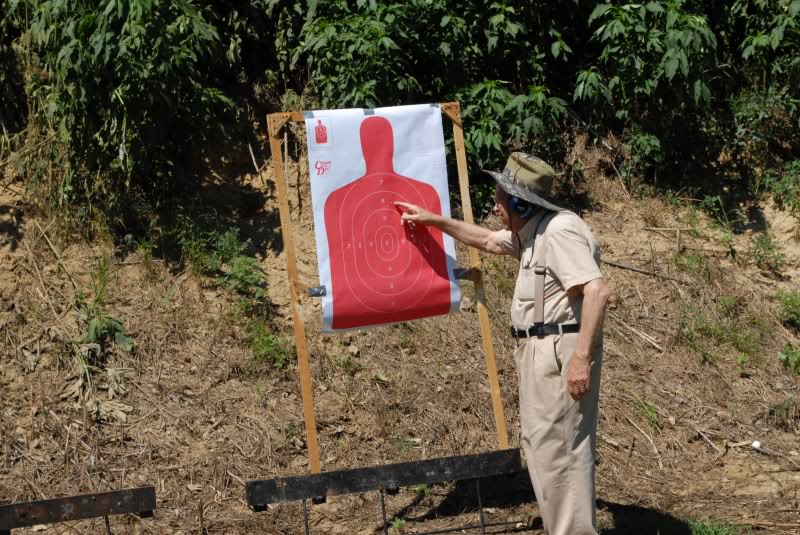
He fired 7 rounds – each time we’d unload the rifle and walk down to look at the target (I forgot my spotting scope). He was happy and talking about the rifle, how to adjust the sights, it was great. My dad got tired and asked that I shoot the rifle. I went on to fire 9 rounds realtively quickly from 50 and 100 yards before we had to leave. Not one single failure or problem of any kind – not one. The rifle functioned perfectly. I got a real nice note from the lead armorer at CMP wishing my dad well and I think they are an awesome group – all of them.

After shooting the rifle I was amazed at how little recoil there was. More of a push than a slam plus the recoil pad made it a joy. My dad said it didn’t hurt at all. We were able to spend about two and a half hours at the range and just had a great time. I’m definitely going to take him more this summer. We have a checkup on his cancer at the end of August and we’ll need to decide whether to keep watching, or just what. When we were packing up, I told him that I couldn’t afford the fishing boat but at least I could get him a Garand and that brought out a big smile. It was a great day – I was so happy and he was too.

Again, I want to thank all of you for your awesome support. We all have our own personal trials but having people go out of their way to help is an amazing thing. I feel very lucky to have a wonderful family and to count so many of you as friends.

God bless all of you and your families.

Sincerely,

George

In closing

Never miss a chance to spend time with your families.  Just before my dad passed away on September 20, 2014, we were planning on taking the Garand out to the range.  The day we were to go he decided against it as he didn’t feel up to it.  A day or two later he passed away in his sleep.  I really wish we had that one last shooting session but I do have some great memories and they outweigh the regrets.

We miss you dad.


In case you are wondering, here’s a bit about my dad:

Carroll Spafford, 88, of Stevensville, formerly of Battle Creek, MI, passed away peacefully on Saturday, September 20, 2014, at the Hanson Hospice Center.

Born in Boston, MA on June 26, 1926, to George RH Spafford and Hazel Holmes (Mr. & Mrs. Spafford) of Everett, MA.  His parents, older brother (George Kendall) and younger sister (Phyllis) moved to a farm his parents bought in Derry, NH, when he was a young teenager.  While there, he attended Pinkerton Academy in Derry and graduated in 1945.

On March 30, 1945, Carroll enlisted in the US Army and was sent to Korea to join the 6th infantry division guarding against any attempts by the Japanese to retake Korea.  While there he rose to Corporal overseeing a seven man heavy machinegun squad.  He was honorably discharged on December 30, 1946, and returned home.

As part of the GI Bill, he attended the Wentworth Institute of Technology and obtained his MC&TD degree in 1949.  After several years working, he then attended Ohio State University and received his MBA in 1955.

Carroll’s career took him to Detroit and Ford Motor.  While in Detroit he met and married Alpha Lee Turman on November 26, 1964.  Following a brief stint working in research at the University of Michigan he then accepted a rewarding position at Kellogg Community College in Battle Creek, MI, where he taught business management and economics/

In 1967 he and Alpha had a baby boy, George, who was joined by his sister, Rebecca, in 1971.  They had a small farm North of Battle Creek with a collection of dogs, cats, horses and gardens plus summer car trips all over the US that occupied their time.

In 1986, he retired from KCC and he and Alpha volunteered at Junior Achievement in Battle Creek.  In 2002, he and Alpha moved to Stevensville, MI, in order to be closer to their grandchildren.

In 2012, Alpha passed on and Carroll continued on with the help of many talented and much appreciated care givers.  He is survived by his son, daughter, three grandchildren (Paolo, Alyssa, and Erika), his sister (Phyllis) and a very large extended family who all love and miss him greatly.

Assembling an AR Lower – Step 3 of 11: Installing the Bolt Catch Assembly

In this step, I’ll install the bolt catch.  This is the part that catches the bolt when the magazine is empty or the operator wants to lock the weapon open.  In terms of risk, this step has probably caused more blemished receivers than any other.  What I hope to show you is a method to minimize that.

The assembly is made up of the catch itself, a cross pin that secures it in the receiver, a spring and the bolt catch buffer.  In this post, I am actually installing a Strike Industries bolt catch.  I like to have a slightly larger paddle to operate the catch and Strike model is a nice size.  If you ever want a giant paddle, Wilson makes one but it is just too big for my taste.

Here is the catch, it’s roll pin directly underneath and then the spring and detent to the right.


Where we are working on the receiver is right here – just above the mag catch:

The spring followed by the detent go down in the hole just above the magazine catch. The bolt catch is then inserted in the slot and the pin secures it. This is when you wonder if a third arm is needed 🙂

Now, this step is really risky.  One slip and you will mar your receiver so take a minute and put some duct tape on just in case.  I like duct tape because it is thick and sticks really well.  I’ve used other types of tape in the past and it really is just cheap insurance.  If you do this and what you use is up to you.  You are mainly worried about the receiver, to the right of the humps/lobes where the catch is going to be installed.

If you want to lower your risk of scratching your receiver, put a heavy tape around the assembly for protection. I’d recommend a duct tape – I’m using Gorilla Tape in this photo.

Now I use three punches for this.  I bought two rubber coated mag catch punches from Wheeler.  They work but I wish they were longer and you still need a third to make it easy.  Let me explain a bit more.  The Wheeler punches are half circle designs which gives you better clearance but I still use my long Astro Pneumatics 1/8″ punch to reach down and drive the pin the rest of the way in. Like I said though, you do need three punches for this.

The two black punches make up the Wheeler 710906 bolt catch tools and I literally use them with every build. Above them is a longer roll pin punch that I use to finish the install. I wish the Wheeler punches were about an inch longer and they would be perfect for me but note I do use them on every build.
The Wheeler punches are must haves for three reasons – they are flat on one side to let you get in closer to the receiver, they are rubber coated to protect the finish and you have both the 3/32″

Ok, so first take the roll pin starter punch and install the pin on the right side part way.  By getting it started you have less to try and mess with as the assembly comes together.  See how the punch is right next to the receiver?  You need to lightly tap this with a small hammer to drive it in while not hitting your receiver – this is why the tape is cheap insurance.

The Wheeler starter punch lets you easily begin the pin with zero drama and swearing.

I like to put a dab of grease in the hole to hold everything gently in place.  This is not a normal step and just something I do.  You then insert the spring first and the buffer on top.  You’ll notice with the AR design that a spring always has a detent or buffer between it and a moving surface to protect the spring.

I put a dab of grease in the hole to hold the spring and detent in place.

  Next, I use the roll pin punch from Wheeler to align bolt catch and hold it in place so the roll pin can be driven further in.  If you do not use something to align the catch holes for the pin you will drive yourself nuts.  Another option is to use a 3/32 drill bit’s smooth end to help line things up by inserting it through the front hump.

Use the pin punch to keep the catch properly positioned as you drive the roll pin through. Just short of bottoming out the starter punch, use a pin punch to drive the pin in the rest of the way.

Next, you need to use the roll pin punch and a small hammer to drive the pin the rest of the way in.  You can use the Wheeler block to hold the receiver or whatever works for you. Having a firm support makes it much easier.  My Astro Pneumatic roll ping punches are long.  My 1/8″ punch is 7″ long so I would recommend looking for something like that so you can clear the receiver when you are hammering the pin all the way in.  I don’t think the Astro set I have is made any longer because I could not find it on Google to share with you.  I use my Tekton punches.

See how much longer the Astro Pneumatics roll pin punch is? This lets me reach in and easily drive the roll pin in the final bit of the way. I can do the same with my Tekton gunsmith set’s punches.

With that you are done.  You can function test the unit by pushing on the top paddle.  You should feel the spring compress and release as you rock the catch back and forth.


Please share the link on Facebook, Forums, with colleagues, etc. Your support is much appreciated and if you have any feedback, please email us in**@*********ps.com. If you’d like to request a report or order a reprint, please click here for the corresponding page to open in new tab.


AR Parts Sources

There are a lot of reputable AR parts vendors online but beware of eBay and bargain basement dealers that sell airsoft parts and tell you they will stand up to firearm use – they will not. At any rate, here are my top sources of AR parts:


Assembling an AR Lower – Step 2 of 11: Installing the Trigger Guard Assembly

The second step is to install the trigger guard.  Now I do not use the kind with a detent that allows you to open the trigger guard.  I prefer aluminum trigger guards from either Magpul or Brownells.  The one you see here is from Brownells and is made from billet 7075 aluminum.  I like how it is slightly oversized for gloves and Brownells prices it quite reasonably at $8.47. The front is threaded with a set screw and the rear has a roll pin – they include both in the package.  A polymer Magpul unit came with the lower build kit and I just put it in my box of spare parts.

Take a minute and check the fit.  The threaded part goes forward and the hole that goes all the way through to the rear.   Just ensure it is going to line up appropriately.

I like to first install the front set screw to help line everything up.  Just use a quality allen wrench – I have been burned with cheap allen wrenches that round the socket so now I pretty much stick with Bondhus and Eklind though there are probably many other good enough brands out there.  I snug the set screw down but do not go crazy torquing it in.  Bear in mind you are threading a small screw into aluminum and that allen key is giving you quite a bit of leverage.

Once that front screw is in and the trigger guard is better held in position, it is time to install the rear roll pin.  Now you have a number of options to install the rear pin and I am going to tell you about the two I use:

Option one, use a starter and roll pin punch to drive in the roll pin.  Now there is a real important thing you need to do – be sure you use a block to support the lower “ear” of the receiver or you may snap it off.  If it breaks off, you just ruined the receiver – game over.  I use a Wheeler block to support the receiver and you can use just about anything – over the years I have used generic gunsmithing blocks and even pieces of wood. For the last 2-3 years I’ve used the Wheeler block and like it.

Don’t try to use a generic punch.  I like to use a Squirrel Daddy roll pin starter to get the first part of the pin installed and then an Astro Pneumatics 1/8″ roll pin punch to hammer it in the rest of the way.  Of course you can use whatever brands you want but the bottom line is that you need to line the pin up vertically to drive it straight in and you must be careful not to slip and mar your receiver.  This is why using the correct punches matter.  The starter punch gives you a lot of control and by using the roll pin punch, you can keep your punch on the pin.  Because of my tremor, I am not very good with hammers and punches but can do this provided I use the two types of punches mentioned.

The Wheeler 156945 bench block does a good job helping you both hold and support work.  You want the “ears” on the receiver to be supported.  There are plenty of stories of guys not supporting the ears, trying to tap in the roll pin that holds the trigger guard in place and then breaking off an ear.  Whether you use the Wheeler block or even a piece of wood – be sure to support the ears.

Note how nicely the Wheeler 156945 bench block supports the AR lower.
This is a roll pin starter punch. This one is made by Squirrel Daddy.

Option two:  Wheeler Engineering makes a nice simple tool to install or remove that roll pin.  Boy does it make it easy and this is my preferred method.  The little tool is super simple – it has two pins that fit into the end of the screw.  A long one for removing the pin and a short one for installing the roll pin.  You just line things up and then tighten the screw.  The pin goes into the hole in a very controlled manner and your finish is protected.  Stop once your pin is flush with the receiver.

Other options:  I have seen guys use pliers with the jaws wrapped in tape, modified C-clamps, and more.  You can Google around or search on Youtube to see a variety of approaches.


Please share the link on Facebook, Forums, with colleagues, etc. Your support is much appreciated and if you have any feedback, please email us in**@*********ps.com. If you’d like to request a report or order a reprint, please click here for the corresponding page to open in new tab.


AR Parts Sources

There are a lot of reputable AR parts vendors online but beware of eBay and bargain basement dealers that sell airsoft parts and tell you they will stand up to firearm use – they will not. At any rate, here are my top sources of AR parts:


Assembling an AR Lower – Step 1 of 11: Installing the Magazine Catch Assembly

Just a quick note – when you get a bare receiver, you are literally getting a chunk of aluminum with nothing installed.  I really like Palmetto State Armory (PSA) lower build kits and they sell them with different types of components such as just the basics for rifles, for pistols, Magpul furniture, etc.  What I like is that the machining is very good and I think they have some of the best Mil-Spec basic triggers that aren’t gritty.  I’ve used Anderson and other brands of build kits and just think the PSA kits are superior.  Bear in mind that I say this as a customer – nobody paid me to tell you this.

With that said, let’s start building.  You’ll notice on any AR magazine on the right side there is a rectangular notch.  This is where the magazine catch engages to hold it in place.  Okay, so the first step is to install the magazine catch assembly.  It’s made up of the “L” shaped catch itself, the mag catch spring and the magazine button.

Now I grease everything that slides with Tetra Gun Grease.  Tetra has worked well for me but I also know guys who use all kinds of greases.  As a rule of thumb, if it slides, apply grease.  It it rotates  then apply oil.  So grease the shaft and insert it into the round hole on the right end of the recessed area for it on the right side of the receiver.  Note, be careful when installing the catch or you may scratch your receiver.

When you turn it over you will see the threaded end of the shaft and you put the spring down over it.

Next, you will screw the magazine button onto the threaded shaft.  Before you do, look at the button.  You should see that one end is smooth (that is the bottom) and the other has grooves (that is the top).  Carefully start screwing the button on but stop before you get near the receiver so you don’t scratch anything. Push the button in, and then turn the long lever arm to continue threading the shaft into the button.  Now stop before the lever arm scratches the receiver.

To screw the catch in the rest of the way you need to push the bullet button in all the way so the catch sticks out as far as it can on the other side so the lever arm can clear the parts of the receiver as the button is screwed on.  At this point, I use a small pusher tool made from plastic to push the button in even further so I can keep turning the lever arm until the screw is relatively flush with the top of the button.  Note, before I had the tool I would use a wood dowel.  Just use something non-metallic to protect the finish.  There is a model of the tool shaped just like the oval button but I don’t know where mine went so I used a takedown tool and got the job done 🙂

The catch is now installed.  To function test, push the magazine button.  You should feel spring resistance and see the magazine catch’s lever arm push out.  When you ease off the button, the lever arm should smoothly go back into place.


Please share the link on Facebook, Forums, with colleagues, etc. Your support is much appreciated and if you have any feedback, please email us in**@*********ps.com. If you’d like to request a report or order a reprint, please click here for the corresponding page to open in new tab.


AR Parts Sources

There are a lot of reputable AR parts vendors online but beware of eBay and bargain basement dealers that sell airsoft parts and tell you they will stand up to firearm use – they will not. At any rate, here are my top sources of AR parts:


News: Vepr rifles now on the banned list – June 20, 2017

Well, this sucks – Molot, the maker of Vepr rifles and shotguns has been added to the treasury’s list of people and organizations US businesses can’t engage in commerce with.

Here’s the website source:  https://www.treasury.gov/resource-center/sanctions/OFAC-Enforcement/Pages/20170620.aspx

MOLOT-ORUZHIE, OOO (a.k.a. OBSHCHESTVO S OGRANICHENNOI OTVETSTVENNOSTYU ‘MOLOT-ORUZHIE’; f.k.a. OBSHCHESTVO S OGRANICHENNOI OTVETSTVENNOSTYU PROIZVODSTVENNO INSTRUMENT KACHESTVO), 135 ul. Lenina, Vyatskie Polyany, Kirov Obl. 612960, Russia; Registration ID 1094307000633 (Russia); Tax ID No. 4307012765 (Russia); Government Gazette Number 60615883 (Russia) [UKRAINE-EO13661] (Linked To: KALASHNIKOV CONCERN).

Notice the part I set in bold black – linked to Kalashnikov Concern.  It may be because Molot was bankrupt and the speculation was that only Kalashnikov Concern was in a position to buy them.

FIME has not commented yet – they are the importer and their website is at:  http://www.fimegroup.com/home.php

So, we’ll see what happens next but do expect supplies of Vepr rifles to be limited/run out on the primary market and prices to rise.

Assembling an AR Lower – Like Legos for Men with Special Comments on Pistol Builds

I have to admit that I like a lot of different firearms including both AK and AR platforms.  So I am not purely an AK fan though my business is largely built around that.  I have owned many, many different ARs over the years including tactical, DMR, snipers, pistols and flat out range toys.  I don’t have much free time any longer so the AR platform gives me a chance to tinker with different combinations and see what I like.

At the heart of the AR is a lower-receiver that can be made by just about anyone as long as it is Mil-Spec.  Now this is critical. Not all receivers are as accurate as they claim to be with their tolerances, hole positions and what not so ask around.  I’ve had very good luck with Anderson (my go to brand for several years now), Palmetto State Armory (PSA), Spikes and Del-ton.  I’ve not had a single problem with any of these brands.  You may not have as much luck with “Uncle Bob’s Lowers made in Podunk Nowhere” so just start with a good foundation.

For the two AR pistols that I will be assembling for the upcoming blog posts, I will be using Anderson lower receivers.

Assembling an AR for a rifle or a pistol is almost identical until you get to the gas tube.  At that point a pistol must use a pistol tube and a rifle will use whatever tube you wish.  I’ll point that out again in post #9.

I am not a lawyer and the following should not be construed as legal advice.  I’m just trying to explain my understanding on how to build an AR pistol legally:

One important item for guys making pistols, to be legal, the receivers must be transferred to use as receivers.  Your FFL must NOT transfer the receiver as a rifle.  There is an FFL notice that once a receiver is built as a rifle, it is a rifle.  If you change it into a pistol, then you are making a short-barreled rifle (SBR) that must be registered.  Oddly enough, you can build a receiver as a pistol and then convert it to a rifle.  [Click here for a link to the ATF letter]

My recommendation is to always take photos of the pistols built appropriately so you can show the paper trail of a receiver transfer from your FFL through to a built pistol.

Also, there is another issue to avoid – do not buy pistol-length uppers (meaning uppers with barrels shorter than 16″) and having them sit around without a pistol receiver waiting.  Buy the receiver first, then corresponding upper and put them together.  Why you might ask?  The concern is something known as “constructive intent”.  You do not want the ATF or others in law enforcement to assume you only have that SBR/pistol upper to put on one of your rifles.  That requires paper work and fees in order to have a legal SBR.  You absolutely can’t just put a sub-16″ barrel on a regular rifle – it will be illegal.  [Click here for the ATF letter about SBRs]

The ATF has ruled that braces do not make a pistol into a rifle.  I have carpal tunnel and can’t hold a heavy pistol so this is good news for me.  So, I bought my Anderson lowers first, my lower pistol build kits from PSA and then an 7.5″ upper from PSA and a 10.5″ upper from Ghost Rifles.  The blog posts that follow document my journey building these two AR pistols.


Please share the link on Facebook, Forums, with colleagues, etc. Your support is much appreciated and if you have any feedback, please email us in**@*********ps.com. If you’d like to request a report or order a reprint, please click here for the corresponding page to open in new tab.


AR Parts Sources

There are a lot of reputable AR parts vendors online but beware of eBay and bargain basement dealers that sell airsoft parts and tell you they will stand up to firearm use – they will not. At any rate, here are my top sources of AR parts:


ATF Letter Regarding Full-Auto M16/M4 Fire Control Groups and SBR Uppers That You Need to Know About

Please note this is an old letter and the ATF doesn’t view these as etched in stone findings any more so just view it for historical purposes. I am not a lawyer and this is not legal advice.  I’m just providing a copy as a service to the firearms community.

Here is the 1999 letter that you should be aware of – I made the two sections that I think semi-auto non-NFA AR owners should know about in bold italics:

DEPARTMENT OF THE TREASURY
BUREAU OF ALCOHOL, TOBACCO AND FIREARMS
WASHINGTON, DC 20226

MAR 29 2000

903050:GKD
3311

Dear Mr. :

This refers to your letter of January 22, 1999, requesting
information on the legality of possessing a registered full auto
AR15 and also possessing one or more semiautomatic pre-1994
assembled AR15 rifles. You appended a number of specific questions
relating to this subject which will be answered in the order
received.

1. Is it legal to own both?

There are no provisions under the Gun Control Act of 1968 (GCA) or
the National Firearms Act (NFA) that prevent an individual from
possessing an AR15 registered machinegun and one or more
semiautomatic AR15 rifles at the same time.

2. If legal to own both, which spare parts for the registered gun
can you also own?

Any weapon which shoots automatically more than one shot, without
manual reloading, by a single function of the trigger meets the
definition of a machinegun in section 5845(b) of the NFA. An AR15
rifle which is assembled with certain M16 machinegun fire control
components, and which is capable of shooting automatically is a
machinegun as defined.

The definition of a machinegun in section 5845(b) also includes any
combination of parts from which a machinegun can be assembled if
such parts are in the possession or under the control of a person.
Thus, an AR15 rifle possessed with separate M16 machinegun
components can meet the definition of a machinegun, if the rifle
shoots automatically when the components are installed.

The fact that a person lawfully possesses a registered NFA firearm
does not grant authorization to possess additional non-registered
firearms. A person who possesses a registered M16 machinegun and
a semiautomatic AR15 and a separate quantity of M16 machinegun
components could be in possession of two machineguns.

We advise any person who possesses an AR15 rifle not to possess M16
fire control components (trigger, hammer, disconnector, selector,
and bolt carrier). If a person possessed only the M16 machinegun
and spare M16 fire control components for that machinegun, the
person would possess only one machinegun.

3. Is it legal to use the upper receiver off of the semi-auto AR’s
on the registered AR if they are different lengths and calibers
than listed on the Form 4’s?

Before changing the caliber of a registered machinegun you should
notify the NFA Branch in writing of the proposed change.

4. Can you have several short barrel uppers (less than 16 inches)
for the registered AR and still own semi-auto AR’s?

The definition of a firearm in section 5845 of the NFA includes a
rifle having a barrel or barrels of less than 16 inches in length.
An individual possessing more than one short (less than 16 inches)
barreled upper receiver for a registered AR15 machinegun along with
one or more semiautomatic AR15 rifles would have under their
possession of control an unregistered short barreled rifle, a
violation of the NFA.

5. If you change the barrel length or caliber do I need to notify
your office if the change is not a permanent one?

This question was answered under Question 3.

We trust that the foregoing has been responsive to your inquiry.
If we can be of any further assistance, please contact us.

Sincerely yours,

[signed]
Edward M. Owen, Jr.
Chief, Firearms Technology Branch


Please share the link on Facebook, Forums, with colleagues, etc. Your support is much appreciated and if you have any feedback, please email us in**@*********ps.com. If you’d like to request a report or order a reprint, please click here for the corresponding page to open in new tab.


Sources For AR Parts

The following are all vendors of AR parts including barrels, handguards, triggers, magaziness and what have you that I use and recommend:

Beware no-name knock off websites selling generic import stuff. Some of the parts are counterfeit and not rated for firearms use.

Have an older car or truck with slow power windows? This simple fix will speed them up

My truck is a 1996 Toyota Landcruiser that is showing its age and I’m always finding ways to keep it going.  One problem I had was that the power windows were very slow to go up and down because the rubber around the glass was oxidizing and not as soft.  This was especially a problem in the winter when plowing as I would sometimes have to use my hand to help the window go back up.  I had been using silicone spray but it’s benefits were pretty short lived.  A friend told me to use silicone grease and WOW what a difference.

Please note to use silicone grease and not petroleum grease. The petroleum grease can cause the rubber to break down or at least make quite a mess.  Silicone grease was designed intentionally to lubricate and protect rubber parts such as seals.
Mission Automotive’s Silicone Paste works great and is very affordable. It’s what I use on old window seals to help with lubrication. I apply it with an acid brush to get into the channel where the window contacts the old stiff rubber.
Old stiff weatherstripping on the windows.


Now, one tip, get a flux brush or some disposable brush with relative small stiff bristles so you can wipe down all the rubber window channels where the glass slides.  Your brush is going to get old rubber and other debris on it.  If you put it back in your silcone grease container, you will have a mess – guess how I know this? 🙂  Instead, put some grease on a paper plate or something as an intermediary to dip your brush in.  This will not take much – maybe a tablespoon or two at most.  I can do all four power windows on my truck with probably right around a tablespoon or just over.  You aren’t looking to leave gobs and gobs of the stuff – just a good coating.

So, a warm day helps.  Put all the windows down and apply it.  Then run each window up and down a few times to get a good coating on everything.  You will see a remarkable improvement with the 2nd or 3rd cycling of the windows as everything gets coated.  Then just wipe off any residue on the window frames (I leave it on the glass edge myself).

That’s it.

By the way, this might be a great example of being able to save quite a bit by purchasing the silicone grease online.  The price of an 8oz bottle of Mission Automotive’s Silicone Paste (grease by a different name) is far cheaper on Amazon than what I can find in local stores.


Please share the link on Facebook, Forums, with colleagues, etc. Your support is much appreciated and if you have any feedback, please email us in**@*********ps.com. If you’d like to request a report or order a reprint, please click here for the corresponding page to open in new tab.


When Strength and Quality Matter Most