Interest in the Beowulf round is growing as people buy the low cost 12.7×42 chambered pistols, rifles and kits. 12.7×42 is the metric designation for the Beowulf and is being used by groups wanting to avoid a trademark problem with Alexander Arms.
The Beowulf is one heck of a thumper delivering massive kinetic energy on target from the base AR-15 platform. That’s the remarkable part – it uses a standard AR lower! To give you an idea of the size of the round take a look at this photo. From top to bottom: .50 Beowulf 350gr XTP, 5.56×45 55gr FMJ , 7.62×39 123gr FMJ and a loose 9mm 124gr Hornady HST. The Beowulf sure dwarfs the little 5.56×45 round!
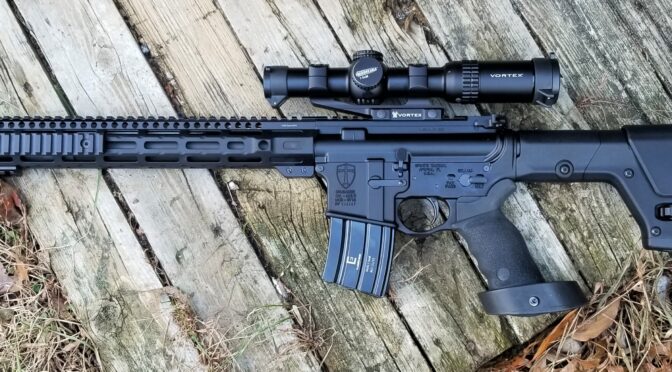
I’ve owned two .50 Beowulf’s and my current one was built using an Alexander Arms DIY kit that allows you to add the handguard and brake that you want. They are built on standard AR lowers so if you have an AR today, it’s just a matter of adding an upper in this caliber or you can do a whole new dedicated build – it’s up to you. I’ve also done a number of posts about my builds in case you want to learn more – click here to see a list.
A Beowulf upper can mate to any in-spec AR lower. This is a Spike’s lower with an Ergo group, Magpul PRS III and Geissele trigger.
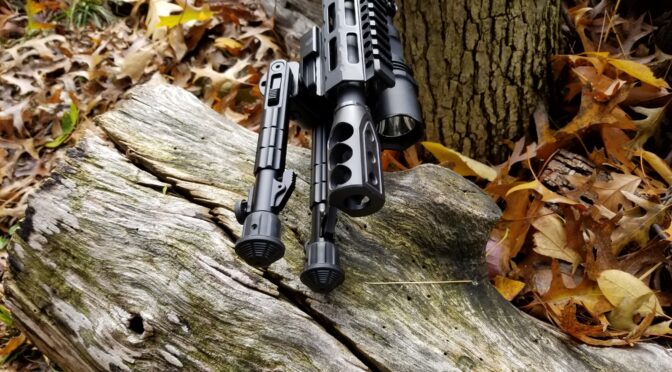
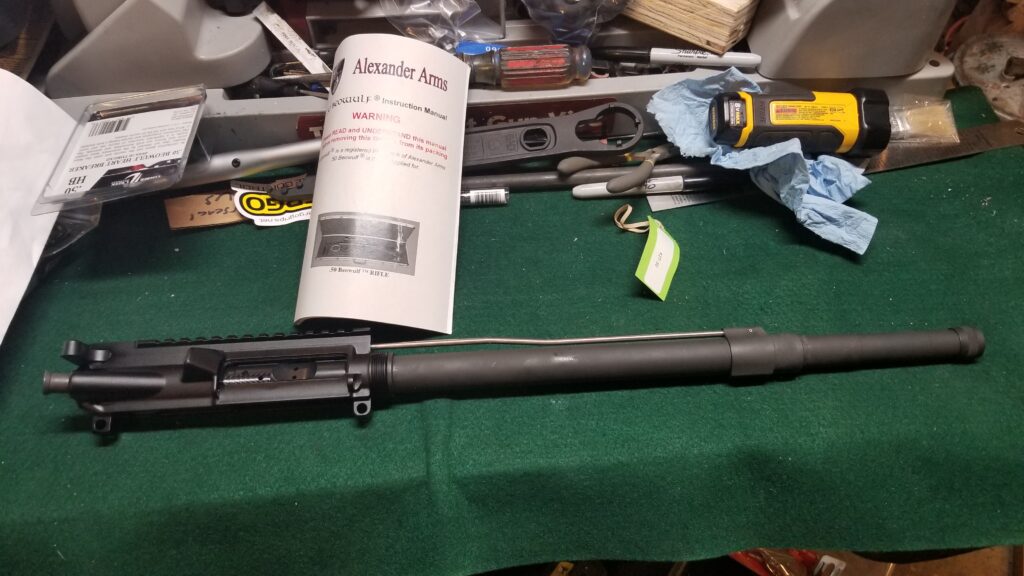
This is the 16″ DIY kit. Alexander Arms has done all the fitting for you. It comes with one magazine as well. In terms of the upper kit, I found the machining and parts fitment to be excellent.This is the Timber Creek Heart Breaker and it does a remarkable job of reducing the recoil. It has three heart shaped ports on each side that redirect the blast backwards to propel the rifle forward and reduce recoil. The three circular ports on the top help reduce climb. Seriously, this is a solid brake.
For ammo, there is an increasing variety out there – Alexander Arms makes their own with a variety of loads plus there are other sellers out there with their own offerings. I’ve found the Alexander Arms 350 grain Hornady XTP ammo to be accurate and the XTPs really open up on impact.
The is older packaging. In 2019 I noticed Alexander was using an eye catching color scheme of navy, black and white – same ammo just a different box. The Alexander Arms .50 Beowulfl 350gr XTP ammo is packed 20 rounds to a box and Primary Arms has it in stock.Here’s the whole Beowulf.
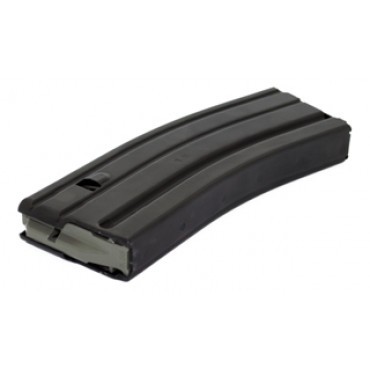
This is one of the 30 round D&H 5.56 magazines that you can use to hold up to 10 Beowulf rounds.
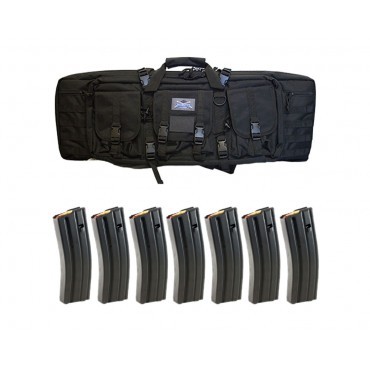
This is the very well made 36″ PSA rifle case deal that includes 7 D&H mags.
Conclusion
That’s it for now. I hope you found this helpful and have fun building and shooting a .50 Beowulf.
If you find this post useful, please share the link on Facebook, with your friends, etc. Your support is much appreciated and if you have any feedback, please email me at in**@*********ps.com. Please note that for links to other websites, we are only paid if there is an affiliate program such as Avantlink, Impact, Amazon and eBay and only if you purchase something. If you’d like to directly contribute towards our continued reporting, please visit our funding page.
Bolt – Carpenter 158 heat-treated, shot peened and magnetic particle inspected. Manufactured to government drawings. Milspec gas rings. NiB-X coated (40% more wear-resistant than chrome).
Extractor – Manufactured, heat treated, and hardened per government drawings. Black extractor buffer and heavy-duty spring. NiB-X coated.
Firing Pin – Manufactured, heat-treated, hardened, chromed and certified per government drawings.
Carrier – AR-15 or M16 style (heavy weight), 8620 material, heat treated and case hardened. Manufacturing tolerances on inside diameters tightly controlled. NiB-X coated for durability and ease of cleaning.
Gas Key – Hardened to USGI Specifications and attached using knurled grade 8 hardened fasteners. NiB-X coated. Staked per military specifications. The knurled screw heads further enhance the effectiveness of the staking.
Cam pin – Manufactured, heat treated, hardened and certified per Government drawings. NiB-X Coated.
Hammer – Manufactured, heat treated, hardened and certified per government drawings. NiB-X Coated. Can be semi-auto or full-auto.
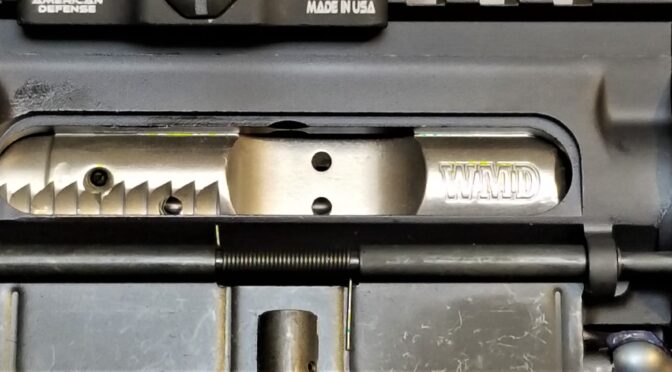
The photo above is of the WMD BCG in my 10.5″ AR pistol. Here are a few more photos for you as well.
The WMD BCG is at the top and a regular PSA BCG is at the bottom.
If you find this post useful, please share the link on Facebook, with your friends, etc. Your support is much appreciated and if you have any feedback, please email me at in**@*********ps.com. Please note that for links to other websites, we are only paid if there is an affiliate program such as Avantlink, Impact, Amazon and eBay and only if you purchase something. If you’d like to directly contribute towards our continued reporting, please visit our funding page.
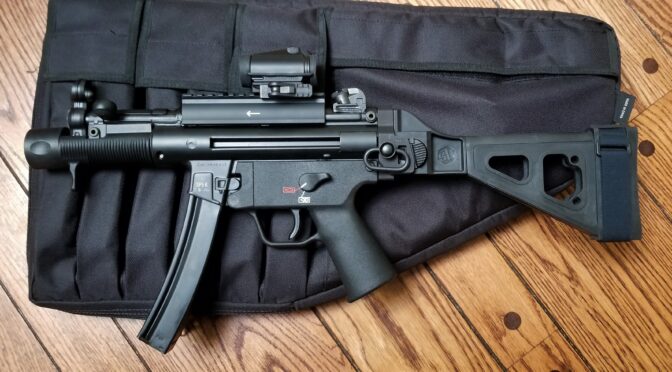
When the ATF reversed the ruling about braces and enabled folks to use them however they saw fit, the demand and supply of pistol braces went into orbit. I have carpal tunnel and a hereditary tremor so for me, using a brace is the only way I can wield a heavy pistol – such as one based on an AR, AK or MP5 type of action.
PSA has come a long way. I’ve used them as my go-to AR parts supplier for years and now they have great deals on parts, kits, receivers, and firearms. They also offer some great deals on braces – by themselves as parts, as part of a kit offering or even on firearms.
If you find this post useful, please share the link on Facebook, with your friends, etc. Your support is much appreciated and if you have any feedback, please email me at in**@*********ps.com. Please note that for links to other websites, we are only paid if there is an affiliate program such as Avantlink, Impact, Amazon and eBay and only if you purchase something. If you’d like to directly contribute towards our continued reporting, please visit our funding page.
I can’t stand Biden and think this is absolutely hilarious – The” Angry Joe-14″ AR-14 Stripped Lower. LMAO!! Complete with a dog face pony soldier logo!
If you find this post useful, please share the link on Facebook, with your friends, etc. Your support is much appreciated and if you have any feedback, please email me at in**@*********ps.com. Please note that for links to other websites, we are only paid if there is an affiliate program such as Avantlink, Impact, Amazon and eBay and only if you purchase something. If you’d like to directly contribute towards our continued reporting, please visit our funding page.
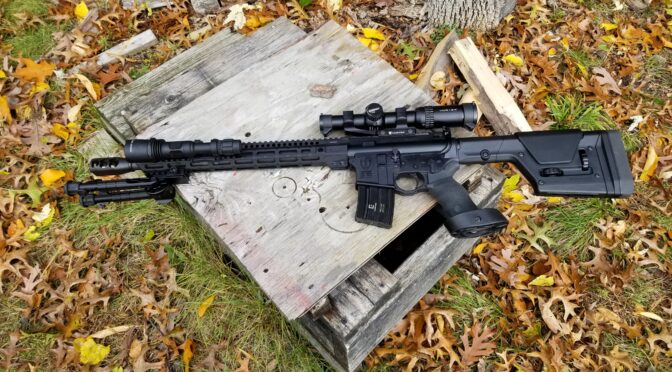
I now have built my second Beowulf and guys ask me about the recoil all the time – the short answer is that it’s very manageable. With just a bit of tuning, I’d put it somewhere between a 20 and a 12 gauge shotgun shooting 2-3/4″ magnum loads. Now that there are a ton of options both from Alexander Arms as well as generic 12.7×42 uppers (the metric designation for the Beowulf so they don’t have to pay royalties to Alexander Arms), a lot of guys are getting into the .50 Beowulf cartridge and ask me about what brake to run with.
My favorite is the Timber Creek Heartbreaker. It does a remarkable job of venting gasses backwards to compensate for the recoil it would otherwise have. I liked it so much on my first build that it was what I used in my second build. It’s very affordable and I’d be surprised if you can find a brake that does a better job!
Side view of the Heartbreaker and you can see where it gets its name.
View from the top. Note the brake includes a jam nut.
Finding The Brake
You may need to go direct to Timber Creek. Primary Arms is out of stock and they are sometimes on eBay.
My Alpha Wulf
I did a series of blog posts when I built my second rifle. My pet name for it was the “Alpha Wulf” or the leader of the pack. It’s all premium parts and probably my best AR build when it comes to paying careful attention to details during assembly. Here are the posts:
I’m a big fan of the .50 Beowulf cartridge and hope you find this post helpful!
3/6/24 Update: I’m not sure if Timber Creek is still making these or just what. I haven’t built a Beowulf for a few years and don’t have any alternative suggestions.
Note, I have to buy all of my parts – nothing here was paid for by sponsors, etc. I do make a small amount if you click on an ad and buy something but that is it. You’re getting my real opinion on stuff.
If you find this post useful, please share the link on Facebook, with your friends, etc. Your support is much appreciated and if you have any feedback, please email me at in**@*********ps.com. Please note that for links to other websites, we are only paid if there is an affiliate program such as Avantlink, Impact, Amazon and eBay and only if you purchase something. If you’d like to directly contribute towards our continued reporting, please visit our funding page.
We’ve all been there – you’re working on a project and wondering how much to torque something so either we don’t bother or just take a guess. What I only found out recently was that in 2017, NASA published a really cool guide called “Installation Torque Tables for Noncritical Applications” – with the document ID as NASA/TM—2017-219475.
The document provides the torque specifications for a ton of general purpose fasteners that do not have an exact specification assigned – hence the term non-critical. As you can imagine, they get very specific in critical/risky situations.
At any rate, given the size of the bolt or screw, the thread pitch, the material and the depth, they provide a reference torque specification you can follow for both metric (M6, M8, M10, etc.) and SAE (#8, #10, 1/8, 1/4, 3/8, etc.) fasteners. Note, they provide an assembly torque (which is a 65% load from failure) and 100% torque. I use the assembly torque spec.
They also recommend that the depth of thread engagement be 1.5x the diameter of the fastener. So a 1/4″ (0.25″) fastener should have at least 0.25″ x 1.5 = .375″ (3/8″).
Here’s an example table. This is for fasteners going into 6061-T6 aluminum with a thread depth of 3/16″. If we go down for a 10-32 UNF screw, the assembly torque is 22.2 inch pounds. I’d use that lacking any other detailed information. I could go up to 34.2 inch pounds but I have stripped so many fasteners I don’t risk it. I’m a huge fan of Loctite so I go with that and the assembly spec.
Kudos to the two authors and to NASA for making it available. The PDF is a cool reference document and one I use whenever I can’t find a specific torque value for a given application. All you machinists and engineers – you know way more than me so please let me know if you have other resources you recommend.
If you find this post useful, please share the link on Facebook, with your friends, etc. Your support is much appreciated and if you have any feedback, please email me at in**@*********ps.com. Please note that for links to other websites, we are only paid if there is an affiliate program such as Avantlink, Impact, Amazon and eBay and only if you purchase something. If you’d like to directly contribute towards our continued reporting, please visit our funding page.
As mentioned in the last post [click here] – building a Beowulf is pretty much like building any other AR15-class rifle. I put it that way because the AR10s are different and the Beowulf uses the AR15 platform with the notable exception of an enlarged ejection port. The modular capabilities of the AR platform are what make it versatile.
Lower Build Comments
First, I’d like to point out I ran into one small snag with the Spike’s lower. The detent spring and pivot pin hole had some kind of debris in it or maybe a bur. I had to chase it to clean it out. Other than that, it went great.
Normally, installing the front pivot pin is pretty easy with a tool like the one shown that helps you trap the deternt and spring. Because of somethign obstructing the hole inside, the deternt didn’t push down and actually scored my relativelyt soft tool. So, I chased the hole and it installed no problem. Two lessons learned – #1 chase the holes first. #2 – I decided to mve to a stainless steel install tool.
My second comment is about the Magpul PRS Gen 3 stock. Wow. It is really cool. First, I went with the rifle buffer tube because I assumed the Gen 3 needed it – in fact, it does not. When you look at the Gen 3, it has a modular front nose that comes apart just behind the front swivel hole. It comes from Magpul all set to use a carbine buffer tube! Now it is a fixed stock and will not adjust but you do not need to change tubes. Had I known that, I would have used a carbine tube to avail of all the different buffers that are out there.
By the way, the PRS is an expensive stock and it pays to watch for sales. Also, this is specifically then third generation model – you will see older stocks pop up on eBay, etc. The older ones will not have the really thick recoil pad or the ability to use a carbine tube. Here it is for sale at PSA.
The PRS Gen 3 is sweet! Note the really thick recoil pad and modular front end that can accomodate either a carbine buffer tube or be swapped out to support an A2-style rifle buffer tube. This gives some nice flexibility.The carbine modular front end is to the left and the rifle is in the right.
By the way, I took the time to torque down everything including the rifle buffer tube in this case. The Magpul wrench makes it real easy to bring the nut down to the torque spec of 35-39 ft lbs.
Screwed in the rifle-length buffer tube with just a bit of moly grease on the threads.Used the Magpul wrench and a toruqe wrench to bring the receiver extension / buffer tube down to a 35-39 foot pound torque spec. In general, I set my wrench at the lower end of a scale unless there is something very specific.
I think I will stick with the basics going forward. In other words, I’ve tried extended head pins, bolt catches with giant heads, ambidextrous selectors and in the end, I find I really don’t need them. The takedown pins and controls are all mil-spec in this build.
Upper Build Parts
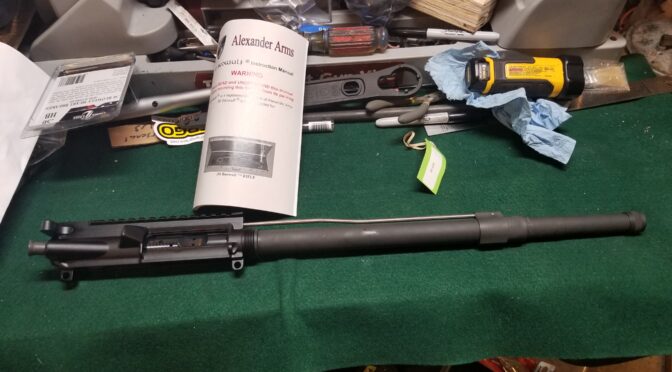
The upper is the actual DIY (Do It Yourself) upper from Alexander Arms and they do all the engineering and machining for you. I also need to point out that it is really well done. I have zero complaints on the fit or the finish.
The DIY kit includes the upper receiver, bolt, carrier, charging handle, barrel, and the gas tube has already been installed in the lowe-profile gas block. The unit arrives assembled including their already divoting the barrel for the two gas block set screws. What you will need to do is to add your own barrel nut and handguard plus whatever you want to do for a muzzle brake. The DIY comes will a thread protector for the 49/64-20 right hand (RH) threads.
Here’s the upper fresh out of the box.They already drilled the divots in the barrel an are using centering set screws so you can just remove the gas tube, install your barrel nut and then slide the gas block back on and tighten it down.
Folks will tell you I am either particular or eccentric (maybe both) when it comes to my builds. I knew there were some parts I wanted to use on this upper:
MI Combat 15: M-LOK handguard. These are very nicely done with all edges beveled plus I like the barrel nut they use. It simplifies aligning the handguard and receiver rails. Also, I really like having the flexibility to add rails or accessories where needed while having a slim profile where I don’t. Keymod has pretty much died out and M-LOK seems to be the lead attachment method now.
BCM Mod 3 charging handle greatly simplifies working around optics to charge the rifle.
Timber Creek Heart Breaker muzzle brake. This is an excellent choice for taming the Wulf. I was so impressed by it on my first rifle that it was my automatic choice for this second rifle.
Upper Build Instructions
A Beowulf upper is very much like any other AR with the exceptions of no ejection port cover and a screw on gas tube block.
Here are some third party resources on assemblign AR uppers in case you are interested:
I always like to combine stuff I read, like the above, with videos I can watch. I always pick stuff up both ways and think the two perspectives are very valuable. With that said, here are some build videos.
If you find this post useful, please share the link on Facebook, with your friends, etc. Your support is much appreciated and if you have any feedback, please email me at in**@*********ps.com. Please note that for links to other websites, we are only paid if there is an affiliate program such as Avantlink, Impact, Amazon and eBay and only if you purchase something. If you’d like to directly contribute towards our continued reporting, please visit our funding page.
Okay, so I built my first .50 Beowulf rifle in 2018, spent a lot of time planning out the recoil mitigation and documented the adventure – click here for the post. At any rate, I sold it to move on to fund other projects but ran into a problem – I missed the ‘Wulf. There are some bragging rights when you say you have a .50 caliber rifle even when you explain it’s not the .50 BMG round. So, I decided to build another one and make it pretty unique. It’s the Alpha, or the dominant Wulf in my mind.
The first thing I want to point out to folks is that the 12.7x42mm is the generic designation of the .50 Beowulf round and is mainly used by firms who don’t want to get into intellectual property issues with Alexander Arms (AA). If you look on Gun Broker and do some searching with Google you will turn up tons of listings for complete 12.7x42mm uppers starting just over $300. … Let me put this delicately – I would recommend that you avoid them. You will get what you pay for either in terms of performance out of the box or over time. If you do some searching you will read that I wasn’t the only buyer who had issues with Radical Arms uppers for example because of the wrong bolt being used.
If you do buy a cheap 12.7×42 upper, I’d recommend you test it right away before the warranty expires. I’m sorry – I just don’t have much faith in them.
Started With an AA .50 Beowulf DIY Upper
This time around, I decided to use an actual Alexander Arms (AA) upper and not screw around with cheap stuff. The only problem was that I wasn’t really sold on the handguards of their complete units. That and the prices were a turn off the last time. As I looked down the AA page, I saw they now sell a “.50 Beowulf Upper Kit DIY” that had everything except for the barrel nut, handguard and brake of your choice. They have both 12″ and 16″ barrel versions of the kit. As much fun as a 12″ howitzer would be, that didn’t interest me as much as building a new rifle using a 16″ barrel.
Here’s the 16″ DIY kit from Alexander Arms. It is very nicely done. Fit and finish were excellent. The manual is for their Beowulf rifles in general and doesn’t help much with the assembly. They do give a bit of guidance with a sheet of paper that comes with the upper. A person new to ARs will need to research how to assemble an upper – I’ll give a quick summary of what I did in this post.Here’s the upper receiver assembly – good finish. No ejection port door as the port is enlarged. I thought about making one but I really don’t need the cover. This is their low profile gas block. All the machining work has been done for you. They already fit and pinned the gas tube plus dimpled the barrel for the two set screws on the gas block to center on. They do include a muzzle nut over the threads. AA threads their barrels 49/64-20 RH for brakes and you definitely want a brake for a ‘Wulf. A brake is essential for reducing felt recoil – weight of the weapon and a good recoil pad help as well.A view of the bottom of the upper – again, want to point out the nice fit and finish. Nothing gritty like you feel with cheap parts – these are very well done. They need lubing certainly but that is to be expected. Cheap parts can be so bad sometimes that it feels like two pieces sandpaper rubbing together. Everything in the AA upper slides/moves smoothly.Here are the two set screws for the gas block. Mine were very lightly tightened and thus easy to remove. I’ll mention this again later but when you install use medium blue Loc-tite (formula 242 or 243 if you want the numbers) and tighten the set screws to 25 in/lbs each.
To sum up the AA upper, they make this build real easy. For me, building an AR is like building with Lego parts from different kits to make something unique, which was exactly my plan with this new ‘Wulf. Next, I am going to skip the upper for a minute and tell you what I in terms of the lower receiver. Why? Well, I’m a creature of habit and always build the lower first and then the upper.
An Overview of The Lower and Parts Used
The stripped Spikes Tactical lower I picked is pretty cool! You have the Crusader Cross up front and then look at the selector markings – Pax Pacis (Peace, Truce, treaty)), Bellum (War) and Deus Vult (God Wills).
I thought about using an existing AR lower from another rifle but I decided to build one from scratch. In case you didn’t know it, a Beowulf upper is actually designed to work with any 5.56 AR lower without any modifications being needed to the lower itself – same trigger, buffer, etc. The magazines are slightly modified but we’ll return to that later. So here are the parts details for the lower assembly:
CMC Triggers AR-15 Lower Assembly Kit without Fire Control Group or Grip. Definitely solid mil-spec parts. Beware of cheap stuff that isn’t dimensionally correct or doesn’t last. I used to get the extended bolt release and takedown pins and ambidextrous safeties but I just didn’t find them necessary as I was so used to the originals.
Geissele SSA-E trigger – these triggers and the CMC trigger modules are my favorites. I used the Geissele because it probably just nudges out CMC just a bit to be my #1 favorite AR trigger plus I had one on hand. These triggers can be hard to find as they are popular. Check out the sources listed at the bottom of the post.
Magpul PRS Gen 3 stock – this new version of the PRS stock is stunningly cool. I’ve used every generation now and this is definitely the best. I’ll write up more later but this is the reason I went with the rifle length buffer system – the interesting thing is that the PRS III can work with a carbine buffer system as well! That was news to me. PSA tends to have them in stock.
Ergo Tactical Deluxe Grip With Palm Shelf – While it may have a hokey product name this is my favorite grip for precision rifles. I couldn’t decide whether to install this or a Magpul grip but since I am running with a precision theme, I decided to use this Ergo model.
Building the Lower
A Beowulf uses a standard lower so there really isn’t anything special that you must do. Thus, I’m not going to do a complete part by part instruction just for this rifle. Here’s a write up I did a while ago while building an AR pistol, which is pretty similar other than the use of a brace with a pistol vs. a stock with a rifle:
Buffer Tube and Arm Brace — An AR rifle will have either a carbine buffer tube, carbine buffer and M4-style stock or a rifle buffer tube, buffer and fixed stock. A pistol is similar but can differ depending on the brace you use. The new SBA3 and SBA4 come with Mil-Spec carbine receiver extensions (buffer tubes) so they are just like a carbine right up until either the brace or stock is installed.
I always found having multiple perspectives to draw on can help. Here are two excellent written resources for you if you are new to building lowers:
Okay, so you have an idea of the Alexander Arms DIY .50 Beowulf Upper upper I bought and the lower parts plus assembly. In the next post, I’m going to give you some tips/observations that I had when assembling my lower. I’ll add a link to the new post here as soon as it is complete.
Note, I have to buy all of my parts – nothing here was paid for by sponsors, etc. I do make a small amount if you click on an ad and buy something but that is it. You’re getting my real opinion on stuff.
If you find this post useful, please share the link on Facebook, with your friends, etc. Your support is much appreciated and if you have any feedback, please email me at in**@*********ps.com. Please note that for links to other websites, we are only paid if there is an affiliate program such as Avantlink, Impact, Amazon and eBay and only if you purchase something. If you’d like to directly contribute towards our continued reporting, please visit our funding page.