The hammer assembly includes the pin, spring and hammer itself. In the next photo, the hammer group is to the right. This is an enhanced trigger group from Palmetto State Armory (PSA) that I really like and recommend for people wanting a decent low-cost trigger for a basic build.
It’s straight forward to install with one important detail to get right – put the spring on so the loop is to the back and top of the hammer and the legs wind down clockwise off the hammer. Installing the spring the wrong way can have weird not always predictable results. I’ve had rifles that fired fine and others that doubled. Be sure to install the spring the correct way:
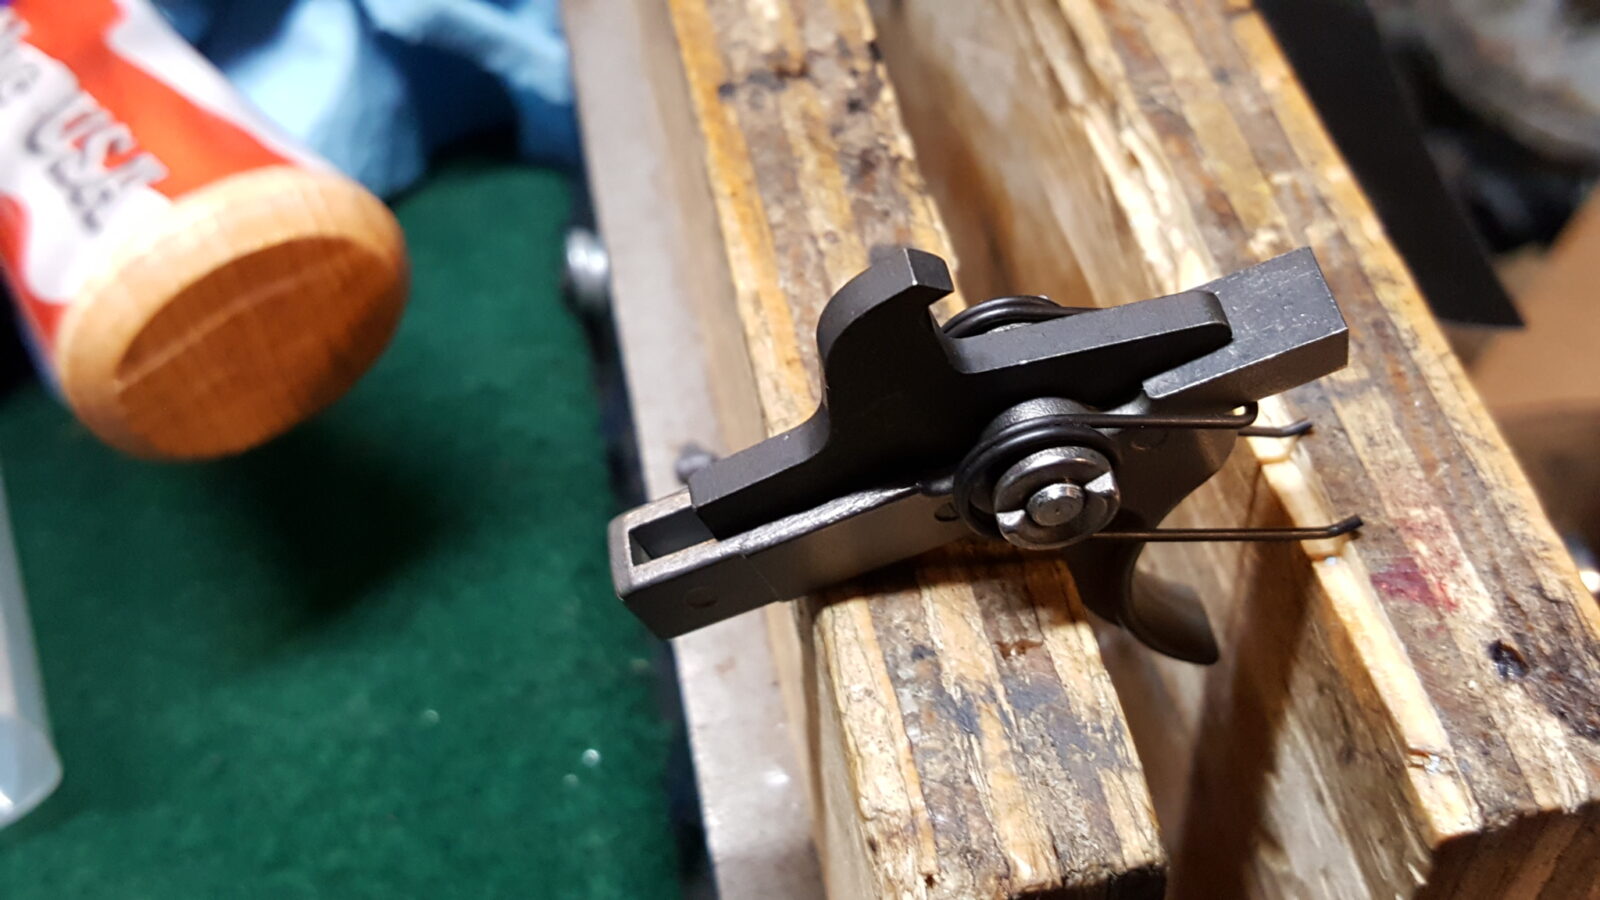
Now this next photo is of a fire control group installed in my Strike Industries jig that is great for tuning. It’s not the PSA enhanced trigger but I wanted you to see the way the hammer spring’s legs must sit in the trigger pin’s groove. This is very important as it locks the pin in place. You may need a pair of needlenose pliers to adjust the leg to make sure it does rest in that groove. By the way, the part the strikes the firing pin is the straight flat face so when you install the hammer, the face is forward as you see in the next photo.
To help line things up, I either use a punch or a little slave in. The hammer spring is pretty strong and something to help you line it up while you install the cross pin will seriously lower your stress level. Here, I am using my slave pin and you can see the actual hammer pin coming in from the left. As a reminder, the trigger and hammer use the same pins.
Next, you need to function test the fire control group. DO NOT LET THE HAMMER COME FORWARD AND SLAM THE MAG WELL!! You need to use your thumb or something to ease the trigger up. A steel hammer hitting an aluminum receiver’s magazine well is not a good combination. Pull the hammer back and the trigger should catch it. Next, pull the trigger while holding the hammer and the trigger should release the hammer letting it come forward.
There are a lot of reputable AR parts vendors online but beware of eBay and bargain basement dealers that sell airsoft parts and tell you they will stand up to firearm use – they will not. At any rate, here are my top sources of AR parts:
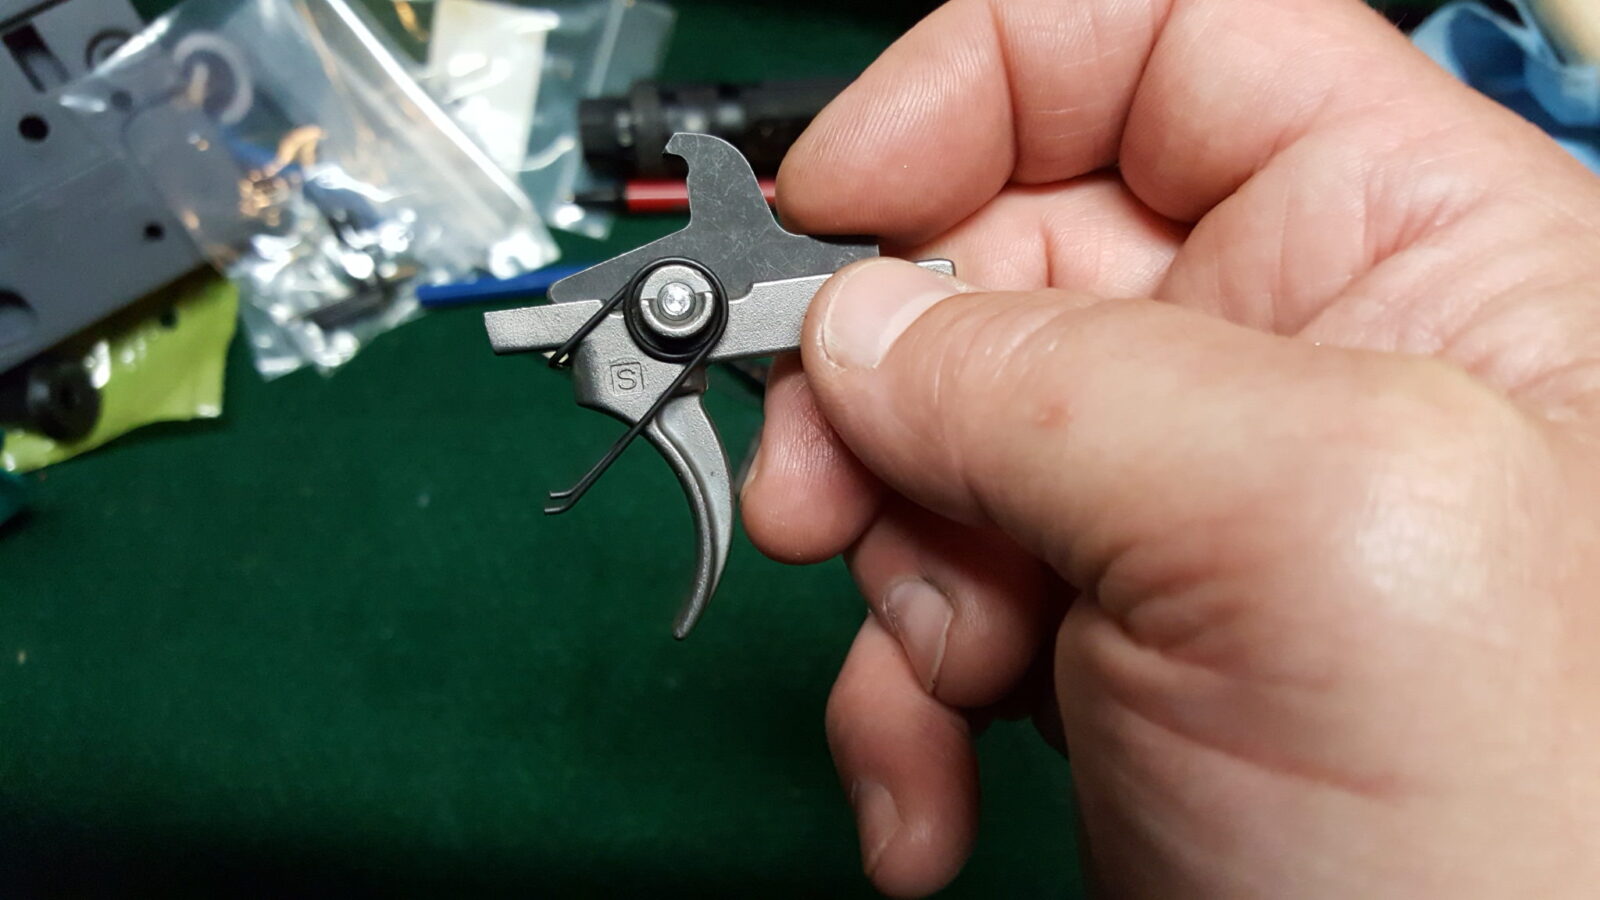
An AR trigger assembly is four parts not including the pin that holds the assembly in the receiver. I like Palmetto State Armory’s Enhanced Trigger Group that has a polished nickel boron finish for my basic AR builds. My favorite trigger manufacturer is Geissele and have used a number of their models over the years but they are pricey. The PSA enhanced trigger is $39.99 and a nice improvement over the normal Mil-Spec trigger. I should note that even the regular trigger from PSA is not bad. I have used build kits from others, such as Anderson, where the trigger felt very “gritty” until it wore in whereas the PSA triggers have not had that feeling out of the bag.
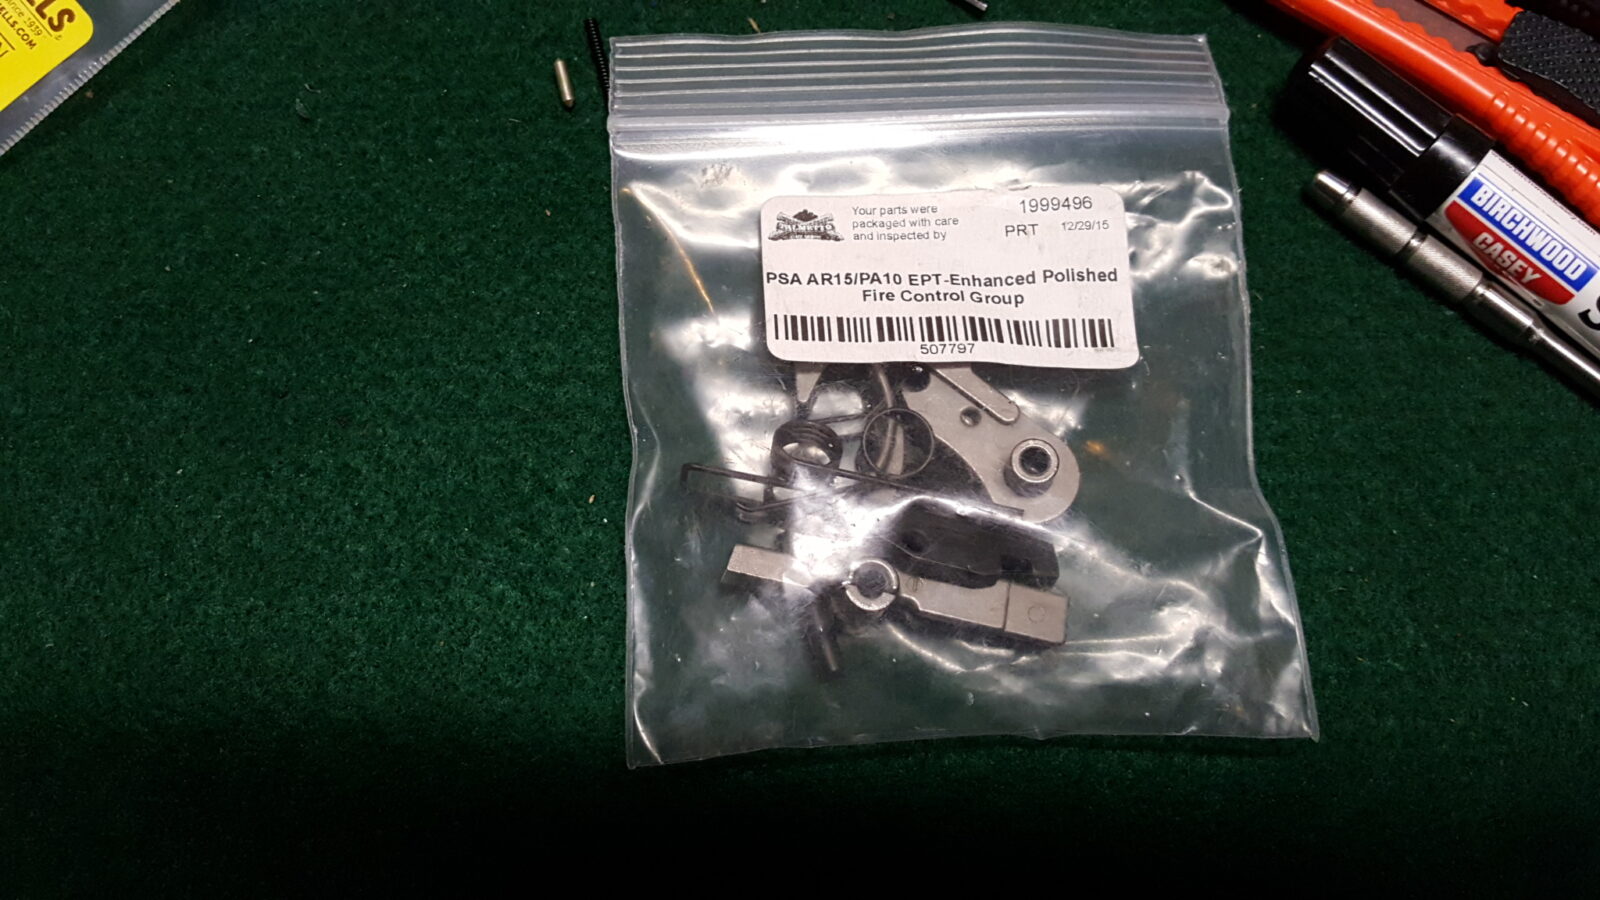
So, when you get a trigger group from PSA, as well as most other vendors, they will have the components in a bag. Pour out the contents and organize them to make sure all the parts are there. Notice I am using a green fabric work mat. These are made by several companies and the benefit is that the fine nap of the mat softens the impact of small parts so they don’t fly/roll all over the place. It helps keep stuff from getting scratched up.
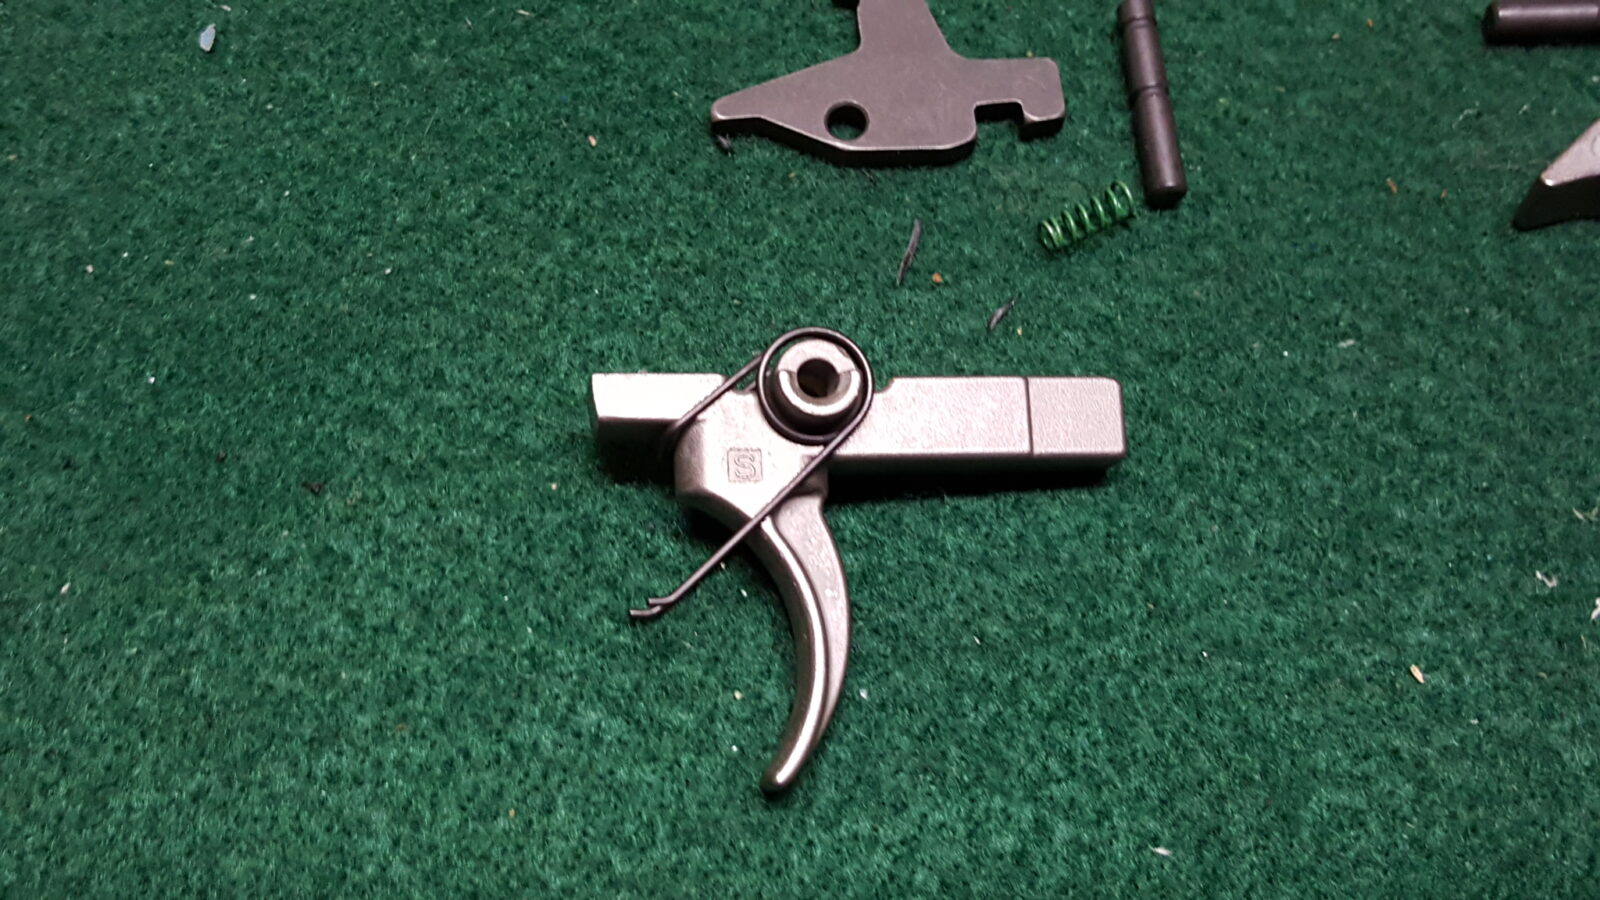
In the next photo you will see the trigger and hammer assemblies and all the parts that should be there. On the left is the trigger assembly – disconnector, trigger pin, small green disconnector spring (note that the vendors do not always color this spring but it is uniquely shaped), the trigger itself and the trigger spring. On the right is the hammer assembly and starting at the top you have the hammer pin (the pins are identical by the way), the hammer itself and the hammer spring.
Even though this trigger is polished, I polish the mating surfaces to a mirror finish with a Dremel, felt wheel and a fine polish such as Flitz. I also remove any burs/rough endges that I encounter with a fine stone. I don’t change the geometries – my goal is just to get things nice and smooth. Note, if you skip this the trigger will need to wear in to smooth out.
Next, install the trigger spring. Note the orientation of the front of the spring under the nose of the trigger:
Now if you look at the disconnector spring and you will notice that one end is wider. You push that wider part down into the round pocket that is machined in the back of the trigger.
See how the bottom is wider? This particular spring is colored green. Rarely are the colored – you need to go by the shape.
Now you have an option that will make your life way easier – assemble the trigger group outside of the receiver using a slave pin. I’m just going to talk about modern ARs and not all the ban-era Colt hijinks or oversize pins for worn rifles. In general, the trigger and hammer pins have a diameter of 0.154″. This is the same size as a #23 drill bit. You can go, buy a cheap bit, cut the shaft off so the length of the pin is the same as the width of the trigger. I would recommend using sandpaper to round the edges of the pin so you wind up with the following:
The silver pin above is a slave pin. The purpose of the slave pin is to hold the trigger assembly together. When the actual fire control pin is inserted, the slave pin is pushed out the other side of the receiver and its job is done. We do make and sell slave pins – click here to open our store in another tab.
You can function test the disconnector and make sure that it smoothly rocks back and forth with the spring supporting it.
Now, if you do not want to go the pin route, you will need to juggle everything in the receiver but I would still recommend using a 9/64″ or 1/8″ pin punch to help line things up from the right side as you are looking down at the receiver. They are smaller than the normal pin so just expect to do a bit more positioning. This method works fine – it’s just not my personal preferred method any longer.
Ok, so let’s say you did take my advice – now place the trigger assembly down in the receiver with the trigger facing forward. Put some pressure on the top of the trigger assembly with your thumb, line up the slave pin with the hole and push in the real trigger pin from the left to the right. Note how I have the groove on the left side – one of the hammer spring’s legs will lay in that groove and lock the pin place. Now it just becomes a matter of wiggling thins around and pushing the pin all the way through. Be sure to catch your slave pin before it falls out. This does not take a ton of force. If the pin isn’t going in all the way and things are lined up properly, use a rubber or plastic faced mallet to tap it in.
Note how the slave pin is exiting the receiver as the actual trigger pin is inserted.
Once installed, squeeze the trigger and make sure to is going back and forth with the spring. Double-check also that the disconnector rotates also. In both cases you should feel the springs doing their job.
There are a lot of reputable AR parts vendors online but beware of eBay and bargain basement dealers that sell airsoft parts and tell you they will stand up to firearm use – they will not. At any rate, here are my top sources of AR parts:
The AR is a modular rifle system wherein the upper half connects to the lower half via two pins. The front pin is known as the “pivot pin” because when the rear pin is opened, the upper half can pivot up allowing for maintenance or to allow the operator to open the pivot pin also and entirely remove the upper for a different model thus allowing tremendous versatility. This is why AR owners can readily swap calibers, barrels, etc. to really tailor their weapon to the task at hand.
Now, when it comes to assembling the lower, there is one big headache when installing the front pivot pin. To keep it from falling out, there is a spring and a tiny detent pin in front of it that will want to launch like a rocket across the room if you aren’t careful. This is one step where I would tell you to wear eye protection – you may think this is a joke but it honestly is not. That detent is tiny and it seriously can come flying out. Some day if I clean out my shop, I will find a handful of these springs and detents hidden from when the flew across the room.
Let me give you a big tip – detent springs and pins are very cheap. Buy spares for those “where the heck did it just go” moments that inevitably happen. You get tired, your mind wanders and then it’s Houston we have a launch! I keep spares – plural – of all small AR parts in my AR parts bin.
Don’t even think about trying to install that pin without a tool to help. I am going to give you a real strong recommendation – buy a pivot pin assembly tool or at least buy a 1/4″ universal clevis pin if you are just doing a single build. The purpose-built tools are dirt cheap and you can find them everywhere – Amazon, Brownells, Primary Arms, Midway USA, etc. I think I bought my first off eBay but I have several because several armorer’s kits I have bought over the years included one. They all basically look like this:
I’ve used this on a ton of builds. It’s aluminum and I’ve since switched to a tool made from steel. I don’t recommend plastic.
If you don’t want to spend the money on the tool, a 1/4″ clevis pin works just fine. A regular 1/4″ clevis pin is $0.95/ea and a universal pin is a $1.50 at my local Ace Hardware & either will work just fine. You then use a punch or an allen/hex wrench to push the detent and spring down. Some of the commercial tools on the market are nothing more than a clevis pin with an allen key so it is up to you as to which to use. Note, if you go the clevis pin route, just go to your local hardware store and get one. They are a fortune on Amazon unless you are buying in bulk. For example, $6 for one from some sellers or $13.50 for 10 from others.
There are two sizes to reflect the two types of receivers that are out there and most AR receivers will use the smaller 1/4″ end. The bigger pin was a Colt ban-era move they did to try and prevent a M16 upper from being put on a sporting lower. For anyone doing a build today with a current upper and lower – it will be the 1/4″ size. You will see there are two pins with your lower build kit, The relatively flat one is for the rear and the one with the large shoulder is the front pivot pin. So in the next photo, the pivot pin is the lower pin. You can also see the small double ended detent – either end can be first down the hole – and one of the detent springs. Both takedown pins use the same detent and spring. By the way, I recommend buying one of the reputable spare parts kits and throw it in your tool box just in case. I can’t tell you how many springs, pins and small parts I have dropped and lost over the years.
The top pin is for the rear, the middle pin with the large head that is flat on one side is the pivot pin and they use the same springs and detents.That tiny thing is a detent pin that hasn’t decided to launch into orbit yet.
To make life interesting, a detent spring is inserted into this receiver hole followed by a detent pin on top of it. The detent pin is what actually makes contact the pivot pin. This is always the case with AR rifles and it makes sense. If the spring contacted a rotating pin directly it would break down over time. In terms of pins, I prefer enlarged takedown pins. The ones I use the most are Yankee Hill Machine (YHM) pins that I get at Brownells. They just make it easier for me to disassemble whatever rifle or pistol I am working on.
The spring goes in first and then the detent. If the two will not easily go down, use a small drill bit by hand to clean out the hole. Sometimes there can be debris in there.The detent will slide into the small recesses at either end of the slot. Grease the channel for smooth movement. This is a Yankee Hill Machine pivot pin with an oversize head.Front and rear Yankee Hill Machine (YHM) pins with their oversize heads to make them easier to grab.
The actual installation is very straight forward if you have tool or clevis pin. Push the tool in so the hole of the tool is over the hole in the receiver and then insert the spring and the detent pin. The pin will stick up some so you then push it down with the little plunger tool. Simply rotate the tool and the spring and pin are adequately captured – now leave the tool there for the next step. Note, in the photo with the spring, it is at an angle just for the photo. To drop in, everything is straight up and down the axis of the receiver. Also, wear eye protection – if that detent pin comes flying out, you don’t want it to hit you in the eye!
All tools work the same. Insert them from left to right so the hole in the tool can line up with the hole in the receiver.When the holes are lined up vertically, drop in the spring. I turned the tool just a hair so you can see the spring. Normally it drops in out of sight. If not, the hole needs to be cleared/chased with a bit.Now the pin will go in part way and you need to use the plunger of your tool, 3/32″ hex key or something to push the pin in far enough that you can rotate the body of the tool thus trapping the spring and detent in place.The nice thing about purpose-built tools is that everything fits and works as intended.With the detent pushed down, slide the plunger out just barely enough to rotate the body of the tool. With most tools, the plunger can enter the receiver hole and you can’t turn the tool until you withdraw the plunger just a tad.
I always grease the channel in the pivot and rear takedown pin so they can slide easier. I like Tetra Gun Grease so that is what you see in the photo but you could use whatever grease you prefer. Always keep the old saying in mind – if it slides, grease it. If it rotates, oil it.
Grease the channel for smoother operation.
Now this is the only tricky part left. If you have not done so already, remove the plunger so the tool can slide back out but leave the main part of the tool in place with the spring and detent pin captured. Take the pivot pin with the channel facing up (so the pin will not engage it), carefully line it up with the tool, push down and forward to slide the tool out and replace it with the pivot pin. You need the slight downward pressure to keep the detent pin and spring from flying out. Once you see the pivot pin coming through the left lobe/hump, you can remove the tool and rotate the pivot pin into final position with the detent pin riding in the channel.
You need to carefully line up the pivot pin with the tool and slide the pin in while the tool is being pulled out. Honestly, this takes practice. As soon as you withdraw the tool enough, you will feel the detent and spring try to push the pivot pin out of the way. I just go slow and apply even pressure with the pin carefully butted right against the tool.At this point, the pin is being held in place by the receiver. I can then push the tool out the rest of the way and rotate the pin around such that the detent will snap into the channel – you can hear and feel it when it does.Done
That’s it! The pivot pin should slide open and closed with the detent catching at either end. Note, this may be a tight fit as the parts wear in. I would not recommend sanding the pin or reaming the hole unless you know for sure the hole is out of spec. Grease the pin and work it in and out. It should loosen up with time as the parts get to know each other.
I do like to grease the pin. It will likely be a very tight fit initially until the parts get to know each other a bit more.
For folks who choose to do this with a clevis pin, it is the same procedure but with the clevis pin and a punch or allen key to do the work. These next photos are just so you can get an idea of how it works. I simply grab whatever punch or allen key that will fit down the hole of the clevis pin to serve as the plunger. I didn’t grease the mil-spec pin as I just did this to take photos. Here I am just using a plain $0.95 clovis pin and a small punch to serve as the plunger. If I had rotated the pivot pin at the end, it would have been a done deal but I took it back apart as I will use the YHM pin when I decide how I want to build this next lower.
See, a dirt cheap 1/4″ clovis pin will work just fine.Done – I just need to grease the pin and rotate it.
So this step is done! I hope it helps. In the next step I’ll install the trigger assembly.
There are a lot of reputable AR parts vendors online but beware of eBay and bargain basement dealers that sell airsoft parts and tell you they will stand up to firearm use – they will not. At any rate, here are my top sources of AR parts:
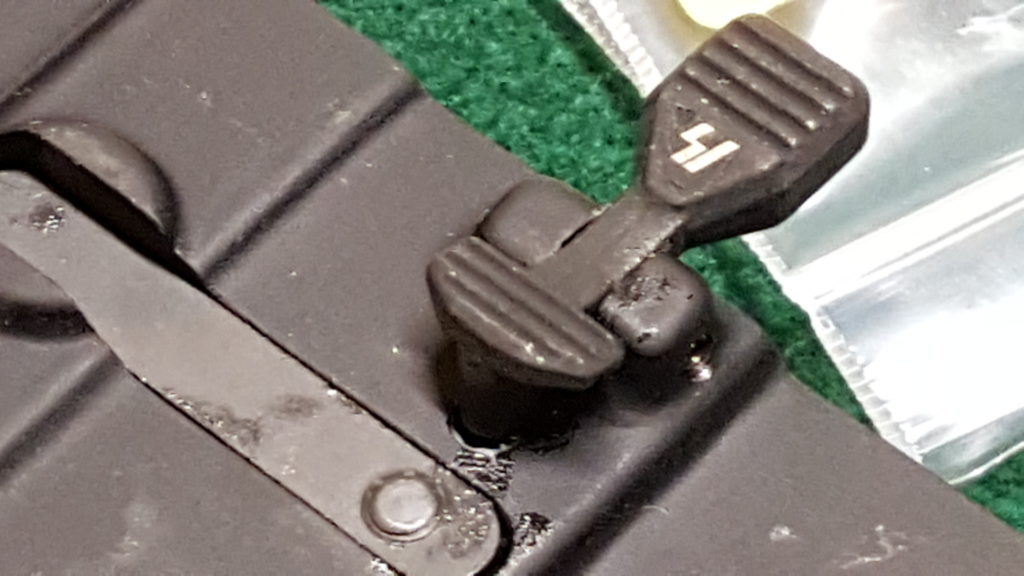
In this step, I’ll install the bolt catch. This is the part that catches the bolt when the magazine is empty or the operator wants to lock the weapon open. In terms of risk, this step has probably caused more blemished receivers than any other. What I hope to show you is a method to minimize that.
The assembly is made up of the catch itself, a cross pin that secures it in the receiver, a spring and the bolt catch buffer. In this post, I am actually installing a Strike Industries bolt catch. I like to have a slightly larger paddle to operate the catch and Strike model is a nice size. If you ever want a giant paddle, Wilson makes one but it is just too big for my taste.
Here is the catch, it’s roll pin directly underneath and then the spring and detent to the right.
Where we are working on the receiver is right here – just above the mag catch:
The spring followed by the detent go down in the hole just above the magazine catch. The bolt catch is then inserted in the slot and the pin secures it. This is when you wonder if a third arm is needed 🙂
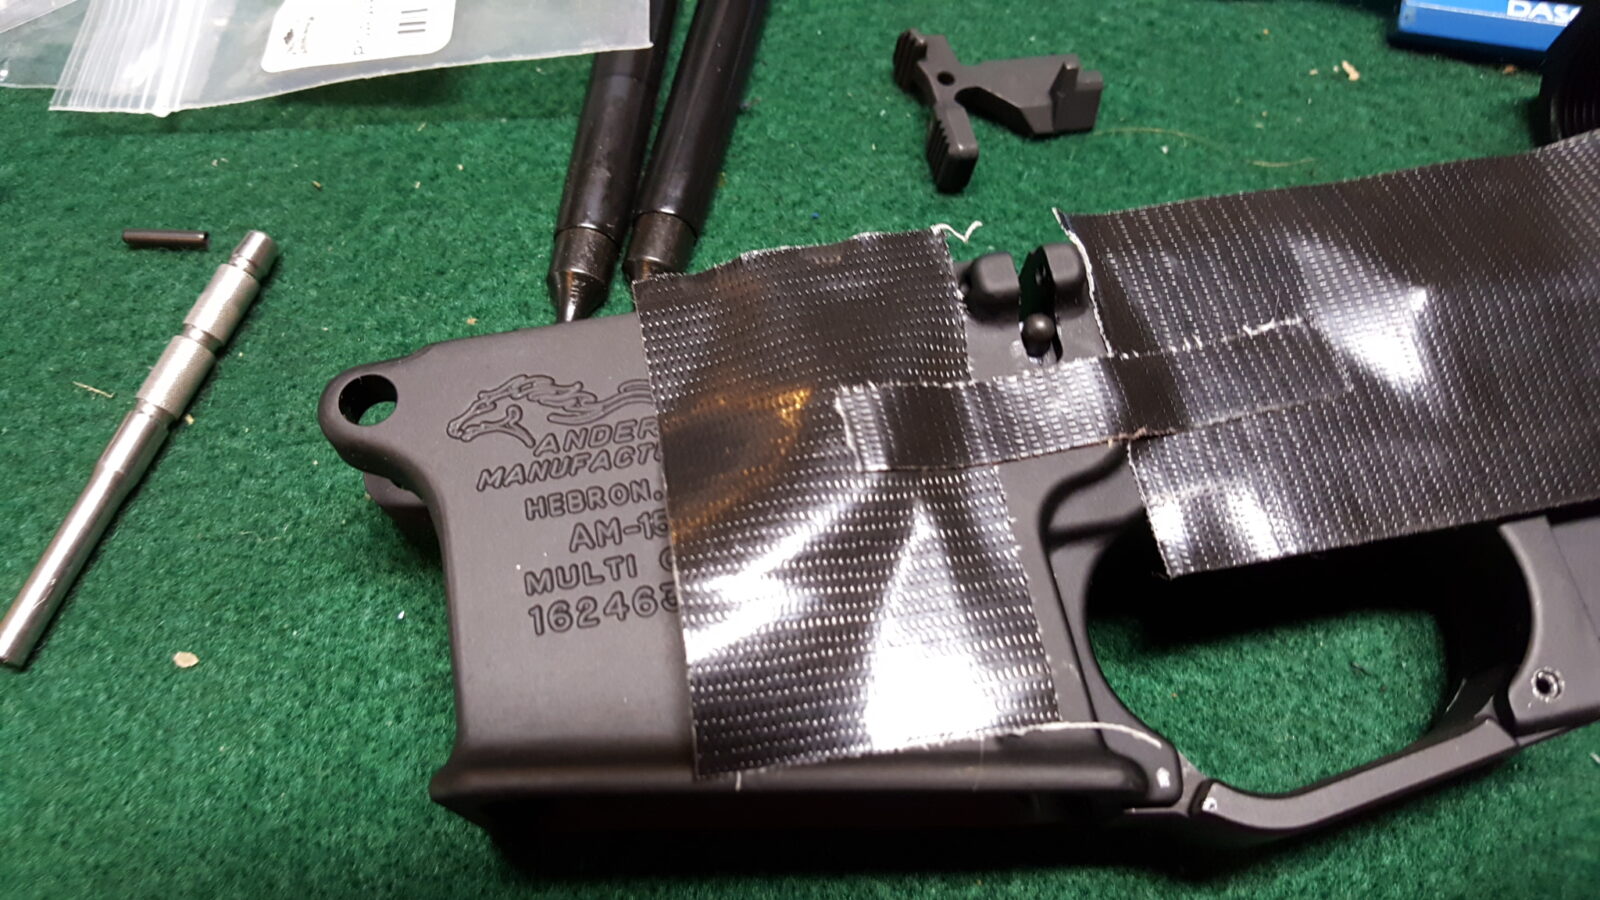
Now, this step is really risky. One slip and you will mar your receiver so take a minute and put some duct tape on just in case. I like duct tape because it is thick and sticks really well. I’ve used other types of tape in the past and it really is just cheap insurance. If you do this and what you use is up to you. You are mainly worried about the receiver, to the right of the humps/lobes where the catch is going to be installed.
If you want to lower your risk of scratching your receiver, put a heavy tape around the assembly for protection. I’d recommend a duct tape – I’m using Gorilla Tape in this photo.
Now I use three punches for this. I bought two rubber coated mag catch punches from Wheeler. They work but I wish they were longer and you still need a third to make it easy. Let me explain a bit more. The Wheeler punches are half circle designs which gives you better clearance but I still use my long Astro Pneumatics 1/8″ punch to reach down and drive the pin the rest of the way in. Like I said though, you do need three punches for this.
The two black punches make up the Wheeler 710906 bolt catch tools and I literally use them with every build. Above them is a longer roll pin punch that I use to finish the install. I wish the Wheeler punches were about an inch longer and they would be perfect for me but note I do use them on every build.The Wheeler punches are must haves for three reasons – they are flat on one side to let you get in closer to the receiver, they are rubber coated to protect the finish and you have both the 3/32″
Ok, so first take the roll pin starter punch and install the pin on the right side part way. By getting it started you have less to try and mess with as the assembly comes together. See how the punch is right next to the receiver? You need to lightly tap this with a small hammer to drive it in while not hitting your receiver – this is why the tape is cheap insurance.
The Wheeler starter punch lets you easily begin the pin with zero drama and swearing.
I like to put a dab of grease in the hole to hold everything gently in place. This is not a normal step and just something I do. You then insert the spring first and the buffer on top. You’ll notice with the AR design that a spring always has a detent or buffer between it and a moving surface to protect the spring.
I put a dab of grease in the hole to hold the spring and detent in place.
Next, I use the roll pin punch from Wheeler to align bolt catch and hold it in place so the roll pin can be driven further in. If you do not use something to align the catch holes for the pin you will drive yourself nuts. Another option is to use a 3/32 drill bit’s smooth end to help line things up by inserting it through the front hump.
Use the pin punch to keep the catch properly positioned as you drive the roll pin through. Just short of bottoming out the starter punch, use a pin punch to drive the pin in the rest of the way.
Next, you need to use the roll pin punch and a small hammer to drive the pin the rest of the way in. You can use the Wheeler block to hold the receiver or whatever works for you. Having a firm support makes it much easier. My Astro Pneumatic roll ping punches are long. My 1/8″ punch is 7″ long so I would recommend looking for something like that so you can clear the receiver when you are hammering the pin all the way in. I don’t think the Astro set I have is made any longer because I could not find it on Google to share with you. I use my Tekton punches.
With that you are done. You can function test the unit by pushing on the top paddle. You should feel the spring compress and release as you rock the catch back and forth.
There are a lot of reputable AR parts vendors online but beware of eBay and bargain basement dealers that sell airsoft parts and tell you they will stand up to firearm use – they will not. At any rate, here are my top sources of AR parts:
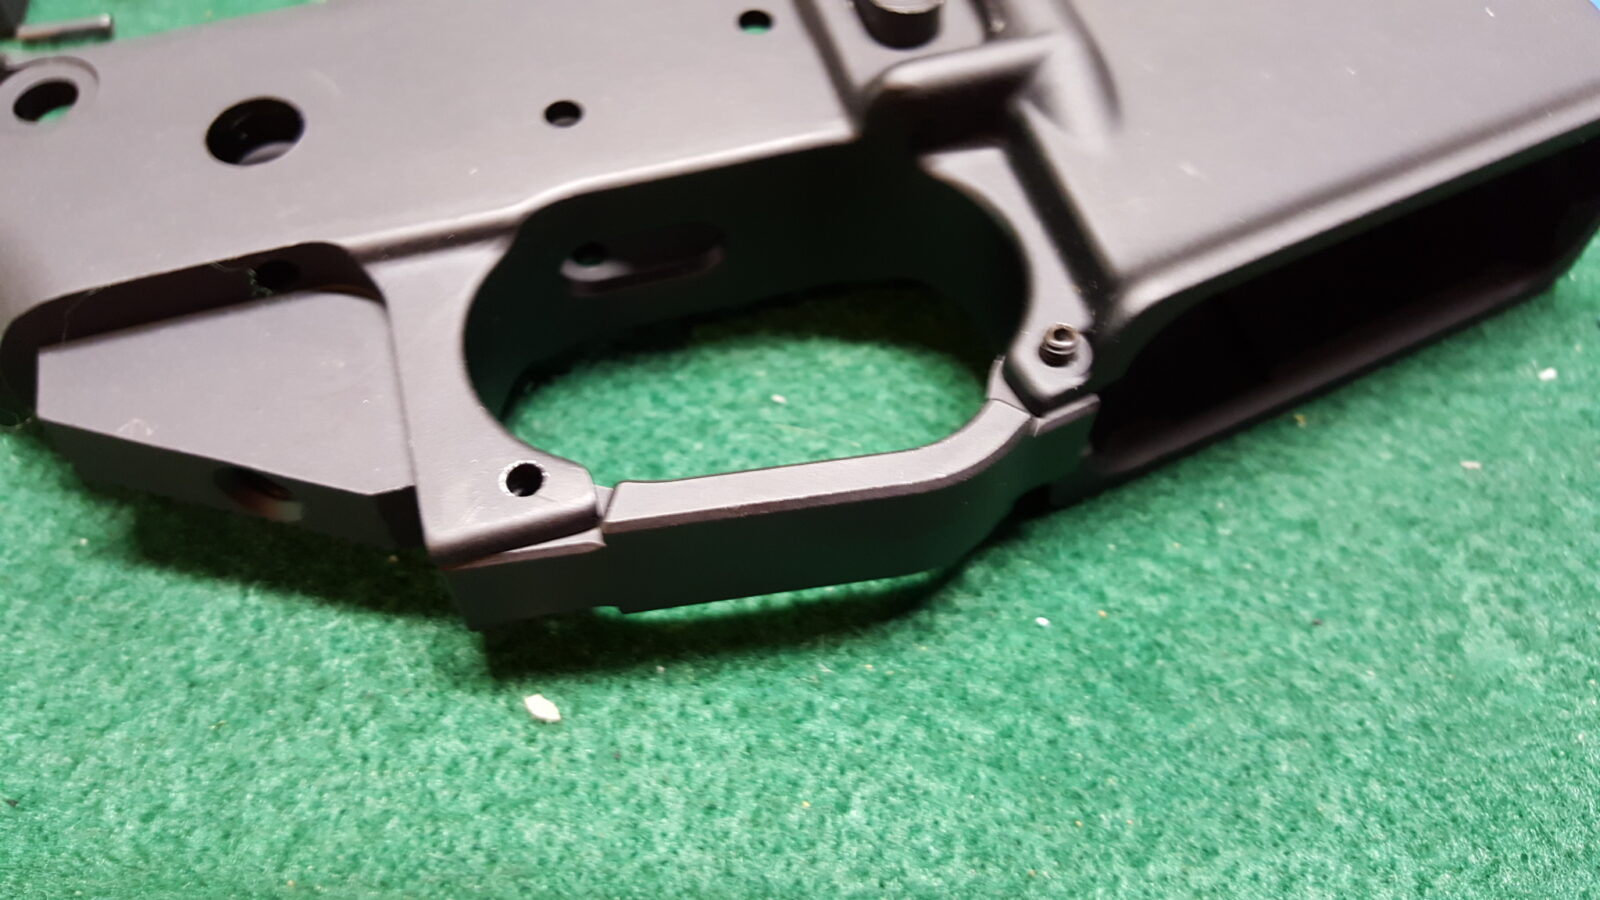
The second step is to install the trigger guard. Now I do not use the kind with a detent that allows you to open the trigger guard. I prefer aluminum trigger guards from either Magpul or Brownells. The one you see here is from Brownells and is made from billet 7075 aluminum. I like how it is slightly oversized for gloves and Brownells prices it quite reasonably at $8.47. The front is threaded with a set screw and the rear has a roll pin – they include both in the package. A polymer Magpul unit came with the lower build kit and I just put it in my box of spare parts.
Take a minute and check the fit. The threaded part goes forward and the hole that goes all the way through to the rear. Just ensure it is going to line up appropriately.
I like to first install the front set screw to help line everything up. Just use a quality allen wrench – I have been burned with cheap allen wrenches that round the socket so now I pretty much stick with Bondhus and Eklind though there are probably many other good enough brands out there. I snug the set screw down but do not go crazy torquing it in. Bear in mind you are threading a small screw into aluminum and that allen key is giving you quite a bit of leverage.
Once that front screw is in and the trigger guard is better held in position, it is time to install the rear roll pin. Now you have a number of options to install the rear pin and I am going to tell you about the two I use:
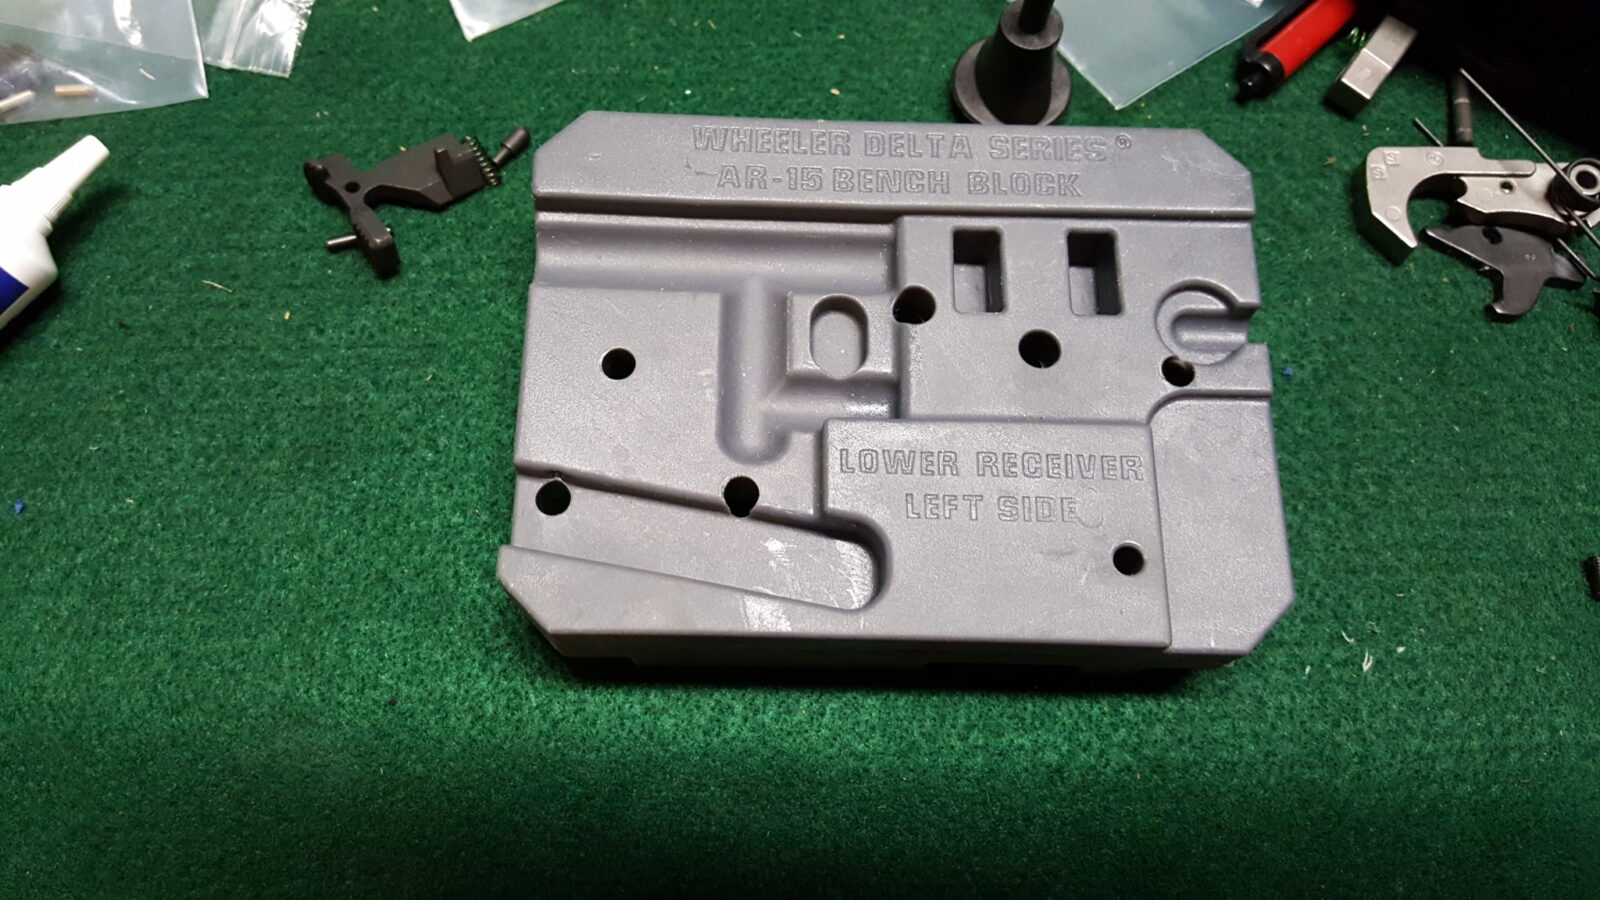
Option one, use a starter and roll pin punch to drive in the roll pin. Now there is a real important thing you need to do – be sure you use a block to support the lower “ear” of the receiver or you may snap it off. If it breaks off, you just ruined the receiver – game over. I use a Wheeler block to support the receiver and you can use just about anything – over the years I have used generic gunsmithing blocks and even pieces of wood. For the last 2-3 years I’ve used the Wheeler block and like it.
Don’t try to use a generic punch. I like to use a Squirrel Daddy roll pin starter to get the first part of the pin installed and then an Astro Pneumatics 1/8″ roll pin punch to hammer it in the rest of the way. Of course you can use whatever brands you want but the bottom line is that you need to line the pin up vertically to drive it straight in and you must be careful not to slip and mar your receiver. This is why using the correct punches matter. The starter punch gives you a lot of control and by using the roll pin punch, you can keep your punch on the pin. Because of my tremor, I am not very good with hammers and punches but can do this provided I use the two types of punches mentioned.
The Wheeler 156945 bench block does a good job helping you both hold and support work. You want the “ears” on the receiver to be supported. There are plenty of stories of guys not supporting the ears, trying to tap in the roll pin that holds the trigger guard in place and then breaking off an ear. Whether you use the Wheeler block or even a piece of wood – be sure to support the ears.
Note how nicely the Wheeler 156945 bench block supports the AR lower.This is a roll pin starter punch. This one is made by Squirrel Daddy.
Option two: Wheeler Engineering makes a nice simple tool to install or remove that roll pin. Boy does it make it easy and this is my preferred method. The little tool is super simple – it has two pins that fit into the end of the screw. A long one for removing the pin and a short one for installing the roll pin. You just line things up and then tighten the screw. The pin goes into the hole in a very controlled manner and your finish is protected. Stop once your pin is flush with the receiver.
Other options: I have seen guys use pliers with the jaws wrapped in tape, modified C-clamps, and more. You can Google around or search on Youtube to see a variety of approaches.
There are a lot of reputable AR parts vendors online but beware of eBay and bargain basement dealers that sell airsoft parts and tell you they will stand up to firearm use – they will not. At any rate, here are my top sources of AR parts:
Just a quick note – when you get a bare receiver, you are literally getting a chunk of aluminum with nothing installed. I really like Palmetto State Armory (PSA) lower build kits and they sell them with different types of components such as just the basics for rifles, for pistols, Magpul furniture, etc. What I like is that the machining is very good and I think they have some of the best Mil-Spec basic triggers that aren’t gritty. I’ve used Anderson and other brands of build kits and just think the PSA kits are superior. Bear in mind that I say this as a customer – nobody paid me to tell you this.
With that said, let’s start building. You’ll notice on any AR magazine on the right side there is a rectangular notch. This is where the magazine catch engages to hold it in place. Okay, so the first step is to install the magazine catch assembly. It’s made up of the “L” shaped catch itself, the mag catch spring and the magazine button.
Now I grease everything that slides with Tetra Gun Grease. Tetra has worked well for me but I also know guys who use all kinds of greases. As a rule of thumb, if it slides, apply grease. It it rotates then apply oil. So grease the shaft and insert it into the round hole on the right end of the recessed area for it on the right side of the receiver. Note, be careful when installing the catch or you may scratch your receiver.
When you turn it over you will see the threaded end of the shaft and you put the spring down over it.
Next, you will screw the magazine button onto the threaded shaft. Before you do, look at the button. You should see that one end is smooth (that is the bottom) and the other has grooves (that is the top). Carefully start screwing the button on but stop before you get near the receiver so you don’t scratch anything. Push the button in, and then turn the long lever arm to continue threading the shaft into the button. Now stop before the lever arm scratches the receiver.
To screw the catch in the rest of the way you need to push the bullet button in all the way so the catch sticks out as far as it can on the other side so the lever arm can clear the parts of the receiver as the button is screwed on. At this point, I use a small pusher tool made from plastic to push the button in even further so I can keep turning the lever arm until the screw is relatively flush with the top of the button. Note, before I had the tool I would use a wood dowel. Just use something non-metallic to protect the finish. There is a model of the tool shaped just like the oval button but I don’t know where mine went so I used a takedown tool and got the job done 🙂
The catch is now installed. To function test, push the magazine button. You should feel spring resistance and see the magazine catch’s lever arm push out. When you ease off the button, the lever arm should smoothly go back into place.
There are a lot of reputable AR parts vendors online but beware of eBay and bargain basement dealers that sell airsoft parts and tell you they will stand up to firearm use – they will not. At any rate, here are my top sources of AR parts:
I have to admit that I like a lot of different firearms including both AK and AR platforms. So I am not purely an AK fan though my business is largely built around that. I have owned many, many different ARs over the years including tactical, DMR, snipers, pistols and flat out range toys. I don’t have much free time any longer so the AR platform gives me a chance to tinker with different combinations and see what I like.
At the heart of the AR is a lower-receiver that can be made by just about anyone as long as it is Mil-Spec. Now this is critical. Not all receivers are as accurate as they claim to be with their tolerances, hole positions and what not so ask around. I’ve had very good luck with Anderson (my go to brand for several years now), Palmetto State Armory (PSA), Spikes and Del-ton. I’ve not had a single problem with any of these brands. You may not have as much luck with “Uncle Bob’s Lowers made in Podunk Nowhere” so just start with a good foundation.
For the two AR pistols that I will be assembling for the upcoming blog posts, I will be using Anderson lower receivers.
Assembling an AR for a rifle or a pistol is almost identical until you get to the gas tube. At that point a pistol must use a pistol tube and a rifle will use whatever tube you wish. I’ll point that out again in post #9.
I am not a lawyer and the following should not be construed as legal advice. I’m just trying to explain my understanding on how to build an AR pistol legally:
One important item for guys making pistols, to be legal, the receivers must be transferred to use as receivers. Your FFL must NOT transfer the receiver as a rifle. There is an FFL notice that once a receiver is built as a rifle, it is a rifle. If you change it into a pistol, then you are making a short-barreled rifle (SBR) that must be registered. Oddly enough, you can build a receiver as a pistol and then convert it to a rifle. [Click here for a link to the ATF letter]
My recommendation is to always take photos of the pistols built appropriately so you can show the paper trail of a receiver transfer from your FFL through to a built pistol.
Also, there is another issue to avoid – do not buy pistol-length uppers (meaning uppers with barrels shorter than 16″) and having them sit around without a pistol receiver waiting. Buy the receiver first, then corresponding upper and put them together. Why you might ask? The concern is something known as “constructive intent”. You do not want the ATF or others in law enforcement to assume you only have that SBR/pistol upper to put on one of your rifles. That requires paper work and fees in order to have a legal SBR. You absolutely can’t just put a sub-16″ barrel on a regular rifle – it will be illegal. [Click here for the ATF letter about SBRs]
The ATF has ruled that braces do not make a pistol into a rifle. I have carpal tunnel and can’t hold a heavy pistol so this is good news for me. So, I bought my Anderson lowers first, my lower pistol build kits from PSA and then an 7.5″ upper from PSA and a 10.5″ upper from Ghost Rifles. The blog posts that follow document my journey building these two AR pistols.
There are a lot of reputable AR parts vendors online but beware of eBay and bargain basement dealers that sell airsoft parts and tell you they will stand up to firearm use – they will not. At any rate, here are my top sources of AR parts:
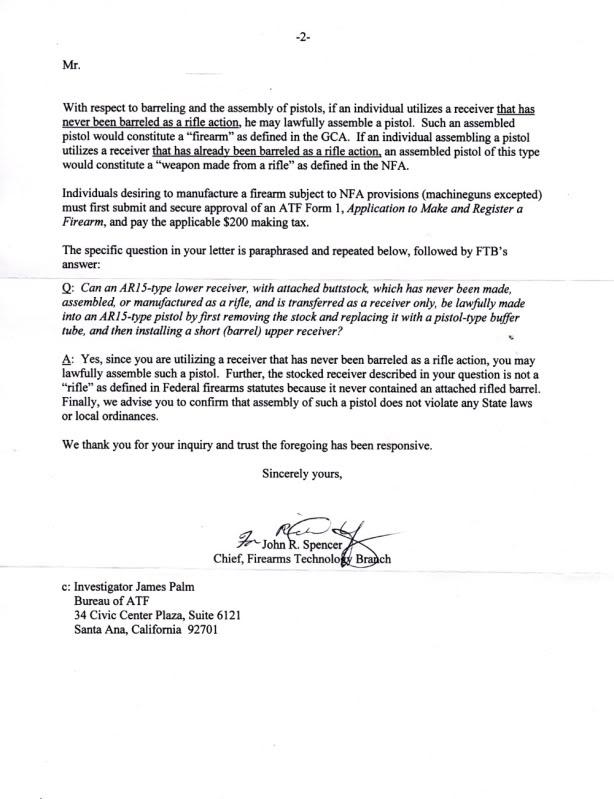
Okay, I posted a couple of ATF letters and a guy sent me a message asking if I had the letter specifying that an AR pistol can be built from an AR receiver that was transferred as a receiver and never assembled as a rifle. It just so happens I did save that one back when I built a couple of AR pistols a few years back. I like to have the letters of anything someone may ask about and keep them in my case with the weapon when I take it shooting. At any rate, here is the ATF letter in case anyone else needs it:
Please note that I am not a lawyer and this should not be construed as legal advice.