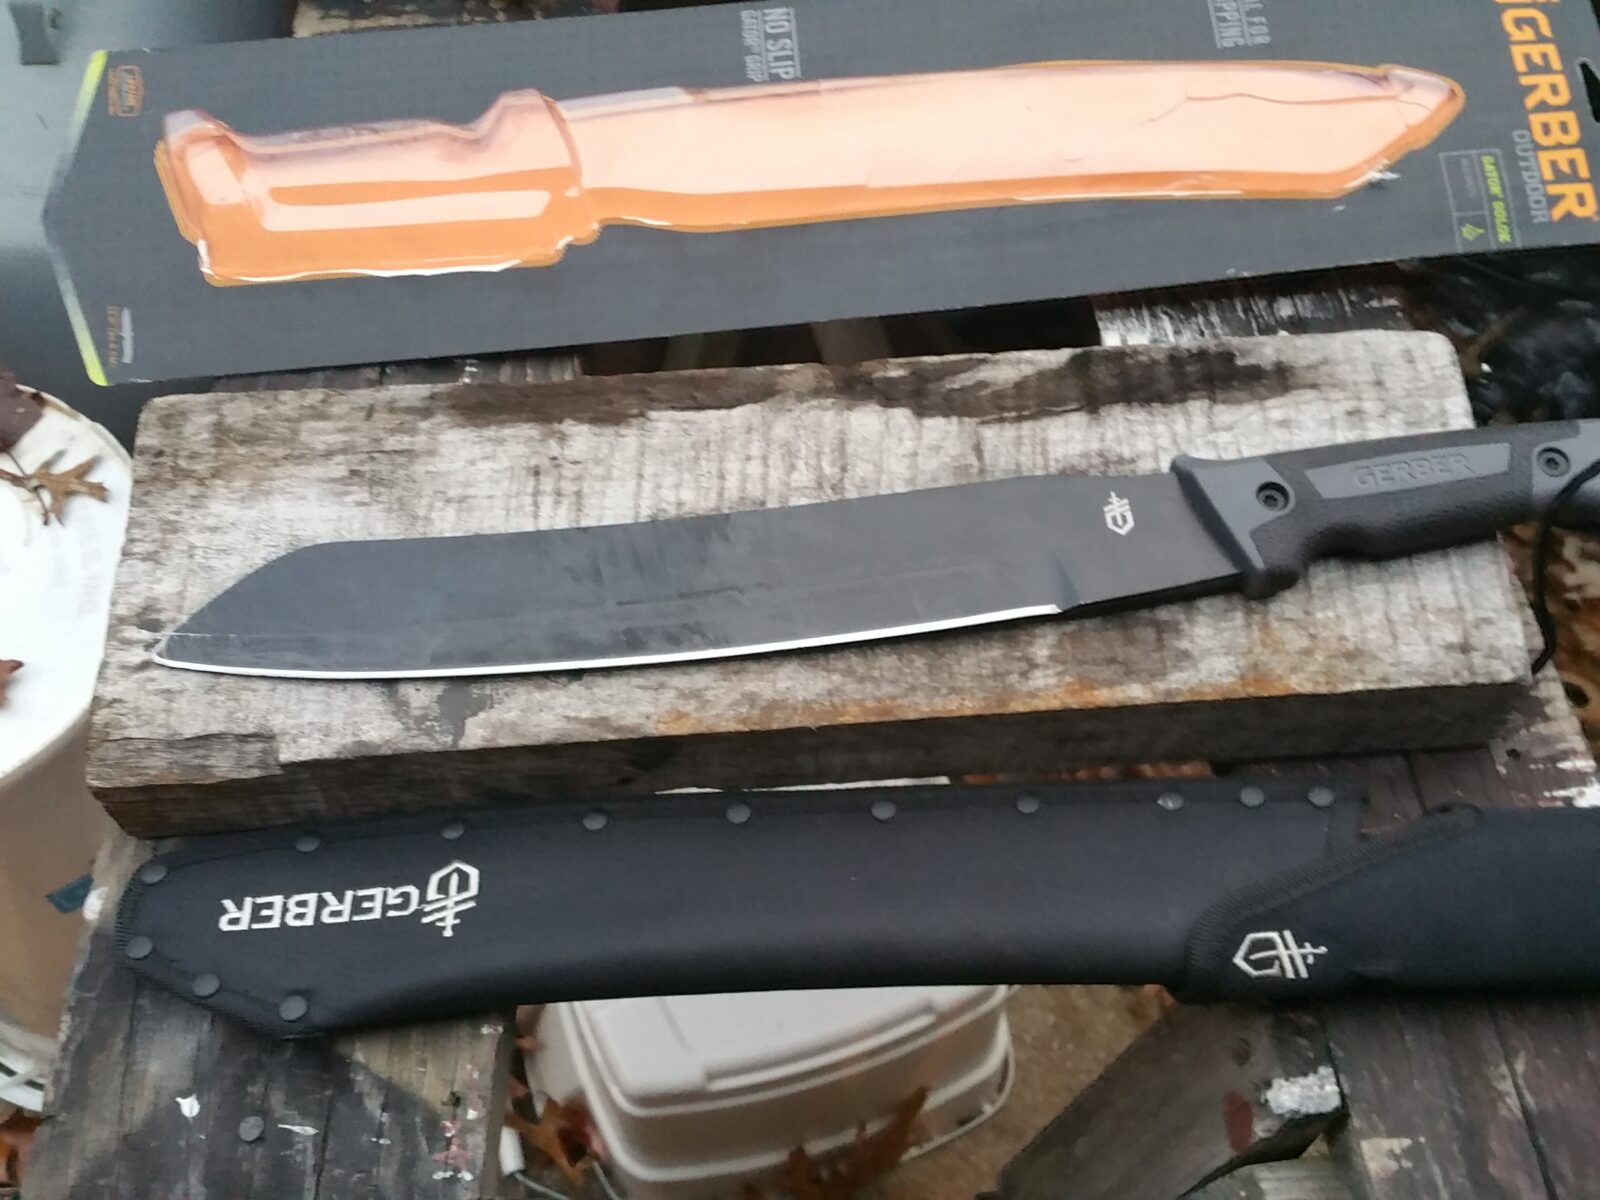
Ok, so I wind up clearing brush pretty regularly. Usually its pine, vines, scrub oak and junk like that. Back in June 2014, I bought a Ken Onion designed Half-A-Chance machete (CRKT K920KKP) from CRKT that has served me well (click here for my review). On my last trip to clear brush this past fall, I accidentally left the Half-A-Chance at home and had to get a replacement machete. Thankfully SMKW was on the way so I stopped in and tried out a bunch of different ones in terms of heft and balance. When I got to the Gerber Golok, I was really surprised. It’s surprisingly thick and that mass makes a big difference when taking out saplings so I bought it and used it to clear the small stuff.
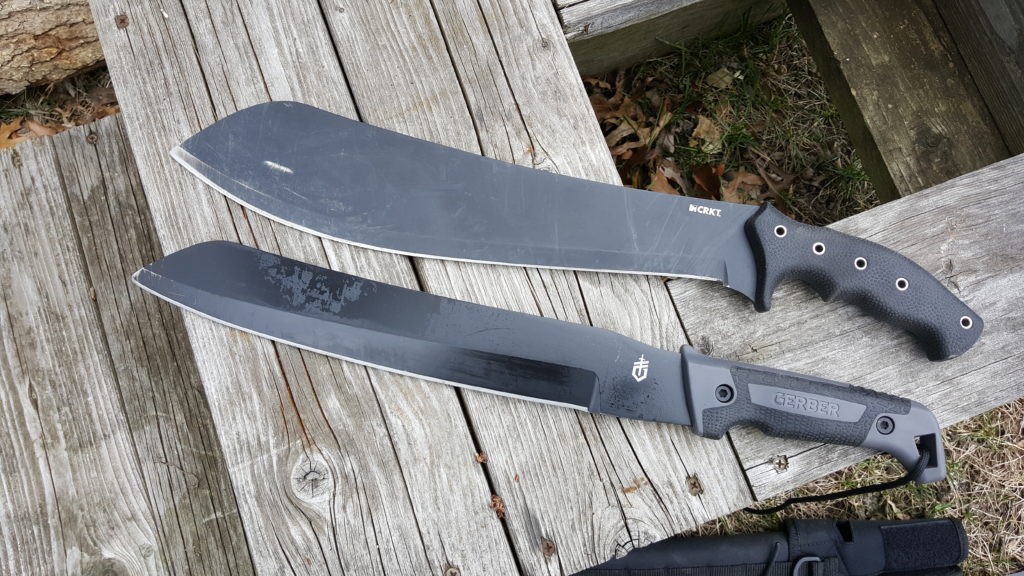
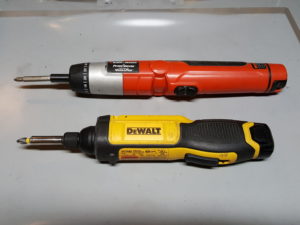
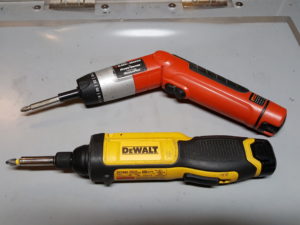
It seems like an opportune time to compare the two and share my thoughts. In the next photo, the top is the Half-A-Chance and the bottom is the Golok.
What really surprised me was that the thickness of the Golok’s blade. Why Gerber doesn’t make a big deal about this, I don’t know because there are fans of knives with big blades. The blade is 12″ long and made from MN65 steel, which is a spring steel that is roughly equivalent to 1065 steel, which is fairly common in machetes. The blade comes in at 0.2566″ when I mike it and weighs 1 pound 10.8oz (26.8 oz). That is a lot of steel! It’s like you are moving the design from being a classical machete more towards a chopper with that kind of width. When I was hitting some dried oak and ash, the Half-A-Chance bit deeper than the Golok and I think it reflects the relatively thin blade of the Ken Onion design that mikes at 0.1147″ which is less than half the Golok. The Half-A-Chance also weighs 20.3oz.
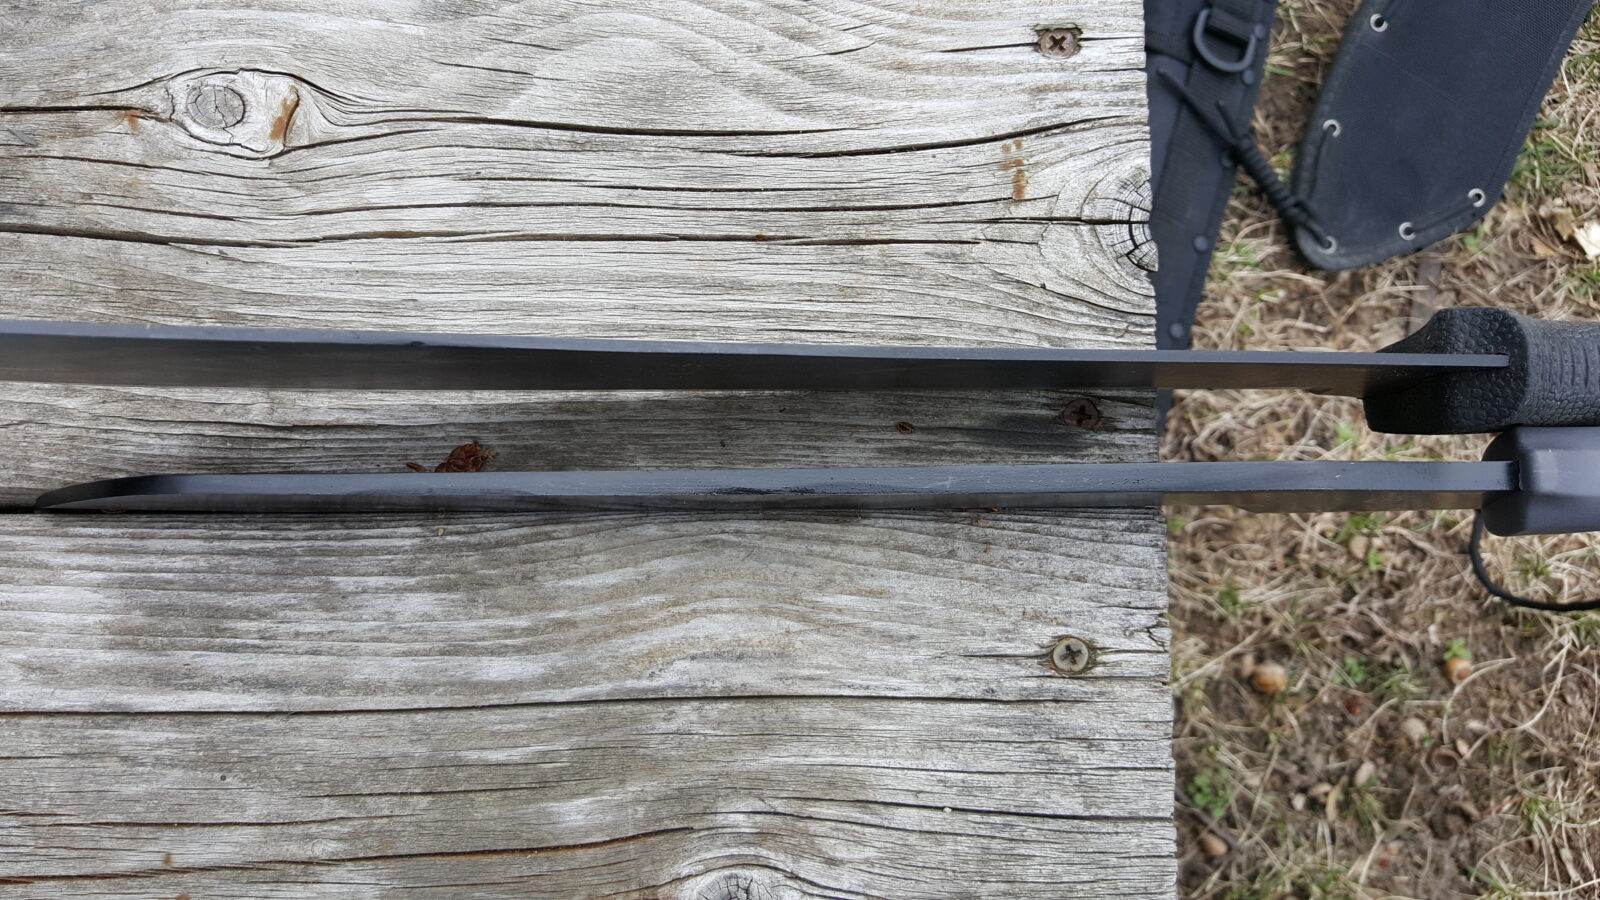
The blade on the left is Half-A-Chance and the right is the Golok on a piece of dried ash.
You can definitely see the the thicker Golok blade right away. It’s the top blade on the left photo and the bottom blade on the right photo:
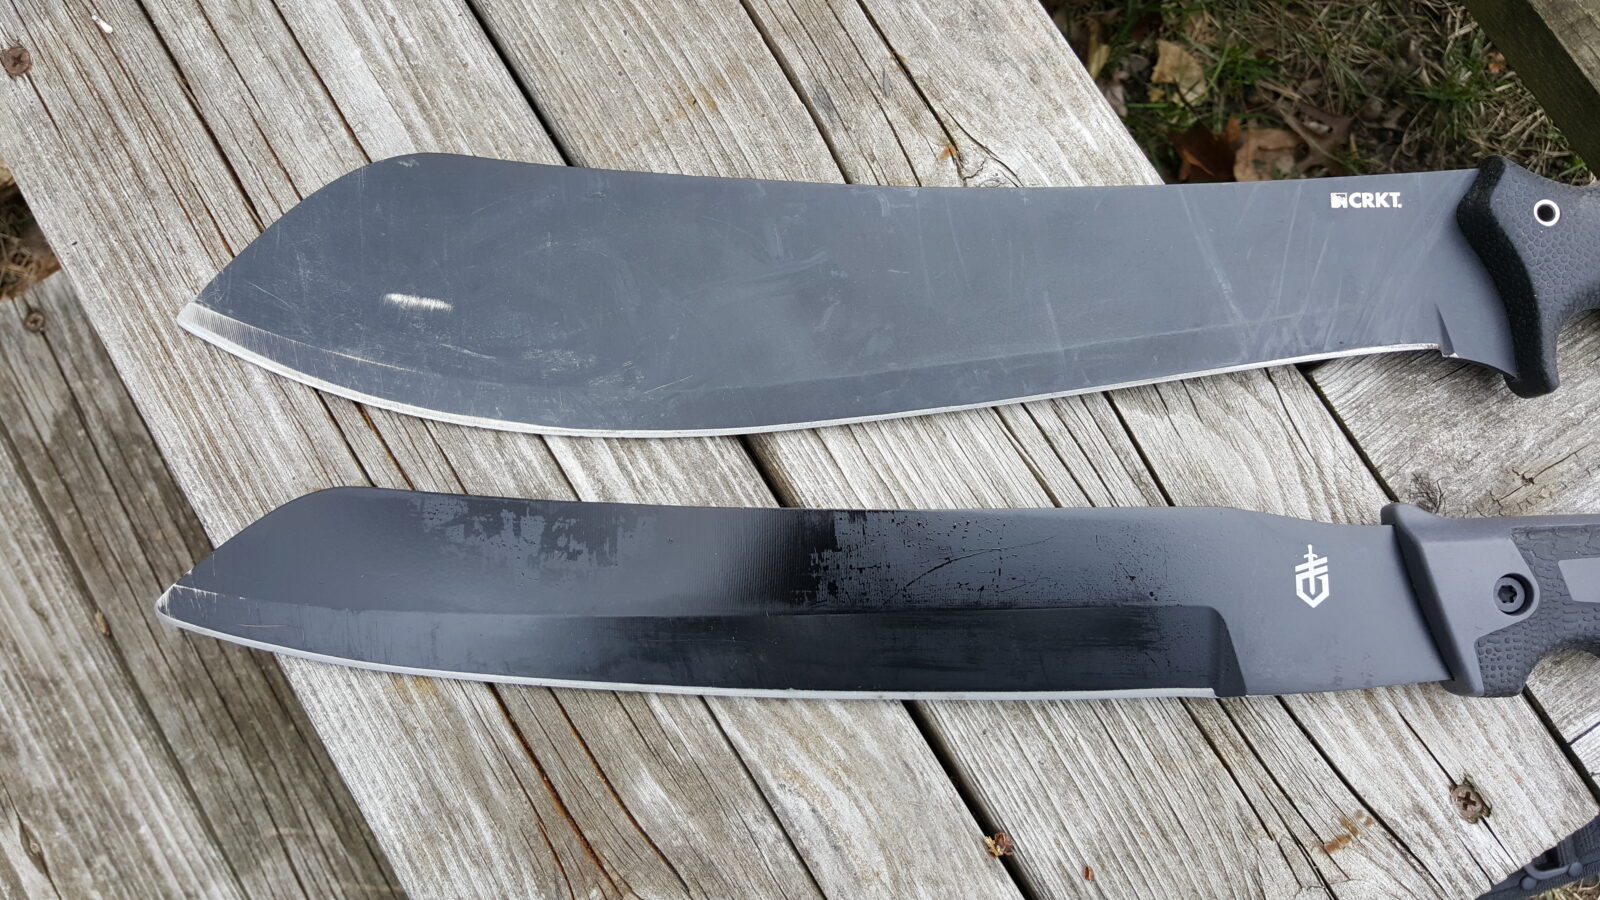
Just a closer view of the Half-A-Chance on top vs. the Golok on the bottom. The Half-A-Chance’s handle is more ergonomic but the rubber coated Golok isn’t too bad.
The Half-A-Chance’s sheath is fancier while the Golok is simple and to the point.
Folks, in the end, the Golok is a chopper. It’s heavy but too thick for the traditional fast slices you are doing with a machete. I’d recommend the Half-a-Chance for thin stuff like vines and stuff under 3/8″ ballpark and the Golok for thicker vegetation where you need to chop but you are also starting to cross over into where a heavy khukuri or hatchet might serve you better.
While clearing the lot I did put a nick in the Golok and used my Work Sharp Ken Onion edition sharpener to take it right out when I got back to my shop. [Click here for my post on the KO sharpener.]
Bottom line, the Half-A-Chance machete is still my favorite and the first one I would grab to clear brush but the Golok is a keeper also because I like its mass and balance. It’s a lot of blade for the money and I do like big blades. You ought to take a look when you get some time or even pick one or both machetes up from Amazon.
Folks, the first time I saw a cordless screwdriver, or power screwdriver, it was a little Black & Decker Quantum 3.6 volt model – probably 15-20 years ago. Do you remember Quantum? They were the green and black line of tools that B&D introduced to try and be a step up from their basic black and orange B&D line. My dad had bought it for me because I had been diagnosed with carpal tunnel and my hands were in tremendous pain and stiff. For folks who have carpal tunnel syndrome (CTS), you know it sucks. For those of you who do not have it but use your hands a ton, you do need to worry about it. Let’s talk about this injury known as CTS that totally sucks for people that use their hands a lot. By the way, did I mention it sucks?
This definition is from Wikipedia“Carpal tunnel syndrome (CTS) is a medical condition due to compression of the median nerve as it travels through the wrist at the carpal tunnel. The main symptoms are pain, numbness, and tingling, in the thumb, index finger, middle finger, and the thumb side of the ring fingers. Symptoms typically start gradually and during the night. Pain may extend up the arm. Weak grip strength may occur and after a long period of time the muscles at the base of the thumb may waste away. In more than half of cases both sides are affected.”
As your tendons go through your wrist, there is this sheath called the carpal tunnel (CT) that they go through. As the tendons pass, they rub the ligament and can get irritated and swell thus reducing space and compressing nerves, which then causes more irritation, more swelling and more irritation and more swelling, etc.
For me, manual screwdrivers suck. My hand is bent and fingers closed and then I am twisting my hand to turn the screwdriver. This really puts strain on the tendons going through the CT. Whenever I do a lot of work with a screwdriver, boy do I feel it later or the next day. Guess what, because of all the stuff I do in my shop, typing on the computer and what not, I can’t escape it. I’ve had CTS for 22+ years but opted to manage it vs. have surgery. Some days, I manage it and others it manages me might be a better way of putting it but I have learned a lot.
To be clear though, when you have carpal tunnel, it really pays off to learn what you need to do differently to put less stress on the tendons going through the carpal tunnel that causes the inflammation. It used to be that after working on something, I would definitely feel it but by trying to reduce the manual twisting as much as I could, I didn’t hurt as much later that night or the next morning. I also learned how to stretch my hands and the benefits of Aleve (naproxen) and Advil (ibuprofen). It wasn’t “one” thing that had to change – it was changing as many things as I could – even how I typed on a computer. Using a cordless screwdriver was one of many changes that helped.
So, back to the story. My dad gave me the cordless screwdriver and I immediately scoffed at the notion of a cordless screwdriver (manly men don’t need them, right? I was wrong!) but the fact of the matter was that the twisting motion used to set and remove screws was tearing up my hands. So, almost reluctantly, I gave it a try while questioning my man hood! What I found out was that it actually made a big difference. By using the cordless screw drivers as much as I could, I found that it made a big difference with my hands because I did not need to do the repetitive twisting motion when I needed to do a lot of screwdriver work — I was going to say screwing but that really looks funny in writing 🙂 It made such a big difference that I was a convert to power screw drivers. Sure, I still have dozens of screwdrivers and nut drivers that I use when I must, but when there is a lot of work to be done, I grab the power screw driver.
In addition to reducing wear and tear on my hands, there was another big benefit too in regards to productivity – I could set and remove screws way faster than before. Granted there were still times where I needed more torque or needed to “feel” the screw that made me do stuff by hand or break out one of my big cordless drills. In case you are wondering, cordless screw drivers are smaller, lighter, easier to maneuver and can turn slower for hand work than a drill. Bottom line, I did a lot less manual twisting with my hands.
My dad had the foresight of getting me a unit with removable batteries and over the years with many cordless tools, I’ve found it pays off to have more than one battery so you aren’t dead in the water waiting for the battery to charge.
I also found out that using the magnetic quarter inch bit holders allowed tremendous flexibility for driving all kinds of screws – philips, blade, torx, hex, small nuts, etc. Over the years, I have tried tons and tons of them. Cheap bits break or wear faster – for example, the sharp edges of a philips bit rounding over, the magnetic bit older cracking, etc.
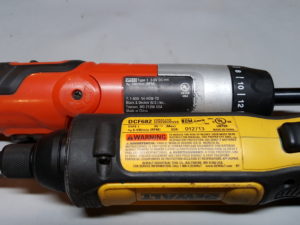
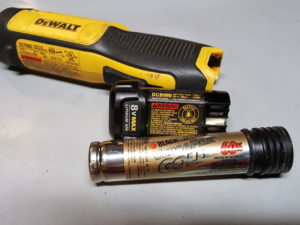
I eventually wore out the Quantum and bought a B&D Vp810 Pivot Driver that used the same Versapak 3.6 volt batteries and both had a clutch and the handle that could pivot. I used the heck out of that thing for a few years (and it is still on a shelf in my shop) but wanted more torque as I really wanted the tool to have broader use so I dug around and bought my current cordless screwdriver, which is an 8 volt Dewalt DCF682 that I’ve had for probably at least two years and use it constantly – probably at least once a day on average.
Being a tool geek, this unit has a gyroscope that senses the direction your hand is turning and by how much. It then turns the motor in the same direction and boosts the speed up according to how much you turn your hand. It’s a bit weird at first but then it becomes second nature. There have been a few tight spaces where I wished there was a switch but 90% of the time, I am pretty happy. It’s also faster at speeds up to 430RPM than the old VP810, which was up to 180 RPM and it does have more torque as you’d expect given the higher voltage.
My exact model is no longer being produced but you can find it on eBay and other secondary markets. Dewalt now has a new model – the DCF682N – that also gets great reviews. From what I can gather, it has two notable improvements over my model, namely a handle that can pivot and a 15 position clutch. I’ve never really missed having a handle that angles but a clutch comes in handy to prevent over-driving a screw. It’s the DCF682N1 and it gets great reviews. You can get it with just the driver, battery and charger or a better deal with the driver, charger, two batteries and a carry bag. I would recommend the kit because for the price of a second battery you can get it and you absolutely want a second battery to avoid delays.
I hope this helps you some. Over the years, I’ve gone from scoffing at these cordless screwdrivers to absolutely being a user and defender of them. Like all tools, they have value when used at the right time for the right task.
I hope this helps some. Bottom line, if you have CTS or are worried about CTS due to a lot of handwork including driving screws, get yourself a power screwdriver. It’s another tool that has a time and a place to help you out.
At the bottom of the page I will have links to the screwdriver and bits on Amazon.
If you want to learn more about CTS and how to manage it, check out:
Definitely learn about stretches that can help. There are a ton of videos on youtube and it pays to actually see how to do them. Here’s one example:
Please note that I am not a doctor and the above is not medical advice – just my experiences and opinions. See a doctor if you are having pains and get the problem properly diagnosed.
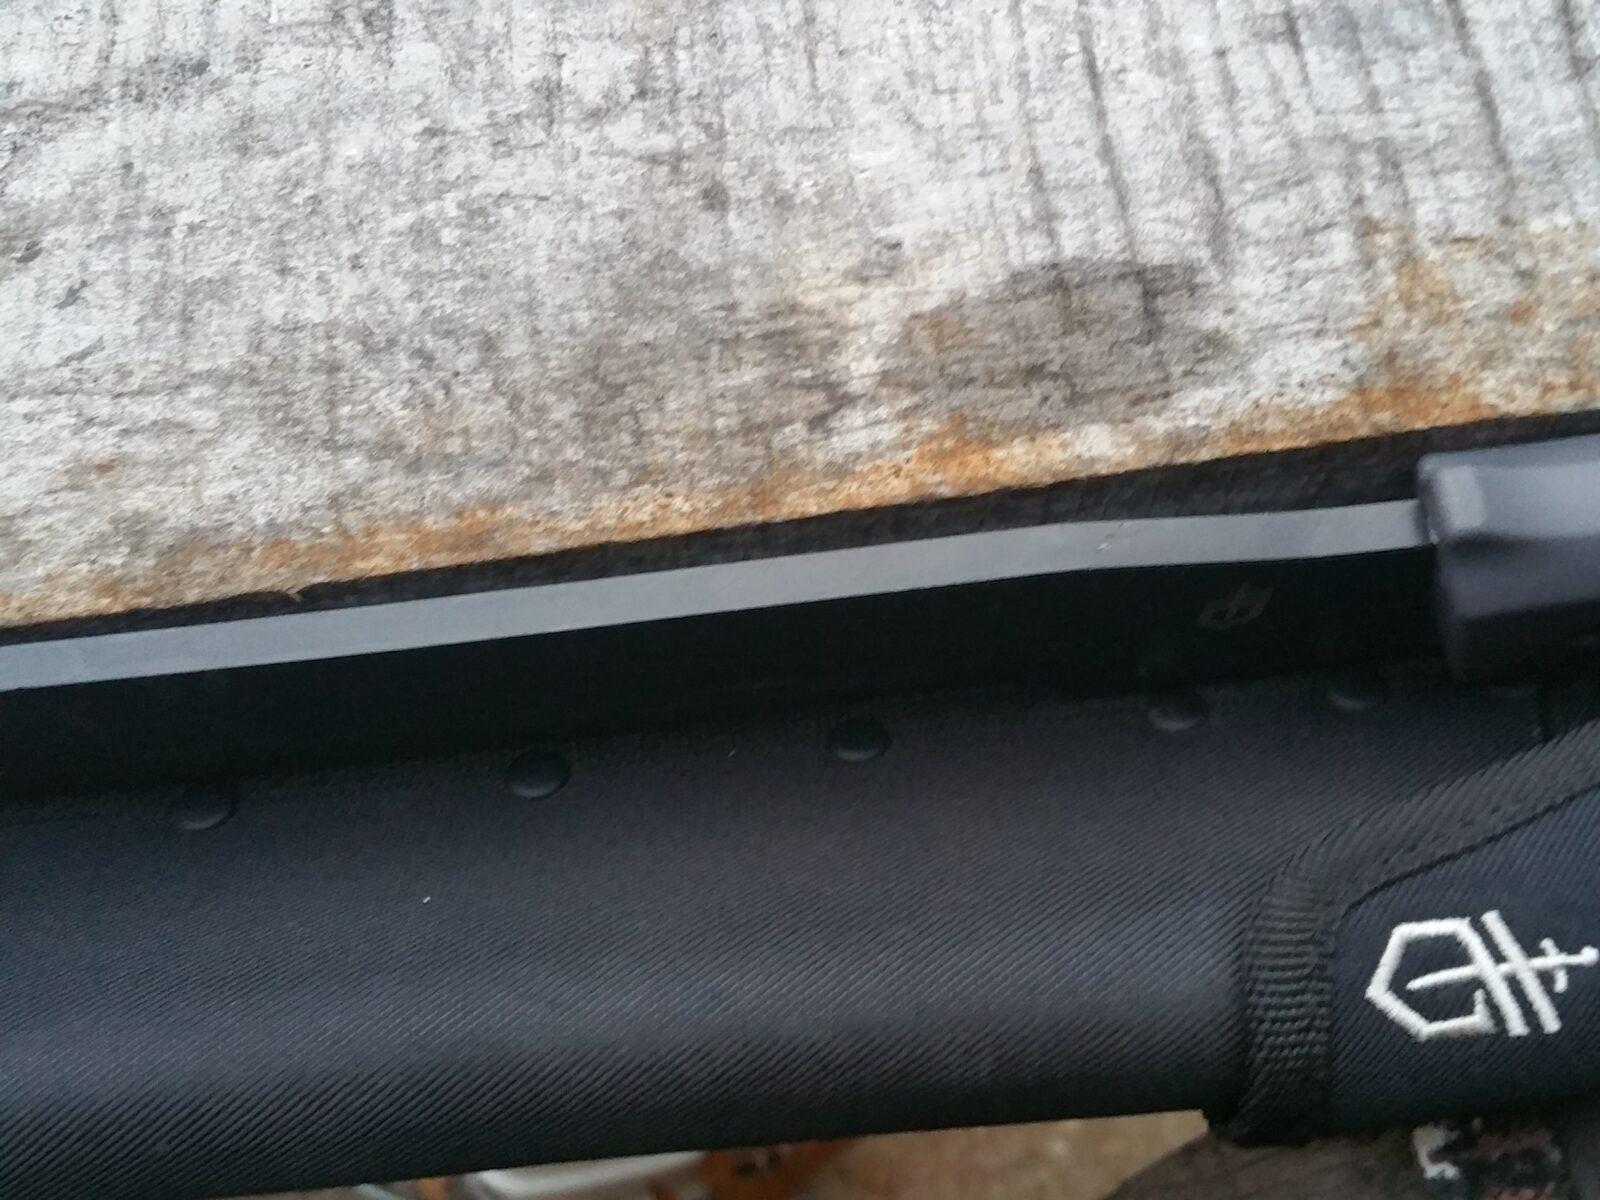
I like to heat treat my entire lower rails before I install them. Some guys just heat treat the tip but I go for overkill. When I would get flats and rails from AK-Builder for whatever I was doing, I’d do all the lower rails at once and store them oiled in a bag for later use.
The process is simple, I heat them up with a torch to dull to medium orange, which comes out to around 1500-1600F. Some guys use magnets and stop the heathing when magnetism is lost, some use marker/applied heat indicators – there are many ways to do it. I tend to use my sheet metal/jewelers oxy-acetelene torch. It is known as a Meco Midget and the thing is awesome for sheet metal work. I’ve had mine for over 10 years and never had a problem. I have a giant Journeyman II set but find it too big and cumbersome for stuff like this.
Tin Man Technologies (TM Tech), who I got mine from years ago and you will need to search around for it or find what some call a jeweler’s torch
Next, quench the parts in room temperature used engine oil. It works great for me. I have an old navy fuse can with a lid glued to a piece of wood that I use for this purpose.
After that, I anneal them by putting them in a flat pan, pouring in some brake fluid with some paper towel exposed, lighting the towel and then letting it all burn it off, which is about 500. It’s messy and you want to do it outdoors for sure – I let it all burn off and then air cool. Some guys put them in a toaster oven at 500F for 5-10 minutes and let them slowly cool down by turning the oven off. That works too.
Here the rails right after the brake fluid is finished burning off – you can see some of the soot that is generated:
When you weld the rails in with a spot welder, just be careful not to ruin the heat treat by letting a tong get up against the ejector tip and heating up. I’ve done it twice over the years. One time I didn’t notice and had to repair a peened over ejector and the other time I saw the discoloring of the tip and did a spot hardening of the ejector tip while it was in the receiver.
At any rate, I’d then oil everything and put them in a ziploc bag for future use. I would sand the backs of the rails prior to installation to get good spot welds.
While I use OA for a lot of my work, MAPP works just fine too.
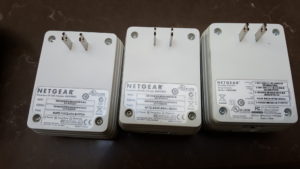
Okay folks, I’ve just spent the last few days and some money replacing equipment blown by an apparent power surge through Netgear Powerline AV500 equipment. What these units do is to transmit ethernet network signals over the AC wiring in a building and are billed as an easy shortcut to pulling wire. Our house has a lot of solid ceilings and is a bear to pull wire through so I opted for these to try and save some time. I have used these for a number of years now up until we had thunderstorms with plenty of lightning last week. One day by daughter told me the TV no longer was connected to the Internet. Then we found out about her room’s wifi access point not having Internet access either and the same for the access point in my shop plus a TV android appliance that we use to watch Netflix and other things. What was the common element? They all worked except their ethernet ports were blown. The little converter units said they were connected but no signal came through and even directly connecting new wire did not solve the problem. In the cases of the TV and android appliance, I switched them to wifi and they worked fine. For the access points, I could log into them but I could not get anything from the ethernet ports. I am convinced a power surge went through these devices and blew the ports in the attached devices. All other ethernet devices in our home were fine. The powerline repeater is in the trash too as I am done with this stuff. I don’t think it is a coincidence – the surge must have gone through the adapters.
So you can see, the next two photos are of the Netgear powerline stuff that is going in the trash along with the two fried network access points (the third photo) that are also history.
In short, I have tossed the four power line adapters and installed much better hard lines going to decent TP-Link 450 access points. We have excellent coverage again but I will never use the powerline stuff again. I’m very happy with these TP units – they get great reviews, were easy to install and have great reception. I’ll link to these access points at the end of the post.
By the way, in digging I found a great Android WiFi signal strength utility that is great and, surprisingly, free. Check out Wifi Analyser by Keuwlsoft. It’s very useful to help you see the signal strength and understand the best place to put an access point.
While I was at it, I also replaced two old 10/100 ethernet hubs with Gigabit switches. We’re definitely seeing a lot better speeds now.
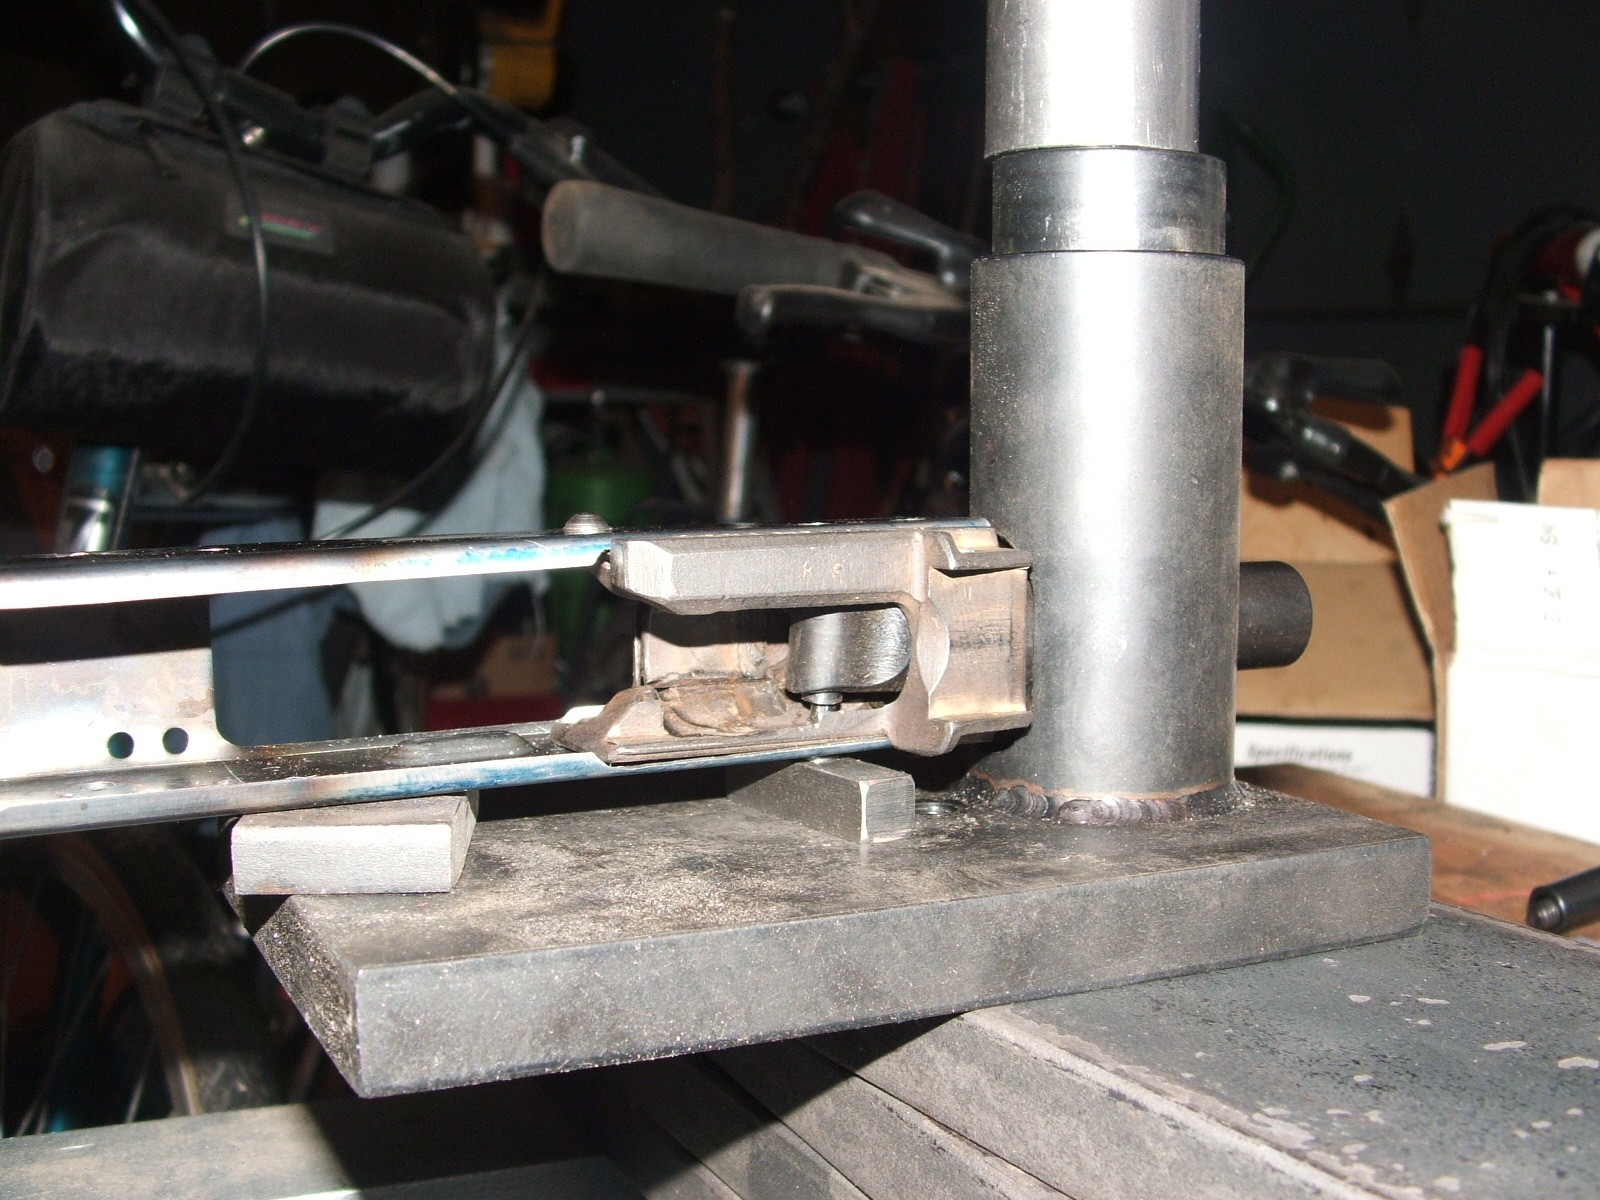
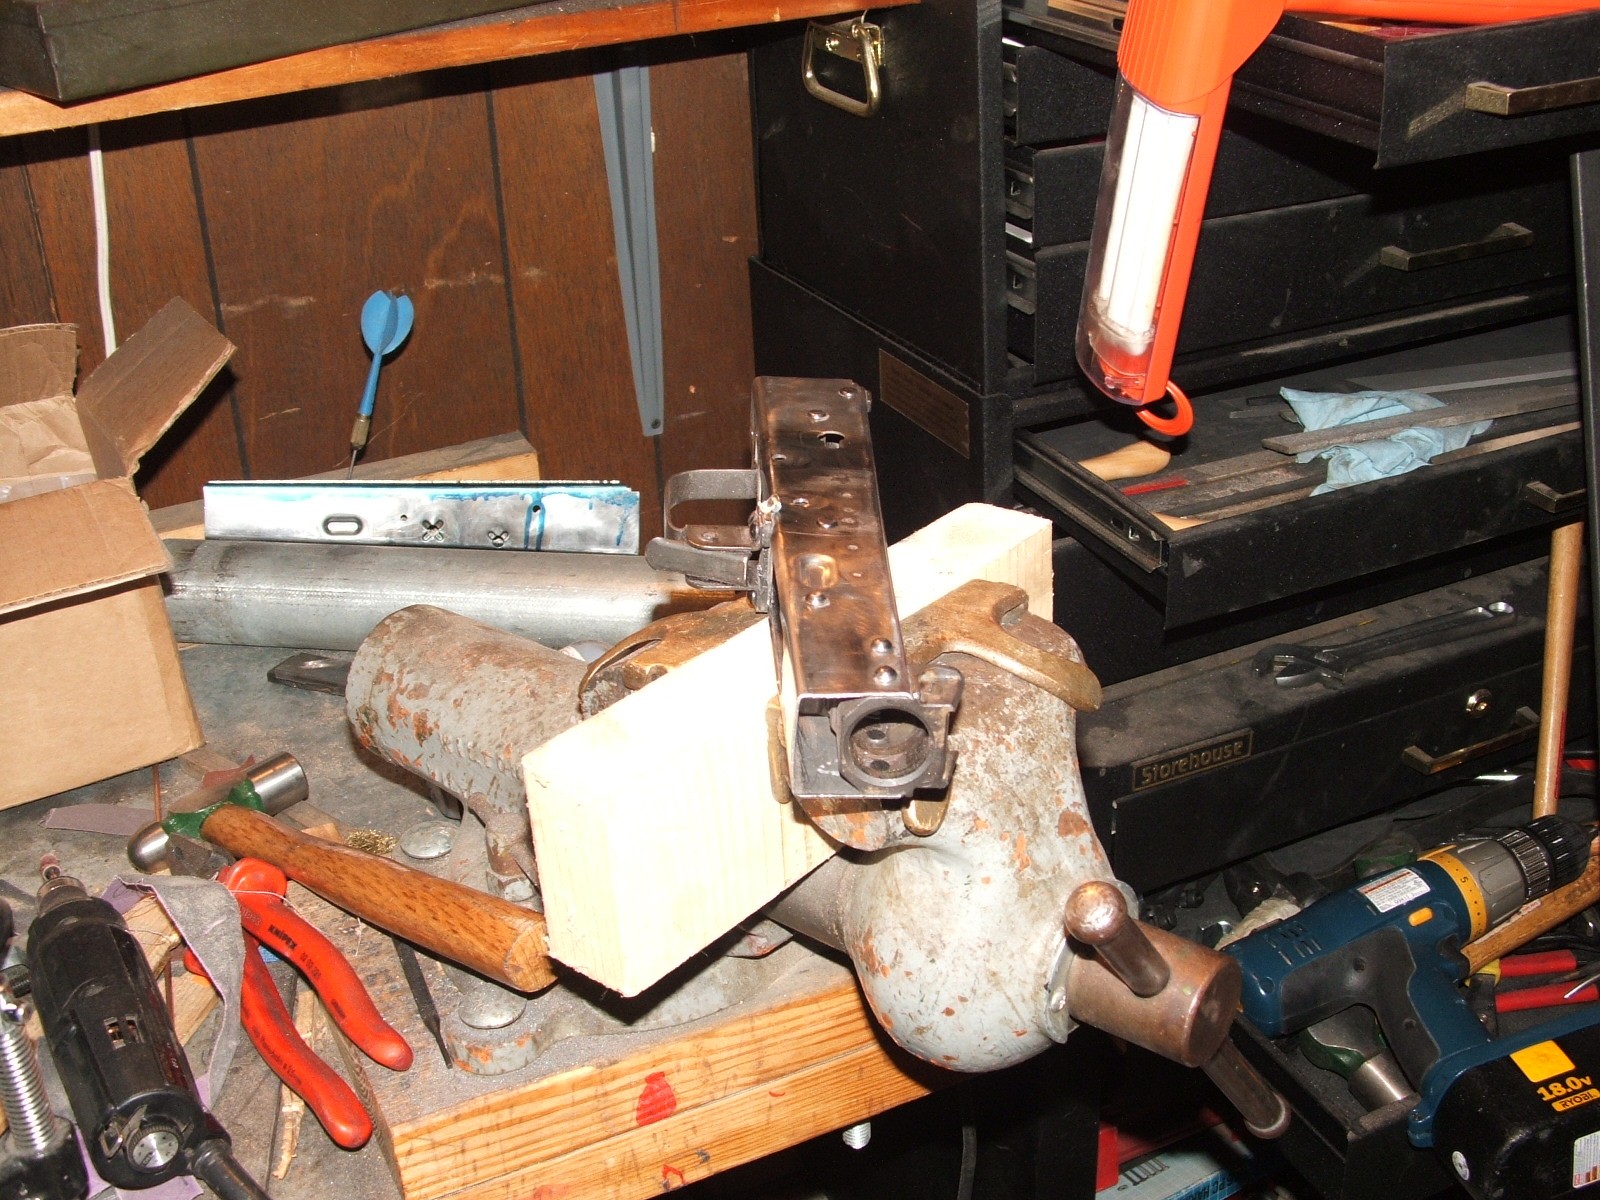
Back when AK-Builder flats didn’t have the top rails cut to size, we had to do the work. I’m talking circa 2006 and then late that year he came out with a simple layout tool that was so awesome. You applied Blue Dychem do your flat, clamped the layout jig to the rail, used a scribe to mark the profile and then you came through with your mill (or Dremel) and cut out the shape. It was faster than doing it all by hand and the one plus was that you could get the exact spacing between the upper rails that you wanted.
It’s pretty straight forward really. You need to insure the rivet jig is sitting on good strong steel cross plates – don’t use wood. I’ve seen guys try so don’t laugh too hard. For the record – that one I never tried – I used 1/2″ steel plate from the get go. Wood is not your friend under high pressures.
Be sure to use the right rivets – AK-Builder sells the best rivets and tailors them to what you are building. Lay them all out and identify what rivets are for the front, the swell neck rivets for the lower back of the front trunnion, etc. A rivet should stick out 1.5x its diameter – that’s it. Just for example and to keep the math easy for me, a 4mm rivet should only stick out 6mm. If you go further, you are going to have problems. As you get experienced, you can buy rivets in bulk and use rivet trimmers but you might want to save that for down the road.
Make sure the rivet and your receiver are all nice and square and that the little cup is under the rivet’s head to support it. Make sure everything is nicely supported too. If you don’t you will bend the receiver. When I make cautions, it’s usually because I did it the wrong way already at some point 🙂
Only extend the rivet arm the minimum amount necessary. The longer it sticks out, the easier it is to bend it. I’ve done that and you may too. If you do, just bend it straight again by pulling it out of the jig, supporting it by steel block and press it straight.
Now go slow. Speed will only help you mess up faster, especially if you are new to this. Extend the little set screw enough to squish the rivet and clear the trunnion walls.
Do not go crazy with the pressure. You want to squish the rivet, not start bending stuff. The rivet swells inside the hole and and the end caps it – that is all you need to accomplish. Too much pressure and tooling starts to bend.
So I have been taking photos of guns and tools for years and years and year. I just recently decided to start dipping in and sharing. I was pretty floored to find this collection of photos of my first build. It was a 1981 Romanian G pattern AKM, affectionately known to many AK builders as a Romy G. I’d invested in AK-Builder tools and used them and a big 20 ton hydraulic H-frame press to do the work. You’ll notice the older AK-Builder flat bending jig is shown. They worked great and the only drawback I ever noticed, and it was not a big one, was that the flats need to have a positioning hole for a roll pin at the end of each flat. This definitely was not a big deal but he did evolve the design to not need that later on.
You can also see the old style AK-Builder flats. They were great to bend but you really needed your act together to do the top rail. I actually botched this first one and made the rails too narrow. Because of this, the gap between the upper rails was too wide and the bolt carrier kept popping out. So, I did a new one and was very careful to get the rails held in place nice and rigid plus I would mill a little and test, mill a little and test to dial the fit in.
I bought a HF mini mill so I could get better looking and more consistent upper rails. Note the 3″ milling vise. I bought that from Little Machine Shop and it works great. I still have both the mini mill and the vise. My one comment on the mini mill is that it is light duty. On my bucket list is a full size mill at least with a digital read out (DRO) if not with CNC. To this day I do a lot of “eye balling” of work and would like to be more precise. Also, I eventually moved away from oak wood fillers to precise steel blocks at some later date. The fun thing about writing this up later is that I recall lessons learned and stuff but remembering dates has never been a forte of mine. As I used the mill more, I really learned to value work holding systems. Old timers’ advise of “take the time set it up right so the work doesn’t move” proved to be a life lesson I draw on to this day.
Here’s the 1981 parts kit. Notice how nice and smooth the barrel is machined. Starting around 1983, the quality started going down hill and you’d see kits where the barrels literally had turning marks going down them that almost looked like threading. By the way, the “G” series AKs were actually well made semi-auto rifles despite one some detractors would say. They were made for the Patriotic Guard hence the “G” for Garda.
The wood was always so coated with goop, I would spray them down with Bix wood stripper several times until I got down to the wood and would then do finish sanding. Now on this rifle I used satin polyurethane and over the years moved to boiled linseed oil as the latter was very easy to fix/maintain. I used a number of reddish brown Minwax stains over the years. I think that was red oak.
I had AK-Builder rivet jigs but I didn’t take photos of them while doing this build for some reason.
Here was the end result. I would have used a US slant brake, Tapco G2 FCG and that might be a Tapco or generic brown US grip. I used to get most of my parts from Copes, Centerfire and DPH Arms back in the day. The finish was Duracoat but I stopped using it after a few years and moved to a combination of parkerizing and Molyresin that held up great. The AK’s selector lever can wear a strip through a finish real fast.
I kept this around but shot it less and less then when the kits skyrocketed to about $300, I cut the receiver off and sold the kit. The funds went to other projects but with 20/20 hindsight, I wish I had kept it for nostalgia. My dad and other family members all had fun shooting this rifle.
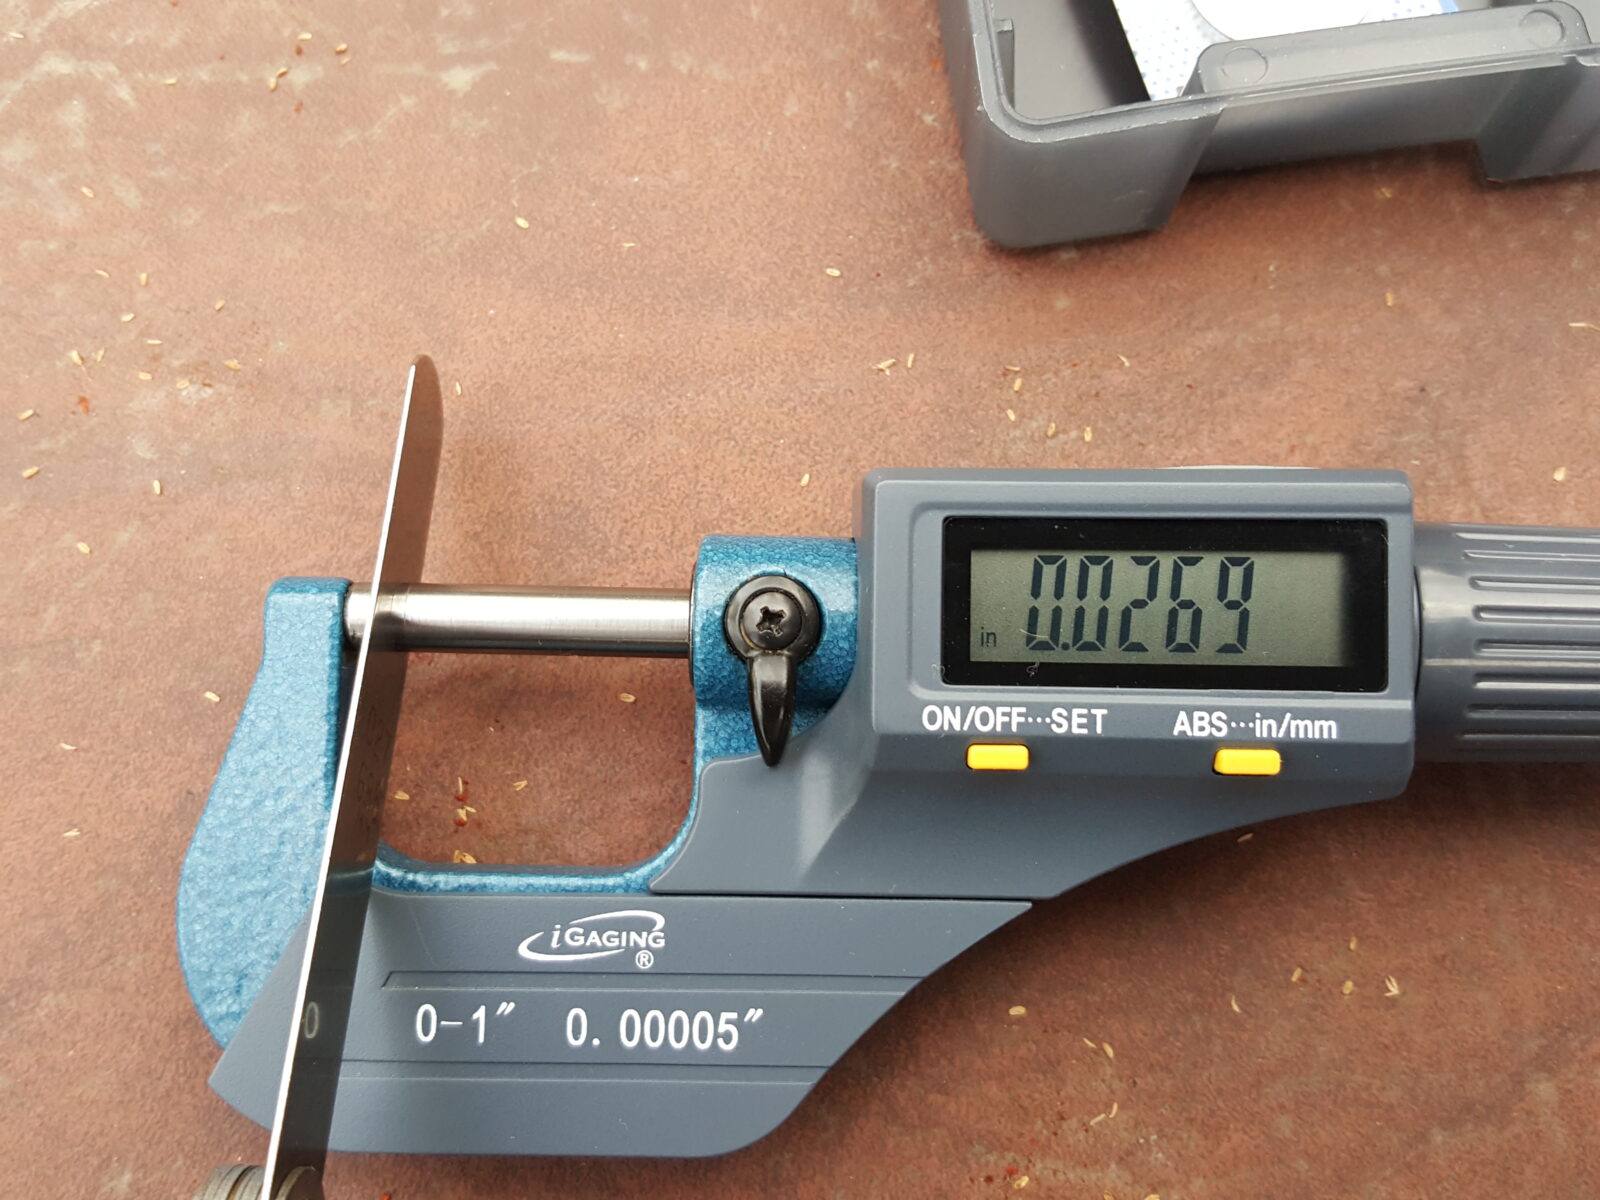
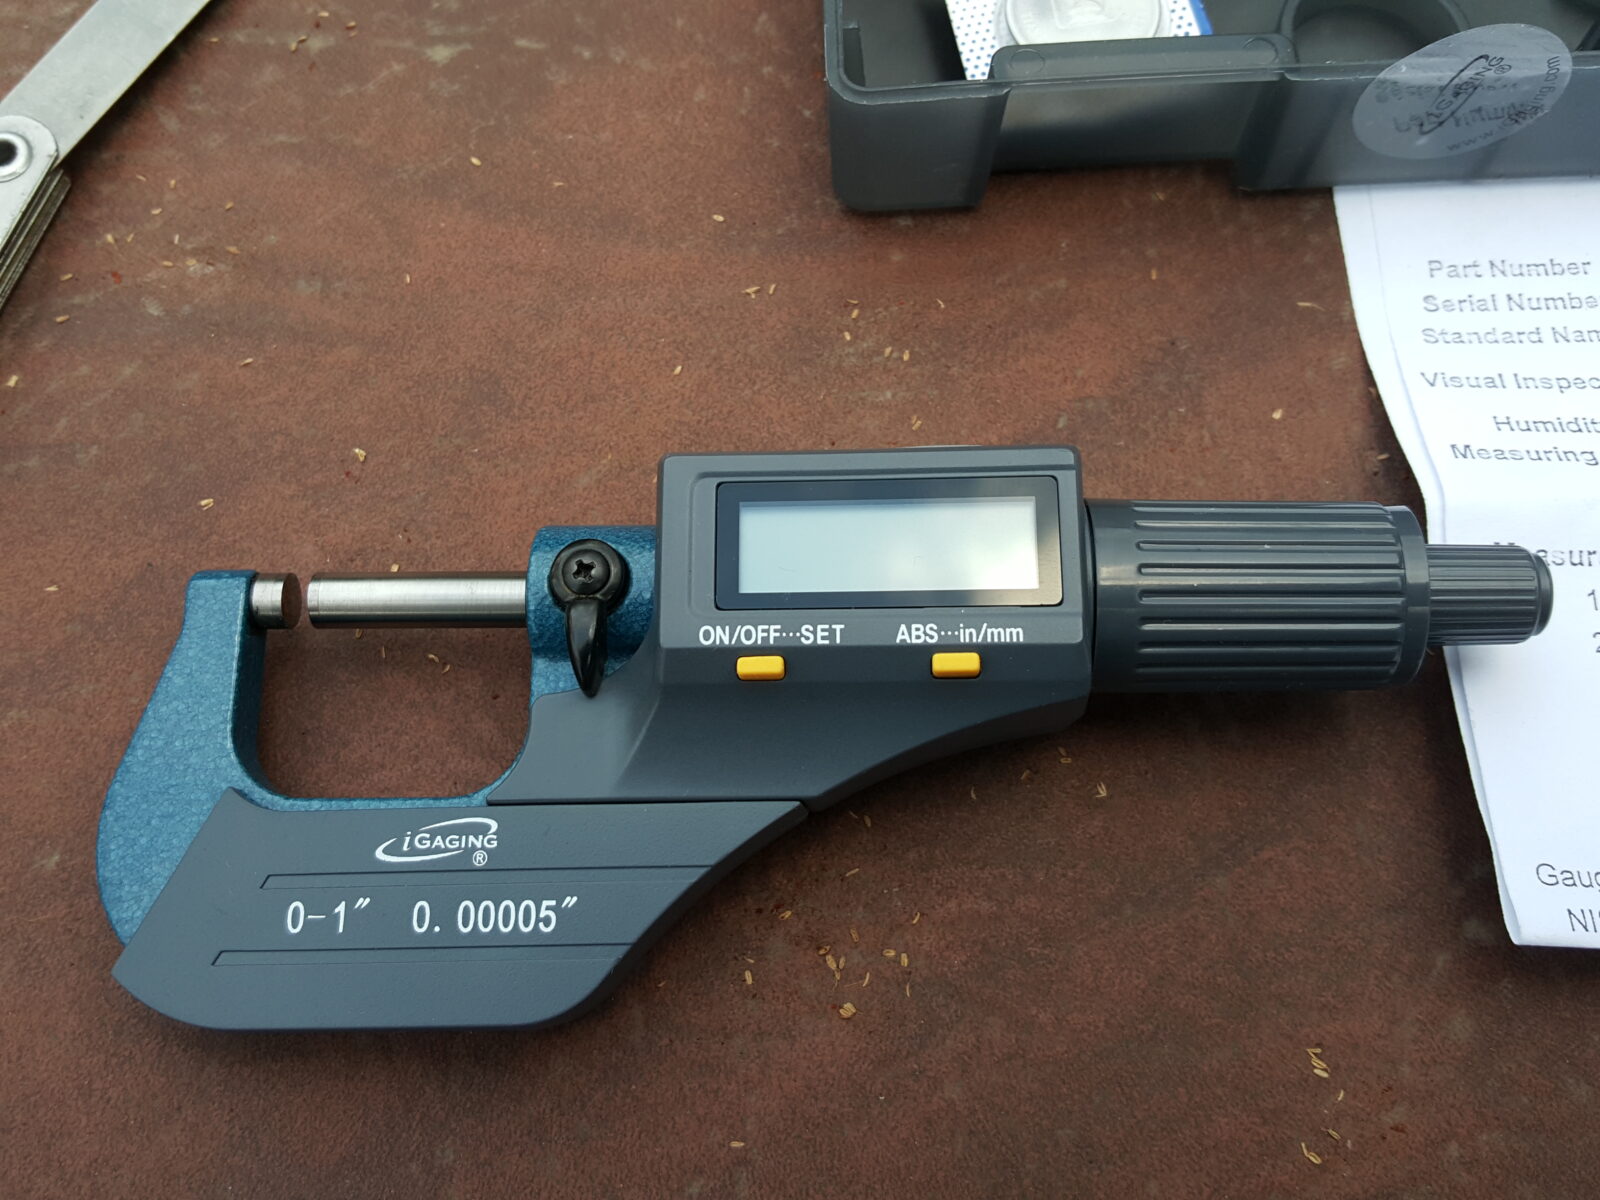
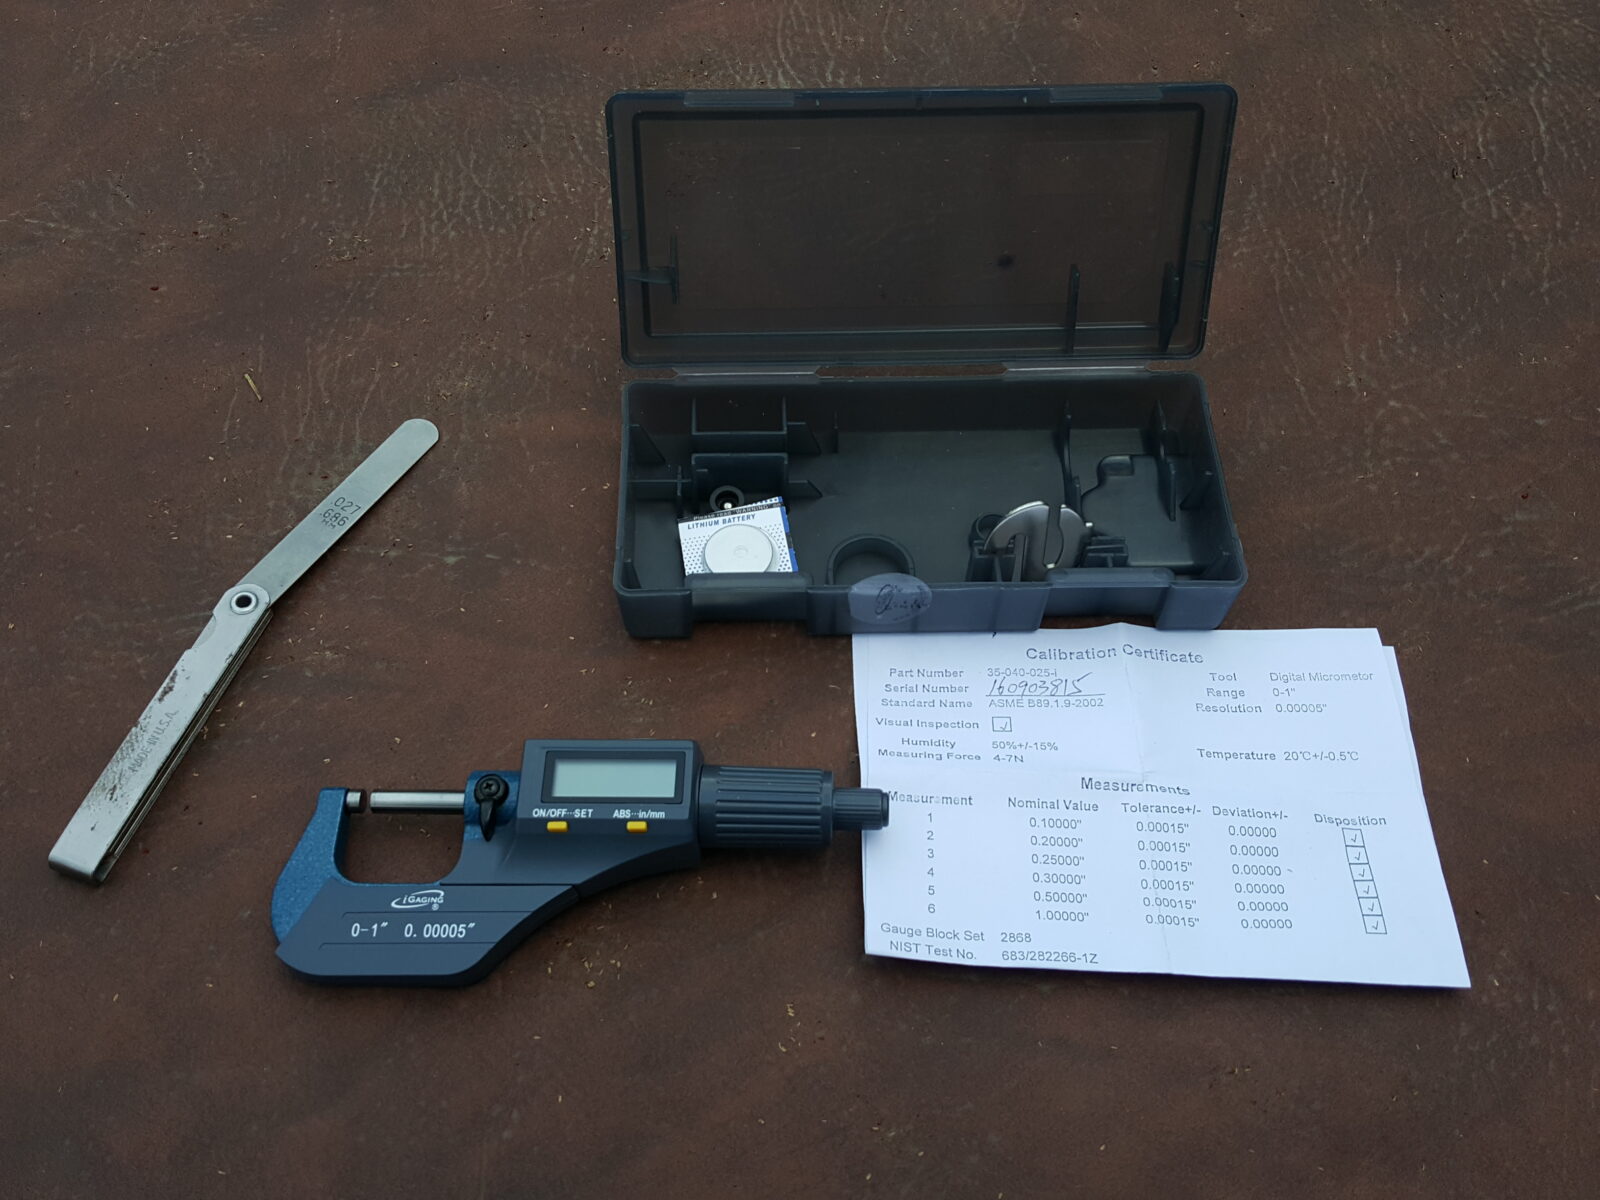
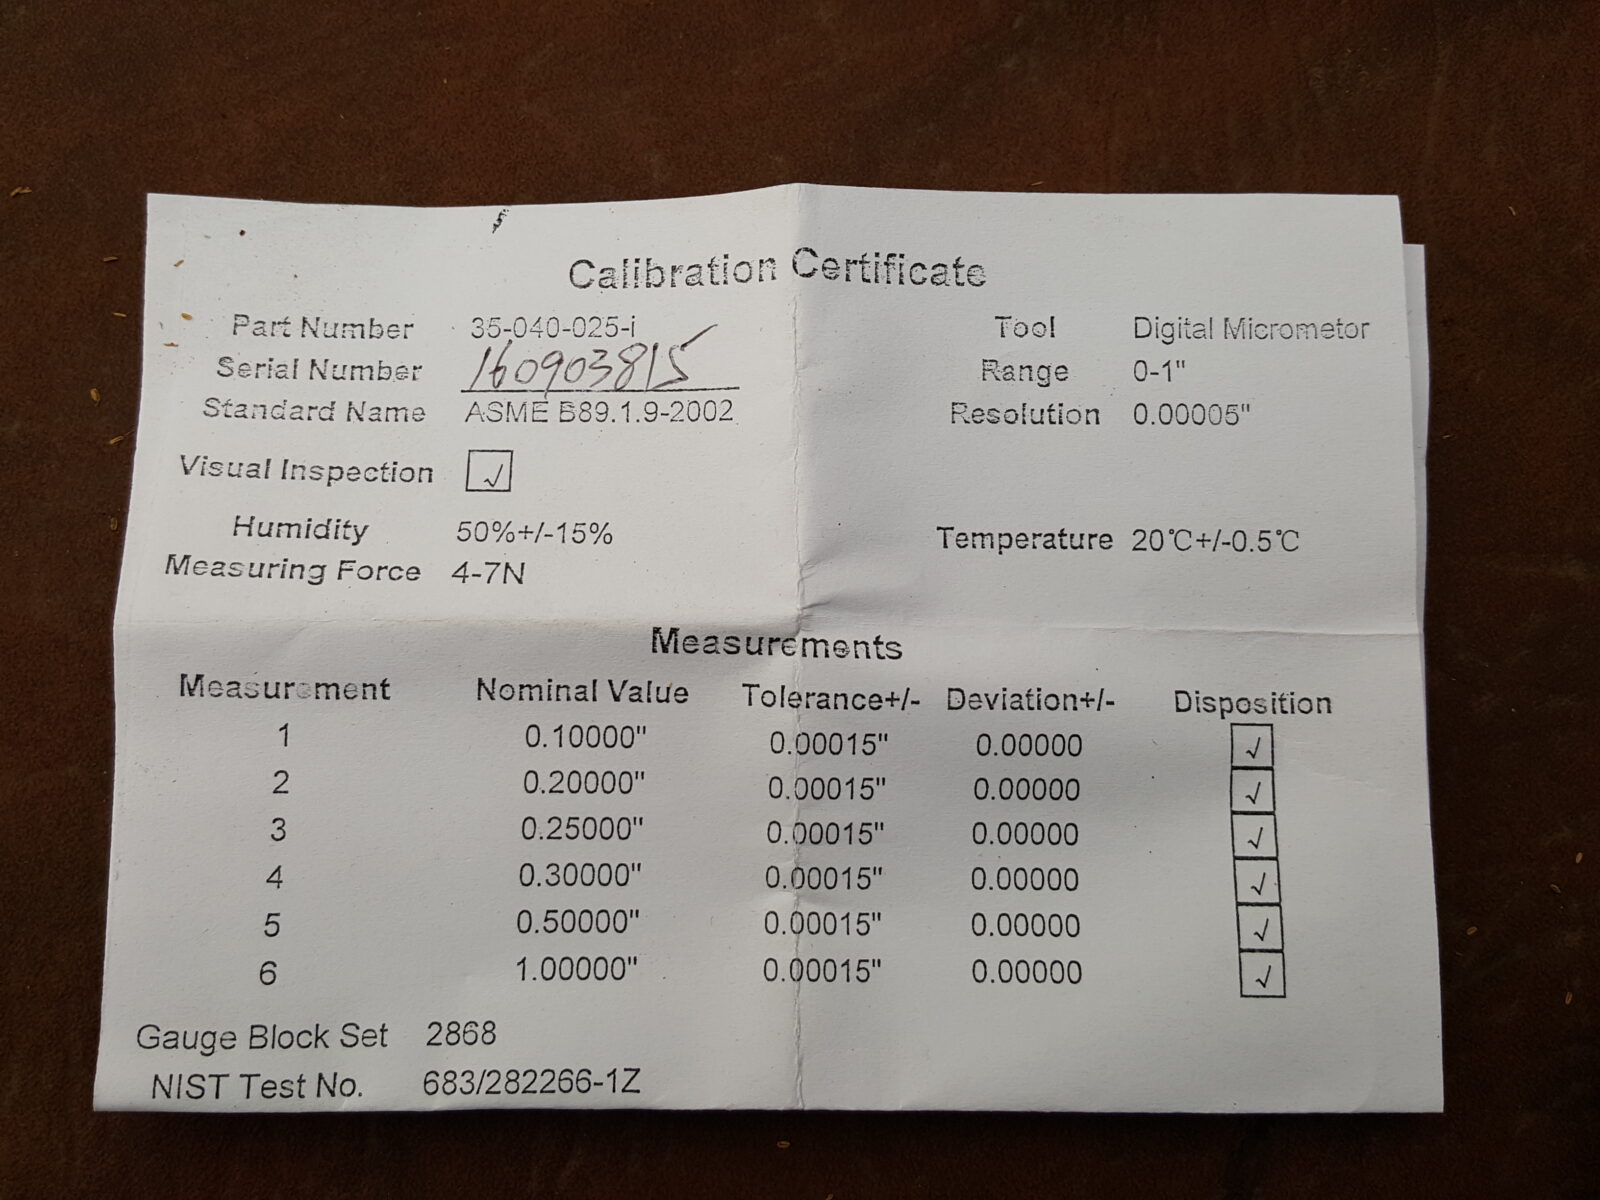
When you are working in the shop, it is frequently very important to have reliable measurements. I have owned a number of calipers and one good dial micrometer (which I can’t find) over the years. I am definitely not a machinist but I run into situations regularly where I need more reliable measurements then what a normal pair of digital calipers can give. I don’t know if you’ve noticed but it is really easy to get readings all over the place on a caliper depending on how hard you squeeze it. At any rate, I realize I really should invest in a digital micrometer but had a limited budget also I started doing a bunch of research and found the IGaging 0-1″ micrometer at Amazon. I bought it back in January 2017 and have been very happy. Everything about it is very easy to use. This is exactly what I have and you can click on the link to learn more and order one:
4/10/2017 Testing:
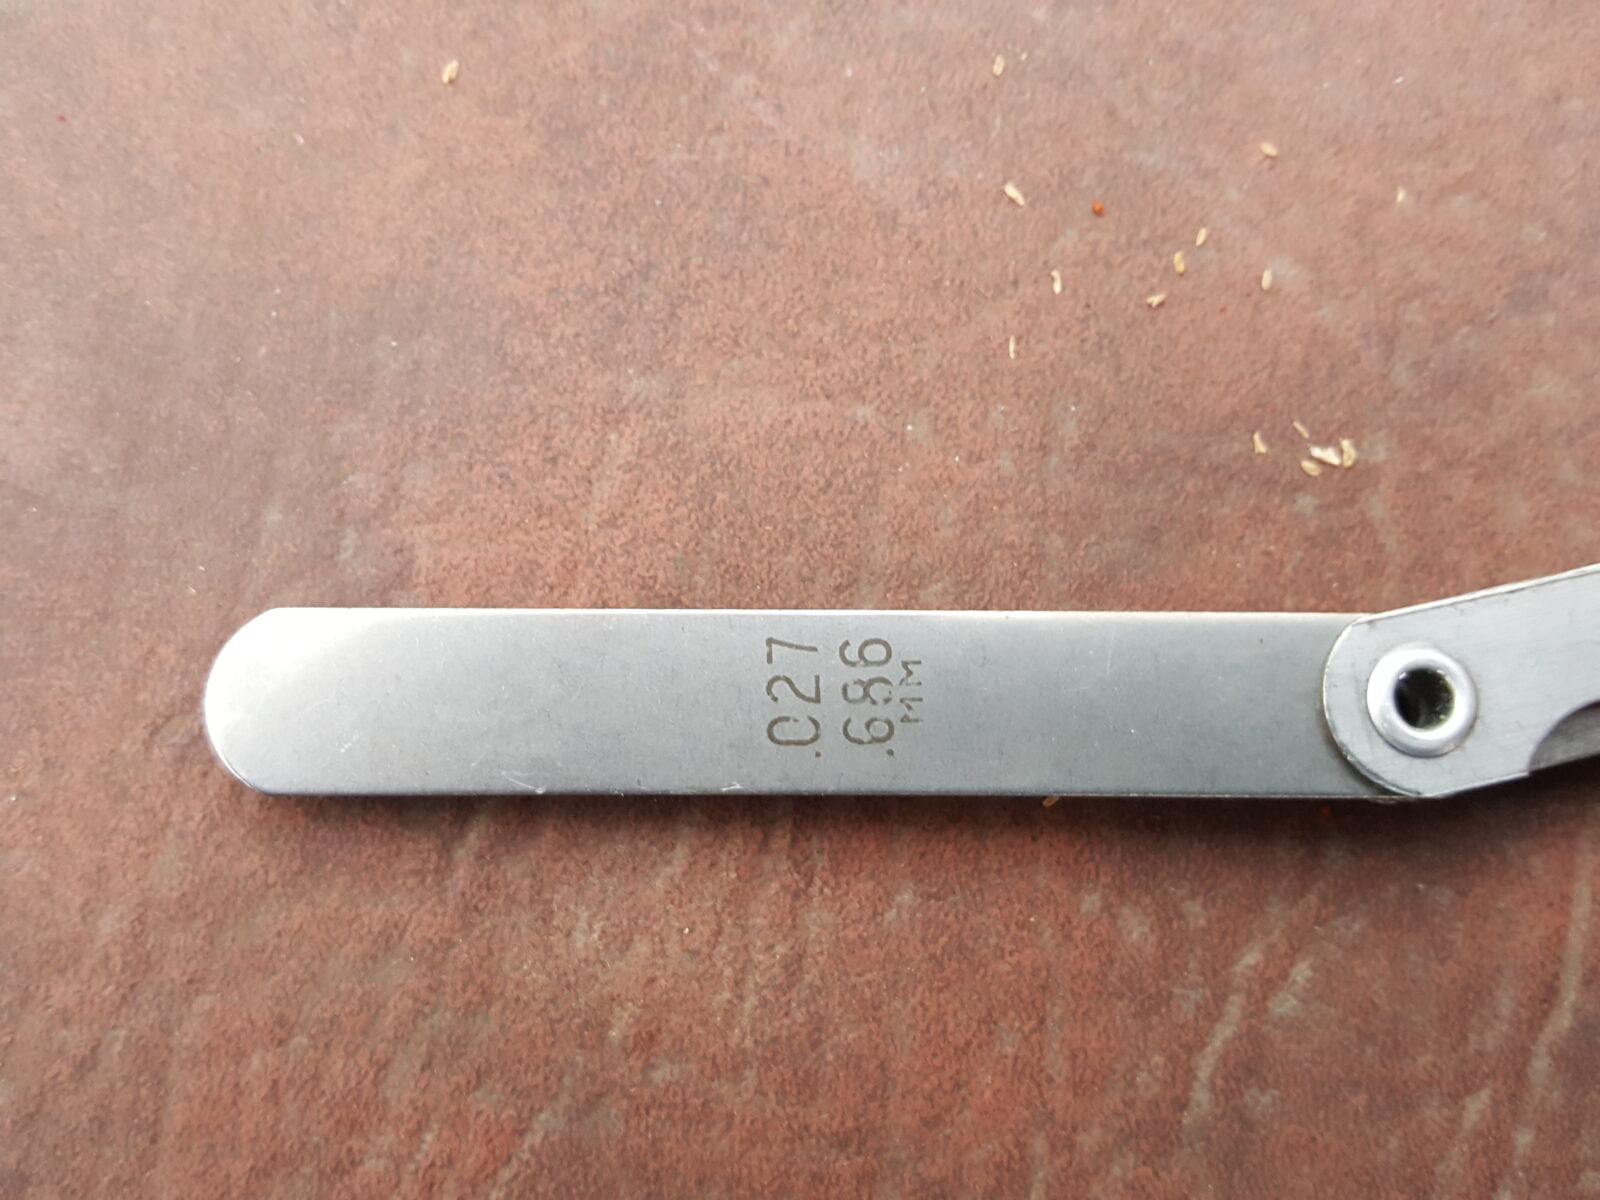
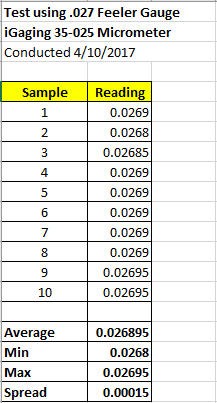
After I posted the blog, some guys asked me to take a feeler gauge, get some samples and post the results. I must admit I know I should take 30 samples but opted just to do 10 for the sake of time. I zeroed the micrometer and pulled out the .027″ blade and I have no idea where the set came from – quite possibly Autozone or Harbor Freight so just how exact it is, I don’t know. I would take a measurement, back the anvil off a few turns, and bring it in again until I could hear the clutch click. The work and the micrometer were resting on the table at all times unlike the photo I took above. Here is the results that I generated in Excel:
I think it is remarkable that out of 10 scores there was only a spread of 0.00015″ – that repeatability is pretty cool given the price of this micrometer and is exactly why I wanted a micrometer vs. a caliper for some of the stuff I do.
What I like:
Very easy to use with simple instructions
Large easy to read digits
You can adjust a little clutch to get consistent clamping during measurements
The battery is easy to get to
Appears to take consistent measures
As you can see from testing, repeatability appears to fall very close to their 0.0001″ claim
If we assume that the gauge really is .027, then the average (.026895) is exactly .000105 short of that but that is an assumption
Easy to toggle between inches and millimeters, which I have to do all the time
Con:
One small complaint is a very cheap case. Now, I’d rather have the money spent on the tool so this is a nit-picking con but also the only one I have so far.
If you’re looking for a good budget 0-1″micrometer that does not break the bank, I would recommend you buy it.
7/19/2019 Update: Still going strong. No problems to report.