My friend Scott Igert owns Michigan Gun Exchange and recently got in a bunch of out the front (OTF) automatic knives from Great Lakes Firearms and Ammunition (GLFA). This caught my attention for a couple of reasons – 1) I had never heard of GLFA. 2) The knives looked and felt decent 3) The 8″ model was only $45 at the time when Scott was introducing the model line. Well, I had to buy one right then and there to study it. At least, that would be my cover story if my wife asked.
Who is GLFA?
According to their “About Us” page – Great Lakes Firearms and Ammunition is located in Sparta, MI, and is a family owned business. They started in firearms retail in 2013 but noticed an opportunity for affordable AR rifles and started manufacturing. They now have over 30 CNC machines, do their own Cerakoting and are steadily expanding. They do not have any knife listings on their site – in general, their site is pretty light on products and details.
I’ll be honest, I did some reading on their ARs and they have mixed reviews. Some guys love their rifles and others don’t so I really can’t speak to them. The focus of this post is about the OTF knife I bought from Scott.
Opening The Box
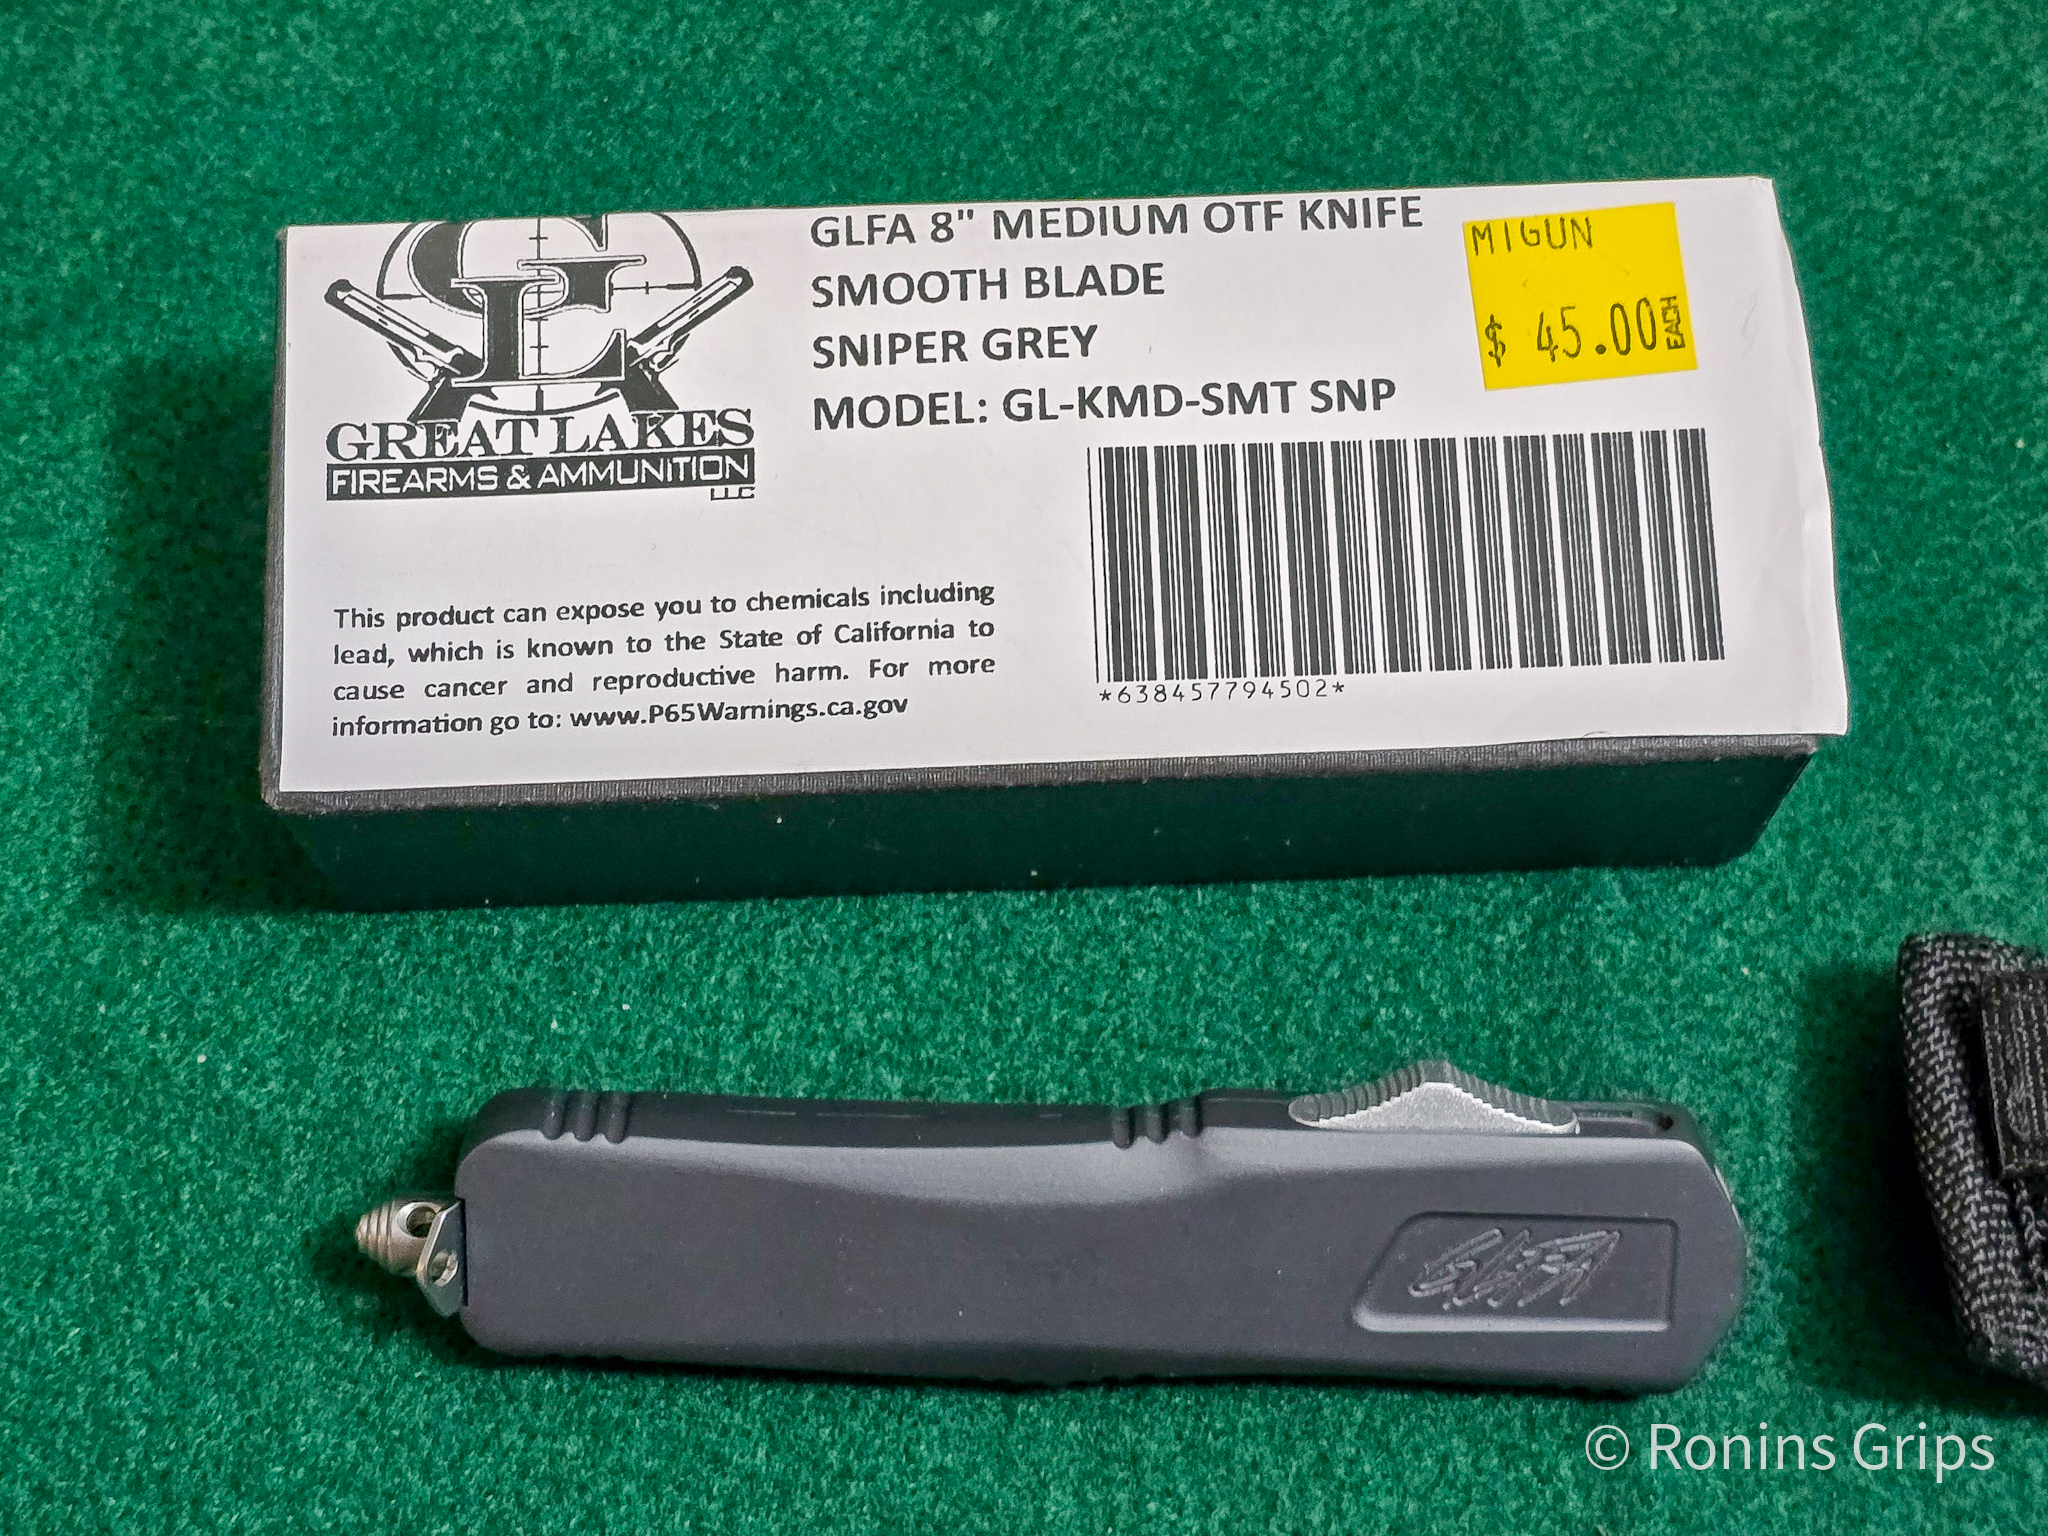
At home, I took a hard look at the knife. It came in a box with a white label on it with a cheap sheath. It was pretty bare bones which immediately made me think it was made by somebody else – probably in China given the price point. I couldn’t think of any firms in the US being able to wholesale an OTF knife for under $45 (you can see the sticker on the box – that was what Scott was selling it for at the time).
The knife came in a bare bones package. The while label is pretty much a giveaway that another firm was the OEM.
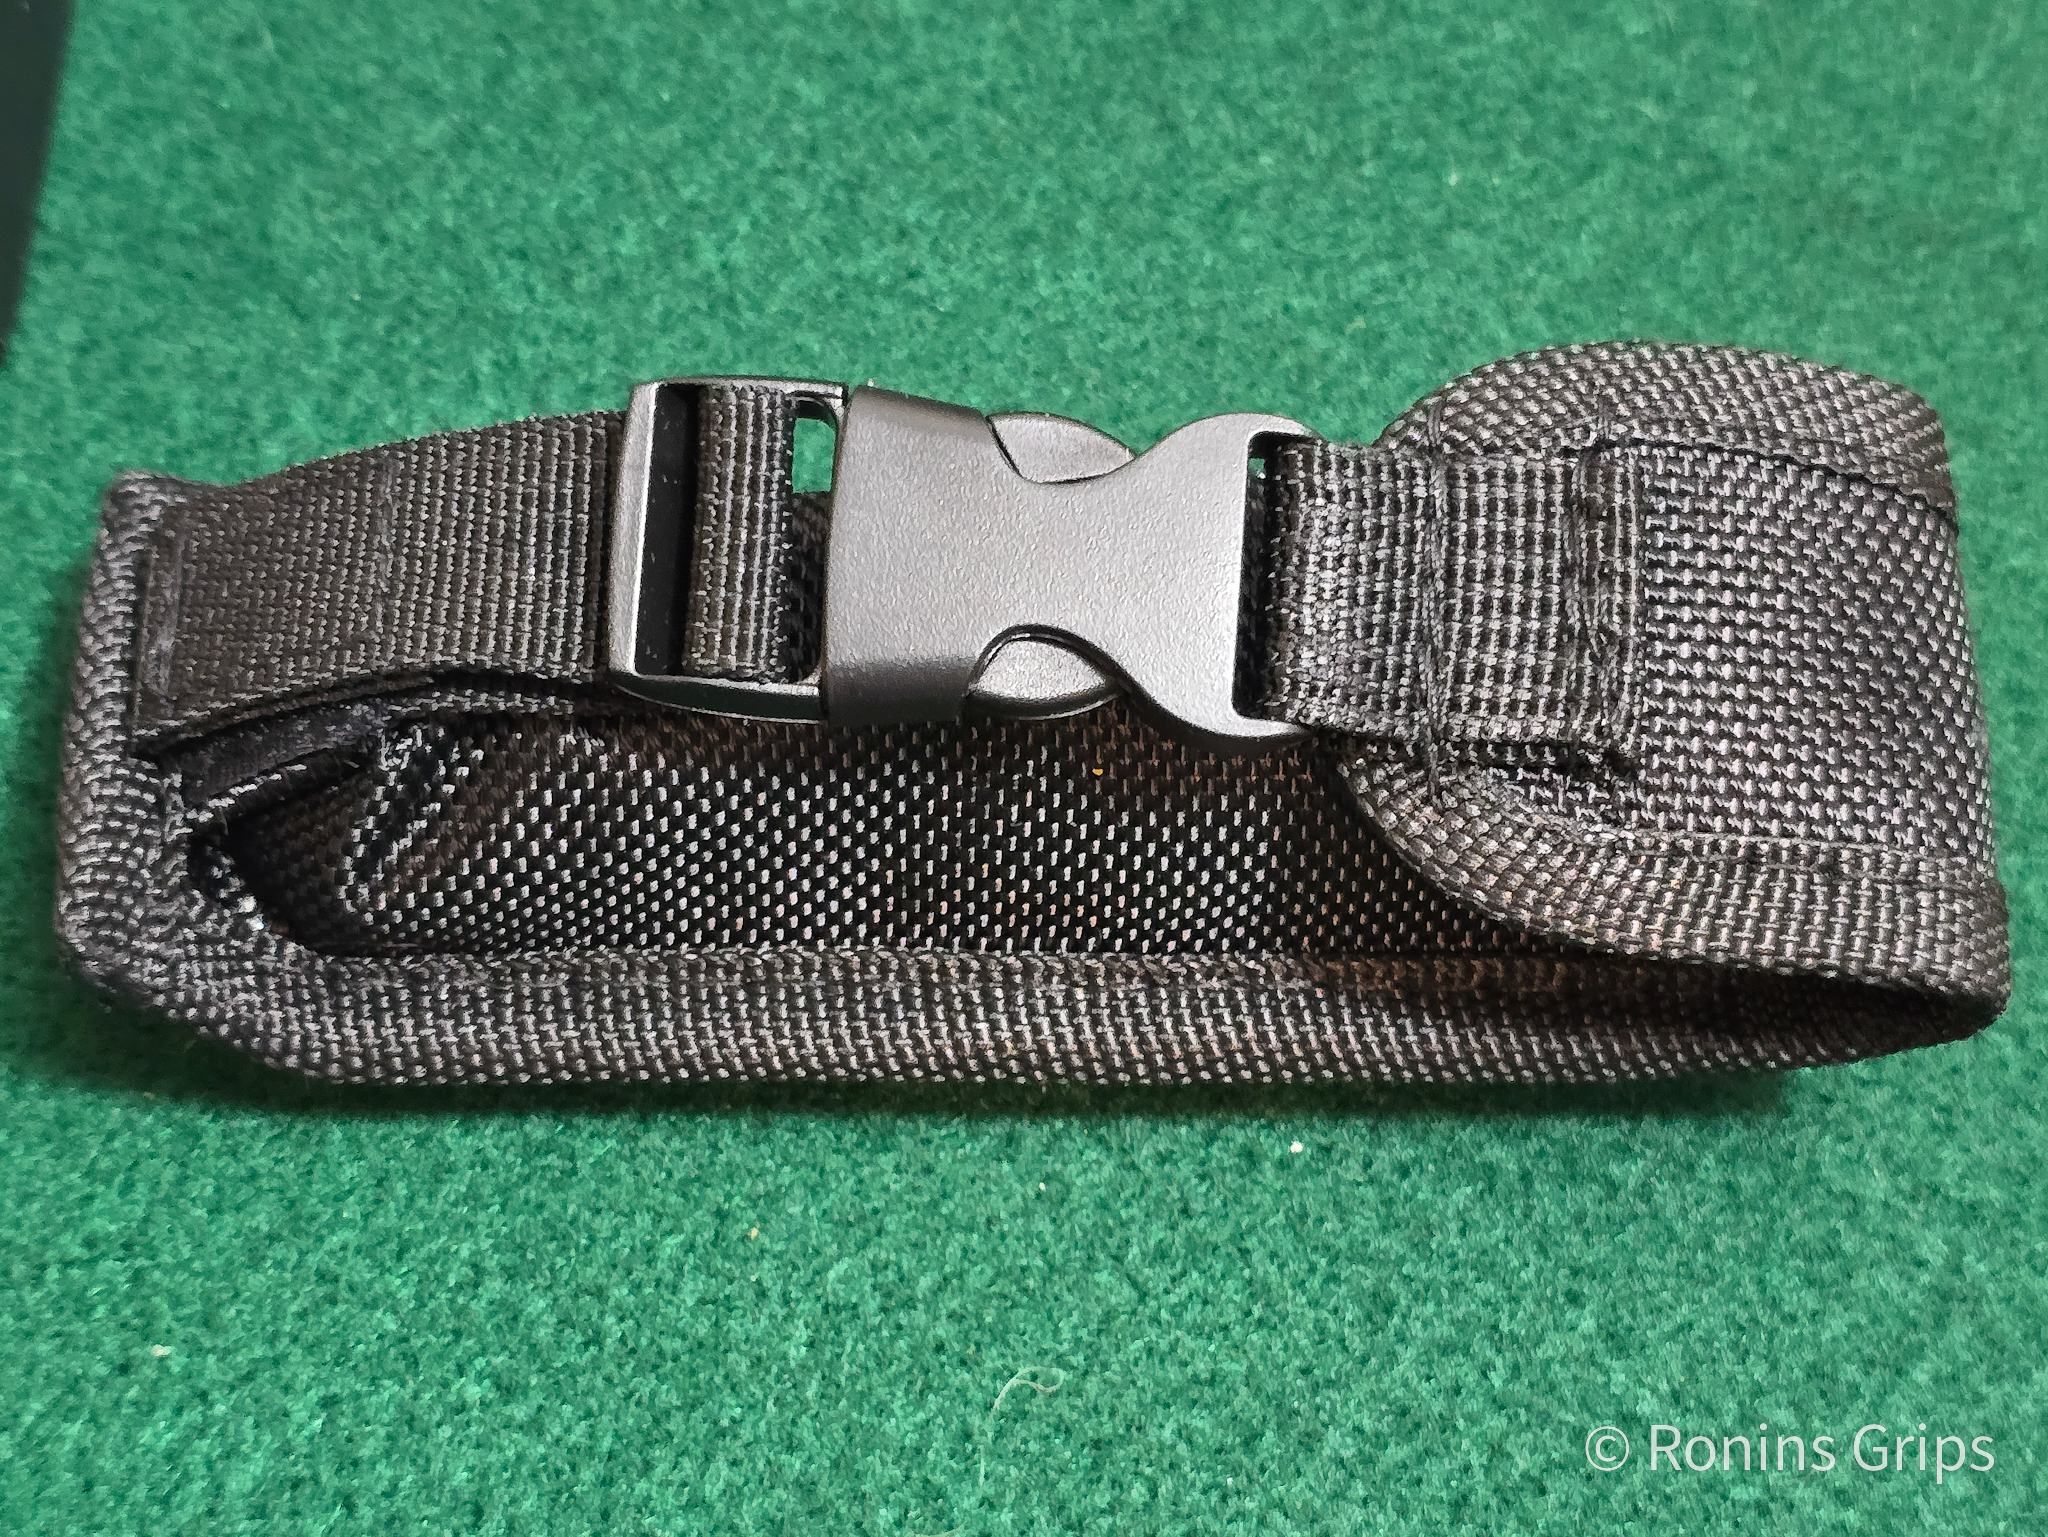
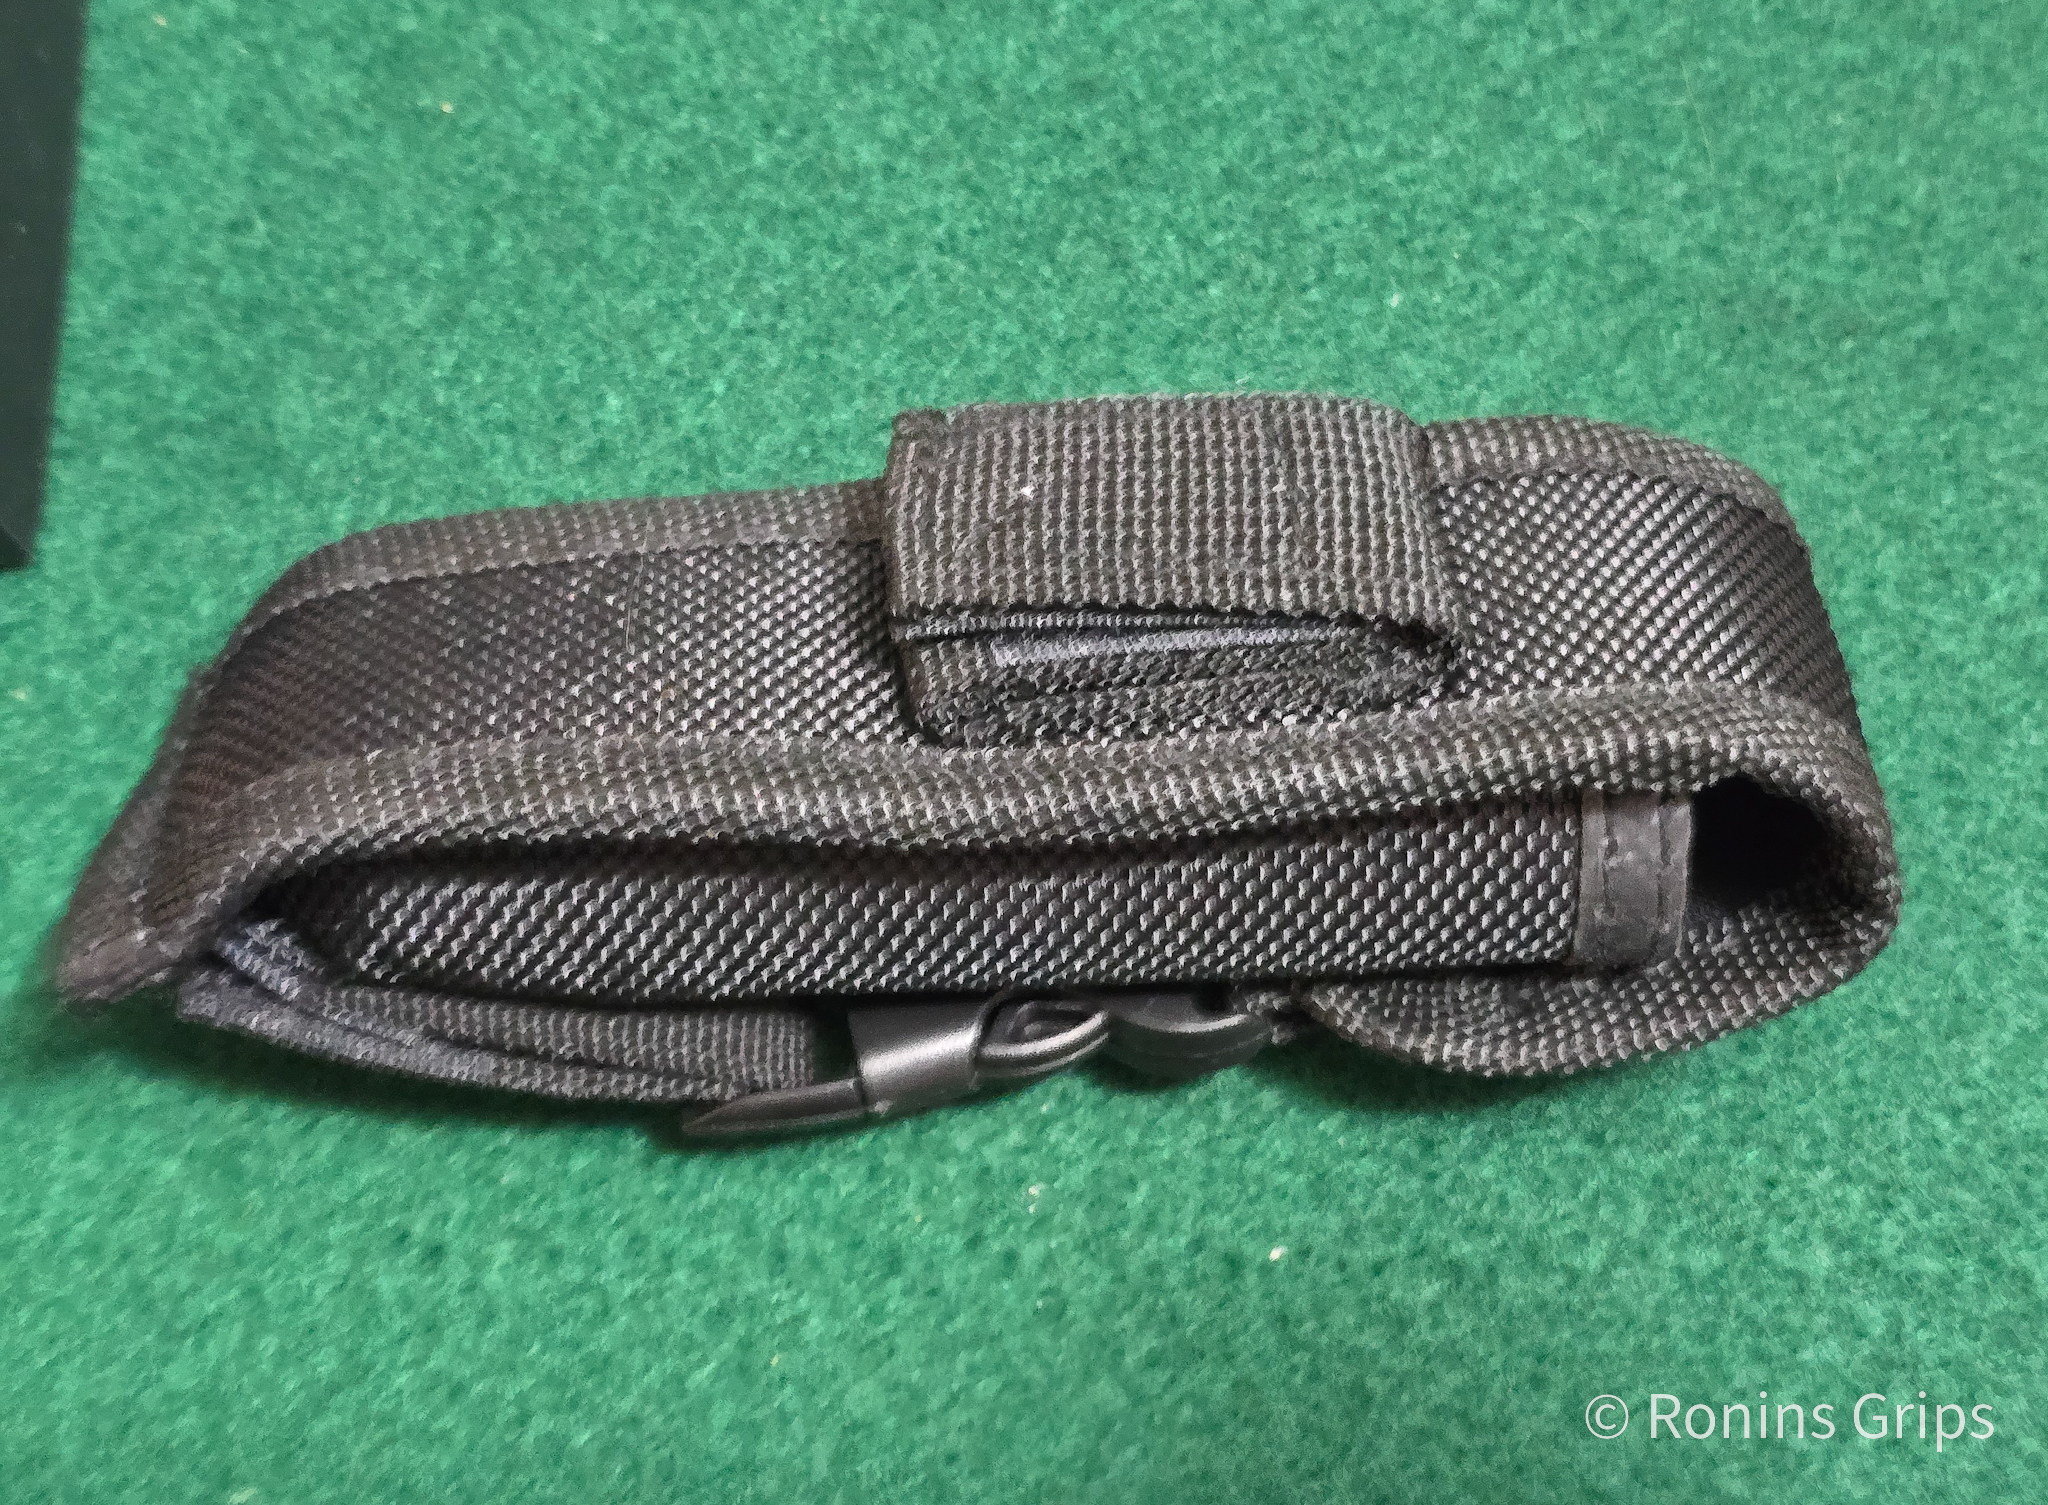
I’m make my only real negative comment up front. It comes with a really cheap belt sheath that I would recommend replacing if you want a sheath. The stitching is light and I have zero faith in the velcro belt loop on the back.
I wouldn’t trust the velcro belt/equipment loop. I guess they felt they needed to include one but I would replace the sheath vs. ever use it *if* I wanted to carry the knife in a sheath.
Honestly, at the price point this sells at, this is the only thing I am going to ding them on and it’s not a big deal to get a good sheath. I’d rather they invested in the knife anyways.
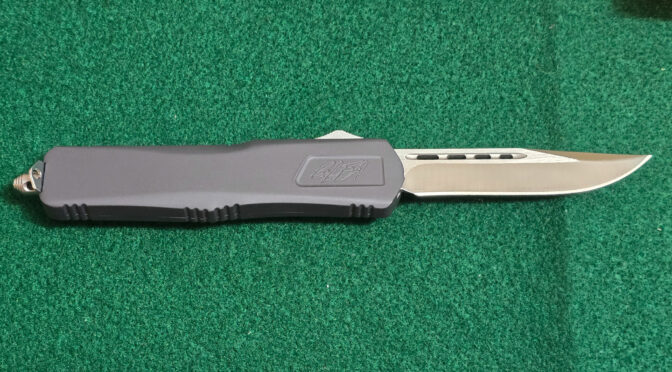
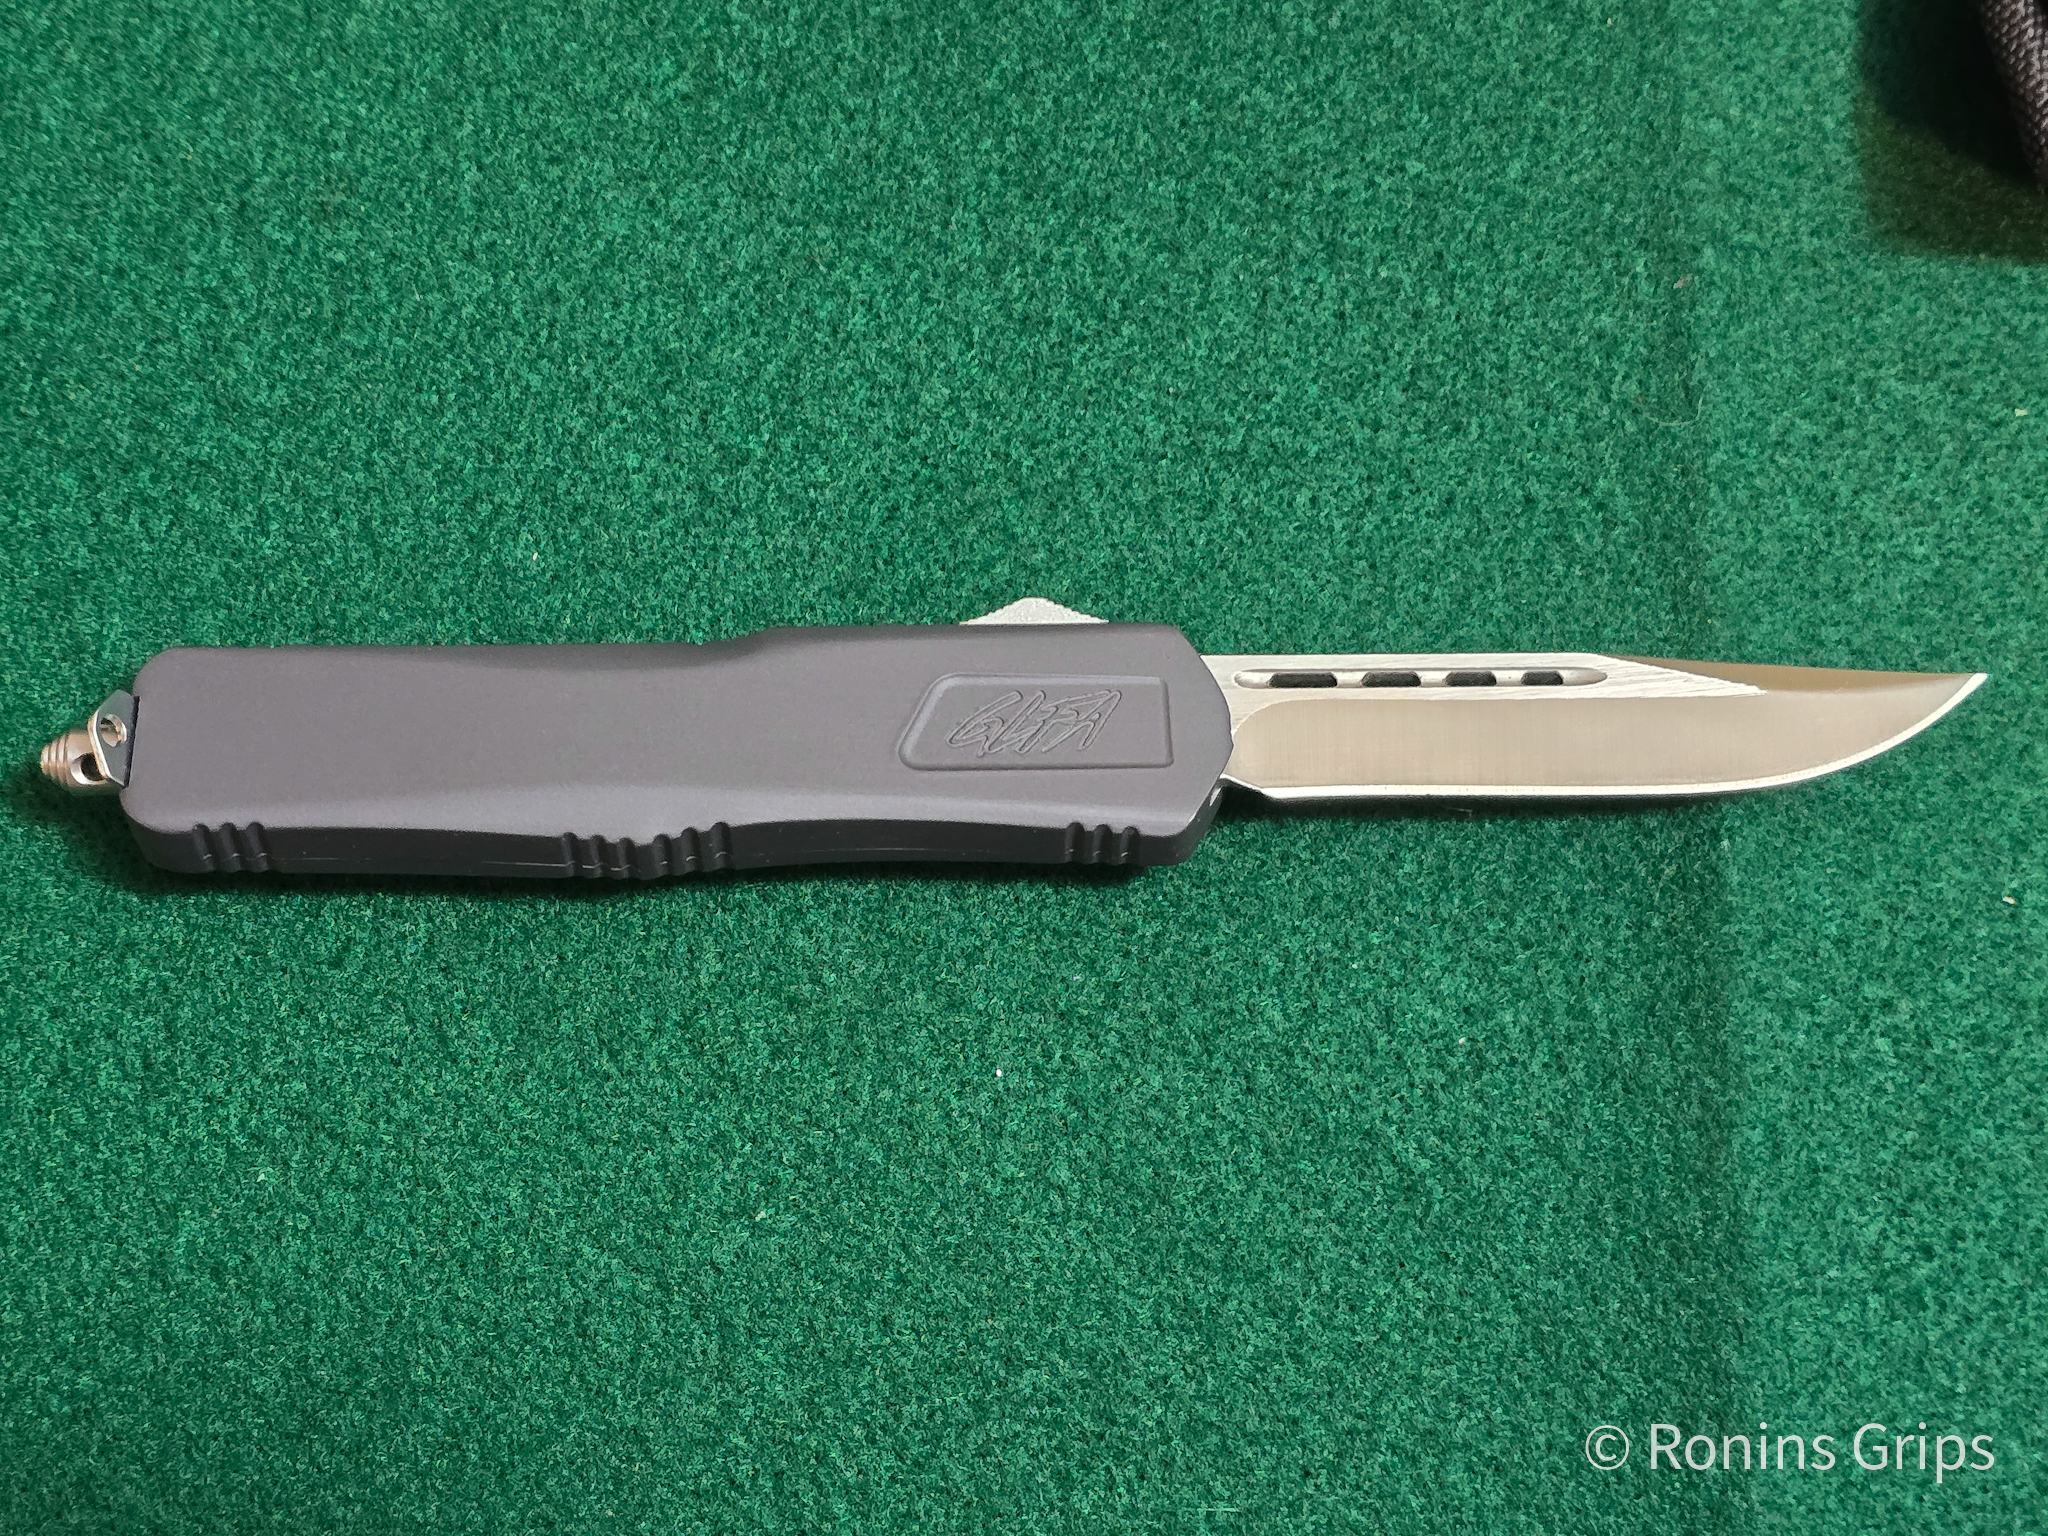
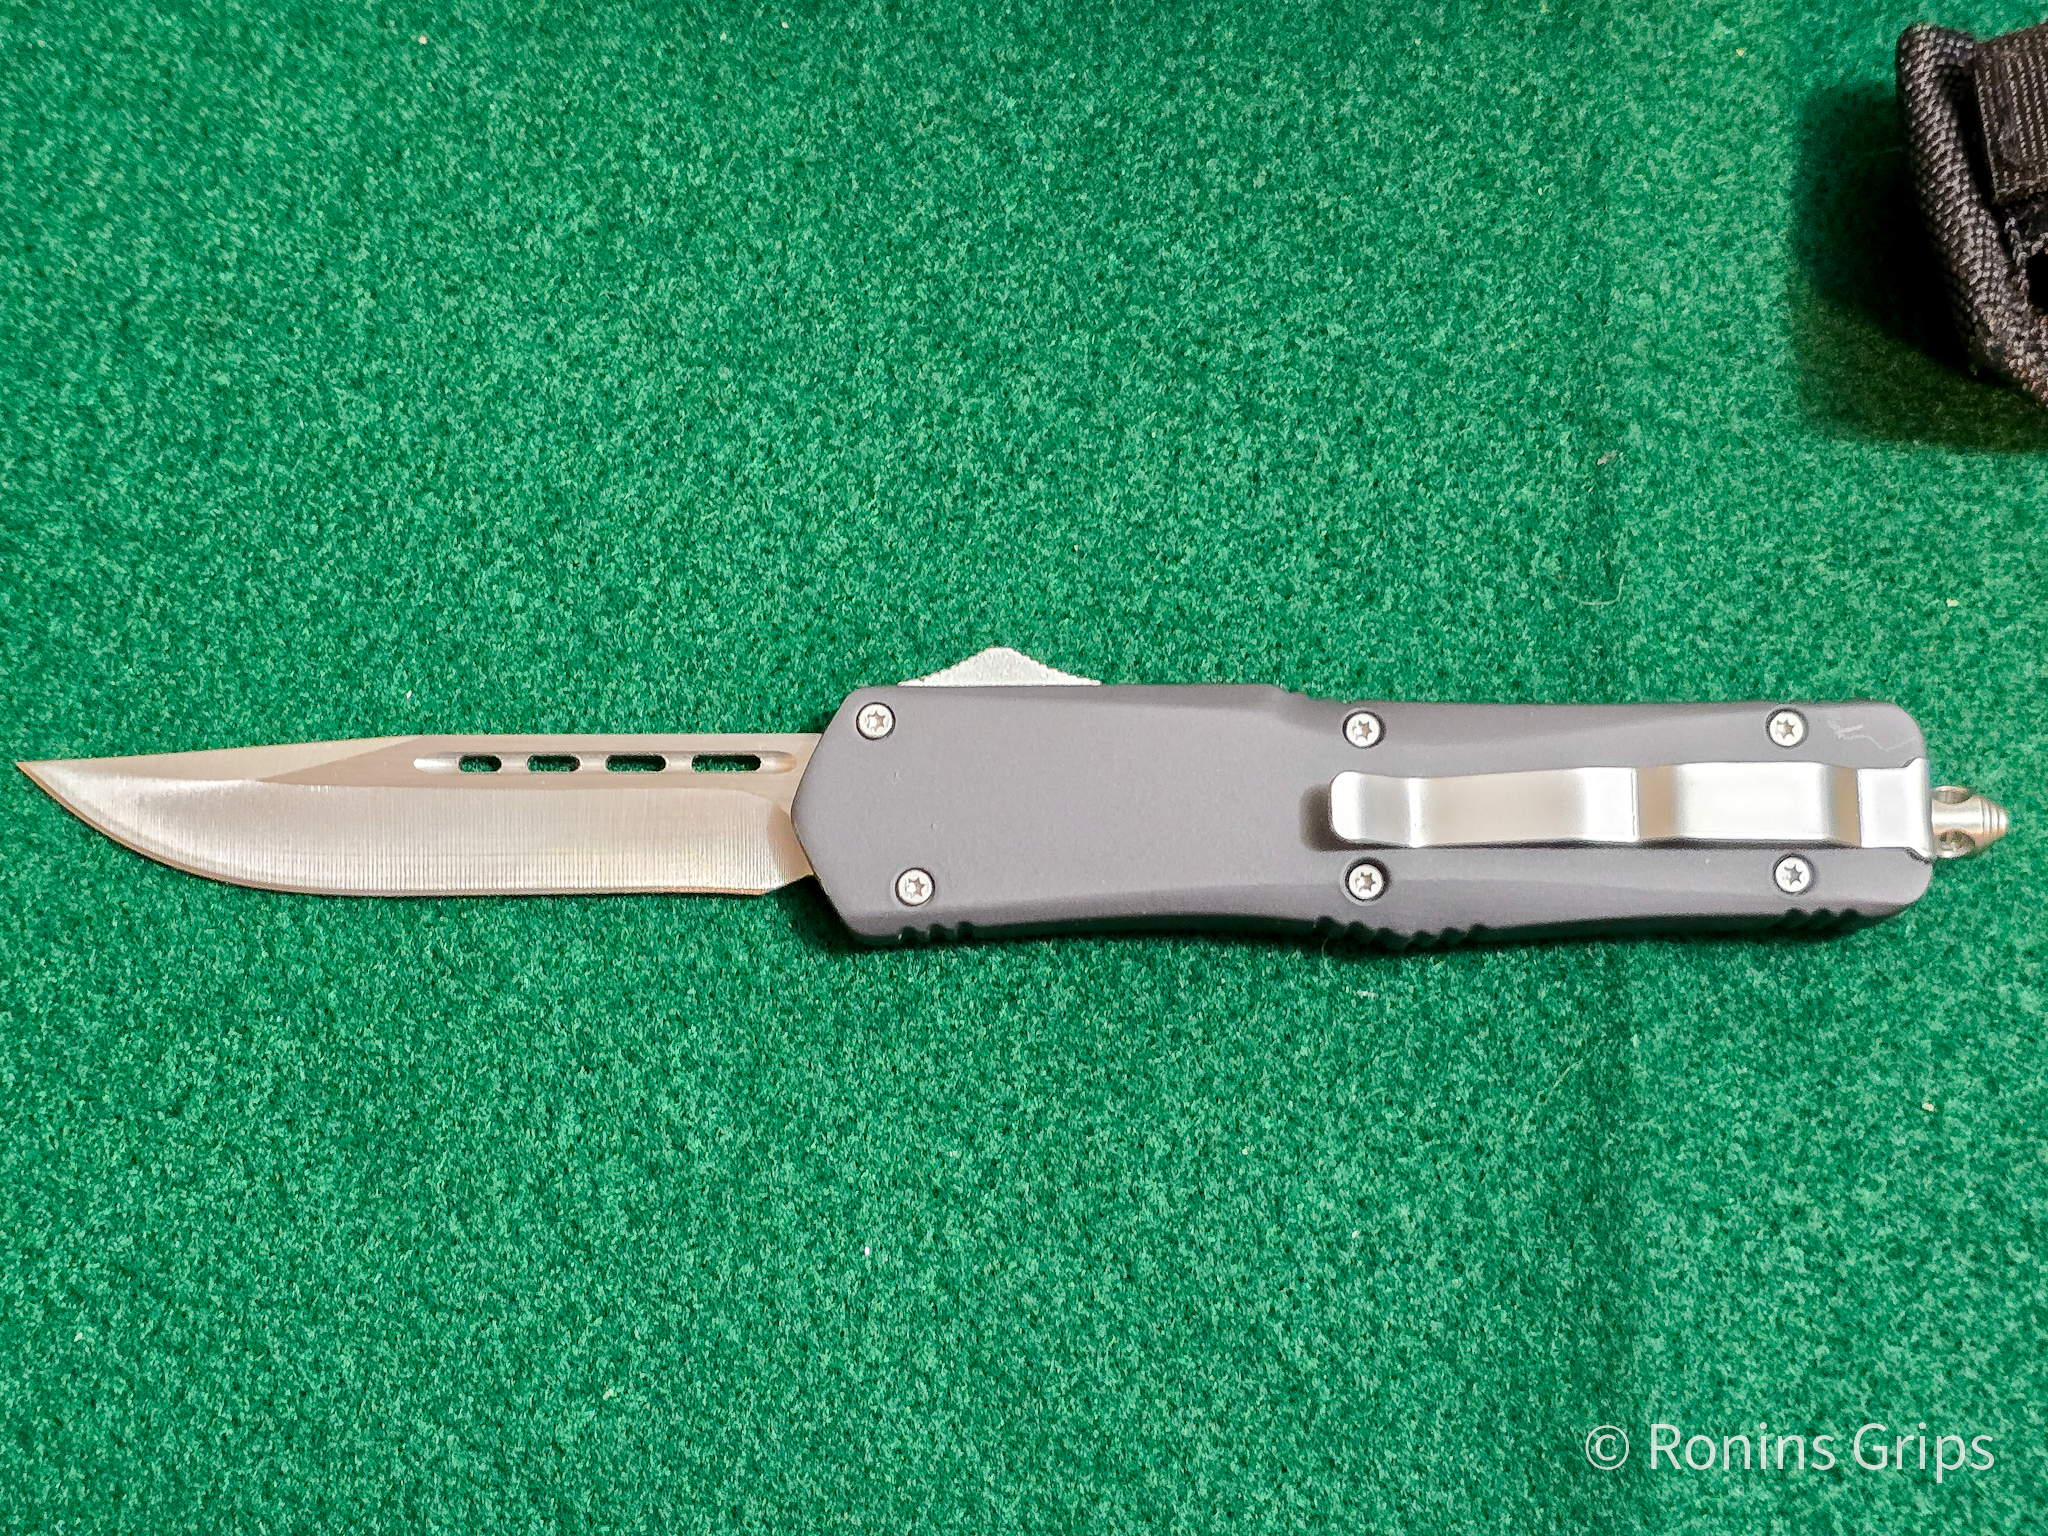
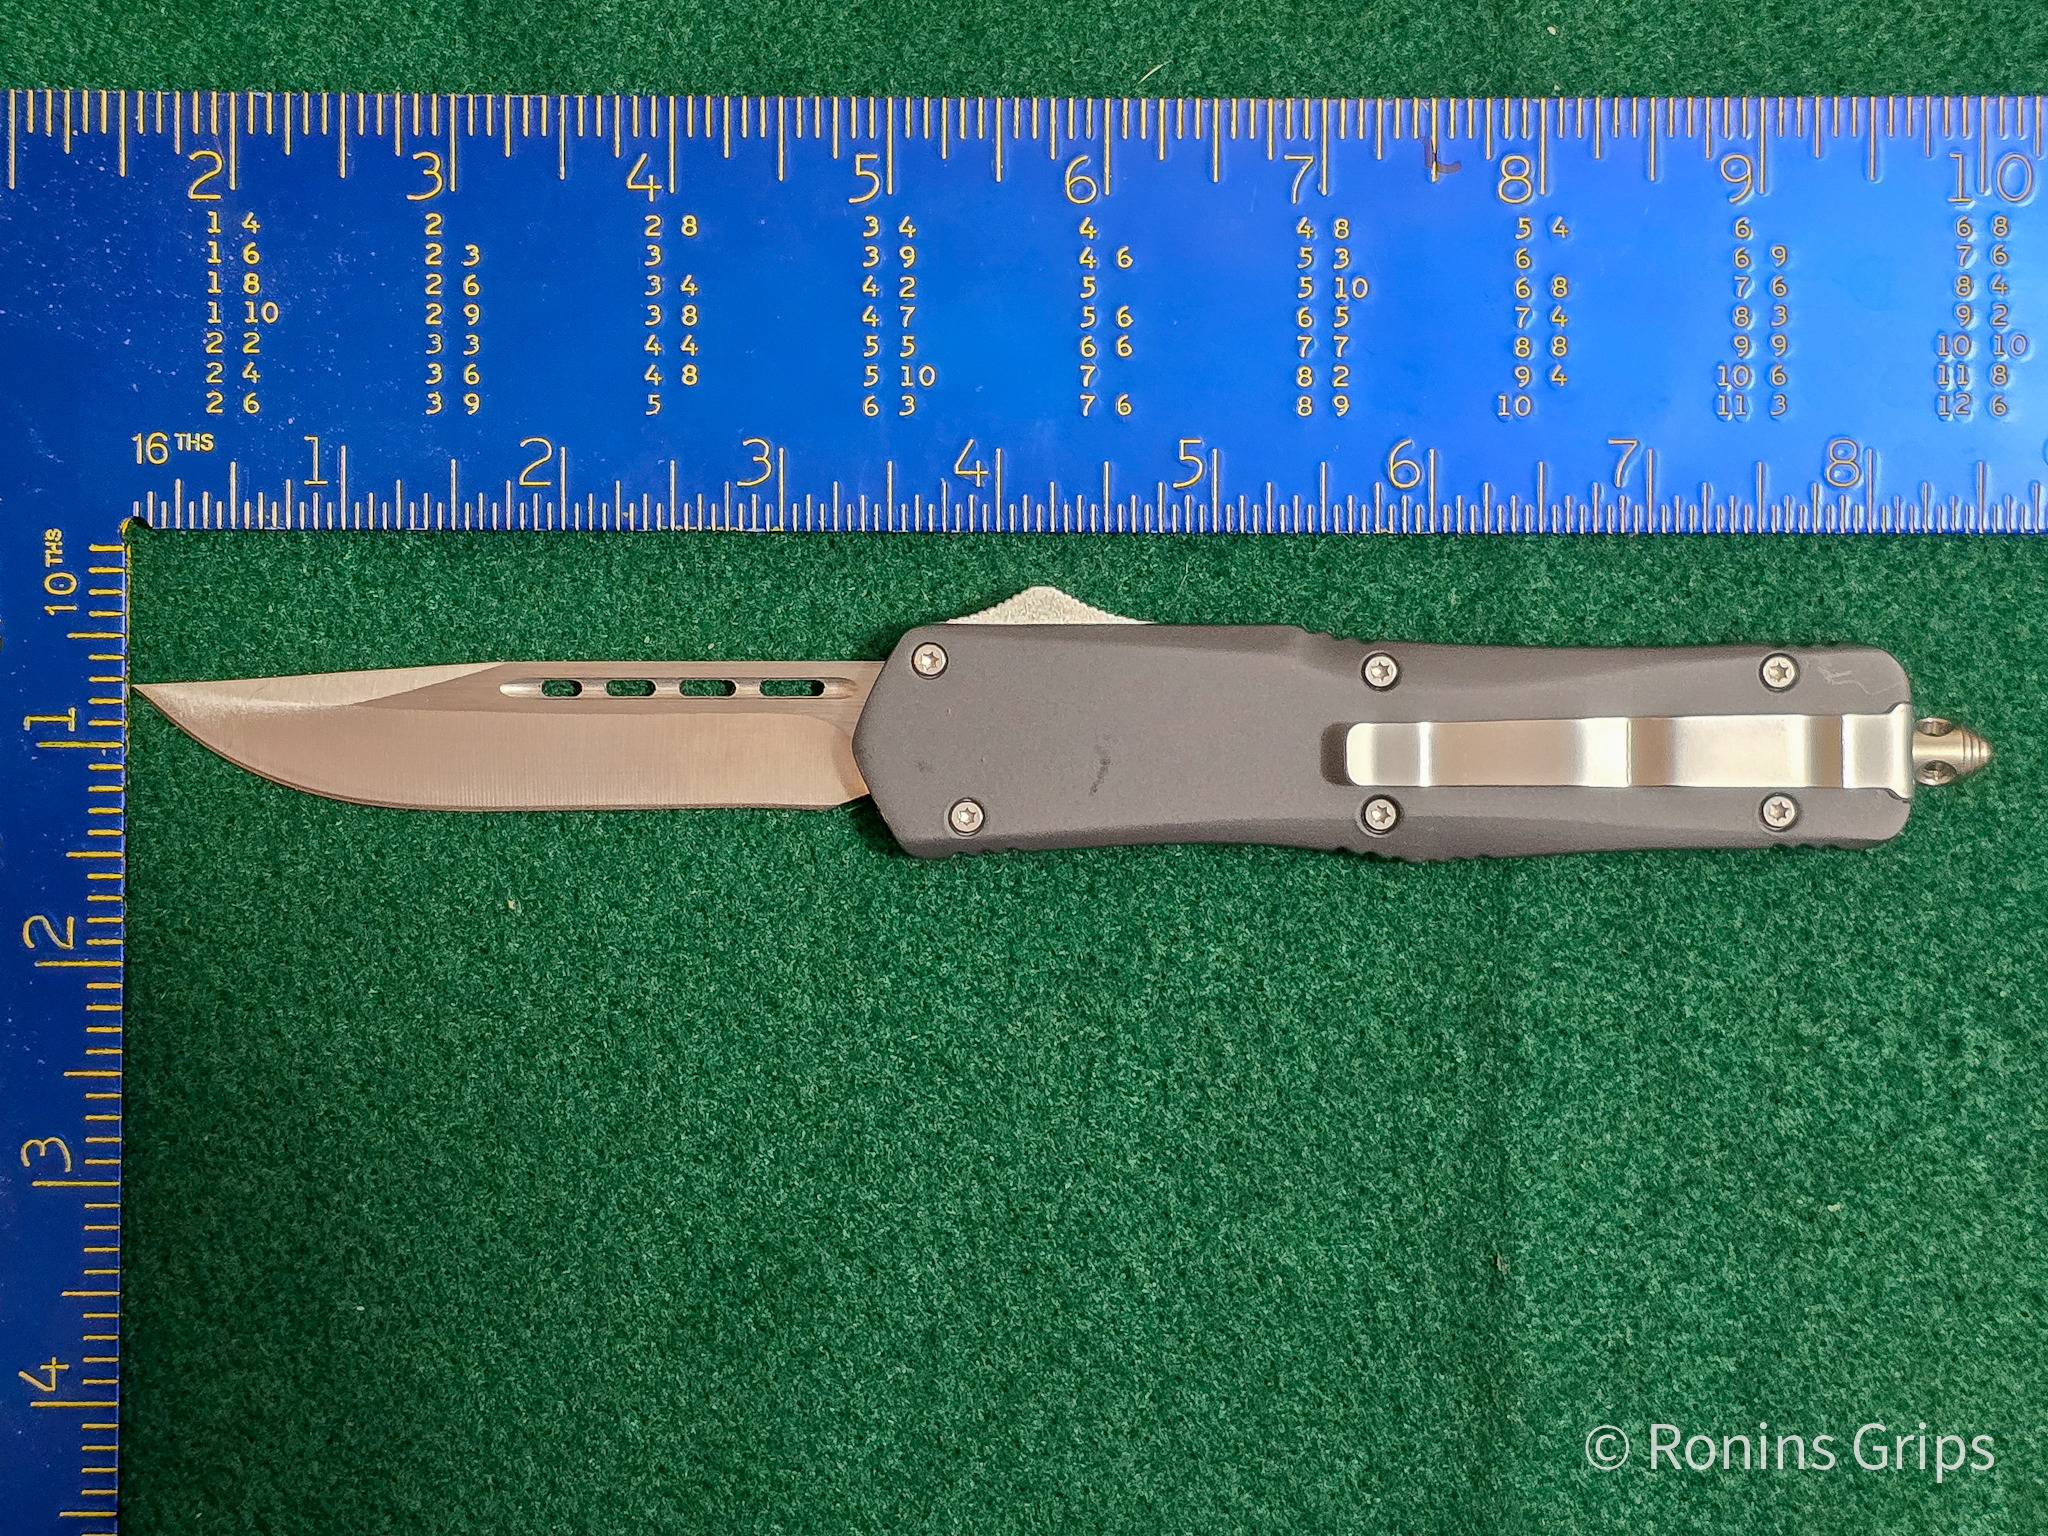
The GLFA OTF Knife Itself
It’s just over 8″ open. It’s almost 8.5″ when you include the glass-breaker stud on the pommel. “GLFA” was engraved in the notched area on the handle below the thumb switch.
It comes with a decent belt clip that is secured by the glass breaker. It also serves to keep the halves together should the screws come loose.
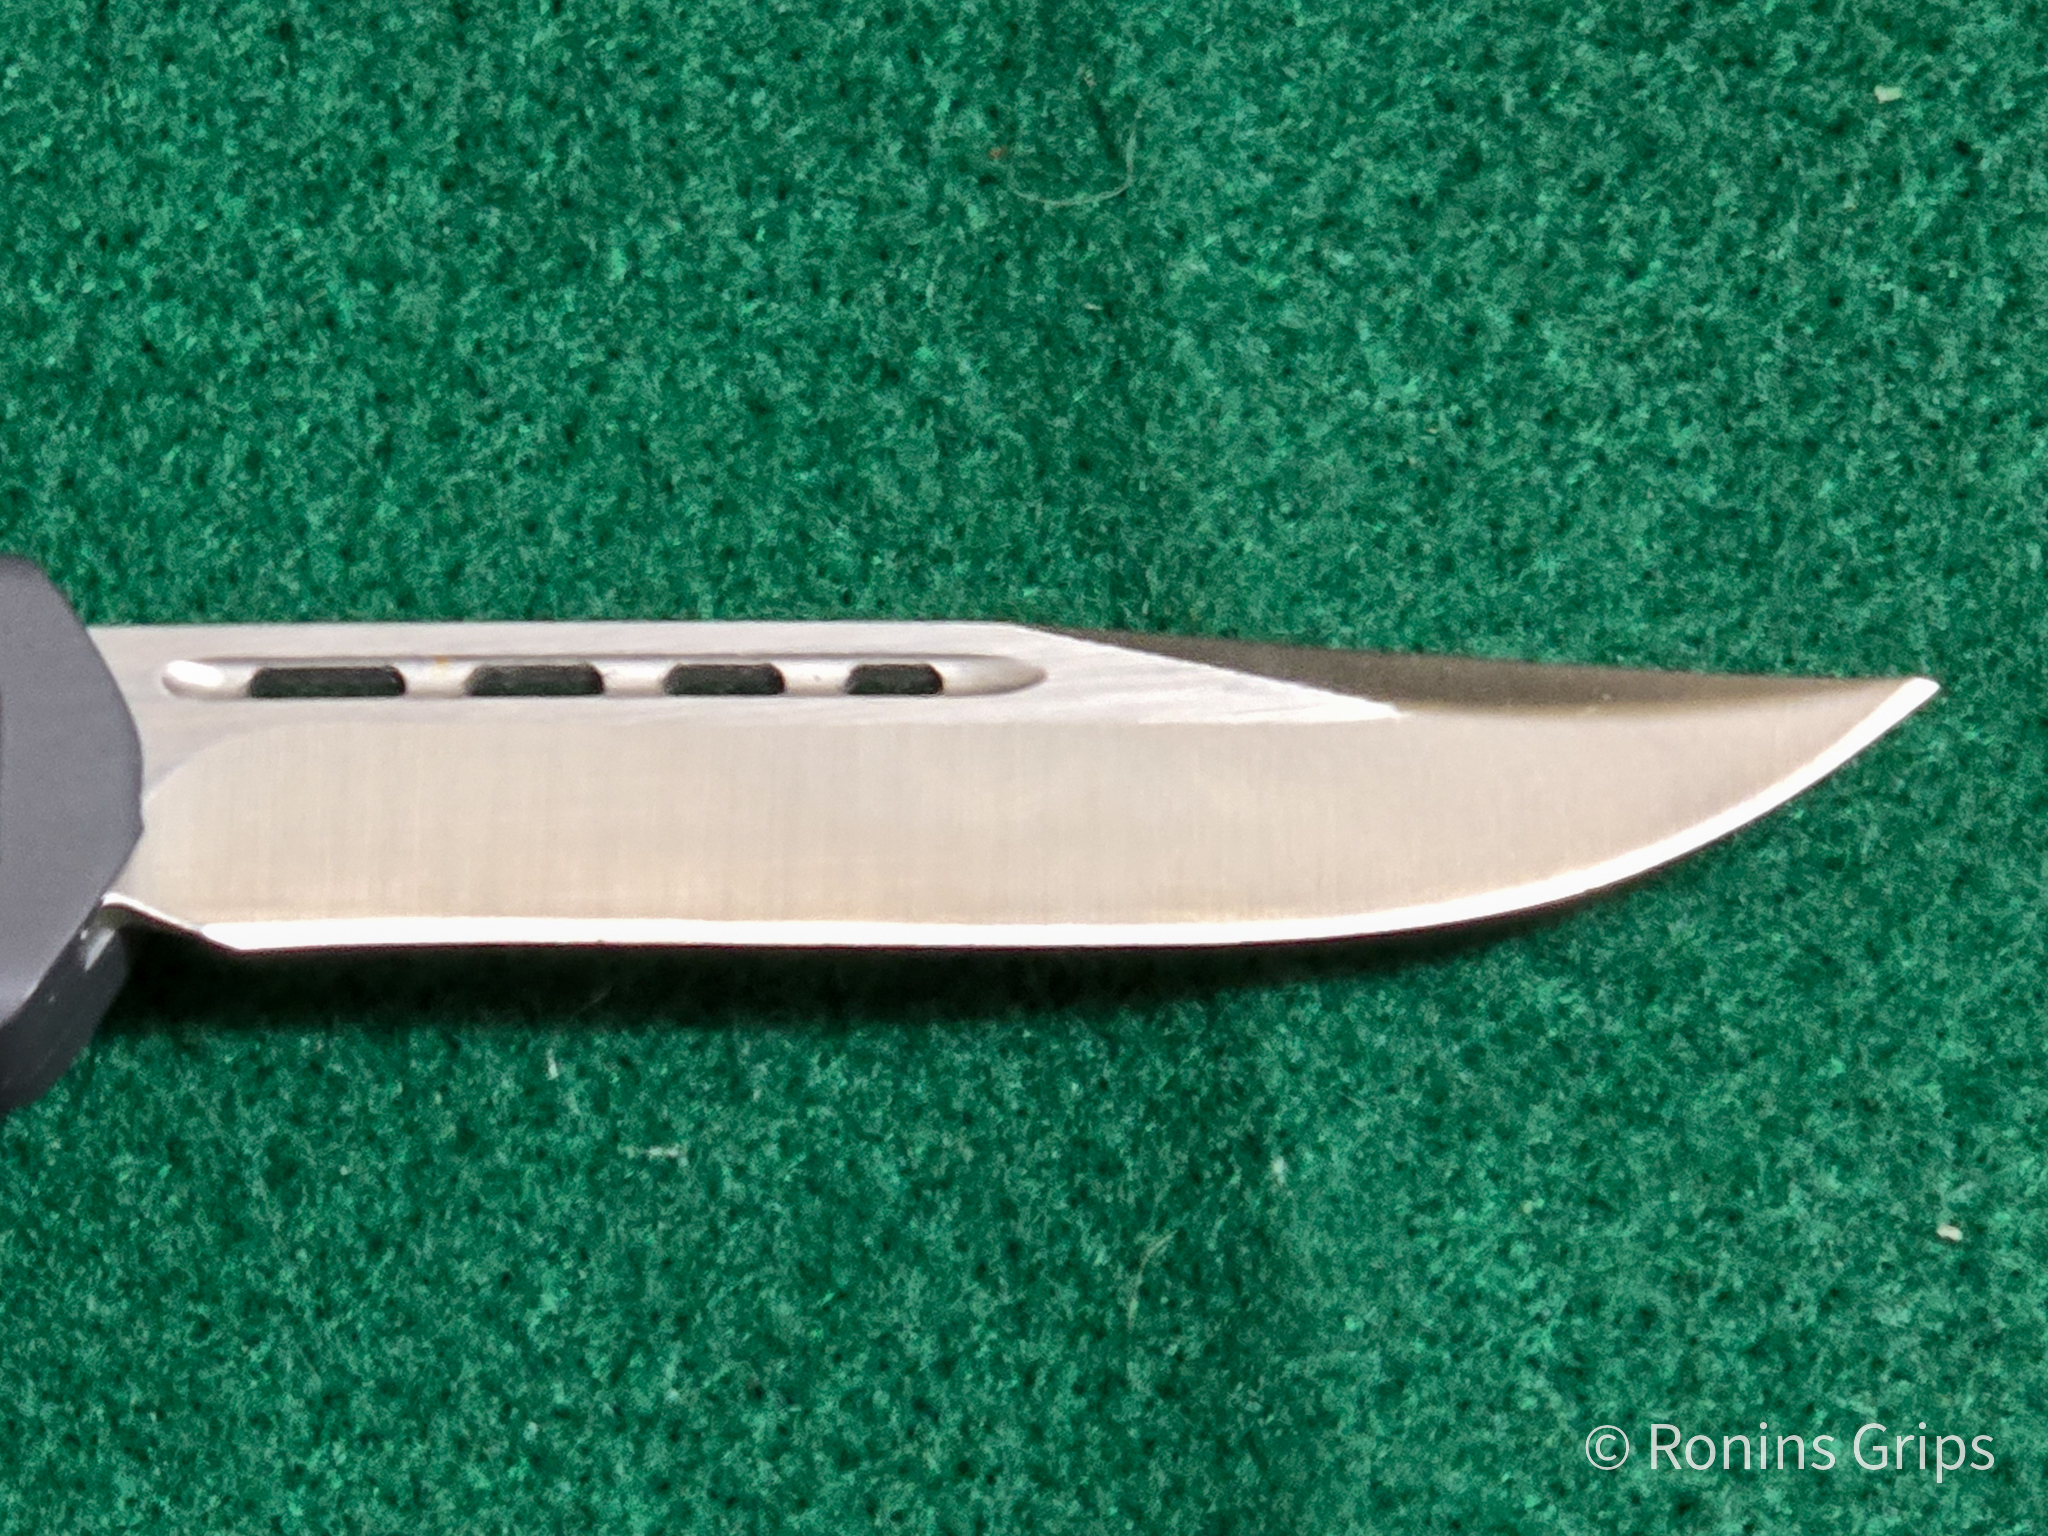
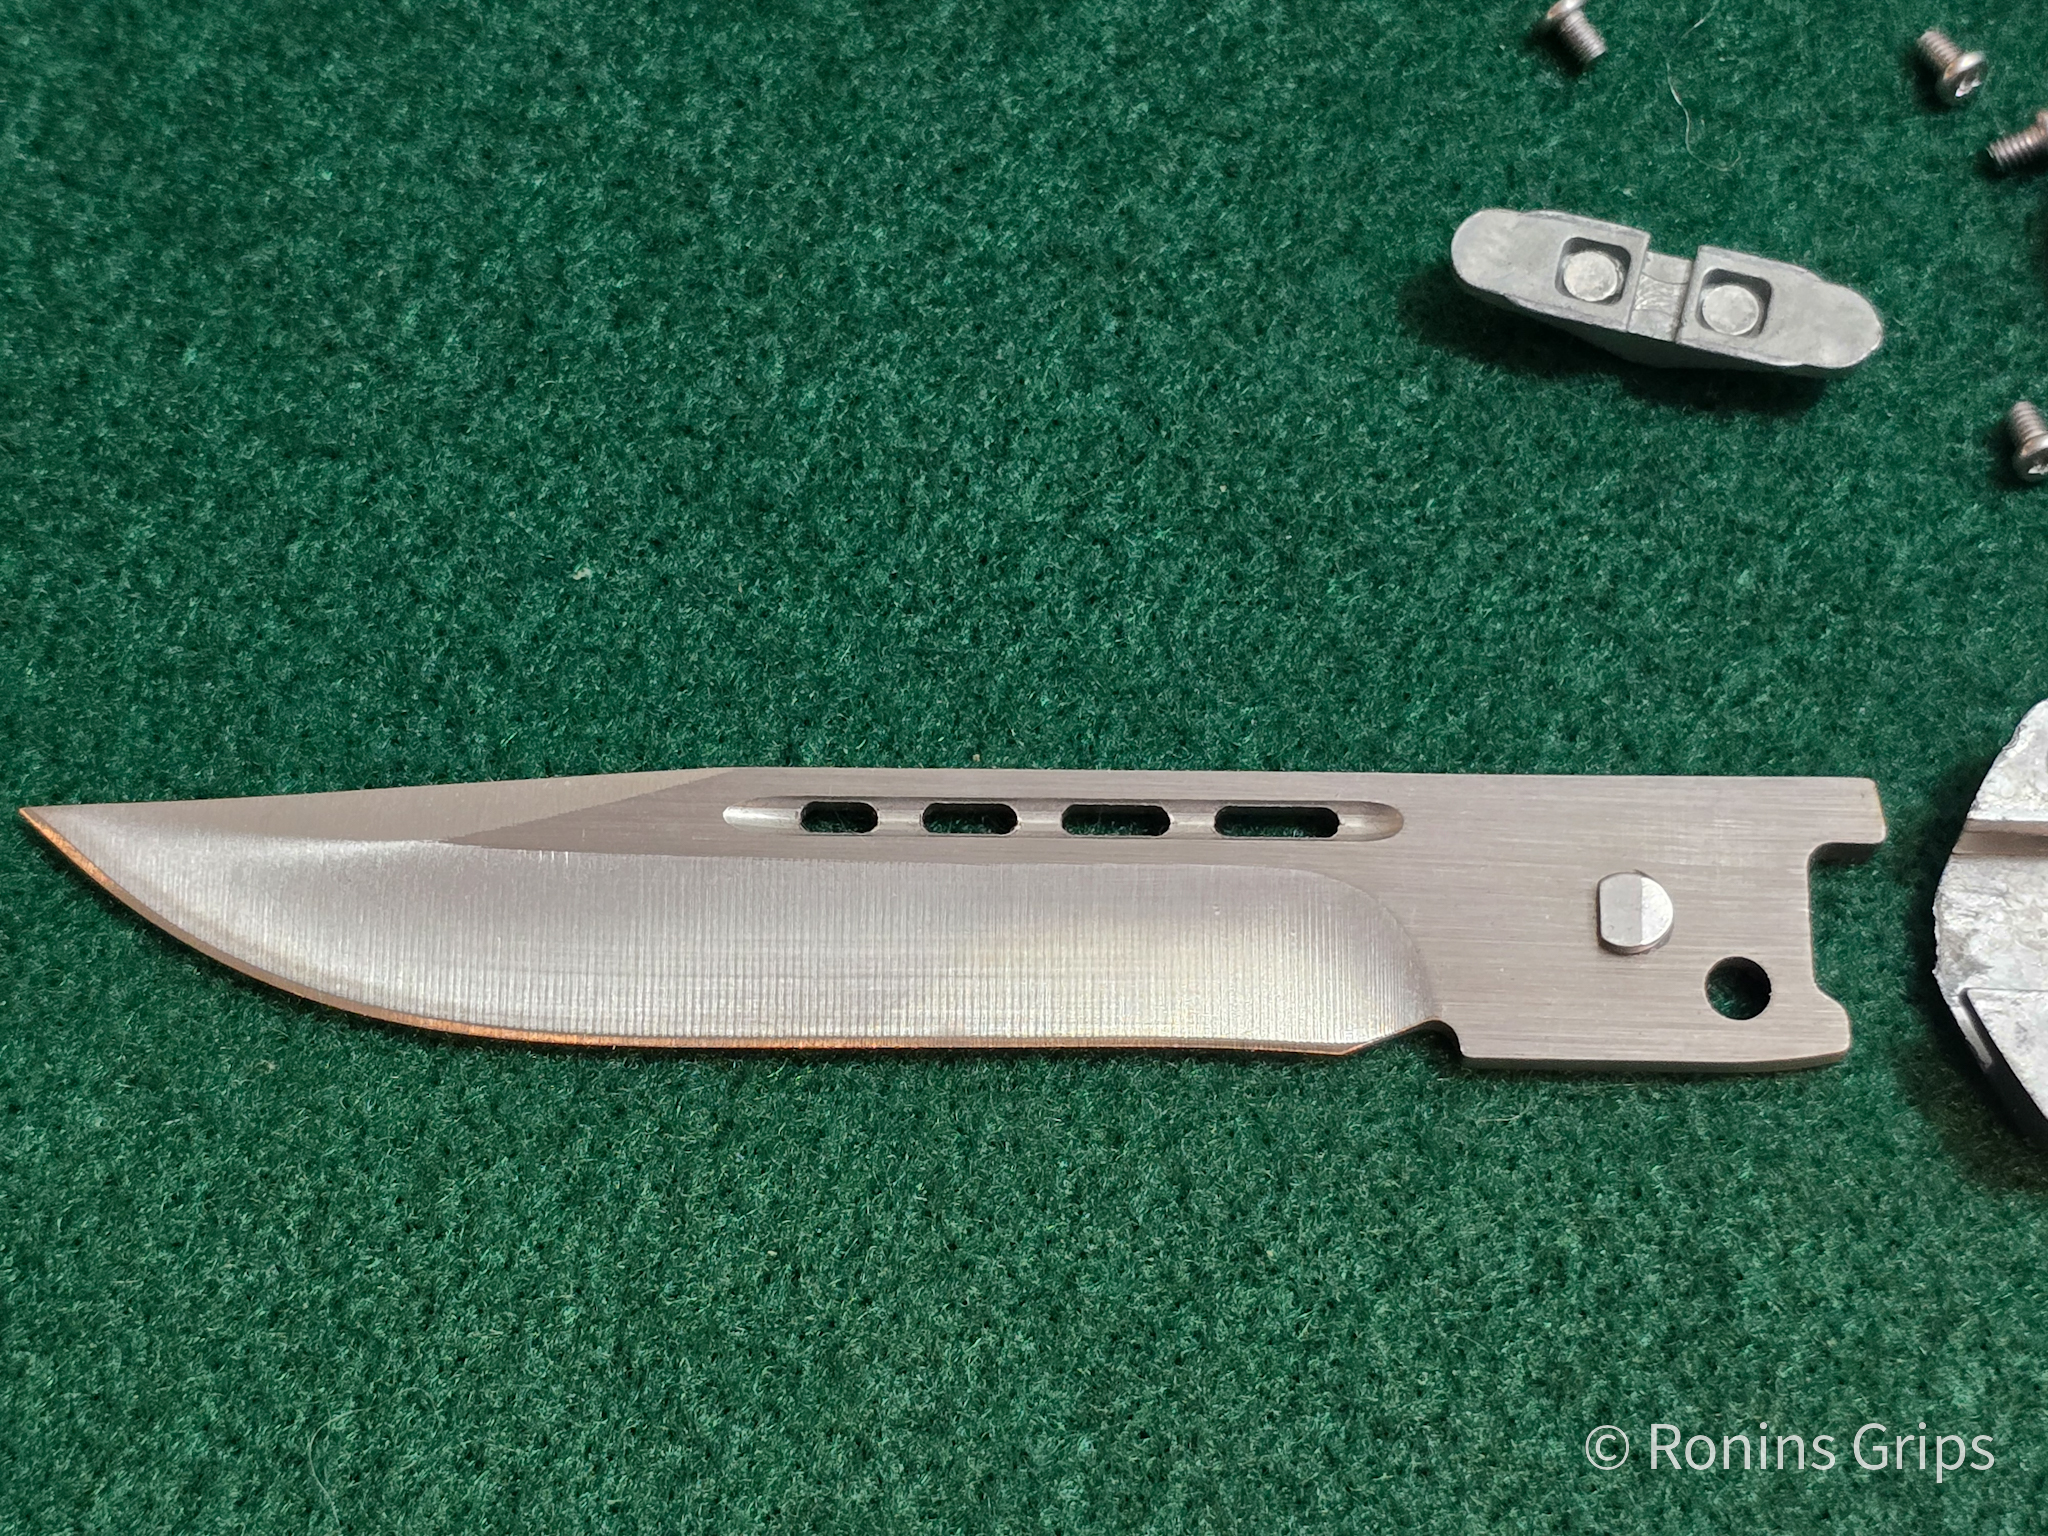
The blade looks the same on both sides. You can see the grinding or milling “lines” on the blade. These are common on many knives and is an observation. Note the distinctively shaped lightening holes at the top. I think they are decorative but may have also been done to reduce mass.
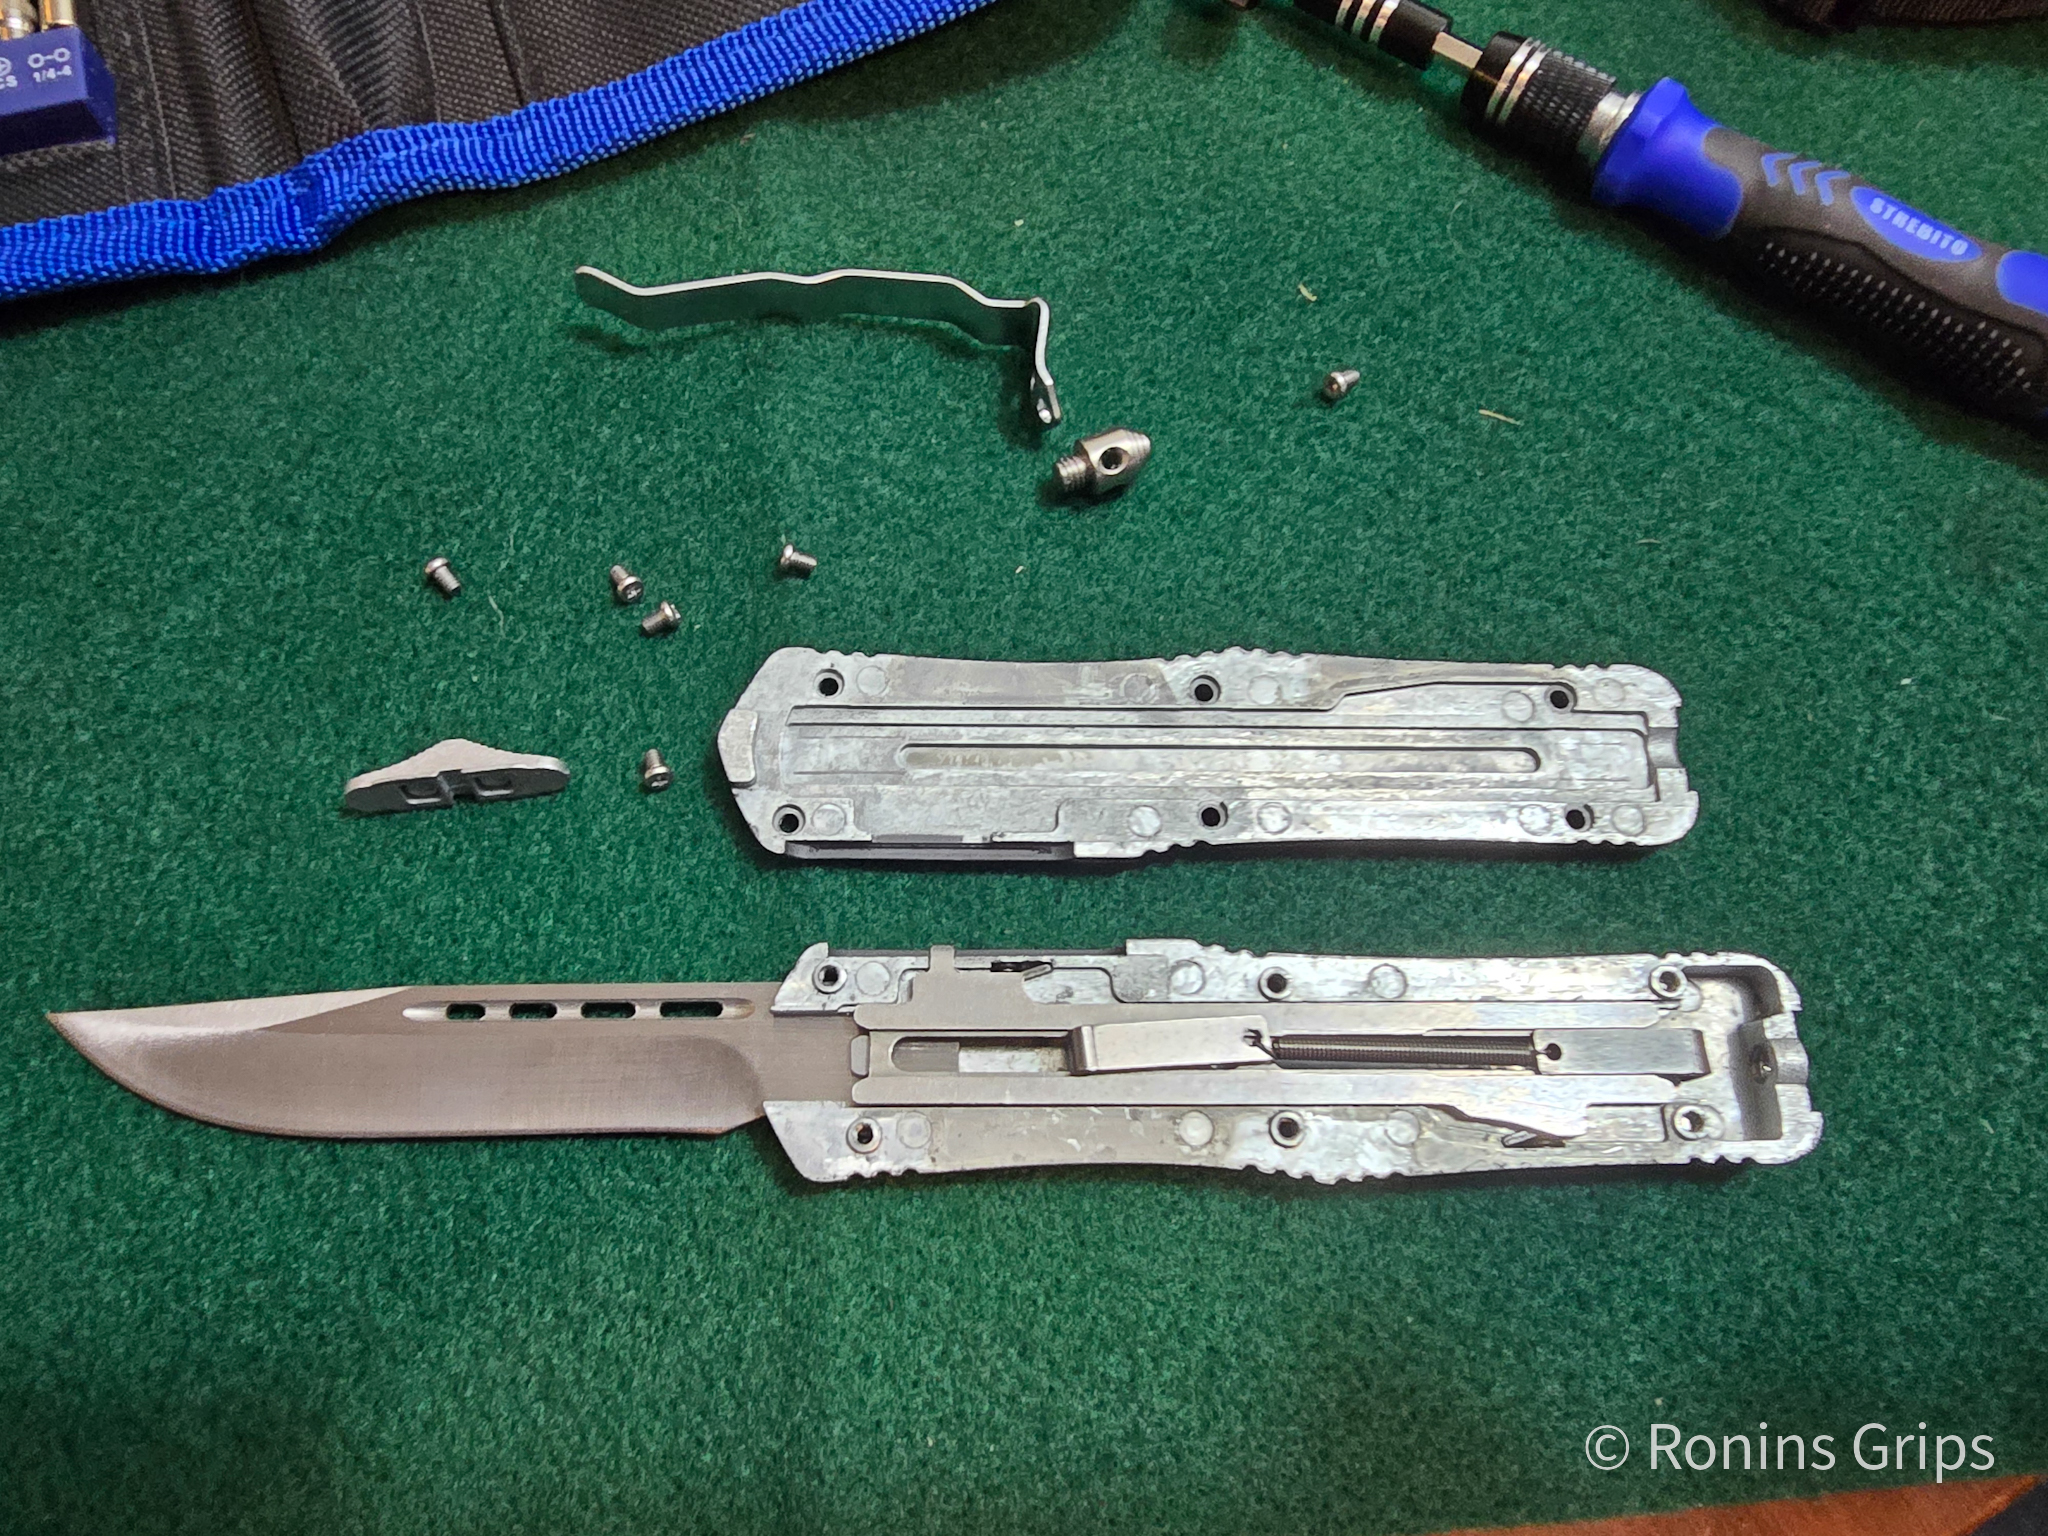
Let’s Disassemble the Knife
To open up the knife, find a nice clear flat work area. The green work matt keeps small parts from rolling or bouncing away – it’s not just a decorative background. I’ve done my fair share of searching for small parts so I try to take some precautions now. Also, take lots of photos to remember how things go back together 🙂
By the way, you may need to do this some day if your knife gets dirty and will not cycle. You’ll need to open and clean it.
I removed the screws and then realized I needed to remove the glass breaker tip. I’d recommend you remove the tip first and then the screws. I just put my screwdrive in one of the holes and turned counterclockwise to remove it.
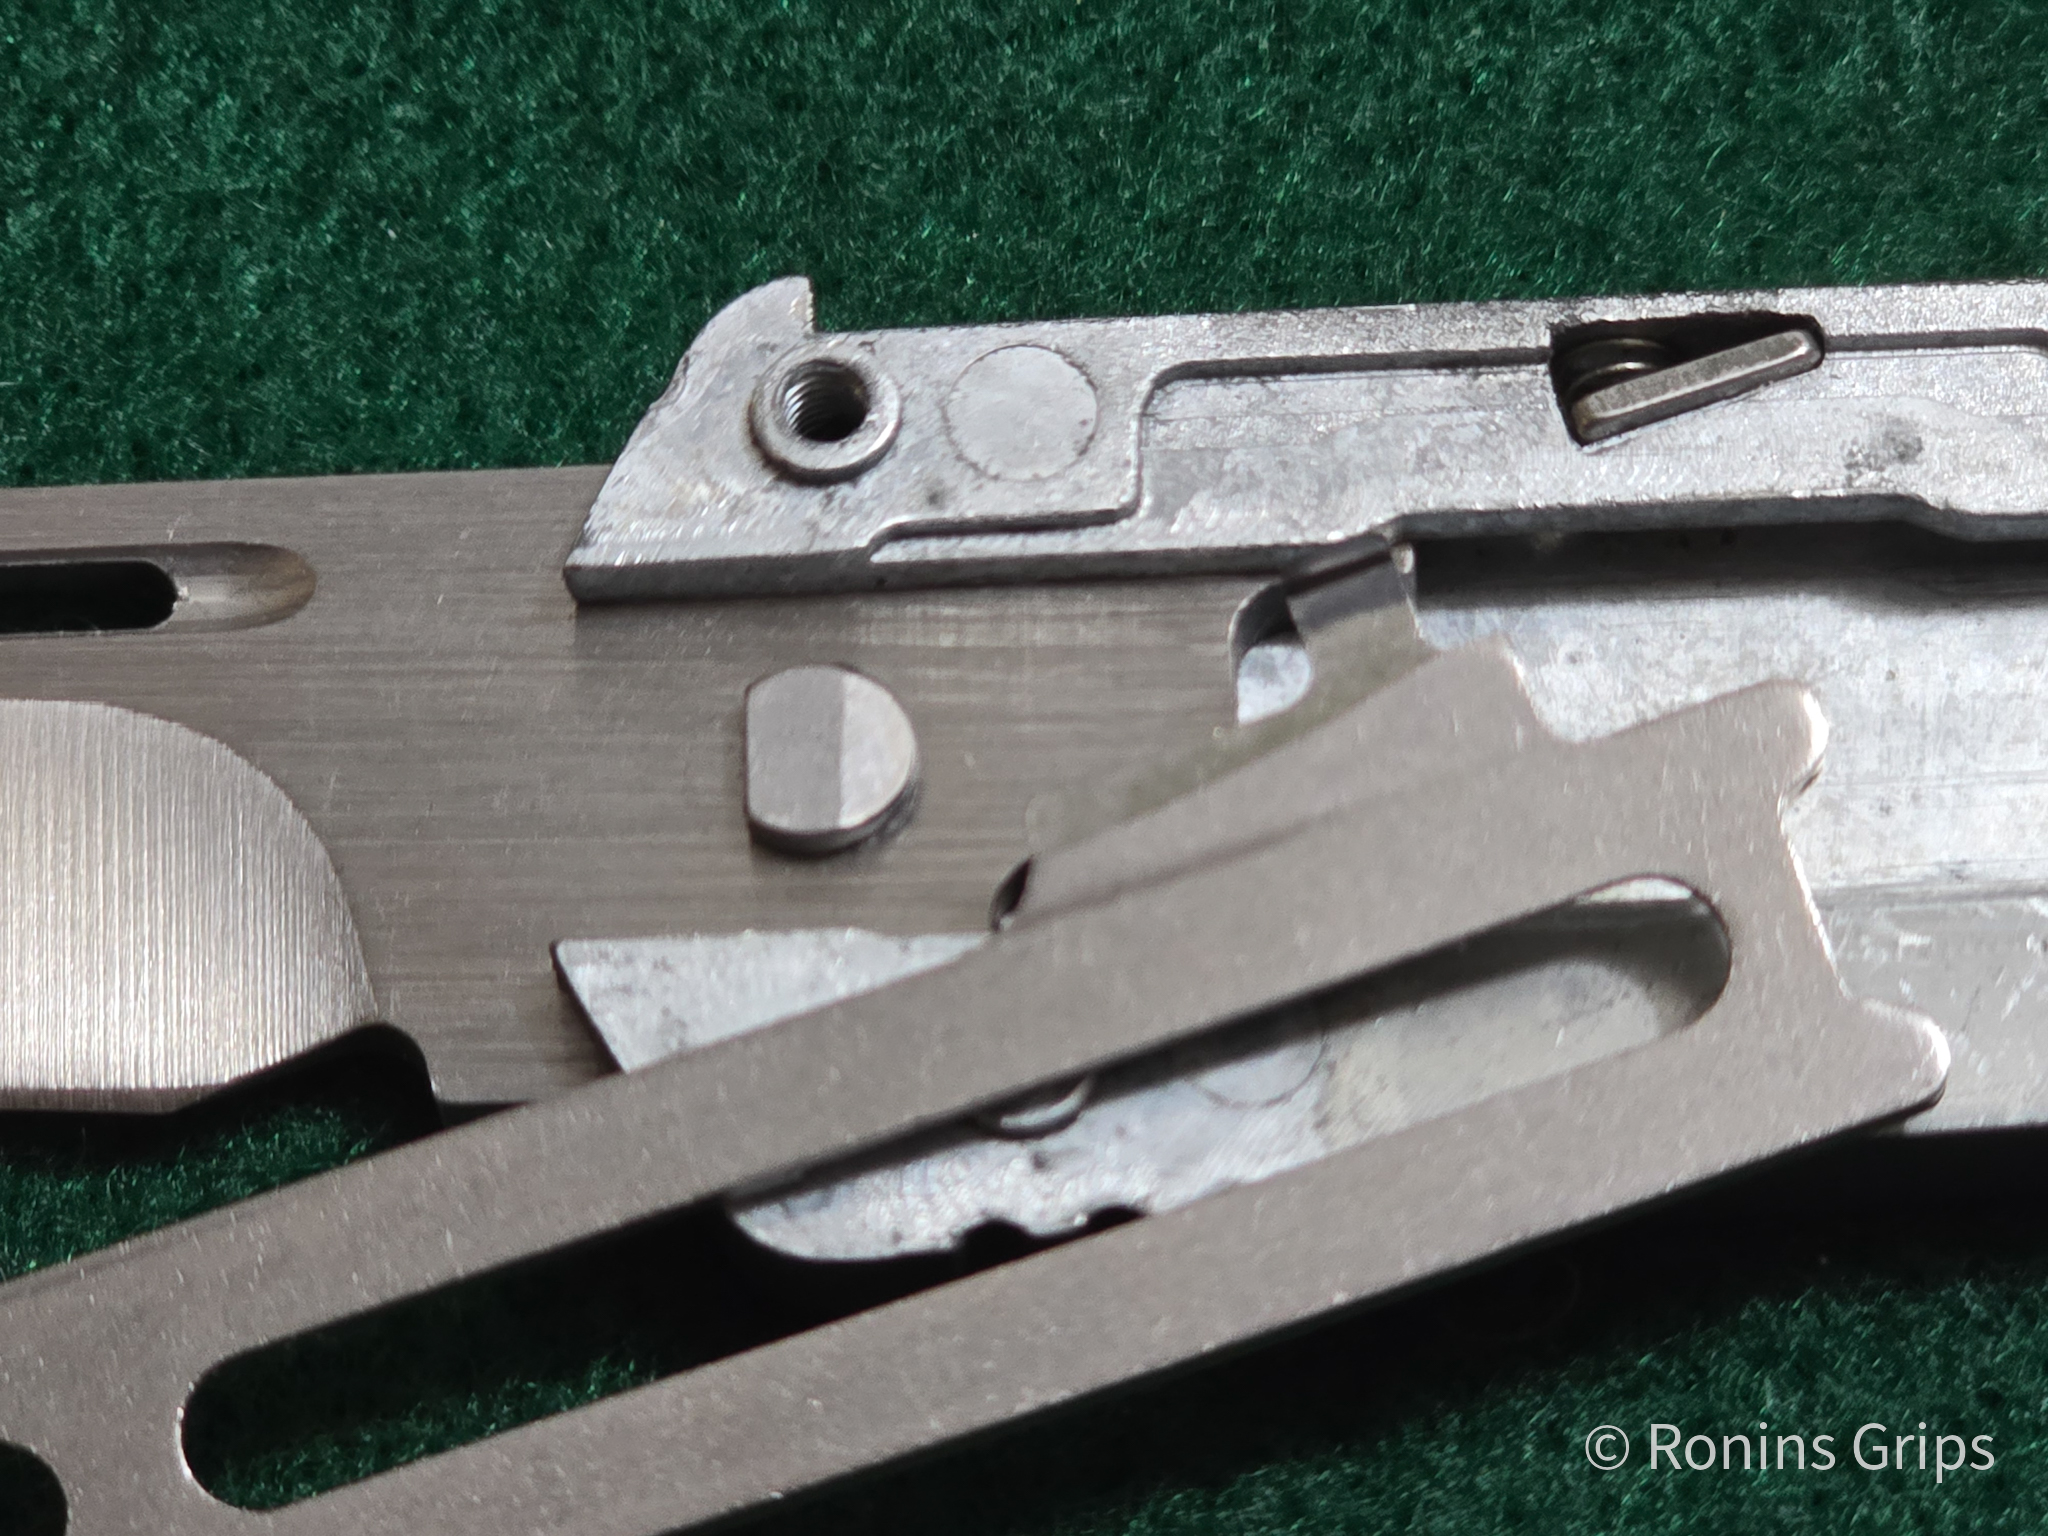
Lift the thin side where the screws were at off the thick part where the mechanism is. At this point, my moving things around ccased the spring clip on the left to slide up and snap back. Normally, it is all the was forward over that rectangular piece called the “lock actuator”
So the spring assemly is in the top middle. It’s sitting on the lock actuator. Under the top left of the actuator is the open lock and to the lower right is the closed lock. The locks look like small tabs seated in the handle.
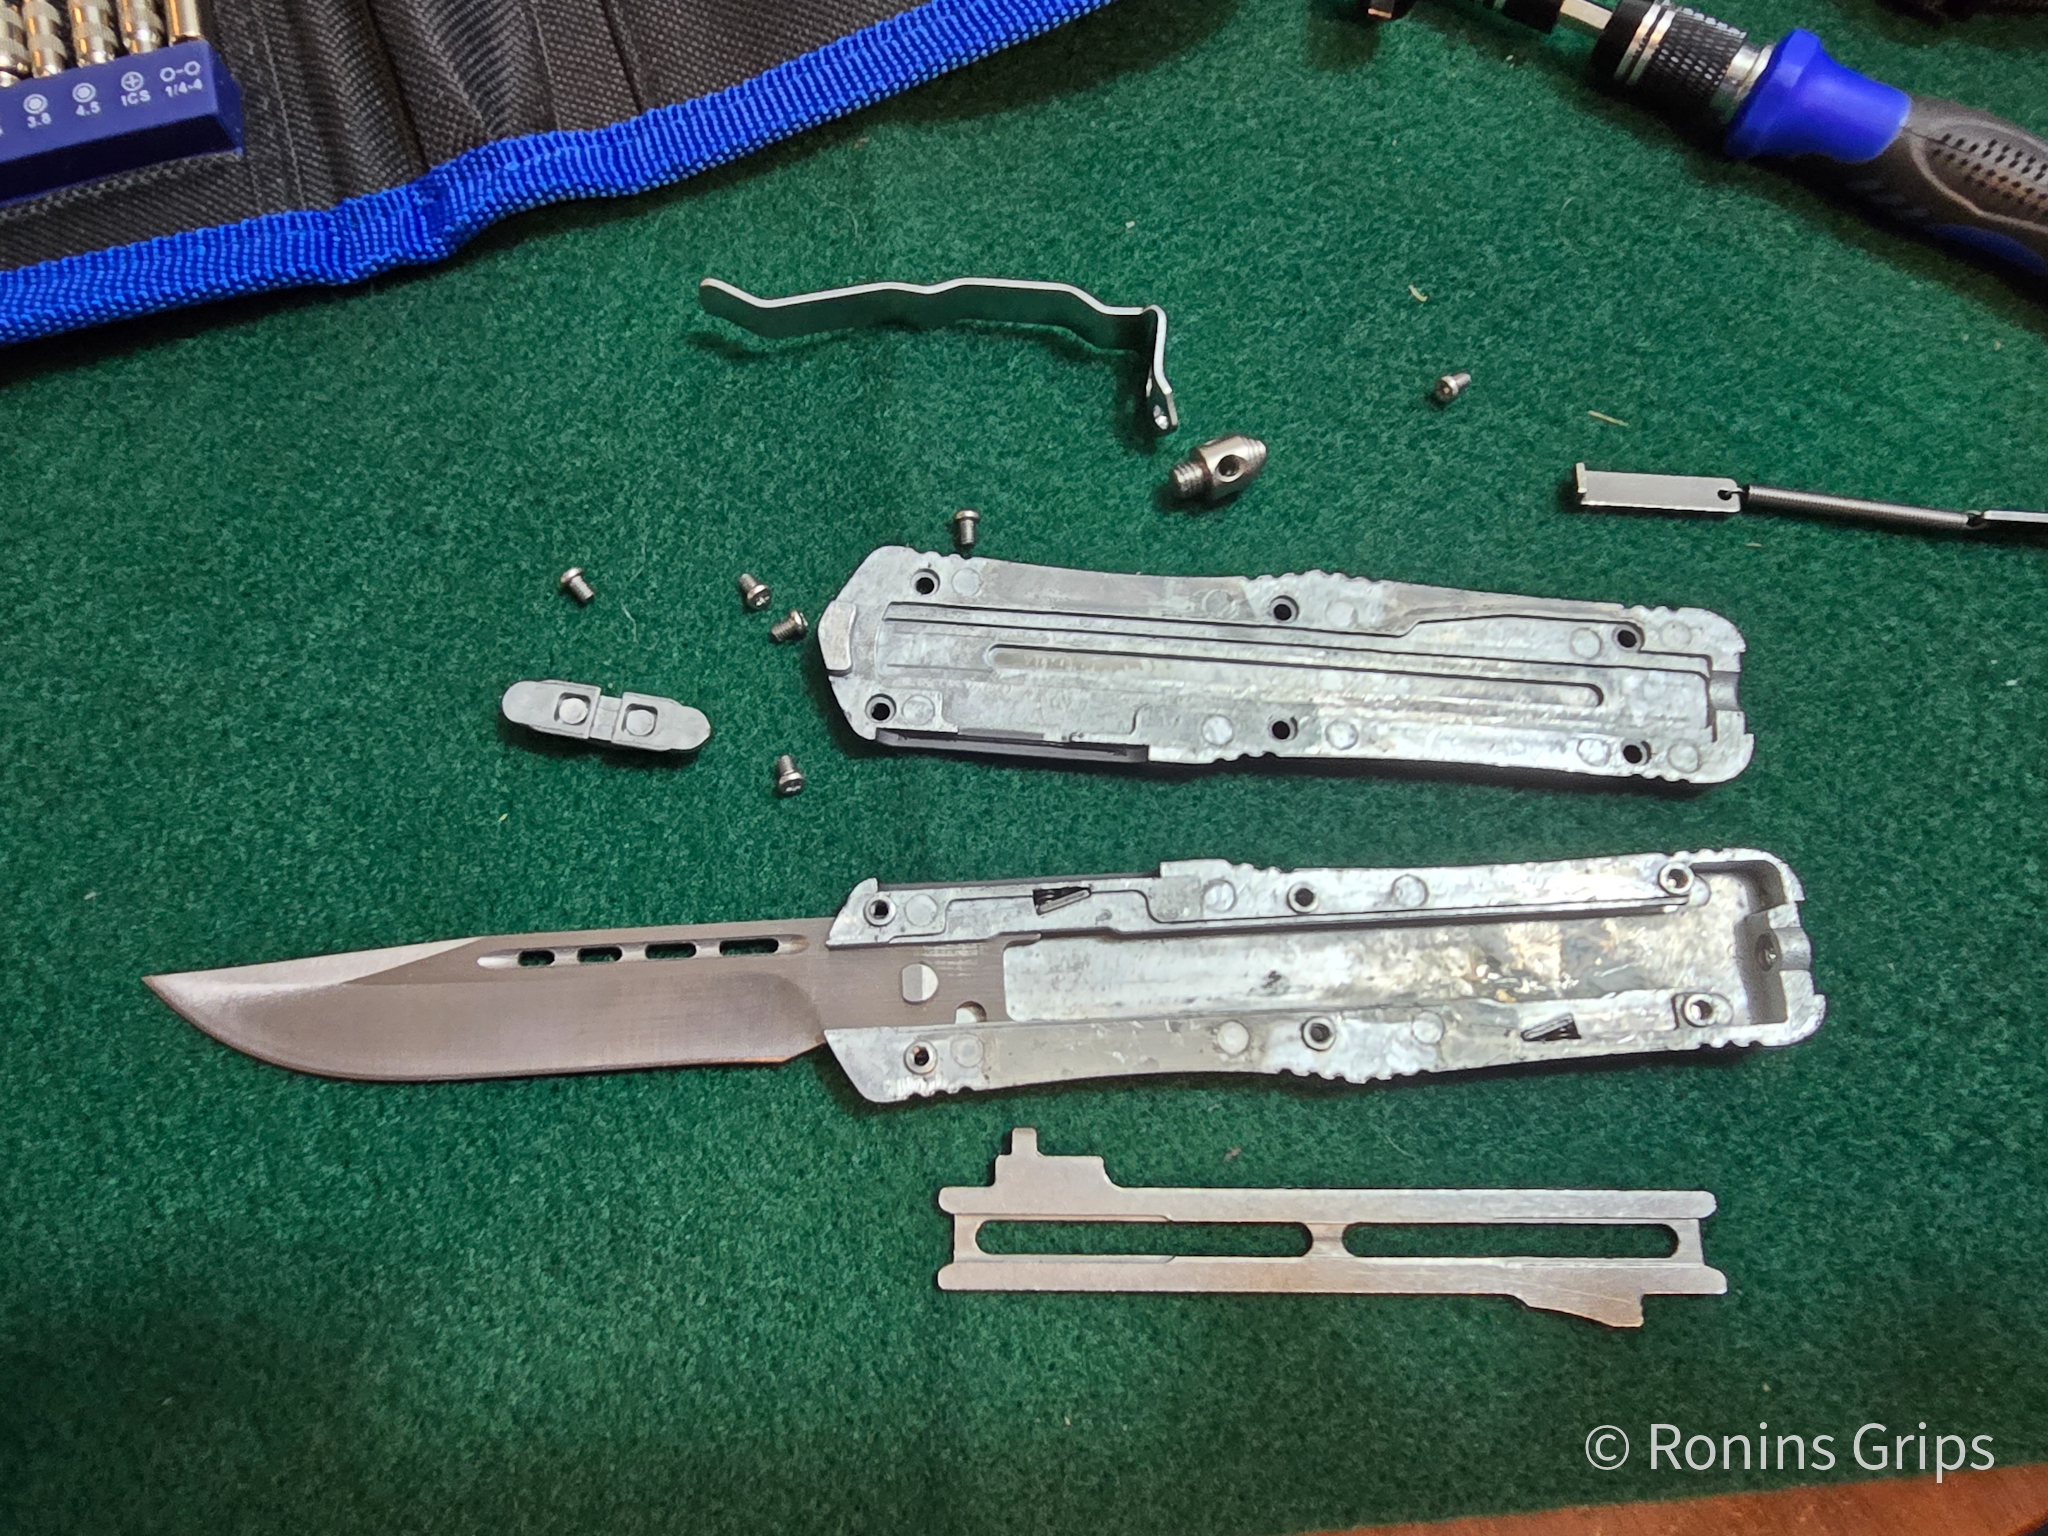
Below the handle is the lock actuator. You can now see the two locks that remain in the handle. The blade could be slid out the end if so desired. By the way, my best guess is the handle is some zinc-aluminum alloy given the weight and color. Note, all of the maching is decent – even inside.
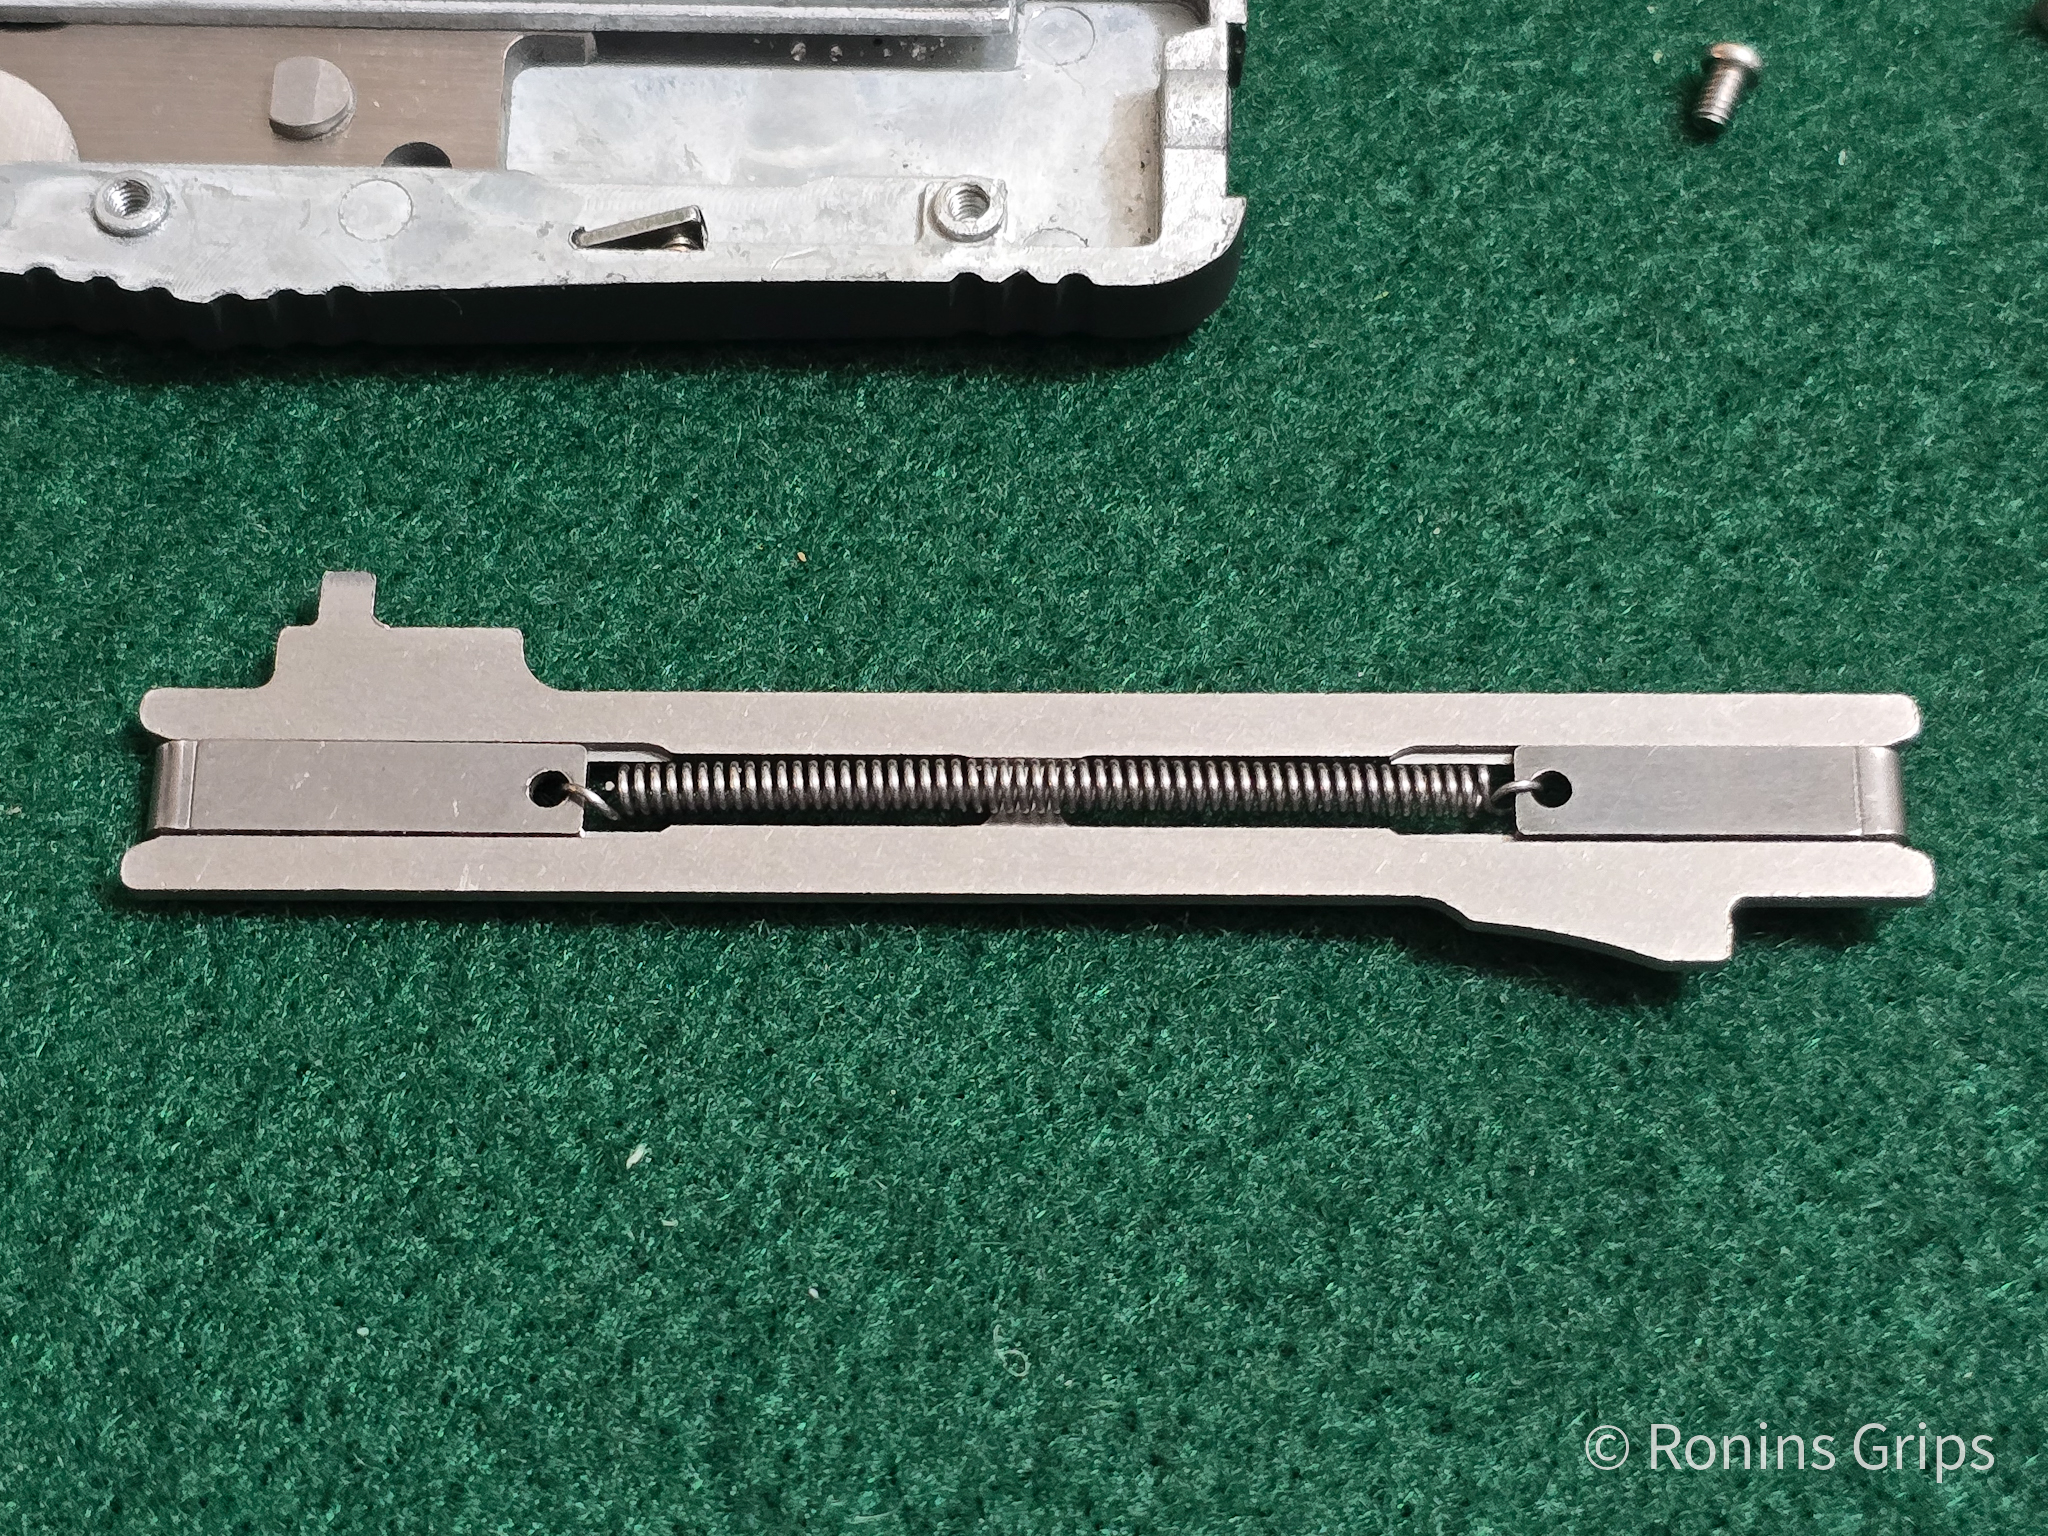
Here’s the blade – it just slides out. By the way, that funny looking piece of metal above it is the thumb stud/trigger. It’s upside down.
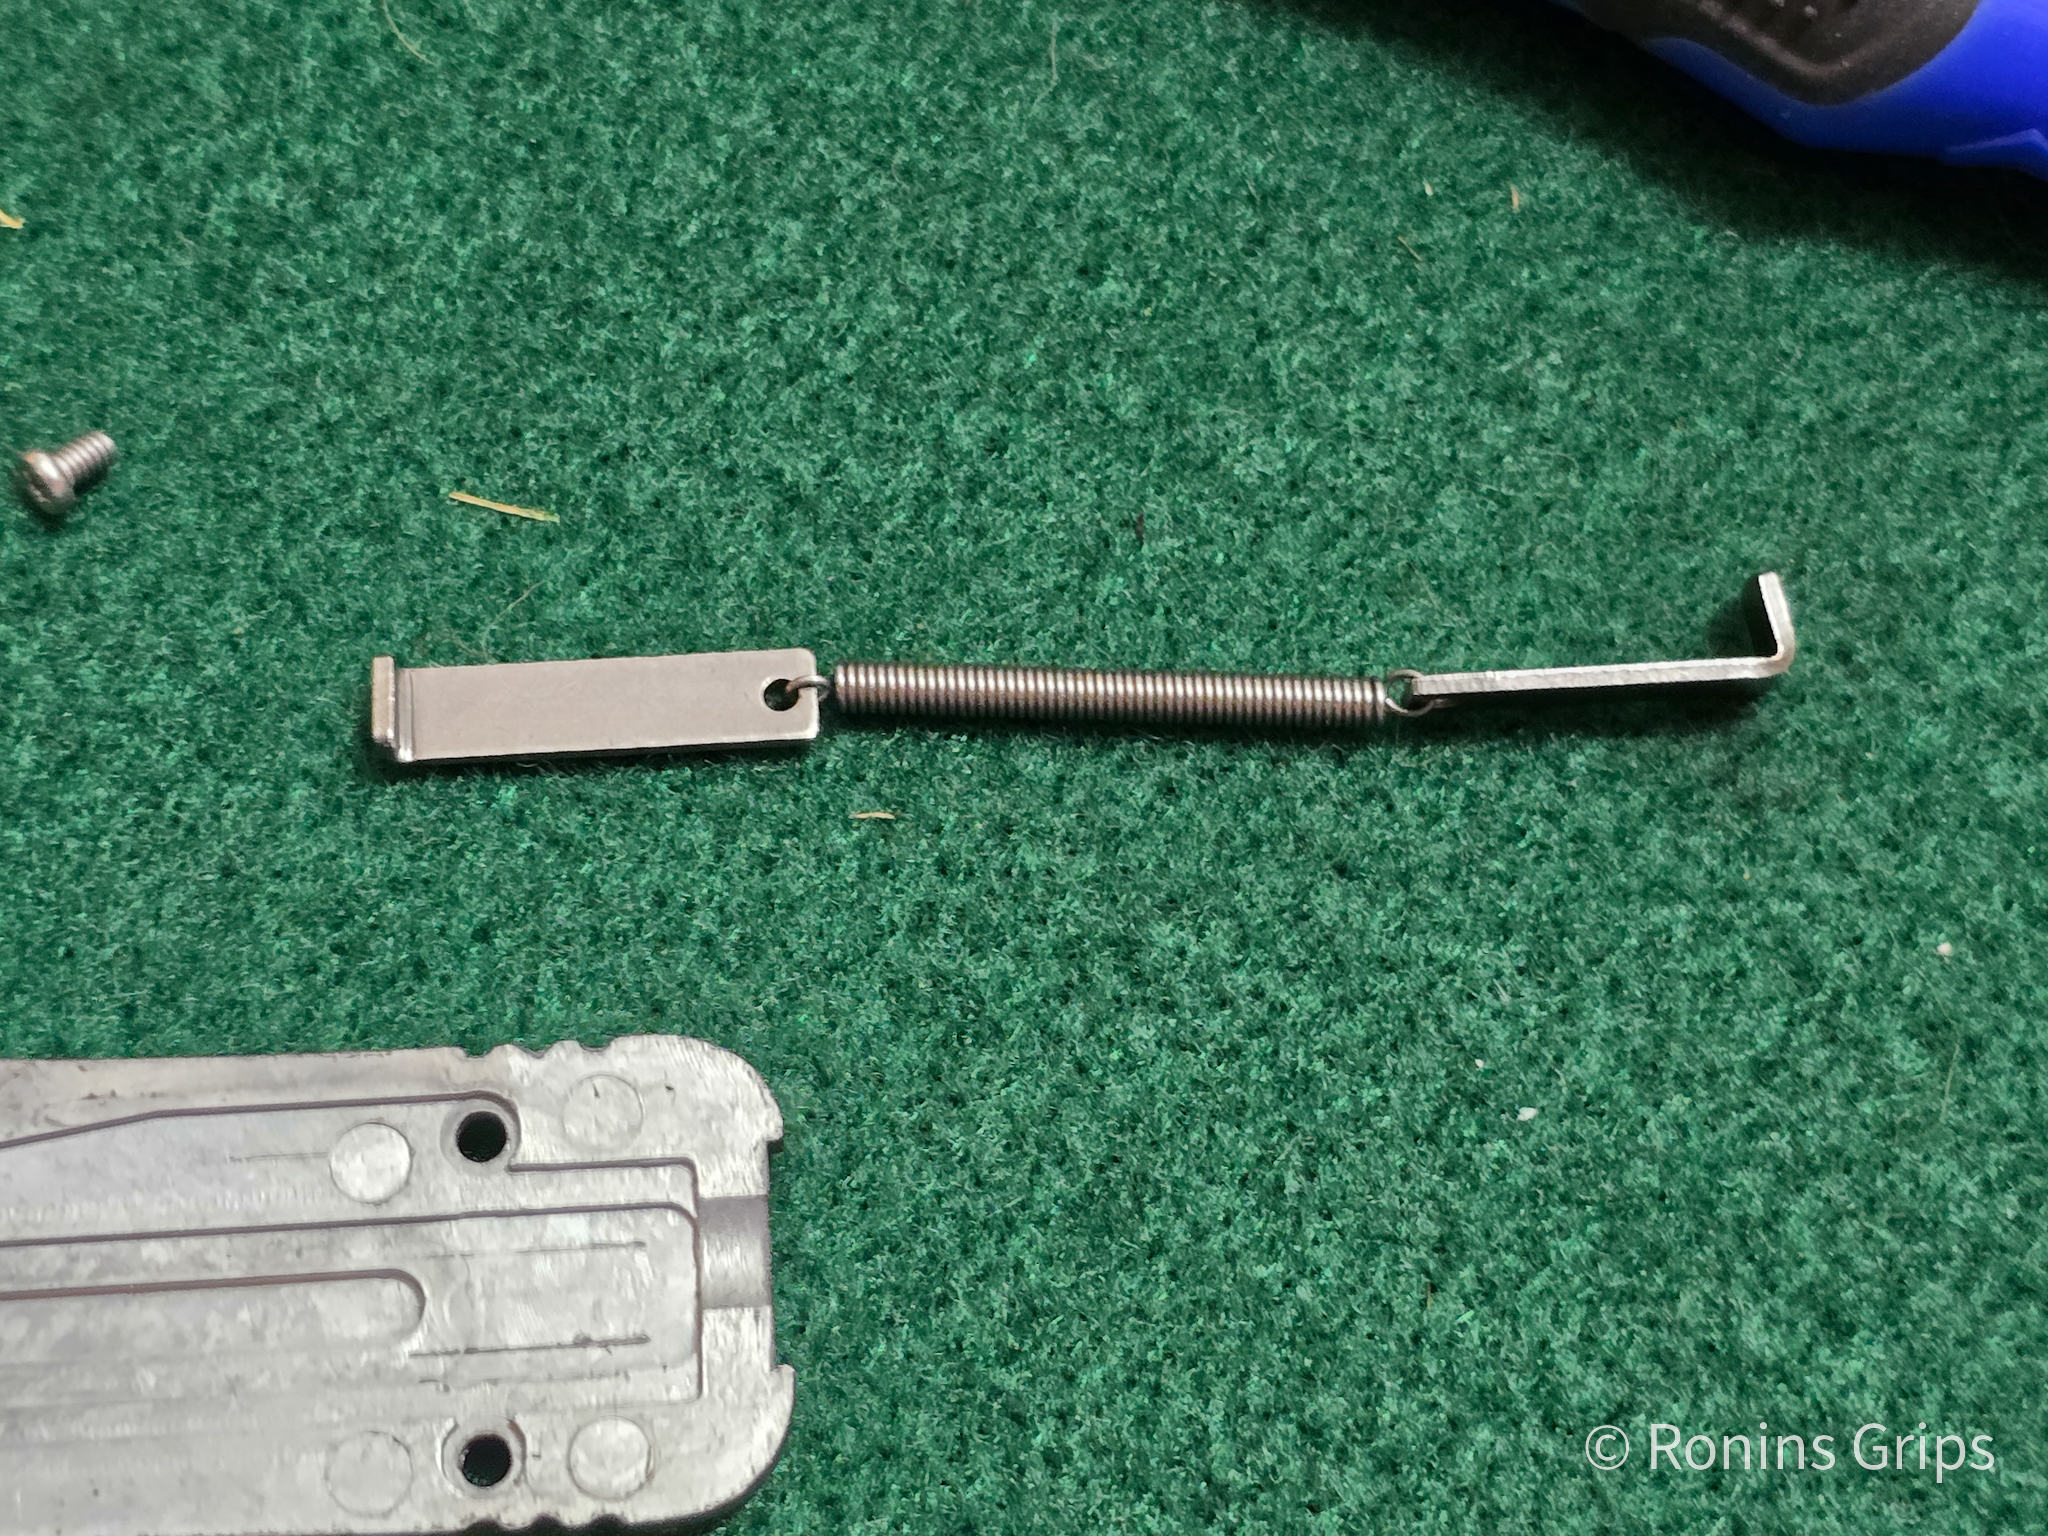
That little spring is what does the magic. Note the small tab is to the left and the longer one is to the right. They get stretched from the front to the end of the lock actuator. Given the size of the spring, you now also know why the blade needs to be clean and it doesn’t take much force to stop the forward momentum of the blade. I literally stopped the blade with a piece of 8.5×11″ 20 pound typing paper. The tip went through about an inch before it stopped. In this stalled state, the blade is “sprung”. You need to either pull it all the way forward to recock the spring or snap your wrist like a gravity knife to get it out and recock the spring.
I’d like to meet who figured out the combination of spring, locks and actuator. The formal name is the “machined lock actuator” and it has surfaces to depress the lock at one end or the other so the blade can spring forward or backward. It’s simple when you look at it but the person who first thought it up was pretty smart!!
To Re-Assemble
Stretch the spring from left with the short tab to the right end of the lock actuator witht he longest tab. Both tabs are face down. Yes, it takes a surprising amount of force to stretch that spring. Note the blade is in the handle and half way but not at one end or the other. You want it out of the way of the spring tabs or they will just pop up if they hit the stud on the blade.
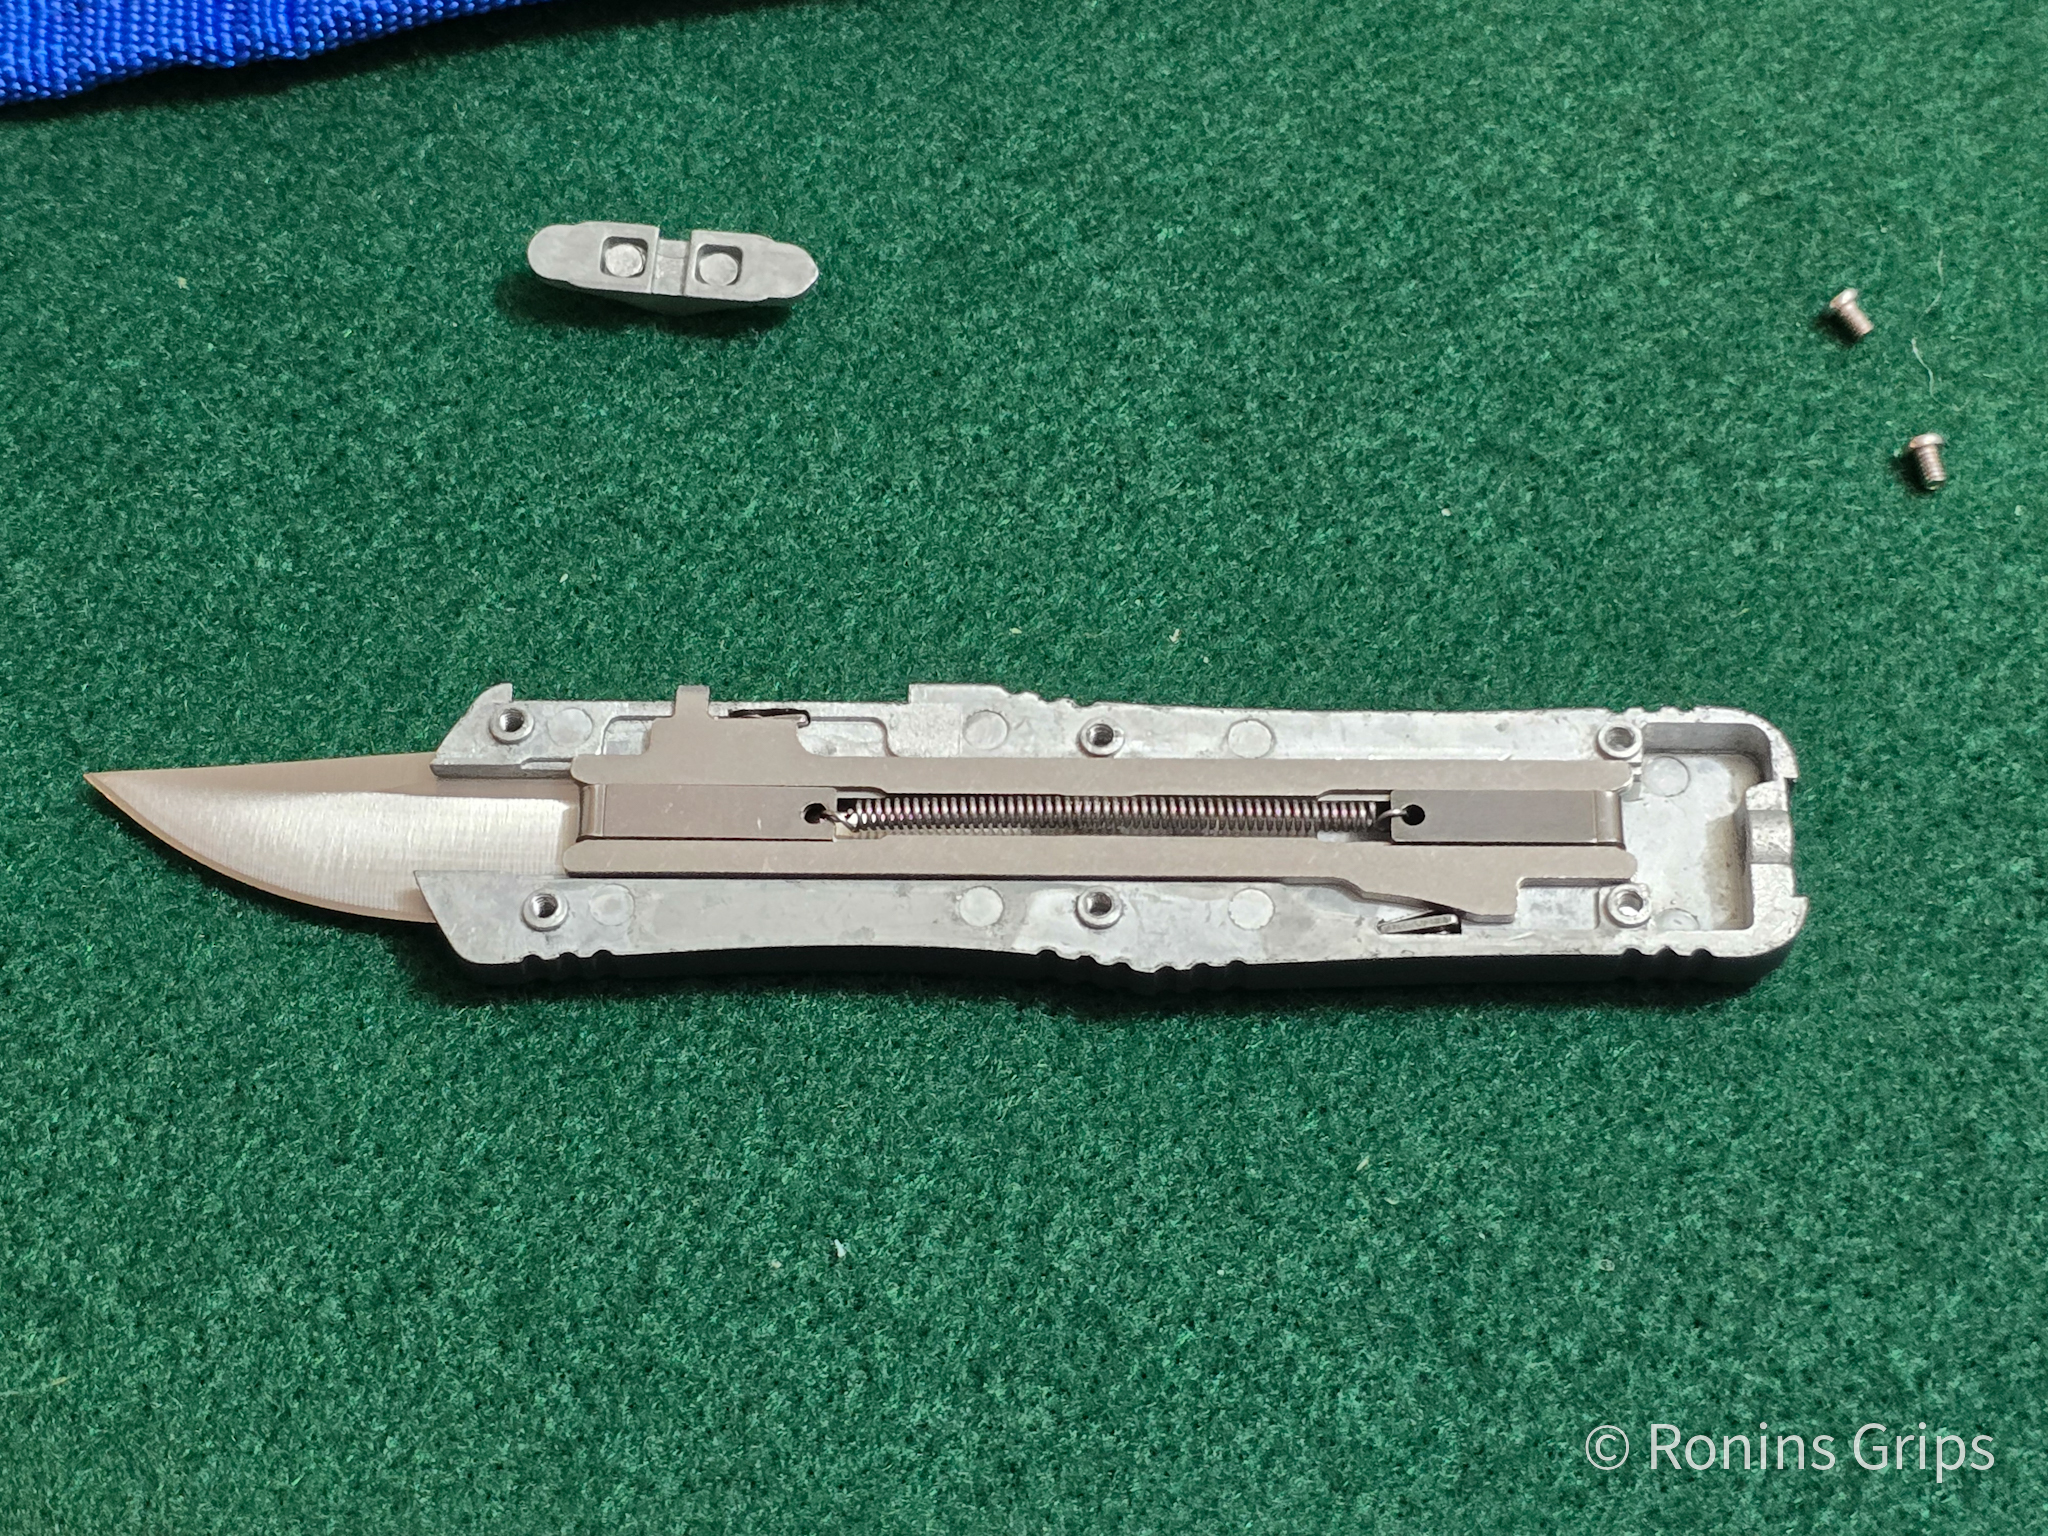
So with the blade part way in, lay the actuator down on top. You then put the thumb switch back on the exposed vertical tab of the slide lock actuator.
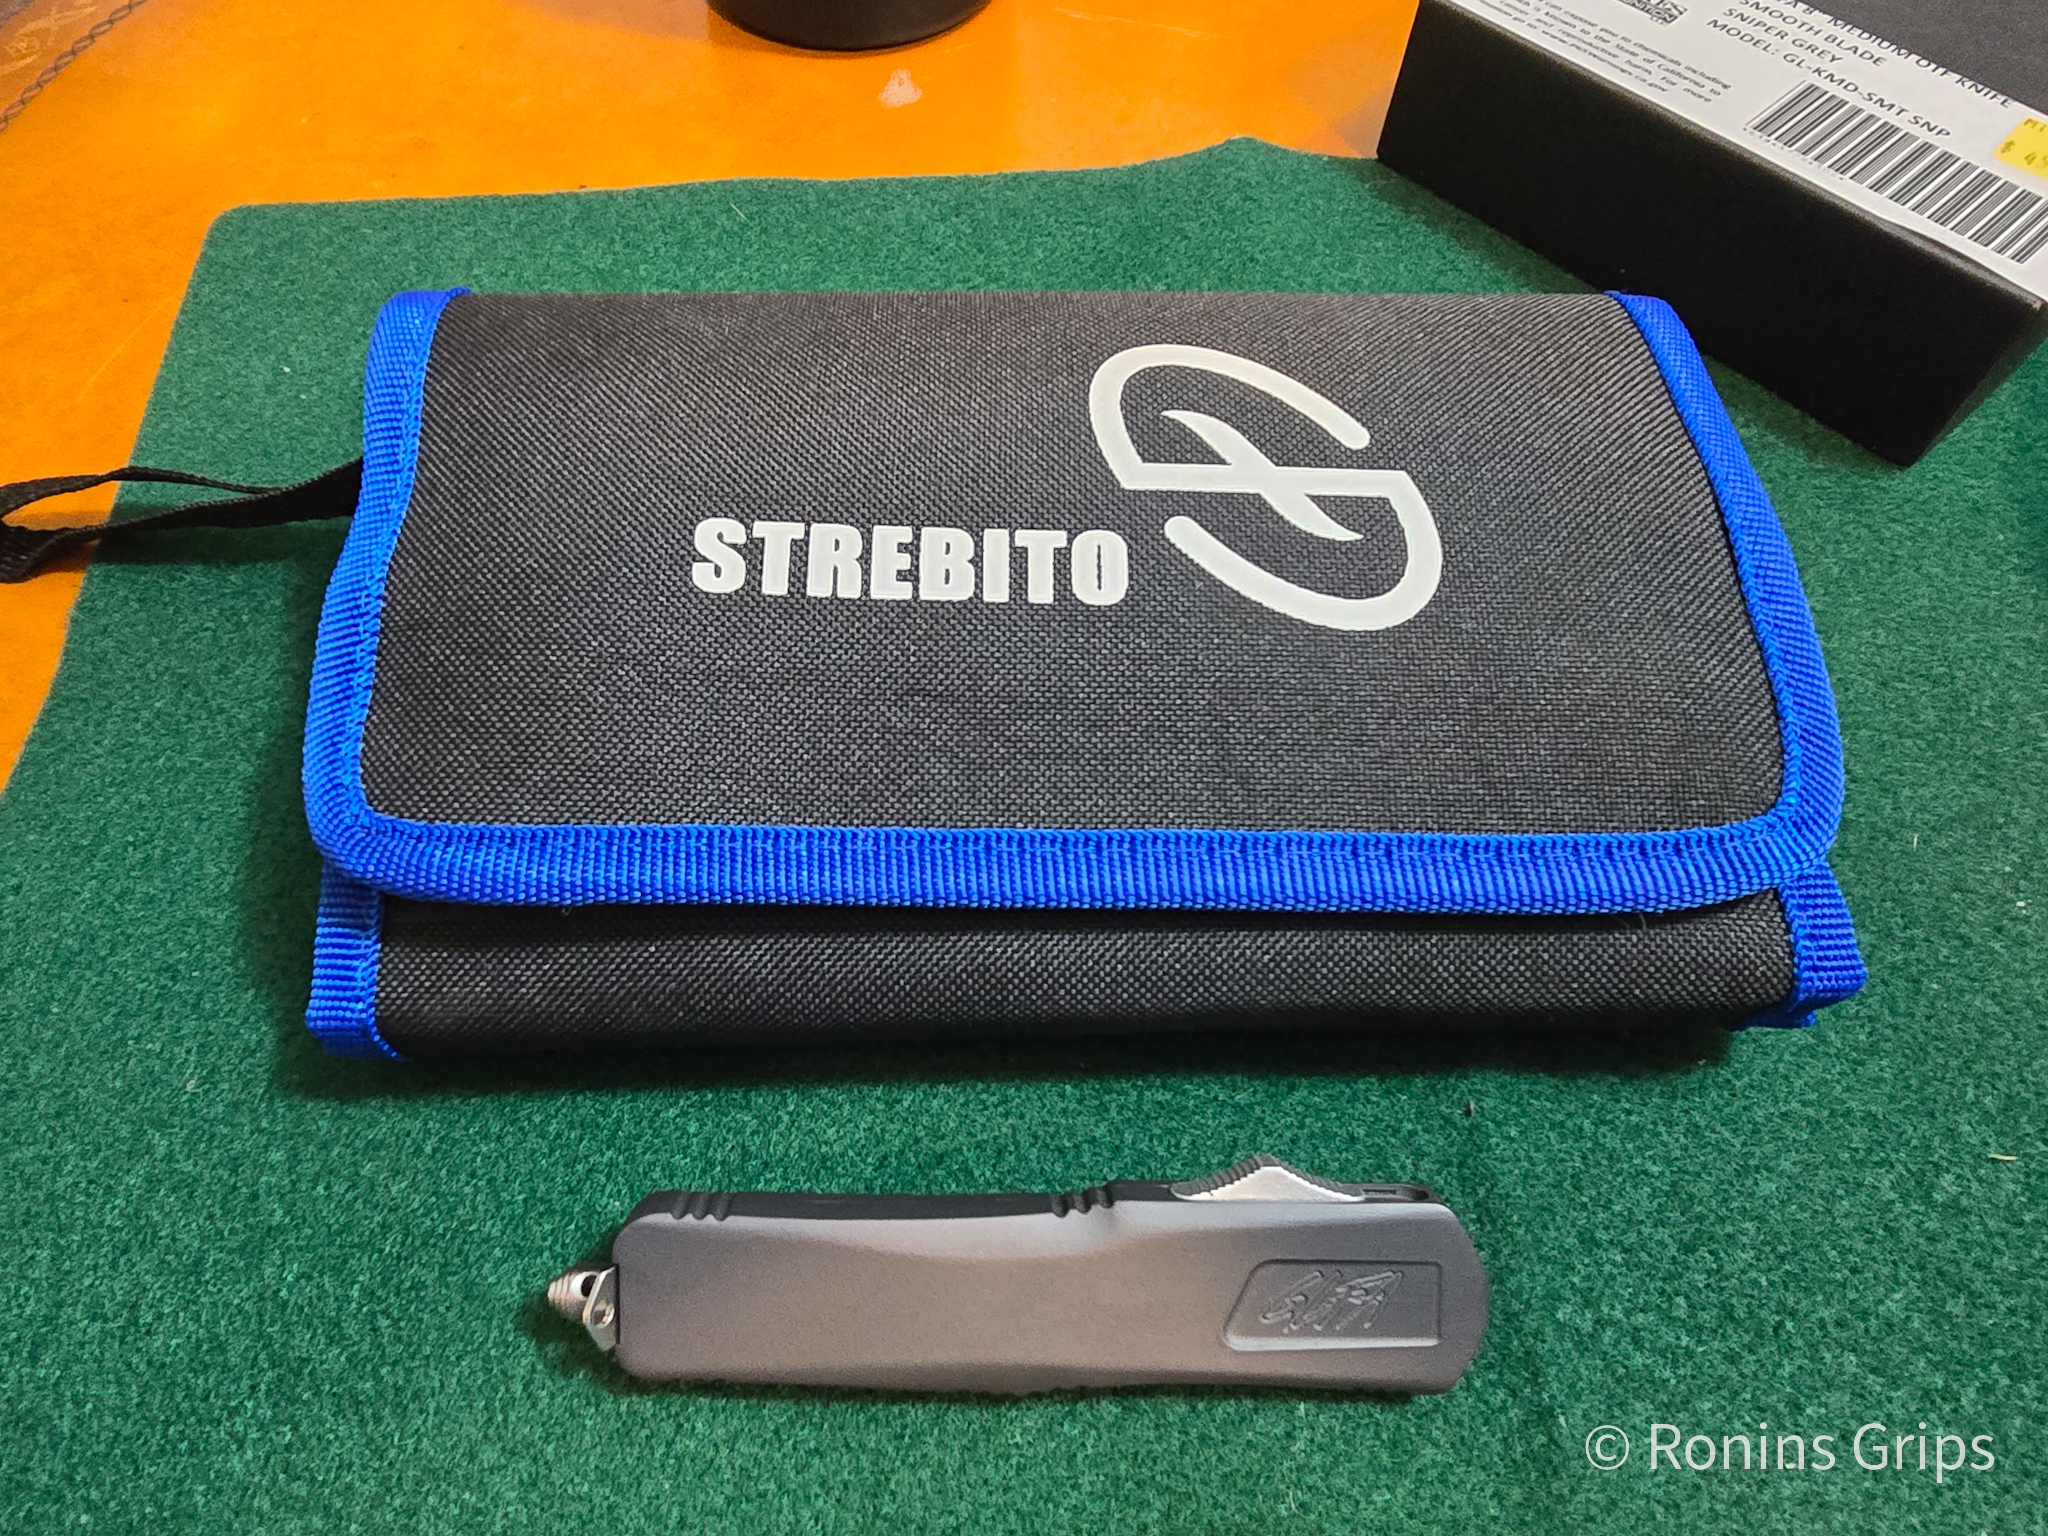
Finally, put the other half of the handle on, reinstall the screws so they are snug and then the belt clip and glass breaker. Done. I definitely recommend the Strebito set if you need small screw driver bits.
As mentioned above, the blade will be sprung. You will need to either pull the blade out to recock the spring or flick it down like a gravity knife. I did the latter out of habit to recock the spring and then everything worked fine.
Here it is by a ruler for scale.
Note, a knife like this needs to break in / wear in as parts get smoother with use. If you need to lubricate it, use a dry lube and not oil. For example, Dupont’s Dry Film Lubricant spray.
Who made the knife?
Whomever built this knew what they were doing and had masws production capabilities to drive the price down. From my perspective, there was no way GLFA could produce a decent OTF knife like this, at such a low price point and still have time to make their rifles. Clearly they were OEM’ing them from someone. As mentioned earlier, I was almost certain it was a Chinese company.
I did some digging based on the four relatively unique design elements that I figured would be rare to see combined – the shape of the handle, profile of the blade, the distinctive successively larger lightening holes in the blade and the glass breaker tip.
I used Google Images and some industry trade sites I know of and narrowed it down to the most likely candidate who does OEM knife work including OTF knives: Yangjiang Honglin Industrial Co., Ltd of Guangdong, China. They claim to have been in business for more than 10 years, have over 20,000 square meters of manufacturing, over 10 production lines and several Chinese quality certifications. They can build a knifefrom the point of raw materials to finished goods.
Could I be wrong about the manufacturer? Yes, but nobody else had all of those design elements present in the photos of sample products I saw.
So, they are a legit knife maker and that then makes my best guess that the knife steel is the Chinese 8CR13MOV which is a perfect decent/average stainless alloy. The average hardness of 8CR13MOV is 58-60 HRC but that’s an industry average and no guarantee of what the Chinese company actually did.
In short, they did a decent job designing and building the knife. I doubt they used junk steel and it’s what you’d find in many sub $40 retail Chinese import blades from Kershaw and others.
By the way, this is not a negative post about GLFA. I was curious as to who made this. Finding and importing quality products takes effort and money.
Summary
For the price, you can’t beat the GLFA OTF knife. You can afford to buy one, use it, enjoy it and not worry about it getting lost or damaged. Speaking for myself, the more expensive a knife gets, the more inclined I am to baby it than use it. I’ll use this GLFA and not worry about it and I’m saying that in a good way.
If you are interested, you can order this and other models from Scott’s website or visit his Michigan Gun Exchange store in Saint Joseph, MI.
I hope this helps you out.
Note, I have to buy all of my parts – nothing here was paid for by sponsors, etc. I do make a small amount if you click on an ad and buy something but that is it. You’re getting my real opinion on stuff.
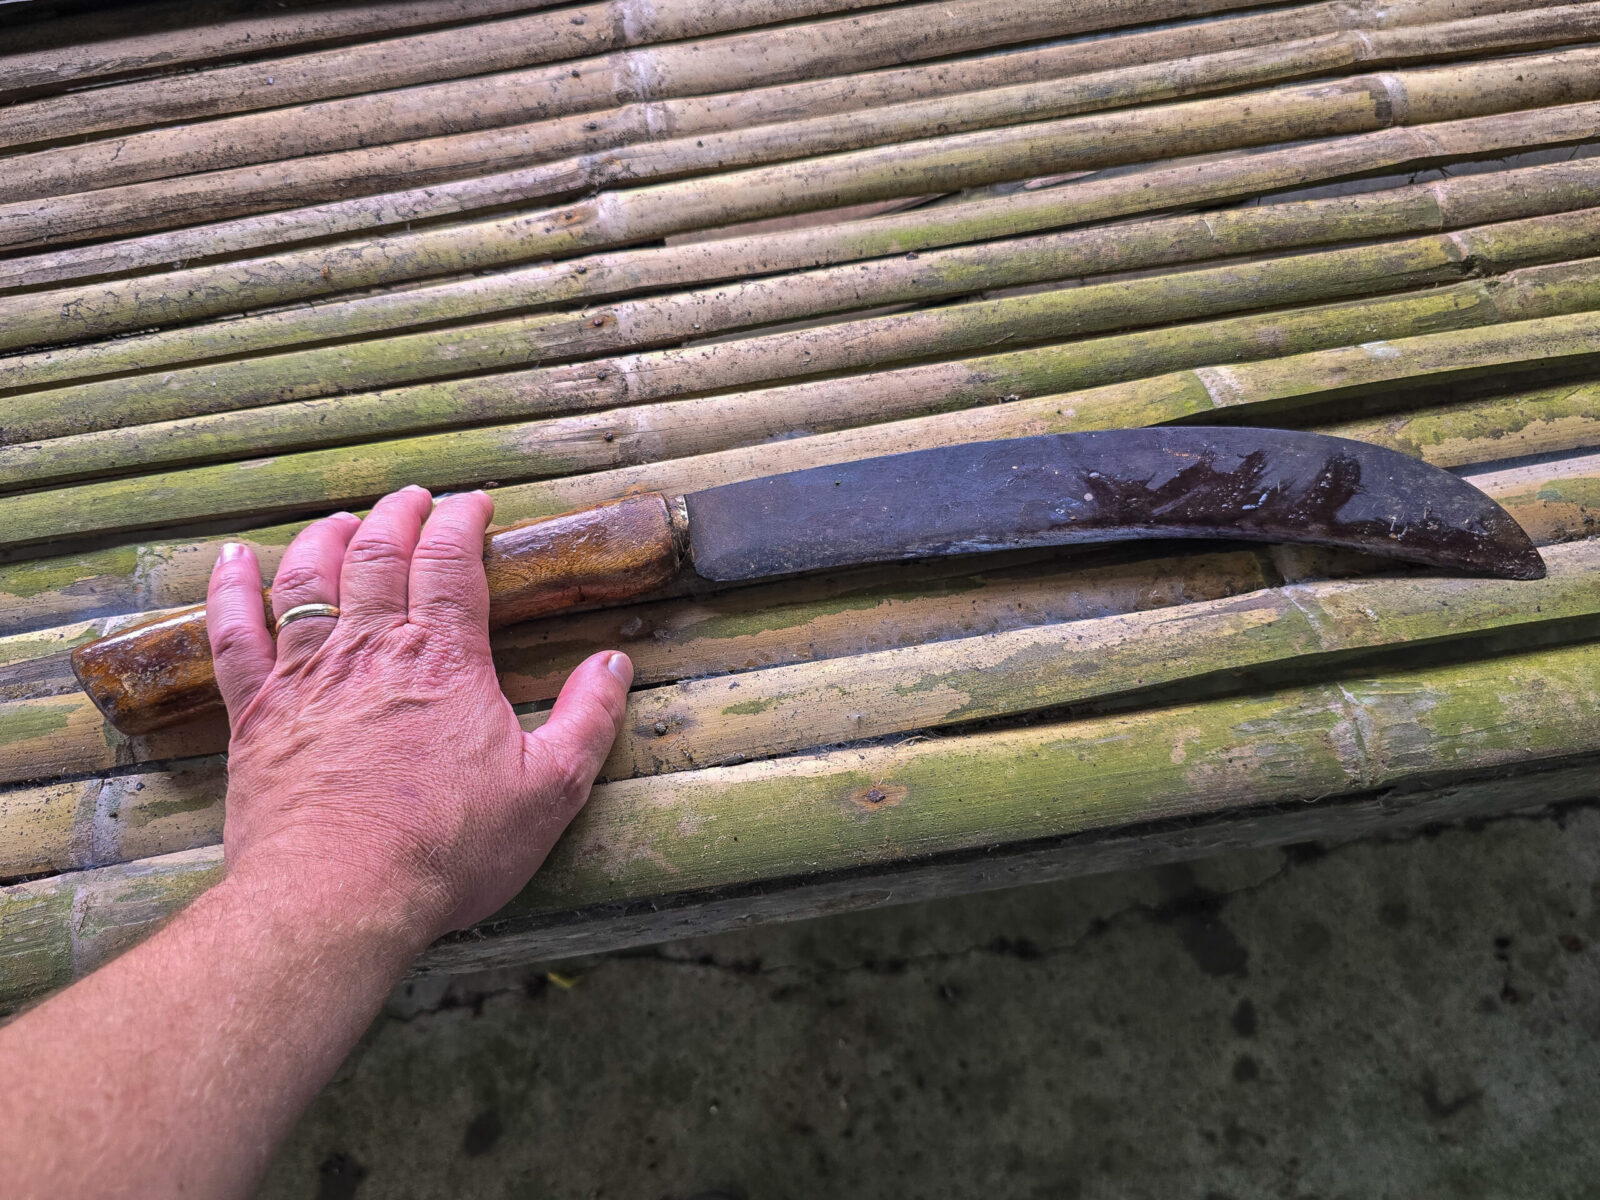
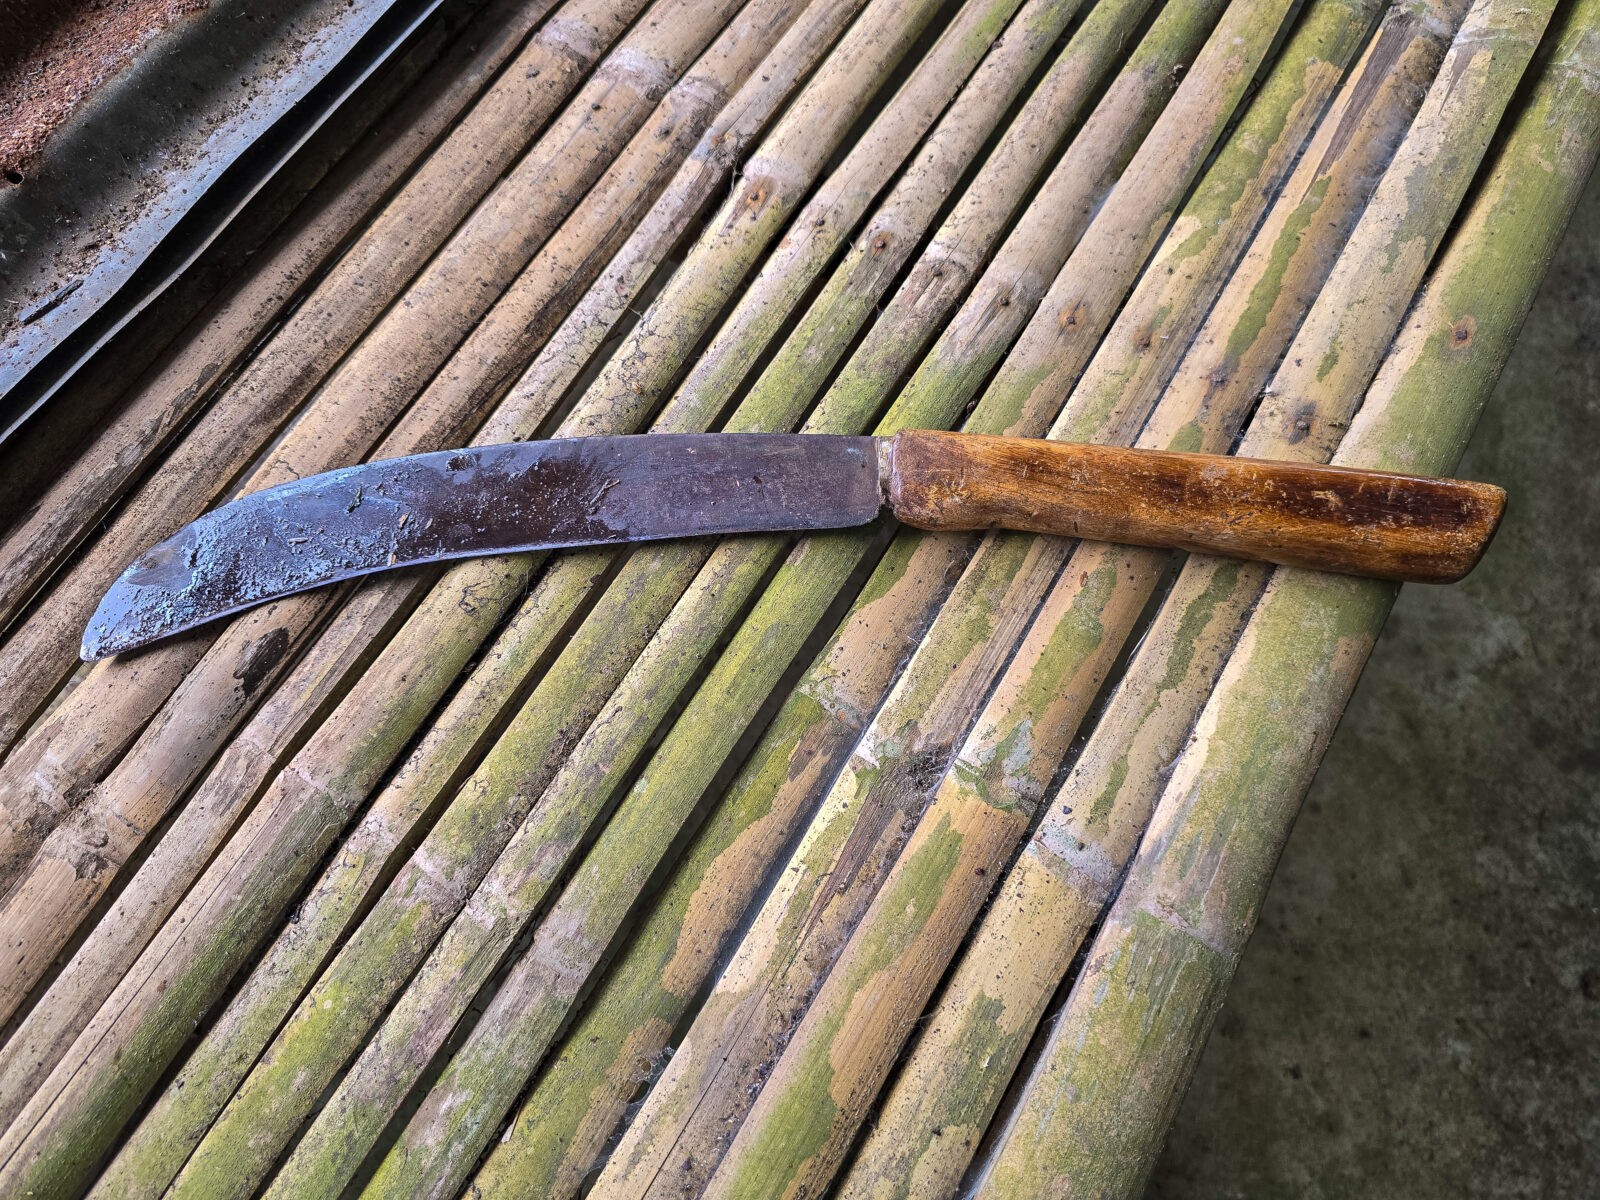
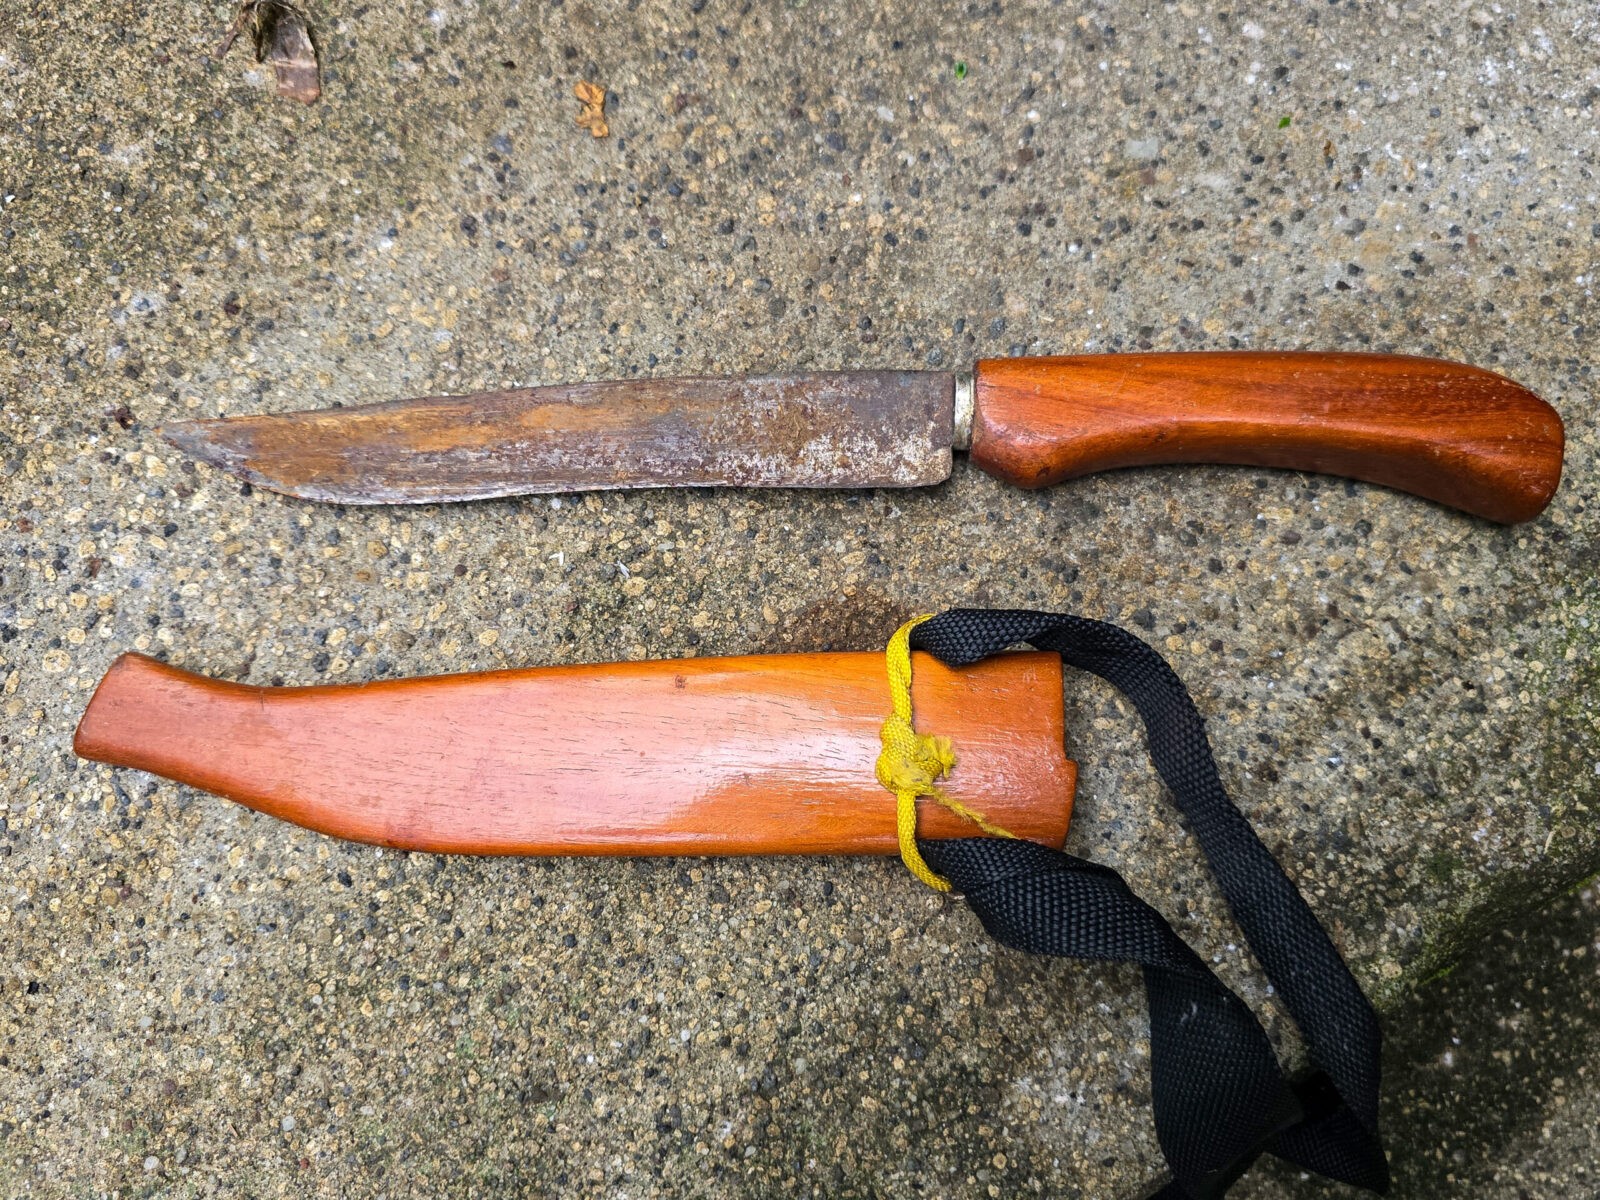
We visited a family member in Alfonso, Cavite, in the Philippines. Her home has a small garden in the back filled with various fruit trees and she insisted we take some fruit with us. Part of what caught my eye was the machete being used. That you can see above.
I turned out that her husband enjoyed making knives before he passed away. He shaped the steel, made the handles and the wood sheaths. I wish I could have taked to him.
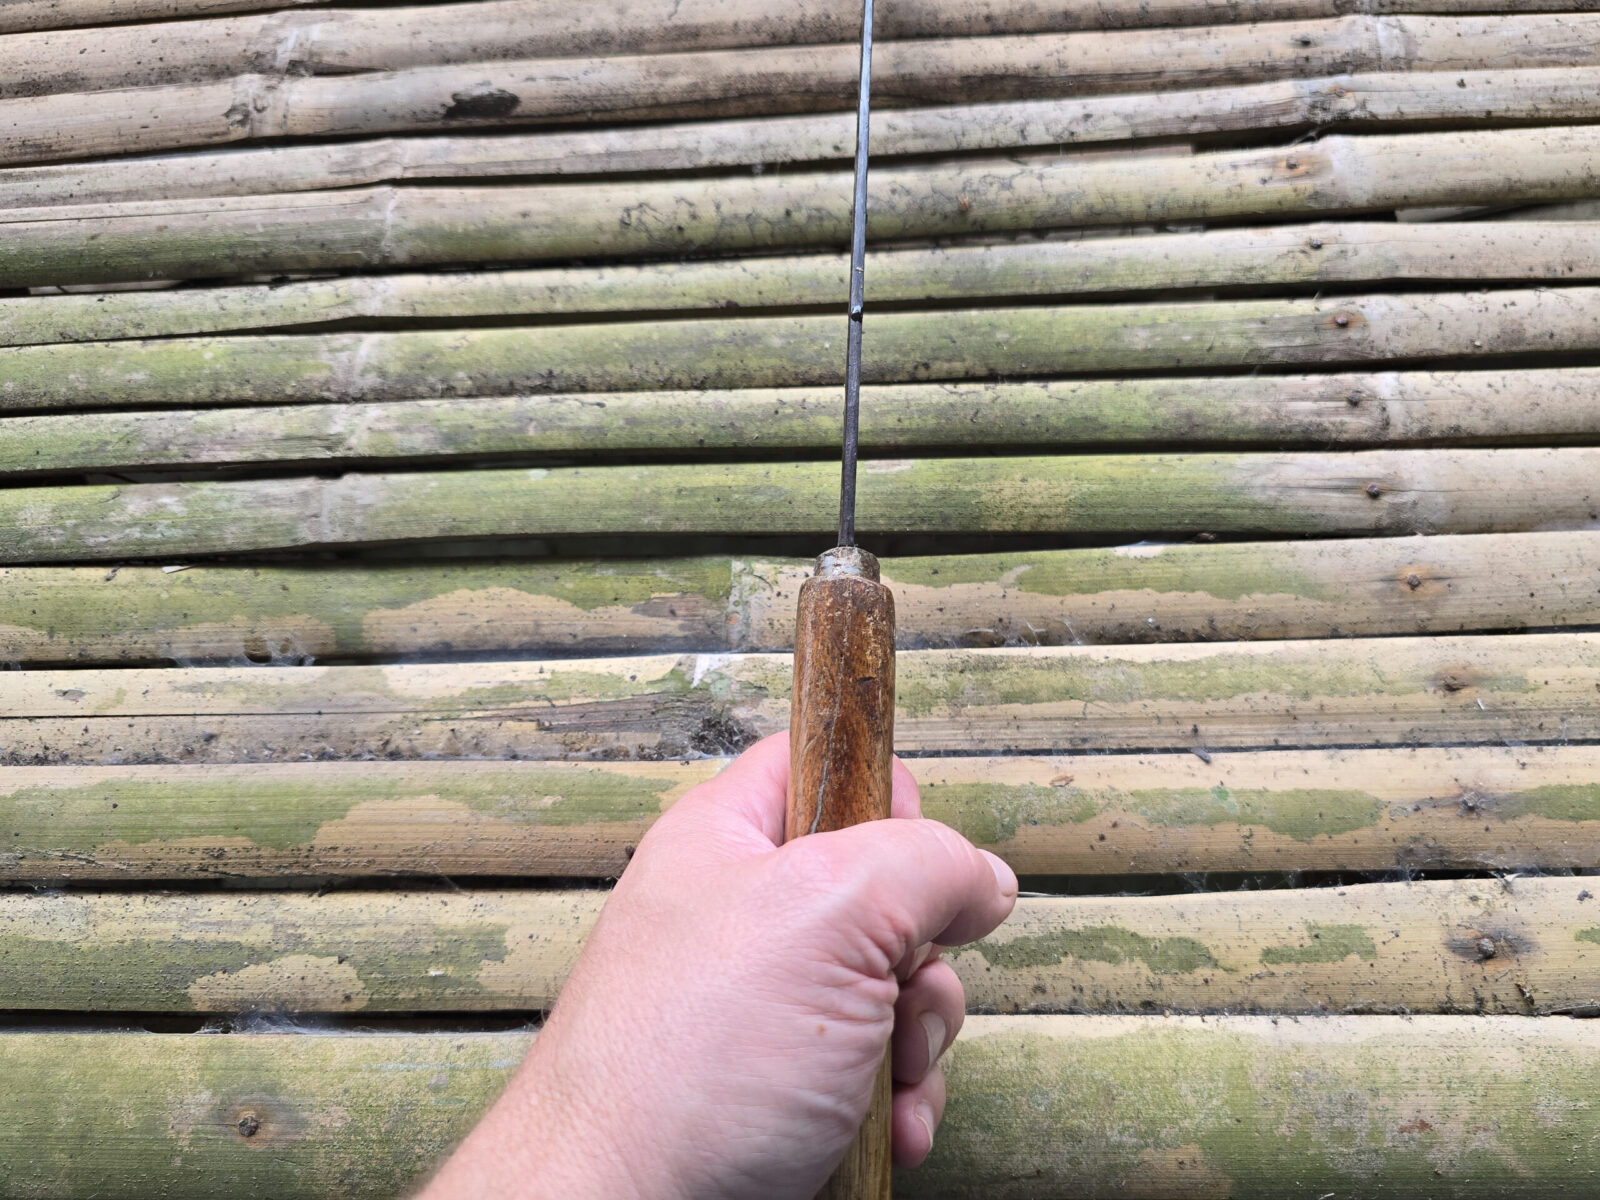
The handle was about 8″ long and the blade is about 12″ long. This side of the handle still has the ferrule to keep the wood from splitting. The blade does have a sickel shape and the cutting edge was facing me (downwards in this photo). Any steel surface wants to rust in the Philippes. It’s due to humidity and salt in the air.On this side, the ferrule is gone. The handle didn’t have a forward taper but he did have a slight bulge at the front to help with gripping the blade and not sliding forward onto the blade.The handle had cracked and been glued at some point. The blade thickness is a tad under an 1/8th inch.
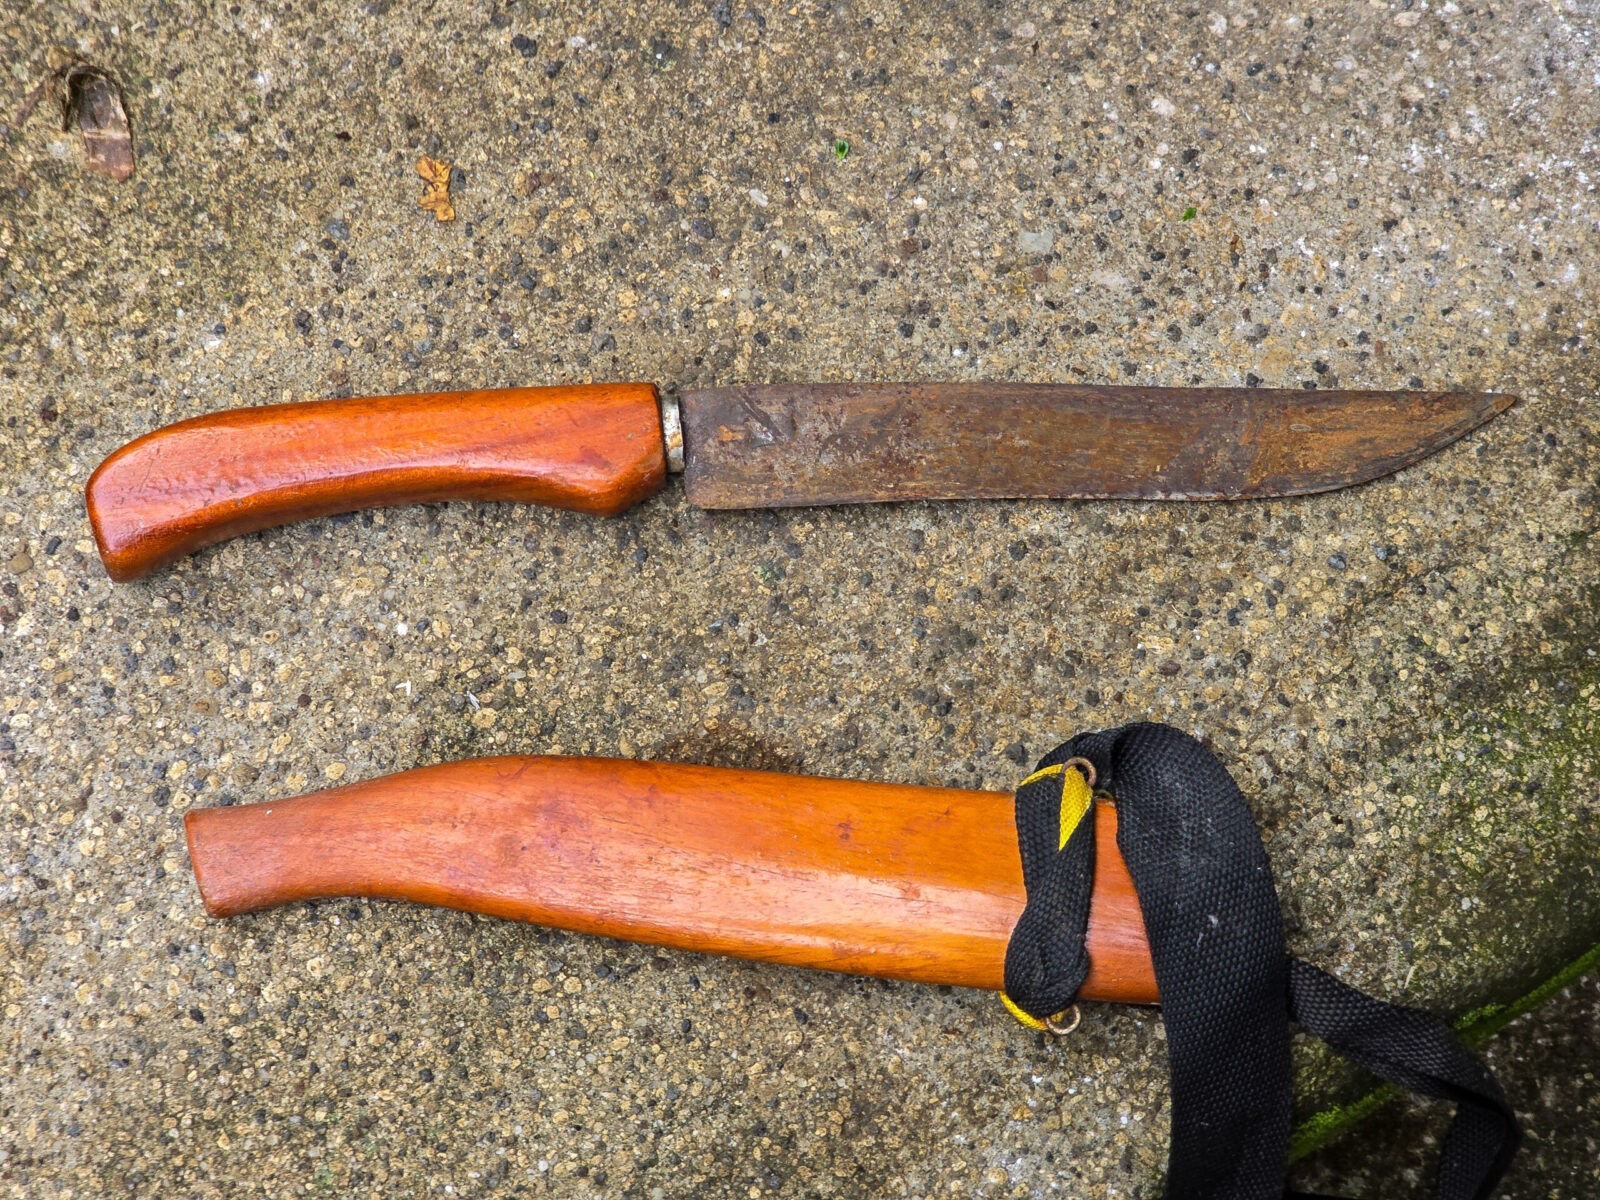
That is the knife they use for everyday tasks. When they heard I am interested in knives and used to make them, they brought out two the husband made that they keep indoors.
This knife immediately caught my eye.He ahd braided string to make a neck strap when climing trees and the overall color was very nice. It would fully seat in the sheath – I didn’t realize it was partly out when I was snapping photos.The handle was about 6″ and he would taper the handle down slightly as he went forward. This knife was in much better shape than the first and you can just see the silver ferrule where the handle transitions to the blade.My best guess is that he differentially tempered the blade by first tempering the blade and then pouring hot water on the edge. The greyish discoloring is the telltale sign. It’s not consistent but clearly it has held up over time. The blade shows marks from plenty of sharpening.This blade is right arond an 1/8th inch or maybe a tad thicker. The handle had cracked a bit.His work on the sheaths was exemplery. He cut the two halves, carved the channel he needed to hold the blade, glued and then clamped them together. I wish I had a good photo of the side – you have to really look for the seam where the two haves come together to find it.
This third knife, I didn’t think we’d get to see it. The blade had rusted into the sheath. My older relative went into her house and came back with it separated. She’d used a small hammer to tap it out – she’s in her 70s and knows how to fix things “old school”. She wanted me to be able to see it.
I’m glad we could see this one, The handle is about 6″ long and the blade is about 8-9″. He had clearly upped his game both in terms of the handle and the sheath. The blade had a bit of a recurve grind also. My guess is that someone else made the ad hoc sling.. Odds are they put it away wet too and it rusted.This side of the blade did show some forging marks. I did recommend to the relative to brush off the rust as best she could and apply a little bit of oil to preserve the blade. We weren’t there long enough or I would have done it.This bade was also about an 1/8th inch thick. Note the slight crack in the handle. The ferrule is still there.
Summary
We were only able to stay for about an hour and really appreciated their sharing the blades with me. I truly wish I could have met their maker but in many respects he lives on with them and his family.
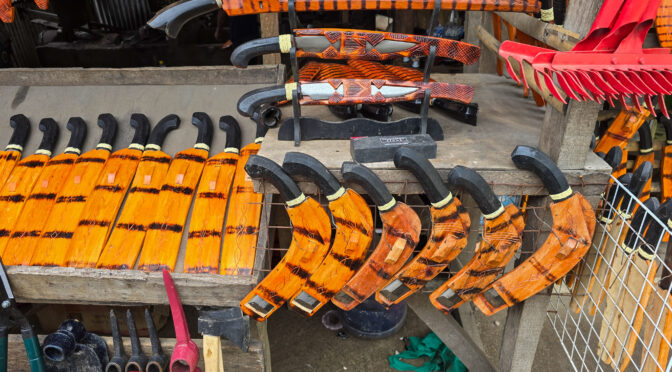
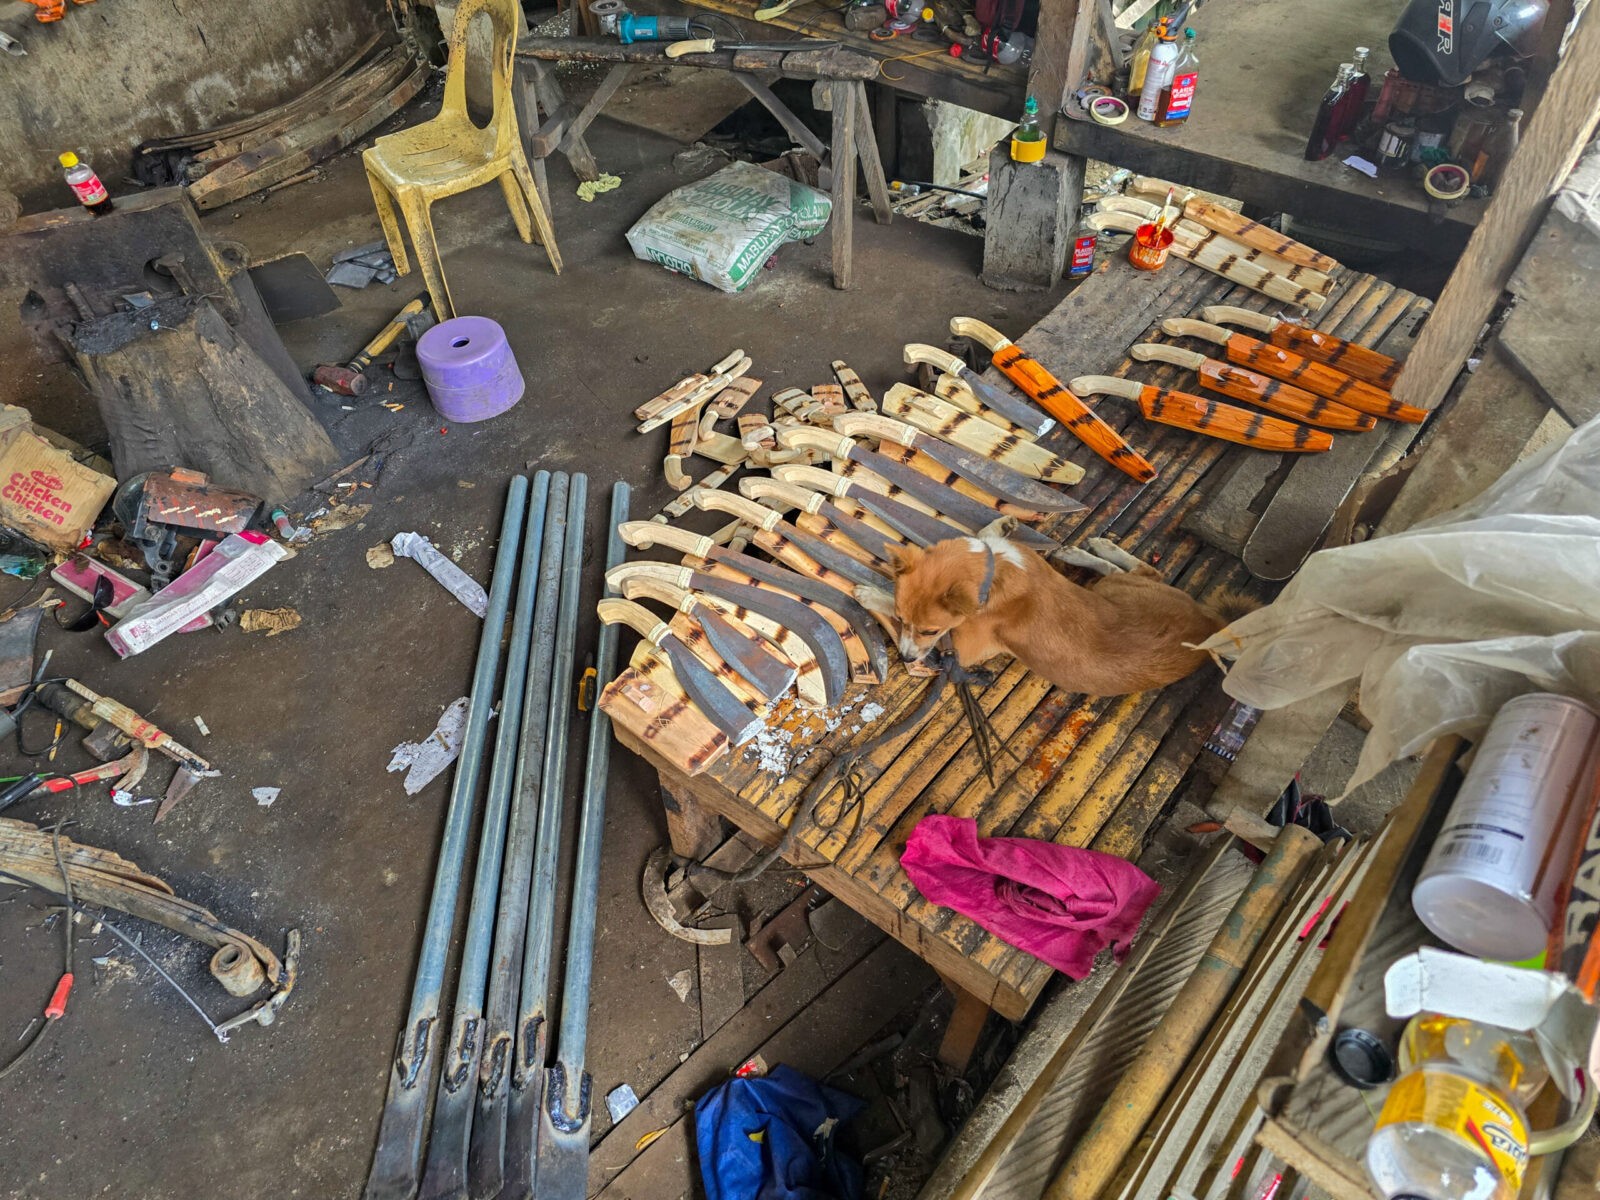
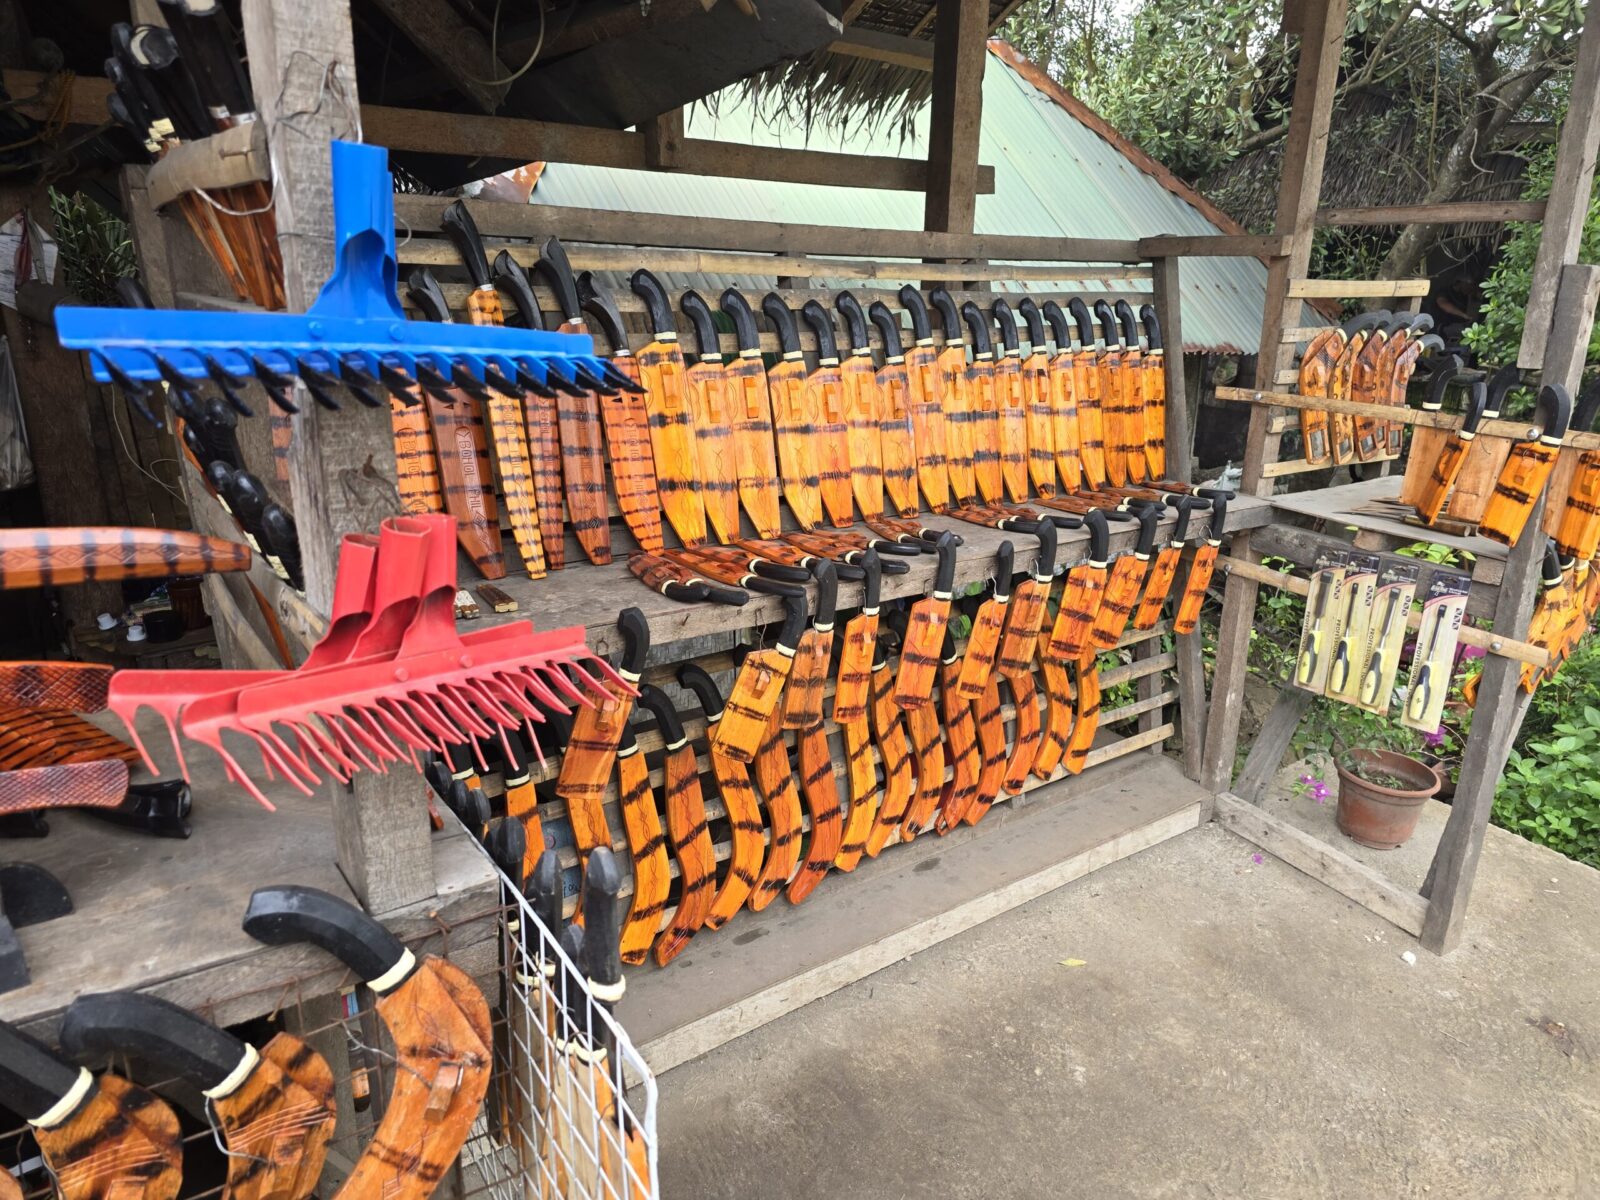
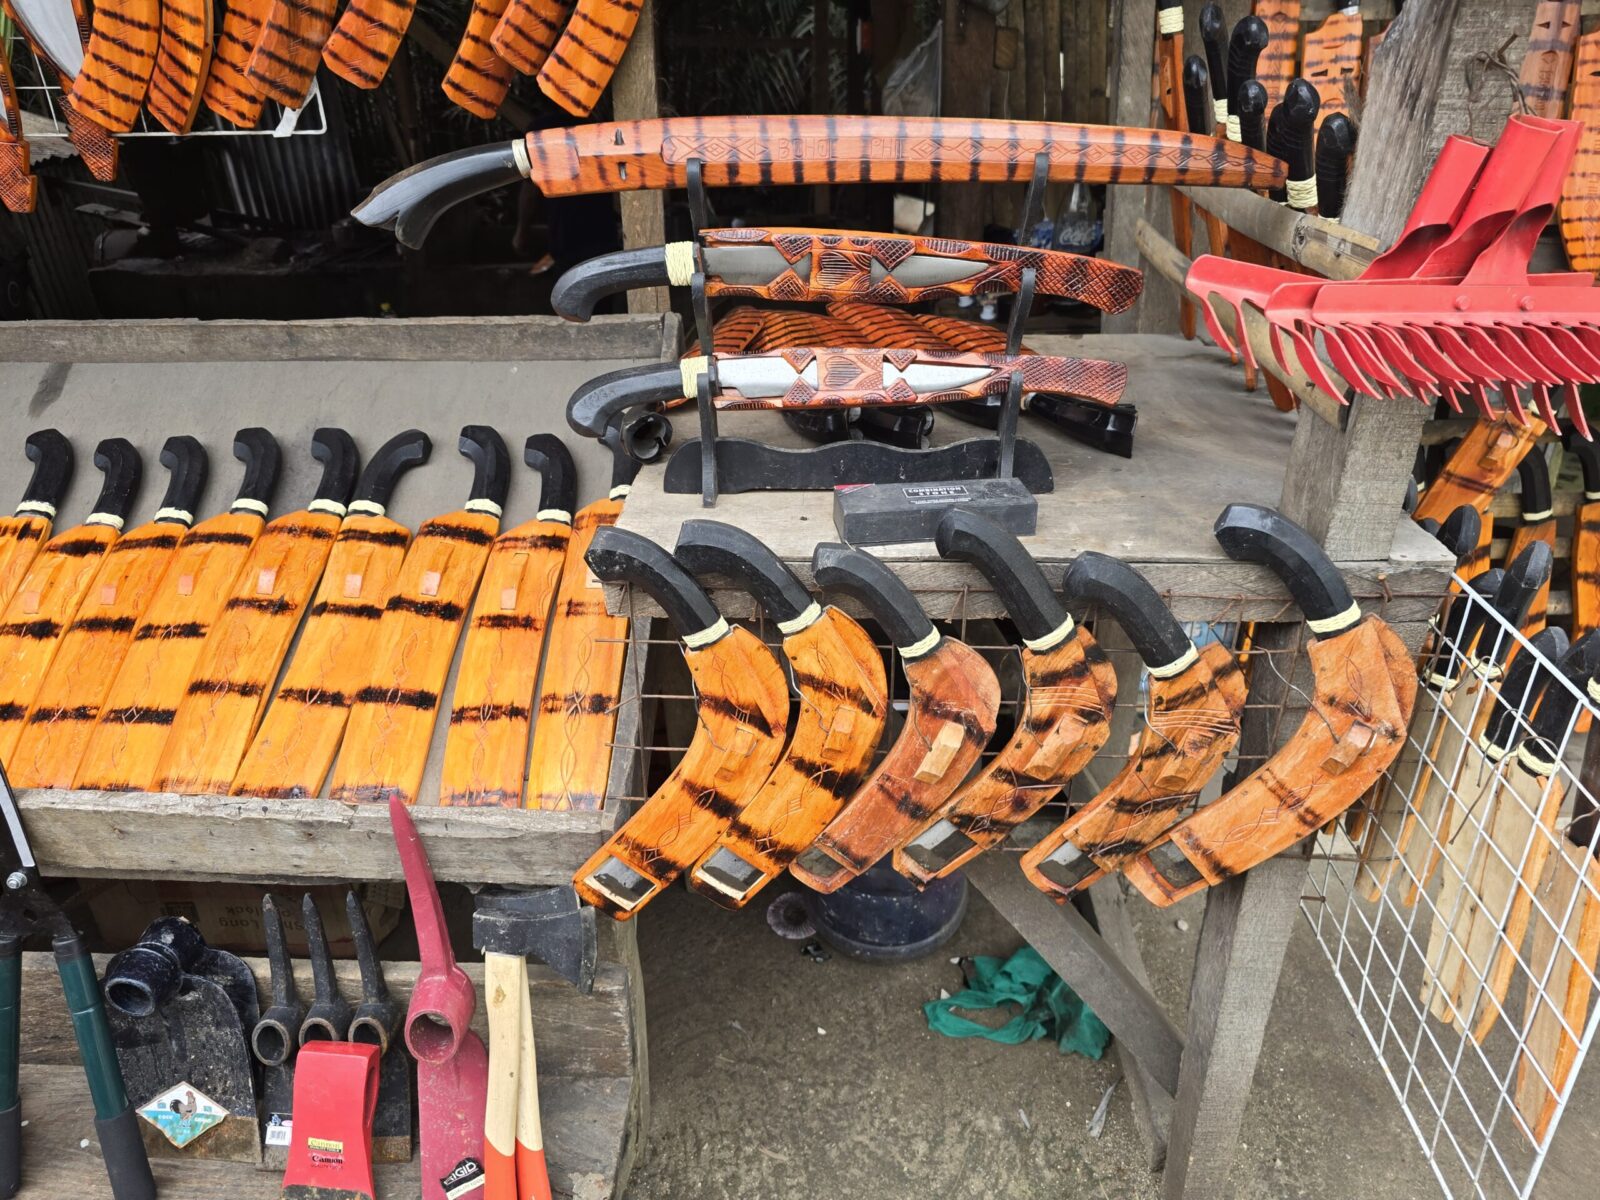
During a recent trip to the Philippines, we visited the island of Bohol. We happened to drive through the village of Loay and saw a shop by the road with an enormous number of blades of all sizes and shapes for sale so we stopped.
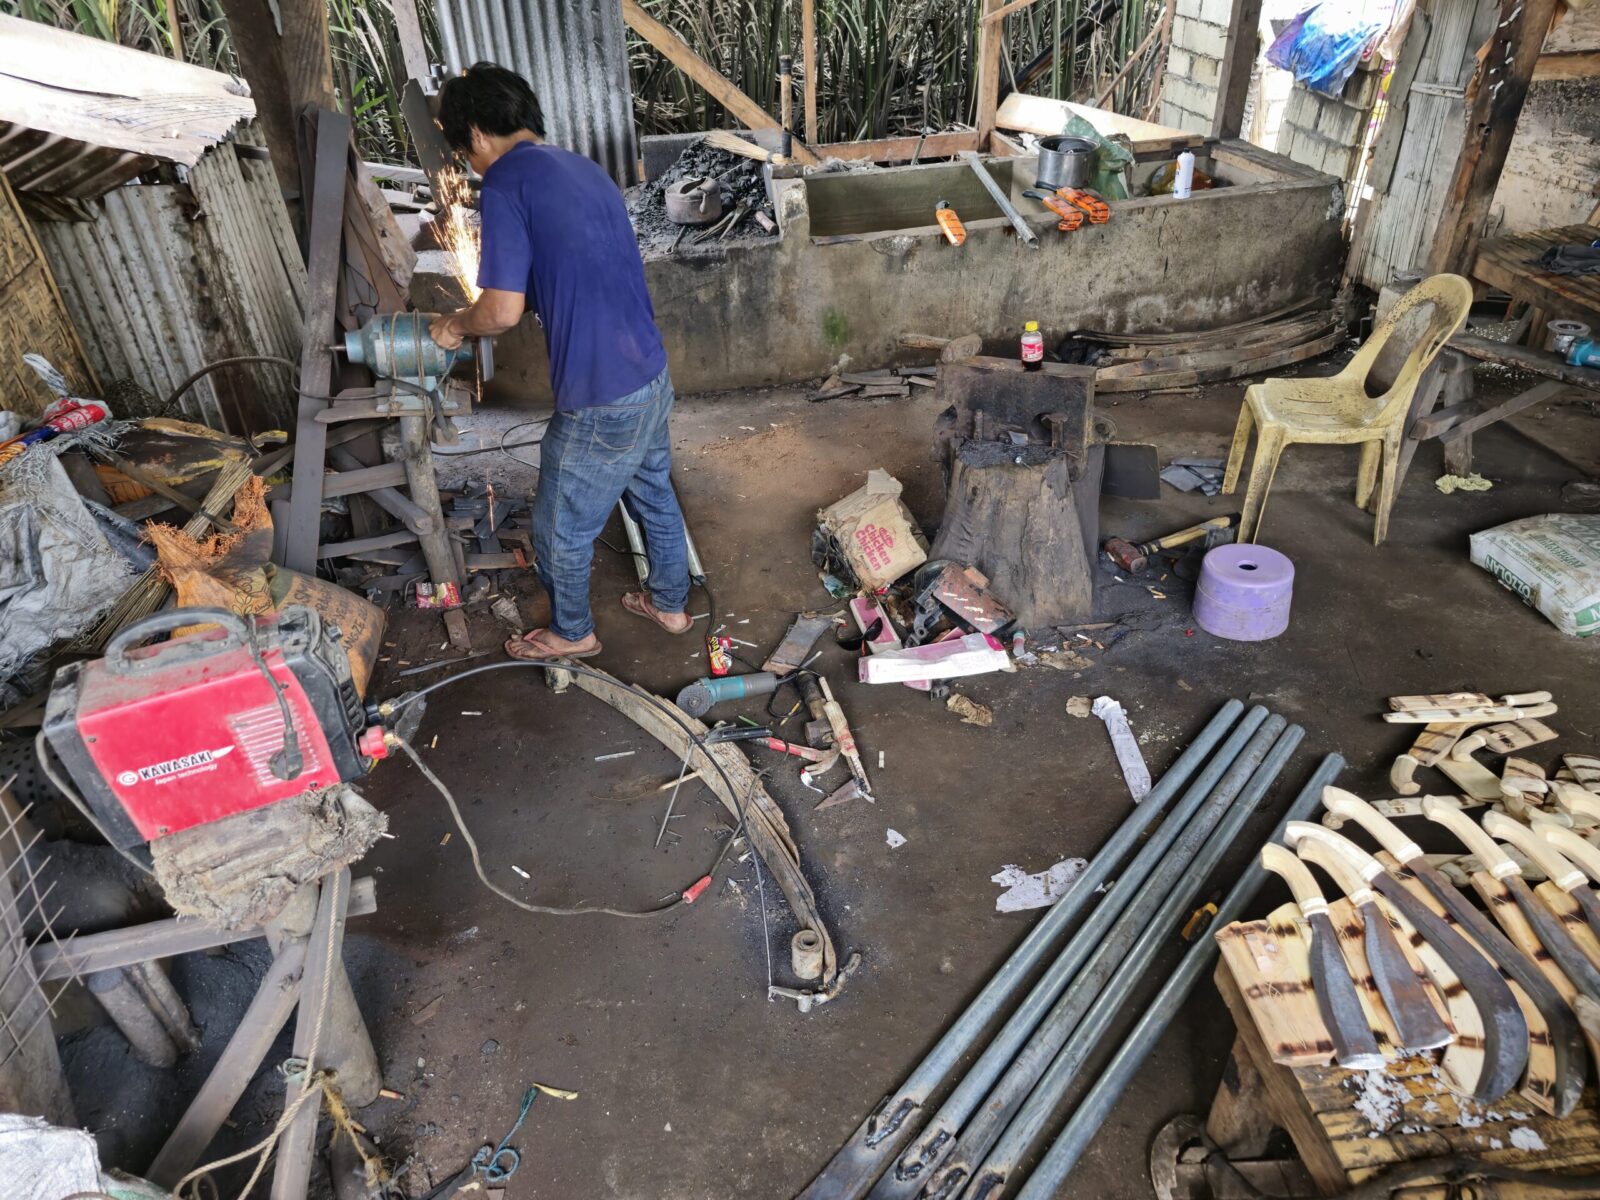
This was the “Bulaklak Blacksmith” shop and at J233+QFH, in Loay. The maker was busy at a grinder and I can only assume it was his wife showing us his wares. Bohol has a booming tourist industry with beautiful beaches and I am sure this stand was trying to capitalize on this. We were visiting at the beginning of September which is when the tourist season is drawing to a close.
He had produced a huge number of machetes and various knifes of all shapes and sizes. We also saw various types of implements such as steel rake heads, steel poles with heavy cutting heads and more.
What struck me was his shop. There he was with very basic equipment – a forge, anvil, hand tools, a stick welder, grinder, and so forth cranking out his wares.
If you are ever on the island of Bohol, the store and shop make for an interesting stop.
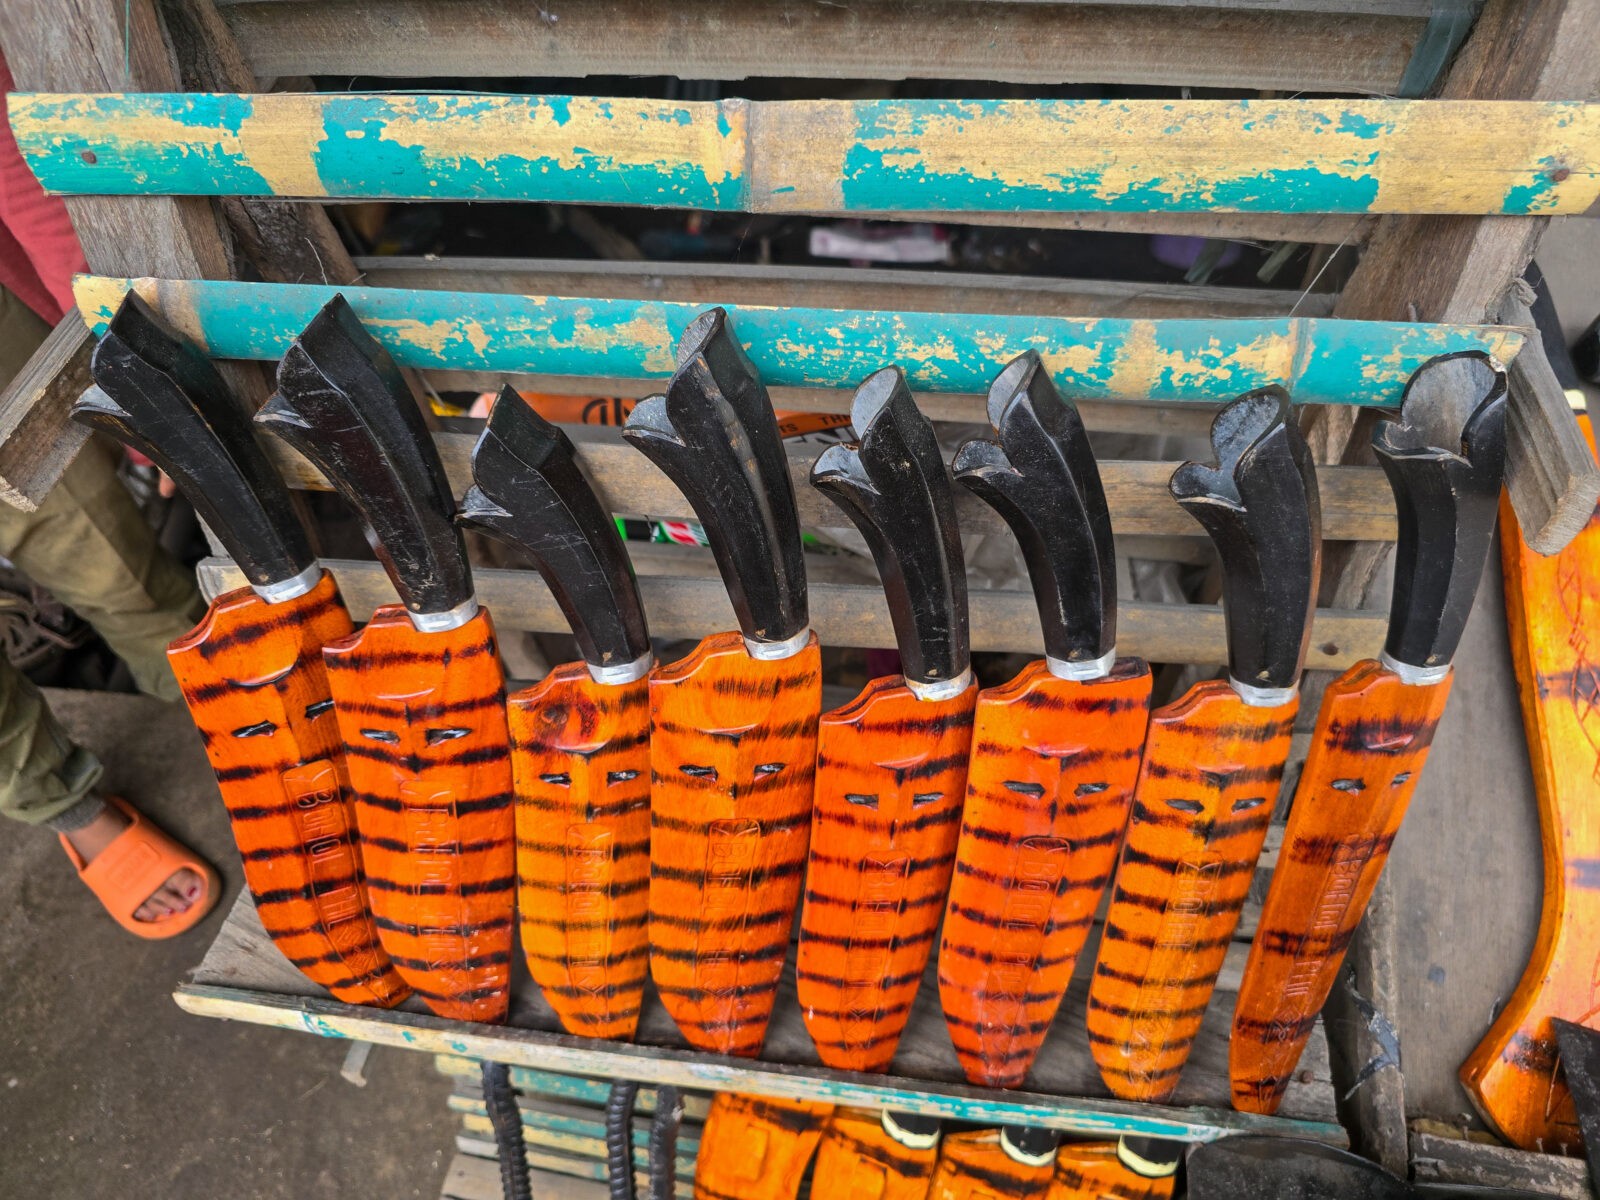
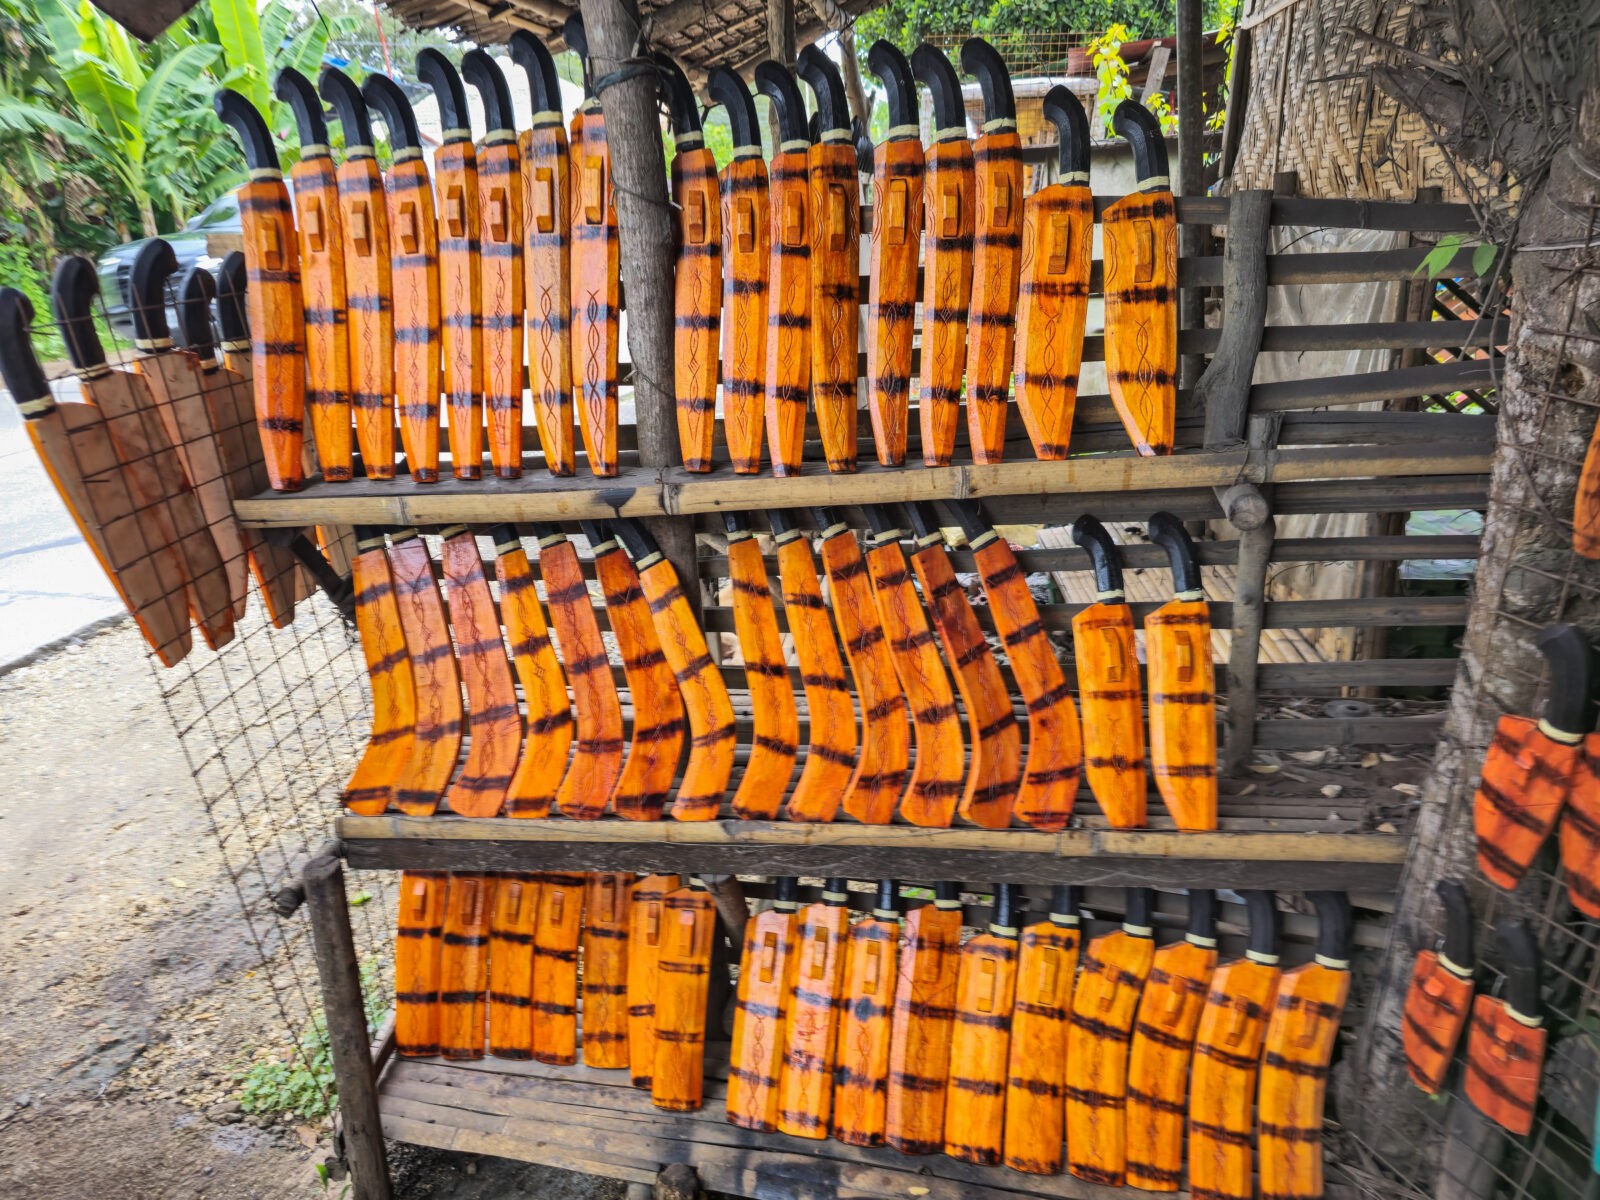
With his finished wares outside facing the road, he was inside cranking out the work. He was grinding the whole time I was there. Note it was 83F with a ton of humidity and there he is on a dirt floor getting work done. Also note the truck leaf springs. The knife makers of Nepal, known as kamis, also get leaf springs to make knives – the alloy works great for them. You can see the poles with cutters on the end – I can guess they are for digging holes or some kind of clearing activity. On the table are various machetes in the works.Here’s a better view of the work in process and his furry helper who woke up just long enough to look at me and then went back to sleep. The machetes I saw were averaging about 3-4mm in thickness.This was maybe a fourth of the knives he had done and ready for sale. Handles were either wood or hollow buffalo horn. The scabbards are of a died wood. The ferrule on the handles is actually a tightly braided twine. Noote the steel rake heads.Here are some large general purppose knives. The handles are all hollow water buffalo horn.Not only was he prolific but there were all kinds of styles from small hunting knives to machetes to swords. Traditional Filipino styles as well as Nepalese kukris and Japanese natas.The majority of the knife blades were of a “villager” style without a lot of finishing and polishing work. By the way, I am very fond of villager-style blades as they really have character. In some cases, such as the sword and blades in the top center, he could turn out more refined work.
I didn’t think to ask if he sells any blades for locals. I would have really liked to see them. However, we had a schedule to keep as we were going on to see the Tarsiers and Chocolate Hills so we had to get going.
If you have ever wanted to visit and very affordable tropical resort, we stayed at the Bellevue Resort and it was beatiful. Great staff, facility and food.
This was the view from our balcony. You can see one wing of the hotel portion on the left and the thatched roof is the restaurant.Looking back at the restaurant and our wing of the hotel. Again, great place to stay.
If you find yourself in Bohol, check out the Bulaklak blacksmith’s shop and if you are looking for a resort, check out the Bellevue. By the way, we were visiting family and I don’t have a habit of jetsetting 🙂
From 1988 to 1989, I went to school in Kobe, Japan. On weekends I would wander through shopping areas and always looked carefully at the hardware, tool and knife vendor stores. Even then, big chopping blades would catch my eye and I found out they were known as “natas”. They were used much like a Western Hatchet intended for use by one hand to remove small limbs and split wood.
Before I returned home to the states, I picked up a 180cm basic model from a hardware store and it rattled around in my shop for years and years … I guess at this point I am old enough to say decades. The nata itself was very cool but over the years the vinyl covering stretched over a wood core slowly fell apart. Eventually, I decided to refinish the nata and sell it with a Kydex sheath.
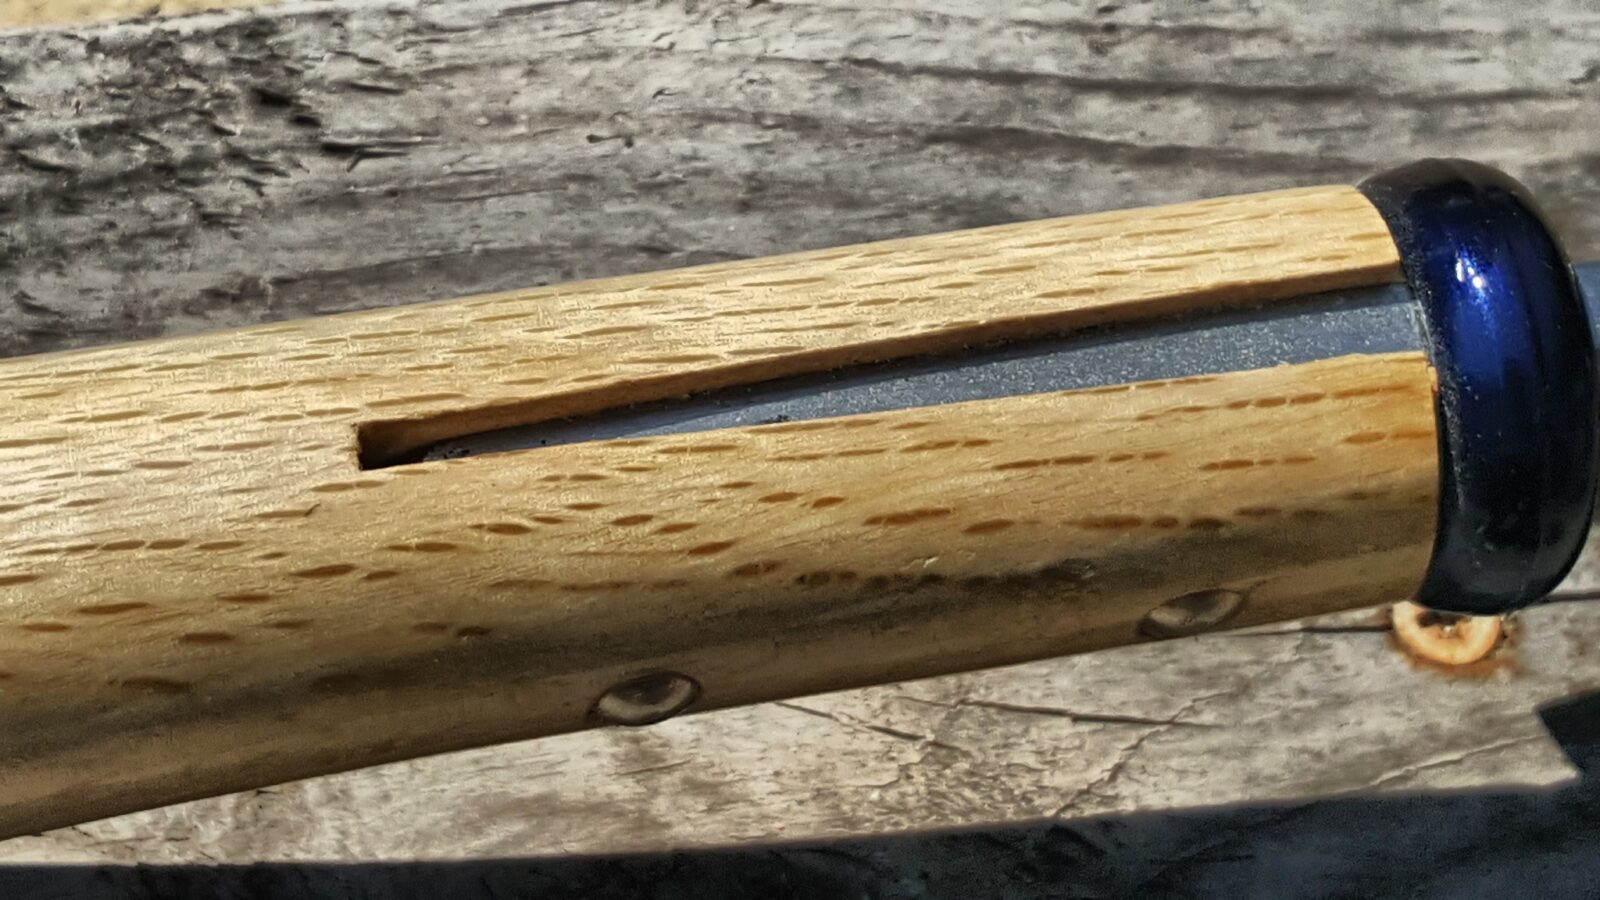
This is the actual 165mm nata I bought near Kobe. 165mm makes the blade about 6.5″ long. It was a very stout blade.You’ll note the blade is only beveled on one side and this is common with the nata blades. Note it is a rait-tail tang – meaning a short partial tang going into the wood. Westerners often look at a design like this and consider it weak. Asians look at it as allowing some flex and not transferring all of the shock into the hand of the user. Changing an exposed tang like this is no bog deal really.This was it after refinishing and new Kydex sheath just before I sold it.I wish I could say who made the nata for sure. The 165 refers to the length in mm and the kanji (the ideograms) translates laterially as “with steel”. A company named “Kanenori” makes natas and does the same kanji and millimeter size stamping,and the ferrule originally being colored blue. Take all of those and they make Kanenori is my best guess.
The funny thing about time is that you can learn a lot along the way. You also get reminiscent about things in the past – in my case, I missed the nata. I’d gone head first down collecting and refurbishing cleavers, khukuris and and other blades – some of which I kept but I no longer had a nata and decided to correct that. Before we get into the three I bought, let’s look at the history of the nata design.
The History of the Japanese Nata
While the exact origin remains unclear, evidence suggests the nata’s presence as early as 720 AD. The word itself (鉈) appears in historical texts, but physical examples or depictions from that era are scarce. This lack of concrete evidence points to a likely origin deeply rooted in rural communities, where functionality overshadowed the need for artistic documentation.
Throughout Japan’s feudal period (794-1853), travel between regions was often challenging. This isolation fostered the development of regional variations of the nata, each tailored to the specific needs of its locality. Village blacksmiths refined the tool based on local materials and methods that evolved over time.
The Edo period (1603-1867) saw a rise in traveling woodcutters. This new mobility led to the spread of efficient nata designs. The “tomari-nata,” developed in Asahi Town, exemplifies this trend. Its unique, bird-beak-shaped tip facilitated stripping bark and collecting firewood, making it a favorite among woodcutters. The tomari’s popularity exemplifies how regional ingenuity could gain national recognition through practical advantages.
Today, several distinct nata styles persist, each reflecting its historical roots. Modern materials like carbon steel and alloy steel have replaced traditional iron, but the core function remains unchanged. Today, nata are prized for their lightweight design and exceptional edge retention, making them ideal for forestry and land management tasks.
Back to the Main Story
We happened to be visiting the Smokies and stopped by Smoky Mountain Knifeworks (SMKW). We visit about once a year and if you are in the Sevierville, TN, area, SMKW is a “must-visit” store with knives, firearms, tons of cooking stuff, antiques and more – click here for directions on Google Maps. I check out the latest in blades in their huge store room and my wife likes looking at all of the cooking and gift ideas downstairs.
At any rate, we were there when they were having an open house with tons of vendors and it just so happened that a representative of Condor Knife and Tool was there. I really like Condor and it’s been great watching them grow over the years. I told the fellow that I had a bunch of Condor blades and planned on buying two this visit.
Well, he and I talked for a few minutes and a really cool Nata-styled knife caught my eye. It is their “Batonata” designed by Joe Flowers and it’s a cool take on the nata design. One look and you know it’s a nata but with a slightly different shape to the head, burnt American Hickory handle and brass wire wrap to further secure the full tang in the handle.
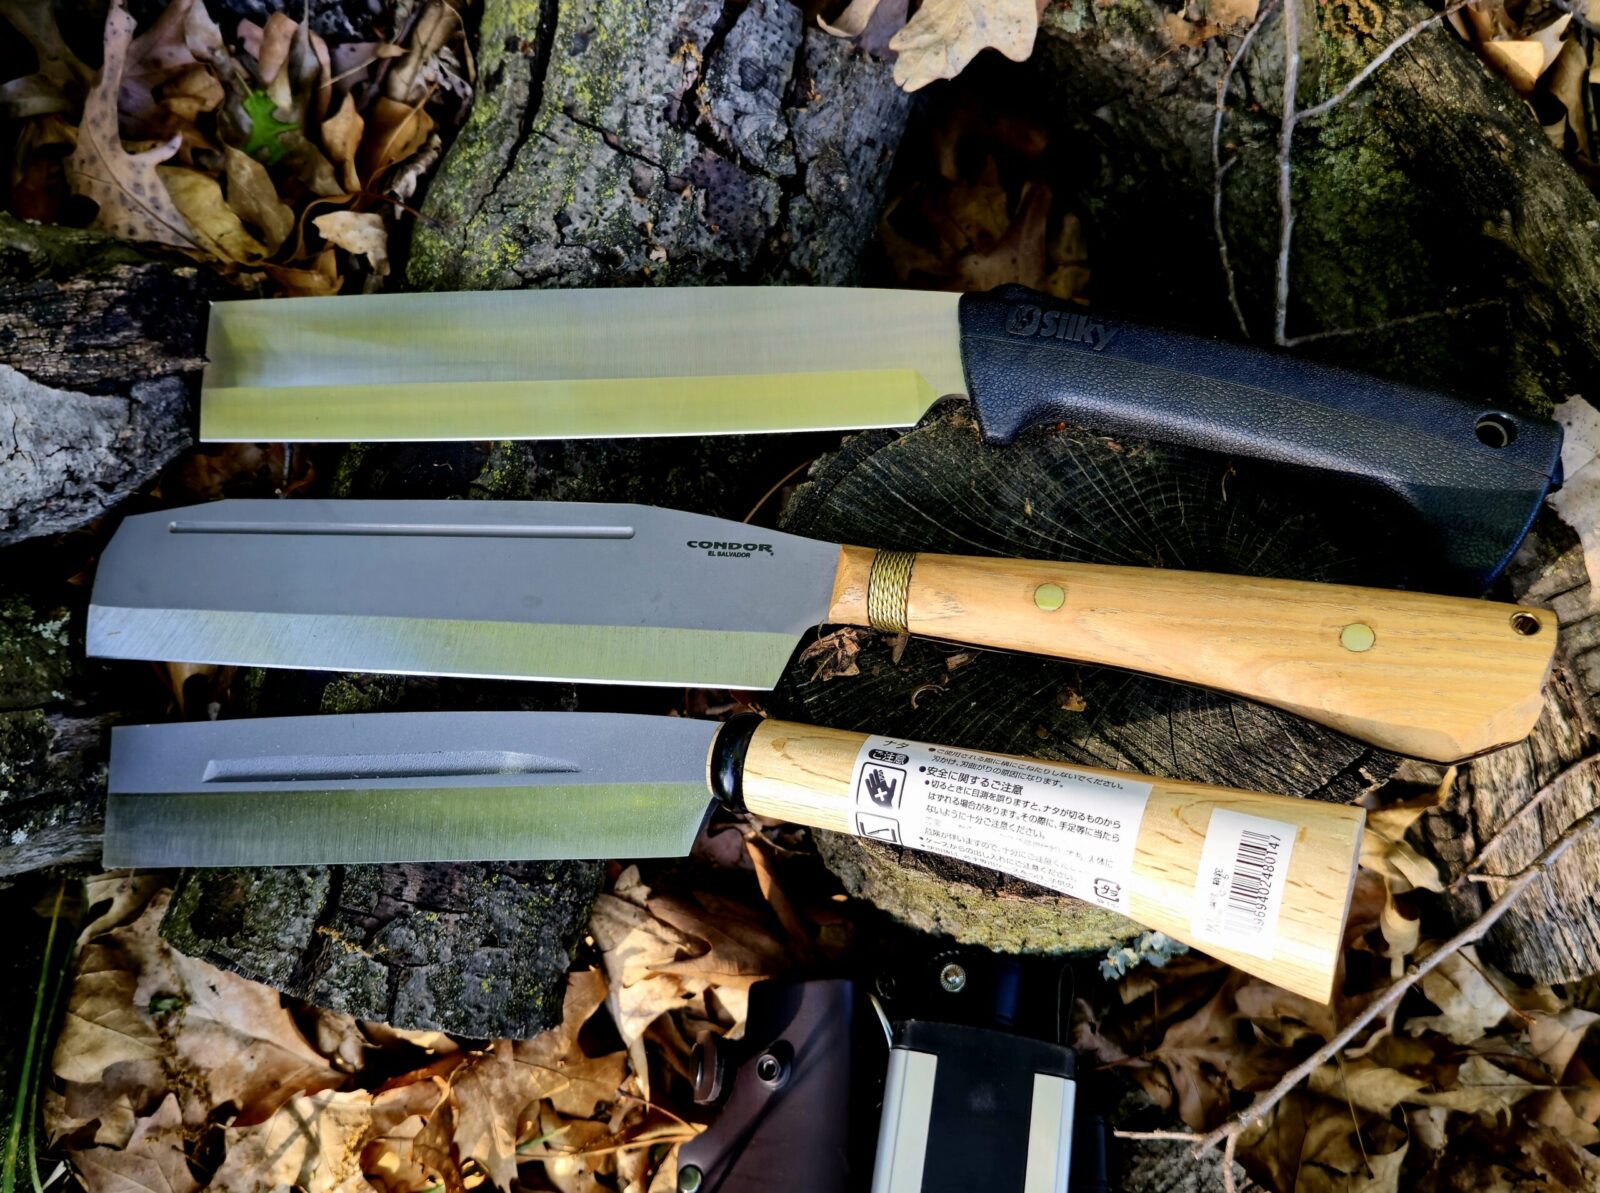
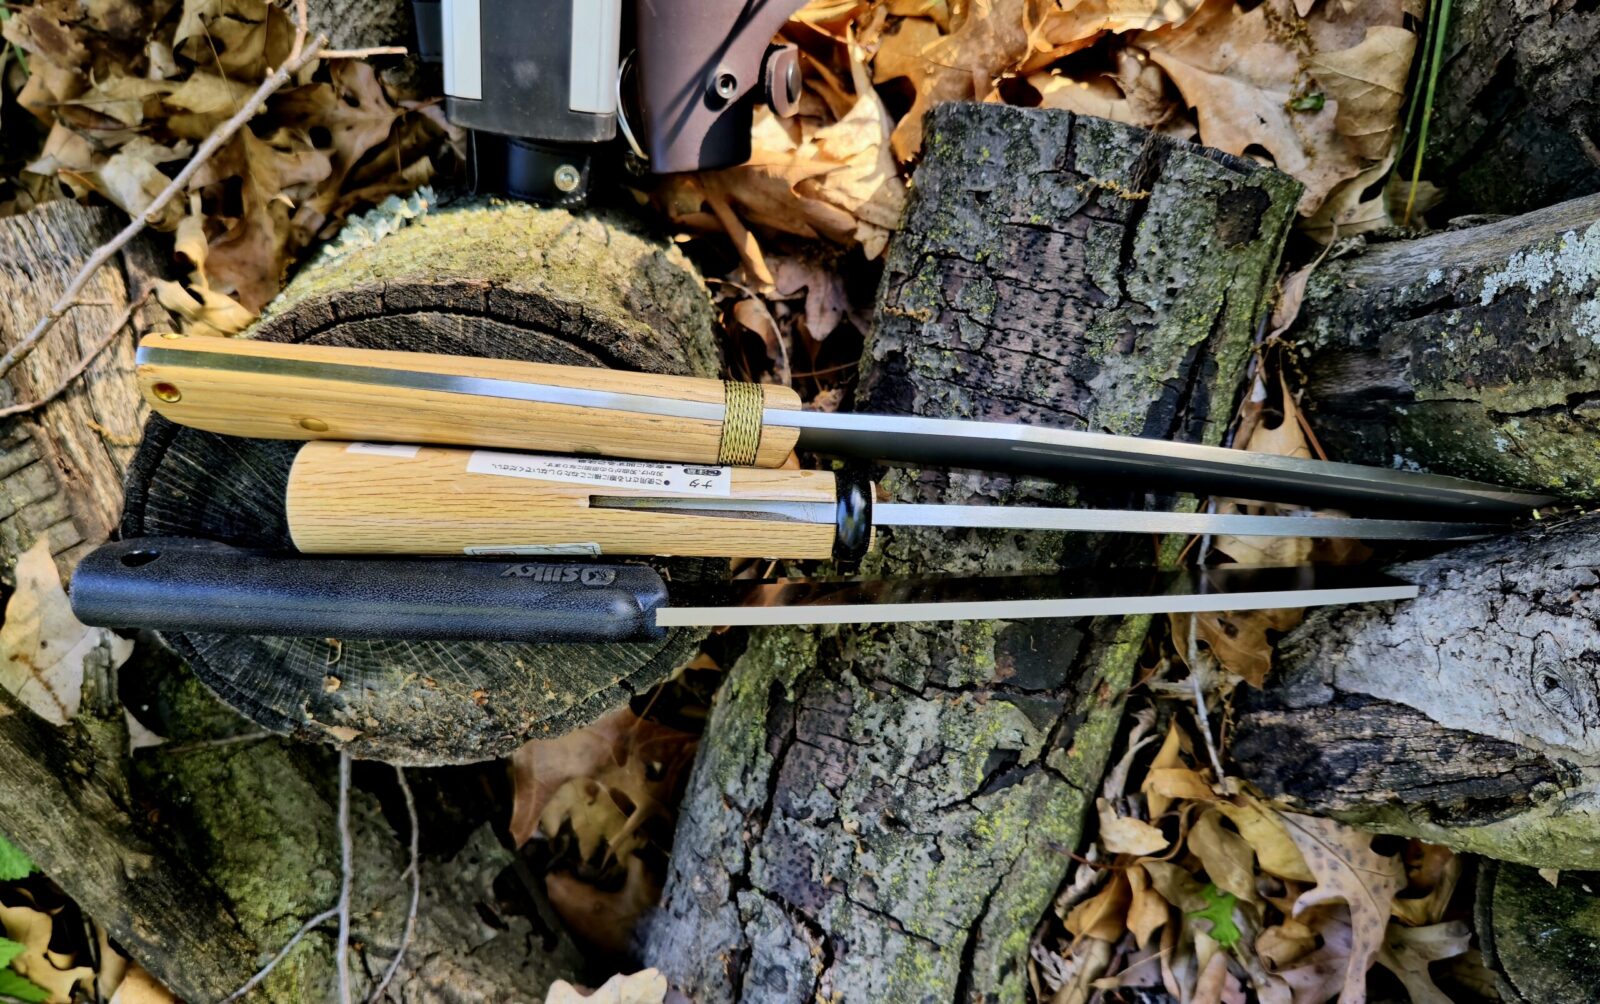
The blade is 0.20″ thick 1075 high carbon steel. The blade itself is about 10″ and overall it’s just under 17.5″. The weight is just under 2 pounds.
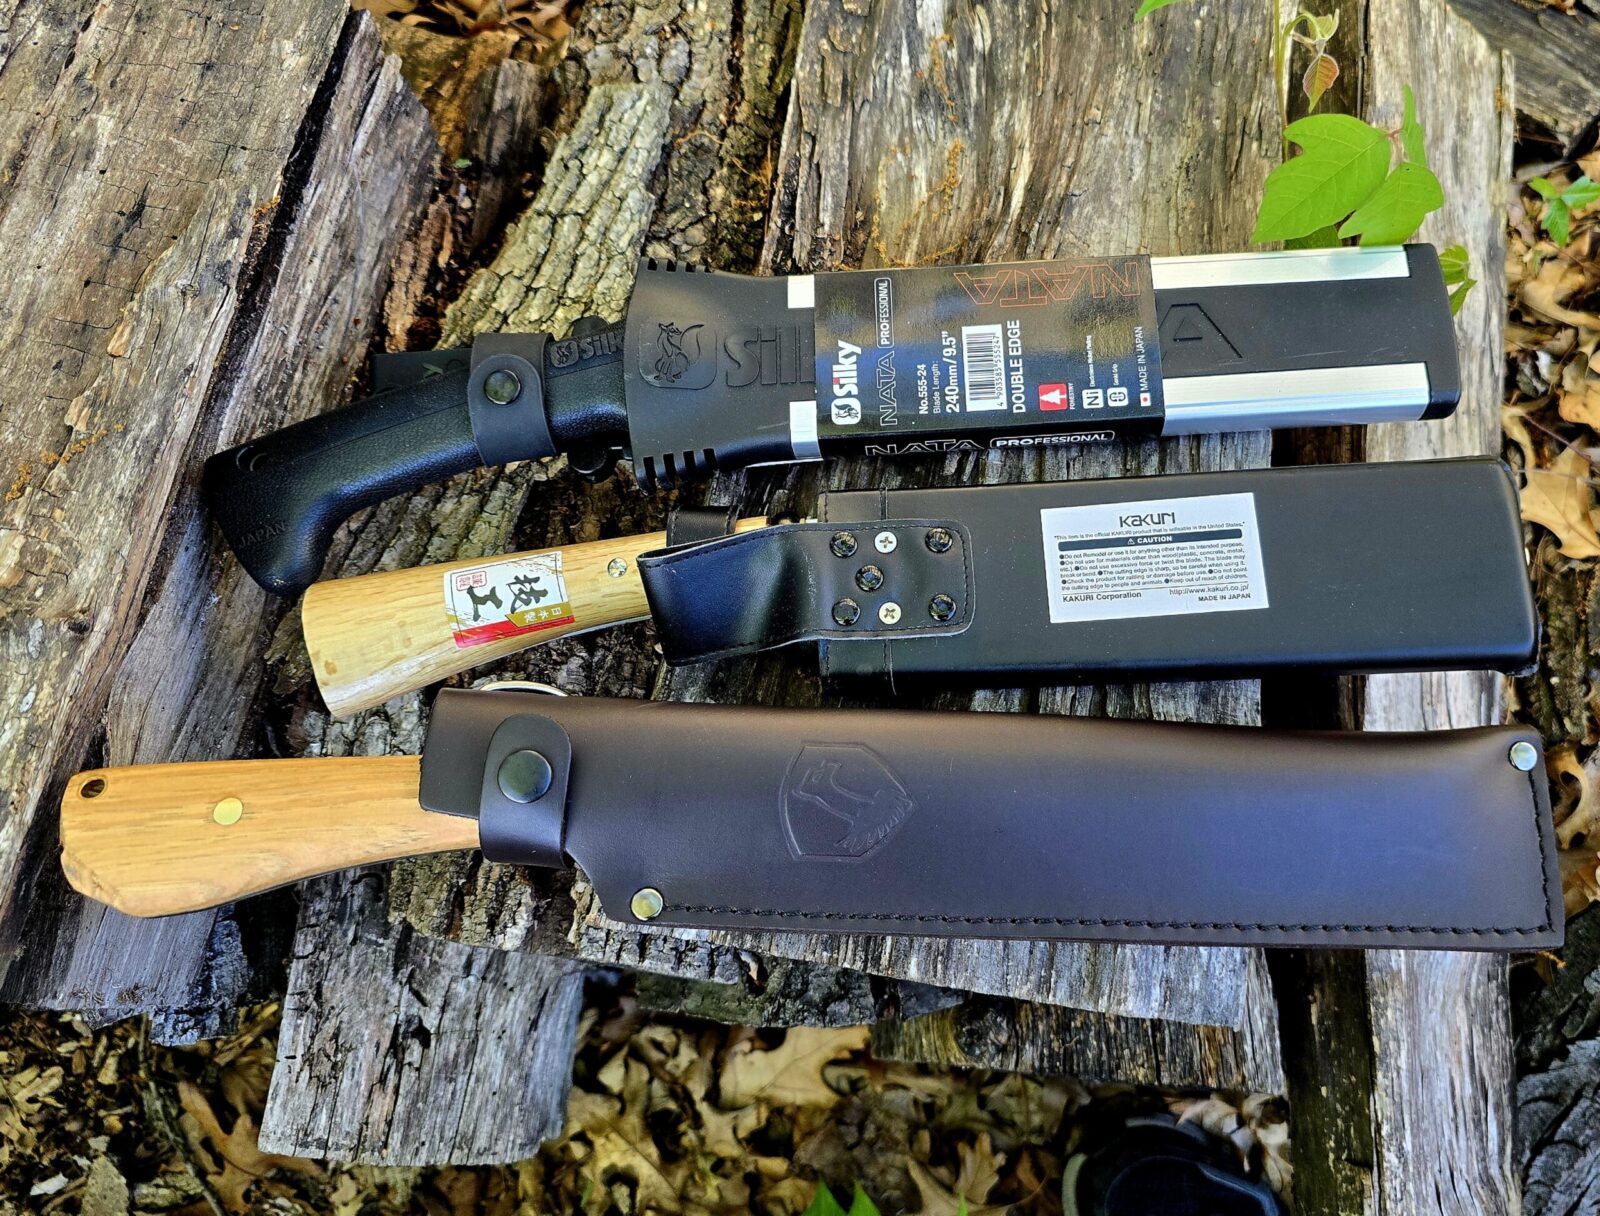
You can see the full tang the design uses and the brass rivets and decorative brass wire – it helps secure the wood slabs to the tang and adds a bit of flourish at the same time.The dangler-style sheath is very nicely done out of thick, rich leather. It beats the heck out of the “vinyl fake leather over wood” cheaper Japanese sheaths. Now, if there is a nata-maker our there doing traditional leather over wood, I haven’t seen it. I’m just not a fan of cheap vinyl whatsoever.
I found the Batonata really easy to chop with. This surprised me due the the spine only being 0.20″ thick. The designer, Joe Flowers, compensated for this by giving the Batonata an oversize head thus having more mass up front. If you will recall force = mass x acceleration. The more mass there is then the more energy there is at the same speed of swing. The Batonata gets the extra mass by the raised steel above the axis of the spine. Going thicker to get more mass would also require more energy to cleve the wood out of the way – that’s why really thick blades make lousy machetes for example. Thicker blads tend to push the vines out of the way vs. slicing through them.
So, two thumbs up for the Batonata. Elegant design, well executed, cool sheath. It’s made in El Salvador instead of Japan but it never claimed to be a “Japanese” nata so we’ll let that part slide. Click here for it on Amazon and here are active listings on eBay:
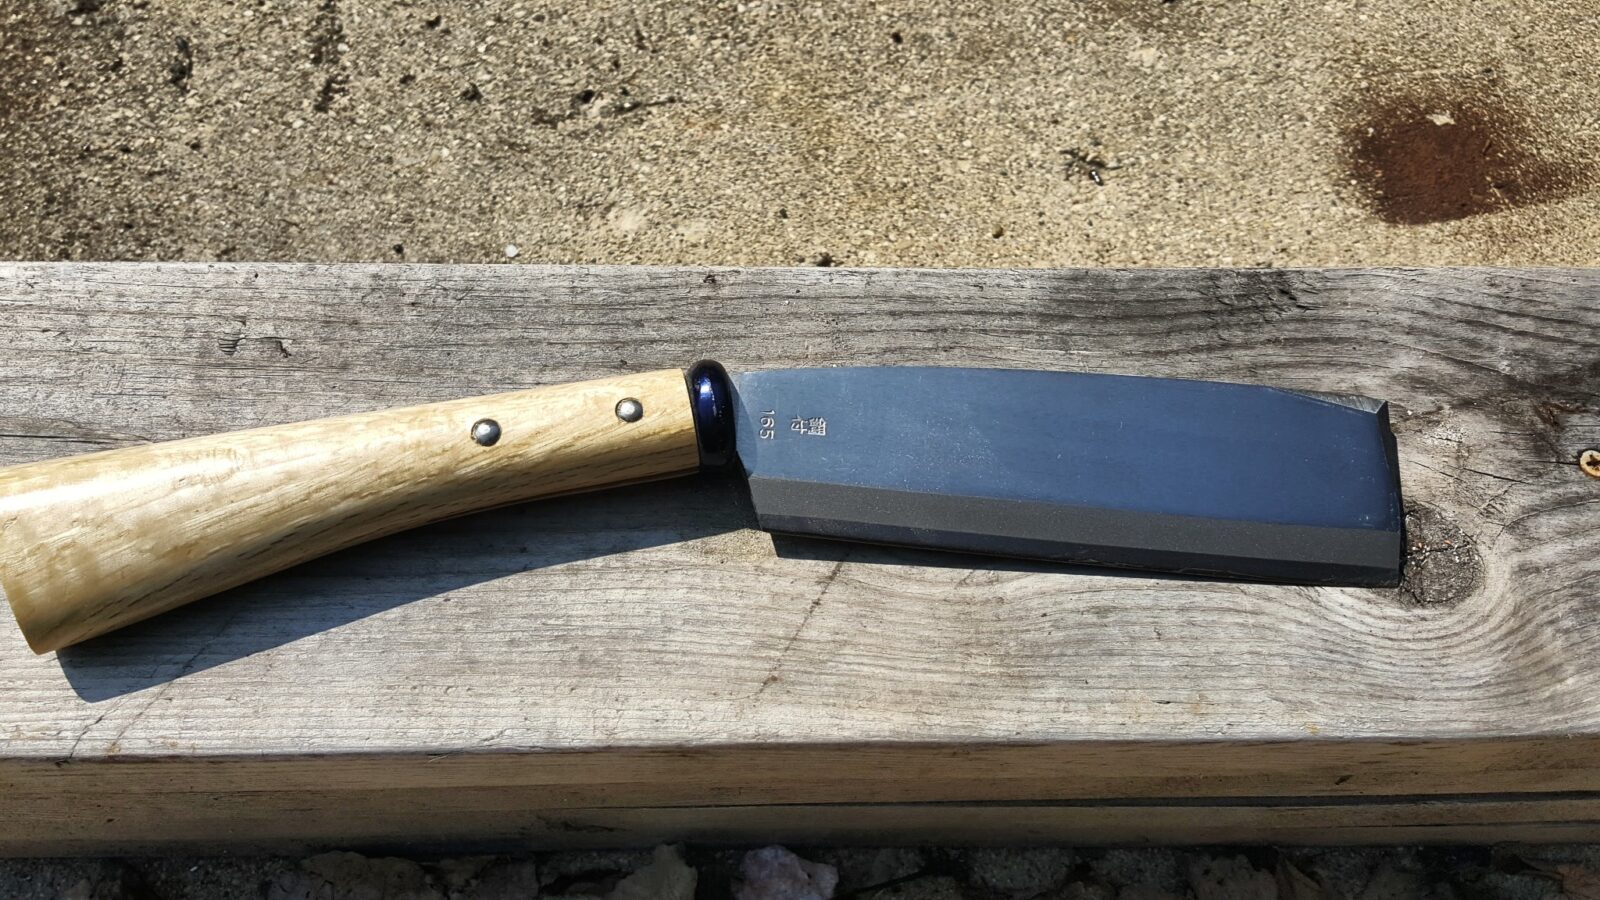
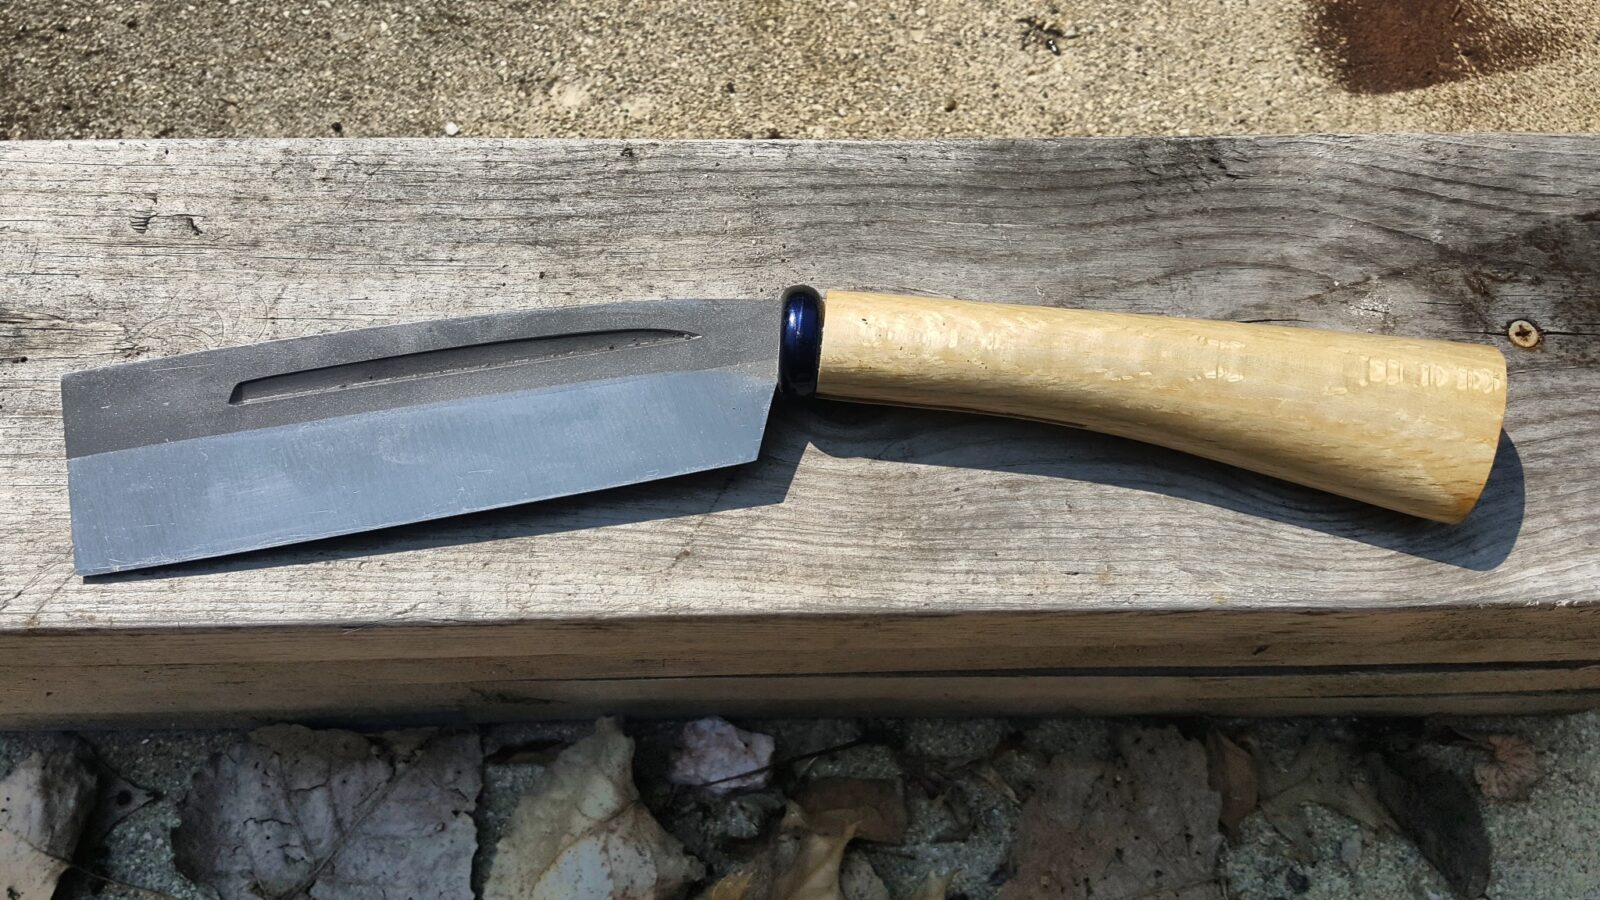
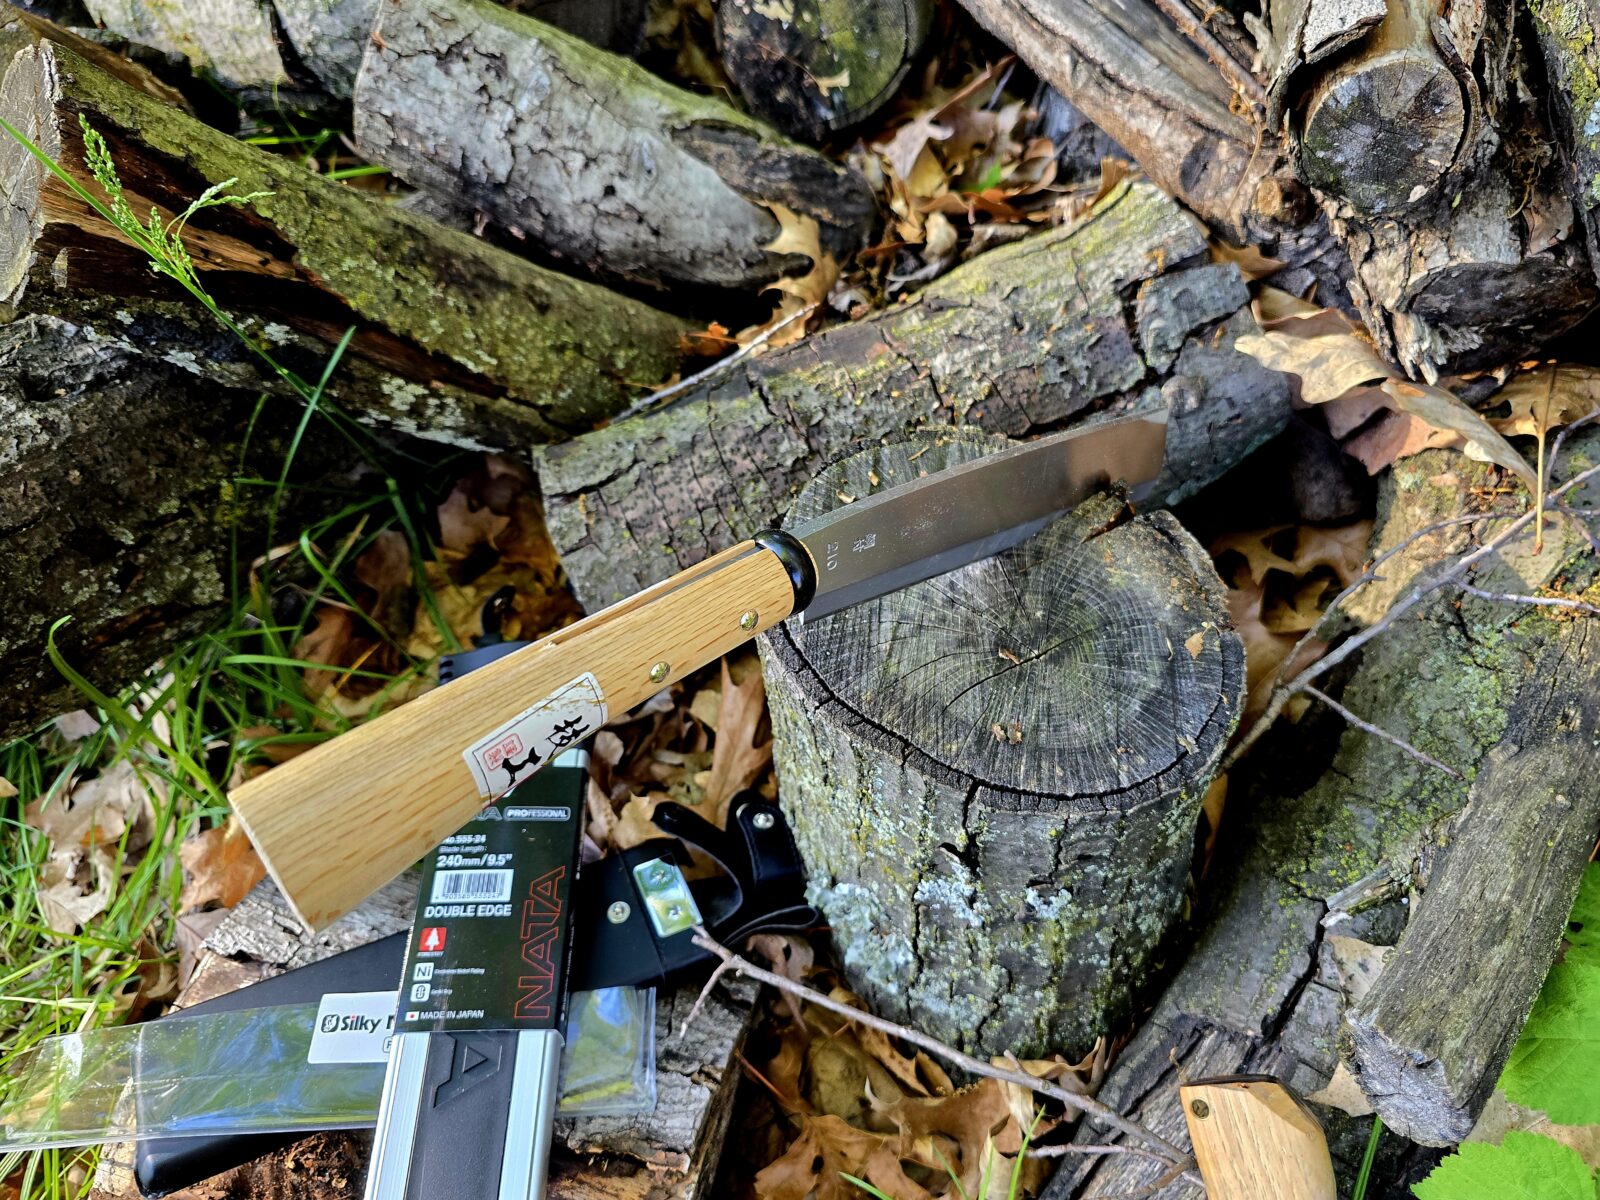
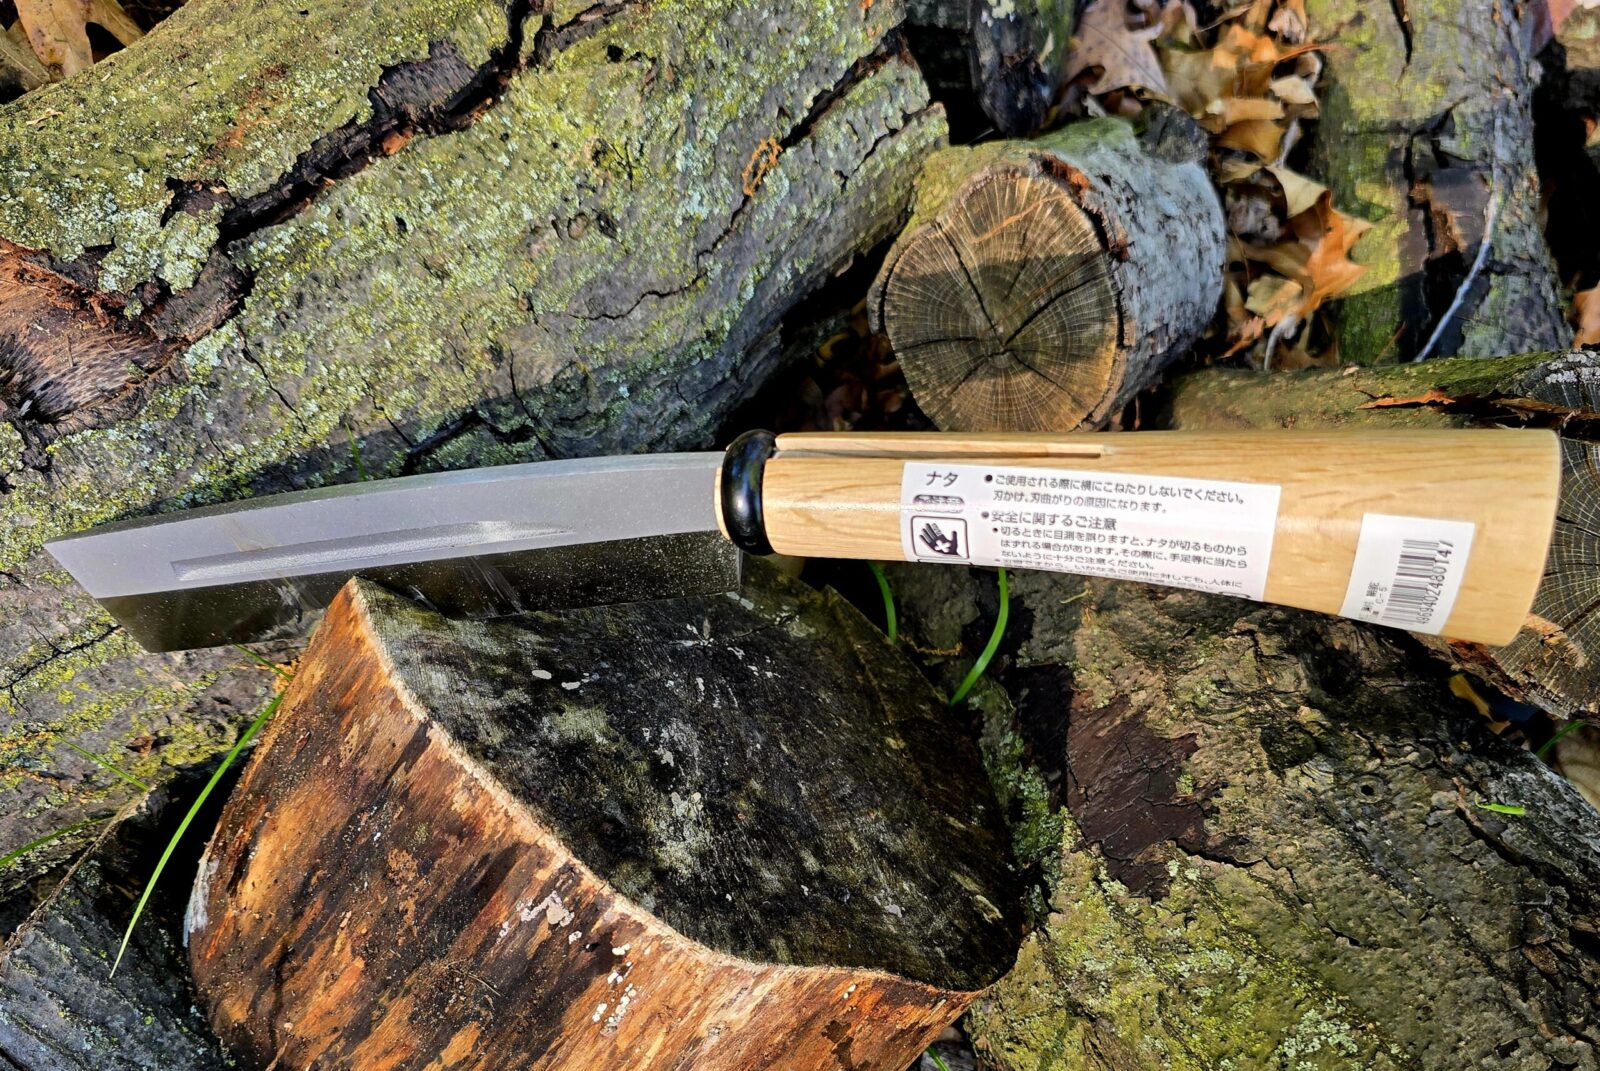
The nata I chose was a basic “Gikoh” series 210mm (8.27″) nata. With a nata, the length given in mm is the length of the blade. It’s also 405mm (15.94″) overall. The nata itself weighs approximately 1.3 pounds.
Most nata makers will have some high-end offerings with better wood, finishes and sheaths in addition to the basic work models with no frills. Kakuri is the same – though they only have one higher-end model and most are working class tools.
One thing I find interesting is their use of high carbon Japanese Yasuki steel. Yasuki (also sometimes written as Yasugi) is a family of steels used in a variety of cutting tools. Yasuki has a very long history dating back to sword making but now owned and produced by Hitachi Metals.
The handle is made from oak wood and has a clear coat finish on it.
I found the Kakuri nata very easy to swing and it took a good bite out of some old oak I had lying around during testing. The edge held up very nicely despite hitting the dried oak.
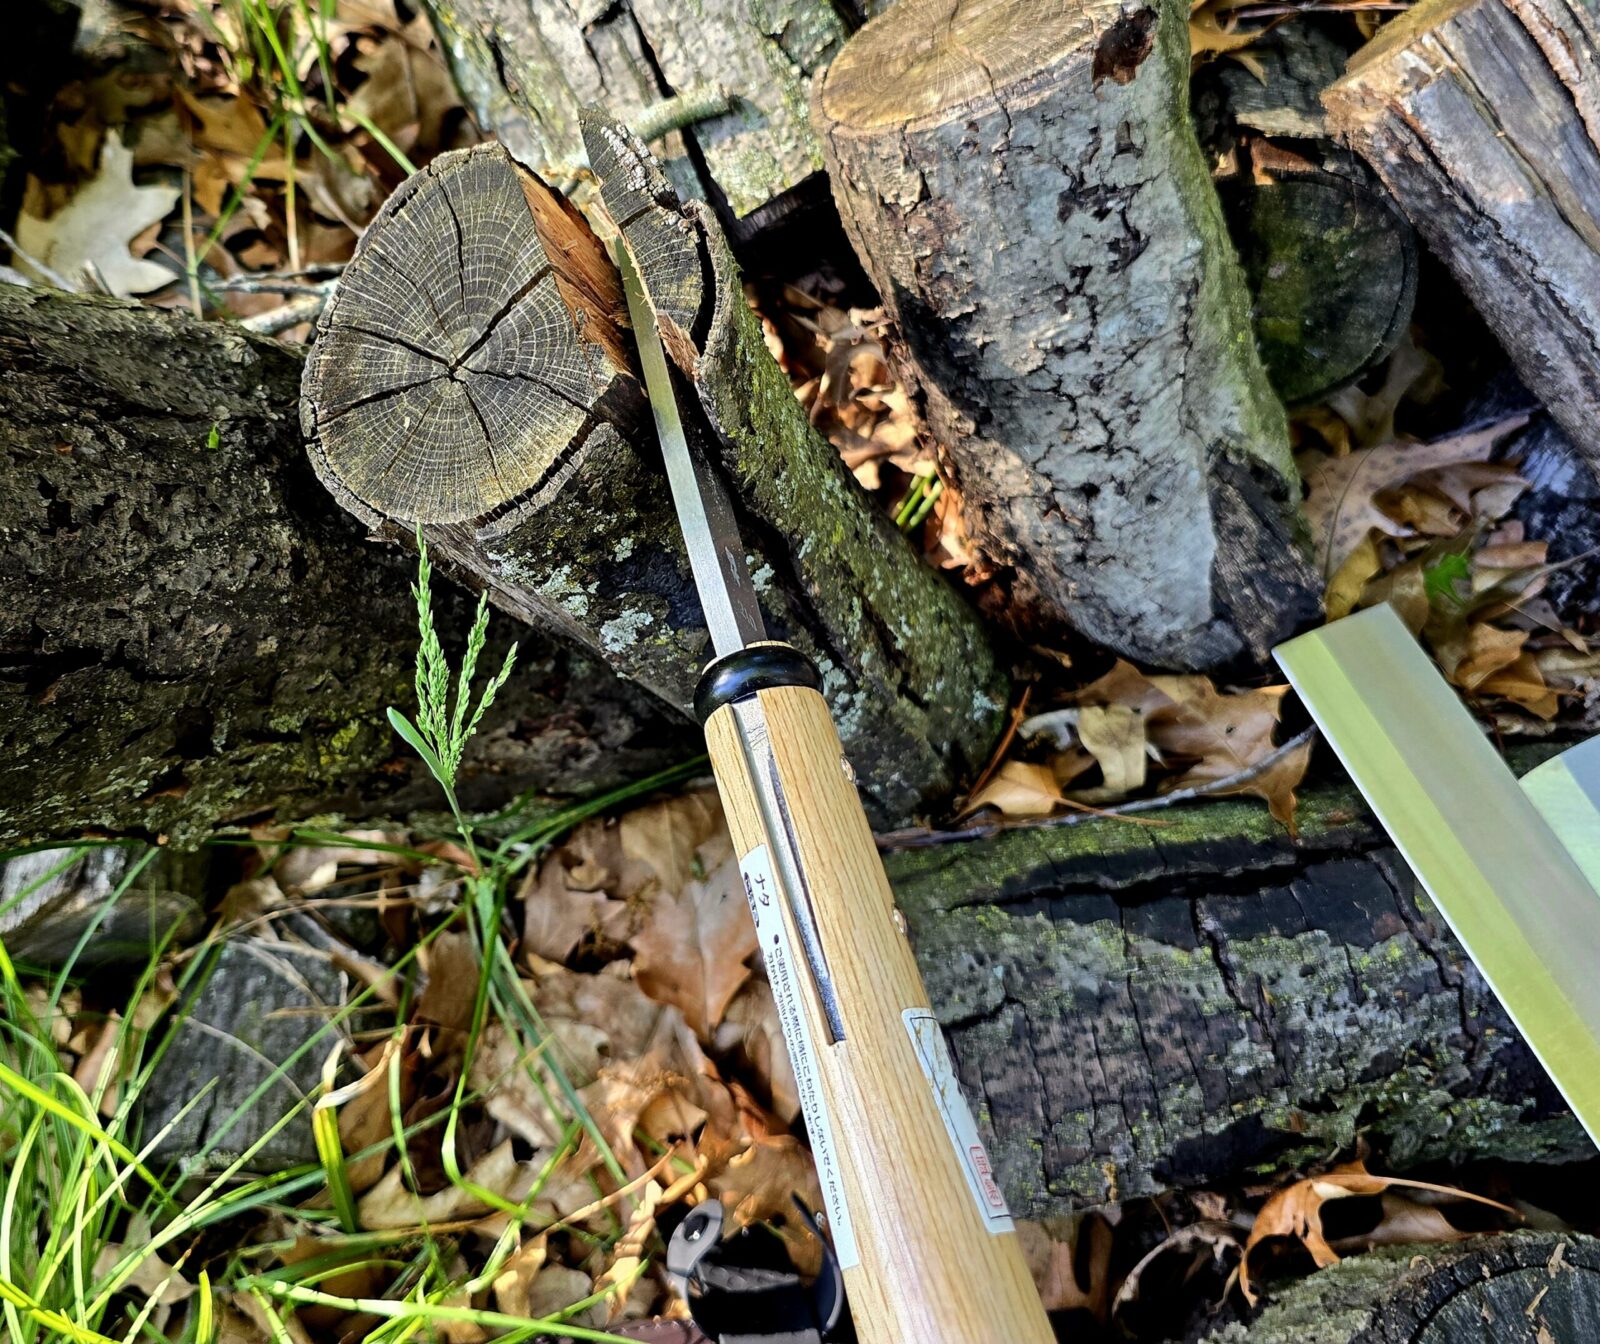
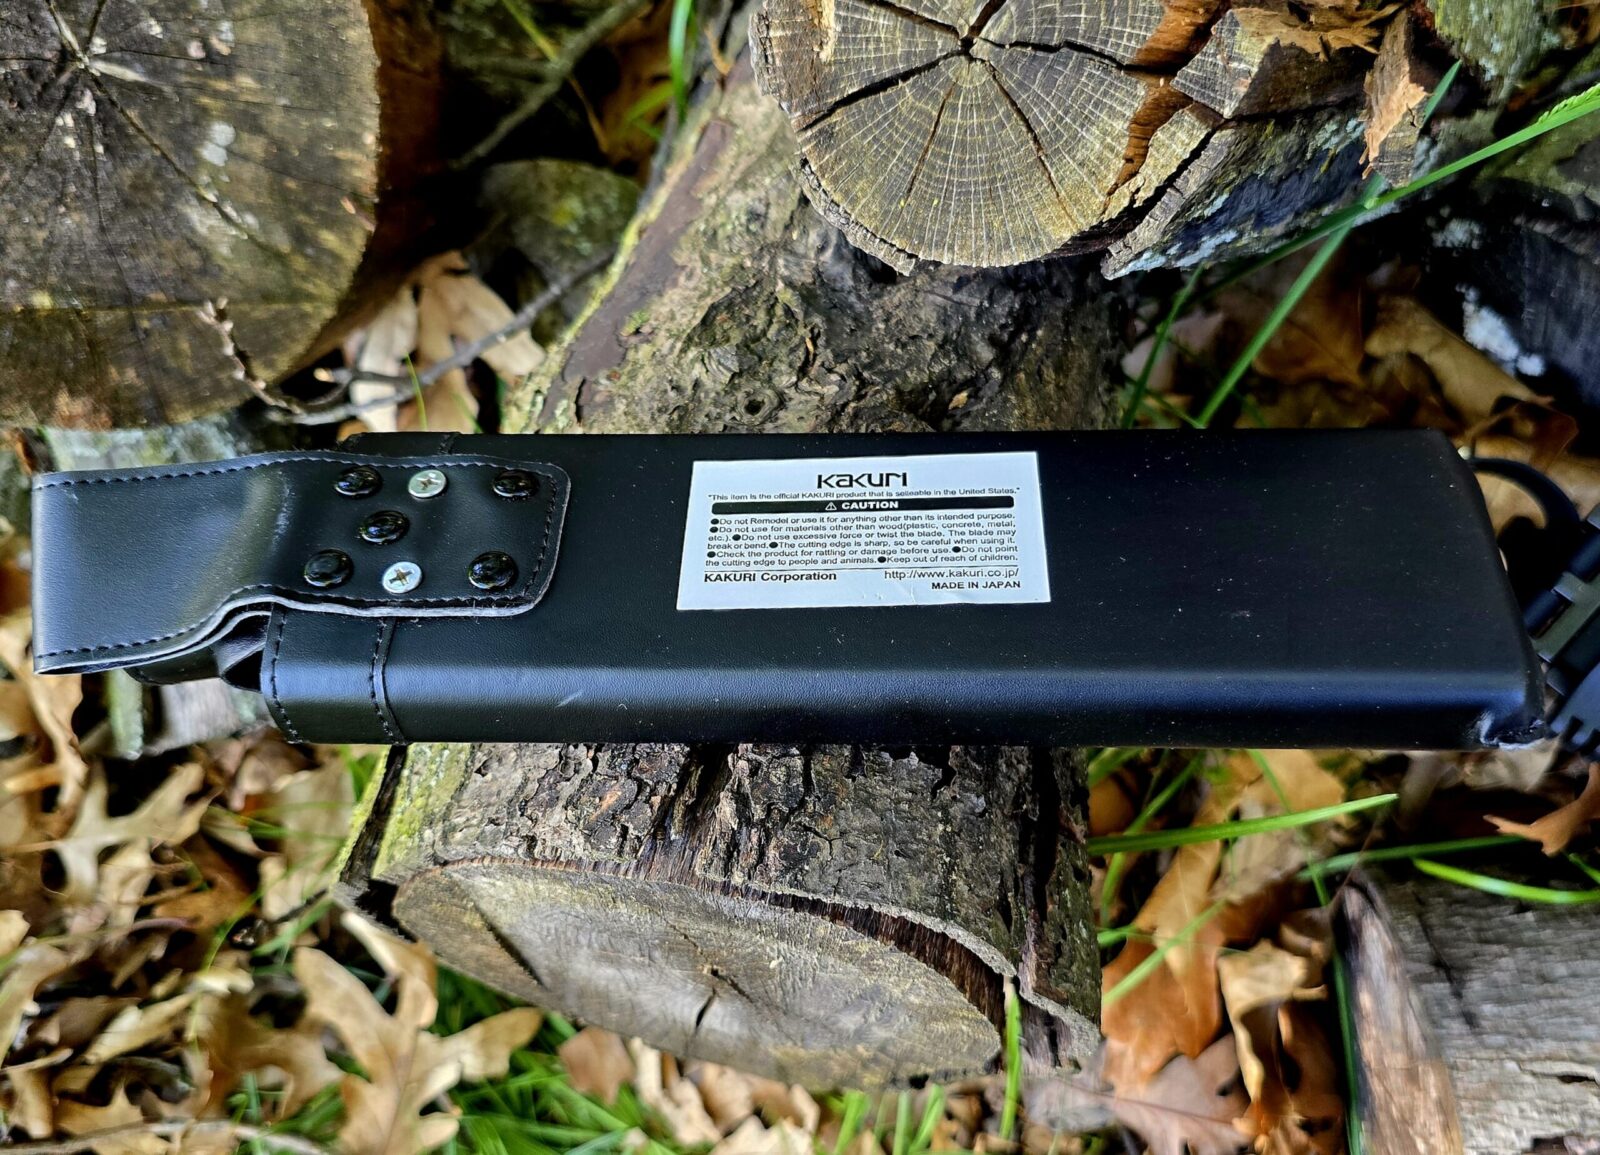
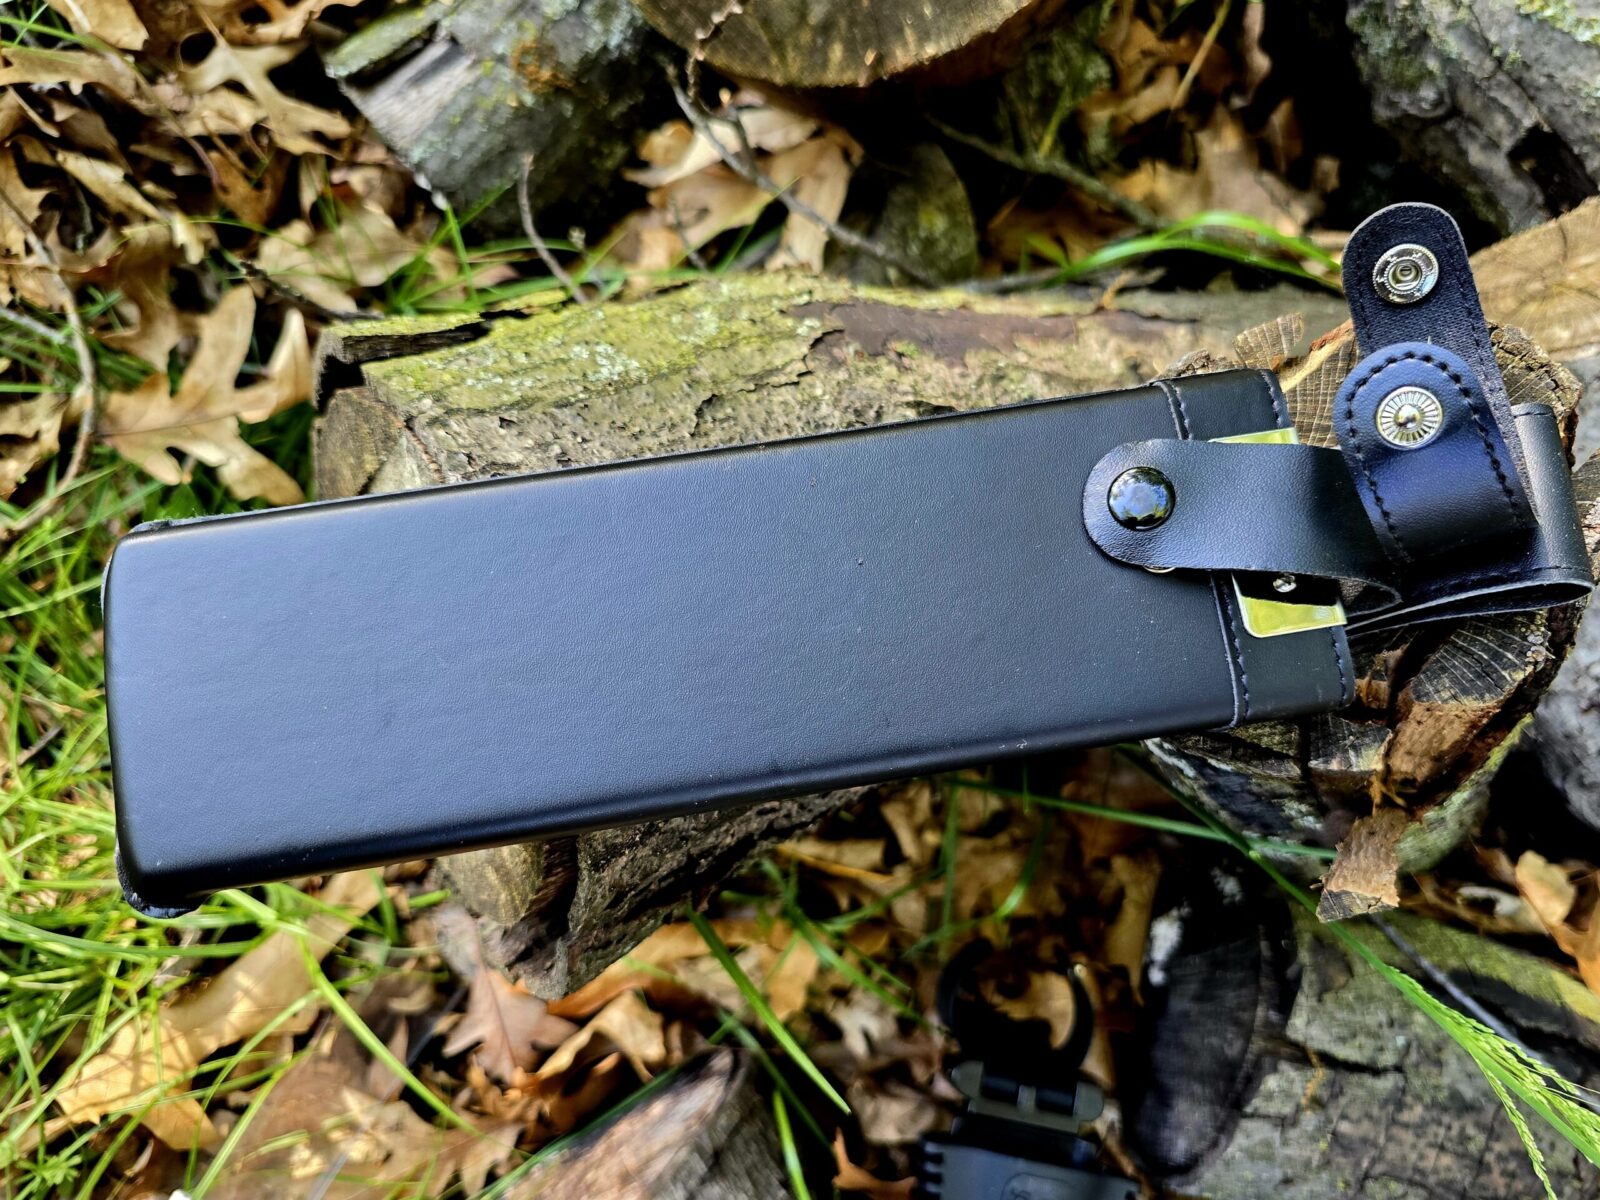
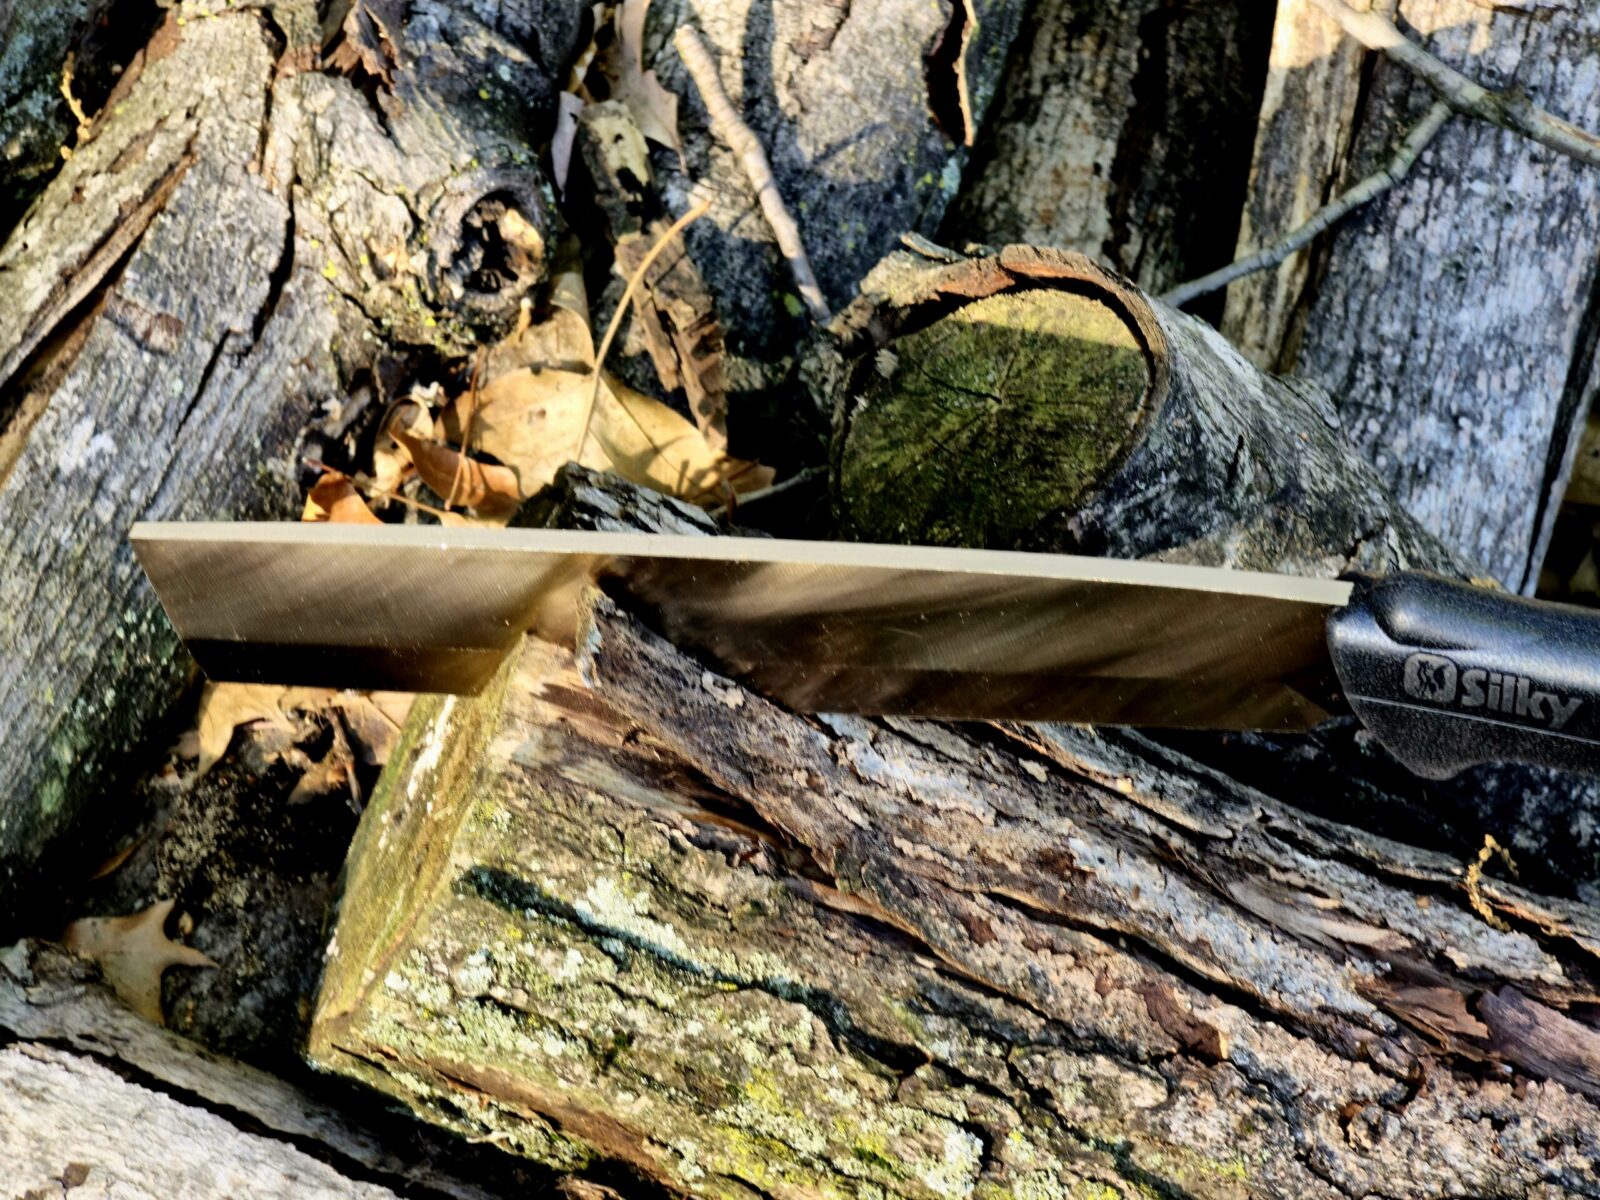
The 210mm blade had no problem biting into dried oak. You can see the single bevelled cutting edge here.This side of the blade does not have a bevel.Thanks to the weight and blade design. the nata sinks right into smaller logs for splitting.It comes with a basic vinyle sheath with the material pulled over a wooden core that helps maintain the needed shape.I was surprised to find two retaining straps – one on the handle and one looping over the back top edge of the blade.Here’s a good view of the wood core. On one hand, designs like this make it quick and easy to get the blade into or or out of the sheath. The negative is that it rattles some. Nepalese khukurik sheathes are the same way except they tend to be water buffalo leather stretched over the wood.
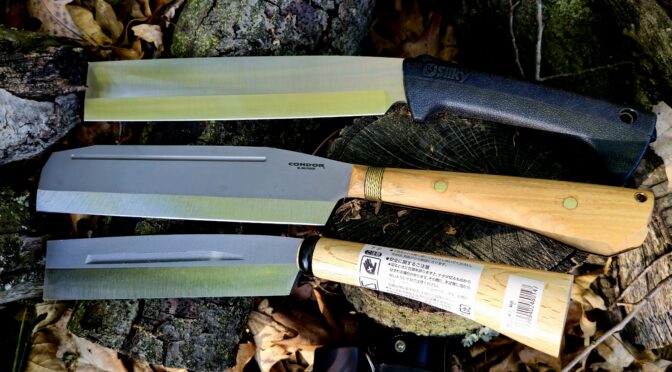
So far, you have seen a nata-inspired design in the Batonata. A classic design from Kakuri and now we need a modernized design from Japan.
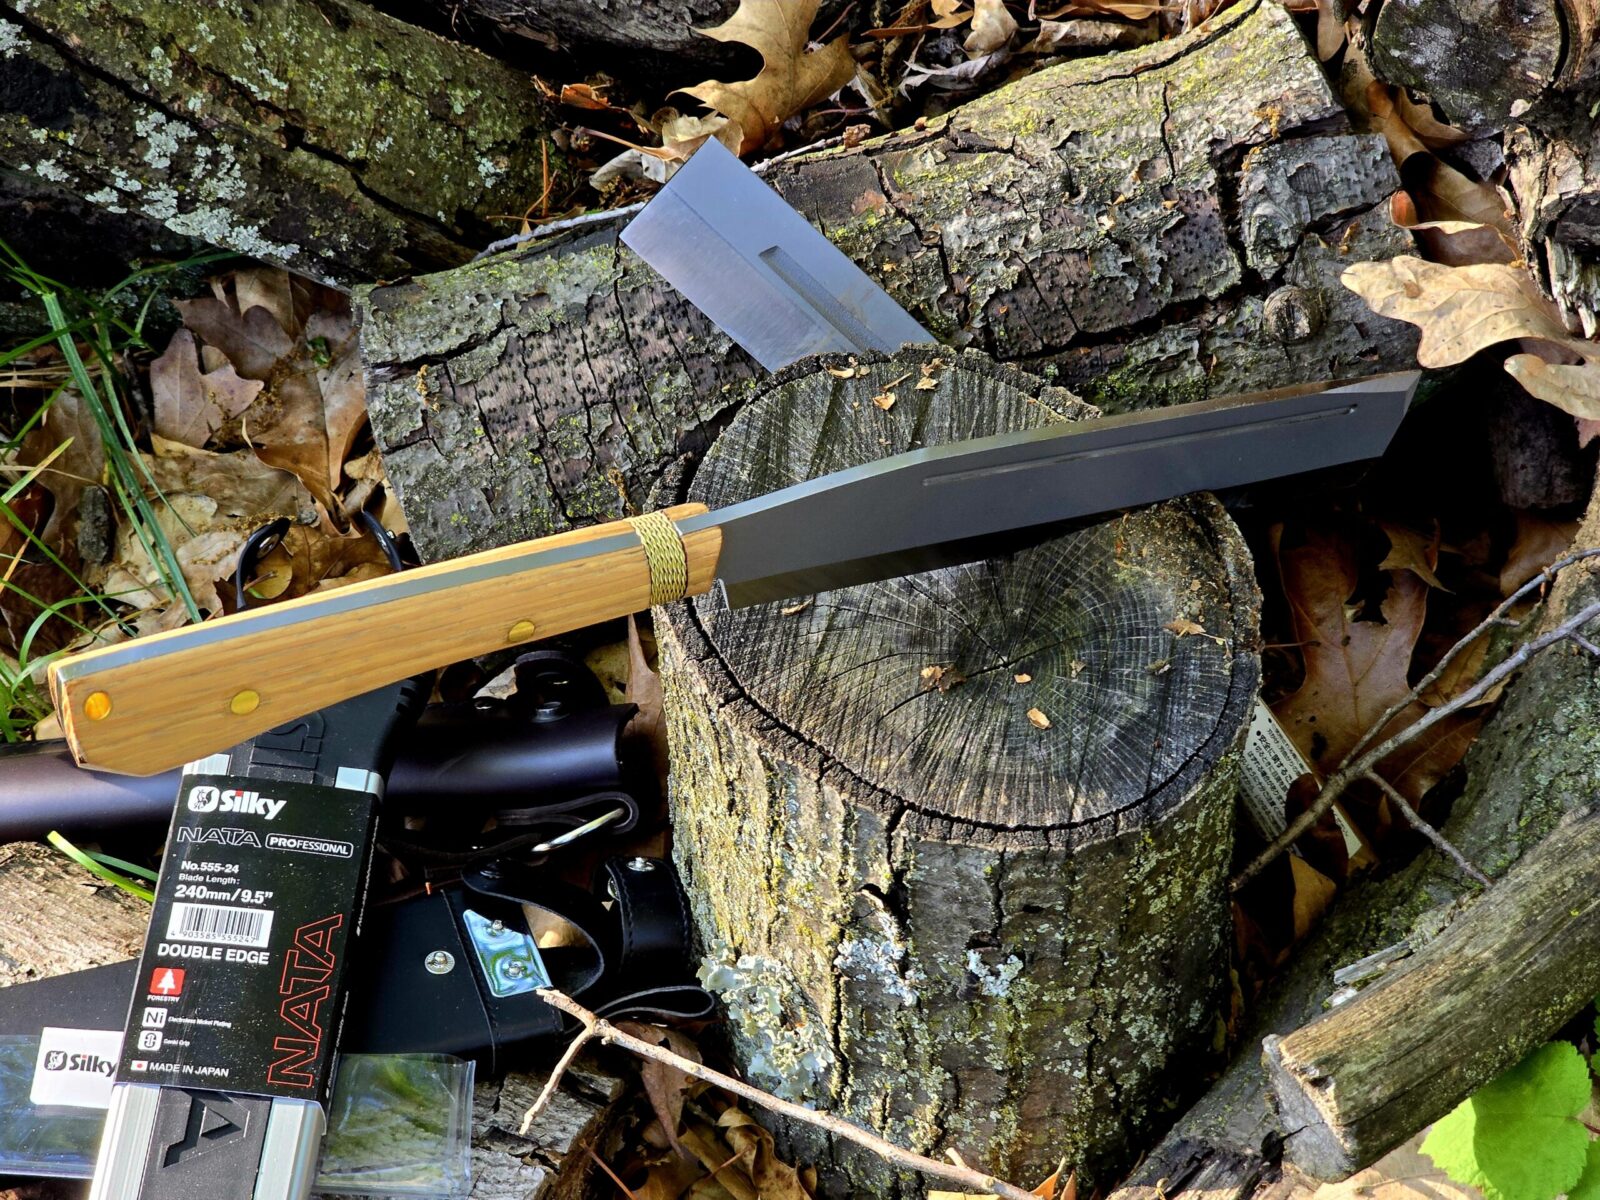
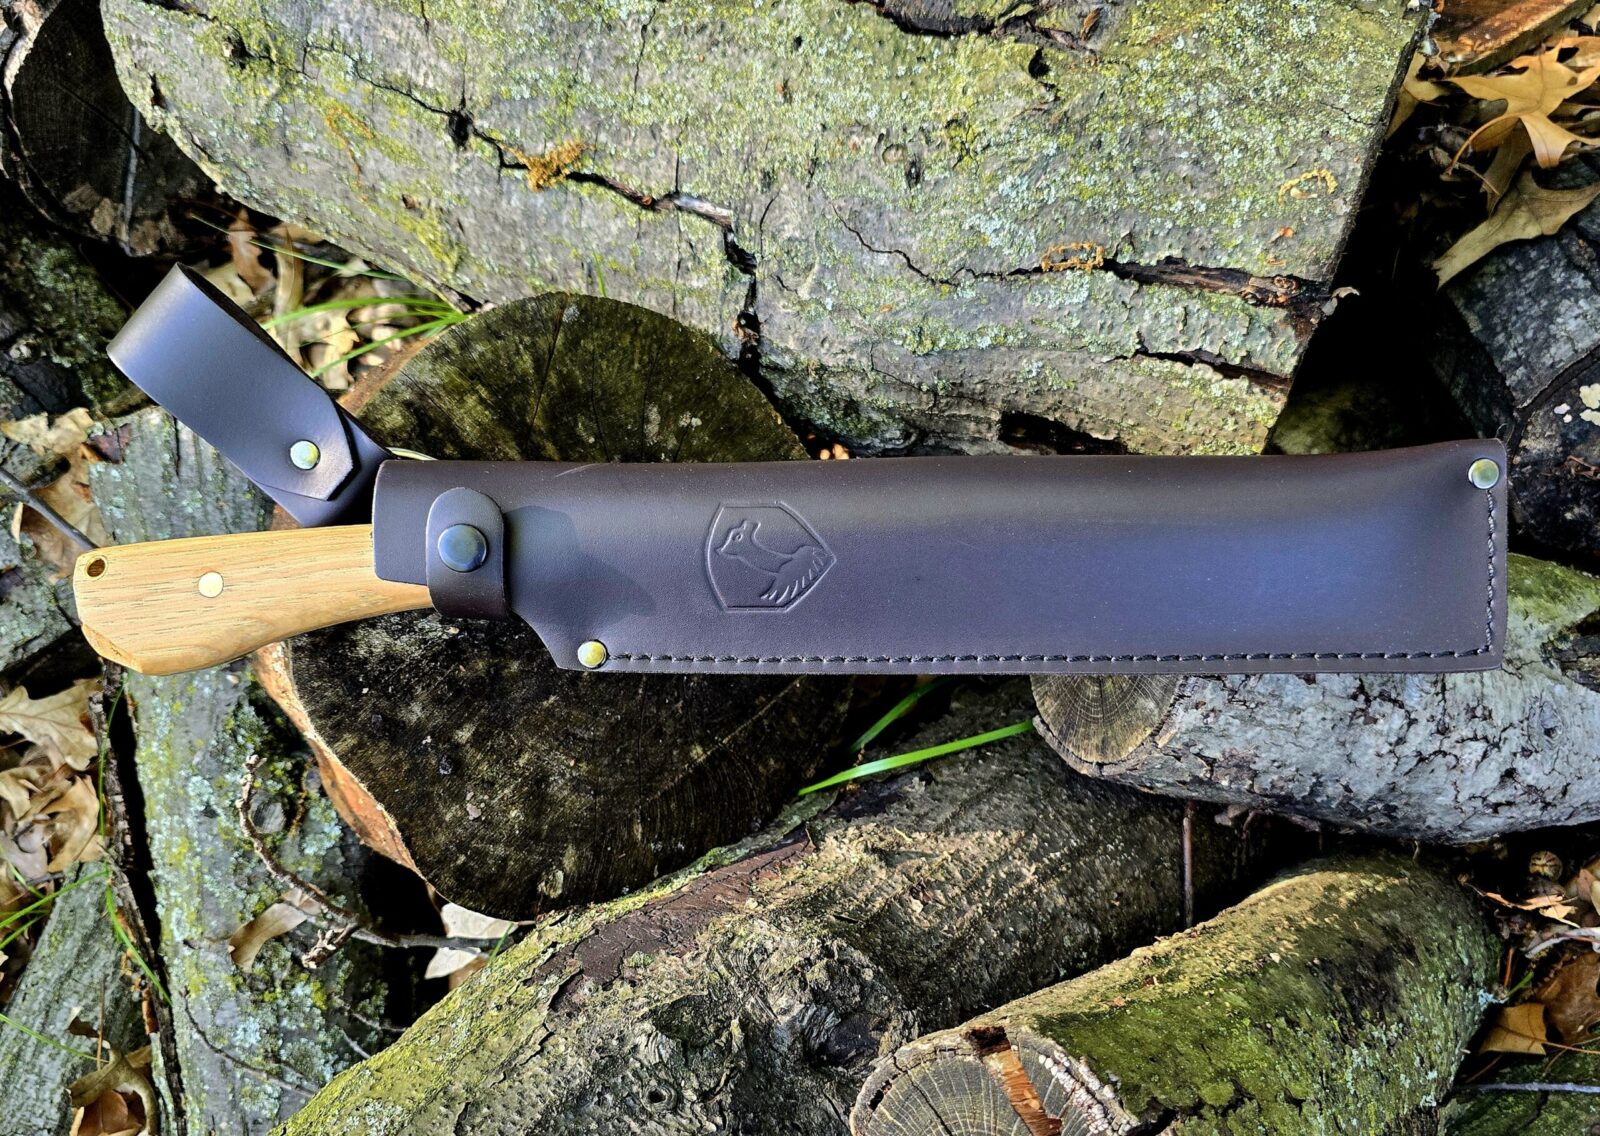
The Silky 240mm Double-Edge Nata
When I was searching for a new nata, I really did not expect to run into this modernized nata from Silky. The blade looks like a nata but everything else is modernized – rubber shock absorbing handle (a BIG thank you for those of us with carpal tunnel) and futuristic looking shealth made from aluminum and polymers.
“Who is Silky?” was my very first thought. The name alone did not sound Japanese but that could just be a brand name or something for the export market so I had to look them up.
Silky is the brand name for U.M. Kogyo located in Ono, Hyogo prefecture, Japan. The company was originally named “Tamakitsune” and was founded in 1919 by Mr. Katsuji Miyawaki to make saws. Today, Silky is led by Uichi Miyawaki who continues to stress excellence.
To be sure, their focus is on saws for woodworking and arborists plus they make a few innovating nata models. Their distributor in the US is Vertical Supply Group and they sell the saws on Amazon [click here to open a listing in a new tab].
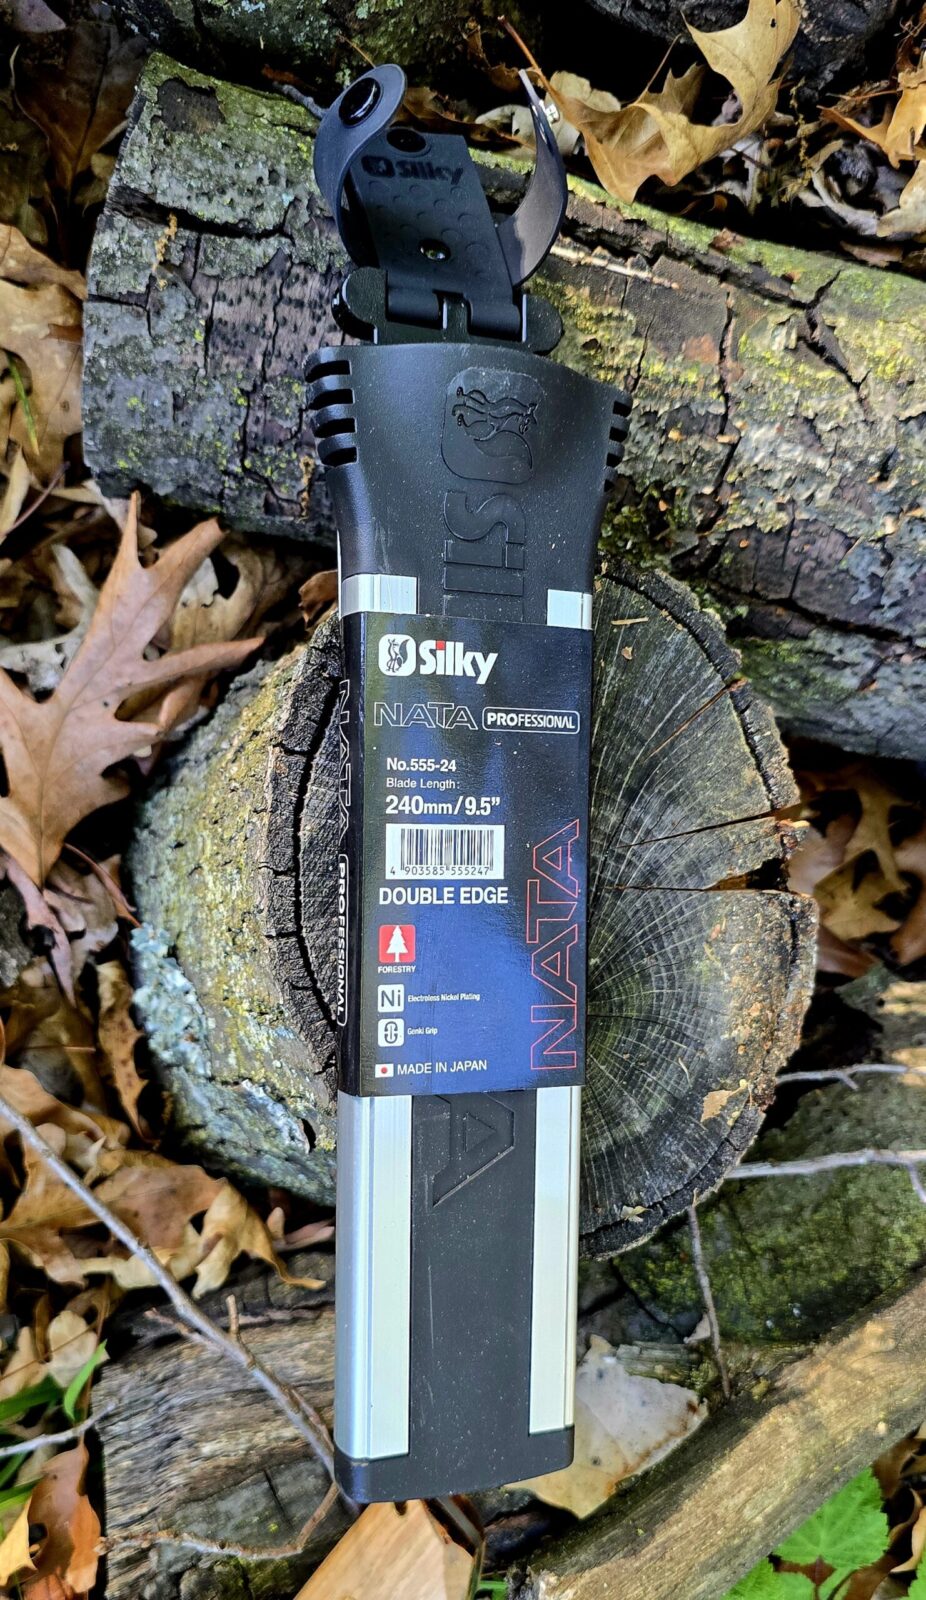
This nata has a 240mm (9.44″) blade that is 5.7mm (0.22 inches) thick and has an overall length of 340mm (13.35″). The weight is 2.11 pounds.
They say an “alloy steel” is used but don’t get into the details. I did some digging and it is reported as a SKS-51 (JIS) steel. SKS-51 is a cutting tool steel that is tough with good wear resistance. It also has a full length tang that extends almost the full length of the handle but is hidden from sight.
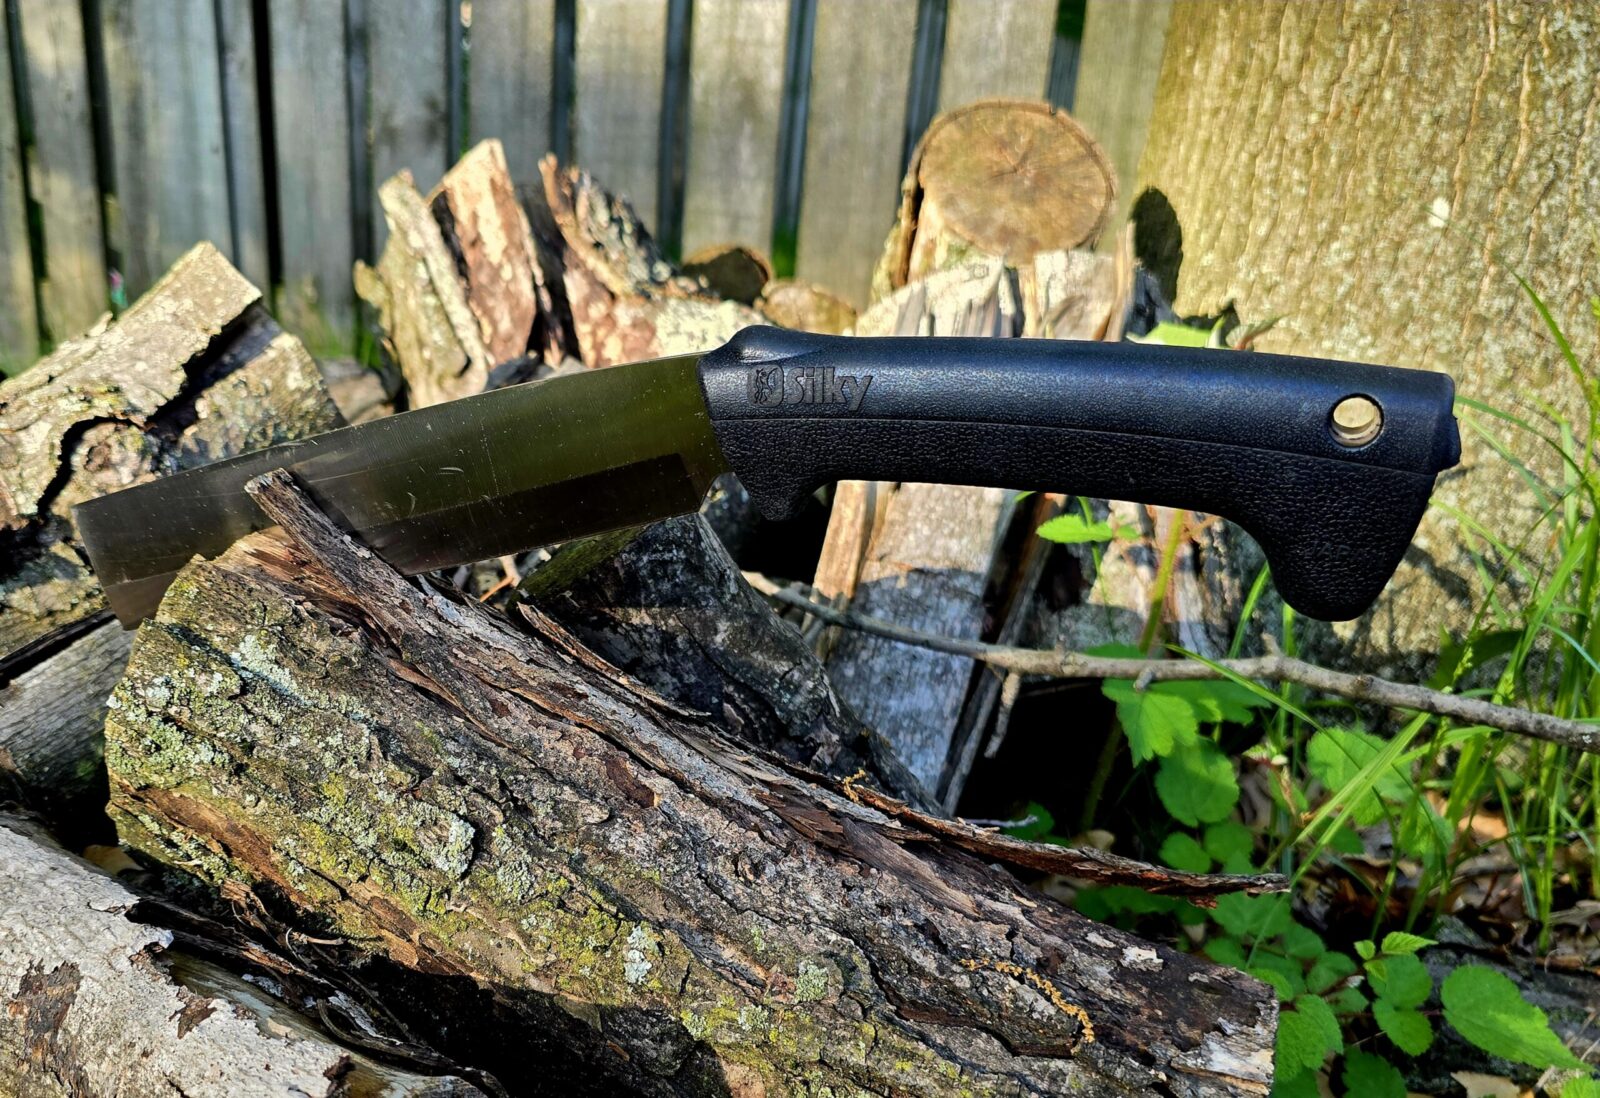
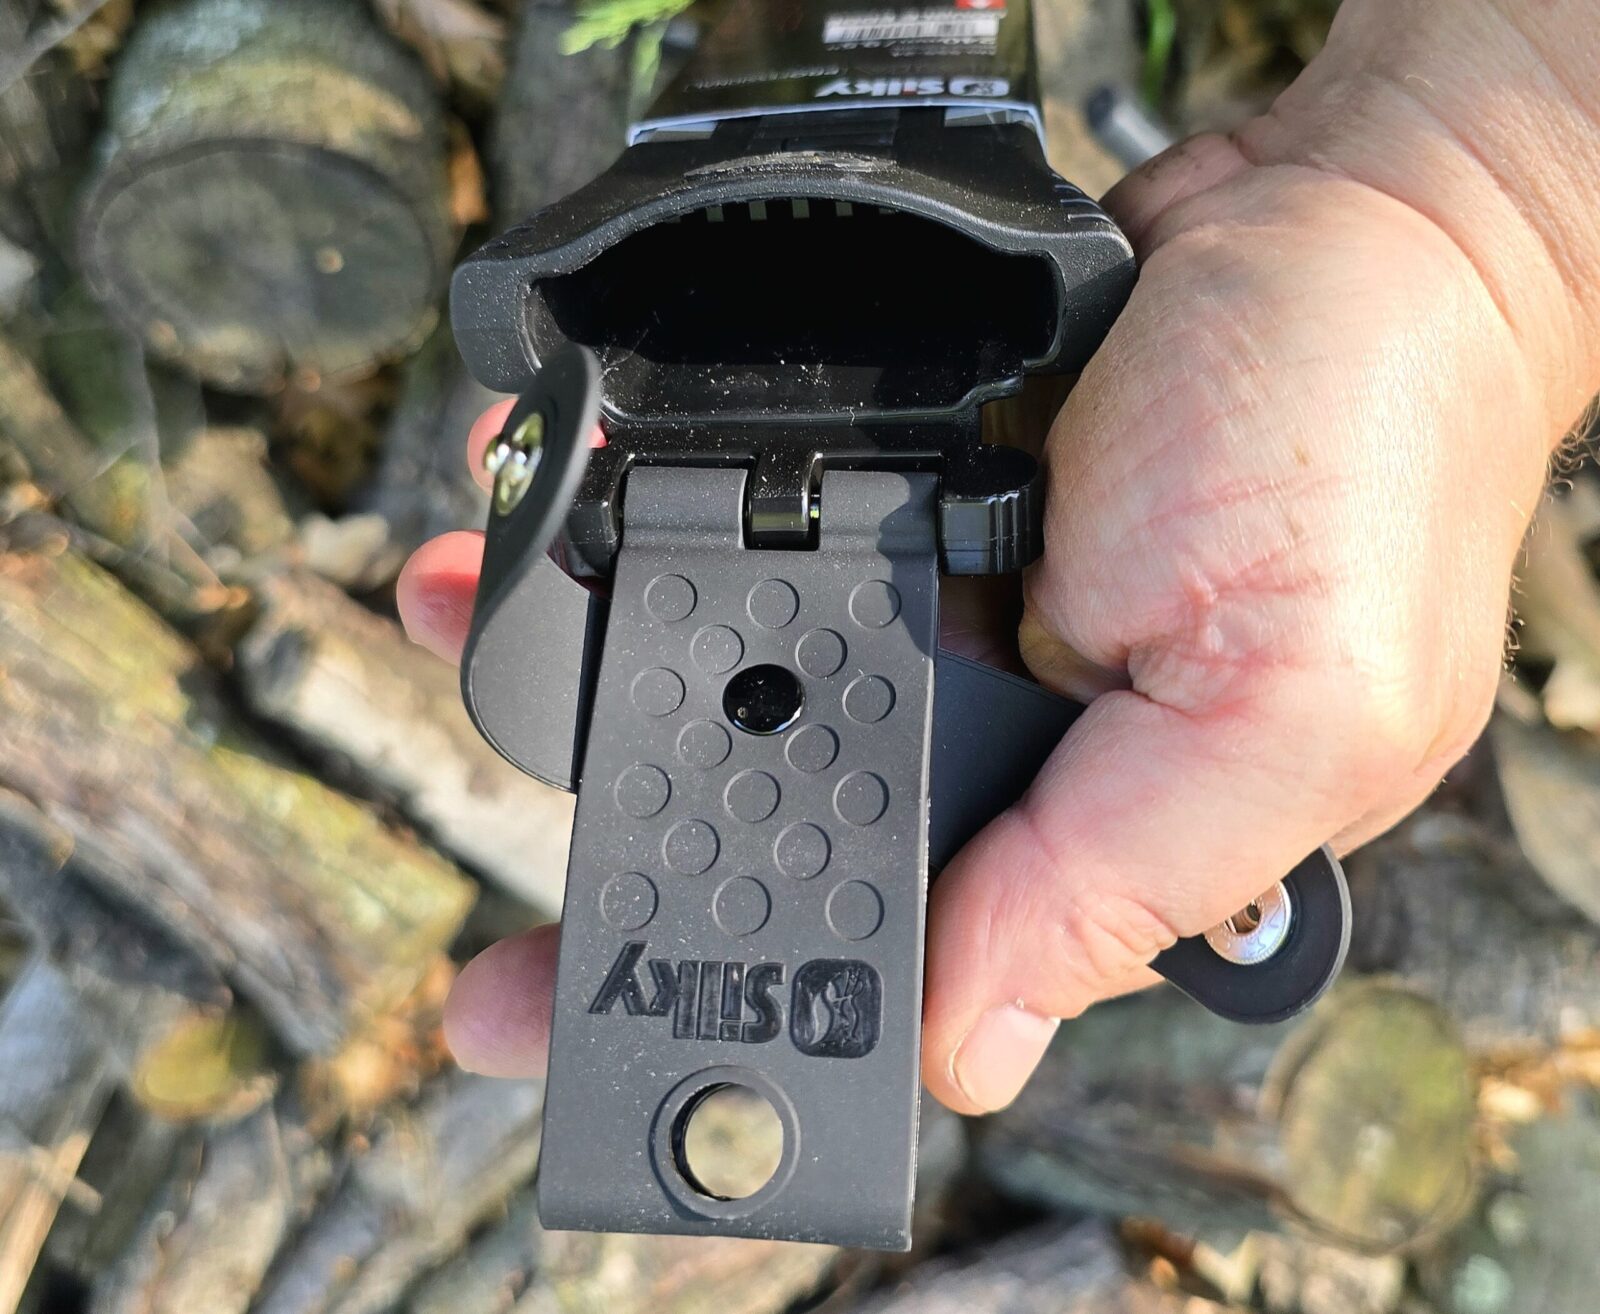
There are three interesting design points that I want to share. First is the “Genki” (that usually translates as health or healthy) rubberized grip. It absorbs the shock instead of your hands – I totally agree on this point. It was the most comfortable nata for me to use. It’s also replaceable without tools.
The second point is the blade finish – it’s an electroless nickel plate that both reduces friction and corrosion. They developed it for their saws to more consistently reduce friction.
The third, is that the nata is user-maintainable. Their suppliers carry replacement handles, blades and quick release clips for the sheath.
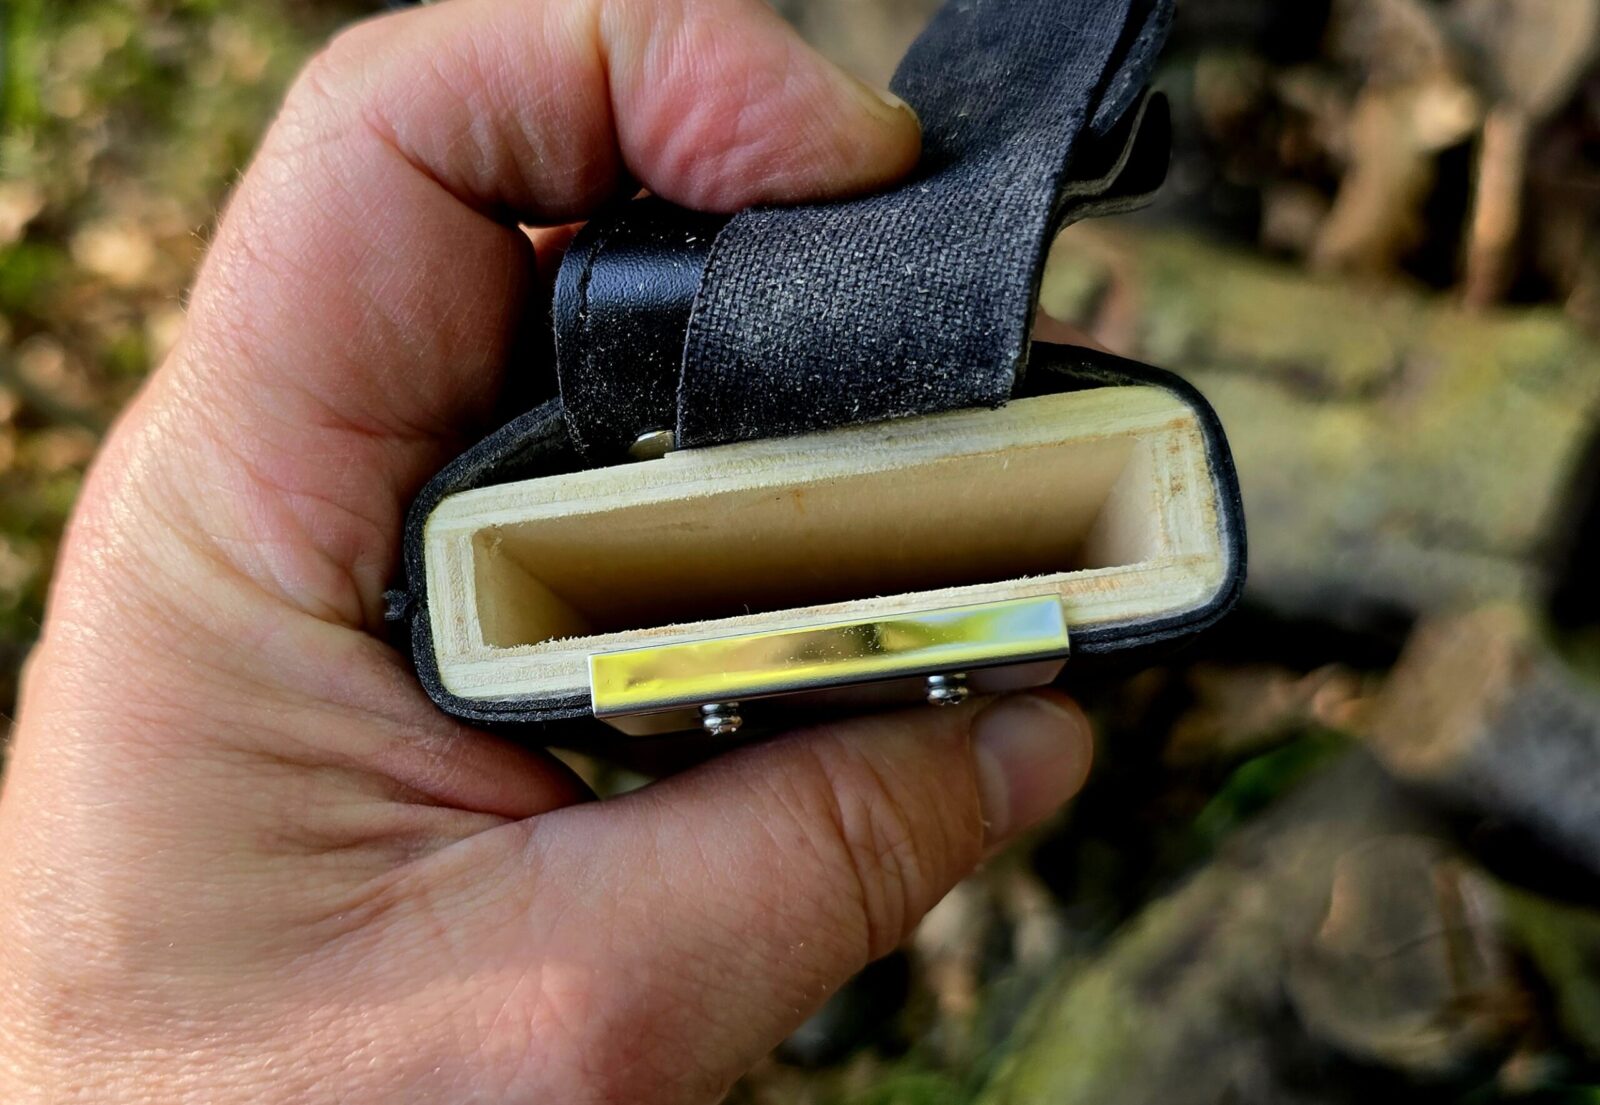
A good photo of the Genki handle. The nata cut into wood beautifully.The unique look to the blade is due to the electroless nickel plating. The nickel reduces friction which means that the blade should penetrate further than an uncoated blade all other things being equal.The sheath is made out of modern materials.I did not expect to see a robust quick release catch to disconnect the sheath from the belt loop in a hurry. If you look at the photo on the sheath, you can see the Genki handle removed and the full length tang of the blade that is otherwise hidden.A look down the mouth of the sheath. The funnel helps you insert the nata by guiding it into position.
Another two thumbs up. It’s an innovative design and the most comfortable for me to chop with – especially given my carpal tunnel.
You can find Silky Natas on Amazon sometimes (I bought mine there) – so click here to see them. Also, the following active listings are on eBay:
Comparing the Three Natas
It’s not easy to compare them and have a clear winner that everybody will agree with. It comes down to preferences. I’m going to first show you some comparison photos and then tell you my order of preference and why.
All three differ – the Silky Nata has a 240mm (9.44″) blade at the top. In the middle, the Batonata has a 254mm (10″) blade and the Kakuri at the bottom has a 210mm (8.26″) blade. Overall length starting with the Batonata on the left is 443.6mm (17.58″). The Kakuri is 405mm (15.94″) and the Silky Nata is 340mm (13.35″).A view frrom the top. Let’s review weights starting with the Batonata at the top – 900g (1.98 pounds). The Kakuri in the middle is 600g (1.32 pounds) and the Silky is 960g (2.11 pounds).My least favorite sheath is the vinyl-over-wood design of the Kakuri in the middle. The Silky at the top has a really slick modern design and the Batonata has a really nice leather sheath.
So, my ranking is:
#1 – The Silky Nata – the rubber hande absorbs a ton of the shock and the thing is a chopper and a half. I will definitely use it more when I need something like a hatchet. It will have to compete with my khukuris but none of them have the extremely comfortable Genki handle.
#2 – The Batonata – The handle is comfortable and it takes a good bite. I definitely like the sheath. It looks cool too. Kudos to Condor for turning out a really decent nata-inspired blade.
#3 – The Kakuri – I have carpal tunnel and a handle of that size and shape is hard on my hands when I chop. It’s a perfectly decent nata and not the fault of the designers but I don’t see myself using it much going forward. If someone wants a traditional basic nata, I’d have no reservation recommending it.
Summary
I hope this gave you some history on the natas plus three models to think about. I’m definitely going to continue using the Silky and probably the Batonata but the Kakuri would be problematic with my carpal tunnel.
I truly hope this helps you out.
Note, I have to buy all of my parts – nothing here was paid for by sponsors, etc. I do make a small amount if you click on an ad and buy something but that is it. You’re getting my real opinion on stuff.
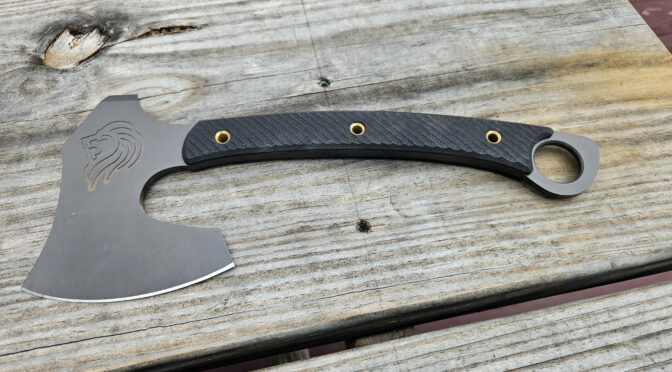
I like axes, hatchets and tomahawks. I actually inherited a number of axes and hatchets from my dad and grandpa. I also have a number of CRKT and ColdSteel models among others – some are worth talking about and some are best forgotten or not mentioned out of sheer embarassment. This story is about a surprisingly good one.
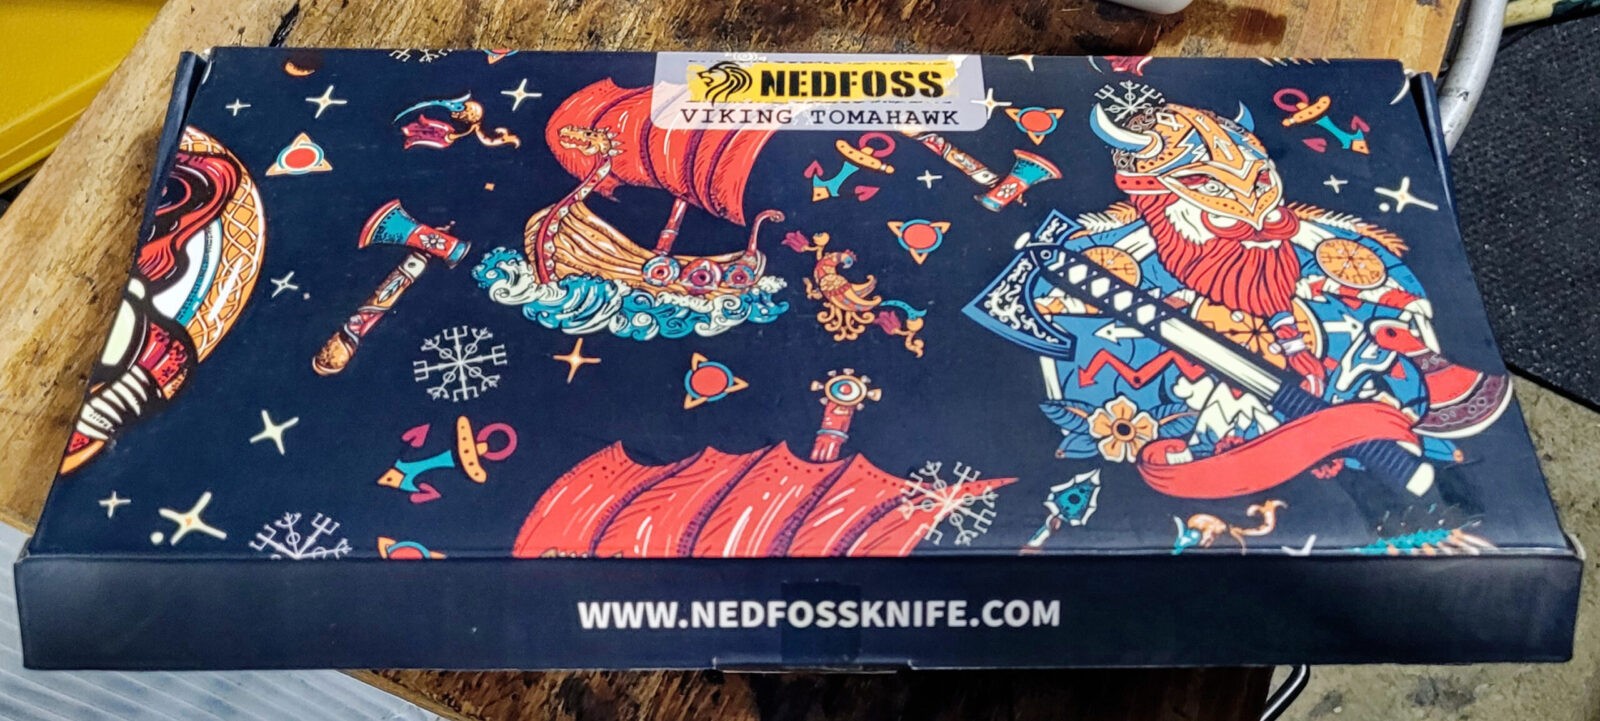
I opened the Amazon box and saw the product box and wondered WTF I had just bought. It looked like the designer dropped acid and created the graphics. Literally, “what did I just buy?” went through my head.
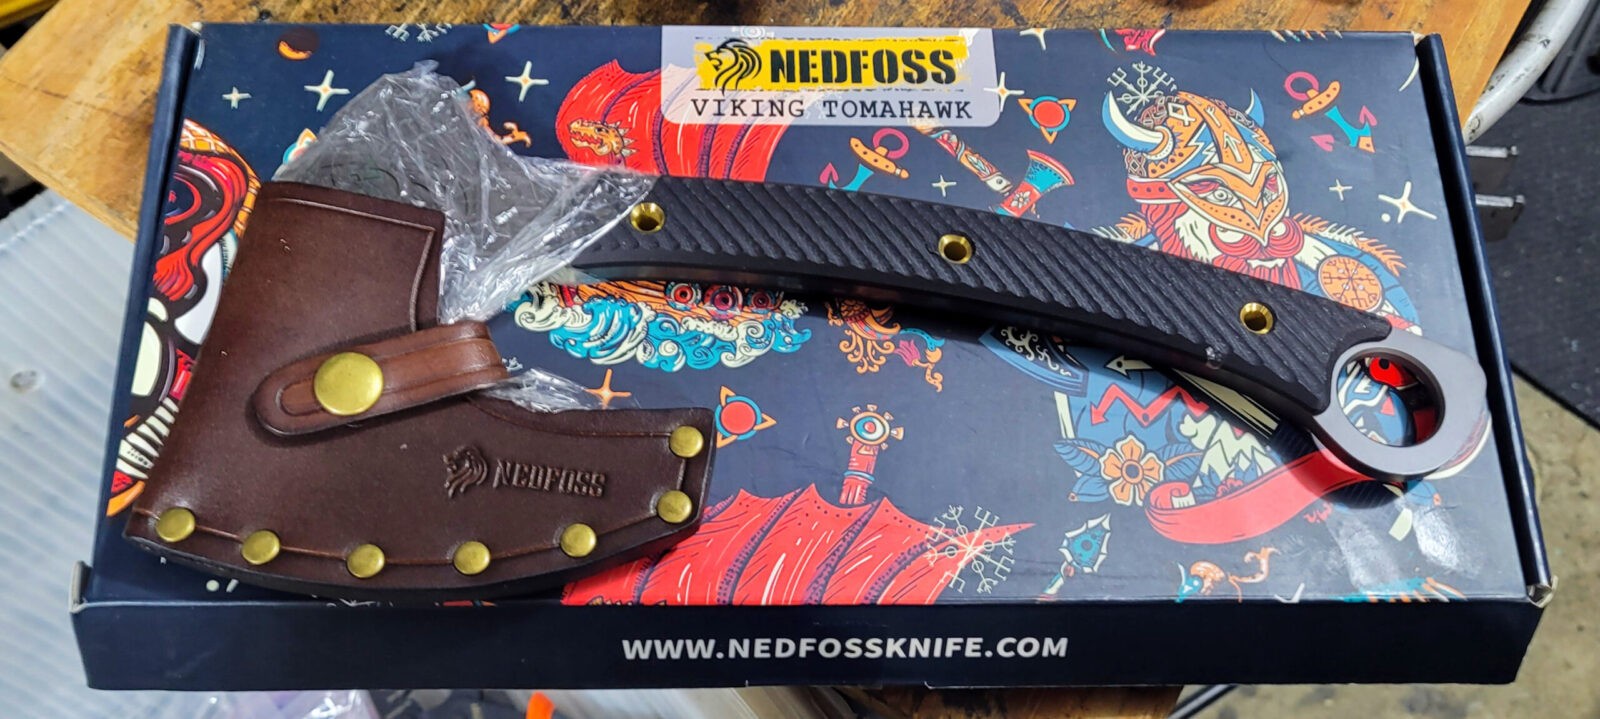
Uhmmm…. what mall ninja shit did I just buy? Do I return it? Do I tell anyone I even bought this? — These were all going through my head when I saw the product box.It was packed in a form fitting hard foam and when I pulled it out, the sheath, handle scales and rivets all caught my eye – they were all very nicely done both in terms of fitment and finish.
Details
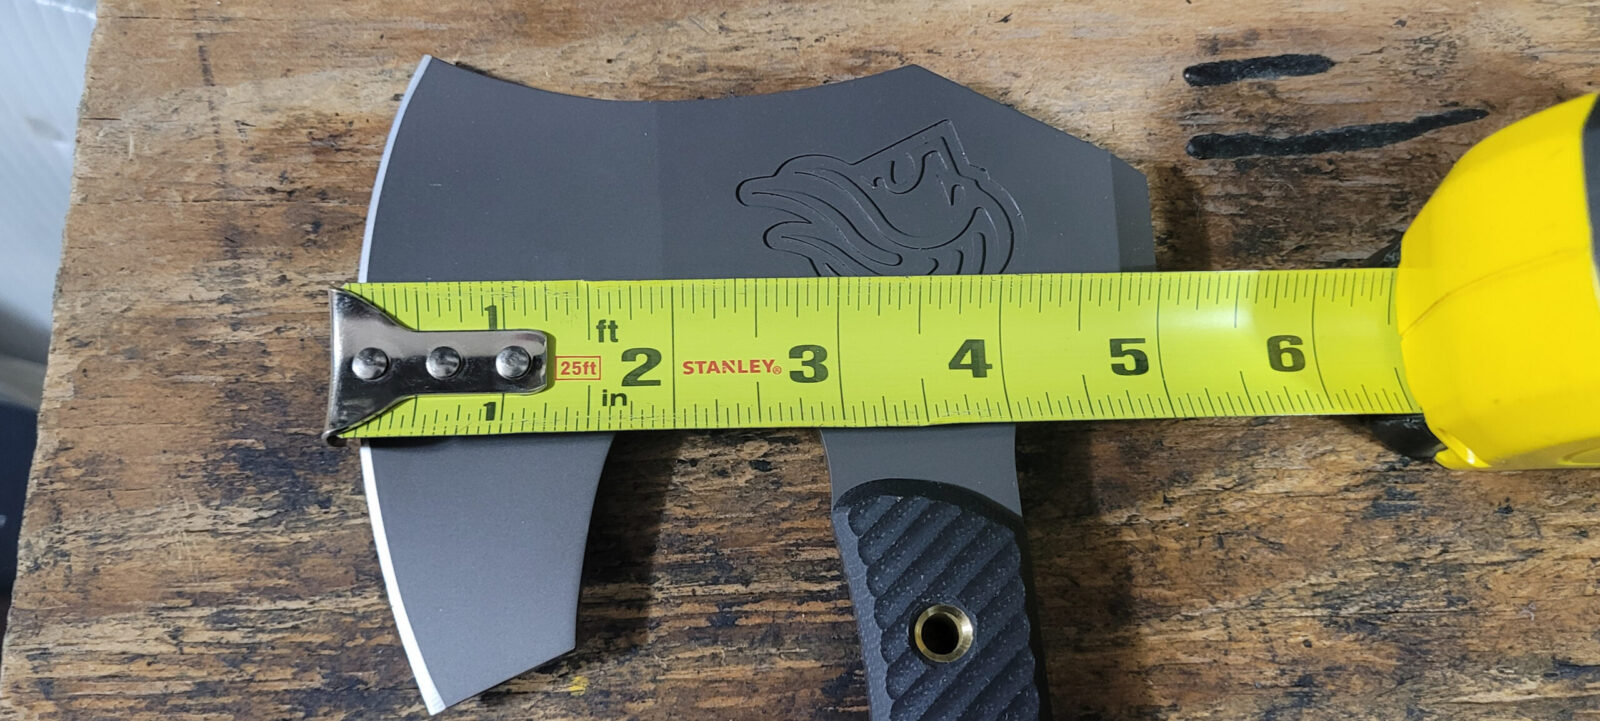
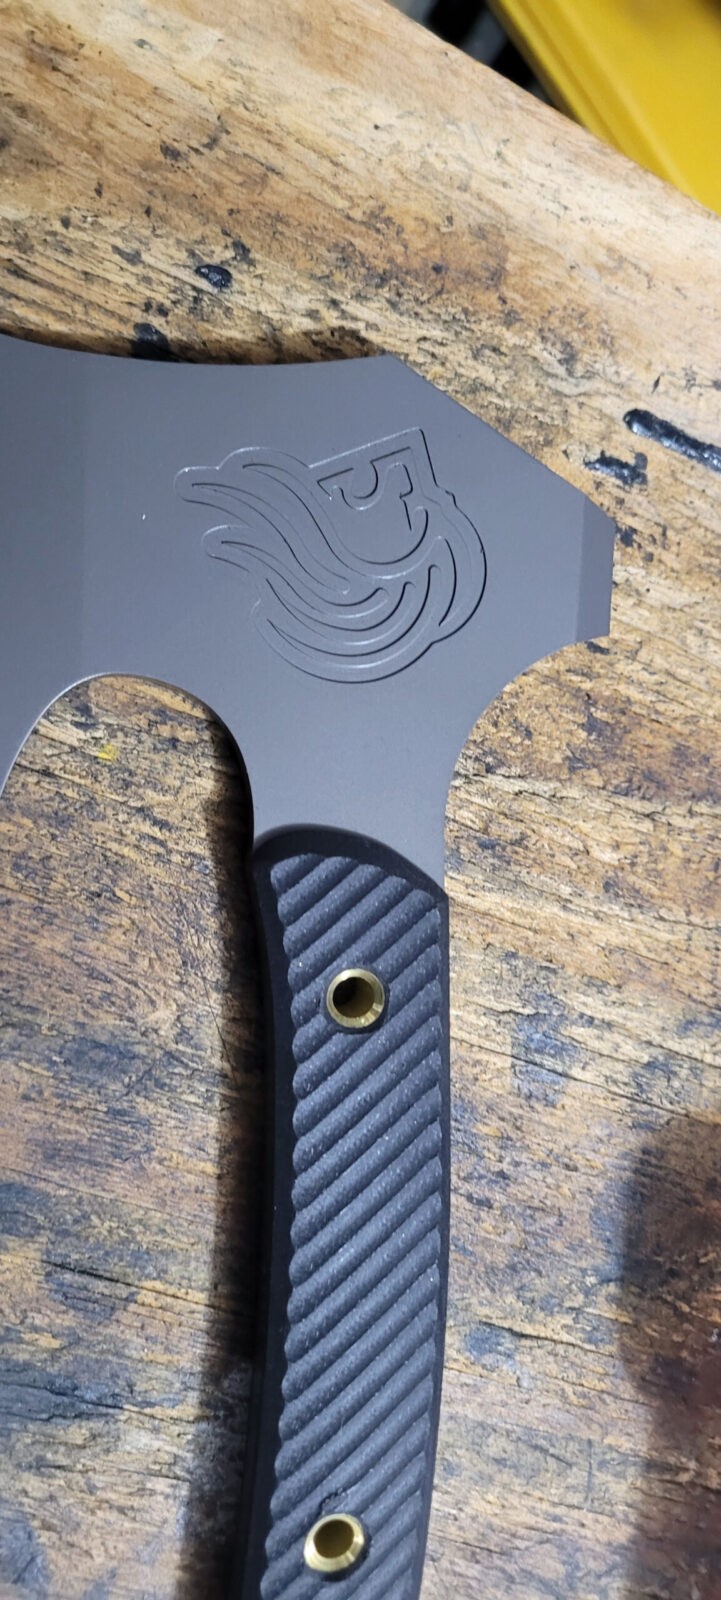
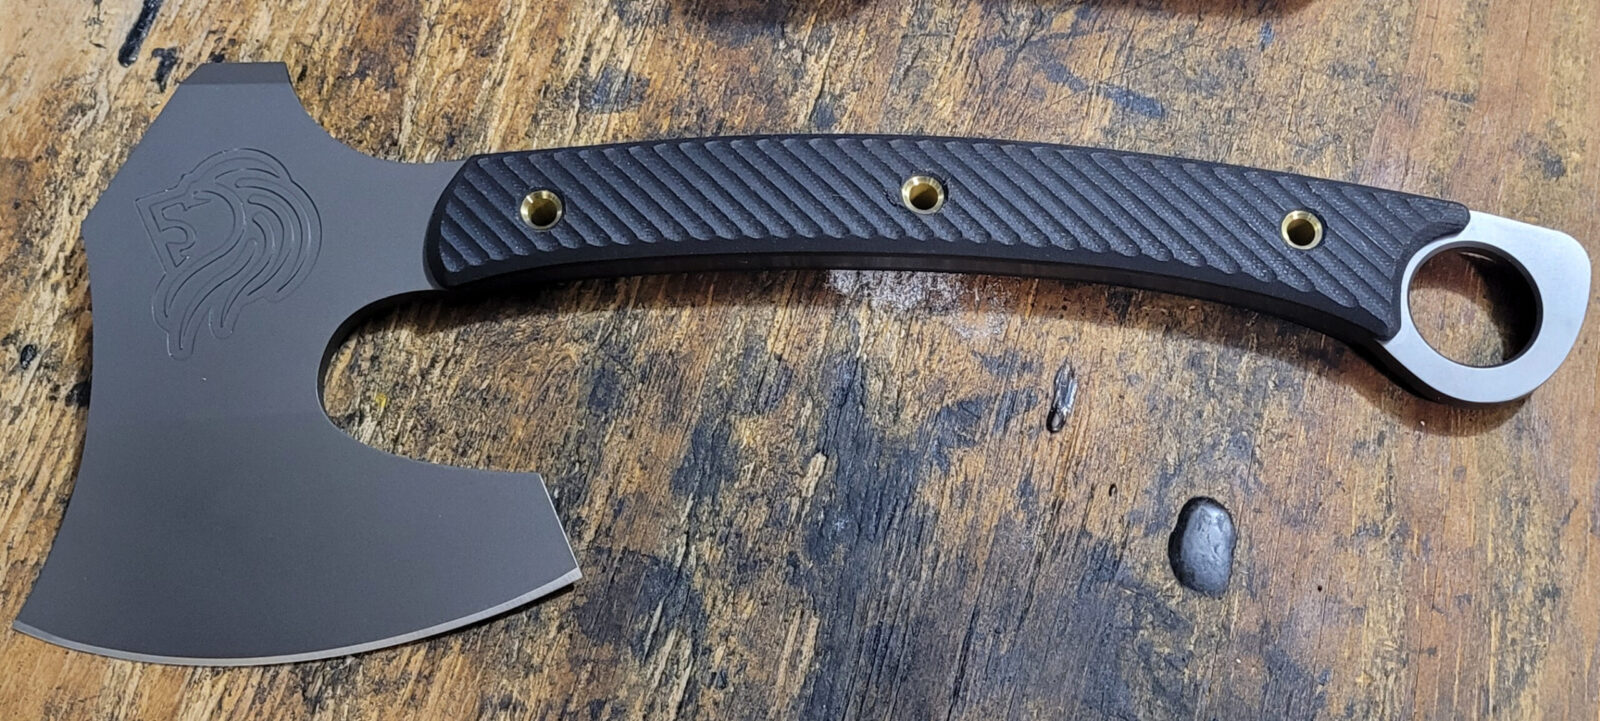
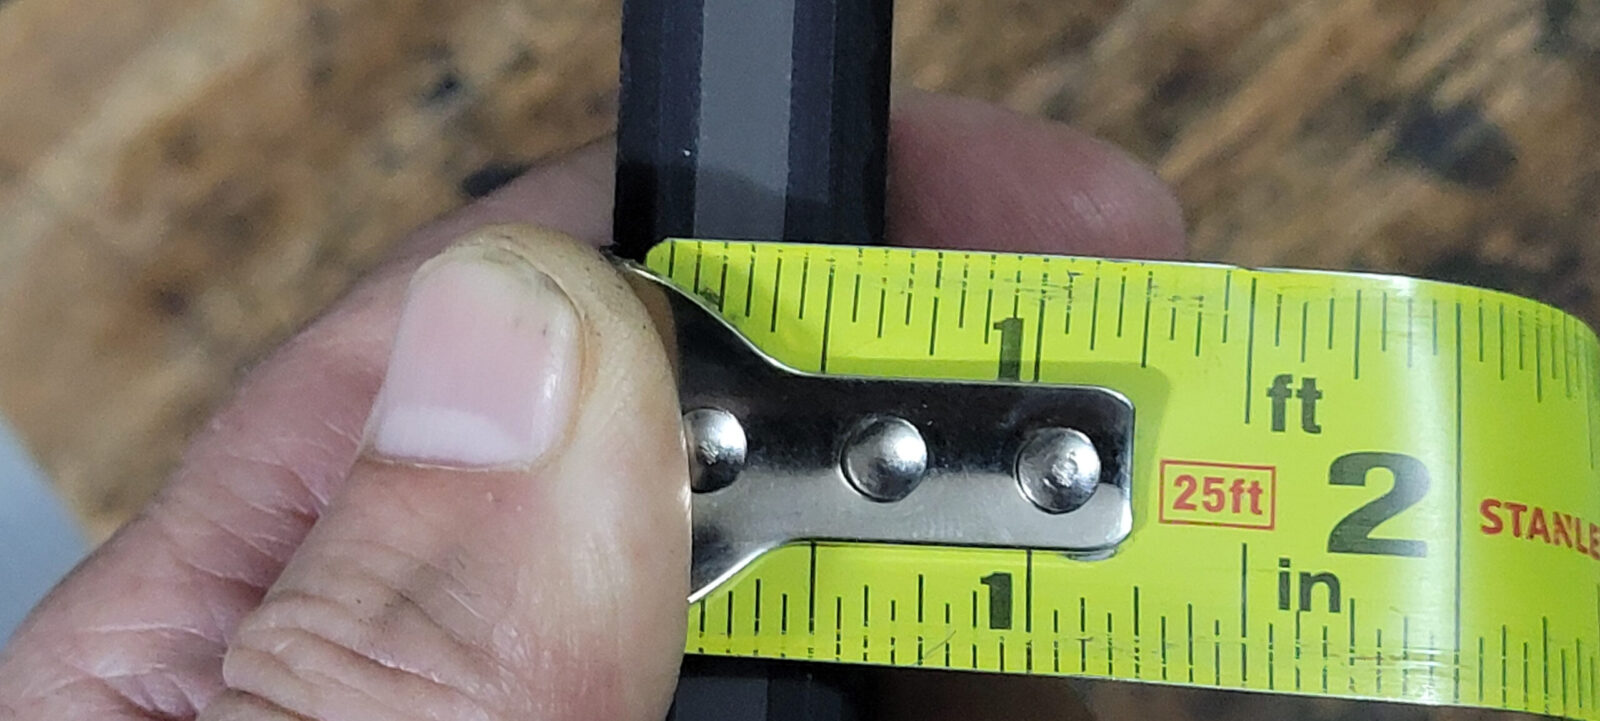
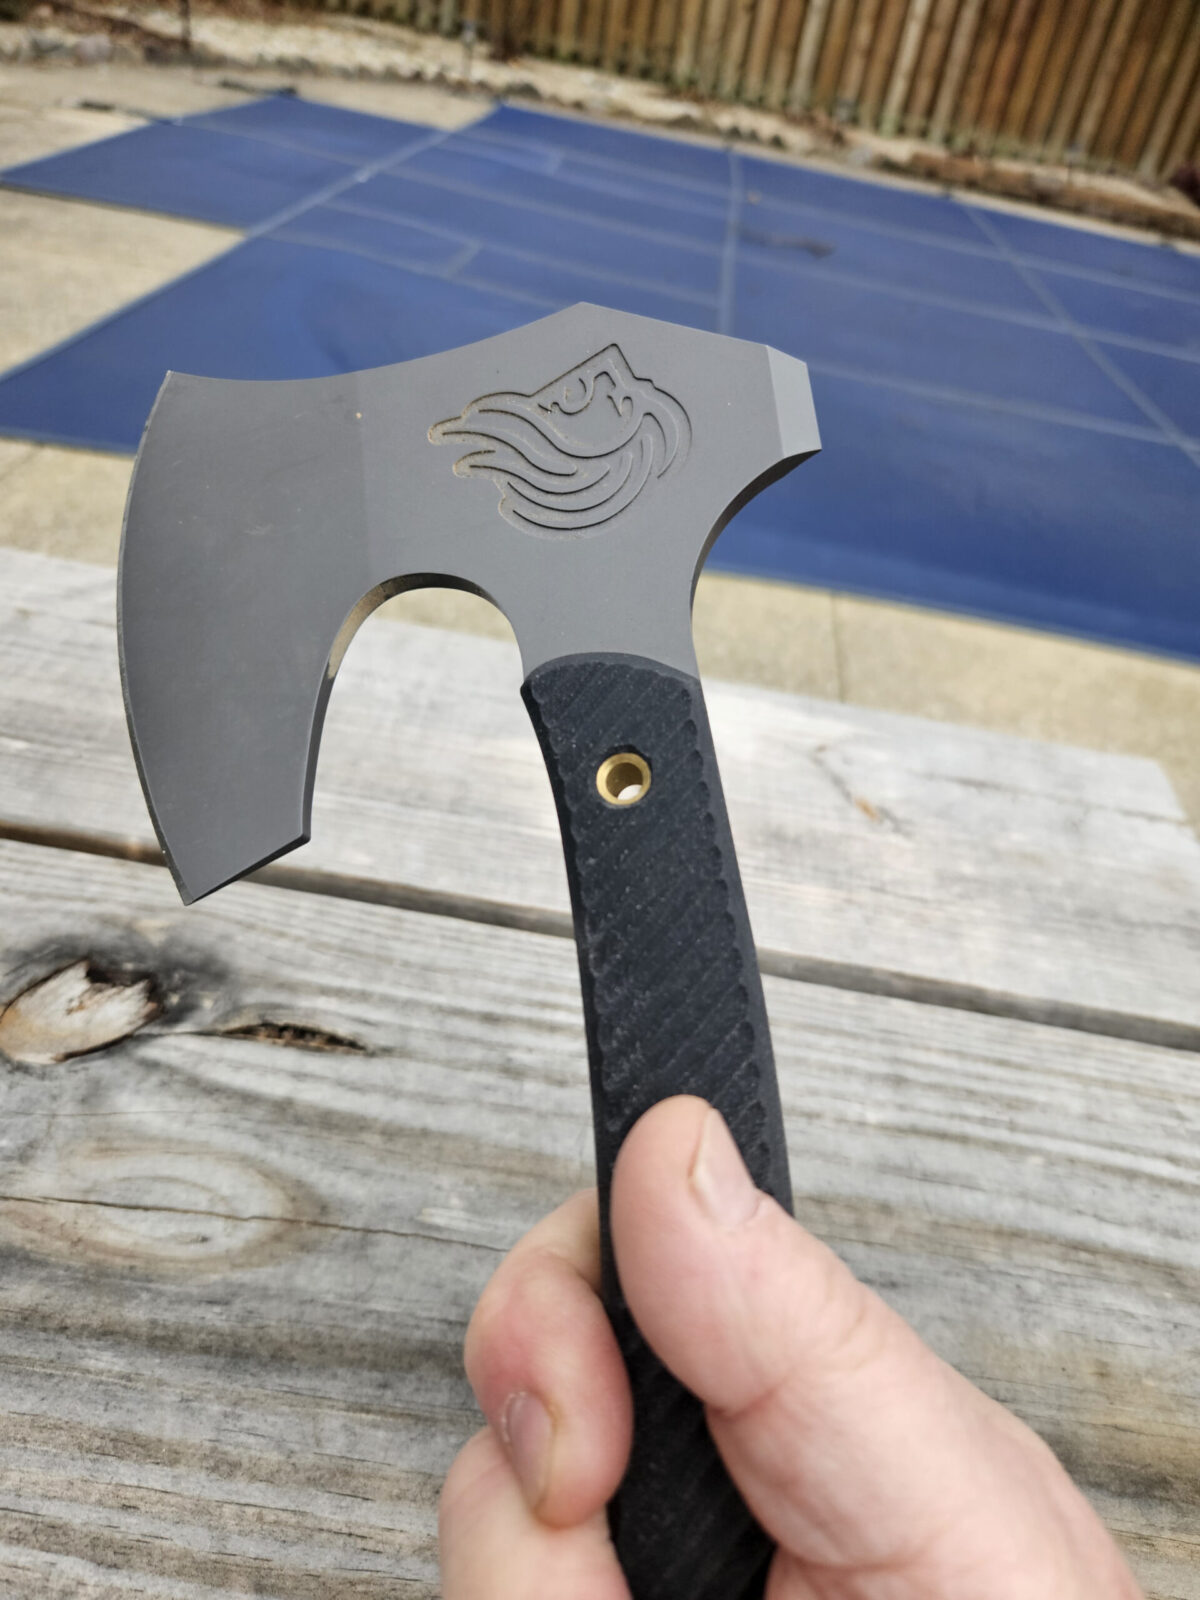
After my intial panic over the box, I started taking a closer look at the little hawk. It was a fairly common size for people looking for a tactical or combat hawk. It’s just over 12″ long and the beareded head is 4.3″.
The hawk is just over 12″ overall.
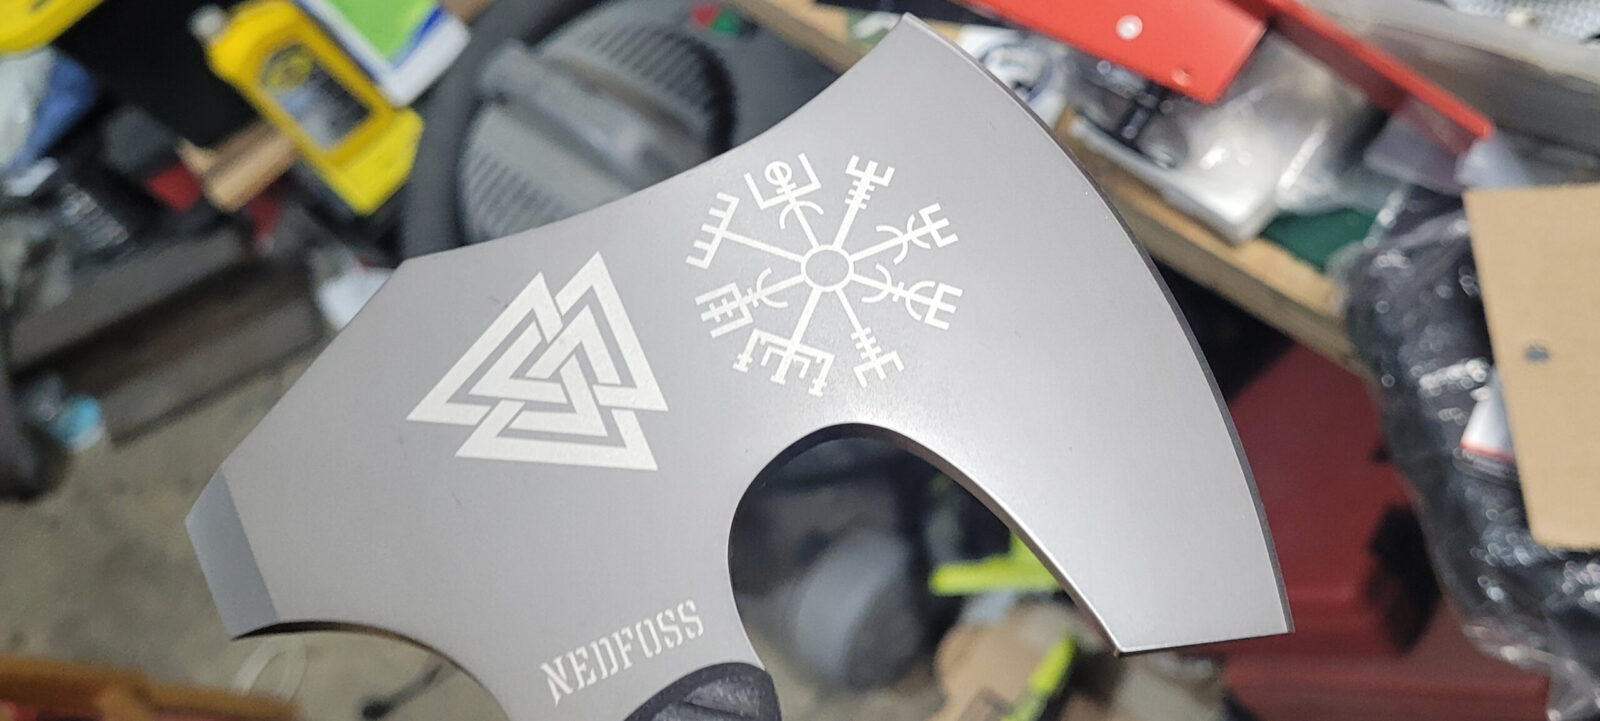
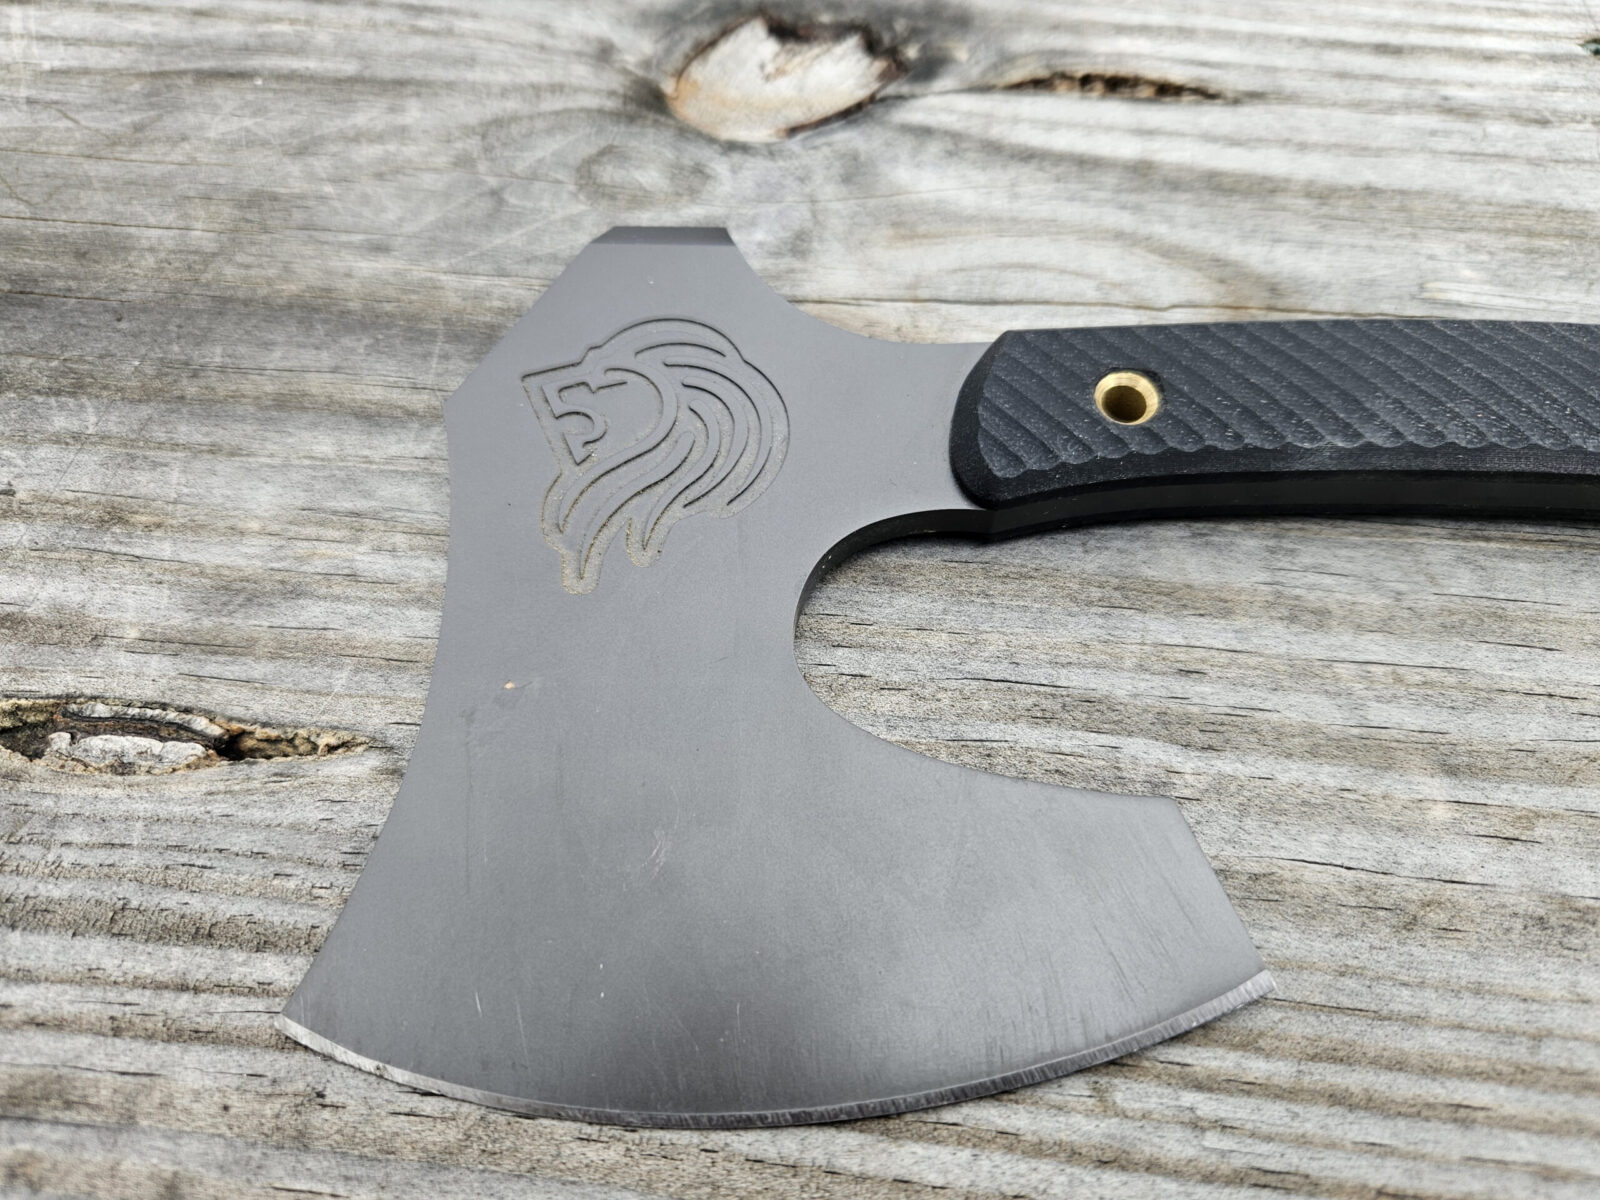
The blade is just over 4″ and front to back is approximately 5″. Note the NedFoss lion logo that is elegantly cut into the head.
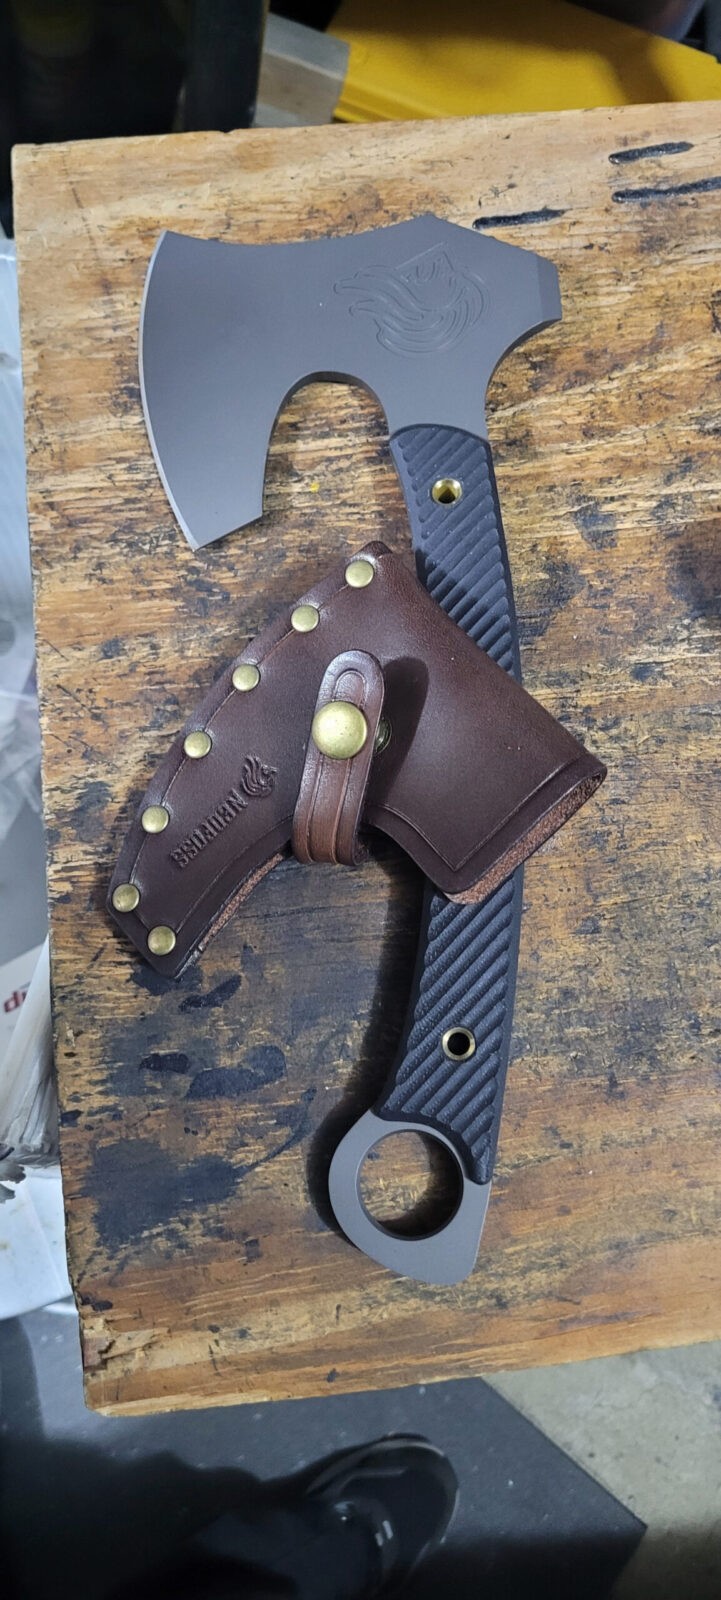
The back of the hawk’s head comes to a chisel point. Conceptually, it would hold up better striking a hard surface than the sharpened head.
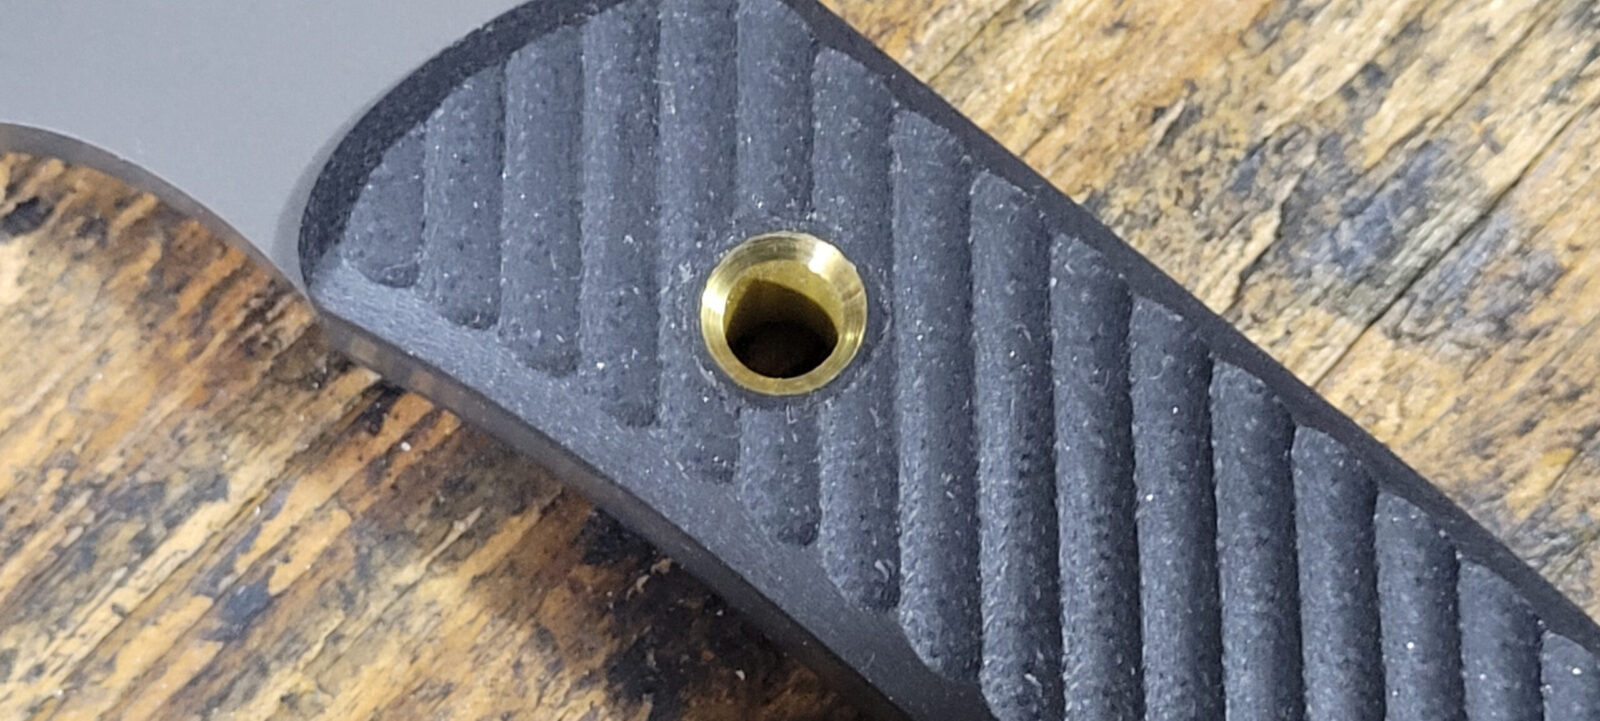
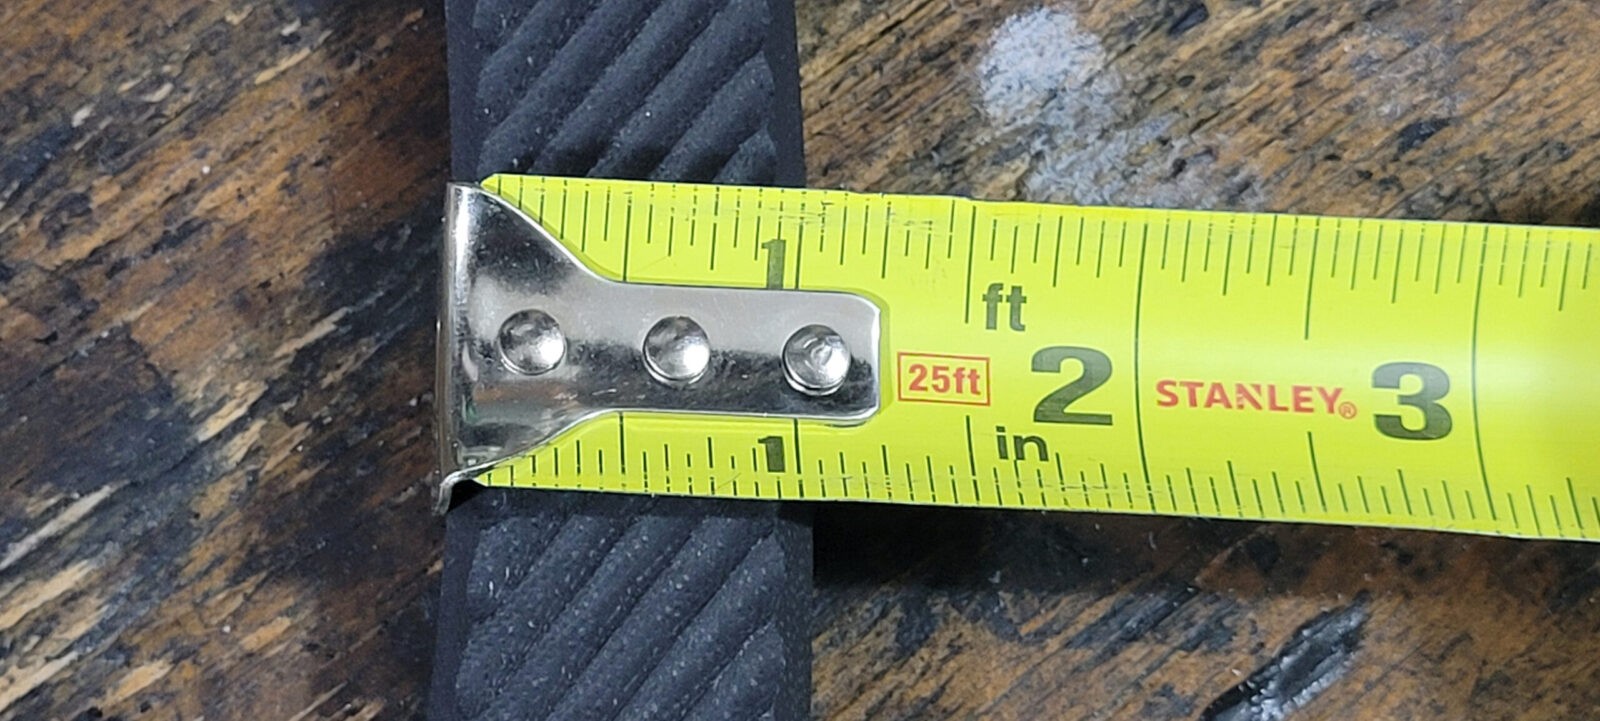
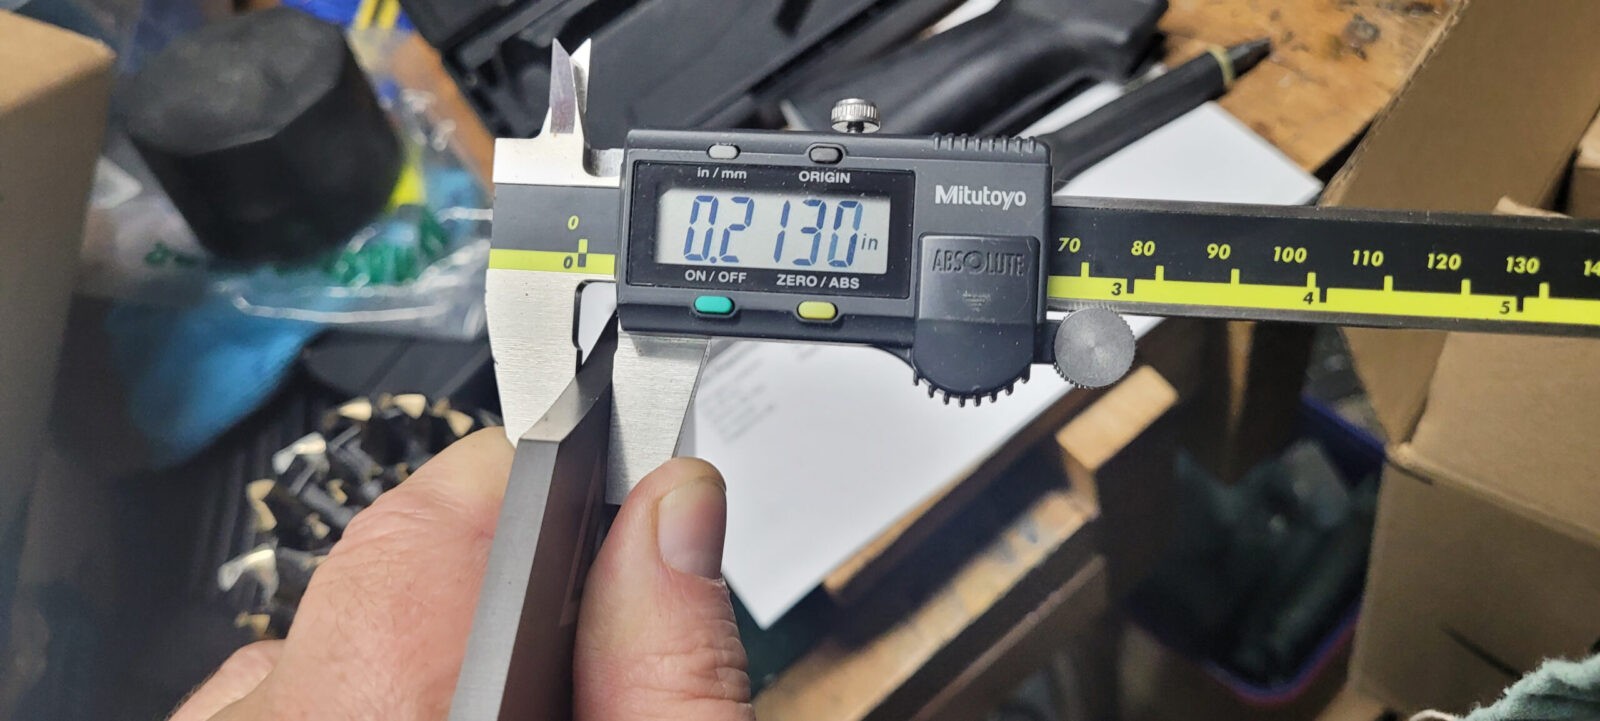
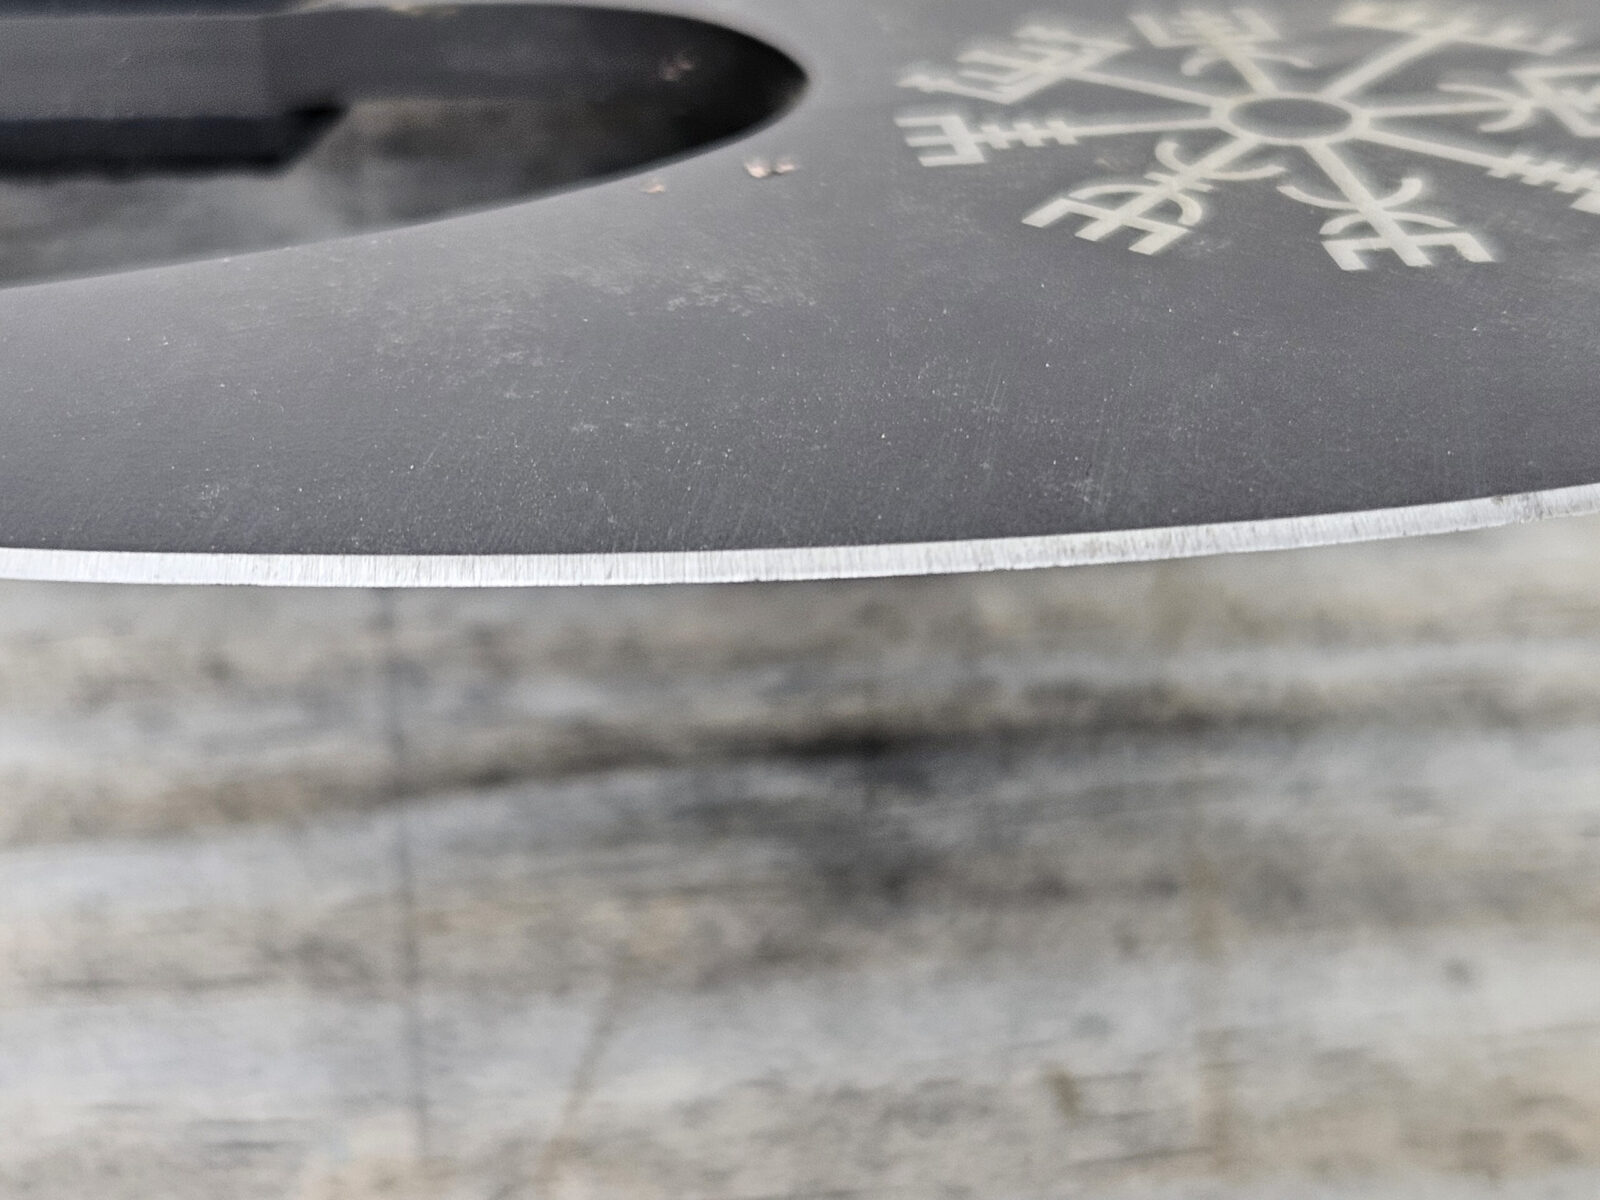
The handles are two separate G10 scales (one on each side) held in place by brass rivets. The grooves give for a very sure grip. The bottom of the tang swells open and serves as an effective hand stop. The hole helps reduce the weight.All of the rivets are well formed with no tool marks/blemishes on them.The handle is about 1″ front to back. That size should fit different size hands comfortably.The handle is about 5/8″ thick overall.The whole steel part of the hawk – tang, head and all – is made from one piece of 0.213″ 8Cr14MoV steel hardened to 55 HRC.I could have done without the hokey printed “runes”. I would have been more impressed if they cut them in like they did the Lion’s head. Note, it is a pretty deep beard – I like the profile.
It includes a leather sheat/blade guard. It doesn’t have a belt loop – it just protects whatever from the sharp edge of the blade it it did arrive sharp.
How did it hold up?
That’s the big question right? I really wasn’t sure how the edge or the finish would hold up and it just so happens I have a wood pile with a lot of dried hard oak. I whacked on some of pieces or oak and so did a friend of mine.
Guess what happened? To my surprise the edge held so so did the grey “titanium” finish. The hawk swings easy, balances well and hits hard.
I really expected the oak to do a number on it and at least roll the edge over or markedly dull it but the edge held. I did not expect that. The 8Cr14MoV steel with a 55 HRC hardness held up remarkably well.
8CR14MoV is a general purpose Chinese knife alloy is a clone of AUS-8 having an identical composition. If you’d like to read a very detailed analysis of it, click here for a post on KnifeSteelNerds.com.
I’m keeping mine and my friend was so impressed he ordered one the same day he handled it. I’m so impressed that I plan on getting more of their models. I especially have my eye on one of their bearded camping hatchets.
Note, I have to buy all of my parts – nothing here was paid for by sponsors, etc. I do make a small amount if you click on an ad and buy something but that is it. You’re getting my real opinion on stuff.
The Following is a Basic Do-it-yourself Manganese Parkerizing Formula
A couple of friends online, Elkaholic and Ding, got me interested in parkerizing years ago and gave me a home brew formula and process steps they use. I have been tuning that formula for a few years and thought I would share it as I use it both for blades and firearms. It works great as either the base for a top finish, such as Molyresin or as a finish all by itself. You may be wondering “why not just buy a premade formula such as the great parkerizing solution from Brownell’s” – the short answer is because tinkering can be fun and more rewarding. I like to experiment and try different things. So, with that said, here is the recipe:
Also, be sure to use stainless steel for your tanks. I watch for sales or buy stuff off eBay. The big cooker above is from Walmart and the rectangular pan shown below is from Amazon and is normally the water pan for buffet lines.
For tongs to move stuff around, use solid stainless. I tried the plastic ones and they can leave a plastic residue on blasted surfaces and mess up your finish.
Just like baking, if you want more of the solution, take the recipe and multiply it by two, four or however many multiples you want. Just be sure you have a place to store it when done. I use 5 gallon jugs and label them.
Steps to Follow
Add acid to water in a stainless pan/pot and heat to 190F – don’t boil and waste it. I use a baking thermometer clipped to the side of the pan.
Spray each wool biscuit with brake cleaner to remove oils and allow each time to dry
As the solution warms shred the steel wool into the liquid and add the manganese dioxide
Let the mix simmer and dissolve the steel wool before adding parts
I always blast my parts before I parkerize them – I’ve heard guys tell about using a wire brush on a buffer or drill press as well but I’ve not tried that. Blasting removes the oxides and exposes the bare steel.
Make sure your parts are very, very clean and degreased — only handle with rubber gloves after they are cleaned or oils from your skin can mess things up
You can suspend your parts in the liquid with stainless wire. Leave them until the fizzing stops or about 30-40 minutes. The time varies.
Rinse the parts with boiling water thoroughly to remove the acid.
Spray parts with WD40 to get the water away from the steel
Wipe down with oil or apply whatever secondary finish you want – don’t do both 🙂 If you are going to apply a finish on top of the parkerized surface, use acetone or brake cleaner to remove any oils and then follow their instructions.
At the bottom of the post are links to Amazon products including long parkerizing tanks.
Cleaning Up
When you are done, let your mixture cool and strain the liquid through a coffee filter into a plastic can for future use. I use a blue kerosene 5 gallon container because it is a different color from all my other 5 gallon containers plus I label it. Point being, you do not want to get confused and pour this stuff in when you meant to use a fuel, etc.
The precipitate, the stuff on the bottom, should be scooped onto a shallow pan, allowed to dry and be disposed of as a hazardous waste. For example, where ever your community collects old paints, batteries, etc.
Brownells Has Great Parkerizing Solutions and Kits
Brownells sells very well regarded ready-to-use formulations. I have no hesitation at all to recommend the below items to you – they are top notch.
Click here for their manganese parkerization supplies. Their formula meets Mil Spec STD171
If you have a lot small parts you want to park, they have a bench top kit ready to go that you can buy – click here
Click here for their complete parkerizing tank system. This is a complete system for gunsmiths or others who need to park everything from small parts and pistols up to firearms and swords.
In Summary
I hope this helps you out. I’ve used the above many times and the results are solid.
Updated 2/13/24 with new sources and fixed some grammar issues.
Note, I have to buy all of my parts – nothing here was paid for by sponsors, etc. I do make a small amount if you click on an ad and buy something but that is it. You’re getting my real opinion on stuff.
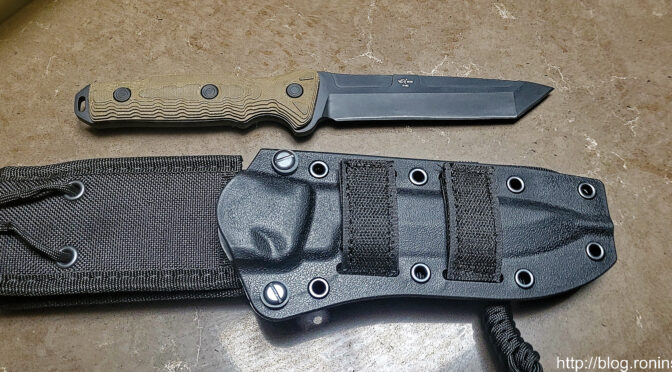
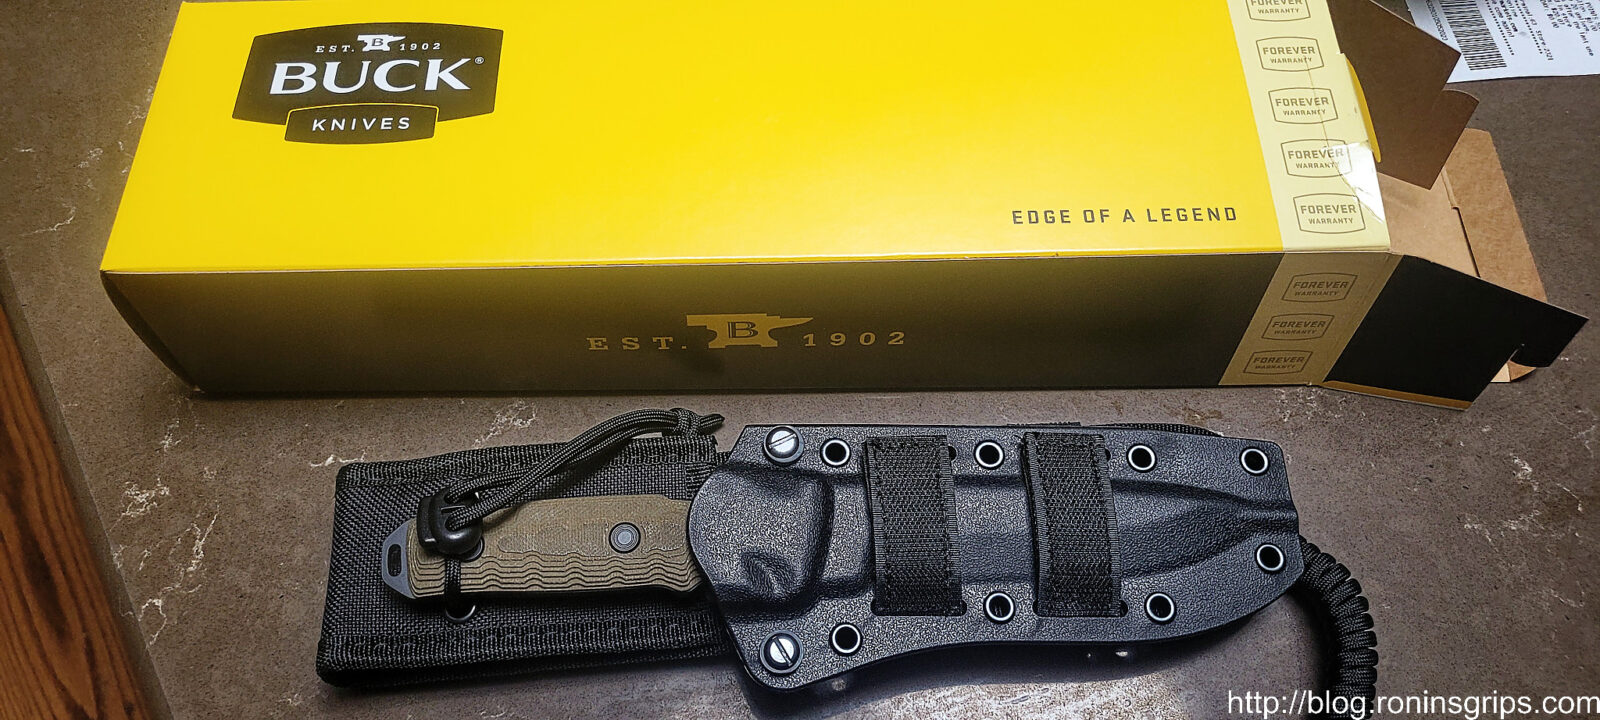
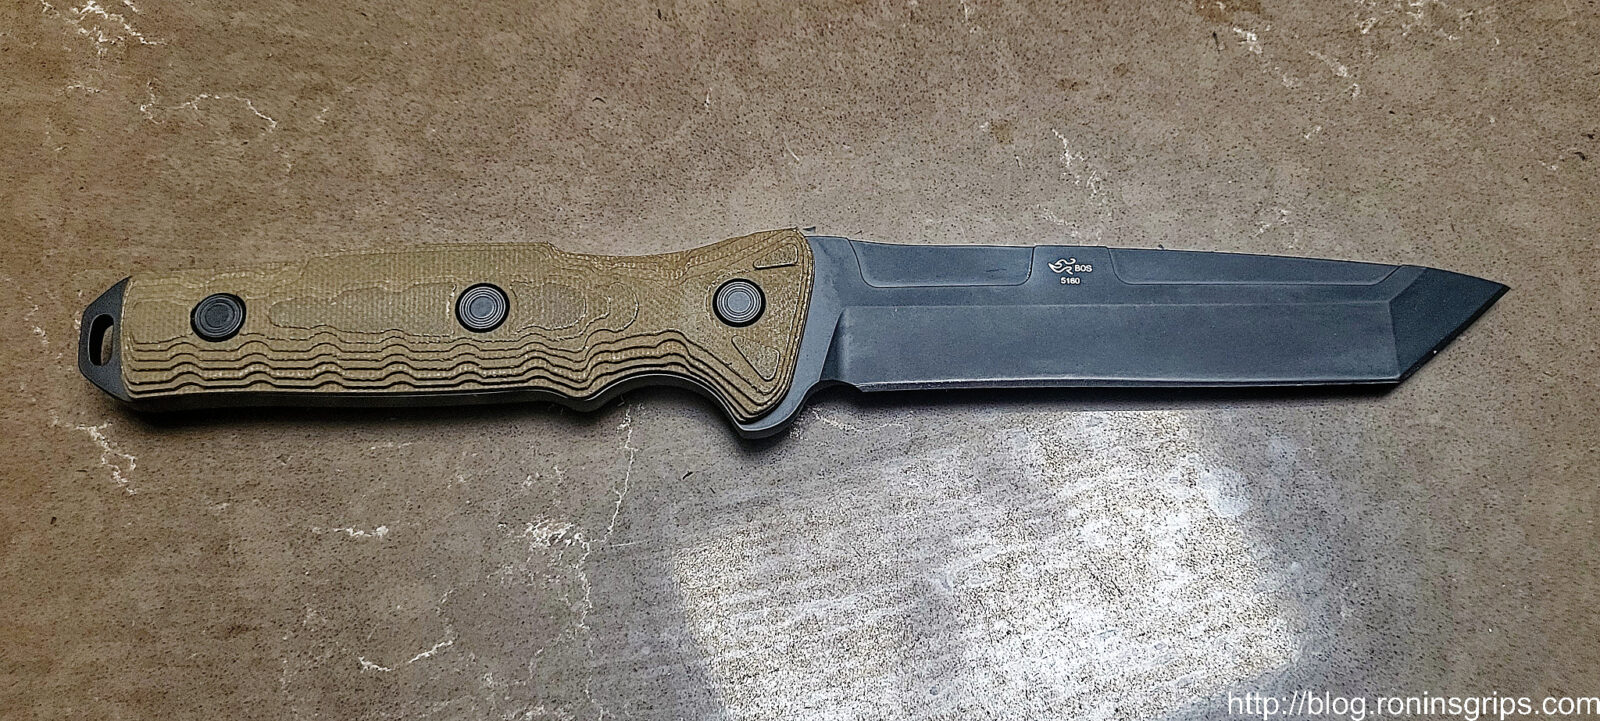
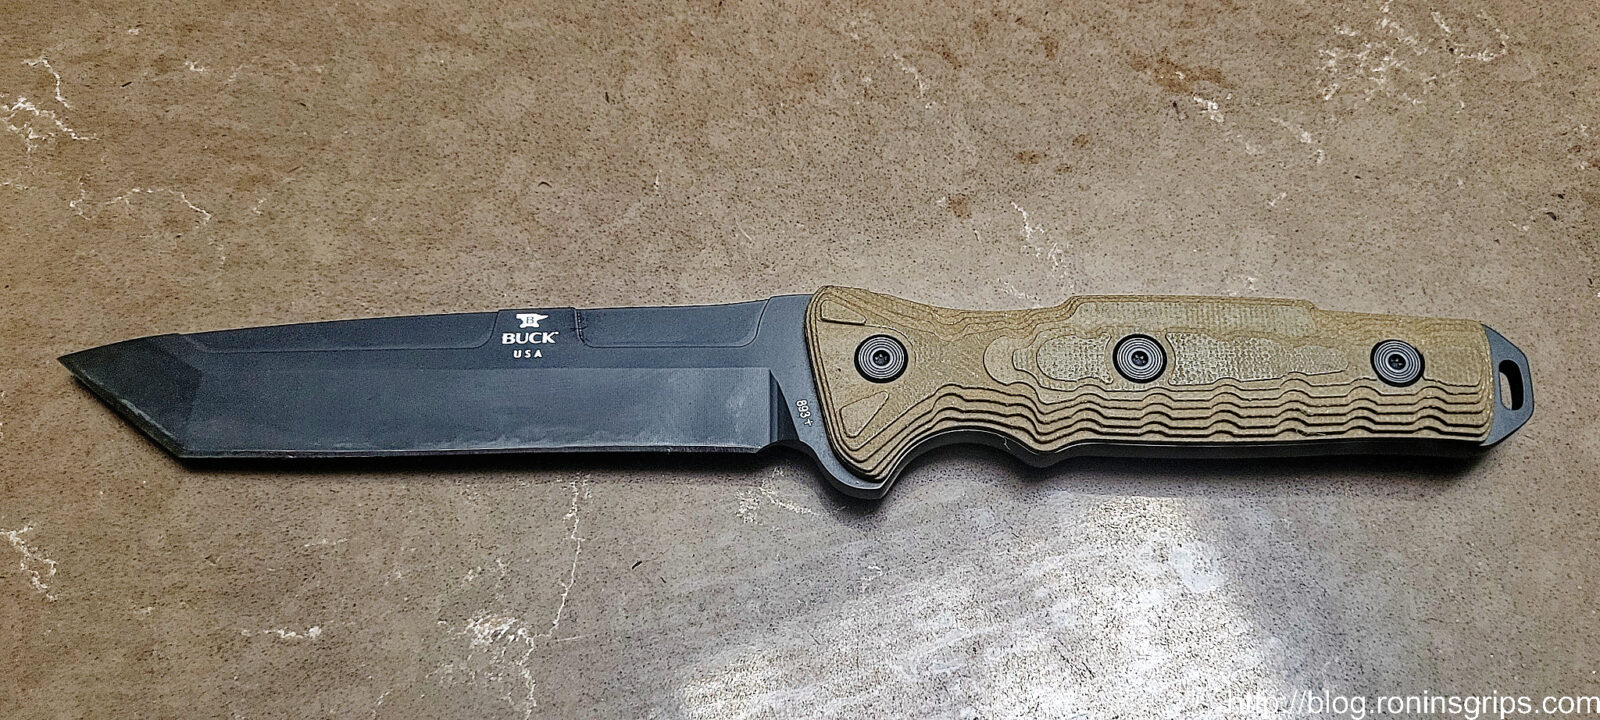
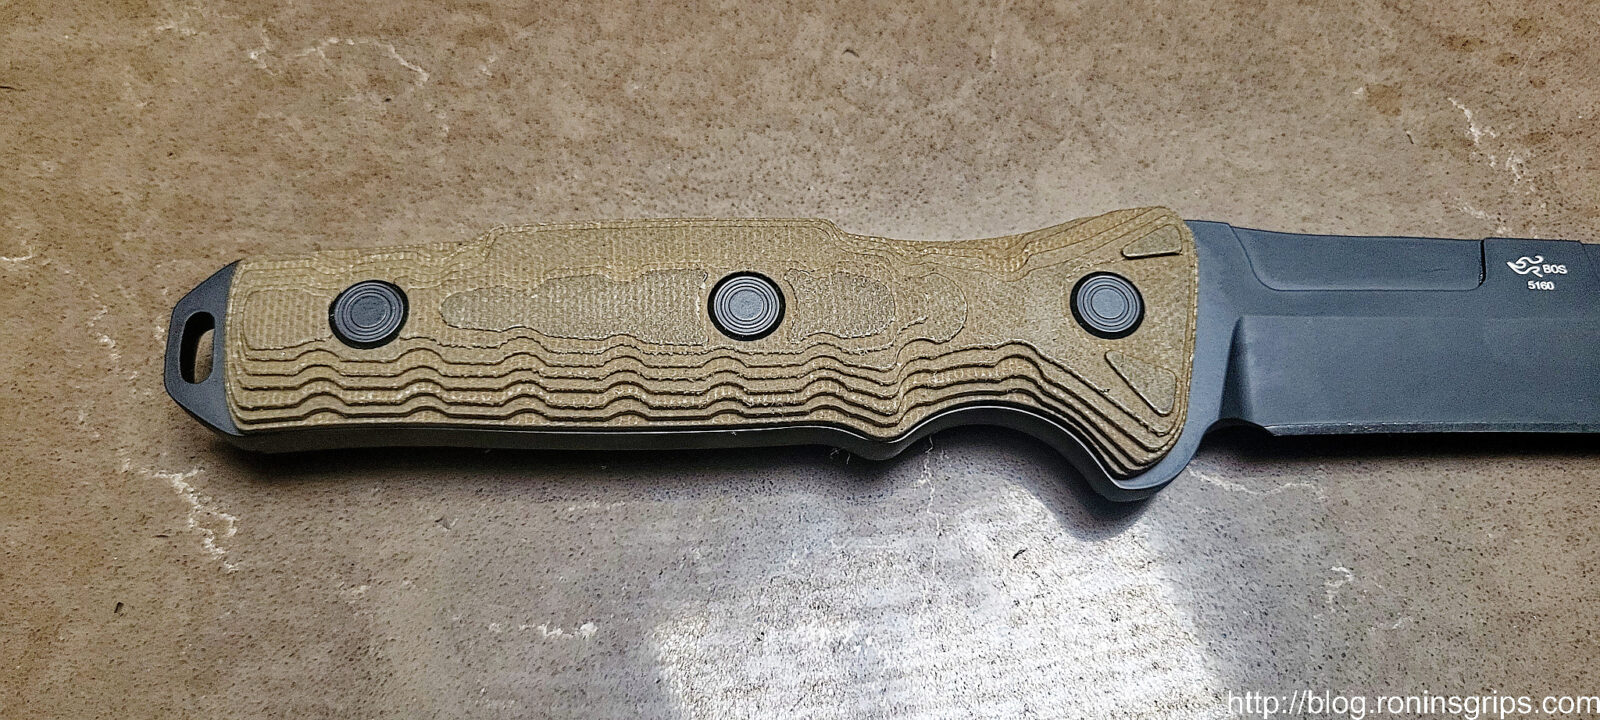
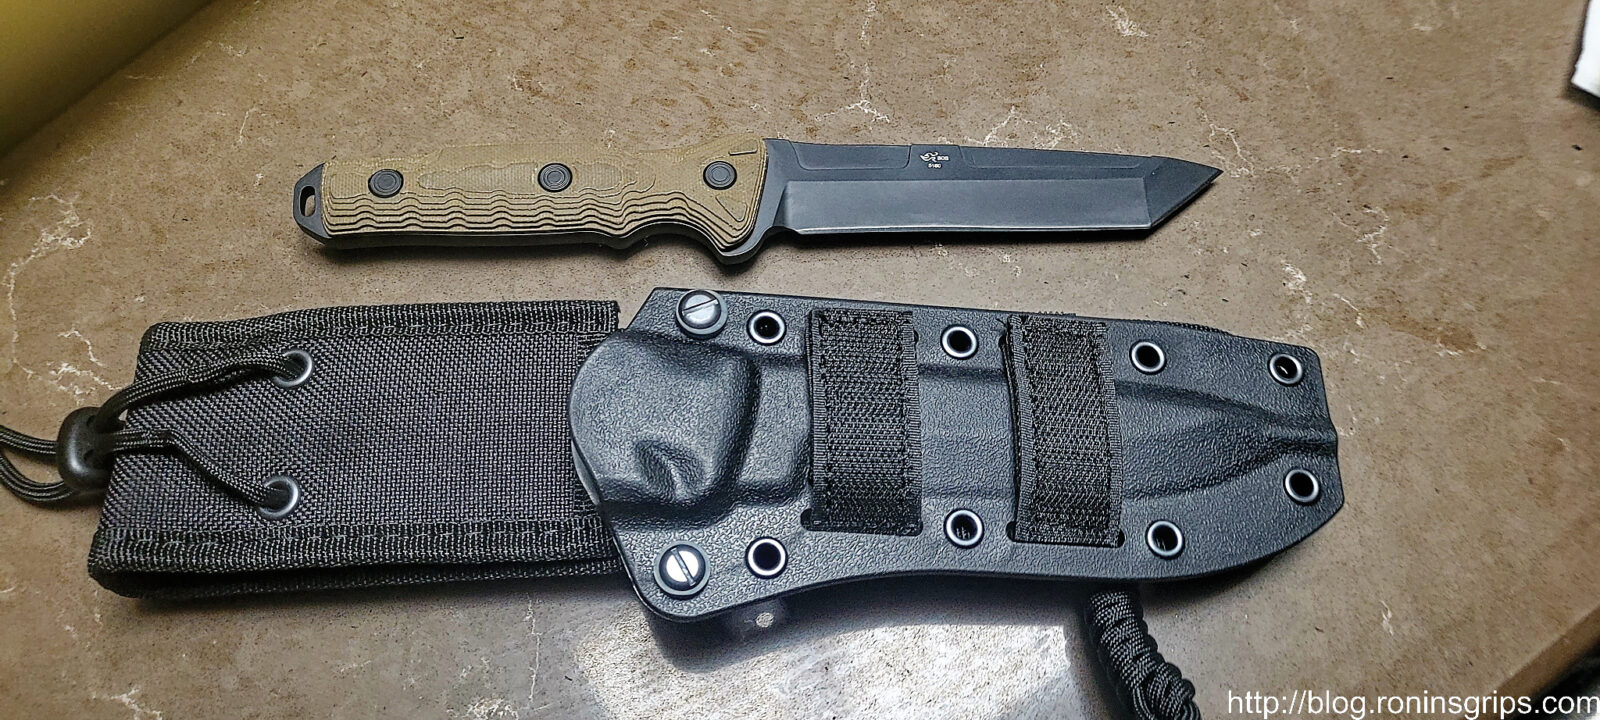
Folks, around 2020 Buck Knives introduced a very handsome line of fixed blade knives they called the Ground Combat Knife (GCKs) with spear and tanto profiles as well as in black and flat dark earth (FDE) Cerakote colors. The canvas micarta handles were in black and a tri-color for the FDE blades. Despite being extremely nice, Buck discontinued them sometime in 2021. Since then, you could only find them on eBay … until now.
5/13/23 Update – Sorry folks but there is no trace of this knife on the Buck website now. A few guys told me they were able to score one but now they are gone.
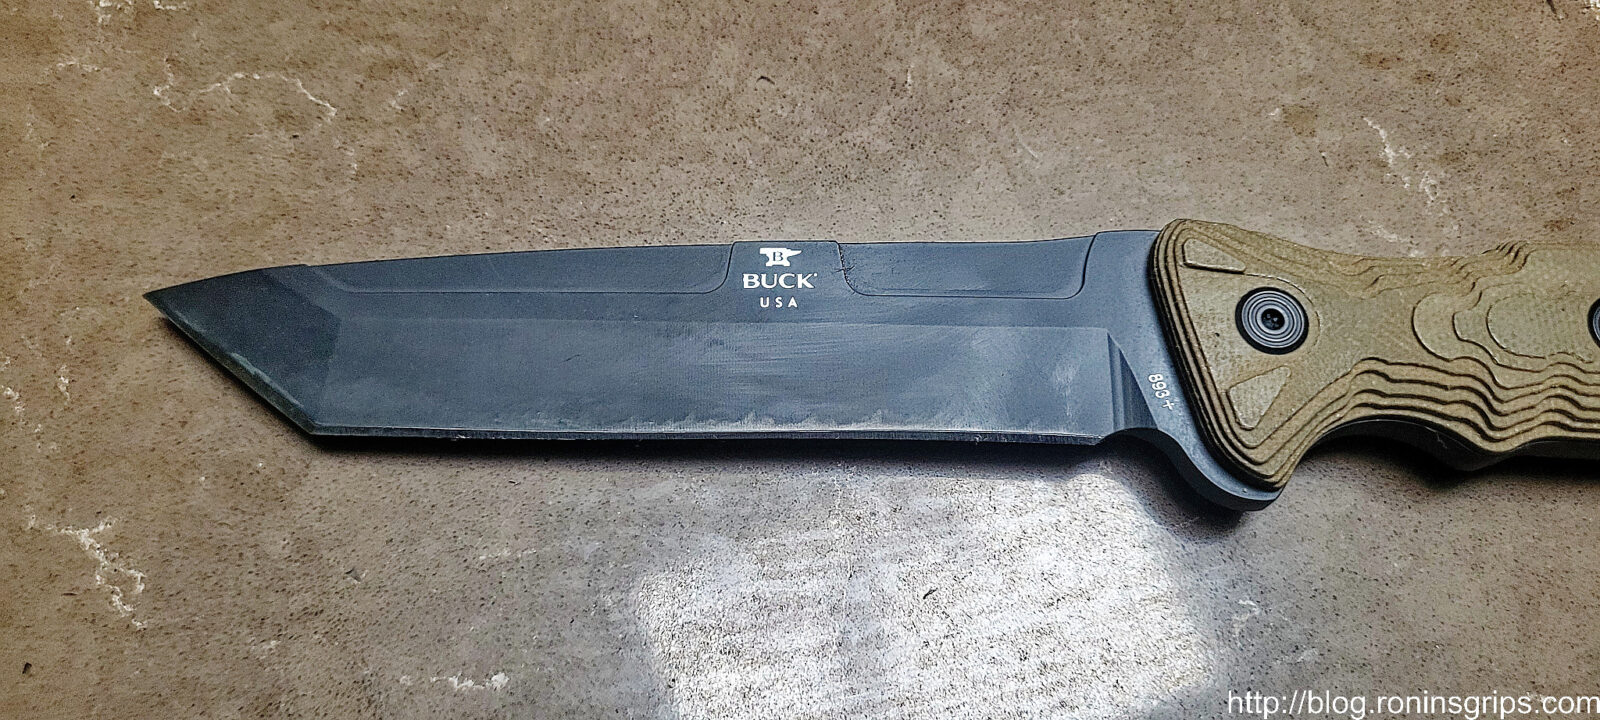
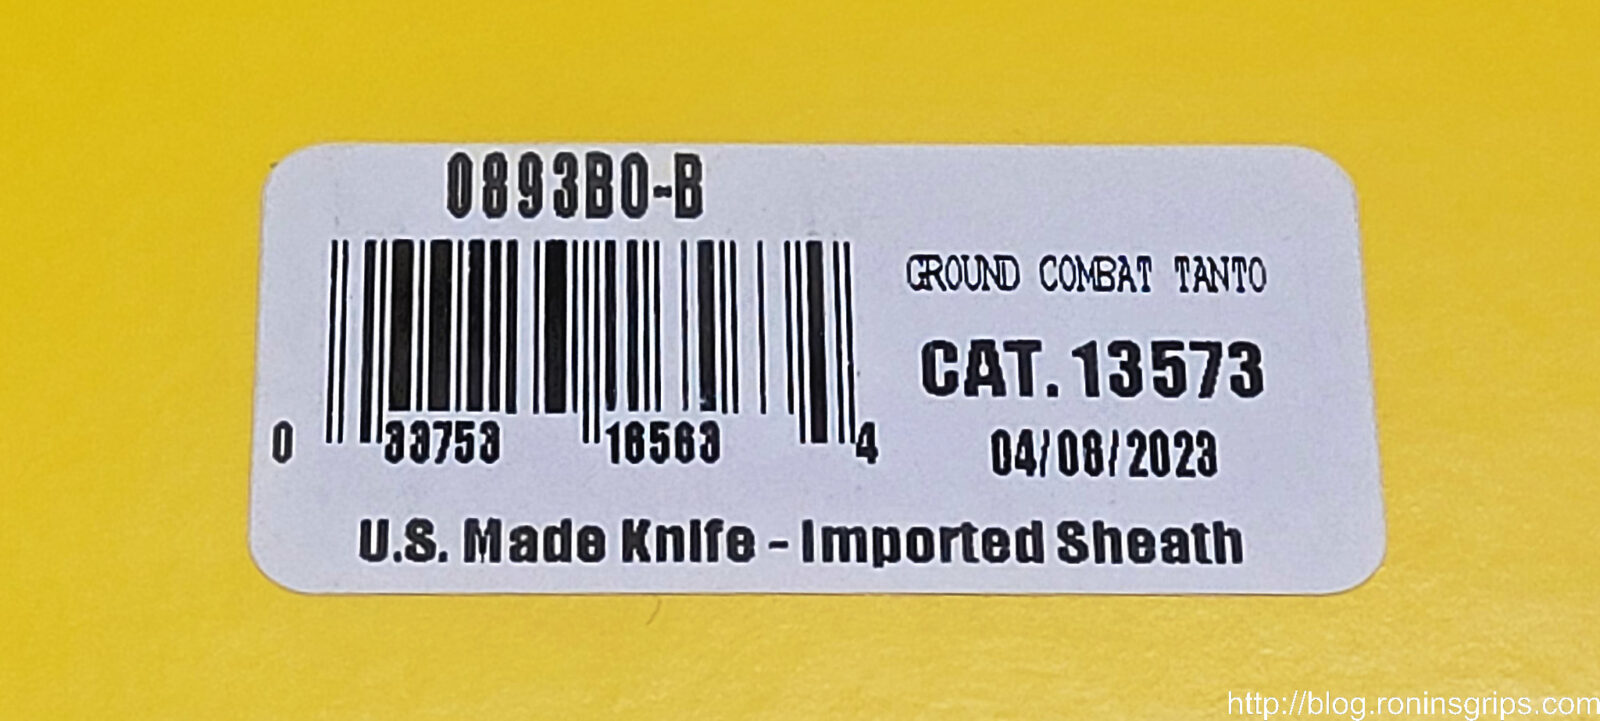
So I was surfing and accidentally pulled up a GCK tanto page at Buck Knives and it showed inventory – curious huh? The knife blade is black Cerakote with an OD canvas micarta handle. I don’t think they offered this configuration before. Now, the price was (and is right now) only $114.99. I ordered a couple and they showed up a few days later. I honestly thought it might be a website bug because I had not heard about these – they are absolutely real.
Whoa…. I paid $199-250 for the four blades I had from the original run and these things are incredibly nice. I do not see these new 893BO-B blades on any other boards (Amazon, KnifeCenter, BladeHQ, etc.) – they are just on the Buck website. I searched Buck 893BO-B and am not finding them anywhere else.
Now here’s my advice. Go buy one. Do it. Do it now. Whether you are a collector or a user, go buy this. I am betting this is a limited run and you will not see it again. Click here to go there now … do it now! I paid a ton for my GCKs from the first run. You can get this new model for a steal.
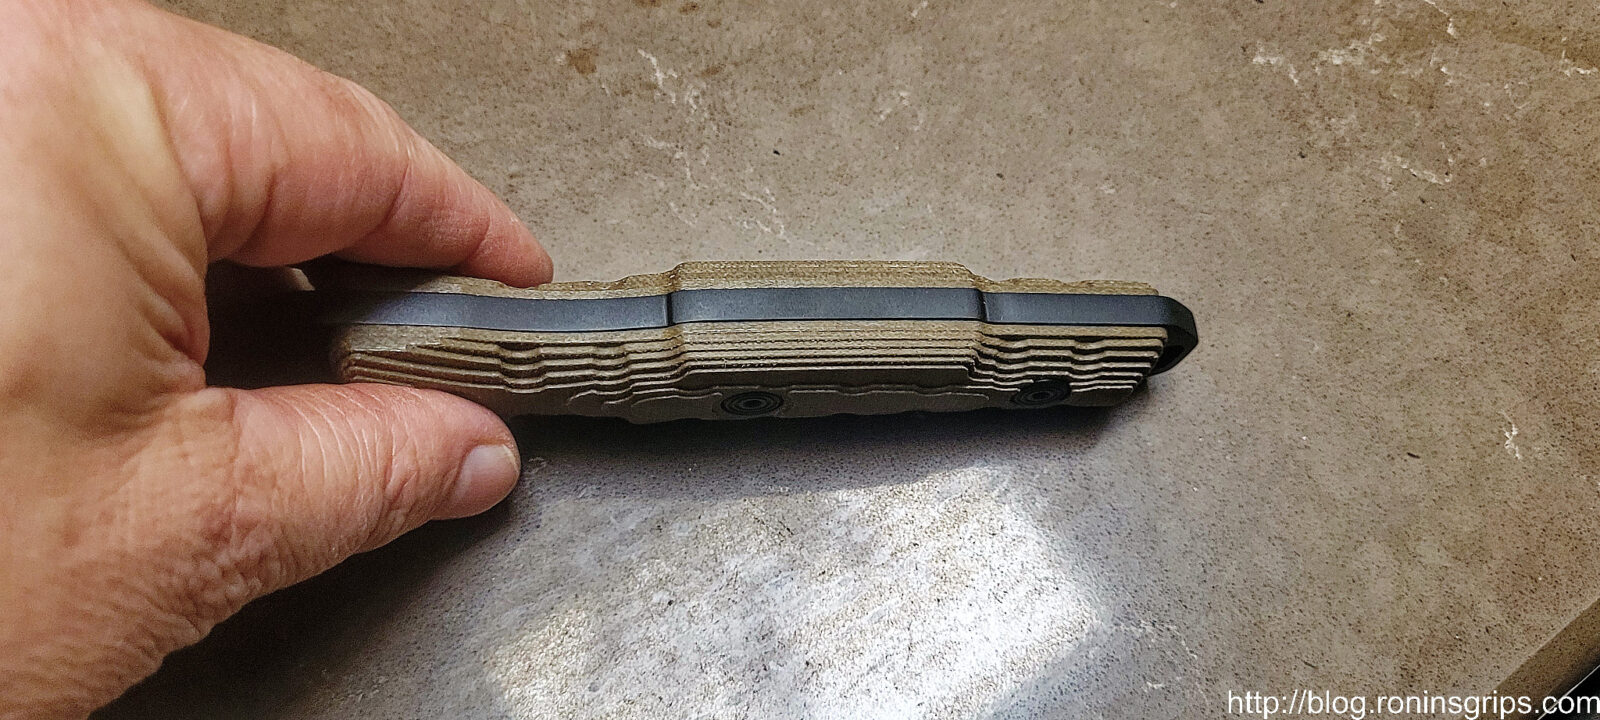
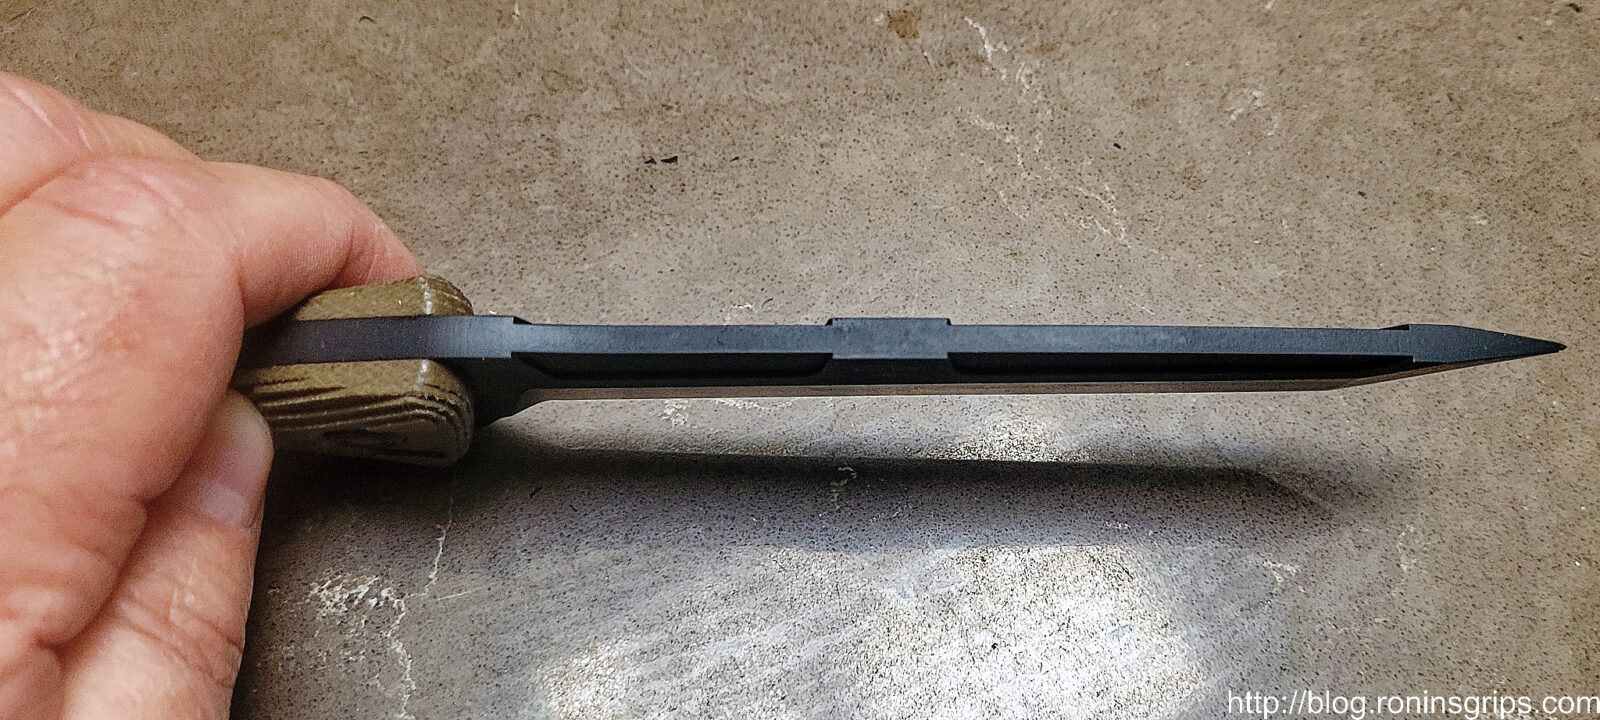
Overall length: 10-3/24″
Blade length: 5-1/2″
Blade thickneess: 0.200″
Blade alloy: 5130 High Cabon
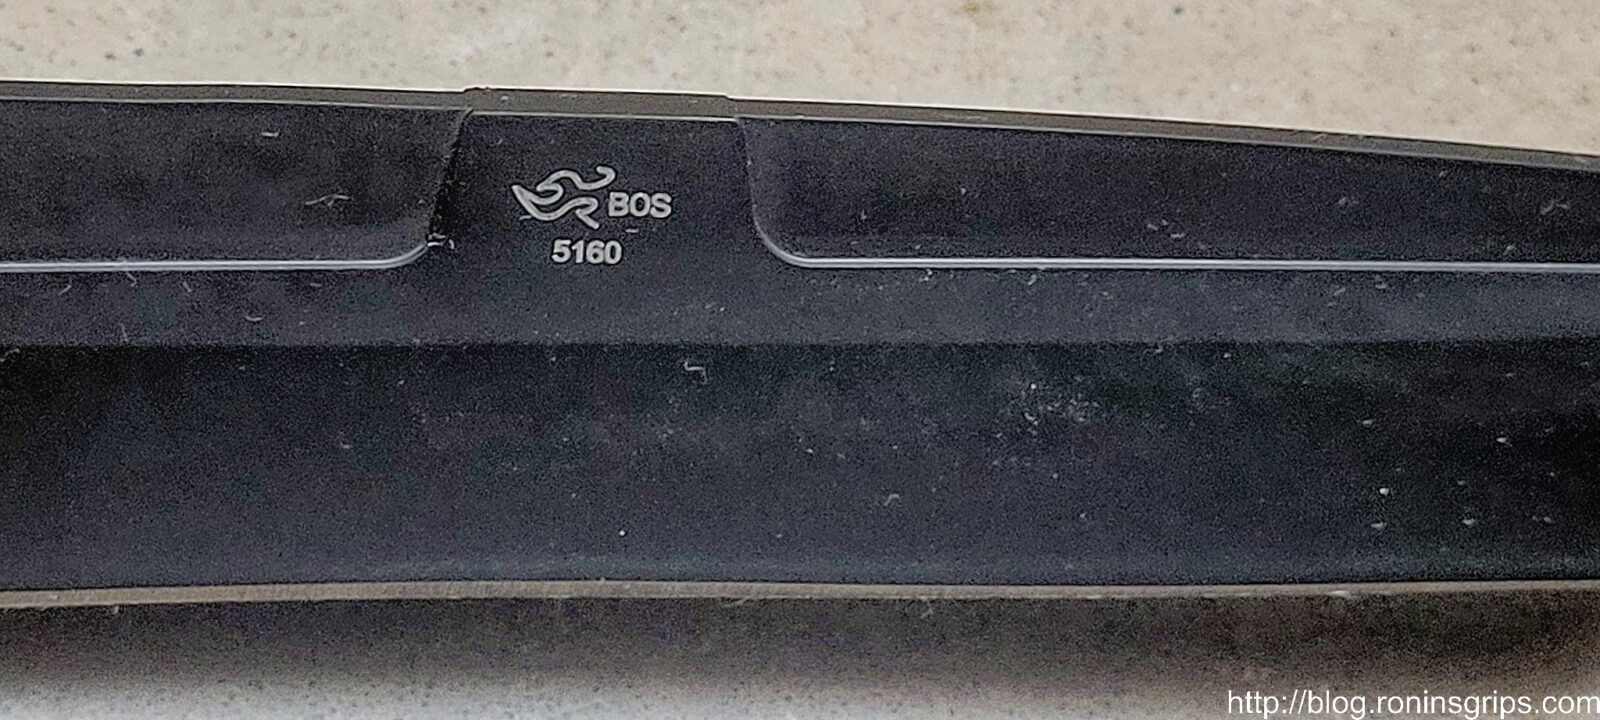
Paul Bos Heat Treat
Weight 9.9oz
Handle: OD Green Micarta
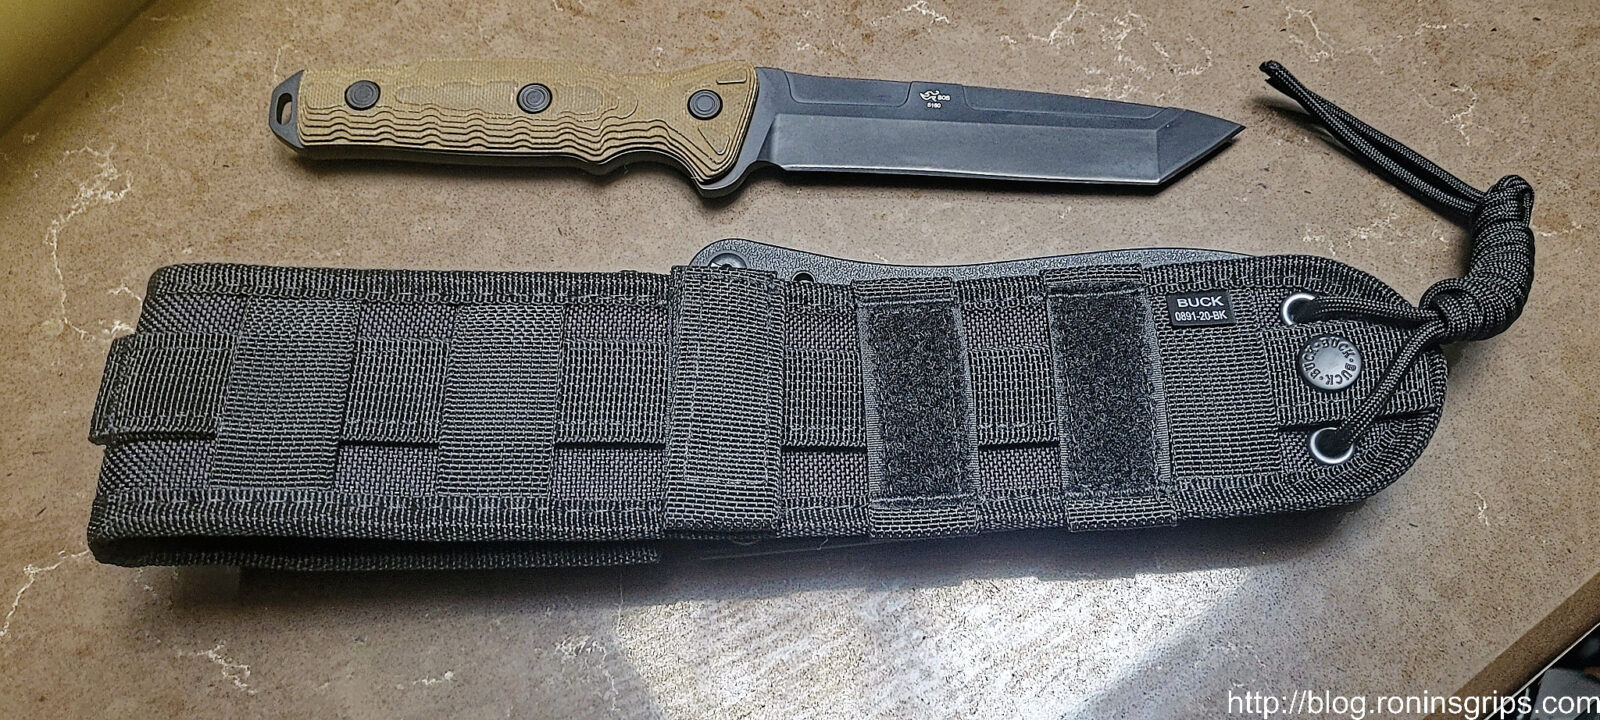
Sheath with MOLLE straps
The knife is made in the USA but the sheath is imported
Buck’s Forever Warranty
Photos of One of My New 893BO-B Knives
Notice the 4/6/2023 production date. These are brand new.
Summary – Buy This Knife Now!
Listen, you will rarely hear me say this – buy this knife now! If you like Buck tactical knives or you know how good they are (and they are very good) – buy this right now. For that matter, buy two – one to use and one to collect. These are superb and I thought we would never see them for a reasonable price again. I doubt Buck will have them indefinitely and you don’t want to miss this chance.
Note, I have to buy all of my parts – nothing here was paid for by sponsors, etc. I do make a small amount if you click on an ad and buy something but that is it. You’re getting my real opinion on stuff.
Some years back I wrote a post on how to find cleavers and figured it was time to update it with better search routines for eBay plus to add a few tips not in the original.
One of my favorite things to do is to restore an old cleaver. I’ve done a ton of them over the years and posted many photos along the way. In response to the photos or sales listings in my online store, guys will ask how to find a good deal on one to restore themselves.
The best deal you’ll get is at garage, barn and estate sales – no two ways about that. Antique dealers usually jack their prices into orbit and I’ve not seen a good deal at an antique dealer in a long, long time.
My challenge is that I don’t have time to go hunting for stuff so I do a lot of automated searches on eBay. What I am going to do in this post is try and give you some tips plus also live searches of eBay using key words that frequently turn up cleavers to keep an eye on.
This is a New Haven Edge and Tool Co Cleaver
That leads us to tip #1 on eBay – set up searches that email you when they find stuff. What you do is enter your search term on eBay and then click “follow this search”. EBay will then give you options for alerts and so forth. You can experiment and figure out what works for you. For me, for example, just searching on “cleavers” is useless because of all the junk that comes back so I keep refining my searches based on key words both to include and to exclude.
This is a 16.5″ Foster Bros #8 – Fosters is another favorite brand
Learn some of the phrases folks use to describe / market these big cleavers. No doubt, I like big cleavers so I use search phrases like “giant antique cleaver”, “giant hog splitter” and what not. In general, the hog and cow splitters are big. These huge cleavers were used in the days before extensive automation to chop up big farm animals such as cows, hogs, lambs and so forth giving them their name.
When searching, look in descriptions and not just the titles if given the option. You may need to use the advanced search option and add key words to exclude when things you don’t care about are included in your searches.
This is a 16.5″ Lamson
There are also certain brands that I really like such as Fosters, WM Beatty, Lamson and New Haven Edge Tool Co. There were a lot of makers including folks on farms and village blacksmiths forging their own cleavers so it really takes some digging. I found searches on Google to turn up interesting information about the history of the makers and so forth when I could find some kind of logo or marking.
This is a 20″ WM Beatty and Sons
Another tip I would give you is to look out for old cleavers that are shiny. Somebody probably sanded or ground the rust off. I have bought a couple that were utter train wrecks from guys trying to make something look good for sale. Just be careful. Nothing that was used is going to be bright silver steel any longer.
Do not worry about rust, dirt and dings – you are going to be working on it anyways. How far you want to go with the wood is up to you. The most fascinating cleaver I ever worked on had a trashed handled that I built up with epoxy. It was stunning wood under decades of grime.
Be careful on the measurements – look for the blade size and overall lengths plus the weight. I like to look for cleavers that are at least 18″ overall. Call be weird but the smaller ones are okay but just not as interesting to me. I do have an exception though – some of the small Fosters are just wicked. They were forged, have a thick blade and quite a heft.
Watch out for photos. Sellers try all kinds of stuff to make them look big, in great shape, etc. You are especially focused on whether the blade is intact, meaning no big nicks or any cracks, and the dimensions. The photos are nice eye candy but don’t base your whole purchase on them. I certainly use them to try and judge the condition of the blade. If a seller doesn’t have an angle you want to see, ask them to send you what you need. Many sellers will oblige these requests.
Giant 24.5″ cleaver with a 1/2″ thick blade from an unknown maker – my all time favorite
Now be patient and don’t rush. Watch the prices these things are selling at and don’t start bidding until the last minute. Also keep an eye on the seller’s ratings. New ones with fewer than 20 sales make me nervous. Read what folks have to say about the seller.
Keep an eye on shipping charges. Some guys will do stuff like list something dirt cheap and then charge a fortune for shipping. Don’t just assume shipping & handling charges will be reasonable if it isn’t listed.
Be patient! You can get some very decent cleavers for under $100 but what you consider a fair price is entirely up to you.
Here are some realy time eBay Searches to help you get started using keywords I use in my own searches and you can buy these right now!! Note that some sections may be empty if there are no current matches,
Giant Antique Cleaver
There will be times you want to qualify a search phrase and “antique cleaver” is one of them. If you search on that you will get matches for things people call cleavers that are just a few inches long. When sellers have a big cleaver they tend to use words like HUGE or GIANT in their description. Of course, most will not be very big but it is something to look for. Let’s try “giant antique cleaver” first:
Next is “huge antique cleaver”
Hog Splitter
This one is searching on “Hog Splitter” and excuding the words “stereo plug mono” because some stereo cords get matched and would be included otherwide.
Cow Splitter
True clow splitters are rare so when you search on eBay you will often get quite a few near matches from their search engine and wind up with a long list of things to exclude such as “witchblade stereo cord wind extender cable engine cent paring comic glove knob”.
Beatty Cleaver
Beatty cleavers come in a variety of sizes from small to big splitters so be sure to carefully read the description. Sometimes the photos make them look bigger than they really are.
Foster Cleaver
Fosters are also very good cleavers. They made a bunch of different models to read the description carefully.
Antique Cleaver
Just to show you what antique cleaver sucks in, here you go:
Vintage Cleaver
Large Vintage Cleaver
I hope these tips and sample search terms help. My biggest tips are to carefully read the descriptions, consider the seller’s ratings carefully and watch out for shipping. Also, don’t rush and get caught up in auction fever – only buy what makes sense to you.