Tag Archives: #AK

Shimming The Loose Handguard on my IMI Galil / JRA Gallant

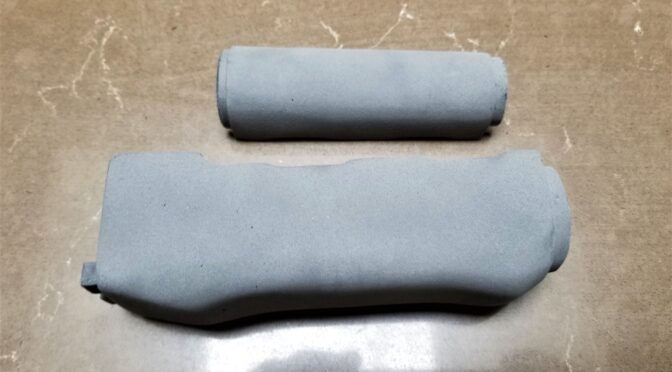
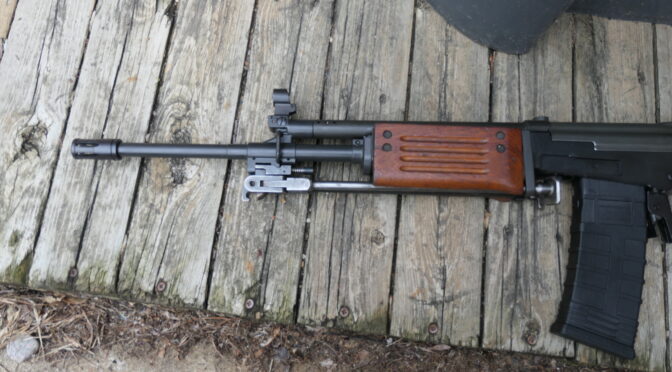
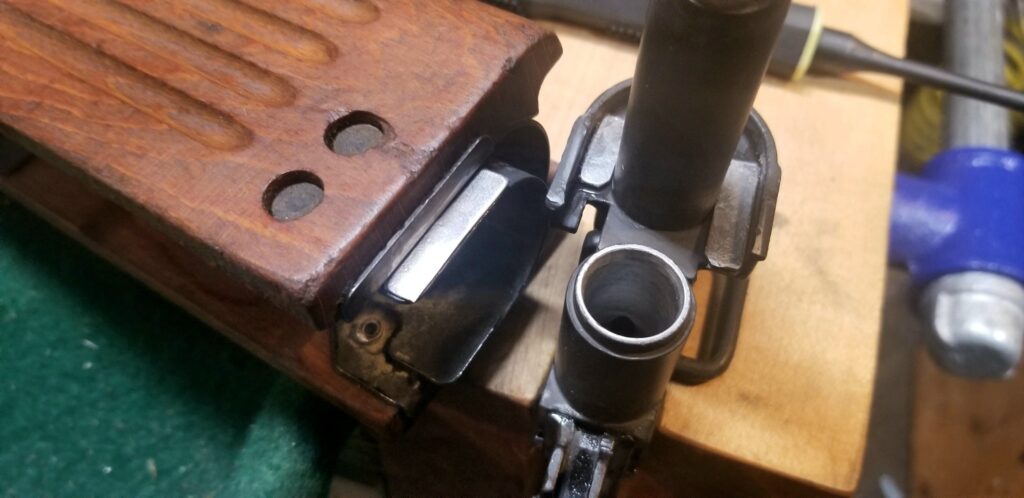
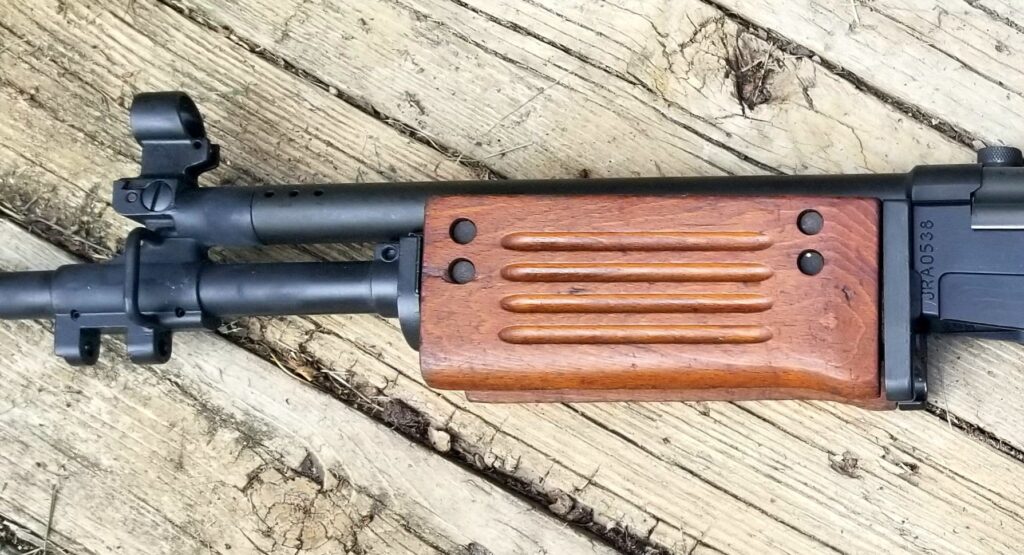
Second on the list of things I needed to fix right after the buttstock was the loose handguard.  It’s a personal preference thing but I don’t like handguards that wiggle and this thing could move front to back as well as side to side.  The reason this happens is usually because the handguard retaining slot on the barrel was cut too far forward such that the cam lever on the retainer couldn’t push the handguard far enough backward.

I expected this. Classic Firearms, and presumably James River Arms (JRA) were up front in the product listing that the handguard would probably be loose and it was.  Thankfully, from years of working on AK rifles, I knew I had a number of options:

  • I could weld the handguard retainer channel closed on the barrel and cut a new one.  Pro – the right way to do it. Con – would take more time than I wanted to invest.
  • Some guys will add layers of epoxy liquid or putty inside the retainer but I am not a huge fan of that one due to the epoxy getting warm and likely breaking down under the relatively sharp edge of the sheet metal nose of the Galil handguard.
  • I could extend the front edge of the handguard retainer by building it up with small welds.  Pro – easier than redoing the barrel channel. Con – would take more time than I wanted plus it’s really hot out and welding did not sound pleasant.
  • I could fabricate some shims and insert them into the handguard retainer. Pro – an age old method with soliders putting everything from  wood and gum wrappers to folded steel and aluminum cans in there Cons – can fall out when you remove the handguard.

I opted for the fourth one and decided to make shims.  You’ll notice a common theme – I do not have a ton of time and am dancing around the battle worn theme with the rifle leaning more towards the newer end of the spectrum vs. extremely worn.

To shim a handguard, I prefer a metal vs. wood, paper or plastic as they tend to all break down with time.  An age old trick on the AK community is to take an aluminum soda or beer can and then cut either into strips or in an approximate shape that fits inside the retainer.

The shape of the Galil handguard added a bit of a challenge in that it is a “U” shaped piece of sheet metal that slides into the retainer.  The front edge is relatively thin vs. the old days of a big thick piece of wood or plastic going into the retainer. This approach can be seen elsewhere also such as in modern Bulgarian and Russian handguards.

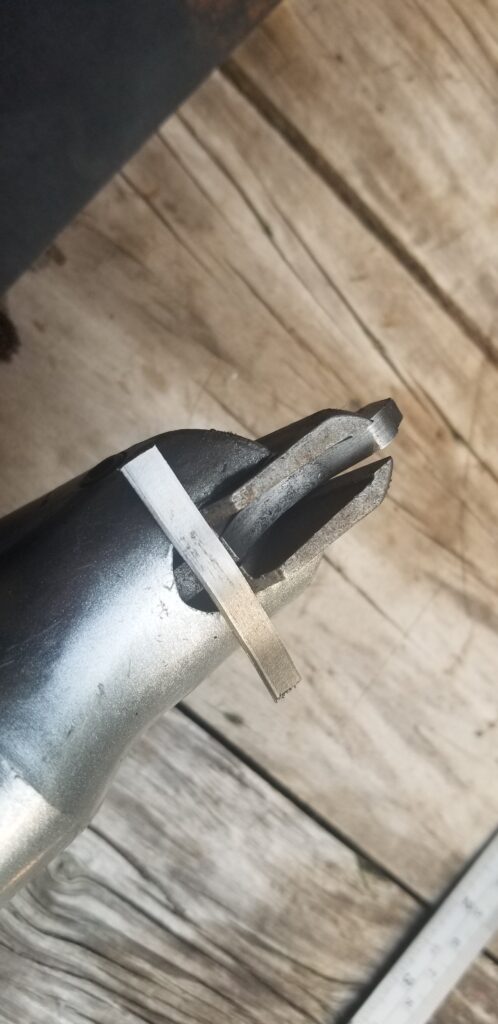
So, given the shapes of the handguard and the retainer,I decided to cut two strips that would closely fit between the barrel and the inside lip of the retainer and also be sufficiently think to secure the handguard.  Given the “U” shape I was betting that I would get enough support from the left and right sides and that I would not need to worry about supporting the bottom.

I measured the gap from the barrel to the inside wall/edge of the retainer on the left and right sides and it was about 6mm (0.236″).  That meant I needed something that either started at a 1/4″ and grind it down or find something closer to 6mm.

My first try was to look for 6mm wide shim sets and none was to be had. A shim set or shim assortment is a collection of steel of varying thicknesses so you can combine whatever thicknesses you neeed to get your final thickness plus you cut them to what is needed.

I ordered in a steel shim assortment set as I haven’t needed any for quite a long time.  I also scrounged around for what sheet metal I had in stock.  I had some rediculously thick 16 (0.0598″) and 18 (0.0478″)  gauge pieces plus a good sized piece of 22 gauge (0.0299″) sheet metal.  I decided to start with the 22 gauge set and fine tune with the shim assortment but a bigger question was forming – what did I have to cut this stuff cleanly that wouldn’t make a big mess.

Good old fashioned sheet metal shears / tin snips were an option but I’ve never been that consitent with the things.  I had an air nibbler that I could set up with a straight edge to cut strips … and then it dawned on that I had a Harbor Freight 14 gauge swivel head double cut sheer (item #92115) that might do the trick and – here’s the plus – it cuts a metal strip out of the source stock to avoid deformation. 

I dug the thing out and lubed the cutter. It had probably been at least a year since I had used it. Guess what?  That “waste” strip turned out to be about 6mm and gave me what I needed.

John's WASR rifle with a Romy Brown STK grip
Here’s the business end of the double cut shear. Note the strip it cuts out. I just ran it into the stock with a straight edge just to keep the donor sheet clean and had all I needed and then some in a few seconds of actual cutting.

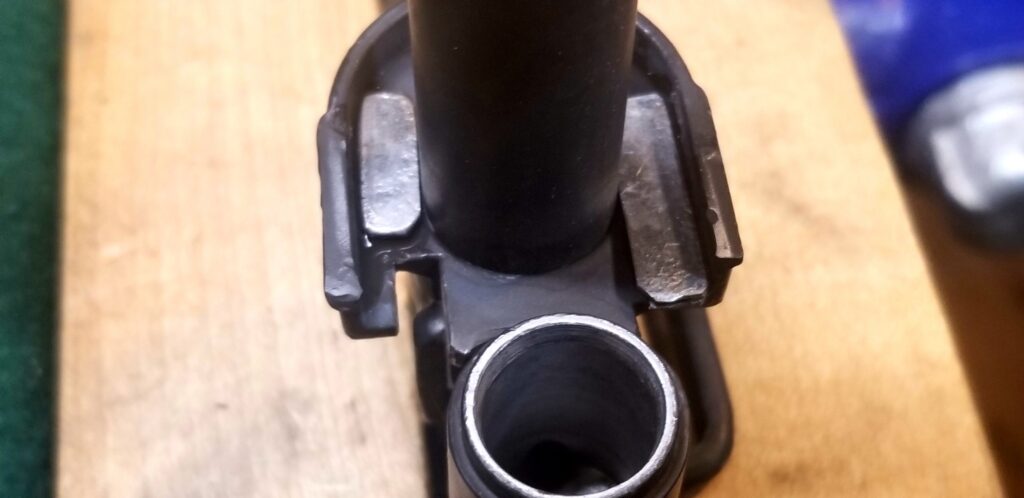
Plain 22 gauge sheet metal is 0.029″ thick and I knew I had a fair sized gap to address so I tried folding it in half and then trimmed to to fit in each side of the handguard. The best way I found for test fitting was to clamp the whole rifle with the muzzle down in my big woodworking vise. From there I could rest the shims in the handguard retainer, insert the handguard and pull up on everything trying to get the locking lever to flip.

Much to my surprise, that double thickness of the sheet metal worked perfectly. I had expected to get close and then keep adding pieces of shim stock until I had a solid lock up.

The next thing I had to consider was how to hold the shims in place when I normally assembled the rifle. I decided to keep things simple – I super glued them in. My reasoning was that I rarely take off handguards and if the two shims fell out in the future I could glue them back.

John's WASR rifle with a Romy Brown STK grip
These are the two shims. Notice I made them as long as I could for each siide but I did not make one for the bottom and that has not proven to be a problem thus far.

Now one thing was still bugging me – there was too much movement left to right in the retainer as well. What I did to fix that was to glue a shim on on the outside edge of one part of the metal handguard’s front steel U-shaped nose.

John's WASR rifle with a Romy Brown STK grip
Here is the single 22 ga shim I needed to stop lateral movement.
John's WASR rifle with a Romy Brown STK grip
It turned out that the shim was visible in the gap between the retainer and the handguard,  I wound up painting it with some of the Rustoleum Satin Black pain also.
John's WASR rifle with a Romy Brown STK grip
With the shim painted black, you don’t even know it is there.

The Results

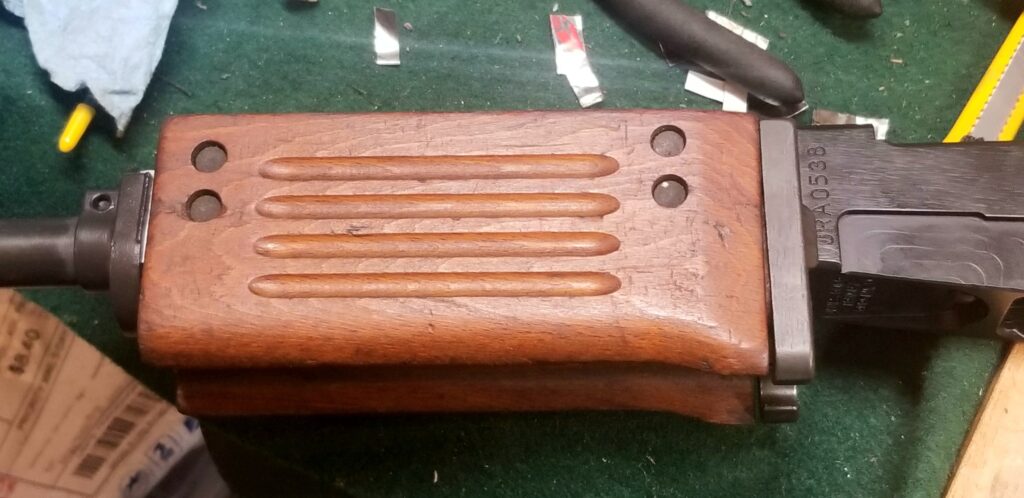
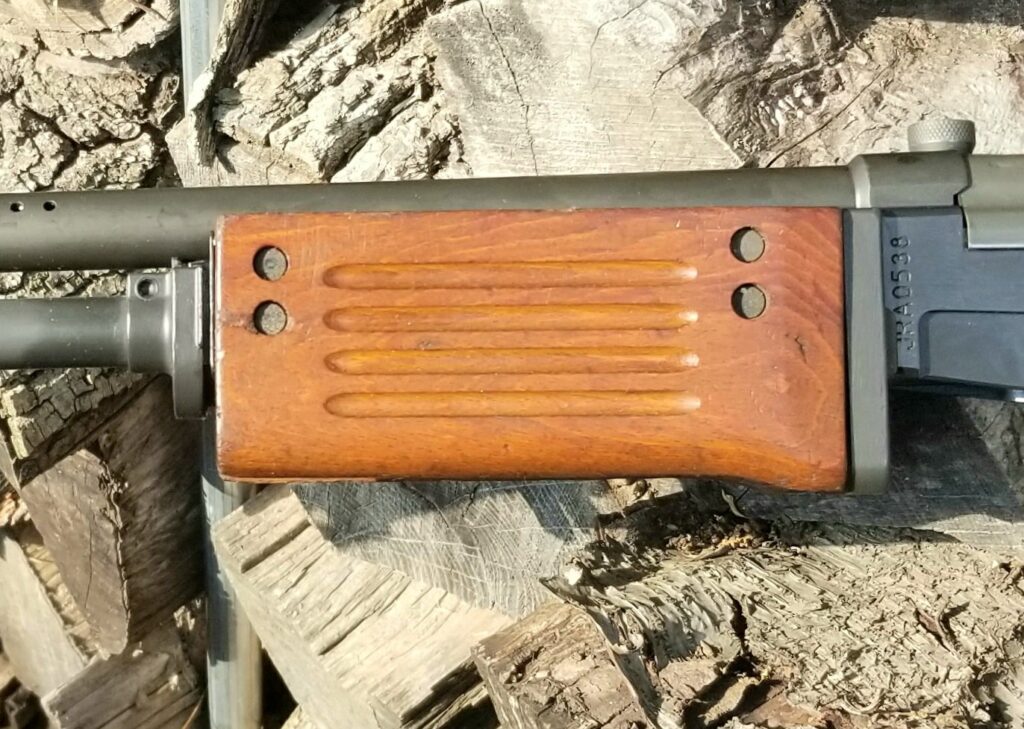
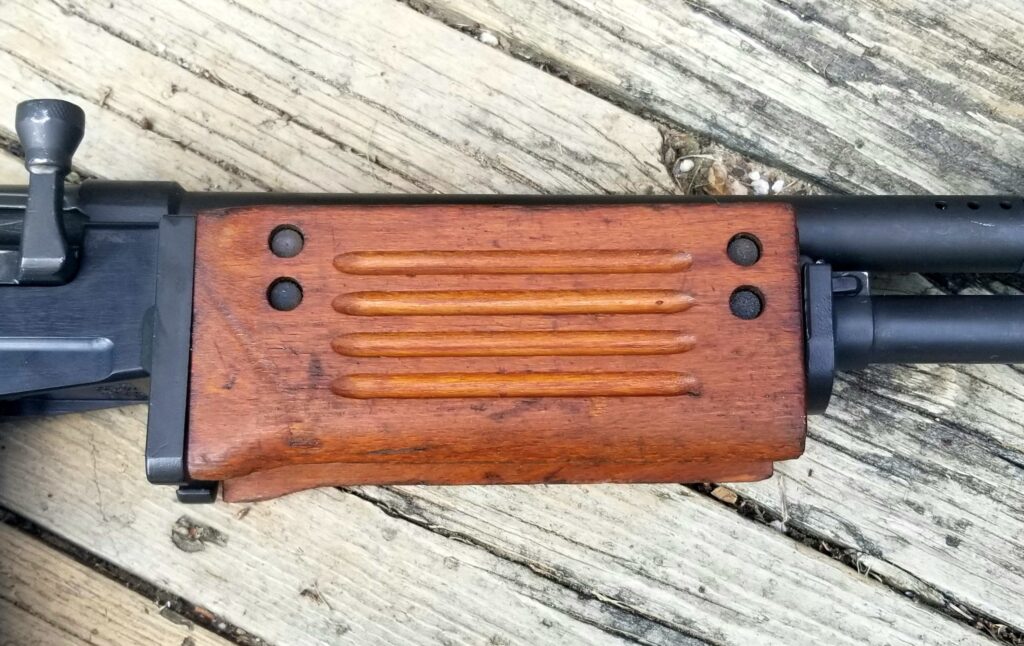
The handguard is now rock solid. I decided not to change the wood at all. I really like the coloring and for me it’s really part of the iconic look of this rifle.

John's WASR rifle with a Romy Brown STK grip

With the handguard done, next up was to switch the fire control group to an ALG enhanced set so I can have the appropriate 922r parts count and be able to use some of the cool IMI surplus mags that are out there.


Note, I have to buy all of my parts – nothing here was paid for by sponsors, etc. I do make a small amount if you click on an ad and buy something but that is it. You’re getting my real opinion on stuff.


Please share the link on Facebook, Forums, with colleagues, etc. Your support is much appreciated and if you have any feedback, please email us in**@*********ps.com. If you’d like to request a report or order a reprint, please click here for the corresponding page to open in new tab.


Why Does the Color of Grips and Handguards From Ronin’s Grips Fade And What To Do About It?

I’ve had guys ask why the color of my grips or handguards seem to fade with time. The short answer is that it has to do with the liquid wax finish oxidizing and not the plastic – the color is actually in the plastic. You see, we sand every grip and handguard to get rid of mold imperfections and then we blast each with abrasive media (currently it’s Black Beauty or Black Magic depending in the store I go to) and that turns the plastic almost white as you can see in the photo above. We blast the surface to create a very sure grip when you grab hold – your hand doesn’t slide easily. The polished finish we used to do resulted in a surface that is slick when wet due to sweat, water, blood, etc.

So, the blasting abrades the surface and messes up the colors being reflected back to your eyes. To solve this problem, I tried a ton of different oils and waxes and the best was Atsko Sno-Seal. It really brought out the color and it did not fade – or at least I never saw it fade. The problem is that Sno-Seal is a paste wax and I have carpal tunnel. Rubbing it into grips and handguards every day over and over was killing by wrists so I had to stop it.

This pushed me back to the drawing board and this time I looked at liquid waxes. Some of them really smelled as the liquids evaporated and the best option I could find find was the various butcher’s block finishes that combine mineral oil and a wax – often a bee’s wax. This stuff goes on like a dream but does fade with time. There’s nothing wrong with the color – it’s just the finish oxidizing and drying out.

What to do about the fading?

As mentioned above, the finish I apply will fade. The good news is that the owner with a number of options and I’ll shorten it down to the four I recommend:

  1. Buy Sno-Seal and apply it. This stuff is awesome for boots and I actually had it for my boots when I tested it. It’s my #1 recommendation and what I do for furniture I make for myself.
  2. Shoe polish holds up really well and you can nudge the colors/hues one direction or another depending on the color of the wax. This goes on pretty easy and seems to last. Just buff it well so you don’t get any color on your hand. I’ve had very good luck with Kiwi products.
  3. Any fine wax for boots, leather, wood or preservation ought to work. Just follow the directions. Absolutely do not use super thick floor wax or it will be a disaster as one customer found out.
  4. Put another coat of butcher’s block conditioner on it. Easy to apply but it will not last.
Brass air compressor automatic drain valve with NPT fitting and components
Atsko Sno-Seal is my #1 choice. Kiwi shoe polish works great. Howard’s Butcher Block Conditioner is what I use in production and is also what fades with time.

How to Apply Sno-Seal

My first recommendation to customers is always Sno-Seal. It takes just a little it to polish a grip or handguard plus you can use it to waterproof your boots.

Brass air compressor automatic drain valve with NPT fitting and components
I did this corner at room temperature and you can tell it takes a bit more effort to rub it in and buff it off.

You can either warm it up on your hand and then rub it in or you can use a heat source to warm up the grip or handguard just a bit – meaning warm to the touch not hot – and it goes on even easier. When I did the M72 hanguard set shown, for example, it was warm after about a minute and 20 seconds in our microwave. You rub the wax in and buff it off – done.

Brass air compressor automatic drain valve with NPT fitting and components
Hello Mr. Microwave! You can optionally warm your piece of furniture up with a microwave, oven turned on at 150F or less, hair dryer, etc. You want it to be warm, not hot. If you can’t pick it up, it’s way too hot. The plastic will not begin to deflect until around 250F and there’s no way you can pick that up hence the rule of thumb. [Click here if you want to read about a heat test we did]
Brass air compressor automatic drain valve with NPT fitting and components
So here’s the finished handguard set after I buffed off the remaining wax.

Again, if you ask me what I do for my own grips and handguards, it’s Sno-Seal and I rarely use extra heat – usually just I just warm it up with my hands and rub it in. Sno-Seal lasts the best of anything I have found.

I hope this helps you out.


Please share the link on Facebook, Forums, with colleagues, etc. Your support is much appreciated and if you have any feedback, please email us in**@*********ps.com. If you’d like to request a report or order a reprint, please click here for the corresponding page to open in new tab.


Izzy’s Wild C39 Micro SBR With Our Orca Handguard

This is Izzy’s wild SBR based on a C39 Micro with our Orca handguard:

Izzy's C39 Micro SBR with Orca handguard and red dot sight.

C39 Micro SBR with Orca handguard and red dot sight

Izzy's C39 Micro SBR with Orca handguard, red dot sight, and tactical grip.

Here are the details from Izzy:

I put a 7 slot magpul one piece rail section, drilled and tapped on the actual [handguard and the] rail is very strong I may add. The micro was something in my head for awhile so when I saw this 6.5 in with a billet receiver I was sold. Not too much was added to make it what it is.
My own design charging handle.
VZ 58 side folding stock drilled and pinned then use para cord for the extension
NRM Defense did the cerakote in Tungsten with all the controls in black
SLR muzzle brake
Red star adjustable trigger assembly
Magpul grip and mags with a Bravo Company vertical fore grip

The web page for our C39 Micro Orca handguard is:  http://shop.roninsgrips.com/Custom-Century-C39-Handguard-Our-Orca-Model-C39MicroOrcaHandguard.htm


Please share the link on Facebook, Forums, with colleagues, etc. Your support is much appreciated and if you have any feedback, please email us in**@*********ps.com. If you’d like to request a report or order a reprint, please click here for the corresponding page to open in new tab.