At this point we are getting into the home stretch. Once the barrelled kits dried up, virgin barrels required a fair amount of work to install the blocks. Personally, I never really enjoyed doing the blocks so now that completed barrel assemblies are available again, I’ll happily leave that work to someone else.
One quick comment on the WBP kit – I really like the crest on the rear sight block (RSB). I didn’t expect it and it is so cool.
There are many methods to install a barrel – I have used two – my 20 ton press with an AK-Builder barrel jig and my IR air hammer. Of the two, I mainly use the air hammer now and that is what I will document in this post. Note, the AK-builder jig works just fine – I have found the IR 117 air hammer to be faster as I don’t have to do as much set up work.
You don’t have to use the same IR as me but I would recommend you get either a bigger air hammer like mine or at least a 4x air riveter. An integral regulator in the gun helps with control.
Three Critical Tips Before You Begin
#1 – If you are new to air hammers, practice before you work on your rifle. They jump around and you need to get a feel for how how control them.
#2 – Mr air hammer is not your friend. Wear eye protection and do not get skin anywhere near punches, etc. They can pinch the hell out of your skin. I’ve had my fair share of blood blisters and cuts from not paying attention or being in a rush over the years.
#3 – DO NOT hammer right on your muzzle. The crown, or end of the barrel where the bullet exits, is the last thing to touch the bullet. If you somehow deform the crown you will negatively impact accuracy and you also risk your threads. Use protection 🙂 I’ll detail that below – I use an old cut down muzzle brake as a protective cap.
Installing the Barrel
To install a barrel, I first install an old slant brake that I ground flat to protect the threads. I have not used a muzzle nut because they do not seem to offer much protection to the front of the muzzle – they are mainly designed to protect the threads. With the ground down slant brake, there is a plenty of material in front of the muzzle to protect it.
You can see how it has mushroomed over time but that’s fine. I’ve used it a ton and if I ever have a problem, I’ll chuck it and make another.
My best guess is that it came out of a Romanian G kit years ago. I have a bunch of oddball parts like this that got replaced by US parts for the sake of 922r compliance. You can use any slant brake you want – just grind the slant off so you have a flat surface to hammer on.
I thread the converted brake / muzzle protector all the way back on the barrel to engage all the threads possible and back it right against the front sight block (FSB). The idea is that you want the threads to take the impact and not the muzzle.
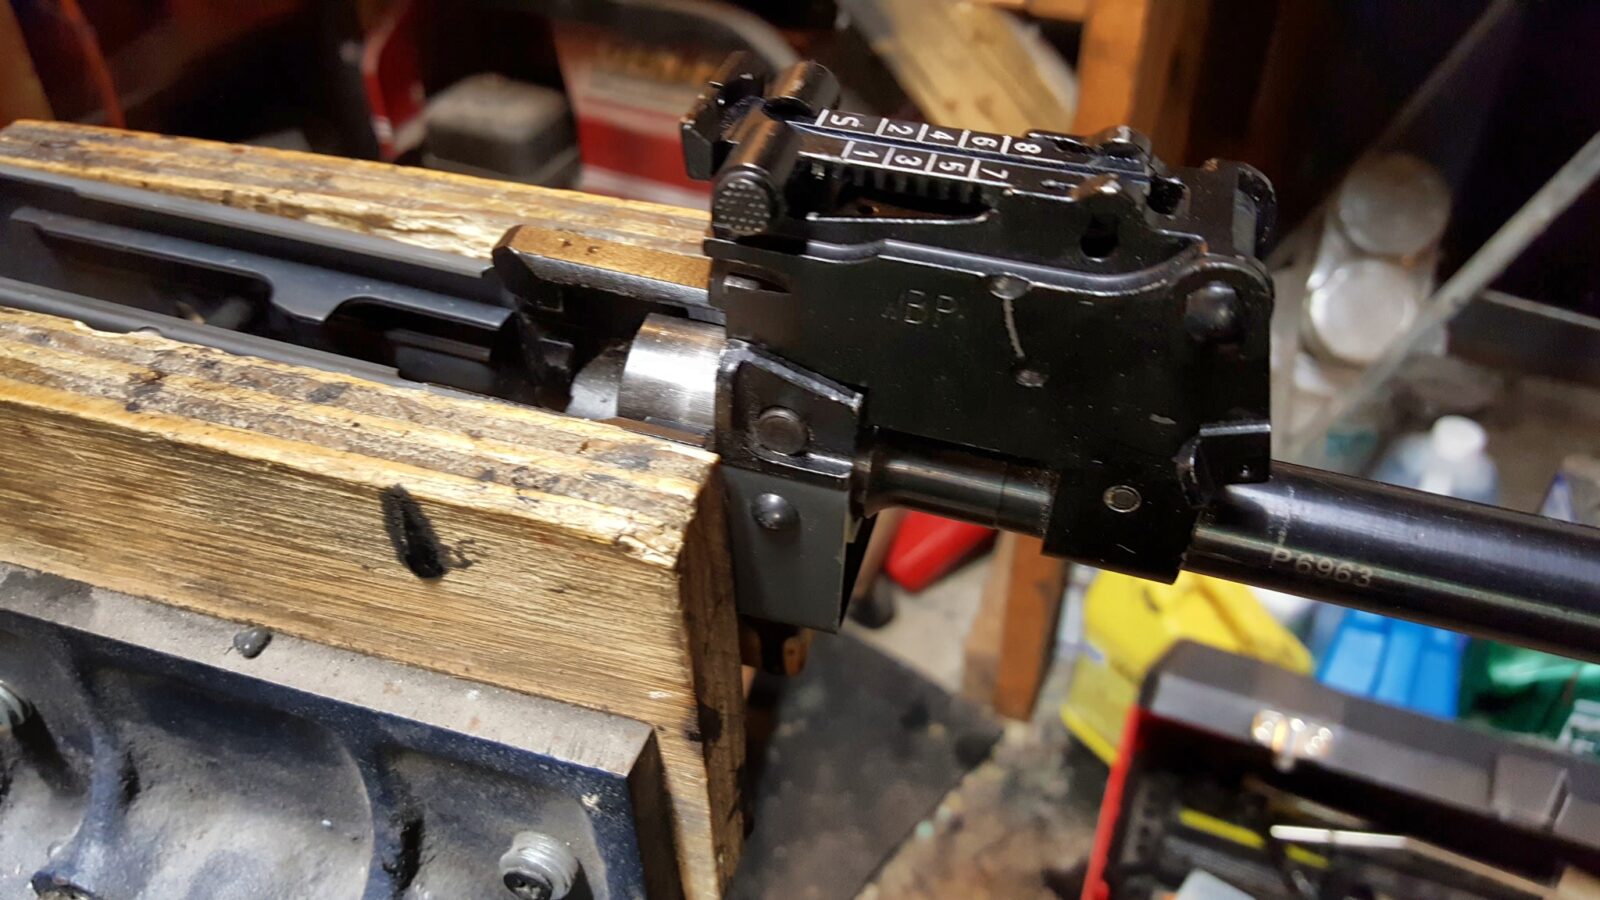
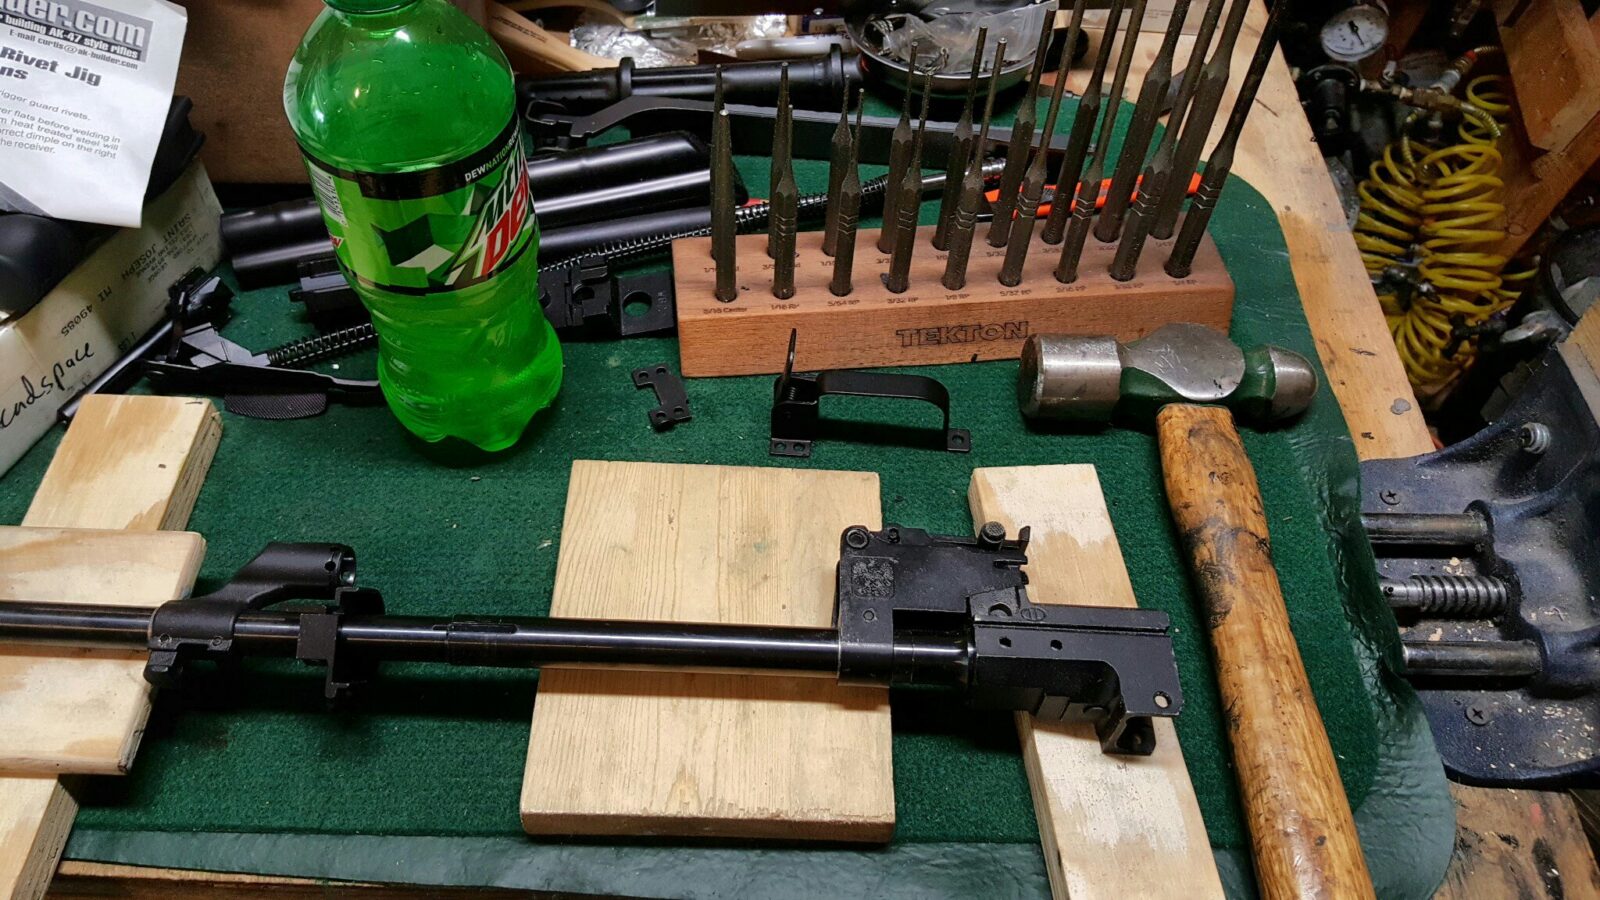
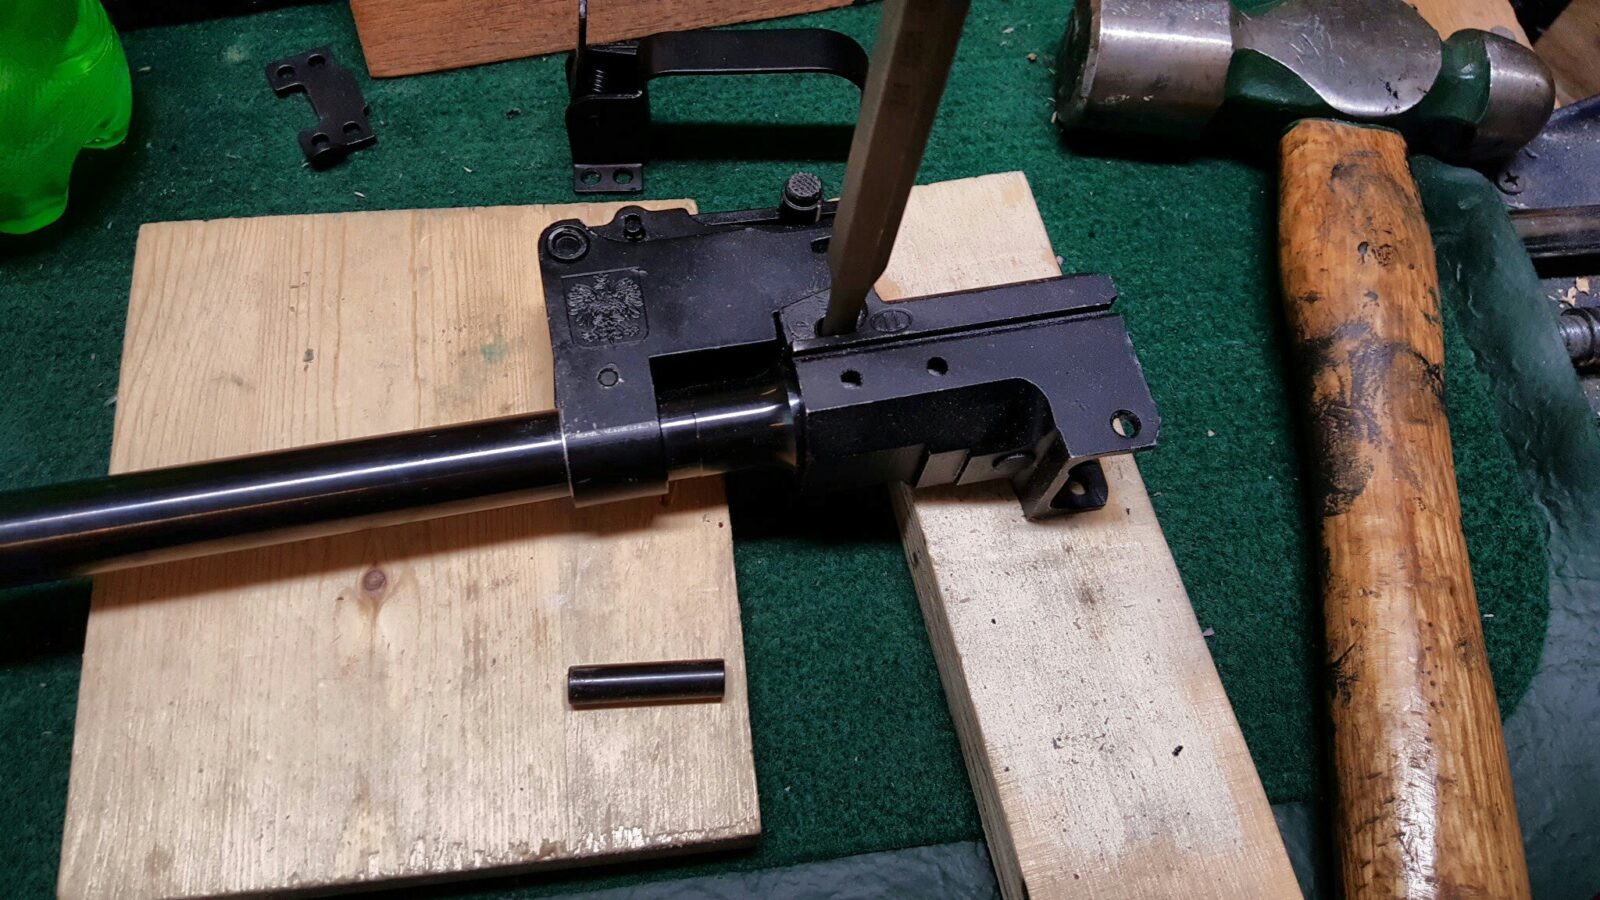
To start the installation, I push the barrel assembly into the trunnion and tap it with a big ball pein hammer. I keep sighting down the rear sight block (RSB) making sure it is true. At the point, you can use a rubber mallet or other non-marring mallet to tap the RSB and angle the barrel slightly one way or the other to course correct. It is really, really important to get the alignment right at the start. You will not be able to adjust it once you get very far in. If it turns out you have alignment problem later, I would recommend driving the barrel assembly out and starting over.
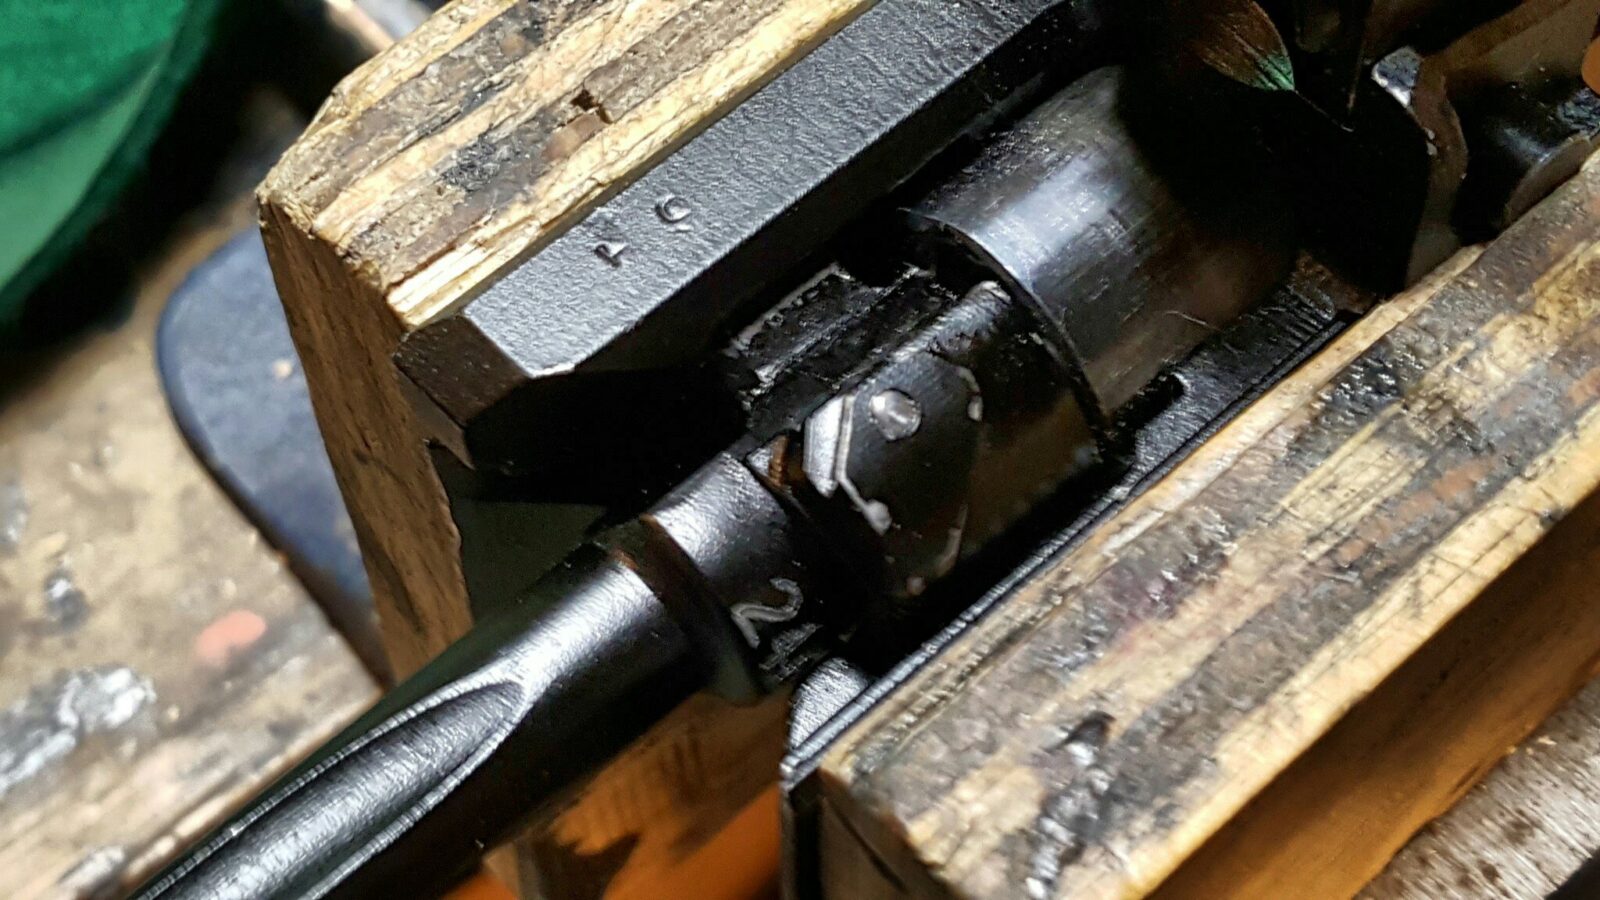
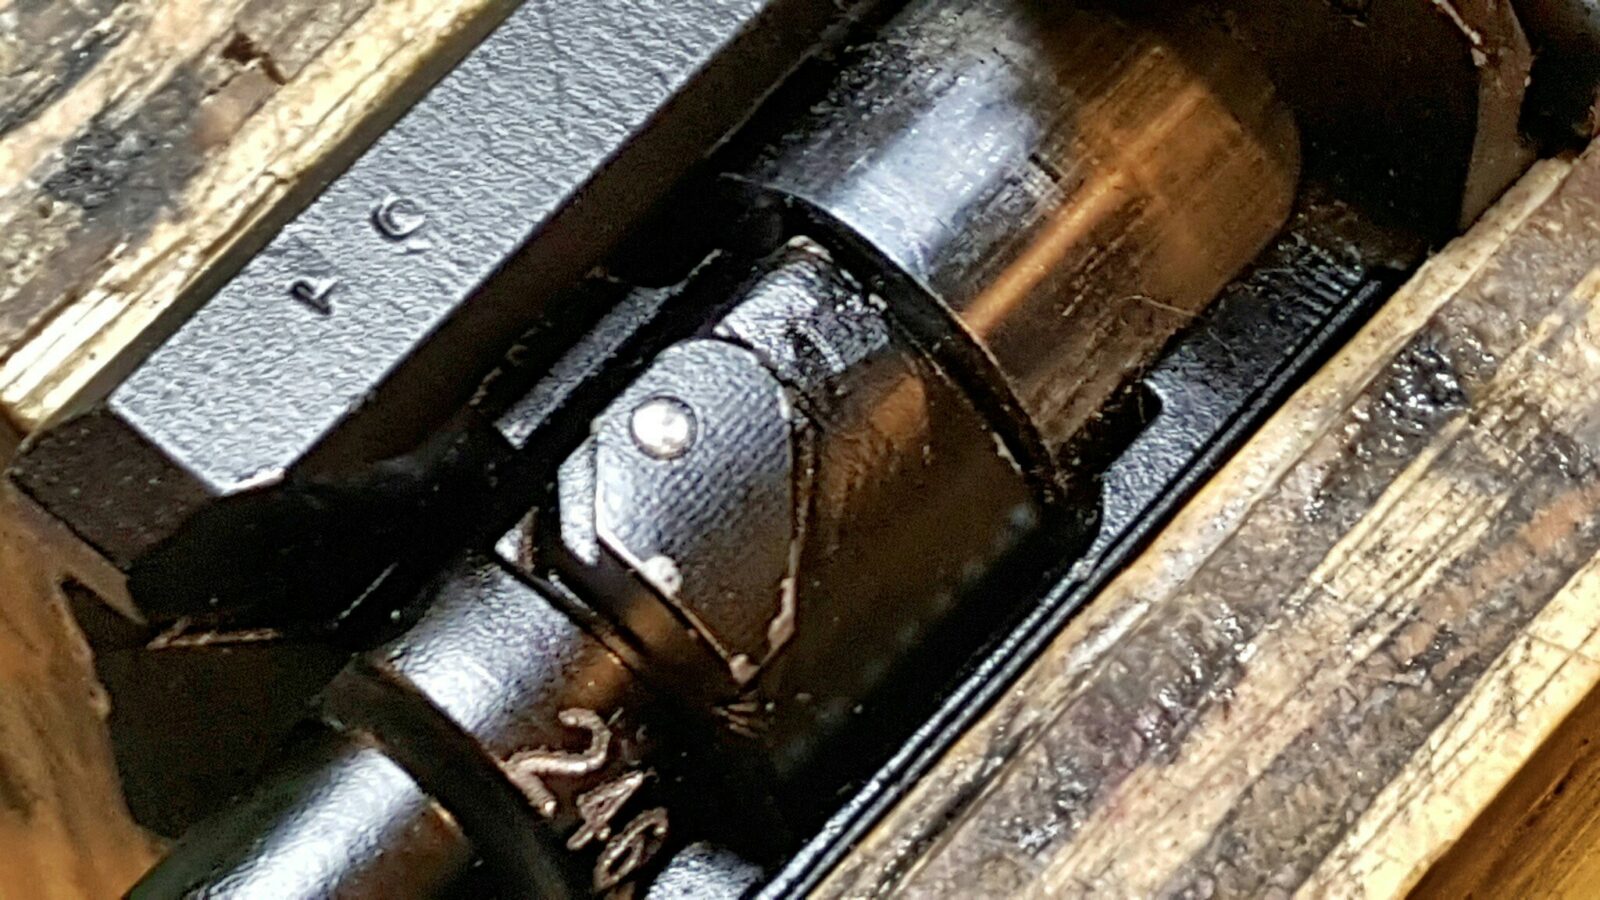
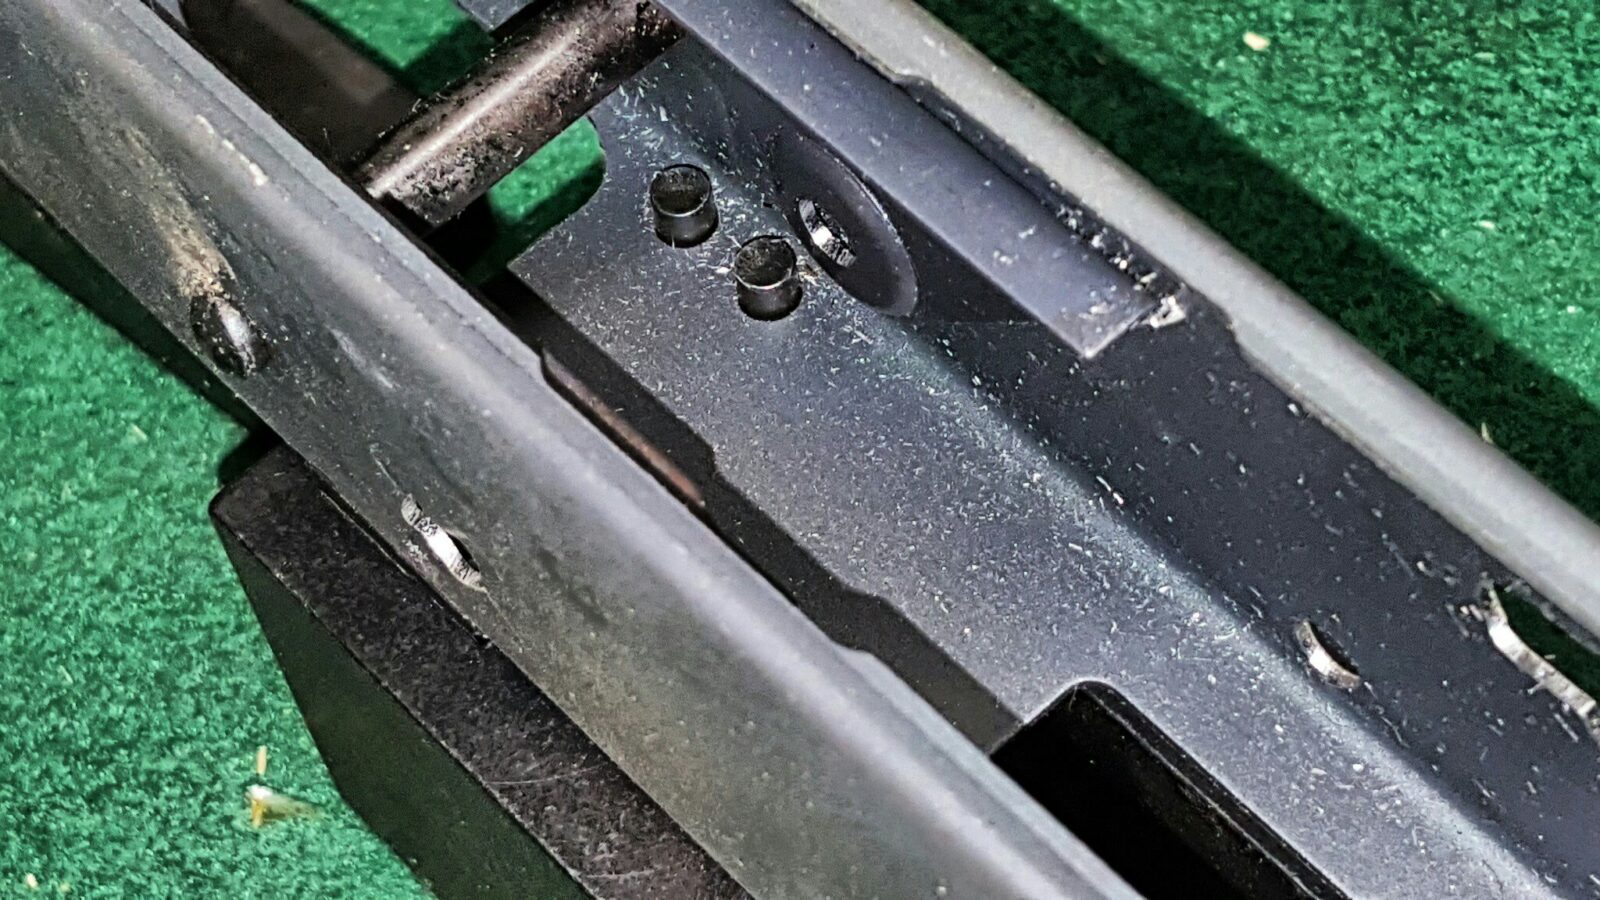
To do the actual driving, I use the IR 117 with the brass peening hammer attachment. I put the brass hammer face right on the converted slant brake and drive it in. I keep checking the barrel pin hole to make sure I stop just short of the final location and that it is aligned. If the surfaces are not aligned, I would drive the barrel back out and start over. In this next photo, you can see I stopped just short of where I need to be.
Now this particular kit was a headspaced Polish WBP kit and I had checked headspace before I removed the barrel. If I needed to set the headspace, I would start checking it somewhere around here.
At this point, I drive the barrel in the rest of the way by tapping the end with a big ballpein hammer – or any BFH will do 🙂 It really doesn’t take a ton of energy. You want to tap and test over and over. Don’t get impatient and try and drive it in all at once or you risk overshooting where you want to be. If you do overshoot, it’s going to take some time and you need to make that longer barrel backout tool and either use your press or your air tool (I’d use my IR 117) and push it back out just enough to then fine tune the location.
Do not use headspace gauges as barrel stops. You may know this but just in case you don’t – gauges are precision instruments and you only install them to test the headspace and *not* as a way to stop travel. I’ve heard of guys doing that and, for a change, I wasn’t one of them 🙂
Assuming you checked and confirmed the headspace before you began, where to stop is easy. Once the channel is clear and you have one nice continous path from one side of the trunnion to the other it is time to reinstall the pin.
Installing the barrel pin
With I do is start the pin with a big ball pein hammer and then drive it in the rest of the way with an old rivet set that I use just for this purpose. Years ago I bought a ton of used 0.401 shank rivet sets and rivet tools off eBay for a very reasonable price. I use one that covers the pin nicely and drive it right in and let me tell you, it goes in fast. You can stop short and drive it in the test of the way by hand if you want. I tend to just drive it right into place with the air tool.
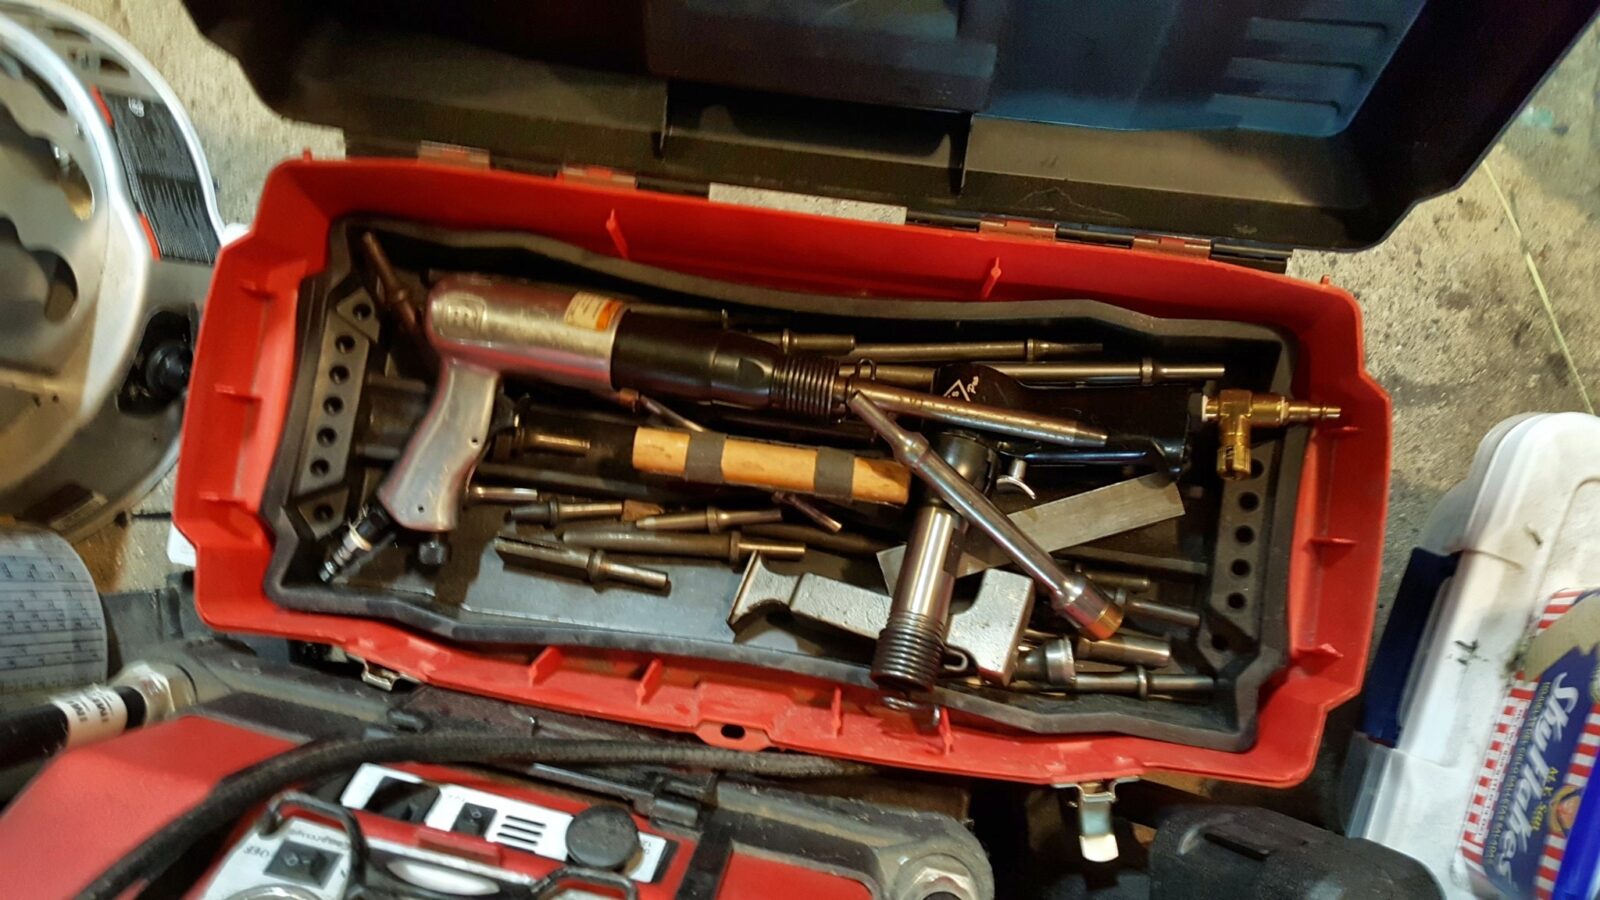
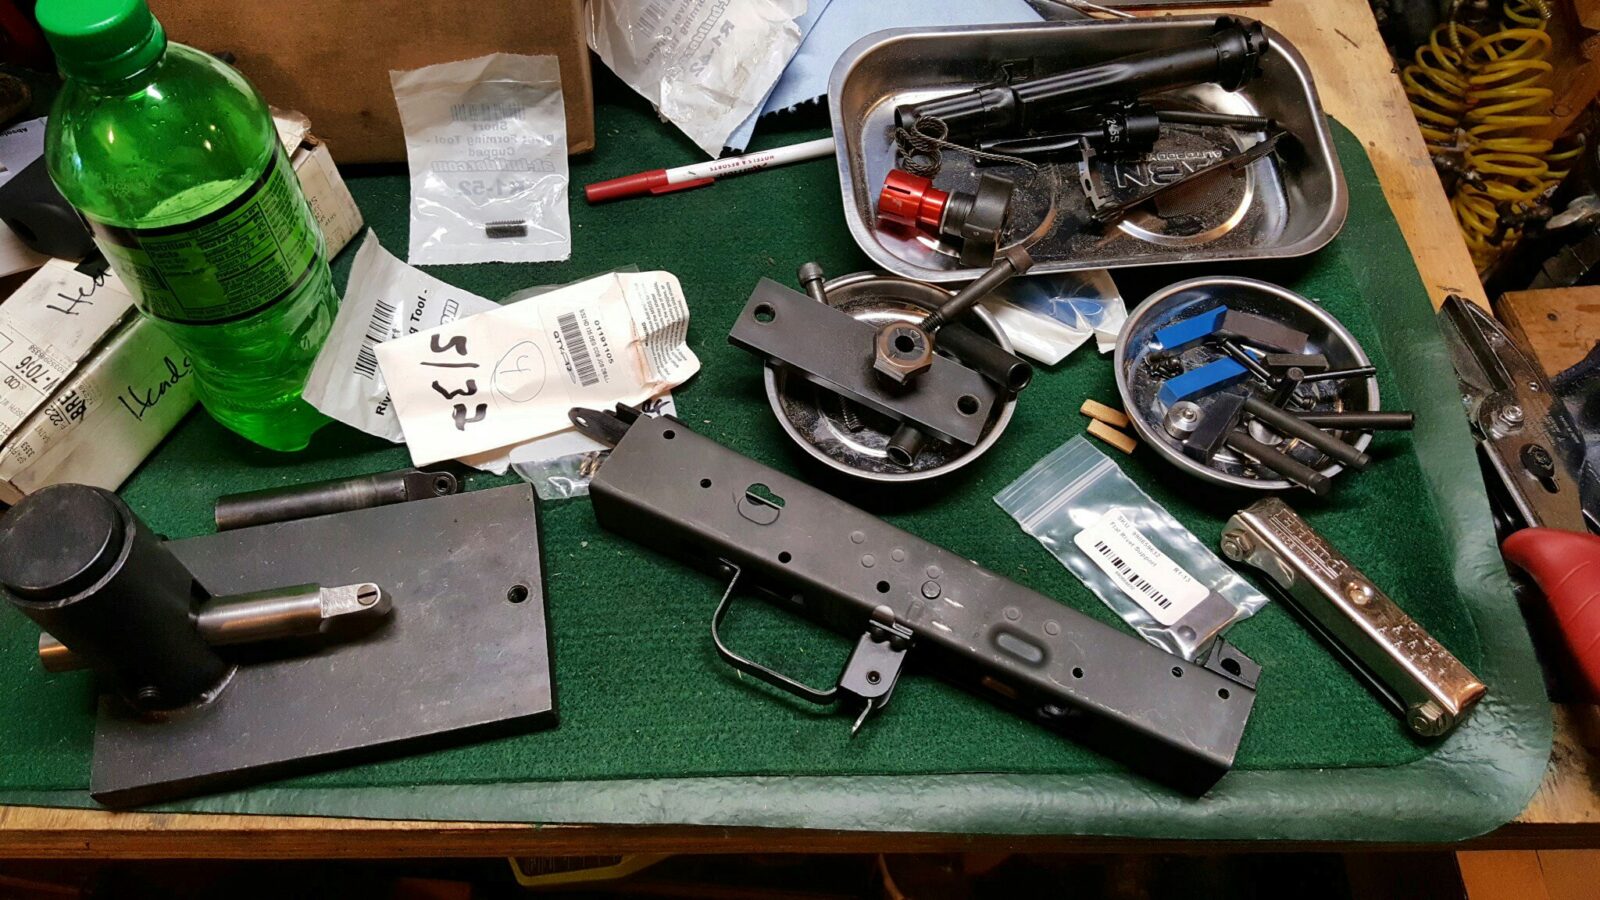
By the way, I’ve accumulated a number of rivet tools and bucking bars over the years. Here’s a quicksnap shot of my toolbox:
That’s it – done. I hope this helps you out! In the next post we will go over the unique Beryl optics rail and installing the furniture.
By the way, here are used rivet tools currently on eBay. Be sure the shank size matches your air hammer or air riveter (all of mine are 0.401″ for example)
If you find this post useful, please share the link on Facebook, with your friends, etc. Your support is much appreciated and if you have any feedback, please email me at in**@*********ps.com. Please note that for links to other websites, we are only paid if there is an affiliate program such as Avantlink, Impact, Amazon and eBay and only if you purchase something. If you’d like to directly contribute towards our continued reporting, please visit our funding page.
As I mentioned in an earlier post, riveting the trunnions to the sheet metal receiver is the proven method. As such, I’ll use rivets in this build but there is a fun thing to point out – there are tons and tons of ways to do the rivets. I’ve known guys who:
Would fashion some type of bucking bar and hammer the rivets directly not really caring what they looked like
Modified hand punches by cutting then down and drilling or milling an inverted dome into the end to create their own rivet sets for use with a hammer
Modified the jaws of 24″ Harbor Freight bolt cutters to make rivet squishers
Bought pneumatic rivet squishers like they use in the aerospace industry
Purchased purpose built rivet tools from makers such as AK-Builder
I got into building rather late in the game in 2006. Fortunately for me, guys had worked out the building methods so I could learn from others. I also decided to buy the AK-Builder rivet jig that I still use today. It works great for setting the front and rear trunnion rivets. I do plan on trying the bolt cutter method some day and will just buy one of the pre-built jaw sets for the front trunnion rivets. I’m curious mainly for reducing the set up time.
The AKMs are assembled using soft steel rivets that deform under pressure. No heat is needed. The sizes can vary depending on the type of build you are doing. The easiest way to get the rivets of the right type, size and length is to buy them from AK-Builder.com. They take all the guess work out of it and it makes for an easy way to go plus they give you a discount if you bought their jig. Hint: Buy two packages for a given build. For an AKM, you have 13 rivets and you can readily sort out what goes where:
The shortest rivet goes to the rear for the trigger guard strap. This makes sense because you are just riveting two pieces of sheet metal together.
You will then notice 10 rivets of the same size but two will be different – they will be what are called “swell neck” rivets and are intended for the rear lower front trunnion rivet positions that are countersunk. Four of the rivets that are flat under the dome will be used for the front trigger guard and four will be used for the foreward two positions on each side of the front trunnion.
The last two are the longest and thickest – they go to the rear trunnion.
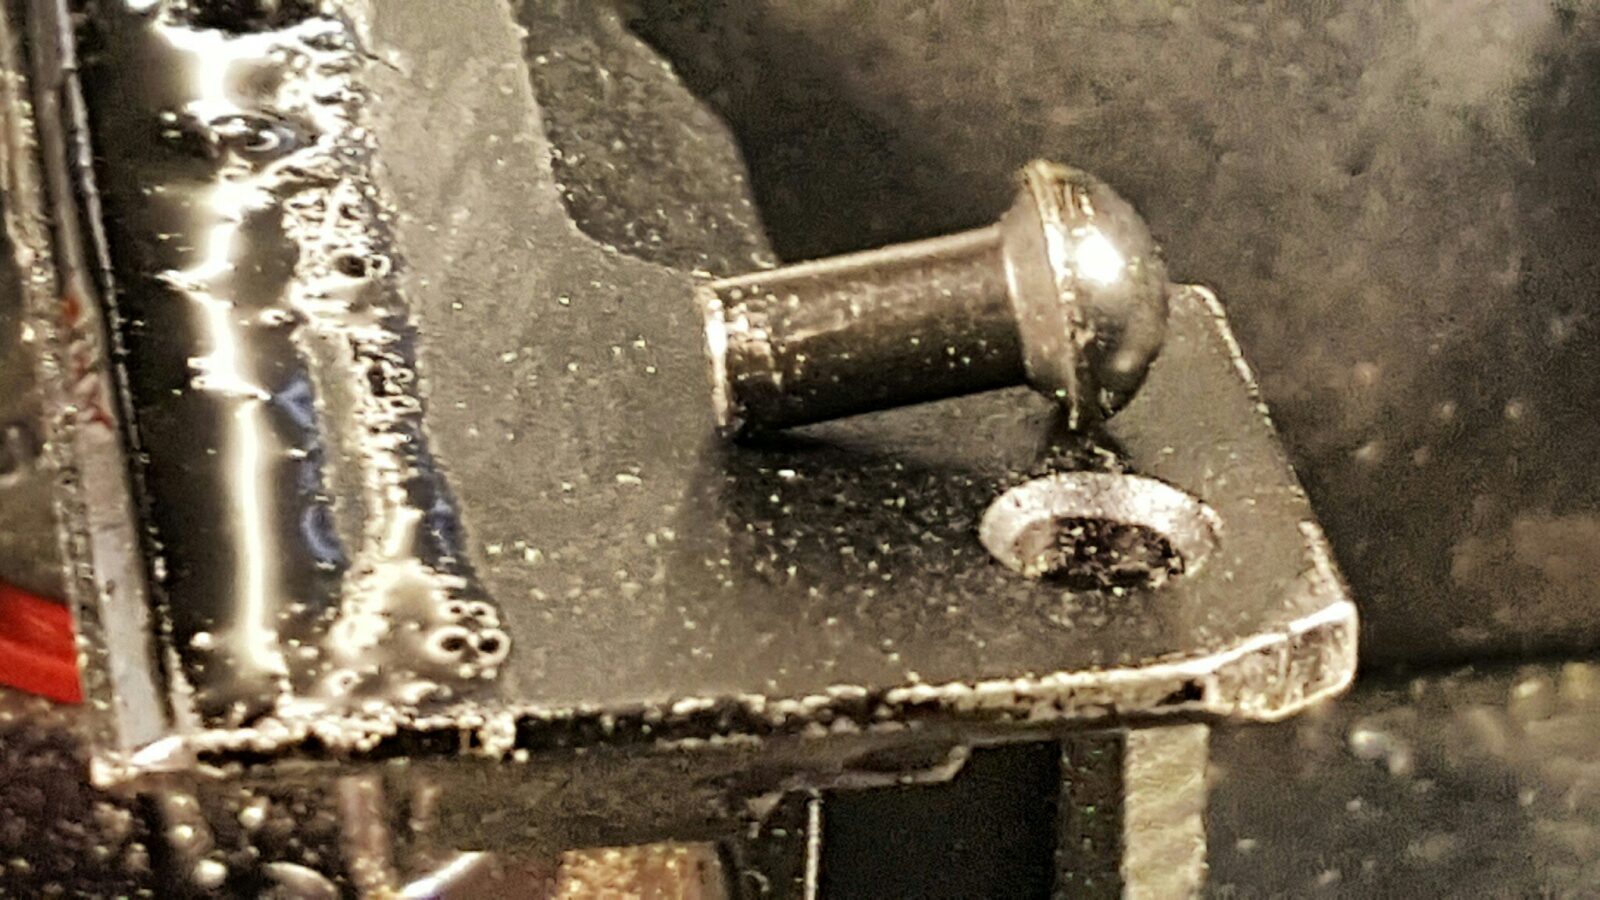
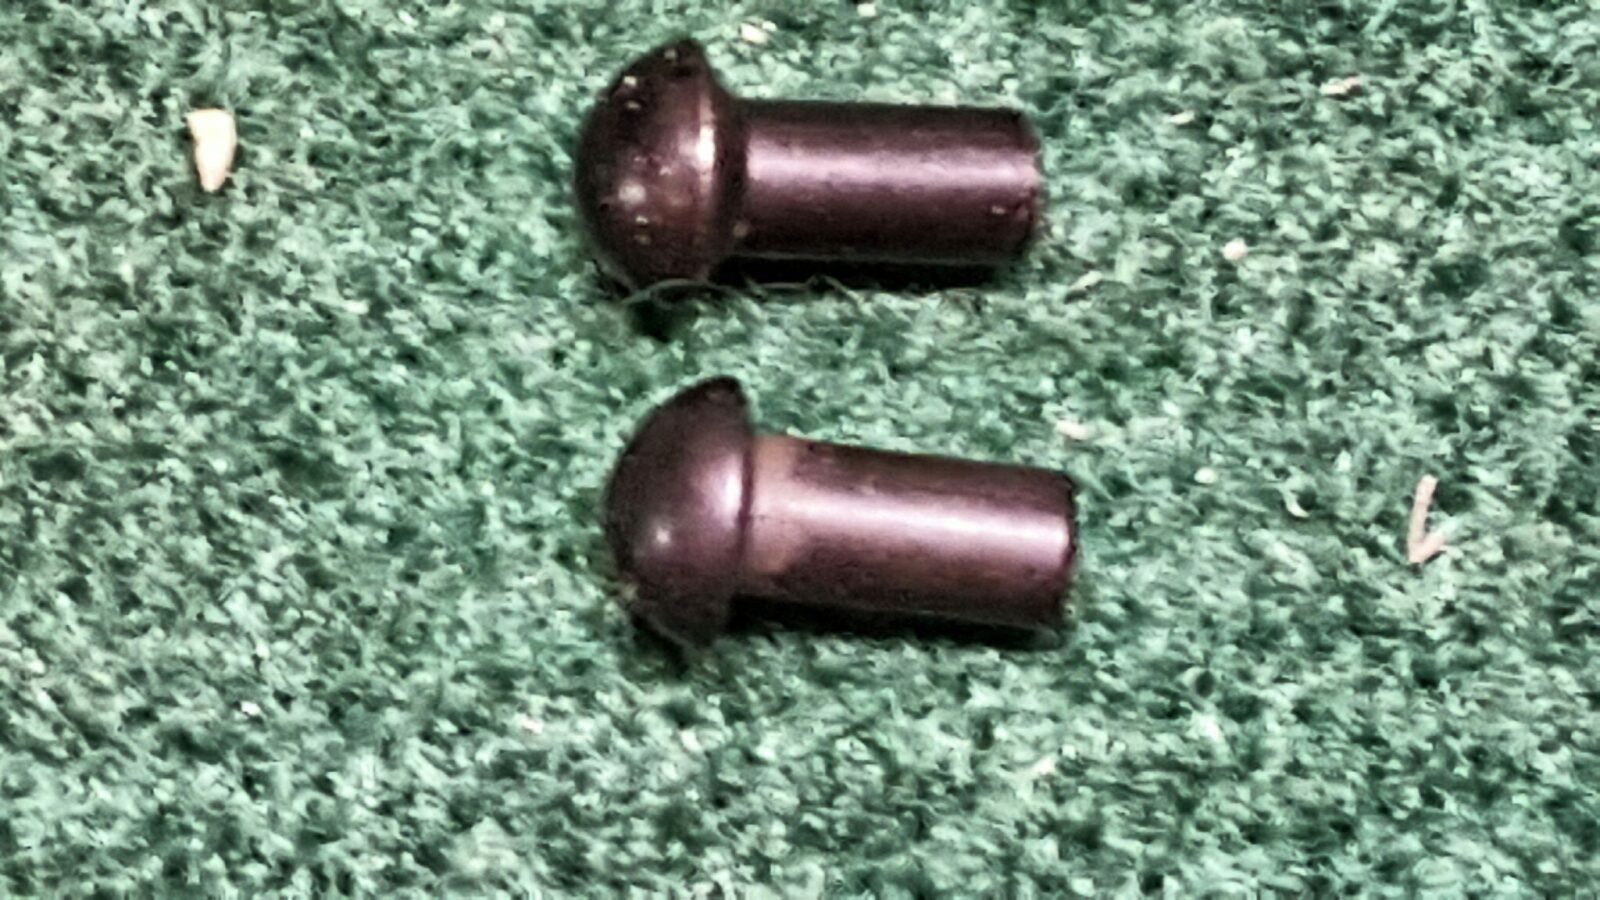
The following photo shows the two types of rivets you will use on the front trunnion. The top is the swell neck rivet that is used for the rear two countersunk holes on the front trunnon. The bottom one is a normal rivet and is what is used for the four front rivets to secure the selector stop and front trigger guard strap to the receiver as well as for front-most four (two on each side) rivets:
This next photo shows one of the swell neck rivets next to the counter sunk hole it will go in. They require a couple of extra steps to install in terms of crushing the receiver material into the recessed area first before setting the rivet and I’ll explain your options to do that later:
Last comment, you can buy rivets in bulk if you want to. McMaster has some and firms like Hanson Rivet have a huge variety. You basically need to know the dome type and diameter. You get rivets longer than you need and trim them using the formula that the rivet must stick out 1.5 x diameter to form properly. If it is too long you will have problems also. So, you measure the depth you need and then add that to the overall length.
AK-Builder now also sells their rivets in bulk if you are interested – click here.
If you were building from a receiver flat or a tube without a center support, you could consider that as a rivet too but you need to buy that separate as it usually comes with the center support tube it passes through as a set.
This post will be mainly me giving you an overview of what to do and tips based on my experience. AK-Builder has a nice set of instructions you can review by clicking here.
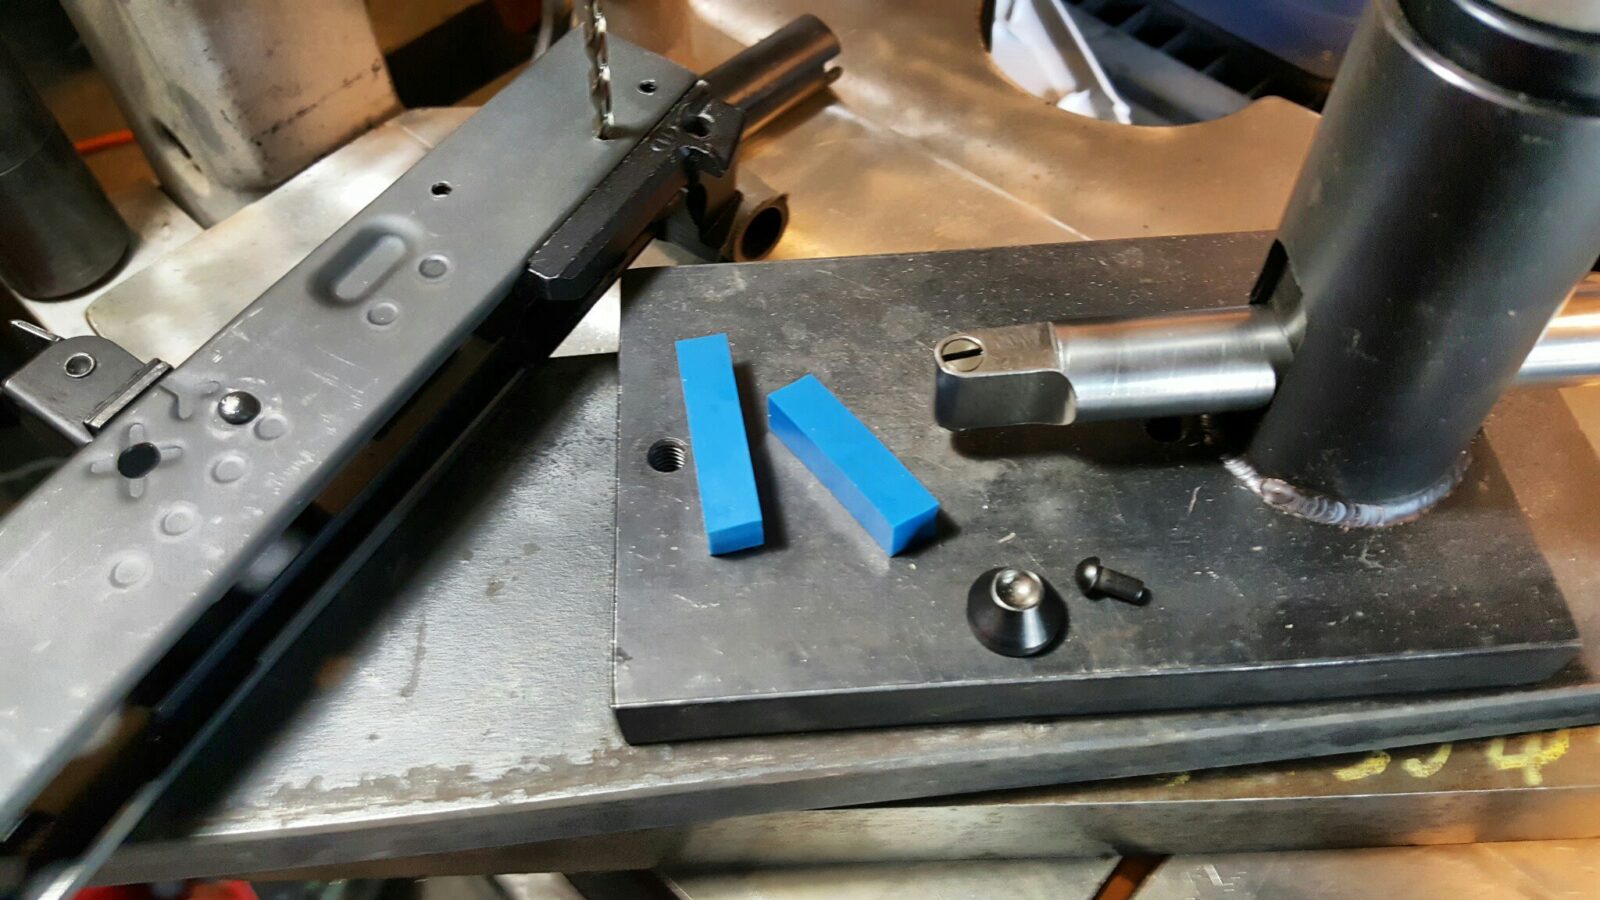
The AK-Builder rivet jig basically uses an arm to transfer downward force from the press to the rivet to squish it. The domed part of the rivet is held by a small cup and two pieces of thick high density rubber help you stabilize the receiver assembly during the operation. In the next photo you can see the parts plus that I have a 5/32″ drill to help keep everything aligned during squishing.
Now for some tips:
Make sure the arm is as short as you can make it. The longer it is, the more likely it will bend. Note AK-Builder sells replacement arms and I am on #3.
Make sure the little set screw anvil is out far enough to squish the rivet down far enough. These will deform over time and replacements are available from AK-Builder – there are replacement parts for everything from them except for the main body which is built like a tank anyways.
Use the little blue rubber blocks to adequately support the receiver. You want the arm to push down straight. The domed rivet to be sitting squarely in the above cup and to be pushing straight down on the rivet. The little blocks can help support stuff so you can focus on alignment.
When you are positioning the trunnion, make sure the arm isn’t going to press on part of the trunnion.
If you have an air-over hydraulic press, only use the air to run the ram down to the jig. You will not hear a difference before stuff bends. By hand, it is nice and slow and you have time to hear, feel and adjust. I turned an arm into a deformed banana right after I got my air-over-hydraulic jack/bottle. They are a great time saver but know when to switch to the hand pump for the fine work.
It does not take a ton of force to squish a rivet. If your rivet is not squishing make sure the arm is not sitting on part of the trunnion, that the set screw is down far enough and that the bottle’s release valve isn’t partly open.
The last two rivets I do are the countersunk rear lower rivets on the front trunnion. For the countersunk holes that use the swell neck rivet, you can either use the conical stubby press tool from AK-Builder after drilling an 1/8″ starter hole and then 5/32″ as a final step to prepare for the rivet. Important: The little tool is sitting on the base of the jig and you are pushing the receiver down on it. I’m not a fan of this because I can’t see what is going on. Your second option is to do what I do – drill the 5/32″ hole, use a 1/4″ ball bearing and a C-Clamp (on the same side reaching in through the mag well) to push the receiver material into the countersink. This really adds strength and I would recommend you take the time to do this. After you have squished the material in, drill with the 5/32″ bit again to clean up any material blocking the hole.
Last tip – when you are doing the counter sunk holes, do not use the long rear punch – that is just for the rear. The reason for this is that the rear trunnion is solid and you can safely do that. However, with the front trunnion – the counter sunk rivet holes are not connected by solid steel and, instead, the mag well is there. You need to pick a method wherein the trunnion is supported or you risk either bending or breaking the rear “ear” of the trunnion.
Note – you will only see replacement parts for your jig if you bought it direct from AK-Builder and are logged in. I bought mine ages ago and Lonnie had to look up my order and manually turn on the part of the website for me to order parts so just FYI.
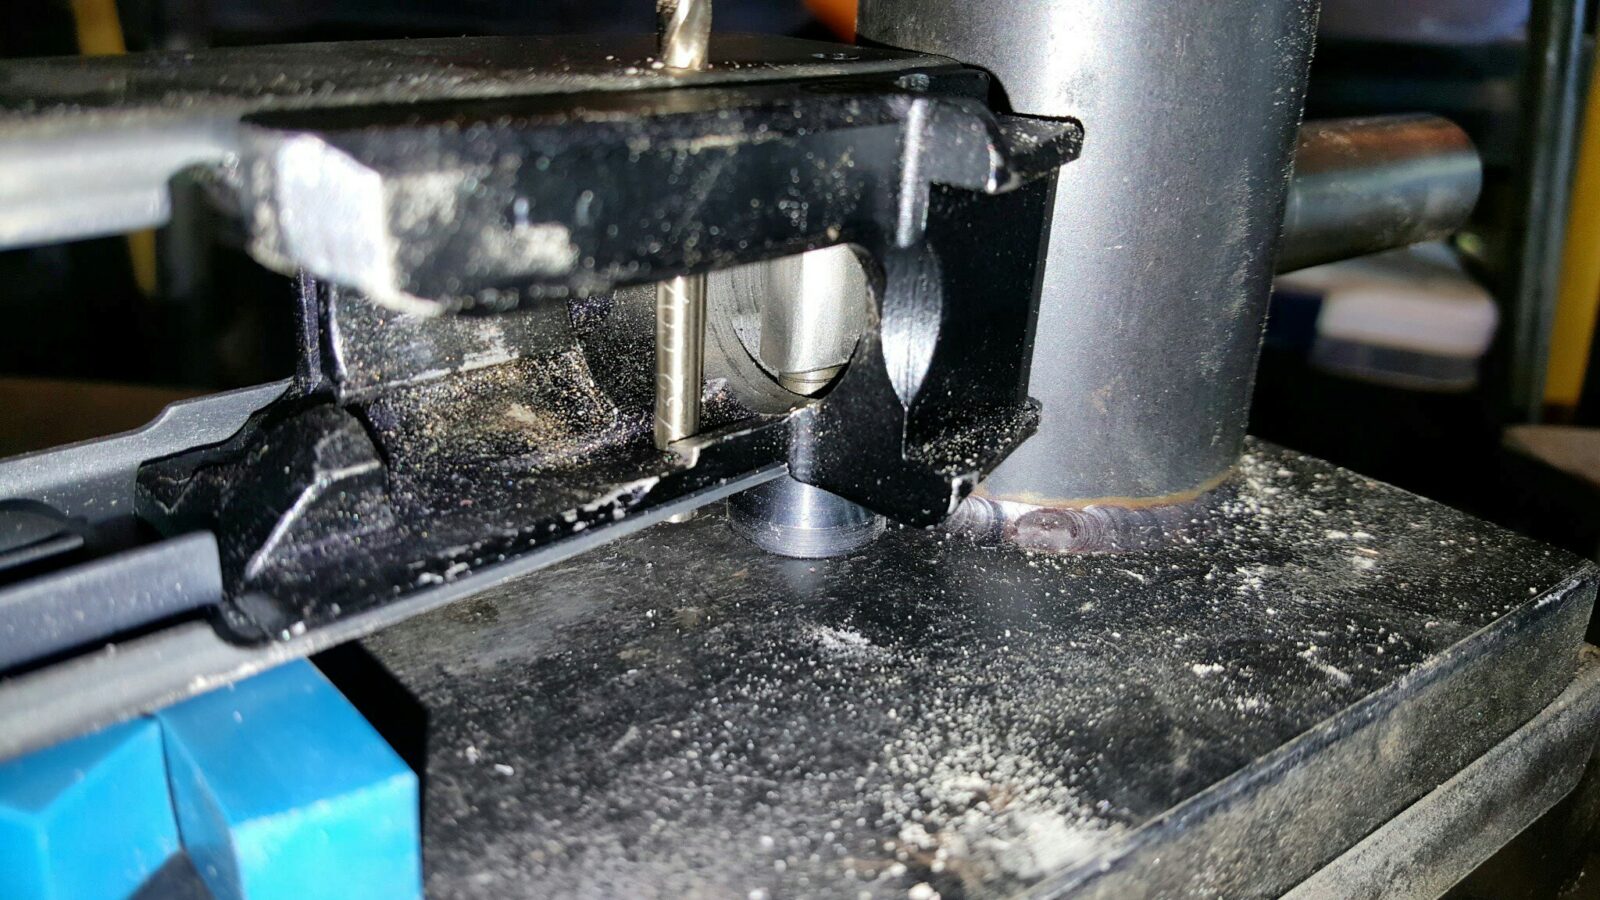
The following photo shows me reaching in with the arm and squishing a rivet – the goal height is to squish the rivet body low enough that you can press the barrel back in and it not hit a rivet:
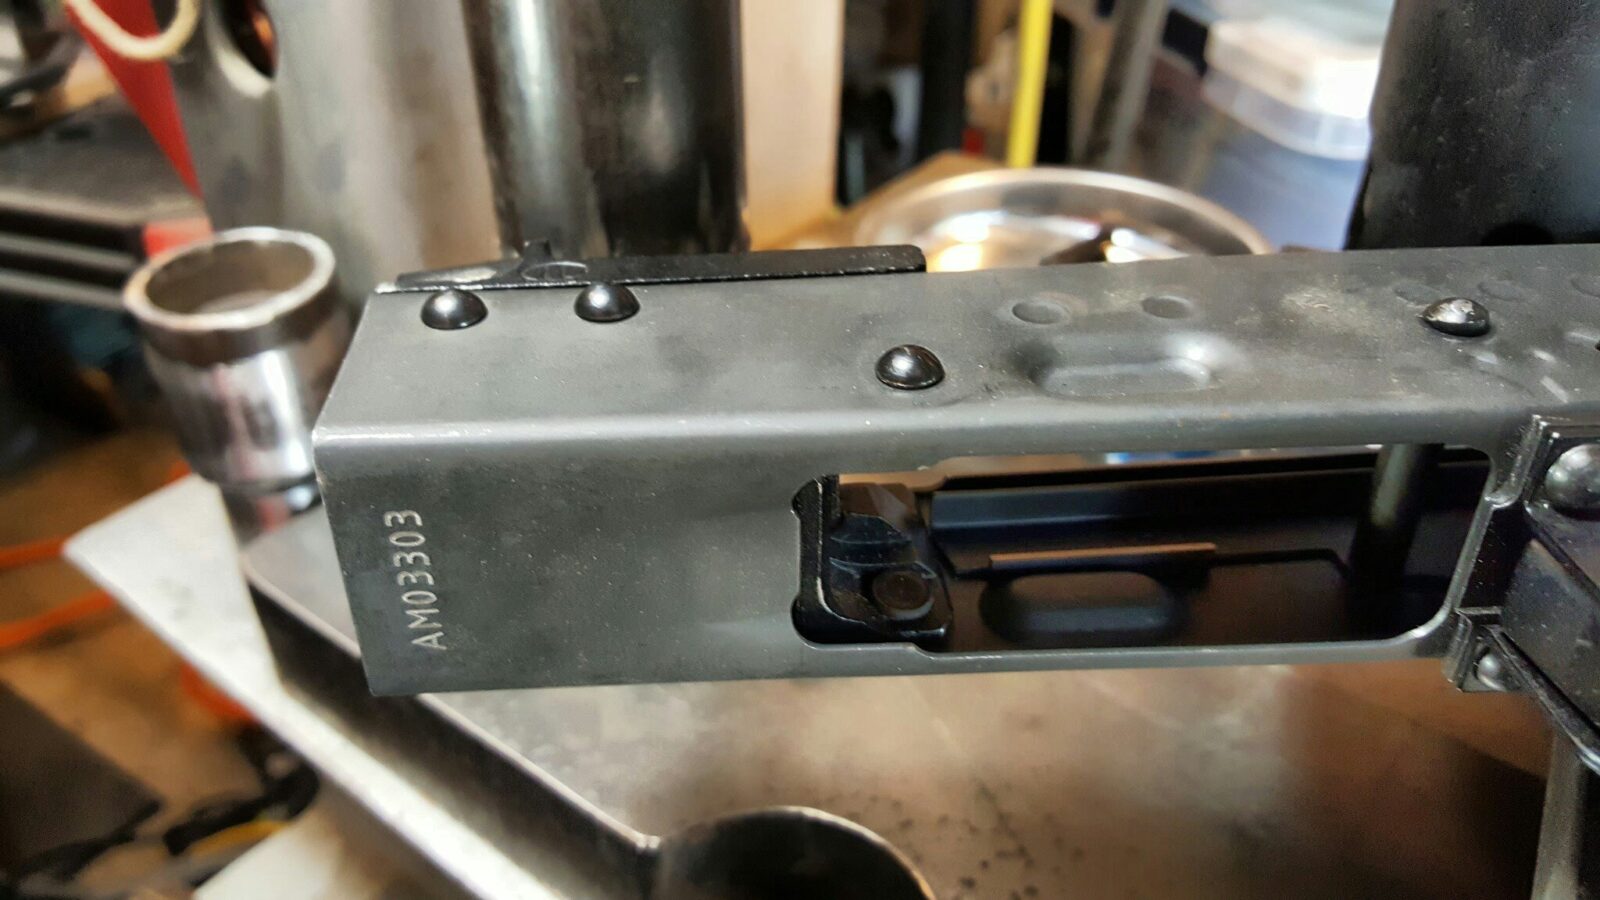
If all goes well, your rivets will look like the following or even better:
I am happy with rivets where the dome is firmly against the receiver. If I mess up, I will drill out the rivet and do it again. Note – The center support rivet was done by Childers and I cleaned that up a bit with my rear rivet set up of the AK-Builder jig.
Setting The Rear Rivets
Next up is to squish the rear rivets. This requires more careful positioning and also support. I have messed up a fair number of rear rivets over the years due to one of those things being wrong. The first thing to do is to remove the arm and install the rear trunnion rivet “bridge”. You will still use the little cup to cradle the rivet head and the rubber strips to help with positioning.
In this next photo you can see the jig set up for the rear rivet. In hindsight, I should not have taken this example photo yet because you first need to use the countersink tool at the bottom to press the receiver material into all four holes and then chase the holes with the drill press to clear any receiver material out of the way before you can install the rivet.
Here is an important tip, after you press the receiver material in, have cleaned up the holes and are getting ready to do a rivet, do some careful alignment and work holding. The piece of metal with a U-shaped cut out goes between the large screw body in the middle and the receiver. Bring that main screw down by hand because you next use the alignment tool – a punch with a hole in the middle to make sure the rivet forming tool (the one with a recessed dome in it) will come down square on the tool. Once it is aligned, use a wrench to bring the main body of the jig firmly down on that metal with the U-shaped slot and make sure nothing moves. Double-check it again with the alignment tool and ensure the rivet head is still squarely in the cup. In my experience you need to use a wrench to bring the body down – it requires more than being hand tight but not so much that you are deforming stuff. The words to think of are “securely aligned”.
Now, use the punch / rivet set with the inverted dome to form the rivet head as you apply pressure from the press. When the tool gets even with the surface of the receiver, stop. If you keep going you will mar the receiver and leave some portion of a telltale dent around the receiver.
Done!
And with that, you should be done and ready to reinstall the barrel.
If you find this post useful, please share the link on Facebook, with your friends, etc. Your support is much appreciated and if you have any feedback, please email me at in**@*********ps.com. Please note that for links to other websites, we are only paid if there is an affiliate program such as Avantlink, Impact, Amazon and eBay and only if you purchase something. If you’d like to directly contribute towards our continued reporting, please visit our funding page.
In the previous post I removed the front trunnion from the barrel assembly and was then ready to install the front and rear trunnion into the receiver that I had already riveted the trigger guard on. This post will focus on drilling the rivet holes needed for the front and rear trunnions.
Front Trunnion Rivet Hole Drilling
The AK-Builder Trunnion Rivet Hole Drilling Fixture makes locating of holes much easier than the methods I used when I first started. I mainly used the Post-It method where you would rub a Post-It note over the holes and then stick the note on the trunnion as a rough guide as to where to center punch and start drilling. Some guys also make little locator tooks out of spring steel but I never tried one of those.
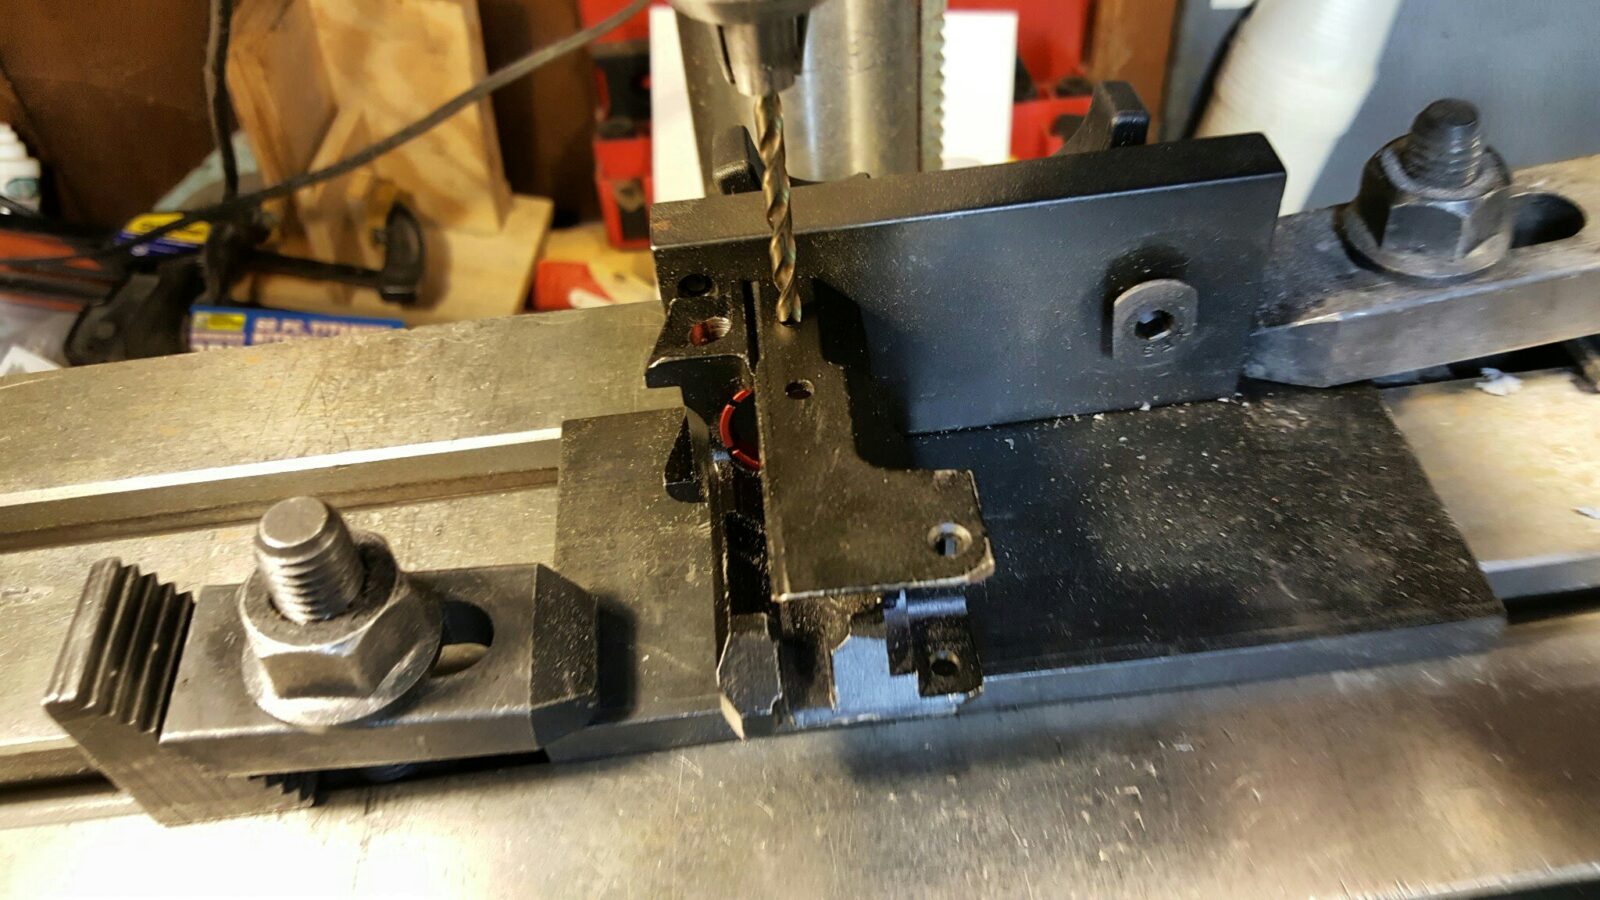
This jig is awesome. There is one very, very important thing you must do when using this jig – make sure you drill press table, column and the jig itself are secure. If the work can shift while you are sliding the receiver on or off, you are hosed and will drill a hole ut of position. I can’t stress this enough.
The jig is on an X-Y table on my drill press. An X-Y table gives you crank knobs like you have on a milling machine and allows for precise drilling. I use it all the time for drilling grips and other items. Basically you secure your item and then use the X-Y table and a spotting bit or whatever to get you right where you need to be. I wrote a post a while back about the table if you are interested. An X-Y table is not mandatory but boy does it help if you do a ton of drilling. Note, when you buy the table it will not come with any kind of fixture/clamp set. You will need to buy one that matches the size of the T Slots of the table you get.
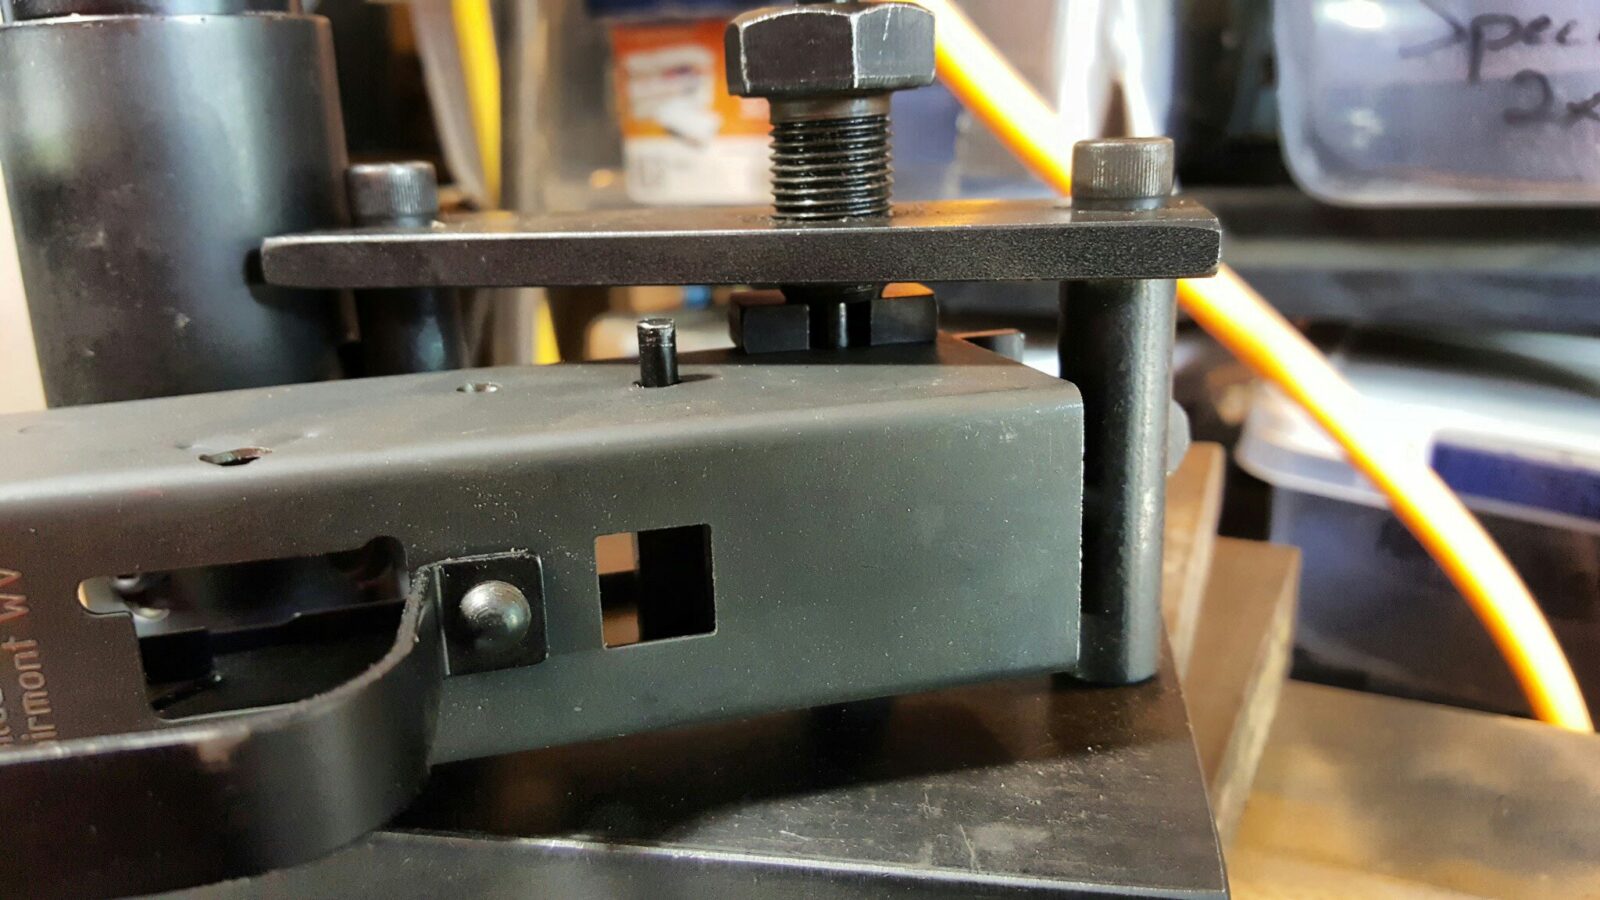
If you look at the next photo, you will see a red mandrel sized for AKM-type trunnions. You will slide the trunnion on to that all the way and turn the knob in the back to expand the mandrel and secure everything in place.
So you basically install the trunnion, locate the hole with your press, slide the receiver on and then run the drill down and make a hole in the same place. It’s that easy and that reliable as long as everything is secure. Again, that is the key part here.
I should point out that I prefer to use a center 135 degree cobalt drill bits and cutting oil when I do drill the holes.
Once I have all of the front rivet holes drilled, I move on to the back trunnion.
Rear Trunnion Installation
The rear trunnion is held in place by the other side of the fixture and the tab fits int the part of the rear trunnion where the operating spring guide would normally sit.
Again, make sure everything is secure or your hole locations will be messed up.
With that, it is now time to proceed to riveting in the next post.
If you find this post useful, please share the link on Facebook, with your friends, etc. Your support is much appreciated and if you have any feedback, please email me at in**@*********ps.com. Please note that for links to other websites, we are only paid if there is an affiliate program such as Avantlink, Impact, Amazon and eBay and only if you purchase something. If you’d like to directly contribute towards our continued reporting, please visit our funding page.
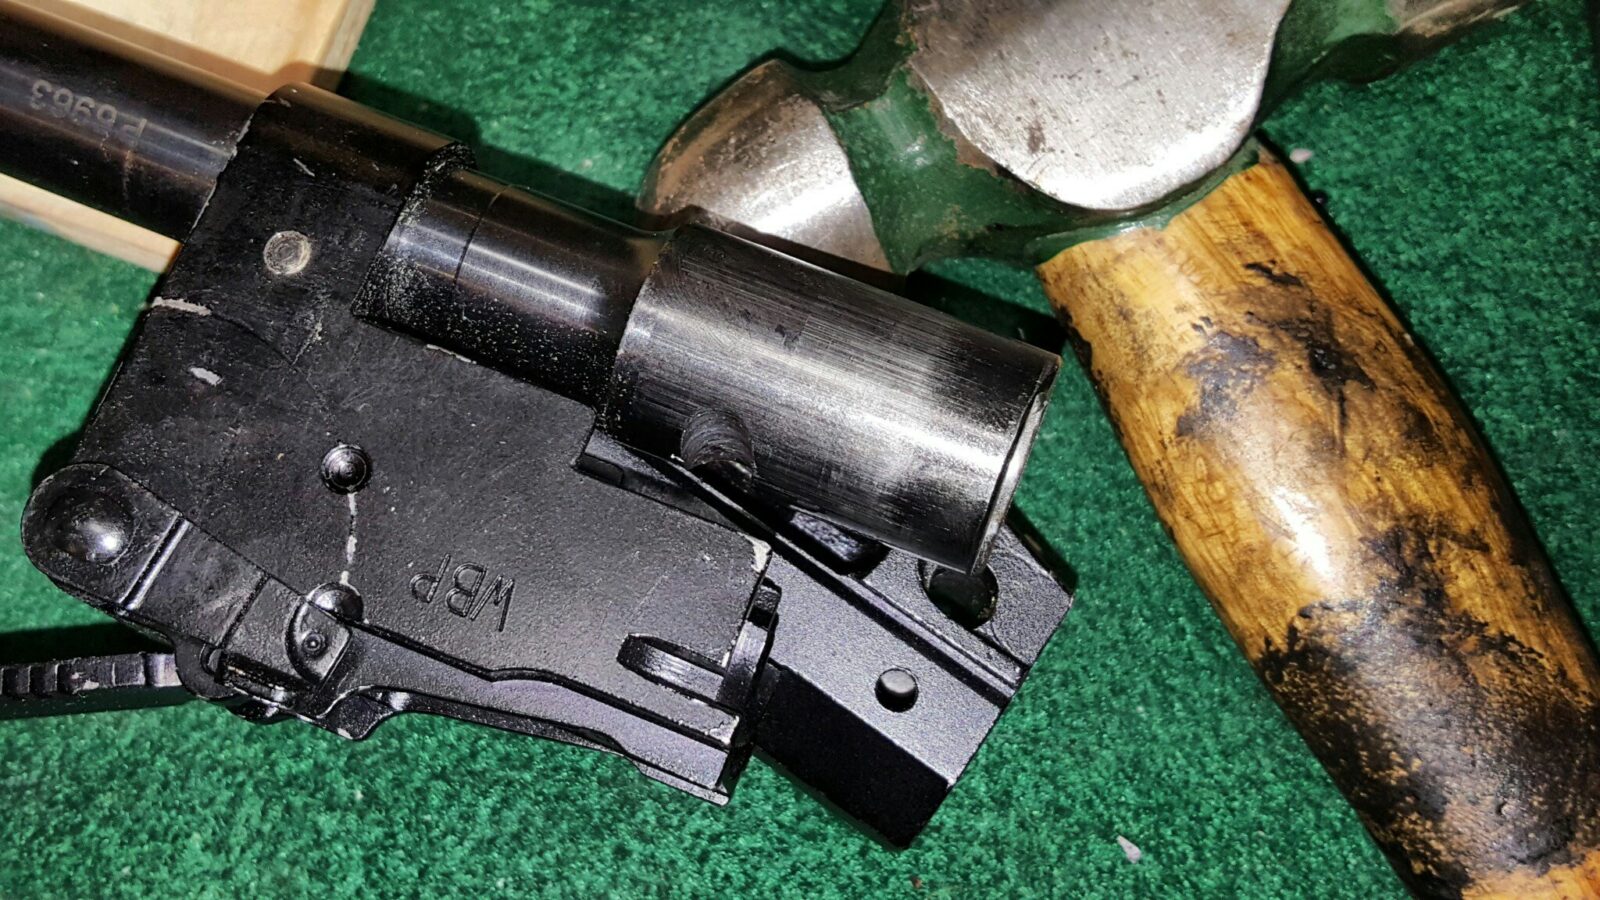
The next step after installing the trigger guard assembly was to rivet the front and rear trunnion in place. The modern Kalashnikov design uses a stamped sheet metal receiver with steel inserts at the ends known as “trunnions”. The sheet metal receiver is really holding the components in alignment vs. providing the strength necessary for the chambering and the rear butt stock.
Historically these were forged and many makers like to point out that these parts still are. For example, the Polish maker WBP likes to point out they use forged trunnions. Some makers are using cast trunnions and the quality can differ. When done right, cast parts can be plenty strong … emphasis on when done right.
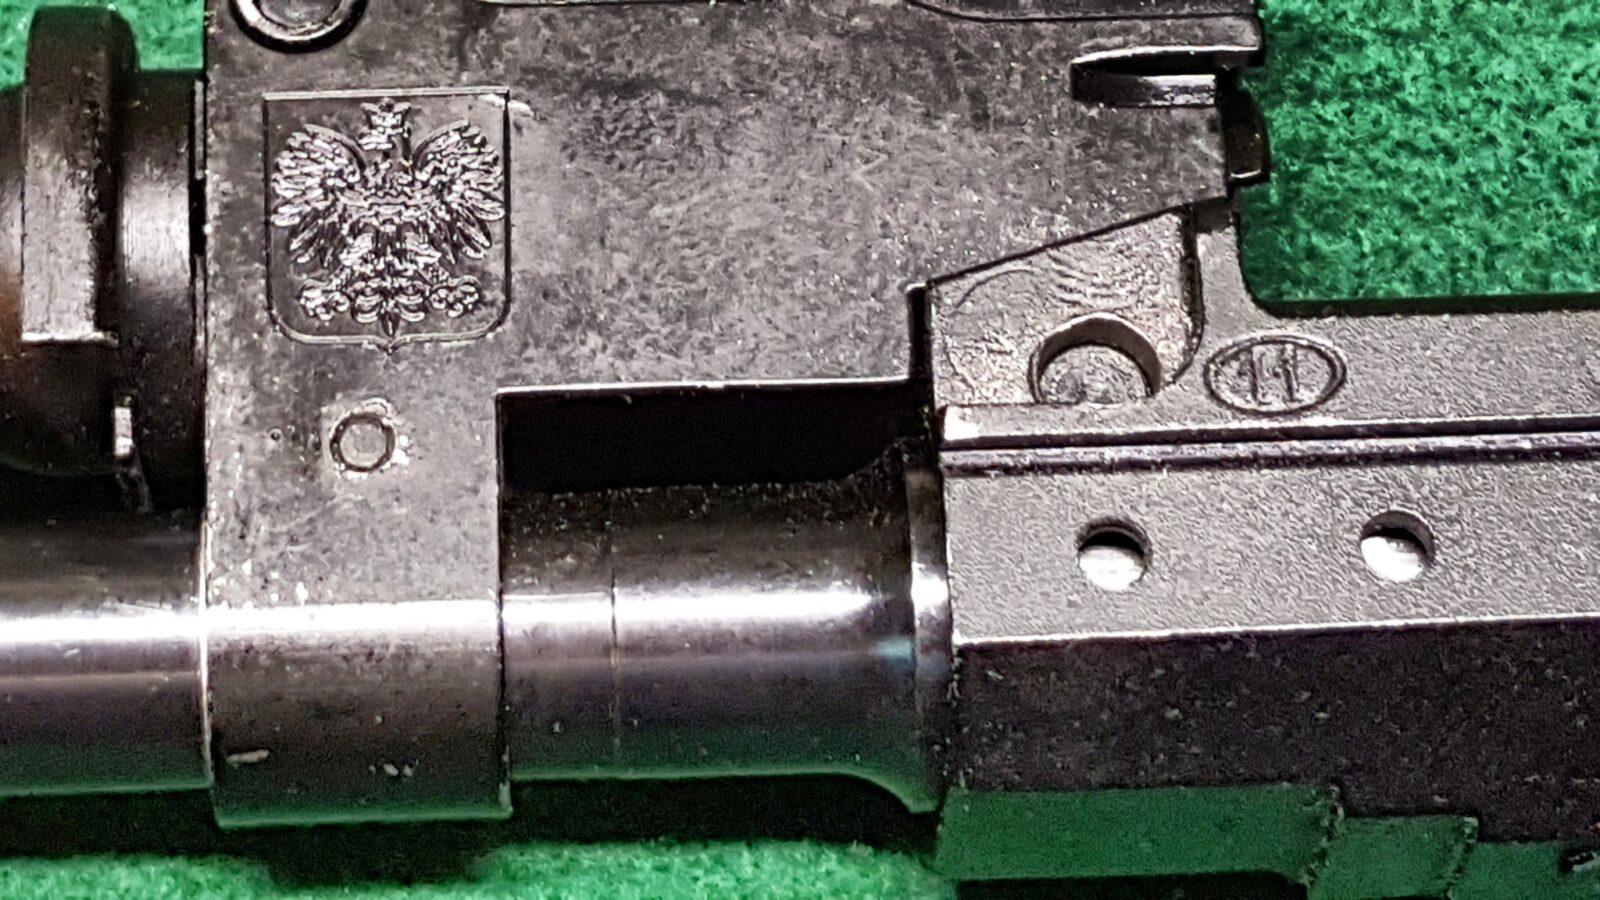
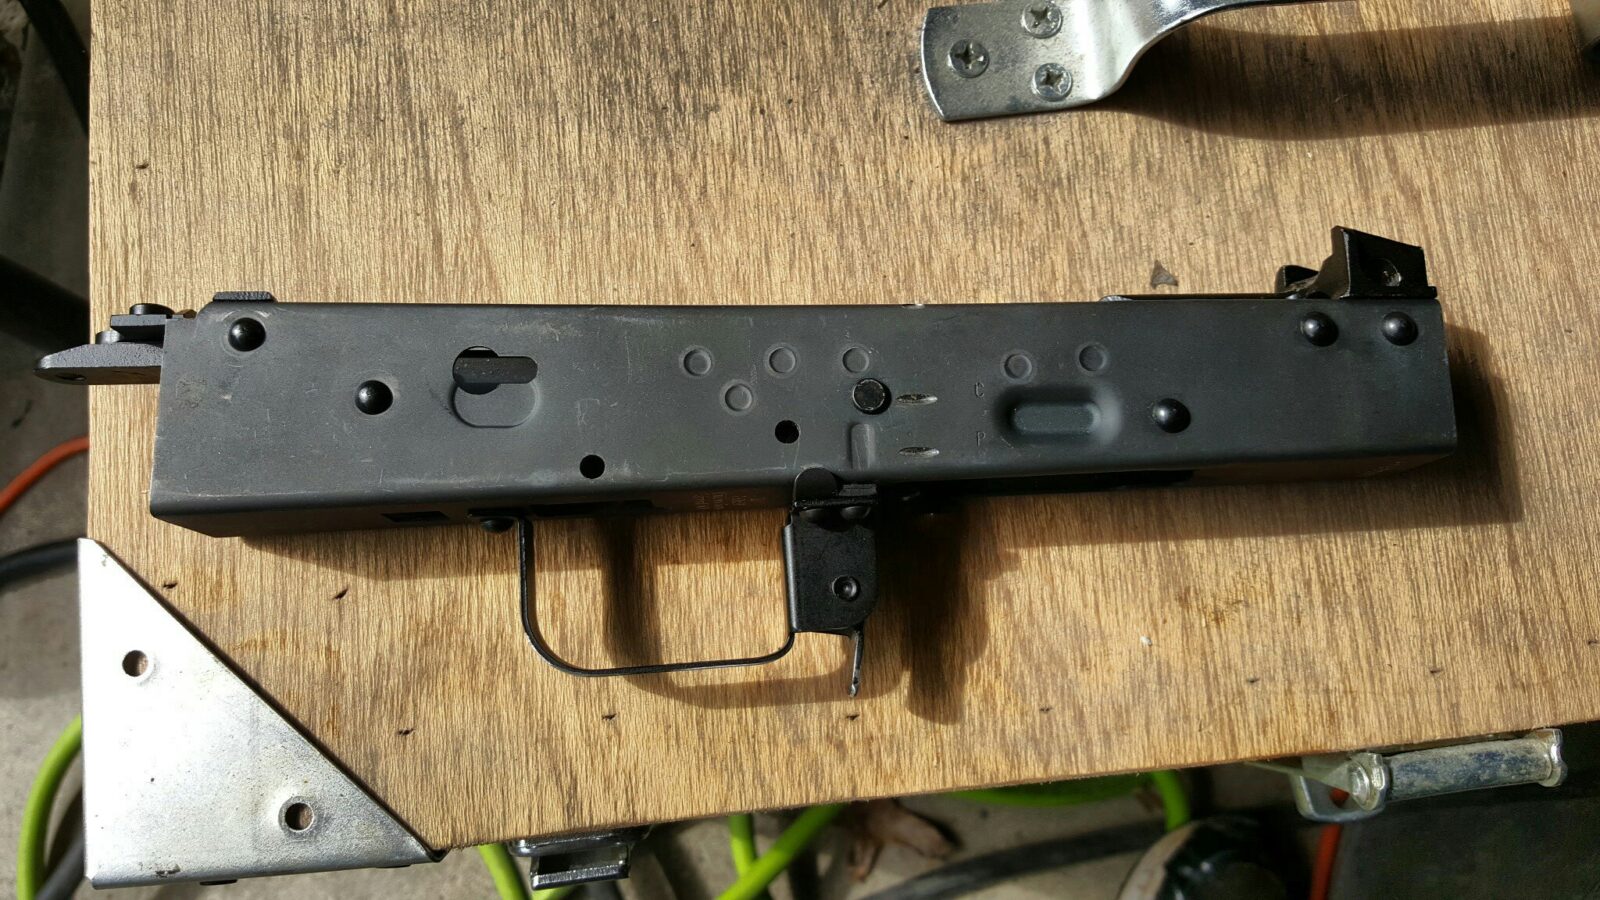
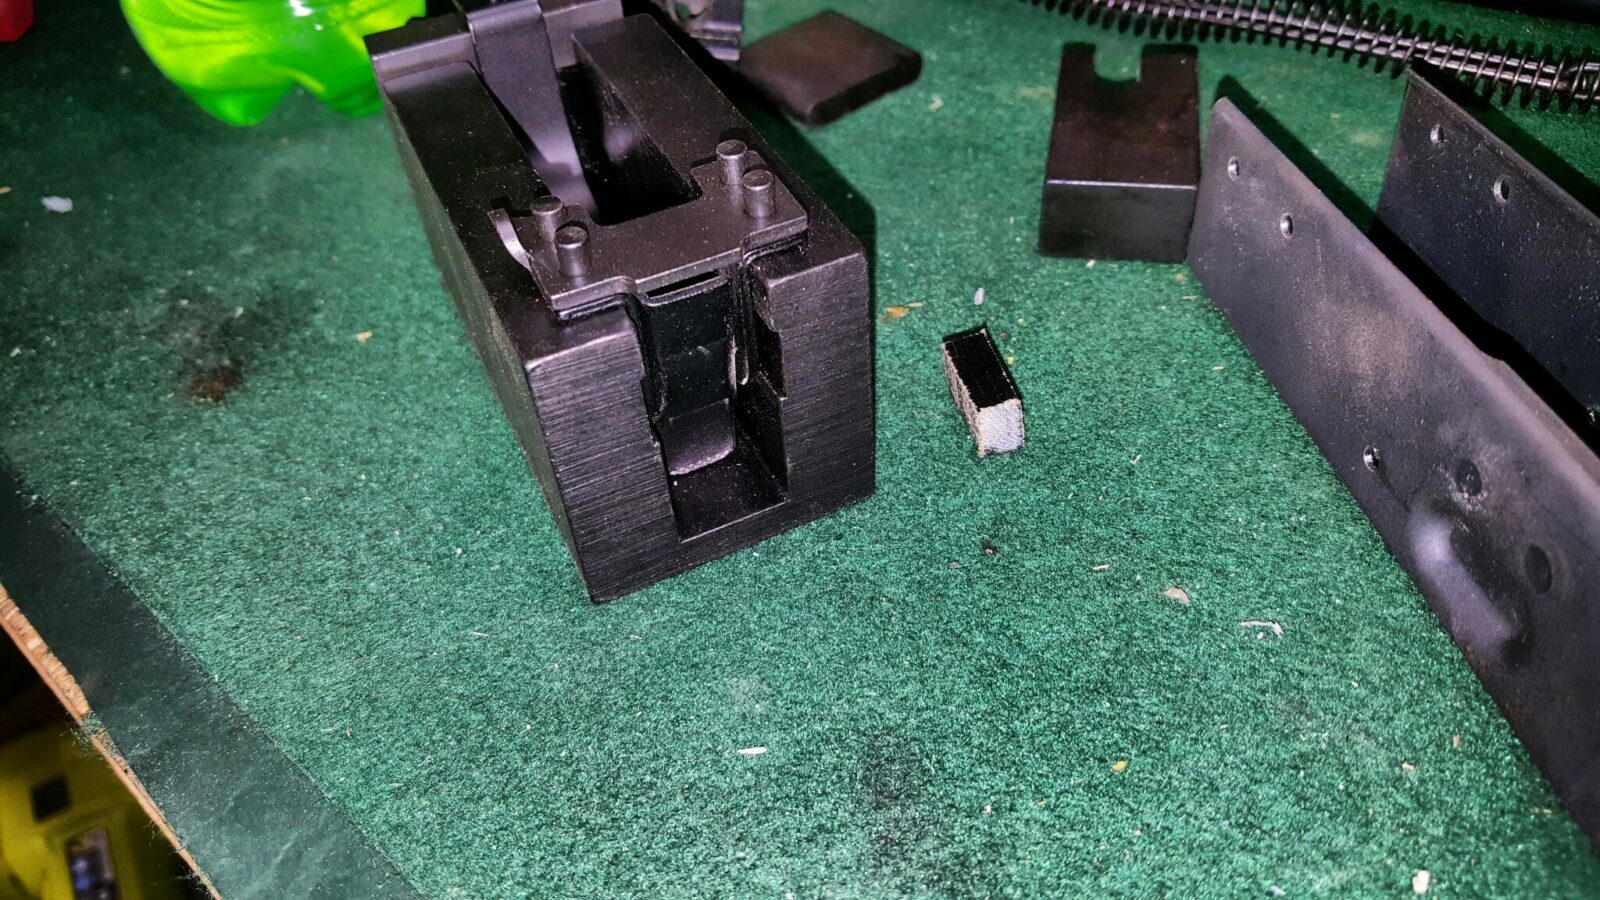
The following photo is of the WBP front trunnion.
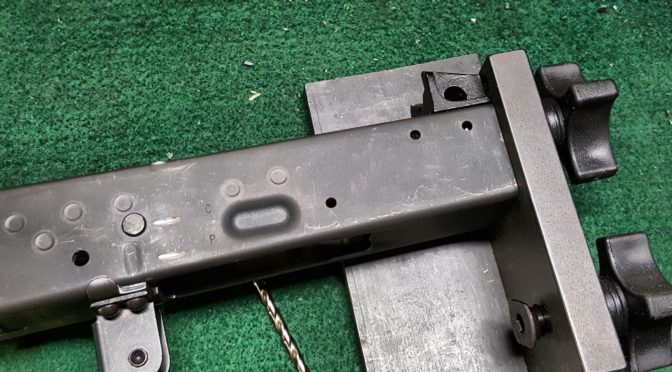
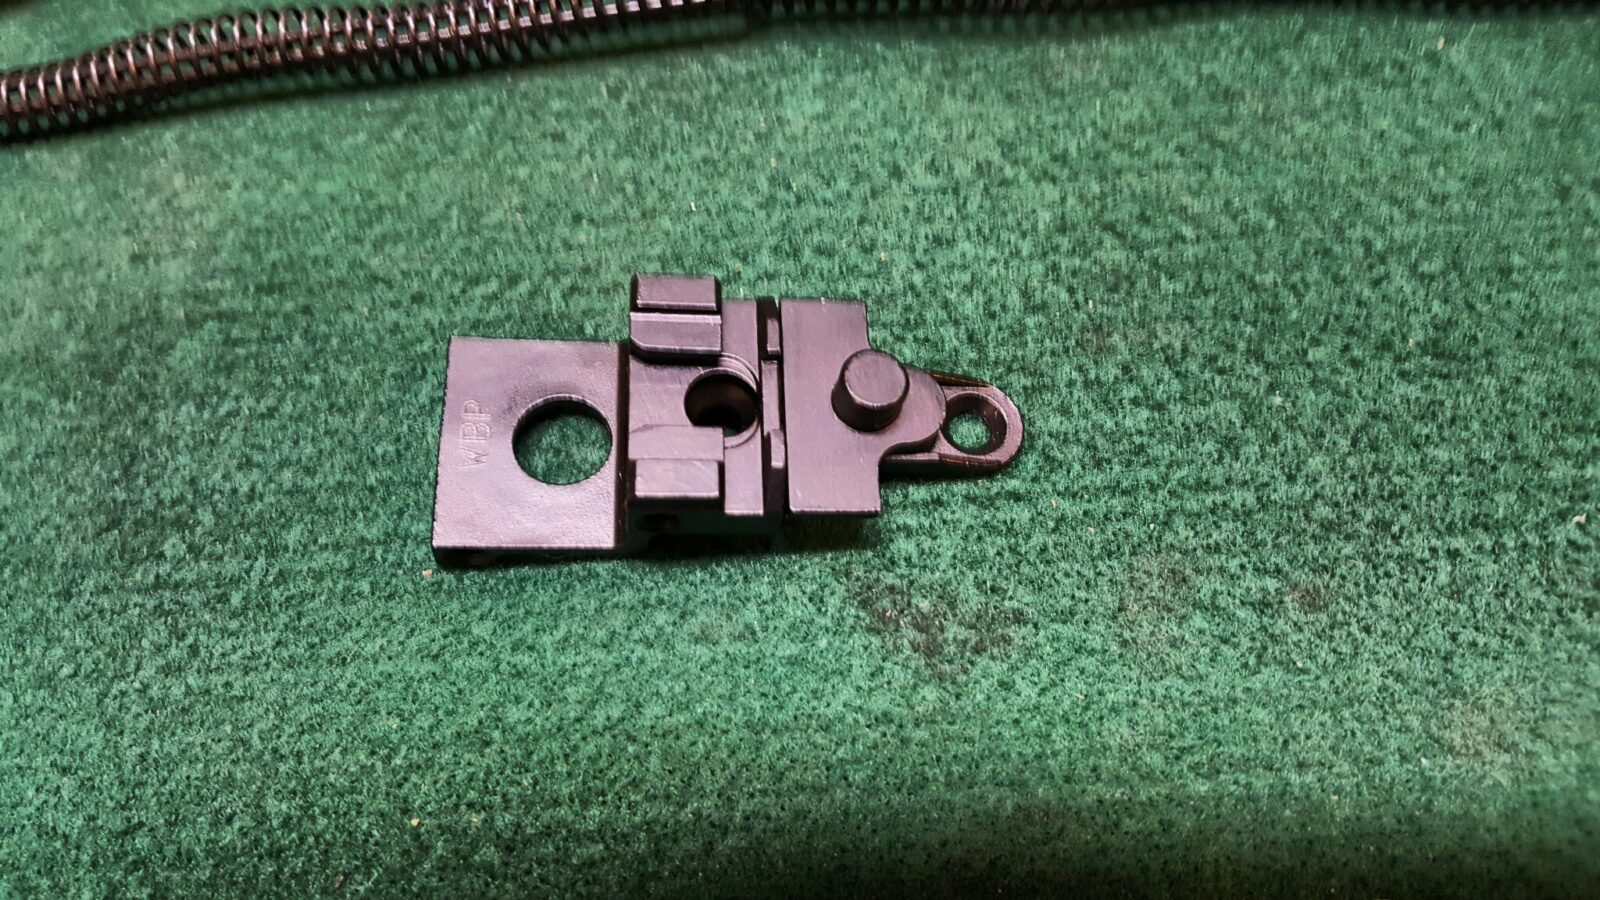
The following photo is of the unique rear trunnion that is designed for the optic rail to lock on to the post you see:
Rivets and Countersinks
The trunnions are held in place by steel rivets. The front rivets are about 5/32″ and the rear is about 3/16″. You’ll want to measure your holes or confirm with your maker what to use. I use AK-builder rivets mostly now and am happy with them. Note that there are many, many different types of rivets in terms of materials used, width, and length. AK-builder makes it easy – if you are going to build an AKM kit then get one or two packets of AKM rivets – he has removed the guess work by putting one of each in the bag. A tip I’d give you is to always have one or two spare bags just in case you lose a rivet or need to redo one.
Before I go further, rivets are the most proven method of assembly for high-strength reliable applications involving automatic fire and military use. For low volume semi-auto use you can also do weld builds. Screw builds are an option but they do risk coming loose and AK guys will honestly give you a hard time when they see the screw heads – I know this first hand 🙂 My recommendation is to go the proven way and use rivets.
On the WBP kit, the front trunnion that holds the barrel is a fairly generic AKM-type forged trunnion. This means it slides into the front of the receiver and the top of the receiver walls form a lip that slide into the recessed grooves in the trunnion. There are two front rivets on each side and a third lower rivet on each rear side that is countersunk.
Now countersunk rivets are actually pretty cool but not everyone understands why. When you look at the trunnion, the rear two rivets also have countersinks. When you install the rear rivets, you actually press receiver material into the countersink before you drill your final holes and install the countersunk rivets. This serves to lock the trunnion into place and would reduce the odds of the trunnion shooting loose over time under heavy military use.
The following photo shows a regular front trunnion rivet with a flat area under the domed part (the bottom rivvet) and a countersunk front trunnion rivet that is tapered under the dome at the top of the photo:
Headspace the Kit Before Proceeeding
Back in the old days we had to remove the parts off the demilled kits and that was a chore. Now with these businesses creating ready-to-build kits, you may just have to press off the front trunnion. I’m really constrained my time so I buy the receiver pre-made by Childer’s and the kits with completed headspaced barrel assemblies.
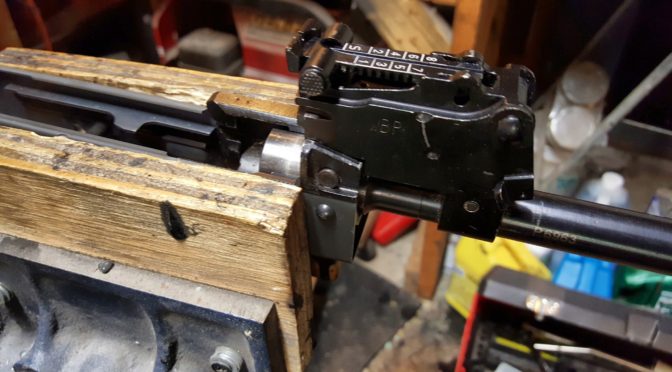
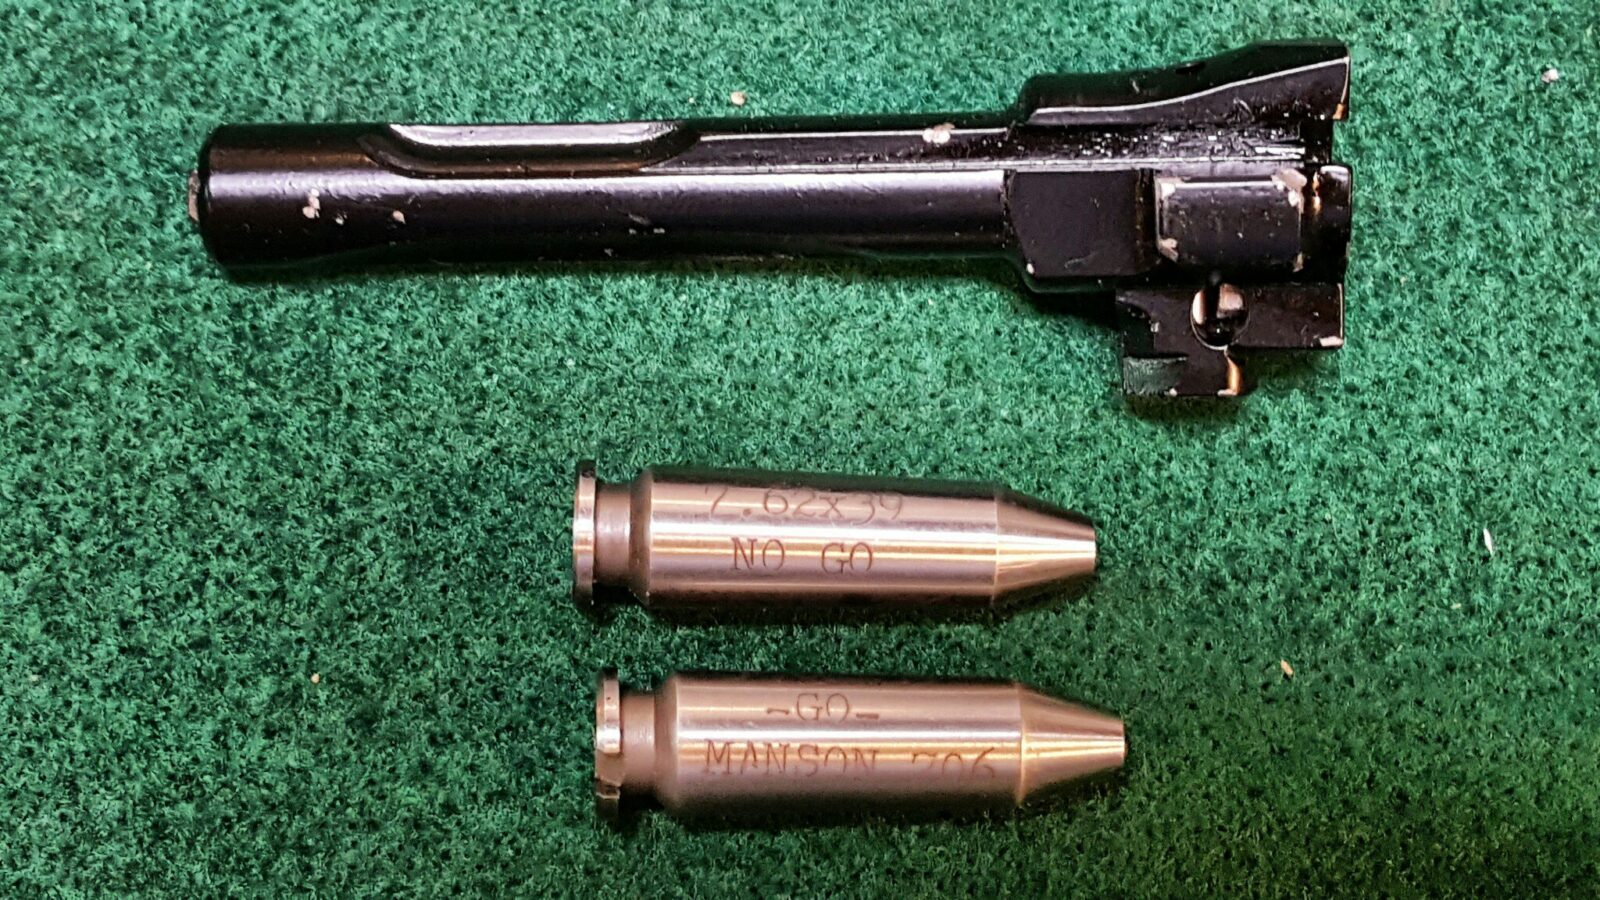
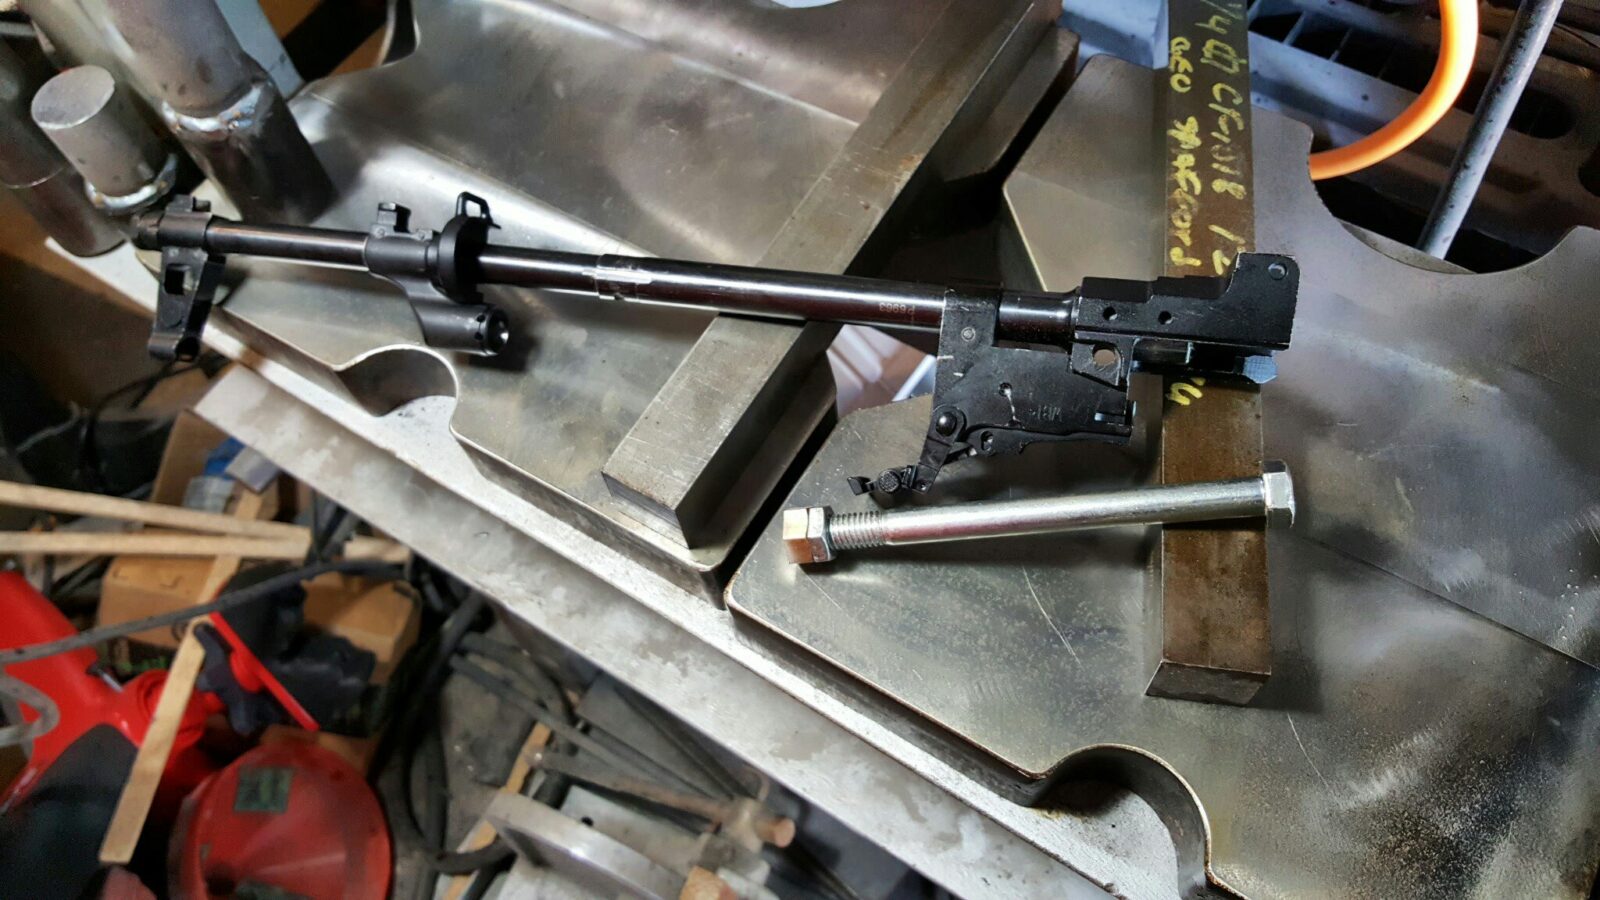
As the old saying goes, “trust but verify”. In theory a kit that claims to be headspaced better be. Before I did anything else, I got out my Manson Reamer GO and NO-GO gauges, put the barrel assembly in my wood vise and tested the headspace. It passed with flying colors closing on GO, meaning it was not too-tight and not closing on NO-GO, which would have indicated the chamer was cut too long.
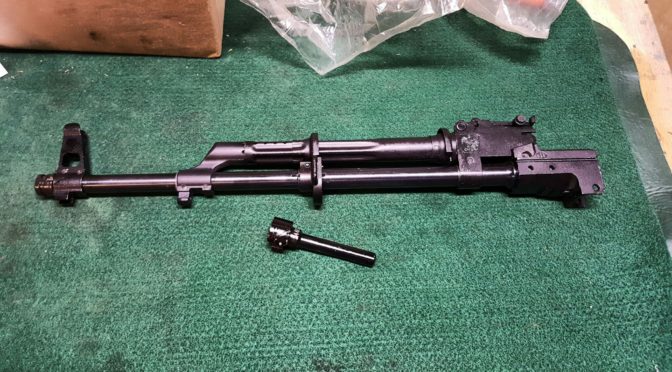
In the next photo, you can see the bolt assembly and the two gauges.
It closed on GO:
It did not close on NO-GO
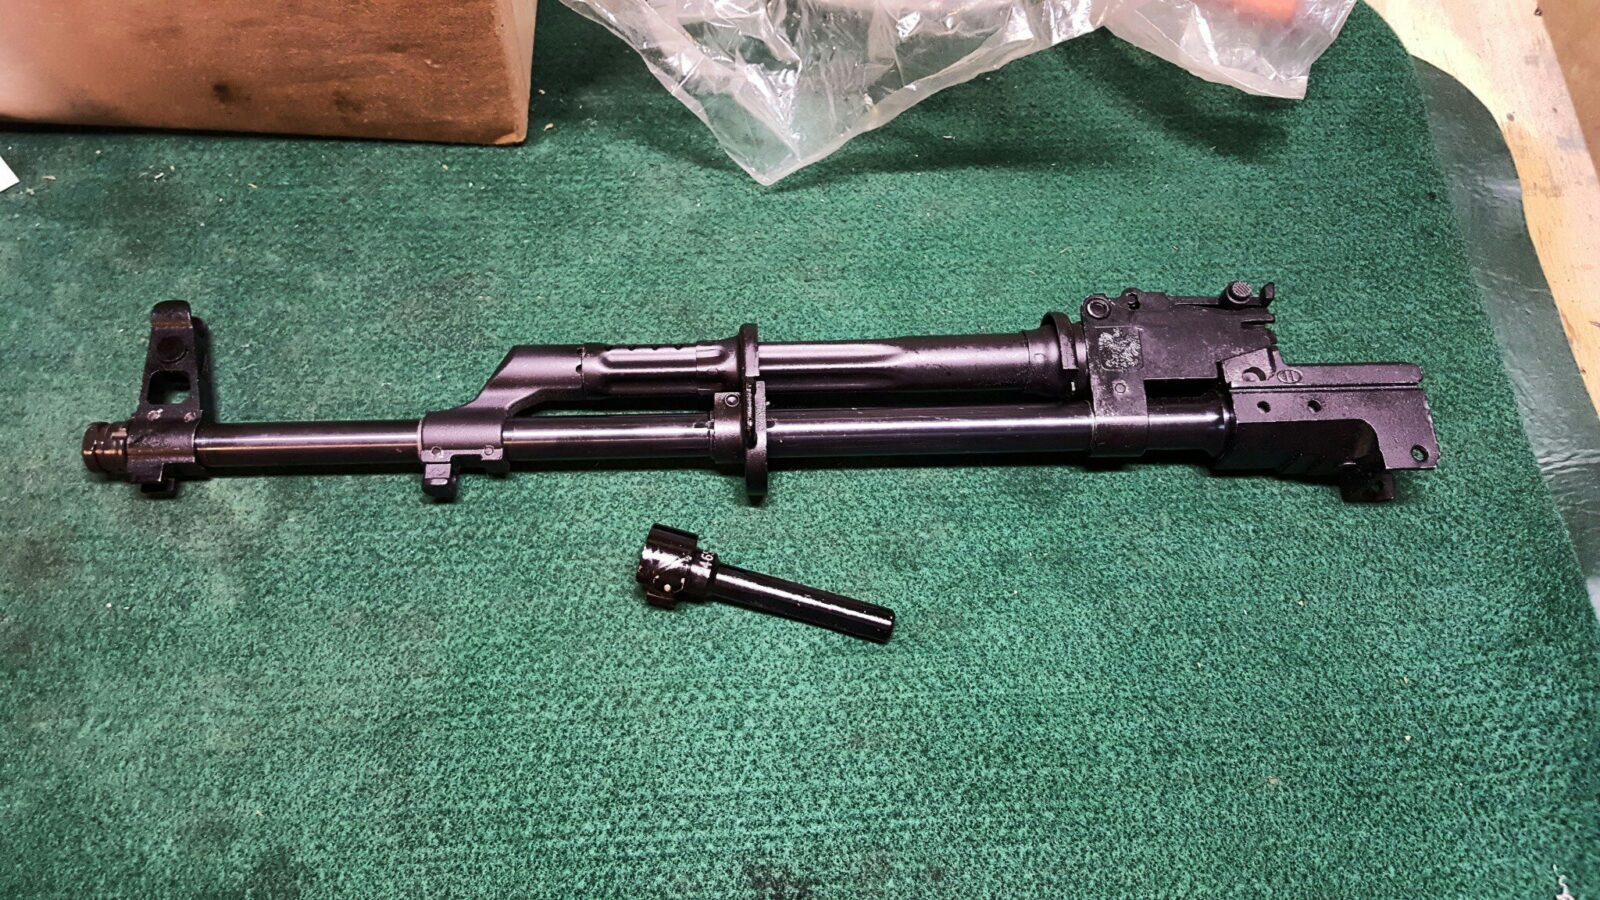
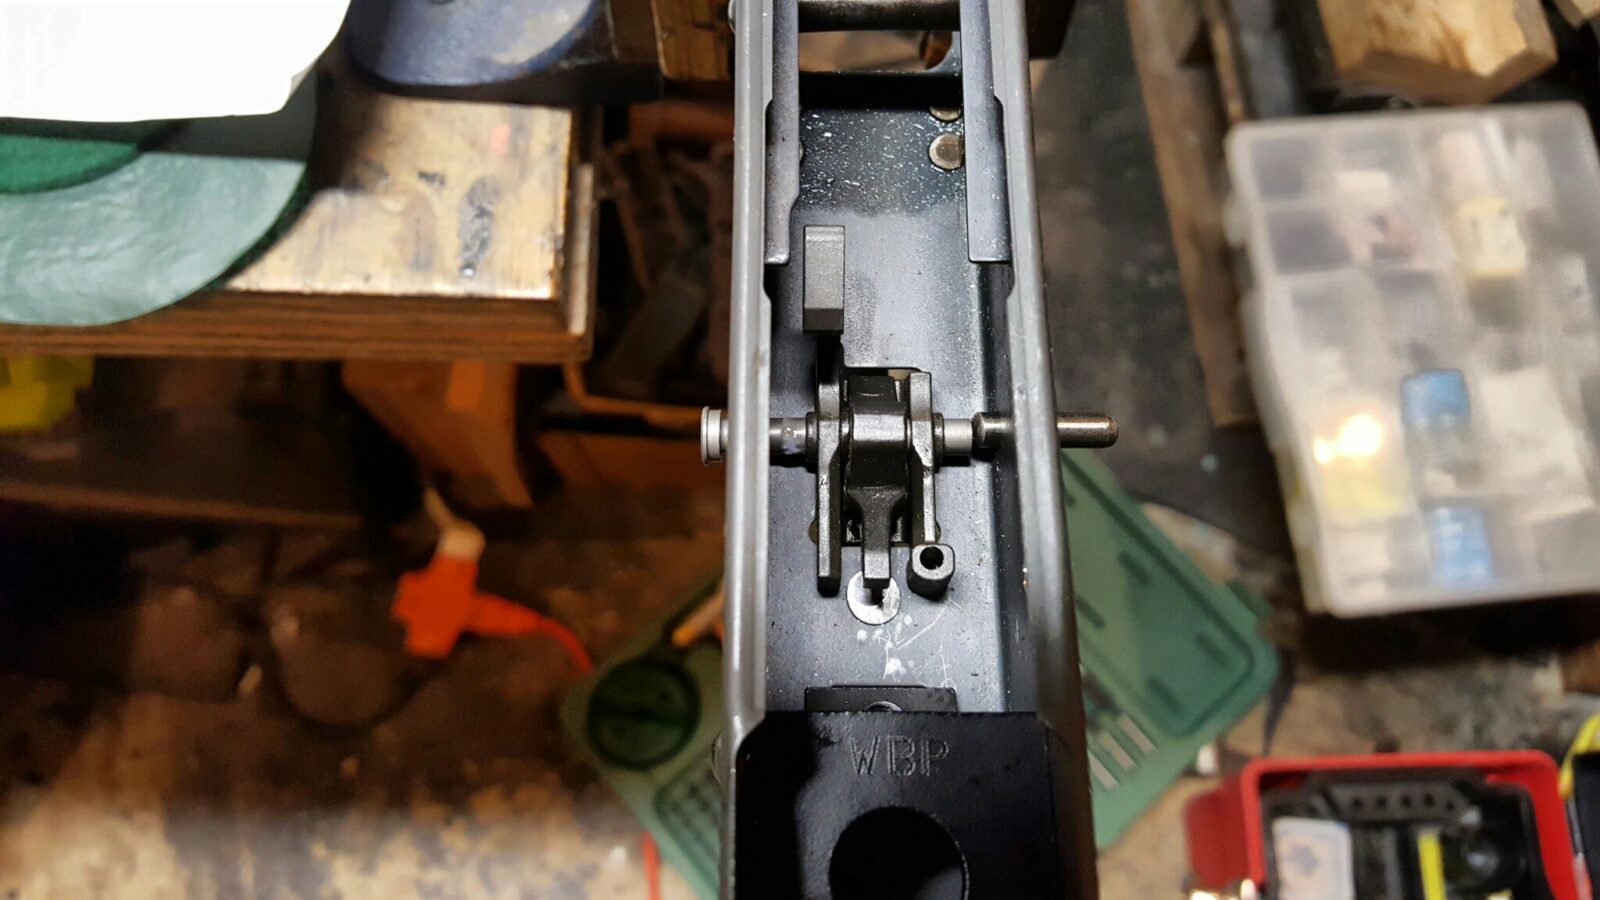
Confirm the Block Alignment
The next quality control check I would recommend is to verify that the barrel “blocks” all align. In other words that the front sight block, gas block and rear sight block all line up properly. Look down the rear trunnion and make sure they all line up properly. If they do not, you have two options. First, if you bought an assembled barrel, I would contact the vendor and arrange either a return or an exchange. They messed up is the bottom line. The second option is to straighten the problem block(s) yourself by driving out the pins from each, correcting the problem and either drilling new holes or using oversize pins. The reason you would go with oversize is if the newly drilled holes would result in a loose fit.
Not only do I want straight blocks for aesthetics but also because I “sight” down the ears of the front trunnion and center the rear sign block (RSB) between the ears when I re-install the barrel – in my case with my IR air hammer.
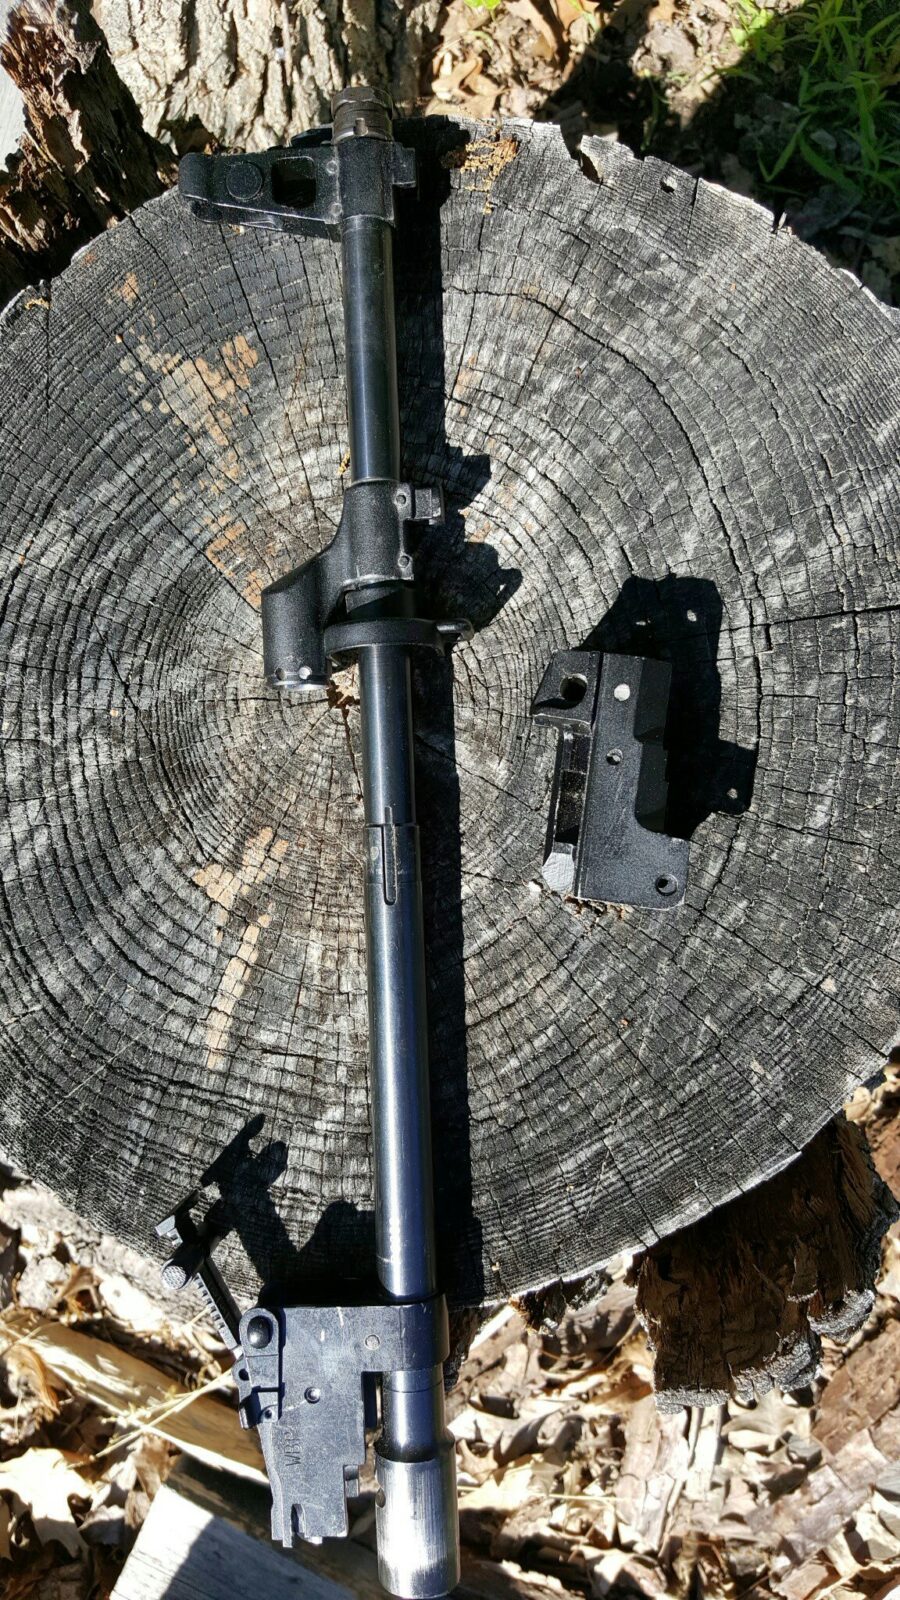
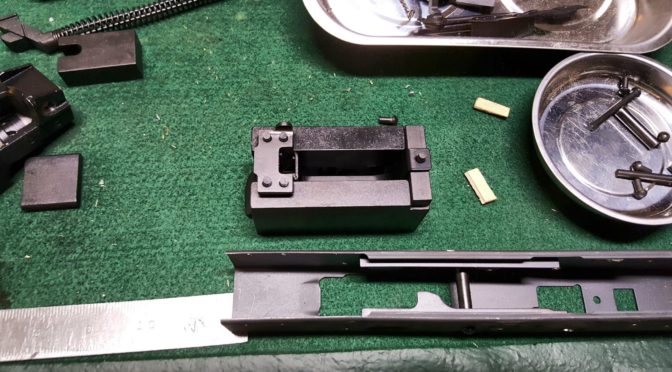
Press Out the Barrel Pin and the Barrel From The Front Trunnion
So the next step was to knock out the partially installed barrel pin. I used a hammer, one of my gunsmith punches and a block. Note in the next photo how I am ensuring the who barrel assembly has good support before I hammer.
I have also done the above with the trunnion in a vise with brass jaws to prevent marring and used an air hammer with a drift punch in it. I didn’t bother with the air hammer because whomever installed the pin after headspacing the barrel had not inserted it fully. My bet, and I was right, was that it would not take much force to knock the pin out.
You have at least three options to remove the trunnion and all will work. All of the above will work and it really comes down to what tools you have and what you are comfortable with.
Option One: Press the barrel off the trunnion
To press the barrel off, I would recommend you have at least a 12 ton press. Many guys use Harbor Freight presses and buy them when they go on sale. Basically you either buy a barrel removal jig from some like AK-Builder or you can simply make one from a 1/2″ bolt, a 1/2″ brass nut and a steel backing nut. [Click here for the blog post where I explain how to make a barrel back out tool.
All you need to do is to dangle the barrel downwards and support the front sides of the trunnion with steel blocks. Insert the barrel back out tool, and then apply pressure which will drive the barrel out of the supported trunnion. Be sure to flip the rear sight leaf out of the way.
Ensure there is a cushion under the barrel just in case it drops out and you aren’t holding it. I put a box underneat with old shipping materials for example. Also, make sure that the barrel back out tool is sitting only on the barrel and not resting on something else in the trunnion or you may mess something up accidentally.
One thing to bear in mind – this should not take tons and tons of pressure. Guys have cracked their front trunnions by thinking the answer was to apply more and more force. If the barrel doesn’t start moving, make sure the back out tool is not resting on a part of the trunnion by mistake. If it still will not move, then hit the side of the press with a mallet so the shock causes the barrel to break free. Note – this also applies to barrel pins but the pins do take more force to start on old kits. This will be a topic for another day.
Option Two: Use an Air Hammer or Air Riveter to Drive Out the Barrel
This is the actual method I used for this rifle. Being a new barrel, I did not expect a big fight to get the barrel and trunnion to separate. I wrote this up in more detail in another post – click here to read it.
Option 3: Use a Big Hammer
This is very similar to the previous option but a big “fricken” hammer (BFH) is used to hit the barrel back out tool which then drives out the barrel. I don’t care much for this option.
Now, of the three, using an air-hammer or air-riveter is my preferred method. I have talked to guys that have used other methods such as making contraptions out of all-thread rods to press out and install barrels and various types of gear pullers. I suppose you are only limited by your imagination.
So at this point we have confirmed the head space and removed the front trunnion. We’re ready for the next step which is to install the trunnions in the new receiver. That will be our next blog post.
If you find this post useful, please share the link on Facebook, with your friends, etc. Your support is much appreciated and if you have any feedback, please email me at in**@*********ps.com. Please note that for links to other websites, we are only paid if there is an affiliate program such as Avantlink, Impact, Amazon and eBay and only if you purchase something. If you’d like to directly contribute towards our continued reporting, please visit our funding page.
The first thing I like to do when building is to install the trigger guard assembly. In this particular case I had paid extra for an extended paddle mag from a
Arms of America (AoA) and I would not do it again to be completely honest. I’m very familiar and comfortable with the standard AK controls and not only did I find the extended magazine release awkward but it would not fit into my ak-builder jig so I wound up having to trim it off anyways.
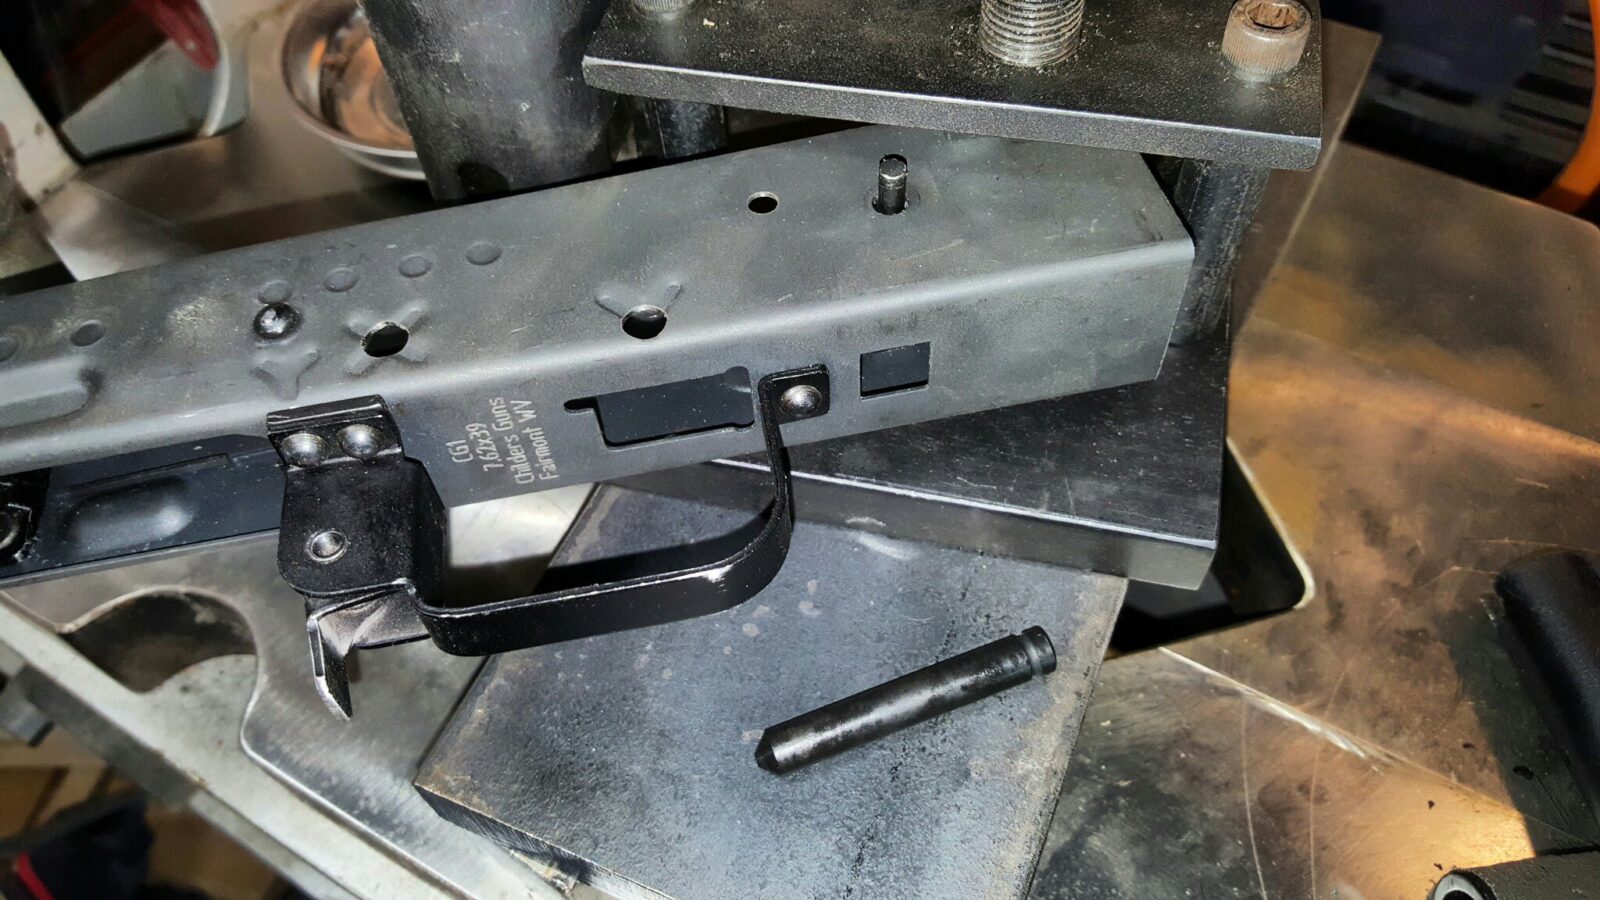
As you can see in this next photo, the paddle hits the front of the ak-builder jig and will not allow the trigger assembly to sit properly. Sure, I could have taken the trigger guard assembly apart and done the frame first but that defeated the purpose of it already being assembled so I simply sanded down the magazine release paddle using the rivet jig as a gauge. Once it fit in, I was good to go. I just did a little bit of cleanup sanding to make everything level and smooth. It was still a little bit bigger than normal but that was fine by me.
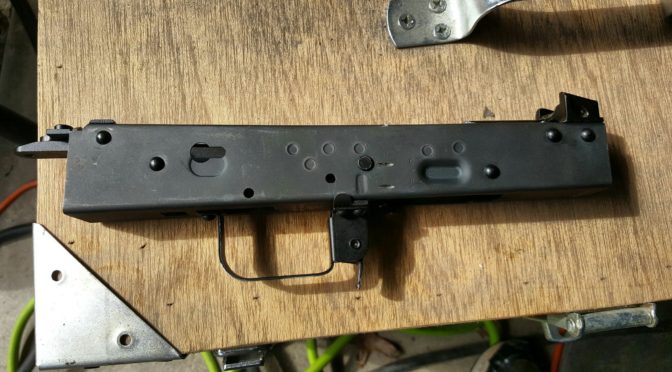
One thing you’ll notice in this next photo is that I have the selector stop plate and rivets already in place in The Jig. It is way easier to get them set and then put the receiver down on top of everything then to try and put the rivets in one at a time with the receiver ID place. Be very careful to orient the selector plate with the stop on the correct side. Years ago I did one backwards and it taught me a lesson.
In the above photo you’ll notice a small square plate just above the trigger guard jig and the block with the u-shaped cut out just to the right of the jig and just touching the receiver. Those are what you will use to squish down the rivets.
I use a big H frame hydraulic press to do a lot of my rivet work. I have also used rivet sets and bucking bars for this as well. But for this step I did use the press and my ak-builder jig .Of course, I did not take a photo of this step and I don’t know why 🙂
If you buy a hydraulic press to build AK rifles, I would recommend at least getting a 12 ton unit. I have a 20 ton unit and it works great.
In the below photo you can see two of the four forward rivet sticking up. The square plate goes on that and then you use the bar to apply the pressure from the ram of the press. Keep checking things carefully. It doesn’t take a great deal of pressure to squish the rivets down and you’re looking for them to be flat.
When you get done, the trigger guard will be secured against the receiver, the inside rivets will be flat and the outside rivets will have nice round domes. I am jumping ahead of bit but with the below photo but you can see some of the squished rivets slightly.
And here are the domes that were protected by the dimples cut in the jig.
So that is it for the trigger guard. Next up are the trunnions.
If you find this post useful, please share the link on Facebook, with your friends, etc. Your support is much appreciated and if you have any feedback, please email me at in**@*********ps.com. Please note that for links to other websites, we are only paid if there is an affiliate program such as Avantlink, Impact, Amazon and eBay and only if you purchase something. If you’d like to directly contribute towards our continued reporting, please visit our funding page.
It’s been a couple of years since I last had time to build an AK and definitely felt the need to catch up. Contrary to what some may think, the majority of guys who like building guns aren’t trying to bypass laws – they genuinely enjoy it. Think of it as being similar to building a model but this one can go “bang” 🙂
I think I got bit by the AK builder bug in 2006 after reading an article in Shotgun News by Steven Matthews about building AKs. The rest, as they say, is history. At the time, you could buy a kit for $50 if you shopped around then after the barrel ban went into effect, the prices just went up and up. Now, with the advent of US and foreign barrels plus businesses that are selling kits with headspaced barrel assemblies, prices are relatively affordable. They are still far higher than years ago, but you can build your own entry level AK for about $500 and then the prices just go up and up.
At this point I have to answer the question “Why do it when you can buy a complete AK rifle for the same amount or less?” In short, you get to control as much of the quality as you want is the answer. Like anything, someone can always figure out how to make an AK cheaper but that doesn’t mean better. Frankly, some of the US-made AKs are total pieces of shit if you will pardon my French and complete honesty. The internet abounds with stories of busted US made parts and hack assembly jobs. Really, the only AKs I would recommend are going to come from custom or semi-custom shops like Two Rivers Arms, Jim Fuller’s Rifle Dynamics, Jim Roberts, Krebs and so forth.
Certainly there are good foreign made AKs but even they can have quality control moments. Zastava can make excellent AKs if they choose to is one example. Russian Molots are my all time favorite but they are banned from further import though there seems to be a ton of them still for sale and prices haven’t gone up much. Bulgarian AKs can be good and that is one reason K-Var can charge what they do. One country with a long AK history that not all American’s know about is Poland. It would be cool if they start selling more models into the US- market but at least Arms of America is bringing in a wide variety of kits right now.
So that brings me full circle. Why do I want to build vs. buy? Because I like building them and I can make an AK do just about anything I want it to at this point. I’ve done rivet, screw and weld builds. I’ve built Romanian, Hungarian, Polish and Yugoslavian AKs and RPKs. I’ve done traditional looking builds and over-the-top “tacticool mall ninja this thing is way too heavy” builds. Seriously, I kind of went nuts with a Hungarian AMD-65 about 10 years ago and put on a quad rail with a red dot, laser, light vertical fore grip and bipod. The thing was so heavy that it literally taught me that just because you can add something on does not mean you should – it takes time and energy to bring something that heavy up into position and also to stop it once on target.
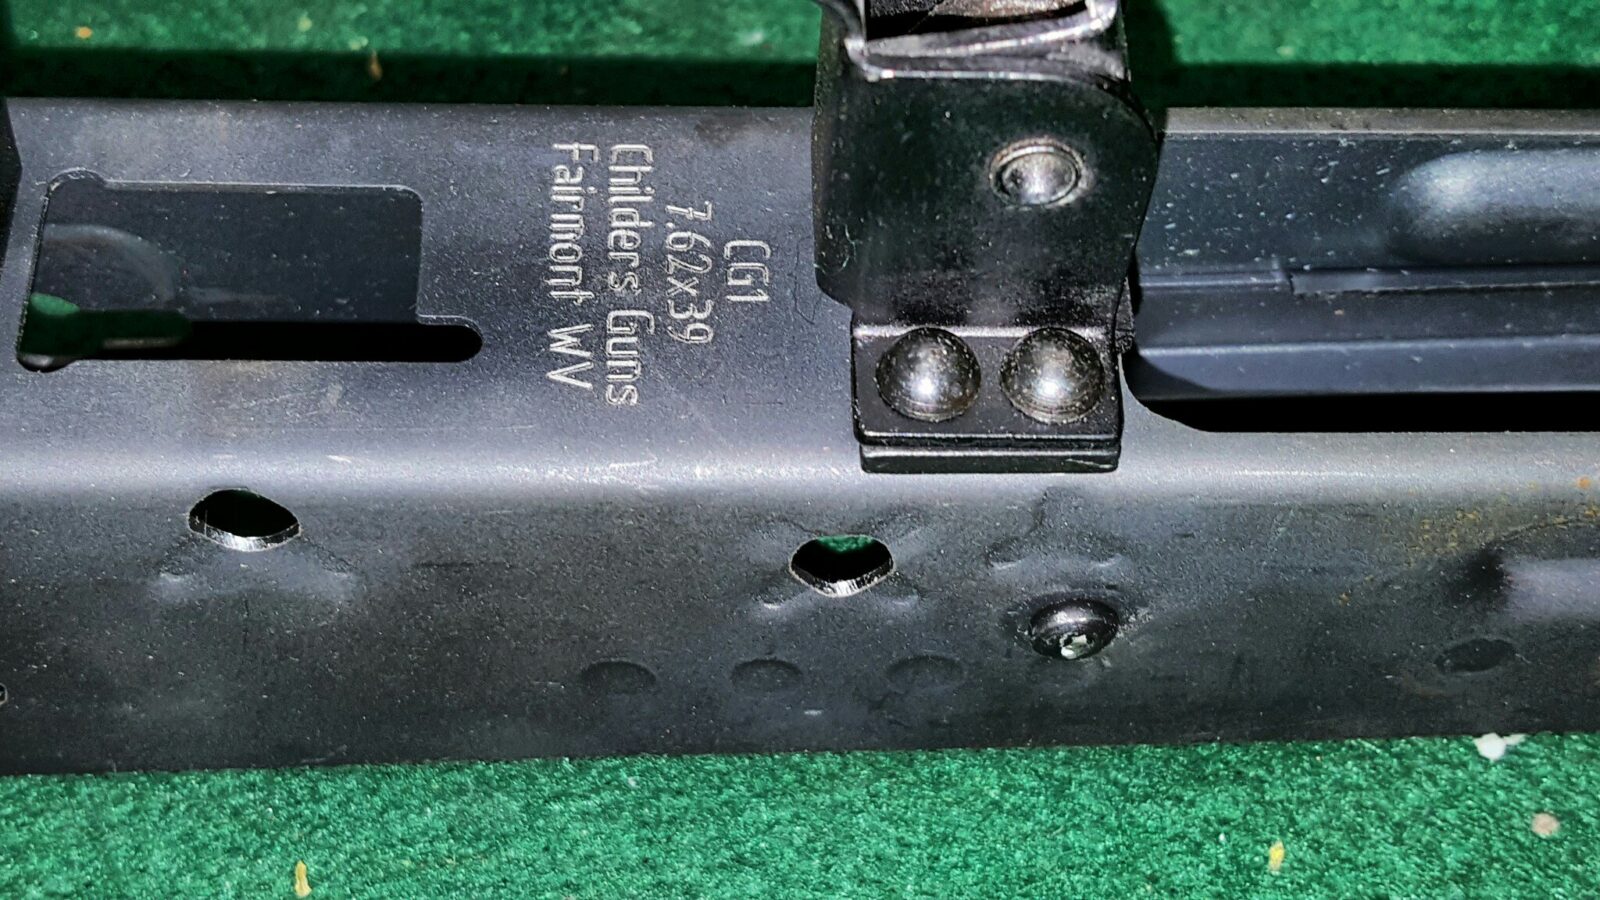
I’m not saying I know everything. I’m just saying I know my way around the AK platform well enough to build what I want. The hardest thing for me is finding the time between my day job, family and Ronin’s Grips. So, an interesting opportunity presented itself because I had Polish Beryl furniture, Childers Guns sells Polish receivers and Arms of America (AoA) had a cool kit for sale. It was a WBP 7.62×39 kit with a Polish chrome-lined Cold Hammer Forged (CHF) barrel that is arguably, and it will start arguments, one of the best AKM-style barrels you can buy right now. The kit included a solid-steel Bery-style optics rail that goes over the dust cover and for about $670. This appealed to me because I already owned the Beryl handguards, was getting ready to release our version of the modern Beryl grip and, separately, AofA was selling a collapsing Beryl stock that is a unique looking beast for sure.
So, I got the wheels in motion and ordered the kit stock plus some translucent WBP mags from AoA, a RRD-4C brake from JMac customs, an ALG trigger and a Vortex Crossfire Red Dot. I ordered a completed 100% receiver from Childers Guns and had it sent to my FFL and good friend, Scott Igert, of Modern Antique Firearms.
Once it all arrived, it was time to start.
If you find this post useful, please share the link on Facebook, with your friends, etc. Your support is much appreciated and if you have any feedback, please email me at in**@*********ps.com. Please note that for links to other websites, we are only paid if there is an affiliate program such as Avantlink, Impact, Amazon and eBay and only if you purchase something. If you’d like to directly contribute towards our continued reporting, please visit our funding page.
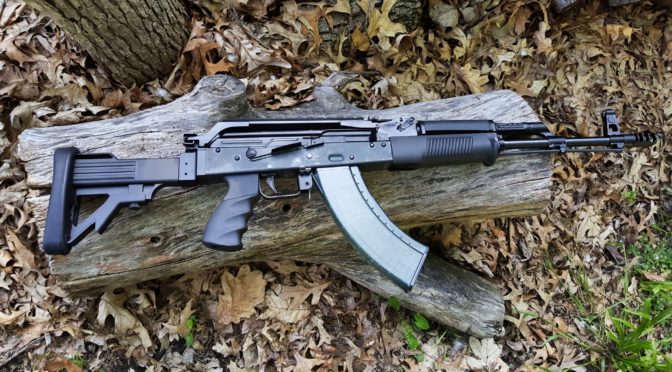
I will do a more In-Depth series of posts about building this rifle later. It is a Polish WBP kit l at the heart from arms of America with a Polish cold hammer-forged Barrel. The internals are installed in a Childers Guns receiver. The trigger is from ALG and I absolutely love it. I kid you not, this is now the only trigger I will use because it is so good.
The muzzle brake is a JMAC RRD-4C and boy does it eliminate muzzle climb. It made the rifle very controllable even during rapid fire.
The optic is a vortex Crossfire. The furniture is original polish Beryl with one of our US made 922r Beryl grips.
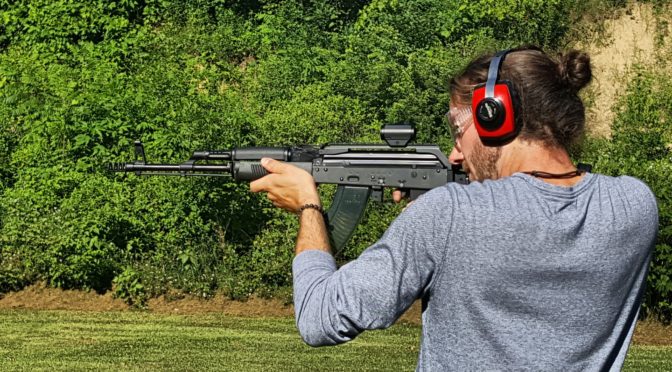
In the following video, this is my buddy Niko doing the shooting and while he is tall and wiry you can tell that the full-power Golden Eagle hundred and twenty four grain FMJ 7.62 x39 round is not moving him much at all.
The build turned out to be extremely reliable and accurate. Like I said I will post more details later but I’m thrilled with the results and had to jump the gun and share this!
If you find this post useful, please share the link on Facebook, with your friends, etc. Your support is much appreciated and if you have any feedback, please email me at in**@*********ps.com. Please note that for links to other websites, we are only paid if there is an affiliate program such as Avantlink, Impact, Amazon and eBay and only if you purchase something. If you’d like to directly contribute towards our continued reporting, please visit our funding page.
For years I used my 20 ton press to remove and install barrels on AK rifles and then somone, Gunplumber maybe, told me to try using an air riveter instead. You know what, it surprisingly works well and now I only use my press on the removal of really stubborn barrels.
I am going to throw two terms around in this post that I need to explain. Air hammers and air riveters are remarkably similar – a pneumatic (air powered) pistol is going down a bore and slamming into the end of the unit where a tool is attached. Thus they are delivered from the hundreds to almost three thousand blows per minute (BPM). What usually, but not always, differentiates the two is the degree of control you have with the trigger and an integral air regulator to adjust the BPM and how hard the blows are. If you see a tool with virtually no controls, it is likely an air hammer. However, as you will read here, there are air hammers that do overlap with air riveters.
With air riveters, the main thing you get is a variable flow trigger, sometimes called a “tickle trigger” and usually a built in air regulator. This allows you to really dial in the speed and strength of the blows. When guys gush about how well they can control a big riveter, pay close attention because they aren’t kidding. When you are building an airplane you need precision and you sure don’t want the riveter to slip and mar the aluminum. Traditionally with air hammers we think about driving apart exhaust pipes, cutting open barrels and what not. With air riveters, think of airplanes,
Okay – enough background – let’s talk about how to size these things – riveters are are sized based on the stroke length of the piston and an arcane naming scheme like “2X”, “3X” and “4X”. Each has a piston about one inch longer than the previous model and the longer the piston, the harder it hits and the bigger rivet you can drive. Think of the piston in a car – diameter and stroke set the stage for more power.
For example Aircraft Tool Supply sells all kinds of tools for folks who build airplanes and have decent riveters – I have one of their ATS-3X units and it has held up great. At any rate, here are their tool ratings for example:
Note how the stroke is increasing from their base 200B unit through the 4x. When you get to the 5x and 7x, both the stroke and bore size increase. The capacity stated is for aluminum rivets so for steel rivets go two sizes up was a rule I was once told.
Most rivets you encounter around firearms will be steel and between 5/32″ to 3/16″. I was told not to go smaller than 3X and have no regret with doing AK trigger guards but I did wind up with two units because I wanted to more powerful unit for barrels and barrel pins. By the way, I was told not to go too small or all the hammer blows would risk work hardening the rivets.
Historically, I have mainly used this riveter for the trigger guard and an occasional barrel pin. For most of my heavy work such as barrel pins and barrels, I use an Ingersoll-Rand (IR) model 117 air hammer. Now here’s the interesting thing – most air hammers, especially cheap imports, do not have variable triggers – they tend to be on or off. Like riveters, the IR 117 has a variable trigger and a built in regulator. With piston stroke of 3.5″, and an 22/26″ bore it makes the 117 a tad bigger than the 4X riveter from ATS so all things being equal, the IR 117 will hit harder.
I know Harbor Freight has an air riveter now (they didn’t when I bought mine) but have zero experience with it and also not so good experiences with their air hammers not lasting.
Even Amazon now has a wide selection of 3x and 4x riveters. Click here to see them in a new tab. Amazon’s searches return pop riveters and all kinds of stuff – you want the solid rivet guns to be clear.
A big requirement for this work is control – you need a variable trigger so you can get just a few blows all the way up to continuous. A regulatory allows you to adjust how hard the unit hits. Some past import air hammers I have used seemed to have triggers that were either wide open, or completely unpredictable. If you have one that is this way, don’t try working on a firearm that you care about.
Both the ATS and IR units were recommended to me and I both do a great job. Note, there are bigger riveters and air hammers out there but you will notice that the tool shank goes from the very common 0.401″ to a larger diameter such as 0.498.
At any rate, let’s get back to barrels. Modern AK barrels are what is known as an interference fit with the barrel being pressed into the front trunnion and locked in place by a cross pin. In general a 12 ton press will do the job reliably but it takes a while to get the jigs set up and parts ready to go. A 4X riveter will usually do the job also but with way less set up time. I say usually because once in a while you run into pins or barrels that just do not want to come out and that’s when a big press is the way to go.
Practice First
Let me give you one piece of honest advice – if you go this route, practice before you beat the snot out of your parts. Air riveters and hammers want to move around on you and you need to know how to control them.
Removing the Barrel Pin
Now you may wonder why I went the pneumatic route vs. sticking with my press. The answer is real simple – when I am taking stuff apart, I don’t want to take a ton of time. I can use the 117 to pop out the barrel pin with either a drift pin or a tapered pin in seconds with very little set up. I usually just put the trunnion and barrel assembly on bench block with a hole for the pin to enter as I drive it out from the other side – I drive from the operating side (right when viewed from the top) towards the non-operating side (the left side).
If you are using a tapered pin driver, get the pin started and stop before the tool will hurt the trunnion. You can drive it out the rest of the way fairly easily with a drift punch and a big hammer. If you have drift punches for your air tool, just pick one slightly smaller than the hole and drive the pin out.
These days I keep parts in a magnetic tray to avoid losing them and that’s where I stick the barrel pin. If you ever lose or damage the pin, get a 7mm drill bit and cut off the shank to create the length you need. I used to keep 7mm drill rod somewhere – I’m not really sure where it is now.
Backing Out the Barrel
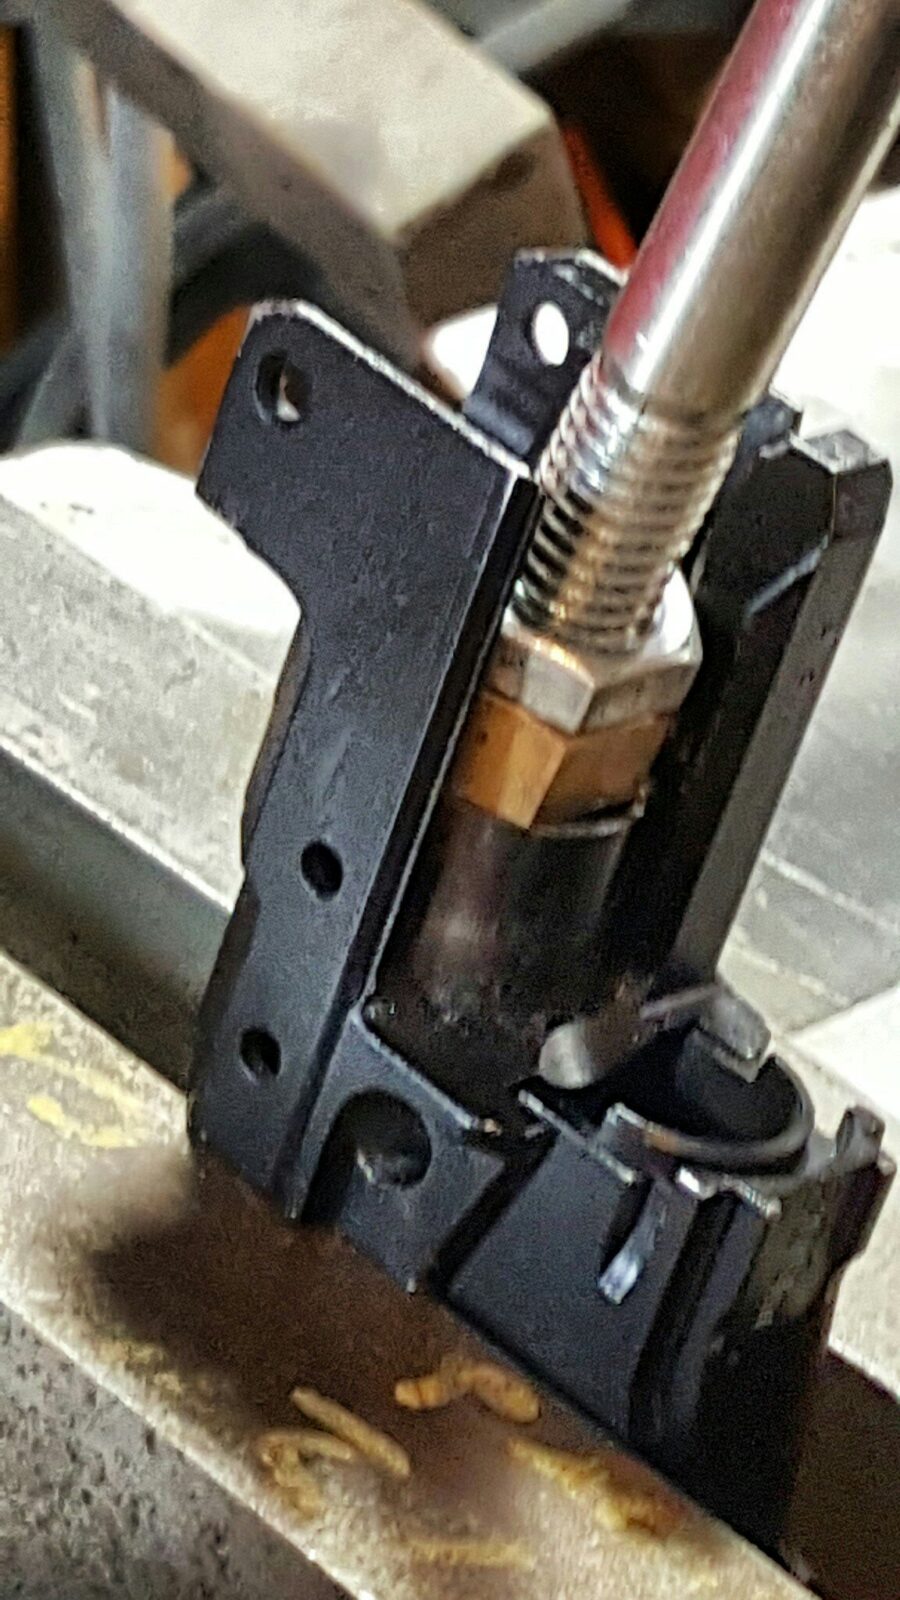
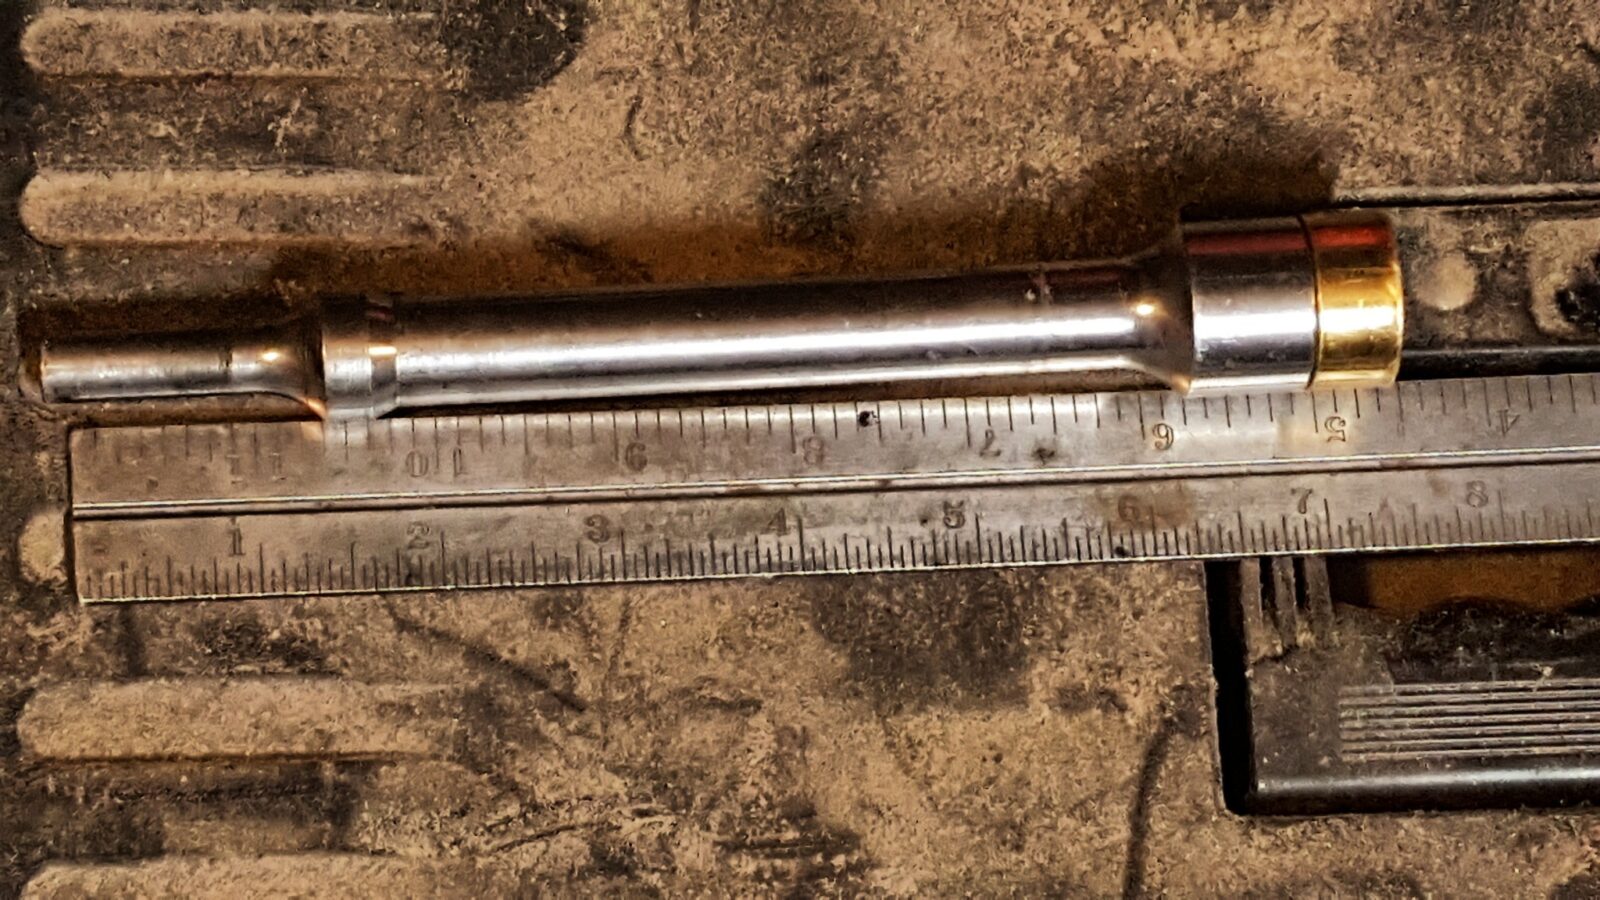
Driving the barrel off the trunnion is pretty easy but you do need to make a tool that fits in the trunnion and has a brass “head” to drive the barrel out without damaging the chamber end – DO NOT USE STEEL – it needs to be a softer metal and brass does a good job.
My backout tool is a 6″ long 1/2″ bolt with a brass nut on the end with a ground down steel backing nut behind it:
Why 6″ long? Because that is what I had in my box. Shorter would be more controllable. I actually have a long 12″ unit I use if I need to back a barrel out of a trunnion that is in the receiver.
Here’s a photo of the ground down steel backing nut and the brass nut that sits on the chamber end and applies the actual blows to drive it out.
You definitely need the steel backing but or the brass will deform and come off the threads. You can also see how the brass extends in front of the bolt – I always check to make sure I have about an 1/8th inch or so of brass before I use it. This is basically a shorter version of my barrel back out tool (click here for the post about that from way back when).
Now to deliver the blows on the business end of my IR 117 is a 7″ brass peening tool that ATS sells directly. I bought a 3″ unit but it will not fit in the wire retainer of my 117. They also have a 5″ model that I bet would work fine.
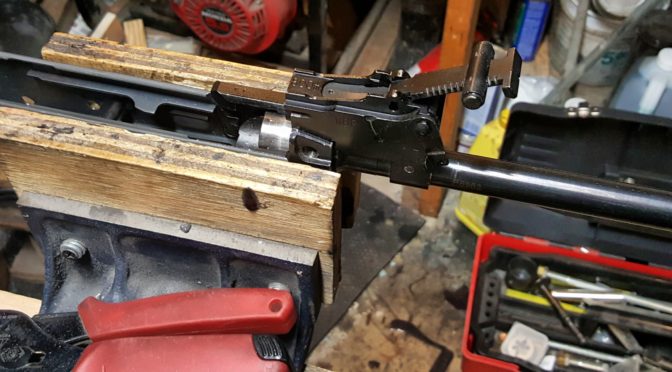
So, I mount the trunnion in my wood jawed vise to not tear it up, insert the backout tool and then use the 117 to apply the blows. I will hold the bolt with one hand and use the 117 with the other. Do NOT put your hand where the bolt and peening hammer come together or you will pinch the hell out of it. I did that once years ago and it taught me a lesson complete with a blood blister as a reminder.
So I do a bit and check – I do not try to do it all at once. By looking int he barrel pin hole, you should see it slowly backing out. In general, the last bit of removing the barrel I do with a big ball pein hammer to make sure the barrel assembly either is pulled out the last bit by me or land in some form of box or cushion vs. the hard floor.
That’s it! The barrel is out.
Installing the Barrel
To install a barrel, I first install an old slant brake that I ground flat to protect the threads. I have not used a muzzle nut because they do not seem to offer much protection to the front of the muzzle – they are mainly designed to protect the threads. With the ground down slant brake, there is a plenty of material in front of the muzzle to protect it.
You can see how it has mushroomed over time but that’s fine. I’ve used it a ton and if I ever have a problem, I’ll chuck it and make another.
My best guess is that it came out of a Romanian G kit years ago. I have a bunch of oddball parts like this that got replaced by US parts for the sake of 922r compliance.
I thread the converted brake / muzzle protector all the way back on the barrel to engage all the threads possible and back it right against the front sight block (FSB). The idea is that you want the threads to take the impact and not the muzzle.
To start the installation, I push the barrel assembly into the trunnion and tap it with a big ball pein hammer. I keep sighting down the rear sight block (RSB) making sure it is true. At the point, you can use a rubber mallet or other non-marring mallet to tap the RSB and angle the barrel slightly one way or the other to course correct. It is really, really important to get the alignment right at the start. You will not be able to adjust it once you get very far in. If it turns out you have alignment problem later, I would recommend driving the barrel assembly out and starting over.
To do the actual driving, I use the IR 117 with the brass peening hammer attachment. I put the brass hammer face right on the converted slant brake and drive it in. I keep checking the barrel pin hole to make sure I stop just short of the final location and that it is aligned. If the surfaces are not aligned, I would drive the barrel back out and start over. In this next photo, you can see I stopped just short of where I need to be.
Now this particular kit was a headspaced Polish WBP kit and I had checked headspace before I removed the barrel. If I needed to set the headspace, I would start checking it somewhere around here.
At this point, I drive the barrel in the rest of the way by tapping the end with a big ballpein hammer – or any BFH will do 🙂 It really doesn’t take a ton of energy. You want to tap and test over and over. Don’t get impatient and try and drive it in all at once or you risk overshooting where you want to be. If you do overshoot, it’s going to take some time and you need to make that longer barrel backout tool and either use your press or your air tool (I’d use my IR 117) and push it back out just enough to then fine tune the location.
Do not use headspace gauges as barrel stops. You may know this but just in case you don’t – gauges are precision instruments and you only install them to test the headspace and *not* as a way to stop travel. I’ve heard of guys doing that and, for a change, I wasn’t one of them 🙂
Once the channel is clear and you have one nice continous path from one side of the trunnion to the other it is time to reinstall the pin.
Installing the barrel pin
With I do is start the pin with a big ball pein hammer and then drive it in the rest of the way with an old rivet set that I use just for this purpose. Years ago I bought a ton of used 0.401 shank rivet sets and rivet tools off eBay for a very reasonable price. I use one that covers the pin nicely and drive it right in and let me tell you, it goes in fast. You can stop short and drive it in the test of the way by hand if you want. I tend to just drive it right into place with the air tool.
By the way, I’ve accumulated a number of rivet tools and bucking bars over the years. Here’s a quicksnap shot of my toolbox:
I’ve bought a number of rivet tool lots from eBay over the years.
That’s it – done. I hope this helps you out!
By the way, here are used rivet tools currently on eBay. Be sure the shank size matches your air hammer or air riveter (all of mine are 0.401″ for example).
Palmetto State Armory (PSA) has a stunning array of Kalashnikov firearms now. AK-47s, AK74s, 100 series, rifles, pistols … it’s impressive. Click here to go to their main AK menu.
If you find this post useful, please share the link on Facebook, with your friends, etc. Your support is much appreciated and if you have any feedback, please email me at in**@*********ps.com. Please note that for links to other websites, we are only paid if there is an affiliate program such as Avantlink, Impact, Amazon and eBay and only if you purchase something. If you’d like to directly contribute towards our continued reporting, please visit our funding page.