Tag Archives: Handguard

Fitting a C39 Micro Orca Handguard

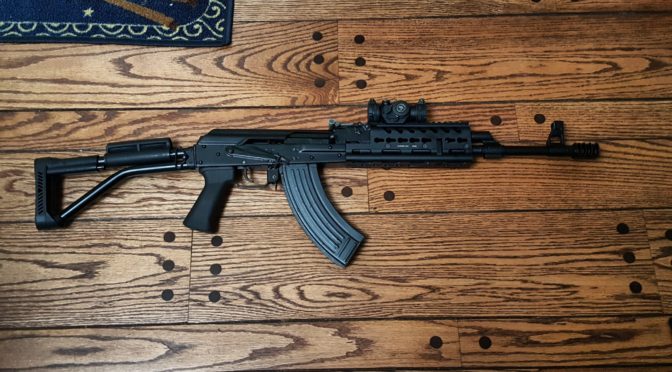
By popular demand we are bringing back our C39 Micro handguard that can also be fit to the Micro Draco. The purpose of this post is to share some fitment issues you need to be aware of and general guidance.

In my honest opinion, installing the Orca requires some expertise with woodworking or machining and is not something I would recommend to a novice. it is not just a drop in handguard like you would expect with an AR handguard for example.

Safe Use Is Your Responsibility – This is a short handguard on a short pistol. Please be mindful of safety whenever you are shooting it. Do not let anyone with a weak upper body, grip or who can’t control the pistol, fire the pistol.

Why You Must Fit the Handguard – A First-Hand Lesson

There are two reasons – first, there are a lot of things that can differ pistol to pistol and the pressure casting method we use has a tolerance that will require you to make some adjustments.

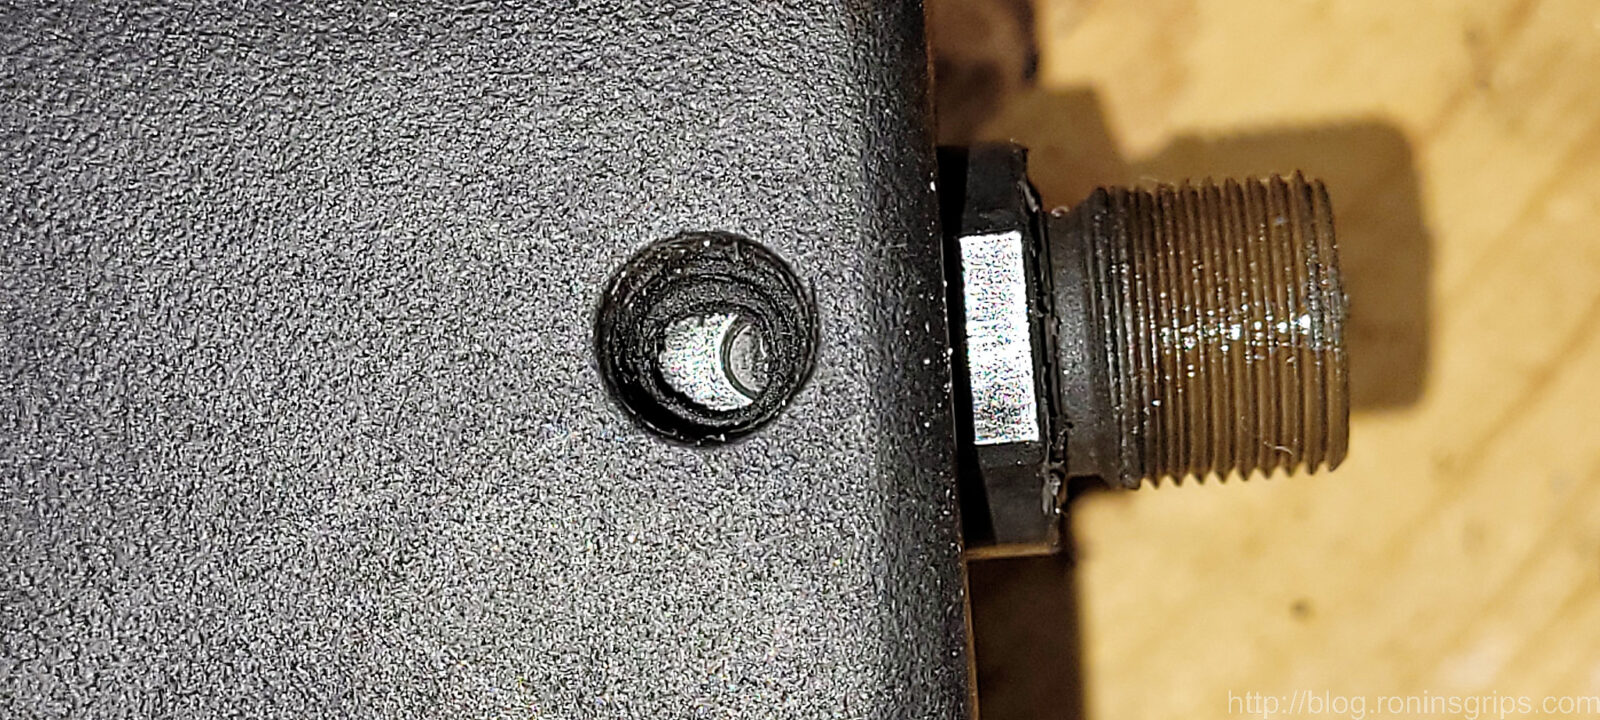
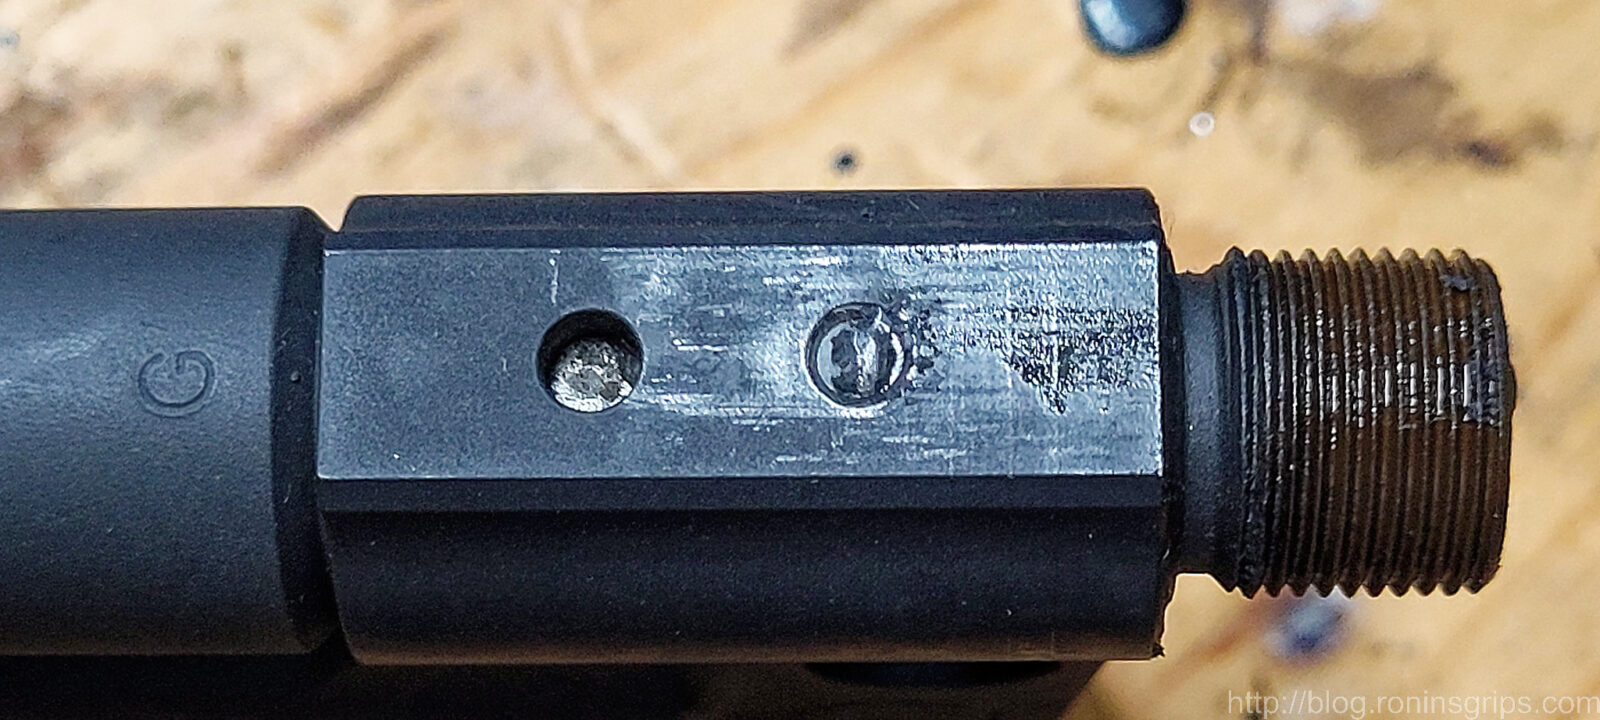
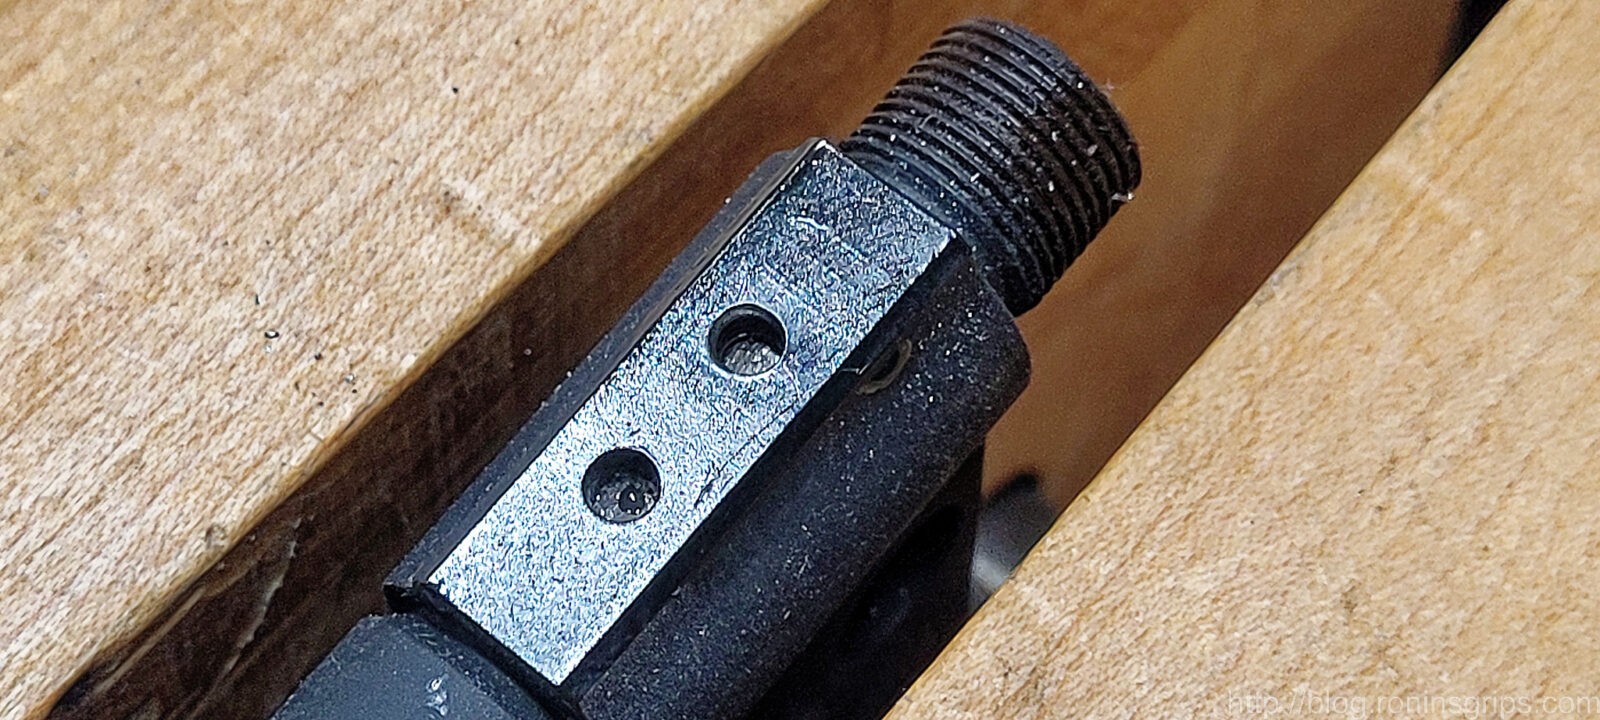
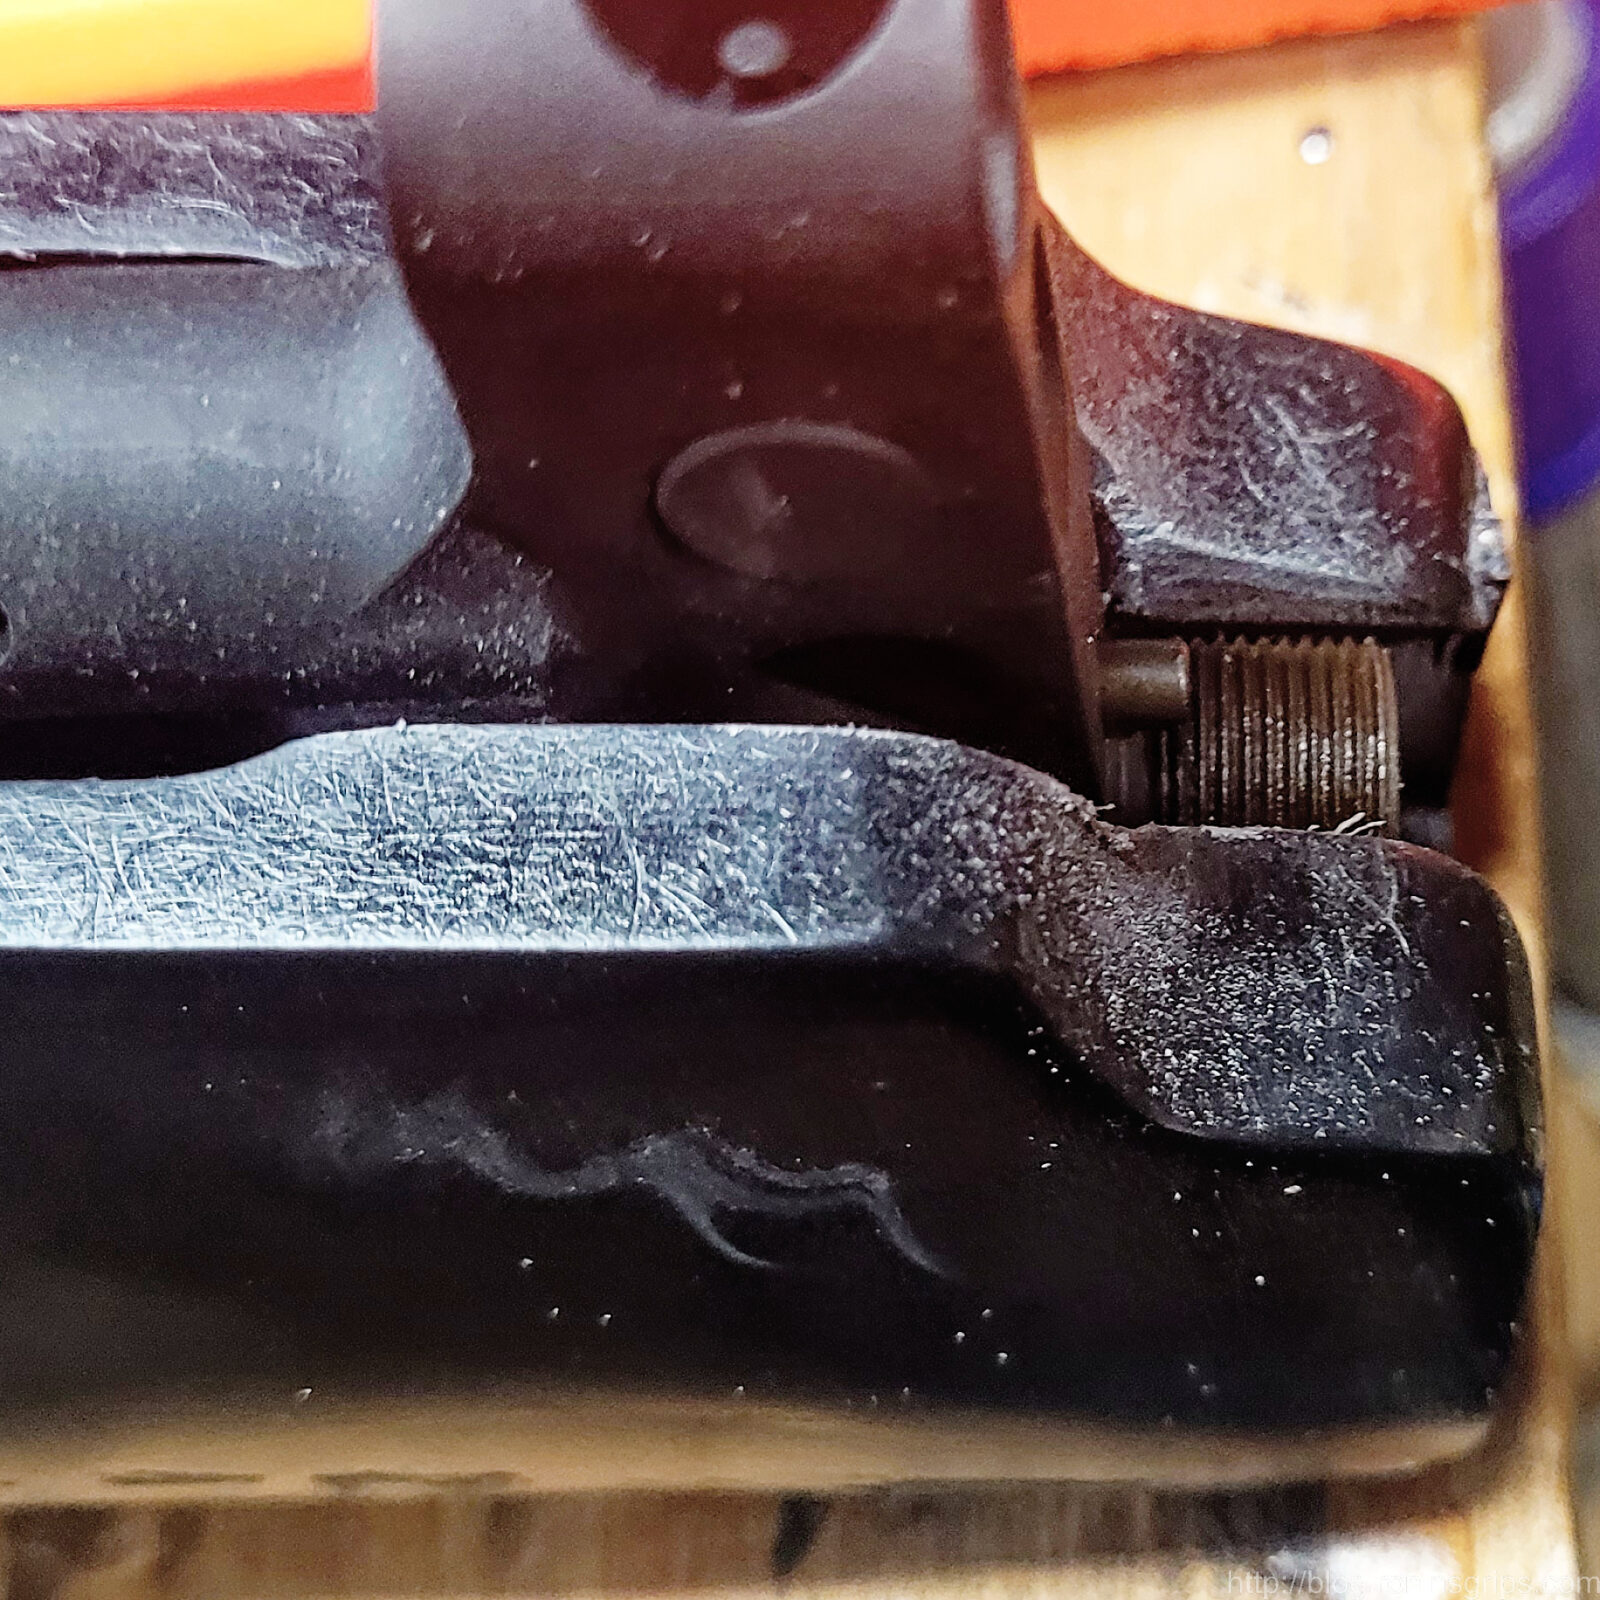
Second reason, the rear of the handguard must butt up against the front of the receiver to transfer the stress of recoil. If these surfaces do not contact each other, all of the stress will be placed on a small #8-32 screw that can’t handle the load and will shear off – I’ll show you what I mean.

Some time early this year, my friend Scott told me the screw sheared off when his wife was shooting his C39 Micro. This caused me to stop bringing the Orca handguard back until I sorted things out.

So, I finally had some time to look at it and the handguard wasn’t fully seated back against the receiver. His was the first Orca I made and I missed it. So, the Orca beat the heck out of the screw until it snapped off.

C39 Micro Orca handguard with threaded barrel and mounting screw
The handguard is firmly against the receiver and you can see what was left of the screw was towards the front of the hole. This tells you that I messed up installing it years ago and the #8 screw was taking all of the load.
The Uzi Submachine Gun examined: David Gaboury book cover
The screw sheared off right at the top of the hol.
The Uzi Submachine Gun examined: David Gaboury book cover
I sanded it flat, center punched the screw, drilled a hole and then used a Hanson screw extractor to back it out.
The Uzi Submachine Gun examined: David Gaboury book cover
Thanks to Brownell’s Oxpho-Blue, you would never know the original finish was missing.

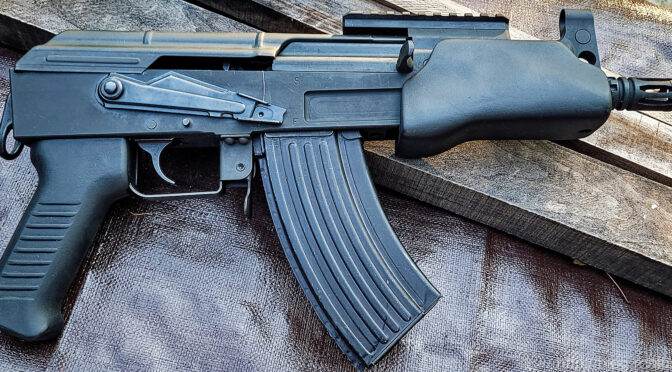
Fitting the Handguard the Right Way to a C39 Micro

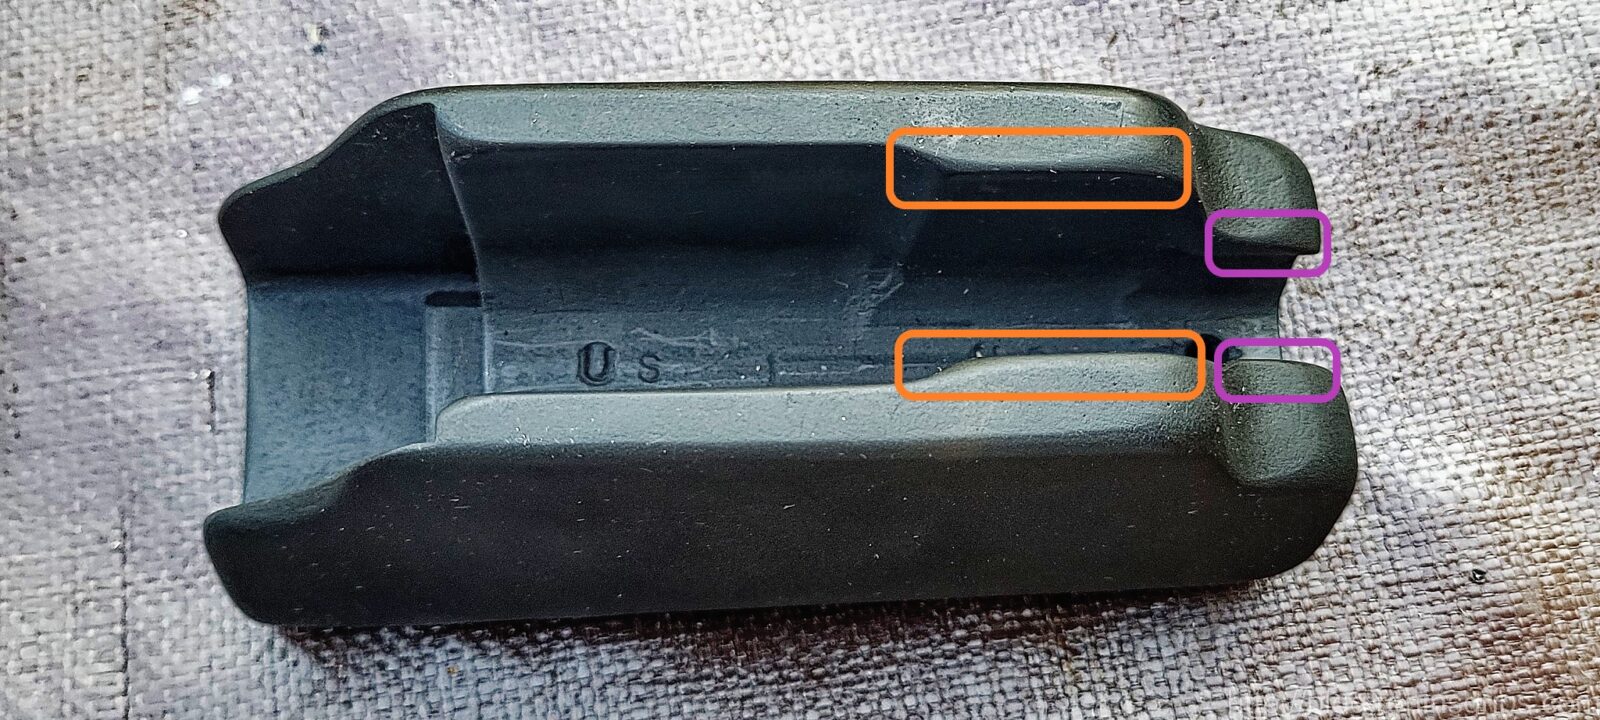
Armed with what went wrong, I dug in. I had the original handguard and I also cast two new ones to test with. For those of you reading this to install an Orca on a Micro Draco, read this for information but there will be a section further down with a video you need to watch.

Safety Brief: Before you do anything with your pistol, please make sure it is unloaded and safe.

Okay, the plastic used is a temperature resistant glass fiber reinforced urethane. It does not like to bend or compress. Think of it as a hardwood with an attitude. It can be sanded, filed, whatever you like. Wear a dustmask to avoid breathing the dust – you don’t want to do that.

The Uzi Submachine Gun examined: David Gaboury book cover
The orange areas will likely need trimming to clear your gas block and the purple areas may need adjusting to allow the area around the barrel to seat. The orange virtually always needs adjusting the but the purple may or may not.

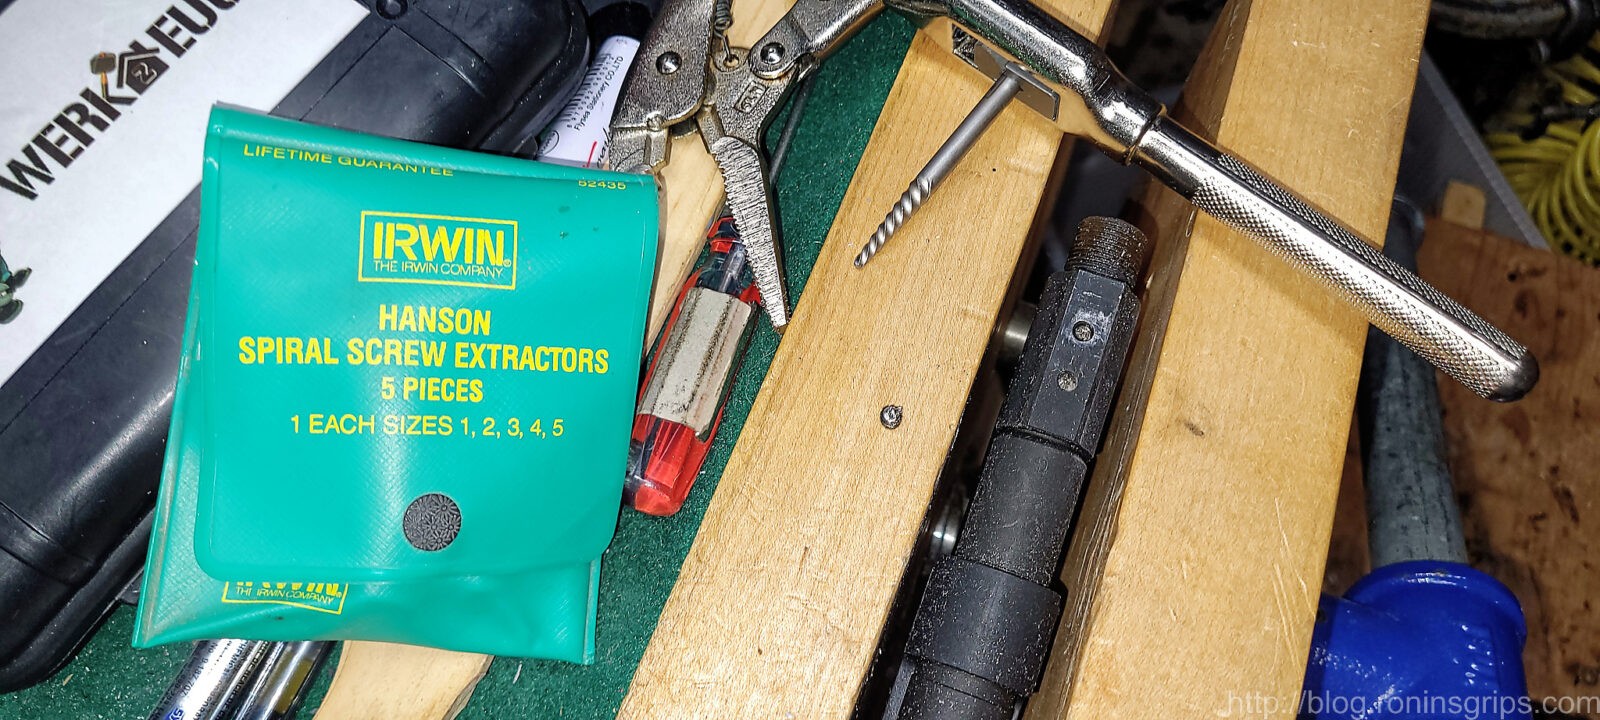
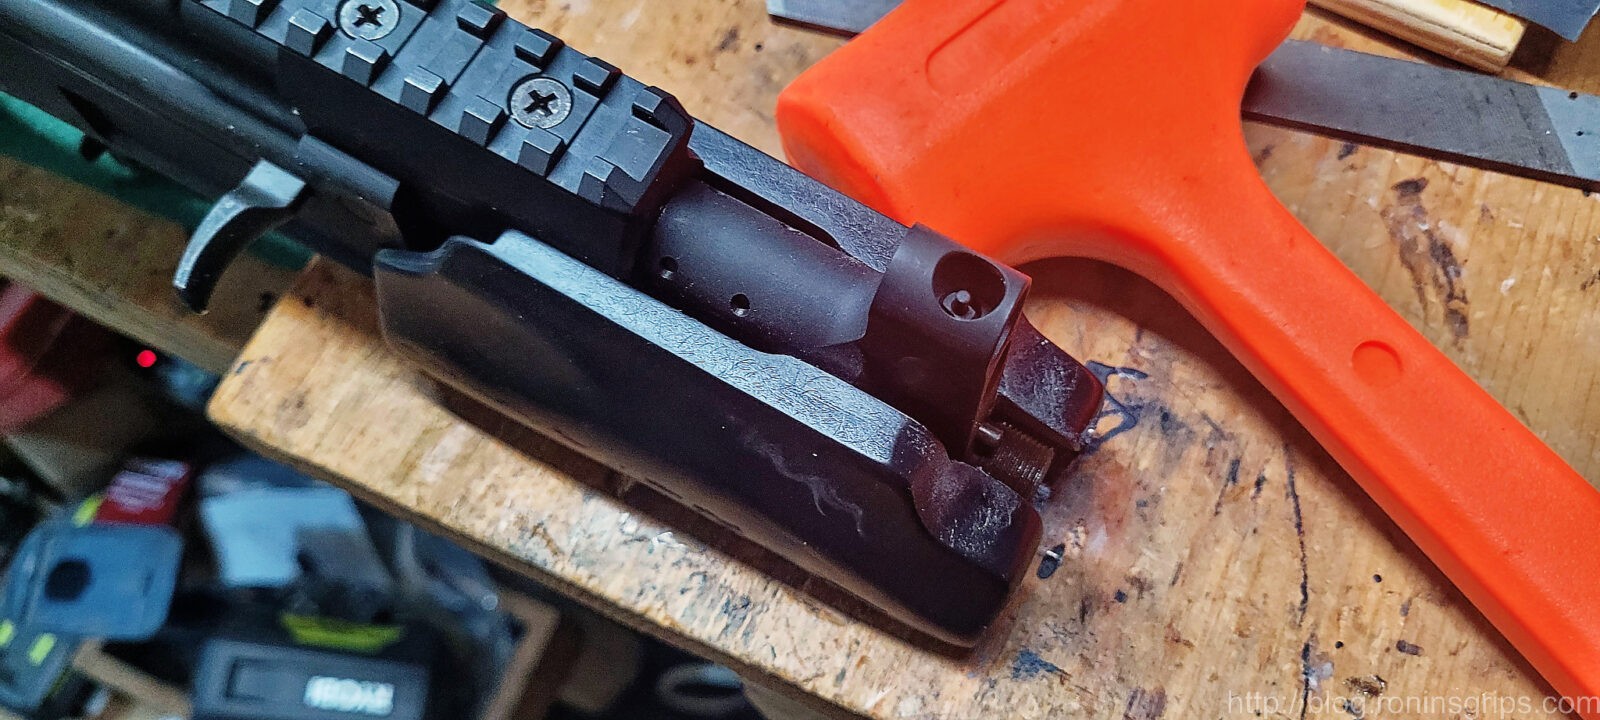
To fit the handguard, pretty much all you need is a file or sandpaper wrapped around a couple of paint stir sticks. I just use a file and you’ll see what in the photos.

The Uzi Submachine Gun examined: David Gaboury book cover
I use a file and take the same amount off each side. Count your strokes and equal pressure. Don’t try and remove everything at once – take off just a bit and test over and over.

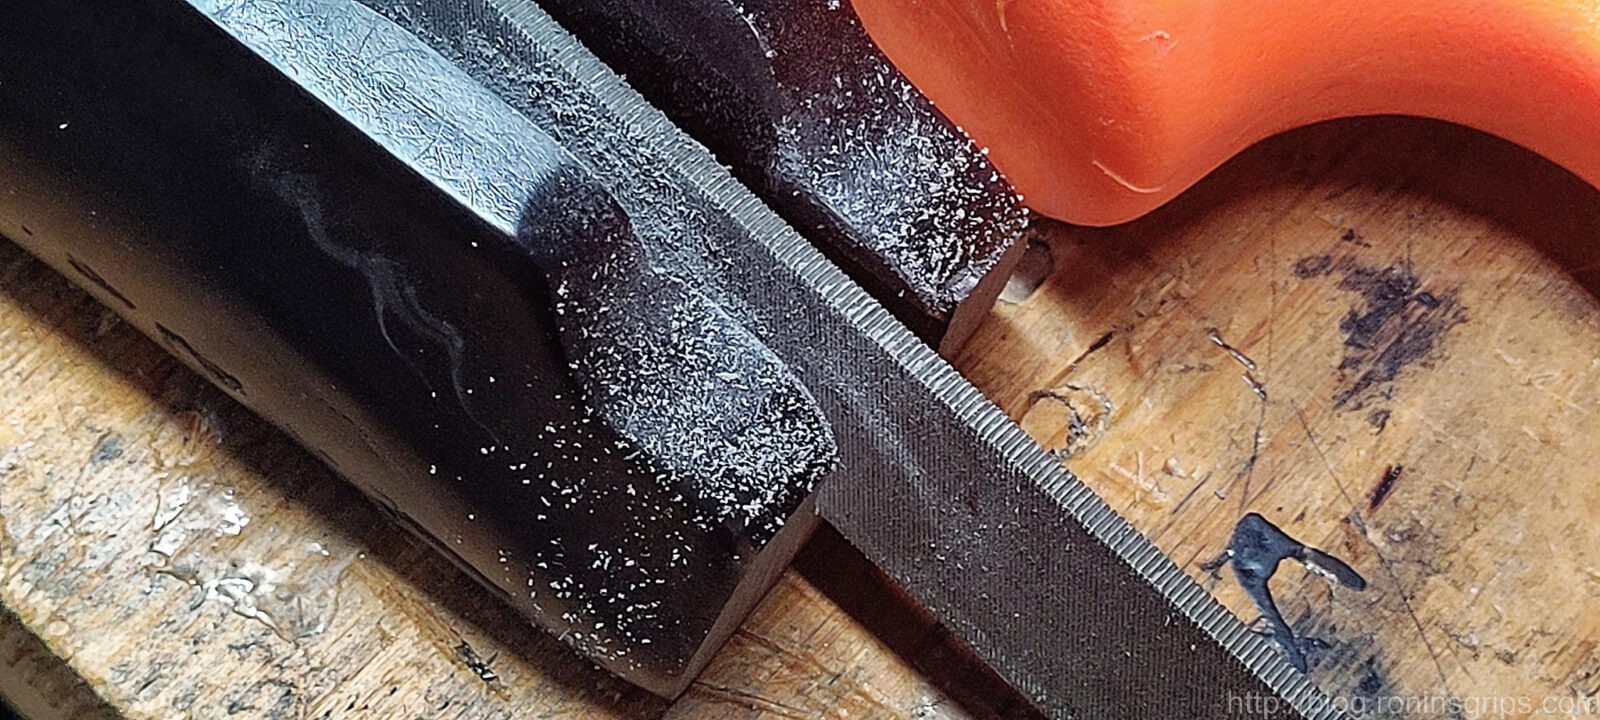
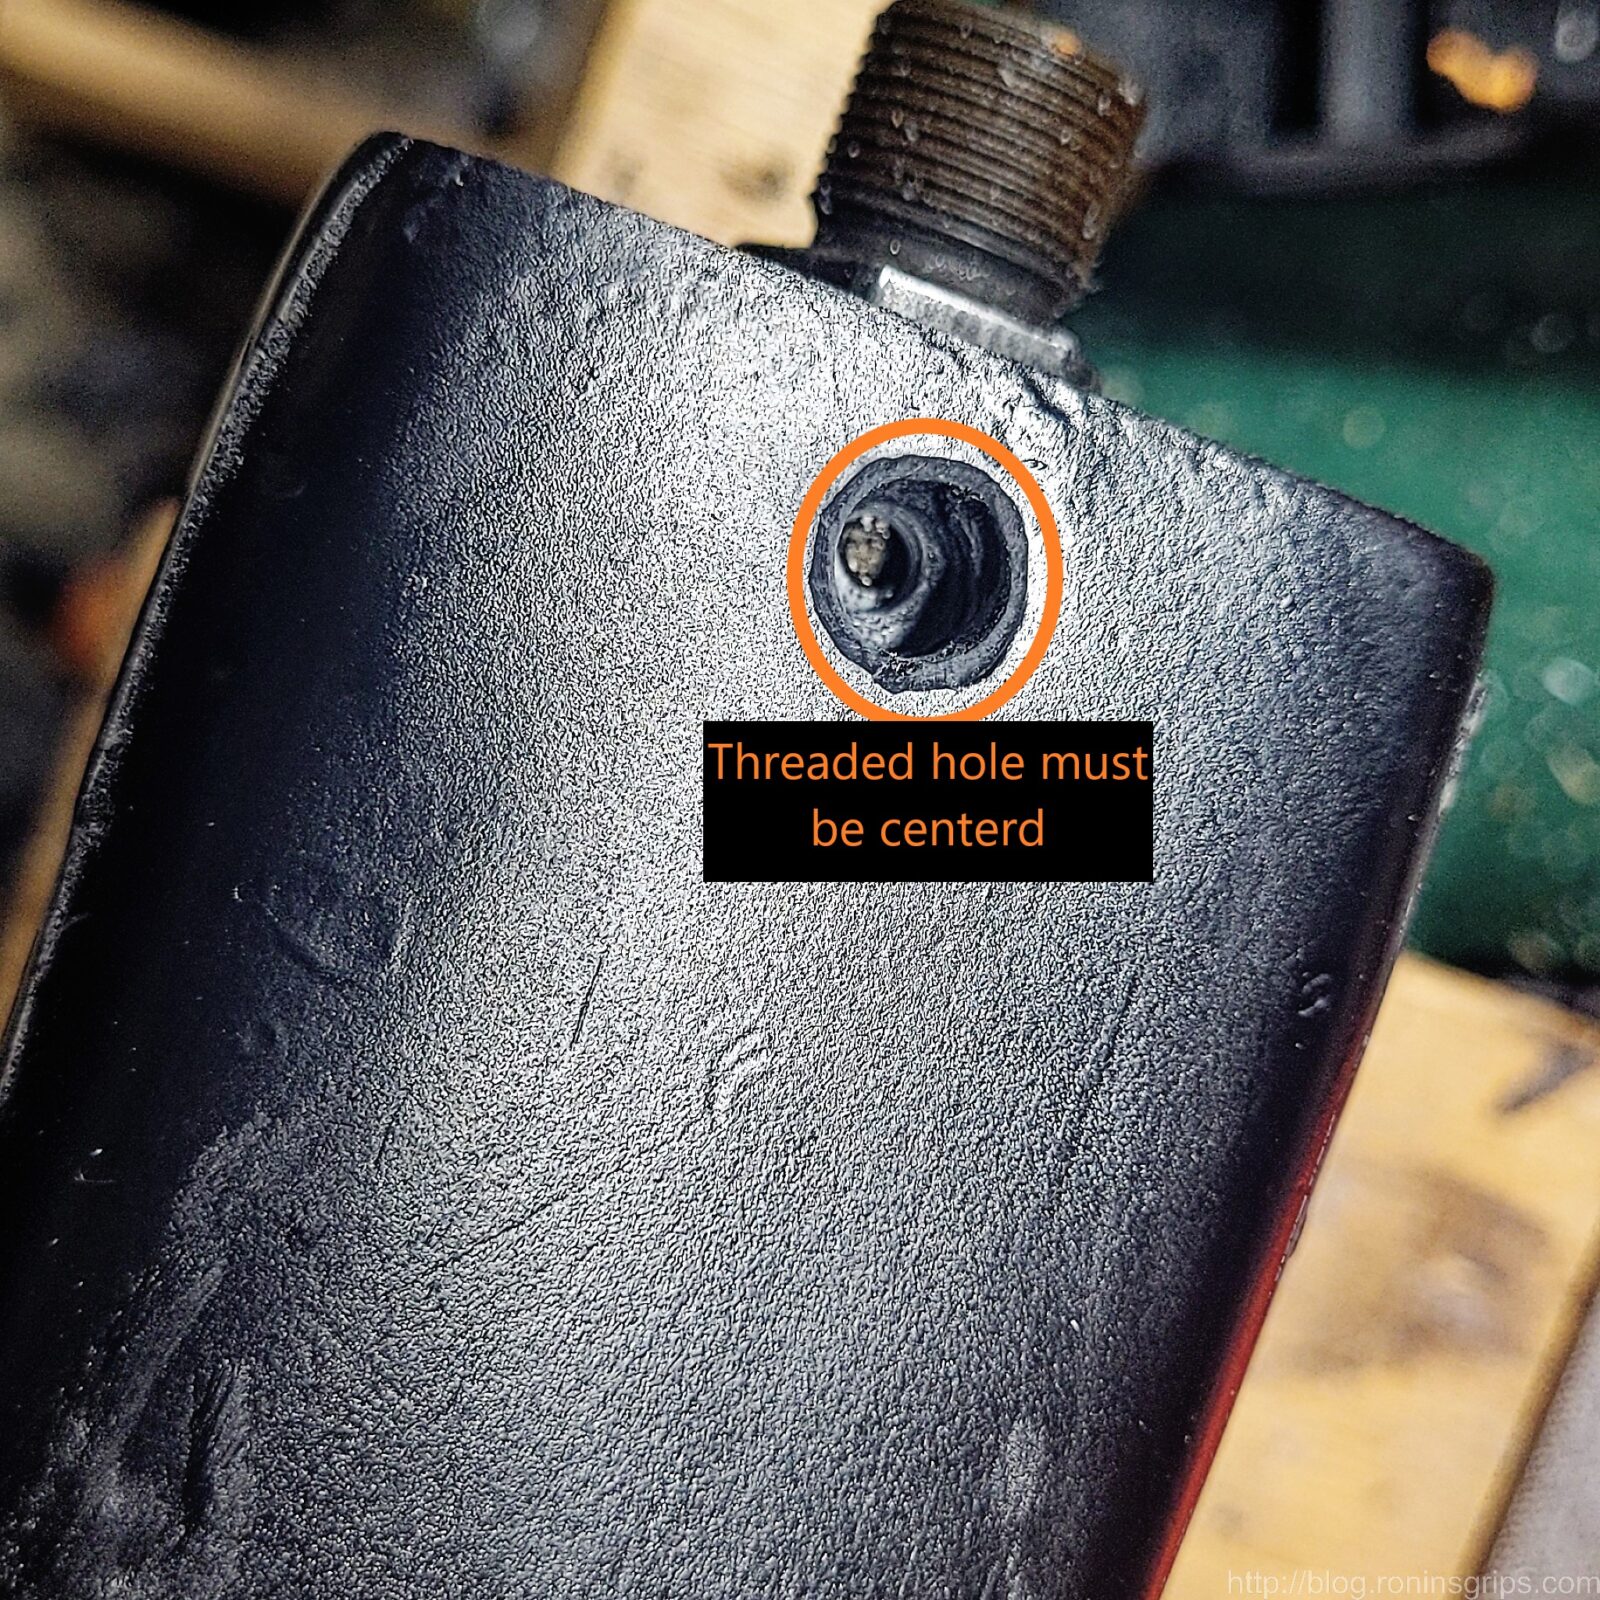
When removing material, do it equally with a few strokes from each side. If you slide the handguard on and the screw hole is off-center then you need to decide which side needs adjusting. Ideally, you don’t want to see that at all – remove material equally from both sides and do it slowly – don’t rush.

The Uzi Submachine Gun examined: David Gaboury book cover
The sides need to clear the gas block and gas tube.
The Uzi Submachine Gun examined: David Gaboury book cover
When you are trying to clear the front, make sure the barrel is to the bottom of the handguard. Here, it is sticking because it is out of position towards the top.
Close-up of C39 Micro Orca handguard showing screw and barrel nut
This test handguard had the waste plastic sawed off but no sanding that’s why the front looks so coarse. I wanted you to see that it is a snug fit up front and the barrel must sit down in the channel during fitting and testing.
The Uzi Submachine Gun examined: David Gaboury book cover
You will need the threaded hole to be centered.

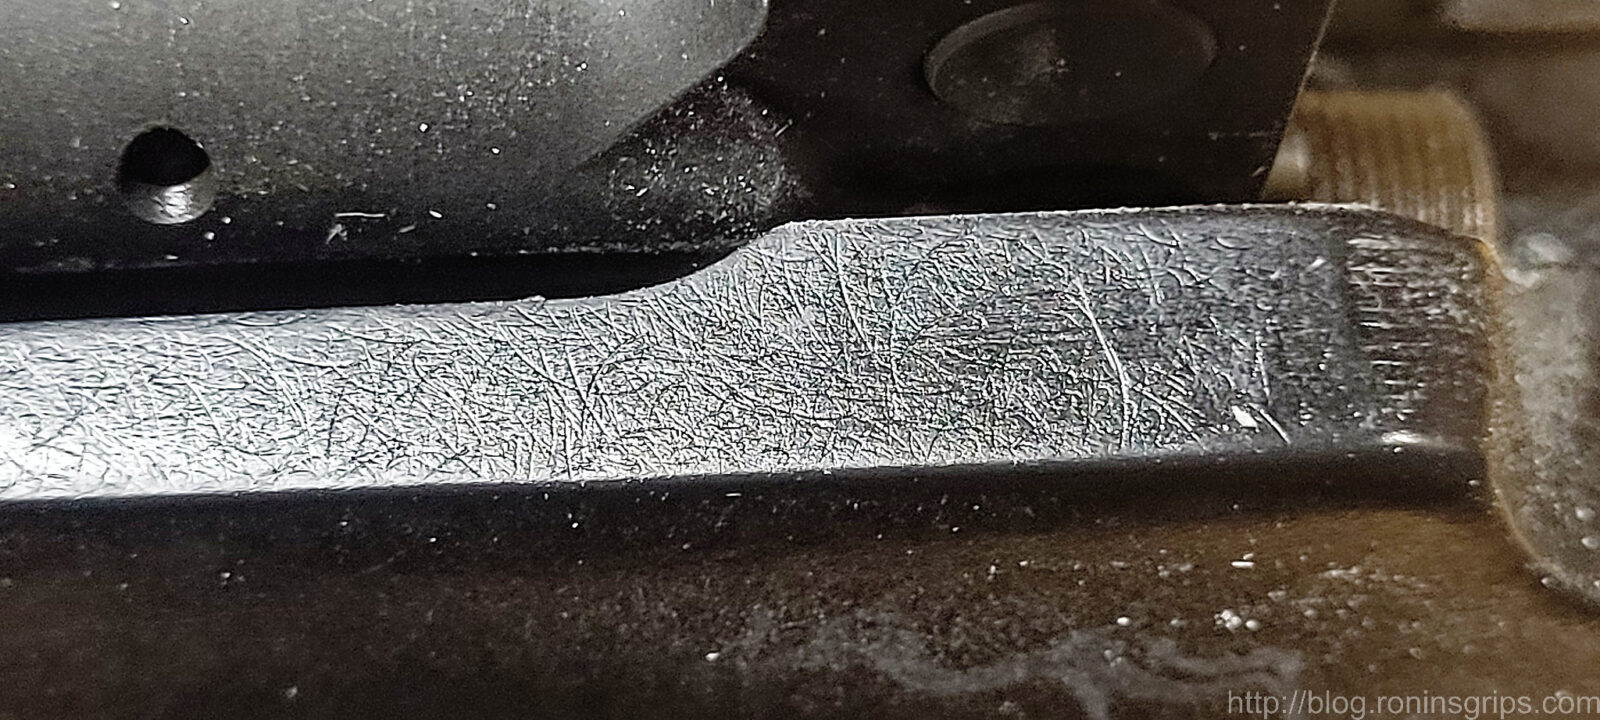
The trick is to test fit, remove a bit of material equally and test again. I have a dead blow mallet to tap the Orca on or off but it is not done forcefully – you want snug. If you try and force it, the plastic will snap sooner or later.

The Uzi Submachine Gun examined: David Gaboury book cover
The dead blow mallet is there to help me tap it on and off. It is not there for a “Mongo smash” level of force. You want a snug fit only.

Depending on your pistol and how the fitting goes you may or may not need to add a shim. A shim is a thing piece of material that closes the gap between the handguard and the front of the receiver. It can be metal strips or a high temp gasket material. Just don’t use paper or cardboard or something that heat or oil/solvents can destroy.

The Uzi Submachine Gun examined: David Gaboury book cover
Close-up of a 1/8th thick shim fitting on a C39 Micro Orca handguard
I had three handguards during testing. One need an 1/8th in shim and the other two needed far less – somewhere between 1/32nd and a 1/16th. I made this one so you could see it.
Close-up of C39 Micro Orca handguard fitting on a firearm
The shims are 2″ tall and 5/32″ wide – I cut them from a sheet of high-temp abrasion resistant Buna rubber. As mentioned, these are an 1/8th” thick. You just need the sides but if you want to go all around and shim every contact surface you could. You can leave them free-floating or but a dab of super glue or your favorite adhesive behind them once you know they are what you need. Don’t glue them in until you’ve done all the testing, etc.

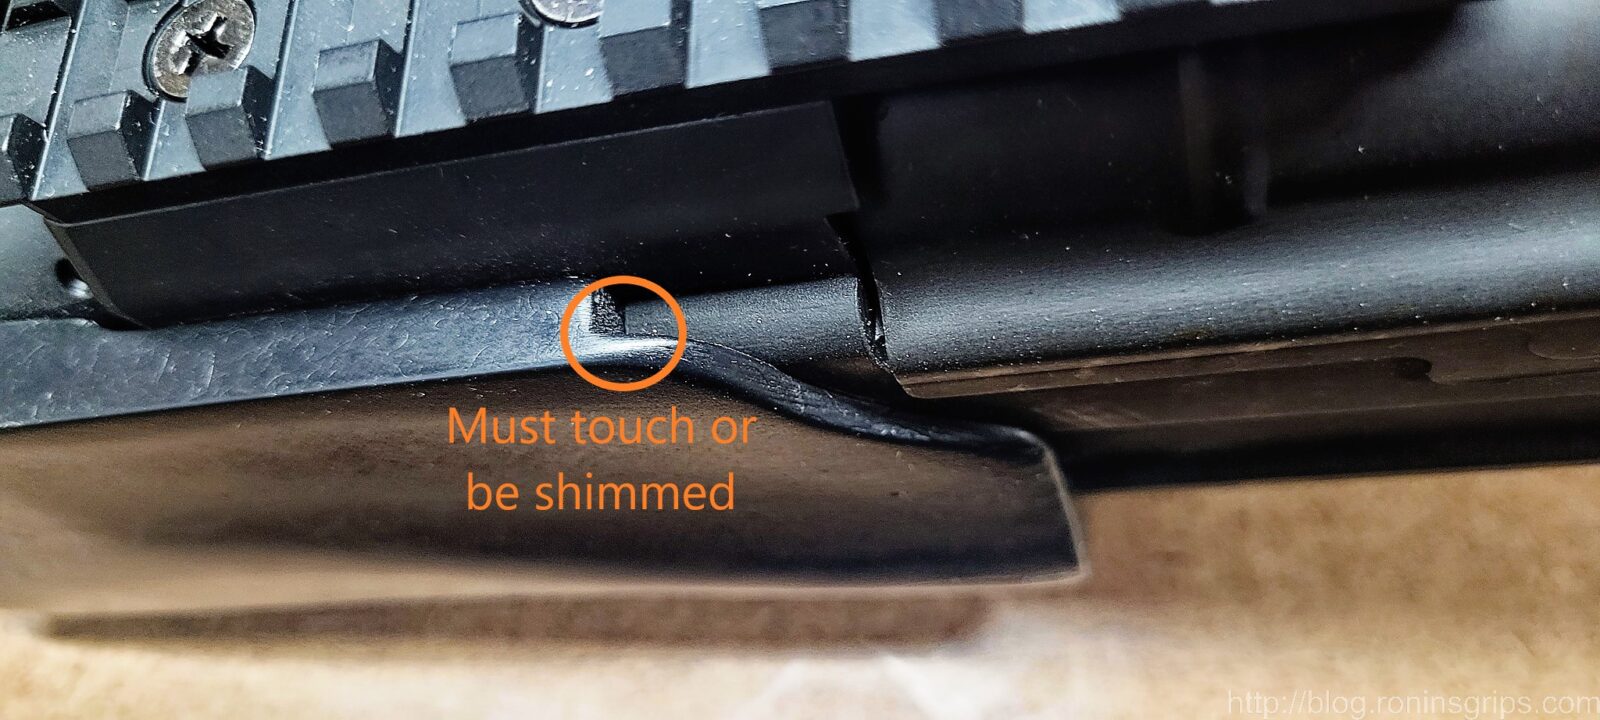
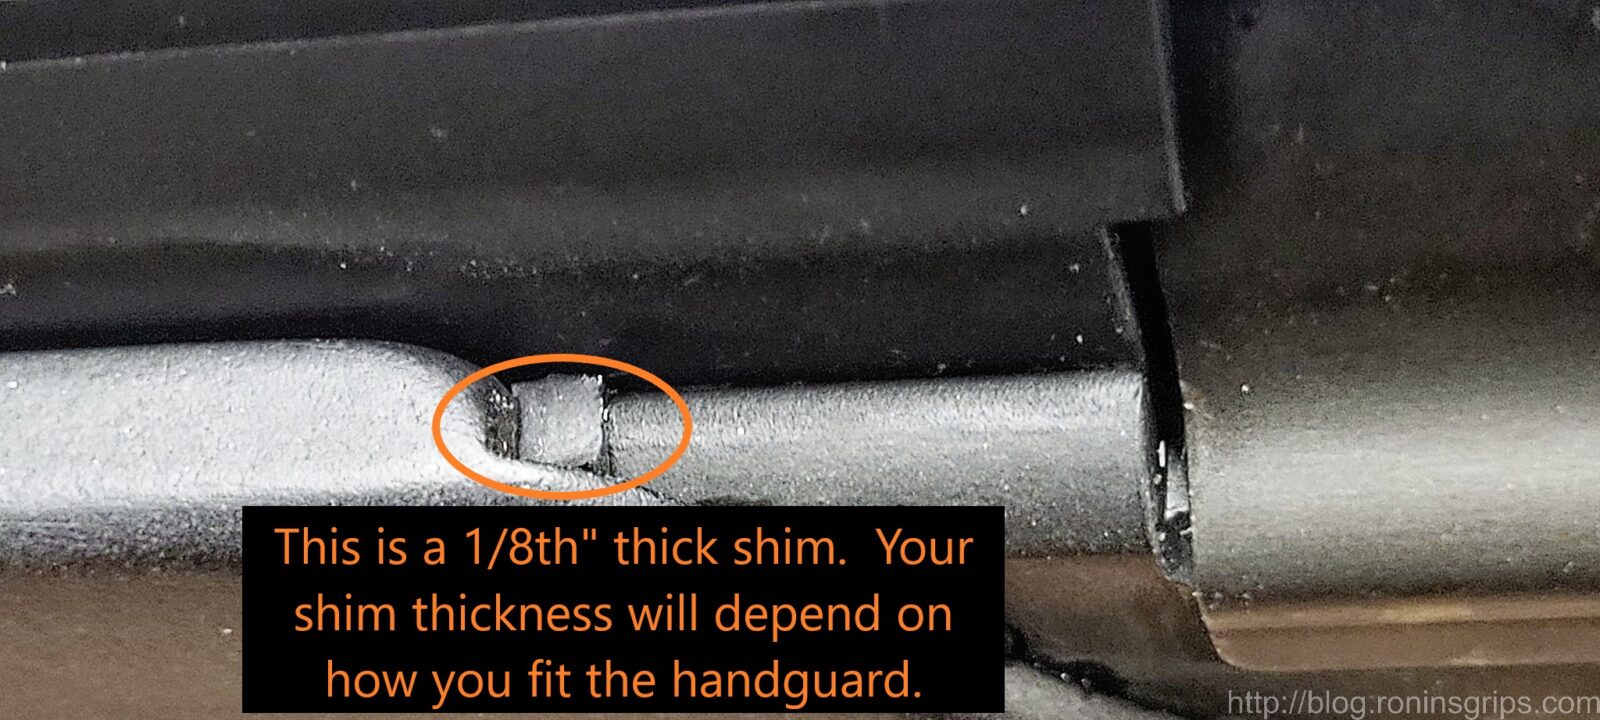
So that’s pretty much it for the C39 Micro – get the handguard to slide on centered over the threaded hole in the gas block and shim if needed to it seats fully.

Fitting the Micro Draco

A fellow did a real nice job documenting how he converted the Orca to fit a Micro Draco. He created this video and put it on YouTube so everyone can benefit from it:

In Conclusion

I hope this install guide helps you out!

Check Out Art’s Wild M92 SBR with our Plum M76 Grip and Handguards

Art shared this photo of his custom M92.  I think the plum furniture really complements his SBR.

Ronin's Grips polymer handles in heat test setup

Click here for our Yugo/Zastava M92 handguard set

Click here for our Yugo/Zastava M76 Fat Cap Grip

A Chaos Rail on a FM-AK47-21 Vepr Rocks!

When the government announced they were going to ban the further import of Molot firearms, I jumped and bought one of the Fime FM-AK47-21 side folding AK-47 Veprs.

Russian Vepr 7.62x39mm side folder rifle on a pile of logs
Russian Vepr 7.62x39mm side folder rifle on a wooden background

The rifle was absolutely awesome except for one regard – I really did not like the ribbed RPK handguard. Now this is the handguard on the Russian RPks and the ribs help with cooling and moving the hand away from the surface of the handguard — the design is genuinely thought out … but I do not like the feel. It’s as simple as that.

With that in mind, I started digging on options. On one hand I could make a new polymer set based on a mint RPK handguard set I picked up along the way. After a while, I changed my mind as the time and cost to create the molds didn’t make a lot of business sense as the Veprs weren’t going to be imported and demand would presumably be low and I would not recover the investment.

So, I researched other options and a firm I didn’t know much about kept popping up – Chaos, Inc. [Note: Chaos has gone out of business. Not sure why.] They made a well regarded handguard that looked great to me and reports on the feel and quality were very good. An important design point is that it connects like a handguard and doesn’t clamp anything on the barrel to transfer heat. That was a beef I had with the Midwest Industries rail design I tried years ago. It required the installation of a clamp on the barrel.

At any rate, I decided on the Chaos Apollo FM11L Keymod handguard. By the way, Chaos does not list on their website that this FM11L will fit the FM-AK47-21 side folder so I called them. The guy I talked to said they would take a return if it didn’t fit and I didn’t beat it up. I was pretty sure it would fit so I went ahead and ordered it.

The rail arrived about a week later and decided to install it when time permitted. The following is a quick overview of the steps required:

1] Make sure your rifle is unloaded! I can’t stress this enough.

2] Push in the dust cover retainer at the rear and remove the cover.

3] Remove the operating rod and the bolt carrier group.

4] You will need to rotate the gas tube retaining lever to remove the gas tube. Now this thing is on incredibly tight. I thought Zastava had very tight levers but they have nothing on Molot. You will either need non-marring pliers or a polymer or wood punch to swing the lever up clockwise until the gas tube assembly can lift out.

5] On the right side of the lower handguard retainer, you will see a small lever laying parallel with the barrel. It will need to be rotated 180 degrees towards the muzzle and this is another incredibly tight fit. I had to use stout needle nose pliers in order to rotate it. Once rotated, you can slide the handguard retainer forward. You may find you need to tap it a bit with a rubber mallet – I did.

Extech IR thermometer and Ronin's polymer grips for heat testing.

6] Now, you need to remove the gas tube cover and this is one of the questions I get asked most frequently. The cover is a semi-circle and rotates out of the semi-circular shaped retainers. Clamp the forged steel end (not the tubular end or you will crush it) and firmly rotate the cover. You may find it turns easier clockwise or counter-clockwise and either way is fine. Rotate it 180 degrees either way and then you can pull it away from the tube.

Extech IR thermometer and Ronin's polymer grips for heat testing.

7] Next up is to install the Apollo FM11 lower. This is where their engineering prowess really shows. Their rail is two parts so remove the three hex screws from each side and set the upper half to the side for the moment.

Extech IR thermometer and Ronin's polymer grips for heat testing.

8] Now unscrew the bottom screws and slide the internal aluminum part backwards out of the way. This part will actually slide into the handguard retainer and lock the unit into place. This is why there is a slot for the retainer. Look at the fitment of the parts – they thought this out. Be sure to screw in the set screws also to lock things in place.

Extech IR thermometer and Ronin's polymer grips for heat testing.

9] For the next part, you install the lower by putting the rear tab into the front of the receiver just the same as any AK-style handguard. Now the front requires you to get the retainer in the right place to nestle into the lower. Get the angle right and slide the internal aluminum retainer part into the handguard retainer and screw the internal part back together. The angle must be right so if you can’t get that internal insert to slide into place, move the handguard’s front up and down until it does. Then swing the handguard retainer lever back into position – it will be a tight fit so tap it into place with a rubber mallet. It would not take a ton of pressure – if it does, check fitment. Over the years I have read guys put a ton of pressure on the levers and snap them – the pressure required is firm and you should see movement as you tap the lever into place. They key is tapping and not trying to do one big “mongo smash” hit to rotate the lever. Once done, the lower should be absolutely rock solid – mine sure is.

Extech IR thermometer and Ronin's polymer grips for heat testing.

10] I then installed the gas tube. Nothing attaches to the gas tube so you can remove or install it as needed. I then used my rubber mallet to tap the catch lever back into position.

Extech IR thermometer and Ronin's polymer grips for heat testing.

11] I then installed the gas tube cover by lining up the holes and installing the screws.

Extech IR thermometer and Ronin's polymer grips for heat testing.

At this point it is done. I installed a Vortex Sparc II nice and low on the rail. I like the cheekweld when I rotate the cheekpiece into position. It does NOT co-witness with the iron sights but I really didn’t care about that – I can remove the sight real fast if I ever need to.

I really, really like the fit and feel of this rail. My side folder can lock folded. I did not need to change anything to support the folder.

Here is the end result:

Extech IR thermometer and Ronin's polymer grips for heat testing.

I hope this helps you out!


Please share the link on Facebook, Forums, with colleagues, etc. Your support is much appreciated and if you have any feedback, please email us in**@*********ps.com. If you’d like to request a report or order a reprint, please click here for the corresponding page to open in new tab.


Check out Derreck’s Yugo M72B1 with our handguards!!

Derreck’s Yugoslav/Zastava M72B1 with our M72 handguard set looks sweet!!

Yugo M72B1 rifle with black handguards Yugo M72B1 rifle with handguards on white paper

Click here to visit our M72 handguard page in our store.


Please share the link on Facebook, Forums, with colleagues, etc. Your support is much appreciated and if you have any feedback, please email us in**@*********ps.com. If you’d like to request a report or order a reprint, please click here for the corresponding page to open in new tab.


Check Out Derreck’s M70B1 with our Bulged Handguards

Here’s Derreck’s M70B1 with the wood furniture:

M70B1 rifle with bulged handguards on a workbench

and here it is with our handguard and a Magpul Zhukov-S stock:

M70B1 rifle with black bulged handguards installed Derreck's M70B1 rifle with Bulged Handguards displayed on white background 

M70B1 rifle with bulged handguards on a workbench


Please share the link on Facebook, Forums, with colleagues, etc. Your support is much appreciated and if you have any feedback, please email us in**@*********ps.com. If you’d like to request a report or order a reprint, please click here for the corresponding page to open in new tab.


Check out Fred’s Wicked PAP with Our Lower Handguard

Fred’s PAP looks sweet.  He’s using both our lower handguard and one of our quick takedown pins.

Fred's PAP rifle with a lower handguard and suppressor Fred's PAP rifle with new lower handguard, suppressor, and optics

The handguards are available as sets or individual pieces at:  http://shop.roninsgrips.com/Yugoslavian_c14.htm

The quick takedown pin for the dustcover is at: http://shop.roninsgrips.com/Yugoslavian-M85-M92-PAP-Pistol-Quick-Takedown-Pin-M92QuickTakedownPin.htm


Check out Frank’s New Hog Rifle – A Vepr With Our Stock Set

Check out Frank’s New Hog Rifle – A slant back Vepr With Our Stock Set.  What Frank did that I think is really neat is that he machined the slots into our Vepr handguard.  The urethane pastic we use is glass fiber reinforced and acts like a hardwood – you can easily route or mill it with a cutting bit.


Frank's new Vepr rifle with custom stock on wooden floor Vepr rifle with custom stock set, Frank's new hog rifle

If you are interested our Vepr furniture, you can buy individual pieces or the set at:  http://shop.roninsgrips.com/Vepr-Furniture_c16.htm


How to Install Our C39 Micro Handguard on a Micro Draco!

Hello folks!  A friend did a great quick youtube video to show people the few quick modifications needed to fit our C39 Micro handguard onto a Draco Micro.  I think he did a great job and sure appreciate his taking the time to make the video and share it with us!

Click here to open a new tab/window to our Orca handguard page.


Please share the link on Facebook, Forums, with colleagues, etc. Your support is much appreciated and if you have any feedback, please email us in**@*********ps.com. If you’d like to request a report or order a reprint, please click here for the corresponding page to open in new tab.