Category Archives: General

Troubleshooting A Pride Mobility GoGo Elite Traveller Scooter’s Power Problem

My mother-in-law is getting older and so are my wife and I. Let me tell you, It was a lot easier pushing around a wheelchair 10+ years ago compared to today. With this in mind, my wife and been watching for a good deal on one of those little electric mobility scooters. Finally, one day she saw one posted on Facebook at a local thrift store so we want and took a look.

The owner of the store buys abandoned storage units and a Pride Mobility Elite Traveller scooter was in one of them. It looked to be in great shape but it wouldn’t run. He could turn the on/off switch and a light would come on the little dashboard but that was it. He said he tried charging it for an hour but nothing happened and thought it was the batteries — this is a great example of someone giving you their diagnoses and then that affects what you do.

At any rate, it came with the original Pride Mobility charger so I figured it was probably the batteries and did a quick search on them and replacements ranged in price from $51-89/pair. With this in mind, we settled on a price of $250 and brought the scooter home.
AK rifle with MI rails and Galil grip, part of a tricked-out Romy G build
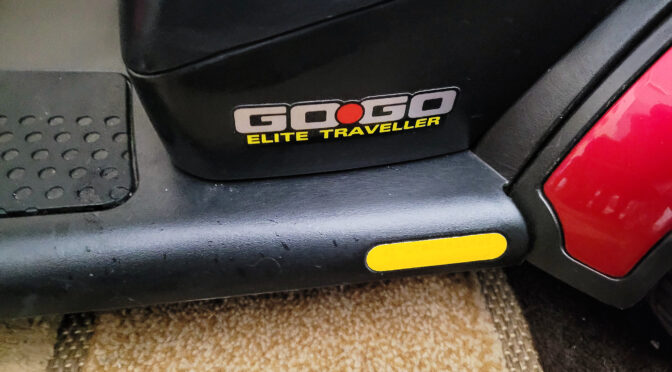
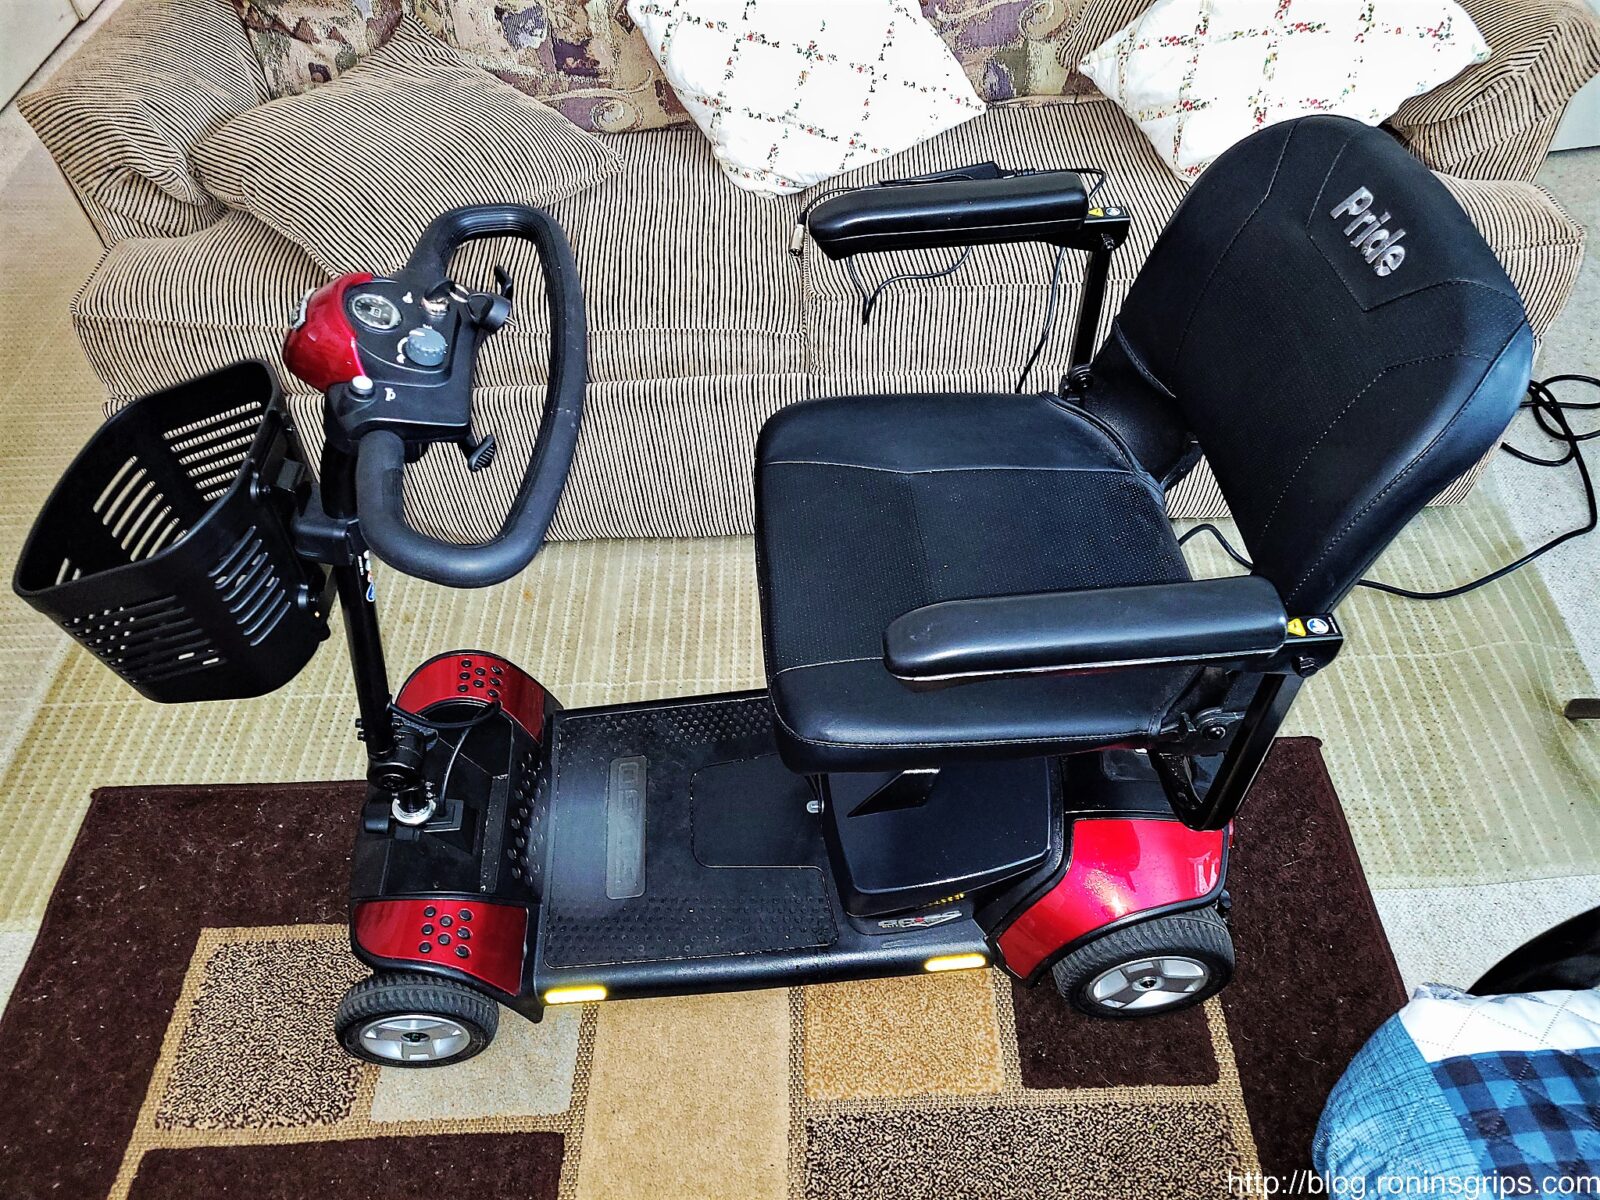
Here’s the GoGo Elite Traveller scooter. It’s remarkably well made. I was impressed the minute I started critically looking at the fit, finish and serviceability.
Note: Pride Mobility puts all of their manuals online. I really appreciate it when firms do this. You can get the brochure, owner’s manual, specification sheet and more on their website – click here. Just FYI: They do not provide a repair manual or technical guide.

A few days went buy before I could work on it. The first thing I did was plug the charger into the wall, then the cord direct to the power pack, turned on the switch and the little red power light came on. The charger’s second indicator LED was supposed to turn yellow that it was charging. It did not – it stayed off. Also, the cooling fan never started. Hmmm…. interesting but I had run into problems before with smart chargers not starting if batteries were dead.

Now, this mistaken assumption cost me some time but I learned a lot in the process that I’ll share.

Removing And Opening The Battery Compartment

Based on what I saw, the engineering and build quality of the scooter was excellent. I’ve seen people driving them around but never had the need to look at one up close or take one apart. Everything is built heavy duty with reliability and resiliency in mind not to mention they put fuses all over the place to protect the electronics. With that overview comment done, my focus was on getting to the batteries because I thought that was the problem.

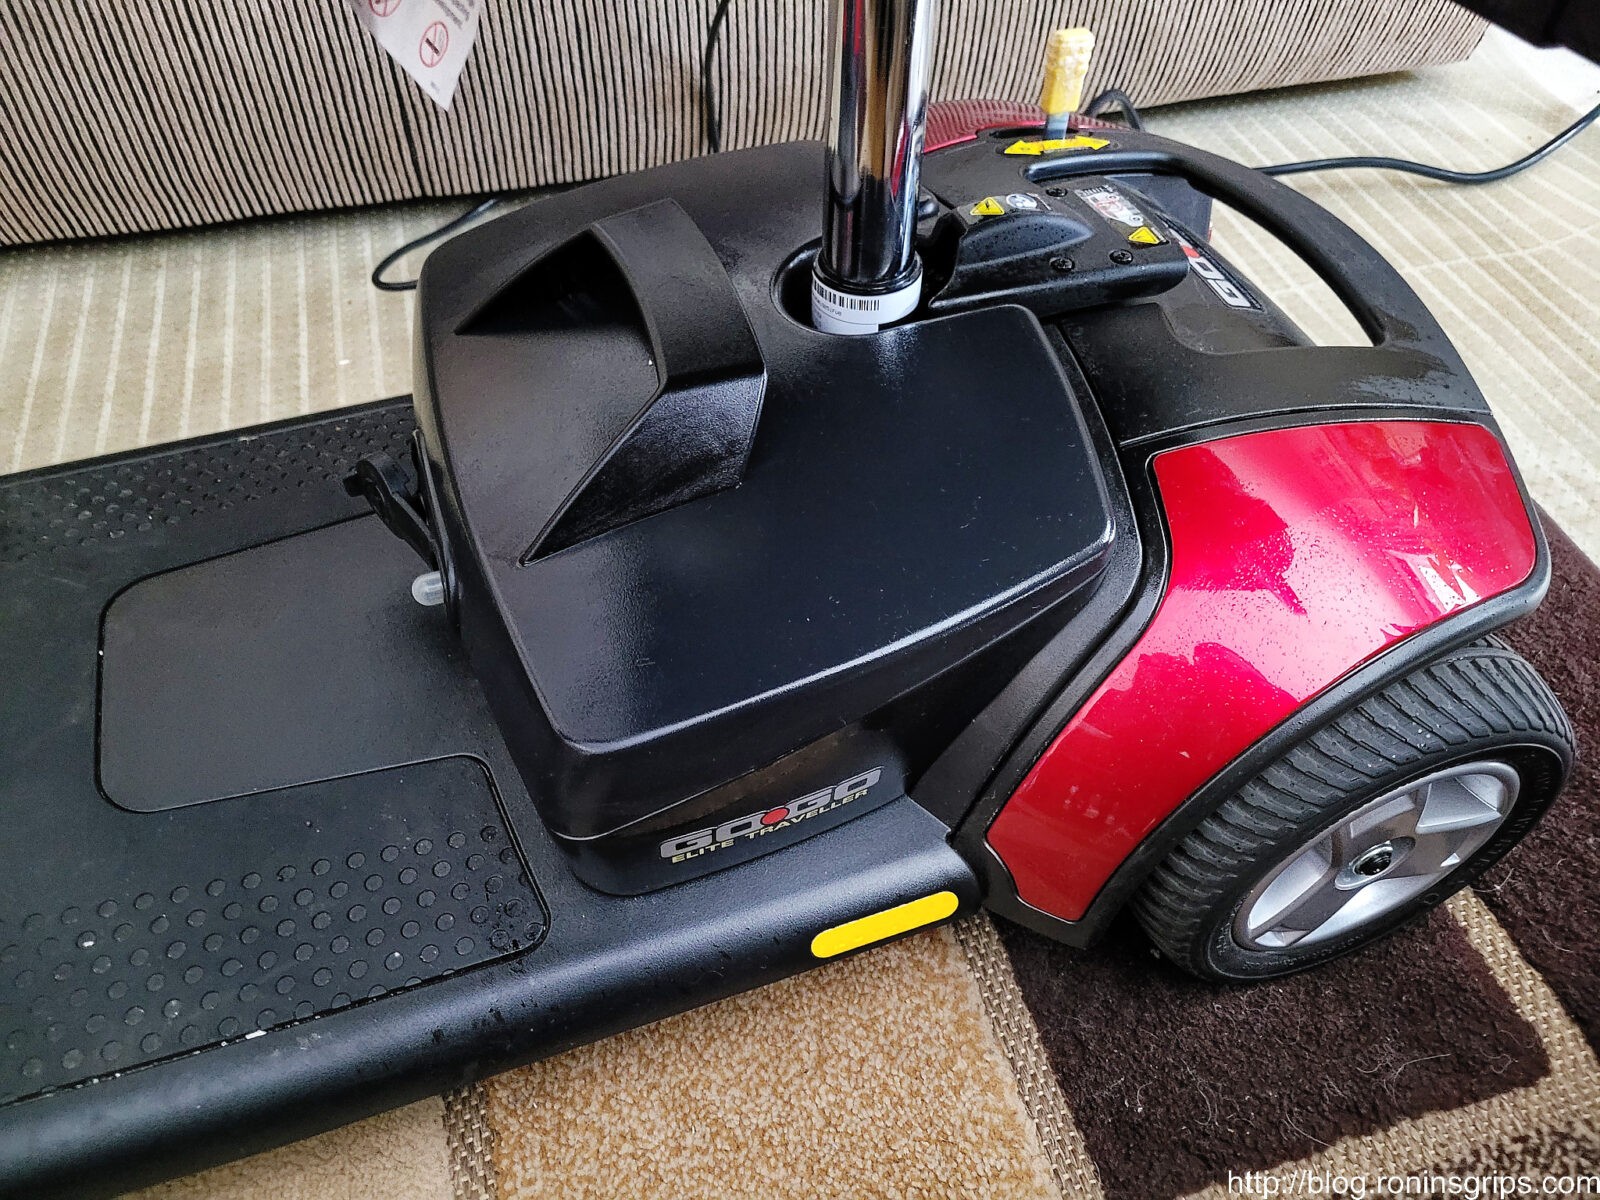
The battery pack is the black plastic “box” with a molded handle directly underneath the seat on the floorboard of the scooter and is held in place by a tab of 3M Dual-Lock fasteners on each side. Dual-Lock is a stronger than traditional velcro and it does a great job of holding the battery compartment in place both for the sake of safety as well as to prevent rattling.

To remove the battery box, lift straight up – there aren’t any bolts or clasps – just a combination of weight, the way the pieces fit together and the Dual-Loc. If you try to lift at an angle, you’ll be surprised how it will not want to budge – straight up is what you need to do.
AK rifle with MI rails and Galil grip, part of a tricked-out Romy G build
That black molded plastic object with the handle in front of the silver set mast is the battery compartment. It comes off the scooter by lifting straight up. FYI – the white label on the seat mast has the date of manufacture.
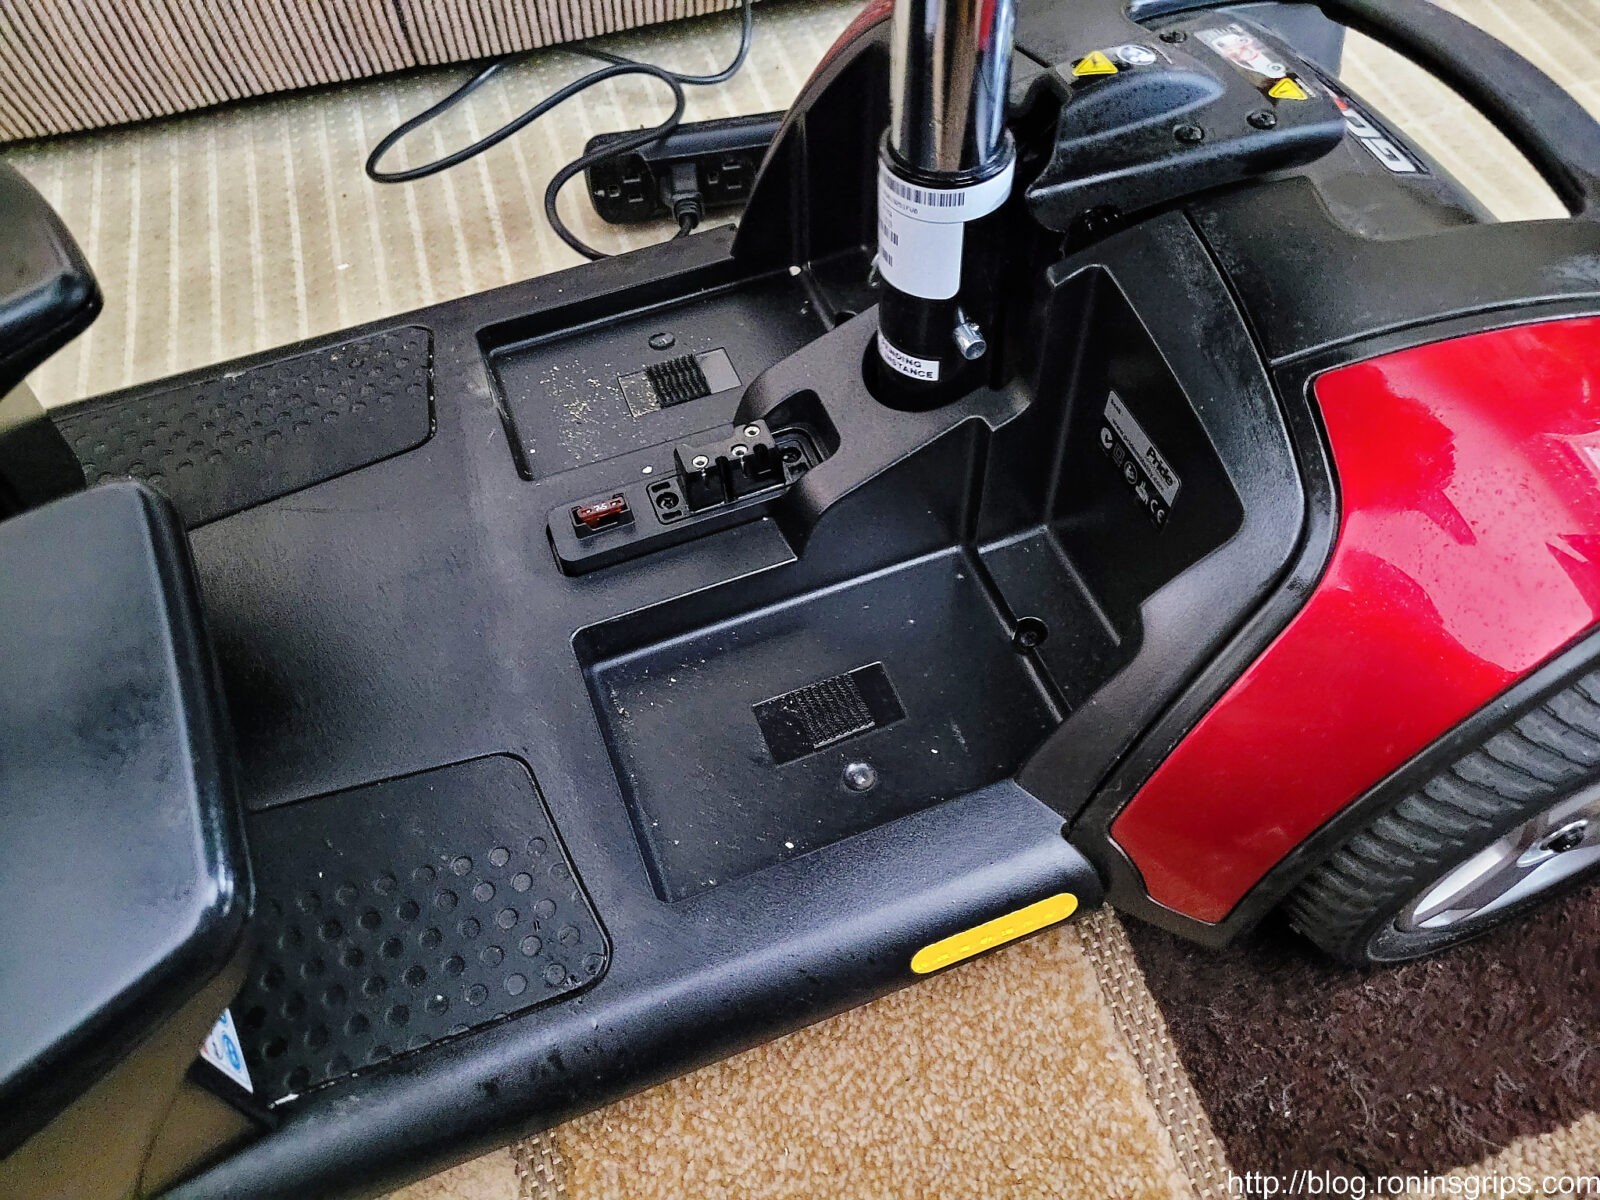
AK rifle with MI rails and Galil grip, part of a tricked-out Romy G build
Between the way the compartment sits into the molded floorboard and the 3M Dual-Loc tabs, the unit is very secure.

The battery compartment is very well made and to disassemble it, you need to remove six philips head machine screws. This is just an example of where I thought the design and execution was excellent – these are threaded machine screws that go into brass female inserts on the other side – they didn’t just go cheap using some self tapping screw. You flip the compartment upside down and remove the screws. The batteries are held securely in place by Dual-Lock also.

The 12 Volt Batteries Themselves

I’m going to step you through some details on the batteries but I did not change them yet. I’d recommend you read this whole post because your “problem” may or may not be the batteries.

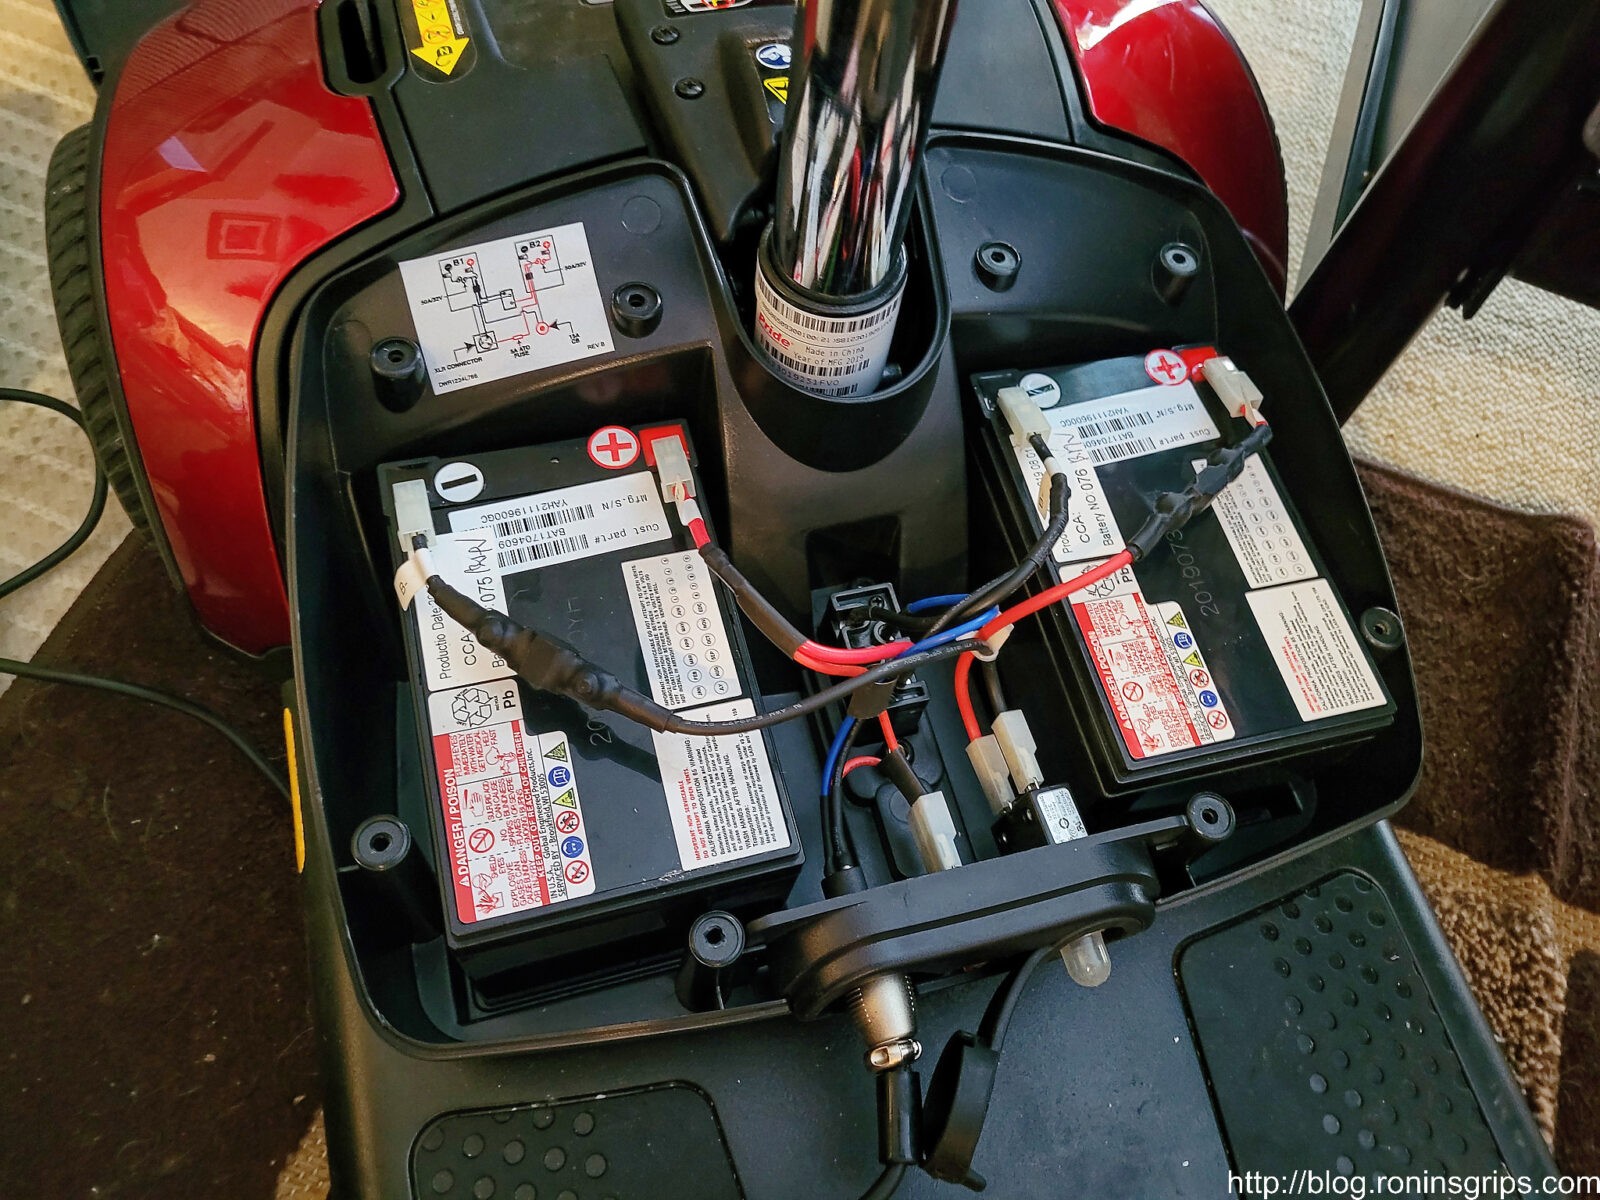
Our scooter is powered by two 12 volt 14 amp hour batteries wired in series to provide 24 volts. In the compartment is a wiring diagram and everything is done very nicely to avoid confusion – red wires to positive tabs on the battery and black wires to the negative tabs on the battery.
AK rifle with MI rails and Galil grip, part of a tricked-out Romy G build
These are the 12 volt 12 amp hour batteries that are hooked up in series to provide 24 volts. If you look to the right of the silver plug, the two red wires white plastic connector is on a fuse assembly that protects the charger circuit that you will want to check and the far right side has a circuit breaker that is also worth checking. Pride says they can go up to 6.7 miles depending on factors such as the weight of the passenger and cargo. Note how everything is so well labeled, the wiring is very neatly done and they even provide a handy wiring diagram above the left battery. Whomever designed and then built this cared about what they were doing.

For those of you unfamiliar with direct current (DC) batteries, these two batteries are hooked up in series to produce 24 volts. This is done by connecting the negative terminal of one battery to the positive of the other and then the opposite as well. In the scooter, this is done at the wiring block in the middle. You don’t need to worry – just note the wires when you take it out (a photo helps) and do a battery at a time – black wire to negative and red wire to positive,

Note, there are at least two sizes of batteries used – their standard battery pack is rated for 6 miles and uses two 12 amp hour (Ah) batteries. There is a 9.7 mile bigger 18 amp hour (Ah) battery and it correspondingly uses a bigger cabinet so if you decide you are going to replace your batteries, confirm what is in your battery compartment first. You can change cabinets – or even buy entire battery packs ready to go. From what I have seen, the cheapest bet is to just buy the batteries and swap them out in your existing compartment. I also see batteries with other capacities like 15Ah and over 20Ah, I’d recommend you confirm that their physical sizes will fit whatever battery compartment you have.

Click here for an Amazon page with a number of battery and housing options. Again, confirm the sizes and capacities before you buy.

Troubleshooting the HP8204B Charger

The batteries hold the charge that runs the scooter but they must be recharged by using a battery charger. I should have checked this first but didn’t because I assumed it was the batteries but let me step you through what I did.

I put a voltmeter on each of the 12 volt batteries and they both read just a tad over 4 volts. So, not absolutely dead but boy were they spent. In doing automotive work, I would have expected the smart charger to sense the voltage and begin. Okay, something was fishy and it wasn’t adding up. It was time to look at the charger again.

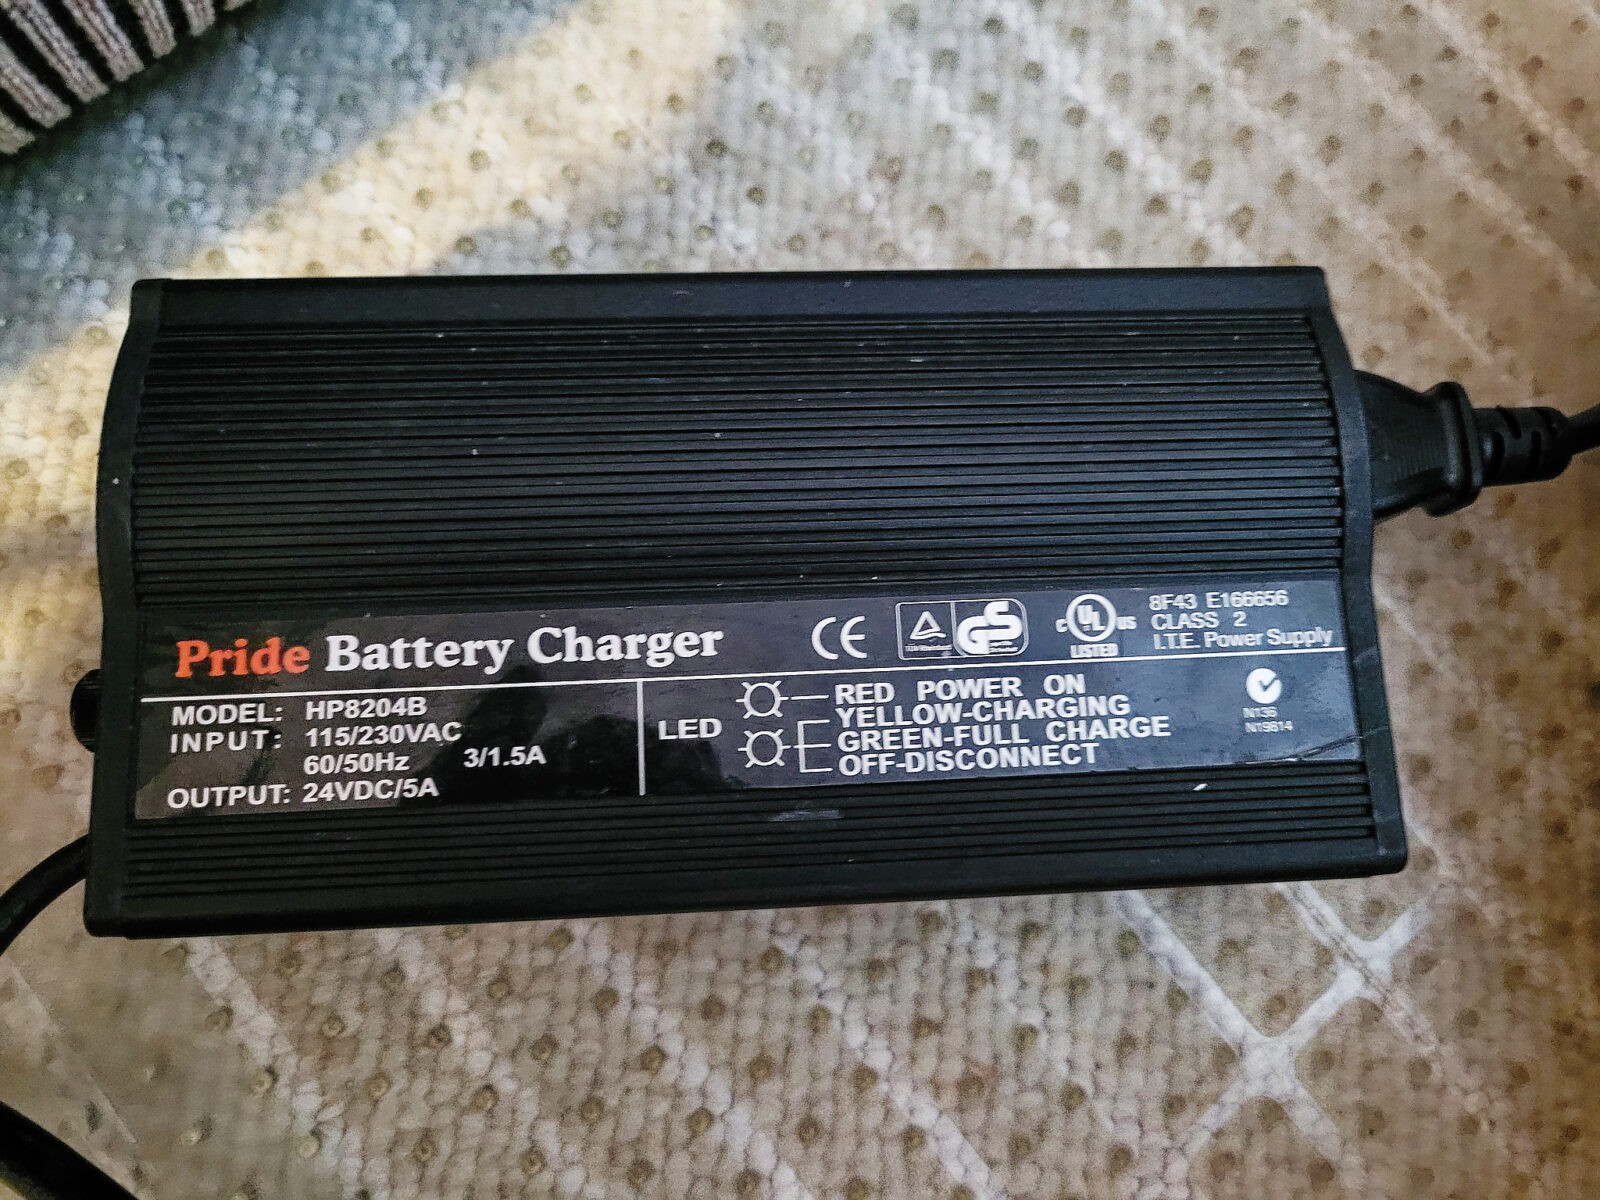
The scooter came with a Pride Mobility HP8204B charger rated for 24 volts DC at 5 amps. That would mean that if I took my meter and put it on the pins, I should read somewhere around 28+ volts (the exact volts is an “it depends” – I would have been cautiously happy with anything over 24 and stopping somewhere around 30).
AK rifle with MI rails and Galil grip, part of a tricked-out Romy G build
This is the original charger. Only a solid red light would come on. That indicated it had power. The cooling fan never turned on and the second LED that should turn yellow for charging or green for fully charged never turned on.

I used my multimeter on the batteries with the Pride charger connected. Only the red bulb on the charger was lit. No fan, no yellow light and no additional voltage detected on the battery terminals. I should have read 13-14 volts when doing the positive and negative tabs on each individual battery with the wires connected but I read just the 4 volts (by the way I word it like this because it was 4 and some decimal but I didn’t write down.)

The fuse you can see outside of the battery pack between the plug and a circuit breaker on the front of the battery pack looked fine and tested okay for continuity.

In looking at the battery pack, I unplugged the pin 1 should have been positive and pin 2 should have been negative. I cautiously touched my probes on the two tips because I didn’t want to unnecessarily short the system out by accidentally touching positive and negative together. Guess what? Nothing – not a thing. My auto-ranging digital meter was doing it’s usual millivolt reading garbage but there was no real voltage coming through.

The next thing I did was to turn off the original charger and remove the fuse from the end of the charger with the lights – undoing the round cap will produce a glass tube fuse. You can usually see if the wire running from one end to the other in the middle of the clear glass is intact or burned out. It looked okay and just to be sure I ran a continuity test with my meter and it was okay.

I also pulled apart the plug that goes into the battery pack just in case something was lose and it read zero volts too. In case you are wondering why there are three pins (I wondered why) – pin three provides voltage to the scooter so the little computer knows the charger is still attached and will not let the driver move the scooter – pretty good idea.

Okay, it was time to Google the scooter and the charger to learn more. The fact that only the red light was coming on but not the fan and/or the yellow charging light was making it look the the charger had failed. I did the “sniff” test to see if I could smell if anything had burned out but if it had, it must have been some time ago as I didn’t detect anything. In short, the charger was history.

There are tons of charger options on Amazon but I want to caution you against the little sealed chargers. They do work but they are going to get hot and they will probably fail at some point due to all of that heat. There’s a reason Pride went with the a fan cooled charger – they get hot converting AC (wall outlet) current to 24 volts DC (direct current).

Companies like Pride rarely make their own chargers. They will either use an existing charger on the market and not bother covering up the name of the maker or they will pay for it have their brand name on the decal. Pride opted for the latter or at least that’s what I think they did. The trick to realize here is that by searching on HP8204B, you can find either the original maker or another firm who did the same thing – had their name put on the charger. Regardless, you can save a bundle off a new Pride charger.

In my case, I found a seller named “ENCAREFOR” on Amazon selling what seemed to be the exact same charger but with the label “High Power” on it. Besides the label, the rated output is at 4 amps vs. 5 which means it will just charge a tad slower. It was going for $89.99 with Prime One Day shipping but I held off as I realized I needed to test the batteries and the scooter before I spent more money. In other words, I knew the charger was bad but didn’t want to spend more money if the scooter itself was burned out – if it was just the batteries, I could still order them.

By the way, you can buy used OEM Pride chargers off of eBay. I’ve had mixed experience with used chargers in general so I tend to just buy new. If you don’t mind gambling on a used one, they are on eBay.

Used a Noco Genius Car Battery Charger For Testing

At this point I was pretty sure it was charger and also thought that the batteries might be okay. Why? First off, there is a sticker on the mast pole of the seat that said the scooter was made in 2019 – that meant it was three or just under three years old (especially given I was doing my troubleshooting in mid-February 2022). Batteries can last maybe five years give or take. If the voltage was zero, I’d bet they were junk but since I was getting just over 4 volts from each battery independently, they weren’t completely dead. I started to wonder if a good reconditioning and charge might work to bring them back to life. I had just the charger to try.

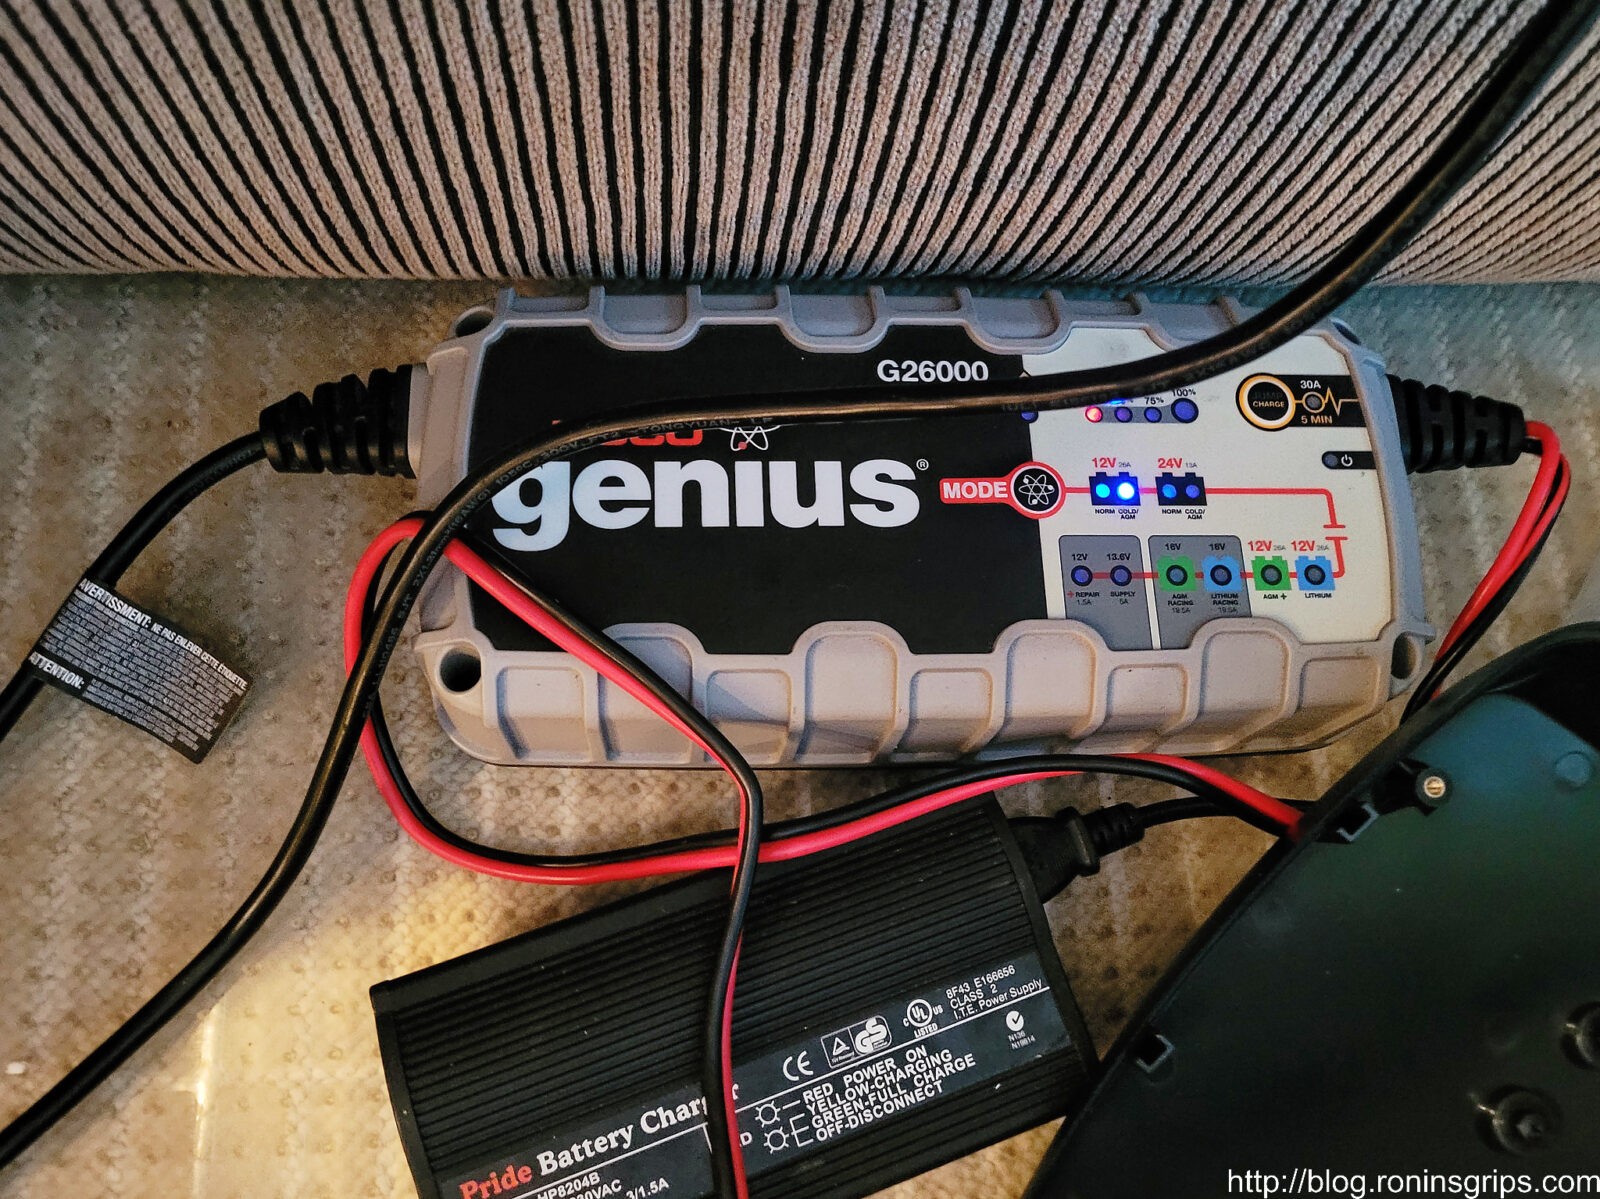
I’ve written in the past about Noco products – I think they are great and I use mine regularly. Not only are they excellent smart chargers with a number of safeguards built in but they can also recover/recondition deeply discharged batteries as well. My big Noco G26000 can do 12 or 24 volt batteries but since I was planning on a battery at a time, I just needed the 12 volt option. Indeed, I have three Noco Genius chargers of varying sizes (meaning the amps they put out) and they all could have done the job although the smaller 5 amp charger would have likely taken longer.
AK rifle with MI rails and Galil grip, part of a tricked-out Romy G build
Any 12 bolt charger can do the job provided you charge the batteries one at a time.

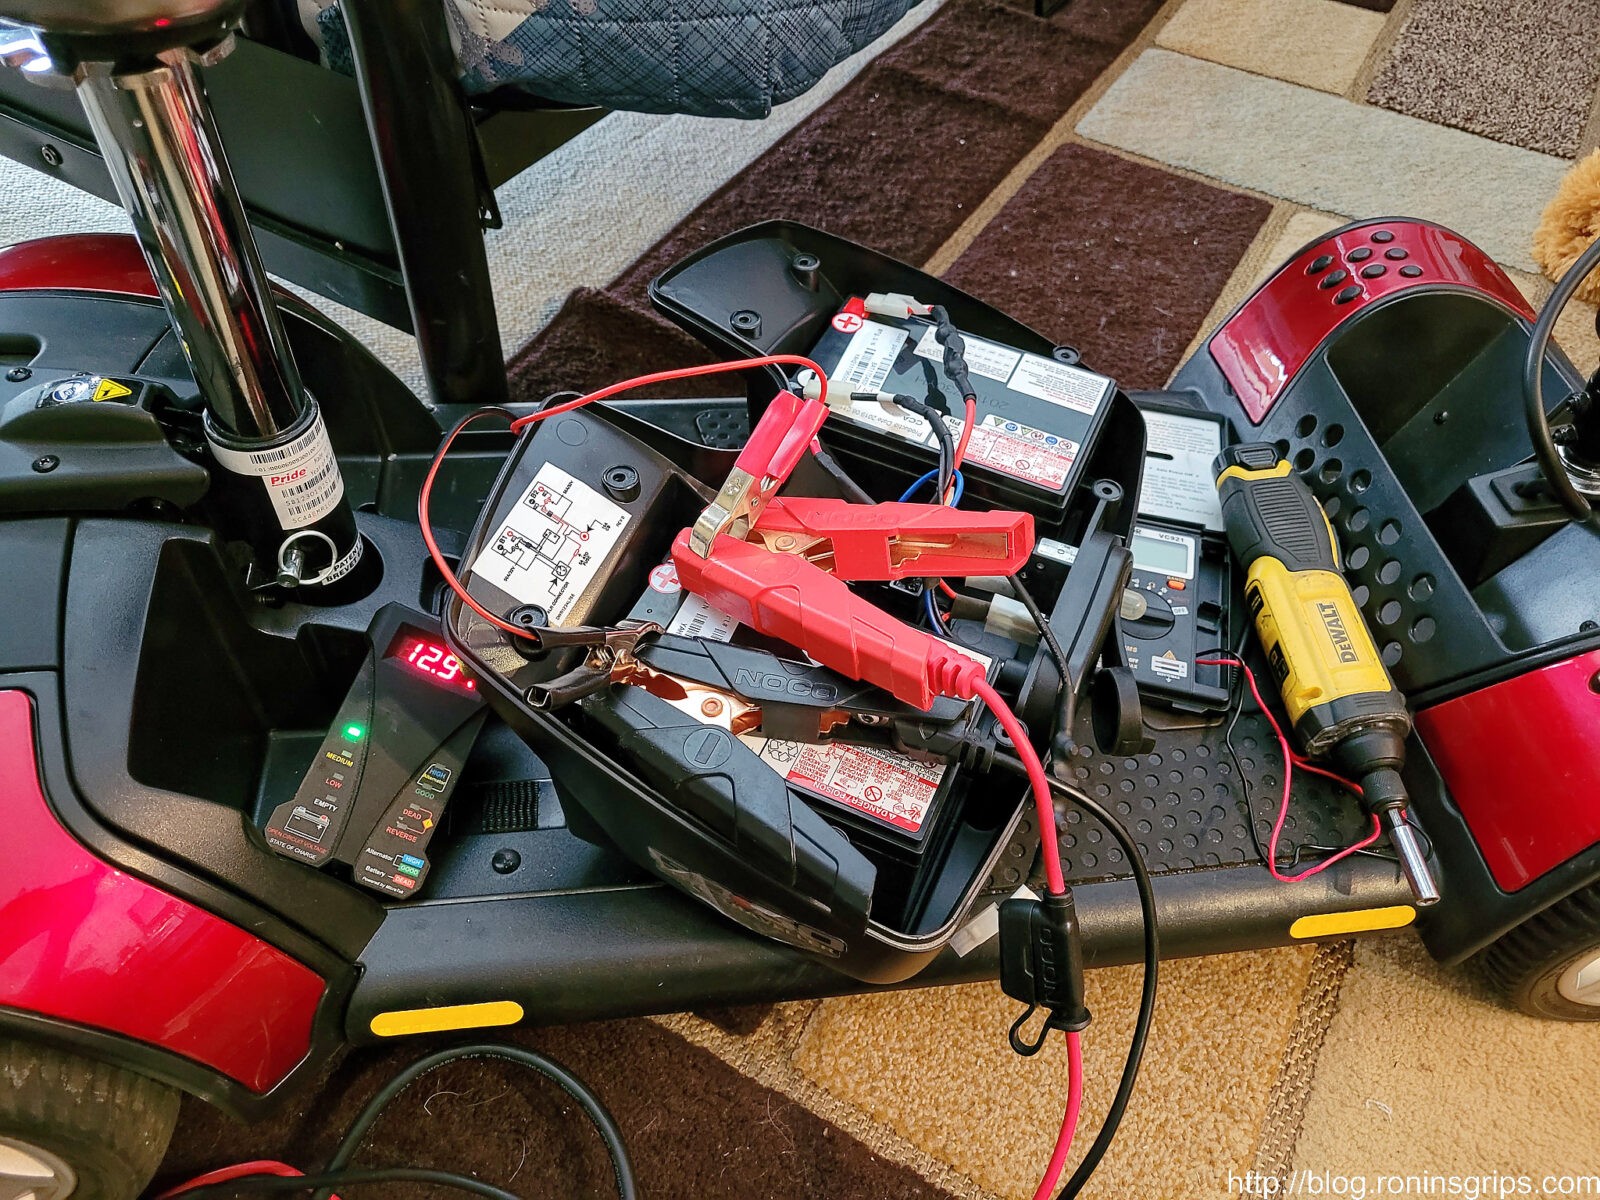
I undid the battery cables from the first battery only and directly connected the Noco to it. I charged for one cycle and then ran a repair cycle. During repair, the charger pulses the battery to desulfinate it.
AK rifle with MI rails and Galil grip, part of a tricked-out Romy G build
Don’t let all the wires intimidate you. I hooked the plus (red) clamp of the Noco to the plus (red) terminal of the battery on the left, I then hooked the negative (black) clamp from the Noco to the black terminal of the same battery. I have a small voltmeter that clamps ,on attached also so I could monitor progress — that’s strictly optional.

Results

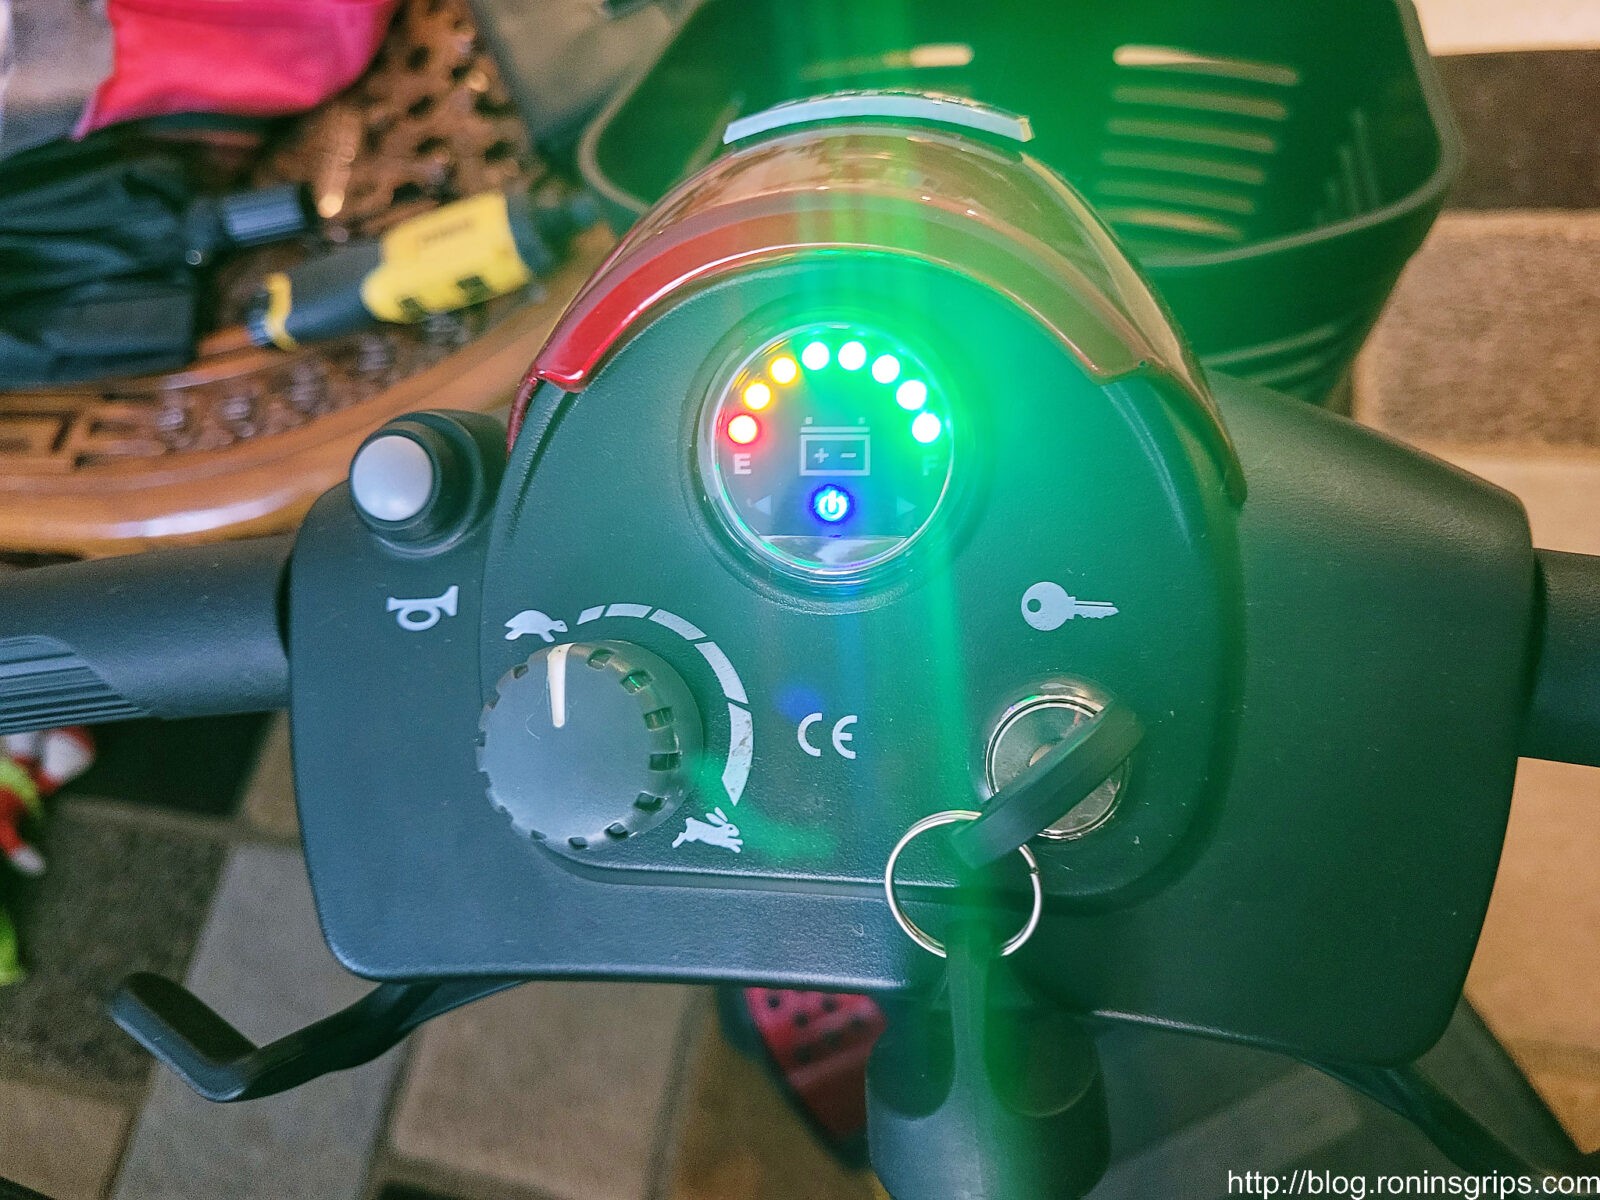
When the charging was done with both batteries, I connected the scooter’s cables back and seated the battery back into its cradle. I then turned the key on for the scooter and moved it forward and backward. It worked just fine. I checked the batteries and the voltage was holding – it wasn’t dropping down.
AK rifle with MI rails and Galil grip, part of a tricked-out Romy G build
This is what I wanted to see — the batteries were fully charged. I drove the scooter around the house and the charge never went down. I also learned that scooters are bizarre little things to drive – their turning is like sitting upright on sensitive go cart.
AK rifle with MI rails and Galil grip, part of a tricked-out Romy G build
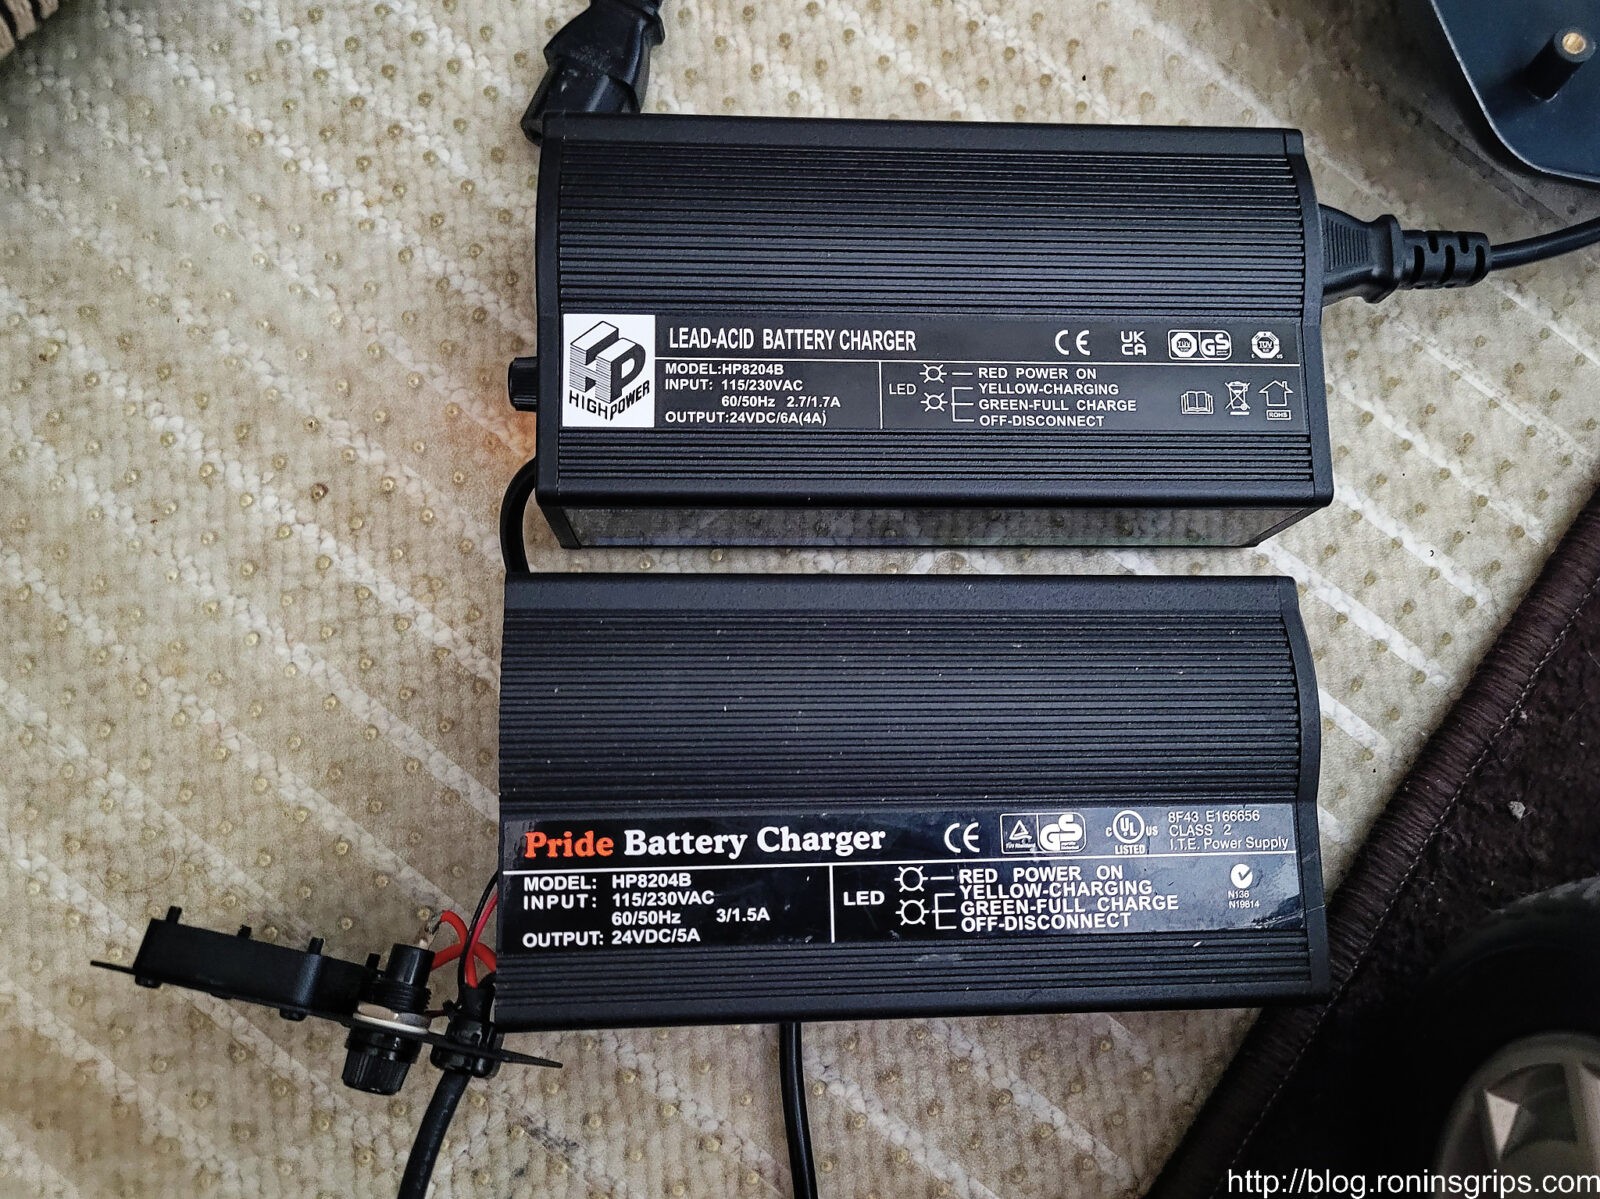
Other than the decals and the lower 4 amp output, the new “High Power” charger looks identical to the Pride unit. Note, I’d opened the front of the unit up to inspect the inside — the front panel is what is dangling in the bottom left of the photo.
AK rifle with MI rails and Galil grip, part of a tricked-out Romy G build
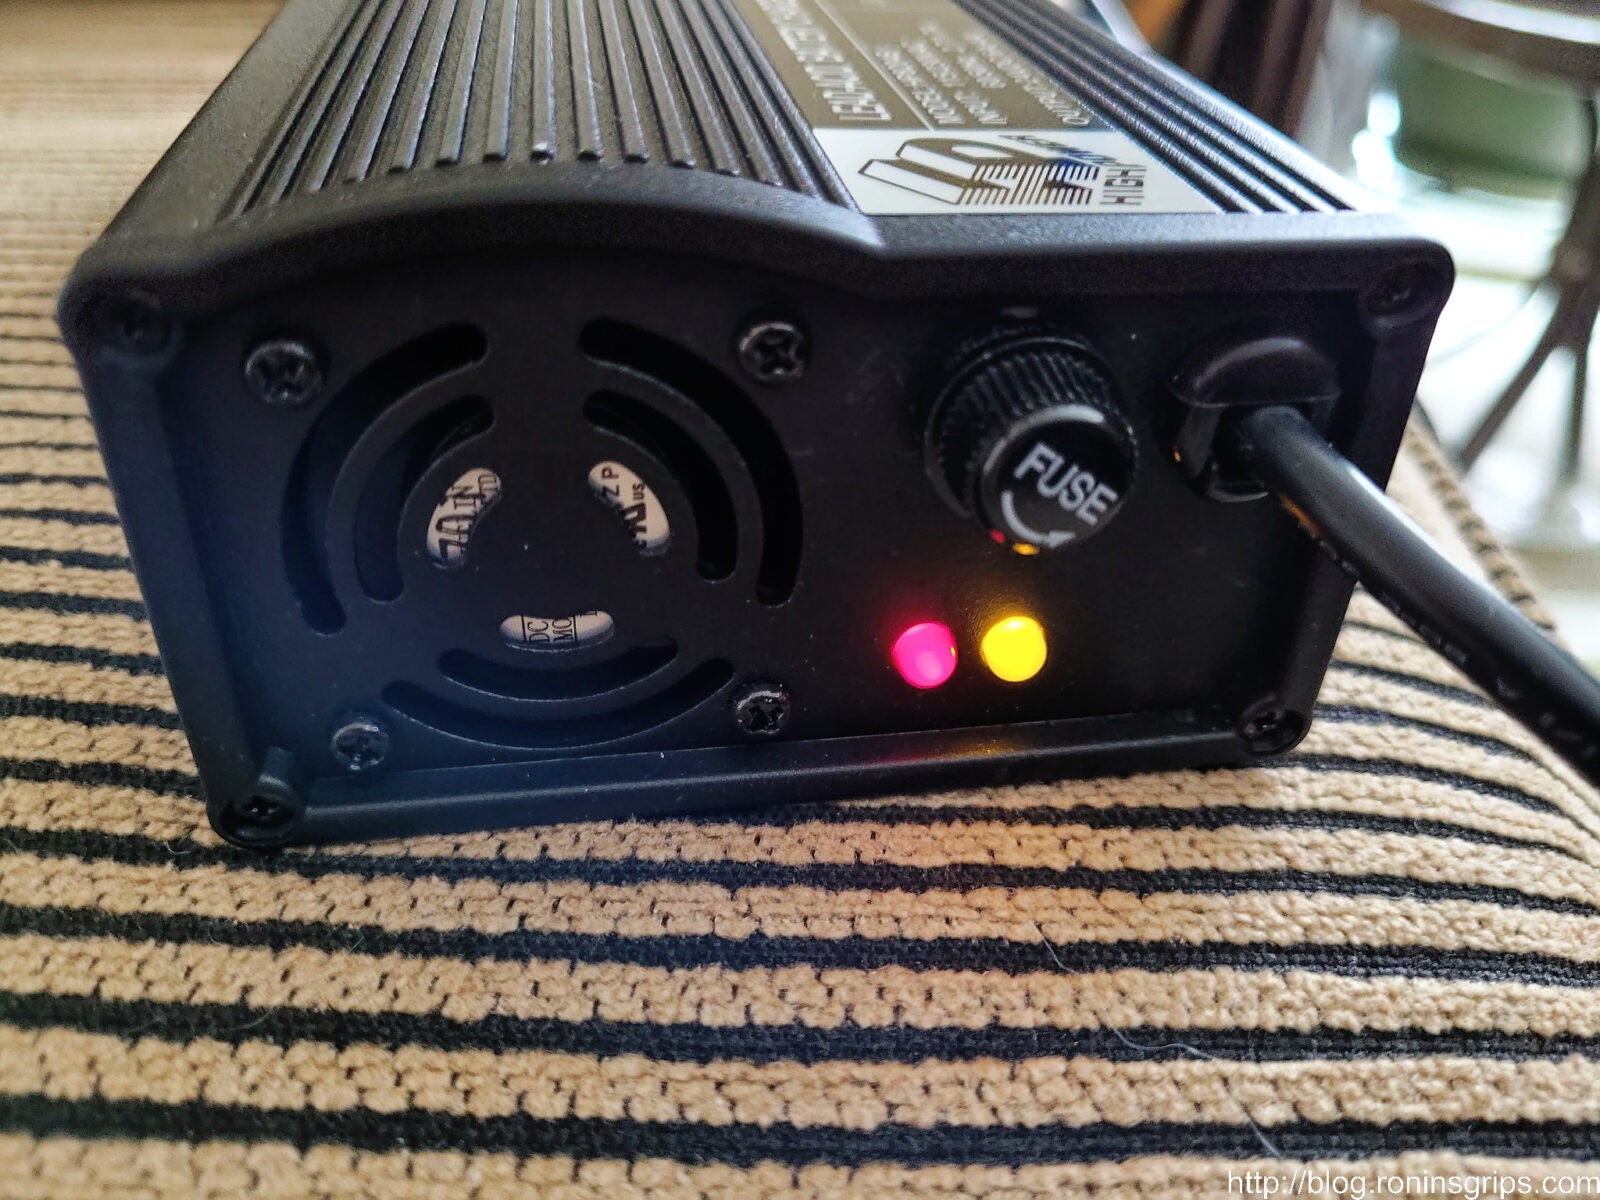
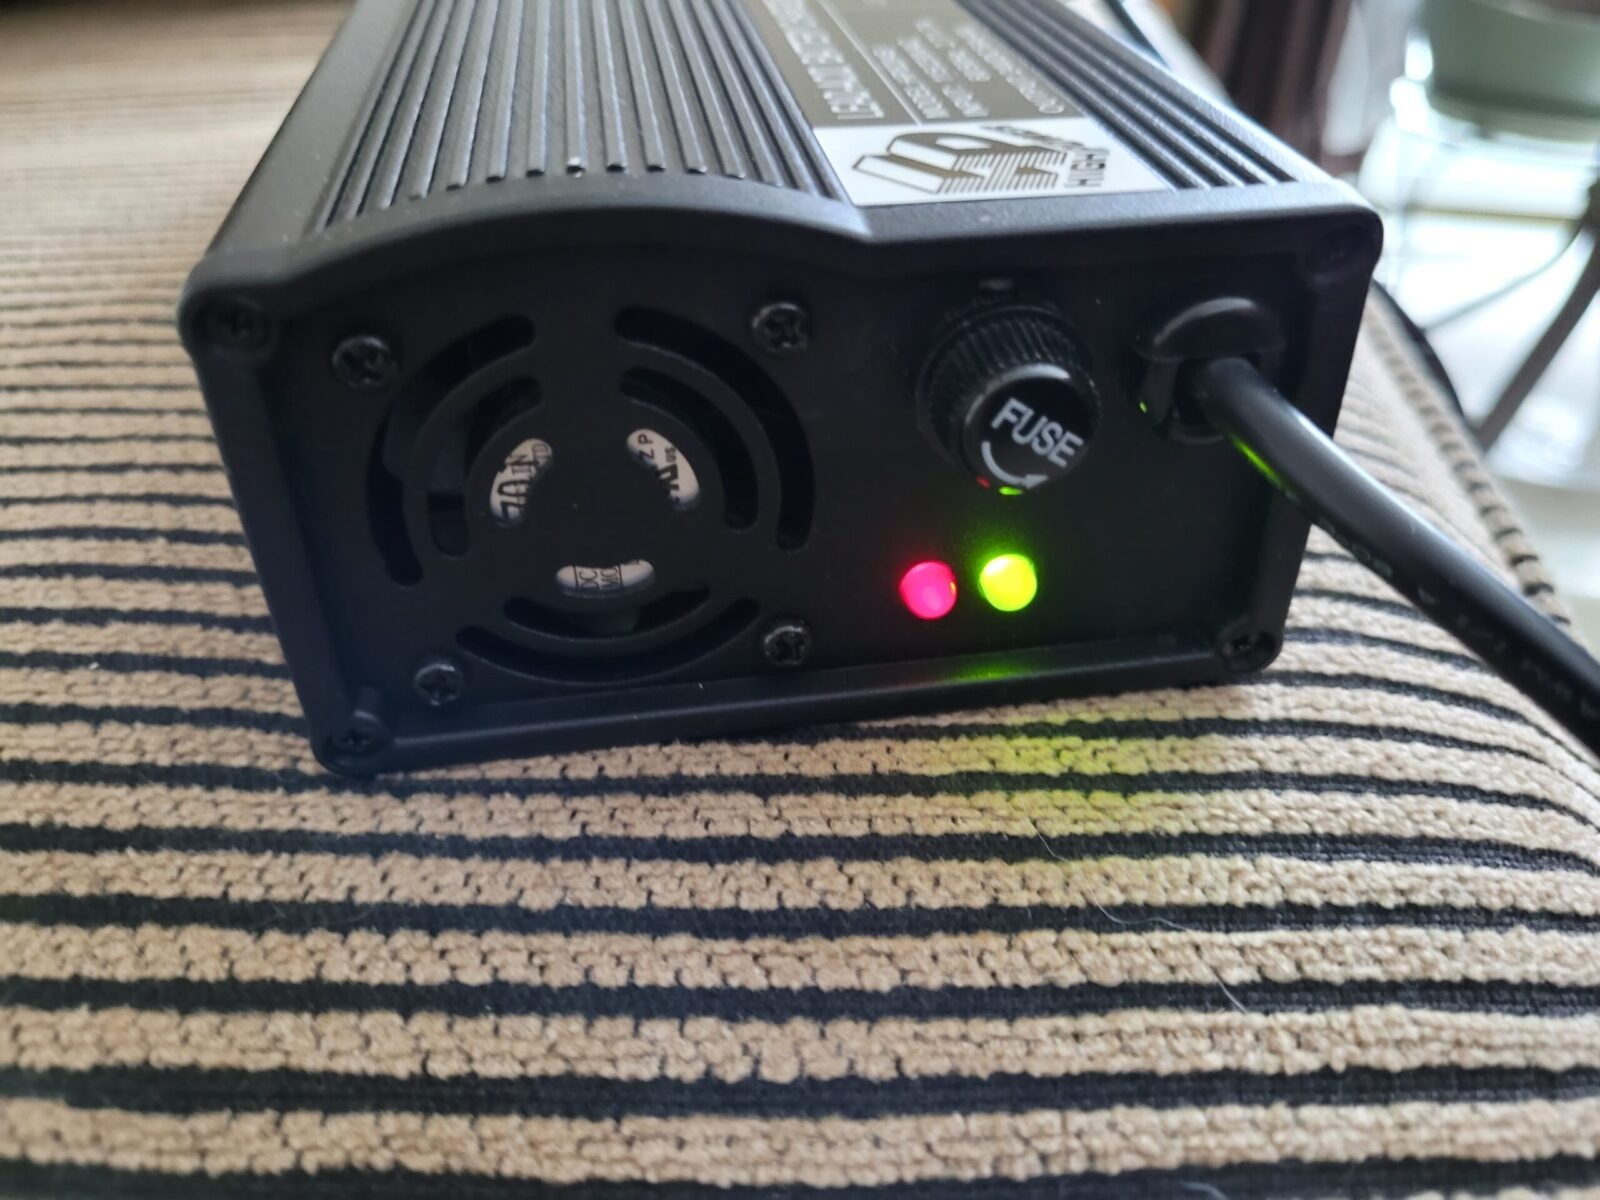
As soon as I plugged in the new charger and turned it on, the red power light and yellow charging lights came on.

By the way, the charger’s fan will make a pulsing or surging sound as the speed changes as it nears the end of charging. This is normal and will give you an indicator that charging is almost complete.
AK rifle with MI rails and Galil grip, part of a tricked-out Romy G build
When the scooter’s batteries are fully charged, the yellow light will turn green. The fan will make a pulsing sound as the charging nears completion.

Bottom line, the batteries and scooter were fine – it was just the charger that had failed so I ordered the replacement above from Amazon and it topped off the batteries. I drove it around the house some and everything was working just fine.

In Conclusion

So I learned a few things. The scooter was exceptionally well made is my first comment. Second, I should have started from the wall and worked towards the scooter vs. focusing on the batteries to start based on what the fellow told me.

I should have confirmed power to the charger, then that there was no power from the charger to the scooter and ordered a new charger. I’d bet a new charger could have recovered the batteries – the documentation says they can recondition a battery but who knows. Even though I started with the battery, at least I could run the Noco charger through charging and repair cycles – I’ve used it to recover a number of really compromised batteries over the years.

The scooter is ready and now we need to wait for warmer weather to let my mother-in-law practice in the driveway. I hope this story helps you out.

March 2024: I did two new blog posts – one on actually replacing the batteries and a second on tightening the ignition switch – which also shows what you would need to do to replace the ignition switch.

3/17/24 Update: I noticed a typo while working on a post about replacing the batteries. The original text above said the OEM batteries from the factory were 12 amp-hour (AH) when they are actually 14AH batteries.

1/22/24 Update: It looks like Noco no longer sells the 26amp model charger. If you get a 12 volt charger, do each battery by itself. If you have a 24 volt charger, you can do the pair and connect where the chair’s leads normally attach to the batteries. I still like the Noco brand in general, but you may want to look at other options also – just go with a well reviewed/regarded model.


Note, I have to buy all of my parts – nothing here was paid for by sponsors, etc. I do make a small amount if you click on an ad and buy something but that is it. You’re getting my real opinion on stuff.


Please share the link on Facebook, Forums, with colleagues, etc. Your support is much appreciated and if you have any feedback, please email us in**@*********ps.com. If you’d like to request a report or order a reprint, please click here for the corresponding page to open in new tab.
Looking For A High Quality 5-Gallon Gas Can? Check Out Wavian

I’ll keep this post short and sweet. A couple of my many-year old plastic gas cans are getting brittle and I needed to replace them. Some years back I bought some steel Chinese ones off Amazon that are doing relatively okay other than starting to rust a bit inside – I looked it up and I bought them in 2014 for $54.50 each so that’s not too bad. I wondered what some higher quality options might be so I did some digging and came across Wavian.

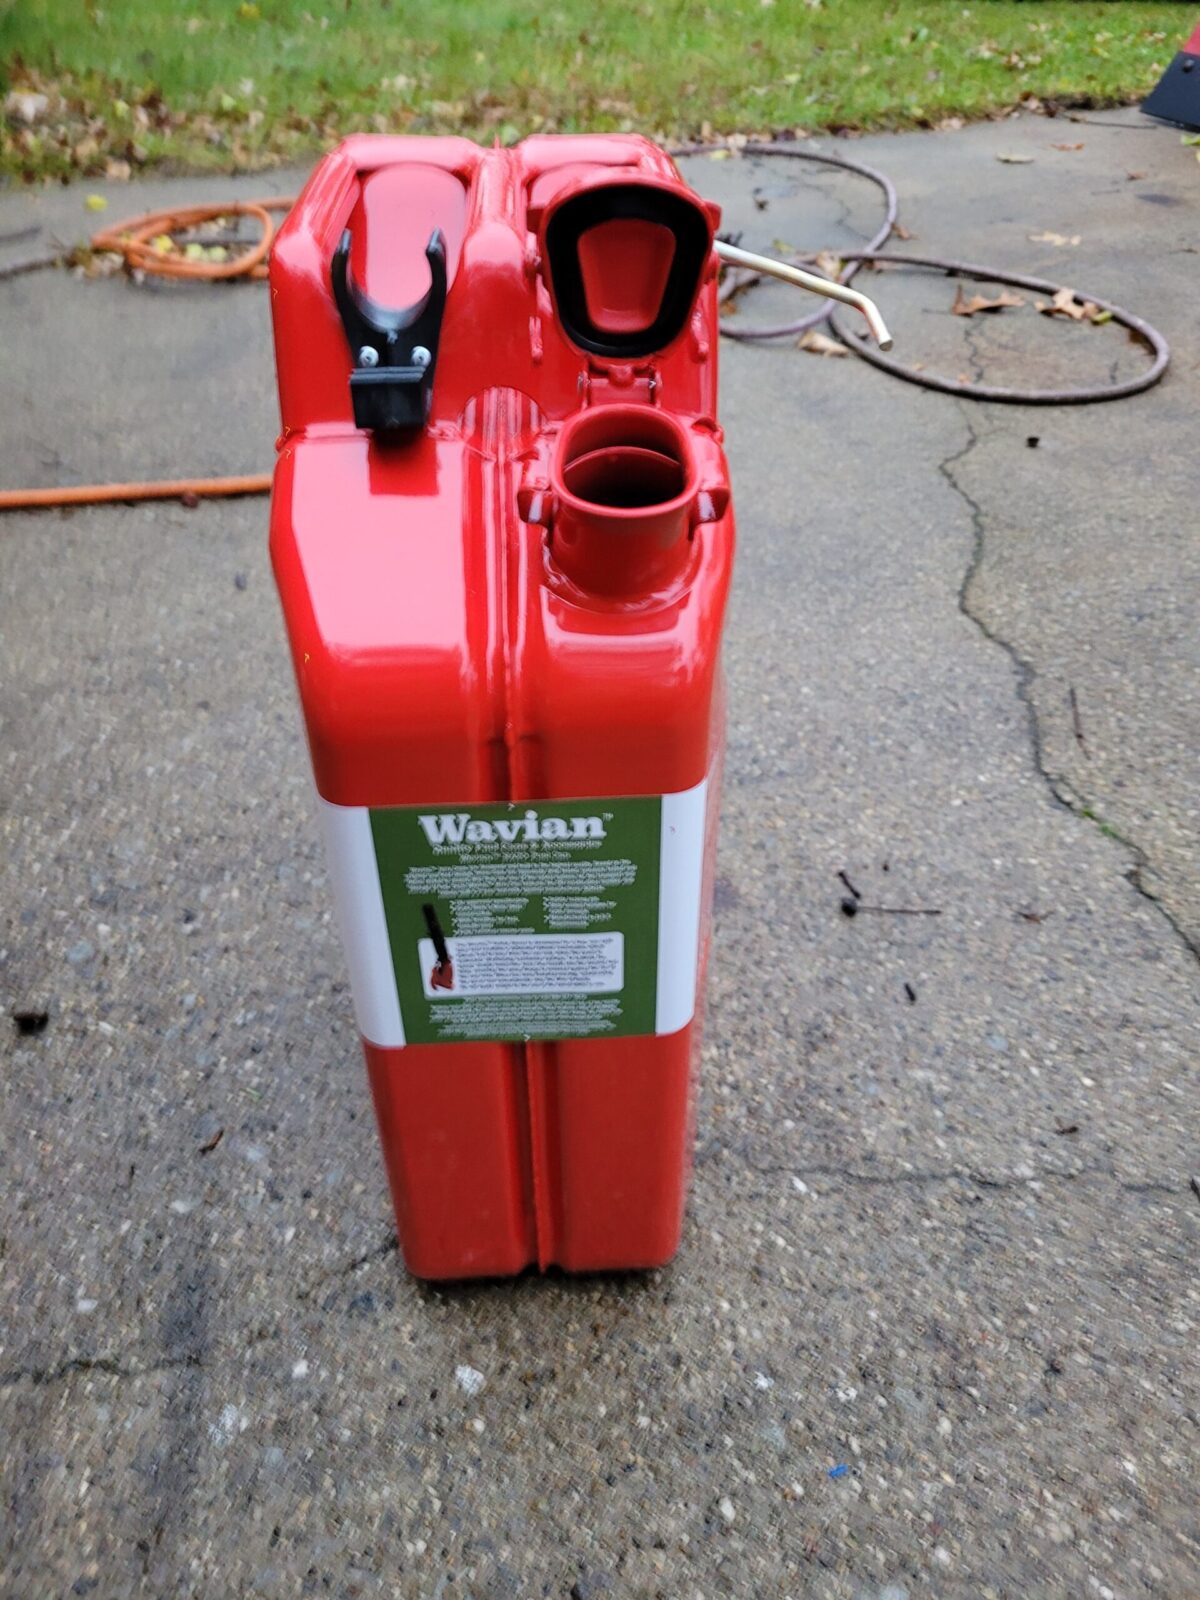
Honestly, when I saw their name I assumed it was some cheap import but then started reading more. Wavian cans are made in Latvia and they are a NATO supplier. After getting mine, I can tell you they are the highest quality cans I have seen since my dad’s old surplus cans from WWII or Korea.

A Bit of History

The “Jerry Can” design dates back to 1937 created the Vinzenz Grügenvogel, the chief engineer of Müeller engineering in Schwelm, Germany. An interesting design requirement of the Wehrmacht-Einheitskanister was that a German soldier needed to be able to carry two full cans or four empty ones hence the size and triple top handle design.

There’s a far more complete historical narrative on Wikipedia including what America did if you are interested – click here.

Fast Forward To Today

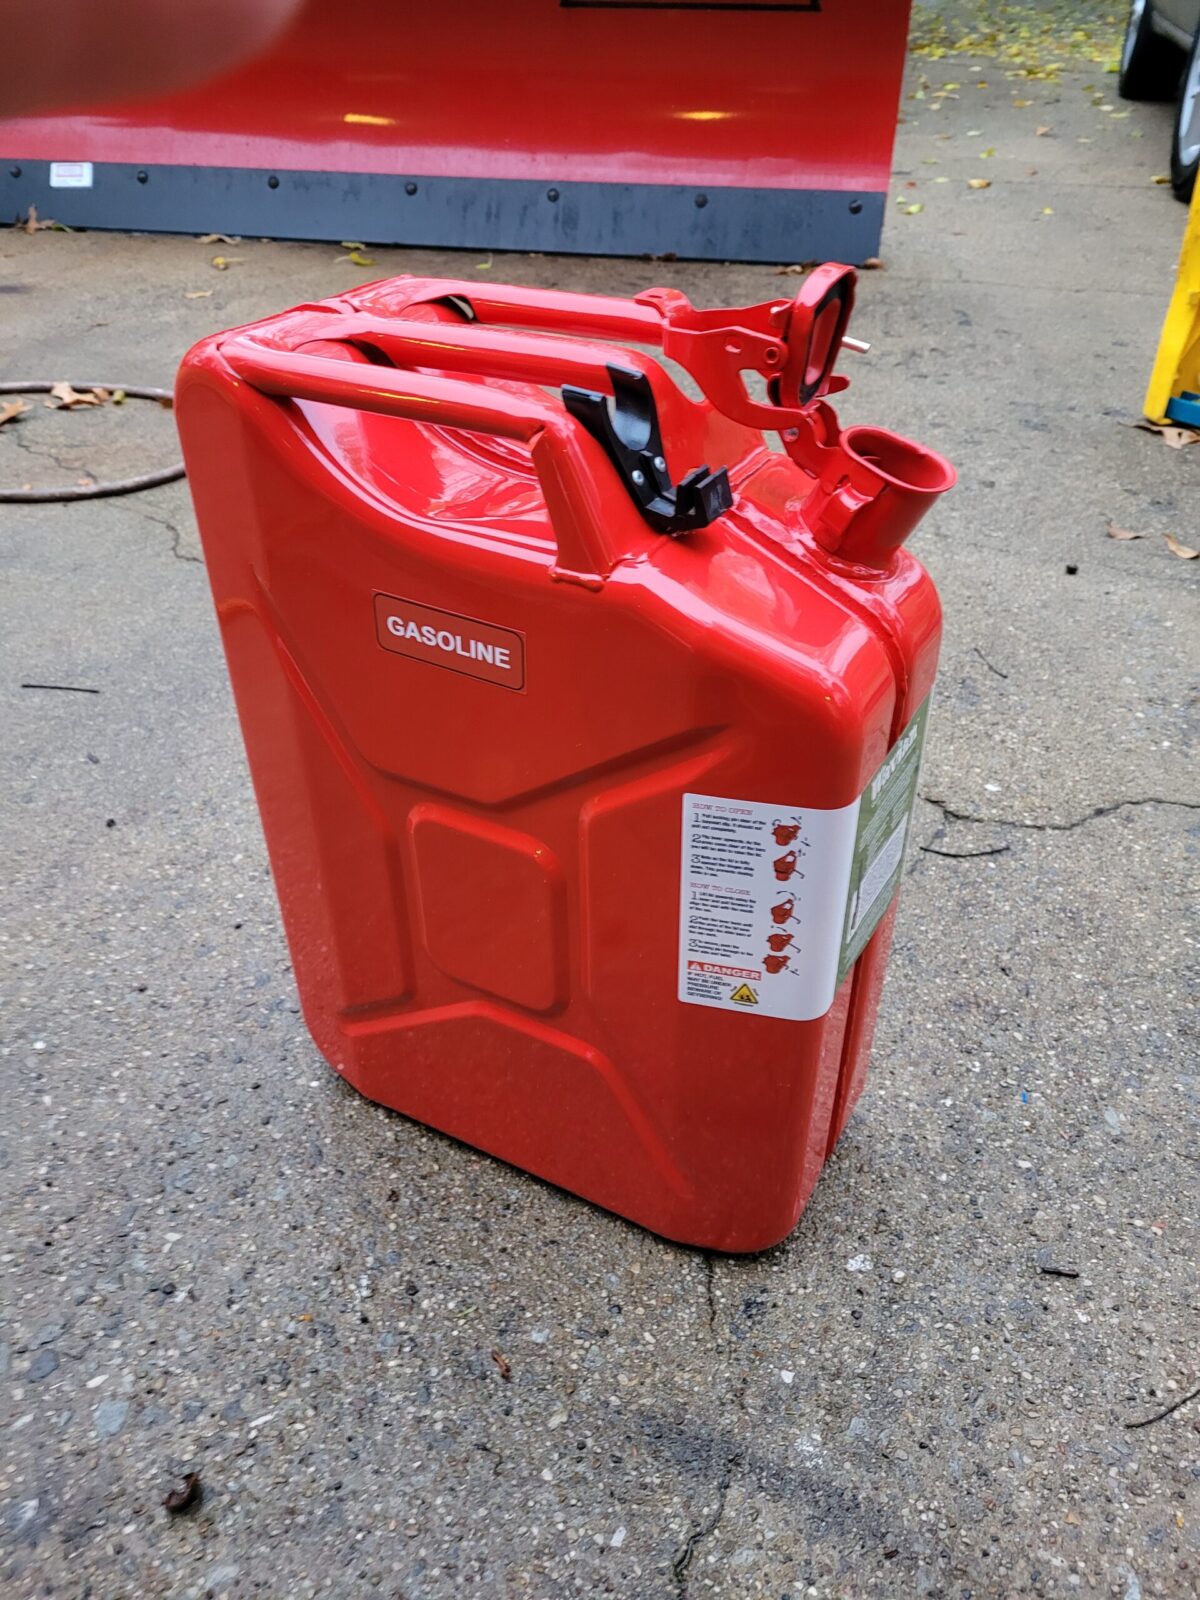
Folks, these are really nice cans. At any rate, they have some cool features and I just want to highlight the ones I noticed and want to share:

  • They are rated for 20 liters which is actually 5.28 gallons of gas
  • The color you choose, I picked red, is powder coated on and a nice deep color and is gas resistant
  • The welding and assembly is excellent – cheap cans use tack welds that do let go.
  • The steel body is 0.9mm (which is 0.0354″ and puts it a tad thicker than 21 gauge (.034375″ 0.873mm)). Cheaper cans use thinner metal.
  • There is an internal coating to protect the steel – I doubt you will see this in a cheap can – it’s not present in my Chinese cans.
Custom Yugo M72B1 carbine with Vortex scope by Two Rivers Arms
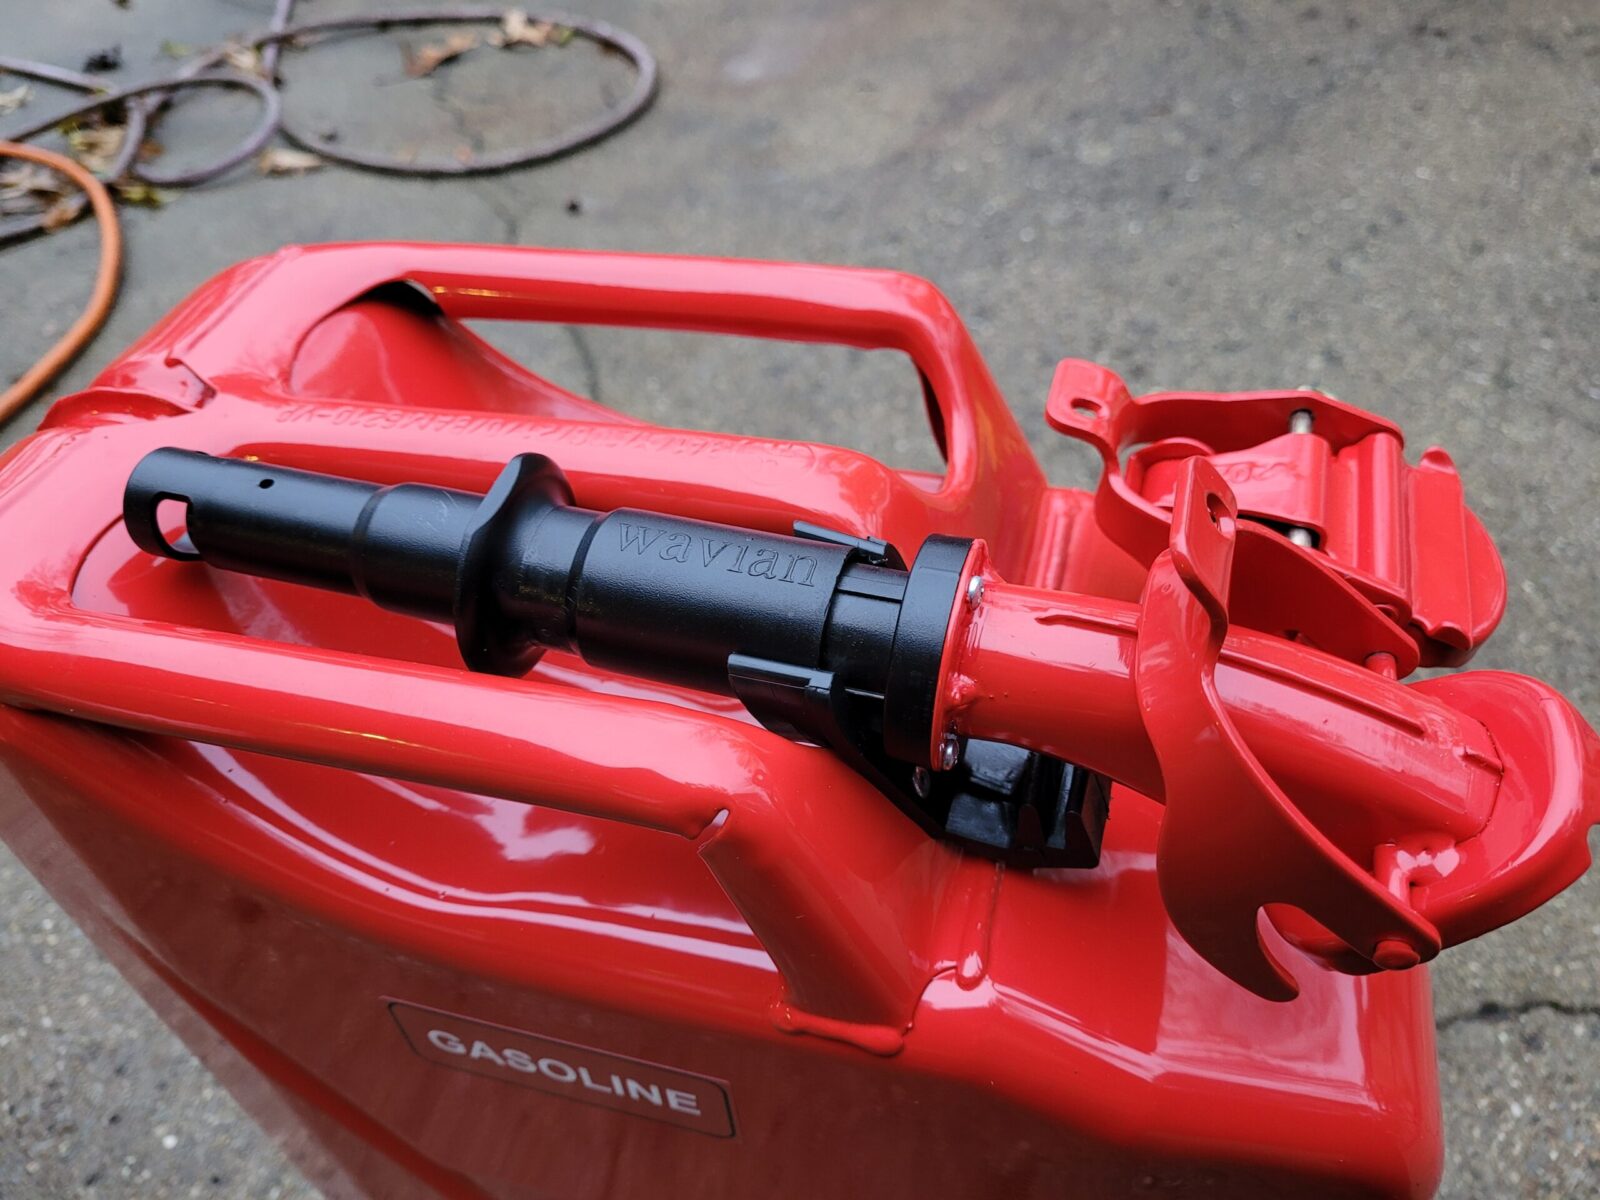
Leave it to the EPA to screw up easy to use gas can spouts. At least Wavian tried to do what they could with the mandate.
Customized Romanian AK rifle with Midwest Industries rails and Galil grip
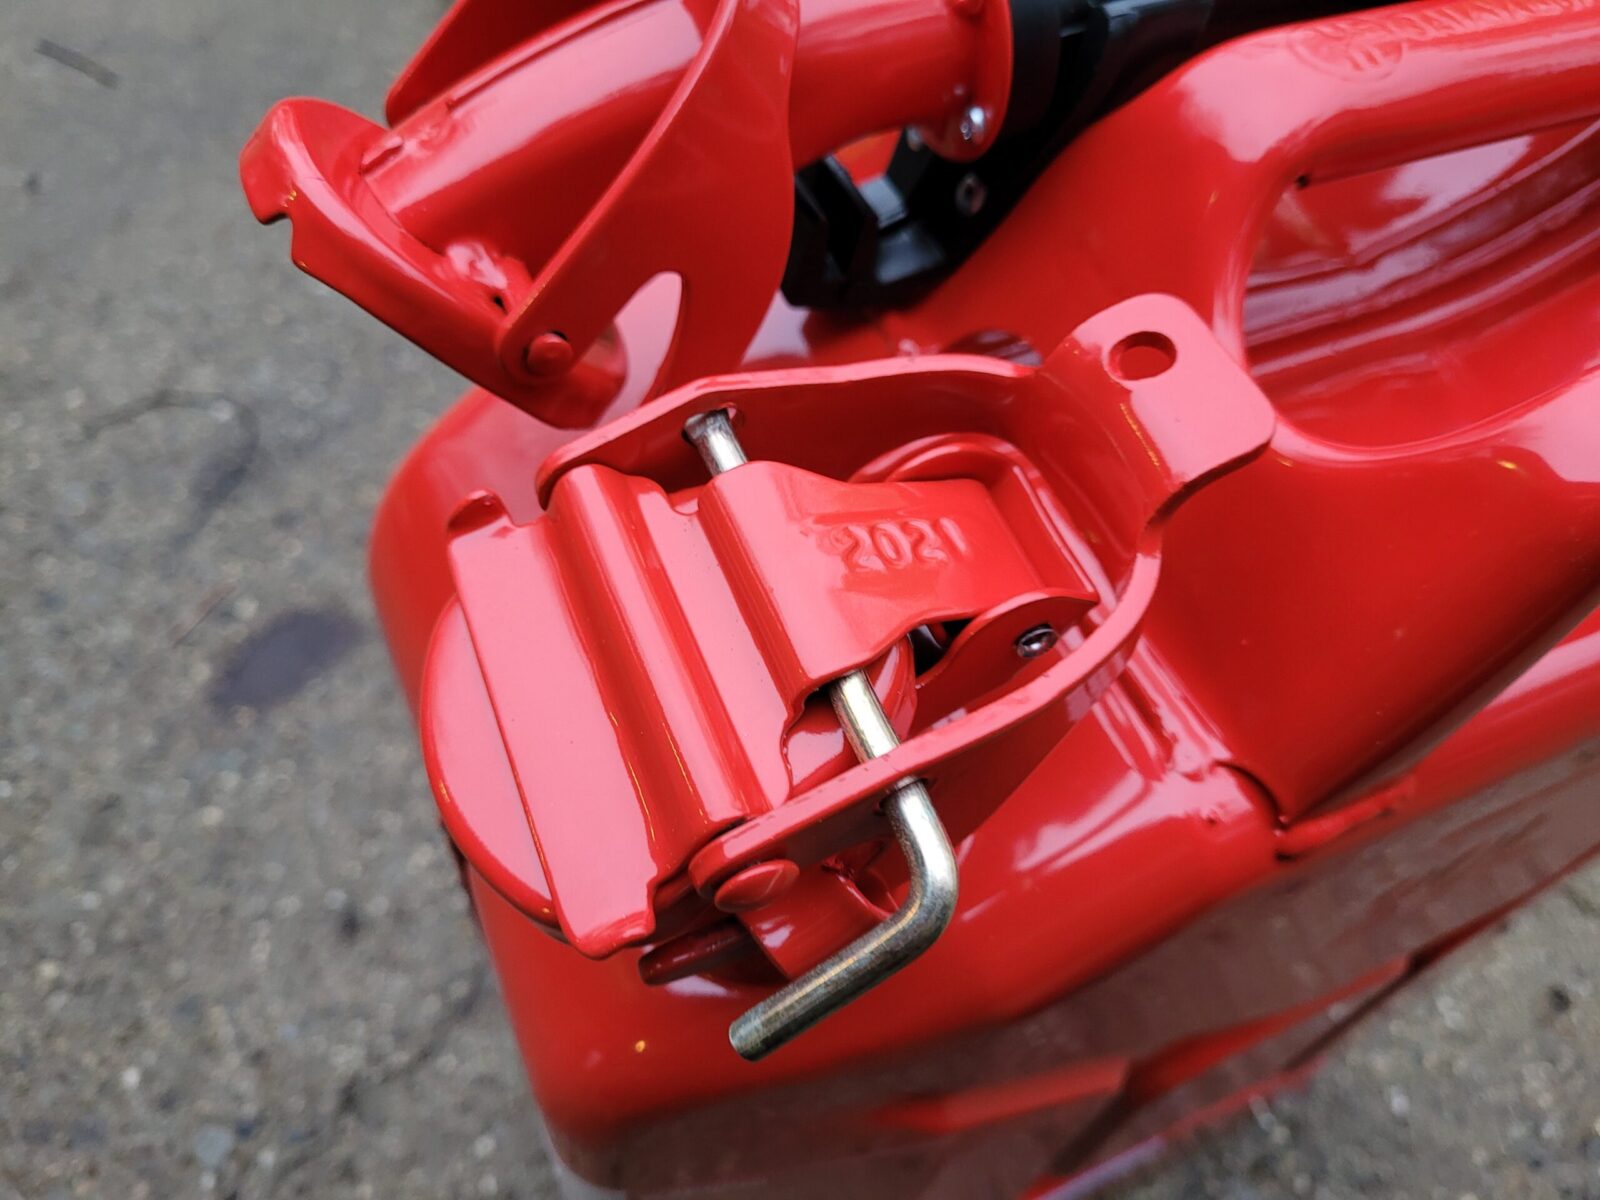
The cap closes very securely and the cadmium colored pin you see locks it in place. The pin itself is flared on the far end on purpose so it can’t be accidentally removed all the way and lose – that’s a nice design detail I think.
Customized Romanian AK rifle with Midwest Industries rails and Galil grip
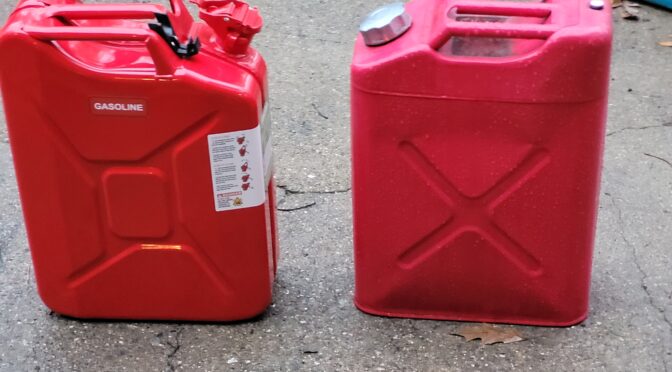
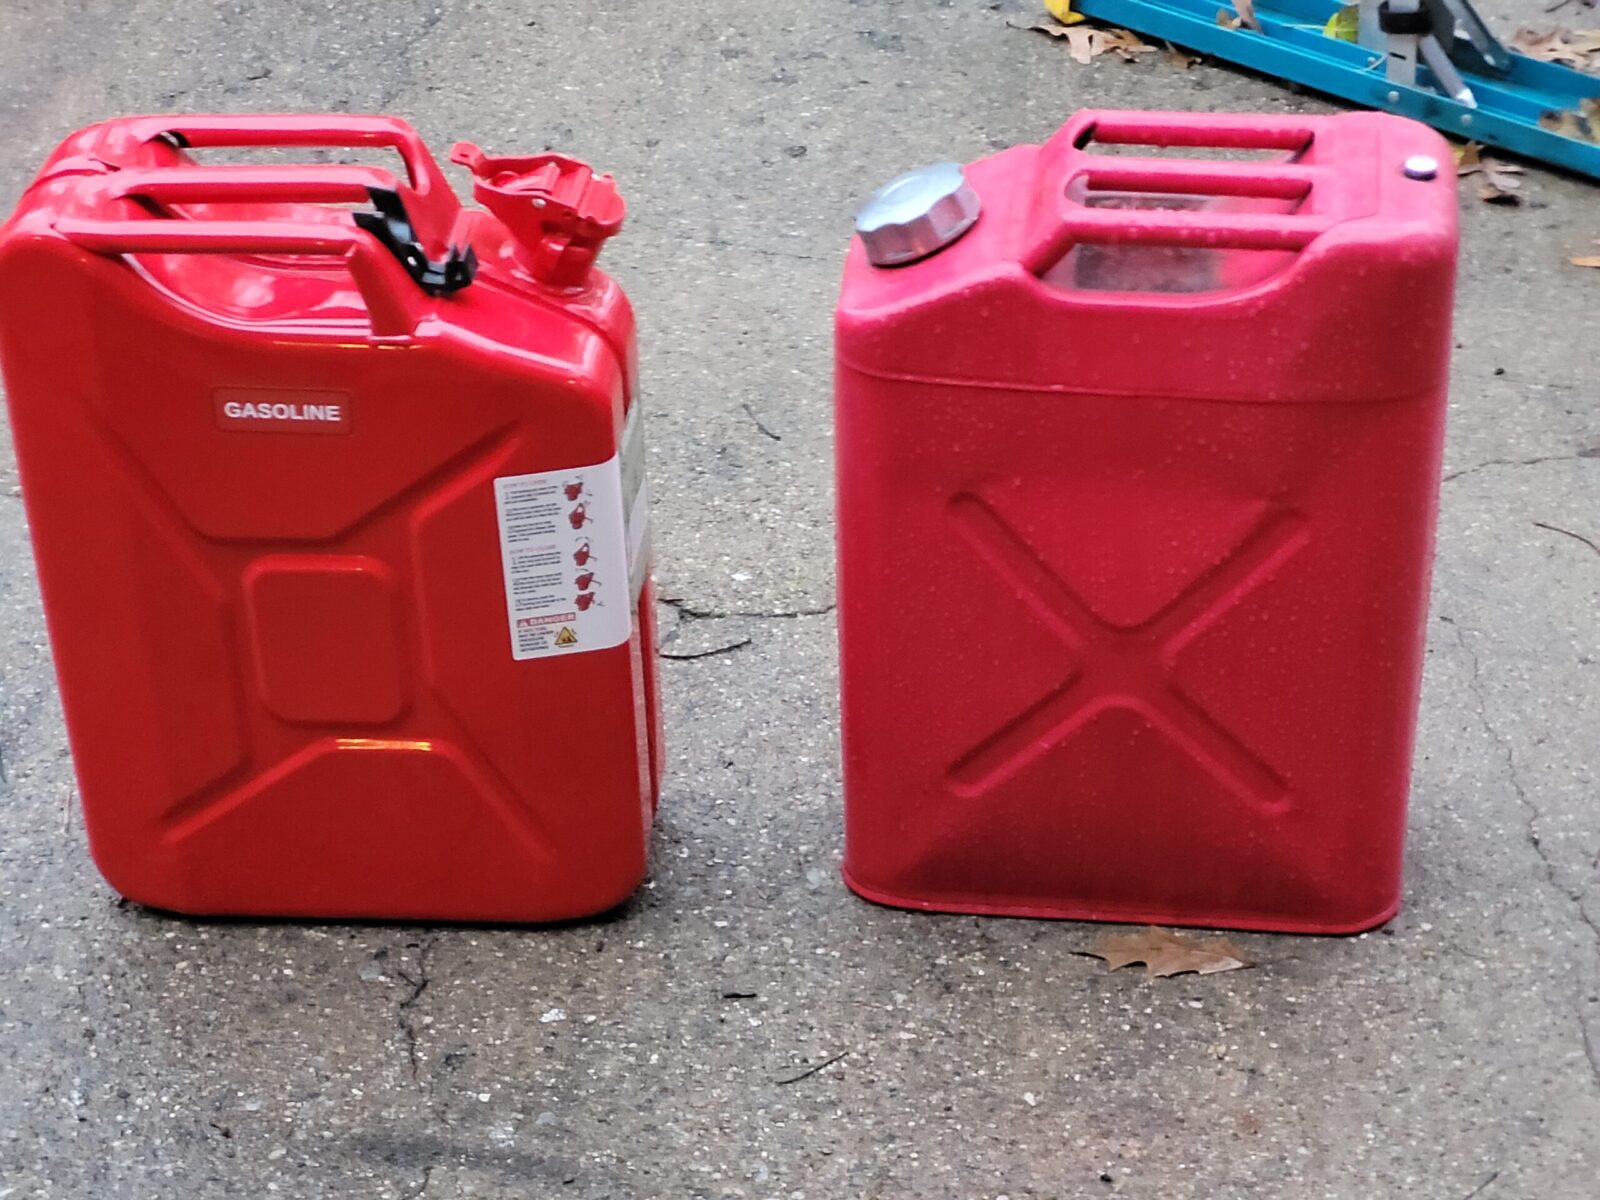
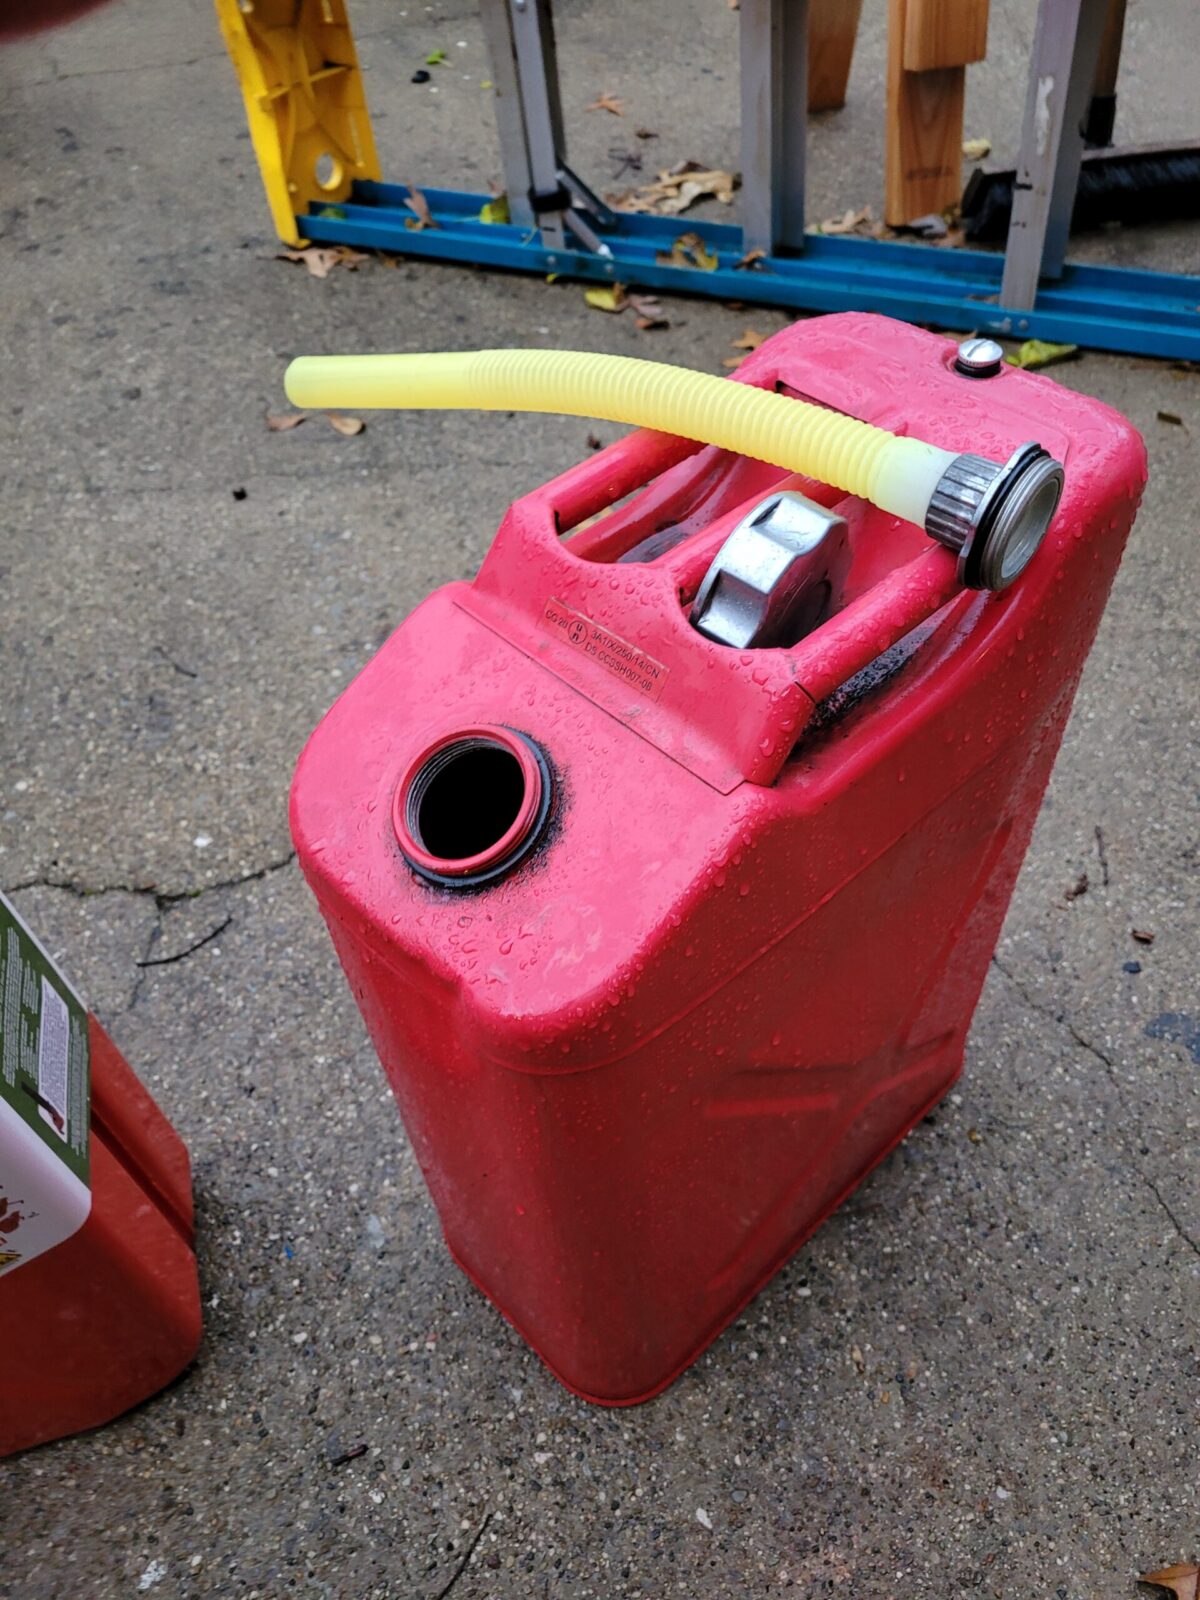
Brand new Wavian on the left – cheap 8 year old Chinese can is on the right. In all fairness, it’s held up for holding gas but I don’t really transport gas in it. The Wavian is built like a tank.
Customized Romanian AK rifle with Midwest Industries rails and Galil grip
Here’s a close up of the Chinese can’s filler tube, It’s discolored with age but it works. The con is the it does flip-flop around when you are trying to start pouring. Again, it’s held up being outside all year long so I can’t knock it too hard.

The negative is that they come with a God-awful EPA compliant nozzle. I absolutely hate any nozzle where I have to pull something back and hold it back while trying to hold a can with up to 33.8-37.7 pounds of gasoline in it. Folks, I am 54 and it’s not that easy any longer. At least Wavian tried to do what they could with the mandate. In many cases, if you can push the spout into a filler port on a vehicle, the pressure would keep the spout open but not all gas tank filler ports are shaped that way – for example it will not work on my lawn tractor or generator that both have horizontal gas tank filler ports.

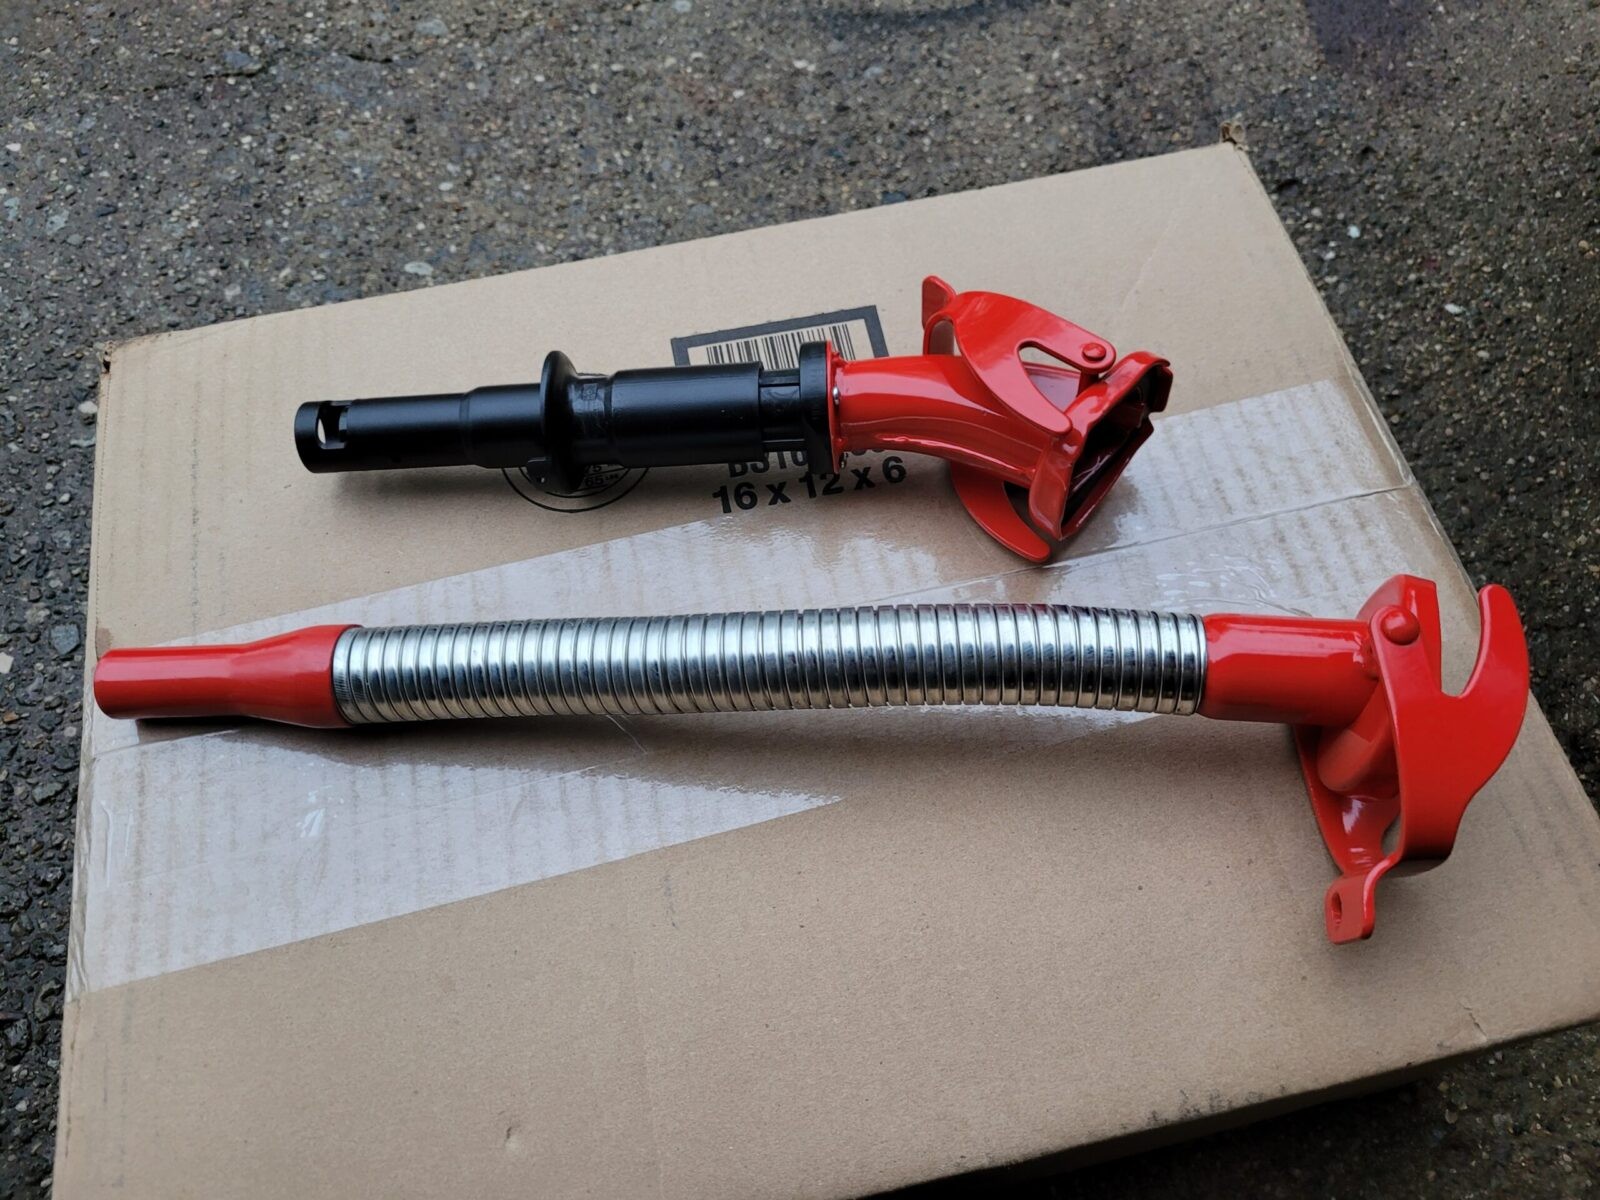
So, I did spend the extra money for a more traditional steel goose neck nozzle that does not have all that EPA stuff on it so I can manage holding and positioning the can with both hands and let the nozzle do it’s thing. By the way, it’s not like Wavian really has a choice – they are mandated to supply a self-closing nozzle but at least they can still sell the aftermarket nozzle.

Custom Yugo M72B1 carbine with Vortex scope by Two Rivers Arms
The EPA-compliant spout is on top. The optional spout that you can buy separately is on the bottom and far easier to use. I will install the longer spout when and where I need it vs. leaving it on the can.

Note, growing up my dad had the old style Jerry cans and kept his nozzles separate from the tanks. I’m going to do the same thing. I’ll grab the nozzle and the gas can I need when it’s time to pour gas.

So, do I like the Wavian can? Absolutely – I just bought a second. If you are looking for just about the best can out there. Get a Wavian. I’ve not seen a modern can even remotely close to this level of quality. I bought both of mine and the fill spout from Amazon:


Note, I have to buy all of my parts – nothing here was paid for by sponsors, etc. I do make a small amount if you click on an ad and buy something but that is it. You’re getting my real opinion on stuff.


Please share the link on Facebook, Forums, with colleagues, etc. Your support is much appreciated and if you have any feedback, please email us in**@*********ps.com. If you’d like to request a report or order a reprint, please click here for the corresponding page to open in new tab.


Used DryLok To Stop Brick Spalling And Sealed a Chimney Cap

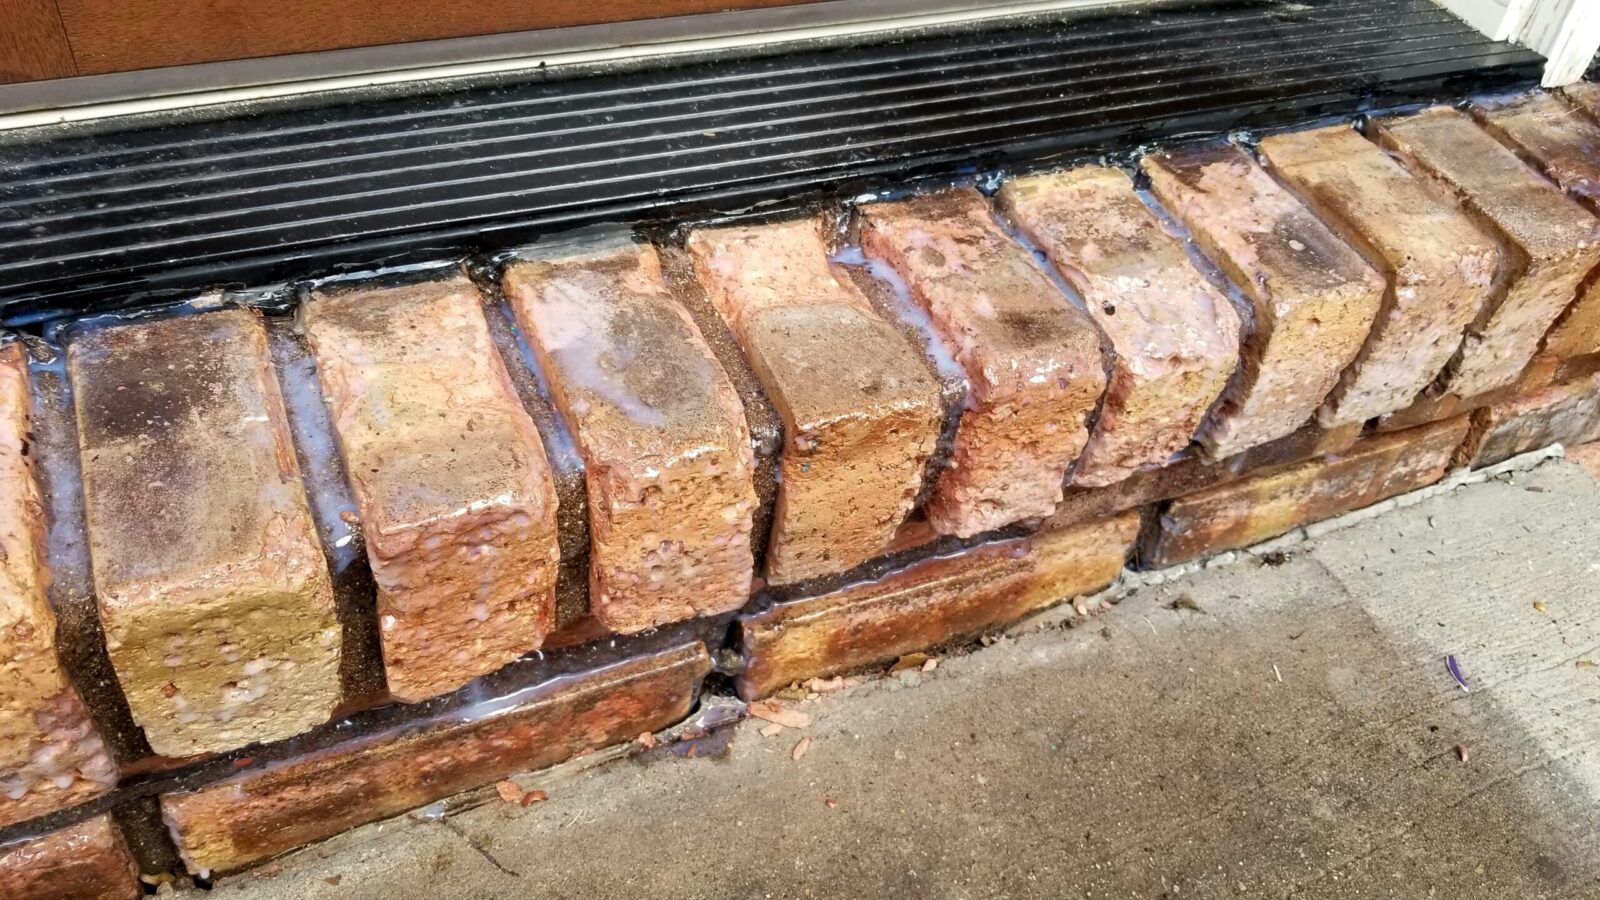
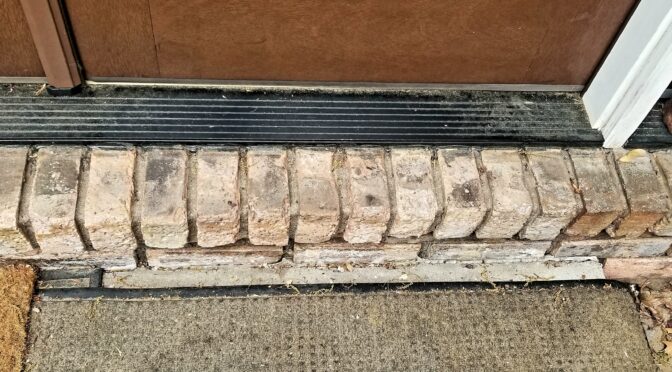
Our home was built in the early 1970s and someone decided to use same relatively soft red brick at the threshold of the door as the rest of house’s exterior walls. I noticed in the fall of 2020 it was really starting to spall – meaning the brick was starting to flake apart. This happens when water gets in, freezes, expands and causes parts of the brick to crack and split. The above photo gives you and idea of what it looked like.

I did what I normally do – I started reading about how to stop spalling brick. The consensus was that sealing the brick before spalling started was the best approach but you know what – that really didn’t help me much because I already had spalling going on but the core of the bricks was intact.

Let me tell you something – there are a ton of brands of masonry sealer and based on the forecast, my procrastination was forcing me to get something applied within three days of cold weather really setting in. This meant and I had to rush and get something on-hand at a local store.

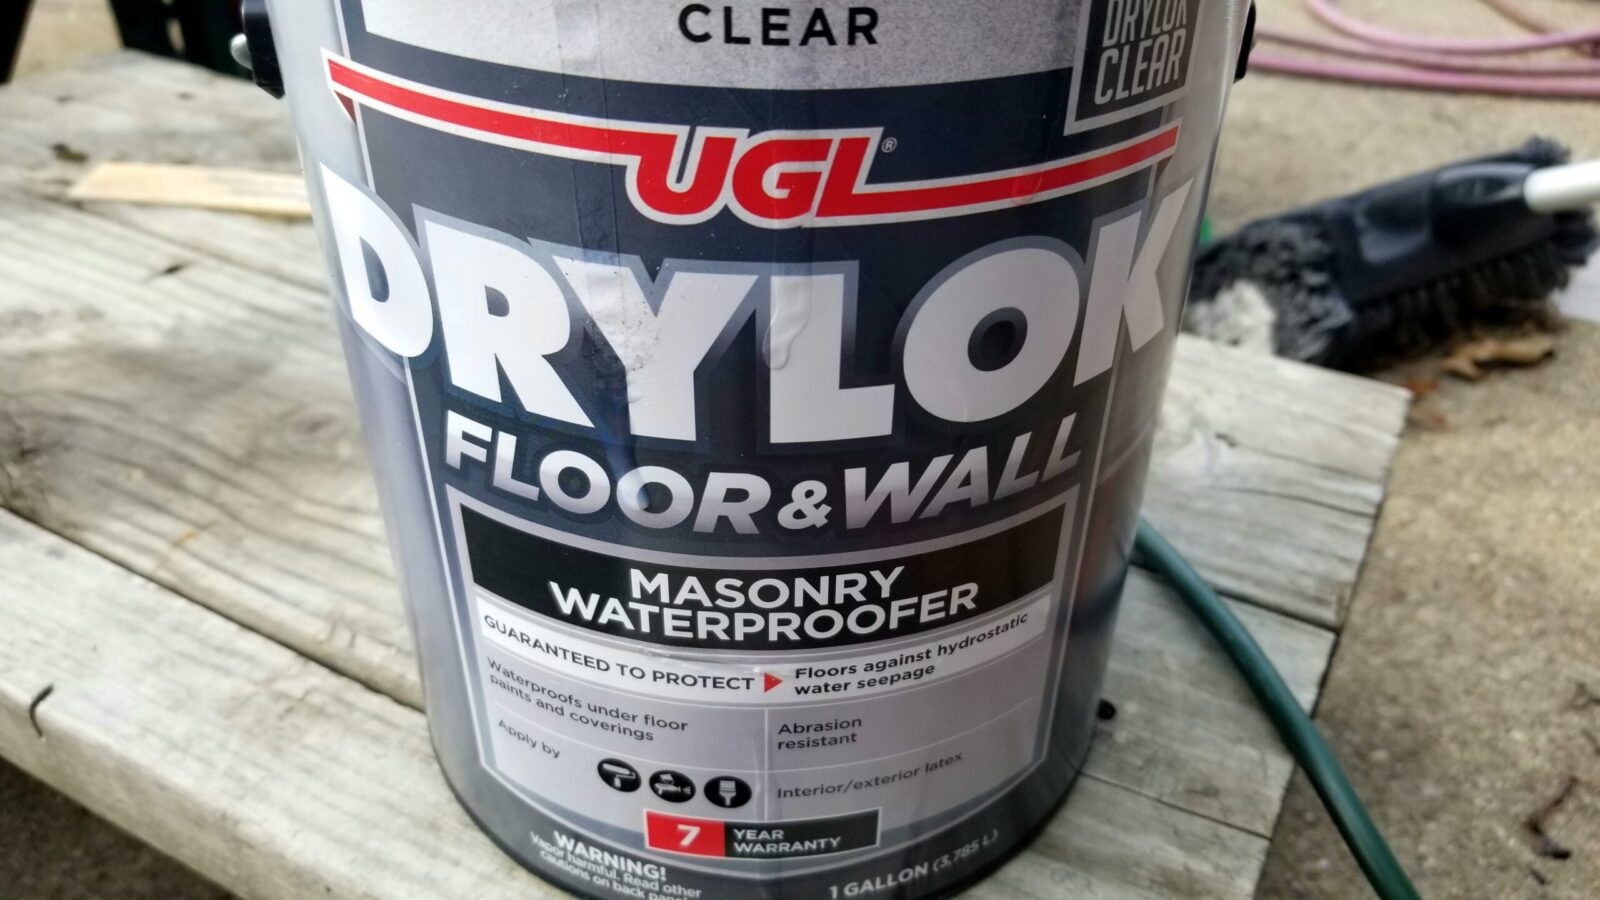
The closest hardware store to me is Ace so I want to the section where they had masonry sealers and started googling and reading reviews of each one that they had in stock. Again, I was pressed for time so I had to move. What I wound up buying was UGL DryLok Floor and Wall Masonry Sealer.

John's WASR rifle with Romy Brown STK grip and EOTech sight
This is what I bought.

I got home, read the instructions, cleaned the brick off, put down a piece of cardboard to catch the drips and applied it fairly thickly with a painbrush taking care to daub it into all of the corners. The stuff seriously reminded me of Elmer’s Glue but not such a bright white.

John's WASR rifle with Romy Brown STK grip and EOTech sight
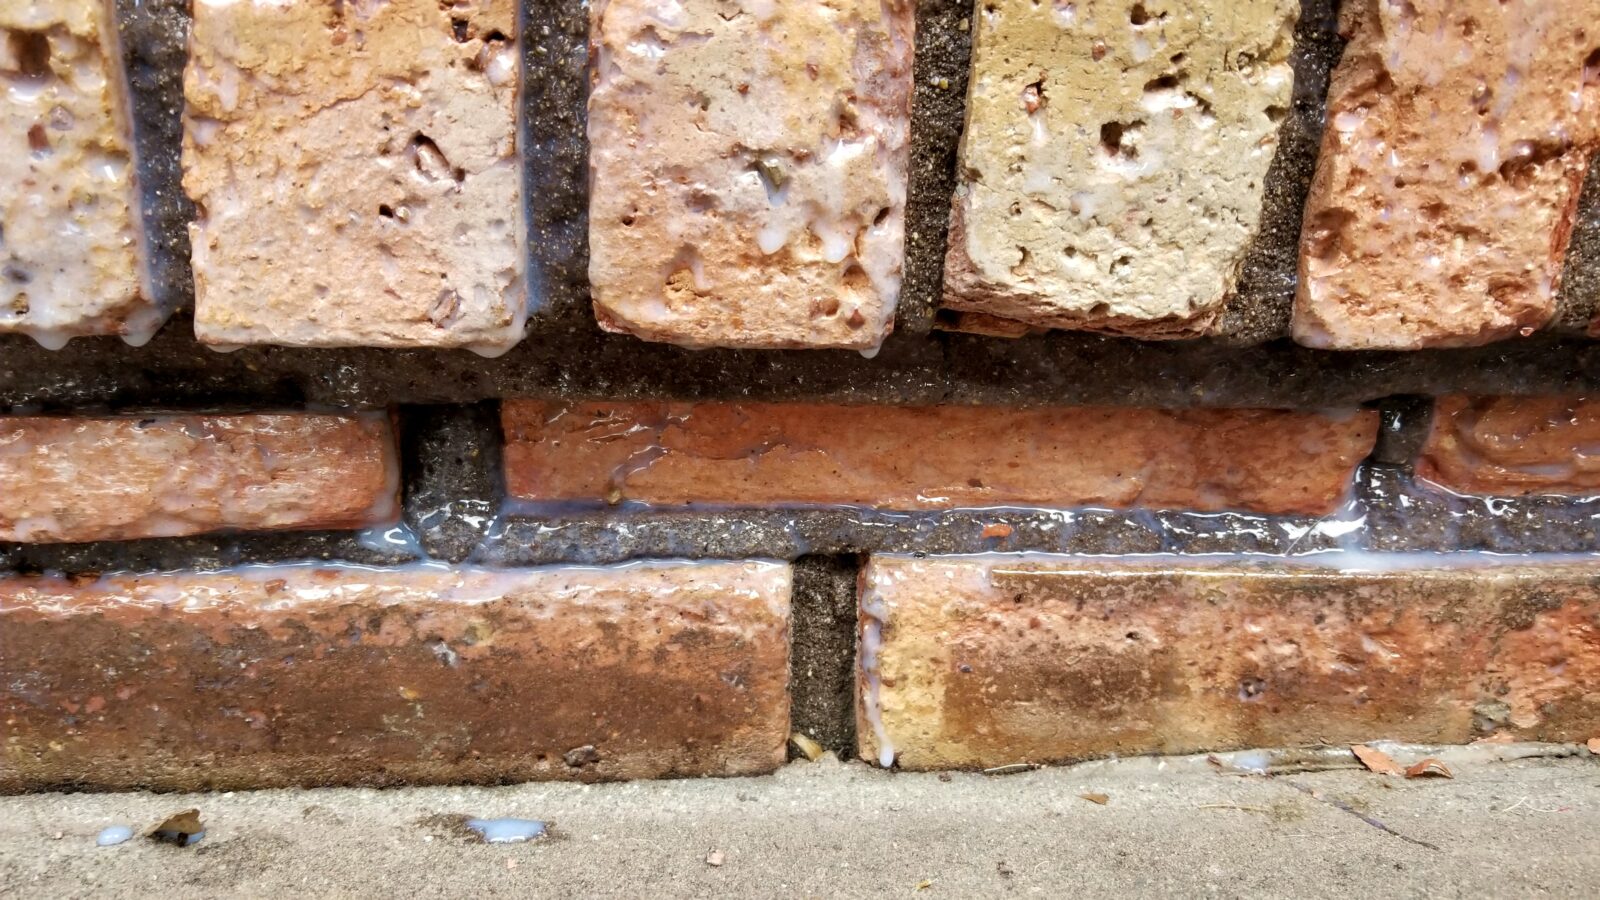
This is the second coat. I applied the first coat the day prior and I took care to make sure I worked the sealer into all of the cracks.
John's WASR rifle with Romy Brown STK grip and EOTech sight
I literaly laid down on my side and worked the sealer into every crack – including where the masonry was gone. I did this for both the first and second coat.

I let it dry overnight and then applied the recommended second coat . After drying, the bricks had a “wet” look to them – they were slightly darker and shinier than before but they appeared sealed. So, I crossed my fingers and hoped it would at least make it through the winter and I would plan a new approach if it failed.

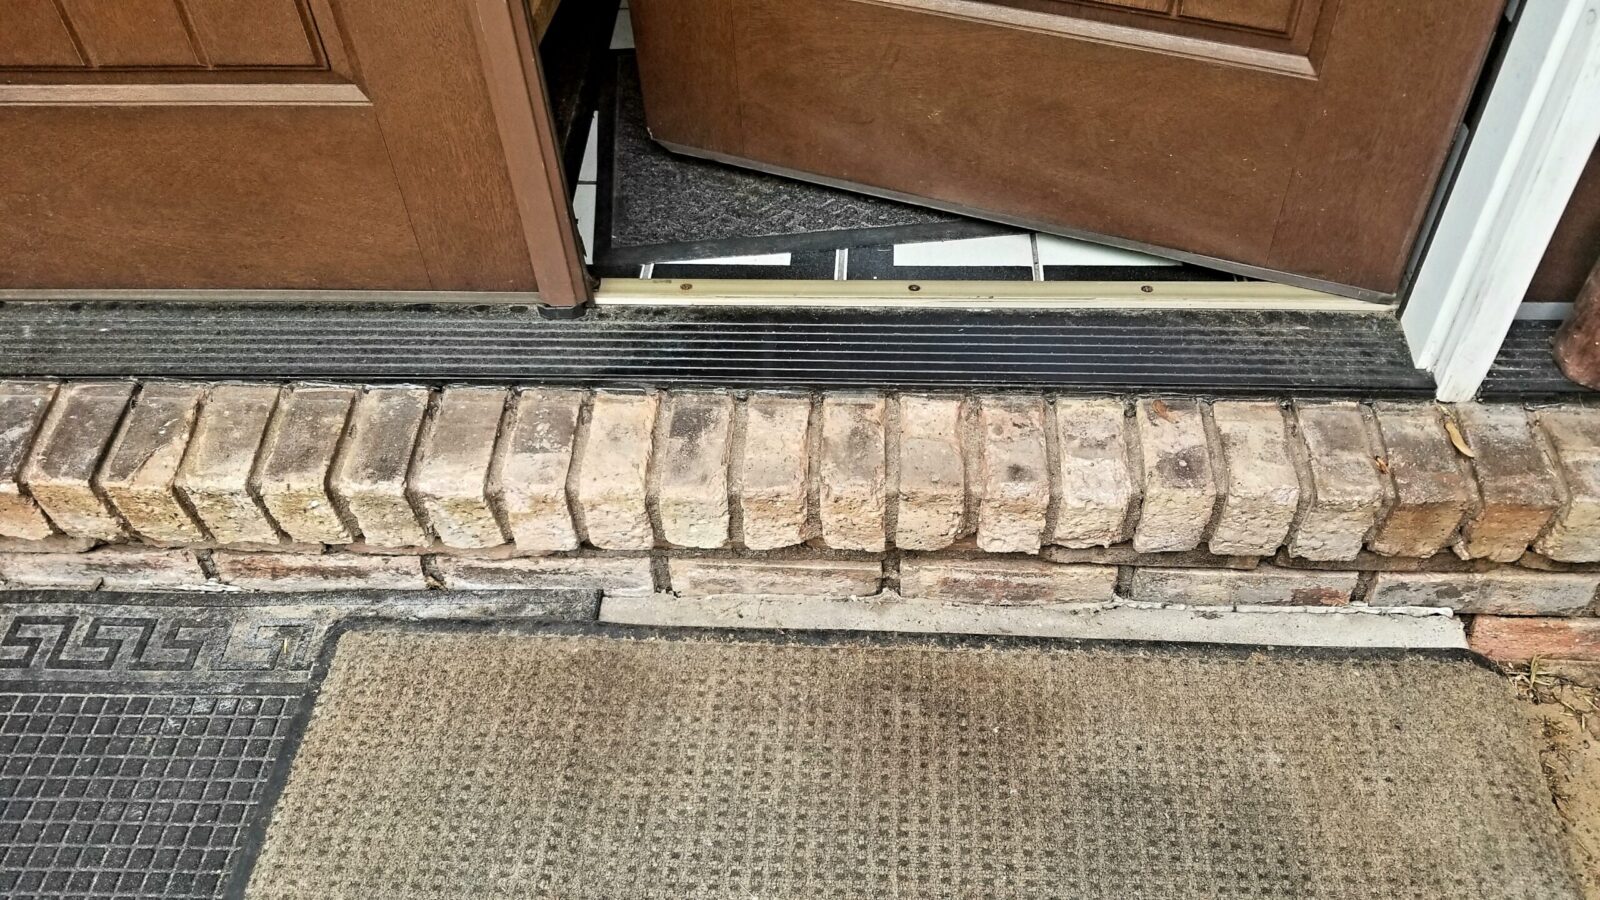
Okay, I am now writing this in June of 2021, about seven months later and the DryLok worked. Not one bit of new spalling and even more surprising, the sealer looks the same. I can’t say that I see any wear in teh shiny finish. I guess now I will just wait and see how long it holds up.

John's WASR rifle with Romy Brown STK grip and EOTech sight
THis photo is from June 21, 2021. No new spalling and the sealer does not show any sign of wear. You can see that the wet look faded as the sealer dried but the bricks are still slightly darker and shinier than the uncoated bricks. All of the bricks in this photo were coated by the way both the top protruding threshold and all of the bricks underneath it.

I Was So Impressed I Used It On Our Chimney Cap

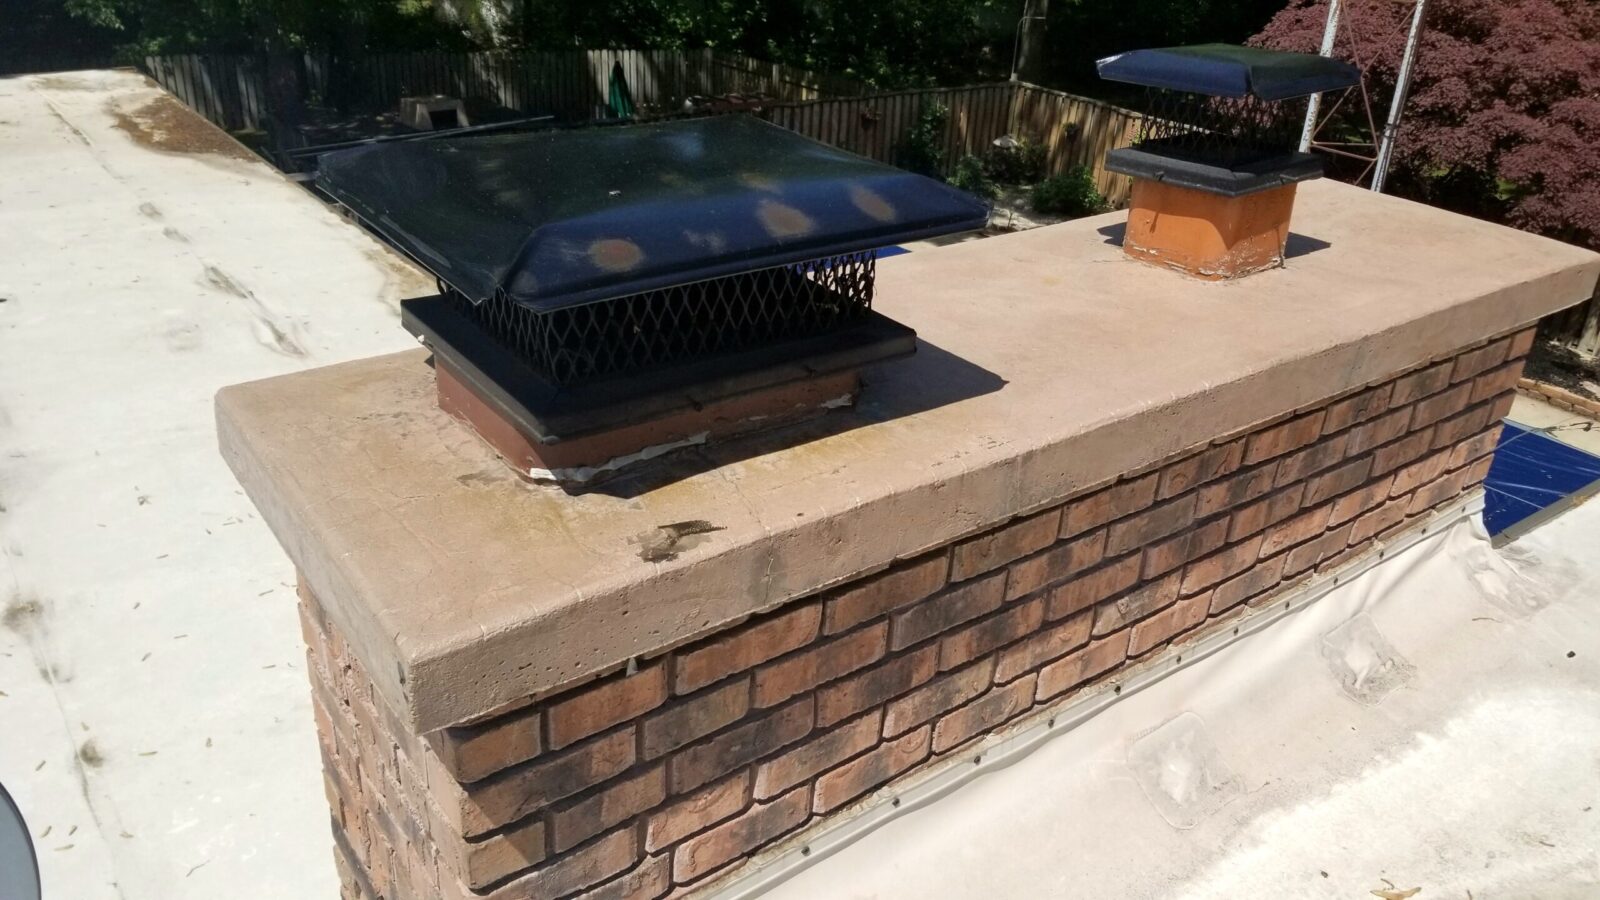
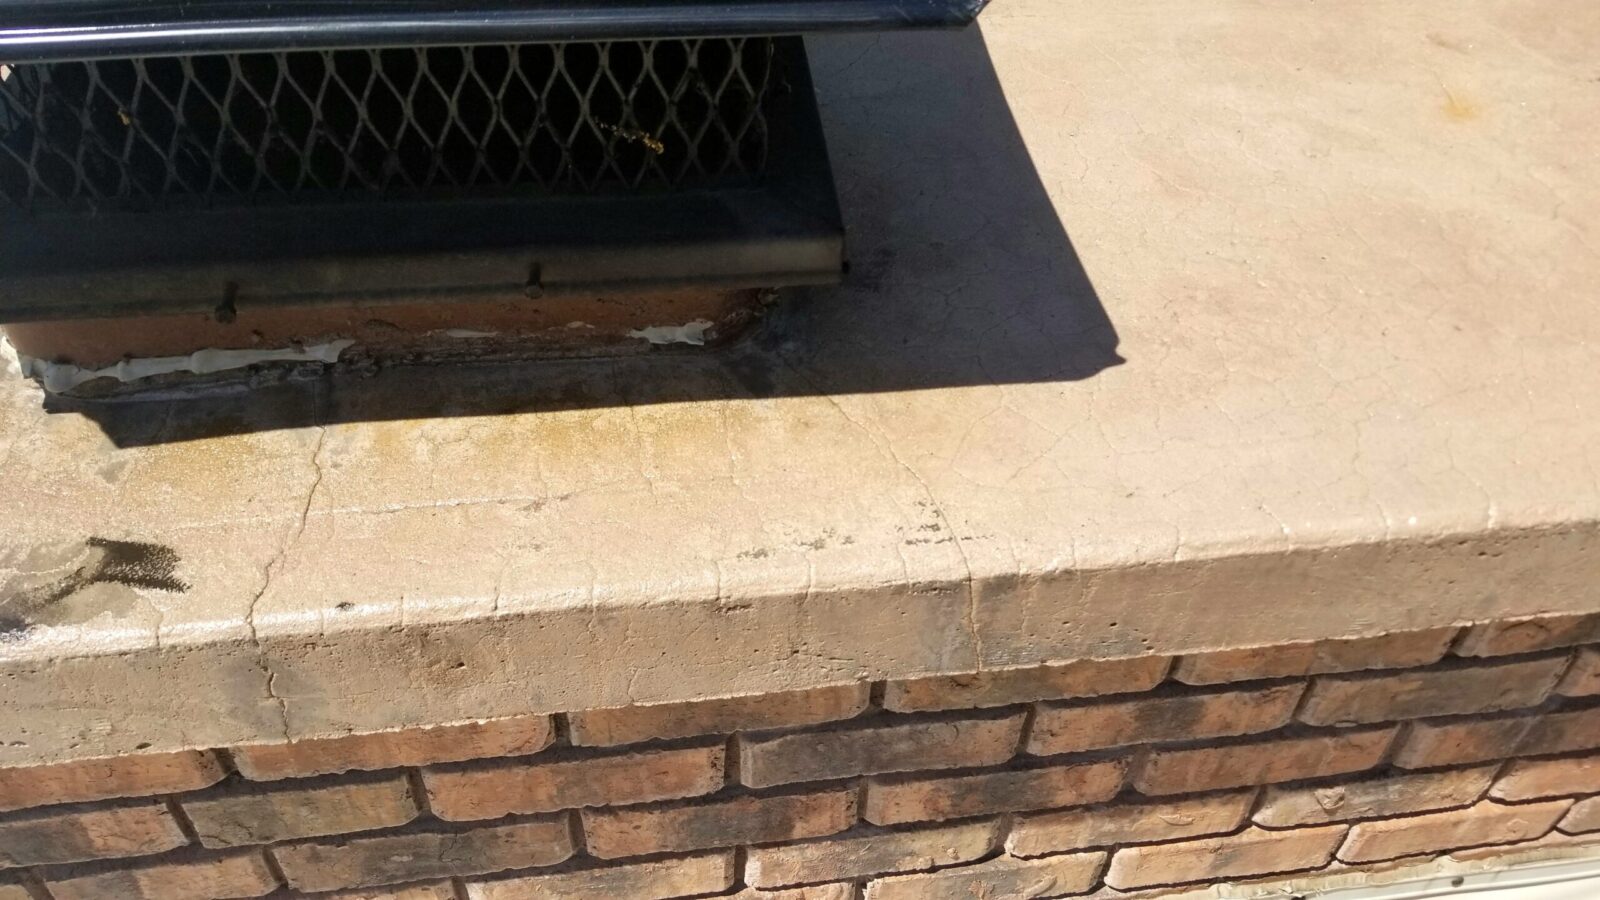
A project on my list for this June was to seal my poured concrete chimney cap. It was starting show some surface cracks and when I ran my hand across it, I could feel loose grains of sand. It definitely needed to be sealed.

Guess what I used? I bought a gallon of the DryLok to do the threshold and only used a tiny amount to do it. I went and got the gallon and used over half of it applying two decents coats to the chimney cap and flue covers. We’ll see how long it holds up but I suspect it will be a few years at least given the threshold.

John's WASR rifle with Romy Brown STK grip and EOTech sight
You want to protect the integrity of your chimney cap as it prevents water from running down into your chimney and causing the bricks to crumble. We replaced the original cap with this new one about 3-5 years ago and the sealer I applied then was long gone. I honestly don’t recall what I used.
John's WASR rifle with Romy Brown STK grip and EOTech sight
That crack is what got my butt in gear to get up and seal the cap. As with the threshold, I applied the recommended two coats and I do put it them on iberally. It was scorching hot up there so the sealer dried fast but I still waited until the next day to put on the second coat.
John's WASR rifle with Romy Brown STK grip and EOTech sight
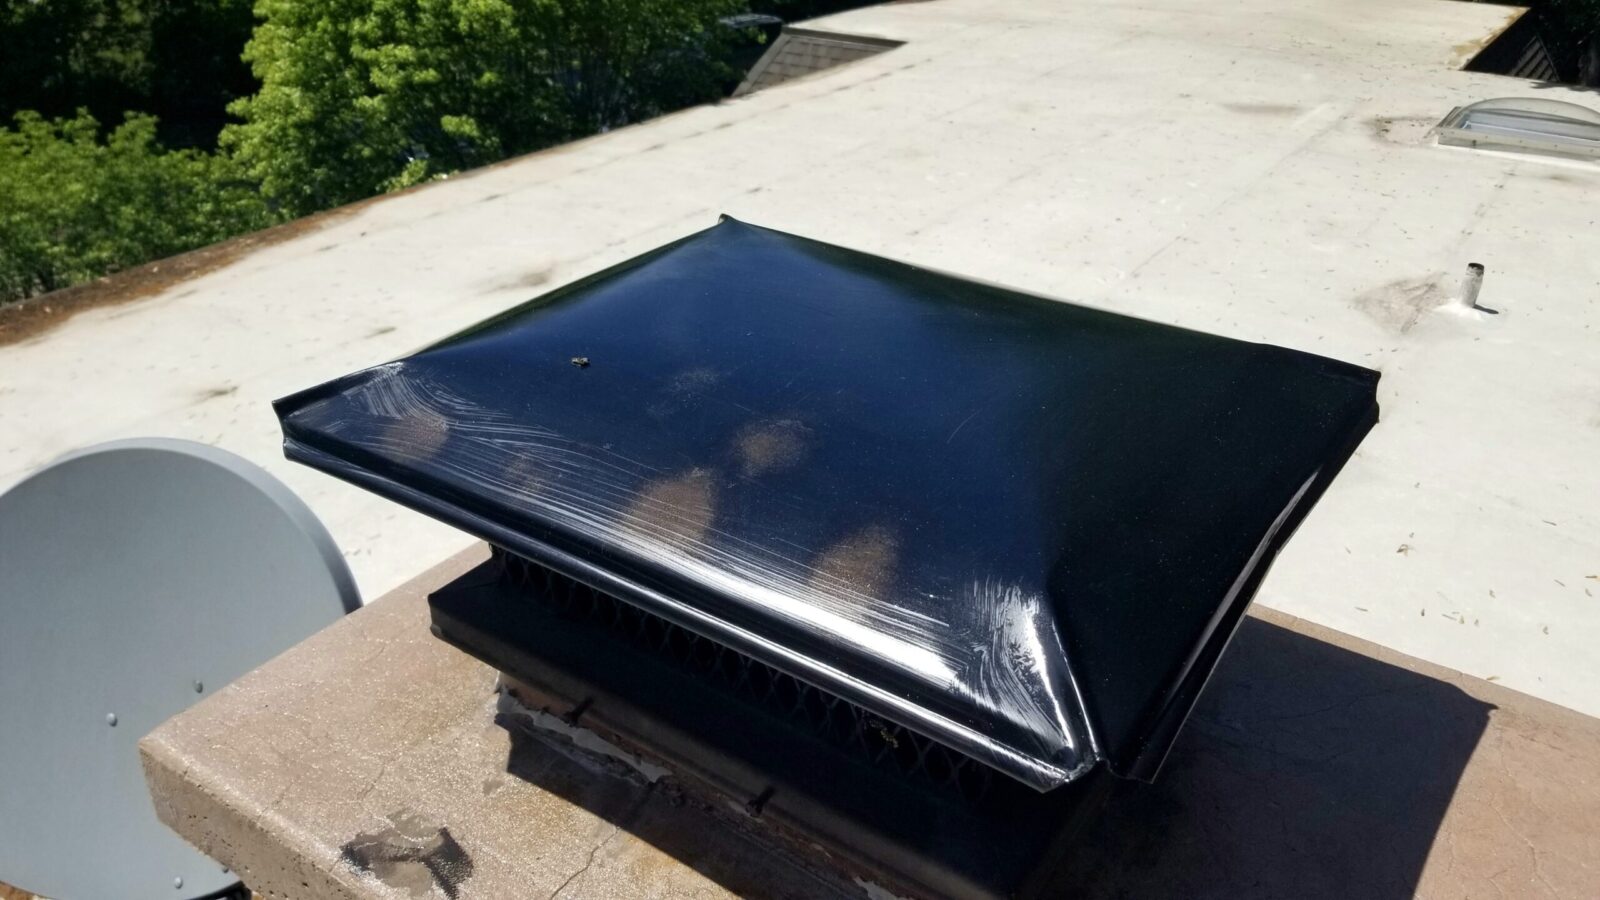
If I can take an easy path I will. I noticed the caps to the flues were starting to rust so I sealed them as well. I was there … I had the sealant … it just seemed a lot easier than going down to the shop, getting black Rustoleum, climbing back up, etc. We’ll see how it holds up – that is a pretty brutal surface when you think about it – full sun and heat in the summer and full sun and cold in the winter … time will tell.

In Summary

The UGL DryLok Floor and Wall Masonry Sealer did a great job stopping the spalling of our front door’s brick threshold and it made it through one winter. Given how it performed, I just used it to seal our chimney cap and we’ll see how long it lasts there as well.

I hope this helps you out.


Note, I have to buy all of my parts – nothing here was paid for by sponsors, etc. I do make a small amount if you click on an ad and buy something but that is it. You’re getting my real opinion on stuff.


Please share the link on Facebook, Forums, with colleagues, etc. Your support is much appreciated and if you have any feedback, please email us in**@*********ps.com. If you’d like to request a report or order a reprint, please click here for the corresponding page to open in new tab.


Recharging The R134A Refrigerant In A Glacer Bay VWD5446BLS-2 Water Cooler

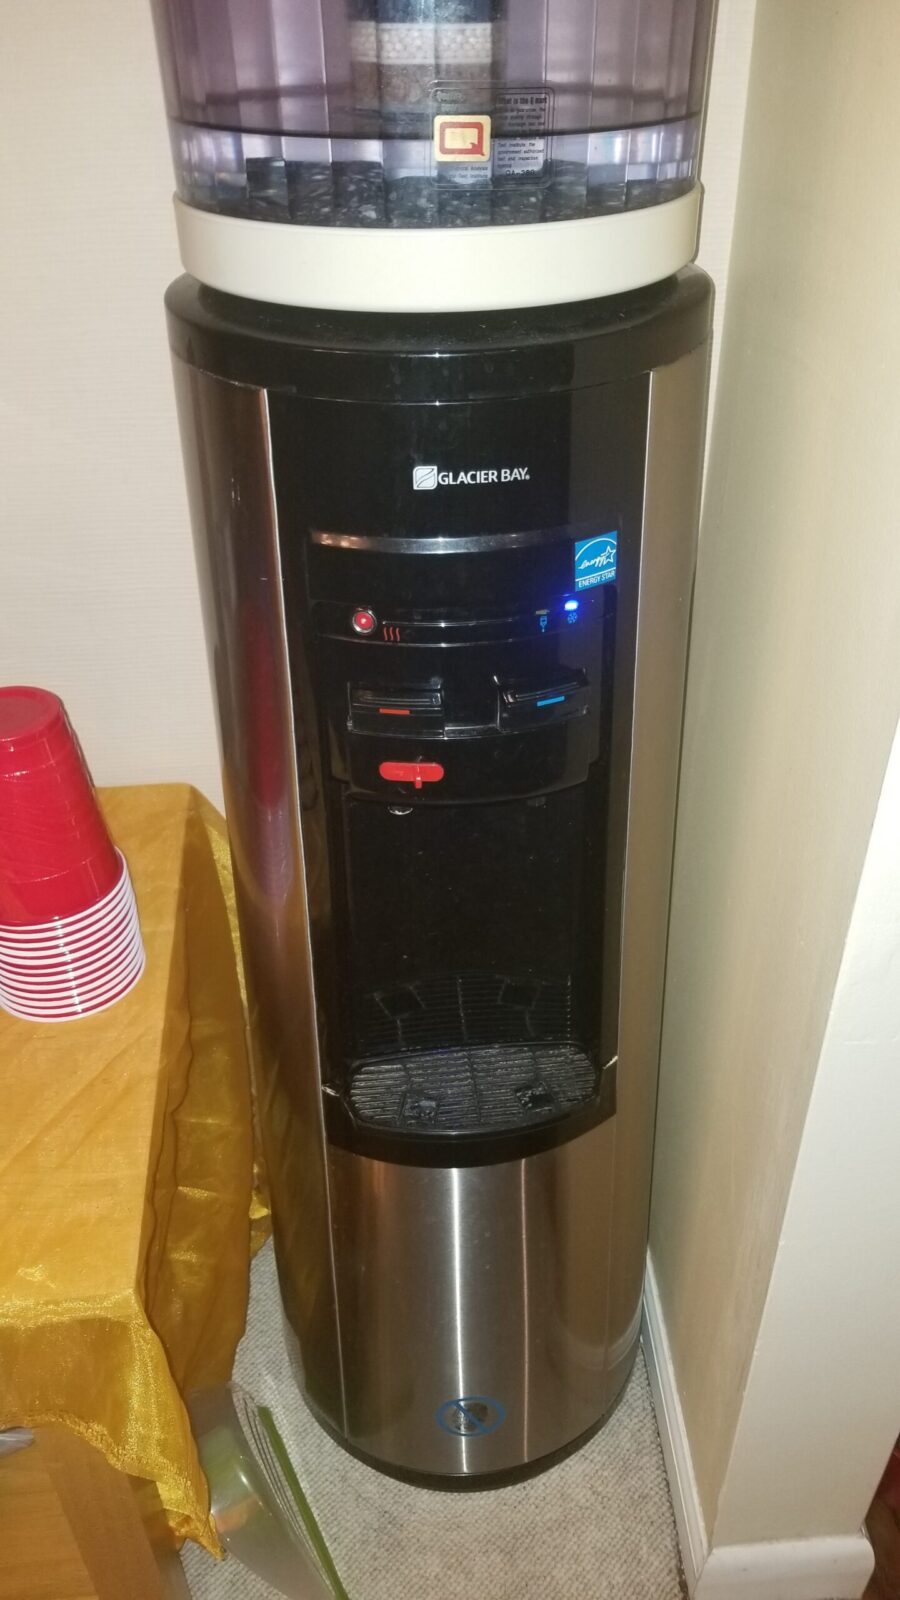
Years ago we invested in a water filter unit that sits on top of a regular water cooler. This lets us have clean good tasting cold water – at least it did until about a year ago. My wife was the first to notice that the water wasn’t getting as cold and finally it got to the point where it was only just a tad cool first thing in the morning. Because this thing was older, my first thought was that it was low on refrigerant because we’d had this happen before with old fridges.

Refrigeration systems are sealed but over time the seals age and slowly the refrigerant leaks out. At some point, there isn’t enough left to effectively cool whatever it is in questions – a fridge, freezer or a water cooler.

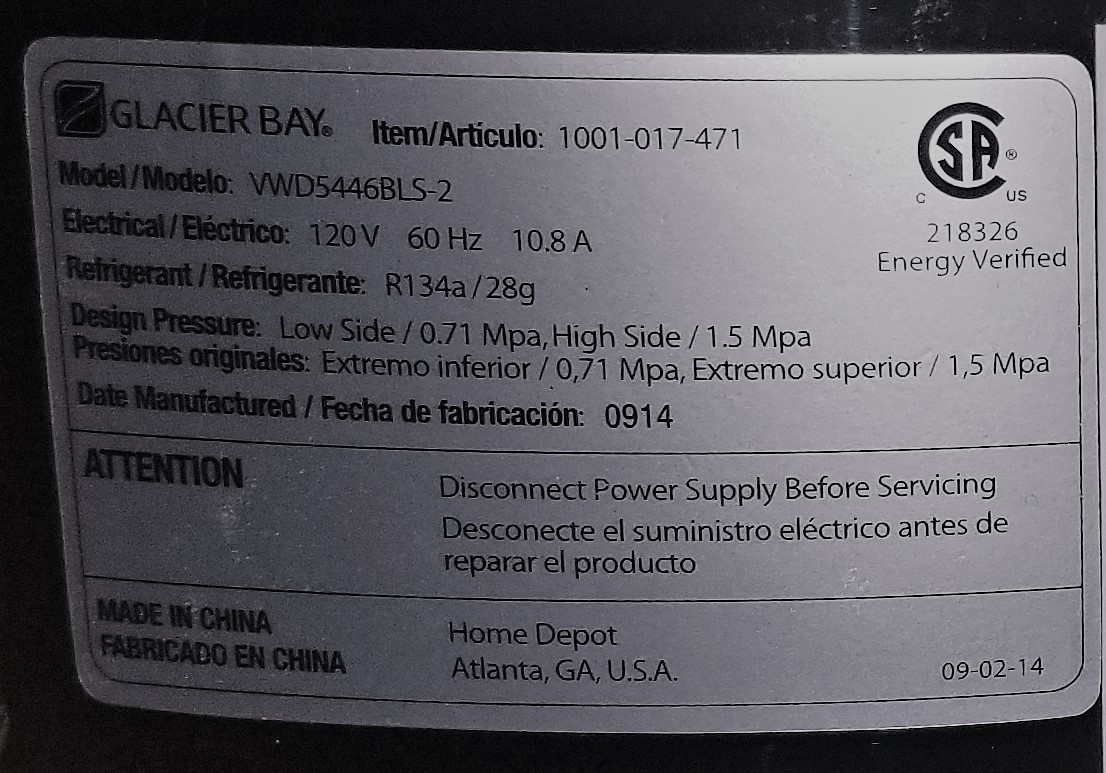
So, step one was to pull the cooler out and look at the manufacturer’s sticker on the back. Glacier Bay is a Home Depot house brand – no surprise there. The refrigerant used was R134A – definitely needed to know that, which was nice because I keep R134A around for use on cars. The sticker also told me the unit was made back in September of 2014 — yeah, this thing was just over six years old and we bought it new way back when.

Ohhunt ambidextrous charging handle in packaging
This is the manufacturer’s sticker off the back of the unit.

Note: If you need R134A refrigerant, go to your local discount car parts store. Odds are you can get a can cheaper there than mail ordering one.

Now there’s one thing I have learned – do some research on things that need to be repaired before you make the wrong assumptions and really screw things up. Boy, I’m glad I did that in this case because these small refrigeration units work at way, way lower pressures than a car or truck.

Watch this great video

What helped me out the most was an amazing video that a fellow put together about how to recharge small fridges. It was exactly what I needed to know and I only made a few small adjustments to his recommendations:

What I did

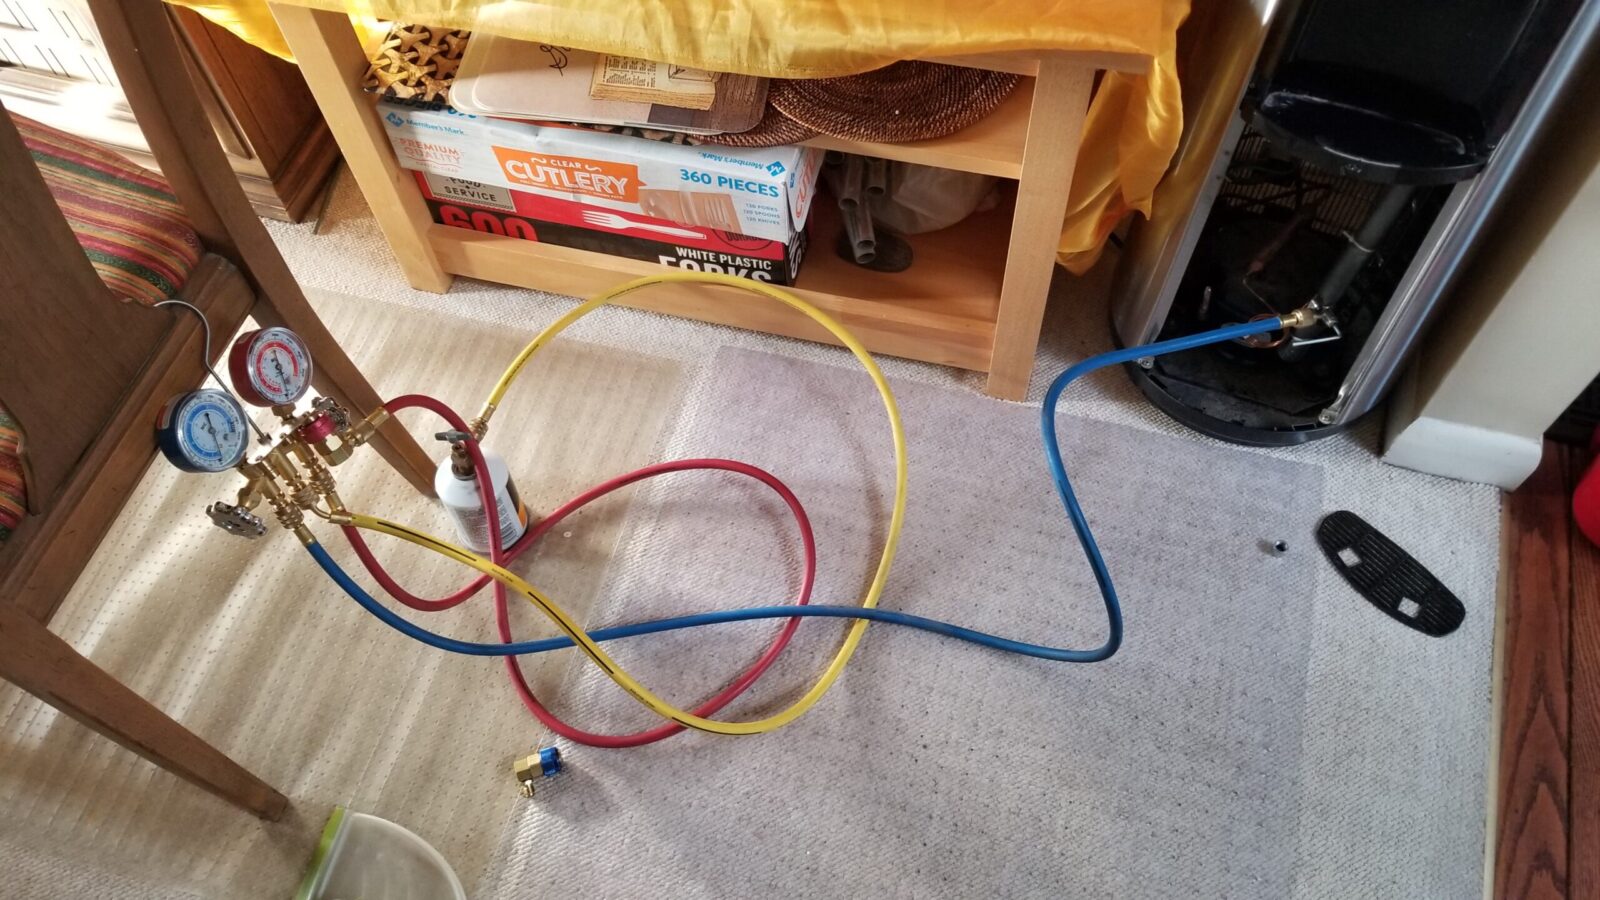
The first thing I had to figure out was how to get to the low pressure line to attach the bullet valve. While you may think to come at it from the back, which was my first thought, it will be a nightmare. It turns out that you remove the water tray by pulling it straight out and you are then looking at the one screw you need to remove to then pull off the front lower cover – voila – you are looking right at the lines.

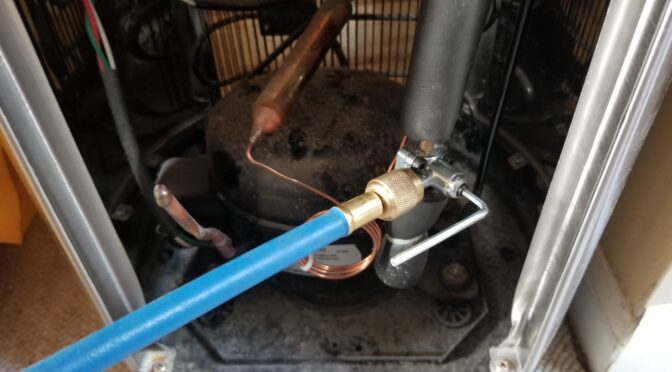
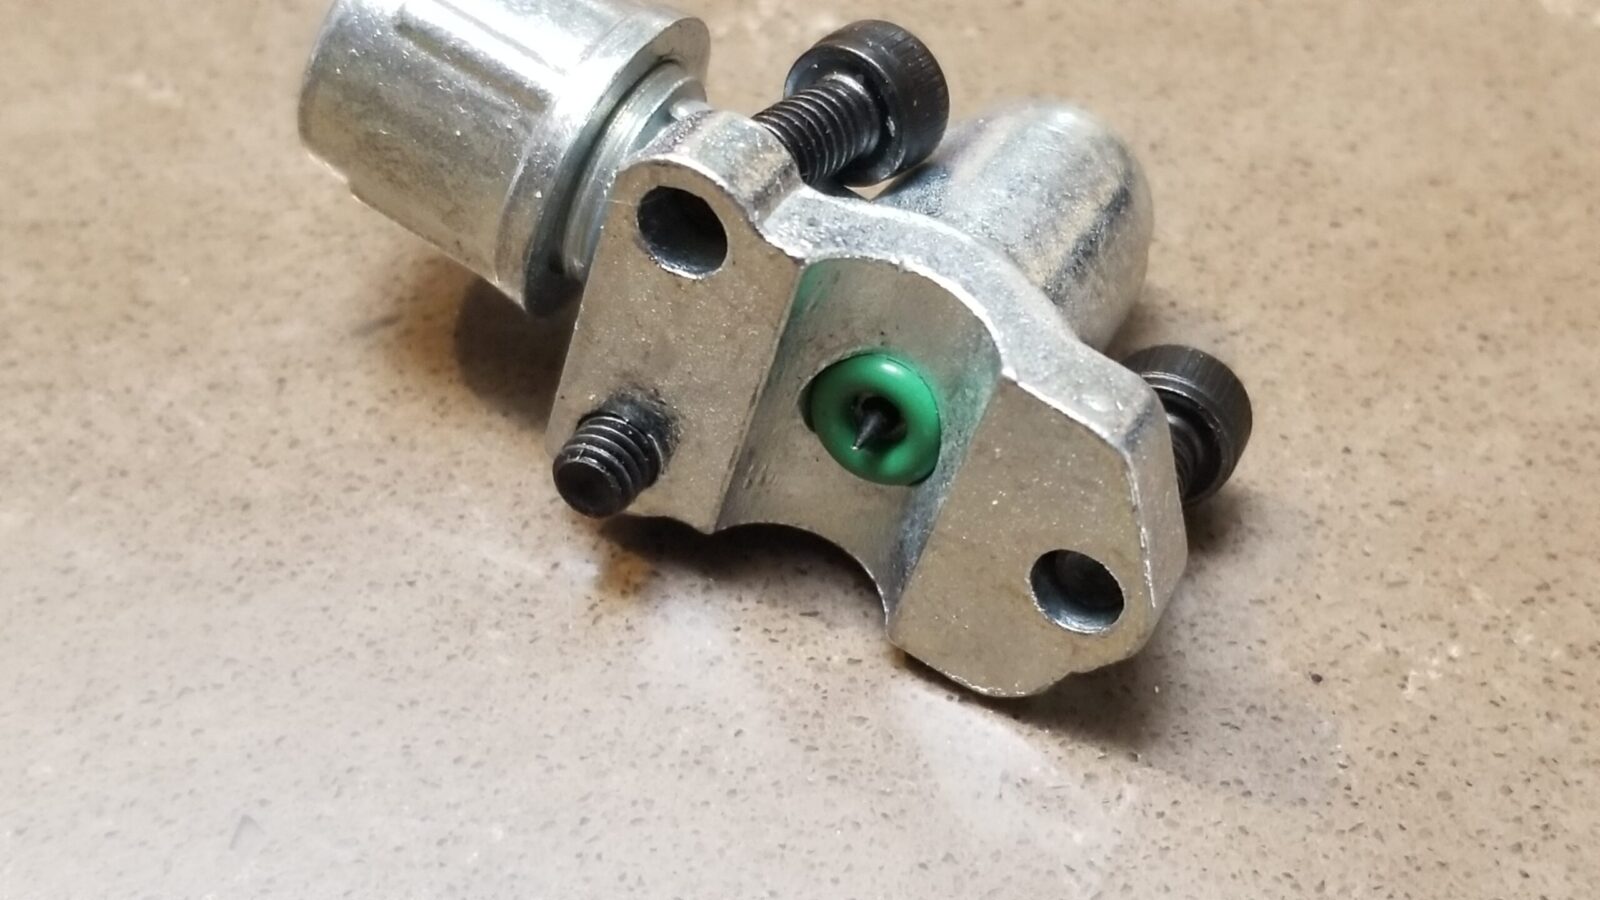
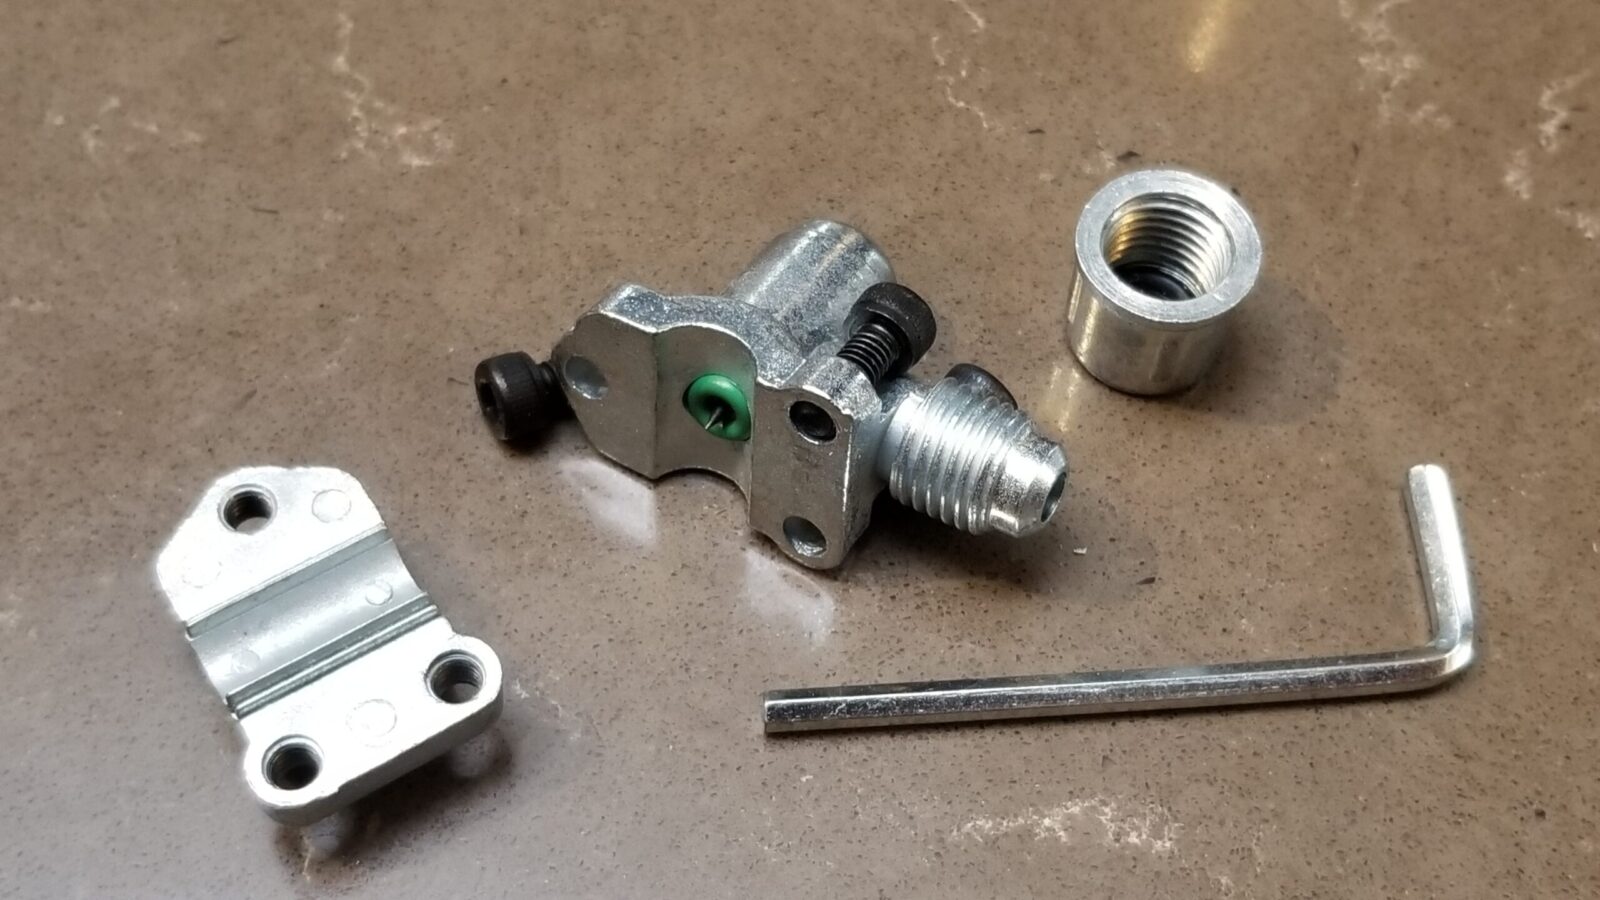
I got my bullet valves off Amazon and you definitely need to back off the valve or it will pierce the line when you clamp it on. The gentleman mentions it in the video and I just want to reinforce you better make sure it is backed off.

Ohhunt ambidextrous charging handle in packaging
This is the way the tap looks when I first disassembled it for installation. You can see the hardened steel point is extended. If you don’t first use the supplied hex wrench to back the valve out, this point will pierce your copper line while you are trying to install the valve and you don’t want that.
Ohhunt ambidextrous charging handle in packaging
Seriously, this is a wickedly simple elegant valve. Everything you need to tap into the line is there with the exception of using sand paper or a brillo pad to clean any oxidation off the copper line where the piercing tap and the green rubber o-ring seal will go.

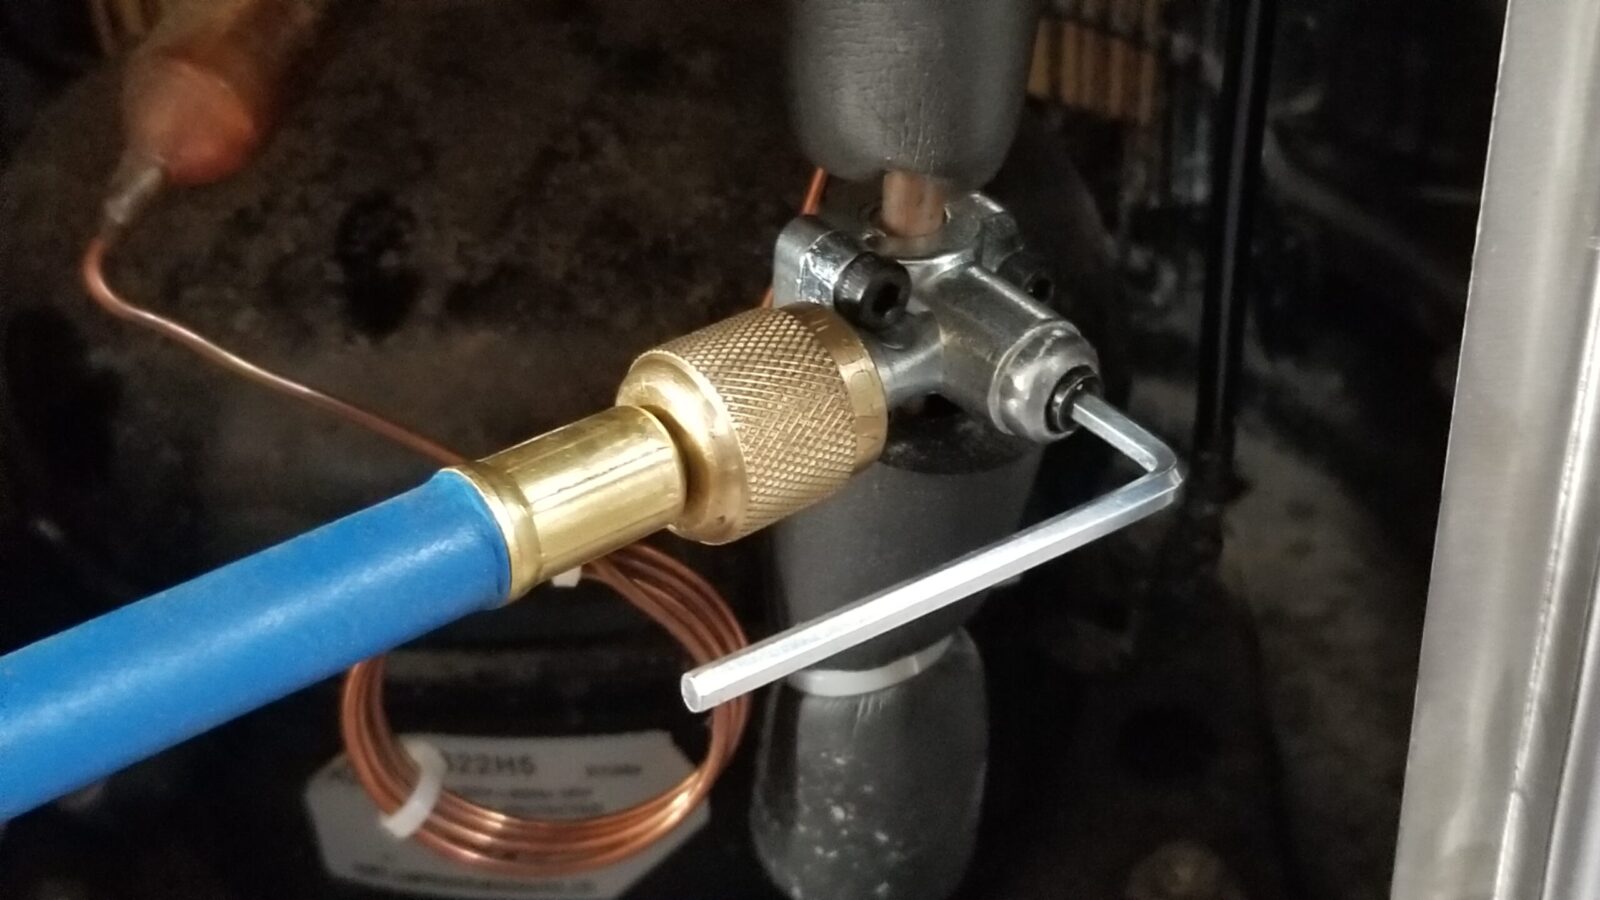
The line you need to attach the valve to has the insulation on it. I slid the insulation out the way, installed the valve assembly so it was just barely snug and then did the final positioning so I had easy access to the valve hex screw and could also attach the refrigerant line.

Ohhunt ambidextrous charging handle in packaging
I moved the valve around until I found a good spot for it where I would have easy access to the valve screw where the hex head wrench is in the photo and also be able to easily get to the refrigerant line. Make sure your copper line is clean. I’d recommend using very fine sandpaper to make sure there’s no oxidation that will interfere with the seal.

The compressor was drawing a vacuum and it appeared to be working and holding the vacuum so I did not use a vaccum pump to draw down the whole system. For me, this worked.

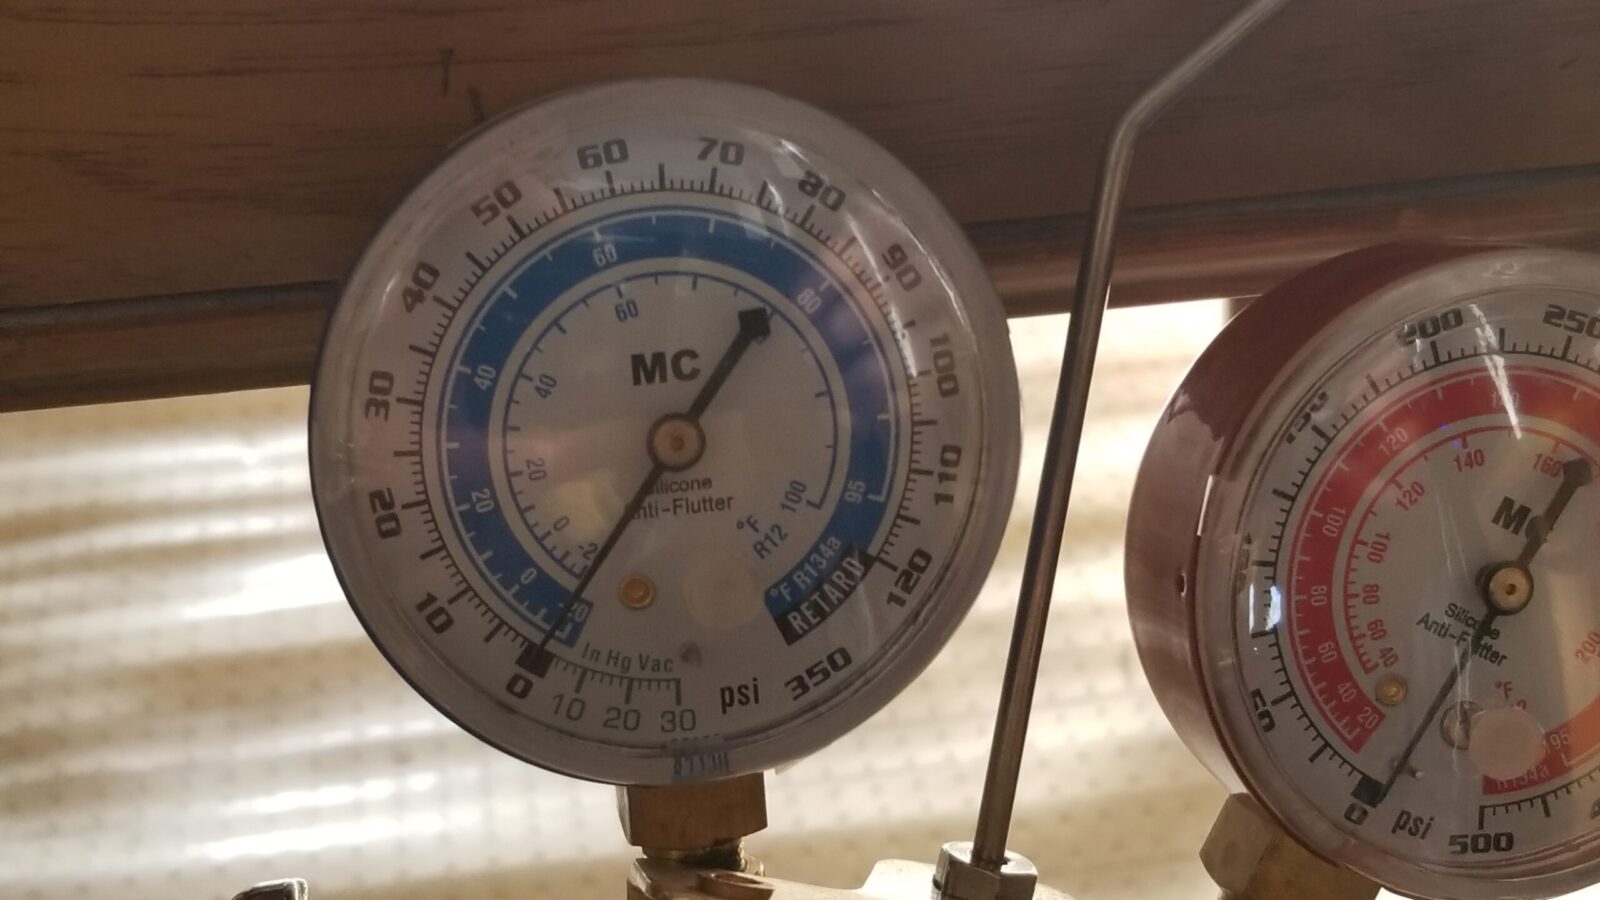
The fellow mentioned these things run at 1-3 PSI on the suction side so I opted to slowly fill it until it was at 2 PSI. Note, I did purge my manifold line before I opened the valve so as to get rid of any air first.

Now when I say slowly fill, I would add a bit with the cooler’s compressor running and then wait a few minutes to see what happened. I did this over and over for almost 30 minutes until the pressure gauge read 2 PSI. Don’t try to do it all in one step.

Ohhunt ambidextrous charging handle in packaging
This is the Master Cool model 66661 air conditioning manifold gauge set that I use on cars and the low-pressure blue side started with a low enough marked increments on pressure and vacuum to work. You can definitely use what the fellow has in the video – I just used what I had. The red hose was not needed in this case.
Ohhunt ambidextrous charging handle in packaging
The blue gauge shows vacuum in inches of mercury (In Hg) colored green down in the lower left and then it switches to pressure in PSI in black above the 0. Again, you just need 1-3 PSI and I stopped at 2.
If you don’t have air conditioning tools, there are tons of them for sale on Amazon. There are whole kits with everything you need to start – vacuum pump, manifold with gauges and more. Click here to see them.
Ohhunt ambidextrous charging handle in packaging
The cooler is working great once again and it’ll be easy to add refrigerant again if needed.

In conclusion

It’s been two weeks and the water cooler is still working just great. I have a spare bullet valve should I need it but other than those, since I already had the gauge set and the R134A, the repair didn’t cost me anything. Even if I had gone with complete repair kit, it would have been cheaper than having a repair person visit.


Note, I have to buy all of my parts – nothing here was paid for by sponsors, etc. I do make a small amount if you click on an ad and buy something but that is it. You’re getting my real opinion on stuff.


Please share the link on Facebook, Forums, with colleagues, etc. Your support is much appreciated and if you have any feedback, please email us in**@*********ps.com. If you’d like to request a report or order a reprint, please click here for the corresponding page to open in new tab.


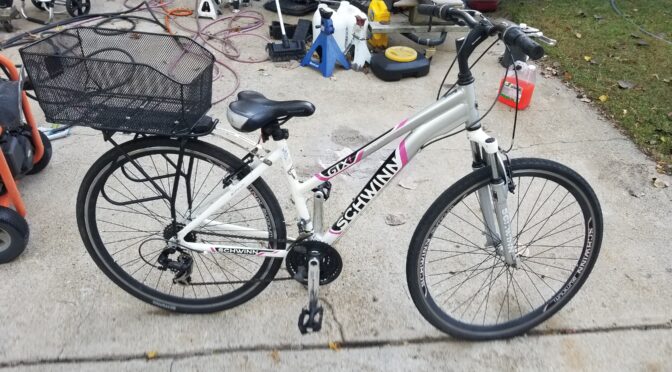
Replacing the Crank / Lower Bracket Bearings On A Schwinn GTX-1 700C Woman’s Bike – Model S5230

In the last post, I described changing the inner tube on my daughter’s bike and then finding that the crank was grinding. It was so bad that it felt like metal on metal. When we brought her home last year, I noticed the crank had a ton of play in it and had a grinding feel when turning and knew that meant the bearings in the crank/lower-bracket were bad.

I’ve not worked on the crank of a bike for probably 40 years – literally. I had a vague idea of what to do but some details have changed over the years and I had to do some reading. Given that I had to really dig to figure out what to do, I figured it was worth sharing this also in case someone else has “what in the heck is this?” moment with one of these Schwinns or a bike with a similar setup.

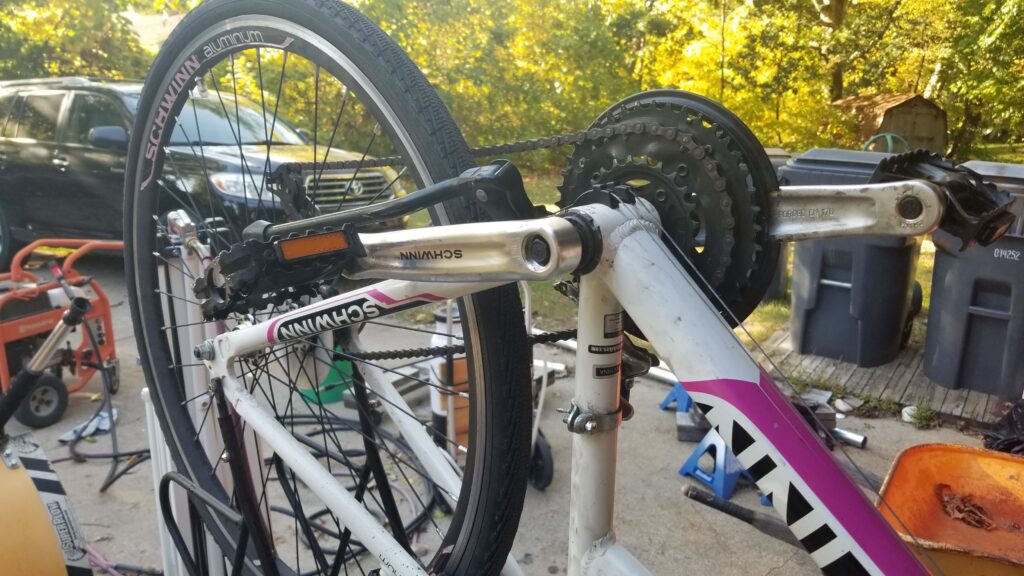
Schwinn GTX-1 bike crankset and chain, ready for inner tube replacement.
Here’s the bike upside down. I have it resting on a work table with the handbars clamped onto a wood working vise. A weird way to hold it but it worked. It just so happens the bike basket helped stabilize things.

I had to watch a bunch of videos and read some blog posts to get an idea of what to do. I thought “crank” applied to the whole assembly but it turns out the correct term for the innards is the “bottom bracket” and cranks just appear to the lever arms the pedals attach to.

Here’s the approximate sequence of what to do

I’m writing this a few weeks after doing the actual work but hope it helps if you find yourself in a similar bind:

Step 1: Remove the left and right cranks. They are pressed in place and I had to buy an actual purpose built puller to get them off. None of my generic gear pullers would work.

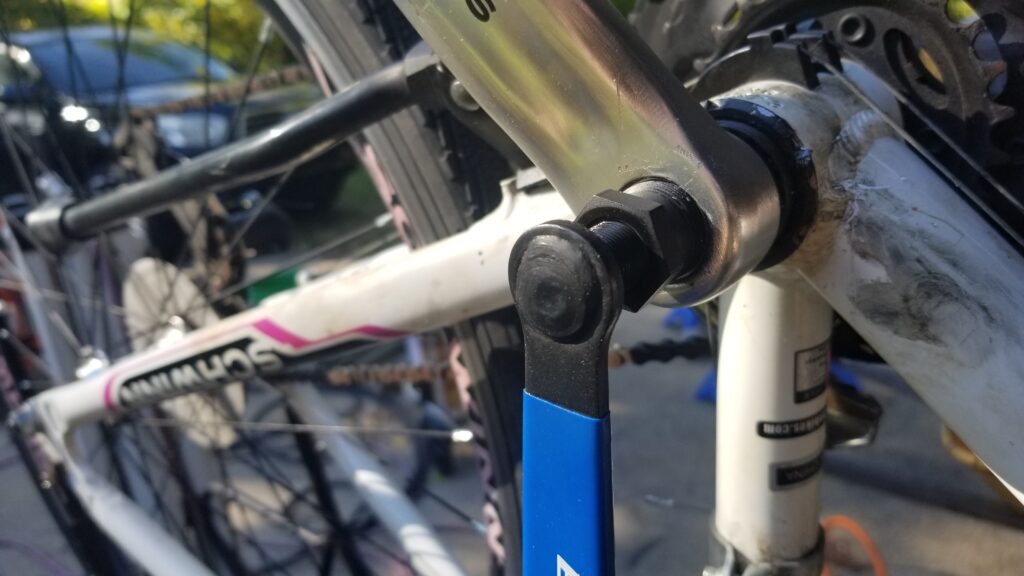
You remove the obvious bolt and then use a purpose-built puller that threads into the crank all the way and then tighten the center bolt to push the crank off. The Schwinn needs a puller that has 22mmx1mm threads made for a square crank.

Park makes two tools – the one I used and the one I bought for future use. I bought and used the CCP-22 crank puller but I would not recommend it. Both cranks were on so hard that I had to hit the handle with a dead blow mallet to get it to turn. At least for the bike I was working on, the integral handle wasn’t sufficient to remove the crank.

Schwinn GTX-1 700C bike with blue tool fixing the inner tube
Here’s the Park CCP-22 crank puller in use. It did the job but the handle alone didn’t give me the torque I need.

After I got done with this bike, I bought a CWP-7 that they call the compact version but what is appealing is that it has a hex head that I will engage with a socket or impact wrench to do the job far easier, I wouldn’t recommend the CCP-22 unless you know the crank is going to come off easy.

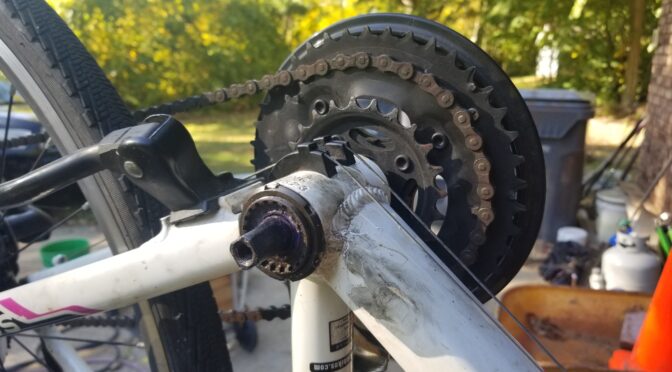
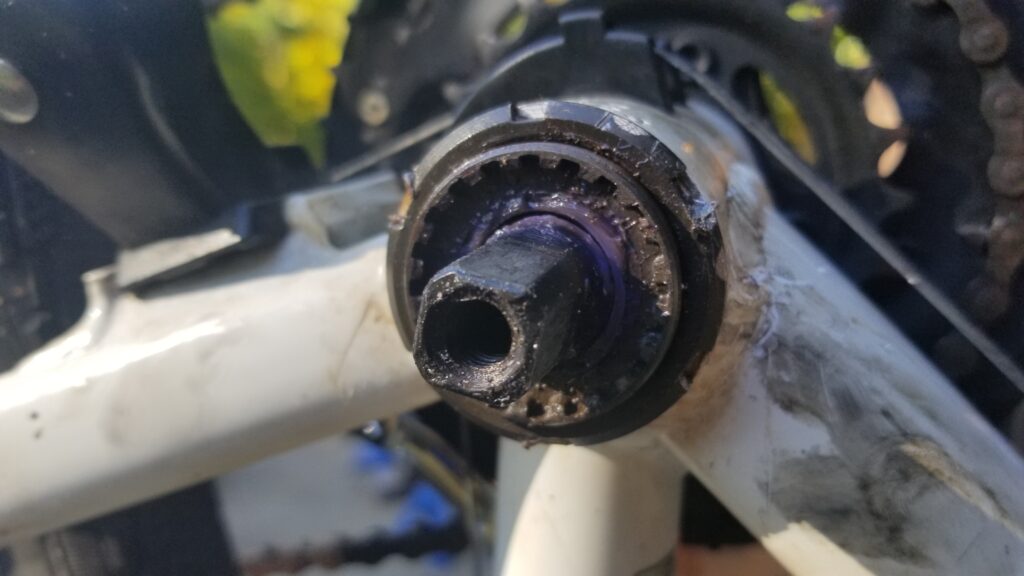
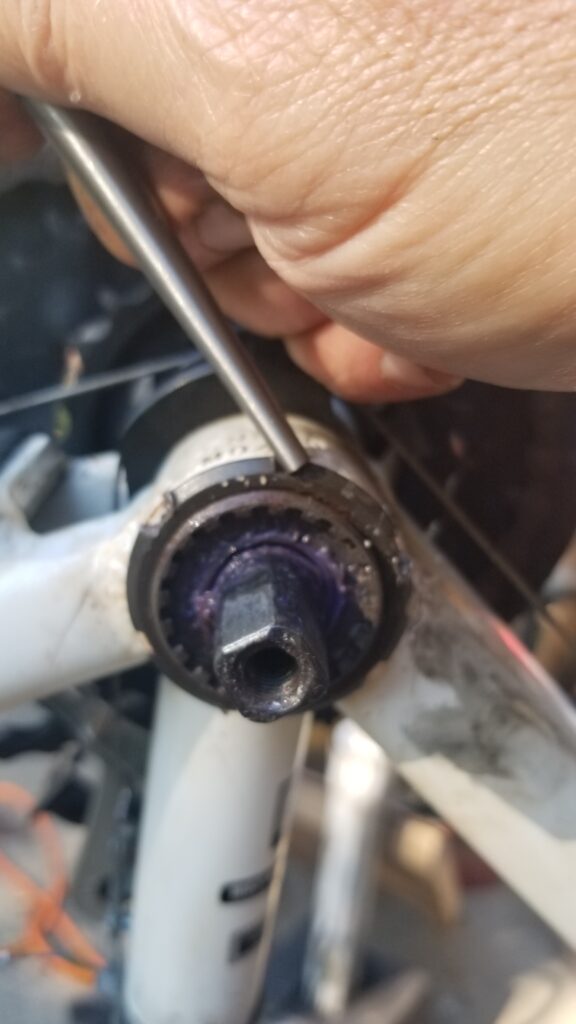
Step 2: Loosen the lock ring. When you look at the bracket, you will notice it is threaded and goes into the frame. Securing it is a locking ring that is threaded and is tightened against the frame to apply pressure. You loosen the locking ring by putting a punch in one of the little “notches” and tapping the ring so it will turn counter clockwise. It will come lose and turn very easily. Just move it a few turns from the frame but leave it on the bracket – you do not need to remove it all the way.

Schwinn GTX-1 bike crankset bottom bracket with grease
The locking ring is the part with the little rectangular notches right against the bike frame. The first evidence of this think being whipped together is here. Look how “smashed” the notch is at about the 2pm position. Regardless, it came free quite easily.

Step 3: Remove the non-geared side of the lower-bracket. If you look at the photo above, you will notice there are splines radiating inwards on the bracket. You need to measure the diameter and count the number of splines in order to buy the correct size wrench to remove this part of the bracket. This one was about 31.5 mm inner diameter and had 22 splines. The Park BBT-22C tool fits these. There are many different sizes so you really to confirm this.

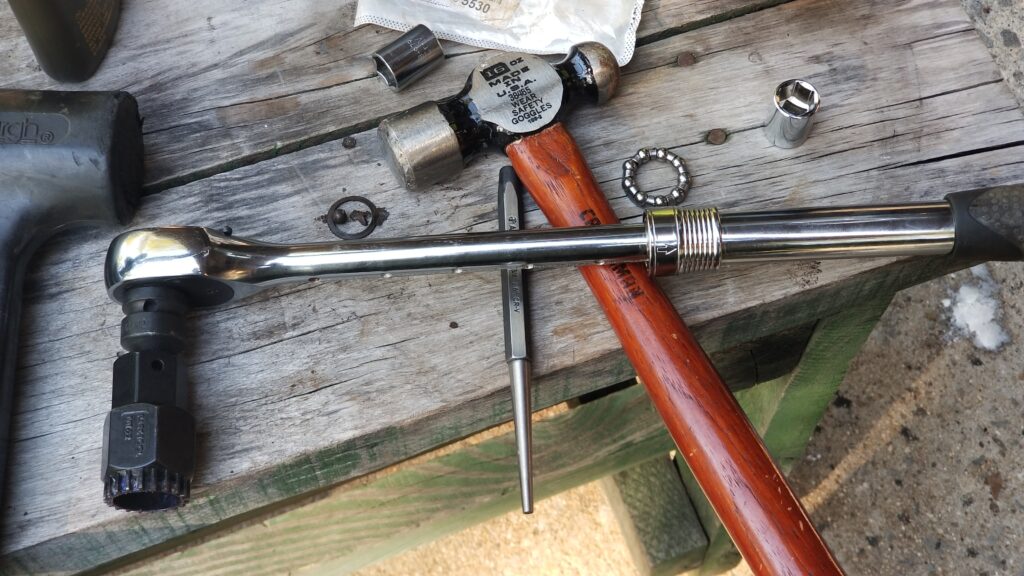
Bike repair tools: ratchet, hammer, bearing, and socket on wooden surface
Here you can see my BBT-22C tool on the end of a big 1/2″ E-Z Red extendable wrench with a Tekton 1/2″ to 3/8″ socket adapter. I like to have plenty of torque when I need it. You can also see the dead blow hammer on the left that I had to use to beat the Park wrench to remove the cranks. You can also see the punch and hammer used to tighten and remove the bracket’s locking ring one one of the two bearing assemblies.

I used the above pictured E-Z Red wrench and BBT-22C adapter to remove the bracket, When the bracket came out of the frame, I kid you not, ball bearings fell out. What a mess.

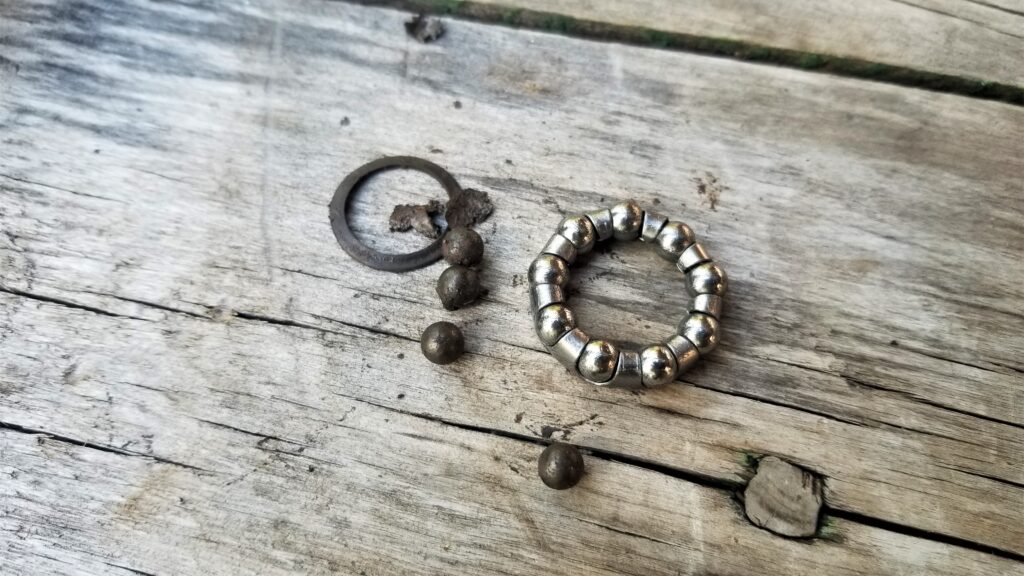
None of the ball bearing assemblies were intact, there was no grease to speak of and the rusty sludge that I had to clear out of the frame had remnants of the ball bearings and the cages/retainers. There were literally no ball bearings supporting the crank axle/spindle. The axle was just turning directly on the ends of the lower bracket! No wonder she was complaining it was hard to pedal

Step 4: Remove the geared side of the bracket. This comes off very similar to the non-geared side with two exceptions. First, it is reverse threaded. Turn clockwise to remove the bracket on that side. Second there is no lock nut. The proper tensioning of the bracket is done from the non-geared side. By the way, if you maneuver the crank and gear assembly around a bit, you can leave the chain in the derailer.

Step 5: Thoroughly clean and grease the frame’s tube where the bracket was at. You do not want debris to get into your brand new bearings. I had a ton of crud to get out and then I liberally greased the walls.

Step 6: Reinstall the geared side of the bracket. Remember that it is reverse threaded and it goes in all the way. The final adjustment is done from the non-geared side. Note, I put a lot of grease in the dome before screwing it back into the frame.

Tip: Re-install all threaded pieces such as brackets and bolts by hand to make sure the thread is properly aligned and not cross-threaded. Use a wrench to tighten things down only once you know the threads are properly mated.

Step 7: Grease and install the bearings. I had grease everywhere at this point and didn’t want to touch my phone. Normally you would be able to see your old bearings and have an idea of what to buy. All I had were some rusty ball bearings and pieces of the retaining rings. So, I did some digging on Amazon only knowing I had a Schwinn bike and needed bearings with an inner diameter based on the axle or shaft between the cranks of about 0.72″ and an outside diameter of about 1.14″ (29mm).

Okay, I got lucky. In reading the comments of a lot of different bearings, a 1/4″ x 9 ball unit from Jaceyon popped up with people reporting they worked on Schwinn bikes. I was running out of time so I ordered them and they worked! Click here for the bearings on Amazon – a new tab will open.

Tip: The Jaceyon bearings were fairly cheap and got good reviews. It came with four bearing sets – meaning two pair. For some reason I busted one during installation and was very happy I had a spare. For $9.28 (at the time), it was totally worth it. If you can swing it, I’d recommend getting four so you have a couple of spares just in case.

Use wheel bearing grease to pack the bearings as best you can. I apply a lot of grease to all surfaces including the bracket face, the axle/shift and the bearings. I like to use a synthetic wheel bearing grease, such as Mobil’s, because I find it doesn’t ooze oil like normal grease does. In the end, use what you have but just be sure to grease the bearings before installation.

When you install them, there is a proper orientation. Please look at the inside ends of the brackets – they are domed. This means the exposed bearings will engage with these ends. The flat part of the housing faces the inside of the tube.

AR lower receiver parts for pivot pin installation.
This is the front or top of the bearing. It will be facing outward from the bicycle such that the bearings are engaging on the domed surfaces of each end of the bracket. Those are some remnants of the original. I don’t think any grease was applied during assembly. By the way, some will refer to the ball bearing group as a set or say that the bearings are caged. No matter how you look at it, the retainer properly positions the balls around the crank’s axle to allow it to turn freely. You can imagine that if they rust it will be game over pretty fast. The retainer is just folded sheet metal.

I slide the geared side bearing and the axle in. Again, make sure the bearings are facing outward so they will engage with the bracket. I then put a bunch of grease in the non-geared bracket end dome and hand screw it back into place.

AR lower receiver parts for pivot pin installation.
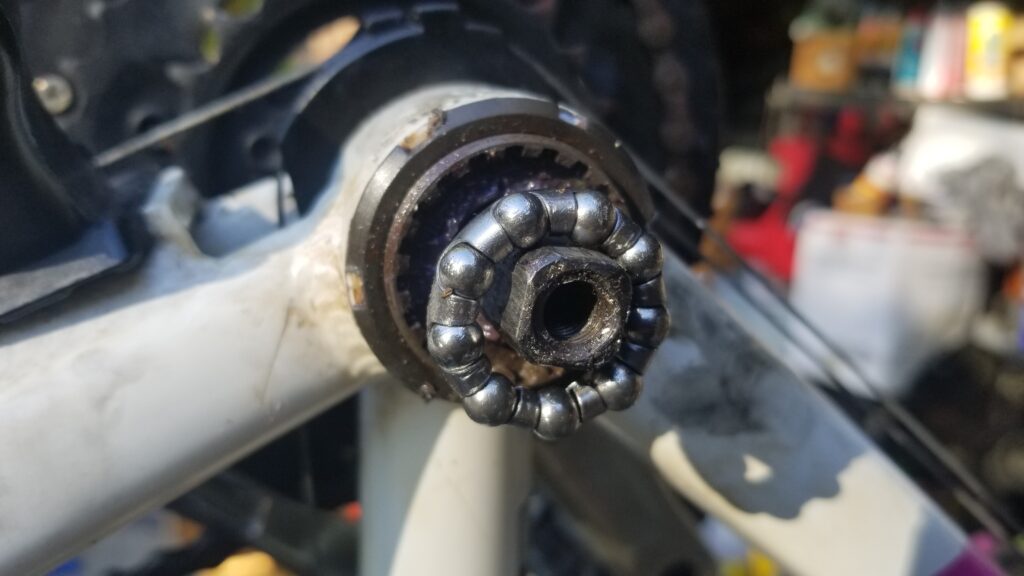
They will go in like this with the ball bearings facing out on each end. I have not greased these yet and this set of bearings is just sitting on the end of the installed bracket for the purpose of this photo. If it were really being inserted, I would have it covered in synthetic wheel bearing grease.

Step 8: Tighten the bracket and install the lock ring. Now this part may take some tuning. By tightening the non-geared side, you are compressing the bearings into place. Tighten the bracket until the crank axle can no longer wiggle but it can still turn. Do not use a huge wrench here or rush – you can smash the bearings – I’ve done it. Tighten a little and feel the axle, over and over.

Step 9: Tighten the lock ring. Use a punch and hammer to rotate the ring clock wise and lock the bracket back in place.

AR lower receiver parts for pivot pin installation.
Use a punch or whatever tool you want and a hammer to tighten the lock ring and secure the backet.

Step 10: Reinstall the cranks. Situate them on the shafts and use the center bolt to press them back into place on the axle as well as lock them there. Each crank arm should be 180 degrees opposite of the other. The square ends of the axle are intended to make this easier 🙂

Reinstall your chain too when you are wrapping up the gear-side if you haven’t already,

Step 11: Give it a test ride. If it makes a creaking or groaning noise when you pedal either the bracket needs more tightening or you trashed the bearings. If the sound will not go away, you will need to take it back apart because the bearing probably failed for some reason. That means you go back to step 3. Hopefully you will not have this happen. It did to me the first time and luckily the bearings I bought were four sets to a bag. I’m really not sure why it busted but I am glad I had a spare.

Videos

I didn’t find any exact videos, which is one of the reasons why I wrote this post, but there are videos that can give you a better idea of what is needed. I’m hoping that between my post above and your watching these videos, you will have a pretty good idea of what needs to be done.

Conclusion

With this done, the bike was all set for my daughter to use again. I don’t think a ton of care was taken during assembly and really wouldn’t be surprised if little to no grease was applied to the bearings.

I hope this helps you out.

4/30/2924 Update: The bike is still going. I am sure that greasing them really well is a big factor for longevity. Go to your local car parts store and get any normal wheel bearing grease – you do not need any that says it is a high-temp formula, extra thick or whatever.

6/27/2021 Update: The bike is still doing just fine. No problems with the crank and bearings at all.


Please share the link on Facebook, Forums, with colleagues, etc. Your support is much appreciated and if you have any feedback, please email us in**@*********ps.com. If you’d like to request a report or order a reprint, please click here for the corresponding page to open in new tab.


Replacing The Inner Tubes On A Schwinn GTX-1 700C Woman’s Bike – Model S5230

Growing up in the 70s, Schwinn bikes were real popular as there was a dealer in town. Over the years, the brand has been bought and sold and is owned by Pacific Cycle now. The bikes are made in Chang Zhou China and are sold through places like Walmart and Sam’s Club.

With that said, my daughter needed a bike and we bought her one in 2016 from Sam’s Club. It was already assembled so I was happy I didn’t have to mess with it. Growing up in a rural area with few kids around, one of my hobbies was fiddling with my Sears Free Spirit 10-speed and often needing my dad to bail me out when I messed things up — I tend to learn a lot by screwing up 🙂

At any rate, the big went with us on a number of trips over the years and went with my daughter to college. It’s hard to beat having a bike on campus to get around and we invested in a basic rear basket for two reasons – the obvious was to let her throw stuff in it. The other was that it could block the water and mud that otherwise throws a stripe up your back when you have to bike in the rain.

AR lower pivot pin assembly being installed in a vise.
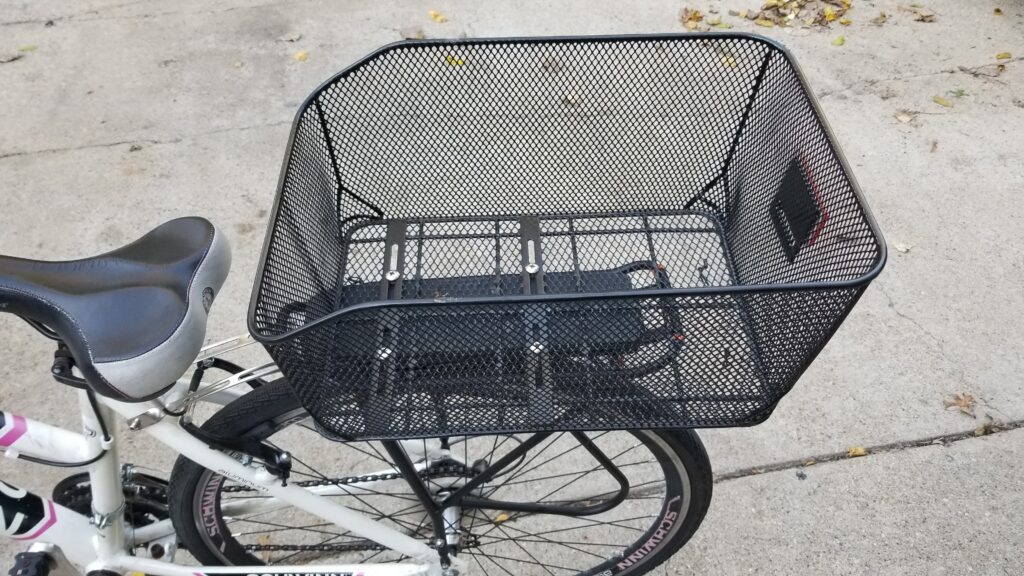
Installing the basket required buying the Ibera adjustable rear rack, installing a piece of wood that I painted black to block the water (you could use any solid you want) and then the Axiom wire basket. I found them on Amazon and bought based on specs and reviews. I did have to get longer bolts from Ace Hardware to connect the basket to the rack due to the wood insert.

Here’s the exact Ibera rack I bought:

And this is the wire mesh basket:

The Call…

The bike worked great until I got a call – “Dad, I have a flat – what do I do?” Well, we live just over an hour drive away so the next time we went up, I brought the bike back.

What Size Inner Tube?

Many bike tires, such as this Schwinn, have an inner tube and eventually it cracks or a hole gets poked in it. Some folks patch their inner tubes but I just replace them – especially given the age of the bike and that I knew it was an original tube.

The info you will need to get a replacement tube is on the side of the tire (not the tube). You may see the  ETRTO (European Tire and Rim Technical Organization – or ISO) number marked as XX-YYY where XX is the tire’s inner width and YYY is the inner tire diameter. On this Schwinn, it is 40-622.

You may also see an older French sizing that is marked something like AAAxBBm. AAA is the approximate tire outer diameter and BB is the width. There will be a letter at the end “m” is the inner diameter. I ike the ERTO method better – it just makes more sense to me. At any rate, the Schwinn had this code also: 700x38C.

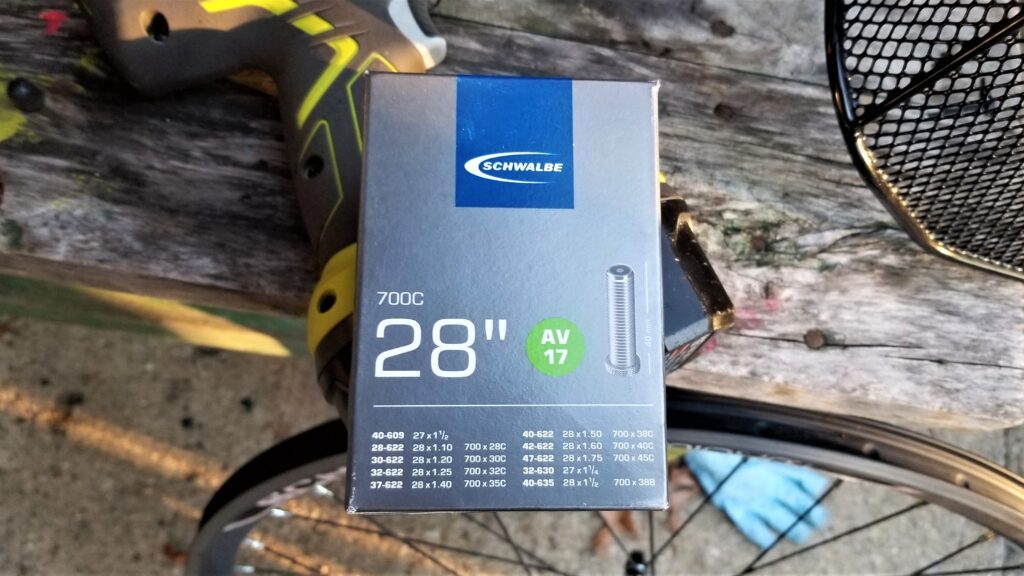
Okay, so armed with that info, I hopped on Amazon and started reading reviews. I didn’t want to buy a cheap tube and have it give out prematurely so I looked at Schwalbe – an old name in German inner tubes. I also used their website to confirm the size I needed – their AV17 model. which fits 700x38C, 28×15 or 40-622 tires and has a Schrader air valve. I bought two because if the one was aging, which was my suspicion, I bet the other was as well.

Tip: If you are in the US, you will want a tube with a basic Shrader Valve to inflate your tube. This is the most common type of valve and you will find it on cars, trucks, tractors, and so forth sold in America – it’s nickname you may hear in other countries is the “American Valve” for that reason. There is another type known as a “Presta Valve” and it is unique. Only buy a tube with that type of valve if you know you need it. There is a third type called the “Woods Valve” or “Dunlop Valve” but that tends to only be in the Netherlands and parts of Asia.
AR lower pivot pin assembly being installed in a vise.
Schwalbe AV17 tubes are the right size.

Last comment – there are a ton of bike tubes on Amazon and at stores. There are also different types such as ones that are self-sealing, etc. The choice is up to you, your budget and whether you mind changing the tubes or not. Since my daughter is not readily available and the bike is a big help to get at school, I spent $14 per tube vs. $5-6/tube for tube-shaped objects that may or may not hold up. Read the reviews and you decide.

Replacing The Tube

There are how-to videos out there you can watch if you want. Basically if the tube is already flat, you pull the tire off the rim a side at time. You can use a blade screw drive to help get it started off the rim but I find most of the time if I push the tire away from me while lifting off the rim, I can get it started and then just work my way around. The old tube should just lift right out of the tire unless it stuck due to glue or something from a past patch.

Note, if there is no inner tube on your bike, you have a tubeless tire and the leak may well be in the tire itself.

Schwinn GTX-1 700C bicycle frame and parts in a garage
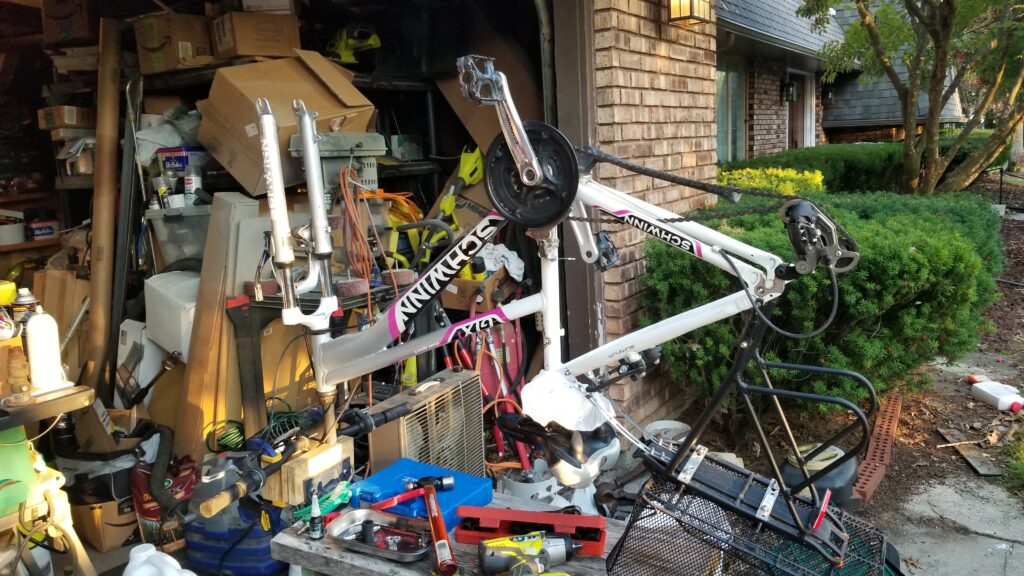
A nice part of the design is that you can pull the rear tire without having to remove the derailer. Back in the dark ages, that was not the case so you wound up with some really dirty hands.

Before you install the new tire, look at the rim and make sure there are no spokes protruding into the area where the tube is at. Your rim should have either have something rubbery to protect the tube glued in place or at least some type of tape. They sell protective inner tube pads or you can even try putting in 2-3 layers of PVC electrical tape. If you go the tape route, you will need to cut a hole for the inflation tube to stick out.

To install the new tube, put in the tire. Yes, put it in the tire – not on the rim. It’s designed to fit the outside diameter of the tire and will not fit otherwise. So, tuck it into the tire and then push the air valve through the hole the rim. A perk of using Schwalbe tubes is that they have a lock nut you can snug down to hold the tube in hole.

You then tuck the tire into the rim. Depending on the fit, you may need to do a side at a time or be able to do both at once. Take care not to pinch or cut the tube.

A trick I learned years ago is to partially inflate the tube and then gently bounce it all the way around to try and ensure the tube is not caught between the tire and the rim. Not everyone does this so it’s up to you. I then bring it up to pressure and re-install it. I check the air pressure a few hours later to make sure it’s sealed and no punctures happened.

Again, because I suspected the age of the tires was the culprit, I did both tubes. It’s up to you.

Schwinn GTX-1 700c bike wheel with cassette and Schwinn aluminum rim
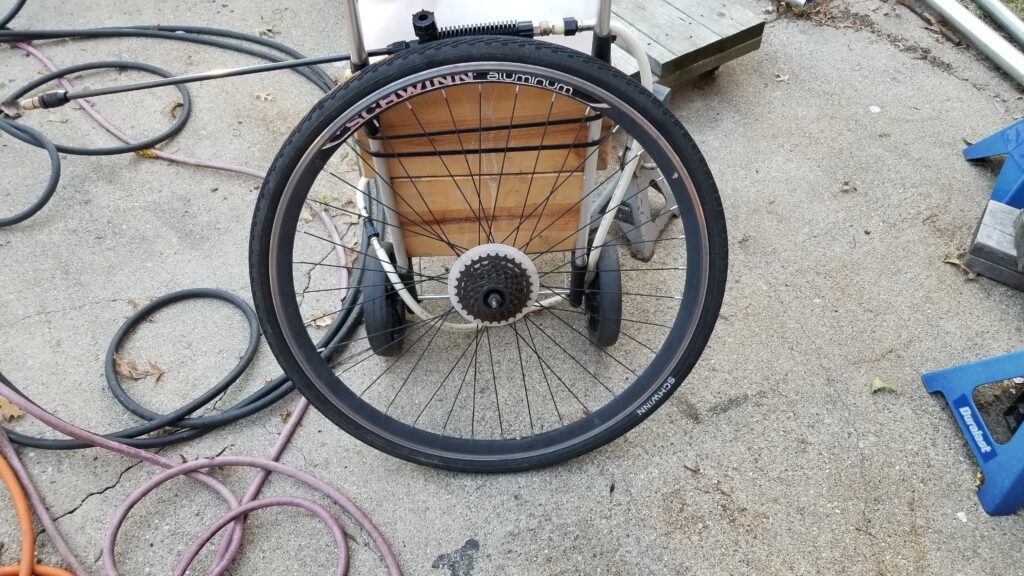
Here’s the finished rear.

Videos

In case you have questions, here are some videos that others have created and posted on Youtube that demonstrate how to remove and install inner tubes:

Conclusion

I hope this helps you out when it comes to the tubes.

thought I was done and then I felt the cranks were grinding horribly. That bugged the heck out of me because I knew it meant to bearings were history and that will be the topic of the next blog post.


Please share the link on Facebook, Forums, with colleagues, etc. Your support is much appreciated and if you have any feedback, please email us in**@*********ps.com. If you’d like to request a report or order a reprint, please click here for the corresponding page to open in new tab.


Restored An Almost 100 Year Old Samson 5263 3.5″ Machinists’ Vise For Regular Use

Growing up, my dad has this big rusty vise on his work bench and we’d use it for all kinds of stuff ranging from holding mower blades and axes during sharpening to bending metal for brackets and so forth. I knew it came from my grandfather’s farm in New Hampshire but not much else., When my parents moved near us, my dad brought the vise with him and installed it on a tool bench in their new garage.

Life can be harsh. I have a lot of good memories about my parents but nothing really prepares you for when they pass away. I was close to my dad and to this day, when I use one of his old tools, it makes me feel good – kind of like he’s still here and happy to see me using something of his – hopefully the right way.

At any rate, when we had to sell their house and clean stuff out, I snagged the big old vise and stuck it on the floor in the corner of my shop and really didn’t think much about it for almost five years. One day I started thinking about installing a second vise in my shop near another area where I do a lot of work that requires both work holding and a vise that can withstand 50-100 ft/lbs of torque. I figured I had two options – I have a 6″ Harbor Freight unit somewhere buried in my shop that I could dig out or I could go find my dad’s and take a closer look at it.

CRKT HalfAChance K920KKP machete blade showing wear and sharpening marks

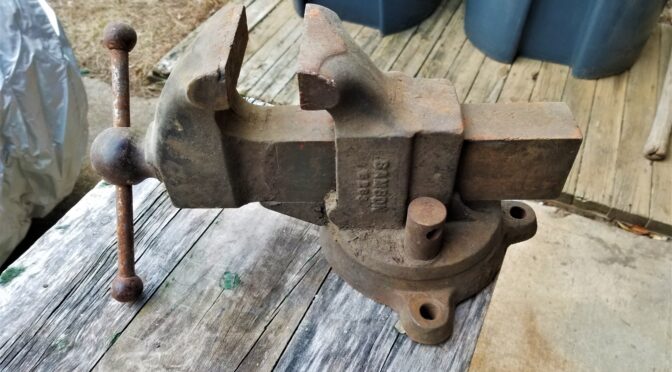
So. I dug out the old vise from under a work bench and blew off a ton of dust and dirt. The first thing that I noticed was that it weighed a ton and the second was that it was remarkably beefy and actually in really good shape other than surface rust. The action moved fairly well albeit a little gritty. Everything felt fairly tight meaning nothing seemed to be bent or broken. Last but not least, other than missing the handle on the locking nut, everything seemed to be there.

Where did Samson vises come from?

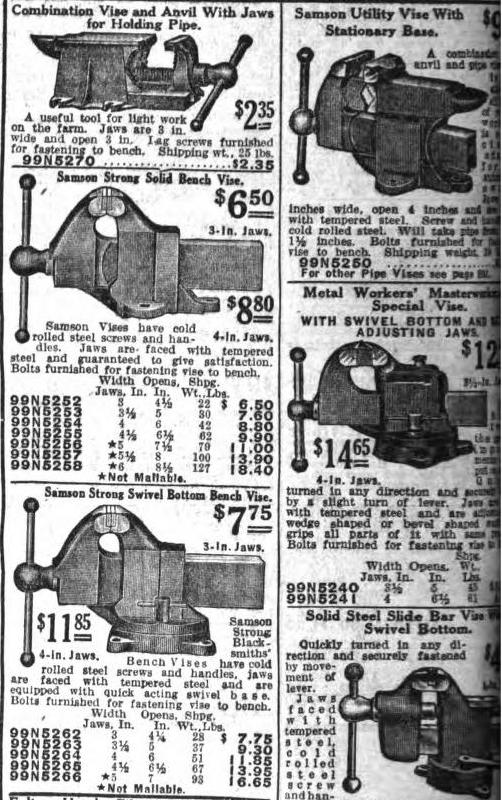
I did some searching on the web and found mention that Samson vises were sold by Sears from about 1908 to 1939 based on searching for “Samson Machinists” on ancestry.com. This page is from a 1923 Sears catalog and was copied from Vintagemachinery.org:

CRKT HalfAChance K920KKP machete blade showing wear and sharpening marks

There it is down in the lower-left – 99N5263. A 3-1/2″ jaw width with a 5″ opening, weight was 37 pounds and cost a whopping $9.30!! Wow! Now, when my grandpa actually bought it, I have no idea. If my dad knew, he never said or I don’t recall – at this point, I’m really not sure.

By the way, in the catalog ad above, look at the weight of the 5266 5″ vise – 93 pounds! That would be a fun one to find. It must be enormous – I’ll have to keep my eye out for one 🙂

By the way, I couldn’t find a definitive answer about who made the Samson vises for Sears. Some people thought it was Reed but I haven’t confirmed that. If you search on Reed Vises, you will see some similar designs but I did not see an exact match. I emailed both Reed and Yost to see if they can share any insights. If I find out, I’ll update this post.

8/25/2020 Update: I got a very nice email from James about Samson vises based on some research he did: “Samson Vises were the Sears house brand before Craftsman took over in 1927. Samson Vises were made by Rock Island Vise Company for Sears and Roebuck out of Rock Island, Illinois.”

Restoring the old vise for regular use

Other than quite a bit of surface rust, it was really in very shape and I decided to use the old vise. The next thing I had to decide was what to do with the finish – it was rusty my whole life so I thought about just oiling the rust and sealing it. Another part wanted to fix it up. I honestly thought about it for a few days because I couldn’t do anything right away. In the end, I decided to refinish it. From what I could tell the vises were originally black and either partially or fully painted. My vise had zero paint on it anywhere.

Note: I am not doing a 100% overhaul to make it look like when it shipped from Sears. I wanted to clean it up some have it be functional. I just want to be clear in case any purists take issue with my use of the term “restoration”.

So, the first step was to disassemble the vise both to make sure it was indeed salvageable and also to clean everything. The weather wasn’t cooperating so you’ll some photos were taken indoors and some outdoors so bear with me.

CRKT HalfAChance K920KKP machete and sheath on wooden surface
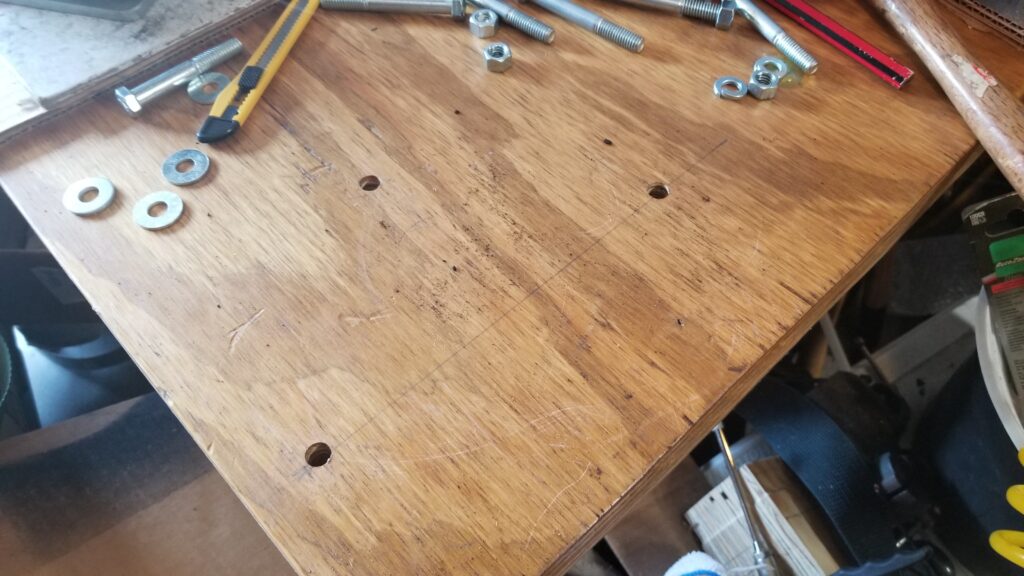
Before I took the vise apart, I mocked up where I wanted it on the bench and drilled the holes. I planned to use 3/8″ bolts to secure it and they are in the photo. The bench it is on has a top made of 1-1/2″ of plywood and weighs 5-600 pounds because of the massive steel frame I built for it.
CRKT HalfAChance K920KKP machete blade showing wear and sharpening marks
The first thing you do is to remove the sliding jaw. This is usually done by rotating the handle until the screw exits the spindle nut in the body of the vise and the sliding jaw then pulls out. Be aware that the sliding unit can be surprisingly heavy depending on the design of the vise.
CRKT HalfAChance K920KKP machete and sheath on wooden surface
The greasy looking thing is the spindle and it was in great shape. There were remnants of old grease protecting it, the screw and the ways where the sliding jaw slid (the clear tracks on the body. There were no signs of cracks – just dirt and rust in non critical areas.
CRKT HalfAChance K920KKP machete and sheath on wooden surface
To the right of the main body of the vise is the lock nut. Normally there is a small handle on it but it’s long gone. This is basically threaded onto a bolt that protrudes us from the clamp in the base. It simply unthreads. The shiny 3/8″ grade 1 bolt to the right of it will become the new handle for it.
CRKT HalfAChance K920KKP machete and sheath on wooden surface
This is the bottom of the slide. As you can see, the machined surfaces and screw are in great shape.
CRKT HalfAChance K920KKP machete and sheath on wooden surface
Somehow I always manage to miss taking a photo. The top part of the vise is secured to the base by a heavily made axle bolt. It’s the beefy chunk of steel sitting between the base and my ball pein hammer. Surprisingly, it came out very easily with a simple adjustable wrench – I just reached in perpendicular and turned the bolt not expecting it to come loose and it did. That was a very pleasant surprise. So you can also see that the bottom surface of the static jaw assembly and the top of the base are in remarkably good shape compared to the exterior.
CRKT HalfAChance K920KKP machete and sheath on wooden surface
Here’s an even closer view of the base and the locking pad bolt. You can also see the axle nut off to the back right by the back ear of the vise even better.. I think they greased it well almost a 100 years ago and that saved the inside parts. I suppose it’s possible my grandfather or dad took it apart and lubed it but I can’t ask them now.
CRKT HalfAChance K920KKP machete and sheath on wooden surface
The weather cooperated and I took the parts outside to degrease and wire brush them.
CRKT HalfAChance K920KKP machete and sheath on wooden surface
I could have punched out pins and removed the spindle nut but I figured the vise was really solid mechanically so I took a shortcut and didn’t tear the static or sliding jaws down further.
CRKT HalfAChance K920KKP machete and sheath on wooden surface
Here’s a zoomed in photo of the static jaw’s pad. I think I can barely see a screw down on the right but it would be a heck of a chore to remove them. Honestly, the jaws were in good enough shape for me.
CRKT HalfAChance K920KKP machete and sheath on wooden surface
“72C” is marked on the base. It was the only other marking I found in addition to “Samson 5263” on the side of the static jaw’s body.
CRKT HalfAChance K920KKP machete and sheath on wooden surface
After cleaning up the static jaw, the model number was clear as day – 5263.
CRKT HalfAChance K920KKP machete and sheath on wooden surface
For the really thick rust, I used my Ingersoll-Rand needle scaler to knock it off. The external surfaces on the base of the vise were the worst.
CRKT HalfAChance K920KKP machete and sheath on wooden surface
Here’s everything after degreasing with lots of brake cleaner and the paint will be Satin Black Krylon Fusion.
CRKT HalfAChance K920KKP machete and sheath on wooden surface
Here they are from another angle.
CRKT HalfAChance K920KKP machete and sheath on wooden surface
I applied four coats of paint following the directions on the can. By the way, when a paint tells you to allow two days for it to cure and you expect it to be rubbing a lot – give it the two days. I have messed up so many finishes over the years that I now follow the directions on timing between coats and how long until a full cure.
CRKT HalfAChance K920KKP machete and sheath on wooden surface
This will be my new locking nut handle. I had to grind down the nut so it would clear the body of the vise and then I abrasive blasted the surface so the black pain will stick. It was not blasted or painted yet for this photo.
CRKT HalfAChance K920KKP machete and sheath on wooden surface
From left to right – Locking nut, locking pad, and then the axle bolt.
CRKT HalfAChance K920KKP machete and sheath on wooden surface
I found it funny to set a modern cheap 4.5″ vise next to the big Samson. Look at the difference in slides! My dad always told me to be careful and not bend the slide on the Samson. Being a kid, I did what he said without knowing much. I look at the Samson’s slide now and it would take a hell of a lot of force to bend that slide!
CRKT HalfAChance K920KKP machete and sheath on wooden surface
I greased everything with Super Lube grease. I use it a lot now because it doesn’t dry out fast and has fine particles of PTFE in it to help with lubrication. I kid you not, I coated threads, surfaces, everything!
CRKT HalfAChance K920KKP machete and sheath on wooden surface
Boy did it turn smoothly on the base!
CRKT HalfAChance K920KKP machete and sheath on wooden surface
It looks and feels like new – with some character marks of course. She is around 100 years old!
CRKT HalfAChance K920KKP machete and sheath on wooden surface
The purplish tinge is the Super Lube grease. I literally coated all sliding surfaces to try and get stuff coated. I then wiped it down after this photo. Note that it also shows at the back that the vise is not perfectly concentric. It’s still tight but not perfectly centered on the base – my guess is that it never was. We’re talking being off center by about a 1/16th of an inch or less.
CRKT HalfAChance K920KKP machete and sheath on wooden surface
Here’s the locking nut with the finished 3/8″ bolt that serves as the new sliding handle. I applied blue LocTite to the nut to secure it. Note that I can turn the vise and use it from either direction on the bench. Right now it is rotated away from the side of the bench where I primarily plan to use it.
CRKT HalfAChance K920KKP machete and sheath on wooden surface
From McMaster I ordered 3.5″ copper Wilton jaw pad covers. My 4″ Wilton has original brass covers that are beefier but these copper units will work.
CRKT HalfAChance K920KKP machete and sheath on wooden surface
So you put the pads in your vise and then tap down the surfaces including the small ears on the left and right sides. The Samson is asymmetrical so I labeled the front pad so when I remove them I don’t have to fumble around figuring out which pad goes to the front and which to the back.
CRKT HalfAChance K920KKP machete and sheath on wooden surface
I also bought some Mission Automotive plastic pads that are held in place by strong magnets. These come in handy for delicate surfaces.

Conclusion

So the vise is back in use. Every time I use it, I feel good about it and hope my dad approves.


Please share the link on Facebook, Forums, with colleagues, etc. Your support is much appreciated and if you have any feedback, please email us in**@*********ps.com. If you’d like to request a report or order a reprint, please click here for the corresponding page to open in new tab.


How To Wash Your Baseball Caps Easily Without Hurting Them

Folks, as my wife will tell you, I like my baseball-style caps and seem to have accumulated a ton of them over the years. With that said, there seem to be just a handful of them that I wear all the time. The problem was that they got pretty dirty with use so what should one do?

I tried putting one in the clothes washer once and ruined my favorite hat at the time. So, since I didn’t have a way to wash my hats, I wound up having piles of “wearable in public” hats, work hats that look bad but feel good and “oh man this is filthy but I don’t want to throw it away in case I ever figure out how to clean it” hats. In the back of my head, I knew I wanted to find a way to wash them but never seemed to find the time.

How To Clean A Ball Cap

One quick comment – what I am about to tell you works on modern caps with plastic liners in the brim (the part that sticks out). Prior to 1983-ish, the liners were often cardboard and getting them wet would ruin them. If you flick the brim of an old hat and it sounds hollow, it’s probably cardboard and you should not do what I am about to outline. All of my hats are modern and have plastic liners.

One day while reading, I ran across the solution and it was so easy I was skeptical that it could work. Not only did it work, but it worked amazingly well. The near miracle fix is to hand wash your hats so they don’t get beat up. You soak your hats in a soapy solution using HE clothes washing soap. In our case, we use Tide for our clothes and that’s what I used. Note, don’t use a detergent with bleach or your hats will fade.

Air compressor automatic drain valve assembly with directional arrow

I took a bucket, poured in about a 1/4-1/3 cup of Tide HE and then just over a gallon of warm water. I took my dirtiest “what do I have to lose” hats and let them soak for a few hours, came in and pushed them around in the water to break things up and then let them sit another few hours – these hats were incredibly dirty folks. I was working outside and forgot about the first test batch and they probably soaked for 6-8 hours at least with no ill effects.

Air compressor automatic drain valve assembly with directional arrow
There are two hats in there with this load. The first time out I probably had six really dirty hats in there.

With everything wet, I really was just hoping they were done and rinsed them 2-3 times. I then hung them to drip dry in our shower. I’ve since found that even a small fan pointed at the hats speeds up drying dramatically.

Air compressor automatic drain valve assembly with directional arrow
Dripping dry – a small fan pointed in their direction dried these two in just a few hours.

The results were remarkable. Oil and sweat marks largely disappeared. Detergents are pretty remarkable – these days, they include enzymes to help break things down and they probably played a role on cleaning the hats so well. Tide Original, which we have, includes three enzymes – amaylase (starch based stains), mannanase (vegetable based stains) and protease (for protein based stains). Seriously, some of the hats were horribly dirty and now they are clean!!

I’ve now got all my hats back in service and they look great. This means my favorite work and shooting hats are back in business! I’m going to guess I’ve done about four batches of hats – maybe a bit over a dozen or so and 3-4 of them have been washed twice. In other words, I’ve done this a number of times and it really seems to work well.

Now that I know how easy it is, I can routinely clean my hats. I’m really happy with the results and hope this helps you out.

By the way, here are some links to what others did so you have some other perspectives to consider:


Please share the link on Facebook, Forums, with colleagues, etc. Your support is much appreciated and if you have any feedback, please email us in**@*********ps.com. If you’d like to request a report or order a reprint, please click here for the corresponding page to open in new tab.