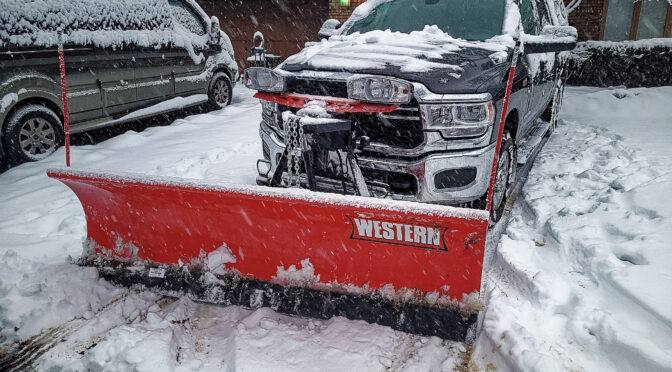
Ok, quick post today. I’m getting ready for Winter here in Michigan and that includes getting my 2021 Ram 2500 Tradesman and 8′ Western Pro Plow 2 ready. Which, by the way, is why you are seeing a bunch of truck posts vs. firearm posts right now. At any rate, last year was my first year plowing with the truck and plow and knew I needed a better solution for holding the ballast weight. That’s the topic for today’s blog post.
What is ballast for a snow plow and why does it need it?
Simply put, ballast is weight that you add at the far back of your truck to balance the weight of the plow in the front and improve traction. Now I like Western plows but if you want a really good explanation of what ballast is and how to use with graphics, click on this link to Boss Plows. Western has one but it’s not as good in my honest opinion.
The important thing that the Boss page explains very well with the diagram is that ballast goes all the way to the rear behind the rear axle and not in front of it or on top of it. Just imagine a long lever arm – by adding weight to the far back, you are levering up the front and offsetting the weight of the entire plow bolted on to the front of your truck.
It does help to understand how much ballast you need and it’s not necessarily the same weight as the plow. A lot of factors go into the calculation. Again, I use a Western plow so I use their Quick Match web page to calculate how much ballast I need and it’s 240 pounds. I do add a bit for more weight to improve traction as well but that is the minimum I need.
What material to use for ballast? I like sand
When I bought my RAM, I looked in the bed and there are very shallow pressed indents on the left and right side to secure the ballast. Ideally they would be deeper so you could drop a 2×6 or 2×8 in there to hold your ballast. I like to use the 60 pound tubes of sand that you can buy. First off they are a great source of dense weight – meaning you get a lot of weight for the volume they take up and second, if I get stuck on ice or need more traction on ice pulling something, I can cut open a tube and use the sand for traction. This is why I don’t use something like steel or lead back there. Back in the day, my dad used clay cat litter bags for the weight and in case traction was needed. He’d use the bags over the summer for our cats’ litter boxes and then buy any new bags he needed in the fall. He pulled my sister’s Tercel out of a lake after spreading the cat litter all over the icy road behind the tires of his 81 Bronco — it definitely works but we don’t have cats so I just use sand.
By the way, a Quickrete 60 pound tube of sand is $5.37 as of my writing this. It’s definitely affordable. By the way, I like Quikrete because they know guys are using this for weight and put it in a durable woven bag that holds up.
One word of caution – some guys use rock salt for balast. I highly recommend against that. It’s going to leak salty water at some point and cause accelerated rusting. Sand or cat litter will not. Some guys fill specialized balast water containers – that’s fine too. If you want your truck to last longer, just don’t use salt is my heart felt recommendation.
Why build a box?
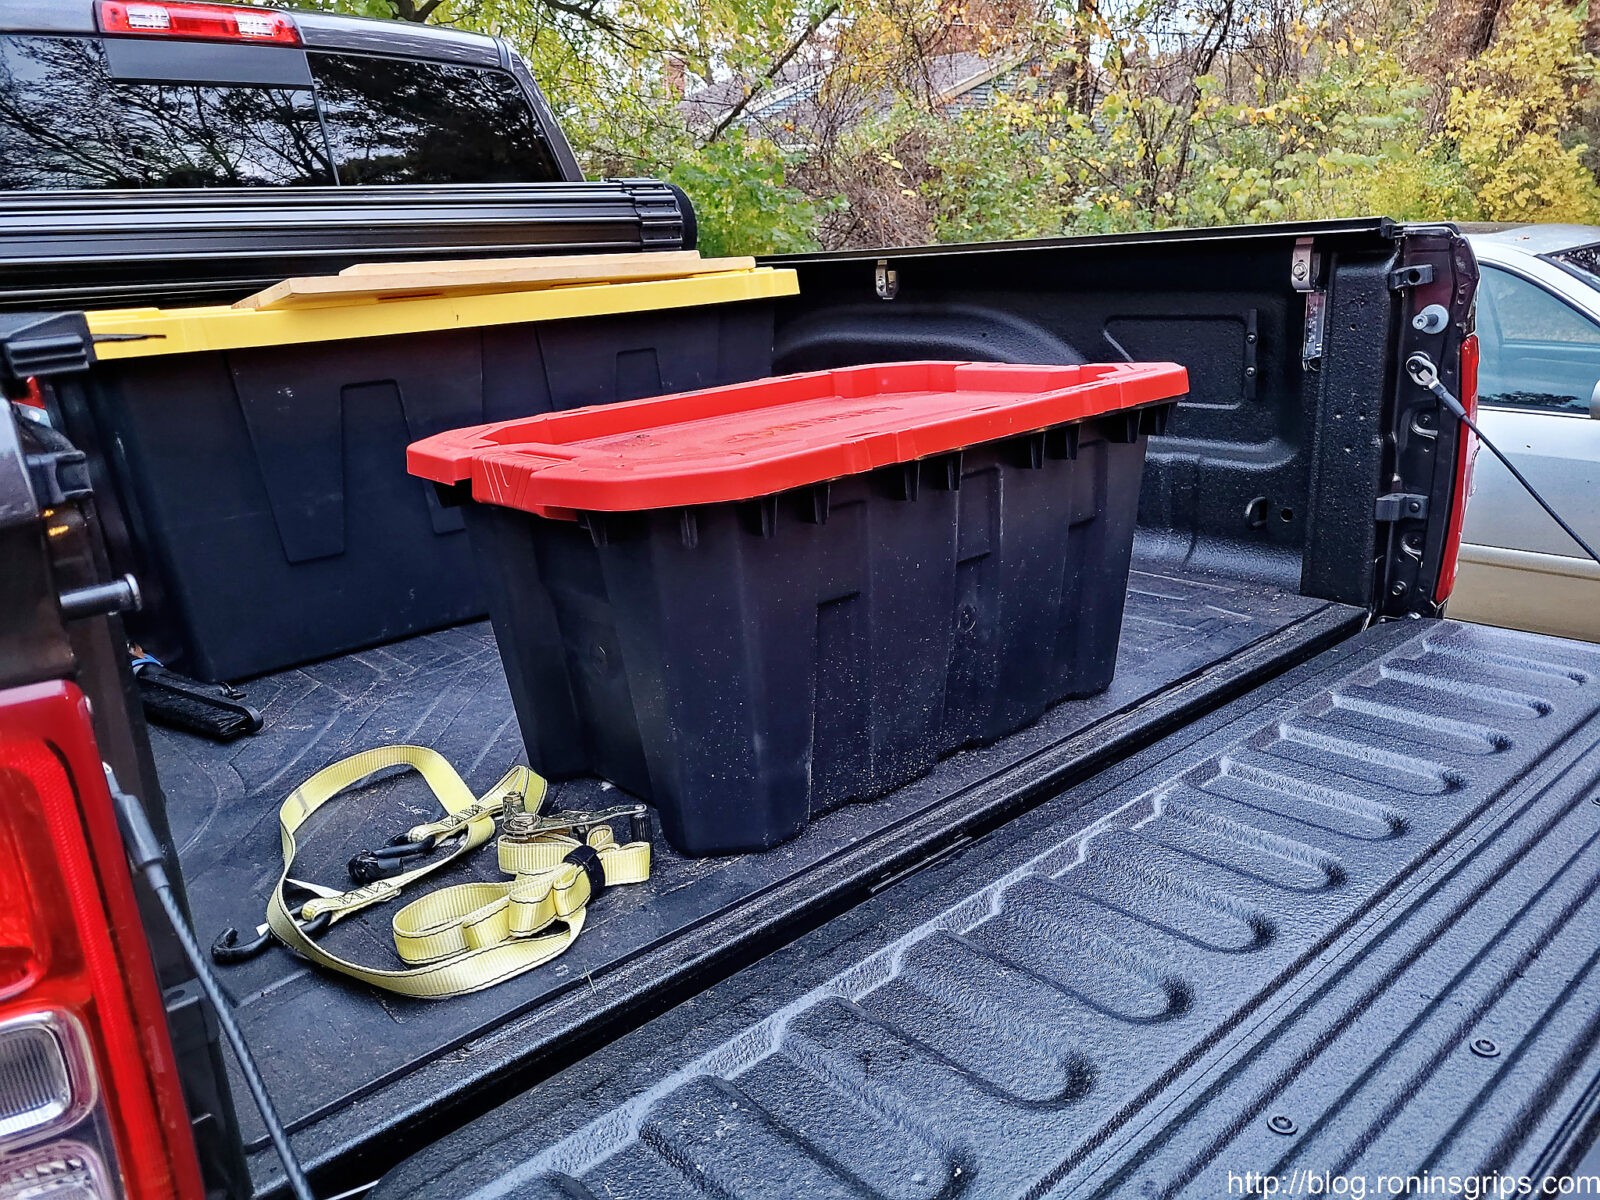
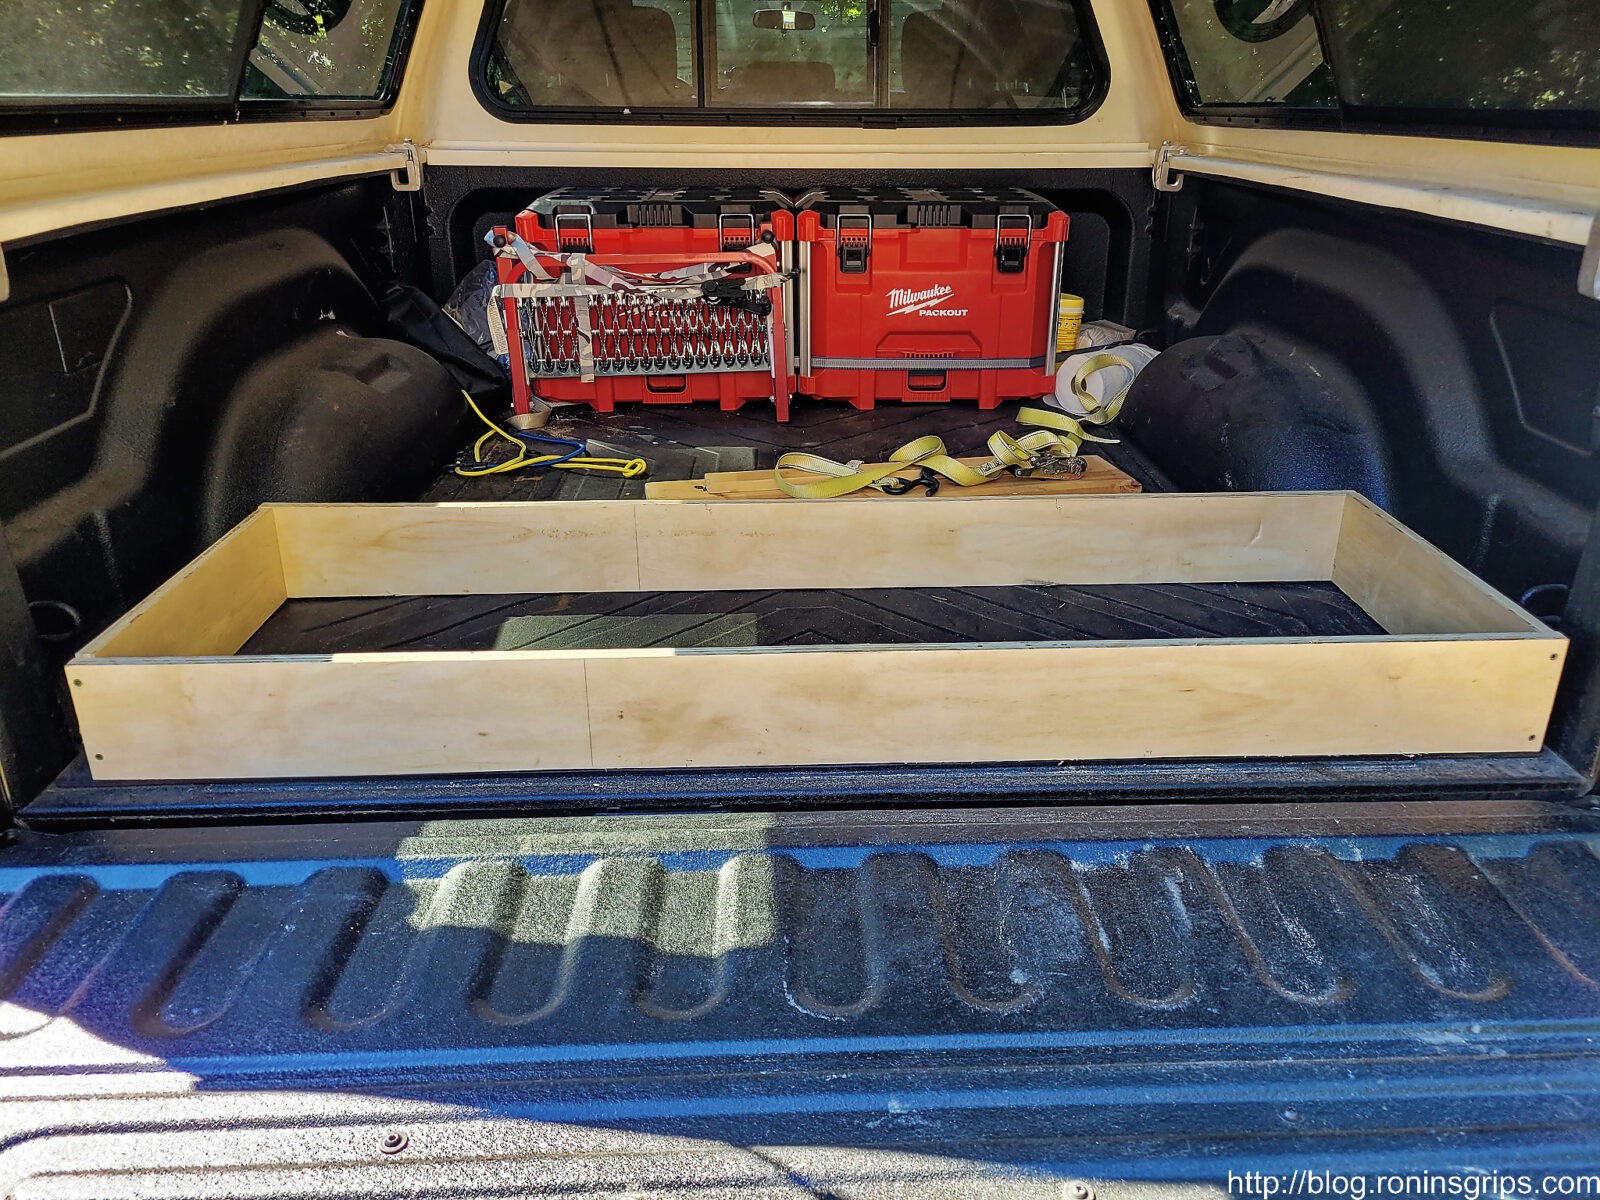
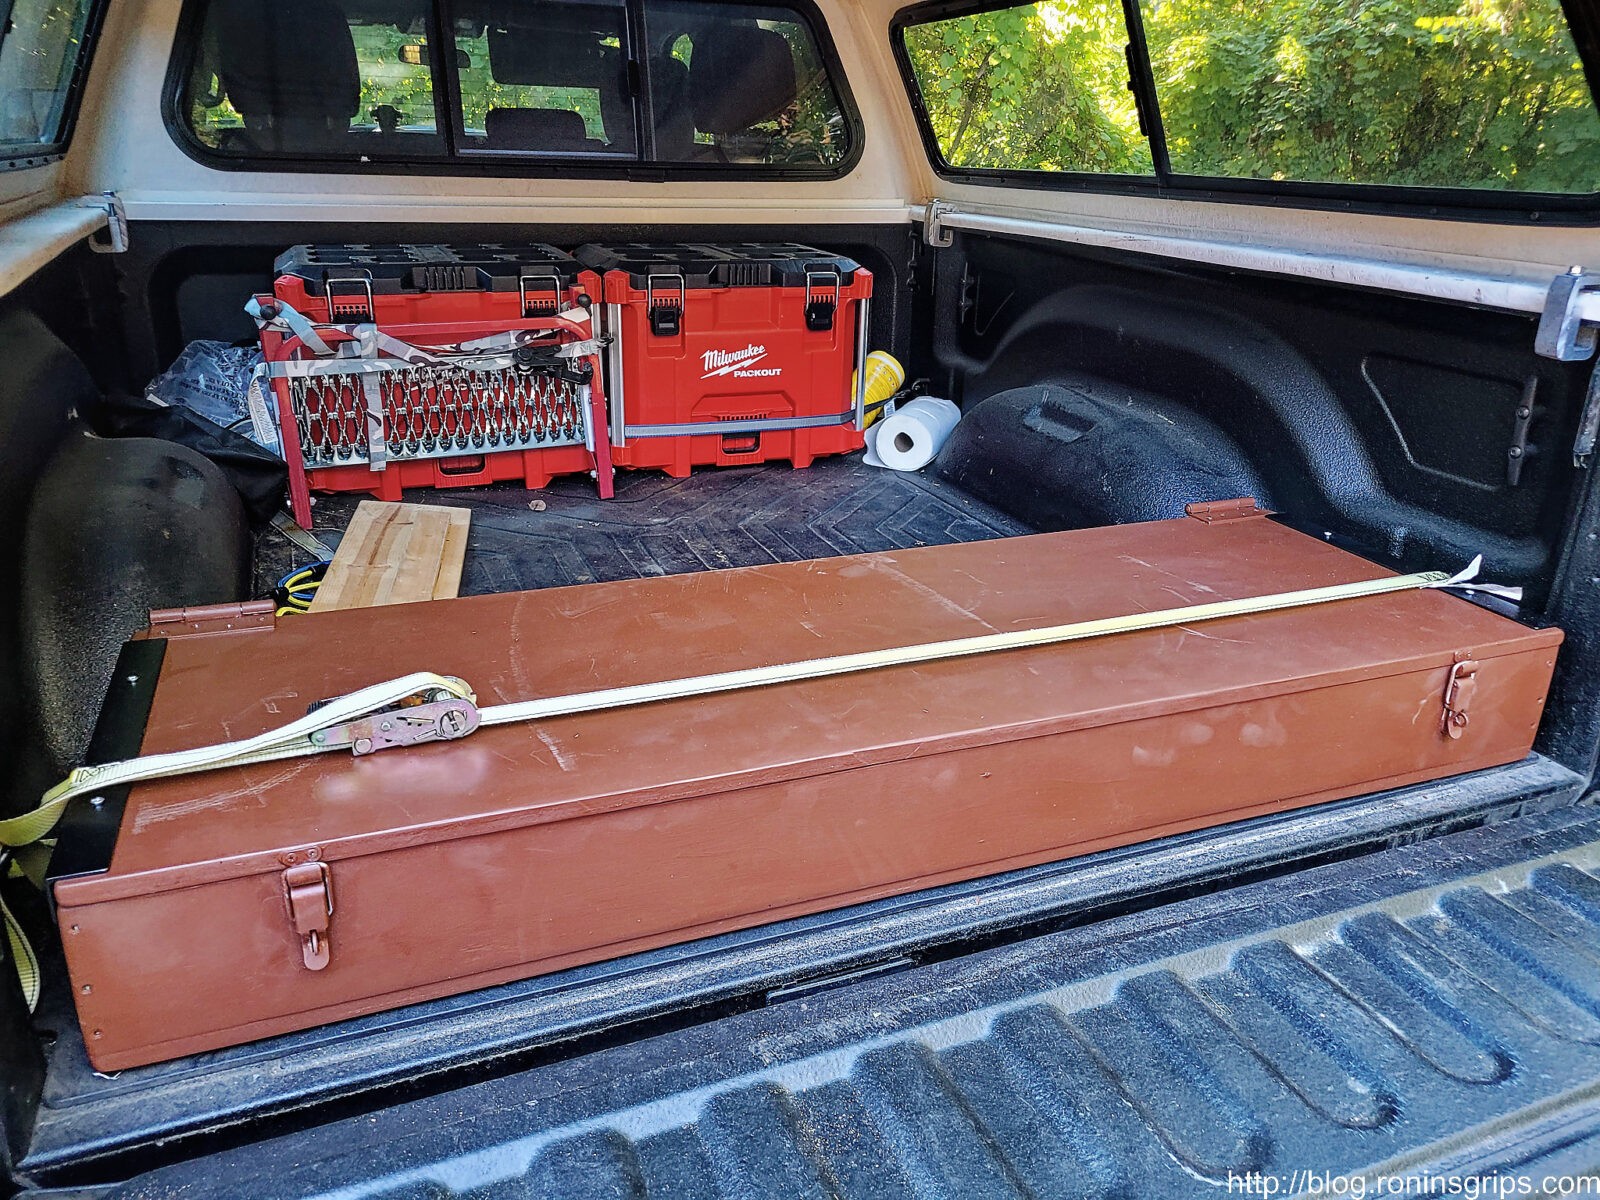
Simply put ballast is in the way and can be a pain in the butt to work around. Last year, I put the four tubes of sand and 100 pounds of old weight lifting plates in a way too tall plastic tote. That turned out to be a mistake. First off, the tote was way too tall and made getting things into and out of the bed a headache. Second, even though I strapped it to the tie downs using a ratchet strap and a board on top, there are limits to how tight you can strap down the load. I had a couple of times last Winter where I stopped fast and the very heavy ballast tote slid forward – that is not good. You certainly do not want a ballast to come flying at the cab during an accident. Bottom like, the plastic tote box was a bad idea.
This was a very bad idea. The plastic wasn’t strong enough and a few times it still slid forward last year. Also, it was way too high and in the way. I was in a rush and bought this tote at Home Depot. It’s a fine tote but don’t try to use it to hold heavy balast – it will move on you. Mine shot forward and slammed into my toolboxes. I regretted ever doing it and immediately started figuring out how to secure the tubes of sand.
Solution: Make a box out of 3/4″ plywood
I did some digging and there really weren’t any ballast solutions out there that I cared for because I wanted something very strong, with minimal height that could also be walked on, stacked on, etc.
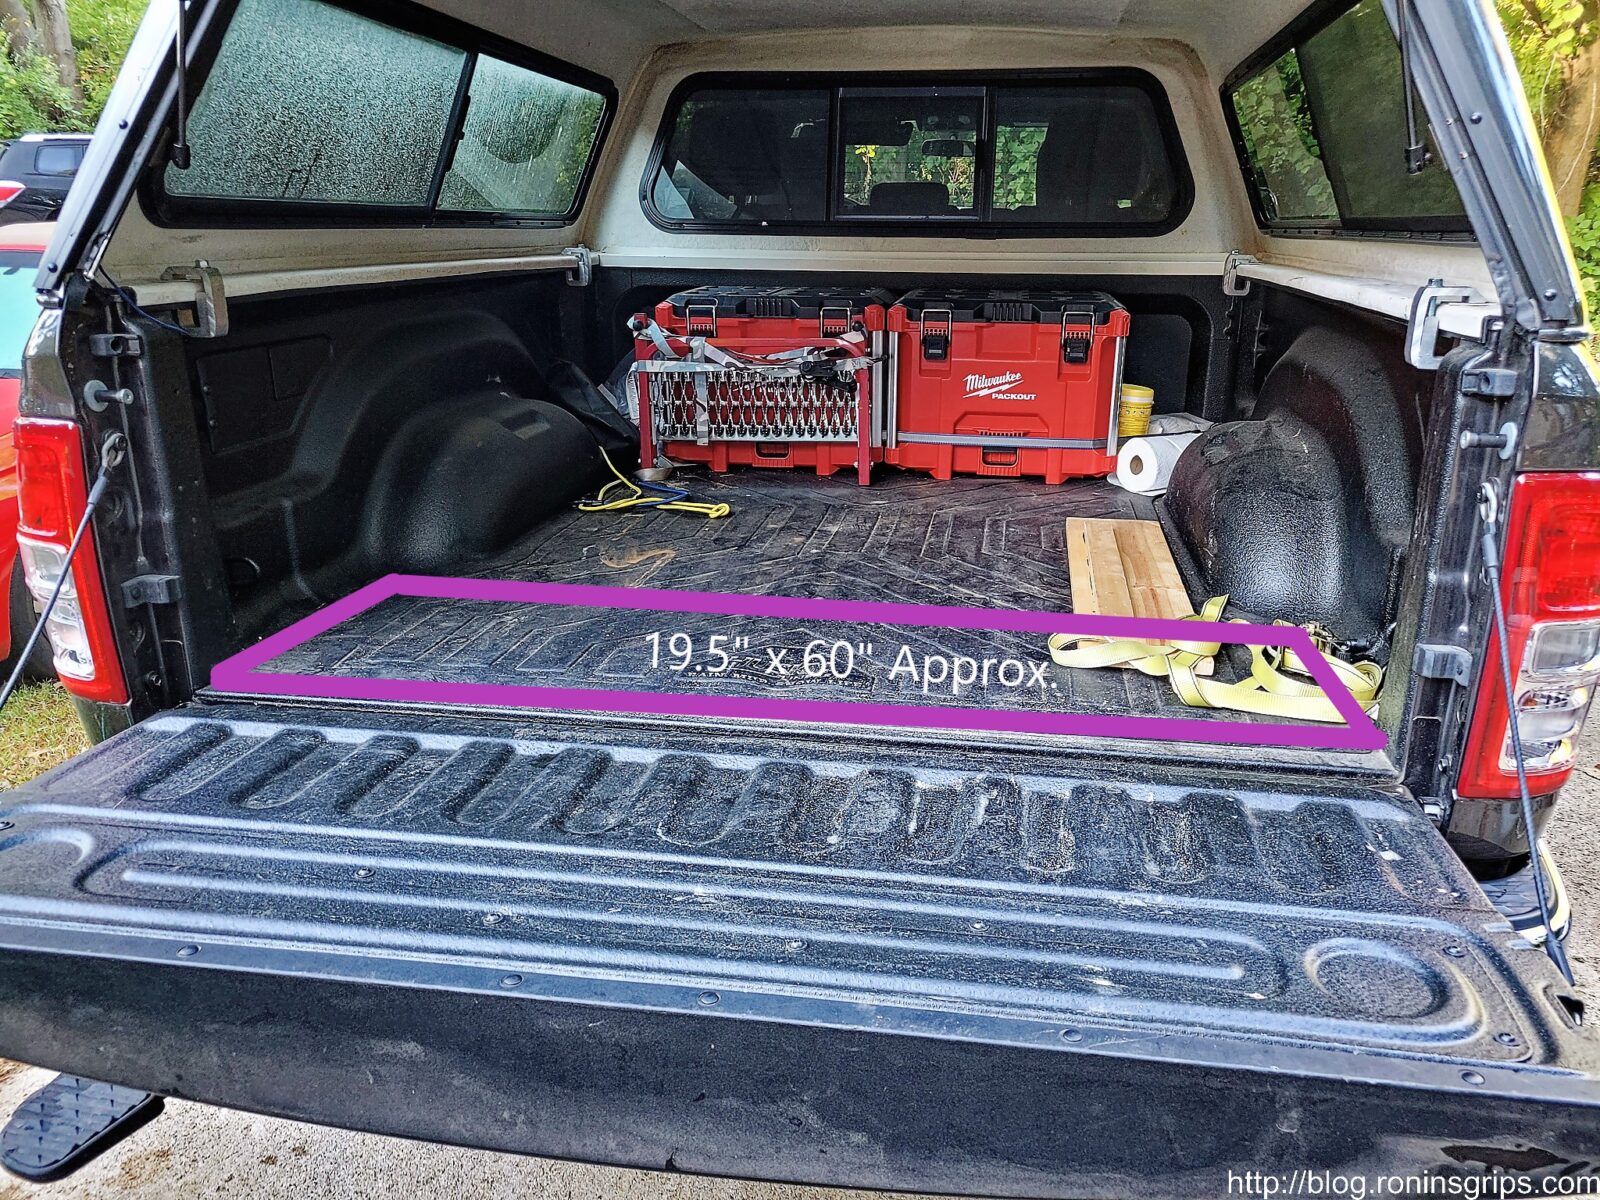
I decided to make a very stout box and it all started with understanding the dimensions I had to work with.
This is about 19.5×60 – I only went back as far as my floor mat plus didn’t want any box latches to hit the tailgate. I decided to only do 19″ deep and about 57-59″ wide. The box would be held down by a ratchet strap.
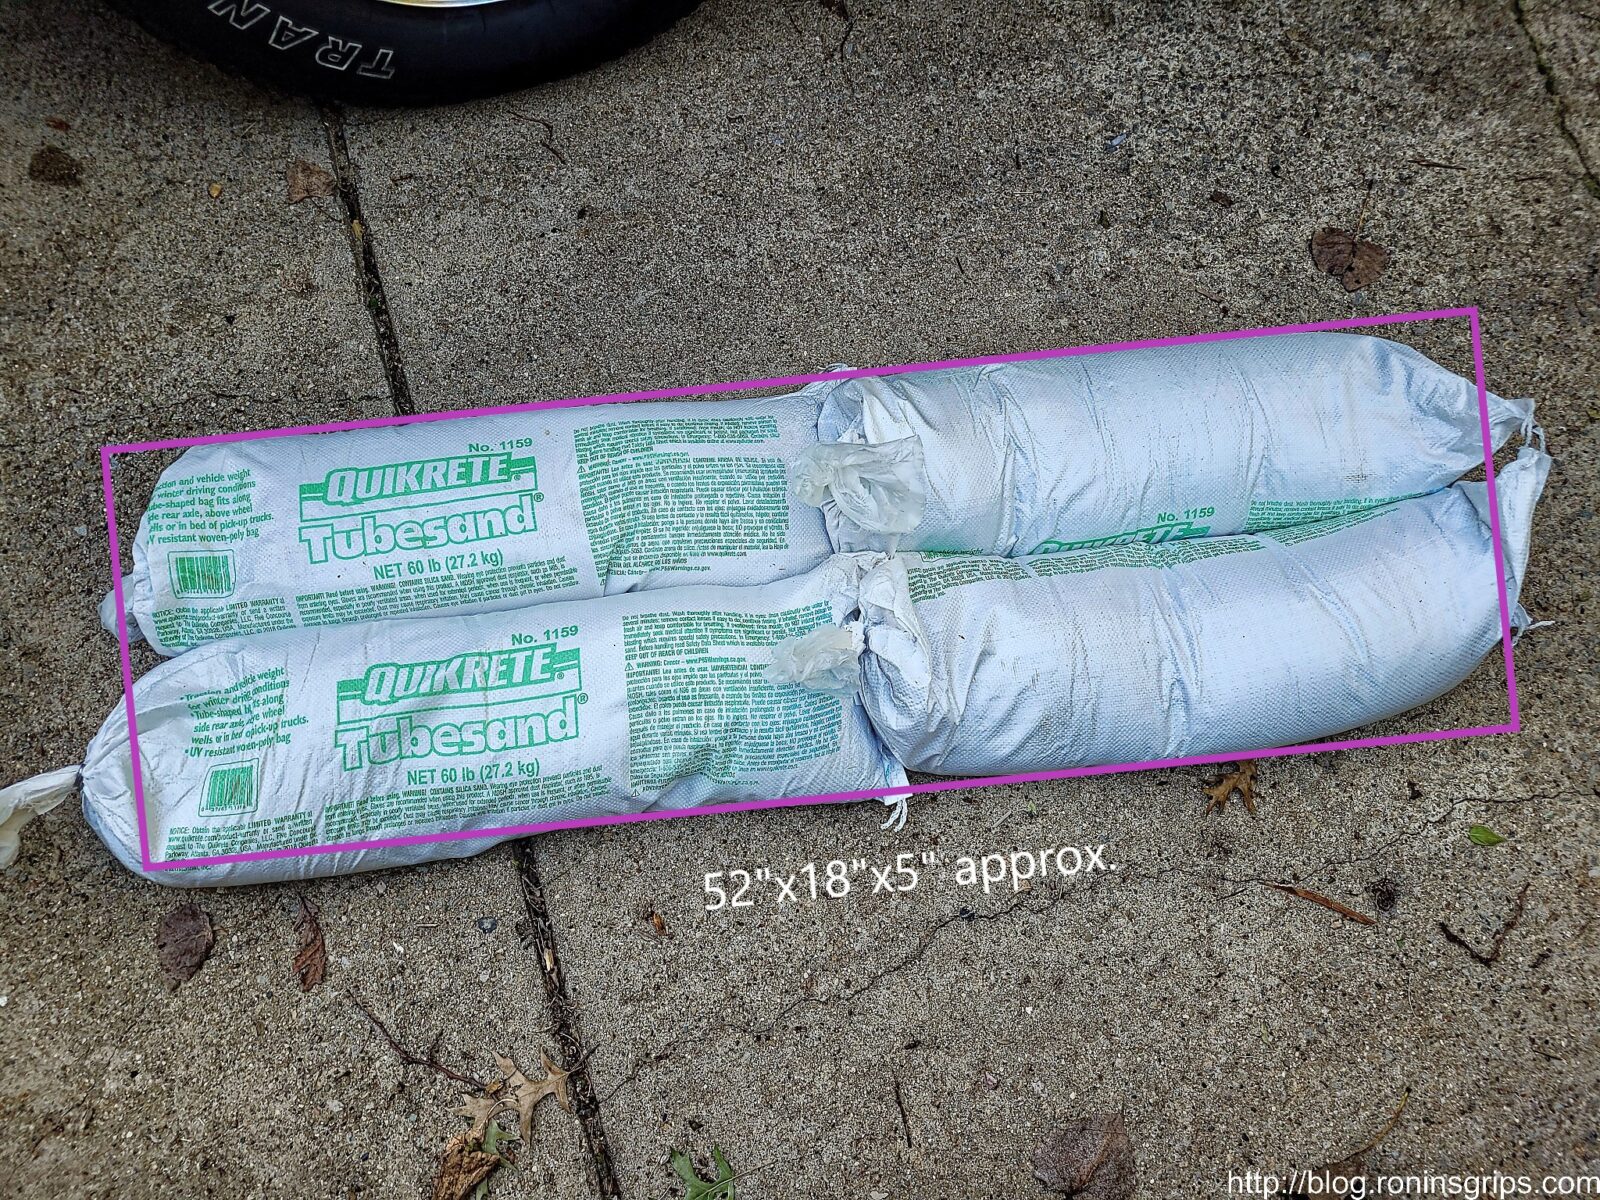
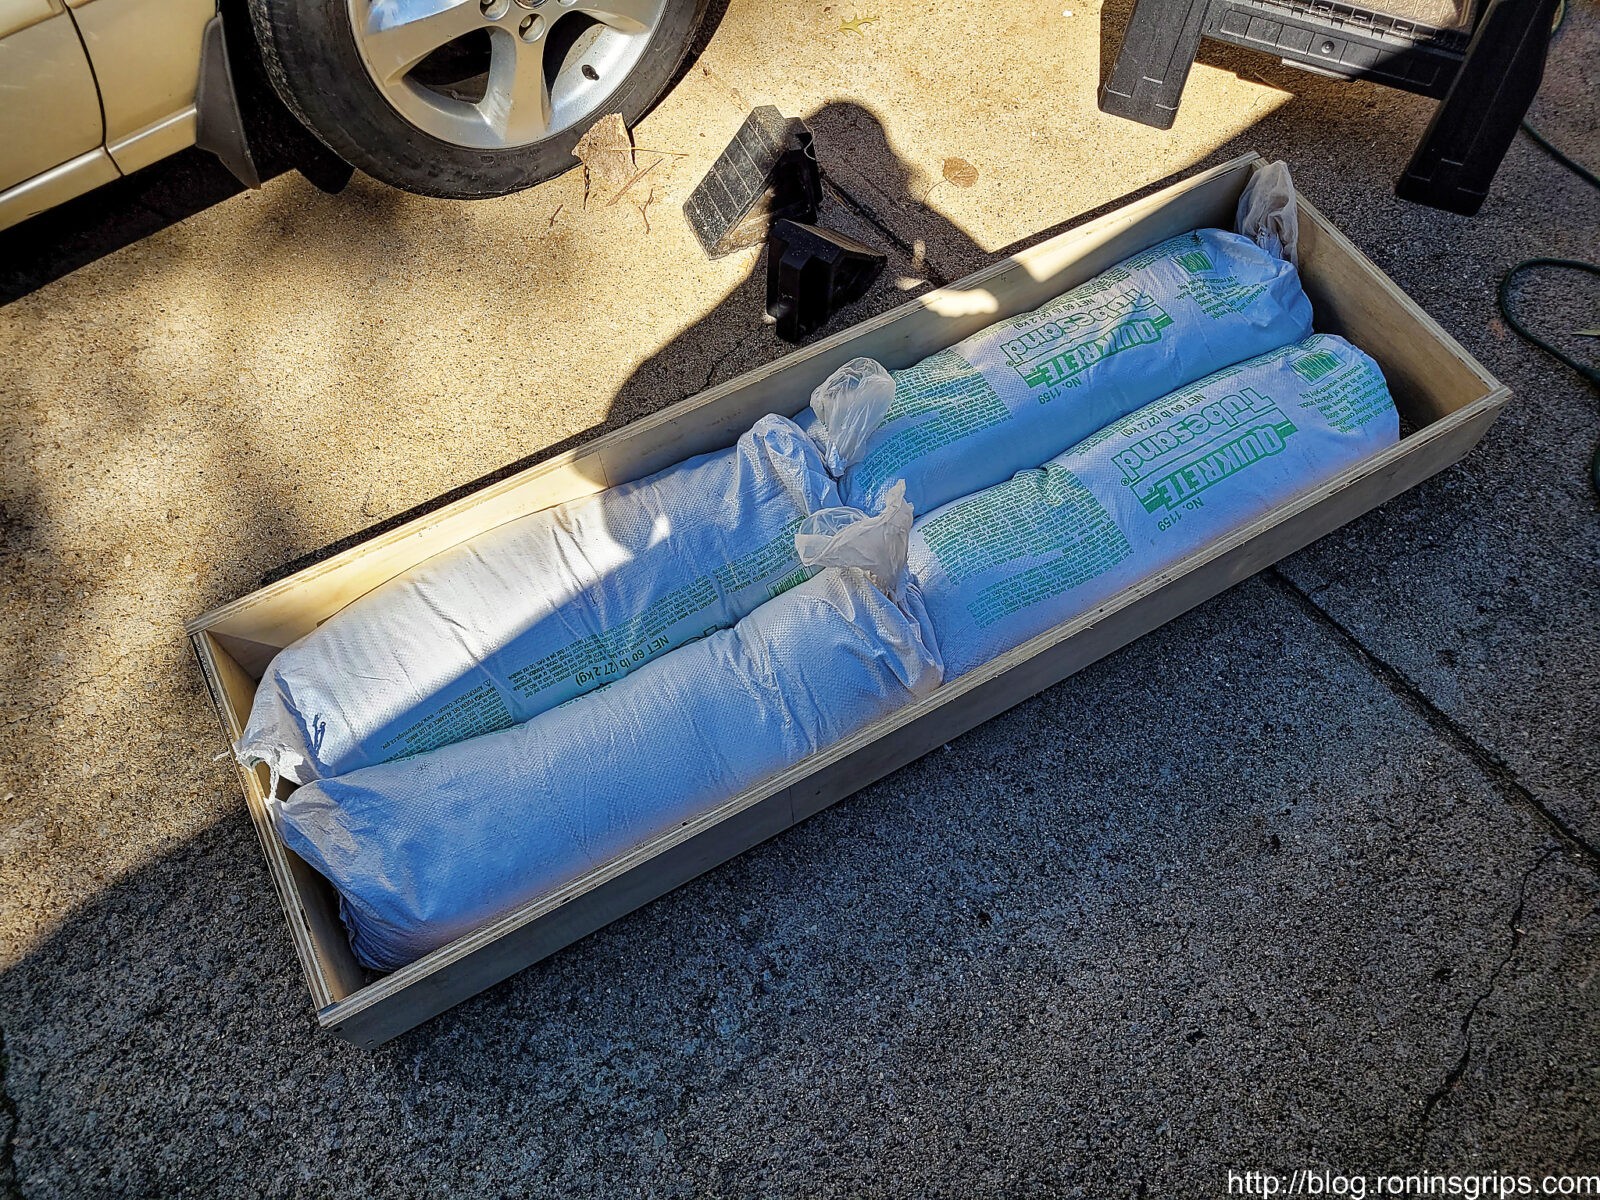
240 pounds is four 60# tubes of sand. Laying them out on the ground and doing some measurements that worked out to 18″ deep, 52″ wide and right around 4″ tall. Now this was some guesswork because the tubes are somewhat malleable – you can push the sand around some and make them shorter, longer, thinner, or fatter.
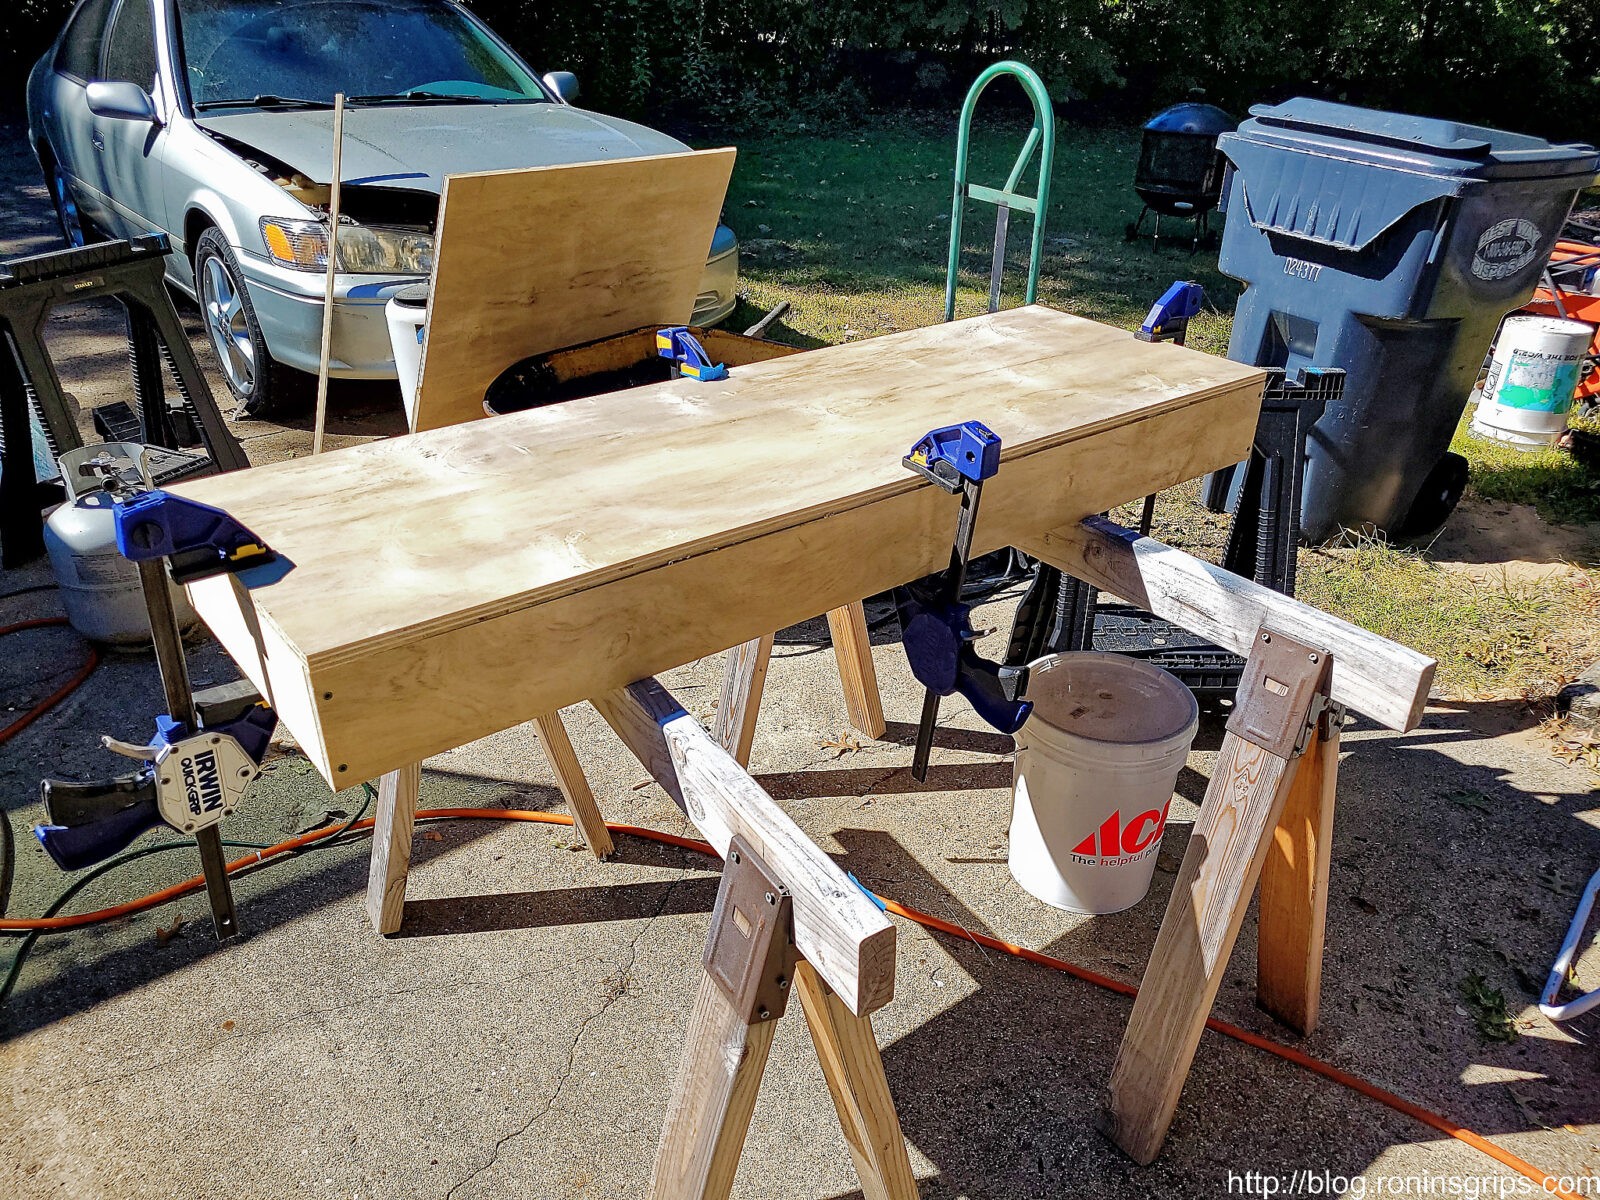
Given the above dimensions, I knew a box with an internal dimension of 18x52x5 would work. The question then became what wood to use. I have had very good luck with 3/4″ plywood. That stuff is remarkably strong. I then considered whether to do framing around it or not with 2x4s or make the walls out of 2x6s but finally just decided to do it all with 3/4″ lumber. The good news is that you can make the entire box from one 4×8 sheet – the top, bottom and four walls.
To hold it together would use #8 1-5/8″ treated deck screws – the new ones with some serious coating and Torx heads. Given they would be in the bed of the truck, I wanted to reduce the odds of rusting plus wanted their strength – both in terms of shear strength and how well the threads would bite into the plywood. I thought about gluing things together as well but changed my mind. If I ever needed to replace a damaged board, then I could with just screws but not so if I glue was used as well.
I wanted the top to have a strong hinge so I could access the sand inside if I needed to cut open a bag and use the sand for traction. I also wanted a strong hinge that wouldn’t bend easy so I went with 4″ gate hinges from Ace and used #10 wood screws. To hold the front down, I used draw clasps from Home Depot. I used the screws in the package and they looked to be about a #6.
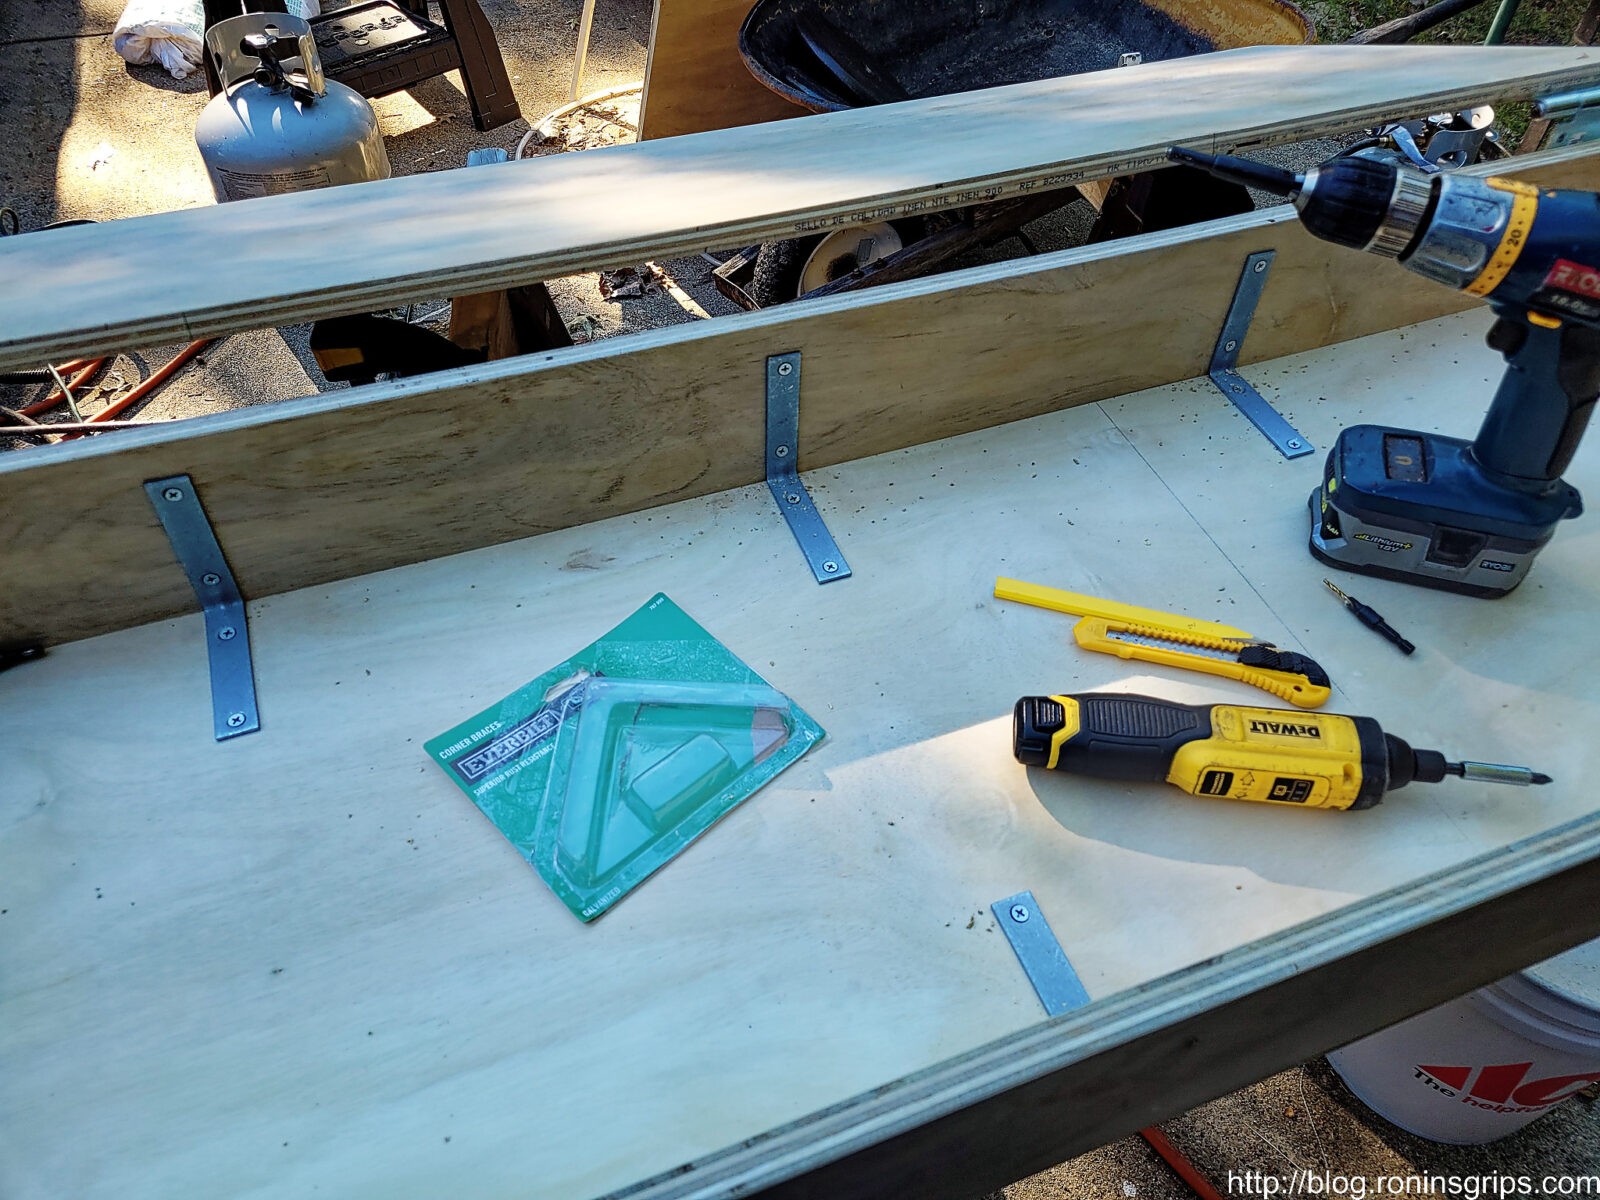
To further reinforce the plywood I would use eight 4″ inside angle braces. The intent was to spread out the support and fastening duties without taking up a ton of space. Three braces on each long wall and one on each short wall. I used #10 wood screws.
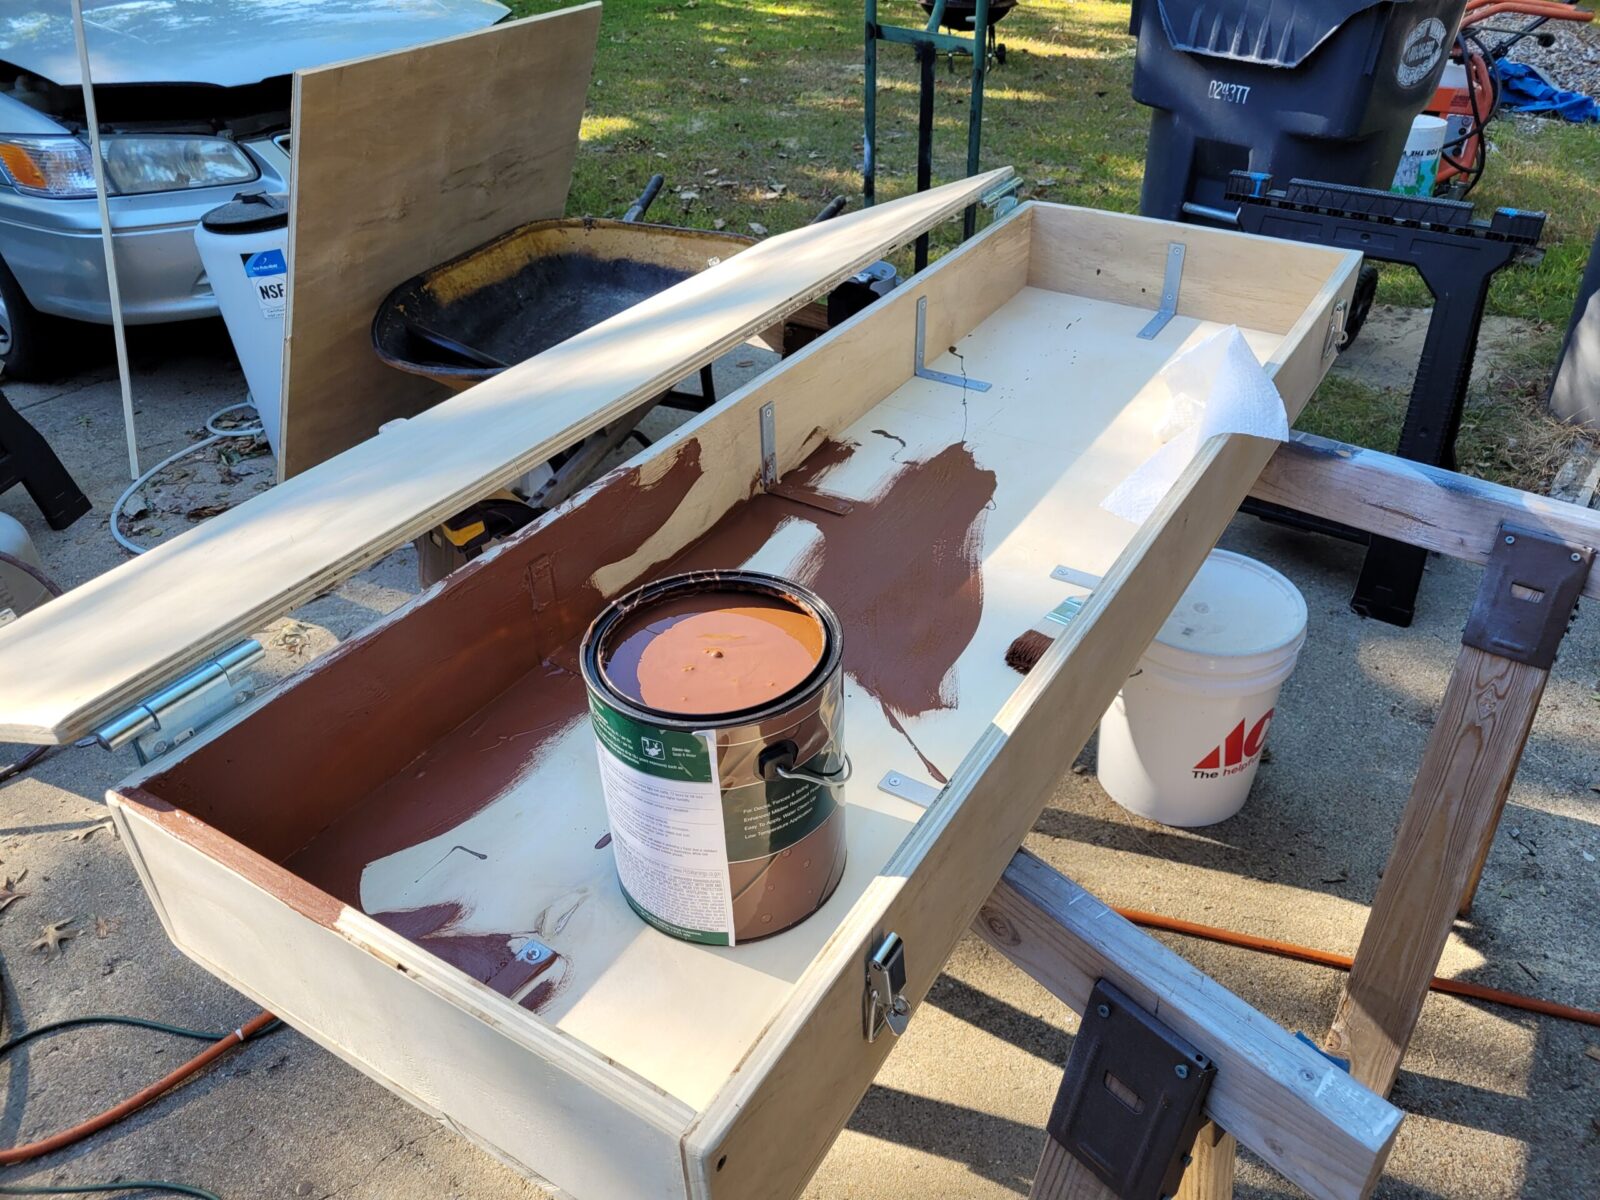
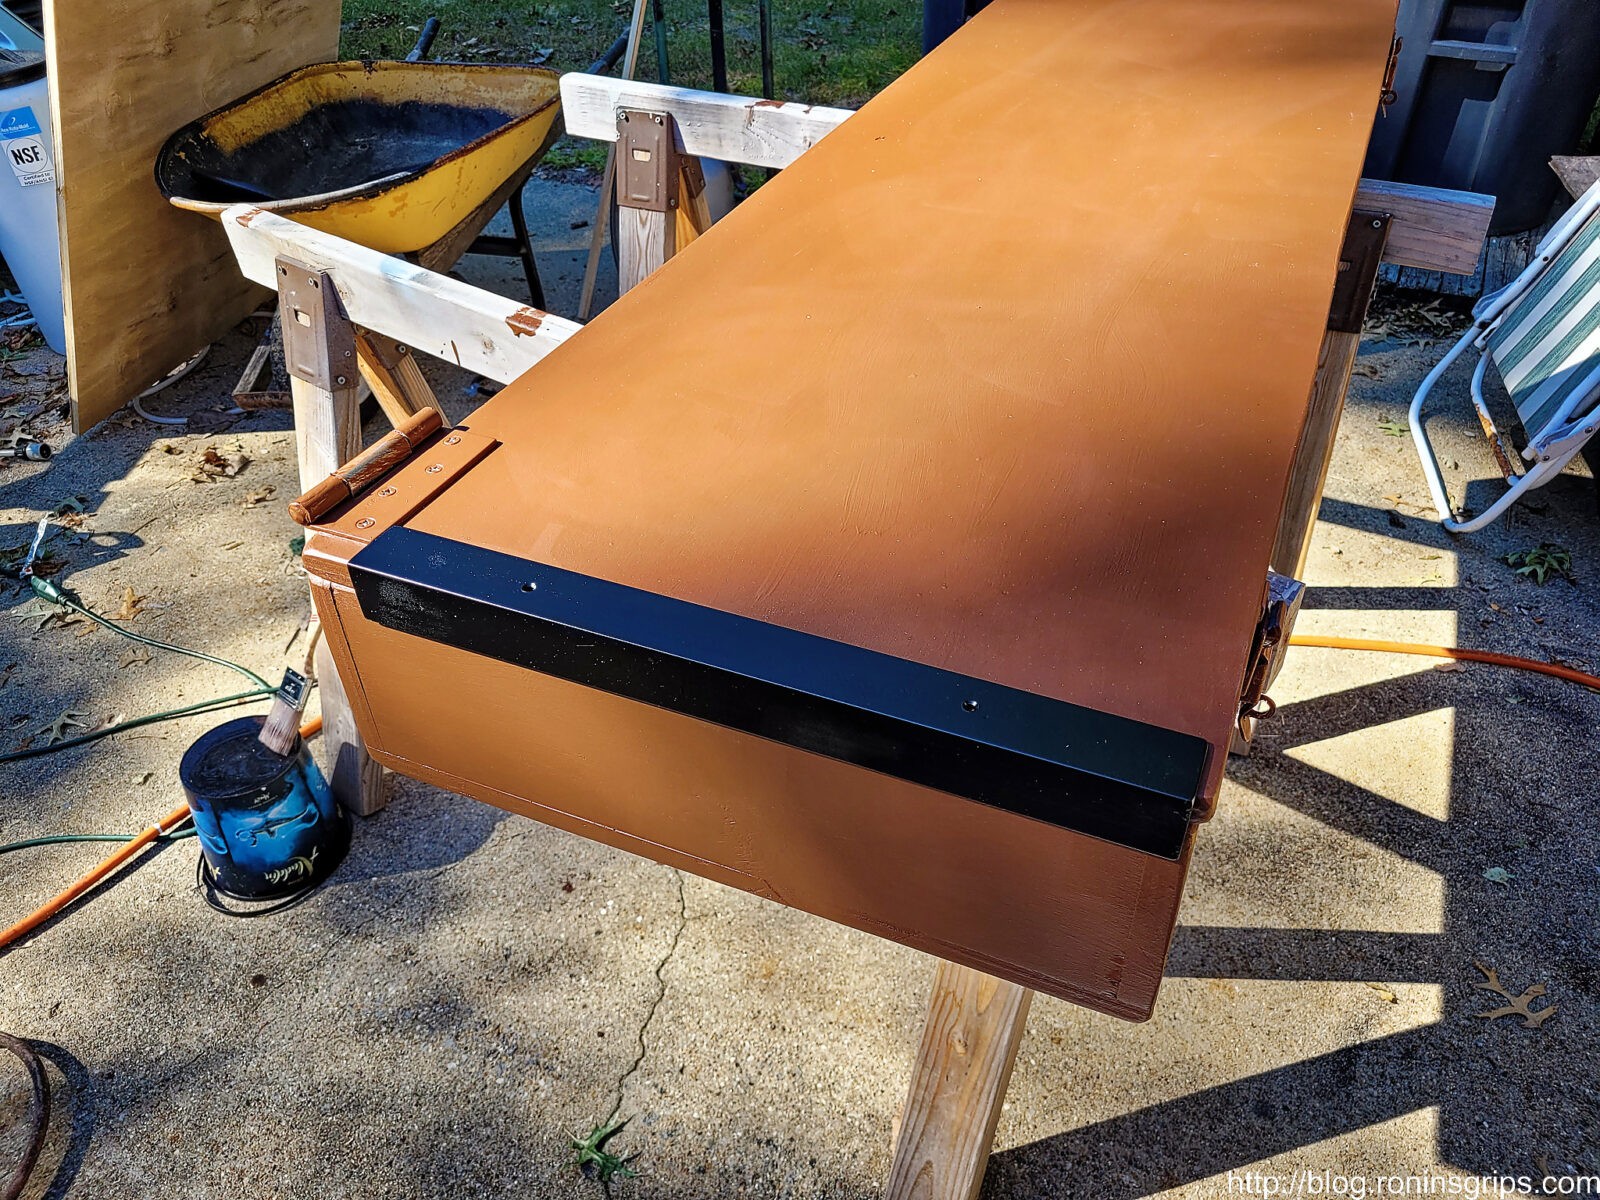
Lastly, I wanted the wood to be protected so I went with a deck stain. We’ve had very good luck with Home Depot’s Behr deck stain so I just grabbed a can of Russet. It’s a decent medium brown but in hindsight I wish I had gone darker.
Here’s the frame. The long pieces are 57.5″ long x 5″ wide. The short sides are 17.5″ long x 5″ tall. That gives an outside diameter of 57.5″ wide x 9″ long for the frame. I could have made it maybe 0.5-1″ shorter but wanted to make sure I had enough room.
I test fit it around the sand tubes and I was good to go. I was a bit higher than needed but decided to slip a couple of 25 pound steel barbell waits in the top. To be clear, there will be a bottom piece of plywood too along with the hinged top.
The top and bottom pieces of 3/4″ plywood are 57.5″x19″. I repeatedly did test fittings to make sure I didn’t mess up a cut.
I installed the Ace Hardware brand 4″ gate hinges with #10×3/4″ wood screws. Self-centering drill bits are worth their weight in gold when you are installing hinges and brackets. I’m using a Bosch set now – the cheap import models fall apart too easy.
Installed eight of the 4″ inside angle braces with #10×3/4″ wood screws.
One recommendation I would tell you is to use a sander and round over all of the edges so reduce splintering in the future. It also reduces the “ow!” factor if you run into it while moving things around.
I bought pre-tinted Behr deck stain. I like it because it does have an opaque pigment and ran over the steel parts to as I was in a rush. I’m not a huge “it’s gotta look perfect” kind of guy. I’m more of a “If it’s sealed it is good enough” guy. My friend John looked at it and declared the color was “baby shit brown” but it was what it was, I didn’t really care about the color.
I did have some spare 1-1/4×1/8″ thick” angle iron that I cut, drilled and painted to protect the sides of the lid from the ratchet strap and to also distribute the downward pressure of the strap more evenly.
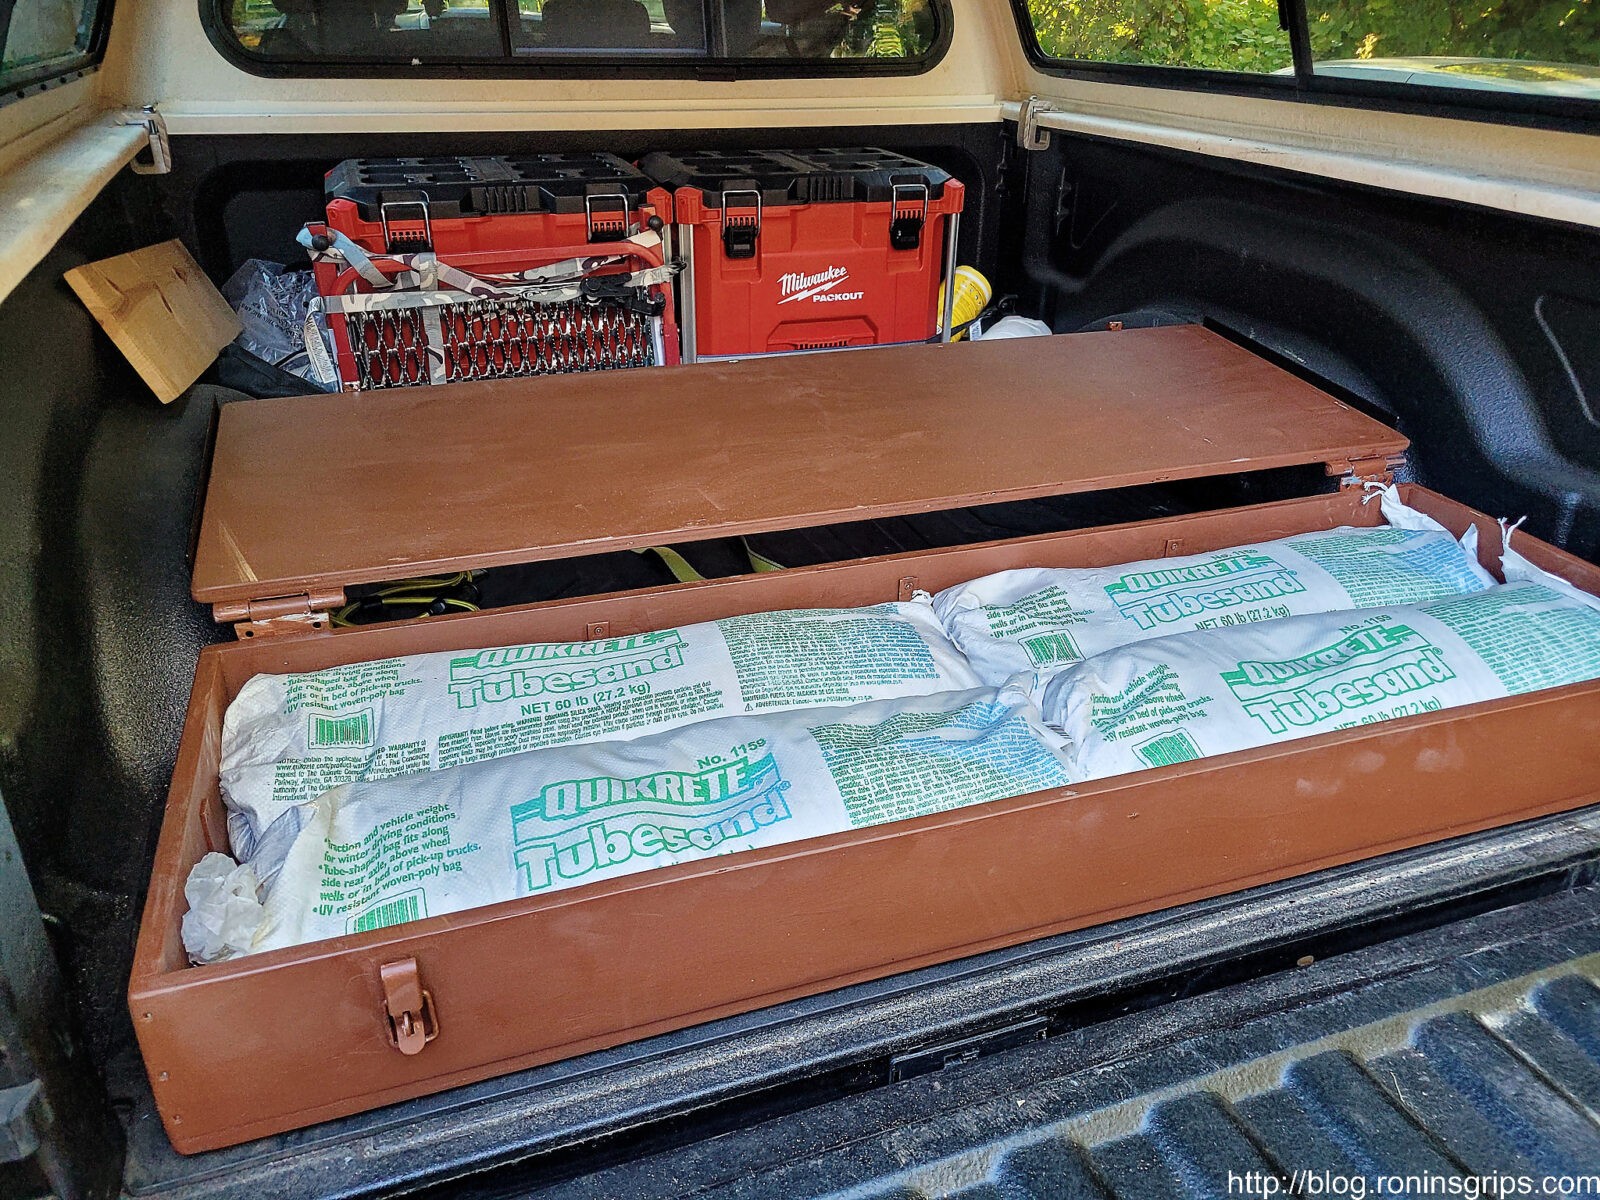
The box fit the back and I did have some room as I flattened the tubes out. By the way, I let the deck finish cure for a day before I put in the truck and part of the second before I installed the tubes. I didn’t want the deck stain to glue itself to the rubber floor mat if I pushed it down too early.
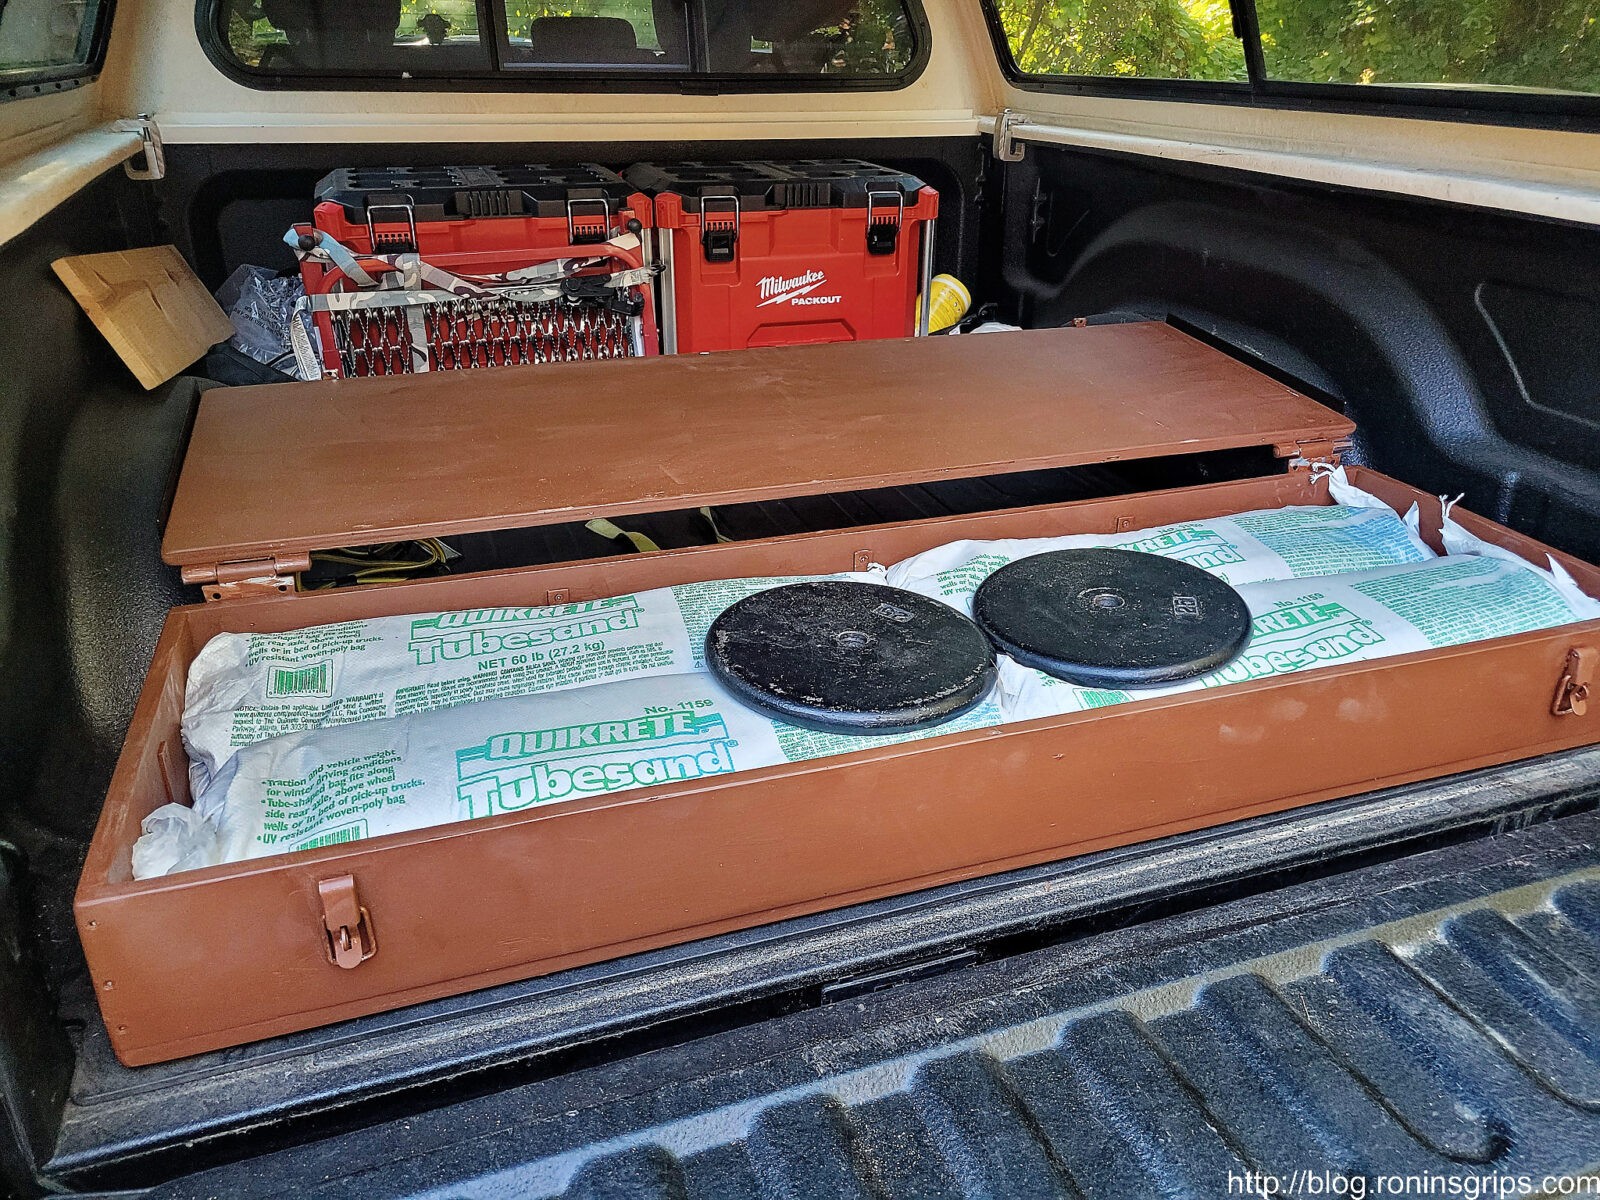
Added in two 1″ 25 pound plates that date back to my early days of weight lifting – late 80s if I were to guess. I had four but there wasn’t room towards the sides. Now that the box was at 290 pounds that was good enough for me.
The box is secured by the 1.25″ ratchet strap to the tie down eyelets of the truck. I really didn’t want to drill holes in the bed and invite rust plus the box will only be installed during the winter. The box can’t slide forward because of the wheel tubs plus the rubber floor mat really has a healthy grip on it and the bed floor thanks to the strap.
Summary
The box feels very sturdy and can’t move at all now that it is strapped in place. I think the truck has the weight it needs and I don’t have to worry about it shifting around.
I hope this helps you out!
10/31/24 – I am still using this setup and it works great. If I had installed a rubber matt or something on top the lid would have been protected better. I have scuff marks all over mine from pushing stuff in and pulling it out. I may get add some rubber floor mat on top but it’s near the bottom of the to-do list.
Note, I have to buy all of my parts – nothing here was paid for by sponsors, etc. I do make a small amount if you click on an ad and buy something but that is it. You’re getting my real opinion on stuff.
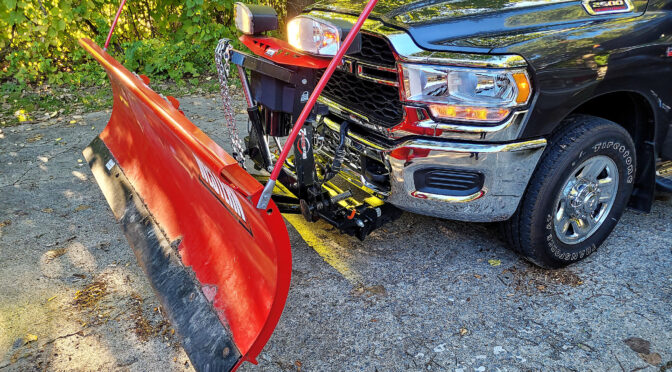
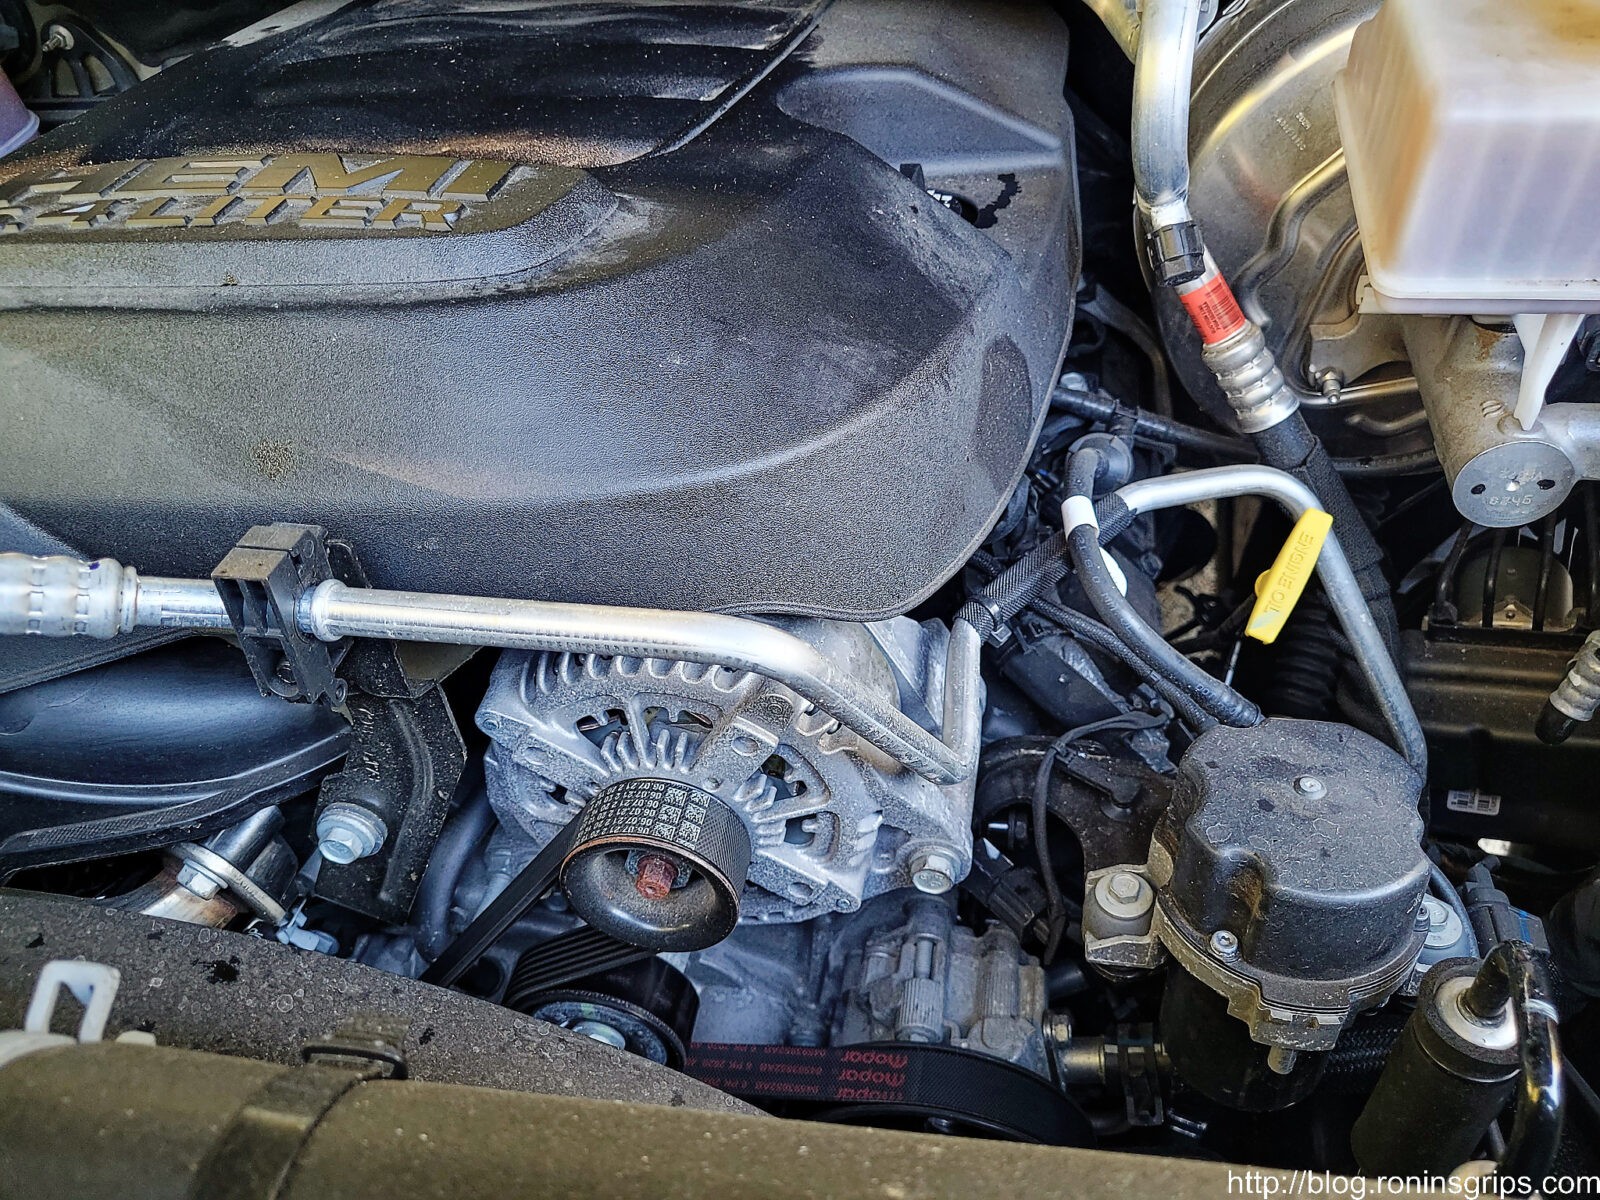
My one big disappointment with my 2021 Ram 2500 with the 6.4 Hemi is it’s lack of sufficient electrical power to run my Western Pro Plow 2 snow plow and the heater on full – yeah, that combo has issues. My truck came with the Snow Chief option package that was supposed to make it snow plow ready with a 220 amp alternator plus anti-spin rear differential, aux switches, LED clearance lamps, LT275/70R/18E tires on 18″ wheels and a transfer case skid plate. One would think it’s good to go but it’s not – at least not in terms of the alternator. Can’t say I am overly thrilled by the tires but at least they work even though not ideally on ice and snow.
At any rate, back to the point of the post – my bone to pick with DC power system (the combination of alternator and battery) is that it can’t keep up with my raising my 8′ Western Pro Plow 2 while having the defroster on full. The truck’s computer senses that there is too much of a power draw and it literally shuts off the blower motor … in the middle of winter while I am trying to plow. When this first happened last year, I couldn’t believe it. I thought for sure something was wrong.
The local Dodge dealer, Siemens in Bridgman, Michigan, was next to no help even though I bought the plow from them — they said the battery and alternator were just fine. Honestly, I am usually not impressed by car dealership service departments and SIeman’s underwhelming response didn’t surprise me although it was disappointing. Bear in mind that 2500-series Ram trucks were hard to find due to COVID and a shortage of chips so I decided to figure this out myself despite being more than a little ticked off that my brand new plow ready truck wasn’t exactly plow ready – which for me means that the heater on full and the plow’s hydraulic motor should be able to run at the same time.
So what was happening?
The newer Ram 2500 computers (technically it is the ECU or Electronic Control Unit), maybe all newer RAMs actually, have their computers programmed to protect electronics by using a strategy that prioritizes some loads over others. This means it shuts off some high draw loads before others to prevent a brownout (a drop below the recommended power levels) that would cause damage. This is known as “load shedding” or just “shedding”.
On one hand, yes, I am thankful that the electronics were protected and the computer shut off the blower and not the plow itself – either of those cases would have really ticked me off. On the other hand, I need heat in the Winter and sometimes the blower set on high is needed. Why was this even happening? Yeah … that was the big question.
Note, I could not find any official details behind how the 2021 Ram’s computer handles load shedding. If you have some any official details, I would sure like to learn more. Email me at in**@*********ps.com
The Western Pro Plow 2
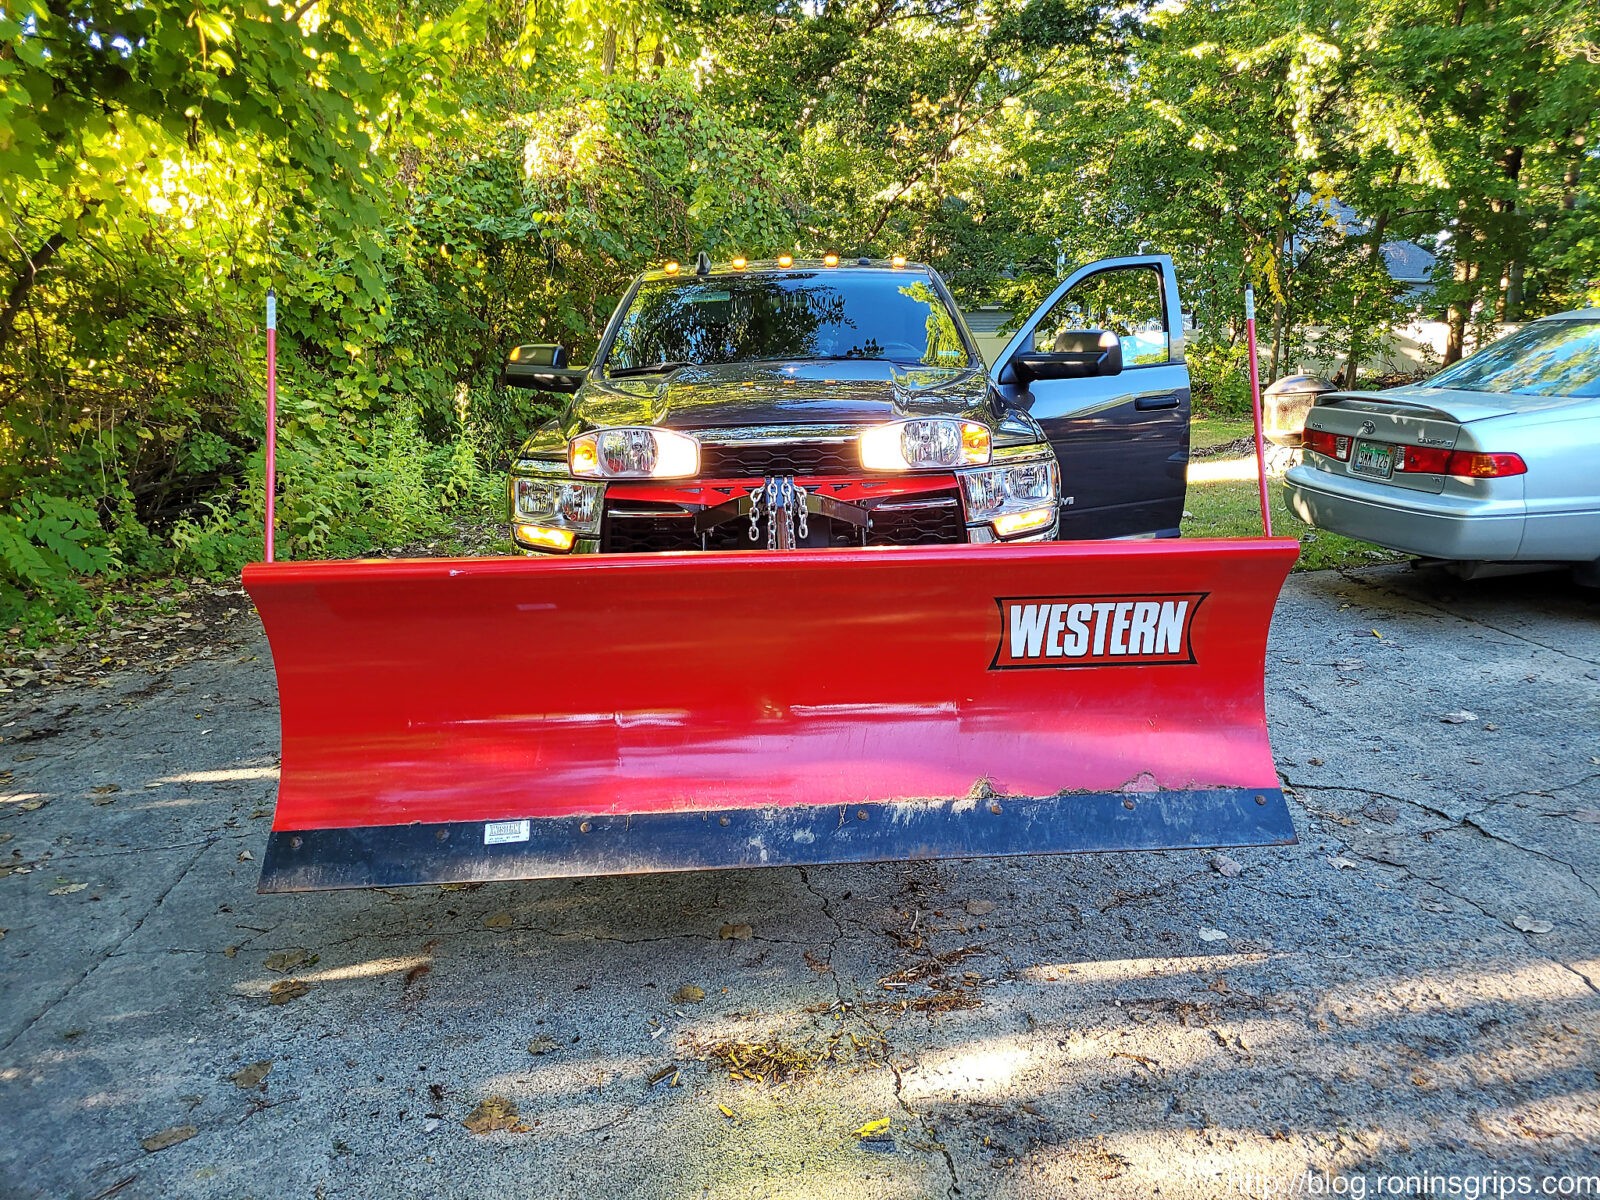
To give some background, I bought a brand new Western Pro Plow 2 with the truck and financed them together. It has an 8′ steel blade and Western’s documentation rates the motor’s draw at 205 amps at 2,250 PSI. There are a few other relatively small draws – 1.5 amps for the solenoid coil, motor relay draw 2.2 amps and switched accessories of 0.75amps.
This is a Western 8′ Pro Plow 2. The plow assembly less the mount weighs 668 pounds.
So. running the hydraulic motor to lift the big 8′ steel blade is substantial – probably pushing near or even past the rated 205amps. I don’t think I ever had shedding happen with left and right pivoting but I can’t say for sure.
The problem scenario was that I would get in the truck, warm it up, turn the blower on high, lift the plow and the computer would shut off the blower completely. I was told it would restart after some time but did not experience that – I would turn off the truck, turn the blower motor down one notch and things would be fine. That was my work around though – I would warm up the cab, reduce the blower by one notch and then use the plow. As the cab warmed up, I reduced the blower speed further and further. Now if I forgot that then the computer would shut off the blower. Man, it was frustrating.
The 220 Amp Alternator
To be very candid, Dodge’s decision to put in place both an underpowered alternator and battery and claim it to be plow ready is bogus. I am not running an abnormally large plow for a 2500 – 8′ is the recommended blade width.
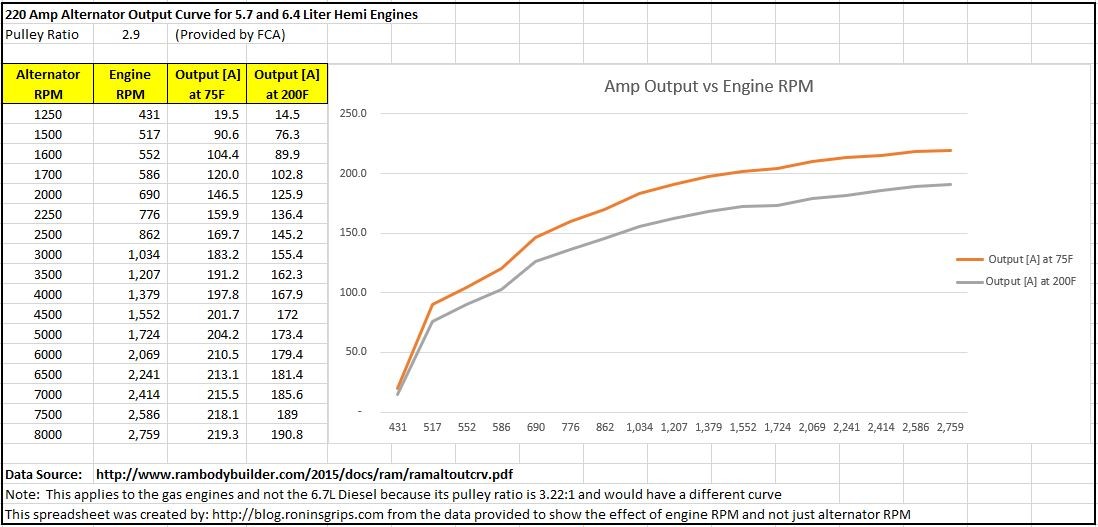
Yes, it is a 220 amp alternator but it is not cranking out that many amps all the time – it depends on the engine RPM. In doing some reading, many/most alternators rate their full output at 6,000 RPM. The RPM is of the alternator itself and the pulley will likely have some multiplier vs. engine RPM. I found a FCA technical bulletin on the smaller 160 amp alternators and they have a 2.9:1 ratio and show the steepest power output between 1,250 and about 2,500 alternator RPM. The power increases much more gradually until they stopped the curve at 8,000 RPM.
The Snow Chief option package includes a 220 amp alternator. The problem is that while 220 amps sounds great it is not producing that level of output all of the time.
My point is that even with the bigger alternator, given that I am plowing, the RPMs are going up and down over and over plus I am never going very fast. Hmmm….. I usually was idling when I had the blower running and went to lift the plow. With an engine idle speed of 720 RPM (I just went out and got that from my ODB2 scanner), we’d get an alternator speed of 720 x 2.90 pulley ratio = 2,088 alternator RPM. Using the output chart that FCA has at 2,000 RPM the alternator is producing about 146.5 amps.
Hmmmm…. far less than the plow’s draw of 205amp let alone having the blower on high. I did some digging and while I couldn’t find an absolute number from Dodge, the range mentioned seems to be 15-20amps. I don’t often plow in the dark so I am not factoring in lights. Regardless, the alternator would not be producing enough amps so the demand would need to tap into the battery’s reserve but that wasn’t enough obviously.
To make this more approachable, I took the data from FCA and generated the following table that shows you engine RPM and the amp output. If you click on the photo you can see a larger version.
Quick comment: I did not know it but there is a dual alternator option for the Hemi-powered 2500. With two alternators, both are contributing amps even at lower RPMs. Had I known, I would have tried to negotiate adding this option in as part of the purchase and at least had it financed. Then again, it would have been a gamble to avoid this problem that I didn’t even know existed.
The Original 730 CCA Battery
Let’s now consider a second important element – The battery powers the starter to start the truck of course but it also serves as a reserve buffer to even out power delivery when there are surges in demand that the alternator is unable to cover. Dodge went mediocre here. Why they didn’t use a bigger battery or even dual batteries – I don’t know. Well, I do know – either they went cheap to make more money or the engineers didn’t have real world snow plowing experience or didn’t talk to any real snow plow owners. Sorry guys – I have to call it the way I see it.
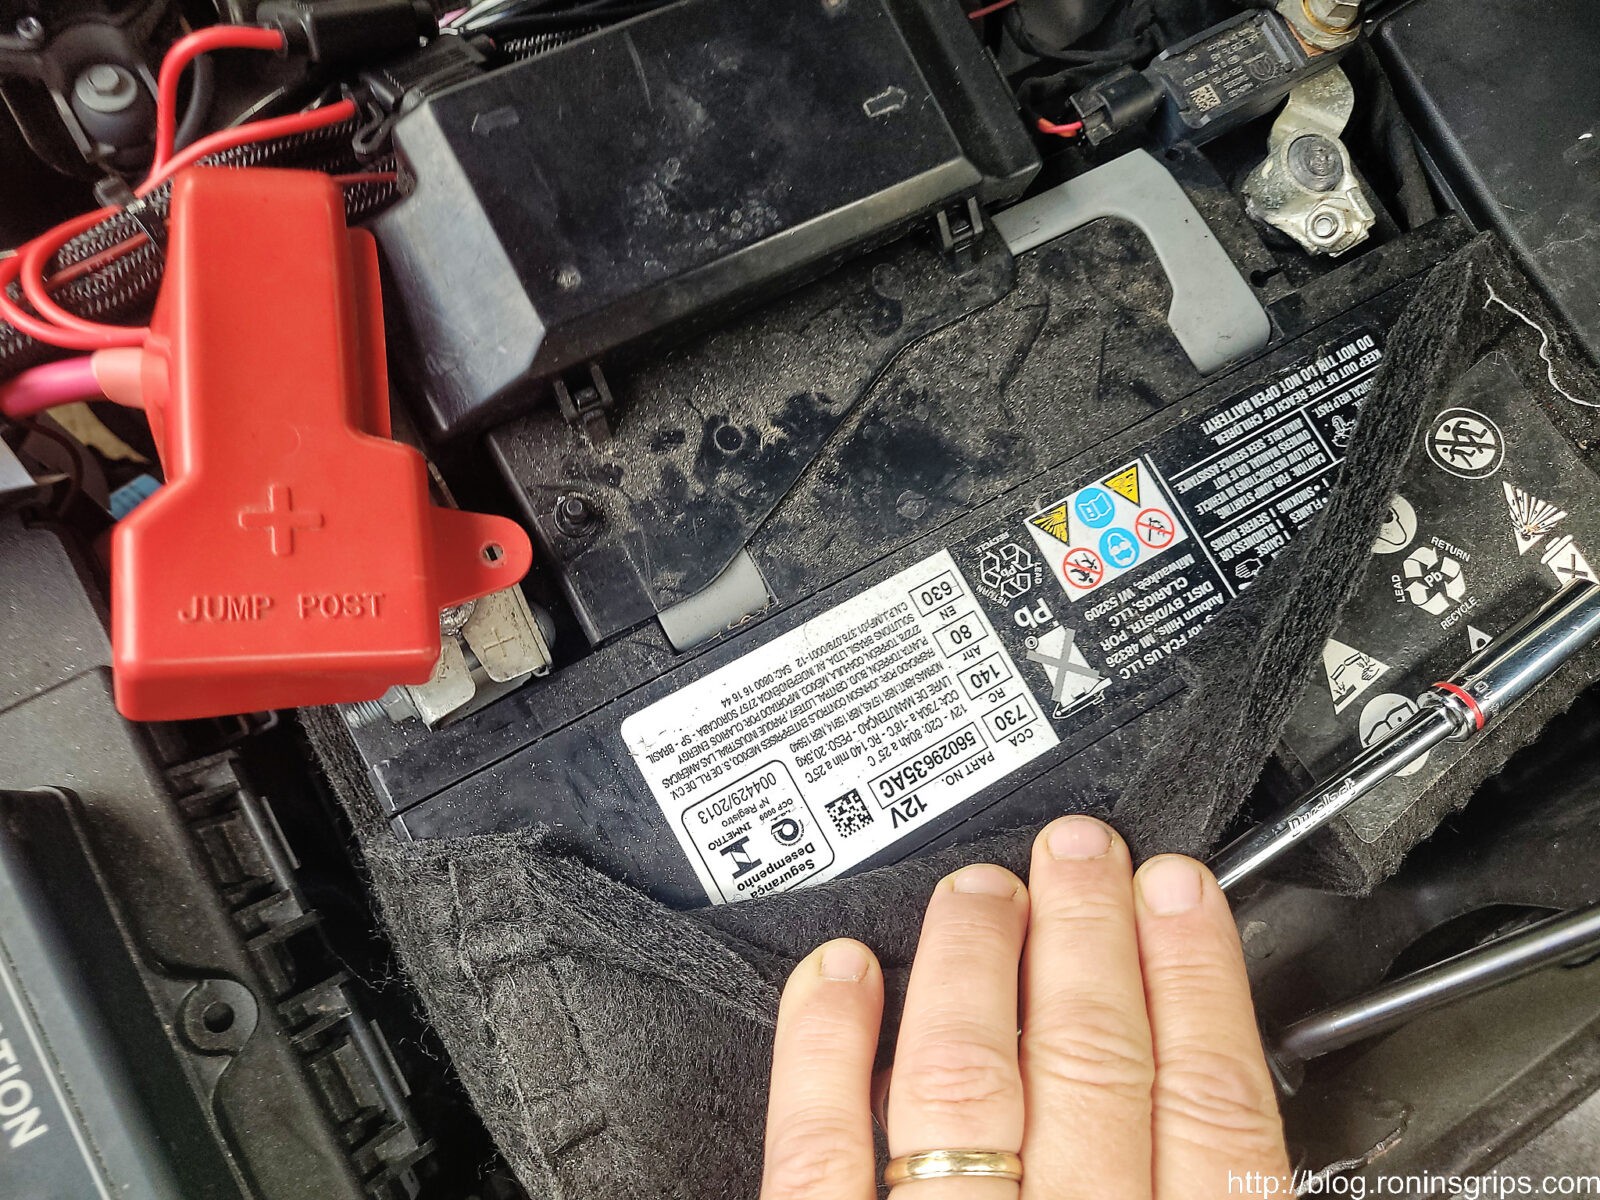
The OEM (Original Equipment Manufacturer) battery that came with the truck brand new was only rated for 730 cold cranking amps (CCA). While that is enough to start a 6.4 liter Hemi and run the stock electronics, it would appear to not enough to compensate for a plow at lower RPMs – at least not my Western 8′ Pro Plow 2 anyways. A smaller plow would likely have lower power demands and conversely, a larger plow would likely have higher power demands.
Here’s a peek at the label that partially covered by insulation. Having the right battery is critical to serve as a buffer for when power draw is higher than what the alternator is currently producing.
By the way, cold cranking amps identifies the battery’s potential amp output at 0 degrees Fahrenheit or -18 Celsius. They measure the output of the new battery for 30 seconds and it has to maintain at least 7.2 volts (technically it is 1.2 volts per cell of the battery).
Because I live in Michigan and it has Winter weather, CCA is what I care about. Cranking Amps (CA) is measured at freezing which is 32F or 0C and not really something that matters to me. I need more CCA both because of starting the big Hemi in the cold winter (the stock battery did fine at that) but also to support all of the electronics plus the plow’s hydraulic motor … and this is where the stock battery fell short.
What did I do?
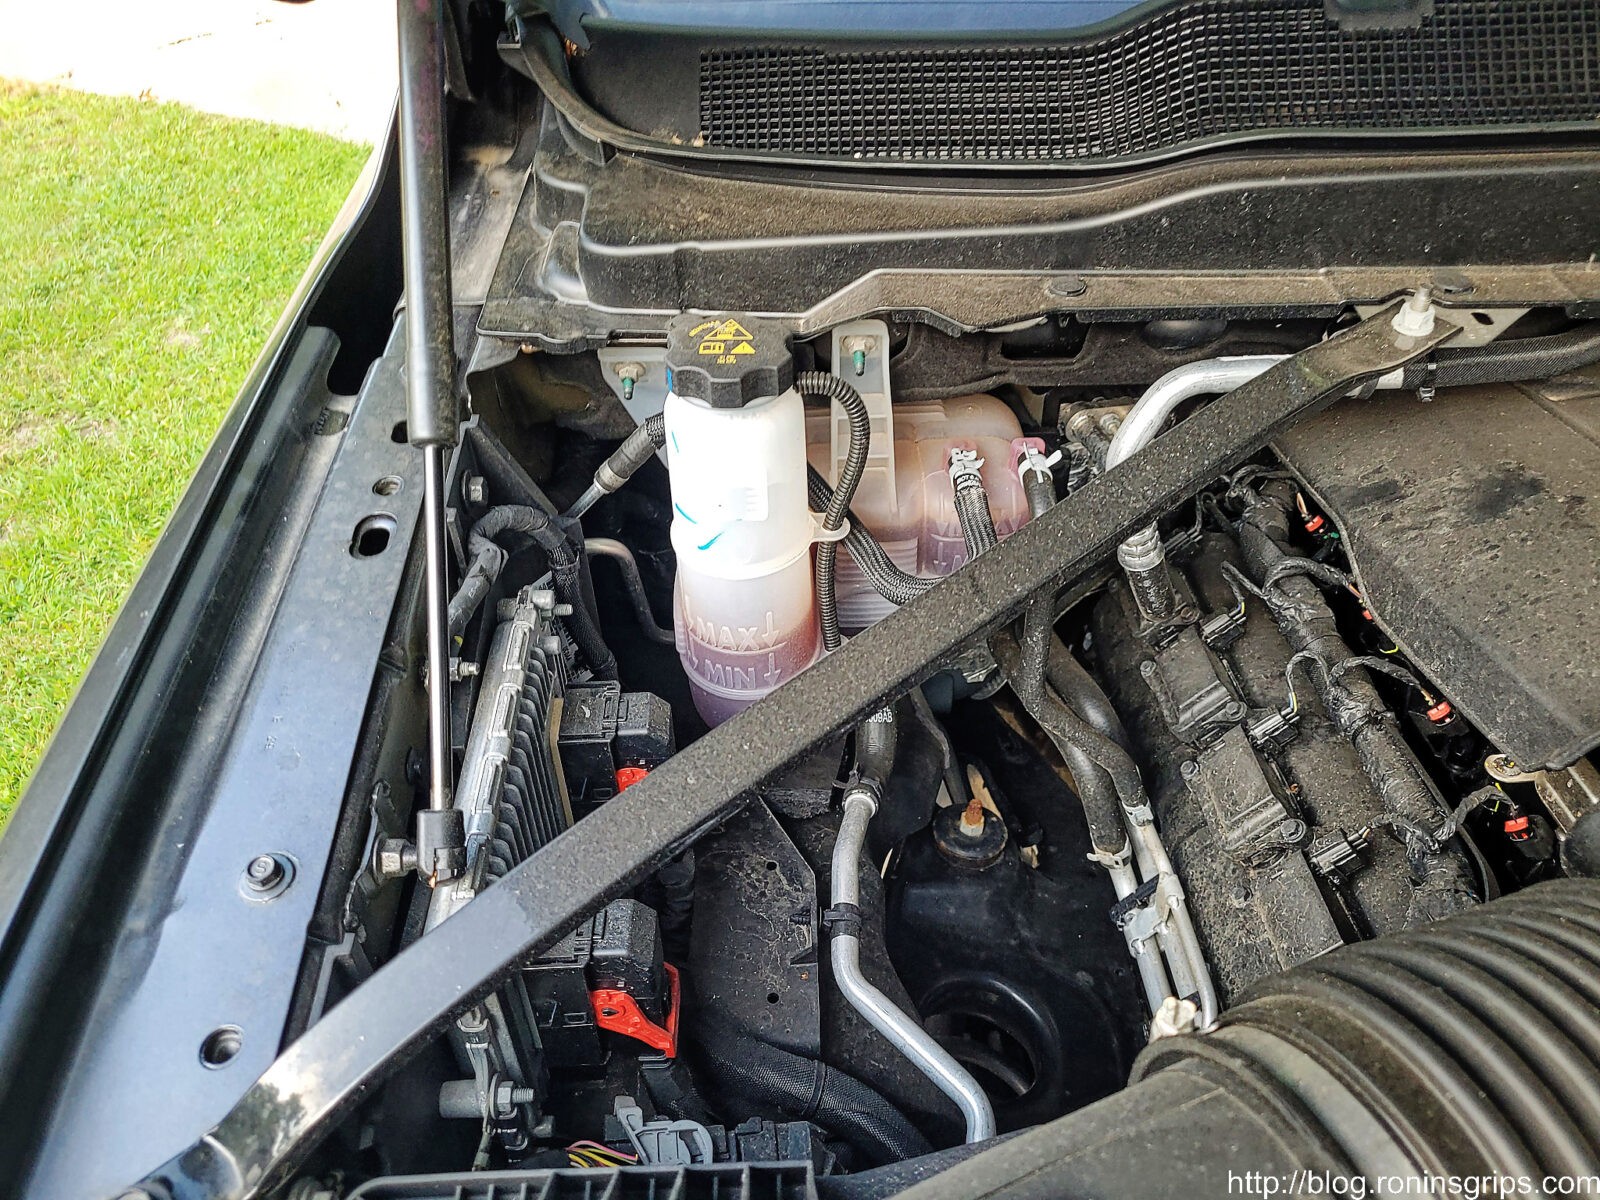
Well, I couldn’t afford to add a second alternator and aftermarket second battery mounts in the engine compartment were expensive (unless I wanted to mount something underneath on the frame which I did not want to do). By the way, I actually bought and tried to test fit the passenger side battery tray for the Cummins diesel models and it will not fit due to the location of the computer/ECU on the fender wall and there wasn’t enough space between the air box and the engine coolant reservoir.
Even though you can buy the passenger side battery tray from the Cummins version of the 2500, the ECU is in the way and there is not enough room between the coolant reservoir on the firewall and the air filter box. So the hope for a Mopar OEM second try and that would fit in there went out the window.
So, once I realized I couldn’t afford to add a second battery given my budget, I opted to buy the best AGM (Absorbed Glass Mat) battery I could find with the highest CCA rating in the H7 form factor. It also had to be affordable (sorry Optima – you’re too expensive).
I talked all of this over with my friend John – who is a professional mechanic with a ton of experience. He recommended that I go with an Interstate H7 size AGM battery. Now let me explain a bit more about why this was the case.
Starting with the brand, Interstate works with a number of manufacturers who actually build their batteries – namely Clarios and Exide. They are sold through a series of 200,000 dealers including Costco.
H7 relates to the shape of the battery that the RAM 2500 is designed to hold. An H7 measures 12-3/8″ x 6-7/8″ x7-1/2″ (315x175x190mm).
AGM is a relatively newer battery technology (it was invented in 1980) that can produce both higher CCA and reserve power compared to traditional flooded lead acid batteries of the same size. AGMs are still lead acid but there is a thin fiberglass matt sandwiched between the lead plates and they are bundled together. There are tons of websites out there with far more details on AGM where you can read more.
The Interstate AGM battery is rated at 850 CCA – almost 120 more than the OEM battery. That really sold me. I’ve used AGM batteries in the past and had very good luck with them so I had John pick one up for me the next time he visited Costco. Thanks to inflation, it was about $217 out the door.
Installing The New Battery
Okay, before you do anything else – make sure the battery you just bought is the same size and the terminals are still in the right place. Stuff happens. It’s better to find a mistaken purchase out before you do anything to your truck.
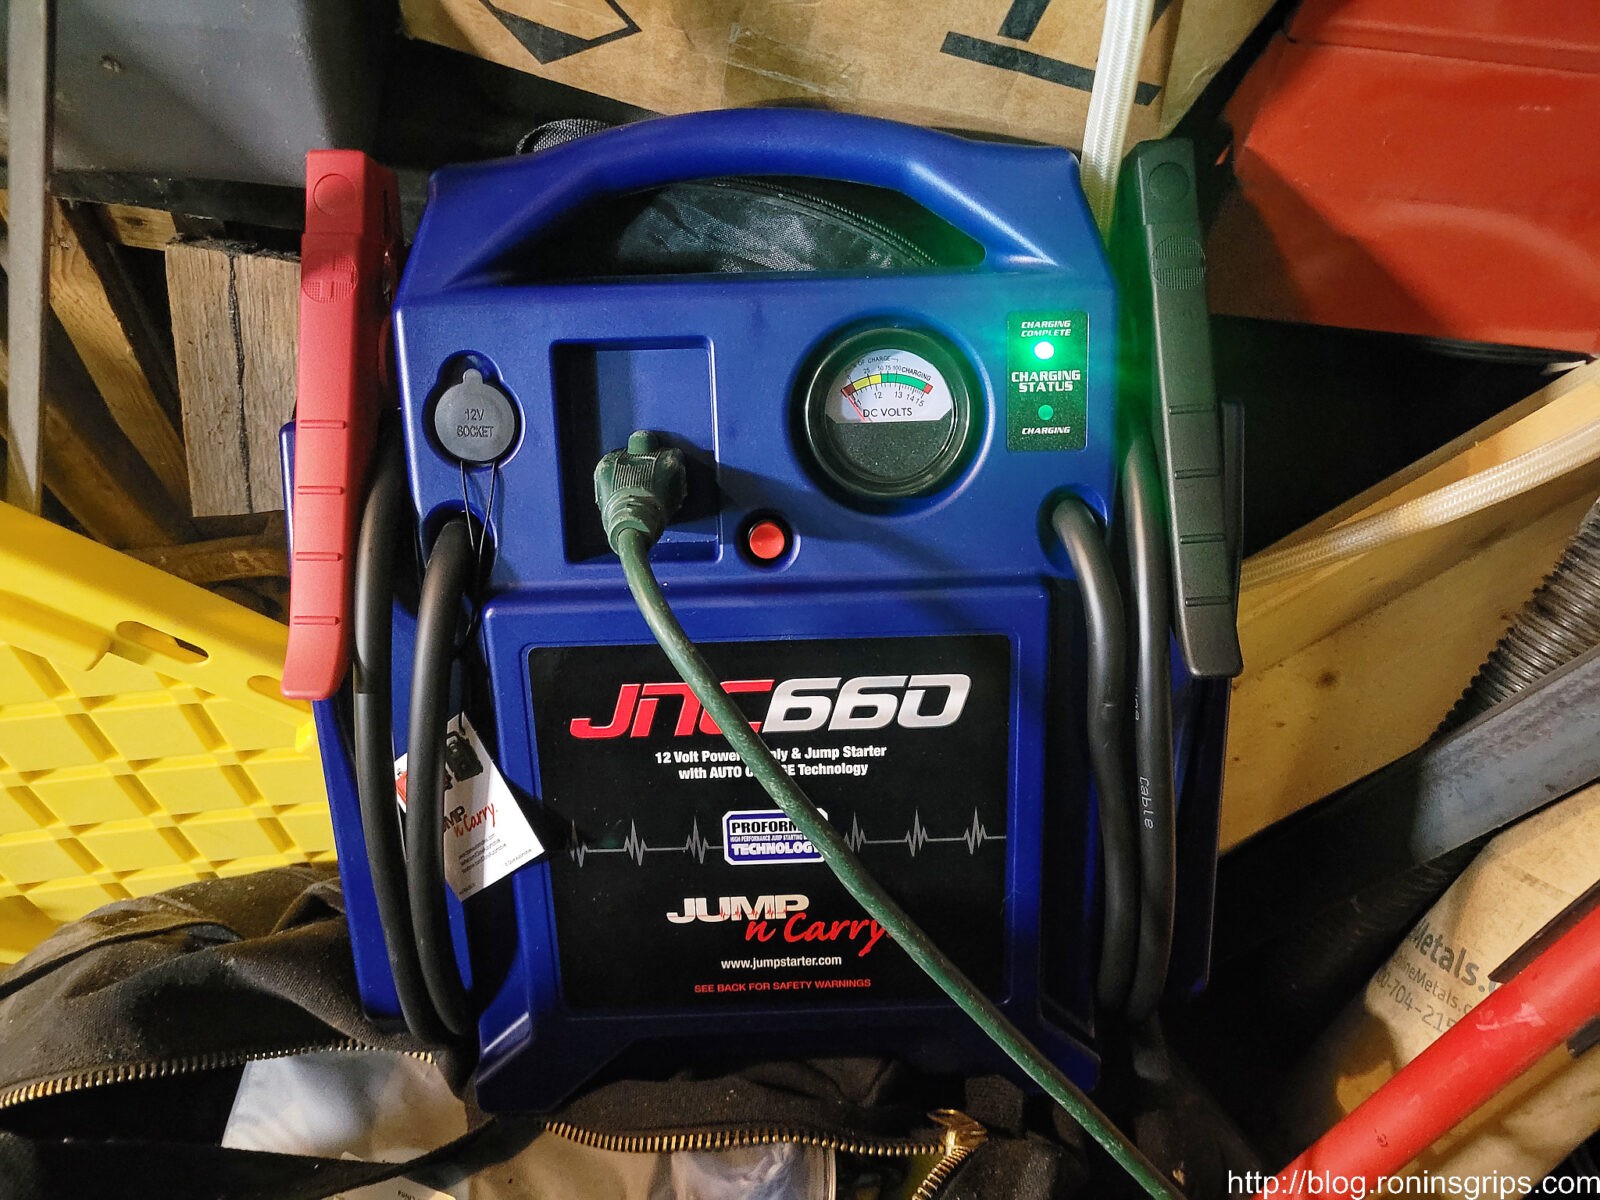
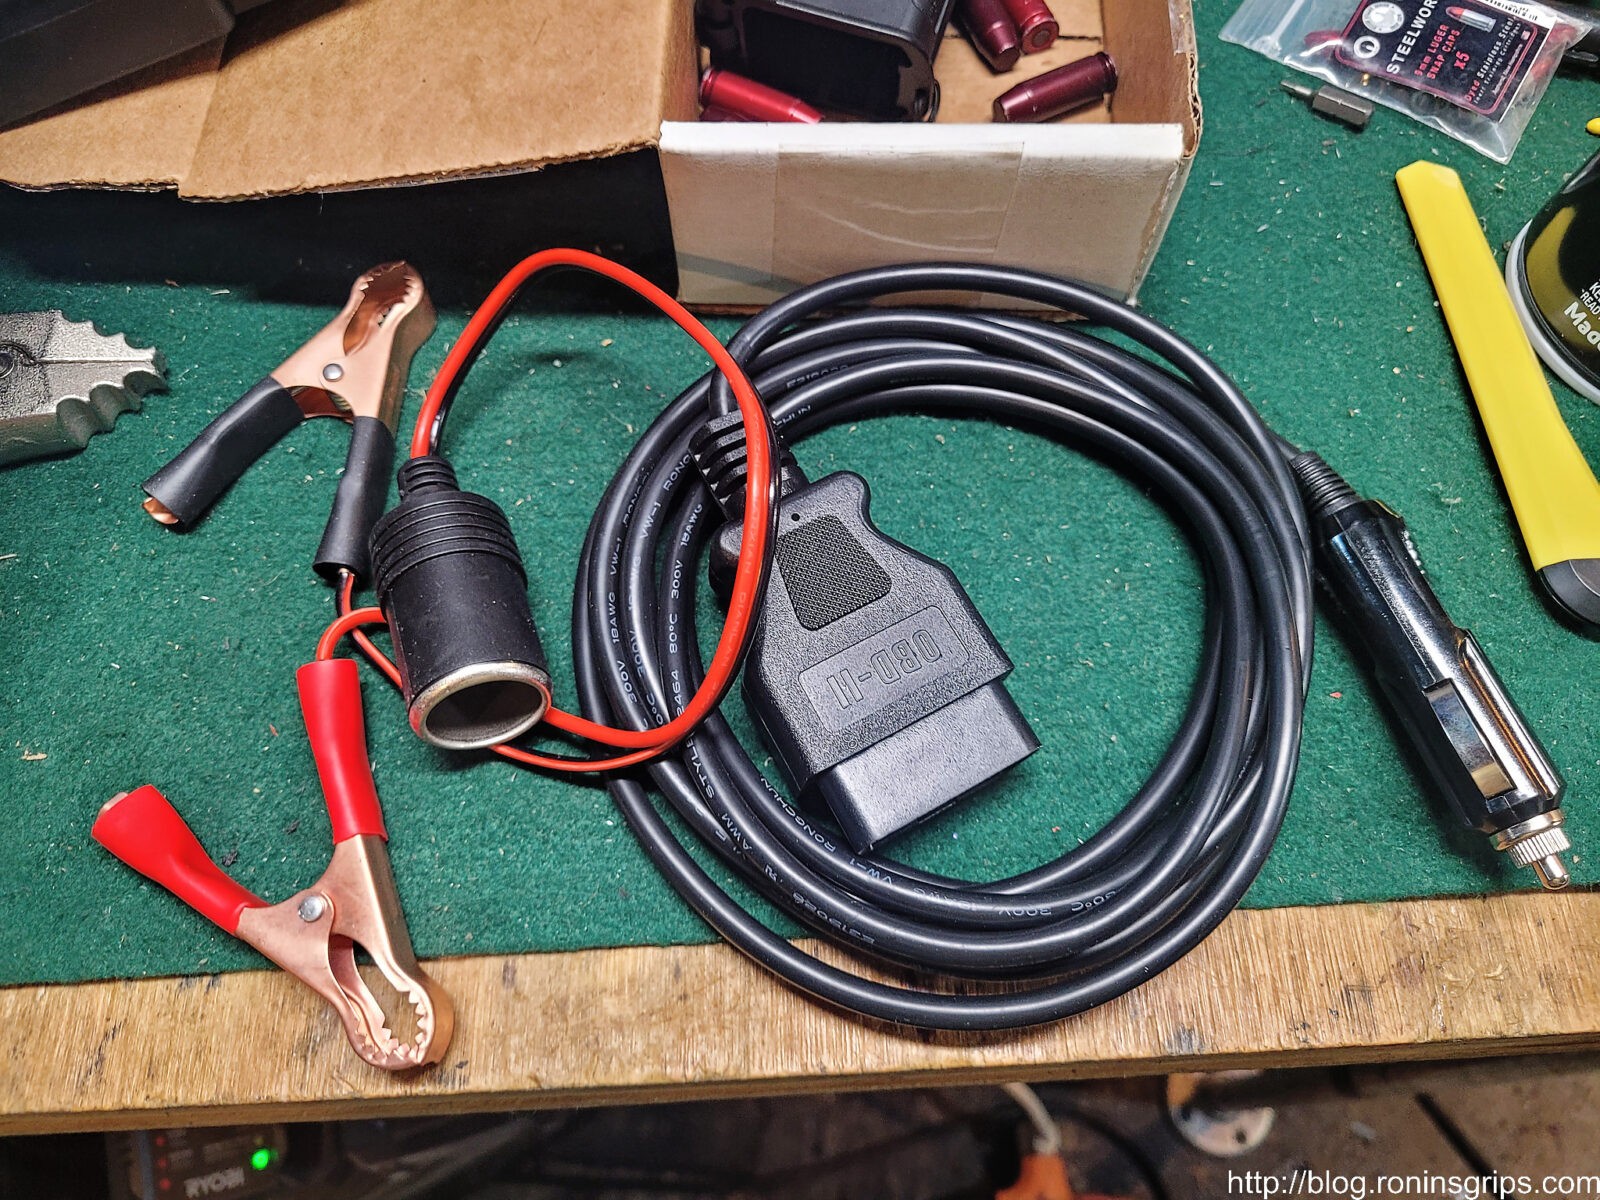
Modern vehicles have a ton of info in their computer and a lot of it disappears when the power is lost – either when your battery completely dies, or in our case, if the battery is disconnected. A lot of it will be re-learned as the computer communicates with the sensors and figures out what is normal. Now what all gets lost in the UConnect system after a power loss tends to get different answers. Let me just say I didn’t want to deal with any problems so what I did was power the computer (ECU) through the OBD2 port under the dash using a purpose built cable from VSTM and a Clore Automotive JNC660 jump pack. This combination provides electricity to the computer so none of your settings are lost – it makes changing a battery very straight forward.
I ran into a situation this summer with our Highlander that had a completely drained battery and my little Noco jump pack couldn’t start it so I decided to get a bigger one. The Clore Automative jump packs got really good reviews so I bought this one plus it has a 12 volt cigarette lighter-type outlet on the left side that I can use to power ECUs via the ODB2 port. I had to charge it and the male prongs for plugging into an extension cord are conveniently located on the front. The green light means it is fully charged,
This is an ODB2 power cord from VTSM. You can plug it into a cigarette outlet in a jump pack or used the supplied adapter and connect it to any 12 volt power source such as another battery.
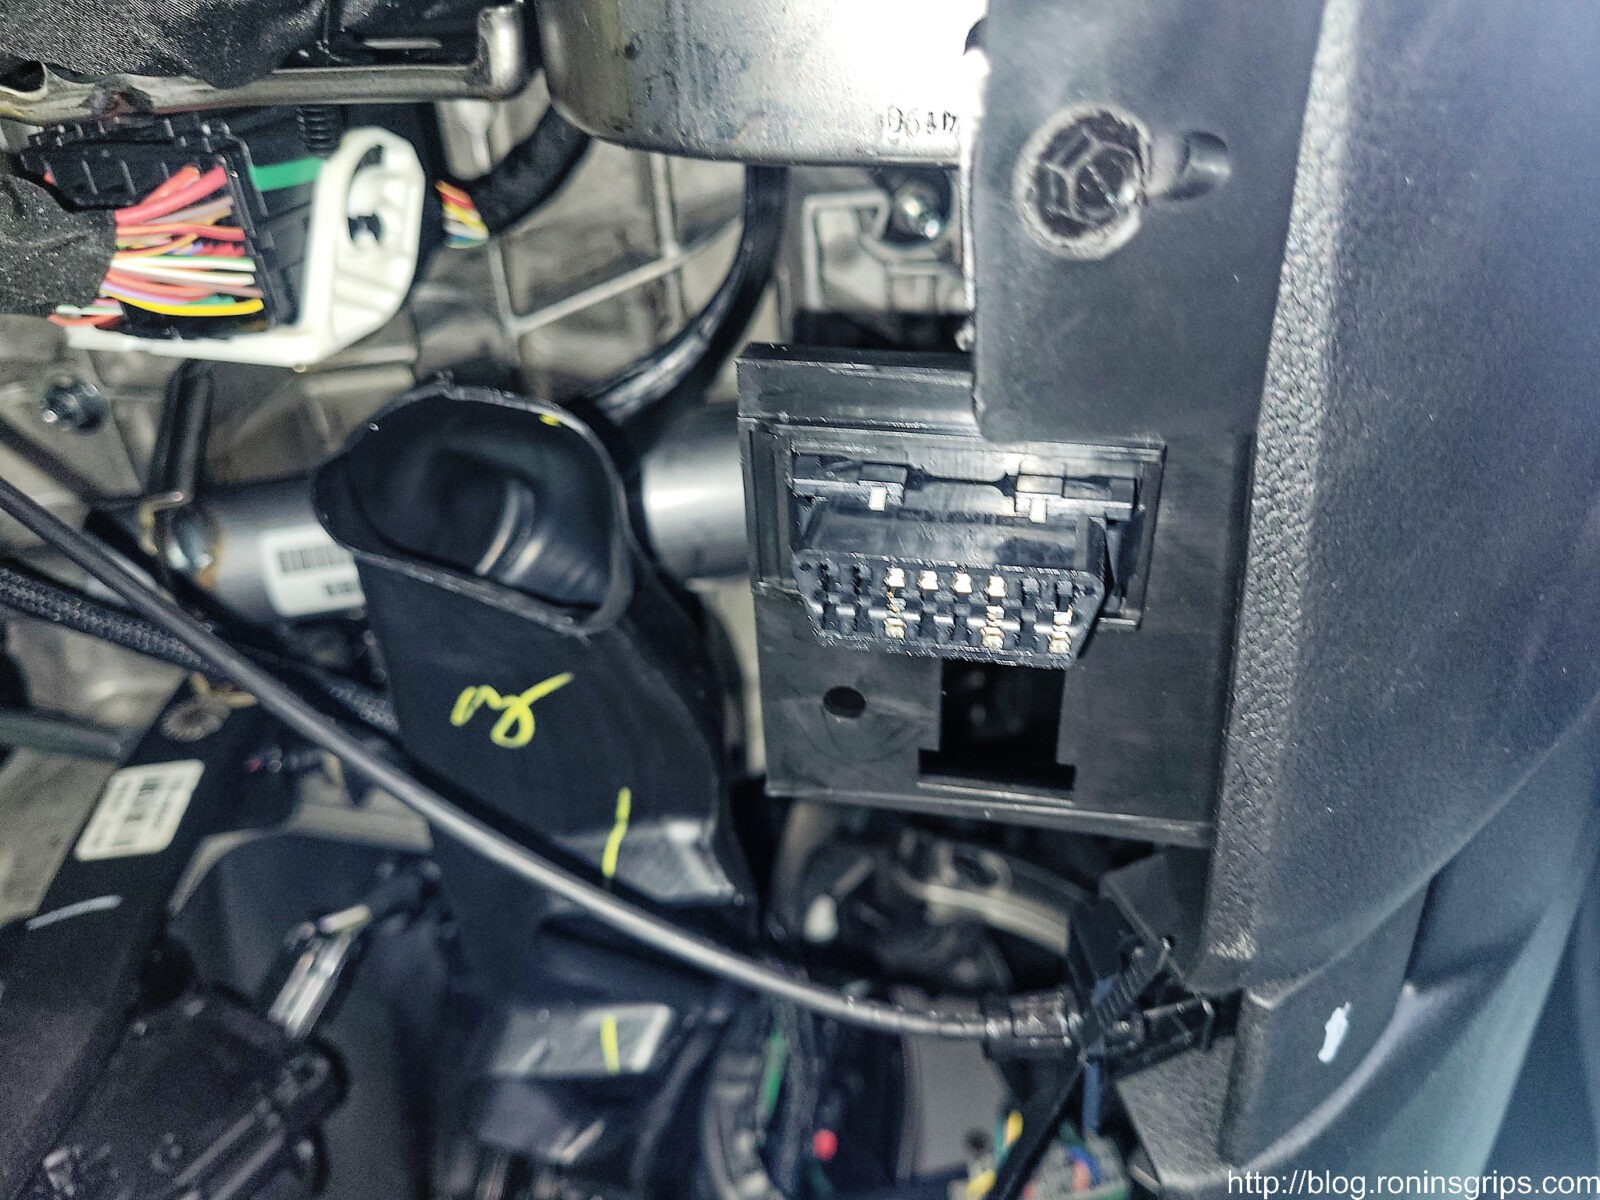
The photo is from a weird angle – I’m down in the foot well looking up – you can see the hood release in the lower right portion of the photo. The V-ish shaped female receptacle is the ODB2 port where we can connect the power charger or connect any ODB2 device such as a code scanner for that matter.
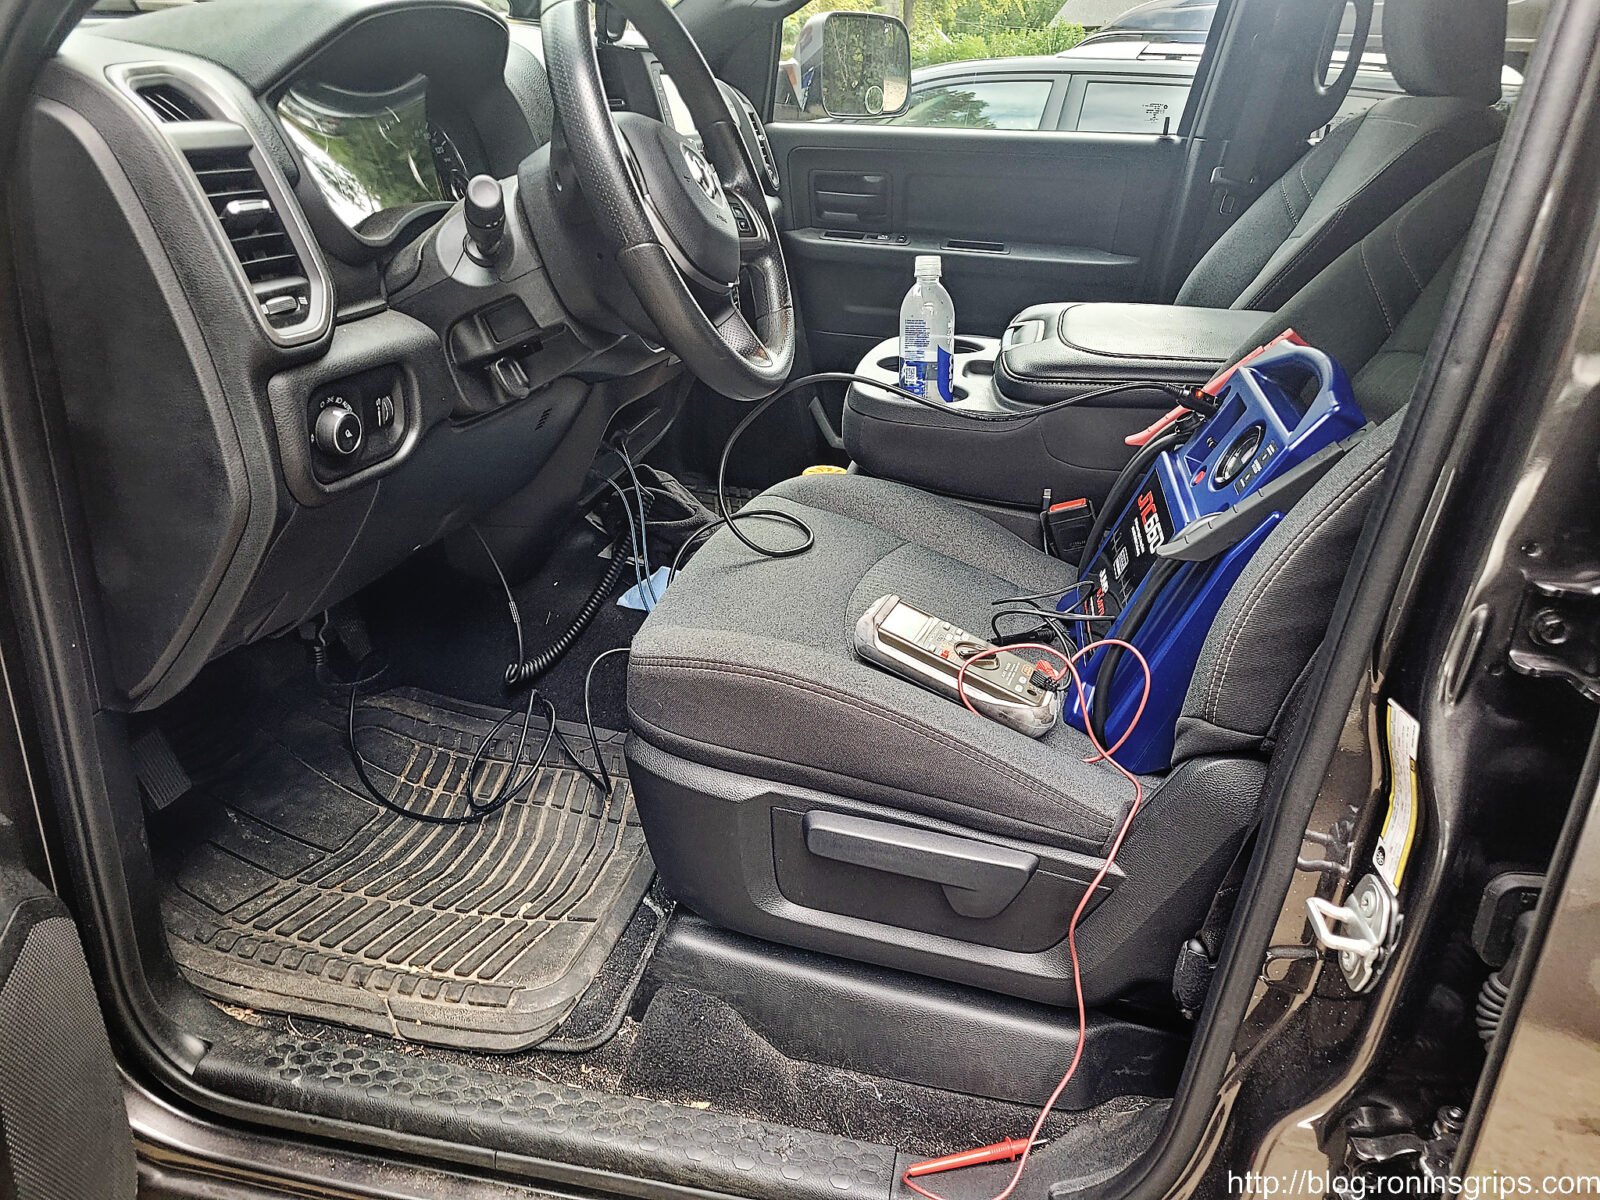
With the ignition off, plug the power cord from the jump pack to the ODB2 connector. My multimeter is on the seat because I wanted to make sure the jump pack was putting out 12-14 volts and the polarity was right before I plugged it into my truck.
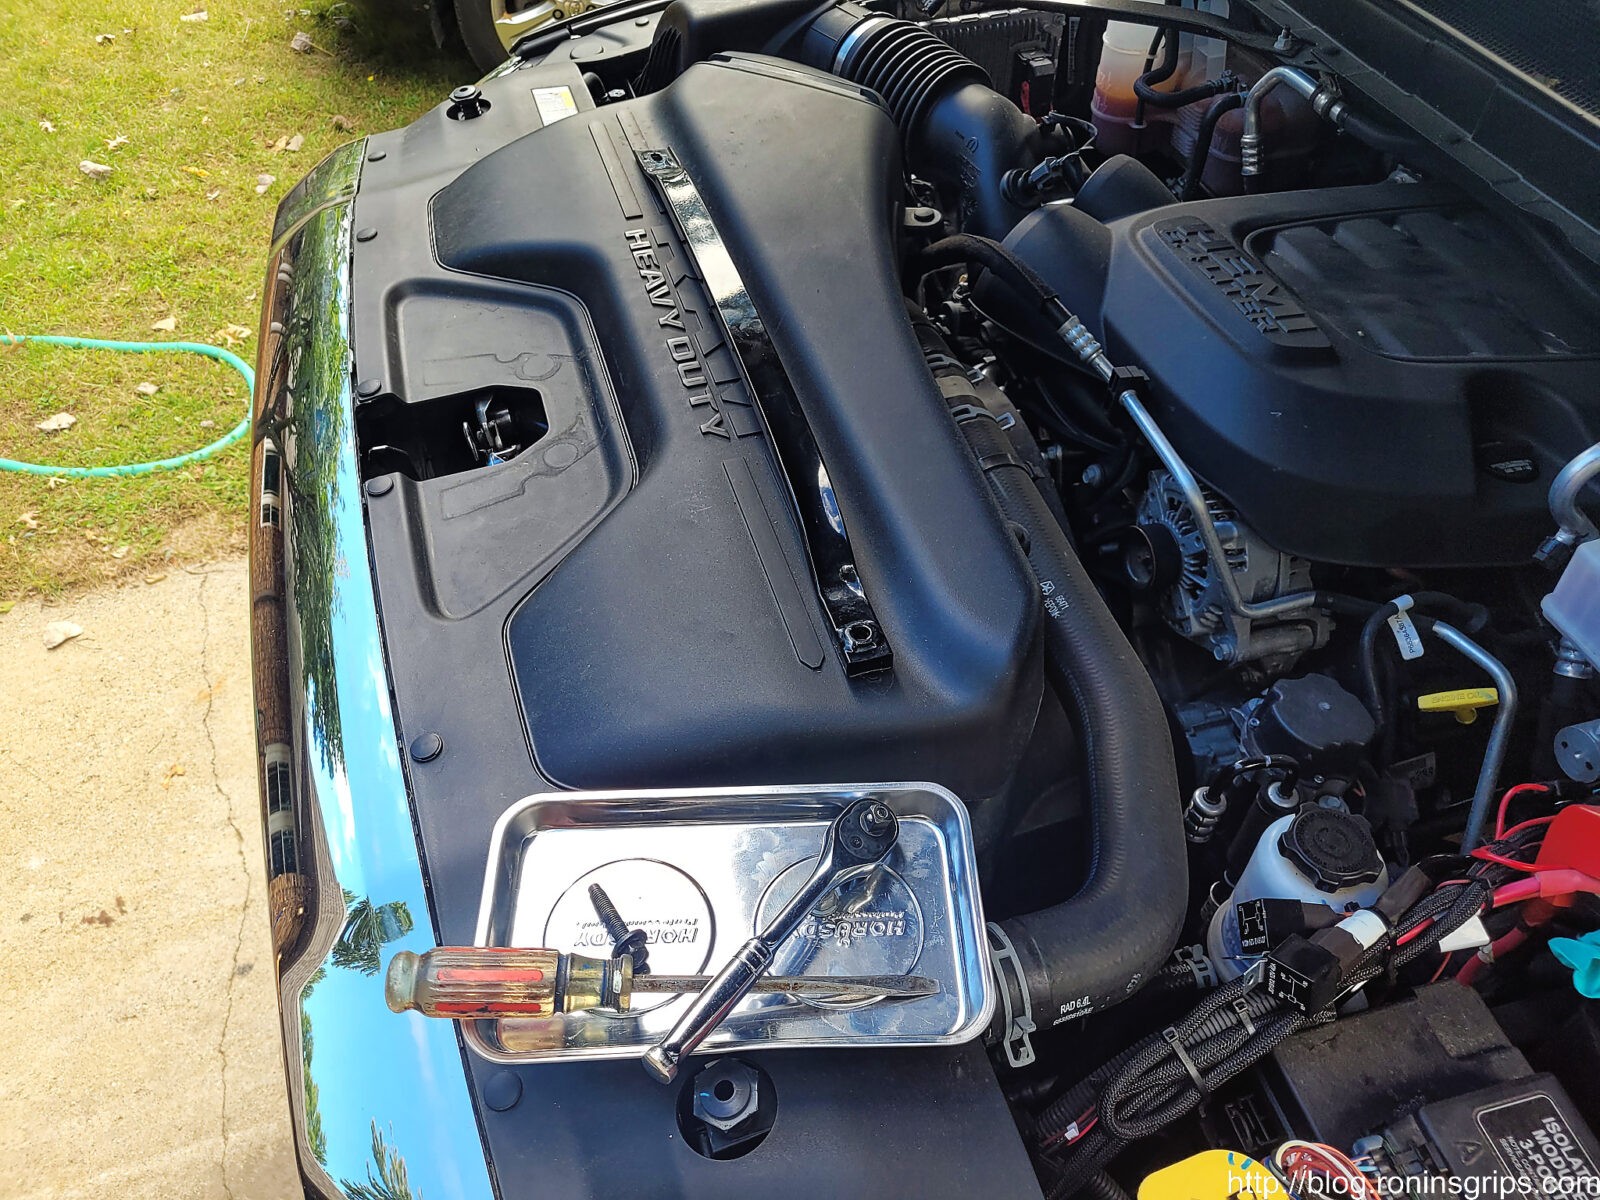
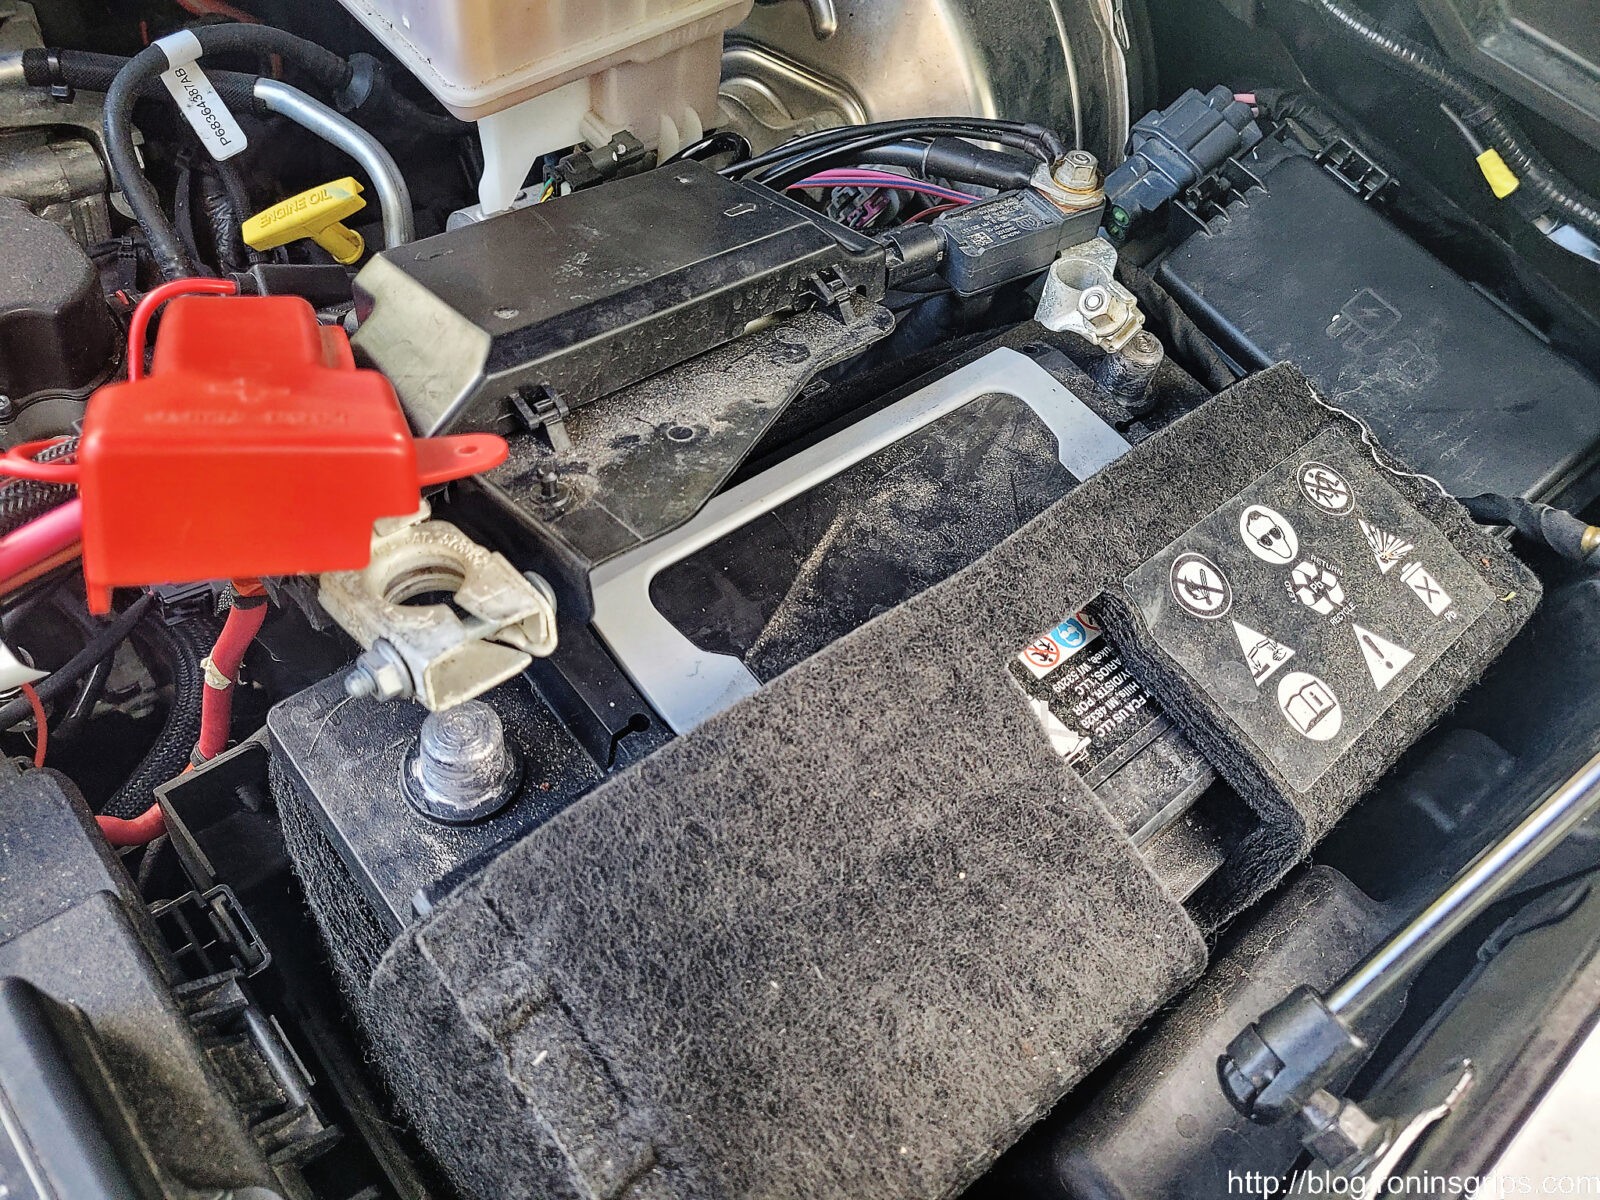
To get started under the hood, I disconnected the stiffening brace that is located right above the battery and set it to the side out the way. I really like magnetic trays to avoid losing parts.
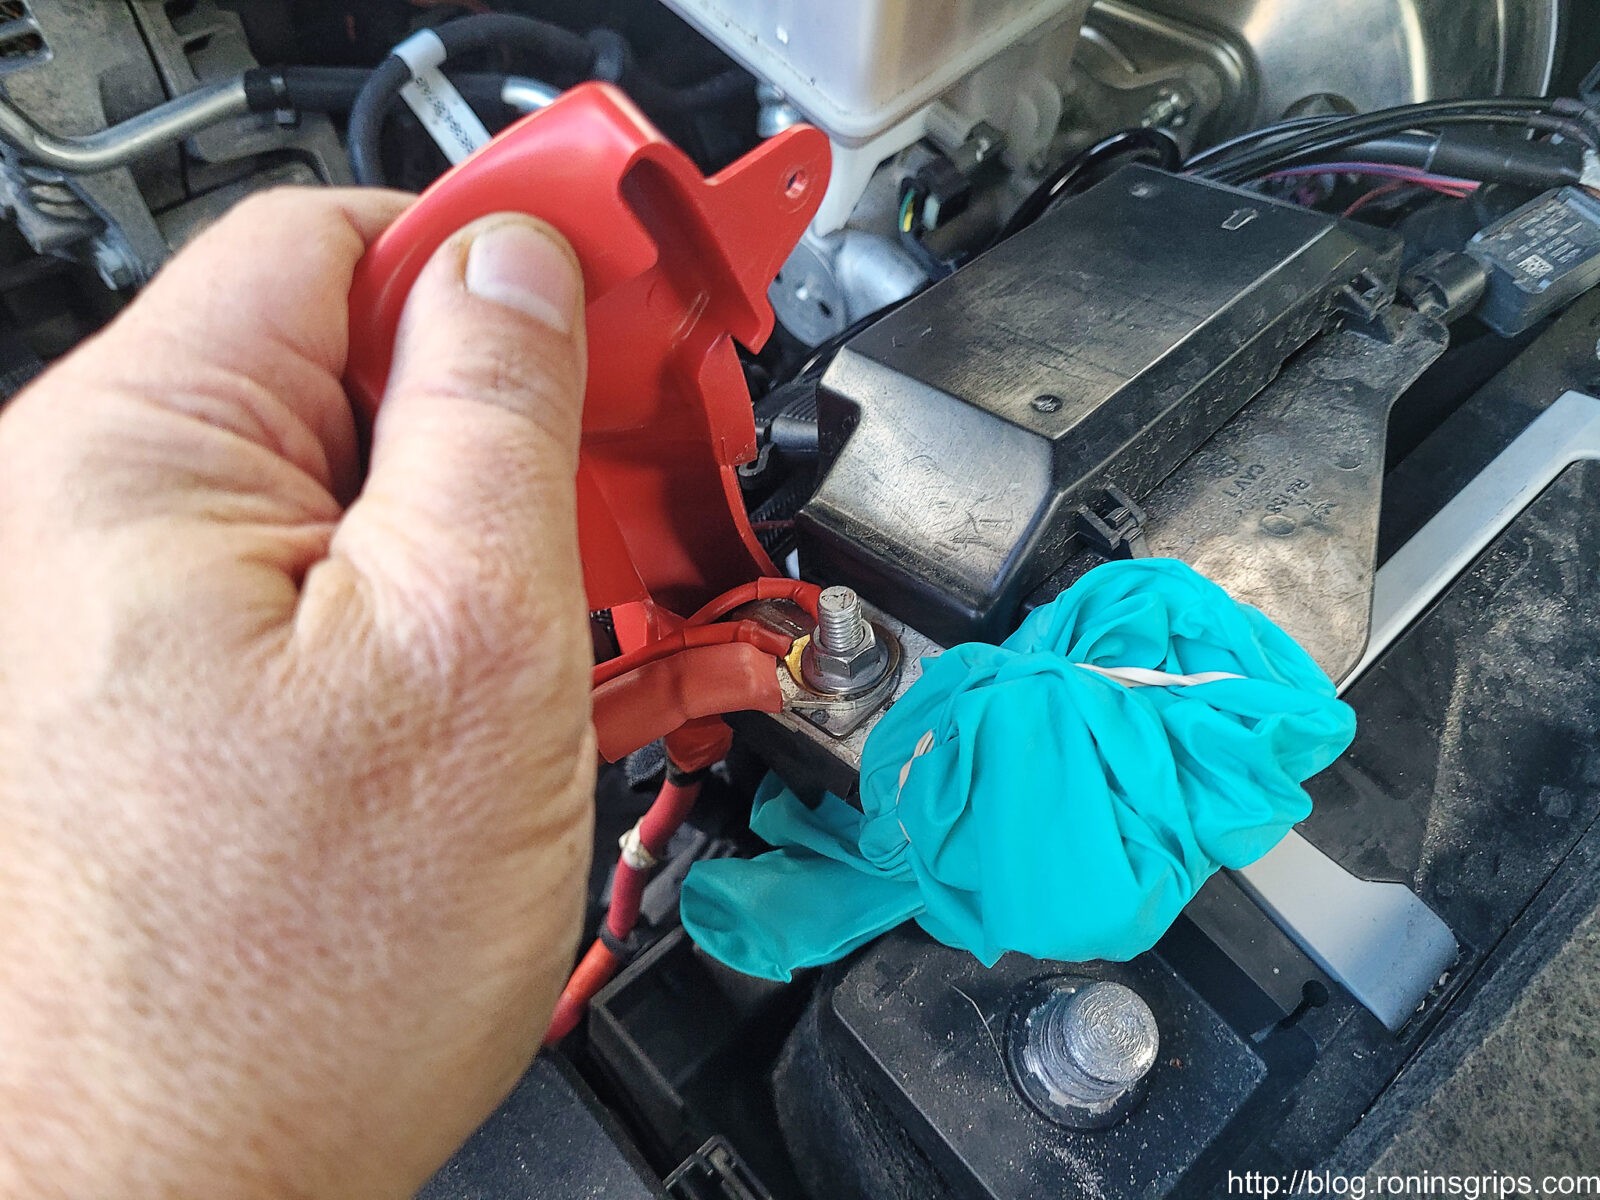
The next step was to disconnect the battery. I removed the negative terminal first and pushed it to the side. I disconnected the positive terminal assembly from the battery’s top post and covered it with a Nitrile glove. In most cars, and I am assuming it is the case with my truck, the powering of the computer through the OBD2 port also sends 12 volt power to the now-disconnected positive power cable and I did not want a surprise from something shorting. Cheap insurance in other words.
With the plow and everything, there is a lot of additional stuff on the positive (red) side but they are all connected to the terminal. When you loosen the terminal and lift it up, everything comes with it. There wasn’t anything else securing the positive terminal assembly in my case.
If it looks stupid but it works then it’s not stupid. Yeah, I wrap the exposed positive terminal with a nitrile glove that is an electrical insulator and rubber band it in place. I don’t want any surprise sparks/shorts. In many cars if you power the ECU via the ODB2 connector then the positive battery wire is energized. I didn’t confirm my Ram was this way – I just assembled it to be clear. I just wrapped the terminal with a glove and called it even out of an abundance of caution.
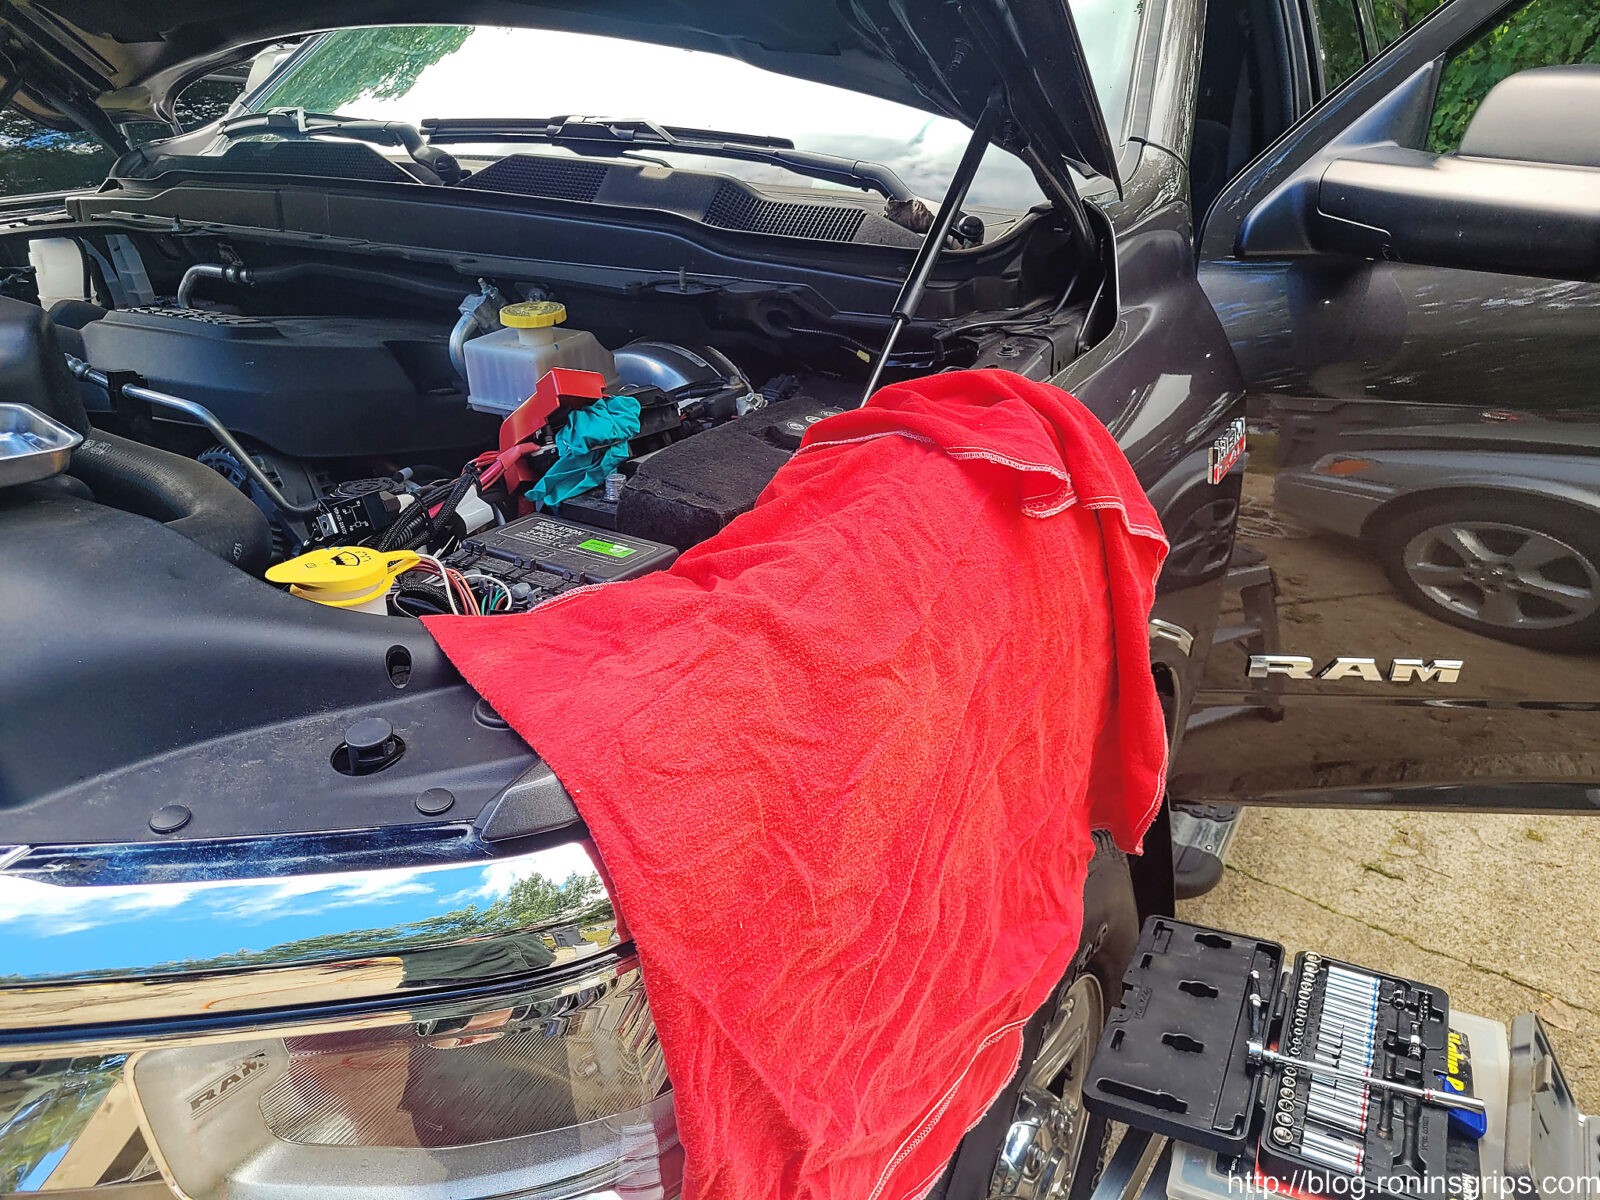
I should mention that I have an aluminum work platform that I stand on to reach in the engine compartment and I also put a fender protector (in this case a thick red fabric) to make sure I don’t scratch anything. Many years ago I scratched a car with a belt buckle and felt like an idiot. Lesson learned. I protect fenders now.
This is the battery clamp that is a plastic wedge and bolt. I removed mine and put them in the magnetic parts holder. Note the orientation of the clamp – if you try to reassemble it smooth side up you will be wondering why it doesn’t line up. Yeah, I tried to install it upside down and spent a few minutes trying to figure out why that was so. The photo shown is the correct orientation.
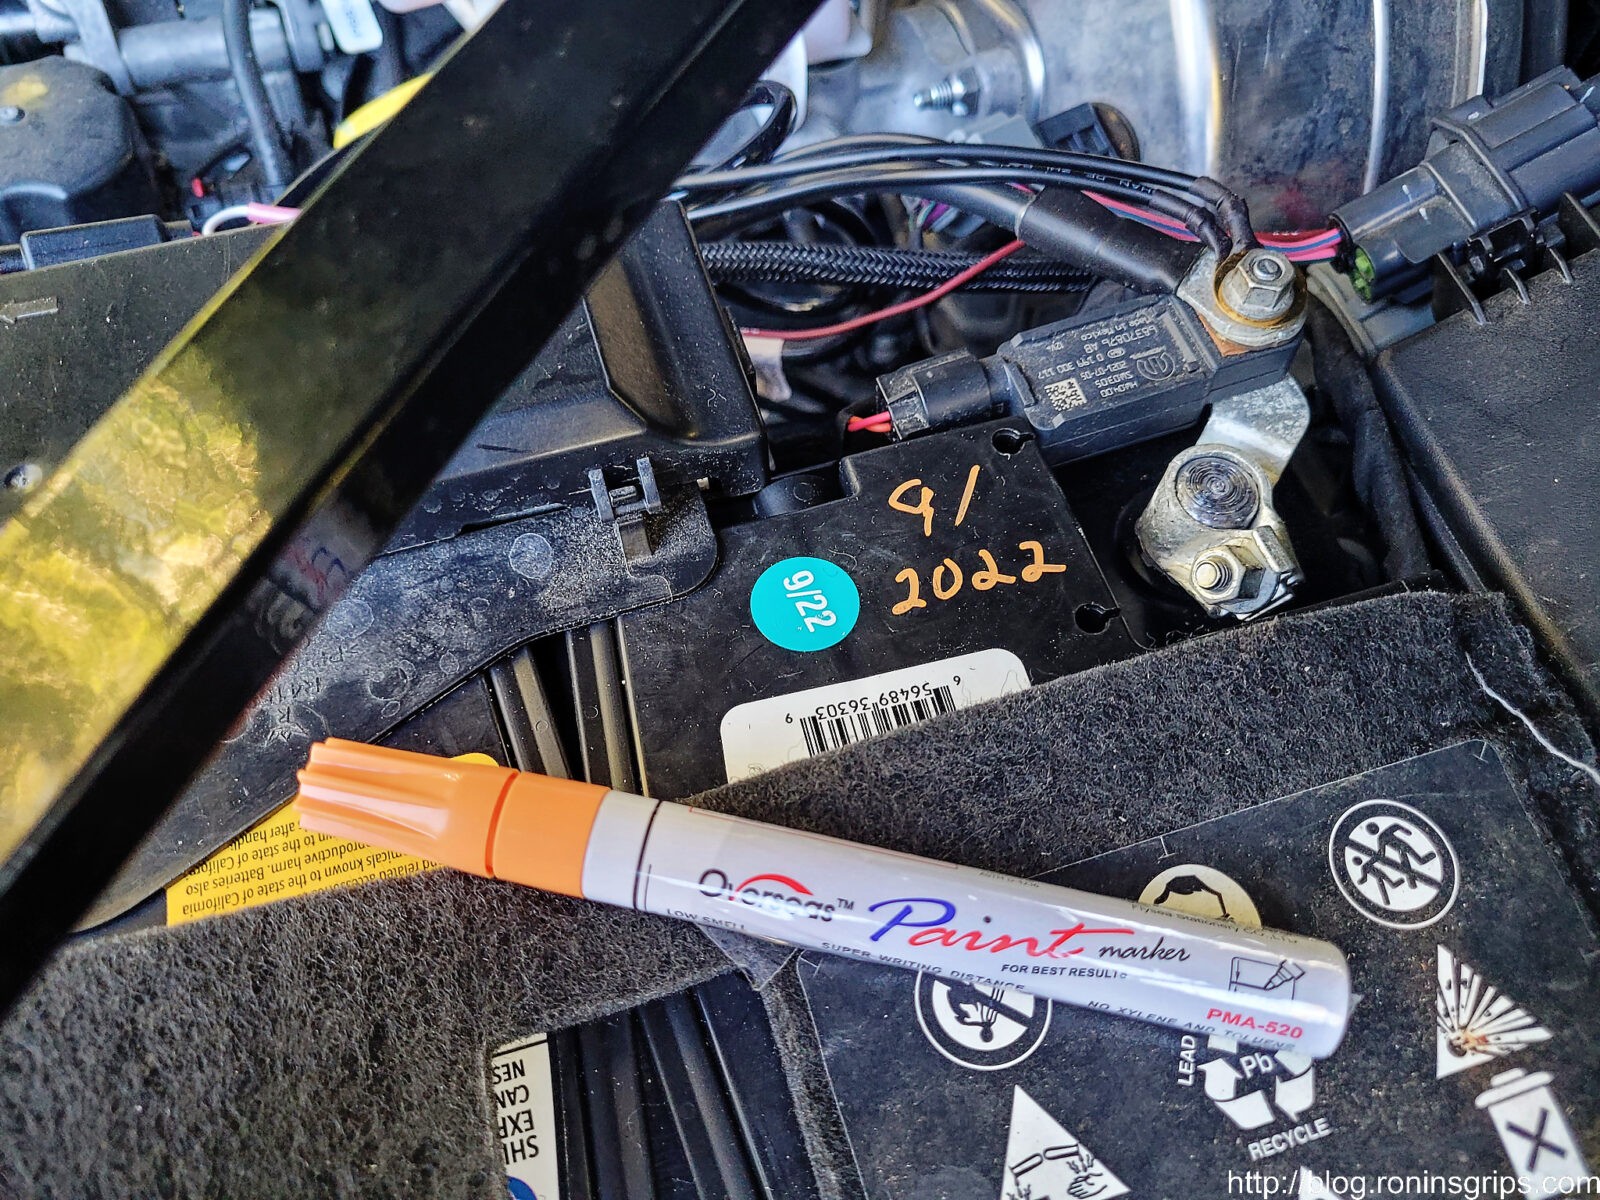
Starting a few years ago I realized it was a really good idea to take a paint pen and write down when I installed the battery. I went to write on the battery and noticed an aqua colored sticker with 9/22 printed on it. Maybe Costco put it there – I don’t know. Knowing my lousy memory I could see me looking at the sticker years from now wondering if it was the install date so I went ahead and wrote 9/2022 on it anyways because I still recognize my own handwriting at my current age 🙂
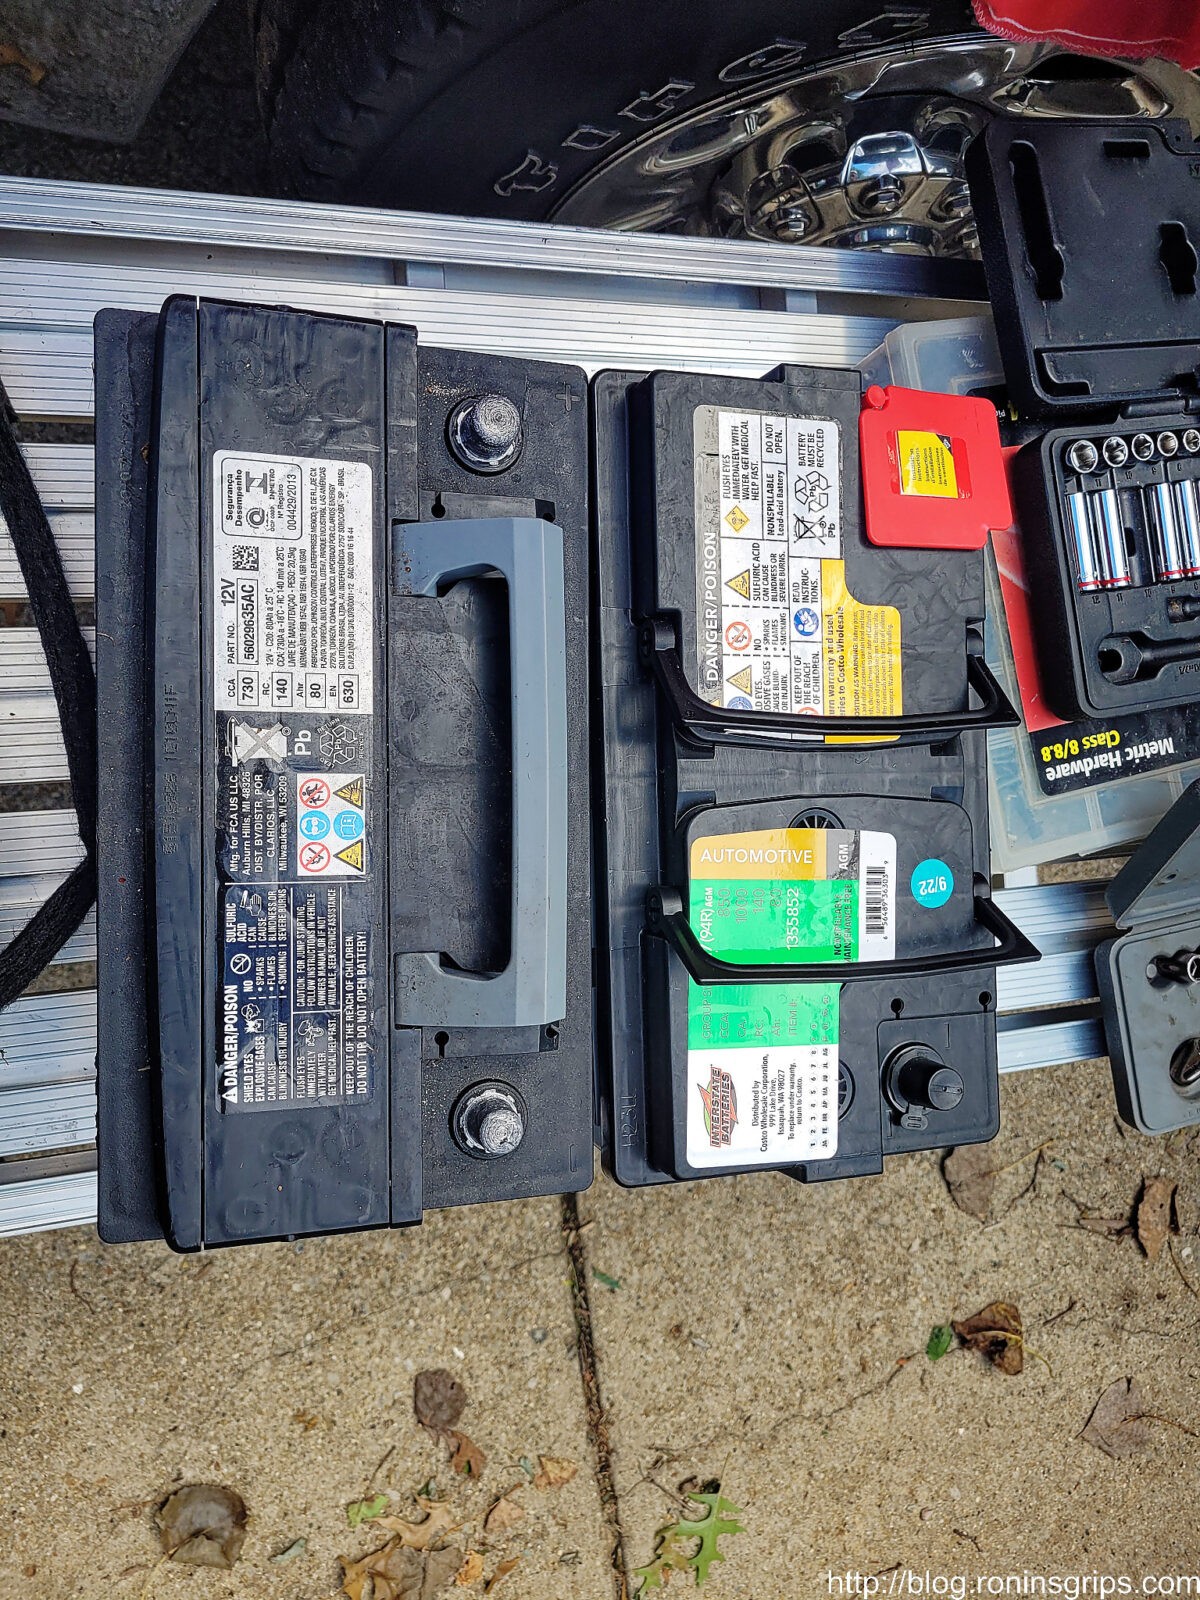
Left is the OEM battery and right is the new Interstate. I always put batteries side by side one last time to make sure the layout matches. I’ve made my share of mistakes in the past and don’t mind sharing with you that it pays to verify things several times before you get too far.
I did take the insulated jacket off the OEM battery and put it on the new Interstate AGM battery. It’s not necessarily to keep it warm – it protects it to some extent from high heat in the engine compartment as well.
Batteries are heavy. Make sure you have a step or something so you can line things up and protect your fender. Installing the new battery is just a reverse of what I listed. Re-install the clamp, the positive side terminal, the negative side terminal and then the reinforcing strut.
Be sure to remove the ODB2 power cord at this point. The battery tested over 12 volts so I turned on the ignition and everything seemed to work – the truck started, ran fine, all of my phone settings and stored Sirius XM stations were there, etc.
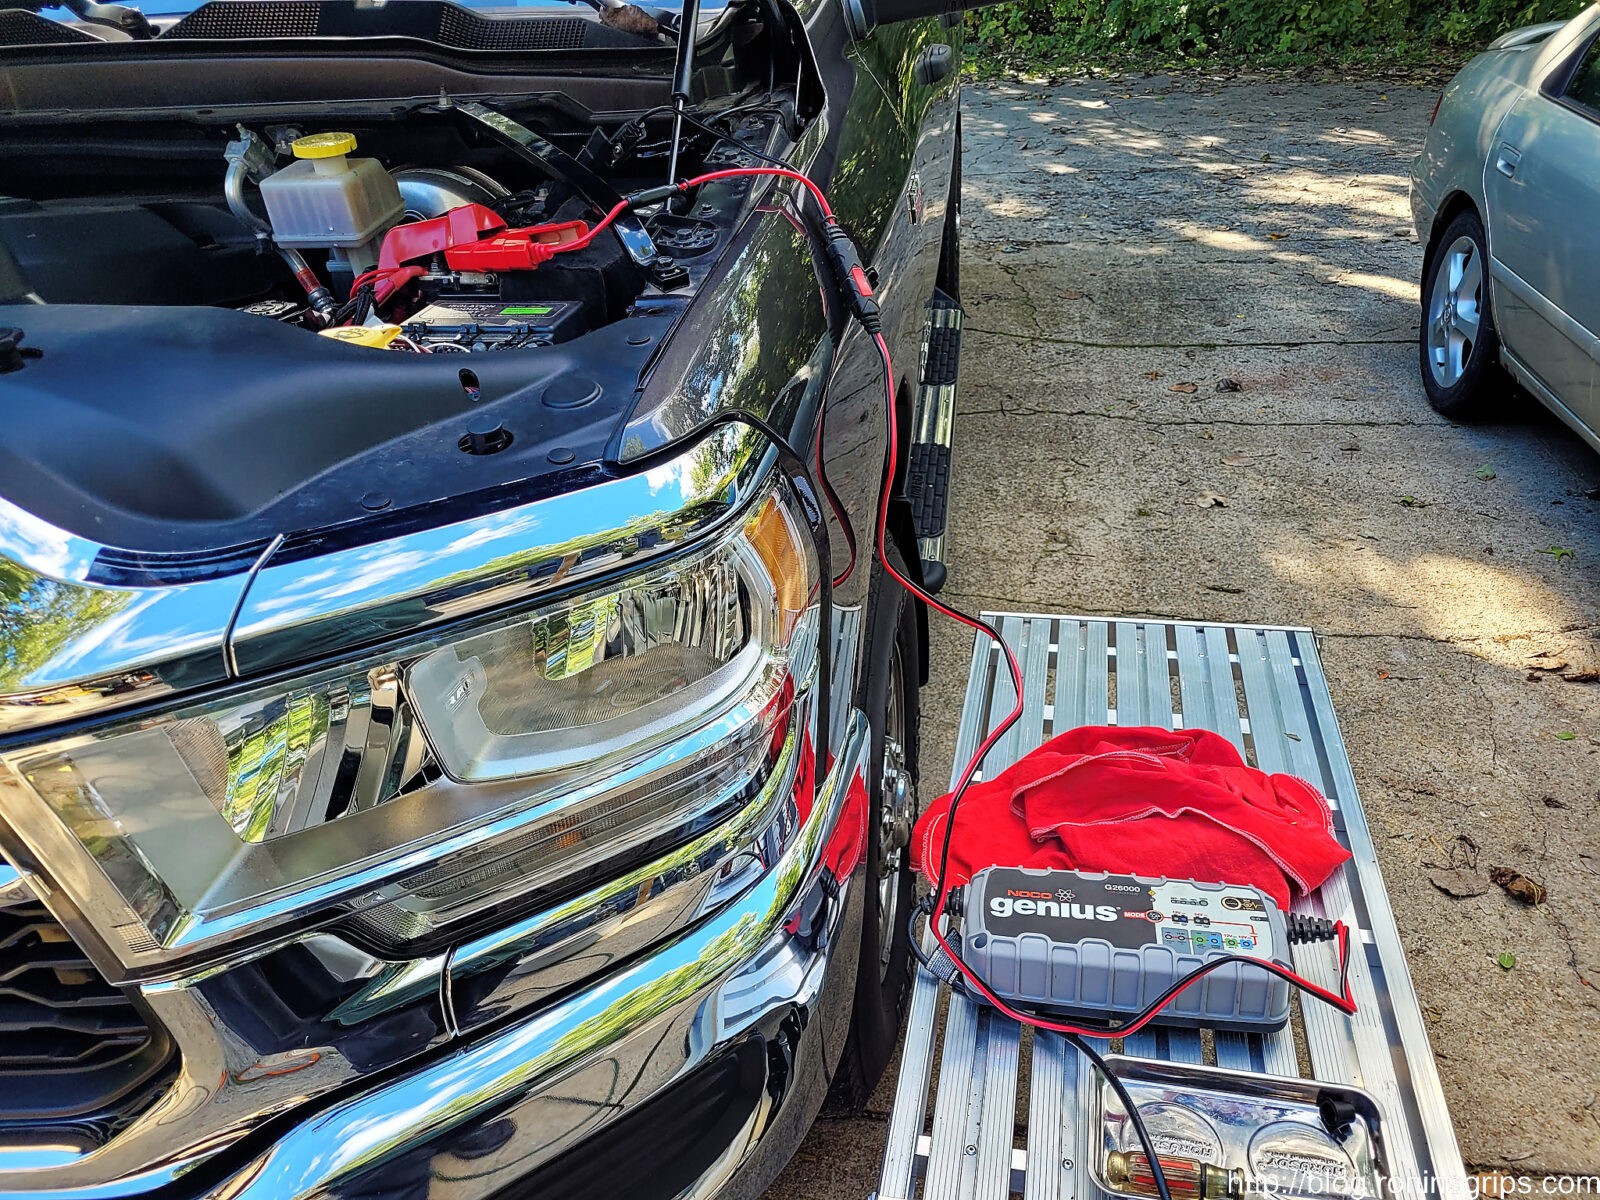
The truck is back together at this point. I do like to make sure any new battery is fully charged. If I had thought about it, I would have done this before I installed the battery – that’s what I usually do. I forgot and just stuck my Noco 26 amp charger on after testing and it went to full very fast meaning the battery was practically full.
Truck & Plow Testing
Starting the truck and running the base electronics are one thing but could it actually support the plow better? Now that was the big expensive question. I sure hoped it would.
For the first time this fall, I hooked up the big plow, lifted it up and brought it over to the driveway. The fact the truck could lift the plow was the first promising sign.
I tested the truck and plow three ways and did short videos of each:
The first test was turning on all of the lights, AC on full, defroster and then running the plow.The second test was running the heater on full plus the lights and defroster then running the plow.I forgot the truck’s voltmeter gauge until I was doing the tests. This lets you see what happens to the volts when each item is turned on. I never thought to do this with the original battery but wasn’t going to bother swapping to do this either – too much work and I am not that curious.
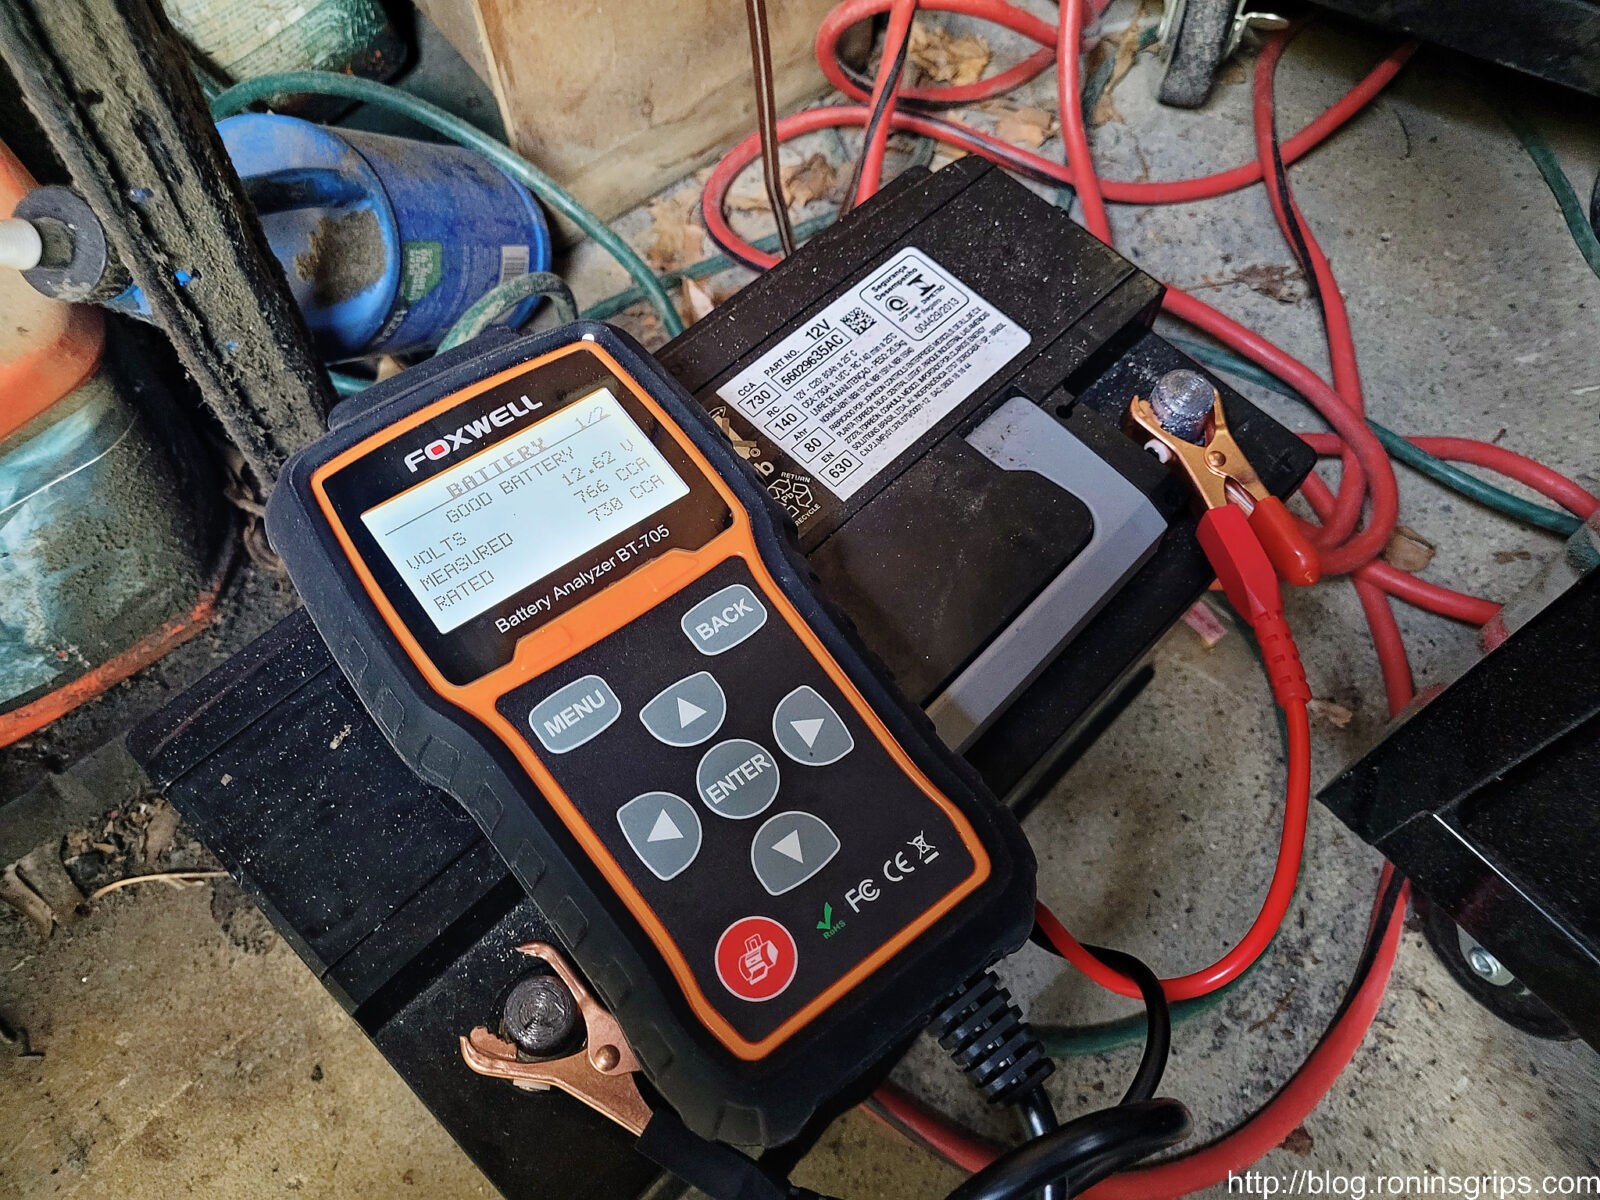
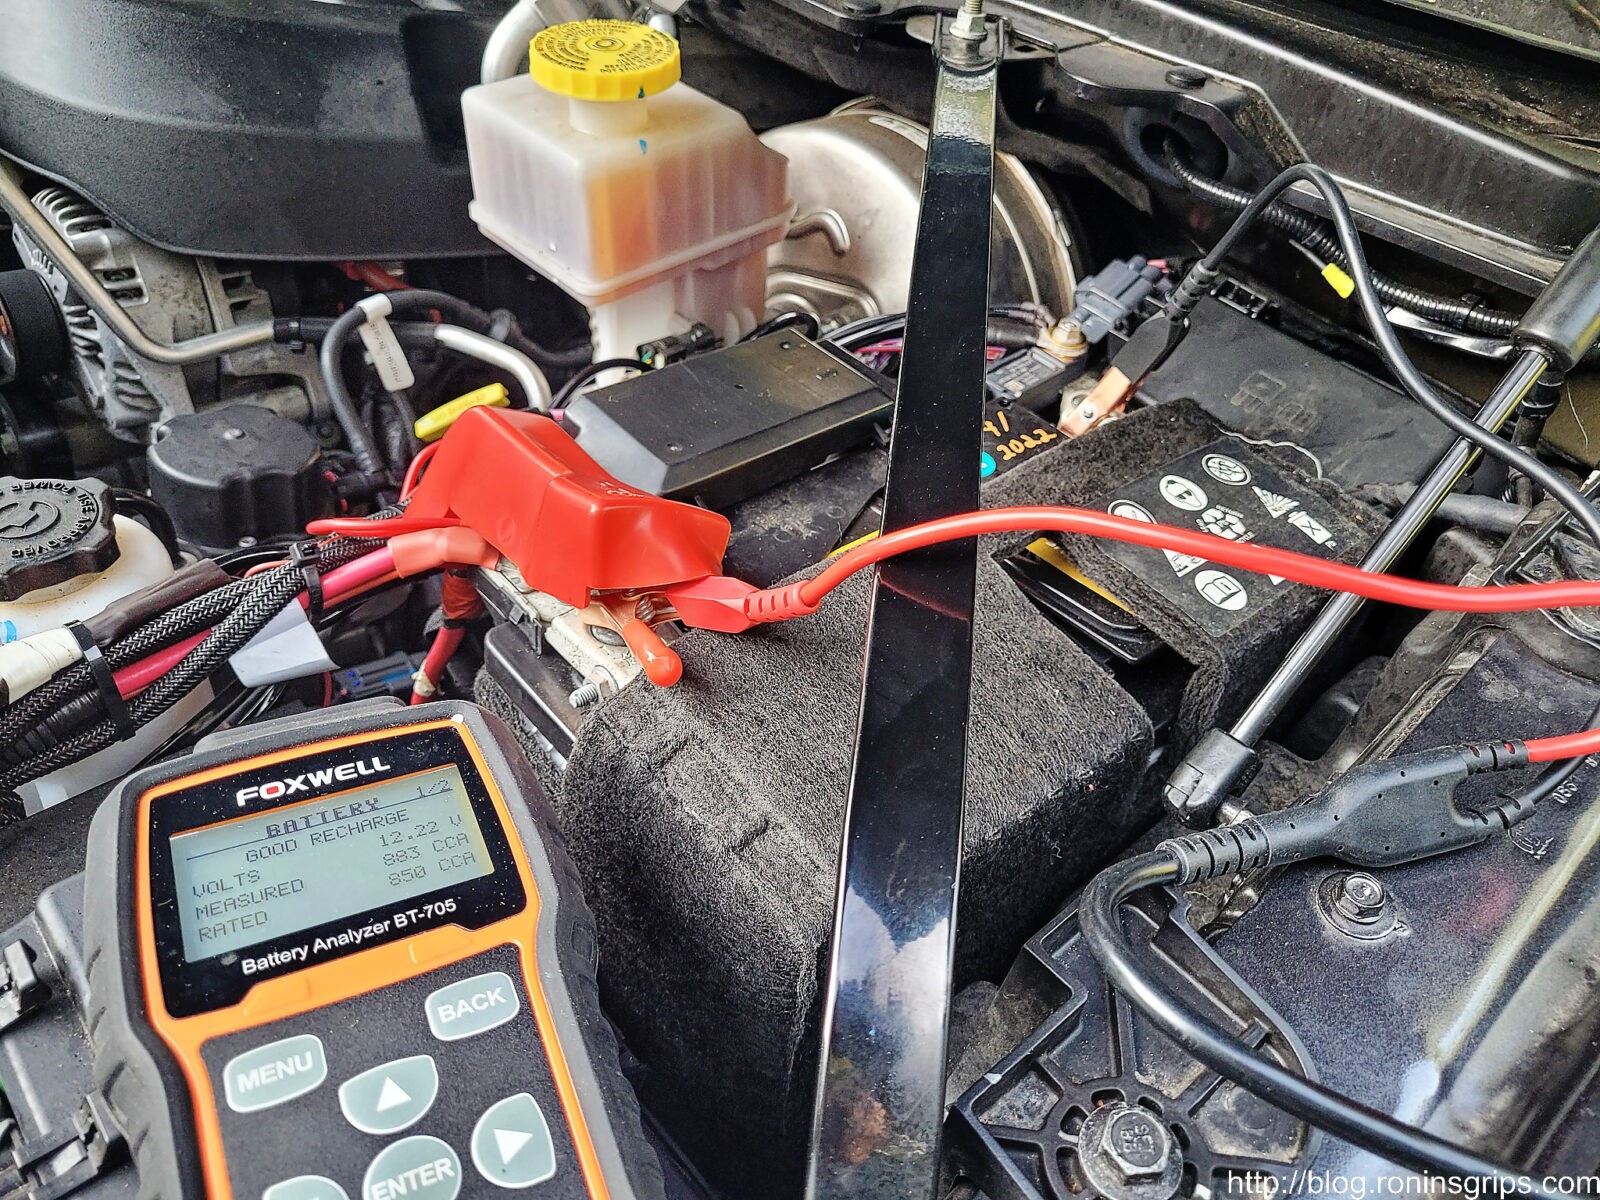
Battery Testing Via Foxwell BT705
The company that actually makes the OEM battery for FCA/Dodge is Clarios. They were a spin off from Johnson Controls and were bought by Brookfield Business Partners, an equity firm, in 2019. My point is that they know how to make batteries and also point out on their website that 1 in 3 cars on the road are running a battery made by them.
The reason I am bringing the lineage up is that the shortcoming is not their fault or something defective during the manufacture of the actual battery in my truck. The factory battery label claims 730 CCA and in testing with my Foxwell BT705 with the temperature at 46F, it delivered 760 CCA and this is despite being out of the truck without any charging for 7 days. No, the battery was just fine in terms of hitting its declared specification but Dodge should have put a bigger one in.
The OEM battery made by Clarios delivers in excess of the amps claimed (766 as measured vs 730 on the label). It’s not their fault that Dodge under-spec’d the battery or failed to do the right pairing of alternator and battery.
In terms of the Interstate, whew. It is packing some amps. The label claims 850 CCA and the digital BT705 meter is reporting 883 CCA. That is 133 amps more than the flooded lead acid OEM battery. The truck hasn’t been used for over 24 hours – closer to 36 if I were to estimate it – so no last minute charging there either. The temperature was still 46F so neither battery was tested at 0F just to be clear.
The Interstate AGM tested at 883 CCA vs 850 on the label. It also scores higher.
By the way, I’ve owned the BT705 battery tester since January 2018 and have found it to be quite reliable. The tester gets great scores on Amazon and I have never had it tell me that a battery was ok that then failed. This matters to be a lot in the Winter as I don’t want family or friends getting stranded with a dead battery.
Test Conclusion
Based on the tests conducted above, the Interstate AGM battery provides enough of a buffer that the problem appears to be fixed. There is one variable though and that is the temperature. You can see from the dash that it was 61F when I did these tests. When I plow it might be anywhere from 0 to 40F. In general, the colder a battery is, the less output it will have. I still have the Interstate’s higher 850 CCA (measured at 0F) to make me hopeful but winter will be the real test. I can hope, right? If I were to bet though, I bet the shedding problem is solved because real world I will not be running all of those accessories at once either.
It’s Not A Perfect Solution — AGM Batteries Still Have Limits
I do need to make one thing very clear – a battery is a buffer. If you are using power faster than the battery can be charged, then eventually load shedding will happen. Think of water behind a dam. If the water goes out slowly or once in a while and the reservoir can refill, everything is good. In contrast, if you use the water too fast or for too long, the reservoir will empty and there will be little to no water running from the dam. Same idea.
An AGM battery contains quite a bit of reserve power and can sustain higher loads longer than a flooded lead acid battery designed for starting and lights. Even an AGM has limits though
I tend to do a bit of plowing and then drive. A bit of plowing and then drive. If you are doing a ton of plowing before the alternator can replenish the battery sufficiently then shedding will still happen. You will then need to decide if you add battery capacity via a second battery or invest in a dual alternator set up. One trick is to hook up a battery charger – I like Noco Genius smart chargers – to fully charge your battery over night if need be. It all comes down to how much you plow and how long the alternator has to catch up.
Summary
Let’s wrap this post up. Despite Dodge’s claim that the Snow Chief package makes a 2500 truck plow ready, that is not necessarily the case. It would appear that the single 220 amp alternator running at realistic engine speeds during plowing will not produce enough amps to support the plow and the blower motor. In addition, the original battery doesn’t provide enough buffer to temporarily compensate either for the lack of alternator output relative to demand.
There is no indication that anything is defective – let me be clear on that. Instead, these are design issues and should not have surprised anyone. Plows have been around for decades. The dealership who sold me the truck and the plow, not to mention the installers they contracted with, should have known whether there would be an issue or not but nobody raised a flag and said “stop” or “hey, just so you know – you can’t run your blower motor on high and raise your plow at the same time.”
Given the test results of placing a full load on the combination of the original 220 amp alternator and new Interstate AGM battery, it would seem that the load shedding problem has been solved. While the temperature during testing was 61F and thus 30-60 degrees higher than what would be encountered during my typical plowing work, the higher CCA rating of the new battery and the likely load on the battery during real use being lower, the probability is quite high that the problem is fixed. That’s a mouth full.
If you are having problems with load shedding, your first least expensive option is to go get a good AGM battery from a reputable dealer with as high of a CCA rating as you can get for the size battery your truck uses – again, my 2021 Ram 2500 Tradesman with the 6.7L Hemi uses an H7 size battery.
I’ll post updates after I actually use the plow in the Winter but I’m betting the problem is fixed. $50 says I never hear a peep from Dodge about fixing this, paying for the battery or even just providing any further insight. So, for all of you folks that snowplow and have a Ram 2500, I hope this helps you out.
01/21/2024 Update: Well, winter hit us hard this past week. Temperatures in the single digits and pushing 20″ of snow not including drifts. The truck is working like a champ – I can plow with the blower on whatever and no shedding happens. I can definitely say now that the AGM battery fixed the problem. Still not thrilled with what Dodge did but then again, the 2500 and 8′ plow are doing an amazing job. I’m very happy. If you’re reading this and are experiencing shedding, get a solid AGM battery such as the Interstate I bought, and it will fix the problem.
12/27/2022: It was 19F and I was plowing about 8-12″ of snow in places. Defrost was on high and my regular plow (halogen) lights were running. I could hear the defrost slow down when I lifted the plow but the computer never shut off the blower. I still wish a better alternator or pair of alternators had been used but the AGM battery seems to have solved my problem.
Note, I have to buy all of my parts – nothing here was paid for by sponsors, etc. I do make a small amount if you click on an ad and buy something but that is it. You’re getting my real opinion on stuff.