Rick sent me these cool photos of his new build and I had to share them. He also gave me some details as well.
The rifle has a “Polish FB Radom barrel, trunion, and optic rail. Childers polish cg1 receiver. To stay with the polish theme, I found an unissued polish soviet era laminate stock. I was originally going to use a bakelite grip. But, since this is a hard use rifle. I wanted something more robust. But correct for the polish theme. Your grip delivered and then some. So here are some pictures of my polish AKM-Beryl transitional rifle. At least I call it that for lack of a better term. “
Yes sir Rick – that is definitely one slick build!
If you find this post useful, please share the link on Facebook, with your friends, etc. Your support is much appreciated and if you have any feedback, please email me at in**@*********ps.com. Please note that for links to other websites, I may be paid via an affiliate program such as Avantlink, Impact, Amazon and eBay.
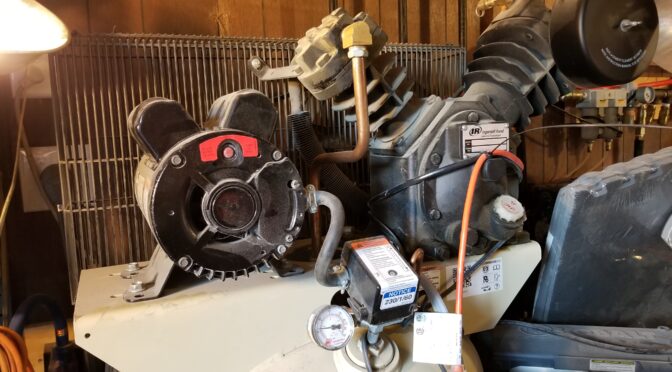
Folks, my shop is unheated and the space where my 60 gallon oil lubricated Ingersoll Rand (IR) 2340L5-V sits can get well below freezing – sometimes even well under 20F. That presents a challenge because the lubricating oil gets thicker as it gets colder and this puts more and more of a load on the motor to start. What usually results is a tripped breaker -I know my 30amp breaker would trip regularly until I took some corrective actions.
One option you can run with is to run variable weight thinner synthetic oil in the winter. I don’t want to run into issues with my pump so I stick with IR straight weight compressor oil so I’m not really keen on doing that. There are guys who will disagree with me and that’s why I point out the option.
The solution I put in place works great. I simply put two Kat’s 24025 25 watt heating pads that measure 1″x5″ on each side of my pump level next to the oil reservoir. These heaters were designed to warm fluid reservoirs including those with oil. I’ve used a ton of them over the years for warming pressure tanks and what have you and have not had one fail yet. My oldest units are probably 3-5 years old and no problems — I just use them during the Winter.
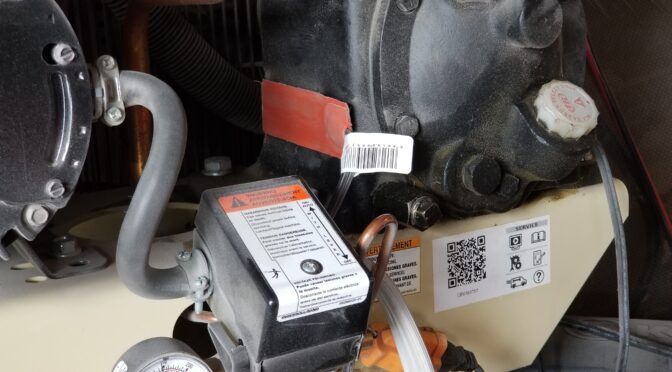
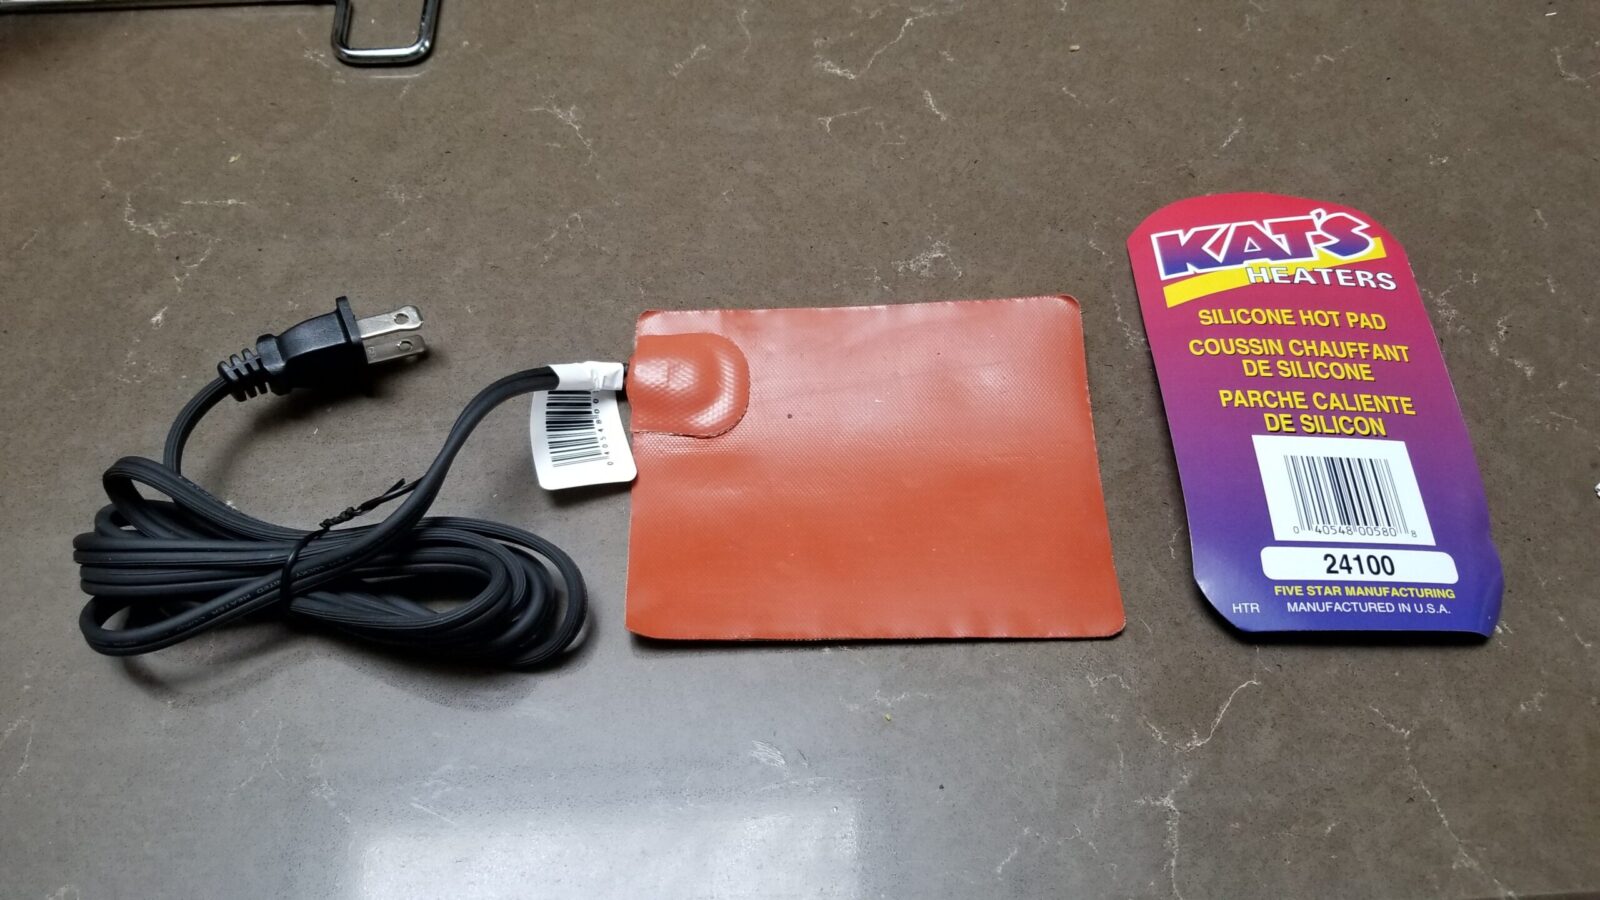
This is the Kat’s 24100 4×5 heater that I have at the bottom of my compressor to keep the condensate from freezing.
In terms of heating my compressor’s pump, I just run mine non-stop in the Winter but if you’d really rather only run them when it is at or below freezing, there are thermal power plug adapters that only turn on when it is that cold. Note, at 25 watts they do not heat fast. If your pump is real cold it could take it a while to get up to an acceptable temperature. That’s one reason why I just let them run and I can turn the compressor off independent of the heaters.
Along with the little 1×5 units, I use one larger 4×5 Kat’s 24100 pad at the bottom of my compressor to allow me to drain the condensate that would otherwise freeze. I do not run that non-stop as it is 100 watts. It’s on a thermally switched outlet that turns on at 35F and off at 45F. Yeah, it may run more than I need it to but I haven’t invested in a better controller yet for that part. I will list the digital controller I plan on getting some day so you can decide.
Installing is about as easy as it can get. The Kat’s units have a self-adhesive back and must be installed before you plug them in or you will ruin them. Clean the surface of oil and dust, peel the cover off the adhesive, stock the heater on and wait the prescribed time then plug it in and it warms up. Note, I have only used them on steel surfaces. They get hot and I would not be inclined to install them on plastic for example.
Kat’s products are made by Five Star Manufacturing and they have a ton of different products for different applications. Click here for their website.
Note: There aren’t as many Kat’s brand heating pads around now but there are a lot of different brands and sizes on Amazon – click here to see them.https://amzn.to/3J1Hpzn
The setup works great. No more tripping breakers due to thick oil caused by cold weather. I hope it helps you out.
If you find this post useful, please share the link on Facebook, with your friends, etc. Your support is much appreciated and if you have any feedback, please email me at in**@*********ps.com. Please note that for links to other websites, I may be paid via an affiliate program such as Avantlink, Impact, Amazon and eBay.
I live in a rural area and wind up doing a lot of my own repairs. About 2-3 years ago I invested in a 60 gallon Ingersoll Rand (IR) 2340L5-V air compressor which is their entry-level “Value Line” of industrial compressors. In hindsight, had I known more about “value” meaning “we made it cheaper”, I would not have made the purchase. Yes, it’s held up way better than my consumer air compressors but a buddy’s big Quincy compressor rocks and that is another story.
At any rate, I use a ton of compressed air for pressurizing my casting tanks and running all kinds of air tools. One of the reasons I went with the 2340L5-V was that I kept burning out the little 30 gallon consumer compressors. Failure is a big deal for me because when a compressor goes down in my shop, almost all work stops.
At any rate, I knew something was going on with my compressor before it stopped running completely. At the end of the air fill cycle that brings the tank back up to pressure, the switch would shut off but then there wasn’t any bleed down to relieve the pressure on the pump. This meant that the compressor may or may not restart without tripping the 30A breaker and it got worse with time. After this got really annoying, I decided it was time to fix it.
I did some reading and it turned out there were two likely culprits – either the check valve was leaking air back or the pressure switch was failing. I had problems with the check valve on other compressors so I jumped to conclusions and replaced that first. It didn’t fix the problem. Argh.
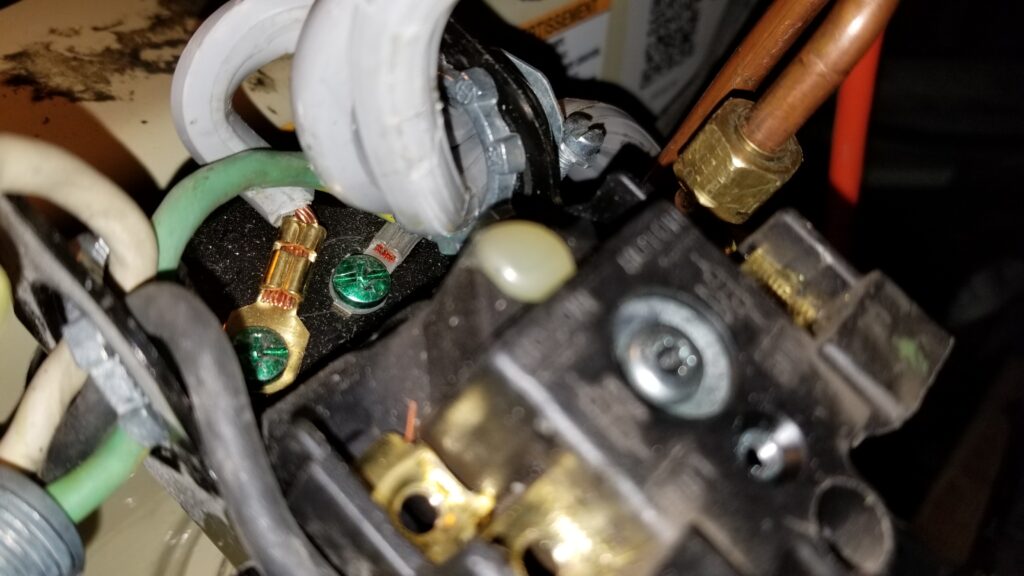
This is the 23474653-R pressure switch. It is just the switch and does not include the gauge, blow off valve or bleed off line (unloader) that you see.
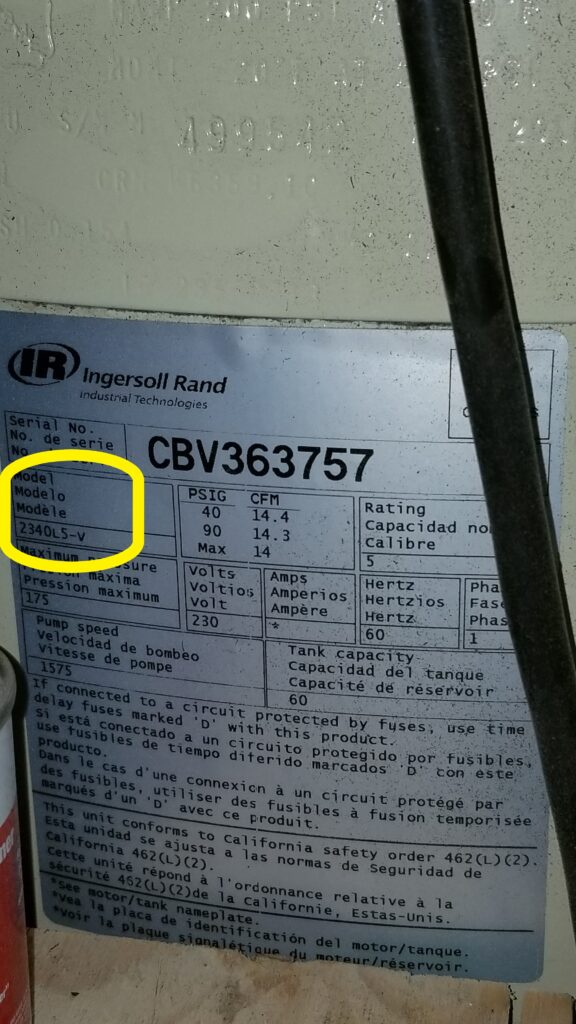
So that left the pressure switch and this is where things just went sideways and I got frustrated. In searching online and calling the parts department, IR’s own parts department sold me the wrong switch and I was down for almost a week. So you don’t go nuts, you must make sure people know if you have the 2340L5 or the 2340L5-V because their pressure switches are different. You can make the better switch from the 2340L5 work but it will take a bit of re-plumbing the lines to do so. I may actually try that some day.
Next comment, do not go with the model number on the pump housing itself. The model number you need is printed on the big silver decal on the tank – not on the pump. The pump will say “2340” but that is not your specific model.
Right there outlined in yellow is the model number you must go by. 2340L5-V in my case.
For whatever reason, IR parts sold me the wrong part even though I asked the fellow to confirm it was right. So, frustrated and with my compressor down, more discussions were held and web searches done and the correct part for the 2340L5-V’s pressure switch is a 23474653-R. Interestingly enough, Tractor and Supply Company (TSC) is an IR dealer and the local store had one of these switches on the retail shelf. This gives you an idea that they are viewed as a wear item if a retailer is going to tie up the money and shelf space to stock one. It was $79.99 and they only had one so I called and confirmed with the clerk that they had one before I drove over. I’ve had way too many situations where a website said “X” was in inventory and when I went to the store, it was not so I try and confirm now. Thankfully, I drove to the store and picked it up.
I removed the cover already but this is what comes in the box. You will need to move your gauge, blow off valve, bleed down line, rear pipe plug and electrical lines over from the old switch to the new one.
Comments On The Swap
So, when it comes to the repair, it’s a fairly easy swap. I took a few photos from different angles to make sure I didn’t forget anything plus I labeled anything that might get turned around. Gone are the days when I try to keep it all in my head. Between my age and interruptions, I find it way too easy to forget things.
Two real important safety comments. Fully drain the compressor – in other words let all of the air out and open the floor drain. Why open the floor drain? Because it’s your double check that it is empty.
Second, please make sure the power is cut. I use a heavy stove/appliance cord going to a wall outlet. I both cut the breaker and unplug the cord. Why do both? It’s your double-check. If you are in a multiperson environment, follow lock out procedures.
Note the top two poles are the hot legs coming from the wall. Folks when you go to remove the blead-off / unloader line, it is held on by a compression nut fitting. Let me give you a piece of hard won advice – use a flare nut wrench if you can to support as many sides of the nut as you can or worst case use a proper fitting box end wrench. Don’t ever use an adjustable wrench or you will likely round the corners off the nut as the jaws of the wrench give. Now IT does give you a new nut and that is plain 1/4″ copper tube if you screw up bad but you can re-use that whole piece if you are careful with removal and re-installation.Okay so the top two terminals are the hot legs from the wall. The middle set of terminals are the hot legs going to motor. Down on the bottom you have the neutral from the extension cord and the green/neutral going to the motor. These are thick wires in a tight space so be careful working things into position.Here’s an odd little thing I encountered. The pipe plug that goes in one unused position of the switch is actually 10mm. Why? I have no idea. The 10mm fit best so I ran with it. Everything else was SAE. For example, the housing itself that you see just above the wrench uses a 3/4″ wrench.Use pipe thread tape on all fittings and properly support the pipes and what not so the right things you care about are moving in the right direction. For example, I used a pipe wrench on this nipple to keep it from turning while I both removed the old pressure switch and installed a new one.Lesson learned, stay organized. That is a small magnetic tray. I cleaned all fittings and installed new pipe thread tape before reinstalling them.
Bottom line is that I installed the new pressure switch and the compressor proper bled off the pressure from the pump after cycling. In talking to IR parts they mentioned to me that this is the most common reason for the bleed down not to happen in my series of compressor – not the check valve. I believe that now. The pressure switch seems cheep and really strikes me as a consumable part now. Lesson learned.
By the way, I found out during the actual swap that IR printed the part number on the inside of the switch cover. Why hidden inside? If they had it on the outside, then this would have all been way simpler.
Also, next time my compressor stops unloading, I am going to order one of these switches vs. waiting for failure and having to scramble. It’s my fault for putting it off but I had a ton of other things going on and eventually it bit me.
I hope this helps you out as well. Bottom line, if you have a 2340L5-V then the correct pressure switch you need to order is the 23474653-R. That way you can avoid the drama I ran into.
One last shot of the right pressure switch box with the part number on the top right 🙂
If you find this post useful, please share the link on Facebook, with your friends, etc. Your support is much appreciated and if you have any feedback, please email me at in**@*********ps.com. Please note that for links to other websites, I may be paid via an affiliate program such as Avantlink, Impact, Amazon and eBay.
Here are switch listings on eBay. Be careful that it is a real IR part or a quality replacement vs. an inferior knock off that will not hold up.
Folks, I’ve found what I think is the best glue for shoe and boot repair. Yeah, I really mean it. It’s called “Shoe-Fix Glue” and is marketed by a small firm called NJoy Distributors and only sold direct or via Amazon. Let me give you a bit of background first.
I’ve tried to fix tons of shoes and boots over the years with varying success using Goop and Shoe Goo amongst others. The two challenges were trying to clamp the shoe or boot while trying without making the profile change once dried and also not using so much glue that it altered the feeling of the shoe. Nothing happened fast either – you had to wait overnight while the stuff set up.
So, I did some digging on Amazon a few weeks back and found this stuff. What really caught my eye were the amazingly high number of positive reviews:
At the time of my writing this blog, there are 845 reviews with a score of 4.5 out of 5. 86% of reviewers give it either 4 or 5 stars. That’s pretty good and I figured I could afford to give it a shot.
I had both the sneakers I wear around home that had the bottom tread coming off and my daughter’s favorite boots had the sole separating from the upper that I could experiment with.
NJoy does have a nice tips page with some videos that I checked out [click here for that] and it largely comes down to making sure the surfaces are clean, dry and then holding them together for 30-45 seconds while the rubberized / flexible cyanoacrylate adhesive cures.
What they are using is the interesting part – they came up with a flexible cyanoacrylate adhesive – a flexible “super glue”. This surprised me more than anything else. Normally I find that the “super glue” class of adhesives as rigid and intolerant of shocks and flexing. This stuff smells as you’d expect when applying it with a medium viscosity meaning it appears to be a little thicker than water and this helps it attempt to balance the need to soak in and establish a bond with the need to not run everywhere.
On their website, they report that their Grandfather Ed started the shoe business after WWII and ran it for 20 years. He then had two sons Dean and John. John is the one who came up with the formula and started bottling the current formula in March 2015 [click here if you want to read more]. By the way, you’ll notice they sell stuff for boots and shoes and this is just marketing so that people searching for boot glue or shoe glue will find the item – it’s the same formula and they are very upfront in telling people this.
If you are wondering about how my tennis shoes and daughter’s boot turned out – the results were amazing. The stuff really is easy to apply and has held up now for two weeks with heavy use. My daughter is a college student and walks a ton every day in those boots in the Michigan winter.
This is her boot with the sole reattached – it was literally more than half the way off the upper. I ran a bead of Shoe-Fix glue around the perimeter of the rubber sole and held the two together with my hands. I let go after about a minute and the repair seemed solid. They’ve held up for her even with a ton of walking as a college student.On my “work around the house” shoes, the dark tread was separating from the middle foam wedge in a number of places. I’d apply some glue in each spot and hold them for 45-60 seconds – done. All the discolored stuff is remnants of Shoe Goo that I did need to clear away in a few places. Shoe-Fix is clear.
I was so impressed by Shoe-Fix Glue that I figured I really needed to write a post and share the info. It really does what it claims and I am intrigued enough to want to try it on other projects that aren’t footwear related where I need a fast flexible bond. In the mean time, I will always have 1-2 tubes of this stuff available for impromptu shoe and boot repair.
2/17/2020 Update: I wrote the original post on 2/7/20 and probably started using this glue maybe 2-3 weeks prior. I’m very pleased to report that all the shoes and boots fixed thus far are still standing up to everyday use. None of the bonds have let go thus far.
If you find this post useful, please share the link on Facebook, with your friends, etc. Your support is much appreciated and if you have any feedback, please email me at in**@*********ps.com. Please note that for links to other websites, I may be paid via an affiliate program such as Avantlink, Impact, Amazon and eBay.
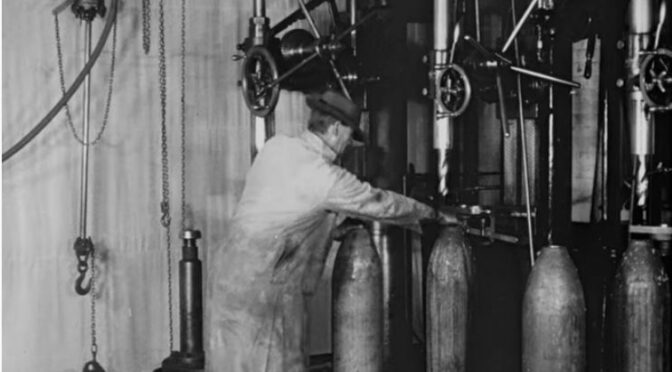
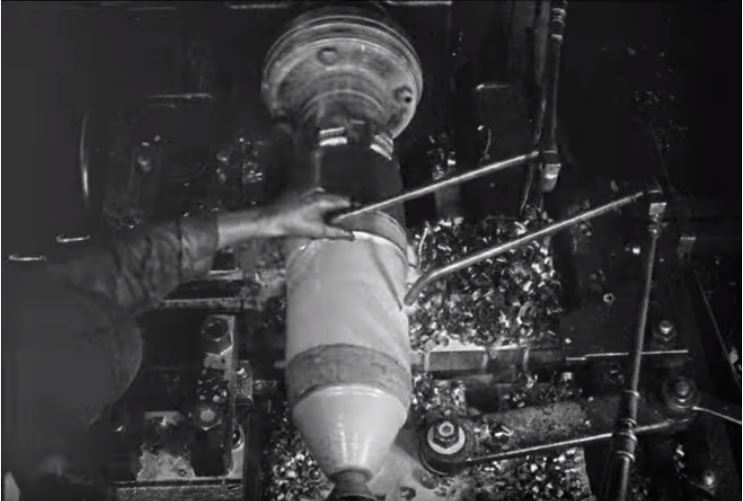
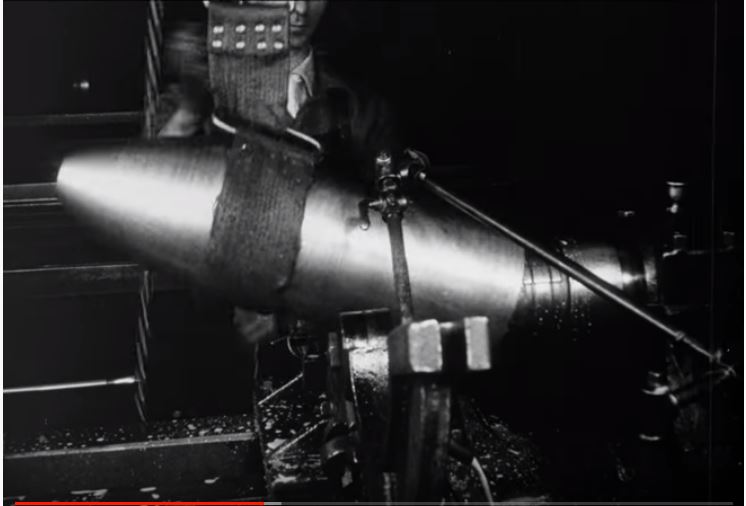
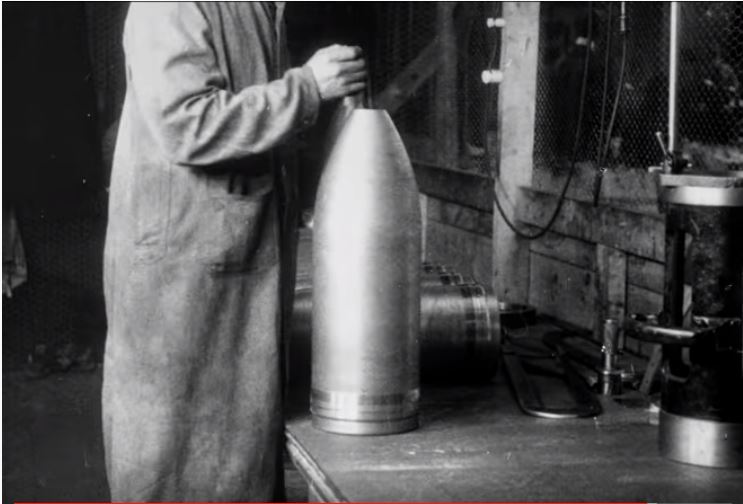
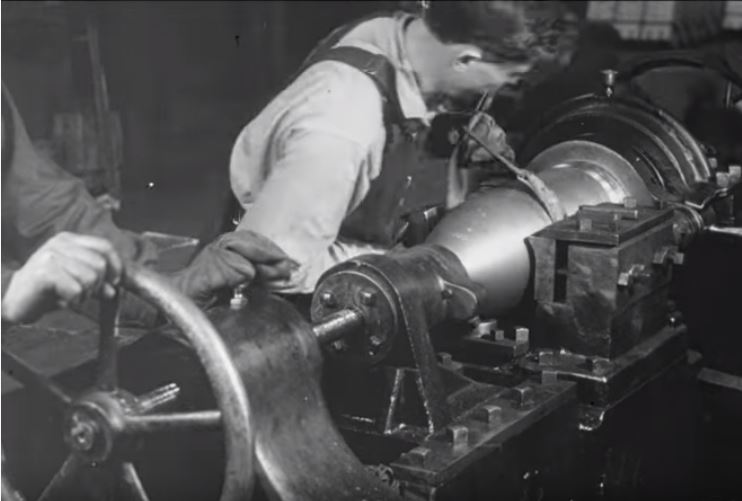
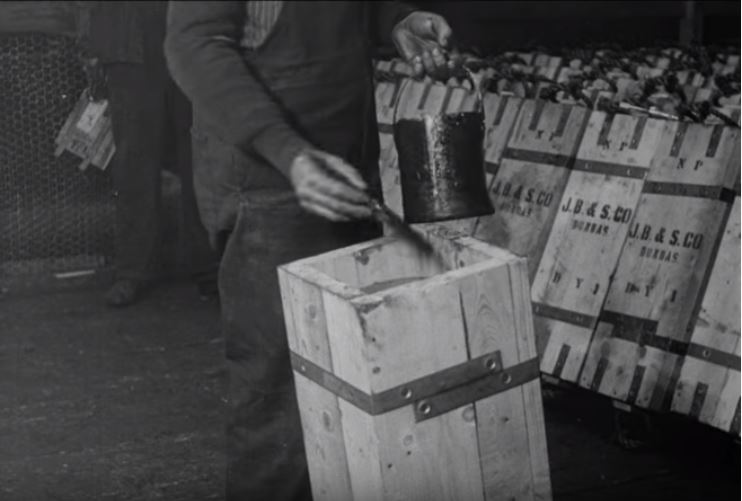
If you like to watch old school machining, this video from the Library and Archives Canada is pretty amazing. It’s a silent black and white video that is just shy of 54 minutes long. The title of the video is “Manufacturing an Eight Inch High Explosive Howitzer Shell At The Works Of The John Bertram & Sons Company, Ltd., Dundas, Ontario – Canada”.
The video steps you through the process as well as general view of the shop. This shows you manufacturing in an era where a lot of artisan skill was required to turn out products. It’s really fascinating to watch. The following are some screen shots from the video:
Here’s the Video:
I hope you enjoyed this bit of history!
Please note that all images were extracted from the video and are the property of their respective owner.
If you find this post useful, please share the link on Facebook, with your friends, etc. Your support is much appreciated and if you have any feedback, please email me at in**@*********ps.com. Please note that for links to other websites, I may be paid via an affiliate program such as Avantlink, Impact, Amazon and eBay.
I thoroughly enjoyed this Japanese video that covers the forging, engraving and heat treat of a Japanese Katana by a Master – Sadatosh Gassan. The video provides a great overview and while it is in Japanese, there are subtitles in English.
What I found most fascinating was the detail of the creation and application of the clay to create the hamon. Sadatoshi-san also is shown carefully engraving a dragon around a plum tree.
He evenly applied the clay and is now drawing the hamon pattern into it prior to the heat reat.Here it iss just prior to the firing.Carving the dragon into the blade.The end result is beautiful.
The Video
I hope you found this video as interesting as I did!
Please note that all images were extracted from the video and are the property of their respective owner.
If you find this post useful, please share the link on Facebook, with your friends, etc. Your support is much appreciated and if you have any feedback, please email me at in**@*********ps.com. Please note that for links to other websites, I may be paid via an affiliate program such as Avantlink, Impact, Amazon and eBay.
In this short video, Ian gives a brief overview of Soviet magazines – notably the slab side, ribbed, waffle and bakelite. As always, Ian does a great job and this is worth a watch!
The first generation was a heavily built (over-built) magazine known as the “slab side”.After the slab side, they developed the ribbed magazine that was copied by many countries.To reduce weight they developed the aluminum waffle magazines- so named due to all the reinforcement ribs. It was relatively short-lived because it was not durable enough.After the waffle mag, they moved to the Bakelite magazine that actually was a glass reinforced polymer. This gave them what they wanted – light weight and durability.When the AK-74 was developed, they went straight to polymer and never developed steel mags. Note, other countries did build steel AK-74 magazines but the Soviets did not.
The Video
I hope you found that video useful. Ian is a wealth of information and you can learn more about his work at Forgotten Weapons.
Please note that all images were extracted from the video and are the property of their respective owner.
If you find this post useful, please share the link on Facebook, with your friends, etc. Your support is much appreciated and if you have any feedback, please email me at in**@*********ps.com. Please note that for links to other websites, I may be paid via an affiliate program such as Avantlink, Impact, Amazon and eBay.
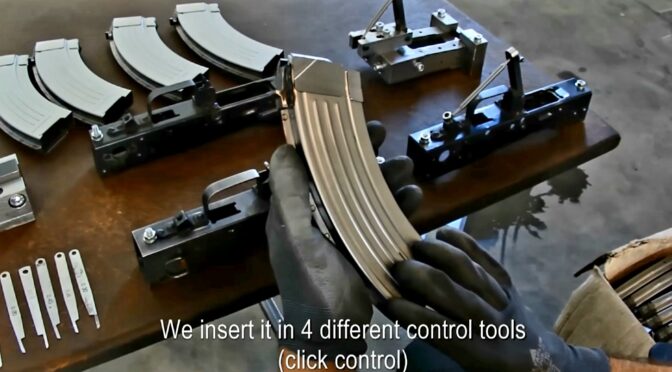
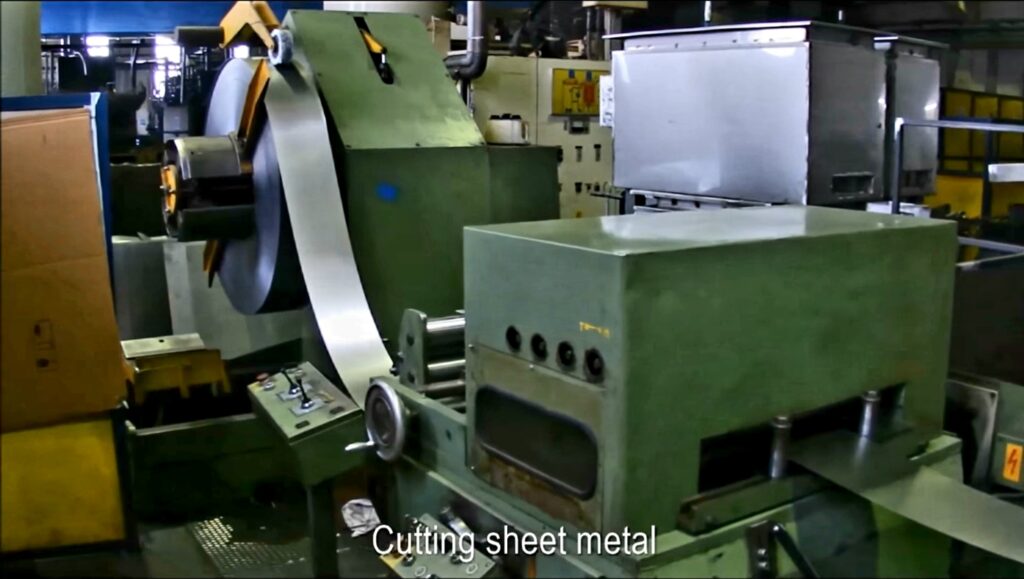
While digging for videos on AK magazines, I found this one posted by Apex Gun Parts in 2016. It shows their Croatian AK-47 magazines being manufactured. While they don’t come right out and say they are being made by Zastava, I have a hunch that they are.
I would like you to compare this video to the one I previously posted showing Matra Group’s process. Matra is using older general purpose machines and there isn’t much attention paid to worker ergonomics and lighting.
Now, watch this video and not the differences. This video is showing a much more modern plant where there is also detail provided on their quality control processes and they show the jigs that they use.
The Video
I hope you find the video interesting.
Please note that all images were extracted from the video and are the property of their respective owner.
If you find this post useful, please share the link on Facebook, with your friends, etc. Your support is much appreciated and if you have any feedback, please email me at in**@*********ps.com. Please note that for links to other websites, I may be paid via an affiliate program such as Avantlink, Impact, Amazon and eBay.