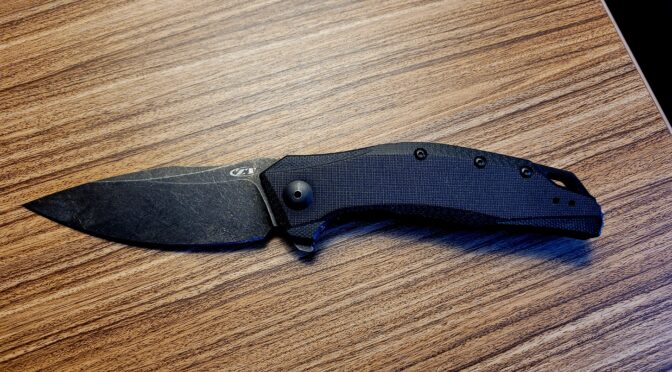
I have a collection of good pocket knives including some I will not lose sleep over if I lose one. On the good scale that I would hate to lose are a few Zero Tolerance, Hinderer and US made Kershaws (they and ZT are both owned by KAI). At any rate, when I look back on this past year and think about what folding knife did I carry the most and the answer would be the ZT 0357BW.
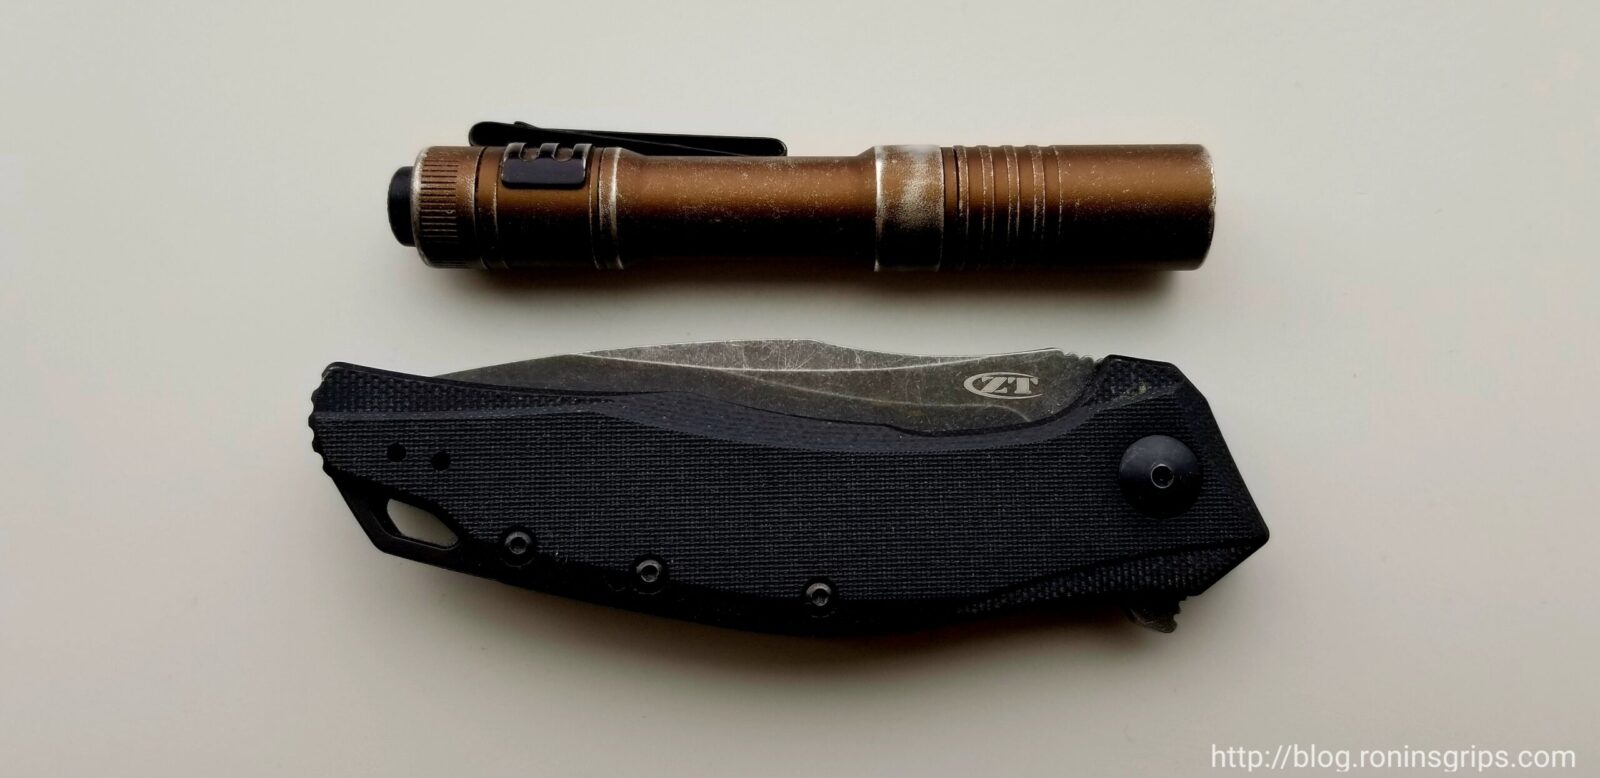
You will find these in my pocket a lot – my ZT 0357BW and one of my Streamlight USB rechargeable 66608 Microstream LED flashlights.
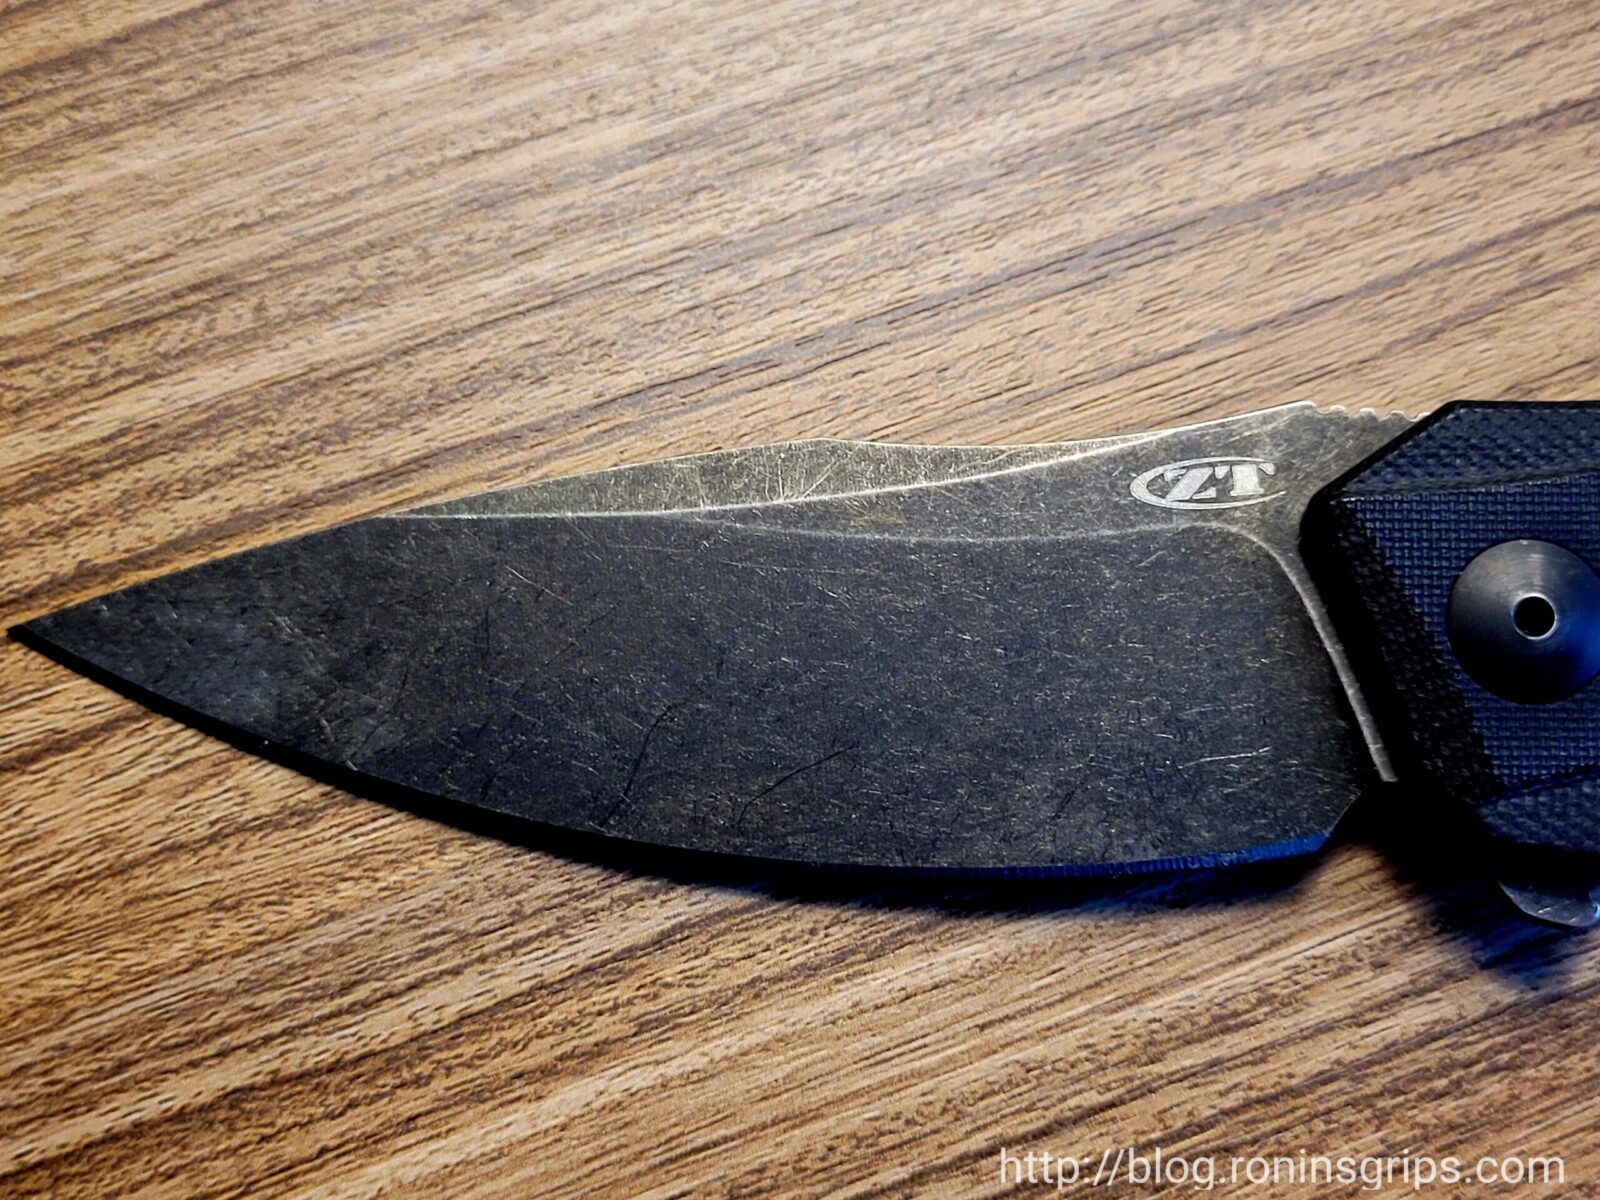
The ZT0357 was a 2020 model year release from Zero Tolerance and became popular right away due to its ergonomics and the CPM20CV steel. In regards to that alloy, it was designed by Crucible Industries to have excellet edge retention, corrosion resistance and toughness. By the way, those first two terms are self explanatory but toughness refers to a steel’s ability to absorb energy and deform without breaking/rupturing. My experience is that the 0357 holds an edge amazingly well based on my cutting open tubs of plastic, tape, boxes, and wire insulation.
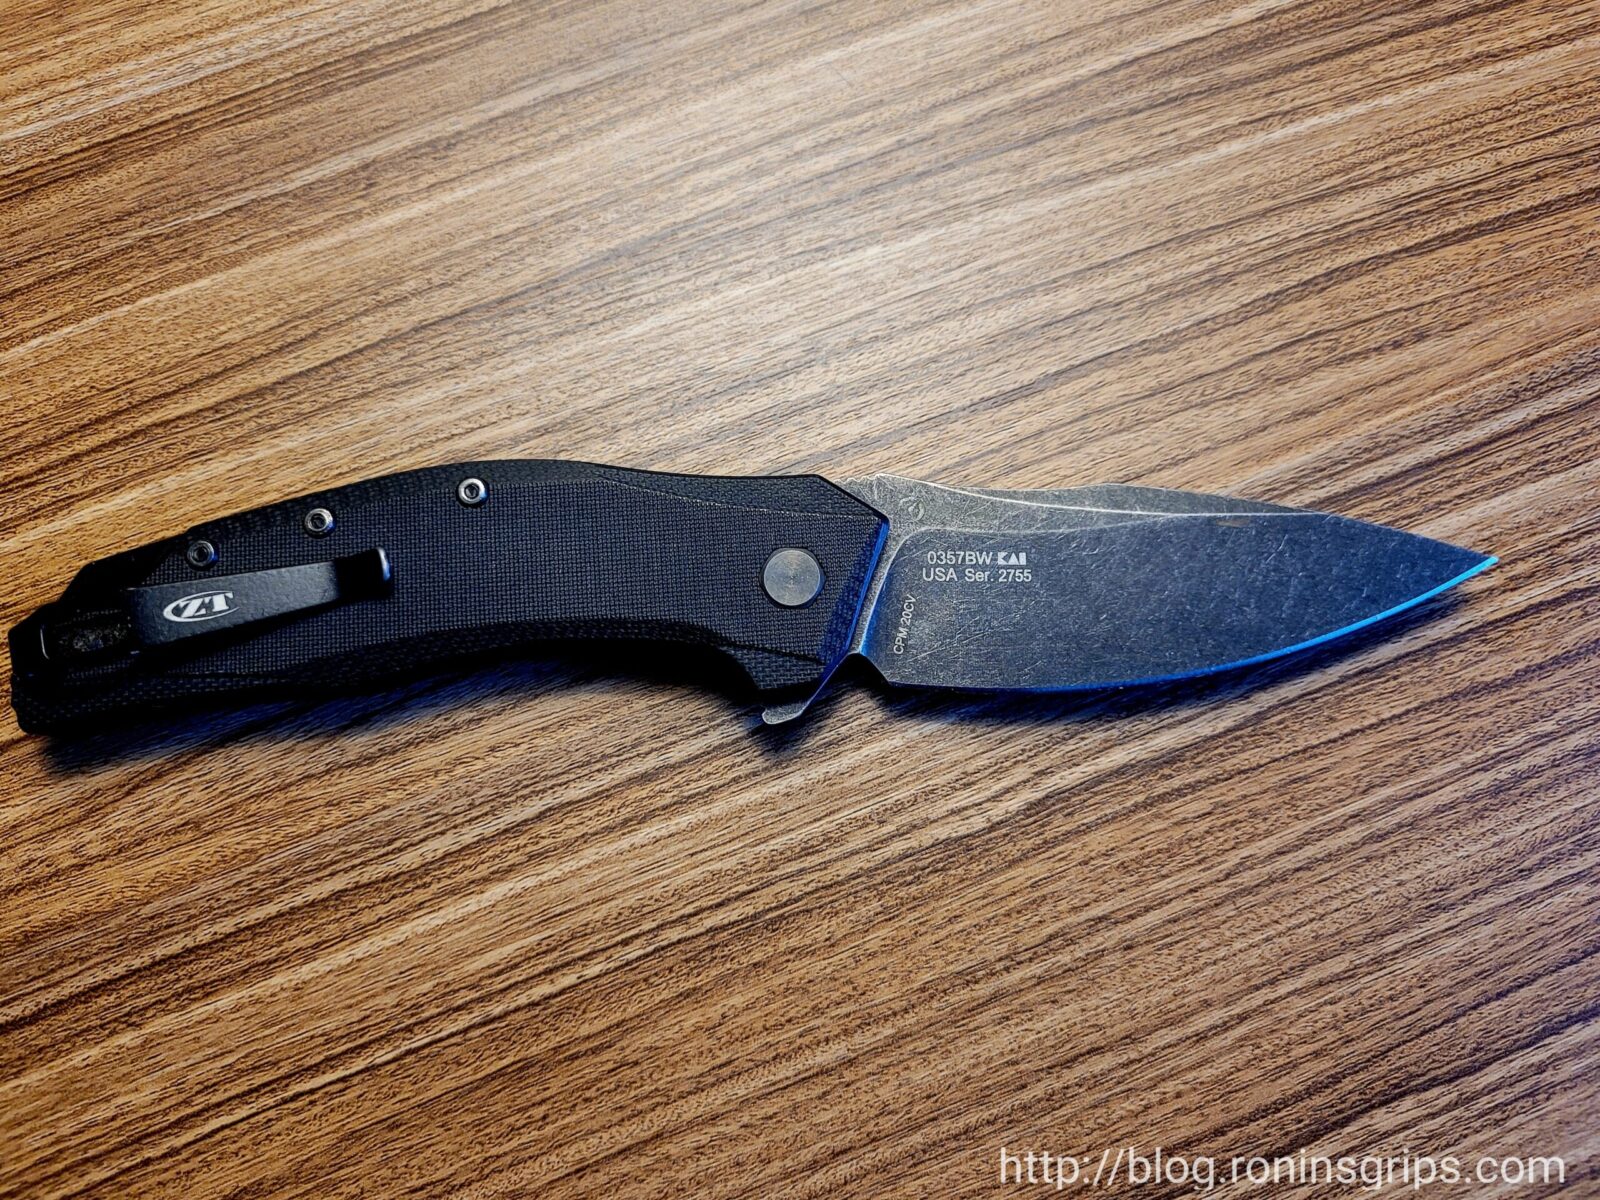
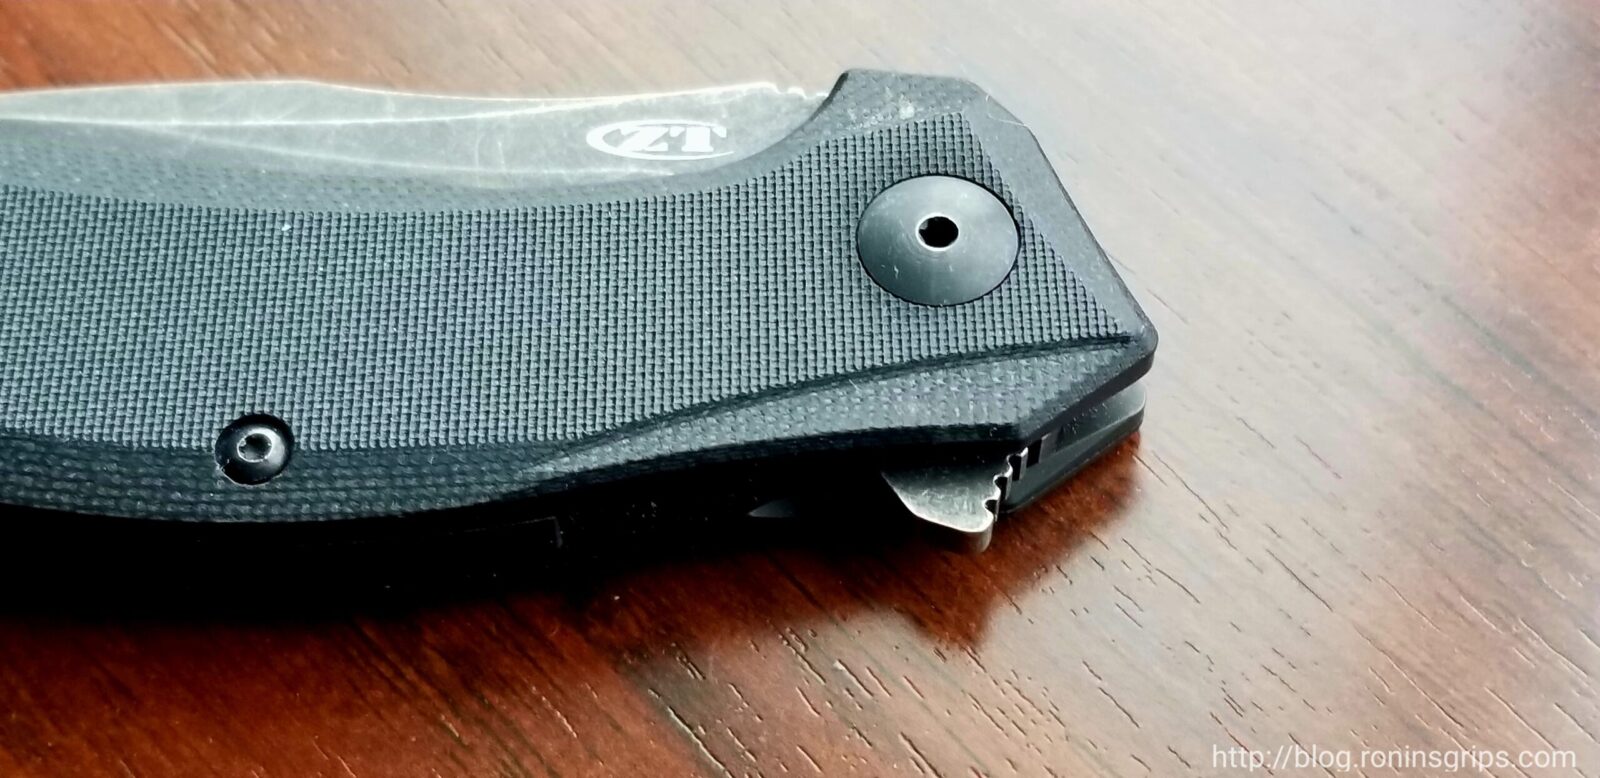
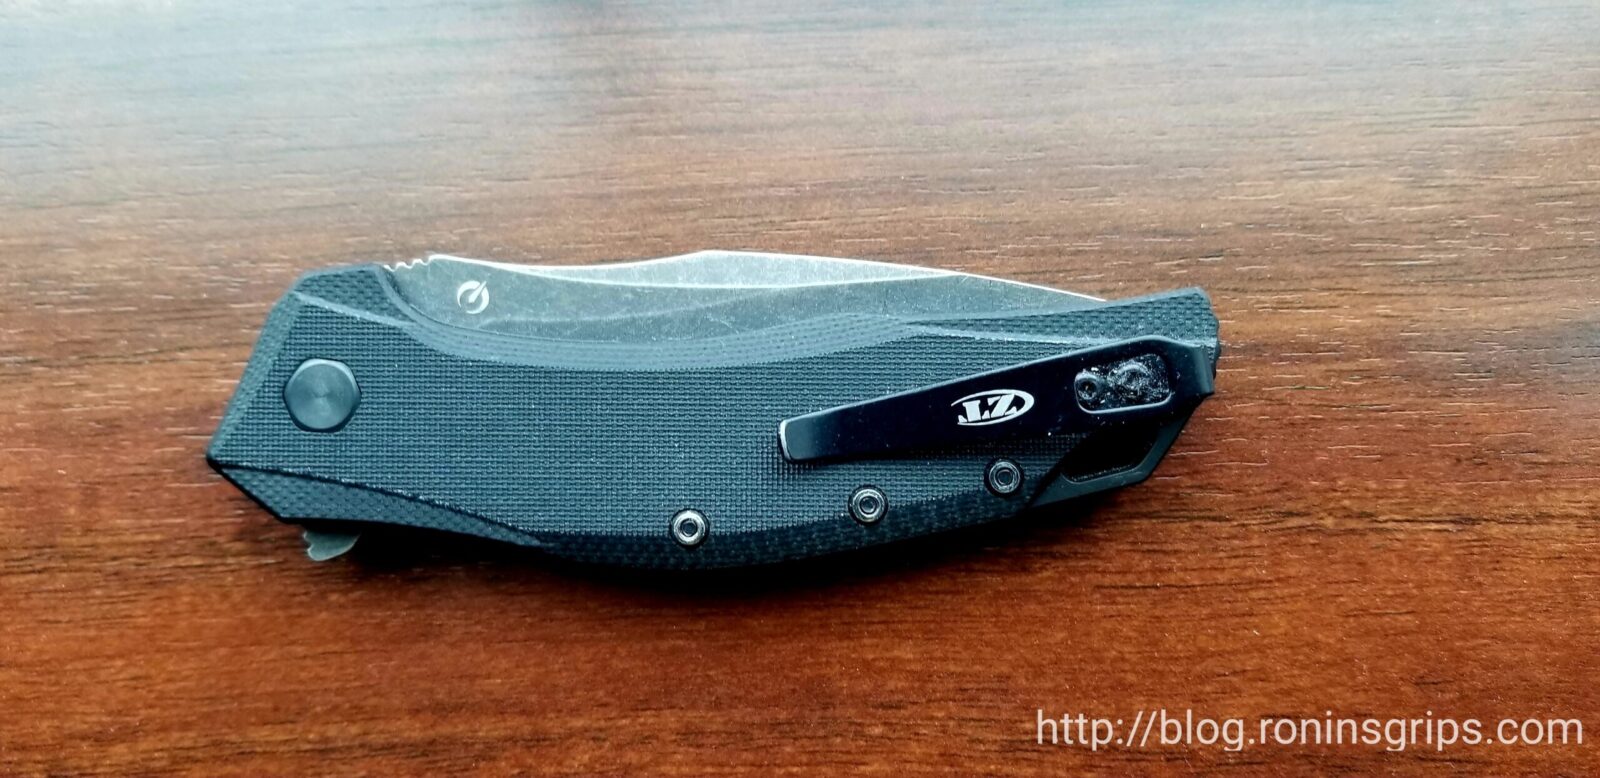
Here’s the other size of my my 0357BW. You can move the clip to either side if you want. Personally, I don’t use the pocket clips but a lot of guys do.
Specifications
This is a very pocket friendly knife in terms of size, weight and shape plus the blade is amazing. Here are the details for you:
Overall Length Open: 7.625″
Overall Length Closed: 4.4″
Weight: 4.3oz
Blade Length: 3.25″
Blade Thickness: 0.121″
Blade Style: Drop Point, no serrations
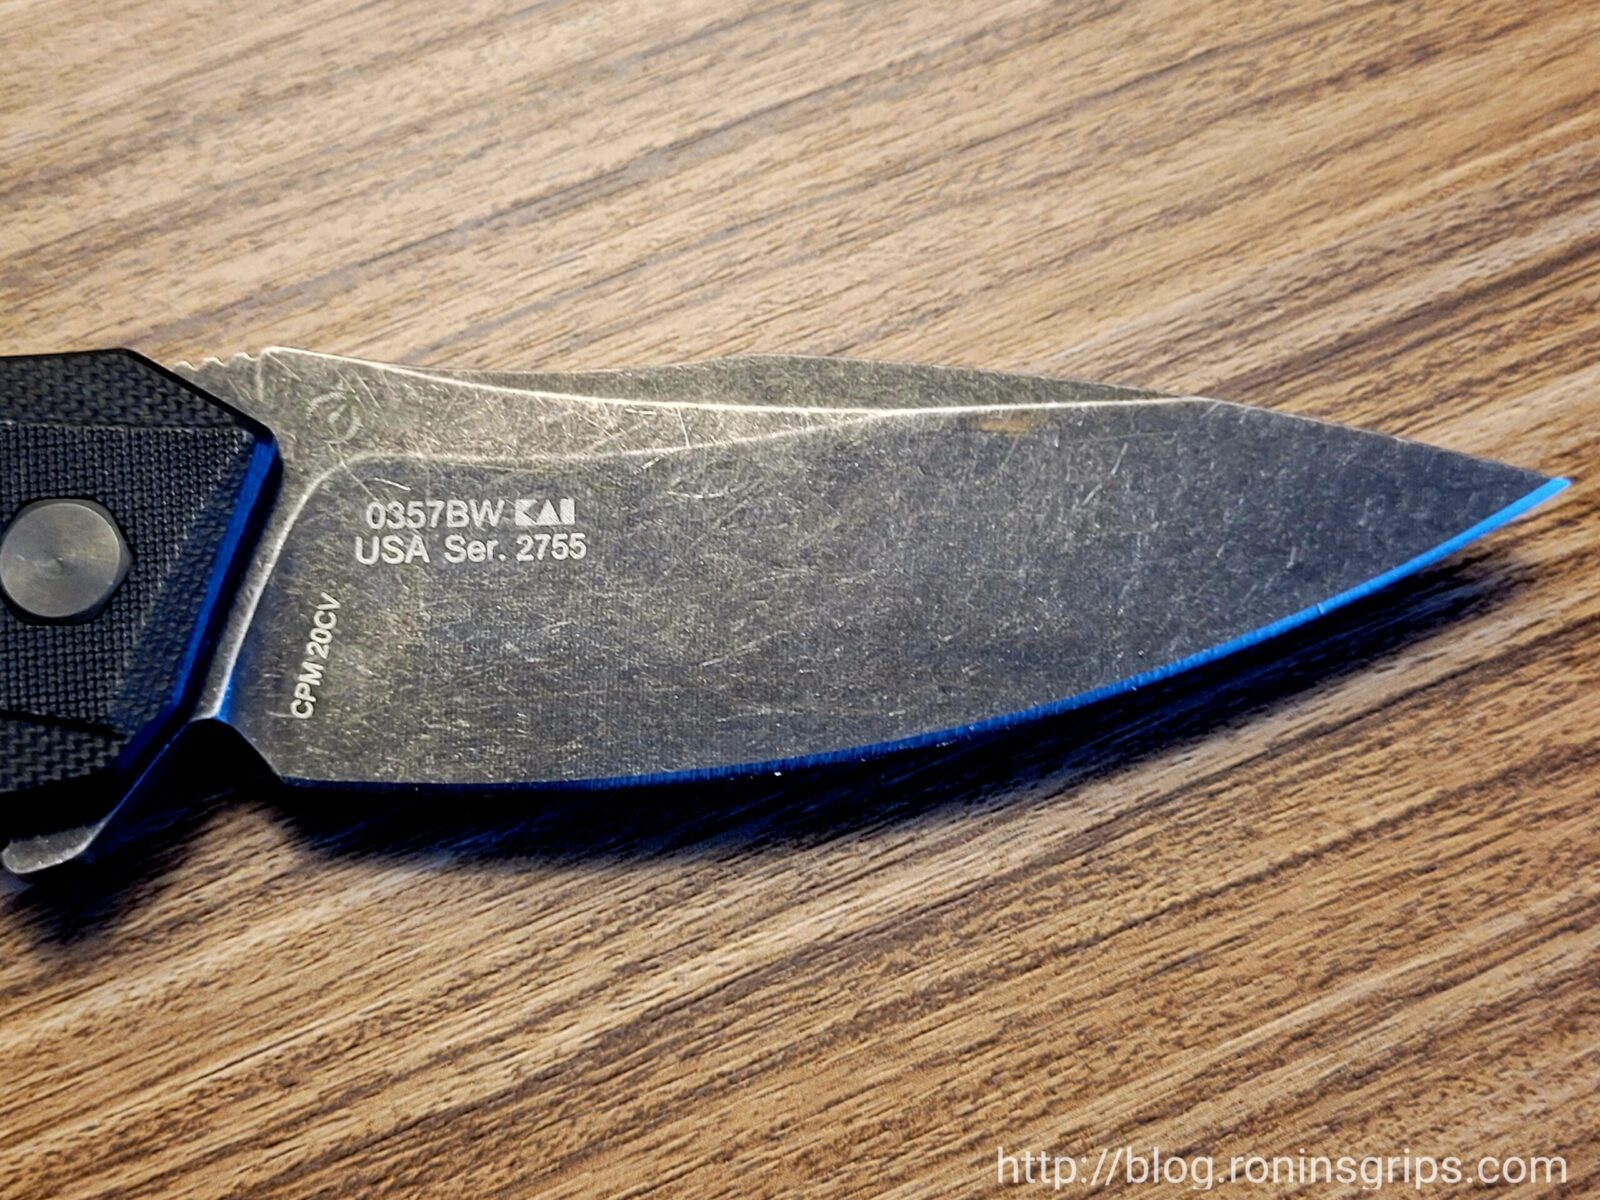
Blade Alloy: CPM20CV
Blade Hardness: 60-62
Blade Grind: Flat
Blade Finish: Black Wash (they also make a plain version)
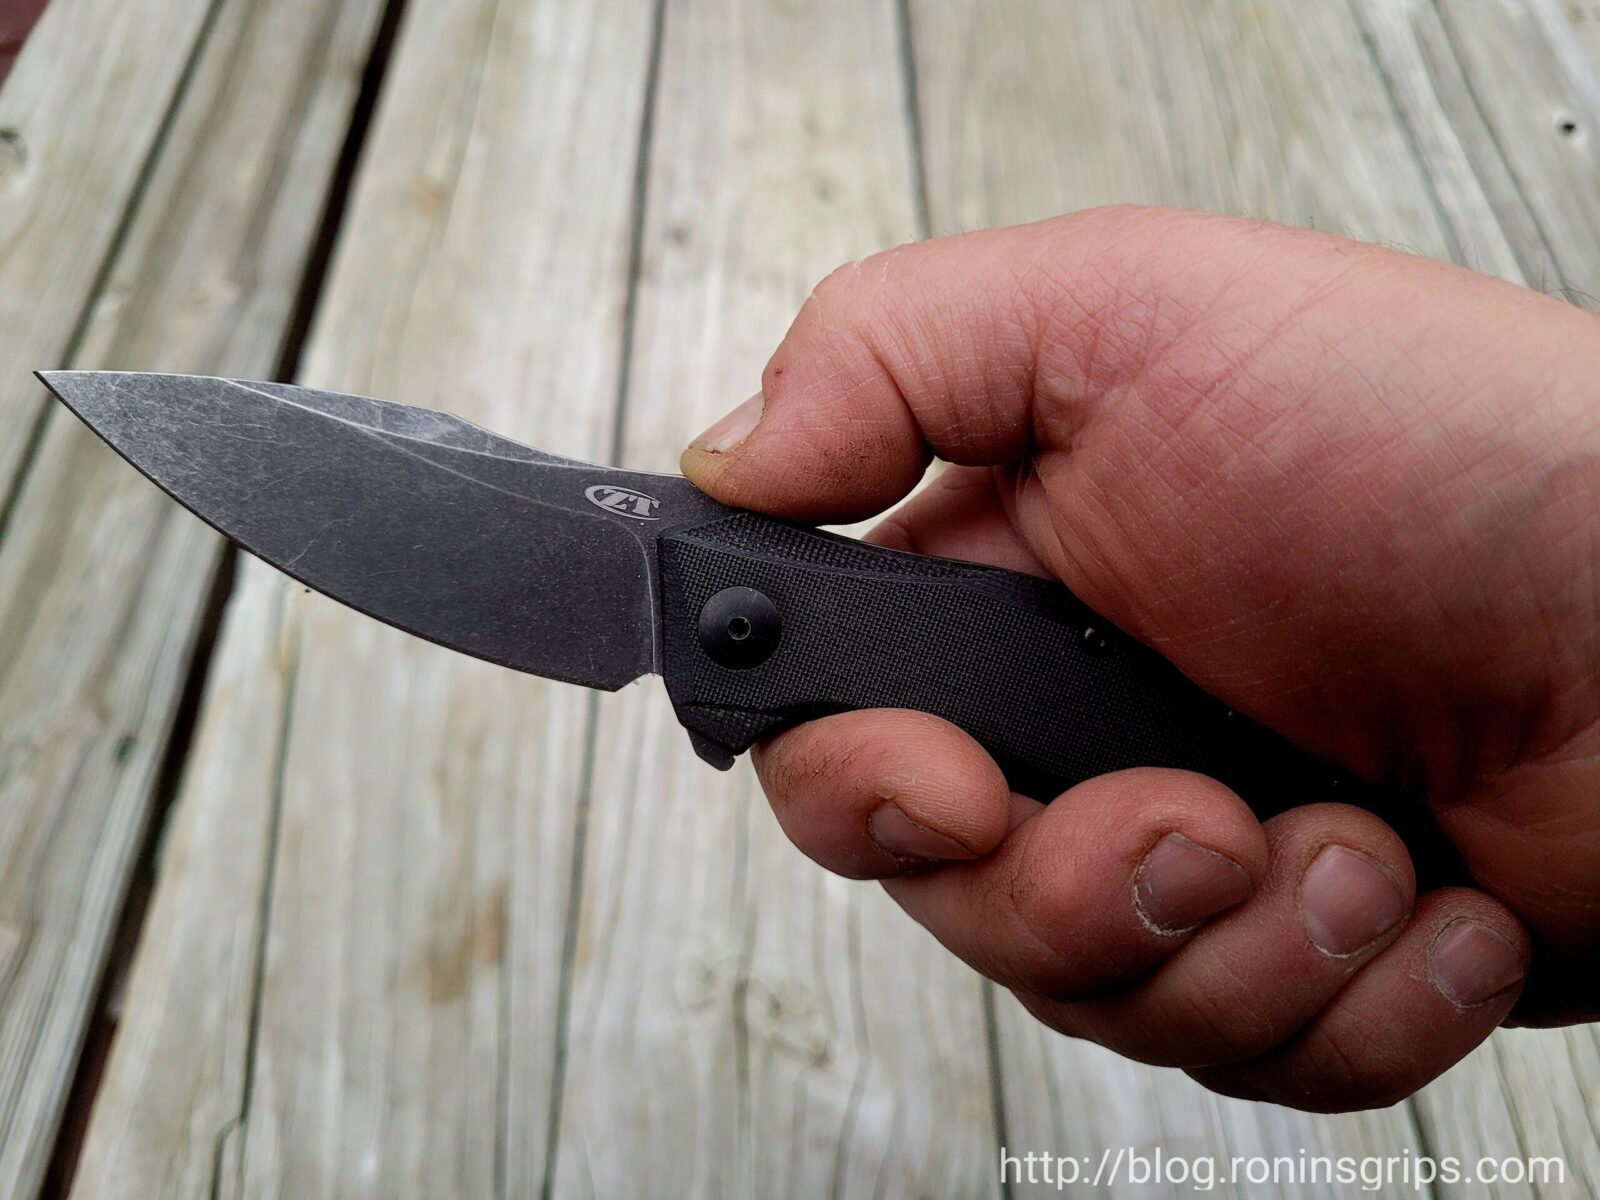
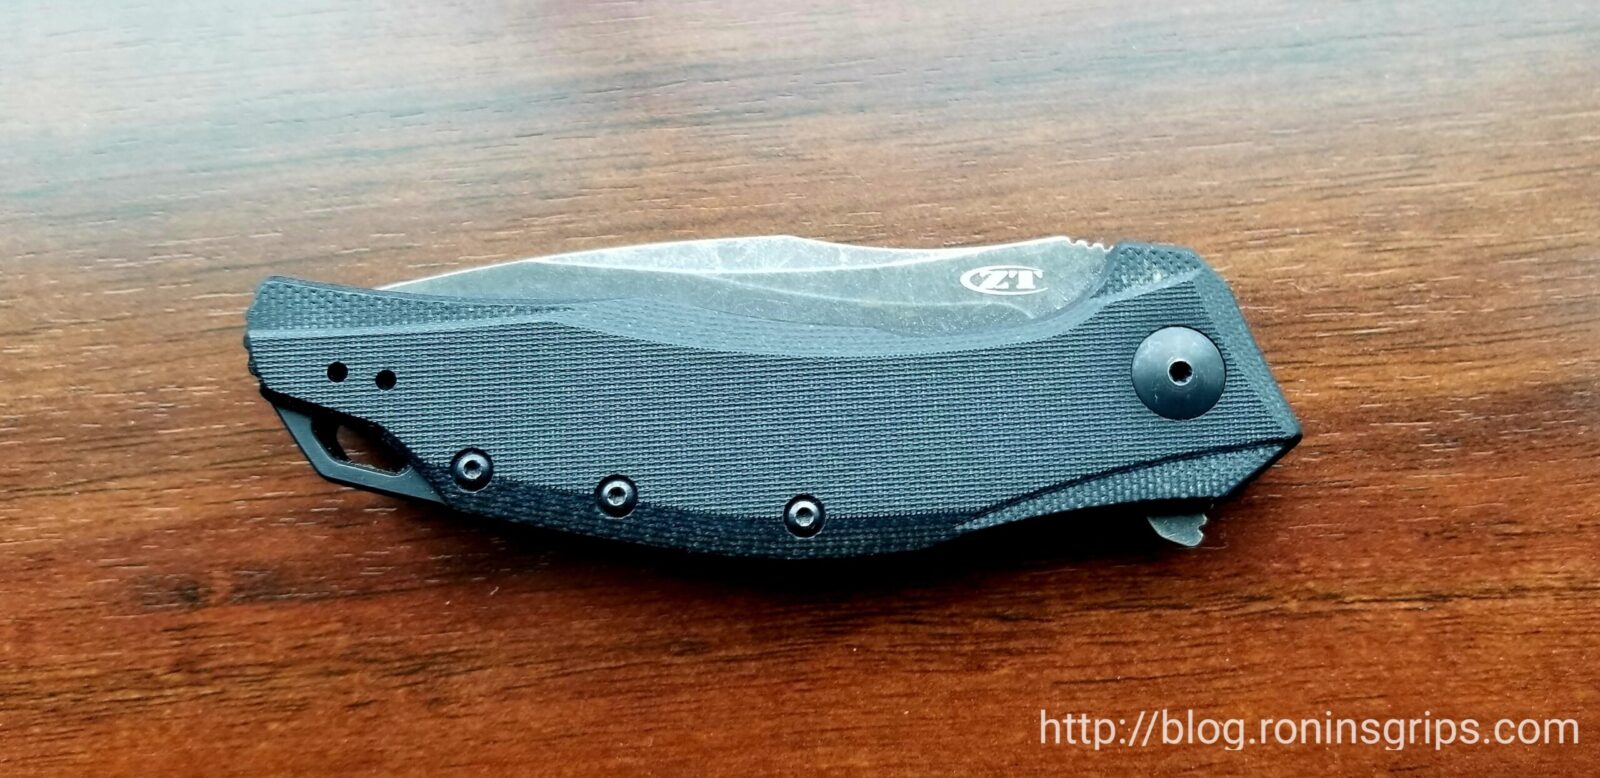
The knife shapes your hand and has a very handy thumbrest on top to give you more leverage if you need it.
What you wind up with is a very eronomic knife with an amazing edge. Now I don’t try and use a knife for something it’s not like being a substitute for a big crowbar but I did use it real world and found it to be great – that’s why it kept winding up in my pocket.
It’s both thin and light without sacrificing strength when it comes to using the knife as a knife and not a crowbar – it’s not mean to be a crowbar!
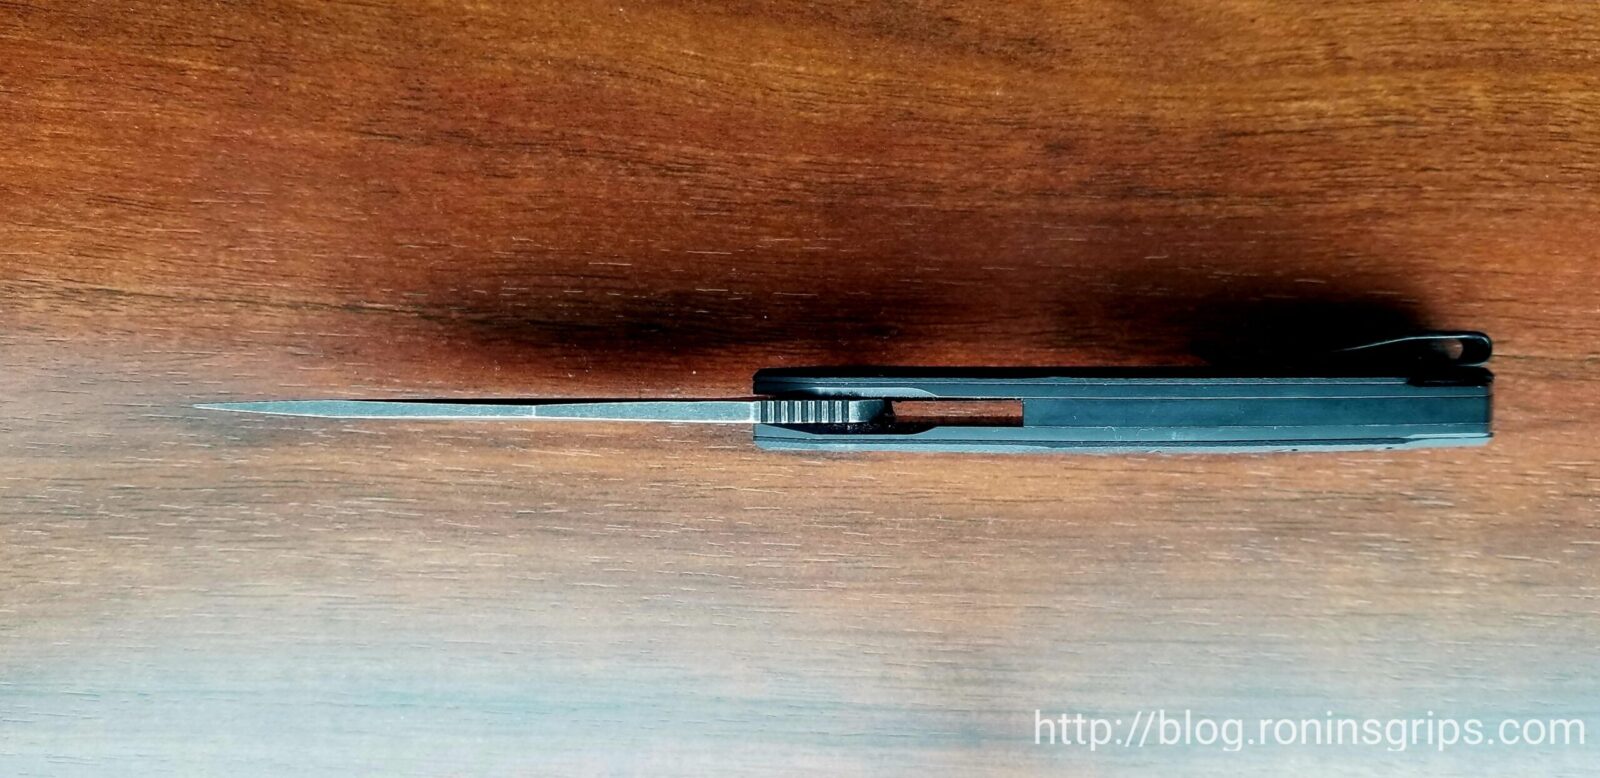
Here’s a view from the top and you can see the thumbrest with serrations called “jimping” designed to keep your thumb from slipping.
I really like the SpeedSafe flipper mechanism that Kershaw and ZT use. It allows you to open the knife with one hand very easily but I have never had one open accidentally in my pocket. Years ago, I had a Gerber and that thing sprung open a few times in my pocket and I have no idea where it is now – the trash maybe.
I don’t know what the Blackwash process is but I can tell you it holds up remarkably well.
Now, I do have one not-so-happy moment to share. We were headed down to the Smokies this past fall and somewhere between Michigan and Tenessee the knife fell out of my pocket. It could have been when I used to to cut open a package of CR2023 batteries for my van’s tire pressure sensors or even some time when I was getting gas … I don’t know but I hope it found a new owner who realizes that he found an excellent knife.
So, what did I do? I actually bought another I liked it so much and it is still what lands in my pocket the most in terms of seeing actual real world use.
Conclusion
The ZT 0357 series are great knives. My blackwash knifes – the first one I lost and the new one are great. I can carry it without feeling like I have an anchor in my pocket and the blade length is great. If you are looking for a new folder, I’d highly recommend it – Like I said, I went so far as to buy a second when I lost the first – that’s how much I like mine.
I hope this helps you out!
Note, I have to buy all of my parts – nothing here was paid for by sponsors, etc. I do make a small amount if you click on an ad and buy something but that is it. You’re getting my real opinion on stuff.
If you find this post useful, please share the link on Facebook, with your friends, etc. Your support is much appreciated and if you have any feedback, please email me at in**@*********ps.com. Please note that for links to other websites, I may be paid via an affiliate program such as Avantlink, Impact, Amazon and eBay.
In searching on the web, I’d seen links to Gun Deals once or twice but never bothered because of the name. My mental scam filter is always set to high in other words. They recently reached out to me about their service so I took a look and was surprised.
Gun.Deals – yeah, that really is their website but wha I didn’t know is that it is a free to the user search engine where you can plug in what you are searching for – firearms, ammo, optics, lights, knives, etc. – and then they return listings at various websites so you can see the prices. You can then click on a result to learn more or order directly from the merchant’s website you go to – Gun.Deals helps you find the deals but they aren’t the actual seller, which is just fine. You can go to merchants you like and skip ones you do not.
They have advertisements and ways for vendors to post listings so I sure they have a number of ways to make money but it is not off you. It’s the same as you using any other search engine but they have tuned Gun.Deals for the things we care about.
One of the biggest value adds in addition to just finding items and seeing their prices is whether they are in stock or not. They also split out “in stock” vs. “out of stock” listings via their real-time inventory information, they can save you time and frustration as well. A pet peeve of mine is searching for something and going through website after website of vendors listing the product but not having it in stock.
Screen Shots
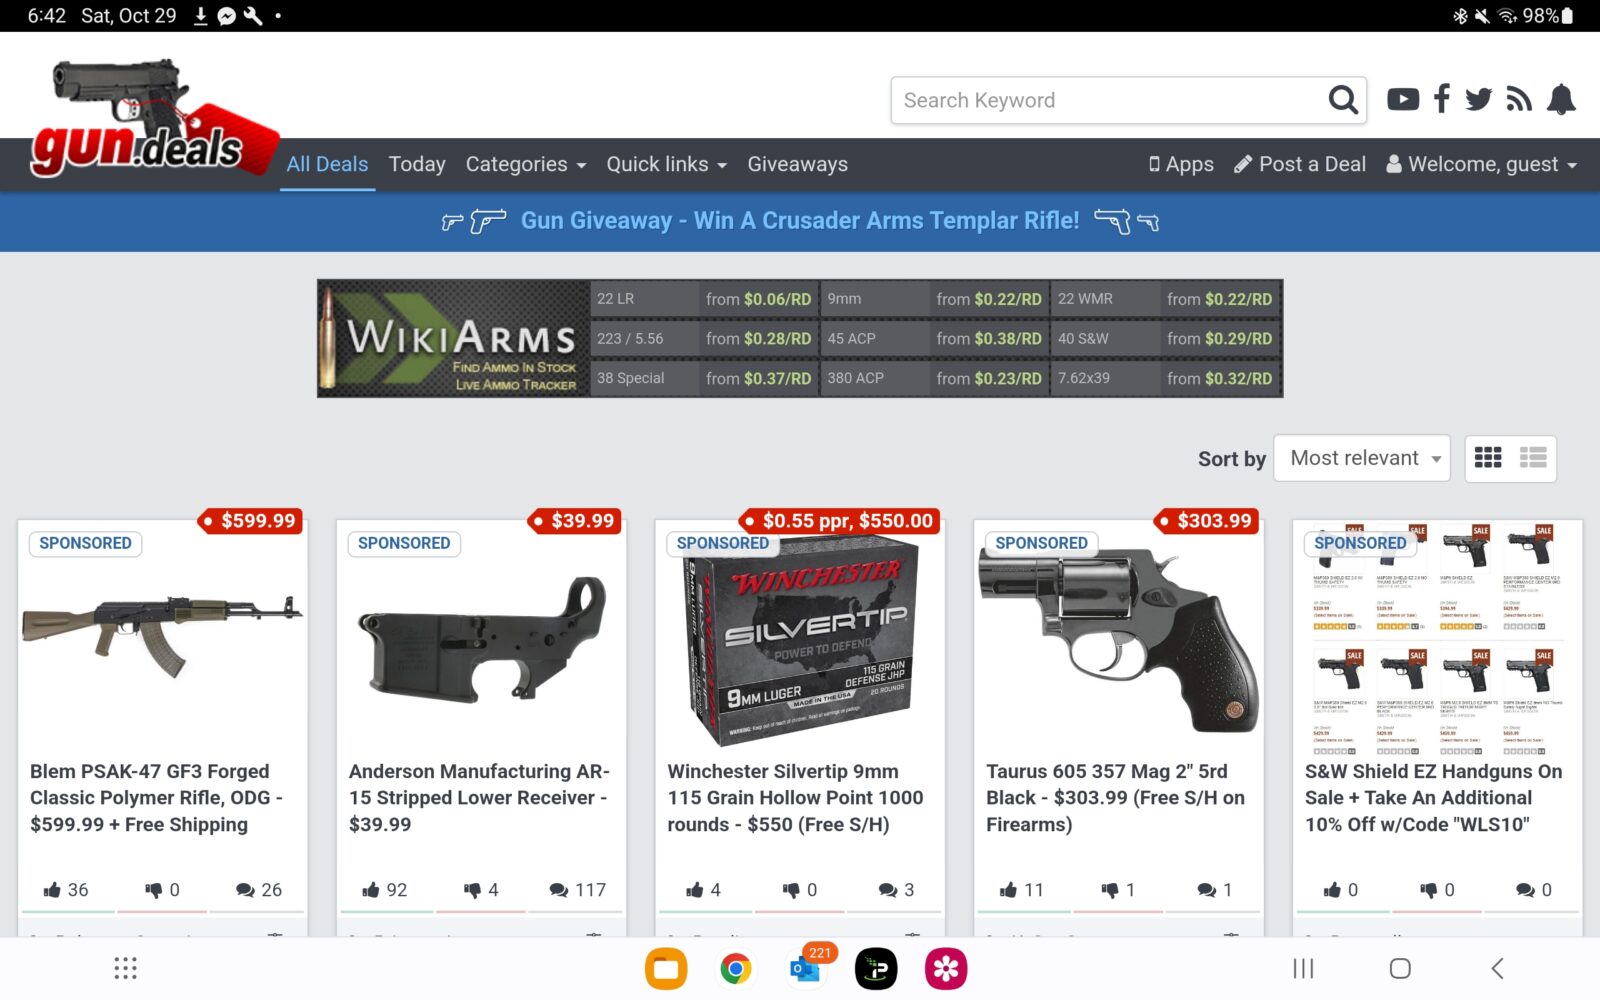
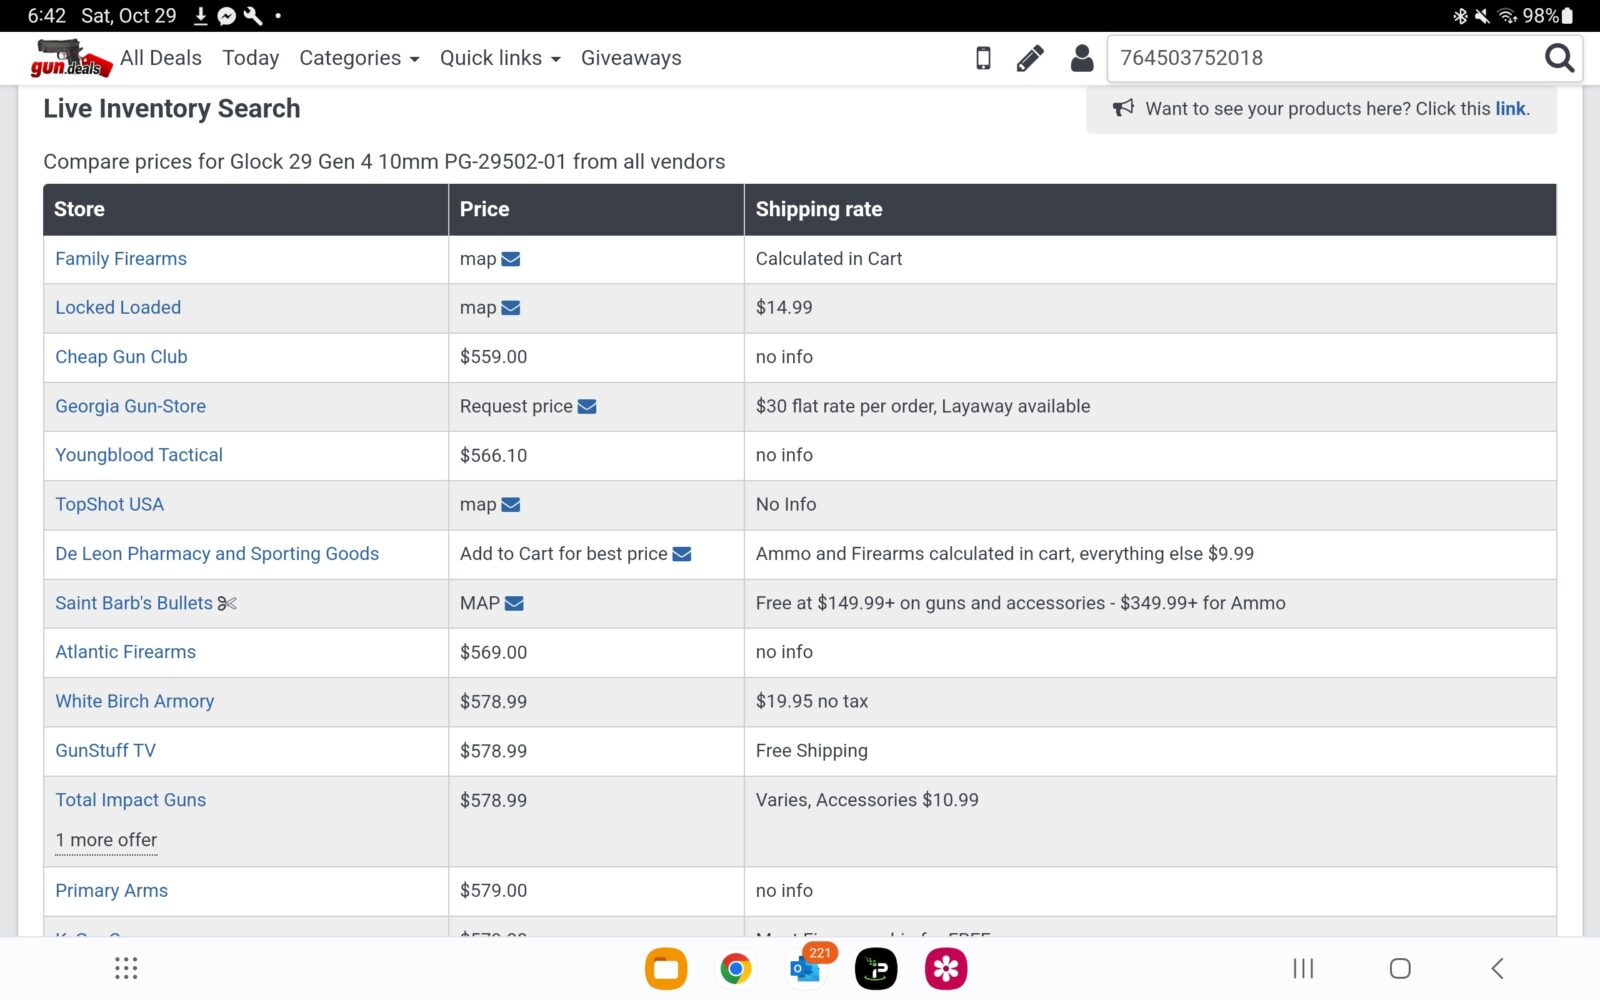
So you can get an idea of what the site looks like, I just went to their main page while writing this post:
This is their main page that came up for me just now. I then entered “Glock 29” in the search bar.
It came up with both the Glock 29 Gen 4 and the SF. I clicked on the Glock 29 Gen 4 and the above is what came up. It separates listings that are in stock from out of stock automatically and that is really cool.
Summary
With money tight these days, add Gun.Deals to the websites you go to for checking prices, finding deals, etc.
If you find this post useful, please share the link on Facebook, with your friends, etc. Your support is much appreciated and if you have any feedback, please email me at in**@*********ps.com. Please note that for links to other websites, I may be paid via an affiliate program such as Avantlink, Impact, Amazon and eBay.
I’ve pointed thius out before – I really enjoy building firearms. I don’t have the hardcore machinist skills to build one from scratch – I wish I could though – but I do enjoy assembling and tinkering plus I don’t mind some fitting / fabricating. With this in mind, I have a lot of fun building ARs from PSA kits because they are affordable, reliable and accurate. I’m not going to waste time with the whole manufacturing tiering or the rediculous “poor” labels – that’s all they are. Now, if you are in the military and you need special weapons, you aren’t reading this post – it’s that simple. If you are like most folks and want to build an AR that you can enjoy with friends and family, then read on.
Founded in 2008
For those of you who do not know Palmetto State Armory (PSA) – they have been around since 2008. It was founded by Josiah McCallum after his Iraq deployment and he started it in his garage. To put it mildly, he has been growing PSA ever since into the powerhouse it is today. Folks, PSA has a ton of offerings now – ARs, AKs, pistols, ammo, parts … the list goes on and on. One thing you will notice is that they are constantly learning and evolving.
I’ve Only Had One Problem
So, I bought and built my first PSA AR many years back – I looked at my order history and it looks like it was 2014. In all the years, I can only remember one problem – they forgot to include the disconnector. I contacted customer service and had one a few days later. That was probably a year or two after my first one and I’ve not had a problem since. You’ll notice now they bag their parts by grouping so this probably helps with quality control considerably.
Have I ever had a part fail? No – not that I recall. I normally will put a few hundred rounds through a build, eventually get bored of it and have my FFL, Michigan Gun Exchange, sell it to fund another project. So all I can tell you is that my experience with their AR kits has been very favorable and have no reservations telling someone to use them – especially if they want to start and learn.
What options do they have?
Whew – they have tons and tons of kits and parts you can choose from. Different barrel lengths, handguards, furniture, triggers, and so forth. You can buy a kit with everything except for a stripped lower receiver or you can buy assemblies such as a build kit for a stripped lower to then use with whatever upper receiver you want.
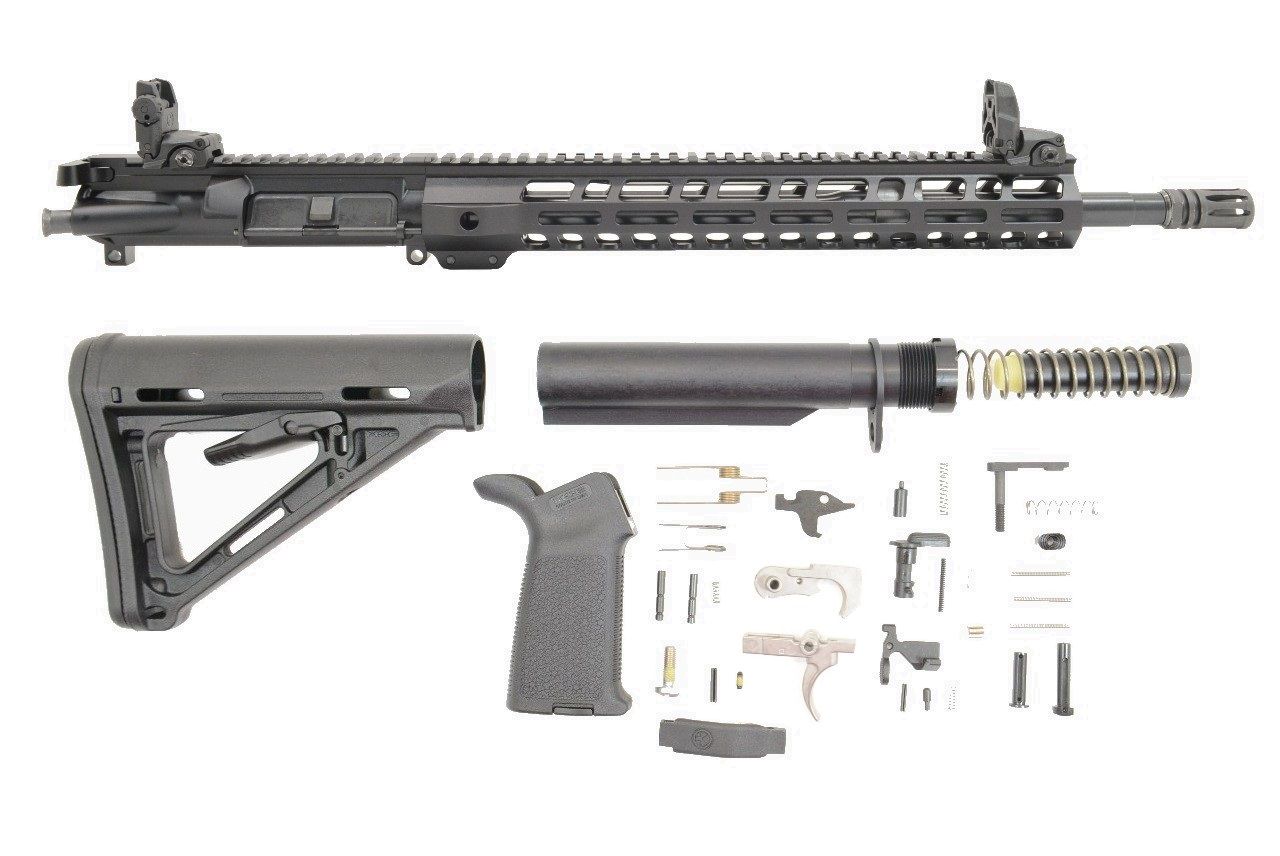
The point is that they have something for everyone and if you are patient and watch their Daily Deals (you can sign up for their emails) then you can get a great deal. For example, the kit I built this time is their “PSA 16″ 5.56 NATO 1:7 MIDLENGTH NITRIDE 13.5″ LIGHTWEIGHT M-LOK MOE EPT RIFLE KIT W/ MBUS SIGHT SET” – which means in has a 16″ barrel that is chambered for 5.56 NATO with a 1:7 twist and black nitried finish, has a 13.5″ M-LOK handguard, comes with Magpul MOE grip and buttstock, their enhanced polished trigger (EPT) fire control group and has a set of Magpul BackUp Iron Sights (BUIS). Yeah, they pack a lot into that description. The kit comes with everything you need except for a stripped lower receiver (I used an Anderson I already happened to have) and the best part was that it was only $479.99 vs. the list of $799.99.
The AR parts are all Mil-Spec – what this means is that rifles that use parts built to the original military specification dimensions can use other parts. For example, I prefer the Magpul ACS stocks – they just feel better to me. Because the PSA buffer tube is Mil-Spec, that meant I coul easily replace the MOE buttstock that came with the kit with an ACS.
My point is that a PSA kit can serve as a foundation that you can very readily build on. Down, the road if you want to change out barrels, triggers, uppers, etc. you can easily do so. If something has a problem and you need to replace, again, there will not be a problem finding parts.
By the way, I would recommend a spare parts kit regardless of brand AR you are using – they are usually relatively inexpensive and include wear items, such as the firing pin, plus parts that get lost – for example, the takedown detents.
A quick comment on the EPT triggers
The PSA EPT triggers are a decent. I recently did a test on a number of triggers and a Mil-Spec Aero brand trigger had an average pull of 6 pounds 12.4oz. The PSA EPT had an average pull of 6 pounds 12.3oz and that was with both lubricated by oil. So, not a huge benefit but I do like them – just don’t expect a world of difference is my point.
If you really want a remarkable trigger, buy the PSA 2-stage trigger that has an average pull of 4 pounds 9.5 oz when lubed. It’s a must-have upgrade for only $64.99 and yes, you can always change to it later.
How do you assemble these kits?
Really, the only thing you need to assemble is the lower. PSA has already done the upper and headspaced it just to be safe. In theory, Mil-Spec barrels going into Mil-Spec uppers should not need headspacing but the reality is that you better check it just to be safe and PSA does.
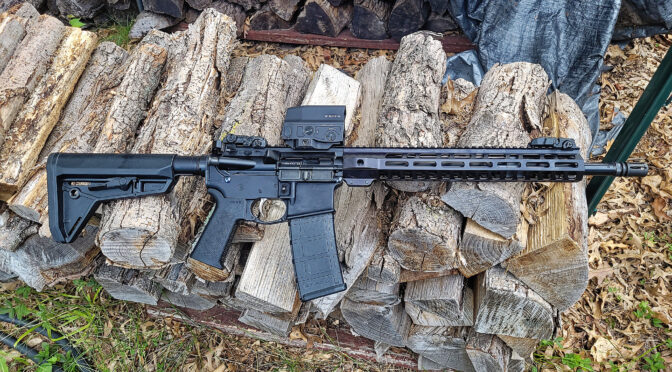
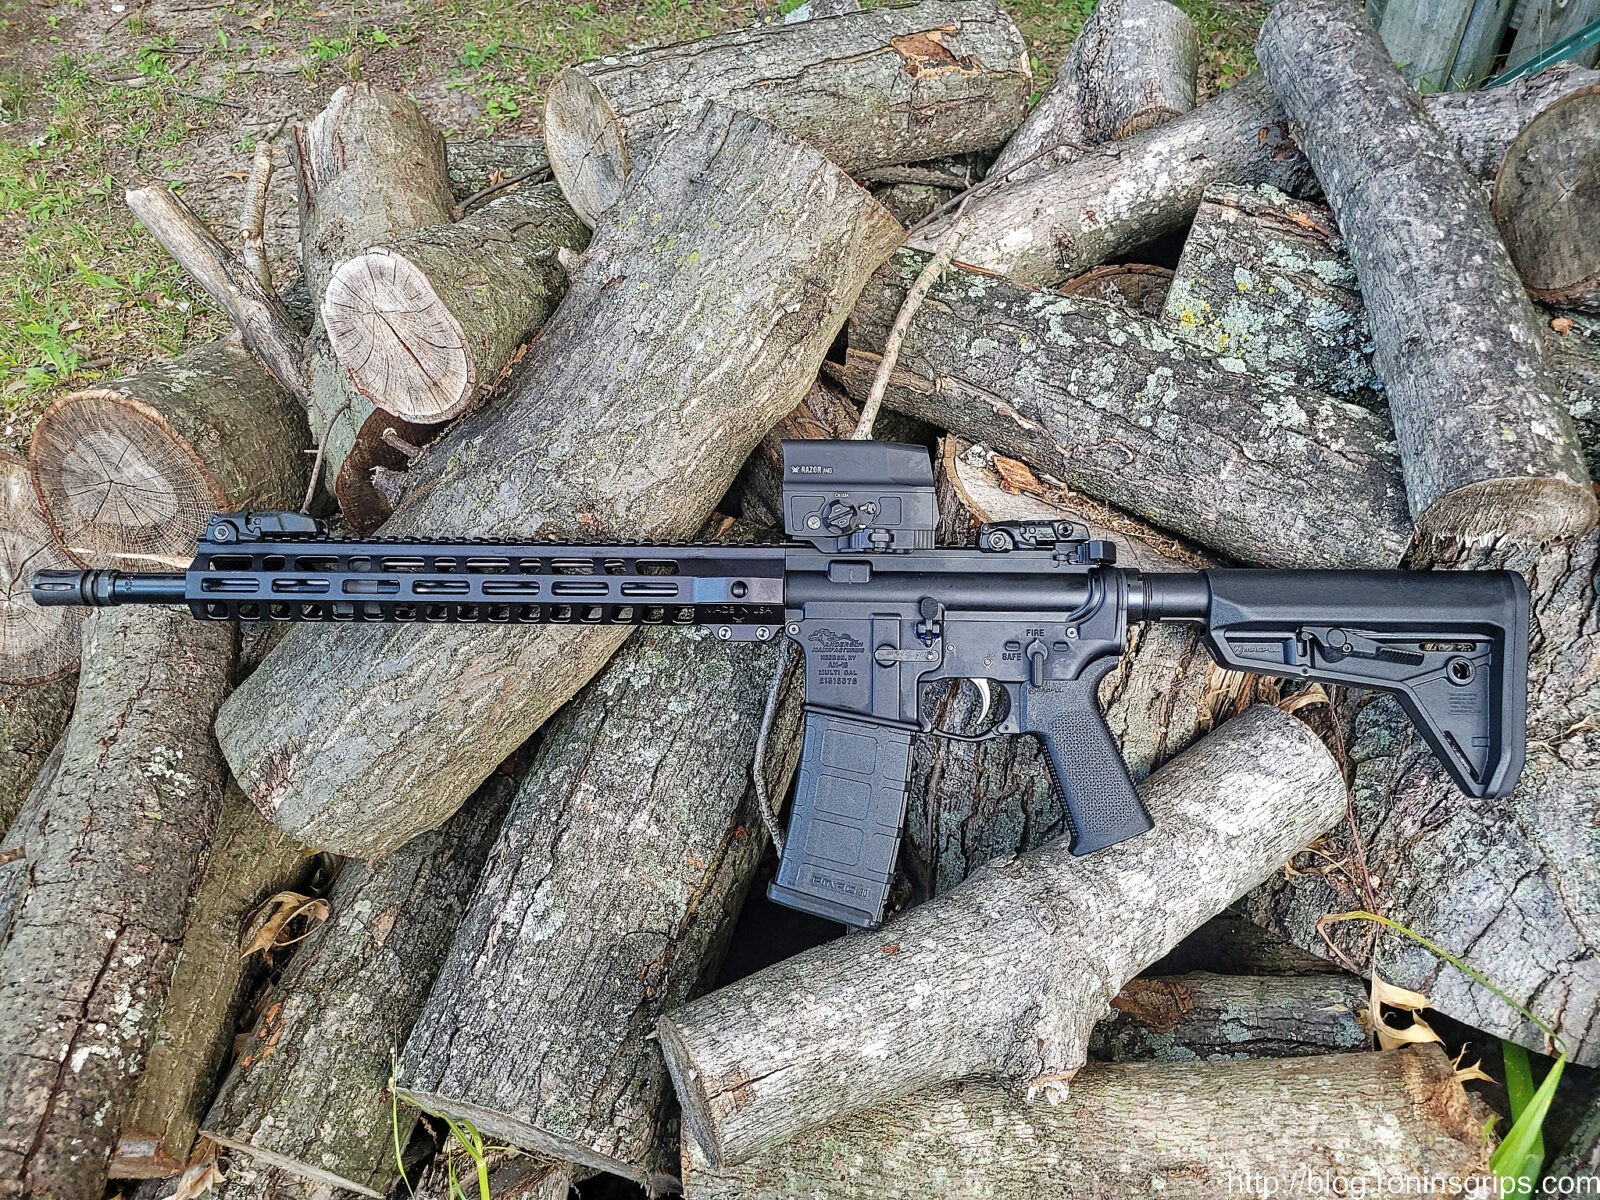
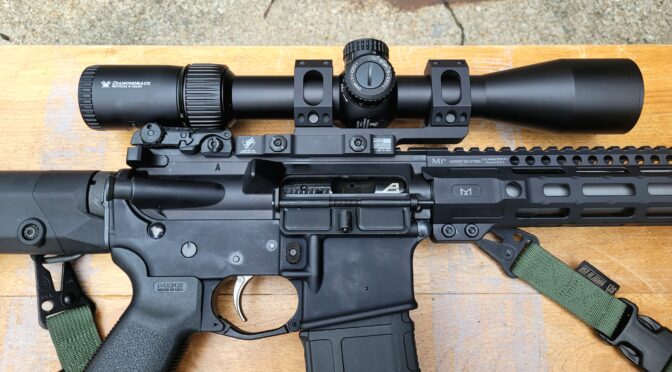
This is my latest 16″ PSA AR build. It has a MOE stock, Magpul BUIS and a Vortex Optics UH-1 sight.
Recommended Tools
Over the years, I have bought and tried quite a few tools but there are just a few that have stood the test of time that I still use. I figured it might help you to have a list so you can consider whether you want to pick them up or not.
Trigger Guard Jig – there are a ton of ways to do the trigger guard roll pin but a tool makes it really simple and reduces the odds of marring the finish or snapping an ear off the receiver.
Magazine Catch Punches – folks, Wheeler and others make long roll pin punches that have a vinyl coating to help install the mag catch. They are totally worth it. No more tearing up your finish or having to apply duct tape – these tools help you get it right the first time.
Front Pivot Pin Detent Jig – installing front pivot pin’s detent and spring is next to impossible without the right tools. Wheeler and others make a very simple pin set to help you save your sanity.
Trigger slave pin – greatly simplifies installation of the assembled trigger, disconnector and spring assembly. We make one 🙂
Magpul Castle Nut Wrench – I have used a wide variety of tools over the years ranging from the old GI tool to bizarre looking combination wrenches. If you want a solid tool that will hold up over time, the Magpul wrench is the way to go.
Gunsmith Punch Set – there are tons of makers. Basically you want a wide range of punches and roll pin punches. I have a mix of punches from Tekton, Weaver and Wheeler plus ones that I have no idea where they came from.
Non-Marring Hammer – You’ll need a small hammer from time to time that will not tear up your finish – I use Vaughan hammers.
Automatic Punch – I have a tremor so my hands shake. To stake the rear castle nut, I just use a good General brand automatic punch. It’s not as deep/good of a stake as a hammer driven punch but I do the automatic punch repeatedly to deform the surface and lock the nut.
Magpul BEV-Block – If you plan to install barrel nuts or muzzle devices, you will need a really secure means to hold the barrel and receiver securely. DO NOT use the blocks that just use the pivot and rear pin holes your you are apt to bend them. I did that once. Get a BEV block. It’s way, way easier and does a great job.
In Conclusion
If you are looking for something fun to do and there are tons and tons of tutorials out there – build an AR. The PSA kits are reliable and very affordable with different options to suit your tastes.
Note, I have to buy all of my parts – nothing here was paid for by sponsors, etc. I do make a small amount if you click on an ad and buy something but that is it. You’re getting my real opinion on stuff.
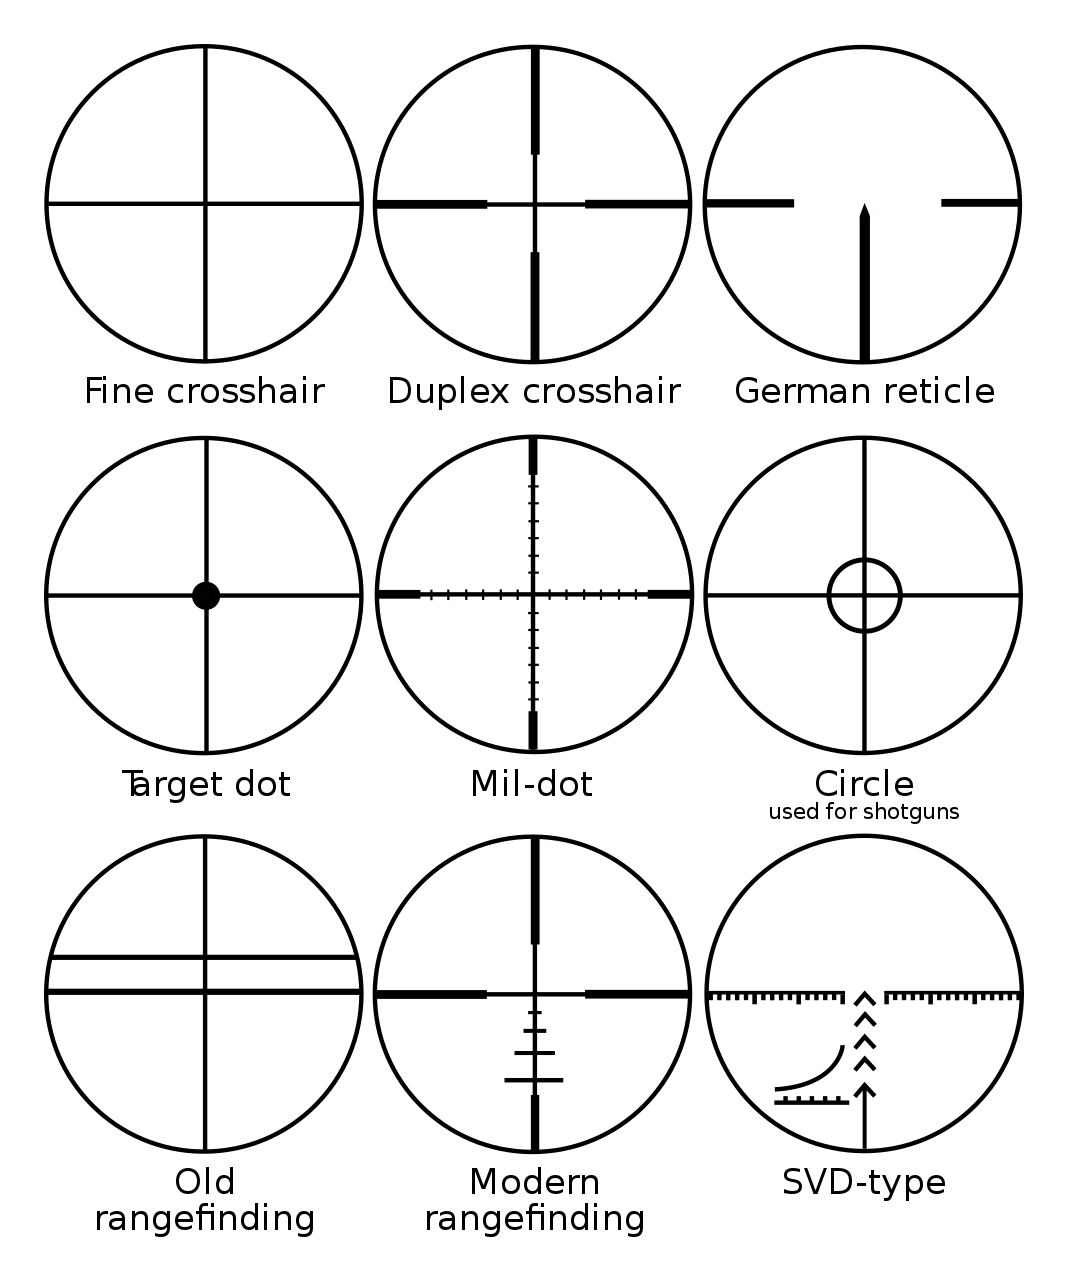
First off, I better explain that a recticle is the formal name for the cross-hairs or series of fine lines that are inside a scope that you use to aim with. There are a ton of different ones out there and one thing you want to do is to get them level with the rifle.
Let’s start with why this matters
The reason for this doesn’t affect the old traditional cross-hair designs but it does the ones that have additional marks to help you better determine the range and the necessary hold based on Mil-Radians (Mils) or Minutes of Angle (MOA).
If you search, there are tons and tons of posts about different types of reticles and how to use them. The important point I want to make is that for any of these more modern reticles with additional lines to help you accurately, the horizontal lines must be parallel with the rifle.
How do you level a reticle?
The first way is the old fashioned “eyeball” method. Hold the rifle and make sure the top of the receiver is as level as possible (meaning the rifle is not tilted left or right), look through the scope and adjust it in the rings until it is true to the top of the receiver and then start tightening down the rings while confirming nothing shifts. It’s not the most precise method but it does work, I’ve done a ton of rifles that way, but there is another approach using levels.
In it’s most form, you put a small level on the top rail or flat spot of your recever, tilt it until it is level and then put the level on the top turret and adjust the scope until it matches. Having something to hold the rifle in place while you work really helps as does having a second level so you can both confirm the receiver and scope are level as you work. You can often find single vial levels at hardware stores or through industrial supply houses. The one negative to this approach is that the levels can slide off if you don’t have things secure. I like to use a Tipton Pro Rifle Vise to hold the rifle in place while working.
Wheeler Engineering does offer a basic level set that works. I don’t use it though because it’s rear receiver piece has a magnet to secure it and that will not work in an AR or other weapon that is made from aluminum and not steel. For this reason, it wasn’t something I could use.
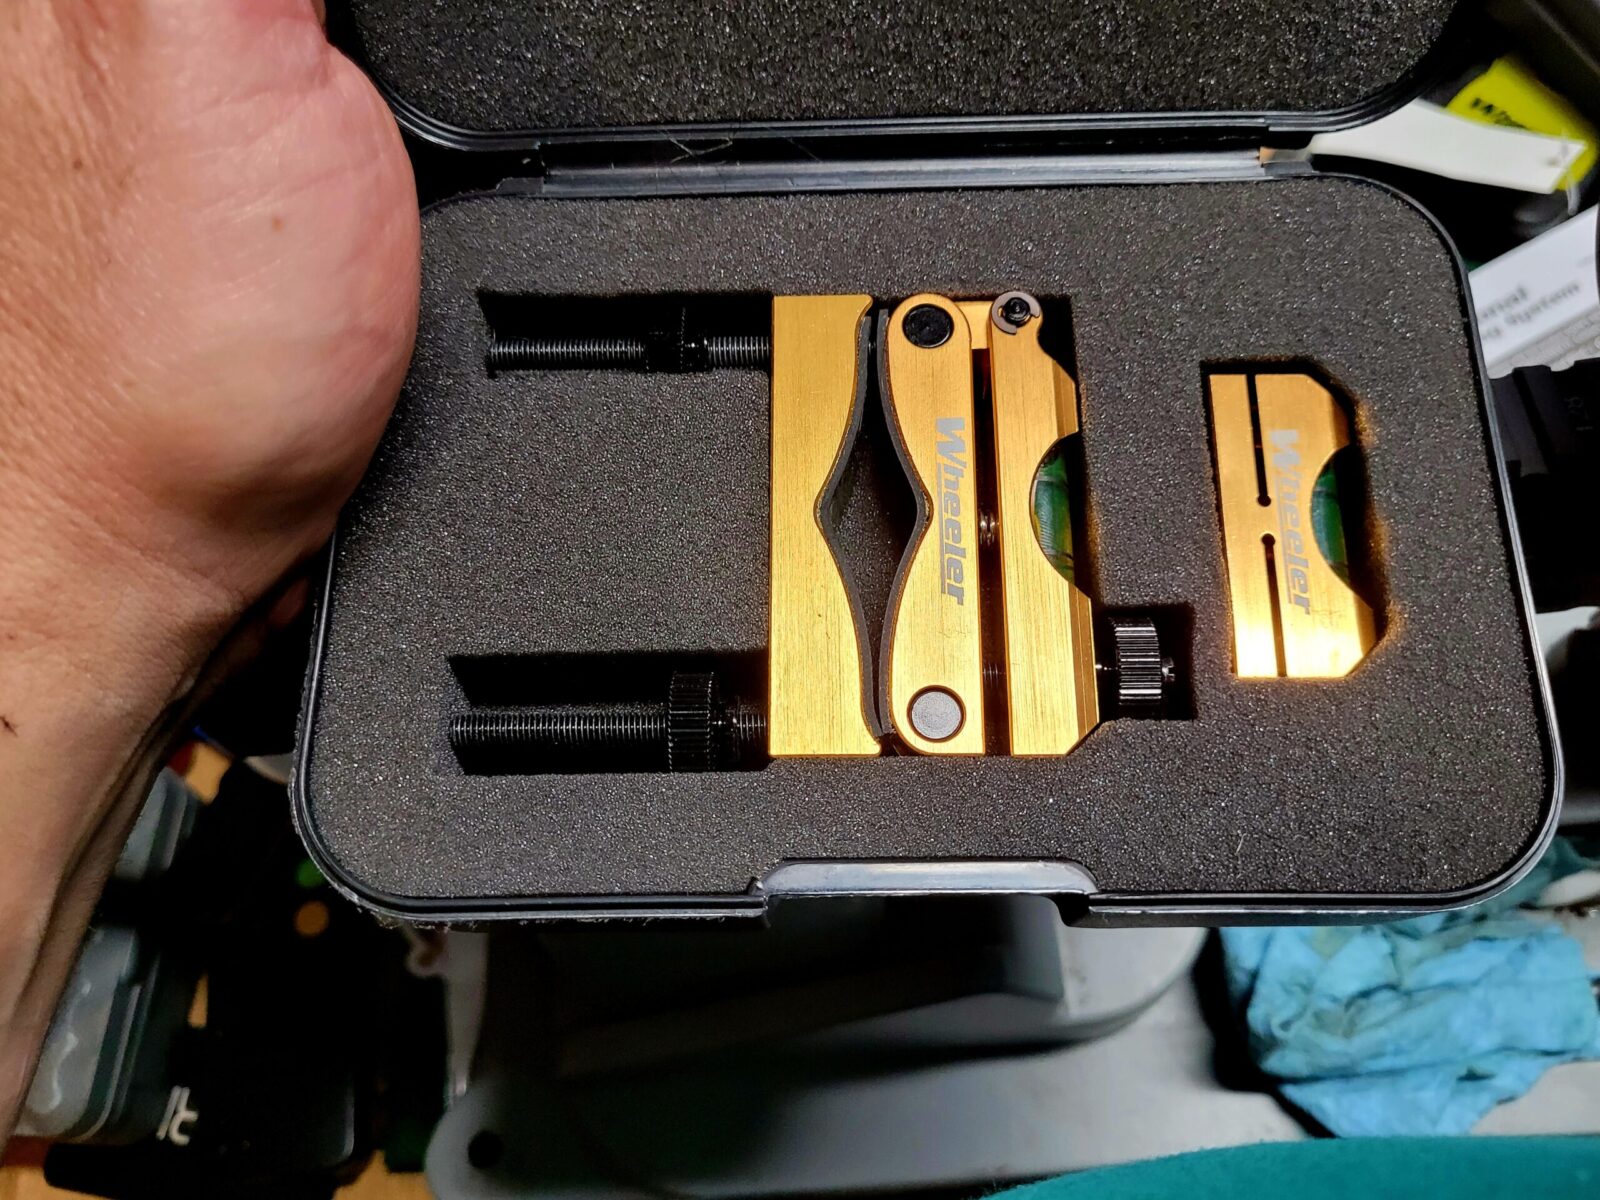
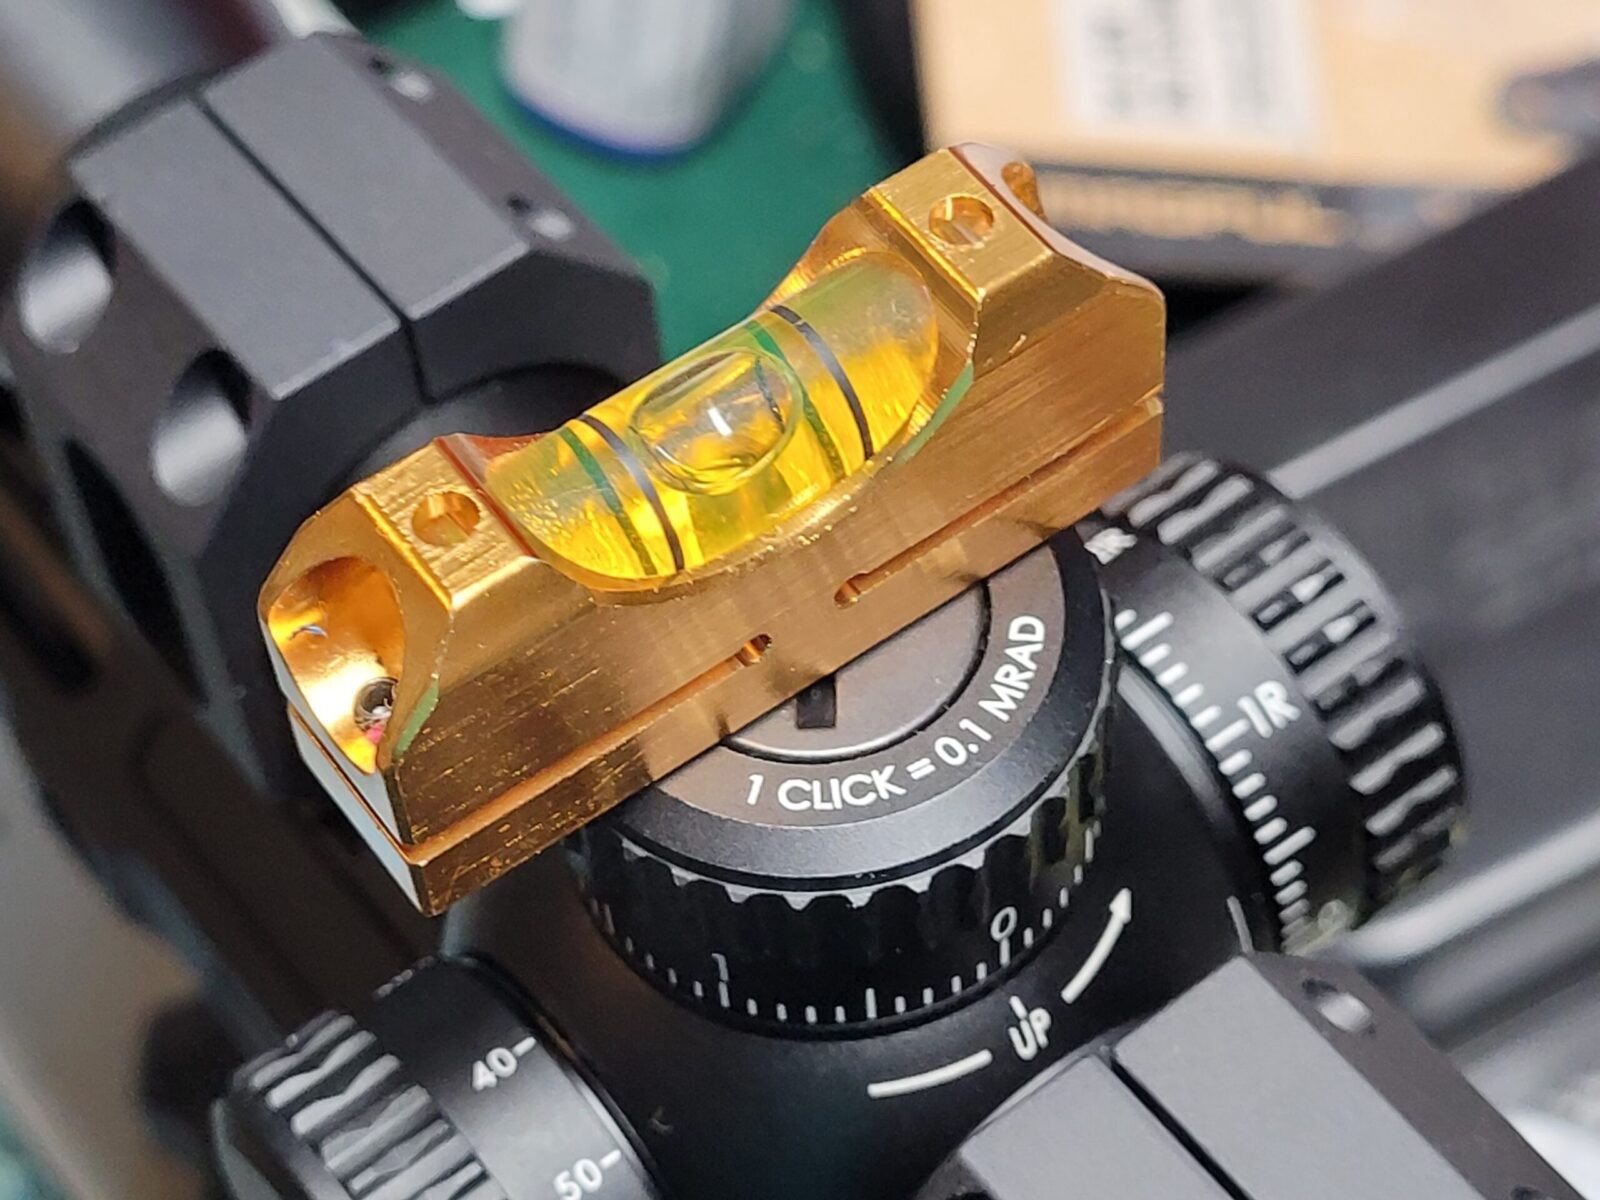
These days, when I have time and I want to try and get the scope as accurately positioned as I can on the first try, I use a Wheeler Engineering Profession Reticle Leveling System. It’s easy and fast.
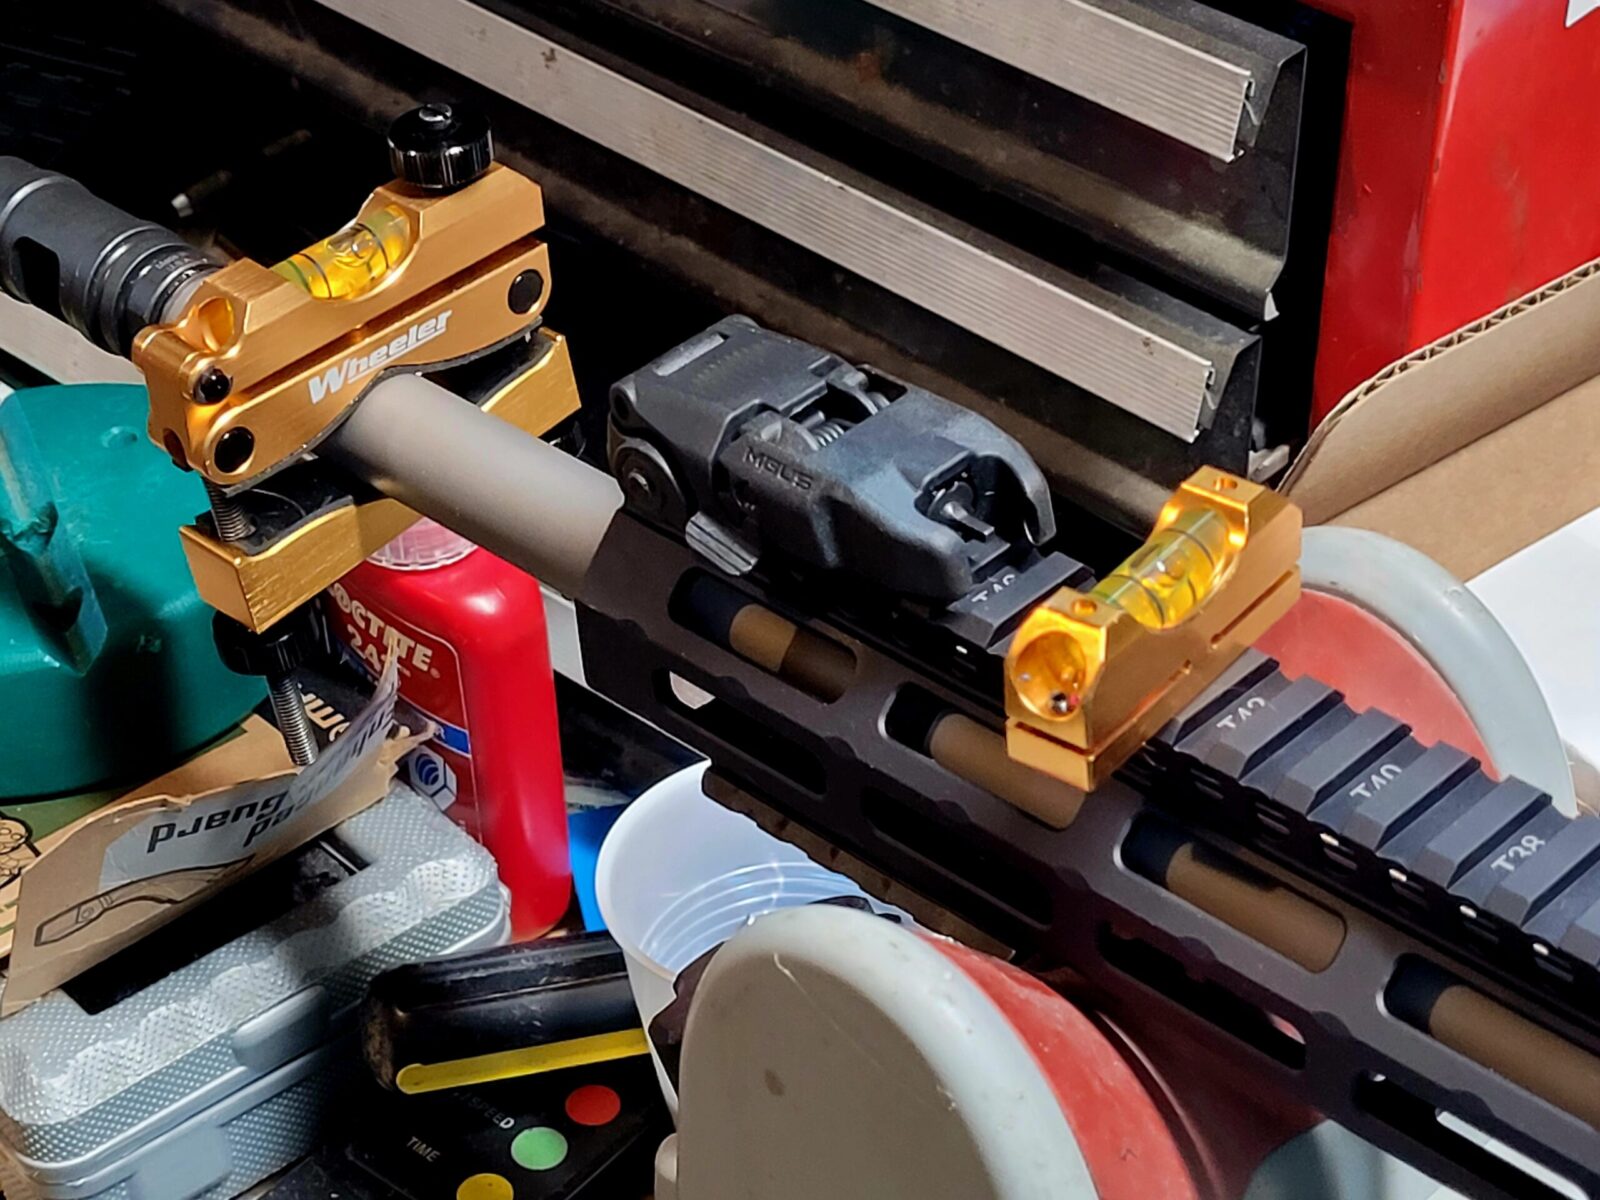
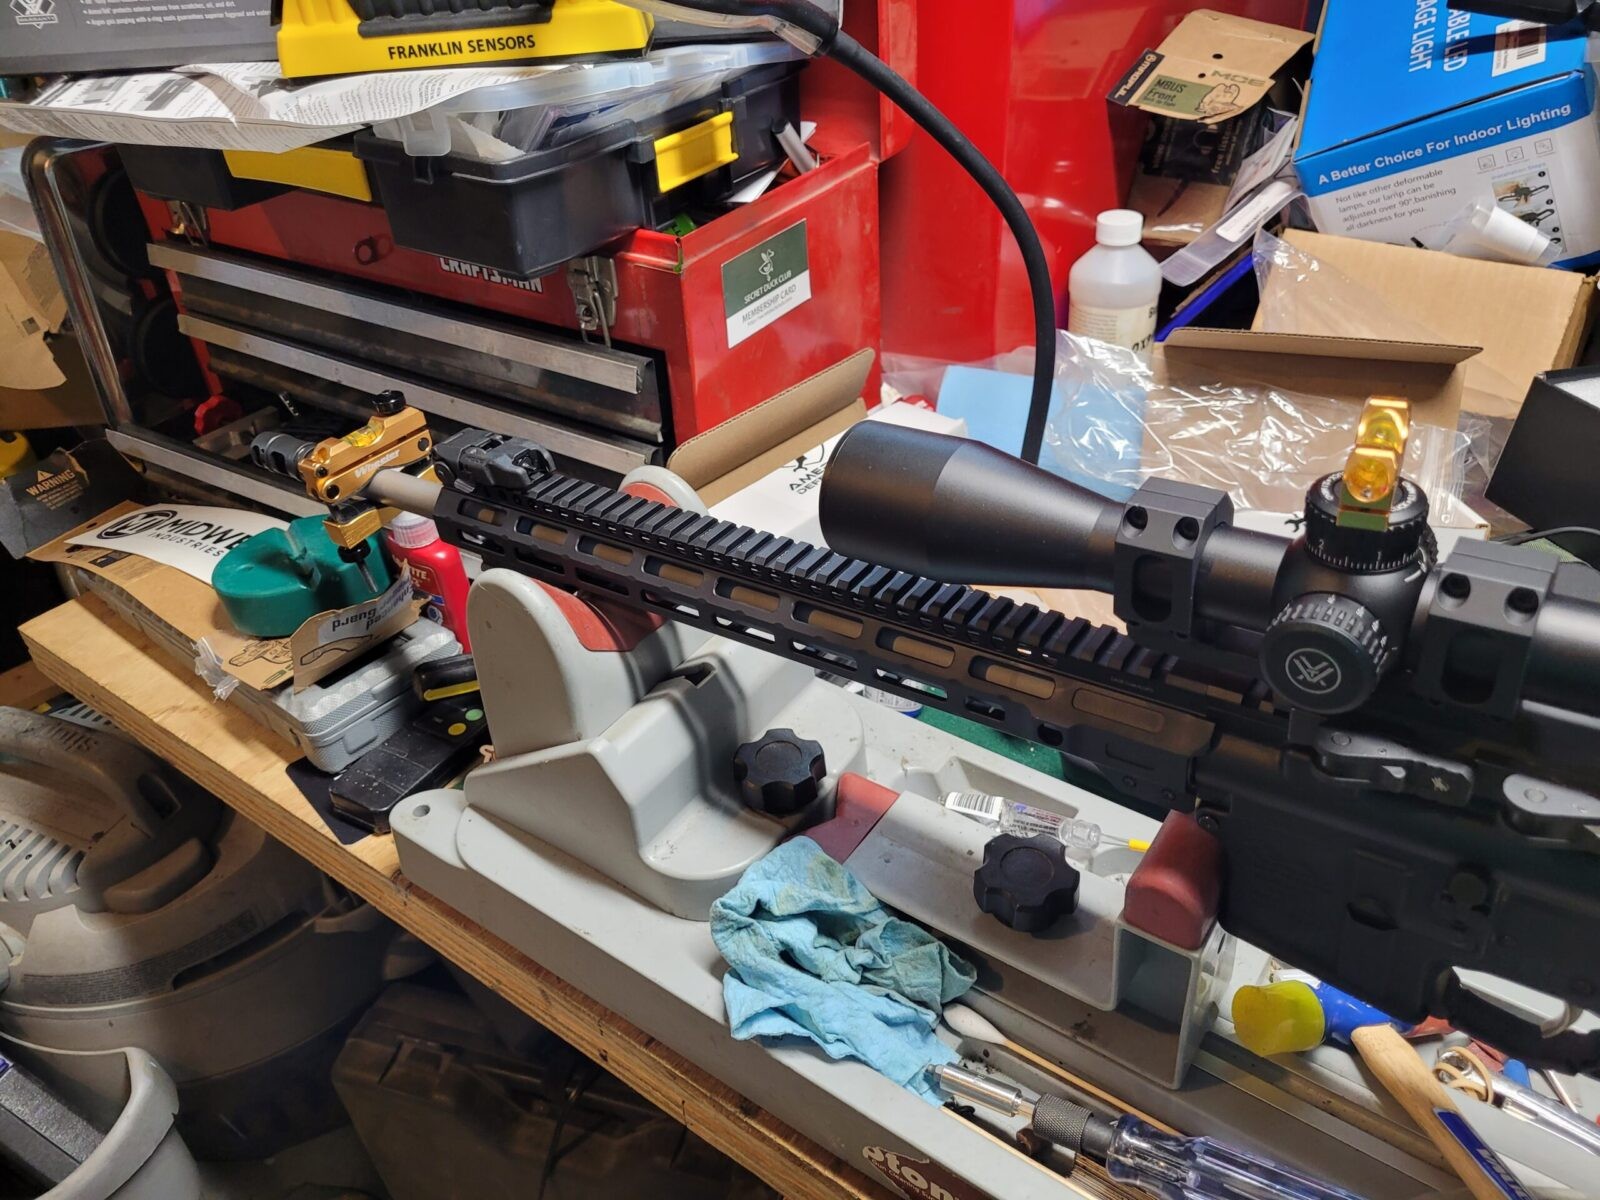
First, you put the level on your receiver/rail and level the receiver. Then you put the clamp on the barrel and level it – I compare both the receiver and the barrel bubble levels before I move the receiver level to the top scope turret. Once the level is on the top turret, I adjust the scope until the bubbles match and it’s done. I’ve used this for a number of years now and am very happy with it.
The professional leveling system has two parts – the barrel clamp and the separate level you use on the receiver and then the scope turret. The two parts are made from aluminum and come in a nice protective case. If it weren’t for the case, mine would look much more beat up. Protecting the parts makes sense for another reason – you don’t want things to get bent, gouged, dented or whatever and then throw off the readings or mar the finish of your weapon.
The first thing you do is to use the small level (shown behind the backuop sight) to true the receiver. Then you adjust the barrel clamp until it is level also. Just visible under the handguard is the front of my Tipton vise.
After the barrel clamp has been levelled, you move the small level to the flat top turret and then rotate the scope however you need to get it flat also. Compare this level to the barrel clamp level to make sure they agree. The more care you take to get the bubbles centered and matching, the better.
I do use a Vortex torquing screw driver to tighten the scope ring screws and am careful to confirm the scopes levelling does not shift in the process. Vortex scopes say not to torque them past 18 inch/pounds (please note that is inch pounds and not foot pounds just to be very clear – you don’t want to damage your scope but at the same time, you do want it secure).
Again, with any of these methods, it really helps to secure the rifle in a vise where you can adjust and then secure the rifle so the top is horizontally true.
Yeah, this is my real work bench. It was worse than normal as I still had all of the packing from the scope,rings and upper on the bench. The Tipton gun vise has served me very well over the years. By the way, notice the level on the turret – you reall want that perpendicular to the rifle. In this photo it is slightly crooked and no longer perpendicular and risk the scope not bein accurately levelled to the rifle.
Conclusion
The Wheeler Engineering Professional Leveling System has served me well and I have used it on a number of projects over the years. I have no hesitations in recommending it to you as well.
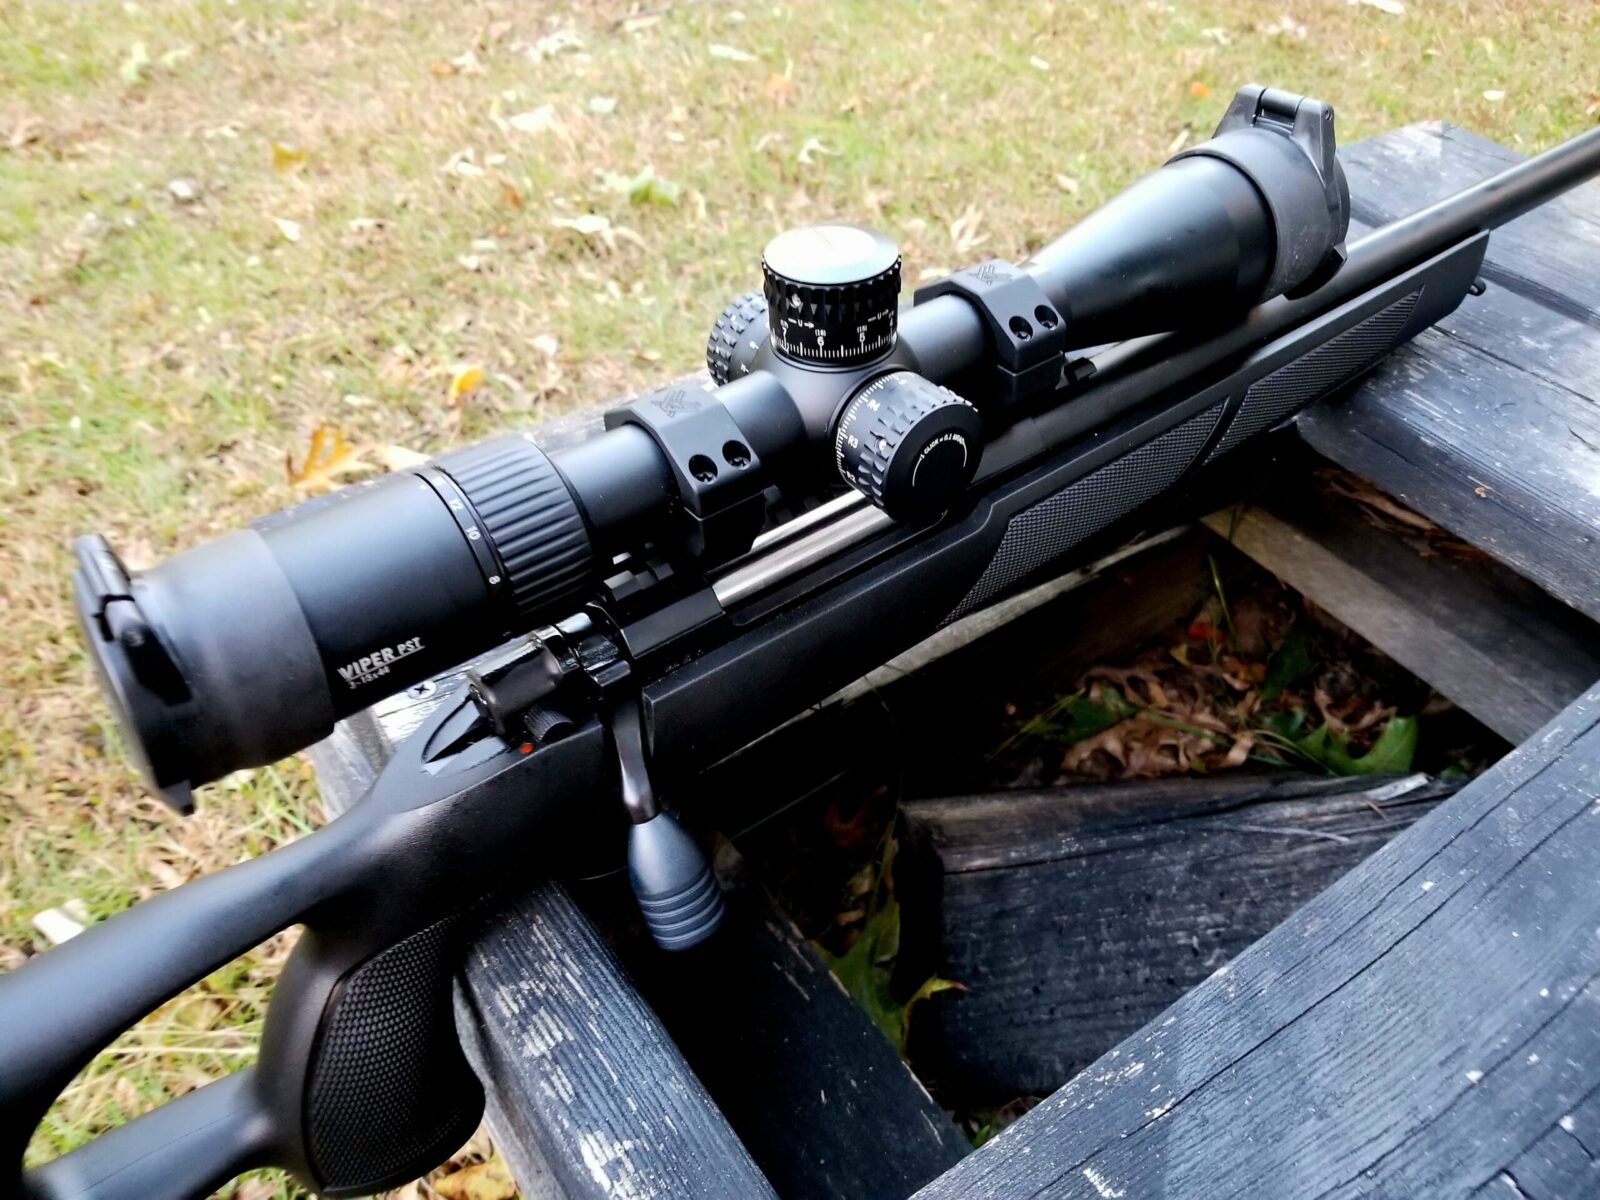
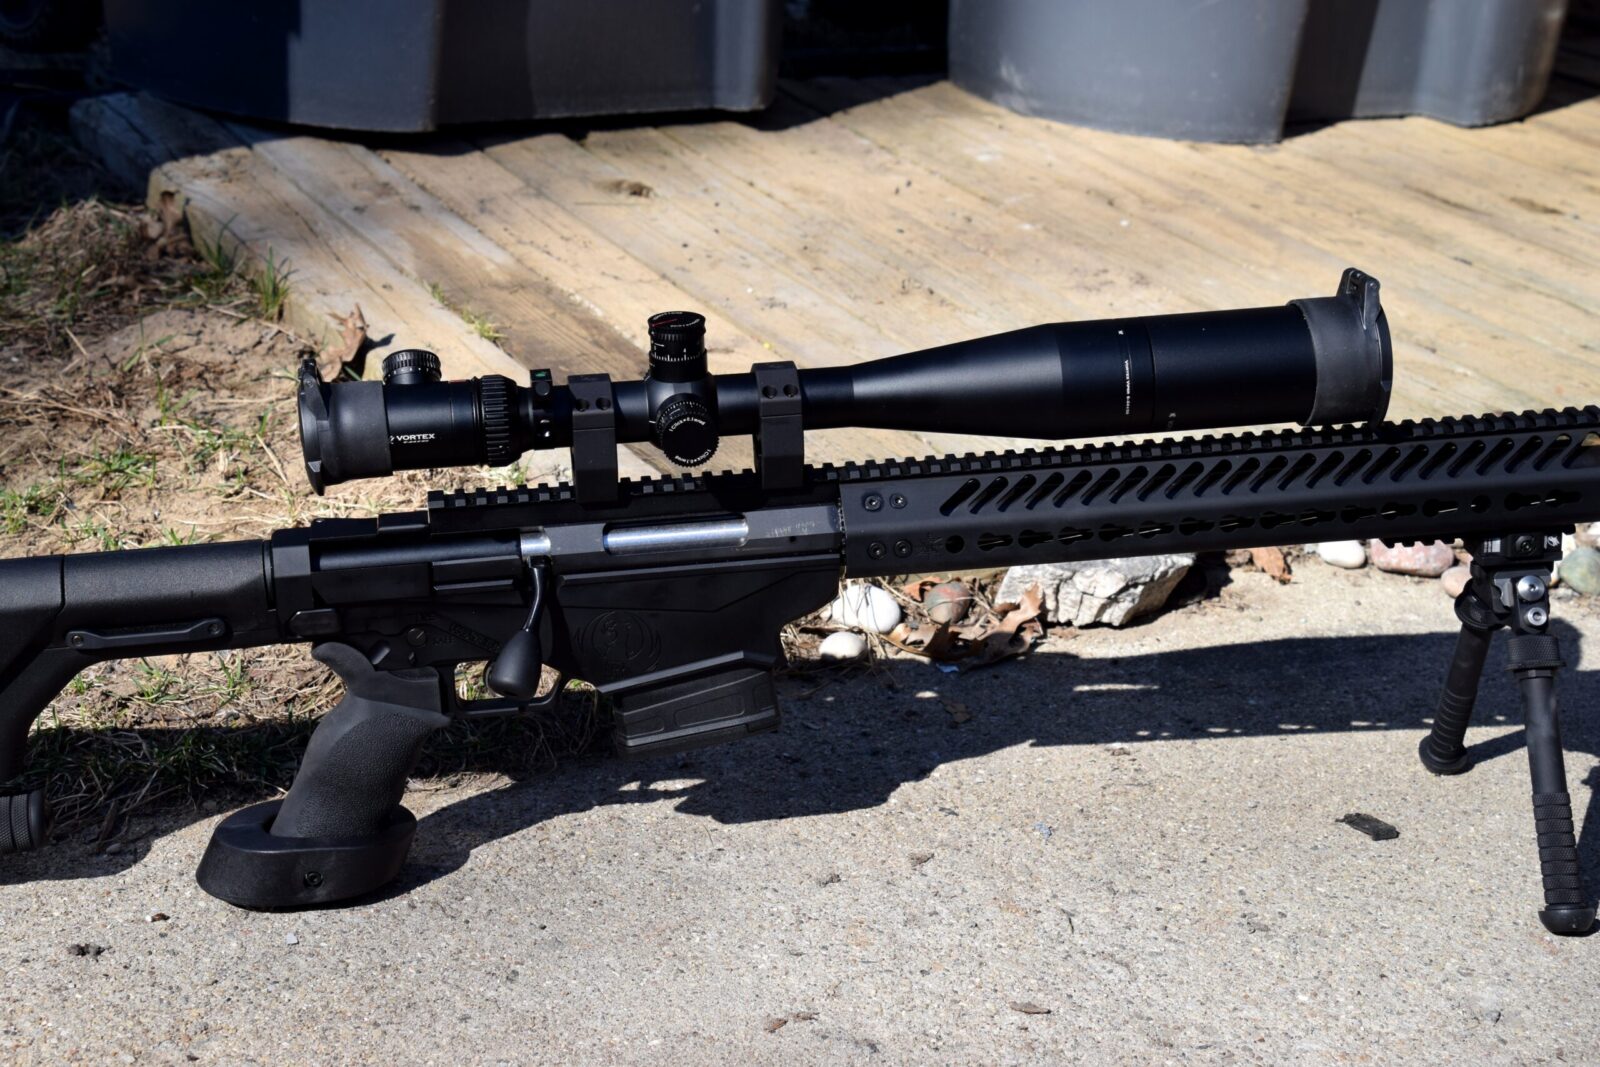
Sabatti Urban Sniper with a Vortex PST scope.
Ruger RPR with Vortex PST optic sporting its sun shade.
IWI .308 Galil with a Vortex PST Gen 2 Scope.
I hope this post helps you out.
Note, I have to buy all of my parts – nothing here was paid for by sponsors, etc. I do make a small amount if you click on an ad and buy something but that is it. You’re getting my real opinion on stuff.
If you find this post useful, please share the link on Facebook, with your friends, etc. Your support is much appreciated and if you have any feedback, please email me at in**@*********ps.com. Please note that for links to other websites, I may be paid via an affiliate program such as Avantlink, Impact, Amazon and eBay.
When I first started buying from Palmetto State Armory (PSA) maybe 10+ years ago, they were a source for cheap but decent AR parts plus other brands of parts, like Magpul, and ammunition. If you compare what PSA is today to way back when, they have achieved a lot – most folks don’t know that PSA is part of a large portfolio of companies under JJE Capital.
Palmetto State Armory (PSA) has a stunning array of Kalashnikov firearms now. AK-47s, AK74s, 100 series, rifles, pistols … it’s impressive. Click here to go to their main AK menu.
The barrel is cold hammer forged chrome moly vanadium steel with a chrome lining and made by Fabrique Nationale Herstal (FN for short) – these are top notch barrels.
Hammer forged front trunnion – US makers tried to do castings originally and they just do not hold up
Hammer forged bolt and carrier – not everyone forges their carriers and you see photos online of them cracking/snapping where the gas piston goes into the body of the carrier.
The trigger is an ALG AKT enhanced model – these are excellent AK triggers and I really think it was a good idea that PSA went with them
They have a lifetime warranty.
Now PSA says they have torture tested the rifles to 10,000 rounds with no problem. A number of folks on the Internet have posted videos blowing through tons of ammo, in the case of JMAC they did it at full auto and the rifles have held up admirably.
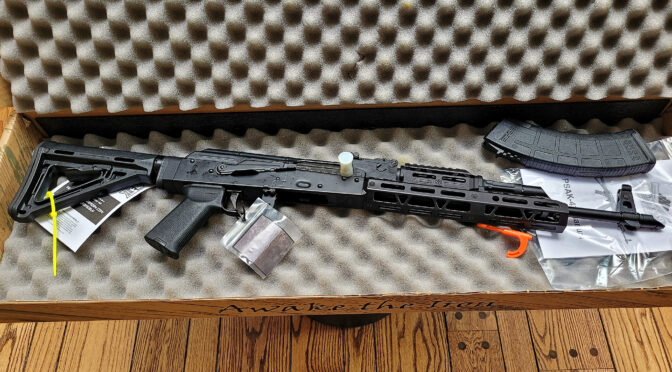
Yeah, I ordered one
The fit and finish of parts was excellent. Rivets were formed very nicely and the tooling marks were reduced in my opinion. In short, it looked pretty good.
Now let’s get into some photos – click on one to see it full size or to then move around and look:
Note, I have to buy all of my parts – nothing here was paid for by sponsors, etc. I do make a small amount if you click on an ad and buy something but that is it. You’re getting my real opinion on stuff.
If you find this post useful, please share the link on Facebook, with your friends, etc. Your support is much appreciated and if you have any feedback, please email me at in**@*********ps.com. Please note that for links to other websites, I may be paid via an affiliate program such as Avantlink, Impact, Amazon and eBay.
I haven’t seen these at this price in the last few years – PSA has them for $649.99. I suspect they will sell fast at that price.
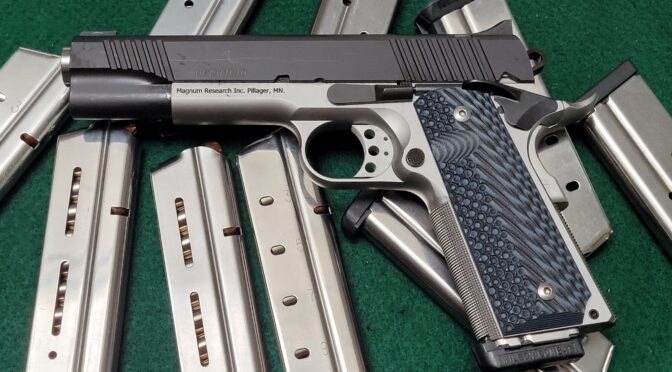
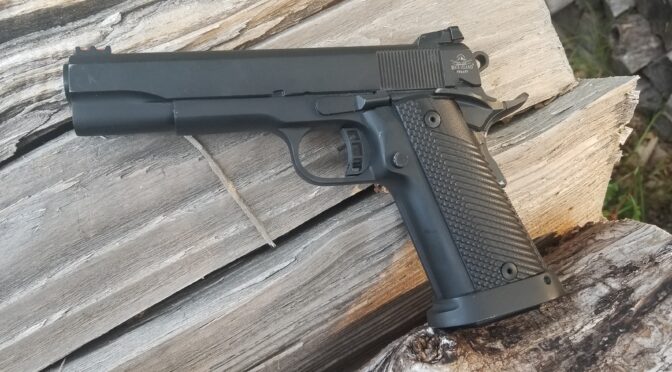
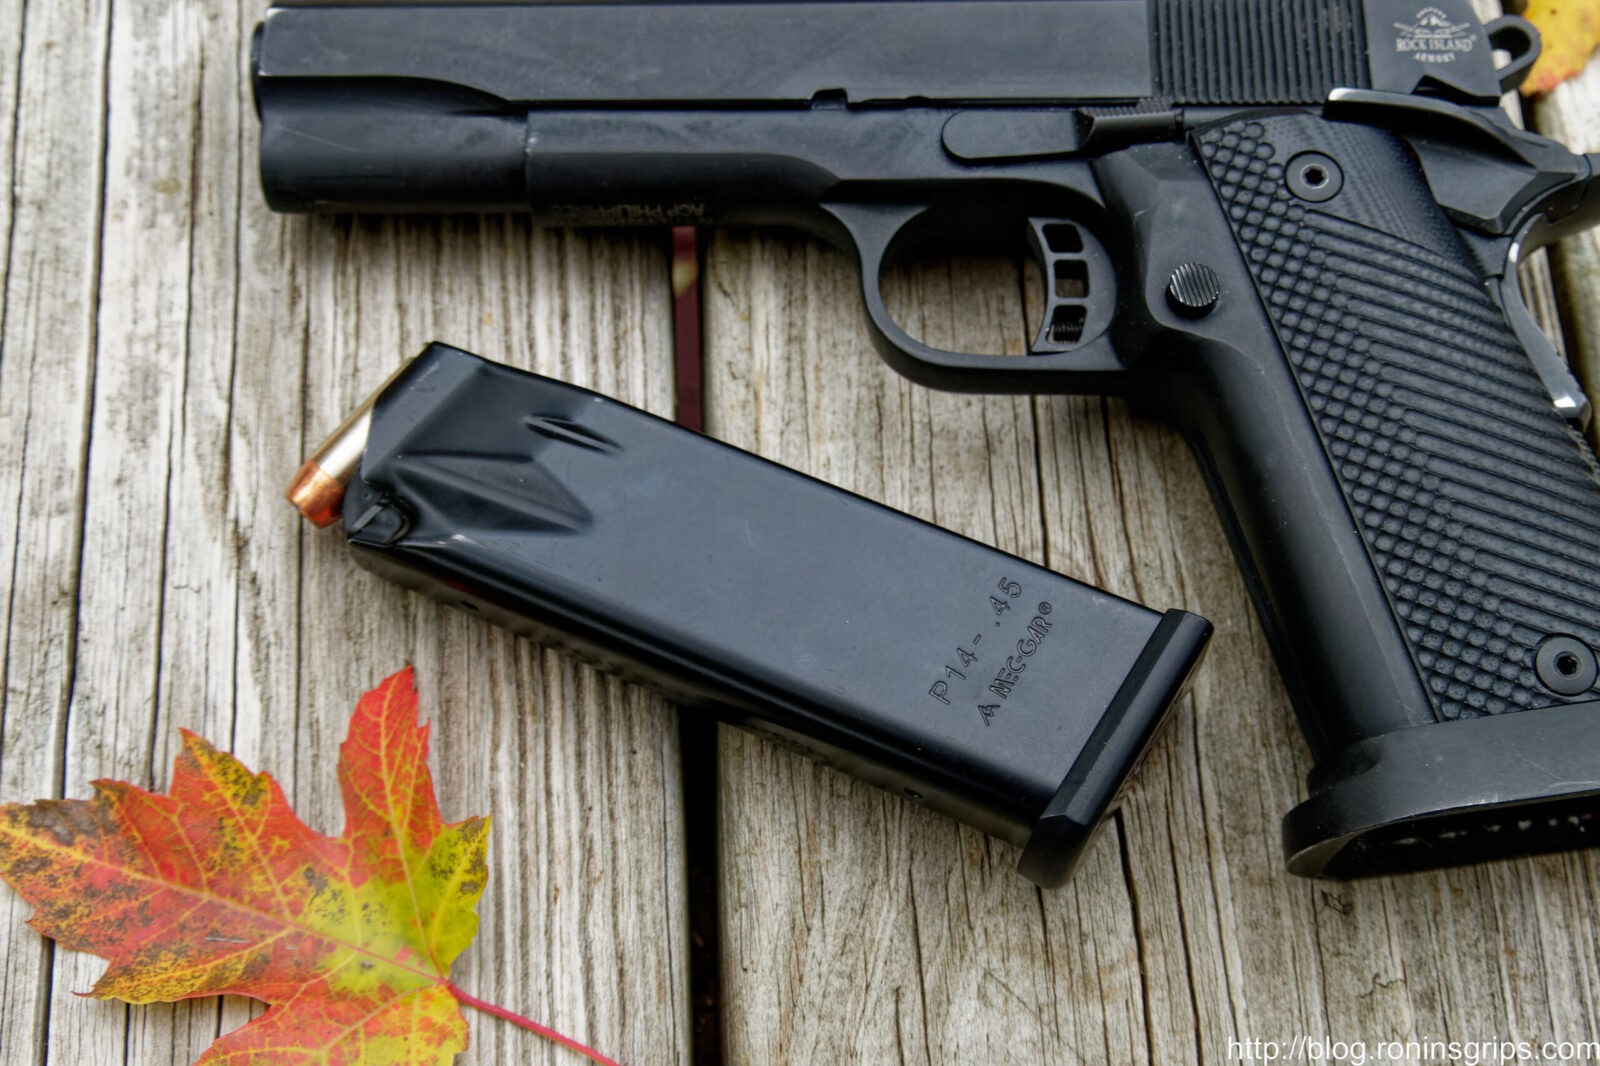
I have one of these 52009 Ultra HC pistols and it is rock solid. Magazine customers tell me the same thing. If you’re looking for a double stack 10mm on the 1911 platform, this is a really good deal:
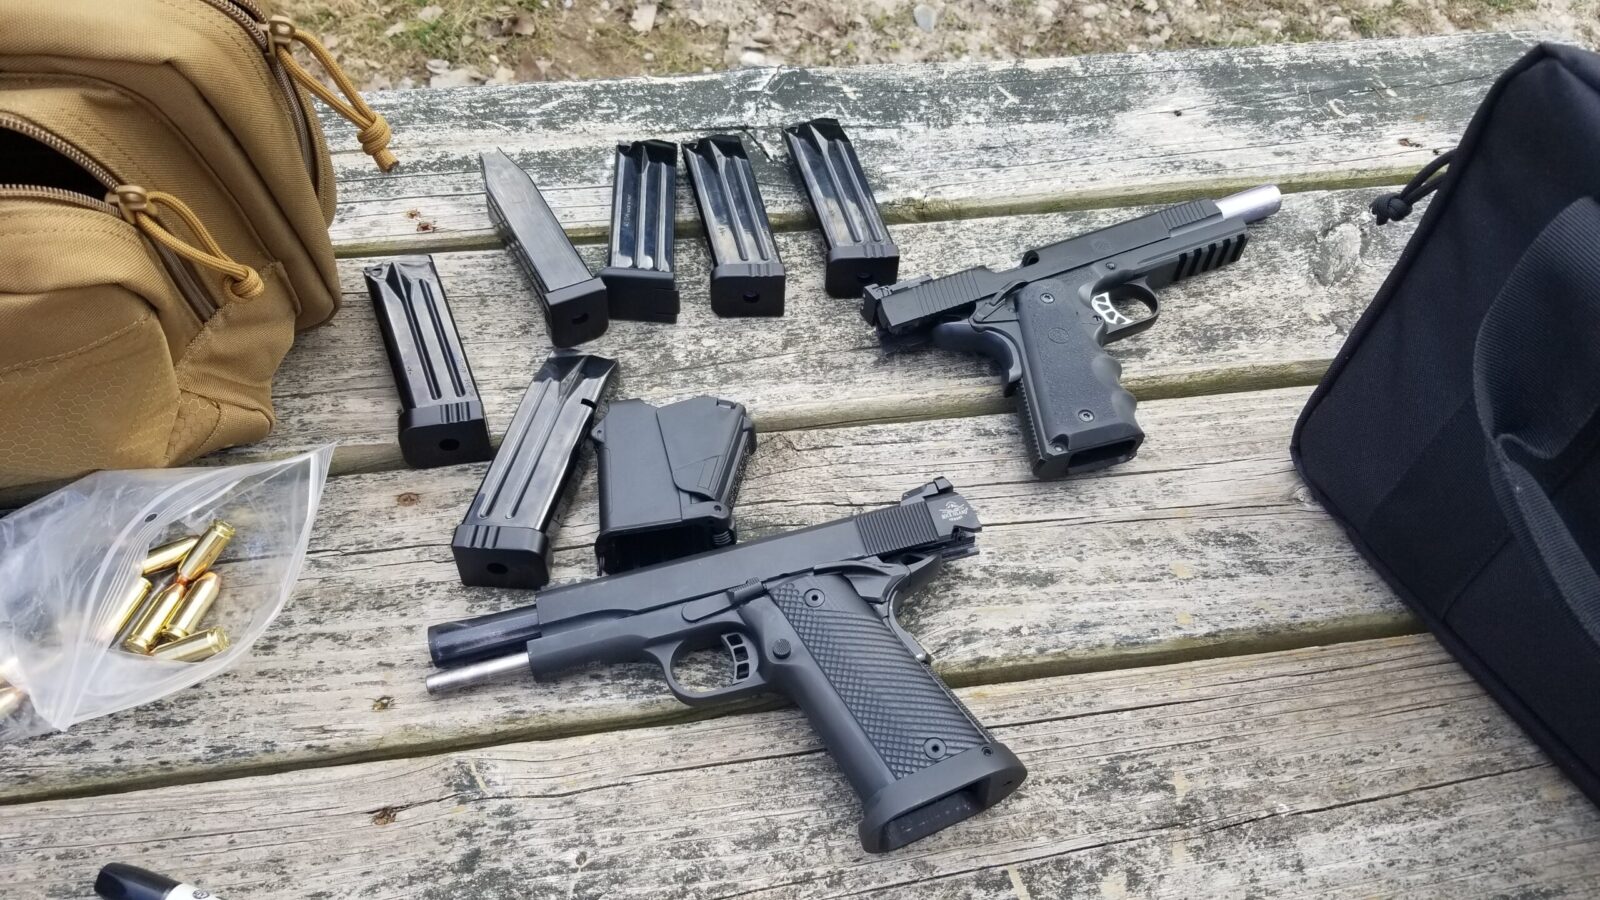
This is from a range visit last year. My RIA 52009 is at the bottom. The pistol on the top right is a 10mm TRP Operator. I still have the 52009 and like it but sold the TRP.
Do You Need 10mm or .40 S&W Magazines
We make custom high reliability magazines for the 10mm and .40 S&W RIA A2 HC pistols if you are interested. Click here for our store page.
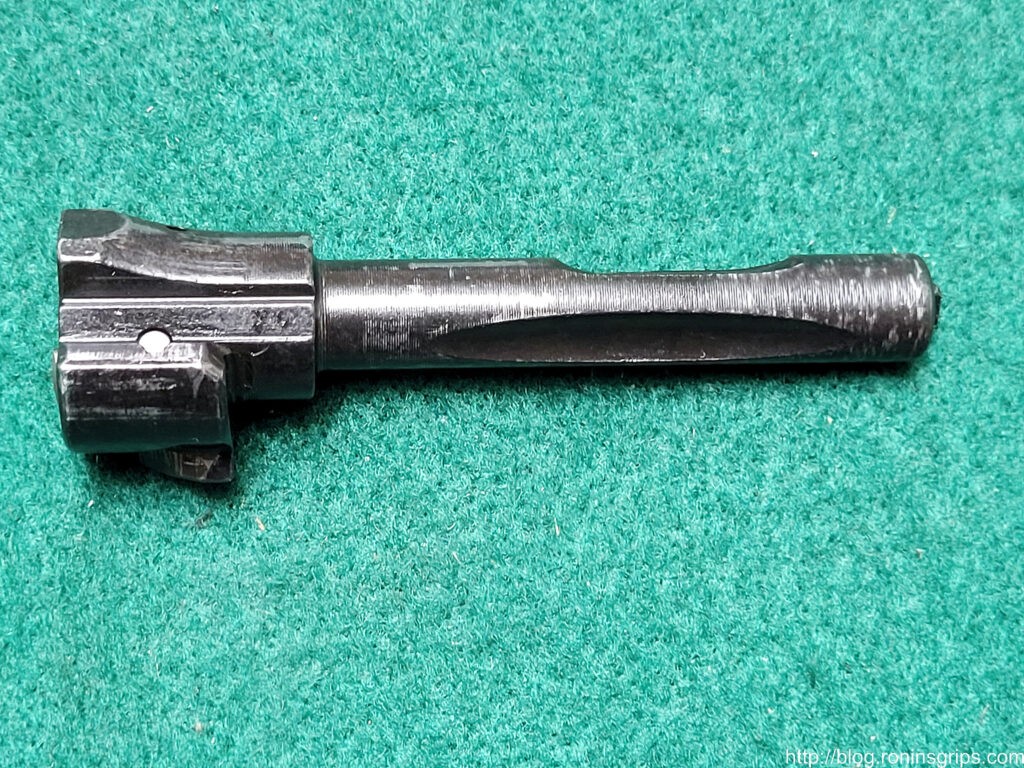
This is one of our 3rd generation magazines. We start with a Mec-Gar P14 .45 magazine tube and modify it to hold both the 10mm and .40 S&W rounds. We have tons of satisfied clients using both calibers.
Conclusion
Just a short post today. That’s such a good price on the 52009 that I figured it warranted it and hope this helps you out.
Note, I have to buy all of my parts – nothing here was paid for by sponsors, etc. I do make a small amount if you click on an ad and buy something but that is it. You’re getting my real opinion on stuff.
If you find this post useful, please share the link on Facebook, with your friends, etc. Your support is much appreciated and if you have any feedback, please email me at in**@*********ps.com. Please note that for links to other websites, I may be paid via an affiliate program such as Avantlink, Impact, Amazon and eBay.
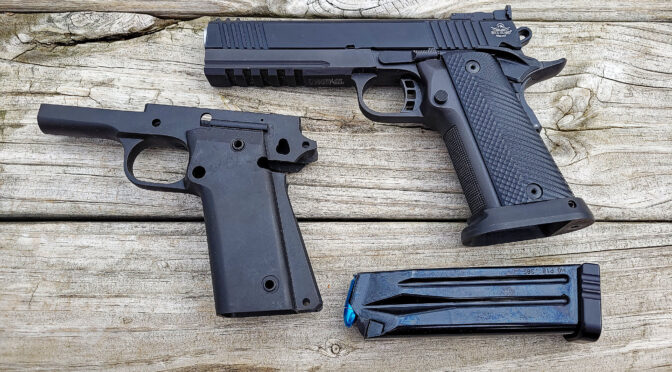
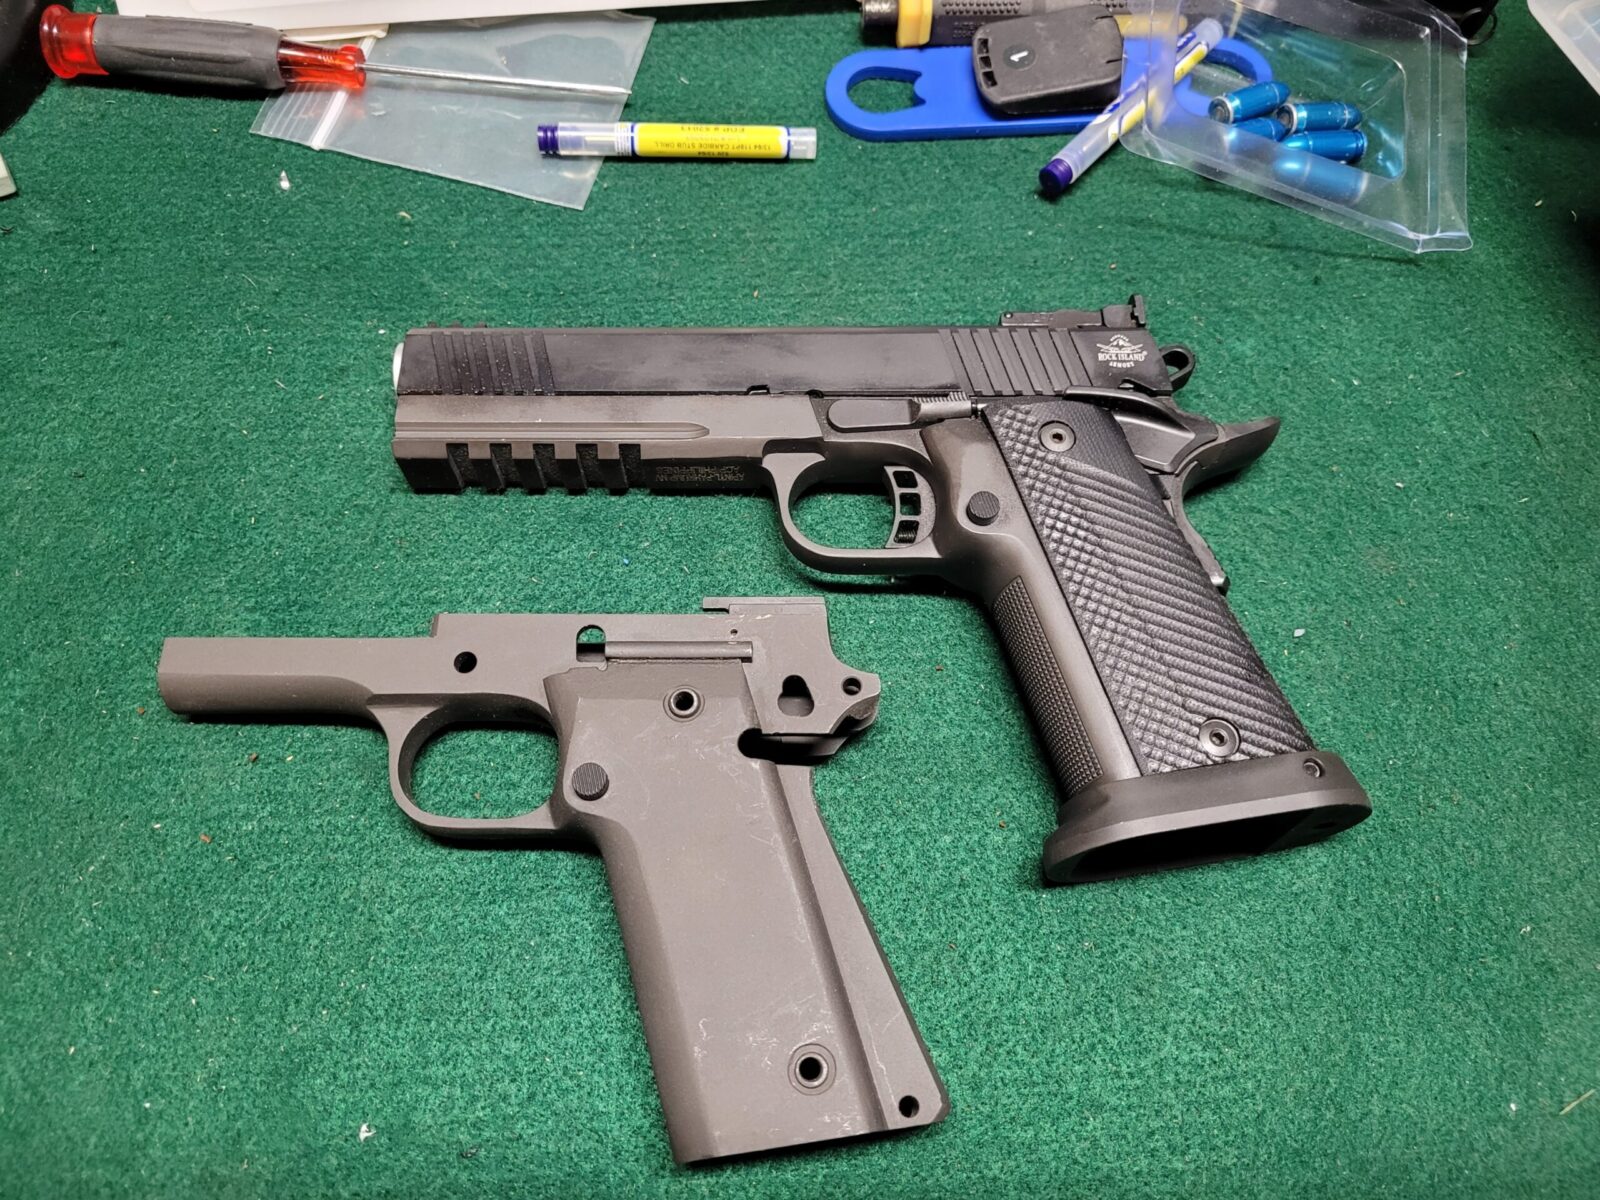
I posted about 9mm magazines for the Rock Island Armory (RIA) FS A2 pistols and a friend on FB, pointed out they weren’t 2011s. The difference being the 2011 has a modular grip assembly and the RIA pistols are just over-sized 1911s. It dawned on me that I really didn’t know the difference and needed to do some reading.
How “2011” originated
It turns out that Chris was right – there is a difference – a substantial difference.
From what I have read the original 2011 concept was essentially a modular 1911 receiver that could have the mag well / grip sub-frame swapped out to allow for more versatility. The 2011 design and patent was by Virgil Tripp and Sandy Strayer who together formed STI and then went separate ways and shared the patent,.
The design is really cool and the best way to help you learn more is to provide you a link to the original patent application that has written descriptions and drawing — click here to see the orginial patent.
Back to the Rock Islands
The RIA pistols are oversized 1911 pistols. The grip and mag well area are integral parts of the frame and can’t be separated plus they use thin grip panels.
At the top is my RIA 566459mm Pro Match. Below it is an 80% frame for that model. Note now the mag wel/grip area are all part of the receiver and that there are grip panels. It’s not modular in other words. This makes it an over-sized 1911 and not a 2011.
In Closing
So now I know a bit more about the differences between the 2011 and 1911 designs. The RIA pistols are oversized-1911 designs and not true to the original 2011 design concept.
Note, I have to buy all of my parts – nothing here was paid for by sponsors, etc. I do make a small amount if you click on an ad and buy something but that is it. You’re getting my real opinion on stuff.
If you find this post useful, please share the link on Facebook, with your friends, etc. Your support is much appreciated and if you have any feedback, please email me at in**@*********ps.com. Please note that for links to other websites, I may be paid via an affiliate program such as Avantlink, Impact, Amazon and eBay.
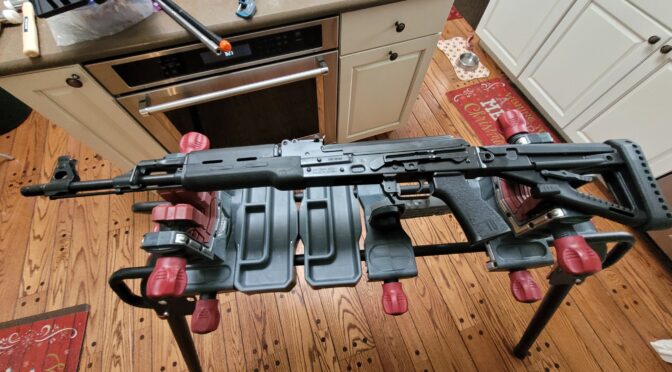
In my last review, I provided detailed photos of a M70 with maple furniture [click here for that review]. I bought this M70 at the same time and it came with a Polymer furniture set. In taking the rifle apart, I saw the same extensive tooling marks.
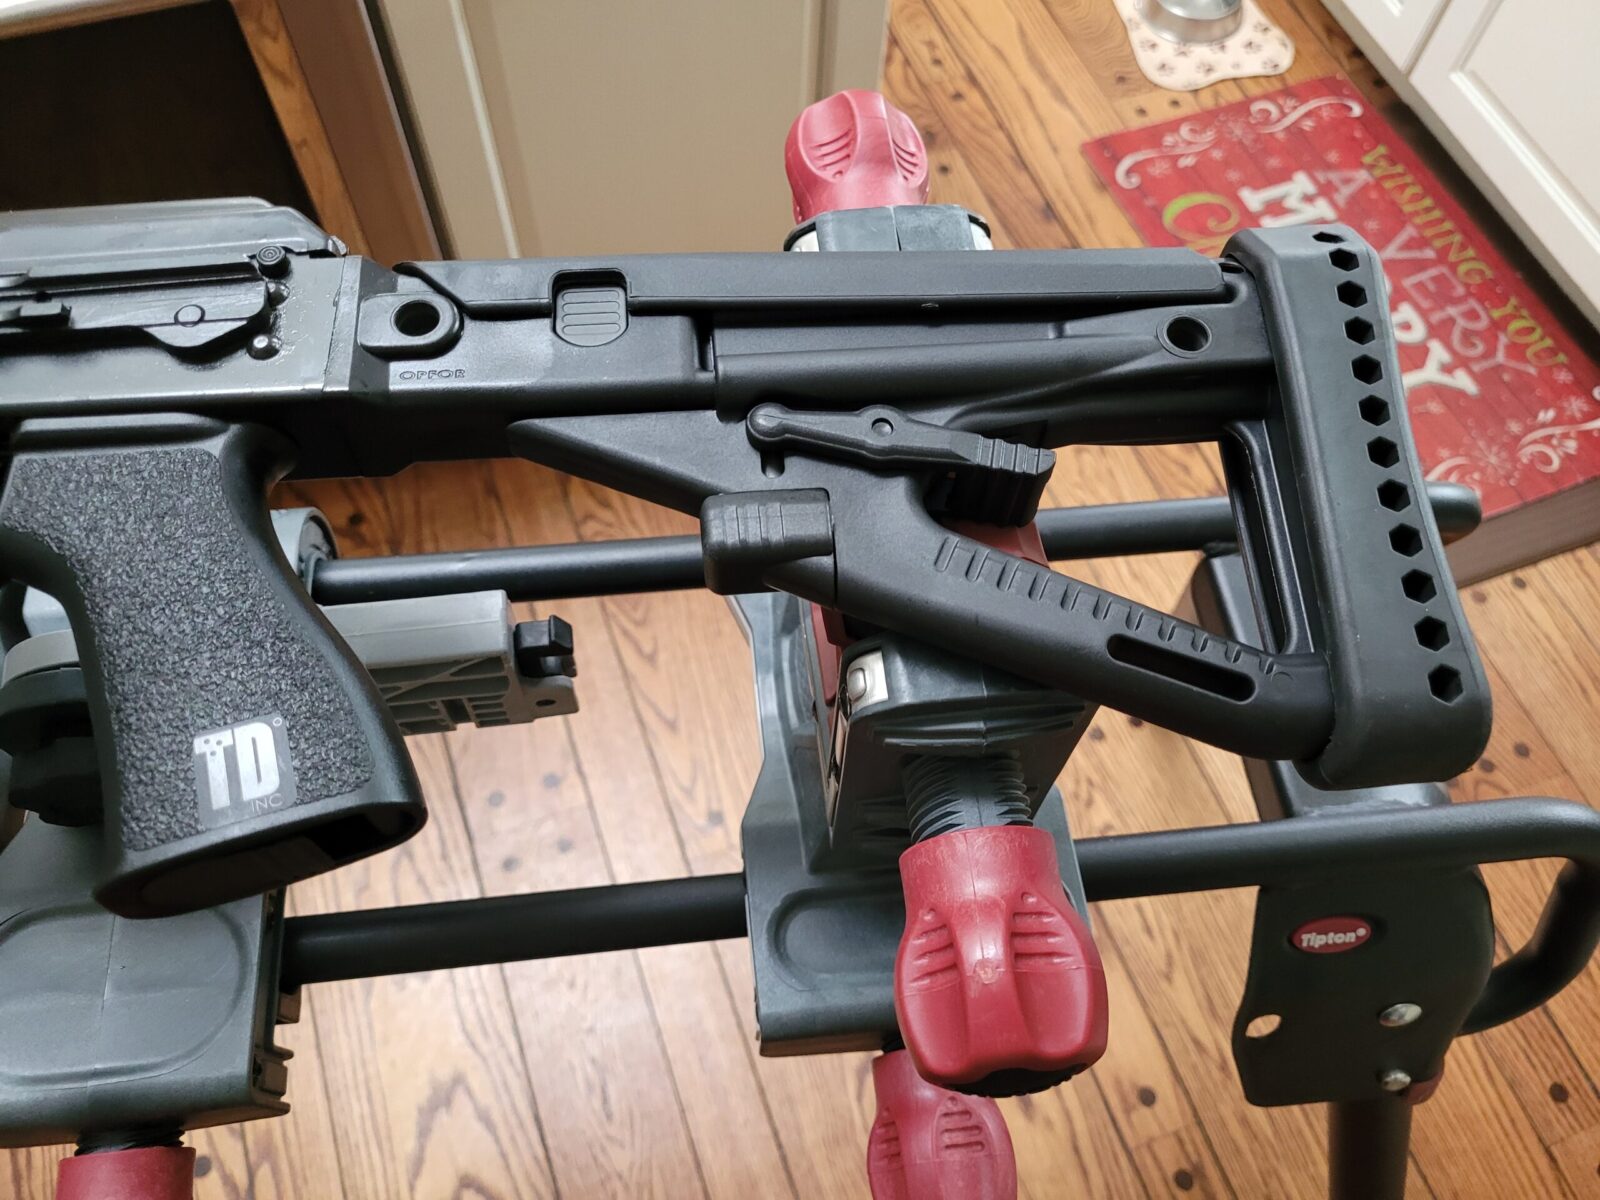
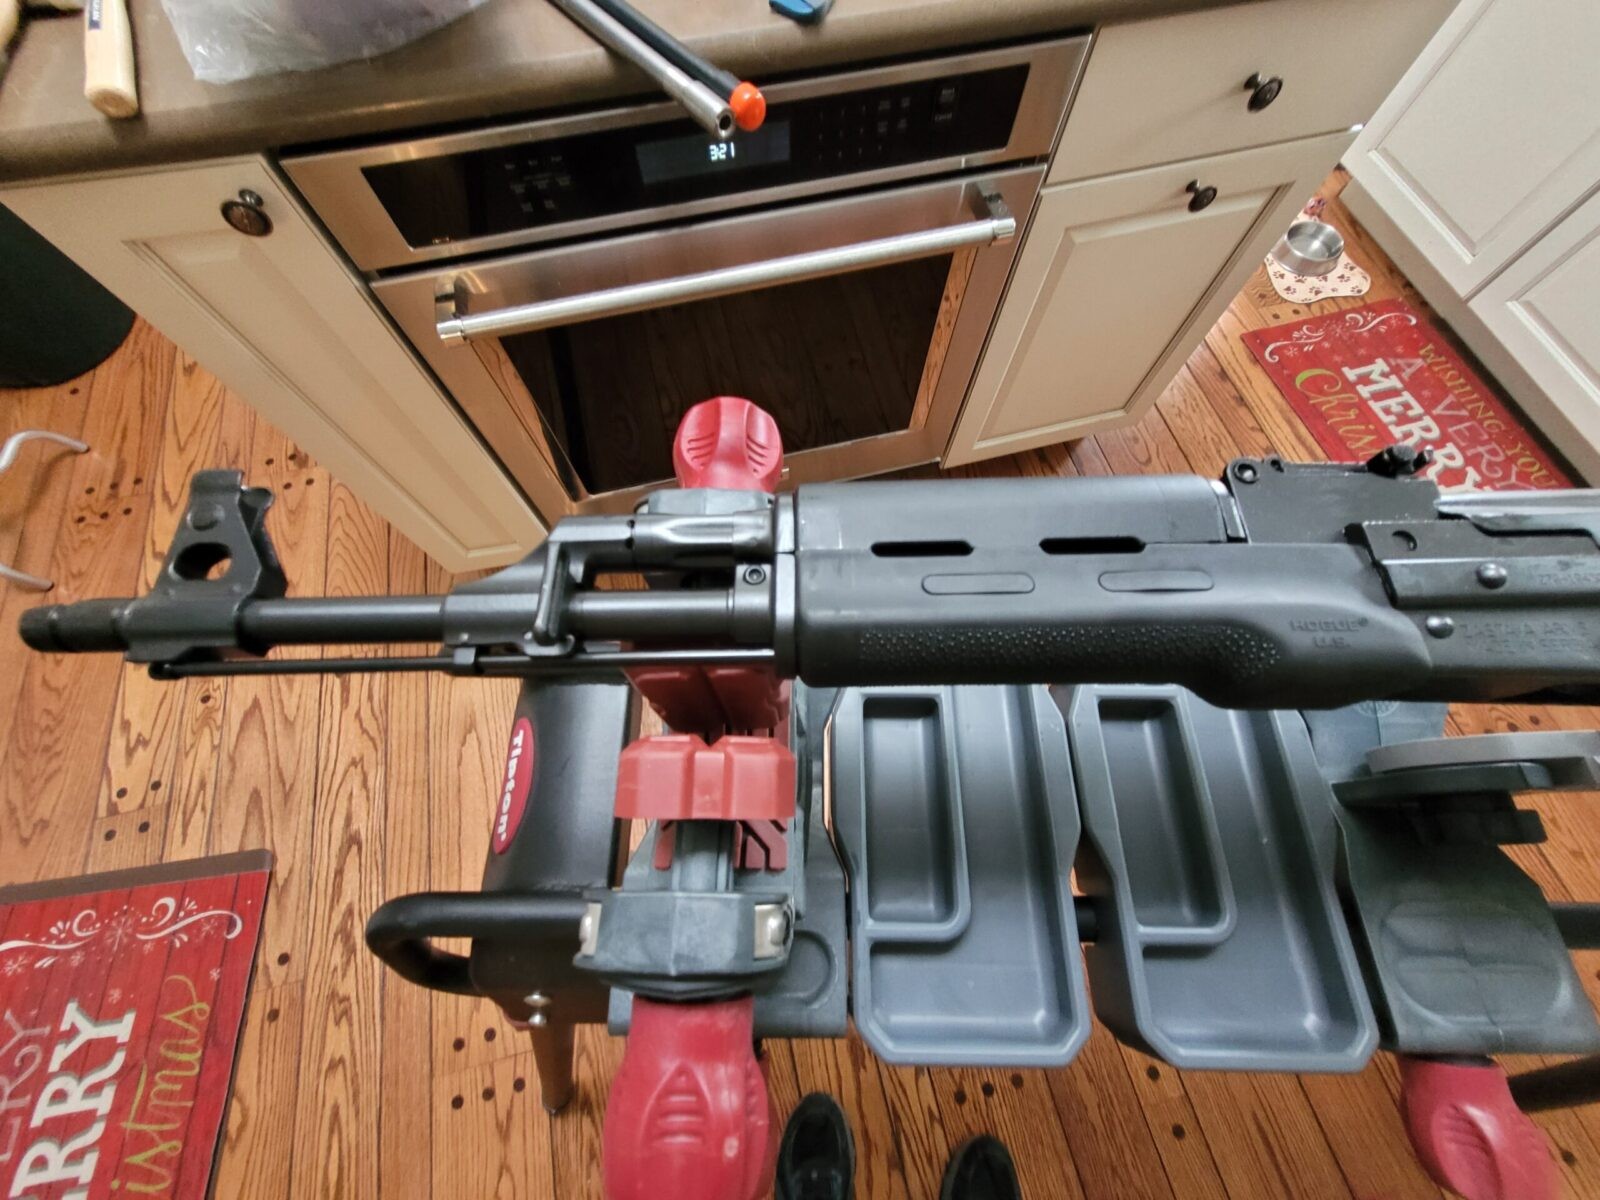
In this post, I’ll provide photos and observations for this rifle. In case you are wondering about the setting, it was 15 degrees outside so I did the review in our kitchen – my shop didn’t suddenly grow appliances 🙂
The stock is a Promag Archangel OPFOR four position stock with an adjustable cheekpiece. It’s solid, well thought out and didn’t rattle when I shook it. The pistol grip is a comfortable Tango Down model. Note the recoil pad on the stock.
The stock is adjustable four positions – here it is fully extended. The stock does not fold by the way.
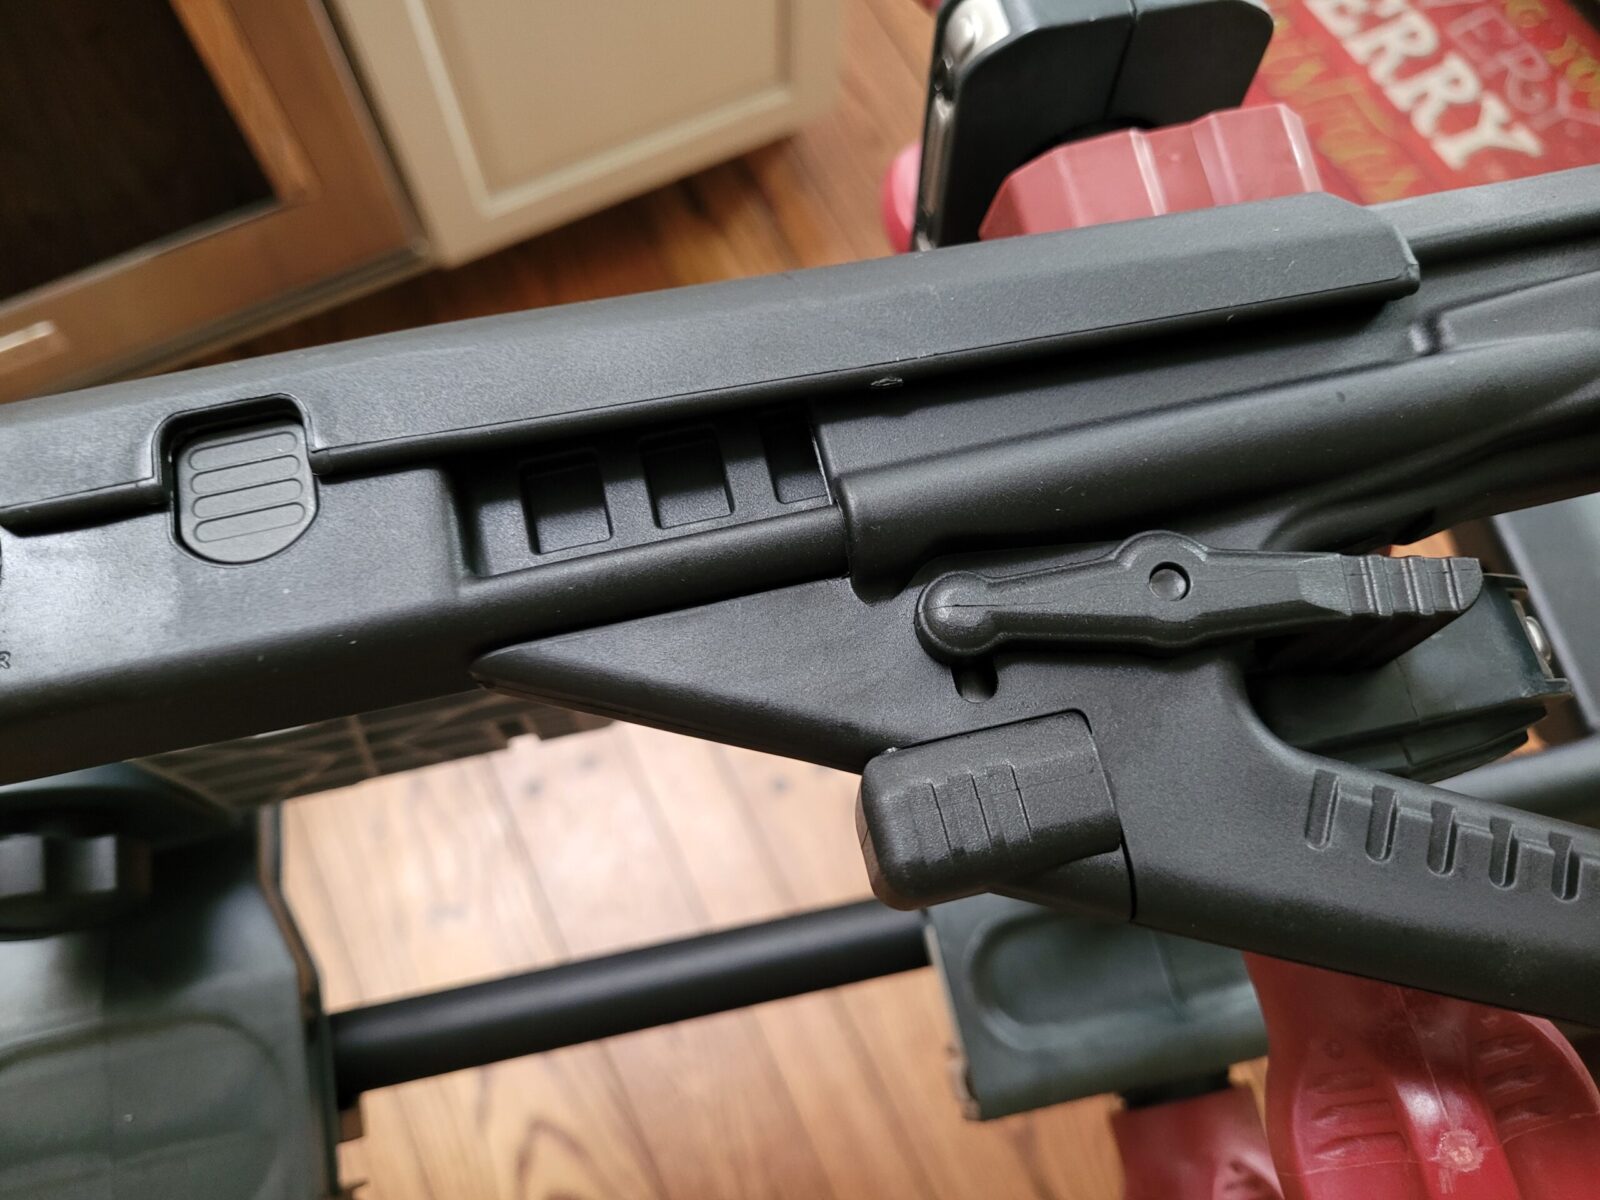
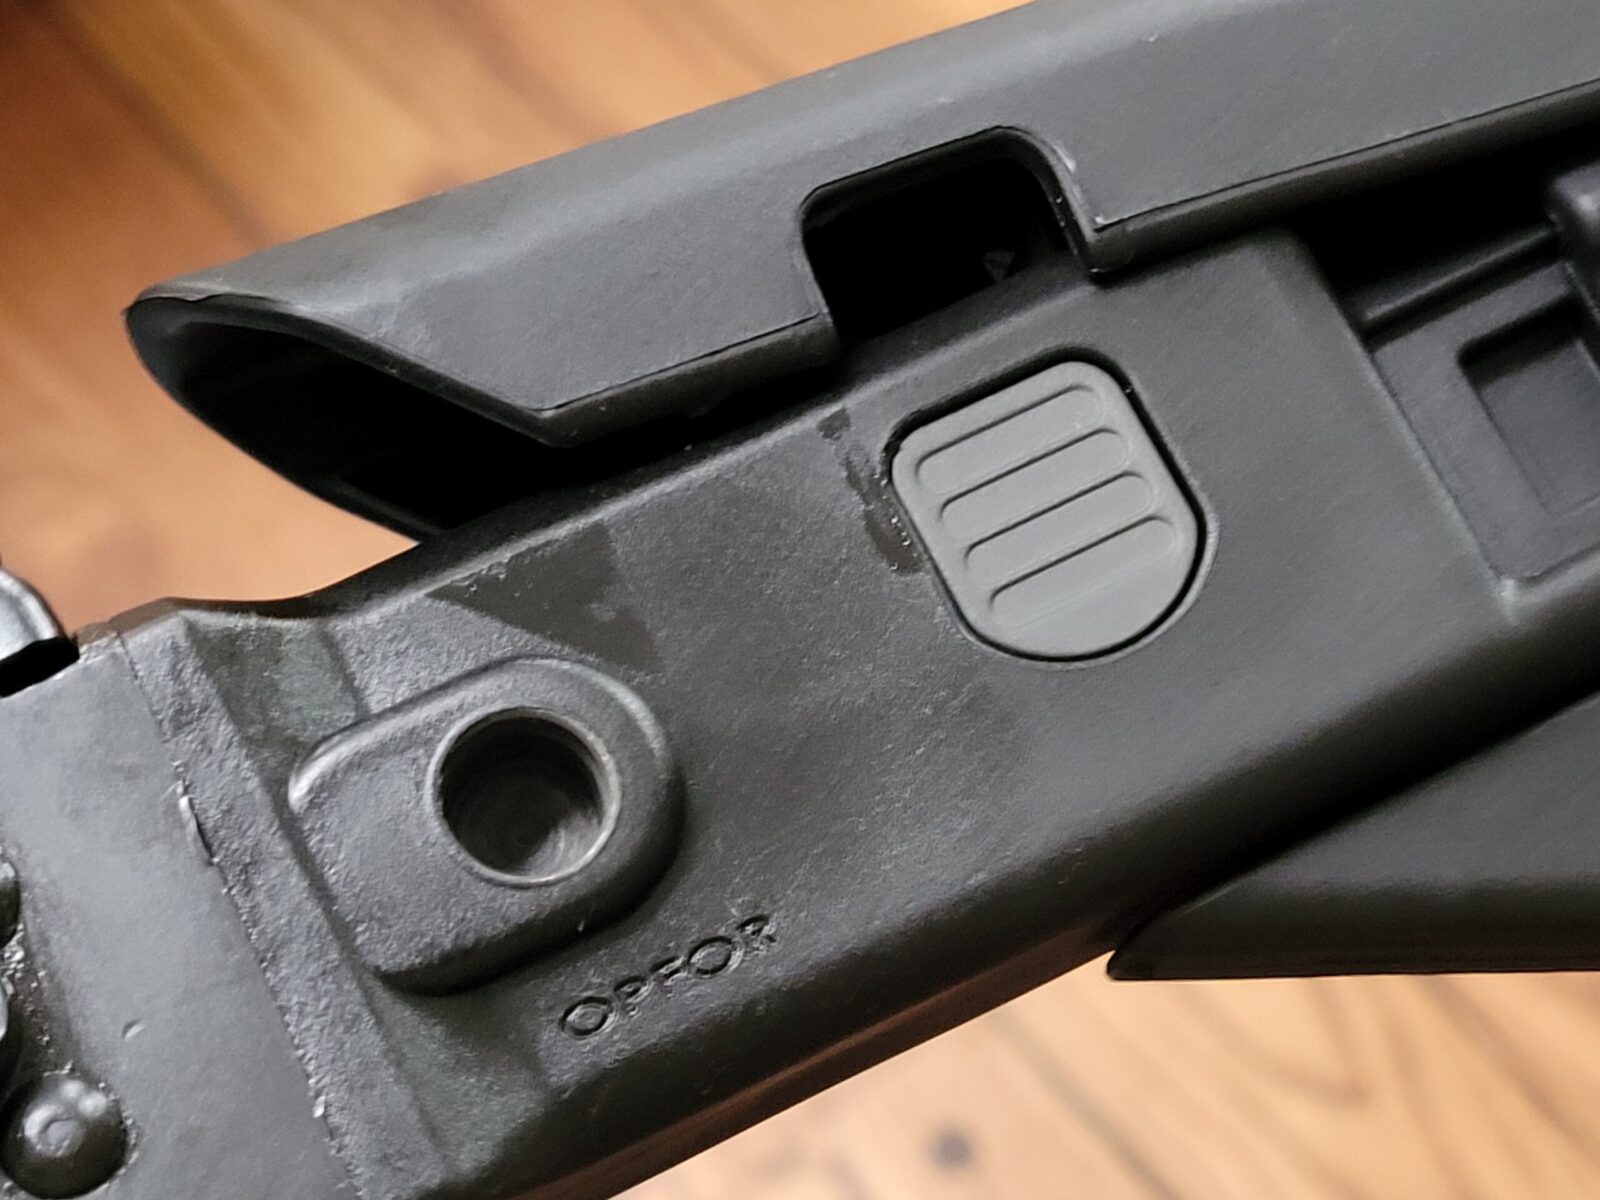
The cheek piece angles upwards in the front by pushiing the grey button. Note the sling swivel quick connect hole.
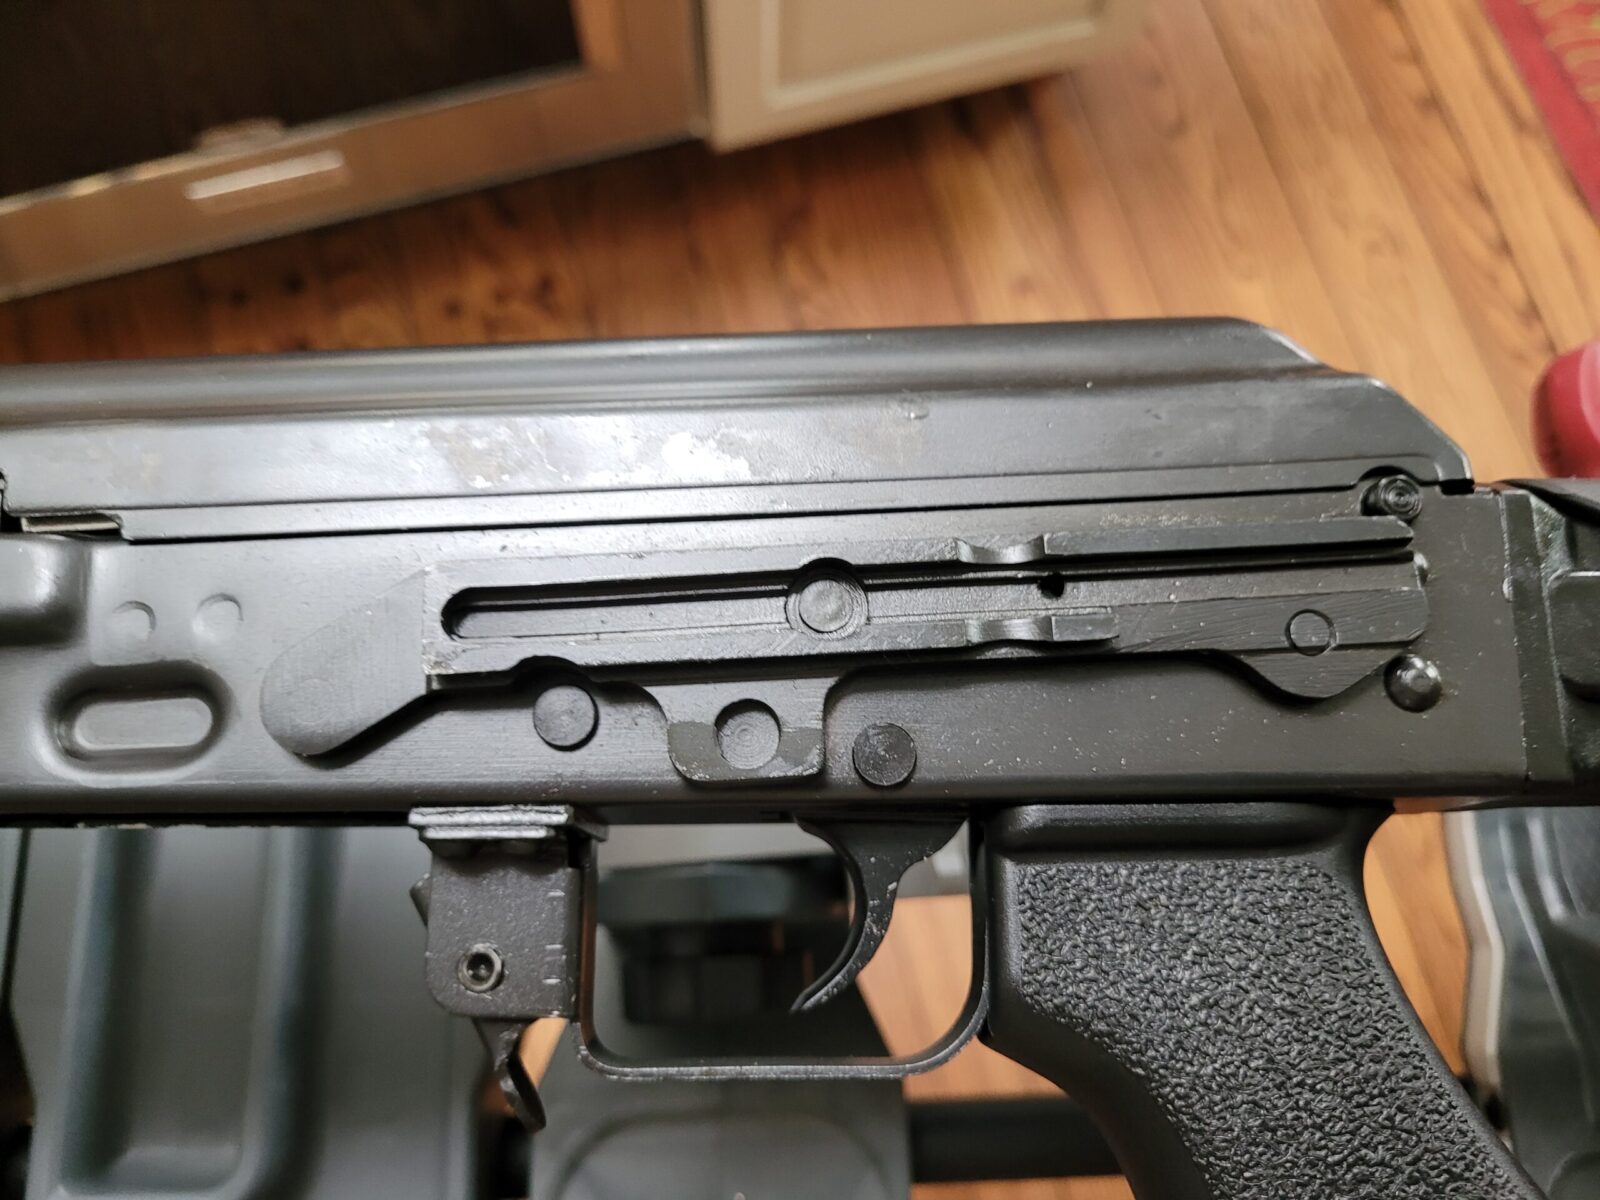
Top left, the dust cover doesn’t fit flush with the trunnion. The unique recoil spring assembly locking buttonm is just above the top right edge of the side mount rail. Speaking of which, I really wish someone would make and sell this side rail. Zastava USA doesn’t import it. You can see tooling marks on the back of the mag catch housing. The ZPAPs have tons of tooling marks but function well despite them.
In general, I like Hogue’s products. This handguard with the overmolded rubber feels really good in the hand.
Conclusion
I thought about doing a big blog post with a ton of photos showing all the machining marks but decided against it. The rifle and furniture are solid but the metal working lacks refinement. If you’d like to see the detailed photos from a M70 ZPAP with a maple stock bought at the same time as this one, click here.
Zastava turned out a rifle probably to hit a price point and could have done better but at a higher cost. I didn’t expect to like the polymer stock set but I do – the buttstock, grip and handguard all feel solid and feel good when you shoulder the rifle.
Note, I have to buy all of my parts – nothing here was paid for by sponsors, etc. I do make a small amount if you click on an ad and buy something but that is it. You’re getting my real opinion on stuff.
If you find this post useful, please share the link on Facebook, with your friends, etc. Your support is much appreciated and if you have any feedback, please email me at in**@*********ps.com. Please note that for links to other websites, I may be paid via an affiliate program such as Avantlink, Impact, Amazon and eBay.