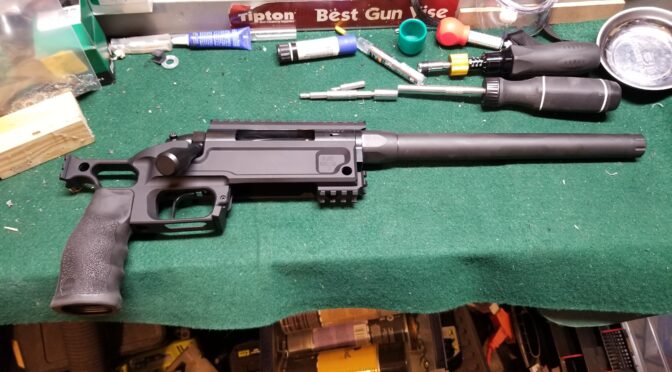
I bought the 12″ FARend, the strut that projects forward from the chassis, thinking that a longer unit would be better. For my purposes and taste, it’s just too long so I bought an 8″ model from Black Collar to replace it. I stored the 12″ just in case but an 8″ unit fits the Magpul AFG and a 5 slot Picatinny rail perfectly.
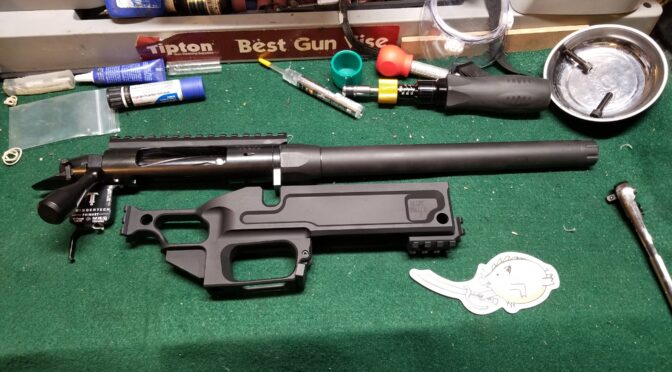
The FARend units are designed to mount MLOK units. I attached the Magpul AFG directly and then installed a 5 slot rail section just forward of that to then mount an American Defense quick release rail section. You can see the length difference between the 8″ and 12″ segments relative to the Pork Sword.
Adding a Quick Release to the Bipod
In hindsight, I should have known that I would not like the screw on clamp attachment that Magpul offers in one model. I should have bought the model that was ARMS compatible and just needed that lever system added to it. Well, I had the bipod and wanted to make do with what I already owned.
This is the Magpul model with a 1913 rail clamp. The core bipod is really nice and the clamp is just fine if you plan to screw it on and leave it. I have found that I need to mount and remove bipods quickly depending on what I am doing.
To be clear, Magpul offers different bipod models with different attachment methods – Sling Stud, M-LOK, 1913 Picatinny Rail and one ready to be mounted on the ARMS 17S quick release adapter. It’s this last model that I should have bought in hindsight. Here are the Magpul bipods with the different attachment methods and colors:
American Defense Manufacturing (ADM) makes a quick release mount with a 5 slot rail section on top that fit the bill perfectly. This unit is available from Brownells under a different part number than what is on the ADM website directly – AD-170-VPG (4102).So, I clamped the Magpul bipod to the ADM adapter. Again, had I known, I would have bought the Magpul ARMS ready model.
Savior Case
To store the Pork Sword, I bought a 28″ Savior tactical case. This is my fourth Savior back and think they are well made. There is ample padding, good stitching, and plenty of pockets to store accessores, mags and ammo. The Savior cases are on Amazon and that is where I bought mine.
This is the 28″ Savior case in olive drab. I added the Crusader cross morale patch.It holds the folded Pork Sword very nicely as you can see.
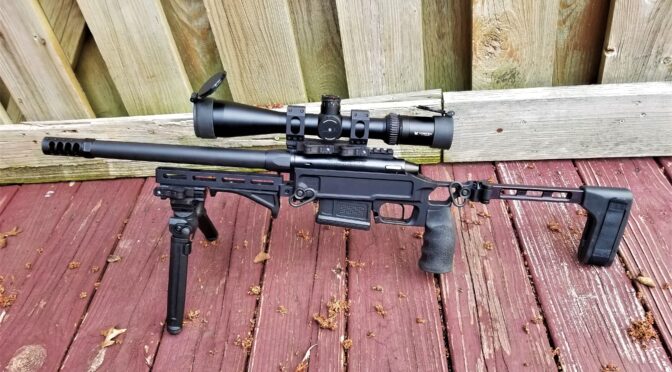
The Final Result
Note, you’ll see a wrap on the aluminum strut that I am prototyping and hope to offer in the near future.
Conclusion
I really like how it turned out. The weight and feel are great – it’s the first time I’ve liked having an AFG on a weapon. Now, I just need to get to the range some day after all this COVID madness fades.
Okay, we’re coming into the last post. In the first post I covered all the parts that were used. The second covered installation of the barrel. The third post provided an overview of the trigger and chassis and now we’re almost done with the installation of the brake, optic, bipod and angled foregrip. Let’s dive in.
The Brake
The American Precision Arms Little Bastard brake is very interesting. It’s built for precision rifles and comes with a series of holes drilled in pairs on the top to allow you to dial in how you want it to vent the gasses. To start, I simply left the top exhaust holes empty.
The main side exhaust vents are pretty good size and angled backward significantly. This out to seriously arrest the recoil and I suspect I’ll feel air movement when I shoot it. The circular exhaust holes that enable the tuning are located only on the top of the brake so to be clear, you are looking at the top. The rear of the brake is actually a nut. You back it off its thread to lock it in place – think unscrewing the nut to jam it against the front lip of the barre or a jam nut. My MTU profile’d barrel has an ample shoulder to back the nut into.Here we are looking at the tunable ports from the top.
You simply thread the brake onto the end of the barrel and then unscrew the nut from the end of the brake and jam it into the shoulder of the barrel to lock it in place. For folks new to this work, use a fixed wrench and not an adjustable wrench for stuff like this. Adjustable wrenches will slip and do nasty stuff to your parts. I only use fixed wrenches on firearms now after a number of mishaps. An adjustable wrench can change a quick job into a long job real quick.
Correctly Installing 1913 Rail Base On The Action
Okay, so this is when I found out the Picatinny rail base was a separate piece. Nothing went wrong but I sure said a prayer for nothing getting botched due to my stupidity. Big Horn installs one screw so you need to install the other three and with blue loctite applied and then remove the original screw and do the same. Short screws up front and long screws in the back. I lightly snugged all four down and then torqued them to 20 inch pounds.
I applied blue loctite to each screw, snugged them all down and then torqued them all to 20 inch-pounds. Note, short screws go to the front and long screws go to the back. The Remington 700 action is thicker at the back and if you reverse this and put a long screw in the front, it will likely hit the bolt.
The American Defense AD-RECON-SL Mount
This is a great scope mount and the one key tip I can give you is to remember that the rings are asymmetrical – the bottom of the rings is thinner than the tops so don’t flip them around or you will be wondering what is going on with the alignment of the screws.
Here’s the view from the side.Here’s the base with the rings removed. One ring has a locator pin to help you get started and then just match the thickness of the top and bottom of the other half to line it up right. I installed the rings at 17 inch-pounds with blue loctite once I have the scope positioned the way I want it front to back and rotationally.Here. the 4-16×44 Vortex HST scope is located the way I want and the rings have been torqued down.For just over a year, I’ve been using this Wheeler green dot bore sight to zero the optics. It uses a rare earth magnet to attach to the end of your muzzle and will at least get you on the paper at 100 yards. I like the green dot because I can see it better during the day, the battery lasts longer and is easier to change and I don’t have to deal with the little arbors when I am changing calibers. They make a red laser version also if you really don’t feel you need the green laser.
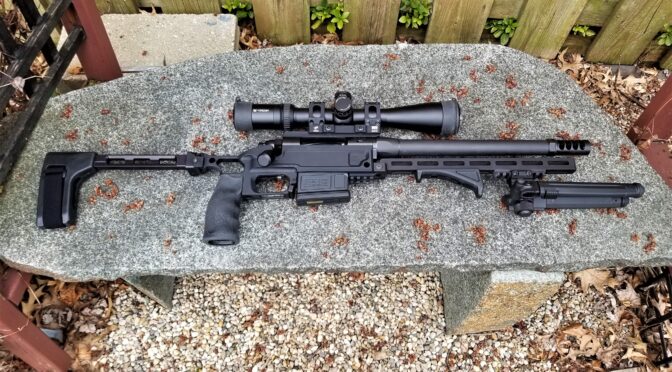
The Magpul Angled Foregrip (AFG) and Bipod
The last three things I did was to add a small 7-section aluminum rail via MLOK out to the front and clamped the Magpul bipod to it. By the way, I really wasn’t sure if I would like the bipod because I’m a bit of an Atlas snob now but I really was impressed and will probably use them again but next time I will get one that is ready to go for an ARMS quick detach mount vs. the screw clamp model I bought. I also added the Magpul AFG because I wasn’t sure if I would like holding a bolt rifle with the relatively narrow FARend.
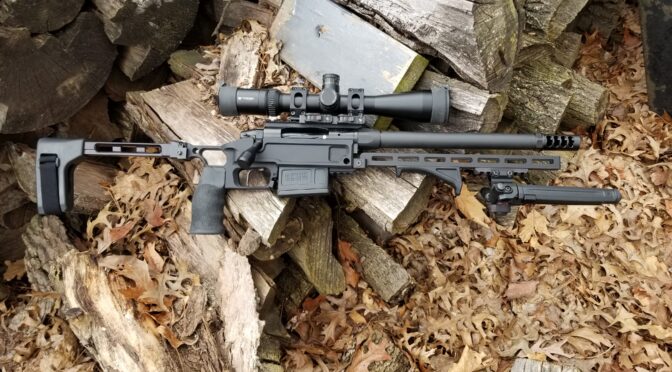
The Results Thus Far
Conclusion
I loved everything but that mile long FARend and the screw attachments for the Magpul bipod. I ordered the 8″ FARend and an American Defense adapter to remedy those issues and that will be the last post.
I went with the Triggertech Primary Trigger because of recommendations from Black Collar Arms and in reading reviews. Now that I have it, I am very impressed. It’s a breeze to install and is incredibly crisp. One thing that is interesting is that the trigger pull adjustment has a detent and each adjustment has a “click” feel to it vs. just being a continual adjustment set screw.
Here’s the trigger. You can see I went with the straight black trigger. The safety lever that will stick out of the top of the chassis is visible and the interesting trigger pull adjustment set screw is on the bottom just forward of the trigger. The two pins in the photo are what hold the trigger in place and are supplied with the Big Horn Origin action.This is the other side of the trigger with the bolt release bar/arm (the silver diagonal). Since the Big Horn does not have this type of release, it will not be used. Notice the slight bevel on the trigger pin to aid in starting it.I keep pieces of hardwood shims and plywood near my bench so that I can properly support work pieces to avoid bending a part or marring the finish. You need to drive the two pins in to secure the trigger. I did the front one first and installed the pin with the beveled edge entering the hole first – it will help parts align as it passes through.Here’s a view of the bottom of the assembly. You can now see the trigger adjustment screw just forward of the trigger plus you can clearly see the two threaded screw holes that will be used to mount the action to the chassis. There is one on the back tang of receiver just behind the trigger assembly and the second hole is just forward of the magazine hole before the recoil lug.Next, I function tested the pistol. Note it really bugs me that I left the live ammo on the bench. Normally I do not like to have any live ammo where I am working but followed the Black Collar recommendation to ensure the bolt would close after headspacing.
It’s really important that you function test the pistol to make sure it is working right at this point. MAKE SURE IT IS UNLOADED. If any numbered step fails, you have a problem and need to investigate.
Cock the firing pin by raising and lowering the bolt knob. On the Origin – the pin will stick out the back of the bolt. This by itself is the first step – it should cock and stay cocked. If so, go to step 2.
Pull the trigger and the firing pin should be released. You will hear and feel the pin slamming home plus it will no longer be protruding out of the back of the bolt.
With the trigger pulled, work the bolt up and down and the firing pin should not cock/arm.
Take your finger off the trigger and work the bolt to cock the firing pin. Turn the safety lever to “On” or “Safe”. Try pulling the trigger – you should not be able to.
Turn the safety lever or “Off” or “Fire”. Try pulling the trigger and you should hear, feel and see that the firing pin is released and slams home.
If all of the five steps above worked, then it passes the function test.
The long silver oval is the bolt release and you can see the firing pin protruding out the back of the bolt. This indicates it is cocked/armed and I really like the immediate visual indicator plus you could feel it in the dark if you needed to.
Installing the Grip, Chassis and Brace
Next up, is the installation of the Ergo Grip onto thePork Sword chassis, and then attaching the FS1913A brace. This is all real easy compared to the preceding steps. Let’s step through it,
At this point I had the barreled action, the grip and the chassis. It seemed like it would be easiest to install the Ergo Zero Angle grip (the TDX-0) so that’s what I did and discovered a surprise.The surprise was that you need to access the screw with a head-head/allen-head wrench through a small hole they cut in the rear of the grip. They needed to do this allow for the proper angle to engage the grip screw because coming in from the bottom of the grip simply would not work for an AR-style grip. Note, I did install the big washer you see in the bottom. Call me paranoid but I was worried about whether the screw would have enough material around the screw hole to securely hold the grip so I added the 1/4″ washer just to be sure.Next, the barreled action beautifully fits right into the chassis – zero fitting was needed. The 1″ long 1/4-28 screws you see secure the action into the chassis. I added blue loctite to each, threaded them in all the way and then torqued them down to Black Collar’s recommended 55-65 inch/pounds each. They recommend being consistent in the front and the back so I went to 60 inch-pounds for both. Note, I had to use my 1/4″ torque wrench to do this as my Vortex torquing screw driver only goes up to 50 inch-pounds.This is the 12″ FARend unit that you see being installed. You remove the screw where you see the driver, slide it into place, put blue loc-tite on the end of the screw, reinstall it and then torque the screw down to 60 inch-pounds. I debated whether that would be too long or not and really wished I had bought their 8″ unit. Later on, I did buy the 8″ unit and swapped it out. I’ll show you photos of both later.The SB Tactical FS1913A brace marries up to the chassis via the rear 1913 Picatinny rail and is held in place by a rail clamp. I added blue loctite to the screw and tightened it down. They did not provide a torque spec so I torqued it to 20 inch-pounds and will see how it holds up.
In the last post, I outlined the major parts of the Pork Sword pistol I planned to build. As it turns out, building a Pork Sword is very straight forward and I had fun doing it.
Research
As always, I did some research before I did the actual build. First off, Black Collar Arms has a nice “how-to” page and the following video tells you about 80% of what you need to know:
The only other thing I needed to look up was what to do for the trigger – as I mentioned in the last post, it has been quite a few years since I owned and installed a trigger in a Remington 700 XCR LR so I did some reading. This Brownells video really helped me visualize what was needed:
Armed with the above knowledge and a well done one page instruction sheet from Black Collar that comes with the Pork Sword chassis, I tackled the build. Let me again emphasize, this is very straight forward.
The Action, The Wrench & A Confession
You know, sometimes I’m not too smart. A cognitive bias is something where your brain plays tricks on you and there are a number of different ones. Today’s confession involves one known as a “confirmation bias” which is where you think one thing and then everything that confirms your belief you accept and stuff contrary to that belief is discarded. Yeah, that caught me here and let me tell you why.
When I bought the Big Horn Origin, I thought the scope rail was a machined part of the receiver. I assumed that – yeah, the old “you make an ass out of u and me when you assume” saying is alive and well. When the action arrived, I looked at it and thought “Oh, that looks nice” and in a little parts bag with the two trigger pins were three scope mount screws – “Oh, I wonder why those are there?” I literally wondered that.
Seriously though, the Big Horn Origin is a work of art. No sloppiness in the action and very smooth. The fitment of the parts is exceptional. Nothing was jumping out at my tired brain saying “hey idiot, the scope mount and receiver are separate parts!”
View of the ejection port side of the receiver.View of the bottomNote the streamlined bolt release and how nice the scope mount is sitting on the receiver.Here’s the recoil lug that screws in with the barrel. Note the indexing pin.
Half-asleep the morning of the build, I got out the action wrench, put it in the vise and added two layers of gorilla duct tape to protect the action. I installed the action upside down so I could juggle the headspace gages easier and then I cranked the action wrench screws down to 10 foot pounds each. Now I got lucky because I put the tape there to protect the scope mount.
Only after I installed the barrel and was more awake did I notice how very lucky I got. The scope mount was removable and only one screw had been installed so the big dummy (me) would see the missing screws in the mount, that they were in the baggy and know to remove the rail before installing the barrel. Yeah, I missed that one but got real, real lucky because of the tape and that not a ton of torque is needed for a new receiver and installing a new “Remage” style barrel.
Remage means you thread the barrel in like normal (the “Rem” part of the name), set the headspace and then torque down the barrel not like a Savage (the “age” part of the name).
Bottom line, my mind played a nasty little trick – because I thought the action and mount were one piece I discarded all information that was pointing out they were two pieces. Don’t be me – take them apart before putting them in the wrench.
This is the Wheeler Action Wrecnh #2 for the Remington 700 – part number 414521. It is basically a clamshell vise/clamp with a solid steel handle. It’s very beefy and I hear it is because the Remington barrels can be a real bear to take off. In our case, we just need the clamp portion and will install the lower part in a vise.Boy am I glad I put in the two layers of tape to protect the scope mount. For everyone else, remove the scope mount first!! The tape definitely protected the finish though and that is what I was after.This photo was taken before I installed the tape but is the best one I have showing the action wrench in the vise. The small center bolt is centering the action and is actually screwed into the action. The two big beefy bolts are what hold the receiver. They will be at 10 foot/pounds each. Again dear reader, don’t do what I did – remove the scope mount before putting it in the wrench.Here, you can see the tape. I was careful to snug the wrench’s bolts down evenly and that the receiver was sitting properly to not get damaged. I installed it this way to make it easier for me to get the headspace gages in and out.
Installing The Barrel
The barrel is simply badass. Sorry, I love a huge solid chunk of steel that is beautifully machined and finished. I’m just weird that way 🙂 The guys at X-Caliber did a great job for me. The make a barrel that is made for the Big Horn Origin, they have tons of barrel profiles and just a ton of options – click here for the Big Horn page. Seriously, the next time I do another full on custom build, I’m going back to X-Caliber for the barrel. They make just a ton of different barrels is what it boils down to.
So you can see the muzzle nut over the 5/8-24 threads, the Savage-style barrel nut and the Remington-style threads peeking out from under the green rubber thread protector. By the way, see the small black scope mount screws in the silver tray above? Yeah, their purpose hadn’t dawned on me yet 🙂
In case you are wondering about the exact specs of the barrel, here they are:
Model: Big Horn Pre-fit
Barrel Steel: 416R Stainless Steel
Barrel Length: 12″
Caliber: .308
Twist: 1:10
6 groove
Contour: #11 Marksmanship Training Unit (MTU)
Threads: 5/8″ x 24 TPI
Finish: Cerakote Graphite Black
Barrel Nut: 1-1/16″ x 20 TPI for Big Horn actions
The total was just under $500
Per the instructions in the Black Collar Arms video, I coated the threads that would go into the receiver with Anti-Seize and the thread where the barrel nut would go with Blue Loctite.Here’s the Clymer GO gage already in the bolt. I installed the barrel down tight and backed it off just a bit. Note how the recoil lug is in position as well. I carefully slid the barrel in through it. The pin seen at the 12 o’clock position helps keep it properly centered as you torque down the barrel.I confirmed both GO and NOGO before torguing down the barrel nut. You can see the recoil lug is now firmly in position as well.Building a precision rifle is not the time to go “Bubba tight”. The barrel nut needs to be torqued down to 55 foot-pounds and the barrel nut needs a 1-1/4″ crowsfoot wrench head to be tightened properly.Here are the two Clymer gages.Okay, so you do the headspace before the nut and after torquing it down. My first try at tightening the barrel nut didn’t work out because I didn’t have a good enough grip to keep the barrel from turning. The second try worked – I hit the torque spec and the headspace passed with GO (meaning the bolt fully closed) and NO-GO (meaning the bolt would not fully close). Black Collar recommended testing the bolt to make sure it would close on ammo. I normally do not keep live ammo on my bench just to be safe but I went and grabbed some S&B SPCE soft point hunting ammo and Federal T762TNB1 130 grain open tip match. The bolt closed firmly on both.
By the way, the Picatinny Rail held up just fine. I’m convinced it was a combination of the tape, setting it up carefully, relatively light torque load and a ton of luck that kept me from screwing it up. If you are planning one of these builds, just confirm whether the mount is integral or not and simplify your life 🙂
I was surfing around on the web one day looking at interesting builds and ran across something I had never seen before – a Pork Sword pistol. It looked like a short barreled bolt gun on a chassis with a pistol brace, scope and can. What in the heck? So it sure made me curious and I searched on “Pork Sword”. It is totally a thing and I’m surprised it hasn’t caught on yet.
Turns out there is a company called Black Collar Arms that is making the parts and also producing rifles and pistols. What I had seen was a braced pistol based on a Remington 700-foot print receiver on their minimalist Pork Sword chassis with a short barrel. At this point, I was hooked. I like bolt guns and really like building unique stuff. They’ve posted quite a few photos of firearms they have built as well as customer guns – click here.
The concept behind the Pork Sword is simple – create a compact weapon in a caliber that packs a punch without needing to go the registered shot barreled receiver (SBR) rifle route by building a pistol with brace. A Pork Sword would be ideal for hog hunting, hunting in heavy brush, survival situations or even urban engagements. Because it uses a short action Remington 700 receiver, you have tons of caliber choices plus you can decide the barrel length – you can make a firearm that is tailored to your needs.
It had been years since I last owned a Remington 700 XCR LR and all I had done was swap the trigger and stock on it so I remembered very little about how they were made. Sure most bolt guns are similar but the Devil is in the details.
I called Black Collar Arms a couple of time and they were really cool and talked me through a lot of considerations. They offered to either build one for me or sell me the parts and I told them building was really my thing and so we had a great talk. I called them two times, talked to two different guys and they were really helpful — I definitely got good vibes from them.
The logo is awesome!! They charge extra to have it on the chassis and while I really like it, I opted to not have it engraved on my unit.
This build was going to be an investment so I didn’t want to screw up. On top of talking with them, I also did a lot of digging based on what the guys at Black Collar told me and what they had for sale. I then assembled a parts list and slowly started accumulating stuff for close to four agonizing months. I’m not a very patient guy so slowly getting the stuff was a new experience vs. jumping right in with both feet.
I probably researched this project more than most with lots of calls direct to vendors to better understand what they had to offer. My goal is a 1/4″ group at 100 yards and 1″ at 400. That would be about 1/4″ minute of angle (MOA) and is a mean feat. It requires that all the parts come together the right way – caliber selection, chassis, action, barrel, trigger, brake, etc.
If you plan to build a pistol start with a new receiver and not a rifle
From a NFA legality perspective, you are building a pistol so that means you must start with a receiver or pistol but absolutely not a rifle. Once a serial number is classified as a rifle it can’t be a pistol and would have to go the SBR (short barreled rifle) registration route. Again, if you plan on building a pistol and using a brace, start with an action/receiver or a barreled action but never with a rifle. If you do not understand what I am talking about then do not proceed until you understand the difference between a pistol build and what would require registration as a SBR prior to building.
Action/Receiver Comment
By the way, the chassis can use Remington 700 receivers as well as others that fit. That sounds odd but not all third party receivers that say they are “Remington 700 compatible” necessarily have the exact same footprint plus you are going to need a recoil lug. I went with a Big Horn Origin that has a Remmage type of barrel mount meaning you thread the barrel into the receiver and set the headspace and you then tighten down the barrel nut to lock it in place. It’s a slick method. Here are other potential action vendors to consider: Defiance, Alamo Precision Rifles, Surgeon, Impact Precision, Accuracy International, Gunwerks, Bighorn Arms, Pacific Tool and Gauge, Thompson Leh, BAT Machine, Impact Precision, GA Precision, Stiller, Kelbly’s, American Rifle Company, Badger Ordnance, Viper Actions, and Bergara. Again, confirm it will fit before you buy anything.
Big Horn Origin Short Action – This includes the scope rail and I bought this from Northland Shooter Supply (NSUS). Note, Big Horn’s name is changing to Zermatt Arms. I talked to Big Horn directly but bought it from NSUS in the hopes of getting it sooner. NSUS often has them in stock but I had about a 4-6 week wait until mine came in because they had run out of inventory and the owner was very up front with me that I might need to wait a while before I ordered.
X-Caliber Pre Fit Big Horn 12.5″ .308 MTU-profile Barrel with 5/8-24 threads – I bought this direct from X-Caliber when they were having a sale. I needed to talk to them because they have a ton of options and most of them I had no idea what to get so they were a huge help. Their lead times vary but I think it took about 3-4 weeks for them to send me the barrel.
TriggerTech Primary Trigger – These things are so sweet!! They drop right in and are very easy to adjust from 1.5 to 4 pounds of pull and are very crisp. I went with a black straight blade trigger purely out of preference. They offer flat/straight and curved triggers as well as colored black or stainless.
SB Tactical FS1913A Brace – These are relatively new braces from SB Tactical with a long strut, a folding mechanism and fairly stout arm brace assembly at the end. Please note the “A” in the model number I bought. The first version of this brace (FS1913 without the “A”) has a polymer strut that can flex. The FS1913A has an aluminum strut and is stiffer. Given my plans to shoot a .308, I definitely wanted stiffer. You may need to shop a bit – I bought mine from Natchez. If the price is under $199, it’s probably the polymer unit. If you are going with a lighter recoiling round, the polymer ought to be fine.
Ergo Tactical Deluxe Zero Angle Grip – I’ve always liked target stocks with near vertical grips so I opted for this model.
APA Little Bastard brake – this is a tunable brake for precision rifles. I will get a suppressor down the road but for now, I’ll run this brake.
Magpul AFG – Normally I am not a huge fan of angled fore grips but think I may want something to hold on to. I’m really not sure if I will keep it on the rifle long-term but we’ll see.
Magpul bipod – I dismissed this bipod when I first heard about it but guys reported liking it so I figured I better check it out. I bought the Picatinny rail version so I could remove it readily. In hindsight I should have bought the one that was ARMS lever ready but that is a topic for another post. There are a ton of color and options combinations you can consider. As you can see in the photo at the top of the page, I went with black and I did use a small section of Magpul M-Lok aluminum rail to mount it.
AD Recon SL 30mm Scope mount – I like quality quick detach scope mounts. There are two big differences between a quality mount like an ADM and a cheap one. First, when you remove the optic and mount from the rifle and then re-attach them, the zero holds true for a good mount and not a cheap one. Second, the cheap ones tend to wear and bend on the throw lever cams and plates over time and then the accuracy gets worse.
Vortex 4-16×44 HST MRAD scope – I am a huge fan of Vortex scopes and thing you get a lot of quality glass at a reasonable price. I opted for a medium physical size scope. My first choice would have been a PST Gen 2 5-25×50 but I couldn’t quite swing it right now. I may well change to this scope down the road.
Magpul PMAG 7.62×51 AC Magazines – the Pork Sword chassis uses the AC short action series of PMAG 7.62×51 magazines. I bought a couple of 5-round magazines and a couple of 10-round magazines.
Tools Needed
Wheeler Remington 700 Action Wrench – this holds the bolt action while you do the barrel work. I didn’t have one and it was definitely a worthwhile purchase.
Clymer .308 GO and NO-GO Headspace Gages – normally I use Manson out of habit. Clymer has a good reputation and one tip I was told long ago is to go with the same brand of gage for a given caliber. So I went with Clymer for both the GO and NO-GO gages because they were in stock.
Wheeler Professional Laser Bore Sighter – I’ve been using a green laser model for about a year now and really like it. The green is very visible further away but they also have a red laser model at a lower price if you aren’t interested in paying extra for the green laser.
The following tools aren’t firearm specific but will help with the build:
1-1/4″ Crowfoot Wrench – you’ll need this to torque the barrel nut to spec. Confirm the size you need with the barrel maker. I didn’t have one this size and needed to buy it.
1/2″ Torque Wrench – Get one that starts at 10 foot/lbs and goes at 100. That gives you a really versatile range. The action wrench bolts are 10 foot/pounds each and then we you bring the barrel nut down, it’s 50-55 foot/pounds.
1/4″ Torquing Screwdriver – Get a good one. I highly recommend the Vortex Optics unit because it is a precision tool for the optics work but it does max out at 50 inch-pounds and the action screws need 55-65 inch/pounds (note that is inch/pounds and not foot/pounds).
1/4″ Torque Wrench – I used a clicker-style torque wrench for the action screws that I installed at 60-in-pounds.
Vise – have a good enough one bolted to a surface that can hold the action wrench and your life will be way easier.
Blue Loctite – Firearms can shake just about any fastener loose so use Blue Loctite, or your favorite medium strength thread locker, to keep them from rattling loose.
SAE Allen Wrench Bits – If I recall right, all of the hex head screws were SAE and you’ll want the bits so you can torque them down to spec with the torquing screw driver.