In the last post, I outlined the major parts of the Pork Sword pistol I planned to build. As it turns out, building a Pork Sword is very straight forward and I had fun doing it.
Research
As always, I did some research before I did the actual build. First off, Black Collar Arms has a nice “how-to” page and the following video tells you about 80% of what you need to know:
The only other thing I needed to look up was what to do for the trigger – as I mentioned in the last post, it has been quite a few years since I owned and installed a trigger in a Remington 700 XCR LR so I did some reading. This Brownells video really helped me visualize what was needed:
Armed with the above knowledge and a well done one page instruction sheet from Black Collar that comes with the Pork Sword chassis, I tackled the build. Let me again emphasize, this is very straight forward.
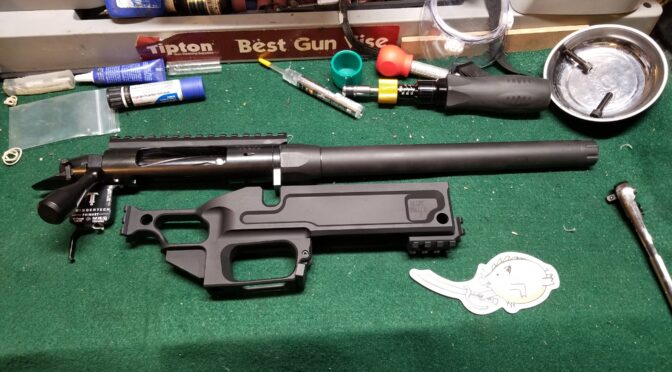
The Action, The Wrench & A Confession
You know, sometimes I’m not too smart. A cognitive bias is something where your brain plays tricks on you and there are a number of different ones. Today’s confession involves one known as a “confirmation bias” which is where you think one thing and then everything that confirms your belief you accept and stuff contrary to that belief is discarded. Yeah, that caught me here and let me tell you why.
When I bought the Big Horn Origin, I thought the scope rail was a machined part of the receiver. I assumed that – yeah, the old “you make an ass out of u and me when you assume” saying is alive and well. When the action arrived, I looked at it and thought “Oh, that looks nice” and in a little parts bag with the two trigger pins were three scope mount screws – “Oh, I wonder why those are there?” I literally wondered that.
Seriously though, the Big Horn Origin is a work of art. No sloppiness in the action and very smooth. The fitment of the parts is exceptional. Nothing was jumping out at my tired brain saying “hey idiot, the scope mount and receiver are separate parts!”


Half-asleep the morning of the build, I got out the action wrench, put it in the vise and added two layers of gorilla duct tape to protect the action. I installed the action upside down so I could juggle the headspace gages easier and then I cranked the action wrench screws down to 10 foot pounds each. Now I got lucky because I put the tape there to protect the scope mount.
Only after I installed the barrel and was more awake did I notice how very lucky I got. The scope mount was removable and only one screw had been installed so the big dummy (me) would see the missing screws in the mount, that they were in the baggy and know to remove the rail before installing the barrel. Yeah, I missed that one but got real, real lucky because of the tape and that not a ton of torque is needed for a new receiver and installing a new “Remage” style barrel.
Remage means you thread the barrel in like normal (the “Rem” part of the name), set the headspace and then torque down the barrel not like a Savage (the “age” part of the name).
Bottom line, my mind played a nasty little trick – because I thought the action and mount were one piece I discarded all information that was pointing out they were two pieces. Don’t be me – take them apart before putting them in the wrench.


Installing The Barrel
The barrel is simply badass. Sorry, I love a huge solid chunk of steel that is beautifully machined and finished. I’m just weird that way 🙂 The guys at X-Caliber did a great job for me. The make a barrel that is made for the Big Horn Origin, they have tons of barrel profiles and just a ton of options – click here for the Big Horn page. Seriously, the next time I do another full on custom build, I’m going back to X-Caliber for the barrel. They make just a ton of different barrels is what it boils down to.

In case you are wondering about the exact specs of the barrel, here they are:
- Model: Big Horn Pre-fit
- Barrel Steel: 416R Stainless Steel
- Barrel Length: 12″
- Caliber: .308
- Twist: 1:10
- 6 groove
- Contour: #11 Marksmanship Training Unit (MTU)
- Threads: 5/8″ x 24 TPI
- Finish: Cerakote Graphite Black
- Barrel Nut: 1-1/16″ x 20 TPI for Big Horn actions
- The total was just under $500


By the way, the Picatinny Rail held up just fine. I’m convinced it was a combination of the tape, setting it up carefully, relatively light torque load and a ton of luck that kept me from screwing it up. If you are planning one of these builds, just confirm whether the mount is integral or not and simplify your life 🙂
Conclusion
That’s it for now. As a reminder, the first post has the links to all of the parts and tools you’ve seen thus far. The next post will be about installing the trigger and chassis. I hope you found this helpful.
Please share the link on Facebook, Forums, with colleagues, etc. Your support is much appreciated and if you have any feedback, please email us in**@*********ps.com. If you’d like to request a report or order a reprint, please click here for the corresponding page to open in new tab.