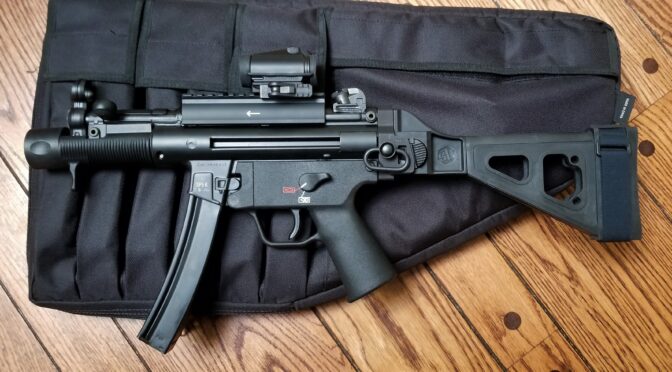
When the ATF reversed the ruling about braces and enabled folks to use them however they saw fit, the demand and supply of pistol braces went into orbit. I have carpal tunnel and a hereditary tremor so for me, using a brace is the only way I can wield a heavy pistol – such as one based on an AR, AK or MP5 type of action.
PSA has come a long way. I’ve used them as my go-to AR parts supplier for years and now they have great deals on parts, kits, receivers, and firearms. They also offer some great deals on braces – by themselves as parts, as part of a kit offering or even on firearms.
If you find this post useful, please share the link on Facebook, with your friends, etc. Your support is much appreciated and if you have any feedback, please email me at in**@*********ps.com. Please note that for links to other websites, we are only paid if there is an affiliate program such as Avantlink, Impact, Amazon and eBay and only if you purchase something. If you’d like to directly contribute towards our continued reporting, please visit our funding page.
Both of these rifles were finished using Duracoat’s spray on finish. You really needed to blast the surface, make sure it was very clean and then allow the finish to cure for a week for it to be durable.Baking on Molyresin over manganese park. That’s a M92 with a long barrel in the front and a M72B1 in the rear from back in the days when I had free time 🙂
These days, I do a base surface preparation of manganese parkerization and then Norell’s Molyresin on top. The park creates an ideal surface for any sprayed on finish like Alumahyde, GunKote or Molyresin to stick.
The following are some great examples of products they carry:
If you find this post useful, please share the link on Facebook, with your friends, etc. Your support is much appreciated and if you have any feedback, please email me at in**@*********ps.com. Please note that for links to other websites, we are only paid if there is an affiliate program such as Avantlink, Impact, Amazon and eBay and only if you purchase something. If you’d like to directly contribute towards our continued reporting, please visit our funding page.
I can’t stand Biden and think this is absolutely hilarious – The” Angry Joe-14″ AR-14 Stripped Lower. LMAO!! Complete with a dog face pony soldier logo!
If you find this post useful, please share the link on Facebook, with your friends, etc. Your support is much appreciated and if you have any feedback, please email me at in**@*********ps.com. Please note that for links to other websites, we are only paid if there is an affiliate program such as Avantlink, Impact, Amazon and eBay and only if you purchase something. If you’d like to directly contribute towards our continued reporting, please visit our funding page.
I now have built my second Beowulf and guys ask me about the recoil all the time – the short answer is that it’s very manageable. With just a bit of tuning, I’d put it somewhere between a 20 and a 12 gauge shotgun shooting 2-3/4″ magnum loads. Now that there are a ton of options both from Alexander Arms as well as generic 12.7×42 uppers (the metric designation for the Beowulf so they don’t have to pay royalties to Alexander Arms), a lot of guys are getting into the .50 Beowulf cartridge and ask me about what brake to run with.
My favorite is the Timber Creek Heartbreaker. It does a remarkable job of venting gasses backwards to compensate for the recoil it would otherwise have. I liked it so much on my first build that it was what I used in my second build. It’s very affordable and I’d be surprised if you can find a brake that does a better job!
Side view of the Heartbreaker and you can see where it gets its name.
View from the top. Note the brake includes a jam nut.
Finding The Brake
You may need to go direct to Timber Creek. Primary Arms is out of stock and they are sometimes on eBay.
My Alpha Wulf
I did a series of blog posts when I built my second rifle. My pet name for it was the “Alpha Wulf” or the leader of the pack. It’s all premium parts and probably my best AR build when it comes to paying careful attention to details during assembly. Here are the posts:
I’m a big fan of the .50 Beowulf cartridge and hope you find this post helpful!
3/6/24 Update: I’m not sure if Timber Creek is still making these or just what. I haven’t built a Beowulf for a few years and don’t have any alternative suggestions.
Note, I have to buy all of my parts – nothing here was paid for by sponsors, etc. I do make a small amount if you click on an ad and buy something but that is it. You’re getting my real opinion on stuff.
If you find this post useful, please share the link on Facebook, with your friends, etc. Your support is much appreciated and if you have any feedback, please email me at in**@*********ps.com. Please note that for links to other websites, we are only paid if there is an affiliate program such as Avantlink, Impact, Amazon and eBay and only if you purchase something. If you’d like to directly contribute towards our continued reporting, please visit our funding page.
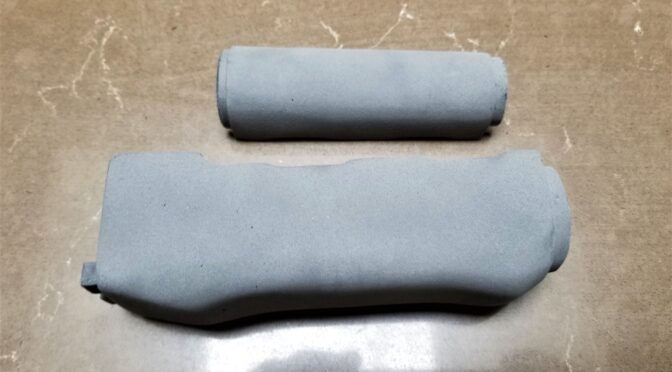
I’ve had guys ask why the color of my grips or handguards seem to fade with time. The short answer is that it has to do with the liquid wax finish oxidizing and not the plastic – the color is actually in the plastic. You see, we sand every grip and handguard to get rid of mold imperfections and then we blast each with abrasive media (currently it’s Black Beauty or Black Magic depending in the store I go to) and that turns the plastic almost white as you can see in the photo above. We blast the surface to create a very sure grip when you grab hold – your hand doesn’t slide easily. The polished finish we used to do resulted in a surface that is slick when wet due to sweat, water, blood, etc.
So, the blasting abrades the surface and messes up the colors being reflected back to your eyes. To solve this problem, I tried a ton of different oils and waxes and the best was Atsko Sno-Seal. It really brought out the color and it did not fade – or at least I never saw it fade. The problem is that Sno-Seal is a paste wax and I have carpal tunnel. Rubbing it into grips and handguards every day over and over was killing by wrists so I had to stop it.
This pushed me back to the drawing board and this time I looked at liquid waxes. Some of them really smelled as the liquids evaporated and the best option I could find find was the various butcher’s block finishes that combine mineral oil and a wax – often a bee’s wax. This stuff goes on like a dream but does fade with time. There’s nothing wrong with the color – it’s just the finish oxidizing and drying out.
What to do about the fading?
As mentioned above, the finish I apply will fade. The good news is that the owner with a number of options and I’ll shorten it down to the four I recommend:
Buy Sno-Seal and apply it. This stuff is awesome for boots and I actually had it for my boots when I tested it. It’s my #1 recommendation and what I do for furniture I make for myself.
Shoe polish holds up really well and you can nudge the colors/hues one direction or another depending on the color of the wax. This goes on pretty easy and seems to last. Just buff it well so you don’t get any color on your hand. I’ve had very good luck with Kiwi products.
Any fine wax for boots, leather, wood or preservation ought to work. Just follow the directions. Absolutely do not use super thick floor wax or it will be a disaster as one customer found out.
Put another coat of butcher’s block conditioner on it. Easy to apply but it will not last.
Atsko Sno-Seal is my #1 choice. Kiwi shoe polish works great. Howard’s Butcher Block Conditioner is what I use in production and is also what fades with time.
How to Apply Sno-Seal
My first recommendation to customers is always Sno-Seal. It takes just a little it to polish a grip or handguard plus you can use it to waterproof your boots.
I did this corner at room temperature and you can tell it takes a bit more effort to rub it in and buff it off.
You can either warm it up on your hand and then rub it in or you can use a heat source to warm up the grip or handguard just a bit – meaning warm to the touch not hot – and it goes on even easier. When I did the M72 hanguard set shown, for example, it was warm after about a minute and 20 seconds in our microwave. You rub the wax in and buff it off – done.
Hello Mr. Microwave! You can optionally warm your piece of furniture up with a microwave, oven turned on at 150F or less, hair dryer, etc. You want it to be warm, not hot. If you can’t pick it up, it’s way too hot. The plastic will not begin to deflect until around 250F and there’s no way you can pick that up hence the rule of thumb. [Click here if you want to read about a heat test we did] So here’s the finished handguard set after I buffed off the remaining wax.
Again, if you ask me what I do for my own grips and handguards, it’s Sno-Seal and I rarely use extra heat – usually just I just warm it up with my hands and rub it in. Sno-Seal lasts the best of anything I have found.
I hope this helps you out.
If you find this post useful, please share the link on Facebook, with your friends, etc. Your support is much appreciated and if you have any feedback, please email me at in**@*********ps.com. Please note that for links to other websites, we are only paid if there is an affiliate program such as Avantlink, Impact, Amazon and eBay and only if you purchase something. If you’d like to directly contribute towards our continued reporting, please visit our funding page.
Rick sent me these cool photos of his new build and I had to share them. He also gave me some details as well.
The rifle has a “Polish FB Radom barrel, trunion, and optic rail. Childers polish cg1 receiver. To stay with the polish theme, I found an unissued polish soviet era laminate stock. I was originally going to use a bakelite grip. But, since this is a hard use rifle. I wanted something more robust. But correct for the polish theme. Your grip delivered and then some. So here are some pictures of my polish AKM-Beryl transitional rifle. At least I call it that for lack of a better term. “
Yes sir Rick – that is definitely one slick build!
If you find this post useful, please share the link on Facebook, with your friends, etc. Your support is much appreciated and if you have any feedback, please email me at in**@*********ps.com. Please note that for links to other websites, we are only paid if there is an affiliate program such as Avantlink, Impact, Amazon and eBay and only if you purchase something. If you’d like to directly contribute towards our continued reporting, please visit our funding page.
We’ve all been there – you’re working on a project and wondering how much to torque something so either we don’t bother or just take a guess. What I only found out recently was that in 2017, NASA published a really cool guide called “Installation Torque Tables for Noncritical Applications” – with the document ID as NASA/TM—2017-219475.
The document provides the torque specifications for a ton of general purpose fasteners that do not have an exact specification assigned – hence the term non-critical. As you can imagine, they get very specific in critical/risky situations.
At any rate, given the size of the bolt or screw, the thread pitch, the material and the depth, they provide a reference torque specification you can follow for both metric (M6, M8, M10, etc.) and SAE (#8, #10, 1/8, 1/4, 3/8, etc.) fasteners. Note, they provide an assembly torque (which is a 65% load from failure) and 100% torque. I use the assembly torque spec.
They also recommend that the depth of thread engagement be 1.5x the diameter of the fastener. So a 1/4″ (0.25″) fastener should have at least 0.25″ x 1.5 = .375″ (3/8″).
Here’s an example table. This is for fasteners going into 6061-T6 aluminum with a thread depth of 3/16″. If we go down for a 10-32 UNF screw, the assembly torque is 22.2 inch pounds. I’d use that lacking any other detailed information. I could go up to 34.2 inch pounds but I have stripped so many fasteners I don’t risk it. I’m a huge fan of Loctite so I go with that and the assembly spec.
Kudos to the two authors and to NASA for making it available. The PDF is a cool reference document and one I use whenever I can’t find a specific torque value for a given application. All you machinists and engineers – you know way more than me so please let me know if you have other resources you recommend.
If you find this post useful, please share the link on Facebook, with your friends, etc. Your support is much appreciated and if you have any feedback, please email me at in**@*********ps.com. Please note that for links to other websites, we are only paid if there is an affiliate program such as Avantlink, Impact, Amazon and eBay and only if you purchase something. If you’d like to directly contribute towards our continued reporting, please visit our funding page.
As mentioned in the last post [click here] – building a Beowulf is pretty much like building any other AR15-class rifle. I put it that way because the AR10s are different and the Beowulf uses the AR15 platform with the notable exception of an enlarged ejection port. The modular capabilities of the AR platform are what make it versatile.
Lower Build Comments
First, I’d like to point out I ran into one small snag with the Spike’s lower. The detent spring and pivot pin hole had some kind of debris in it or maybe a bur. I had to chase it to clean it out. Other than that, it went great.
Normally, installing the front pivot pin is pretty easy with a tool like the one shown that helps you trap the deternt and spring. Because of somethign obstructing the hole inside, the deternt didn’t push down and actually scored my relativelyt soft tool. So, I chased the hole and it installed no problem. Two lessons learned – #1 chase the holes first. #2 – I decided to mve to a stainless steel install tool.
My second comment is about the Magpul PRS Gen 3 stock. Wow. It is really cool. First, I went with the rifle buffer tube because I assumed the Gen 3 needed it – in fact, it does not. When you look at the Gen 3, it has a modular front nose that comes apart just behind the front swivel hole. It comes from Magpul all set to use a carbine buffer tube! Now it is a fixed stock and will not adjust but you do not need to change tubes. Had I known that, I would have used a carbine tube to avail of all the different buffers that are out there.
By the way, the PRS is an expensive stock and it pays to watch for sales. Also, this is specifically then third generation model – you will see older stocks pop up on eBay, etc. The older ones will not have the really thick recoil pad or the ability to use a carbine tube. Here it is for sale at PSA.
The PRS Gen 3 is sweet! Note the really thick recoil pad and modular front end that can accomodate either a carbine buffer tube or be swapped out to support an A2-style rifle buffer tube. This gives some nice flexibility.The carbine modular front end is to the left and the rifle is in the right.
By the way, I took the time to torque down everything including the rifle buffer tube in this case. The Magpul wrench makes it real easy to bring the nut down to the torque spec of 35-39 ft lbs.
Screwed in the rifle-length buffer tube with just a bit of moly grease on the threads.Used the Magpul wrench and a toruqe wrench to bring the receiver extension / buffer tube down to a 35-39 foot pound torque spec. In general, I set my wrench at the lower end of a scale unless there is something very specific.
I think I will stick with the basics going forward. In other words, I’ve tried extended head pins, bolt catches with giant heads, ambidextrous selectors and in the end, I find I really don’t need them. The takedown pins and controls are all mil-spec in this build.
Upper Build Parts
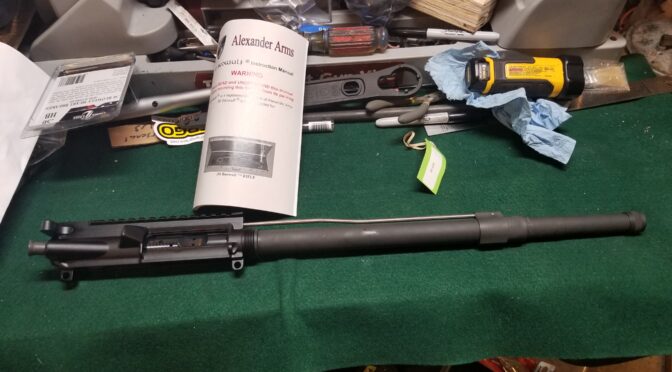
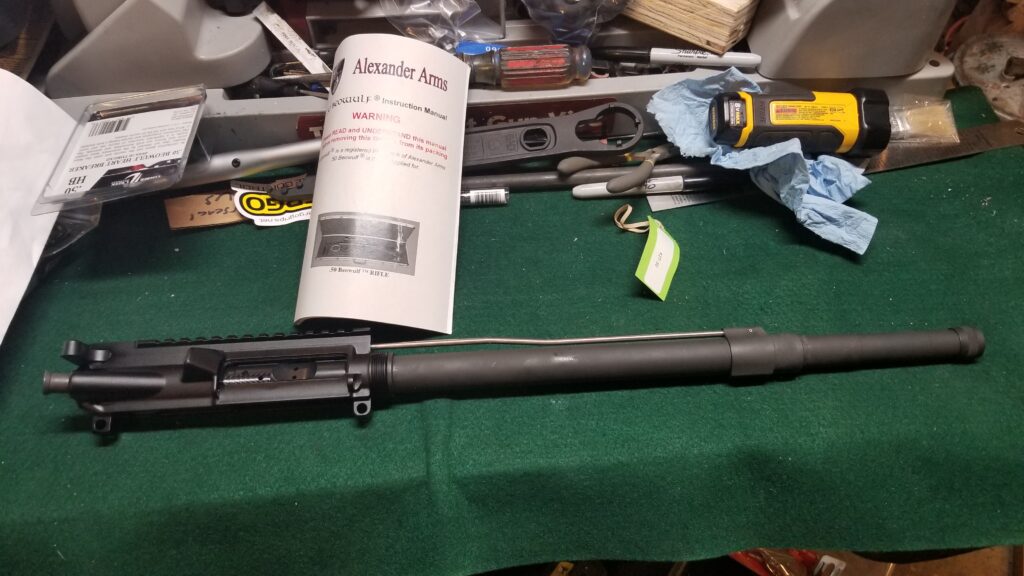
The upper is the actual DIY (Do It Yourself) upper from Alexander Arms and they do all the engineering and machining for you. I also need to point out that it is really well done. I have zero complaints on the fit or the finish.
The DIY kit includes the upper receiver, bolt, carrier, charging handle, barrel, and the gas tube has already been installed in the lowe-profile gas block. The unit arrives assembled including their already divoting the barrel for the two gas block set screws. What you will need to do is to add your own barrel nut and handguard plus whatever you want to do for a muzzle brake. The DIY comes will a thread protector for the 49/64-20 right hand (RH) threads.
Here’s the upper fresh out of the box.They already drilled the divots in the barrel an are using centering set screws so you can just remove the gas tube, install your barrel nut and then slide the gas block back on and tighten it down.
Folks will tell you I am either particular or eccentric (maybe both) when it comes to my builds. I knew there were some parts I wanted to use on this upper:
MI Combat 15: M-LOK handguard. These are very nicely done with all edges beveled plus I like the barrel nut they use. It simplifies aligning the handguard and receiver rails. Also, I really like having the flexibility to add rails or accessories where needed while having a slim profile where I don’t. Keymod has pretty much died out and M-LOK seems to be the lead attachment method now.
BCM Mod 3 charging handle greatly simplifies working around optics to charge the rifle.
Timber Creek Heart Breaker muzzle brake. This is an excellent choice for taming the Wulf. I was so impressed by it on my first rifle that it was my automatic choice for this second rifle.
Upper Build Instructions
A Beowulf upper is very much like any other AR with the exceptions of no ejection port cover and a screw on gas tube block.
Here are some third party resources on assemblign AR uppers in case you are interested:
I always like to combine stuff I read, like the above, with videos I can watch. I always pick stuff up both ways and think the two perspectives are very valuable. With that said, here are some build videos.
If you find this post useful, please share the link on Facebook, with your friends, etc. Your support is much appreciated and if you have any feedback, please email me at in**@*********ps.com. Please note that for links to other websites, we are only paid if there is an affiliate program such as Avantlink, Impact, Amazon and eBay and only if you purchase something. If you’d like to directly contribute towards our continued reporting, please visit our funding page.