Surprisingly, Zastava has sold all of their first batch of M91 rifles. I say “surprisingly” because I thought the steep price would deter buyers. Atlantic Firearms had it listed at $3,144.99 on 7/10 and pretty much sold out the same day. I guess I should say I was alerted they were there on 7/10 and they were gone by the time I got there. [Note: This is the link to Atlantic’s listing.]
Zastava USA is posting photos of their new M70 PAP rifles and someone asked if more M91s would be coming in. They replied that there would be more in August. Click here for the thread.
I am not sure who else got the M91 besides Atlantic so there might be some others floating around. Two have popped up on Gunbroker but without photos and that always makes me suspicious. [Click here to do a search]
Sorry, but I will not be purchasing one of these rifles at this price point. I simply can’t afford it. I have the M76 (8mm Mauser), the M77 (.308) and will stick with them. I’m hoping the rumors of a FEG Dragunov being imported pan out. [Note, my M77 cost me something like $6-700 from Centerfire hence my disappointment at the price of the M91.]
If you find this post useful, please share the link on Facebook, with your friends, etc. Your support is much appreciated and if you have any feedback, please email me at in**@*********ps.com. Please note that for links to other websites, I may be paid via an affiliate program such as Avantlink, Impact, Amazon and eBay.
I wish I had better news but Youtube cancelled the channel for the Kalashnikov Concern so the video is no longer available. I am leaving the post up so at least you can see the screen shots.
Because of the import restrictions of the Russian firm Kalashnikov Concern, Americans will not get a chance to see a cool new rifle just released by them. Their AK TR3 rifle is a civilian version of the modern AK-12 and will be available in both 5.45×39 and 7.62×39 cartridges. [Click here for a previous post that goes into the AK-12 in more detail.]
The AK TR3 is identical to the military AK-12. Note that it has three fire control group pins.The AK TR3 is chambered for both traditional Russian cartridges, the 5.45×39 and 7.62×39
Yeah, I sure wish I could buy an AK TR3 but given the political issues between our countries, that is not going to happen. Regardless, it looks like a very slick rifle and I’ll just have to ogle it from afar.
If you find this post useful, please share the link on Facebook, with your friends, etc. Your support is much appreciated and if you have any feedback, please email me at in**@*********ps.com. Please note that for links to other websites, I may be paid via an affiliate program such as Avantlink, Impact, Amazon and eBay.
All images were extrated from the video and remain the property of their respective owner.
Last week, my wife and I had to drive to Dowagiac, a small town in Southwest rural Michigan, to get plates for a car. We’ve done the forty minute drive before and I always find it relaxing as we go through fields and small towns.
As we passed through Eau Claire, I was so impressed by all the American Flags on every lamp post on the main street. In addition to the flags, there are a number of war memorials for the Civil War, and the first and second World Wars. I don’t think I saw any revolutionary war memorials but they may well be present in one of the towns along the way.
What strikes me is how we forgot what it took to become the country that we are. I can’t help but think of the observation by the writer and philosopher George Santayana “Those who do not learn history are doomed to repeat it.” We can’t forget our past, change our past or sugar coat our past. It is what it is and made us who we are. I have no doubt there are errors and omissions but as schools stopped teaching history, a lot of people are going down a dangerous path of self-righteousness that can justify almost any action no matter how it has been proven destructive over and over.
So with this in mind, I jotted down the following:
Go down the streets of small town America and you see the flags, you see the monuments to the war dead dating back to the Civil War … these people paid the price. For generations these people fought and died for our country, for their families, for their neighbors – they paid the price for our freedom, not politicians.
These folk work hard, play hard, and value family and life. When we talk about America, we need to remember who built it. It is not a place. It is not a thing. It is a people.
In closing, let’s remember more than just fireworks and barbecues this Forth of July. What are we celebrating? Our independence and the birth of our country.
If you find this post useful, please share the link on Facebook, with your friends, etc. Your support is much appreciated and if you have any feedback, please email me at in**@*********ps.com. Please note that for links to other websites, I may be paid via an affiliate program such as Avantlink, Impact, Amazon and eBay.
The flag photo at the top of the blog post is the copyright of Joshua Nathanson. The flag in the meme is by HARRIS.news (Own work) [CC BY-SA 3.0 (http://creativecommons.org/licenses/by-sa/3.0)], via Wikimedia Commons
In case you are interested, the following are patriotic shirts on Amazon that I like. Click on one and you can order it:
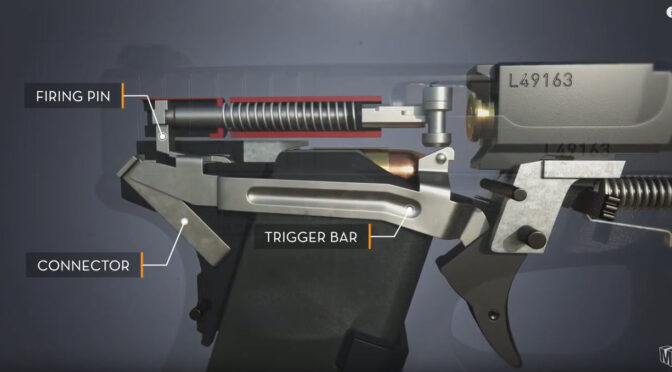
As the saying goes, a pictures is worth a 100 words. Well, this video is worth a few thousand. I am very, very impressed by the fire control group that Gaston Glock created with the three integral safeties. In talking with a lot of Glock pistol owners, they aren’t very clear on how the pistol operates and now I can share this video with folks.
This example screen shot from the video shows how a case is extracted and then ejected. The level of detail is exceptional. Note how the creator of the video shows you a faint ghost image of the pistol around the components he is demonstrating.In part of the video, the creator shows you how all three safeties work. The above screen shot is from the part of the video where the firing pin safety mechanism is explained.
If you find this post useful, please share the link on Facebook, with your friends, etc. Your support is much appreciated and if you have any feedback, please email me at in**@*********ps.com. Please note that for links to other websites, I may be paid via an affiliate program such as Avantlink, Impact, Amazon and eBay.
Here are our favorite pro Second Amendment shirts and now is a great time to show how you feel about protecting your right to bear arms. Click on any of the photos below to go to Amazon, learn more about a given shirt and order it.
“A well-regulated Militia, being necessary to the security of a free State, the right of the people to keep and bear Arms, shall not be infringed.“
“A well-regulated Militia, being necessary to the security of a free State, the right of the people to keep and bear Arms, shall not be infringed.”
Don’t tread on me
“A freepeople ought notonlybearmed and disciplined, but they should have sufficient arms and ammunition to maintain a status of independence from any who might attempt to abuse them which would include their own government.” — George Washington
Shall not be infringed
My rights don’t end where your feelings begin
“Americans have the right and advantages of being armed – unlike the citizens of other countries whose governments are afraid to trust the people with arms”
Second Amendment Come and Take It – In Defense of Freedom
We the people
2nd Amendment
United We Stand – Land of the free. Home of the brace.
Second Amendment
Don’t Tread on me
“America will never be destroyed from the outside. If we falter and lose our freedoms, it will be because we destroyed ourselves.” – Abraham Lincoln
2nd Amendment Brotherhood
2nd Amendment – If we can’t protect ourselves, who will?
Nobody needs an AR15? Nobody needs a whiny little bitch either, yet there you are.
“The beauty of the Second Amendment is that it will not be needed until they try to take it.” – Thomas Jefferson
We the people of the UnitedStates, in order to form a more perfect union, establish justice, insure domestic tranquility, provide for the common defense, promote the general welfare, and secure the blessings of liberty to ourselves and our posterity, do ordain and establish this Constitution for the UnitedStates of America.
USA 2nd Amendment
My rights don’t end where your feelings begin
If you find this post useful, please share the link on Facebook, with your friends, etc. Your support is much appreciated and if you have any feedback, please email me at in**@*********ps.com. Please note that for links to other websites, I may be paid via an affiliate program such as Avantlink, Impact, Amazon and eBay.
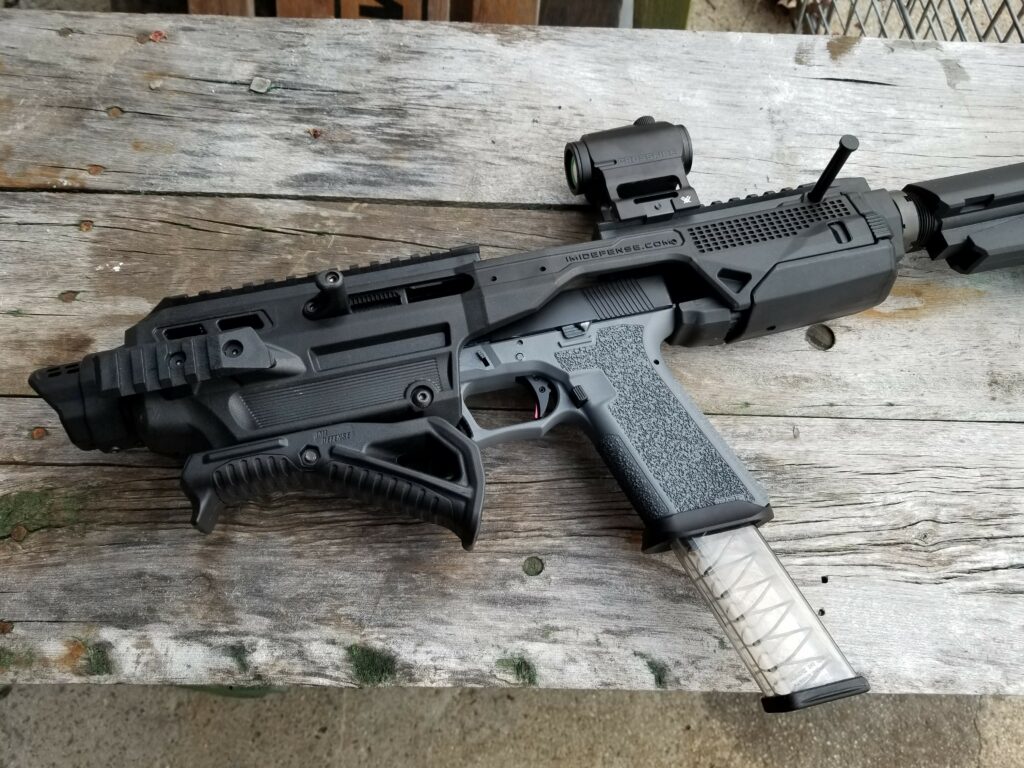
Folks, I have built a couple of Polymer80 pistols – A Glock 17 clone and a 34 clone and really like them. When I heard that Polymer80 was going to import the Israeli Military Industries (IMI) Kidon Pistol Conversion Kit I got pretty excited. My first real pistol was a .44 Magnum IMI Desert Eagle in 1990. The Desert Eagle was awesome so I had high expectations for the Kidon Pistol Conversion Kit. So far, I must admit that I am disappointed. This may change with more use but want to pass on my experiences to you. To be blunt, for me it is a range toy at best in its present incarnation.
The concept was cool – have a chassis readily available in a soft-case in the trunk of your car, or where ever, that you could slide a pistol into with no tools and instantly have a much more stable platform to work with that could also enable you to mount an optic and light. This would aid accuracy immensely and you could imagine a potential appeal to law enforcement or others who might need an impromptu pistol caliber carbine.
I could definitely benefit from something like this but for a completely different reason. I was born with a hereditary tremor, also sometimes called a “necessary tremor”, that causes my hands to shake a bit. I’ve had it my whole life and I can work around it most of the time except when holding a pistol at arms length. Andrew Zachary, my CPL instructor, gave me some great tips to improve my groups for self-defense but I will never be a great pistol shooter. However, if you give me carbine or rifle, I can do a heck of a lot better off hand and hold my own with most folks if I have a rest. So, I was really looking forward to using the Kidon – not just to review it.
When Polymer80 started selling them after the 2019 SHOT show, the price was $525 but it dropped down to $350 fairly quickly so I bought one. A plus was that they included a pre-installed adapter for the Polymer80 pistol frames that I am a fan of. If you like building firearms, you have to try one of their frames – it’s like a double-stack 1911 in terms of the angle and girth but it uses Glock parts. With that said, let’s get back to the Kidon.
What Pistol Did I Test With?
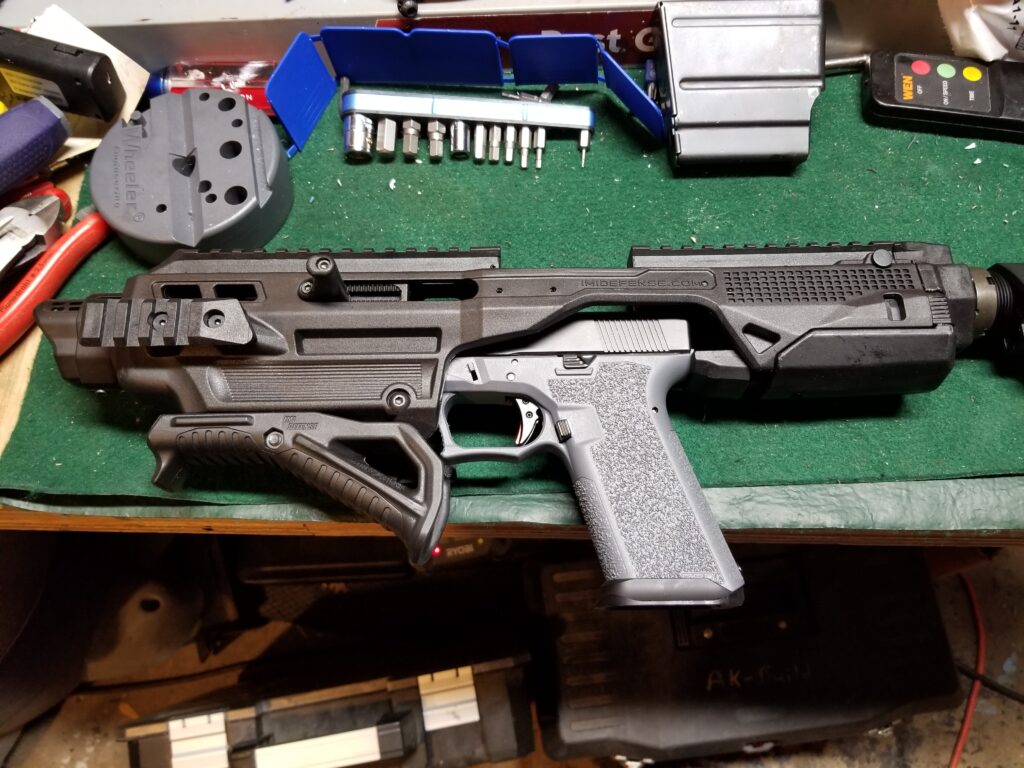
For testing, I only used my Polymer80 PF940V2 frame Glock 17 clone. I didn’t test any other models. So please bear in mind you might have different results with other pistols.
The test pistol is my personal Polymer80 PF940V2 Glock 17 build. Notice the slight bevel on the front of the slide. I don’t think that affected the fit in the frame any. When I inserted the pistol into main frame of the Kidon, it was the lower that could be pushed in too far. The slide did not move. The PF940V2 frame has not been altered in any way.
Opening the Box
I ordered the Kidon direct from Polymer80 and they were pretty quick to ship the unit. It arrived in a surprisingly large box. It turned out that the Kidon unit includes a soft case with a sling, adjustment tool and room for the M4 stock or brace.
The Kidon Pistol Conversion Kit includes an interesting custom soft case with carrying handle and shoulder strap. That is Molle webbing at the bottom. I wish it was higher or they had put more of the webbing on the bag so long magazines would not extend below the case.Pretty cool layout. I was starting to feel my inner James Bond unexpectedly. The Kidon was looking pretty cool so far.
So, I did a quick skim of the manual to find out how to install the pistol. I’d not seen anything quite like the Kidon before and couldn’t readily guess how it all worked.
Inserting the Pistol Into the Main Frame
Basically the pistol slides forward into the chassis and is secured in place by the front rail. It is length sensitive and this is why some pistols, such as my G34 will not fit it. My Polymer80 G17 went right in. Note, it uses the Polymer80 PF940V2 full size frame and it is what I used during my evaluation – you may have better success with other models of pistols.
Okay, this is looking like something from Star Wars. The screw just above the rear of the angled fore grip (AFG), is for adjusting the clamp. Note, the AFG is included with the Kidon and is removable. Note, the main frame as IMI calls it, or the main part of the chassis as I would describe it, is a polymer. The part in front of the pistol’s barrel is a heat shield / blast shield and is made from aluminum – I think that was a good idea on their part.The big Front Lock Lever that says “Flip Up To Lock” is what clamps down on the rail of the Polymer80 frame.
Let me share some of my observations at this point:
P1: The pistol does not intuitively slide into the “main frame assembly” of the Kidon chassis. I have yet to pick the two pieces up (the pistol and the main frame) and get them to go together with the first try. I’ve got a trick that works better though – I hold the Kidon’s main frame vertically and settle the pistol into the clamp.
P2: The clamp is not as secure as I would like and it does not lock the pistol parallel to the top rail. This causes a problem when inserting the rear locking assembly and I’ll come back to this. It also means you can flex the Polymer80 in the chassis. When I sighted in my red dot, with a laser through the bore, I found I could change the impact point dramatically depending on how hard I pushed or pulled on the pistol’s grip.
P3: The pistol can go in too far. With a Glock, pushing the slide back just a bit will disable the trigger and that can easily happen if you are in a rush. I’m getting a better feel for this but it really needs a better way to insert the frame and have it stop and lock in the proper position. I install vertically per the above and stop when the frame comes to the initial rest and no further.
Some of the above I’ve gotten better at with practice and will likely improve further but am not keen on the fumbling around. Let’s continue with the review.
Installing The Rear Locking Assembly
The Rear Locking Assembly (RLA) pushes the pistol from the rear into the Main Frame and holds it at the proper angle relative to the bore. IMI made this modular by adding a Rear Adapter Clamp. This adapter enables the Kidon to support an absolute ton of different pistols. It comes with the adapter for the Polymer 80 frame pre-installed so I did not need to mess with that.
The Rear Locking Assembly (RLA) is the part just below the rear of the main frame in this photo. It is held in place by the takedown pin in the main frame (sticking out in this photo) and two tabs that are in the sides of the the RLA. Note the pistol you see is my full size Glock 17 clone built on a Polymer80 PF940V2 frame.Here’s a close up of the RLA. The forward part is the modular rear adapter clamp. You can just see the tabs in the middle that mate with the rectangular holes in the main frame as well.This is the modular rear adapter clamp that is specific for Polymer80 pistols. It actually slides over the beavertail part of the receiver just a tad and both pushes it forward and holds it in place vertically as well.You can see the rear locking adapter pushing the beaver tail area of the Polymer80 frame into position. It’s spring loaded to apply pressure.Here you can see the tabs better plus the rear nut. I don’t know what else to call it. If you remove this nut, you can install an M4 gas tube and then whatever stock or brace you want.
Installing A Brace
In other parts of the world without our crazy short barreled rifle (SBR) laws, the unit would have an IMI brand M4-style stock on it but in the US, it ships with a nut that has a sling swivel in it instead. It does give us options though and if we don’t go the SBR registration route, we can install a brace at least. I opted for the very well done SB Tactical SBA3. Hint – use a fixed wrench when removing the end nut on the chassis – I used an adjustable wrench and it rounded it over a bit. That was my fault – I knew better but was in a rush.
Be sure to back out the set screw that locks the nut or gas tube into position.Here’s the SB Tactical SBA3 brace – it has three adjustment positions (fully collapsed, middle and fully extended) and is very well made.The brace simply screws into the RLA. Note, I bought a basic castle nut and installed it just to lock things in place even further. I’m old school that way.This example shows that the adapter missed the beaver tail and went underneath it lifting the pistol up at an angle. If you grab the pistol now you can move it around and it can still fire.
It is a bit of a challenge to get that rear locking assembly to line up and go into the main frame. If you aren’t careful and purposefully watching the pistol, the rear adapter clamp may go under the rear of the pistol and cant it up at an angle. In other words, the bore of the pistol is now pointing down towards the front bottom of the Kidon’s front heat shield and the pistol can still fire.
I’ve dry fired it during testing when it was angled like that but not with a live round. I’m real, real careful now to inspect the system before I load ammo. I think the bullet may just miss the lower part of the heat shield but I say that by visually looking at the direction of the barrel’s bore when I push the back of the pistol up as high as it will go. At the very least your point of impact will be a lot lower than you expected due to the angle.
Sights, Optics and a Curiously Angled Top Rail
Let’s start with what I noticed very shortly after taking the Kidon’s main frame out of the case. The top rail is not flat. It angles upward just before the ejection port and just forward of it, it angles back down. I asked Polymer80 about this and they said they were all that way. Why? I have no idea. As it turns out I could still get my Vortex Crossfire Red Dot to zero so I’m not going to worry about even though the purist in me wishes it was flat.
Can you see the slope to the rail before and after the ejection port?This steel rule is sitting square on the rail on the left side of the photo. You can definitely see the angle here.
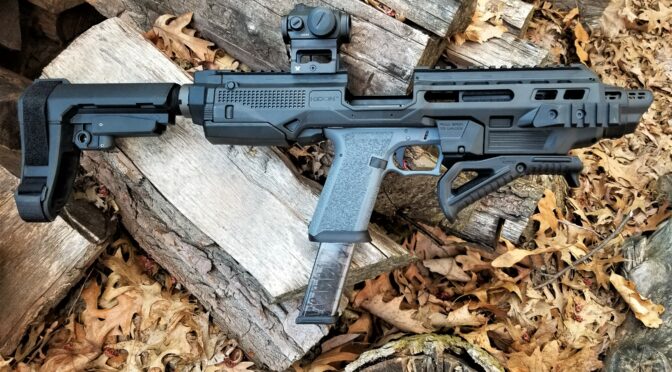
Well, I installed Magpul backup polymer sights and then a Vortex Crossfire Red Dot sitting up on a tall quick detach mount from American Defense – their model AD-T1-10. I did this to line up with the sights and couldn’t quite get it all to line up. I don’t think that misshapen top Picatinny rail was doing me any favors even though I could get the red dot to line up with the bore laser during sighting in. So, I left the sights as a backup but am no longer trying to co-witness.
Vortex Crossfire Red Dot on a tall AD-T1-10 Quick Detach mount with a Magpul rear sight behind it,Here’s what my Kidon case looks like as of my writing this post.
Do I have anything good to say about it?
It looks cool. The chassis is a cool concept along with the tool-less design. It does provide a lot more stability than the pistol alone – until you flex the pistol in the chassis and change the point of impact, which defeats the whole point of having the chassis – to improve accuracy. I like that they used aluminum for a heat shield and not just polymer. I like that they enabled the use of an M4 gas tube for braces and stocks. That’s about it.
The Verdict: Based on my experience, it’s a range toy
I really, really wanted to post a glowing report. At this point, it’s a range toy and not fit for any form of real defensive use. Could the problems be me or my particular Polymer80? They could be but I doubt all of them are.
At this point, it’s my opinion that it takes way too much care to assemble this thing and make sure it all goes together correctly. I do plan on taking it to the range but I don’t see its use evolving for me beyond that for the following reasons:
Imagine the adrenaline is pumping and you are in a rush – fine motor skills are going to greatly impaired — there is a real high risk that the pistol will be shoved in to far and push the slide back. That slight push on the slide is going to lock the Glock-style trigger safety and not fire after assembly. You would have to test after you insert the pistol that it can still fire.
Getting that rear locking assembly to mate up and go into the main frame is real hard for me. Maybe it will improve over time but I doubt I could do it in a rush with my heart pounding and hands shaking.
You may pull down, push up or otherwise shift the pistol in the frame and change the zero. The combination of the front and rear clamps does not hold the pistol securely enough – I did not try tightening the front screw down to the point that the front locking lever will not release – that defeats the purpose. If the whole intent was to improve accuracy but the pistol can shift inside of the frame when too much pressure is applied to the pistol grip, then what is the value?
Lastly, during the assembly process the user may fail to notice the pistol is canted downward in the frame and risk shooting the front bottom of the aluminum heat shield of the frame or at least way lower than you expected because of the angle. This happens maybe half the time unless I purposefully watch and make sure the rear adapter clamp properly engages the rear of the receiver.
Bottom line: I would carry a dedicated backup firearm before I would ever trust this thing in a defensive situation – at least based on my experience with my Polymer80. I did not test any other pistol models. Sorry I don’t have better news. If you try the Kidon and have better luck, that is great. As for me, I wish I had not spent $350. It’s a great concept but it needs significant refinement to improve ease of assembly, reliability and safety before being put in a defensive/combat/high-stress situation.
By the way, I hate posting something like this because it is a cool design but I want to give folks my honest opinion. Do your research and read other reviews and decide for yourself. I’m actually going to shoot more with it at the range and see if I can figure out techniques that work better. If I discover better ways or things that I was doing wrong, I’ll certainly post updates.
12/1/19 Update: I sold it. The design just did not work for me. I can’t recommend this for any use – not for the range and certainly not for defensive use.
4/26/20 Update: 478 page views up to now and not one person has emailed me to voice support of the Kidon. That ought to tell you something.
8/3/21 Update: Almost two years later and not one person has defended the system which has also largely disappeared other than popping up on Gunbroker from time to time or a few niche outlets.
3/14/24 Update: Almost five years and over 1,900 views, not one defender of the Kidon has ever contacted me. One fellow reached out and said he didn’t need to be politically correct and called it a “piece of shit.” This is the last update I’ll do to this post.
If you find this post useful, please share the link on Facebook, with your friends, etc. Your support is much appreciated and if you have any feedback, please email me at in**@*********ps.com. Please note that for links to other websites, I may be paid via an affiliate program such as Avantlink, Impact, Amazon and eBay.
Okay, while researching what to do with my 2008 Toyota Highlander’s flaky alarm, I ran across some good videos you can watch on how to diagnose the switch and even how to replace the microswitch. As for me, I wrote up how I bypassed the sensor by creating a loopback plug from the old sensor’s wire. My approach still allows the rest of the alarm system to work just fine and can be done in less than an hour with little to no cost. With that said, let’s take a look at these really well done videos that helped me think out my approach – especially the first one on diagnosing the switch.
Diagnosing the Switch
The following is the best video I found on diagnosing the problem and he even disassembles the latch to show you what is going on in detail – it’s very well done. This video helped me figure out my approach and kudos to Ozzstar for making it:
If You Want To Replace the Microswitch
This next video is really well done and is specific to the 2008 Highlander. He ordered the same Panasonic automotive grade micro switch that Toyota used:
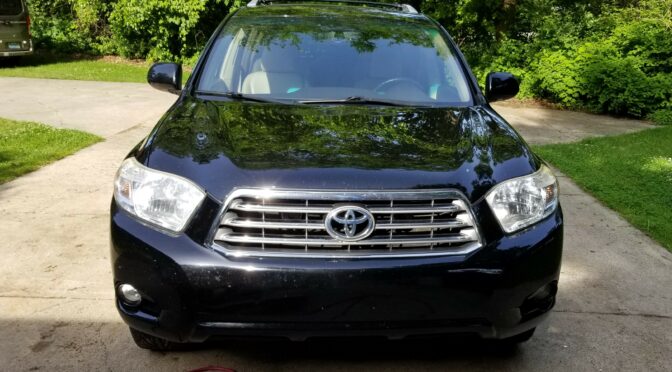
We recently became the new owners of a 2008 Toyota Highlander. It was in great shape and I thought we got a pretty good deal on it. The previous owner disclosed to us that the hood alarm switch was flaky and the car alarm would go off randomly.
After we bought the Highlander and returned home I did some research that night. There is in integral microswitch in the hood latch assembly that detects if the hood is open or closed. The alarm system will not arm if it detects that the hood is open and it will sound an alarm if someone tries to open the hood. Uhm… ok. My first thought was “you can only open it from the inside lever that is protected by the door alarms so why have this one?”
Unfortunately, or fortunately depending on your perspective, the switch is a known problem. It’s also one of the rare times where I will say Toyota did a bad design. Putting a basic microswitch in the front of a car where it will get wet all the time and corrode, not to mention the impacts and grease/oil from the latch itself, is not really that good of an idea — at least not to me.
After reading and watching videos, it seemed like there were three options:
Replace the whole hood latch assembly that includes the sensor. Third party, these latch assemblies were about $56 on Amazon and $50-60 on eBay. Original Toyota would be higher, of course. Pro: It is pretty easy to remove the assembly and install this one. Con: It’s a relatively expensive and will fail sooner or later unless someone fixed the switch design and sealed it better.
Replace just the microswitch. You can get the unit real cheap from Digikey and other suppliers plus there are Youtube videos that show you what to do. The previous owner did this and it worked for about two years he said. Pro: Real cheap (under $10 including shipping). Cons: Takes time and will not last without figuring out some better way to seal the original design.
Simply bypass the switch. As mentioned earlier – you can’t open the hood from the outside so what are the odds that someone will successfully break into the car and then open the hood without setting off the alarm? The risk is real low – low enough for me to go with this option. Pro: Easiest of all and is a permanent solution. Con: The hood alarm sensor will no longer work. This is the one I went with.
I’d like to point out that just unplugging the sensor is not an option. Doing that will make the computer think the hood is open and the car alarm will not arm at all. This means you must pick one of the three options listed above. I opted for the last one – I bypassed the sensor by creating a loopback plug – a fancy term meaning I joined the input and output wires together thus making it look like the switch was always closed so the computer would think the hood was closed regardless of whether it was or not.
What I want to do next is walk you through what I did. If you are not comfortable with basic wiring, I’d recommend against your trying this just to be up front. Always ask yourself if you can reverse what you are about to do or can you recover if something goes wrong – if the answer is “no”, then don’t do it. For example, don’t cut wires off right next to a fitting – leave yourself some pigtails in case you need to reconnect them.
One last comment – these directions are just based on my 2008 Highlander. Different years and models may not be like this. Research your vehicle before doing anything like this.
Bypassing the Sensor
So, to bypass the sensor we just need to create a circuit that normally exists when the switch is closed. First, I needed to get a better look at the location of the wiring so the cover needed to come off.
The plastic cover between the grill and the frame needs to come off. It is held in place by Toyota push-type retaining clips and two 10mm screws. The screws are to the front on the left and right sides. Note that two of the clips on the right side are bigger than the others – this will help you with reassembly later.
I use a small flat screw driver to pop the middle part up. You then grab hold of that, lift up and the clip comes right out.
Just remove the clips and then the plastic cover simply lifts off. I found one more that anchors the grille in the middle of the grille vertically and I removed it. That gave me ample room to work and I did not need to remove the grille given what I planned to do.
I did not take as many photos as I should have so let me explain. With the plastic cover off and the middle anchor clip removed, I had plenty of access to the switch and wiring to see what to do. The wire assembly runs from the hood latch – and there is only one wire – do not pick the hood cable used to open the hood. The wire runs from a small switch in the latch assembly and then plugs into a connector shortly below it.
I inserted a small blade screw driver to release the plug from the socket. To be safe, make sure you confirm the wires that you plan to cut lead up to the sensor and are *not* the wires going to the harness / wiring loom.
Why care? Because if you cut the wires on the sensor side and connect them together, you can easily replace the hood latch assembly and go back to having a sensor if you want. However, if you cut the wiring loom, it’s gone. You can manually splice in but it simply is not an elegant approach.
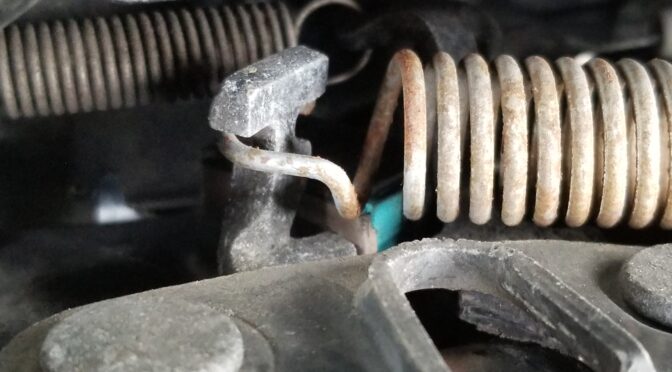
Note I am saying wires and when you look at the plug it looks like just one black wire. What you are seeing is the insulation tube that is black. Inside are two thin green wires that run from the plug to the sensor switch.
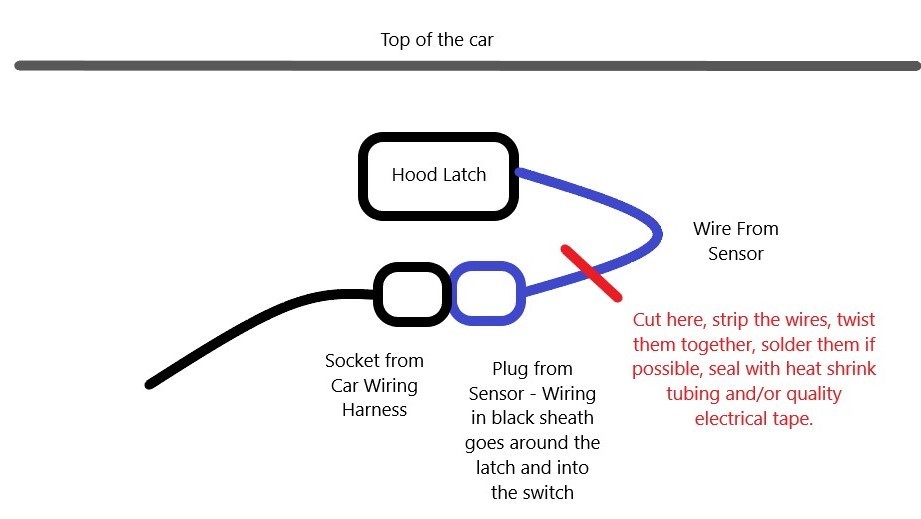
I’ll not get awards for artwork but hopefully this will give you an idea. When I faced the front of my Highlander, the wiring from the sensor was on the right hand side. You need to confirm this just in case. It is the wire to the sensor switch wire that you want to cut and not the wiring from the harness. On my 2008 Highlander, the harness wiring was on the left.
Once I was certain which wire to cut, I reached in with some snips and cut the wire leaving a couple of inches to work with. DO NOT CUT THE WIRES FLUSH TO THE PLUG!! You need a short length of the wires to connect together to make the circuit loop back.
To make work easier, I took the short wire with the plug on it and worked at a bench where everything was handy, I stripped a bit off the end of each wire, twisted the bare wires together, soldered them, bent them over the small wire pigtail and then used heat shrink tubing and electrical tape to secure everything. Total overkill but I never wanted to bother with this again.
Here’s the finished result. The front of the car is to the left. Part of the hood latch spring is to the upper right and we are looking down at the newly made loopback plug. As far as the alarm system is concerned, the hood is closed. The red color is the heat shrink tube I had on hand. I folded the heat shrink tubing over at the end and then applied electrical tape to seal it.
I installed the newly created loopback plug back into the socket. I then tested the system by turning the alarm on with the key fob, putting the key fob out of signal range in the garage and waited for the system arm. Once the alarm indicator light went solid on the dash, I simply reached in through the open window and tried to open the door from the inside and the alarm went off. Yeah, I had to run back to that fob to shut it off 🙂
If the system thought the hood was open, it would never have armed by the way. That’s why you can’t just unplug the switch. I then reinstalled the plastic cover by installing the clips and then pushing the middle piece down to lock it in place. By the way, remember that the right two clips are bigger than the others. The two 10mm screws went back in with a dab of non-seize on each just in case they ever need to come out again.
That was it – the alarm is happily armed and protecting the Highlander as I write this and not one single false alarm since. I hope this helps you out.
5/23/2020 Update: This has worked great for me. Not one single problem since.
If you find this post useful, please share the link on Facebook, with your friends, etc. Your support is much appreciated and if you have any feedback, please email me at in**@*********ps.com. Please note that for links to other websites, I may be paid via an affiliate program such as Avantlink, Impact, Amazon and eBay.