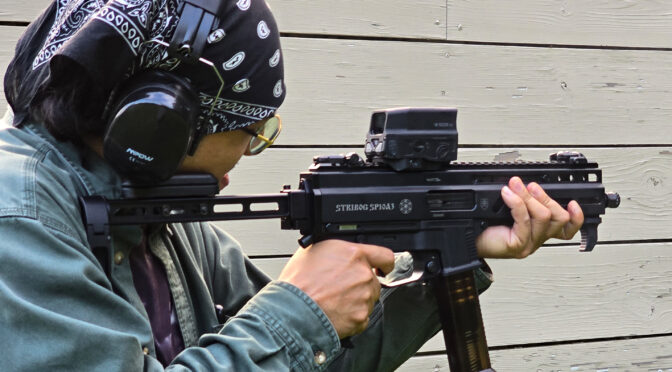
I posted about the modifications to the SP10A3 as well as magazine loaders and now it is time to talk about how it performed. One of my brother-in-laws and nephews were in town and ready to help me try it out. First off, we had a lot of fun and second, the 10mm Stribog ran stunningly well.
Preparing For the Range
When the Stribog arrived, I field stripped, cleaned and lubricated it. This is always a good idea because you never know what all will be in a firearm – preservatives, dirt or even dry with no lubricant.
The manual is well written so read it. The sections on field stripping, cleaning, and oiling are worth your time. I would also recommend hand cycling the action a few hundred times to accelerate your parts getting to know each other – also known as wearing in.
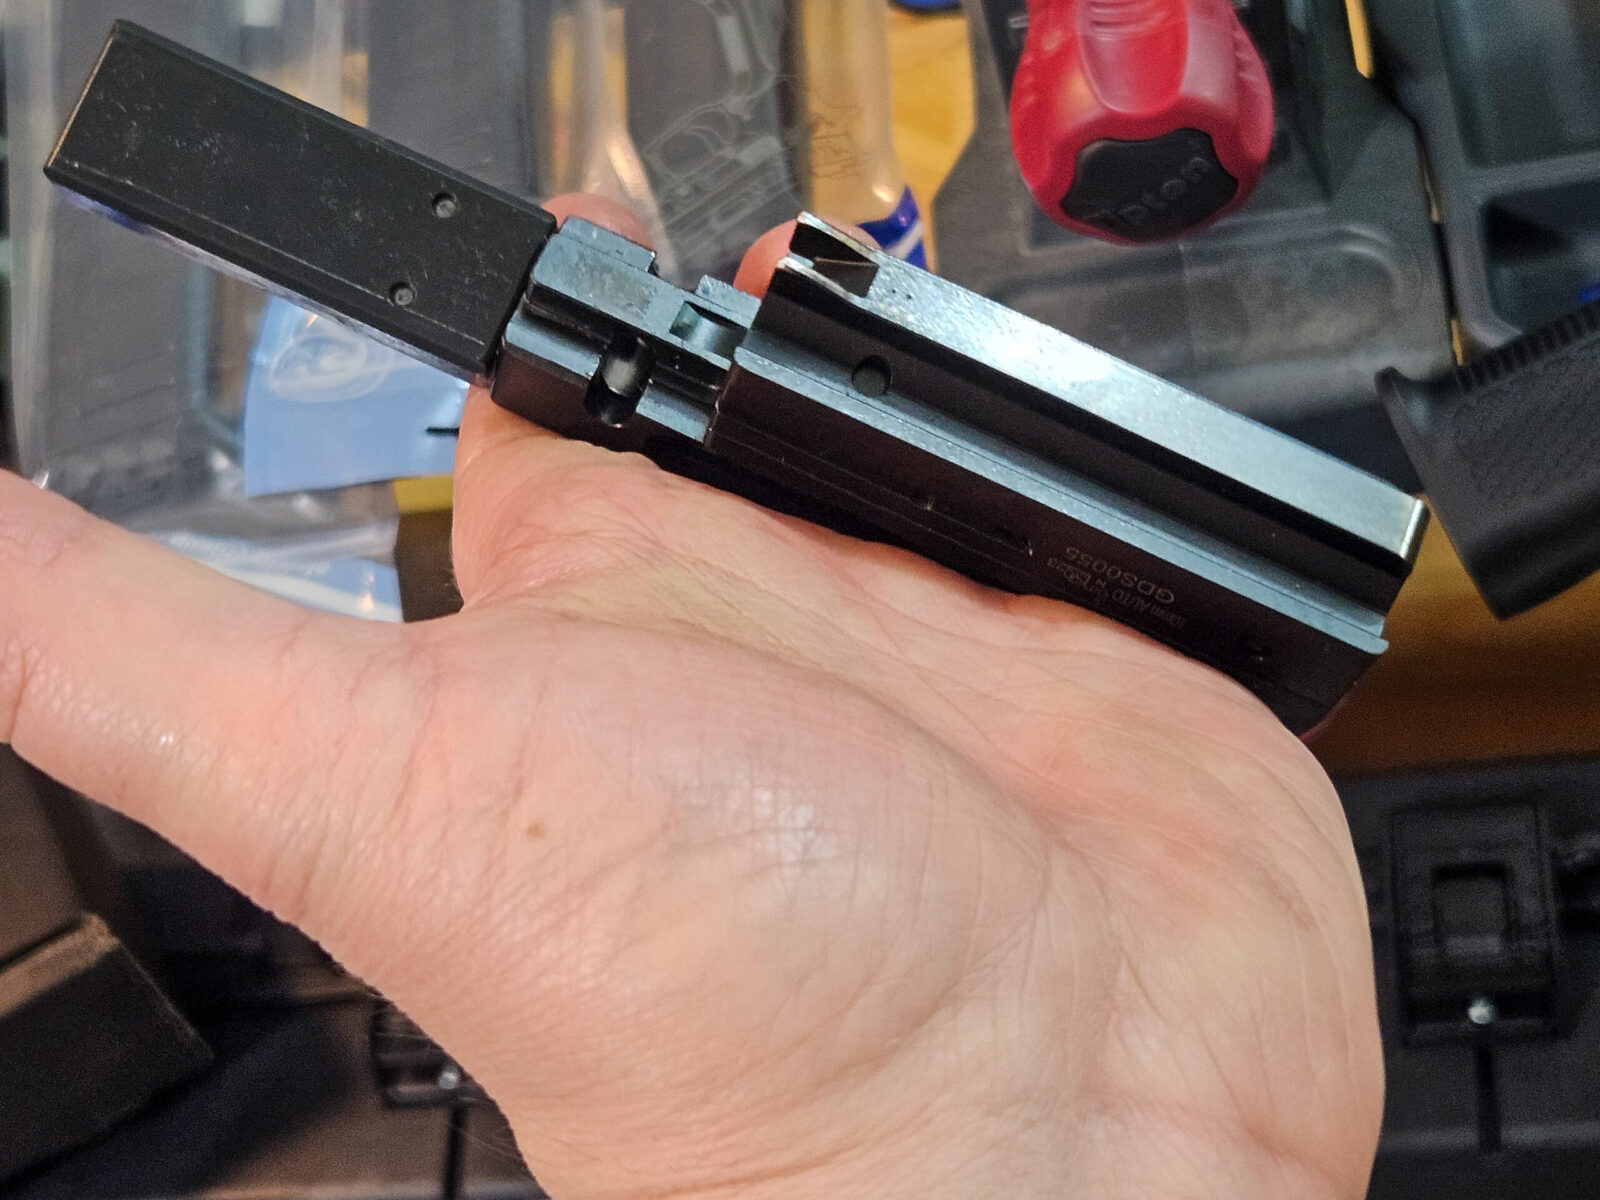
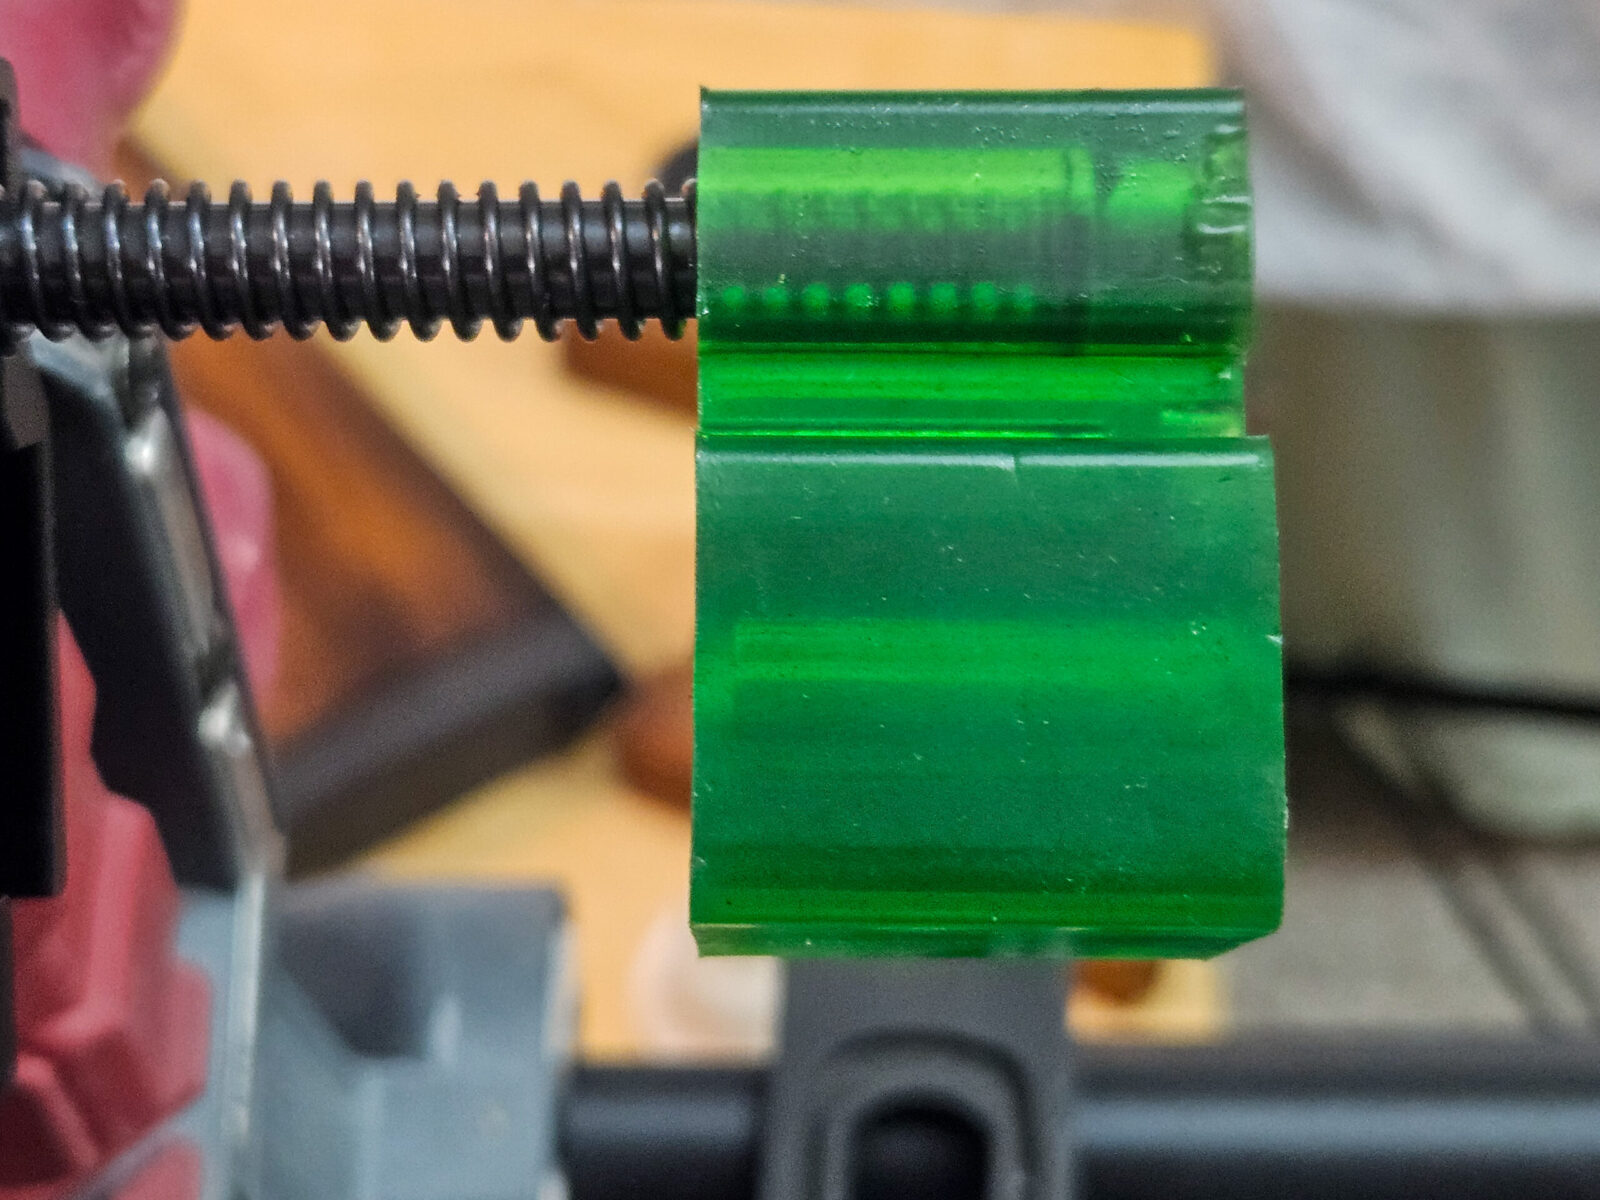
The bolt assembly made up of the large carrier to the rear (right) and the bolt head in front (left), is enormous. A lot of the 10mm recoil is eaten up by inertia, the recoil spring and then a giant buffer block. It’s no wonder the recoil is incredibly mild. Also, when you have something this big, there can be a ton of friction so you need to lubricate it.This giant rubbery green thing is the recoil buffer. I honestly don’t recall ever seeing one this big – every. If the inertia of the bolt and recoil spring leave enough energy to drive the bolt carrier into this buffer, it can handle it without a doubt.
Visiting the Range
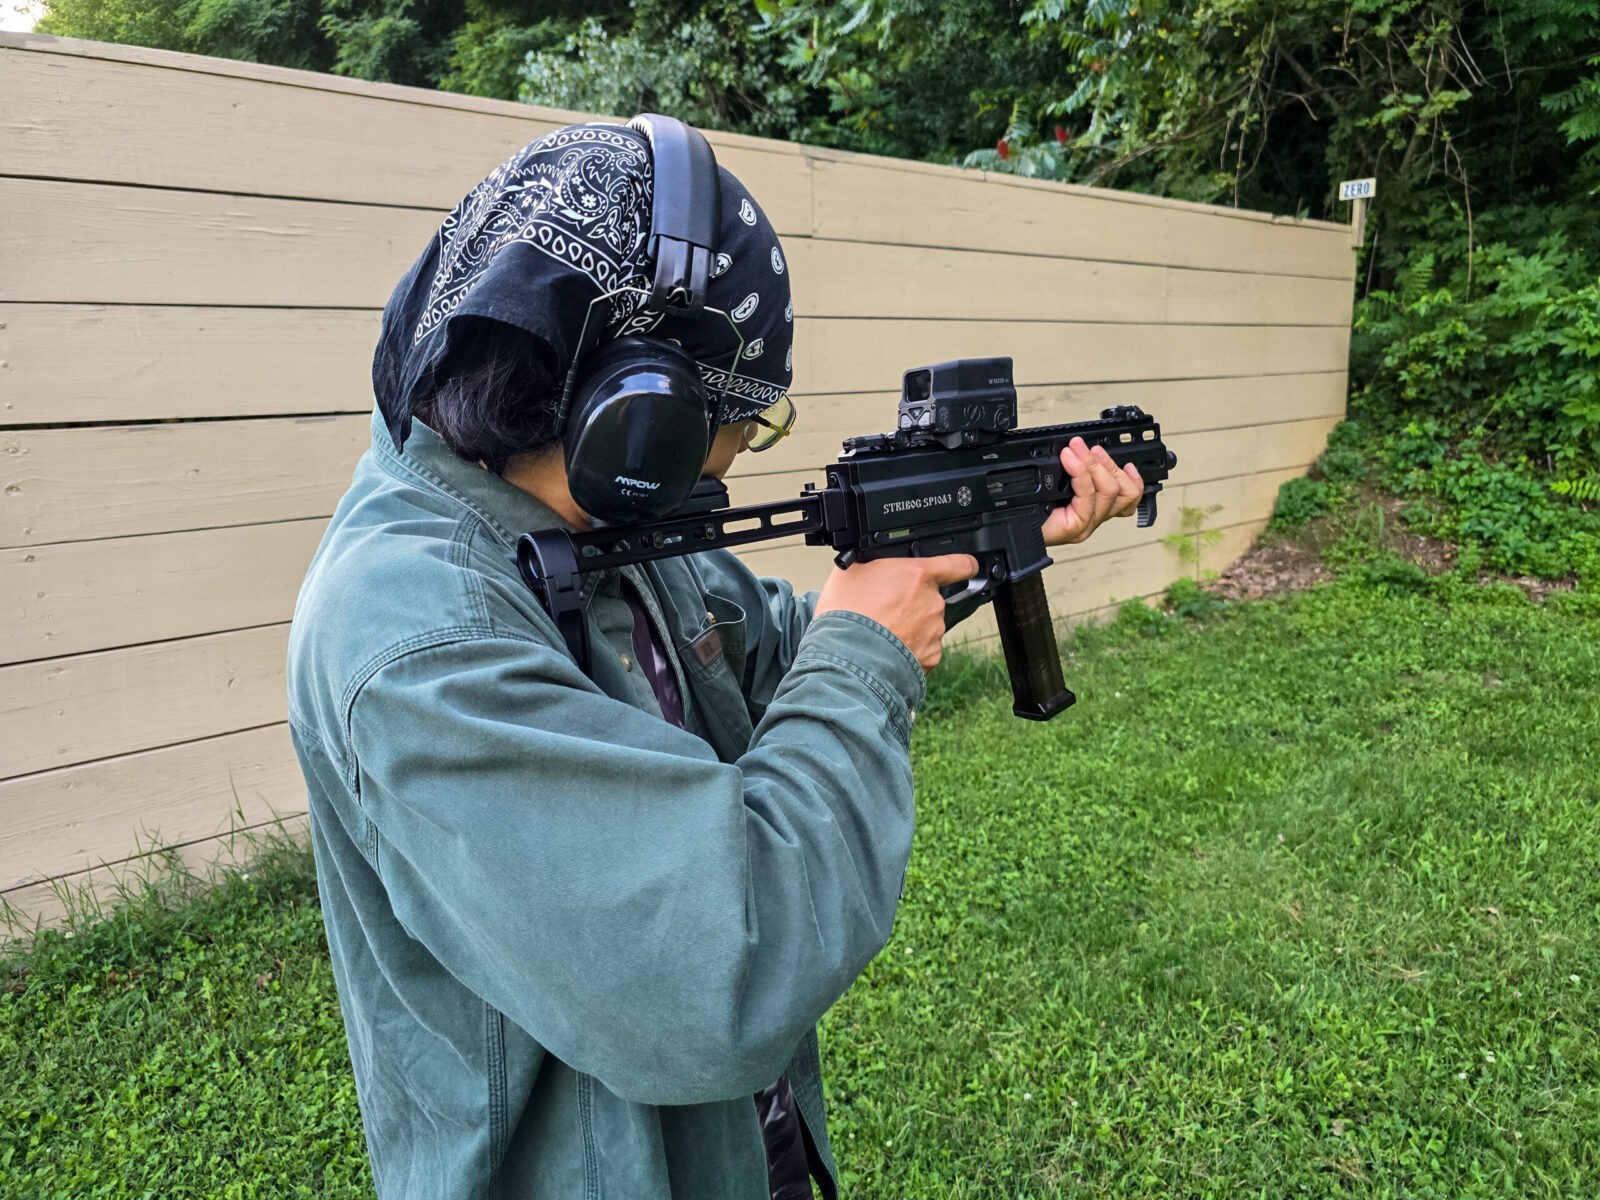
My brother-in-law, Banduy, and nephew, Julian, headed to the range to have some fun and break in the Stribog. It was a great day as we unloaded and set up the targets, moved the bench into place and got ready.
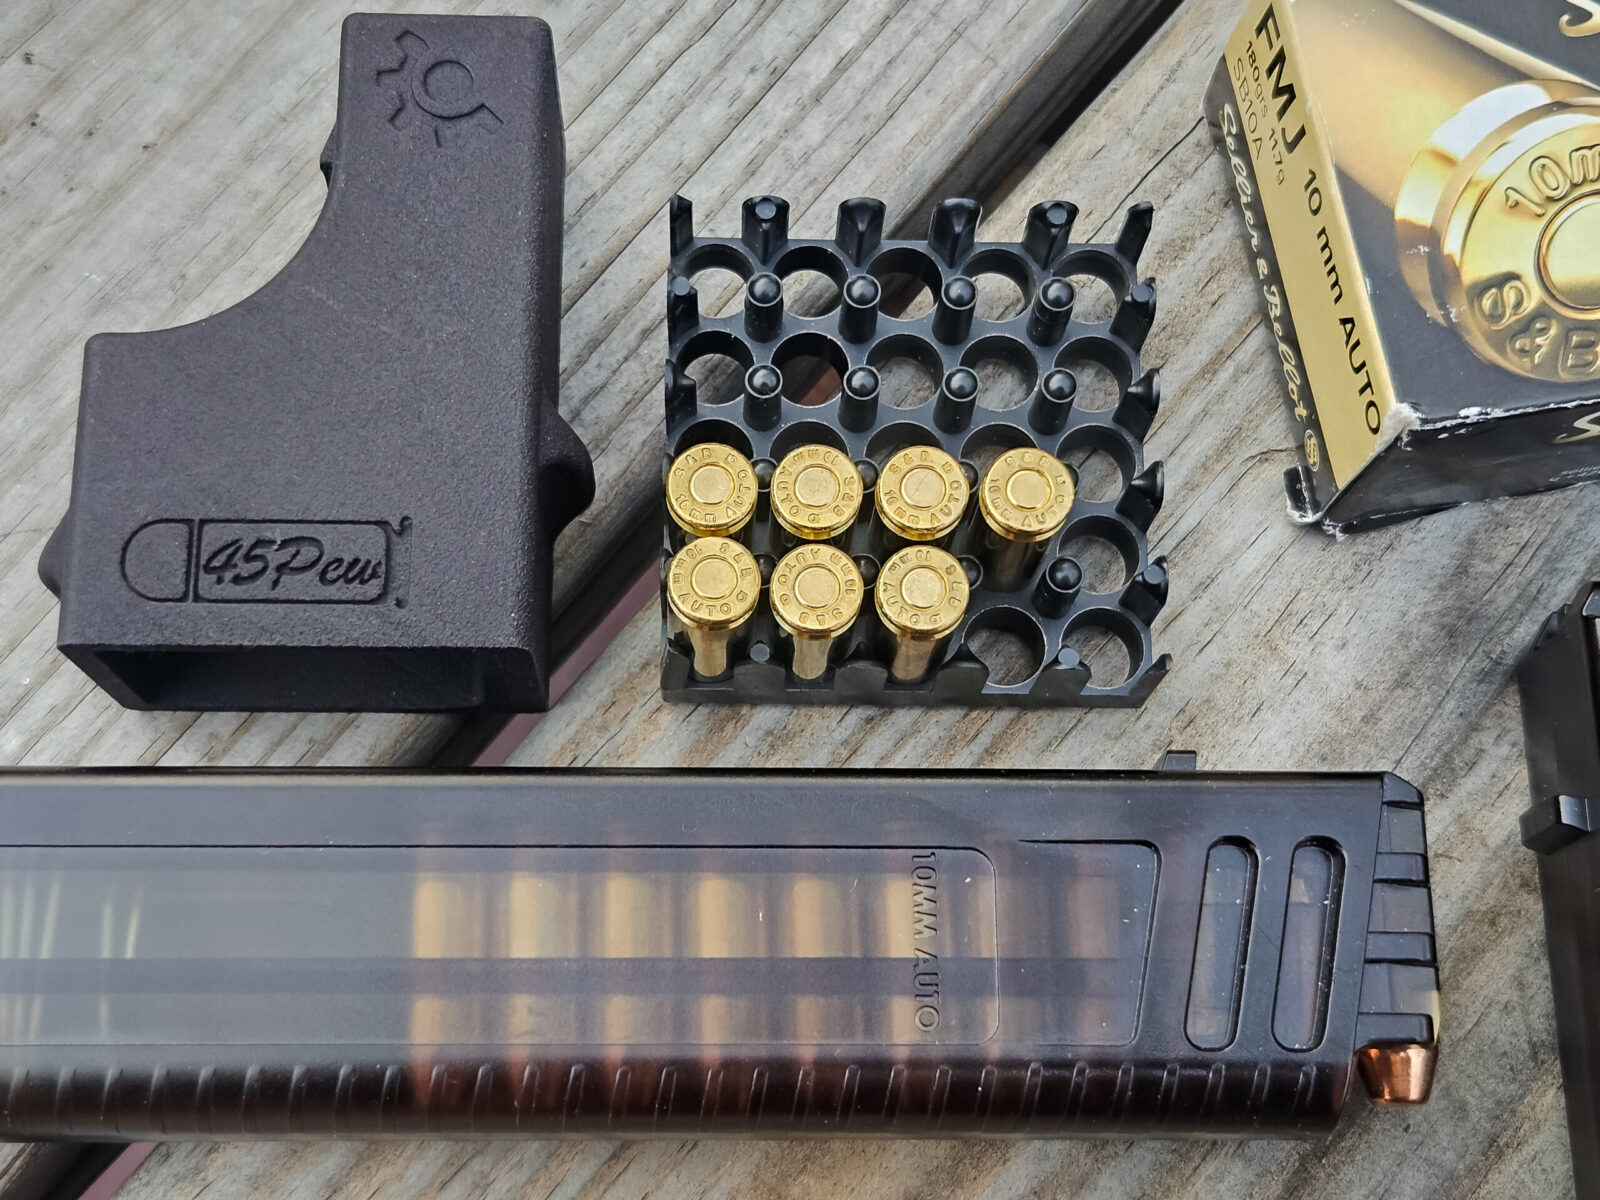
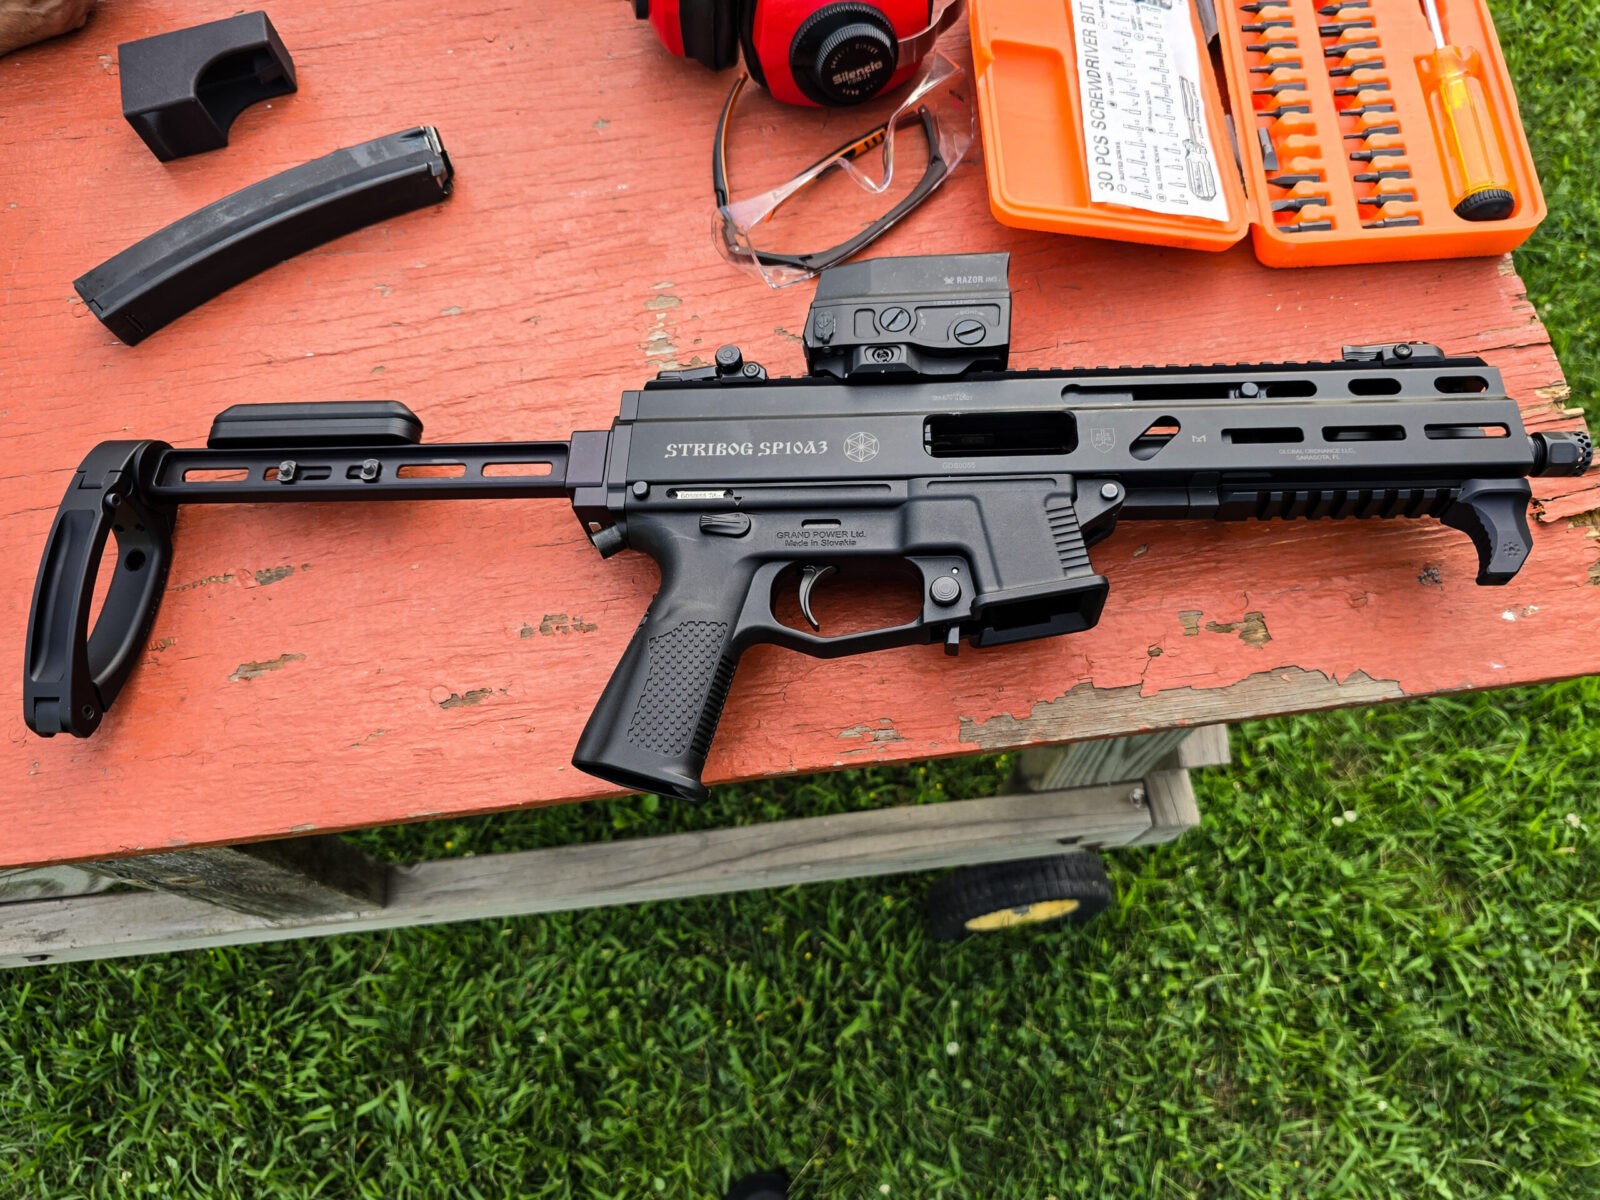
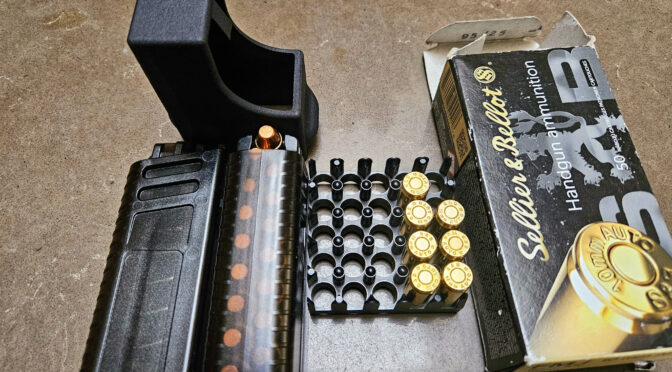
We used the Custom Smith .45 UMP loader to fill up four 20 round magazines with S&B 180gr FMJ. Folks, I have shot cases of this stuff and it’s fantastic range ammo in all of my 10mm pistols and now the Stribog.
I shot the first magazine and was very impressed. The action was smooth with very little felt recoil. I did need to dial in the UH-1 a bit as the laser boresight allowed me to get the UH-1 in the vacinity if the round impacts on the paper.
By the way, I initially had a quick connect sling loop on the A3 Stribog adapter just about the top rear of the grip. It was really annoying and I got rid of it very quickly. Maybe someone with smaller hands wouldn’t notice it but I sure did.
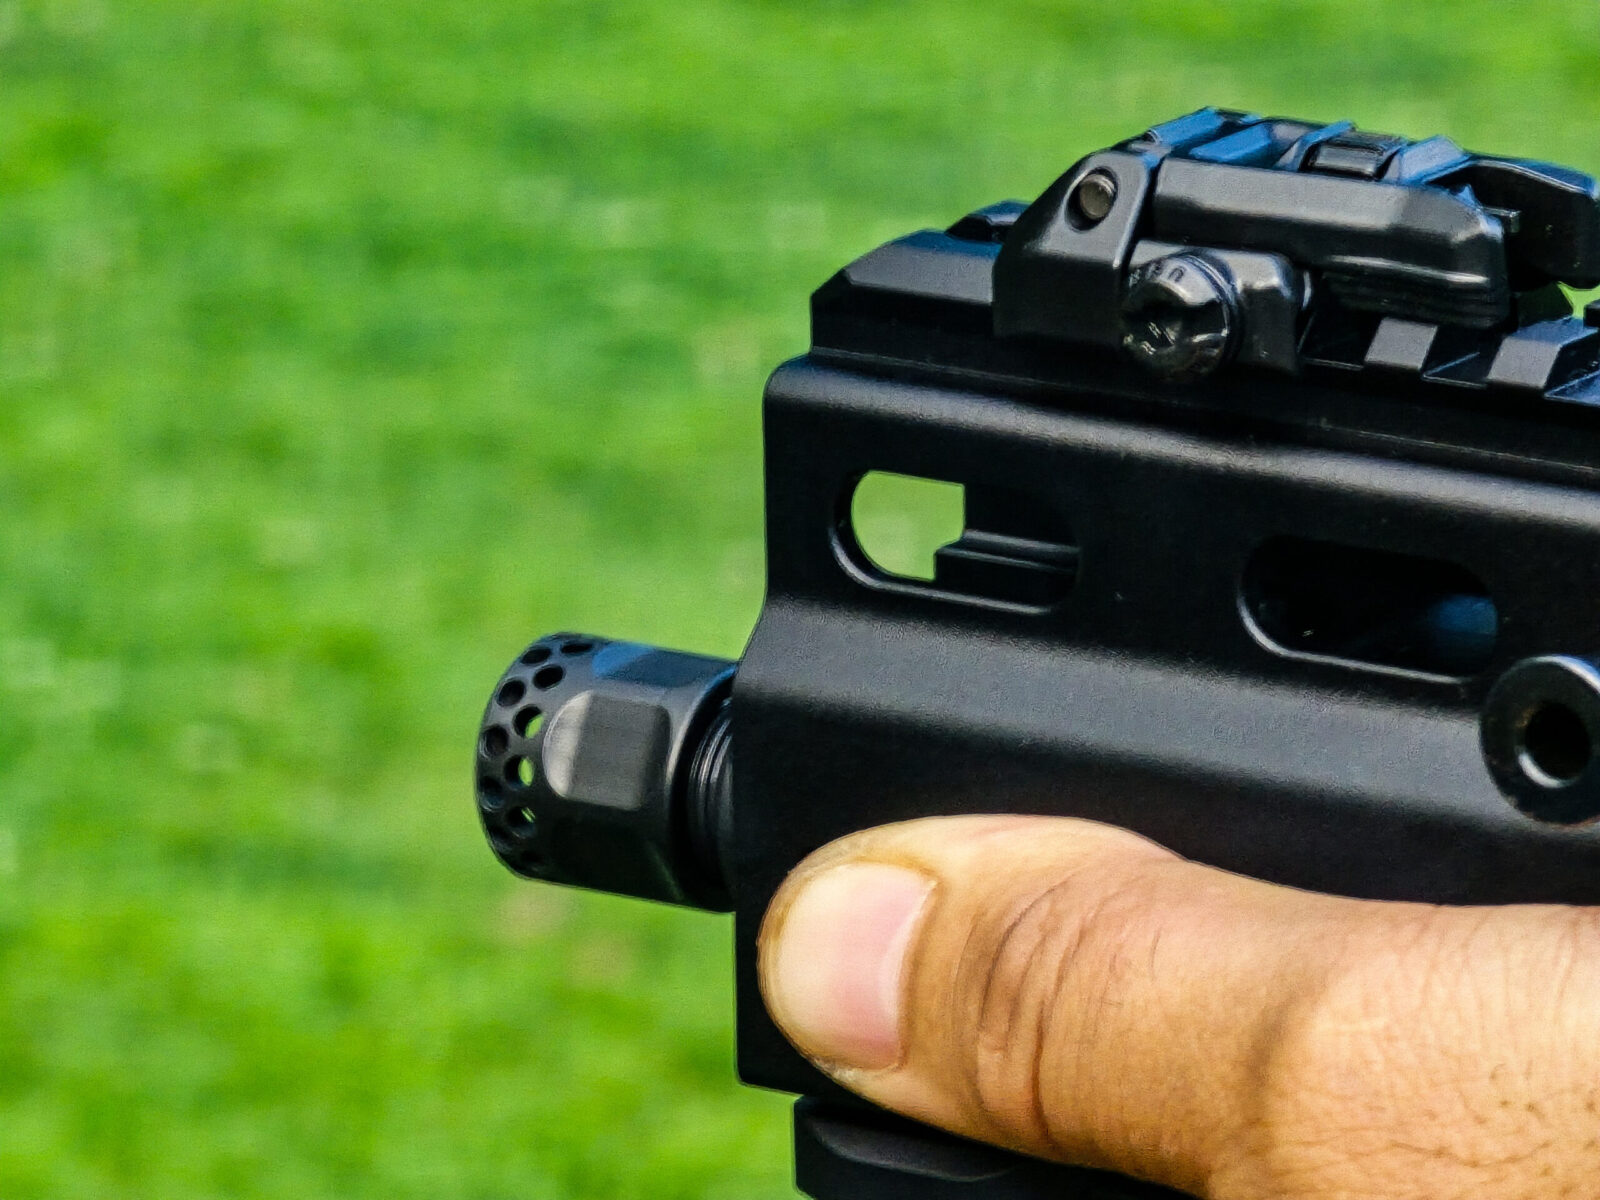
Julian has been shooting with me for almost 20 years now. Time flies by. He was next up and with practiced skill did a steady 20 round set standing freehand with no problems at all.This was his first 20 round set as he got used to the Stribog. He was about 25-40 feet back getting started.His dad was up next and did a good run. I haven’t done a comparison of felt recoil with the micro compensator and without. I can tell you that it is incredibly smooth with it on.We had a lot of fun. The Stribog just rocked it, No failures of any kind through 200 rounds of ammo. The one thing I realized after the outing was that I could shoot through a case of 10mm pretty quick with the SP10A3.
Summary
We shot the Strbog freehand back to about 25 yards and found it to be a delight to shoot. It definitely filled my desire for a 10mm carbine vs. my various 10mm pistols and would highly recommend it. GrandPower did another great job with the SP10A3.
I’ve since had it out a couple of more times and it’s run great everytime. Yes, I did have to buy more S&B 180gr ammo because of it 🙂
I hope this helps you out.
Note, I have to buy all of my parts – nothing here was paid for by sponsors, etc. I do make a small amount if you click on an ad and buy something but that is it. You’re getting my real opinion on stuff.
If you find this post useful, please share the link on Facebook, with your friends, etc. Your support is much appreciated and if you have any feedback, please email me at in**@*********ps.com. Please note that for links to other websites, I may be paid via an affiliate program such as Avantlink, Impact, Amazon and eBay.
As some of you may know, we make custom magazines for the Armscor Rock Island Armory (RIA) A2 HC family of .40 and 10mm pistols. Once in a while I get to talk to a new owner before they go to the range and either they ask for advice or I give it regardlesss 🙂 I will tell anyone that will listen that they need to clean, lubricate and cycle their pistols 200 times before they go to the range. I’ve been sharing this advice for years but never really had evidence. Guess what? Now I do and I truly hope people will take this to heart and do it.
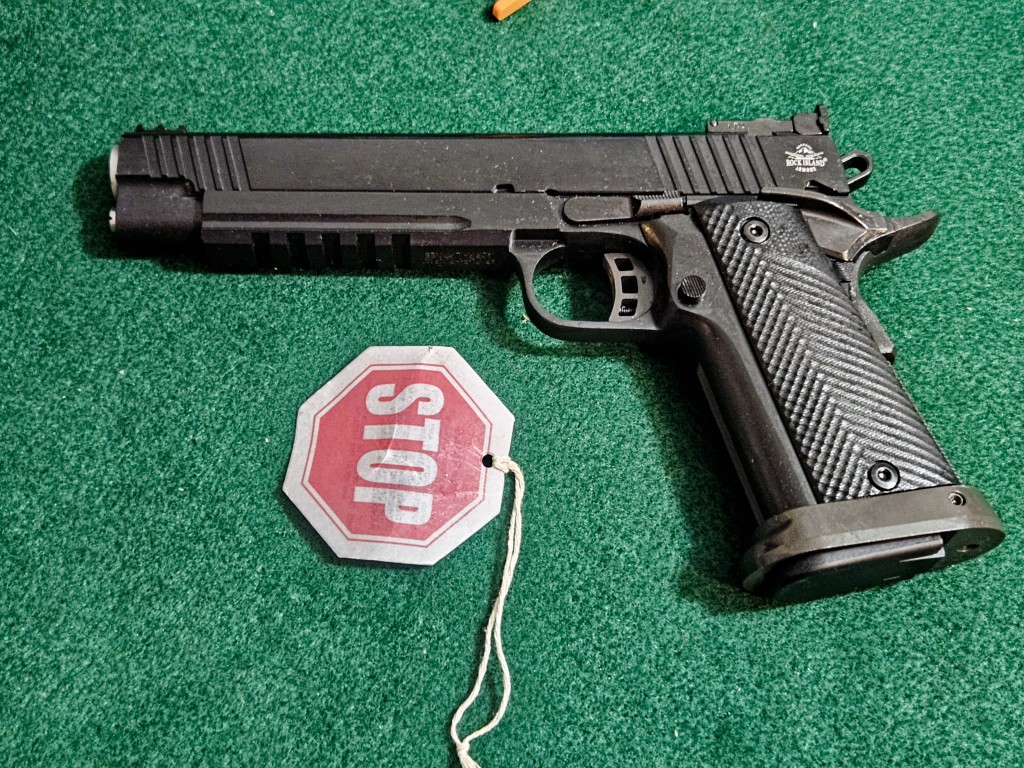
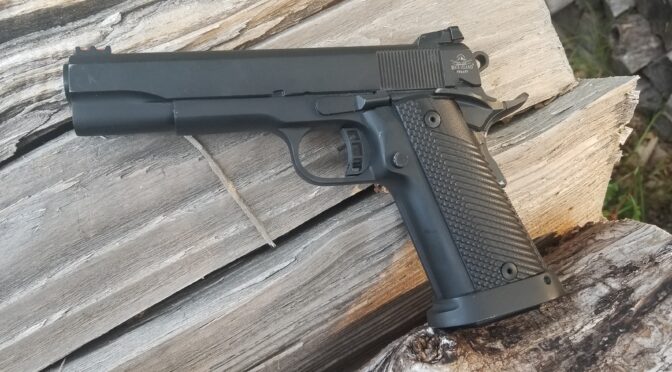
I recently purchased a RIA 52000 Big Rock – this is their 6″ barrelled 10mm match pistol. I had one years ago that I sold when I needed money and regretted it – especially after I started making the custom mags. What I am going to show you is true of all Rock Island 1911-style pistols – not just the A2 HC models – and for almost all semi-automatic factory-produced firearms. They are not ready to go out of the box and if you take them straight to the range they are going to fail a lot, you’re going to get frustrated, blame the gun/ammo/mag/dealer and it’s not their fault so please read the following and heed the advice.
Opening the Factory Box
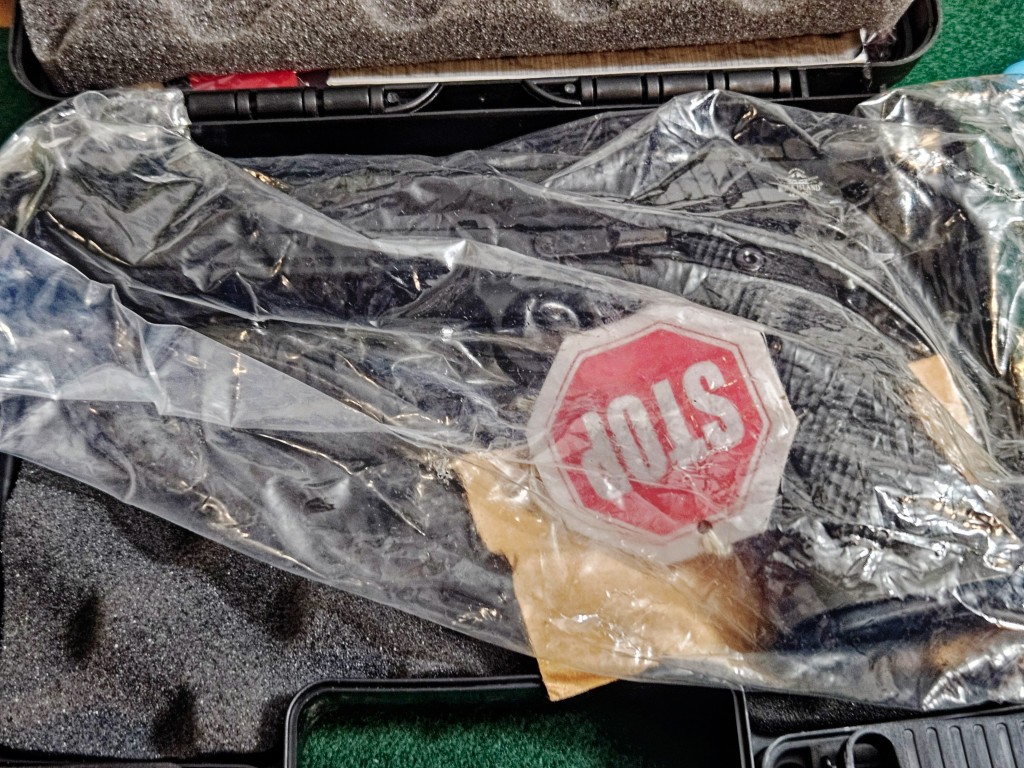
For RIA 1911 pistols, they ship them in a bag absolutely coated in some kind of oil – just what I am not sure. Do not look at that and think it is all lubricated and ready to go. It absolutely is not and it is actually pretty dirty – you need to get rid of all of that including the junk in the bore.
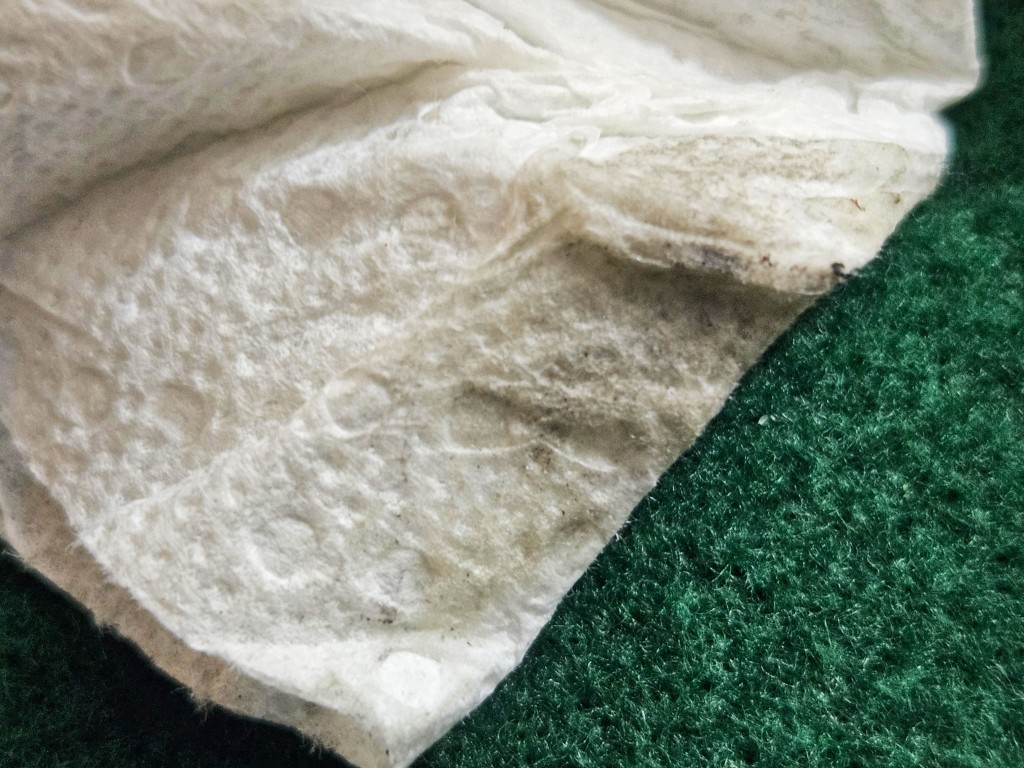
STOP is right. What is in the bag is not ready to go.First off, wipe it down. It will be drenched in oil to keep it from rusting. The 52000 Big Rock is definitely big.This is what your white towel will look like. Note it is not just clean oil – there is debris in it and it’s not inteded to lubricate but to prevent rust. This stuff is everywhere in the pistol and we need to field strip the pistol, clean and oil it to ensure proper functioning.
Now you may be thinking your Glock was pristine compared to that and while it was cleaner it was also pretty dry and needed to be lubricated. The Rock Islands are decent but they need to be cleaned up.
How about the barrel?
The anti-corrosion “oil” and grime are everywhere in the pistol.
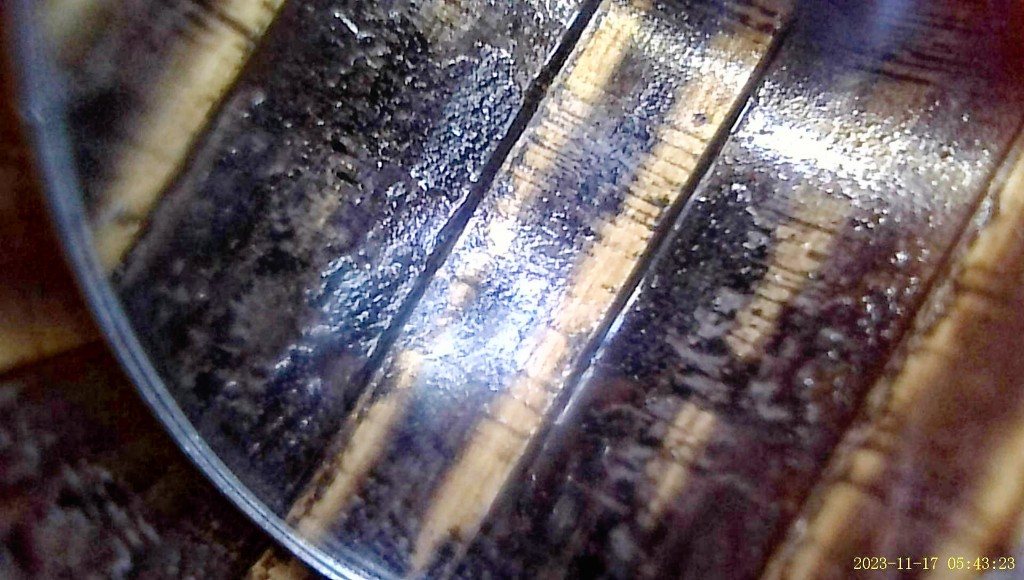
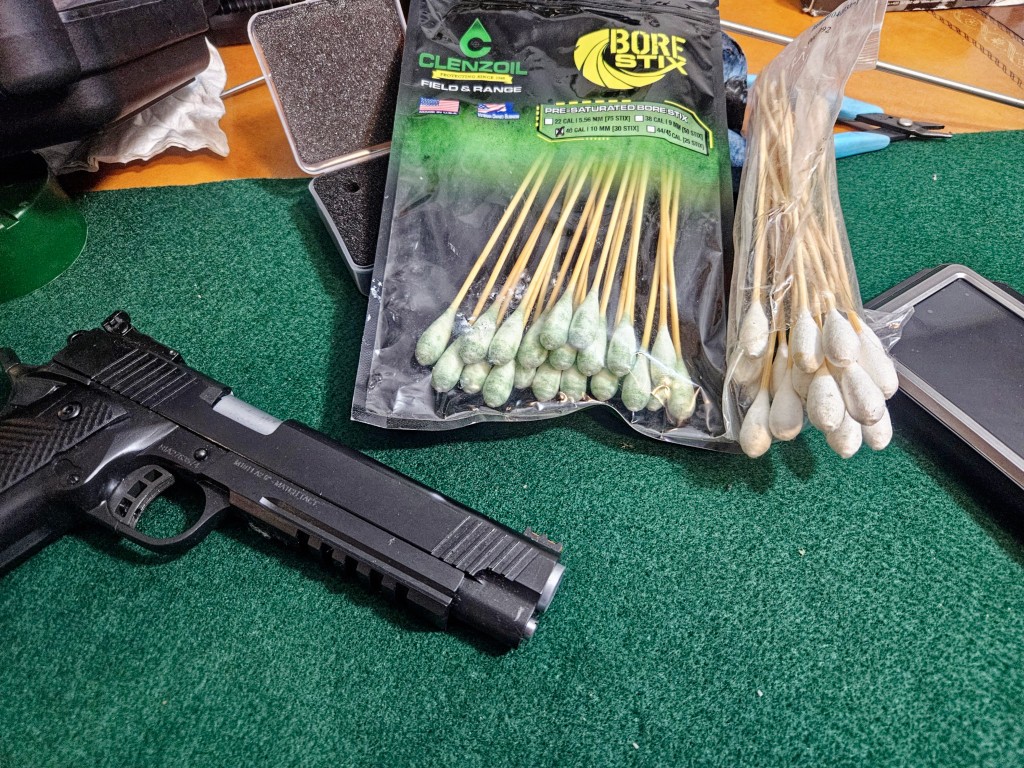
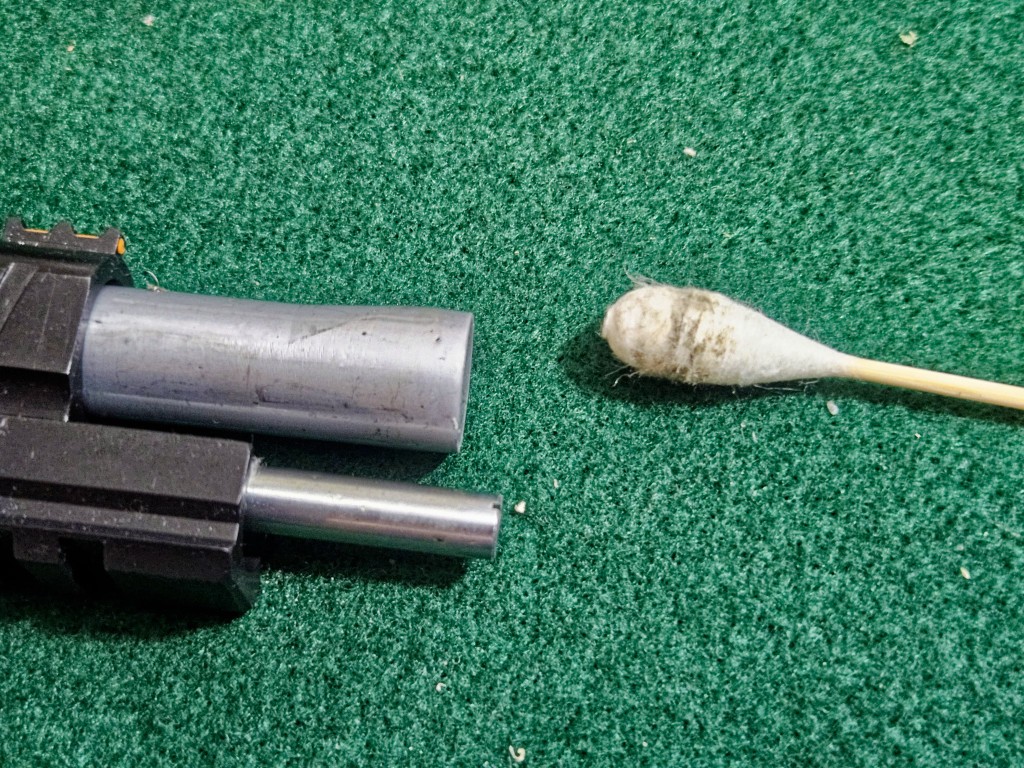
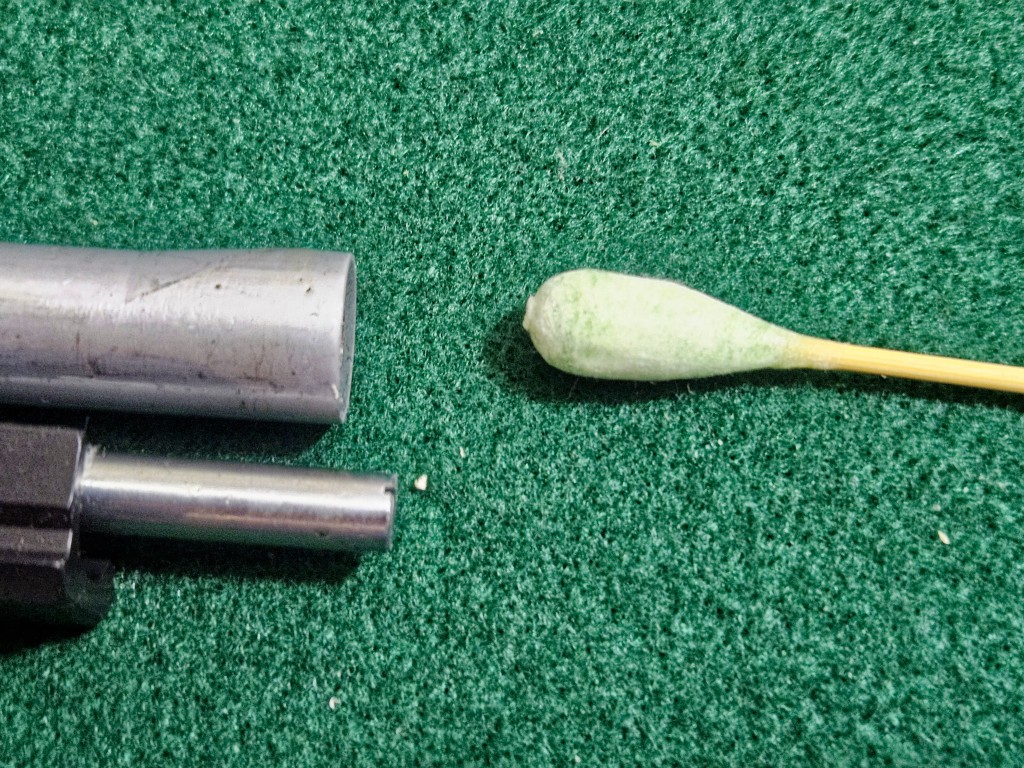
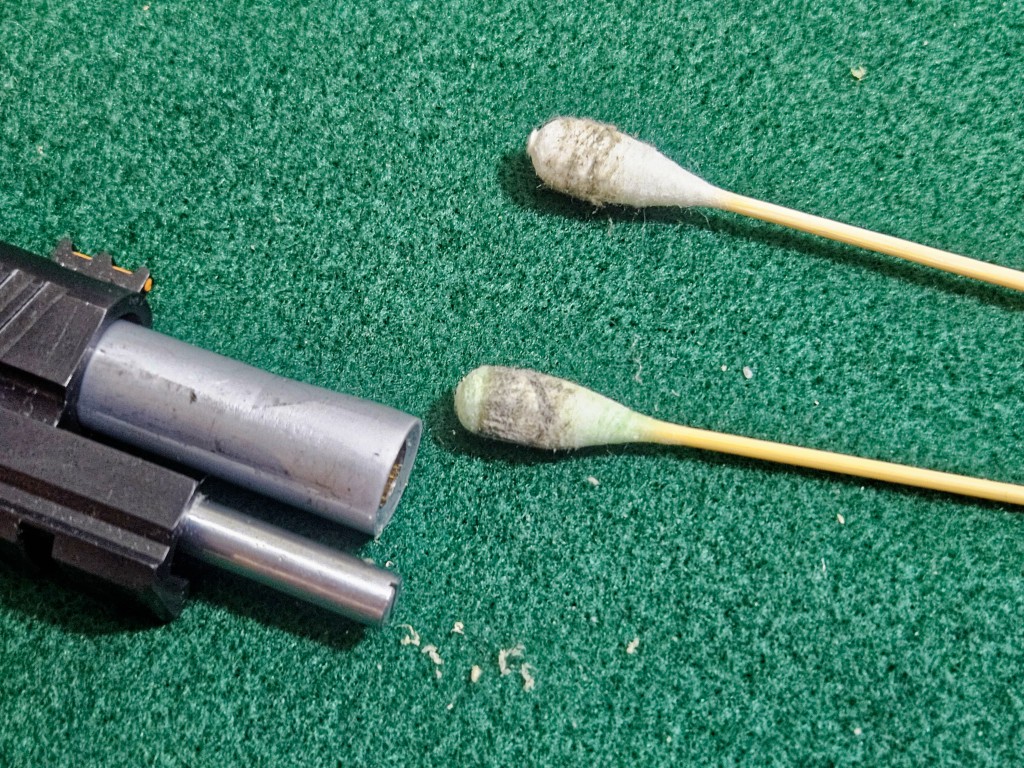
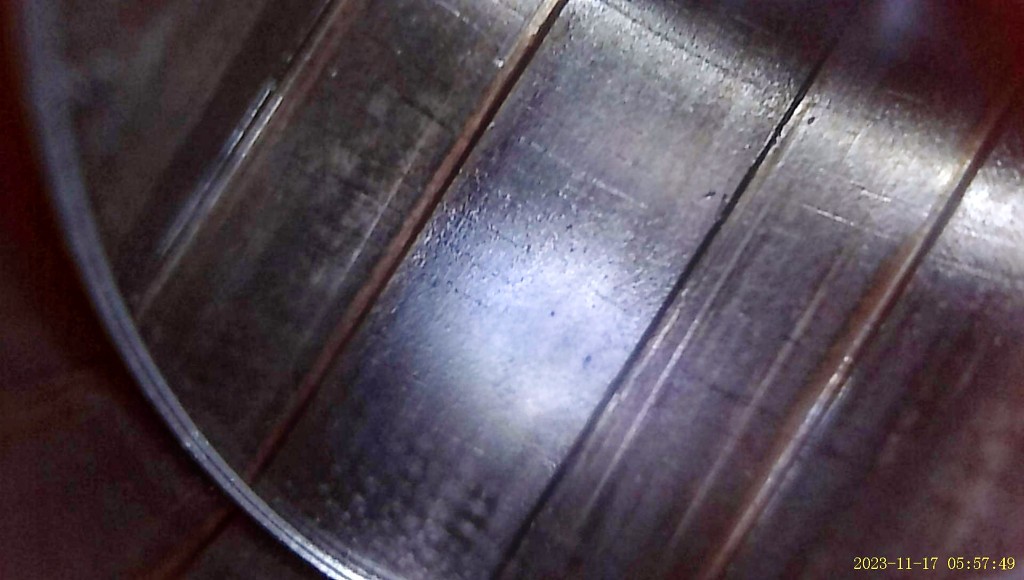
This is a real photo of an area of the bore before cleaning. It was captured with my Teslong borescope. The brass or copper color is probably from the test firing they did but the main thing for you to see is all of the preservative and grime in there, You do not want to shoot with this junk in there as it could adversely affect the pistol in any number of ways including affecting accuracy, By the way, the Teslong Rigid Rifle Borescope with 1080P resolution is pretty remarkable. I really like mine – it’s many times better than anything I have experimented with that I could afford.I have used Ramrodz for years – the giant Q-tips on the right – to clean pistols. I just started trying the Clenzoil Bore Stix (on the left) and they seem to be decent with the advantage of having a cleaner/lubricant on them already. The Ramrodz being unprepared let me decide what I want to coat them with given the situation at hand so pros and cons with both. BTW- the sticks can snap easily so you hold them close up by the “bulb” when you insert them and then run the back and forth with the stick.Here’s what the first Ramrodz looked like after I ran it up and down the bore a few times. It was coated with Kroil penetrating oil to help break things free. You can see the grime that came out. I then decided to try a Bore Stix with just its normal coating.The Clenzoil BoreStix seemed to remove even more grime than the Ramrodz but it is hard to say because the Kroil was in there working as I switched from the RamRodz to the Bore Stix.This is after cleaning and lubricating. Again, the Teslong borescope is a game changer for me in terms of actually seeing the bore in considerable detail.
What I want you to take away from this section is to clean the bore – you can absolutely use your favorite method – patches, boresnake, whatever – but definitely clean it.
Field Stripping the Pistol
Armscor includes a half-way decent manual about how to field-strip your 1911 and I recommend you read it. Some of their models have barrel bushings and they have at least two models of full length guide rods that I know of. You just need to break the pistol down into its major groups – do not start taking apart the frame unless you seriously know what you are doing or you are going to get a hard lesson in how a 1911 goes together internally and it is not simple enough for the average shooter in my honest opinion. If you are a person that assembles 1911s from the bare frame – go ahead and do it. Have fun. If you have never disassembled and reassembled a 1911 – don’t. You don’t have to at this point is the bottom line.
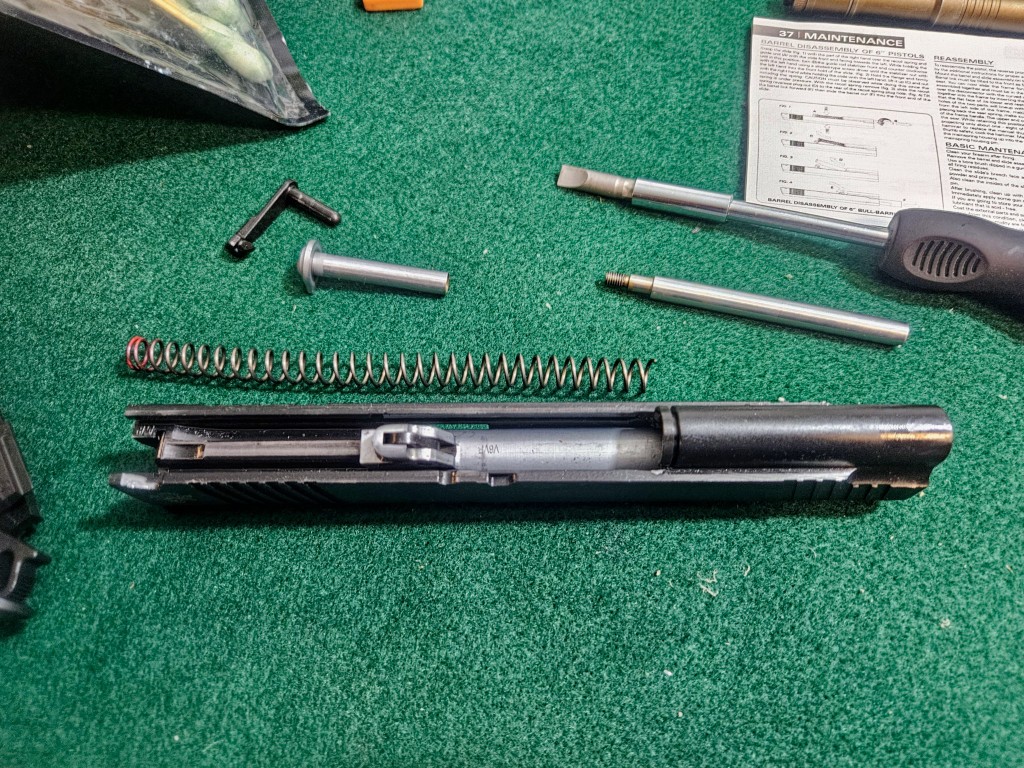
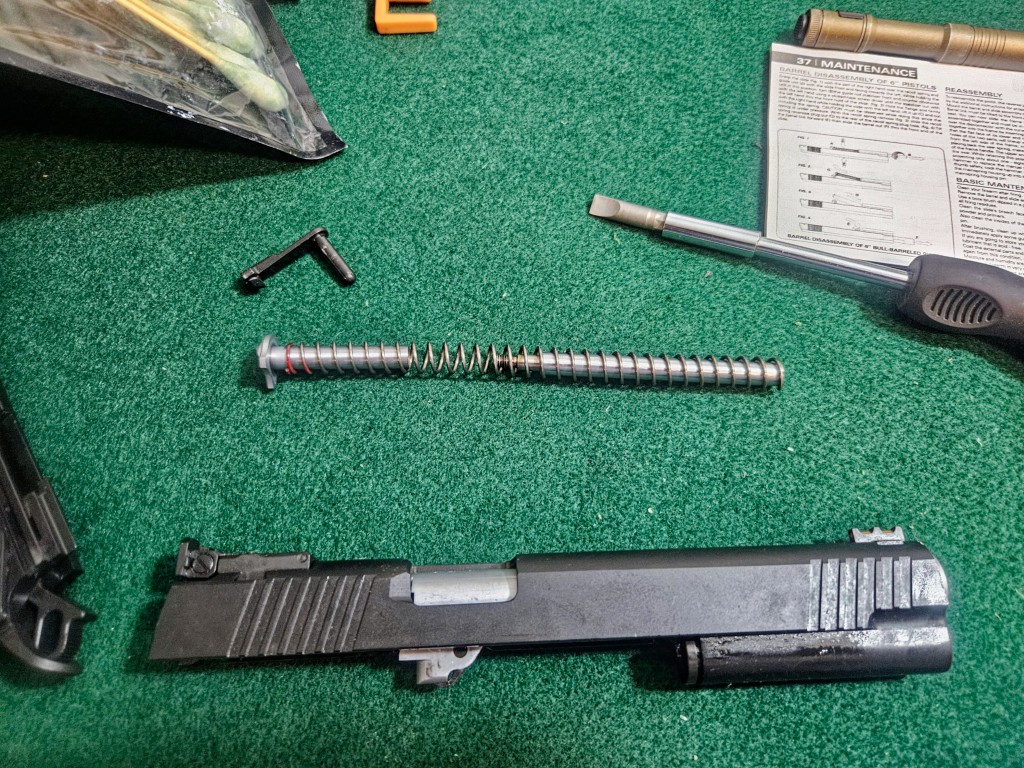
One unique thing about the Big Rock you need to know is the unique full length guide rod (FLGR) they used and as far as I know, it is not in any other RIA pistol. If you have one of the 10mms, you are aware of the FLGR design which uses a pin to capture the two halves of the FLGR from separating, The Big Rock’s FLGR is threaded. To remove it, you turn counter-clockwise quite a few turns to unscrew the two halves and separate them. Now pay attention – that is a 20 pound spring in there and it will launch one half or the other so capture or retain the assembly by securing it with your other hand to prevent you from digging around for a launched part.
That slotted part is the FLGR and it is removed by turning it counter clockwise. I was taking pictures here – remove it with the slide closed so there is less tension on the spring. Notice the dent in the outer edge of the barrek at about the 5 o-clock position. The crown was fine and that’s what really matters. I’m not going to bother sending it back.
I’m not going to write a comprehensive guide to lubricating a 1911, read your pistol’s manual. I will tell you I now use ALG’s Go-Juice which is a thin grease on anything that slides. Before the ALG, I used Super Lube Synthetic Grease applied with an acid brush and before that I used wheel bearing grease. I would at least recommend doing this while the weapon breaks in. If you want to go to an oil later after it has worn in, then do it by all means. Right now though, you need the extra lubrication the grease brings. If surfaces slide together, use grease.
If they turn, use oil. I am all over the place trying oils. Right now, I am using ALG’s biosynthetic stuff. Don’t ask me what is in it. Before that I have used a ton of different oils – MGW, Super Lube, Mobil 1, etc., etc., etc.
Getting a jump on breaking in the pistol
You will hear guys call it “breaking in”, “wearing in”, “letting the parts get to know each other” – they all refer to any firearm needing to smooth out parts through their normal cycling. Expensive guns, such as customs and semi-customs, an experienced gunsmith used huning stones, rubberize abrasive bits or whatever was their preffered tool, to get rid of the tooling marks and sharp edges to give you a smooth weapon right out of the box.
Well, RIA is not expensive and they don’t spend a ton of time fitting and tuning their parts for a perfect fit. You know what? I’m fine with that – it’s easy to smooth things out but first I want to show you why you need to do this via some digital photos courtesy of an Andonstar AD246S-M digital microscope.
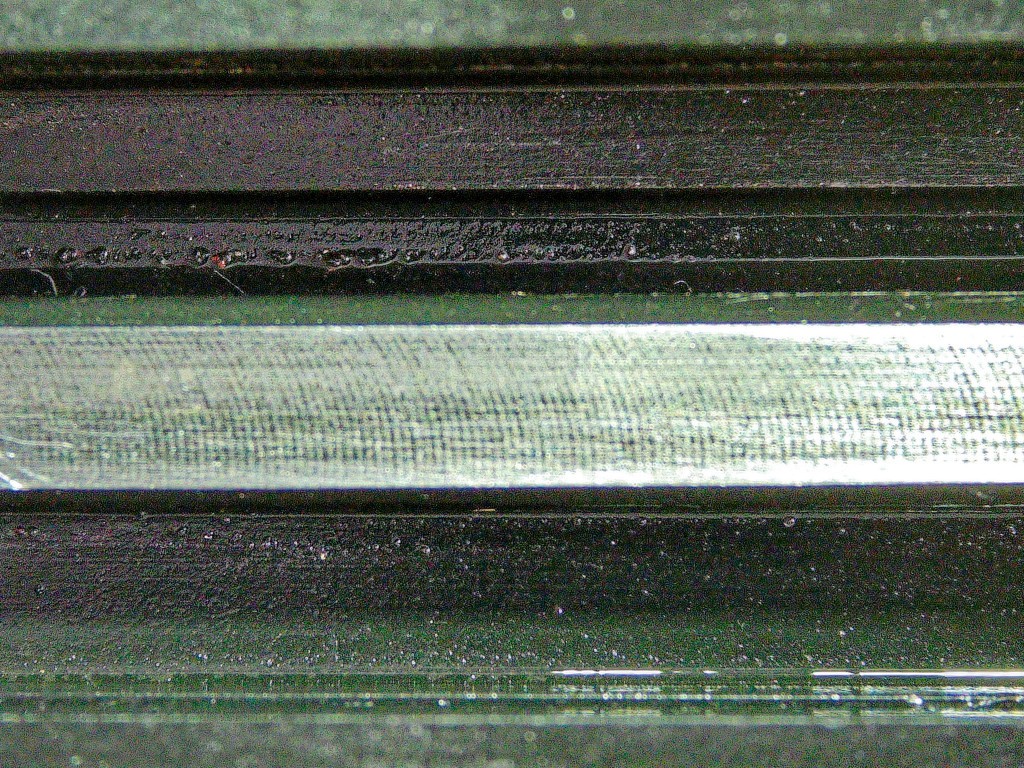
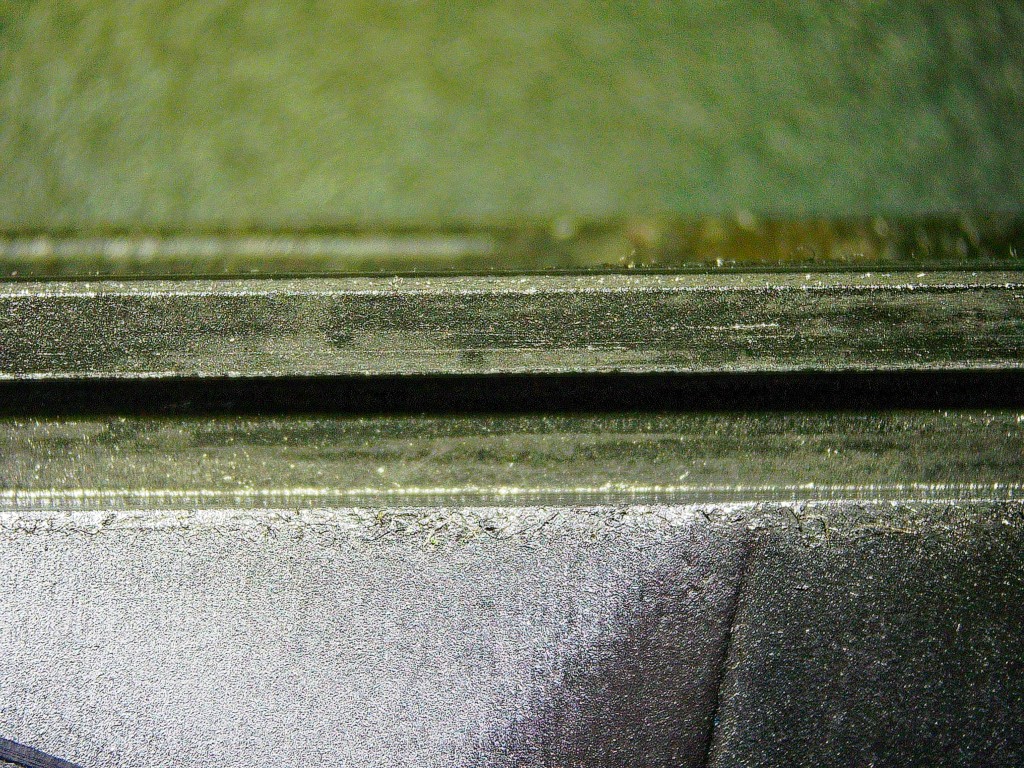
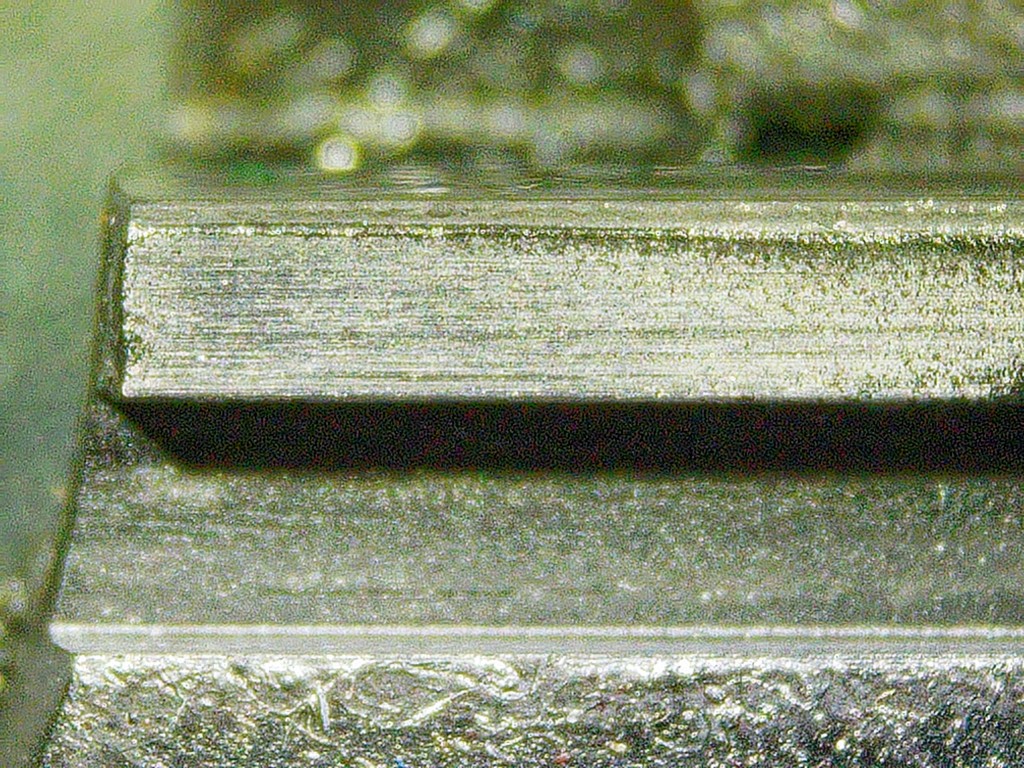
The following are example photos showing the tooling marks on various areas that need to slide freely. The tooling marks are everywhere and cause friction until the places where surfaces contact start to wear down the protruding areas:
Bottom of slideSample of tooling marks on slide rail areaTooling marks on the receiver’s slide area.Front of the left side of the receiver – the shiny areas are already making contact with the slide and wearing in.
Again, the above are all examples. Areas starting to shine are wearing in and starting to smooth out. I’d maybe cycled the slide a dozes or so times before the above photos were taken as I wanted to show before.
Now, there are tons of things you could do with honing storines, rubberized abrasive bits and even with lapping stones. If you want to do one or more of those, go for it. I have an even simpler solution – rack the slide open and closed a couple hundred times. Literally, don’t have a mag in it and work it back and forth over and over. It’s a workout with that 20# spring but it will accelerate wear-in dramatically. Think about it, a lot of firearms get more reliable just under a 100 rounds. You are really smoothing things out at 200, What you will notice is that if you do the above, you will not waste a lot of time and money dealing with jams.
How do I know this? I have owned a number of RIA pistols over the years. My test pistols that I use to test each mag before they leave have been handcycled thousands of times and the slide feels like that of a high-end pistol – like it is sliding on glass.
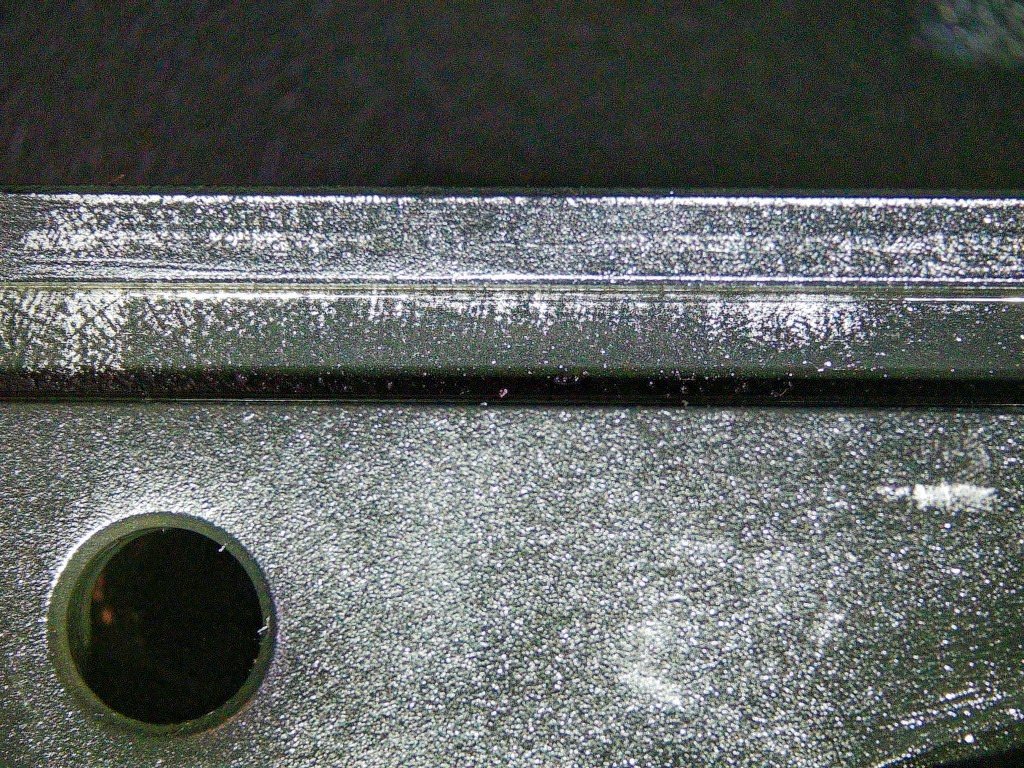
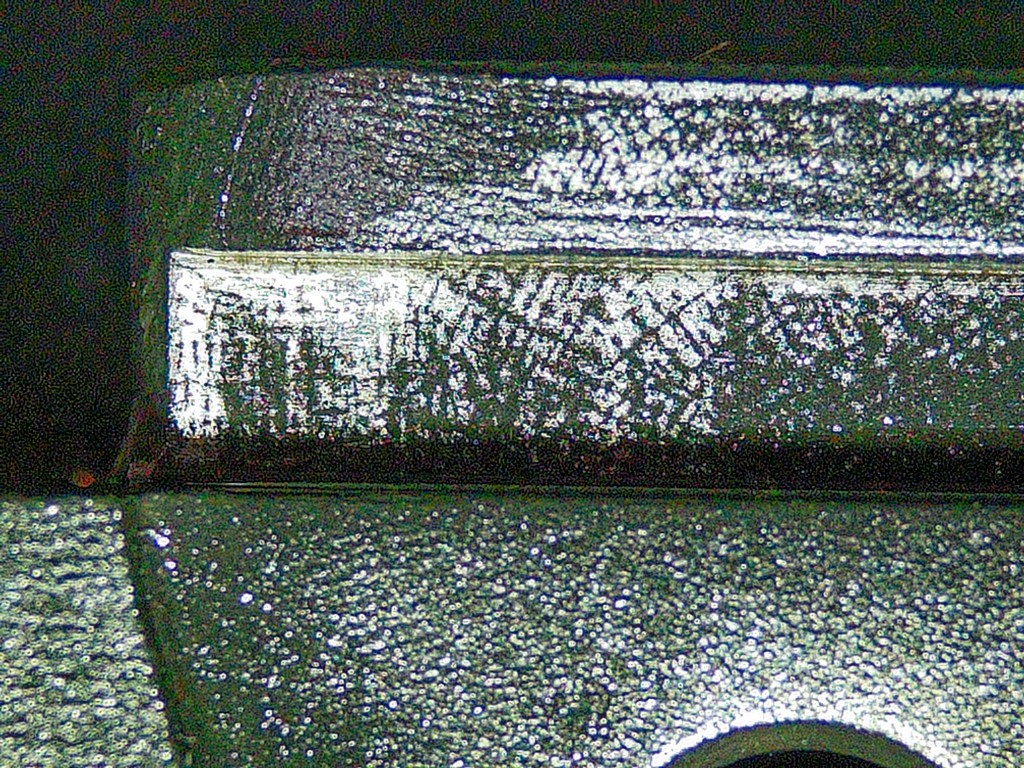
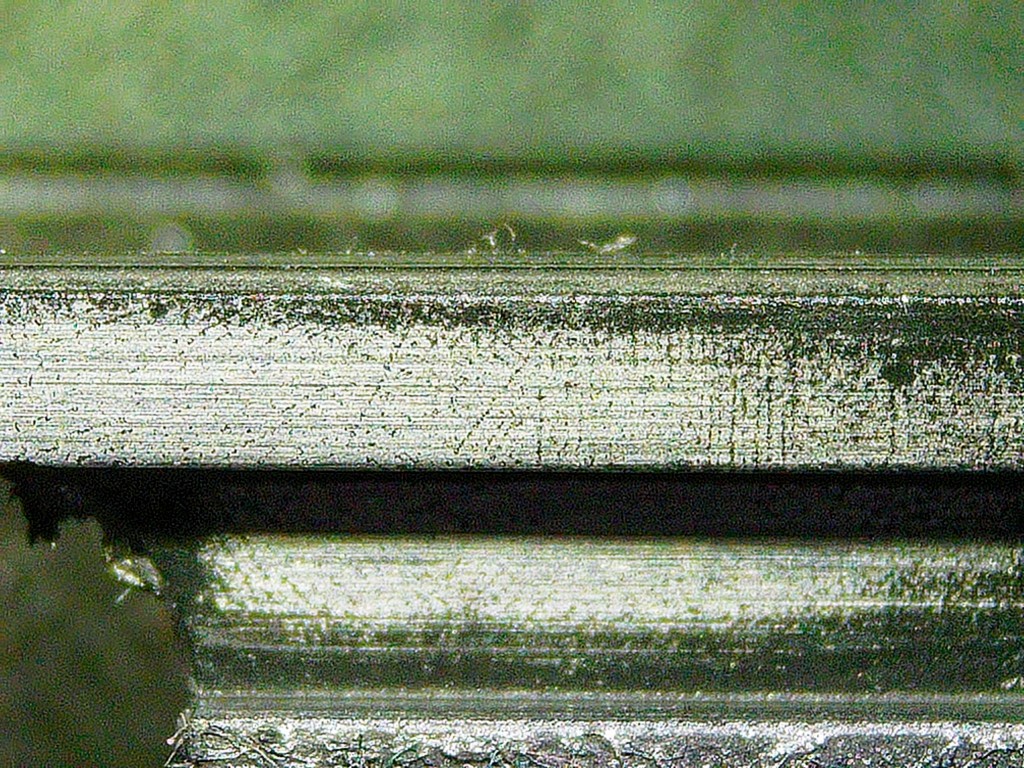
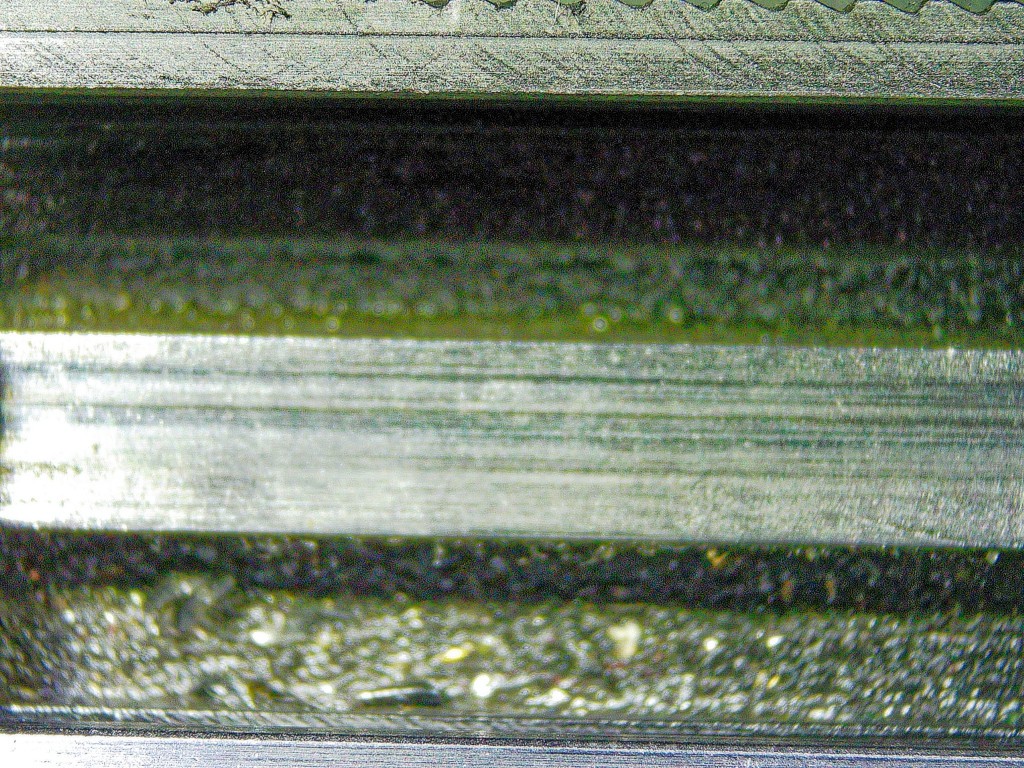
The following photos show contact areas after thousands of cycles:
Shiny areas neans the parts wore together and smoothed out.In this area the tooling marks are all but gone.Again, lots of wear – only the deepest tooling marks are still there.The bottom of the slide is worn smooth.
Guys are always surprised how smooth these pistols are and then even more surprised when I tell them they are unmodified RIA pistols that have had their slides cycled thousands of times.
So, do you need thousands of times? No, just go for 200 and you can do more if you really want to.
Last comment on the FLGR and reassembling it
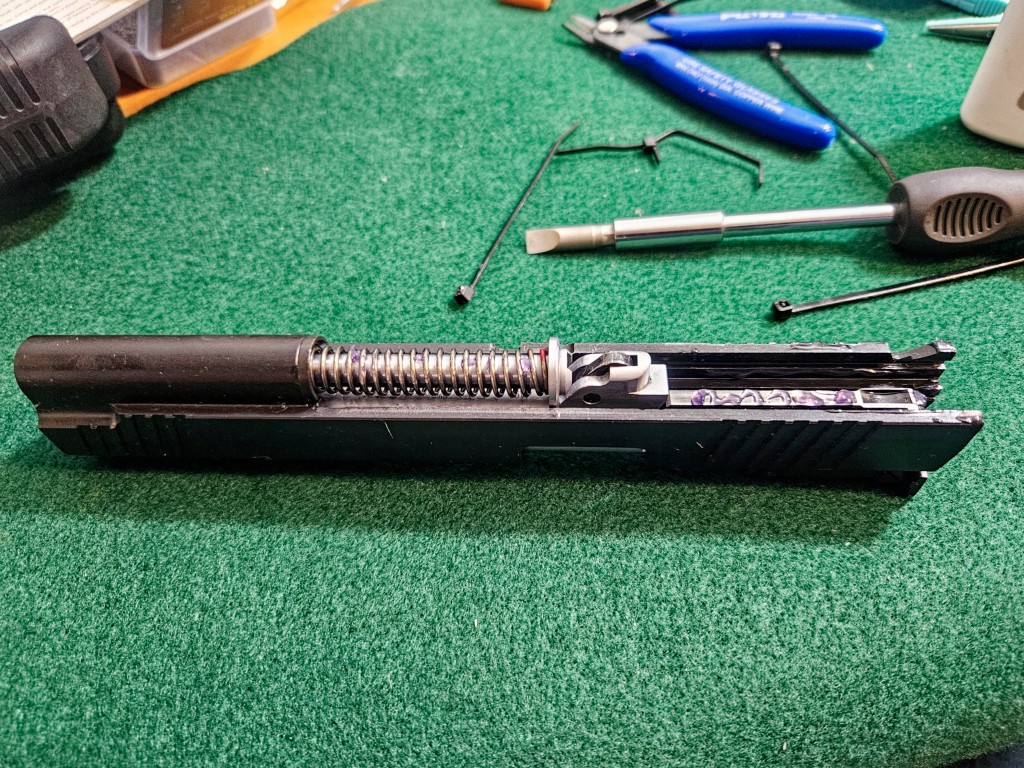
I seriously started hating on the unique Big Rock FLGR design when it came time to put it back together. You are fighting a 20# spring and I couldn’t remember how I did my last one years ago or find any tips or tricks about how to do it. The best thing I can tell you is that you need to secure the back half against the barrel link with the left hand. Insert the front section with the right and try to get front threaded insert into the hood of the back, try to hold them in approximate alignment as you try to screw the front half back in. Translation – it sucks and I have no tips.
I haven’t gotten this frustrated iin a while. The FLGR assembly is those three parts – the 20# spring and the two sliver rods. The one saving grace, the only saving grace for that matter, is the design of how they come together. The two shafts need to line up with the front long part with the slot sliding into the short stubby back part hat has a hooded opening. This photo was mere seconds before I launched the back half six feet away where it luckily hit a wall and dropped in plain sight because I wasn’t keeping it secure enough with my left hand. Note, I still have a 1911 recoil spring plug somewhere that launched in my shop and was never found.This is just to prove it is possible to get them back together. Note the purple ALG thin grease on the slide.
Summary
I hope this post helps impress on you the need to clean, lubricate and cycle your pistol, or whatever firearm, before you go to the range the first time. I do this myself and have shared it with many, many folks over the years and the feedback has always been positive.
By the way, the majority of guys who contact me hating on the RIA pistols did not break them in so I walk them through this. The second largest majority are really frustrated with the OEM magazine.
If you find this post useful, please share the link on Facebook, with your friends, etc. Your support is much appreciated and if you have any feedback, please email me at in**@*********ps.com. Please note that for links to other websites, I may be paid via an affiliate program such as Avantlink, Impact, Amazon and eBay.
The Stribog line of subguns, pistols and pistol caliber carbines are really cool. When the brace fiasco erupted, I sold my 9mm SP9A1 and regretted it. When Grand Power said they were coming out with a 10mm, I was an early buyer. One question popped out though – what was out there to help load the 20 round 10mm magazines? I hate loading magazines with stiff springs as many hands start to cramp so I needed to find a loader.
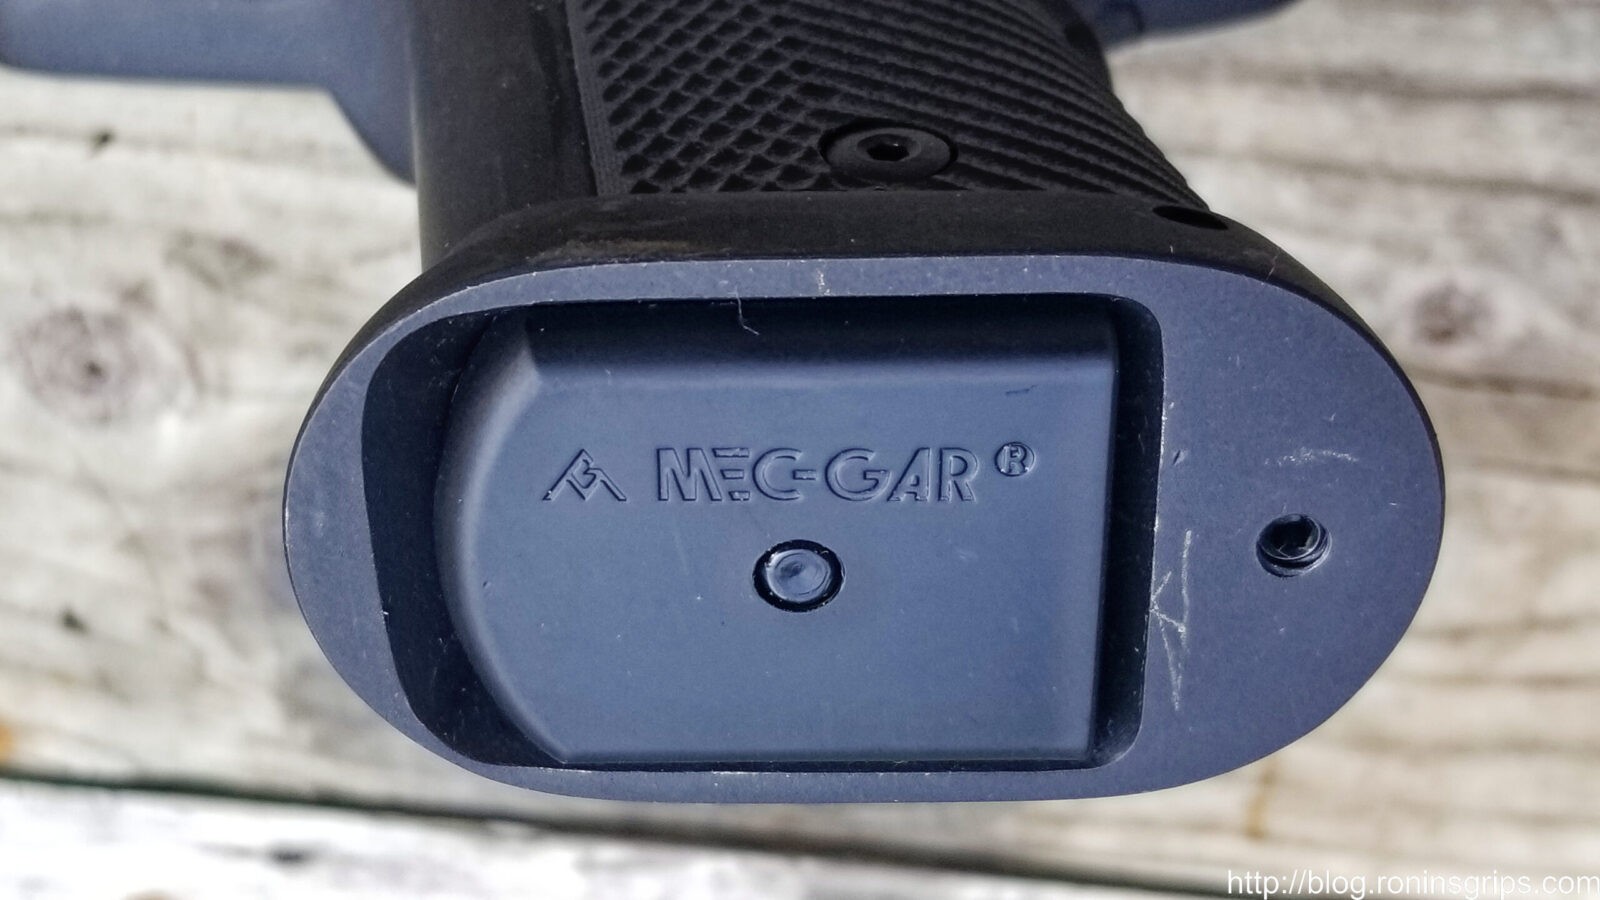
First off, they are HK UMP pattern magazines
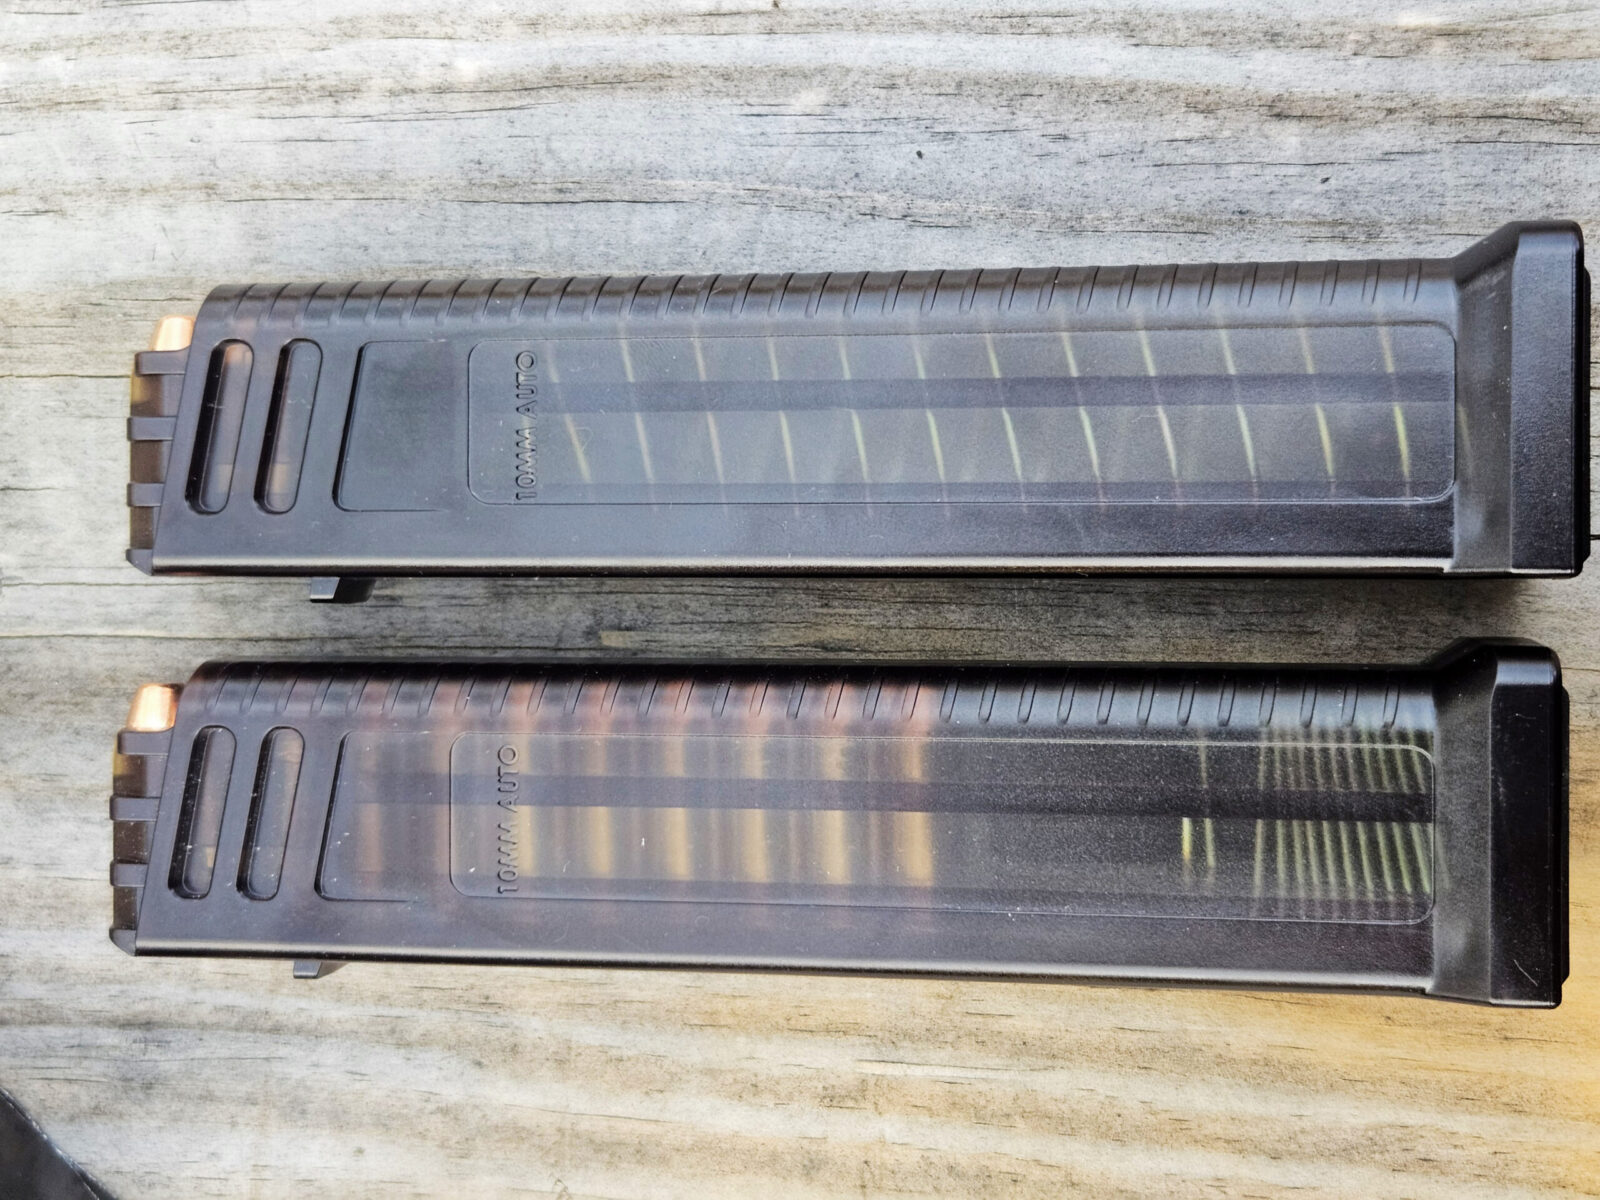
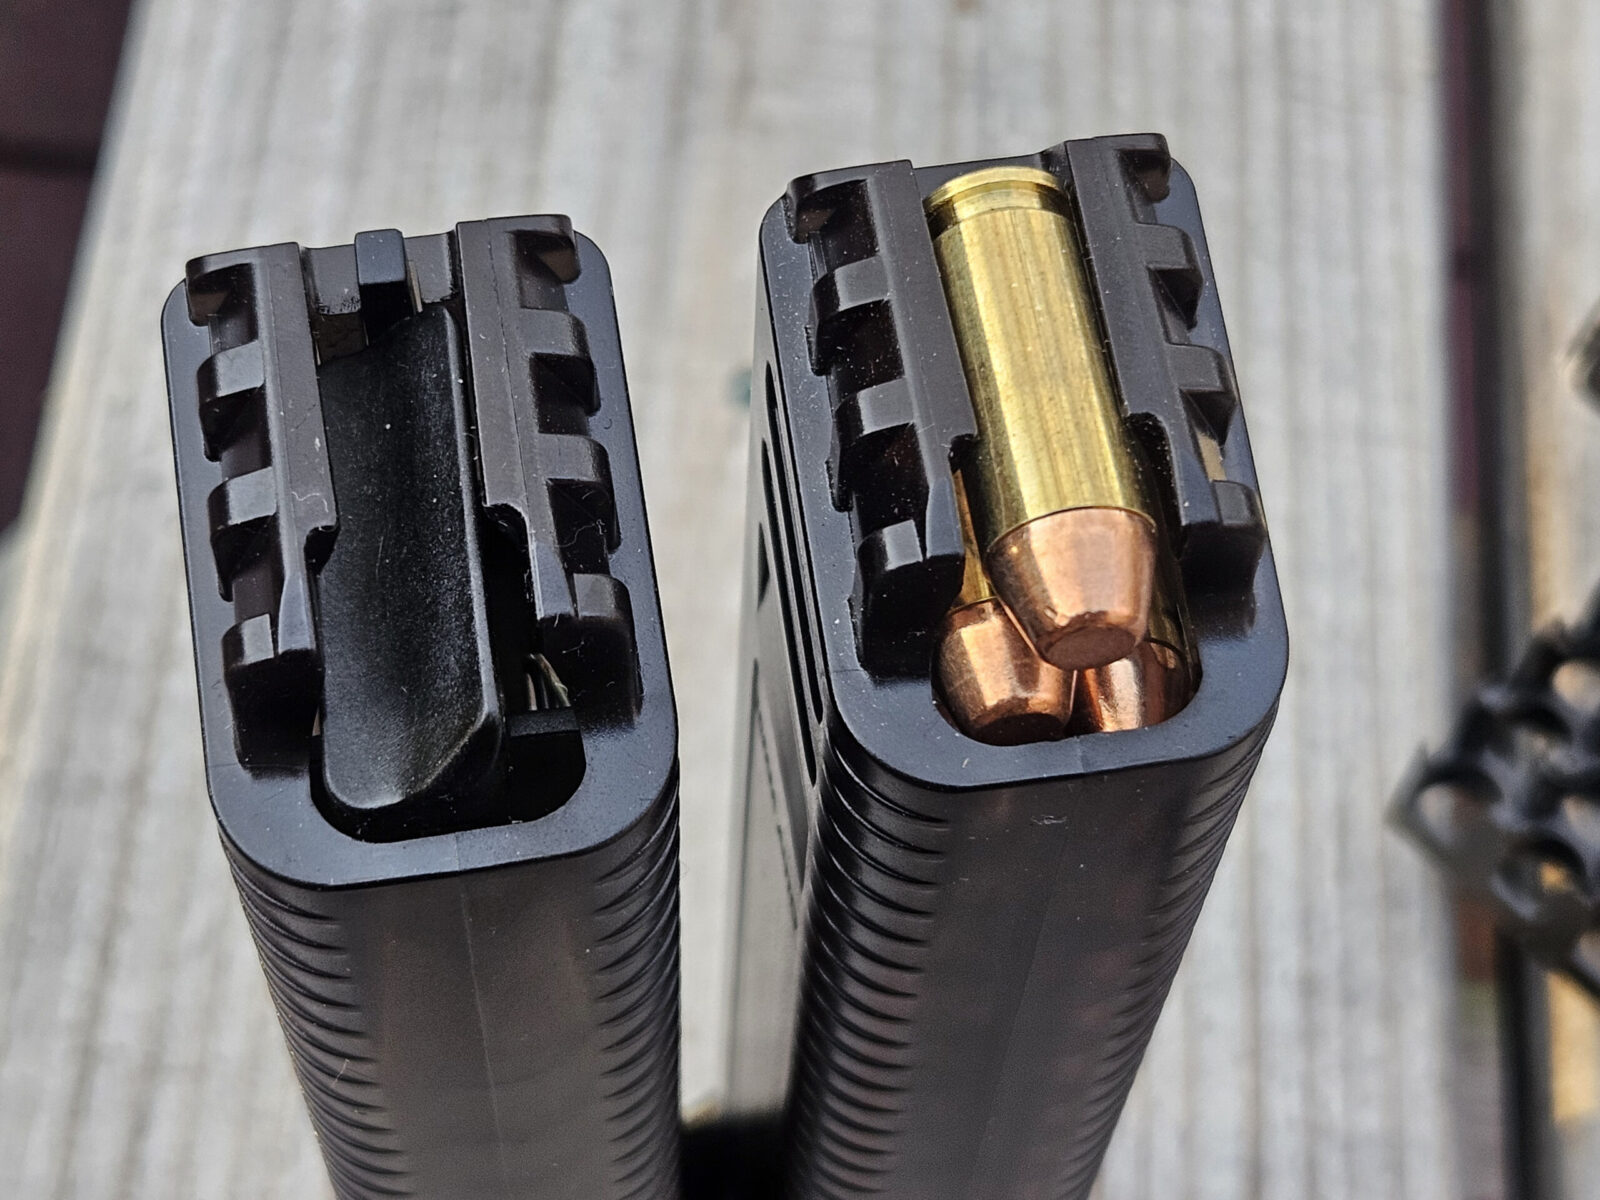
The Stribog 10mm mags are nicely made, beefy as hell and based on HK’s UMP magazines. I like that – I am really tired or proprietary mags where you have one and only one option. Using an existing mags opens up options. Now, are UMP magazines all over the place and cheap? No, they aren’t – especially not 10mm mags. HK doesn’t make 10mm UMP magazines any longer.
The 20 round magazines have stout springs and it takes a lot of work to manually insert cartridges
Real HK 10mm mags have starting costs around $139 but are 30 rounds so there is a perk for the price. Considering Stribog mags list at $45 and can sometimes be found for $39.99, I’ll stick with Stribog mags.
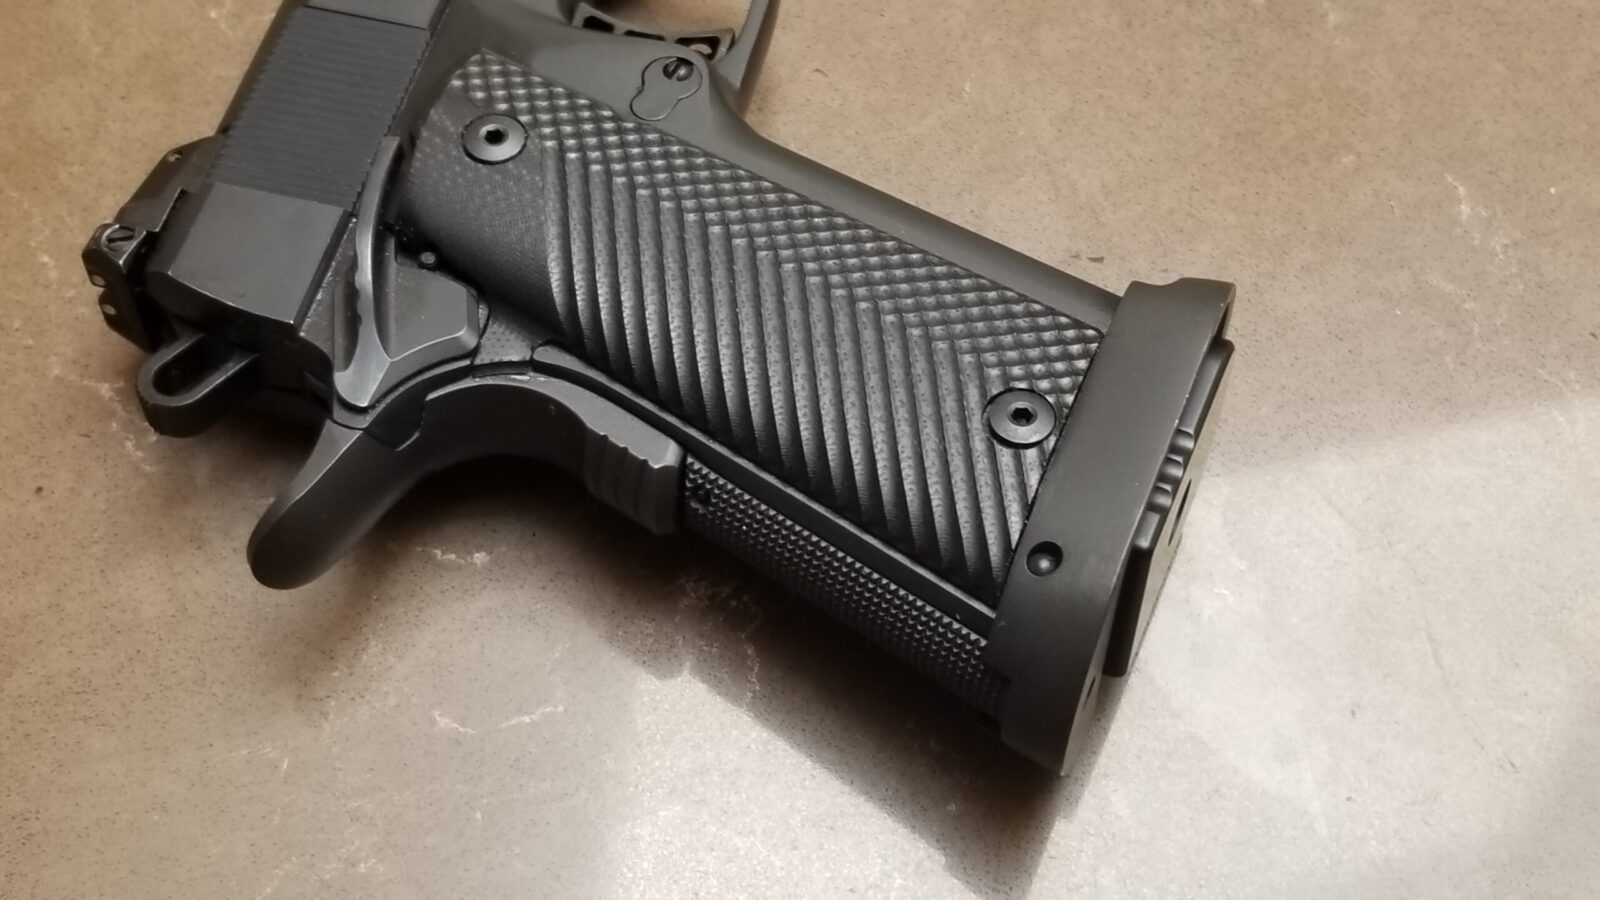
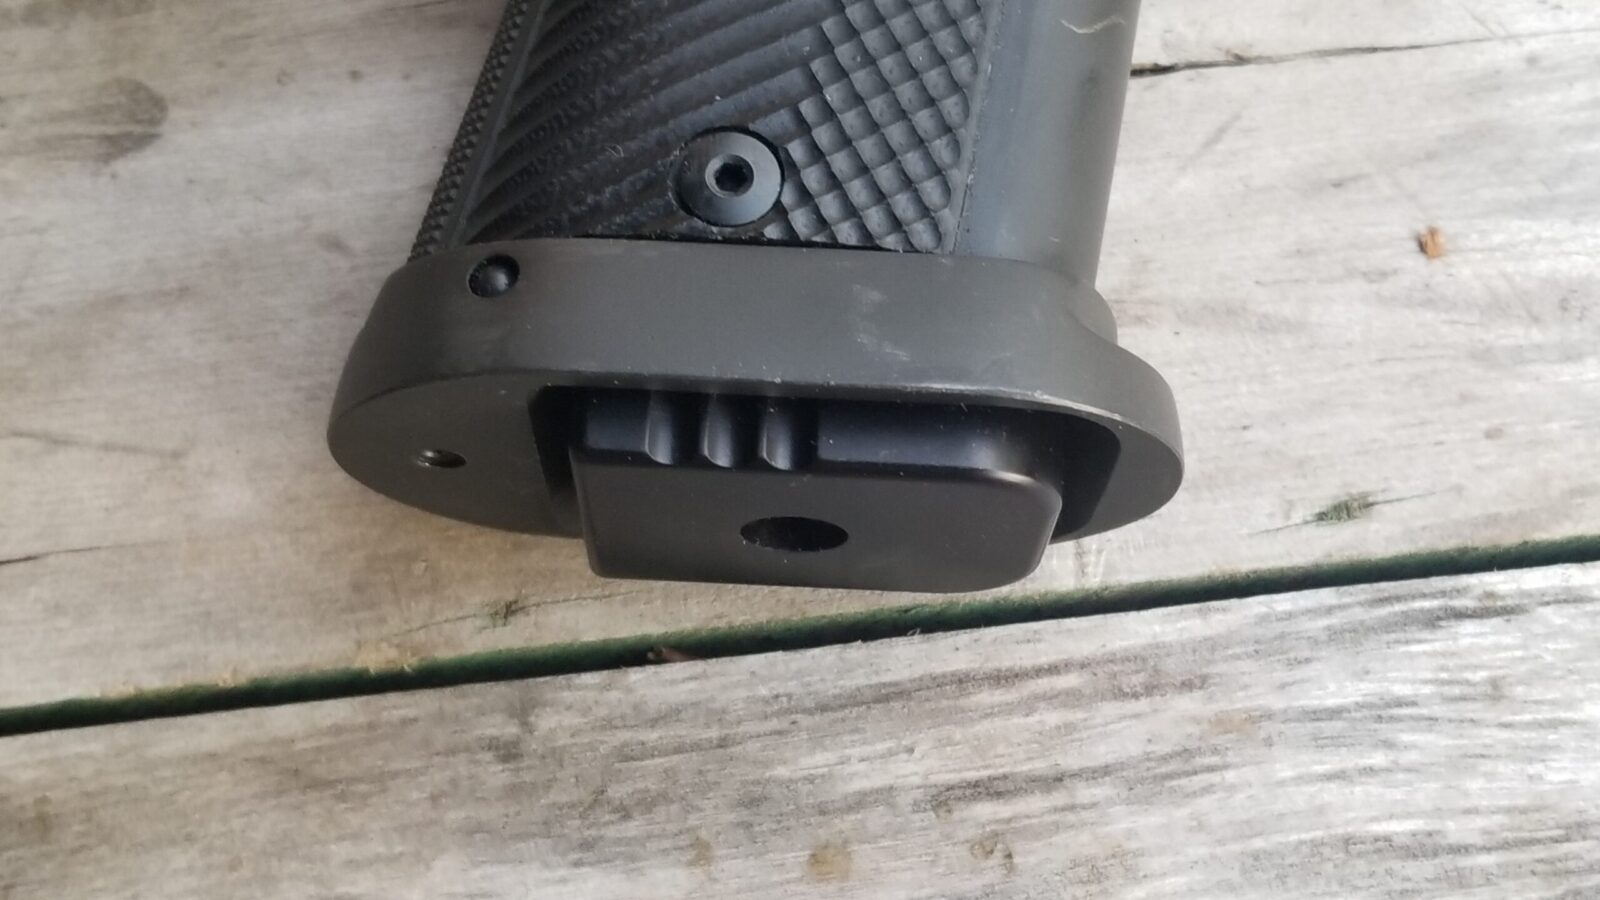
Stribog 10mm magazines are built like a tank
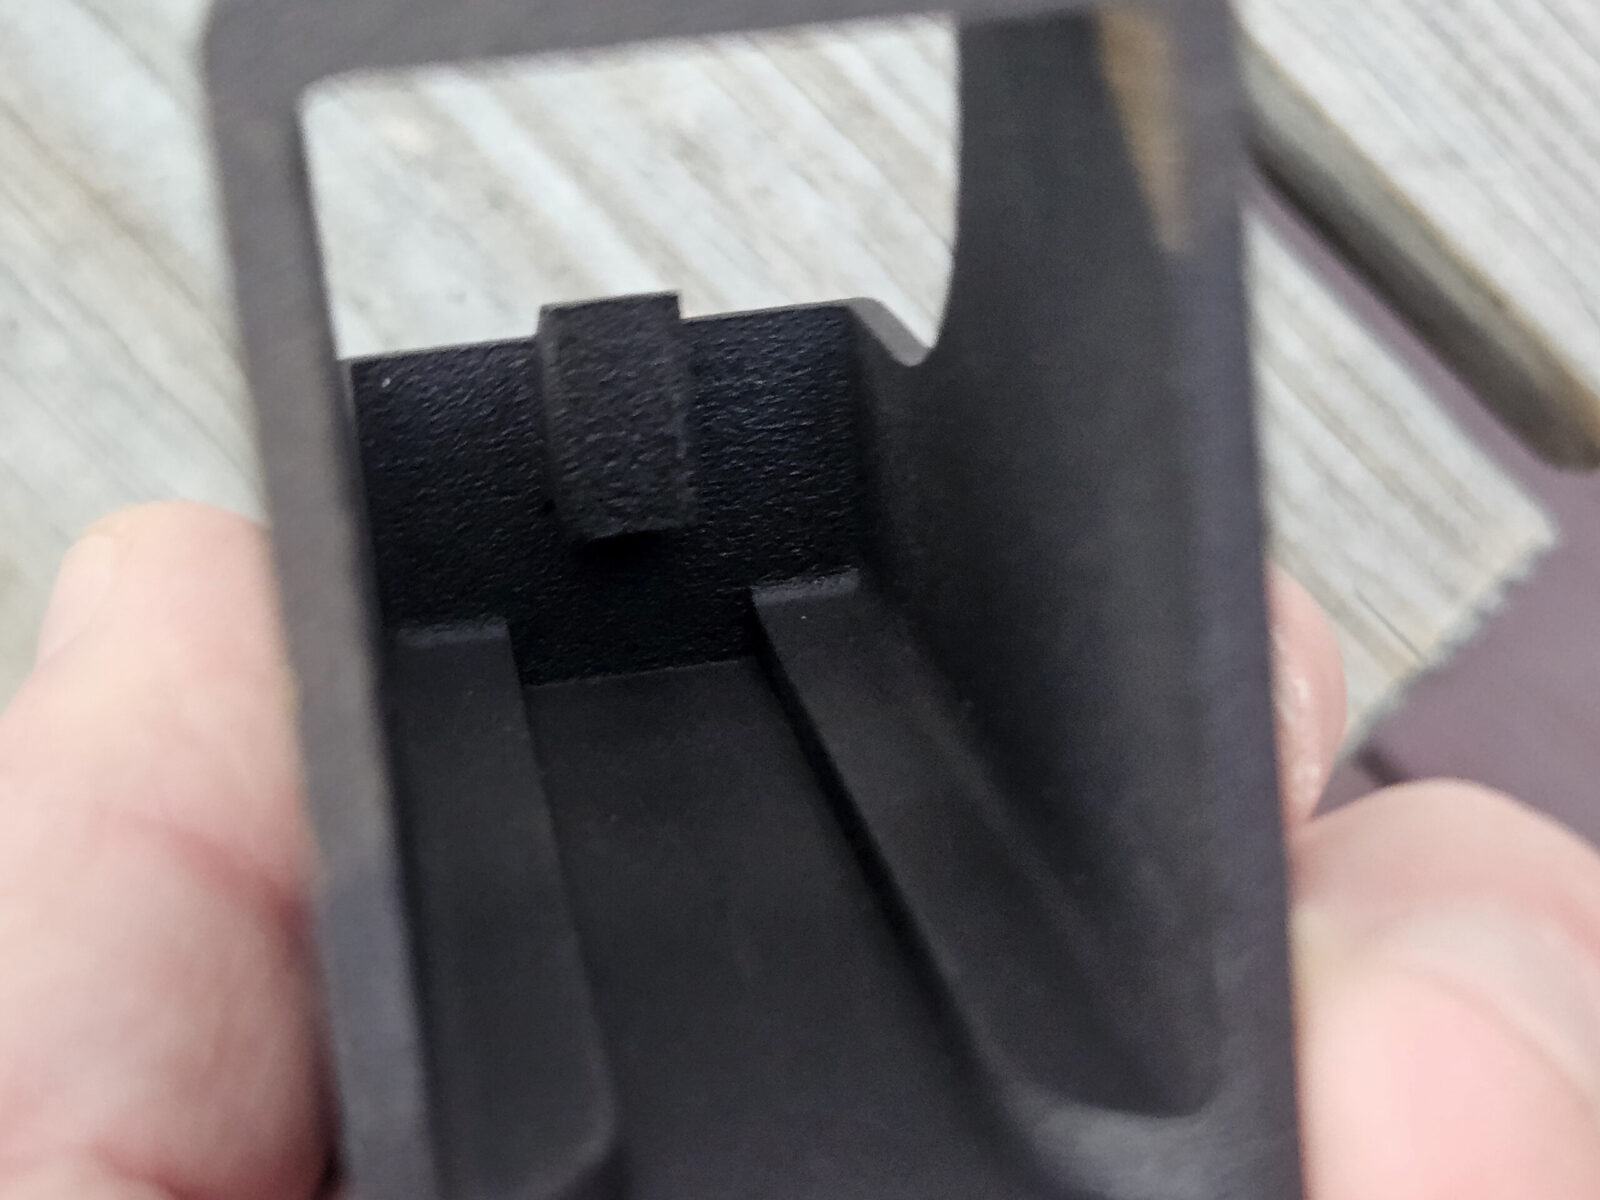
This is both a pro and a con. The top sports a lot of reinforcements making for a quite a large magazine in terms of circumference. They will not fit inside a Maglula Universal loader – I had hoped they would but it is a no-go.
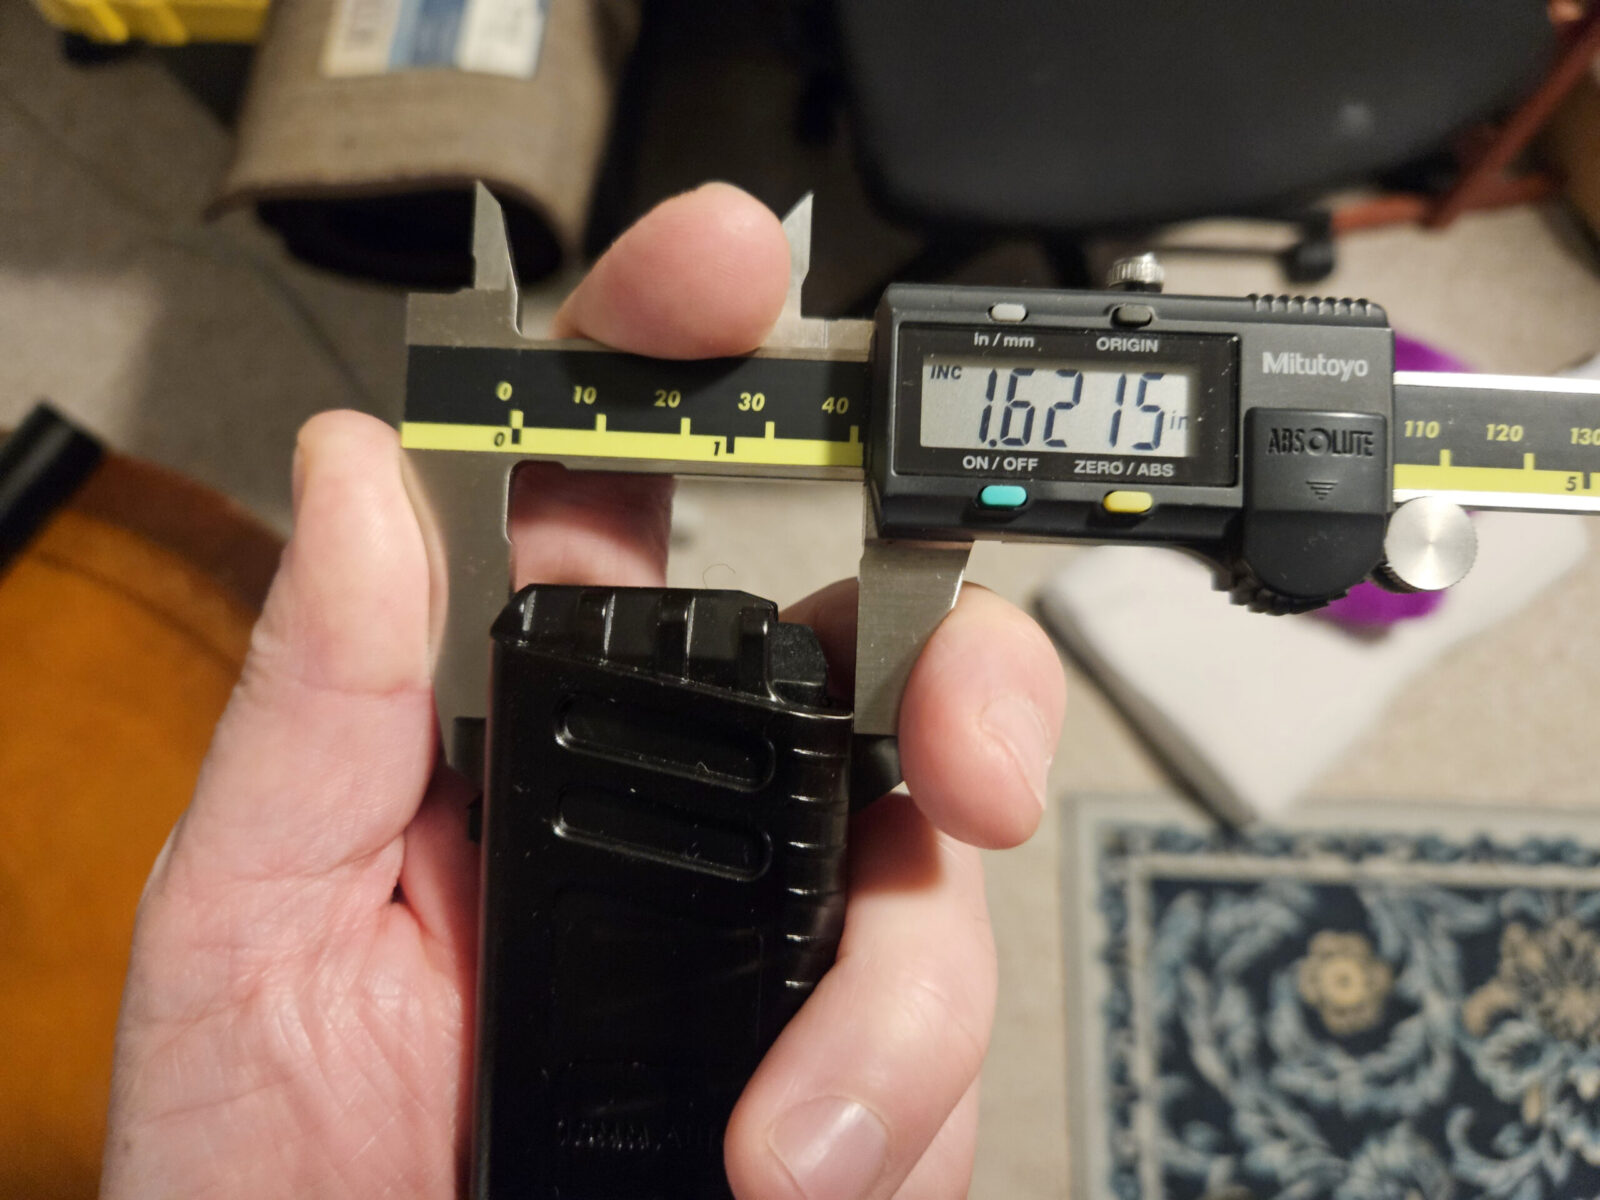
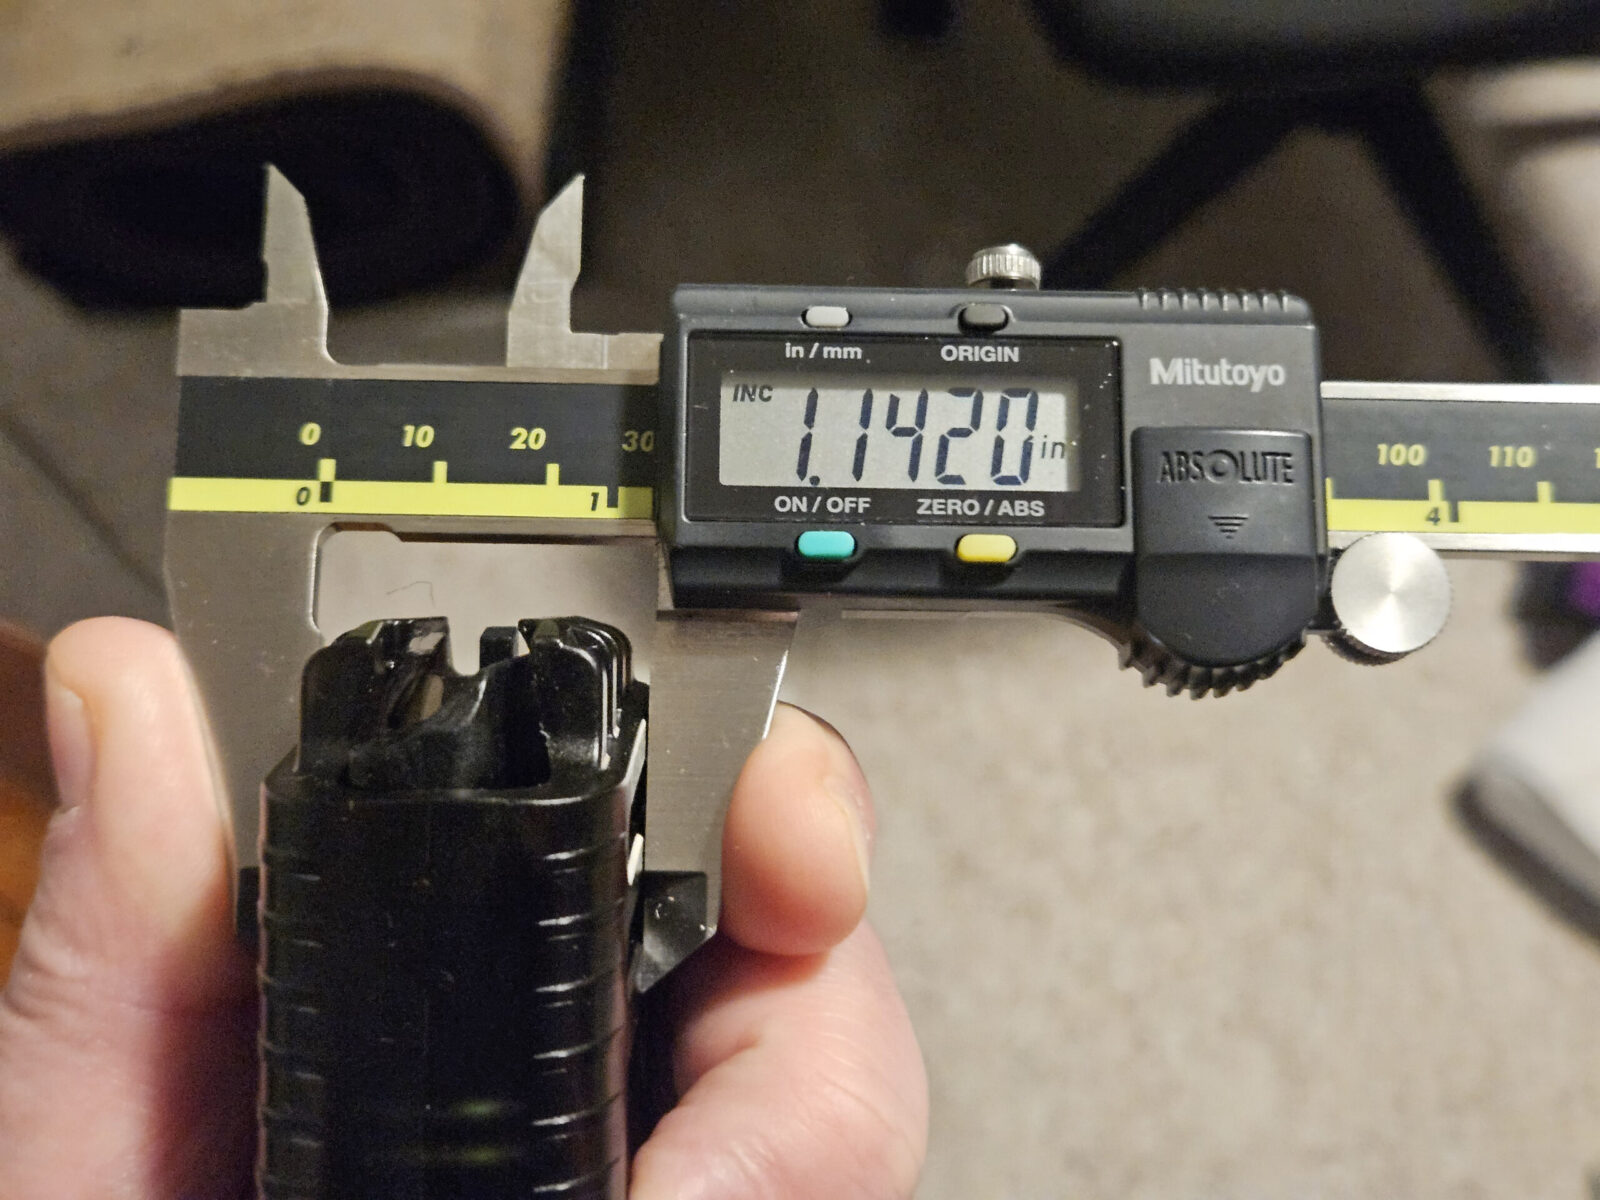
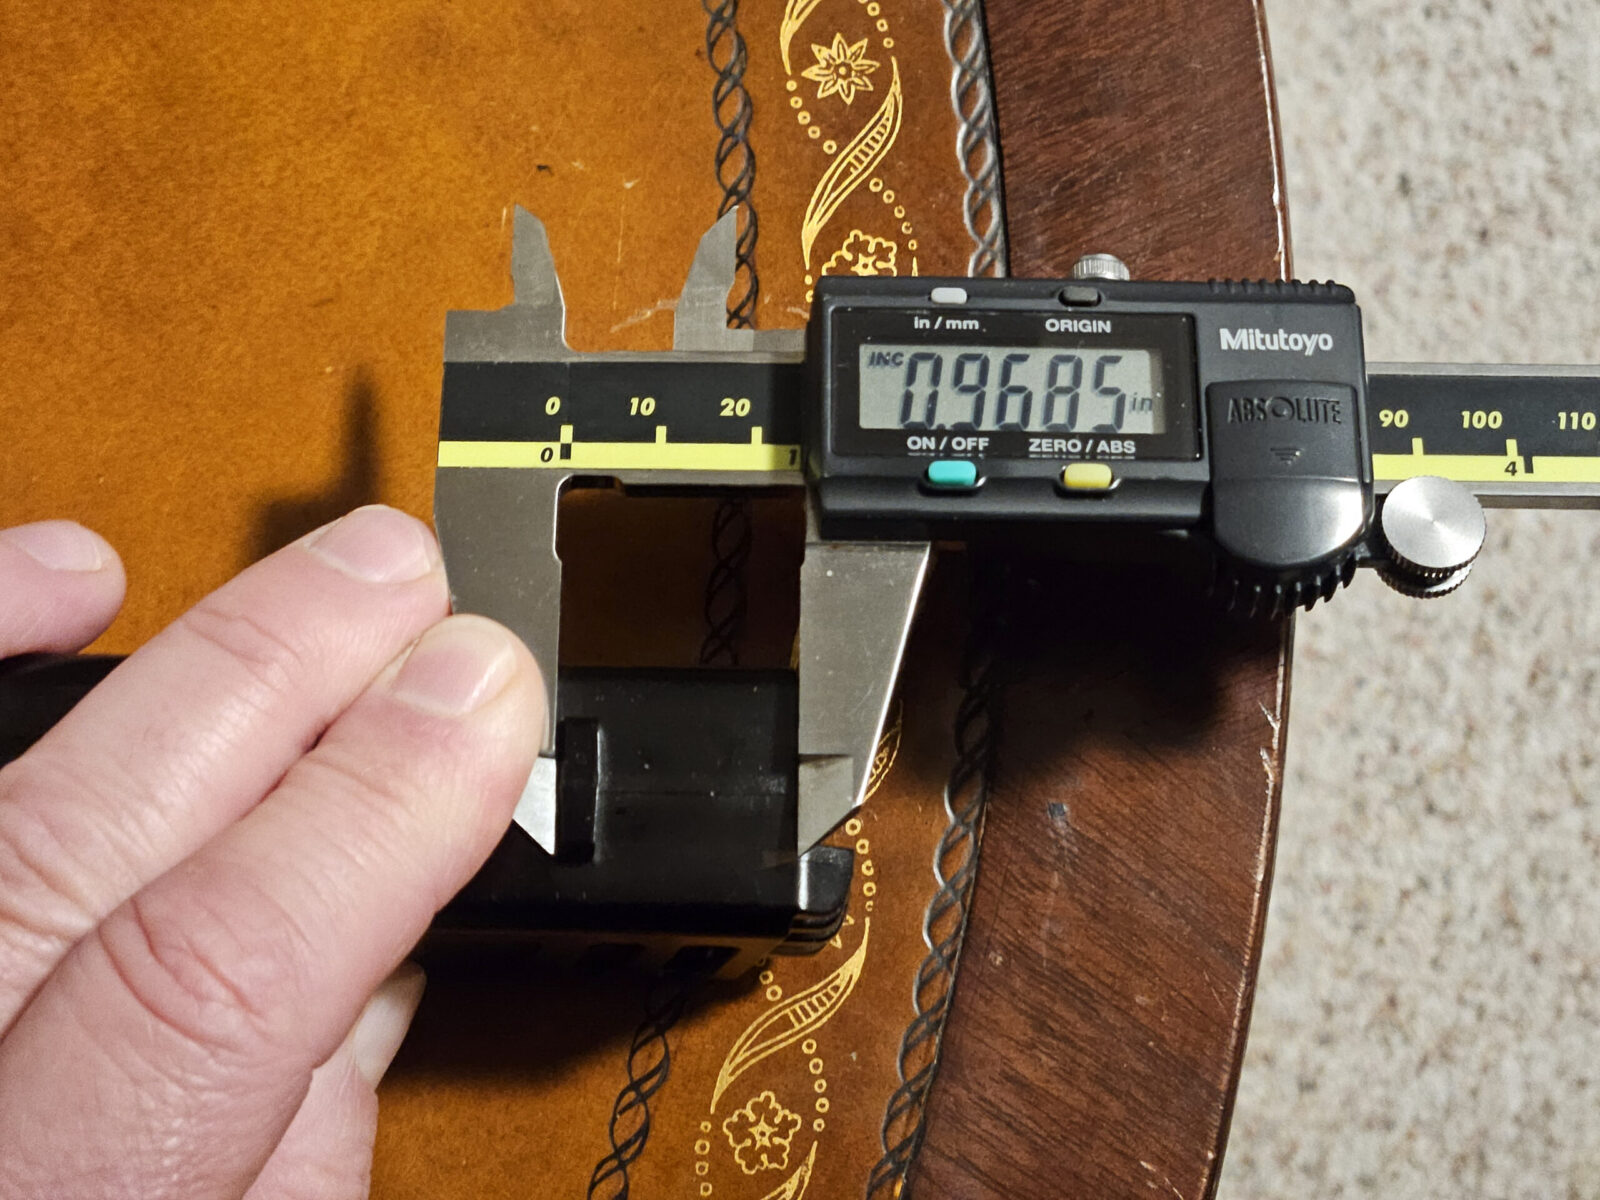
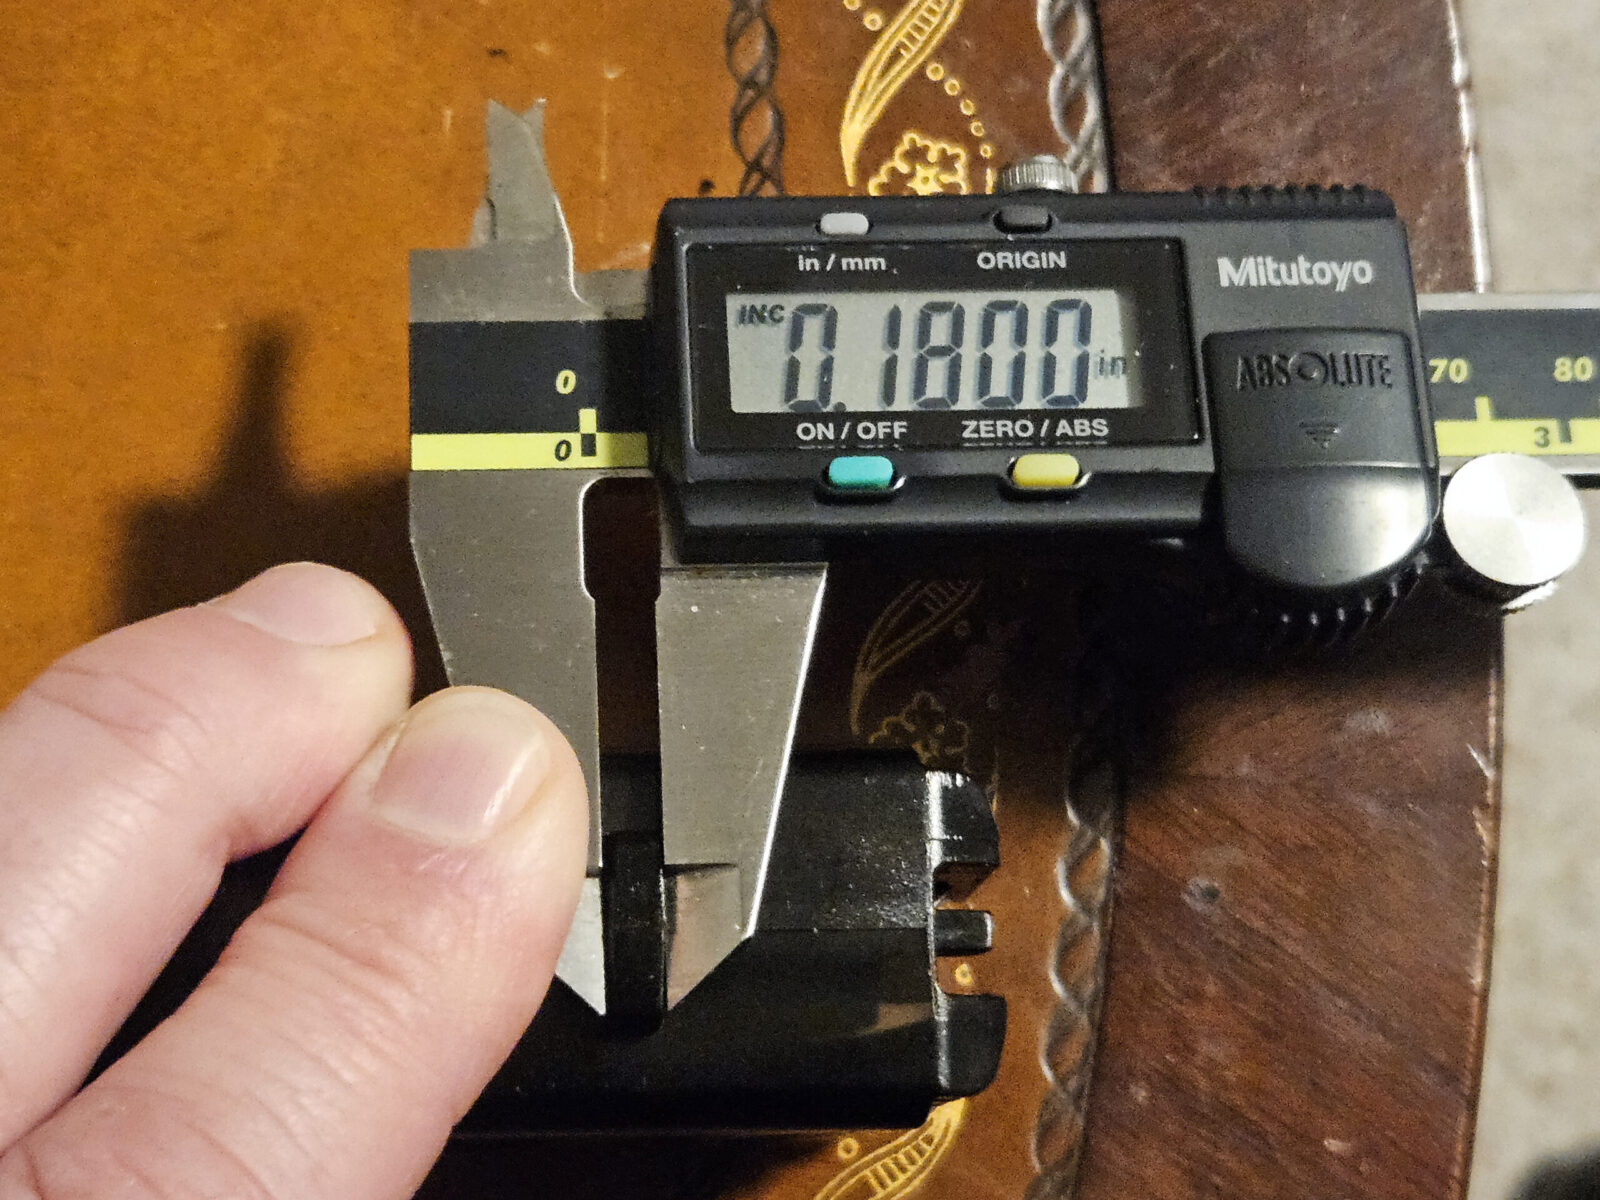
The girth of the heavily built mags means most loaders will not fit them. On the other hand, those are some impressive reinforcements on the mag lips and thick walls.Front to back is about 1.62″Left to right is approximately 1.14″Distance from the botttom of the locking tab to the top of the magazine body is about 0.96-0.97. It’s molded so there’s a bit of ballparking as to the exact top.The magazine locking tab is about 0.18″ thick.
Playing a hunch
Ok, so I did some searching on .40 caliber and 10mm UMP loaders and then played a hunch. I make magazines for Rock Island Armory’s A2 HC .40 and 10mm pistols. They use a staggered magazine and my source tube for the custom mags I make is actually a Mec-Gar .45 mag. What if a UMP .45 loader would work? I had a pretty good hunch it would so I started researching them.
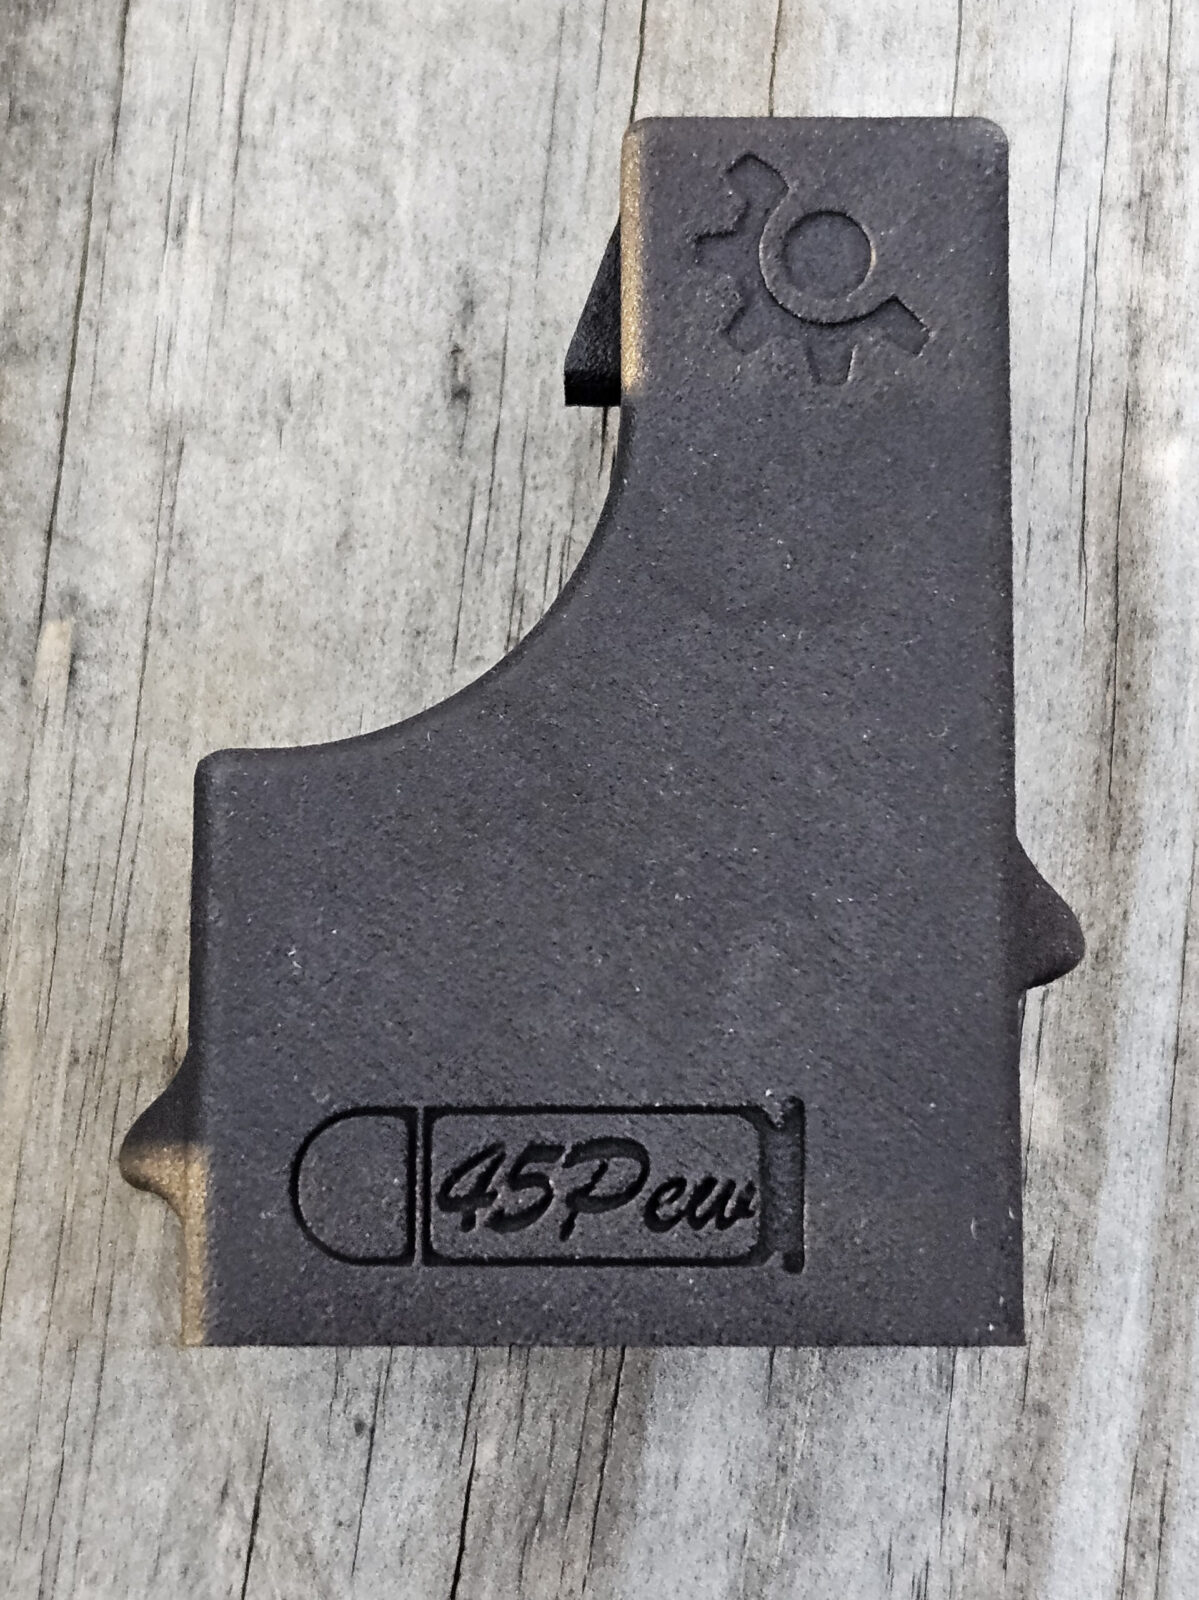
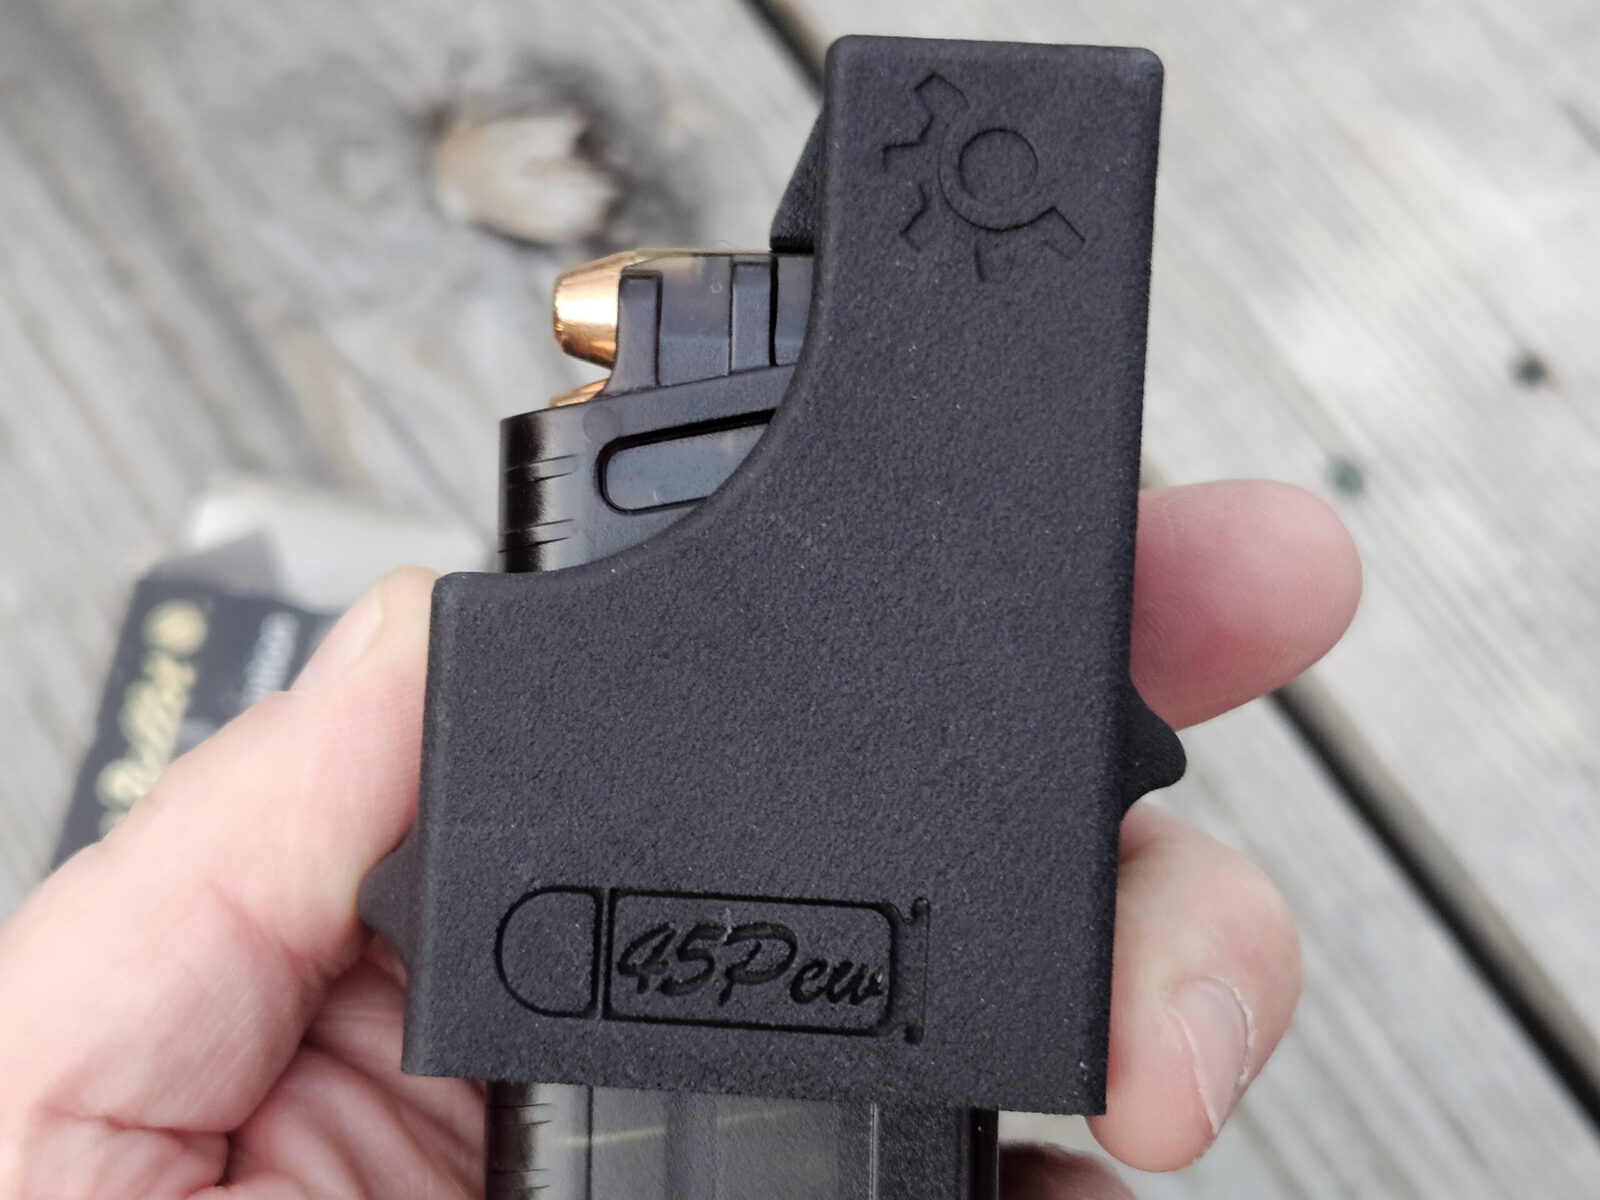
The UMP .45 is much more common so I had options. The one that caught my eye was from Custom Smith so I ordered it and must say I am impressed.
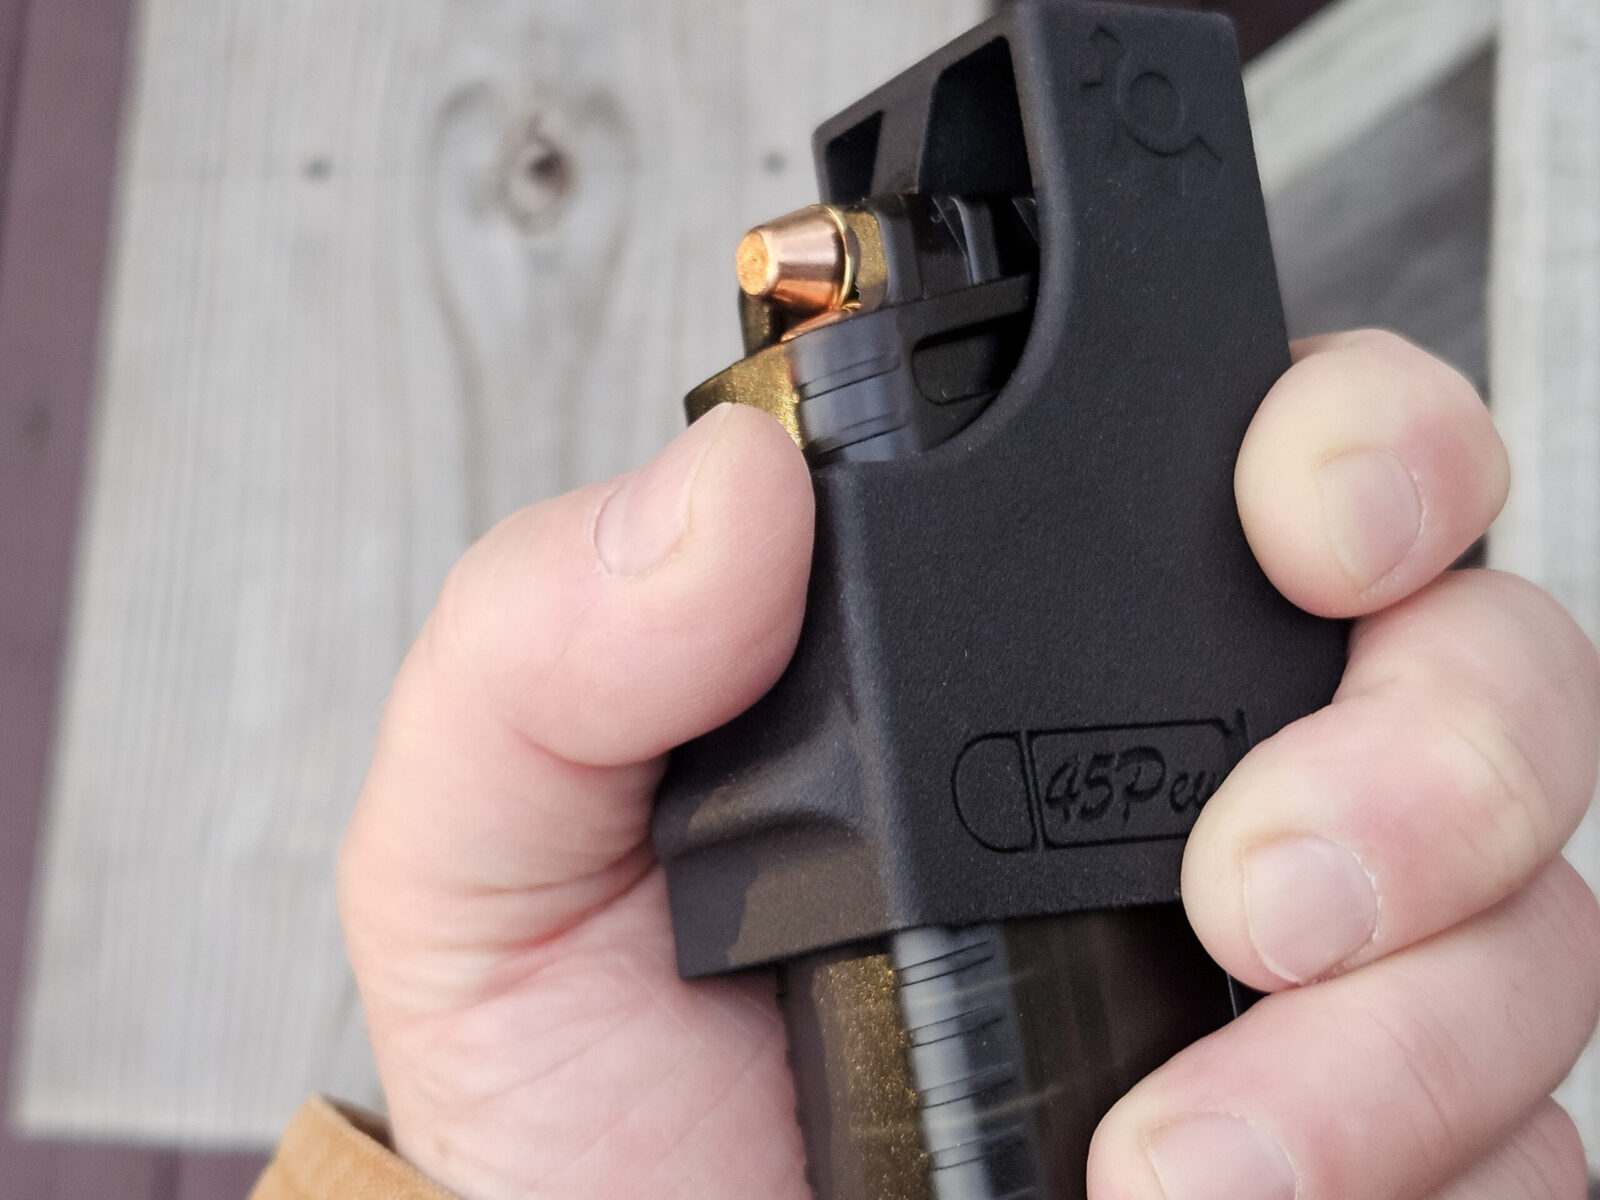
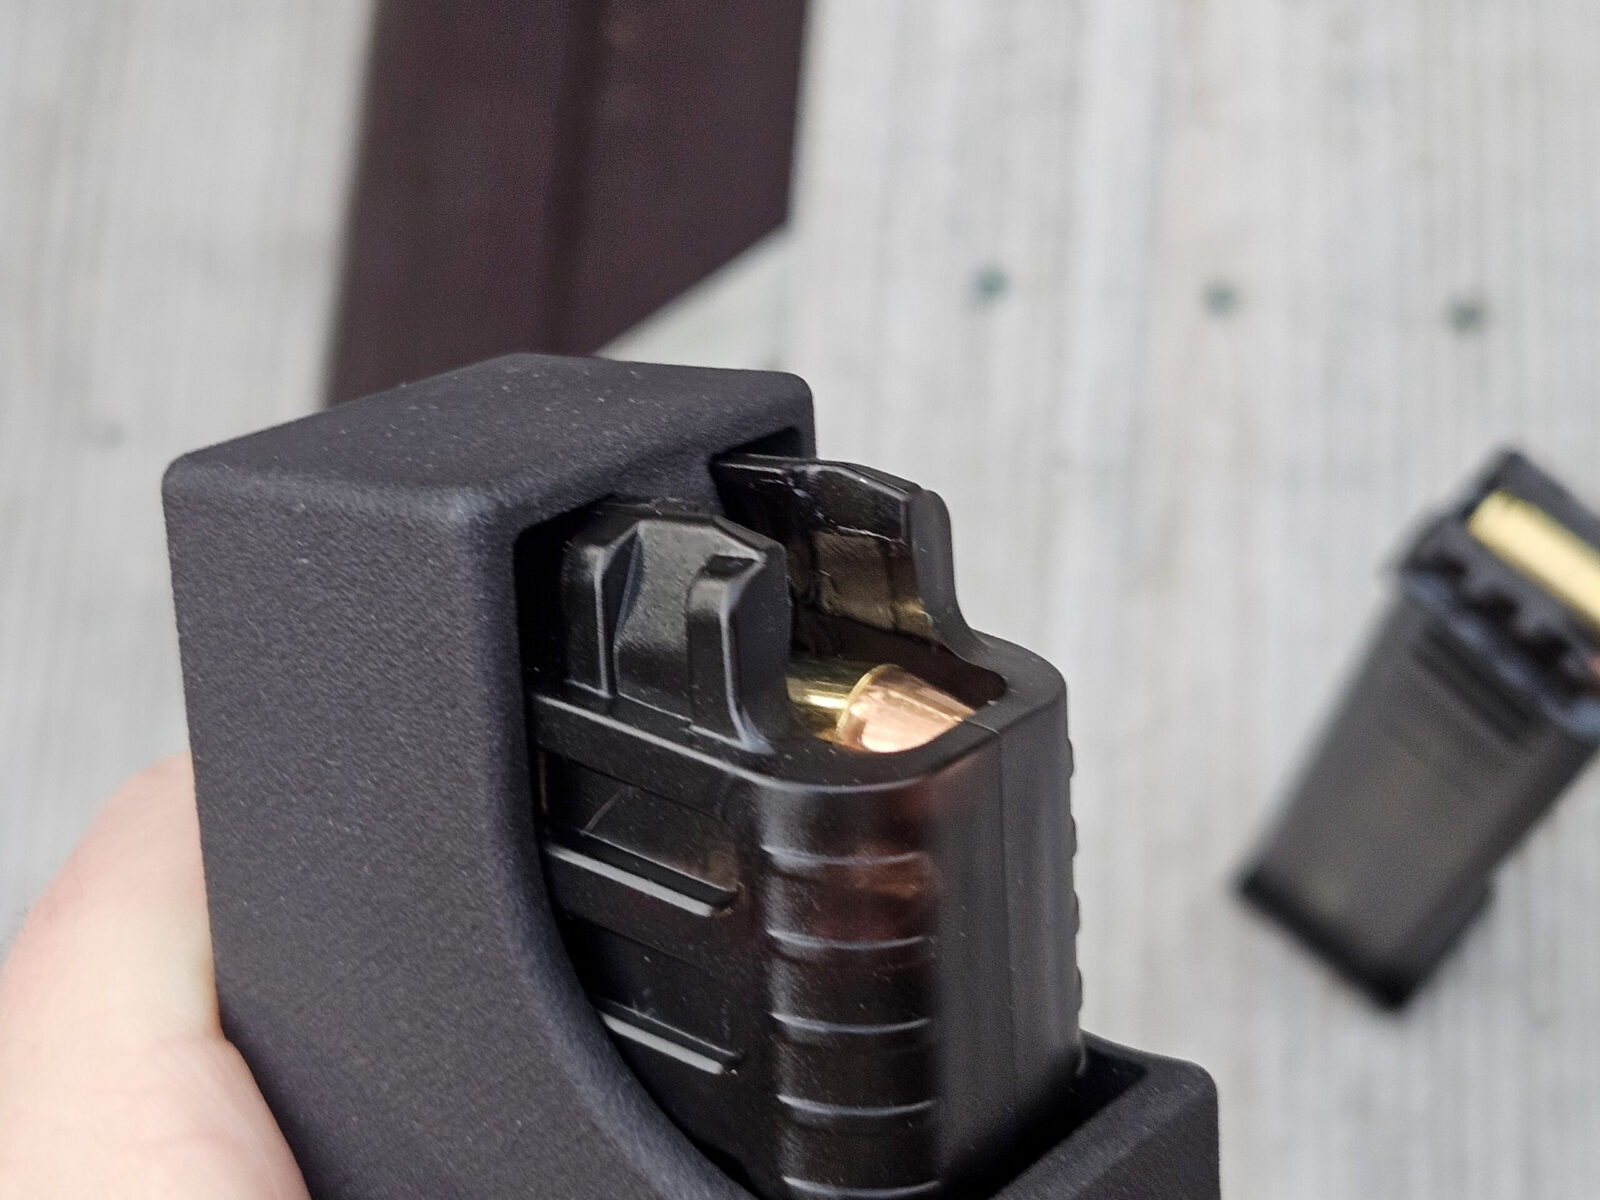
It is 3D printed and nicey done. Everything seems thick enough to have proper rigidity. I like finger rests on the sides to give your hand something to get hold of. I promptly loaded two mags super easy. You push down, slide the cartridge in part way, lift the loader up, slide the cartidge in the rest of the way and repeat.
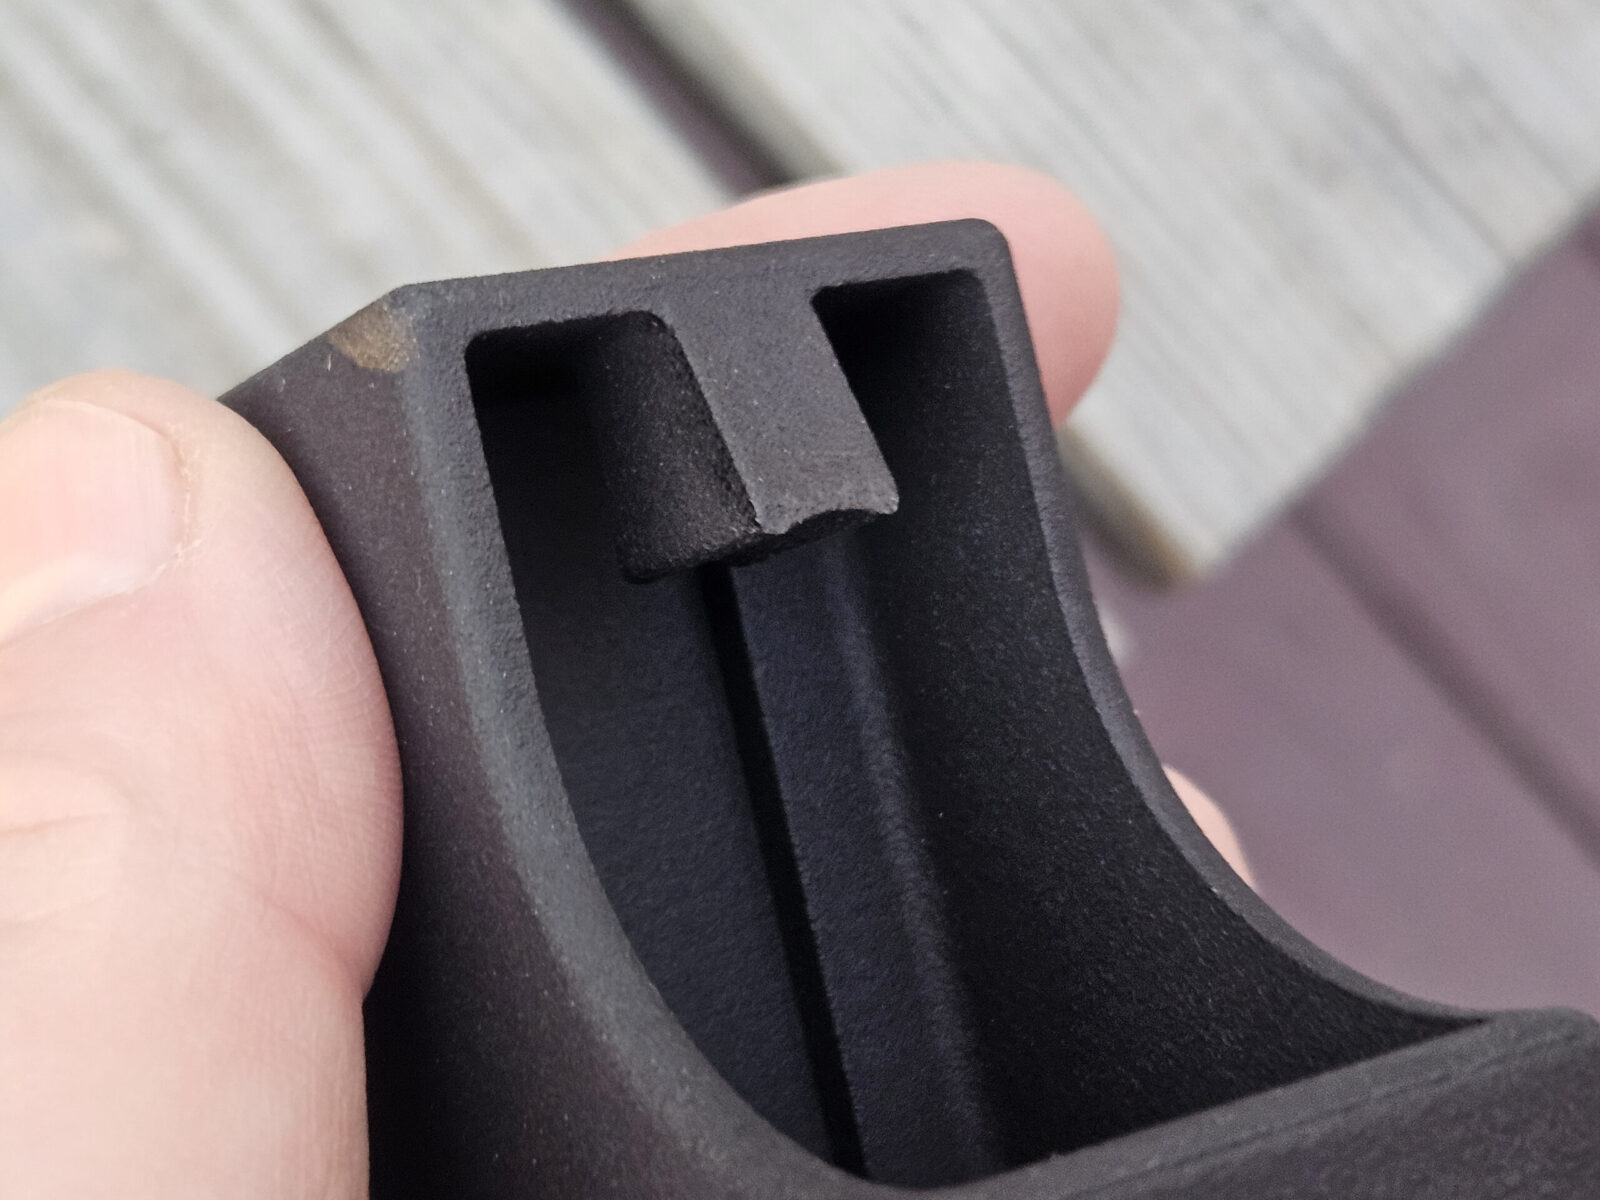
Side shotThe ram that pushes the cartridges done is beefy and nicely done.Inside is nice and clean also.The UMP .45 loader fits great.The ram does a great job pushing the last cartridge down so you can slide the base of the next cartridge part way in. You then move the loader out of the way, push the cartridge all of the way in and move on to the next round.Parting photo – it works great.
Summary
Grand Power Stribog’s 10mm model uses magazines based on the HK UMP design. The Grand Power magazines are affordable and relatively easy to find. You may need to dig just a bit as the 10mm Stribog sales are outpacing magazine availability but I am sure the mag availability will catch up.
No, I wasn’t paid to write this – I had to buy it because I wanted the 10mm Stribog and manual mag loading kills my hands.
By the way, S&B 180 grain FMJ 10mm is my goto range ammo. It’s affordable and runs great. I use it for breaking in and target practice with all of my 10mms.
If you find this post useful, please share the link on Facebook, with your friends, etc. Your support is much appreciated and if you have any feedback, please email me at in**@*********ps.com. Please note that for links to other websites, I may be paid via an affiliate program such as Avantlink, Impact, Amazon and eBay.
I haven’t seen these at this price in the last few years – PSA has them for $649.99. I suspect they will sell fast at that price.
I have one of these 52009 Ultra HC pistols and it is rock solid. Magazine customers tell me the same thing. If you’re looking for a double stack 10mm on the 1911 platform, this is a really good deal:
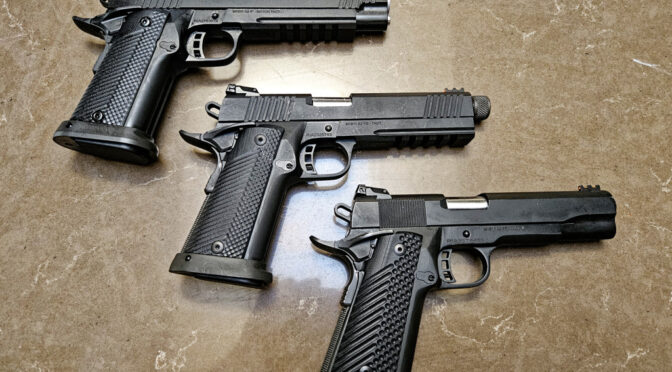
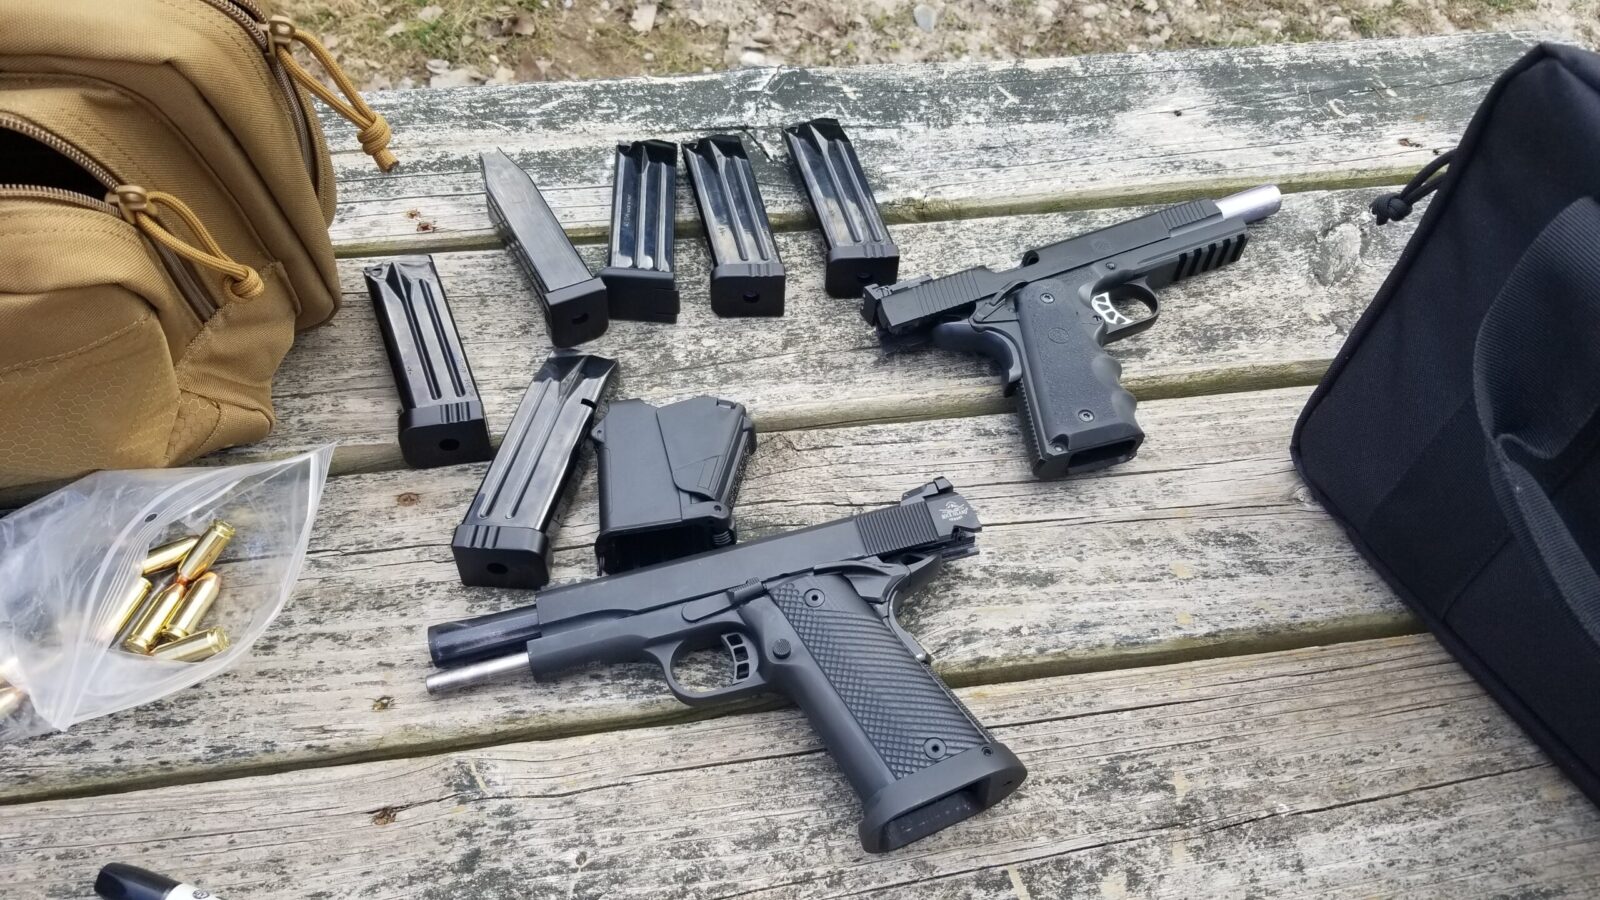
This is from a range visit last year. My RIA 52009 is at the bottom. The pistol on the top right is a 10mm TRP Operator. I still have the 52009 and like it but sold the TRP.
Do You Need 10mm or .40 S&W Magazines
We make custom high reliability magazines for the 10mm and .40 S&W RIA A2 HC pistols if you are interested. Click here for our store page.
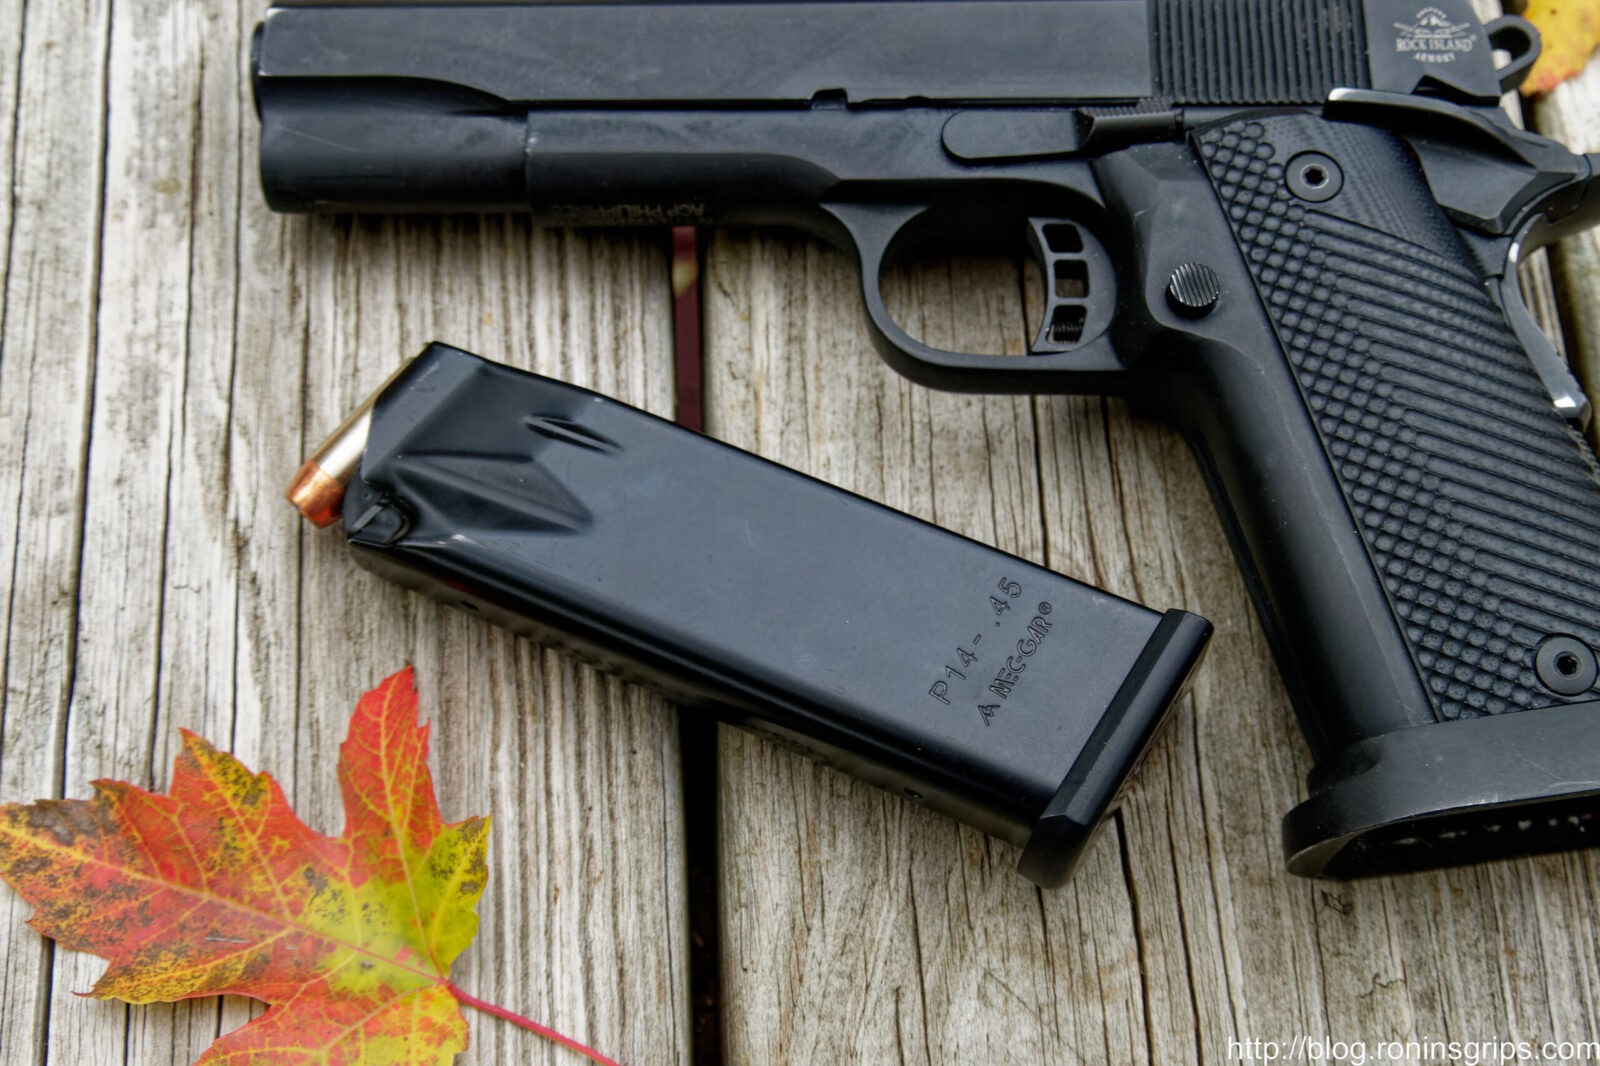
This is one of our 3rd generation magazines. We start with a Mec-Gar P14 .45 magazine tube and modify it to hold both the 10mm and .40 S&W rounds. We have tons of satisfied clients using both calibers.
Conclusion
Just a short post today. That’s such a good price on the 52009 that I figured it warranted it and hope this helps you out.
Note, I have to buy all of my parts – nothing here was paid for by sponsors, etc. I do make a small amount if you click on an ad and buy something but that is it. You’re getting my real opinion on stuff.
If you find this post useful, please share the link on Facebook, with your friends, etc. Your support is much appreciated and if you have any feedback, please email me at in**@*********ps.com. Please note that for links to other websites, I may be paid via an affiliate program such as Avantlink, Impact, Amazon and eBay.
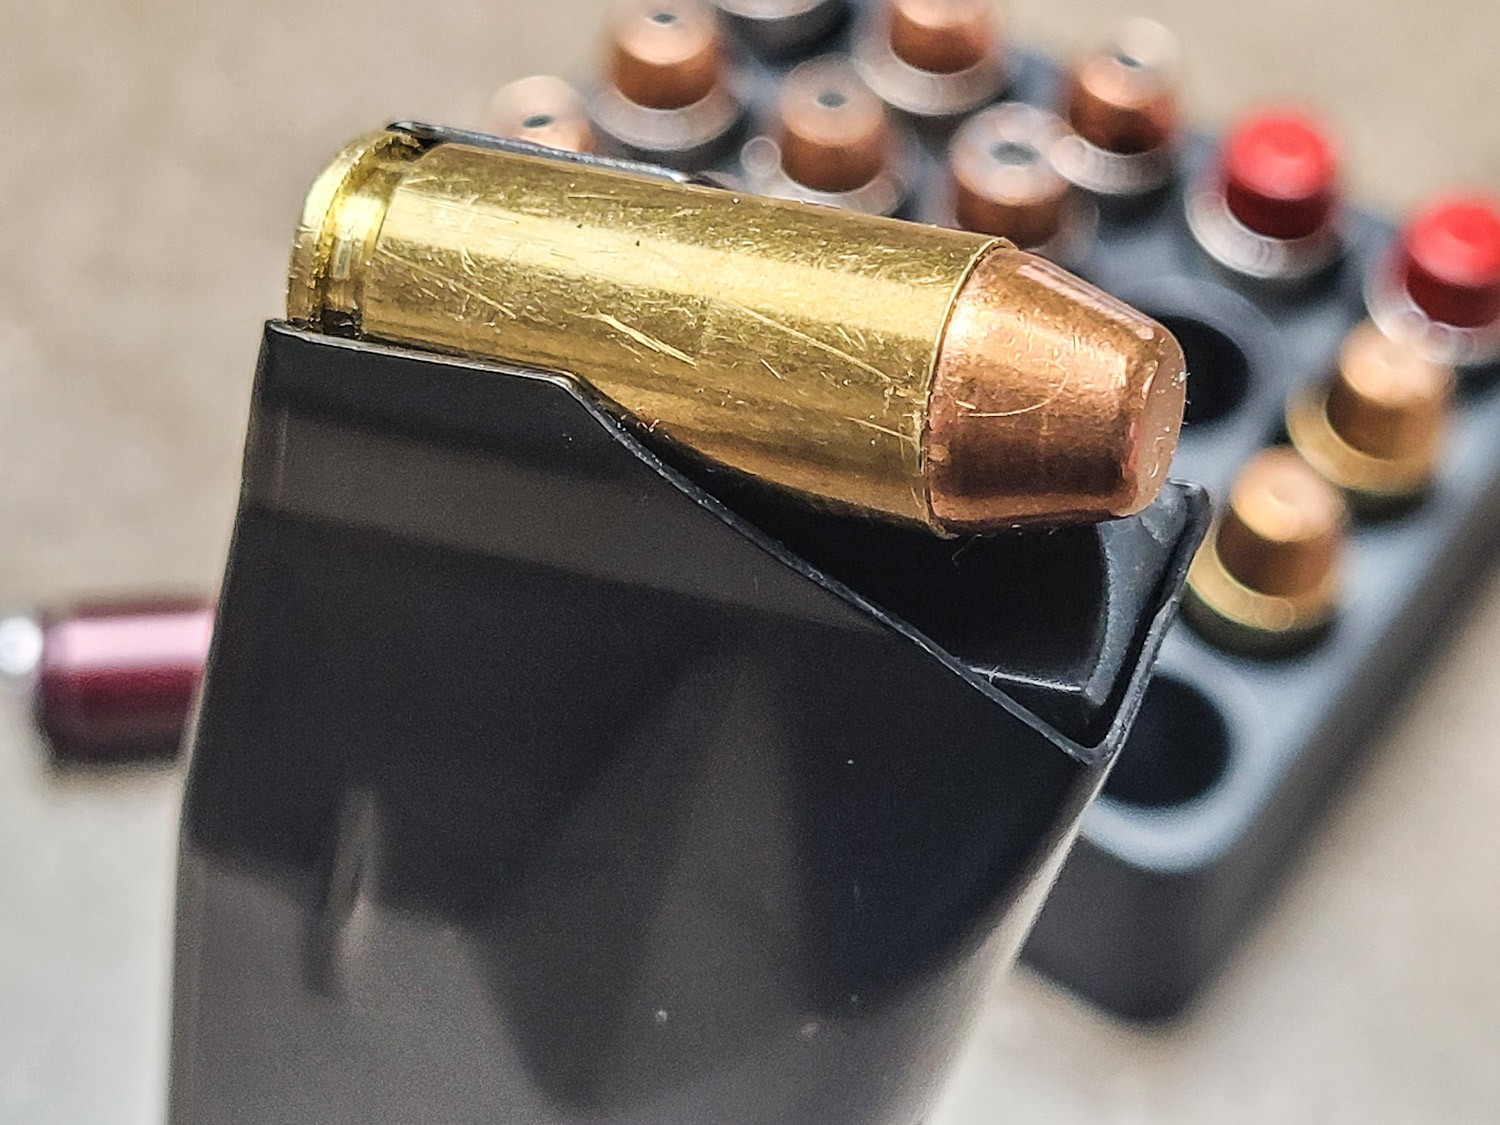
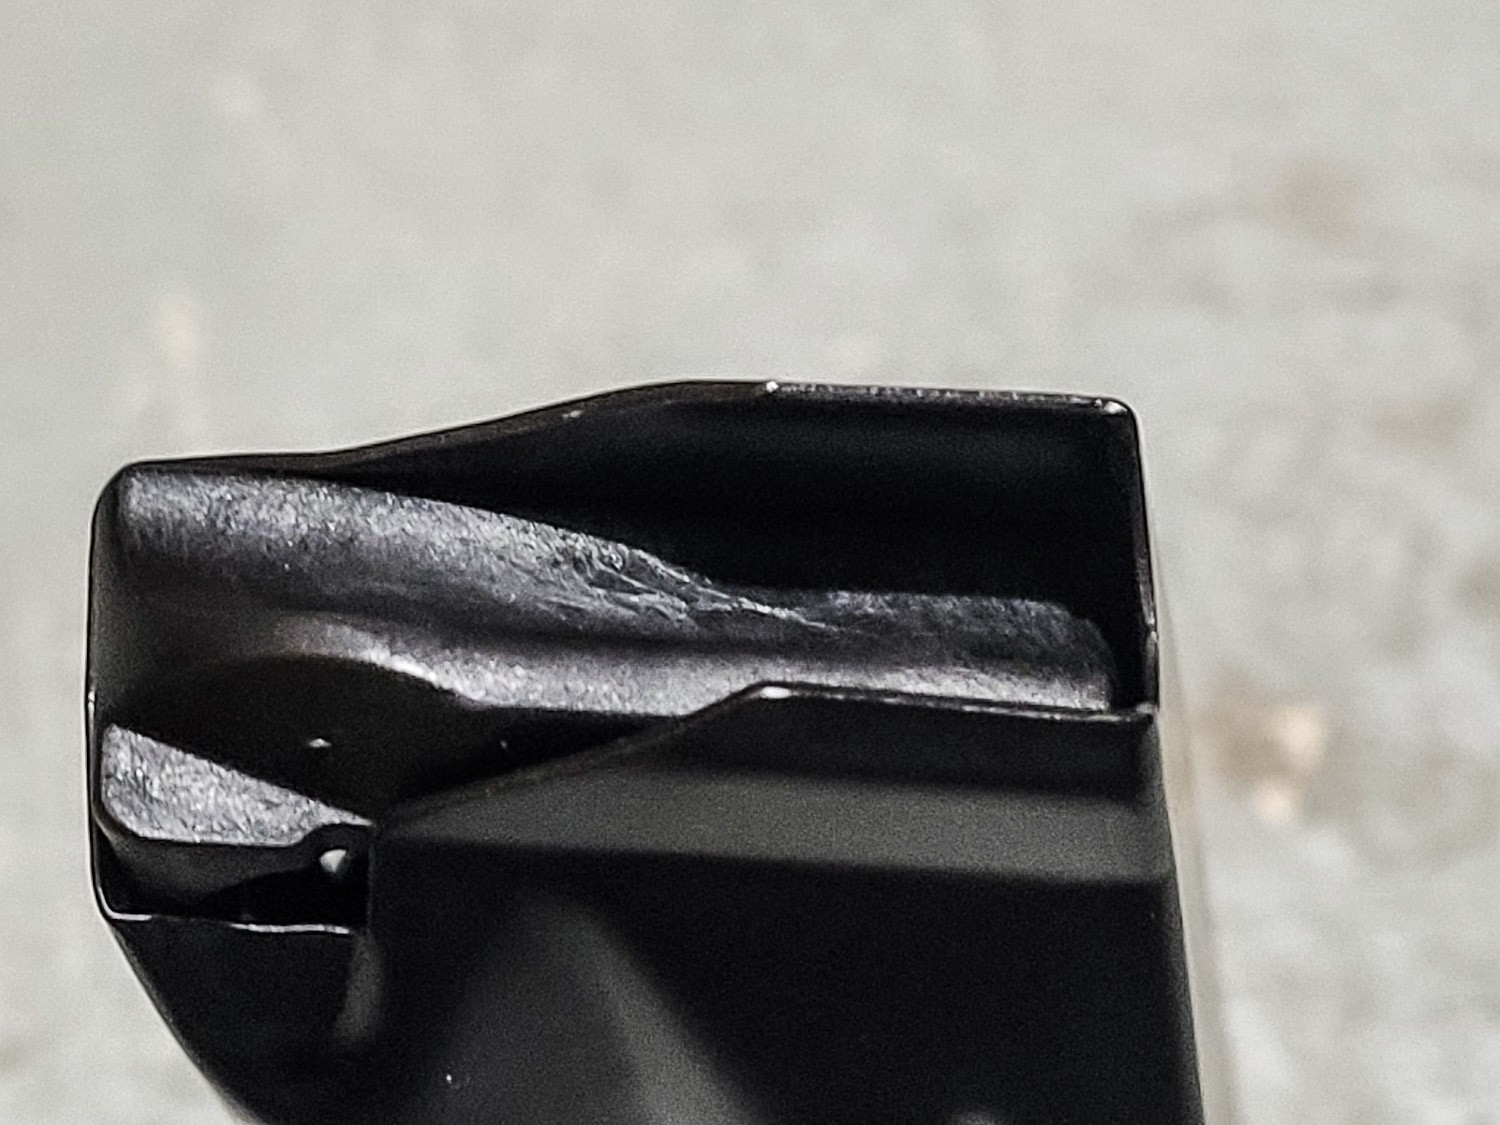
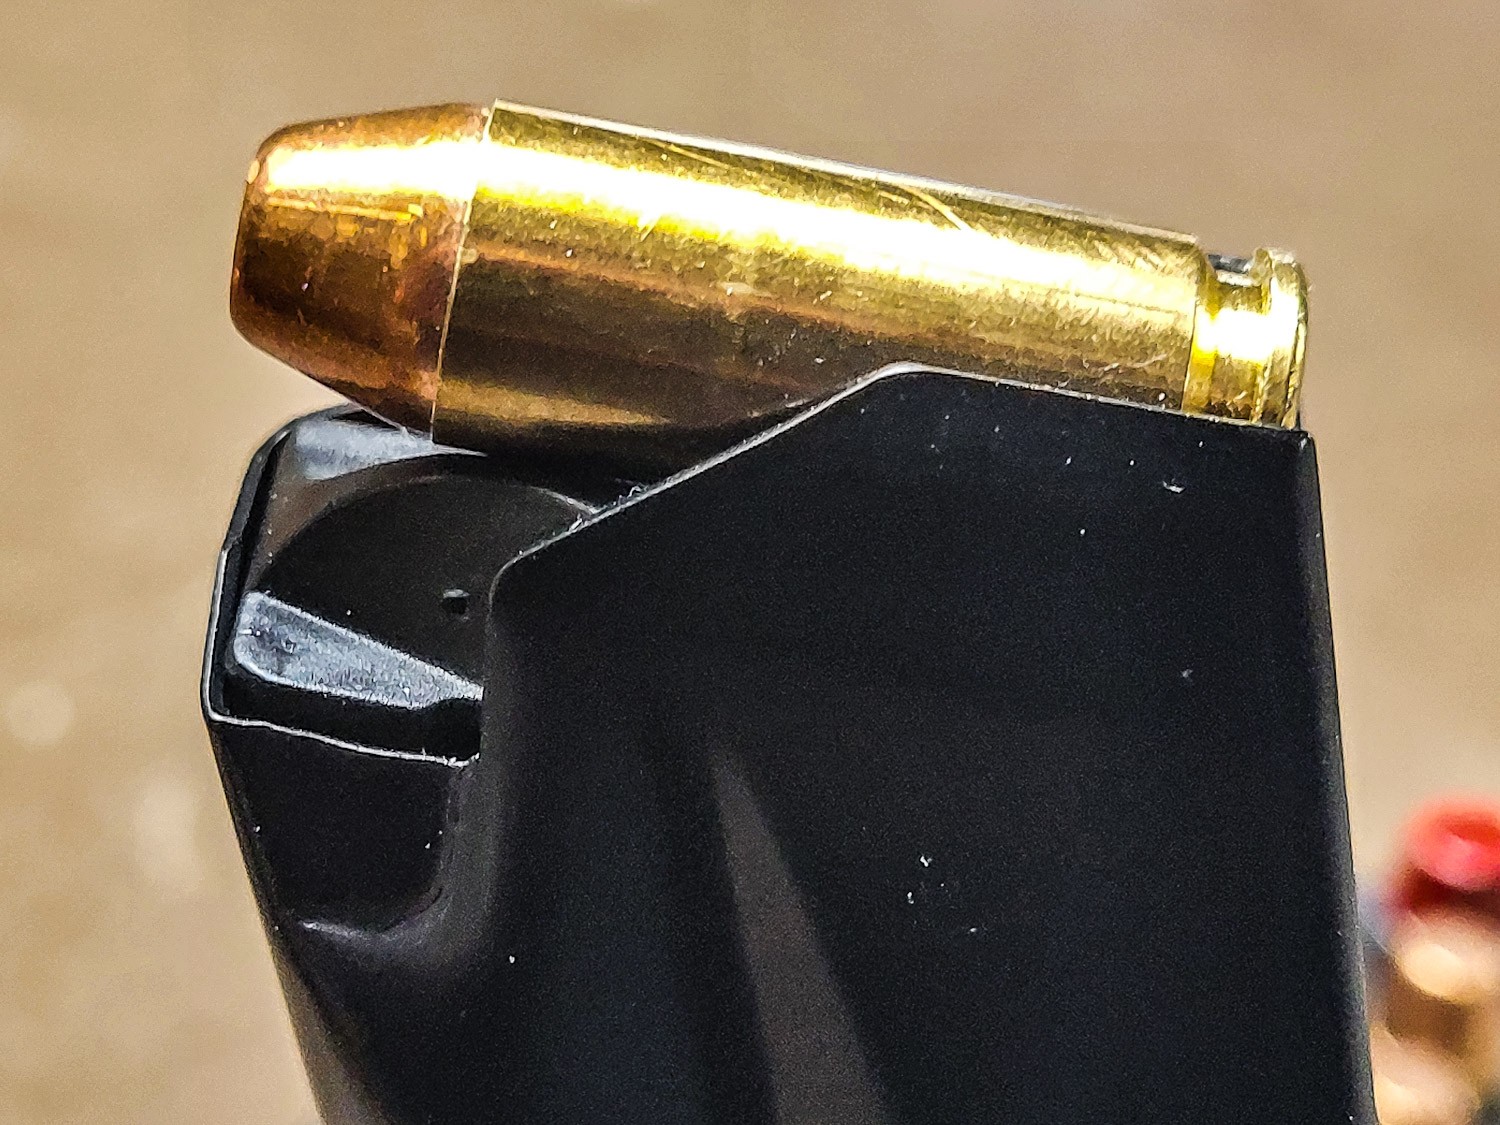
S&B 180gr FMJ round. The black “flaps” over the back of the cartride are known as the “feed lips”. They serve to limit how far the cartridge sticks up, the vertical angle as well as the left-to-right angle. On our magazines, it is the front of the lips, or right right edge of the lips in this photo, that are key for proper positioning of the round.
When I first started the magazines, I was setting the front edge of the feed lips between 0.36 and 0.375. In talking with customers who have bought the mags and were having feeding problems (notably stovepiping) , when the magazine lips were down at the lower end of 0.360″. I’d walk them through setting the gap for their pistol and at the end, I would have them measure the final front lip gap that worked. It was usually between 0.370 and 0.390″ and averaged 0.380″.
June 2024: The nominal front feed lip gap is 0.375 +/- 0.002. 0.380 seems to be the average maximum but the best average gap is that 0.373-0.377 range. Your pistol might vary so look at how the bullet points towards the chamber – either straight in or just slightly below. Some tinkering will help you figure out what is best for your pistol and the types of ammo you are shooting.
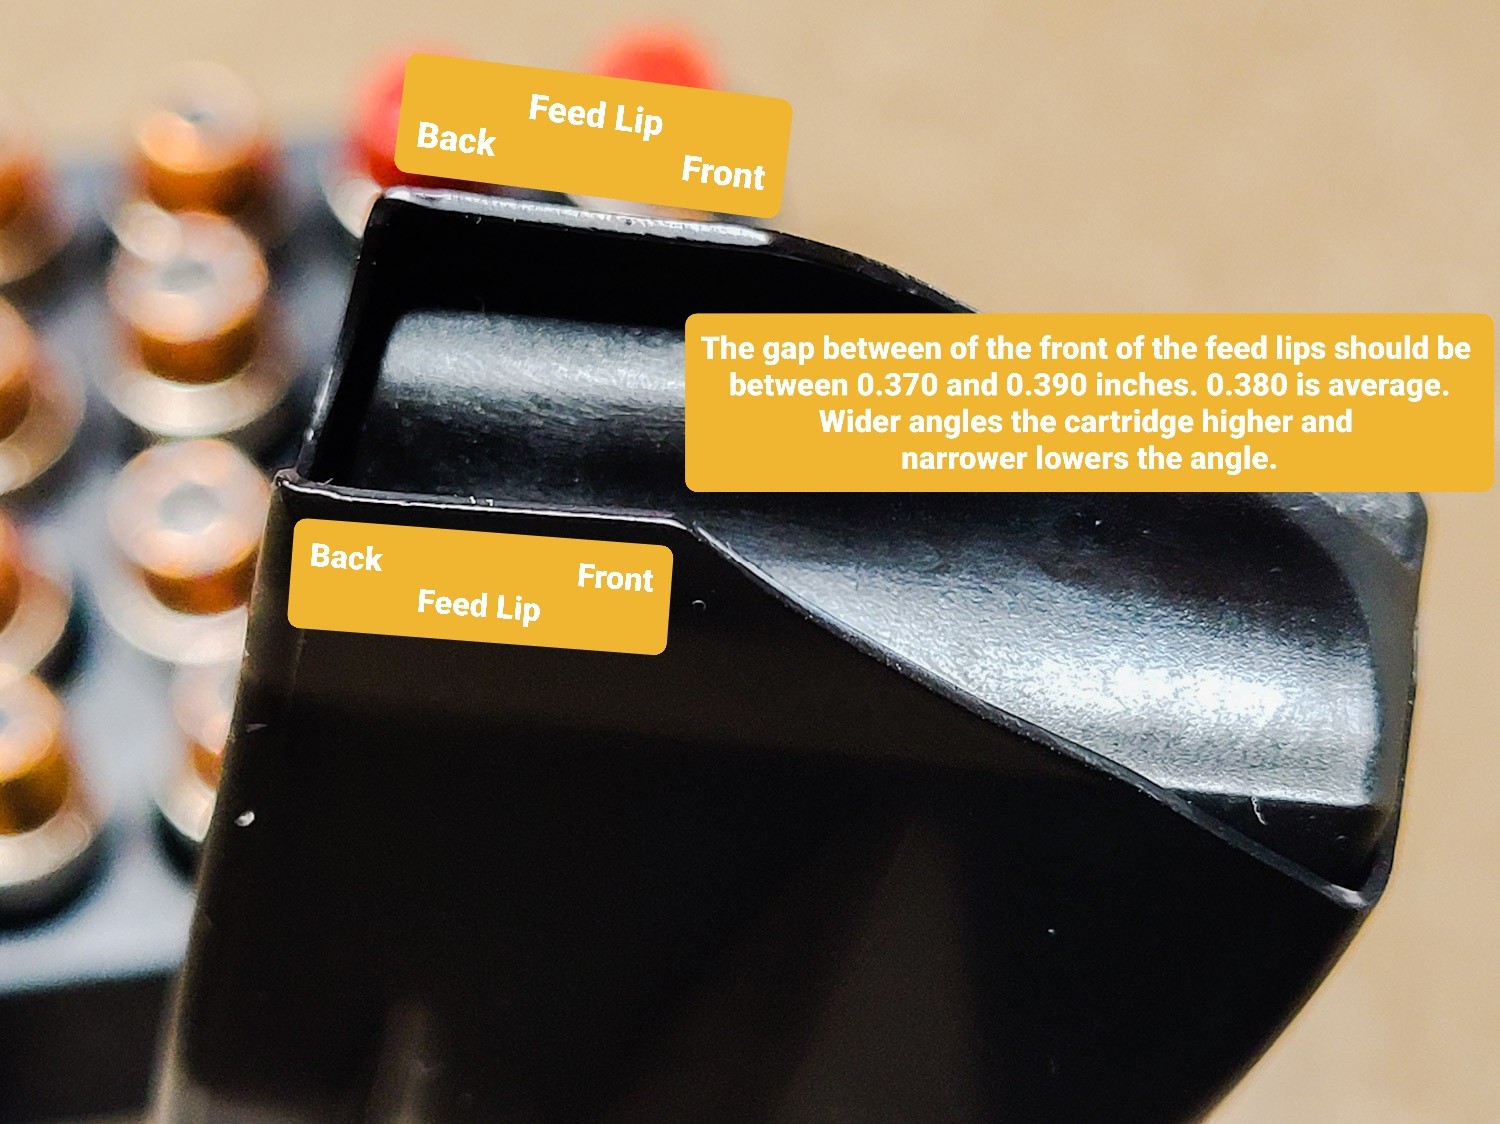
Here is a photo with labels.
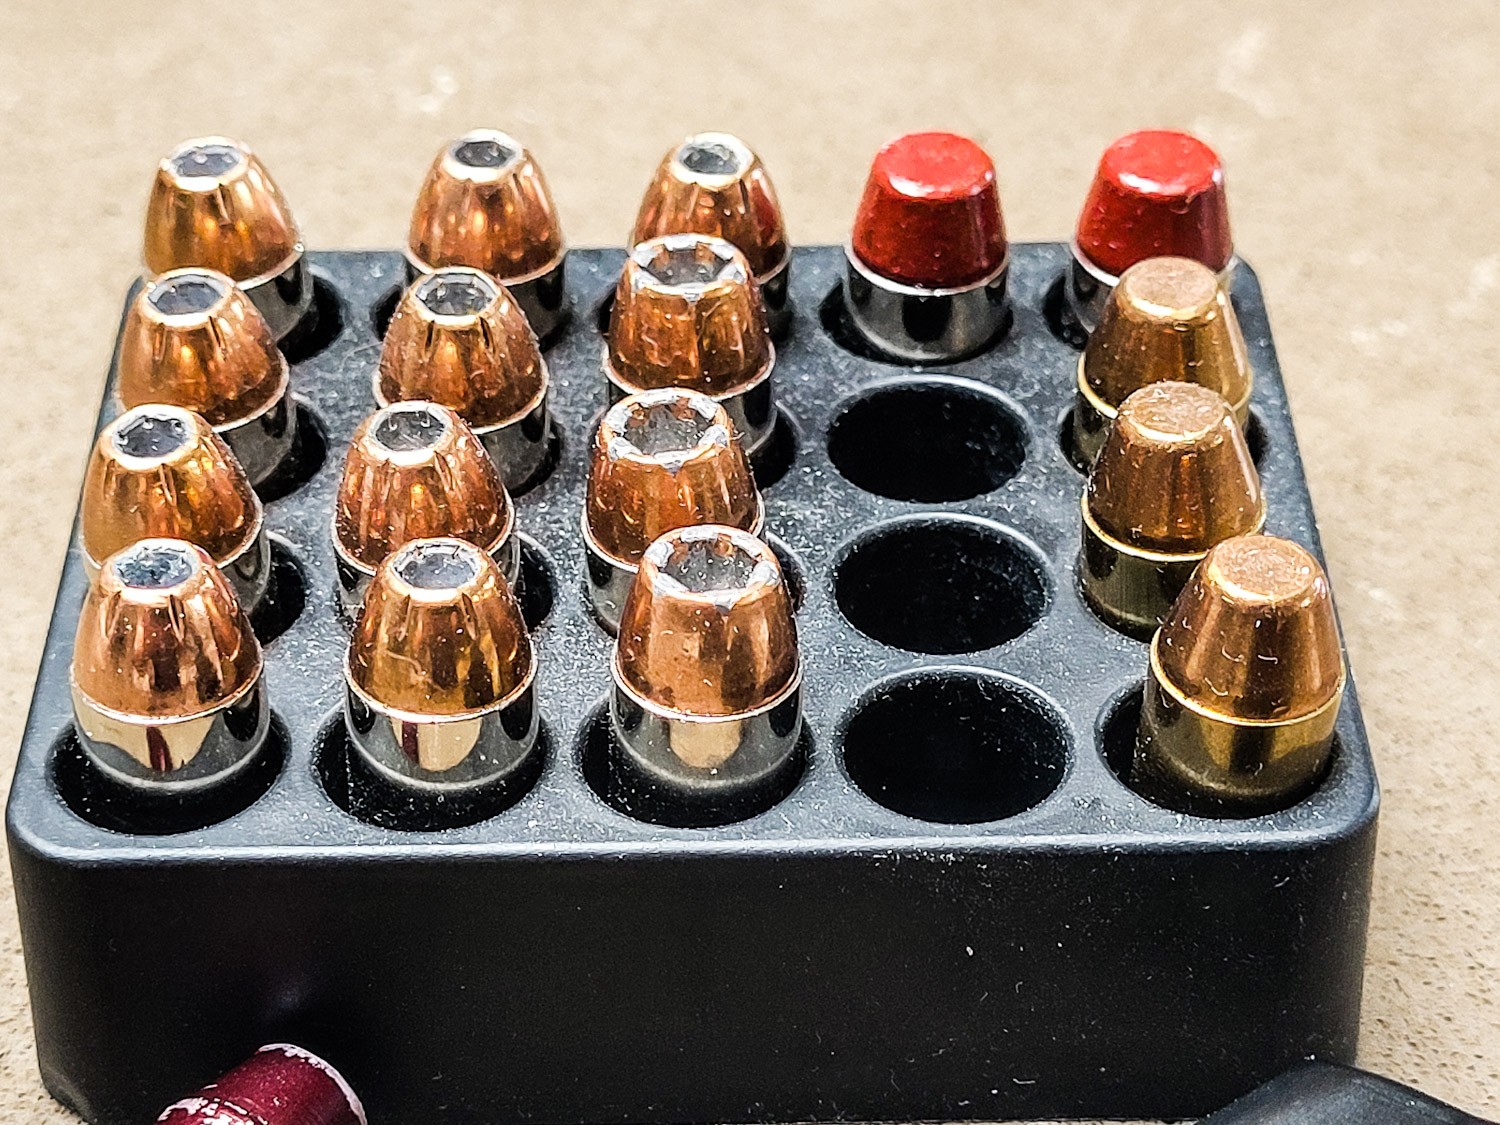
There are a lot of different 10mm cartrdiges on the market. Look at the different bullet shapes – the different angles can all affect reliable feeding which is one of many reasons why you may find one pistol likes one ammo and can cycle it all day long but not another.
Adjusting the Feed Lips Isn’t Hard
I’d recommend the following tools for the adjustments:
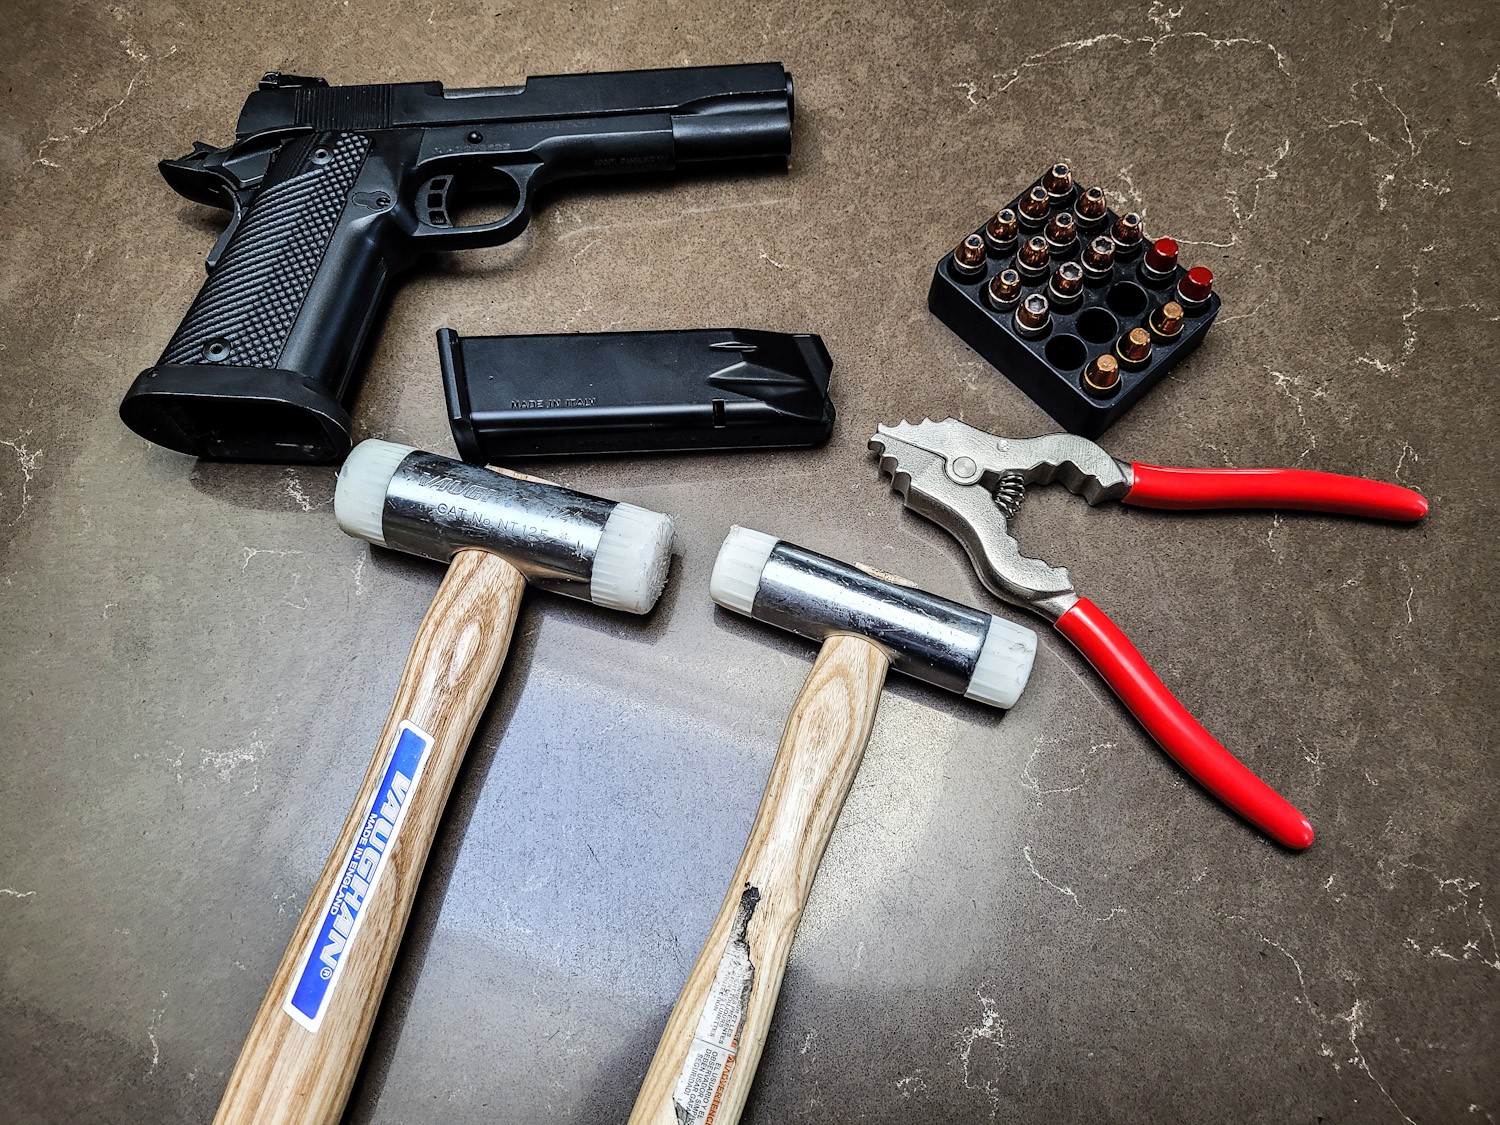
1/2-3/4 pound non-marring mallet – or even both. A lighter one for fine adjustments and a heavier one for coarse adjustments. It doesn’t take much to bend the lips. (May 2024 Update: I started using sheet metal hammers maybe a year and a half ago and find that they work great. The force of the strike bends the metal very nicely and doesn’t hurt the finish so while the photos all say use a non marring mallet – I would tell you to get some basic light sheet metal / body work hammers. Cheap ones break down quickly as the face of the hammer is weak so read reviews and get a good one. You just need a decent flat face and not a lot of weight – look at Martin, Fairmount, Performance Tool, etc.)
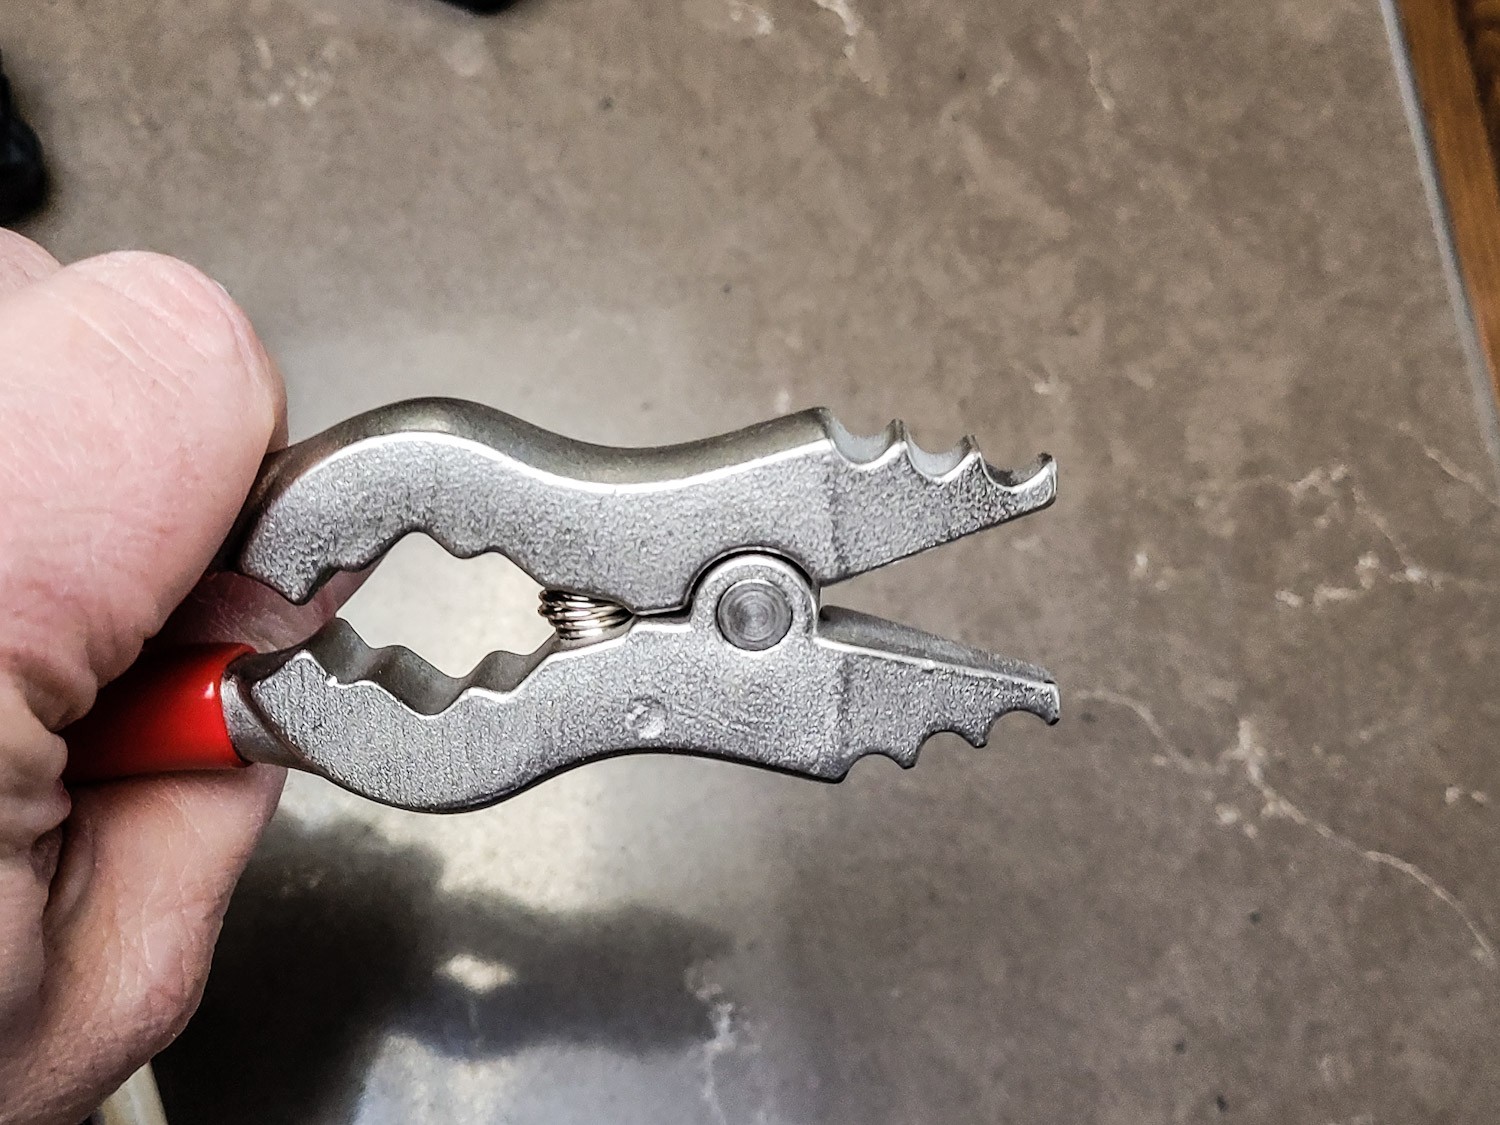
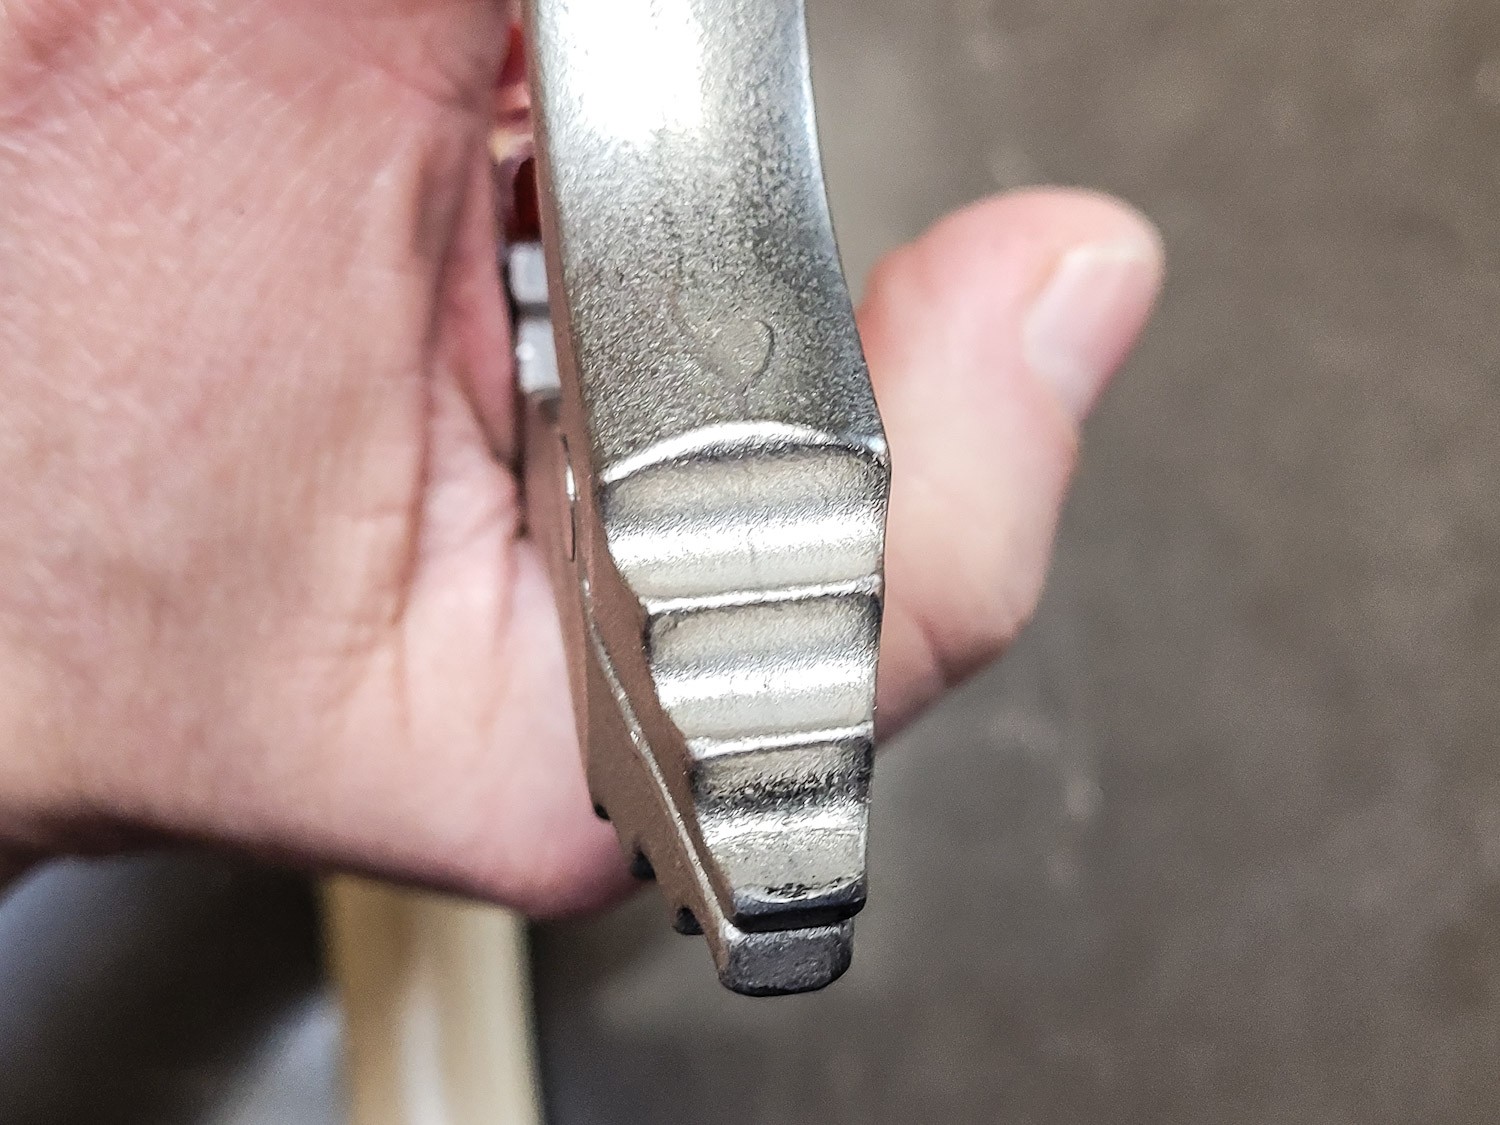
A pair of snap ring or malleable chandalier pliers that can spread the lips open. I highly recommend the Westinghouse 70099 pliers specifically because they have nice wide jaws that really help you make solid contact with the lips. Other brands have narrower jaws, probably to lower costs, that work but want to roll over on you while you are adjusting.
A pair of straight plastic jawed pliers come in hand if you need to tweak the lips left or right. I like the Beadsmith Parallel Pliers with nylon jaws for this work.
A vise with non-marring jaws or some means to hold the mag without crushing or excessive scratching
Use Zoom Snap Caps to test cycling vs live ammo. In general, snap caps or action proving rounds are a good idea to avoid misfires. There’s also a second reason – the recoil springs in the RIA pistols are robust and if the bullet from a live round or dummy round (a bullet loaded into a case that does not have powder or a primer) smacks hard into something, it will get pushed back further and further into the case plus they deform easily. All of my testing is done with solid aluminum snap caps now. I use A-Zoom 10mm Snap Caps for both my 10mm and .40 S&W mags. I’ve had positive feedback from owners of .40 S&W pistols so I know they work for both. Note I do NOT use A-Zoom snap caps for 9mm as the bullet shape does not remotely reflect common 115gr FMJ ammo at all.
From left to right bottom row: Vaughan 3/4 pound NT-125 mallet, Vaughan 1/2 pound NT-100 mallet and Westinghouse 7009900 lighting fixture chain pliers. The Vaughan mallets hold up great – the plastic is both pretty solid and robust so tapping in the feed lips goes very smoothly.
The Westinghouse pliers make opening the feed lips wider a very easy job. You could also use snap ring pliers but they will not distribute the pressure the same or be as easy to use.
The Westinghouse pliers have wide jaws – meaning left to right in the photo above. I’ve bought a number of chain pliers and the cheaper ones do not have as wide of jaws and have a tendency to want to roll when you are applying pressure. They work – but take a bit more control on your part.
Procedure to follow
Ensure your pistol is unloaded and no ammo is immediately nearby that might get accidentally loaded during testing.
Okay, let’s walk through the steps:
Checking Cartridge Alignment
Lock the slide open
Put a snap cap in the magazine
Insert the magazine into the pistol
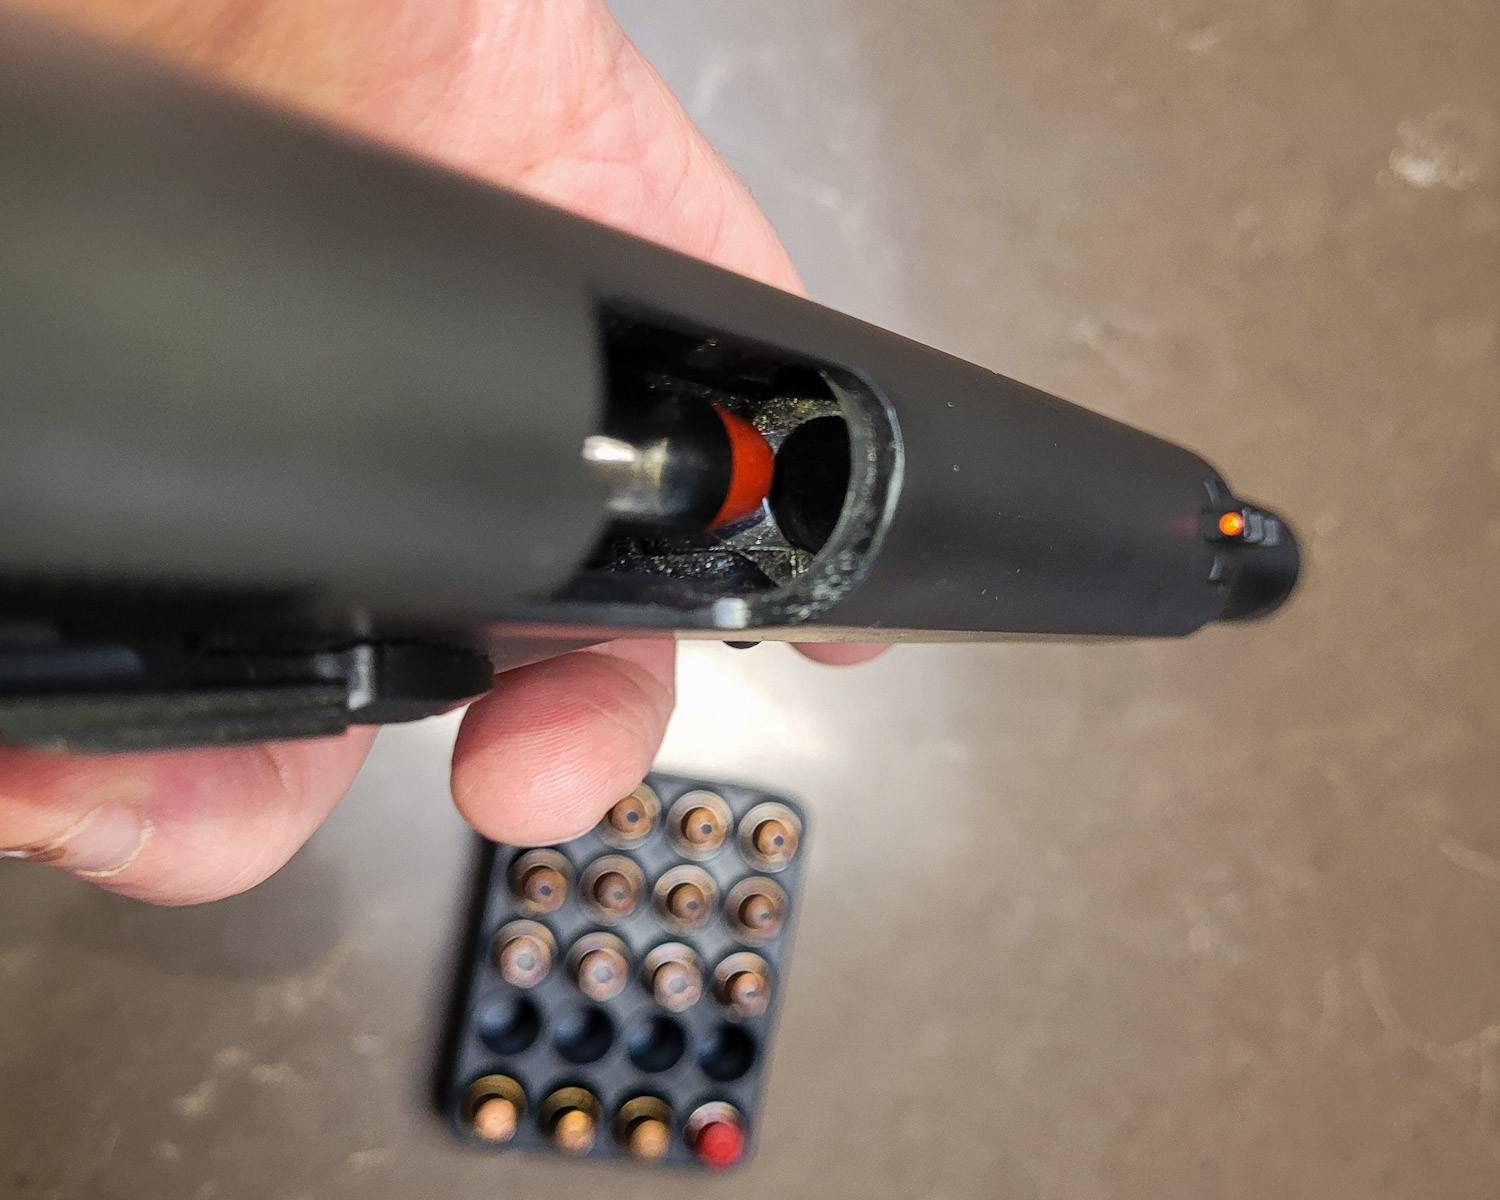
From different angles, look at where the catridge is pointing in the chamber. Imagine a line from the center of the bullet going straight forward – where is it hitting? You will want to make small adjustments and test over and over until you get that bullet pointing into the center of the chamber (no, it does not need to be perfect).
The front edge of the feed lips are adjusted such that the cartridge is aiming into the middle of the chamber vertically and horiztontally.
Adjusting The Vertical Angle
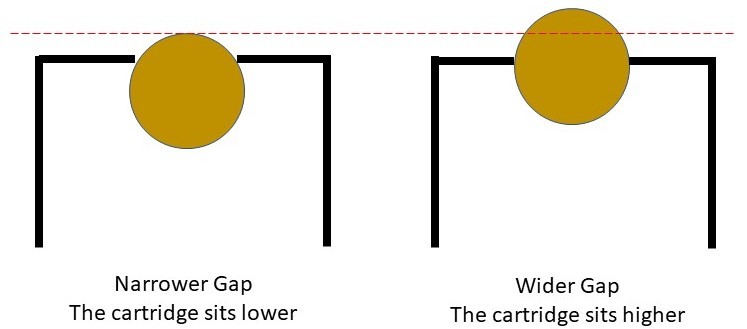
On most mags, including our’s, the angle the bullet sits at is adjusted by changing the gap of the front mag lips. The back can’t be adjusted because it will buckle or crack given the right angle bend to the back. What happens is that by opening the front of the mag lips, the front of cartridge sits higher (meaning it is a steeper angle). Correspondingly, by narrowing the front of the mag lips, the cartridge can’t rise up as far and the bullet sits lower.
The circle representing a cartridge is the same size in both figures. By making the gap wider on the right, the circle rises up higher before it contacts the black feed lips.
The angle is often the biggest problem. If the bullet isn’t angled enough, it gets stripped from the magazine by the slide and will either slam straight into the feed ramp and stop or it will hit, shoot up at a 45 degree angle jamming the pistol open – this is known as “stovepiping”. In both of these cases, you would want to open the lips up until there is proper feeding.
There is such a thing as the lips being too wide and hitting the top of the chamber or literally falling out. The feed lips need to be narrower than the case diameter of 0.421″ for sure otherwise the case will literally fall right through the lips.
I set the lips at 0.375 +/- 0.002 and you will need to see what works best for your pistol and the type(s) of ammo you are shooting. You may find you need a couple of mags at one gap for the type of HP ammo you are shooting and a couple of mags for FMJ. Personally, my pistols run all of my S&B, Buffalo Bore and Underwood ammo with that 0.373-0.377 range.
To open the front of the lips, use the chain pliers shown above on the front of the feed lips. It doesn’t take much pressure to open (or close) the feed lips so you will need to get the “feel” for how much to squeeze.
To close the front of the lips, tap the left feed lip in and then the right feed lip in equal amounts using the mallet. If you aren’t careful then you are liable to have the bullet pointing too far left or right even though the gap is the same.
Note, it doesn’t take much force with the mallet to move the lips. If you go crazy and crush the lips such that the gap dips below 0.33″, you may find that the throat of the magazine bent and the follower will not longer be able to pass. You don’t want this to happen so make small adjustments, measure and test over and over.
Adjusting the Horizontal Angle
You have a few ways to adjust the left to right horizontal angle. The first is to tap the lips in the direction you need. You can hit in the outside edge of the lip to close it or the right side to open it. I don’t use this because I find it takes too long.
I like to use parallel plastic jawed pliers that fit right inside the lip and let me easily adjust the angle with a good deal of control.
Here’s another look at the lips without a cartridge present.
Here’s a magazine with a 180 grain FMJ round by S&B loaded.
It really helps to number your magazines so you can keep track of feed lip gaps, which ones are having problems, etc.
Summary
Each pistol can vary slightly so each magazine may need different feed lip gaps. Going forward, the feed lip gap on our 10mm and .40 S&W magazines will vary between 0.370 and 0.380″. This gives you a starting point but you may find a bit of final tweaking of the feed lips beneficial.
If you are reading this and are not using our magazines, your feed lip gap may differ.
Note, I have to buy all of my parts – nothing here was paid for by sponsors, etc. I do make a small amount if you click on an ad and buy something but that is it. You’re getting my real opinion on stuff.
If you find this post useful, please share the link on Facebook, with your friends, etc. Your support is much appreciated and if you have any feedback, please email me at in**@*********ps.com. Please note that for links to other websites, I may be paid via an affiliate program such as Avantlink, Impact, Amazon and eBay.
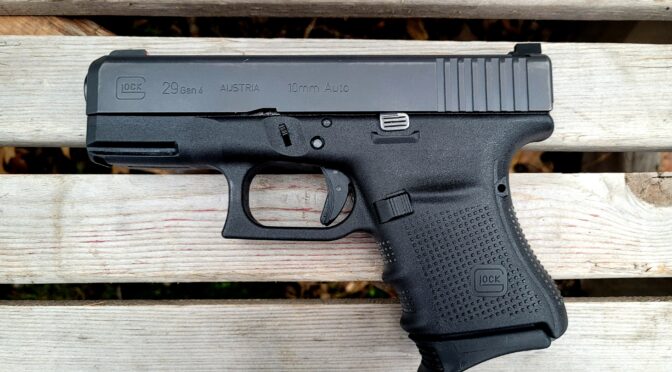
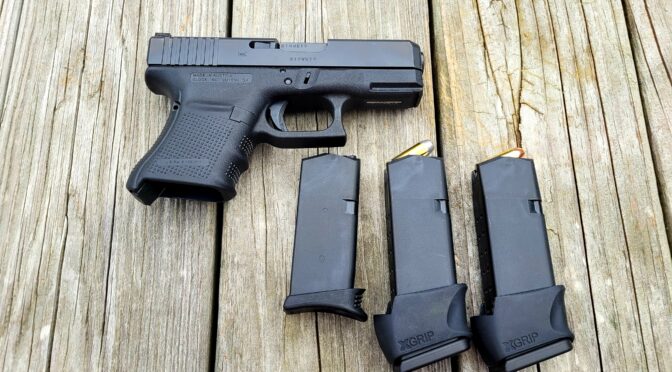
I recently wrote about my Glock 29 Gen 4 and carrying it while hiking. A fellow asked me for more details on what I was using to carry it ands I told him I was using a 5.11 Select Carry Pouch – which is a fancier product name than “tactical fanny pack”. Joking aside, it really does a great job.
Ok, why the fanny pack? I’m on the heavy side and when I go hiking I am usually wearing shorts or sweatpants depending on the weather. Jeans are a “maybe” but I’m at the point in life where I go for comfort. I’m sure not dressing to impress anyone.
If I am wearing jeans and can use a pistol belt then I might use a holster but it depends on the weather. I’d rather conceal the firearm vs. dealing with people staring at my pistol as we are walking along. If I am wearing a coat or open long sleeve shirt then I might wear a belt holster. My preferred option is a Galco shoulder holster.
What I find is that I am often hiking or fishing and it’s too hot for a coat or loose shirt so I had to figure out what to do. I knew a fanny pack might look goofy but would work great if I could find the right one given how it could distribute the weight while concealling the pistol.
The Glock 29 gen 4 is relatively compact but it is not tiny by any means and once you load it down with 10 rounds of 10mm and have a couple of back up mags of 10mm, you’ve got a lot of weight to deal with.
A couple of years ago I ordered in some different models of the no-name import fanny packs that claim to support concealed carry and the quality was very disappointing – light fabrics, lousy sewing and poor zippers across the board. They weren’t an option for the Glock 29 gen 4 because they would never hold up to real world use.
There are a lot of carry options out there but I think I can make the blanket generalization that you get what you pay for – you need a well thought out design, rugged materials, a rock solid zipper and these aren’t cheap.
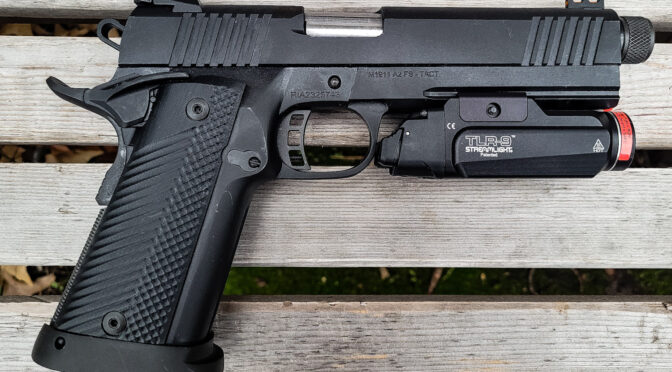
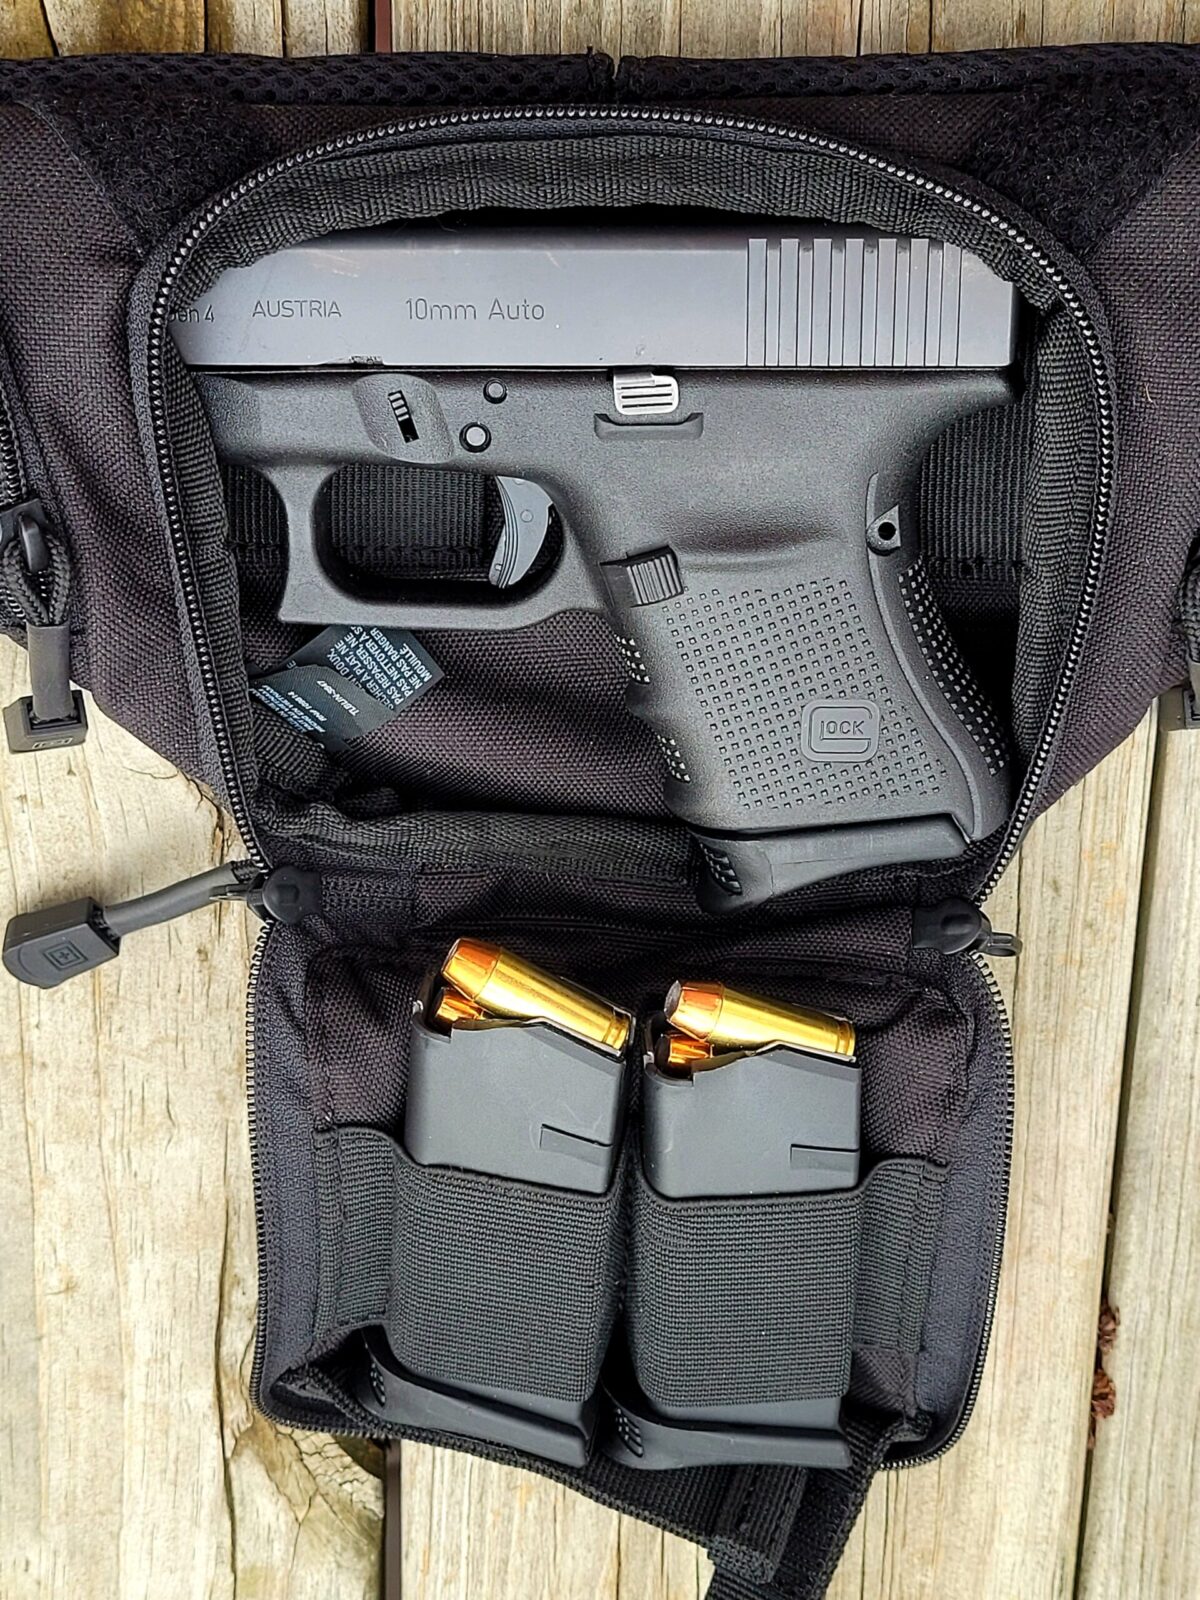
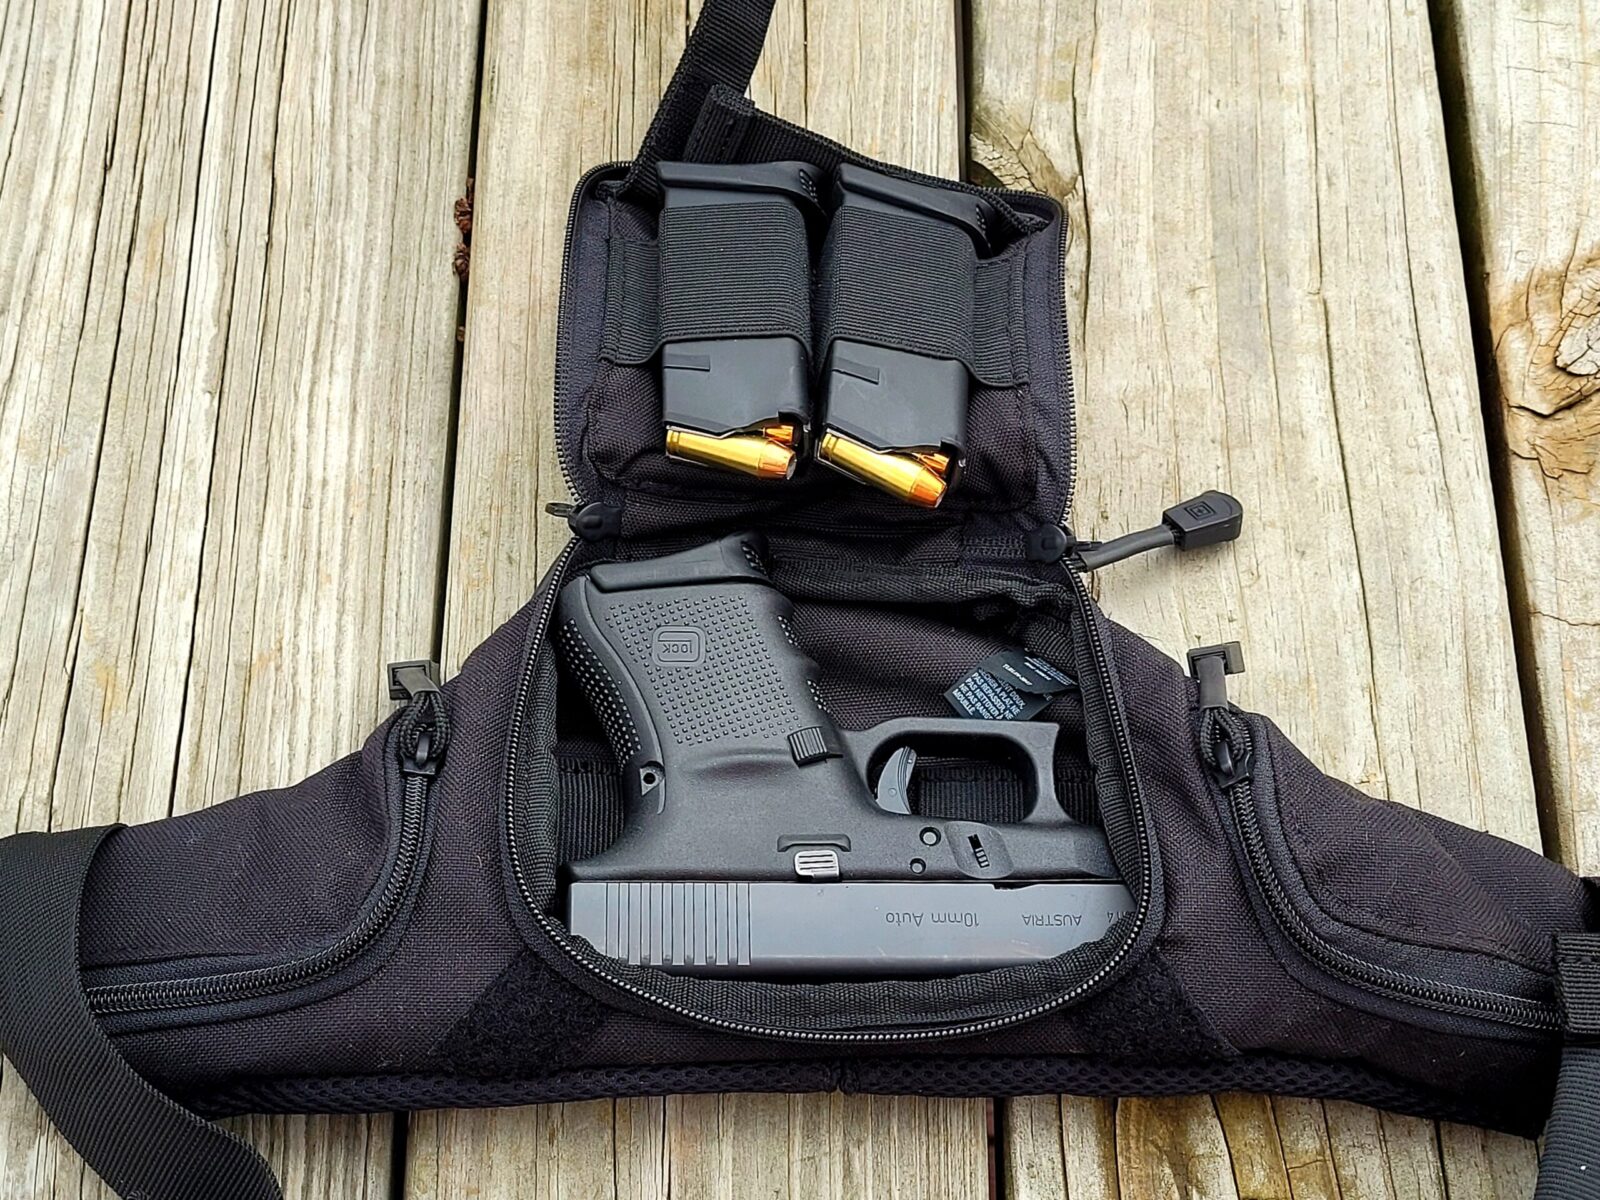
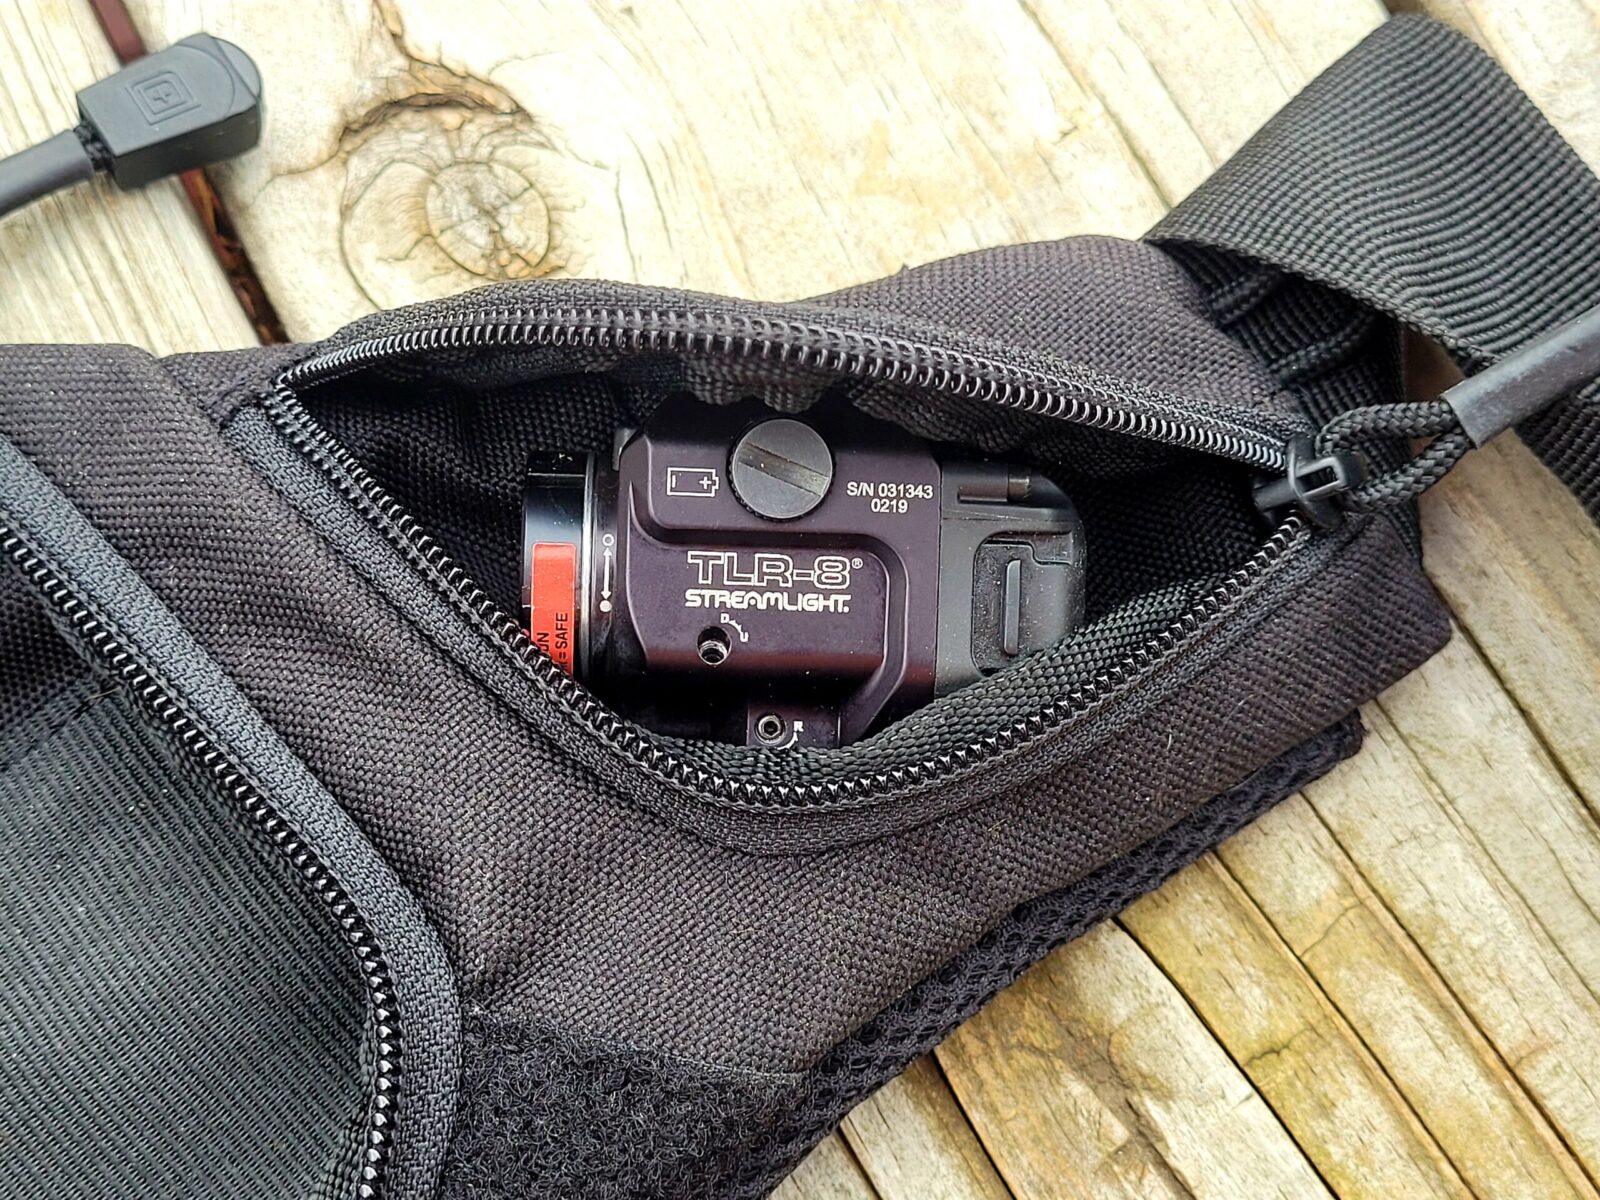
One company I like is 5.11. Their gear is reasonably priced and has never let me down. Yes, I am getting to my point – their 51804 Tactical Select Carry Pouch is very well made, looks good and doesn’t attract attention. It’s a tight fit but I can squeeze in my G29 with the Pearce magazine base plate so I have a place to rest my pinky finger, two more 10 round mags and a Streamlight TLR-8 that I keep in a side pouch.
The main pouch is a tight fit but I can squeeze in what I need. It’s symmetrical so you can insert the pistol facing either left or right. I have mine set up to rip open with the left and pull the pistol out with my right hand.
Here’s another angle. When you have the load shown, there is very little extra space.
I keep a TLR-8 stored in the right side pouch. It’s a snug fit also.
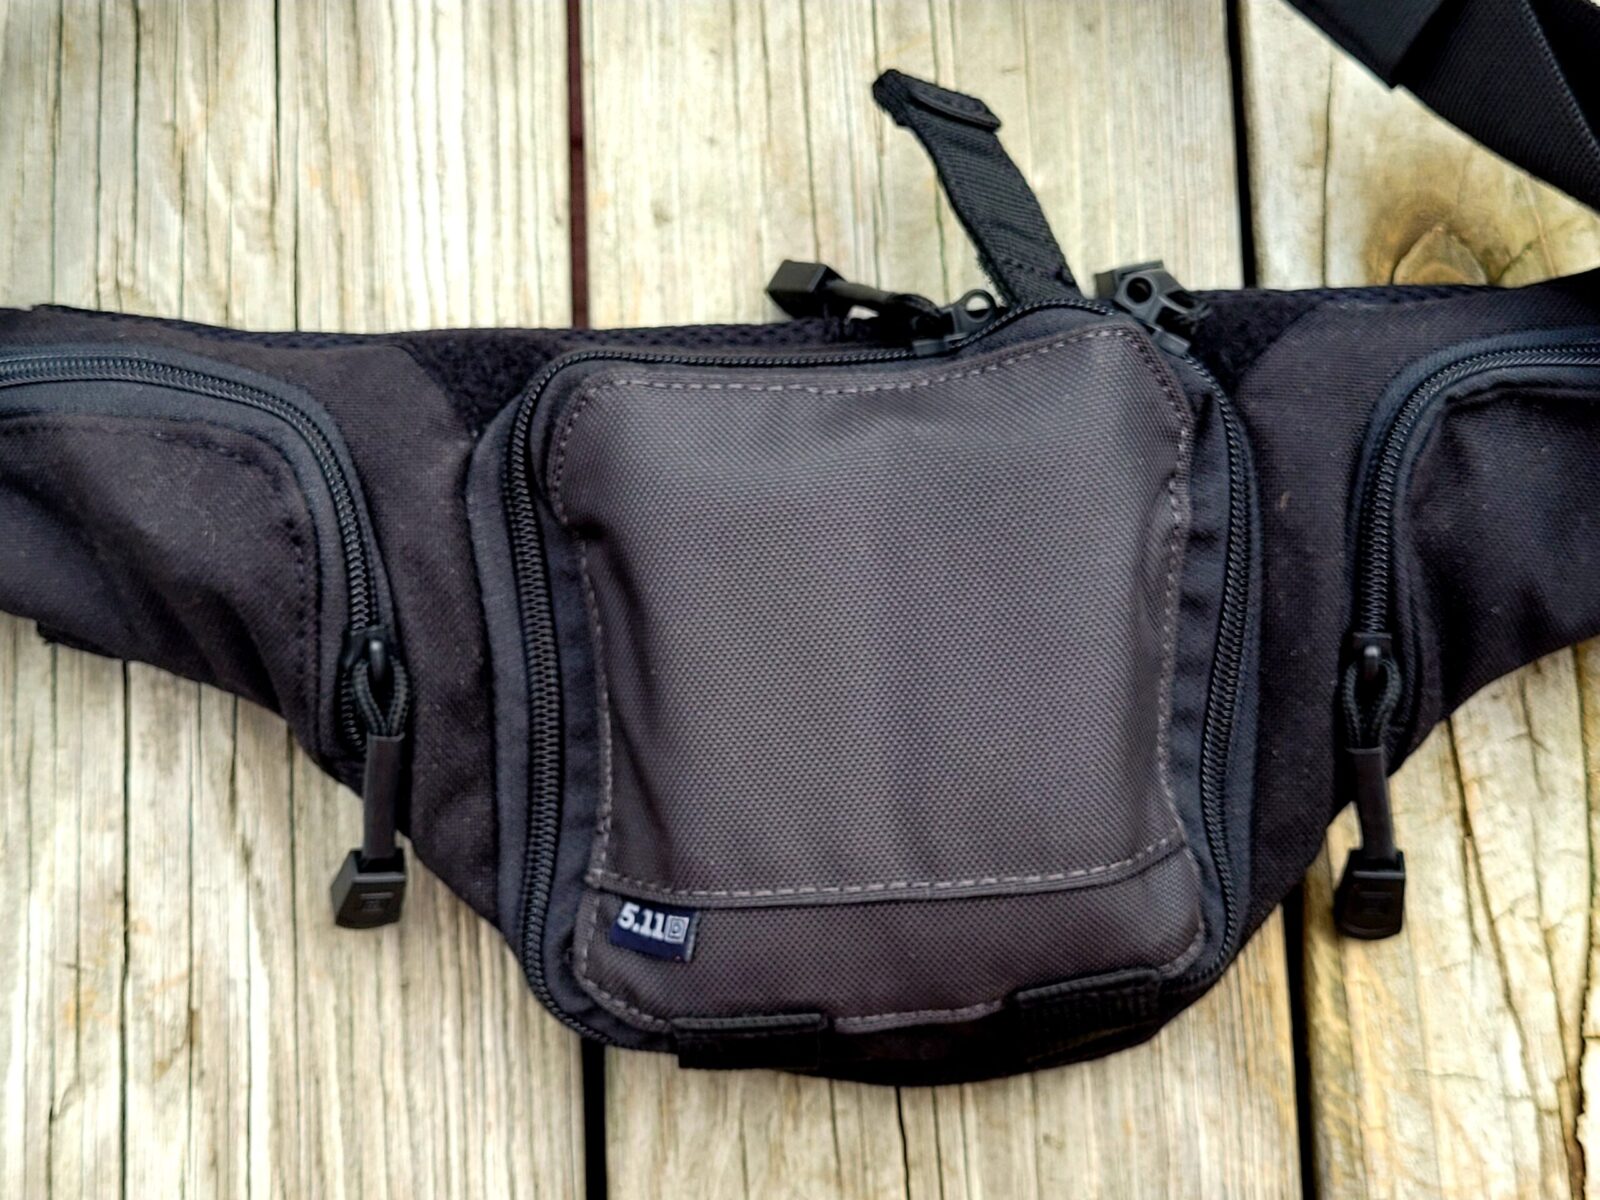
They call that thing sticking up a “hot pull strap” that you can use to yank the compartment open in a rush. Now that folks is one heck of a good idea. If you are in a hurry and the adrenaline is kicking in, fumbling with a zipper is going to suck. Grabbing that pull strap and yanking open the pouch is very do-able.
To give you an idea of real world sizing, a G29 Gen 4 is about 7″ long andjust over 4.5″ with a regular mag. Let’s just round that to 5″ in my case with the Pearce base plates. You can see in the photos that it is a snug fit. My Sig P365 fits no problem.
Note, I have to buy all of my parts – nothing here was paid for by sponsors, etc. I do make a small amount if you click on an ad and buy something but that is it. You’re getting my real opinion on stuff.
If you find this post useful, please share the link on Facebook, with your friends, etc. Your support is much appreciated and if you have any feedback, please email me at in**@*********ps.com. Please note that for links to other websites, I may be paid via an affiliate program such as Avantlink, Impact, Amazon and eBay.
I genuinely like the Rock Island Armory (RIA) double stack 10mm pistols. I jumped into the deep end of the pool and started converting some really cool Mec-Gar Para P16 mags for use in the 10mm and .40 S&W pistols for folks who need either 10 or 15 round limited pistols due to unfortunate magazine limit laws where they live. The feed lips must be shortened and reprofiled to work reliably in RIA double stack pistols.
I’ve written about the conversion and you can click here to learn more but I didn’t really show a lot of photos of the different Dawson Precision base plate options. In addition to changing the feed lips, you have to replace the plate because it literally will not fit in the funnel – it’s a show stopper plus it really does need to be longer to allow for positive seating of the mag in the pistol. You could grind the OEM plate down but then you would need to glue/add material so you can fully set it – note, if you do that, leave a hole so you can unlock the plate in the future.
This post also applies to folks who own the RIA A2 HC double stack 9mm pistols. The same base plates are used on the magazines for your pistols as well and the magazine capacity is limited to 15 rounds as a result.
At any rate, here are a number of photos showing the Dawson Precision base plates and get a better idea of their different thicknesses relative to each other as well as when fully seated in the pistol:
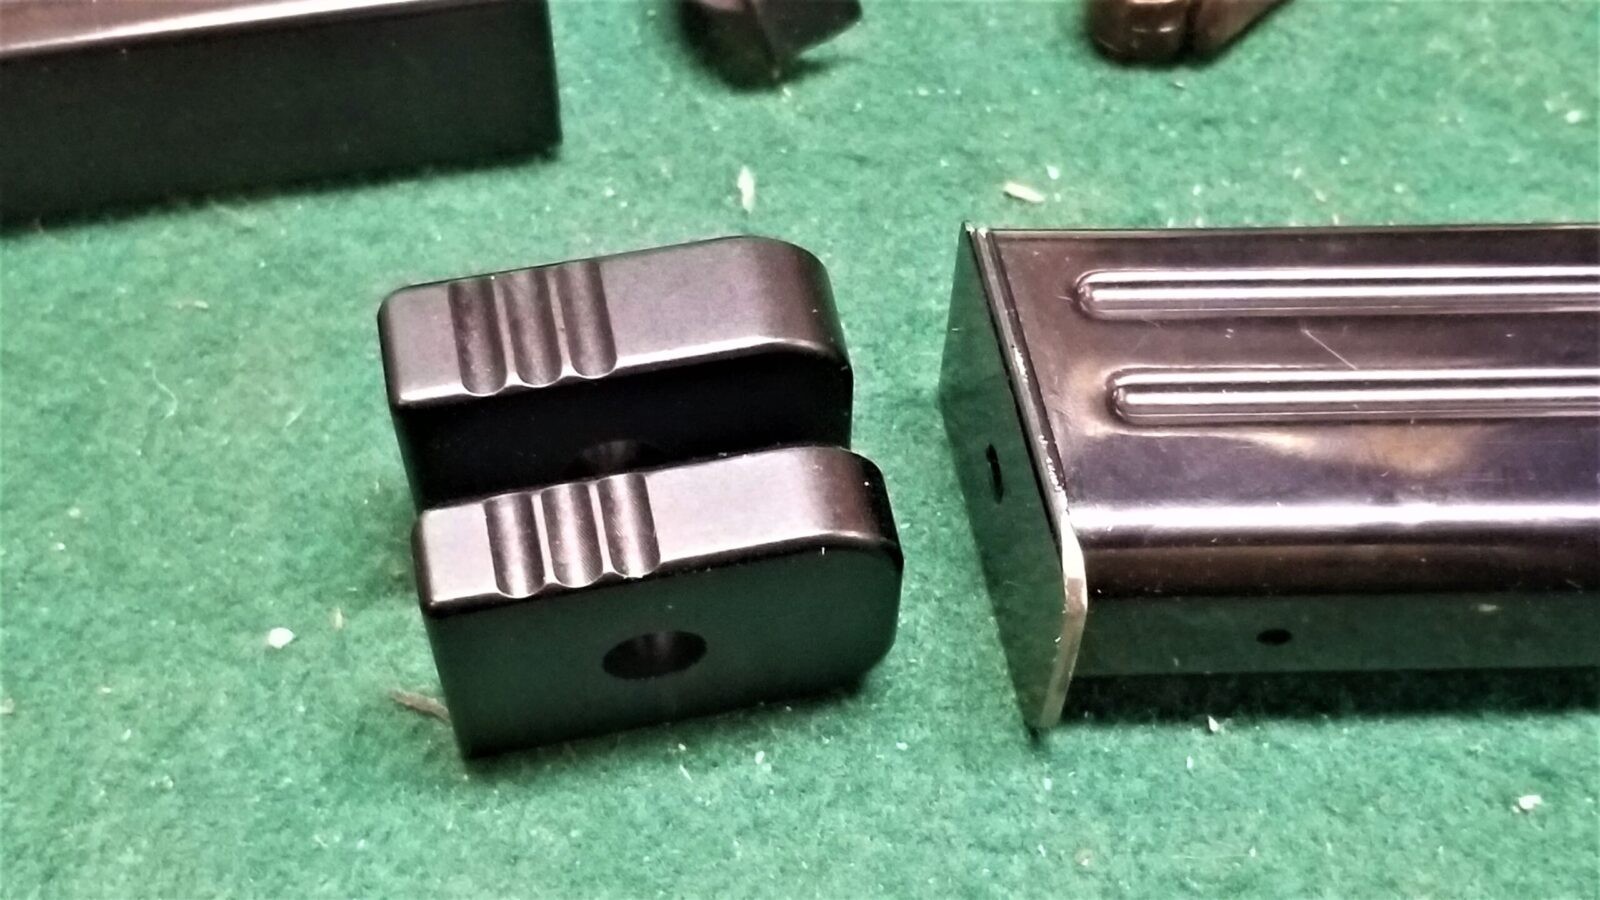
The Dawson plates are machined from aluminum and their sizes are how much thicker they are than the original Para P16 base plate shown on the right. The bottom left Dawson plate is their +200 model and the one above it is the +300.
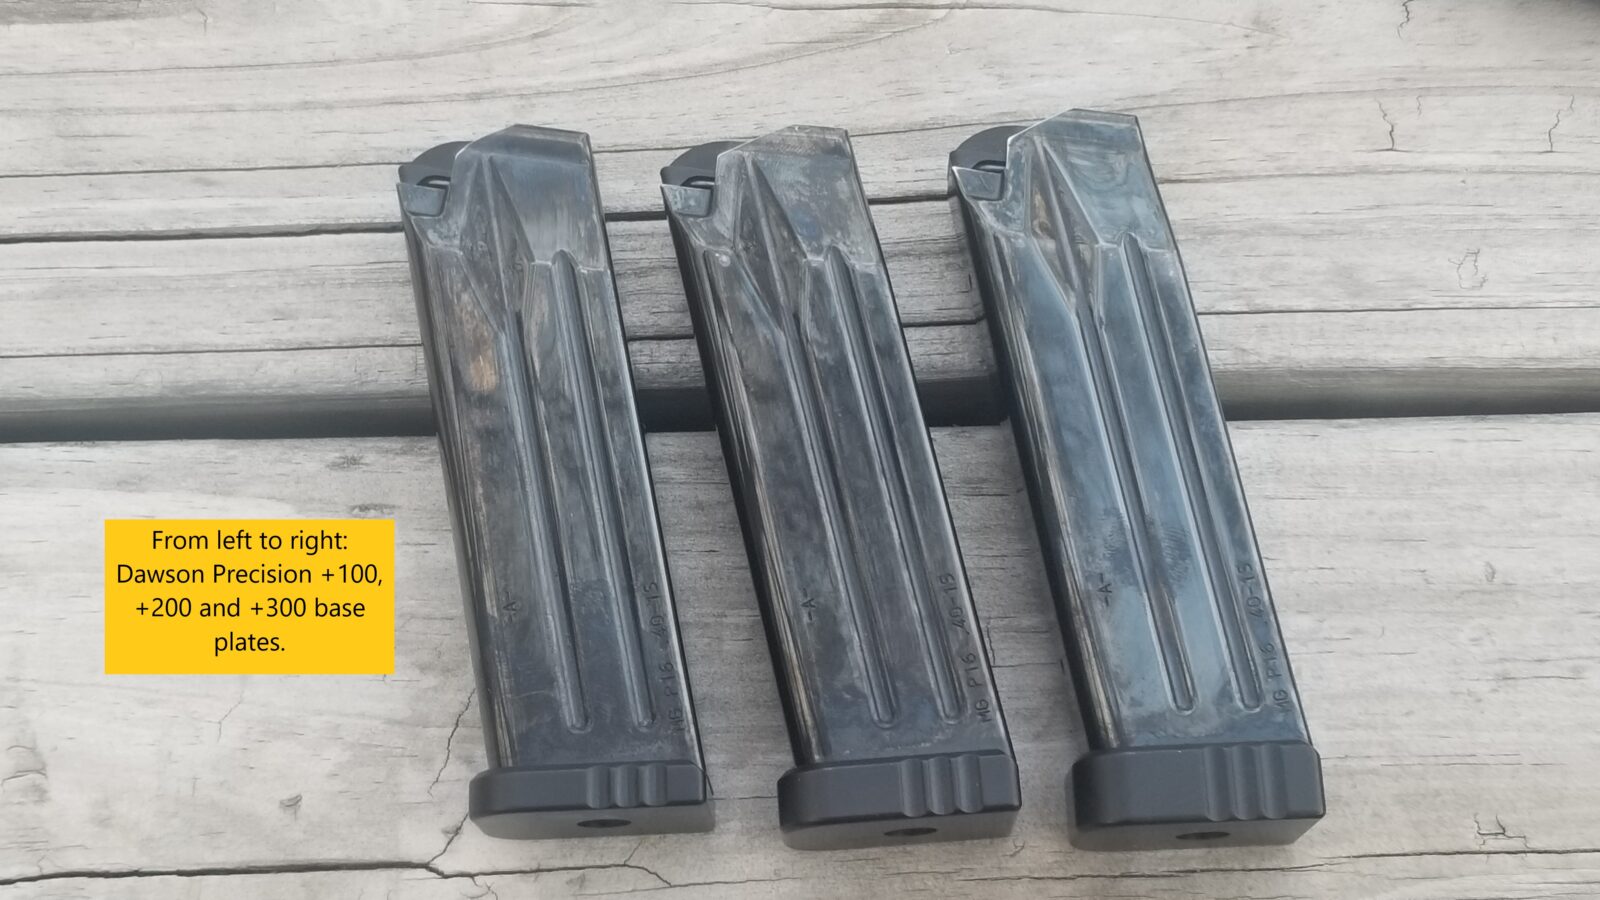
Here are the three Dawson plates next to each other on our converted P16 magazines. The +100 is on the left, +200 in the middle and +300 on the right. They increase the height and weight of the mag but do not increase the capacity.
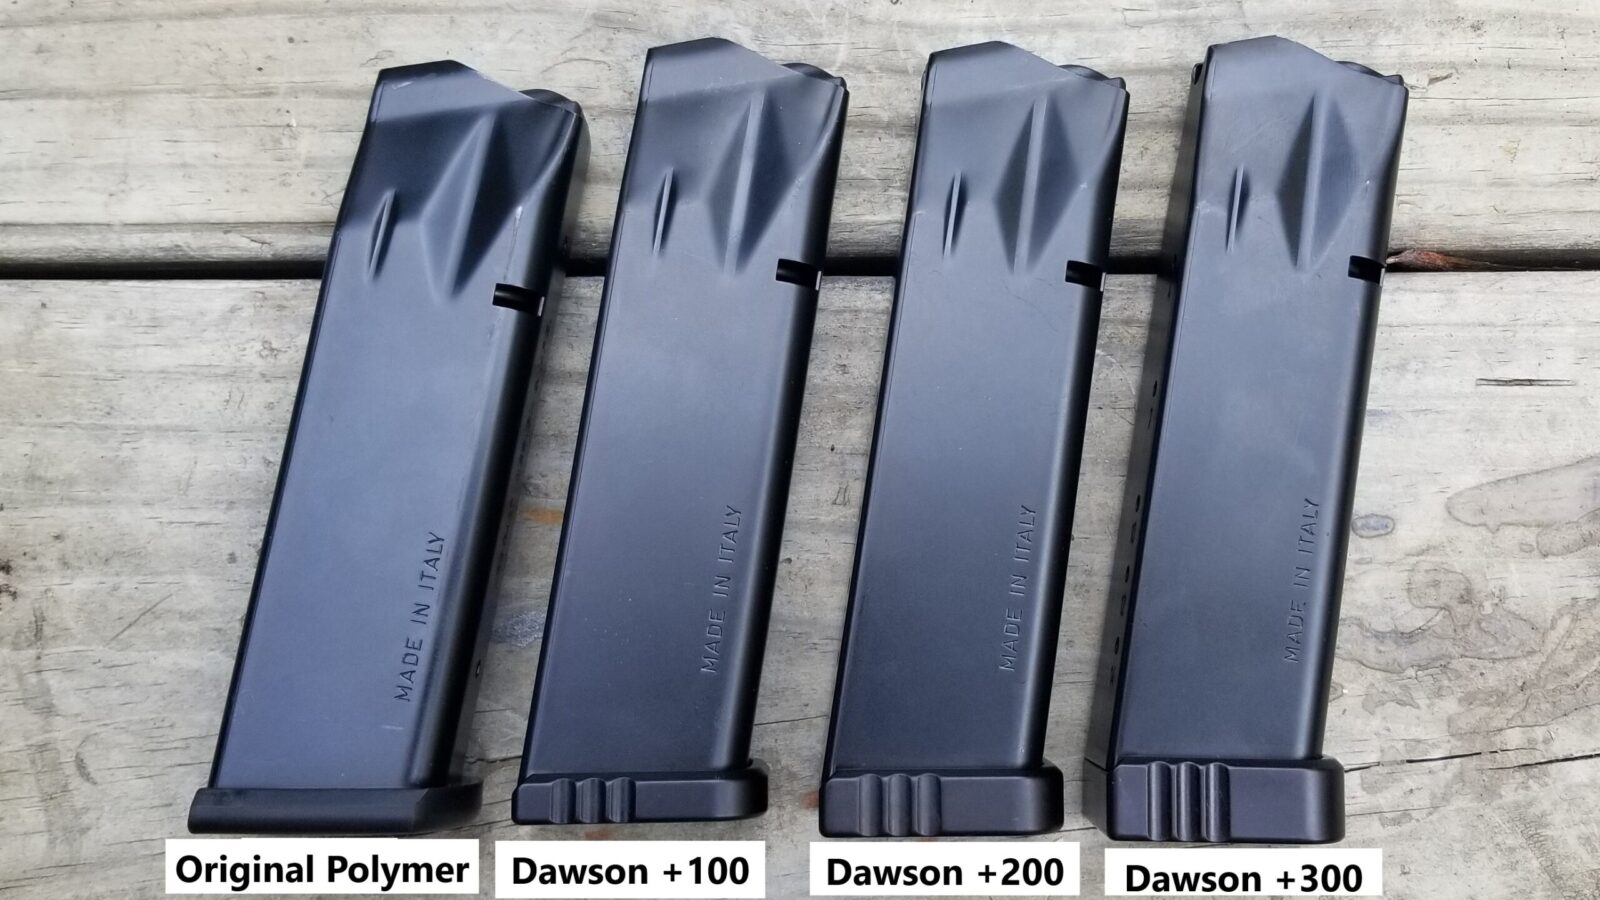
With our 3rd Gen mags, Mec-Gar started using the left polymer plate and it works great in the RIA pistols. Both it and the +100 Dawson plate sit flush in the RIA mag funnel.
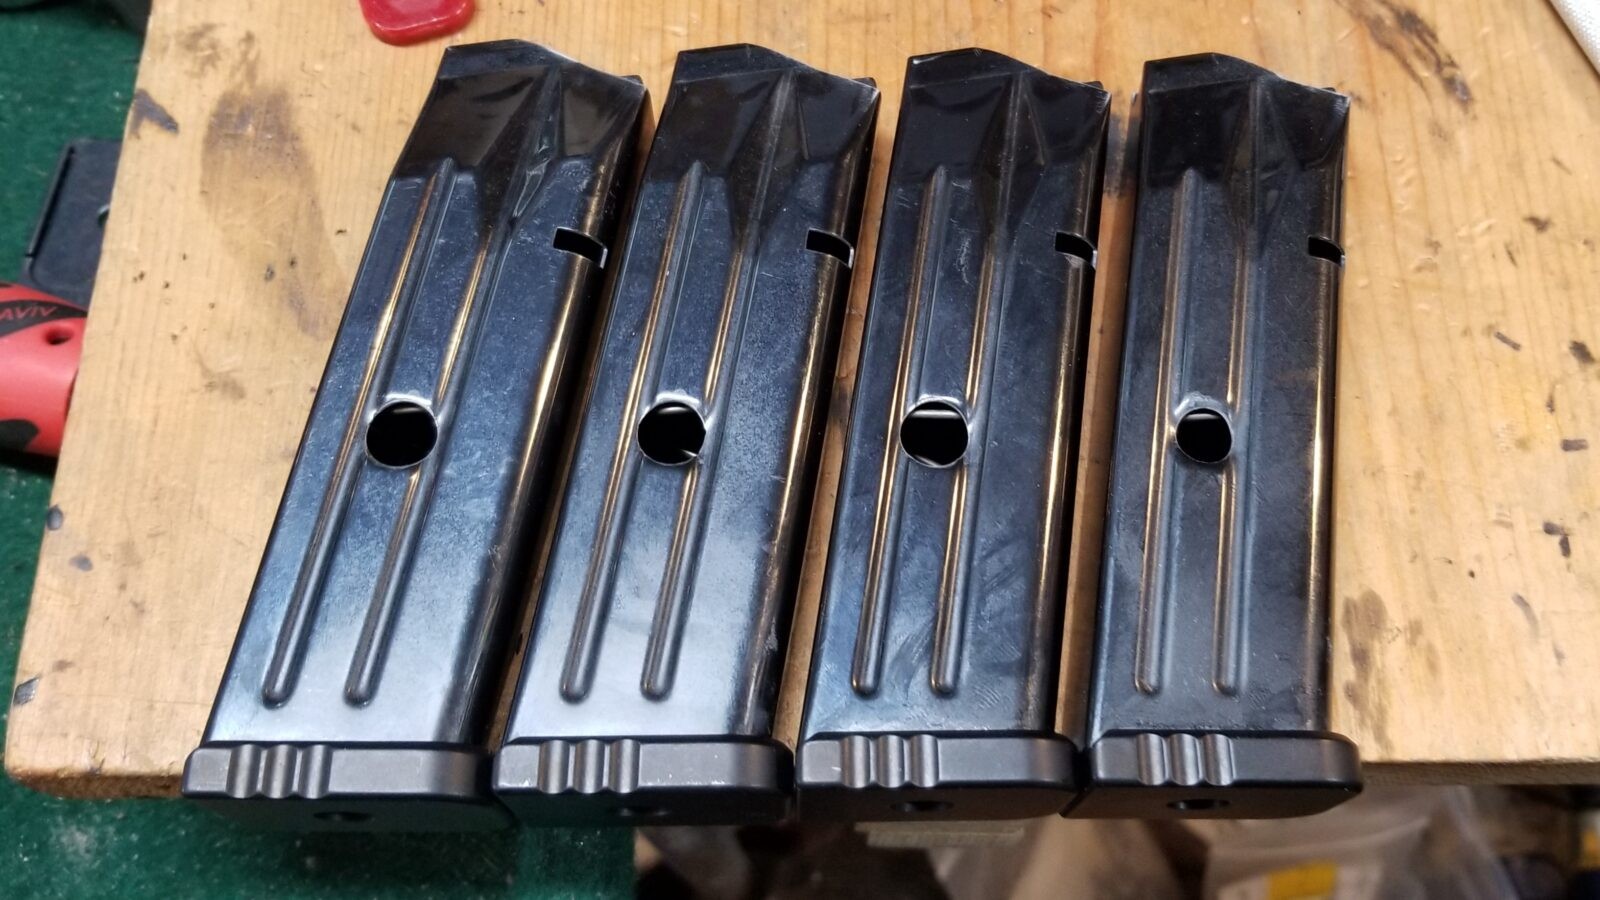
These 15 round windowed mags all have +100 Dawson plates.
This is a +100 Dawson plate in my RIA 52009 Ultra HC 10mm pistol.
This is the +200 base plate.
This is a +300.
This is the 3rd gen polymer Mec-Gar plate that comes on the 10mm/.40 S&W mags for reference. It fits the RIA funnel just fine.
I do need to note something – out of the two to three hundred converted P16 mags I sold, two buyers had pistols where the distance from the mag catch to the bottom of the funnel would not allow the mags with the Dawson plates to fully seat. I gave them full refunds and don’t know if the issue was the mag catch or the fitment of the funnel to the pistol. Again, only two gentlemen out of hundreds. I really do not think it was an issue with the base plates just to be clear – just stacked tolerances going in the wrong direction.
Summary
Dawson Precision makes great base plates for Para P16 and P18 magazines that enable them to fit in the funnel of most RIA high cap 9mm, 10mm and .40 S&W pistols. They come in three sizes and you can choose based on your preference.
Note, I have to buy all of my parts – nothing here was paid for by sponsors, etc. I do make a small amount if you click on an ad and buy something but that is it. You’re getting my real opinion on stuff.
If you find this post useful, please share the link on Facebook, with your friends, etc. Your support is much appreciated and if you have any feedback, please email me at in**@*********ps.com. Please note that for links to other websites, I may be paid via an affiliate program such as Avantlink, Impact, Amazon and eBay.
The Glock 29 Gen 4 offers a solid platform out of the box and for many, that is all they want. For me, after building a few Polymer80s and having a better idea of what I liked, I knew I wanted to upgrade some of the parts to personalize it plus run heavier loads.
Wait – Not The Trigger You Ask?
You may look at that list and be surprised that I left the trigger alone – yes, I did. I’ve used Zev, Overwatch and other aftermarket triggers along with other aftermarket parts like connectors, springs, etc. My personal choice, and this is just me, was to go with the tried and proven OEM Glock parts and let them wear in. I’m not shooting matches or precision targets – this was to be a defensive pistol so I wanted reliability and a trigger with enough pull that I wouldn’t have an accidental discharge. There are guys that will agree with me and ones that will strongly disagree – the trigger decision is totally up to you. Mine was to go with the original Glock trigger parts.
New Sights
The original Glock sights are better than nothing but I really do not care for them. Others must feel the same way because there are a ton of aftermarket sight vendors. By the way, go for a brand name – some are just total junk and not sufficiently rugged.
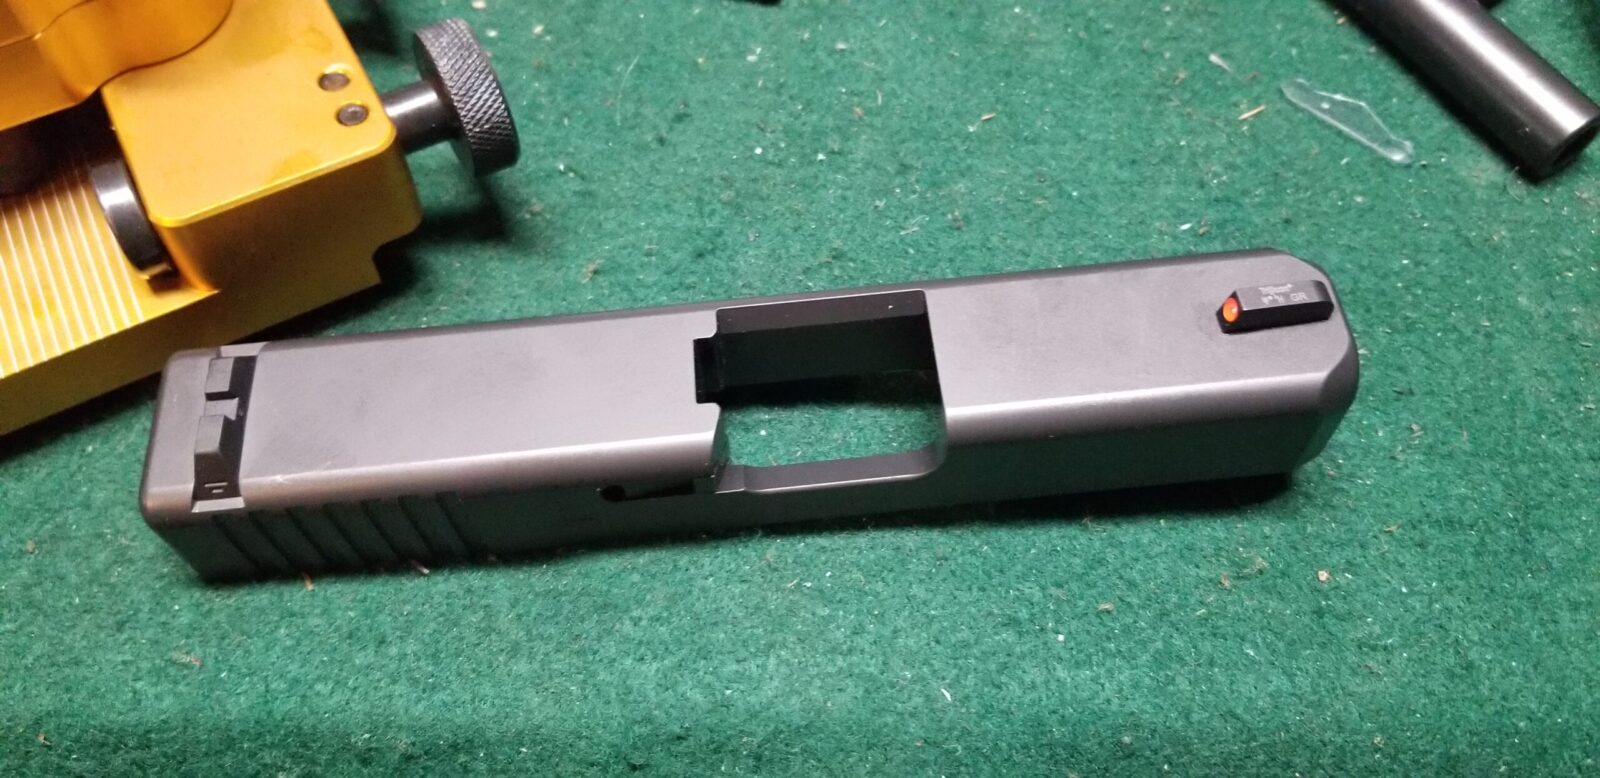
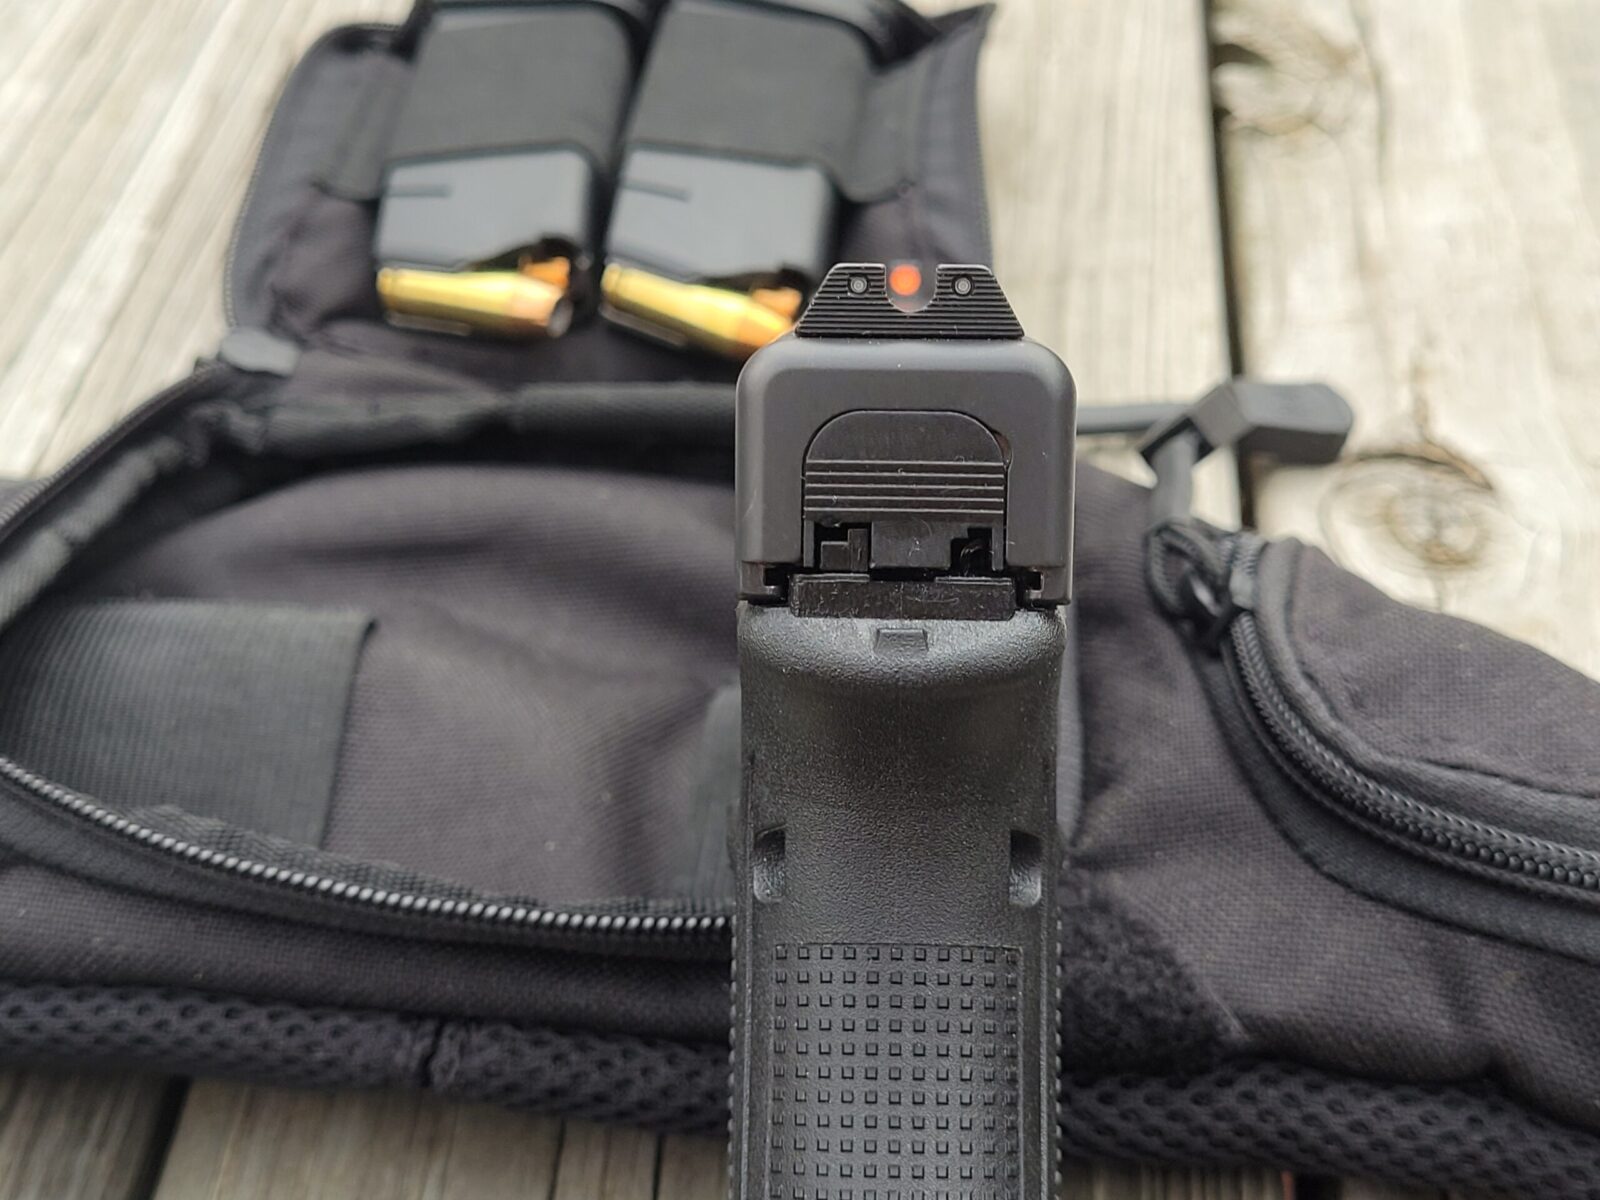
I’ve had very good luck with TruGlo and Trijicon and I tend to favor the latter more. Trijicon sights are very well designed, make aiming super easy and are incredibly rugged. I opted for the Trijicon HD Night Sights (GL1040) for large frame night sights that have an orange ball in the front and tritium illumination. I intentionally wanted a low-light sight but not to add an optic.
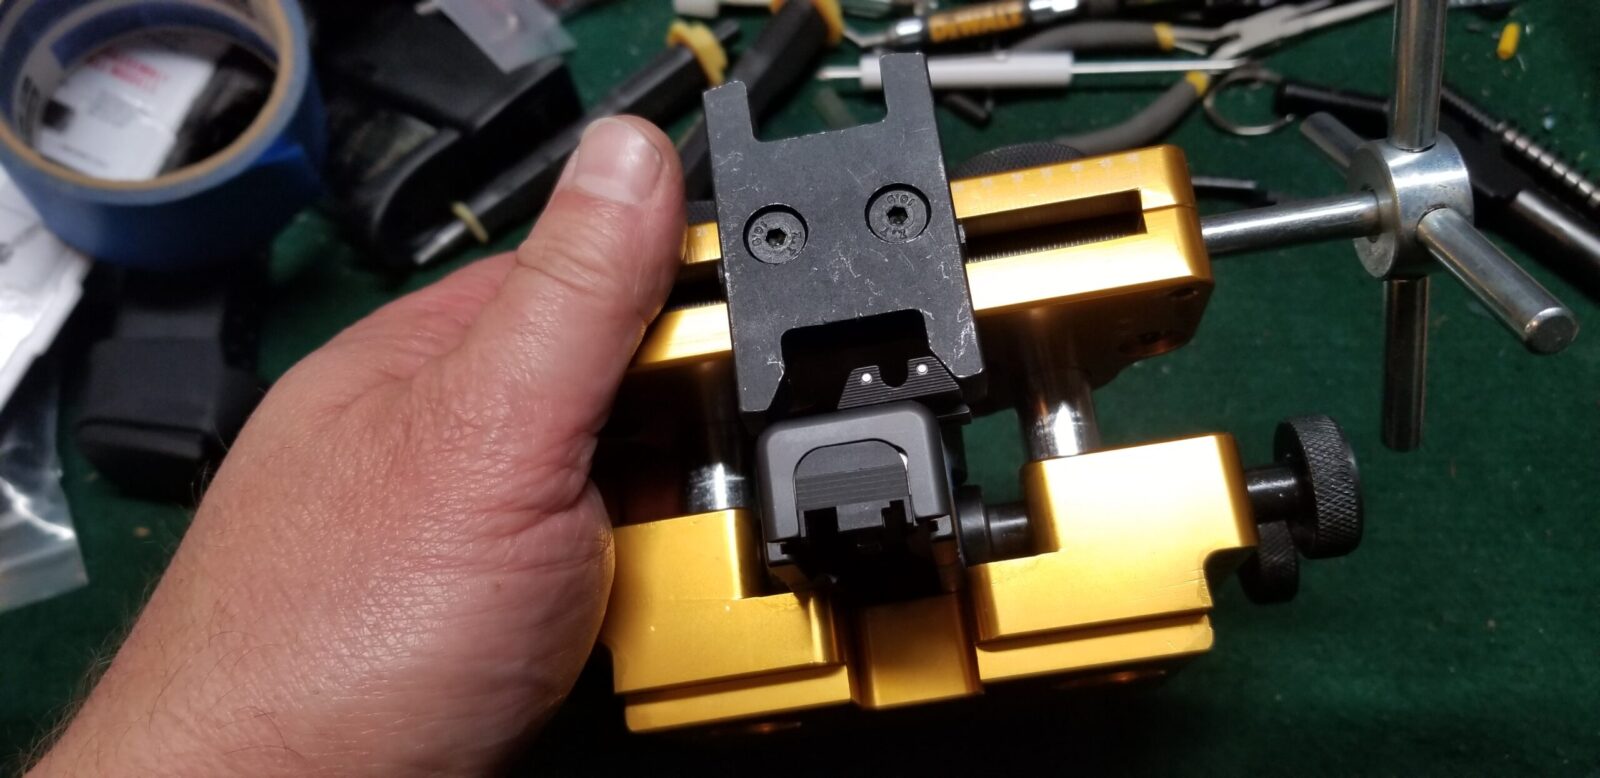
I used a Wheeler Sight Tool for pistol sights and really like it. Installing and removing Glock sights is a breeze with this tool. You can’t see it from this angle but I do have blue painter’s tape on the slide to protect the finish just in case.
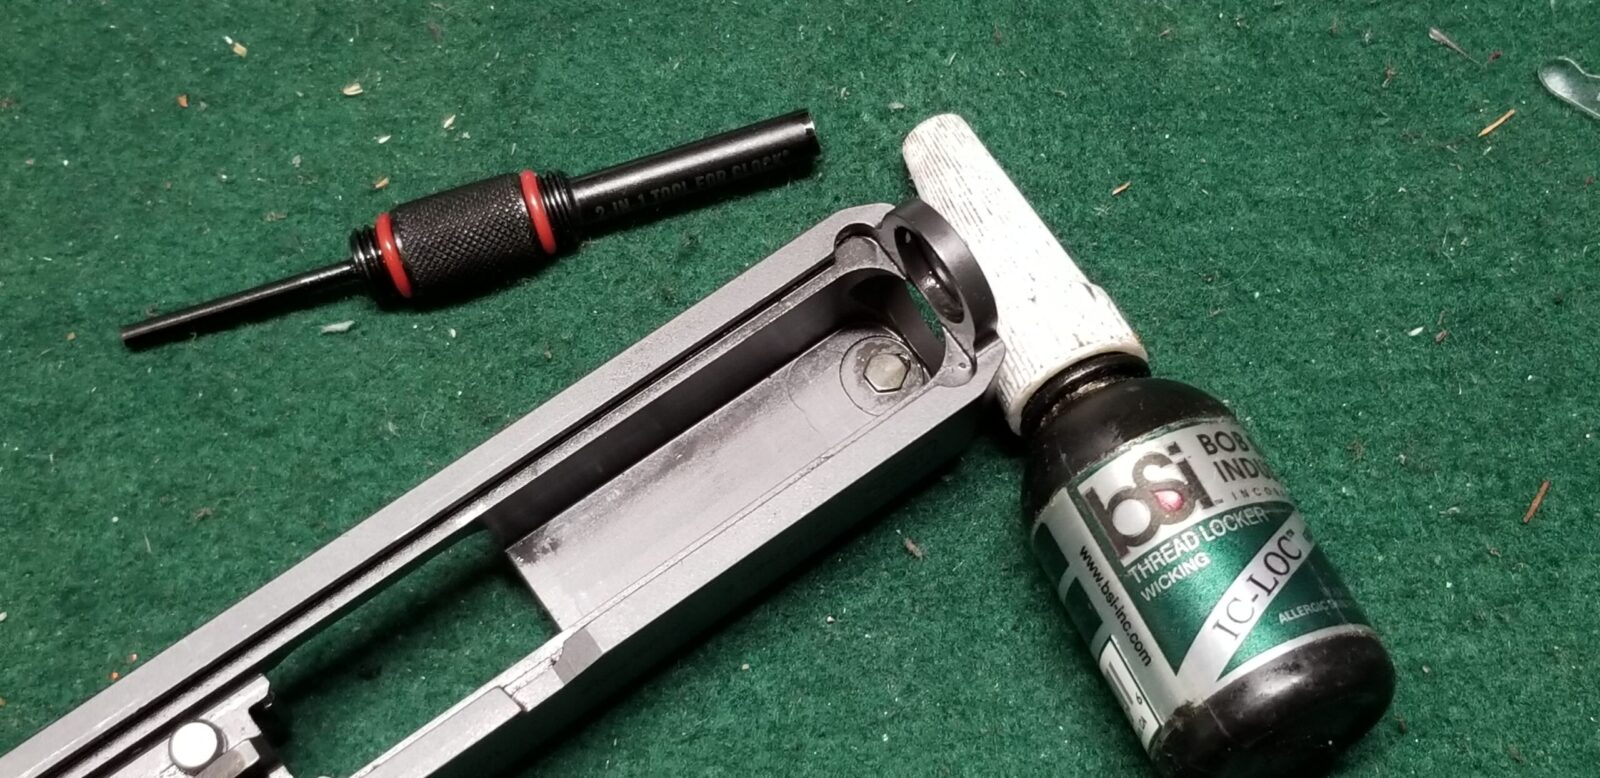
My current tool for removing and installing Glock sights is this 2-in-1 Real Avid tool that has a pin pusher on one end and a pin pusher on the other. What makes a good tool? The little bolt you see requires a 3/16″ thin wall socket. Having a rare earth magnet at the right depth makes all the difference in the world to properly hold the bolt while you are trying to get it threaded into the sight. Cheap tools do not have the socket properly formed, don’t have a magnet, etc. The Real Avid tool gets it right. Cheap imports are just that – I’ve seen them useless right out of the box.
Done. It took me maybe 10-15 minutes including taking these photos. The right tools make it very easy.
The dots glow green in low light due to tritium inserts.
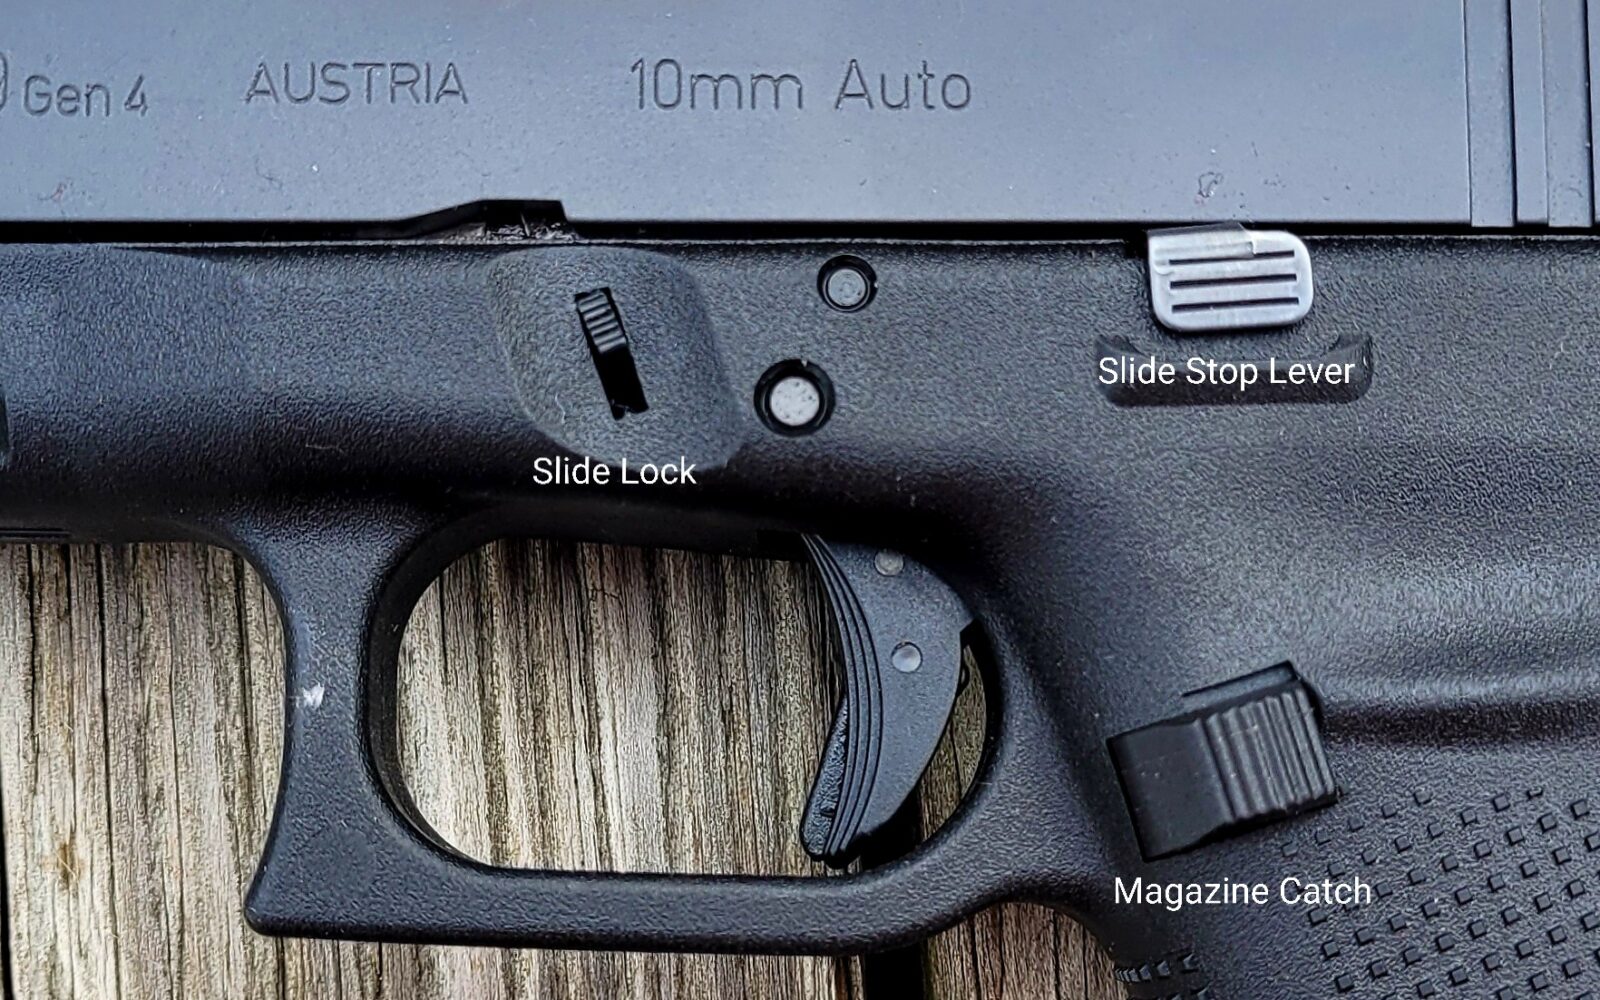
Changing The Controls
That is a Rival Arms Extended Slide Lock. An OEM Glock Slide Stop Lever and a Tango Down Vickers Tactical Magazine Catch.
I like to replace the slide lock, slide release and mag catch normally. The slide stop is actually a big problem for me as I have a hard time grabbing, even feeling, the two sides to pull it down to remove the slide. This really drives me nuts and is one thing I always replace. I installed a Rival Arms extended slide release that sticks out just enough for me to get a much better grip on it. I wish I could find the packaged but I installed a no-name unit online and it had problems from the start – the Rival Arms unit is what I went to next and am still using. Point of the story – beware of cheap parts and test your stuff.
For the Slide Stop Lever, I actually am still using the Glock unit. Normally I would replace it but had a hard time finding one that would fit a Glock Gen 4 model 29. I can use the Glock lever, it’s just not my first choice.
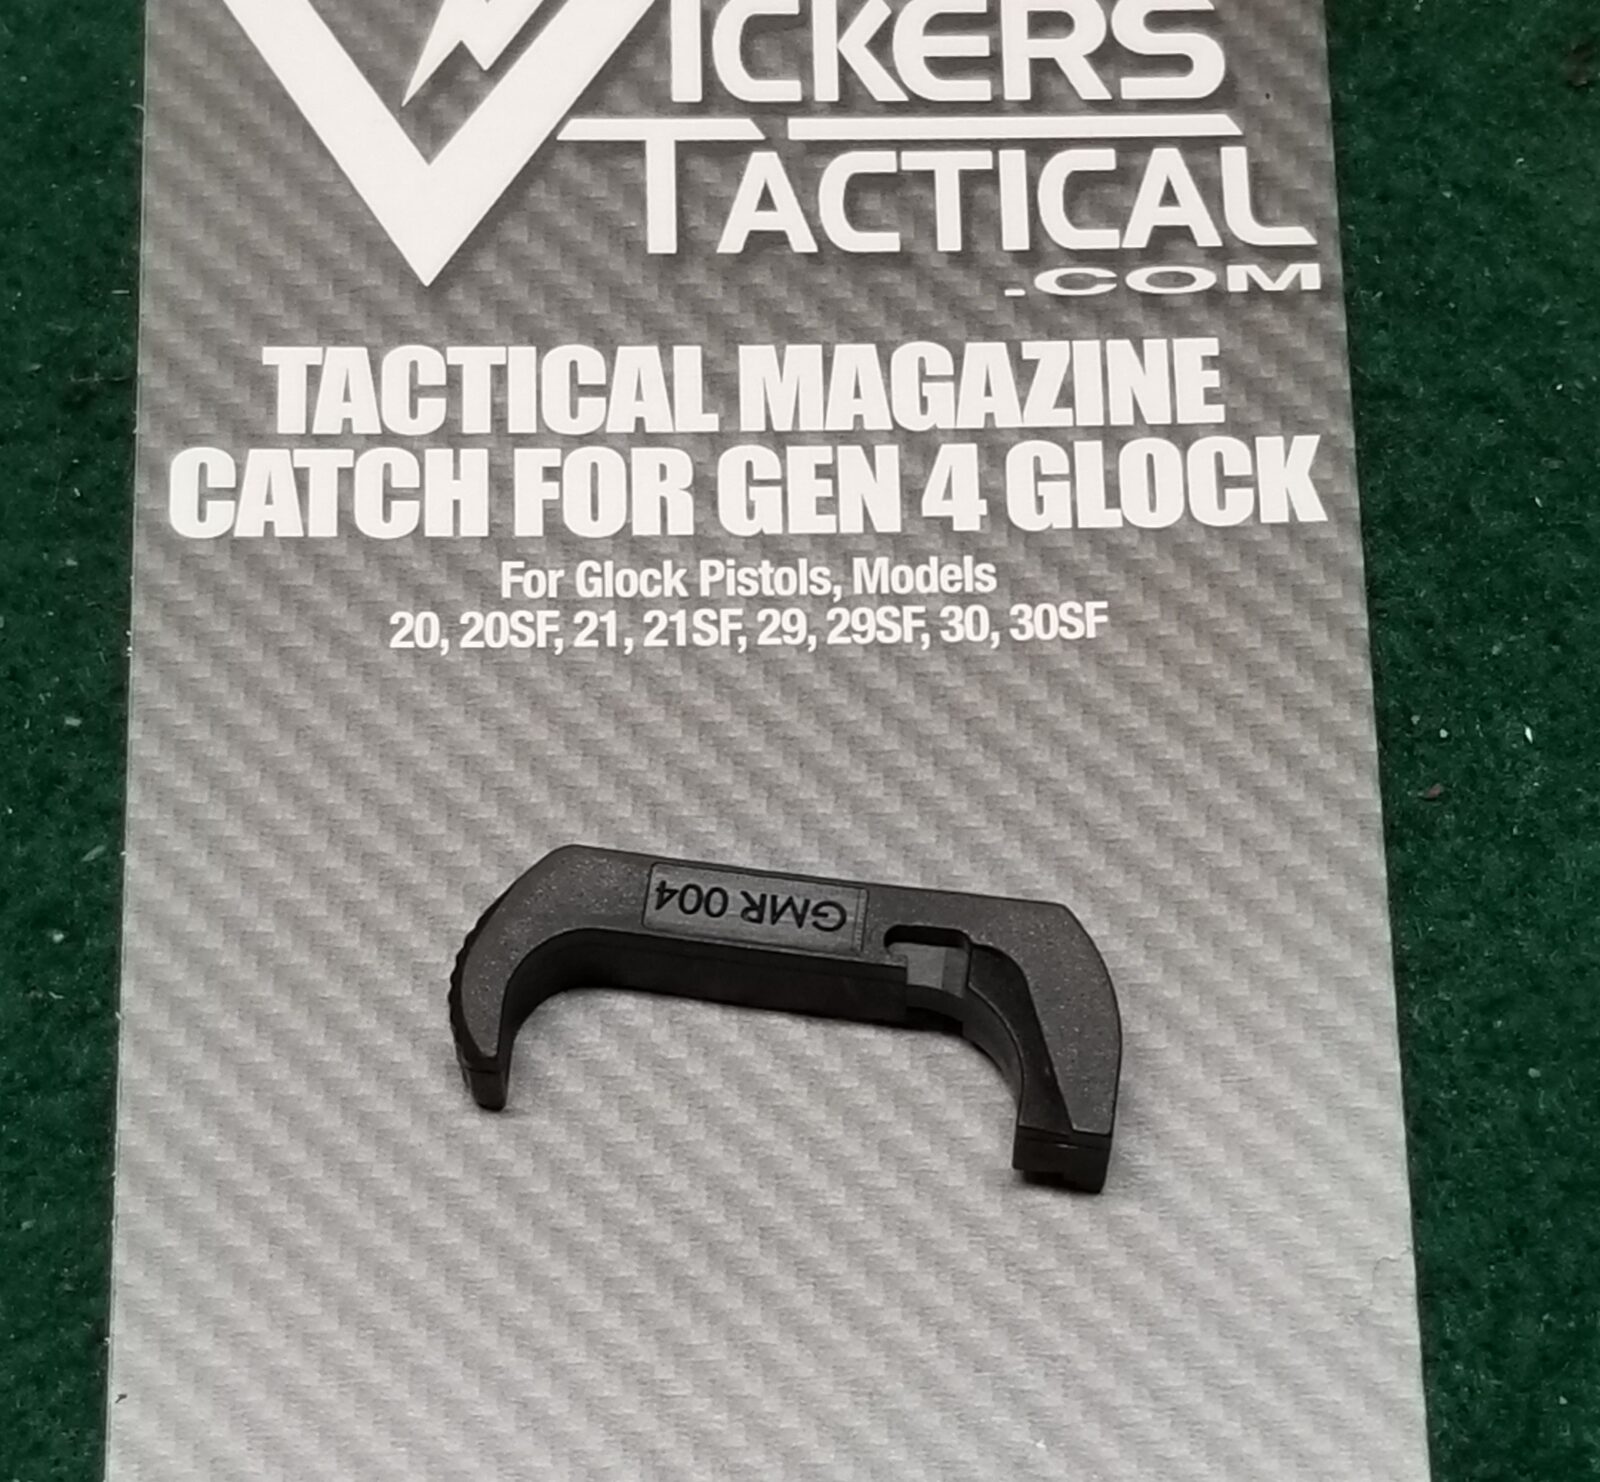
For the Magazine Catch, I went with a Tango Down Vickers Tactical model. I’ve used these a number of time of times now because I like how it sticks out just a bit more than the original but not too much. I’ve tried ones that stick out so far that if you even lay the pistol on its side, the catch is depressed enough to release the magazine and then the next round fails to feed because the mag isn’t properly seated.
The Vickers Tactical Magazine Catches are really my preferred unit these days for Glocks and Polymer80s.
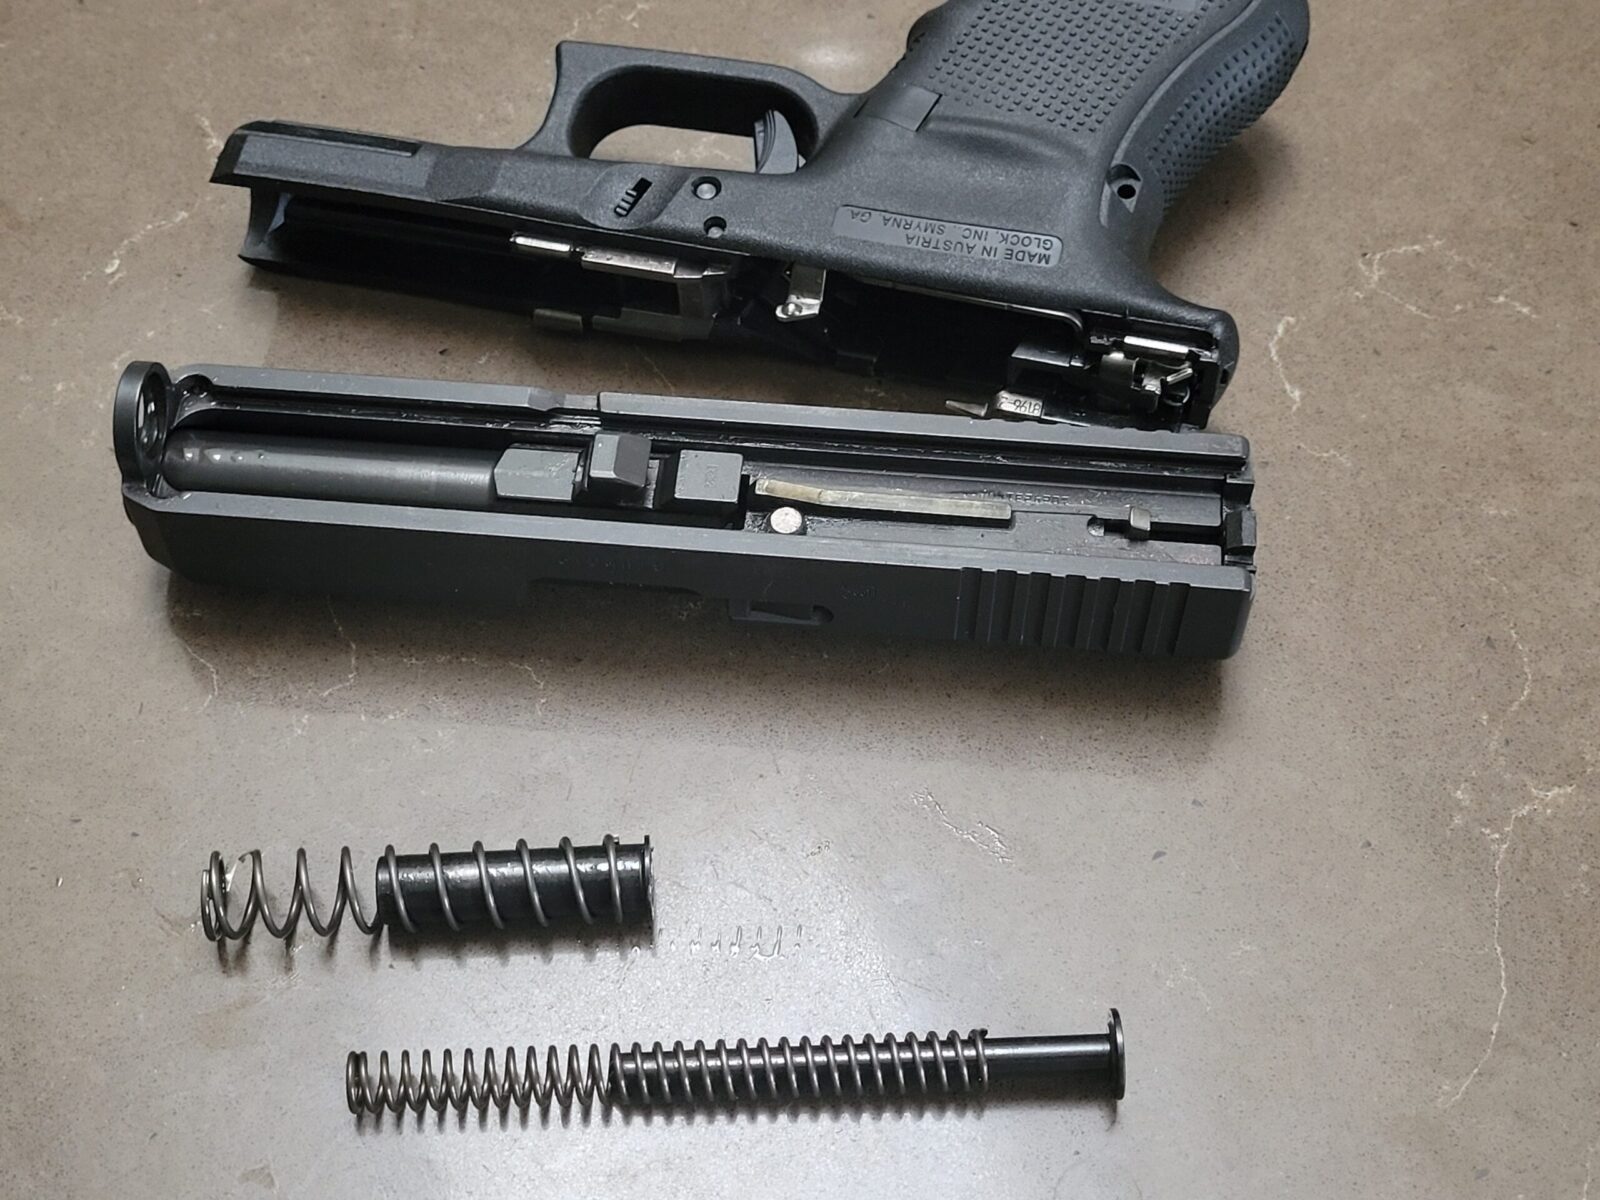
Recoil Spring Upgrade
The stock Glock 29 spring is rated for 17 pounds as I understand it. To better run the hotter loads from Buffalo Bore and Underwood, I wanted to put in a stiffer spring but I wasn’t exactly sure what to go with. This helps with obtaining both higher and more consistent velocities with these loads. Yes, the OEM recoil spring will still work – this is an improvement is all. However, if you run too stiff of a spring, your pistol may not cycle reliably with other loads you want to run.
Wolff Gun Springs makes this decision super easy for you. They sell what they call a “Recoil Calibration Pak” with springs at 17, 19 and 21 pounds. They have a variety of these assortments for different Glock models as well.
To install the spring, you need to get a two piece guide rod assembly and Wolff sells them as well. The native Glock springs are in a captured assembly that really isn’t designed to come apart. The Wolff guide rods make it super easy for you to try different springs and do not affect accuracy or reliability in terms of the rods themselves.
That is the Wolff two piece guide rod and springs. It’s worked great so far.
I installed a 19 pound spring and found it functioned just fine with all of my Buffalo Bore, Ammo Inc, S&B, and Underwood loads. That’s what I am running at this point and haven’t had any reliability issues so far.
In Conclusion
The pistol is configured the way I want it and as reliable as ever. The end of the day, what you do is your choice but just be sure to test your combinations (the new parts, magazine and ammo) before you rely on them.
Note, I have to buy all of my parts – nothing here was paid for by sponsors, etc. I do make a small amount if you click on an ad and buy something but that is it. You’re getting my real opinion on stuff.
If you find this post useful, please share the link on Facebook, with your friends, etc. Your support is much appreciated and if you have any feedback, please email me at in**@*********ps.com. Please note that for links to other websites, I may be paid via an affiliate program such as Avantlink, Impact, Amazon and eBay.