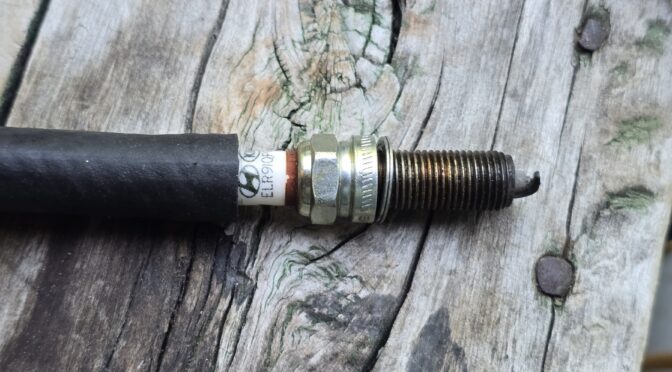
I was helping my brother in law do some basics on his 2020 Hyundai Kona – oil change, etc. One thing he wanted to do was to put new plugs in. So, we used a Craftsman 5/8″) spark plug socket to remove the plugs and lost the rubber insert along the way. Thus, he had a chance to see a few old school ways to insert a plug down into hole through the valve cover.
You can use just about any socket to remove a plug – assuming it fits – again the Kona used a 5/8″ socket. With the rubber fitting in the stocket missing, there was nothing to hold the plug position as you lower it down into the opening through the valve cover. (By the way, old guy tip, if you have those rubber fittings, clean it, your socket and then glue it in place so it stays put – silicone glue, rubberized super glue, etc.)
The teaching question for him was “how do you get the socket down there without hurting the ceramic insulator?” Well, let me tell you two ways and show you a third with a tool you can make.
Option 1 – hold the plug in the socket and chase the plug down with the socket so it doesn’t have time to fall out. Pro – it works and all you need is the right size deep socket. Con – if you don’t know how to do it you will break the insulator. Not a great option for a newbee.
Option 2 – use a magnetic pick up tool to start the plug. You literally dangle the plug off the top of one of the plugs by sticking it to one of the rare earth magnet pick up tools. I have done a ton of plugs this way. You lower it down, feel it squarely engage and turn the plug. You can usually just get the thread to start so you can then pull off the tool and use a deep well socket to do the test. Definitely start the plug with your hand and feel the fit to make sure it’s not cross threaded. Pro – a lot of folks have a pick up tool at home. They have saved my bacon many times over the years and want to say I have 3-4 different sized ones. Cons – you need enough experience to feel it is sitting square and start it. I showed my brother in law twice and he got it the second time.
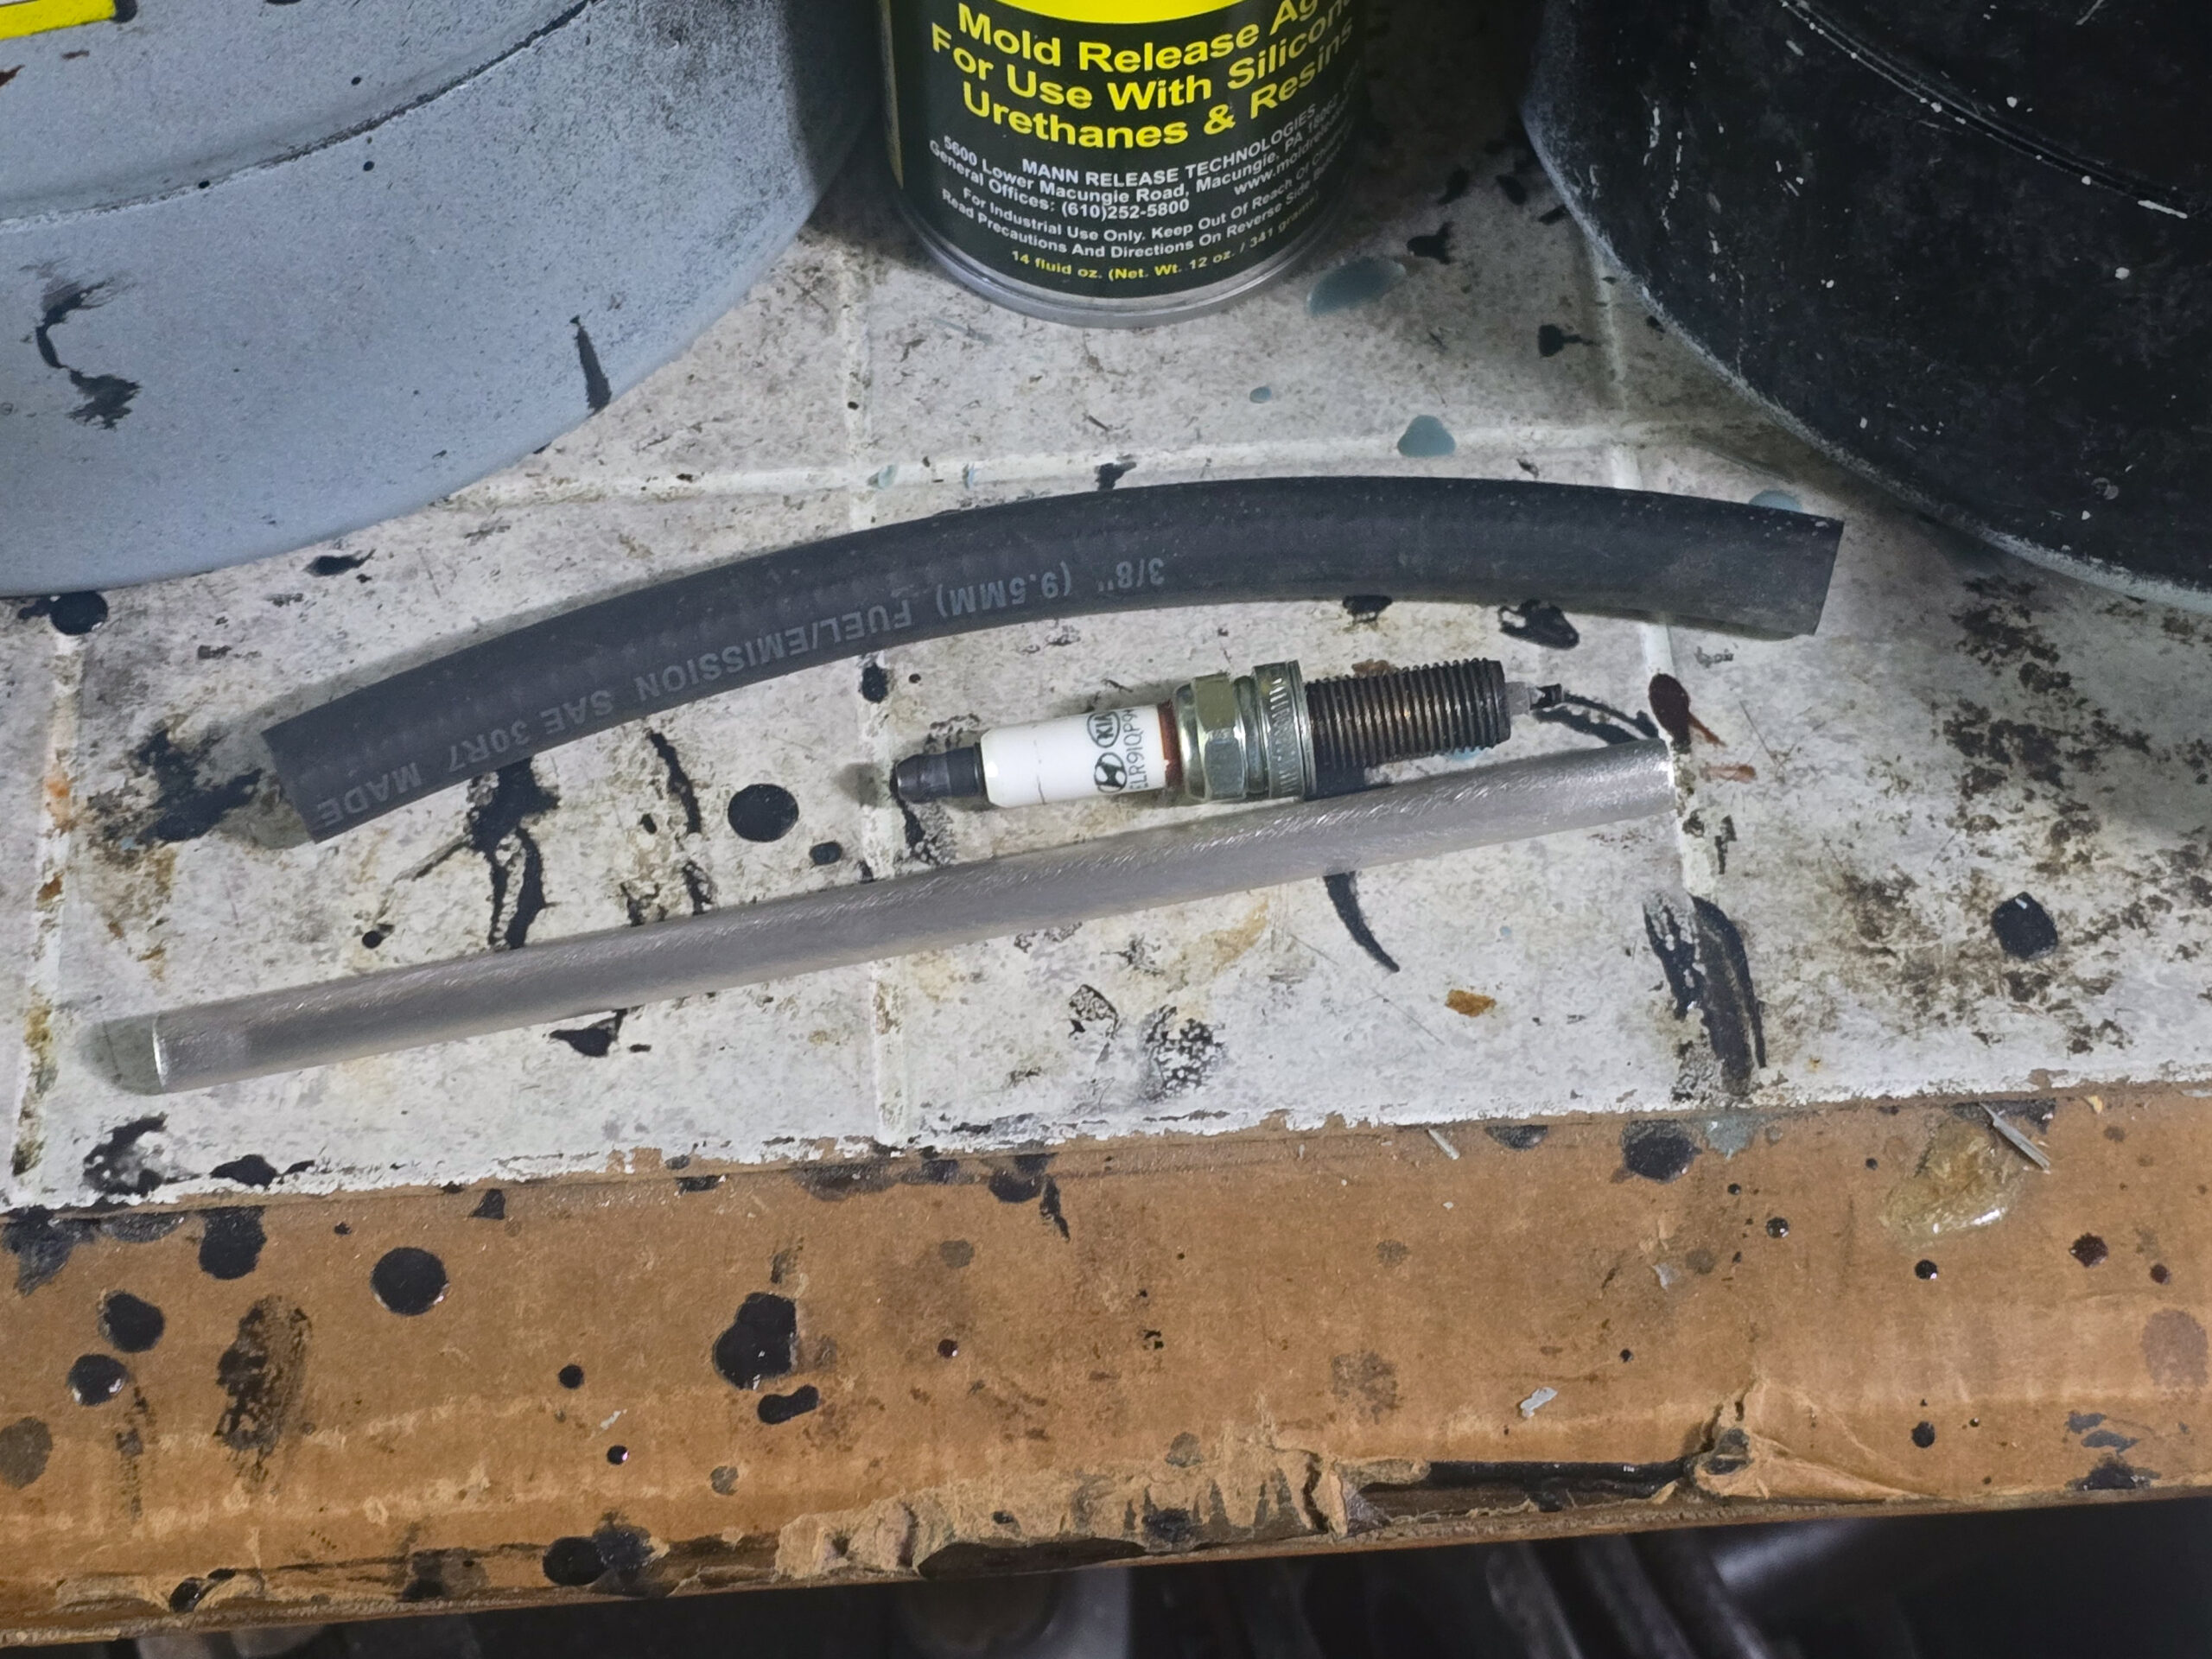
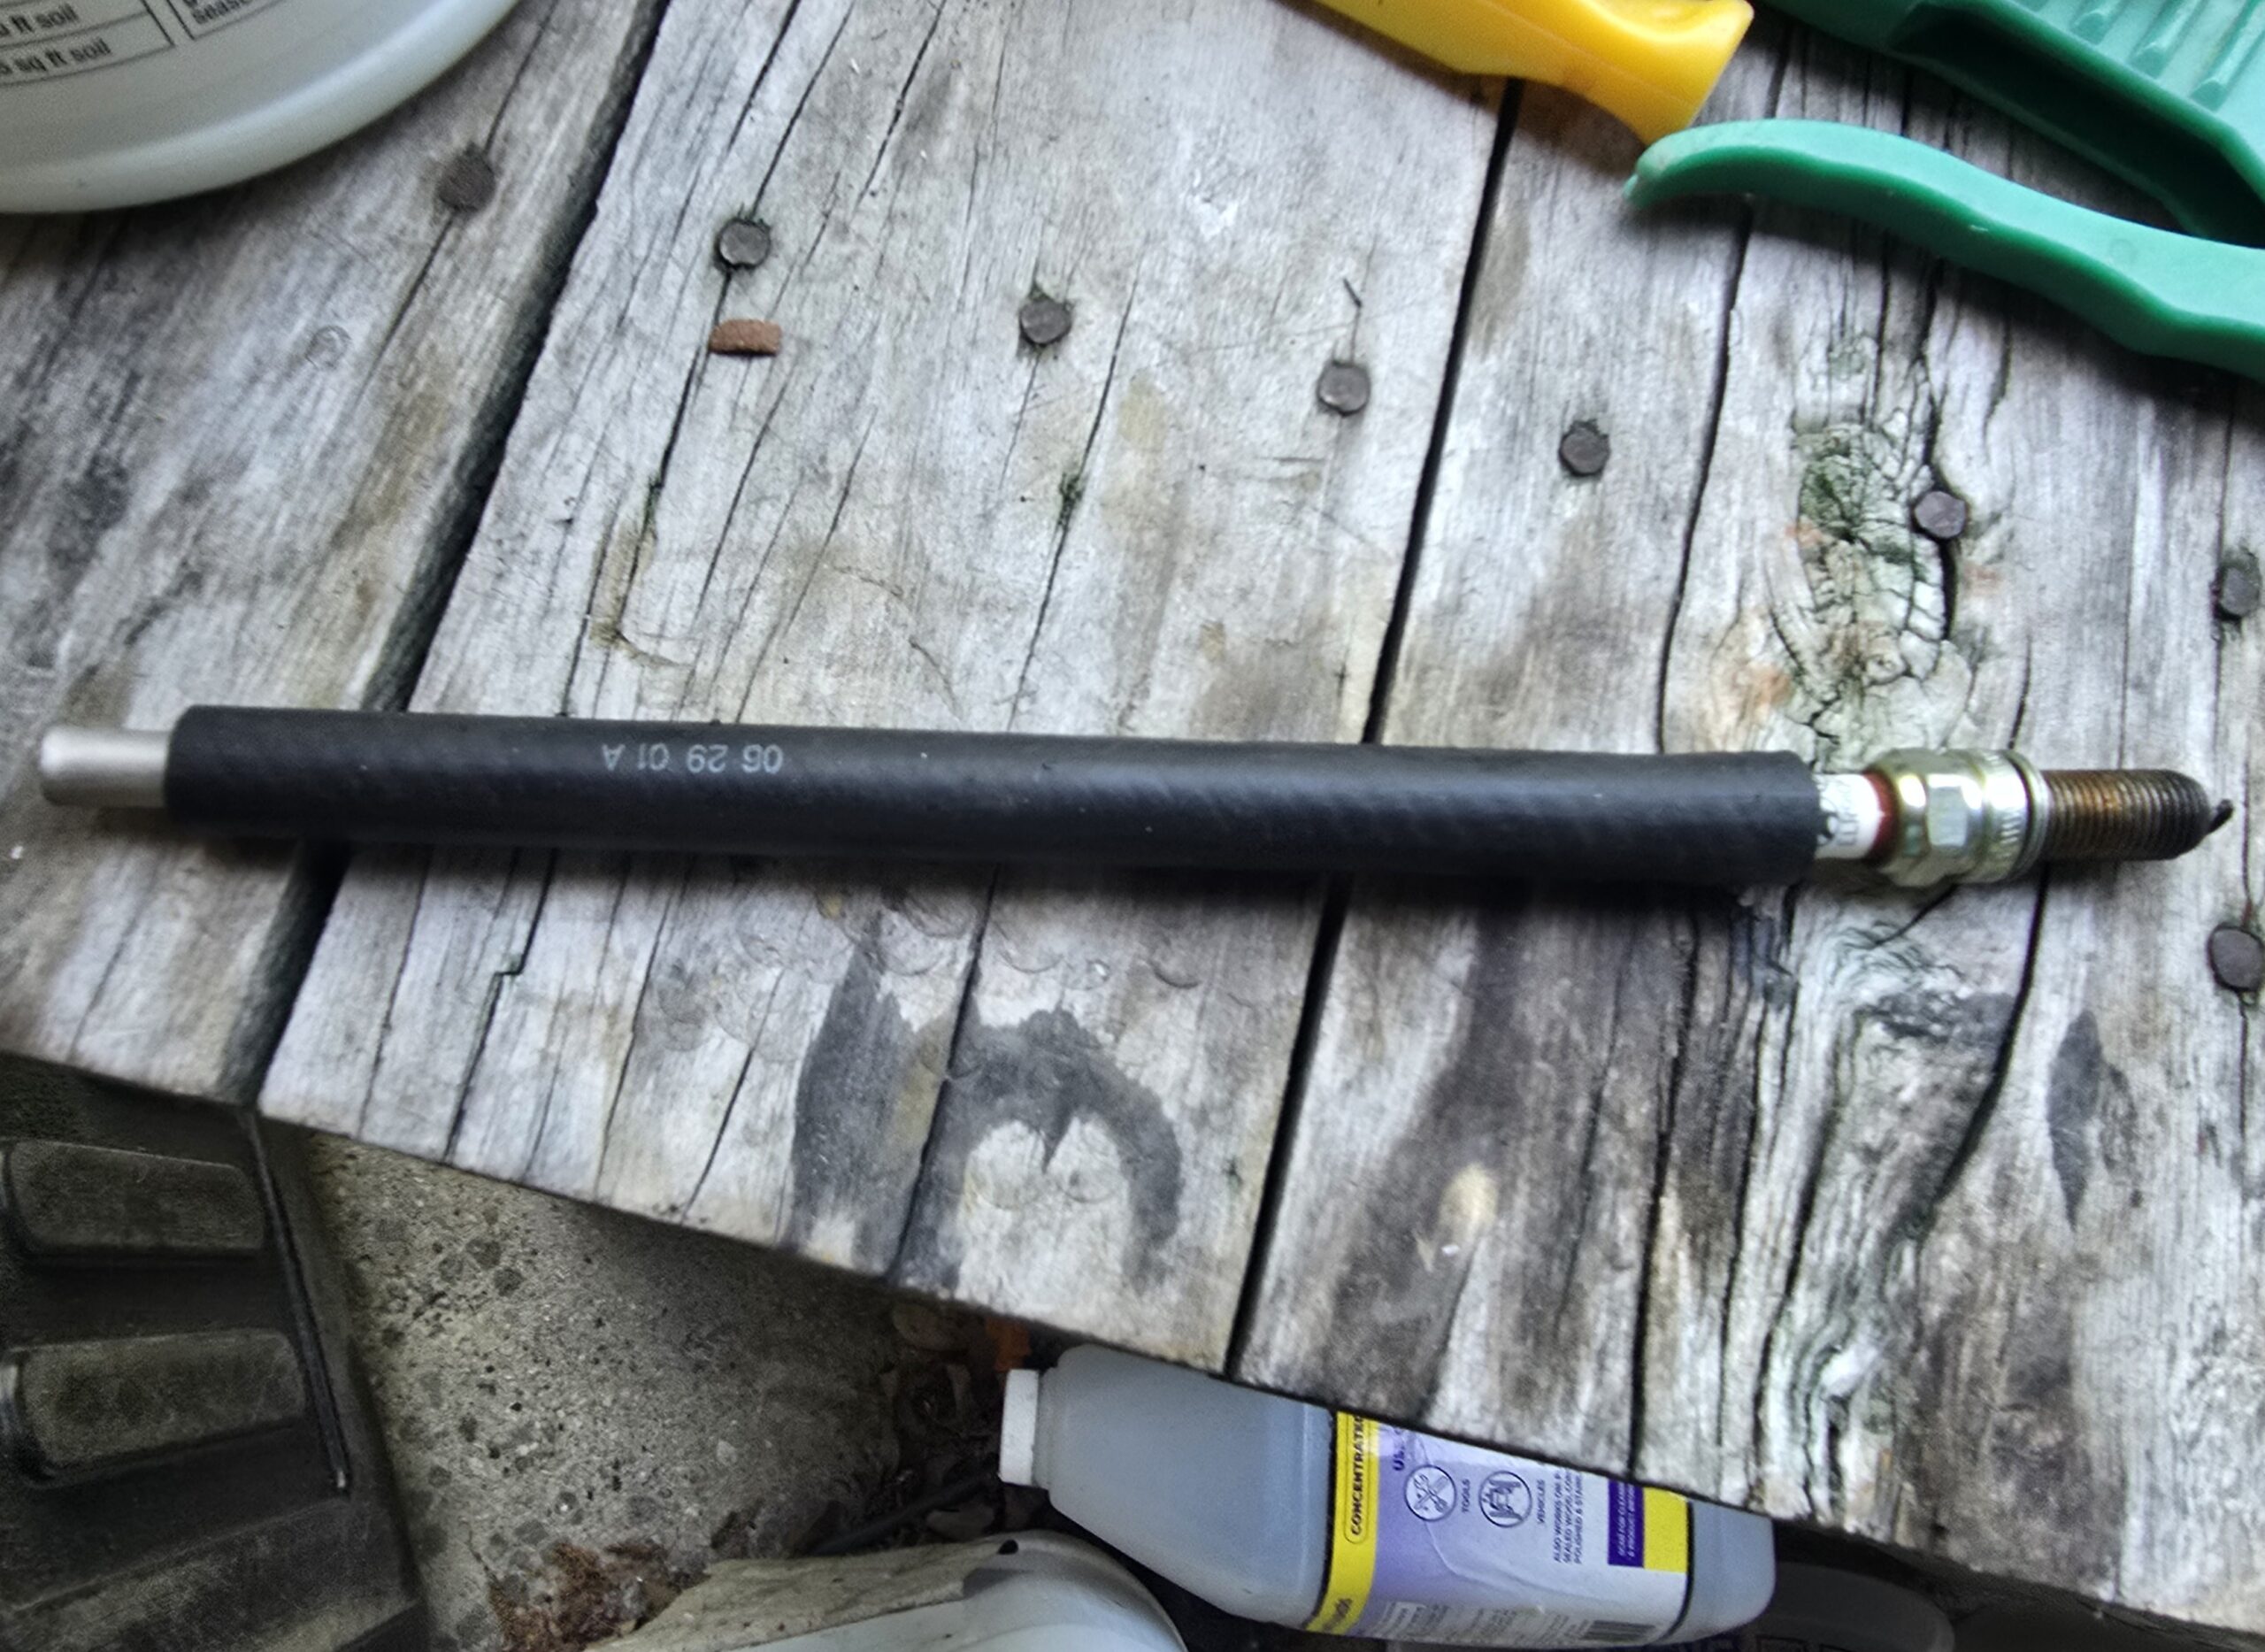
Option 3 – make an improvised out of fuel line to hold the spark plug and lower it into position. This is an old school trick. 3/8″ fuel line will slide over the insulator and hold the plug. You can then do what you need to do. I take it step further and slide metal shaft part way down to make it a little straighter.
3/8″ ID fuel line, 3/8″ piece of scrap rod cut to length. I spray the inside with silicone and shove in the rod but stop so there is enough room for the spark plug to go part way in.
Here it is all done. Use this to start the plug and then tighten down to the torque spec with a socket and torque wrench.
In all cases, I would recommend you start the plugs by hand – literally use your fingers on the end of the extension shift from the socket to start the plug and make sure it isn’t cross-threaded. Then torque it down with a torque wrench to the published torque spec.
Summary
If you need to insert plugs and lack a true spark plug socket, I hope this gives you some options. There are some really nice magnetic sockets for plugs and I bought one later. I bought a Workpro and really like it.
If you find this post useful, please share the link on Facebook, with your friends, etc. Your support is much appreciated and if you have any feedback, please email me at in**@*********ps.com. Please note that for links to other websites, I may be paid via an affiliate program such as Avantlink, Impact, Amazon and eBay.
Want a really nice socket with a magnetic spark plug holder built in? I have a few sizes of WorkPro sockets and also Lexivon sockets that have worked great, I bought short and longer ones for those fun hard to reach places.
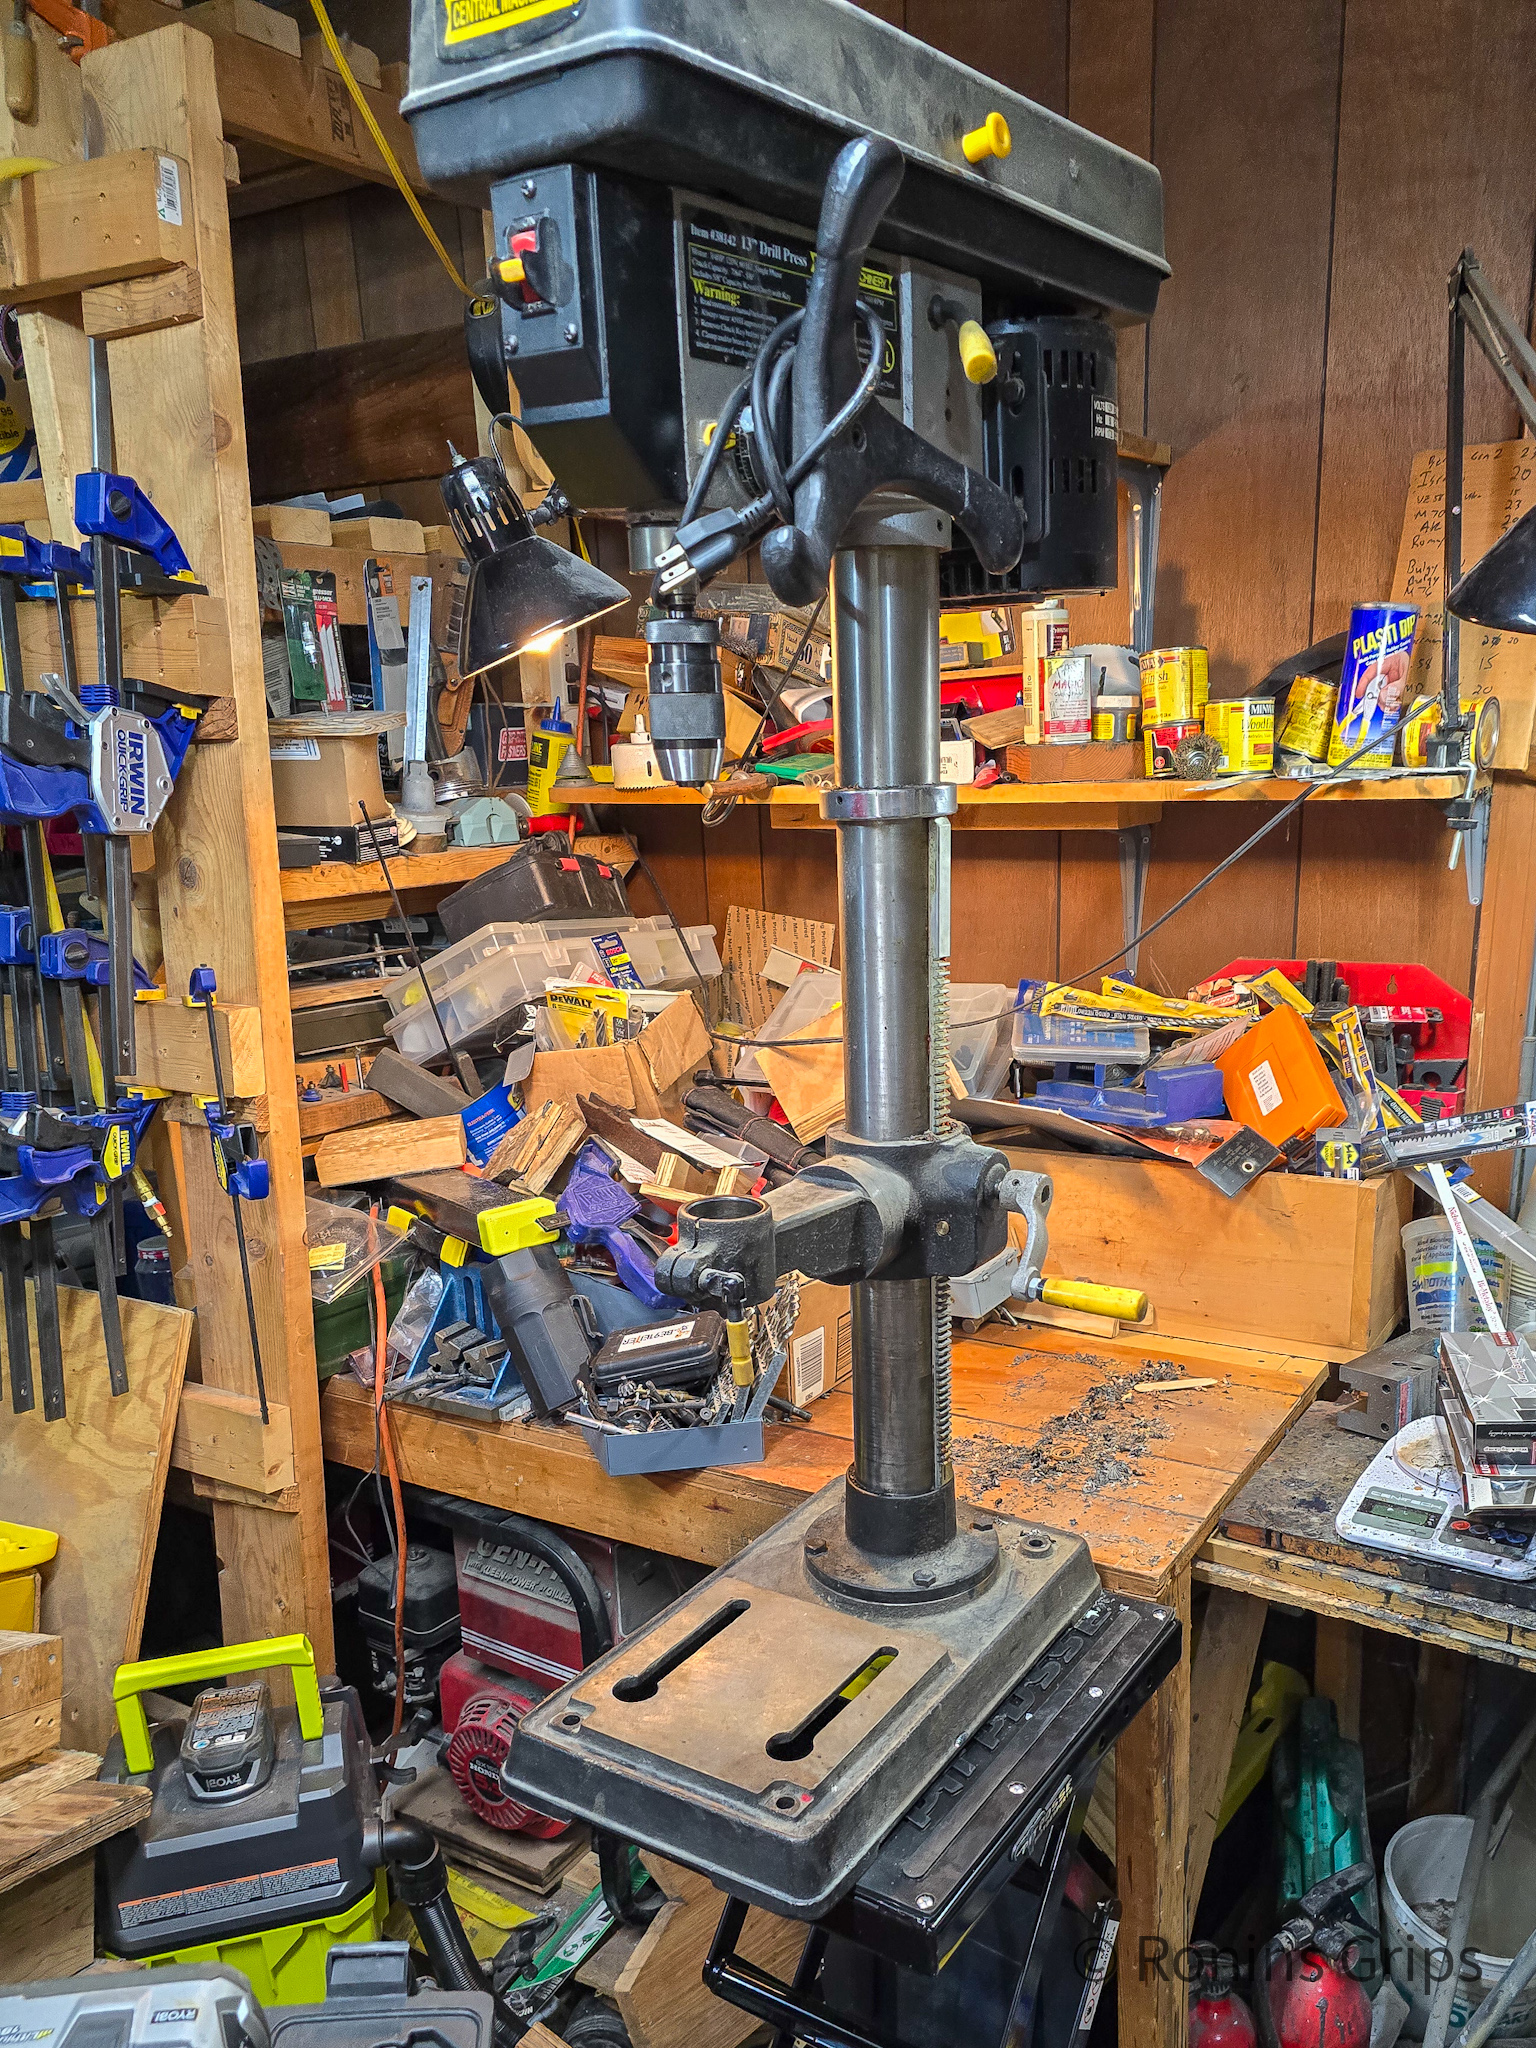
Ok, in August 2024, I realized my old Harbor Freight (HF) 38142 13″ bench top drill press was having real issues. I always thought the switch would die or maybe the motor but it was actually the bearings in the spindle. It could no longer drill an accurate hole – runout was horrible and the whole spinde would deflect on angled work pieces.
Now, I need to be fair – the HF drill press lasted me from some time around 1998 all the way to late Summer 2024. Thousands of Ronin’s Grips AK and Galil grips had been drilled there and and it takes three drilling operations per grip so that is a ton of drilling. I can’t even begin to guess what all else I have drilled over the years – gun parts, car parts, stuff for the house … Yeah, I’m not going to bash the Harbor Freight press. The challenge was that I needed a new press, wanted something that was relatively accurate and had to do some digging. I ruled out a lot of cheap stuff right away due to a number of factors.
I knew I wanted another bench top drill press – they just fit into my shop easier that way and that’s another story. One thing I needed was a tall drill press to accommodate my jigs for the grips including an X-Y table for precision adjustments. I also wanted one that was accurate, had some power to it and … didn’t have belts. It may sound silly but I hate changing pulleys.
In case you are new to drills, the material you are drilling, size of bit, and type of bit all affect the RPM you should be drilling at and how fast you push the bit into the material. Traditionally, a drill press has the electric motor at the rear and two or three stepped pulleys that let you adjust the RPM. The adjustment is done by opening the top, loosening the motor (usually by pulling a lever) and then moving the one or two belts on the top to the combination of pulleys you want to get the approximate speed you want. It drives me nuts. I guess everyone has things that bug them and this is one of mine. I’d usually run an average speed and adjust my feed speed accordingly which meant I was almost always drilling slower than what I could have been. Also, old belts slipping would introduce another level of joy as the drill bit would bog down and even stop at times. At any rate, it was a pet peeve and I really didn’t want belts so let’s move on.
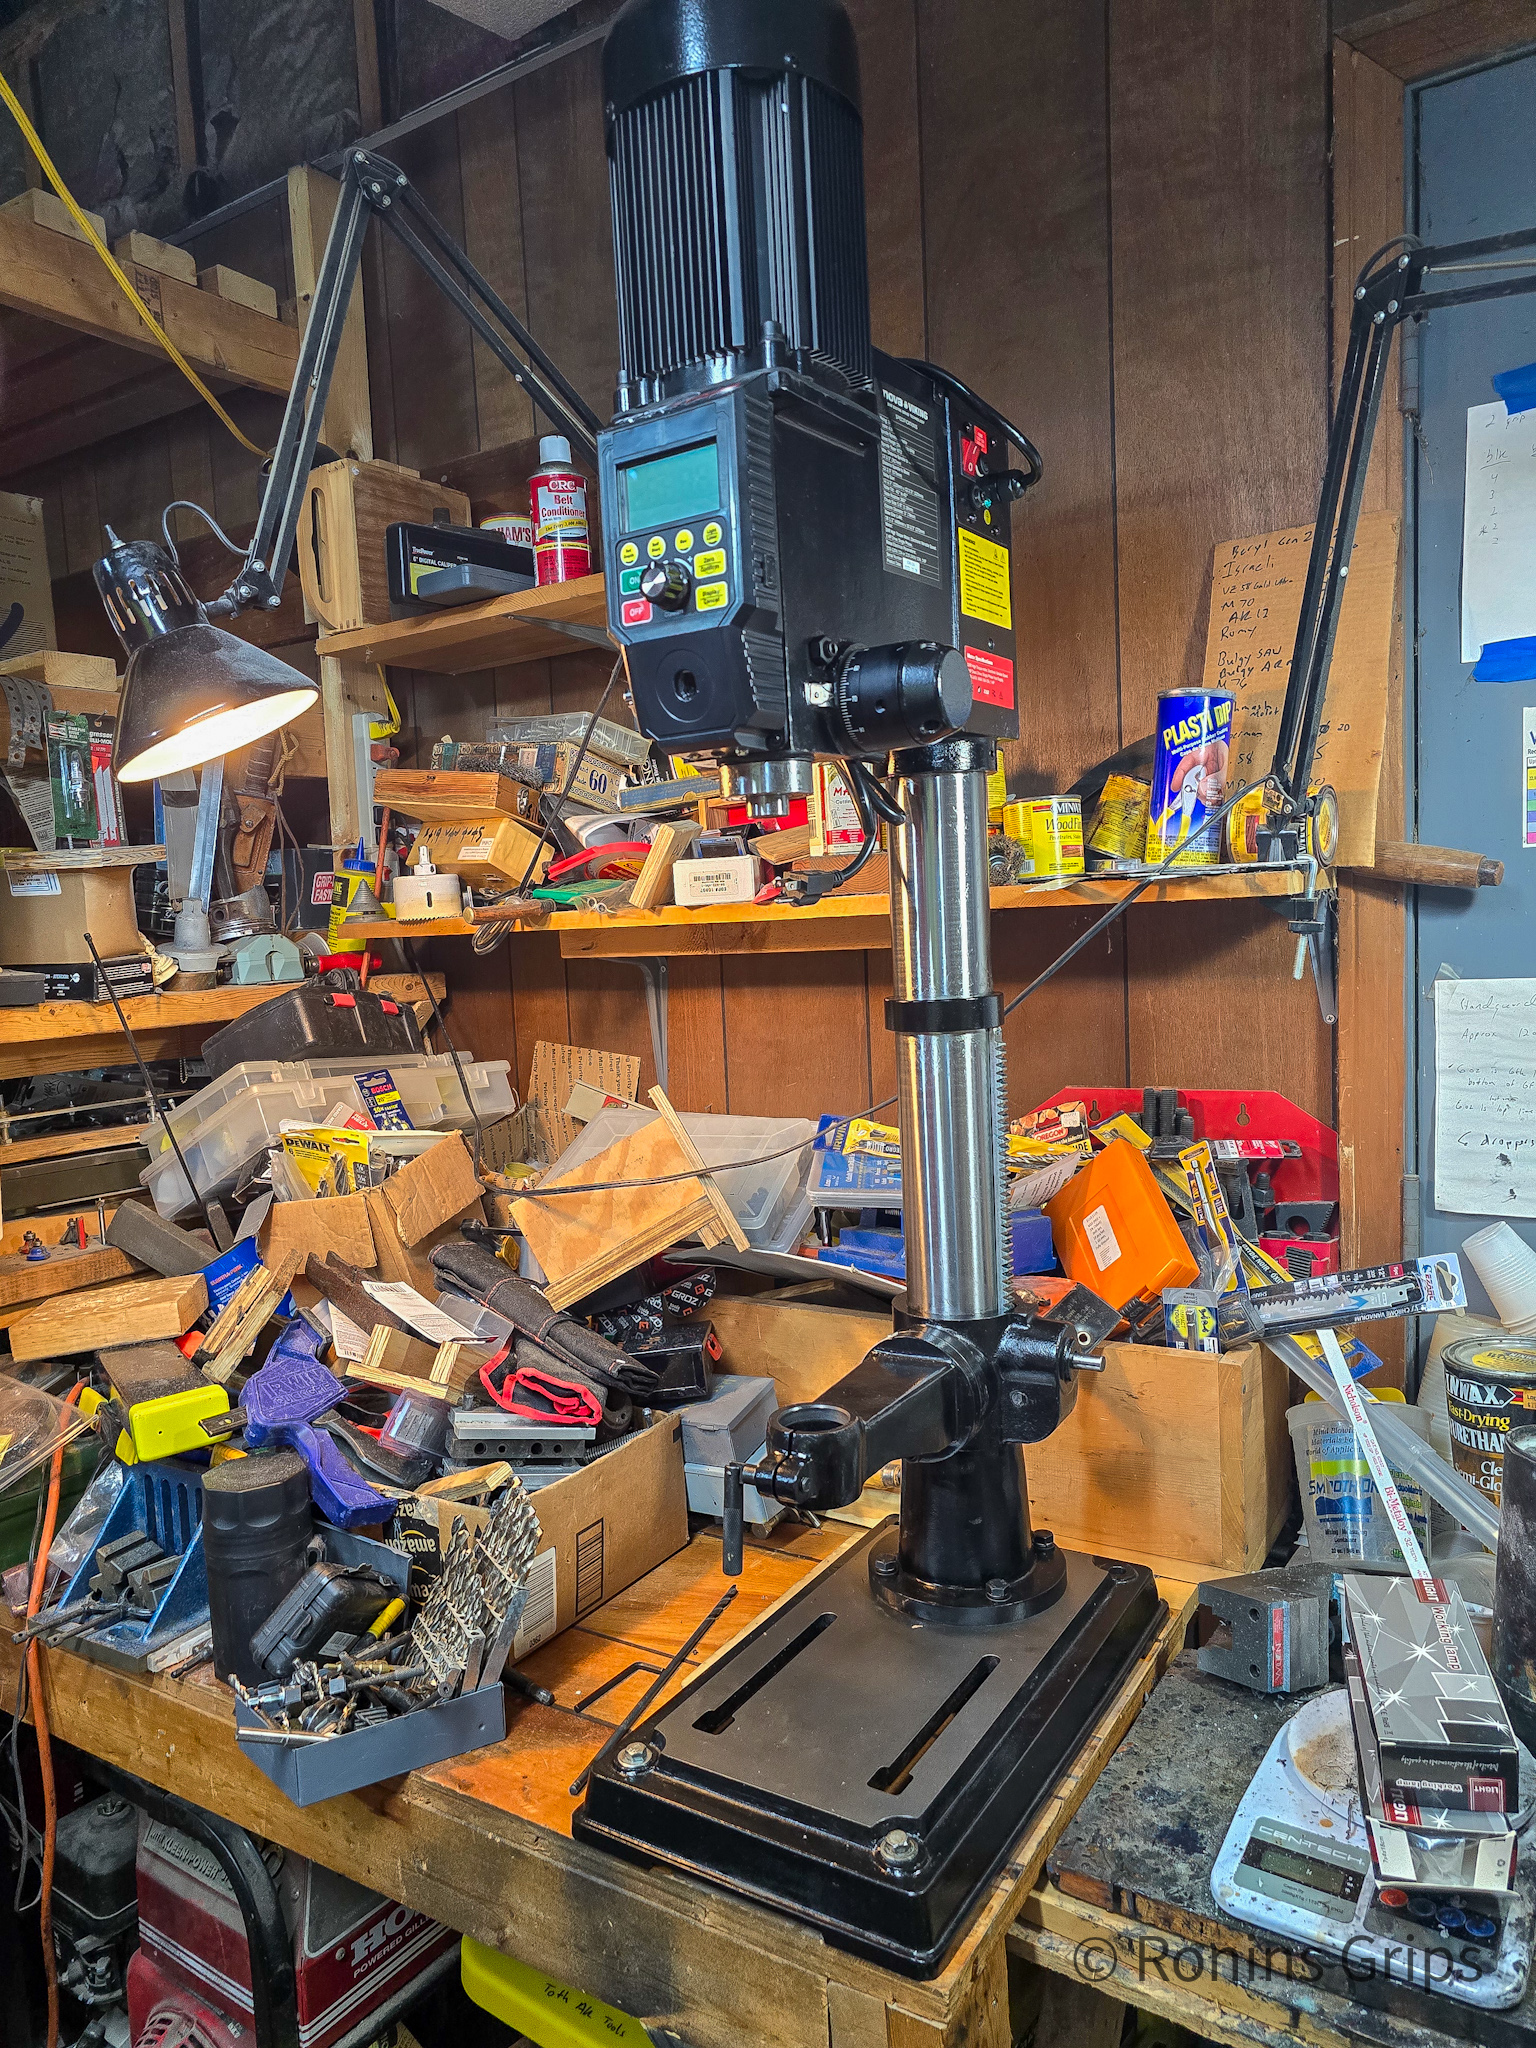
Because the HF drill press had a 13″ swing (the largest diameter object that can be drilled to its center), I knew I at least wanted that. So, I dug and dug and finally got it down to either a Jet or a Nova Viking model 83700 by Teknatool. After even more digging, I got it down to the Viking. You know what? I’m very happy with it almost two full months in.
Variable frequency 1 horsepower 120 volt motor (no more belts)
Very good accuracy – they tell you how to test the runout
Variable Speed: 150 – 3,000 RPM (programmable to 6,000 RPM)
Swing: 16”
Stroke: 4.5”
Spindle to table: 12-2/3″ (320mm)
Spindle to base: 22-2/3″ (575mm)
Drill Chuck: 5/8” (1-16mm)
Spindle Taper: 2MT
Quill:4.5” of quill travel
Weight: 154 pounds … it was definitely not light.
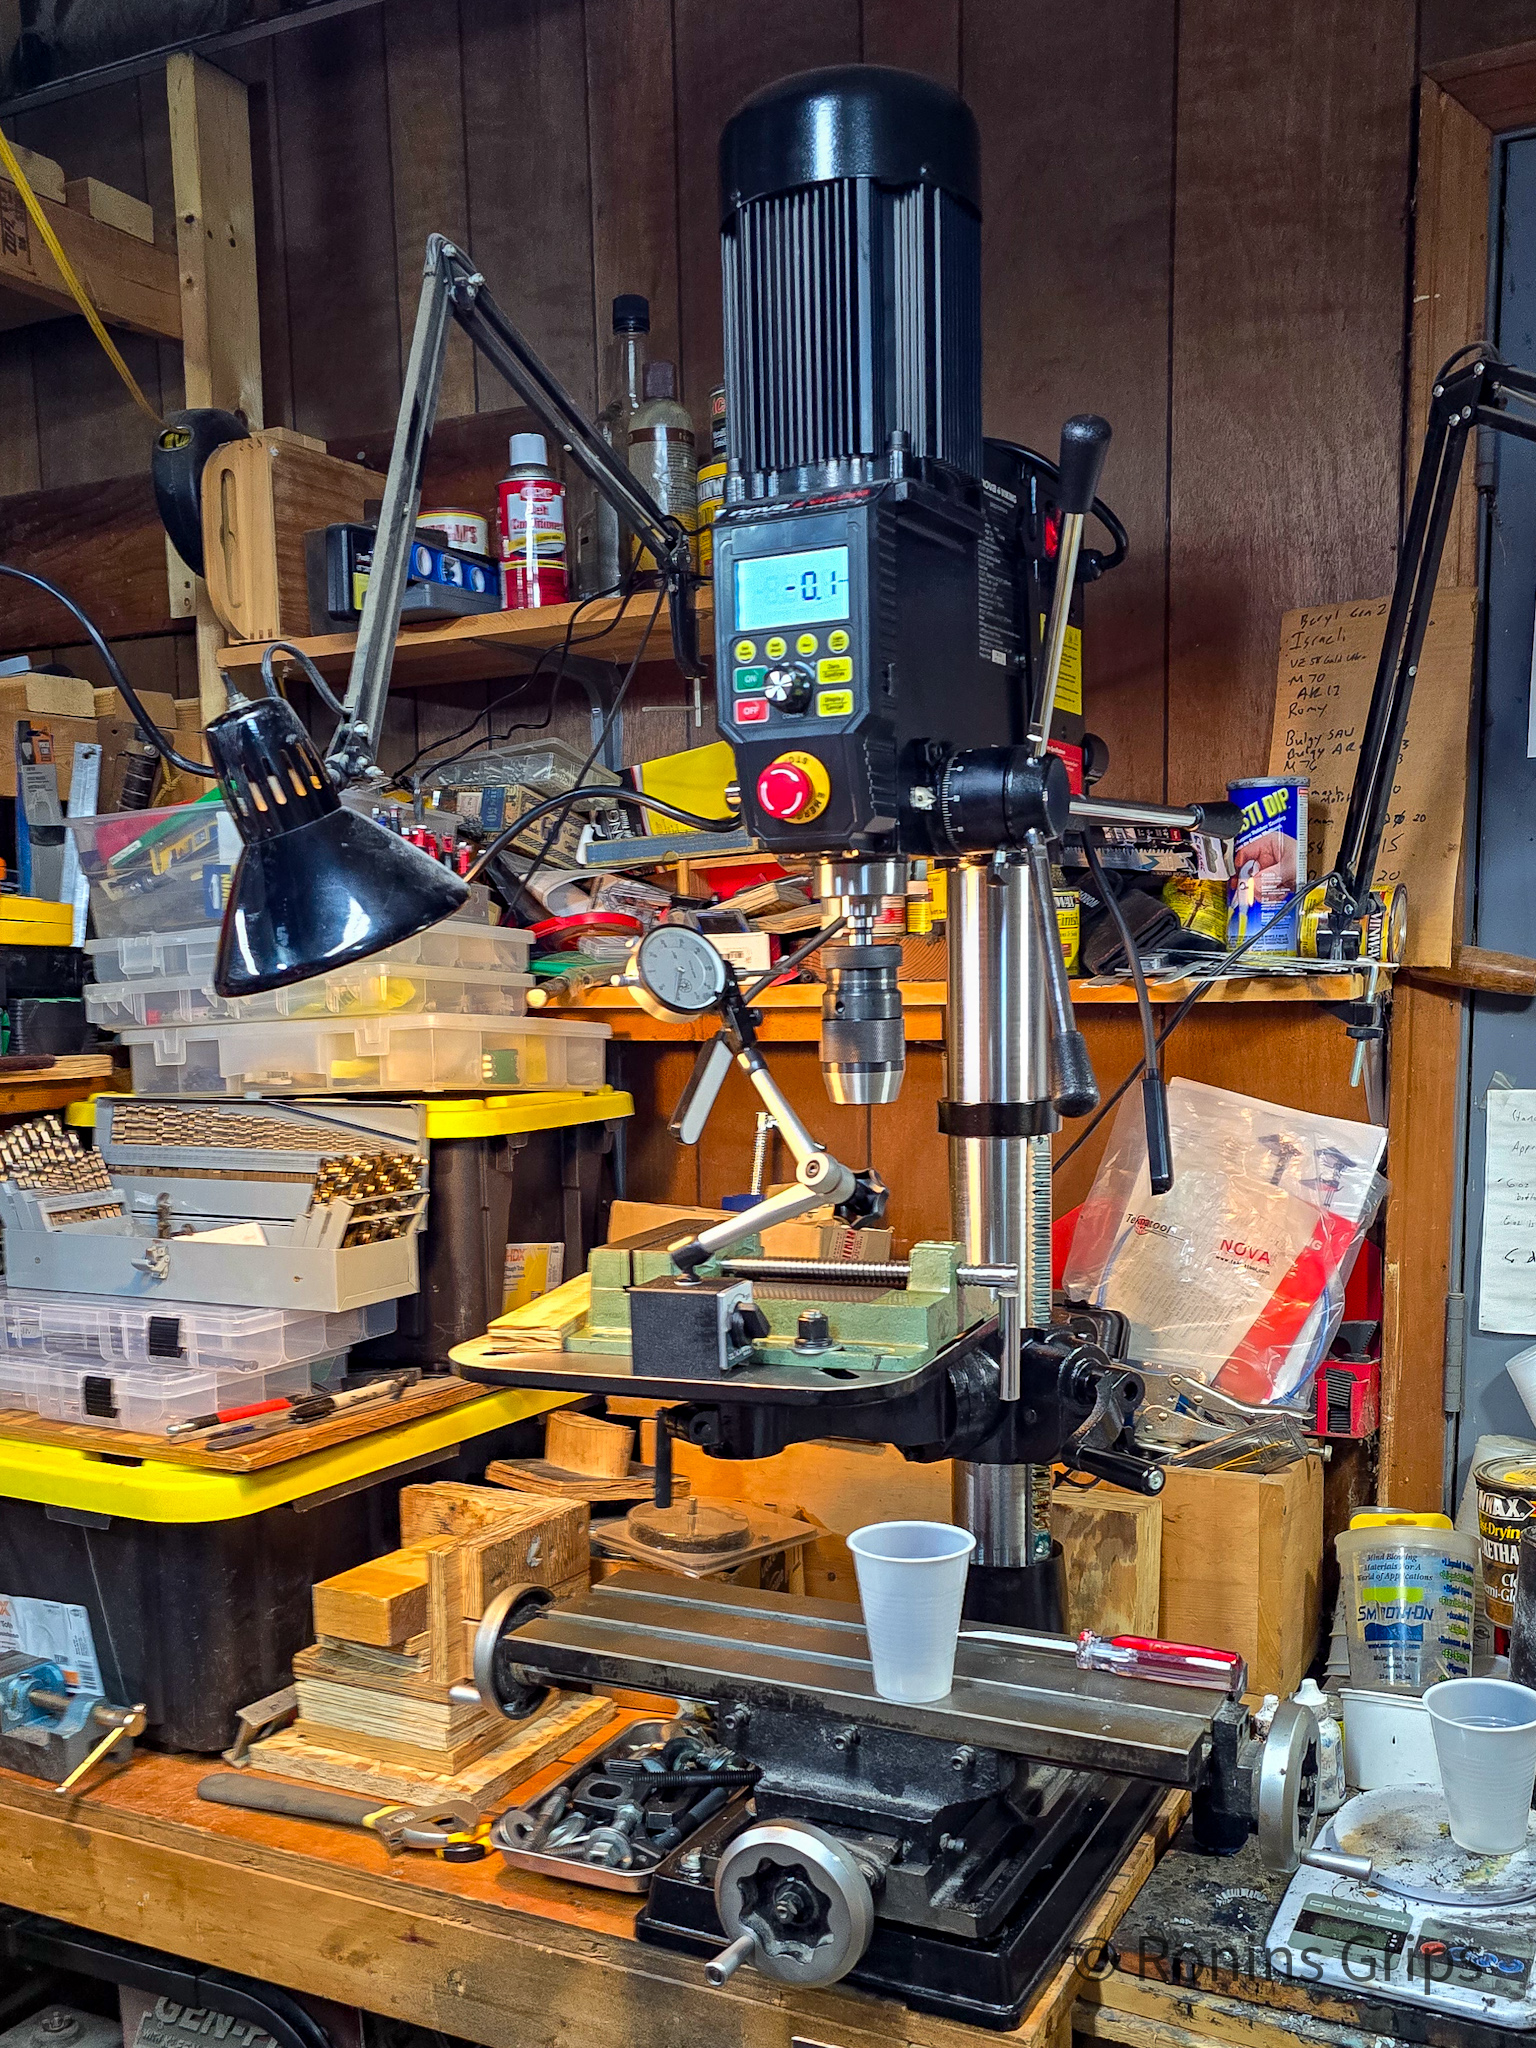
Now, I need to point out that spindle to table measure of 12-2/3″. That actually was too short if I set my XY table and jobs on it. The HF unit had a far bigger maximum spindle to table distance because the base and table collars were far smaller / less beefy than what the Viking has. The way I worked around this was to mount my XY table on the base and not the table and I had to make some of my jigs taller. This actually worked out really well because I can swing the table out of the way and use the XY table for my grips where I need adjustable precision. When I want to drill something ad hoc, I remove the jig from the XY table, and swing the drill’s own table back into position,
The Arrival
Honestly, it arrived in great shape via UPS. I saw the UPS truck pull in and I directed him where to drop it off and helped him. I knew it was going to way a ton and didn’t want him to either drop it or get hurt.
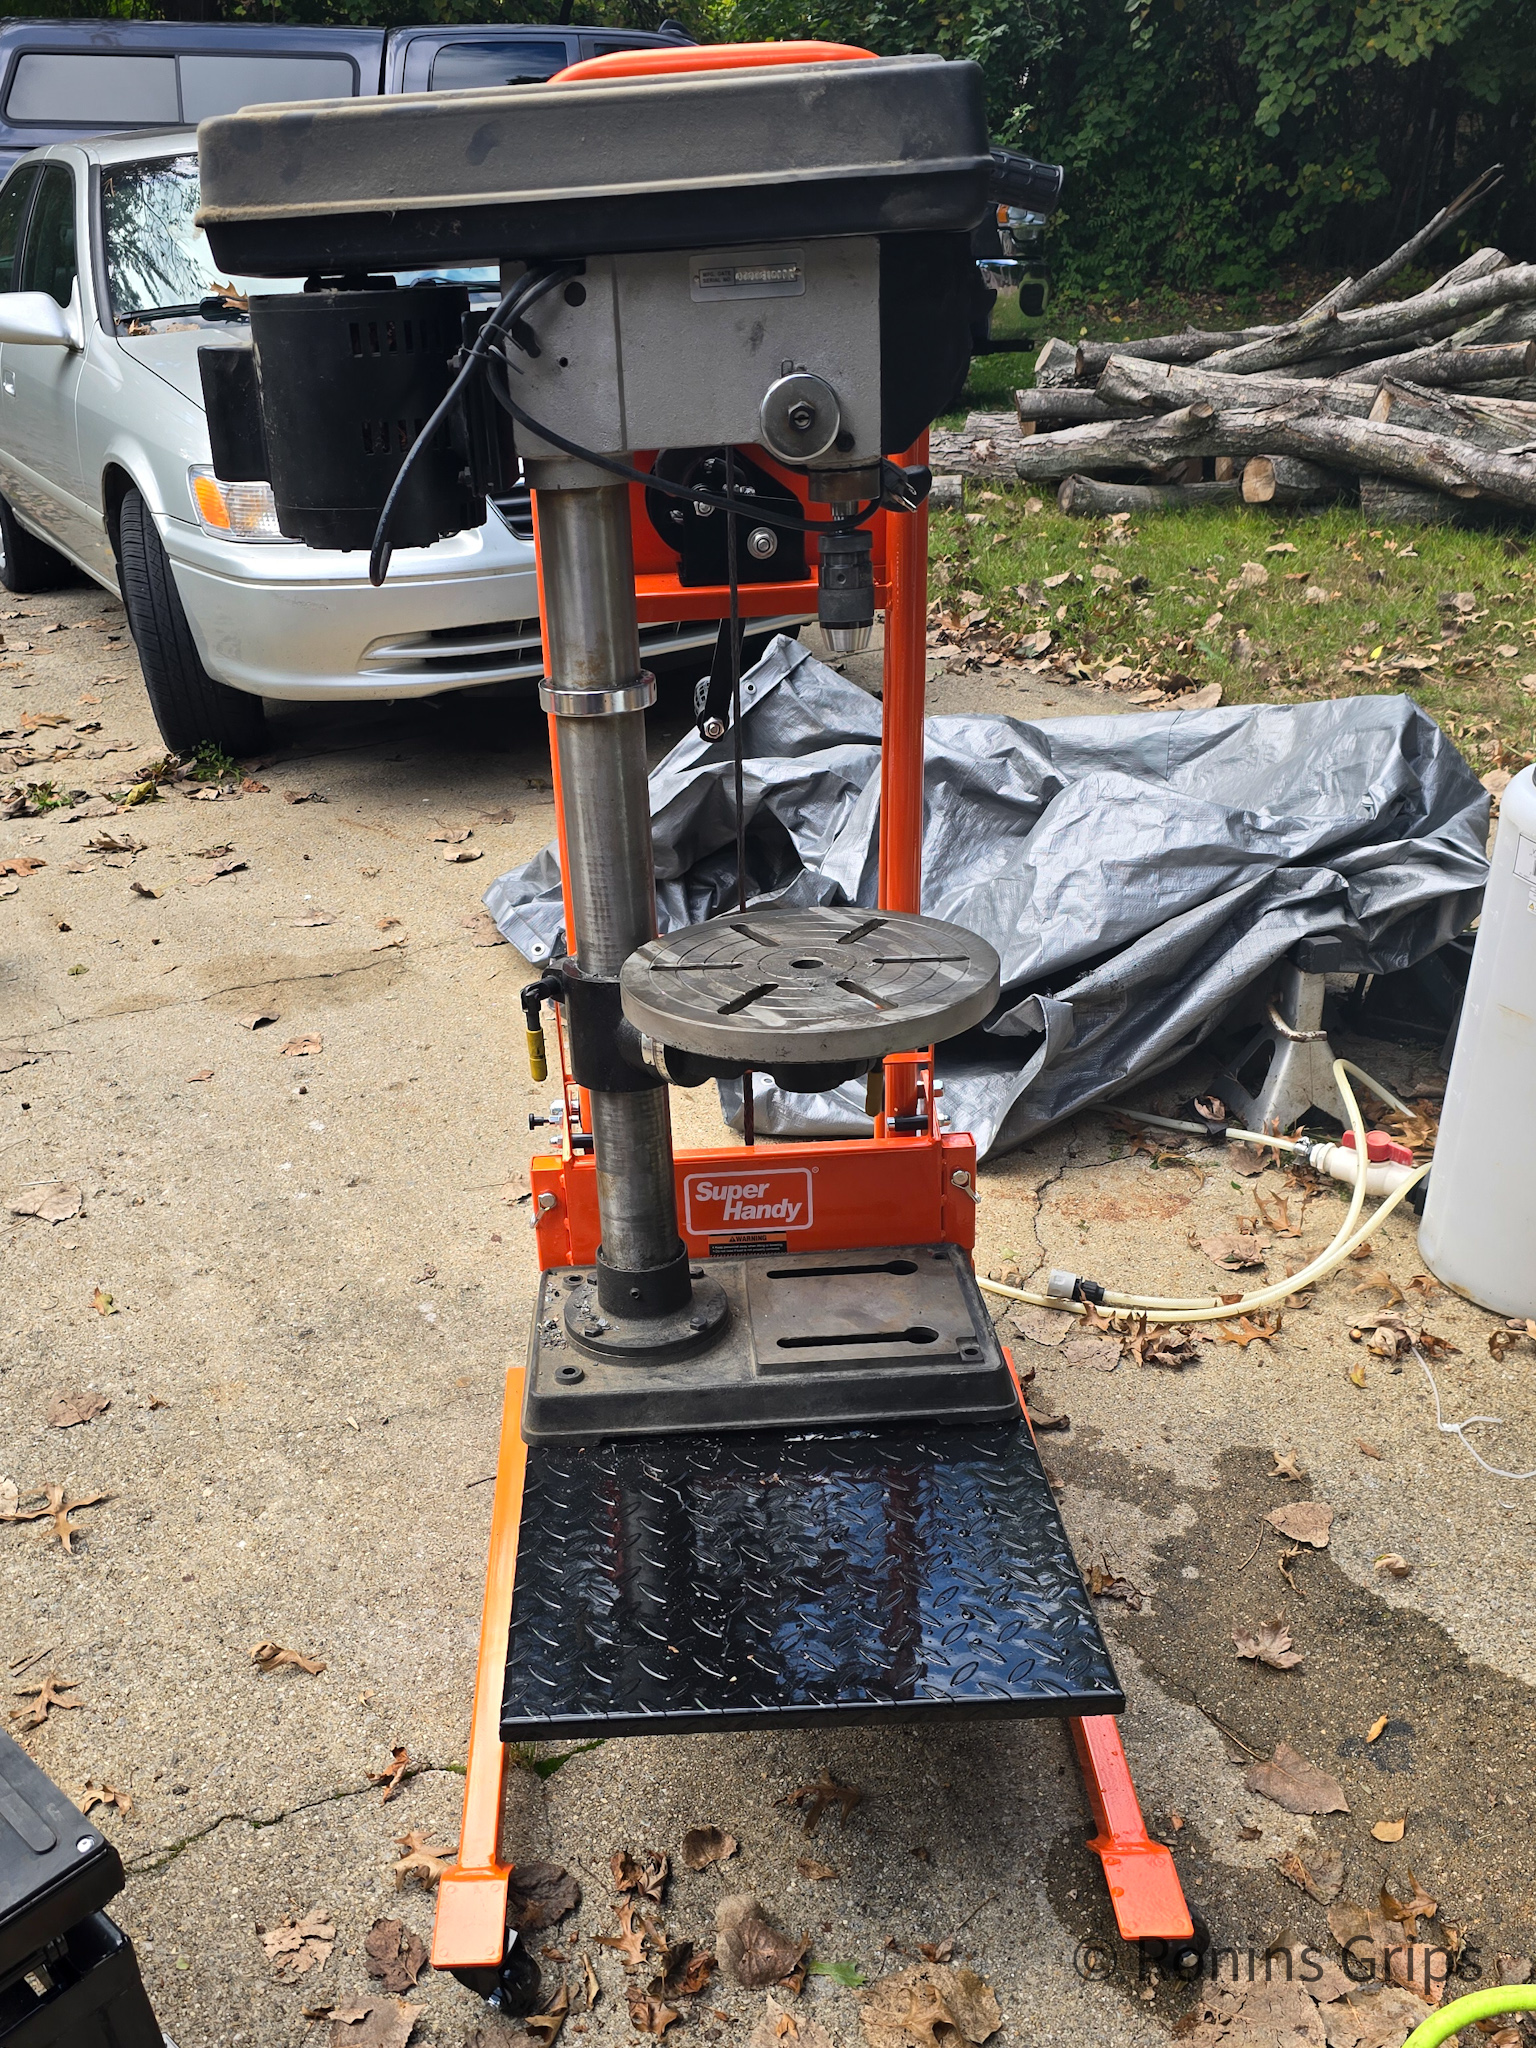
Moving Heavy and Awkward Drill Presses
The first thing I needed to do was to remove the old HF drill press. It weighed in around 100 pounds back and in the day and with my back as screwed up as it is, I needed some way to get it out and whatever I used had to fit in a tight area.
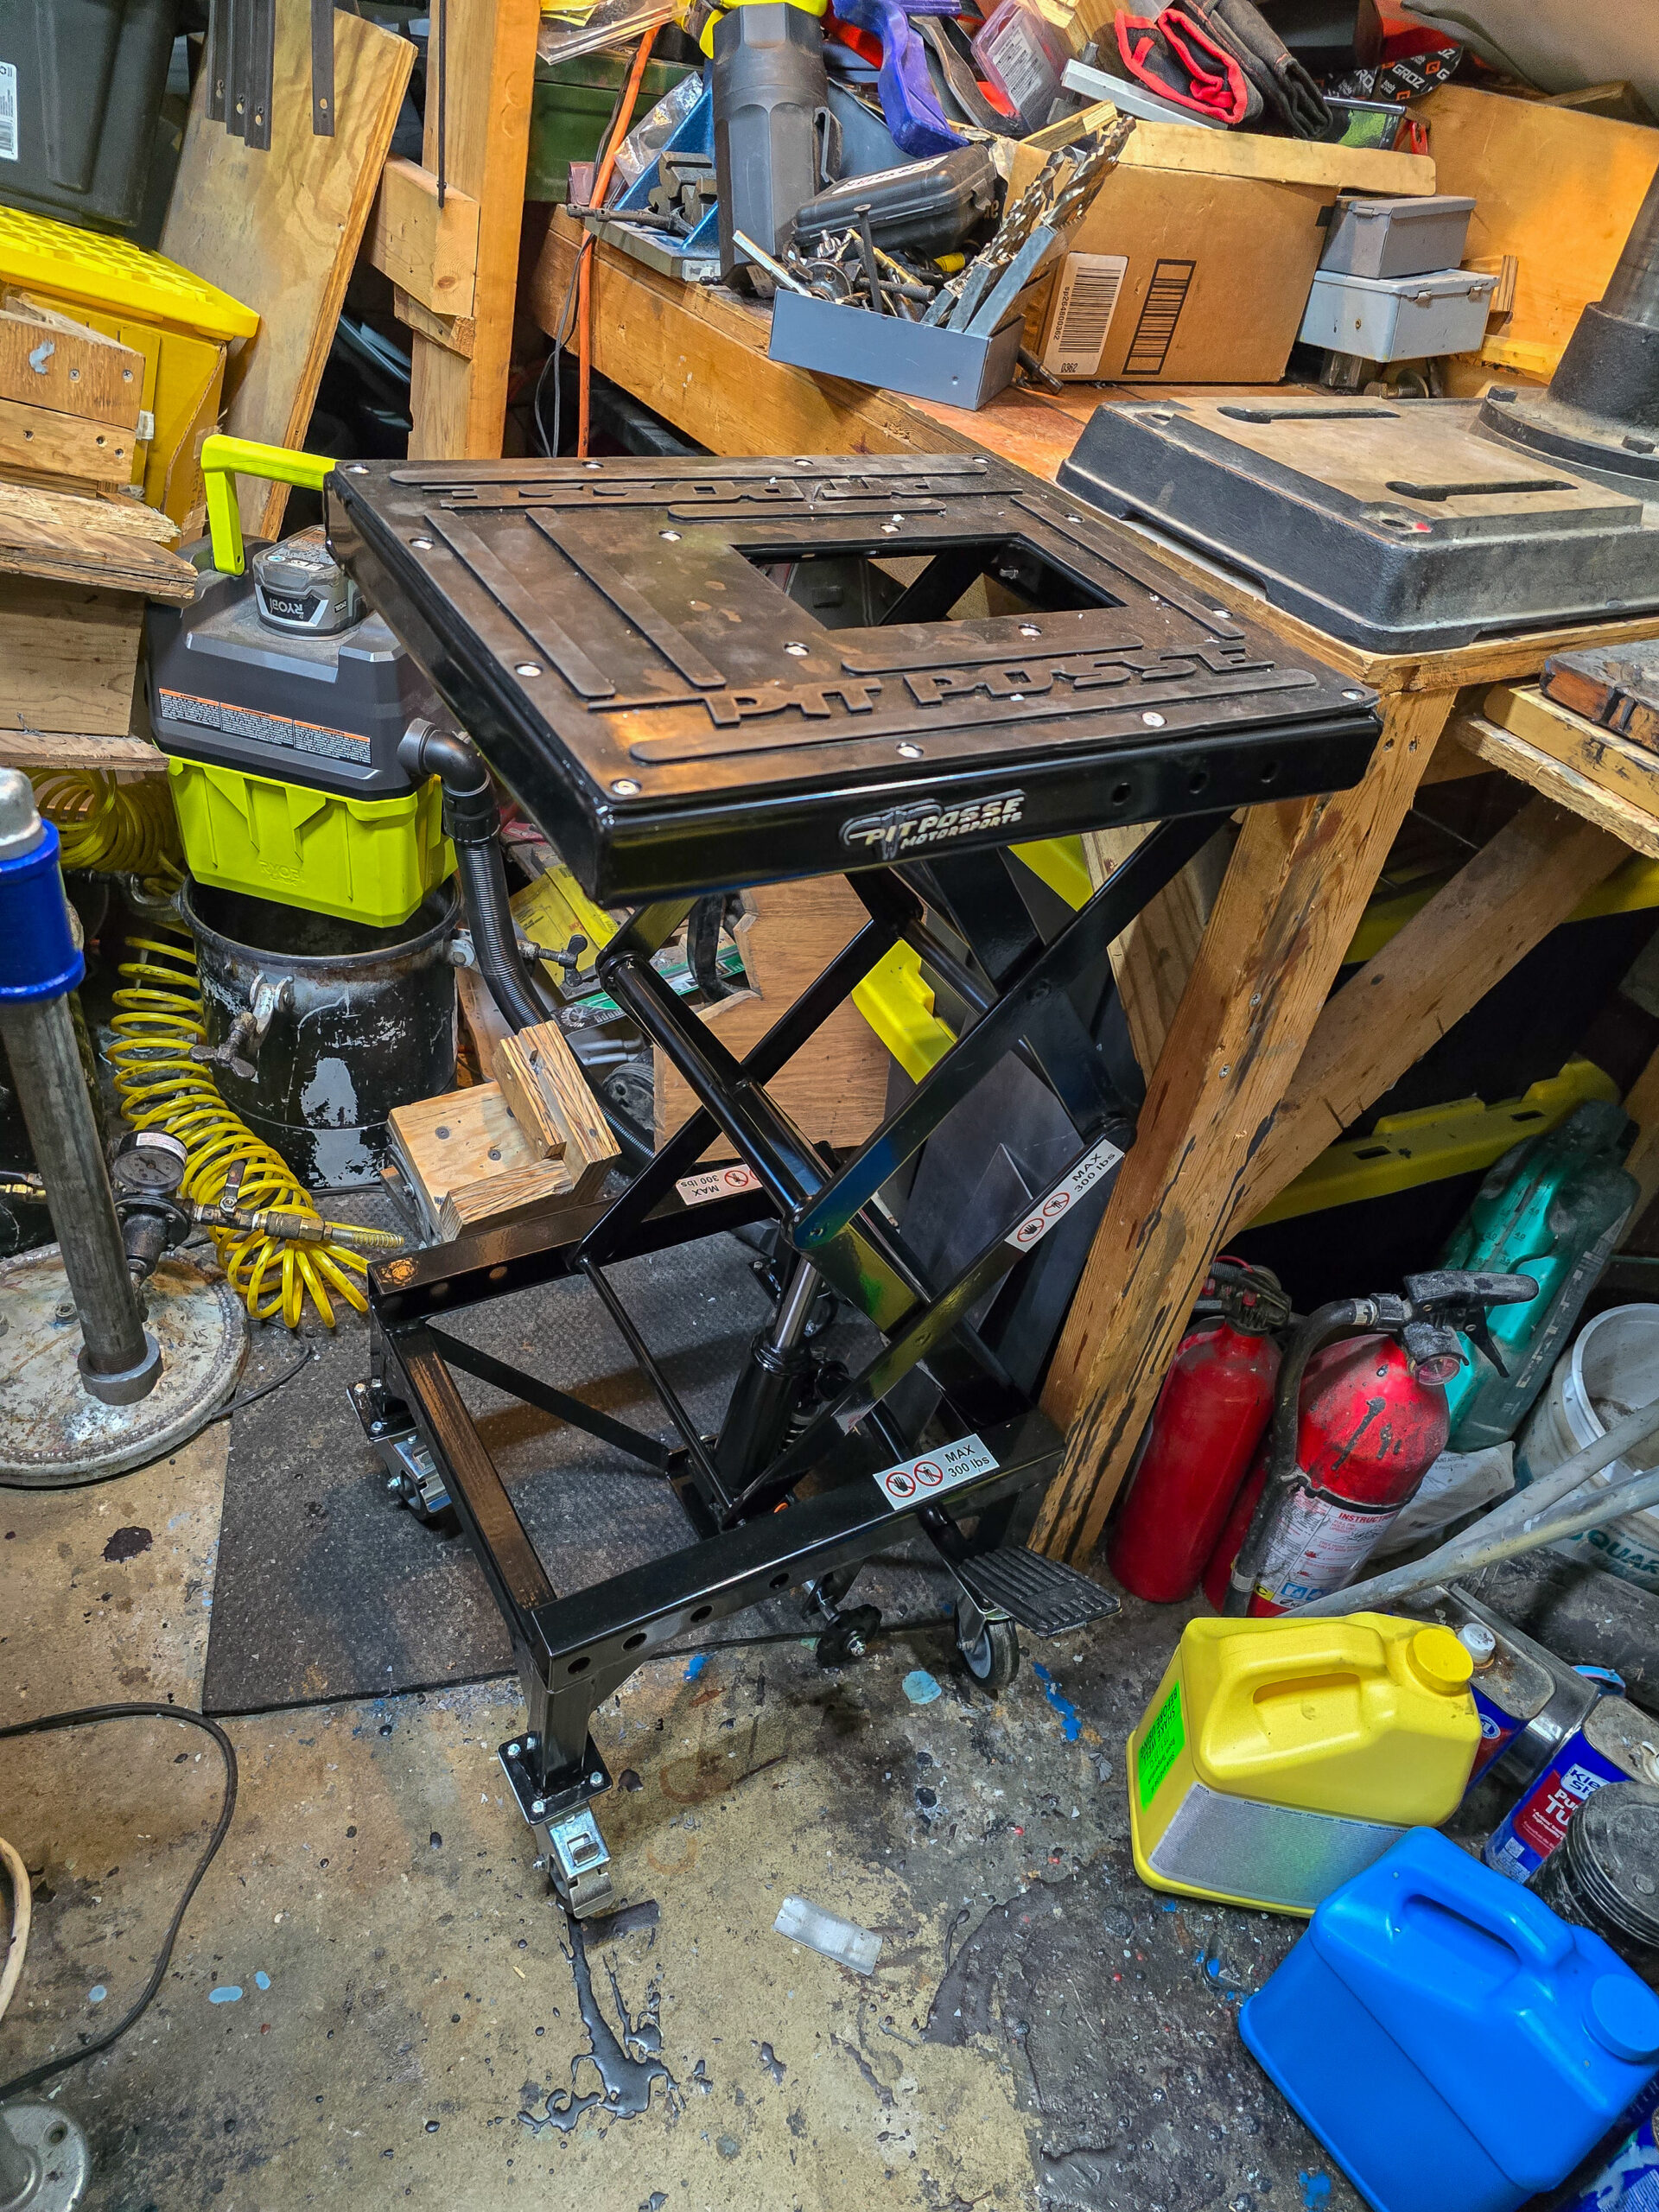
I’d done some research and ordered a Pit Posse PP2551S Motorcycle ATV Scissor Floor Jack Lift Table … Amazon descriptions are often a mile long to squeeze in keywords for searching but bottom line this is a nice small lift. It’s area is about 20″ x 18.5″ and it can go up about 36″ with 300 pounds. I read guys used this to move different stuff besides motorcycles and it worked great. I used it both to remove the old HF and wheel the much heavier Viking into position.
I bought the Pit Posse lift of Amazon and really like it. I do find it odd that the hydraulic bleed valve knob hits the foot pedal just a bit but it wasn’t a big deal. That has been my only “nit” about it. The counter is about 33″ off the ground so you have an idea.I was able to easily slide the drill on all by myself. Like any bottle jack. just barely open the bleed valve and the load will slowly go down. By the way, it has a set of locking casters to once I locked them, the unit didn’t move as I walked the press onto the lift table. Once I unlocked the casters, I was able to easlily move the old drill out the of shop.
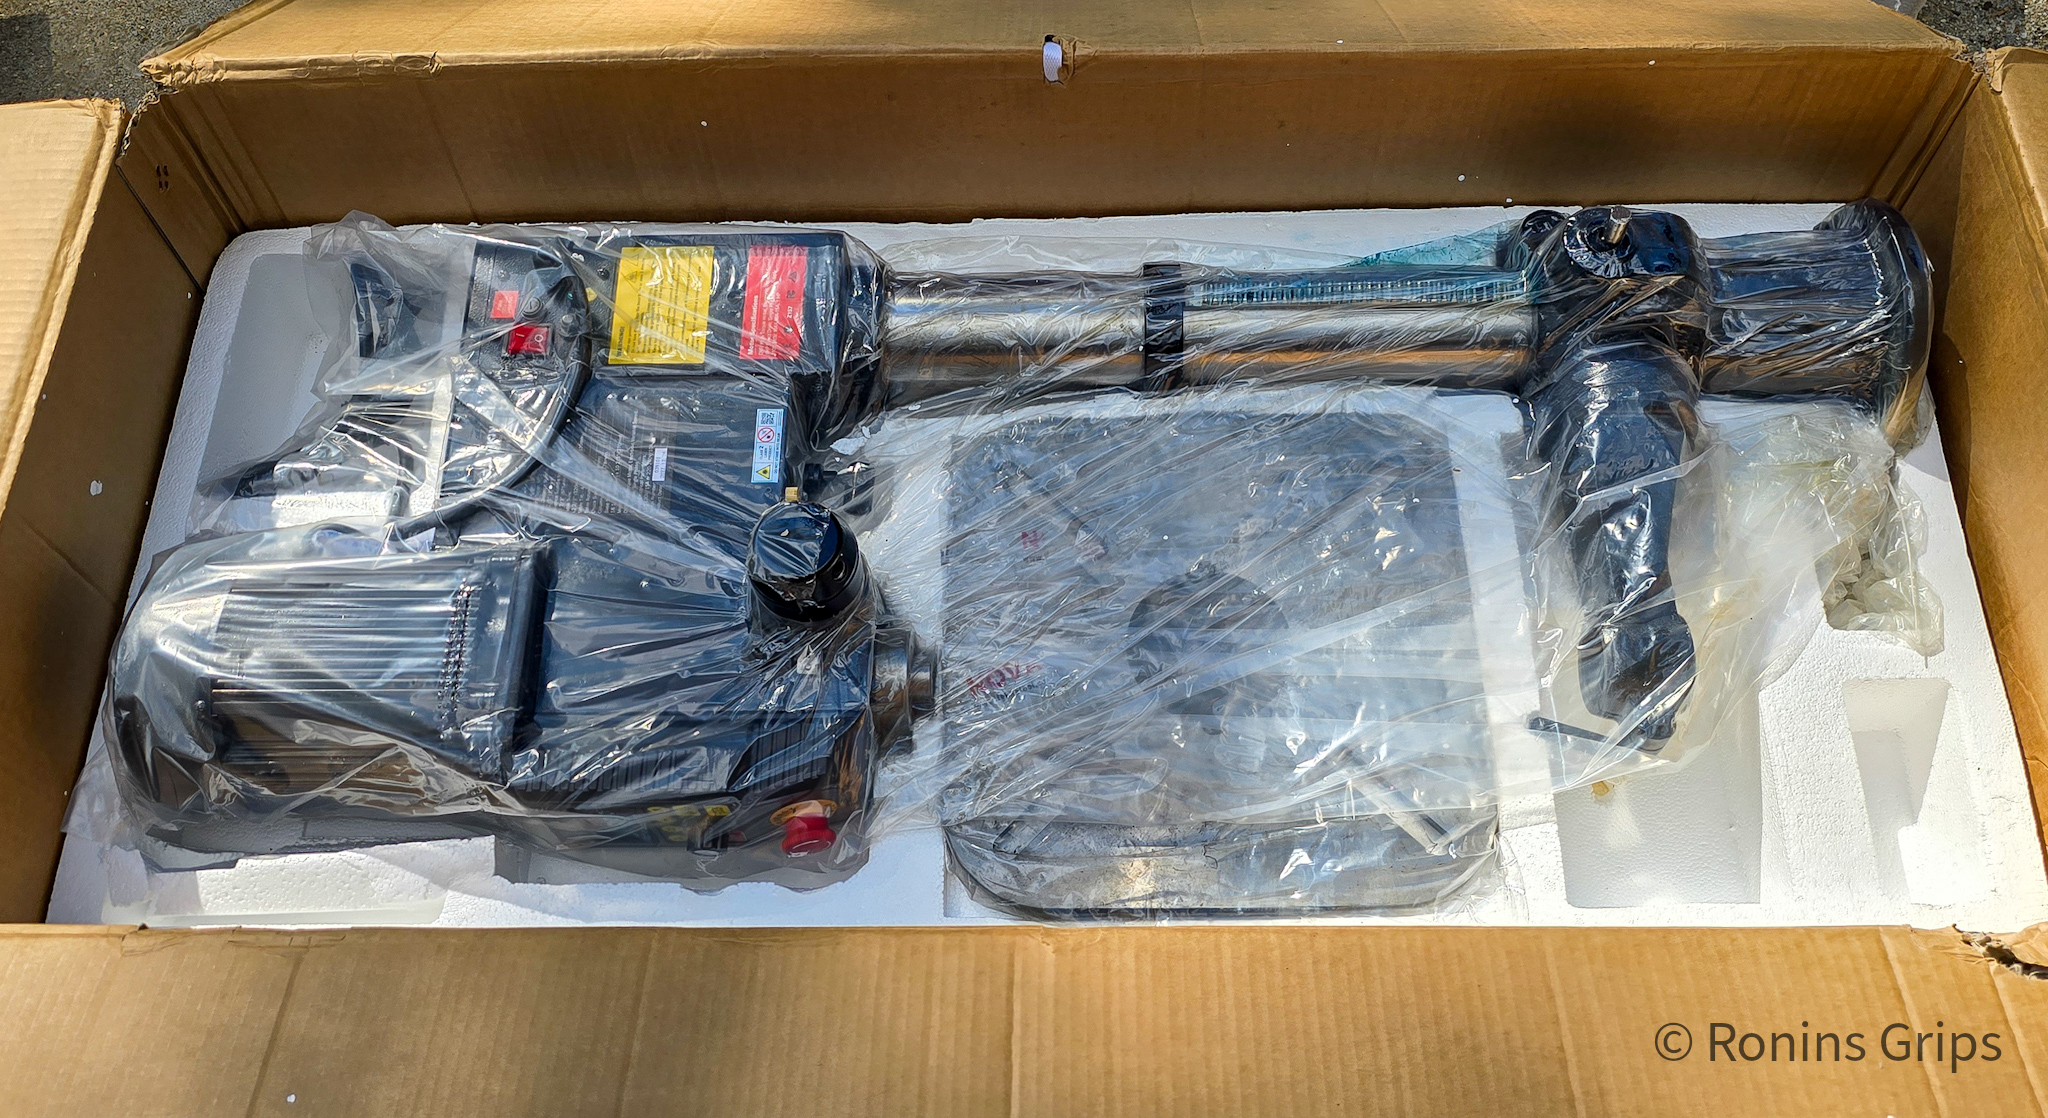
Unboxing and Assembling the Viking Drill Press
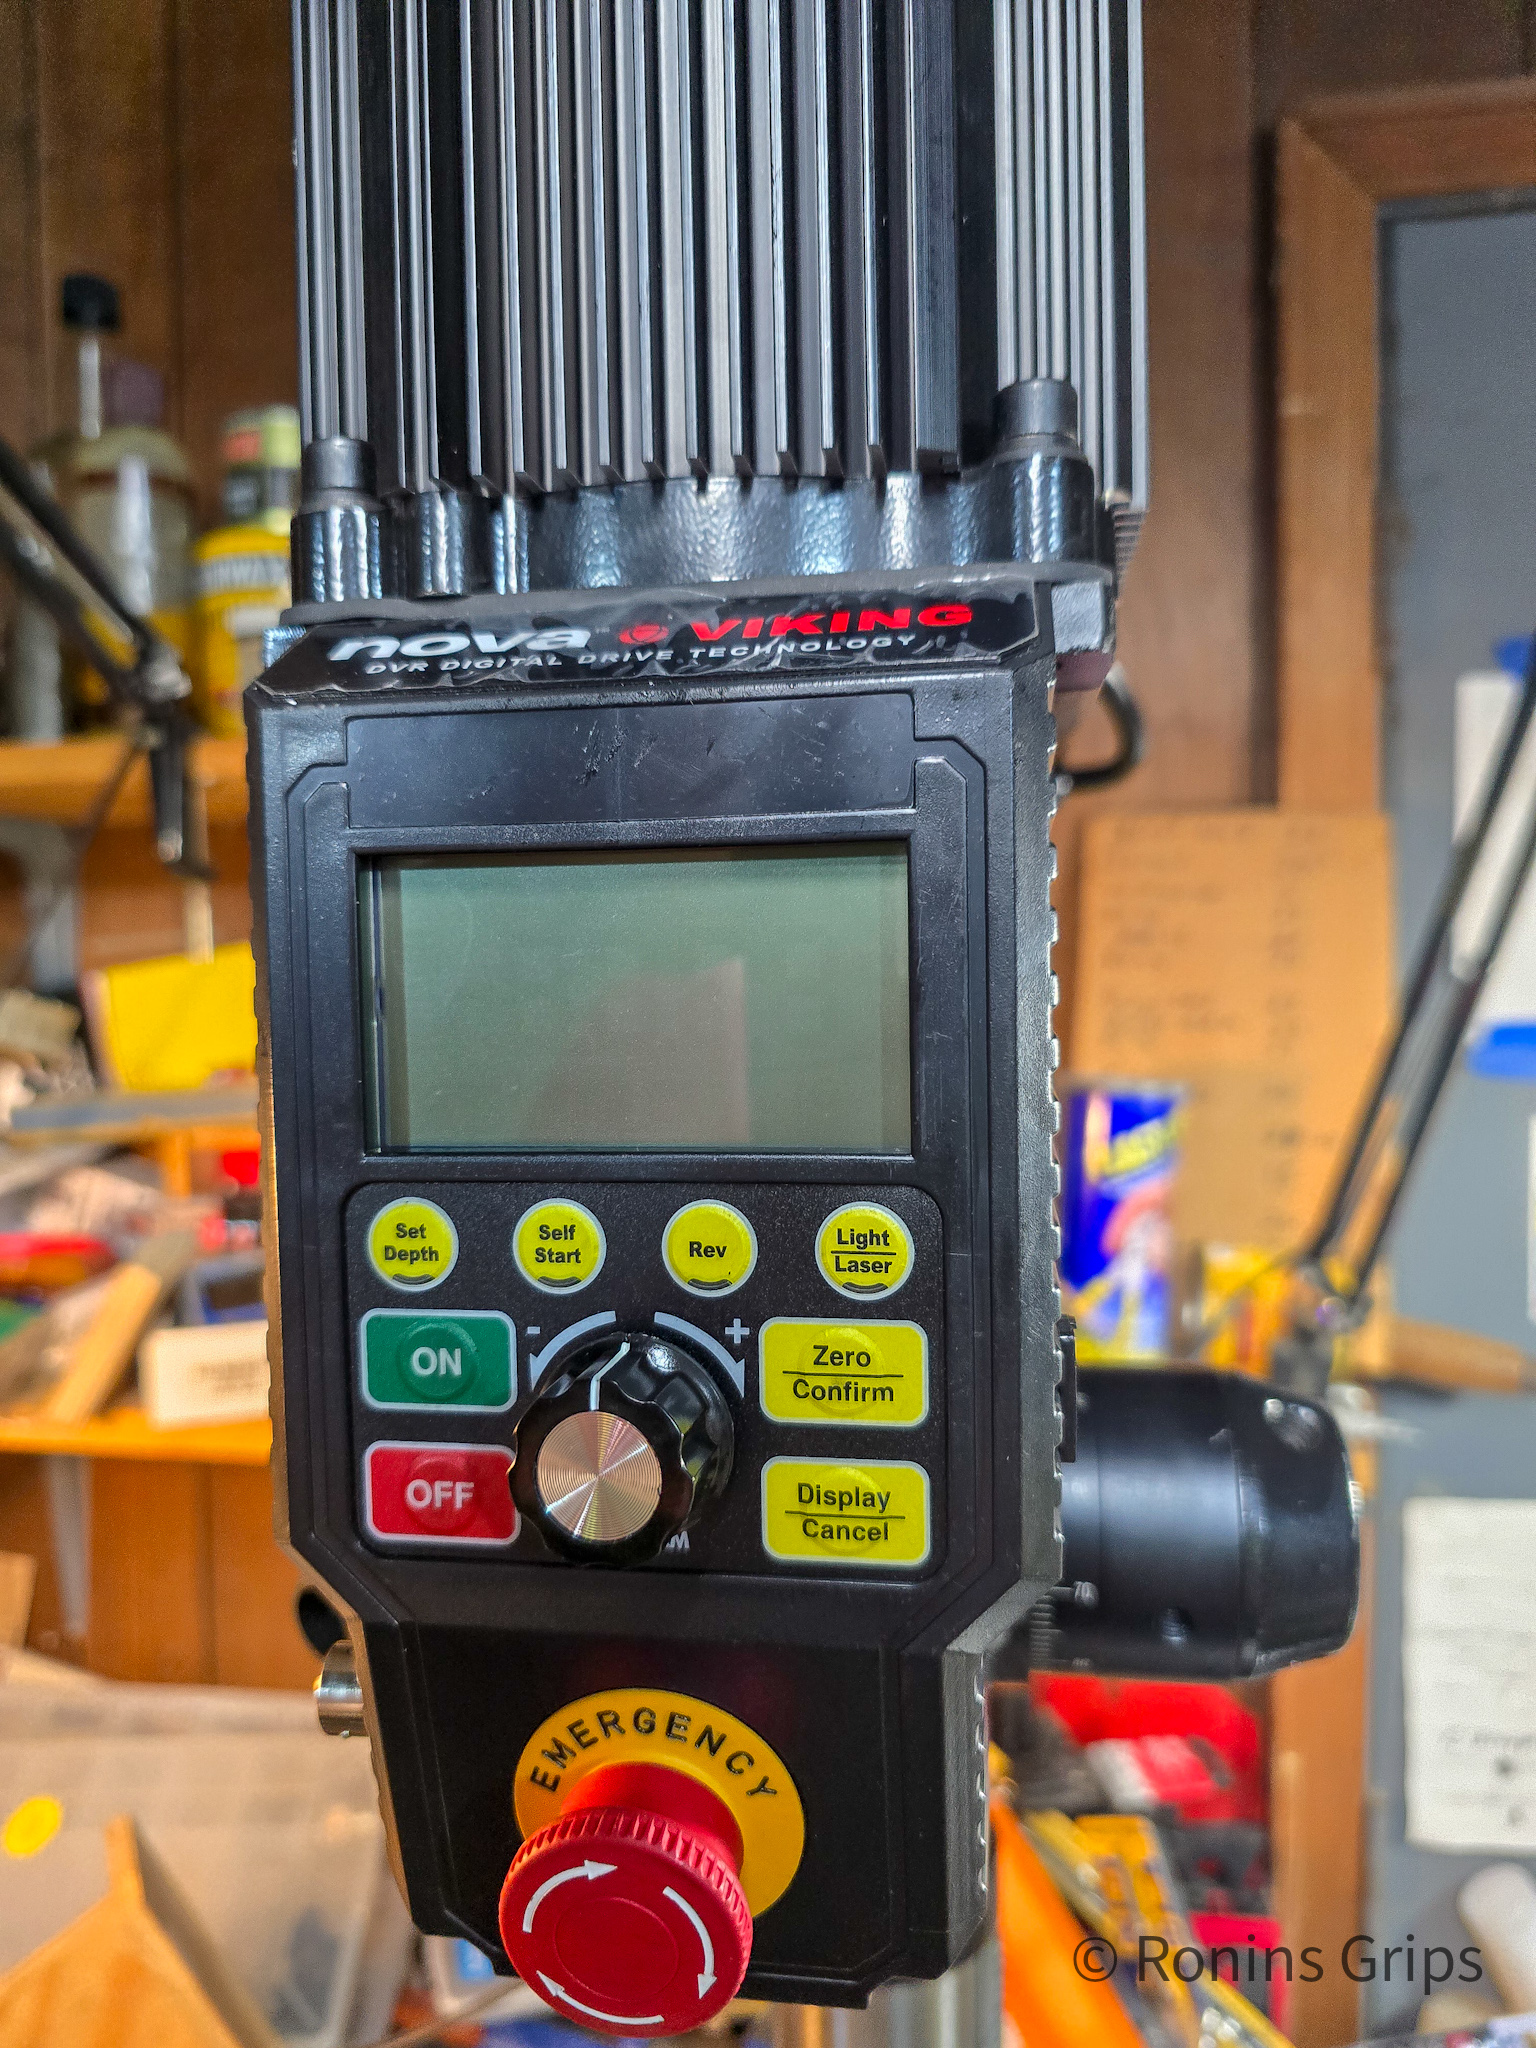
This is the first tool I’ve bought where they require you to install a large surge protector. I’ve always thought it was a good practice to do it, but here they require one that is rated for at least 2900 joules to protect the DVR motor’s electronics. I bought a Tripplite TLP18TTUSBB 12 outlet model to protect it. I worked in IT for many years and Tripplite units never failed us. It is rated for 4,320 joules and has its own insurance for $150,000 of equipment protected. Click here for it on Amazon. Note, if you are installing the drill on a GFI protected circuit, they mention it needs a leak current threshold rating of 300 mA / 0.03 amps so the DVR doesn’t trip it I guess so check your ratings. I don’t have the drill on a GFI circuit so I did not need to worry about that.
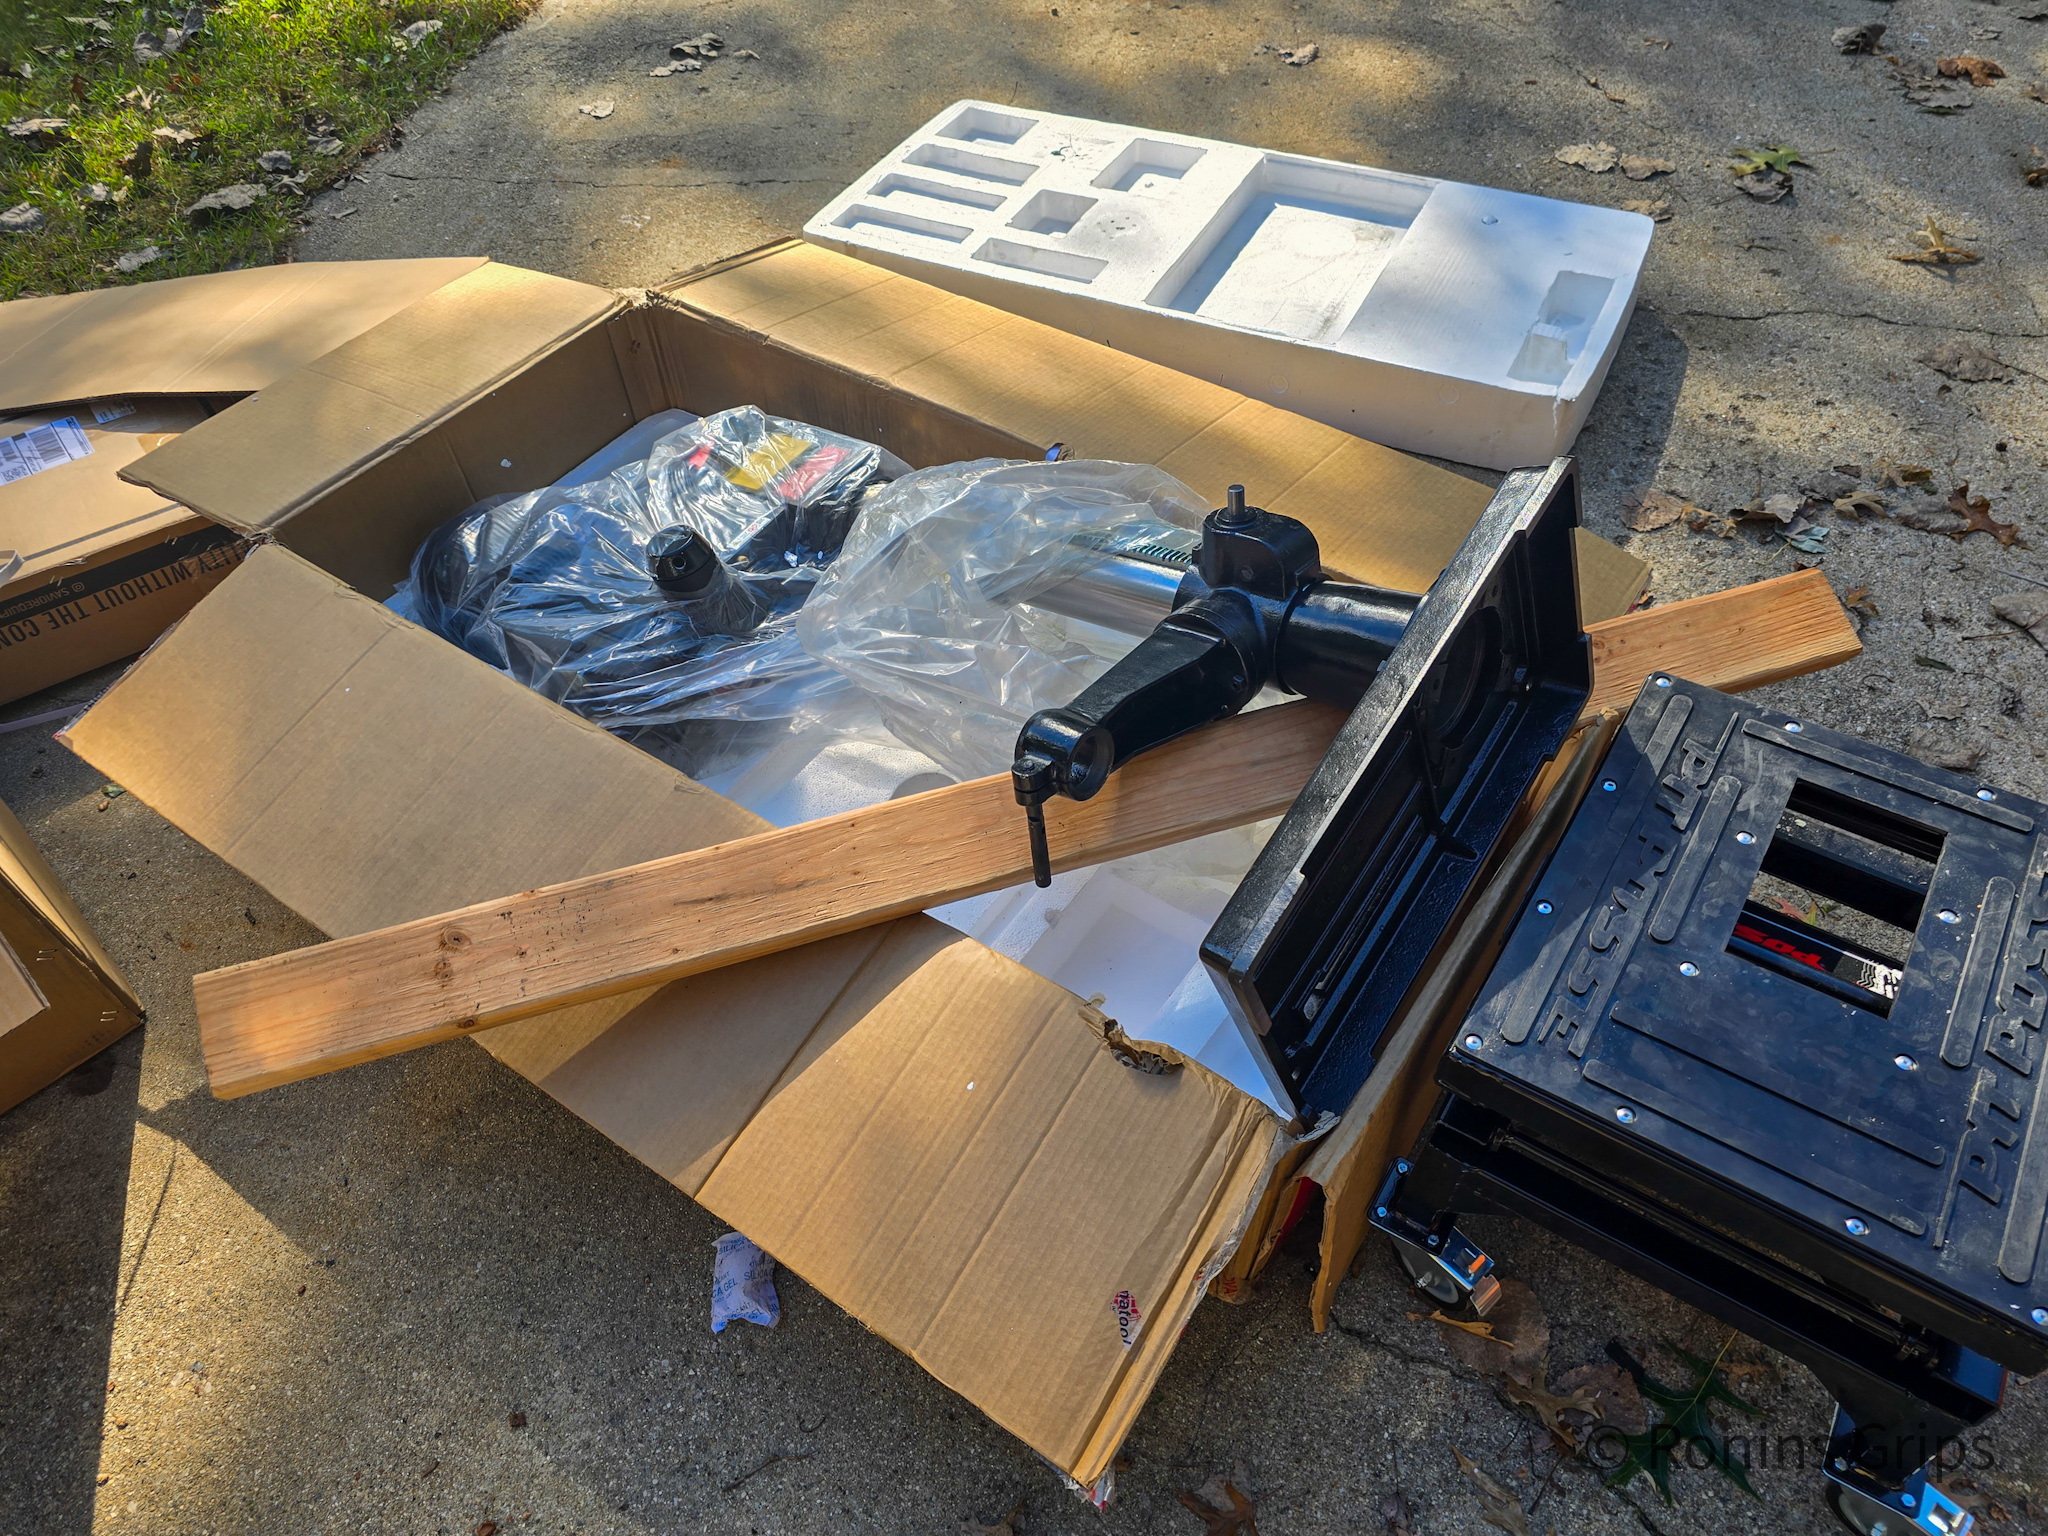
With the old drill press out of the way, it was time to unbox and assemble the Viking. Let me tell you, it’s super easy. You basically bolt the upright portion to the bottom table. Now it was big and awkward so I used the foam packaging to help me lever the assembled until up onto the Pit Posse table.
I had already removed the top layer of foam with the base. Everything was packed very well. You really have minimal assembly to do.I laid a 2×4 across and propped up the column so I could bolt on the base.I then pivoted the whole assembly up onto the Pit Posse lift table. Note, I did put a piece of plywood on top the Pit Posse first so the base would be fully supported. I could then easily wheel the unit into the shop and placed it on the bench. Note, I did not install the table until the unit was in place.It’s a tall unit with the motor installed like that. I bolted it down to the table to make sure it wouldn’t move. Because the bottom mount of the column was so beefy and the collar for the table, the distance from spindle to table was far less than the HF drill that was actually shorter overall. Yes, I did clean up the area when I was done.Remove the decal and ensure the E-Stop button is disengaged before you turn on the unit or you will wonder why you have an error message right off the bat.
Testing
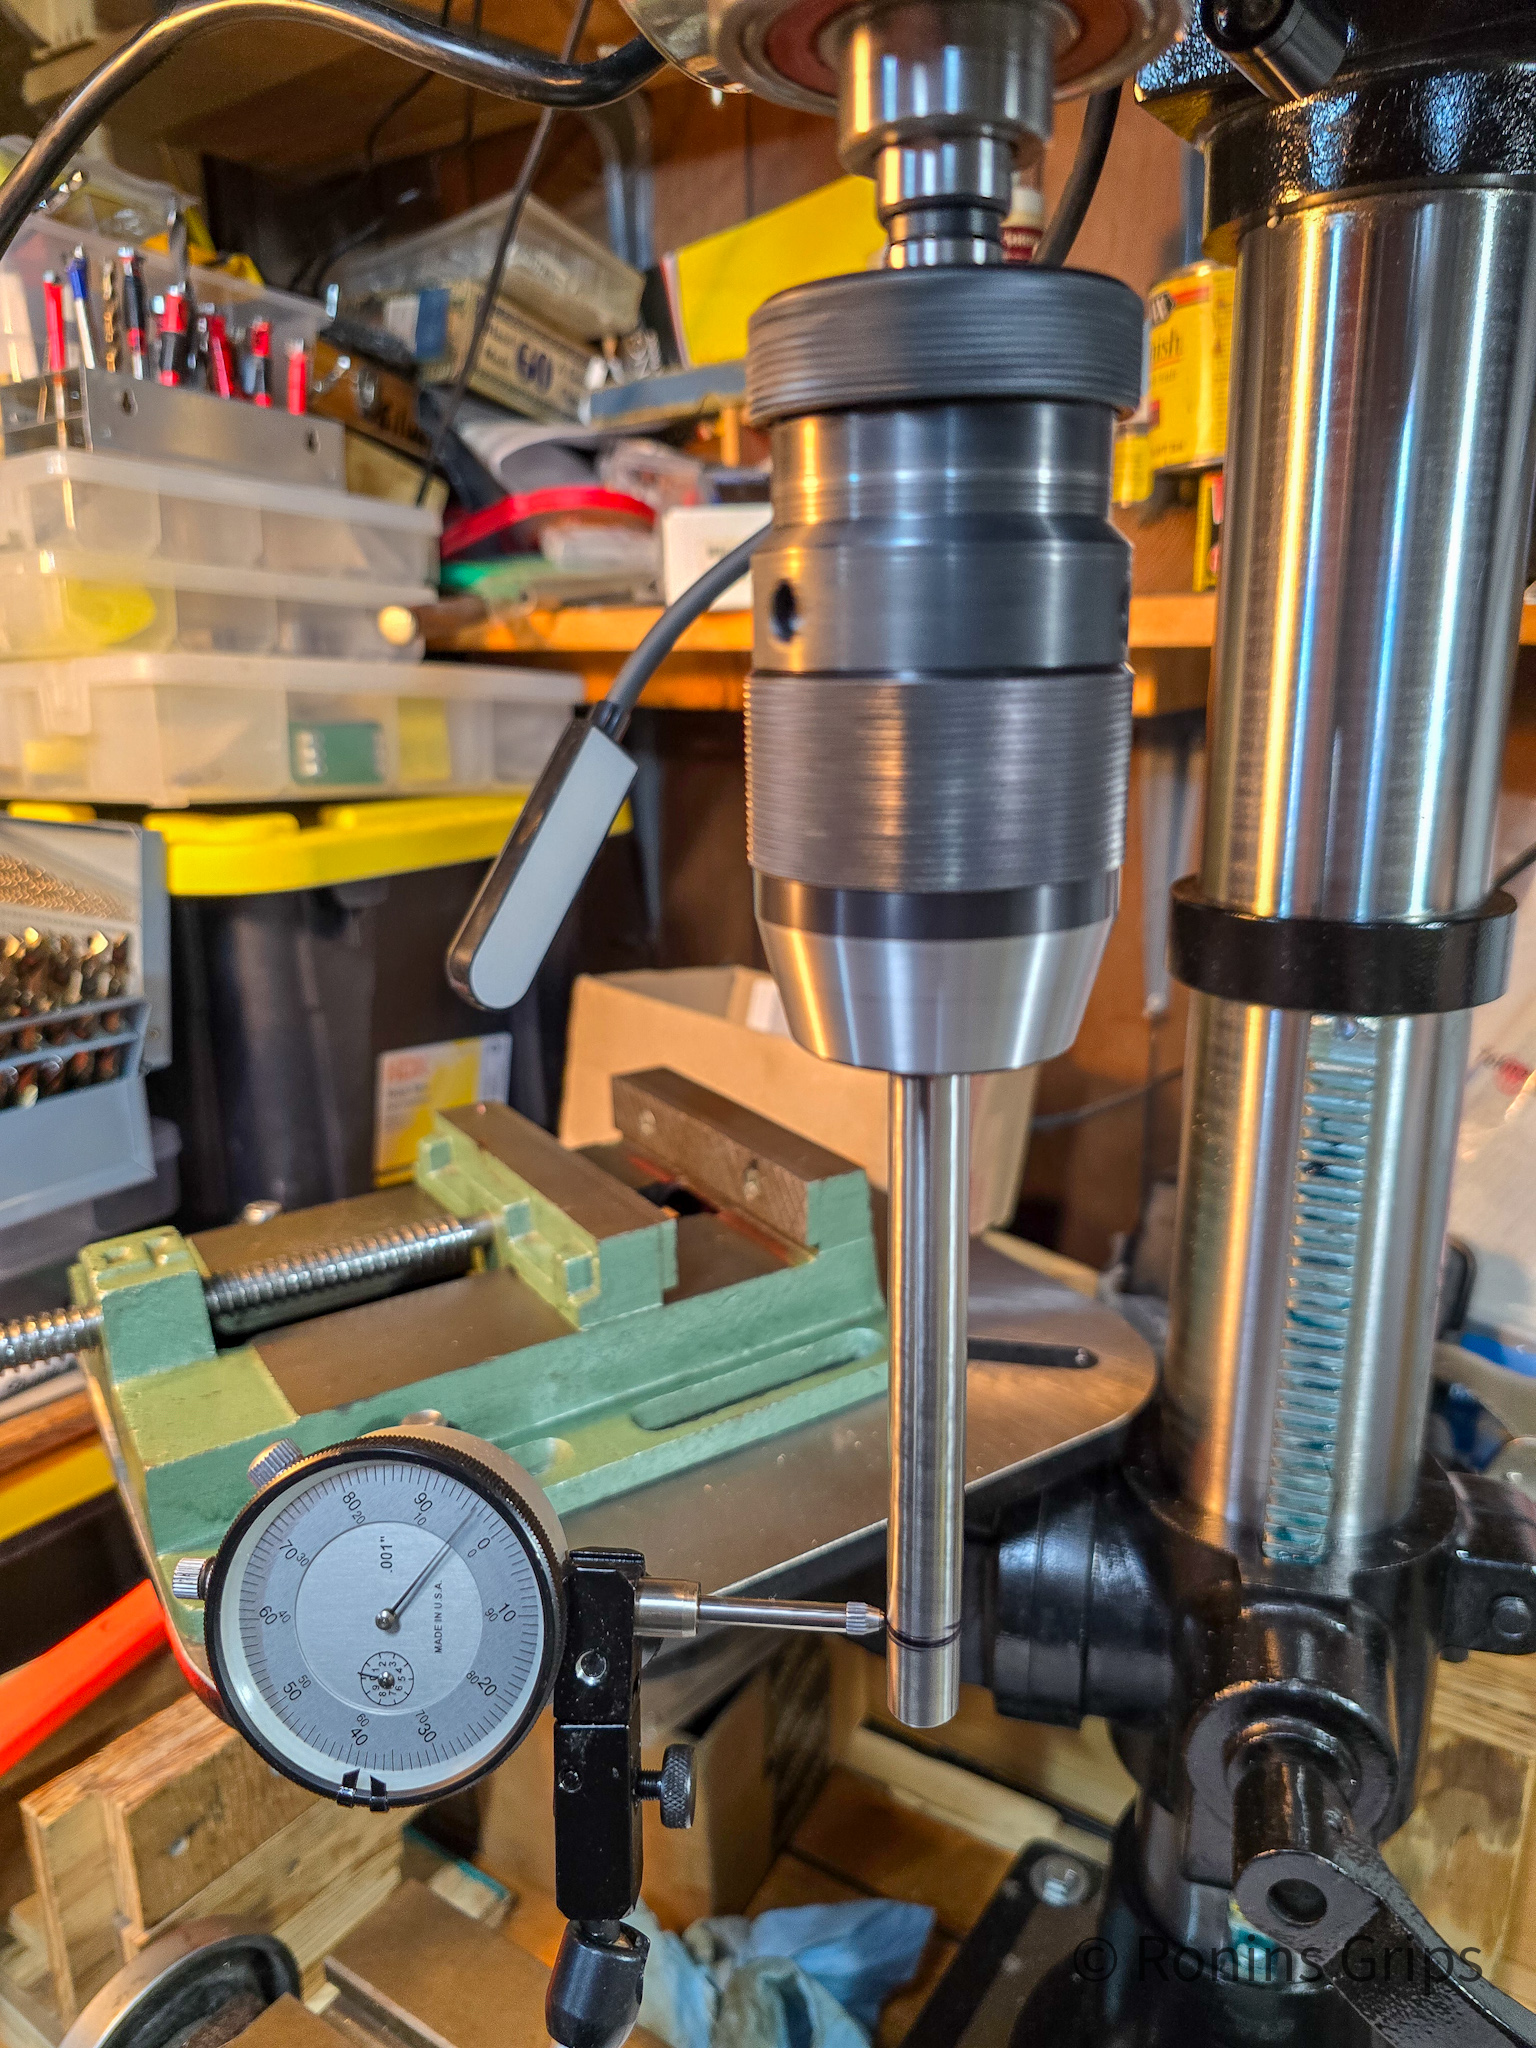
Okay, I installed the chuck, inserted a bit and expected magic. Instead, I watched a bit turning in an orbit. In other words, so much runout I could see it and I had a serious WTF? moment. I then followed Teknatool’s guidance and measured runout at various points and everything was within spec except for the chuck. Teknatool has you insert a precision ground rod, and measure runout at 100mm below the chuck.
I did some digging at that point and somehow I had missed comments that it was a great drill press with a marginal chuck. I had bought their keyless chuck also so I installed it and still wasn’t impressed. I literally tried five chucks before I settled on the one I am using now. Let’s go through each and the measured runout measured at 100mm below the chuck using a precision ground 1/2″ rod. To be in spec, the target was to be 0.18mm:
Chuck
Runout
Notes
Original Chuck
Awful – didn’t record it. I could see the bit turning in an orbit that is how bad it was.
Nova Keyless Chuck
0.279mm
Still not happy and am not going to recommend it.
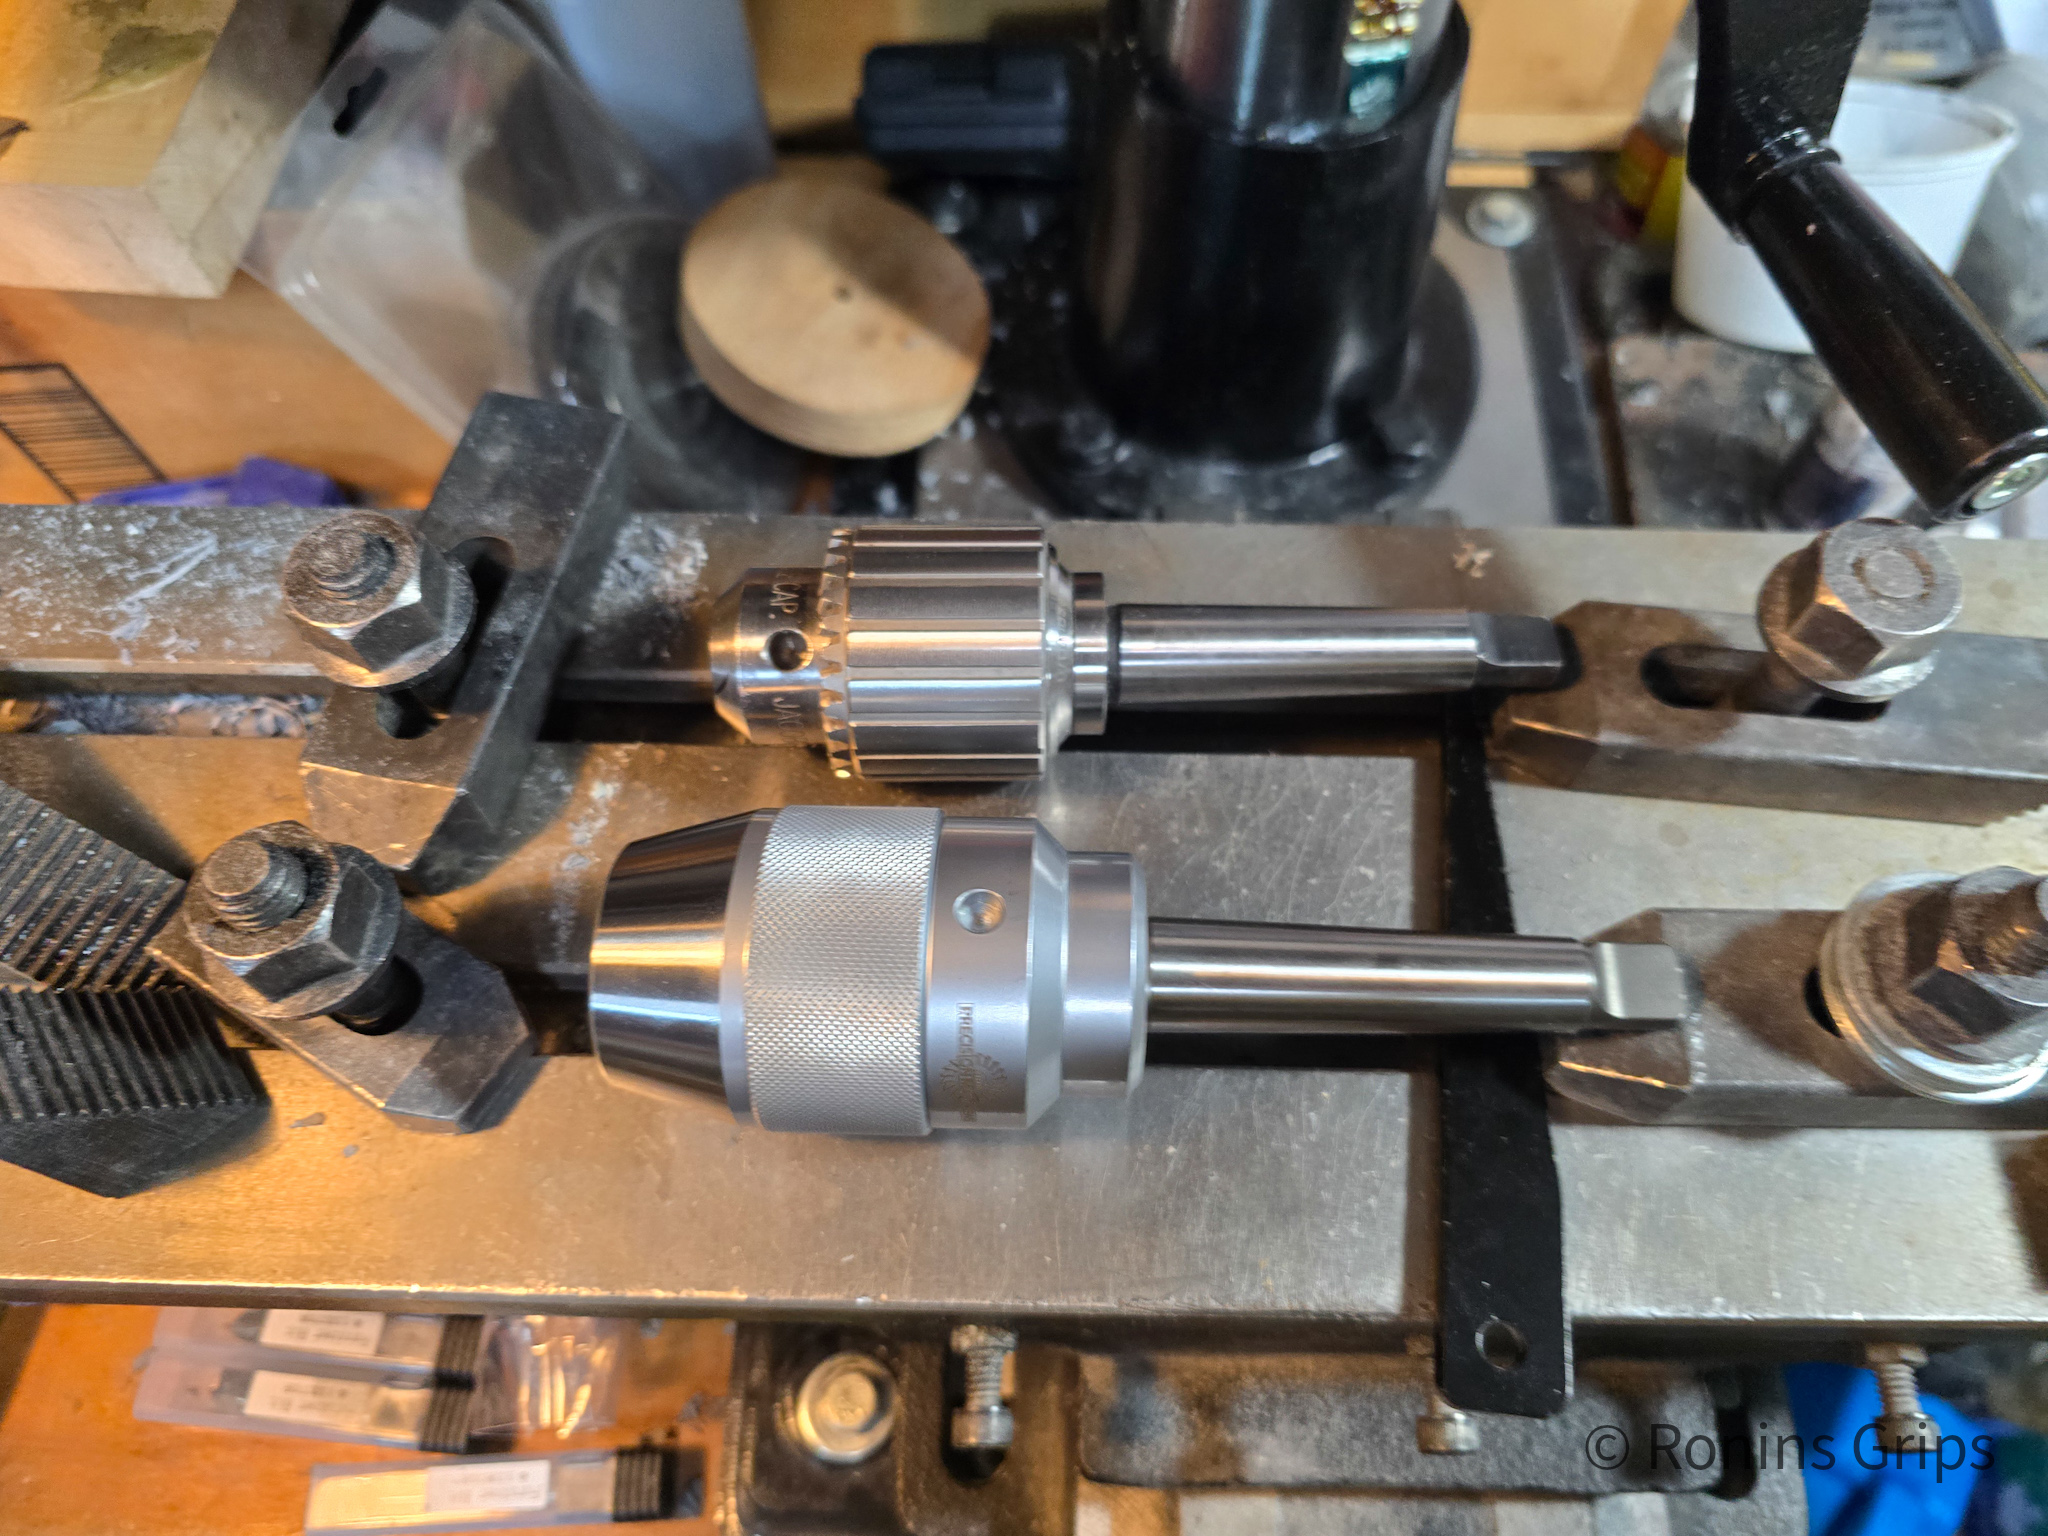
Jacobs Model 33 Chuck (I have heard not so good comments about current Jacobs chuck quality so I am not going to link to them)
0.006mm
I bought this in 2016 and has an integral taper. It’s decent in terms of runout but you must use a key with it and I really wanted keyless. $60 back in the day.
WOW. I would have used this but it would have required I used the spanner constantly as the Viking doesn’t have enough resistance when off to hold the spindle in place when you turn the chuck. At $119.99, it’s hard to beat the price.
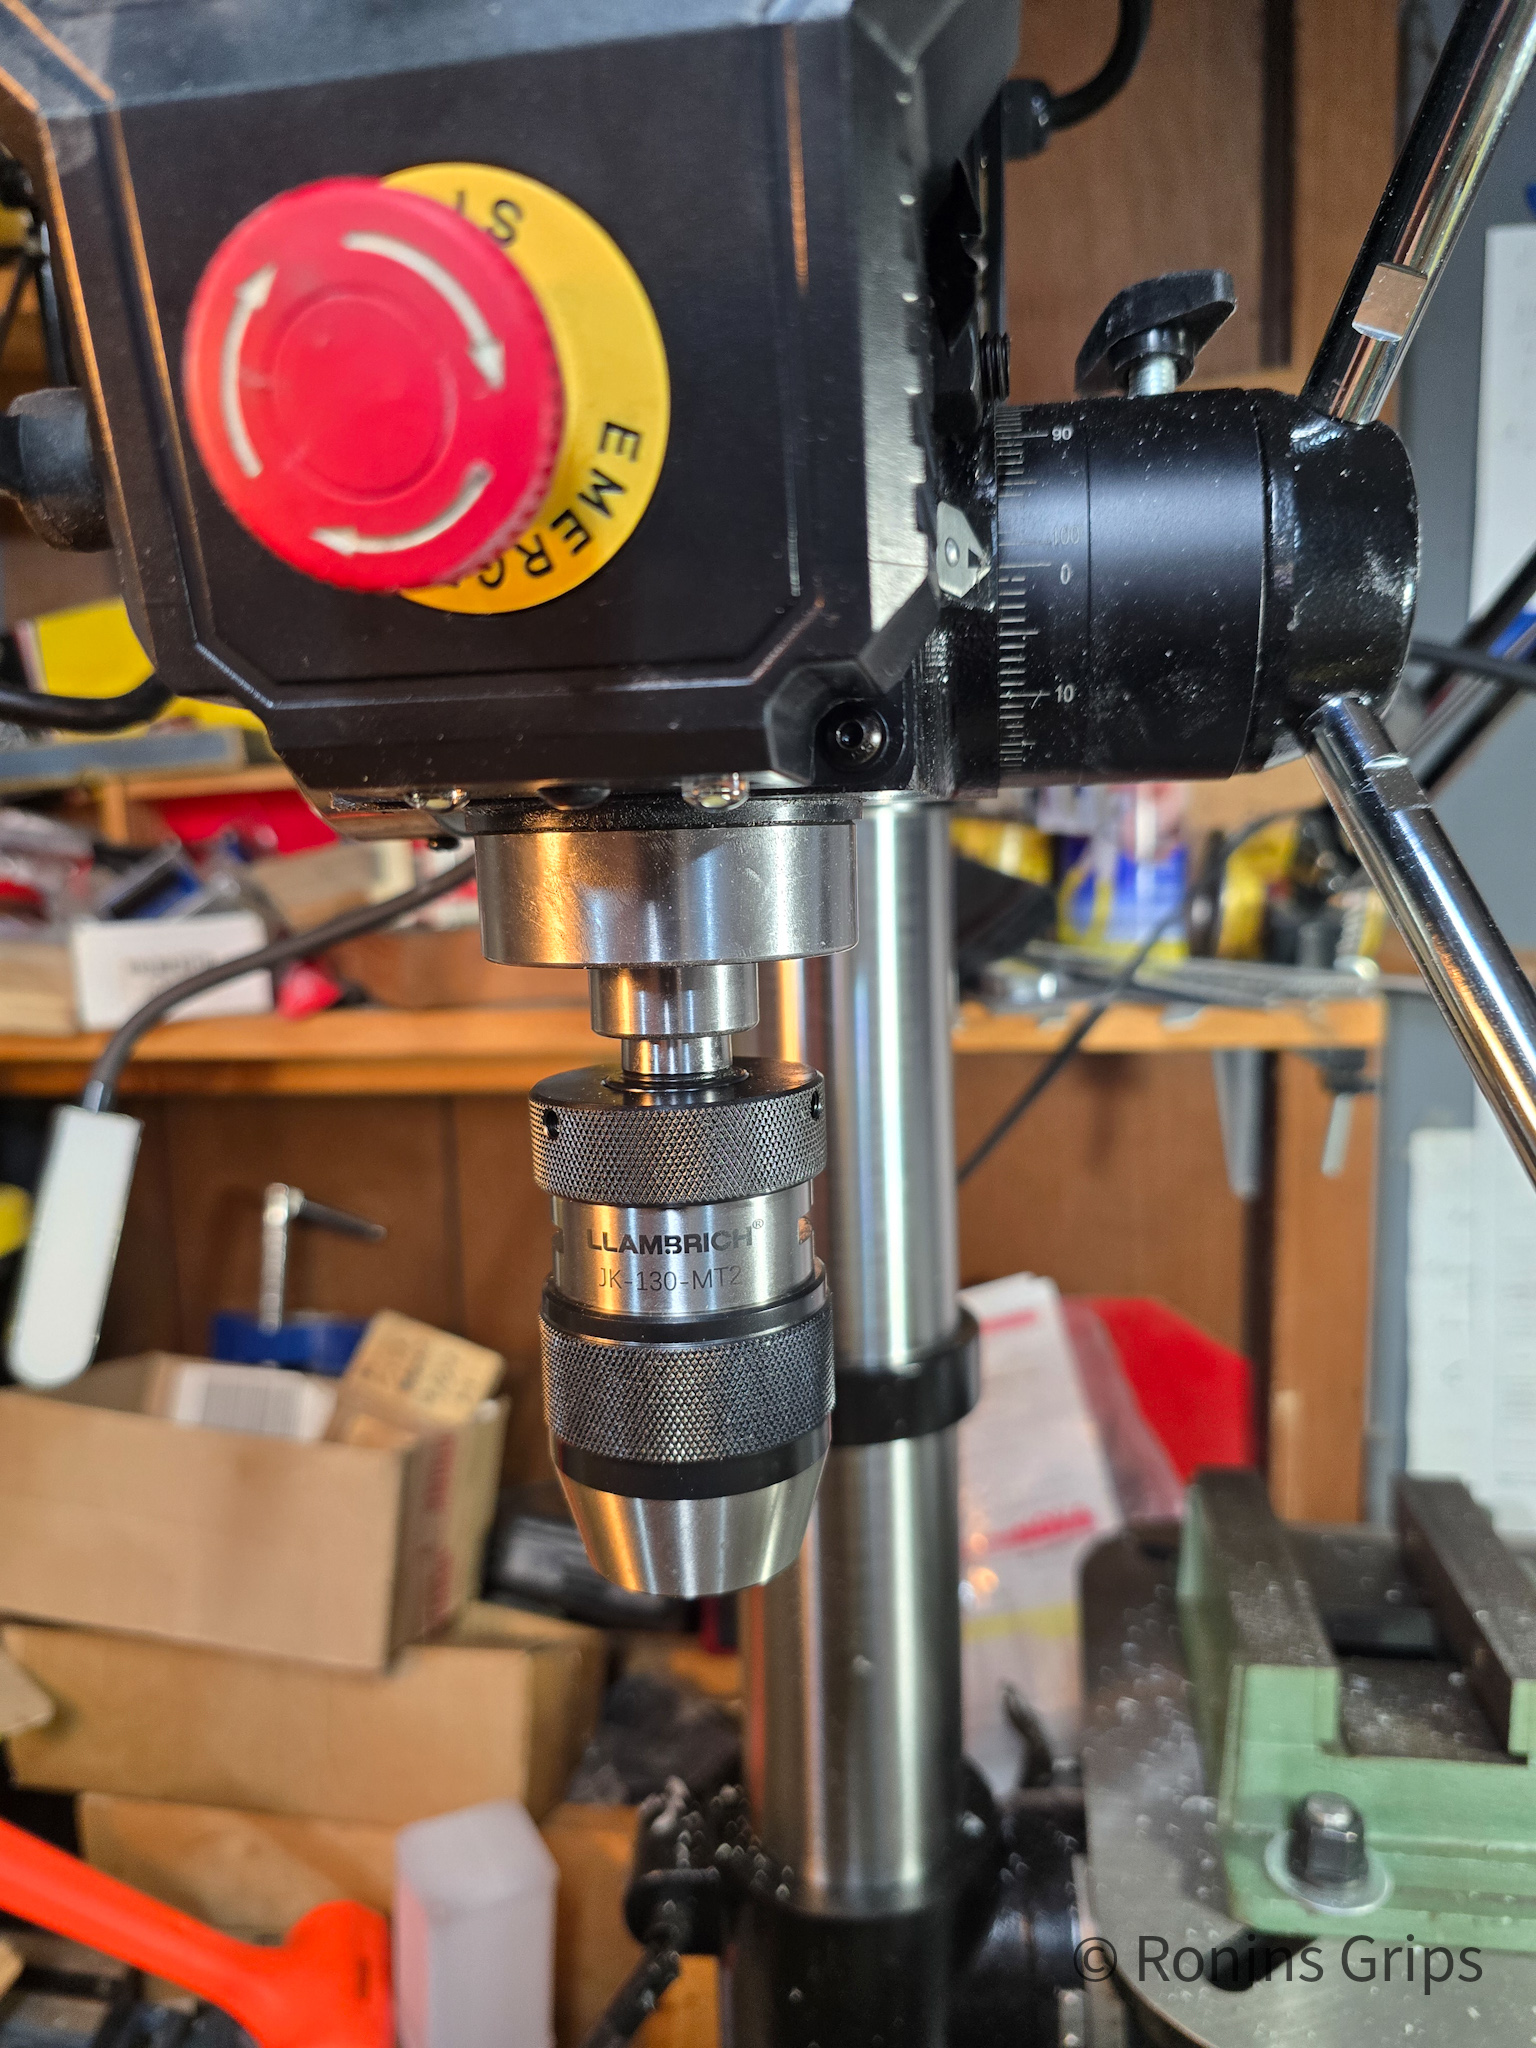
Llambrich JK-130-MT2 (I bought mine off eBay. Pricing can vary tremendously but make sure you are buying from a reputable seller – click here for current listings.)
The Nova Viking has a #2 Morse Taper. That is sometimes written as 2MT or MT2. Any chuck you get will need to fit that taper. In general, chucks with an integral shank are more accurate than similar two piece models where the chuck and shank are separate parts. There are always exceptions to that and someone who knows how to mount the chuck on the shank and true up the combination can create an assembly with pretty decent results but is usually not that way out of the box.
So, I am currently using the Llambrich because of the big price jump up to the Albrecht. I’ve had guys tell me to buy a used Albrecht but I didn’t want to inherit someone else’s problems. Maybe I’ll give a used Albrecht model a try some day where I can return it if it doesn’t test appropriately but I have other things to spend money on at this point.
Some photos from setting up and early use
This was the Nova keyless chuck that I can’t recommend given the runout I measured. By the way, runout is measured by looking at the min and max values when turning the spindle. It. Note, the drill’s table has a 6″ drill vise on it and is swung out of the way. The base for the dial indicator is actually sitting on the XY table.That is the Jacobs up top with the integral shank. It did surprisingly well but requires a key. The lower unit is the Precision Matthews Ultra Precision Chuck. Note there is no knurled top part to grab. It you had a mill or something with a spindle that will not turn when it is off, this would work great for you. On my Nova Viking, the spindle turns easily when the motor is off which means you have to try and grab part of the spindle to undo it. I wish I could have used it because of the amazing accuracy but it just wasn’t an option for me.And here’s the Llambrich JK-130-MT2. It’s pricey but you do get a pretty nice chuck for the money and it’s what I am actually using. If you notice the off-white rectangle on the far left of the photo opposite of the chuck, it is one of two LED worklights I installed. I bought the same for my mini-mill and they make a world of difference in terms of lighting up work pieces you are working on. They connect with rare earth magnets and plug into AC power so super easy to install. Click here to see them on Amazon.You can see how I can swing the drill’s own table around. When I built the wood table way back when, it was levelled. I ensured the base was level when I bolted it to the wood table. I then bolted the XY table and ensured it was level. This is my original XY table that I bought from Enco if I recall correctly. For folks new to machining, Enco was a discount supplier who was eventually purchased by MSC. Oh – the plastic cups are what I use for mixing plastic just in case you are wondering why they are there. My plastic mixing area is off to the right.
My Thoughts After Two Months Of Real Use
I honestly can tell you the Nova Viking drill press is one of the best tool purchases I have made. I’ve drilled probably 50-100 grips since I got it plus other parts also – composites and steel mostly.
Why do I like it?
It’s surprisingly quiet. For whatever reason that was the first thing that popped in my head as I started writing the list of reasons.
I like being able to turn a dial and adjust the RPM for the drill bit and material I am working with. The Viking has a variable frequency drive so you still have a ton of torque at slower speeds. The speed is changed by adjusting the frequency of the power curve and not by simply starving the motor of power.
The motor is a beast. My old HF drill would bog down – this one just eats material. It’s actually stunning how powerful it is. I’ve not bogged it down yet. I also watched it snap a piece of composite in a way I had not thought possible with all of that power.
So, combine all that power and easy-to-set RPM and I am able to drill holes a lot faster. I’d say my time spent drilling almost was cut by almost 30% and that’s just a best guess. I can tell you I know I am getting drilling work done a lot faster overall.
I really like the auto-start feature. When enabled, the motor turns off when the spindle is returned to the top. The motor turns on as you bring the spindle down. No more spinning bits while changing workpieces so safety increased.
The spindle and bearings are rock solid – zero play when drilling at angles or at least I sure don’t notice it. When I measure where and test where the bit will hit the surface, that is where the bit hits the surface and then it doesn’t move during the plunge.
I’ve used the depth indicator a few times when I’ve needed to know when to stop on repetitive pieces. It wasn’t a big reason why I bought the press but it is handy.
I should also point out you can buy all of the parts from Teknatool if something goes wrong plus you can buy a warranty. I’ve always thought warranties tell you a bit about the quality. The shorter the warranty then the more likely things are to break. The longer the warranty then the less likely things are going to break during that duration. Out of the box, the Viking has a decent warranty:
2 Year Full Replacement motor and controller 5 Year Full Replacement mechanical
I went ahead and bought the extended warranty direct from Teknatool just in case plus I felt it was affordably priced.
The Emergency Stop button turned out to be broken during testing and Teknatool replaced it right away along with decent instructions about how to do so. Stuff happens so for a vendor to respond quickly to make things right, I value that. They had no idea who I was or that a blog was going to be written – they just made it right.
I really like the Nova Viking drill press by Teknatool. Buying it off Amazon meant I saved $100-200 on shipping plus I figured I had Amazon’s customer service if something went wrong. Click here to see the listing on Amazon. Other than a busted E-Stop button, and they sent me a replacement and instructions on how to replace it right away, I have had zero problems. Quality and productivity have both increased with this new drill press as explained above.
If you are looking for a drill press, I’d recommend any of the Teknatool units. I’ve heard nothing but good things about the other models and I would absolutely buy my Nova Viking again.
I hope this helps you out.
Note, I have to buy all of my parts – nothing here was paid for by sponsors, etc. I do make a small amount if you click on an ad and buy something but that is it. You’re getting my real opinion on stuff.
If you find this post useful, please share the link on Facebook, with your friends, etc. Your support is much appreciated and if you have any feedback, please email me at in**@*********ps.com. Please note that for links to other websites, I may be paid via an affiliate program such as Avantlink, Impact, Amazon and eBay.
A friend sent me a meme “I never thought getting old would happen so fast.” It was one of those memes where I couldn’t help but laugh because it was true. A second one is “The number one cause of injury to old men is thinking they are young men.” Well, combine the two and here I am with back problems caused by years of wear and tear – basically my L1-L5 discs are all having issues. But…. the work still needs to get done and I am learning more and more about how to use mechanical aids.
Back when I was young, I bench pressed somewhere close to 300 pounds and squated over 300. Now, I pay the price when I bend over and pick up 40-50 pounds the wrong way. So, I can’t just use brute force any longer and needed something to help me lift. I couldn’t afford a fork truck nor did I have room to store it. Something like a cross between a forklift and a work table was a possibility. My Esteem Grinder sits on a hydraulic lift work table for example.
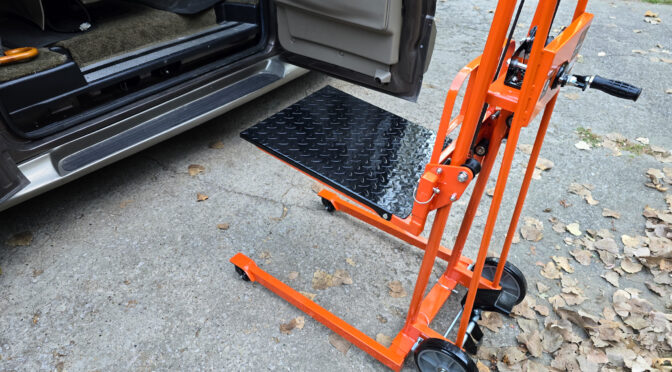
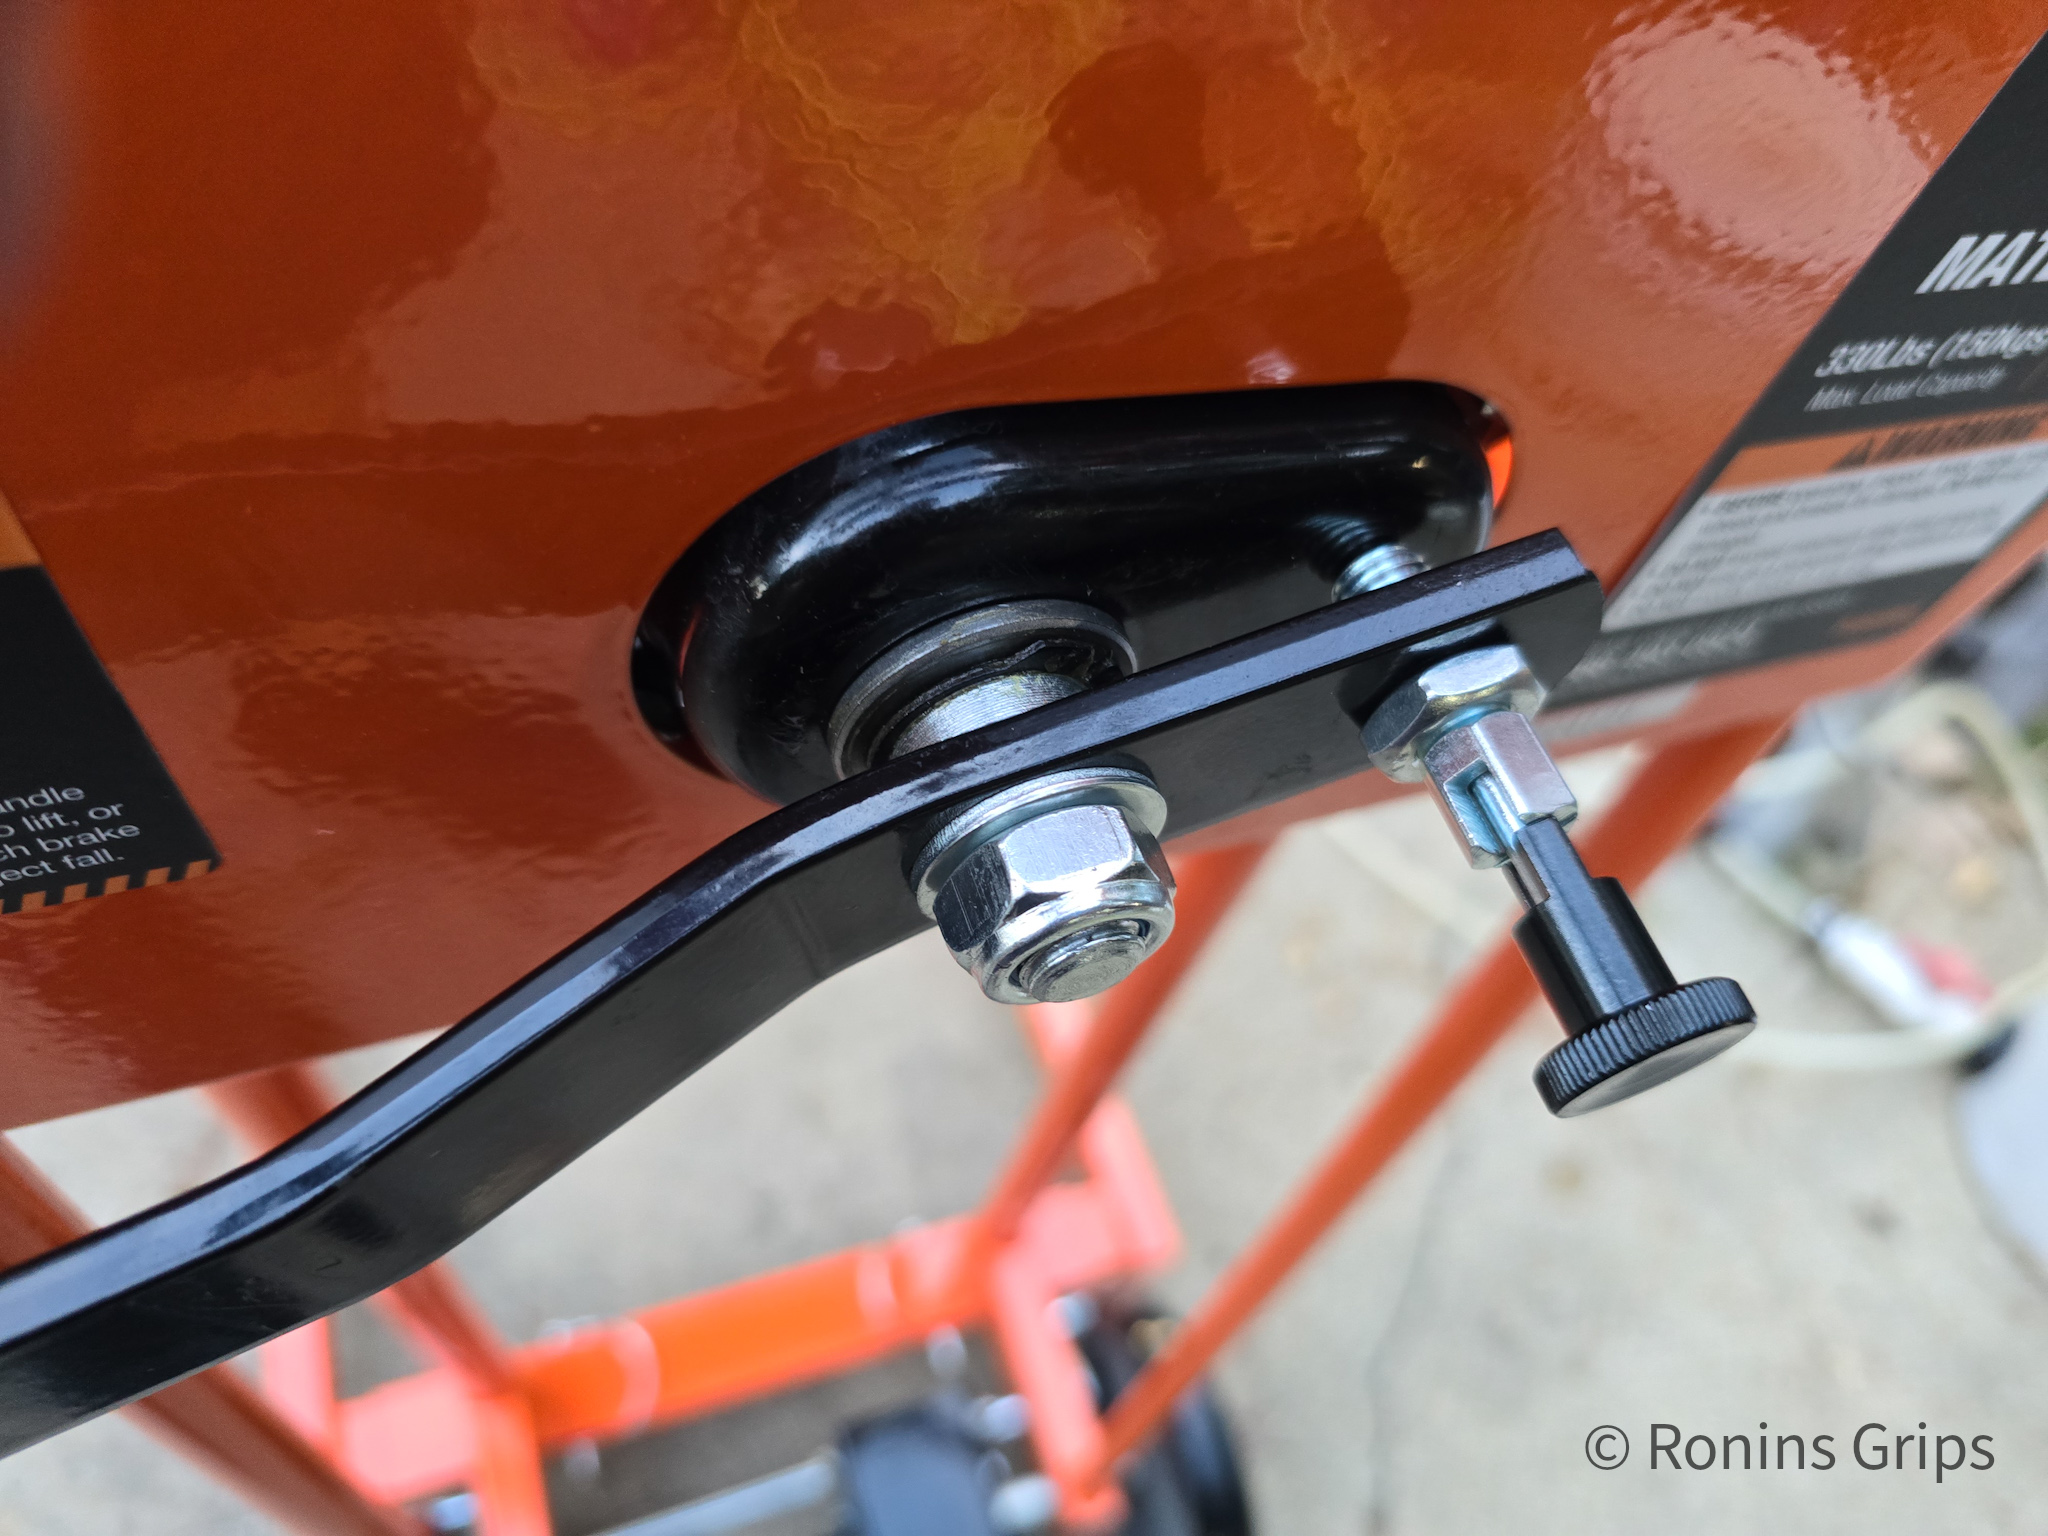
It had a few features I really wanted – first and foremost it could lift330 pounds up to 40″. It was relatively compact and could be collapsed when not in use plus the lifting surface could either be a solid table or a pair of forks. I could also get it with ree shipping which can save a ton on heavy objects (always shop around though because sometimes the “free” shipping is included in the jacked up price). At any rate, I ordered it.
The Unboxing
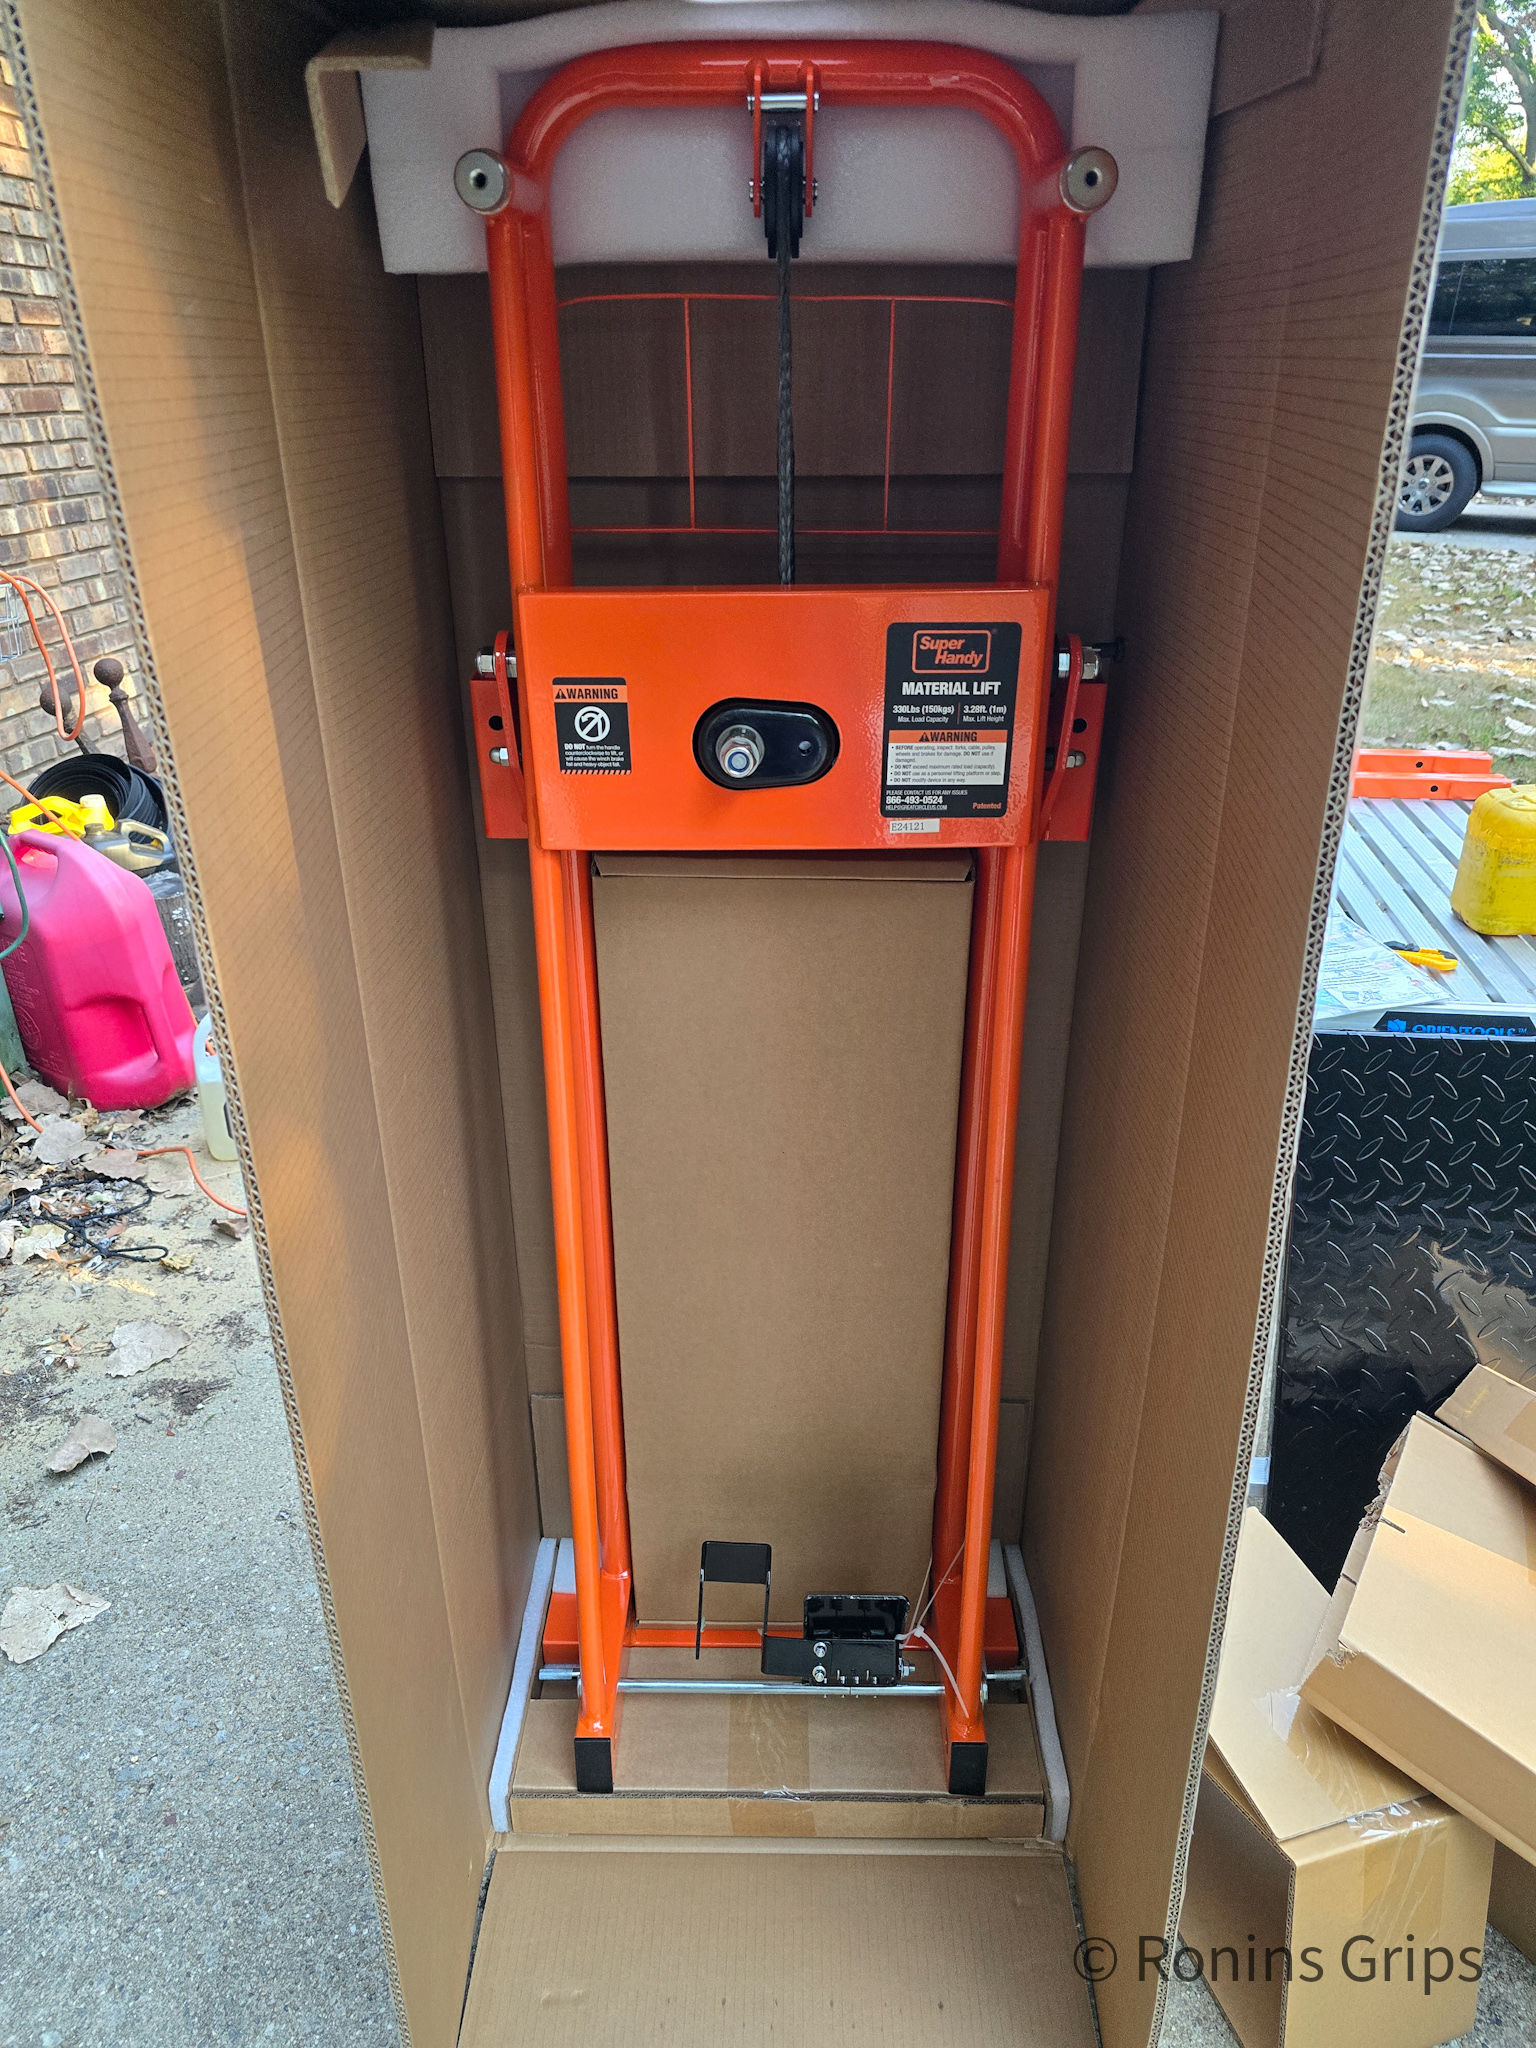
It literally arrived the next day via an Amazon truck and, not surprisingly, it’s a BIG box. Now, I have to give the company some kudos – some easy assembly is required and all of the components are incredibly well packed. Sometimes, I honestly hate packaging engineers or whoever told them to do it as cheaply as possible. In this case, they used a lot of well thought out cardboard to securely pack everything vs. a ton of messy styrofoam.
It arrived very well packed with zero damage. I appreciated the careful use of cardboard to secure the majority of the componets vs. styrofoam that is a hassle to deal with and clean up after.
Assembly was quick and easy – I didn’t carefully watch the time but I bet it was less than 15 minutes. The instructions are nice and clear and it went together with very good fitment.
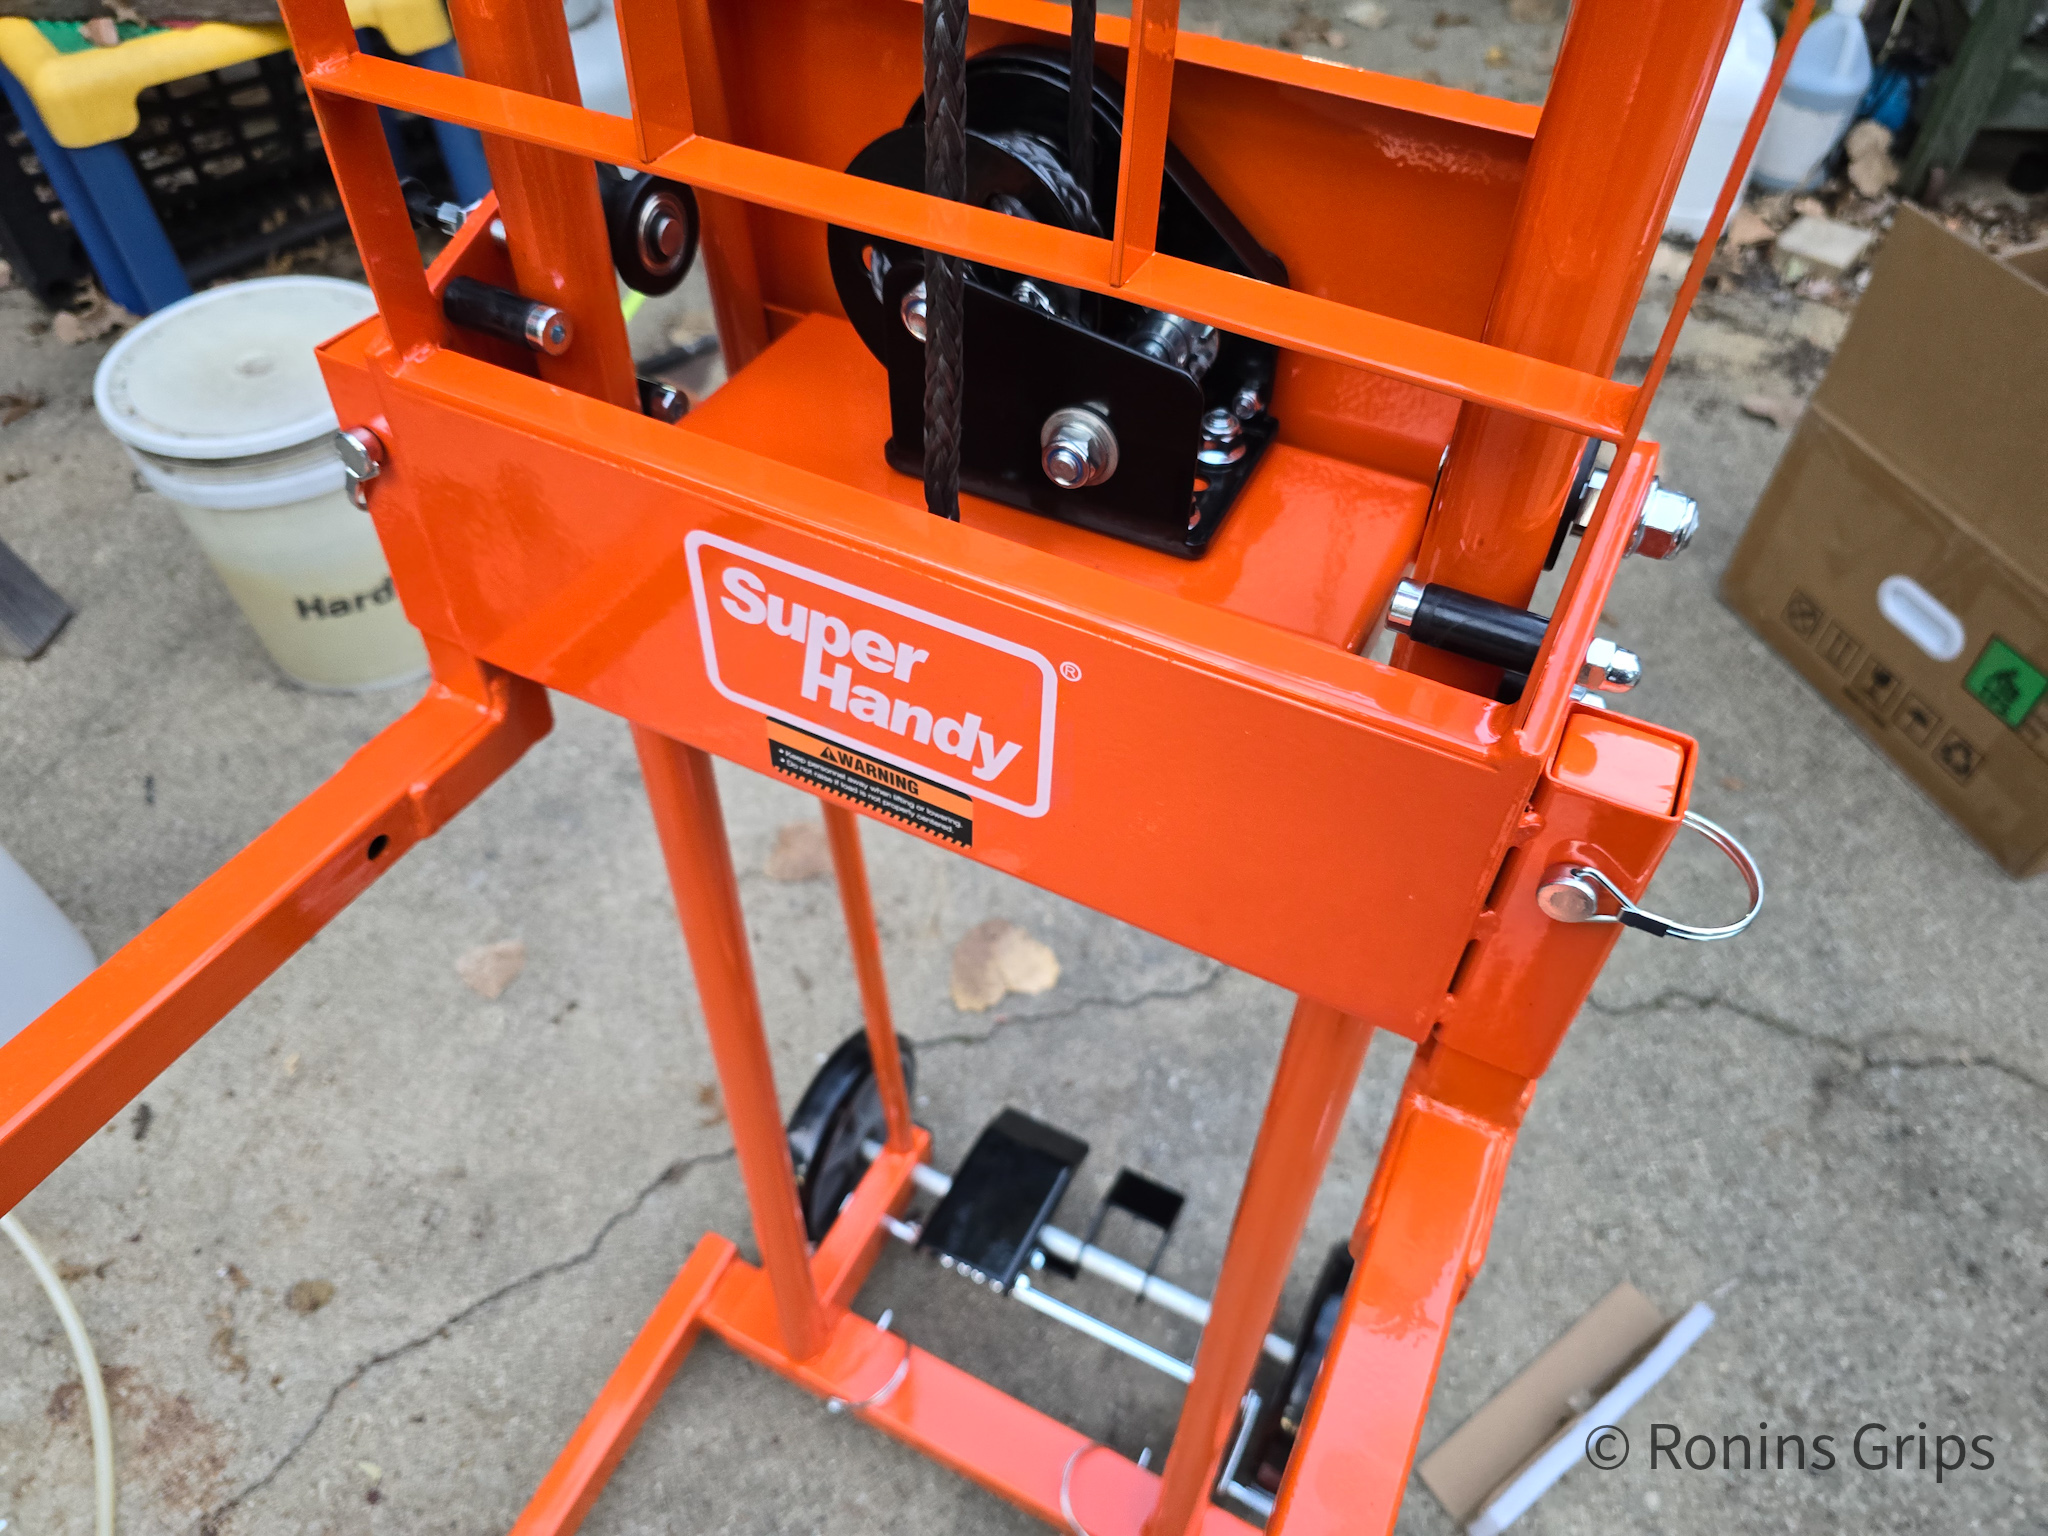
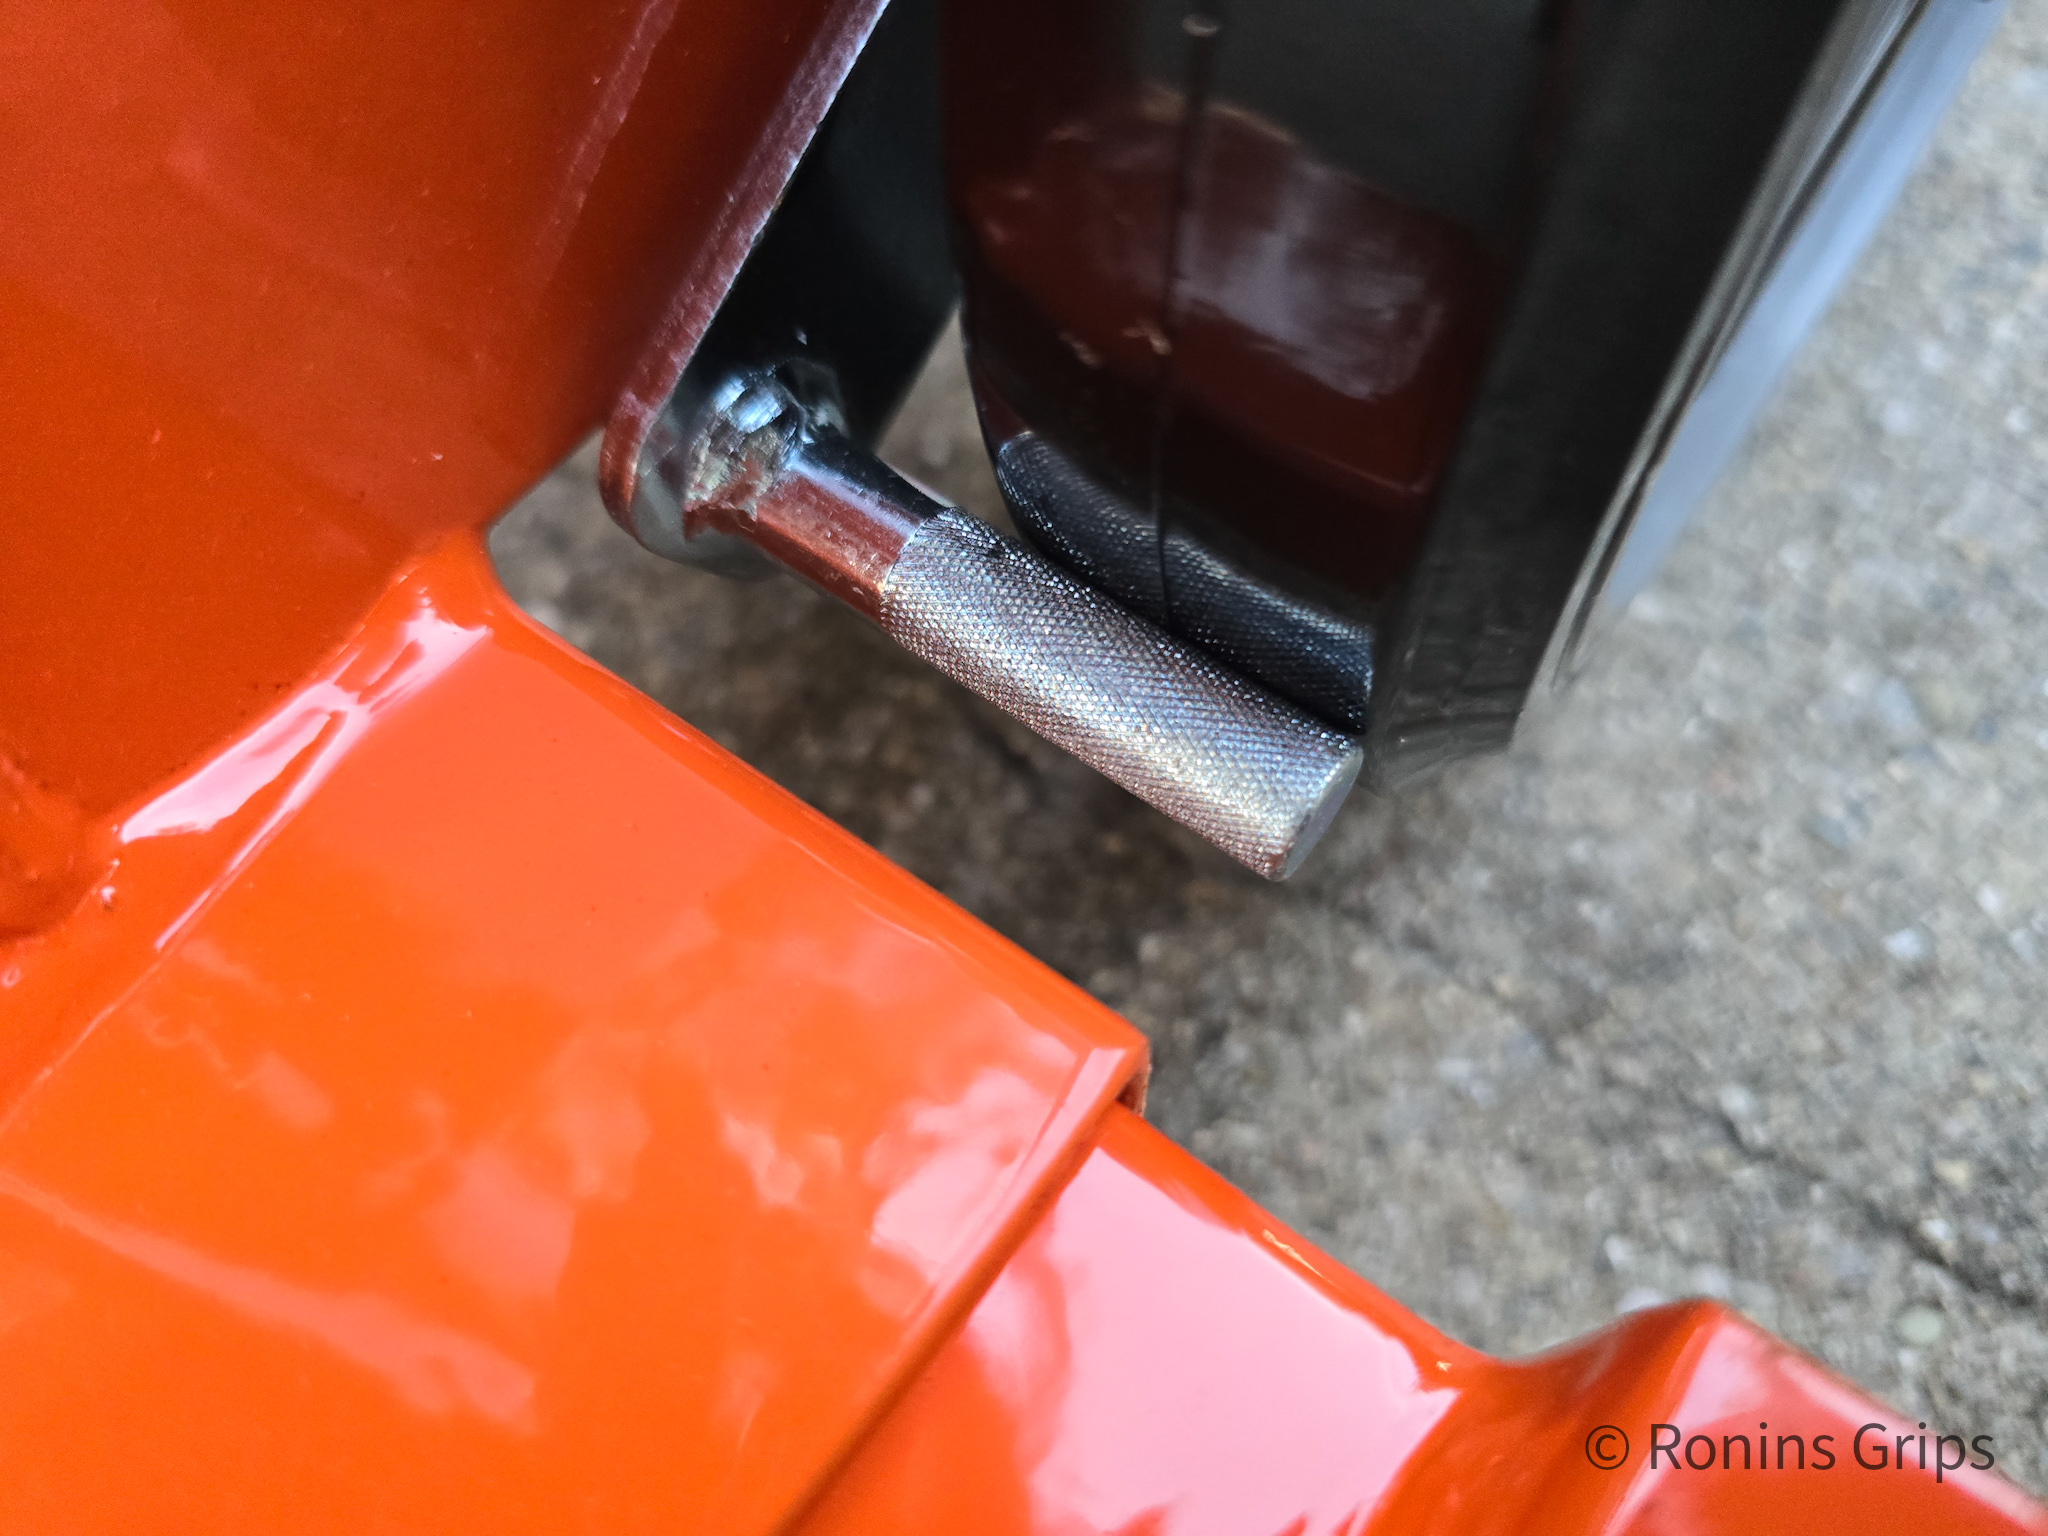
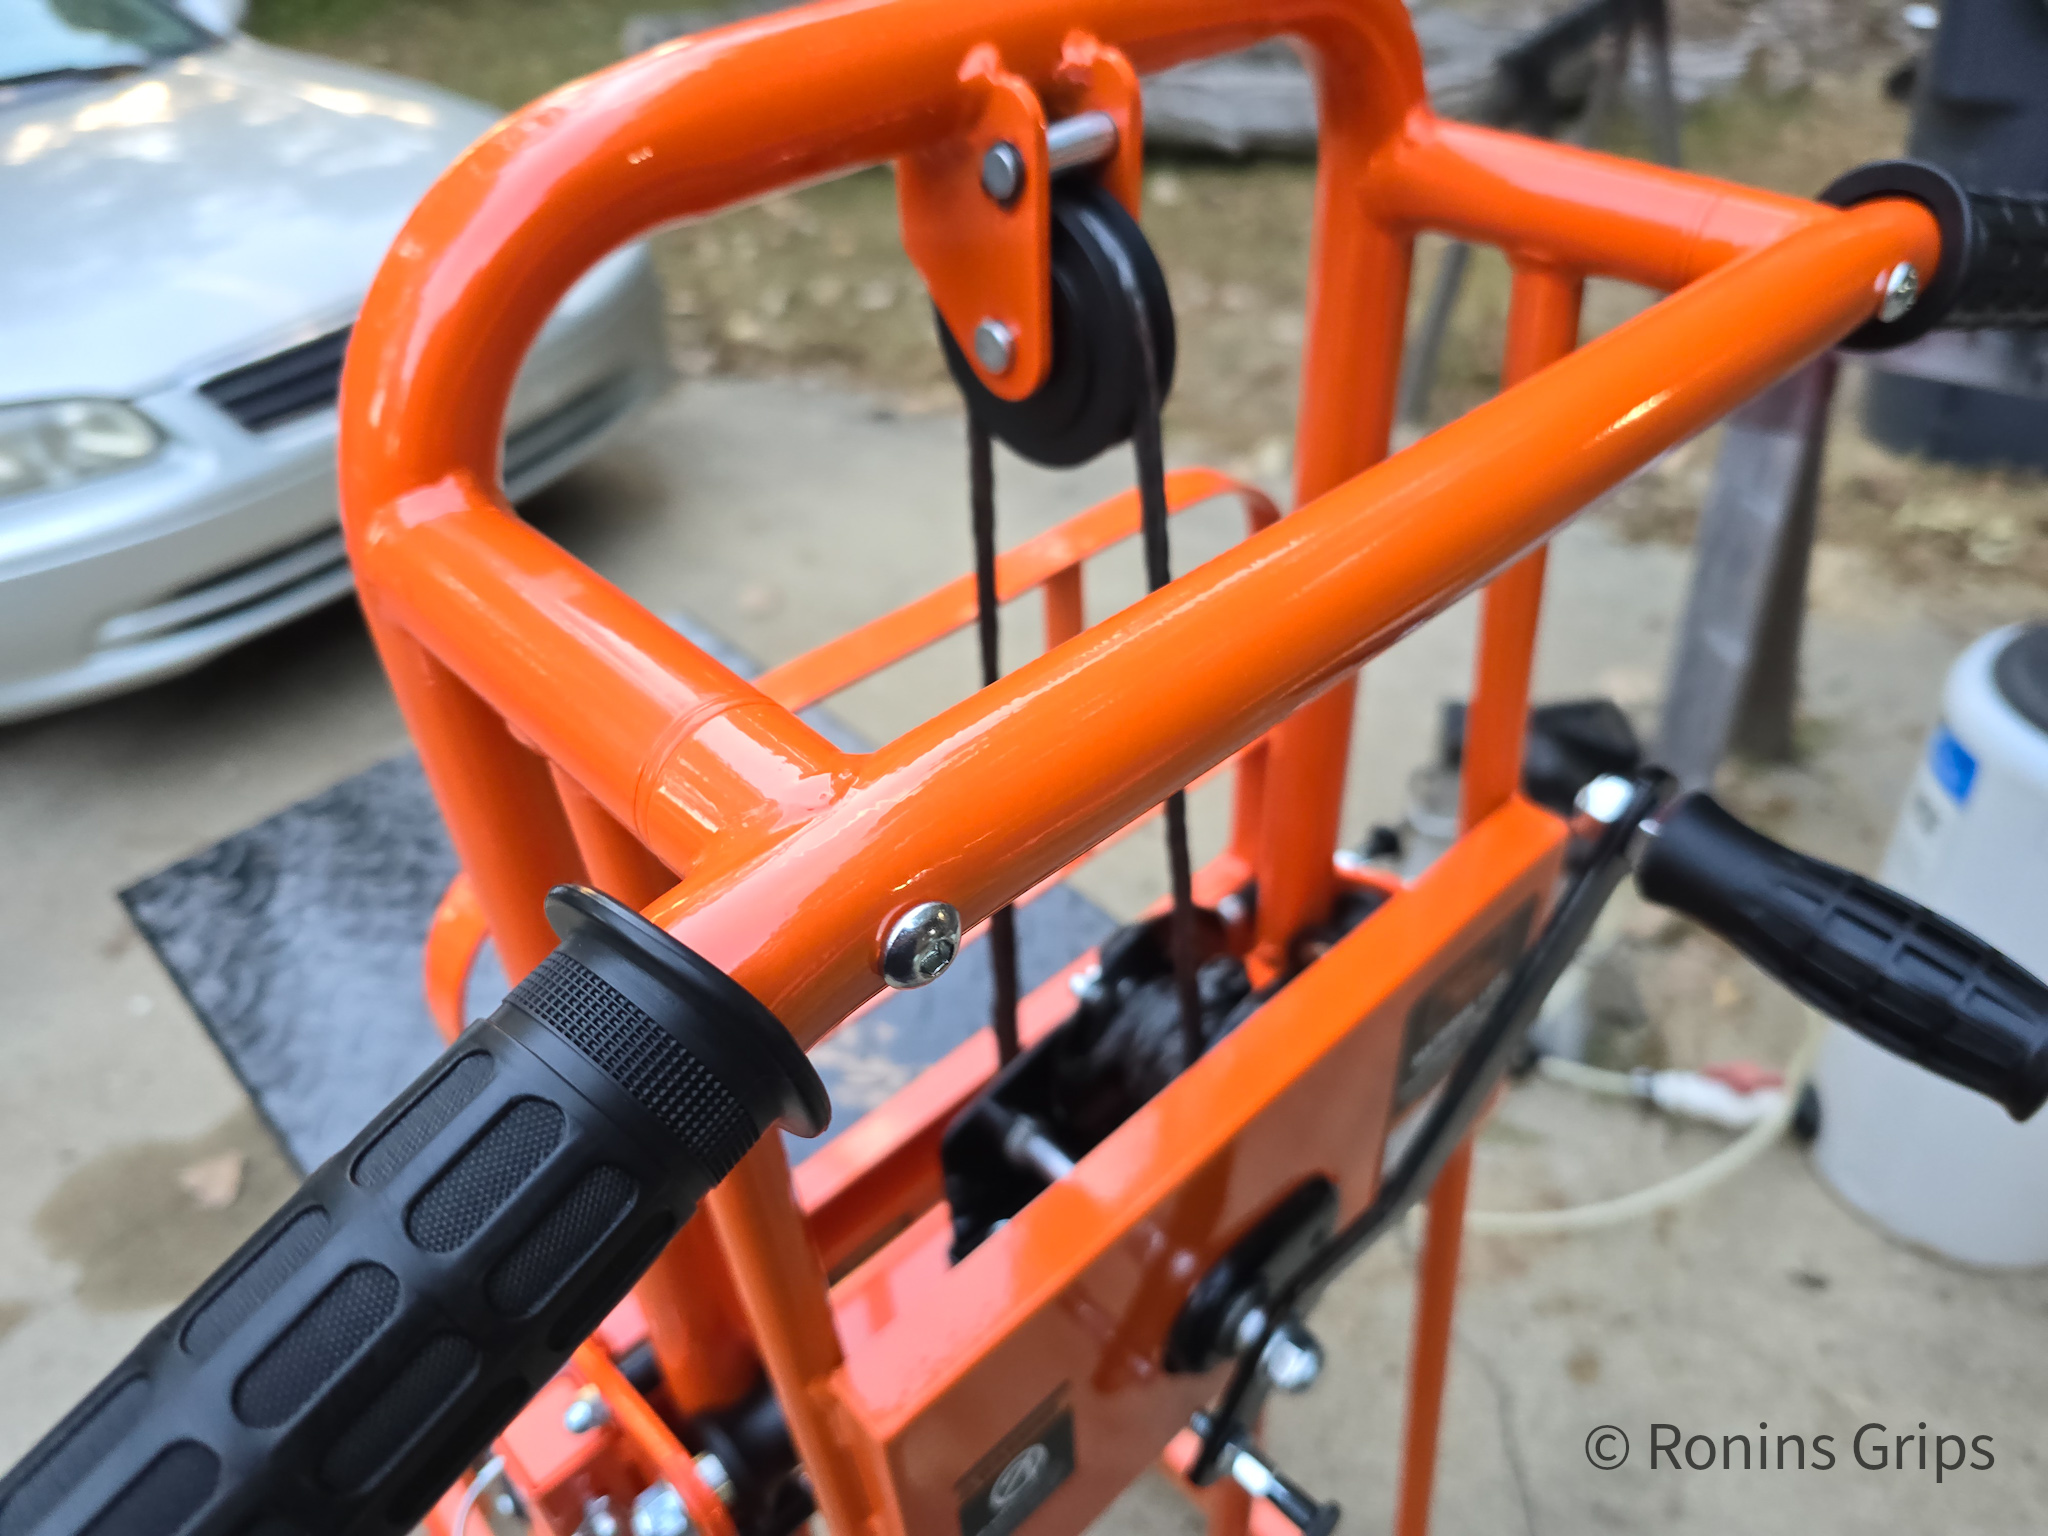
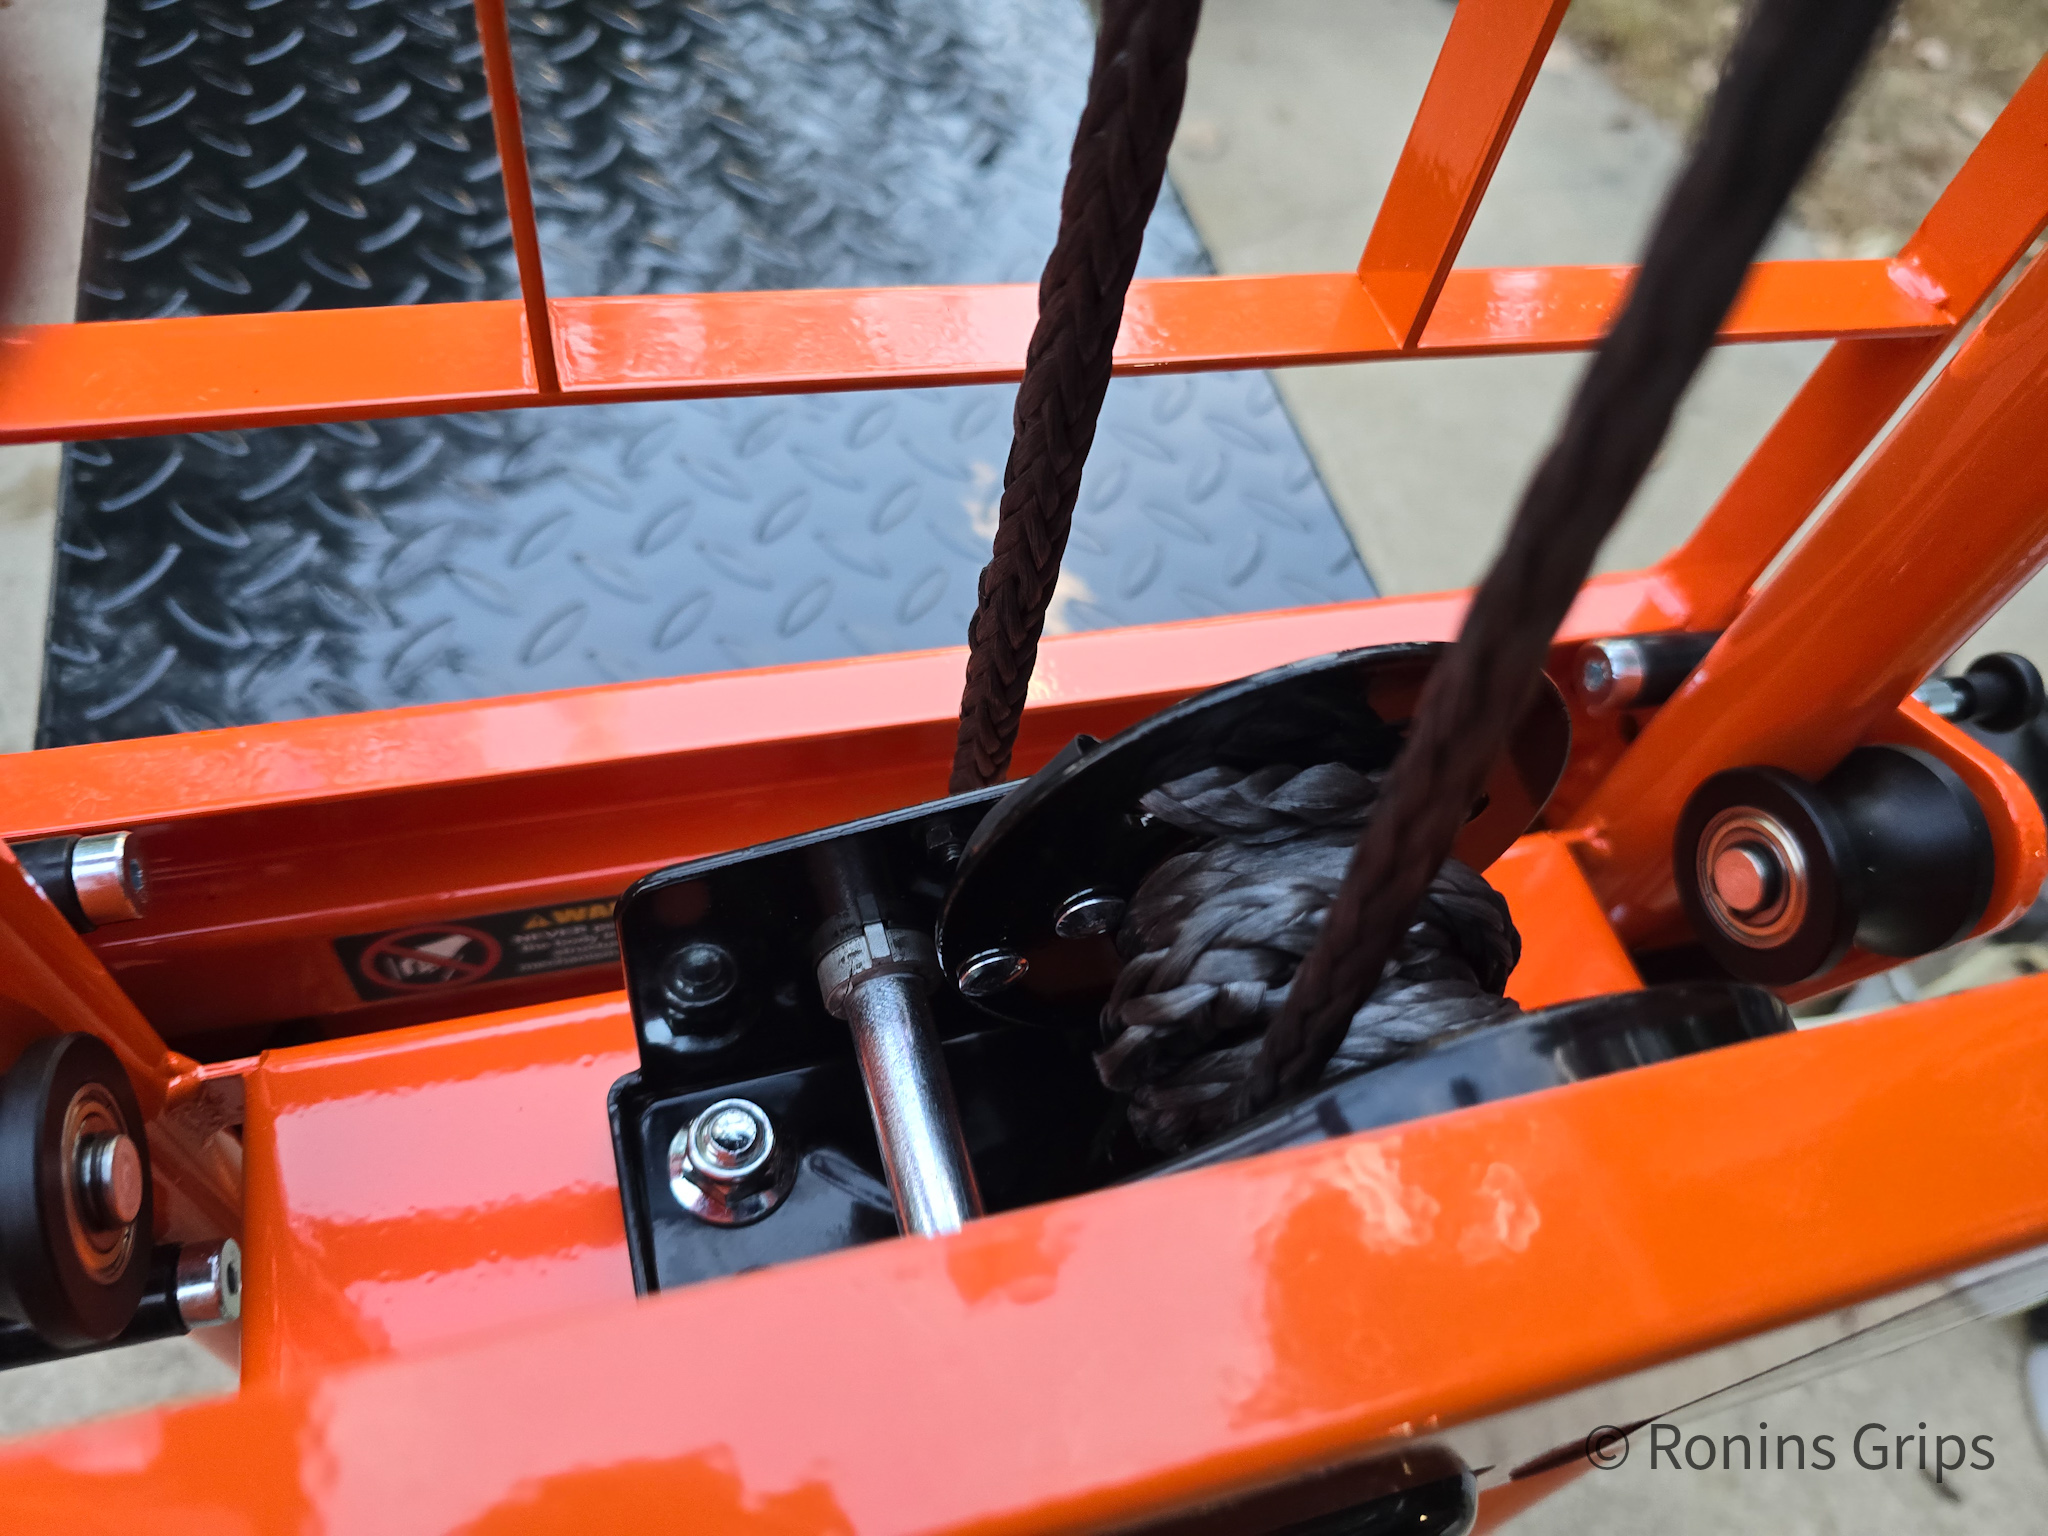
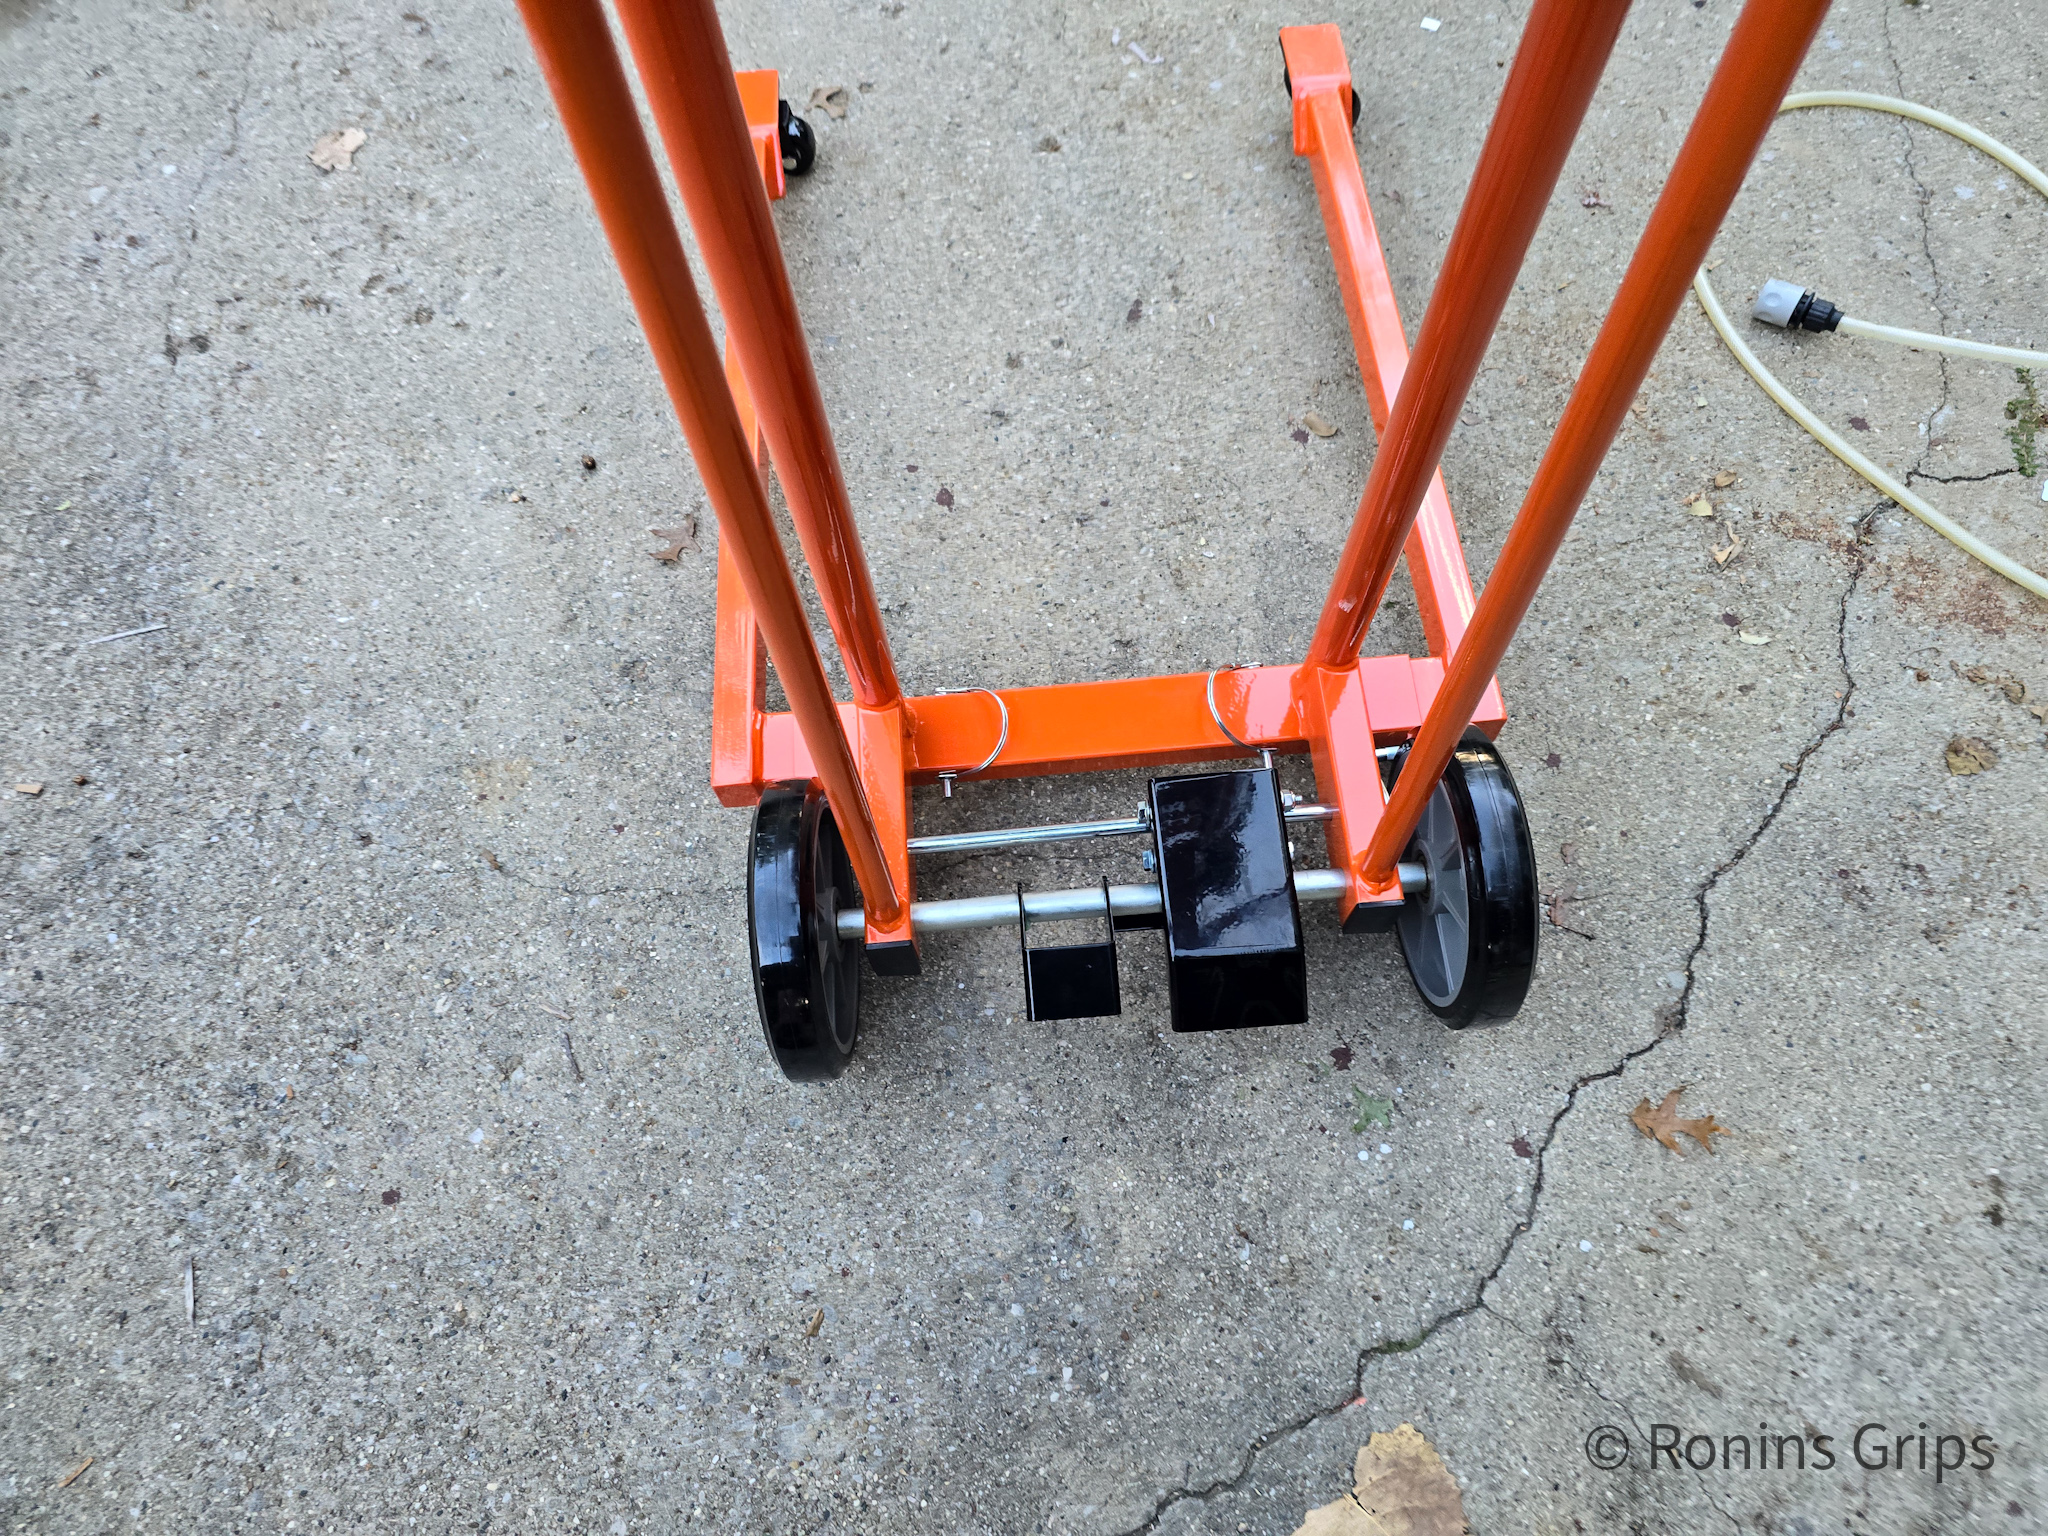
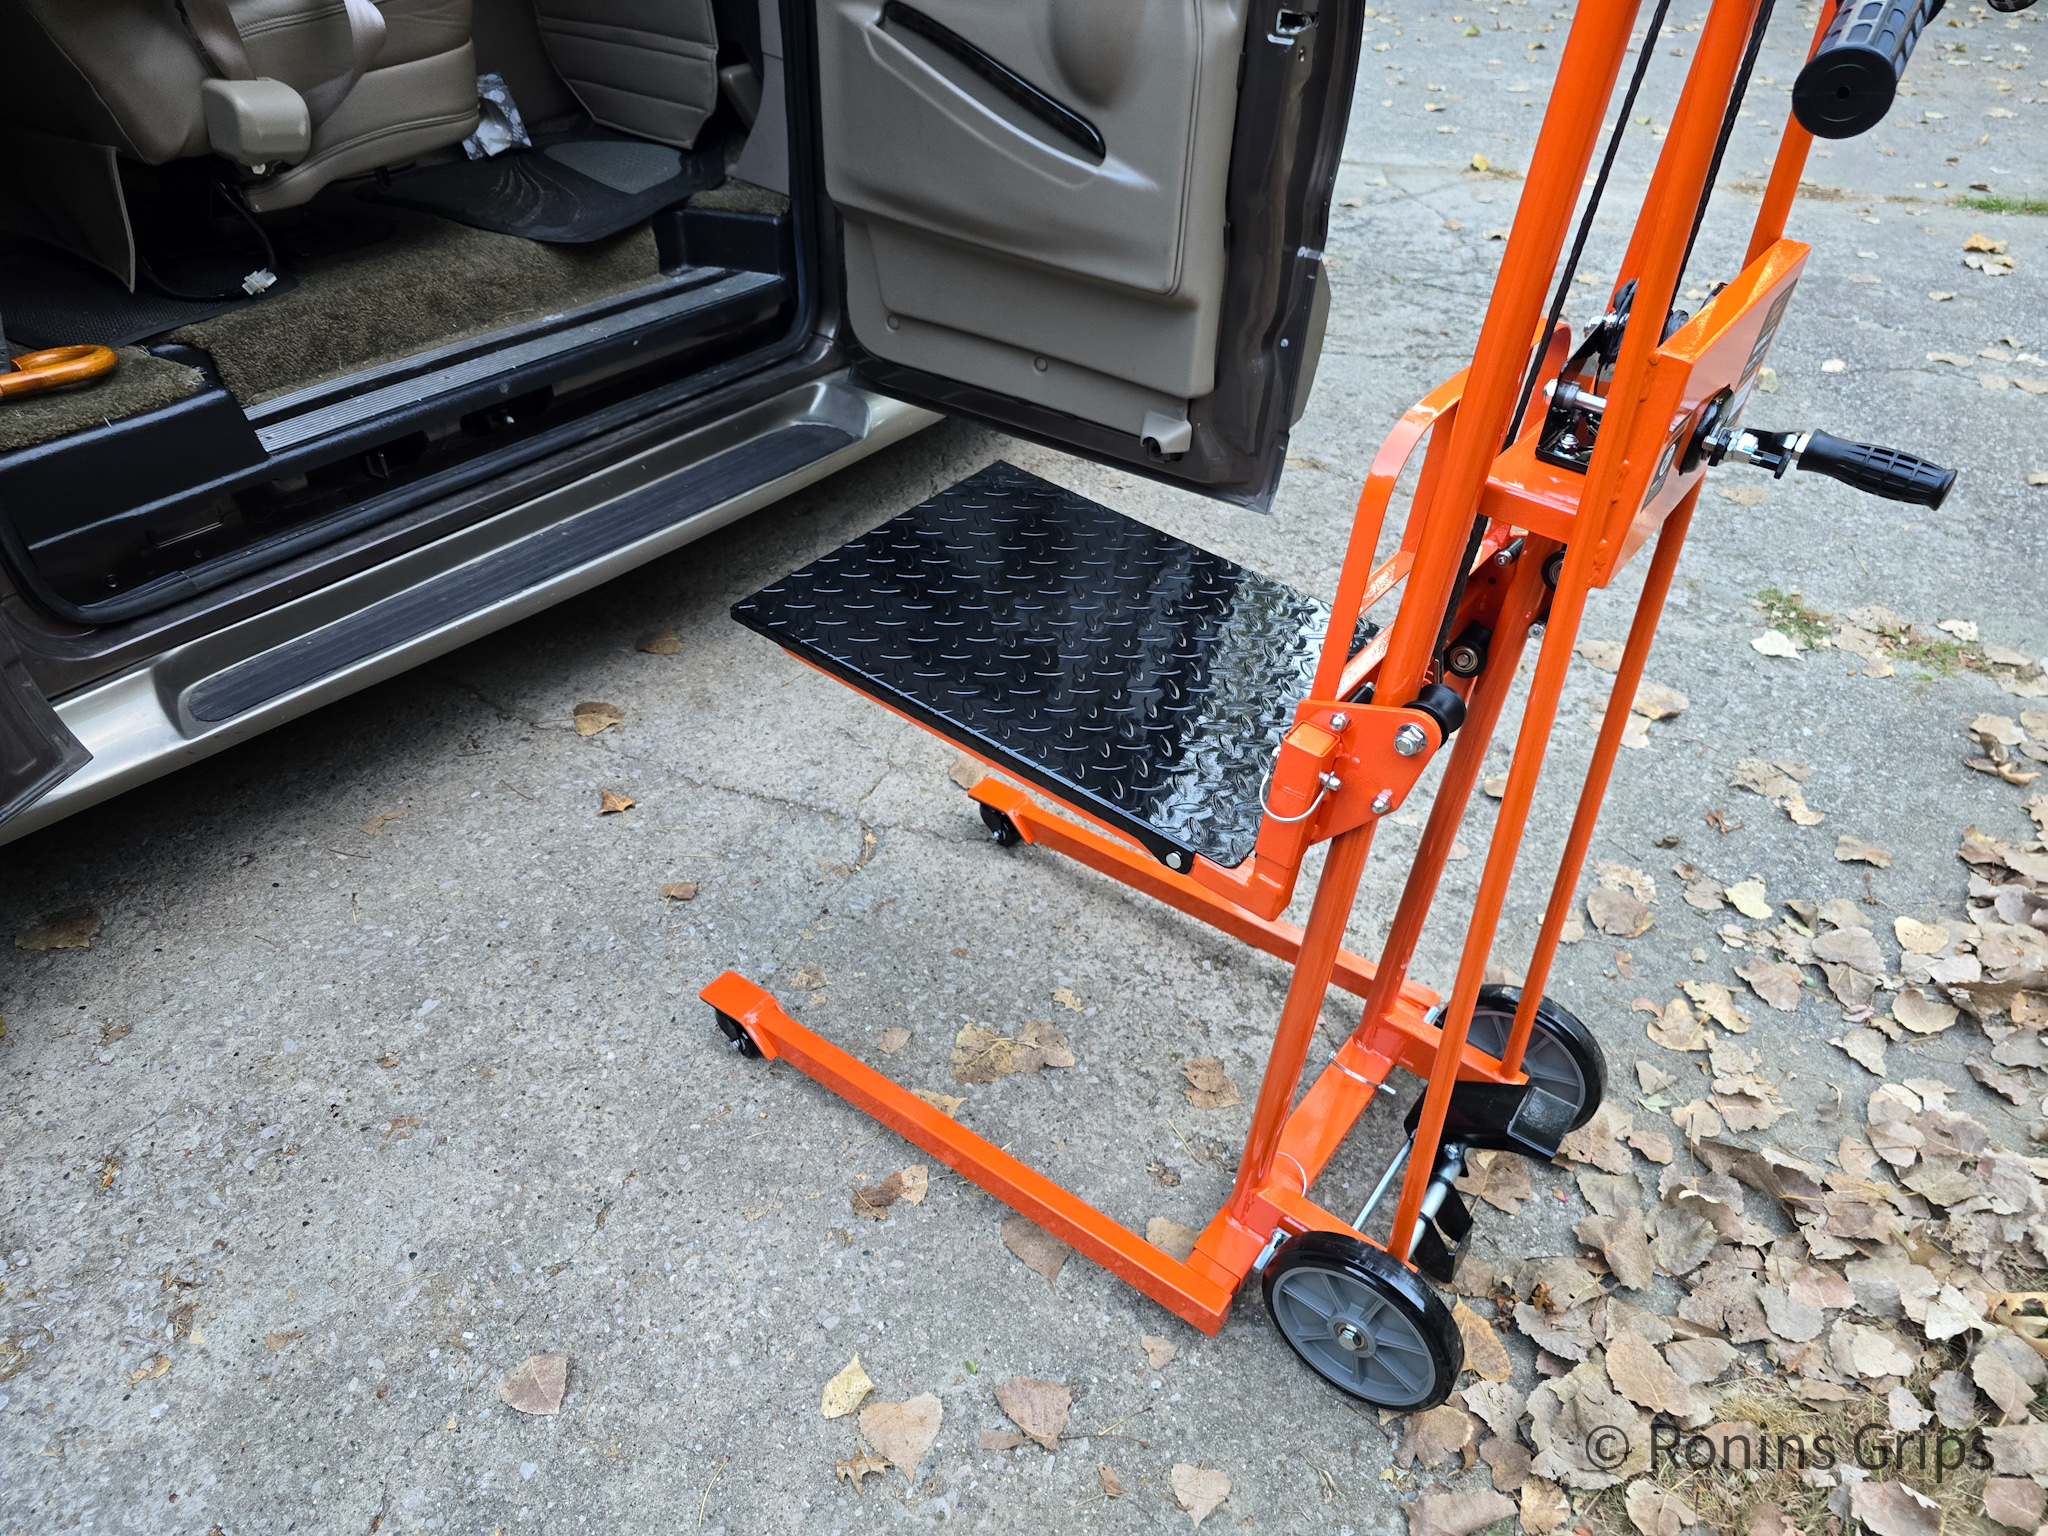
Clear instructions and easy assembly. The parts actually fit and no beating or bending during assembly was required.The fitment of the parts and the quality of the finish are remarkable. Honestly, they were surprisingly good – I’m used to having to force parts together or ignore scufff marks, etc. Here, you can see part of the forks.All of the welds are nicely done and there is good attention to details. Notice that the braking pin is knurled to better hold the tire in place vs. a smooth pin that would have been cheaper but less effective.You can see the welds and the finish but there is another attention to detail element here – the handle bars join the unit as a female sleeve that fits over a smaller diameter tube. The screws just keep them together – the acual tubes deal with the stress and not the screws. That’s a smart idea.The actual lifting is done via a hand cranked winch that uses synthetic rpe and not wire. To prevent binding, the designers incorporated rollers like you see on the left and right to guid the load up and down the vertical tubes. The unit has a 320 pound weight limit. I’ve lfted close to 200 pounds and it was a very easy lift. Note the black work patform/table over the forks.The crank handle is keyed and the nut just holds it in place. The assembly with the black knob to the right is a lock. When you release it, you move the handle to where the locking pin can engage and then the load is secured.The parking brake is easily engaged and disengaged via a foot pedal.
Actually Using It
The unit rolled easily and I had no problem lifting loads up to 200 pounds. I did find that it is best on level surfaces because the brake pedal hits steps vs. rolling up or down them.
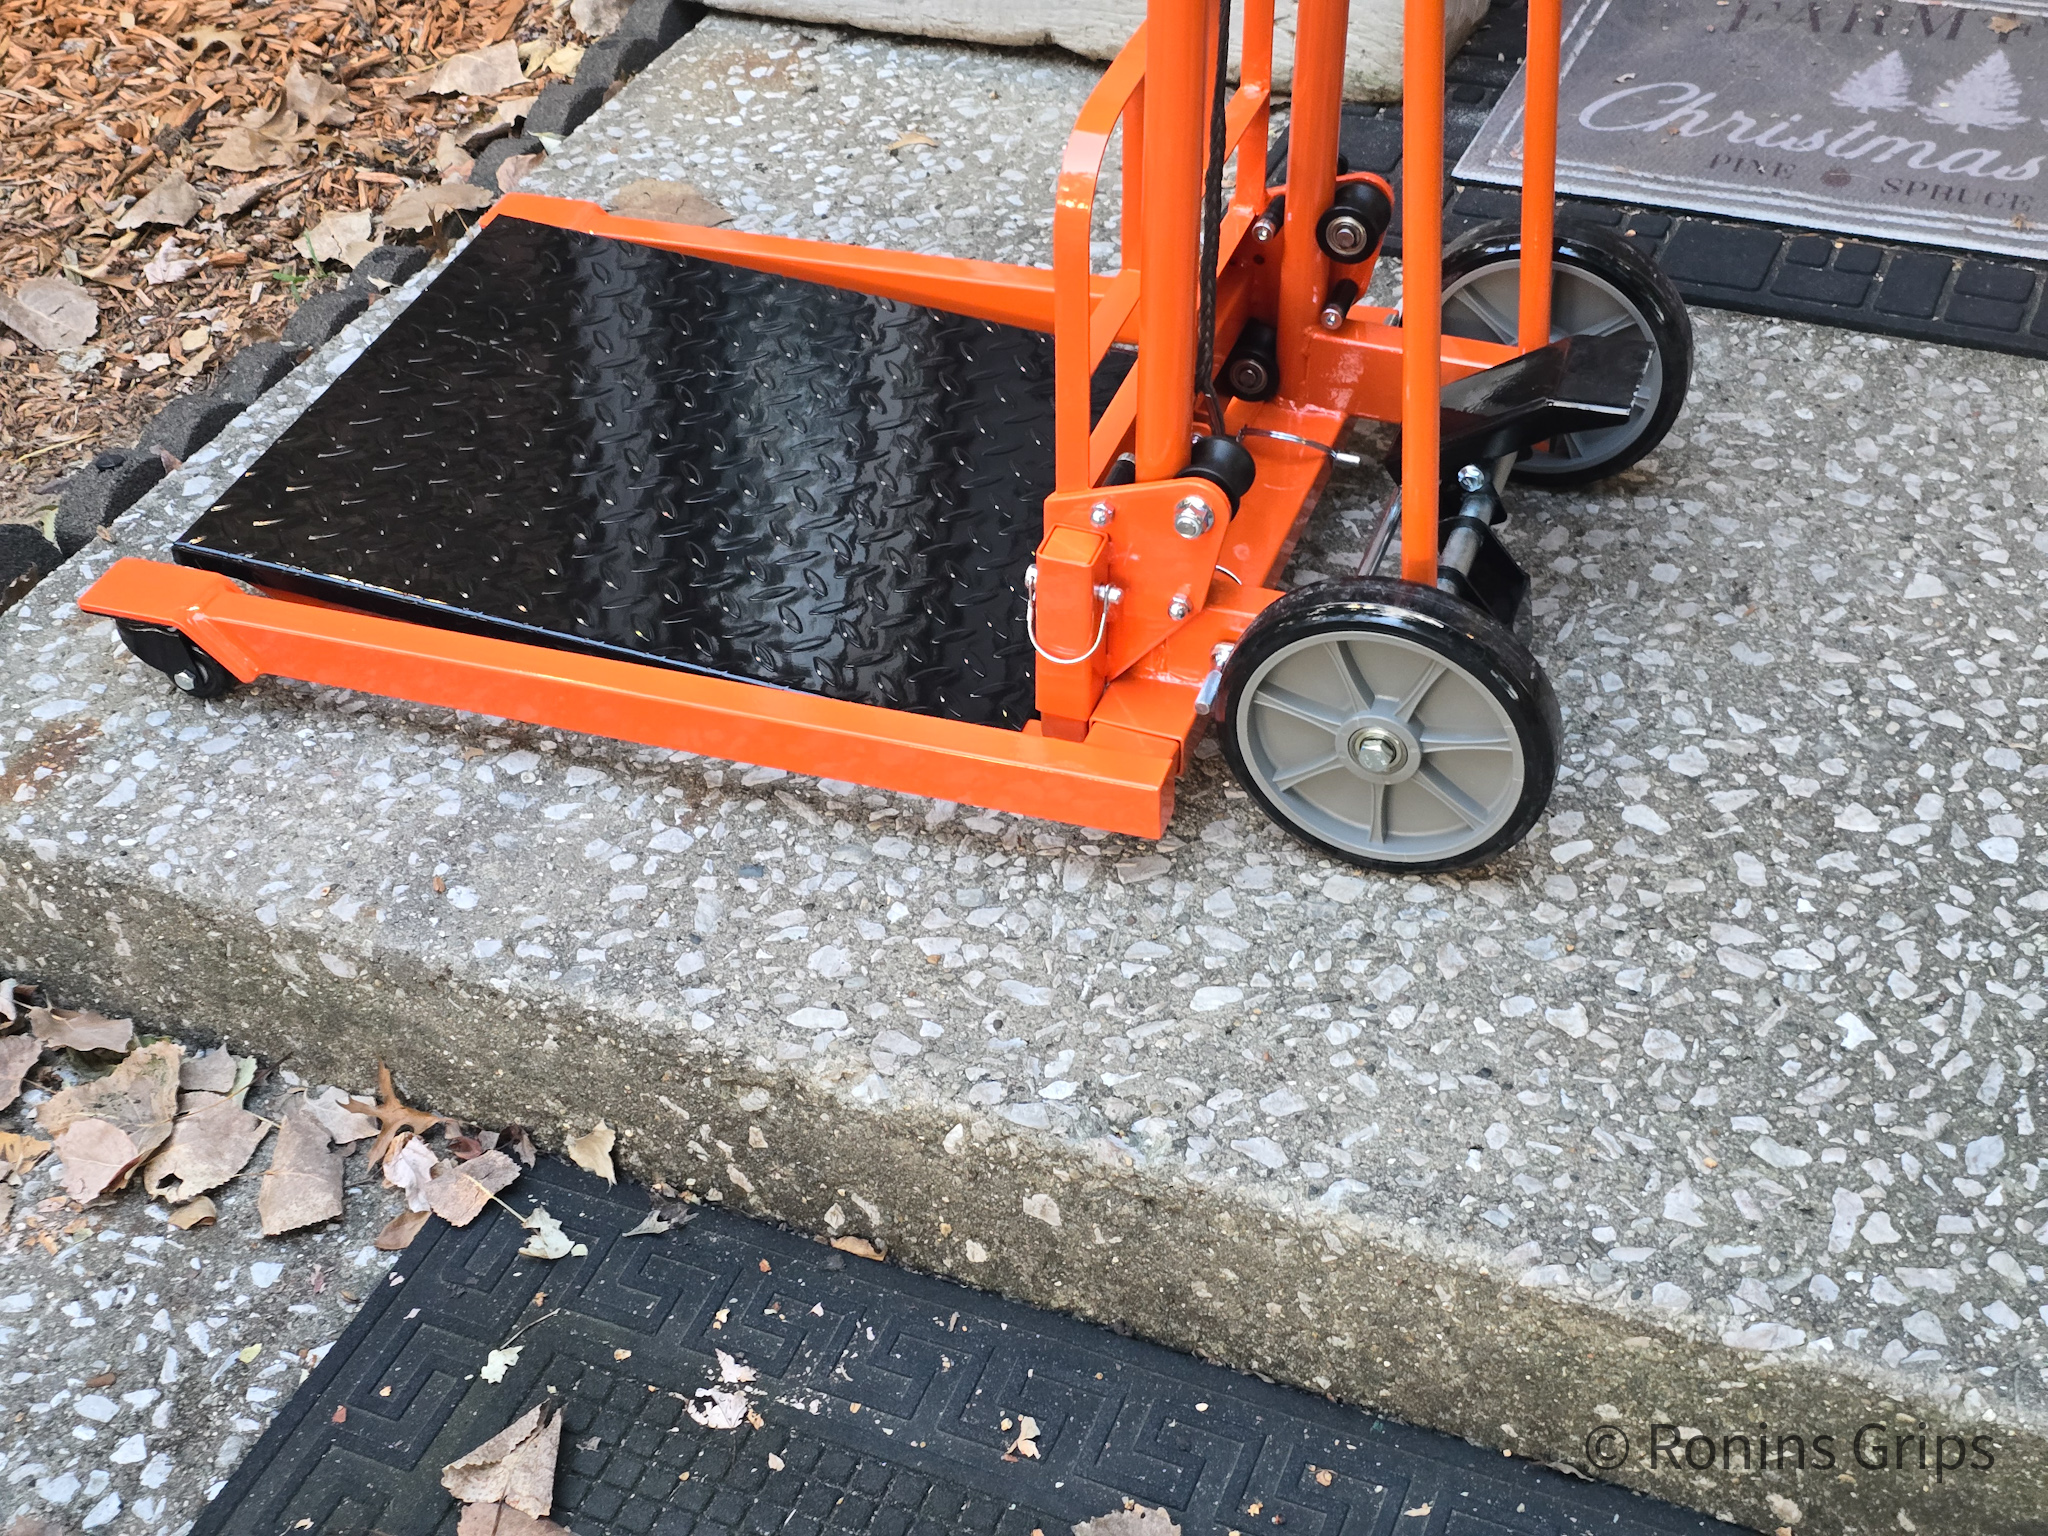
These captain’s chairs weigh quite a bit and are bulky. I could slide the runners of the lift under the van, set brake and then moved the chair onto the table. Once it was secured, I released the brake, backed up and lowered the chair. By the way, the black “table” top folds back out of the way if it’s not needed.Moving the chair didn’t quite go the way I had hoped. With the chair strapped to the unit so it couldn’t shift, I tried to move the load up some concrete stairs. The parking brake pedal stuck out too far and hit the step vs. the whole unit rolling up and over the stairs as I had hoped. Instead, I had to unload the chair, put it on a dolly and then rolled that up the stairs. You can just barely see it in this photo, I scraped the paint off the parking pedal’s back edge by trying to get it up over the steps shown. From a design perspectivem they could avoid this by either making the brake lever shorter or the wheels slightly larger … or a combination.That’s a 125 pound drill press. No problem lifting it up into a F250.
Summary
The SuperHandy brand lift is affordable on Amazon and actually does what it claims to do. I’ve now moved some stuff around that there was just no way that I could have done it by myself. Sure, I wish it could lift heavier and higher but this lift will do what I need the majority of the time.
Would I buy it again? Yes. Would I recommend it? Yes, definitely – it’s well made and has a nice finish.
I hope this helps you out.
Note, I have to buy all of my parts – nothing here was paid for by sponsors, etc. I do make a small amount if you click on an ad and buy something but that is it. You’re getting my real opinion on stuff.
If you find this post useful, please share the link on Facebook, with your friends, etc. Your support is much appreciated and if you have any feedback, please email me at in**@*********ps.com. Please note that for links to other websites, I may be paid via an affiliate program such as Avantlink, Impact, Amazon and eBay.
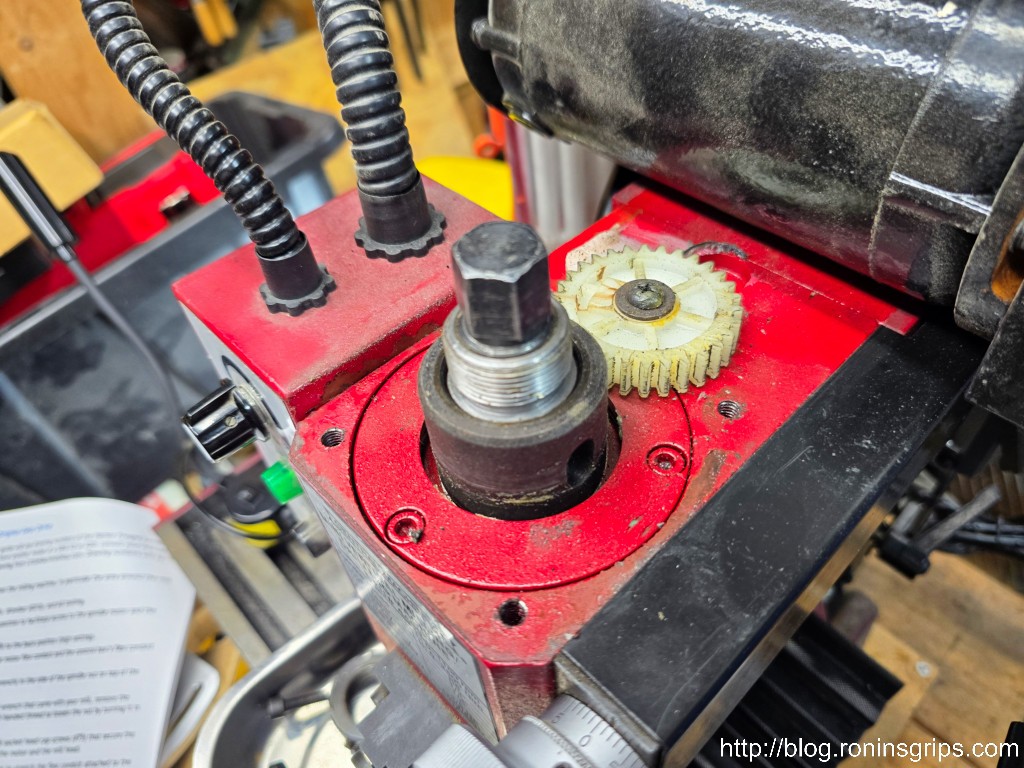
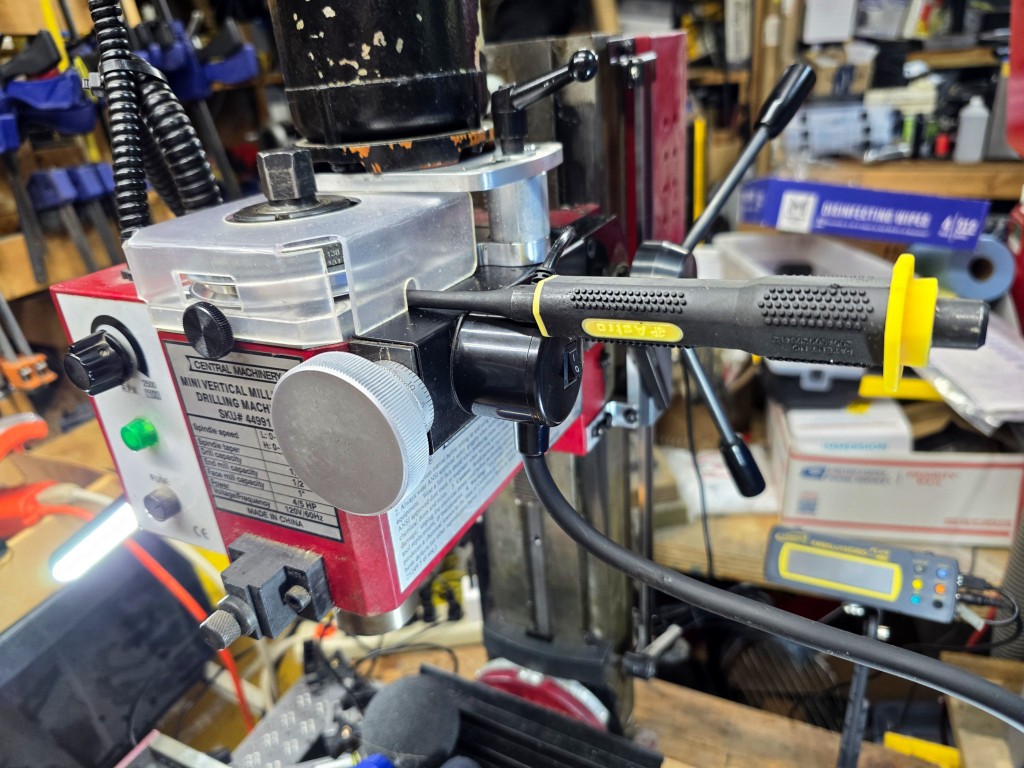
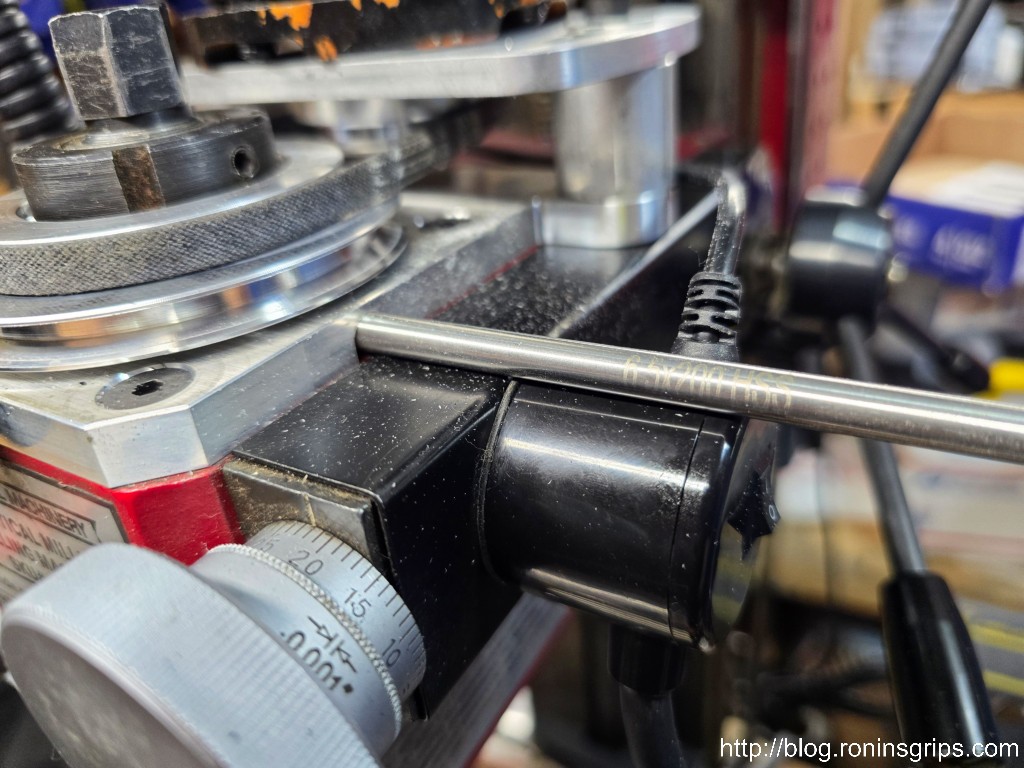
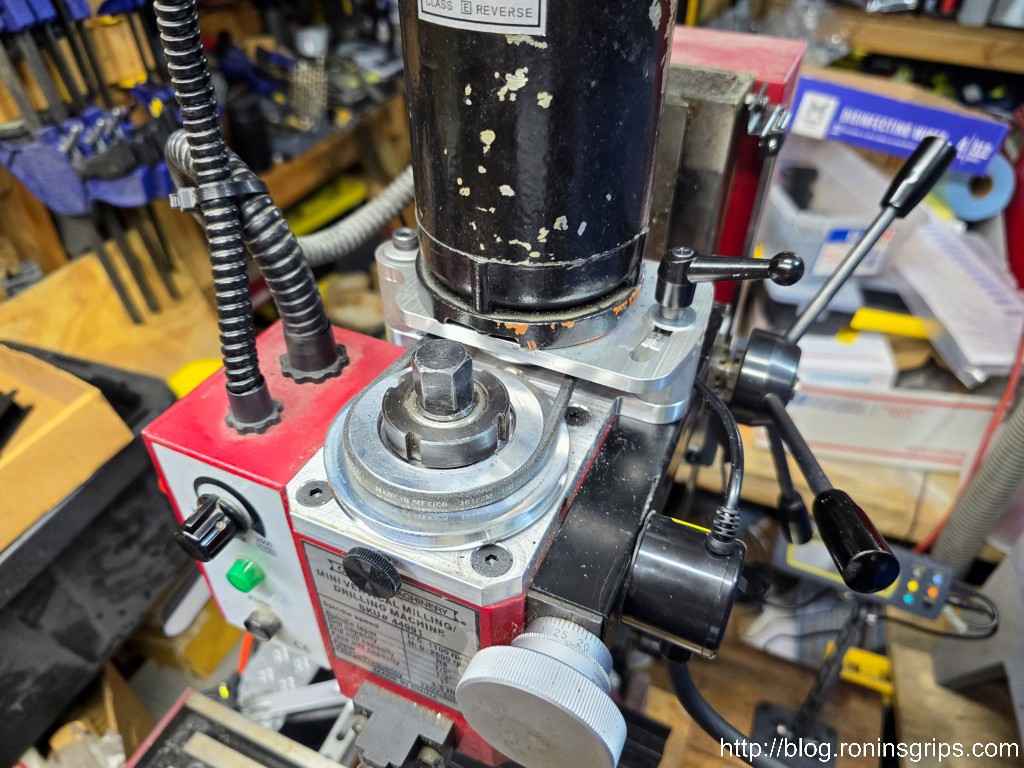
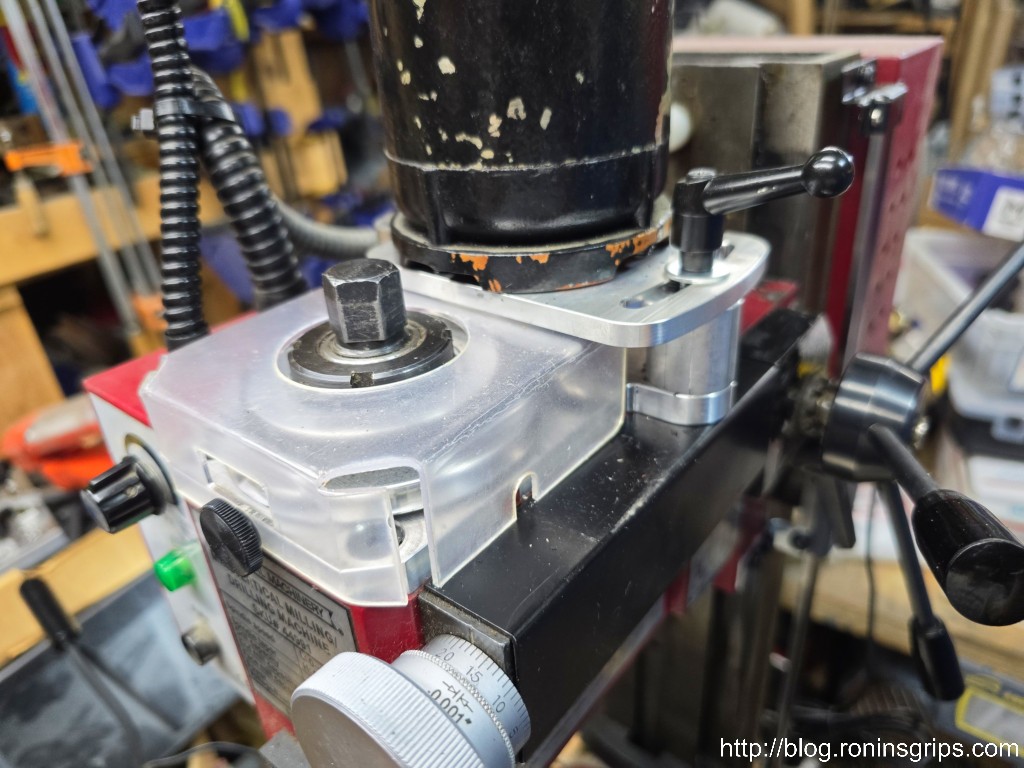
I have a Harbor Freight 44991 Mini Mill that I bought in 2006 or there abouts. My use of it has been off-and-on depending on what projects I had. Lately, I’ve been using it a lot and happened across a blog post talking about the benefits of upgrading from the gear drive to a belt drive using a mini mill belt drive conversion kit from LittleMachineShop.
There were two benefits that really caught my attention. First, I’d read that one of the key gears was nylon and could break. It hadn’t happened yet but given my machine is around 18 years old, it was concerning. Second, it could take care of the annoying loud whirring gear sound. I’d lived with it but I knew exactly what the author meant.
A company name Sieg in Shanghai actually makes these mini mills and they are sold under many different brands so if you have a Mini Mill from Harbor Freight, Grizzly, Micro Mark, Norther Tool, Sieg, Travers Tiiks, Wen and more, this ought to work. They tell you to confirm that the rear shaft is 9mm with a 3mm key and the front pulley that will go on the spindle has a 30mm bore and a 5mm key.
LittleMachineShop is my goto source for parts for my little mill and I aways had good luck with them. Overall, folks spoke highly of it so I ordered direct from them so I could get faster shipping. You can also buy it from Amazon if you prefer also [click here].
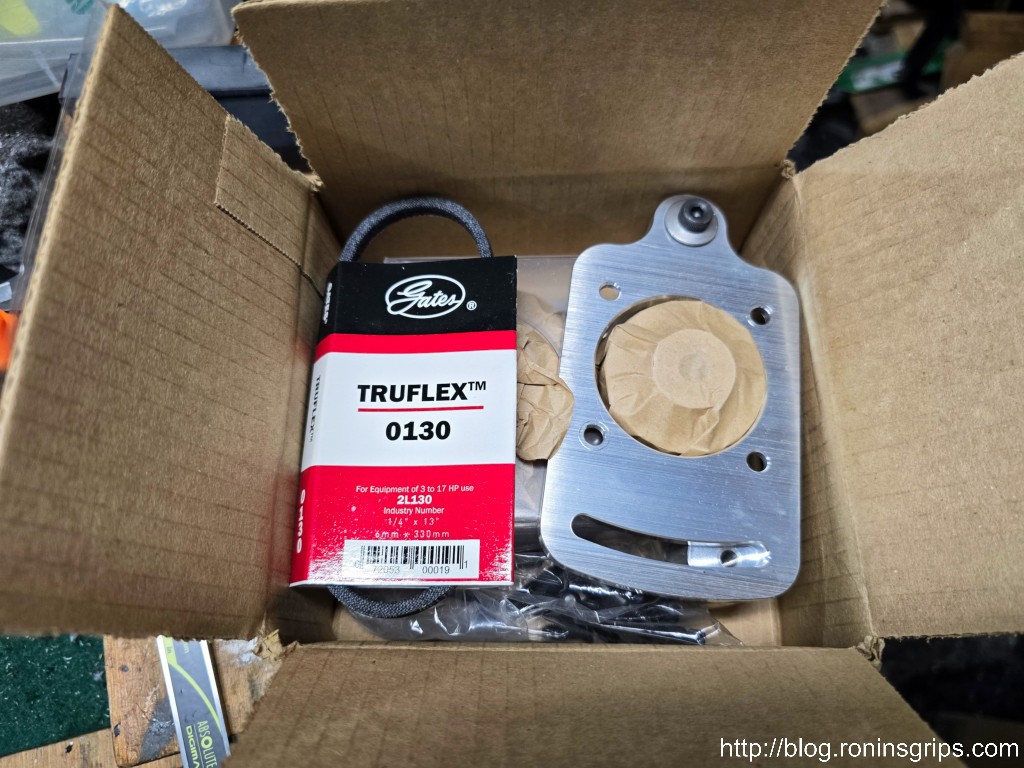
What arrived was a neatly done little kit with all the parts you need. A few people left comments on Amazon that they didn’t like the maching but what arrived for me was just fine.
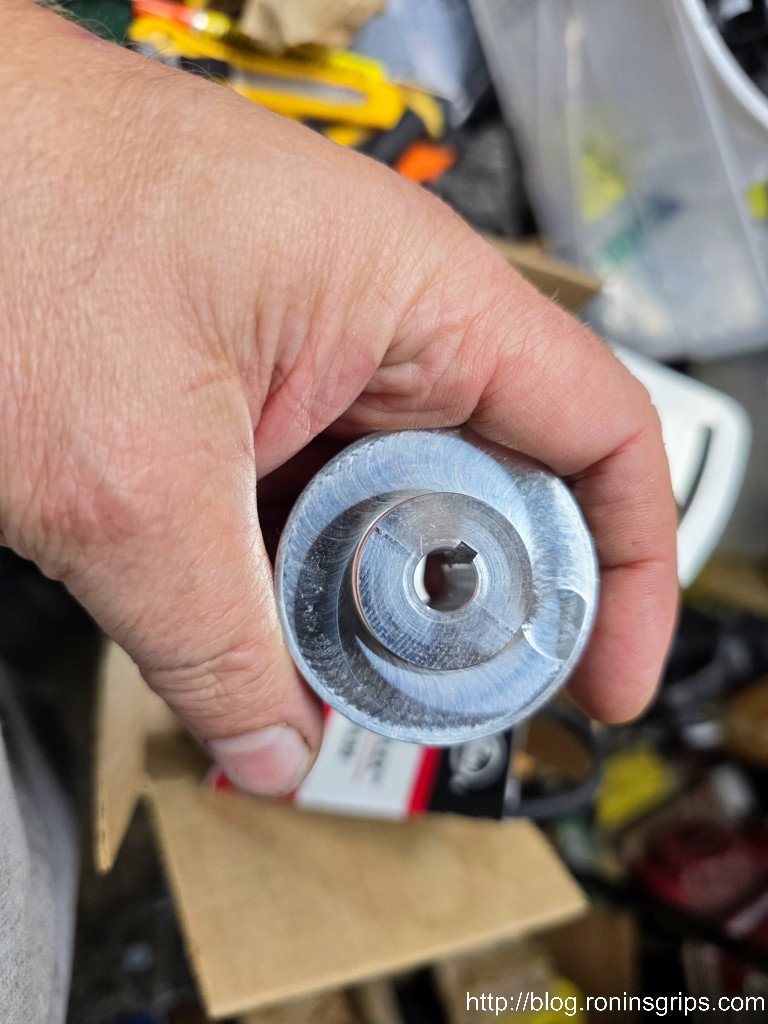
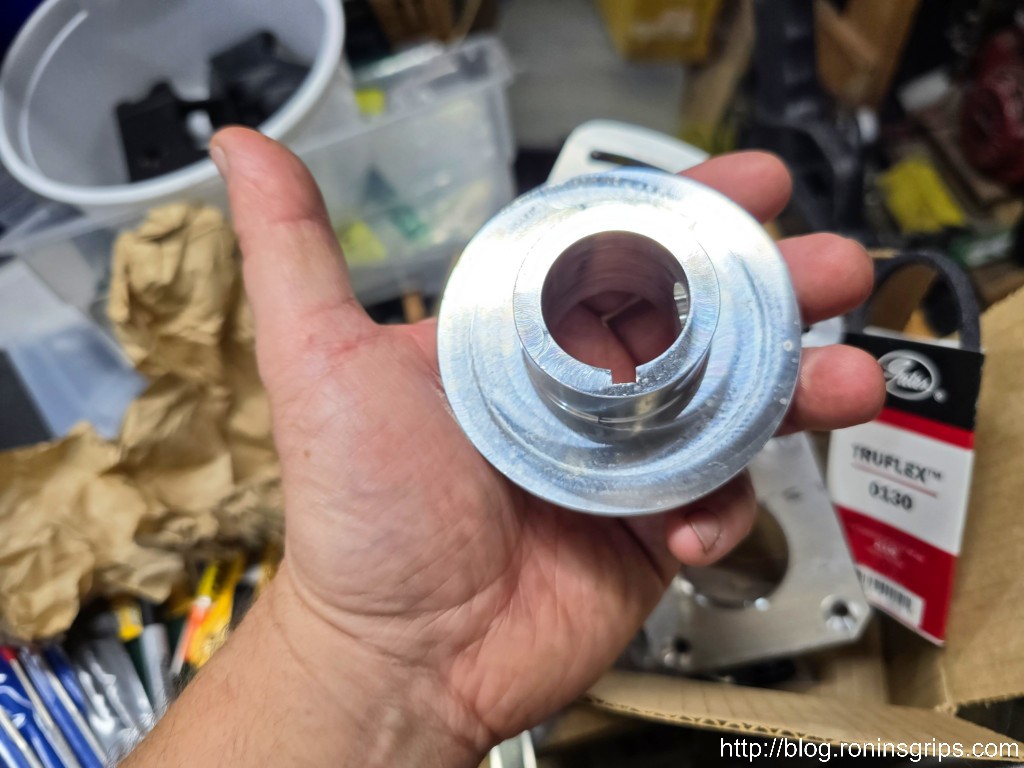
This box was in another box – everything was packed very well. Note the small drive belt they include in case you ever need another. Gates 0130 or 2L130.This is the pully for the motor.This pully will go on the spindle.
Now, before you do anything read the instructions from their website. They also come with the kit and were on the bottom of the box. I through them one by one and found them to be detailed and accurate. There are a number of steps so I am going to post photos only of some of them – follow their instructions and you can do this.
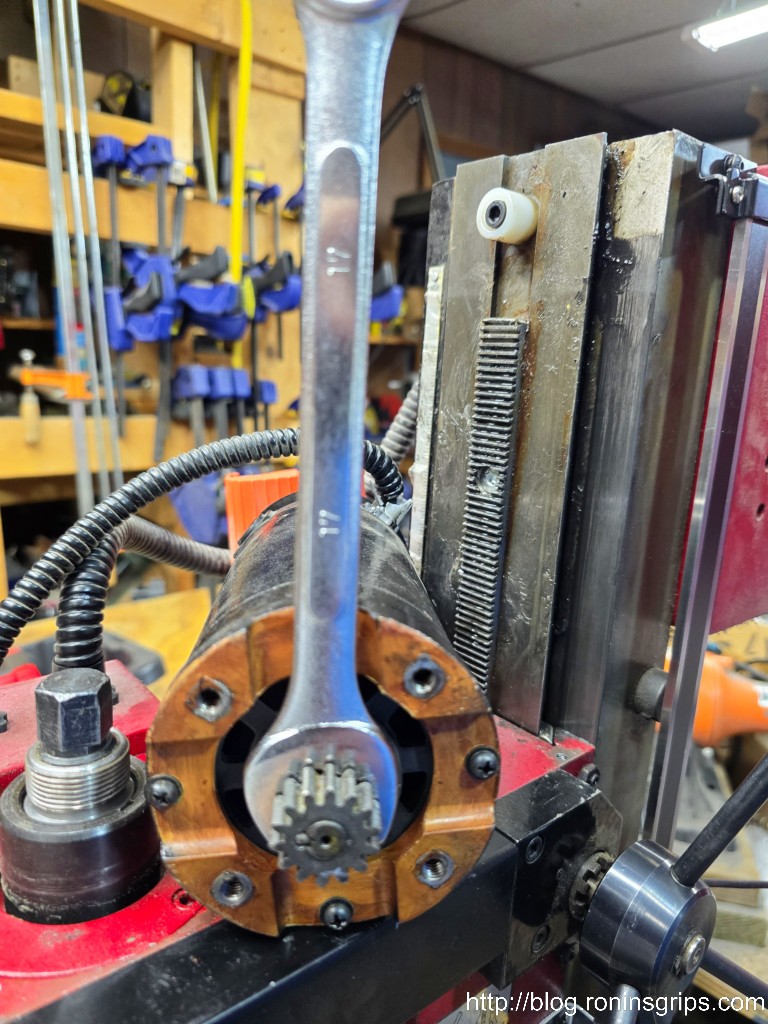
They tell you this can be done in 15-20 minutes. It took me just over an hour as I had to fight to get the pinion gear off the motor because I couldn’t find any of my bearing/gear pullers so I blew time trying to find them and then making do with what I had.
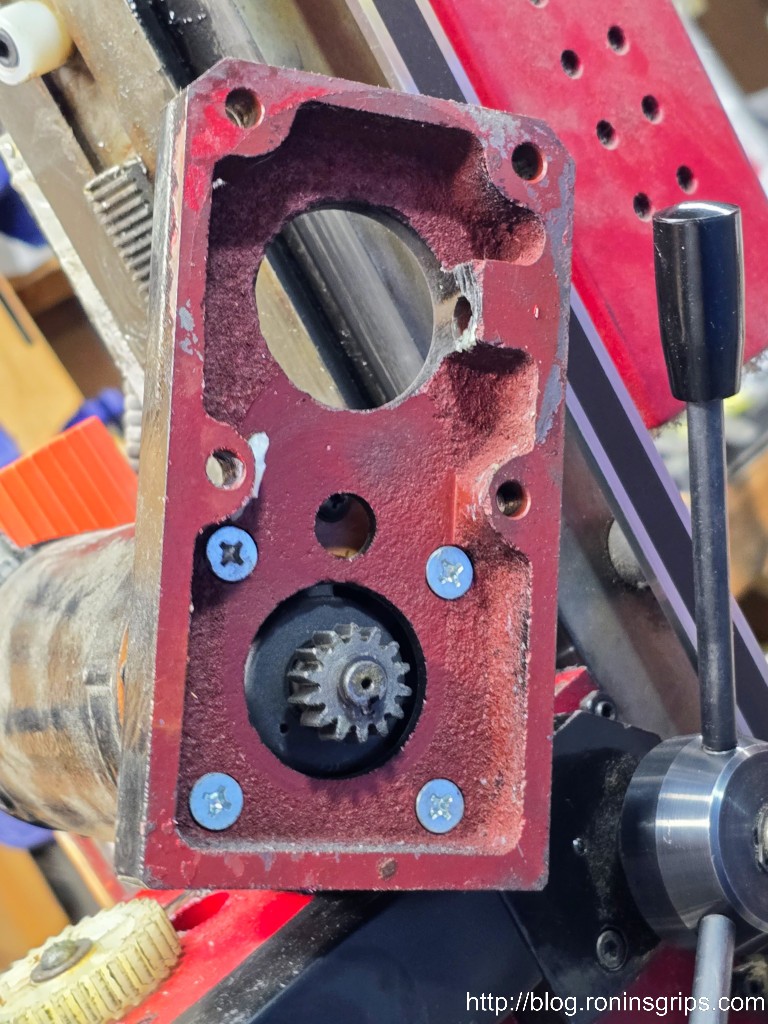
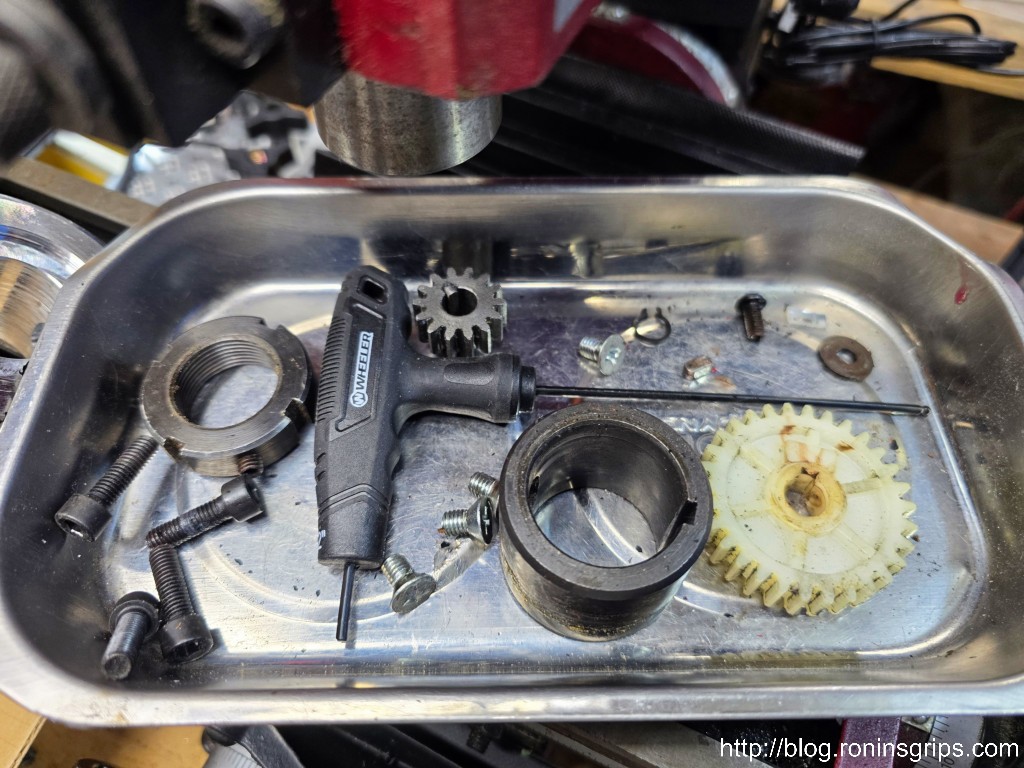
So that’s the nylon gear everyone talks about. It connects to a steel gear on the motor (what could possibly go wrong). The nylon gear spins and sends power down to the Hi/Lo gear. The mill speed is set to high, you remove that gear and a snug fitting piece of clear tubing is put in its place just to keep the now-gearless shaft from falling. I found disassembly very easy until I got to this gear. The instructions say it may be tight. Well, it’s definitely a tight interference fit. Every fastener came off surprisingly easily but that gear is a pain.What would have made quick work of this would have been a bearing/pinion gear puller. Guess who couldn’t find his …. anywhere! So, I got a 17mm box end behind and levered it out part way and then used a big flat head screwdriver where the head was bevelled. I’d lightly tap the screwdriver down and as the wedge-shaped head moved down, the gear moved out. I just had to be careful not to lose the Woodruf key that holds the gear in place relative to the shaft. I was able to slowly work it out. The only causualty was knocking paint off the motor as it moved around.My pile of parts grew. I like using a magnetic tray to hold everything. I scooted everything left over into a heavy ZipLoc type bag and stored it in my mill’s toolbox.
I kept following the instructions and everything went together real easily. I’m actually impressed that they were clearly described and complete.
Now there was one catch – they told me to use my old spindle lock pin when I was putting the spindle nut back on. Maybe there’s been a design change in the 18 years since I bought mine but my original spindle lock was 7.865mm and far too big to go in the new top plate’s hole. I found I could get a handy roll pin punch (6.42mm) to fit albeit with a little slop in the locked spindle. My original spindle stop pin had a diameter of 7.865mm according to my Mitutoyo micrometer. I used some drill bit shafts to get an idea of the size rod I needed. 6.5mm fits through the hole and is about as large as I can go. I toyed with filing the hole open larger to fit a bigger pin but think this will hold up ok. It doesn’t have to withstand a lot of torque.Here’s a side view. Note the paint scuffed off the black motor from my hear removal shenanigans. Note hole for the locking pin.Looking down at it a bit.With the cover.
Summary
I can’t say that the sound level went down much but it did change. More of a whirring sound instead of the gears meshing. Running at max speed on the low speed pulley, my sound meter is reading 90-92db while sitting on the table right below the spindle.
For me, the most important thing is that I don’t have to worry about one of the gears breaking. I’m pleased with it because that was what I really cared about.
If you want to upgrade your mini mill so you don’t have to worry about the gears, The LittleMachineShop belt drive conversion kit is pretty slick.
I hope this helps you out.
Note, I have to buy all of my parts – nothing here was paid for by sponsors, etc. I do make a small amount if you click on an ad and buy something but that is it. You’re getting my real opinion on stuff.
If you find this post useful, please share the link on Facebook, with your friends, etc. Your support is much appreciated and if you have any feedback, please email me at in**@*********ps.com. Please note that for links to other websites, I may be paid via an affiliate program such as Avantlink, Impact, Amazon and eBay.
I have a Harbor Freight 44991 mini mill that I bought it in 2006 if I recall right – it’s been so long that I don’t actually remember at this point. It’s served me well but like anything, stuff happens with age. In this case, the mini mill way covers were breaking down due to oxidation and repeated flexing.
I’ve replaced the way covers a few times over the years but this time had a challenge finding any in stock. In general, my goto spot for mini mill parts is LittleMachineShop.com and I recommend them to anyone with a mini mill or lathe. They’ve been out of stock for a while now and I wanted a solution sooner instead of later. I was adjusting my mill, cleaning it up in general and wanted to get the covers on so the ways would stay clean.
If you are new to machining, way covers aren’t just cosmetic. They keep debris off the ways (the machined surfaces that move on the X-Y table). If you don’t keep the ways clean you run the risk of something getting under the table and throwing it off or even just making cranking the handles harder.
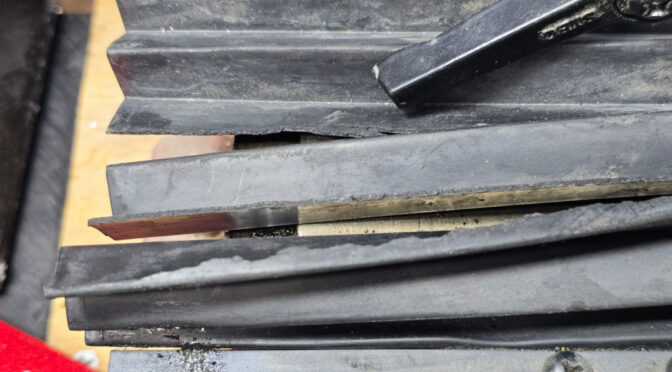
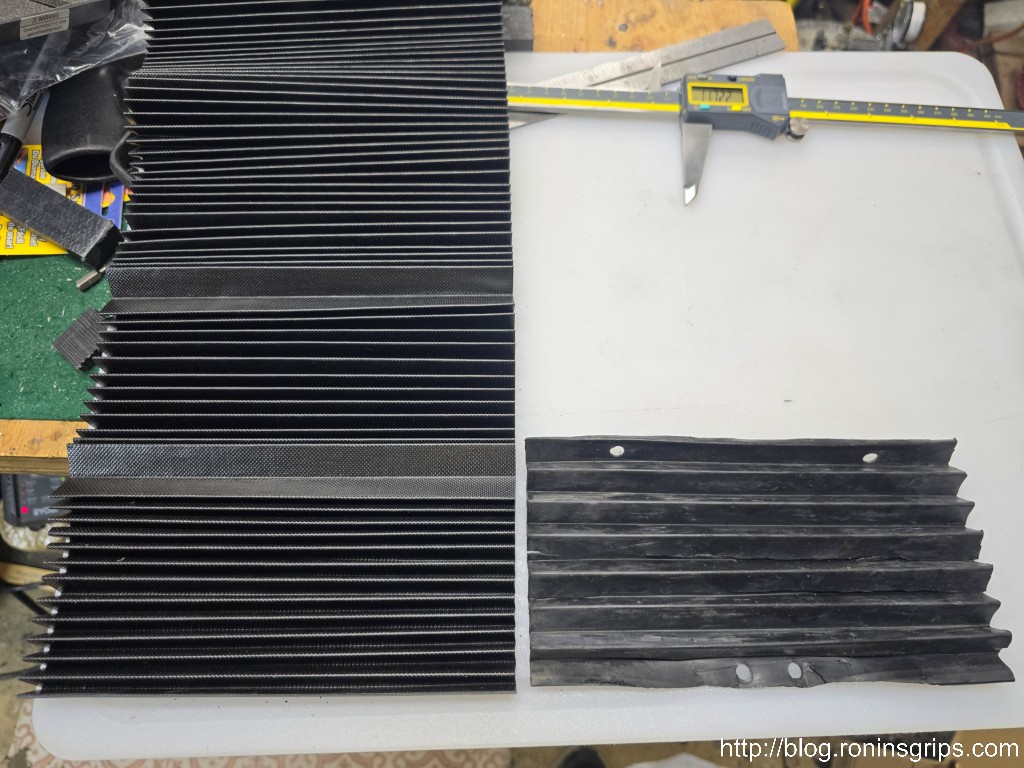
So, I needed to find another source but where? I had to figure out an alternative. Way covers have a diameter and length – how hard can it be if I searched using the measures and adapted whatever I found? The answer is that making your own is surprisingly easy. The way covers for the 44991 mini mill, and the two dozen or so brands that are actually the same machine made by Sieg in Shanghai, are 200mm wide and that’s the key – looking for millimeters vs. inches.
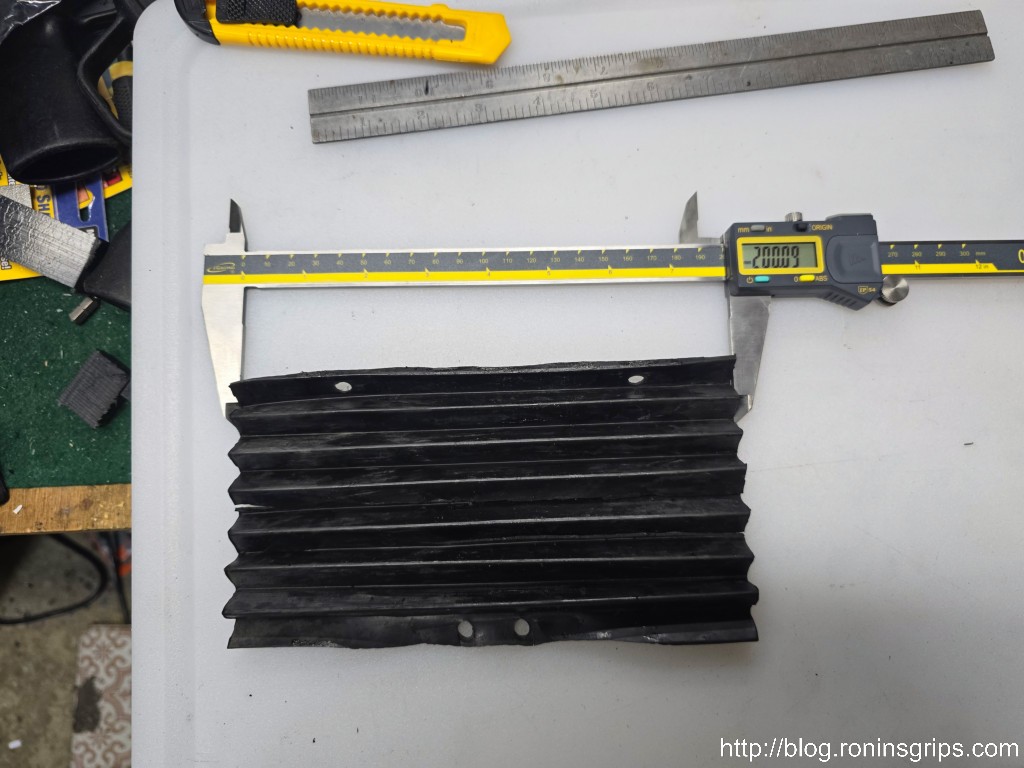
My initial mistake was to try and find a cover with a width between 7.75 and 8 inches. Then it dawned on me that the machine’s parts are actually metric and the width was 200mm. I figured if I could find a long enough length I would just cut it down and that strategy worked. By the way, that’s a 12″ IGaging Absolute Origin caliper. It’s a rare job where I need to measure something bigger than my 6″ Mitutoyo caliper can handle. For those rare occasions, the IGaging caliper has been good enough for me.
Armed with that, I immediately found way covers on Amazon. They are really long but you can cut them down with a plain sharp knife and straight edge no problem. Click here for the listing. At the time of purchase, they had one review. I was in a rush and figured I would gamble $10.19 not including a 5% off coupon. It was shipped from China and took about two weeks to arrive.
Guess what? They are actually really decent. Instead of rubber, these way covers are some kind of rubberised fabric. I’m not even sure rubber is the correct term and cutting them down to fit is fast and easy with plenty left over for a few more replacements (I stored the remainder in a heavy ziploc industrial bag and actually purged it with nitrogen. Yeah, I work with plastics so I have access to that stuff. Just sealing it in a good ziploc-type bag and keeping it safe would probably work too.
Let’s Step Through The Process
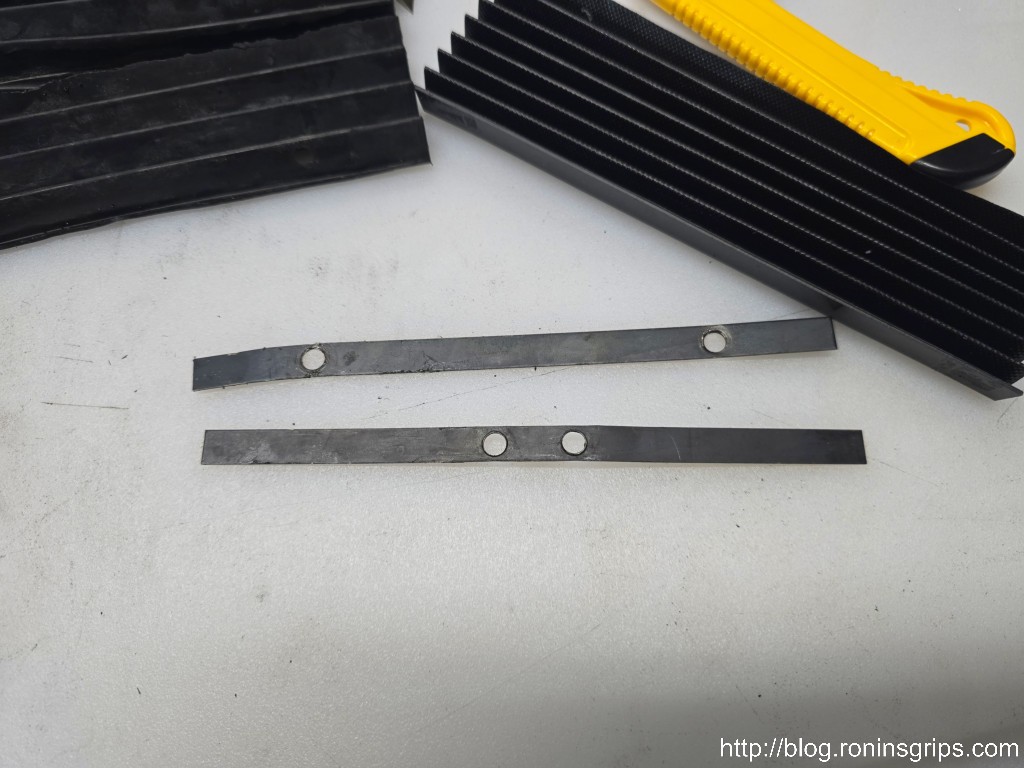
I did my covers one at a time starting with the front. The cover is held in place by a bracket on each end. Each bracket is held in place by two Phillips round head screws. Remove the brackets and the covers. Note the front cover has two sizes of screws when you go to reassemble it.
Each way cover is held in place by a metal strip and two Phillips round head metric screws. Note, on the front way the front and back screws are two different sizes so pay attention what goes where (the larger diameter screws are to the back if I recall correctly). This is either my second or third set of rubber way covers. They slowly break down with time and use.
With the cover off, I cleaned and lubed the ways and also the threaded rod. I then moved on to make the cover.
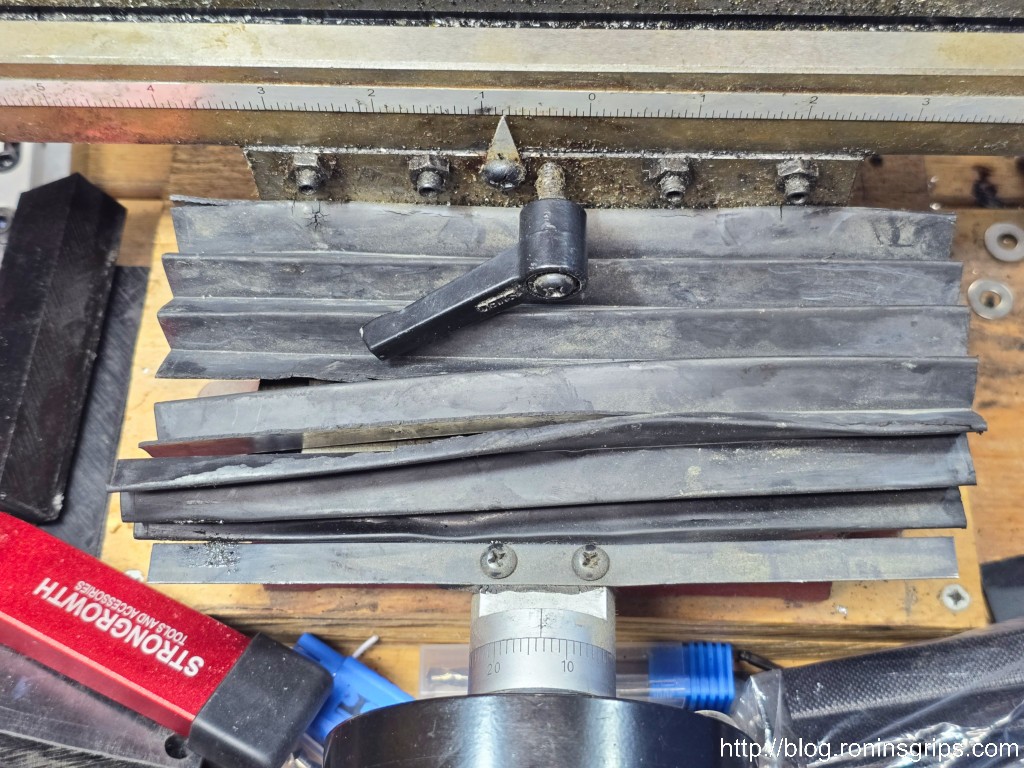
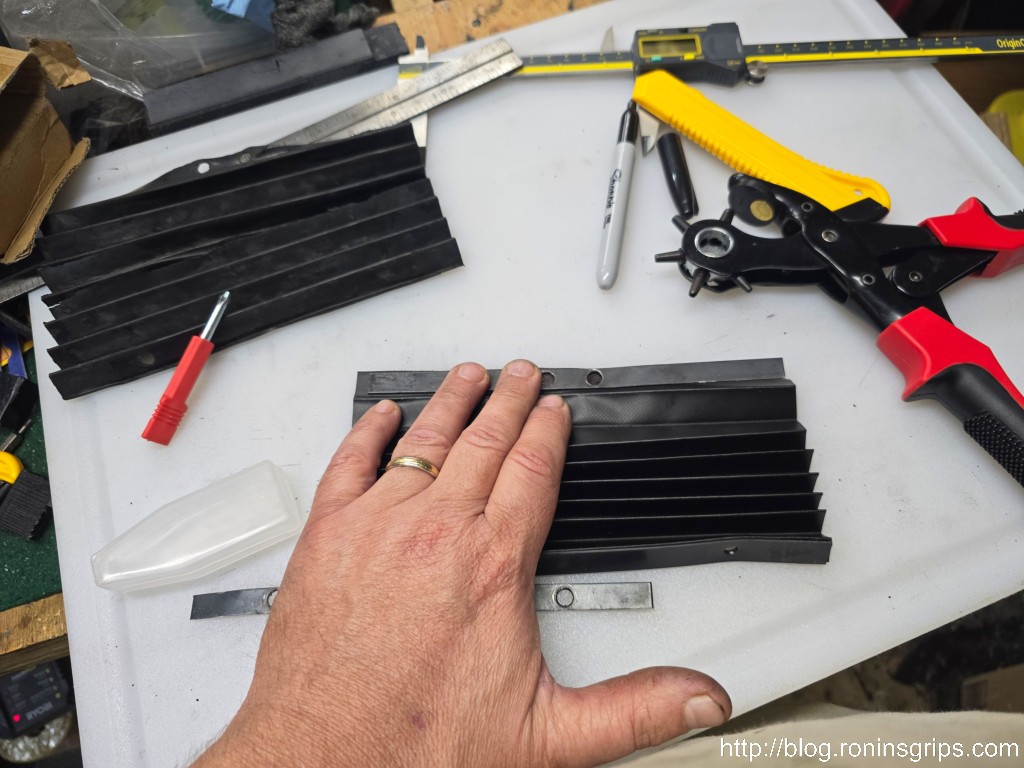
I removed the front cover and took the time to clean and lube the ways and threaded rod.The old way cover is to the right. The 200mm x 1500mm new way cover is to the left. It turns out the folds are 1.5cm on both so I just counted the peaks and made my cut. If the fold height didn’t match then I would have fit it based on the smoothed out length.I cut the length of new cover I needed and then used the old brackets to mark the hole locations.I marked the holes and then used a revolving hole punch plier to approximate the openings. I actually own a hole punch set but I don’t know where I put it – that would have been more elegant than my nibbling around the circle with the pliers but I got the job done.
I then did the same for the back and installed the way covers on the mini mill. The next time I do them, I may glue a plastic strip on each end to make it a tad more secure at each end but what I have is working great.
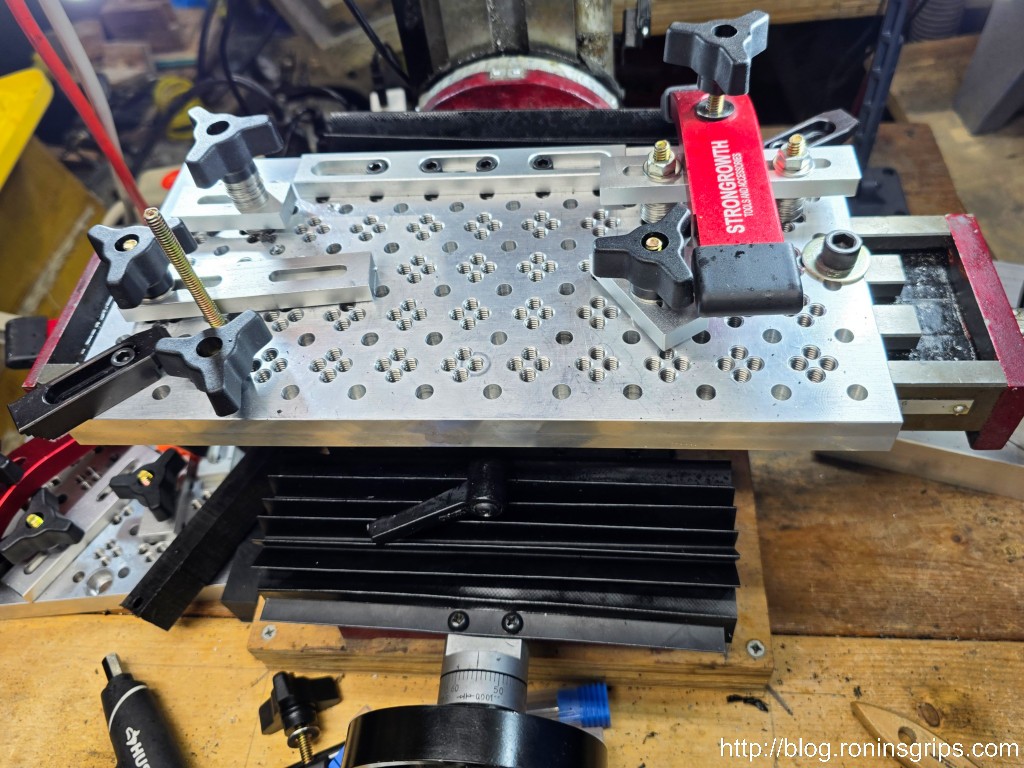
Looks much, much better and the ways are once again protected. It’s a tad floppy at the ends and next time I will add either a small steel or plastic strip the full width of the cover, scuff both sides for a good grip and join them with Starbond black super glue. The cover is perfectly serviceable as-is for now but am keeping that in mind for the future. By the way, that is a Dayton CNC 12″ workholding plate. I have two of them and they’re great. Here’s the link and the wait time is about 2-4 weeks. The positioning strips are from a vendor called Bulk Man 3D on AliExpress. All the holes and fasteners are 1/4-20 and the metric strips can accomodate 1/4-20 socket head screws in case you are wondering.I’m not sure what this material is but have a suspicion it will hold up better than the rubber. Time, use and exposure to lubricants will tell though. I’ve only had them on for over a week but cutting oil and penetrating oil don’t appear to have affected the material thus far.
Summary
The new way covers are working great. You can make your own and have plenty left over for the next time plus it is cheaper regardless. I have no problem recommending you buy this way cover and cut it to fit. I do suspect it will hold up better than rubber given it is fabric reinforced and not just plain rubber and we’ll see if that proves to be true.
I hope this helps you out.
Note, I have to buy all of my parts – nothing here was paid for by sponsors, etc. I do make a small amount if you click on an ad and buy something but that is it. You’re getting my real opinion on stuff.
If you find this post useful, please share the link on Facebook, with your friends, etc. Your support is much appreciated and if you have any feedback, please email me at in**@*********ps.com. Please note that for links to other websites, I may be paid via an affiliate program such as Avantlink, Impact, Amazon and eBay.
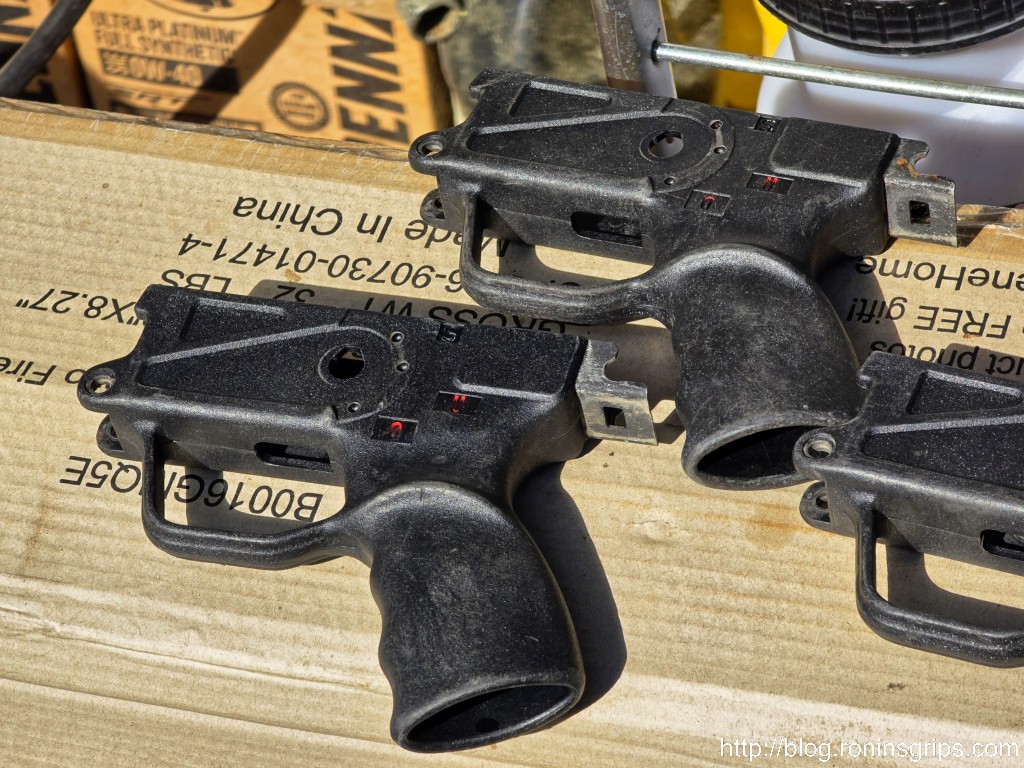
I’ve heard about using ultrasonic cleaners on firearms for years but never really investigated them. Recently, I had a need to clean a bunch of HK33 grips that had cosmoline, oil, and whatever else on them. Actually, I knew well in advance because they were part of a project and I had to figure out how to clean up a 50+ of these used grimy grips.
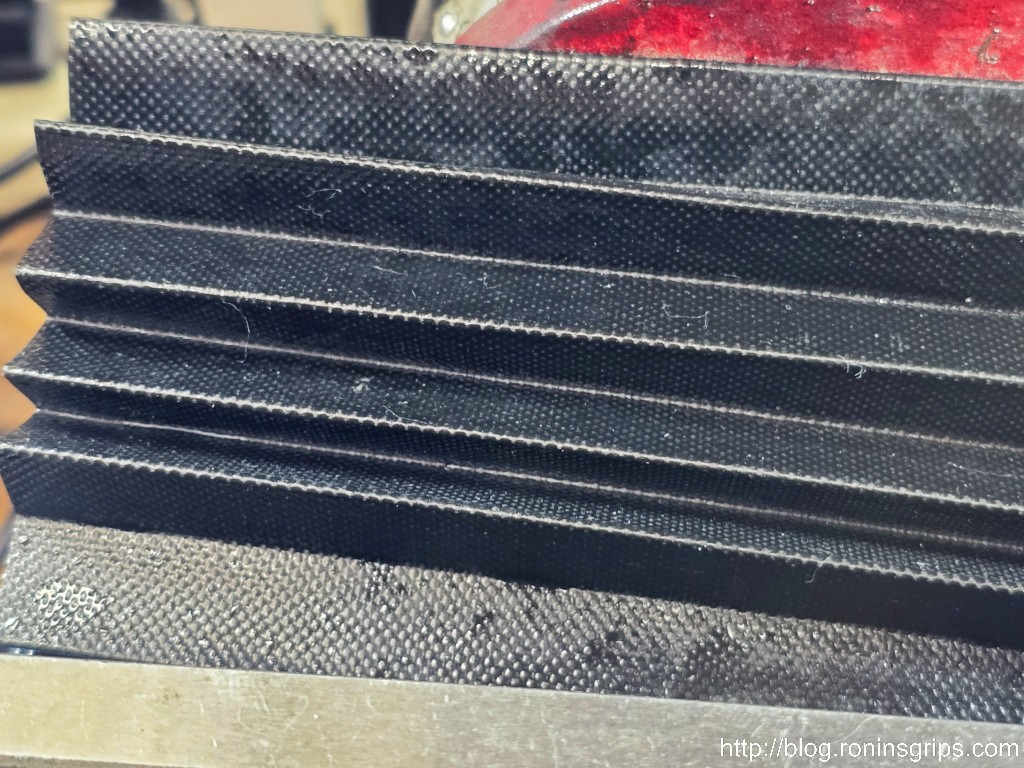
The HK 33 grips had cosmoline on them.
My Cleaning Options
I knew cleaning that many by hand with a solvent would take forever and be expensive. Hot water and dish soap was an option but slow and time consuming. An ultrasonic cleaner seemed like a perfect solution. I talked it over with my friend Scott, who owns Michigan Gun Exchange. Scott has one in his shop and uses it to clean firearms. He showed me how it worked and I was impressed. This type of cleaning would be perfect.
Ultrasonic Cleaners
An ultrasonic cleaner cleans parts three ways – the liquid bath, ultrasonic vibrations and heat all combined at once. If you’ve every fought getting cosmoline or old grease that has set up, you know how heat is your friend.
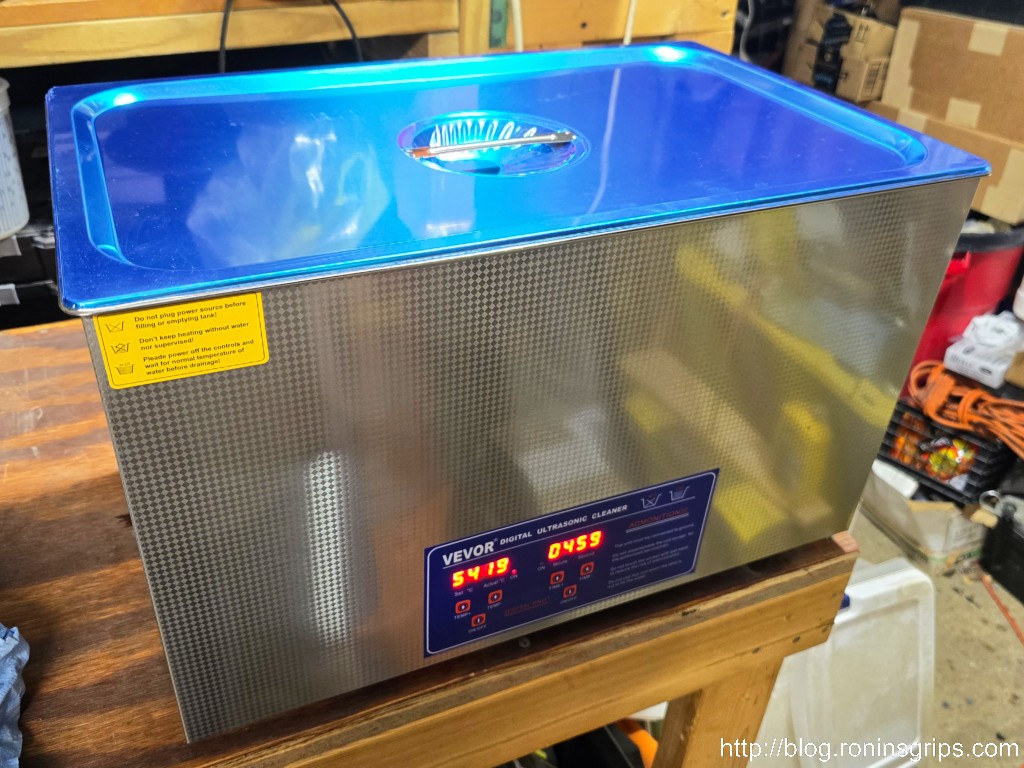
Okay, it was time to research. I couldn’t afford or have the space for a giant unit. Doing some digging, the Vevor 30 liter unit got good reviews and looked like it would work for the majority of firearm parts I would need to put in it. I considered the length, width, height and the diagonal for really long parts. The stainless basket you put the parts in measures 18.3″ x 10.8″ x 6.7″. The diagonal is 21.25″.
Note, in terms of actual volume it holds, they say the unit is 30 liters in the title but also report that it measures between 29 and 30 liters or 7.7-7.9 gallons. They recommend the fluid be at least 75% full to protect the heating element plus you never run an ultrasonic cleaner dry or it can damage the unit.
By the way, on a larger unit like this, make sure it has a drain valve and the Vevor 30L does.
This is the Vevor 30L cleaner. The unit is simple to operate with the temperature on the left and the timer on the right,
Deciding On The Solvent To Use
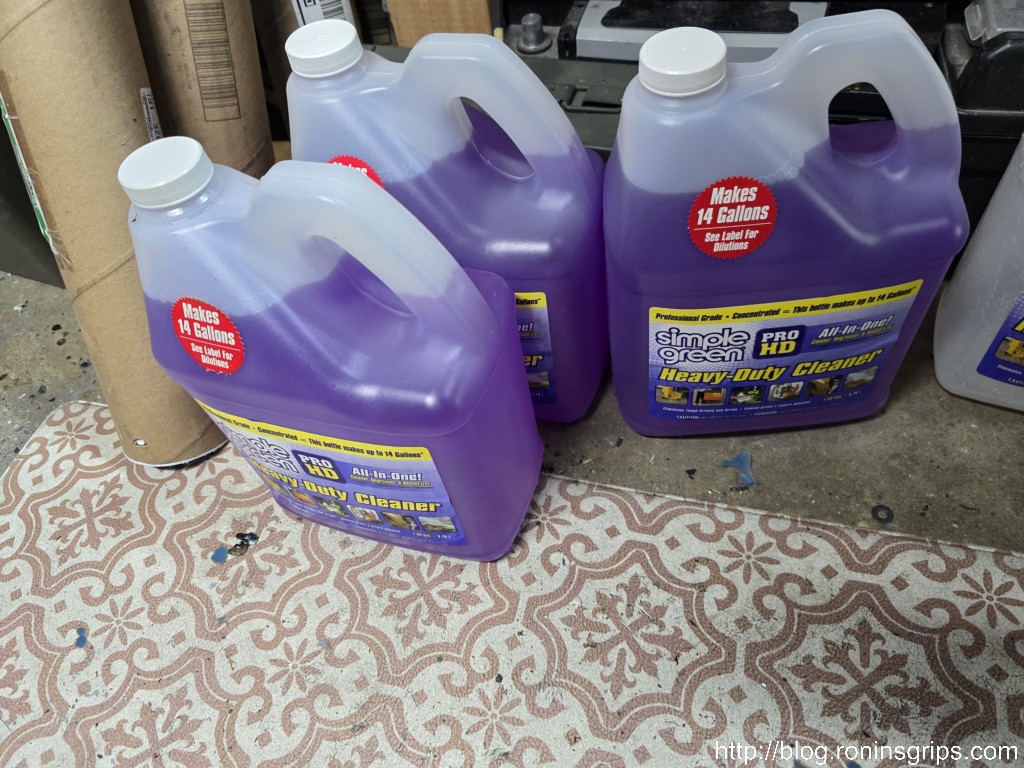
Dedicated ultrasonic cleaner fluids are rediculously expensive. What a lot of gun guys do is to use 50:50 Simple Green and water. I started reading more on that and there was one small detail I wanted to avoid – aluminum left in plain Simple Green for too long is apt to react and cause pitting. The aluminum friendly formulation is Simple Green Pro HD.
I’d recommend using Simpe Green Pro HD because it is aluminum friendly. I know guys using the regular Simple Green at a 50:50 ratio and they aren’t having problems – my suspicion is that the parts in the liquid long enough for a problem to happen.
Simple Green’s recommended ratios for their Pro HD formulation are:
For heavy cleaning: 1 part Pro HD to 3 parts water
For medium cleaning: 1 part Pro HD to 5 parts water
For light cleaning: 1 part Pro HD to 10 parts water
Well, given how thick cosmoline, grease and oil can be, I went with the heavy cleaning 1:3 ratio and it worked great.
Two comments – first, I bought mine from Home Depot. They ship to a home for free in my area. Amazon is rediculously expensive due to the weight. Second, I didn’t find out until later that Simple Green also has an “Extreme Aircraft and Precision Cleaner” formula. I might try that in the future as they expressly made it to not react with plastics, composites, aluminum, etc.
Heating the Tank
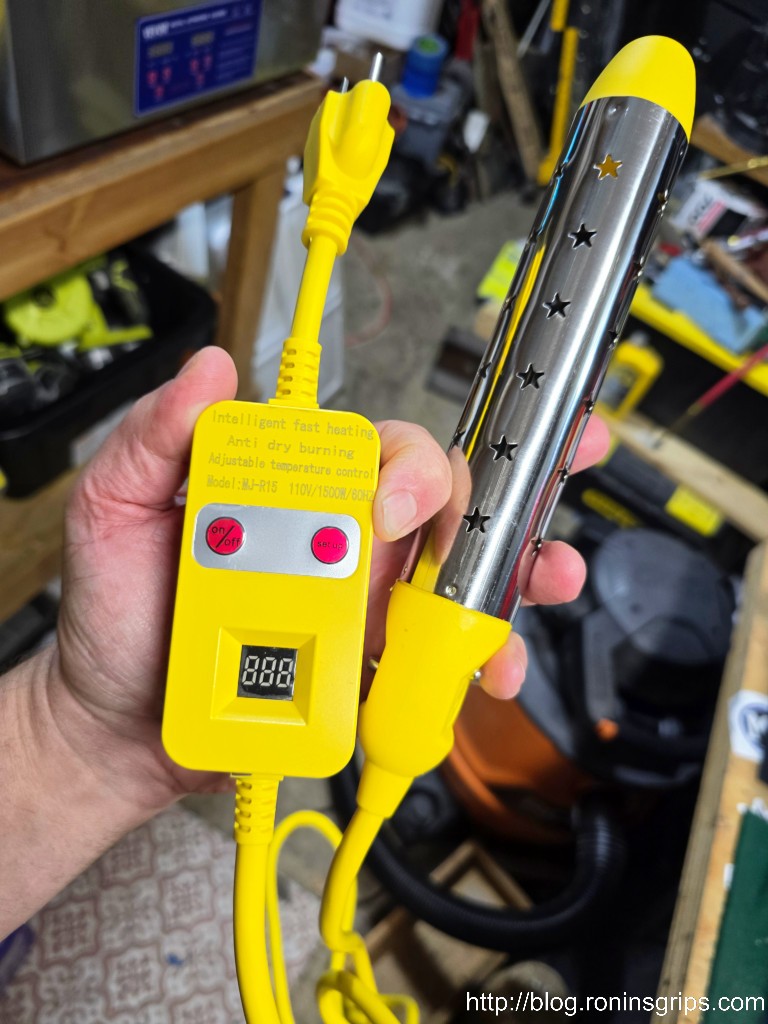
One complaint of folks using the large ultrasonic cleaners is that their internal heaters take hours to heat the fluid up. Well, I can’t wait hours so did some digging on that front and bought an immersion heater. They all have a potential shock hazard so you do not want to put your hand in the fluid while heating it.
I bought an immersion heater made by HAIYEATBNB off Amazon. because it has a temperature regulator and got good reviews — it’s a game changer. Scott bought one after I told him how fast it heated the tank.
To be clear, the immersion heater is to dramatically speed up the heating of the solvent and then it is removed. A quick summary of steps is to put the heater in the fluid, plug in the unit and set the temperature, let it heat it up, unplug the heater, let it cool off a tad before you remove it and set it in a container so it doesn’t drip. The Vevor cleaner’s internal heating unit can maintain the temperature. The immersion heater is just fast forwarding the heating process.
The recommended temperature range for ultrasonic cleaners range from 130-180 degrees Farenheit. The theortetical “best” temperature for cavitation is 158F (70C) and guys report great luck between 155 and 165. Just bear in mind that the hotter you go, the more evaporation you will have also.
This is the HAIYEATBNB immersion heater. I like having the temperature control and the actual heating element contained inside the metal shield that has the stars on it. Yeah, I am sure the shape will cause some jokes but it works quite nicely.
The immersion heater sped things up dramatically. I could bring the tank up to temperature in 30-40 minutes. The exact time depends on the volume of liquid and what the starting temperature of the fluid is.
The immersion heater’s temperature gauge will not match the ultrasonic cleaner’s temperature gauge. If you want to know the actual temperature more accurately, you use a more precise instrument such as my Fluke 62 Max+ shown here. Note, the temperatures will vary depending on where you point it. At some point you just have to say “close enough” and call it even.
Safety comment: There is the potential for electric shock with any immersion heater. We used them on our farm growing up and survived. I’m not too sure I would worry about any freaked out electric shock comments you see in all of the reviews on Amazon across most of the heaters I looked at. Simply put, avoid sticking your hand in there while it is heating. Standing barefoot in a puddle of water that has an earth ground while putting your hand in the solvent during operation of the immersion heater will get you shocked so don’t do that!! Sheesh.
Testing
I timed the ordering with everything arriving so I could immediately put the unit into use. If it was going to fail, I wanted to know as soon as possible so I could return it.
In terms of fluid, Vevor recommends you have at least three quarters full or you may damage the unit. If the fluid capacity is about 7.7 gallons then this puts it at 5.8 gallons of fluid. (The above photos do not reflect this just to be clear – I had about three to four gallons in when I snapped them.)
I then put in the immersion heater and watched the temperatures climb both on the heater and cleaner’s gauges and they didn’t match. That really wasn’t surprising to me. It’s hard to say which is more accurate but I decided to go with the temperature measurement from the Vevor cleaner. They claim their temperature reading is within +/- 5 degrees celsius which would be about +/- 9 degress Farenheit if I am doing my math right.
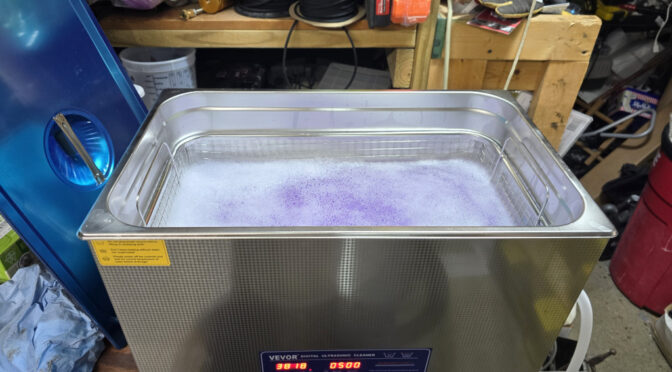
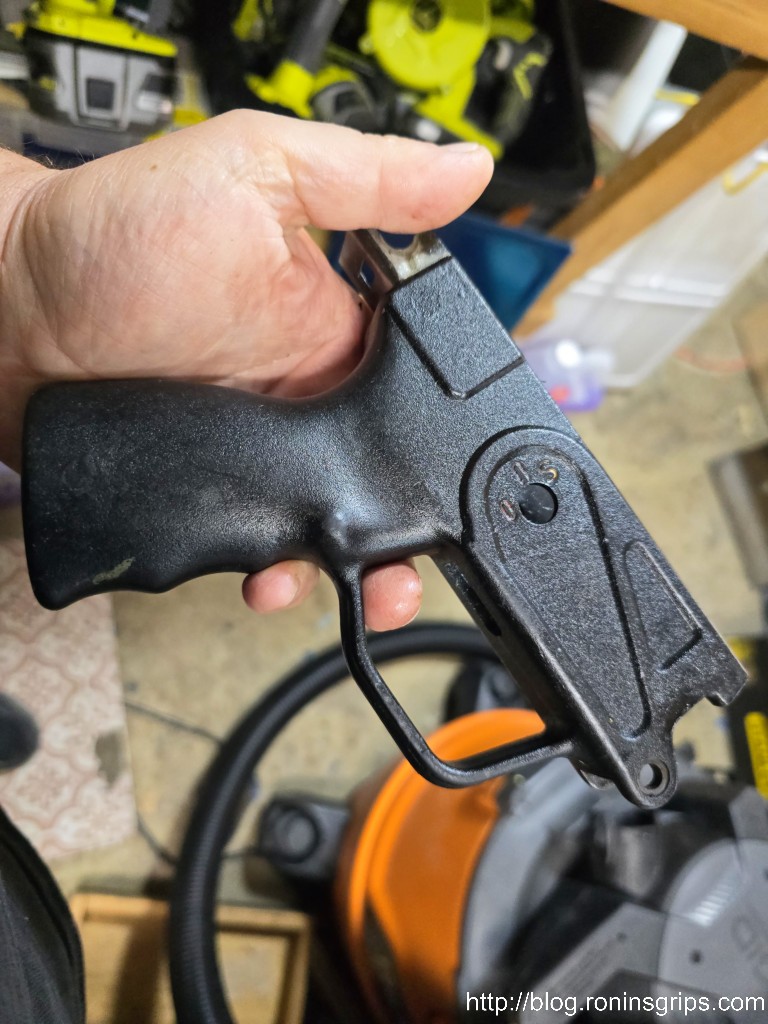
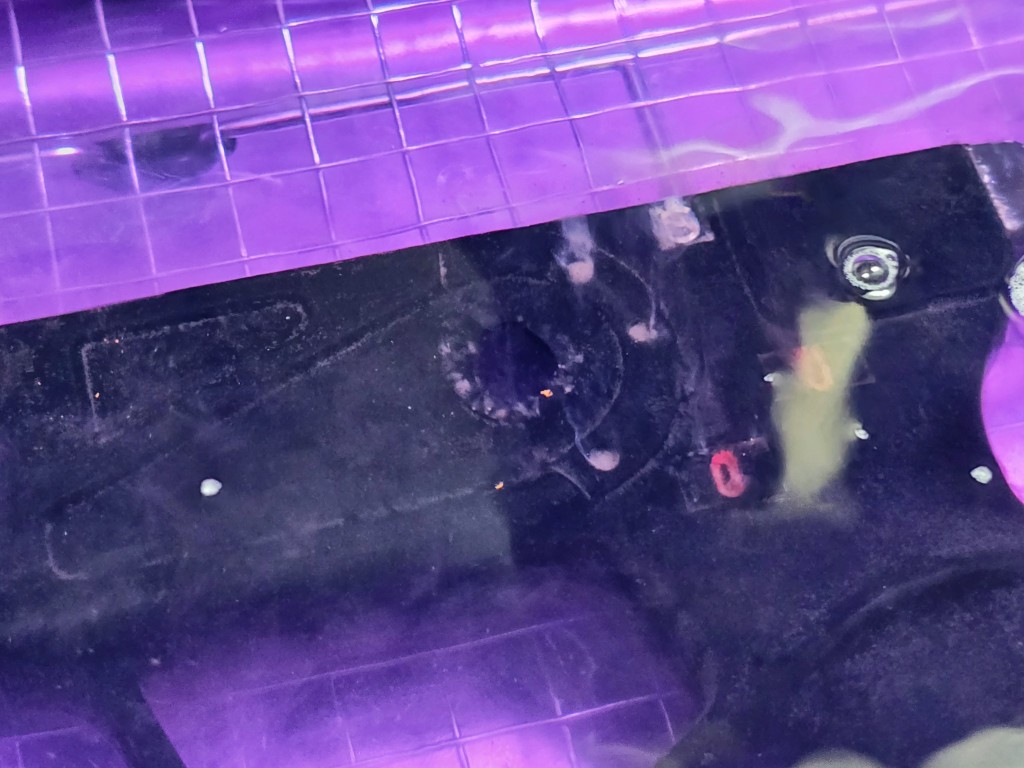
Given the size of the unit I could easily put two grip modules in side by side and that’s what I did. I didn’t try stacking them as that might reduce the cleaning effectiveness. I put the unit’s timer at five minutes and let it run. It was fascinating to watch the crud come off – even the red and white paint filler in the S-U-O symbols on the grip were dissolving.
The cleaner was fascinating to watch operate. I took this photo because you caan see the paint dissolving from the selector position marks.
I read a few complaints about the noise these things generate. The Vevor makes a buzzing sound for sure. Maybe it’s just me but it really didn’t bother me. I didn’t need it to be quiet – I needed it to clean stuff.
The timer went off, I then removed the units, sprayed them down with water to remove the cleaner and then used an air line to blow all of the water out.
The results were amazing. Scott had warned me that everything comes off – including the “sheen” of the black plastic resulting in a dull charcoal color. I then went on to do about a dozen more. In two or threee cases there was still some caked on cosmoline inside the grips that a second pass got rid of.
The results were very impressive. In just a few cases did I run a grip through a second time.
Have A Plan to Avoid Rusting Afterwards
I should tell you to have a game plan to avoid flash rust forming on steel items you clean. Ultrasonic cleaners will strip all the oil and grease off so that means untreated steel can form rust when exposed to moisture in the air. “Flash rusting” is a term for when bare steel is exposed to moisture in the air and starts to show visible rust within minutes of exposure.
Spraying WD-40 can help displace water – another option is to use compressed air if you have access to all surfaces – first but then you need something to prevent rust such as a light spray oil or whatever your preference is. My point is to think it through to avoid flash rusting after you clean.
Summary
At this point, I am very happy with the Vevor 30L ultrasonic cleaner. If you have ever wanted to get into ultrasonic cleaning for whatever you are working on, the Vevor units are cost effective and you just need to decide on what size works for you. Click here for a listing of Vevor cleaners on Amazon and here for all brands.
I hope this helps you out.
Note, I have to buy all of my parts – nothing here was paid for by sponsors, etc. I do make a small amount if you click on an ad and buy something but that is it. You’re getting my real opinion on stuff.
If you find this post useful, please share the link on Facebook, with your friends, etc. Your support is much appreciated and if you have any feedback, please email me at in**@*********ps.com. Please note that for links to other websites, I may be paid via an affiliate program such as Avantlink, Impact, Amazon and eBay.
Hi folks – back in 2020, I wrote about buying a Mophorn 3 ton pneumatic/air- pillow jack to work on our vehicles. Actually, I bought it in 2019 and it’s still going strong. This past Fall, I decided to get a second air bag jack but decided to get one with a higher lift capacity to better jack up my 2021 Ram 2500.
To give some background, I wanted an air-pillow/air-bag lift for speed and to save my shoulders that could no longer handle pumping a hydraulic jack arm over and over to lift a vehicle. I have an air-over-hydraulic bottle jack but it is tall and slow. The air bag jacks use compressed air to inflate a rubber cylinder that then lifts the vehicle – like what you see in air-ride or air-lift suspensions on trucks. They are called by a variety of names as you can see in this post: pneumatic jacks, air bag jacks, air pllow jacks, pillow lift jacks. Air-over-hydraulic is a different creature – air is used to actuate the hydraulic pump vs. you hand pumping to move the hydraulic pump up.
Always Use Jack Stands
Once the vehicle is in the air, I always put jack stands all the way around to support it. This is always a good idea regardless of jack type you use and the air bag jacks are no different.
There was one thing in their product page on Amazon that confused me until I realized it was a metric term. They say it can lift 11,023 pounds / 5 tons. Well, being used to American measures, 5 tons if 10,000 pounds soI wondered if this was some kind of hype. The issue is that they mean 5 metric tons. A metric ton is 1,000 KG or 2,204.6 so 5 metric tons is 11,023 pounds.
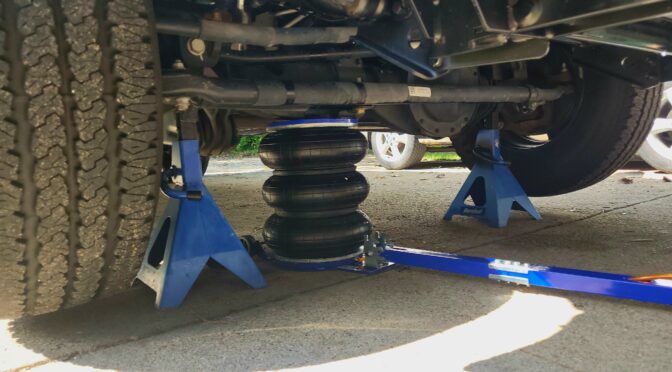
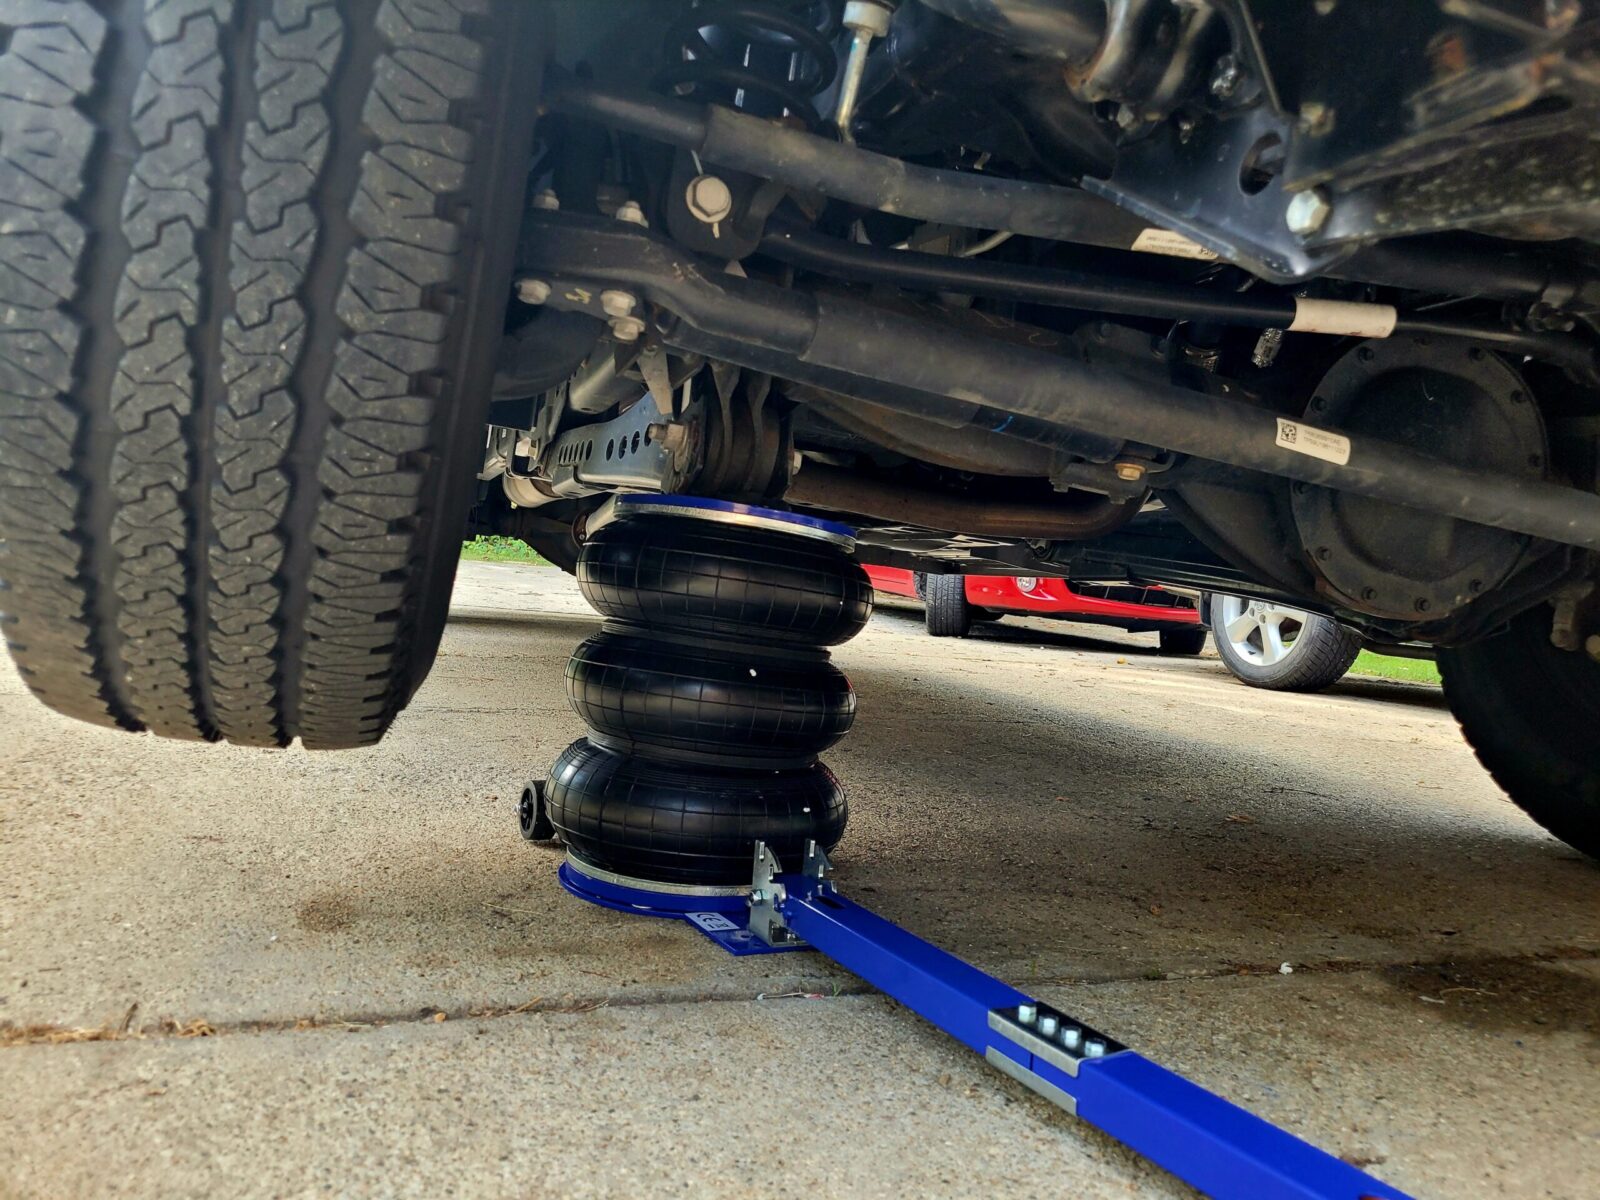
Their stated operating air pressure range is 5-10 kg/cm^2. That comes out to 71.1 to 142.2 PSI. The airline for my driveway tools is at 100 PSI – most of my tools are 90 PSI. My guess is that given their operating range, the jack can’t lift its rated maximum capacity. I can tell you that it has no problem lifting the front or rear of either my 6.7L Hemi 2021 Ram 2500 or full size 2016 Ford Transit F150 van and that’s really what I wanted. The photo at the top of the blog is the Vevor with my Ram 2500 up in the air.
The lifting height is about 15.75″ and the minimum height is 5.3″. The minimum matters a lot when you are trying to get it under some vehicles. One trick I have found is to stand on the air bag to get the air out and then close the exhaust valve to make it thin enough to slide under some cars.
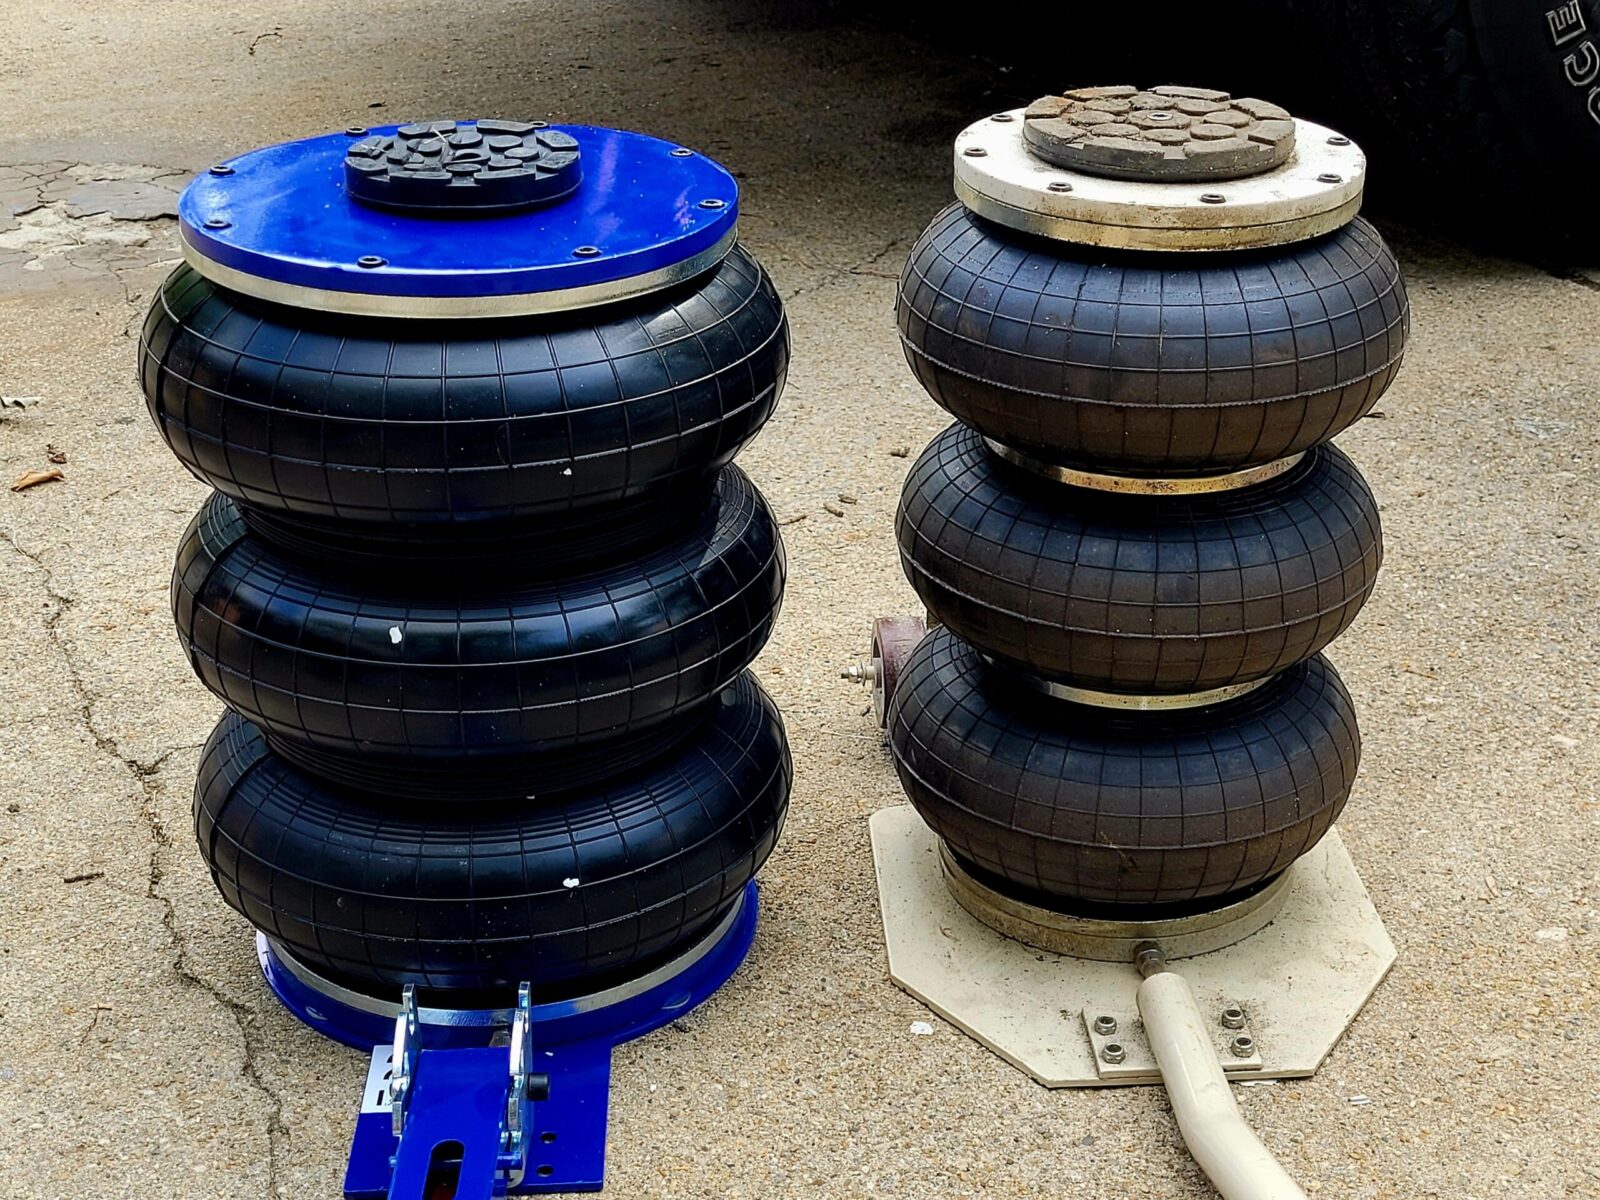
The Mophorn is slightly taller and you can see the Vevor has a larger diameter air bag.
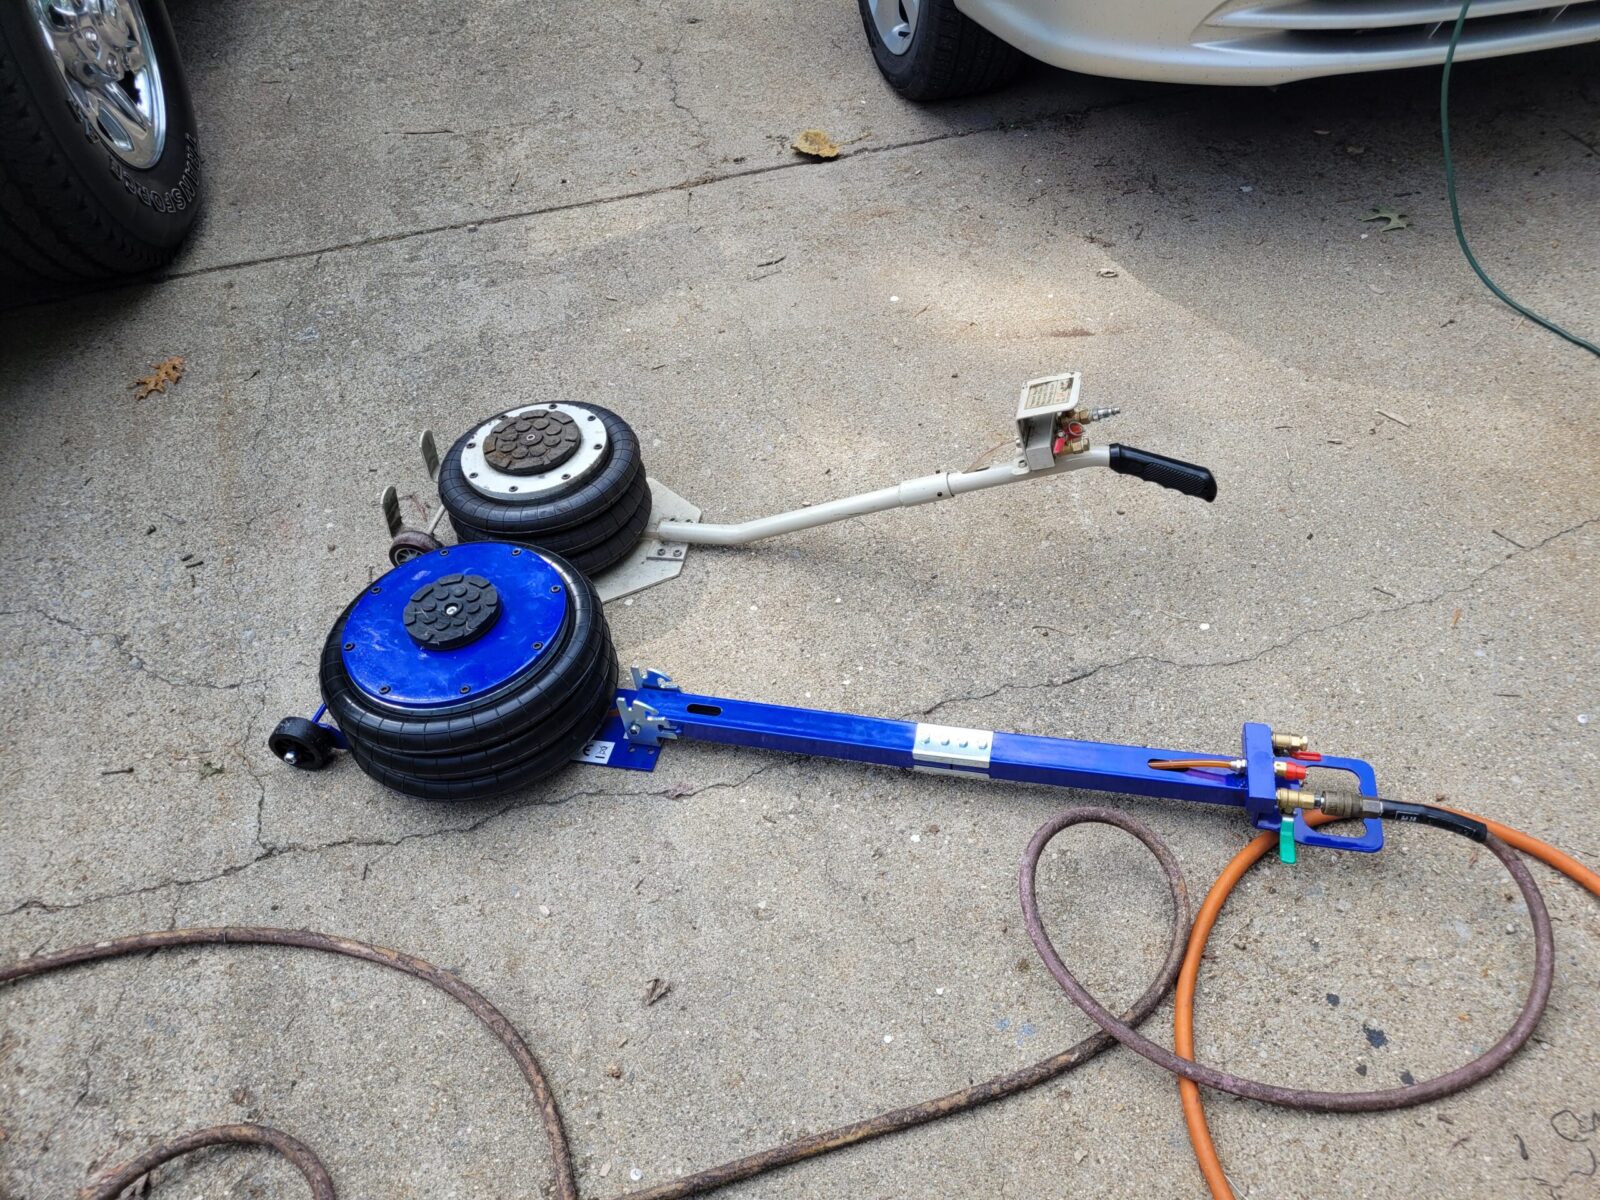
One of the nice perks is that the handle has three positions so you can slide it in flat under a vehicle or at an angle if so you choose. My Mophorn jack’s handle is in a fixed position so that limits how far it can slide under some vehicles but it’s also more sturdy since it can’t move.
You can see the difference between the fixed Mophorn handle vs the 3-position Vevor.
With the Mophorn jack, the screws securing the botton of the bag to the plate started to come loose and the unit was leaking air. With the Vevor, they are in solid and really did not want to back off – I was going to add medium Loc-Tite but since they were in so firmly, I decided to leave them alone. They may even have a thread locker applied already – I’m not sure. I think out of all of the screws there were only one or two I could torque down further.
The Vevor has no problem lifting my Ram 2500 with 100 PSI of air.
Summary
All in all, the Vevor air bag lift seems like a solid unit. I’ve not had any problems at all. I sometimes wish the handle wouldn’t move so easily but its ability to fold flat to the ground makes up for that.
If you find this post useful, please share the link on Facebook, with your friends, etc. Your support is much appreciated and if you have any feedback, please email me at in**@*********ps.com. Please note that for links to other websites, I may be paid via an affiliate program such as Avantlink, Impact, Amazon and eBay.
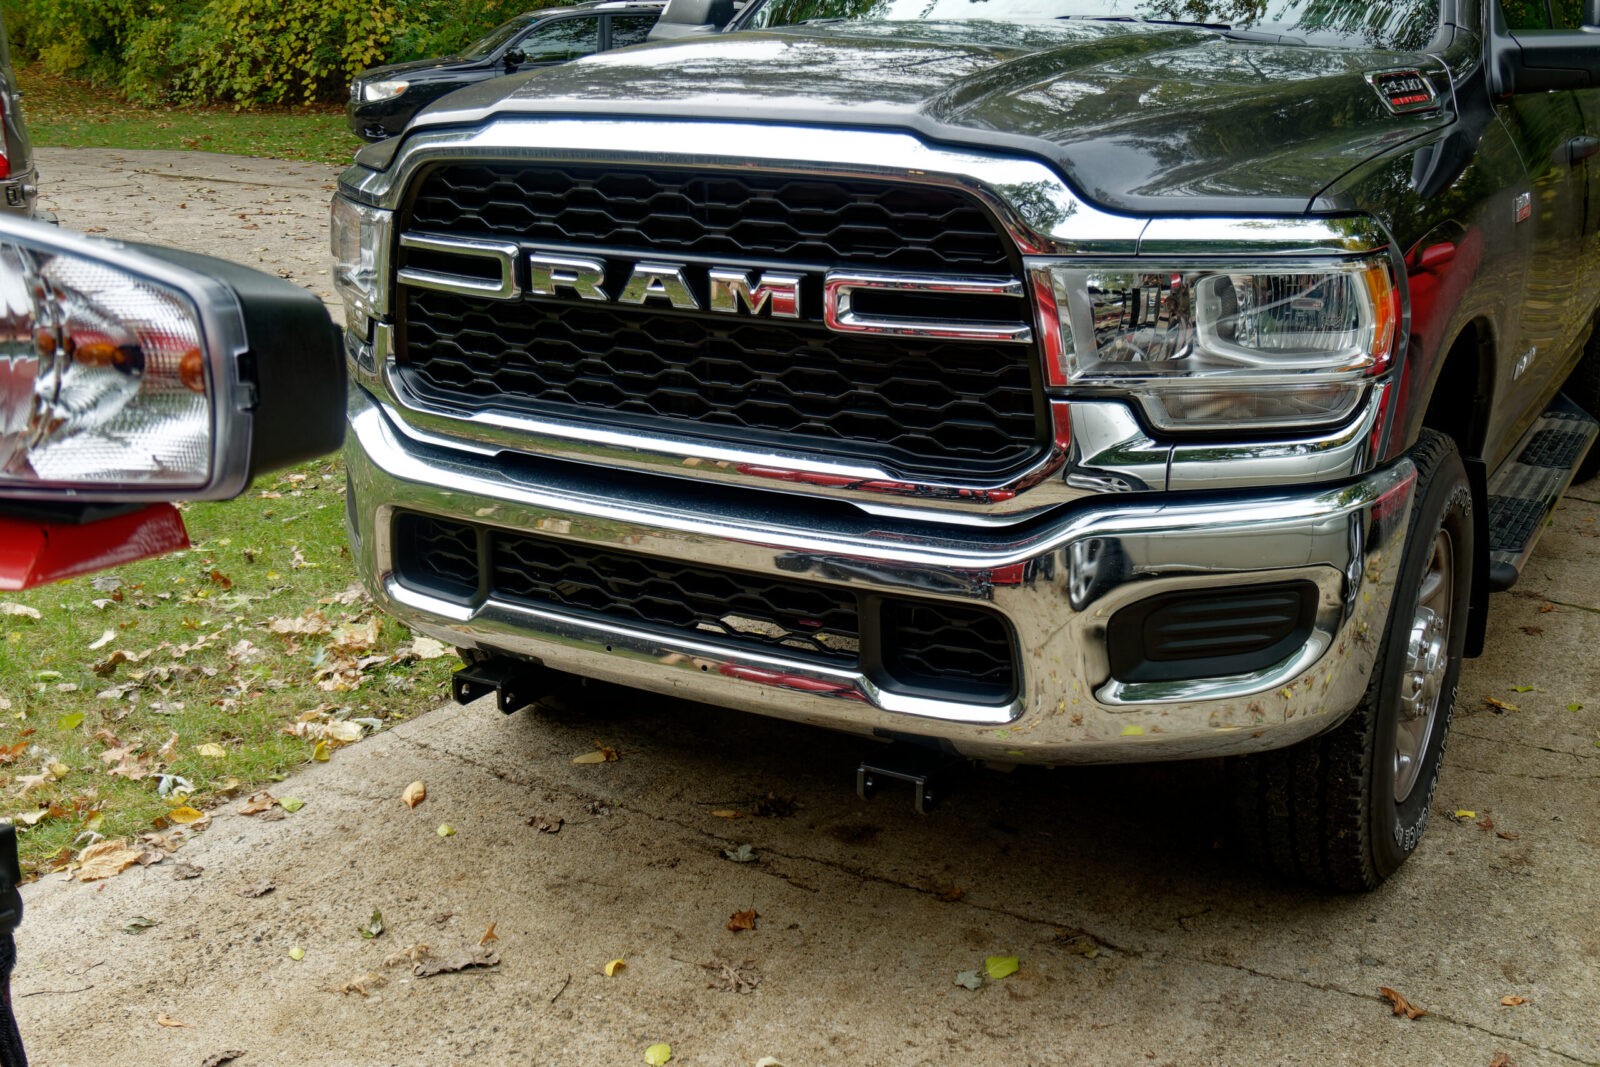
In September I bought my first new truck from a dealership – a 2021 RAM 2500 with the 6.4L Hemi engine. It was a Tradesman with a crew cab and the 2GA customer package group – meaning it had the Snow Chief, Chrome Appearance, Tradesman Level 2, Shift on the Fly transfer case, Power Black Trailer Mirrors, LED bed lighting, and Trailer controller. What it didn’t have was front tow hooks — seriously. I was actually surprised by this. I’ve used front hooks so many times over the years that to not have them wasn’t an option but I figured I could add them later and bought the truck.
Wow – Have You Seen The Price To Add Hooks?
Well, this surprised me. I shouldn’t have assumed the cost wouldn’t be bad. Let me itemize this for you real quick:
Tow Hook – Mopar 68349551AD List $132 Online around $93.36 each – you need two
4 hex flange mounting screws / bolts – Mopar 6512808AA. List $5.10/ea and online they are around $3.84/ea. Again, you need four of them – two for each hook
4 hex flange lock nuts – Mopar 6512809AA. List is $5.10 each and online is about $3.84/ea. Thread is M16x1.50mm. Again, you need four of them – two for each tow hook.
That adds up fast. The list total is $304.80 and online is $217.44 – a savings of $87.36 but that does not include shipping or taxes
This does not include the bezels / changes to the bumper if you do it by the book
This does not reflect labor of maybe 2-3 hours or the shop supply charge either.
Also, confirm with the supplier if they have something before you buy it. When I was looking, hooks were hard to find in stock at any kind of discount plus some dealers say they have things but they do not.
So, this definitely wasn’t looking cheap either in terms of parts or labor if I had a dealer do it or even if I went will all new Mopar parts.
How to save money and not sacrifice quality?
What is quality? Quality means meeting my requirements and what did I require? I cared about brute strength. I talked to some guys and they all told me to go with the Ram hooks but to get them off eBay because salvage yards put them up for sale at a huge savings. Wow, they were right. You can get both hooks off eBay that look like new for less than half the price but usually with no fasteners included.
Search on eBay for 68349551ac or 68349551ad tow hooks. The letter designators (aa, ab, ac, and ad) tells us there have been minor changes and the most current version as of my writing this is the “ad” release. I can’t speak to all of the versions but I can tell you I am using the “ac” hooks, no problem. You could search for an earlier release such as “aa” or “ab” if you wanted – I’m just telling you what I did. If you can get a great deal on the newest version, go for it.
When I looked at the Mopar site, it seems to be the hook for all of the trim styles (Tradesman, Big Horn, Laramie, Limited, Limited Longhorn, Lone Star and Power Wagon) of both the 2500 and 3500 series trucks for 2019-2021.
Note: some eBay sellers list two hooks (meaning the pair) in an eBay listing and some just list one so pay attention.
I also always look at how many sales they have done and their rating as well. I’ll pay more for an established seller vs. gambling on a seeming deal from a relatively unknown seller.
I also noticed some sellers put all of the part numbers in their description so searches pull them up so read the listing carefully.
Click on the following to search for:
The 68349551ac hooks (this is what I bought and installed on my 2021 Ram 2500 Tradesman)
By the way, the RAM 1500 hook is not the same so make sure you get a 2500 hook for your model year truck.
Okay, for the bolts and nuts, I did actually go with Mopar and bought them online. I have read posts of fellows going to the hardware store and buying Grade 8 – 5/8″ x 4-1/2″ long bolts, washers, lock washers and nuts. It’s an option but I didn’t want to gamble with the metallurgy so I bought the bolts and washers from https://store.mopar.com/ and there are other online sellers you could go to as well.
As far as the bezels and stuff go, honestly, just cut the fake plastic grill out of the way. Yeah, you could spend the time and money to make it look factory but this is a work truck and the tow hooks are near the bottom of the bumper so nobody is going to be looking for the bezel behind realistically.
As for labor, you can totally do this yourself in less than an hour. I think it took me about 30 minutes.
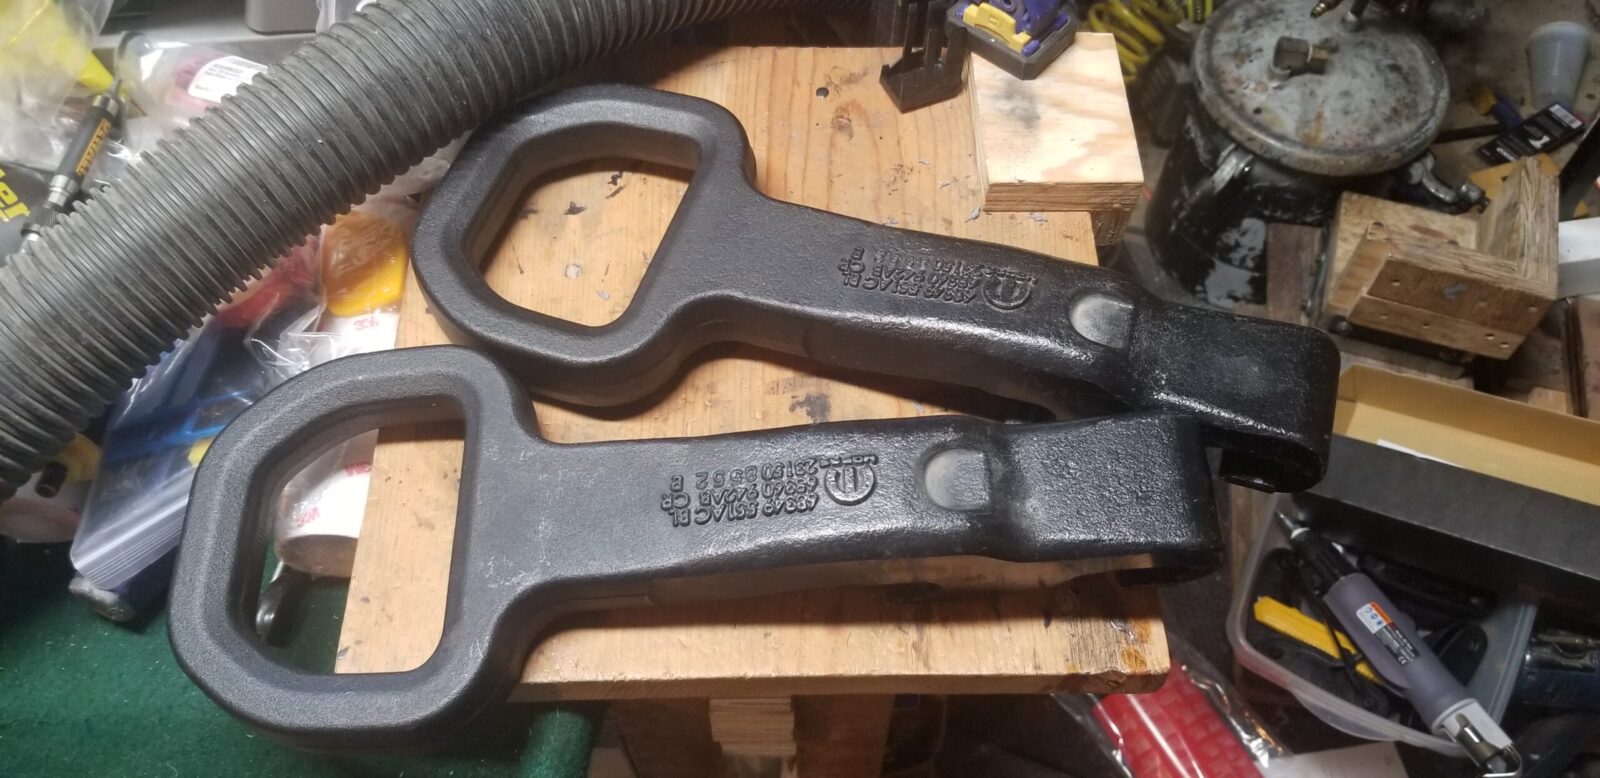
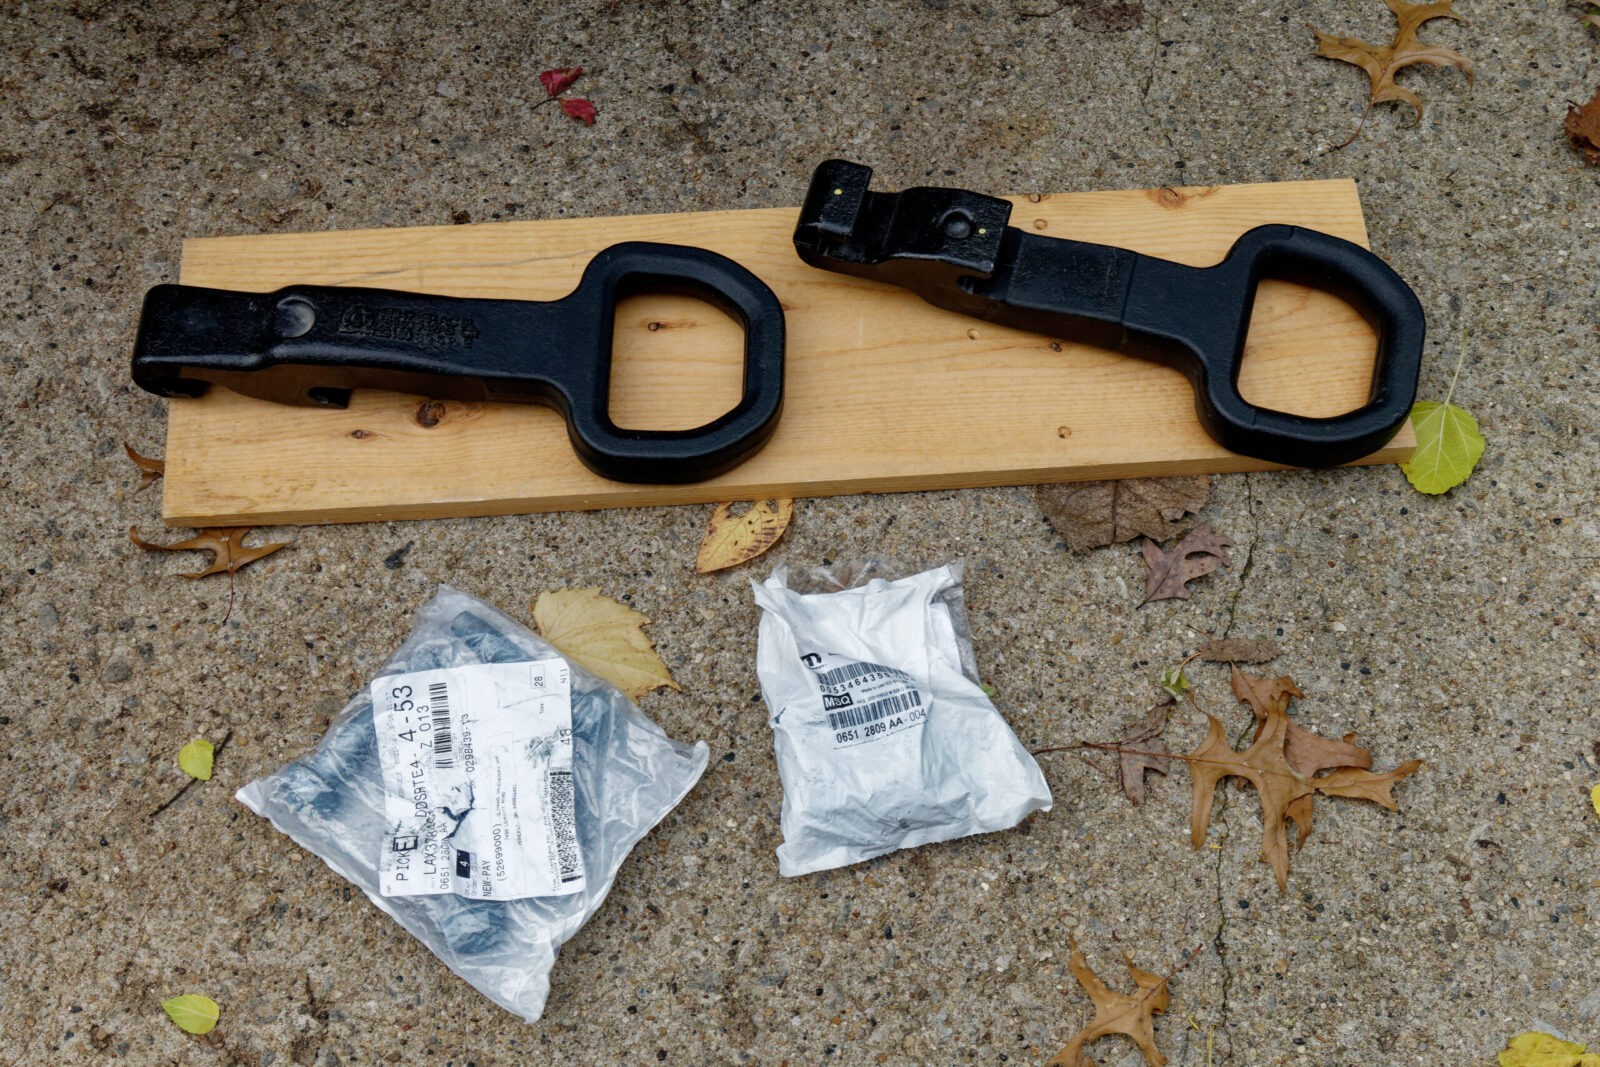
These arrived via USPS Priority Mail maybe 2-3 days after I ordered them. They are like new – I doubt they were ever used. Yes, they do weigh a ton. I guess I could have weighed them but that didn’t occur to me as I really didn’t care. The point is that they sure are beefy. These are the 68349551AC series hooks by the way.
Installing The Hooks
You can totally do this if you are comfortable with cutting on your truck (some guys aren’t and that is okay – find a buddy who is and bribe him/her with beer, BBQ or whatever) and can turn a wrench. I kid you not, you only need a 15/16″ socket, 2-4″ extension and a big ratchet wrench to do this after your cut the little grills out of the way. A torque wrench capable of 80-90 foot pounds is handy but not essential.
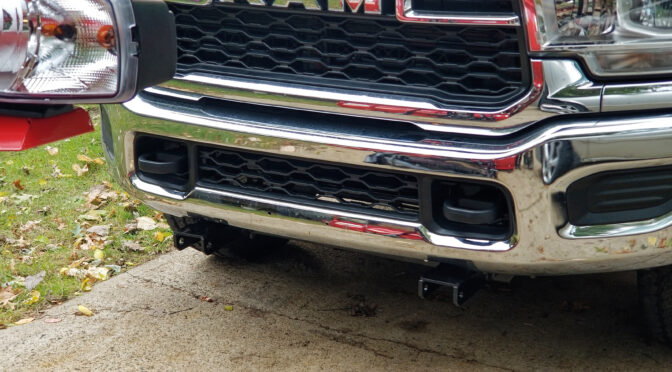
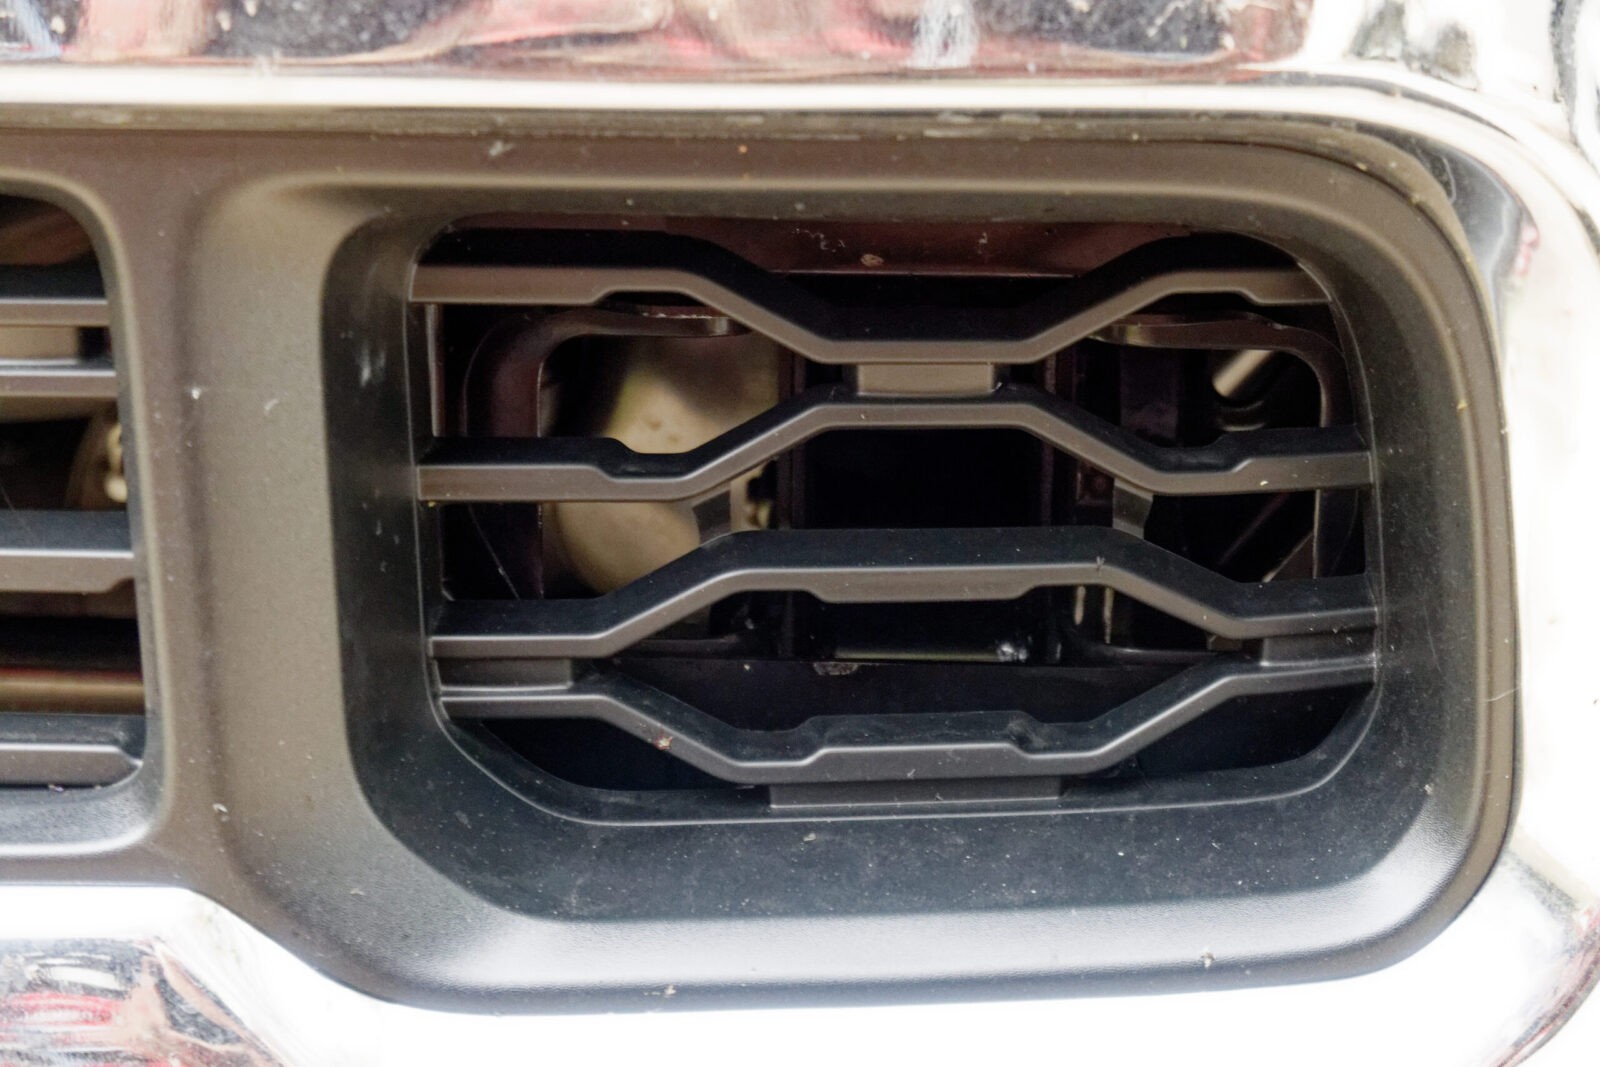
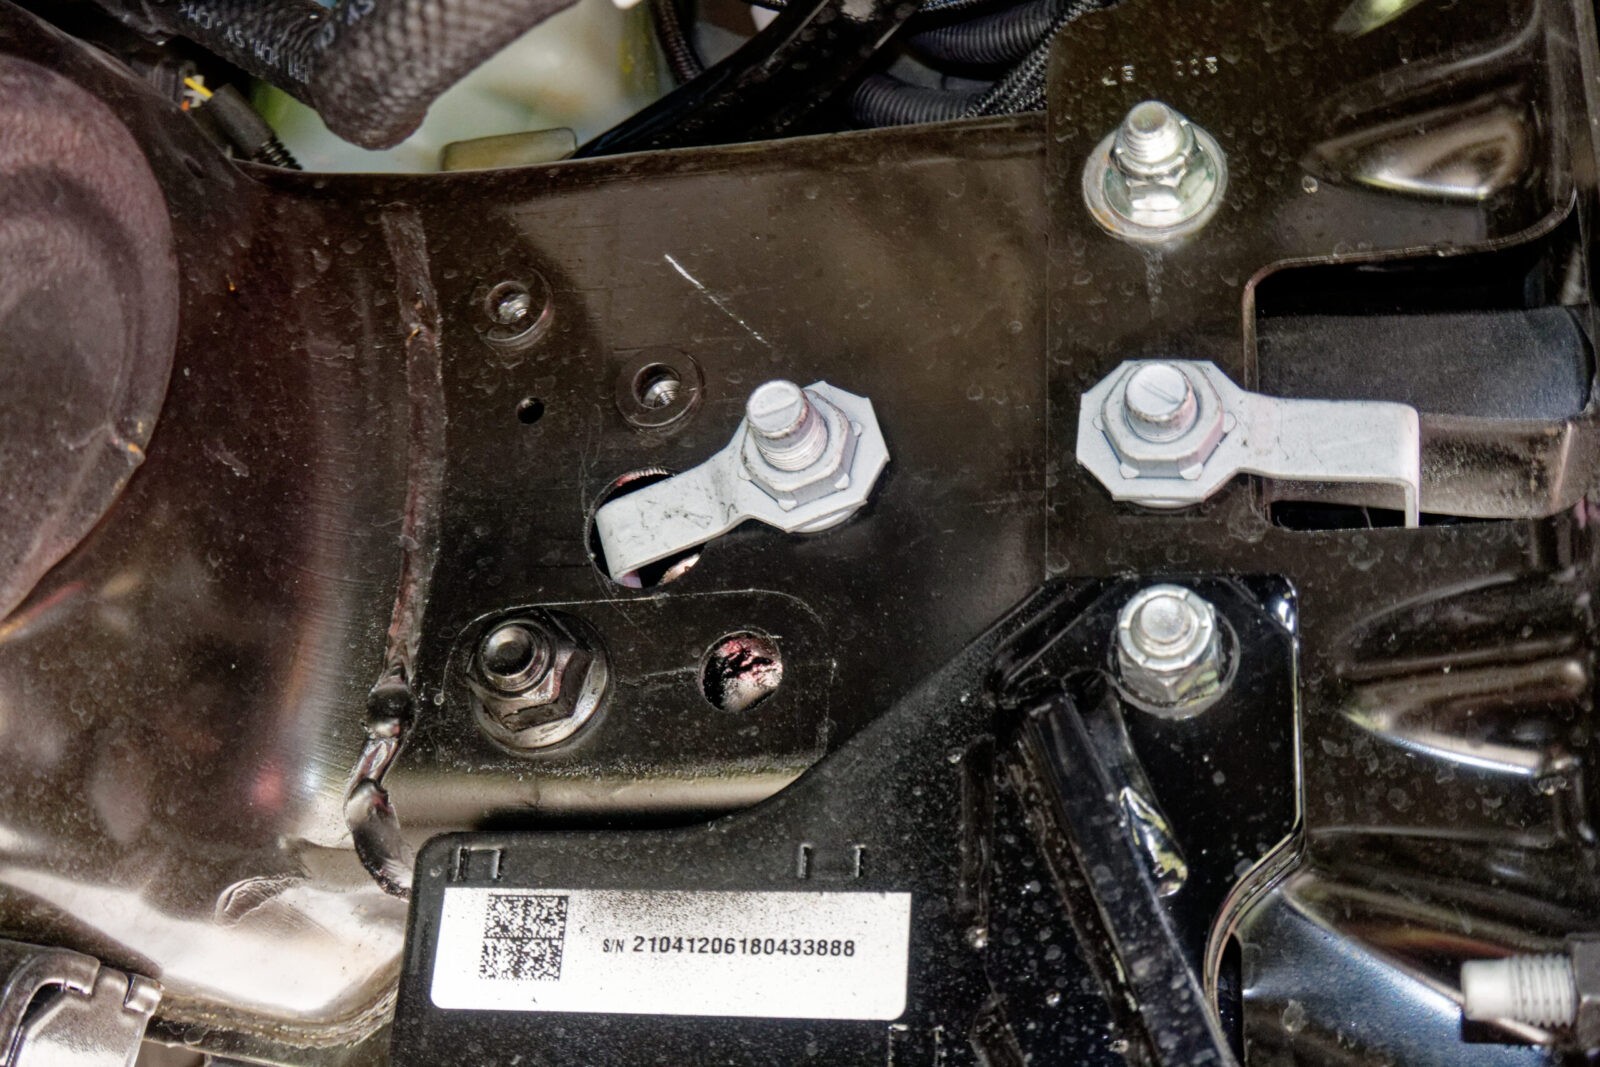
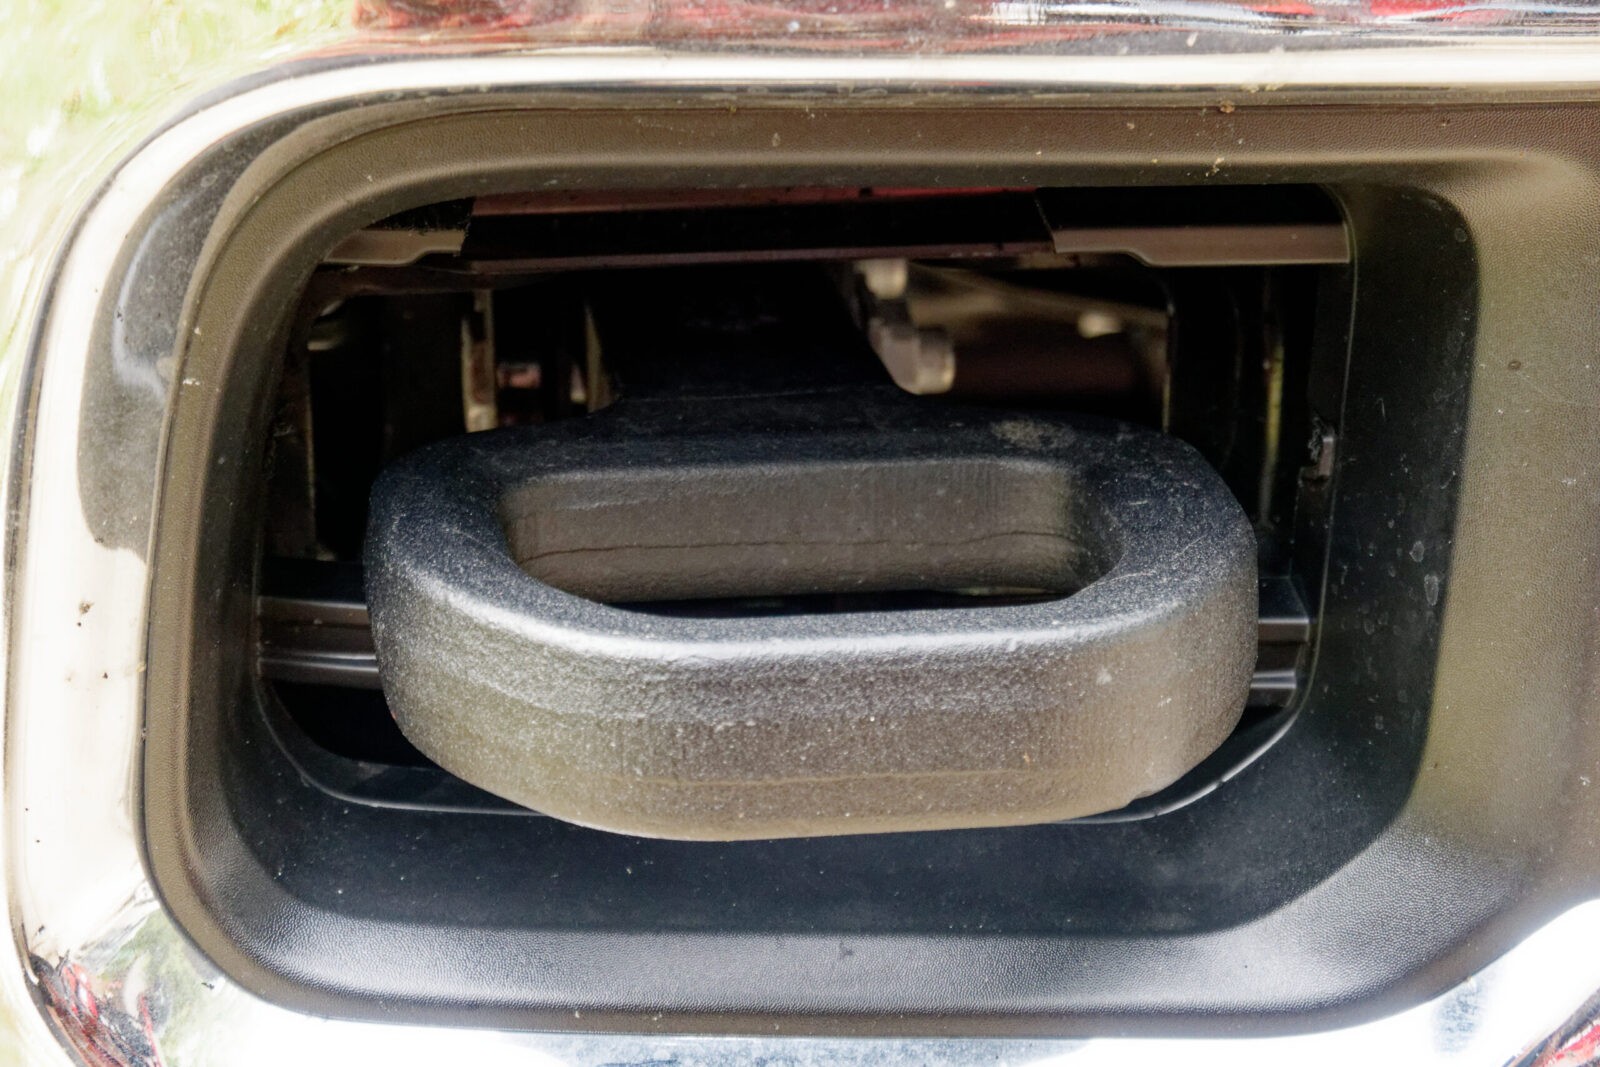
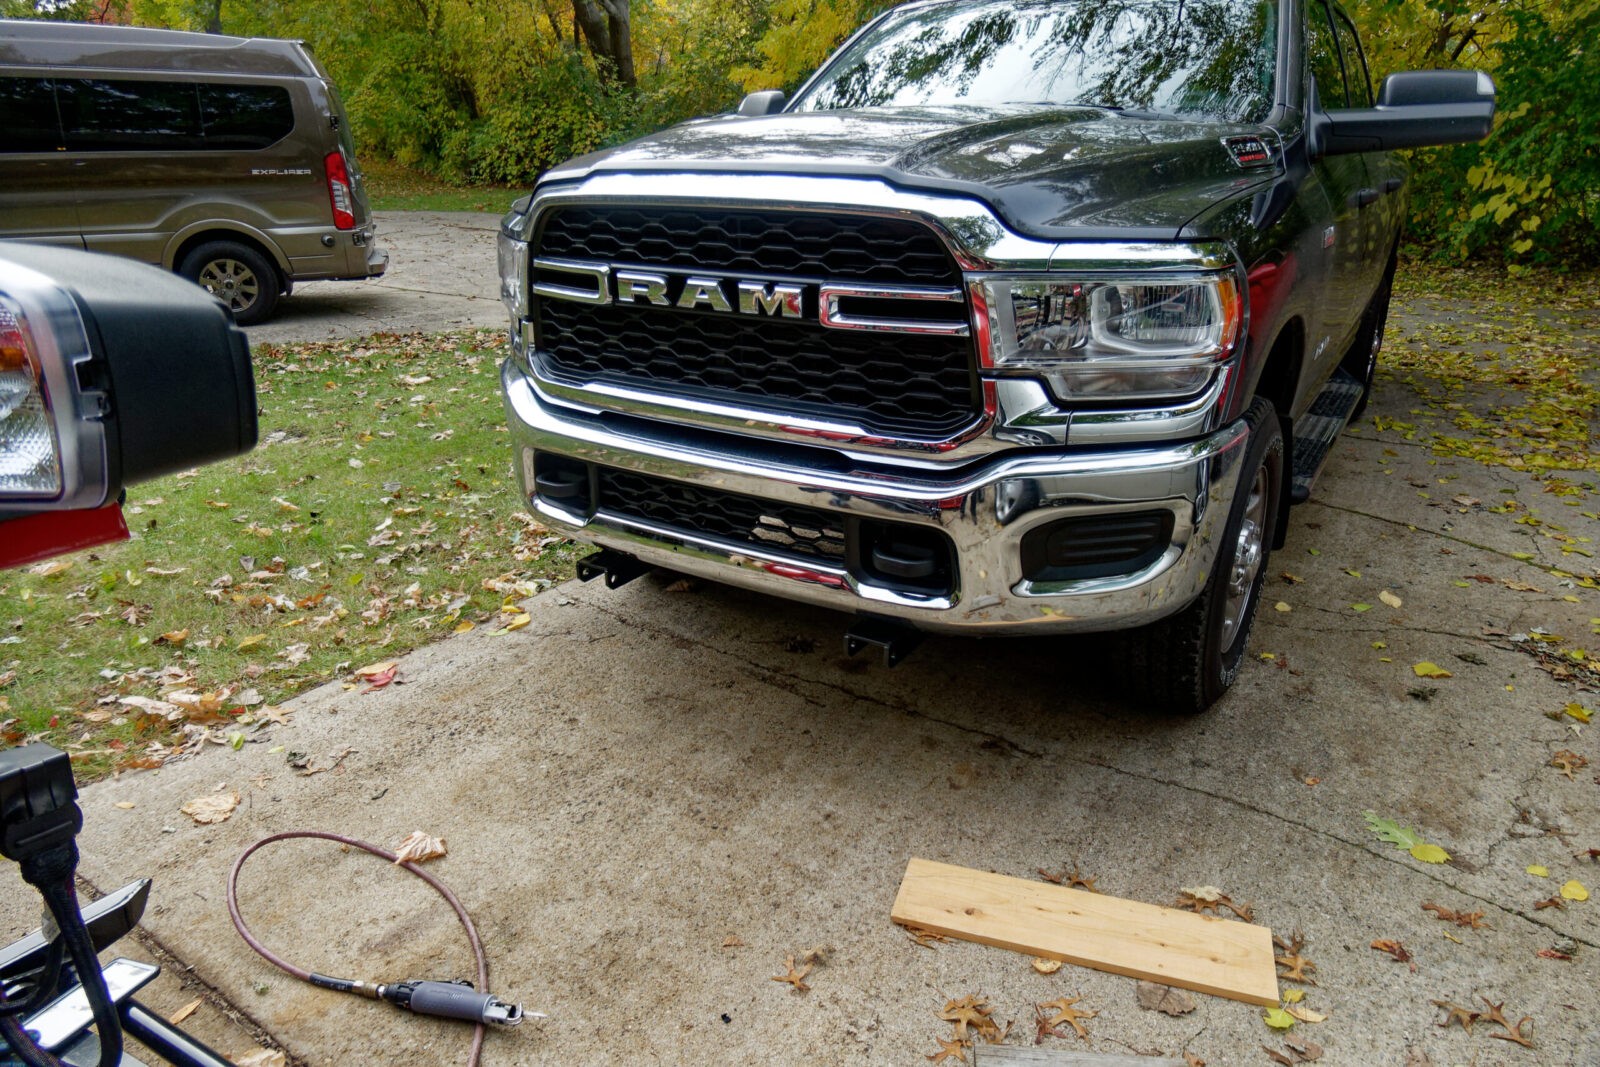
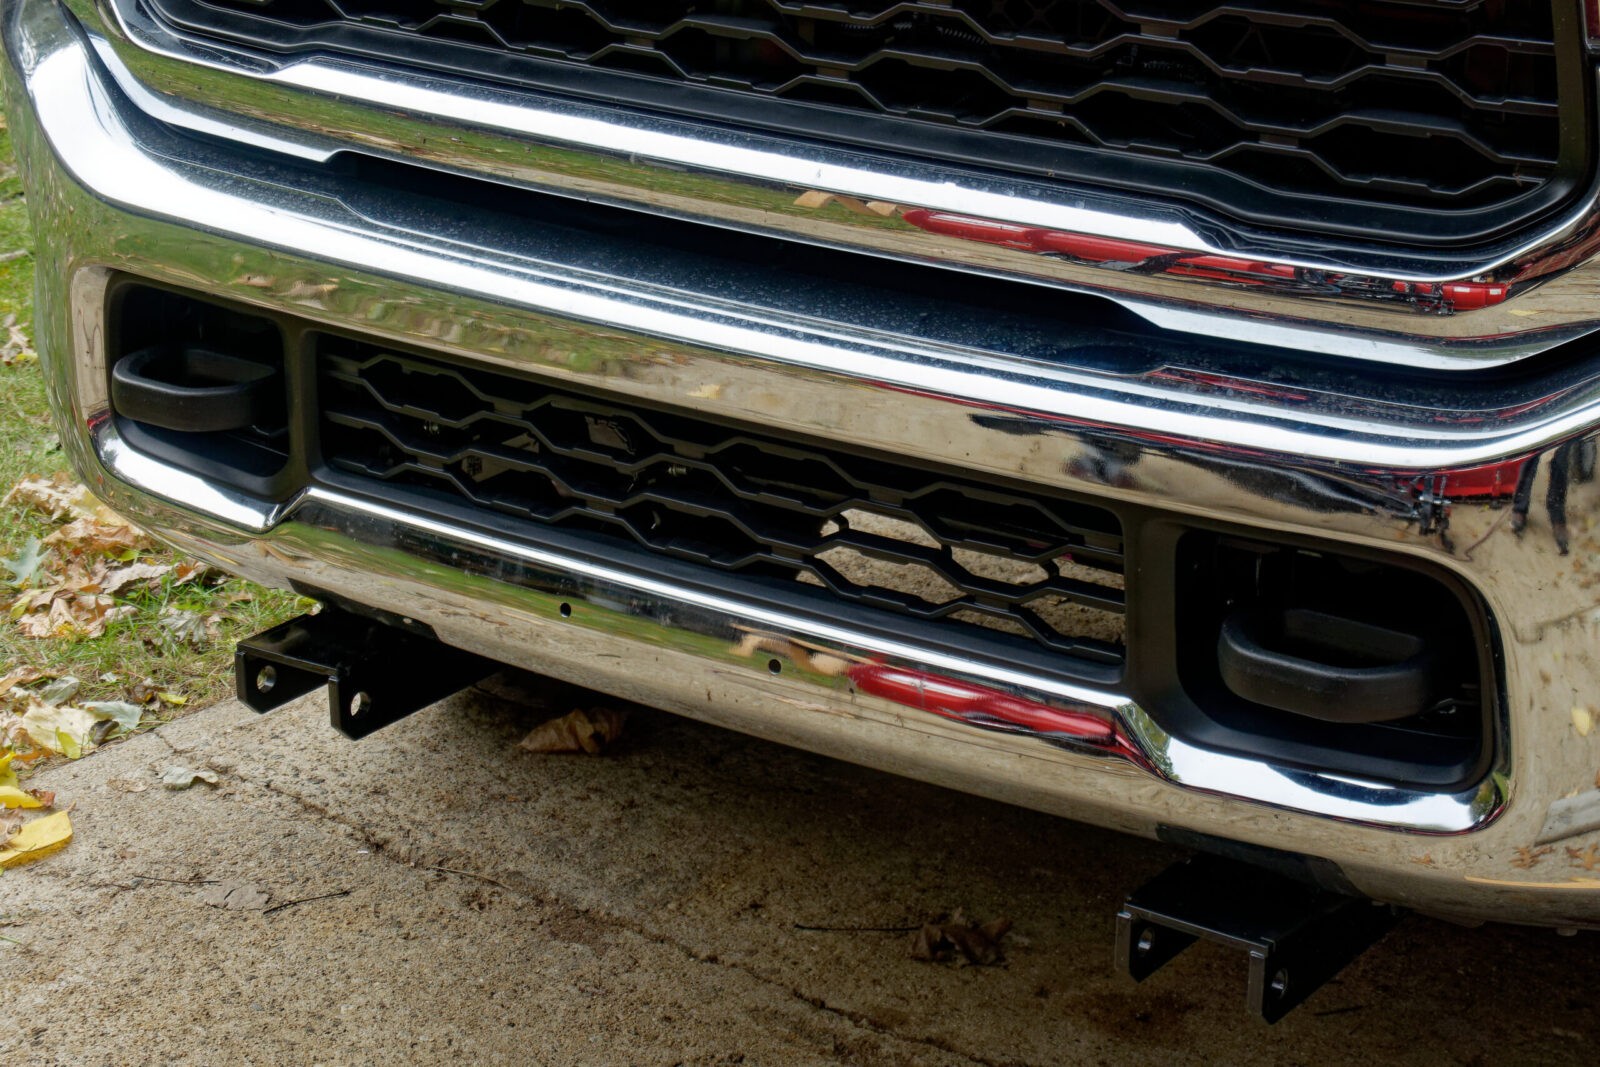
This is my 2021 Ram 2500 Tradesman. The hooks go in the openings located right under the left and right sides of the main grill or the next opening over from where the fog light covers are.
That is the driver’s side tow hook opening with the soon to be cut out plastic grill in the way.
The part of the frame rail where the town gook goes is that square opening straight back from the center so I planned to cut the top three horizontal pieces out of the way.
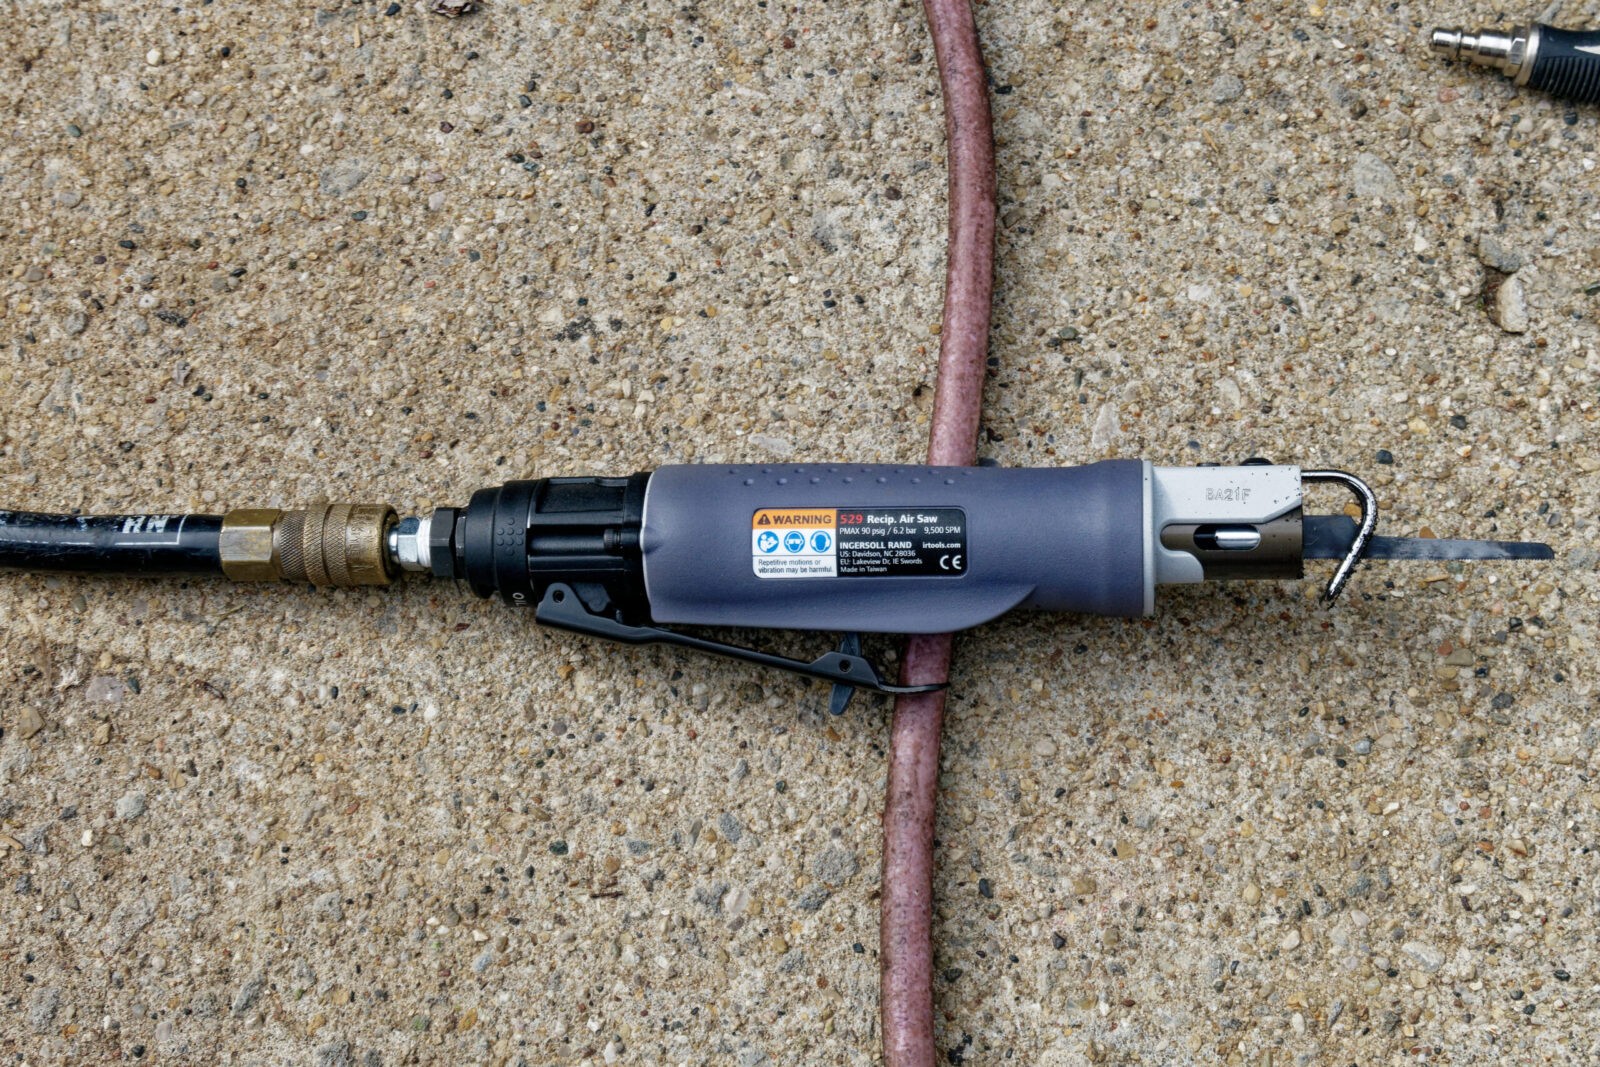
This is an Ingersoll Rand model 529 reciprocating saw used for body work and what not. This thing is amazing. Cheap reciprocating saws have a ton of vibration when they run but not this one. It makes cutting sheet metal as easy as soft grill plastic 🙂 This is a fine 24 tooth blade. Use a fine blade on plastic to avoid any snags and tears. Your other option is to look for one of the small hack saw blade holders or other small saw where you can reach in. The more teeth per inch, the better.
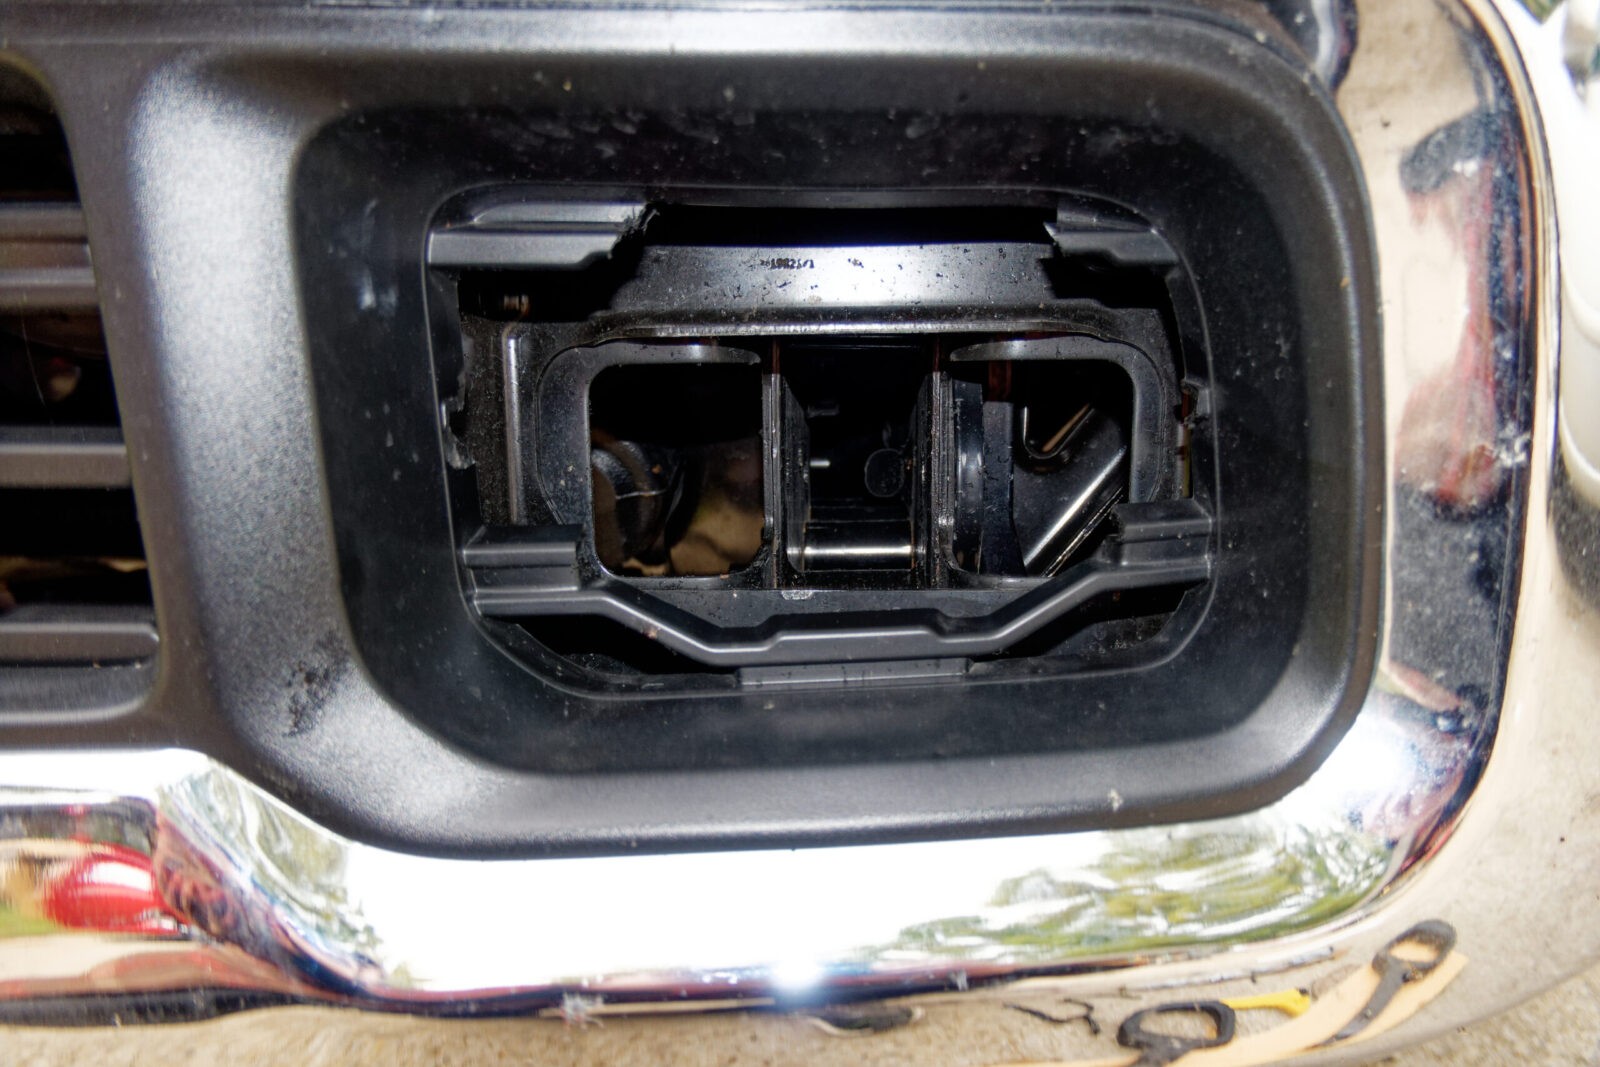
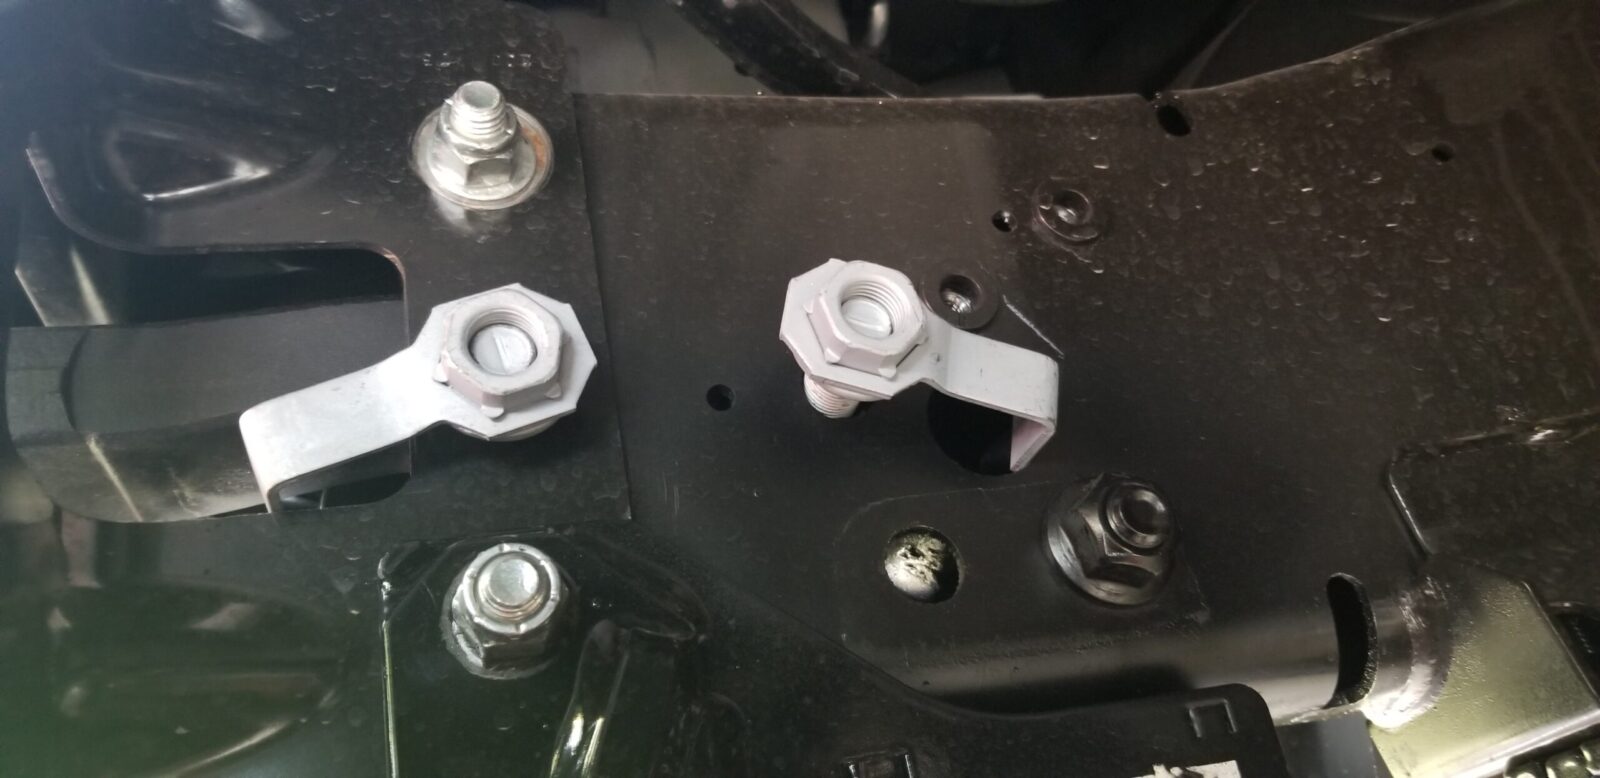
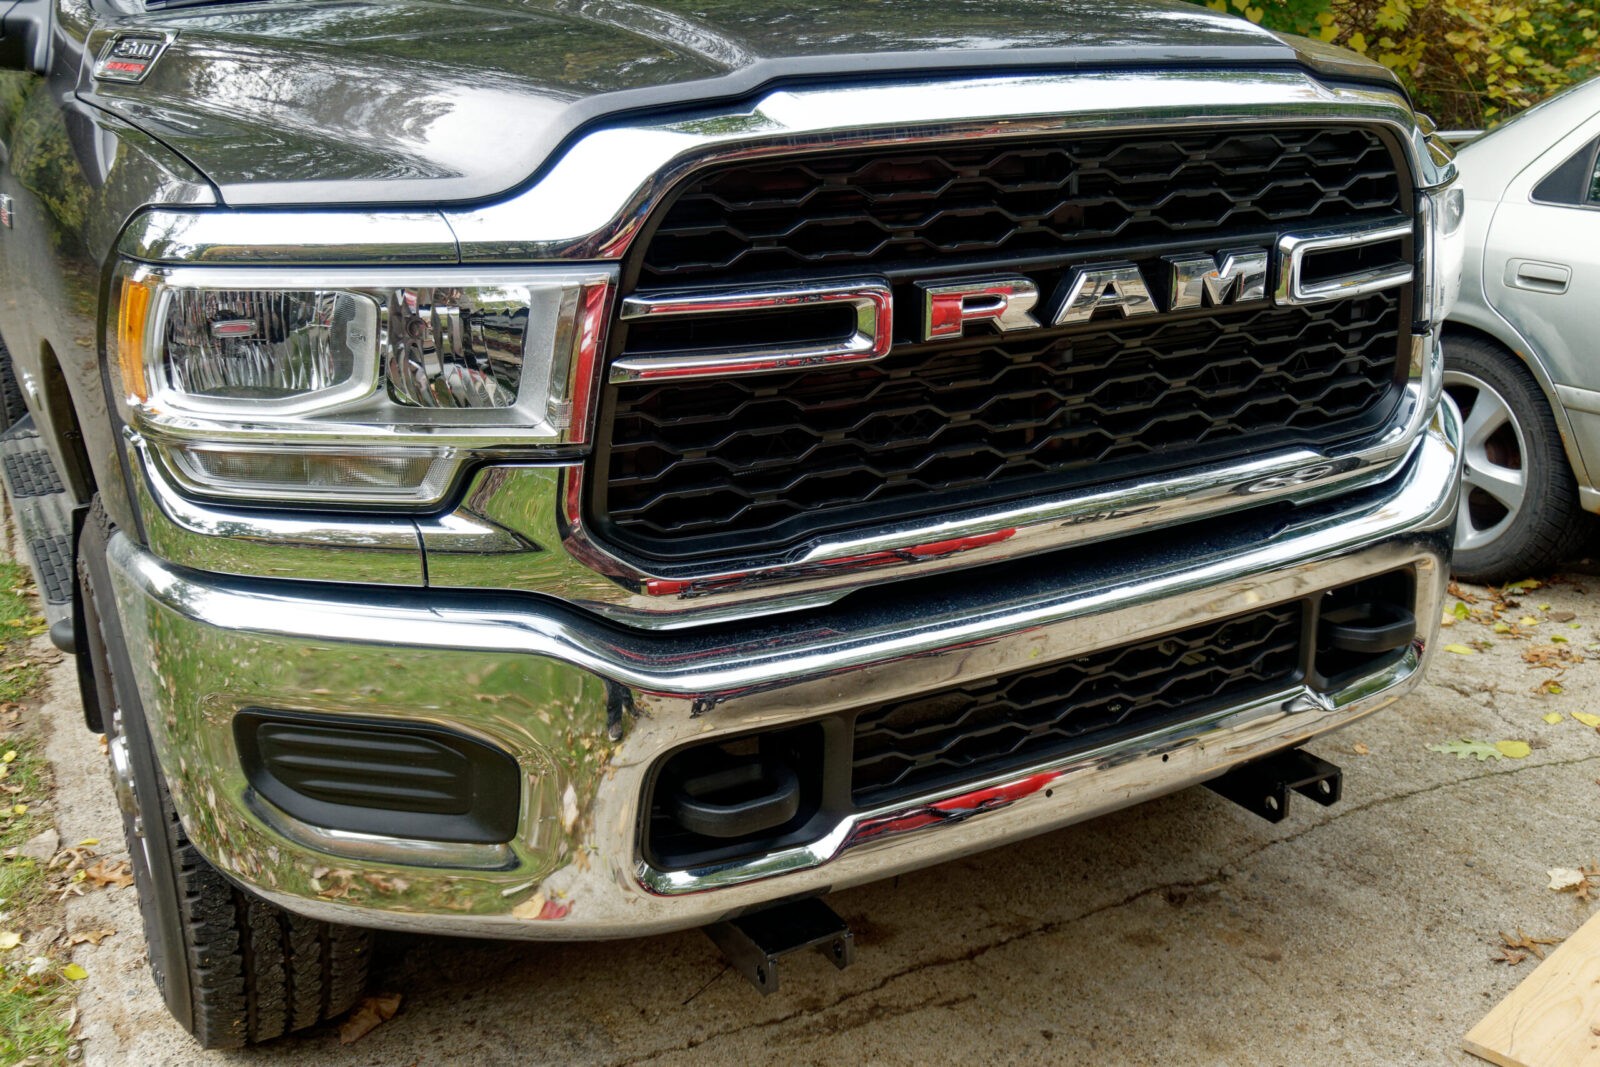
This is right after cutting. I haven’t cleaned up the cuts or blown out the plastic cuttings yet. The tow hook will go straight into that center opening and you will need to jiggle the hook around to get the two bolts through.
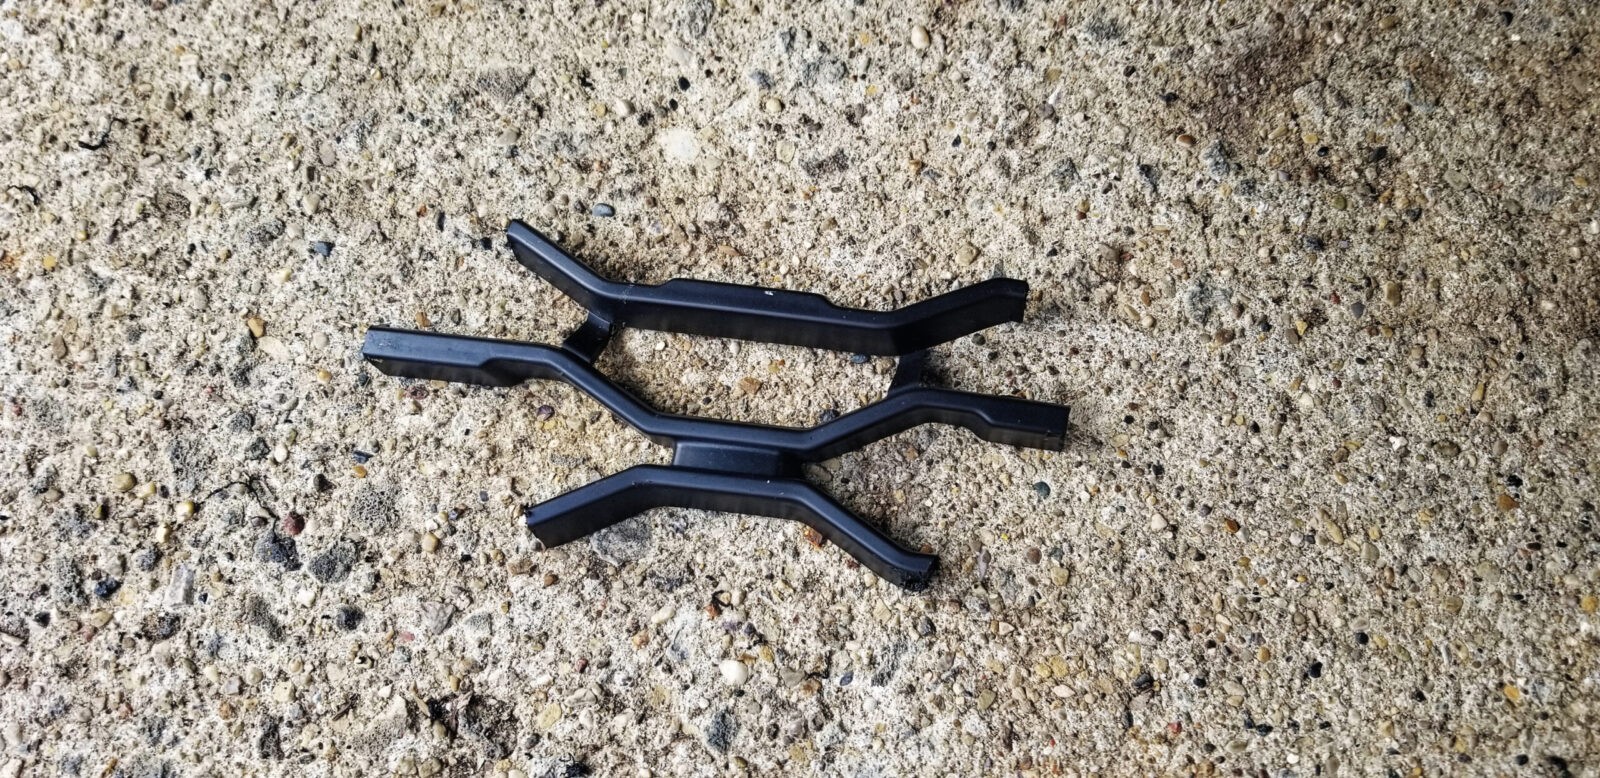
This is what I cut out. A fine tooth saw really does a nice job – fast and clean.
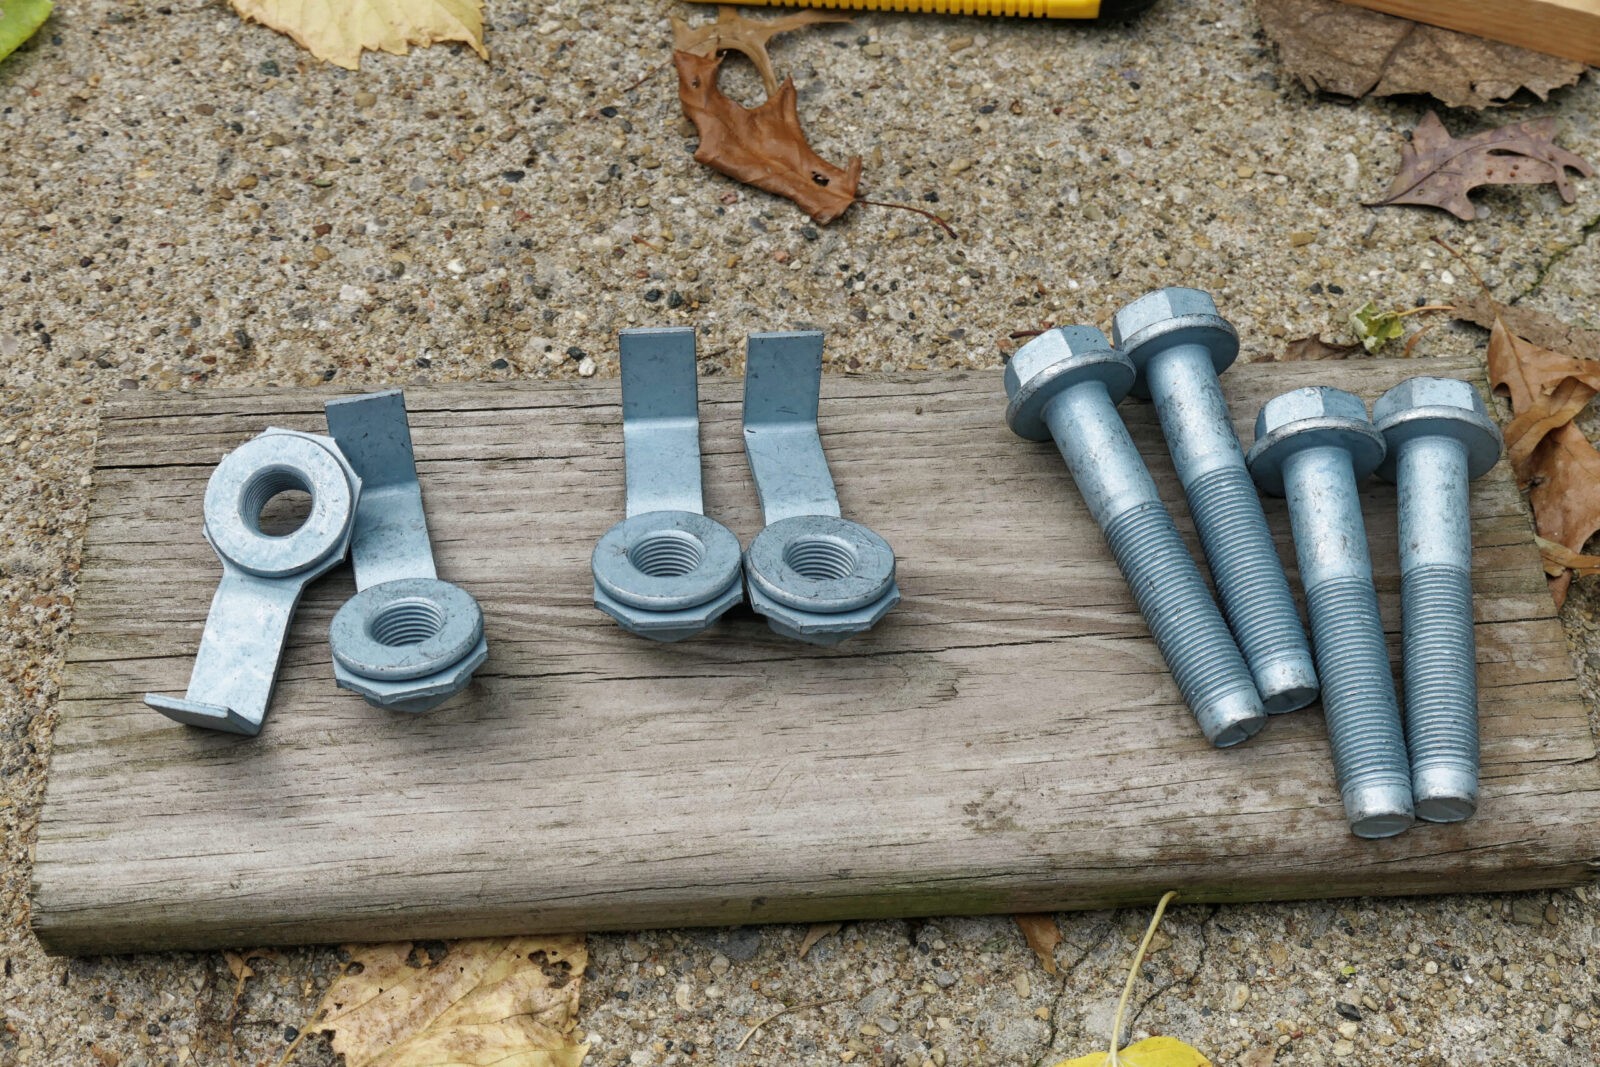
Here are the hooks, bolts and buts.
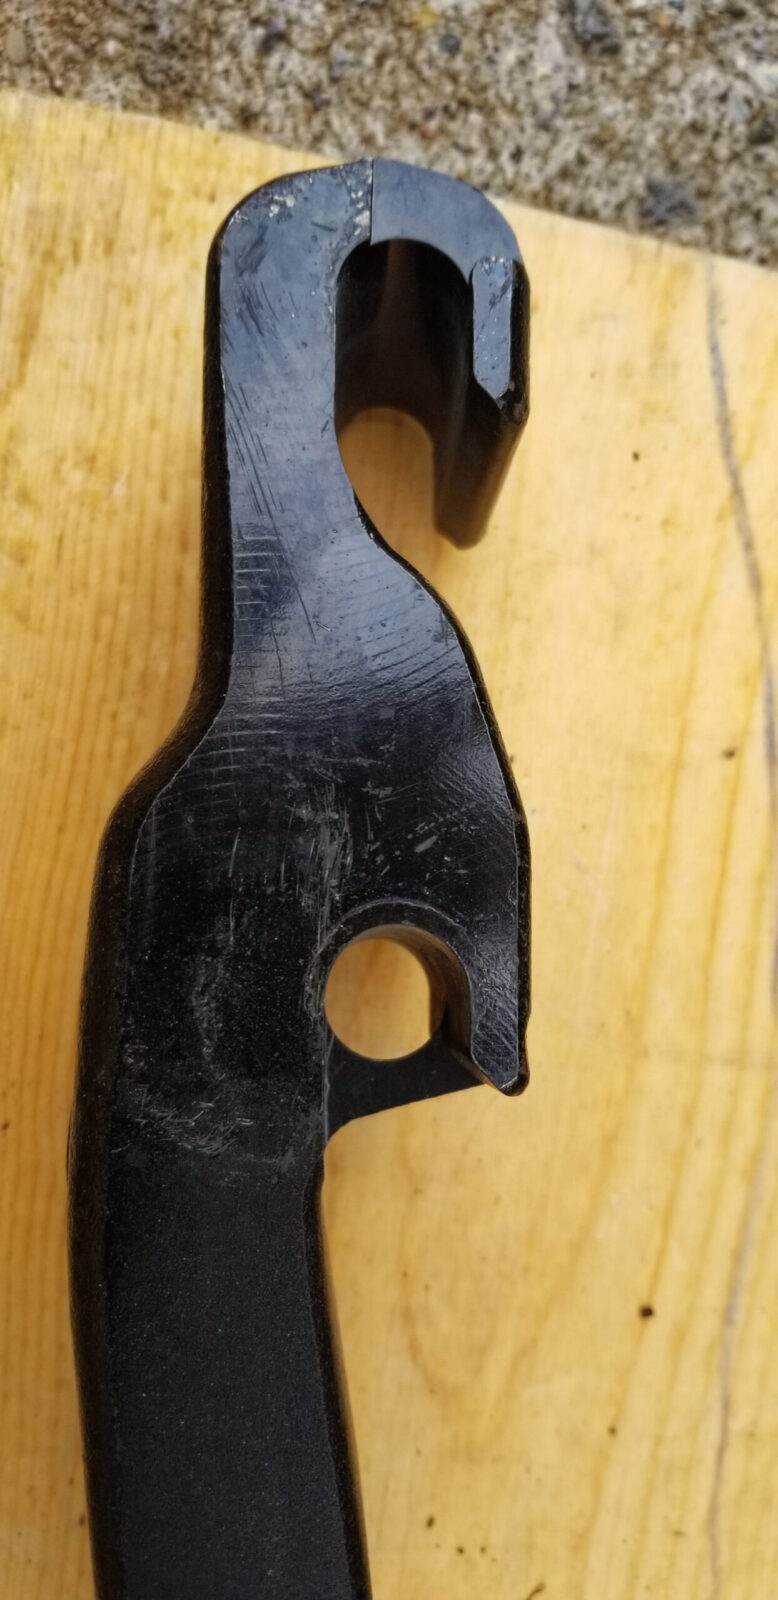
I wanted you to see the side profile of where the bolts engage the hook. The front groove actually has a retaining ring cast into it. I installed the front bolt first – and it will take some wiggling around to get it in and then I did the rear. I did all of this with the truck on the ground by the way, Also, I think the design is pretty interesting. They know the force will be applied by pulling forward so that is where they put their emphasis. The sides of the frame rail clamping against the sides of the hook will further lock it in place not to mention the inevitable rust that will happen sooner or later.
/lbThese are the four Mopar bolts and lock nuts. The wings/tabs on the nuts go into openings in the frames so you can focus on tightening the bolt down to 80-90 ft/lbs. They also limit travel of the nut over time to keep the whole assembly secure.
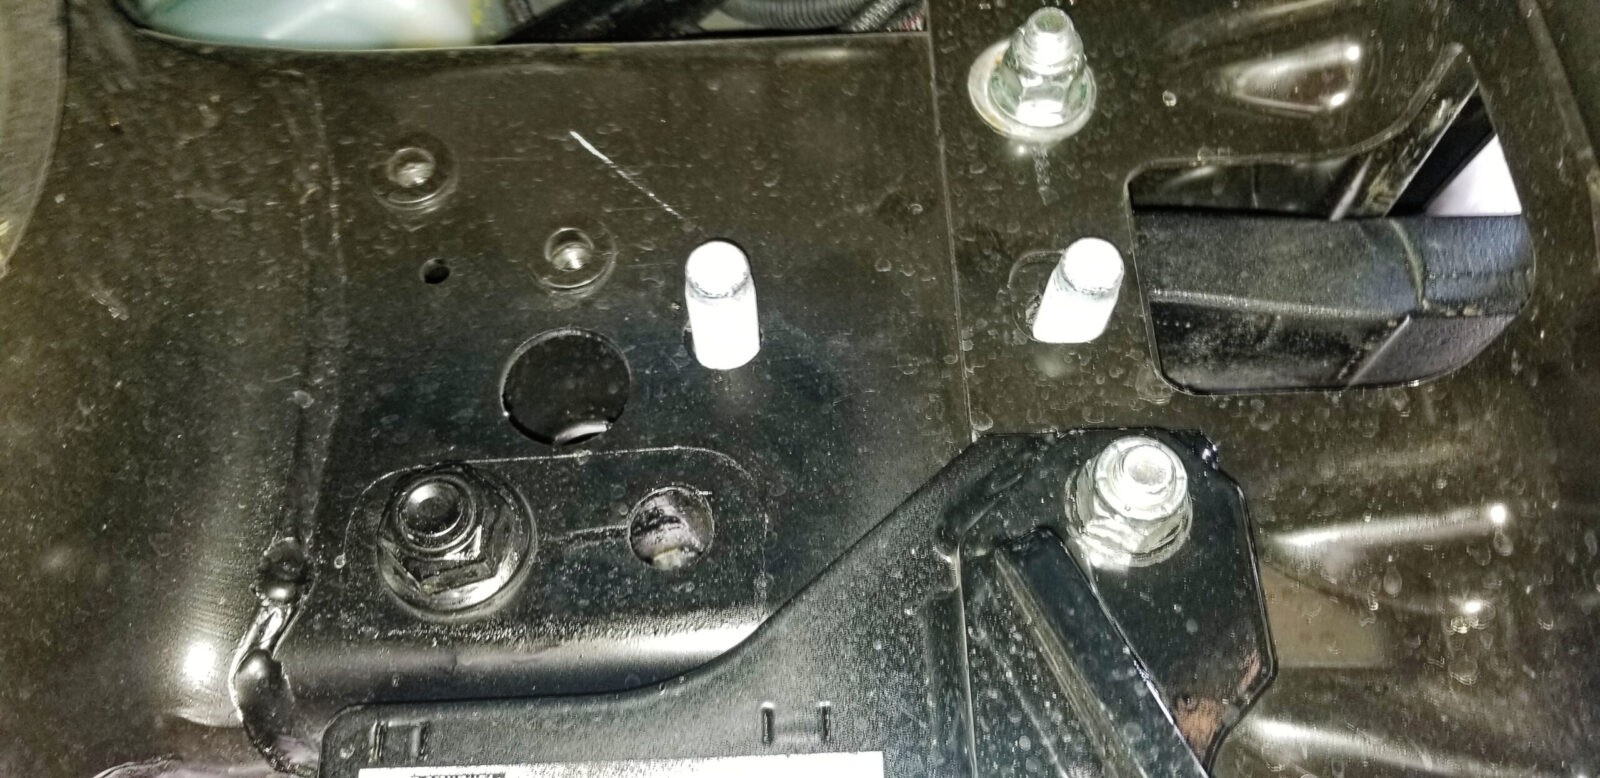
So push the bolts from the outside of rain through to the inside. This is the driver’s side.
So here you can see the bolts with the lock nuts in place.
This is the passenger side. I had just started the bolts into the nuts when I took this picture.
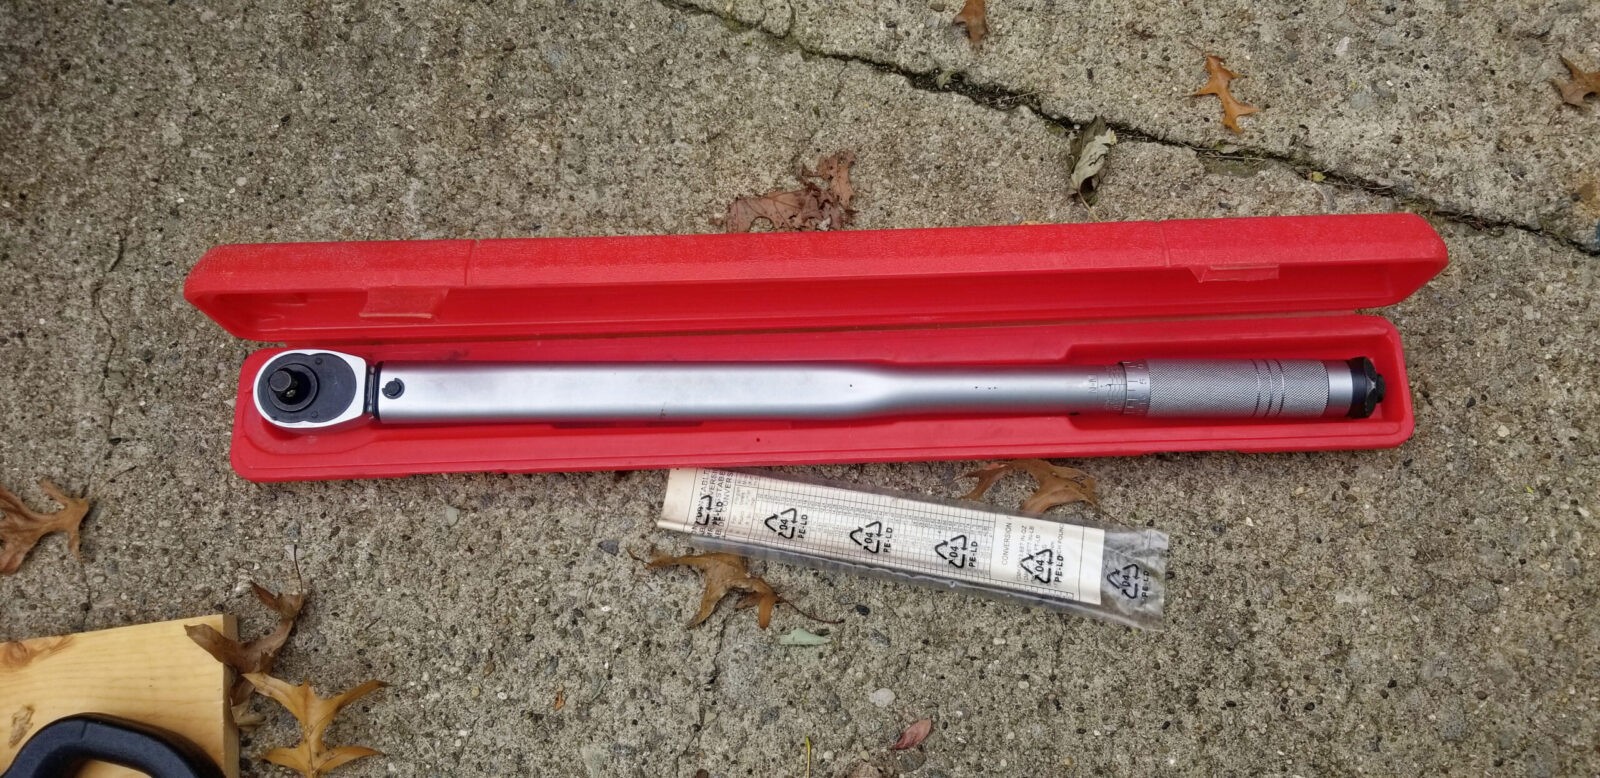
Torque Down The Bolts
Some guys reported that their hooks rattled and I think they were not torquing them down enough. Yes, they will rattle when you insert them in the frame but not once you tighten them down. Thanks to the WWW, I could not find an absolute “here’s what RAM said for the 2500 tow hook” torque spec. I saw numbers all over the board.
I took a different tact, Mopar says the nut is a M16x1.5 on their website so when I look that up, a class 8.8 bolt has a 245 Nm spec and a class 10.9 has a 335 Nm spec. Converting 245 Nm to ft lbs gives us 180.7 ft lbs. Wow. I divided that by half and took the nuts to 90 ft lbs and called it even. No rattling and the hooks feel solid as a rock. If they loosen up, which I highly doubt, I’ll search around again for the torque spec and/or apply Loc-Tite. Given the design of the locking nuts, I really do not think this is going to happen.
If you don’t believe in torque wrenches, do whatever works for you. Due to a variety of nerve factors, I can’t feel how much pressure I am applying any longer so I torque stuff down to spec.
If you do know a definitive value, please email me and I’ll adjust accordingly.
This is big Ed my 50-250 ft lb 1/2″ torque wrench. I have “bigger Ed” that is a giant 3/4″ unit. I also have a number of 1/4, 3/8 and 1/2 torque wrenches for different applications.
The Result
They are rock solid. I haven’t used them yet but am ready for winter.
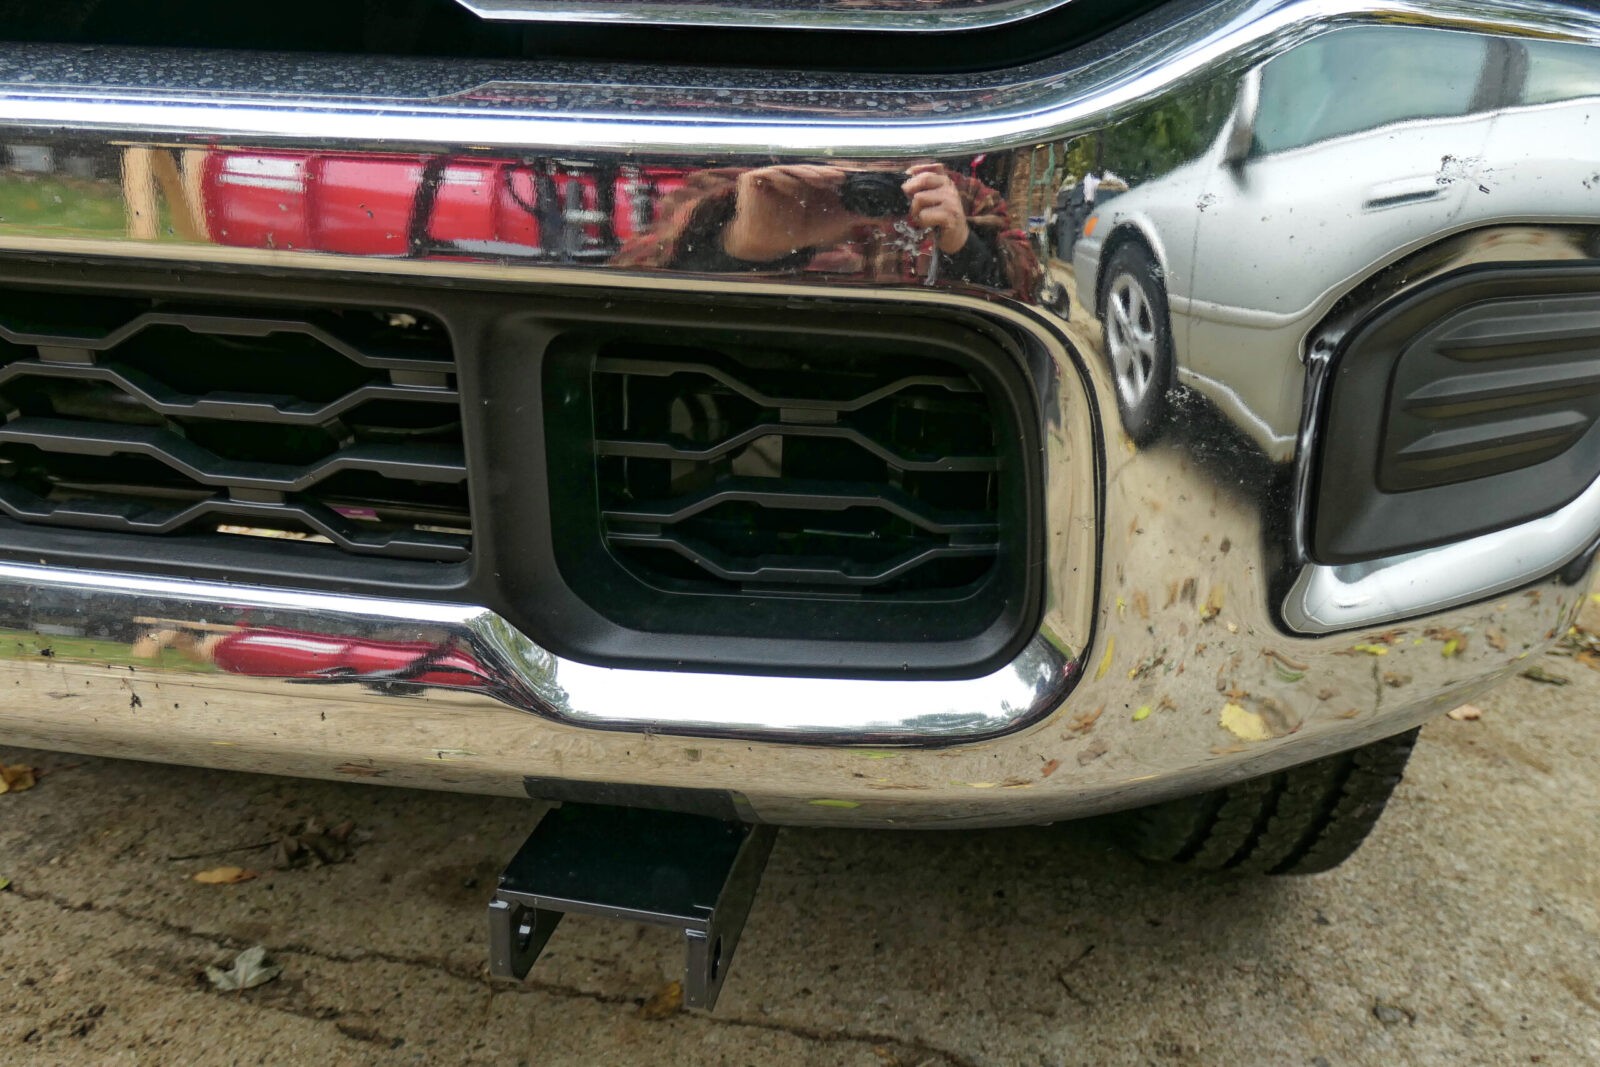
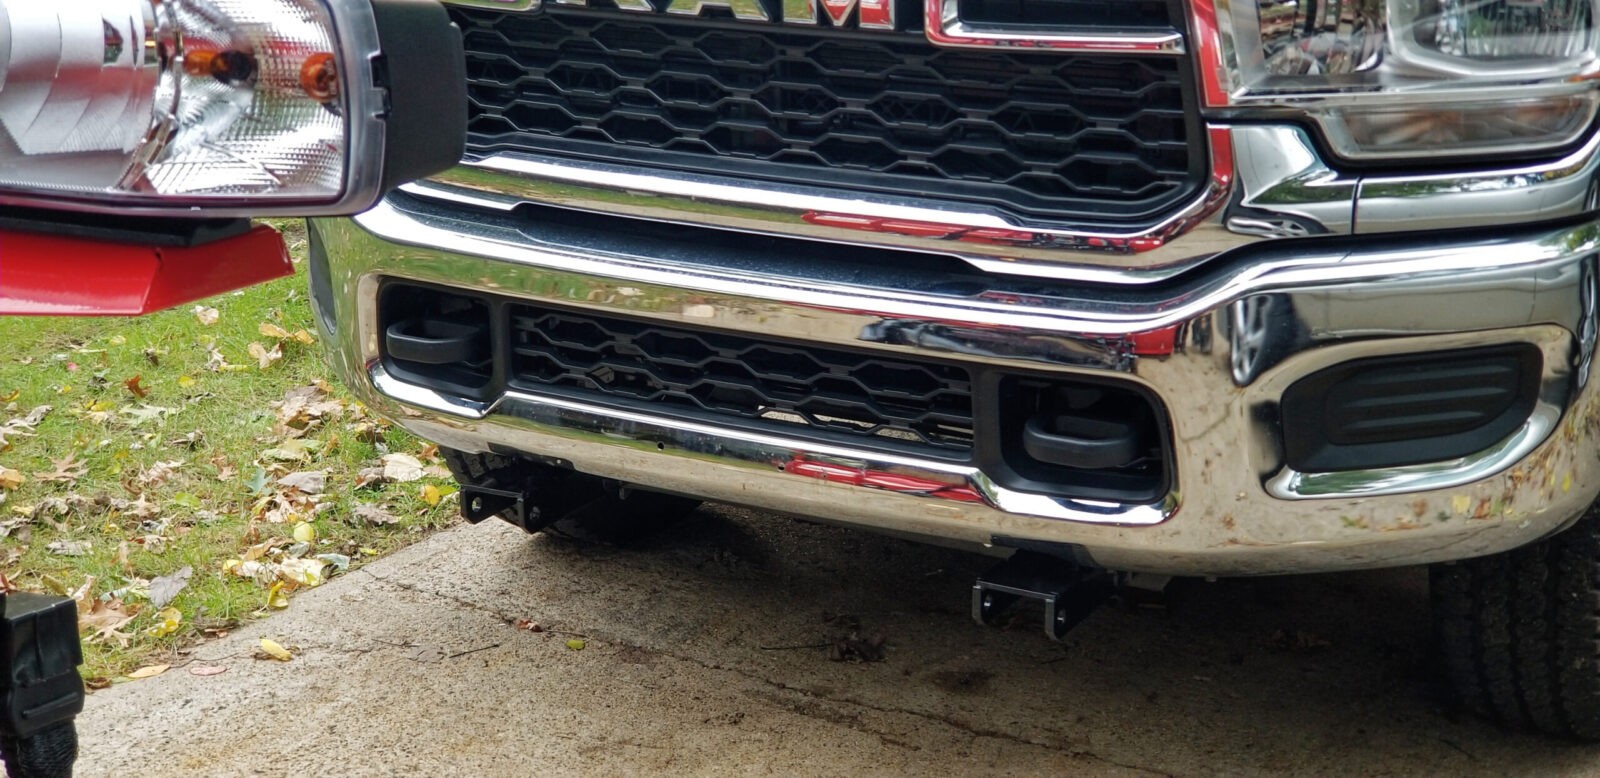
Driver’s side. I think I could have left the one top section of the grill but I am also not sure if it would have gotten busted off anyways from shackles, hooks, etc. I also can’t get rid of the slight angle of the hook left to right despite trying to make it flat several times so I am not going to worry about that either,
Passenger side
One last comment, I did go in a week or two later and spray painted all of the exposed bolts and nuts with black paint to slow up the rust on the fasteners. In Michigan, fighting rust is an art form and also a losing battle – that salt that gets put on the roads gets everywhere and eventually takes its toll but I sure do try to delay that 🙂
Summary
You can definitely do the hooks yourself. Save some money and get them off eBay, do what you want with the bolts and then trim the front grills so the tow hooks can slide in. It looks pretty good and will do the job.
Note, I have to buy all of my parts – nothing here was paid for by sponsors, etc. I do make a small amount if you click on an ad and buy something but that is it. You’re getting my real opinion on stuff.
If you find this post useful, please share the link on Facebook, with your friends, etc. Your support is much appreciated and if you have any feedback, please email me at in**@*********ps.com. Please note that for links to other websites, I may be paid via an affiliate program such as Avantlink, Impact, Amazon and eBay.