
The Avtomat Kalashnikova is more than a rifle; it is a defining technological and political artifact of the 20th century. Its silhouette is recognized globally, a symbol of revolution, state power, and asymmetric warfare. Its reputation for unparalleled simplicity and rugged reliability, often under the most trying conditions, has cemented its place in military history.1 However, the common term “AK-47” is a pervasive misnomer, a generic label often applied incorrectly to a vast and diverse family of weapons.3 This report will provide the necessary clarity, tracing the lineage and adoption of military Kalashnikov variants across the globe.
The global proliferation of the Kalashnikov design stems from three foundational Soviet models, each serving as a template for licensed and unlicensed production worldwide. These pillars are:
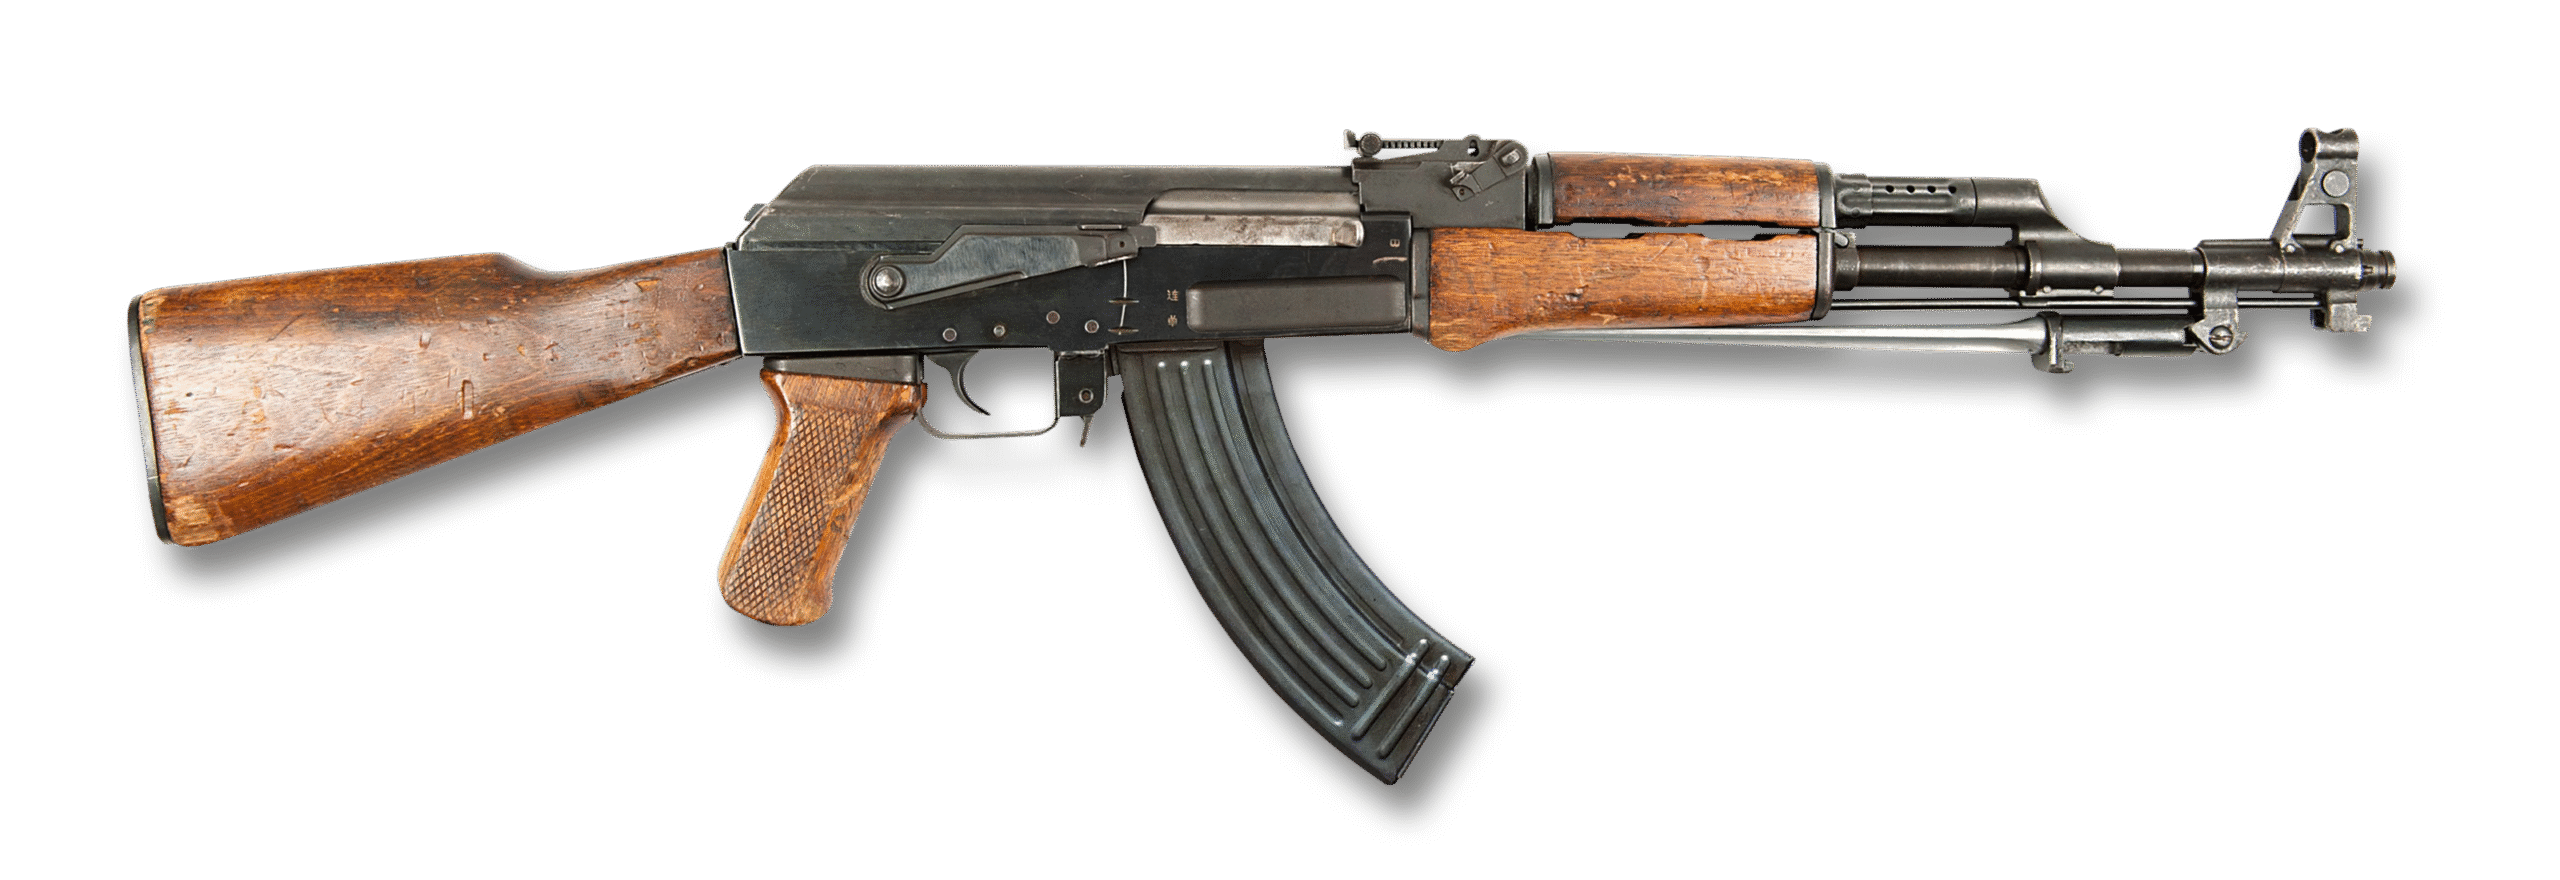
- The AK, the original milled-receiver rifle colloquially known in the West as the “AK-47,” specifically the final and most common Type 3 pattern.
- The AKM, the modernized, stamped-receiver rifle that became the most influential and widely mass-produced Kalashnikov variant.
- The AK-74, the small-caliber evolution that reflected the shift in infantry doctrine during the later Cold War.
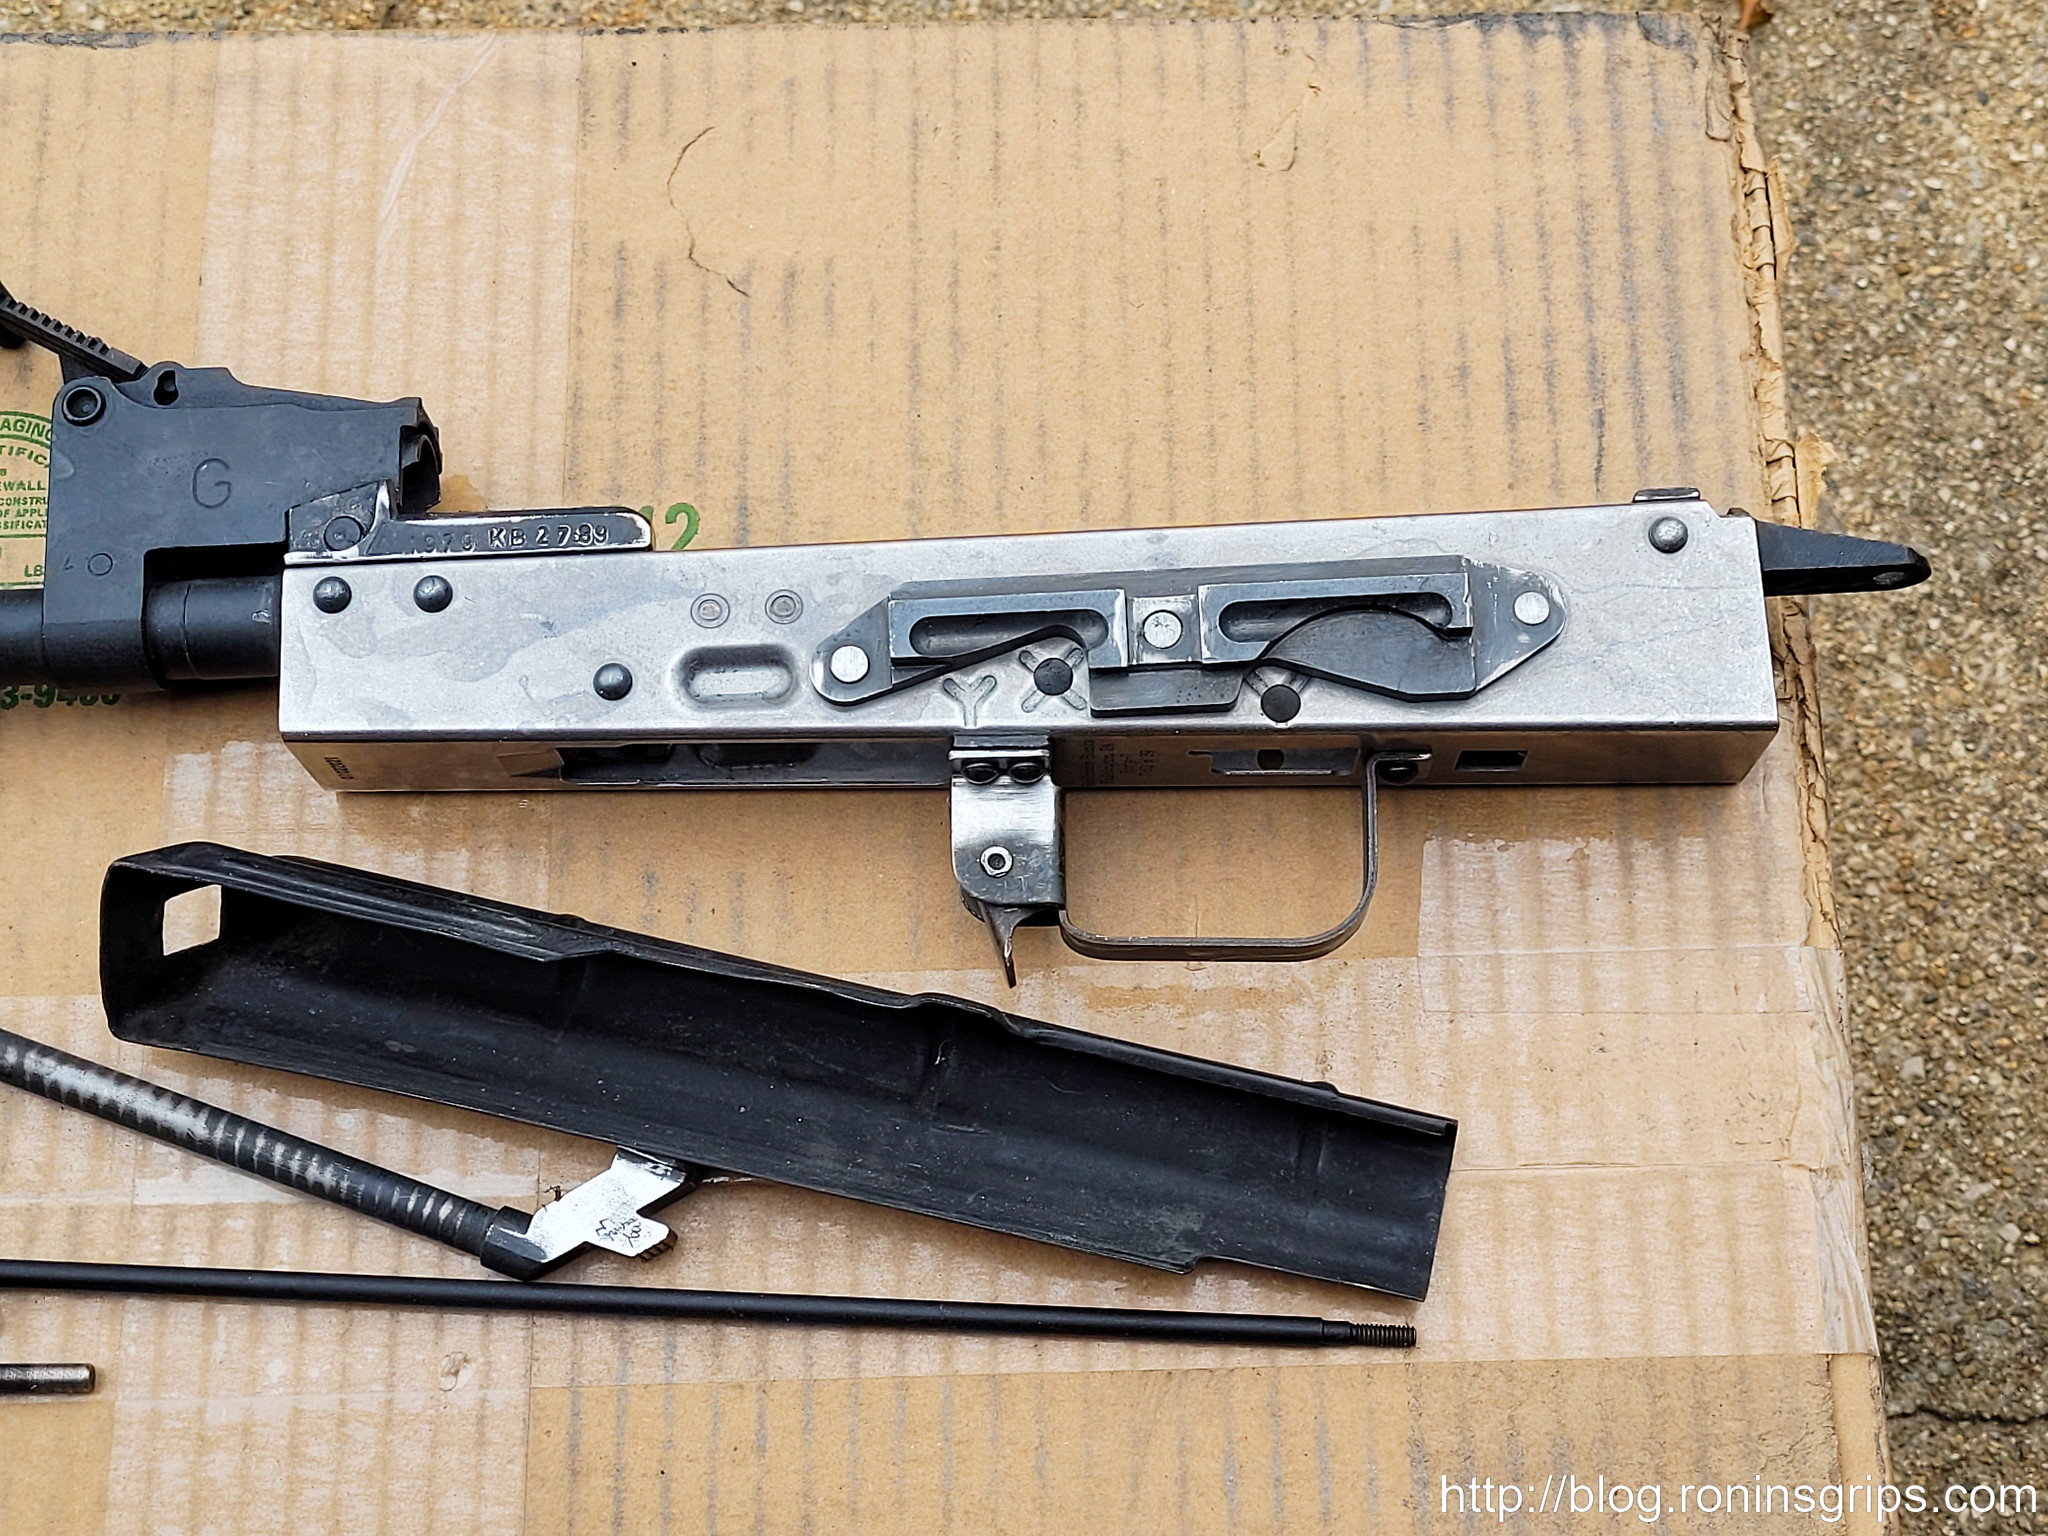
Central to understanding the entire history of the Kalashnikov’s development and proliferation is the profound manufacturing distinction between milled and stamped receivers. A milled receiver is machined from a solid billet of steel. This subtractive process is time-consuming and wasteful of material, but it results in a strong, smooth-functioning, and heavy firearm. It was a technology well understood by Soviet industry in the early 1950s.5 In contrast, a stamped receiver is formed by bending a flat sheet of steel into its final shape, with critical components like the barrel trunnion riveted in place. This method is significantly lighter, cheaper, and far better suited for mass production, but it requires advanced and precise manufacturing techniques, particularly in heat treatment and welding, which the Soviets struggled to master initially.5 This technical dichotomy between milling and stamping is not a mere footnote; it is the central axis around which the Kalashnikov’s production history, both within the Soviet Union and abroad, revolves.
The following is a summary timeline and more details will follow:
| Date (Estimated Production Start) | Country | Model(s) |
| 1949 | Soviet Union | AK (Type 1) |
| 1951 | Soviet Union | AK (Type 2) |
| 1954 | Soviet Union | AK (Type 3) |
| 1956 | China | Type 56 (Milled Receiver) |
| 1957 | Poland | PMK (Milled Receiver) |
| 1958 | Bulgaria | AKK / AKKS (Milled Receiver) |
| 1958 | North Korea | Type 58 (Milled Receiver) |
| 1959 | Soviet Union | AKM / AKMS |
| 1959 | East Germany | MPi-K (Milled Receiver) |
| 1959 | Hungary | AK-55 (Milled Receiver) |
| 1962 | Finland | Rk 62 |
| 1963 | Hungary | AKM-63 |
| 1963 | Romania | PM md. 63 |
| 1964 | East Germany | MPi-KM (Stamped Receiver) |
| 1965 | Hungary | AMD-65 |
| 1965 | Romania | PM md. 65 |
| c. 1966 | Poland | kbk AKM / AKMS (Stamped Receiver) |
| c. 1967 | China | Type 56 (Stamped Receiver) |
| 1968 | North Korea | Type 68 (Stamped Receiver) |
| 1970 | Yugoslavia | Zastava M70 |
| c. 1970s | Egypt | Maadi “Misr” |
| 1972 | East Germany | MPi-KMS-72 |
| 1974 | Soviet Union | AK-74 / AKS-74 |
| 1977 | Hungary | AK-63 (AMM) |
| 1980s | Bulgaria | AK-74 / AKS-74 / AKS-74U |
| 1980s | China | Type 56-2 |
| 1981 | Hungary | NGM-81 |
| 1983 | East Germany | MPi-AK-74N |
| 1986 | Romania | PA md. 86 |
| 1989 | Poland | wz. 88 Tantal |
| 1990 | Romania | PM md. 90 |
| 1991 | China | QBZ-56C |
Part I: The Soviet Foundation (1947–1974) – Forging the Archetype
The Genesis of the Avtomat Kalashnikova (1944-1949)
The origins of the Kalashnikov rifle are rooted in the crucible of the Second World War. Soviet military planners, having witnessed the effectiveness of the German Sturmgewehr 44 (StG 44) and its revolutionary 7.92x33mm Kurz intermediate cartridge, recognized the need for a new class of infantry weapon.9 The traditional paradigm of a long, powerful bolt-action rifle supplemented by a short-range submachine gun was obsolete. The future belonged to a weapon that could bridge this gap. In 1943, the USSR developed its own intermediate cartridge, the 7.62×39mm M43, which would become the heart of its postwar small arms doctrine.11
Following a series of design competitions starting in 1944, a young, self-taught tank sergeant named Mikhail Timofeyevich Kalashnikov submitted his design for an automatic rifle.11 His prototype, which underwent official military trials in 1947, proved to be exceptionally reliable and simple to operate.12 While the designation “AK-47” was used for these experimental and trial versions, the weapon was formally adopted by the Soviet Army in 1949 under the simple designation “7.62 mm Kalashnikov rifle (AK)”.1 The “AK-47” name, however, would persist in Western intelligence and popular culture, becoming the ubiquitous identifier for the entire family of rifles.9
The Milled Receiver Era – The “Classic” AK-47 (1949-1959)
The journey from adoption to true mass production was fraught with technical challenges that forced a significant deviation from the original design intent. This period is best understood through the evolution of three distinct receiver “types,” a classification created by modern historians to differentiate the major production patterns.15
The Type 1 AK (1949-1951) was the first production model and ironically, the one that most closely resembled Kalashnikov’s ultimate vision: a rifle built around a lightweight stamped sheet metal receiver.12 Produced from a 1.0mm steel stamping with a separate milled trunnion riveted in place, the Type 1 was intended to be cheap and easy to manufacture. However, Soviet industry at the time lacked the sophisticated welding and heat-treatment technology to produce these receivers with acceptable quality control. High rejection rates plagued the production lines, making the Type 1 a relative failure and a rare collector’s item today.12
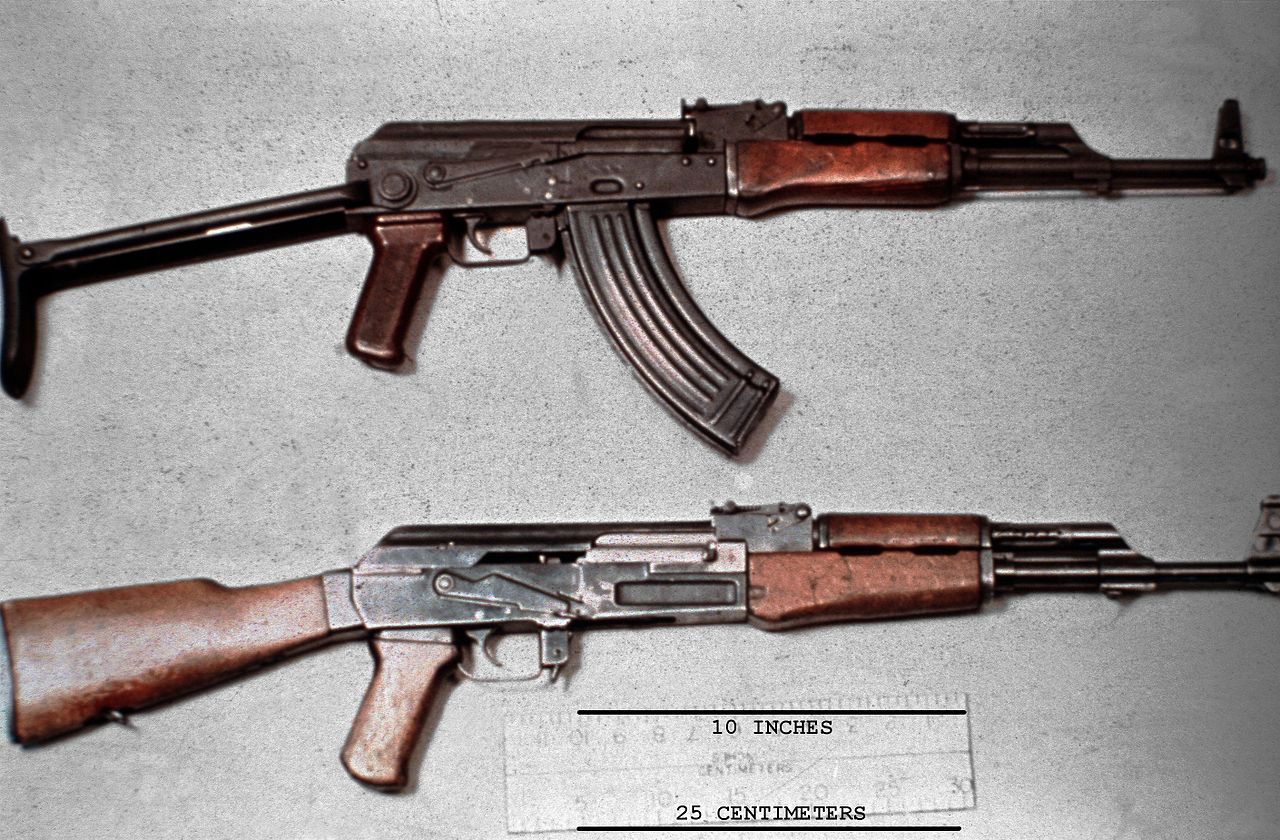
To solve this crisis and get a functional rifle into the hands of soldiers, Soviet engineers made a pragmatic but significant pivot. The Type 2 AK (1951-1955) abandoned the troublesome stamped receiver in favor of a heavy, durable, and expensive milled receiver machined from a solid steel forging.12 This move leveraged the existing industrial capacity for producing milled components, such as those used for the older Mosin-Nagant rifle, ensuring that production could proceed at scale.12 The Type 2 is identifiable by the “boot” or socketed metal insert connecting the buttstock to the receiver and by the long, shallow lightening cuts on the receiver’s sides that run parallel to the barrel.12
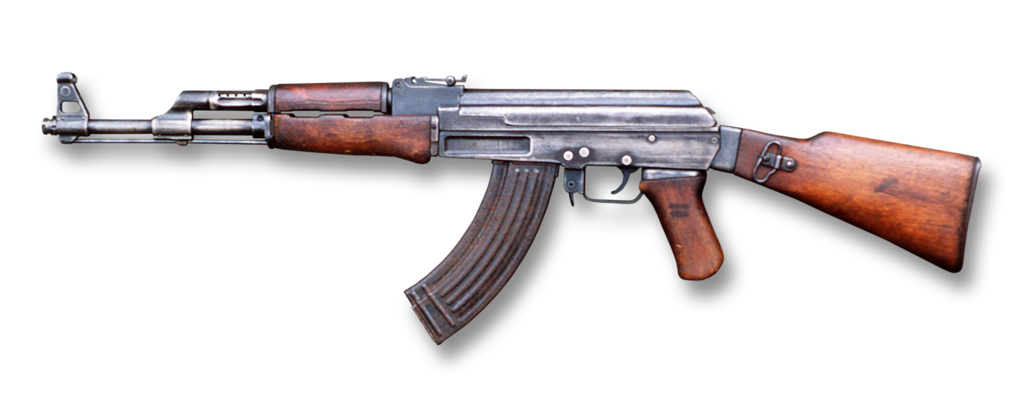
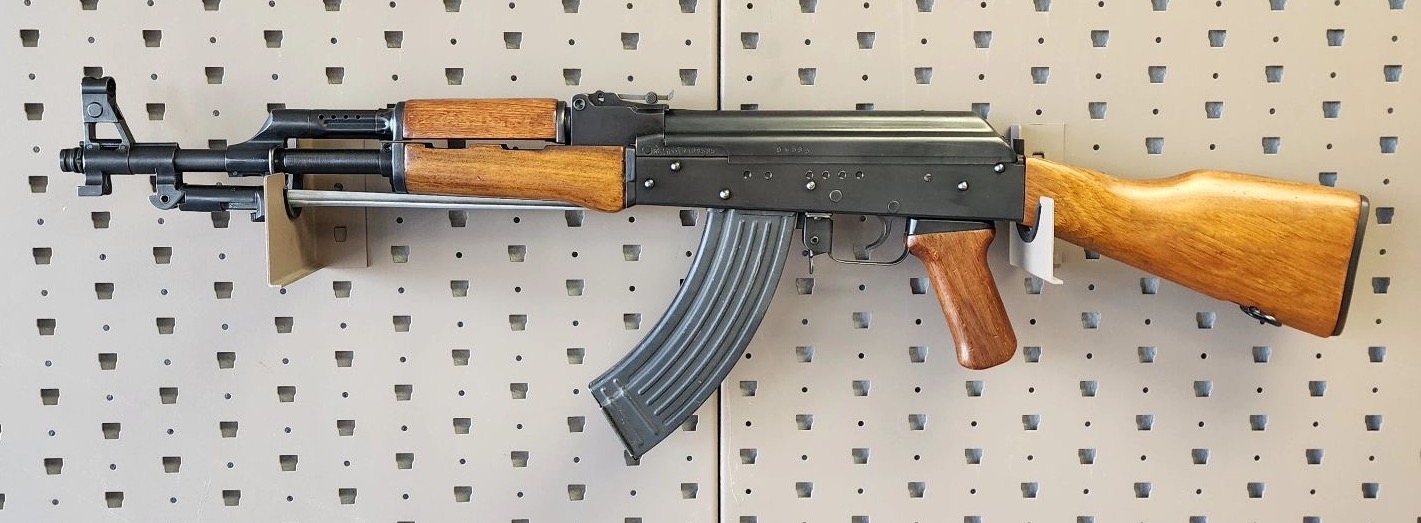
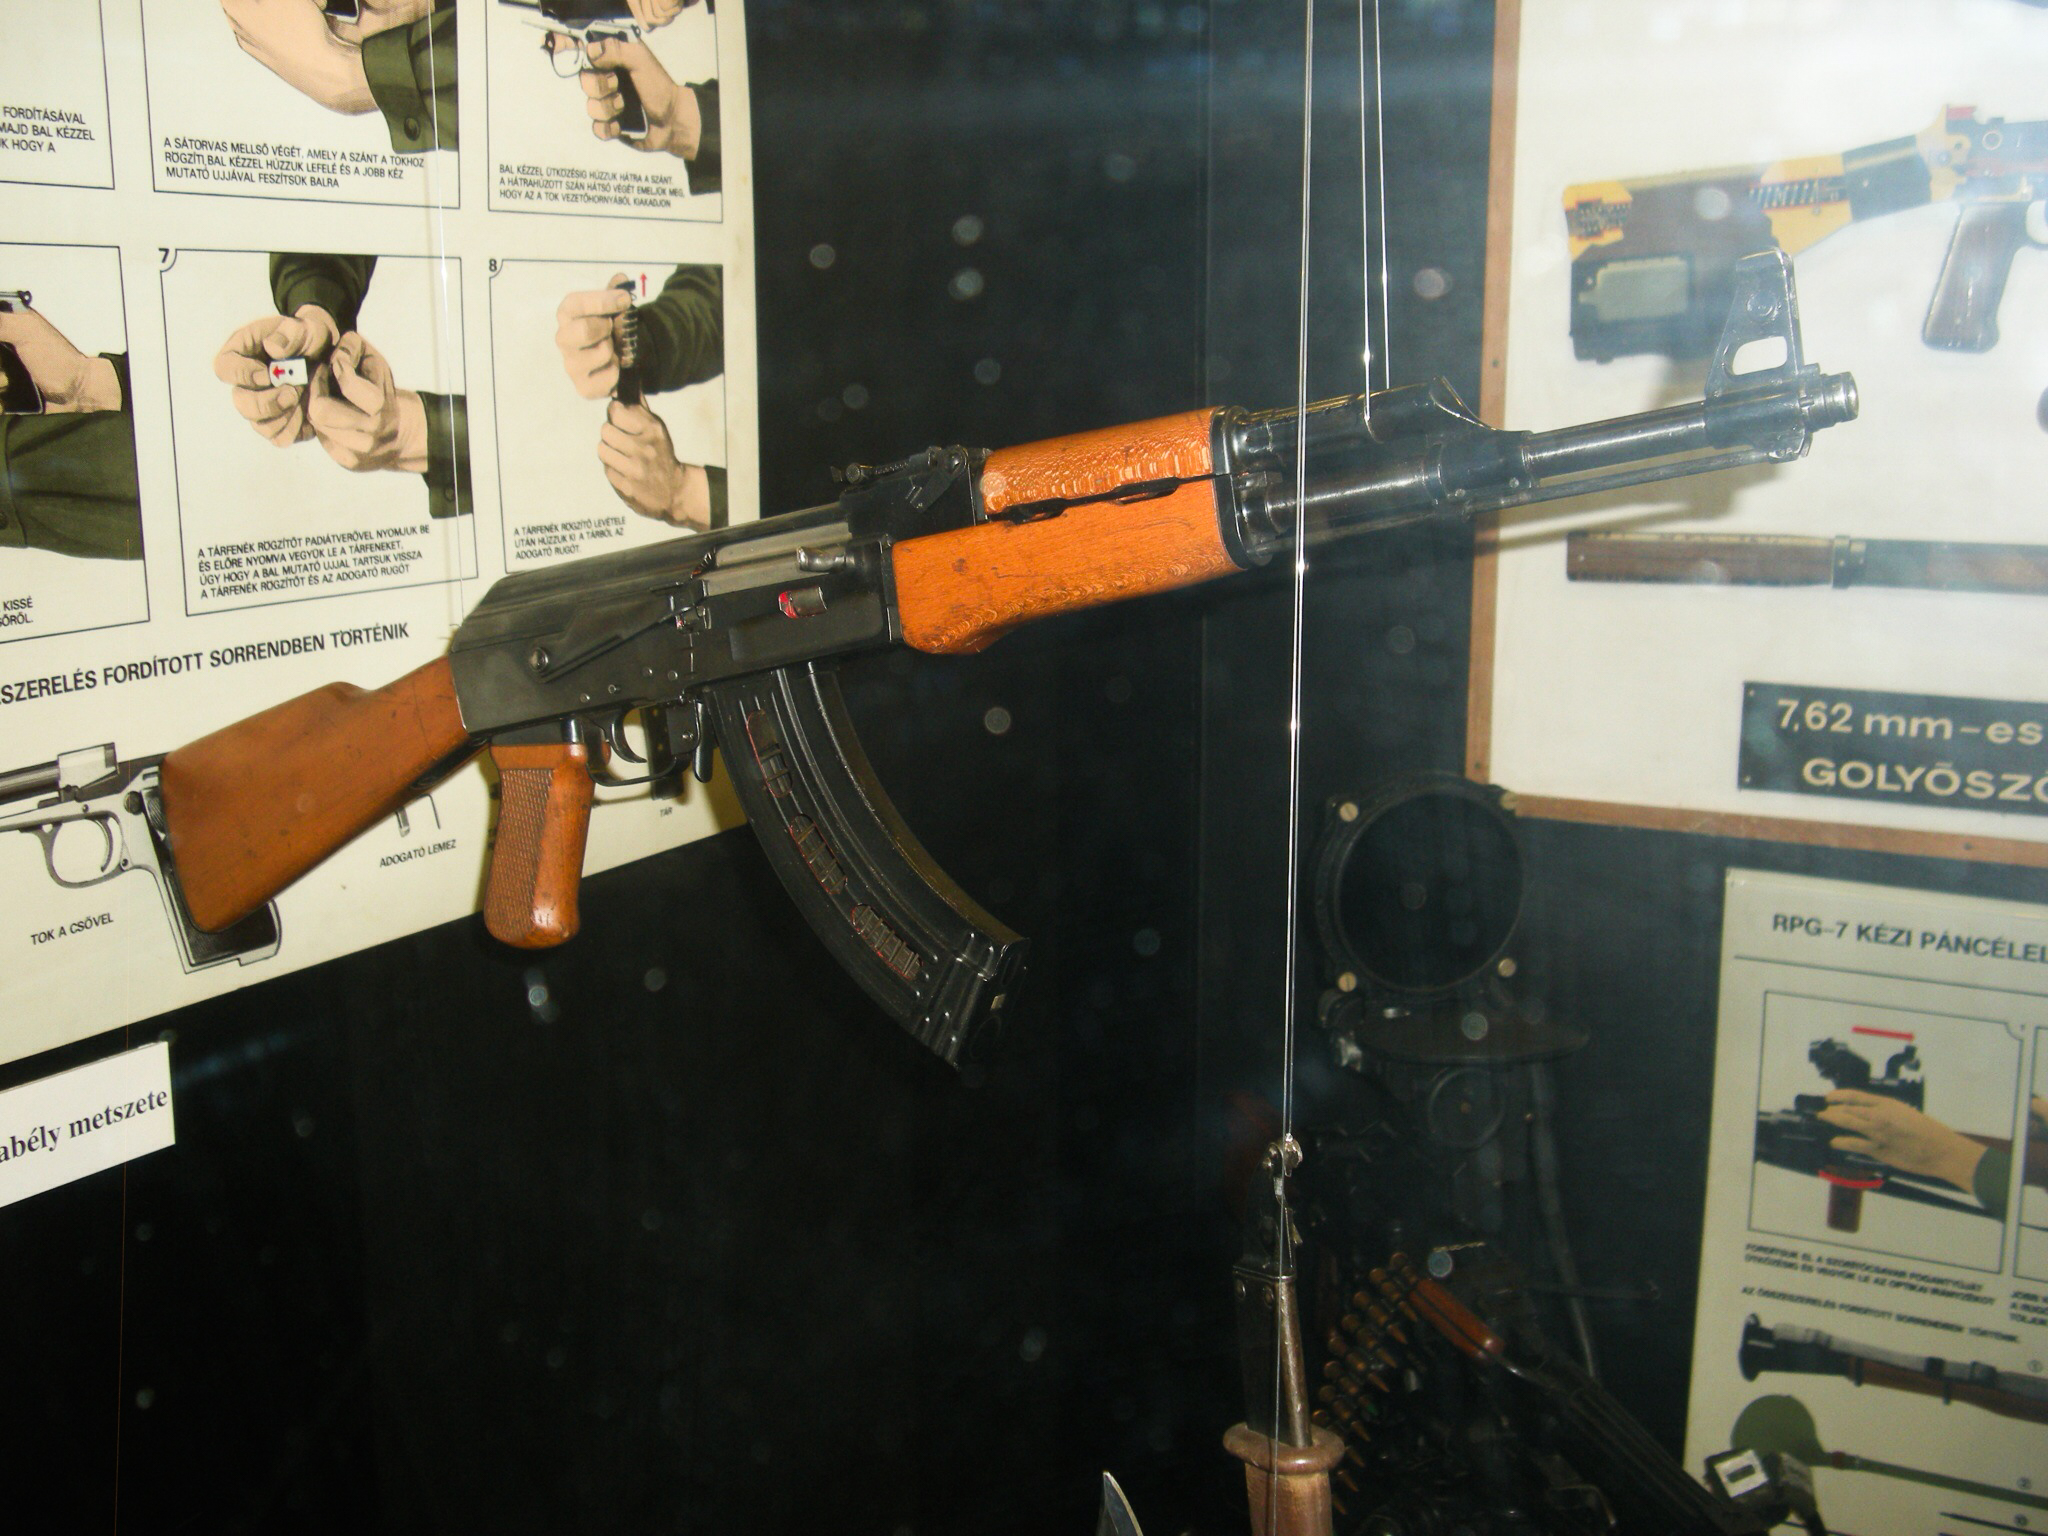
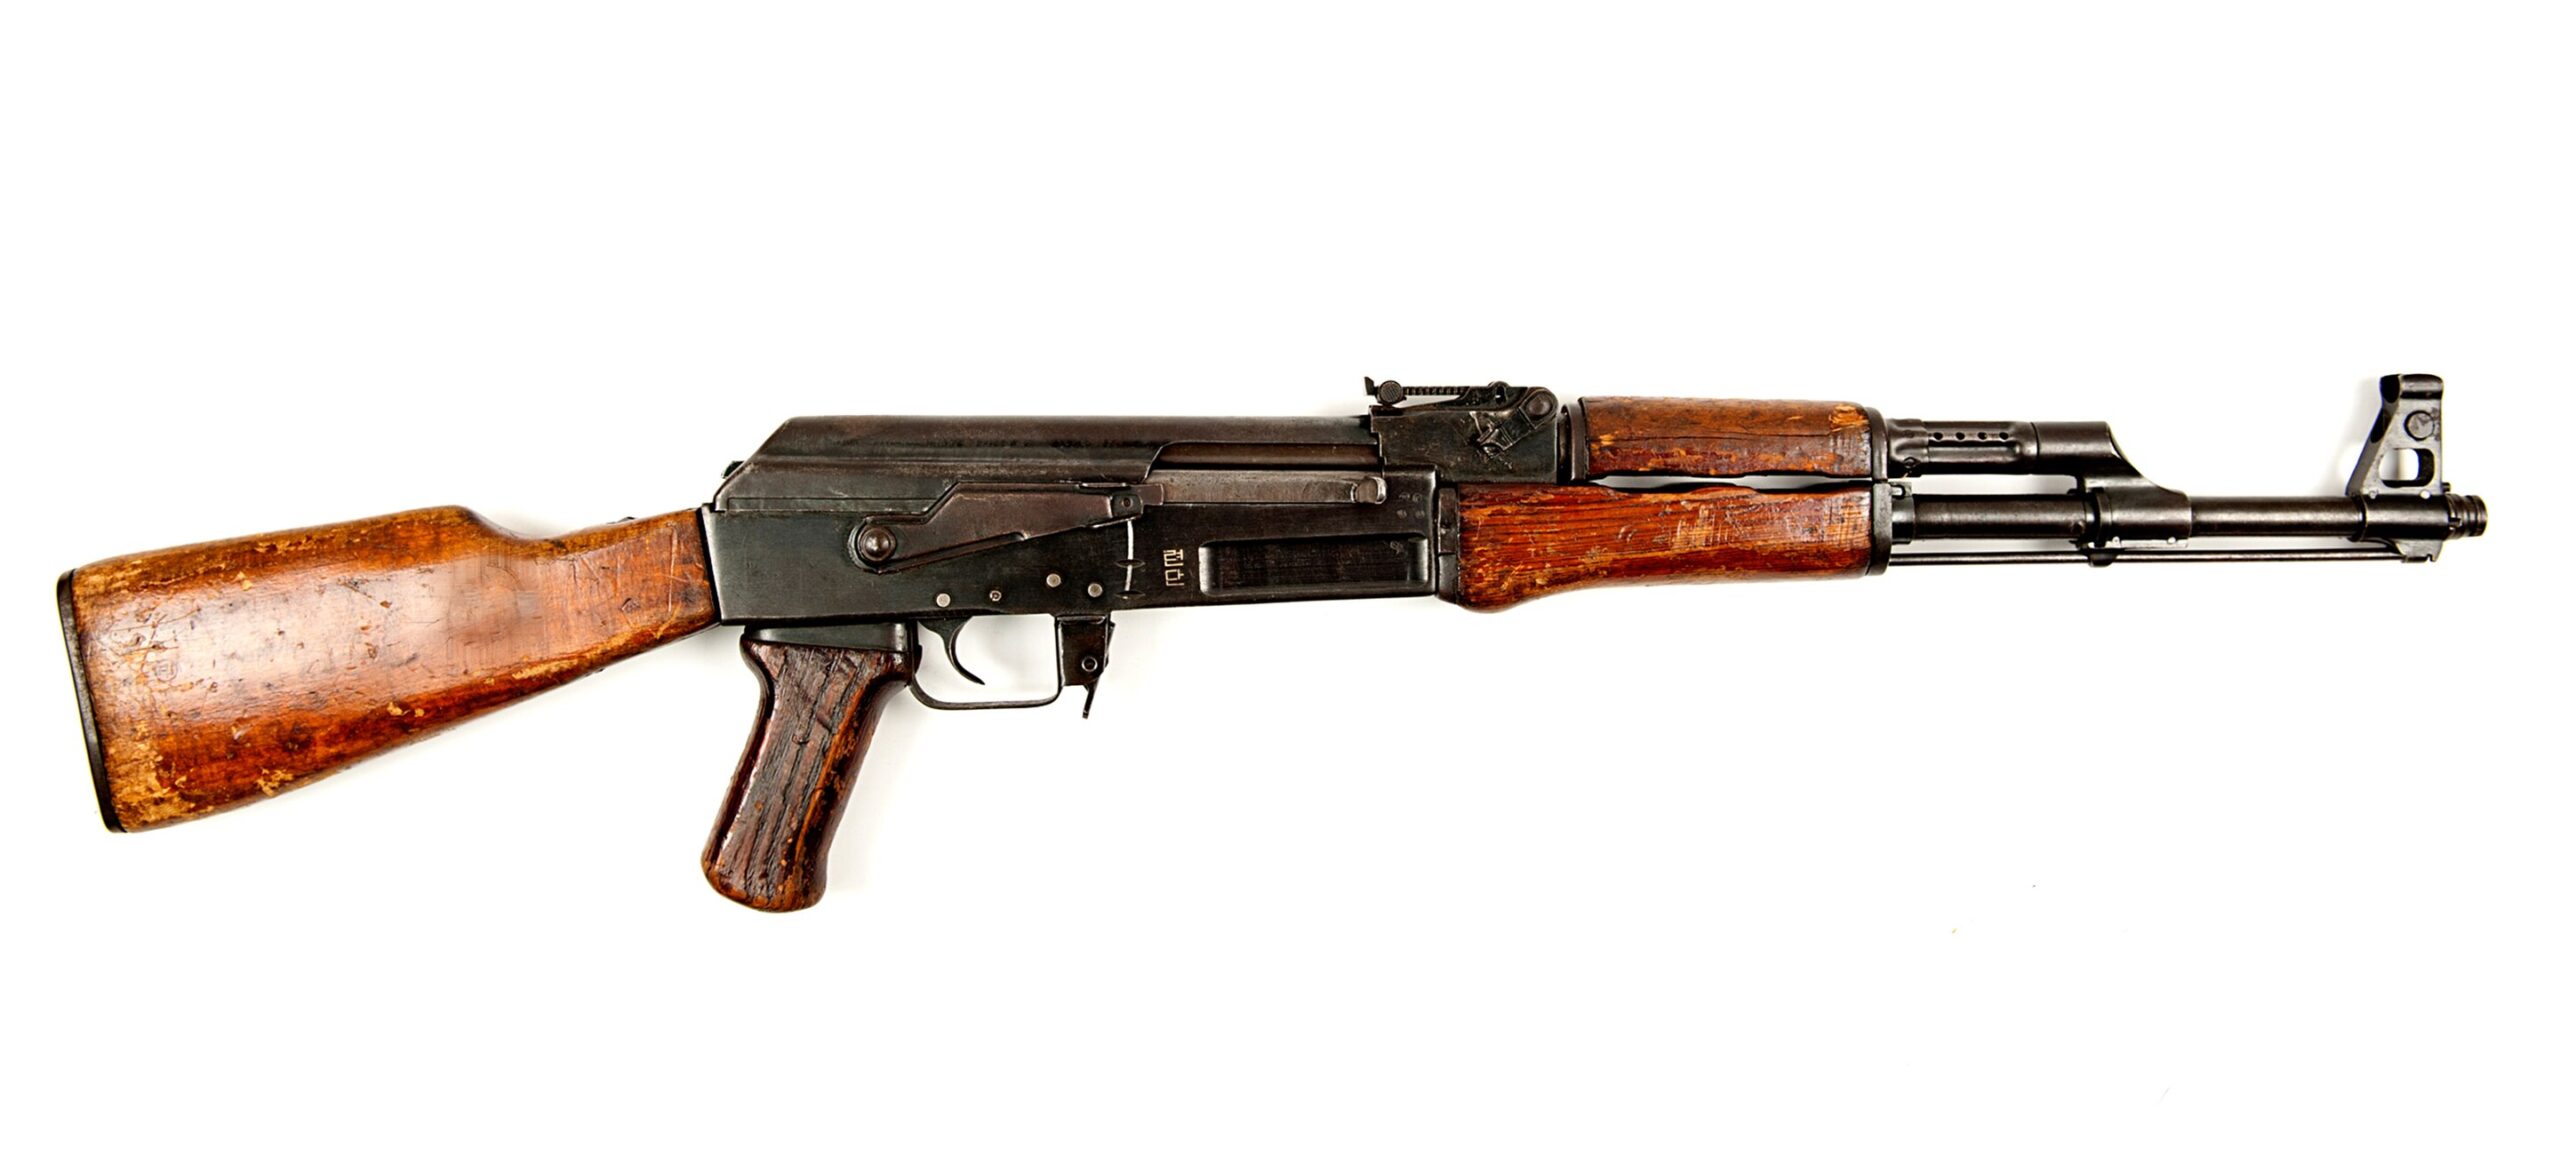
The final evolution of the milled receiver was the Type 3 AK (1955-1959). This model featured a further refined and simplified milled receiver, this time machined from steel bar stock rather than a forging. It was lighter than the Type 2 and did away with the separate stock boot, attaching the stock directly to the receiver.12 Its most prominent visual cue is that the milled lightening cut on the side of the receiver is slanted relative to the barrel axis.12 The Type 3 became the most common and widely produced of the milled-receiver AKs and served as the direct template for the first wave of technology transfer and licensed production to Soviet allies.12
The AKM Revolution – The People’s Rifle (1959)
The milled-receiver AK was, in the eyes of its designers, a necessary but temporary stop-gap. Throughout the 1950s, Soviet engineers continued to work on perfecting the stamped receiver concept. This effort culminated in 1959 with the adoption of the Avtomat Kalashnikova Modernizirovanniy (Modernized Kalashnikov Automatic Rifle), or AKM.1
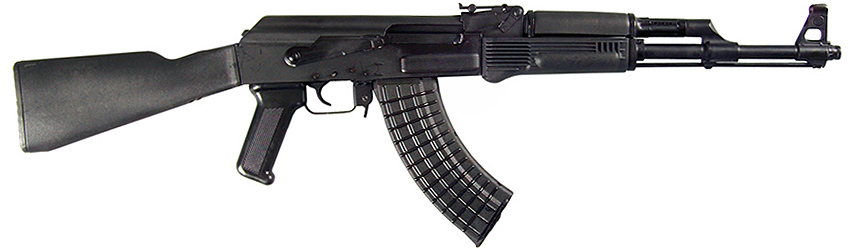
The AKM was a landmark achievement that finally realized Kalashnikov’s original vision. Its core was a U-shaped receiver stamped from a 1.0mm sheet of steel, which was significantly lighter, faster, and cheaper to produce than its milled predecessor.7 The AKM introduced several other key improvements that defined it as a second-generation Kalashnikov:
- Laminated Wood Furniture: The stock and handguards were made from birch plywood laminates, which were stronger, more resistant to warping, and cheaper than the solid wood of the milled AKs.7
- Slant Muzzle Brake: A distinctive slanted muzzle compensator was threaded onto the muzzle. It was designed to redirect propellant gases upwards and to the right, counteracting the rifle’s natural tendency to climb during automatic fire for a right-handed shooter.16
- Hammer Retarder: A small, simple delay mechanism was added to the trigger group. Often misidentified as a “rate reducer,” its actual function is to slightly delay the hammer’s fall in full-auto fire, preventing “bolt bounce” and ensuring the bolt is fully locked before the next round is fired, thereby increasing reliability.3
- Weight Reduction: As a result of the stamped receiver and other changes, the AKM weighed approximately 1 kg (2.2 lbs) less than the Type 3 AK, a significant reduction for the individual soldier.7
The AKM, not the milled Type III AK-47, became the definitive Kalashnikov rifle of the Cold War. It was produced in the tens of millions and its technical data package was widely distributed to Warsaw Pact nations, making it the basis for the vast majority of foreign copies.19 An under-folding stock version, the AKMS, was introduced concurrently for airborne and armored troops.7 This iterative development cycle—from the failed stamped Type 1, to the successful but expensive milled Type 2/3, and finally to the perfected stamped AKM—demonstrates a core Soviet design philosophy of long-term, pragmatic problem-solving. The ultimate goal was always a rifle suitable for a massive conscript army, and the AKM was the triumphant fulfillment of that objective.19
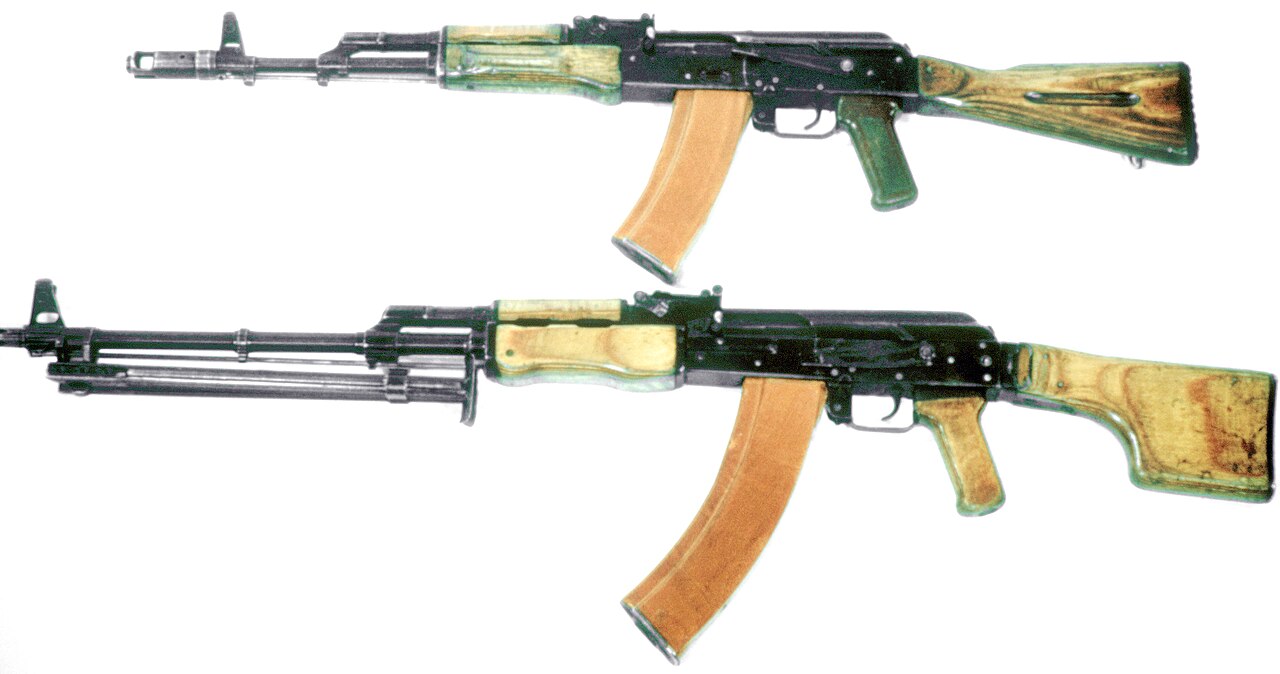
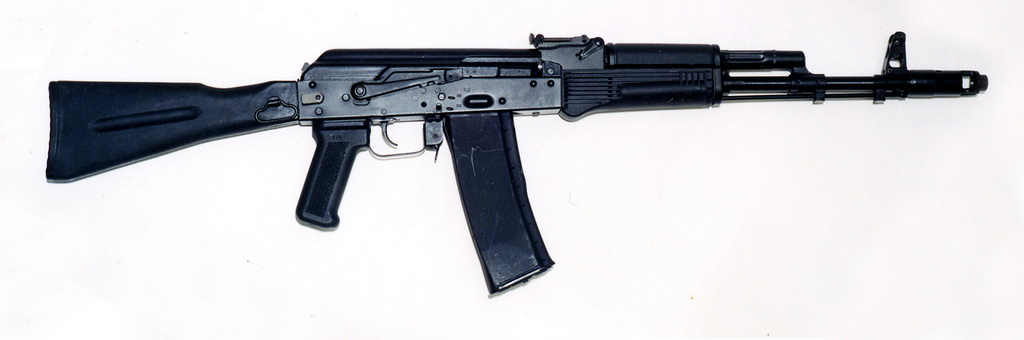
The Small Caliber Shift – The AK-74 (1974)
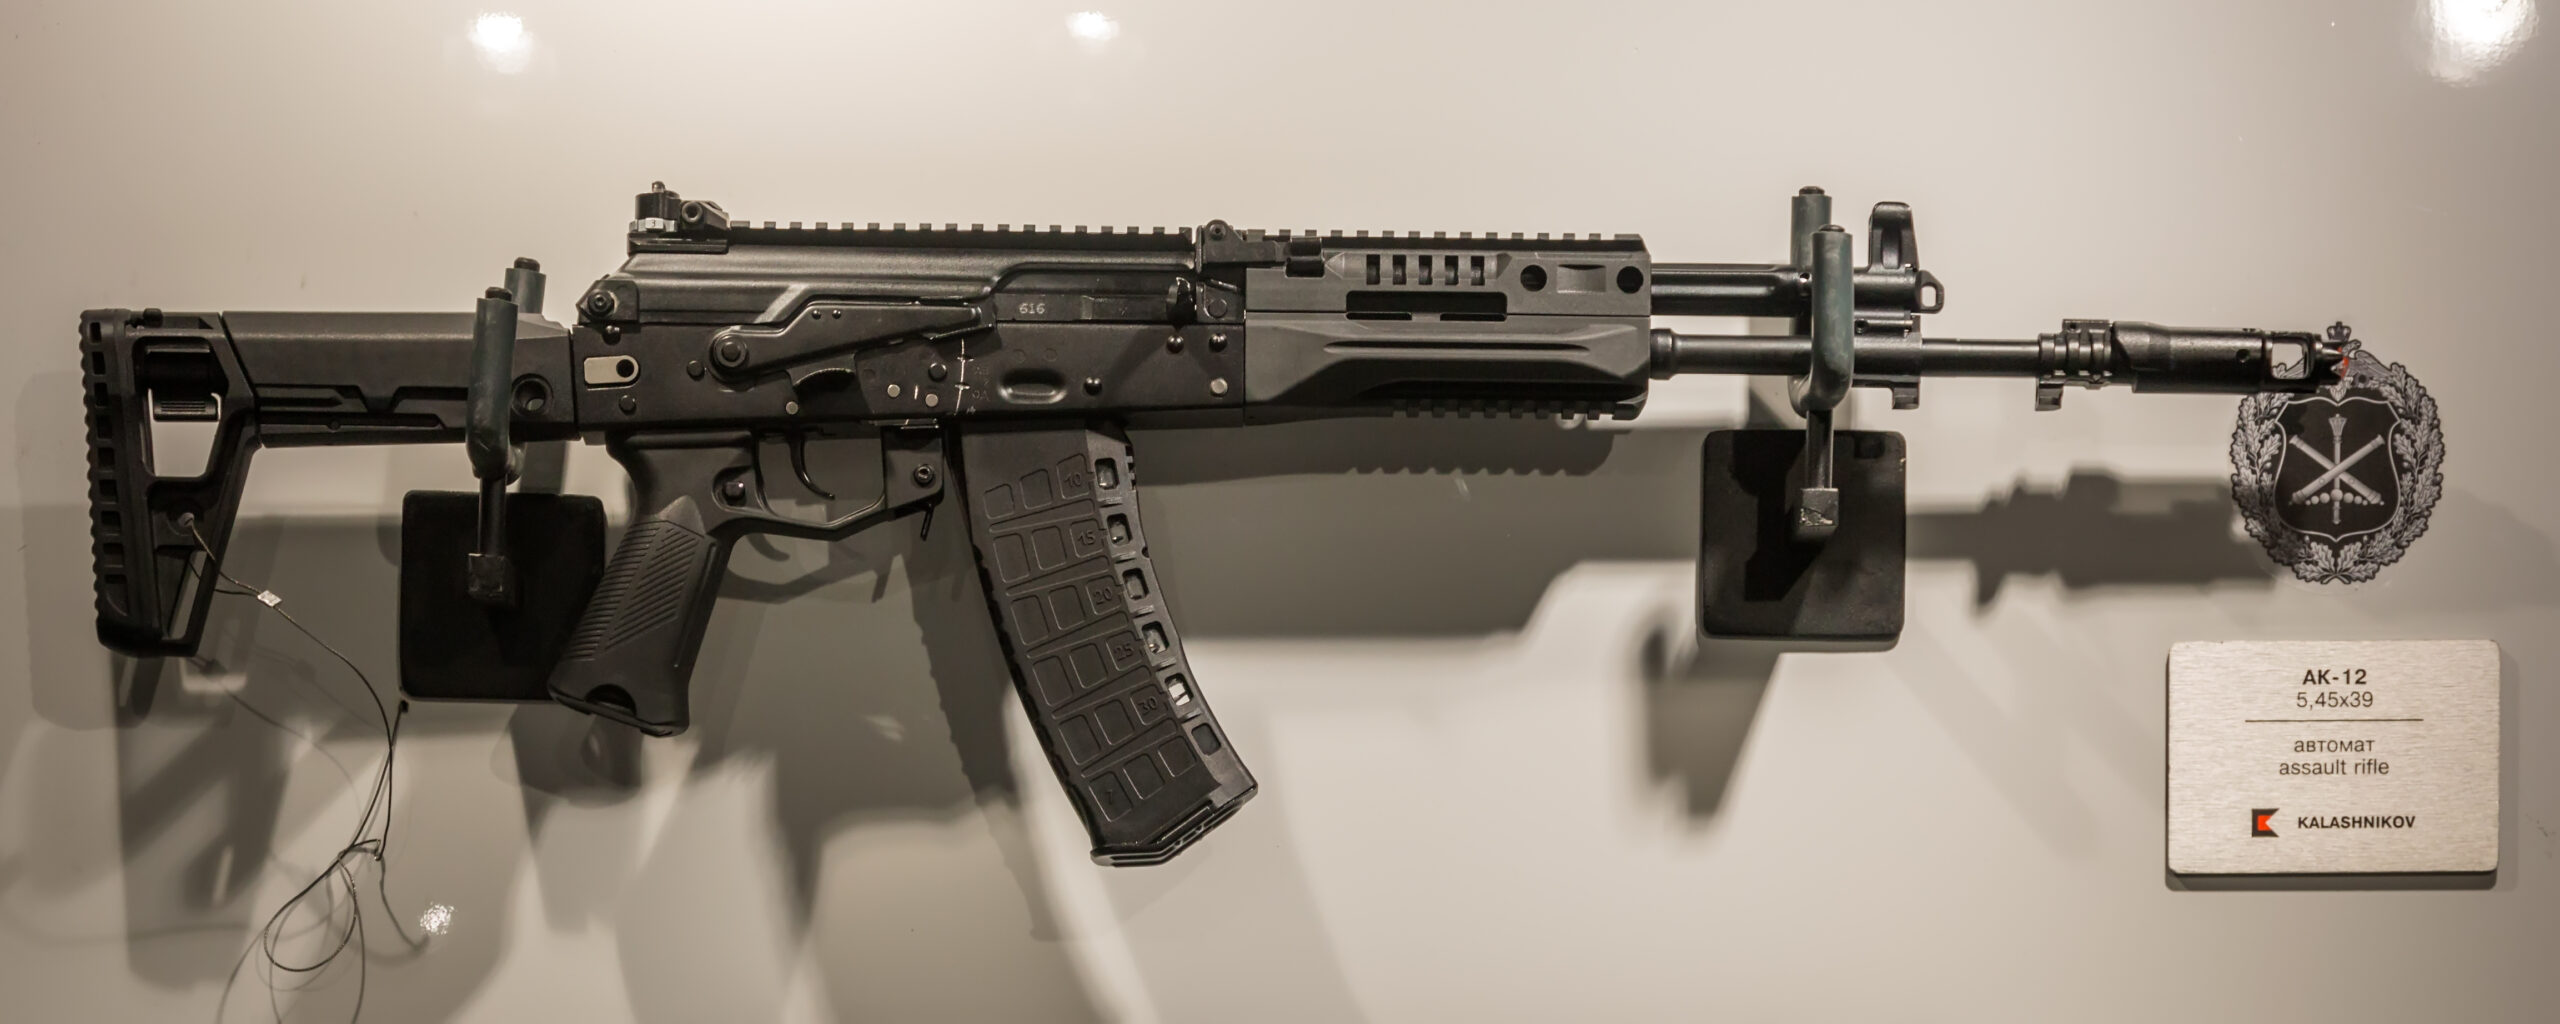
In the 1960s, the United States’ adoption of the M16 rifle and its small-caliber, high-velocity 5.56mm cartridge prompted a major shift in global small arms doctrine.1 The Soviet Union, observing the performance of this new ammunition type in Vietnam, initiated its own program to develop a similar cartridge. The result was the 5.45×39mm round, which was adopted in 1974 along with a new rifle to fire it: the AK-74.1
The AK-74 was not a revolutionary new design, but rather a clever adaptation of the proven AKM platform to the new caliber.26 The core operating system remained the same, with approximately 50% parts commonality with the AKM.26 The key changes were directly related to the new cartridge:
- Muzzle Brake: The most visually distinctive feature of the AK-74 is its large, cylindrical, dual-chamber muzzle brake. This device was remarkably effective at reducing felt recoil and muzzle climb, making the already mild-recoiling 5.45mm rifle exceptionally controllable during automatic fire.20
- Gas Block: The gas block was redesigned with the gas port drilled at a 90-degree angle to the bore, a change from the AKM’s 45-degree gas block. This was done to reduce bullet shear and gas port erosion with the smaller, faster projectile.17
- Magazines: The AK-74 introduced new magazines, initially made from a distinctive orange-brown AG-4S polymer (a type of Bakelite), and later from a true black or “plum” polymer.21
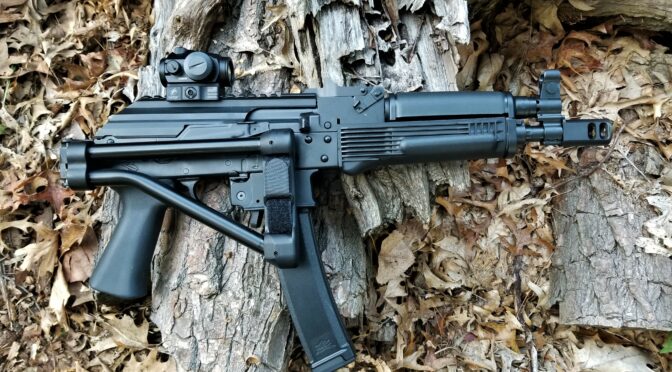
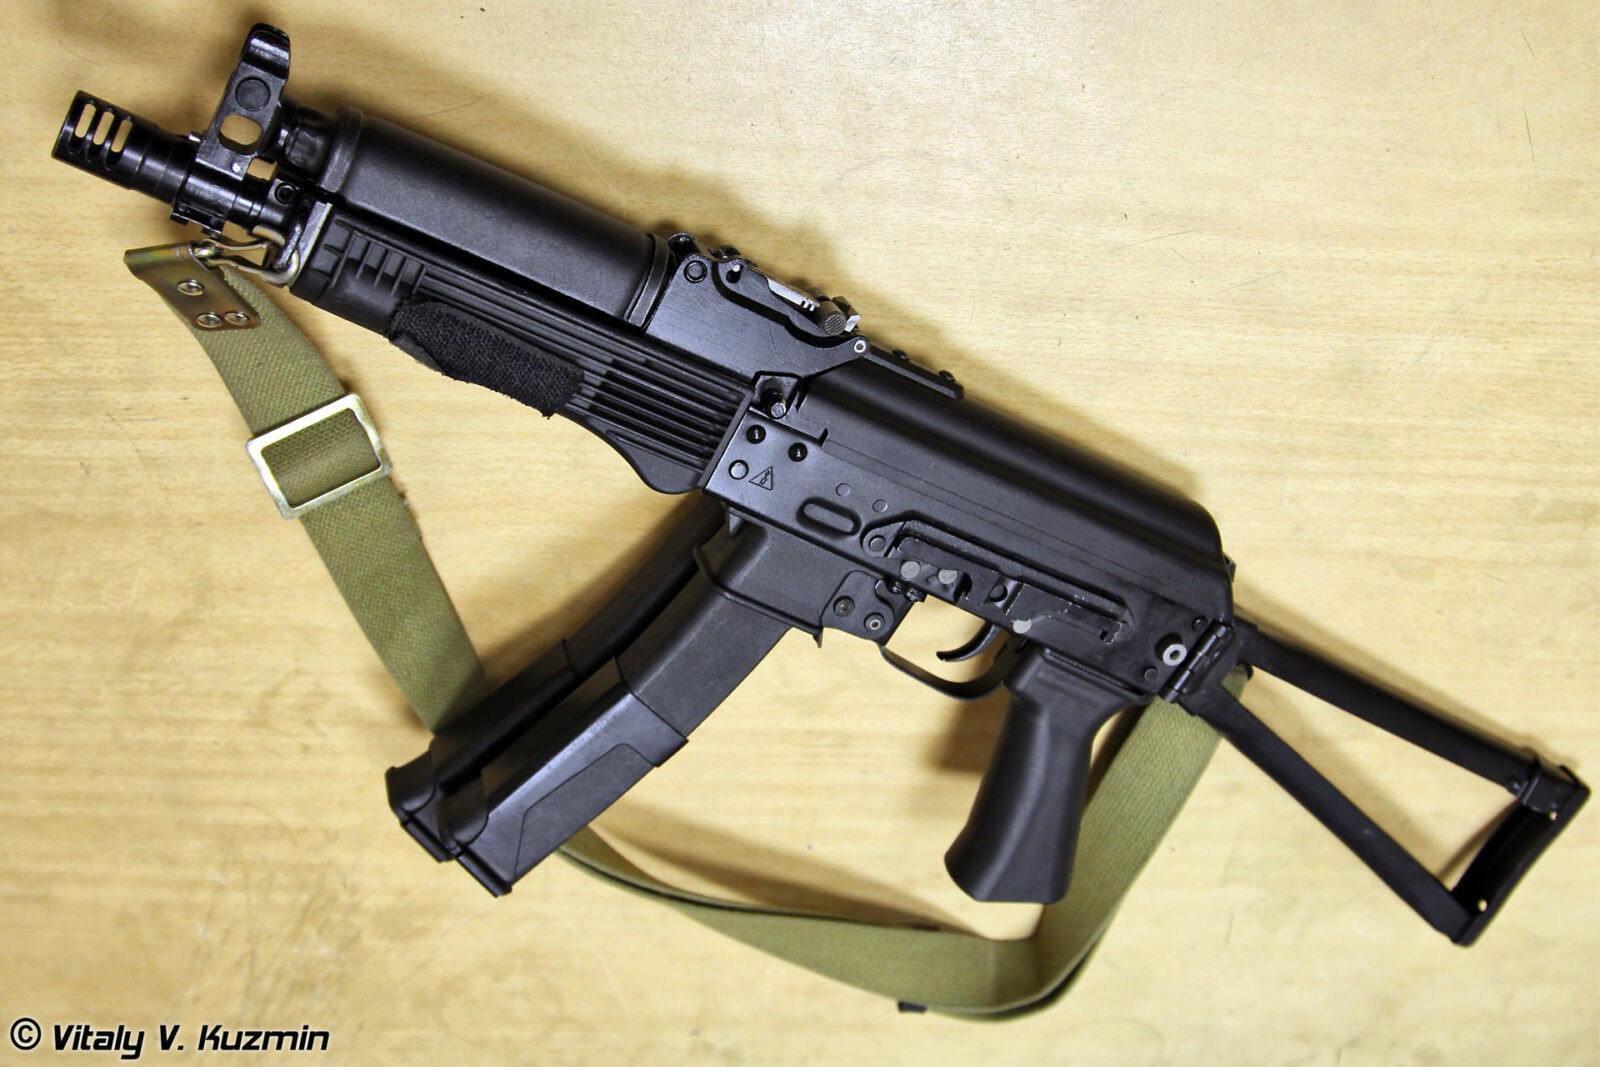
Like its predecessors, the AK-74 family included a version with a side-folding stock, the AKS-74, which utilized a more robust triangular metal stock that folded to the left side of the receiver. A compact carbine version, the AKS-74U (colloquially known in the West as the “Krinkov”), was also developed for special forces and vehicle crews, featuring a drastically shortened barrel and a unique muzzle device that acted as both a flash hider and a gas expansion chamber to ensure reliable cycling.20
Table 1: Soviet AK Main Production Model Evolution (1949-1974)
| Model Designation | Production Years | Receiver Type | Caliber | Key Visual Identifiers |
| AK (Type 1) | 1949–1951 | Stamped (1.0mm) | 7.62×39mm | Stamped receiver with large dimple, smooth dust cover, early wood furniture. Very rare. |
| AK (Type 2) | 1951–1955 | Milled (Forging) | 7.62×39mm | Heavy milled receiver with parallel lightening cuts, metal “boot” at stock-receiver junction. |
| AK (Type 3) | 1955–1959 | Milled (Bar Stock) | 7.62×39mm | Lighter milled receiver with slanted lightening cuts, no stock “boot”. The classic “milled AK-47”. |
| AKM / AKMS | 1959–1977 | Stamped (1.0mm) | 7.62×39mm | Stamped receiver with small dimple, ribbed dust cover, slant muzzle brake, laminated wood furniture. |
| AK-74 / AKS-74 | 1974–1991 | Stamped (1.0mm) | 5.45×39mm | Large cylindrical muzzle brake, 90-degree gas block, plum or orange polymer magazine. |
Part II: The Warsaw Pact Proliferation – Licensed Production and National Adaptation
The Soviet Union’s military doctrine for the Warsaw Pact was built on a foundation of standardization. To ensure logistical simplicity and interoperability in a potential large-scale conflict with NATO, member states were strongly encouraged, and often required, to adopt Soviet-pattern weaponry.28 The Kalashnikov rifle was the cornerstone of this policy. The USSR provided technical data packages and manufacturing assistance to its allies, using this technology transfer as a potent tool of foreign policy to bind the bloc together militarily and politically.30 While this policy aimed for uniformity, the realities of national industrial capabilities, unique military requirements, and even a subtle sense of engineering pride led to the development of distinct national variants. The story of the Warsaw Pact AKs is therefore one of both enforced integration and quiet divergence.
People’s Republic of China (Est. Production 1956)
China’s relationship with the Kalashnikov began in 1955, when it signed a deal with the Soviet Union to receive the technical data package for the Type 3 AK-47 and the SKS carbine.32 Production began in 1956 at State Factory 66, with the rifle being designated the Type 56 Assault Rifle (not to be confused with the Type 56 Carbine, which was the Chinese SKS).32
The initial milled-receiver Type 56 was a near-direct copy of the Soviet Type 3, but already exhibited some unique Chinese characteristics.32 However, the Sino-Soviet split of the late 1950s and early 1960s meant that China never received the technical data for the improved AKM. Undeterred, Chinese industry reverse-engineered the stamped-receiver AKM, creating a new version of the Type 56 around 1967.32 This stamped model is a fascinating hybrid, combining features of the older milled AK (like the smooth dust cover and gas system design) with the manufacturing principles of the AKM (a stamped receiver and pinned barrel).34
Chinese Type 56 rifles are among the most recognizable AK variants due to a set of consistent and unique features 34:
- Front Sight: A fully enclosed, hooded front sight, distinct from the partially open sight on Soviet and most European models.
- Bayonet: An integral, folding spike bayonet (often called a “spiker”), a feature borrowed from the Type 56 Carbine (SKS). Not all Type 56s have this, but it is their most iconic feature.
- Furniture and Markings: The gas tube lacks the vent holes seen on European models, and the fire selector markings are often in Chinese characters: 连 (Lian – Automatic) and 单 (Dan – Single), or simply the letters ‘L’ and ‘D’.36
- Receiver: The stamped receiver is thicker (1.5-1.6mm) than a standard AKM (1.0mm) and uses a distinctive rivet pattern.
Later developments included the Type 56-1, an under-folding stock version, the Type 56-2 with a side-folding stock introduced in the 1980s, and the compact QBZ-56C carbine developed in 1991.34
Republic of Poland (Est. Production 1957)
Poland was one of the first Warsaw Pact nations to begin licensed production of the Kalashnikov, starting in 1957 at the famed Łucznik Arms Factory in Radom, identifiable by a “Circle 11” arsenal mark.37
The first Polish model was the PMK (Pistolet maszynowy Kałasznikowa), a licensed copy of the Soviet Type 3 milled-receiver AK.37 From the outset, Polish engineers showed an interest in rifle-launched grenades, and some PMK variants were adapted with a special muzzle device and gas system to accommodate this, a theme that would recur in later Polish designs.38
Around 1966, Poland transitioned to the stamped-receiver AKM pattern, redesignating their rifles kbk AK (karabinek AK) and later kbk AKM for the fixed stock version and kbk AKMS for the under-folder.37 Polish AKMs are widely regarded as being among the highest-quality and most faithful copies of the Soviet originals, featuring excellent fit and finish, laminated wood furniture with a distinctive palm swell on the lower handguard, and an exceptionally robust under-folding stock mechanism.38
Poland’s most unique contribution to the Kalashnikov family is the wz. 88 Tantal, which was adopted in 1989.37 This rifle, chambered in the Soviet 5.45x39mm cartridge, is a highly modified AK-74 derivative. Its most distinguishing features are a unique selector switch on the left side of the receiver that provides a three-round burst capability (in addition to semi- and full-auto) and a robust side-folding wire stock that was itself a copy of an East German design. The Tantal also retained Poland’s focus on grenade launching, with a muzzle device designed for that purpose.38
People’s Republic of Bulgaria (Est. Production 1958)
Bulgaria began its Kalashnikov production journey in 1958, establishing manufacturing at “Factory 10” in Kazanlak, which would later become the world-renowned Arsenal AD.27 Bulgarian AKs quickly earned a reputation for exceptionally high quality, often considered equal to or even exceeding Soviet standards.43
Their first model was the AKK, a licensed copy of the Soviet Type 3 milled-receiver AK, with the under-folding stock version designated AKKS.41 These rifles are prized by collectors for their meticulous machining and finish. Bulgaria subsequently produced standard stamped-receiver AKM and AKMS copies, maintaining their high manufacturing standards.
In the 1980s, as the Warsaw Pact shifted to the new small-caliber cartridge, Bulgaria became a major producer of licensed AK-74, AKS-74, and the compact AKS-74U models, again noted for their superb quality.45 Bulgarian-made AK-74s are easily identified by the “Circle 10” arsenal mark.45
After the Cold War, Arsenal AD leveraged its expertise in milled receivers to create the modern AR-M series. These rifles, such as the AR-M1 and AR-M9, are based on the classic, durable milled receiver but are updated for the modern battlefield with black polymer furniture, effective muzzle brakes, and options for both the traditional 7.62×39mm and the NATO standard 5.56×45mm calibers.41
German Democratic Republic (Est. Production 1959)
The German Democratic Republic (GDR or East Germany) began producing its Kalashnikov variants in 1959, giving them the designation MPi-K (Maschinenpistole-Kalashnikov), a reflection of early doctrine that sometimes classified the weapon as a “machine pistol” or submachine gun.47
The first East German rifle, the MPi-K (1959-1964), was based on the Soviet Type 3 milled receiver. It is most easily identified by a feature of omission: it lacks the under-barrel cleaning rod and the cleaning kit compartment in the buttstock found on nearly all other AK variants.47
In 1964, the GDR transitioned to a stamped receiver, creating the MPi-KM. This became the most-produced East German variant and is famous for its unique plastic furniture, which came in shades of brown or black and featured a distinctive “pebble grain” texture.47 Early versions had plastic lower handguards that were prone to melting under sustained fire and were often replaced with wooden ones, creating a mixed-furniture appearance.47
East German engineers, dissatisfied with the perceived weakness of the Soviet under-folding stock, developed their own solution for a folding-stock rifle. The resulting MPi-KMS-72, introduced in 1972, featured a simple, robust right-side folding stock made from a single steel strut. A major innovation was that this stock could be mounted on a standard fixed-stock rear trunnion, vastly simplifying production and allowing stocks to be interchanged easily. This excellent design was later licensed to other countries, including Romania and Egypt.47
Following the bloc-wide trend, East Germany adopted the 5.45x39mm cartridge in 1983, producing the MPi-AK-74N. These rifles often featured the signature East German wire side-folding stock and a side rail for mounting optics, as indicated by the ‘N’ suffix (Nachtsicht).47 They also produced a compact carbine, the MPi-AKS-74NK.47 Near the end of its existence, the GDR developed the Wieger StG-940, an AK-74-based rifle chambered in 5.56×45mm NATO, intended purely for export to generate desperately needed foreign currency.49
Hungarian People’s Republic (Est. Production 1959)
Hungary began its Kalashnikov journey in 1959, with the state arms factory FÉG producing the AK-55, a high-quality, direct copy of the Soviet Type 3 milled-receiver rifle.51
However, Hungary quickly moved to develop some of the most visually distinct and innovative AK variants of the entire Warsaw Pact. In 1963, they introduced the AKM-63. This rifle used a modern stamped receiver but discarded the traditional wooden handguards in favor of a forward-canted sheet-metal lower handguard with a prominent vertical foregrip and an exposed gas tube.52 This was followed in 1965 by the
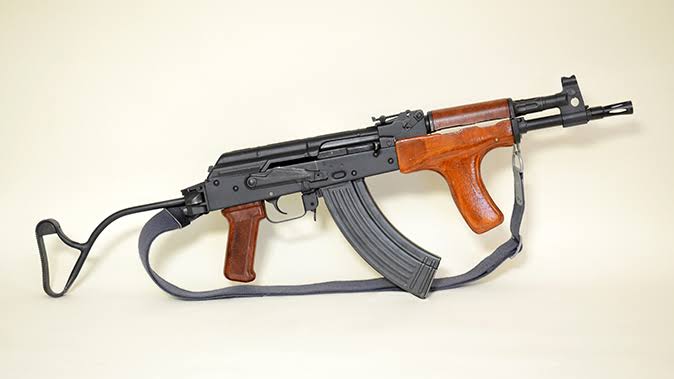
AMD-65, a compact carbine version designed for paratroopers and vehicle crews. It featured a shorter barrel, a simple side-folding single-strut stock, and was typically issued with shorter 20-round magazines to improve handling.40
While innovative, these designs were more complex and expensive to manufacture. In 1977, seeking to simplify production and standardize, Hungary adopted the AK-63 (also known in service as the AMM). This was a much more conventional and cost-effective AKM clone, but it retained a few Hungarian characteristics, most notably a straight, un-ergonomic pistol grip and a lower handguard that lacked the comfortable “palm swells” of the Soviet AKM.54
In the 1980s, Hungary developed the NGM-81, an AK-74-style rifle offered in both 5.45x39mm and 5.56x45mm NATO, but it was produced in limited numbers and not widely adopted by Hungarian forces.55
Socialist Republic of Romania (Est. Production 1963)
Romania commenced licensed Kalashnikov production in 1963 at the Cugir Arms Factory.56 Its primary service rifle, the
PM md. 63 (Pistol Mitralieră model 1963), was a licensed copy of the Soviet AKM. Its most famous and defining feature, added in the mid-1960s, is a distinctive vertical foregrip integrated into the lower handguard, made of laminated wood and typically canted forward.56 This grip was intended to help control the rifle during automatic fire.
The under-folding stock version was designated the PM md. 65. To allow the under-folding stock to clear the foregrip, the grip on the md. 65 was redesigned to be shorter and canted sharply rearward, giving it a unique and somewhat awkward appearance.56 Romania also produced large numbers of semi-automatic-only versions for its Patriotic Guards (Gărzi Patriotice). These “G-models” are identifiable by a large letter ‘G’ stamped on the left side of the rear sight block.56
Later Romanian variants continued to evolve. The PM md. 90 adopted the East German-style wire side-folding stock. Since this stock folded to the side and not underneath, it allowed the rifle to revert to using the standard, forward-canted vertical foregrip of the md. 63.56
Following the Soviet shift to small-caliber rifles, Romania developed the PA md. 86, its domestic version of the AK-74 in 5.45x39mm, which also featured the wire side-folder and a vertical foregrip.60
Part III: Beyond the Pact – Independent Development and Reverse Engineering
While the Warsaw Pact was the primary conduit for the AK’s proliferation, several key nations outside the bloc developed their own variants through reverse engineering or unique licensing agreements. These rifles were often tailored to specific national doctrines and geopolitical circumstances, resulting in some of the most interesting and capable Kalashnikovs ever produced. The contrast between these independently developed rifles, such as the Yugoslavian M70 and the Finnish Rk 62, provides a clear illustration of how a common design platform can be adapted to suit vastly different military philosophies.
Socialist Federal Republic of Yugoslavia (Est. Production 1970)
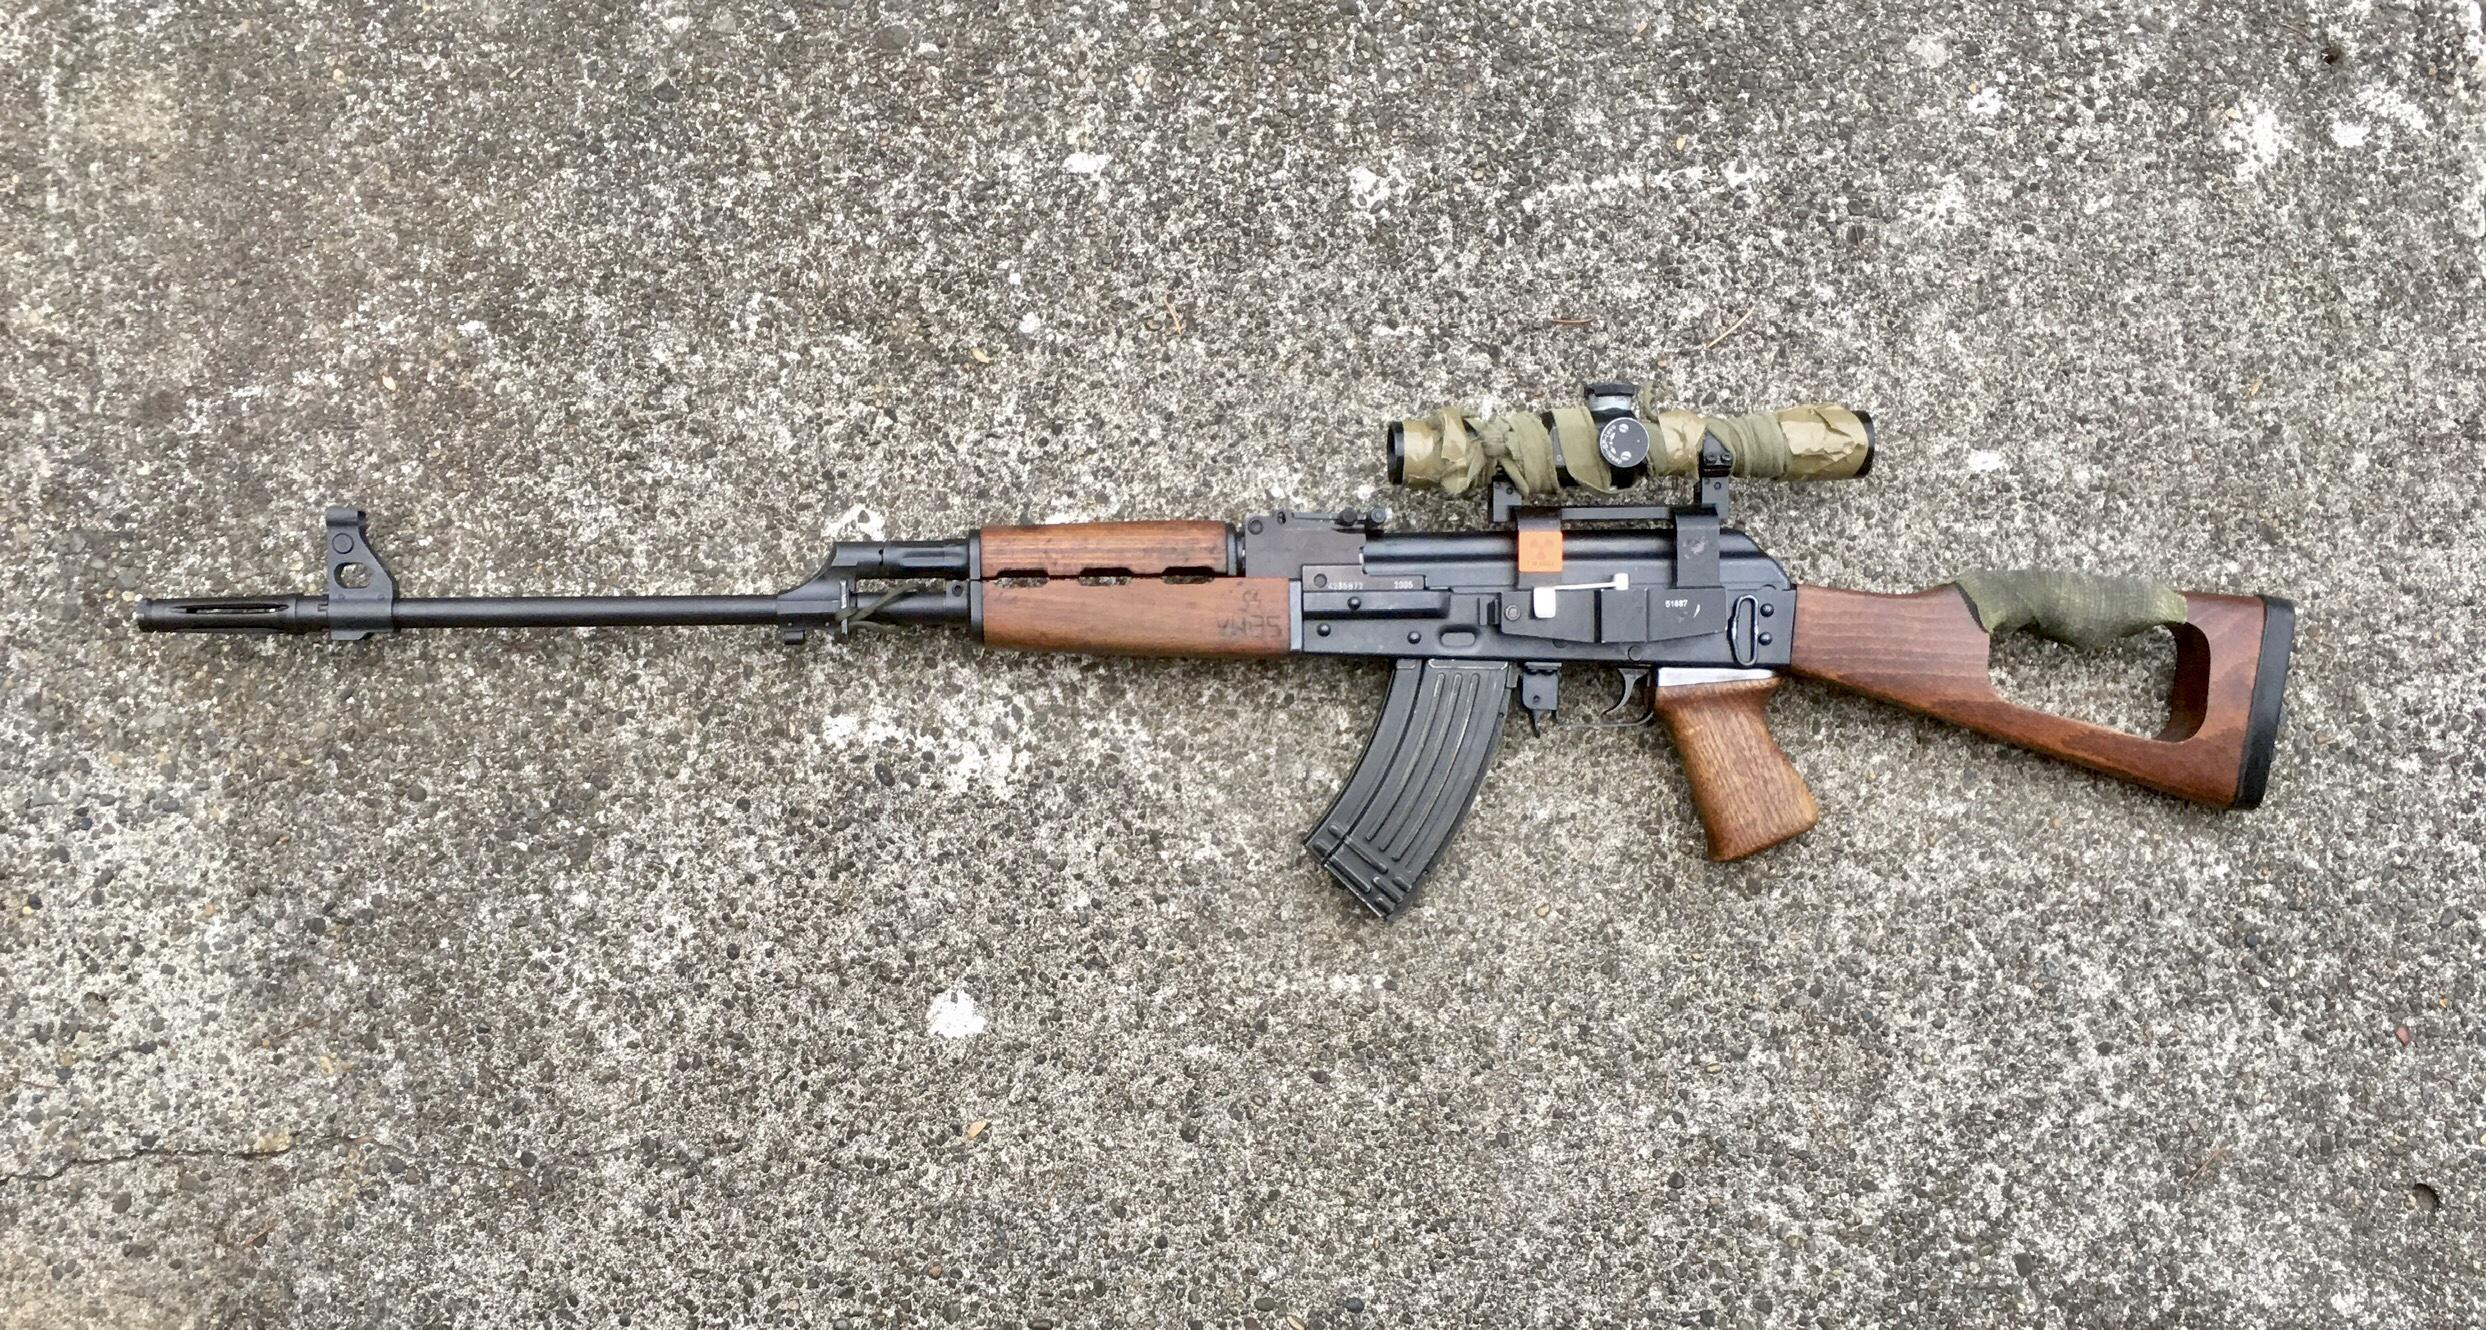
Yugoslavia’s unique position as a non-aligned socialist state after the Tito-Stalin split in 1948 meant it was outside the Soviet sphere of influence and did not receive a technical data package for the AK.61 Instead, Zastava Arms reverse-engineered the design, leading to the adoption of the
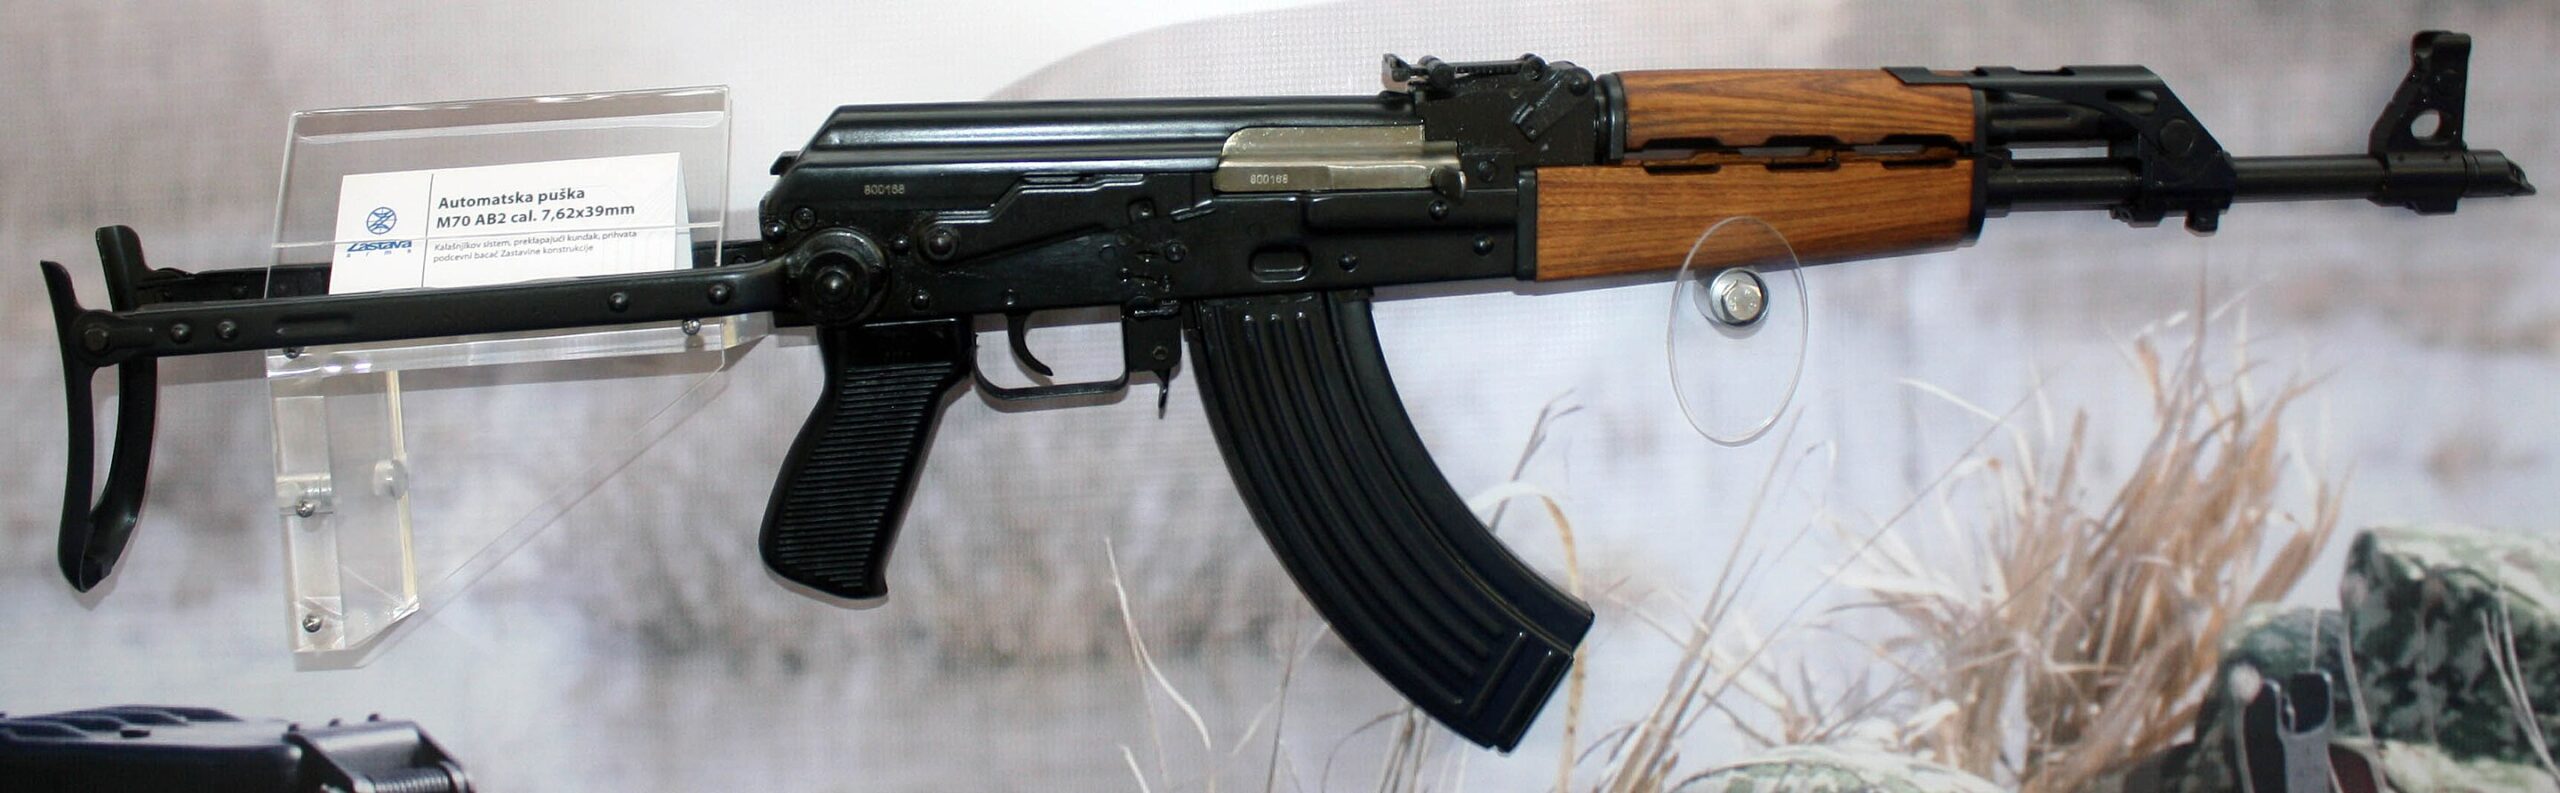
Zastava M70 in 1970.61 The Yugoslavian military doctrine, which emphasized a “Total National Defense” concept reliant on partisan-style warfare, heavily influenced the M70’s design, turning it into a rugged, multi-purpose weapon.61
The M70 family is defined by a set of features optimized for durability and launching rifle grenades 61:
- Grenade Launching System: This is the M70’s defining characteristic. It includes an integral, flip-up ladder sight mounted on the gas block. When raised for aiming grenades, this sight automatically cuts off the gas supply to the piston, turning the rifle into a single-shot launcher to prevent damage to the action. A locking mechanism on the dust cover prevents it from being jarred loose by the heavy recoil of a grenade launch.
- Reinforced Construction: To withstand the immense stress of grenade launching, M70s are built to be exceptionally robust. Stamped receiver versions use a thicker 1.5mm steel sheet (compared to the AKM’s 1.0mm) and feature a bulged front trunnion, a design element borrowed from the heavier RPK squad automatic weapon.
- Unique Features: M70s often feature three cooling slots in their wooden handguards, a feature not seen on other variants. While they lacked a built-in bolt hold-open device, Zastava produced proprietary magazines with a follower designed to hold the bolt open after the last round was fired.
- Non-Chrome-Lined Barrel: Unlike most Soviet and Warsaw Pact AKs, Yugoslavian barrels were typically not chrome-lined, a decision that prioritized potential accuracy over maximum corrosion resistance.
The main variants include the original milled-receiver M70, the standard stamped-receiver M70B1, and the under-folding stock M70AB2.61 The M70 stands as a testament to how a nation’s military strategy—preparing for a defensive, guerrilla-style war—can fundamentally shape the evolution of a weapon system.
Arab Republic of Egypt (Est. Production c. 1970s)
Egypt’s entry into Kalashnikov production was a direct result of Soviet foreign policy in the Middle East. During the 1950s, as part of a military aid program, the USSR helped establish a production line at “Factory 54,” the Maadi Company for Engineering Industries in Cairo.65 Soviet engineers supervised the plant and provided the tooling and technical specifications for the AKM, a relationship that lasted until Soviet advisors were expelled by Anwar Sadat in 1972.65
The result of this direct technology transfer is the Egyptian Maadi “Misr” assault rifle. It is widely considered to be one of the most faithful and exact copies of the Soviet AKM ever produced outside of Russia.65 For all intents and purposes, a Maadi is a Soviet AKM built in Egypt. Its features are virtually identical to a mid-1960s Izhmash or Tula AKM, including the 1.0mm stamped receiver with guide dimples, laminated wood furniture (some early furniture was even imported from Finland), a 1000-meter rear sight, and a slant muzzle brake. The primary way to distinguish a Maadi from its Soviet progenitor is by the Arabic factory markings on the receiver.65
Democratic People’s Republic of Korea (Est. Production 1958)
North Korea, a close Soviet ally, began domestic Kalashnikov production with Soviet assistance in 1958.67 Their rifles are identifiable by Hangul selector markings and a distinctive star-in-a-circle arsenal proof mark.67
The first North Korean model was the Type 58, produced from 1958 to 1968. It was a direct copy of the Soviet Type 3 milled-receiver AK.67 In 1968, production shifted to a stamped-receiver model, the
Type 68. This rifle is a peculiar hybrid. While it is based on the AKM, it retains several features from the older milled AKs, such as the smooth (non-ribbed) dust cover and a double-hook trigger mechanism. Crucially, it lacks the AKM’s hammer-retarding device, making its internal mechanism simpler and closer to the original AK.67 The folding stock version is designated the Type 68-1.
Republic of Finland (Est. Production 1962)
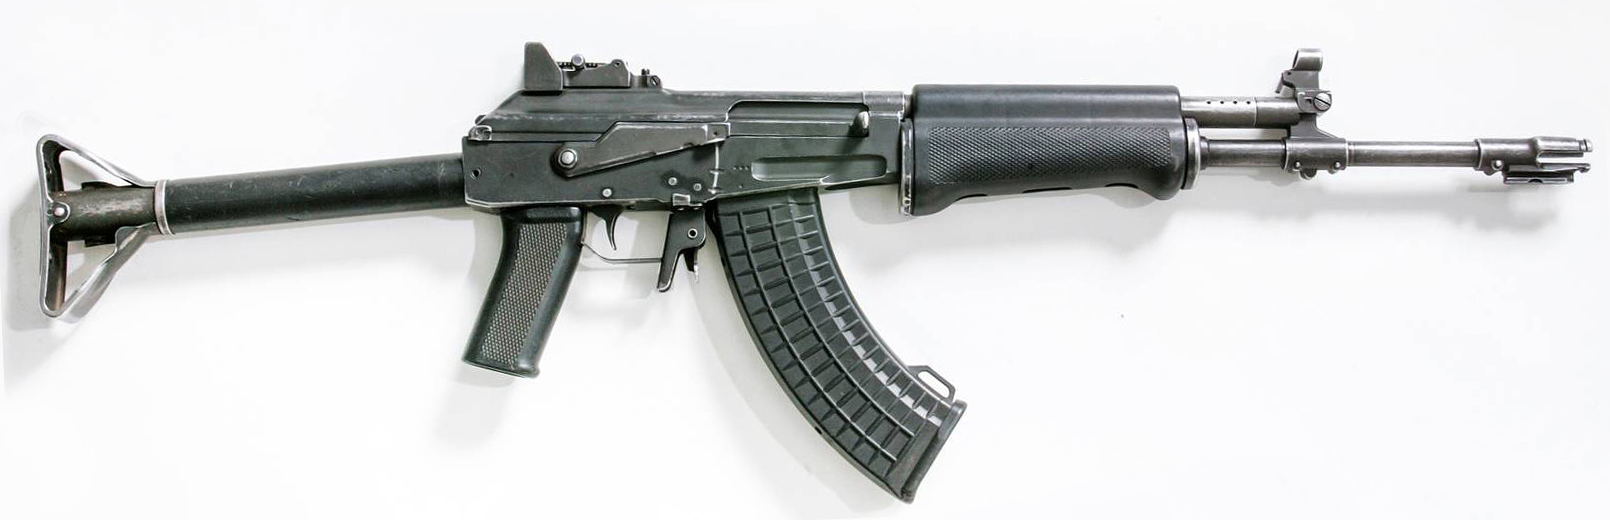
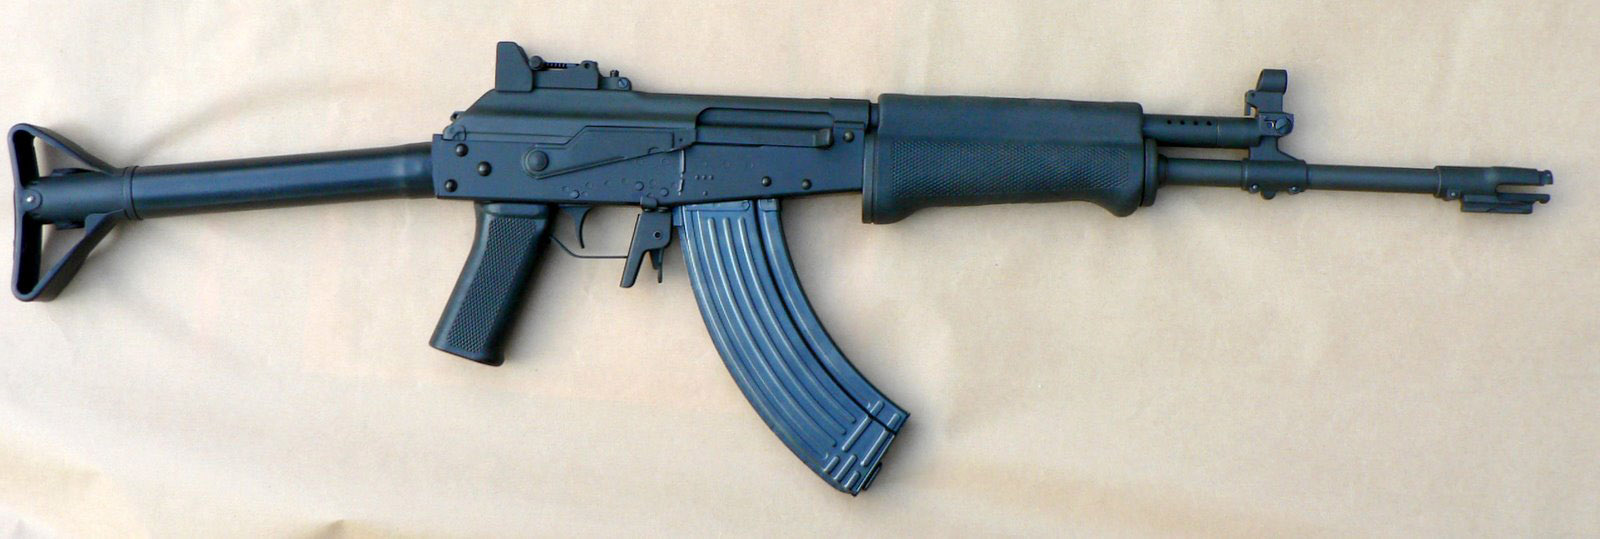
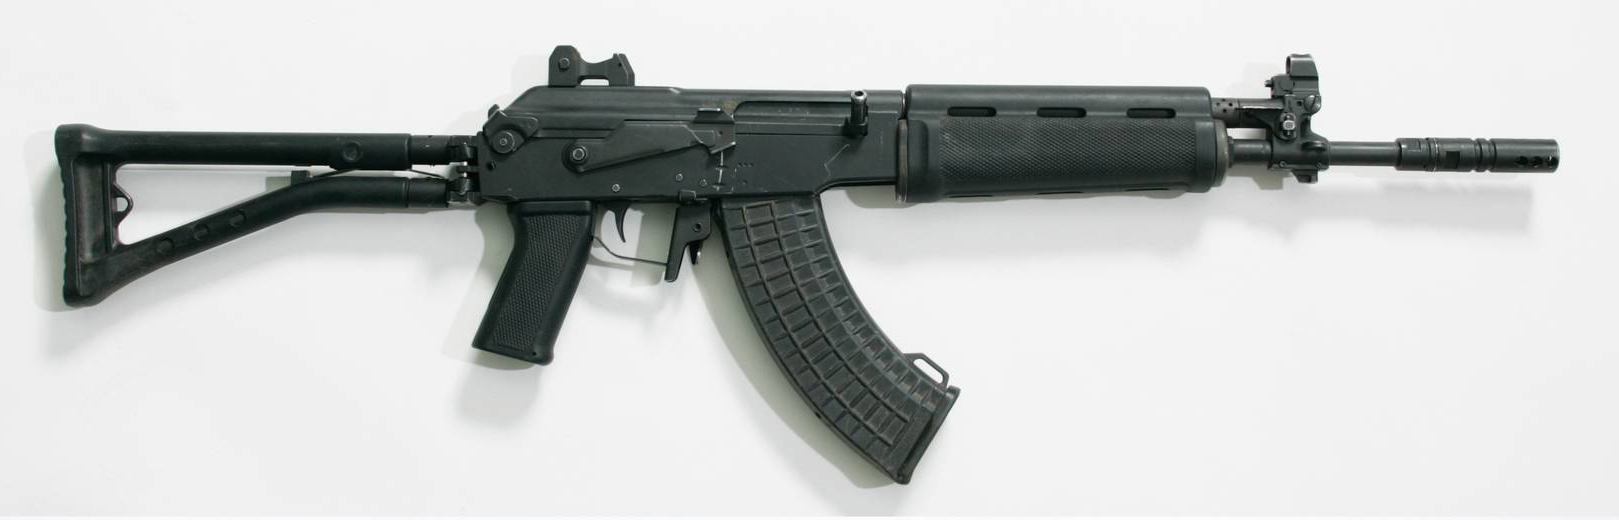
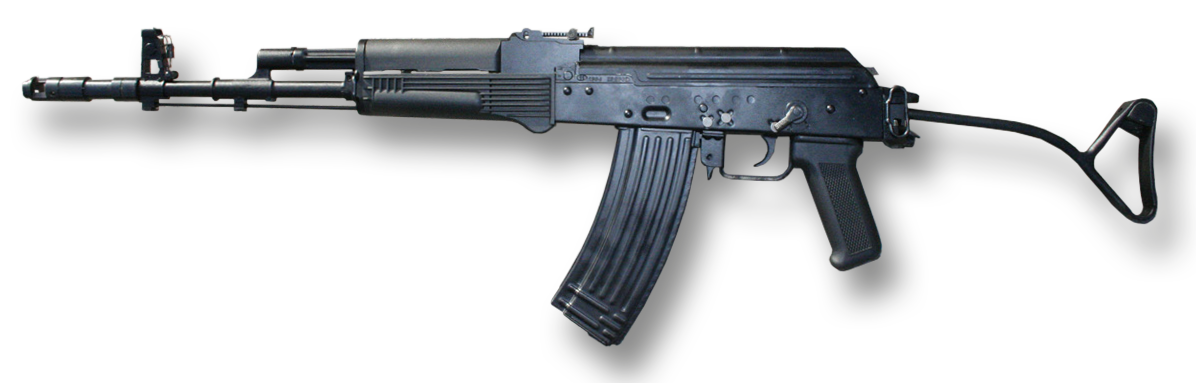
Finland’s unique geopolitical position during the Cold War—maintaining neutrality while sharing a long border with the USSR—drove its arms procurement and development. Seeking a modern assault rifle, Finland acquired a license for the AK platform (reportedly based on a Polish model) and began developing its own version in the late 1950s.69 The result, adopted in 1962, was the Rk 62 (Rynnäkkökivääri 62, or “Assault Rifle 62”).
The Rk 62 is not a mere copy but a significant redesign, widely regarded as one of the highest-quality AK variants ever made.69 Finnish doctrine emphasized marksmanship and reliability in harsh arctic conditions, which is reflected in the rifle’s features 69:
- Superior Sights: The most important improvement was the sighting system. The Finns replaced the standard AK’s open tangent sight with a rear aperture (peep) sight and moved it to the very back of the receiver cover. This modification doubled the sight radius compared to a standard AKM, dramatically improving potential accuracy. The sights also included integrated tritium inserts for night use.
- High-Quality Manufacturing: The Rk 62 features a high-quality milled receiver and a hammer-forged match-grade barrel, contributing to its reputation for accuracy, with some examples reportedly capable of achieving near 1 MOA (minute of arc) precision.69
- Distinctive Muzzle Device: It is fitted with a unique three-pronged, open-ended flash hider that is also robust enough to be used to cut barbed wire by placing it over a strand and firing a round.
- Furniture: The Rk 62 is often seen with a simple tubular metal stock and distinctive green polymer or plastic handguards and pistol grip.
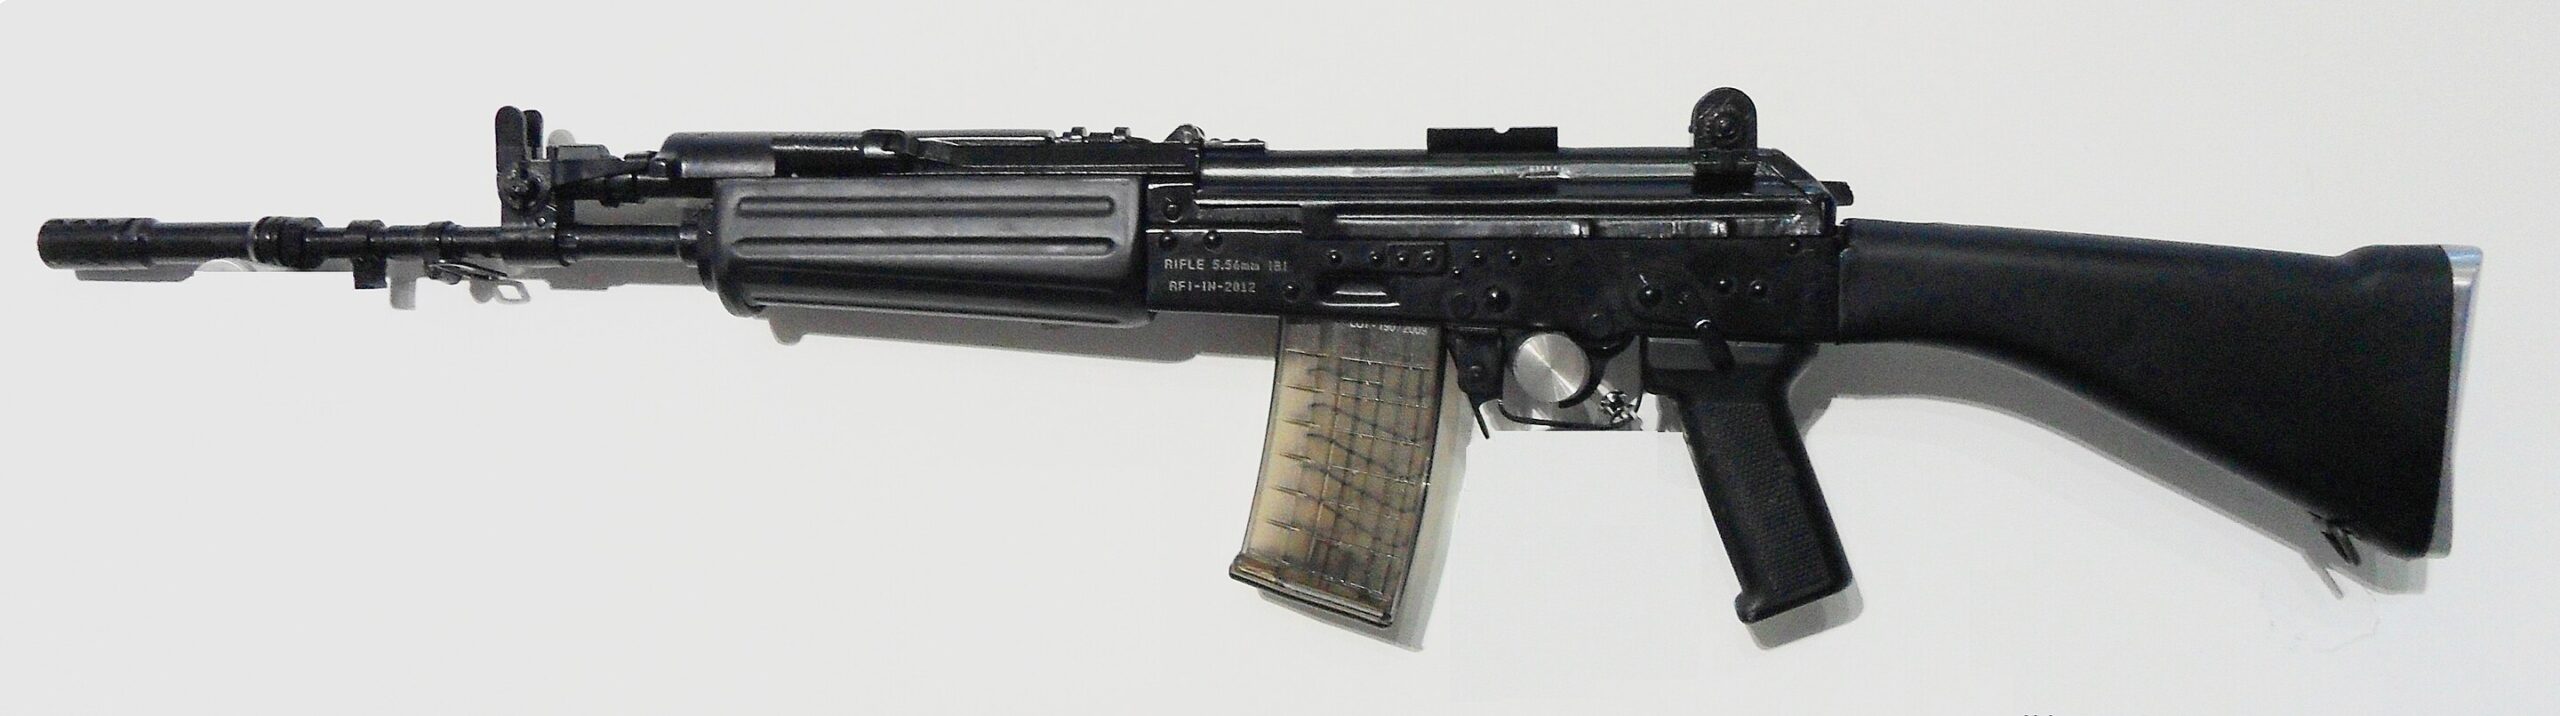
The exceptional design of the Rk 62 was so well-regarded that it became the direct basis for the Israeli Galil assault rifle, after Israel purchased the machinery and documentation from Valmet.70 The Finnish Rk 62 demonstrates how a nation focused on precision marksmanship could transform the utilitarian Kalashnikov into a refined shooter’s tool.
Table 2: Comparative Analysis of Primary 7.62x39mm National Variants
| Country | Model Designation | Receiver Type | Most Distinguishing Feature(s) |
| China | Type 56 | Stamped (1.6mm) / Milled | Fully enclosed front sight; Folding “spiker” bayonet; Chinese selector markings. |
| Poland | kbk AKM | Stamped (1.0mm) | High-quality laminated wood with palm swells; “Circle 11” Radom marking. |
| Bulgaria | AKK | Milled | Extremely high-quality fit and finish; “Circle 10” Arsenal marking. |
| East Germany | MPi-KM | Stamped (1.0mm) | Brown/black “pebble grain” plastic furniture; No cleaning rod on early models. |
| Hungary | AK-63 | Stamped (1.0mm) | Straight pistol grip; No palm swells on handguard. (Earlier AMD-65: vertical foregrip). |
| Romania | PM md. 63 | Stamped (1.0mm) | Laminated wood vertical foregrip, canted forward. |
| Yugoslavia | M70B1 | Stamped (1.5mm, Reinforced) | Integral grenade sight/gas cut-off; Bulged trunnion; 3-slot handguard. |
| Finland | Rk 62 | Milled | Rear-mounted aperture (peep) sight; 3-prong flash hider; Tubular stock. |
Part IV: The Geopolitical Engine – Technology Transfer, Proliferation, and Legacy
The Kalashnikov rifle did not spread across the globe by accident. Its proliferation was the result of deliberate geopolitical strategy, followed by the chaotic consequences of imperial collapse. The story of the AK is a microcosm of the Cold War itself—a tale of ideology, industrial might, proxy wars, and ultimately, unintended consequences that continue to shape global conflicts today.
The Engine of Proliferation – Soviet Doctrine and Technology Transfer
At its core, the Warsaw Pact was a military alliance designed to fight and win a large-scale conventional or nuclear war against NATO in Europe. Soviet military doctrine, which dictated the Pact’s posture, placed an immense premium on the standardization of equipment.28 Common weapons, ammunition, and parts would simplify the colossal logistical challenge of supplying multiple national armies operating under a unified command. The AKM, designed for cheap and rapid mass production, was the perfect instrument for this doctrine.19
The Soviet Union used the licensing of AK production as a powerful tool of statecraft. Providing a friendly nation with a technical data package and the means to produce its own modern assault rifle was a way to cement military alliances, ensure dependence on the Soviet logistical chain, and extend Moscow’s geopolitical influence.2 This process was not always a simple transfer of equals. The Soviets carefully managed the flow of technology, and the defense industries of the non-Soviet Warsaw Pact countries often lagged a generation behind their Soviet counterparts, ensuring that Moscow retained the technological edge.73 This created a dynamic where allies were made powerful enough to serve Soviet strategic interests, but not so powerful as to become truly independent.
The Unraveling – The Collapse of the Soviet Union and the Global Flood
The fall of the Berlin Wall in 1989 and the dissolution of the Soviet Union in 1991 triggered a seismic shift in the global arms landscape. The collapse of the Warsaw Pact and the economic turmoil that engulfed the former Soviet republics unleashed the vast arsenals that had been stockpiled for decades.2
This was not merely a release of weapons; it was the bursting of a dam. Millions of surplus Kalashnikovs flooded the international market. In the ensuing chaos, state control over these stockpiles evaporated. Weapons were stolen from poorly guarded depots, sold by corrupt officials, and bartered by desperate soldiers.30 A thriving black market emerged, trafficking these rifles to any group with the cash to buy them. The AK became the weapon of choice for non-state actors, terrorist organizations, insurgents, and criminal cartels across the globe.76 Its price on the illicit market plummeted, with rifles available for as little as $50 in some African conflict zones, making it more accessible than ever.2
The very characteristics that made the AK a perfect weapon for a state military—its simplicity, durability, and ease of use by minimally trained conscripts—also made it the perfect weapon for an insurgent or terrorist. A rifle designed to project the centralized power of a superpower became the primary tool for challenging and dismantling state authority worldwide. This is the ultimate irony of the Kalashnikov’s legacy: a weapon forged to arm the soldiers of a communist empire became the most recognizable symbol of anti-government rebellion and asymmetric warfare in the post-Cold War era.
Conclusion: An Enduring Legacy of Variation
The global journey of the Avtomat Kalashnikova is a remarkable story of technical evolution and geopolitical consequence. From its origins as a secret project in the postwar Soviet Union, the rifle’s design was first shaped by the pragmatic industrial realities of its creator nation, evolving from a failed stamped receiver to a robust milled stop-gap, and finally to the perfected, mass-producible AKM. This Soviet foundation served as the archetype for a worldwide manufacturing enterprise.
The timeline of adoption across the Warsaw Pact and beyond reveals a fascinating tension between the Soviet drive for standardization and the impulse for national adaptation. While initial variants in Poland, Bulgaria, and East Germany were faithful copies, they soon gave way to unique models like the Hungarian AMD-65, the Romanian PM md. 63, and the Polish Tantal, each rifle a reflection of its nation’s specific military doctrine and industrial character. Beyond the Iron Curtain, nations like Yugoslavia and Finland reverse-engineered or heavily modified the design to create highly specialized variants like the grenade-launching M70 and the marksman-focused Rk 62, proving the platform’s incredible versatility.
Ultimately, the Kalashnikov’s proliferation was driven first by the calculated strategies of the Cold War, where technology transfer was a currency of influence. It was later fueled by the chaotic aftermath of the Soviet Union’s collapse, which transformed a tool of state power into the ubiquitous weapon of non-state actors. The story of the AK’s countless variants is therefore inseparable from the history of the second half of the 20th century—a narrative written in steel, wood, and polymer, chronicling an age of ideology, industry, conflict, and consequence that continues to echo in the world’s hot spots today.
If you find this post useful, please share the link on Facebook, with your friends, etc. Your support is much appreciated and if you have any feedback, please email me at in**@*********ps.com. Please note that for links to other websites, we are only paid if there is an affiliate program such as Avantlink, Impact, Amazon and eBay and only if you purchase something. If you’d like to directly contribute towards our continued reporting, please visit our funding page.
Works cited
- AK-47 | Definition, History, Operation, & Facts – Britannica, accessed July 16, 2025, https://www.britannica.com/technology/AK-47
- The AK-47: The Global Icon of Modern Warfare – Ryan J. Hite, accessed July 16, 2025, https://www.ryanjhite.com/2024/07/03/the-ak-47-a-global-icon-of-warfare/
- What’s the difference between an AK74, AKM, and an AK47? : r/guns – Reddit, accessed July 16, 2025, https://www.reddit.com/r/guns/comments/1mgelf/whats_the_difference_between_an_ak74_akm_and_an/
- Kalashnikov AK-47 (& close derivatives) – Small Arms Survey, accessed July 16, 2025, https://www.smallarmssurvey.org/sites/default/files/SAS-weapons-assault-rifles-Kalashnikov-AK-47.pdf
- Which is better? A milled or stamped AK – Guns.com, accessed July 16, 2025, https://www.guns.com/news/review/best-ak-milled-vs-stamped
- Identifying AK Receiver Types – UltiMAK, Inc., accessed July 16, 2025, https://ultimak.com/ak-receiver-types/
- AKM – Wikipedia, accessed July 16, 2025, https://en.wikipedia.org/wiki/AKM
- en.wikipedia.org, accessed July 16, 2025, https://en.wikipedia.org/wiki/AKM#:~:text=Compared%20with%20the%20AK%2D47,a%20U%2Dshaped%20steel%20stamping.
- History Of The AK-47 – Wideners Shooting, Hunting & Gun Blog, accessed July 16, 2025, https://www.wideners.com/blog/history-of-the-ak-47/
- AKM rifle | weapon – Britannica, accessed July 16, 2025, https://www.britannica.com/technology/AKM-rifle
- AK-47: History of creation, accessed July 16, 2025, https://warhistory.org/ru/@msw/article/ak-47-history-of-creation
- An Overview of the AK-47 Assault Rifle – Boot Camp & Military Fitness Institute, accessed July 16, 2025, https://bootcampmilitaryfitnessinstitute.com/2023/08/28/an-overview-of-the-ak-47-assault-rifle/
- AK-47 – Wikipedia, accessed July 16, 2025, https://en.wikipedia.org/wiki/AK-47
- Type 1 Russian AK: The Actual AK-47 – Forgotten Weapons, accessed July 16, 2025, https://www.forgottenweapons.com/type-1-russian-ak-the-actual-ak-47/
- AK-47 Types – Gun Rambles – Quora, accessed July 16, 2025, https://gunrambles.quora.com/AK-47-Types
- AKM vs. AK-47: What’s the Difference? – The Armory Life, accessed July 16, 2025, https://www.thearmorylife.com/akm-vs-ak-47/
- What Are the Different Types of AKs? – Guns.com, accessed July 16, 2025, https://www.guns.com/news/what-are-ak-variants
- AKM – I Like to Hear Myself Talk History, accessed July 16, 2025, https://www.hearmyselftalkhistory.com/featured-firearm/akm
- AKM: The Acme Of AKs – Gun Digest, accessed July 16, 2025, https://gundigest.com/military-firearms/akm-the-acme-of-aks
- AK Variants: A Closer Look – The Primary Source On PrimaryArms.com, accessed July 16, 2025, https://blog.primaryarms.com/guide/ak-variants-explored/
- ARES Research Note 6 – An Introduction to Basic AK Type Rifle Identification, accessed July 16, 2025, https://armamentresearch.com/wp-content/uploads/2014/12/ARES-Research-Note-No.-6-Introduction-to-Basic-AK-Type-Rifle-Identification.pdf
- Kalashnikov AKM: One of the most produced versions of the AK – Combat Operators, accessed July 16, 2025, https://combatoperators.com/firearms/rifles/kalashnikov-akm/
- Whats the difference between the AK-47 and the AK-M? :: Far Cry 5 General Discussions, accessed July 16, 2025, https://steamcommunity.com/app/552520/discussions/0/1779388024838982117/
- Modernized AKM & AKMS – AK History Part II – YouTube, accessed July 16, 2025, https://www.youtube.com/watch?v=4xkws8j6WGc
- 5.45×39mm – Wikipedia, accessed July 16, 2025, https://en.wikipedia.org/wiki/5.45%C3%9739mm
- AK-74 – Wikipedia, accessed July 16, 2025, https://en.wikipedia.org/wiki/AK-74
- Identifying & Collecting the 7.62×39 AK-47/AKM Magazine – Small Arms Defense Journal, accessed July 16, 2025, https://sadefensejournal.com/identifying-collecting-the-7-62×39-ak-47akm-magazine/
- MANAGEMENT OF WARSAW PACT WEAPONS ACQUISITION: SOVIET GOALS AND PACT REALITY – CIA, accessed July 16, 2025, https://www.cia.gov/readingroom/docs/CIA-RDP89T01363R000200300005-4.pdf
- NATO Weapons Should Be Standard ized-But a Lot of Realities Stand in the Way – AUSA, accessed July 16, 2025, https://www.ausa.org/sites/default/files/DR-78-6-NATO-Weapons-Should-Be-Standardized-but-a-Lot-of-Realities-Stand-in-the-Way.pdf
- How the AK-47 earned its (controversial) reputation – Military Times, accessed July 16, 2025, https://www.militarytimes.com/off-duty/gearscout/irons/2020/01/21/how-the-ak-47-earned-its-controversial-reputation/
- Methodology: Kalashnikov & Variant Factory Dataset (1947-present …, accessed July 16, 2025, https://www.audreykurthcronin.com/p2p-pvid/p2p-pvid-kalashnikov/kalashnikov-variant-factory-dataset-1947-present/methodology-kalashnikov-variant-factory-dataset-1947-present/
- Chinese Type-56 AK History – Faktory 47, accessed July 16, 2025, https://www.faktory47.com/blogs/kalashnikov/chinese-type-56
- Chinese Type 56 carbine [SKS] – Imperial War Museums, accessed July 16, 2025, https://www.iwm.org.uk/collections/item/object/30029470
- Type 56 assault rifle – Wikipedia, accessed July 16, 2025, https://en.wikipedia.org/wiki/Type_56_assault_rifle
- Chinese Type-56 Assault Rifle – 5th Battalion – The Royal Australian Regiment Association, accessed July 16, 2025, https://5rar.asn.au/type-56-assault-rifle/
- Identifying a Type 56 – Firearms History, Technology & Development, accessed July 16, 2025, http://firearmshistory.blogspot.com/2014/01/identifying-type-56.html
- Poland | The Kalash Connection, accessed July 16, 2025, https://thekalashconnection.com/poland/
- Polish AK-47 History – Circle 11 – Faktory 47, accessed July 16, 2025, https://www.faktory47.com/blogs/kalashnikov/polish-ak-history
- 1968 Polish KBK AKM Rifle From AofA Parts Kit Review – YouTube, accessed July 16, 2025, https://www.youtube.com/watch?v=Wut5R9_kD_w
- 20 AK-47 Variants You Want to Own – Guns and Ammo, accessed July 16, 2025, https://www.gunsandammo.com/editorial/20-ak-47-variants-around-the-world/249760
- AR-M1 – Wikipedia, accessed July 16, 2025, https://en.wikipedia.org/wiki/AR-M1
- Identifying and Collecting 7.62x39mm AK-47/AKM Magazines – Small Arms Review, accessed July 16, 2025, https://smallarmsreview.com/identifying-and-collecting-the-7-62x39mm-ak-47-akm-magazine/
- Bulgarian Arsenal AK-47: Top Features and Specs Guide – GunCreed, accessed July 16, 2025, https://guncreed.com/2024/08/18/what-are-the-top-features-of-the-bulgarian-arsenal-ak47-rifles/
- Bulgarian AK-47 vs. Romanian WASR AK-47: A Comprehensive Comparison, accessed July 16, 2025, https://akoptionsllc.com/blogbulgarian-ak47-vs-romanian-wasr-ak47-a-comprehensive-comparison/
- Centrefire automatic rifle – AR-M1 (Kalashnikov AK-74) – 1989 | Collection Object | Royal Armouries, accessed July 16, 2025, https://royalarmouries.org/collection/object/object-278310
- 5.45×39 mm – AK 74 Assault Rifles – Armatec, accessed July 16, 2025, https://www.armatec.bg/products/5-45×39-mm-ak-74-assault-rifles
- East German AK History – Faktory 47, accessed July 16, 2025, https://www.faktory47.com/blogs/kalashnikov/east-german-ak-history
- www.faktory47.com, accessed July 16, 2025, https://www.faktory47.com/blogs/kalashnikov/east-german-ak-history#:~:text=East%20Germany%20started%20production%20of,to%20the%2072%20series%20rifles.
- Wieger StG-940 – Wikipedia, accessed July 16, 2025, https://en.wikipedia.org/wiki/Wieger_StG-940
- The East German AK-47 Kalashnikov, 1959-1990. A comprehensive history. From the MPi K to the STG-940 – YouTube, accessed July 16, 2025, https://www.youtube.com/watch?v=xnZT1oT_NHg
- Rifles on the Danube: Hungarian AK-Pattern Firearms – NOW SHIPPING – YouTube, accessed July 16, 2025, https://www.youtube.com/watch?v=Bf8iZ4_YDlI
- Behind the Iron Curtain: The Hidden Story of Hungary’s Special Breed of Kalashnikovs, accessed July 16, 2025, https://akoptionsllc.com/blogbehind-the-iron-curtain-the-hidden-story-of-hungarys-special-breed-of-kalashnikovs/
- Hungary | The Kalash Connection, accessed July 16, 2025, https://thekalashconnection.com/hungary/
- AK-63 – Wikipedia, accessed July 16, 2025, https://en.wikipedia.org/wiki/AK-63
- Kalashnikov NGM-81 in Hungary, accessed July 16, 2025, http://www.hungariae.com/NGM81.htm
- Pistol Mitralieră model 1963/1965 – Wikipedia, accessed July 16, 2025, https://en.wikipedia.org/wiki/Pistol_Mitralier%C4%83_model_1963/1965
- PM md. 63 – Weaponsystems.net, accessed July 16, 2025, https://weaponsystems.net/system/489-PM+md.+63
- Romanian Md. 63 AKM Battlefield Rifle – RD w/ CHF Chrome Barrel – Arms of America, accessed July 16, 2025, https://armsofamerica.com/romanian-md-63-akm-battlefield-rifle-rd-w-chf-chrome-barrel/
- PM md. 63 – Weapon Systems, accessed July 16, 2025, https://old.weaponsystems.net/weaponsystem/AA04%20-%20PM%20md%2063.html
- WASR-series rifles – Wikipedia, accessed July 16, 2025, https://en.wikipedia.org/wiki/WASR-series_rifles
- Zastava M70 assault rifle – Wikipedia, accessed July 16, 2025, https://en.wikipedia.org/wiki/Zastava_M70_assault_rifle
- Zastava Arms – Wikipedia, accessed July 16, 2025, https://en.wikipedia.org/wiki/Zastava_Arms
- Zastava M70 vs. AK-47: A Detailed Comparison of Variants – GunCreed, accessed July 16, 2025, https://guncreed.com/2024/08/17/how-does-the-yugoslavian-zastava-m70-compare-to-other-ak47-variants/
- Zastava M70 vs. AK-47: Key Differences – AR15Discounts, accessed July 16, 2025, https://ar15discounts.com/zastava-m70-vs-ak-47-key-differences/
- Is Maadi (Egyptian AK-47) as good as the Russian one? – Quora, accessed July 16, 2025, https://www.quora.com/Is-Maadi-Egyptian-AK-47-as-good-as-the-Russian-one
- Kalashnikov rifle – Wikipedia, accessed July 16, 2025, https://en.wikipedia.org/wiki/Kalashnikov_rifle
- Type 58 assault rifle – Wikipedia, accessed July 16, 2025, https://en.wikipedia.org/wiki/Type_58_assault_rifle
- AK RIFLE OF THE DEMOCRATIC PEOPLE’S REPUBLIC OF (NORTH) KOREA – Small Arms Review, accessed July 16, 2025, https://smallarmsreview.com/ak-rifle-of-the-democratic-peoples-republic-of-north-korea/
- RK 62 – Wikipedia, accessed July 16, 2025, https://en.wikipedia.org/wiki/RK_62
- RK 62 | PDF | Projectile Weapons – Scribd, accessed July 16, 2025, https://www.scribd.com/document/175754726/Rk-62
- Valmet RK 62 | Weaponsystems.net, accessed July 16, 2025, https://development.weaponsystems.net/system/677-Valmet%20RK%2062
- Warsaw Pact – Wikipedia, accessed July 16, 2025, https://en.wikipedia.org/wiki/Warsaw_Pact
- MANAGEMENT OF WARSAW PACT WEAPONS ACQUISITION: SOVIET GOALS AND PACT REALITY | CIA FOIA (foia.cia.gov), accessed July 16, 2025, https://www.cia.gov/readingroom/document/cia-rdp89t01363r000200300005-4
- Western technology and Soviet military power, accessed July 16, 2025, https://www.tandfonline.com/doi/pdf/10.1080/05679328408457487
- The Illicit Trade Of Small Arms | Geopolitical Monitor, accessed July 16, 2025, https://www.geopoliticalmonitor.com/the-illicit-trade-of-small-arms-4273/
- The AK-47, the Responsibility to Protect and the Arms Trade Treaty, accessed July 16, 2025, https://www.globalr2p.org/publications/the-ak-47-the-responsibility-to-protect-and-the-arms-trade-treaty/


.jpg)
.jpg)