Tag Archives: dryer

Need Drier Shop Compressed Air? – Step 2: Build a Moisture Separation System

When compressed air leaves a compressor, the the temperature drops as it expands, and moisture condenses on the wall of whatever surface is below the dew point of the air and then runs down to the lowest spot where it is collected and dispose of.  Now the cooling part is critical – just putting an air filter immediately outside of a compressor tank will not accomplish much.  Ideally you want the air to travel and cool for a bit in a metal pipe that is at least 20 feet long.  You may wonder why I mention 20 feet – it’s because I was told 20 feet at a minimum – in other words, I have no basis in engineering, just what guys have told me over the years.  I would just use that as a rule of thumb about how far the air needs to travel at a minimum before you do another round of moisture filtering.  The further the better.

I looked at three simple options when I was considering how to remove the bulk of the moisture from my airlines:

Run your hard air lines at an upward angle and install traps

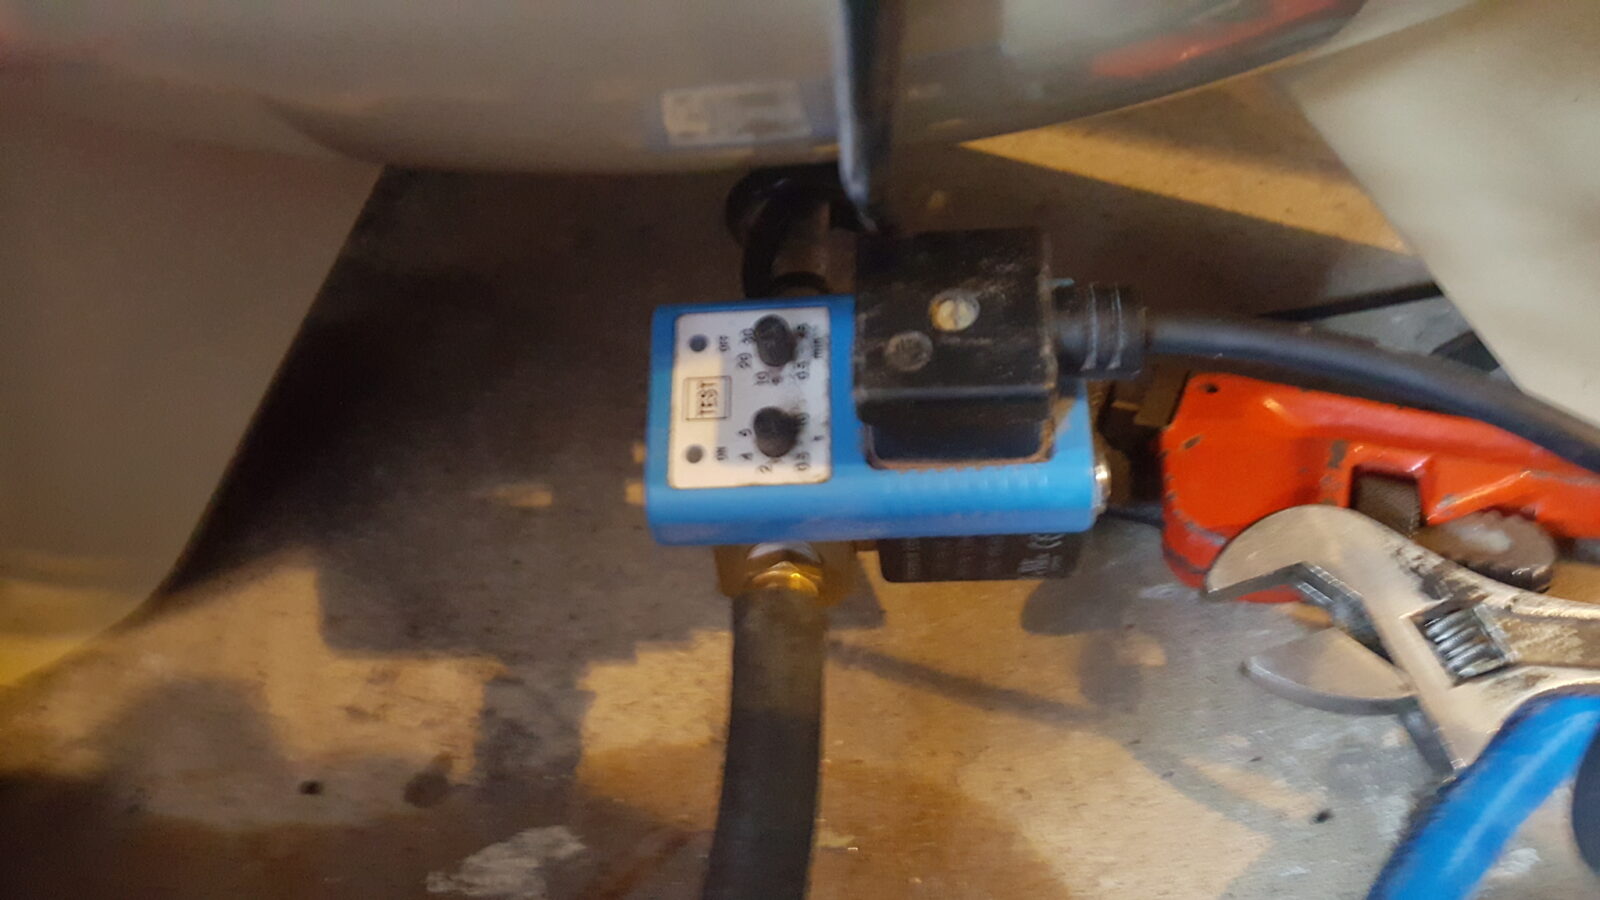
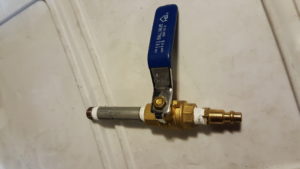
This is as simple as it sounds.  I like to always install a ball valve and then a quick connect on the tank and run a rubber/flexible airline to the hardline to isolate vibrations. Plug into the airline above a moisture trap like so:

Uphill Hard Line Sample

I investigated this approach but it was going to take up too much space.  I needed to start accessing dry air much closer to my compressor so this was discounted right away.  If I were to build this, I would still use the PneumaticPlus drains referenced in more detail in the next section.

Pros of this approach:  Relatively cheap and easy to build

Cons:  Takes a long distance / not very compact.  It was going to be too long or my needs.

Build a compact moisture separator

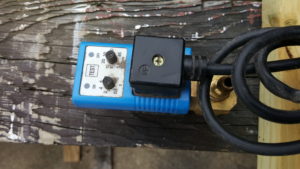
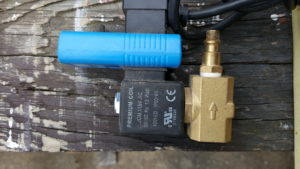
Now this is what I do in my shop and it works great.  I use a series of vertical 1/2″ pipes with PneumaticPlus SAD402-N04D-MEP water traps with automatic drains at the bottom of each riser.  Now this works very well.   The vertical pieces are 6 feet tall and the cross sections are 6″.  This is occupying an area about 24″ wide and 8 feet tall.  It’s mounted on the shop wall and out of the way.  Most of the condensation happens in the first pipe. A lesser amount in the second and very little in the third.  It cost about $120 for the plumbing, $56 for each of the automatic drains and then maybe $50 for the  short hoses and 1/2″ fittings.  I installed this in August 2016 and am quite happy with it.

For me, one of the big benefits is with the automatic drains in the water traps.  When the float rises to a certain level there is a quick “pffft” sound and the trap blows out the water and closes again.  It’s not something you have to remember to drain, which is something I am not great at.  Also, when I am doing a lot of work, I might hear the first trap drain twice in one day but that is rare.


Sorry I don’t have a photo of the whole system from top to bottom.  I have equipment in front of it now and can’t get a good overall photo.  It’s just too tall for my camera given the limited distance I have to get the photo.

For me, it is really intriguing to see how much condensate is caught in the first trap closest to the compressor.  The second trap has much less and the third is dramatically less than either of the others.  This is not perfect as I still catch moisture in my air filters but it has made a dramatic difference at the end of the line.  When I blow air at a glass or mirror, there isn’t water all over it any more 🙂  I have wondered what would happen if I used 1″ pipe in that first vertical six foot section but have never had the need to spend the money and time to experiment.  In theory, the greater the expansion, the greater the cooling and thus the greater the level of condensation all other things being equal.

By the way, I really like PneumaticPlus.  I actually bought this gear off Amazon with my own money – this is a real review.  Every time I have questions they actually answer their phones and help me.  I had one defective part in one bowl and they immediately sent me a replacement.  In short, not only is the hardware itself good but I like the company behind it too.

You can add 1/8″ tubing to drain the condensate away from the water traps.  I feel it is a good idea to get the water away from the compressor as much as possible:

Pros to this approach:  It actually works, does not need electricity, automatically drains, uses relatively little space

Cons:  The floats could freeze in cold weather so I insulate and heat them in the winter.  I did not have any problems during the 2016/2017 winter with that approach.  It’s a little pricey but it really gets the job done.

By the way, if you can’t afford the automatic drains/traps, then put in ball valves with longer pipes to hold the accumulated condensate and drain them manually.  It definitely works but you must remember to manually drain the traps.

Install a refrigerated air dryer

The last option is the most expensive and that is to install a refrigerated air dryer.  Basically, the warm moist air enters a dryer that is a series of tubes that are refrigerated causing the moisture to condense and then drain out of the unit.  There is a Harbor Freight unit that gets surprisingly good reviews plus many different industrial models to select from.  I have not needed this yet, so I do not have first hand experience.  I’ve read about guys using them to protect their plasma cutters.  I use the above compact moisture separator described above, a two stage air filter system and then a very fine final filter from Hypertherm right before the inlet of my plasma cutter and have not had a problem.

Pros:  You can definitely remove the moisture.  Guys say they really like the low-cost Harbor Freight unit.

Cons:  Expensive and you need electricity for it to work.  It will get pretty dirty in a high dust environment like my shop and need routine cleaning to stay efficient.

If you are interested, here is the link to the HF dryer:  http://www.harborfreight.com/compressed-air-dryer-40211.html

So the first stage of moisture defense in my shop is to keep the tank drained.  Then it is this separator system to get the bulk of the moisture out of the compressed air.  In the last part of the series, I’ll talk about fine air filters.

The three blog posts in the series are:


If you find this post useful, please share the link on Facebook, with your friends, etc. Your support is much appreciated and if you have any feedback, please email me at in**@ro*********.com. Please note that for links to other websites, I may be paid via an affiliate program such as Avantlink, Impact, Amazon and eBay.


Need Dryer Shop Compressed Air? – Step 1 Tank Draining Options

In my shop, I need clean dry air for working with the plastics, the abrasive Blaster, and my air tools. It also comes in handy when I’m spraying on finishes such as Molyresin.  I have certainly had my share of problems over the years caused by dirty air including air tool failures, water or oil spraying on paint, clumping of abrasive Blaster media and so forth. As time went on I identified a number of practices that could help reduce moisture in the air lines as well as other contaminants.  I don’t use an inline oiler so most of my issues revolve around water, rust particles (from the tank and hard air lines) and some amount of air compressor oil that makes it past the piston rings.

The fact is that all compressed air systems will have some amount of moisture when first compressed. Natural air contains moisture and as your compressor pumps it into the tank, it is both heating and concentrating it.  Once the temperature drops below where the moisture will settle out of the air, that is known as the “dew point”, that is when the water appears.   Some of it will collect in the bottom of the tank causing rust and some will likely remain in the compressed air.

Now I am not an expert on this stuff but I have had to try and learn a lot over time.  In this post and the two that follow it, I am going to try and explain options I looked at and what I did.  I’m not going to go into a ton of theory or talk about things I didn’t check out.  If I am really wrong on something, please let me know.  If you really want to get into details, check out a cool website called Compressed Air Best Practices that has tons of information.

I live in Michigan and have a ton of moisture to fight.  I have a lot of air powered wrenches and sanders plus an abrasive blast cabinet and plasma cutter so this is a big deal to me – I need clean dry air.   For me, there’s not one single cost effective solution so I approach the reduction of moisture in stages.  The first and cheapest approach is to dry your air is to Drain your tank!  I can’t emphasize this enough!!

As water settles inside the tank, it gets blown all over the place during use plus it is causing your tank to rust and form sediment at the bottom. The best offense is a good defense. Get rid of the water by regularly draining your tank and this may mean several times every day.  Here’s the amount of moisture I blew out the drain after my compressor ran for several hours (and I do mean actual run time). It’s about a half a cup of water if I were to guess:

Water sitting in your tank not only means you have water blowing everywhere in your tank and potentially adding moisture to the outgoing air but it also causes rust inside your tank both adding further contaminates and weakening the tank over time.  We were all young once, right?  I bought some low end Devilbiss compressor 20-25 years ago and had it in the garage.  My dad asked if I had ever drained it and I really hadn’t been diligent about it.  We opened the valve and it was stunning as to how much smelly rusty water came out.  That sold me.  Over the years I have heard stories of blown / leaky corroded tanks but thankfully have never had that happen first hand.  For me, it is the moisture in the lines that is the problem and regular draining of the tank is the first step in combating that.

So, if draining regularly is a good idea, what are our options for small shops?

Use the drain valve that came with the compressor:

Every consumer or prosumer grade compressor I have seen comes with a drain valve.  When you get up to the industrial models, you may see a hole where they expect you to add something but for most small shops what you have will either look like the old petcock valve from a radiator or a round unit like the above.  Even though reaching those things is a total headache, one option is to live with it, reach under the tank and drain it.  If you are a light user, do this when you are done for the day and leave it open letting everything run out or at least let stop after the bulk of the condensation stops.  If you are doing a ton of work, you may need to drain it every few hours vs. at the end of the day.  It all depends on your experience and how much water you see coming out for a given amount of time.  In general, once is a day is fine and by doing it at the end, it doesn’t sit there needlessly for however long until the next use.

Pros with this approach:  Usually is supplied with the compressor so it is ready to go with not additional investment and it does work.
Cons:  Total headache to reach, ejects the water right under the tank waiting to evaporate and go back into the tank not to mention is messy because you can’t readily control where the condensate goes, and you have to remember to do it (which is the hardest thing always).  Also, these drain valves are pretty cheaply made, can corrode and then be a total bear to open. I really dislike these things but they are better than nothing.

If your existing drain fails for some reason, stores and vendors sell exact replacement drains but don’t do that.  Do one of the next two options to make your life easier.  Matter of fact, do one of the next two options as soon as you can to make your life easier.

Replace the cheap original drain with a better positioned ball valve and drain hose


Get rid of that awful little stock valve and install a ball valve that is easier to reach.  This can make things so much simpler.  Odds are the old valve is 1/4″.  Remove it and confirm the size.  Install a nipple, a right angle fitting, a long enough piece of pipe, the ball valve itself and then a hose barb (or 1/4″ quick adapter) with a piece of hose that allows you to drain the condensate where ever you want.  Be sure to wrap all the threads with PTFE tape.  I buy most of my plumbing stuff from Home Depot.  In general, I get pneumatic parts and supplies from Amazon such as Milton quick connect fittings, filters, etc.  I always read the reviews and ratings carefully.

One tip, go with whatever length nipple and a female-female right angle pipe fitting to get the greatest flow.  Also, make sure you have enough room for whatever you are installing.  There is often very little clearance between the bottom of the tank and the floor.  On my IR compressor, I use a “street elbow” that, even though has a relative small internal dimension, works just fine to drain water. I have a valve with a good sized handle and it is very easy to access and to turn.

Since my shop is not heated and I live in Michigan, I need to get creative.  The black cable you see is a pipe warmer with a thermal switch that only comes on at 32F to keep the valve from freezing.  I actually have it on a timer so it will only run 7am-10pm – when I am usually in the shop.

The rubber drain line you see is 3/8″ fuel hose pushed over a regular 1/4″ male quick connect fitting and it goes out the corner of my shop’s garage door.  I’ve never needed a hose clamp and it gets the condensate out of my shop.

Pros:  Quick, easy and cheap  It’s also very reliable in cold weather.

Con:  You still need to remember to do it and you can’t constantly do it.

Now, here’s an interesting alternative for low clearance situations.  I have only seen these – I have never used one but they make sense and pretty much anything is better than that hard to reach stock valve in my opinion:

Install an automatic drain and reap the rewards!

This is the last option and one I recommend – Invest in a automatic drain that has adjustments for how often to open and how long to remain open. Let me tell you, that automatic drain is worth its weight in gold when the temperatures are above freezing.  The only time I go back to the ball valve is when temperatures are below freezing and I don’t want the automatic drain to freeze open and it will do just that in cold weather.  When the warm weather comes, I reinstall the automatic drain.

At any rate, the installation is the same as the ball valve except the automated unit goes in place of the manual valve.  My unit is a Midwest Controls EAD-25 that is probably at least 5-6 years old.  Let me put it this way, I have moved it from one compressor to the next probably three times as I wore consumer compressors out.  I currently have an IR 2340 entry-level industrial compressor that has survived for 2-1/2 years, which is remarkable given how I blew through the consumer Husky models.


The following photos are of my doing my spring swap wherein I replace my ball valve with my freshly cleaned automatic drain valve:


These automatic drains are simple as can be – the timer trips and an electromagnet turns on and opens the valve for the specified duration.  The timer then cuts the electricity to the electromagnet and springs shove the valve back closed.  The only wear point I can see is the rubber surface on the valve and mine still works fine all these years later.  I just have to take it apart and clean it a few times a year, which I will post about later.  The photos in this post were taken in the spring as I converted back from the ball valve to the automatic drain.

Pros:  It is actually easy to install – just add the pipe and install the automatic unit, plug it in, set the timer and blow-off duration and call it even.  It is the best approach I have found when the weather is above freezing.

Cons:  It can be expensive if you buy a name brand but they last forever (I have never tried another brand as my local tool supplier recommended this one and it is still working!).  They will freeze up in the winter (I put my ball valve back in before it gets super cold as my shop is unheated most of the time) and debris can jam it but it is very easy to clean.

This is the exact model I have:

This is my model except mine has a blue case … it’s old and still working!


Here are automatic drain with very good reviews on Amazon:


In my next post, I’ll explain how to build a condensation based moisture separator and explain some concepts for you to consider.

The three blog posts in the series are:


If you find this post useful, please share the link on Facebook, with your friends, etc. Your support is much appreciated and if you have any feedback, please email me at in**@ro*********.com. Please note that for links to other websites, I may be paid via an affiliate program such as Avantlink, Impact, Amazon and eBay.