Please note that there are three posts in this series. The method in the third post would fix just about any magazine while the other two helped some of the magazines:
- Sluggish Marauder Mag Fix: Try #1 – Loosen the Center Screw
- Sluggish Marauder Mag Fix: Try #2 – Dry Film Lubricants – Not a Good Fix – But Avoid 3-In-1 Dry Lube Because It Isn’t Dry!
- Sluggish Marauder Mag Fix: Try #3 – Change the Internal Spring Position – This is the best fix!
Now on to the post:
I am less than impressed with Marauder airgun magazines to be honest. Their spring tension seems to be inconsistent. The springs are in the same hole and in some cases, simply backing off the center screw was enough. In other cases, I am finding that it helps to use a dry film lubricant in the magazine. Why a dry lube? If you use oil, it will attract dust and grit that will build up and cause problems down the road. Dry films do not have a liquid that captures contaminants.
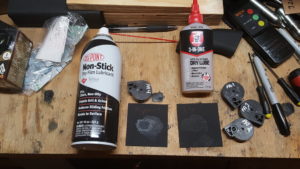
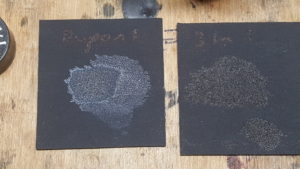
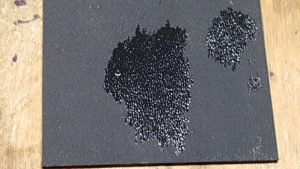
I experimented with two types of lubricants – 3-In-1 and also Dupont’s Non-Stick Dry Film Lubricant, which is an aerosol Teflon. In 3 magazines, the 3-in-1 helped. In the fourth magazine, tension improved with the use of the Dupont product. In spraying some test pieces of black Kydex, you can see the Dupont product leaves a thick coat of Teflon behind. The 3-in-1 leaves a greasy residue. I am betting contaminants will stick to it. Reviewers of it are not mincing words – despite what the label says, it is not a true dry lube. The first photo shows the Dupont Teflon powder on the left and the greasy/oily feeling residue of the 3-in-1 on the right. The second photo is a close up of the 3-in-1 residue.
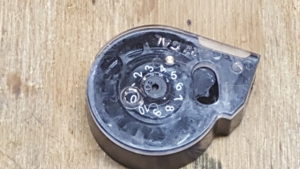
After doing more reading and testing, I have changed all four magazines over to the Dupont product to avoid problems down the road. To make a long story short, the magazines all turn much more freely and I would tell you do NOT to buy the supposed 3-in-1 dry lube because its greasy surface will likely be a problem down the road. The next photo shows a magazine with the Teflon residue visible.
The magazines are better but do not feel as snappy as I think they should. I’d say it helped some but my worst magazine, PA4, still feels way to light. In my next post, I will adjust the spring position internally.
If you find this post useful, please share the link on Facebook, with your friends, etc. Your support is much appreciated and if you have any feedback, please email me at in**@*********ps.com. Please note that for links to other websites, I may be paid via an affiliate program such as Avantlink, Impact, Amazon and eBay.
Like this:
Like Loading...