Okay, while researching what to do with my 2008 Toyota Highlander’s flaky alarm, I ran across some good videos you can watch on how to diagnose the switch and even how to replace the microswitch. As for me, I wrote up how I bypassed the sensor by creating a loopback plug from the old sensor’s wire. My approach still allows the rest of the alarm system to work just fine and can be done in less than an hour with little to no cost. With that said, let’s take a look at these really well done videos that helped me think out my approach – especially the first one on diagnosing the switch.
Diagnosing the Switch
The following is the best video I found on diagnosing the problem and he even disassembles the latch to show you what is going on in detail – it’s very well done. This video helped me figure out my approach and kudos to Ozzstar for making it:
If You Want To Replace the Microswitch
This next video is really well done and is specific to the 2008 Highlander. He ordered the same Panasonic automotive grade micro switch that Toyota used: ABS1413409 from Digikey.
We recently became the new owners of a 2008 Toyota Highlander. It was in great shape and I thought we got a pretty good deal on it. The previous owner disclosed to us that the hood alarm switch was flaky and the car alarm would go off randomly.
After we bought the Highlander and returned home I did some research that night. There is in integral microswitch in the hood latch assembly that detects if the hood is open or closed. The alarm system will not arm if it detects that the hood is open and it will sound an alarm if someone tries to open the hood. Uhm… ok. My first thought was “you can only open it from the inside lever that is protected by the door alarms so why have this one?”
Unfortunately, or fortunately depending on your perspective, the switch is a known problem. It’s also one of the rare times where I will say Toyota did a bad design. Putting a basic microswitch in the front of a car where it will get wet all the time and corrode, not to mention the impacts and grease/oil from the latch itself, is not really that good of an idea — at least not to me.
After reading and watching videos, it seemed like there were three options:
Replace the whole hood latch assembly that includes the sensor. Third party, these latch assemblies were about $56 on Amazon and $50-60 on eBay. Original Toyota would be higher, of course. Pro: It is pretty easy to remove the assembly and install this one. Con: It’s a relatively expensive and will fail sooner or later unless someone fixed the switch design and sealed it better.
Replace just the microswitch. You can get the unit real cheap from Digikey and other suppliers plus there are Youtube videos that show you what to do. The previous owner did this and it worked for about two years he said. Pro: Real cheap (under $10 including shipping). Cons: Takes time and will not last without figuring out some better way to seal the original design.
Simply bypass the switch. As mentioned earlier – you can’t open the hood from the outside so what are the odds that someone will successfully break into the car and then open the hood without setting off the alarm? The risk is real low – low enough for me to go with this option. Pro: Easiest of all and is a permanent solution. Con: The hood alarm sensor will no longer work. This is the one I went with.
I’d like to point out that just unplugging the sensor is not an option. Doing that will make the computer think the hood is open and the car alarm will not arm at all. This means you must pick one of the three options listed above. I opted for the last one – I bypassed the sensor by creating a loopback plug – a fancy term meaning I joined the input and output wires together thus making it look like the switch was always closed so the computer would think the hood was closed regardless of whether it was or not.
What I want to do next is walk you through what I did. If you are not comfortable with basic wiring, I’d recommend against your trying this just to be up front. Always ask yourself if you can reverse what you are about to do or can you recover if something goes wrong – if the answer is “no”, then don’t do it. For example, don’t cut wires off right next to a fitting – leave yourself some pigtails in case you need to reconnect them.
One last comment – these directions are just based on my 2008 Highlander. Different years and models may not be like this. Research your vehicle before doing anything like this.
Bypassing the Sensor
So, to bypass the sensor we just need to create a circuit that normally exists when the switch is closed. First, I needed to get a better look at the location of the wiring so the cover needed to come off.
The plastic cover between the grill and the frame needs to come off. It is held in place by Toyota push-type retaining clips and two 10mm screws. The screws are to the front on the left and right sides. Note that two of the clips on the right side are bigger than the others – this will help you with reassembly later.
I use a small flat screw driver to pop the middle part up. You then grab hold of that, lift up and the clip comes right out.
Just remove the clips and then the plastic cover simply lifts off. I found one more that anchors the grille in the middle of the grille vertically and I removed it. That gave me ample room to work and I did not need to remove the grille given what I planned to do.
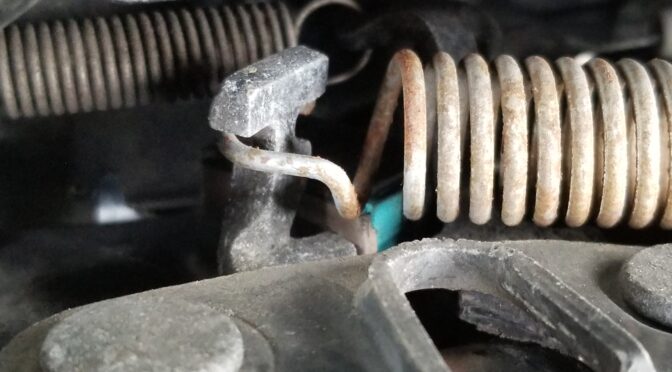
I did not take as many photos as I should have so let me explain. With the plastic cover off and the middle anchor clip removed, I had plenty of access to the switch and wiring to see what to do. The wire assembly runs from the hood latch – and there is only one wire – do not pick the hood cable used to open the hood. The wire runs from a small switch in the latch assembly and then plugs into a connector shortly below it.
I inserted a small blade screw driver to release the plug from the socket. To be safe, make sure you confirm the wires that you plan to cut lead up to the sensor and are *not* the wires going to the harness / wiring loom.
Why care? Because if you cut the wires on the sensor side and connect them together, you can easily replace the hood latch assembly and go back to having a sensor if you want. However, if you cut the wiring loom, it’s gone. You can manually splice in but it simply is not an elegant approach.
Note I am saying wires and when you look at the plug it looks like just one black wire. What you are seeing is the insulation tube that is black. Inside are two thin green wires that run from the plug to the sensor switch.
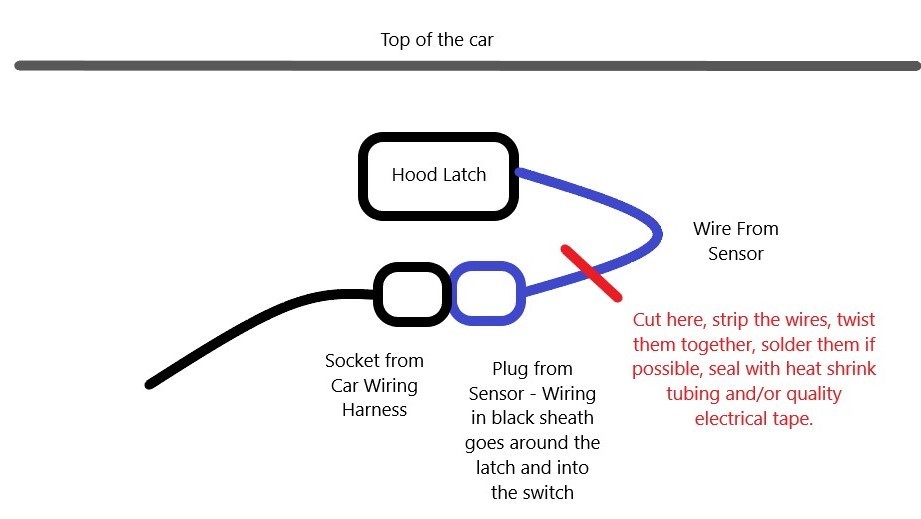
I’ll not get awards for artwork but hopefully this will give you an idea. When I faced the front of my Highlander, the wiring from the sensor was on the right hand side. You need to confirm this just in case. It is the wire to the sensor switch wire that you want to cut and not the wiring from the harness. On my 2008 Highlander, the harness wiring was on the left.
Once I was certain which wire to cut, I reached in with some snips and cut the wire leaving a couple of inches to work with. DO NOT CUT THE WIRES FLUSH TO THE PLUG!! You need a short length of the wires to connect together to make the circuit loop back.
To make work easier, I took the short wire with the plug on it and worked at a bench where everything was handy, I stripped a bit off the end of each wire, twisted the bare wires together, soldered them, bent them over the small wire pigtail and then used heat shrink tubing and electrical tape to secure everything. Total overkill but I never wanted to bother with this again.
Here’s the finished result. The front of the car is to the left. Part of the hood latch spring is to the upper right and we are looking down at the newly made loopback plug. As far as the alarm system is concerned, the hood is closed. The red color is the heat shrink tube I had on hand. I folded the heat shrink tubing over at the end and then applied electrical tape to seal it.
I installed the newly created loopback plug back into the socket. I then tested the system by turning the alarm on with the key fob, putting the key fob out of signal range in the garage and waited for the system arm. Once the alarm indicator light went solid on the dash, I simply reached in through the open window and tried to open the door from the inside and the alarm went off. Yeah, I had to run back to that fob to shut it off 🙂
If the system thought the hood was open, it would never have armed by the way. That’s why you can’t just unplug the switch. I then reinstalled the plastic cover by installing the clips and then pushing the middle piece down to lock it in place. By the way, remember that the right two clips are bigger than the others. The two 10mm screws went back in with a dab of non-seize on each just in case they ever need to come out again.
That was it – the alarm is happily armed and protecting the Highlander as I write this and not one single false alarm since. I hope this helps you out.
5/23/2020 Update: This has worked great for me. Not one single problem since.
I have both SAE and Metric 3/4″ socket sets that come out once or twice a year when I am working on big bolts on cars and trucks. As you may know, the longer the wrench, the more torque you can apply. Back when I was younger would would slide a piece of pipe or heavy wall tube over a ratchet or breaker bar to get even more mechanical advantage. We definitely snapped some socket wrenches while doing this as we exceeeded their design specs.
You see, a ratcheting socket wrench has limits as to how much torque the mechanism can handle before something either bends or breaks. Quite often, the rathchet pawl would bend/crumple and no longer be able to engage the teeth of the gear. When that happens, we’d toss the cheap wrench.
This is why breaker bars were made by the way – they have no ratcheting mechanism and, thus, can handle more torque. There’s one problem though, there are times where you can’t get the breaker bar into position because you can’t turn the handle relative to the socket. So, what is a person to do when they need a ton of torque and a ratchet mechanism?
The short answer is to get a wrench with a long handle that is designed to handle a ton of torque. A ton of companies make socket wrenches with longer handles. I have a couple of these but what I find really handy are wrenches with extending/telescoping handles. When you are working in a relatively tight space, you may not have room for the fully extended handle or you have need to work it into position before you can open the handle.
The EZRed MR34 Wrench
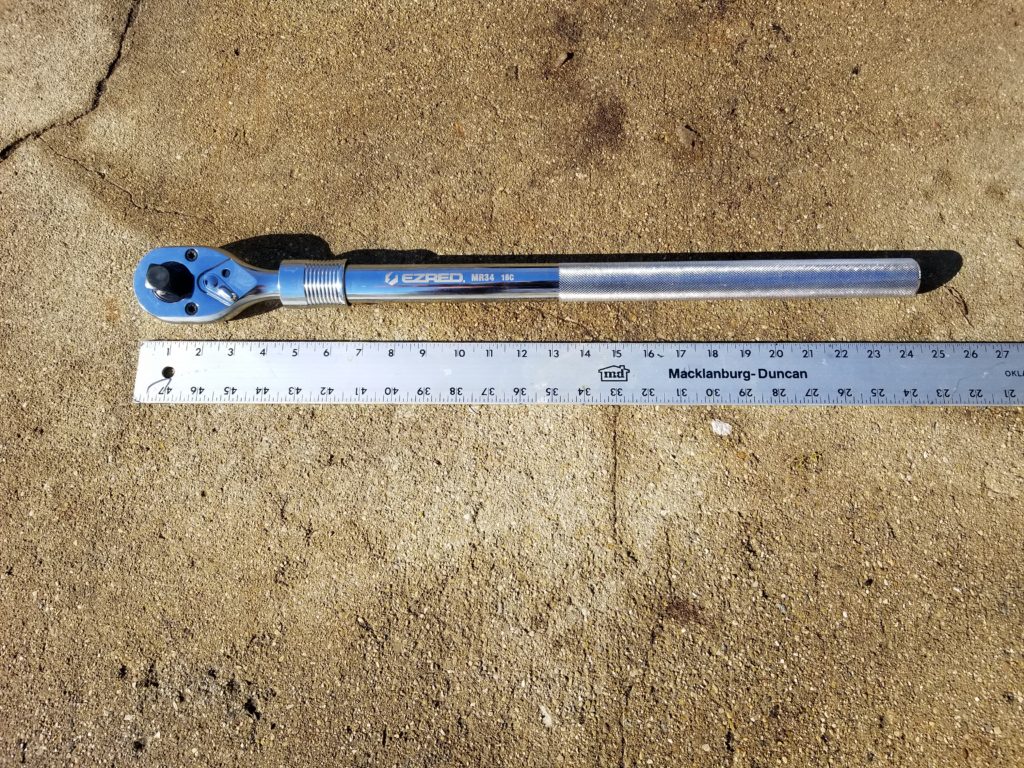
So, when I need a ton of torque and mechanical advantage to help me get there (I’m at the age where I need to work smarter because my body doesn’t support harder any longer 🙂 – I break out the wrench I affectionately call “The Beast”. It is a beautifully made and chromed giant 3/4″ ratchet wrench.
The wrench is sold in the US by a firm called “EZRed” with a lifetime warranty and, like many things, is actually made in Taiwan. When you do some digging around, there are a lot of guys using this wrench for heavy equipment, farm equipment, trucks, steam pipes and more. After reading about the real world experiences with the wrench, I ordered one in.
Here is the wrench closed and you can see it is about 24″ overall. Here is the MR34 fully open and about 40″ long overall.
The first things I noticed was that it’s a big wrench even without the handle extended. Next, it’s a heavy wrench and weighs in at about 8.5 pounds. I have to be honest, I don’t usually pay much attention to looks but the chrome finish is gorgeous.
Pull the collar down and a detent is released that allows the handle to telescope out. The handle then locks into position in the next available hole. The locking feature is definitely nice.
I use this for 3/4″ sockets and also have a SunEx 3/4 to 1/2″ reducer for those times I want to apply a ton of torque to a smaller bolt.
Here’s the wrench with a SunEx 3/4 to 1/2″ adapter.
So far, I am very happy with the wrench. As you can tell, I haven’t used it a ton yet but for the few quick jobs so far, it worked great.
Two Big Tips
A fellow recommended apply Blue Loctite to the head screws and grease the wrench while it was open. He was spot on – the screws were surprisingly lose. Even though they have blue thread locker on them from the factory something seems odd and guys have reported losing the screws. I really think if Ihad not followed the fellow’s advice I would have already lost mine as well – they are that loose.
The screws come out and then the head is very serviceable. You can see the two pawls and their springs plus the selector in the middle. What you don’t see is any lubricant! I must say I am a bit surprised.You can see the faceplate and the 24 tooth geared head.
So, I used a brush and lightly applied SuperLube grease to everything, reassembled the wrench and put Blue Loctite on the two head screws before tightening them down. The whole thing took maybe 10 minutes start to stop including taking the photos.
If you ever need it, the EZRed sells a rebuild kit – part number RK34.
Summary
I really like the wrench. It’s worked great so far but I really haven’t done anything super stressfulso far – just breaking some very rusty 1/2″ diameter carriagle bolts free off my plow. It’ll definitely get used this upcoming summer a lot more.
Here’s a quick tip for you when you need to turn a wrench outside except it is really cold but you still need to feel what you are doing or can’t wear bulky insulated work gloves.
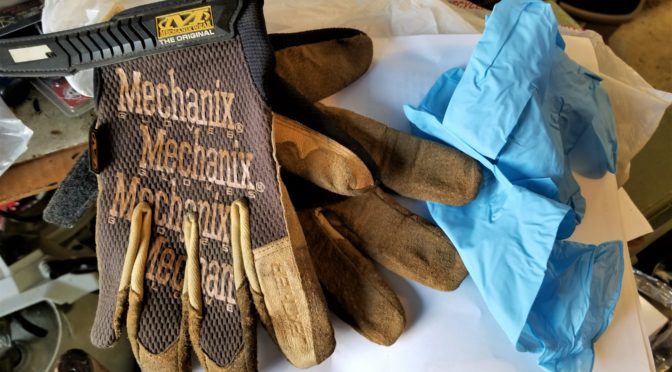
What you need to do is real simple – put on nitrile gloves first. This layer next to your skin insulates and protects you from both the wind and your hands getting wet. This is a big deal when there is snow. The second layer is your regular thin mechanics gloves. I have several brands of work gloves but Mechanix is probably the brand I use most followed by Ace.
I meant to write about this last year but forgot. Yesterday I had to work on my plow and it was +9F. The above worked great. Of course there is a limit and I don’t want anybody getting frostbite so use your common sense and play it is safe it is super cold.
At 9 degrees Farenheit, holding steel tools and moving metal parts around is a recipe for frostbite. It was this kind of work last year that led me to experimenting with putting Nitrile gloves under my thin Mechanics gloves.
I buy boxes of 5 mil Nitrile gloves whenever they go on sale at Harbor Freight. I think the sale prices tend to be around $5.99 and there are 100 in each box. I use a ton of them with my plastics work but also when working on cars. Any brand ought to work but I think the Harbor Freight gloves are a great deal when on sale.
I settled on 5 mil thick gloves because thinner ones fall apart very easily and thicker ones start to be bulky and mess with your sense of touch. I tried both 7 and 9 mil gloves before going back to 5.
I like 5 mil. It’s neither too thin nor too thick in my opinion. Note, they are meant to be disposable so you may or may not get more than one use from them.
The outer gloves are just basic Mechanix brand gloves.
I literally snapped this photo on my way out to work on the plow in 9 degree snowy weather.
I hope this little trick helps you out! I set up some Amazon product links for you below this post in case you would like to buy gloves.
Amazon is really cool. I can get good deals on stuff and have it delivered to where I live. The problem is that I used to historically look at the number of reviews and the average score to determine if something was worthwhile or not. A pure math approach of looking at the numbers is not working any more and let me tell you why.
I’m noticing a lot of reviews where people give 4 to 5 stars without really using the product. I don’t know if they feel they need to report right away or just what but you will read stuff like “it looks good” or “it feels good” and nothing about the actual use. I suppose it’s better than nothing but not by much.
Also, some merchants reach out and correct problems then ask the buyer to revise the score. You know, I’m cool with that. A friend of mine recounted the story of being hounded – email after email – from the seller to change the score. So, you need to be aware of this too – I’m not a huge fan of wasting time troubleshooting stuff – I want it to hit the ground working.
Recommendations
Again, the basics are true. Products with no reviews are very risky and less than 30 are still risky but you are starting to get a safety margin. However, you must dive deeper to learn what folks are saying.
What I am finding is that you need to read the reviews and:
Look for people who actually used the product and are reporting back.
Look for trends – was the product great and having more and more problems or vise versa?
Look out for tons of edits where people post that they have revised the score after the vendor sent a replacement. Why was this necessary? I could understand a few but not a lot and definitely not a trend.
Be sure to click on the number of reviews right under the product name so you can see the breakdown of scores and even click on the number of stars to read the reviews. So, if you click on “1 star” you can read those reviews.
Fortunately with Amazon, they give great customer service and I can’t guess how many times they have made things right over the years. I think a lot of folks have a level of comfort with Amazon now and I also think you need to use the tools they gave us to make a better purchase decision.
I did some bodywork on my 1996 Landcruiser (an 80-series Landcruiser) this past summer and had to replace the weatherstripping clips on the bottom of the driver side door. I did some digging and found that these clips are the correct size (5mm with a 15mm head) and they worked great for me. The one guy complains that these are green so he only scored it three stars. My originals were a pinkish color so green didn’t matter to me at all plus once installed, you can’t see them.
I popped the remaining originals out with a removal tool. If you don’t have one, they make a world of difference in the removal of clips. In a truck this old, I try to replace old plastic clips when I can as often find them to be brittle and either break during removal or re-insertion.
Here is a clip removal tool. The green clips under it are the brand new replacement units.
The tool you see in the above photo came with the following replacement Toyota Trim Clips package that has helped me out a number of times such as securing drooping engine bay plastic shields on a 2002 Toyota Camry.
Here were the remaining original clips. Note the lovely pink-ish color thus I really didn’t mind what colors the originals were as long as they worked.
Here is the end result – I worked the clips into each hole in the weather stripping and then simply pushed them into the body holes. I think I installed a total of five to six clips. The drooping problem was solved.
The heads securely fit in the holes in the weather stripping and into the body. No more drooping weatherstripping!
In Summary
These clips worked great. I just did this post to try and save anyone trying to find clips specifically for an 80 series Landcruiser.
Folks who know me also know that I am always tinkering with something – cars, trucks, tractors, firearms, you name it. A few years ago a guy showed me how he could change fluids in his car using a vacuum siphon and I was intrigued but let it slide.
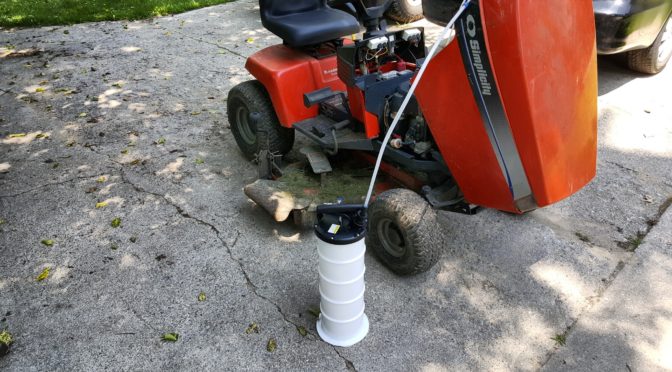
I recently went through all our old Toyotas and changed the transmission fluid to Valvoline Max Life and it dawned on me that it would be real nice to have a way to more precisely get the fluid right where I wanted it in the transmissions because I had slightly overfilled one car. Then I remembered the vacuum siphon and hopped on Amazon.
At any rate, thanks to Amazon prime, I ordered it and the unit arrived two days later. I must say that I was impressed. The plastics are all well done and it worked like a charm.
In this next photo you can see the little adapter and hose extension that comes with the unit. They say three in the ad and the first hose is attached to the cap with a strain relief. The hose is about .39/.31 (OD/ID) and 39.3″ long. The other two hoses are basically extensions via a soft rubber connector. I am using the medium extension that is .26/.21 OD/ID) and also 39.3″ long. That diameter has worked fine for Toyota T-IV ATF, Valvoline Max Life ATF and also 10W30 engine oil. When I say it can suck, that is a compliment in this case 🙂
The next photo shows the pump handle and also the venturi vacuum generator. I have that air line on my dryer system and is running 90PSI off a 60 gallon IR two stage compressor. It really didn’t use too much air. No vacuum generator will win awards for air use but you don’t need to run it for very long – just while you are pumping the fluid out and that will probably be about 2-3 minutes for most engines and transmissions.
The first time I used it, I did so with an air line (it can use compressed air to create a venturi vacuum) . It actually pumped way faster than I realized and I had over a quart out of the car before I realized it. You can definitely reduce the air flow to reduce the vacuum – it was just faster than I thought it would be, which is good news.
I was so impressed that I used the extractor to remove all the ATF from a 94 Corolla in very short order. I let it pump until nothing else came out — no problem.
I recently needed to change the oil in my tractor – again, used the siphon and it drained it very quickly. This is noteworthy as I used the hand pump to create the vacuum and it really was effortless. This was also when it dawned on me I better take some photos 🙂 You can see it pulling out the 10W30 no problem at all.
In this next photo, you can see the unit with the hose cap off – it just twists off – and this is the pour spout to empty the unit also.
I’m still on my first set of hoses but they do have a variety of replacement hoses on Amazon in case you want just one hose or a set.
In summary, it’s a great unit. I’ve not had any problems at all and recommend it. Here’s the link one more time:
7/18/2023 Update: Still working just fine – it’s a lot dirtier from use but is still doing the job. A fellow did ask me if they have other sizes and the answer is “Yes”. Click here for the EWK store on Amazon.
6/28/2022 Update: Still working great. I’ve used this on cars, trucks, tractors and even to suck the hydraulic fluid completely out of my snow plow’s hydraulic fluid reservoir.
Well, I parked our full size Ford Transit van at the end of the driveway on the grass to get it out of the way. Of course, given the recent snow melt the ground turned out to be too muddy and soft to support the van’s weight – but I didn’t notice that because it took a while to slowly sink. Yeah, I didn’t notice anything – my wife did we she went to use it! Oh crud. So she called my cell phone and was none too happy. I didn’t really worry about it because my truck could pull it out – or so I thought.
I drove to the house, cockily pulled my trusty old 96 Landcruiser up in front of the van and got out one of my big tow straps and walked up to the van. Should have been easy, right? Wrong. Nothing, nada to hook on to. Ford, in their infinite wisdom does not put a tow hook, eye or anything up near the bumper! Crap, crap, crap. [Note, near the bottom of this blog post I added in what I found after researching how to recover a full size Transit. I’m still irked at Ford.]
Did I mention my wife was standing their fuming? Yeah, she was. I should have known better than to park the heavy full size van on soft ground. Point taken – I didn’t realize it was that soft.
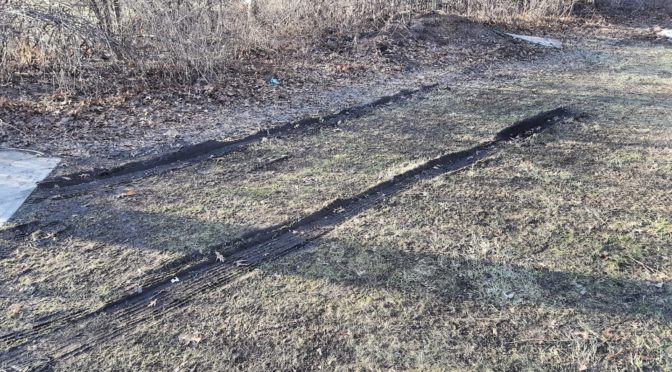
At any rate, I went back and looked at the 5″ deep rut the driver’s side rear tire had dug for itself. By the way, these photos are after removal.
I needed something long to fill the ruts and give traction. Luckily, back in 2010 and then in 2014 I bought these things called “traction mats” from a company called OTW Enterprises who touted them as portable tow trucks. In 2010 I bought the black ones after getting my truck stuck on ice with the plow blade buried in a snow mound. In 2014. I bought an orange set to put in my wife’s car in case she got stuck. Here they are after I hosed all the mud off.
Well, they bounced around in the trunks for a while and did bail me out a couple of times over the years but were actually leaning on the outside wall of my shop. They don’t fold and while they fit in the trunk you have the little plastic spikes catching stuff so I tool them out at some point and leaned them against the wall of the shop. At any rate, I walked over and they were exactly what I needed. Each mat measures 36″ long and 8″ wide. Since I had four, I butted on up against the front of each tire and placed a second one in front of it to help the tire get up and out of the rut. The sides are labeled by the way – the relative few long spikes go down and the side with many spikes goes up.
I got in and rolled the the van back a bit and then forward to get up on the mats. I then slowly gave it more gas (not much) and the van up and forward onto the mat and got out of ditch and I kept moving forward onto the pavement. I don’t have any action photos – things were stressful at the time and I really wasn’t thinking about a blog post 🙂
Well, I was pretty pleased with the outcome. Wreckers charge at least $65 to come out to our house so avoiding that charge is always a good thing. My wife was relatively happy but gave me a hard time for causing the problem in the first place.
Are these mats perfect? No. They will fly out from under your car if you don’t go slow and make sure you have the correct side down. Even then they sometimes do so I would never have someone stand behind the car. My recommendation is to go slow – avoid your spinning tires and rock the vehicle onto the mat if need be – don’t spin your tires onto them.
My wife is so impressed she wants them back in the cars. I just wish they had a carry case but I do recommend them as another tool to keep in your bag of tricks.
I hope this helps you out.
Comment about Ford and Their Oversight on Towing
By the way, I looked up the tow/winch location up for future reference so if you are surfing the web trying to figure out how to tow a full size 2016 Ford Transit, here is the reference link at Ford – click here.
Look just behind the tires at the frame and you’ll see the eye rings that are part of the frame. You can’t make this stuff up — Thanks Ford. It drives me nuts when you look at decisions made in ivory engineering towers vs. real world needs. Sure, let’s bury it under the van, make it hard to get to and pretty much ensure damage will occur if you actually use this to pull the van for whatever reason.
Now look how their factory winch attachment point lines right up with hitting the front radiator. If you pull this at just about any angle where the recovery vehicle is higher than the van then the cable/strap is going to cut right into the aluminum radiator at the front. In the next photo, you can see the silver aluminum radiator just above the lip of the bumper molding.
If you wanted to protect that radiator, you’d actually need a harness with something to push the attached cable lower to the ground – or fabricate another attachment method. Maybe my 4″ drop hitch in my rear class IV receiver would be low enough to tie onto vs. my truck’s winch or front recovery hooks. … Something for another day. I didn’t buy a new van to have to worry about something people in rural areas need regularly in the winter. They should have been in the front.
2/11/2018 Update: The traction mats bailed me out again when I got the van stuck on ice in our yard while turning around. I’ve come to realize the van does a fair job on the road but the tires are damn near useless on uneven icy surface, With this van, it’s really handy to have four. With only two handy, I could move the van forward and then get stuck, move the mats, move forward again, get stuck, etc. I had to do the cycle about three times. I think if I had all four handy it would have done the trick in one shot because I could have built up some forward momentum. I now have all four stored together, We’re nearing the end of Winter finally and I think I will keep all four in the van next year and need to find some kind of carrier bag to store them in.