Category Archives: AK & Related Rifles

Used to discuss AK-47, AK-74, and related rifles

Converting a milled M70 receiver stub to a stamped receiver front trunnion using plug welds

I miss building AKs – I never have the time any more.  At rate, some years back I wound up with two Yugo M70 front milled stubs, and then decided to convert the rifle to a stamped receiver because I liked working with AK-Builder flats.  So, in the spirit of trying something new, I decided to convert a stub to a trunnion and plug weld it in place vs. trying to machine the rivet seats inside.

Yes, I’ve heard tons of people say not to weld them together and that rivets are better.  Yes, rivets are better and I have done many of them.  Have I ever had problems with a weld build where I filled the holes I drilled with plugs, stayed away from the locking lugs and was careful with the heat?  No, I have not had any problems.  I have an AMD-65 with tons of rounds through it that still runs fine.  My thinking is that I am not firing full auto, not using grenades, don’t use this in combat … I’m not really stressing it.  What would I use for a reliable build vs. a test like this?  I’d use rivets.

Why the big caveat in the previous paragraph – I get one or two emails a year from a purist telling me that what I did was evil, that I am a clueless half-wit, etc. Folks, innovation happens by trying new things. I have built more AKs than most – using rivets mainly because they do work best. There are a ton of reasons why rivets are best for joining forged blocks to sheet metal.

In terms of welds, do I understand the risk of destroying the heat treat in the locking lug area, the risk of causing embrittlement around the plug welds, that the Soviets explored this and dropped the idea due to cracking? Yes, I do and tried it anyway because I wanted to explore how to compensate. So, don’t send me hate mail me because I will not bother responding. When I first shared this, three guys immediately sent me hate mails and unfriended me – I did not lose sleep about it.

If you want to try and experiment, go for it. Should you do this with an AK build that you want to be historically accurate or plan to use heavily perhaps even under full auto, then the answer is “no – don’t do it”.

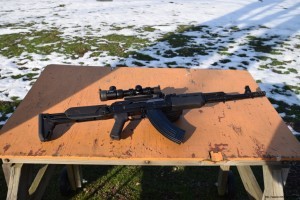
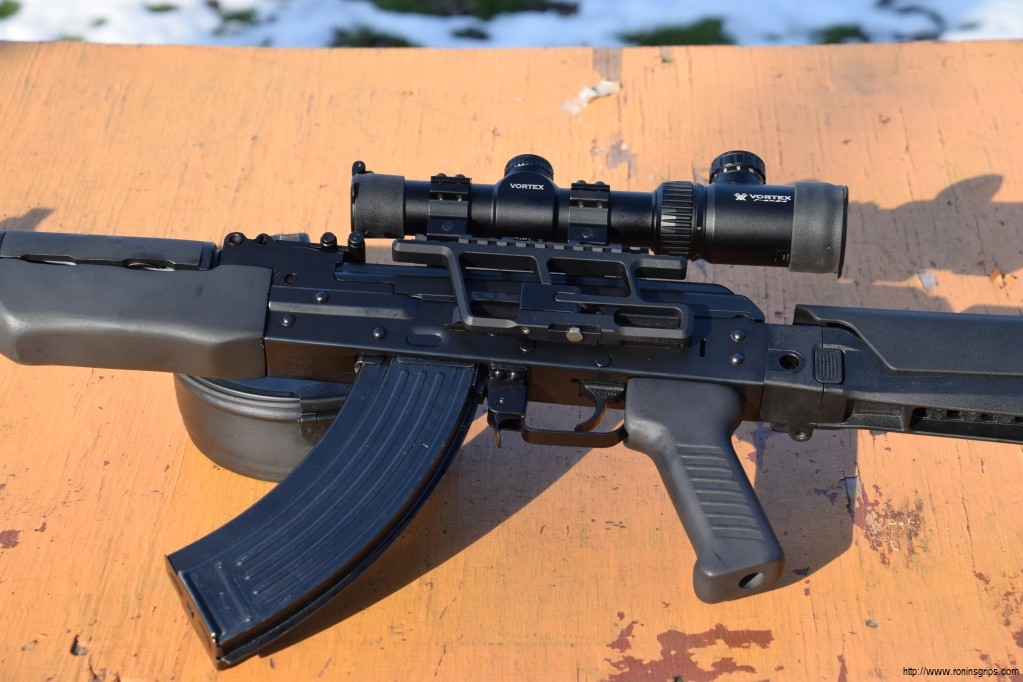
The build I am sharing photos of was done in 2009.  I found the photos and thought you might like to see them.

Here are the front stubs.

When you look at the front stub, you can see readily hiw it could become a trunnion.

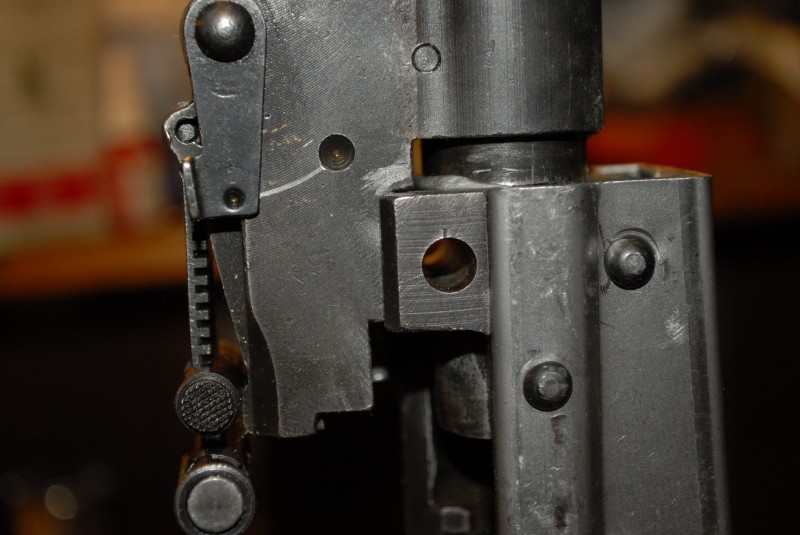
Here’s a Hungarian AMD trunnion next to it.

Here are the stubs from a couple of angles.  I already used my bandsaw to cut the top one

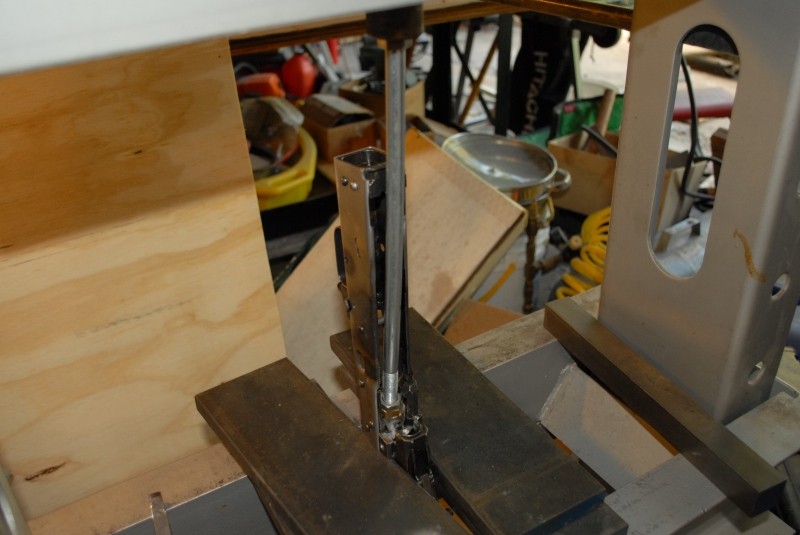
Ok, time to make some chips.  It’s secured an I’m milling the OD under the top shelf of the trunnion that sticks out over the receiver:

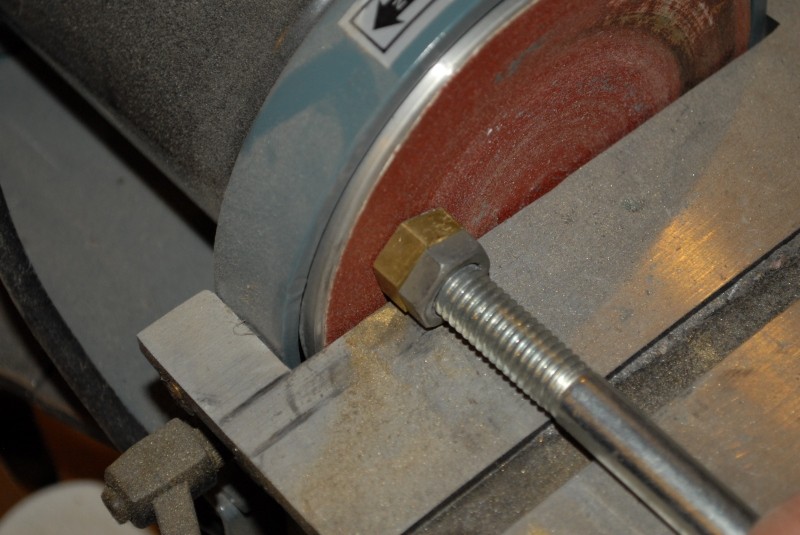
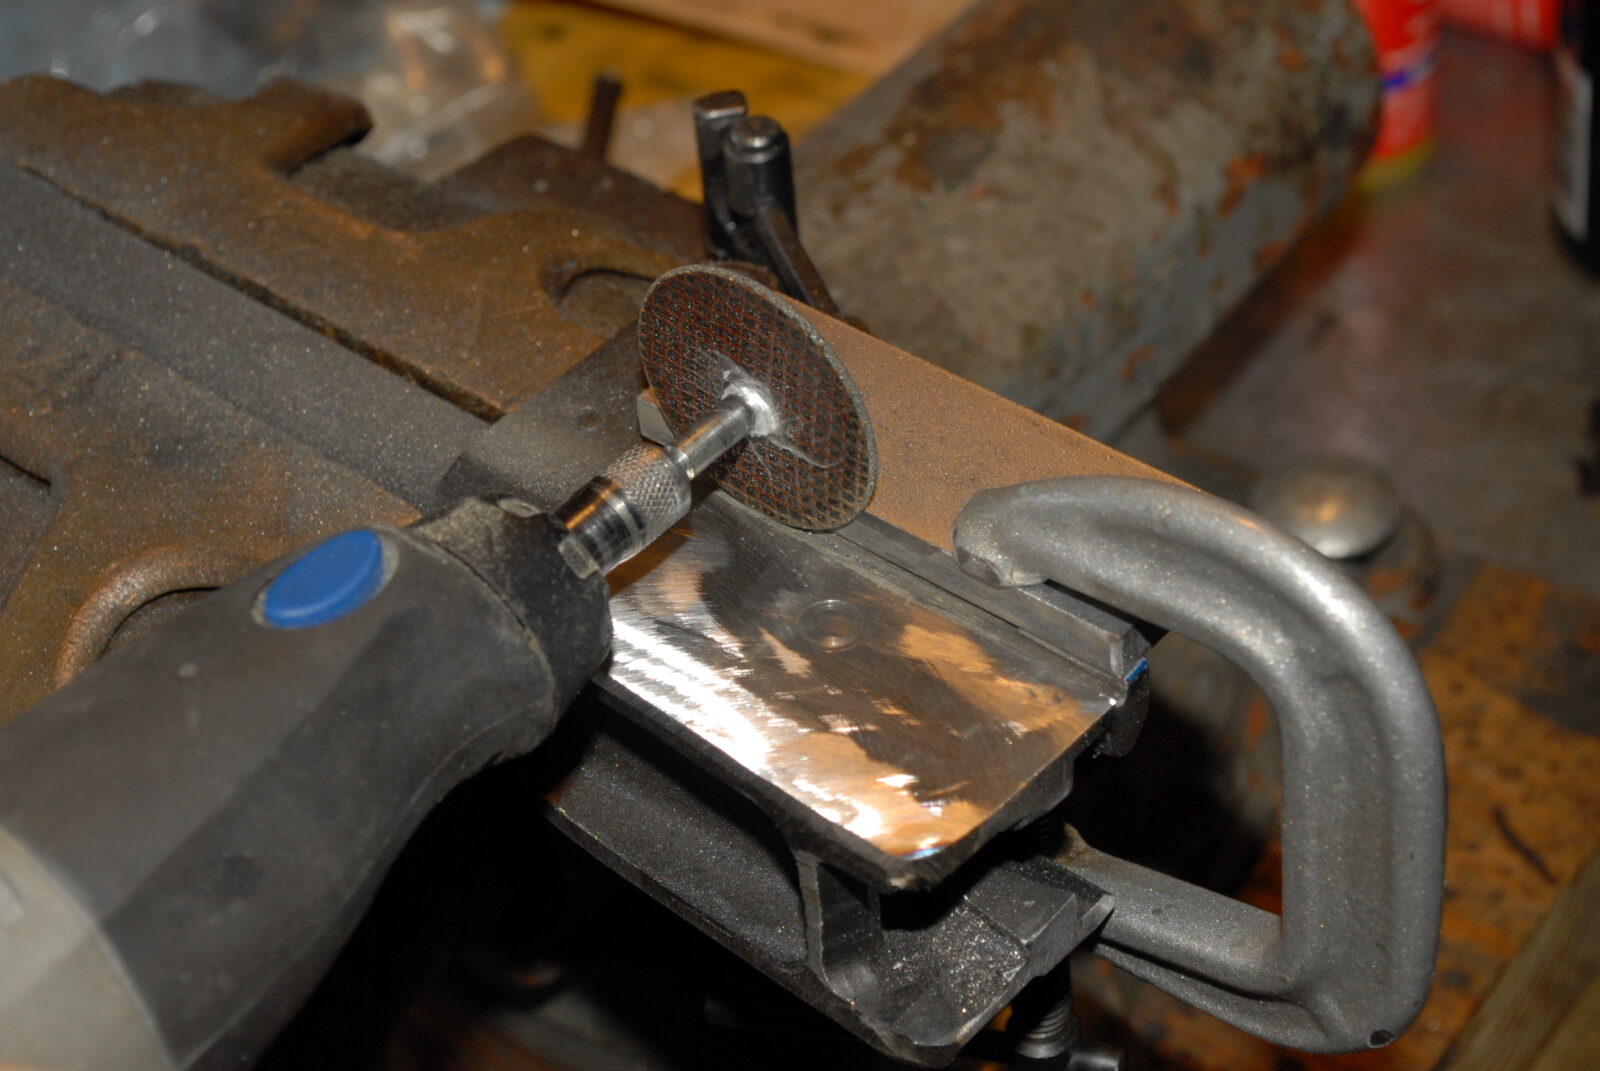
I didn’t have anything to cut the slot with for my mill so I clamped a straight edge and then ran a Dremel wheel down it over and over until I got the depth and width needed for the stamped receiver to to slide into:

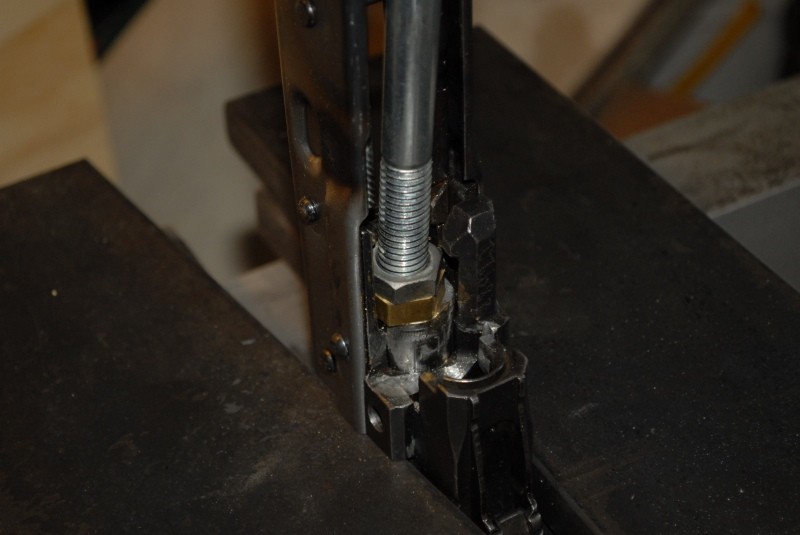
My theory was that by drilling holes and filling them via plug welds that I could lock the receiver into place.  Thus, I drilled holes for the plug welds both in the stamped receiver and into the newly made trunnion:

The plug welds were done with a Harbor Freight 220V MIG running ArCo2 gas and .030 wire.  I let it cool down after each weld and was careful not to pour on a ton of heat.  Notice the relatively big weld area to distribute the load.

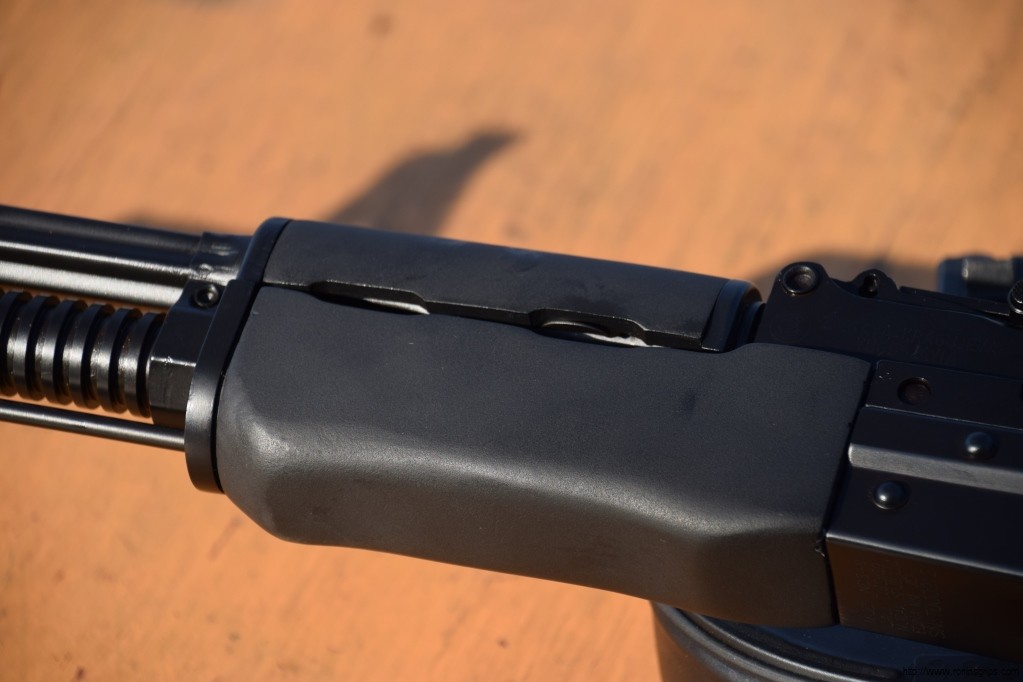
I then sanded it all down with a flap sander.  The back was just a regular M72 rear trunnion that I found at R-Guns. I never had problems with cracking, etc.  The experiment seemed to work for a casual use semi-automatic rifle.

That’s all I have as far as photos go.  I hope maybe it gives you some ideas.

Writing this makes me wish I had time to build another AK but it’s back to our grips and handguards 🙂


Note, I have to buy all of my parts – nothing here was paid for by sponsors, etc. I do make a small amount if you click on an ad and buy something but that is it. You’re getting my real opinion on stuff.

If you find this post useful, please share the link on Facebook, with your friends, etc. Your support is much appreciated and if you have any feedback, please email me at in**@*********ps.com. Please note that for links to other websites, I may be paid via an affiliate program such as Avantlink, Impact, Amazon and eBay.


Custom Yugo M72 RPK By Two Rivers Arms and Ronin’s Grips

Two Rivers Arms is an impressive group – they can really build Yugo rifles (and just about any other AK for that matter).  I recently had them build a replica M72 RPK that looked like it came fresh from the factory.  I also had them build this rifle and it took some creativity on their part and our’s.

I sent them a Yug0 M72B1 kit from Apex with a Green Mountain barrel, Tapco FCG, Nodak Spud NDS-9 receiver and asked that they turn the barrel down to 16.5″ and not bother with the bipod. I also asked Tim to fabricate a scope rail so I could mount my RS!Regulate rail system there. Thus, they got started and did their assembly and tuning of the rifle.  As many of you know, AKs can be pretty gritty until they wear in.  The guys at Two Rivers have tuning the AK down pat and when it arrived, everything was silky smooth.  By the way, I had them put the original funky wood on it so it looked pretty funny when it arrived and then I went to work.

We’ve been working on a custom M72 RPK handguard set off and on all year.  First we had problems with the gas tube and then the lower turned out to have issues twice!  Finally, with this generation, we nailed the M72 handguard set and I am very happy. You’ll notice it is very thick as the mold was cast from wood originals and is a very snug fit.

What you see in these photos is the M72B1 rifle from Two Rivers but to it I have added our custom Yugo M72 handguard set, a custom Bulgy Arm-9 grip and one of the Magpul ZHUKOV-S butt stock with the 3/4″ riser as I needed to get my cheek into better position to look through one of my favorite Vortex Crossfire II 1-4x scopes.  These are one of the best values in scopes in my opinion.

I also replaced the original Yugo hammer and operating springs with fresh ones from Falcon Arms to give everything a bit more life.  To top it off, I added a Precision Armament M4-72 AK-47 Severe-Duty Compensator.

The rifle about 1/2″ groups at 50 yards with Golden Tiger FMJ.  I am very happy with the results.  The rifle handles great and between the weight and the aggressive Severe-Duty compensator, recoil was very, very mild.

Here are some photos of the rifle:

DSC_0157
DSC_0155
DSC_0158
DSC_0159
DSC_0160
DSC_0162
DSC_0164
DSC_0165

If you are interested, here are some links:

Our M72 Handguard Set:    http://shop.roninsgrips.com/Yugo-M72-Handguard-Set-No-Ferrule-Needed-YugoM72RPKHGSetNoFerrule.htm 

Our Bulgy ARM-9 grip:  http://shop.roninsgrips.com/Bulgarian-ARM-9-Grip-Converted-For-All-AKs-No-Notch-w-Screw-BulgyARM9NoNotchWithScrew.htm

Two Rivers Arms is at:  http://tworiversarms.com/

Precision Armament Severe Duty Compensator:  http://precisionarmament.com/product/m4-72-ak-47-compensator/

Magpul Zhukov-S Stock:  https://www.magpul.com/products/zhukov-s-stock-yugo

Falcon Arms Springs:  http://www.falconarms.com/ak47/ak-spring-kit.html


If you find this post useful, please share the link on Facebook, with your friends, etc. Your support is much appreciated and if you have any feedback, please email me at in**@*********ps.com. Please note that for links to other websites, I may be paid via an affiliate program such as Avantlink, Impact, Amazon and eBay.


We have a Facebook Page Wherein We Post About Sales And Upcoming Products

If you are interested, please visit us at:  https://www.facebook.com/ronins.grips

Two Rivers Arms Built Yugo M72B1

Once in a while I get to have fun.  For years I have worked with Two Rivers Arms making their grips so I knew they did a good job.  Well over a year ago, I bought two Apex M72B1 kits to have as prototypes but never had time to build them.  I must admit I have fun building rifles but the time just isn’t there any more.  So, given our new M72 handguards were almost ready, I called up Tim at Two Rivers and asked if they could build an M72B1 that looked like it came straight from the factory and that is exactly what they did.  Here are the amazing results of their efforts:

DSC_0321

DSC_0323

DSC_0325

DSC_0326

DSC_0332

DSC_0334

DSC_0338

DSC_0339

Note, the following is our Yugo M70/M72 grip:

DSC_0340

DSC_0341

DSC_0342

DSC_0343

Let me give you a quick run down of the parts you see above and a few you don’t:

  • Yugo M72B1 kit from Apex with a new Green Mountain barrel
  • Nodak Spud NDS-9 receiver
  • New virgin stock set from R-Guns
  • One of our Yugo M70 pistol grips
  • Tapco G2 FCG
  • RSA FCG retainer plate (I hate the shepherd hooks)
  • Real Yugo BHO Magazine

Two Rivers did the assembly, engraving, bluing and hooked me up with the right muzzle nut and cleaning rod.  This rifle looks simply amazing.  If you ever are looking for a builder, give them a shout … now if I can just afford one of their Tabuk DMRs some day 🙂  Tim, Shawn & Ed – thank you!!

Two Rivers Arms is at:  http://tworiversarms.com/ 

Our pistol grip is online at:  http://shop.roninsgrips.com/Yugoslavian-M70-M72-M85-M92-Grip-Yugo-M70-M72-M92.htm


If you find this post useful, please share the link on Facebook, with your friends, etc. Your support is much appreciated and if you have any feedback, please email me at in**@*********ps.com. Please note that for links to other websites, I may be paid via an affiliate program such as Avantlink, Impact, Amazon and eBay.


Jeffrey’s M92 with our Bulgarian AK74 Grip in Dark Russian Plum

Jeffrey’s M92 looks pretty slick!  He opted to use our Bulgarian AK-74 grip in Dark Russian Plum and sent in these photos:


pap_1 pap_2


If you find this post useful, please share the link on Facebook, with your friends, etc. Your support is much appreciated and if you have any feedback, please email me at in**@*********ps.com. Please note that for links to other websites, I may be paid via an affiliate program such as Avantlink, Impact, Amazon and eBay.


What the M92 Looks Like After All the Mods

This shows what the M92 looks like today.  I haven’t had time to go to the range yet but the “feel” is fantastic in terms of weight, balance and length. CNC Warrior nailed the folding arm brace.  Wow – how cool it is!

Here is a list of the modifications made:

  1. CNC Warrior Folding Arm Brace
  2. CNC Warrior 4 Piece Brake
  3. CNC Warrior Detent Pin
  4. CNC Warrior Picatinny Rail Scope Mount
  5. Ronin’s Grips M92 Ferrule Cut Handguard Set
  6. Ronin’s Grips Bulgy ARM-9 Pistol Grip
  7. Ronin’s Grips M92 Dust Cover Quick Takedown Pin
  8. Vortex Sparc Red Dot with the Low Mount
DSC_0326
DSC_0331
DSC_0332
DSC_0333
DSC_0334
DSC_0337
DSC_0339
DSC_0341
DSC_0432

If you find this post useful, please share the link on Facebook, with your friends, etc. Your support is much appreciated and if you have any feedback, please email me at in**@*********ps.com. Please note that for links to other websites, I may be paid via an affiliate program such as Avantlink, Impact, Amazon and eBay.


CNC Warrior Brake and Replacement Detent Pin for the Zastava M92 PAP

To be imported, the M92 has a muzzle nut, or muzzle cap, installed over the threads with a single big weld.  It’s obvious where the weld is and guess what?  It can be easily removed and if you look close that will also then clear the detent spring hole as well.

DSC_0048 DSC_0049

There are a few brake options out there for the M92.  Bear in mind that like many Yugo rifles, the designers made the size and thread of the M92’s muzzle unique.  It is left-hand 26mm wide with a 1.5mm pitch thread – definitely an oddball.   At any rate, CNC Warrior makes a four piece Bulgarian style brake that really cuts down on muzzle flash that I have been drooling over for a while plus they make a number of other brakes, adapters and fake cans that can fit that thread.

The following are more detailed photos for you.  By pulling the small locking wire down, the end cap can be unscrewed and the brake disassembled into its four parts – the body, cap, cone and spring.

DSC_0037

DSC_0038

DSC_0039

DSC_0040

DSC_0041

DSC_0042

DSC_0043

They also sell a detent pin kit so you can have the original method to retain the brake as well and it can be installed in literally less than five minutes because the PAP comes with all the holes drilled:

DSC_0033

Click here for our post that shows how to install them.


If you find this post useful, please share the link on Facebook, with your friends, etc. Your support is much appreciated and if you have any feedback, please email me at in**@*********ps.com. Please note that for links to other websites, I may be paid via an affiliate program such as Avantlink, Impact, Amazon and eBay.


How to Make a Simple and Effective AK Barrel Back Out Tool

DSC_0341
The barrel pin is popped out of this Yugo.

AK rifles use press-fit barrels wherein the barrel is pressed into either the forged trunnion (if it is a sheet metal receiver) or the receiver and then held in place by the 7mm barrel pin.  As part of this, the barrel must be headspaced to the bolt to help ensure the cartridge is properly seated.  A challenge that commonly happens is that a builder inserts the barrel using whatever method ranging from a big hammer to a hydraulic press but when they try to use their headspace gauges, they find they have gone too far.  Alternatively, folks trying to insert a barrel back in that was already headspaced notice that they overshot the barrel pin groove when looking through the holes across the groove in the barrel.  Regardless of how the mistake is identified, the question becomes “what do I do now?”

There is a relatively quick and easy solution – use a long shaft to drive the barrel back out.  These tools are generically called “barrel back out tools” and you can make one many ways.  They can all be summarized as having a long shaft to reach through the receiver to the chamber end of the barrel and then either a copper or brass fitting to protect the chamber from being damaged by the rod.   I have seen everything from guys using socket extensions, to pieces of round steel, to custom purpose built tools.

One time, I pressed in a Yugo M72 barrel too far and had to press it back out so I came up with a quick and easy tool that I kept in my tool box and even sold for a while until I stopped because the profit margin just wasn’t sufficient.  With that said though, it’s worth sharing with folks just in case they wind up in a jam.

Here is what you need:

  • One 1/2″ grade one or two bolt that is about 12″ long (or however long you want to make it)
  • One 1/2″ grade one or two steel nut
  • One 1/2″ brass nut

For my first tool, that I still have, I just went to my local Ace Hardware store and bought the parts.

Basically, the long bolt allows you to reach into the receiver to the chamber end of the barrel to apply pressure.  I used a really long bolt because a Yugo’s rear trunnion is solid and you have to go down at a long shallow angle to press the barrel back out.  With AKMs or other AKs with open rear trunnions, you can simply go straight from the back to the front.  Note that you need to clear the ejector without damaging it.  I purposefully used a low grade bolt as I did not want it brittle from hardening.

The steel nut needs to be ground down enough so that the combination of it and the brass nut can fit in the area where the bolt normally locks up.  You want as much brass as possible to be in front of it and the brass nut should protrude from the bolt.  You don’t need a great deal of the brass nut threaded on the bolt as the steel nut is backing it up to provide much needed support.  I would grind and test repeatedly until the timing was such that the two nuts matched up just right when I tightened them down.

DSC_0431
Use the bolt to hold each nut and sand them down. The steel nut is there to reinforce the brass nut.
DSC_0434
I don’t have exact dimentions so you can experiment. The steel nut is about half it’s original thickness and the brass is about two thirds. You need enough steel for strength, enough brass to be able to deform yet the assembly must fit in the pocket area inside the trunnion just before the chamber.

Note, I used to grind the brass nut to match the extractor notch in the barrel but have stopped doing so as the brass simply deformed anyways.  The following photo shows how the brass simply bends and conforms to the extractor notch plus you can see that the brass nut extends well forward of the steel bolt.

DSC_0432
I just let pressure form the end of the brass nut however it needs to. I just grind the brass nut flat. Very important note – the brass nut must extend past the end of the bolt by about 1/4-3/8″ thick. The longer the better. You do not want the steel bolt to contact the chamber even when compressed – just the brass. I talked to guys who used to put two real copper pennies on the end of the barrel to press it out so I used that as my minimum thickness.

In the next photo, you can see the shallow angle I used to press the Yugo barrel back out.  Again, you would not need the same if you could go straight through the receiver:

DSC_0344
I actually have a few of these pushers made and ready to use. I have a long 12″ one to be able to reach down at an angle in Yugos (their rear trunnion is solid) plus a much shorter one – maybe about 6″ that I have when I am just working with a barrel in a trunnion.
DSC_0345
This is actually under load. Only the brass nut is touching the end of the barrel.

Historically I did all my barrel work with my 20 ton press but now I mainly use air tools except for really stubborn parts.   When I originally did this post in 2014, I used my press.

With the M72, I was able to very simply move the barrel back out a bit, turn things around and then press the barrel in until the proper headspace was achieved.  The tool worked so well that I have it in my tool box still and have used it a few more times plus I did make a dozen or so and sold them to guys who had good luck as well.

As a caution, make sure the trunnion is well supported – you can see I have it resting on the press plates in the photo above.  Make sure everything is set up, stable and that you are clearing everything else before you apply pressure with the press. 

Lastly, be safe – take your time and play it smart.  A press can develop massive pressure.  Wear safety glasses and do not dream of having your hands anywhere in, on or around the parts being pressed.  All things considered, backing a barrel out should take very little force but you do not want an accident to happen.  If you are tired and frustrated, stop and wait until the next day or when you have relaxed and calmed down.  Most of my personal accidents have happened when I was in a rush, tired or angry – don’t be me 🙂

In closing, I hope this helps you in your building efforts!


Note, I have to buy all of my parts – nothing here was paid for by sponsors, etc. I do make a small amount if you click on an ad and buy something but that is it. You’re getting my real opinion on stuff.

If you find this post useful, please share the link on Facebook, with your friends, etc. Your support is much appreciated and if you have any feedback, please email me at in**@*********ps.com. Please note that for links to other websites, I may be paid via an affiliate program such as Avantlink, Impact, Amazon and eBay.