Tag Archives: maglite

How to Upgrade Mini Maglites to LED, Replacing the Lens and Adding a Switched Tail Cap

Okay, I have to admit it up front – I’m nostalgic.  When I was a teenager in the 1980s Maglites were a big deal.  I had a four D-Cell unit and a friend encouraged me to get a Mini Maglite probably in the 1985-ish timeframe and I have used it a ton.

I also bought a Mini Maglite with remote switch and shot gun barrel adapter for my dad.  He would slip out the door at night to see what the dog was barking at and would often take a firearm with him – often an old reliable 16 gauge single shot Iver Johnson.  It really creeped me out.  It wasn’t until years later that I understood how my dad viewed that having both grown up on a rural farm in New Hampshire and serving in the 6th Infantry in Pusan at the end of WWII (Yes, we had troops in Korea towards the end of WWII to prevent the Japanese from returning).

At any rate, I bought my dad a Mini MagLite with a remote switch for that old Iver Johnson and installed it.  Years later I would find the shotgun and the light separate – I suspect my dad never really needed it.

At any rate, I wound up with both my old light and my dad’s sitting next to each other and figured it was time to upgrade them and return them to service.

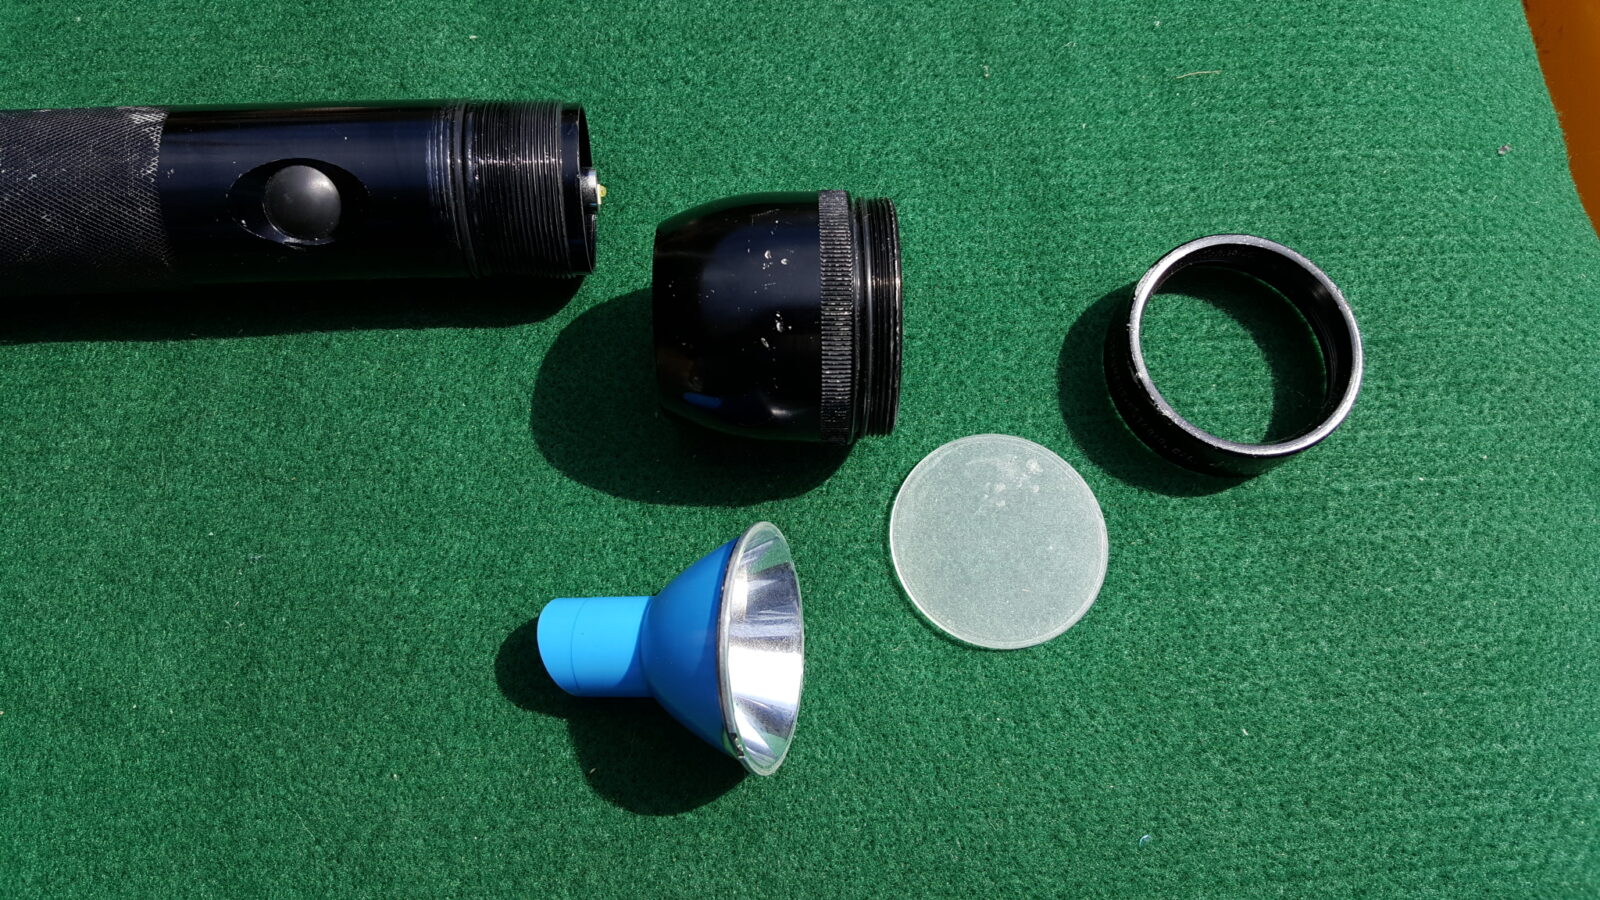
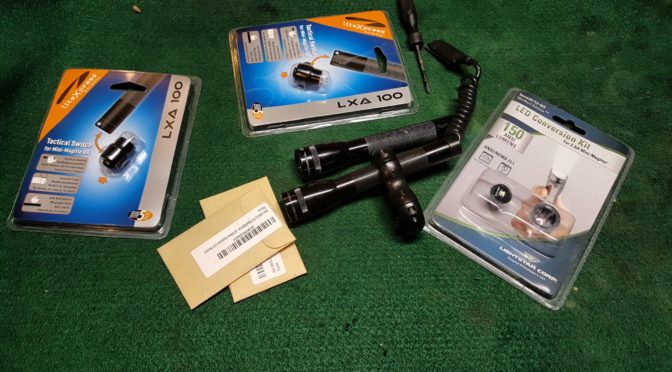
For me, researching is part of the fun so I dug around on replacement tail caps, LED upgrade units and lenses.  So, I wound up with the following pile on my work bench:

I bought two of the LED upgrades but had already installed one before it dawned on me that I better get a picture 🙂

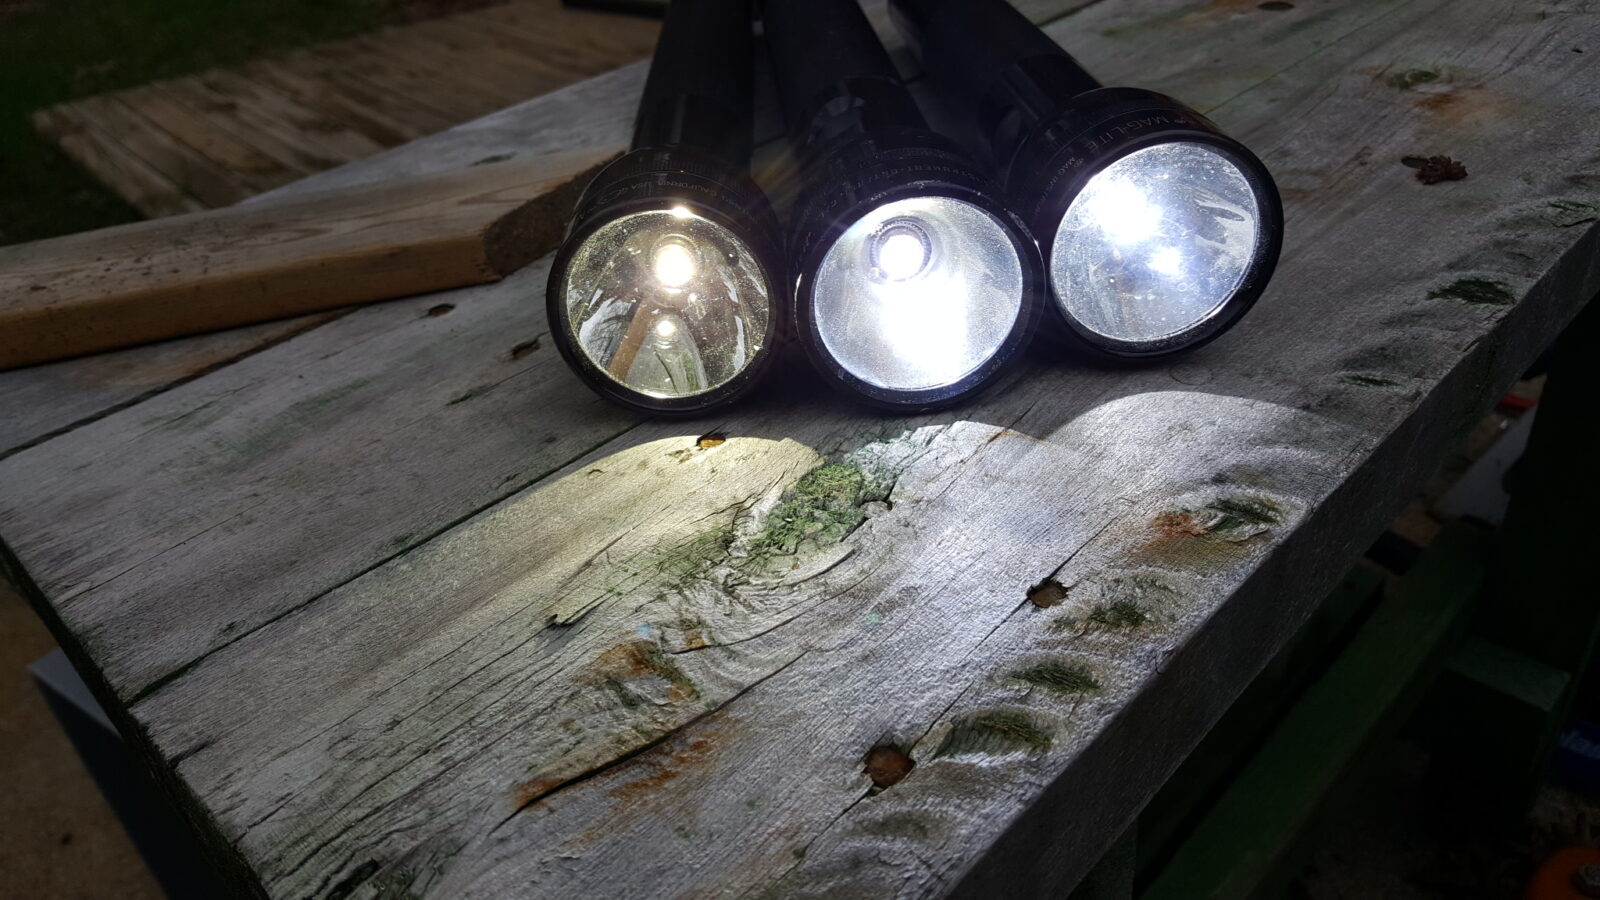
The  LED upgrade is from TerraLux and is their TLE-5EX MiniStar2 Extreme.  They claim 150 maximum lumens for four hours.  I can’t speak to the duration but they are definitely bright – brighter than my 80 and 100 lumen lights for sure with a really nice solid coverage. 


Basically, you unscrew the head from the camera body and while you are at it, remove the lens cap also because you will replace the old lens with a new one.  If you see any stretched, torn or missing O-rings, then replace them while you are at it.

Here are the old and new reflectors and lenses:

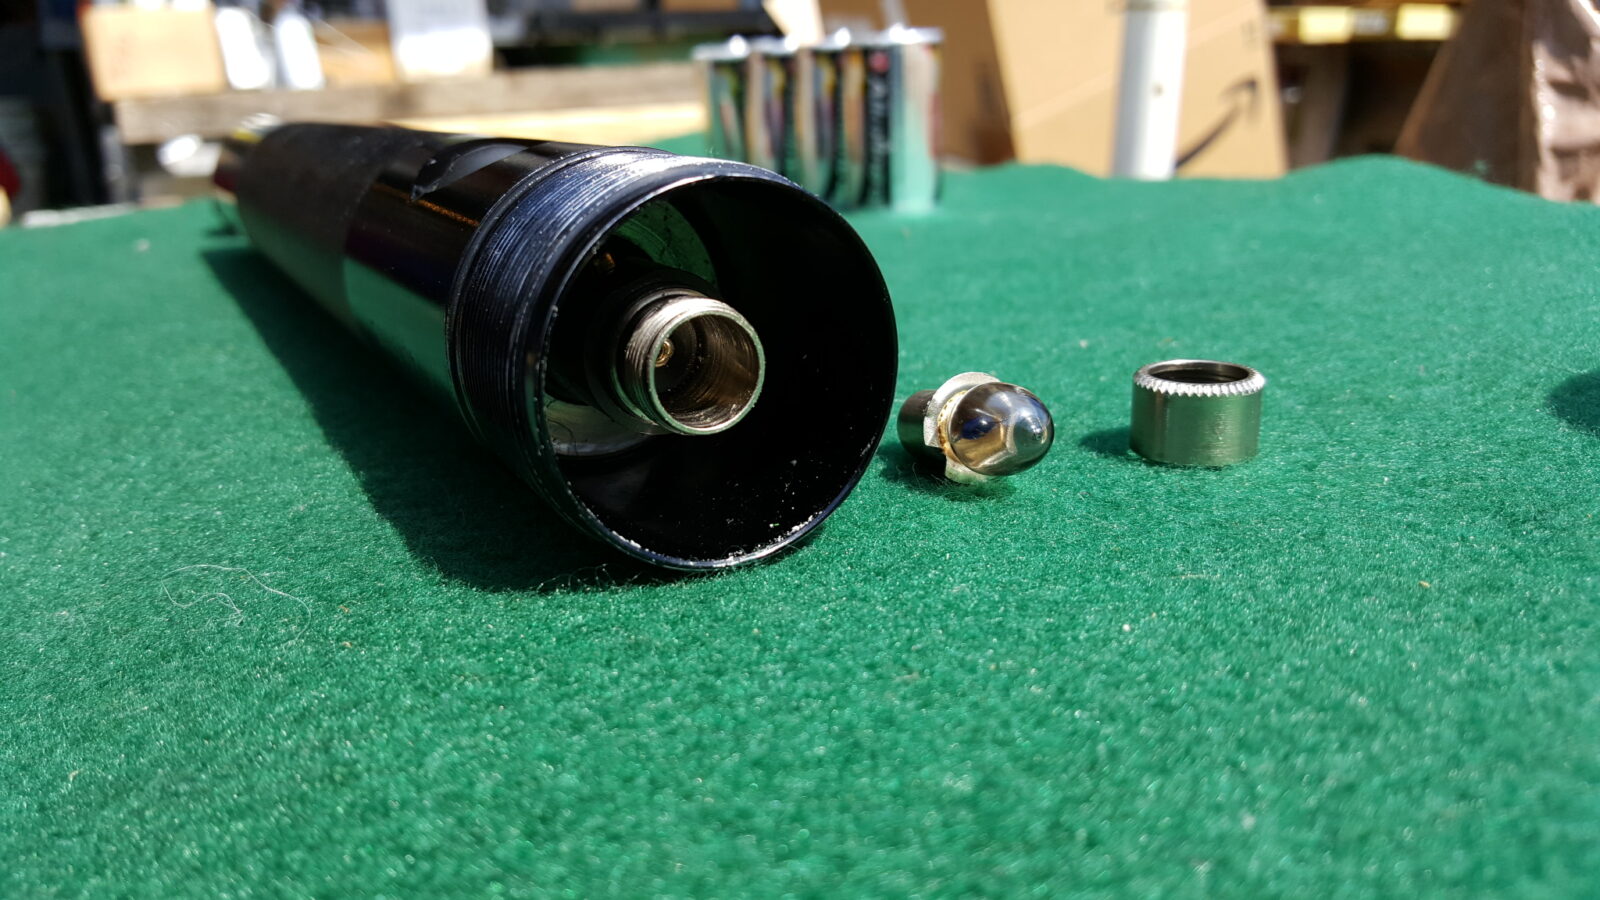
The old bulb just pulls straight out of the body.  You don’t need to do anything else – just pull it out.

Now the LED module’s legs just go in where you removed the old bulb.  Have batteries in the light because you need to find out if the module is plugged in the right way or not.  What I mean by this is that the polarity does matter.  If you plug the module in and it will not light then turn it the other way so the legs switch the power holes they are plugged in to.

Notice how the reflector that comes with the module has a much wider hole to accommodate the LED.  You can save your old bulb and reflector if you want to.

The module will sit on top of the housing.

I got lucky – the light worked the first try.  If it did not, I would have removed the module and exchanged holes the legs were going into.


The tailcap has a nice switch.  What I like is that I can adjust the lens how I want and just turn the unit off and on at the tail cap.  If you were packing this, you can still turn the light off the old way and reduce the odds of it turning on.  Lastly, the cap has a perk – it has a lanyard ring on the side and it will prevent the light from rolling off a surface.  On one hand you can’t stand the light up and run it like candle but on the easy on/off switch and elimination of rolling are nice bonuses.

So that’s all there is to it.  I’d say it took me 5-10 minute per light and I satisfied my nostalgia by keeping them and have far, far brighter lights.  I’ve been using one of the lights for almost two months as of writing this blog without any problems at all.

By the way, I also wrote a post about upgrading my bigger 4-D cell Maglites as well.  Click here to read that post.


If you find this post useful, please share the link on Facebook, with your friends, etc. Your support is much appreciated and if you have any feedback, please email me at in**@ro*********.com. Please note that for links to other websites, I may be paid via an affiliate program such as Avantlink, Impact, Amazon and eBay.


If you want to upgrade your older 4-6 D cell Mag-Lite, be very cautious about the Terralux TLE-310M-EX MiniStar 1000 Lumen Conversion Kit

Hi folks,

I actually buy what I post about so if something doesn’t work, I’m going to report it.  In 2015, I upgraded my three Mag-Lites with TerraLUX TLE-6EX Ministar5 140 Lumen LEDs.  Those have worked great – they are bright, durable, and easy on the batteries.  A few weeks back, I ran across an Amazon listing for a TerraLUX TLE-310M-EX Ministar31M-EX LED Conversion kit for 4-6 D cell Maglites.  Now that kind of excited me – 1,000 claimed lumens plus I had good luck with their bulb replacements so the upgrade kit seemed like a no brainer.  Unfortunately, I was not so lucky this time because it did not fit either my four or five D-cell lights.

The conversion kit looks well made and is super easy to install — or at least it should be if it will fit the head of your light:

To be fair to TerraLUX, my 4-D cell Mag-Lite dates back to the early- to mid-1980s.  My 5-D cell was bought by my dad for his own use shortly there after.  The 3-D cell I have was bought by my dad at an unknown time.  I just want to point out right up front these are older lights.  To get to the point, the TLE-310M only fit the 3-D cell the way it should but it was not recommended for that few of cells plus was not as bright.

My best guess is that Mag-Lite evolved the shape of the flashlight’s heads over the years.  My 4-D cell’s head actually is curved inside behind the reflector.  The 5-D cell is flat inside.  The 3-D is flat inside too but it look like the stem that holds the bulb sticks up further.  When I screwed the TLE-301M straight onto the bulb stem, WOW.  On my 5-D cell, my Lux meter could not go up that high.  The problem is that the kit would not fit with the head on the way it should.  I suspect the positive contact on the bottom of the kit could not touch the Mag-Lite’s positive contact.

Here’s the 5-D cell taken apart with the conversion kit.  Normally to install the kit, you would just remove the bezel, lens, reflector and bulb.  The kit then screws in place of the bulb.  I had it all apart trying to figure out what was going on.

At this point I was getting a bit miffed.  I did not take a picture of my 4-D cell taken apart but it definitely had a conical shape under the reflector and the kit again would not make contact with the head in place.  if I screwed the kit right on to the stem, it was fine but no-go with the head on.  Note, they say to turn the head for the kit and positive contact to come together – that did not work on either the four or five cell lights no matter how firmly I turned the head.

Here is my 3-D light.  Look at how far the stem is sticking up with the head on! Sure enough the kit installed just fine on that light *but* it had fewer cells than recommended and it negatively impacted the brightness.

Here is the light output measured before (60,500 Lux because the meter is set to the x100 Lux range) and after (119,800 Lux) on the 3-D cell light:

So it did almost double the light out the front but not enough for me to want to spend $50.  When I did the test with the 5D cell with just the conversion kit screwed straight onto the stem with no head, the output exceeded the meter’s 200,000 Lux limit.  Wow – it was bright.  I sure wish it would have fit.

The one plus out of all this is that I did discover my 3-D cell’s light needed a bit of silicone grease on the threads to turn smoother and it had an old plastic lens that I upgraded to clear glass unit from Neutek:

Bottom line, I returned it the conversion kit to Amazon.  I feel TerraLux should have known it wouldn’t fit all lights — shouldn’t they?  So, if you have an older Maglite (say 1980s or 90s), stick with the single bulb upgrade to LED (the TerraLUX TLE-6EX) and you’ll be a happy camper.  If you have a newer Mag-Lite, you may be okay but I do not know that for sure.


If you find this post useful, please either buy something using one of the links to eBay and Amazon or click one of the advertisements.  It will help us fund continued development of the blog.

This is the conversion kit you should be cautious about in terms of fitting an older light – the quality looked very good:

The single LED unit listed below is in use in all three of my 80s/90s Mag-Lites and works great.  No problems yet of any kind!

7/20/19 Update:  The TerraLUX Ministar 5 TLE-6EX-CNC LEDs are still working great in my lights.  They have survived multiple winters, bouncing around in vehicles, camping, etc.  I’m very happy with them.  Definitely upgrade your lens as well with the unit above.

2/19/20 Update:  Still no problems.


If you find this post useful, please share the link on Facebook, with your friends, etc. Your support is much appreciated and if you have any feedback, please email me at in**@ro*********.com. Please note that for links to other websites, I may be paid via an affiliate program such as Avantlink, Impact, Amazon and eBay.


Converting 1980s-1990s 3, 4 and 5-D Cell Maglites to LED – What a difference!!

Back in about 1982 or 83, I saved my money up in high school and bought a seemingly giant 4-D cell Maglite.  That thing has been all over the US with me – camping, in cars, trucks, by the night stand and so forth.  My dad was so impressed he bought both a three and five cell version and used them on the farm.  Fast forward to 2015, my dad had passed away and I had both of his lights plus my old one – the paint was chipped and the old-style bulbs didn’t crank out anywhere near the light of a modern LED flashlight but they were still operational.  Face it, Maglites were built to last!   My Maglight and my dad’s were just sitting on the shelf and I couldn’t bring myself to toss them.

As so many things go in life, I was researching on LED upgrades for Surefire M951 weapons lights and wondered if some kind of upgrade existed for Maglites.  The answer was a resounding “yes”! There were all kinds of replacement and upgrade parts available.  I wound up getting three TerraLUX TLE-6EX MiniStar5 140 Lumens replacement for the traditional bulbs in May 2015.  Because I am writing this almost two years later, I can tell you the bulbs are a great deal – they’re not very expensive, bright as heck, durable and really easy on the batteries.  I was impressed then and still am now.

LED upgrade vendors come and go on Amazon. Click here to see the current list and pay attention to the scores and number of reviews. I’d not buy anything with less than four stars and at least 30 reviews and the higher the better.

At any rate, two years later,  zero problems, way brighter and better battery life – sounds like something worth sharing while I drink my morning coffee.

First, the Maglite design is really cool.  You can readily get to just about everything that can wear out.  You don’t need to pull the batteries unless you want to, but you do need to unscrew the head and remove it.  Years ago I had a battery burst in this light so I always check batteries just to play it safe.  This is my four cell that I’ll take apart:

Now, you unscrew the front bezel and that gives you access to the lens.  I am pretty sure I tossed my original because it was so scratched up.  When I upgraded the LED, I also put in a new Crystal Glass upgrade lens in.  I just did it on mine and have had zero problems with it.  When you take the bezel off, the lens just lifts/falls right out.  There’s no glue to deal with.

Now the lens  sits in the body on a shock absorbing system.  I found an old bulb and inserted it so you could see the steps.  The bulb is held in place by a threaded collar that simply unscrews and you can then remove the bulb unit.  In the third and fourth photo, you can see the collar to the right of the bulb.

The LED emitter is a tad longer than the bulb but this doesn’t matter.  Just put it in place of the bulb and then screw the collar back into place.  Just snug the collar – you don’t need it to be crazy tight.  Also, I inspected all the O-Rings and out a light smear of heavy silicone grease on all the threads and O-rings to make everything turn smoothly – you can still change the beam from flood to spot, same as always.  Note, if an O-ring is torn, cracked or looking bad, take it to your local hardware store and replace it.

Next up, the rubber cover on my light’s switch was cracked and oxidized.  You can find replacements for those as well.  They are simply press fit so you can remove them very easily with your fingers or use a small tool to lift the cover up.  The replacement I bought in 2015 still looks like new.

The result:  I spent about $30 and have a very bright durable light.  I keep one in my truck and the other big light floats around between my shop and the house.  In the next photo, you can see the LED emitter working.

One thing that is interesting is that the five cell’s LED is not as white as the other two but it used to be.  I’m not sure why – I think it has the original batteries from two years ago.  It’s something else to add to the need to check out when there is free time list 🙂

Would I do it again?  Absolutely.  I like being able to use these lights once again.  There’s a lot of nostalgia involved with both of them.

12/28/23 Update: The upgrade I bought is no longer sold. The following are options that are highly rated on Amazon:

5/23/19 Update:  Still working great.  No problems and has been used a ton not to mention bouncing around in my truck through the winter.

2/9/20 Update:  Still going strong – no failures or problems.


If you find this post useful, please share the link on Facebook, with your friends, etc. Your support is much appreciated and if you have any feedback, please email me at in**@ro*********.com. Please note that for links to other websites, I may be paid via an affiliate program such as Avantlink, Impact, Amazon and eBay.