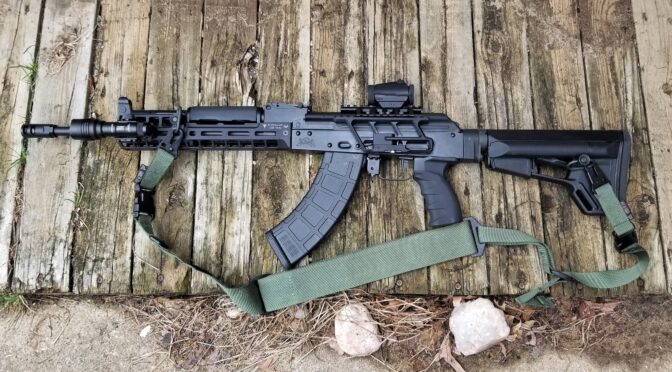
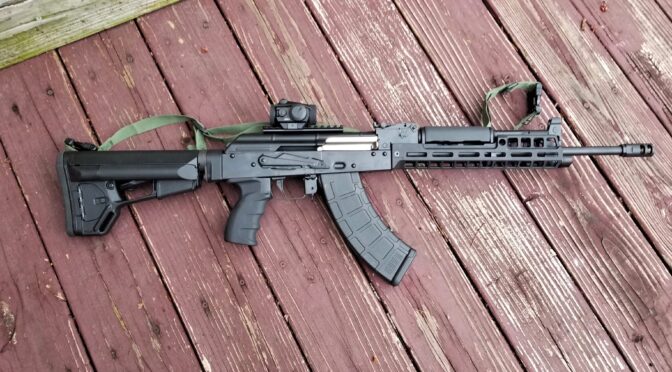
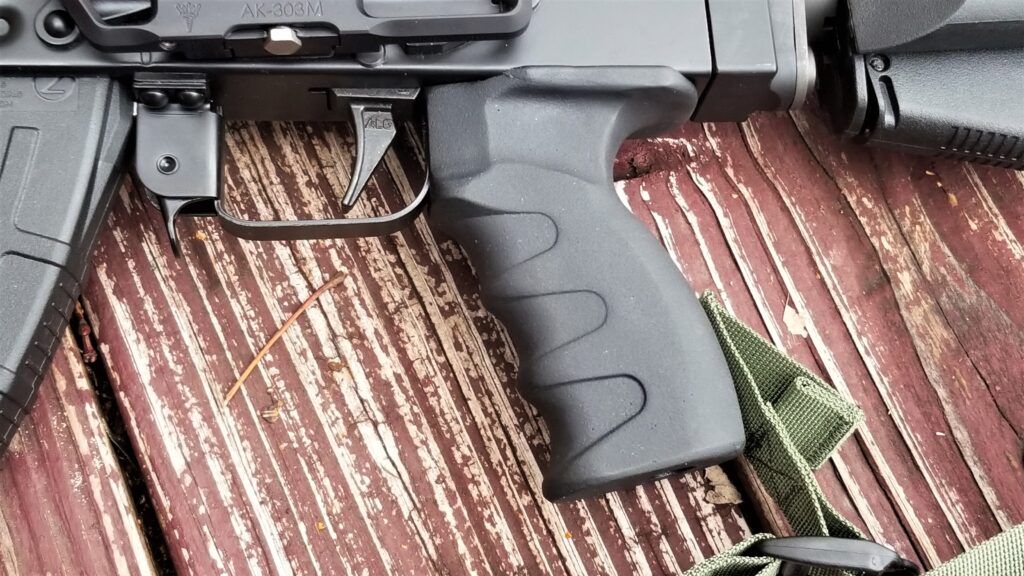
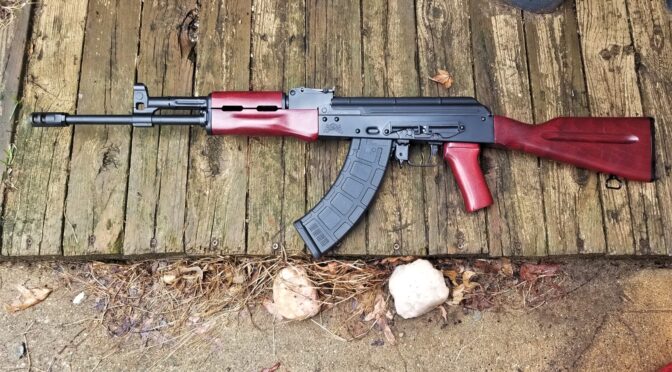
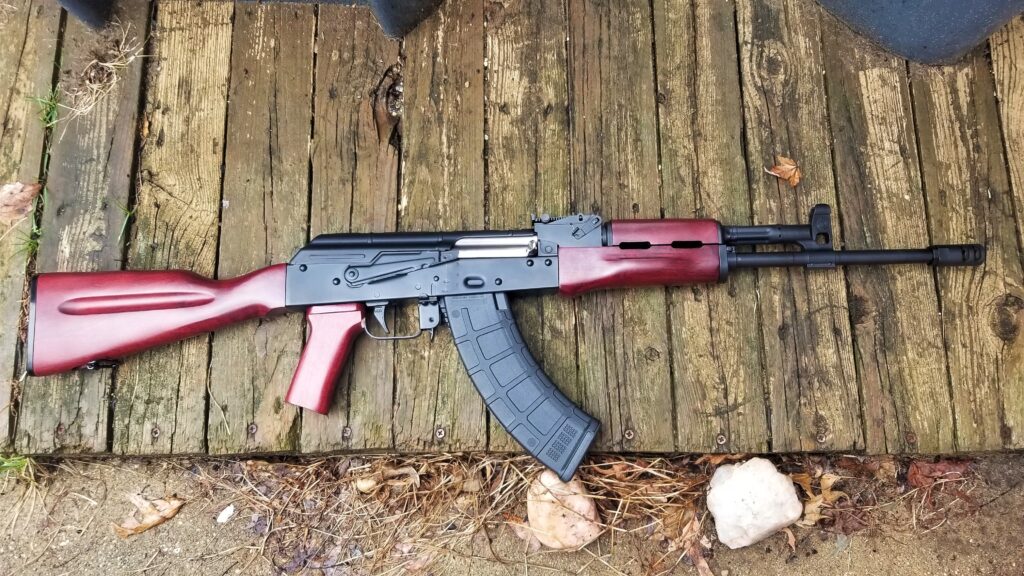
In this final post, I want to share a series of photos of the end result:
By the way, the sling you see is from S2 Delta. I have a number of their slings now and they are nicely done. You can pick them up on Amazon.
Palmetto State Armory (PSA) has a stunning array of Kalashnikov firearms now. AK-47s, AK74s, 100 series, rifles, pistols … it’s impressive. Click here to go to their main AK menu.
Conclusion
This is it for now. Hopefully when the Corona Virus stuff calms down I’ll be able to take it to the range. I’m betting it’s going to run real nice based on how it feels.
If you find this post useful, please share the link on Facebook, with your friends, etc. Your support is much appreciated and if you have any feedback, please email me at in**@*********ps.com. Please note that for links to other websites, I may be paid via an affiliate program such as Avantlink, Impact, Amazon and eBay.
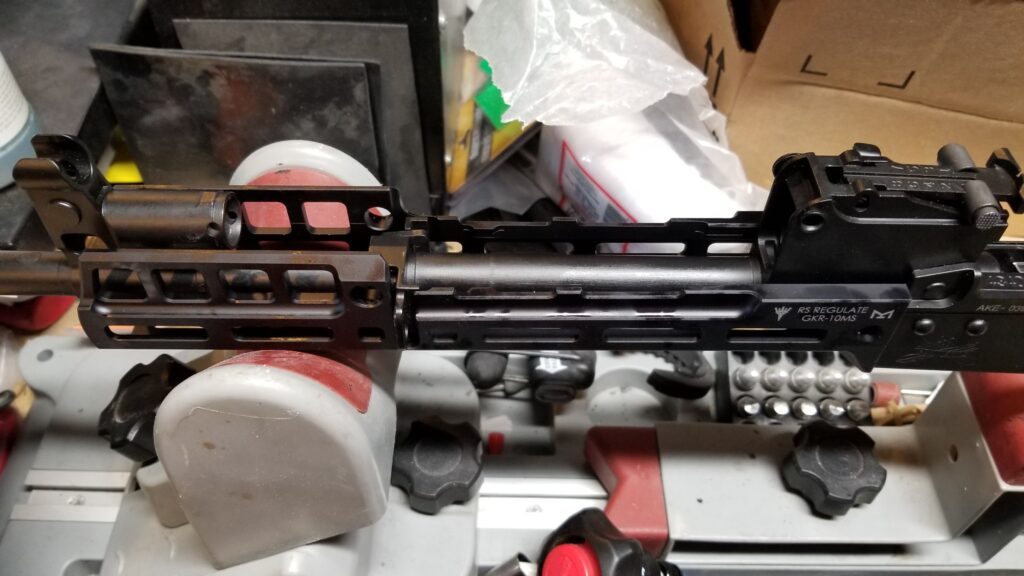
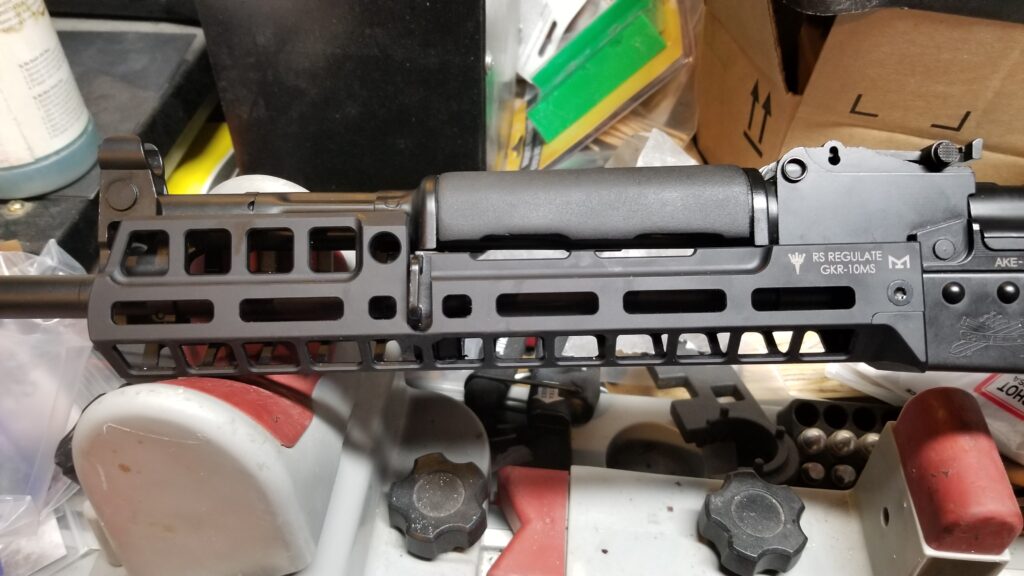
In place of the handguards, I planned to install one of the RS!Regulate GKR-10MS aluminum rails. It’s 10″ long, is ready for MLOK attachments and looked wicked. Furthermore, you do not need to remove the sling loop on the lower handguard retainer. Scot Hoskisson is the owner and I’ve used his scope mounts on a number of rifles plus one of his handguards on my IWI Galil Ace pistol and really liked it.
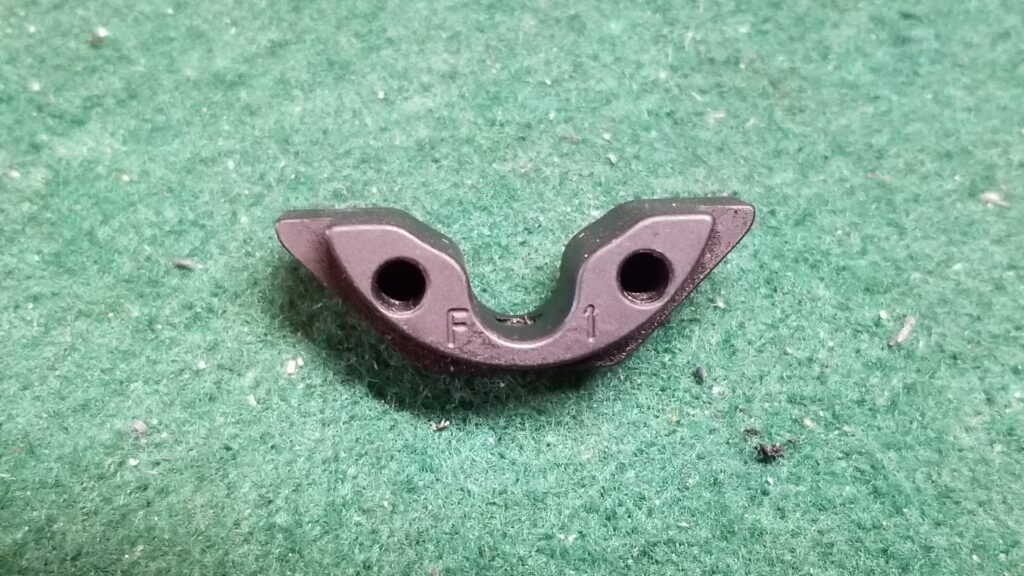
I thought this would be easy but that turned out not to be the case due to a seemingly small change PSA made that I’ll cover in a moment. Basically the rail system has three parts – The F1 front piece, the middle rail section and a rear end cap. Scot provides good instructions so follow them to the letter.
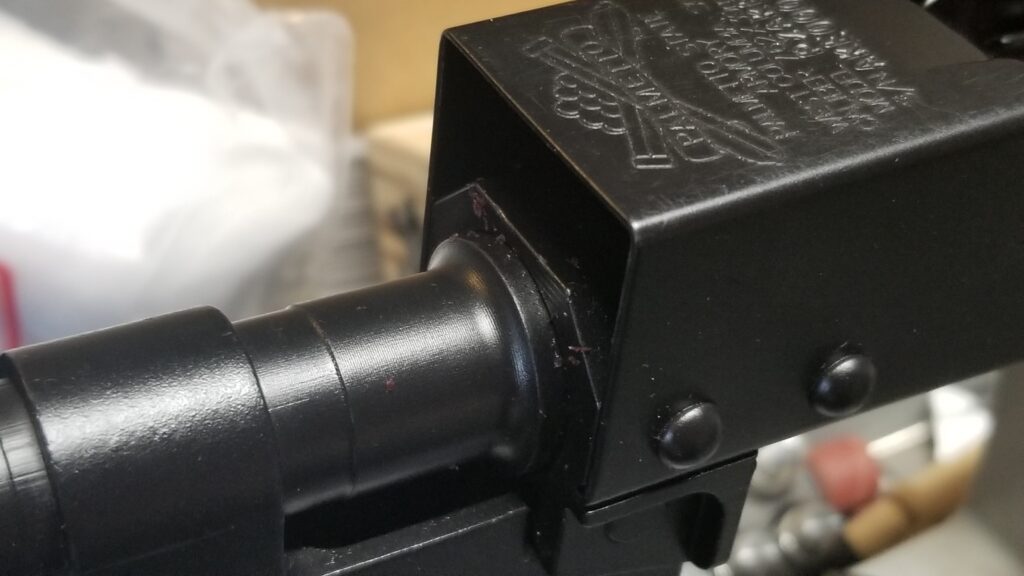
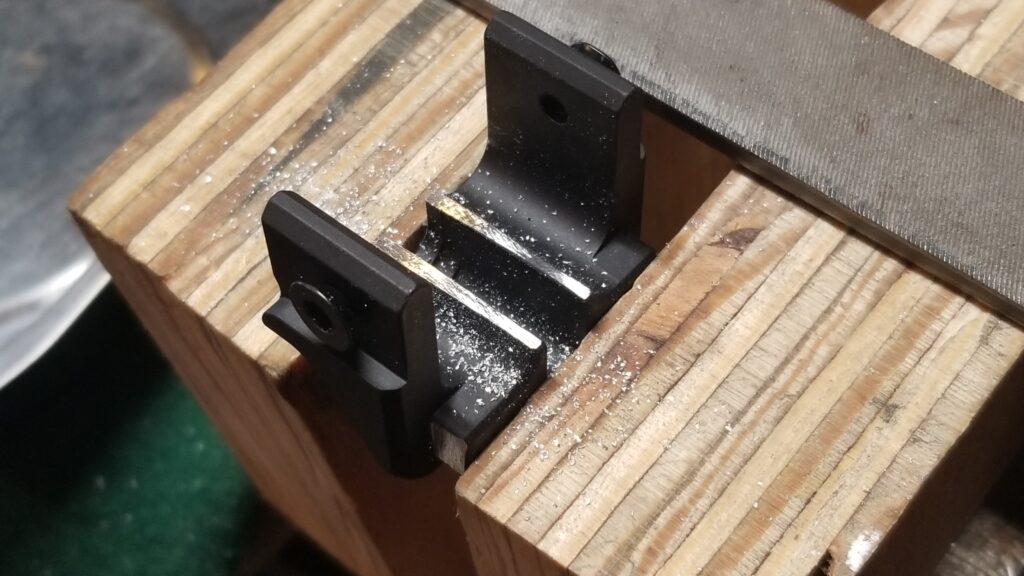
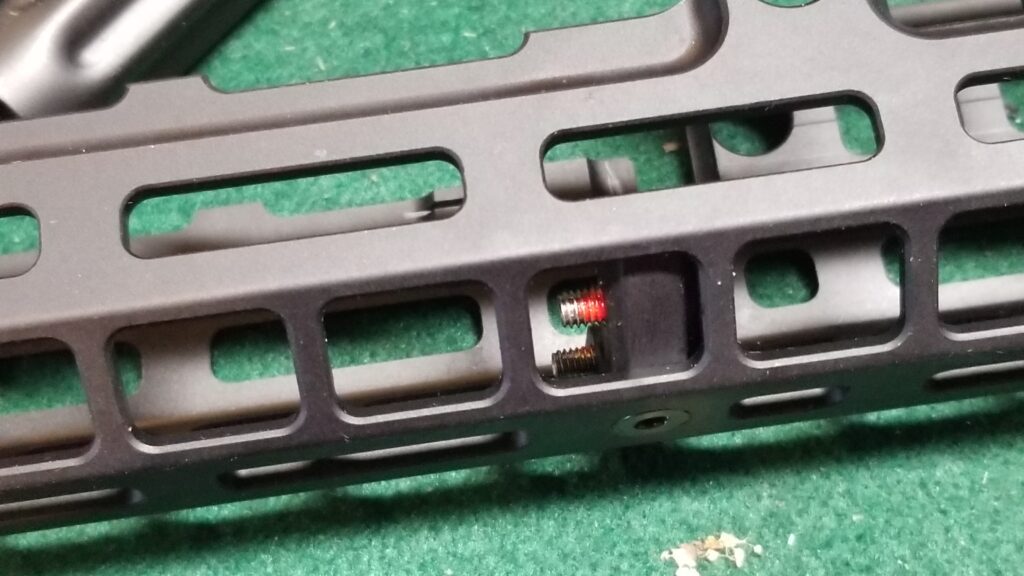
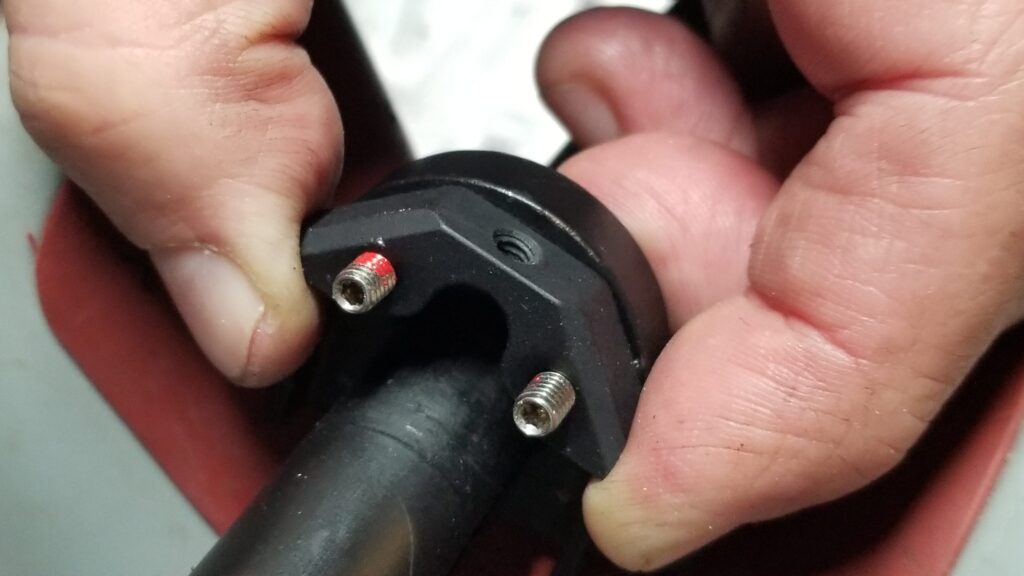
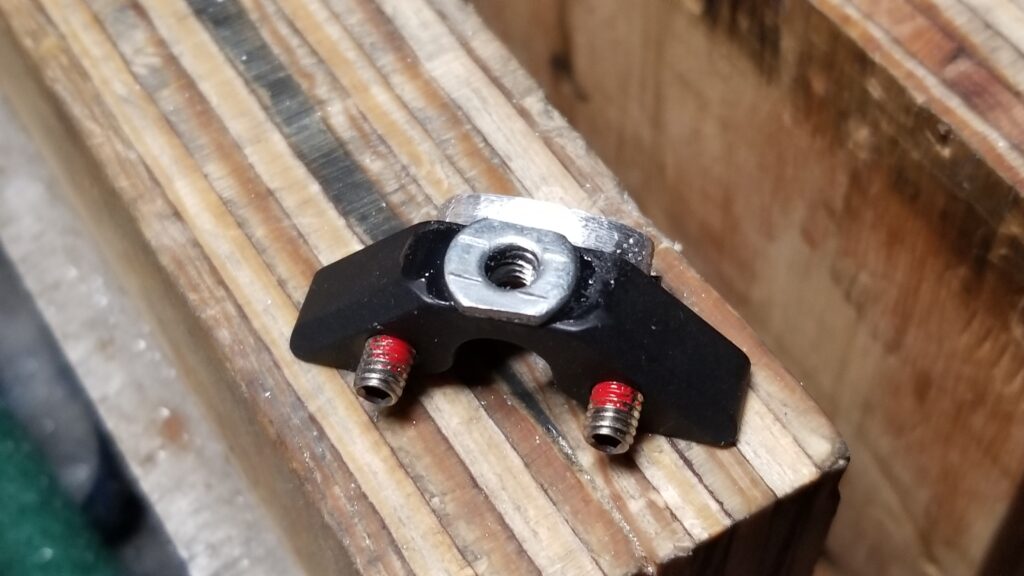
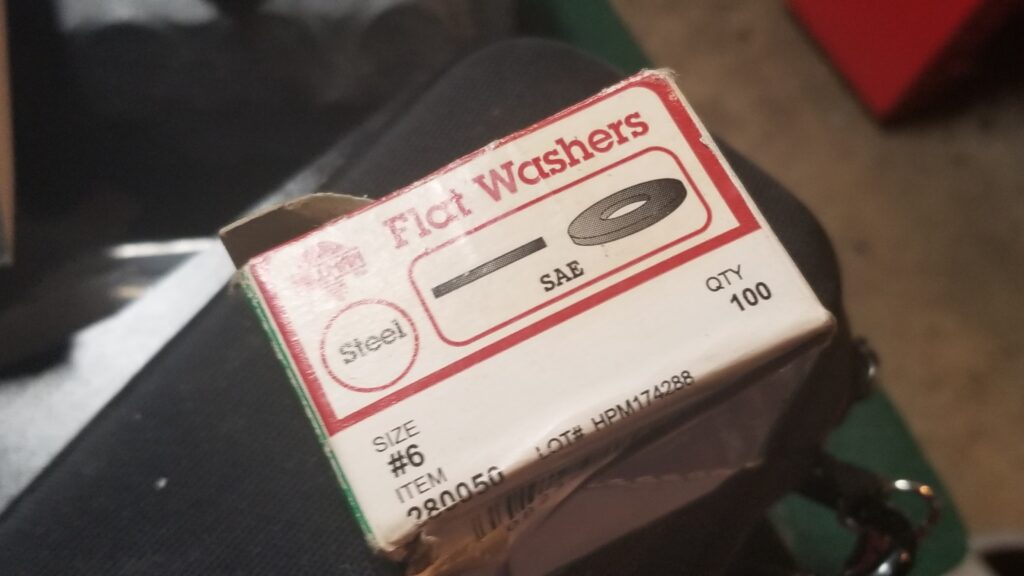
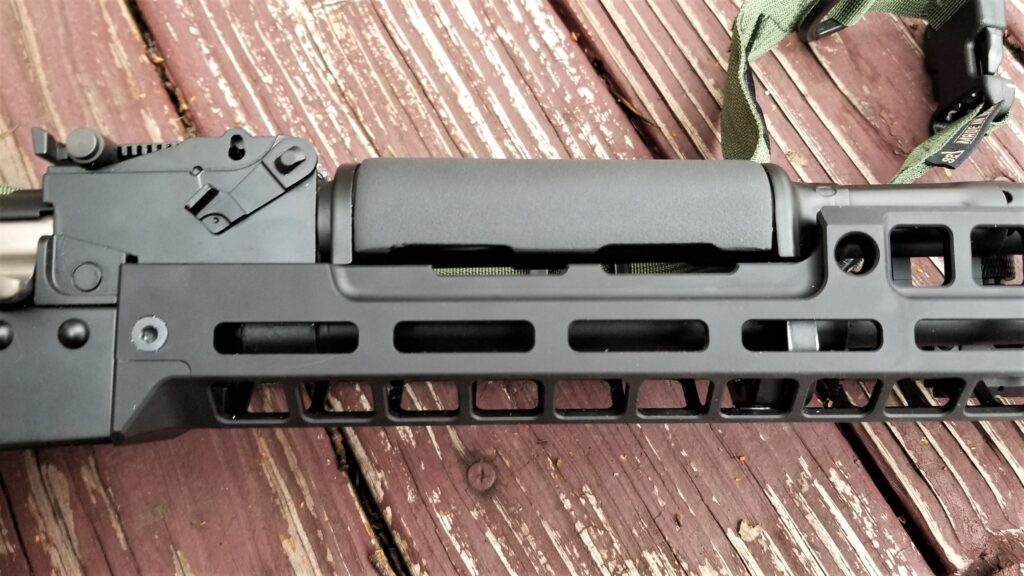
Like other AK rifles, there is a space between the front trunnion and the receiver to allow the tab of the handguard to press into. The flakes you see in the photo are presumably from the finish of the red handguard, just FYI.The block is designed to be filed to fit. You can see where it will go but you will need to take your time and file it to fit. The elevated sides of the U in the middle need to be filed to fit and you might need to take some off the sides as well.So take your time, remove a little and test fit over and over. A trick I learned that I applied is to file the protrusions at a very slight angle so that as the handguard is pressed further in, the tighter the fit becomes.It was coming together nicely. Notice the rail is secured to the end cap and is clearing the handguard retainer nicely in terms of the slot.Next, this F1 nosepiece has to slide back inside the handguard, get screwed in place and then set screws on the opposite side are tightened thus locking everything in place This is where things go sour.Every time I tightened down the bottom screw, the F1 piece would cam backwards vs. sitting properly. I tried a few times and could not get it to sit. I have both carpal tunnel and a tremor so this is very tedious for me to try and do. I reached out to Scot and he told me a compatability issue had come up with the PSA handguard retainer.Due to ever so slight dimension differences, the F1 piece does not sit flush or even lower than the retainer so when the bottom screw is tightened down it cams the F1 backwards. Argh!I spent almost an hour of careful filing and test fitting and finally decided to super glue a trimmed #6 washer to the bottom of the F1 unit to address the issue. I think this would have worked from the start. Note, Scot tells me that he plans to make a PSA specific unit. It’s totally do-able as-is once you realize you need to add a spacer to the unit. It was rock solid after I made that change and tightened down the set screws. I also had to use a longer 8-32 screw vs. the supplied unit due to the spacer.Folks, this is the type of washer I used – literally it came out of this box. I ground two flat sides so it wouldn’t stick out past the front or back of the F1 part. Your goal is for the washer to make contact with the handuard before the retainer does. If the retainer hits first, it will want to make the F1 part cant as you tighten it.Look closely at the F1 fitting in front of the handguard retainer inside the rail – you can see the shiny #6 washer doing its job.
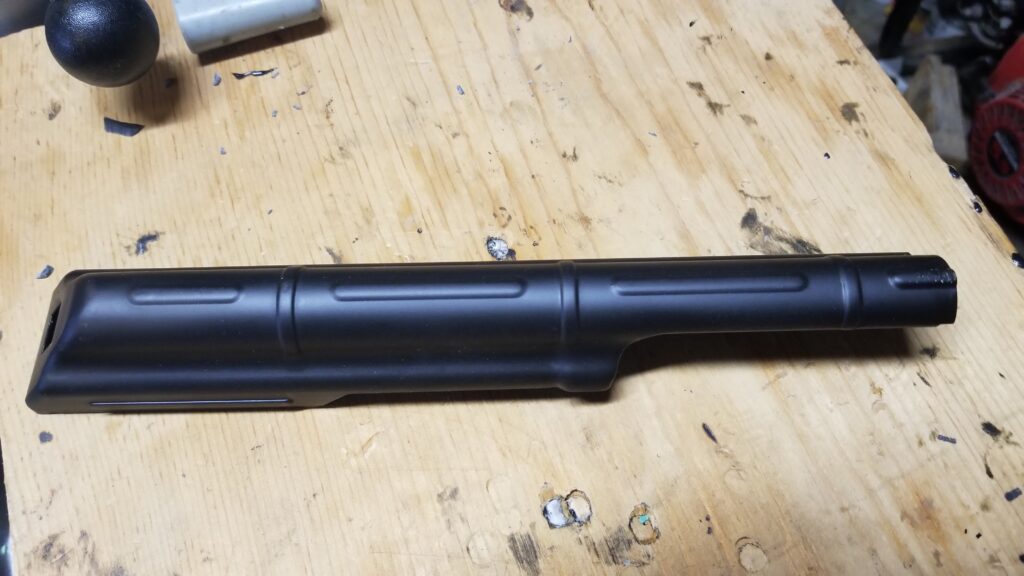
One Of Our Gas Tube Covers
I made a bunch of new molds to make AKM gas tube covers and they are all based on Polish AKM units. In other words, the masters were real Polish covers that I then used to make the molds. It turns out that the PSA gas tube cover is just a tad taller and uses a different spring clip than the Polish units. Our new covers work just fine – the difference surprised me though.
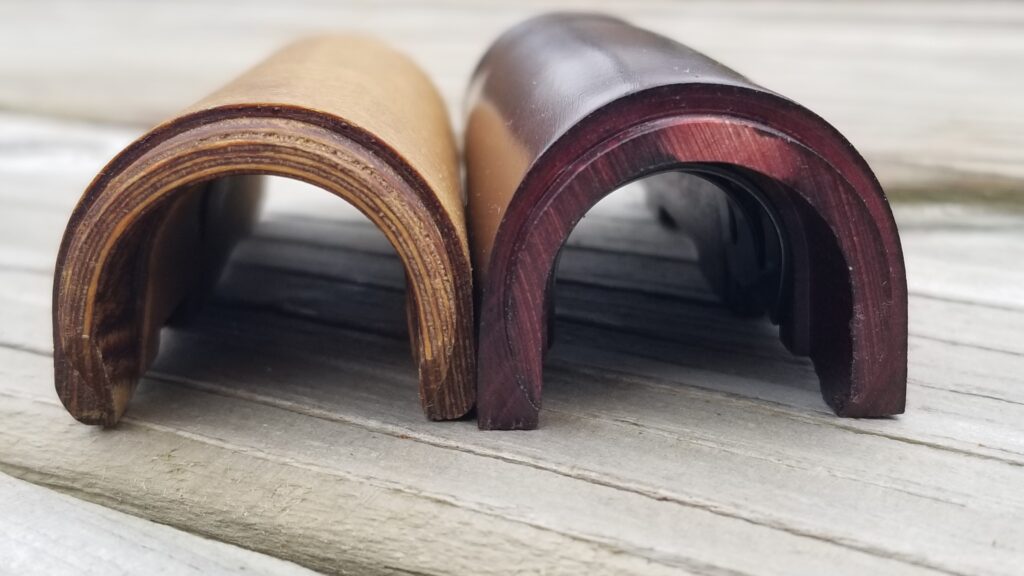
Here’s an original wood Polish AKM gas tube cover on the left and the PSA model on the right. Note the PSA unit is just a tad taller.To remove the PSA cover, you just rotate it on the tube 180 degrees and pull them off. Because the rifle is brand new, this is very easy to do. On surplus rifles you can have a real fight on your hands trying to get them off sometimes.Here’s a photo of the installed GKR-10MS rail and our gas tube cover.
One Of Our Russian AK-12 Grips
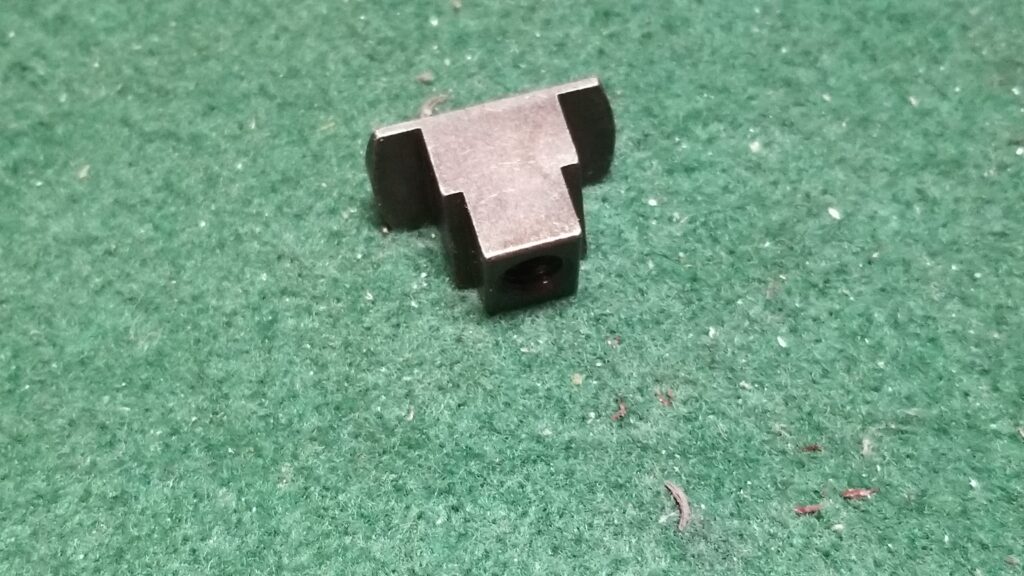
To change the pistol grip, you remove this bolt and then the T-nut inside will flop around.This is the loose T-nut that sticks through the receiver. When you install the new grip, use one finger to keep this in place while you are getting the bolt started.This is our custom US-made AK-12 grip.
M4 Adapter and a Magpul ACS Stock
Next up was the stock. I really prefer the M4-style adjustable stocks and the Magpul ACS is really my go-to unit for most of my builds. It’s solid and has a locking clamp so there is no wiggle.
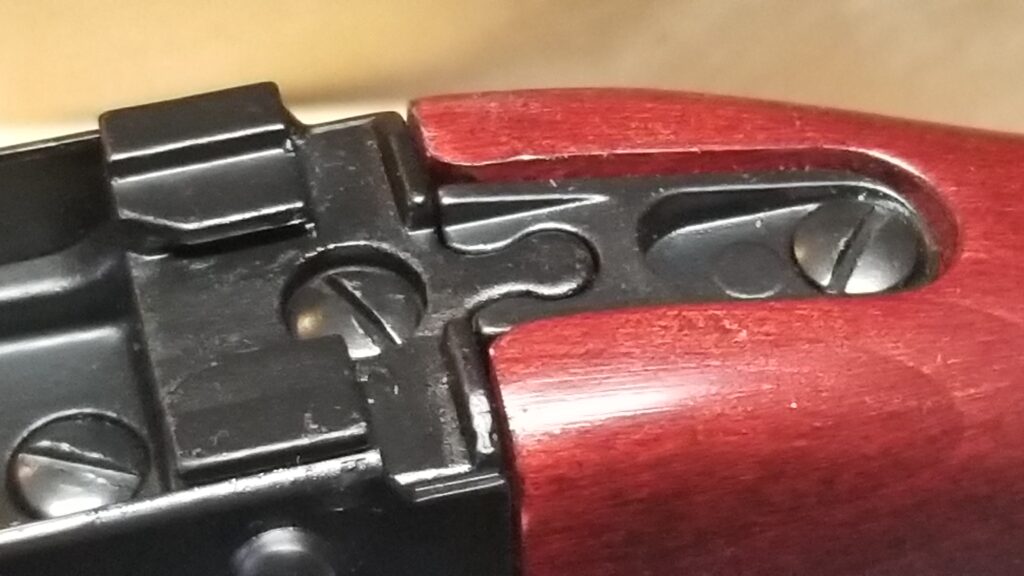
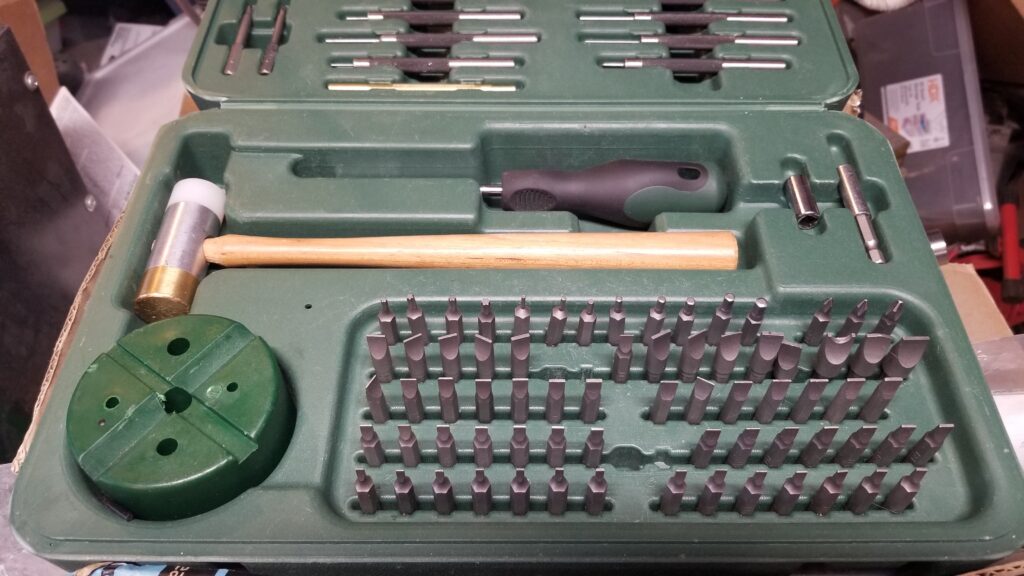
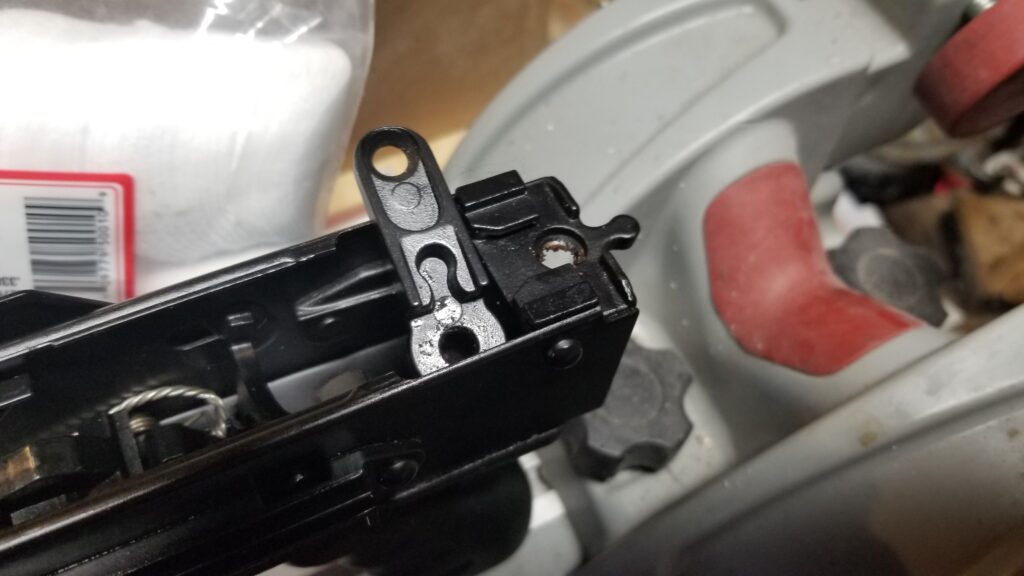
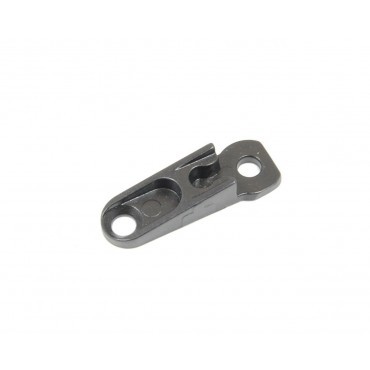
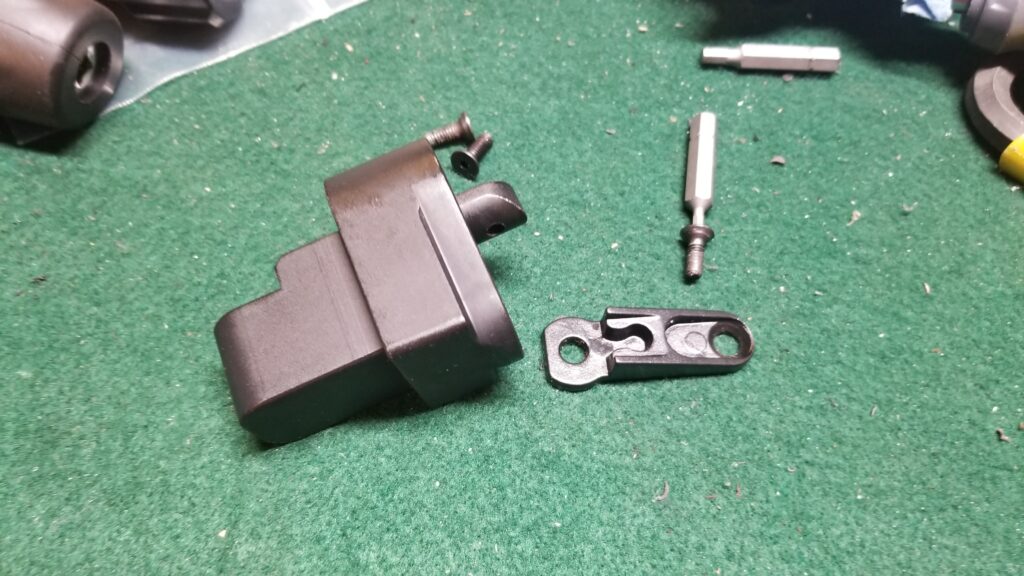
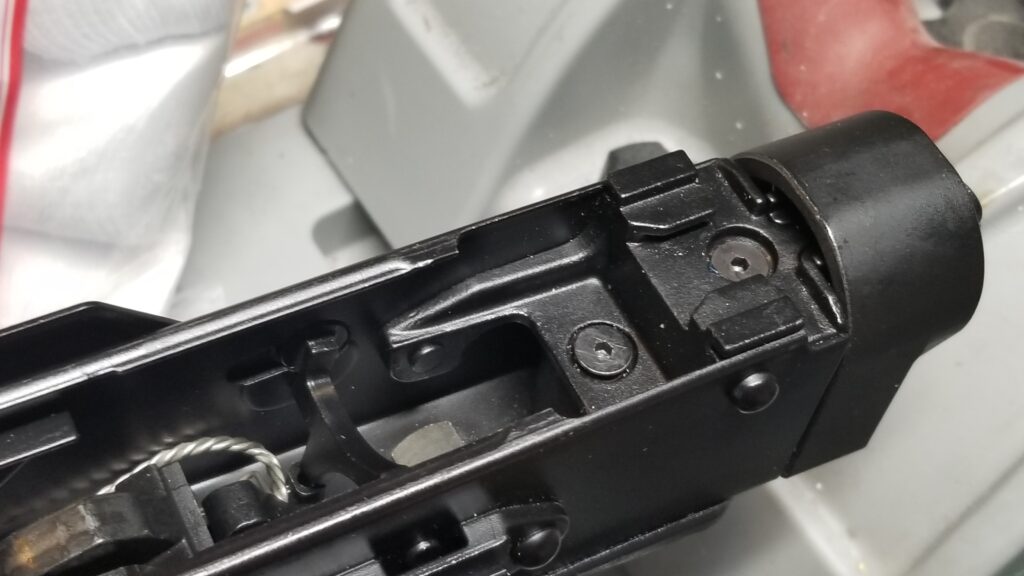
To remove the stock, first take out these three blade screws. Now, to avoid chewing them up, use a screwdriver blade bit that completely fills the slot from top to bottom and left to right. Using a screw driver that is too small will cause the metal to deform around the screw heads and make a mess. Furthermore, screw driver bits are hollow ground so their end is not tapered unlike a normal screwdriver is.One of the reasons I keep this Weaver tool set handy is the bit collection. Note how there are a variety of sizes of blade bits. This is my go-to for removing stocks for that very reason.The stock is press fit into the receiver. It should either just pull out or you may need to use a mallet and wood dowel to tap it out. Surplus AK buttstocks can be a bear to remove but since the AK-E is brand new, you will probably find it fairly easy. In this photo, you can see what some call the “puzzle piece” or “jigsaw puzzle piece” that is unique to PSA. This lets them have one rear trunnion and if the application does not warrant the tang, then it is not installed. Historically, we would have needed to cut that off depending on what type of buttstock system we planned on using. In this build, I am going to use an M4 adapter and I do need the tang so I was careful not to lose it.
If you are now thinking, “crap, I lost the puzzle piece/rear tang” then you are in luck. PSA sells just that part. Click here to go to the product page.
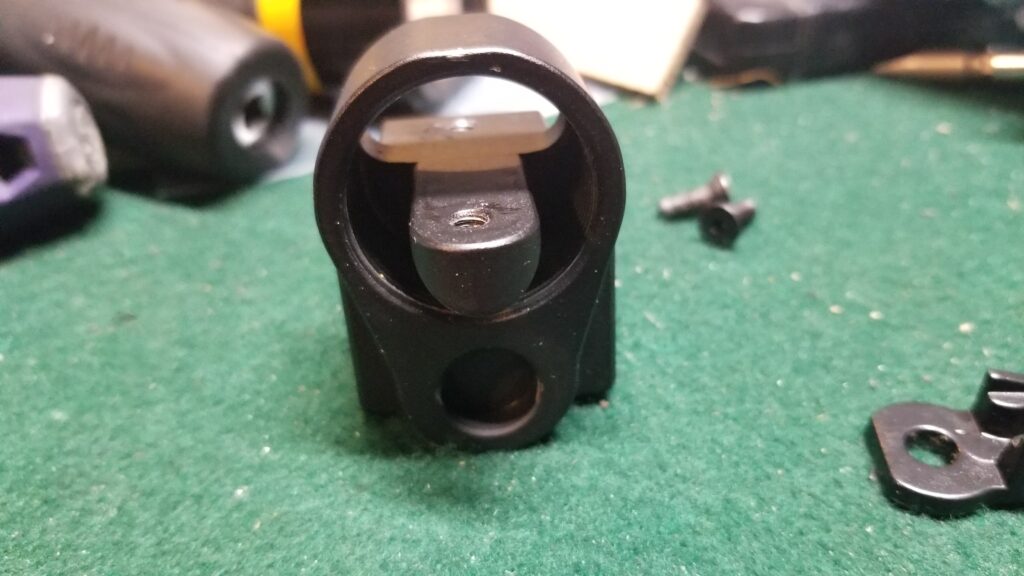
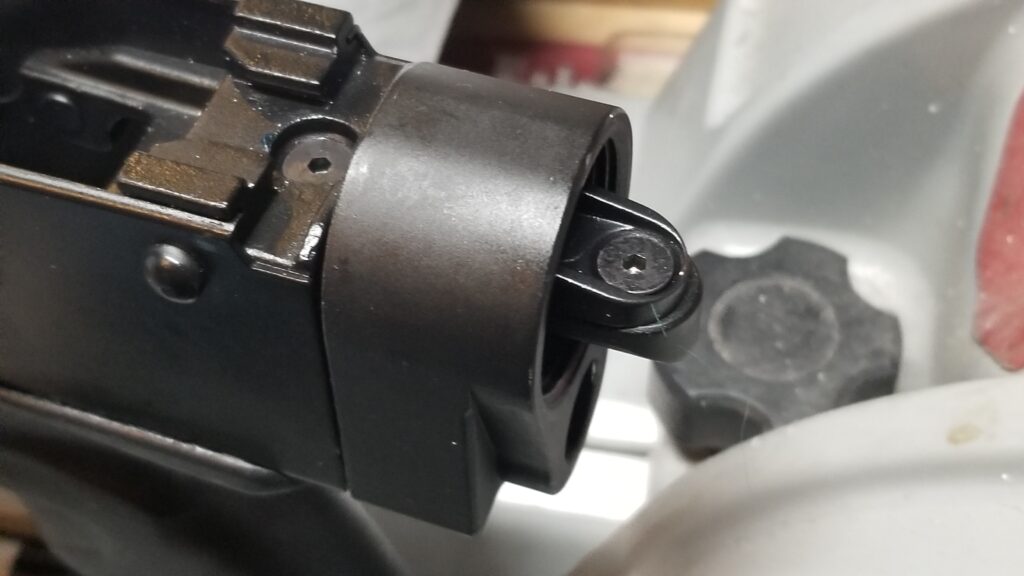
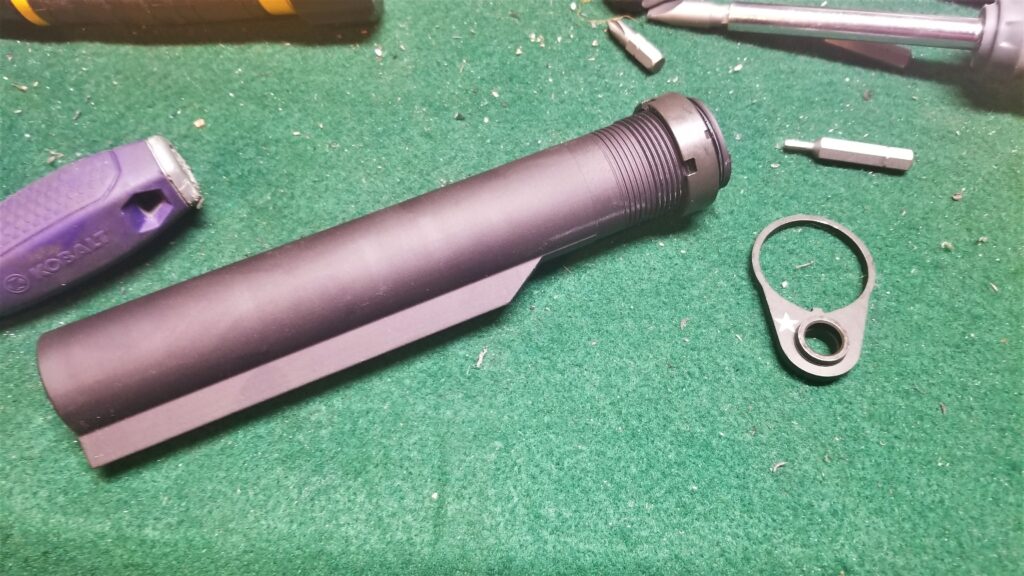
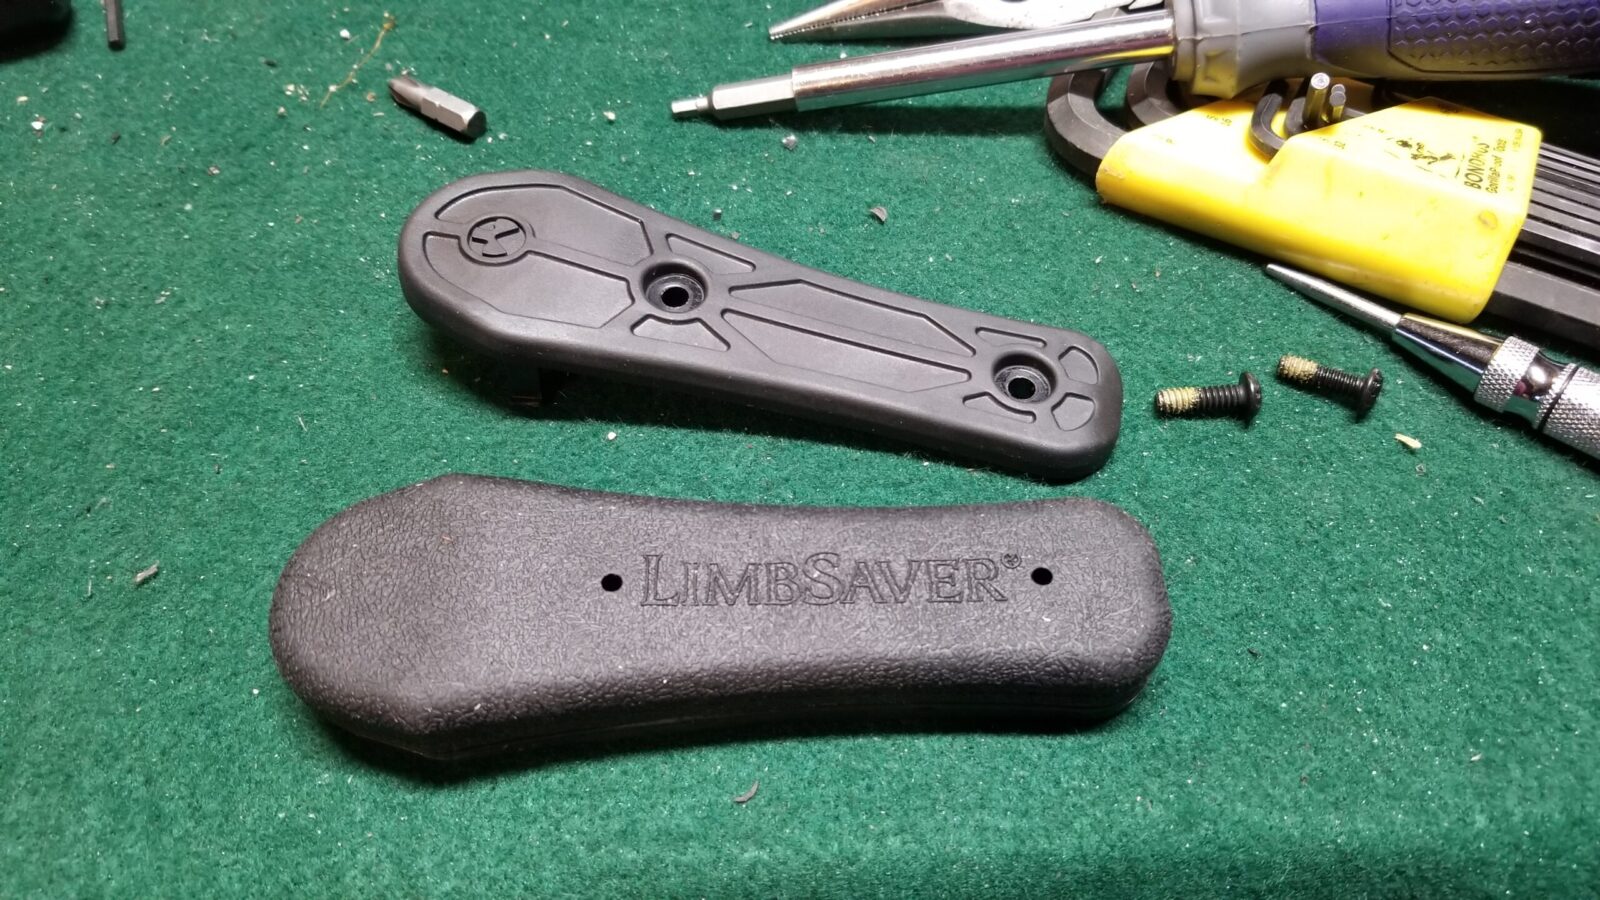
This M4 adapter was on my AK-V. It is either made for PSA by Rifle Dynamics (RD) or it looks just like RD’s design. Basically it slides in place of the stock and the tang of the stock passes through the M4 buffer tube’s mouth. This was an ingenious move and created a short solid adapter. PSA does sell this – click here for the product listing. Unfortunately it is out of stock a lot probably due to the popularity of their rifles and pistols that use it. I’ve used the RD adapter and it is rock solid so I definitely recommend getting that one if you can – check out Brownells or RD directly.Here’s a view of the adapter from the rear. You can see the tang passes through the threaded circle where the buffer tube will screw in.The adapter goes where the stock was at using the supplied machine screws. Apply blue loctite so they don’t vibrate loose.You can see the puzzle piece / modular rear tang is installed and is protruding through the threaded attachment for the buffer tube. Be sure to apply blue loctite to this screw also. When I need AR parts in a rush, Primary Arms is one of the vendors I check first. They ship fast – often the same day if not the next. This is an Expo Arms 6 position Mil-Spec buffer tube, an Expo Arms castle nut and a BCM Gunfighter QD End Plate (meaning it is an M4 receiver end plate but it has the attachment point for a QD swivel.On an AR, I worry about torque specs for the castle nut. On an AKM with a sheet metal receiver, you will see it start to twist as you apply more more torque so my recommendation is *not* to treat it like an AR because I don’t want to bend the receiver. I tighten the castle nut down farmer firm (meaning snug and then some) and then stake the nut to the end plate to keep it from moving.These are my three key tools for installing a Magpul ACS buttstock as well as the tube and cast nut. The above is an automatic center punch. It’s be Neiko and I also have one from General Tools. I use them for staking the castle nut by striking the surface 3-4 times. With my tremor I have a hard time with a hammer and center punch, which is what most folks use. To tighten the castle nut, I use a Magpul wrench. The way it engages the castle nut is very well thought out and reduces the odds of the tool slipping and marring the finish. The bottom is a simple tool I make and sell to grab the friction locking mechanism of the ACS stock and lift it high enough so the stock can slide into place. Yes, there are other ways of doing it but the tool makes it super simple.Here’s the installed ACS stockWhile the AK doesn’t have much of a recoil, it can be softened further by adding a Limbsaver recoil pad that simply replaces the OEM Magpul pad that is a fairly hard plastic. You just use a drive to remove the two screws, pull the old pate off, push the screws into the new Limbsaver pad, line the pad up with the stock and drive them into place.Here’s the installed Limbsaver recoil pad. It fits very nicely as you can see.
RS!Regulate Optics Mount and Vortex Crossfire Red Dot
This is the AK-303M lower. The clamp is adjusted by compressing the clamping bar and turning that silver shiny screw that is then exposed. Clockwise tightens it and counter-clockwise loosens the clamp. I had to dial it in a bit for the PSA clamp and you probably will for just about any rifle. It’s nice and snug now. Here’s another view of the AK-303M. The top AKR will mount onto the lower and be screwed into place. When everything is dialed in, the rail can be drilled and a roll pin installed to permanently marry the upper and lower if you so choose. Yes, that is a picatinny rail. The upper mounts to it by have the inverse of the rail that then marries together.Here are the two halves mated together with a Vortex Crossfire Red Dot. The Crossfire red dot is my go-to when I need a good basic red dot optic. I may change it out for a 1-6 or 1-8 scope but time will tell.
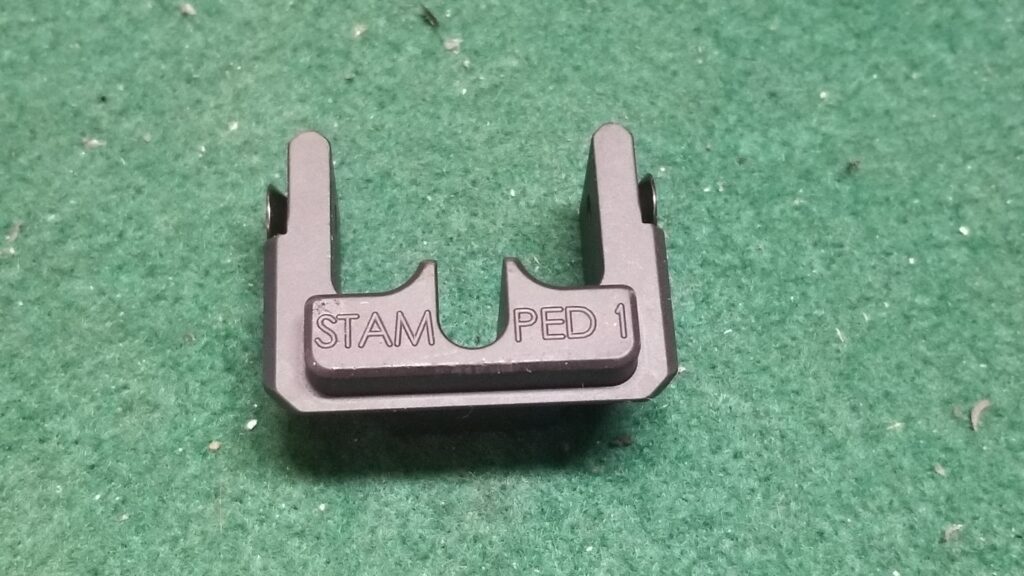
Streamlight 88058 Protac Rail Mount 1
The last tweak I did was to add a short piece of aluminum Magpul rail and a Streamlight 88058 Protac Mount 1 light. I have found Streamlights to be very reliable and I use them on a variety of weapons. This model is dedicated for a rail and comes with a pigtail and pressure switch if you want to mount the switch remote from the light. I am right handed, not a huge fan of vertical grips and find it very easy to reach up with my left thumb and turn the light on or off.
The 88061 is a 350 lumen LED light that can use either a AA battery or a CR123A – I prefer the CR123A batteries – it is brighter and lasts longer than if you use the AA battery. Regardless it is cool to know that you have an option in case you are out of your preferred battery but have the other.
By the way, you can see the quick disconnect (QD) sling swivel in the background. This is an example of a part where you do not want to go cheap. The unit seen above is Midwest Industries. Go with a name brand and not some cheap knock-off.
Note, I have to buy all of my parts – nothing here was paid for by sponsors, etc. I do make a small amount if you click on an ad and buy something but that is it. You’re getting my real opinion on stuff.
If you find this post useful, please share the link on Facebook, with your friends, etc. Your support is much appreciated and if you have any feedback, please email me at in**@*********ps.com. Please note that for links to other websites, I may be paid via an affiliate program such as Avantlink, Impact, Amazon and eBay.
PSA AK Webstore Links
Interested in an American made AK? Consider Palmetto State Armory (PSA) as a source. Click on the following links for the associated webstore categories for AK-related rifles, pistols and parts at PSA:
Everyone is scrambling for face masks to protect themselves and it makes perfect sense. On one hand we want to protect ourselves and our loved ones and on the other, we don’t want to spread the illness either. At this point, if you are going to the store or other area with people, you really should be wearing a mask. Particles will float in the air and that is bad news for everyone.
The recent CDC guidance to wear face masks seems to be mainly aimed at capturing droplets from the wearer so as to not infect others. It’s not really aimed at protecting the wearer from inhaling. I would recommend you do some reading about what amazing people are figuring out in terms of making your own personal protective face masks using shop towels and other materials. In general, if you can see light readily through it, such as a basic T-shirt or bandanna, you really aren’t stopping anything. I’d like to help improve your odds and want to share some resources with you.
A study found that denim, 80-120 thread count bed sheets, paper towel, canvas and shop towels are the top 5 materials for face masks combining both filtering and breathability.
There is a new material called “Filti” that can hit N95 filtration that you can buy. Click here to learn more.
Buy the shop towels at stores such as home improvement, hardware, automotive and industrial supply stores. Blue shop towels are *not* regular kitchen towels. If you try to buy them online they will likely be insanely expensive. You will probably pay $3-4 from a store for a roll with 50 sheets. They often come in single rolls, doubles, six packs, 12 packs and boxes. Don’t go nuts and hoard them please.
The following are shop towelas and 1/16″ bungee/elastic cord for making masks at Amazon
The following is a great how-to video. By the way, the accordion folds help with fit and increase the surface area which will make breathing easier. The larger the surface area then the easier air flows.
By the way, there are tons and tons of designs as media and bloggers share advice. Google and read by all means – educate yourself. Always ask – does this make sense? Also remember that you need to both be able to inhale as well as exhale.
Quick test to see if your mask has any chance of helping you – Dr. Gady Abramson
Cleaning Face Masks For Re-Use
With face masks, assume they are contaminated when you remove them with your hands. Immediately wash your hands and do not rub your eyes, touch other surfaces, etc.
Now, you can disinfect these things and other PPE using an oven. Heat them to 70C/158F for 30 minutes. Be sure not to touch other surfaces around your oven. Clean all surfaces just to be safe.
1/4 cup bleach per gallon of water for tables,bathrooms and toys
1/3 cup of bleach per gallon of water in case of accidents or illness.
I hope this helps you out – we’re all in this together.
If you find this post useful, please share the link on Facebook, with your friends, etc. Your support is much appreciated and if you have any feedback, please email me at in**@*********ps.com. Please note that for links to other websites, I may be paid via an affiliate program such as Avantlink, Impact, Amazon and eBay.
In my last post, I showed you a bunch of photos with my observations of the AK-E right out of the box. In this post, I am going to take it apart and see what I see. Like the last post, I’ll post photos with my thoughts in the captions.
I’m going to be upfront and tell you what I found in terms of flaws or things you ought to be aware of. With that said, this is the smoothest cycling AK with the best trigger out of the box without any lubrication at all that I have ever felt – my IWI Galil Ace was this way also.
So, let’s get to it…
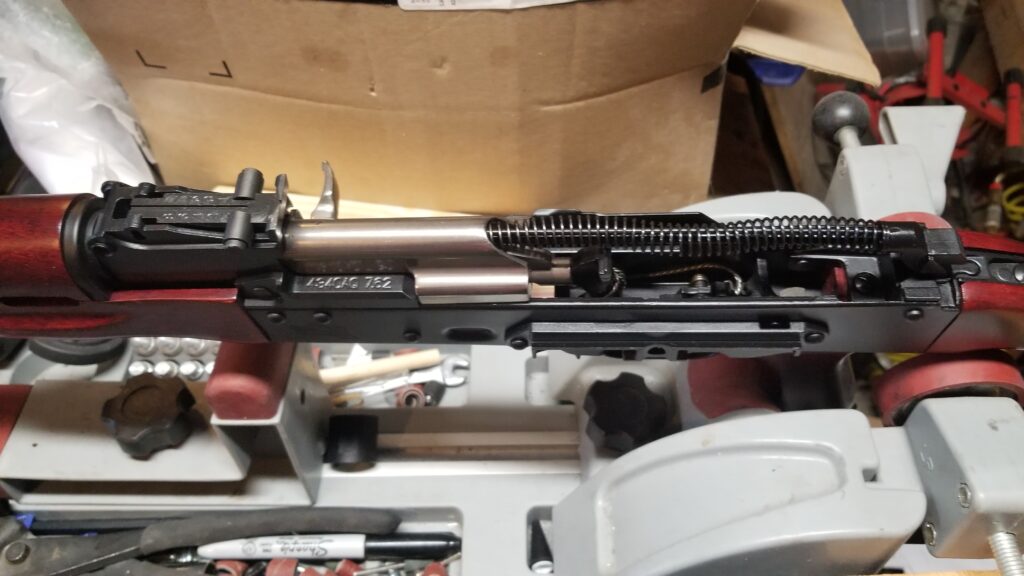
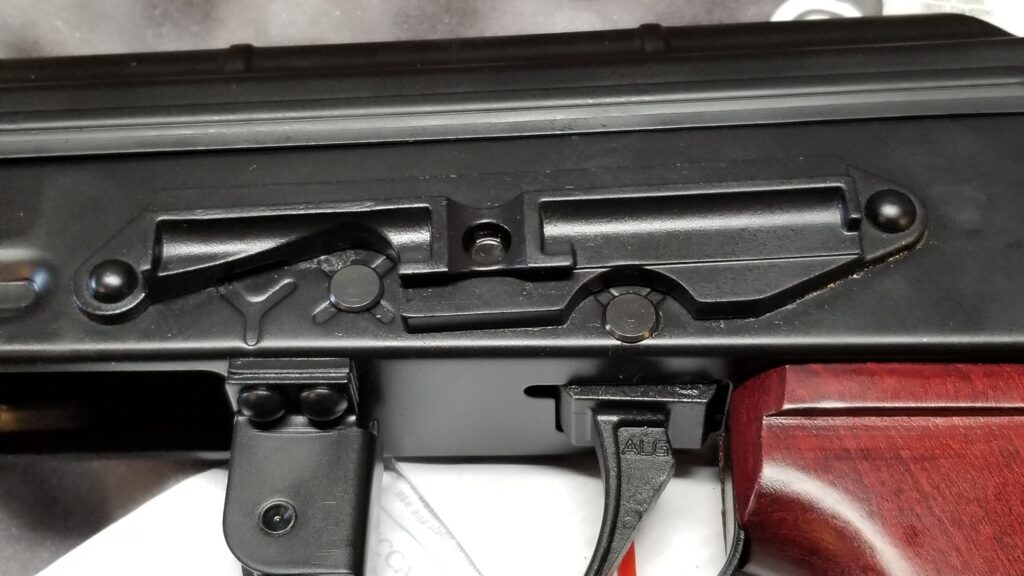
You push in the protruding button of the recoil spring assembly to do the takedown. Note the proprietary jigsaw puzzle piece rear tang that PSA uses. It allows them to have one trunnion and the flexibility to support different types of stocks. Note the slightly bent edges of the screw’s slot. I really wish guys would use the proper sized screw driver to switch to a different type of fastener. This one’s not too bad but the inside ones are worse.It has a basic stamped dust cover with beading to stiffen it.Here’s the top of the dust cover. The beading definitely stiffens the cover up.Here’s our first peek inside. Note the marking on the shoulder of the front trunnion. You have a clear view of the top of the Nickel Boron (Ni-B) coated bolt carrier and the bolt is sitting just in front of the ALG AKT hammer. Good view of the characters on top of the trunnion. The AKE-0393 is the SN. Note the Ni-B coating is very consistent. You can see the hammer is solidly engaging the bolt and firing pin.The recoil/operating spring is captured on a two-piece wire assembly just like other AKMs.The wood is fit nicely. I mentioned earlier the external screw head was messed up just a bit and now you can see the internal two that have their slots messed up more. This happens from using two small of a screw driver. The assemblers need to use the proper sized driver. Note the split rear trunnion where the forward rivets are.Close up view of the ALG EKT-EL trigger. You can tell this is the enhanced trigger vs the ultimate because the trigger does not have the Ni-B coating that the ultimate does. Note that is has the auxiliary trigger spring installed – that is the single wound spring at the top of the photo. According to ALG, it adds 10-14oz of pull over the normal AK spring by itself. Also note that the select/safety lever can sit fully on trigger without needing the optional roll pin that ALG includes with the aftermarket trigger to allow builders to accommodate different lengths of selector stop bars.Here’s the hammer in the cocked position held by the hook. The manganese phosphate (parkerized) finish is notably smooth. If it wasn’t, there wold be a grittiness. It’s a very nice trigger. You can see the leg of the auxiliary spring pushing down on the top trigger leg in the photo – it’s the single would spring just forward of the double wound spring.
In case you are wondering, I collected a sample of 10 trigger pulls using my Lyman Digital Trigger Pull Gauge. Weights varied from 4lbs 1oz to 4lbs 12oz. The average was 4lbs 5oz. If someone wanted a lighter pull, then you could remove the auxiliary spring located on the trigger and probably be down in the 3 pound range. I like the feel of the trigger currently and am going to leave the spring in for now.
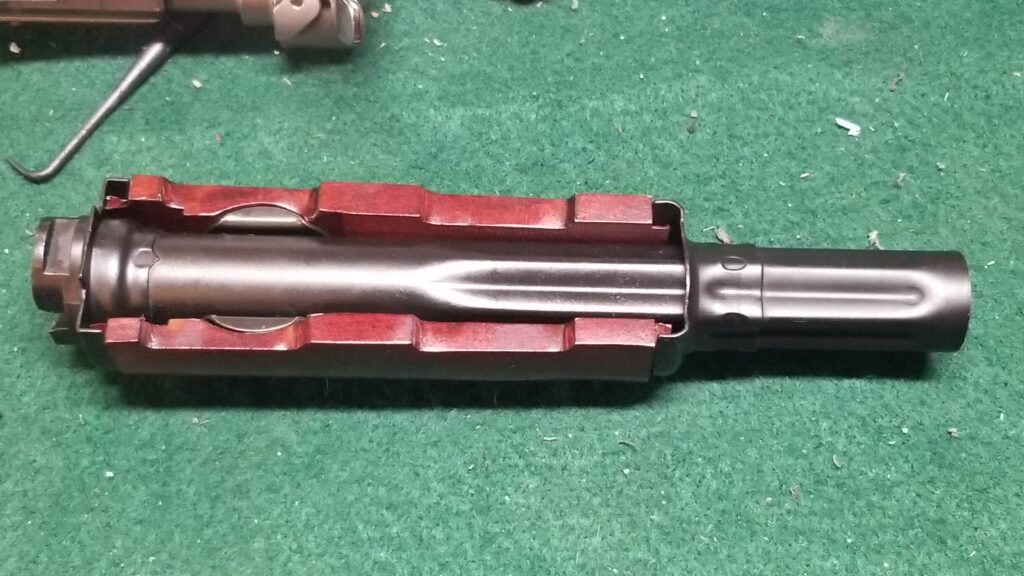
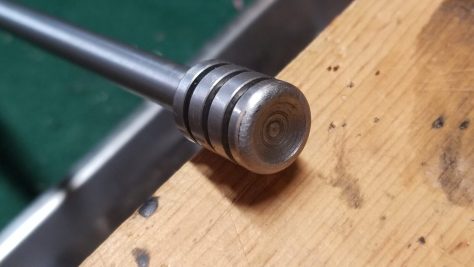
Boy it looks gorgeous from the top. I like that I can see the gas piston rivet easily – they are a bear when you have to hunt for them. The Ni-B treatment is consistent. The bolt and carrier have serial numbers that match the receiver and trunnion. For those new to the AK platform, the barrel is pressed into the trunnion to the point that the headspace is correct with the bolt that is matched to it. Once the headspace is correct, a hole is drilled and cross pin installed to lock the barrel in place. In the old days, this had to be done because loose manufacturing tolerances could not guarantee that all barrel, trunnion and bolt combinations would headspace correctly. Reliability issues would happen if parts were mixed from different rifles so this led to serializing the parts. By putting a serial number on the parts, an armorer could be sure to put the matching parts back in the correct rifle.Here’s a view of the bottom of the bolt carrier with the bolt fully forward.You can see the machining marks very clearly. This did surprise me – I would have expected it to be smooth but the action itself seems to not have any issues. I very carefully watched the bolt head cam travel in the carrier’s channel and it does not hang up anywhere. So, it might not look very good but it does not appear to harm functioning at all.Here’s another view of the tool marks.Here’s the best photo I can get with my phone. Everything clears. Time will tell how the Ni-B coating holds up. It appears to be well implemented.First view of the boltSecond view of the bolt bodyThe gas piston’s face is slightly concave.Here’s the famous Fabrique Nationale Herstal (FN) barrel that everyone is ogling over. As I understand them, the markings mean: HF=Hammer Forged MP=Magnetic Particle tested CL=Chrome Lined 7.62×39 is the chambering and 1/9.45 is the twist rate.
Now you may be wondering, how on Earth did FN pick such an odd twist rate. In short, that is the conversion of “1 turn in 240mm” that is the Russian military spec for 7.62×39. Actually, the metric conversion of 240mm to inches gets you “9.44882” and with rounding we get 9.45. If we rewind the clock, it was also the twist rate they used in the Mosin Nagant and they wanted to save money and use the same barrel making machines. [There’s a real cool write up – click here]
The front and rear sights are just what you’d expect.By applying the bead to the ejector tab, they stiffened the unit. It’s a nice touch that you don’t always see people address.
So, thanks to the quarantine, I can’t take it out and shoot it. My impressions overall are favorable but the proof will be at the range. I think you are getting a solid rifle for the price. Time will tell how they hold up compared to the premium AKs – Veprs and custom builds.
I hope this helps you out. In the next post I’ll write about the customizations I did to fit my tastes.
If you find this post useful, please share the link on Facebook, with your friends, etc. Your support is much appreciated and if you have any feedback, please email me at in**@*********ps.com. Please note that for links to other websites, I may be paid via an affiliate program such as Avantlink, Impact, Amazon and eBay.
PSA AK Webstore Links
Interested in an American made AK? Consider Palmetto State Armory (PSA) as a source. Click on the following links for the associated webstore categories for AK-related rifles, pistols and parts at PSA:
After researching and deciding to buy the AK-E, I ordered it and then waited about a week. The trick with any of PSA’s AKs these days is finding them in stock. Here’s my tip to you – the email notification is broadcasting the news to a ton of people and anyone may buy before you do. I’d recommend checking their site manually between 10am to 3pm Eastern. Just leave your browser open on the page and hit refresh when you can – say every half hour or hour. It took me a week or two but that’s how I was able to get both my AK-V and AK-E. This approach works for any of their hard-to-find because everyone is buying them AK-series weapons. Click on the below to go straight to the PSA page in a new tab:
For me, it’s really interesting how PSA has jumped with both feet onto the AK bandwagon and are offering different grades and styles to appeal to different levels of shooters.
Getting back to the AK-3, I only waited about a week and Scott Igert, my good friend who owns Michigan Gun Exchange, called me up when the AK-E arrived and I went and got it.
Opening The Box
For this post I took a bunch of pictures to share first impressions and will put them in the captions of each photo.
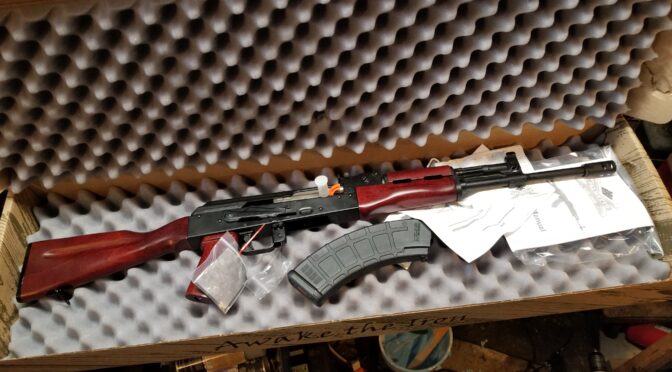
It’s a good looking rifle. The red furniture is brighter than I care for but I bought the rifle with the knowledge that I literally planned to replace everything so my strategy was to get the first AK-E that I could get and move ahead from there. Note, PSA packed it well. It comes in this foam lined box and note the little buffer on the end of the charging handle to keep it from poking through the packaging.Yeah, it’s really red! Note the AK-74 style lightening cut on the stock. The wood is really light. I’m not sure what they used but when you pull the stock, it is surprisingly light.You can see the little orange chamber flag they include. The front sight block (FSB) is a combination unit that includes the gas block. Because it is now set back, the brake is secured with a jam nut rather than the traditional detent pin that protrudes from the FSB. The rifle ships with one Magpul 30 round magazine. PSA has been teasing they are going to sell their own line of inexpensive AK magazines and I’m going to keep an eye out for that. Magpul is now on their third generation of AK magazine based on lessons learned for reliability and feedback/desires from the AK community.You can see the handguards have a slight hand swell. An AKM-style optics rail is ready to go. The grip is basic but functional.I could have done without the Palmetto logo on the side but at least it is relatively small. Note the good job they did on the rivets and the magazine stabilizer dimples. The bluing is nicely done. Fitment of the handguard is good as well.
The muzzle device has two ports on each side and is secured by a jam nut. PSA reports the thread is the standard 14mm x 1mm left hand thread that one would expect on an AK. That means you can use other muzzle devices if you want. I’m going to try and the supplied brake out first before I change anything.
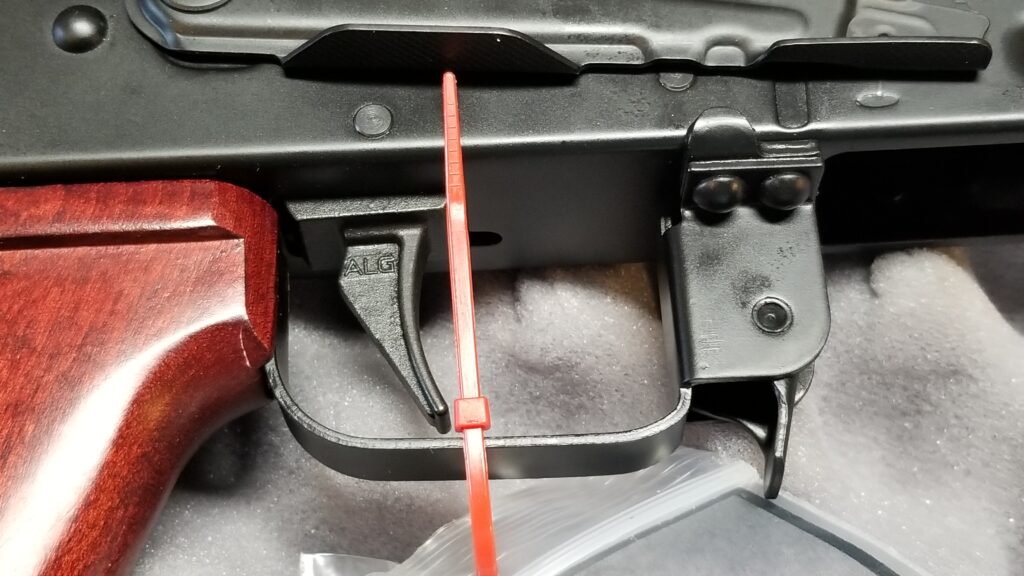
Here’s a closer look of the combo front sight block (FSB). It’s pinned in place and looks good. Note there are no additional vent holes in the gas tube. Some AK variants have them and some don’t – it’s just an observationCloser view of the side mount optics rail. You can also see the ALG AKT trigger and more of the nicely done rivets. By the way, the AK-E has the best out of the box trigger I have encountered. I’ve been an ALG fan for a few years now and am happy to see PSA use them. Here’s a closer view of the trigger, selector stop, trigger guard and the magazine catch. Note the cracked pistol grip. I contacted customer service and they offered to either send me a replacement grip with the risk of the shade of red not matching or a $30 credit back to my card. I opted for the $30 credit as I did not plan on keeping it anyways.Here’s the selector lever. You can also see the nickel-boron (Ni-B) coated bolt carrier. Folks, the rifle arrived unlubricated but it was one of the slickest actions I have felt out of the box. My Galil Ace was that smooth and my Vepr was after I lubricated it. Point being is the Ni-B coating definitely aided lubricity as one would expect.Definitely a good looking AK.The manufacturer info is forward of the mag well. You can see the Ni-B coated bolt carrier and part of the bolt itself. Also note that they dimpled the ejector to reinforce it.The pistol grip is attached via a screw with a washer.
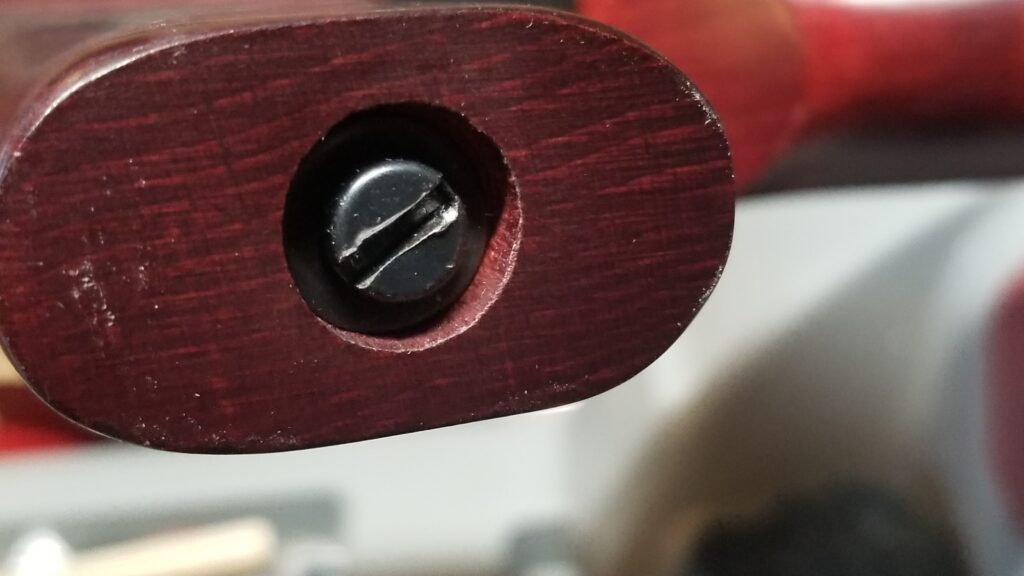
The rear sling mount. You can see the metal butt cap wrapping around the end.
Note the FSB does not have any provision for a cleaning rod. No big deal to me. I have never actually used the supplied cleaning rod on any of my AKs. I either use a Tipton cleaning rod or a bore snake. I honest prefer bore snakes at this point.
If you find this post useful, please share the link on Facebook, with your friends, etc. Your support is much appreciated and if you have any feedback, please email me at in**@*********ps.com. Please note that for links to other websites, I may be paid via an affiliate program such as Avantlink, Impact, Amazon and eBay.
In 2019, I bought a PSA AK-V and really liked it. The little pistol caliber carbine was reliable, accurate and fun. I did an initial four blog posts about the purchase and then one on converting it.
Because I liked the AK-V so much, I started paying close attention to reports about the improved quality of the PSA AK line in general. I read the posts in the Facebook AK-47 group regularly and guys were reporting how happy they were with the GF3 series and the new AK-E that would be the PSA premium rifle with forged trunnions, nickel boron coated carrier and bolt plus a premium cold hammer forged barrel from FN. It definite caught my attention so I decided to monitor the situation.
Out Comes Rob Ski’s Videos
Rob is the creator and host of AK Operator’s Union’s video series. He was born in Poland and served in the Polish Land Forces as an infantryman. Then, when his family immigrated to the United States, he joined the US Army and was a paratrooper. In short folks, he’s the real deal when it comes to his opinions and experiences. If you’d like to read more, click here to read a 2014 interview.
Some people like Rob and some don’t – I like Rob. I think he’s a character and like his videos. I also respect his opinions. At any rate, he did a series of videos on the AK-E and the first one caught my eye because of the title “I hate new Palmetto State Armory AKE” – here it is:
He then posted an update after 2,000 rounds:
One at 3,000 rounds
After even more rounds and after pouring in a bunch of sand while it was running, accurate and Rob was impressed.
Well, between the Facebook group and Rob, I ordered my AK-E and will post about taking it out of the box next.
Please note that all images were extracted from the video and are the property of their respective owner.
If you find this post useful, please share the link on Facebook, with your friends, etc. Your support is much appreciated and if you have any feedback, please email me at in**@*********ps.com. Please note that for links to other websites, I may be paid via an affiliate program such as Avantlink, Impact, Amazon and eBay.
PSA AK Webstore Links
Interested in an American made AK? Consider Palmetto State Armory (PSA) as a source. Click on the following links for the associated webstore categories for AK-related rifles, pistols and parts at PSA:
I’ve read a few guys asking about where to buy ammo so I did a quick dig on availability and assembled the below ammunition listings from my sponsors.
Also, so you are aware of what’s moving, I get a feed from Brownells of their current Top Sellers:
I hope this helps you out some.
If you find this post useful, please share the link on Facebook, with your friends, etc. Your support is much appreciated and if you have any feedback, please email me at in**@*********ps.com. Please note that for links to other websites, I may be paid via an affiliate program such as Avantlink, Impact, Amazon and eBay.
Up front, please let me stress that this post if for informational purposes only. The author will not be liable if you decide to attempt to make or use pepper spray. You assume all liability going forward.
Please abide by all laws and regulations in your area – it is illegal to possess pepper spray in some places let alone use it.
Last but not least, please follow safe practices if you choose to attempt making pepper spray.
Pepper spray irritates the eyes, lungs and skin. The intent is to cause extreme temporary discomfort and allow the defender a chance to get away or the police officer to more easily restrain a subject. The reason I researched and wrote this post is that a number of people are worried about personal and family safety and how to ward off attackers given the craziness with people panicking over COVID-19.
For one reason or another, not everyone can buy a firearm and. thanks to government regulation, many law abiding citizens can’t even purchase pepper spray. Now, machining a firearm and its costs are beyond many but making pepper spray is something people might want to consider but there are a whole lot of potential issues I want you to think through before you make some home brew and pour it in a spray bottle.
What is pepper spray anyways?
As you can guess from the name, the main ingredient is technically known as oleresin capsicum (OC) is derived from peppers. OC is an oily organic resin obtained from finely ground chili powder where the capsaicin of the pepper is removed using an alcohol – typically ispropyl or ethanol. The capsaicin is most concentrated in the parts of the pepper that hold the seeds and the rest of the pepper to a lesser extent.
The following video does a great job explaining how pepper spray affects the human body and how it is made:
How do you make a pepper spray?
Do not rub your eyes and be careful breathing any airborne powders or liquids. I’d recommend wearing nitrile gloves, eye protection and a dust mask – even a basic nuisance dust one.
Please abide by all laws and regulations in your area and follow safe practices if you choose to attempt making pepper spray.
Let me tell you up front that I am not incredibly impressed by anything I have read or watched. Do you research and be very, very careful.
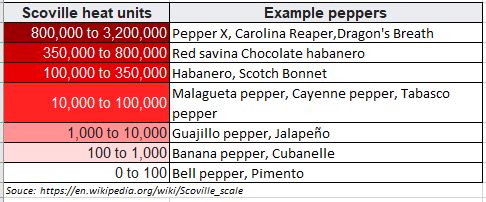
The “heat” of pepper varieties is measured by the Scoville Heat Units (SHU). The SHU value of a given pepper is measuring the concentration of capsaicinoids, which is premoninantly capsaicin – the part of the pepper we need. So, the higher the Scoville rating, the hotter the pepper is and the stronger the pepper spray will be.
The above is a Scoville Scale with popular peppers rated. You can see that Cayenne is in the middle with some god awful hot ones at the top.
Note – Focus on the peppers not some of the weird home brews folks are making where they are adding in other ingredients because they seem to be irritants based on their own past experience – for example, people adding salt, black pepper and even curry.
Going back to peppers, bear in mind that commercial pepper sprays range from 2-5.3 million SHU. Just because you think Cayenne pepper (30-50,000 SHU) or a Jalapeno (2,500-8,000 SHU) is hot does not mean it is adequate. You need to be thinking about the hottest peppers you can find and using them. Let me give you specifics of the 10 hottest peppers
Safety comment – you do need to realize pepper sprays made by the hot peppers over 80,000 SHU are dangerous and may cause permanent damage to eyes, etc. You better not spray this hot stuff on anyone without real good causeand be extra careful working with them!
With the god awful hot peppers, I have no idea how you can safely test your concoction. Honestly, at some point of capsaicin concentration, you are going to cause chemical burns. If you are trying to make liquid hell, you have some very dangerous stuff going on. Please don’t test it on other people, pets, animals, etc.
First extraction video
This gentleman does a good job showing you how to extract the the capsaicin that we need. Note, he uses acetone but I’d recommend an alcohol as it is less volatile and doesn’t dissolve anywhere near as many varieties of plastics as acetone does. There’s solid guidance other than that.
Video Two – The author makes and tests his pepper spray
This fellow both made his own pepper spray and then tests it while reporting the results. Notice how he points out the delay — keep that in mind.
Some mistakes I noticed during my research
When you look around on Youtube and reading blog posts, there are a lot of fundamental mistakes that people make that I want you to be aware of:
Your goal is to make a concentrate – start with the hottest pepper you can find
You need to extract the capsaicin so grind up the pepper – don’t just add flakes.
Focus on the pepper!! Folks adding in other stuff may sound cool but I am not convinced curry powder, salt, black pepper, etc. will help. One fellow even added in a pain killer (lidocain) for reasons I can’t begin to fathom.
Use a ton of powder/ground pepper. You want to make a concentrate and not something really diluted. Now is not the time to go cheap.
Use alcohol and not acetone unless you know your plastic can handle it – many household/cheap plastics can’t.
Allow the alcohol time to dissolve the capsaicins from the peppers. Use a sealed container and give it at least 12 hours to a day while shaking or stirring periodically. A sealed container makes the most sense to me unless you want the solvent to evaporate off and make a concentrate, which is a legitimate consideration.
You definitely need to strain the resulting mixture. Any type of sprayer will be at risk of clogging if there are solids in the liquid. The folks with a stew of materials floating around in their dispensers are at risk of a clog just when they need the spray the most. I was really surprised at the number of authors who had dispensers with solid remnants floating around.
Nobody seems to know how long this stuff will last – 3 months might be a starting assumption. It’s not indefinite.
Delivery mechanism considerations
I’ve seen everything from squeeze bottles, to squirt guns to home made single shot stream sprayers. Consider the following:
whatever you select needs to be leak proof or you will have an awful mess.
You don’t want it accidentally going off in your purse or pocket … or you will have an awful mess.
If you do a charged can of some type – ensure the propellant doesn’t slowly leak out and/or have a means to recharge it. Even commercial units will slowly lose their propellant charge.
Remember to strain the liquid you’re going to use or floating solids will likely clog up your device — and probably when you need the spray the most. Seriously, it blew my mind how few did this.
You need to test to see how far the liquid can travel. In general you want a stream and not a fog both to concentrate delivery plus you do not want the person near you! Also, bear in mind that a mist will float around and land on others – potentially even yourself.
Okay folks, the following is so you know what to do if you get this stuff on you. The short answer is saline, non-mint antacid in distilled water in a 50/50 mix placed in a squeeze bottle to neutralize the chemical or some form of water and mild soap.
Reality is not like the movies – especially with home grown pepper sprays. Expect attackers to respond differently to pepper spray.. Some will immediately lose visibility and the will to fight, some may have a delay before the react and some will keep fighting no matter what due to drugs or whatever. Do not expect an attacker to magically drop to the ground.
The best way to win a fight is avoid the situation – don’t walk alone, avoid dark allies, stay alert, and so forth. View this stuff as a last resort or part of a layered defense that you have thought about.
Conclusion
Someone casually making pepper spray without a lot of thought put into it will likely have very mixed unsafe unreliable results. I didn’t find one video or blog post that I felt addressed my concerns for reliability so I collected the above for you to consider. If you can buy commercial pepper spray, I would highly recommend you do so.
The information presented here is for people who need protection and home-made pepper spray might be their last option. Do your research, plan and build with safety in mind. Last comment, don’t rely solely on pepper spray – consider other things like loud personal alarms, clubs, saps, fake money clips, take a self-defense class, etc.
Again, please, please be safe if you make anything discussed here. Also, be aware of any laws and regulations that are applicable. In some locales, pepper spray is treated virtually the same as a firearm and civilian use is strictly prohibited.
If you find this post useful, please share the link on Facebook, with your friends, etc. Your support is much appreciated and if you have any feedback, please email me at in**@*********ps.com. Please note that for links to other websites, I may be paid via an affiliate program such as Avantlink, Impact, Amazon and eBay.