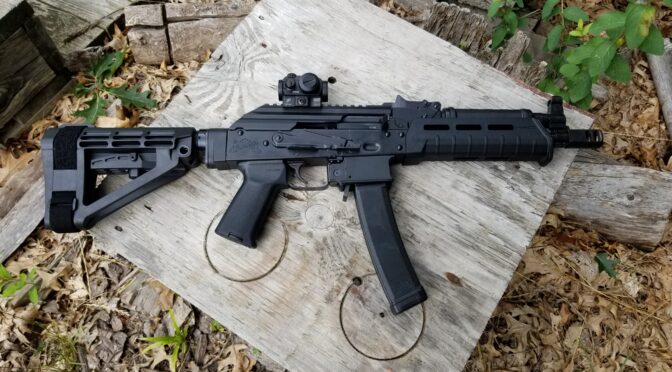
Out of the box, the AK-V is impressive. The trigger is decent, the grip and handguard are functional but there were three things I really wanted to do – move to a SBA4 brace, install an optic and create a quick takedown pin so the dust cover could be removed (the big reason I bought the AK-V from a business perspective). So let’s step through each.

| Palmetto State Armory (PSA) has a stunning array of Kalashnikov firearms now. AK-47s, AK74s, 100 series, rifles, pistols … it’s impressive. Click here to go to their main AK menu. |
Replace The SBA3 Brace With An SBA4
Yes, they are both adjustable braces but that comparison ends there. The SBA4 is much more sturdy and has five length of pull adjustment positions. The SBA4 does go on sale and that is the time to buy one. I got mine for $99 at PSA’s July 4th sale and there was free shipping!

Now PSA did something with the SBA3 that is a best practice. They staked the castle nut to the receiver end plate. Now, I started thinking about what would be my easiest option and it dawned on me that if I was SB Tactical and wanted to control cost and complexity, I would try and have as few inventory parts as possible and that means as few buffer tubes. Guess what? The SBA3 and the SBA4 both use a Mil-Spec 6 position buffer tube. Problem solved. You can remove the brace just like most AR/M4 stocks – lift up on the locking pin and slide it right off.


The result is a very sturdy brace. After comparing the two, I will only use SBA4 braces going forward.
Vortex Crossfire Red Dot Optic and American Defense Mount
I doubt I will ever go past 100 yards with the AK-V and a much more likely engagement distance is 50 yards so a red dot is perfect. I’m a huge Vortex Optics fan and this was a perfect situation for their Crossfire Red Dot mounted on an American Defense AD-T1-L STD quick detach mount. They are my favorite combination of price and performance these days.
By the way, be sure to keep a couple of spare 2032 Lithium batteries in your case or range bag. Nothing dampens a range trip like dead batteries. It’s also why I use a quick detach mount – if the batteries are dead or that optic fails, I am yanking that optic off.
With the AD-T1-L STD mount you are a tad higher than the AK-V’s sights. I plan to watch how they relate at the range so I can ballpark where to aim if the battery is dead and am in a rush. Practice, practice, practice and not just when everything works.

The AK-V Dust Cover Quick Takedown Pin
I had to look up — I built my first Yugo M92 in 2012 and instantly hated the hinged dust cover. I drilled out the rivet and came up with a stainless pin with a ball detent and pull ring to secure the cover. The rest is history. I wound up making pins for the M92/M85, Tula and Bulgy Krinks use the same pin, Vepr shotguns and now the AK-V.
The reason for wanting a quick takedown pin is plain and simple, when you want to clean the weapon or work in the receiver, the hinged dust cover is in the way. To remedy this, you can install our AK-V quick pin and it’s about a 10 minute job if you know how to strip down an AK. This is a quick overview:
- Ensure the weapon is empty.
- Field strip the weapon like you would any AK, remove the gas tube and the lower handguard so they are out of the way.
- The AK-V’s hinge is simply a 5/32″ roll pin that needs to be tapped/punched out so use something like a bench block to support the weapon and create a hole/gap for the pin to exit into.
- Use a 5/32″ roll pin punch and a hammer to tap the roll pin out. You can save it for the future in case you ever want to use it again for some reason.
- Put the dust cover back in place with the hinge holes lined up and slide in our quick takedown pin.
- Re-assemble the weapon.
- Done


We have the pins up for sale on our website now. Click here to order one.
Summary


The AK-V was almost done at this point. I still needed to lubricate the weapon and put it in a suitable case. I’ll tell you about that part of the journey in the next post.
This is a four part series on the PSA AK-V 9mm:
- Part One: Good Reviews Really Raised My Interest After PSA Fixed the Initial Problems
- Part Two: First Thoughts Out Of The Box (tons of photos)
- Part Three: Changing the Brace, Adding a Red Dot and Installing a Quick Takedown Pin For the Dust Cover
- Part Four: Lubricating the AK-V and a 28″ US Peacekeeper Carrying Case
Note, I have to buy all of my parts – nothing here was paid for by sponsors, etc. I do make a small amount if you click on an ad and buy something but that is it. You’re getting my real opinion on stuff.
If you find this post useful, please share the link on Facebook, with your friends, etc. Your support is much appreciated and if you have any feedback, please email me at in**@*********ps.com. Please note that for links to other websites, we are only paid if there is an affiliate program such as Avantlink, Impact, Amazon and eBay and only if you purchase something. If you’d like to directly contribute towards our continued reporting, please visit our funding page.
